

Page 1
SHARP
\\
VC-ME80GM
~
VIDEO
®
VlDEOCASSE1TENRECC)RDE~
~;l'MGNEro5COPE
®·:.YlDEOCASSE1TE~RDER
CASSETTEREcl)RoEIl
•....•..•.•.•
OPERATION
BEOIENUNGSANLEnuNG
MANUEL
:GEBRQIKSAANWUZlNG
MANUAL
D'UTlUSATION
Page 2

Page 3
~
Dear
SHARP
~
Thank
llIerotion
Copyright
•
•
'1>"
Sehr
\..V
Vielen
Bei
oufmerksam
Copyright
•
• Ohne die
Cher client SHARP
CD
Nous
famille.
Copyright
•ilest
enregistres
•
Reproductior\
I'accord
IGi\
Geachte SHARP Idant. Gefeliciteerd
\J.!!,I
De
dooru.gekochte
allerbeste
Auteuruecht
•
Sommig
het
• Geen
voorofgoonde
Gentile Cliente
CD
Grozie
Un'ettento
Consigllomodilegge'l1l
Cop'yright
•
II
elpressamente
•
La
aulorizz:oziona
Lo
prescrizioni
quanta indicato
'1'
Estlmado
\..5...1
proporcionar6
empazor
Copyright
•EImoterial
outorizaci6n
•
Se
permiso
"$"
Basta
\...V
ror
helo
Copyright
•
Audiovisuellt
log.
•
Denno
fran
I'Tii\
Sayln
\.!.!Y
SHARP
Iyi
bir
Llitfenbutallmallar
Telif
•
Ses-gorLintU
kendi
•Buyeytntn
hangi
II
SBOWVIIW
The
SaowVlE.\v
CU5tc::lmer
yOli
for
buying
manual
cOr-llully
Audio-visual
copyright.
No
ELECTRONICS
50rgtCilHger
Audiovisuelles
lnhabers nkht au;genammen werden.
irgendeinar
moieriole
sacieta
haklan
mol~riol
Please
part
geehrter
Dank
vaus
Veuillez
possible
outeursrecht'wi/orden
per
riproduzione
0
prohibe10reJlrcducci6n, almocenamiento 0
SHARP·kwnd
familienj611killigo
SHARP
SHARP
VIDEO
baklmla,
ulkenizdeklilgili
blr
nfer to
of
this
p'ulJliootion
{EUROPEj
SHARP-Kunde
fUr
den
Kauf
Beho.,dlung
duren,baver
MCllerial
vorheri~e
Form
felicitons
cI'ovoir
lire
o1lentivementcemanuel
queklmoleriel
sonsI'outorisotionduproprieloira
miseanreservaoutronsmission
prioD
bledeSHARP
"VCR
resultaten
>oNOrden
beeld-
eil
enkel
ond~rdeal
to-e.stemming
over
OCll~illolo
curoeune:-
monuienzione
oudio"l'ilivo
o~torizz:oto
Clnche
d i
SHARP
SHARP
ElECTRONICS
del
D.Iy\.n~54B
ne=llort.2,
c1ientedeSHARP
antreianimiento
utilizor
e:lvideo.
audiovisuol
del
propietorio
previodeSHARP
rnt:llerial
handbok
iir
ElECTRONICS
mO~lerisi,
aldlQlnlzdan
bGtiJln
aileye
kllavuzunu,
melaryalleri
hiltb~paryasl,
;;ekildeyaymianamaz.
NEXTVIEIo'II
Unk.
is
a trodemark opplied
sysrcmismanufactured under
this
SHARP
VCR.
Given
proper
core
before
attemptingtooperate
may
consistofcopyrightocl
the
relevent
Jowsinyour
maybereproduceCl,
GmIiH.
dieses
SHARP-Videorecorders.
wirderIhnen
Sie das GeratinBelrieb
kann
Genehmigung
roproduziert,
ocherecemognetoscape
mookt
bereikt.
geluidsmo!erioel
apgenamen.
von
un
videoregislrolore
altentomente
puo
essere
dol
porziole,10memorizzazione 010trosmissione
ELECTRONICS
commo1dello
duronte
puede comprender
ELECTRONICS
Taek
for
6r.
LOs
kon
voro
skyddad
dolayl
yillar
telif
kanunlara
SHARP
und
Arbeiten
enlhalten,
Bina
durch
die
gespeichert oder iibartrogen werden.
ClVonl
oudio-visuel
gebruik
daze
von
del
Le
del
ottduhor
enligt
(EUROPE)
VIDEO'yu
comp'renne
ELECTRONICS
met
de oonschof
vondeallarmoder.nste
Metdejuiste
bestoot
Roodpleegdewelteninuw
publico~e
SHARP
ELECTRONICS
punluole
potronno
questo
monuole
tolvalto
sOj3getlo
titolore
dei
diritli.
(EUROPE)
IEUROPE]
GmbH
28/8/95,
stesso
ogrodecemos
muchos
copyright.
IEUROPEl
kOp.t
instruktionsboken
copyright-skyddot
copyright.lagen
GmbH.
te;;ekkGr
slirec:ek
hakklna
ederiz.
blr
eglence saglayacaktlr.
~1I9t1rmedan
tabii
ba!jvurunuz.
ELECTRONiCS
forbyGemslor
licence
itwill
the
VCR.
works
which
country.
storedortransmittedinony
Ihrer
Familie
johrelang
nehmen.
fUr
die
informieran
des
(EUROPEI
uit
mag
SHARP.
pUbblicoto
ooos a lode h
trobojos
Consulie
SHARP-vicleooondspeloren.
yah;;malan
ein
Sia
SHARP
ELECTRONICS
SHARP.
Une
d'essoyer
d'utiliserIemogrletoscope.
des
travau"
droil5.
Consultaz10legislotionanvigueur
tololeouportielle
GmbH.
von
verzorging
oeuvres
onder outeursrechtenmeg
worden
13ekopieerd,
(EUROPE)
ossieurore
primodiprocedere
olle
Iefilgi
Fore
rifenmento
GmbH
DithiCirozionedic:onformitil
diehiaro che i
sullo
decreto.
que
hoya
odgulnda
protagidos
los
leyes
lronsmisi6n
GmbH.
noggront
innanduonvandervideobondspelaren.
so
011
det
oeh
fcirejkopieros, rorveros
once
h;erebilir,
(EUROPE)
Development
from
Gemstor
provide
years of entertainment
must
notberecorded wilhoutthc
form
without
Freude
berei/en.
Copyright
besteht.
sich
iiber
utilisation
proreges
de
celie
daze videoc:ossellerecorder
.electrocische
zoluwhele
eigen
GmbH.
onnididivertimento
0110
sui
diritti
aile
leggi
modelli
G.U.
nO
301
este
fumilio.
Leo
por
derechos de autor
vigentes
par cuolquier
inte
for
spelosinuton
dikkatlice
tall!
GmbH'den
Corporalion.
Development
Diese
die
einschlogigen Gesetzeinlhrem
(EUROPE)
GmbH
correde garantit
por
des
droils d'outeur
publication
circui!:;ennieuwe
fomilie
jorenlong
lond
die
opgeslogenofverzondeninwalke
d'ouloreiinqueslo
del
okuyunuz.
hakklnln
hierop
0 tullo
messoinfunzione
vigenH
nel
presente
SHARP
VC-MEBDGM
del
28/12/95
aparato de video
oientornenie esie
.
al respecto que
medio
de ninguna parte de esto
Med
god
skiitsel
upphCIVsmonnans
eller
malikinln
izln
atlnmadan ure!iiemez, depolanamaz veya her
Corporation.
for
the
whole
fumily.
outhority
ofthe ownerofthe
prior
permission
from
Bilte
Jesen
Sie
diese Bedielllmgsanieilung
dorfen
ahne
Zustimmung
derf
kein
des
anneesdediverlissemerlt
dons
est
intemile
von
SHARP.
vervoordigingsmethodes, zodot de
van
dit
niet zonder
belrekking
10
famiglio.
del
vii:!eoregistrotore.
coso10duplicazione
poese d'uso.
monuole
richiedono l'espresso
ad
in
SHARP.
manuoldeinslrucciones
quenodeben groborse
existonensu
skll.nkervideobondspelaren
overroros
izni
oimaksizin
Land.
Teil
dieser
quinadoivent
vatre
pays
respeclif.
sous
toule
farma
toestal
kunnen
toestemming
hebben.
vorm
sono
costruitiinconformila
porticolore sono
Silo cuido
pois.
1i1l6ielse.
i nagot
forma!
kaylt
please
SHARP
des
Publiketion
pos
etre
quecesoit
genieten.
von
de eigenaor
don
deve
essere
conformi
correctomente
ontes
sin
10
publicoci6n
mycket
J6mror
med
uton
edllemez.
reod
this
Copyright·
in
pour
toute
son5
ook,
zander
olle
a
de
sin
el
noje
svensk
medgivande
Lutfen,
Ie
von
(i)
Page 4
BEfORE
IMPORTANT NOTES
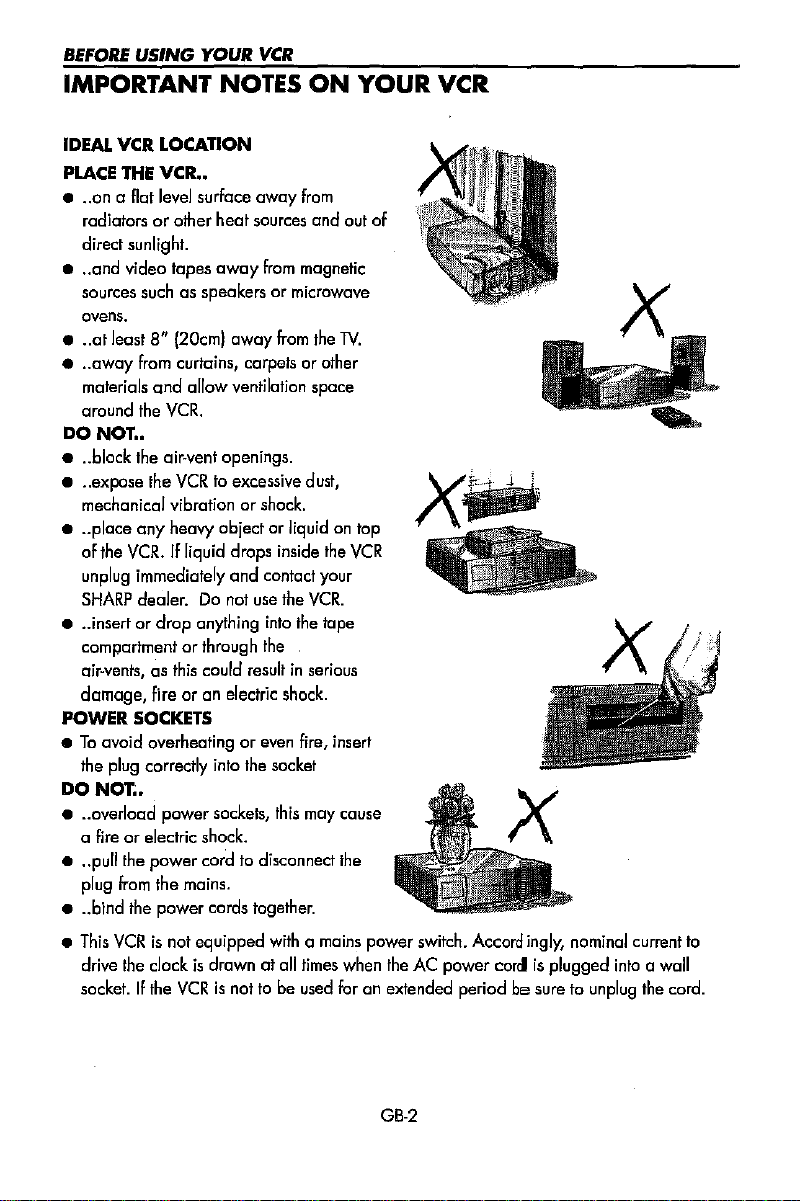
IDEAl. VCR LOCATION
PLACE
• ..on a flat level surface
• .. and
•..at least 8"
• ..
DO
• ..block the
•..expose the
• ..place
• ..insertordrop
POWER SOCKETS
•Toavoid
DO
• ..overload
• ..
• ..bind the power cords together.
•
USING
YOUR
VCR
ON
THE
VCR
••
away
from
radiatorsorother
direct
sunlight.
video
sources such as speakersormicrowave
ovens.
away
from curtains, carpetsorother
materials
around
mechanical vibrationorshock.
of
unplug immediately
SHARP
compartmentorthrough the
air-vents,05this could resultinserious
damage,
the plug correctly into the socket
a
pull
plug
This
drive the clock
socket.
and
the
NOT
..
any
the
VCR.Ifliquid
dealer.Danat
fire
overheatingoreven fire, insert
NOT..
fireorelectric shock.
the
power
from
VCRisnot equipped
If
the
heat
sources
tapes
away
from magnetic
(20cm)
away
from
allow
ventilation space
VCR.
air~vent
openings.
VCRtoexcessive
heavy objectorliquid on top
drops
and
anything
ar an
electric
power
sockets,
cord to disconnect the
the mains.
is
drawnatall
VCRisnot to be used foranextended periodbesure to unplug the cord.
dust,
inside
contact your
use
the
VCR.
into
the tape
shack.
this
may cause
with
a mains power switch. Accord
times when the AC power corelisplugged
YOUR VCR
and
out of
the
TV.
the
VCR
ingly,
nominal current to
into
a wall
GB·2
Page 5
BEFORE
USING
UNPACKING
YOUR
THE
VCR
ACCESSORIES
.(:flECK
YOuR
ALL
THESE
ACCESSO,UES
DEALERIFANY
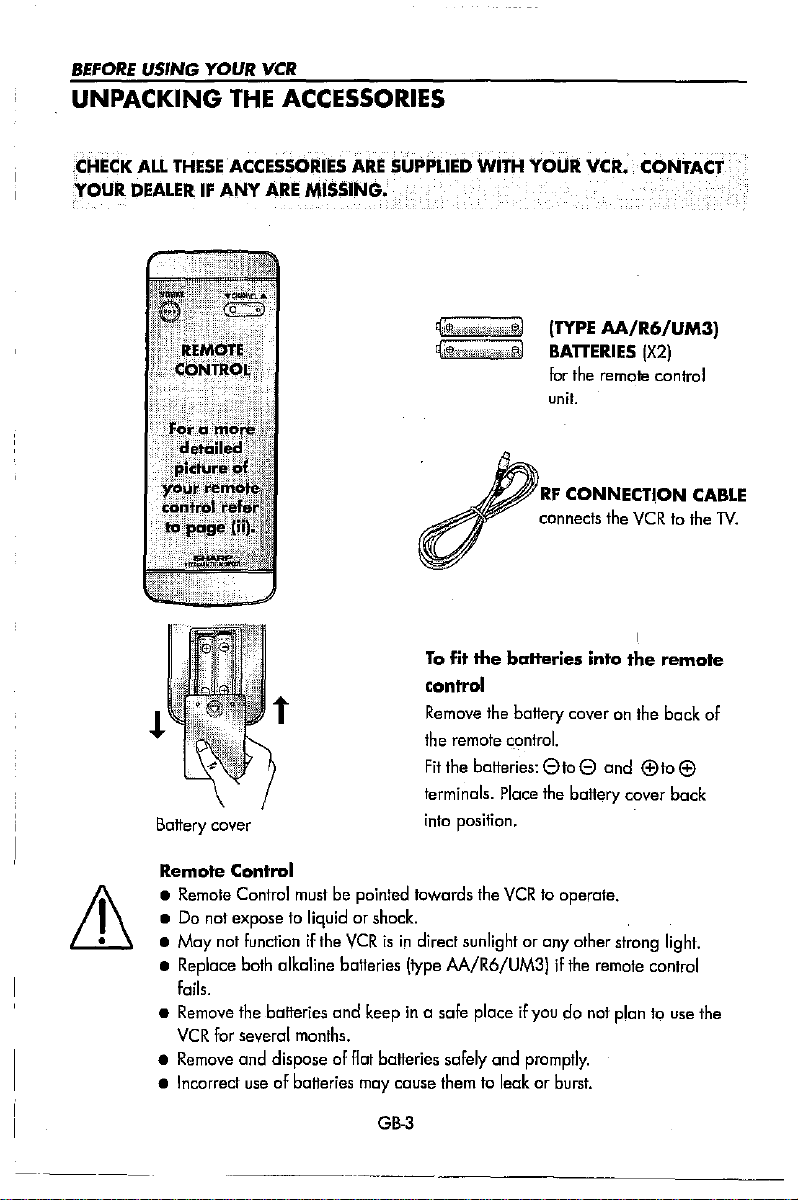
Battery cover
ARE
ARE
MISSiNG.
SUPPLIED
WIT'"
Q:i\ll:CiR
W
41i0i
Q}:fh?in:;,vl
YOUR
WiEN
(TYPE
-;'@,!
w
BATTERIES
for the remole control
unit.
'
RF
CONNECTION
:
..
--"'""
tI
To
fit the batteries into
control
Remove the battery cover on the
the remote
Fit
the
terminals. Place the battery cover
into position.
Gantro!.
baiteries:
eta
e and
VCR.
CONTACT
AA/R6/UM3j
IX2j
""
\
the
remote
<:!:lto
CABLE
....
back
of
<:!:l
back
'"
Remote Control
• Remote Control must be pointed towards the
• Do not expose to liquid or shock.
• May
not
function
•
Replace
fails.
• Remove the batteries
VCR
•
Remove
• Incorrect
both
for several
and dispose of
if the
VCRisin
alkaline
useofbatteries may cause them to leakorburst.
baiteries
and
months.
flat
direct sunlight or any other strong light.
Itype
M/R6/UM3jifthe
keepina safe placeifyoudonot plan to use the
batteries safely and
GB-3
VCR
promptly.
to operate.
remote
control
Page 6
INSTALUNG YOUR
CONNECTING
SATELLITE
RECEIVER.
VCR
THE
VCR
TO
THE
Tv,
AERIAL
AND
~i~A~~~E
Connect
mains
Optional: Connect
receiver
or decodertothe
using
a seart leadtoLINE 2
IN/DECODER
VCR.
socketonthe
your
the
VCR10the
Satellite
VCR
::::::::::>
Connect your existing aerial cable
the
ANTENNAINsocket on your
VCR.
Connect your Ntothe
the suppliedRFconnection coble,
i.e. connect
sockettotheTVAERIALINsocket.
the
VCR
VCRRFOUT
using
!,
::
!i
1]
II
'.:,:::_-:::::_--_-_---:::-:_-::::::::::::_0=:..::::::
BACK
OF
TELEVISION
to
lecx::l"lf
..(
The
Optional
TV
you
terminal
fully
DECODER
SATEUITE
•Donot
•Toobtain stereo sound output, connect your slereo
leads ortothe
•
Sound
•IfyourTVhas
connectiontothe
• for
NEXTVIEW
UNIT
SYSTEM
connect
a
SeARl
LINE1IN/OUT
fromRFOUT
more
VCR.
LINK
OR
terminalisMONO
than1SCARl
operation, a
SCART
and
LINE
1 IN/OUT
wishtotune
using
SeARl leads as
only.
socket,
refertoyourTVoperation
wired
scartcoble
VCR
is correctly connected.
GB-4
lnot
supplied).Ifyou
socketonthe
the
VCRRFchannel, dependingonyour
TVtothe
mustbeused
AUDIO
shown.
have a scart lead
VCR.
OUT
terminals
manual
for
.
using
correct
connectitto
lV.
audio phono
SCARl
your
Page 7
INSTALLING YOUR
OPERATING
-
-
[]
~
To
operate
-
e-
LJ
-
, ,
,-------~----~._---------~----~-------~---------------
3 4 5 6 7
VCR
YOUR
VCR
~~
\.
"-....
'"
the VCR gently pull
r-
~ ~
I-
r-
~,
4·HEADINlcAM
~
~
•
down
IIGR
the
control panel as
HI·FI
STEREO
8 9
10
~'!l
ii
--------_.
11
I
,:':,:'
I
EiEi
~
tm5IH~
JQI
shown.
I
:~:,:'
I
EiEi
'
..
_,--'
H
lmliI
Q.1QI
"
12
.,
..........
"
0:-"15'[
O,.Q
7
0
0
I
2
1.
SET
2,
CHANNEl
3,
MENU
4.
CHANNELUP
5.
LANC
6,
COUNTER
7,
EDIT
8,
EDIT
9.
JOG
1
D,
VIDEO
DOWN
REMOTE
START/STOP
STANDBY
ON/OFF
SELECTOR
RESET
INSERT
GB·5
11.
AUDIO
12,
EJECT
13,
PLAY/x2
14,
STOP
15,
FAST
16.
JOG
17,
REWIND
18,
PAUSE/STILL
19,
RECORD
INSERT
FORWARD
SHUTTLE
DIAL
Page 8

INSTALLING YOUR
TUNING
THE
VCR
TV
INTO
THE
VCR
IMPORTANT
between
illuminatedinlow
1.
Ensure
mode
2.
Switch on the lV. Selectanunused
channelonyour N
may be a dedicated video channel refer
to
yourTVoperation manual).
3.
Press
seconds.
display
4.
Tune the selected channel on your
(refertoyourTVmanual) until
screen appears.
5.
Press
place
NOTE:Bypressing
STANDBY
and
power
your
VCRisstillinthe
Inot
low power!.
for
and
hold
the
MENU
The
VCR
will
the
idealRFchannel.
SET
to
store theRFchannel and
the
VCR
bock into
LOW
mode.
STANDBY
your
VCR
buffan
search and
the
STANDBY.
the
STANDBY
POWER
modes.
(there
for 3 e.g.
TV
menu
to
button,
The
VCR
the
VCR
display
will
will
toggle
not
be
NOTE:
If
you
have
Step3using
../
The
a'preferred
L""/T
channel,
)
keys
TVistuned
.
to
the
VCR.
GB-6
Page 9
INSTALlING YOUR
VCR
AUTO INSTALLATION
SATELLITE
Ifyau
install
sameasfor
Follow
1.Connect
2.
Place
infrared
3.
Ensure
safellite
receiver
4.
Ensure
•
The
RECEIVERICABLE
haveasatellite
the
satellite
satellne
steps
1-4
your
the
satellite
signals
all
the
receiverasthe
operation
the
receiverisnotinany
satellite
willbeprompted
•
SHARP
connot
•.
See
the
listofsatellite
tQ
AU.iI1forrTldtton
INSTALLAnON
These
models
outomoticolly
information
sort
receiver
channels
using
receivers
below before
satellite
receivertothe
receiver
near
from
the
VCR
channels
chon
manual
nels
can
for
further
guarantee
receiver
you
VCR
this
PROCEDURE
tune
theTVchannels
BOX CONTROL
or cable
(for
this
cable
box
connectedtoyour
feature.
The
box
connections
INSTALLATION
VCRaspreviously
the
VCR
(ideallyonthe
which
control
wishtobe
will only
for
instructionsonmoving
special
tuned
tune
the
mode
nowbetunedinas
informotion
feature
manufacturers
the1Ychon
into
from
will work
nels
a standard order and
VCR
you
can automatically
installation
procedure
refertoyour cable box
for
PROCEDURE:
shown.
top),
This
ensures
the
satellite
receiver can reachitunimpeded.
are within channel
first99channels-refertoyour
channels.
.
portofthe
the
on·screen
with
011
satellite
codes
at the end of
for your oreo,
positions
outo·instollotion procedure.
displays.
receivers
this
manual.
then
using
set
the
clock.
cable
that
1~99
and
coble
Teletext
boxesisthe
manual).
the
reflected
on
your
satellite
boxes
You
.
•
Ensure
•
Turn
theTVon
•
Press
STOPtoswitchonyour
If
the
VCR
instructions
you
through
If
the
screen
is
first
switched
start
from
If
the
screen
the
videoisfirst
on
the
next
the
VCRisconnectedaspreviously
and
select
the
video
VCR.
has
not
previously
willbegivenonscreentoguide
this
procedure.
opposite
on,
press
point4on
opposite
switched
page. .
been
appears
SETtoconfirm
the
next
does
not
on,
start
when
page.
appear
tuned-in,
the
from
channeL
video
and
when
point
shown.
1
GB-7
Page 10
INSTALLING YOUR
AUTO
VCR
I.
2.
3.
INSTALLATION
RESET
Press
STOPtoswitchonthe
Press
and
bunons
10
The
nowbeshowing on your
confirm.
hold
togetheronthe
seconds.
AUTO
4••Press[...
and
press
•
Press[...
use
and
press SET.
•
Ensure
your
connected to
SET
to confirm.
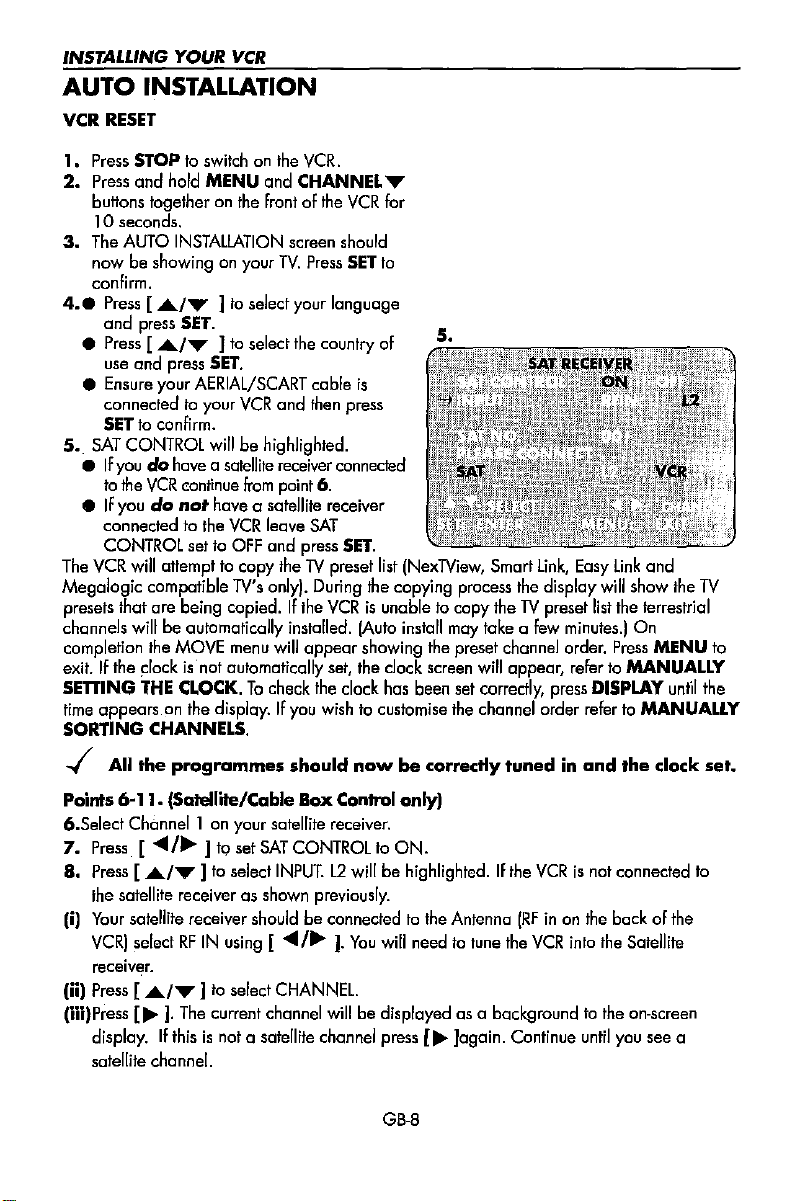
S.
SAT
CONTROL
• IFyoudohave a satellite receiver connected
to
the
VCR
•
IF
you
do
connectedtothe
CONTROL
The
VCR
will
anempttocopy
Megalogic compatible
presets that
channels willbeautomatically installed. (Auto install may fake a few minutes.j
completion the
exit.Ifthe
SETTING
time
SORTING
are
~Iock
THE
appears.on
CHANNELS.
VCR
VCR.
MENU
and
frontofthe
INSTALLATiON
/",1to
SET.
/",)to
screen
TV.
select
select
AERIAl/SCART
your
VCR
and
CHANNEL
Press
your
the
country
cable
then press
VCR
should
SET
to
language
of
is
'"
for
S.
willbehighlighted.
continue from point 6.
not
have a satellite receiver
VCR
leave
SAT
settoOFF
being copied.Ifthe
MOVE
is'nof automatically
CLOCK.Tocheck
the display.Ifyou wish to customise the channel order refer to MANUALLY
TV's
menu
and
press
theTVpreset
only).
During
VCRisunable to
will
appear
set,
the
SET.
list
(NexTView,
the
copying
showing the preset channel order.
the clock
clock
has
screen
been set
Smart
process
copy
will
correctly,
link,
the
display
theTVpreset
appear,
Easy
will
list
refer to MANUALLY
press
DISPLAY
link
and
show
the
the terrestrial
On
Press
MENU
untH
TV
to
the
-I
All
the
programmes
Points
6-11.
(Satellite/Cable
6.Select
7.
B.
(i)
(ii)
(iii)Press [ ]. The current channel
Channell
Press
[
Press[...
the satellite receiverasshown previously.
Your
satellite receiver shouldbeconnectedtothe Antenna
VCRI
selectRFIN
receiv~r.
on your satellite receiver.
""/~
)toset
/"')toselect
using
Press[,,,,)toselect
display.
satellite channel.
If
thisisnot a satellite channel press [
should
Box
SAT
CONTROLtoON.
INPUT.12willbehighlighted.Ifthe
[ .."
I~
CHANNEl.
now
be correctly
tunedinand
the
clock
Control only)
VCRisnot
(RFinon the back of the
).
You
will
needtotune
willbedisplayedasa backgroundtothe on-screen
.....
GB-B
]again.
the
VCR
Continue
into
the
until
connected
Satellite
you
see
a
set.
to
Page 11
INSTALLING YOUR
AUTO
9.
1
D.lf
II.The
INSTALLATION
Press
[.110./..."lto
the makeofyour satellite receiver and
code
number listed.
should now change to preset channe112.
your satellite receiver has changed to preset channel 12/ press
confirm
the
maytake a few minutesl.
VCR
will
Megalogic compatible Tv's only). During the copying process the display
TV
presets
that are
terrestrial
few minutes.)
order.
appear,
correctly, press
the
and
Press
refertoMANUALLY
channel order
VCR
select
SAT
NO.
Turntothe
use
For
example number 8 shouldbeentered 0 08.Your
VCR
will
automatically
attempttocopy
being
copied.Ifthe
satellite channels will be automatically installed. (Auto install may take a
On
completion the MOVE menu
MENU
to exit. If
install
theTVpreset
VCRisunabletocopy
the
clockisnot automatically set, the
SErrlNG
DISPLAY
until
the
time
refertoMANUALLY
appears
SORTING
table at
the
NUMBER
both
satelli1e
list
INexTView,
the
endofthis
BUTTONS
and
1errestrial
Smart
theTVpreset
will
appear
showing the preset channel
THE
CLOCKTocheck
on the display.IFyou wish to customise
CHANNELS.
NOTES:
elfyoqrsatellite
numberon the
from
point
If
your satellite receiver
numbers
to.12,.enter. 0
channel 12.ifit
check.,Conti
i<'lHhereis
imProve
•
Auto-installation
all
the84VCR
The
VCR
•
channels
receiverhasn,~t,
list;
Continue until the receiver
chang~d
10. '
.liste~
..
For
y~~r:
O,l,ondl.ook,
has,
continue
nue
untilyour receive,r
still..no·
response
the
InFaRed VfRto
will
slop
presel channels
will
place
all
From
the
first
is.nqfliste~
receiv~r"
From.
when
found
(Jvailable presett;hannel after the terrestrial
althe
t~esatellite,
t~see
if
the
from
point
cHa~ges
yoursatellH~
satellHereceiyerrecepti~n;
the
satellile
have
been
terrestrial
channels slarting at preset 1,
t()
pres~t~hannel.12~nterthene~code
showspresetchanneJ
endoHhi~
r~ceiyefpres~tchanne<lhas
satellite
10.Ifnot,
tl),
receive~,tryadiusting
receiver reaches
used
rnanuol or.lJtterenteririgOllthe
rec~i~~r
presetl,~i~hen
has
press~to
changedtopr~set
select 0 0 2 and
...
cqntinue fr()nlPolnt
',..,.
presel
.
manual.
to enter the first
SET
to
channels.
Link,
Easy
dock
the
dock
satellite
Link
will
list
screen
has
Look
IThis
and
show the
the
will
been set
for
12, then .contiiju¢
still
<n~t?hph9i;'q
re-
JO;
,it~.·positiQnt?
....••
,.'
••.,...•...•.••..•',....<>
channel 99,orwhen
then
all
salellite
cha,nne1s.
'
..j'
All
the
programmes
n
IF
you
replace
your satellite receiver, you
U installation procedure to tune your
new satellite receiver
IFiy~u.·.
~6nneda.
SATELLITE
sat~llite
RECEIVERICABLE
should
will
not over-write the previous satellite channelsinyour
rece-iv~rtb
the
BOX
nowbecorrectly
will
needtoFollow
VCR
to the satellite receiver.
VCRior
the
firsi',
fjfue,
INSTALLATION.
GB-9
tunedinand
the complete outo-
Thisisbecause your
the
clock
VCR.
set.
Page 12
BASIC OPERATION
IMPORTANT NOTES
VIDEOTAPES
•
If
you
use
only
good
quality video tapes, generally it
video heads.
•IFpoor
•Toremove minor contamination
• Use video tapes which
•
quality
tapes
are
from
the
tape
may
"dog"
"
l',
snowy
will needtohave the heads cleanedbya
is
This
or even disappear.
necessaryitis
VCR
does
nof
coveredbyte
not
playback or record
ON
used, or if a
the video heads.
run
carry
the
YOUR
tapeisloaded after changing
a video tapeinvisual search mode. If this fails, you
ljIorantee.
\fI.IS
S-VHS
This
SHARP
mark.
VCR
AND
will
will
cause the playback picture to
Service Facility. Please note, if cleaning
format
video tapes.
VIDEO
notbenecessarytoclean the
VCR
TAPES
location, oxide
be
HOW
it
PLAYBACK
1.
2.
•Ifthe record-protection tab has been
3.Tostart playback,
TO PLAYBACK A VIDEO
BEFORE
Condensation
you
VCRonand
before operating.
Switchonyour
channel.
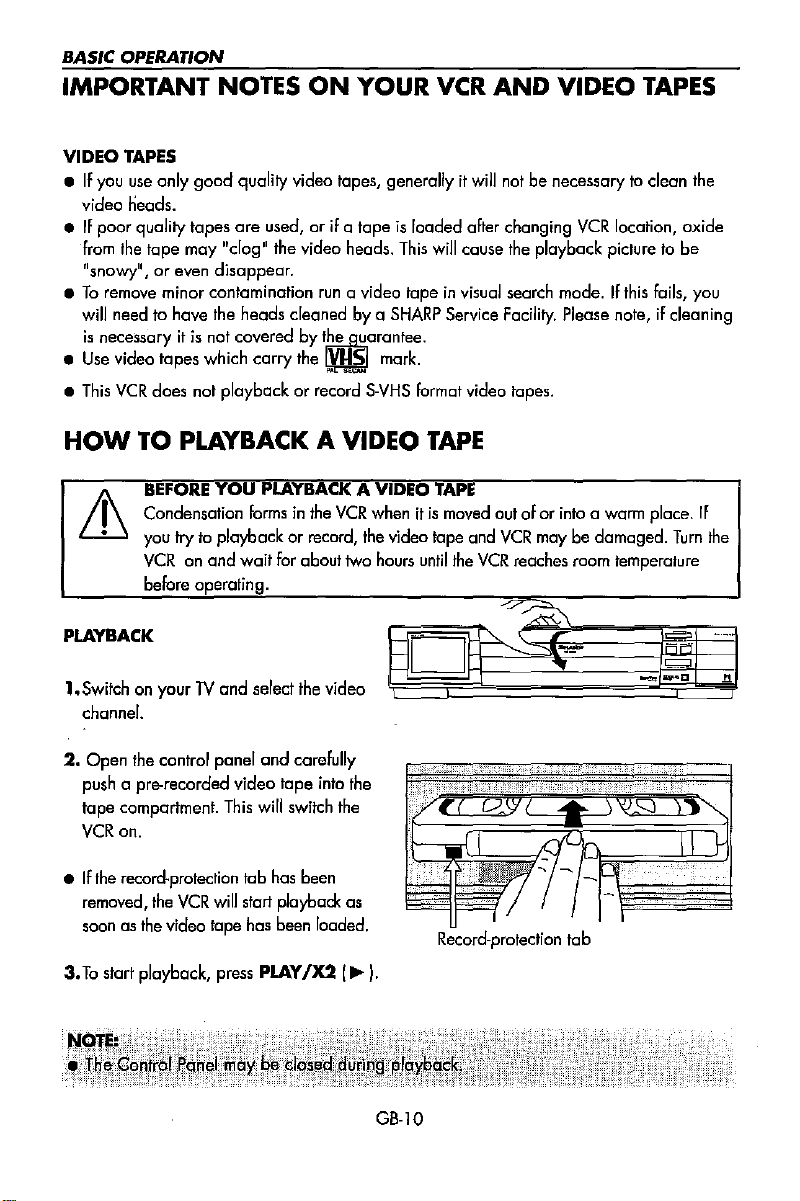
Open
the
push a pre-recorded video
tape
compartment.
VCR
on.
removed,
soonasthe video tape has been loaded.
the
YOU
PLAYBACK A VIDEO
formsinthe
try
to
playback or record,
wait
For
about two hours
TV
and select the videa -
control panel and carefully
tape
into the
This
will
switch the
VCR
will
start
playback as
press
PLAY1X2 I~
TAPE
TAP.
VCR
when itismoved out oforinto a warm place.
the
video lope and
until
SD'
Record-protection
the
VCR
may
be damaged.
VCR
reaches room temperature
-~~
C\
~
.",.
~
tab
).
~
_0
Turn
IF
the
-,_.
11
GB-10
Page 13
BASIC
HOW
OPERATION
TO PLAYBACK A VIDEO
TAPE
SHARP SUPER
PICTURE
should enhance the picture quality during playback.Itis
normally set to ON.Taturn SHARP SUPER PICTURE onoraff press SUPERP.on the
VCR
front
panel,oron
NOTE:
•
The
folloWing
otherwisBstated.
•
For
double speed playback Iwithout sound), press PLAY
•Torevert to normal playback, press PLAY
•
To
stop the video tape, press STOP
•Toeject
PICTURE DISTURBANCE
This
to playback a
display. If
During
•
Press
the
tape
VCR
hasanautomatic
video
the
picture
PlAYBACKafa video lape.
CHANNEL
the
remote
control.
instructions are
press~EJECTonthe
tape. When
still
has
....or.....toposition
bosed
DURING
tracking
system
auto-trackingisin
disturbance
on using
I-
Control
PLAYBACK
you
picture
the
/X2
I~)again.
).
Panel.
which
reduces
may needtomanually
interference
remOfebdnfrol
/X2
picture
operation
~K-
off
.
hand
I~)
again.
disturbance when
Rashesonthe
track
the
video tape:
theTVscreen.
not
you
on-screen
(Manual
Tracking)
•
Press
CHANNEL
PAUSING
1.
Press
2.
To
AND
PLAY/X2
pause the video tape, press PAUSE/STILL
•Tominimise
• Press PLAY
3.
To
playbackinslow motion Iwithout sound) press
motion
speed can be
disturbance
....
and
.....
buttons
SLOW
MOTION
I
~)
to start the video
jitter
whilstinpause
/X2
1~)ta resume playback.
adjusted
mode
using
canbeimprovedbyusing
togethertostart
tape
playing.
III).
press
CHANNEL
the
Gar®buttons
the
CHANNEL
I~
Auto
SLOW
......or.....
Tracking.
......or......
on the remote control. Slow
nexttothe
slow
during
button.
slow
motion
playback.
• Press
PLAY
/X2
I
~
Ito resume playback.
start
Picture
GB-ll
Page 14

BASIC OPERATION
HOW
FAST
1.
2.Press
3.To
TO
PLAYBACK A VIDEO
FORWARDING/REWINDING A VIDEO
Press STOP
Panel on the
clockWise).
stap fast forward/rewind, press STOP
FAST
I-
}
to
stop the video
FORWARD
VCR.
(The
1*1/REWIND
Jog/Shuttle dial may alsobeusedbyrotating clockwiseorcounter
tape.
(-
TAPE
TAPE
I~)
on the remote controlorthe Control
I.
Visual Search
on the remote control
VCR
Control Panel.
1.Press
2.To
decrease
3.
Press
OR:
Jog
canbeoperated
FAST
FORWARD
the
PLAY
/X2
Shuttle
during playbackbyeither the Fast Forward/Rewind buttons
and
on the
VCR
Control Panel
I*I/REWIND
speed,
press
FAST
FORWARD
I~ ,to resume playback.
dial
orbyusing the Jog/Shuttle dial on the
(~I
during playback.
1*1
/REWIND
NOTE:
•
JOG
SHUTTLE
During playback the Shuttle dial canbeused to provide Search
mode
of operation
• Shuttle operation
•
Jog
Shuttle operation
DIAL
OPERATION
canbeselected.
(~)
and
Pause functions.
again.
Two
GB·12
Page 15
BASIC OPERATION
HOW
TO PLAYBACK A VIDEO
TAPE
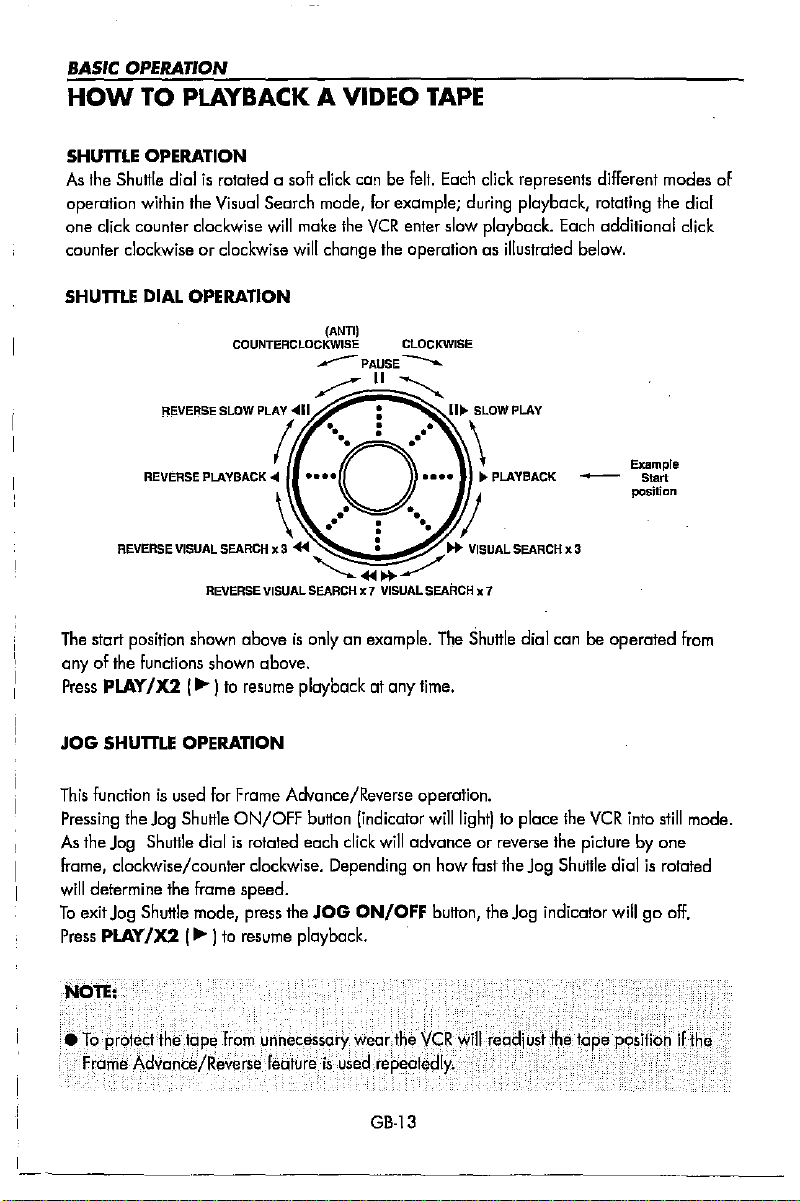
SHUTTLE
As
the
Shuttle
operation
one
click
counter
SHumE
The
start
anyofthe
Press
PLAY
OPERATION
dialisrotatedasoft
within
the
Visual
Search
counter
clockwise
clockwiseorclockwise
DIAL OPERATION
position
shown
functions
1X2
I~)
will
aboveisonlyanexample.
shown
above.
to
resume
click
canbefelt.
mode,
for
make
the
VCR
will
change
the
playback at any
Each
click
represents
example;
enter
during
playback,
slow
playback.
operationasillustrated
The
Shuttle
dial
time.
different
rotating
Each
below.
- Start
canbeoperated
the
additional
Example
position
modes
dial
click
from
of
JOG
SHUTTLE
This
functionisused
Pressing
As
Frame,
will
To
Press
the
the
Jog
clockwise/counter
determine
exit
Jog
PLAY
OPERATION
Jog
Shuttie
Shuttle
the
Shuttle
/X2
(~
for
Frame
ON/OFF
dialisrotated
clockwise.
frame
speed.
mode,
press
I
to
resume
Advance/Reverse
button
(indicator
each
click
will
Dependingonhow
the
JOG
ON/OFF
piayback.
GB-13
operation.
wiillight)topiace
advanceorreverse
fast
the
Jog
button,
the
Jog
the
VCR
the
picturebyone
Shuttle
indicator
into
still
mode.
dialisrotated
willgooff.
Page 16
BASIC OPERATION
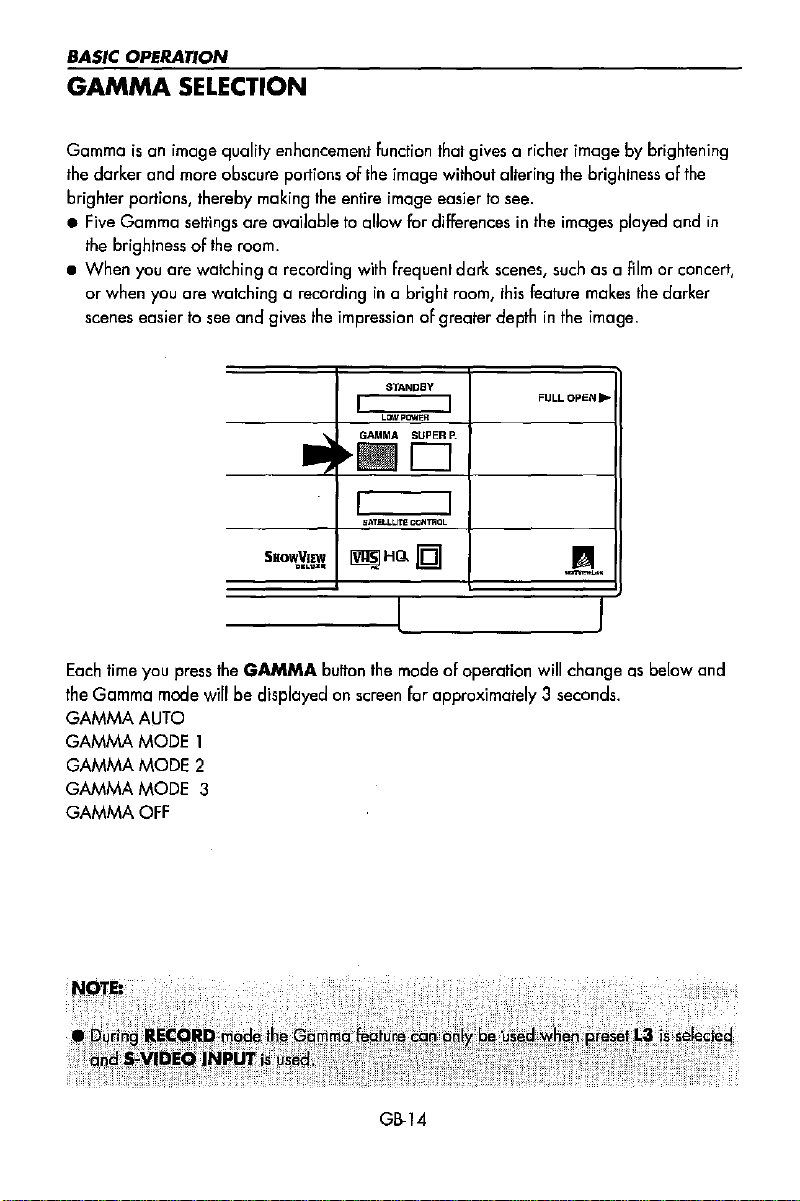
GAMMA
SELECTION
Gammaisan image quality enhancement function that gives a richer
the darker
brighter portions, thereby making
• Five Gamma settings
the brightness
•
When
or
scenes easier to see
and
more obscure portionsofthe image without altering the brightnessofthe
the
entire image easiertosee.
are
availabletoallow for differencesinthe images played and
ofthe
room.
you
are
watching a recording with frequent
when you are watching a recordingina bright room,
and
gives the impressionofgreater depthinthe image.
STANDBY
I I
LOWPOW~R
dark
scenes, such as a
fhis
feature makes the darker
FULL
~iiEf
I I
SATEU.t.lTl! CClNmOL
~HQ.IQI
I
button the mode of operation
For
approximately 3 seconds.
will
Each time you press the
the Gamma mode
GAMMA
GAMMA
GAMMA
AUTO
MODE
MODE
GAMMAMODE
GAMMA
OFF
will
1
2
3
SBO\li¥!!!
GAMMA
be
displayedonscreen
imagebybrightening
Aimorconcert,
OPEN"
A
I
change
as below and
in
GB-14
Page 17

BASIC OPERATION
IMMEDIATE RECORDING
SELECTION
Select the channelbyusing the number buttons on the remote controllor
next/previous channelbypressing
To
change
For example,
You
can record the channel you are watchingora different channel.
1.
Insert a video tape into your
position.
2.Select
3.Tostart
4.Topause
5.
To
continue recording, press
6.Tostop recording/
SIMPLE
1.Tospecify a stop
2.
Each
will
3.
To
OF A
CHANNEL
between single digit
for
channel
the
channel
recording,
during
you
press
recording,
press
TIMED
RECORDING:
time,
additional
delay
stop recordingatany
the
stop
pressofREC
timeby10
CHANNEL
and
2-digit channel numbers, press
24,
press
AM/PM
VCR
and ensure the Hi-Fi
wishtorecordonthe
REC
I.
).
press
PAUSE/STILL
REe(.).
STOP
once.
press
REC
I.
I
I.
)
minutes.
time, press
.A. or .....
C!EJ
then press 2
VCR.
III).
Ree
4.
Level
AM/PM
Controlisin
STOPI-lance.
select the
@.
its
central
GB·15
Page 18

BASIC OPERATION
DIRECT
THIS
and
By
pressing
currently
This
Power mode.
•
If
•
Ensure
position
I.To
2.To
3.
To
4.
To
NOTl'S;
, A
TV
RECORDING
FEATURE
Megalagic
feature can be started
E'J
appearsonthe
start
pause
continue recording,
stop
~lIywireciscart
CAN
ONLYBEUSED
COMPATIBLE TV'S.
the
DIRECT TV
being displayedontheTVregardlessofthe
REC
when
VCR
display,
a video tapeisinsertedinthe
..
the
recording, press
during
recording,
press
recording, press STOP 1-).
must
be used
lIlfDIR!"GITVREGqRDcoulci
(RefertoibeTV
operation
TIMER RECORDING
Itispossibletoprogram
I.NexTView
2.Showview
3.Manually
HOW
•
If
E'J
•
Check
Some
broadcasts
controls,
automatically.
manual
menu
willbedisplayed
oncetoplace
(DELAYED
TO
USE
appearsonthe
that
the
the
program
This
for
further
the
the
VCR
RECORDING)
NexTView
VCR
display,
clockisdisplaying
transmitanElectronic
you
wishtorecord
featureiscompatible
information. After
for
approximately 5 seconds, afier
VCRinSTANDBY
WITH
bunononthe
the
VCRisin
press
TIMER
VCR
DIRECTTVREC.
press
PAUSE
REC
Ie).
for
bIRECTJYi~!"G~lRpqperqtlo~.
nol
start,
Ihe
manuall
using
three
TO
press
TIMER
the
correct
Program
canbeselected
with
transferofthe
mode.
E'J
NexTView,
remote
signal
STANDBYorOPERATE
ON/OFF
and
the
Hi·Fi
control,
source.
before
Ree
Smart
Link, Easy Link
the
VCR
will
record
mode,
but
starting.
level Controlisin
III).
TV1lhoOlciinclicWelh¢feasQnWhY,
different
methods
:-
MAKE A RECORDING
ON/OFF
time.
Guide
NexNiew
willbeshownonthe
before
(EPGJinwhich
and
N's.
timer
informationtothe
which
starting.
case,
using
usedtoprogram
Refertoyour N operation
VCR,
press
TIMER
display.
the
NOT
its
central
the
the
VCR
the
timer
ON/OFF
signal
low
TV
GB·16
Page 19

BASIC OPERATION
HOW
•
•
•
SHOWVIEW
SHOWViEW
1.
2.Enter
TO
If
E!l
appearsonthe
Check
that
the
Ensureavideo
position.
allows youtoprogram the VCRtorecordupto
numbers
Press
[SV
/V+
the
SHOWVIEW
listing
using
USE
SHOWVUW
VCR
display,
cbckisdisplaying
tapeisinserted
publishedinTV
I
on
the
remote
number
the
NUMBER
press
the
correct
into
the
VCR
listings.
control.
from
the
BUTTONS.
TO MAKE A RECORDING
TIMER
TV
time.
and
ON/OFF
the
before
starting.
Hi-Fi
Ree
Level
eight programmes using the
NOTE:
.J\nER~()RTl1essa~e,wnlappedr
SHOWVIEW
and enter
3.
Press[...
4.lf
you
[
"'/~
5.
Press
SETtoconfirm.
number.Ifthis
the
correct
SHOWVIEW
,...,Ito
wanttomake additional recordingsatthe same time each
I
to
select
select
the
WEEKLY,orDAilY
happens
ONCE,
itrou
h~~~
press
number
WEEKLY,
~f1tereda
CLEAR
number
to
delete
DAilY.
option
as appropriate.
that
the
NOTE:
•
Check
that
the
menu
list
agrees
with
the
times
shownintheTVlisting.Ifit
CLEAR
to
returntothe
SHOWVIEW
menu,
and
re-enter
the
correct
Controlisin
is nota
numbers
day
as required
or week, then
does
SHOWVIEW
its
central
cur~ent
use
not
press
number.
The
first
time
that
you
use
SHOWVIEW
make a recording on each channel
(PRJ
may
be highlightedonthe
6.
Enter
theche
using
the
exampleiFyou
press
0 2.
for
the
Future.
nnel
you
NUMBER
Wishtorecord
The
VCR
menu.
wishtorecord
BUTTONS,
will
remember
NOTES:
You
may
also access
i.
Press
MENU.
ii.
The
SHOWVIEW
Continuefrornstep
the
SHOWVIEW
option
willbehighlighted.
2above~
Preset,
for
channel
this
to
2
menubythe
Press
GB-17
following
SET
to
procedure
confirm.
Page 20

BASIC OPERATION
HOW
7.
8.
9.
10.
TO
USE
If
your
VCR
has long
to
you wish
SPEED,
SP.
Press
play
change
use
the[....
[
A'''''''
(SP)orlong
[See NOTE below].
setting
use[....
final
column.
select
VPS/PDCONor
- =
OFF).
Press
SETtoconArm
The
SHOWViEW
IF
you
wishtoenter
SHOWVIEW
procedure.
When
timer
settings,
the
menu
recordings repeat
you
have
press
from
SHOWVUW
ploy
focililyond
the
RECORDING
/~
1
to
highlight
1
to
select standard
play
(lPI
as required.
For
VPS/PDC
/~
1
to
highlight
Using
the
[A'''''''
OFF
(*
the
programme.
menu
will
reappear.
further
completed entering
MENU
theTVscreen.
to
remove
TO MAKE A RECORDING
the
1
will
= ON
this
11.
Press
TIMER
the
VCRinTIMER
E'J
willbeshown
ON/OFF
STANDBY
on the
oncetoplace
mode.
disploy.
GB-18
Page 21

BASIC OPERATION
HOW
You
The
from the manual clock selting menu.
12-hour clock
•
• Check that
•
TO
SET
A DELAYED RECORDING
can make a maximumofeight delayed recordings up to a yearinadvance.
example
If
Ensure
position.
shownisfor
am/pm
E'J
appearsonthe
the
that a video tapeisinserted into
24-hour
canbeselected using the AM/PM (IE) button on the remote control.
VCR
display,
clockisdisplaying
clock
operation. 12-hour
press
TIMER
the
correct
the
time.
VCR
ON/OFF
and
the
clock
operation can be selected
before
starting.
Hi-Fi
Ree
Level
SmlNGARECORDING
For
example: Recording a programme on channel 3
I.
Press
STOP
I-
)
to
switchonthe
2.
Press
MENU.
3.
Press[...
SET
4.The
is
Press
•
The
,.... ]toselect
to
con~rm.
position
whichisinitially
the next available timer record entry.
SET
to
confirm this.
display
will
auromalically
TIMER.
VCR.
Press
highlighted
show
from21:05to22:30
MENU
SCREEN
today's date.
Controlisin
on July 9th.
its
central
Either:
If
thisisthe date
make the recording on, press
confirm this.
Or: enter the recording date using the
[
...
,.... ]orthe
Enter
two digits for the day, then two for
the month.
o9
5.Then press
6.lf
you
at the same
[
...
(weekly).
7.
Enter
the
to record a programme on channel
press 03.Then press
For
example for July 9thtpress
(9th),
then
0 7
SET
to
want
to make additional recordings
timeeach
,.... ] ta select D
Then
press
the
channel
NUMBER
BUTTONS.
you
NUMBER
Uuly).
confirm.
dayorweek, use
(daily)
SETtocanfirm.
using
the[...
SET
10
wish
SET
BUTTONS.
or W
Far
confirm.'
to
to
,.... ]
example
3,
or
GB-19
Page 22

BASIC OPERATION
HOW
8.
9a
1O.lfyour
11.[See
12.Press
13.
14.Press
TO
Enter
the
start
or
the
NUMBER
then
minutes
minutes
add a
for
example
05.
Then
press
Enter
the
stop
22:30
stop,
VCR
you
wish
to change
SPEED,
SP.
. play or
seffing
final
select
• =
•
settings
make
this
When
settings,
menu
the
E!J
use
Press
[ ~
long
NOTE
use
[~/~
column.
VPS/PDC
OFF).
SETtoconfirm
The
MENU
you
additional
procedure.
you
have
press
from
theNscreen.
TIMER
VCRinTiMER
willbeshownonthe
SETADELAYED
time
(when
'0'
for21:05
time,
press
has
the
I~
playas required.
below].
Using
now
have
MENU
ON/OFF once
using
the
BUn-ONS
entering
before
fhe
start,
SET
to
confirm.
for
example for
2 2 3
O.
long
play
the
RECORDING
[
~/~
J
1
to
select standard
ForVPS/PDC
J
to
highlight
the
[
A/T
ON or
OFF
.
shows
all
entered.Ifyou
timer
recordings,
completed
to
remove
STAN[).BY
display.
[A/T
hours
Jess
number).
press 2 1
facility
to
highlight
1*
the
timer
entering
the
to
mode.
RECORDING
J
first
than
10
and
the
J
will
= ON
wish
10
repeat
timer
place
GB·20
Page 23

BASIC OPERATION
HOW
TO
SETADELAYED
RECORDING
CHECKING,
CHANGING
AND
CHECKINGARECORDING
1.lfinTIMER
ON/OFF
2.
Press
3.
Press
4.
Press
SET
•
All
memory
•
You
cancel them.
STOP
STANDBY
to
exit.
to
mode,
switchonthe
MENU.
[ A'''''I
to
confirm
the
delayed recordingsinthe
can
will
check
be
to
.
shown
the
select
settings
TIMER.
.
and
CHANGINGARECORDING
I.Follow steps 1to4
of
CHECKING
RECORDING.
2.lf
you
wishtochange a delayed
recording, press [
the recording,
3.Press [
...
/~
be changed and corred
[A/"" I
4.
When
all corrections are complete press
SET,
then
press
or
A'''''
then
I
to
the
NUMBER
MENU.
I
to
press
SET.
highlight the
it
by
CANCELLINGARECORDING
press
TIMER
VCR.
Press
VCRs
change
or
A
highlight
setting
to
using
the
BUTTONS.
MENU
SCREEN
CANCELLINGARECORDING
1.
Follow
steps 1
to4of
CHECKING
RECORDING.
2.lfyou
wish10cancel a delayed
recording,
the
press
recordingtobe
[ A/""I
cancelled,
to
CLEAR.
3.
Press
MENU.
NOTE:
A
highlight
then
press
STP,NC)·BY
GB·21
mode.
not
forgettopress
nMER
O'~/(]FF
Page 24

ADVANCED OPERATION
AUDIO
HI-FI
Stereo soundispossible
with a
normally set so that stereo soundispossible. The sound output
the AUDIO OUT buttononthe
can
•
Press
appearonthe
•
Press
will
•
Press
R will disappear from the
AND
STEREO
s~art
use
the
AUDIO
AUDIO
AUDIO
appearonthe
AUDIO
YOUR
SOUND
lead,
OUT
OUT once.
VCR
OUT
VCR
OUT three
VCR
from
this
VCRifyou have a
or
audio equipment connected
remote control. Ifyou wishtochange the sound output you
buttonasfollows:
The
LEFT
audio channel
display.
twice.
The
RIGHT
audio channel
display.
times.
The
MONO
VCR
display.
(The
stereo
with
audio phone leads.
will
be senttoBOTH
will
track
will
be senttoBOTH
Hi-Fi
level control will not operateinthis
mode.)
•
Pressing
will
NICAM
Your
factory
depends
Audio
1.
Hi-Fi:
will
2.Normal: A mono recording
AUDIO
appearonthe
Hi-Fi
VCR
can receive and record programmes broadcastinNICAMorIGR
pre-set
on the programme being received.
is
automatically recordedintwo different ways:
Using specialised rotary heads, two audio signals
be stereo, mono or bilingual depending on the sound being received.
OUT a
STEREO
condition
fourth
VCR
display.
SOUND
for
NICAMisAUTO!.
is
also
time,
made
normal
Hi·Fi
stereo sound
NICAMorIGR
on the conventional
are
TV
connected to the
from
the
VCRiscontrolled
The
VCR
VCR
speakers. L
be senttoBOTH
speakers. R
speakers. Land
will
be heard. Land R
sound
~he
sound
may
notbestereo,
recorded on to the tape. These
analogue
audio
track.
is
by
will
this
1.Press
MENU
the screen.
2.~ress
["""-/.." I
3.Press
SET.
4.
Press
[
"'/~
5.Press
SET
MENU
6.Press
to display the main menu on
to
select
MODE.
NICAM
to return to the menu screen.
will
be selected.
I
to
select
OFF.
to exit to normal screen.
GB-22
Page 25

ADVANCED OPERATION
AUDIO
CONNECTING TO AUDIO EQUIPMENT
The
in
this
BACK
AND
diagram
below
way
stereo soundispossible
OF
YOUR VCR
shows
howtoconnect
from
the speakers.
TELEVISION
your
VCRtoaudio
RF
CONNECTION
equipment.
EXISTING
CABLE
CABLE
When
connected
AUDIO OUT
Land
R
AUDIOPHONO
LEADS
(NOT SUPPLIED)
GB-23
Page 26

ADVANCED OPERATION
EDITING
Your
VCR
will
allow
youtoeditatapeinthree
VCR
or Cam Corder.
•
AV
INSERT replaces the video,
• VIDEO INSERT replaces the video
unaffected.
•
AUDIO
unaffected.
INSERT replaces the Mono Audio but leaves the video and
AVJNSERT
.,.','~
'S~",,;~~"R;;e~:~~.~~:;~~~~_;;;;;;;;;;;;;:t:
'0
~
...-"
~
VIDEO
TAPE
Hi-Fi
1~-~__--i_L~:
I
I
'==!:;i:'~;='==j:t=:llllli:=:t~)
and
and
HI-FI
VIDEO
different
Mono Audio.
waysinconjunction
Audio but leaves the Mono Audio
INSERT
I AUDlOINSERT
~~~~,••~,
~,;
,',""
.. , I • I
----7--------;----"
----f:~'
,;':
with
another
Hi-Fi
Audio
MONOAUDJO
::::::)~
VIDEO
--f:~-=K.~
I
'
H,Ff1::DtO
MONO
AUDIO
VIDEO
,,<0
HIFlAUDIO
the
PLAYBACKVCR
GB-24
OR
CAMCORDER
Page 27

ADVANCED OPERATION
BASIC EDITING
Connections
S-YIDEO
The
conventional
colour
signal
allows
separate
NOTE:
•
This
VCR
LANC
The
Local
transport of other/video equipment connected to
1.
Switchonthe
2.
Press INPUT
be
displayed on the
3.
load
the source
protection
camcorder
4.
load
the
the
and
the start position
5.
Press
REC
6.Tostart editing press
simultaneously.
7.Tostop
video
socketsofVCRs
(CJ
combined,
transmissionofsignalstoenhance
does
not playbackorrecord
Application
Nand
SELECT
which
Control
Bus
seled
the video channel.
an
the remote control to select the
For
are
recordedonthe
S-VHS
System
or
output
LANe
VCR.
tape
tab
for
tapetobe
HiFi
Rec
to place your
the
editing
into the playback VCR or camcorder ensuring that the record
has been removed. Search the source tapeonthe playback
the
playback
Level
and
process
recorded
Controlisin
select
VCR
PAUSE
press
start
position
into
your
VCR,ensure
its
central
PAUSE.
into
RECORD
on the recording
the
STOP
and
and
input
video
picture
clarity.
format video tapes.
jack
canbeused
it.
video/audio
select
PAUSE.
the
record
position.
Search
PAUSE.
VCR
and
PLAY
buttonsonboth
are
the
luminance
tape.
The
for
protection
the
tapetobe
on the playback
units.
signallYj
S-Video
Socket
controlling
the
tape
input, L2 or L3 will
VCR
or
tabisin
place
recorded for
VCR
and
GB-25
Page 28

ADVANCED
OPERATION
BASIC EDITING
ASSEMBLE
To
cut out unwanted scenes while using the procedure on the previous page
PAUSE
endfaresume
EDITING
button on
recording.
the
recording
VCRatthe startofthe unwanted section
NOTE:
•
Ens~r~
q~toormon~ollrockih\l
c:;ommencing
INSERT
1. Switch on theTVand
2.
Press INPUT
be disployedonthe
3.
load
the source lape into the playback
protection tab has been removed. Search the source fape on the playback
camcorder for the playback start position
4.
load
the
and
that the
Search the
5.
Press
COUNTER
6.
Rewind the
7.
Press
editing.
EDIT
SELECT
tapetobe
HiFi
Rec
tapetobe
RESET.
tape
to the start of the section tobereplaced
the
INSERT
TO
Picture
Hi-Fi
Mono sound only
Picture
Mono Sound
button
REPLACE
and
sound
Hi-Fi
and
select the video channel.
on the remote controltoseled
VCR.
recorded into your
level Controlisin
recorded
hqs
b~.n
VCR
VCR,
its
for
the
endofthe scene tobereplaced
II~II
PRESS
VIDEO
V.INSERT
TV
screen.
AUI)IO
A.INSERT
TV
screen.
VIDEO
AV.lNSERT
theTVscreen.
cqmpleteq
and
central position.
on
th~
ploybock
the video/audio input,12orL3will
or camcorder ensuring that the record
select pause.
ensure the record protection tabisin
and
press
INSERT
oppeorsonthe
VCR
display andonthe
INSERT
oppeorsonthe
INSERT
then
appearsonthe
VCR
display andonthe
AUDIO
VCR
press
and
againatthe
VCR
befqr~
VCR
and
select pause.
PAUSE.
INSERT
display and
the
or
place
on
8.Tostart
simultaneously.
automatically.
editing
press
When
Press
stoponthe
PAUSEonthe
the
tape
counter reaches
ploybock
recording
VCR.
GB-26
VCR
ond
0:00.00
PLAYonthe
the recording
playback
VCR
will
VCR
pause
Page 29

ADVANCED OPERATION
AUDIO
INSERT
RECORDING
This
feature enables youtoadd
•
The
audio signal will be recordedonthe mono
unchanged.
SOUND
ONTOA
VIDEO
narration or background music to a pre-recorded
C2=:=L:r;;:::::::::::::::::::::=~~~
•
If c microphoneisto
be used, connectitto
your eudio equipment.
AUDIO
SOURCE.
1.
Connect the audio sourcetothe AUDIO
L-R
terminabonthe
shown above,IAseart connection toL2can
alsobeused).
2.
Insert
the
pre-recorded tape
3.
Press
PLAY/X21'-)10view
4.
lfyau
wish to listentothe original
while you
audio
toONin
S.
Press
the point on the
inserttostart.
6.
Press
shownonyour1Vandonthe
7.
Press
insert.
B.
Press
insert(A.INSERT
1V
are
track
you
the
PAUSE/STILL
AUDIO
PAUSE/STILL
STOP
andonthe
frontofthe
recording the new inserted
will
need10set
MODE
menu.
III)
tape
where you want audio
INSERT
(II)tostart audio
I-
I
to
finish
will
disappear
VCR
display)
VCR
into
the
the
AUDIO
when
you
IA.INSERT
VCR
audio
from
recording.
Hi-Fi
IN
as
VCR.
track
MIX
reach
will
be
display.)
your
TAPE
track~
The
Hi-Fi
track will remain
II
Connect
your
equipment
terminals on the frontofyour
VCR.
to
tape
.
audio
At)DIOINL·R
GB-27
I
'-
Page 30

ADVANCED OPERATION
AUDIO
INSERT
AUDIO
1.
2.
3.
4.
5.
6.
7.
NOlES;
•
..
PLAYING BACK
•
•
Press
on
Press
Press
Press
Press
Press
Press
screen.
Bec(,use
,rJ,\UUIU
If
you
will
needtoset
You
can change
control.
MIX
SELECTION
MENUtodisplay
the
screen.
[ ....
SET.
[ ....
[ ~/~ ] to select ON.
SETtoreturntothe
MENUtoexittothe
...
want
to listen to
Refertothe
/T
/T
]
to
]
to
._
AN
AUDIO
AUDIO
the
audio
table
the
main
select
MODE.
select
AUDIO
menu
normal
INSERTED
the
original and
MIXtoON.
outputbypressing
below.
menu
MIX.
screen.
the
TAPE
new
inserted
the
AUDIO
MODE
audio
MENU
SCREEN
previol" ",col'dirio
signal
simultaneously,
OUT
buttononthe
on
audiq
you
remote
AUDIO MIX
ON
AUDIO
Hi-fi
OUT
and
Mono audio
MODE
VCR
GB-28
DISPLAY
Ii)
~
~
Ii)
Original
HI·Fi
CHANNElSl
Original
plus
Original
Hi-Fi
inserted
Hi-FI
CHANNEll
RESULT
audio
(l&R
and
inserted
audio
audio(lCHANNEL)
audio
audio
(R
plus
inserted
audio
Page 31

ADVANCED OPERATION
EDITING WITH A LANC
Using
the
LANe
connectionasillustrated
VCR
from
the
EDIT
Camcorder with
LANCTerminal
MODE
recording
SELECTION
VCR
allowing
CABLE
belowitwill enable
youtostart
CONNECTION
and
youtocontrol
stop
both
unitsatthe
VCR
with
LANCTerminal
VCR with LANCTerminal
the
playback
same time.
t
OR-
Press
MENUtodisplay
including
To
SET.
Highlight
access
EDIT
MODE.
the
edit
the
optionstobe changed
MIS or ON/OFF as appropriate, press
NOTE:
LANCMODE
This
semng
determines
and
the
playbock
JOG
MODE
~~:;;:~e::onno:~
ON
if
the
OFF
if
the
• '
To
protect
the
Frorne.Advanqe!Reversefeature.is
the
main
mode
menu
which
VCR
settoS.
mode
dependingonwhether
playback
playback
tape
VCR
VCR
From
unnecessaryWedr
menuonthe
highlight
using
VCR
controls
has
a
does
EDIT
JOG
not
used
the
SET
the
SHumE
have
ri:lpeatedly;
GB-29
screen.
The
main
MODE
using
the
[
""T
I
bunons.
then
MENUtoreturntothe
other.
The
recording
the
playback
VCR
function.
a
JOG
SHUTTLE
the
VCR
will.reodjustthe
menu
has
FIVE
[""T
1
bunans,
Press[..../..Ito
normal
VCR
has
a
JOG
function
.
tape
options
then
select
screen.
press
Page 32

ADVANCED OPERATION
BASIC EDITING USING A LANC CONNECTION
1.
SwitchontheTVand
2.
Press
INPUT
be
displayedanthe
3.
Load
the
source
protection
camcorder
4.
Load
and
recording.
5.
Press
VCR
mode.
6.
Press the
will
7.
To
tab
for
th~
tapetobe
the HiFi
EDIT
will
enter record
Ree
STANDBY
EDIT
light.
stop editing press the
SELECTonthe
select
the
video
channel.
remote
controltoselect
VCR.
fape
into
the
has
the
Level
been
removed.
playback
recorded
Controlisin
an
pause
playback
start
into
your VCR.
mode, the playback
VCRorcamcorder
Search
the
source
position.
your
VCR,
ensure
its
central position. Search the tape for positiontostart
The
EDIT
STANDBY indicator
START/STOP bunon to start editing.
EDIT
START/STOP
bunon. Then the
the
fapeonthe
the
VCR
The
video/audio
ensuring
playback
record
protection
will
also enter playback
EDIT
START/STOP
EDIT
that
will
STANDBY
input,
the
tabisin
light
L2 or L3 will
record
VCR
or
place
and
the
pause
indicator
bunon.
be
REMOVING UNWANTED
Unwanted
1.
2.
3. Using the
scenes
When
you reach the scene
recording
pause.
Press
display.
VCR.
LANC
This
SHUTTLE
canbecut
The
EDIT
REMOTE
will
on the recording
allow you to control the playback
DIAL find the next starting point on the
and ensure the playback
4.
Press
LANC
VCR
display.
5.Press
EDIT
START/STOP on the recording
light
and
the
6.To
stop editing press the
REMOTE
editing
on the recording VCR,
function
SCENES
out
whilst
makingacopybyfollowing
you
wish to leave out press
START/STOP indicator
VCR,
VCRisin
pause
made. (refer to
VCR,
will
resume.
EDIT
START/STOP
G8-30
LANC
LANC
the
bunon.
EDIT
willgoaut
REMOTE
VCR
from
SHUTTLE
REMOTE
EDIT
START/STOP
Then
the
steps1to6above
START/STOP
and
both
will
the recording
on the
units
willgointo
appearanthe
VCR.
tapeinthe playback
DIAL
OPERATION)
will
disappear
indicator
EDIT
STANDBY
then:
VCR
VCR
from
buncn.
the
will
Page 33

ADVANCED OPERATION
BASIC EDITING
USING
A LANC CONNECTION
INSERT
1. SwitchonthelYand select the video channel.
2.
3.
4.
5.
6.
7.
8.
9.
10.
11.Press
EDIT
Press
INPUT
SELECTonthe remote controltoseled the video/audio input,L2or
willbedisplayedonthe
Load
the
source tape info
protection tab
Load
the
and
ensure the HiFj
Press
LANC
display.
Press
Play/x2
the playback
Press
LANC
VCR
display.
Press
Ploy
in
the
recording
Press
COUNTER
Using
the
replaced
the
TO
Picture
Hi-Fi
Mono
has
been removed.
tapetobe recorded
Ree
REMOTE
This
will
allow
then
using
VCR.
[refer
REMOTE
/x2
then
using
VCR.
RESET.
JOG
SHUTTLE
and
press
PAUSE.
INSERT
button.
REPLACE
and VIDEO
sound
sound
only
VCR.
the
playback VCR or camcorder ensuring that
into
your VCR, ensure the record protection tabisin place
Level
Controlisin
on
the
recording
youtocontrol
the
SHUrrLE
to
SHUTTLE
on
the
recording VCR, LANC
the
SHUTTLE
Irefer
to
SHUTTLE
VCR,
the
playback
DIAL
DIAL OPERATION!
DIAL
DIAL OPERATION!
111001
DIAL
rewind
the
PRESS
INSERT
V.INSERT
1V
screen.
AUDIO
A.INSERT
TV
screen.
Picture
Mono
Hi-Fi
Sound
and
VIDEO
AV.lNSERT
theTVscreen.
INSERT
the
ifs
central position.
LANC
REMOTE
VCR
find the next starting pointonthe tape
REMOTE
find
the
next
tapetothe
startofthe sectiontobe
appearsonthe
INSERT
appearsonthe
then AUDIO
appearsonthe
will
appearonthe
from
the
recording
will
disappear
starting pointonthe
VCR
display andonthe
.
VCR
display andonthe
INSERT
VCR
display and
VCR.
record
fram
tape
on
L3
VCR
in
the.
12.
13.To
Press
EDIT
both
VCRs
stop editing
The
EDIT
START/STOP
will
stop automatically.
press
the
STANDBY indicator wililig
to
start editing. When the tape counter reaches
EDIT
STANDBY
bunon.
hI.
GB-31
0:00.00
Page 34

ADVANCED OPERATION
DIGITAL DISPLAY
TIMEOFDAY
Shows current time of day, if the clockisset.
Press
DISPLAY
appears.
TAPE
COUNTER
until the timeofdoy
For
example,21:20 appears:
AND
ZERO
BACK
1I1111ili
Tape counter measures the current positionofthe video tape in real time. ZERO BACK
the tape counter to determine a specific
1.
Press
DISPLAY
appears,
2.
To
identify the current position on a
video tape press
control
or
VCR's control ponel
counter will
When you wish to return to this position on the video fape, press
will
rewind/advance
until tape counter
for
example:
CLEAR
COUNTER
appear:
to this point.
on the remote
RESET
ond
the
tope
on the
point
on a tape you
may
wish to return fa.
ZERO
BACK.
The
uses
tape
GB-32
Page 35

ADVANCED
OPERATION
PLAYBACK OF A VIDEO
TAPE
CHECKING
When
remaininginhours
THE
AMOUNT OF
you loada video
and
TAPE
REMAINING
tape
into the
VCR
it can calculate approximatelythe amount
minutes.
Thisisusefulindetermining whether or
lefttomakearecording.
When
a video tapeisplayingjthe amountoftape remainingiscalculated for
To
display
the
amountofvideo tape remaining:
I.lood
the
video
tope
into
the
VCR.
2.
Press
DISPLAY
the
VCR
tape
remaining
o
;h
t~~:~pie,
:
on the remote controlasmany timesasnecessary
display. The
if1hour23ininutesisleft
tape
will
be shown on the
will
wind forward
and
VCR
displayinhours
on
.111111
then return to
NOTES
lit
D~nollnt13rfuptthe:tape
•
·.·.If
less
than
5 minutes oftaperelTlCllnsthe displqy
PLAYING
You
the entire
To
use this feature:
1.Press
on the screen.
2.Press [
3.
Press
4.Press [
S.Press [
6.Press
7.Press
BACKAVIDEO
can
setyour
tape
again.
MENUtodisploy
...
,..,]to
SET.
,..,]to
/~
SET.
MENU
to return to normal screen.
VCR
]to
remCiiIF~g~blcul~Jtidn
TAPE
REPEATEDLY
to automatically rewindatthe
REPEAT
will
appear
the
main
menu
select
MODE.
select
REPEAT.
.
will.
end
on the on-screen display when selected.
.
select ON.
not
thereissufficient tape
until"R"
its
original position. The
and
minutes.
flash.
of playing a video
MODE
MENU
you
automatically.
appears on
tape
SCREEN
of
video
and
tape
replay
PLAYING
NTSC INational Television Standards Committee)isa differentTVstandard to
usedinsome Non-European Countries.
onto a
Note
•
You
•
You
Remaining with a pre-recorded
•
On
picture.
•
On
the top and bottom of your screen.
On
•
fault
BACKANNTSC
PAL
system
TV,
that
••
cannot record
cannot use Slow speed,
some televisions, the picture may
This
some televisions, the picture may shrink vertically causing black
some televisions, the played-back picture may
with
your
NTSC
does not indicate a fault with your
VCR.
TAPE
Your
VCR
can
playback pre-recorded NTSC
but cannot recordanNTSC signal onto a video
signals or dub
Still
NTSC
NTSC
frame, Double
tape.
appearinblack
GB-33
tapes onto other
Speed,
Frame AdvanceorTape
and
whiteorthere
VCR.
roll
vertically, this
VCRs
tape.
from this
bandstoappear
does
PAL
and
tapes
VCR.
maybeno
not indicate a
is
at
Page 36

ADVANCED OPERATION
MODE
SELECTION
Press
MENUtodisplay
the
screen.
including
I.To
occess
using
MODE.
the
SET.
2.
Highlight
the
[ ....1
select
AUTO,
press
SET
normal screen.
the
The
main
menu
the
mode
menu
[....1
.....
]
buttons,
the
optiontobe chonged
.....
]
buttons.
ON or
then
Press[..../~]
OFF
MENUtoreturntothe
main
menu
has
five
options
highlight
then
MODE
press
using
os oppropriote,
on
to
REPEAT.
automatically
this
AUDIO
Mono audio
16:9
This
which
operationofthis
Asearl
During
mode.
If
you
wanttoplayback repeatedly an
rewindatthe
feature.
MIX
When
tracks.
PLAYBACK
fealure
allows
should
connection
this
AND
the
automatically
PLAYBACK
feature,
mustbeused
PLAYBACKofa 16:9 encoded tape
NICAM.
will
COLOUR.
qualify
and
reduce
although
black
BLUE
background
willbeblueifaTVchannel
is
playedorthe
tapeispoor.
Feature.
entire
endofthe
tape and
replay.
functionisswitchedONthe
RECORDING.
and
change
ensure
RECORDINGofwide
the
picture
16:9
modeissettoAUTOinthe
between
the
size
VCR
theTVshould
(Hi-Fi
Models
only)
Selecting
disoble
the
NICAM
sound reception.
If
the
VCRisplaying
recording,
white.
this
coloured
and
MUTE.
selected,anunrecorded sectionoftape
video
This
VCR
settingona wide
(SOCKET
the
picture
Selecting
(dependingonthe
white
colour.
PALorMESECAM
speckles
recordings.
This
enables
That
is,
qualityofthe
Select
OFFtodisable
tape,
this
function
will
screen
ll)
feature
enables or disables
playback
both
format
screenN.To
MODE
the
menu.
TV.
and
may
recording),
will
the
theTVscreen
withnosignal
recordingonthe
will
Hi·Fi
signals (16.9)
a poor
turn
appear
blue
this
and
allow
OFF
black
switchtolWidescreen) 16:9
may
on
is
the
GB·34
Page 37

ADVANCED OPERATION
VCR
CODE
This feature allows
remote
control.
1.
Press
MENUtoenter
2.
Select
MODE
3.Select
VCR
CODE using the
NOTE:
•.
If
thes~~~n~
Iherefore the
4.
Press
SETtoconfirm
5.
Press
and
hold
control
together
1W0
Sharp
the
using the
VCR
does
VC-MEBO
selection.
either
the1or2number
for5seconds.
VCRs
to be controlled independenlly of
main
menu.
[./...,
n~t
shouldbeset10VCR
I buttons
[./...,
have
canbechanged
this
1buttons
feature
and
buttons
press
and
then
it
CODE 2.
and
SET.
the [ ....
isfdctory
the
VCR
enable
/~
Ibuttons
set
as
CODE
operation
each
other, by
10
selecl ,
buttononthe
.
oFOsecond
one
or
remote
2.
GB-35
Page 38

ADVANCED OPERATION
SEARCHING
THE
VIDEO
TAPE
SKIP SEARCHING
You
can
search
I.Press
2.
•
PLAY
Press SKIP
control.
The
SKIP
SEARCH
search time.
After
searching,
resume
automatically.
DIGITAL PROGRAMME
Your
VCR
records
can be used latertolocate the starting pointofa recording.
Press
DPSS
41
For
example,
I.
load
the video
2.
Press DPSS
fast
forwardtolocate
3.
Press
DPSS
to
locate
the
THE
VIDEO
the
tapein30
/X2
1
~
Ito
start the video tape playing.
SEARCH
numberoftimes
on the remote
determines the forward
normal
playback
SEARCH
a marker
I •
tape
...
three
@l
once. A·1will
beginning of
to
locate a
into the
times.
the
signalonthe
third
the
Rewind
TAPE
second
you
previous
VCR
A 3
recording
appear
current
time
intervals.Todo
press
2
3
4
will
SYSTEM
will
DPSS
(DPSS)
tape at
the
startofeach
programme or
appearonthe
after
the
on-screen
current
on the on-screen display
recording.
Signals Fast Forward
this
1
press
presses
presses
presses
the
next
one.
follow
the
=
30
seconds.
= 1
minute.
= 1 minute
= 2
minutes
recording.
programme.
display, and
and
the
procedure below:
30
seconds.
.
These
signals
the
VCR
will
VCR
will
rewind
4.Tocancelthe
Current tape
position
search beforeithas finished, press
GB-36
STOP
I-
)
or
PLAY
/X2
1~
J.
Page 39

ADVANCED OPERATION
REMOTE
In
additiontooperating
on
rvs,
CONTROL
including brands other than
OPERATION
the
VCR
the femote control will
SHARP.
OF
TV
also
operate
basic
functions
SETTINGUPTHE
CONTROLTOOPERATE
1.
Switch on theN.Open
femote control
2.
Hold
downTVBRAND
remote control then the appropriate
button
for
seconds.
pressTVBRAND
3.
TheTVwill
the correct
4.Toturn
TV
BRAND
seconds.
theTVon
CONTROLLING
•
TV
OPERATE
• TV INPUT
VCR
REMOTE
THE
the door on the
and
point the unit at the
SETonthe
theTVfrom
For
example
enter standby mode to confirm
code
SET
the
foraSHARP
SET
has
been entered.
from
standby
and 1
list
ond 1.
for
about 2
THETVWITH
Switches theTVto
SELECT
Determines which input to
screen.
•
TVCH
•
TV
• Certain
_SHARP
..../ ....
VOL
8/®
modelsofTVdonot
TV
BRAND
mode
(You
will
'cannotgl/arantee:the
Changes theTVchannels.
Increases or decreases the volume.
SET,
then
press
reedtor~~et
TV
TV
shown,
TV.
VCR
for
2
BRAND
SHARP
PHILLIPS
THOMSON
GRUNDIG
FERGUSON
mNOKIA 7
SONY
BunoH
I
2
:lorA
,
6
8
TV BRAND
TOSHIBA
PANASONIC
HITACHI
SANYO
NC
MITSUBISHI
BunON
9
Oor
(jjjJ)
INPUT
SElECT
MODE
OED
DISPLAY
AUDIOQUT
TV,
mode
hold
THE
VCR
REMOTE
use
standard codes
eoch af
the
bunonsinthe
~he~
~eIllPt~,co~trot~9~erl.efar~replqced).
VCR
rembte
9()ntrol.wjltope~ateyour
and
CONTROL
from
Standby Mode.
theTVis
for
their
list
to
be displayedonthe
brand.Inthis
Until
case
theTVenters stand·by
lY
hold
down
'
GB·37
Page 40

ADVANCED OPERATION
RECORDING FROM OTHER EQUIPMENT
You
can record video and audio signals from various sources, for example a camcorder,
onto a video
tape
using
your VCR.
For example, recording
Mono/Stereo camcorder
I.load
tape
into
the
VCR.
2.
Press
INPUT
SELECT
control
until
the
VCR
3.Ifyou
4.
wishtorecord
connectedtoLINE1IN/OUT,
If
you
wishtorecord
connected
socketsonthe
S-YIDEO
with
audio
frontofthe
connection
from
a camcorder connectedtoLINE2IN/DECODERonyour VCR:
Optional
on the
display
fromasource
fromasource
phona
lead,
SCART
remote
shows
select.L1.
leadstothe
VCR
and
select
L2.
L3.
connection
•
Inot
supplied).
S.
Press
RECtostart
the
recording.
GB-38
Page 41

ADVANCED OPERATION
DECODER
If
you connect a separate decoder
need to set the decoder functiontoONinordertorecord the descrambled signal
watchiton
terminaltothe
terminal
through
When
the decoder function
If
will
To
SCART
•
•
If
NOTbeabletowatch
and
the
making
you connect a
automatically allow yourTVto
use
this
leads.
Press
STANDBY
Press
[TV
appearonthe
you
switch
SWITCHING
your
TV.
Now,
decoder.
the
signal
lINEl
terminal
recordings
ON.
decoder
feature
make
Then:
to
/VCRI
an
display.
the
decoder
to
when
the
The
decoder
canberecorded.
and
you
can
usingaseparate
unittothe
VCR,
display
sure
that
the
place the
the
the
VCRinStand·by mode,
remote
controliaplace the
functionONwhen
descrambled
OPERATION
the
VCR
connectedtoL2aspreviously
VCR
receivesascrambled
then
outputs
the
descrambled
The
VCR
outputs
watch
the
descrambled
decoder
the
the
VCRisconnectedtobothTVand decoder
connectedasshown
decoder
unit
descrambled signal
VCRin'VCR
connected-
pictureinTV
made orinVCR
signalitis
the
descrambled signaltoyour TV
picture.
providesasWitching
output
signal
backtoLINE
remembertoleave
routed
through the
OR
made'.
'VCR'
to a decoder
unitasshown
made.
shown,
and/or
via
signal
unit
will
you
you
LINE
VCR.
by
will
2
2
which
will
GB·39
Page 42

SPECIAL
LOW
To
POWER
LOW
FEATURESONYOUR
POWER
meet
new
power
mode
the
POWER
MODE
I.Press STANDBY
2.
Press
STANDBY
display
will
appear
The
VCR
power
FEATURE
regulations
VCR
power
consumptionisreducedtobelow
(<91
to
place
(<91
againtoplace
blank.
consumption
VCR
your
VCR
canbeplaced
the
VCRinSTANDBY
the
will
now
VCRinLOW
be
below
in
lOW
mode.
POWER
I Watt.
POWER
1 Waff.
mode.
mode.
The
VCR
In
digital
lOW
DISENGAGING
Either
Or
NOTES:
'•.With.,.pqqr,SIijnal
•
~:E:n';;,~~~
•
If
a
signqlisinput
•
When
disengaging
Press
Press
LOW
POWER MODE
STANDBY
STOP
(.
conditions
STANDBY,
framanAV
LOW
(<9)
to
return
the
VCRtoSTANDBY
I
to
use
the
VCR.
CJnin:reas~jn.
noise
source,
POWER'
n;ise·.m?Y:Pi~R:s~rye,d'~9th~.spr~e?intOW
may
be observed.
the
VCR
may
notgointo
mode
from
the
VCR
press
CHILD LOCK
You
can
lock
your
VCR
with
this
preventing
TO ENGAGE CHILD LOCK
Press
@;;,
has
Regardlessofwhat
its
present
end,
TO DISENGAGE CHILD LOCK
Press
©iii
and
flashes
been
the
and
starts
adivated.
VCR
children
hold
and
mode.IfCHILD
hold
flashing
from
@liiJ
on
then
@;;,
other
will
automatically
©iii!
for
and
operating
the
remote
remains
operating
LOCKisactivated
about2seconds.
then
disappears.
feature.Itwill
the
control
litonthe
buttons
rewind
VCR.
for
VCR
are touched,
the
fape,
CHILD
work
even
about 2
during
seconds.
dispby
conRnming
playback,
eiect
it,
LOCKisdisengaged.
when
the
and
':,
the
the
VCR
once
turn
mode.
true
LOW
POWER
STANDBY
VCRisin
that
CHILD
LOCK
will
continuetooperate
the
tape
the
power
buffon.'·
standby,
reaches
off.
.
mode.
in
its
G~40
Page 43

CUSTOMISED INSTALlATION
MANUALLY
TUNING
A CHANNEL
Normallyitwill
circumstances
Ensure
the
I.Press
SET
UP.
2.CHANNEL
Press
3.MANUAL
Press
4.
PRESET
to
choose
5.lf
you
ON
continue
continue
6.
Press
[ ....,
choose the required source:
• If
you
channel pressto[
Then
press [ .... ,
CHANNEL.
using
to
step
Continue
•
If
you
Continue
7.Press [ '
8.
Press[,....]to
received.IFitisnot
9.
Press
[ ....,
pictureisobtained.
notbenecessarytotuneina broadcast channel manually exceptinunusual
suchaspoor signal.
video channelisselectedonthe
MENU.
Press
Press
SETtoconfirm.
PRESET
SETtoconfirm.
TUNING
SETtoconfirm.
willbehighlighled.
the
required
have
SATELLITE
from
from
point
.....]to
select
wishtotuneasatellite
~
.....]to
Enter
preset
NUMBER
through
wishtotune
from
from
.....
.....]to
point10•
point
]10
BUTTONS or [
each
a terrestrial channel
select channel.
start
selecl
[ .... ,
.....]to
select
willbehighlighted.
will
be highlighted.
Press
[
~/~]
VCR
preset
channel.
CONTROL
point
6.
set
Otherwise
7.
SOLIRCE.
or cable
I~
]select
SAT.
select
satellite
channel
~
preset
satellite
7.
tuningineither
the
desired
channel,
FINE
TUNING.
TV
to
The
I~
]
channel
until
the
channel
pressto[ ~/~ ] select
direction.
press[.....,..]to
Press
and
Tuning
hold
will
[
~/~
you
wishisdisplayed.
CH.
stop
when a channel
continue
]
tuning.
until
the
sharpest
is
colour
IMPORTANT NOTE:
10.
Press
[ .... ,
.....]to
satellite
receiver
connect a decoder,asshown
function
ON.
into
Refer
select
the
DECODER.
VCR
l2,
as
previously,
to
DECODER SWITCHING OPERATION.
ThisispresettoOFF.Ifyou
shown
previously,
you
must
leave decoder
use[.....,...]to
GB·41
connect a
OFF.Ifyou
turn
the
decoder
Page 44

CUSTOMISED INSTALLATION
MANUALLY
TUNING
A
CHANNEL
11.
Press
I
AfT]
function
can be selected
IT,....
] instead
to
determines
when
of
BUn-oNS.
12.
Press
I
.../~]
this
13.
The
positions each of
the
the
cable
and
setting.
SATELLITE
If
receiveritis
option.
Press
MENUtoleave
VCR
has84programmable
broadcast and CAN channels
table. If
you
willbetuned
non-eabJe
you
wishtoconnectasatellite
not
to
Press
SETtoconfirm.
which
selectCCon
first.
willbetuned
RECEIVER INSTALLATION
necessarytocompletely
select
SKIP.
The
whether
using
the
NUMBER
SKIP
the
channel
CHANNEL
select ONorOFF
this
function.
channel
canbesettoany of
shown
the
menu,
Note
that
both
regardlessofthe
cable
receivertoyour
V
H
for
F
in
U
H
F
BROADCAST
Station
Sianals
2/A.
3/B.
4 CH:04
5/D.
6/E.
7/F.
8
9/G.
10/H.
l/HII
12/H21
511
21
22
"
"
6"8
69
AND
CATV
RealC~Clnne
Numbers
CH:02
CH:03
CH:05
CH:06
CH:07
CH:08
CH:09
CH:l0
CH:11
CH:12
CH:13
CH:21
CH:22
5U:t.
502/5224
C./503/5234
A
MY?l
T
M2/52 CC:02
Ml0/51O
Ul/5l1
UlOJ520
I
CH:68
CH:69
CHANNELS
Stetion
SiQnoJs
5LI4
5244
5254
51
55 CH:85
521
540
541
• AvailableInitaly4AvailableInSWitzerland
VCR
after
fe-install
all
channels.
aufcrinstallation
Follow
withoutasatellite
the
procedure
R
Numbers
CH:75
CH:76
CH:77
CH:7B
CH:79
CH:BO
CC:Ol
CC':10
CC:ll
CC':20
CC:21
CC;40
CC:41
below:
"
"
J.Press
MENU.
2.
Press
I
AfT]
SEYtoconfirm.
3.CHANNEl
Press
4.
Press
Press
screen
S.
Follow
PRESET
SETtoconFirm.
I
AfT
SETtoconfirm.
will appear.
points
INSTALLATION
control
only).
6.
Then
press I
SEARCH.
Press
satellite channels
may
takeafe·w
7.
Then
press
MENU.
to
select
SET
willbehighlighted.
]10
select
SAT
The
satellite
6-11.inAUTO
(satellite/cable
AfT
]to
select
SET
to
confirm.
willbeinstolled.
minutes}.
UP.
Press
RECEIVER.
receiver
box
SAT
PROG
The
[This
GB-42
Page 45

CUSTOMISED
INSTALLATION
MANUALLY SORTING CHANNELS
SORTING
When
order using teletext information.
procedure.
1.
Press
2.
Press
SET
3.
Press
SORT.
4.
The
Press
S.Press [
channeltobe moved. Press
confirm.
6.Press
new
to
THE
CHANNELS
your
VCR
tunes in broadcast channels automaticallyitsorts them into a standard
MENU.
[
A/T
I
to
select
to
confirm.
[
A/T
I
to
select
Press
SET
to
confirm.
MOVE
position
willbehighlighted.
SET
to confirm.
A/T/""'/~
[A/T/""'/~
position
confirm.
for
the
I
channel.
CHANNEL
I
to
highlight
to
highlight
SET
SET
INTO
YOUR
PREFERRED
You
can change the orderofthe channels with
ORDER
MENU
2.
UP.
Press
5.
the
to
the
Press
6.
SET
SCREEN
the-
following
7.lf any more channels
repeat procedure
8.
When
all the channels
preferred order, press
MENU
function.
from
NOTE:
• On
leClving-
this
menu'.
NexTView,
compl~te
Smart
link,
this
opElratiol1.IRefer
are
to be moved,
step
5.
areinyour
MENU
to leave the
the
VCR will ottempt
Easy
link
toyovrTYopera~on
to
ar Megalagic
GB-43
_transfer
compatible
manualfqr
the
channel.informationtoa
TV.
Please
wait
more
information).
lor
the
VCR
to
Page 46

CUSTOMISED INSTALLATION
MANUALLY
SORTING
CHANNELS
DELETING
If
thereisa
CHANNELS
channel
below.
1.
Press
MENU.
2.
Press
[ A''''I
SET
to
confirm.
3.
Press
[
A''''
SORT.
Press
5ET
4.
Press
[A''''
5ET
to
confirm.
5.Press [
6.
7.
A/"'/~/"1
channeltobe
Press
SET
twicefacancel
When
all
the channels
been cancelled, press
you
wishtodelete
to
select
I
to
select CHANNEl
to
confirm.
I
to
select
10
cancelled.
you
MENU.
SET
UP.
CANCEL
highlight
the
channel.
wish
Press
the
have
from
Press
the
2.
5.
6.
VCR
memory
you
can
follow
MENU5CREEN
the
procedure
GB-44
Page 47

CUSTOMISED INSTALlATION
MANUALLY SORTING CHANNELS
RE·NAMING
When your
information.
I.Press
MENU.
2.
Press
[A''''
SET
to
confirm.
3.
Press
[A''''
SORT.
Press
4.
Press
[
A''''
SET
to
confirm.
5.
Press
[
A/"'/"'/~]
channel
confirm.
6.
Press
channel.
tobenamed.
["'/~/A/"']
CHANNELS
VCR
tunesinbroadcast
You
can
change
]
10
select
]
to
select
SETtoconfirm.
]
to
highlight
Press
SETtoconfirm.
the
SET
CHANNEl
10
highlight
Press
SET
to
rename
channels
nameofa channel with
UP.
Press
NAME.
automatically,itnames
Press
the
to
the
them
the
following procedure.
using
teletext
7.lf
any more channels
repeat procedure
8.
When
all
the
correctly,
MENU
press
function.
NOTE:
•Onleaving
NexTView,
complete
this
aretobe
from
channels
this
Smart
bp~ration.(Referto
are
MENUtoleave
menu,
the
link,
Easy
renamed,
step
5.
named
the
VCR
will
linkarMegalogic
yourTY
attempttotransfer
operation
GB-45
._--
compatible
--_.------
the
channel
manual
TV.
for
Please
more
infanmation10a
wait
far
the
informationj.
VCR
to
Page 48

CUSTOMISED INSTALLATION
CHANGING
THE
ON-SCREEN DISPLAY LANGUAGE
Changing
VCR
1.
Press
2.
Press[...
displayisnotina language you can
understand,
the
3.
Press[...
the
language
or makeitsuitable
MENU.
/T
]
to
thisisthe
top.
Press
SETtoconfirm.
/T
]
to
usedbythe
For
any
select
fourth
select
SET
option
LANGUAGE
lost option).
4.
Then
press
SETtoconfirm.
S.
Press[...
language.
/T/"'/~
Then
]
press
SETtoconfirm.
to
select
MANUALLY SETTING
The
clock
will
normallybeset
in
the
broadcast
notbeabletoset
I.Press
MENU.
SET
UP.
2.Press [
SET
to
3.
Press[...
hour
clod.
4.
Press
[
time
using
[
"'/T].
enter
the
clock
enterAMor
on
the
S.
Press[.../~]toselect
dote
using
[
"'/T].
enter 01
6.Press [
last
two
NUMBER
example,
2000 enter 00.
7.
Select •
ON, -
channels.Iffor
the
Press[...
Press
SET
to
...
/T]
to
select
confirm.
/T]
to
select either12or
"'/~
]toselect
the
NUMBER
If
the
minutes
leadingO.If
PMbypressing
remote·control.
the
NUMBER
For
example,
04.
"'/~
]toselect
digitsofthe
BUTTONS
for
1998 enter
for
AUTO
is
OFFJ.Then
clock.
/T]
confirm.
CLOCK.
TIME.
BUTTONS
are
using
DATE.
for1sf
YEAR.
year
or [
98.
CLOCK
press
This
the 12
BUTTONS
using
"'/T].
on/off(0is
SET
on-screen
other
broadcast standard.
UP.Ifthe
from
Ithe
your
THE
CLOCK
using
teletext
any
reason
procedure
to
select
Press
24
Enter
the
or
less
than 10,
hour
(j£;
Enter
the
or
April
Enter
the
the
For
For
the
year
to
confirm.
display
information
teletext
signals
will allow
will
not
when
are
youtoset
change
your
not
the
the
VCR
automatically
present
clock
operation of
your
VCR
manually.
the
tunes
will
GB-46
Page 49

MORE
INfORMATION
VCR
DIGITAL DISPLAY
ABOUT YOUR
VCR
(NICAM)
VPS
POC
VCR
SPLPEP
STOP
~~DD[>[>
<JO~[>
~\f~
rm
EDIT STANDBY
LANe REMOTE
A V
INSERT
Oiru
~r~
Pr.D
~=~
~]
~=
~
AM
PM
U~
=
r~~
=
~~~~~a~ODDODDDDODD
+10dB
NOTE:
Some
display.
models
0 0 0 o 0 0
not
have
all
the~atures
~\
~
=
[Q
f]
= =
lID
DDODDDDDDDO~a~~~~~
there,tare. they
I\~
m
will
~
~
+10dB
-
SELECTING
If
your
VCRisconnectedtoyour TV with a scart lead, when
the
VCR
will
In
this
case
You
can
manually
broadcast
display.
•
Pressing
THE
automatically switch
'VCR'
will
appear
override
channel
willbeseenontheTVscreen
(TV/VCR]
again
OUTPUT
its
output so that the playback pictureisshawnanthe W.
an the
VCR
thisbypressing
will
return
FROM
display.
theTVpicturetothe
THE
[TV/VCR]onthe
and
VCR'
GB-47
VCR
you
remote
will
playback
starttoplaya
control.
disappear
picture.
----------
video tape
Now
from
the
the
VCR
TV
Page 50

MORE INFORMATION ABOUT YOUR
ON-SCREEN
All
the
information
IF
you
are recording, playing back a tape or watching a broadcast
you
can
callupthree standard on-screen displays.
the
MODE
05D
DISPLAY
you
need on
buttononthe
the
remote
VCR
VCR
status
will
contro" 1,2,3 or 4
be summarisedonthe
The
on-screen display.
on
the video channel
display can be selectedbypressing
times.
I.AUTO, the current mode
number
will
be displayed
when an operation or number button
pressed.
2.FULL" allthe active
shown on screen.
Programme number
and
and
for
features
channel
channel
3 seconds
will
also
------,,,----------,
Tape Status
These
dependon{
model features Audio output mode
Tape
speed
------------
Tape remaining
Time
--------------
Date
--------------
Tape counter
3.COUNTER,
tape counter
remaining.
4.
DISPLAY
display
from
------------
this
display
and
OFF,
this
the
screen.
NICAM
signal
will
show
amountoftape
will
remove
the
the
1.
is
be
3.
GB-48
Page 51

MORE INFORMATION
MANUFACTURERS
The
following table is a listofsatellite manufacturers' code numbers. Your VCR
of
theseinorder
to recognise your satellite receiver.
ABOUT
CODES
YOUR
VCR
FOR
SATELLITE
The
code number must be entered
RECEIVERS
point9.during installation with a satellite receiver.
Lookupyour
Use
the NUMBER BUTTONS to enter the
should be entered 0 0
makeofsatellite receiver.
8,
Continue
from
first
code number listed,
point
10.
(AUTO INSTALLATION),
will
For
example number 8
use
one
at
ABSAT
ALBAD
ALlSATO
AMSTRAOlflDELITY
ARMSTAONGO
BESTIDISKEXPRESSD
BUSHD
CAMBRIDGED
CHANNEL
ECHQSTAMECHNISATIDNTIPOLYTRONI'RADEXIJ2,29,31
FERGUSOND
FUBAfTRIASAT/TRIAXIFREECOMD
G.1.JERROLDD
GALAXISJALQES/PROSATlS!<VMASTERlANARKOCB6,99,78
GRUNDIGD
HIRSCHMANND
HUTHD
JOHANSSONfWlNNERSATD
KATHREIND
LENKOD
MASPROD
MATSUIO
MOAGAND
NETWORKD
NOKIAD
PACE,MANHATTANISABAD
PALSATINAGAIIPALCOMD
PHILLlPSNISIOPASSISONOLORD
SAlORA/LUXORD
SATSIE/STANONO
SCHWAlGERlSEIMENSfTELED1REK'TO
SCIENTIFlCATALANTAO
SEGD
STRONGfTRISTARD
TATUNGJ1IIIKKO/QUADRELO
TELEVESD
TPSD
UNIDENO
VORTEC/SAMSUNGO
WISlfTECHD
ZENDHERD
MASTERO
ANKARO
HANSEATICD
123
6,9,12,14,16,32,39,45,57,72,79,85
9,14,65
35,36,41
,47,46,49,51
2,9,12,20,22,36,41,59,73,74,82
75
9,12,14,72,79
53
12,41
,54,58,64,87,102,118
9,14,16,45,65
19,37,69,71,94,104,117
106
2,16,23,44,70,91,114,119
2,11,24,25,30,97
56,61,73,89
40
2,9,10,16,
17,
117
10,26,68
84,116
115
73
9,14
2,3,5,7,8,151629,31,42,46,54,58,64
6,9,14,16,32,45,57,85,120,122,124
27,94
2,9,20,22.36,59,74,82,114123
3,5,7,8,15,16,424666,75
91214397279
85,121
13
9121419373
18
21,289396
9,14,16,35.38,41,45.47,48,49,51,52,63,65,76,80,85,90,109,110
125126
84
11
1,2.4,31
,33,34,43,50,60,n
1,2,4,17,18,25,27,31,33,34,40,43,50,60,67,77,81
,52,55,63,65,76,80,90,109,109,110
1a.20,22,25.26,27,36,4O,59,67,68,
103
6717794104117
,81,95,98,101,107,113
74,82,84,88,92,
66,75,87,102,103,111
88,92,94,95,98,
100,105,108,112
100.101,
105,
107,108
GB,49
Page 52

MORE
INFORMATION
SPECIFICATIONS
ABOUT YOUR
VCR
format:
Numberofheads:
Video signal system:
Hi-Fi
audio
recording
system:
Maximum
Tope
Tape speed:
Antenna:
Reception
RF
Power requirement:
Power
Operating temperature:
Storage temperature:
Video
Video
Audio
Audio
Hi-Fi
Dimensions:
width:
output
signal:
consumption:
input:
output:
input:
oUlput:
audio:
playing time:
channels:
Weight:
Supplied accessories:
VHS
PAL
standard
Four
heads
PAL/MESECAM
Deep layer recording
colour or
standard.
480
min.
with
E-240
12.7
mm
23.39 mm/s
75 g
VHF
channel
UHF
channel
AC
230V,50
19
Wopprox
Standard
unbalanced
2-12
21-69
Hz
(low
+ S
power
5°Cto400C
-20oCto55°C
1.0
Vp-p,
75 g -
1.0
Vp-p,
75 Q
Line
1&2:
-3.8dBs,10kQ;
Line
1&2:
-3.8dBs,1kg
Dynamic
20
430(W) x
kHz;
range:
Wow
3001D)
- 90
and
4.3kg(approx)
75QConnection
R6/AA/UM3
cable, operation manual,
battery
system
video
Ploy
1-541,UHF
consumption
S-VIDEO
Audio-out:
dBs
flutter:
x 91.5(H)
(x2)
monochrome
conformingtostereo
signal:
cossetteinLong
(SP):
11.70
mm/s
channel
21-69
s 1
W)
input
1.0
Vp-p,
Line3:-5.0
dBs,
-5.0dBs,1kg
(SP);
Frequency
< 0.005%
Wrm
mm
625
lines
Hj~Fi
VHS
Ploy
(LP)
mode
Long
Ploy
(LP)
75 Q
47kQ
response:20Hz-
UIS
A)
remote
control,
• Specifications are
improvement.
No
liabilityisaccepted
•
every
possible
care
subiect
has
to
change
without
noticeaspart of our policy of
for
any inaccuraciesoromissionsinthis
been
takentomakeitcomplete
GB-50
continuous
publication,
andasaccurateaspossible.
although
Page 53

TROUBLESHOOTING
TROUBLESHOOTING
PROBLEM
Display·isnot working.
VCR
will
not
in
VCR
VCR
commands.
Tape
VCR
control.
No
Rewindisnot
Picture
though
are pressed.
Desired
selected.
No
normal
Playback
Tapeisautomatically ejected
pressing
ON/OFF
Playback/ recording does
playback
SHOWVIEW
desired programme.
Satellite
to
VCR
Desired
selectedbythe
HiFi
operate. 0 appears
disp
lay.
will
nol
respondtoany
cennotbeloaded.
cannot
be
operatedbyremote
picture
appears.
possible.
does
not
change
position
VCR.
audio
even
A/"'"
cannot be•The
I• J
or
not
record
not
respond
leveL
CHANNEL
channel
colourorpoorTVpicture
viewing.
picltJreissnowy.
RECORD
buHons.
in
stereo.
does
receiver does
commands.
satellite channel cannot
Record
Low
buHons
on
when
TIMER
not
be•R8'"install
ANSWER
Make
sure
the
•
Make
•
N\ake
•
Press the
•
Check
•
Safety
•
Make
•
Make sure
•
Remote
•
Point
•
Batteries are flat - replace both.
•
Balleries have not been inserted correctly.
•
VCRispositionedinstrong
•
Check
•
Make
•
Check
•
Make
•
Make
•
channel
Cancel
Make
•
Make
•
Adjust
•
T!y
another tape.
•
The
video
•
Service
The
record-protection
•
Ensure
•
Programme
•
Broadcast
•
time.
Check
•
Ensure
•
Adjust
•
a~
special
beowchannel99on
Ensure
•
recording.
VCRisnol in LOW
sure
the
power cordisplugged
sure
the
wall
socket
has
TIMER
ON/OFF
CHILD
LOCKisnot engaged.
device operating: unplug
sure
thereisno
you
are loacling the tope correctly.
control is too for
the
remote controlatthe VCR.
VCR
CODEisset
sureTVis
all
sure
sure
sure
sure
the
VCRisconnectedtoa stereoTVand
VPS/PDC
date and
the
HiFi
settothe
connecting
tapeisnotatthe
VCRisnotintimerormenu
position
the
skip
mode
all
the
cables are connected
VCR
power
tracking
heads
may
Facility.
may
not
does
not
modeisswitchedtoON.
lime
positionorangleofthe
all
channels
channel
Rec
Level
button to
other tapeinthe
away
light.
correctly.
video channel.
cables.
start.
has been settobe skipped.
for
that channel.
cordisproperly
using
CHANNEL
have been contaminated·
tab has been
carry stereo.
carry
VPS/PDC
are
correctly
ensuring
setting
that
mode
your
satellite
Controlissettoits
POWER
mode.
in.
power
(plug
another
disengage
VCR
for 2
hOUJs.
VCR.
from the moin unit.
moqe.
proper~.
plugge
At'"
buHons.
removed.
SCART
signal
which
.
setonthe
satellite
the
and
receiver.
satellite
thot
central
receiver.
the
VCR.
receiverisnot
desired channel
position
applicmce
timer.
.
in.
refertoa
SHARP
lead.
alters recording
before
in).
in
is
GB-51
 Loading...