

Page 1
BEFORE USING YOUR VCR
UNPACKING THE ACCESSORIES
CHECK ALL THESE ACCESSORIES ARE SUPPLIED WITH YOUR VCR. CONTACT YOUR DEALER IF
ANY ARE MISSING.
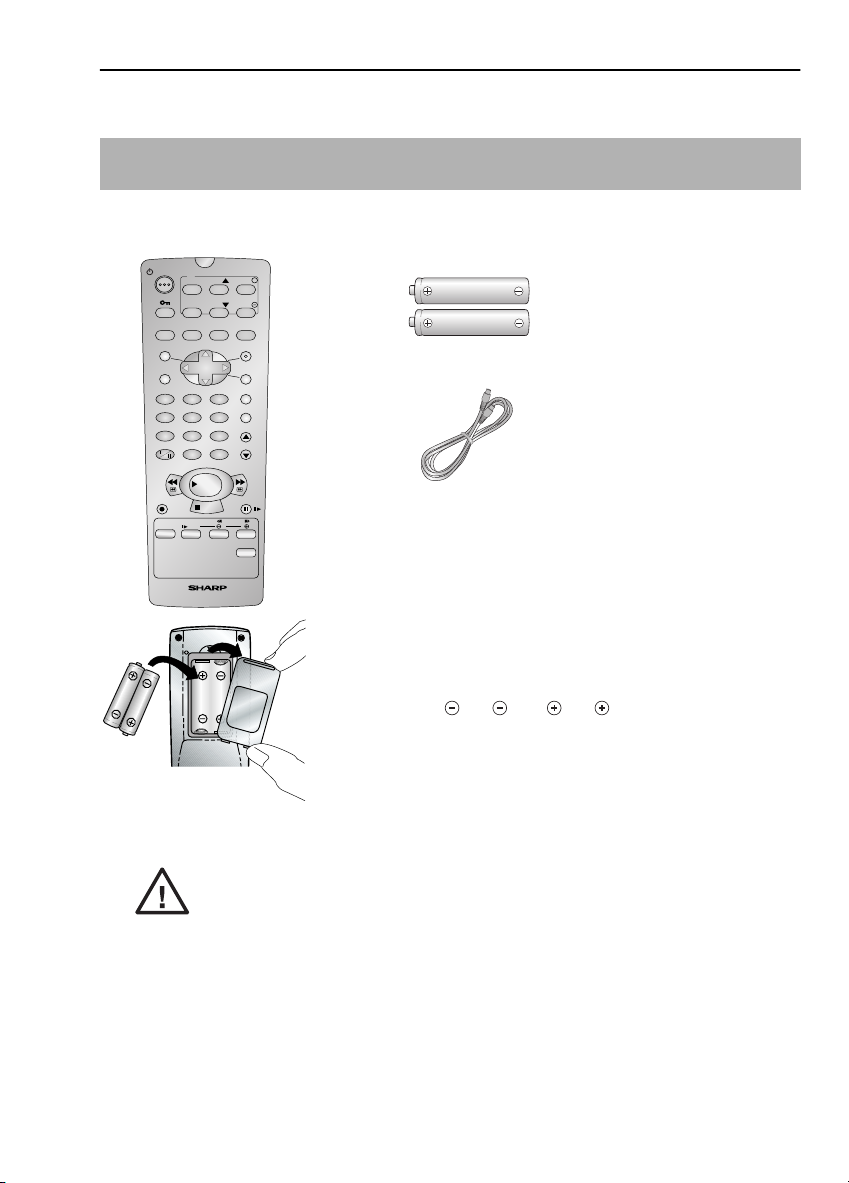
REMOTE CONTROL
STANDBY
TV
OPERATE VOL
INPUT
SELECT
TIMER
AUDIO
ON/OFF
OUT
MENU SET
SV/V+/
TIMER
231
475
8
AM/PM
0
REW FF
REC
TAPE
SPEED
SLOW
VIDEO CASSETTE RECORDER
CH
CH
SKIP
SEARCH
INPUT SELECT
PLAY / X2
STOP
+
VOL
ZERO
BACK
CLEAR
MODE OSD
DISPLAY
6
9
CHANNEL
PAUSE/STILL
DPSS
TV/VCR
(TYPE AA/R6/UM3)
BATTERIES (X2)
for the remote control unit.
RF CONNECTION CABLE
connects the VCR to the TV.
To fit the batteries into the remote control
Remove the battery cover on the back of the remote control.
Fit the batteries: to and to . terminals. Place the
battery cover back into position.
Battery cover
Remote Control
• Remote Control must be pointed towards the VCR to operate.
• Do not expose to liquid or shock.
• May not function if the VCR is in direct sunlight or any other strong light.
• Replace both alkaline batteries (type AA/R6/UM3) if the remote control
fails.
• Remove the batteries and keep in a safe place if you do not plan to use
the VCR for several months.
• Remove and dispose of flat batteries safely and promptly.
• Incorrect use of batteries may cause them to leak or burst.
If problems persist contact the SHARP Helpline on tel: 0990-274277
3
Page 2
INSTALLING YOUR VCR
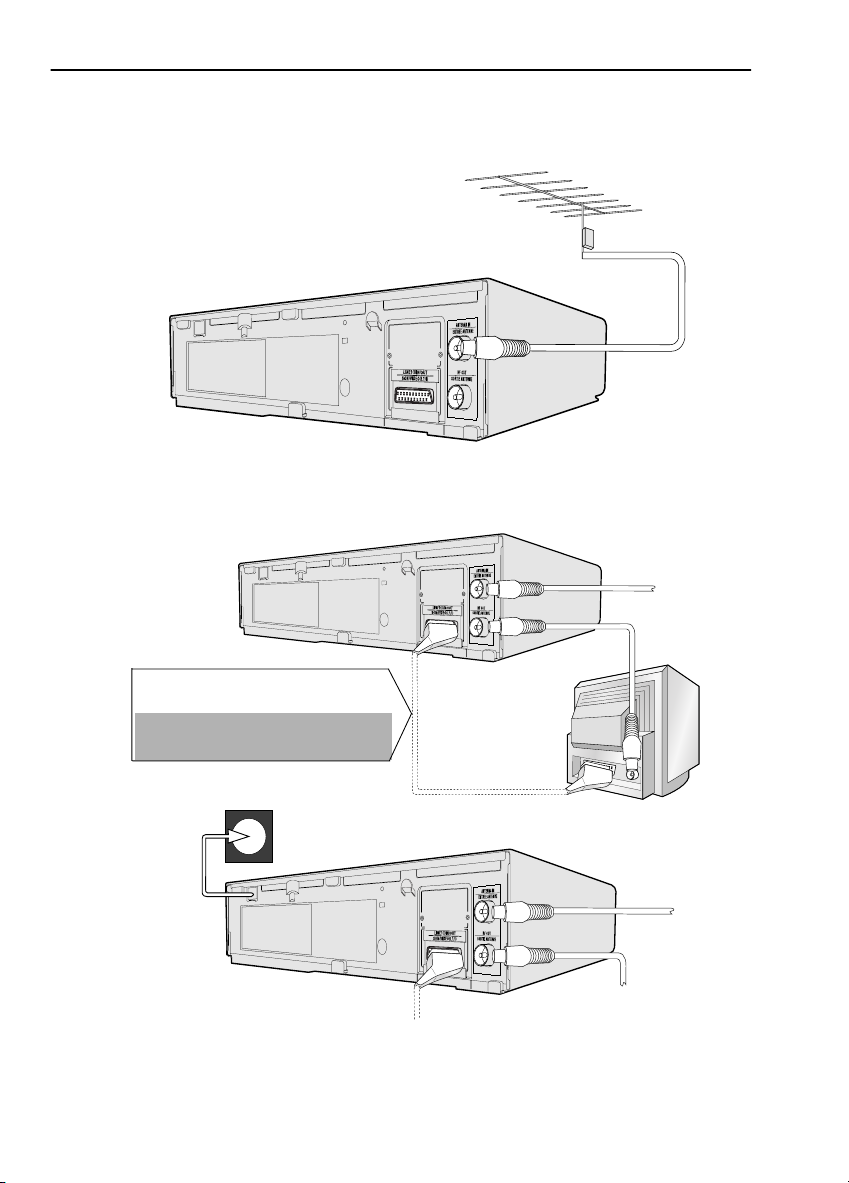
CONNECTING THE CABLES
Connect your existing aerial
1
cable to the
socket on your VCR.
Connect your TV to the VCR using the
2
supplied RF connection cable, i.e.
connect the VCR
the TV
ANTENNA IN
AERIAL IN
RF OUT
socket.
socket to
EXISTING AERIAL
OR CATV CABLE
AERIAL
RF CONNECTION
CABLE
Connect the
3
VCR to the
mains.
Optional
have a scart lead connect it to your TV and
LINE 1 IN/OUT
- The advantage of a Scart connection is
improved picture and sound quality during
playback.
SCART (not supplied). If you
socket on the VCR.
SCART LEAD
The VCR is correctly connected.
✔
If problems persist contact the SHARP Helpline on tel: 0990-274277
BACK OF
TELEVISION
4
AERIAL
RF CONNECTION
CABLE
Page 3

INSTALLING YOUR VCR
TUNING THE TV INTO THE VCR
Press the
1.
VCR is in the STANDBY mode. The display on the
front of the VCR should show “
please perform the VCR RESET procedure on
page 30.
2.
Press and hold the button located on VCR
front panel for 3 seconds.
The VCR will search and display an ideal
channel.
Wait for the flashing channel number to appear on the VCR display, this number will be
between 21 and 69.
STANDBY
button to ensure your
SHARP
”, if not,
EXAMPLE
CAUTION:
If the clear button is pressed at this point it will not allow the TV to be tuned to the VCR. Refer
to RF through ON/OFF on page 30.
Switch on the TV.
3.
4.
Select the next available or unused channel on your TV, this will become the dedicated
video channel.
Example of
TV channels
Tune the selected channel on your TV until the screen below appears.
5.
(Refer to your TV manual for instructions on how to tune in your TV).
1 = BBC1 4 = Channel 4
2 = BBC2 5 = Channel 5
3 = ITV ? = VCR
MENU SCREEN
ME NU
TIMER
MOD E
SET UP
: SELECT
SET :ENTER MENU :EX I T
Store this as your VCR channel.
Press the button to place the VCR back into STANDBY. (The MENU screen will not
6.
be displayed when the VCR is in STANDBY mode.)
If problems persist contact the SHARP Helpline on tel: 0990-274277
5
(Blue background
with white text)
Page 4

INSTALLING YOUR VCR
AUTO INSTALLATION
This model automatically tunes the TV channels in your area.
Turn the TV on and select the video channel. (As previously explained).
1.
2.
STOP
Press
the VCR.
to switch on
STOP
Follow the instructions that appear
on the TV screen by pressing the
SET
button. (Auto tune may take a
few minutes)
AUTO I NSTAL LAT I ON
PRESS SET KEY TO START
SET : ENTER MENU : EX I T
Press the button.
PL EASE BE SURE THE
AER I AL / SCART CABL E I S
CONNECTED TO YOUR VCR .
PRESS SET TO CONT I NUE
SET : ENTER MENU : EX I T
Press the button.
SET
SET
Button positions for your reference.
REMOTE CONTROL
1CH22
AUTOMAT I C T UN I NG .
PL EASE WA I T .
MENU:EXIT
See next page to continue
STOP
SET
NOTE:
• If the AUTO INSTALLATION screen doesn’t appear when you switch on your VCR or you
wish to reset your VCR and start the installation again, refer to
of the book.
If problems persist contact the SHARP Helpline on tel: 0990-274277
6
VCR RESET
at the back
Page 5

INSTALLING YOUR VCR
INSTALLATION CONTINUED
On completion, the
to tune in. Using the [ / /
BBC1. Some channels may be duplicated, with interference. Search for the best quality
picture and, using the procedure below, move this channel to Preset 1. Repeat this procedure
for BBC2 - Preset 2, ITV - Preset 3, etc.
3.
Press [ / /
the channel to be moved.
4.
Press the button to confirm.
Press [ / /
5.
the new position for the channel.
6.
Press the button to confirm.
7.
If any more channels are to be
moved,
repeat procedure from step 3.
8.
Press the button to exit if you are
happy with the channel order.
MOVE MENU
SET
SET
/
] to highlight
/
] to highlight
will appear showing all the channels the VCR was able
] menu select buttons scroll through the channels to find
/
3.
1CH21 7 13
2CH32 8 14
3CH43 9 15
4CH54 10 16
5 CH 6 5 11 17
61218
SELECTED :CH65
: SELECTED
SET : ENTER MENU : EX I T
MOVE 1/3
5.
1 CH 6 5 713
2CH21 8 14
3CH32 9 15
4CH43 10 16
5CH54 11 17
61218
SELECTED :CH65
: SELECTED
SET : ENTER MENU : EX I T
MOVE 1/3
REMOTE CONTROL
MENU
SET
If you wish to change the channel
order at a later date refer to
MANUALLY SORTING
CHANNELS - Sorting the
channels into your preferred
order
.
If problems persist contact the SHARP Helpline on tel: 0990-274277
MENU SELECT
BUTTONS
7
Page 6

INSTALLING YOUR VCR
INSTALLATION CONTINUED
.
The clock setting screen will now appear.
To set the time and date follow the steps below:
Press the [ / ] menu select
1.
buttons to select either 12 or 24 hour
clock operation.
2.
Press [
the time using the
BUTTONS
/
] to select TIME. Enter
NUMBER
or the [ / ]
buttons. If the minutes or hours are
less than 10, enter the leading 0. If
using the 12 hour clock enter AM or
PM by pressing the
AM/PM
button on the remote control.
AM/PM
24 hour example:
MENU SET
SV/V+/
TIMER
475
AM/PM
231
8
0
6
9
INPUT SELECT
CLEAR
MODE OSD
DISPLAY
CHANNEL
Remote Control
CLOCK
MOD E T I ME DAT E YEAR
24H 15:0501/0400
MODE : 2 4H / 1 2H
: SELECT : CHANGE
SET : ENTER MENU : EX I T
Press [
3.
the date using the
BUTTONS
buttons. For example, for 1st April
enter
4.
Press [
the last two digits of the year using
the
/
] to select DATE. Enter
NUMBER
or the [ / ]
.
01 04
/
] to select YEAR. Enter
NUMBER BUTTONS
or the
12 hour example:
CLOCK
MOD E T I ME DAT E YEAR
12H 03:05PM 01/04 00
[ / ] buttons. For example, for
00
2000 enter
enter 01.
5.
Press the button to store the time
. For the year 2001
SET
MODE : 2 4H / 1 2H
: SELECT : CHANGE
SET : ENTER MENU : EX I T
and date.
NOTE:
• You will need to update the clock for Winter/Summer daylight saving.
All the programmes should now be correctly tuned in and the clock set.
✔
If problems persist contact the SHARP Helpline on tel: 0990-274277
8
 Loading...