

Page 1
1- 39
ENGLISH
SS GB GB
VC-FH30SM
VC-FH30SM
VIDEO CASSETTE RECORDER OPERATION MANUAL
GB
VIDEOBANDSPELARE ANVÄNDARHANDBOK
S
KUVANAUHURI KÄYTTÖOHJE
FIN
DK
VIDEOMASKINE BETJENINGSVEJLEDNING
VIDEOSPILLER BRUKSANVISNING
N
●POWERSAVE FEATURE
●CHILD LOCK
●SHARP SUPER PICTURE
●AUTO TUNING
1- 39
SVENSKA
FINFIN
1- 39
SUOMI
DKDK
1- 39
DANSK
NN
1- 39
NORSK
Page 2

Dear SHARP customer Thank you for buying this SHARP VCR. GIven proper care it will provide years of entertainment for the
GB
whole family. Please read this operation manual carefully before attempting to operate the VCR.
Copyright
● Audio-visual material may consist of copyrighted works which must not be recorded without the authority of the owner of the
copyright. Please refer to the relevant laws in your Country.
● No part of this publication may be reproduced, stored or transmitted in any form without prior permission from SHARP
Electronics (UK) Ltd.
THIS MANUAL COVERS A RANGE OF MODELS. ALL OF THE FEATURES MENTIONED MAY NOT NECESSARILY
APPLY TO YOUR VCR.
Bästa SHARP-kund Vi tackar dig för ditt köp av videobandspelare från SHARP.
S
Om du sköter videobandspelaren på rätt sätt kommer den att skänka dig och hela din familj mycket nöje under lång tid framöver.
Studera denna bruksanvisning noggrant innan du använder videobandspelaren.
Copyright
● Audiovisuella material och produkter kan lyda under upphovsrättslagen och får då inte spelas in utan tillstånd från
upphovsrättsinnehavaren. Kontrollera vilka lagar som gäller i ditt land.
● Denna skrift får inte till någon del reproduceras, lagras eller spridas i någon form utan tillstånd från SHARP ELECTRONICS
(EUROPE) GmbH.
DENNA BRUKSANVISNING GÄLLER FÖR FLERA OLIKA MODELLER.
OBSERVERA ATT ALLA FUNKTIONER OCH EGENSKAPER SOM BEHANDLAS I TEXTEN KANSKE INTE AVSER JUST
DIN MODELL.
Hyvä asiakas
FIN
Kiitos Sharp-kuvanauhurin hankinnasta. Kun huolehdit asianmukaisesti uudesta laitteestasi, se tulee palvelemaan sinua ja perhettäsi
vuosia tästä eteenpäin. Neuvomme sinua lukemaan huolellisesti tämän käyttöohjeen ennen kuin ryhdyt käyttämään kuvanauhuria.
Tekijänoikeus
● Audiovisuaaliset materiaalit saattavat sisältää tekijänoikeudella suojattuja teoksia, joita ei saa nauhoittaa ilman tekijänoikeuden
omistajan lupaa. Noudata maakohtaista lainsäädäntöä.
● Tätä julkaisua ei saa osittainkaan kopioida, tallentaa tai siirtää edelleen missään muodossa ilman Sharp Electronics (UK) Ltd.:n
lupaa.
OHEINEN OPASKIRJA SISÄLTÄÄ USEIDEN ERI KUVANAUHURIMALLIEN KÄYTTÖOHJEET. HANKKIMASSASI
LAITTEESSA EI VÄLTTÄMÄTTÄ OLE KAIKKIA MAINITTUJA OMINAISUUKSIA.
Kære Sharp kunde. Tak fordi De købte denne SHARP videomaskine. Med den rette pleje vil den kunne give mange års
DK
underholdning til hele familien. Læs venligst denne manual grundigt, før De forsøger at anvende videomaskinen.
Copyright
● Audiovisuelt materiale kan være omfattet af copyright. I så fald må det ikke optages uden tilladelse fra indehaveren af en sådan
copyright. Vi henviser til den relevante lovgivning.
● Ingen del af denne publikation må gengives, lagres eller udsendes i nogen form uden forudgående tilladelse fra SHARP
Electronics (UK) Ltd.
DENNE MANUAL OMFATTER EN RÆKKE MODELLER. ALLE DE NÆVNTE FUNKTIONER GÆLDER MÅSKE IKKE FOR
NETOP DERES VIDEOMASKINE.
Kjære SHARP-kunde. Takk for at du har kjøpt denne videospilleren fra SHARP. Med riktig vedlikehold vil den gi mange år med
N
underholdning for hele familien. Les nøye gjennom denne bruksanvisningen før du begynner å bruke videospilleren
Opphavsrett
● Audiovisuelt materiale kan inneholde av kopibeskyttet arbeid som ikke kan spilles inn uten tillatelse fra eieren av opphavsretten.
Se gjeldende lover om opphavsrett og kopibeskyttelse.
● Ingen del av denne publikasjonen kan reproduseres, lagres eller overføres på noen form uten forhåndstillatelse fra SHARP
Electronics Ltd., Storbritannia.
DENNE HÅNDBOKEN GJELDER FOR EN REKKE MODELLER. ALLE DE OMTALTE
FUNKSJONENE FINNES IKKE NØDVENDIGVIS PÅ DIN VIDEOSPILLER.
(i)
Page 3

///
+
2. STANDBY
/
/
/
+
/
3. AUDIO OUT
4. EJECT
5. VOLUME
GB
1. VCR
/
6. MENU
VCR REMOTE CONTROL
16. TV
17. TIMER ON/OFF
18. MODE ON
SCREEN DISPLAY
19. DISPLAY
20. CHANNEL
21. SET
22. MENU SELECT
7. SV/V+/TIMER
8. NUMBER
BUTTONS
8. AM/PM or
9. REWIND 29. FAST FORWARD
10. STOP
11. RECORD
12. SLOW
13. TAPE SPEED
14. DIRECT RECORD
TV
15. A.DUB (
has no function with this
model
)
VCR FRONT PANEL/REMOTE CONTROL EQUIVALENT FUNCTIONS.
If you prefer, or if remote control batteries fail, you will need to use the VCR front panel controls. The only
differences in function are shown below:
Moving UP/DOWN menu
Moving LEFT/RIGHT menu
This button
FUNCTION
OSD
OPERATION WITH REMOTE
CONTROL
[]buttons
[ ] buttons
23. CLEAR
24. ZERO BACK
25. SKIP SEARCH
26. SUPER SHARP
PICTURE
27. CHILD LOCK
28. INPUT SELECT
30. PLAY/X2
31. PAUSE/STILL
32. DPSS
/SLOW SPEED
33. TV/VCR
OPERATION WITH VCR
FRONT PANEL
CHANNEL buttons.
Rotate the shuttle dial
counter clockwise/clockwise
/
(ii)
Page 4
+
///
S
/
/
/
/
+
KNAPPAR PÅ FJÄRRKONTROLLEN
1. VIDEOBANDSPELARE
2. STANDBY-LÄGE
3. AUDIO OUT
4. EJECT
5. VOLYM
6. MENU
7. SV/V+/TIMER
8. FM/EM eller
9. ÅTERSPOLNING
10. STOPP
11. INSPELNING
12. SLOW
13. INSPELNINGSHASTIGHETEN
14. DIRECT TV RECORD
15. A.DUB (Denna knapp har inte någon
funtion på denna modell
16. TV
Videobandspelarens frontpanel/motsvarande funktioner på fjärrkontrollen.
Du kan om du vill, eller om batterierna i fjärrkontrollen är slut, använda kontrollerna på
videobandspelarens frontpanel. Skillnaderna mellan funktionerna listas nedan:
/
)
17. TIMER AV/PÅ
18. SKÄRMPANEL
19. DISPLAY
20. KANAL
21. BEKRÄFTA
22. MENYVAL
23. MAKULERA
24. ZERO BACK
25. SKIP-SÖKNING
26. SUPER SHARP PICTURE
27. BARNLÅS
28. VAL AV INGÅNG
29. FRAMSPOLNING
30. PLAY/X2
31. PAUS/STILLBILD
32. DPSS
33. TV/VIDEOBANDSPELARE
[ ]
/SLOW
/
FUNKTION
BILDSKÄRMSMENY
Meny: Flytta UPP/NED
Meny: Flytta till
HÖGER/VÄNSTER
FJ
ÄRRKONTROLLSFUNKTIONER
[ ] knappar
[ ] knappar
(ii)
FUNKTIONER PÅ
VIDEOBANDSPELARENS
FRONTPANEL
CHANNEL knappar.
Vrid snabbspolningsringen
medsols/motsols
Page 5
FIN
/
/
/
+
///
/
+
KUVANAUHURIN KAUKOSÄÄDIN
1. KUVANAUHURI
2. VALMIUSTILA
3. AUDIO OUT
4. EJECT
5. ÄÄNENVOIMAKKUUS
/
6. VALIKKO
7. SV/V+/TIMER
8. AM/PM TAI
9. TAKAISINKELAUS
10. PYSÄYTYSPAINIKE
11. NAUHOITUSPAINIKE
12. HIDASTUS
13. NAUHAN NOPEUS
14. DIRECT TV RECORD
15. A.DUB (Tälle painikkeelle ei ole asetettu
toimintoa tässä mallissa)
16. TV
18. TOIMINTOTILAN KUVARUUTUNÄYTTÖ
19. DISPLAY
20. KANAVA
21. VAHVISTUSPAINIKE
22. VALINTA VALIKOSTA
23. POISTOPAINIKE
24. ZERO BACK
25. HAKU HYPPÄYKSITTÄIN
26. SUPER SHARP PICTURE
27. LAPSILUKKO
28. TULON VALINTA
29. ETEENPÄINKELAUS
30. TOISTOPAINIKE/X2
31. TAUKO/PYSÄYTYSKUVAPAINIKE
32. DPSS
[ ]
HIDAS NOPEUS
/
/
33. TV/KUVANAUHURI
17. AJASTIN KYLLÄ/EI
KUVANAUHURIN ETUPANEELIN PAINIKKEIDEN / KAUKOSÄÄTIMEN
PAINIKKEIDEN TOIMINTOJEN VASTAAVUUS
Jos kaukosäätimen paristot ovat lopussa, tai muutenkin halutessasi, voit käyttää
kuvanauhuria myös etupaneelin painikkeista. Etupaneelin ja kaukosäätimen painikkeiden
toiminnot ovat lähes samat. Vähäiset eroavaisuudet on merkitty alla olevaan taulukkoon
TOIMINTO
Liikkuminen YLÖS/ALAS
valikossa
Liikkuminen
VASEMMALLE/OIKEALLE
valikossa
KAUKOSÄÄDIN
[] painikkeet
[] painikkeet
KUVANAUHURIN
ETUPANEELIN PAINIKKEET
KANAVA [ ] painikkeet
Käännä säätönuppia
vastapäivään/
myötäpäivään
(ii)
Page 6
FJERNBETJENING
/
/
/
+
///
/
+
DK
1. VIDEO
2. STANDBY
3. AUDIO UDGANG
4. EJECT
5. VOLUMEN
/
6. MENU
7. SV/V+/TIMER
8. AM/PM eller
9. TILBAGESPOLING
10. STOP
11. OPTAGELSE
12. LANGSOMT
13. BÅNDHASTIGHED
14. DIRECT TV RECORD
15. A.DUB (Denne knap har ingen
funcktion på denne model)
16. TV
17. TIMER TIL/FRA
18. DISPLAY PÅ SKÆRMEN
19. DISPLAY
20. PROGRAM
21. INDSTIL
22. VÆLG MENU
23. SLET
24. ZERO BACK
25. SKIP- SØGNING
26. SUPER SHARP PICTURE
27. BØRNELÅS
28. VÆLG INDGANG
29. HURTIG FREMADSPOLING
30. AFSPIL/X2
31. PAUS/STILL
32. DPSS
[ ]
/
LANGSOM HASTIGHED
33. TV/VIDEO
/
VIDEOMASKINENS FRONTPANEL/FUNKTIONER, DER SVARER TIL
FJERNBETJENINGENS
Hvis De foretrækker det, eller hvis fjernbetjeningens batterier svigter, får De brug for
knapperne på videomaskinens frontpanel. De eneste forskelle i funktionerne vises i det
følgende:
FUNKTION
Display på skærmen
OP/NED
Display på skærmen
HØJRE/VENSTRE
MED FJERNBETJENINGEN
Knappene []
Knappene []
(ii)
PÅ FRONTPANELET
PROGRAM [ ]
Drej ring til højre/venstre
knapperne
Page 7

FJERNKONTROLL
/
/
/
+
///
+
/
N
1. VIDEOSPILLER
2. STANDBY
3. AUDIO OUT
4. EJECT
5. VOLUM
/
6. MENY
7. SV/V+/TIMER
8. AM/PM eller
9. SPOL TILBAKE
10. STOPP
11. SPILL INN
12. SAKTE
13. BÅNDHASTIGHET
14. DIRECT TV RECORD
15. A.DUB (Denne knappen har ingen
funksjon på denne modellen
)
16. TV
17. TIMER PÅ/AV
18. MODUS FOR SKJERMVISNING
19. VIS
20. KANAL
21. BEKREFT
22. MENYVALG
23. SLETT
24. ZERO BACK
25. HOP OVER SØK
26. SUPER SHARP PICTURE
27. BARNESIKRING
28. VELG INNGANG
29. SPOL FREMOVER
30. PLAY/X2
31. PAUS/STILLBILDE
32. DPSS
[ ]
SAKTEFILM
/
/
33. TV/VIDEOSPILLER
TILSVARENDE FUNKSJONER PÅ VIDEOSPILLERENS FRONTPANEL OG
FJERNKONTROLLEN.
Hvis du foretrekker det, eller hvis batteriene i fjernkontrollen er flate, må du bruke kontrollene
på videospillerens frontpanel. De eneste forskjellene i funksjonalitet er beskrevet nedenfor:
FUNKSJON PÅ SKJERMEN
Flytte OPP/NED i menyen
Flytte til VENSTRE/HØYRE
i menyen
VED Å BRUKE
FJERNKONTROLLEN
Knappene []
Knappene []
(ii)
VED Å BRUKE
FRONTPANELET
Knappene CHANNEL [ ]
Roter stryrehjolet mot
klokken/med klokken
Page 8
CONTENTS
BEFORE USING YOUR VCR
Important notes on your VCR .......................................................................................................2
Unpacking the accessories........................................................................................................... 3
INSTALLING YOUR VCR
Connecting the cables .................................................................................................................4
Tuning the TV into the VCR............................................................................................................5
Auto installation .............................................................................................................................. 6
BASIC OPERATION
Important notes on your VCR and video tapes .........................................................................7
How to playback a video tape....................................................................................................7
Immediate recording................................................................................................................... 10
Direct TV recording ......................................................................................................................11
How to use to make a recording ..............................................................................12
How to set a delayed recording ................................................................................................14
ADVANCED OPERATION
Audio and your VCR .................................................................................................................... 17
Playback of a video tape ...........................................................................................................19
Digital Display................................................................................................................................ 21
Blue mute ......................................................................................................................................22
Colour ............................................................................................................................................22
16:9 Playback and recording .....................................................................................................22
Searching the video tape ........................................................................................................... 23
Remote control operation of TV................................................................................................. 24
Recording from other equipment ..............................................................................................25
Decoder switching operation.....................................................................................................26
SPECIAL FEATURES ON YOUR VCR
POWERSAVE feature ....................................................................................................................27
Child lock....................................................................................................................................... 28
CUSTOMISED INSTALLATION
Manually tuning a channel......................................................................................................... 29
Broadcast and CATV channels ..................................................................................................30
Manually sorting channels........................................................................................................... 31
Changing the on-screen display language.............................................................................. 34
Manually setting the clock .......................................................................................................... 34
MORE INFORMATION ABOUT YOUR VCR
VCR digital display .......................................................................................................................35
Selecting the output from the VCR............................................................................................ 35
On-screen display......................................................................................................................... 36
Specifications................................................................................................................................ 37
Troubleshooting ............................................................................................................................38
Pausing and slow motion........................................................................................ 8
Fast forwarding/rewinding a video tape.............................................................. 9
Checking, changing and cancelling a recording ............................................ 16
Checking the amount of tape remaining .......................................................... 19
Playing back a video tape repeatedly ..............................................................19
Playing back an S-VHS tape................................................................................. 20
Playing back an NTSC tape .................................................................................20
Skip searching the video tape ............................................................................. 23
Digital programme search system (DPSS)........................................................... 23
Sorting the channels into your preferred order.................................................. 31
Deleting channels.................................................................................................. 32
Re-naming channels ............................................................................................. 33
GB-1
Page 9
BEFORE USING YOUR VCR
IMPORTANT NOTES ON YOUR VCR
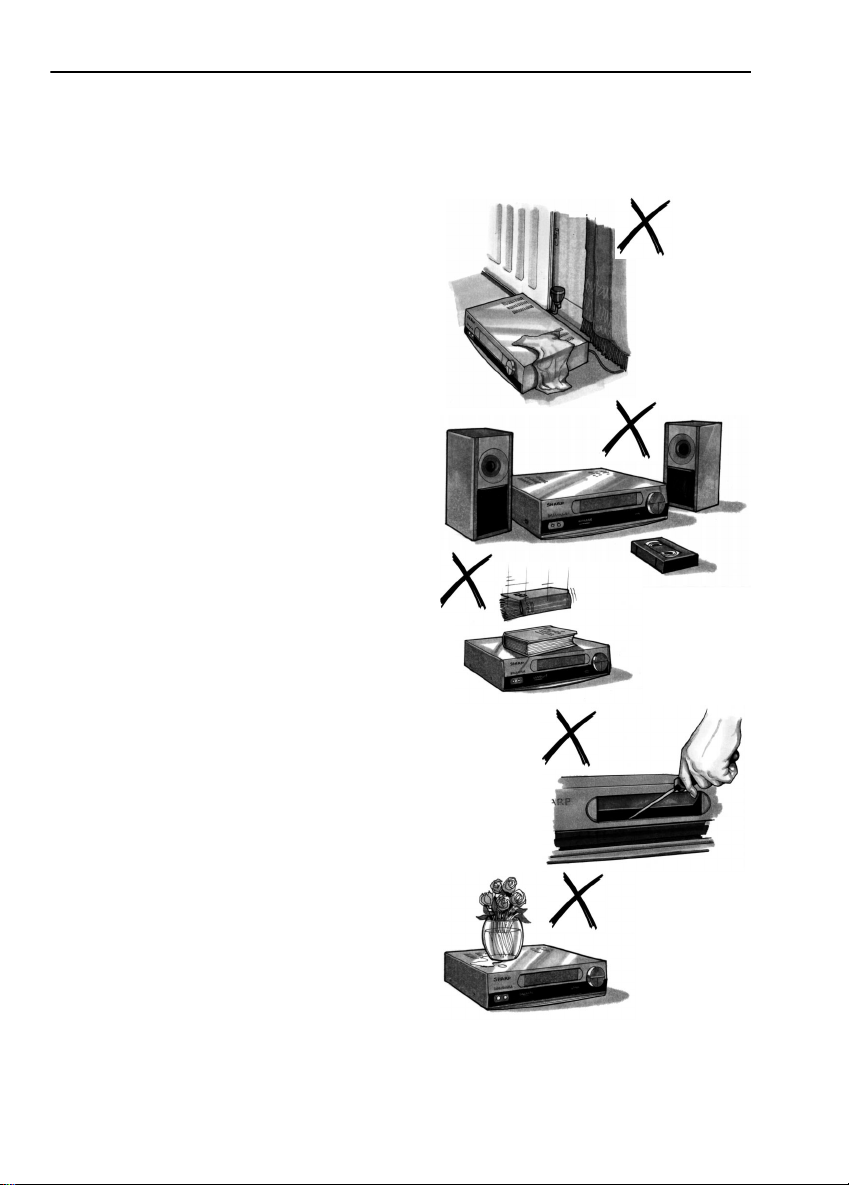
IDEAL VCR LOCATION
PLACE THE VCR..
• ... on a flat level surface away from radiators
or other heat sources and out of direct
sunlight.
• ... and video tapes away from magnetic
sources such as speakers or microwave ovens.
• ... at least 8” (20cm) away from the TV.
• ... away from curtains, carpets or other
materials and allow ventilation space around
the VCR.
DO NOT...
• ... block the air-vent openings.
• ... expose the VCR to excessive dust,
mechanical vibration or shock.
• ... place any heavy object or liquid on top of
the VCR. If liquid drops inside the VCR unplug
immediately and contact your SHARP dealer.
Do not use the VCR.
• ... insert or drop anything into the tape
compartment or through the
air-vents, as this could result in serious
damage, fire or an electric shock.
POWER SOCKETS
• To avoid overheating or even fire, insert the
plug correctly into the socket.
DO NOT...
• ... overload power sockets, this may cause a
fire or electric shock.
• ... pull the power cord to disconnect the plug
from the mains.
• ... bind the power cords together.
• This VCR is not equipped with a mains power
switch. Accordingly, nominal current to drive
the clock is drawn at all times when the AC
power cord is plugged into a wall socket. If
the VCR is not to be used for an extended
period be sure to unplug the cord.
GB-2
Page 10
BEFORE USING YOUR VCR
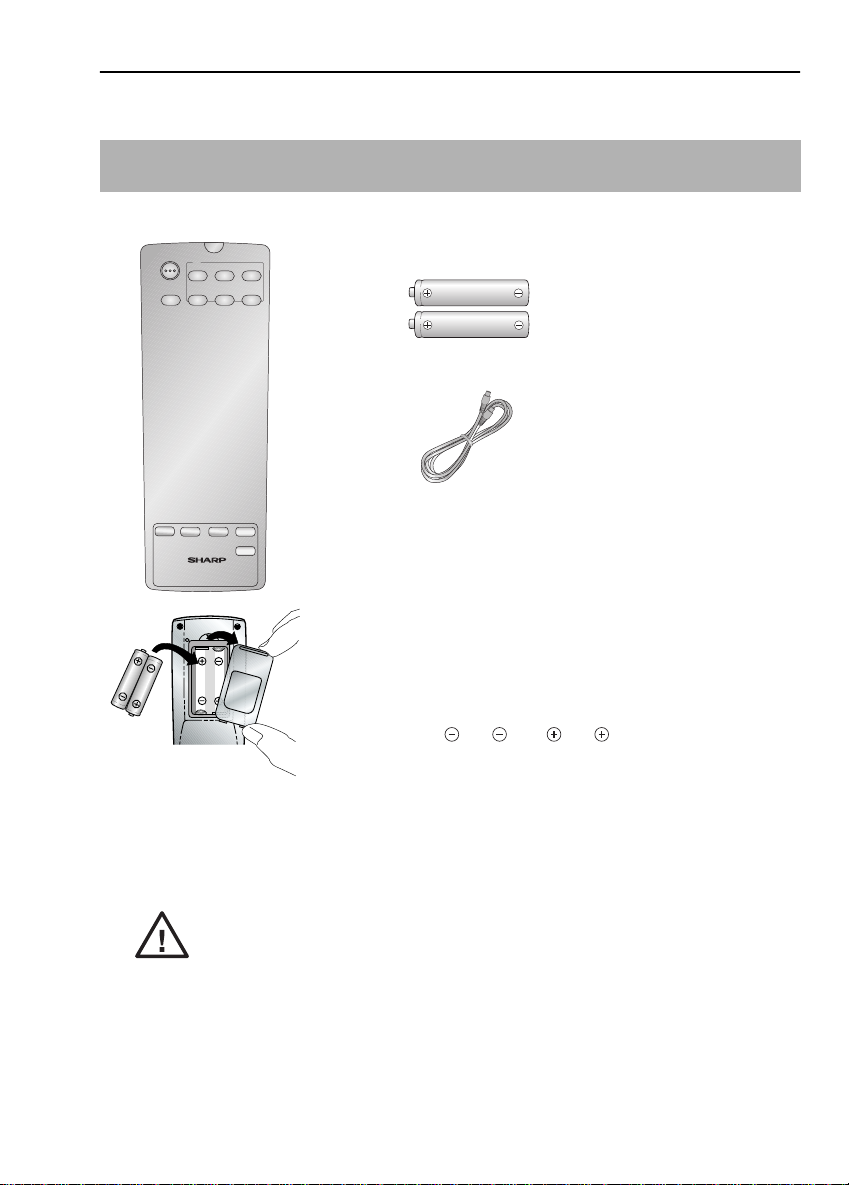
UNPACKING THE ACCESSORIES
CHECK ALL THESE ACCESSORIES ARE SUPPLIED WITH YOUR VCR. CONTACT YOUR DEALER IF
ANY ARE MISSING.
REMOTE
CONTROL
For a more
detailed
picture of
your remote
control refer
to page (ii).
VIDEO CASSETTE RECORDER
Battery cover
(TYPE AA/R6/UM3)
BATTERIES (X2)
for the remote control unit.
RF CONNECTION
CABLE
connects the VCR to
the TV.
TO FIT THE BATTERIES INTO THE REMOTE
CONTROL
Remove the battery cover on the back of the remote control.
Fit the batteries: to and to . terminals. Place the
battery cover back into position.
REMOTE CONTROL
• Remote Control must be pointed towards the VCR to operate.
• Do not expose to liquid or shock.
• May not function if the VCR is in direct sunlight or any other strong light.
• Replace both alkaline batteries (type AA/R6/UM3) if the remote control
fails.
• Remove the batteries and keep in a safe place if you do not plan to use
the VCR for several months.
• Remove and dispose of flat batteries safely and promptly.
• Incorrect use of batteries may cause them to leak or burst.
GB-3
Page 11
INSTALLING YOUR VCR
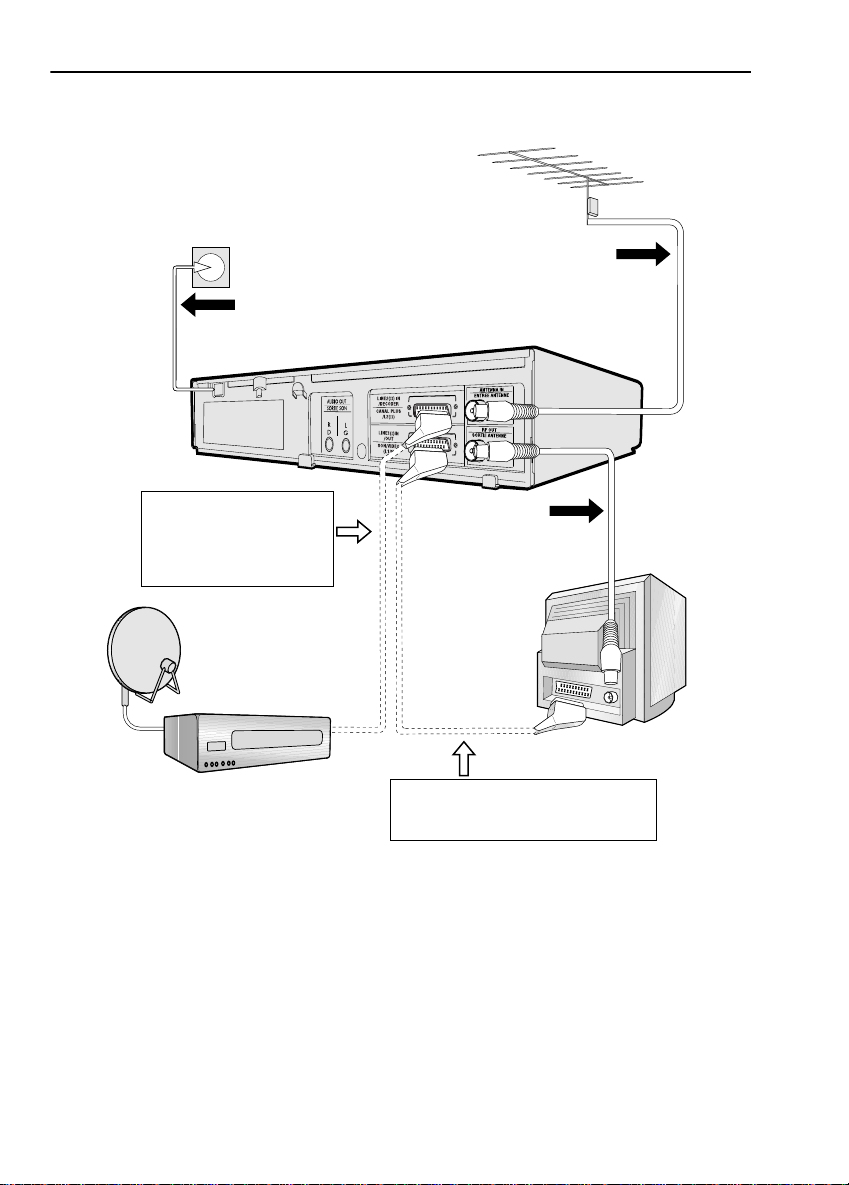
CONNECTING THE CABLES
AERIAL OR
CATV CABLE
3
Connect the VCR to the
mains
Optional:
Satellite receiver or decoder to
the VCR using a scart lead to
LINE 2 IN/DECODER
socket on the VCR.
DECODER UNIT
OR SATELLITE SYSTEM
Connect your
Connect your existing aerial
cable to the
socket on your VCR.
ANTENNA IN
2
Connect your TV
to the VCR using
the supplied rf
connection cable,
1
i.e. connect the
VCR
socket to the TV
AERIAL IN
socket.
Optional
have a scart lead connect it to your TV and
LINE 1 IN/OUT
RF OUT
SCART (not supplied). If you
socket on the VCR.
BACK OF
TELEVISION
The VCR is correctly connected.
✔
GB-4
Page 12
INSTALLING YOUR VCR
TUNING THE TV INTO THE VCR
IMPORTANT NOTE: By pressing the STANDBY button, the VCR will toggle
between STANDBY and POWERSAVE modes. The VCR display will not be
illuminated in POWERSAVE mode.
1.
Ensure your VCR is still in the STANDBY
mode (not POWERSAVE).
Switch on the TV. Select an unused
2.
channel on your TV for your VCR (there
may be a dedicated video channel refer
to your TV operation manual).
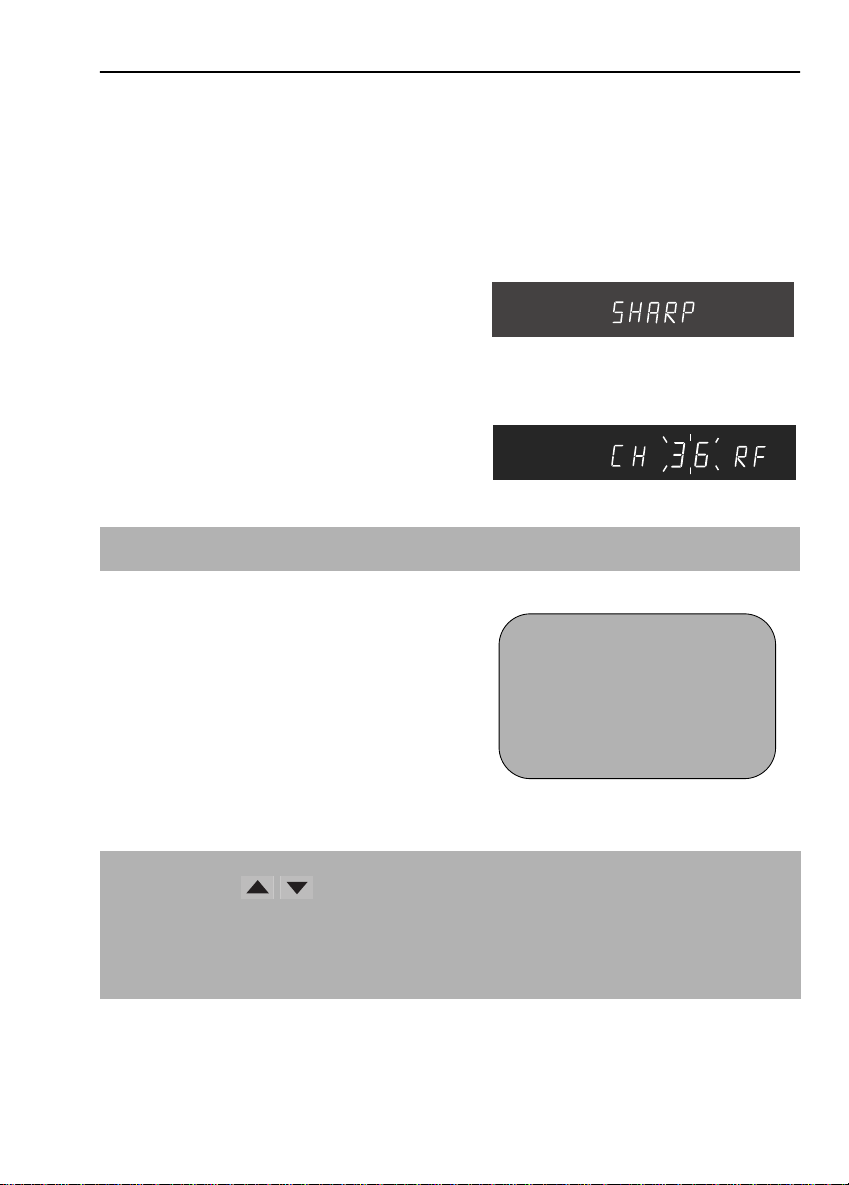
Example:
3.
Press and hold the
seconds. The VCR will search and display
the ideal RF channel.
CAUTION:
If the clear button is pressed at this point it will not allow the TV to be tuned to the VCR. Refer
to RF through ON/OFF.
MENU
button for 3
4.
Tune the selected channel on your TV
(refer to your TV manual) until the menu
screen appears.
Press
5.
place the VCR back into STANDBY.
to store the RF channel and to
SET
MENU SCREEN
SHOWVIEW
TIMER
MODE
GRUNDE I NSTELLUNG
MN :WÄHLEN
SE T : E I NGABE MENU : E NDE
NOTE:
• If you have a preferred channel, the RF channel can be set manually (21-69) after
Step 3 using [ / ] keys.
RF THROUGH ON/OFF:
• If you wish to connect your VCR to the TV with only a scart lead, the RF Output on your
VCR can be turned OFF and ON by pressing the
STANDBY at point 2. This will help minimise interference.
The TV is tuned to the VCR.
✔
GB-5
CLEAR
button then
SET
to return to
Page 13

INSTALLING YOUR VCR
AUTO INSTALLATION
Press
STOP
to switch on your VCR.
This model will automatically tune in the TV channels in your area, sort them into a standard
order and set the clock.
The screen opposite should be showing on your TV.
AUTO I NSTAL LAT I ON
Follow the instructions from the screens.
The VCR will attempt to copy the TV preset list
(NexTView, Smart Link, Easy Link and Megalogic
compatible TV’s only). During the copying process
the display will show the TV presets that are being
copied. If the VCR is unable to copy the TV preset
list the terrestrial channels will be automatically
installed. (Auto sort will take a few minutes to
complete)
On completion, the MOVE MENU will appear
showing the present channel order. Press
exit.
If the clock is NOT automatically set, the clock
screen will appear., refer to
SETTING THE CLOCK
been set correctly, press DISPLAY until the time
appears on the display.
MANUALLY
. To check the clock has
MENU
to
PRESS SET KEY TO START
AUTOMAT I SCHE E I NSTELLUNG
ZUM BEGINN,DIE SET-TASTE
DRÜCKEN .
SE T : E I NGABE MENU : E NDE
• If the screen above does not
appear, follow the procedure
VCR RESET below.
If you wish to customise the channel order refer to
MANUALLY SORTING CHANNELS
VCR RESET
1.
Press
Press and hold
2.
for 10 seconds.
3.
The AUTO INSTALLATION screen should now be showing on your TV.
Follow the on-screen display to proceed with auto installation.
4.
Refer to the
• Your VCR could not tune automatically - due to for example poor reception.
• You wish to re-arrange the channel order.
• You wish to change the time on the clock or if the VCR could not set the time.
✔
to switch on the VCR.
STOP
MENU
and
CHANNEL
CUSTOMISED INSTALLATION
buttons together on the front of the VCR
chapter if
All the programmes should now be correctly tuned in and the clock set.
GB-6
.
Page 14
BASIC OPERATION
IMPORTANT NOTES ON YOUR VCR AND VIDEO
TAPES
VIDEO TAPES
• If you use only good quality video tapes, generally it will not be necessary to clean the
video heads.
• If poor quality tapes are used, or if a tape is loaded after changing VCR location, oxide
from the tape may "clog" the video heads. This will cause the playback picture to be
"snowy", or even disappear.
• To remove minor contamination run a video tape in visual search mode. If this fails, you
will need to have the heads cleaned by a SHARP Service Facility. Please note, if cleaning
is necessary it is not covered by the guarantee.
• Use video tapes which carry the mark.
SECAMPAL
HOW TO PLAYBACK A VIDEO TAPE
BEFORE YOU PLAYBACK A VIDEO TAPE
Condensation forms in the VCR when it is moved out of or into a warm place.
If you try to playback or record, the video tape and VCR may be damaged.
Turn the VCR on and wait for about two hours until the VCR reaches room
temperature before operating.
PLAYBACK
Switch on your TV and select the video channel.
1.
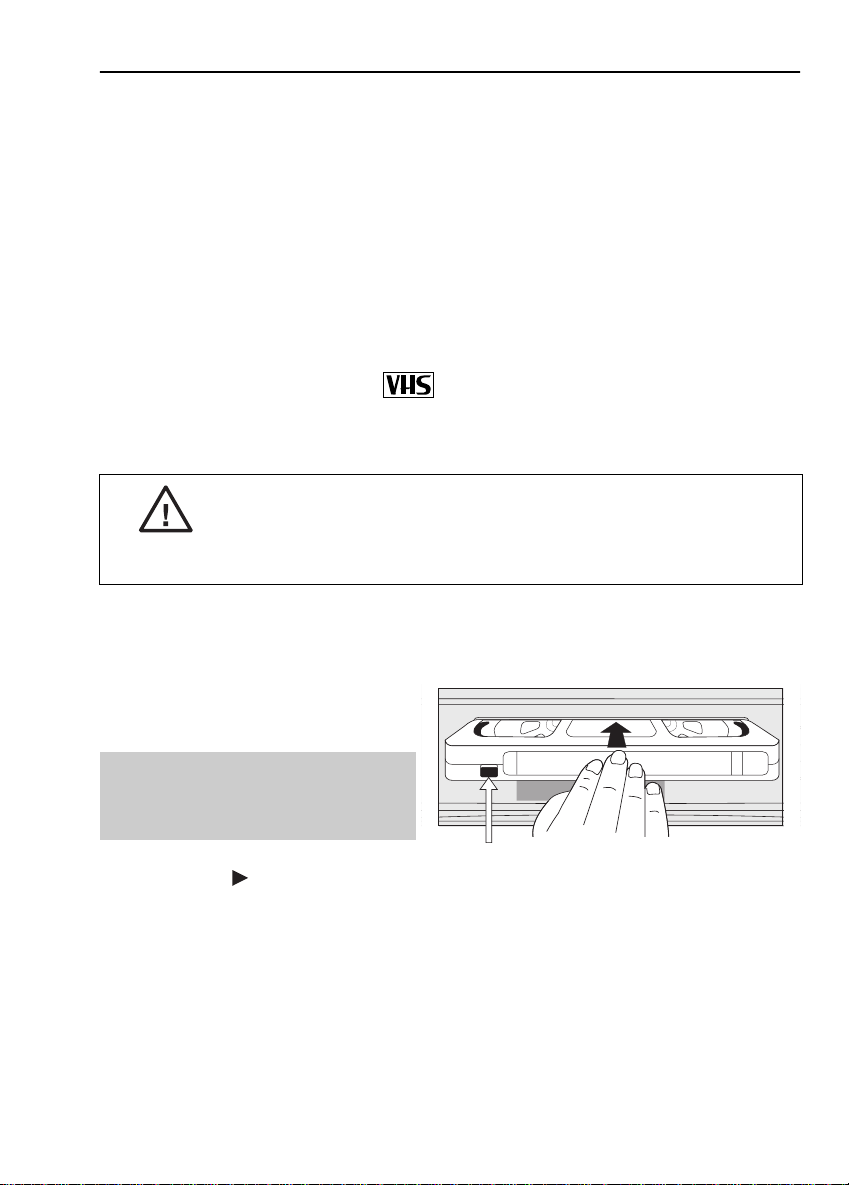
Carefully push a pre-recorded video
2.
tape into the tape compartment.
This will switch the VCR on.
• If the record-protection tab has
been removed, the VCR will start
playback as soon as the video tape
has been loaded.
To start playback, press
3.
PLAY/X2
().
Record protection tab
GB-7
Page 15

BASIC OPERATION
HOW TO PLAYBACK A VIDEO TAPE
SHARP SUPER PICTURE
normally set to ON. To turn
VCR front panel.
• For double speed playback (without sound), press
• To revert to normal playback, press
• To stop the video tape, press
• To eject the tape press
should enhance the picture quality during playback. It is
SHARP SUPER PICTURE
PLAY/X2
().
STOP
EJECT
on the VCR.
on or off press
PLAY/X2
( ) again.
SUPER P.
( ) again.
on the
PICTURE DISTURBANCE DURING PLAYBACK
This VCR has an automatic tracking system which reduces picture disturbance when you start
to playback a video tape. When auto-tracking is in operation flashes on the on-screen
display. If the picture still has disturbance you may need to manually track the video tape:
During PLAYBACK of a video tape.
• Press
Tracking)
• Press
CHANNEL
CHANNEL
or to position picture interference off the TV screen. (Manual
and buttons together to start Auto Tracking.
PAUSING AND SLOW MOTION
1.
Press
PLAY/X2
2.
To pause the video tape, press
• To minimise jitter whilst in pause mode press
• Press
3.
• Press
PLAY/X2
To playback in slow motion (without sound) press
motion speed can be adjusted using the or buttons next to the slow button.
Picture disturbance can be improved by using the
motion playback.
PLAY/X2
( ) to start the video tape playing.
PAUSE/STILL
()
CHANNEL
( ) to resume playback.
( )to resume playback.
.
or .
SLOW
on the remote control. Slow
CHANNEL
or during slow
NOTES:
• When using SLOW MOTION function some mechanical noise may be heard.
• There will be picture interference and possibly a change to black and white picture
using Pause and Slow functions.
• PAUSE mode will disengage after about 5 minutes.
GB-8
Page 16

BASIC OPERATION
HOW TO PLAYBACK A VIDEO TAPE
FAST FORWARDING/REWINDING A VIDEO TAPE
Press
1.
2.
Press
shuttle dial clockwise for Fast Forward and counter clockwise for Rewind then release.
( ) to stop the video tape.
STOP
FAST FORWARD
() /
REWIND ( ) on the remote control or rotate the
3. To stop fast forward/rewind, press STOP ().
FORWARD/REVERSE VISUAL SEARCH
COUNTERCLOCKWISE CLOCKWISE
REVERSE VISUAL SEARCH x 3
REVERSE VISUAL SEARCH x 7
Visual Search can be operated during playback by either the Fast Forward/Rewind buttons
on the remote control or by using the shuttle dial on the VCR front panel.
Remote Control Operation
(ANTI)
PLAYBACK
PLAY/X2
VISUAL SEARCH x 3
VISUAL SEARCH x 7
1. Press FAST FORWARD ( ) /REWIND ( ) during playback.
2. To decrease the speed, press FAST FORWARD ( ) /REWIND ( ) again.
3. Press PLAY/X2 ( ) to resume playback.
OR: Shuttle Dial Operation
As the Shuttle dial is rotated a soft click can be felt. During playback, rotating the dial one click
clockwise will make the VCR enter Visual search x 3 mode. An additional click clockwise or
counter clockwise will change the operation as illustrated above.
The start position shown above is only an example. The Shuttle dial can be operated from any
position.
Press
PLAY/X2 ( ) to resume playback at any time, or rotate the shuttle dial clockwise/
counter clockwise until the playback function is selected.
NOTE:
• There will be picture interference and possibly a change to black and white picture
using Visual Fast Forward/Rewind functions.
GB-9
Page 17

BASIC OPERATION
IMMEDIATE RECORDING
SELECTION OF A CHANNEL
Select the channel by using the number buttons on the remote control, or select the
next/previous channel by pressing
To change between single digit and 2-digit channel numbers, press
For example, for channel 24, press
You can record the channel you are watching or a different channel.
1. Insert a video tape into your VCR.
2. Select the channel you wish to record on the VCR.
3. To start recording, press REC ().
4. To pause during recording, press PAUSE/STILL ().
5. To continue recording, press REC ().
6. To stop recording, press STOP ( ) once.
SIMPLE TIMED RECORDING:
1. To specify a stop time, press REC ().
2. Each additional press of REC ( ) will delay
the stop time by 10 minutes.
3. To stop recording at any time, press
STOP ( ) once.
CHANNEL [or].
AM/PM .
AM/PM then press 2 4.
STOP 15:30
NOTES:
• If the tape ends before the recording is complete the VCR will stop recording and
rewind, or eject if the VCR is in timer record mode.
• If the VCR ejects the video tape when you press
protected. i.e. record protection tab has been removed.
GB-10
REC ( ) the tape is record
Page 18

BASIC OPERATION
DIRECT TV RECORDING
This feature can only be used with nexTView, Smart Link, Easy
Link and Megalogic compatible tv’s.
By pressing the DIRECT TV REC button on the remote control, the VCR will record the
signal currently being displayed on the TV regardless of the signal source.
This feature can be started when the VCR is in STANDBY or OPERATE mode, but NOT
POWERSAVE mode.
• If appears on the VCR display, press
1. To start the recording, press DIRECT TV REC.
2. To pause during recording, press PAUSE ( ) .
3. To continue recording, press REC () .
4. To stop recording, press STOP ().
NOTES:
• A fully wired scart must be used for DIRECT TV RECORD operation.
• If DIRECT TV RECORD could not start, the TV should indicate the reason why.
(Refer to the TV operation manual).
TIMER ON/OFF before starting.
TIMER RECORDING
It is possible to program the VCR using three different methods :-
1. NexTView
2. Showview
3. Manually (DELAYED RECORDING)
HOW TO USE NexTView TO MAKE A RECORDING
• If appears on the VCR display, press TIMER ON/OFF before starting.
• Check that the clock is displaying the correct time.
Some broadcasts transmit an Electronic Program Guide (EPG) in which case, using the TV con-
trols, the program you wish to record can be selected and used to program the VCR automatically. This feature is compatible with NexTView TV’s. Refer to your TV operation manual for
further information. After transfer of the timer information to the VCR, the timer menu will be displayed for approximately 5 seconds, after which press
VCR in STANDBY mode.
will be shown on the display.
NOTES:
• The timer menu will not be displayed if this procedure is carried out while the VCR is in
STANDBY mode.
• VPS/PDC is a signal broadcast by some TV stations which adjusts the start and stop time
of your VCR recording. This ensures that if there is a change in broadcast time for your
programme the VCR will still record the whole programme. It is essential that the start
time as it appears in the TV listing is used to program the VCR, as this information is used
to identify the VPS/PDC signal corresponding to your programme.
• If flashes a video tape has not been inserted into the VCR.
• During recording, press STOP
ings to be made, the VCR will return to TIMER STANDBY.
( ) to cancel the recording. If there are further record-
GB-11
TIMER ON/OFF
once to place the
Page 19

BASIC OPERATION
HOW TO USE TO MAKE A RECORDING
• If appears on the VCR display, press TIMER ON/OFF before starting.
• Check that the clock is displaying the correct time.
SHOWVIEW allows you to program the VCR to
record up to eight programmes using the
SHOWVIEW numbers published in TV listings...
1. Press SV/V+/TIMER on the remote control
2. Enter the SHOWVIEW number from the TV
listing using the
NUMBER BUTTONS.
NOTE:
• An ERROR message will appear if you have entered a number that is not a current
SHOWVIEW number. If this happens press
and enter the correct SHOWVIEW number
Press [ / ] to select ONCE, WEEKLY, DAILY
3.
CLEAR to delete the numbers as required
4. If you want to make additional recordings at the same time each day or week, then use
[ / ] to select the WEEKLY, or DAILY option as appropriate.
5. Press SET to confirm..
NOTE:
• Check that the menu list agrees with the times shown in the TV listing. If it does not press
CLEAR to return to the SHOWVIEW menu, and re-enter the correct SHOWVIEW number
SHOWVIEW NO. -
→
ONCE WEEK L Y DA I L Y
The first time that you use SHOWVIEW to make a
recording on each channel Preset, (PR) may be
highlighted on the menu.
6. Enter the channel you wish to record using
the
NUMBER BUTTONS, for example if
you wish to record channel 2 press
VCR will remember this for the future.
0 2. The
DATE PR START STOP
21/06 02 12:00 13:00 SP*
--/-- -- -:-- -:-- ---
--/-- -- -:-- -:-- ---
--/-- -- -:-- -:-- ---
PR : ZDF
OP : SELECT MN :CHANGE
SET : ENTER MENU:EX I T
NOTES:
You may also access the SHOWVIEW menu by the following procedure:
i. Press MENU.
ii. The SHOWVIEW option will be highlighted. Press SET to confirm.
Continue from step 2 above.
GB-12
1/2
Page 20

BASIC OPERATION
HOW TO USE TO MAKE A RECORDING
7.
If your VCR has long play facility
to change the
the [ / ] to highlight SP. Press [ / ]
to select standard play (SP) or long play (LP)
as required.
RECORDING SPEED, use
8. [See NOTE below]. For VPS/PDC setting use
[ / ] to highlight the final column. Using
the [ / ] will select VPS/PDC ON or OFF
(
✱ = ON - = OFF).
9. Press SET to confirm the programme. The
SHOWVIEW menu will reappear. If you wish to
enter further SHOWVIEW recordings repeat
this procedure.
10. When you have completed entering timer
settings, press
from the TV screen.
MENU to remove the menu
11. Press TIMER ON/OFF once to place the VCR
in TIMER STAND-BY mode. will be shown on
the display.
and you wish
DATE PR START STOP
21/060212:0013:00SP*
--/-- -- -:-- -:-- ---
--/-- -- -:-- -:-- ---
--/-- -- -:-- -:-- ---
TAPE
SPEED :SP / L P
OP : SELECT MN :CHANGE
SET : ENTER MENU:EX I T
DATE PR START STOP
21/060212:0013:00SP-
--/-- -- -:-- -:-- ---
--/-- -- -:-- -:-- ---
--/-- -- -:-- -:-- ---
VPS/PDC ✱ :ON - :OFF
OP :SELECT MN : CHANGE
SET : ENTER MENU:EX I T
1/2
1/2
NOTES:
• VPS/PDC is a signal broadcast by some TV stations which adjusts the start and stop time
of your VCR recording. This ensures that if there is a change in broadcast time for your
programme the VCR will still record the whole programme. It is essential that the start
time as it appears in the TV listing is used to program the VCR, as this information is used
to identify the VPS/PDC signal corresponding to your programme.
• If flashes a video tape has not been inserted into the VCR.
• If the video tape is ejected when the VCR tries to record the record protection tab has
been removed.
• During recording, press
recordings to be made, the VCR will return to TIMER STAND-BY.
STOP ( ) to cancel the recording. If there are further
GB-13
Page 21

BASIC OPERATION
HOW TO SET A DELAYED RECORDING
You can make a maximum of eight delayed recordings up to a year in advance.
The example shown is for 24-hour clock operation. 12-hour clock operation can be selected
from the manual clock setting menu.
12-hour clock am/pm can be selected using the
• If appears on the VCR display, press
• Check that the clock is displaying the correct time.
SETTING A RECORDING
For example: Recording a programme on channel 3 from 21:05 to 22:30 on July 9th.
1. Press STOP ( ) to switch on the VCR.
2. Press MENU .
3. Press [ / ] to select TIMER. Press SET to
confirm.
4. The position which is initially highlighted is the
next available timer record entry. Press
confirm this.
• The display will automatically show today's
date.
Either:
If this is the date you wish to make the
recording on, press
Or:
enter the recording date using the
[ / ] or the
Enter two digits for the day, then two for the
month. For example for July 9th, press
then
0 7 (July).
SET to confirm this.
NUMBER BUTTONS.
5. Then press SET to confirm.
6. If you want to make additional recordings at
the same time each day or week, use
[ / ] or select D (daily) or W (weekly).
Then press
SET to confirm.
7. Enter the channel using the [ / ] or the
NUMBER BUTTONS. For example to
record a programme on channel 3, press 0 3.
Then press
SET to confirm.
AM/PM button on the remote control.
TIMER ON/OFF before starting.
MENU SCREEN
TIMER
MODE
SET to
0 9 (9th),
SET UP
MN : SELECT
SET : ENTER MENU:EX I T
DATE PR START STOP
21/060212:0013:00SP*
9/07 -- -:-- -:-- ---
--/-- -- -:-- -:-- ---
--/-- -- -:-- -:-- ---
DATE PR START STOP
21/060212:0013:00SP*
9/07D -- -:-- -:-- ---
--/-- -- -:-- -:-- ---
--/-- -- -:-- -:-- ---
1/2
1/2
GB-14
Page 22

BASIC OPERATION
HOW TO SET A DELAYED RECORDING
Enter the start time using the [ / ] or the
8.
NUMBER BUTTONS
(when entering less than 10 minutes add a '0'
before the number), for example for 21:05 start,
press
2 1 0 5
9.
Enter the stop time, for example for 22:30 stop,
press
2 2 3 0
If your VCR has long play facility
10.
change the
[ / ] to highlight SP. Press [ / ] to
select standard play (SP) or long play (LP) as
required.
[See note below]. For VPS/PDC setting use the
11.
[/]
[ / ] will select VPS/PDC ON or OFF
( * = ON - = OFF).
12.
• The MENU now shows all the timer settings you
13.
14.
SET
Press
have entered. If you wish to make additional
timer recordings, repeat this procedure.
When you have completed entering timer
settings, press
from the TV screen.
TIMER ON/OFF
Press
in TIMER STAND-BY mode. will be shown on
the display.
. Then press
.
RECORDING SPEED
to highlight the final column. Using the
to confirm.
MENU
hours first then minutes
to confirm.
SET
and you wish to
, use the
to remove the menu
once to place the VCR
DATE PR START STOP
21/060212:0013:00SP*
9/07D03 21:05 -:-- SP*
--/-- -- -:-- -:-- ---
--/-- -- -:-- -:-- ---
DATE PR START STOP
21/060212:0013:00SP*
9/07D03 21:05 22:30 LP*
--/-- -- -:-- -:-- ---
--/-- -- -:-- -:-- ---
DATE PR START STOP
21/060212:0013:00SP*
9/07D03 21:05 22:30 LP-
--/-- -- -:-- -:-- ---
--/-- -- -:-- -:-- ---
1/2
1/2
1/2
NOTES:
• VPS/PDC is a signal broadcast by some TV stations which adjusts the start and stop time
of your VCR recording. This ensures that if there is a change in broadcast time for your
programme the VCR will still record the whole programme. It is essential that the start
time as it appears in the TV listing is used to program the VCR, as this information is used
to identify the VPS/PDC signal corresponding to your programme.
• If flashes a video tape has not been inserted into the VCR.
• If the video tape is ejected when the VCR tries to record the record protection tab has
been removed.
( ) to cancel the recording. If there are further
• During recording, press
recordings to be made, the VCR will return to TIMER STAND-BY.
STOP
GB-15
Page 23

BASIC OPERATION
HOW TO SET A DELAYED RECORDING
CHECKING, CHANGING AND CANCELLING A RECORDING
CHECKING A RECORDING
1. If in TIMER POWERSAVE/TIMER STANDBY mode,
TIMER ON/OFF to exit.
press
2. Press STOP to switch on the VCR.
3. Press MENU.
4. Press [ / ] to select TIMER. Press SET to
confirm.
• All the delayed recordings in the VCR’s memory
will be shown.
• You can check the settings and change or
cancel them.
CHANGING A RECORDING
1. Follow steps 1 to 4 of CHECKING A
RECORDING.
2. If you wish to change a delayed recording,
press [ / ] to highlight the recording,
then press
SET.
3. Press [ / ] to highlight the setting to be
changed and correct it by using the[ / ]
NUMBER BUTTONS.
or the
4. When all corrections are complete press SET,
then press
CANCELLING A RECORDING
MENU.
1. Follow steps 1 to 4 of CHECKING A
RECORDING.
2. If you wish to cancel a delayed recording, press
[ / ] to highlight the recording to be
cancelled, then press
CLEAR.
3. Press MENU.
MENU SCREEN
TIMER
MODE
SET UP
MN : SELECT
SET : ENTER MENU:EX I T
DATE PR START STOP
21/060212:0013:00SP*
--/-- -- -:-- -:-- ---
--/-- -- -:-- -:-- ---
--/-- -- -:-- -:-- ---
DATE PR START STOP
21/060212:0013:00SP*
--/-- -- -:-- -:-- ---
--/-- -- -:-- -:-- ---
--/-- -- -:-- -:-- ---
1/2
1/2
NOTE:
• If there are some programmes to be recorded, do not forget to press TIMER ON/OFF
button to return the VCR to TIMER STAND-BY mode.
GB-16
Page 24

ADVANCED OPERATION
AUDIO AND YOUR VCR
HI-FI STEREO SOUND
Stereo sound is possible from this VCR if you have a stereo TV connected to the VCR with a
scart lead, or audio equipment connected with audio phono leads. The VCR is normally set
so that stereo sound is possible. The sound output from the VCR is controlled by the
AUDIO OUT button on the remote control. If you wish to change the sound output you can
use the
AUDIO OUT button as follows:
• Press
• Press
• Press
• Pressing
AUDIO OUT once. The LEFT audio channel will be sent to BOTH speakers. L will
appear on the VCR display.
AUDIO OUT twice. The RIGHT audio channel will be sent to BOTH speakers. R will
appear on the VCR display.
AUDIO OUT three times. The MONO track will be sent to BOTH speakers. L and R
will disappear from the VCR display.
AUDIO OUT a fourth time, normal Hi-Fi stereo sound will be heard. L and R will
appear on the VCR display.
NICAM/IGR Hi-Fi STEREO SOUND
Your VCR can receive and record programmes broadcast in NICAM or IGR sound (the factory
pre-set condition for NICAM is AUTO). NICAM or IGR sound may not be stereo, this depends
on the programme being received.
Audio is automatically recorded in two different ways:
(i) Hi-Fi: Using specialised rotary heads, two audio signals are recorded on to the tape. These
will be stereo, mono or bilingual depending on the sound being received.
(ii) Normal: A mono recording is also made on the conventional analogue audio track.
1. Press MENU to display the main menu on the
screen.
2. Press [ / ] to select MODE.
➝NICAM AUTO OF F
COLOUR AU TO PAL MESECAM
3. Press SET. NICAM will be selected.
4. Press [ / ] to select OFF.
5. Press SET, to return to the menu screen.
6. Press MENU, to exit to normal screen.
NOTES:
• If the tape being played back does not carry sound recorded on Hi-Fi tracks, L and R
will not appear on the display.
• lf the sound contains ‘crackling’ or ‘popping’ noises the sound quality may be
improved by adjusting the tracking using CHANNEL / .
• If the poor quality is for a long period the VCR will automatically select the mono track
and the sound will be in mono.
• Not all TV transmitters provide NICAM or IGR sound. In this case the VCR automatically
switches to receive the mono signal.
• NICAM sound may not be stereo.
GB-17
Page 25

ADVANCED OPERATION
AUDIO AND YOUR VCR
CONNECTING TO AUDIO EQUIPMENT
The diagram below shows how to connect your VCR to audio equipment. When connected
in this way stereo sound is possible from the speakers.
EXISTING AERIAL
BACK OF
TELEVISION
RF CONNECTION CABLE
CABLE
AUDIO OUT
L and R
AUDIO PHONO LEADS
(NOT SUPPLIED)
LINE2(II) IN
/DECODER
CANAL PLUS
/L2(II)
LINE1(I)IN
/OUT
SON/VIDEO
(L1/I)
+
AMPLIFIER
AERIAL IN
RF-OUT
GB-18
Page 26

ADVANCED OPERATION
PLAYBACK OF A VIDEO TAPE
CHECKING THE AMOUNT OF TAPE REMAINING
When you load a video tape into the VCR it can calculate approximately the amount of
video tape remaining in hours and minutes. This is useful in determining whether or not there is
sufficient tape left to make a recording.
When a video tape is playing, the amount of tape remaining is calculated for you
automatically.
To display the amount of video tape remaining:
1. Load the video tape into the VCR
2. Press DISPLAY on the remote control as many times as necessary until “R” appears on
the VCR display. The tape will wind forward and then return to its original position. The
tape remaining will be shown on the VCR display in hours and minutes.
For example, if 1 hour 23 minutes is left on the tape:
NOTES:
• Do not interrupt the tape remaining calculation.
• If less than 5 minutes of tape remains the display will flash.
PLAYING BACK A VIDEO TAPE REPEATEDLY
You can set your VCR to automatically rewind at the end of playing a video tape and replay
the entire tape again. REPEAT will appear on the on-screen display when selected.
To use this feature:
1. Press MENU to display the main menu on the
screen.
2. Press [ / ] to select MODE.
3. Press SET.
4. Press [ / ] to select REPEAT.
5. Press [ / ] to select ON.
6. Press SET.
7. Press MENU to return to normal screen.
GB-19
MODE MENU SCREEN
BLUE MUTE AU TO OF F
➝REPEAT ON OFF
16:9 AUTO OFF
MN : SELECT OP :CHANGE
S E T : E NT E R M EN U : E X I T
Page 27

ADVANCED OPERATION
PLAYBACK OF A VIDEO TAPE
PLAYING BACK AN S-VHS TAPE
S-VHS (super -VHS) pre-recorded tapes give you a better quality playback picture with
increased detail and depth.
Your VCR will automatically recognise which type of tape is being used, VHS or S-VHS and
playback the appropriate standard accordingly.
NOTE:
• All of the VCR’s playback functions can be used during S-VHS playback, SLOW, PLAY/
X2, VISUAL SEARCH, etc.
• Your VCR is S-VHS playback only, it will not record S-VHS.
• Some picture noise may be observed on the screen in Long Play (LP) mode.
PLAYING BACK AN NTSC TAPE
NTSC (National Television Standards Committee) is a different TV standard to PAL and is used
in some Non-European Countries. Your VCR can playback pre-recorded NTSC tapes onto a
PAL system TV, but cannot record an NTSC signal onto a video tape.
Note that..
• You cannot record NTSC signals or dub NTSC tapes onto other VCR’s from this VCR.
• You cannot use Slow speed, Still frame, Double Speed, Frame Advance or Tape
Remaining with a pre-recorded NTSC tape.
• On some televisions, the picture may appear in black and white or there may be no
picture. This does not indicate a fault with your VCR.
• On some televisions, the picture may shrink vertically causing black bands to appear at
the top and bottom of your screen.
• On some televisions, the played-back picture may roll vertically, this does not indicate a
fault with your VCR.
GB-20
Page 28

ADVANCED OPERATION
DIGITAL DISPLAY
TIME OF DAY
Shows current time of day, if the clock is set.
Press
DISPLAY until the time of day appears. For
example, 21:20 appears:
OPERATION MODE
Shows status of tape. Press DISPLAY until the display
appears, for example:
TAPE COUNTER AND ZERO BACK
Tape counter measures the current position of the video tape in real time. ZERO BACK uses the
tape counter to determine a specific point on a tape you may wish to return to.
PRCH
PRCH
1. Press DISPLAY until tape counter appears, for
example:
2. To identify the current position on a video tape
press
CLEAR and the tape counter will appear:
When you wish to return to this position on the video tape, press
rewind/advance to this point.
ZERO BACK. The tape will
NOTE:
• The tape counter will only operate on recorded sections of tape.
PRCH
PRCH
GB-21
Page 29

ADVANCED OPERATION
BLUE MUTE
The TV screen will be blue if a TV channel with no signal is selected, an unrecorded section of
tape is played or the quality of the recording on the tape is poor. Select OFF to disable this
feature.
1. Press MENU to display the main menu on the
screen.
2. Press [ / ] to select MODE.
3. Press SET.
MODE MENU SCREEN
NICAM AUTO OFF
COLOUR AU TO PAL MESECAM
BLUE MUTE AU TO OFF
REPEAT ON OF F
16:9 AUTO OF F
4. Press [ / ] to select BLUE MUTE.
5. Press [ / ] to select OFF.
6. Press SET and then MENU to return to the
normal screen.
COLOUR
If the VCR is playing poor quality recording, the picture may turn black and white. Selecting
PAL/MESECAM may improve this (depending on the recording), although coloured speckles
may appear on black and white recordings.
1. Follow steps 1 to 3 from BLUE MUTE.
2. Press [ / ] to select COLOUR.
3. Press [ / ] to select AUTO/PAL or MESECAM
4. Press SET and then MENU to return to the normal screen.
16:9 PLAYBACK AND RECORDING
This feature allows the PLAYBACK and RECORDING of wide screen format signals (16.9) which
should automatically change the picture size setting on a wide screen TV. To allow the
operation of this feature, ensure 16:9 mode is set to AUTO in the MODE menu.
A scart connection must be used between the VCR (SOCKET L1) and the TV.
During PLAYBACK of a 16:9 encoded tape the TV should switch to (Widescreen) 16:9 mode.
1. Follow steps 1 to 3 from BLUE MUTE.
2. Press [ / ] to select 16:9.
3. Press [ / ] to select AUTO/PAL or MESECAM
4. Press SET and then MENU to return to the normal screen.
GB-22
Page 30

ADVANCED OPERATION
SEARCHING THE VIDEO TAPE
SKIP SEARCHING THE VIDEO TAPE
You can search the tape in 30 second time intervals. To do this follow the procedure below:
1. Press PLAY/X2 ( ) to start the video tape
playing.
2. Press SKIP SEARCH on the remote control.
The number of times you press
determines the forward search time.
• After searching, normal playback
will resume automatically
SKIP SEARCH
1 press = 30 seconds.
2 presses = 1 minute.
3 presses = 1 minute 30 seconds.
4 presses = 2 minutes.
DIGITAL PROGRAMME SEARCH SYSTEM (DPSS)
Your VCR records a marker signal on the tape at the start of each recording. These signals can
be used later to locate the starting point of a recording.
DPSS to locate a previous programme or the next programme.
Press
For example,
/
1. Load the video tape into the VCR.
2. Press DPSS three times. DPSS 3 will appear on the on-screen display, and the VCR
will fast forward to locate the third recording after the current one.
3. Press DPSS once. DPSS -1 will appear on the on-screen display and the VCR will
rewind to locate the beginning of the current recording.
DPSS Signals
RECORDING 1
RECORDING 2
RECORDING 3
RECORDING 4
Fast ForwardRewind
RECORDING 5
DPSS
Number
-1
Current tape position
+1
+2
+3
4. To cancel the search before it has finished, press STOP ( ) or PLAY/X2 ( ) .
NOTES:
• Recordings must be longer than 3 minutes..
• The starting point of playback may vary.
• This feature will only work with video tapes recorded on a VCR with the DPSS feature.
GB-23
Page 31

ADVANCED OPERATION
REMOTE CONTROL OPERATION OF TV
In addition to operating the VCR the remote control will also operate basic functions on TVs,
including brands other than SHARP.
SETTING UP THE VCR REMOTE
CONTROL TO OPERATE THE TV
Switch on the TV. Open the door on the
1.
remote control and point the unit at the TV.
2.
Press the TV button on the VCR remote
control to place the VCR into TV mode,
then, hold down the
button and the appropriate button for the
TV from the list shown for 2 seconds. For
example, for a SHARP TV press
STANDBY
3.
The TV will enter standby mode to confirm
the correct code has been entered.
To turn the TV on from standby mode hold
4.
and
STANDBY
STANDBY
.
1
1
and
for about 2 seconds.
CONTROLLING THE TV WITH THE VCR REMOTE CONTROL
STANDBY
•
•
TV INPUT SELECT
•
•
• Certain models of TV do not use standard codes for their brand. In this case place the
• SHARP cannot guarantee the VCR remote control will operate your TV.
TV CH
TV VOL
remote control into TV mode by pressing the TV button then hold down
then press each of the buttons in the list until the TV enters stand-by mode (You will need
to reset when remote control batteries are replaced).
Switches the TV to and from Standby Mode. (When the remote is
/
/ Increases or decreases the volume.
+
in TV mode).
Determines which input to the TV is to be displayed on the
screen.(When the remote is in TV mode).
Changes the TV channels. (When the remote is in TV mode).
TV BRAND BUTTON TV BRAND BUTTON
SHARP 1 TOSHIBA 9
PHILIPS 2 PANASONIC 0 or
THOMSON 3 or 4 HITACHI INPUT SELECT
GRUNDIG 5 SANYO MODE OSD
FERGUSON 6 JVC DISPLAY
ITT NOKIA 7 MITSUBISHI AUDIO OUT
SONY 8
STANDBY
,
GB-24
Page 32

ADVANCED OPERATION
INPUT SELECT
CHANNEL
REW FF
PLAY / X2
7809
AM/PM
RECORDING FROM OTHER EQUIPMENT
You can record video and audio signals from various sources, for example a camcorder, onto
a video tape using your VCR.
For example, recording from a camcorder connected to LINE 2 IN/DECODER on your VCR:
Optional Scart connection (not supplied)
ANTENNA IN
ENTREE ANTENNE
RF OUT
SORTIE ANTENNE
Input Select
➘
Mono/Stereo Camcorder
Load tape into the VCR.
1.
2.
Press
INPUT SELECT
until the VCR display shows
on the remote control
.
L2
LINE2(II) IN
/DECODER
CANAL PLUS
/L2(II)
LINE1(I)IN
/OUT
SON/VIDEO
(L1/I)
If you wish to record from a source connected to
3.
LINE 1 IN/OUT, select
If you wish to record from a source connected
4.
L1
.
with audio phono leads to the sockets on the
front of the VCR (if fitted), select
REC
5.
Press
to start the recording.
L3
.
LINE1(I)IN
/OUT
SON/VIDEO
(L1/I)
VIDEO
LINE IN 3
L - AUDIO - R
NOTE:
• There are many different ways of connecting external equipment to your VCR. Please
refer to your equipment operation manuals for further information.
GB-25
Page 33

ADVANCED OPERATION
DECODER SWITCHING OPERATION
If you connect a separate decoder to the VCR connected to L2 as previously shown, you will
need to set the decoder function to ON in order to record the descrambled signal and/or
watch it on your TV. Now, when the VCR receives a scrambled signal it is output via LINE 2
terminal to the decoder. The decoder then outputs the descrambled signal back to LINE 2
terminal and the signal can be recorded. The VCR outputs the descrambled signal to your TV
through the LINE1 terminal and you can watch the descrambled picture.
When making recordings using a separate decoder connected as shown remember to leave
the decoder function ON.
If you connect a decoder unit to the VCR, the decoder unit provides a switching signal which
will automatically allow your TV to display the descrambled signal routed through the VCR. To
use this feature make sure that the VCR is connected to both TV and decoder unit by SCART
leads. Then:
• Press
• Press
If you switch the decoder function ON when connected to a decoder unit as shown you will
NOT be able to watch the descrambled picture in TV mode or in VCR mode.
STANDBY
[TV/VCR]
appear on the display.
to place the VCR in STAND-BY mode. OR
on the remote control to place the VCR in ‘VCR mode’. ‘VCR’ will
GB-26
Page 34

SPECIAL FEATURES ON YOUR VCR
POWERSAVE FEATURE
To meet new power regulations your VCR can be placed in
POWERSAVE mode. In POWERSAVE mode the VCR power
consumption is reduced to below 1.5 Watt.
POWERSAVE MODE
1.
Press
STAND BY
Press
2.
STAND BY
mode. The VCR digital display will appear blank.
The VCR power consumption will now be below 1.5 Watt.
DISENGAGING POWERSAVE MODE
Either
Press
STAND BY
( ) to place the VCR in STANDBY mode.
( ) again to place the VCR in POWERSAVE
( ) to return the VCR to STANDBY mode.
Or
Press
STOP
( ) to use the VCR.
NOTES:
• With poor signal conditions an increase in noise may be observed on the screen in
POWERSAVE mode.
• When entering STANDBY, noise may be observed.
• If a signal is input from an AV source, the VCR may not go into true POWERSAVE mode.
• When disengaging POWERSAVE mode from the VCR press the Standby button.
GB-27
Page 35

CHILD LOCK
You can lock your VCR with this feature. It will work even when the VCR
is in standby, preventing children from operating the VCR.
TO ENGAGE CHILD LOCK
Press and hold on the remote control for about 2 seconds.
flashes and then remains lit on the VCR display confirming
that CHILD LOCK
has been activated.
Regardless of what other operating buttons are touched, the VCR will
continue to operate in its present mode. If CHILD LOCK is
activated during playback, once the tape reaches its end,
the VCR will automatically rewind the tape, eject it, and turn
the power off.
TO DISENGAGE CHILD LOCK
Press and hold for about 2 seconds.
starts flashing and then disappears. CHILD LOCK is disengaged.
NOTES:
• If you attempt to change modes by pressing another button while CHILD LOCK is on,
the indicator will flash on the VCR display.
• If power is interrupted for more than 60 seconds (due to power failure etc), CHILD LOCK
may disengage.
GB-28
Page 36

CUSTOMISED INSTALLATION
MANUALLY TUNING A CHANNEL
It should not be necessary to tune in a broadcast channel manually except in unusual
circumstances such as poor signal.
To manually tune in a channel follow the procedure below.
1. Press MENU.
2. Press [ / ] to select SET UP. Press
SET to confirm.
3. CHANNEL PRESET will be
highlighted. Press
SET.
4. Press [ / ] to select CHANNEL.
5. Press [ / ] to start tuning in either
direction. Tuning will stop when a channel
is received. If it is not the desired channel,
press [ / ] to continue tuning.
6. Press [ / ] to select FINE
TUNING. Press and hold [ / ] until
the sharpest colour picture is obtained.
IMPORTANT NOTE:
7. If you connect an independent
decoder, you must press [ / ] to
select DECODER, then select [ / ] to
turn the decoder function ON.
➔
CHANNEL PRESET
CHANNEL SORT
CLOCK
LANGUAG E
PRESET 1
CHANNEL CH2 1
FINE TUNING
DECODER ON OFF
SKIP ON OFF
▲
▲
8. Press [ / ] to select SKIP.
The SKIP function determines whether the
channel can be selected when using the
CHANNEL / instead of the
NUMBER BUTTONS.
9. Press [ / ] to select ON or OFF for
this option.
10. Press SET to confirm.
11. Press MENU to leave this function.
GB-29
Page 37

CUSTOMISED INSTALLATION
BROADCAST AND CATV CHANNELS
V
H
F
U
H
F
Station
Signals
2/A
3/B
4
5/D
6/E
7/F
8
9/G
10/H
11/H1
12/H2
S11
21
22
:
:
68
69
Real
Channel
Numbers
CH:02
CH:03
CH:04
CH:05
CH:06
CH:07
CH:08
CH:09
CH:10
CH:11
CH:12
CH:13
CH:21
CH:22
:
:
CH:68
CH:69
C
A
T
V
Station
Signals
S01/S21
S02/S22
C /S03/
S23
S24
S25
S1
S5
M1/S1
M2/S2
:
M10/S10
U1/S11
:
U10/S20
S21
:
S40
S41
Real
Channel
Numbers
CH:75
CH:76
CH:77
CH:78
CH:79
CH:80
CH:85
CC:01
CC:02
:
CC:10
CC:11
:
CC:20
CC:21
:
CC:40
CC:41
● Available in Italy ▲ Available in Switzerland
NOTE:
• The VCR has 84 programmable channel positions each of which can be set to any of
the broadcast and CATV channels shown in the table.
GB-30
Page 38

CUSTOMISED INSTALLATION
MANUALLY SORTING CHANNELS
SORTING THE CHANNELS INTO YOUR PREFERRED ORDER
When your VCR tunes in broadcast channels automatically it sorts them into a standard order
using teletext information. You can change the order of the channels with the following
procedure.
1. Press MENU.
2. Press [ / ] to select SET UP. Press SET to
confirm.
3. Press [ / ] to select CHANNEL SORT. Press
SET to confirm.
4. The MOVE position will be highlighted. Press
SET to confirm.
5. Press [ / / / ] to highlight the
channel to be moved. Press
SET to confirm.
6. Press [ / / / ] to highlight the new
position for the channel. Press
SET to confirm.
7. If any more channels are to be moved, repeat
procedure from step 5.
8. When all the channels are in your preferred
order, press
function.
MENU to leave the MENU
MENU SCREEN2.
MODE
SET UP
5.
1ARD1 7 13
2ZDF 8 14
3RTL1 9 15
4RTL2 10 16
5NDR 3 11 17
61218
MOVE 1/5
6.
1NDR 3 713
2ARD 1 8 14
3ZDF 9 1 5
4RTL1 10 16
5RTL2 11 17
61218
MOVE 1/5
GB-31
Page 39

CUSTOMISED INSTALLATION
MANUALLY SORTING CHANNELS
DELETING CHANNELS
If there is a channel you wish to delete from the VCR memory you can follow the procedure
below.
1. Press MENU.
2. Press [ / ] to select SET UP. Press SET to
confirm.
3. Press [ / ] to select CHANNEL SORT. Press
SET to confirm.
4. Press [ / ] to select CANCEL. Press SET to
confirm.
5. Press [ / / / ] to highlight the
channel to be cancelled.
6. Press SET twice to cancel the channel.
7. When all the channels you wish have been
cancelled, press
MENU.
MENU SCREEN2.
TIMER
MODE
SET UP
5.
1ARD1 7 13
2ZDF 8 14
3NDR 3 9 15
4RTL1 10 16
5RTL2 11 17
6CH5 12 18
CANCE L 1 / 5
6.
1ARD1 7 13
2ZDF 8 14
3RTL1 9 15
4RTL2 10 16
5CH5 11 17
6 12 18
CANCE L 1 / 5
GB-32
Page 40

CUSTOMISED INSTALLATION
MANUALLY SORTING CHANNELS
RE-NAMING CHANNELS
When your VCR tunes in broadcast channels automatically, it names them using teletext
information. You can change the name of a channel with the following procedure.
1.
2.
3.
4.
5.
6.
7.
8.
MENU
Press
Press [ / ] to select SET UP.
Press
SET
Press [ / ] to select CHANNEL SORT.
Press
SET
Press [ / ] to highlight NAME.
Press
SET
Press [ / / / ] to highlight the
channel to be named.
Press
Press [ / / / ) to rename the
channel.
Press
SET
If any more channels are to be renamed,
repeat procedure from step 5.
When all the channels are named correctly,
press
to confirm.
to confirm.
to confirm.
SET
to confirm.
to confirm.
MENU
.
to leave the MENU function.
MODE
SET UP
MENU SCREEN2.
:
5.
1ARD1 7
2ZDF 8
3RTL1 9
4RT L2 10
5CH5 11
6CH6 12
:
6.
1ARD1 7
2ZDF 8
3RTL1 9
4CH 4 10
5CH5 11
6CH6 12
NAME 1/5
NAME 1/5
GB-33
Page 41

CUSTOMISED INSTALLATION
CHANGING THE ON-SCREEN DISPLAY LANGUAGE
Changing the language used by the on-screen display will not change the operation of the
VCR or make it suitable for any other broadcast standard.
1.
2.
3.
4.
5.
MENU
Press
Press [ / ] to select SET UP. If the display is
not in a language you can understand, this is
the fourth option from the top. Press
confirm.
Press [ / ] to select LANGUAGE (the last
option).
Then press
Press [ / / / ] to select your language.
Then press
.
SET
SET
.
to confirm.
SET
to
LA NGUAG E
ENGL I SH SVENSKA
DEUTSCH NEDERLANDS
FRANÇA I S DANSK
I TAL I ANO NORSK
ESPAÑOL SUOMI
MANUALLY SETTING THE CLOCK
The clock will normally be set using teletext information when your VCR automatically tunes in
the broadcast channels. If for any reason teletext signals are not present your VCR will not be
able to set the clock. This procedure will allow you to set the clock manually.
1.
2.
3.
4.
5.
6.
7.
MENU
Press
Press
Press [ / ] to select CLOCK. Press
confirm.
Press [ / ] to select either 12 or 24 hour
clock.
Press [ / ] to select TIME. Enter the time
using the
[ / ]. If the minutes are less than 10, enter
the leading 0. If using the 12 hour clock enter
AM or PM by pressing on the remote
control.
Press [ / ] to select DATE. Enter the date
using the
[ / ]. For example, for 1st April enter
01 04
Press [ / ] to select YEAR. Enter the last two
digits of the year using the
BUTTONS
2000 enter 00. For the year 2001 enter 01.
Select * for
OFF
). Then press
. Press [ / ] to select SET UP.
to confirm.
SET
NUMBER BUTTONS
NUMBER BUTTONS
.
NUMBER
or [ / ]. For example, for
AUTO CLOCK
SET
on/off (*
to confirm.
SET
or
or
is ON, - is
to
CLOCK
MODE T I ME DAT E Y EAR
24H 0:00 1/04 00 *
MODE : 2 4H / 1 2H
OP : SELECT MN :CHANGE
SET : ENTER MENU:EX I T
NOTE:
AUTO CLOCK
• If
daylight saving.
is set to
OFF
(- is
OFF
) then you will need to update the clock for
GB-34
Page 42

MORE INFORMATION ABOUT YOUR VCR
VCR DIGITAL DISPLAY
1. AUDIO OUTPUT indicators.
2. TIMER indicator.
3. PLAY indicator.
4. RECORDING indicator.
5. STOP indicator.
6. VCR TAPE indicator.
7. PRESET indicator.
8. VCR mode indicator.
9. VIDEO PROGRAMMING
SYSTEM/PROGRAMME
DELIVERY CONTROL indicator.
10. DECODER indicator.
11. LONG PLAY indicator.
12. STANDARD PLAY indicator.
13. CHILD LOCK indicator.
14. AM/PM indicators.
NOTE:
• Some models do not have all the features shown, therefore, they will not appear on the
display.
SELECTING THE OUTPUT FROM THE VCR
If your VCR is connected to your TV with a scart lead, when you start to play a video tape the
VCR will automatically switch its output so that the playback picture is shown on the TV. In this
case ‘VCR’ will appear on the VCR display.
You can manually override this by pressing
broadcast channel will be seen on the TV screen and ‘VCR’ will disappear from the VCR
display.
• Pressing
[TV/VCR] again will return the TV picture to the playback picture.
[TV/VCR] on the remote control. Now the TV
GB-35
Page 43

MORE INFORMATION ABOUT YOUR VCR
ON-SCREEN DISPLAY
All the information you need on the VCR status will be summarised on the on-screen display.
If you are recording, playing back a tape or watching a broadcast on the video channel you
can call up three standard on-screen displays. The display can be selected by pressing the
MODE OSD button on the remote control, 1,2,3 or 4 times.
1. AUTO, the current mode and channel
number will be displayed for 3 seconds when an
operation or number button is pressed.
2. FULL., all the active features will also be shown
on screen.
These
depend on
model
features
Programme number and channel
Tape Status
NICAM signal
Audio output mode
Tape speed
Tape remaining
Time
Date
Tape counter
3. COUNTER, this display will show the tape
counter and amount of tape remaining.
4. DISPLAY OFF, this will remove the display
from the screen.
1.
■ 1CH59
SP L R
NICAM
ST EREO
2.
■ 1CH59
SUPER P . ON N I CAM
SP L R
22:00 REM1:05
9/07 00 0:00.00
ST EREO
3.
REM 1:05
0:00.00
NOTES:
• The default time and date will not be displayed if the clock has not been set.
• The VCR will return to display
• If you are recording from this VCR to another, make sure you remove the display from
the screen otherwise it will be recorded.
1. each time it is switched on.
GB-36
Page 44

MORE INFORMATION ABOUT YOUR VCR
SPECIFICATIONS
Format: VHS PAL standard
Number of heads: 6
Video signal system: PAL/MESECAM colour or monochrome signal:
625 lines
Hi-Fi audio recording
system:
Maximum playing time: 240 min. with E-240 video cassette in Standard
Tape width: 12.7 mm
Tape speed: 23.39 mm/s Standard Play (SP):
Antenna: 75 Ω unbalanced
Reception channels: VHF channel 2-12 + S1-S41, UHF channel 21-69
RF output signal: UHF channel 21-69
Power requirement: AC 230V, 50 Hz
Power consumption: 19 W approx. (POWERSAVE ≤ 1.5 W)
Operating temperature: 5 ˚C to 40 ˚C
Storage temperature: -20 ˚C to 55 ˚C
Video input: 1.0 Vp-p, 75 Ω
Video output: 1.0 Vp-p, 75 Ω
Audio input: Line1&2: -3.8 dBs, 10 kΩ Line 3: -3.8 dBs, 47 kΩ
Audio output: Line1&2: -3.8 dBs, 1 kΩ Audio Out: -3.8 dBs, 1 kΩ
Hi-Fi audio: Dynamic range:~ 90 dBs typ. (SP);
Dimensions: 430(W) x 300(D) x 91.5(H) mm
Weight: 4.3 kg (approx.)
Supplied accessories: 75 Ω RF Connection cable, operation manual,
Deep layer recording system conforming to
stereo Hi-Fi VHS standard.
Play (SP) mode.
480 min. with E-240 video cassette in Long Play
(LP) mode
11.70 mm/s Long Play (LP)
Frequency response: 20 Hz - 20 kHz;
Wow and flutter: < 0.005% Wrm (JIS A)
remote control, AA/R6/UM3 battery (x2)
• Specifications are subject to change without notice as part of our policy of continuous
improvement.
• No liability is accepted for any inaccuracies or omissions in this publication, although
every possible care has been taken to make it complete and as accurate as possible.
GB-37
Page 45

TROUBLESHOOTING
TROUBLESHOOTING
AREA PROBLEM POSSIBLE CAUSE/CURE
INITIAL
INSTALLATION
INSTALLATION
POWER
When the VCR is first
plugged in the VCR
display appears
blank. When the
STANDBY ()
button is pressed the
display still appears
blank.
TV will not tune in to
the VCR.
Auto Installation
screen does not
appear when the
VCR is switched on
OR Auto Installation is
not complete.
Display is not working. • Make sure the VCR is not in POWERSAVE
VCR will not operate -
appears in VCR
display.
• The Video may be in POWERSAVE mode.
Press the
VCR on then press and hold the
STOP ( ) button to switch the
CHANNEL buttons together on the
front of the VCR for 10 seconds.
Now continue from step 1 of TUNING THE TV
INTO THE VCR.
• Check all the cables are correctly
connected.
• Check your TV manual for correct tuning of
your TV.
• Reset the VCR and complete AUTO
INSTALLATION again. (Refer to VCR Reset.)
mode.
• Make sure the power cord is plugged in.
• Make sure the wall socket has power (plug
another appliance in).
• Press the
disengage timer.
TIMER ON/OFF button to
MENU and
PLAYBACK
RECORDING
VCR will not respond
to any commands.
No picture appears. • Make sure the TV is set to the video channel.
Playback picture is
snowy.
Playback recording
does not playback in
stereo.
Tape is automatically
ejected when
pressing
REC ( ) or
• Check CHILD LOCK is not engaged.
• Safety device operating: unplug VCR for 2
hours.
• Check all connecting cables.
• Adjust the tracking using
/ buttons.
• Try another tape.
• The video heads may have been
contaminated - refer to a SHARP Service
Facility.
• Ensure the VCR is connected to a stereo TV
and SCART lead.
• Programme may not carry stereo.
• The record-protection tab has been
removed.
CHANNEL
TIMER
ON/OFF buttons.
SHOWVIEW does not
record desired
programme.
• Broadcast does not carry VPS/PDC signal
which alters recording time.
• Check VPS/PDC mode is switched to ON.
• Ensure date and time are correctly set on the
VCR.
GB-38
Page 46

TROUBLESHOOTING
TROUBLESHOOTING
AREA PROBLEM POSSIBLE CAUSE/CURE
TAPE
TRANSPORT/
MECHANISM
Tape can not be
loaded.
• Make sure there is no other tape in the VCR.
• Make sure you are loading the tape
correctly.
REMOTE
CONTROL
OTHER
PROBLEMS
Rewind is not
possible.
The VCR can not be
operated by remote
control
Picture does not
change even though
• Make sure the tape is not at the start.
• Remote control is too far away from the main
unit.
• Point the remote control at the VCR.
• Batteries are flat - replace both.
• Batteries have not been inserted correctly.
• VCR is positioned in strong light.
• Make sure the VCR is not in Timer or Menu
mode.
CHANNEL
/ buttons
are pressed.
Desired channel
position can not be
selected.
No colour or poor TV
picture on normal
viewing.
Not possible to view
picture or playback
through RF OUT.
Desired channel has
interference.
No picture appears. • Make sure the TV is on the video channel.
• The channel position has been set to be
skipped. Cancel the SKIP mode for that
channel.
• Make sure all the cables are connected
properly.
• Make sure the VCR power cord is properly
plugged in.
• Make sure the RF OUTPUT has not been
switched off. (Refer to note on RF THROUGH
ON/OFF in the TUNING THE TV TO THE VCR
section of the manual.)
• Possible weak signal strength, the same
channel with a better signal strength may
have been tuned in on another VCR preset
channel. Example;
VCR preset 1 = ZDF and
VCR preset 14 = ZDF
(Refer to Manually Sorting Channels section
to move the channel to your desired
position.)
• TV aerial may need adjusting.
• Check all connecting cables.
GB-39
 Loading...