

Page 1

Introduction
b
Symbols
Thank you for purchasing the V201SH.
For proper handset use, read this manual beforehand.
^
^
Keep this manual in a convenient place for reference.
^
V201SH is compatible with Vodafone Prepaid Service.
Web-related functions are not available. For details,
see Vodafone Prepaid Service Guidebook.
V201SH transmits at 1.5 GHz and is compatible with
the Vodafone K.K. network. This product is exclusively
for use in Japan.
Note
^Copying this manual in whole or part without
authorization is prohibited.
Manual content is subject to change without prior notice.
^
^Efforts have been made to ensure the accuracy and
clarity of this manual. Please contact Customer
Service, General Information (see P.15-25)
concerning unclear or missing information.
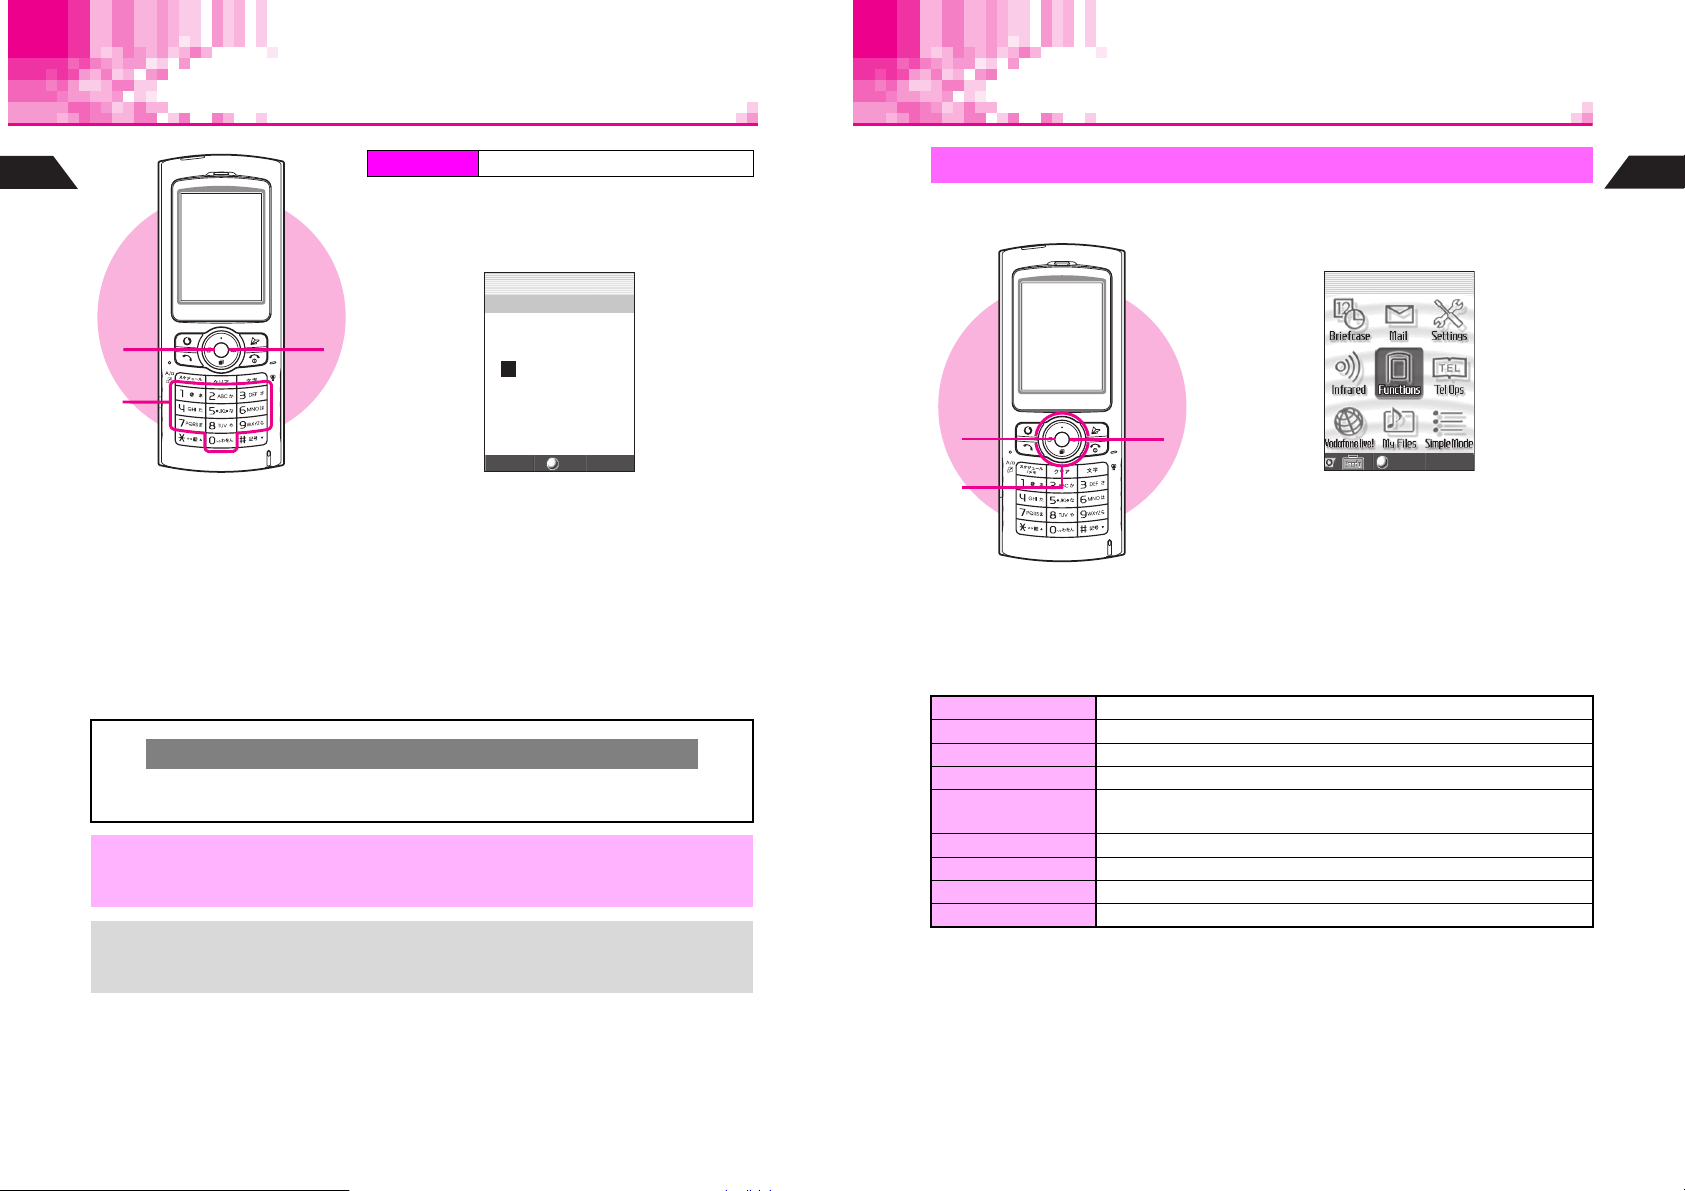
Multi Selector
Use Multi Selector to select menu items, move cursor, scroll, etc.
In this manual, Multi Selector operations
are indicated as shown to the right.
Basic Multi Selector Operations
B E: Press C or D
B F: Press B or A
B G: Press C, D, B or A
^ In this manual, most operations start with handset in Standby.
,
^ Sample screen shots, etc. are provided for reference only. Actual handset windows,
menus, etc. may differ in appearance.
C
B
A
D
i
Page 2
Abbreviated Steps
Handset operations starting from Index Menu are abbreviated as follows:
Press e to open Handy Features menu
Press b
Index Menu H Menu Item A Handy (e) A Selection A Operation A Menu (A)
Select the folder or file and press b
Select the menu item and press b
Perform the operation such as opening a window
Press the corresponding key in parentheses
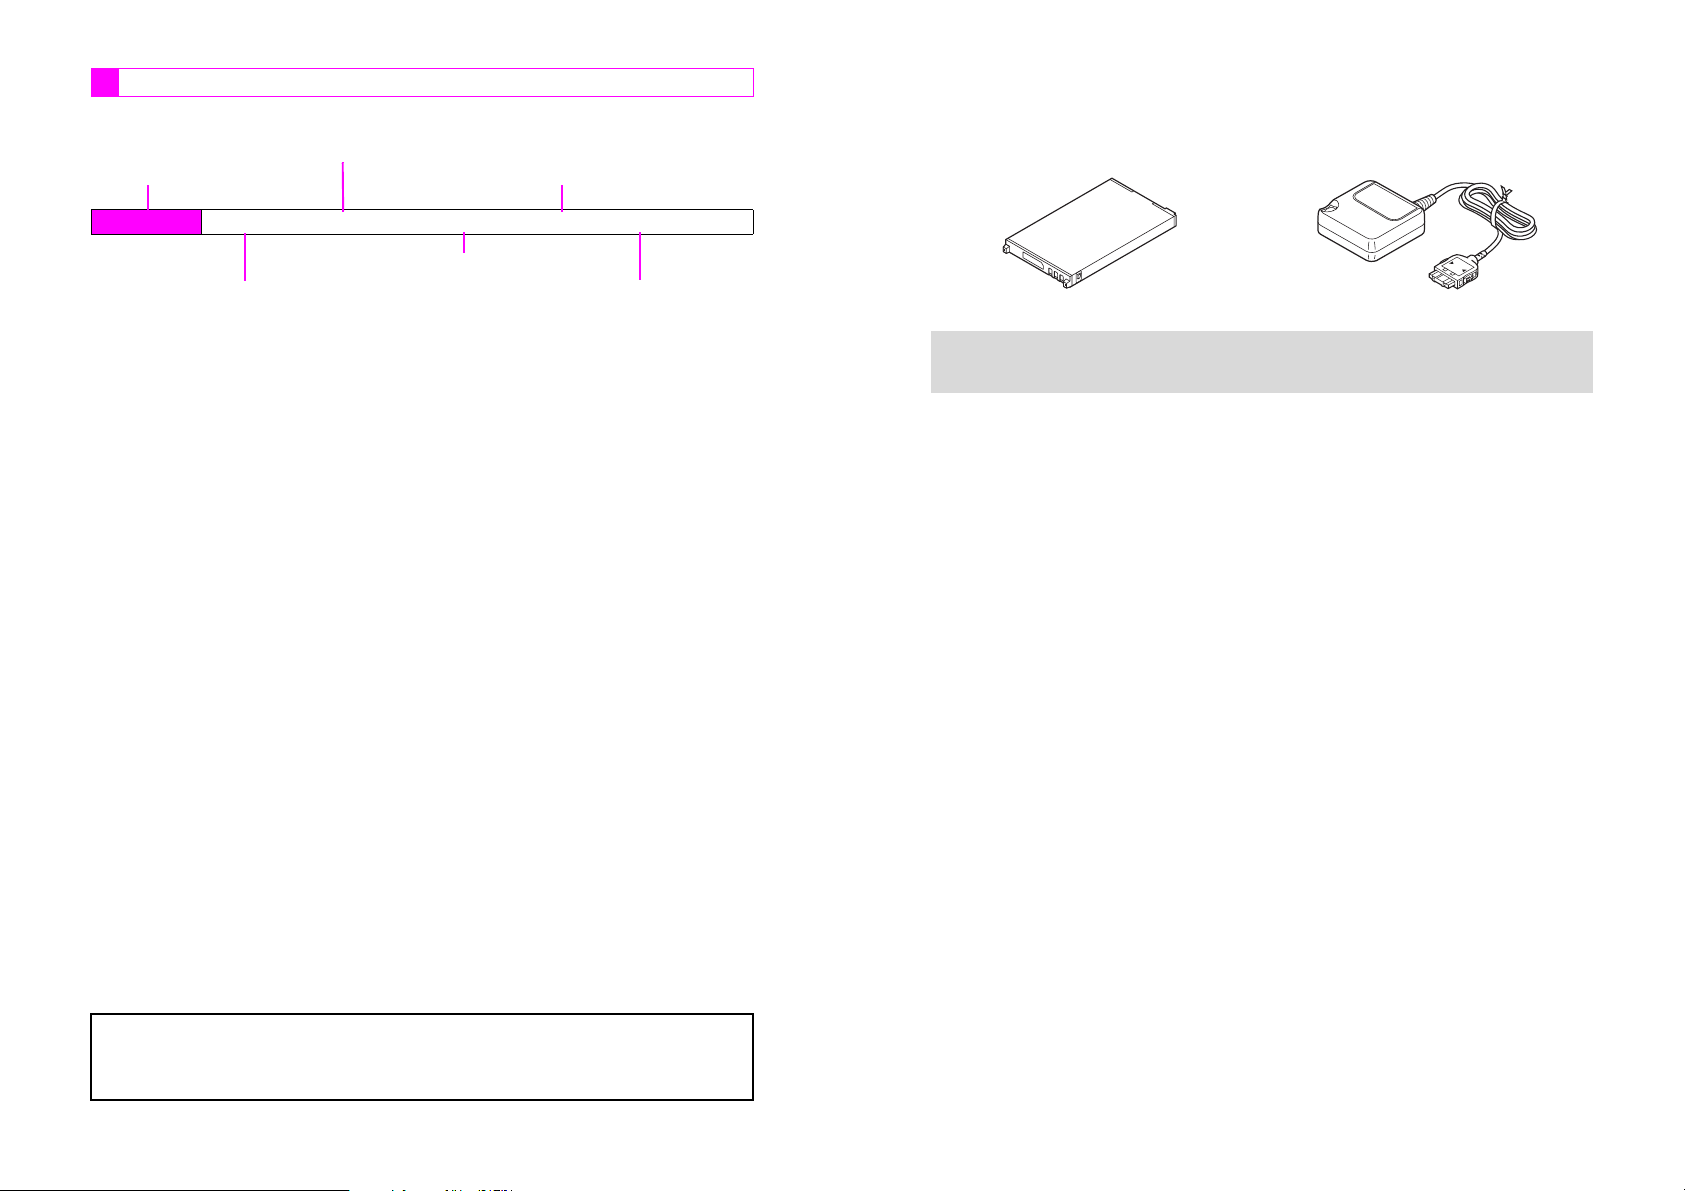
Accessories
CBattery (SHBAM1)
(Type 1 lithium-ion battery)
Above accessories may also be purchased separately.
For accessory-related information, please contact Vodafone Customer Center,
+
General Information (see P.15-25).
CRapid Charger (SHCQ01)
^ Vodafone and Vodafone live! are trademarks or registered trademarks of Vodafone
Group Plc.
^ Sha-mail, Action Item, Station and Sky Mail are trademarks or registered trademarks of
Vodafone K.K.
ii
iii
Page 3

Contents
Symbols....................................................................................................................... i
Accessories............................................................................................................... iii
Contents .................................................................................................................... iv
Safety Precautions ................................................................................................. xiv
General Notes ....................................................................................................... xxiii
Specific Absorption Rate (SAR)........................................................................... xxv
Getting
1
Started
Basic
2
Handset
Operations
Function & Feature Preview............................................ 1-2
Handset Parts & Functions ............................................. 1-3
C Handset...................................................................... 1-3
C Display Indicators....................................................... 1-6
Battery & Charger ............................................................ 1-8
C Getting Star ted........................................................... 1-8
C Installing & Removing Battery.................................. 1-12
C Rapid Charger.......................................................... 1-14
C In-Car Charger......................................................... 1-15
Handset Power On/Off................................................... 1-16
C Key Guard ................................................................ 1-17
Clock Settings ................................................................ 1-18
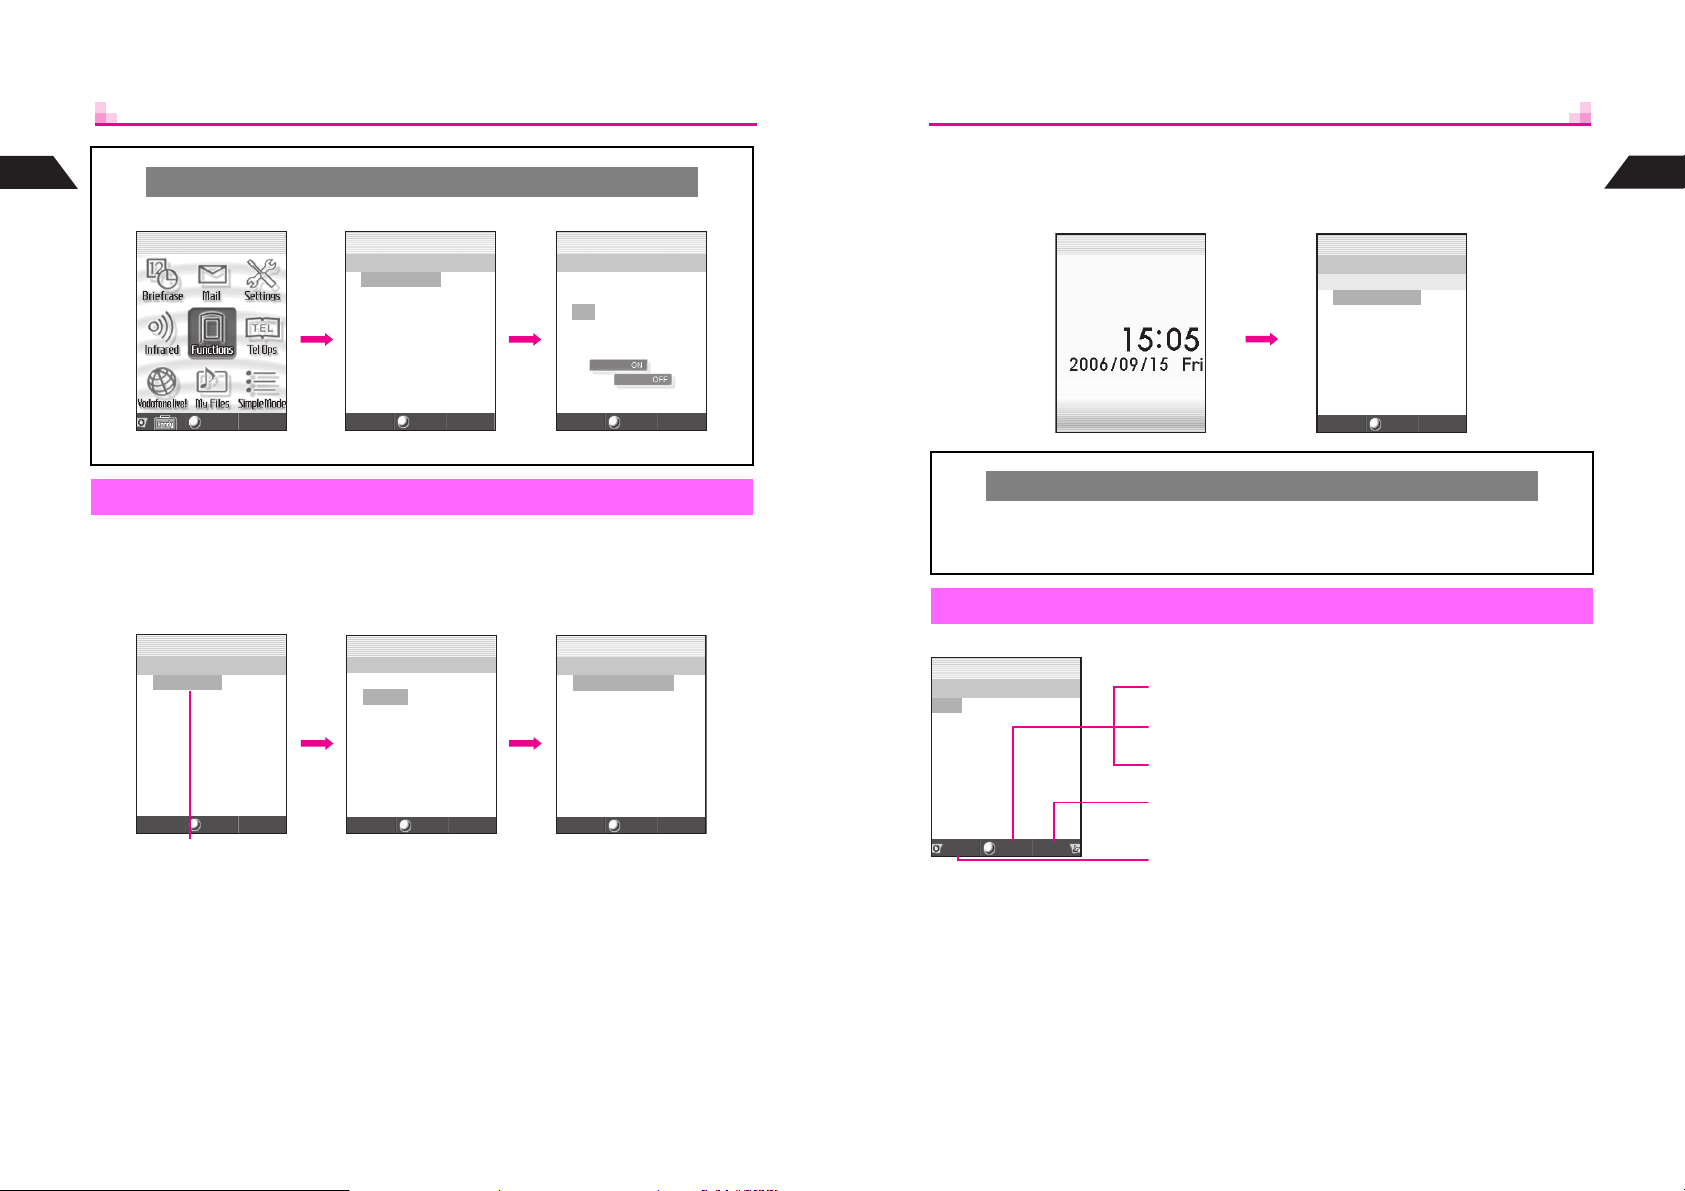
Handset Menus .............................................................. 1-19
C Index Menu .............................................................. 1-19
C Functions Menu ....................................................... 1-20
C Soft Keys.................................................................. 1-21
C Quick Operations ..................................................... 1-22
C Guide ....................................................................... 1-23
Security Code................................................................. 1-24
Initiating a Call ................................................................. 2-2
C Emergency Calls........................................................ 2-3
C Redial ......................................................................... 2-4
C International Call & Send With Code ......................... 2-5
● Setup Preset .......................................................... 2-5
● International Call/Send With Code......................... 2-5
Incoming Call ................................................................... 2-6
C Call History................................................................. 2-7
Handling Incoming Calls ................................................. 2-8
C Placing Callers on Hold.............................................. 2-8
C Quick Recorder .......................................................... 2-9
Delayed Ringer............................................................... 2-10
Manner
3
Mode
Text Entry
4
Engaged Call Operations...............................................2-11
C Earpiece Volume ......................................................2-11
C Voice Memo..............................................................2-12
C Notepad Memory......................................................2-13
● Opening Entries....................................................2-13
Redial & Call History ......................................................2-14
● Delete ...................................................................2-14
Simple Mode ...................................................................2-16
C Activating/Canceling Simple Mode ...........................2-16
C Simple Mode Operations ..........................................2-17
Call Time .........................................................................2-19
● Reset ....................................................................2-19
● Instant Display ......................................................2-19
Call Charge .....................................................................2-20
● Reset ....................................................................2-20
● Instant Display ......................................................2-20
My Number & Owner Profile ..........................................2-21
● Edit, Delete, Copy.................................................2-21
Minding Mobile Manners .................................................3-2
Manner Mode ....................................................................3-3
C Activating & Canceling ................................................3-3
C Manner Mode Settings ...............................................3-4
● Message Recorder .................................................3-4
● Ring Tone Level......................................................3-4
● Vibration .................................................................3-4
● LED Indicator..........................................................3-5
● Whisper Mode ........................................................3-5
● Sound Volume ........................................................3-5
Off-Line Mode ...................................................................3-6
Character Selection..........................................................4-2
C Entry Modes ...............................................................4-2
C Key Assignments ........................................................4-3
Entering Characters .........................................................4-4
C Kanji, Hiragana & Katakana .......................................4-4
C Entering Alphanumerics .............................................4-7
C Symbols, Pictographs & Emoticons............................4-7
C Mail & Web Extensions ...............................................4-9
C Copying from Phone Book ..........................................4-9
C Character Code ........................................................4-10
C Pager Code...............................................................4-10
iv
v
Page 4

Text Entry
4
Phone Book
5
Conversion Methods (Japanese Only)......................... 4-12
C Phonetic Conversion ................................................ 4-12
C One-Hiragana Conversion ....................................... 4-12
C Hiragana to Katakana/Alphanumerics Conversion .. 4-13
C Quick Conversion (for Hiragana).............................. 4-13
C Conversion Settings ................................................. 4-14
● Optional Predictive Functions .............................. 4-14
● Reset Learning .................................................... 4-14
Dictionaries (Japanese Only) ....................................... 4-15
C User Dictionary ........................................................ 4-15
● New Entry ............................................................ 4-15
● Edit....................................................................... 4-15
Editing Characters ......................................................... 4-16
C Deleting .................................................................... 4-16
C Replacing ................................................................. 4-16
C Copy/Cut & Paste..................................................... 4-17
C Deleting Text Before or After Cursor ........................ 4-17
Text Memo ...................................................................... 4-18
● Edit/Delete ........................................................... 4-18
Overview........................................................................... 5-2
Saving to Phone Book..................................................... 5-3
C Phone Book Entry Items ............................................ 5-3
C New Phone Book Entries ........................................... 5-4
C Photo.......................................................................... 5-6
C Saving Secret Mode Entries ...................................... 5-7
C Saving from Redial or Call History ............................. 5-8
C Phone Book Memory Status ...................................... 5-8
Option Settings ................................................................ 5-9
C Overview .................................................................... 5-9
C Setting Options ........................................................ 5-10
● Personal Ring Tone & Incoming Notice ............... 5-10
● Mail Folder ........................................................... 5-10
Using Phone Book ......................................................... 5-11
C Dialing from Phone Book ......................................... 5-11
C Phone Book Search ................................................. 5-12
● Memory No. Search ............................................. 5-13
● Katakana Search ................................................. 5-13
● Group Search ...................................................... 5-13
● Search by Reading .............................................. 5-13
C Speed Dial ............................................................... 5-14
C Show Photo.............................................................. 5-14
Editing Phone Book....................................................... 5-15
C Correction/Change................................................... 5-15
C Deleting Entries........................................................ 5-15
Display
6
Sounds &
7
Related
Functions
Group Settings ...............................................................5-16
C Changing Group Name.............................................5-16
C Group Ring Tone ......................................................5-16
Wallpaper ..........................................................................6-2
Clock & Calendar..............................................................6-3
C Clock Display ..............................................................6-3
C Calendar .....................................................................6-3
Display Images .................................................................6-5
Fonts..................................................................................6-6
Display Patterns ...............................................................6-6
Light Settings ...................................................................6-7
● Brightness ..............................................................6-7
● In-Car Backlight ......................................................6-7
Other Display Settings .....................................................6-8
● Language ...............................................................6-8
● Power On Message................................................6-8
● Vodafone live! Animation ........................................6-8
● Mail Background.....................................................6-8
● Screen Animation ...................................................6-9
● Incoming Light ........................................................6-9
Call Functions...................................................................7-2
C Ring Tone Level ..........................................................7-2
C Ring Tone ...................................................................7-3
C Handset Vibration .......................................................7-4
C Small Light ..................................................................7-5
C Ring Time ...................................................................7-5
Sound Effects ...................................................................7-6
C Sounds .......................................................................7-6
C Basic Sound Settings .................................................7-7
● Sound Volume/Set LED to Sound ..........................7-7
Original Voice....................................................................7-8
Original Ring Tones..........................................................7-9
C Basics .........................................................................7-9
C Creating an Original Ring Tone ................................7-13
C Editing an Original Ring Tone ...................................7-15
C Deleting an Original Ring Tone.................................7-17
Instrument Effects ..........................................................7-17
C Basics .......................................................................7-17
C Creating Instrument Effects ......................................7-21
Other Sound Related Functions ...................................7-22
● Speaker ................................................................7-22
● Tone Octave .........................................................7-22
vi
vii
Page 5

Managing
8
Files (Data
Folder)
File Organization.............................................................. 8-2
Data Folder ....................................................................... 8-3
C Contents..................................................................... 8-3
C Window Description ................................................... 8-3
C Icons .......................................................................... 8-4
C Display Settings ......................................................... 8-5
Opening Files ................................................................... 8-6
C Handset Data Folder .................................................. 8-6
C Properties .................................................................. 8-7
Editing Files & Folders .................................................... 8-8
● Changing Folder/File Name ................................... 8-8
● Secret Mode .......................................................... 8-8
● Copy/Move............................................................. 8-8
● Delete .................................................................... 8-9
Animation Files ................................................................ 8-9
C Simple Animation....................................................... 8-9
C Opening Animation Files.......................................... 8-11
Using Images & Animation ........................................... 8-11
C Changing Display Size............................................. 8-11
C Setting Image & Animation as Wallpaper................. 8-11
C Setting Image & Animation as Display Images ........ 8-12
C Slide Show ............................................................... 8-12
C Sending Files via Long Mail..................................... 8-13
Editing Images ............................................................... 8-14
C Enlarging/Reducing Images..................................... 8-14
C Changing Image Size............................................... 8-15
C Marker Stamp .......................................................... 8-16
C Visual Effects ........................................................... 8-17
C Face Arrange ........................................................... 8-18
C Additional Picture Effects......................................... 8-20
● Frame................................................................... 8-20
● Rotate .................................................................. 8-20
● Moving Photo Frame............................................ 8-21
● Change File Format ............................................. 8-21
Combining Images......................................................... 8-21
C Split Screen.............................................................. 8-21
C Panorama Images .................................................... 8-23
C Combining Split Mail Images ................................... 8-24
Melody Files ................................................................... 8-25
C Playback Volume...................................................... 8-25
C Using for Incoming Tone/Sound Effects................... 8-25
Infrared
9
Handset
10
Security
Additional
11
Functions
Getting Started .................................................................9-2
C Transferable Files .......................................................9-2
C Precautions.................................................................9-3
IR Password ......................................................................9-3
Transferring Files .............................................................9-4
C One File Transfer ........................................................9-4
C All File Transfer...........................................................9-5
Changing Security Code................................................10-2
Handset Locks ................................................................10-2
C Keypad Lock .............................................................10-2
C Auto Key Lock...........................................................10-3
C Phone Book Lock .....................................................10-3
C Restrict Dial ..............................................................10-4
Accept Call & Reject Call...............................................10-4
C Saving Entries ..........................................................10-4
C Accept Call ...............................................................10-5
C Reject Call ................................................................10-5
C Rejecting Other Calls................................................10-6
Secret Mode ....................................................................10-6
C Activating Secret Mode .............................................10-6
C Opening Secret Mode Entries ..................................10-6
Reset................................................................................10-7
C Reset Defaults ..........................................................10-7
C Reset All ...................................................................10-7
Handy Call Functions.....................................................11-2
C Signal Alert ...............................................................11-2
C Push Tones...............................................................11-2
Message Recorder .........................................................11-3
C Activating ..................................................................11-3
C Canceling..................................................................11-4
C Playing Messages.....................................................11-4
Voice Memos ...................................................................11-5
Alarm ...............................................................................11-6
C Setting Alarm............................................................11-6
C Alarm Options...........................................................11-8
C Canceling & Reactivating Alarm ...............................11-9
● Cancel ..................................................................11-9
● Delete ...................................................................11-9
● Settings ................................................................11-9
Auto Power On/Off........................................................11-10
C Auto Power On........................................................11-10
C Auto Power Off........................................................11-11
viii
ix
Page 6

Additional
11
Functions
Schedule....................................................................... 11-12
C Saving Entries ........................................................ 11-12
C Setting Alarm ......................................................... 11-13
● Set Alarm ........................................................... 11-13
C Schedule & Action Item Options ............................ 11-15
C Opening Entries ..................................................... 11-16
C Setting Holidays..................................................... 11-17
C Editing Entries........................................................ 11-19
C Deleting Entries...................................................... 11-19
● Delete Item ........................................................ 11-19
● One Day Schedules ........................................... 11-19
● Delete All ........................................................... 11-19
C Other Schedule Settings ........................................ 11-20
● Auto Delete ........................................................ 11-20
● Secret Mode ...................................................... 11-20
● Set Color............................................................ 11-20
● View ................................................................... 11-20
● Event List ........................................................... 11-20
Useful Diary.................................................................. 11-21
C Saving Entries ........................................................ 11-21
C Opening Entries ..................................................... 11-22
C Editing Entries........................................................ 11-23
C Deleting Entries...................................................... 11-23
● Delete Item ........................................................ 11-23
● Delete All ........................................................... 11-24
Stopwatch..................................................................... 11-24
Kitchen Timer............................................................... 11-25
Barcode ........................................................................ 11-26
Create QR Codes ......................................................... 11-28
Battery Saving.............................................................. 11-29
C Power Saving ......................................................... 11-29
C Panel Saving .......................................................... 11-29
Calculator ..................................................................... 11-30
Spending Memo ........................................................... 11-31
● Entry .................................................................. 11-31
● Totals ................................................................. 11-31
● Delete ................................................................ 11-31
● New Item............................................................ 11-32
Headphones with Call Button ..................................... 11-32
C Initiating Calls......................................................... 11-32
C Answering Calls ..................................................... 11-32
C Ringer Out.............................................................. 11-33
Fax & PC Transmissions............................................. 11-33
● Fax Transmissions ............................................. 11-33
● PC Transmissions .............................................. 11-33
12
13
Vodafone
live!
Overview
Mail
Vodafone live! Basics.....................................................12-2
Customizing Handset Address .....................................12-3
Memory Status................................................................12-4
Disabling Vodafone live!................................................12-4
Sending Text Messages.................................................13-2
C Creating Messages...................................................13-2
C Option Settings.......................................................13-10
● PIN .....................................................................13-10
● Privacy................................................................13-10
● Set Priority..........................................................13-10
● Polling.................................................................13-11
● Recipient Type....................................................13-11
C Save Auto Send ......................................................13-11
C Touch Mail ..............................................................13-12
C Mail Templates........................................................13-14
C Greeting ..................................................................13-16
Incoming Text Messages .............................................13-17
C Opening New Messages ........................................13-17
Mail Box.........................................................................13-19
C Window Description................................................13-19
C Checking Messages ...............................................13-21
C Mail Box/Message Menu ........................................13-23
● Show/Display Address........................................13-23
● List......................................................................13-23
● Copy ...................................................................13-23
● Display Size........................................................13-23
Using Messages ...........................................................13-24
C Replying to Messages ............................................13-24
C Forwarding Messages ............................................13-24
C Resending Messages.............................................13-25
C Linked Info ..............................................................13-25
C Protecting Messages..............................................13-27
C Deleting Messages.................................................13-28
C Attachments............................................................13-30
● Sound Auto Play.................................................13-31
x
xi
Page 7

Mail
13
Station
14
(Japanese
Only)
Additional Functions ................................................... 13-32
C Chat Mail Log......................................................... 13-32
C Mail Folders............................................................ 13-34
C Confirm Delivery & Cancel Delivery....................... 13-38
C Sending from Outbox ............................................. 13-39
C Combining Split Mail Images ................................. 13-40
C Unretrieved List ...................................................... 13-41
C Server Mail............................................................. 13-43
C Sky Melody ............................................................ 13-43
C BBS ........................................................................ 13-45
● BBS.................................................................... 13-45
● Saving Message ................................................ 13-45
● Polling Message................................................. 13-46
Mail Settings................................................................. 13-46
C Basic Settings ........................................................ 13-46
● Mail Notice ......................................................... 13-46
● Confirm Delivery ................................................ 13-46
● Auto Send .......................................................... 13-46
● Custom Fixed Text (Japanese Only).................. 13-47
C Long Mail Setting ................................................... 13-47
● Auto Retrieve ..................................................... 13-47
C Sky Mail Settings ................................................... 13-47
● Set Priority ......................................................... 13-49
● Sender ............................................................... 13-49
Resetting Mail & Center Address ............................... 13-50
● Reset ................................................................. 13-50
● Delete All ........................................................... 13-50
● Access Points .................................................... 13-50
Getting Started ............................................................... 14-2
C Station Content ........................................................ 14-2
Opening Main List.......................................................... 14-3
My List ............................................................................ 14-4
C Saving to My List ...................................................... 14-4
C Editing My List.......................................................... 14-5
C Received Information ............................................... 14-5
Sub Menu Settings ........................................................ 14-7
● Copy..................................................................... 14-7
● Property ............................................................... 14-7
● Screen Scroll ....................................................... 14-7
● Set Display Size................................................... 14-7
● Save to Text Memo .............................................. 14-7
Saving Information ........................................................ 14-8
C Saved Information .................................................... 14-8
C Checking Information ............................................... 14-8
C Deleting Selected Information.................................. 14-8
15
Appendix
Using Linked Info ...........................................................14-9
Images ...........................................................................14-10
C Saving to Data Folder .............................................14-10
C Wallpaper & Display Images...................................14-10
Location Info .................................................................14-12
C Checking Location Info ...........................................14-12
C Protecting Location Info..........................................14-12
Station Settings ............................................................14-13
● Screen Savers ....................................................14-13
● Update Frequency ..............................................14-13
● Save Info Number...............................................14-13
● Image Link ..........................................................14-13
Resetting Station & Center Address ..........................14-14
● Reset ..................................................................14-14
● Clear Memory .....................................................14-14
● Center Address ..................................................14-14
Function List ...................................................................15-2
C Mail Settings .............................................................15-5
C Station Settings ........................................................15-5
Troubleshooting .............................................................15-6
Character Code List .....................................................15-10
Pictograph List .............................................................15-14
Specifications ...............................................................15-17
Memory List ..................................................................15-18
Index ..............................................................................15-19
Warranty & After-Sales Services.................................15-24
Customer Service .........................................................15-25
xii
xiii
Page 8

Safety Precautions
^ Read safety precautions before using handset.
^ Observe precautions to avoid injury to self or others, or damage to property.
^ Vodafone is not liable for any damages resulting from use of this product.
Before Using Handset
C Symbols
Make sure you thoroughly understand these symbols before reading on.
Symbols and their meanings are described below:
DANGER
!
WARNING
!
CAUTION
!
C Symbols
Great risk of death or serious injury from improper use
Risk of death or serious injury from improper use
Risk of injury or damage to property from improper use
$(%+* #) !
Prohibited Actions Compulsory Actions Attention Required
!DANGER
Handset, Battery & Charger
Use specified battery and
Charger only (see P.iii).
Using non-specified equipment may
cause malfunctions, electric shock or
fire due to battery leakage,
overheating or bursting.
Battery
Prevent injury from battery
leakage, breakage or fire.
Do not:
^ Heat or dispose of battery in fire
^ Open/modify/disassemble battery
^ Damage or solder battery
^ Use a damaged or deformed battery
^ Use non-specified charger (see P.iii)
^ Force battery into handset
^ Charge battery near fire or sources
of heat; or expose it to extreme heat
^ Use battery for other equipment
#$
$#
Do not short-circuit Charger
terminals.
Keep metal objects away from
Charger terminals. Keep handset
away from necklaces, hairpins, etc.
Battery may leak, overheat, burst or
ignite causing injury. Use a case to
carry battery.
If battery fluid contacts eyes, do
not rub them. Rinse with clean
water and consult a doctor
immediately.
Eyes may be severely damaged.
xiv
xv
Page 9

!WARNING
!WARNING
Handset, Battery & Charger
Do not insert foreign objects
into the handset or Charger.
Do not insert metal or flammable
objects into handset or Charger; may
cause fire or electric shock. Keep out
of children's reach.
Keep handset out of rain or
extreme humidity.
Fire or electric shock may result.
Keep handset away from
liquid-filled containers.
Keep the handset and Charger away
from chemicals or liquids; fire or
electric shock may result.
Avoid sources of fire.
Prevent fire or explosion. Do not use
handset in the presence of gas or fine
particles (coal, dust, metal, etc.).
Keep battery, handset or
Charger away from microwave
ovens.
Battery, handset or Charger may leak,
burst, overheat or ignite, leading to
accidents or injury.
Do not disassemble or modify
handset or related hardware.
^ Do not open handset or Charger;
may cause electric shock or injury.
Contact Vodafone Customer Center,
Customer Assistance for repairs.
^ Do not modify handset or Charger;
fire or electric shock may result.
$
%
$
$
$
(
If water or foreign matter is
inside handset:
Discontinue handset use to prevent
fire/electric shock. Turn off handset,
remove battery and unplug Charger,
then contact Vodafone Customer
Center, Customer Assistance.
Do not subject handset to
strong shocks or impacts.
Strong shocks or impacts to handset
or Charger may cause malfunction or
injury.
Should handset be damaged, remove
battery then contact Vodafone
Customer Center, Customer
Assistance. Discontinue handset use;
fire or electric shock may occur.
If an abnormality occurs:
If a handset emits an unusual sound,
smoke or odor, discontinue use; may
cause fire or electric shock. Turn off
handset, remove battery and unplug
Charger; contact Vodafone Customer
Center, Customer Assistance.
)
$
)
Handset
Take measures to prevent
accidents.
^ For safety, never use handset while
driving. Pull over beforehand.
Cellphone use while driving is
prohibited by the revised Road Traffic
Law (effective November 1, 2004).
^ Do not use Headphones while
driving or riding a bicycle. Accidents
may result.
^ Moderate volume outside, especially
at road/rail crossings to avoid
accidents.
Charger
Use only the specified voltage.
Non-specified voltages may cause fire
or electric shock.
^ Rapid Charger
AC 100V Input
^ In-Car Charger
DC 12V-24V Input
Do not use In-Car Charger if
vehicle has a positive earth.
Fire may result. Use In-Car Charger
only inside vehicles with a negative
earth.
$$
$
$
Do not swing handset by
handstrap.
May result in injury or breakage.
Turn handset power off before
boarding aircraft.
Using wireless devices aboard aircraft
may cause electronic malfunctions or
endanger aircraft operation.
Adjust vibration and Ring Tone
settings:
Users with a heart condition/
pacemaker/defibrillator should adjust
handset settings accordingly.
During thunderstorms, turn
power off; find cover.
There is a risk of lightning strike or
electric shock.
Charger care
^ Do not touch blades with wet hands.
Electric shock may occur.
^ Do not use multiple cords in one
outlet; may cause excess heat/fire.
^ Do not bend, twist, pull or set objects
on cord. Exposed wire may cause
fire or electric shock.
Do not short-circuit Charger
terminals.
May cause overheating, fire or electric
shock. Keep metal away from
terminals.
#
#
#
+
$
$
xvi
xvii
Page 10

!WARNING
!WARNING
Charger
Take measures to prevent
accidents.
Secure In-Car Charger to avoid injury
or accidents.
Damaged Rapid Charger/In-Car
Charger cord:
May cause fire or electric shock;
discontinue use and purchase a new
Charger.
#
#
During thunderstorms:
Unplug Charger to avoid damage, fire
or electric shock.
Charger use and children:
May cause electric shock/injury; keep
out of reach.
)
#
Handset Use & Electronic Medical Equipment
This section is based on "Guidelines on the Use of Radio Communications Equipment
such as Cellular Telephones and Safeguards for Electronic Medical Equipment"
(Electromagnetic Compatibility Conference, April 1997) and "Report of Investigation of
the Effects of Radio Waves on Medical Equipment, etc." (Association of Radio
Industries and Businesses, March 2001).
People with implanted
pacemakers/defibrillators
should keep handset more than
22 cm away.
Radio waves can interfere with
implanted pacemakers or defibrillators
causing such devices to malfunction.
Turn handset off in crowds or
trains where persons with
implanted pacemaker/
defibrillator may be near.
Radio waves can interfere with
implanted pacemakers or defibrillators
causing such devices to malfunction.
#
#
Observe these rules inside
medical facilities:
^ Do not enter an operating room or an
Intensive or Coronary Care Unit
while carrying a mobile handset.
^ Keep handset off in hospitals.
^ Keep handset off in hospital lobbies.
Electronic equipment may be near.
^ Obey rules regarding cellphone use
in medical facilities.
Consult manufacturer for radio
wave effects on electronic
medical equipment.
#
#
Battery
^ If battery does not charge properly,
stop charging. Battery may overheat,
burst or ignite.
^ If there is leakage or abnormal odor,
avoid fire sources. Battery may catch
fire or burst.
##
!CAUTION
Handset, Battery & Charger
Handset care
^ Place handset on stable surfaces to
avoid malfunction or injury.
^ Keep handset away from oily smoke
or steam. Fire or accidents may
result.
^ Cold air from air conditioners may
condense, resulting in leakage or
burnout.
^ Keep handset away from direct
sunlight (inside vehicles, etc.) or heat
sources. Distortion, discoloration or
fire may occur. Battery shape may
be affected.
^ Keep handset out of extremely cold
places to avoid malfunction or
accidents.
^ Keep handset away from fire sources
to avoid malfunction or accidents.
!!
If there is abnormal odor, excessive
heat, discoloration or distortion,
remove battery from handset.
It may leak, overheat or explode.
Usage environment
^ Excessive dust may prevent heat
release and cause burnout or fire.
^ Avoid using handset on the beach.
Sand may cause malfunction or
accidents.
^ Keep handset away from credit
cards, telephone cards, etc. to avoid
data loss.
xviii
xix
Page 11
!CAUTION
!CAUTION
Handset
Avoid leaving handset in
extreme heat (inside vehicles,
etc.).
Handset may become hot to the touch,
leading to burn injuries.
Volume settings
Moderate handset volume; excessive
volume may damage ears or hearing.
If you experience any skin irritation associated with handset use,
discontinue handset use and consult a doctor.
See handset materials below. Some materials may cause skin irritation, rashes, or
itchiness depending on your physical condition.
Parts Materials & Finishing
Housing (Display/battery side), battery cover
Display window Acrylic resin
Infrared Port, Small Light ABS resin
Multi Selector ABS resin/Chrome plating
Vodafone live! Key, Mail Key, Start Key, Power
On/Off Key, Keypad, Schedule/Memo & A/a
Key, Clear Key, Text & Manner Key (i)
Housing ornament (battery side), battery PC resin
Headphone Connector cover, External Device
Connector cover
Charger Terminal
Screw SWCH12A/Ni plating
Speaker cushion Urethane foam
Speaker mesh Polyester
$
!
Inside vehicles
Handset use may cause electronic
equipment to malfunction.
ABS resin/Acrylic UV curing painting (sealer:
acrylic painting)
PC resin/Acrylic UV curing painting (sealer:
acrylic painting)
Elastomeric resin
Nylon 6T/Brass, Au plating (sealer: nickel,
copper)
!
#
Charger
Charger & In-Car Charger
^ Grasp plug (not cord) to disconnect
Charger. May cause fire/electric
shock.
^ Keep cord away from heaters.
Exposed wire may cause fire or
electric shock.
^ Stop use if plug is hot or improperly
connected. May cause fire/electric
shock.
^ Keep In-Car Charger socket clean.
May overheat and cause injury.
Use only the specified fuse.
1 A fuse for In-Car Charger.
Or may cause breakage/fire.
Always charge handset in a
well-ventilated area.
Avoid covering/wrapping Charger;
may cause damage/fire.
$
#
$
$
Do not use In-Car Charger when
engine is off.
To avoid weakening the car battery,
always start engine before charging
the handset using In-Car Charger.
During periods of disuse
Always unplug Rapid Charger or
In-Car Charger after use.
Handset maintenance
Always disconnect Rapid Charger or
In-Car Charger when cleaning
handset, to prevent shock/injury.
Installing In-Car Charger
Properly position the cable for safe
driving to avoid injury or accidents.
$
)
)
!
xx
xxi
Page 12

!CAUTION
General Notes
Battery
Do not throw or abuse battery.
Battery may overheat, burst or ignite.
Do not leave battery in direct sunlight
or inside a closed vehicle; may reduce
battery performance or overheat. An
overheated battery may cause fire.
Do not expose battery to liquids.
Performance may deteriorate.
If battery fluid contacts skin or clothes,
rinse with clean water immediately.
Do not dispose of an exhausted
battery with ordinary refuse; always
tape over battery terminals before
disposal. Take exhausted battery to a
Vodafone shop, or follow the local
disposal regulations.
Keep battery out of children's reach.
$
$
*
#
$
#
^ Charge battery in ambient
temperatures between 5]C and
35]C; outside this range, battery may
leak/overheat and performance may
deteriorate.
^ If your child is using handset, explain
all instructions and supervise usage.
^ If there is abnormal odor or
excessive heat, stop using battery
and call Vodafone Customer Center,
Customer Assistance.
^ Charge battery at least once every
six months; an uncharged battery
may become unusable.
!
General Use
^ Vodafone is not liable for any damages resulting from accidental loss/alteration of handset
data. Keep a copy of Phone Book entries, etc. in a separate place.
^ Handset transmissions may be disrupted inside buildings, tunnels or underground, or
when moving into/out of such places.
^ Use handset without disturbing others.
^ Handsets are radios as stipulated by the Radio Law. Under the Radio Law, handsets must
be submitted for inspection upon request.
^ Handset use near landlines, TVs or radios may cause interference.
^ Beware of eavesdropping.
Because this service is completely digital, the possibility of signal interception is greatly
reduced. However, some transmissions may be overheard.
Eavesdropping
Deliberate/accidental interception of communications constitutes eavesdropping.
Inside Vehicles
^ Never use handset while driving.
^ Do not park illegally to use handset.
^ Handset use may affect a vehicle's electronic equipment.
Aboard Aircraft
Never use handset aboard aircraft (keep power off). Handset use may impair aircraft
operation.
xxii
xxiii
Page 13

Handset Care
^ If handset is left with no battery or an exhausted one, data may be altered/lost. Vodafone
is not liable for any resulting damages.
^ Use handset within temperatures of 5 ]C to 35 ]C and humidity of 35% to 85%. Avoid
extreme temperatures/direct sunlight.
^ Do not drop or subject handset to shocks.
^ Clean handset with dry, soft cloth. Using alcohol, thinner, etc. may damage it.
^ Do not expose handset to rain, snow or high humidity.
^ Never disassemble or modify handset.
^ Avoid scratching handset Display.
^ Handset is not water-proof. Avoid exposure to liquids and high humidity.
B Keep handset away from precipitation.
B Cold air from air conditioning, etc. may condense causing corrosion.
B Avoid dropping handset in damp places (restroom, bath/shower room, etc.).
B On the beach, keep handset away from water and direct sunlight.
B Perspiration may seep inside handset causing malfunction.
^ Avoid heavy objects or excessive pressure. May cause malfunction or injury.
B Do not sit down with handset in a back pocket.
B Do not place heavy objects on handset in a bag.
^ Connect only the specified products to Headphone Connector. Non-specified devices
may malfunction or cause damage.
^ Always turn off handset before removing battery. If battery is removed while saving data
or sending mail, data may be lost, changed or destroyed.
Copyrights
Copyright laws protect sounds, images, computer programs, databases, other
materials and copyright holders. Duplicated material is limited to private use only. Use
of materials beyond this limit or without permission of copyright holders may constitute
copyright infringement, and be subject to criminal punishment.
Specific Absorption Rate (SAR)
V201SH meets the government's requirements for exposure to radio waves.
These requirements are based on scientific basis to assure that radio waves emitted
from cellphones and other handheld wireless devices do not affect human health.
They require that the Specific Absorption Rate (SAR), which is the unit of
measurement for the amount of radiofrequency absorbed by the body, shall not
exceed 2 W/kg
safety of all persons, regardless of age or health, and meets the international standard
set by International Commission on Non-Ionizing Radiation Protection (ICNIRP) in
cooperation with World Health Organization (WHO).
The highest SAR value for V201SH is 0.77 W/kg. Tests for SAR are conducted with
handset transmitting at its highest certified power level, and follow the testing methods
set by the government. While there may be differences between the SAR levels for
various handsets, they all meet the governmental requirements for safe exposure. The
actual SAR level of the handset while operating can be well below the highest value.
This is because the handset is designed to operate at multiple power levels so as to
use only the power required to reach the Network.
Additional information on SAR can be obtained on the following Websites:
Ministry of Internal Affairs and Communications (Protection from Radio Wave
Environment)
http://www.tele.soumu.go.jp/e/ele/index.htm
Association of Radio Industries and Businesses (ARIB)
http://www.arib-emf.org/index02.html (Japanese only)
*Requirements are stipulated in Radio Law (Ordinance Regulating Radio Equipment,
Article 14-2).
*
. This limit includes a substantial safety margin designed to assure the
xxiv
xxv
Page 14

Getting Started
1-1
Page 15

Function & Feature Preview
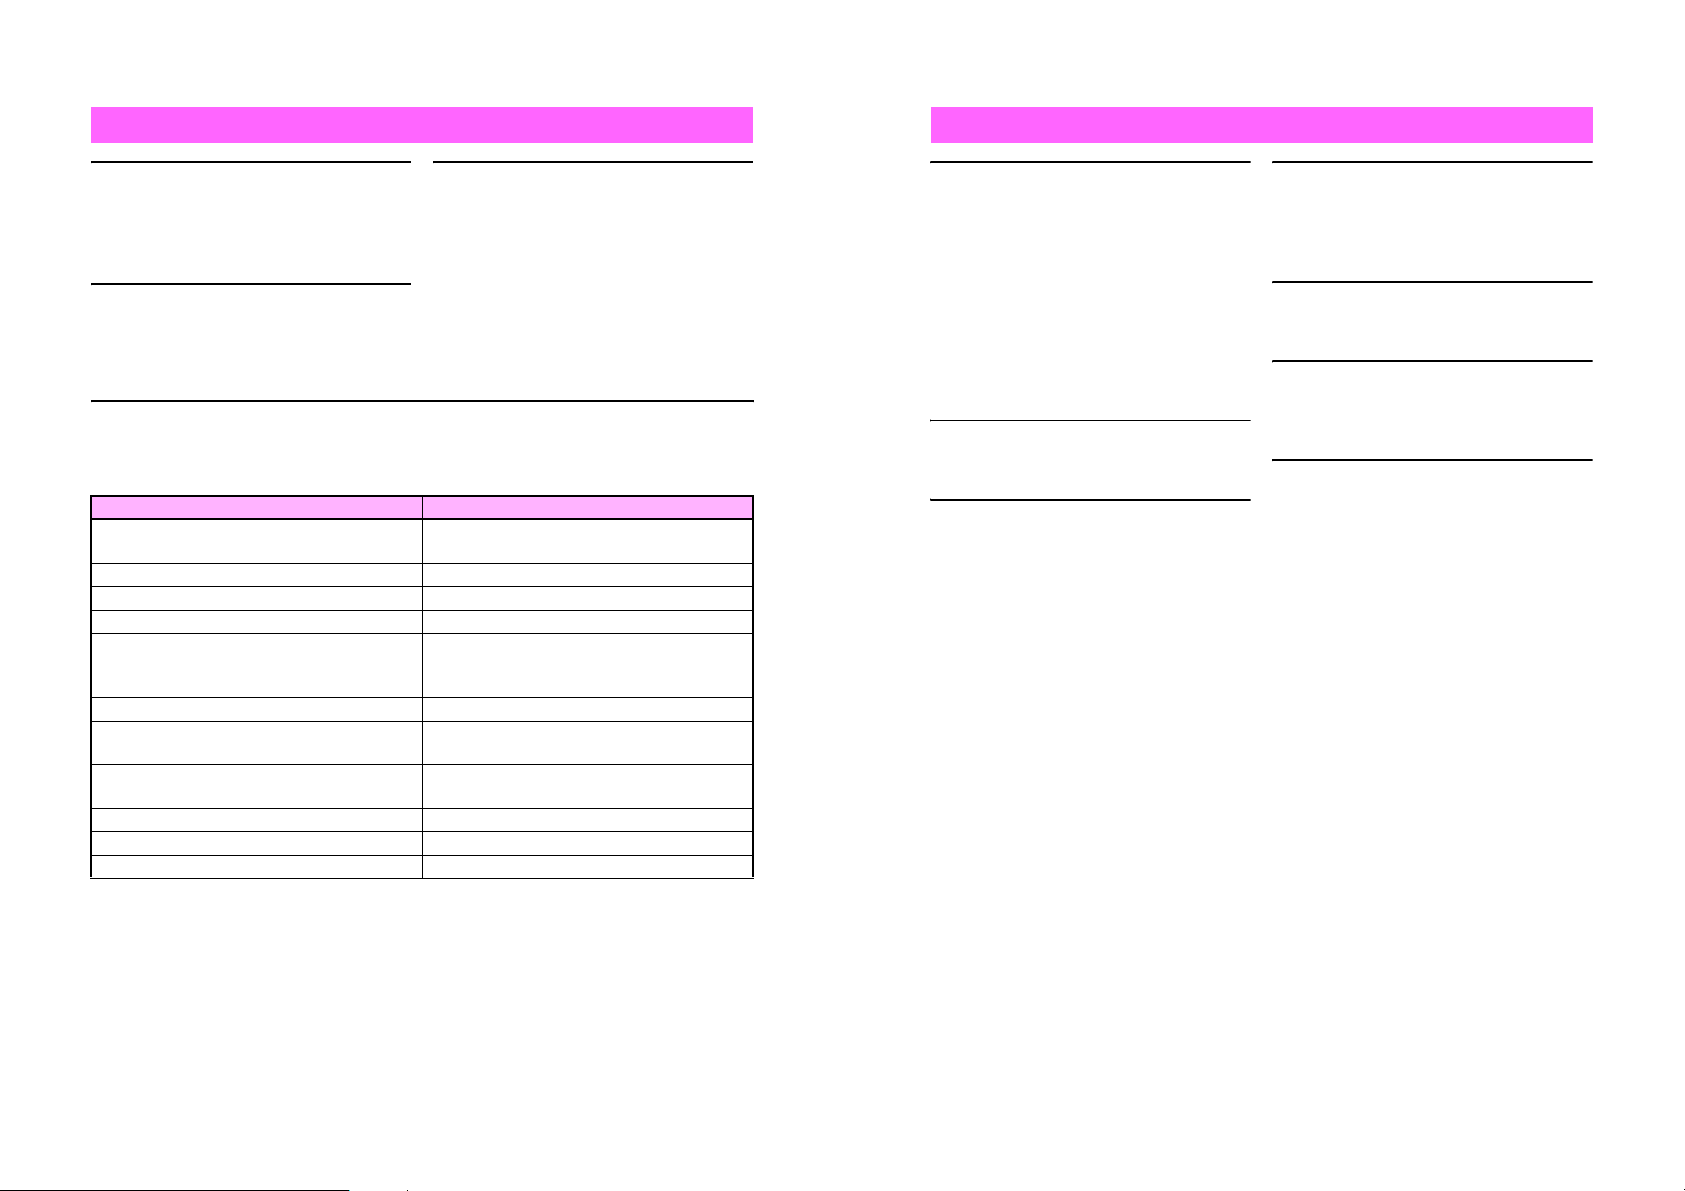
Handset Parts & Functions
Simple Mode
Select a simplified menu, ideal
1
for users who use only basic
Getting Started
handset functions.
J
Q
SimpleModeMenu
0MyNumber
1PhoneFunctions
P.2-16
Phone Book
Save up to 500 entries (with up
to three phone numbers and
mail addresses each).
J
Q
UedaMikio
1Friends
ppuu
y
zPattern1
dPattern2
P. 5 -2
Data Folder
Access handset image and
sound files from here; files are
organized by file type.
J
Q
DataFolder
DataFolder
g
QIma
es
PMelodies
SAnimation
Manner Mode
Press a single key to mute
ringer and activate Message
Recorder automatically.
E
n
j
P. 3- 3
Display Settings
Change Wallpaper, Display
Images, Fonts, et cetera to
customize handset interface.
n
005
J
Q
:
F4
*
DisplaySettin
[Off
1Wallpaper
2DisplayIma
3Fonts
E
n
g
s
]
g
es
Kanji Conversion
Use Predictive or Previous
Usage to reduce key strokes
when entering Japanese text.
J
Q
Input/Conversion
[Kana
1InputMethod
2Predictive
3PreviousUsa
E
n
]
g
e
P. 4- 5
Display Language
Set menus, etc. to appear in
English or Japanese.
J
Q
F
*
0ご自分の電話番号
1音関連機能
2管理機能
3表示/設定1
E
n
Handset
1
2
3
5
6
7
4
8
A
B
C
D
9
1
2
3
4
5
Getting Started
1
E
P.6-2, P.6-5, P.6-6
Use the IR Port to wirelessly
exchange handset files with
compatible mobiles/devices.
E
n
Infrared
P. 6- 8
Enter event date and time
parameters. Set up Alarm; add
Stamp/select Options.
Schedule
JG
Q
n
1 Display
2 Vodafone live! Key
Open Vodafone live! menu or execute
left Soft Key functions (see P. 1- 2 1).
3 Start Key
Initiate or answer calls.
4 Clear Key
Delete entries, escape/return to previous
window.
5 Schedule/Memo & A/a Key
Save/check Schedule or record/play
Voice Memos. In text entry windows,
toggle upper/lower case roman letters or
standard/small hiragana/katakana.
Change image display sizes.
6 Keypad
P. 8 -3
Useful Diary
Create personal diary entries
using both text and images.
Save up to 400 entries.
J
Q
F54:UsefulDiary
s2
**
6Y9M26D
Iwasveryluckyto
finditinthisseas
on!Icouldn'thelp
n
P. 1 1- 2 1
1-2
P. 9- 2
Vodafone live!
Enjoy messaging services &
area-based news/event info.
(Web & V-Appli not available.)
P. 12 - 2
P.11-12
Mail Templates
Select default or customized
templates by theme and fill in
fields to create messages.
J
Q
PresetText
Notesfor1by2
Date&Time:
3
4
D
n
P.13-14
+
Descriptions (P. 1- 3 - 1-5) are illustrative of general handset usage. For other specific
key assignments, refer to the descriptions for each function.
1-3
Page 16
7 U Key
1
Getting Started
8 Earpiece
9 Multi Selector
While an image or message appears,
press to open next one (newer one). In
alphanumeric entry, open web/mail
address prefixes & suffixes, and in kanji
(hiragana) entry, toggle Symbol/
Pictograph Lists.
Select menu items, move cursor, scroll,
etc. or use for the following:
a Redial & Notepad Memory Key
^ Select dialed numbers or return to
the previous window.
^ Press for 1+ seconds to open
Notepad Memory.
b Shortcut Guide Key
^ In Standby, open Long Press Key
Guide.
^ In Standby, press for 1+ seconds to
open Earpiece Volume window.
c Phone Book Key
^ Launch Phone Book Search, scroll
Phone Book entries or items within
entries; open selected menu items.
^ In Standby, press for 1+ seconds to
save new entries.
d Function & Key Guard Key
^ In Standby, press to open Index
Menu; press twice for Functions
Menu. Open any selected menu/
menu item or execute functions.
^ In Standby, press for 1+ seconds to
toggle Key Guard on/off.
e Call History Key
^ Open received call records.
^ In Standby, press for 1+ seconds to
open Earpiece Volume window.
A Mail Key
Open Mail menu or execute right Soft
Key functions (see P.1-21).
B Power On/Off & End Key
^ End calls, place callers on hold or
cancel operations.
^ Press for 2+ seconds to turn handset
power on/off.
C Text & Manner Key (E)
^ Toggle between entry modes or create
Phone Book entries.
^ Press for 1+ seconds to activate/cancel
Manner Mode.
D # Key
While an image or message appears,
press to open previous one (older one).
In text entry windows, toggle Symbol/
Pictograph Lists.
E Microphone
F
G
H
I
F Infrared Port
Use for infrared data transmissions.
G Headphone Connector
Connect Headphones with Call Button,
etc.
H Small Light
Illuminates/flashes while charging, for
incoming calls, etc.
I External Device Connector
Connect Charger here.
,
Do not cover or place stickers, etc. over the area containing Internal Antenna.
J
J Strap Eyelet
Attach straps as shown.
K Internal Antenna Location
L Speaker
M Battery Cover
K
L
M
Getting Started
1
1-4
1-5
Page 17
1
Display Indicators
Getting Started
zqxiUW DEsnG
J
jlfhj
wd Q
1 J Battery Strength
2 z Secret Mode Active
Flashes when a Secret Mode entry is
open.
3 q Original, p Enlarged
Mail or Data Folder image display
size
4 w Speaker Phone Active
x Speaker Active
D (gray) Station Menu Manual Update
5 U Mail
Unread mail except Long Mail
6 E Delivery Report
New Delivery Report
E d Alarm Set
F Entry Mode
Current character entry mode
1
234 5 687
n
zqxiUW DEsnG
J
G j Message Recorder Active
H f Vibration Active
I n Key Guard Active
9 A B C
D
E F G H I
Display is a precision device, however, some pixels may appear brighter/darker.
^ Although Vibration and Ring Tone Level for incoming calls and Vodafone live!
functions are set separately, f, g and h are Incoming Call indicators.
^ When Wallpaper (see P. 6- 2 ) is set, cancel Show Indicators (see P. 6- 2 ) to hide
indicators.
h
jlfhj
wd Q
J LMK
7 n Signal Strength
n: Strong o: Moderate p: Low
q: Weak s: Out-of-Range
Z Infrared Transmission
8 G Scroll
The menu, information, etc. can be
scrolled.
9 i Manner Mode Active
A W Long Mail
Unread Long Mail
B D (red) Station
Unread Station information
C s Off-Line Mode
D w Schedule (Alarm On)
x Schedule (Alarm Off)
,
n
+
J Q Keypad Lock Active
K l Message
Message Recorder messages
L h Silent
Ringer is Silent.
g Rising Tone
Ringer is set to Rising Tone.
M j Simple Mode Active
Getting Started
1
1-6
1-7
Page 18

Battery & Charger
1
Getting Started
Getting Started
Charge battery before first use/after a period of disuse.
Battery Life
^ Use specified Charger only. Other
chargers may damage handset, or
cause battery to deteriorate, overheat
or ignite.
^ Do not use or store battery at extreme
temperatures. May shorten battery life.
Ideal working temperature is between 5]C
and 35]C.
^ Replace battery if operating time is
noticeably shorter than normal.
Charging
^ Do not use Charger for other purposes.
^ Battery may short-circuit, overheat or
burst from contact with metal objects.
^ Small Light illuminates red while charging.
(It may take a while for the light to
illuminate when handset power is off.)
^ Battery must be inserted to charge handset.
+
^ Handset will charge with power on. J flashes and stays on when complete.
Charging takes approximately 115 minutes
^
(with handset power off).
B Charging time may vary by ambient
temperature.
^ Charger and battery may become warm
during charging.
^ Move Charger away from home TVs or
radios if interference occurs.
Precautions
^ Use a dry cotton swab to clean handset,
battery and Charger terminals.
^ Avoid:
B Extreme temperatures
B Humidity, dust and vibration
B Direct sunlight
^ Charge battery at least once every six
months; an uncharged battery may
become unusable.
^ Use a case when carrying battery
separately.
Estimated Hours of Use
(fully charged battery)
Continuous Talk Time
Continuous Standby Time 450 hours
Continuous Operating Time 290 minutes
Above values were calculated with
Backlight Brightness set to Level 4
(default).
^ Continuous Talk Time is an average
measured with a new, fully charged
battery, at maximum output with both
Power Saving and Panel Saving off, with
stable signals.
^ Continuous Standby Time is an average
measured with a new, fully charged
battery without calls or operations, in
Standby with stable signals. Standby Time
may be less than half this value if handset
is out-of-range or signal is weak. Standby
Time may vary by environment (battery
status, temperature, etc.).
^ Continuous Operating Time is the length
of time handset keys can be pressed
continuously without calls.
^ The above values (Battery Time) are
nominal values, measured under stable
signal conditions.
140 minutes
Battery Time
Battery Time may shorten when
handset is used in poor conditions:
^ Poor Usage Conditions
B Extreme temperatures (use in ambient
temperatures between 5]C and 35]C)
B Dirty handset, battery or Charger terminals
(charging may be hampered)
B Signal is weak/handset is out-of-range
^ Power Consuming Operations
B Using Station service
B Continuous Keypad use (Backlight stays on
for long periods)
B Frequent infrared transfers
^ Power Consuming Settings
B Increasing Backlight/Keypad Light time
B Using animated Wallpaper
B Using Screen Animation
B Canceling Panel Saving
B Setting Backlight to illuminate brighter
Getting Started
1
1-8
1-9
Page 19
1
Getting Started
Adjust the following settings:
^ Backlight (see P.6-7)
^ Panel Saving (see P.11-29)
Extend Battery Time When Battery Runs Out
A message appears and short beeps
sound. Handset shuts down after
20 seconds unless charged.
Press g to stop short beeps. (Short
beeps do not sound in Manner Mode.)
^ If battery runs out during a call, a double
beep sounds every five seconds. After 20
seconds, the call ends and handset shuts
down.
Battery Disposal
Do not dispose of an exhausted battery
with ordinary refuse; always tape over
battery terminals before disposal. Take
exhausted battery to a Vodafone shop, or
follow the local disposal regulations.
C Indicator
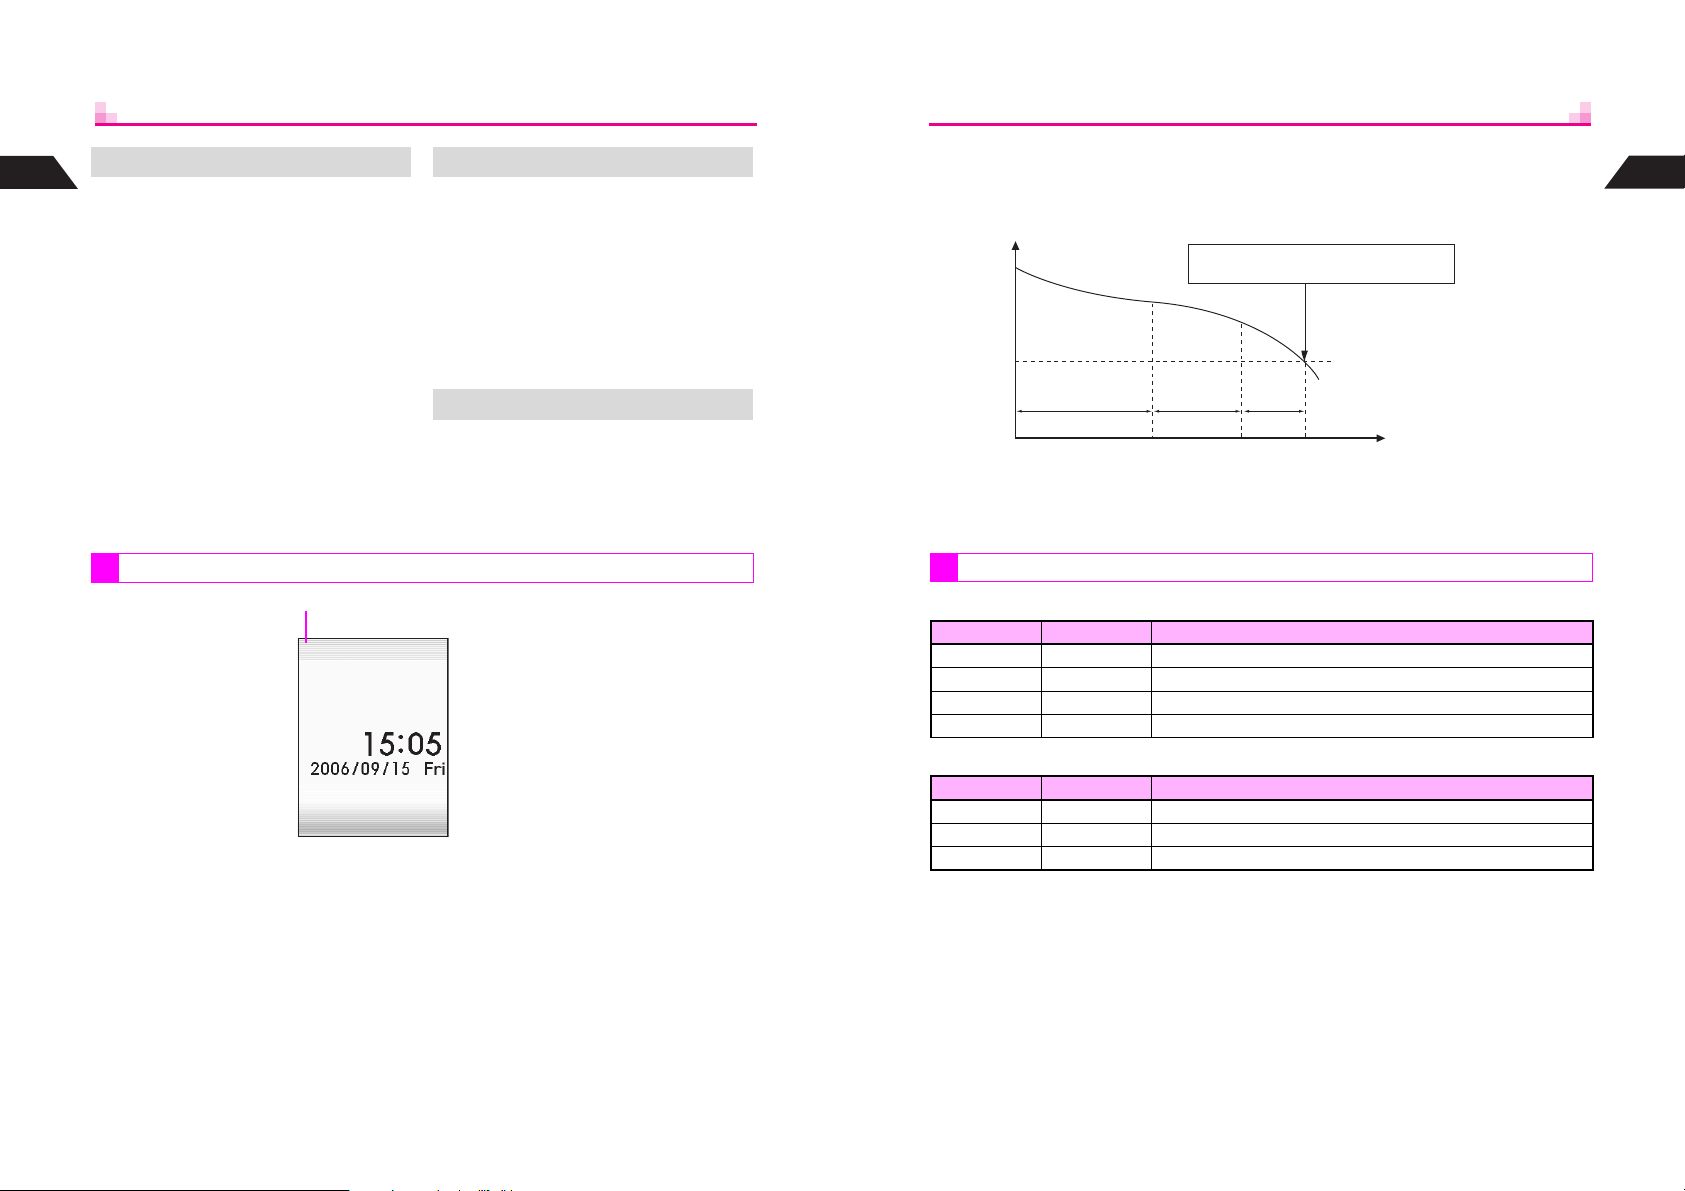
Battery Strength indicator varies as shown. Charge or replace when level is low.
Battery Strength indicator is for reference only.
Recharge Battery appears.
Charge or replace battery immediately.
Battery Voltage
Level 3
Approx. 70% Approx. 20%
Remaining Strength (at 25]C)
Level 2 Level 1 Level 0
Approx. 10%
Minimum Operating Voltage
M L K J
Hours of Use
C Battery Strength & Environment
At low temperatures, battery is consumed faster.
At high temperatures, battery lasts longer.
Getting Started
1
Battery Strength
Signal Strength (see P.1-11)
J n
When battery runs out, Recharge Battery appears and short beeps sound. Handset
shuts down after 20 seconds.
1-10
Small Light & Battery Strength Indicator
C Handset Power On
Small Light Indicator (J) Conditions
Off Flashes Ambient temperature is outside the range of 5]C to 35]C
Flashes red Flashes Battery life has ended, or battery is defective
Illuminates red Flashes Charging
Off On Charging completed
C Handset Power Off
Small Light Indicator (J) Conditions
Flashes red Off Battery life has ended, or battery is defective
Illuminates red Off Charging
Off Off Charging completed
1-11
Page 20
1
Installing & Removing Battery
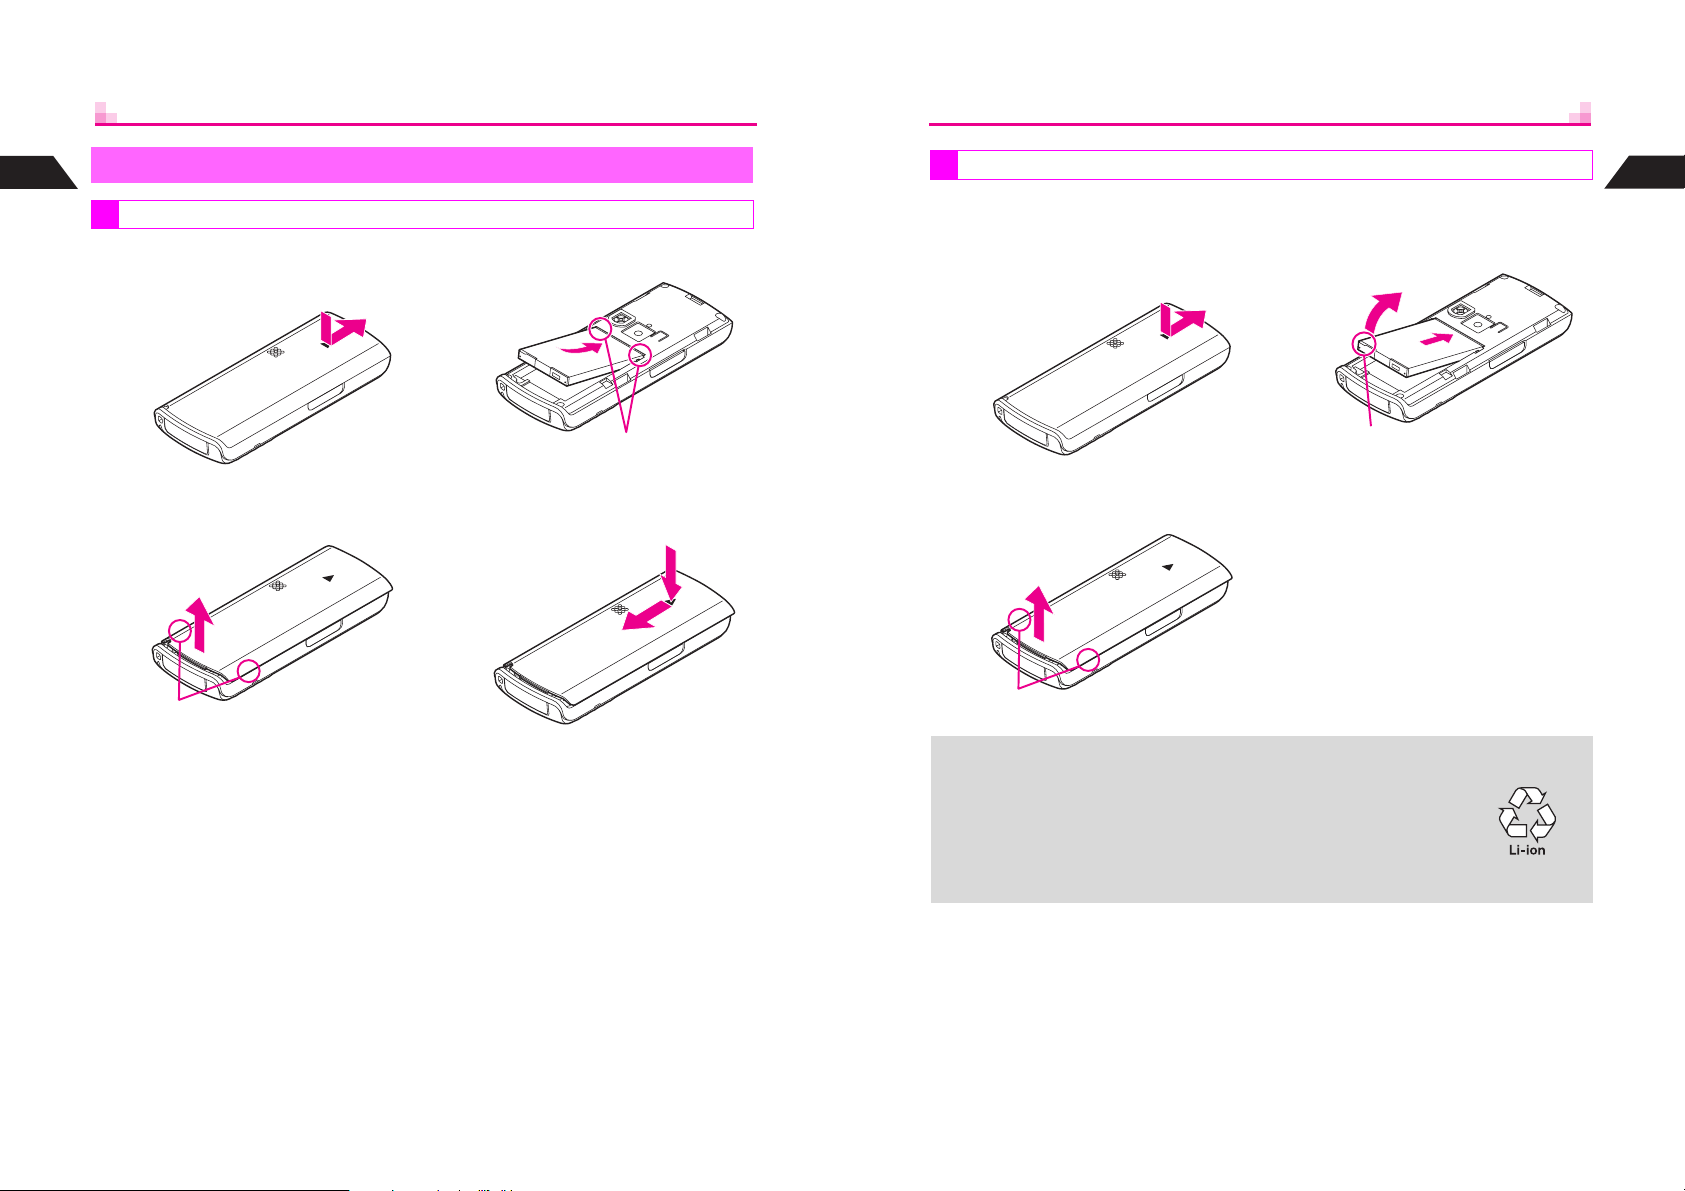
Getting Started
Inserting
Removing
^ Always make sure handset power is off before opening handset.
^ Do not remove battery immediately after saving files, sending messages, etc.
Getting Started
1
Press down and slide cover as
1
shown until it clicks
Lift and remove cover as
2
shown
^ Grasp here and lift as shown.
Insert battery
3
^ With printed side up, fit tabs into
battery cavity slots.
Close cover
4
f
^ Position and slide the cover as shown
until it stops.
e
Press down and slide cover as
1
shown until it clicks
Lift and remove cover as
2
shown
^ Grasp here and lift as shown.
This product requires a lithium-ion battery.
+
Lithium-ion batteries are a recyclable resource.
^ To recycle a used lithium-ion battery, take it to any shop displaying
the symbol shown to the right.
^ To avoid fire or electric shock, do not:
B Shor t-circuit battery
B Disassemble battery
Remove battery
3
f
e
^ Grasp Battery Tab and lift as shown.
1-12
1-13
Page 21
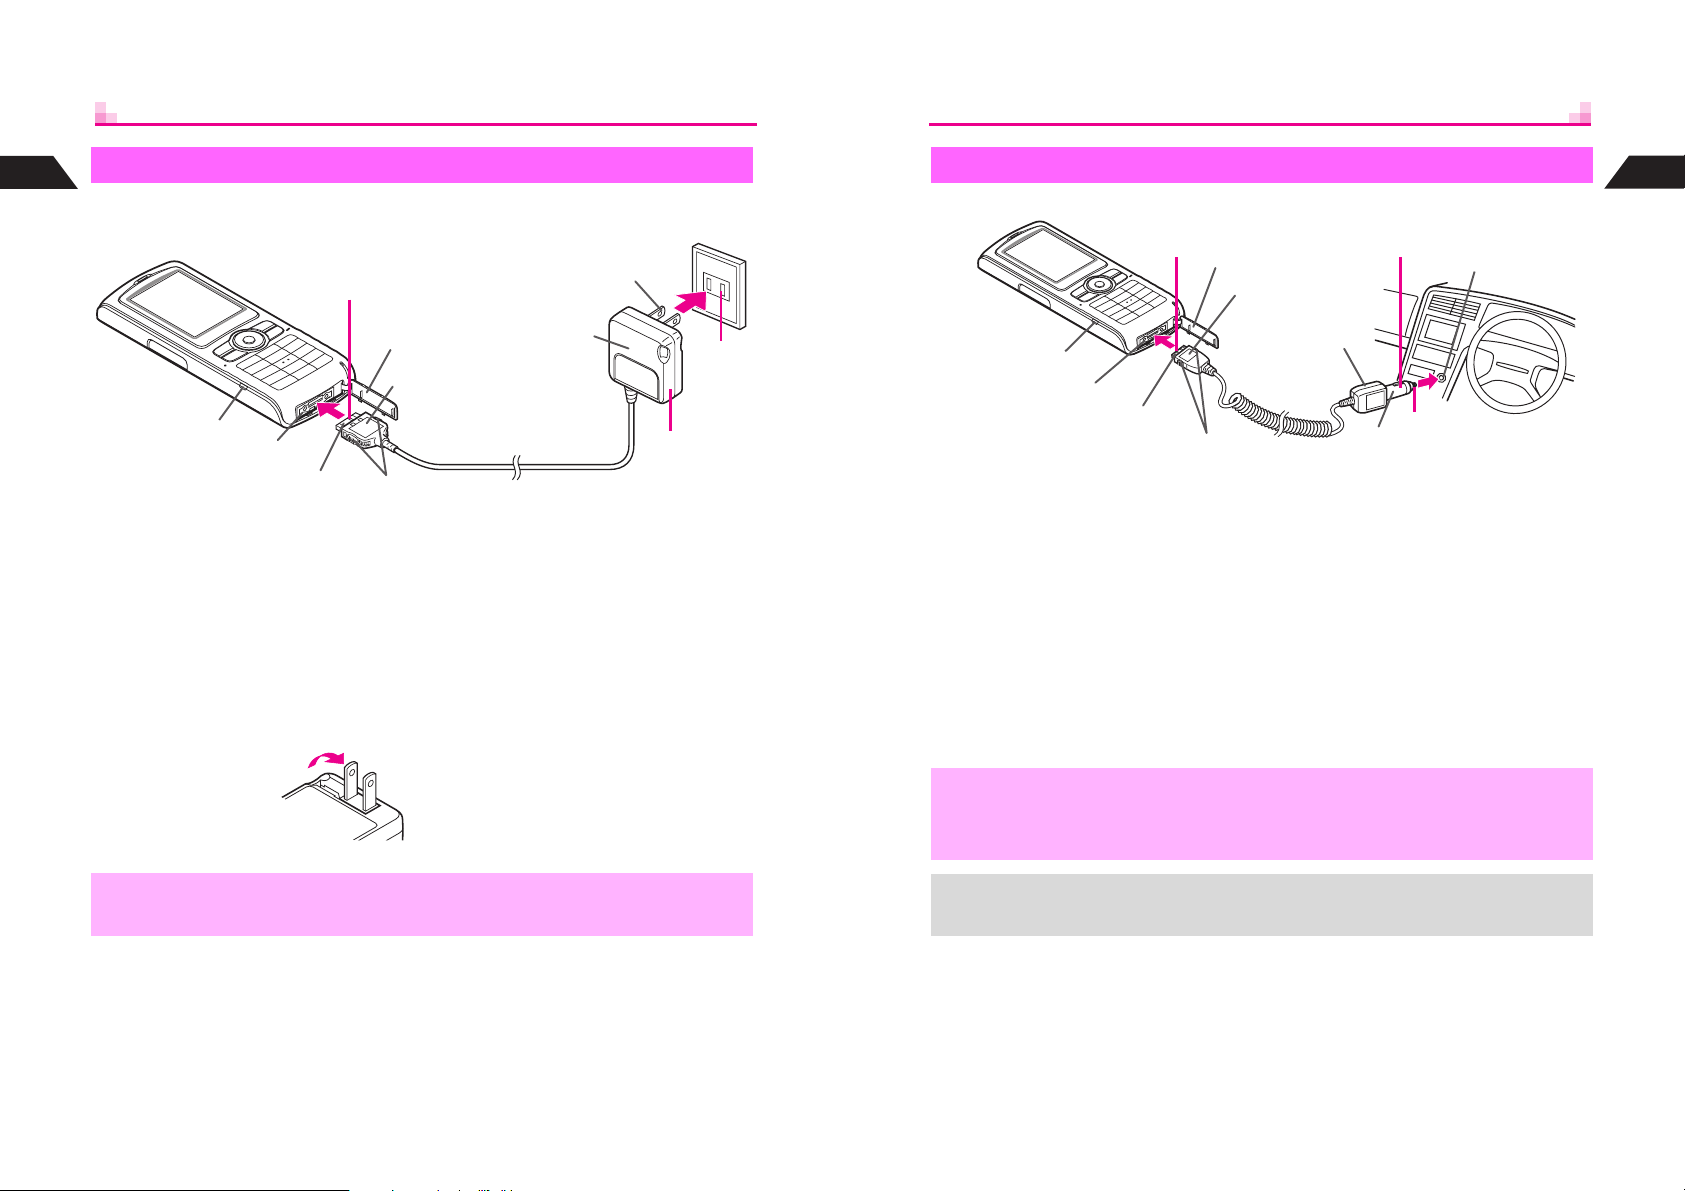
1
Rapid Charger
Getting Started
Use specified Charger only.
1
AC 100V Outlet
Blades
In-Car Charger
Use specified In-Car Charger only.
1
Terminal Cover
Printed Side Up
2
Cigarette Lighter
Socket
Getting Started
1
Small Light
External Device Connector
Charger Connector
Open Terminal Cover and
1
insert Charger connector
^ Squeeze release tabs and insert
connector fully.
Plug Charger into AC outlet
2
^ Charging starts and Small Light
illuminates red (see P.1-11). Charging
takes approximately 115 minutes.
^ Charging is complete when Small Light
goes out.
^
Extend Charger
blades. (Fold
back when not
in use.)
,
Do not pull, bend or twist Rapid Charger cord.
Terminal Cover
Printed Side Up
Release Tabs
3
Rapid Charger
2
3
After Charging
Unplug Charger from the AC
outlet, then handset
^ Squeeze release tabs and pull
connector straight out.
^ Replace Terminal Cover to protect
External Device Connector.
Small Light
External Device Connector
Charger Connector
Open Terminal Cover and
1
insert Charger connector
^ Squeeze release tabs and insert
connector fully.
Plug Charger into cigarette
2
lighter socket
^ Use In-Car Charger inside vehicles with a negative earth only.
,
+
^ Disconnect Charger before leaving vehicle to prevent charging with engine off.
^ Avoid charging battery inside extremely hot vehicles.
^ Never use handset while driving.
^ For more information, see In-Car Charger manual.
^ Use optional In-Car Holder to secure handset.
Release Tabs
In-Car Charger
3
4
Plug
Start car engine
3
^ Charging starts and Small Light
illuminates red (see P. 1- 1 1 ). Charging
takes approximately 115 minutes.
^ Charging is complete when Small Light
goes out.
After Charging
4
Unplug Charger from cigarette
lighter socket, then handset
^ Squeeze release tabs and pull
connector straight out.
^ Replace Terminal Cover to protect
External Device Connector.
1-14
1-15
Page 22
Handset Power On/Off
1
Getting Started
Turning On
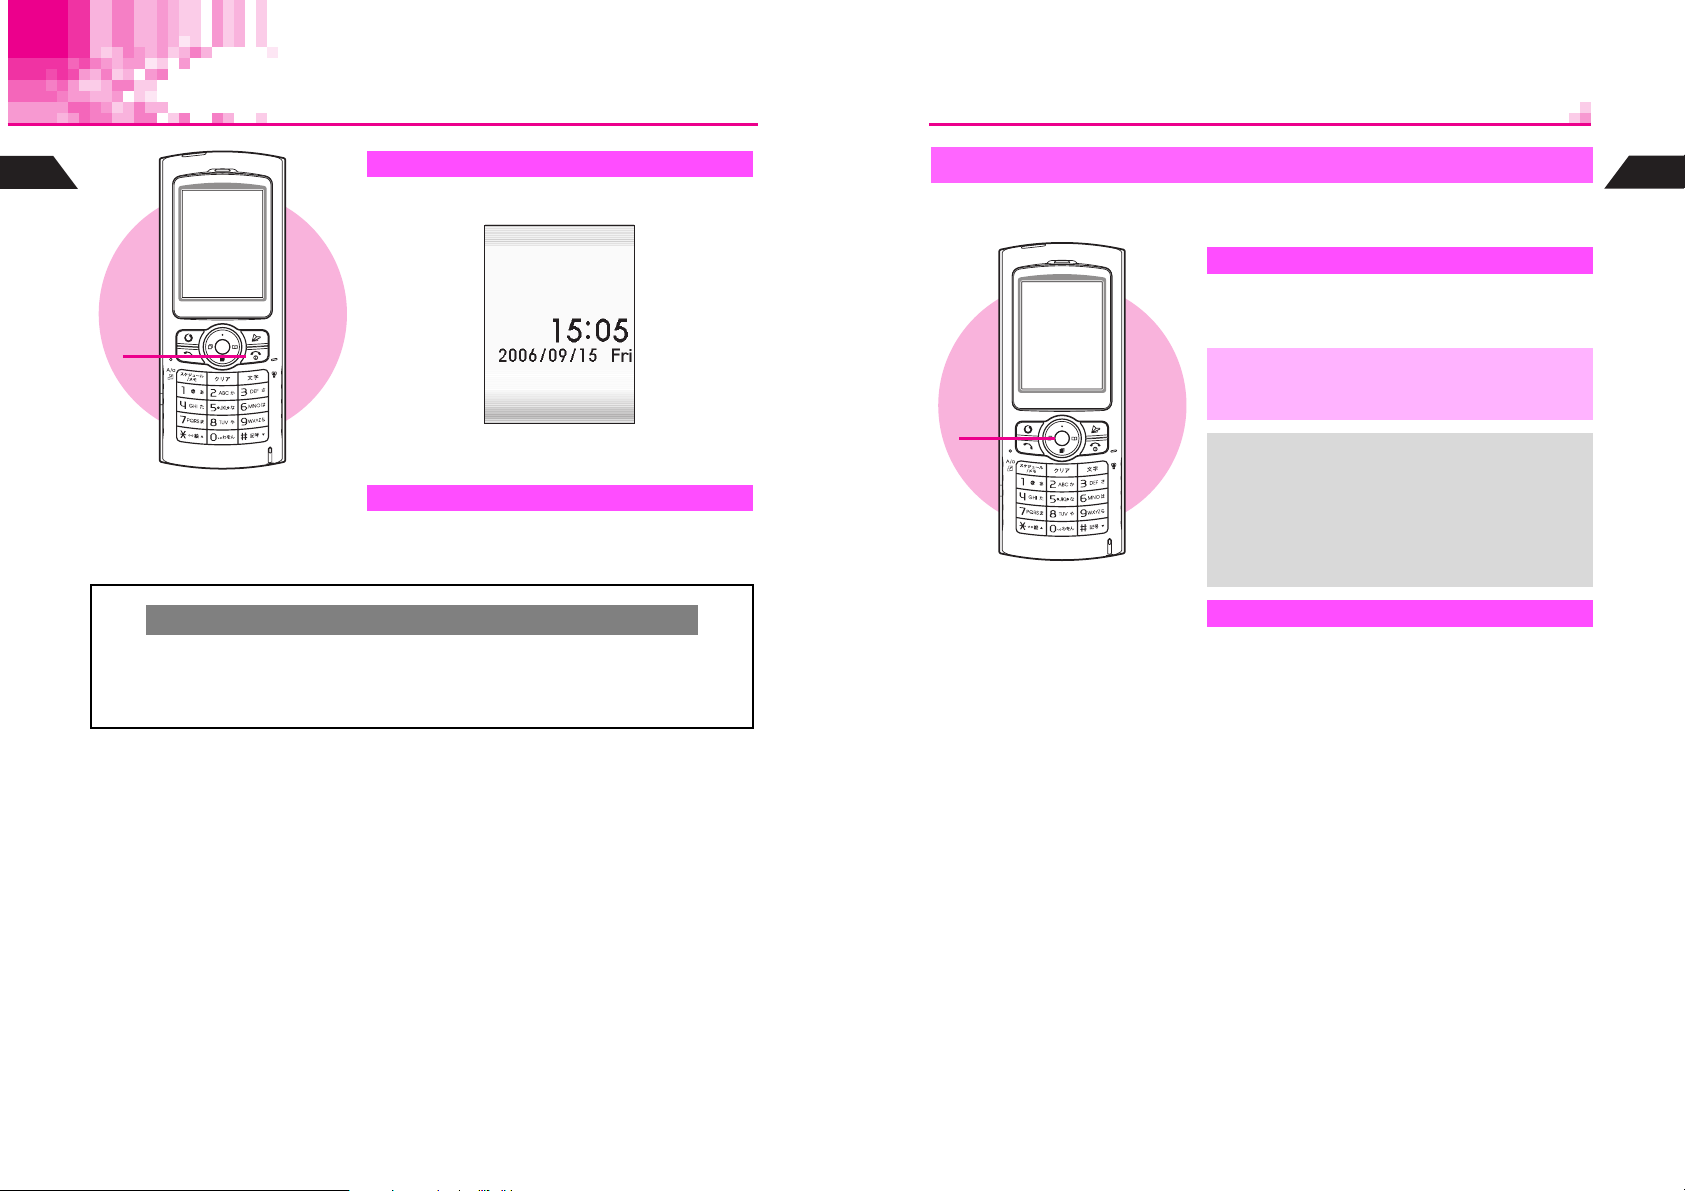
Press g for 1+ seconds
1
J n
1
Backlight illuminates; after Power On Graphic,
handset enters Standby (shown above).
Turning Off
Press g for 2+ seconds
1
After Power Off Graphic, handset shuts down.
Clock Settings
C If date and time have not been set, a confirmation appears after Power On Graphic.
Choose 1Ye s A Press b A Perform from Step 2 on P.1-18
B Choose 2No A Press b A Standby appears without date and time
^ Unless otherwise noted, operations in this manual are described with Clock set.
Key Guard
Use Key Guard to lock handset keys and prevent accidental operation/function
activation.
Activating
Press b for 1+ seconds
1
n appears and Key Guard is set.
Emergency calls (110, etc.) are not possible
,
1
+
Canceling
1
when Key Guard is active. For more, see
P. 2- 3 "Emergency Calls."
When Key Guard is Active
^ Incoming calls temporarily cancel Key
Guard. To answer calls, press keys for Any
Key Answer (see P. 2 -6 ). Key Guard
reactivates after the calls end.
^ Handset power does not turn off even if
g is pressed for 2+ seconds.
Press b for 1+ seconds
n disappears.
Getting Started
1
1-16
1-17
Page 23
Clock Settings
Handset Menus
1
Getting Started
1
Index Menu H Functions A Clock
Select 9Clock Settings and press
1
Enter the year
2
5
J
g
b
n
Index Menu
Access functions/operations from Index Menu.
Press b
1
JG
Q
n
Getting Started
1
2
3
4
Example: Year 2006 A 2006
Enter the month and day
3
Example: September 15 A 0915
Enter the time
4
^ Apply 24-hour clock format.
Example: 3:05 PM A 1505
Press b
5
^ Clock starts and handset returns to Standby.
^ The day of the week is set automatically.
Cursor
C Use F or E to move cursor (C or highlight bar). Enter or edit characters at the
cursor position.
When removing the battery for replacement, etc., Clock settings remain. However,
,
+
should the handset go without power for an extended period of time (approximately
one month), Clock will need to be reset.
^ When Clock has not been set, --/-- --:-- appears for date and time.
^ Choose a Clock type and layout or use Calendar for Standby (see P. 6 - 3).
^ Clock can be set during calls.
1
2
C Index Menu Items
Briefcase Use Schedule, Calculator, Alarm, etc.
Mail Create and send messages, check sent/received messages, etc.
Settings Customize display, sounds, etc.
Infrared
Functions
Tel Op s Create or search Phone Book entries. Check Redial and Call History.
Vodafone live! Use Mail or Station
My Files Open files saved on handset
Simple Mode Activate Simple Mode
Exchange information and data via infrared
Functions Menu opens (see P.1-20). Check and change settings of
various functions.
3
Select
Index Menu opens.
Use G to select an item
2
C To open Handy Features menu, press e.
Press b
3
Menu for each item opens.
1-18
1-19
Page 24
1
g
Getting Started
Handy Features Menu
C In Index Menu, press e 3 to open Handy Features menu.
JG
Q
n
JG
Q
HandyFeatures
1SimpleMode
2DisplayPatterns
e
3UsefulDiary
(Q)
4ChatMailLo
5MailTemplates
n
g
JE
Q
SimpleMode
1On
2Off
b
n
C Selecting Functions by Numbers
In Standby, press b to open Index Menu, then enter numbers. Corresponding
function or menu opens.
J n
b13
JE
Q
F13:SoundEffects
[On]
1KeypadSound
2ErrorTone
3PowerOn
4PowerOff
5SoundVolume
6SetLEDtoSound
n
Getting Started
1
Select
Index Menu
Select
Handy Features
Select
Functions Menu
In Index Menu, select Functions and press b. Use Functions Menu to access
handset functions and settings. A number is assigned to each function.
C Selecting First Layer Items
Select an item with E and press b.
JE
Q
*
0
1
2
g
3
g
4
5
g
6
7
8
n
Selected item is
hi
hlighted.
JE
Q
0
1
2
g
3
g
4
5
g
6
7
8
n
JE
Q
*
0
1
3
b b E
g
5
6
g
7
8
9
First Layer
Related Functions
n
Select
Return to Standby
C Press g to return to Standby (see P. 1 -1 6 ) from function windows, menus, etc.
^ When a confirmation appears, choose 1Yes and press b. Handset returns to
Standby.
Soft Keys
Soft Key functions appear at the bottom of Display.
JE
Q
LongMail
Y[NoAddress]
Z[NoSubject]
G[NoBodyText]
H[NoAttach]
ConfirmDeliveryK
SaveAutoSendK
Save
When W appears while creating Original Ring Tone, etc., press j to execute the
assigned operation.
Select
Send
n
When h Select appears, press b to open selected menu
items, execute functions, etc.
When B
When L Auto appears, press q to execute the function.
Press d to select or execute the assigned function or
operation.
Press e to select or execute the assigned function or operation.
Convert
appears, press D to convert kana to kanji, etc.
1-20
1-21
Page 25
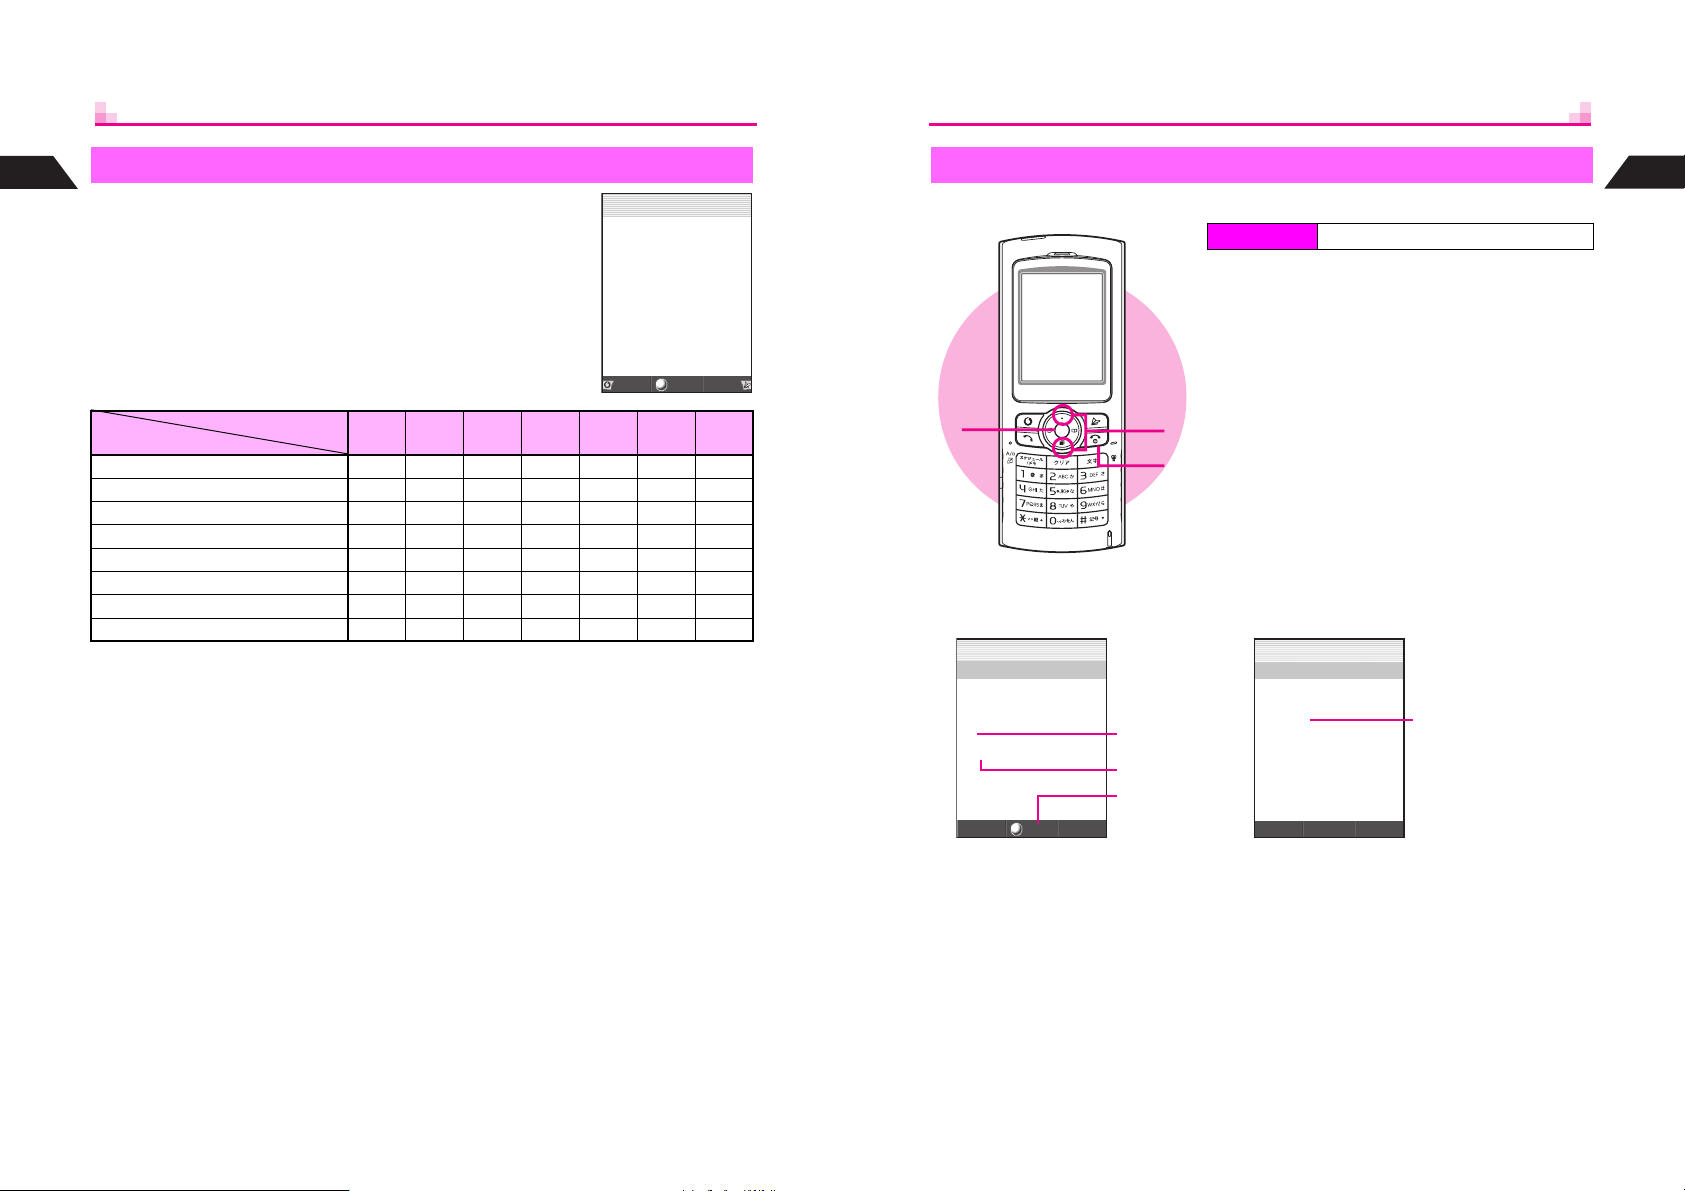
1
Quick Operations
Getting Started
In Standby, enter numbers to access functions. Accessible
functions vary by entered digits. (Functions shown to the right
appear for single digits.) To activate functions, press
corresponding Soft Key (example: press f for Speed Dial).
Digits
Function
Speed Dial (see P.5-14) !!#####
Spending Memo (see P.11-31) !!!!!##
Add to Phone Book (see P. 5 -3 ) !!!!!!!
Entry Search
Calculator (see P.11-30) !!!!!!#
Send Touch Mail
Set Alarm
Schedule
1
Only Katakana Search is available.
2
Press e 1 or d 2 after entering a number. Save entries to Touch Mail List
(see P. 13 - 12) beforehand.
3
Enter four digits (24-hour format) and press e M to set Alarm. Full appears when
five entries exist.
4
Enter four digits for month and day and press d O to view entries up to 12 months
forward of current date; save new entries.
1
(see P.5-12) !######
2
(see P.13-13) !######
3
(see P.11-6) ###!###
4
(see P.11-16) ###!###
1 2 3 4 5 - 6 7 - 12 13 - 24
J
Q
J:SpeedDial
X:Spendin
S:AddtoPhoneBook
E:EntrySearch
g
Lon
g
Calc
n
Memo
y
Sk
1
Guide
Learn when/how to use Keypad functions/shortcuts.
Index Menu H Functions A Settings 1
Select 0Guide and press b
1
Manner Mode guide appears.
Use E to toggle guides
2
Press g to exit
3
1
2
3
C Display Contents
JE
Q
:
Guide
F3
*
b
Redial
Show
n
Target Key
Function
Press b to use
the function
(Available for
some functions)
JE
Q
:
Guide
F3
*
ging
Rin
K
Hold
n
Current Handset Status
Action: while handset is
ringing, press indicated
key to put caller on hold.
Getting Started
1
1-22
1-23
Page 26

Security Code
9999 or the 4-digit number selected at initial subscription; required to use/change
some handset functions.
1
Getting Started
^U appears when Security Code is entered.
^ If Invalid Code appears, try again.
^ Change Security Code as needed (see P.10-2).
^ Write down Security Code. If lost, contact Vodafone Customer Center, General
,
Information (see P.15-25).
^ Do not reveal Security Code. Vodafone is not liable for misuse or damages.
1-24
Page 27

Basic Handset Operations
2-1
Page 28

Initiating a Call
2
Basic Handset Operations
1
2
3
4
Confirm handset is on
1
^ Check signal strength.
^ Handset will not transmit when s, s, n or Q
appears (see P.15-8).
Enter a phone number
2
J
Q
J:Dial
:
AddtoPhoneBook
W
n
03123XXXX1
Calc
^ Include area code for all numbers.
Sending/Blocking Caller ID
^ Press the following keys when placing a call.
B Send......186
B Block......184
Confirm the number and press f
3
Correcting Numbers
^ Use F to move cursor and press i to delete
the digit above the cursor.
^ Press i for 1+ seconds to delete the entire
number and return to Standby.
^ If you misdial, press g to hang up and try
again.
Busy Numbers
^ Press g to end the call and try again later.
^ Do not cover handset microphone (see P. 1- 3 E) while talking on the phone.
,
+
^ Avoid covering area over Internal Antenna (see P. 1 -5 K).
^ Voice quality is affected depending on how and where handset is used.
^ Use Instant Display to see Call Time and Call Charge (see P. 2- 1 9, P.2-20).
^ Confirm Total Talk Time (see P.2-19) and Total Charges (see P. 2- 2 0 ).
^ To use Speaker Phone or Speaker during calls, see P.7-22.
^ For information on international calls, contact Vodafone Customer Center, General
Information (see P.15-25).
Emergency Calls
Emergency calls (110, 119, 118, etc.) are possible even while some handset
restrictions are active.
Active Restriction Emergency Calls
Key Guard (see P.1-17) Not Possible
Off-Line Mode (see P.3-6) Not Possible
Keypad Lock (see P.10-2) Possible
Auto Key Lock (see P.10-3) Possible
Restrict Dial (see P.10-4) Possible
2
Basic Handset Operations
2-2
Press g to end call
4
2-3
Page 29
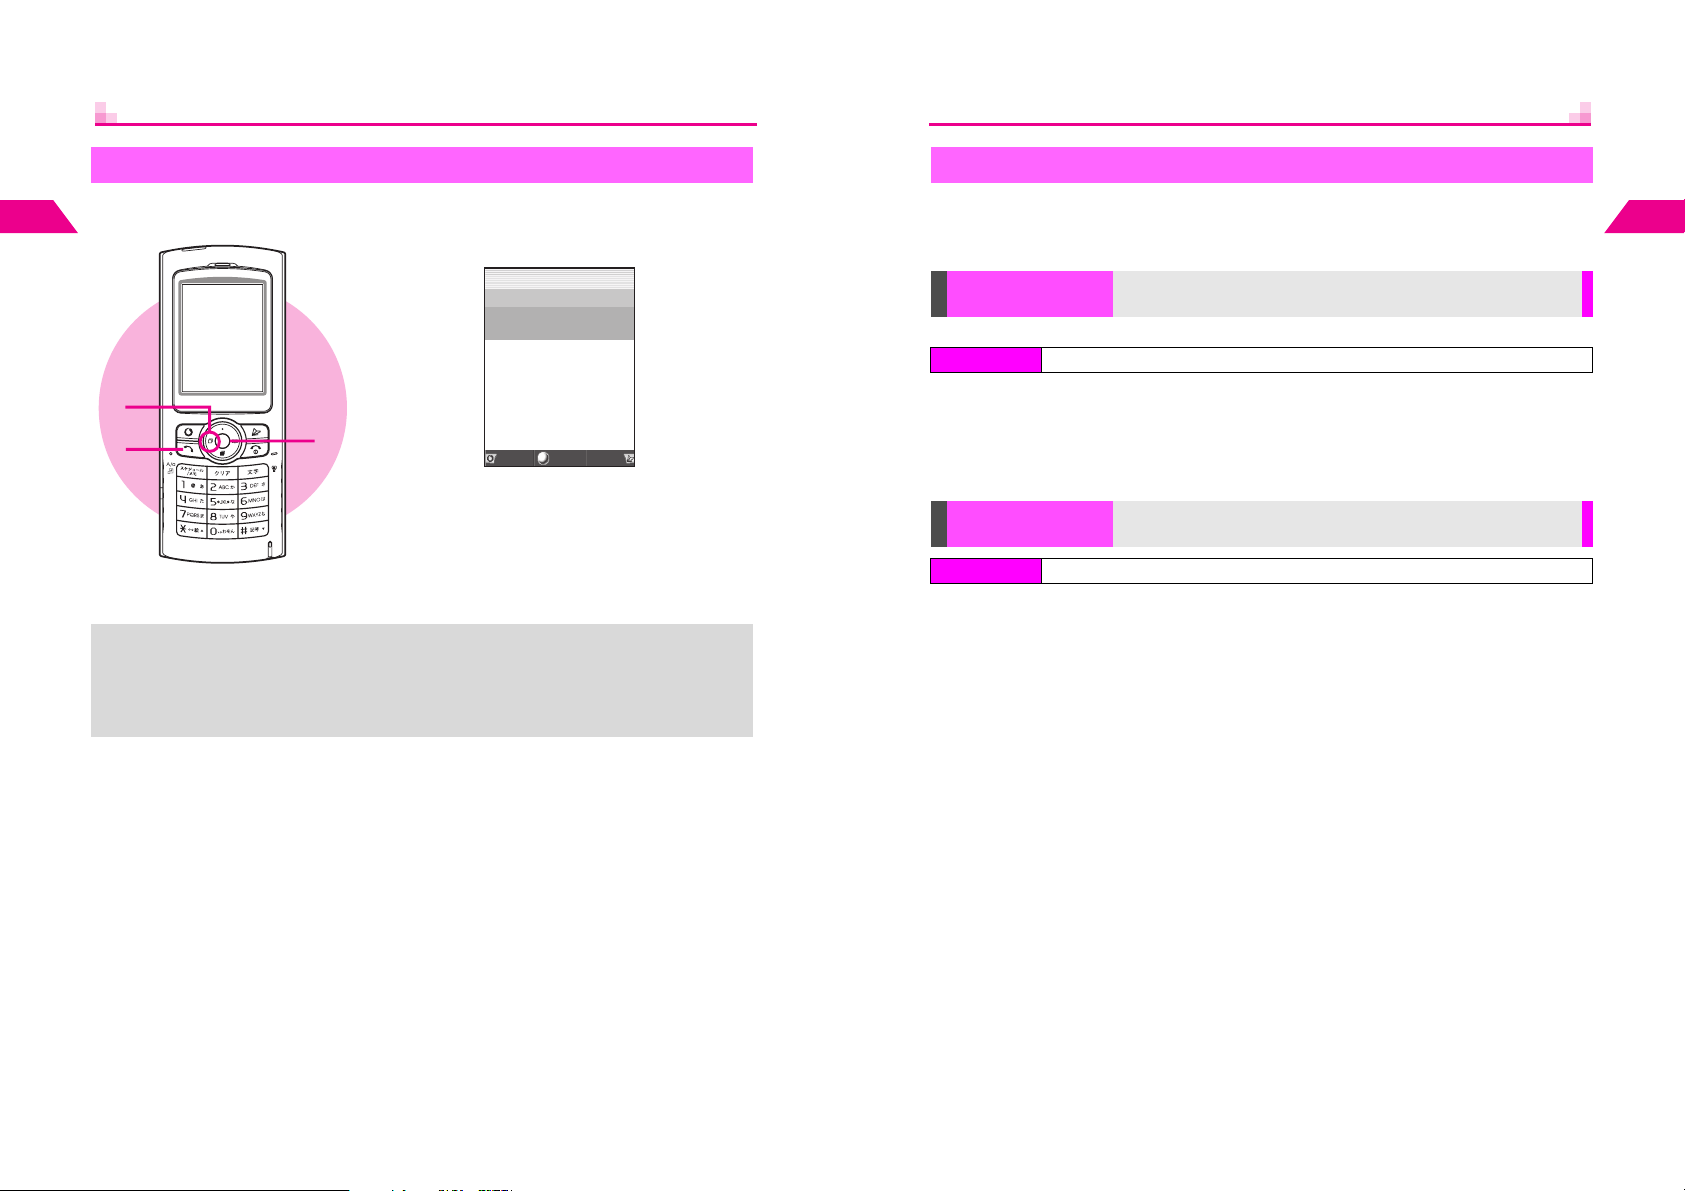
Redial
Place calls from Redial. Up to 20 recently dialed numbers are saved in Redial.
2
Basic Handset Operations
Press B (F)
1
JE
Q
Redial
2:9/2215:2
UedaMikio
1:9/2118:45
*
3123XXXX2
1
3
+
2
Dialed numbers appear with date and time.
^ Name appears if saved in Phone Book.
Select a record and press b
2
Press f
3
Number is dialed.
^ When the same number is dialed more than once, only the last record appears.
^ Names in Secret Mode entries appear only in Secret Mode.
^ Records remain even after handset power is turned off.
^ When there are 20 records, oldest records are replaced by new ones. To delete
records manually, see P.2-14.
Memo
X
Select
*
Received
Menu
n
International Call & Send With Code
Preset the number to add before dialing a phone number saved in Phone Book. Use
International Call to place international calls and Send With Code to add one prefix
such as 186 (Send Caller ID) or 184 (Block Caller ID).
Setup Preset
Index Menu H Functions A Services A Setup Preset
Preset the number to add before a phone number
KInternational Call: 0046010, Send With Code: None
Select 1International Call or 2Send With Code A Press b A Enter
a prefix A Press b
C To change the prefix, select 1International Call or 2Send With Code A Press b A
Press i (Long Press) A Enter a new prefix A Press b
^ Enter up to seven digits for International Call and up to six digits for Send With Code.
International Call/
Send With Code
Index Menu H Tel Op s A Entry Search
Use Setup Preset number (above) to dial from Phone Book
Open an entry (perform Steps 2 - 3 on P.5-11) A Press b I A
Select International Call or Send With Code A Press b
2
Basic Handset Operations
2-4
2-5
Page 30
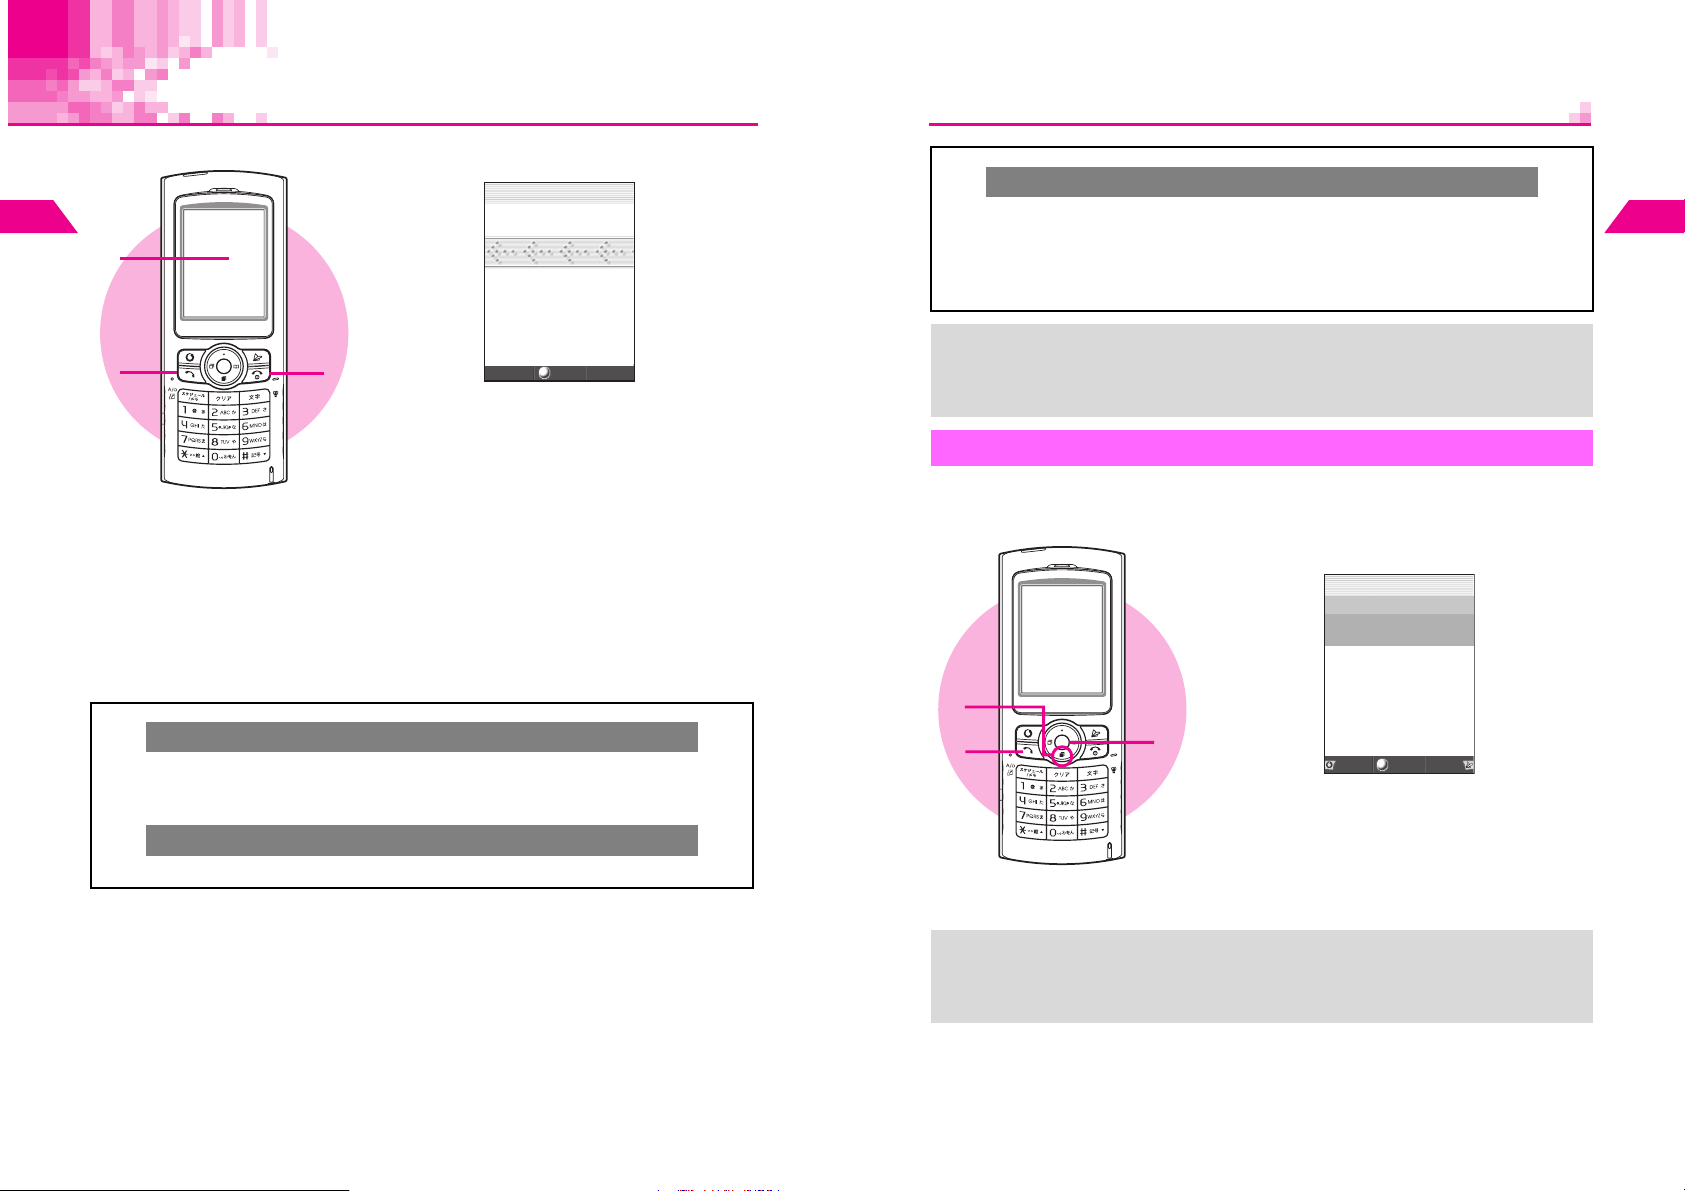
2
Basic Handset Operations
1
Incoming Call
A call arrives
1
J
Q
<<IncomingCall>>
n
C Follow these steps while handset is not receiving calls.
Press b A Select Functions A Press b A Select 1Sounds A Press b A
0
Select
7
Select
^ Any Key Answer is active by default.
To Activate/Cancel Any Key Answer
Call Functions A Press b A Select 1Incoming Call A Press b A
Any Key Answer A Press b A Choose 1On or 2Off A Press
b
2
Basic Handset Operations
2
C Press C (up) or D (down) to adjust volume.
^ Ring Tone Level setting (see P. 7- 2 ) changes accordingly.
^ Cancel Manner Mode (see P. 3-3 ) to adjust level.
C Press j to instantly mute Ring Tone for that call only.
3
Number appears when Caller ID is sent.
^ Name appears if saved in Phone Book.
When Message Recorder is Active
^ Outgoing message plays and recording starts
(see P. 11 - 4 ).
Press f
2
^ Alternatively, press any of the following keys
(Any Key Answer):
0 - 9, q, p, k, i, e, d,
B, A
C Handling Incoming Calls: see P. 2 -8 - 2-9
Press g to end call
3
Ring Tone Volume
Quick Silent
03123XXXX1
Menu
^ Up to 20 incoming call details are saved (see P.2-14).
+
^ Activate Delayed Ringer (see P.2-10) to delay handset ringer for three seconds for
incoming calls from numbers not saved in Phone Book or Owner Profile.
^ To customize Ring Tone and Small Light pattern, see P. 7- 2 - 7-5 "Call Functions."
Call History
Up to 20 received calls are saved in Call History. When Caller ID is sent, numbers
appear. Place calls directly to those numbers.
Press D (W)
1
3
2
1
Received numbers appear with date and time.
^ Name appears if saved in Phone Book.
Select a record and press b
2
Press f
3
Number is dialed.
JE
Q
MissedCall
3:9/2317:2
SuzukiItirou
2:9/2211:2
UedaMikio
1:9/2112:45
*3123XXXX1
X
n
*
*
Memo
SelectRedial
Menu
2-6
+
^ Names in Secret Mode entries appear only in Secret Mode.
^ Records remain even after handset power is turned off.
^ When there are 20 records, oldest records are replaced by new ones. To delete
records manually, see P.2-14.
2-7
Page 31

Handling Incoming Calls
Placing Callers on Hold
Callers placed on hold hear a message explaining that you cannot answer their call
2
right away and asking them to hold or call back later.
Basic Handset Operations
When a call arrives, press g
1
Hold tone sounds for five seconds.
^ No tone sounds when Ring Tone Level is set to
Silent.
Press f to answer the call
2
^ Alternatively, press keys for Any Key Answer
1
(see P. 2- 6 ).
2
,
Calls on hold end if callers hang up.
Rejecting Calls
C While handset is ringing/vibrating, press b A Select 3Reject Call A Press b
Quick Recorder
Activate Message Recorder (see P.11-3) for one time only to record caller messages
on handset.
When a call arrives, press bj
1
Outgoing message plays and recording starts.
C Press bk to play recorded messages (see
P. 11 - 4 ).
1
When less than 4 seconds remain or 20 messages are recorded, Message Recorder
,
is disabled.
2
Basic Handset Operations
2-8
2-9
Page 32

Delayed Ringer
Engaged Call Operations
Activate Delayed Ringer to help screen one-ring sales calls. Handset ringer is delayed
for three seconds for incoming calls from numbers not saved in Phone Book or Owner
Profile. Delayed Ringer is Off by default.
2
Basic Handset Operations
Index Menu
Select 6Delayed Ringer and press
1
Choose 1On or 2Off and press b
2
H Functions A Sounds A Call
Functions A Incoming Call
1
2
b
Earpiece Volume
Adjust Earpiece volume (5 levels).
^ Volume level remains as set even after handset power is turned off.
^ Earpiece volume is Level 5 by default.
During a call, press C or D
1
Press C (up) or D (down) to adjust
2
volume
Each press changes volume by one level.
^ Wait five seconds or press b to save the level.
1
2
Adjusting Earpiece Volume in Standby
C Press b A Select Functions A Press b A Select 1Sounds A Press b A
Select 1Vol um e A Press b A Use E to adjust level
^ Wait five seconds or press b to save the level.
2
Basic Handset Operations
2-10
2-11
Page 33

2
Voice Memo
Basic Handset Operations
1
2
During a call, press
1
Recording starts.
Press b or k to stop
2
^ Voice Memo recordings remain even after
handset power is turned off.
^ To play/delete Voice Memo, see P.11-4 - 11-5
"Playing Messages."
k
for 1+ seconds
Notepad Memory
Save up to three sets of numbers during a call.
^ Use up to 24 digits (0 - 9, U and #) per entry.
^ When full, oldest entries are deleted to make room for new ones.
^ Save phone numbers from Notepad Memory to Phone Book.
During a call, use Keypad to enter
1
digits
Press k
2
Entered digits are saved to Notepad Memory.
^ When the current call ends before Step 2,
entered digits are saved automatically.
2
1
2
Basic Handset Operations
2-12
Opening Entries
Index Menu H Tel Op s
Select 6Notepad A Press b
^ Up to three sets of numbers appear, most recent first. (If there is no entry, Notepad
Memory Not Found appears.)
^ Press f to dial the number.
^ Alternatively, press Be ? to open Notepad Memory.
C Press g to exit.
C To save to Phone Book, select an entry A Press d I A Select Add to Phone
Book A Press b A Perform from Step 4 on P. 5- 8
C
To delete, select an entry A Press d
A
Choose 1Yes A
Open saved Notepad entries
I A
Press
b
Select
Delete
or
Delete All A
Press b
2-13
Page 34

Redial & Call History
2
Opening Redial Records
Press B (F)
1
Basic Handset Operations
1
1
Delete
Index Menu H Tel Op s
Select 4Redial or 5Call History A Press b A Press d I A
Select Delete or Delete All A Press b A Choose 1Yes A Press b
2
2
Delete Redial/Call History records
Dialed numbers appear with date and time.
^ Name appears if saved in Phone Book.
^ When there is no Redial record, Call History
appears.
Select a record and press b
2
C Press f to dial the number.
C Press g to return to Standby.
Opening Call History Records
Press D (W)
1
Received numbers appear with date and time.
^ Name appears if saved in Phone Book.
Select a record and press b
2
C Press f to dial the number.
C Press g to return to Standby.
Call History Indicators
Completed Call Answered call
Missed Call Unanswered call (including calls screened by Delayed Ringer)
Hold Disconnected after hold
Message Recorder Recorded on Message Recorder
Reject Rejected call
Payphone Call from payphone
No Caller ID Call without Caller ID
Missed Call Notice
For missed calls, one of the following notices appears. (X indicates the number of
missed calls or recorded messages.)
Message Recorder Voice Messages: X
Missed Call Missed Calls: X
^ Press D or C to see more.
B Press f to dial the number.
B Press g to exit.
^ Press g to close Missed Call notice.
B See P.2-14 to reopen Missed Call details.
^ For more about Message Recorder, see P. 1 1- 3 .
Message Recorder &
Missed Call
Voice Messages: X
Missed Calls: X
2
Basic Handset Operations
2-14
2-15
Page 35

Simple Mode
Activate Simple Mode to reduce available handset functions
and simplify menus. Handset is limited to basic operations
(see P.2-17 - 2-18).
2
Basic Handset Operations
Activating/Canceling Simple Mode
Activating
Press b
1
Select Simple Mode and press b
2
Choose 1On and press b
3
^ Simple Mode remains active even after handset
power is turned off.
1
2
3
+
^ When Simple Mode is activated while any of the following are in use, a confirmation
appears. Choose 1Yes and press b to activate Simple Mode.
B Off-Line Mode
B Restrict Dial
B Reject Call
B Alarm
B Schedule (Alarm set)
1
Cancel Simple Mode to reactivate.
2
Security Code is required.
^ In Simple Mode, Ring Tone sounds in Pattern 1 (for incoming calls) and Mail (for
incoming mail) even when melody files in Data Folder are used.
1
(see P. 3- 6 ) B Phone Book Lock
1, 2
(see P.10-4) B Accept Call
1, 2
(see P.10-5) B Secret Mode2 (see P. 10 - 6 )
1
(see P.11-6) B Auto Power On/Off1 (see P.11-10, P.11-11)
Canceling
1
2
3
1
(see P.11-12)
Press b
Select 4Standard Mode and press
Choose 1Yes and press b
1, 2
1, 2
(see P.10-5)
JE
Q
n
j
0
1
2
g
3
(see P.10-3)
b
Simple Mode Operations
Simple Mode Menu Operations
In Standby, press b to open Simple Mode Menu.
0My Number Show handset phone number (Owner Profile is not available)
1Phone Functions
2Mail Create, reply, forward, resend and edit or delete messages (see P.2 - 1 8)
3Tools & Settings
4Standard Mode Exit Simple Mode (see P.2-16)
Sub Menus:
C
1Phone Functions
1Add to Phone Book
2Entry Search
1Incoming
3Incoming
Tone
4Manner Mode Activate/cancel Manner Mode (see P. 3- 3 )
5Message
Recorder
Although 6Voice Mail appears in Phone Functions, Voice Mail is not available on
V201SH.
2Incoming
1Recorder Settings Activate/cancel Message Recorder (see P.11-3)
2Play Play messages (see P.11-4)
Access Add to Phone Book, Entry Search, Incoming Tone, Manner
Mode and Message Recorder (see below)
Access Keypad Lock, Auto Key Lock, Wallpaper, Font Weight,
Calculator, Alarm, Clock Settings and Instant Display (see P.2 - 18 )
Save entries (see P. 5- 3 ).
Enter name, reading, up to three phone numbers and
mail addresses.
Search entries by katakana (see P. 5 -1 3 "Katakana
Search"). Only Katakana Search is available.
1Ring Tone Select Ring Tone for incoming calls (see P. 7 -3 )
Call
Mail
2Ring Tone
Level
1Ring Tone
2Ring Tone
Level
Adjust volume (see P. 7- 2 )
Select Ring Tone for incoming mail messages
(see P. 7- 3 )
Adjust volume (see P. 7- 2 )
2
Basic Handset Operations
2-16
2-17
Page 36
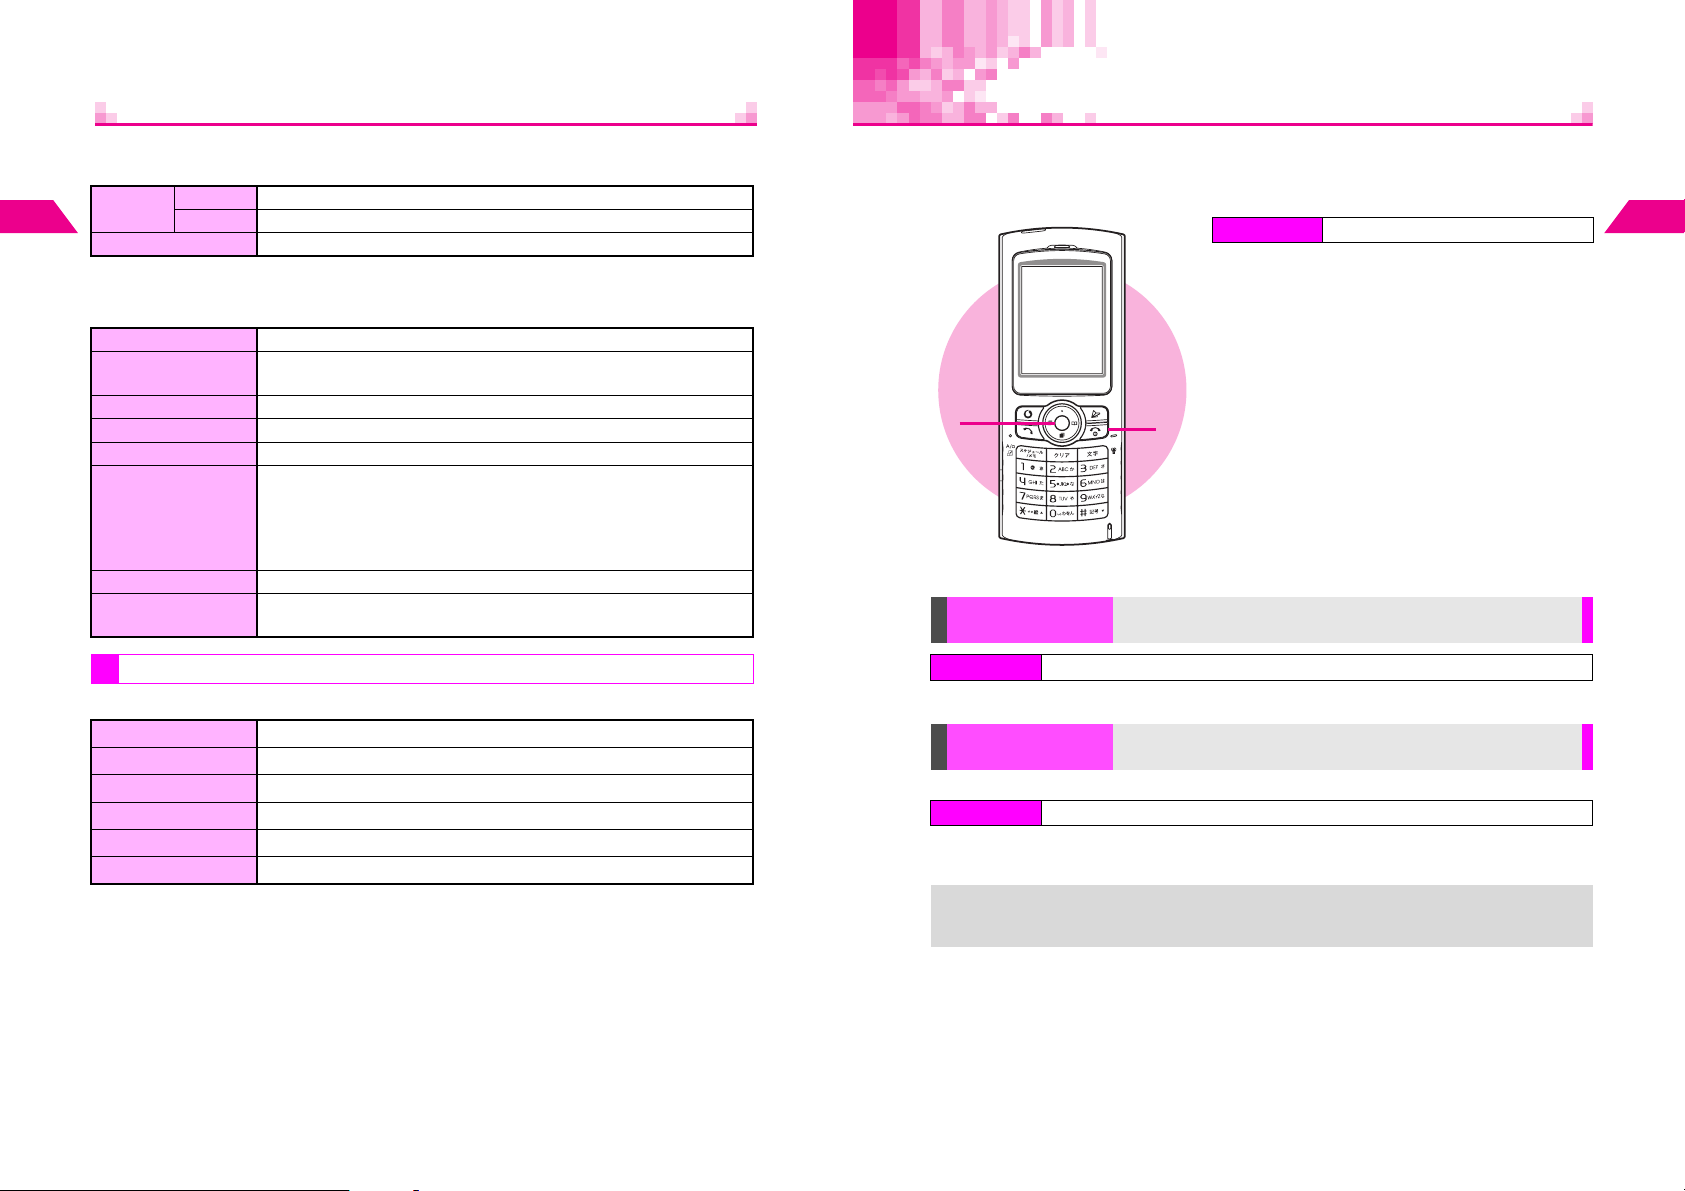
Call Time
C 2Mail
1Mail
2
Basic Handset Operations
2Write Mail Create and send Sky Mail messages (see P.13-3)
In Simple Mode, Mail Settings are disabled and cannot be changed.
1Inbox Open received messages (see P.13-21)
Sent Open sent messages (see P. 1 3- 2 1 )
2
C 3Tools & Settings
1Keypad Lock Restrict access to handset functions (see P.10-2)
2Auto Key Lock
3Wallpaper Show an image or animation in Standby (see P.6 - 2)
4Font Weight Change the weight of handset fonts (see P. 6- 6 )
5Calculator Use for basic arithmetic, percentage and tax calculation (see P.11-30)
6Alarm
7Clock Settings Enter date and time (see P.1-18)
8Instant Display
Key Assignments
In Standby:
Automatically activate Keypad Lock each time handset power is turned
on (see P.10-3)
Set Alarm to sound at a specific time.
To set, choose 1On A Press b A Enter time A Press b A
Choose 1On or 2Off (for Snooze) A Press b A Select 1Every
Day or 2Weekdays (for Weekly) A Press b A Press e j
B To cancel, choose 2Off A Press b
Automatically show estimated Call Time and Call Charge after calls
(see P.2-19, P. 2- 2 0 )
Check estimated time of the most recent call (Call Time) and all calls made since
Reset was last applied (Total Talk Time).
Call Time appears for calls made and those received.
Index Menu H Functions A Charges
Select 3Call Time and press b
1
C For all calls, select 2Total Talk Time A
Press b
Press g to exit
2
1
Reset
Index Menu H Functions A Charges A To tal Ta l k T ime
2
Reset Total Talk Time
Press b A Enter Security Code A Choose 1Yes A Press b
2
Basic Handset Operations
B Open Redial records (see P. 2 -4 )
A Search Phone Book (Katakana Search: see P. 5 -1 3 )
D Open Call History records (see P. 2 -7 )
b (Long Press) Toggle Key Guard on/off (see P.1-17)
j (Long Press) Activate/cancel Manner Mode (see P. 3- 3 )
bj Activate/cancel Message Recorder (see P.11-3)
^ Other keys are disabled except for placing calls.
^ In Simple Mode, shortcuts by Keypad and Quick Operations (see P. 1 -2 2 ) are disabled.
2-18
Instant Display
Index Menu H Functions A Charges A Instant Display
Set Call Time to appear automatically after each call
Choose 1On or 2Off A Press b
^ Call Charge also appears for calls you made.
^ Total Talk Time and Call Time remain even after handset power is turned off.
+
^ Ring time for incoming or outgoing calls is not counted. On hold time is counted.
KOff
2-19
Page 37

Call Charge
My Number & Owner Profile
Check estimated call charge of the most recent call and all calls.
Index Menu H Functions A Charges
2
Basic Handset Operations
1
Reset
Index Menu H Functions A Charges A Total Charges
Press b A Enter Security Code A Choose 1Yes A Press b
Instant Display
Index Menu H Functions A Charges A Instant Display
Choose 1On or 2Off A Press b
^ Call Time appears at the same time.
^ Total Charges and Call Charge remain even after handset power is turned off.
+
^ When the most recent call is a received call, -------Yen appears.
^ Call Charge will not appear when calls are interrupted due to weak signal.
2
Reset Total Charges
Set Call Charge to appear automatically after each call
Select 1Call Charge and press b
1
C For all calls, select 0Total Ch ar ges A
Press b
Press g to exit
2
KOff
Confirm handset phone number.
^ Save name, reading, up to three phone numbers and three mail addresses, a 7-digit
postal code, personal data and photo.
^ Create QR Codes from Owner Profile (see P. 11 - 28 ).
^ Handset phone number cannot be changed or deleted on the handset.
Index Menu H Functions
Select 0My Number and press b
1
C To open Owner Profile, press d w A
Enter Security Code
^ Owner Profile contents are similar to those of
Phone Book (see P. 5 -1 2 ).
Press g to exit
2
1
Edit, Delete, Copy
Index Menu H Functions A My Number A Details (d)
Adding/Editing Items
Enter Security Code A Press b A Select Edit A Press b A
Perform Steps 4 - 6 in "Editing Phone Book" on P.5-15
Deleting All Items Except Handset Number
Enter Security Code A Press b A Select Delete A Press b A
Choose 1Yes A Press b
Copying Items
Enter Security Code A Use F to select an item A Press b A Select
Copy A Press b A Perform from Step 5 on P.4-17
^ Image for Photo cannot be copied.
2
Add/edit, delete or copy Owner Profile items
2
Basic Handset Operations
2-20
2-21
Page 38

Manner Mode
3-1
Page 39

Minding Mobile Manners
Manner Mode
Please use your handset responsibly. Use these basic tips as a guide. Inappropriate
handset use can be both dangerous and bothersome. Please take care not to disturb
others when using your handset. Adjust handset use according to your surroundings.
^ Turn it off in theaters, museums and other places where silence is the norm.
^ Refrain from using it in restaurants, hotel lobbies, elevators, etc.
^ Observe signs and instructions regarding handset use aboard trains, etc.
3
^ Refrain from use that interrupts the flow of pedestrian or vehicle traffic.
Manner Mode
Manner-Related Features
C Manner Mode: see P.3-3
Press Manner Key to automatically mute all Ring Tones and activate Vibration mode
for incoming calls, mail, etc.
C Vibration Mode: see P.7-4
Activate Vibration mode to use handset vibration to alert you to incoming calls, mail,
etc. in public places.
C Volume Settings: see P.7-2, P.7-7
Decrease or mute Ring Tone volume for incoming calls, mail, etc. when carrying
handset in public places.
C Whisper Mode: see P.3-5
Use Whisper Mode to increase microphone sensitivity, allowing you to lower your
voice and speak softly when you must use handset in public places.
C Off-Line Mode: see P.3-6
Use Off-Line Mode to temporarily suspend all handset transmissions. In Off-Line
Mode, incoming/outgoing calls and Vodafone live! transmissions are blocked.
C Message Recorder: see P.11-3
Use Message Recorder to handle incoming calls when it is inappropriate or unsafe to
answer.
Activating & Canceling
1
Activating
Press j for 1+ seconds
1
i appears and Manner Mode is set.
i
J n
jfh
^ The following indicators appear as set in
Manner Settings (see P. 3- 4 ).
j
Message Recorder
h Silent g Rising Tone
Canceling
Press j for 1+ seconds
1
i disappears and Manner Mode is canceled.
f Vibration
3
Manner Mode
3-2
Activate or cancel Manner Mode in Standby or mail windows (Mail Box, message
+
window, etc.).
When Manner Mode is Active
C Power On/Off and error tones as well as Keypad Sound are muted.
C Settings for Manner Mode are applied to: Message Recorder, Ring Tone Level,
Vibration, LED Indicator, Whisper Mode and Sound Volume.
C When Message Recorder is recording messages, the other party's voice is heard
through Earpiece.
3-3
Page 40
Manner Mode Settings
Customize Manner Mode settings.
Default Settings:
Message Recorder
3
LED Indicator Small Light Whisper Mode On Sound Volume Silent
Manner Mode
Message Recorder
On Ring Tone Level Silent (All) Vibration On (All)
Activate or deactivate Message Recorder
LED Indicator
Index Menu H Functions A Settings 2 A Manner Settings A LED Indicator
Flash Small Light for incoming communications
Select 1Normal, 2Small Light or 3Off A Press b
Normal Small Light flashes as set in Call Functions (see P.7 - 5 )
Small Light Small Light flashes
Off No lights
3
Manner Mode
Index Menu H Functions A Settings 2 A Manner Settings A Message Recorder
Choose 1On or 2Off A Press b
Ring Tone Level
Index Menu H Functions A Settings 2 A Manner Settings A Ring Tone Level
Set Ring Tone volume
Select from 1Incoming Call to 6Confirm Delivery A Press b A
Select 1Silent, 2Rising Tone or 3Level 1 A Press b
^ For Silent, Speaker is muted and sounds can be heard through Headphones. Volume is
fixed to Level 1.
Rising Tone
C When Silent is set for Ring Tone Level (see P. 7 -2 ), no sound is heard. If Level 1 to
Level 5 is set, Rising Tone is activated and sound will increase to the set level (Level
3 is set: Level 1 % Level 2 % Level 3).
Vibration
Index Menu H Functions A Settings 2 A Manner Settings A Vibration
Set vibration to alert you to incoming calls/mail
Select from 1Incoming Call to 6Confirm Delivery A Press b A
Choose 1On or 2Off A Press b
Vibration
C Handset vibrates even when Vibration for Call Functions (see P. 7- 4 ) is set to Off or
SMAF Link.
Whisper Mode
Index Menu H Functions A Settings 2 A Manner Settings A Whisper Mode
Activate or deactivate Whisper Mode
Choose 1On or 2Off A Press b
^ Activate Whisper Mode to increase microphone sensitivity, allowing you to lower your voice
and speak softly when you must use handset in public places (i flashes).
Press j for 1+ seconds during a call to activate/cancel Whisper Mode for
+
Sound Volume
Index Menu H Functions A Settings 2 A Manner Settings A Sound Volume
that call only.
Adjust sound volume
Adjust level A Press b
3-4
3-5
Page 41

Off-Line Mode
Use Off-Line Mode to temporarily suspend all handset transmissions.
^ In Off-Line Mode, incoming/outgoing calls and Vodafone live! transmissions are blocked.
^ Off-Line Mode is Off by default.
Activating
3
Manner Mode
1
+
Index Menu
Choose 1On and press b
1
s appears and Off-Line Mode is set.
Canceling
Index Menu
Choose 2Off and press b
1
s disappears and Off-Line Mode is canceled.
^ Emergency calls (110, etc.) are not possible in Off-Line Mode. For more, see P.2 - 3
"Emergency Calls."
^ While Display shuts down for Panel Saving in Off-Line Mode, Small Light flashes.
H Functions A Settings 1 A Off-Line
Mode
H Functions A Settings 1 A Off-Line
Mode
3-6
Page 42

Text Entry
4-1
Page 43

Character Selection
k
Use Kana and Pager (see P.4-10) to enter alphanumerics, Symbols, hiragana, kanji,
katakana and Pictographs. Unless otherwise noted, text entry operations are
described for use in text entry windows using Kana Mode.
Entry Modes
Press j to toggle between character entry modes as follows:
n%o%p%h%i%j%l
h
4
Text Entry
ijlnop
NewMessage
Current Entry Mode
Text Menu
OK
^ Alternatively, use F to toggle between entry modes after pressing j once.
^ k and m appear in upper/lower case mode (see below).
C In double or single-byte alphanumerics mode, press k to toggle between upper
case and lower case modes. In Pager Mode (see P. 4- 1 0), while selecting double or
single-byte entry mode, press k to toggle between upper and lower case modes.
C Press e to toggle as follows:
Pictograph Code 1 % Pictograph Code 2 % Pictograph Code 3 %
Pictograph Code 4 % Pictograph Code 5 % Pictograph Code 6 % Character
Code % Pictograph Code 1
^ Pictograph Code page number appears at the bottom.
^ Handset Character Codes correspond to 6,355 kanji.
+
^ Some characters are not available for mail addresses, etc.
Available Modes
*
/128
h Kanji (hiragana) m
i Double-byte katakana n
Single-byte alphanumerics
(upper/lower case)
Single-byte alphanumerics
(lower case)
j Single-byte katakana o Single-byte number
Double-byte alphanumerics
k
(upper/lower case)
Double-byte alphanumerics
l
(lower case)
p Pictograph Code
q Character Code
Upper & Lower Case
hijknop
hijlnop
Pictograph & Character Codes
Key Assignments
Multiple characters are assigned to each key. Press a key to toggle between character
options for that key.
Example: In katakana entry, press 1 three times for
When entering characters, press f to toggle options in reverse. (Not available for
single-byte numbers, Pictographs or Character Codes.)
Example: Enter
Kanji (Hiragana)
Key
1
2
3
4
5
6
7
8
9
0
q
p
j
k
i
Press
i
Long Press
f
e
d
1
Disabled until hiragana is converted.
2
- is available only in single-byte katakana entry.
3
Extensions are listed for easy entry.
4
- and P (Pause) are for phone number entry.
5
Single-byte for single-byte katakana/alphanumeric entry.
6
Press f once for each character to recover immediately after deleting. (Not available
after deleting text with i (Long Press).)
7
List is not available for Character Codes.
[Double-byte]
あいうえお
ぁぃぅぇぉ
かきくけこ カキクケコ ABCabc2
さしすせそ サシスセソ DEFdef3
たちつてとっ タチツテトッ GHIghi4
なにぬねの ナニヌネノ JKLjkl5
はひふへほ ハヒフヘホ MNOmno6
まみむめも マミムメモ
やゆよゃゅょ ヤユヨャュョ TUVtuv8
らりるれろ ラリルレロ
わをんー、。
e (Line Break)
゛゜
Symbol/Pictograph List
Conversion (Up) Cursor Up
C
Conversion (Down)
D
B
A
Toggle Case (for some characters)
Delete One Character/
Cancel Conversion
b
Conversion
Hiragana to Katakana/
Alphanumerics Conversion
い
, then press f to return to あ.
[Double & Single-byte]
e (Line Break)
, Log/Double-byte
Phonetic
1
Log, Double-byte Symbol
Katakana
Alphanumerics
[Double & Single-byte]
アイウエオ
ァィゥェォ
ワヲンー、。
2
゛゜-
Recover up to 64 deleted characters
@./_―1
X (Space)
PQRSpqrs
WXYZwxyz
,. 0
e (Line Break)
Single-byte Mail/
Web Extensions
5
/Pictograph List #
Cursor Down e (Line Break)
Cursor Left
Cursor Right
Change Entry Mode
To gg le C ase + Tog gl e
Mode (upper/lower
and lower case)
Delete One Character
Delete All
OK
―――――――
―――――――
ウ
.
Numbers
[Single-byte]
11
22
33
44
55
66
7
9
3
77
88
99
00
U - u (Pause)
――――――― ―――――――
4
6
Pictograph Code 1 - 6
& Character Codes
―――――――
―――――――
Delete Code/
One Character
Toggle Pictograph Code
1 - 6 and Character Code
Open list7 for
Pictograph Code 1 - 6
4
Text Entry
4-2
4-3
Page 44

Entering Characters
Kanji, Hiragana & Katakana
Following the example below, enter 鈴木 to learn how to enter characters in kanji
(hiragana) entry mode. Switch to double or single-byte katakana mode to enter
katakana. Alternatively, enter hiragana and then select katakana from the word
suggestion list.
Press 3 three times
1
4
Text Entry
^ Word suggestions change as hiragana are entered.
J
h
Q
g
*
JE
h
Press D k and use E to select a word
5
^ The most recent selection appears first in the list.
C To see other suggestions, press d J or e W.
C To exit the list, press i.
C To change segment, see "Segmenting Phrases" below.
n
Press b
6
Q
NewMessage
鈴木
*
7鈴木
*
6スズキ
*
5鱸
*
4鈴木京香
*
3鈴木田
Back
JE
h
Q
g
Select
n
*
/128
Next
n
*
4
Text Entry
Press A
2
^ When the next character is on the same key, press A first.
Press 3 three times and press q
3
Press 2 twice
4
^ To enter unconverted hiragana, skip ahead to Step 6 on P. 4- 5 .
J
Q
g
J
Q
g
J
Q
NewMessage
すずき
h
h
*
h
n
*
n
*
n
*
/128
*
Predictive & Previous Usage
C Use these functions to convert hiragana to kanji more quickly.
Predictive Word suggestions change as up to five hiragana are entered
Previous Usage
Suggests words/characters likely to follow entry based on previous entries
^ Both functions are active by default (see P. 4- 1 4 "Optional Predictive Functions").
User Dictionary
C Save frequently used words/phrases to select from the word suggestion list (see
P.4-15).
C Segmenting Phrases
If the word is not listed, press i after Step 5 to exit. Use F to segment hiragana to
convert separately.
Example: Segment
B DEb DEb
みち みち 三ち 三智
みち
into み and ち.
4-4
*
7鈴木
*
6スズキ
*
5鱸
*
4鈴木京香
*
3鈴木田
Kanji
Convert
InputMethod
4-5
Page 45

C Selecting Multiple Converted Words
D
Press k.
Example: To enter
西山大輔
にしやま だいす け
西山大輔
k
西山大輔
Small Kana (っ , ッ , etc.)
Enter small hiragana あ, い, う, え, お, つ, や, ゆ and よ as well as small katakana.
Enter a character and press k
1
4
Text Entry
Adding ゛or ゜
Enter a character and press q
1
^ In kanji (hiragana)/double-byte katakana entry, press the key once to
か
add ゛to
press twice to remove. For
add ゛, twice to add ゜and three times to remove.
In Single-byte Katakana Entry
+
^ Press q once to add ゛and twice for ゜. Symbols are single-byte.
^ Press i to remove ゛or ゜.
(Ka) row, さ (Sa) row and た (Ta) row characters, and
は
(Ha) row characters, press once to
Space
Press A
1
^ Alternatively, in alphanumeric entry, press 1 seven times for
space.
つ
っ
つ
は
ば
ぱ
は
Ueda
Ueda
k
k
q
q
q
A
Line Break
Insert line breaks in mail message text, Text Memo, BBS, etc.
Press D at the end of text
1
^ To insert line breaks in text, press 0 until e appears.* In kanji
(hiragana) entry mode, then press b.
*
Keystroke count varies by character entry mode (see P. 4 -3 ).
Contact me at
D
Contact me at
e
Entering Alphanumerics
Enter alphanumerics in double or single-byte alphanumerics mode. Alternatively, enter
numbers in single-byte number mode.
a ad
^ In double or single-byte alphanumerics mode, press k to toggle between upper and
lower case.
^ When the next character is on the same key (example: entering a then b), press A first to
move cursor.
3
Symbols, Pictographs & Emoticons
Symbols & Pictographs
Press p or q to open Log List (Log List is available in some
1
entry modes)
Recently used Symbols/Pictographs appear.
^ - appears by default or when Log List is deleted (see P. 4- 8 ).
Use G to select one and press b
2
^ Repeat Step 2 to enter more.
C To see more lists, press p; toggles as follows: Log List %
Symbol List (1 - 3) % Pictograph List (6 - 1)
B
Press q to toggle the list in reverse order.
B Alternatively, press e to toggle the list.
B Press D to scroll down.
JG
h
Q
NewMessage
5/128
n
4
Text Entry
4-6
Press d W to exit list
3
Symbol1
Select
Back
4-7
Page 46

4
Deleting Log List
C
In a text entry window, press d
A
Select 5Clear Symbols A Press b A Select 1OK A Press
B To return to the text entry window, press i A Press i
C Log List cannot be deleted in Pictograph Code mode.
In Pictograph Code Mode
C To enter a Pictograph directly, enter 2 digits (see P. 1 5 -1 4 - 15-16).
B To edit a code mid-entry, press i to clear first digit then enter correct digits.
C To select from Pictograph List, follow these steps.
Text Entry
Press d a A Select a Pictograph A Press b
^ To toggle through Page 1 - 6 and Log List, press e.
I A
Select 9Input/Conversion A Press b
b
Mail & Web Extensions
In alphanumeric entry, press q
1
Select an extension and press b
2
^ Mail addresses and URLs are single-byte.
JE
n
Q
1.co.jp
2.ne.jp
3.ac.jp
4.or.jp
5http://
6www.
7.com
8@
9
Select
n
4
Text Entry
^ Symbols are double or single-byte according to the entry mode. (All Pictographs are
+
1
2
3
,
+
double-byte.)
^ Single-byte Symbols do not appear in Log List.
^ Alternatively, enter
Emoticons
Press d I
Select 8Emoticons and press b
^ Enter two digits (01 - 50) to jump to the emoticon assigned to the number.
Select an emoticon and press b
Emoticons cannot be entered in Pictograph Code (1 - 6) mode.
For other emoticons, enter かお and press D k.
Alternatively, enter a descriptive word such as
きごう
and press D k. Some Symbols can be selected.
わーい
or
うーん
and press D k.
Copying from Phone Book
Insert Phone Book entry items into text entry windows.
Select from names, phone numbers, mail addresses or Personal Data.
Press d I
1
Press e 4
2
Open a Phone Book entry
3
C To search Phone Book, perform Steps 2 - 3 on P.5-11.
Use F to select an item and press b
4
Use G to select target location
5
Press b
6
Selected item is inserted.
Inserting Owner Profile
C In a text entry window, press d I A Select XSaved Info A Press b
A Select 1Profile A Press b A Enter Security Code
^ For more, perform Steps 4 - 6 above.
J
Q
NewMessage
<Paste>
Mr.Ueda'sphonenumb
eris
Set
Start
n
Back
4-8
4-9
Page 47

Character Code
Use multi-digit Character Codes to enter characters.
In Character Code entry mode, enter four digits (see P.15-10 - 15-13)
1
Pager Code
Press d I
1
Select 9Input/Conversion and press b
2
4
Text Entry
Select 1Input Method and press b
3
Select 2Pager and press b
4
Pager Code entry window opens.
C To switch to Kana Mode, select 1Kana A Press b
Enter two digits (see P.4-11)
5
^ Pager Mode is active until switched to Kana Mode.
Character Entry Modes
C For text entry in Pager Mode, press j to toggle between entry modes as follows:
Single-byte lower case (w) % Pictograph Code 1 - 6 (p) & Character Code
mode (q) % Double-byte lower case (s)
^ Press e to toggle between Pictograph Code 1 - 6 and Character Code mode.
C While selecting double or single-byte entry mode, press k to toggle between
upper and lower case modes.
^ Hiragana to Katakana/Alphanumerics Conversion is disabled in Pager Mode.
+
^ To enter ゛or ゜, see Pager Code List on P.4-11.
Pager Code List
^ Blanks indicate no entry.
^ Gray background indicates upper and lower case available. Press k to switch.
Double-byte upper case Double-byte lower case
Second digit (Press next) Second digit (Press next)
1 2 3 4 5 6 7 8 9 0 1 2 3 4 5 6 7 8 9 0
1
あ い う え お A B C D E
2
かきくけこ
3
さしすせそ
4
たち
つてとP Q R S T
5
なにぬねの
6
はひふへほZ?!ー/
7
まみむめもV&
8
や( ゆ)よU#
First digit (Press first)
9
らりるれろ12345
0
わをん゛]67890
Single-byte upper case Single-byte lower case
Second digit (Press next) Second digit (Press next)
1 2 3 4 5 6 7 8 9 0 1 2 3 4 5 6 7 8 9 0
1
ア イ ウ エ オ A B C D E
2
カキクケコ
3
サシスセソ
4
5
6
7
8
First digit (Press first)
9
0
*1
Press 70 to insert line breaks (in mail message text, Text Memo, etc.).
*2
Press 80 to toggle between upper and lower case modes.
^ and are double-byte.
ツテトP Q R S T
タチ
ナニヌネノ
ハヒフヘホ
マミムメモ
ヤ(ユ)ヨ
ラリルレロ12345
ワヲン゛゜67890
F G H I J
K L M N O
U V W X Y
*1
*2
Space
F G H I J
K L M N O
U V W X Y
Z?! - /
V
&
U
#
Space
*1
*2
1
ぁ ぃ ぅ ぇ ぉ a b c d e
2
3
4
5
6 z
7
8
First digit (Press first)
9
0
1
2 f g h i j
3 k l m n o
4
5 u v w x y
6 z
7
8
First digit (Press first)
9
0 ,.
っ p q r s t
ゃ ゅ ょ
ァ ィ ゥ ェ ォ
ッ
ャ ュ ョ
f g h i j
k l m n o
u v w x y
、。
a b c d e
p q r s t
4
Text Entry
*1
*2
*1
*2
4-10
4-11
Page 48

Conversion Methods (Japanese Only)
Phonetic Conversion
Enter alternate readings to search for kanji.
Enter reading in hiragana
1
Press e _
2
Select a kanji and press b
3
4
Text Entry
One-Hiragana Conversion
Enter the first hiragana to access previously selected words.
Example: To enter
^ One-Hiragana Conversion and User Dictionary (see P.4 - 1 5) share memory. Selected
words may not be saved if User Dictionary is full.
^ Up to 20 entries are saved per hiragana (Title Word) between One-Hiragana Conversion
and User Dictionary. When full, oldest entries are deleted to make room for new ones.
However, User Dictionary remains unchanged.
鈴木
DE b
鈴木す 鈴木
JG
h
Q
[かい]
**
壊廻快怪悔
*
魁晦械海灰
*
開階貝凱蓋
*
懷懈槐榿薤
*
Back
1介会解回塊
11恢懐戒拐改
21界皆絵芥蟹
31街鎧骸會偕
41薈誨誡谿豈
OK
Hiragana to Katakana/Alphanumerics Conversion
Enter katakana and alphanumerics in kanji (hiragana) entry mode.
Enter hiragana and press d ^
1
^ To enter AM, press 26 then d ^.
Use E to select a word and press b
2
^ Hiragana to Roman Letter Conversion (hiragana with ゛or ゜is converted to the same
n
characters/Symbols):
あ@い.う/え_お
かAきBくCけ
さDしEすFせ
たGちHつIて
なJにKぬLね
はMひNふOへ
まPみQむRめSも
やTゆUよV
らWりXるYれZろ
ー
わ,を.ん
^
Hiragana to Number Conversion (hiragana with ゛or ゜is converted to the same numbers):
B あ (A) row...1 B か (Ka) row...2 B さ (Sa) row...3 B た (Ta) row...4
B な (Na) row...5 B は (Ha) row...6 B ま (Ma) row...7 B や (Ya) row...8
B ら (Ra) row...9 B わをんー (Long Sound)、。Line Break...0
Space
Space
Space
Space
Space
Space
――――
(Long Sound)、。 Line Break
Space
Space
こ
Space
そ
Space
と
Space
の
Space
ほ
Space
Space
Space
4
Text Entry
Quick Conversion (for Hiragana)
Quick Conversion helps reduce keystrokes needed to enter frequently used words.
A list of word suggestions appears based on the key pressed.
Use Quick Conversion in kanji (hiragana) mode only.
Example: To enter
Normal Conversion
Quick Conversion 6q (ば) 7 (ま) 8 (や) 1 (あ) C (convert)
微妙
66q (
111 (
び
) 77 (み) 888888 (ょ)
う
) D k
4-12
Enter hiragana and press C
1
Cursor turns green.
^ While cursor is green, use F to segment entered hiragana and then convert one
segment at a time.
C To cancel Quick Conversion, press i A Press D for normal conversion
Use E to select a word and press b
2
+
The most recent selection (mostly nouns) appears first.
4-13
Page 49

One Hiragana Predictive Entry
Enter hiragana and initiate Quick Conversion. Words starting with a hiragana in the
same row (
Example: When
朝一番
朝帰り
行ってきます
いってらっしゃい
4
^ Words in the list are preset by time blocks.
Text Entry
^ If Clock is not set, only words for 11:00 - 16:59 are available.
あ, い, う, え, お
あ
5:00 - 10:59 11:00 - 16:59 17:00 - 22:59 23:00 - 4:59
...
for あ) appear. Word suggestions vary by time of day.
is entered
あちぃ〜
後でね
いただきま〜すY
移動中
...
遊ぼう
明日
急いで行くよ
今どこ?
...
アウチ!!
ありがとう
いえーい!!!
行こうね
One Hiragana Word Call
Enter the first hiragana of entries you used Quick Conversion for. The most recent
selection appears first.
Example: You entered
あたあさわ
and selected
C
お父さんあ
お父さん
last time.
Conversion Settings
Optional Predictive
Functions
Press d I A Select 9Input/Conversion A Press b A
Select 2Predictive or 3Previous Usage A Press b A Choose
1On (activate) or 2Off A Press b
Activate or cancel Predictive or Previous Usage (see P.4 - 5)
...
KOn
Dictionaries (Japanese Only)
User Dictionary
Save up to 100 frequently used words/phrases and assign Title Word in hiragana to
each entry. In text entry windows, enter Title Word and convert. Saved words/phrases
appear among word suggestions. Save up to five entries per Title Word.
New Entry
Index Menu H Functions A Settings 2 A User Dictionary A New Entry
Enter a word/phrase A Press b A Enter Title Word A Press b
^ Enter up to 30 single-byte characters per word/phrase and eight characters in hiragana per
Title Word.
Edit
Index Menu H Functions A Settings 2 A User Dictionary A Edit
Edit
Select a word or phrase A Press b A Edit A Press b A Edit Title
Word A Press b A Select 1Overwrite or 2New Entry A Press b
Deleting One Entry
Select a word or phrase A Press d I A Select 2Delete A
Press b A Choose 1Yes A Press b
Deleting All
Press d I A Select 3Delete All A Press b A Choose 1Yes
A Press b
Save words/phrases to User Dictionary
Edit or delete entries
F43
Text Entry
4
Reset Learning
Clear log of words selected in kanji conversion, Predictive, etc.
Press d I A Select 9Input/Conversion A Press b A
Select 4Reset Learning A Press b A Select 1OK A Press b
^ Words saved in User Dictionary remain.
4-14
4-15
Page 50

4
Editing Characters
Deleting
Use G to select a character and press i
1
The highlighted character is deleted.
^ Recover up to 64 characters deleted with i. Press f once for
each character to recover immediately after deleting. Pressing any
other key disables the recover function.
Text Entry
,
1
2
Press i for 1+ seconds to delete all text. Characters deleted in this manner cannot
be recovered.
Replacing
Press i to delete a character
Enter another character
Kinoshita
Kioshita
Mikako
Mikko
Mikiko
i
i
Copy/Cut & Paste
Copy or cut and paste text (up to 6,000 single-byte characters) into the same window
or another (when Paste appears).
Press d I
1
Select 1Copy or 2Cut and press b
2
Select the first character of text and press b
3
Start point is set (Start changes to End).
C To change the start point, press i.
Select the end point and press b
4
Open text paste target window and press d
5
Select 3Paste and press b
6
Select target location and press b
7
Text is inserted.
I
J
Q
NewMessage
<Cut>
g
erofalumni.E
Mana
mployeeofatradin
company.Callatho
meafter1
J
n
Q
PersonalData
g
erofalumni.C
Mana
allathomeafter1
PM.
*
PM.
End Back
Cut
n
n
4
Text Entry
g
*
4-16
Deleting Text Before or After Cursor
Use Delete
Previous to
delete
Press d I
1
Select 6Delete Posterior or 7Delete Previous and press b
2
Use G to move cursor and press b
3
Use Delete
Posterior to
delete
OK
Menu
4-17
Page 51

Text Memo
Save frequently used phrases for use in mail message, etc.
^ Save up to 20 Text Memo phrases.
^ Save up to 128 single-byte characters per phrase.
^ Ten editable Text Art are saved by default. Edit and replace default entries.
^ When memory is full, delete text to make room for new ones (see below).
^ Create QR Codes from Text Memo (see P.1 1 -2 8 ).
Index Menu H My Files
Select 4Text M emo and press b
1
4
Text Entry
Initial portions of saved text appear.
C To open entries, select one A Press b
Select a number and press b
2
C If the number is already used, saved text appears. Press d I A Select 2Edit
A Press b
Enter text and press b
3
Text is saved.
^ To save more text, repeat Steps 2 - 3.
Saving from Message or Phone Book
C
In a text entry window, press d
A
Select the first character of text A Press b A Select the end point A Press b
A
Select a number A Press
b
I A
Select 4Save Text Memo A Press b
Edit/Delete
Index Menu H My Files A Tex t M e m o
Edit or delete Text Memo
Edit Memo
Select text A Press d I A Select Edit A Press b A Edit A
Press b
Delete Single Text Memos
Select text A Press d I A Select Delete A Press b A
Choose 1Yes A Press b
^ Default Text Art is restored after deleting text in 01 - 10.
4-18
Page 52

Phone Book
5-1
Page 53
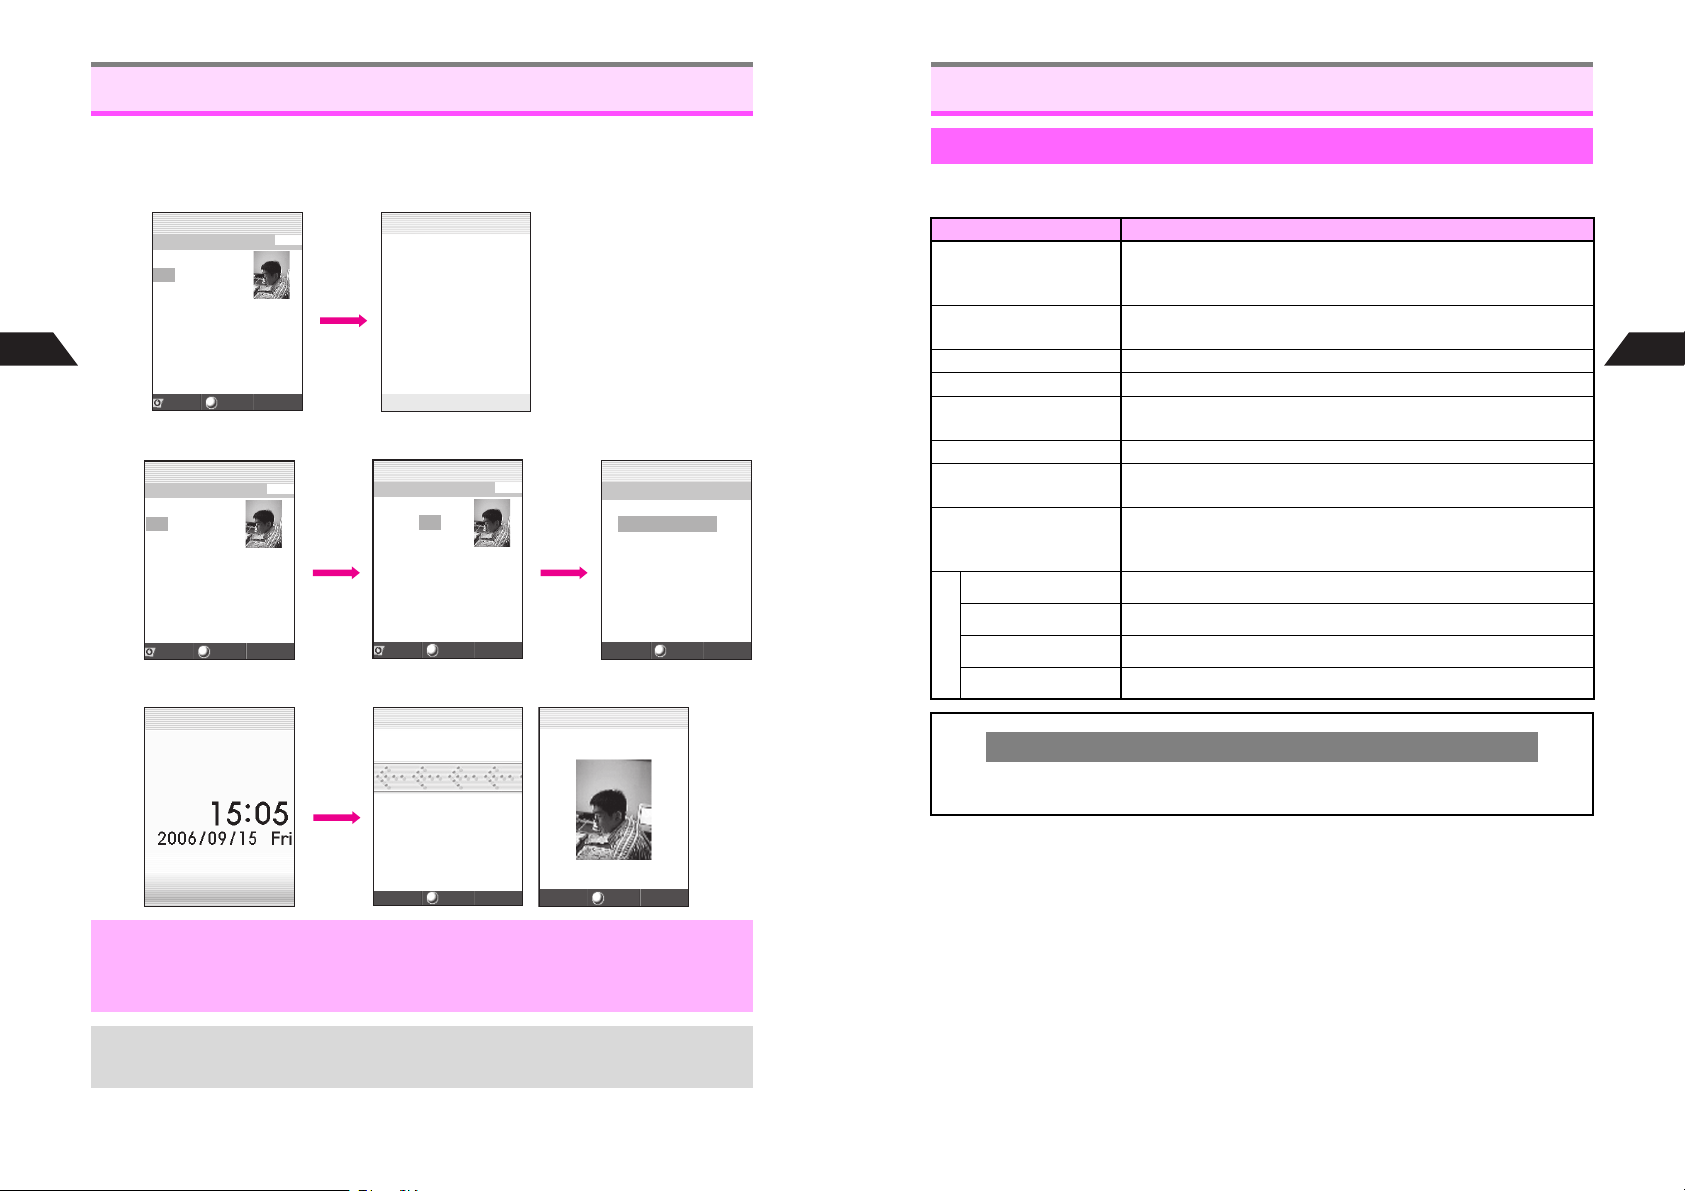
Overview
Saving to Phone Book
Save frequently used phone numbers and mail addresses to Phone Book. Entry
names appear for calls from numbers saved in Phone Book.
C Dialing from Phone Book
5
Phone Book
J
Q
UedaMikio005
1Friends
ppuu
y
zPattern1
dPattern2
eMailFolder1
fMailFolder2
03123XXXX3
Back
n
Menu
f
J
Q
UedaMikio
03123XXXX3
n
C Sending Sky/Long Mail from Phone Book
J
Q
UedaMikio005
1Friends
ppuu
y
zPattern1
dPattern2
eMailFolder1
fMailFolder2
03123XXXX3
Back
n
Menu
J
Q
UedaMikio
1Friends
ppuu
y
F bb
dPattern2
eMailFolder1
fMailFolder2
aaa@xxx.yyy
Back
Menu
n
005
C When a Call Arrives
J n
A call arrives
J
Q
<<IncomingCall>>
J
n
Q
UedaMikio
JE
Q
SelectMailType
1SendLon
2SendSkyMail
g
Mail
Select
n
n
Phone Book Entry Items
^ Save up to 500 entries (000 - 499) in Phone Book.
^ Create QR Codes from Phone Book entries (see P.11-28).
Item Description
Enter up to 16 single-byte characters.
c Name
d Reading
e Phone Number Enter up to three phone numbers (24 digits each)
i Mail Address
k Group
x Personal Data Add personal details. Use up to 60 single-byte characters.
b Secret Mode
m Photo
Personal Ring Tone Set Ring Tone by caller
Incoming Notice Set Ring Tone by sender
Picture Call/Mail Set images to appear by caller or sender
Mail Folder Messages are sorted into folders
Option Settings
C Contents are temporarily saved. To return, end the call and follow these steps.
Press b A Choose 1Yes A Press b
Use kanji, hiragana, katakana (double or single-byte),
alphanumerics (double or single-byte) and Pictographs.
Katakana, alphanumerics or Symbols appear as names are entered
(up to 10 single-byte characters including ゛and ゜)
Enter up to three mail addresses (60 single-byte alphanumerics each)
Sort entries into 10 Groups (0 - 9). Change Group names or set
Ring Tone by Group.
Restrict access to Phone Book entries by saving them as Secret
Mode entries
Select an image to appear when you open a Phone Book entry.
Activate Picture Call/Mail to see the image set here for incoming
calls/mail.
Incoming Calls while Creating Entry
5
Phone Book
,
+
5-2
03123XXXX3
Menu
Back-up Important Information
Keep separate copies of important information. When battery is exhausted/removed
for long periods, Phone Book entries may be lost; handset damage may also affect
information recovery. Vodafone is not liable for damages from lost or altered data.
Use Phone Book Lock (see P. 10 - 3 ) to protect entries from accidental alteration and to
restrict access to Phone Book information.
Menu
5-3
Page 54

5
Phone Book
New Phone Book Entries
Index Menu H Tel Op s A Add to Phone Book
Enter a name
1
Press b
2
Characters entered for names (kanji reading) appear after d.
^ Reading does not appear for Pictographs, pasted characters and
names entered with Quick Conversion.
^ Katakana, roman letters, numbers and Symbols appear in
single-byte.
C To correct reading, select d A Press b A Edit reading A
Press b
C To cancel, press e 3 A Choose 1Ye s A Press b
Select e and press b
3
Enter a phone number
4
^ Include area code for landline numbers.
C To correct phone number, press B to move cursor A Press i to delete a digit at the
cursor position A Enter a digit (Press i for 1+ seconds to clear all.)
C Press q twice to enter - between digits. (- counts as a digit.)
C To enter Push Tones, press q three times to enter Pause (u) A Enter numbers or
Symbols
B Each pause (u) indicates a one-second pause. The subsequent numbers or Symbols
are also sent as Push Tones (see P.11-2).
Press b
5
Select an icon and press b
6
C To save additional phone numbers, select e<Unsaved> A Press b A Repeat
Steps 4 - 6
Select i and press b
7
Enter a mail address
8
Press b
9
Select an icon and press b
10
C To save additional mail addresses, select i<Unsaved> A Press b A Repeat Steps
8 - 10
C To set a Group, select k A Press b A Select a Group A Press b
C To enter Personal Data, select x A Press b A Enter information A Press b
C Photo: see P. 5 -6
C Saving Secret Mode Entries: see P. 5 -7
JE
Q
cUedaMikio
dUedaMikio
e<Unsaved>
i<Unsaved>
k0Untitled
l<Unsaved>
bOff
m<Unsaved>
OptionSettin
Cancel
Phone Book
Details
g
s
Select
n
Save
Press d q
11
Memory Number entry window opens. Assign a Memory Number to each entry.
Enter Memory No. (000 - 499)
12
Entry is saved to Phone Book.
C Use Headphones to call the number saved in Memory Number 000 (see P.11-32).
C Use Speed Dial to call numbers saved in Memory Numbers 000 - 099 (see P. 5- 1 4 ).
Assign Memory No. Automatically
C Press q to assign the smallest available number.
C To specify a range of numbers, enter hundreds or tens digit and press q.
B To specify hundreds, enter first digit A Press q
Example: Enter 3q. The range is 300 - 399.
B To specify tens, enter two digits A Press q
Example: Enter 21q. The range is 210 - 219.
+
Overwrite?
Memory Full Cannot
Save
Secret Data saved
Exchange Phone Book entries via infrared with compatible devices (see P. 9- 2 ).
Warning Messages
On Display Cause Operation
Number assigned to
another entry
All Memory Numbers
have been assigned
Number assigned to a
Secret Mode Phone
Book entry
Press 1Yes to overwrite the entry or
press 2No to enter another number.
Assign Memory No. automatically (see above).
Overwrite or delete entries (see P.5-15)
Activate Secret Mode (see P.10-6) to overwrite
5
Phone Book
5-4
5-5
Page 55

Photo
Save a still image or animation to each Phone Book entry; saved image appears for
calls/mail from phone numbers/mail addresses saved in that entry.
Saving an Image to Photo
Follow these steps after opening Phone Book Details (see P. 5- 4 ).
Select m and press b (Data Folder opens)
1
Select an image (see P.8-6) and press b
2
^ Some images may be too large for Phone Book Photo.
Press b
3
5
Phone Book
Phone Book Details (see P. 5- 4 ) returns. Complete other fields.
Picture Call/Mail
^ Follow these steps after opening Phone Book Details (see P.5 - 4 ).
^ Picture Call/Mail is Off by default.
Select Option Settings and press b
1
Select 3Picture Call/Mail and press b
2
Choose 1On and press b
3
C
To cancel Picture Call/Mail (hide images for incoming calls/mail), choose 2Off A
Press e j
4
Phone Book Details (see P. 5- 4 ) returns. Complete other fields.
Press
b
Saving Secret Mode Entries
Follow these steps after opening Phone Book Details (see P.5 - 4).
Select b and press b
1
Choose 1On and press b
2
Phone Book Details (see P. 5- 4 ) returns. Complete other fields.
^ Activate Secret Mode (see P. 10 - 6 ) to open Secret Mode entries.
Change Secret to Standard
C Activate Secret Mode (see P.1 0 - 6) and follow these steps.
Open a Phone Book entry (perform Steps 1 - 3 on P.5-11) A Press b A
Select Edit A Press b A Select b A Press b A Choose 2Off A
Press b A Perform Steps 6 - 8 on P.5-15
Do not save confidential information in Phone Book. Security Code and thus Secret
,
+
Mode entries may be compromised.
When not in Secret Mode, Phone Book Names/Photo images do not appear for
incoming calls/mail from numbers/addresses in Secret Mode entries. Personal Ring
Tone and Incoming Notice are disabled. Names for numbers in Secret Mode entries
do not appear in Redial or Call History. Names saved in Redial/Call History before an
entry is converted to Secret Mode appear even if handset is not in Secret Mode.
5
Phone Book
,
5-6
Picture Call/Mail is canceled when source file in Data Folder is deleted.
5-7
Page 56

F31
5
Phone Book
Saving from Redial or Call History
Index Menu H Tel Op s
Select 4Redial or 5Call History and press b
1
Select a record and press d I
2
Select Add to Phone Book and press b
3
New Entry
4
1 Select 1New Entry and press b
2 Enter name and press b
Phone number is entered automatically and Phone Book Details (see P. 5 -4 )
appears. Complete other fields.
New Item
1 Select 2New Item and press b
2 Open a Phone Book entry (perform Steps 2 - 3 on P.5-11)
^ When three phone numbers are already saved, the phone number is not added.
3 Select an icon and press b
Phone Book Details (see P. 5- 4 ) appears. Complete other fields.
,
+
No Caller ID records cannot be saved.
Numbers and mail addresses in received messages (see P.13-25) or Notepad
Memory (see P. 2 -1 3 ) can be saved to Phone Book.
Phone Book Memory Status
Option Settings
Set Personal Ring Tone, Incoming Notice, Picture Call/Mail (see P. 5 -6 ) and Mail
Folder. Select Set All or One Number/Address.
Set All
One Number/Address
Overview
Follow these steps after opening Phone Book Details (see P.5 - 4).
Select Option Settings and press b
1
Option Settings menu appears.
Select an item and press b
2
Apply Same Setting to All
3
1 Select 1Set All and press b
Settings by Number/Address
1 Select 2One Number/Address and press b
2 Select a number or address and press b
3 Choose 1On and press b
C
To cancel, choose 2Off A
Canceling
1 Choose 3Off and press b
Option Settings menu returns.
CPress e j
Apply the same setting to every number/address in a single Phone
Book entry. Set All cancels One Number/Address settings.
Apply setting to each number/address independently. One Number/
Address cancels Set All settings.
JE
Q
OptionSettings
]
[Off
Press b A Press e
j
1PersonalRin
2Incomin
3PictureCall/Mail
4MailFolder
g
Notice
Select
Set
Option Settings
Menu
g
Tone
n
5
Phone Book
Index Menu H Functions A Settings 1
Select 1Memory and press b
1
Number of entries appears.
5-8
J
Q
F31:Memory
<MemoryStatus>
PhoneBookXX
Mail:XX%
Web:XX%
Station:XX%
n
Set Options (see P.5-10)
4
Phone Book Details (see P. 5- 4 ) returns. Complete other fields.
For phone numbers, the following settings apply only to Vodafone handset
,
numbers: Incoming Notice and Mail Folder.
5-9
Page 57

Setting Options
Follow these steps after opening Option Settings menu (see P.5 - 9 ).
Personal Ring Tone
& Incoming Notice
Ring Tone
Select 1Personal Ring Tone or 2Incoming Notice A Press b A
Perform Step 3 on P.5-9 to set target number/address A
Select 1Ring Tone A Press b A Select a tone or melody (perform
Steps 1 - 3 on P.7-3) A Press e j A Press e j
C For One Number/Address, press e j again.
Vibration
5
Select 1Personal Ring Tone or 2Incoming Notice A Press b A
Phone Book
Perform Step 3 on P.5-9 to set target number/address A
Select 2Vibration A Press b A Select 1On, 2Off or 3SMAF Link
A Press b A Press e j A Press e j
C For One Number/Address, press e j again.
Vibration Pattern
Select 1Personal Ring Tone or 2Incoming Notice A Press b A
Perform Step 3 on P.5-9 to set target number/address A
Select 3Vibration Pattern A Press b A Select a pattern A
Press b A Press e j A Press e j
C For One Number/Address, press e j again.
Small Light
Select 1Personal Ring Tone or 2Incoming Notice A Press b A
Perform Step 3 on P.5-9 to set target number/address
Indicator
set pattern
C For One Number/Address, press e j again.
Ring Time (for Incoming Notice)
Select 2Incoming Notice A Press b A Perform Step 3 on P.5-9 to set
target number/address
(01 - 99 seconds)
C For One Number/Address, press e j again.
,
A
A
^ When source file in Data Folder is deleted, Ring Tone is set to Pattern 1 for
Personal Ring Tone and Mail for Incoming Notice.
^ To apply Personal Ring Tone or Incoming Notice setting to Secret Mode
entries, activate Secret Mode first.
Select Ring Tone, vibration, etc. for incoming calls/mail from
numbers/addresses saved in Phone Book
Press b A Perform Steps 1 - 3 in "Small Light" on P.7-5 to
Press e
A
j A
A
Select 5Ring Time A Press b A Enter time
Press b A Press
Press e
e j A
j
A
Select 4LED
Press e
j
Using Phone Book
Dialing from Phone Book
Search Phone Book by Memory Number (default search method) to call numbers
within entries.
^ To search by other methods, see P. 5- 1 3 .
^ To dial numbers saved in Secret Mode entries, first activate Secret Mode (see P. 10 - 6 ).
Press A (M)
1
Press D + or enter Memory No.
2
^ Press D + to open a list of Phone Book entries in Memory
Number order.
^ Enter Memory Number to open Phone Book Entry List including
the entered number.
C Use E to select an entry.
Use E to select an entry and press b
3
Window Description: see P.5-12
C For entries with multiple numbers, use F to select other icons.
Press f
4
Number is dialed.
,
Cancel Phone Book Lock (see P. 1 0- 3 ) to open Phone Book.
JE
Q
005UedaMikio
007KitayamaKaoru
008KimuraTetsuya
Select
Menu
Entry List
n
5
Phone Book
Mail Folder
Select 4Mail Folder A Press b A Select 1Inbox Auto Sort or
2Sent Auto Sort A Press b A Perform Step 3 on P.5-9 to set target
number/address A Select a folder A Press b A Press e j
A Press e j
C For One Number/Address, press e j again.
5-10
Specify Mail Folder for each Phone Book entry to sort
messages automatically
5-11
Page 58

Window Description
Switching Search Methods
5
Phone Book
J
Q
UedaMikio005
1
2
1Friends
peuu
3
y
zPattern1
4
dPattern2
bMailFolder1
5
cMailFolder2
03123XXXX3
Back
Use F to toggle saved items. Phone number or mail address appears in 8. Personal
+
Data or Photo image appears in a new window.
n
Menu
1 Name
2 Group Name
6
3 Icon for Saved Items
7
8
B Phone Number (e Call, f Home,
r Mobile, s Company)
Mail Address (i Internet, j Mobile)
B
B Personal Data (l)
B Photo (m)
4 Tone Set for Personal Ring Tone or
Incoming Notice
n Personal Ring Tone,
o Incoming Notice
5Mail Folders Set for Auto Sort
e Inbox Mail Folder
f Sent Mail Folder
6Memory No.
7Image Set for Photo
8Phone Number or Mail Address
Phone Book Search
Search Methods
Memory No. Search Lists Memory Numbers including the one you enter
Katakana Search
Group Search Opens entries in a specified Group
Search by Reading Shows entries with Reading starting with entered character
Search method is Memory No. Search by default.
Shows entries with Reading starting with specified katakana or
katakana in the same row
Press A (M)
1
The method used last appears.
Press d I
2
Select a method and press b
3
Selected method appears.
^ To search and open an entry, see below.
Searching/Opening Phone Book Entries
Follow these steps in Standby. Skip the step of pressing A (M) when continuing
from Step 3 above.
Memory No.
Search
Search by Memory Number
CSet search method to Memory No. Search (see P.5-12).
Press A (M) A Enter Memory No. (000 - 499) A Select a name A
Press b
C Press f to dial.
Katakana Search
Search by katakana row which includes the first character of
Reading
CSet search method to Katakana Search (see P.5-12).
Press A (M) A Specify a row A Select a name A Press b
C Press f to dial.
^ Katakana-Key Assignments:
ア (A) row
ナ (Na) row
ラ (Ra) row
B
When Reading starts with a roman letter, number or Symbol, or is not entered, press p (Others).
Group Search
カ (Ka) row
1
ハ (Ha) row
5
ワ (Wa) row
9
Search by Group
サ (Sa) row
2
マ (Ma) row
6
Others
0
CSet search method to Group Search (see P.5-12).
3
7
p
タ (Ta) row
ヤ (Ya) row
4
8
Press A (M) A Select a Group A Press b A Select a name A
Press b
C Press f to dial.
5
Phone Book
5-12
Search by Reading
Search by Reading saved in d
CSet search method to Search by Reading (see P.5-12).
Press A (M) A Enter reading (up to 10 single-byte characters) A
Press b A Select a name A Press b
C Press f to dial.
5-13
Page 59

Speed Dial
Use Speed Dial to call first phone number saved in Memory Numbers 000 - 099.
To dial numbers saved in Secret Mode entries, first activate Secret Mode (see P.10-6).
If not, Secret Data saved appears and handset returns to Standby.
Dialing Memory No. 000 - 009
1
1 Enter the last digit (0 - 9)
Dialing Memory No. 010 - 099
1 Enter the last two digits (10 - 99)
Press f
2
5
Phone Book
Name and phone number appear and the number is dialed.
^ When there is no entry/phone number saved for the entered Memory No., No Number
appears and handset returns to Standby.
^ For entries with multiple numbers, the first one is dialed.
,
Cancel Phone Book Lock (see P.10-3) to use Speed Dial.
Show Photo
Show the assigned images in Phone Book Entry List.
JE
Q
Entry List
(Memory No. Search)
Press A (M) then D +
1
Press d I
2
Select Show Pics and press b
3
Images appear in Phone Book Entry List.
C To hide images, select Show List A Press b
n
JE
Q
***
J
**
*
**
*
**
*
Entry List with Images
(Memory No. Search)
**
n
H
Editing Phone Book
Correction/Change
Press A (M), then open an entry
1
Press b
2
Select Edit and press b
3
Phone Book Details (see P. 5- 4 ) appears.
Select an item and press b
4
Edit contents.
^ See procedure for saving items to Phone Book (see P.5 - 4 ).
^ Edit Reading manually after editing names.
Press b when finished
5
^ To edit other items, repeat Steps 4 - 5.
C To cancel, press e 3 A Choose 1Ye s A Press b
Press d q
6
Press b
7
Choose 1Yes and press b
8
The entry is overwritten.
C To save to another Memory No., choose 2No A Press b A Enter another Memory
No. (or press q)
Deleting Entries
Press A (M), then open an entry
1
Press b
2
Select Delete and press b
3
Choose 1Yes and press b
4
The source files remain in Data Folder, even if you delete entries containing Original
,
Ring Tones, Voice files and images set for Personal Ring Tone, Incoming Notice or
Picture Call/Mail.
5
Phone Book
5-14
5-15
Page 60

F37
Group Settings
Customize Group options; create new Group names. Personal Ring Tone and
Incoming Notice settings (see P.5-10) take priority over Group Settings.
Changing Group Name
Index Menu H Functions A Settings 1 A Group Settings A Change Group Name
Select a Group and press b
1
Enter a name
2
^ Enter up to 10 single-byte characters.
5
Phone Book
Press b
3
^ Repeat Steps 1 - 3 for other Groups.
Group Ring Tone
Group Ring Tone is Off for all Groups by default.
Index Menu H Functions A Settings 1 A Group Settings A Group Ring Tone
Select a Group and press b
1
Select 1Incoming Call or 2Incoming Mail and press b
2
Select 1Call Functions and press b
3
Choose 1On and press b
4
C To cancel, choose 2Off A Press b (Omit the next step.)
Select from 2Ring Tone to 6Ring Time and press b
5
^ 6Ring Time is available for incoming mail only.
C For Ring Tone settings, see P. 7 -3 .
C For vibration and Small Light patterns, see P. 7- 4 - 7-5.
C For Ring Time setting, see P. 7- 5 .
+
5-16
When Group Ring Tone is Off, Ring Tone setting for incoming calls applies.
Page 61

Display
6-1
Page 62

F40
Wallpaper
Use Wallpaper to set an image or animation to appear in Standby. Choose from preset
images and images or animation obtained via Long Mail, etc.
^ Some images may not be usable.
^ Wallpaper is Off by default.
Index Menu H Functions A Settings 2 A Display Settings A Wallpaper
Choose 1On and press b
1
C To cancel Wallpaper, choose 2Off A Press b (Omit the next step.)
Preset Images
2
1 Select from 19-Ball Break to 6New Beginning and press b
2 Press b
6
Display
Original Images
1 Select 7Original and press b
CIf Original image is already saved, press d X to use other image.
B Existing Original image will be replaced. (Unsaved images will be deleted.)
2 Select an image from Data Folder (see P.8-6) and press b
CTo change image size, press d I A Select 1Enlarge/Reduce A Press
b A Use E to enlarge or reduce
CTo create split-screen Wallpaper, press d I A Select 2Split Picture A
Press b A Select from 2 to 4 A Press b A Select an image A Press b A
Press b A Press e j
3 Press b
Show Indicators
C To hide indicators in Standby while Wallpaper is set, follow these steps.
Press b A Select Functions A Press b A Select Settings 2 A Press b A
Select Display Settings A Press b A Select 5Show Indicators A Press b
A Choose 2Off A Press b
C While indicators are hidden, press g. Indicators appear for five seconds.
^ Regardless of this setting, indicators always appear in windows other than Standby
and when Wallpaper is not set.
^ To set Wallpaper from Data Folder, see P.8-11.
+
^ Using Wallpaper shortens Battery Time. Using animation or multiple images
consumes more handset power.
^ Wallpaper does not appear when Calendar Large Stamp or Schedule & Stamps
appears in Standby (see below).
^ Animation may stop after 15 seconds of inactivity.
^ During animation, Calendar (Month (Large) - 6-Month) does not appear (see
below); Small Clock appears even if Large Clock is set.
Clock & Calendar
Choose a Clock type and layout or use Calendar for Standby.
Clock Display
Clock Display is Large by default.
Index Menu H Functions A Clock A Clock Display
Select 1Large or 2Small and press b
1
C To hide Clock, choose 4Off A Press b
B When 4 Off is set, Calendar (see below) is also hidden.
Calendar
^ Select from seven Calendars: Month (four types), 2-Month, 4-Month and 6-Month.
^ Select Large Stamp to show stamps on Large Calendar. Select Schedule & Stamps to
show Schedule as well as stamps.
^ For Month (Small) and 2-Month, select a display position.
Index Menu H Functions A Clock A Clock Display
Select 3Calendar and press b
1
C To hide Calendar, choose 4Off A Press b
B When 4 Off is set, Clock (see above) is also hidden.
Select from 1Large Stamp to 76-Month and press b
2
C For 4Month (Small) and 52-Month, select a display position A Press b
C To customize colors of the days of the week, select 8Set Color A Press b A Select a
day A Press b A Select a color A Press b
F53
Display
6
6-2
6-3
Page 63

Calendar Contents
Holiday
^ Appears in red (see P.11-17)
J n
Current Date
^ Highlighted
Scheduled Date
^ Underlined, except when stamp appears (see P.11-12 for
more about Schedule)
Stamp (see P.11-12)
Schedule & Stamps
6
^ Press C once to open the previous month, and press D once to open the next month.
Display
Use E to toggle between months. (In 2-Month Calendar, display changes by one month
at a time. In 4-Month and 6-Month Calendars, display changes by two months at a time.)
Press i to return to the current month.
^ Press g to hide Calendar temporarily. While Calendar is hidden, press C to open Key
Long Press Guide or D to open Call History. (Press g again to show Calendar.)
^ Calendar appears on Wallpaper. However, Wallpaper does not appear when
+
Calendar is Large Stamp or Schedule & Stamps.
^ Calendar does not appear while a Wallpaper animation is active.
Display Images
Select images to use them for Power On/Off, incoming calls and Alarm windows. Use
preset images or images received via Long Mail, etc.
Display Images is Off for all items by default.
Index Menu H Functions A Settings 2 A Display Settings A Display Images
Select an item and press b
1
Select 1Fixed Graphic 1, 2Fixed Graphic 2 or 3Original and press
2
^ For 1Fixed Graphic 1 or 2Fixed Graphic 2, skip ahead to Step 5.
C To cancel Display Images, choose 4Off and press b. (Omit the next steps.)
C When Original image is already saved, press d X to use other image.
B Existing Original image will be replaced. (Unsaved images will be deleted.)
Select an image from Data Folder (see P.8-6) and press b
3
Image appears with a rectangle indicating display size (see below).
^ Unavailable images do not appear.
Power On W 120 x H 130 dots Incoming Call W 120 x H 38 dots
Power Off W 120 x H 130 dots Alarm W 120 x H 51 dots
^ Display Images appear 200% larger.
C To toggle display size between 100% and 200%, press k.
Use G to specify display area
4
^ Display area may be unspecifiable depending on image size or type.
C To select another image, press i A Start over from Step 3
b
F40
Display
6
6-4
5
,
Press b
^ Even if 3Incoming Call is set to 3Original, Picture Call/Mail setting takes priority
for calls (with caller ID) from numbers saved in Phone Book with Picture Call/Mail
On.
^ When Incoming Call Ring Tone is set to melody with animation, Display Images
Incoming Call setting has no effect.
6-5
Page 64

F40
F41
Fonts
F34
Light Settings
Change the size and weight of handset fonts.
Font weight is Font 3, and font size is standard (Large Font: Off) by default.
Index Menu H Functions A Settings 2 A Display Settings
Font Weight
1
1 Select 3Fonts and press b
2 Select from 1Font 1 to 4Font 4 and press b
Font Size
1 Select 4Large Font and press b
2 Choose 1On (enlarge) or 2Off (standard) and press b
^ When Large Font is active, major menu items (Functions, Settings, Briefcase, etc.)
6
Display
+
always appear large. However, other items may appear in standard size.
V201SH employs LC Fonts for easing viewing of handset menus
and messages. LC Font/LCFONT, as well as the LC logo are all
registered trademarks of SHARP CORPORATION.
Display Patterns
Item Description Default
Battery Level Select from five icons Icon 1
Signal Strength Select from five icons Icon 1
Title Bars Select from five color schemes Color 1
Menu Design Select from five number key patterns for menu items Menu Design 1
Guide Keys Select from five Soft Key patterns Pattern 1
Indicator Bar
Index Menu H Functions A Settings 2 A Display Patterns
Select an item and press b
1
Select an option and press b
2
^ For other settings, repeat Steps 1 - 2.
Select from five background patterns for upper part of
Display on which indicators appear
Background 1
Activate or deactivate Backlight and Keypad Light. Adjust Active Time and Brightness.
^ Specify Active Hours for a set period each day. (Set Clock first. See P. 1 -1 8 .)
^ Backlight and Keypad Light are On (15 seconds) by default.
Index Menu H Functions A Settings 1 A Light Settings
Backlight
1
1 Select 1Backlight and press b
Keypad Light
1 Select 2Keypad Light and press b
Changing Active Time
2
1 Choose 1On and press b
2 Enter Active Time (01 - 99 seconds) and press b
Active Time is set.
Disabling Backlight/Keypad Light
1 Choose 2Off and press b
Specifying Active Hours and Active Time
1 Select 3Active Hours and press b
2 Enter Start Time and End Time, then press b
Backlight and Keypad Light are available between Start Time and End Time.
3 Enter Active Time (01 - 99 seconds) and press b
^ Active Hours settings have no effect if Clock is not set.
+
^ Shorten Active Time to extend Battery Time.
Brightness
Index Menu H Functions A Settings 1 A Light Settings A Brightness
Use E to adjust level A Press b
^ Keypad Light Brightness is fixed.
In-Car Backlight
Index Menu H Functions A Settings 1 A Light Settings A In-Car Backlight
Choose 1On (illuminate) or 2Off A Press b
Select Display Brightness from four levels
Set Backlight/Keypad Light to illuminate while using In-Car
Charger
KLevel 4
KOff
6
Display
6-6
6-7
Page 65

F35
F40
F48
6
Other Display Settings
Language
Index Menu H Functions A Settings 1 A
Select 1
Index Menu H Functions A Settings 2 A Display Settings A Power On Message
日本語
Power On
Message
Choose 1On A Press b A Enter text A Press b
Display
^ Enter up to 16 single-byte characters.
C To cancel, choose 2Off A Press b
Vodafone live!
Animation
Index Menu H Functions A Settings 2 A Animation A Vodafone live!
Select from 1Send Mail to 7Vodafone live! A Press b A Choose
1On (show) or 2Off A Press b
Mail Background
Index Menu H Functions A Settings 2 A Animation A Mail Background
Choose 1On (show) or 2Off A Press b
Switch handset user interface between Japanese and English
K日本語 (Japanese)
言語選択
or 2English A Press b
Create a short text message to appear on Display each time
handset power is activated
Show or hide animations when sending/receiving mail or
receiving Station information
Set for each occasion separately
Show or hide animation in backgrounds of received messages
containing compatible Pictographs
KOff
KOn (All)
KOn
Screen Animation
Index Menu H Functions A Settings 2 A Animation A Screen Animation
Animation appears on Display after a specified period of
inactivity (except in Standby)
Preset Animation
Choose 1On A Press b A Select 1Animation A Press b A
Select 1Animation 1 or 2Animation 2 A Press b A Press b
Original Animation
Choose 1On A Press b A Select 1Animation A Press b A
Select 3Original A Press b A Select an image A Press b A
Press b
Period of Inactivity
Choose 1On A Press b A Select 2Start Time A Press b A
Select a period A Press b
Canceling
Choose 2Off A Press b
^ Only E-Animation files (.nva) are available.
^ While animation appears, press any key to stop it.
^ Animation may not appear depending on handset status.
+
Incoming Light
Index Menu H Functions A Settings 2 A Incoming Light
Using Screen Animation shortens Battery Time.
Set Small Light to flash for missed incoming calls/mail, Alarm,
etc.
Select an item A Press b A Choose 1On or 2Off A Press b
^ Small Light flashes while notice appears.
^ In Off-Line Mode, Small Light always flashes while Display shuts down for Panel Saving.
KOff
KOn (All)
F48
F47
Display
6
6-8
6-9
Page 66

Sounds & Related Functions
7-1
Page 67

F10
Call Functions
Use Call Functions menu items to adjust Ring Tones, Vibration, Small Light and Ring
Time settings. See below for the default settings.
Incoming
Call
Ring Tone Pattern 1 Mail Web Station Pattern 5 Report
Ring Tone Level Level 5 Level 5 Level 5 Level 5 Level 1 Level 5
Vibration Off
Vibration
Pattern
LED Indicator Small Light
Small Light
Blink Pattern
Ring Time N/A
^ Received Complete settings apply after you:
7
Sounds & Related Functions
B Retrieve complete messages or acquire Unretrieved List
B Delete Server Mail
B Manually update Station Main List or Location Info
^ Confirm Delivery settings apply to Delivery Reports.
^ Settings remain even after handset power is turned off.
^ In Manner Mode, Manner Settings (see P. 3- 4 ) take priority.
Vibration 1 Vibration 2 Vibration 3 Vibration 4 Vibration 5 Vibration 2
Ring Tone Level
Index Menu
H Functions A Sounds A Call Functions A Select an item A Ring Tone
Level
Incoming
Mail
10 Seconds 10 Seconds 10 Seconds
Incoming
Web
Pattern 1
New
Station Info
Received
Complete
1 Second
Confirm
Delivery
10 Seconds
Ring Tone
Select from preset patterns, preset melodies, Original Ring Tones, Voice files, etc.
Check preset melodies on handset.
Index Menu H Functions A Sounds A Call Functions A Select an item A Ring Tone
Preset Patterns/Melodies
1
1 Select 1Preset Tones or 2Preset Melodies and press b
Melodies in Data Folder
1 Select 3Data Folder and press b
Voice Files in Voice Folder
1 Select 4Voice Folder and press b
^ Voice files cannot be used for Received Complete.
,
Select a tone or melody
2
C To play tones or melodies, press e !.
+
Press b
3
^ Files cannot be selected if the file name exceeds 24 single-byte characters.
^ Some files may not be usable.
B Press e C to stop.
B When Manner Mode is active or Ring Tone Level is Rising Tone or Silent, sounds play
at Level 1.
For some melodies, handset vibrates to the melody when Vibration (see P.7 - 4 )
is set to SMAF Link.
7
Sounds & Related Functions
Use E to adjust level
1
^ Level 5 is maximum. When Rising Tone is set, volume increases in the order of Level 1 -
Level 5 every three seconds.
C To check volume, press e !.
B Press e C to stop.
Press b
2
When Ring Tone Level is Rising Tone for Incoming Call, g appears in Standby, and h
appears for Silent.
7-2
+
If source file in Data Folder or Voice Folder is deleted, Ring Tone returns to default.
7-3
Page 68
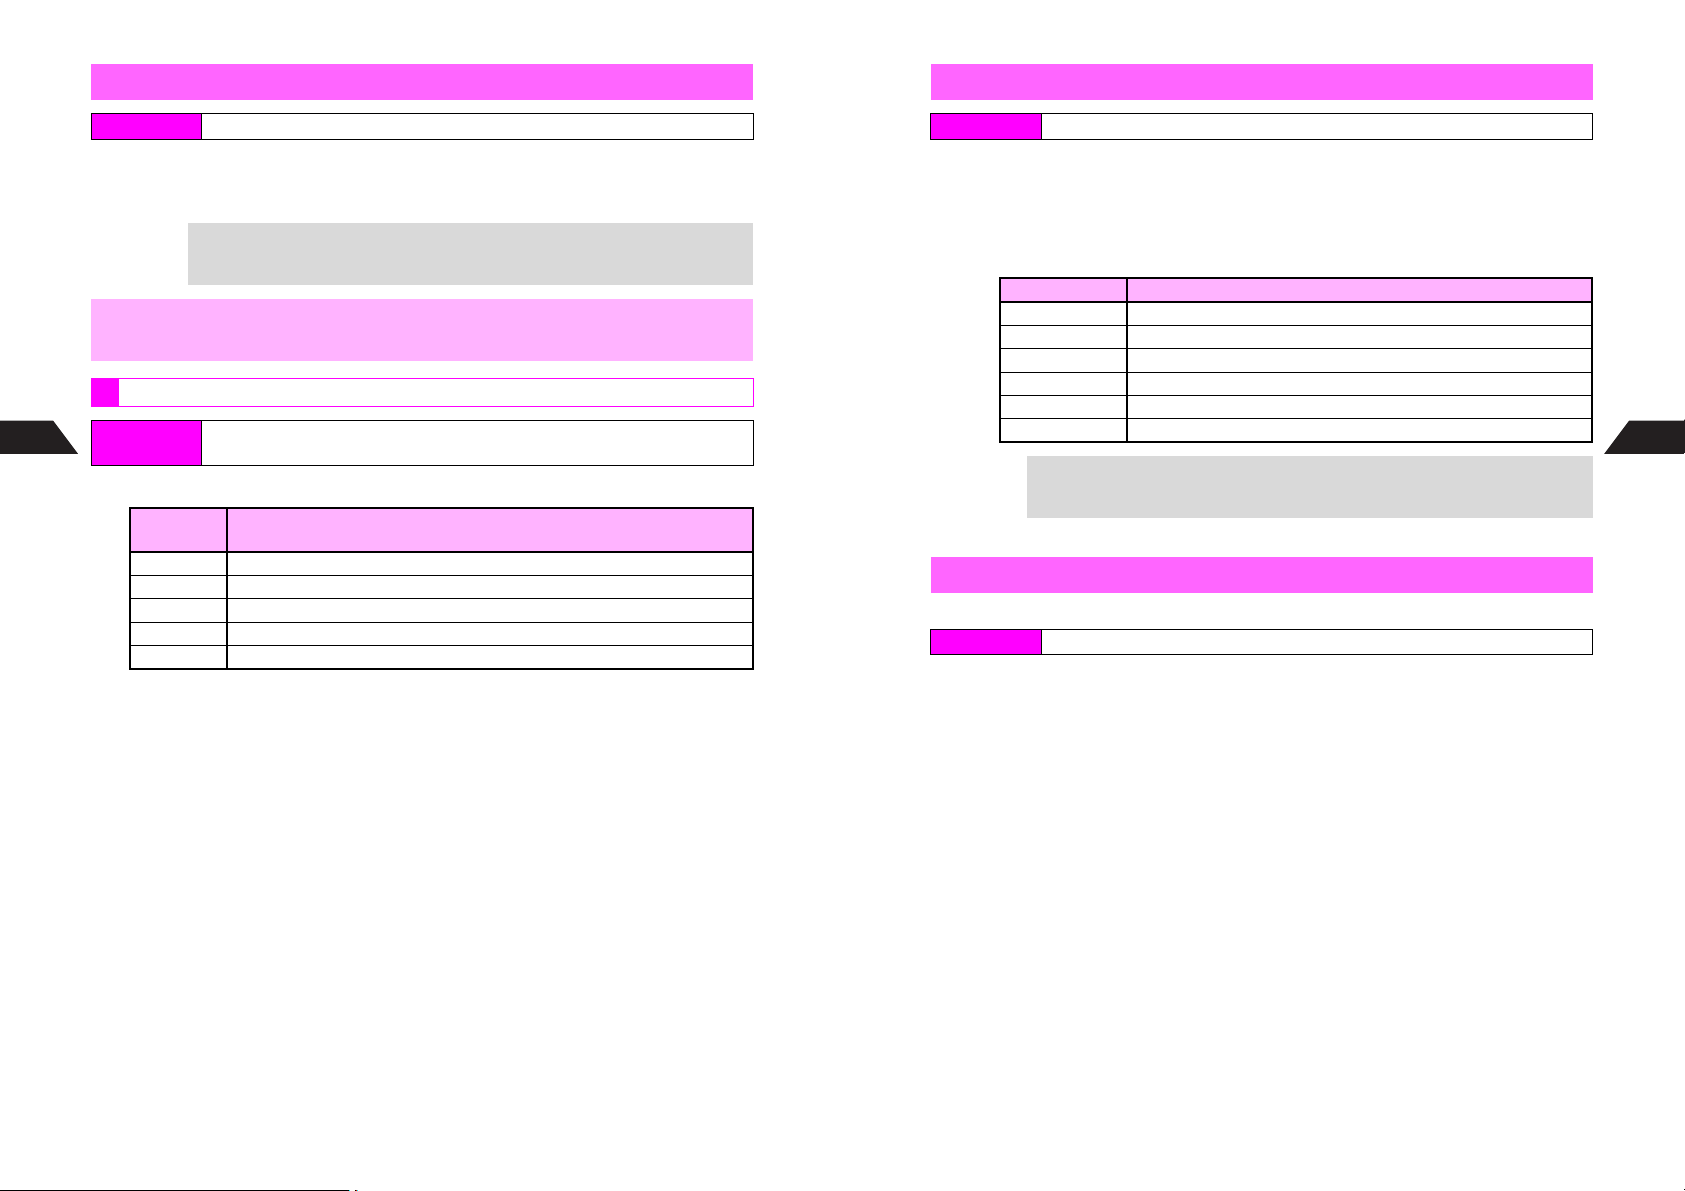
Handset Vibration
Small Light
Index Menu H Functions A Sounds A Call Functions A Select an item A Vibration
Choose 1On and press b
1
C To cancel, choose 2Off A Press b
C To link to SMAF files, select 3SMAF Link A Press b
+
,
Vibration Pattern
7
Index Menu
Sounds & Related Functions
Select a pattern and press b
1
Vibration 1 Vibrate (0.75 Sec) % Stop (0.75 Sec)
Vibration 2 Vibrate (0.25 Sec) % Stop (0.25 Sec) % Vibrate (0.25 Sec) % Stop (1 Sec)
Vibration 3 Vibrate (1 Sec) % Stop (2 Sec)
Vibration 4
Vibration 5 Vibrate (0.5 Sec) % Stop (0.5 Sec) % Vibrate (0.5 Sec) % Stop (1 Sec)
Select 3SMAF Link to allow compatible SMAF files to control Vibration.
Disable vibration when charging.
H Functions A Sounds A Call Functions A Select an item A Vibration
Pattern
Vibration
Pattern
Operation (repeats)
Vibrate (1 Sec) % Stop (1 Sec) % Vibrate (1 Sec) % Stop (2 Sec)
Index Menu H Functions A Sounds A Call Functions A Select an item A LED Indicator
Select 1Small Light and press b
1
C To cancel, choose 2Off A Press b (Omit the next steps.)
Select a blink pattern
2
C To check patterns, press e x.
B Press e C to stop.
Pattern Operation (repeats)
Pattern 1 On (0.75 Sec) % Off (0.75 Sec)
Pattern 2 On (0.25 Sec) % Off (0.25 Sec) % On (0.25 Sec) % Off (1 Sec)
Pattern 3 On (1 Sec) % Off (2 Sec)
Pattern 4 On (1 Sec) % Off (1 Sec) % On (1 Sec) % Off (2 Sec)
Pattern 5 On (0.5 Sec) % Off (0.5 Sec) % On (0.5 Sec) % Off (1 Sec)
SMAF Link Flashes according to SMAF files
Select 6SMAF Link to allow compatible SMAF files to control Small Light.
3
+
Press b
Ring Time
Ring Time settings are not available for Incoming Call.
Index Menu H Functions A Sounds A Call Functions
Select an item other than 1Incoming Call and press b
1
Select 6Ring Time and press b
2
Enter time (01 - 99 seconds) and press b
3
7
Sounds & Related Functions
7-4
7-5
Page 69

F13
Sound Effects
Adjust sounds and volume for handset operations.
Keypad
Sound
Setting On On On On
Sound Push Tones Error Tone Opening 1 Ending 1
Volu me
Time
^ Power On is when turning on handset, and Power Off is when turning off.
^ Sound Volume applies to sounds in Data Folder, mail attachments, etc.
^ Set LED to Sound is for flashing Small Light with sounds.
^ Settings remain even after handset power is turned off.
Level
Medium
0.05 Seconds 0.5 Seconds
Sounds
7
Sounds & Related Functions
Index Menu H Functions A Sounds A Sound Effects
Select 1Keypad Sound, 2Error Tone, 3Power On or 4Power Off
1
and press b
Choose 1On and press b
2
C To cancel, choose 2Off A Press b (Omit the next steps.)
Select 1Sound and press b
3
Preset Patterns/Melodies
4
1 Select 1Preset Tones or 2Preset Melodies and press b
Error Tone Power On Power Off
Level
Medium
Level 5 Level 5
3 Seconds 3 Seconds
Sound
Volu me
Level 5 Small Light
Set LED to
Sound
Press b
6
C To adjust Sound Effect volume, select 2Vol ume A Press b A Use E to adjust level
A Press b
C To set Sound Effect duration, select 3Time A Press b A Select time (Keypad Sound/
Error Tone) or enter time (Power On/Power Off) A Press b
+
If source file in Data Folder is deleted, sound pattern returns to default.
Basic Sound Settings
Sound Volume/
Set LED to Sound
Index Menu H Functions A Sounds A Sound Effects
Sound Volume
Select 5Sound Volume A Press b A Use E to adjust level A
Press b
Light Settings
Select 6Set LED to Sound A Press b A Select 1Small Light or
2Off A Press b
+
Blink pattern for Set LED to Sound is fixed to SMAF Link.
Set playback volume
Set to flash Small Light with sounds
KSee P. 7 -6 .
7
Sounds & Related Functions
Melodies in Data Folder
1 Select 3Data Folder and press b
^ Files cannot be selected if the file name exceeds 24 single-byte characters.
,
^ Some files may not be usable.
Push Tones (Keypad Sound)
1 Select 4Push Tones and press b
Pattern is set. (Omit the next steps.)
Select a tone or melody
5
C To play tones or melodies, press e !.
B Press e C to stop.
7-6
7-7
Page 70

F17
BAGAf B f Cdddddd dD E F G A B C D E F G A B CcccccccD E F CeeeeD E F
;#A#f
C#D#F#G#A#C#D#F#G#A#C#D#F#G#A#C#D#F
#
Original Voice
Record sound for up to 30 seconds per file and use as Ring Tones or Alarm Tones.
Sound is saved to Voice Folder.
Index Menu H Functions A Sounds A Original Tones A Original Voice
Enter title and press b
1
^ Enter up to 24 single-byte characters. Title is mandatory.
^ Original Voice files are saved by title by default.
Press b
2
Recording starts.
Press b to stop
3
^ When maximum recording time is reached, recording stops automatically and sound is
saved.
7
Sounds & Related Functions
C Recording stops and recorded material is lost.
C After Step 3, select a Voice file A Press b
B Press e C to stop.
C To use as Ring Tone, follow these steps after Step 3.
Select a Voice file A Press d I A Select Incoming Tone A Press b
A Select an item A Press b
^ Voice files cannot be used for Received Complete.
Incoming Calls while Recording
Playing Recorded Sounds
Voice Ring Tone
Original Ring Tones
Basics
Create melodies to use as Ring Tones, or to send via Long Mail.
^ Use up to 95 sounds x 32 chords, 190 sounds x 16 chords, or 380 sounds x 8 chords.
^ Original Ring Tones are saved to Data Folder (Melodies). See P. 8- 3 .
Original Ring Tones are saved in SJM format. To send Original Ring Tones to
,
Melody Chord
A W:Chord 1, X: Chord 2
Y:Chord 3...Z: Chord 32
Ton e
Loudness
Pitch
A (Low) f % d % No symbol % c % e (High)
A #: Semitone
A U: Rest
Use the following scales (range: approximately 4 octaves including semitones).
handsets other than Vodafone live! packet-enabled SHARP handsets, convert them
to Melody files or SMAF files (see P.13-7 - 13-8). (Converted files may not play on
recipient handsets.)
Window Description
J
Q
WToneLevel?
Piano
k [
YX.X
X
SX
D
y
Pla
Sound
A Indicated by pitch and note
Save
**5/**
Menu
n
Sound at Cursor
Entered Notes/Rests
4]
Cursor
A Move to enter/edit sounds
Duration
A Varies by note or rest
3
A
: Triplet, _: Slur
Pitch Range
7
Sounds & Related Functions
7-8
dd
d
cc ccc ee edd
7-9
Page 71
Notes & Rests
C
C
C
C
Note Rest Duration Note Rest Duration
Whole note/rest Dotted half note/rest
Sixteenth note/rest Whole note triplet/rest
Eighth note/rest Sixteenth triplet/rest
.
Dotted eighth note/rest Eighth triplet/rest
Quarter note/rest Quarter triplet/rest
.
Dotted quarter note/rest Half note triplet/rest
Half note/rest
Tone s
Handset contains 128 basic tones and 61 extra tones preset.
^ Create tones and save as Instrument Effects (up to 8 types to 3 locations).
^ Adjust octave of tones (see P.7-22).
7
Sounds & Related Functions
Procedure
1 Enter title
^ The entered title will appear when selecting Ring Tone.
^ Enter up to 24 single-byte characters. Title is mandatory.
2 Select tempo
^ X: Number of quarter notes played per minute
1Fast X = 150 3Slightly Slow X = 107
2Standard X = 125 4Slow X = 94
3 Select number of chords
^ Type: 8 Phonetic Chord, 16 Phonetic Chord and 32 Phonetic Chord
4 Enter sounds one by one for melody chord 1 (W)
^ Arrange pitch, octave or duration of each sound, and use semitones and triplets
(see P.7-11 - 7-12).
^ Press e ! to play all entered sounds. When you press k, sounds are
played up to cursor. Adjust playback volume in Sound Volume (see P. 7 -7 ). In
Manner Mode, sounds play at Level 1 even if Silent is set in Manner Settings,
Sound Volume.
^ To change tone or loudness while creating melodies, press d I.
5 For harmony, enter sounds in other melody chords
(Melody chord 2: X, melody chord 3: Y...melody chord 32: Z)
^ Press j to move to other melody chords.
^ Enter sounds in the same way as melody chord 1.
6 Select tone
^ Piano is set for all melody chords by default.
.
^ Select preset tones or Instrument Effects (see P.7-17) created beforehand.
^ Selected tone applies to two melody chords (pairs: 1&17, 2&18, 3&19...16&32).
7 Adjust loudness
^ Strong is set for all melody chords by default.
^ Select Strong, Standard or Faint for each melody chord.
^
Selected loudness applies to two melody chords (pairs: 1&17, 2&18, 3&19...16&32).
8 Save melody as Original Ring Tone
^ To use as Ring Tone (see P. 7- 3 ), select from Data Folder.
Entering Sounds
This section describes how to enter a sound.
The same procedure applies to melody chords 1 to 32.
1 Note & Rest
Key Assignments:
Do Re Mi Fa Sol La Ti Rest
12345670
7
Sounds & Related Functions
<Changing Pitch>
^ Press a key once to enter a quarter note. Press the same key repeatedly to adjust
the octave.
6
A
^ Use E to change pitch by semitone.
…
…
CC
D
Ac
6
6
#
D
6
Af Ad
D
#
E
D
DD
…
…
<Entering Rests>
^ Press 0. A quarter rest (with U) is entered.
7-10
7-11
Page 72

2 Note/Rest Type
q
Press q to toggle as follows. Press p to toggle types in reverse.
q q q q
Quarter
note/rest
<Using Dotted Notes or Triplets>
^ Enter a note and press 9. The dotted version is available for half/quarter/eighth
notes and rests.
9
X
Standard9Dotted9Triplet Standard
^ Connect 3 triplets as follows:
7
Sounds & Related Functions
A A A
3Y3Y3
Y
Melodies may not play properly, or may not attach to Long Mail if contained
,
<Using Slurs>
^ Enter a note and press 8. _ appears on the right connecting the note to the
next.
Standard8Slur Standard
C A sound is entered.
To enter more, press A to move cursor and repeat from Step 1 on P.7-11.
^ Use E to enter the same sound as the one on the left.
,
+
triplets are not a set of three. Use triplets of similar pitch to avoid failure.
8
X
^ Sounds may not play properly if notes of the same scale/pitch play in some melody
chords simultaneously.
^ Distortion may occur when multiple melody chords play simultaneously.
In Manner Mode, Keypad Sound is muted.
Eighth
note/rest
X.
_
X
3
X
X
Sixteenth
note/rest
F17
Creating an Original Ring Tone
Make sure there is enough free memory. When Data Folder is full, delete files and try
again (see P. 8 -9 ).
Index Menu H Functions A Sounds A Original Tones A Original Ring Tone
Enter title and press b
Whole
note/rest
Half
note/rest
X
1
^ Enter up to 24 single-byte characters. Title is mandatory.
^ Original Ring Tones are saved by title by default.
Select tempo (see P.7-10) and press b
2
Select number of chords and press b
3
Enter note or rest (see P.7-11)
4
Specify note or rest type (see P.7-12)
5
Press A to set
6
Cursor moves right.
Repeat Steps 4 - 6 to enter more
7
^ To adjust tone or loudness here, press d I, select Tone or Adjust Loudness and
press b, then perform Step 11 (tone) or Step 16 (loudness) and press b.
C Press e ! to play sounds in all melody chords.
B Press e C to stop.
C To play current melody chord up to cursor, press k.
B Press e C to stop.
C To move to other melody chords, press j (repeatedly).
Press b when finished
8
^ To save melody without adjusting tone or loudness, skip ahead to Step 19 on P.7-14.
C To edit entered sounds, select 2Edit A Press b A Perform from Step 3 on P.7-15
Select Tone and press b
9
Select a melody chord and press b
10
Select a genre with F and a tone with E
11
^ To use Instrument Effects, select Original (FM) or Original (WT).
C To check tones, press e ! or d j.
B Press e C or d C to stop.
B Press e ! to play created melody and d j to play Do Re Mi Fa Sol La
Ti Do.
Press b
12
^ Repeat Steps 10 - 12 for other melody chords.
C To play melody, press e !.
B Press e C to stop.
7
Sounds & Related Functions
7-12
7-13
Page 73

Press d W
13
^ Skip ahead to Step 19 when not adjusting loudness.
Select Adjust Loudness and press b
14
Select a melody chord and press b
15
Select from 1Strong to 3Faint
16
C To check loudness, press e !.
B Press e C to stop.
Press b
17
^ Repeat Steps 15 - 17 for other melody chords.
C To play melody, press e !.
B Press e C to stop.
Press d W
18
Select 1Save and press b
19
7
Sounds & Related Functions
C Melody is temporarily saved. To resume, end the call and follow these steps.
Press b A Choose 1Yes A Press b
Although most tones are named after musical instruments, they may sound different.
,
+
Also, playback volume may vary or distortion may occur depending on the tone/scale.
When you press e !, Cannot play back too many Phonetic chords may
appear, and when you press b q, Cannot save too many Phonetic chords
may appear. Delete melody chords, replace short notes with longer notes, or reduce
triplets.
Incoming Calls while Editing
Editing an Original Ring Tone
Make sure there is enough free memory. When Data Folder is full, delete files and try
again (see P. 8 -9 ).
Index Menu H Functions A Sounds A Original Tones A Data Folder
Select a file and press d I
1
^ Original Ring Tones are marked with k.
Select Edit and press b
2
Edit title and press b
3
Select tempo and press b
4
Select number of chords and press b
5
Move cursor to sound
6
C To edit other melody chords, press j.
When Changing Number of Chords
C When changing the number of phonetic chords, a warning of possible data loss may
appear. To proceed, choose 1Yes and press b (see table below).
B To cancel, choose 2No A Press b
Current Chords Changed to Data to be Lost
8 16 Sounds after the 190th
8 32 Sounds after the 95th
16 32 Sounds after the 95th
16 8 Melody chords 9 - 16
32 8 Melody chords 9 - 32
32 16 Melody chords 17 - 32
C Tone may alter when number of chords is changed.
7
Sounds & Related Functions
7-14
7-15
Page 74

Editing Sounds
7
1 Use E to change pitch and switch type with p/q/8/
9 (see P.7-12)
^ Keys 1 - 7 are not available for this operation.
Adding Sounds
1 Enter sound
Sound is entered at the cursor position.
^ Refer to entry limit (see P. 7- 9 ).
Deleting an Original Ring Tone
Index Menu H Functions A Sounds A Original Tones A Data Folder
Select a file and press d I
1
Select Delete and press b
2
Choose 1Yes and press b
3
Deleting Sounds
1 Use F to select a sound
2 Press i
Sound at the cursor position is deleted.
CTo delete all sounds, press i for 1+ seconds.
CTo delete sound sequence before or after cursor, press d I A Select
6Delete Posterior or 7Delete Previous A Press b A Press b
7
Sounds & Related Functions
Copy/Cut & Paste Melodies
1 Press d I
2 Select 3Copy or 4Cut and press b
3 Select the first sound of a portion and press b
4 Select the last sound of the portion and press b
Portion disappears when cut.
5 Open a window to paste the melody
^ When pasting into other melodies, close the current melody and open another
window.
6 Press d I
7 Select 5Paste and press b
8 Press b at target location
Press b when finished
8
C To edit tone or loudness, perform Steps 9 - 18 on P.7-13 - 7-14.
Select 1Save and press b
9
Select 2Overwrite and press b
10
Original Ring Tone is overwritten.
To save edited melody separately, select 1New Entry and press b. The
+
original melody remains and the edited melody is saved as a new file.
Instrument Effects
Basics
Create original tones for Original Ring Tones and other melodies. Save up to eight
tones per chord type (8/16 Chords, 32 Chords and WT Original Tone).
Procedure
This system, based on FM synthesis, allows you to select Algorithm and Effect Level
and adjust parameters of Operator to create Instrument Effects.
^ Select and arrange preset tones or Instrument Effects you have already created.
^ Play sounds as you arrange tones to check effects of changes.
^ Use WT synthesis by selecting WT Original Tone.
1 Select chord
^ Type: 8/16 Chords, 32 Chords and WT Original Tone
2 Select a save location
3 Enter name
^ Effect names appear in tone list under Original (FM) or Original (WT).
^ Enter up to 12 single-byte characters.
4 Select source tone
^ Select from preset tones if this is your first time.
JE
Q
BaseTone
Piano
J[
Piano
g
htPiano
Bri
GrandPiano
Honky‑tonkPiano
ElectricPiano1
ElectricPiano2
Harpsichord
Clavi
D
y
Pla
Select
n
]H
7
Sounds & Related Functions
7-16
7-17
Page 75

5 Select Algorithm
^ Choose from six types for 8/16 Chords, and two types for
32 Chords.
^ Algorithm setting is not available for WT Original Tone.
JE
Q
1Algorithm3
g
orithm4
2Al
g
orithm5
3Al
g
orithm6
4Al
g
orithm7
5Al
g
orithm8
6Al
n
Algorithm
Select a combination of Operators from six types (8/16 Chords) or two types (32
Chords).
For 8/16 Chords
6 Adjust parameters of each Operator (OP)
^ There are four types of Operators for 8/16 Chords and two
types for 32 Chords.
^ Default parameters are the same as those of the source
tone.
^ Use E to select a parameter and F to adjust.
7
^ Press e ! to check effects of parameter changes.
Sounds & Related Functions
7 Set Effect Level, Basic Octave, etc.
JE
Q
SetOP 1
Multiple1
SustainOn
KeyScaleRate1
KeyScaleLevel2
TotalLevel25
AttackRate
DecayRate9
SustainLevel1
SustainRate16
8 Save tone (Instrument Effects)
^ Select Instrument Effects from tones to use for Original Ring Tone, etc.
WT Synthesis
C WT synthesis is based on recorded waveform data from musical instruments, etc.
which are close to original sounds.
FM Synthesis
This system synthesizes various tones by generating a sine wave called Operator.
Algorithm is a combination of Operators.
Depending on the Algorithm, Operators work either as Modulator (that which
modulates) or Carrier (that to be modulated).
Feed Back
Operator 1
Modulator
Modulate
Operator 2
Carrier
Various Tones
^ Adjust a variety of parameters including Multiple and Sustain.
^ Some Operators have a parameter called Feed Back for more effects.
D
Pla
y
Select
Adjust
n
Set
Algorithm 3 Algorithm 4 Algorithm 5 Algorithm 6
(Shaded)
Modulator (that which modulates)
(White)
Algorithm 7 Algorithm 8
For 32 Chords
*
Algorithm 1 Algorithm 2
Carrier (that to be modulated)
7
Sounds & Related Functions
^ Available Operators vary depending on the combination.
^ Algorithm setting is not available for WT Original Tone.
Operator (OP)
See the table for details. Available parameters may vary by the number of chords.
Parameter Description
Multiple
(13 levels)
Sustain (On/Off)
Key Scale Rate
(two levels)
Key Scale Level
(four levels)
Total Level
(64 levels)
Multiple affects tones most. The higher the Carrier level, the higher the
pitch. Adjust the Modulator level for a variety of tones.
When Sustain is set, sound continues after produced. Choose On to
provide sustaining effects to tones in Piano, Glockenspiel, etc.
Set Key Scale Rate high to shorten the rise and fall time. Select 2 to
emphasize this effect.
The higher the Key Scale Level, the lower the volume level.
Select 0 to disable this effect.
(1) Carrier
The higher the Carrier value, the higher the volume level.
Normally set 64 (maximum value), and select smaller values to use tones
effectively at low volume for accompaniments, etc.
(2) Modulator
Increasing Modulator value brightens tones.
Select smaller values for softer tones. Normally set between 40 and 64 to
enjoy effects of tone changes.
7-18
7-19
Page 76

Parameter Description
Attack Rate
(15 levels)
Decay Rate
(16 levels)
Sustain Level
(16 levels)
Sustain Rate
(16 levels)
Release Rate
(16 levels)
KEYOFF Nullify
(On/Off)
7
Sounds & Related Functions
Wave Select
(29 types)
Vibrato
(four levels/Off)
AM Modulation
(four levels/Off)
Feed Back
(eight levels)
+
Effect Level
(four levels)
Basic Octave
(four levels)
Panpot (31 levels)
Sustain (On/Off) Choose On to extend sounds
Vibration Level
(four levels/Off)
Basic Octave, Sustain and Vibration Level settings are not available for WT Original
Tone.
When Release Rate is set high for Normal Tones, rests may be ignored in playback.
Additional Settings
Parameter Description
The higher the Attack Rate, the longer sounds take to reach the maximum
volume. When using tones with Attack Rate high, use longer notes or select
slower tempo.
Lower Decay Rate to shorten the time sounds reach down to Sustain Level
The Sustain Level for a Normal Tone equals the sustained volume. For
Step-Down Tones, Sustain Level measures the volume at which Ring Tone
begins to decrease. The higher the Sustain Level, the higher the volume.
The lower the Sustain Rate, the longer the Sustain Level volume is
sustained. 16 is Normal Tone, and other levels are Step-Down Tones.
The Release Rate for a Normal Tone equals the time from beginning to end
of a sound. For Step-Down Tones, Release Rate measures the time from
when a sound begins to decrease until it ends completely. The lower the
Release Rate, the sooner the sound ends. For sustaining effects, increase
Release Rate.
Choose On to avoid sound skipping of Step-Down Tones including those in
DRUM
Select from 29 waveforms
Vibrato is a periodic variation in pitch
The higher the AM Modulation level, the stronger the tremolo (periodic
changes in loudness)
Set Feed Back (not available for some Operators)
Effect Level affects cycle time of wavering quality in pitch or loudness.
Select high level to shorten the cycle.
Adjust octave of tones
Panpot measures the position of sounds, which varies by combination of L
(left) and R (right). Sound bias is emphasized as the value difference
increases.
Select higher level for stronger vibrato
Creating Instrument Effects
Index Menu H Functions A Sounds A Instrument Effects
Select 18/16 Chords, 232 Chords or 3WT Original Tone and press
1
If Instrument Effects are already saved and renamed, they appear in Effects list.
Select a save location and press b twice
2
^ To leave the name unchanged, press b once and skip ahead to Step 4.
Enter name and press b
3
^ Enter up to 12 single-byte characters.
Select Base Tone and press b
4
Select a genre with F and a tone with E
5
C To check tone, press e !.
B Press e C to stop.
Press b
6
Select Tone and press b
7
^ To keep Algorithm unchanged or for WT Original Tone, skip ahead to Step 10.
Select Algorithm and press b
8
Select Algorithm and press b
9
^ To keep each Operator (OP) unchanged, skip ahead to Step 14.
Select Operator (OP 1, etc.: see P.7-18) and press b
10
Default parameters are the same as those of the source tone.
^ For WT Original Tone, select Set OP and press b.
Select a parameter with E and adjust it with F
11
C For parameter descriptions, see P.7-19 - 7-20.
Repeat Step 11 to adjust other parameters
12
C Press e ! to check effects of parameter changes.
B Press e C to stop.
Press b or d j
13
Select Effect Level and press b
14
Select a frequency for tremolo/vibrato and press b
15
Confirmation appears.
^ For WT Original Tone, skip ahead to Step 18 on P.7-22.
Select Basic Octave and press b
16
Select a level and press b
17
F18
b
7
Sounds & Related Functions
7-20
7-21
Page 77

F16
F19
Select Panpot and adjust with F
18
^ For WT Original Tone, skip ahead to Step 21.
Select Sustain and choose On or Off with F
19
Select Vibration Level and adjust with F
20
Press d j
21
When finished with all settings, press d j
22
^ To create more, repeat from Step 2 on P.7-21.
Other Sound Related Functions
Speaker
7
Index Menu H Functions A Sounds A Speaker
Sounds & Related Functions
Select 1Speaker Phone or 2Speaker A Press b
C To use Earpiece and Microphone for phone conversations, choose 3Off A Press b
C Before or during calls, press f for 1+ seconds.
^ w: Speaker Phone is active. x: Speaker is active.
^ When Speaker is Off, use Earpiece and Microphone for phone conversations.
^ To cancel manually during a call, press f for 1+ seconds.
C When calls end, speaker talk is canceled.
^ Speaker is not available when Headphones are in use.
,
Tone Octave
Index Menu H Functions A Sounds A Tone Octave
Select a genre with F and a tone with E A Press b A Select a
level A Press b
C To check tone or octave, press e !.
^ Adjust octave of Instrument Effects in Basic Octave setting (perform Steps 16 - 17 on
P. 7- 2 1 ).
^ When Speaker Phone is active, ringback tone may not sound. Handsfree
conversations may be hampered by ambient noise. Keep handset as close as
possible when using Speaker Phone.
B Press e C to stop.
Select whether to activate Speaker Phone (for handsfree
conversations) or Speaker (to listen only)
KOff
Talk with Speaker
Select an octave for each tone from four levels
7-22
Page 78

Managing Files (Data Folder)
8-1
Page 79

File Organization
Data Folder
Handset has two storage areas. Files are automatically sorted into Memory by
function and into File Cabinet by file format. Handset File Cabinet capacity is
approximately 8 MB.
Handset Memory Structure
8
Managing Files (Data Folder)
Memory
Phone Book
Schedule
Text Memo
Mail Box
File Cabinet
Data Folder
Images
Melodies
Animation
Voice Folder
Save files created/obtained using
functions. The capacity varies by
function.
Files are sorted into folders by file
format. File Cabinet capacity is fixed
and shared by all folders.
File Cabinet Memory Status
C To check memory usage status, press b A Select My Files A Press b A
Select 5Memory Status A Press b
+
Exchange images via Long Mail, infrared, etc.
Contents
Files created or obtained via Sky/Long Mail, etc. are organized in separate folders
according to file format. Files are sorted as follows:
Data Folder
Images
Melodies
Animation
Create QR Codes from image/melody files in Data Folder (see P.11-28).
Image Files including Still Images
Melody Files such as Original Ring Tones
Animation Files
Window Description
To open Data Folder from Standby, follow these steps.
Press b A Select My Files A Press b A
Select 1Data Folder A Press b
File View
Open a folder to view files.
To customize the appearance of File View, see P. 8 - 5 "Display Settings."
JE
Q
DataFolder
DataFolder
g
es
QIma
PMelodies
SAnimation
p
O
en
Menu
Data Folder
n
8
Managing Files (Data Folder)
8-2
C File View (List)
JG
Q
**
s
Images Folder
n
Format, Name and Size (of selected image)
Saved Files
^ Icons appear for files other than images or images not
supported by handset.
8-3
Page 80
C File View (List File Names)
JE
Q
DataFolder
3.7KB
g
es
Ima
*6‑*
9‑2112‑34
s
*6‑*
9‑2112‑21
s
*6‑*
9‑2111‑25
s
*6‑*
9‑2111‑*1
s
*6‑*
9‑211*‑15
s
*6‑*
9‑211*‑11
s
*6‑*
9‑211*‑*4
s
Sha‑mail
Images Folder
To view folders first, select Thumbnails or File List in Display Settings for Images or
+
Animation folder (see P. 8- 5 ).
Show
n
Menu
File Size
Folder Name
Saved Files (format and file name)
Icons
8
Managing Files (Data Folder)
Still Image & Animation Files
Icon Format Description
*
w
(P: white)
*
w
(P: purple)
*
s
*
q
(E: white)
*
q
(E: Yellow)
*
x
*Blue icon: forwardable, red icon: unforwardable
^ Unforwardable files cannot be edited, combined, attached to Long Mail, converted to QR
Codes or sent via infrared.
^ A yellow triangle appears (r) on icons of files used for Phone Book Photo, Useful Diary,
Schedule, etc.
PNG PNG image
Transparent PNG Transparent PNG image
JPEG JPEG image
E-Animation (NEVA files) Animation (may include sound)
E-Animation (NEVA files) with jump
buttons
Animation (JPEG, PNG, or PNG/
JPEG Animation)
Animation (may include sound)
Animation
Sound Files
Icon Format Description
*
y
*
u
P Sky Melody
k Original Ring Tone Melody created on handset (forwardable)
l Voice Voice/sound recorded on handset (forwardable)
*Blue icon: forwardable, red icon: unforwardable
^ Unforwardable files cannot be edited, combined, attached to Long Mail, converted to QR
Codes or sent via infrared.
^ A yellow triangle appears (p) on icons of files set for Ring Tones, Alarm, etc.
SMAF Melody via Long Mail, etc. (may include images)
Melody Melody via Long Mail, etc.
Melody downloaded from Sky Melody Center
(unforwardable)
Display Settings
Customize appearance of each folder in Data Folder.
Setting Description
1
List
List File Names
Thumbnails
File List
1
Not available for Melodies folder.
2
Appears as List for Melodies folder.
3
Appears as Folder for Melodies folder.
Index Menu H My Files A Data Folder
1
2
3
4
,
1
3
Select a folder and press d I
Select 4Display Settings and press b
Enter Security Code
Select a type and press b
In this manual, most operations are described with Data Folder appearance set to
List. Operations may differ if folders are set to appear.
Thumbnails appear
2
File names appear
Sub folders appear (thumbnails appear within)
Sub folders appear (file names appear within)
8
Managing Files (Data Folder)
8-4
8-5
Page 81

8
g
Opening Files
Handset Data Folder
Index Menu H My Files
Select 1Data Folder and press b
1
Select a folder and press b
2
Thumbnails or file names appear (see P. 8 -3 , P. 8- 4 "File View").
Select a file and press b
3
The content plays or appears.
^ Press q to open or play the previous file, and press p to
open or play the next one. (Available in most cases.)
Managing Files (Data Folder)
+
Press i to return to File View
4
JPEG Images Exceeding W 240 x H 320 Dots
Images are reduced to fit Display. To restore the original size, press d
select
Original Size
and press b.
E-Animation Files with Jump Buttons
C Some E-Animation files contain jump buttons with which to open linked images. To
use the buttons, open an E-Animation file and follow these steps.
Press d I A Select E-Animation Mode A Press b
^ Click buttons on screen for operations.
JG
Q
DataFolder
*6‑*
s
Sha‑mail
(Ima
9‑2112‑
Show
File View
es Folder)
I
3.7KB
Menu
Properties
Index Menu H My Files A Data Folder
Select a folder or a file within it
1
Press d I
2
Select Property and press b
n
,
3
Details appear.
^ Press D to scroll down.
^ Item Descriptions:
1
Title
Typ e File/folder type
Location File/folder location
File Size Data size
Memory Used File size on handset
Width x Length
Copy/Fwd
Save
Transfer
Phone Book (Photo)
Incoming Tone
Set Useful Diary
Schedule Memo
1
Appears for files in Melodies folder.
2
Appears for JPEG/PNG images, etc.
3
Number of entries for which the file is used also appears.
2
1, 3
3
3
Melody file name
Image size in dots
OK: can be copied within Data Folder
Invalid: not supported
OK: can be saved
Invalid: not supported
OK: can be transferred to external device
Invalid: not supported
3
Yes: set for Photo setting
Yes: set for Ring Tones, Alarm, etc.
Yes: set for Useful Diary
Yes: set for Schedule
8
Managing Files (Data Folder)
+
8-6
Exchange files via infrared with compatible devices (see P.9 - 2 ).
8-7
Page 82

F48
Editing Files & Folders
To change folder names or activate/cancel Secret Mode, set folders to appear from
Display Settings (see P. 8- 5 ).
8
Managing Files (Data Folder)
Changing Folder/
File Name
Index Menu H My Files A Data Folder
Folder Name
Select a folder A Press b A Select from Folder 1 to Folder 9 A
Press d I A Select 2Folder Name A Press b A Enter
name A Press b
File Names
Select a folder A Press b A Select a file A Press d I A
Select Change File Name A Press b A Enter name A Press b
^ Changing names does not affect titles of melody files.
,
Secret Mode
Index Menu H My Files A Data Folder
^ When you attach a file to Long Mail, single-byte katakana used in the name
change to double-byte, and Pictographs are deleted. File names consisting
only of Pictographs are changed to image, melody, etc.
^ Some single-byte Symbols may not be used for file names.
Select a folder A Press b A Select from Folder 1 to Folder 9 A
Press d I A Select 3Secret Mode A Press b A Enter
Security Code A Choose 1On or 2Off A Press b
^ Enter Security Code to open folders set to On.
Copy/Move
Index Menu H My Files A Data Folder
Select a folder A Press b A Select a file A Press d I A
Select Copy or Move A Press b A Select a target folder A Press b
Rename folders (except Folder 0) or files
Restrict access to folders (except Folder 0)
Copy or move files to other folders within each Data Folder
Delete
Index Menu H My Files A Data Folder
Delete a single file or all files at once
Deleting Single Files
Select a folder A Press b A Select a file A Press d I A
Select Delete A Press b A Delete?* appears A Choose 1Yes A
Press b
*If the file is used for Incoming Tone, Picture Call/Mail, Useful Diary, etc., File in Use Delete?
appears.
Deleting All Files
Select a folder A Press d I A Select 3Delete All A Press b
A Enter Security Code A Choose 1Yes A Press b
Animation Files
Simple Animation
Select up to four JPEG images to create Simple Animation. Images appear one after
another at the selected tempo.
^ Simple Animation files are saved to Animation folder. However, those made of a single
image are saved to Images folder.
^ When memory is full, delete files to free some space (see above).
^ Image quality may change when used for animation.
Creating Simple Animation
Index Menu H Functions A Settings 2 A Animation A Simple Animation A New
Enter name and press b
1
^ Enter up to 32 single-byte characters. Name is mandatory.
Select tempo and press b
2
In animation, images appear in numerical order at the tempo.
JE
Q
SimpleAnimation
*.*
FileName[Easy‑
Tempo[Sli
1‑‑‑‑‑‑‑‑‑‑‑‑‑‑‑‑‑‑
2‑‑‑‑‑‑‑‑‑‑‑‑‑‑‑‑‑‑
3‑‑‑‑‑‑‑‑‑‑‑‑‑‑‑‑‑‑
4‑‑‑‑‑‑‑‑‑‑‑‑‑‑‑‑‑‑
g
oin]
g
htlySlow]
n
KB
8
Managing Files (Data Folder)
8-8
Select
8-9
Page 83

Select a blank entry and press b
3
Select an image from Data Folder (see P.8-6) and press b
4
C Press d X to use other image.
C To start over from Step 3, press e W.
Press b
5
The image is set.
C To play animation, press d I A Select 1Animation
Playback A Press b
B To return, press e W A Press i
C To change images, select one A Press d I A Select
2Change A Press b A Start over from Step 4
C To delete images, select one A Press d I A Select
3Delete A Press b A Choose 1Ye s A Press b
Repeat Steps 3 - 5 to add images
6
^ Select up to four images.
Press e j when finished
7
8
Managing Files (Data Folder)
C To send animation via Long Mail, select 2Attachment A Press b A Perform from
Step 2 on P.13-3
B For large animation, choose 1Ye s A Press b (File may be too large to be attached
even if the size is reduced.)
Select 1Save and press b
8
Editing Animation
When memory is full, delete files to free some space (see P. 8 -9 ).
Index Menu H Functions A Settings 2 A Animation A Simple Animation A Edit
Select animation and press b
1
Edit name and press b
2
Select tempo and press b
3
C To add images, select a blank entry A Press b A Select an image A Press b A
Press b
C To change images, select one A Press d I A Select 2Change A Press b
A Select an image A Press b A Press b
C To delete images, select one A Press d I A Select 3Delete A Press b A
Choose 1Yes A Press b
JE
Q
SimpleAnimation
FileName[Easy‑
Tempo[Sli
1
2‑‑‑‑‑‑‑‑‑‑‑‑‑‑‑‑‑‑
3‑‑‑‑‑‑‑‑‑‑‑‑‑‑‑‑‑‑
4‑‑‑‑‑‑‑‑‑‑‑‑‑‑‑‑‑‑
*6‑*
9‑2111‑*8
g
htlySlow]
Select
n
4.4KB
g
oin]
MenuSet
Opening Animation Files
Index Menu H My Files A Data Folder
Select a folder and press b
1
Select animation file and press b
2
Selected animation plays.
C Press e W to stop playback.
C Using Images & Animation: see below
Using Images & Animation
Some images may not be usable.
Changing Display Size
Open a file and press k
1
Display size toggles between 100% (with indicators), 100% (no indicators), Enlarged (with
indicators) and Enlarged (no indicators).
^ Size may not be changed or size options may vary depending on the file. When enlarged,
the entire image may not appear on Display.
^ q: 100%, p: Enlarged
Setting Image & Animation as Wallpaper
Save As Wallpaper can be selected only for compatible files.
Index Menu H My Files A Data Folder A Open a folder A Select a file A Menu (d)
Images
1
1 Select 2Display Setting and press b
2 Select 1Save As Wallpaper and press b
Animation
1 Select 2Save As Wallpaper and press b
Press b
2
8
Managing Files (Data Folder)
When finished editing, press e j
4
Select 1Save and press b
5
Select 1New Entry and press b
6
C To overwrite, select 2Overwrite A Press b
8-10
8-11
Page 84

Setting Image & Animation as Display Images
To Display Images can be selected only for compatible files.
Index Menu H My Files A Data Folder A Open a folder A Select a file A Menu (d)
Sending Files via Long Mail
Attach files to Long Mail from Data Folder.
Index Menu H My Files A Data Folder A Open a folder A Select a file A Menu (d)
Images
1
1 Select 2Display Setting and press b
2 Select 2To Display Images and press b
Animation
1 Select 3To Display Images and press b
Select an item and press b
2
C For more, perform from Step 4 on P. 6- 5 .
Slide Show
All images in Data Folder (Images or Animation) appear sequentially. Adjust Slide
Show speed.
8
Index Menu H My Files A Data Folder A Open a folder
Managing Files (Data Folder)
Select an image and press d I
1
Select 1Slide Show and press b
2
Select 1Slide Show and press b
3
Slide Show starts from the selected image.
C To stop Slide Show, press b.
B To resume, press b.
C To skip images manually, press d J.
Setting Interval
C To change interval, follow these steps after Step 2.
Select 2Display Speed A Press b A Select an interval A Press b
^ Interval is Standard by default.
Select Attachment and press b
1
C Large JPEG/Animation Files: see below
C For Melody files or Original Ring Tones, select a file format (see P. 1 3 -8 ) A Press b
Complete other fields and send Long Mail (from Step 2 on P.13-3)
2
Large JPEG Files
C Exceeds Limit appears after Step 1 above. Follow these steps to proceed.
^ Reduce & Send (Reduce Width & Height by 50%)
Select 1Attach 1/4 Size A Press b A Perform from Step 2 on P.13-3
^ Compress & Send (Maintain Same Width & Height)
Select 2Attach Original A Press b A Perform from Step 2 on P.13-3
B Compression affects image quality.
^ Send Split Mail (Split Image into Four Frames)
Select 3Attach Split Mail A Press b A Select or enter recipient A Press b
A
Choose 1Yes A Press b A Perform from Step 3 in "Send Continuously"
on P.13-39
B Split Mail transmission charges are equivalent to sending four Long Mail
messages.
Large Animation Files
C Too large Reduce and Retry? appears after Step 1 above. Follow these steps to
proceed.
Choose 1Yes A Press b A Perform from Step 2 on P.13-3
8
Managing Files (Data Folder)
8-12
8-13
Page 85
8
Editing Images
Enlarging/Reducing Images
H My Files A Data Folder A Open a folder A Select a file A Menu (d) A
Image Size
To Center the Point to Enlarge/Reduce
^ Press e 1 and use G to move the point to the center of Display.
^ Image stops when you release the key or the limit is reached.
To Return to Resize Mode
Press e 0.
^ Portions outside Display are cut when saved.
^ When e 1 is pressed after zooming, image
returns to the original scale.
Managing Files (Data Folder)
Index Menu
Select 1Enlarge/Reduce and press b
1
If NMove does not appear in the left bottom corner, press e 0.
^ Shortcut: From Data Folder, open an image and press e 0
+
Press and hold C to zoom in and D to zoom out
2
To stop zooming, release the key (stops automatically when the
limit is reached).
C To soften images, press d }.
,
Press b
3
Image is saved as a new entry.
Save
Move Soft
Changing Image Size
Resize images in Data Folder to send via Long Mail or set as Wallpaper.
^ Alternatively, crop image for size. File size changes when images are resized.
^ Images may not appear depending on the size.
^ Change Image Size can be selected only for compatible files.
Resize to Preset Size
Index Menu
Select from 1Wallpaper to 5Alarm and press b
1
A rectangle appears on the image (except for 1Wallpaper).
Wallpaper W 240 x H 320 dots
Sha-mail Size W 120 x H 160 dots
Power On/Off W 120 x H 130 dots
Incoming Call W 120 x H 38 dots
Alarm W 120 x H 51 dots
C To start over from selecting preset size, press i or
Selecting Display Area
2
Enlarge or Reduce
H My Files A Data Folder A Open a folder A Select a file A Menu (d) A
Image Size A Change Image Size
d |.
1 Use G to specify display area and press b
^ Display area may be unspecifiable depending on image size.
1 Press e 0
NMove appears in the left bottom corner.
2 Press C to zoom in and D to zoom out, and press b
Resize
8
Size
Managing Files (Data Folder)
OK
8-14
Press b
3
Image is saved as a new entry.
8-15
Page 86

Cropping Images
H My Files A Data Folder A Open a folder A Select a file A Menu (d) A
Image Size A Change Image Size
8
Managing Files (Data Folder)
Index Menu
Select 6Cut and press b
1
Use G to move + to the upper left corner of the
2
portion to crop and press b
Use G to move + to the lower right corner of the
3
portion
C To cancel, press e W A Start over from Step 2
Press d j
4
C To start over from Step 1, press i or d |.
C To adjust display area/scale, perform Step 2 on P.8 - 1 5.
Press b
5
Press b again
6
Image is saved as a new entry.
Marker Stamp
Add text/marks (arrows/plus sign) to images.
^ Apply to JPEG and PNG images. Some images may not be usable.
^ Marker Stamp can be selected only for compatible files.
Index Menu
Select 1Marker Stamp and press b
1
C To specify color, select 7Font Color A Press b A Select a combination A Press b
C To hide outline of text/mark with the latter color, select 8Border A Press b A Choose
,
H My Files A Data Folder A Open a folder A Select a file A Menu (d) A
Picture Effect
2Off A Press b
For PNG images, Font Color and Border cannot be selected (White w/ Black
applies).
Resize
Entering Text
2
1 Select 1Character and press b
2 Enter text and press b
^ Enter up to 16 single-byte characters.
CTo re-enter text, press e W A Start over from Step 1
3
OK
Size
4
5
6
CPress 1 - 9 to change the color.
CPress 0 to toggle Border On and Off.
Adding Marks
1 Select a mark and press b
CTo change mark, press e W.
CPress 1 - 9 to change the color.
CPress 0 to toggle Border On and Off.
Use G to move text or mark to target location and press b
Choose 1Yes and press b
C To add more text or mark, select 2Marking A Press b A Press d I A
Repeat Steps 2 - 4
C To check the image, select 3Check Image A Press b
C To cancel editing, select 4Cancel Edit A Press b A Choose 1Ye s A Press b
Select 1Complete and press b
Choose 1Yes and press b
Image is saved as a new entry.
8
Managing Files (Data Folder)
Visual Effects
Dress up images with preloaded visual effects.
^ Apply to JPEG images.
^ Use images between W 52 x H 52 and W 240 x H 320 dots.
^ Image Decoration can be selected only for compatible files.
Index Menu
Select 2Image Decoration and press b
1
H My Files A Data Folder A Open a folder A Select a file A Menu (d) A
Picture Effect
8-16
8-17
Page 87

Select an effect and press b
2
^ Decoration Effects:
Sepia Renders image in sepia tones
Sparkling Adds sparkling effect to bright portions of an image
Soap Bubbles Superimposes bubbles over an image
Kaleidoscope Renders an image as a kaleidoscopic image
Emboss Renders images in black and white relief
Scrunch Renders image as a pencil sketch
Aluminum Can Superimposes image onto a 3D can image
Round Frame Adds a round, opaque frosting to the edges of an image
Soft Frame Adds a soft, opaque edged frame to image
Zigzag Frame Adds a jagged edged frame around image
Press b
3
Image is saved as a new entry.
,
8
Managing Files (Data Folder)
Make smiley, angry or sad faces.
^ Apply to JPEG images.
^ Face Arrange may not fit all images. Adjust position and size as required (see P.8 - 19 ).
^ Face Arrange can be selected only for compatible files.
1
Edited images may be too large to save or send via Long Mail.
Face Arrange
Index Menu
Select a type and press b
^ Face Arrange Types:
Mirror:
Right-half
Mirror:
Left-half
Grin Pulls eyes down & mouth up Dark Darkens skin tone
Mad Pulls eyes up & mouth down Fair Brightens skin tone
Sad Pulls eyes & mouth down Angry Mark Adds a stress mark to face
C To start over, press e W.
H My Files A Data Folder A Open a folder A Select a file A Menu (d) A
Picture Effect A Face Arrange
Copies right side of face
onto left side
Copies left side of face onto
right side
Slender
Crush Face
Stretches face to lengthen
appearance
Shortens distance between
top and bottom of face
Press b
2
Image is saved as a new entry.
When using Face Arrange, take care not to create images that may embarrass or
,
offend others. Always obtain permission before photographing others.
Adjusting Face Arrange Position
After Face Arrange (Step 1 on P.8-18), change the positions and sizes of targets to fit
your images. Changes apply to the current image only.
Select LPositioning and press b
1
Face Arrange targets appear.
Press d u
2
A rectangle appears with + in the upper left corner.
Set the face line
3
J q G
Q
Use G to move + to
the upper left corner
C To start over, press e W.
Set the eyes and then mouth in the same way
4
J q G
Q
RightEye/LowerRight
+
n
n
J q G
Q
Use G to move + to
the lower right corner
J q G
Q
LeftEye/LowerRight
n
n
+
J q G
Q
g
bb
Face line is set
J q G
Q
Mouth/LowerRight
bb
n
n
+
8
Managing Files (Data Folder)
8-18
Back
Eye (Right of Image)
OK
Set
OK
Back
Eye (Left of Image)
Set
Back
Set
Mouth
8-19
Page 88

Press d j when finished
5
All the targets appear.
^ To start over from the face line, return to Step 2.
C To restore the original positions, press e l.
Press b
6
Choose 1Yes and press b
7
Image is saved to Data Folder as a new entry with Face Arrange positions adjusted, and
Face Arrange menu returns.
^ Complete Face Arrange. Face Arrange is applied to the adjusted positions.
Additional Picture Effects
^ Frame, Rotate, Moving Photo Frame and Change File Format can be selected only for
compatible files.
^ Edited images are saved as new entries.
Moving Photo
Frame
Index Menu
H My Files A Data Folder A Open a folder A Select a file A Menu (d) A
Picture Effect A Moving Photo Frame
Add Moving Photo Frame to JPEG images to create
animations
Select a frame A Press b A Press b
C To view file animation alone, select one A Press e 9
B Press e W to return to Select Frame list.
^ Animations are saved as E-Animation files with a .nva extension.
Moving Photo Frame size is W 120 x H 130 dots. For images larger than this
+
size, Moving Photo Frames appear centered. Resize or crop images to fit frame
(see P.8-15, P.8-16).
Change
File Format
Convert image format to JPEG (s) or PNG (w)
8
Add Frame to JPEG images
Managing Files (Data Folder)
Frame
Index Menu
H My Files A Data Folder A Open a folder A Select a file A Menu (d) A
Picture Effect A Frame
Select 1Preset Frames or 2Original Frames A Press b A Select a
frame A Press b A Press b
C To check frames, select one A Press e 9
B Press e W to return to Frame list.
Rotate
Index Menu
H My Files A Data Folder A Open a folder A Select a file A Menu (d) A
Picture Effect
Rotate images
Select 6Rotate A Press b* A Press b
*
To rotate further, press d z. Each press rotates image by 90 degrees.
Index Menu
H My Files A Data Folder A Open a folder A Select a file A Menu (d) A
Change File Format
Select a format A Press b
^ Apply to images smaller than 120 x 160 dots.
^ The original format cannot be selected.
,
Changing file format may affect image quality.
Combining Images
Some images may not be combined and menu items may vary by file type.
Split Screen
Combine up to four reduced images into one.
^ Apply to JPEG images.
^ Make sure there is enough free memory.
^ Images are placed in the upper left, upper right, lower left and
lower right in numerical order.
J q G
Q
Resize
Split Image
8
Managing Files (Data Folder)
n
Menu
8-20
Index Menu H My Files A Data Folder A Open a folder
Select an image for upper left and press b
1
Press d I
2
8-21
Page 89

8
Managing Files (Data Folder)
Select 5Composite and press b
3
Select 1Split Image 120 x 160 or 2Split Image 240 x 320 and press
4
Enter name and press b
5
^ Enter up to 32 single-byte characters. Name is mandatory.
Select a blank entry and press b
6
Data Folder opens.
Select an image and press b
7
^
Some images may not be selected.
C To change the image, press d X.
C To start over from selecting an entry, press e W.
Press b
8
Repeat Steps 6 - 9 to add images
9
C To preview Split Image, press d I A Select 1Split
Screen A Press b
B To return, press e W A Press i
C To change images, select one A Press d I A Select
2Change A Press b A Start over from Step 7
C To delete images, select one A Press d I A Select
3Delete A Press b A Choose 1Ye s A Press b
Press e j
10
C To send split images via Long Mail, select 2Attachment A
Press b A Perform from Step 2 on P.1 3 - 3
Select 1Save and press b
11
Image is saved as a new entry.
JE
Q
SplitPicture
FileName[MyPhoto
*6‑*
1
*6‑*
2
3Sleepy
*6‑*
4
9‑2*15‑17
9‑2*15‑18
9‑2*15‑2
Select
Panorama Images
b
Combine two images into one.
+
Select two images Merge Panorama
Panorama Image Effects:
Standard Applicable to all kinds of shots
Near View Best suited for close-up shots with parallax correction
Document Use for images with text
n
]
*
MenuSet
^ Use JPEG images between W 48 x H 64 and W 120 x H 160 dots/W 160 x H 120 dots.
^ Some portions may be cropped to adjust two images to the same size.
^ The result may not be satisfactory if color tones are different between two images.
^ Merge Panorama can be selected only for compatible files.
Index Menu H My Files A Data Folder A Open a folder
Select an image and press b
1
Press d I
2
Select 5Composite and press b
3
Select 4Merge Panorama and press b
4
The first selected image appears on the left when combined.
Select from 1Standard to 3Document and press b
5
Select 2 and press b
6
Data Folder opens.
8
Managing Files (Data Folder)
8-22
Select another image and press b
7
8-23
Page 90

Press b
8
^ If the image is too large or too small, select another.
C
To change images, select either A Press b A Press d
A
Start over from Step 7 on
Press e j when finished
9
Combined image appears.
^ Use G to scroll the image.
C To switch the positions, press d r.
Press b
10
Image is saved as a new entry.
P. 8- 2 3
X
JE
Q
MergePanorama
Effect[Standard
*6‑*
1
*6‑*
2
Set
Combining Split Mail Images
Use one of four Split Mail images to combine them all into one.
^ Images may not be combined properly if file names of Split Mail images are changed, or
the same file name exists.
^ When combined, image quality may change.
H My Files A Data Folder A Open a folder A Select a file A Menu (d) A
Composite
8
Managing Files (Data Folder)
Index Menu
Select 3Combine Split Mail and press b
1
Press b
2
Image is saved as a new entry.
9‑2*15‑17
9‑2*15‑18
Select
n
]
Melody Files
Some functions may not be available and menu items may vary by file type.
Playback Volume
Index Menu H My Files A Data Folder A Melodies
Select a file and press d I
1
Select 1Playback Volume and press b
2
Use E to adjust level and press b
3
Using for Incoming Tone/Sound Effects
^ Files cannot be used if the file name exceeds 24 single-byte characters.
^ Incoming Tone or Sound Effects can be selected only for compatible files.
Index Menu H My Files A Data Folder A Melodies
Select a file and press d I
1
Select 2Incoming Tone or 3Sound Effects and press b
2
Select an item and press b
3
Editing Melodies & Adjusting Tone or Loudness
C Press b A Select My Files A Press b A Select 1Data Folder A Press b A
Select Melodies A Press b A Select a melody A Press d I
B To edit melodies, select 5Edit A Press b A Perform from Step 3 on P. 7- 1 5
B To adjust tone, select 6Tone A Press b A Perform from Steps 10 - 13 on
P. 7- 1 3 - 7-14
B To adjust loudness, select 7Adjust Loudness A Press b A Pe rfo rm Steps
15 - 18 on P. 7- 1 4
^ Melody format files are saved as Original Ring Tone format after Edit.
8
Managing Files (Data Folder)
8-24
8-25
Page 91

Infrared
9-1
Page 92

Getting Started
Exchange files/entries with infrared-compatible Vodafone handsets and other devices.
^ V201SH complies with IrMC 1.1, but some files/entries may not be exchanged.
^ Infrared transfers are disabled while handset is connected to the Network (receiving/
sending mail or information).
^ During infrared transfers, handset automatically enters Off-Line Mode (see P.3 - 6). Thus
transfers are disabled while receiving calls/messages, during calls, while editing mail or
data, etc. Off-Line Mode is canceled after transfers.
Transferable Files
Function One File All Files Notes
The following settings are lost: Photo, Personal Ring Tone,
Incoming Notice and Mail Folder. In One File transfers,
Phone Book Available Available
Data Folder Available N/A
Camera Mode
9
Infrared
Images
,
Available N/A Transfer a DCF format file of up to 40 KB
^ Files over 40 KB cannot be transferred.
^ Images may not appear on recipient handsets.
Group and Secret settings are also lost.
All File transfer includes Owner Profile (except handset
phone number).
Transfer JPEG and PNG files in Images folder as well as
E-Animation (NEVA files) in Animation folder. Copy
protected files cannot be transferred.
Precautions
^ Align Infrared Ports within 20 centimeters with no obstructions between handsets.
Infrared Port
Within 20 cm
^ Keep Infrared Ports aligned during transfer.
^ Transfers in direct sunlight, under fluorescent lighting or near infrared equipment may fail.
^ Dust/oil may impair file transfers; clean Infrared Ports with a soft cloth beforehand.
When transfer fails, Remote Device Not Found Reconnect? appears. Implement
+
the above precautions and try again. (Choose 1Yes and press b.)
IR Password
Required for infrared transfers; passwords on both handsets must match.
The password specified when receiving an infrared transfer for the first time remains in
place until changed. Follow the steps below to change IR Password.
Index Menu H Infrared A Set IR Password
Infrared
9
9-2
Enter Security Code
1
Enter IR Password
2
Password is set and Infrared Transfer menu returns.
If IR Password is set in this manner beforehand, password entry is not requested
+
when receiving an infrared transfer for the first time.
9-3
Page 93

Transferring Files
y
One File Transfer
Sending
Send one file/entry from Data Folder or Phone Book.
Open file/entry list and highlight a file/entry
1
^ Alternatively, for Phone Book, open an entry.
Press b I or d I
2
Select Send via Infrared and press b
3
Off-Line Mode is set and title entry window opens.
^
When handset fails to enter Off-Line Mode, file/entry list returns.
Edit title and press b
4
^ Source file/entry name remains unchanged. To proceed without
changing the title, press b.
Prepare recipient handset
5
9
Infrared
Within 15 seconds, choose 1Yes and press b
6
Transfer starts. When finished, file/entry list returns.
JE
Q
J
[No.
***
**5UedaMikio
*3123XXXX3
**7KitayamaK
*3123XXXX8
**8KimuraTet
*3123XXXX5
Phone Book
Entr
‑**9]
Select
List
n
H
Menu
All File Transfer
Security Code and IR Password are required to transfer all entries.
B Security Code: see P.1 - 2 4
B IR Password is required for infrared transfers. Transfers are possible when the passwords on
both handsets match. To set recipient handset password before transfer, see P. 9- 3 .
Sending All Phone Book Entries
Index Menu H Infrared
Select 1Send All Entries and press b
1
Off-Line Mode is set.
^ When handset fails to enter Off-Line Mode, Infrared Transfer menu returns.
Enter Security Code
2
Prepare recipient handset
3
Enter IR Password
4
Within 15 seconds, choose 1Yes and press b
5
Transfer starts. When finished, Infrared Transfer menu returns.
Receiving All Phone Book Entries
Index Menu H Infrared A Acquire Signal
Infrared
9
Receiving
Index Menu H Infrared A Acquire Signal
Enter Security Code
1
Standing by... appears. Handset receives file/entry if sent within 30 seconds and
confirmation appears.
C Press e 3 to cancel.
C Press g to end.
Infrared Password
+
To save, choose 1Yes and press b
2
File is saved and Infrared Transfer menu returns.
C To cancel transfer, choose 2No A Press b A Choose 1Ye s A Press b
9-4
^ IR Password? appears when receiving an infrared transfer for the first time.
Enter a 4-digit password to start receiving.
^ The entered password remains valid. See P.9 - 3 to change the password.
^ If incorrect, Infrared Transfer menu returns.
Enter Security Code
1
Standing by... appears. Handset receives entries if sent within 30 seconds and
confirmation appears.
C Press e 3 to cancel.
C Press g to end.
C When IR Password? appears, see P.9 - 4 "Infrared Password."
Adding Entries
2
1 Select 1New Item and press b
Transfer starts. When finished, Infrared Transfer menu returns.
Overwriting Existing Entries
1 Select 2Delete All & Save and press b
2 Choose 1Yes and press b
Transfer starts. When finished, Infrared Transfer menu returns.
When Phone Book is overwritten, Owner Profile except handset phone number
,
is overwritten as well.
9-5
Page 94

Handset Security
10-1
Page 95

F28
F20
Changing Security Code
Whenever necessary, change Security Code.
Index Menu H Functions A Privacy A Change Code
Enter current Security Code
1
C Security Code: see P. 1 -2 4
^ If incorrect, handset returns to Standby.
Enter new Security Code
2
Re-enter Security Code
3
^ If incorrect, handset returns to Standby.
Handset Locks
Keypad Lock
Restrict access to handset functions.
Index Menu H Functions A Privacy A Keypad Lock
Enter Security Code
1
10
Handset Security
Q appears and Keypad Lock is set.
When Keypad Lock is Active
C
In Standby, press g for 2+ seconds to deactivate handset power, b for 1+ seconds
to activate/cancel Key Guard,
Security Code entry. Emergency calls to Police (110), Fire (119) and Coast Guard (118)
are possible.
C During a call, press g to end the call, 0 - 9 to enter Security Code or i to
edit Security Code entry.
C Answer calls by pressing f or keys for Any Key Answer (see P.2 - 6 ). Press g to
place callers on hold.
Emergency calls (110, etc.) are possible even when Keypad Lock is active. For more,
+
see P. 2- 3 "Emergency Calls."
0
- 9 to enter Security Code or i to edit
Canceling
Enter Security Code
1
Q disappears and Keypad Lock is canceled.
^ Keypad Lock can be canceled during calls.
^ Keypad Lock remains active even if handset power is deactivated, then reactivated.
Auto Key Lock
Index Menu H Functions A Privacy A Auto Key Lock
Enter Security Code
1
Choose 1On and press b
2
^ Keypad Lock activates from the next time handset power is turned on.
Emergency calls (110, etc.) are possible even when Auto Key Lock is active. For
+
Cancel Keypad Lock (see above) first and follow these steps.
1
2
more, see P. 2- 3 "Emergency Calls."
Canceling
Index Menu H Functions A Privacy A Auto Key Lock
Enter Security Code
Choose 2Off and press b
Phone Book Lock
Protect Phone Book entries from accidental alteration and restrict access to Phone
Book information.
Index Menu H Functions A Privacy A Phone Book Lock
Enter Security Code
1
Choose 1On and press b
2
C To cancel Phone Book Lock, choose 2Off A Press b
When Phone Book Lock is active, the following Phone Book operations are disabled:
,
B Searching, saving, editing and dialing, including Speed Dial (see P.5-14)
B Creating QR Codes from Phone Book entries or Owner Profile (see P.11-28)
F21
F23
10
Handset Security
10-2
10-3
Page 96

F24
F25
F26
Restrict Dial
Index Menu H Functions A Privacy A Restrict Dial
Enter Security Code
1
Choose 1On and press b
2
C To cancel Restrict Dial, choose 2Off A Press b
Emergency calls (110, etc.) are possible even when Restrict Dial is active. For more,
+
see P. 2- 3 "Emergency Calls."
Accept Call & Reject Call
Designate numbers from which to accept or reject calls.
Accept Call
Reject Call Reject calls from designated numbers. Caller hears a busy tone.
^ For rejected calls, Missed Calls appears in Missed Call notice (see P.2 - 1 5 ) and Reject
appears in Call History.
^ Accept Call and Reject Call operate only when Caller ID is sent.
^ To reject calls with No Caller ID or Payphone calls, see P.10-6.
^ Accept Call and Reject Call cannot be set at the same time.
10
Handset Security
Saving Entries
^ Save at least one entry before activating Accept Call or Reject Call.
^ Save up to 10 entries each.
Index Menu H Functions A Privacy
Accept Call
1
Reject Call
Accept calls from designated numbers only. Calls from other numbers are
rejected and caller hears a busy tone.
1 Select 5Accept Call and press b
2 Enter Security Code
1 Select 6Reject Call and press b
2 Enter Security Code
3 Select 1Specify Number and press b
Select 3Save to List and press b
2
Names or phone numbers appear if saved.
C To delete entries, select one A Press d y A Choose 1Ye s A Press b
Select a blank entry and press b
3
Enter a phone number
4
C To select from Phone Book, perform Steps 1 - 3 on P.5-11.
Press b
5
Name appears if selected from Phone Book. Number appears if entered directly. (Name
does not appear even if saved in Phone Book.)
^ Repeat Steps 3 - 5 to save other numbers.
Accept Call
^ At least one entry is required to set Accept Call (see P.1 0 -4 ).
^ Cancel Reject Call before activating Accept Call.
Index Menu H Functions A Privacy A Accept Call
Enter Security Code
1
Choose 1On and press b
2
C To cancel, choose 2Off A Press b
Reject Call
^ At least one entry is required to set Reject Call (see P.10-4).
^ Cancel Accept Call before activating Reject Call.
Index Menu H Functions A Privacy A Reject Call
Enter Security Code
1
Select 1Specify Number and press b
2
Choose 1On and press b
3
C To cancel, choose 2Off A Press b
Handset Security
10
10-4
10-5
Page 97
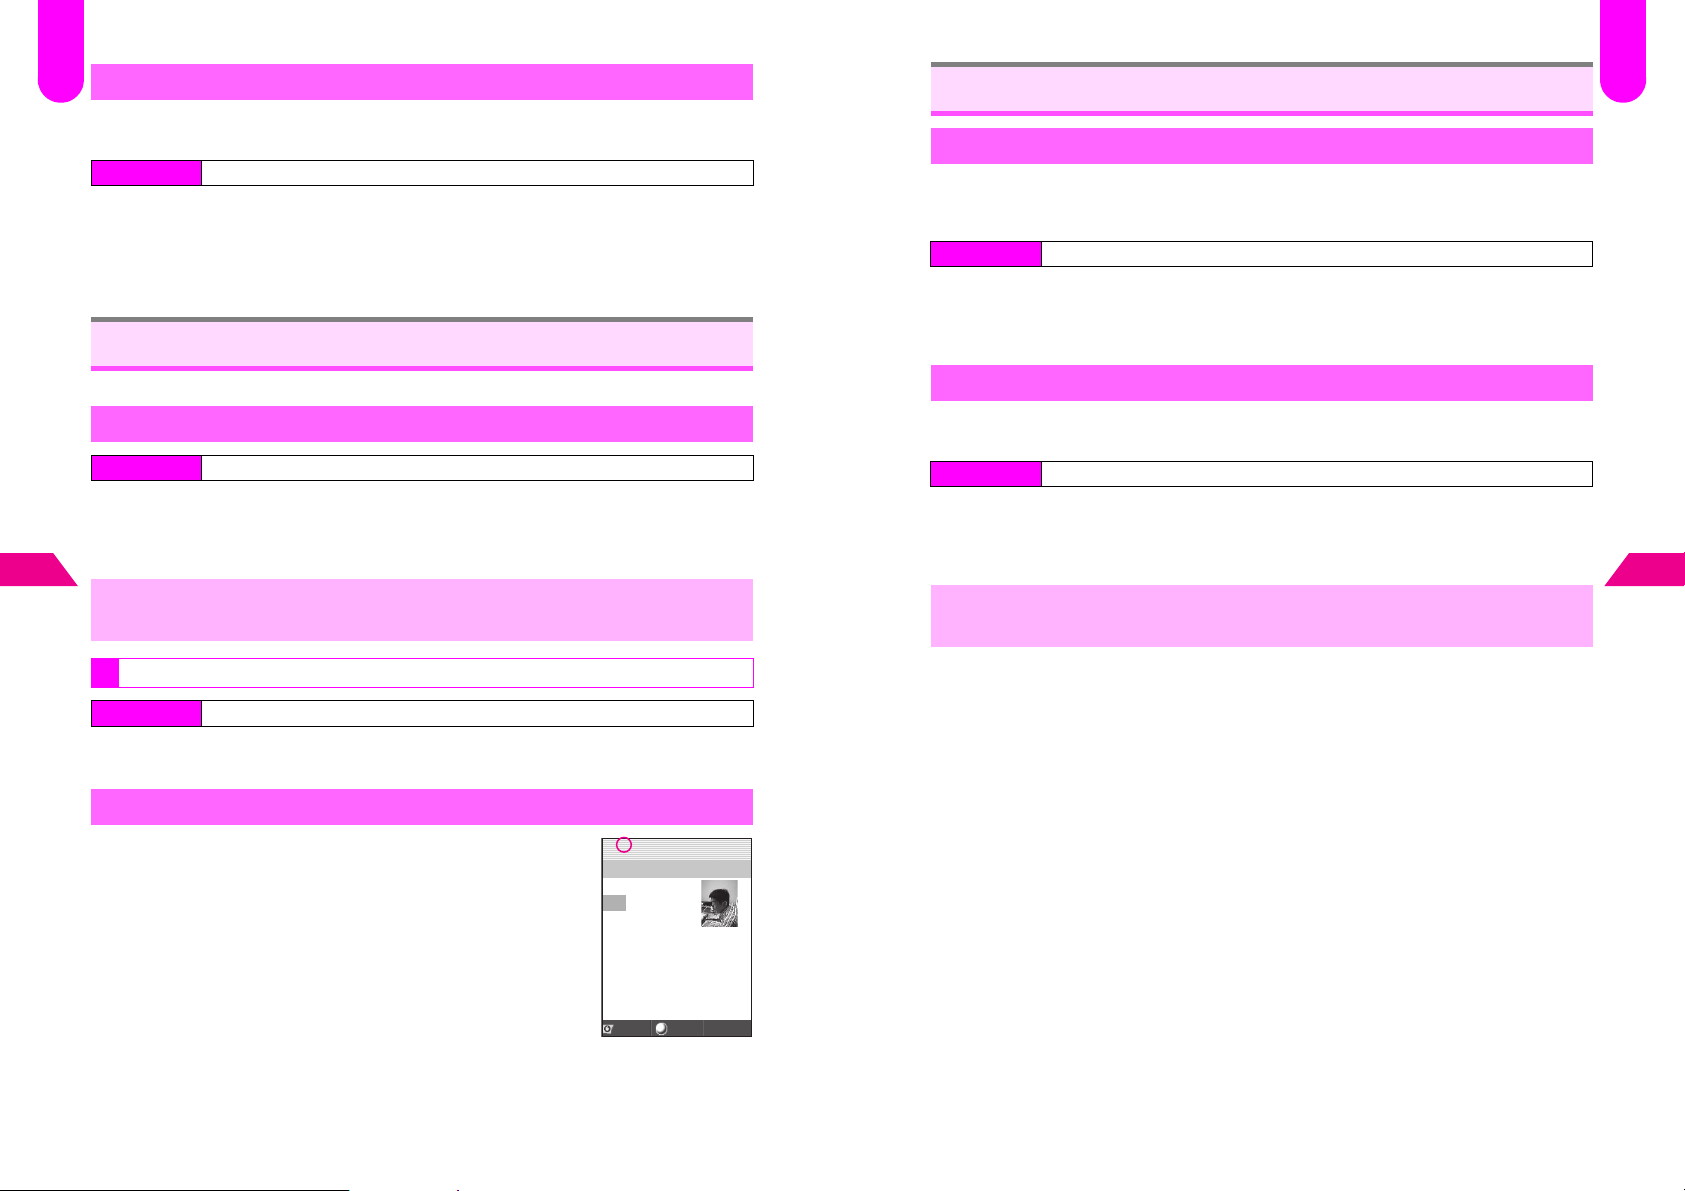
F22
Rejecting Other Calls
Reject calls with No Caller ID or Payphone calls. Handset does not ring and caller
hears a rejection message.
Index Menu H Functions A Privacy A Reject Call
Enter Security Code
1
Select 2No ID or 3Payphone and press b
2
Choose 1On and press b
3
C To cancel, choose 2Off A Press b
Secret Mode
Reset
Reset Defaults
Cancel custom settings and return handset functions to their default settings.
^ Phone Book entries are unaffected.
^ For settings affected by Reset, see P. 15 - 2 - 15-4.
Index Menu H Functions A Privacy A Reset Defaults
Enter Security Code
1
Select 1OK and press b
2
C To cancel, select 2Cancel A Press b
F29
F27
Activate Secret Mode to open Secret Mode entries.
Activating Secret Mode
Index Menu H Functions A Privacy
Select 2Secret Mode and press b
1
Enter Security Code
2
10
Handset Security
Secret Mode is set and z appears.
,
1
Secret Mode is canceled when handset power is turned off.
Exiting Secret Mode
Index Menu H Functions A Privacy
Select 2Secret Mode and press b
z disappears and Secret Mode is canceled.
Opening Secret Mode Entries
Activate Secret Mode and open a Phone Book entry.
^ z lights for standard entries and flashes for Secret Mode entries.
^ To edit or delete Secret Mode entries, see procedures for standard
entries.
Jz
Q
UedaMikio005
1Friends
ppuu
y
zPattern1
dPattern2
bMailFolder1
cMailFolder2
03123XXXX3
Back
Menu
n
Reset All
Clear all Phone Book entries, Original Ring Tones and other data (including Mail).
Custom settings return to their defaults. However, Security Code is unchanged.
Index Menu H Functions A Privacy A Reset All
Enter Security Code
1
Select 1OK and press b
2
C To cancel, select 2Cancel A Press b
,
Files and records deleted by Reset All cannot be restored.
Handset Security
10
10-6
10-7
Page 98

Additional Functions
11-1
Page 99

F38
Handy Call Functions
Message Recorder
F
文字
F44
Signal Alert
When Signal Alert is active, handset emits warning beeps when the signal is weak
and the call may be disconnected. Signal Alert is Off by default.
Index Menu H Functions A Settings 1 A Signal Alert
Choose 1On and press b
1
C To cancel Signal Alert, choose 2Off A Press b
,
Even when Signal Alert is active, calls may be disconnected without warning.
Push Tones
Use Push Tones to send alphanumeric messages to pagers or operate a home
answering machine remotely.
From Phone Book
Use this function to send set messages to pagers.
^ Save Push Tones to Phone Book first (see P. 5- 4 ).
When saving Push Tones to Phone Book (e), do not save other information to that entry.
^
11
Additional Functions
After a connection is established, open a Phone Book entry
1
(perform Steps 1 - 3 on P.5-11)
Press b
2
Select Send All Push Tones and press b
3
Enter u (Pause) in Push Tones to separate each sequence. To send following
+
Direct Entry
Press Keypad to send individual Push Tones during calls.
After a connection is established, use Keypad to enter numbers
1
^ For more information, see the manual for the recipient device/corresponding service.
^ Use 0 - 9, U and # to send Push Tones.
sequences, press d g for each.
Activating
Record caller messages on handset.
^ Message Recorder cannot be used when handset is off, out-of-range or in Off-Line Mode.
^ Record up to 90 seconds or 20 messages between Message Recorder, Voice Memo and
My Voice Memo (see P. 11 - 5 ).
Index Menu H Tel Op s A Message Recorder
Select 1Recorder Settings and press b
1
Remaining recording time appears and Message Recorder menu returns (j appears).
C To sample outgoing message, select 3Outgoing Message A Press b
B Press b to stop.
C To activate or mute Earpiece for outgoing message/caller message recordings, select
4Volume Level A Press b A Select 1Volume Level Link (default) or 2Silent A
Press b
Message Recorder Disabled
C When less than 4 seconds remain or 20 messages are recorded, Message Recorder
is disabled. Delete messages (see P.11-5) to activate Message Recorder.
C In Manner Mode, activate/cancel Message Recorder via Manner Settings only.
Answer Time
C Adjust ring time between 0 and 59 seconds (Message Recorder waits to answer
calls).
Press b A Select Tel Op s A Press b A Select 7Message Recorder A
Press b A Select 6Answer Time A Press b A Enter time (00 - 59) A
Press b
B To start recording immediately after a call arrives, enter 00 A Press b
^ Answer Time is 09 seconds by default.
In-Car Recorder
C Activate In-Car Recorder to automatically activate Message Recorder when In-Car
Charger is in use. In-Car Recorder is active by default. To cancel this setting, follow
these steps.
Press b A Select Tel Op s A Press b A Select 7Message Recorder A
Press b A Select 5In-Car Recorder A Press b A Choose 2Off A
Press b
11
Additional Functions
Press d g
2
11-2
11-3
Page 100

F
スケジュール
メモ
1
When Message Recorder is Active
C For incoming calls, outgoing message plays and recording starts.
^ To answer calls, press f during recording (no message will be recorded).
C When recording ends, l appears.
C If recording capacity becomes full (see P.1 1 -3 "Message Recorder Disabled") after
the recording, Message Recorder is canceled and j disappears. (l remains lit until
the message is deleted.)
Quick Recorder
C Use Quick Recorder to record caller messages on handset when Message Recorder
is inactive. When a call arrives, press bj to activate Quick Recorder. Outgoing
message plays and caller's message is recorded.
^ When recording capacity is full (see P.1 1 - 3 "Message Recorder Disabled"), delete
messages (see P.11-5) to activate Message Recorder.
Canceling
Index Menu H Tel Op s A Message Recorder
Select 1Recorder Settings and press b
Message Recorder is canceled and menu returns (j disappears).
Playing Messages
Deleting Recorded Messages
C Press i A Choose 1Yes A Press b
^ The next message plays, if any. l disappears after all messages are deleted.
Voice Memos
Record the other party's voice (Voice Memo) during a call or your own (My Voice
Memo) in Standby.
^ For Voice Memo, only the other party's voice is recorded.
^ Record up to 90 seconds between Voice Memo, My Voice Memo and Message Recorder
(see P.1 1 - 3). When less than 4 seconds remain or 20 messages are recorded, messages
cannot be recorded.
Recording Voice Memo
1
1 During a call, press k for 1+ seconds
Recording starts.
Recording My Voice Memo
1 In Standby, press k for 1+ seconds
2 Select 1My Voice Memo and press b
Recording starts.
^ Talk to Microphone from the distance of 5 - 10 cm.
11
Index Menu H Tel Op s A Message Recorder
Additional Functions
Select 2Play and press b
1
Number of recordings appears and playback starts from the most recent message. After all
messages have played, playback ends and handset returns to Standby.
C Press g to stop playback.
+
C Playback Operations (Example: 3 Messages are Recorded)
Press D during
playback
No.3 No.2 No.1
Playback
11-4
Message playback stops for incoming calls. Press f to answer the call.
Replay the message Play the previous messageSkip the message
Press C during
playback
No.3 No.2 No.1
Playback
Playback
Playback
Press C twice during
playback
No.3 No.2 No.1
Playback
Playback
Press b or k to stop
2
My Voice Memo stops for incoming calls. Press keys for Any Key Answer (see
+
+
P. 2- 6 ) to answer the call. (The recorded message is saved.)
^ Recordings remain even after handset power is turned off.
^ To play/delete Voice Memo/My Voice Memo, see P. 11 - 4 - 11-5 "Playing Messages."
11
Additional Functions
11-5
 Loading...