

Sharp SMC1842CS, SMC1843CM Owner’s Manual
MICROWAVE OVEN
OPERATION MANUAL
SMC1842CS/1843CM
CONTENTS
• For Customer Assistance ..... 2
• Precautions to Avoid Possible
Exposure to Excessive
Microwave Energy .................... 3
• Consumer Limited Warranty ....................... 4
MODELS
• Important Safety Instructions ..................... 5
• Federal Communication Commission Radio
Frequency Interference Statement ............ 6
• Grounding Instructions .............................. 6
• Installation Guide ........................................ 7
• Specications .............................................. 9
• Features Diagram ........................................ 10-11
• Operation Procedure .................................. 12
• Controls ....................................................... 13-22
• Care of Your Microwave Oven ................... 23-24
• Questions and Answers ............................. 25
• Cooking Instructions .................................. 26-36
READ ALL INSTRUCTIONS CAREFULLY BEFORE USING THE OVEN.
※ Keep the waveguide cover clean at all times.
Wipe the oven interior wth a soft damp cloth after each use.
If you leave grease or fat anywhere in the cavity it may overheat, smoke or even catch re
when next using the oven.
2
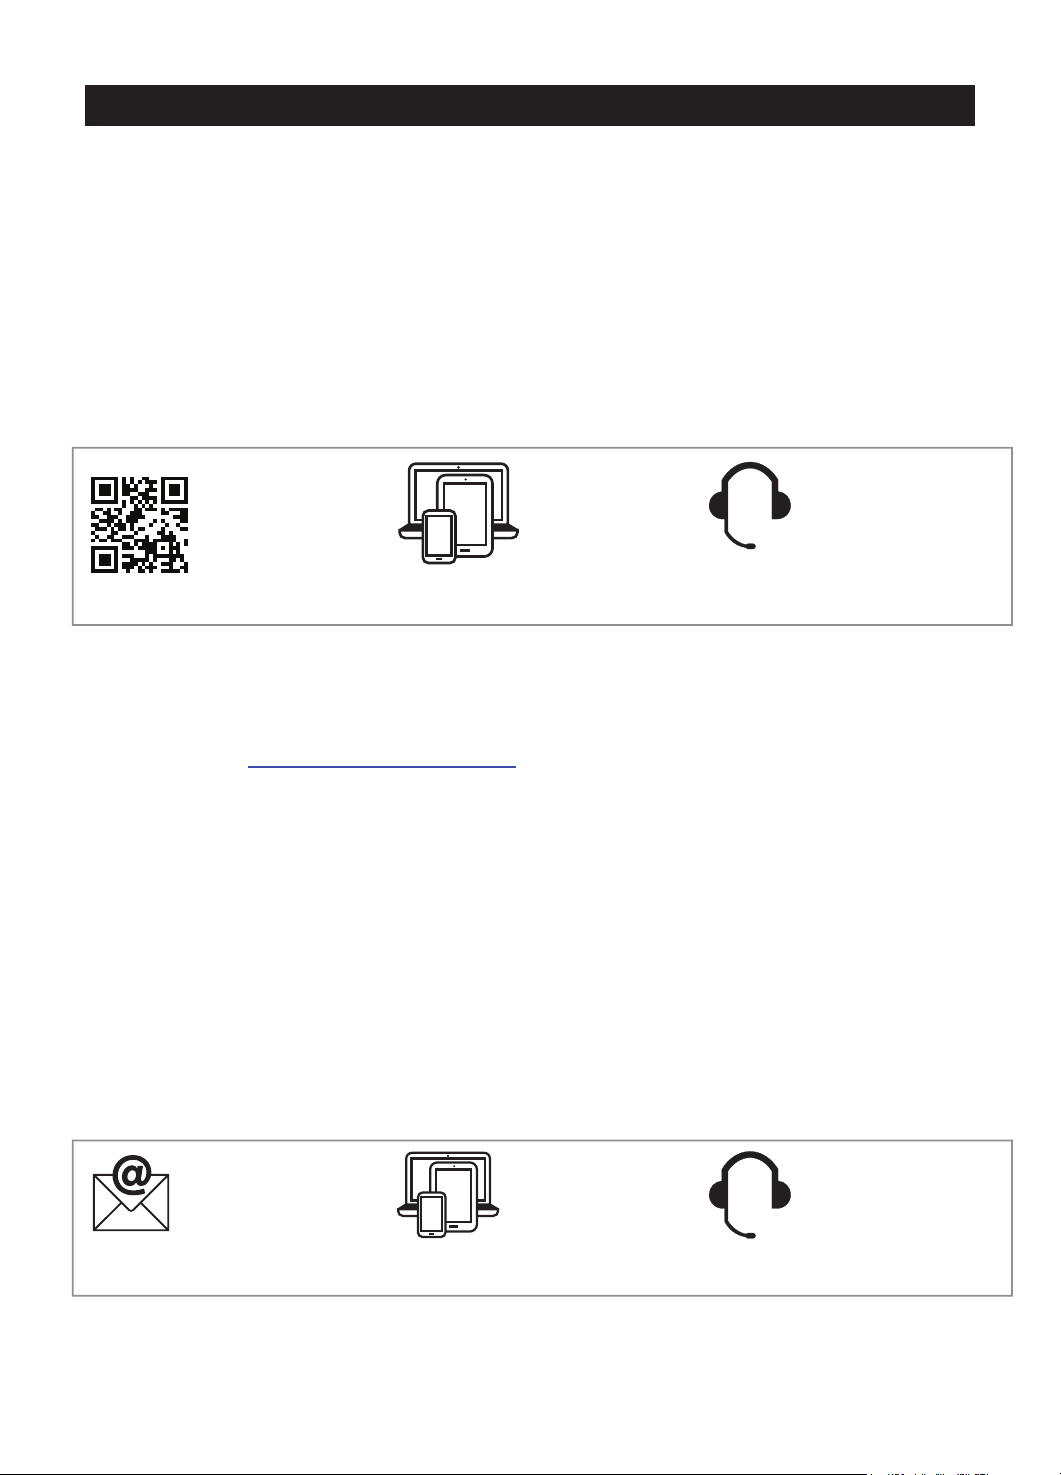
FOR CUSTOMER ASSISTANCE
CUSTOMER ASSISTANCE UNITED STATES ONLY
REGISTER YOUR PRODUCT
Registering your new product is easy and offers benets that help you get the most out of
your Sharp product including:
9 Convenience: Ifyoueverneedwarrantysupport,yourproductinformationisalreadyonle.
9 Communication: StayuptodatewithimportantnoticationsandspecialoffersfromSHARP.
9 Support: QuicklyaccesssupportcontentincludingOwnersManuals,FAQ’s,How-toVideos,
andmuchmore.
3 EASY WAYS TO REGISTER TODAY!
SCAN
Use the camera or
QR code scanning
application on your
smart phone
Scan this QR Code on your smart phone Visit http://www.sharpusa.com/register
ONLINE
Visit our sites to learn
more about your
product at
sharpusa.com and
sbl.sharpusa.com
Contact a Sharp Advisor on the phone
CALL US
US 800-BE-SHARP
800-237-4277
Mon-Fri: 7am-7pm CST
Sat-Sun: 9am-7pm CST
PRODUCT SUPPORT
If you have questions about the setup or operation of your product, please refer to the
corresponding section within this manual.
Additionally, visit www.sharpusa.com/support to access exclusive content about your product
including:
Æ FAQ’s and How-To Videos
Æ Find or Request Service
Æ Purchase an Extended Warranty
Æ Downloads including the Installation Guide, Spec Sheet, and Owner’s Manual
CONTACT US
If at any time you have questions or comments concerning your SHARP product, please
contact the SHARP Customer Assistance Center. We are available to assist you through
multiple contact methods for your convenience:
EMAIL
Available 24/7
US: sharpusa.com
See the Contact Us section on our sites U.S. | www.sharpusa.com/support Contact a Sharp Advisor on the phone
CHAT ONLINE
Mon-Fri: 7am-7pm CST
Sat-Sun: 9am-7pm CST
2
CALL US
US 800-BE-SHARP
800-237-4277
Mon-Fri: 7am-7pm CST
Sat-Sun: 9am-7pm CST

PRECAUTIONS TO AVOID POSSIBLE
EXPOSURE TO EXCESSIVE
MICROWAVE ENERGY
(a) Do not attempt to operate this oven with the door open since open-door operation can result
in harmful exposure to microwave energy. It is important not to defeat or tamper with the
safety interlocks.
(b) Do not place any object between the oven front face and the door or allow soil or cleaner
residue to accumulate on sealing surfaces.
(c) Do not operate the oven if it is damaged. It is particularly important that the oven door
close properly and that there is no damage to the: (1) door (bent), (2) hinges and latches
(broken or loosened), (3) door seals and sealing surfaces.
(d) The oven should not be adjusted or repaired by anyone except properly qualied service
personnel.
3
CONSUMER LIMITED WARRANTY
SHARP ELECTRONICS CORPORATION warrants to the rst consumer purchaser that this Sharp brand
product (the “Product”), when shipped in its original container, will be free from defective workmanship and
materials, and agrees that it will, at its option, either repair the defect or replace the defective Product or
part thereof with a new or remanufactured equivalent at no charge to the purchaser for parts or labor for the
period(s) set forth below.
This warranty does not apply to any appearance items of the Product nor to the additional excluded item(s)
set forth below nor to any Product the exterior of which has been damaged or defaced, which has been
subjected to improper voltage or other misuse, abnormal service or handling, or which has been altered or
modied in design or construction.
In order to enforce the rights under this limited warranty, the purchaser should follow the steps set forth below
and provide proof of purchase to the servicer.
The limited warranty described herein is in addition to whatever implied warranties may be granted to purchasers by law. ALL IMPLIED WARRANTIES INCLUDING THE WARRANTIES OF MERCHANTABILITY
AND FITNESS FOR USE ARE LIMITED TO THE PERIOD(S) FROM THE DATE OF PURCHASE SET
FORTH BELOW. Some states do not allow limitations on how long an implied warranty lasts, so the above
limitation may not apply to you.
Neither the sales personnel of the seller nor any other person is authorized to make any warranties other
than those described herein, or to extend the duration of any warranties beyond the time period described
herein on behalf of Sharp.
The warranties described herein shall be the sole and exclusive warranties granted by Sharp and shall be
the sole and exclusive remedy available to the purchaser. Correction of defects, in the manner and for the
period of time described herein, shall constitute complete fulllment of all liabilities and responsibilities of
Sharp to the purchaser with respect to the Product, and shall constitute full satisfaction of all claims, whether
based on contract, negligence, strict liability or otherwise. In no event shall Sharp be liable, or in any way
responsible, for any damages or defects in the Product which were caused by repairs or attempted repairs
performed by anyone other than an authorized servicer. Nor shall Sharp be liable or in any way responsible
for any incidental or consequential economic or property damage. Some states do not allow the exclusion
of incidental or consequential damages, so the above exclusion may not apply to you.
THIS LIMITED WARRANTY IS VALID ONLY IN THE FIFTY (50) UNITED STATES, THE DISTRICT OF
COLUMBIA AND PUERTO RICO.
Your Product Model Number &
Description:
Warranty Period for this Product:
Additional Item(s) Excluded from
Warranty Coverage (if any):
Where to Obtain Service:
What to do to Obtain Service:
TO OBTAIN SUPPLY, ACCESSORY OR PRODUCT INFORMATION, CALL 1-800-BE-SHARP OR VISIT www.sharpusa.com.
SAVE THE PROOF OF PURCHASE AS IT IS NEEDED SHOULD YOUR OVEN EVER REQUIRE WARRANTY SERVICE.
SMC1842CS/1843CM Home Use Carousel Microwave Oven. (Be
sure to have this information available when you need service for
your Product.)
One (1) year parts and labor. The warranty period continues for an
additional four (4) years, for a total of ve (5) years, with respect to the
magnetron tube in the Product for parts only; labor and service are not
provided free of charge for this additional period.
Non-functional accessories, turntable and light bulb.
From a Sharp Authorized Servicer located in the United States.
To nd the location of the nearest Sharp Authorized Servicer, call Sharp
toll free at 1-800-BE-SHARP (1-800-237-4277).
Ship prepaid or carry in your Product to a Sharp Authorized Servicer.
Be sure to have Proof of Purchase available. If you ship the Product,
be sure it is insured and packaged securely.
4

IMPORTANT SAFETY INSTRUCTIONS
When using electrical appliances, basic safety precautions should be followed, including the following:
WARNING-To reduce the risk of burns, electric shock, fire, injury to persons or exposure to excessive
microwave energy:
11. Read all instructions before using the appliance.
12. Read and follow the specific “PRECAUTIONS TO
AVOID POSSIBLE EXPOSURE TO EXCESSIVE
MICROWAVE ENERGY” found on page 3.
13. This appliance must be grounded. Connect only to
properly grounded outlet. See “GROUNDING
INSTRUCTIONS” found on page 6.
14. Install or locate this appliance only in accordance with
the provided installation instructions.
15. Some products such as whole eggs and sealed
containers - for example, closed glass jars are able to
explode and should not be heated in this oven.
16. Use this appliance only for its intended use as
described in this manual. Do not use corrosive
chemicals or vapors in this appliance. This type of
oven is specifically designed to heat, cook, or dry food.
It is not designed for industrial or laboratory use.
17. As with any appliance, close supervision is necessary
when used by children.
18. Do not operate this appliance if it has a damaged
cord or plug, if it is not working properly, or if it has
been damaged or dropped.
19. This appliance should be serviced only by qualified
service personnel.
Contact nearest authorized service facility for
examination, repair or adjustment.
10. Do not cover or block any openings on the appliance.
11. Do not store this appliance outdoors. Do not use this
product near water — for example, near a kitchen
sink, in a wet basement, near a swimming pool, or
similar locations.
12. Do not immerse cord or plug in water.
13. Keep cord away from heated surfaces.
14. Do not let cord hang over edge of table or counter.
15. Either.
a) When cleaning surfaces of door and oven that
comes together on closing the door, use only mild,
non-abrasive soaps or detergents applied with a
sponge or soft cloth., or
b) See door surface cleaning instructions on page 23.
16. To reduce the risk of fire in the oven cavity:
a) Do not overcook food. Carefully attend appliance
when paper, plastic, or other combustible materials
are placed inside the oven to facilitate cooking.
b) Remove wire twist-ties from paper or plastic bags
before placing bag in oven.
c) If materials inside the oven ignite, keep oven door
closed, turn oven off, and disconnect the power
cord, or shut off power at the fuse or circuit breaker
panel.
d) Do not use the cavity for storage purposes. Do not
leave paper products, cooking utensils, or food in
the cavity when not in use.
17. Liquids, such as water, coffee, or tea are able to be
overheated beyond the boiling point without appearing
to be boiling due to surface tension of the liquid. Visible
bubbling or boiling when the container is removed
from the microwave oven is not always present. THIS
COULD RESULT IN VERY HOT LIQUIDS
SUDDENLY BOILING OVER WHEN A SPOON OR
OTHER UTENSIL IS INSERTED INTO THE LIQUID.
To reduce the risk of injury to persons:
a) Do not overheat the liquid.
b) Stir the liquid both before and halfway through
heating it.
c) Do not use straight-sided containers with narrow
necks.
d) After heating, allow the container to stand in the
microwave oven for a short time before removing
the container.
e) Use extreme care when inserting a spoon or other
utensil into the container.
18. Do not use this microwave oven to heat corrosive
chemicals (for example, sulfides and chlorides).
Vapors from such corrosive chemicals may interact
with the contact and springs of the safety interlock
switches thereby rendering them inoperable.
19. Keep the waveguide cover clean at all times.
Wipe the oven interior with a soft damp cloth after
each use. If you leave grease or fat anywhere in the
cavity it may overheat, smoke or even catch fire when
next using the oven.
20. Never heat oil or fat for deep frying as you cannot
control the temperature and doing so may lead to
overheating and fire.
21. Do not operate the oven without the glass tray in
place. Be sure it is properly sitting on the rotating base.
22. Under-cabinet and wall-mounted appliances:
1) Do not mount over a sink.
2) Do not store anything directly on top of the
appliance surface when the appliance is in
operation.
SAVE THESE INSTRUCTIONS
5

FEDERAL COMMUNICATIONS COMMISSION
RADIO FREQUENCY INTERFERENCE STATEMENT
WARNING:
This equipment generates and uses ISM frequency energy and if not installed and used properly, that is in
strict accordance with the manufacturer's instructions, may cause interference to radio and television
reception.
It has been type-tested and found to comply with limits for an ISM Equipment pursuant to part 18 of FCC
Rules, which are designed to provide reasonable protection against such interference in a residential
installation.
However, there is no guarantee that interference will not occur in a particular installation.
If this equipment does cause interference to radio or television reception, which can be determined by
turning the equipment off and on, the user is encouraged to try to correct the interference by one or more
of the followings.
• Reorient the receiving antenna of radio or television.
• Relocate the Microwave oven with respect to the receiver.
• Move the microwave oven away from the receiver.
• Plug the microwave oven into a different outlet so that microwave oven and receiver are on different
branch circuits.
THE MANUFACTURER is not responsible for any radio or TV interference caused by
UNAUTHORIZED MODIFICATION to this microwave oven. It is the responsibility of the user to correct
such interference.
GROUNDING INSTRUCTIONS
This appliance must be grounded. In the event of an electrical short circuit, the grounding plug reduces the risk of
electric shock by providing an escape wire for electric current. This appliance is equipped with a cord having a
grounding wire with a grounding plug. The plug must be plugged into an outlet that is properly installed and
grounded.
WARNING:
Improper use of the grounding can result in a risk of electric shock.
Consult a qualified electrician or serviceman if the grounding instructions are not completely understood, or if
doubt exists as to whether the appliance is properly grounded, and either
1) If it is necessary to use an extension cord, use only a 3-wire extension cord that has a 3-blade grounding
plug, and a 3-slot receptacle that will accept the plug on the appliance. The marked rating of the extension
cord shall be equal to or greater than the electrical rating of the appliance, or
2) Do not use an extension cord. If the power supply cord is too short, have a qualified electrician or
serviceman install an outlet near the appliance.
WARNING:
Do not cut or remove the third (ground) prong from the power cord under any circumstances.
6

INSTALLATION GUIDE
1. Examine the oven after unpacking.
Check for damage such as a misaligned door, broken door or dent in the cavity.
If any damage is visible, DO NOT INSTALL, and notify your dealer immediately.
2. Level, flat location.
Install the microwave oven on a level, flat surface.
3. Ventilation.
Do not block air vents. If they are blocked during operation, the oven may overheat and eventually cause a
failure.
For proper ventilation, allow 4 inches of space between oven top, sides, rear and adjacent surfaces.
4. Away from radio and TV sets.
Poor television reception and radio interference may result if the oven is located close to a TV, radio, antenna,
feeder, etc.
Place the oven as far from them as possible.
5. Away from heating appliances and water taps.
Keep the oven away from heat, steam or splashing liquids. These things can adversely affect oven wiring and
contacts.
6. Power supply.
• Check your local power source.
This microwave oven requires a current of approximately 14 amperes, 120Volts, 60Hz and a grounded outlet.
1. A short power-supply cord is provided to reduce the risks of the user becoming entangled in or tripping over
a longer cord.
2. Longer cord sets or extension cords are available and may be used if care is exercised in their use.
3. If a long cord or extension cord is used:
• The marked electrical rating of the cord set or extension cord should be at least as great as the electrical
rating of the oven.
• The extension cord must be a grounding type 3-wire cord.
• The longer cord should be arranged so that it will not drape the table top or counter where it can be pulled
on by children or tripped over unintentionally.
7. The minimum height of free space necessary above the top surface of the oven is about 4 inches.
When use 3-pronged plug
3-prong Receptacle
Receptacle
Box cover
3-prong plug
“THE CANADIAN ELECTRICAL CODE DOES NOT ALLOW THE USE OF THE GROUNDING ADAPTOR”
When use grounding adaptor, make sure
the receptacle box is fully grounded.
Grounding
Lead
Grounding
Adaptor
Receptacle Box Cover
Receptacle
7
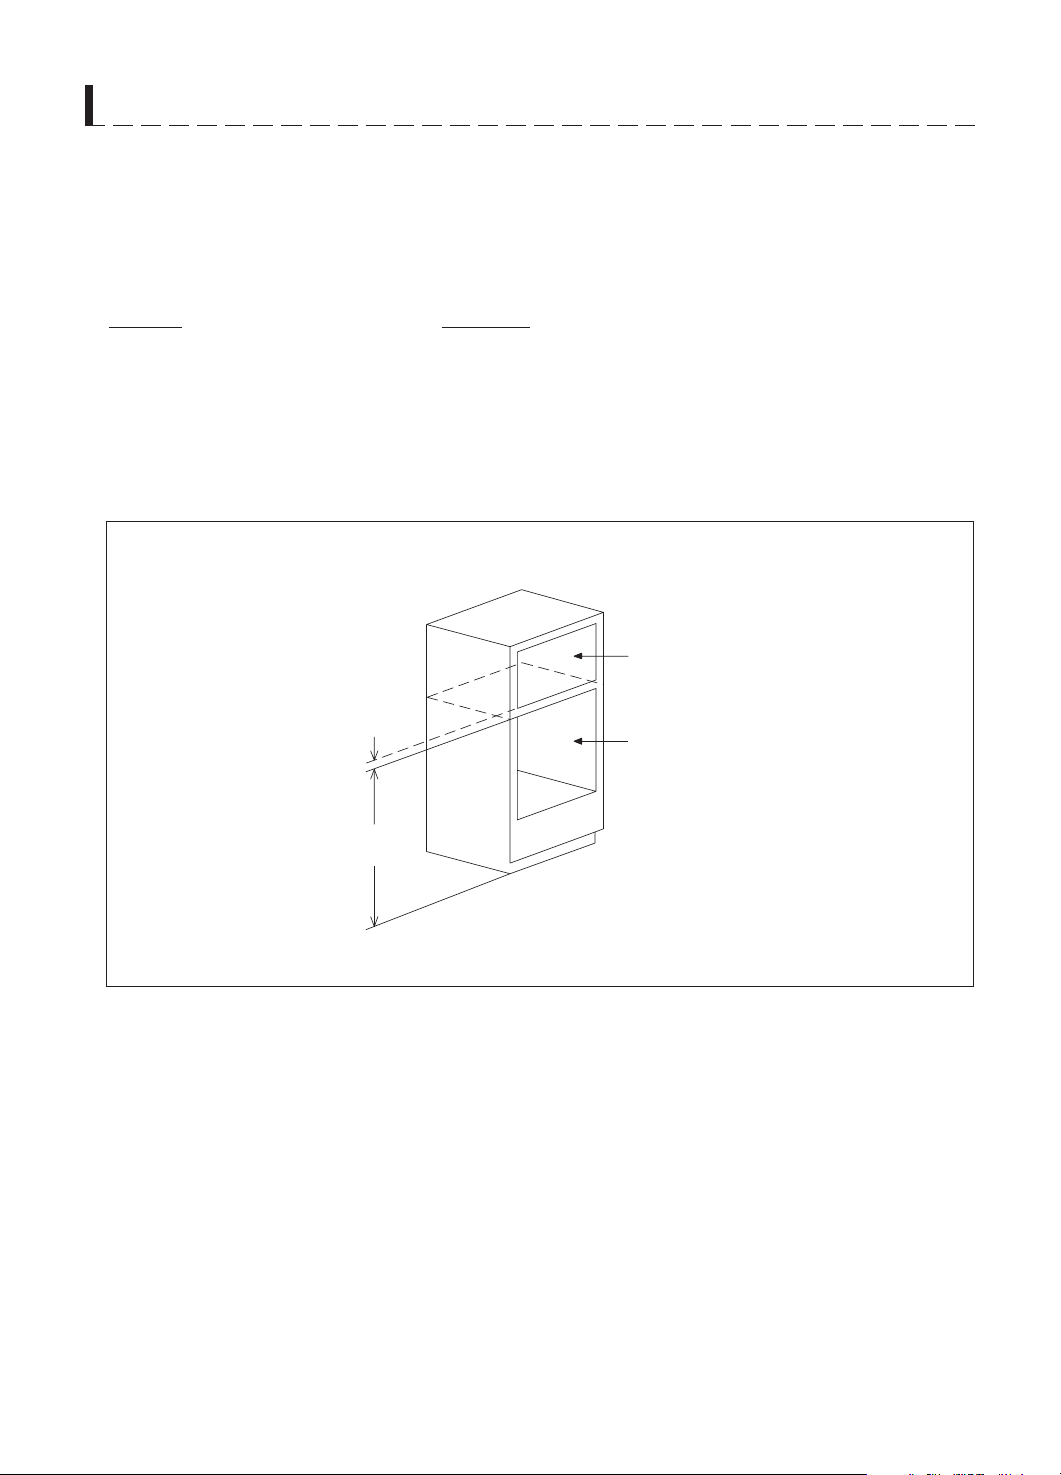
INSTALLATION GUIDE
8. Choosing a Location for Your Oven
You will use your oven frequently so plan its location for ease of use. Your microwave oven can be built into a
cabinet or wall by itself or above any electric wall oven or warming drawer using Sharp’s Built-in Kits listed
below.
Please note: It cannot be built in above any gas wall oven.
Trim Kit # Description
RK49S27F SMC1842CS/1843CM Trim Kit, 27" Stainless Steel
RK49S30F SMC1842CS/1843CM Trim Kit, 30" Stainless Steel
See Sketch-1 for proper location when building in above an electric wall oven or a warming drawer. Carefully
follow both the electric wall oven/warming drawer installation instructions and Sharp’s Built-in Kit instructions. Be
sure that the clearance of the floor between the electric wall oven/warming drawer and the microwave oven is a
minimum of 1-1/2 inches.
MICROWAVE CUTOUT
MIN.
1½"
MIN.
36"
ELECTRIC WALL
OVEN/WARMING
DRAWER CUTOUT
Sketch-1
8
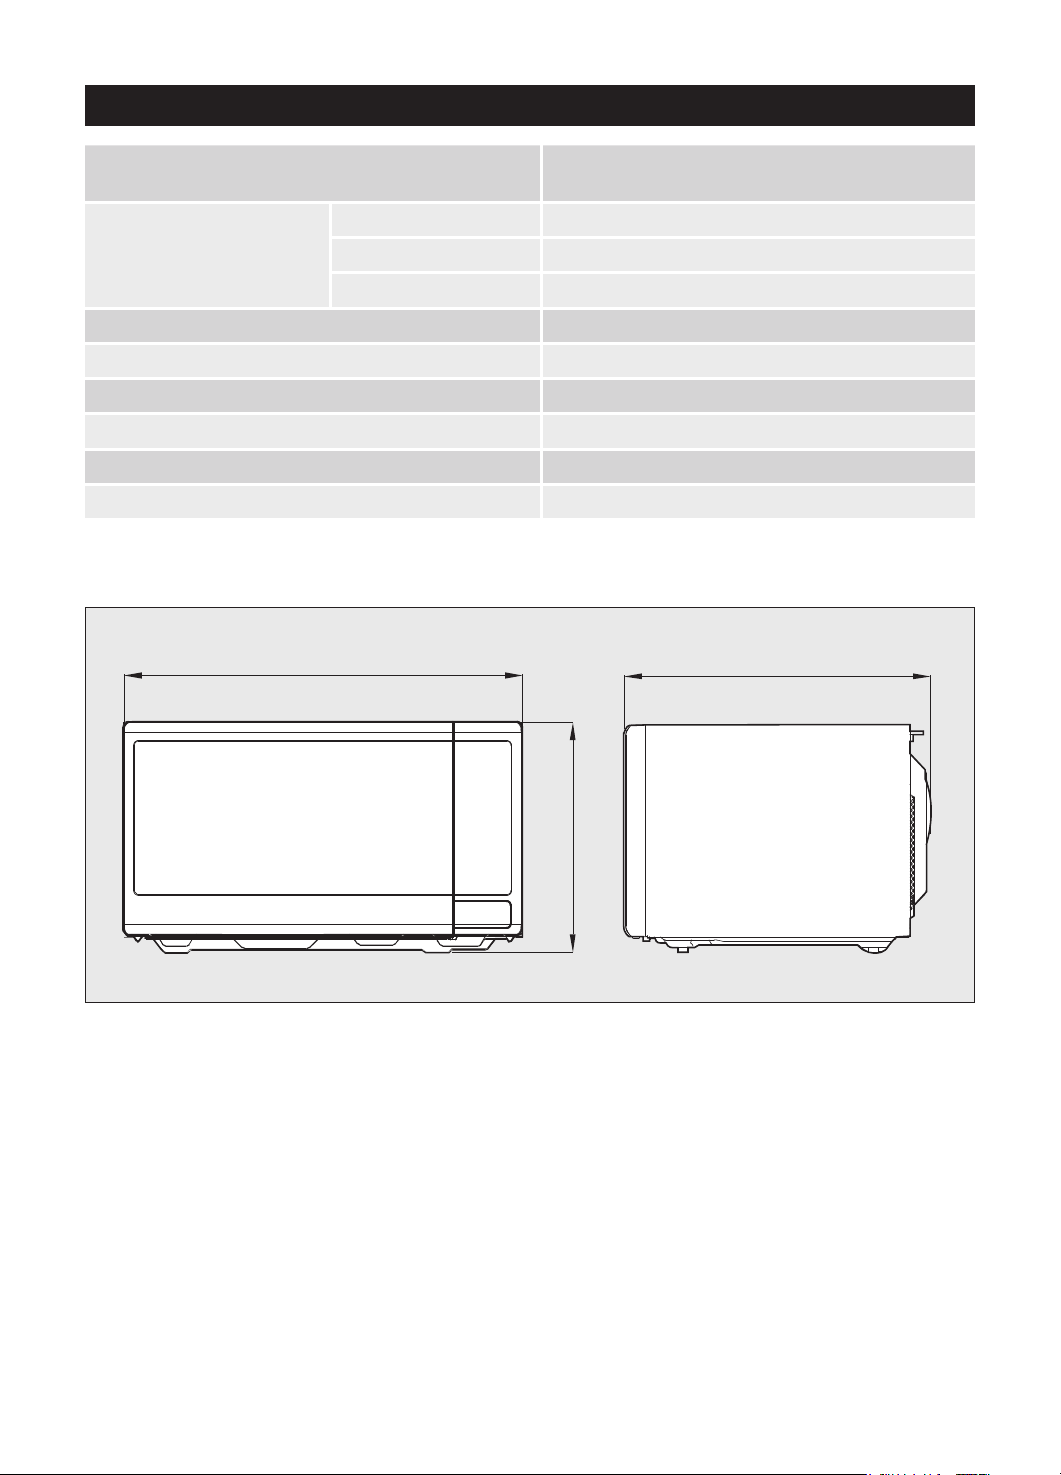
SPECIFICATIONS
POWER SUPPLY
INPUT POWER 1600 W
MICROWAVE
OUTSIDE DIMENSIONS (W x H x D) 23.2 x 13.3 x 18.9 in.
CAVITY DIMENSIONS (W x H x D) 15.7 x 10.9 x 17.8 in.
CAVITY VOLUME 1.8 cu.ft
NET WEIGHT APPROX. 39.2 lbs.
TIMER 59 min. 99 sec.
POWER SELECTIONS 10 Levels
* Specifications are subject to change without notice.
ENERGY OUTPUT 1100 W
FREQUENCY 2,450MHz
120V AC, 60Hz SINGLE PHASE WITH
GROUNDING
23.2 18.9
13.3
9
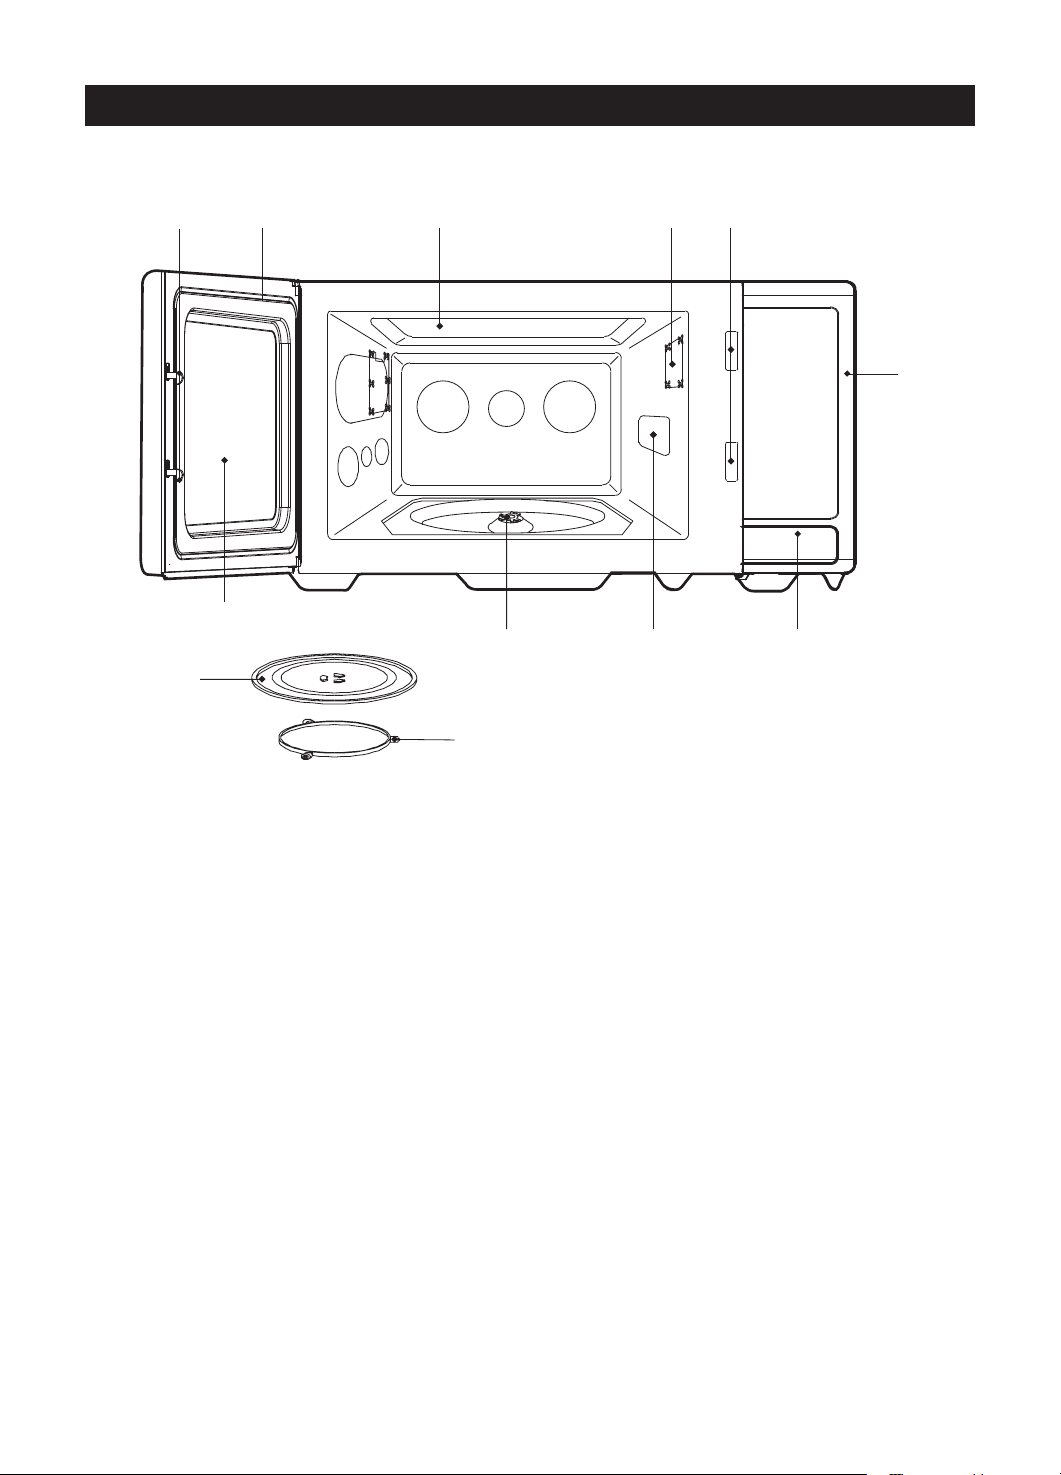
FEATURES DIAGRAM
1
q
2 3
w
9
0
54
6
8 7
1 Door latch - When the door is closed, it will
automatically shut off. If the door is opened
while the oven is operating, the magnetron
will automatically shut off.
2 Door seal - The door seal surfaces prevent
microwaves escaping from the oven cavity.
3 Oven cavity
4 Oven lamp - Automatically turns on during
oven operating.
5 Safety interlock system
6 Control panel
7 Door open button - To open the door push
the door open button.
8 Waveguide cover - Protects the microwave
outlet from splashes of cooking foods.
9 Roller guide - This must always be used for
cooking together with the glass cooking tray.
0 Coupler - This fits over the shaft in the
center of the oven cavity floor.
This is to remain in the oven for all cooking.
q Glass cooking tray - Made of special heat
resistant glass. The tray must always be in
proper position before operating. Do not
cook food directly on the tray.
w Viewing screen - Allows viewing of food.
The screen is designed so that light can
pass through, but not the microwave energy.
10
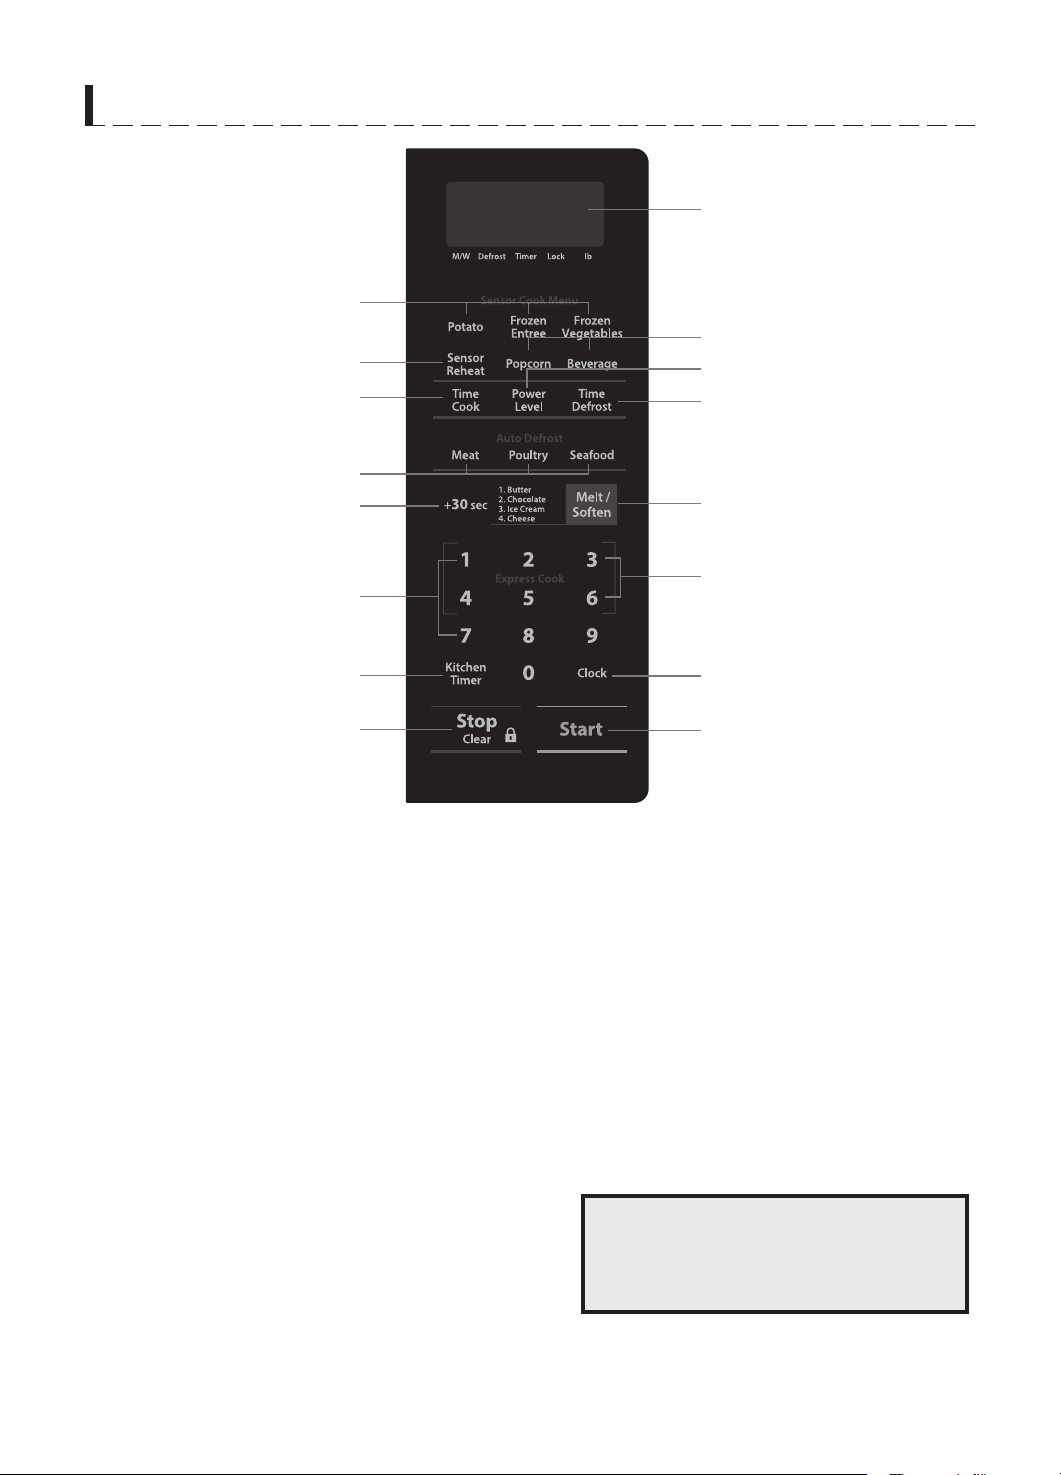
FEATURES DIAGRAM
2
4
5
8
9
1
3
6
7
0
q
e
t
1 DISPLAY - Cooking time, power level,
indicators and current time are displayed.
2 SENSOR COOK - Used to cook many of
favorite food.
3 ONE TOUCH COOK - Used to cook or
reheat specific quantites of food.
4 SENSOR REHEAT - Used to reheat food.
5 TIME COOK - Microwave for a selected
amount of time.
6 POWER LEVEL - Used to set power level.
w
r
y
0 MELT/SOFTEN - Used to melt or soften
food.
q TIME SET PAD - Used to set the cooking
time and the current time.
w EXPRESS COOK - Used to set 1-6 minutes
preset cooking time at 100% power level.
e KITCHEN TIMER - Used as a minute timer
r CLOCK - Used to set clock.
t STOP / CLEAR - Used to stop the oven
operation or to delete the cooking data.
7 TIME DEFROST - Used to defrost foods for
time.
8 AUTO DEFROST PAD - Press to select
DEFROST feature by weight.
9 +30 SEC - Used to extend heating time by
30 second increments or for an "instant on"
for 30 seconds.
Also press and hold this pad for 3
seconds to set child safety lock
function. For detailed information on this
feature, see Controls section, page 22.
y START - Used to start the oven.
11
OPERATION PROCEDURE
This section includes useful information about oven operation.
Plug power supply cord into a standard 3-pronged
1
14 Amp, 120V AC 60Hz power outlet.
After placing the food in a suitable container, open
2
the oven door and put it on the glass tray.
The glass tray and roller guide must always be in
place during cooking.
Close the door. Make sure that it is firmly closed.
3
The oven light is on when the microwave oven is
4
operating.
The oven door can be opened at any time during
5
operation by pushing the door open button of
control panel. The oven will automatically shut off.
Each time a pad is pressed, a BEEP will sound to
6
acknowledge the press.
The oven automatically cooks on full power
7
unless set to a lower power level.
The display will show “ : 0” when the oven is
8
plugged in.
Time clock returns to the present time when the
19
cooking time ends.
When the STOP/CLEAR pad is pressed during the
10
oven operation, the oven stops cooking and all
information retained. To erase all information(except
the present time), press the STOP/CLEAR pad once
more. If the oven door is opened during the oven
operation, all information is retained.
If the START pad is pressed and the oven does not
11
operate, check the area between the door and door
seal for obstructions and make sure the door is
closed securely. The oven will not start cooking until
the door is completely closed or the program has
been reset.
Make sure the oven is properly installed and
plugged into the electrical outlet.
WATTAGE OUTPUT CHART
• The power-level is set by pressing the Power Level pad and number pad. If you wish to use a different power
level, press the POWER LEVEL pad before pressing START pad. Enter the power level desired by pressing the
appropriate number pad. The chart shows the display, the power level and the percentage of power. (See TIME
COOK Cooking Guide)
PRESS POWER PAD AND NUMBER POWER LEVEL (DISPLAY)
POWER LEVEL + 1 + 0 PL10 100%
POWER LEVEL + 9 PL-9 90%
POWER LEVEL + 8 PL-8 80%
POWER LEVEL + 7 PL-7 70%
POWER LEVEL + 6 PL-6 60%
POWER LEVEL + 5 PL-5 50%
POWER LEVEL + 4 PL-4 40%
POWER LEVEL + 3 PL-3 30%
POWER LEVEL + 2 PL-2 20%
POWER LEVEL + 1 PL-1 10%
POWER LEVEL + 0 PL-0 0%
APPROXIMATE PERCENTAGE OF POWER
NOTE : If “PL-0” is selected, the oven will work with the fan but no power. You can use this level to remove odors.
12
 Loading...