

Page 1
ELECTRIC REFRIGERATOR
SJ-68L-A2
OPERATION MANUAL
Thank you very much for buying this SHARP product.
Before using your SHARP refrigerator , please read this operation
manual to ensure that you gain the maximum benefit from it.
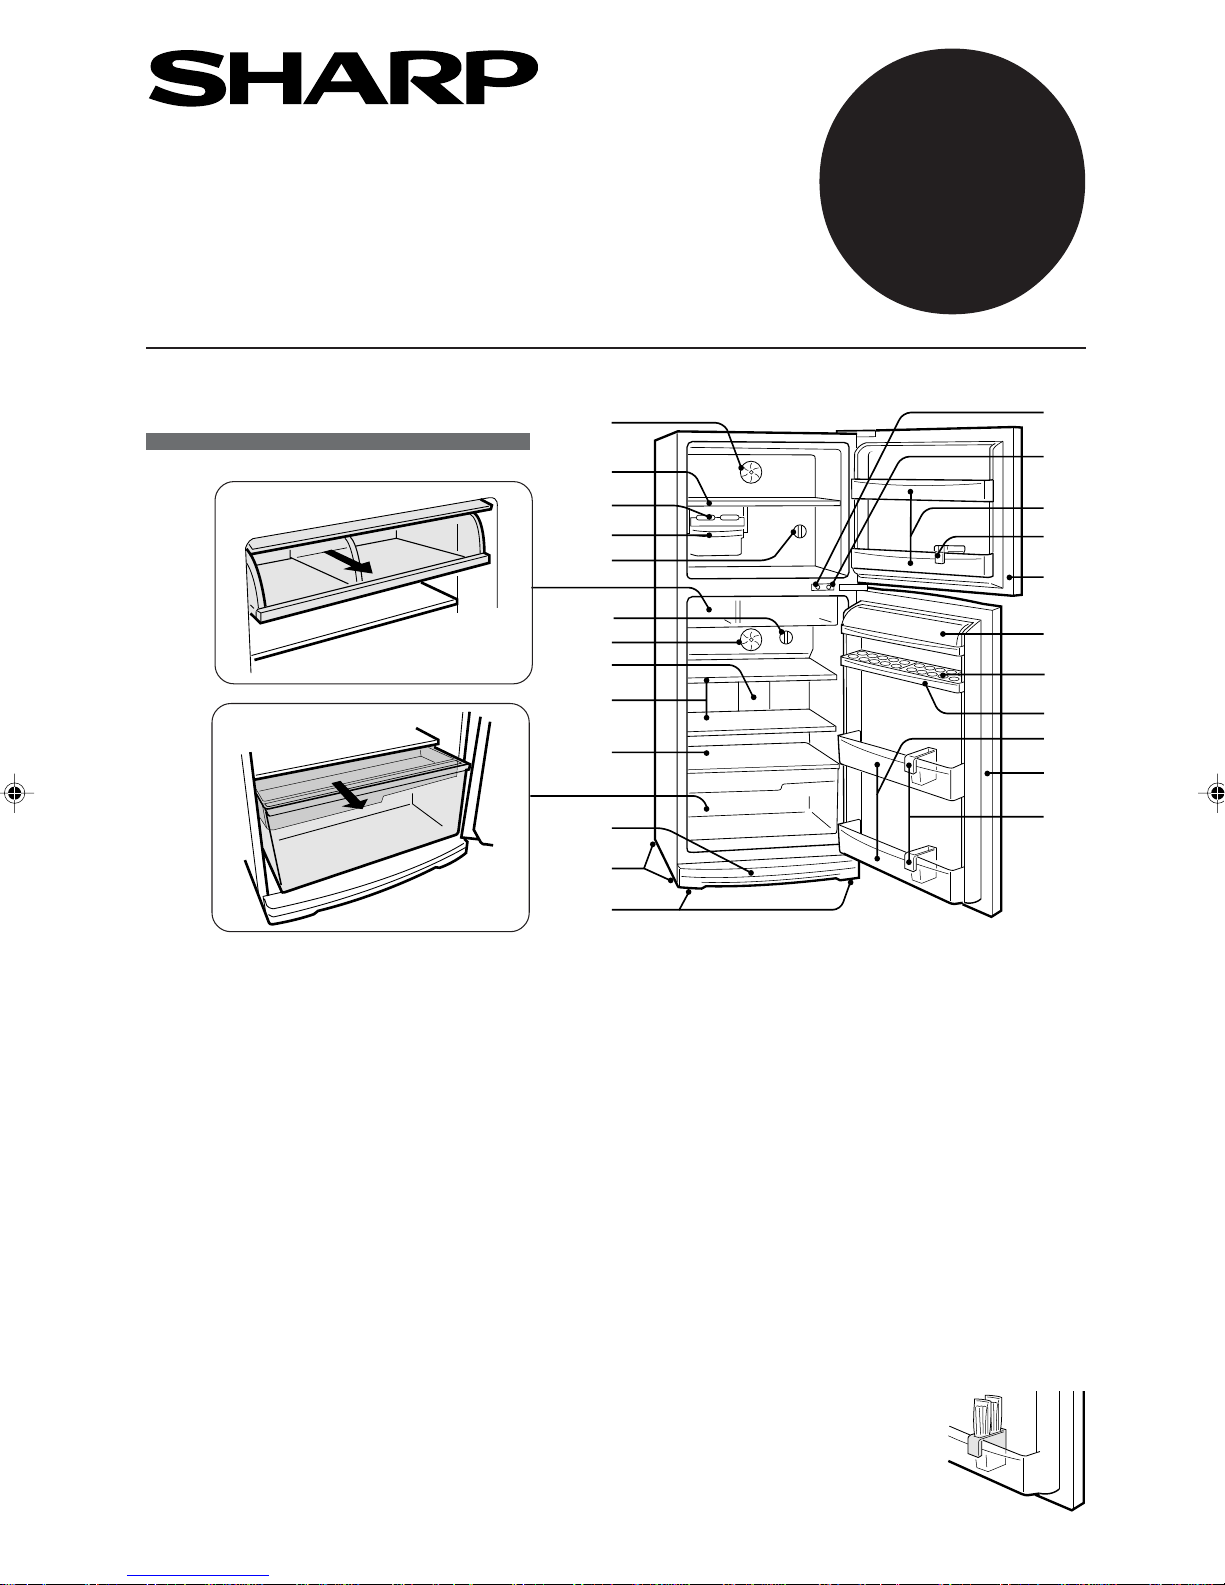
DESCRIPTION
6
12
1
2
3
4
5
7
8
9
10
11
SJ-63L-A2
SJ-58L-A2
16
17
18
19
20
21
22
23
24
20
1. Freezer fan
2. Freezer shelf
3. Ice cube maker
4. Ice cube box
5. Freezer temp. control knob
6. Slide case
The cover of Slide case opens as the case is pulled.
NOTES on the Slide case :
• Do not keep bottled beverages in this case, as the
content could freeze and the bottle may consequently
break.
• Also storing non-glass bottles for long periods of time
may lead to the freezing of the content; consequently ,
these bottles may warp or break and leakage may
result.
7. Refrigerator temp. control knob
8. Refrigerator fan
Refrigerator compartment is equipped with a special
fan, that quickly and evenly cools the inside of the cabinet should the inside temperature increase when opening the door or for other reasons.
9. Light
10. Refrigerator shelf
(SJ-68L; 3 shelves, SJ-63L/58L; 2 shelves)
13
14
15
25
11. Shelf
12. Vegetable crisper(with Fruit case)
13. Evaporating pan & cover
14. Casters
15. Adjustable feet
16. Fan switch for freezer
17. Fan & light switch for refrigerator
18. Freezer pocket
19. Water supply cup
20. Magnetic door seal
21. Utility case
22. Egg holder
23. Free pocket
(SJ-68L; 2 pockets, SJ-63L/58L; 1 pocket)
24. Bottle pocket
25. Bottle guard
Prevents bottles,etc. from falling. Sticktype food products can also be stored
inside.
1
Page 2

INSTALLATION
1.To ensure adequate ventilation for your
refrigerator, it is recommended to provide space of 6cm on both sides and at
the back, and space of 9cm above the
refrigerator.
crease the cooling efficiency, resulting
in unnecessary consumption of electricity.
2.
Using the two front Adjustable feet, ensure that the refrigerator is positioned firmly and level on the floor.
3.Clip Evaporating pan cover (supplied inside the refrigerator
compartment) in position in front of the two Adjustable feet.
4.Connect the power plug to a 230/240 volt. 10 amp. power
point.
NOTE:
Insufficient spacing will de-
6cm 6cm
• Keep your refrigerator out of direct sunlight.
• Do not place next to heat generating appliance.
• Do not place directly on the ground. Provide a
clean, level, firm floor surface such as concrete
or timber.
6cm
9cm
148 cm
135 cm
Adjustable
foot
Evaporating pan
cover
When transporting
Carry the refrigerator by holding the handles located on the
rear and bottom.
REVERSIBLE DOOR
It is possible to change the door to left side opening. To modify the door a REFRIGERA TOR HINGE KITS
(for left side opening) will be required, SJ-L838LD2. For details of the kit and modification work, please
contact SHARP Customer Information.
CAUTION
SHARP recommend that all modification work will be carried out by a competent person.
2
Page 3
OPERATION
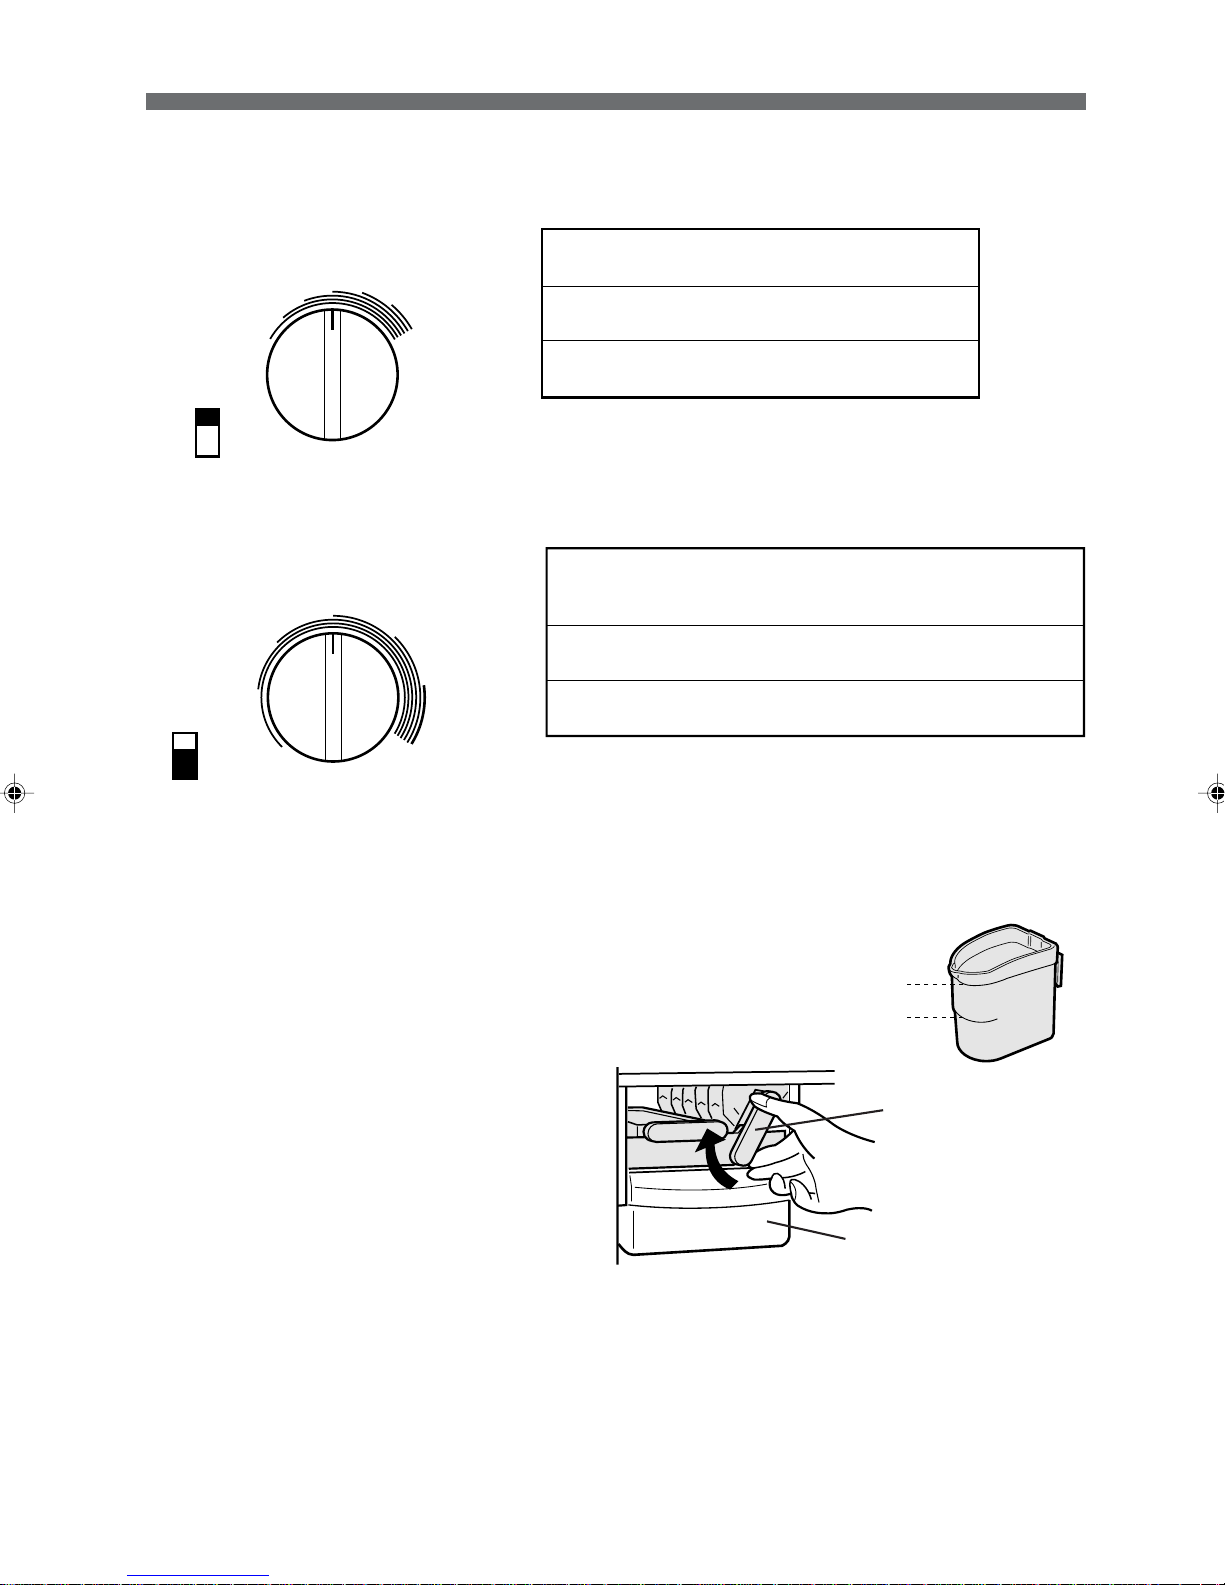
CONTROLLING TEMPERATURES
The refrigerator controls its temperature automatically. However, if needed, adjust the temperature as
follows.
Freezer compartment
MED
4
3
2
1
MIN
5
6
7
MAX
Coldest
FREEZER TEMP. CONTROL
Refrigerator compartment
MED
4
3
2
1
MIN
REFRIGERATOR TEMP. CONTROL
5
6
MAX
7 Coldest
7(MAX)
For making ice rapidly or fast freezing.
4(MED)
For normal freezing.
1(MIN)
When frozen food or ice cream is not stored.
• If the refrigerator is operated for a long time with FREEZER
TEMP. CONTROL set at 7(MAX), foods stored in the refrigerator compartment may also freeze.
7(MAX)
For keeping foods fresher tasting.
When the refrigerator does not provide sufficient cooling.
4(MED)
For normal operation.
1(MIN)
When the refrigerator provides excessive cooling.
• If the refrigerator is operated for a long time with REFRIGERATOR TEMP. CONTROL set at 7 (MAX), foods stored
in the refrigerator compartment may also freeze.
• Low ambient temperature may cause placed foods to
freeze even if REFRIGERATOR TEMP. CONTROL is set
to 1 (MIN).
HINTS WHEN MAKING ICE
1. The included Water supply cup can be used
to measure the amount of water to pour into
Ice cube trays. Pouring too much water into
the tray will result in the ice cubes connecting
to each other when frozen.
2. When the ice cubes are made, turn the lever
clockwise to empty the ice into Ice cube box.
Amount for both Ice cube trays
Amount for one Ice cube tray
Lever
NOTE:
To prevent damage to the Ice cube box, do not
make ice in the Ice cube box or pour oil into it.
Ice cube box
DEFROSTING
Defrosting is fully automatic due to a unique energy saving system. Whereby the defrost cycle start time
is proportional to the running time of your refrigerator compressor, i. e., the less time the refrigerator
compressor operates (during the winter season or you’re away on holidays), the longer the time between
each defrost cycle.
DEODORIZING UNIT
A built-in unit which requires no manual operation because it automatically starts operating when the
refrigerator is powered on.
3
Page 4

CARE AND CLEANING
Some household cleaning chemicals may
affect the internal food liner and plastic
shelves resulting in splitting or cracks occurring.
When cleaning all plastic parts inside this refrigerator, only use diluted dishwashing
liquid(soapy water).
Make sure that all plastic parts are thoroughly
rinsed with water after
cleaning.
1. Remove the shelves and pockets from the
cabinet and door . W ash them in warm soapy
water; rinse in clean water and dry.
2. Clean the inside with a cloth soaked in warm
soapy water. Then, use cold water to wipe off
soapy water.
3. Wipe the exterior with a soft cloth each time
it is soiled.
4. Clean Magnetic door seal with a toothbrush
and warm soapy water.
5. Evaporating pan should be removed and
cleaned once a year.
Evaporating pan & cover;
Evaporating pan
How to remove
1. Hold both sides of Evapo-
rating pan cover and angling upward.
2. Pull Evaporating pan out.
How to set
1. Put Evaporating pan on
Radiator plate, then slide it
in completely.
2. Fit the pawls of Evaporating pan cover into the
holes of the cabinet, then
push the cover to attach.
NOTE:
• Do not use polishing powder, benzine, hot water etc.
• If undiluted detergent is used or soapy water is not
wiped off thoroughly, cracking of plastic parts can
result.
• Wipe any food oils adhered to plastic components
as they can cause cracking of the plastic surface.
• The glass shelves weighs approximately 3kg each.
Hold firmly when removing from the cabinet or carrying.
Evaporating
pan cover
Hole
Pawl
Replacing the lamp bulb
Replace lamp bulb with same type : base E12,
MAX 15W, T-20.
Make sure that the rated voltage and wattage
of the lamp bulb are correct when replacing.
(Check the label near the bulb.)
When replacing the lamp bulb, unplug the refrigerator to prevent electric shock.
Switching off your refrigerator
If you switch your refrigerator off when you are going
away for an extended period, remove all food, clean
the interior thoroughly. Remove the power cord plug
from the power socket and leave all doors open.
WHAT TO DO BEFORE YOU CALL FOR SER VICE
Before you call for service, check the following point .
WHEN YOUR REFRIGERATOR DOES NOT WORK
• Check that the power is switched on and that the plug is correctly connected.
• Check with another appliance or lamp to see if the outlet has electric current. The fuse be blown or a
circuit breaker tripped.
WHEN THERE IS A NOISE DURING OPERATION
• Cabinet not level.
•Weak or uneven floor.
• The back of the cabinet touching the wall.
IT IS NORMAL for the refrigerator to produce the following sounds.
• Loud noise produced by the compressor when operation starts --- Sound becomes quieter after a
while.
• Loud noise produced once a day by the compressor --- Operating sound produced immediately after
automatic defrost operation.
• Sound of flowing fluid (gurgling sound, fizzing sound) --- Sound of refrigerant flowing in pipes (sound
may become louder from time to time).
• Cracking or crunching sound --- Sound produced by expansion and contraction of inner walls and
internal parts during cooling.
• Squeaking sound --- Sound produced by expansion and contraction of internal parts.
IT IS NORMAL that the outside of a cabinet may be hot when touched. The hot pipe is in the cabinet in
order to prevent dew generation.
IF YOU STILL REQUIRE SERVICE
Refer to your nearest service agent approved by SHARP.
4
Page 5

STORING FOOD
Refrigeration reduces the rate of food spoilage. To maximize the shelf life of perishable food products,
ensure that the food is of the freshest possible quality. The following is a general guide to help promote
longer food storage.
Fruit / Vegetables
To minimize moisture loss, fruit and vegetables
should be loosely enclosed in a plastic material e.g.
wrap, bags ( do not seal ) and place in Vegetable
crisper. Those fruits and vegetables with thick skins
e.g. oranges do not require wrapping.
Dairy Products & Eggs
• Most dairy products have a use by date on the
outer packaging which informs the recommended
temperature and shelf life of the product.
• Eggs should be stored in the Egg holder.
MILK
MILK
NOTE:
• Evenly place the food on the shelves to allow the cooling air to circulate efficiently.
• Hot foods should be cooled before storing.
Storing hot foods increases the temperature
in the unit and increases the risk of food spoilage.
• Do not block the outlet and inlet of the cool
air circulating circuit with foods or containers; otherwise the foods will not be evenly
cooled throughout the refrigerator.
Do not place food directly
in front of cold air outlet.
This may lead to the food
freezing.
Meats / Fish / Poultry
• Place on a plate or dish and cover with paper or
plastic wrap.
• For larger cuts of meat, fish, or poultry, place to
the rear of the shelves.
• Ensure all cooked food is wrapped securely or
placed in an airtight container.
FOR BEST FREEZING
• Quality of foods should be fresh.
• Freeze small quantities of food at a time to freeze them quickly.
• Food should be properly stored or covered and the air should be removed to seal tightly.
• Evenly place the food in the freezer.
• Label bags or containers to keep an inventory of freezing food.
IN
OUT
5
Page 6

SPECIFICATION
Rated voltage (V~)
Rated frequency (Hz)
Rated current (A)
Rated input of heating systems (W)
Defrosting input (W)
Internal lamp input (W)
Climate class
Refrigerant
Charge (g)
Insulation blowing gas
Rated storage volume (L)
Rated gross volume (L)
Group (AS / NZS 4474.1)
SJ-68L SJ-63L SJ-58L
230 - 240
50
1.4 - 1.5
151 - 164
150 - 163
15 max.
T
HFC - 134a
130
125 120
Cyclo pentane
564
606
524
566
484
526
5
WARNING
1. This refrigerator is airtight. TO PREVENT F A-
TAL ACCIDENTS TO CHILDREN, please
completely remove the door prior to discarding the refrigerator.
2. Highly volatile and inflammable materials such
as ether, petrol, propane gas, adhesive agents
and pure alcohol etc. are liable to explode.
Do not store these materials in the refrigerator.
3. To prevent damage to the outer cabinet, avoid
contact with lacquer, and paint, etc.
4. When cleaning your refrigerator, do not splash
water directly on the outer cabinet or the interior. This may lead to rusting and deterioration of the electrical insulation.
5. If any areas adjacent to electrical components
have to be cleaned, unplug the refrigerator
first to prevent electric shock, then wipe the
area with a dry cloth.
6. Should electrical components be accidentally
immersed in water, unplug the refrigerator , dry
the parts and contact your nearest service
agent approved by SHARP.
7. This refrigerator is designed solely for the purpose of storing foodstuff for domestic use in
accordance with the instructions given in this
manual. Using the refrigerator for other purposes might be harmful to persons or property.
8. This refrigerator is not suitable for the storage
of materials requiring precise temperatures.
Deterioration of these materials will be dangerous.
9. Dust deposited on the power plug may cause
fire. Wipe it off carefully.
10. When replacing the lamp bulb, unplug the refrigerator first to prevent electric shock.
11. Do not attempt to change or modify this refrigerator. This may result in fire, electric shock or
injury.
12. Information regarding disposal of the appliance
Flammable insulation blowing gases should be
disposed appropriately. Take the cabinet and
doors to a recycling plant for flammable insulation blowing gases.
6
Page 7

CAUTION
1. Do not touch the compressor unit, as it can
become extremely hot during operation.
2. If the power supply is accidentally disconnected, please wait for at least 5 minutes before re-connecting the power, as back pressure in the compressor may trip the overload
relay.
3. Avoid removing food from the freezer with your
bare hands. Directly touching products stored
at sub-zero temperatures can result in frostbite.
4. To prevent accidental power disconnection,
plug the refrigerator directly to the source. Do
not use a double adaptor as loss of power
could lead to the spoiling of the stored food.
5. Do not place bottles in the freezer as they may
crack when frozen.
6. Keep the door securely closed. If the door is
left ajar, the controlled inner temperature will
rise, resulting in food spoilage and increase in
electricity costs.
7. Do not install the refrigerator in a damp or wet
location as this may cause damage to the insulation and a leak. Condensation may also
build on the outer cabinet and cause rust.
10.Disconnect from the mains electricity supply
by removing the mains plug from the electricity supply socket. Do not remove by pulling
the mains lead. This may cause electric shock
or fire.
11. Make sure that you leave adequate ventilation space around the refrigerator to prevent
the compressor from overheating and stopping. Please follow the instructions given for
installation.
12. The refrigeration system behind and inside the
refrigerator contains refrigerant. If this system
is punctured it could result in serious damage
to your refrigerator, therefore do not allow any
sharp objects to come into contact with the
refrigeration system.
13. Should the flexible supply cord be damaged,
it must be replaced by service agent approved
by SHARP as a special cord is required.
14. In case of gas leak, ventilate the area by opening a window, etc. Do not touch the refrigerator or the power outlet.
15. Do not place heavy or easily broken objects
on top of the refrigerator. Objects may fall when
opening or closing the refrigerator , causing injury.
8. When installing or moving the refrigerator,
make sure that you do not nip or kink the power
cord. Damage of the power cord may cause
electric shock or fire.
9. Do not use this refrigerator when the power
cord or plug is damaged, or the outlet attachment is loose, as they may cause electric
shock or fire.
16. Do not place objects containing liquid on top
of the refrigerator. Spillage may cause electric shock or fire.
17. Do not drop objects inside the refrigerator or
strike the inner wall. This may cause the inner
surface to crack.
18. This refrigerator is not intended for use by
young children or infirm persons without supervision. Young children should be supervised to ensure that they do not play with the
refrigerator.
7
Page 8

SHARP CORPORATION
Osaka, Japan
SHARP CORPORATION OF AUSTRALIA PTY.LTD.
A. C. N. 003 039 405
1 HUNTINGWOOD DRIVE, HUNTINGWOOD, BLACKTOWN. N.S.W. 2148
P.O.BOX 827, BLACKTOWN. N.S.W.2148
8
TINS-A563CBRZ 02H- TH
1
 Loading...