

Page 1

User Guide
SH630E
Page 2

ii
Table of Contents
Chapter 1: Getting Started.................................................................... 1
1.1 Your Device.................................................................................................. 1
1.1.1 Front ............................................................................................................... 1
1.1.2 Back................................................................................................................ 1
1.2 Accessories....... .......................................................................................... 2
1.3 Installing SIM Cards, Memory Card and Battery...................................... 2
1.3.1 Remove the back cover .................................................................................. 2
1.3.2 Install the SIM cards....................................................................................... 2
1.3.3 Install the memory card .................................................................................. 3
1.3.4 Remove the memory card............................................................................... 3
1.3.5 Install the battery ............................................................................................ 3
1.3.6 Replace the back cover................................................................................... 4
1.4 Charging the Battery................................................................................... 4
1.5 Turning the Device On or Off ..................................................................... 5
1.5.1 Turn Device On or Off ................................................................................... 5
1.5.2 Set Device to Airplane Mode ......................................................................... 5
1.5.3 Set Device to Vibrate Mode ........................................................................... 5
1.5.4 Set Device to Silent Mode.............................................................................. 5
1.5.5 Set Device to Sleep Mode .............................................................................. 5
1.6 Locking and Unlocking the Screen ........................................................... 6
1.7 Creating a Google Account........................................................................ 7
1.8 Using the Headset....................................................................................... 9
1.9 Adjusting the Volume ............................................................................... 10
Chapter 2: The Basics......................................................................... 11
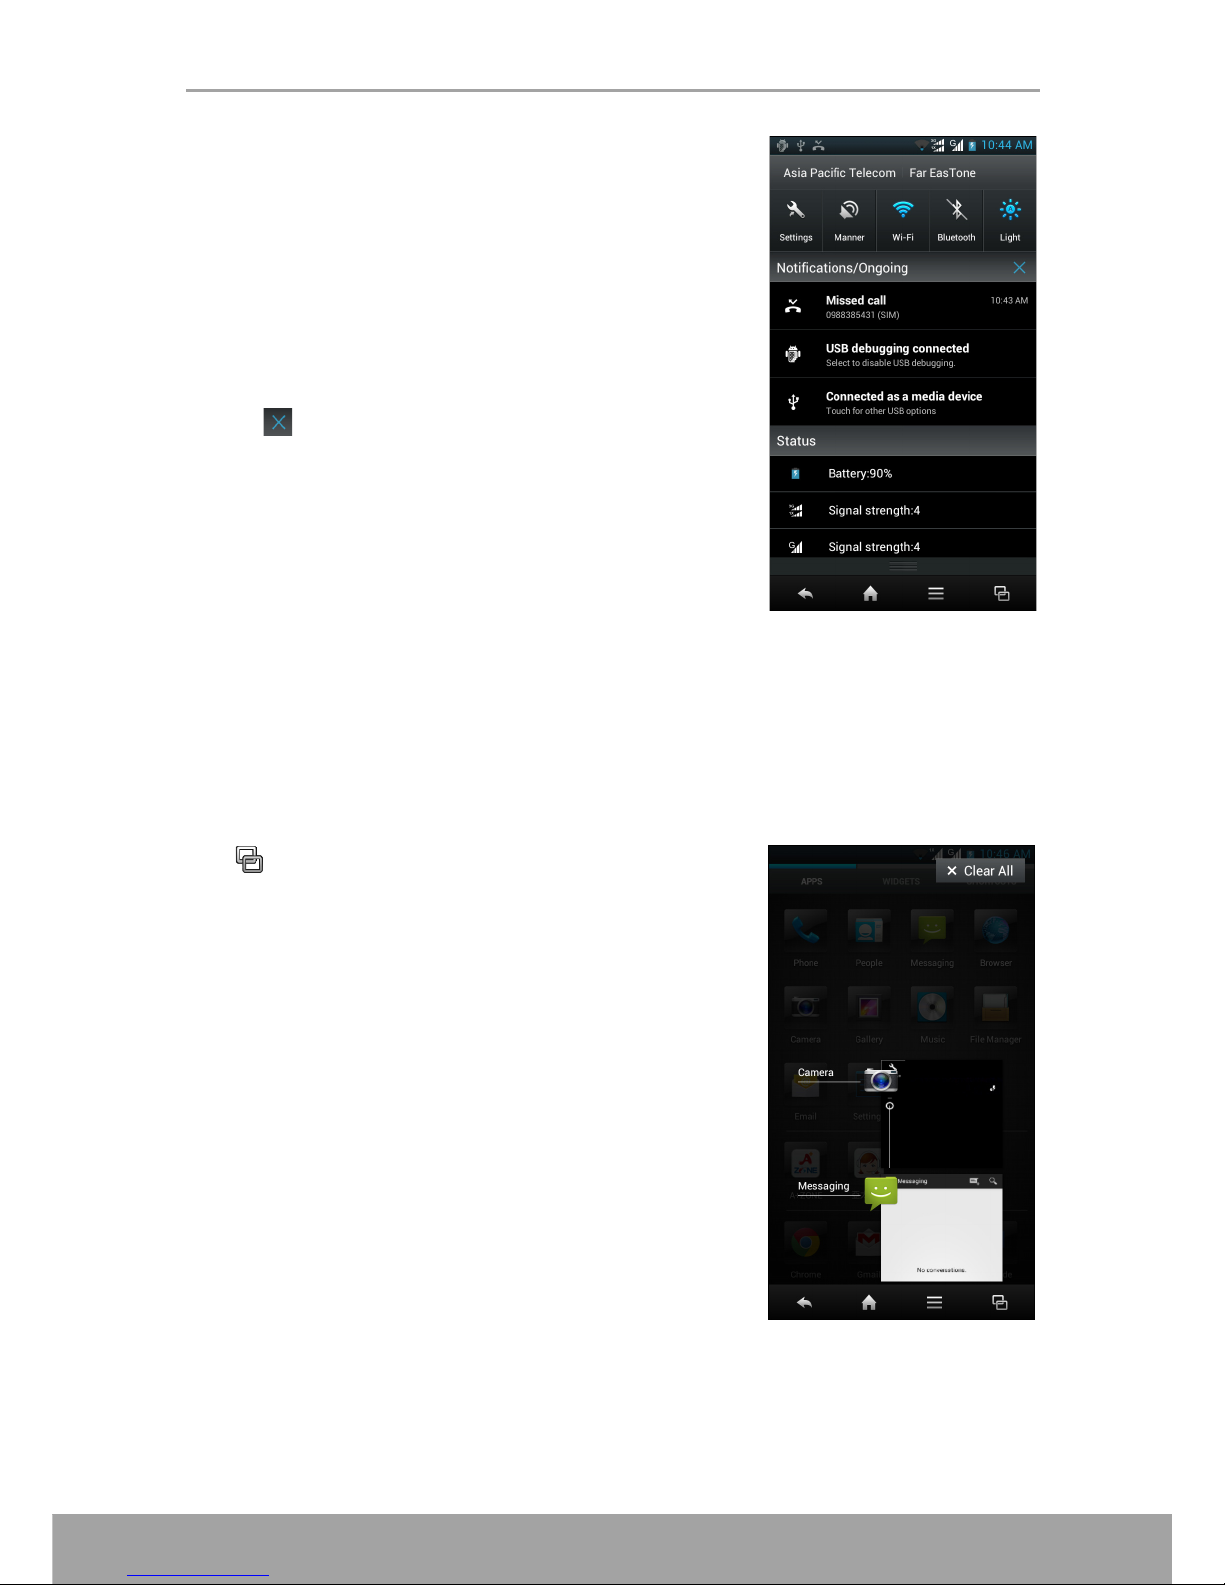
2.1 Home Screen ............................................................................................. 11
2.1.1 Status Bar...................................................................................................... 12
2.1.2 Notifications Panel ....................................................................................... 13
2.1.3 Open Applications ........................................................................................ 13
2.1.4 View Recently-Used Applications ............................................................... 13
2.1.5 Shortcut Icons............................................................................................... 14
2.1.6 Widgets......................................................................................................... 16
2.1.7 Change Home Settings ................................................................................. 17
2.1.8 Organize the Applications ............................................................................ 18
2.2 Lock Screen............................................................................................... 21
2.2.1 Change the Welcome Sheet Wallpaper ........................................................ 21
2.2.2 Notification Reminder .................................................................................. 23
2.2.3 View Current Stock Information .................................................................. 24
2.2.4 Switch Different User Interface.................................................................... 24
Chapter 3: Using On-screen Keyboard............................................. 26
3.1 On-Screen Keyboard................................................................................. 26
3.1.1 Use the On-Screen Keyboard ....................................................................... 27
3.1.2 Select Layout ................................................................................................ 27
3.1.3 Switch Language .......................................................................................... 27
3.1.4 Switch Input Method .................................................................................... 28
Page 3

iii
3.1.5 English Input ................................................................................................ 28
3.1.6 Voice Input Method...................................................................................... 31
3.1.7 Configure the Input Method ......................................................................... 31
Chapter 4: People................................................................................ 32
4.1 Adding Contacts........................................................................................ 32
4.2 Importing Contacts ................................................................................... 32
4.3 Backing up Contacts................................................................................. 33
4.4 Sharing Contacts....................................................................................... 33
4.5 Communicating with Contacts................................................................. 34
4.5.1 Call Contacts ................................................................................................ 34
4.5.2 Text Contacts................................................................................................ 34
4.5.3 Email Contacts.............................................................................................. 34
4.6 Managing Contacts ................................................................................... 35
4.6.1 Edit Contacts ................................................................................................ 35
4.6.2 Delete Contacts............................................................................................. 35
4.6.3 Share Contact Information ........................................................................... 35
4.6.4 Send Contact Information............................................................................. 35
4.6.5 Assign Contact Ringtone.............................................................................. 35
4.7 Favorite Contacts...................................................................................... 36
4.7.1 View Favorites.............................................................................................. 36
4.7.2 Add to Favorites ........................................................................................... 36
4.7.3 Remove from Favorites ................................................................................ 36
4.8 Searching for Contacts............................................................................. 36
Chapter 5: Using the Phone............................................................... 37
5.1 Making a Call ............................................................................................. 37
5.2 Answering a call........................................................................................ 38
5.3 Ending a call.............................................................................................. 38
5.4 In-Call Options........................................................................................... 39
5.5 Call Log...................................................................................................... 39
Chapter 6: Email & Messaging........................................................... 40
6.1 Text Message............................................................................................. 40
6.1.1 Create and Send Text Messages ................................................................... 40
6.1.2 Receive and Manage Messages .................................................................... 40
6.2 Multimedia Message ................................................................................. 42
6.2.1 Create and Send MMS Messages ................................................................. 42
6.3 Voice Message........................................................................................... 43
6.4 Customizing Message Settings ............................................................... 44
6.5 Email Accounts ......................................................................................... 45
6.5.1 Set Up Email Account .................................................................................. 45
6.5.2 Add More Email Accounts........................................................................... 47
6.5.3 Select Email Accounts.................................................................................. 47
6.5.4 Delete Email Accounts ................................................................................. 47
6.6 Using Email................................................................................................ 48
6.6.1 Compose and Send Emails ........................................................................... 48
6.6.2 Receive Emails ............................................................................................. 48
6.6.3 Read and Reply to Emails ............................................................................ 49
6.6.4 Manage Email Folders.................................................................................. 49
Page 4

iv
6.6.5 Customize Email Settings............................................................................. 50
6.7 Gmail .......................................................................................................... 51
6.7.1 Sign in to Gmail............................................................................................ 51
6.7.2 Refresh Gmail............................................................................................... 51
6.7.3 Create and Send Emails................................................................................ 52
6.7.4 Read and Reply to Emails ............................................................................ 52
6.7.5 Manage Emails ............................................................................................. 53
6.7.6 Configure Gmail Settings ............................................................................. 53
Chapter 7: Using Internet ................................................................... 55
7.1 Connecting to Internet.............................................................................. 55
7.1.1 Wi-Fi............................................................................................................. 55
7.1.2 Cellular Data Network.................................................................................. 57
7.2 Browsing a Web Page............................................................................... 59
7.2.1 Manage Web Page........................................................................................ 59
7.3 Google Maps.............................................................................................. 61
7.4 Using Turn-By-Turn Navigation............................................................... 62
7.5 Google Play Store ..................................................................................... 63
7.6 YouTube..................................................................................................... 63
Chapter 8: Using Bluetooth................................................................ 64
8.1 Connecting to Bluetooth Devices............................................................ 64
8.2 Transferring Files to Bluetooth Devices ................................................. 65
8.3 Receiving Files to Bluetooth Devices ..................................................... 66
Chapter 9: Connectivity...................................................................... 67
9.1 Connecting to Computer or Notebook.................................................... 67
9.1.1 List of Software ............................................................................................ 68
9.1.2 Driver Installation......................................................................................... 69
9.2 Factory Data Reset.................................................................................... 70
9.3 OTA Software Update ............................................................................... 71
Chapter 10: Multimedia Applications................................................ 74
10.1 Photos and Videos.................................................................................. 74
10.1.1 Take Photos ................................................................................................ 74
10.1.2 Record Videos ............................................................................................ 75
10.1.3 Take Panorama Shots ................................................................................. 76
10.1.4 Review Photos ............................................................................................ 77
10.1.5 Review Videos............................................................................................ 77
10.1.6 Configure Camera Settings......................................................................... 78
10.1.7 Capture Screenshots ................................................................................... 80
10.2 Viewing Photos & Videos....................................................................... 81
Chapter 11: Music ............................................................................... 82
11.1 Using Music Player ................................................................................. 82
11.1.1 Play Songs .................................................................................................. 82
11.1.2 Playback Screen.......................................................................................... 82
11.1.3 Create Playlists ........................................................................................... 83
11.1.4 Customize Ringtone ................................................................................... 84
11.1.5 Delete Songs............................................................................................... 84
Page 5

v
11.1.6 Customize the Sound Effects...................................................................... 85
11.1.7 Enable Sleep Mode..................................................................................... 85
11.2 FM Radio.................................................................................................. 86
11.2.1 Listen to Radio ........................................................................................... 86
11.2.2 Record the Radio ........................................................................................ 86
Chapter 12: Programs......................................................................... 87
12.1 Browser.................................................................................................... 87
12.2 Calculator................................................................................................. 87
12.3 Camera..................................................................................................... 87
12.4 Clock......................................................................................................... 88
12.5 Email......................................................................................................... 88
12.6 File Manager ............................................................................................ 89
12.7 Messaging................................................................................................ 89
12.8 Gallery...................................................................................................... 89
12.9 People....................................................................................................... 89
12.10 Phone ..................................................................................................... 90
12.11 Date and Time Settings......................................................................... 90
12.12 Voice Note.............................................................................................. 91
Chapter 13: Managing Your Phone.................................................... 92
13.1 Wireless and Networks Settings............................................................ 92
13.1.1 Wi-Fi........................................................................................................... 92
13.1.2 Bluetooth .................................................................................................... 92
13.1.3 Data usage .................................................................................................. 92
13.1.4 Dual Card Settings...................................................................................... 94
13.1.5 Airplane Mode............................................................................................ 94
13.1.6 VPN ............................................................................................................ 95
13.1.7 Tethering & Portable Hotspot .................................................................... 96
13.1.8 Wi-Fi direct ................................................................................................ 96
13.1.9 Mobile Networks ........................................................................................ 97
13.2 Device Settings........................................................................................ 98
13.2.1 Sound.......................................................................................................... 98
13.2.2 Display........................................................................................................ 99
13.2.3 Storage...................................................................................................... 101
13.2.4 Battery ...................................................................................................... 101
13.2.5 Apps.......................................................................................................... 101
13.3 Personal Settings.................................................................................. 101
13.3.1 Accounts & Sync...................................................................................... 101
13.3.2 Location Services ..................................................................................... 101
13.3.3 Security..................................................................................................... 102
13.3.4 Language & Input..................................................................................... 103
13.3.5 Backup & Reset........................................................................................ 104
13.4 System Settings .................................................................................... 104
13.4.1 Date & Time ............................................................................................. 104
13.4.2 Accessibility ............................................................................................. 105
13.4.3 Developer Options.................................................................................... 105
13.4.4 About Phone ............................................................................................. 107
Page 6

vi
Chapter 14: Specifications............................................................... 108
Chapter 15: Troubleshooting........................................................... 109
Page 7
Chapter 1: Getting Started
1
Chapter 1: Getting Started
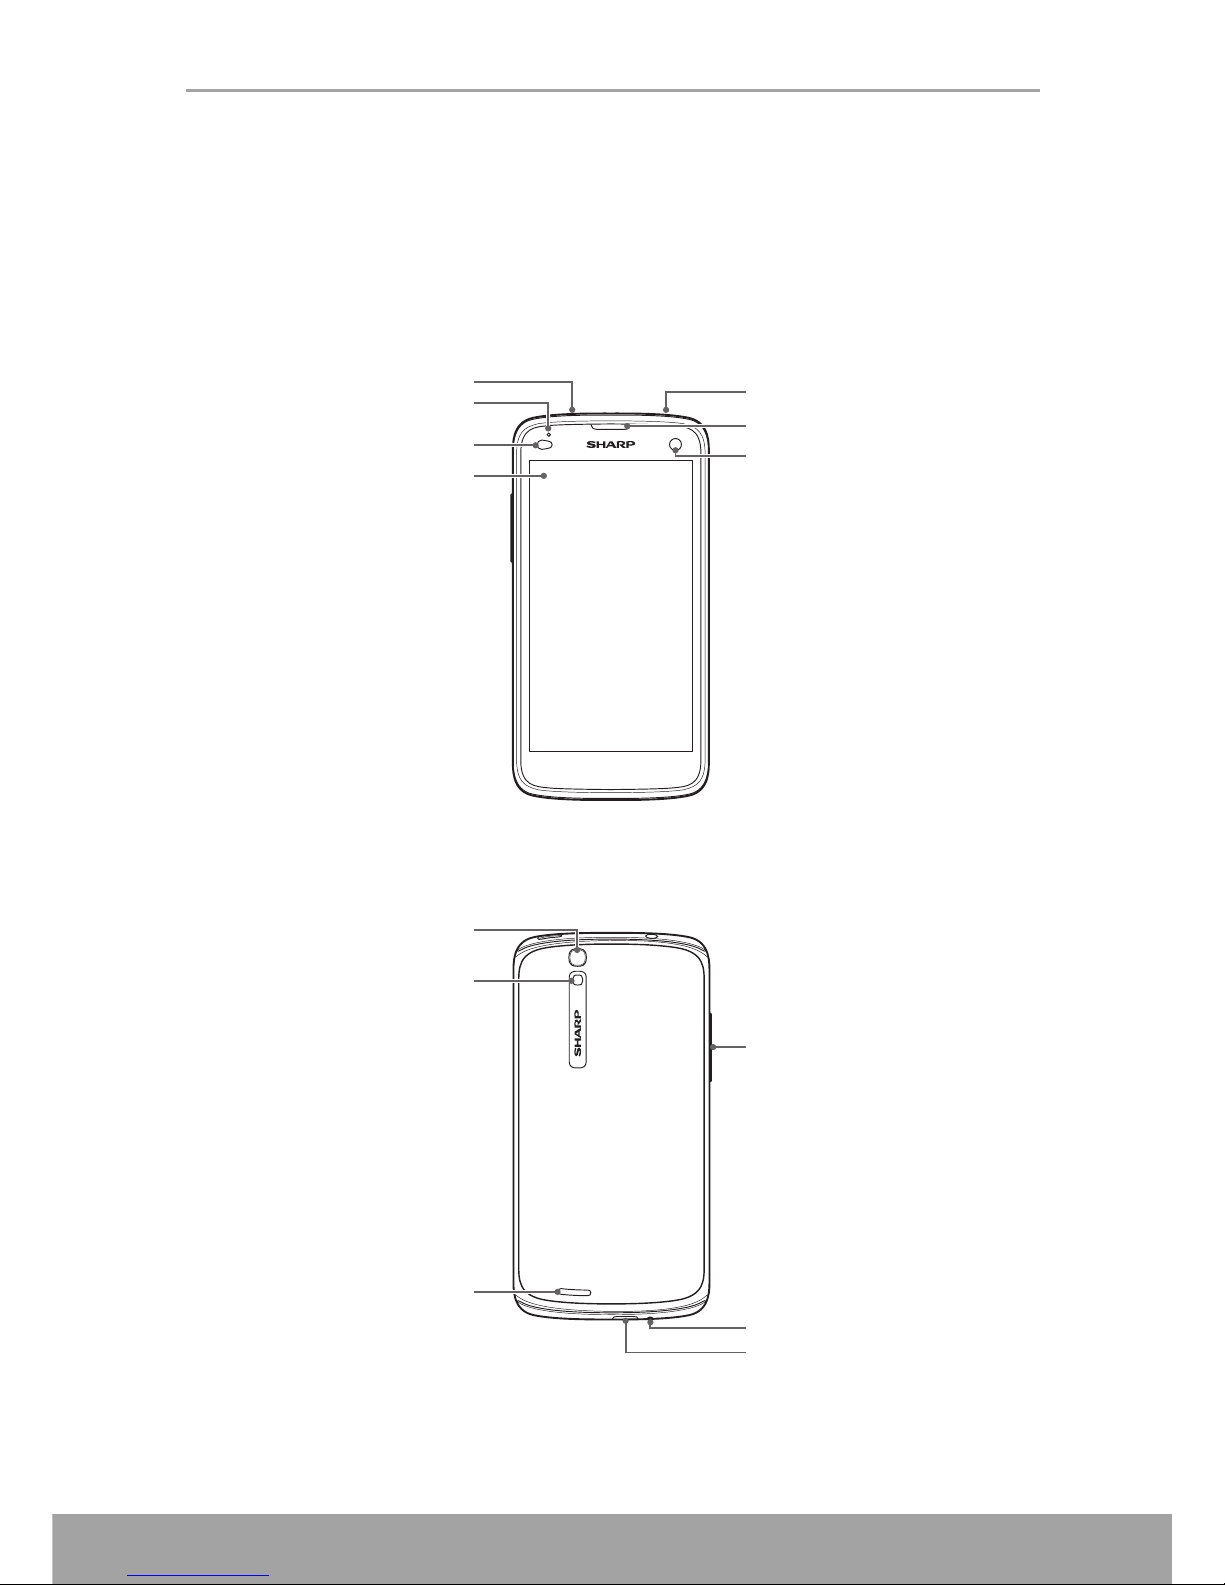
1.1 Your Device
1.1.1 Front
1.1.2 Back
Power button
Headset jack
Status LED
Light sensor
Touch screen
Earpiece
Front camera
Rear camera
Speaker
Microphone
USB port
Volume (+/-)
button
Flash
Page 8
Chapter 1: Getting Started
2
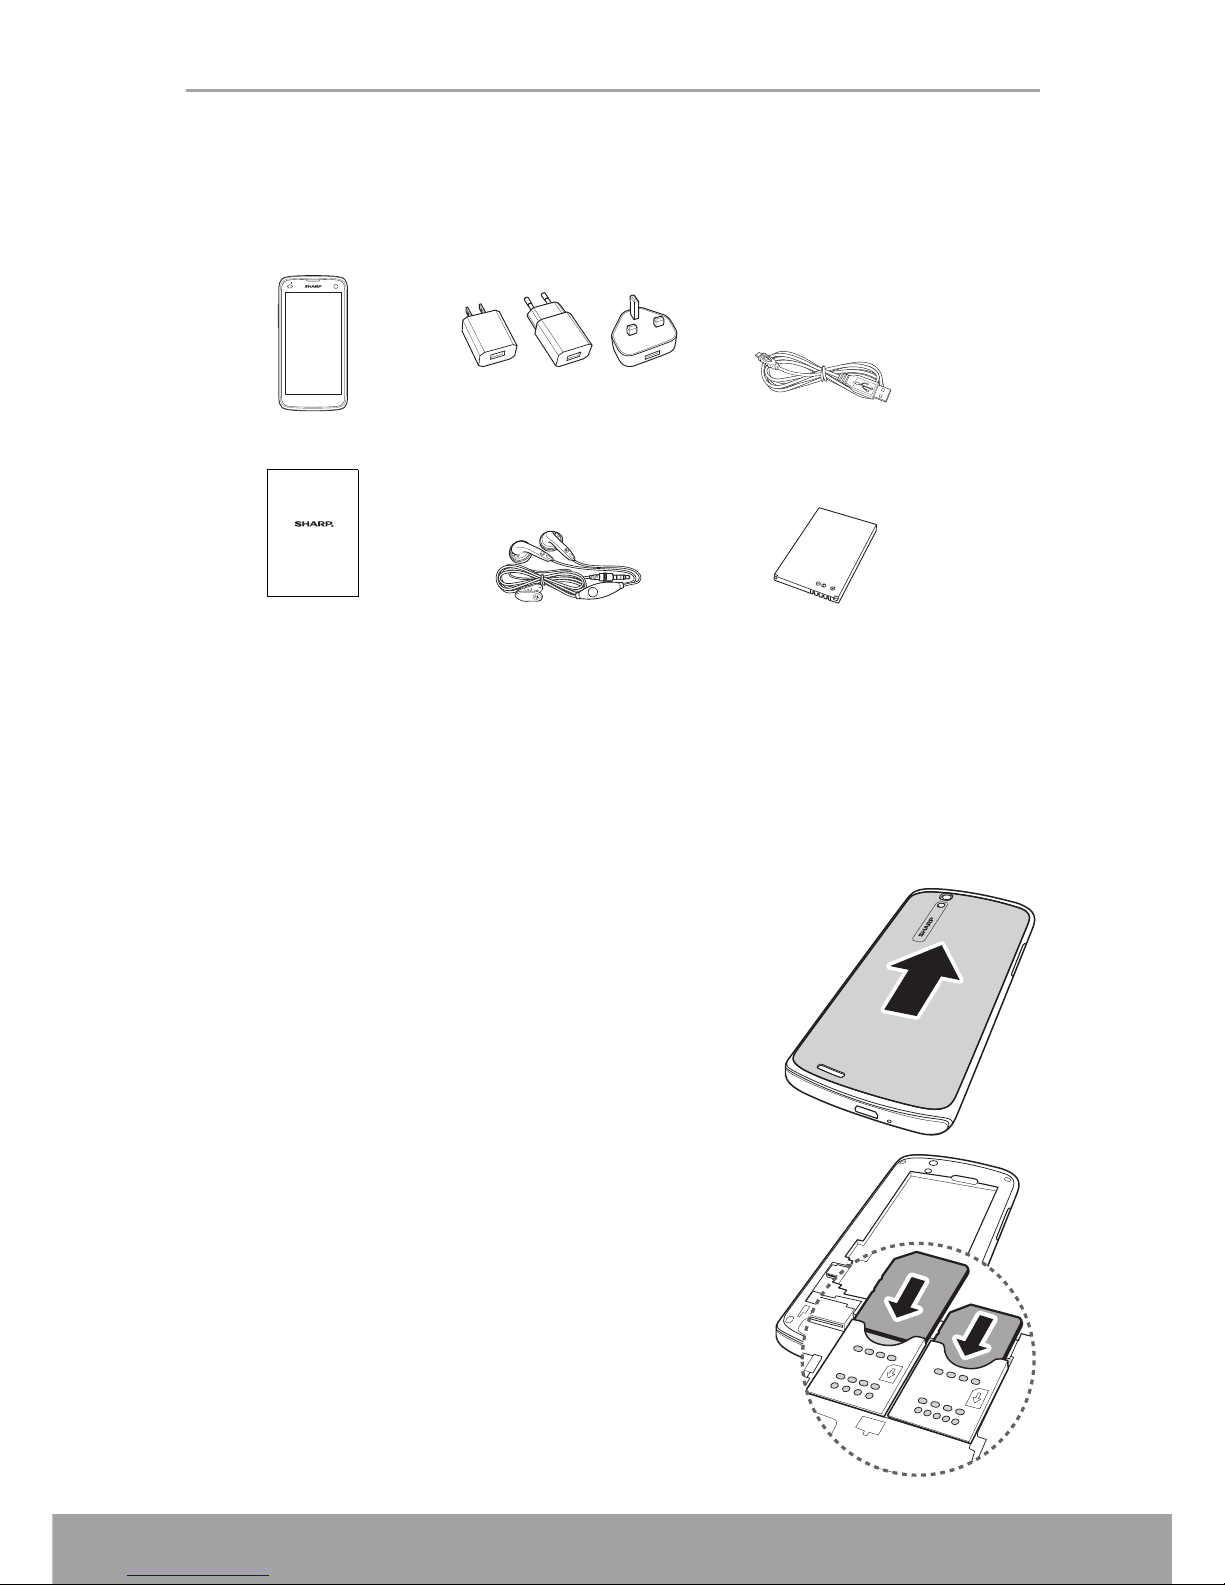
1.2 Accessories
Your package comes with the following items. If any of them is missing, please
contact your retailer.
1.3 Installing SIM Cards, Memory Card
and Battery
1.3.1 Remove the back cover
1. Turn the device off.
See “Turn off the device” on page 5.
2. Push and slide upwards to open the back cover.
1.3.2 Install the SIM cards
1. Insert the SIM cards as shown.
2. Make sure the gold contacts are facing down and
the cut-off corner is facing towards the battery slot.
3. Insert your CDMA UIM card or dual-mode card into
the slot on the left side and your GSM SIM card into
the slot on the right side. When inserting, make sure
the card’s gold contact are facing down and its
cut-off corner facing out.
Smartphone AC adapter USB cable
User Guide Headset Battery
US EU UK
User Guide
SH630E
Page 9
Chapter 1: Getting Started
3
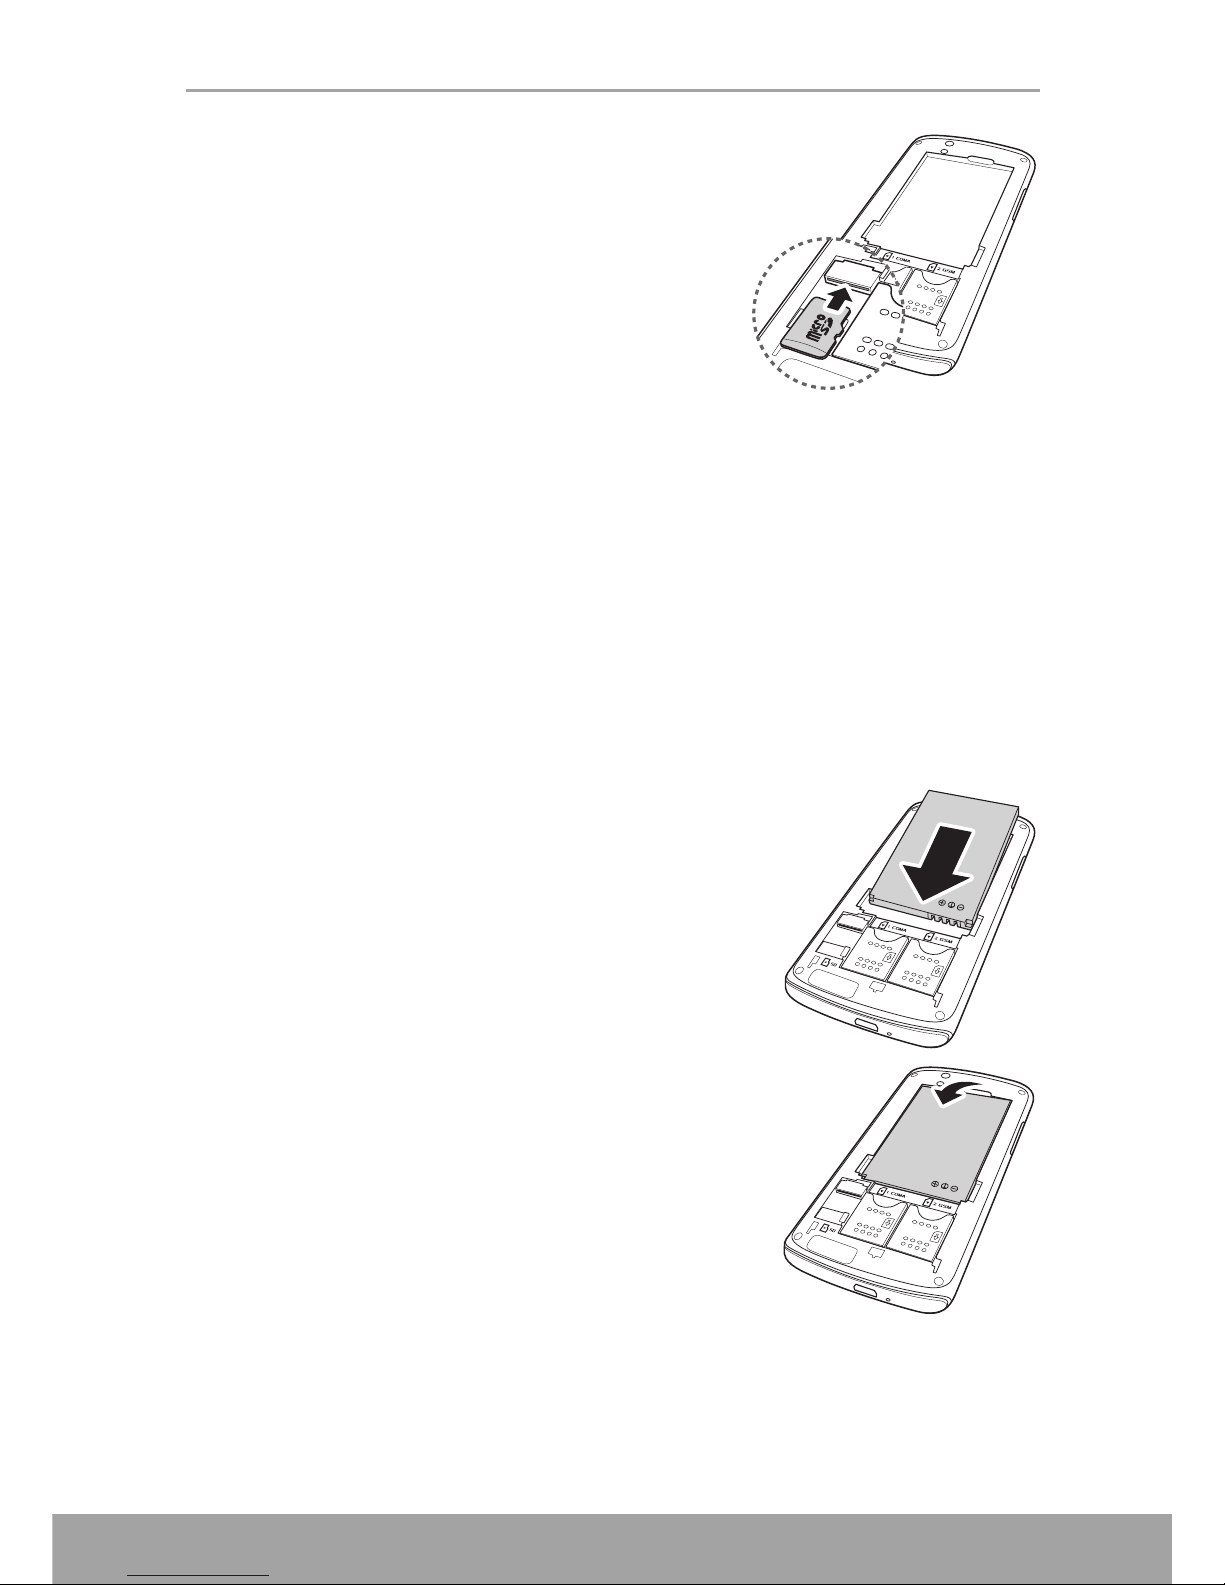
1.3.3 Install the memory card
You will need a memory card to store photos, music,
videos and other data. This device accepts
microSD™ or microSDHC™ memory cards with
maximum capacities of 32 GB (depending on the
memory card manufacturer and type).
Insert the memory card with the gold contacts facing
down.
1.3.4 Remove the memory card
Before removing the memory card, unmount the storage card first so that you can
safely remove it.
1. Tap Settings > Storage > Unmount SD card > OK.
2. Remove the back cover.
3. Remove the memory card from the card slot.
4. Replace the back cover.
NOTE: Do not remove the memory card while the device is transferring or accessing
data, as this could result in loss of data or damage to the memory card or device.
1.3.5 Install the battery
1. Insert the battery.
2. Make sure the contacts of the battery are aligned
with the connectors on the battery slot.
• To remove the battery
Use your fingertip to lift the battery and remove it
from the slot.
Page 10
Chapter 1: Getting Started
4
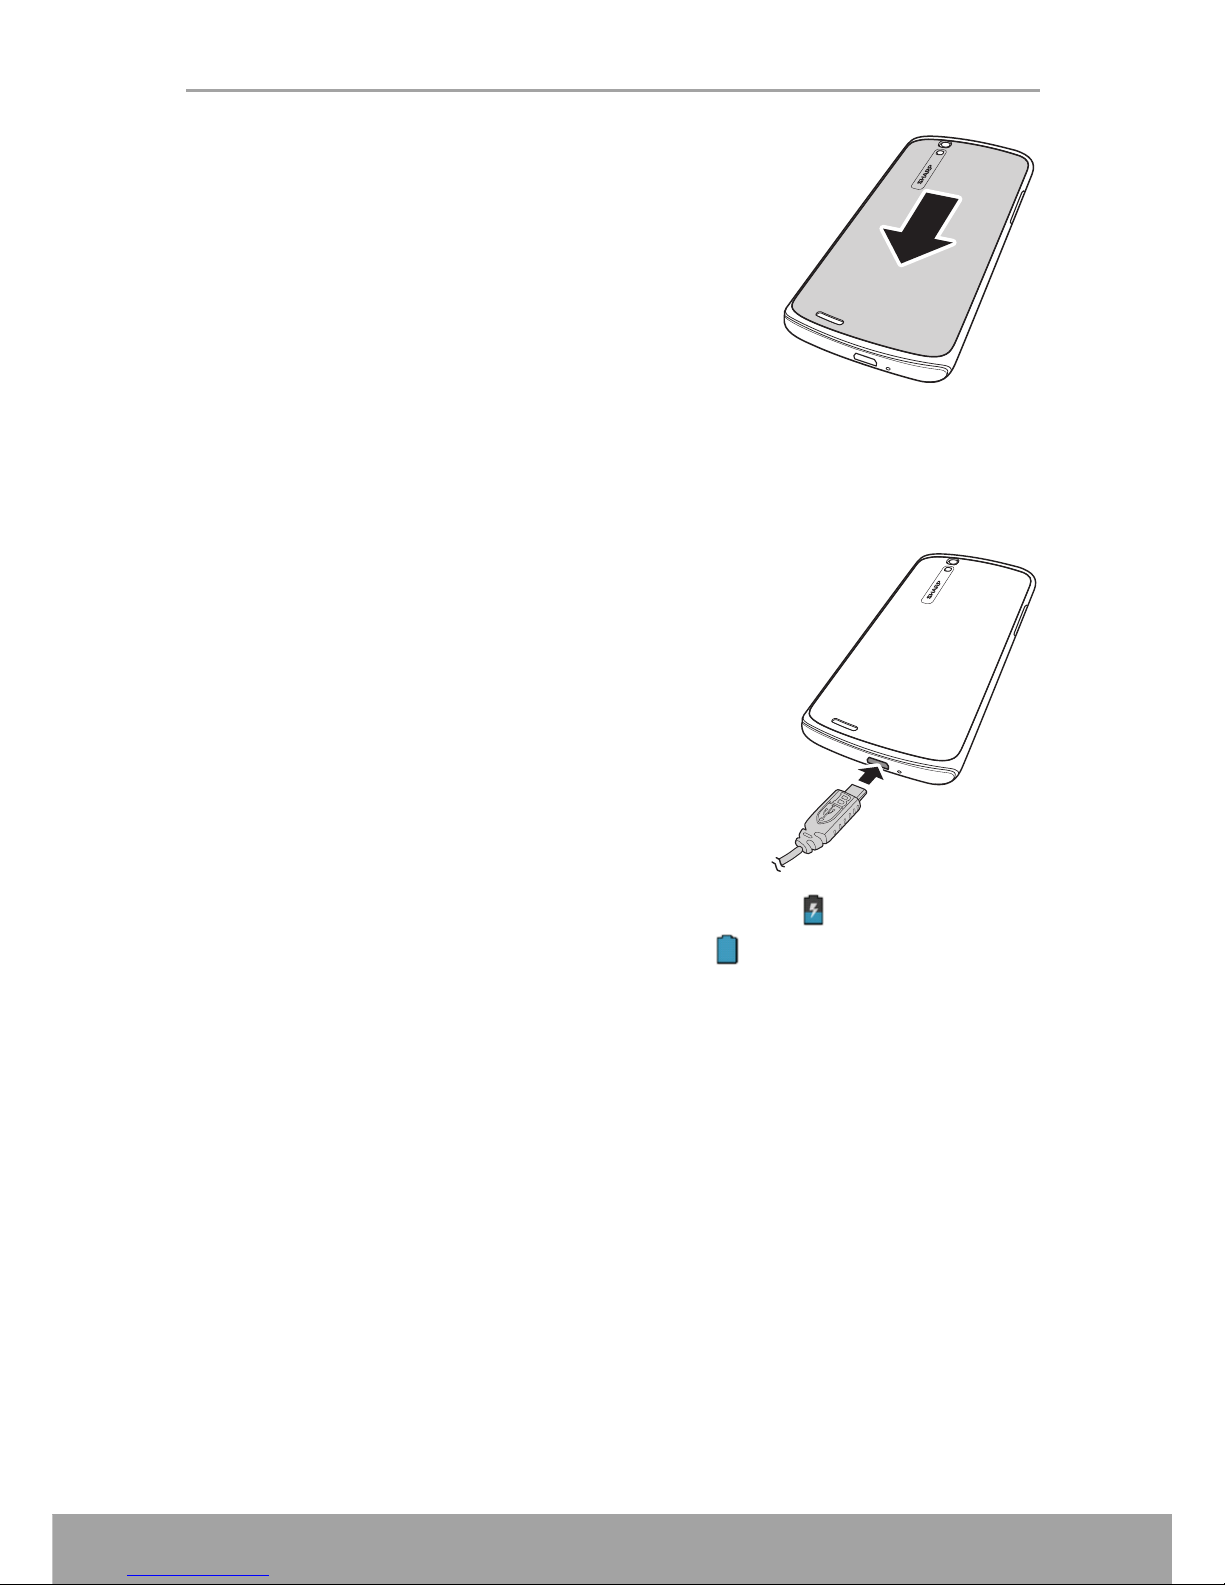
1.3.6 Replace the back cover
Secure the hooks on the back cover with the designated
holes on the device and close the back cover.
1.4 Charging the Battery
The battery that came with the device is only partially charged.
Charge the battery
1. Connect the USB cable to the USB port of the
device.
2. Connect the other end of the USB cable to the AC
adapter.
3. Plug the AC adapter to a wall outlet to start
charging.
When the battery is charging and the device is turned on, the icon is displayed on
the status bar. When the battery is fully charged, the icon is displayed on the
status bar.
Warning
• Please use indoors and in dry places.
• Overheat protection mechanism is activated, the device will temporarily stop
charging:
When the system temperature reaches the maximum operating temperature, the
device will automatically activate the overheat protection mechanism and
temporarily stops battery charging. When the system temperature drops, the
system will automatically restart the battery charging.
NOTE: Battery life varies depending on network, applications, and ambient
temperature.
Page 11
Chapter 1: Getting Started
5
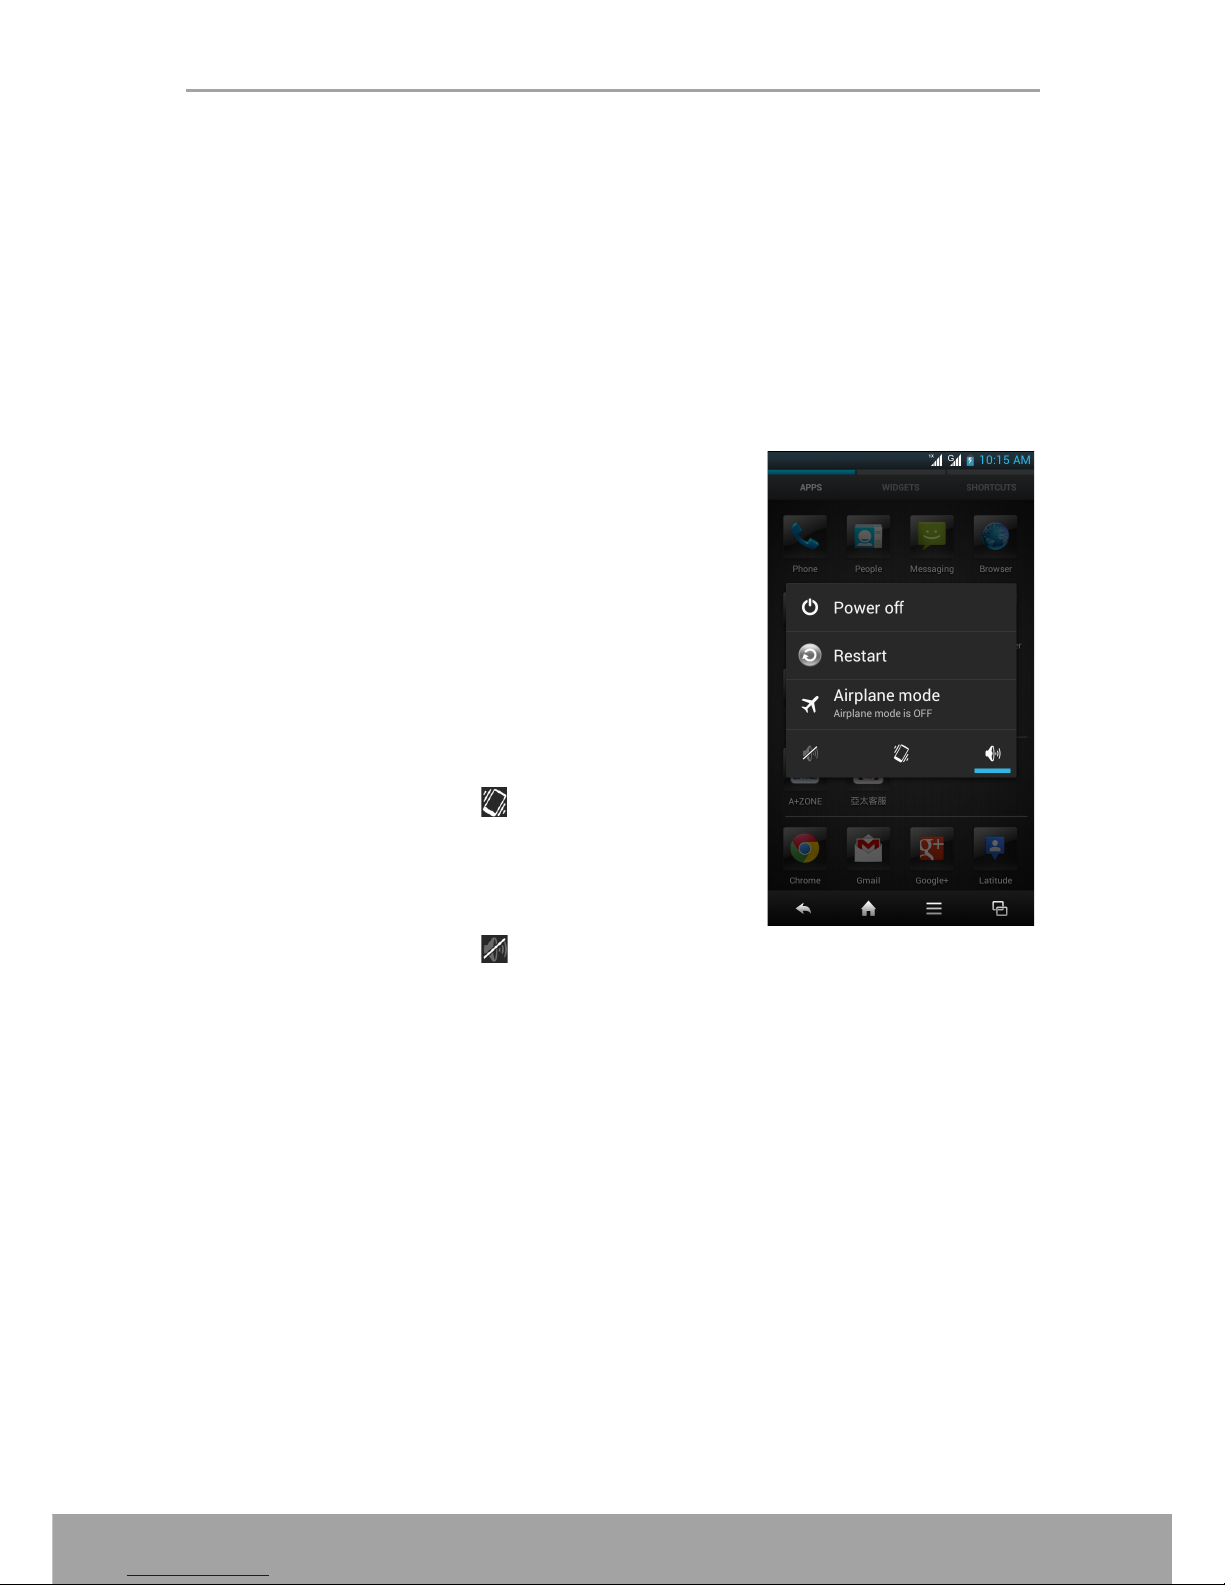
1.5 Turning the Device On or Off
After installing the SIM card and charging the battery, the device is ready to be turned
on.
1.5.1 Turn Device On or Off
• Turn on the device
Press and hold the Power button until the device turns on.
• Turn off the device
1. Press and hold the Power button for 5 seconds.
2. A pop-up window appears, tap Power off.
3. Tap OK to confirm.
1.5.2 Set Device to Airplane Mode
1. Press and hold the Power button for 5 seconds.
2. On the options menu, tap Airplane mode.
1.5.3 Set Device to Vibrate Mode
1. Press and hold the Power button for 5 seconds.
2. On the options menu, tap .
1.5.4 Set Device to Silent Mode
1. Press and hold the Power button for 5 seconds.
2. On the options menu, tap .
1.5.5 Set Device to Sleep Mode
To set the device to sleep mode, press the Power button. This turns the display off.
To turn the display on, press the Power button again.
Page 12
Chapter 1: Getting Started
6
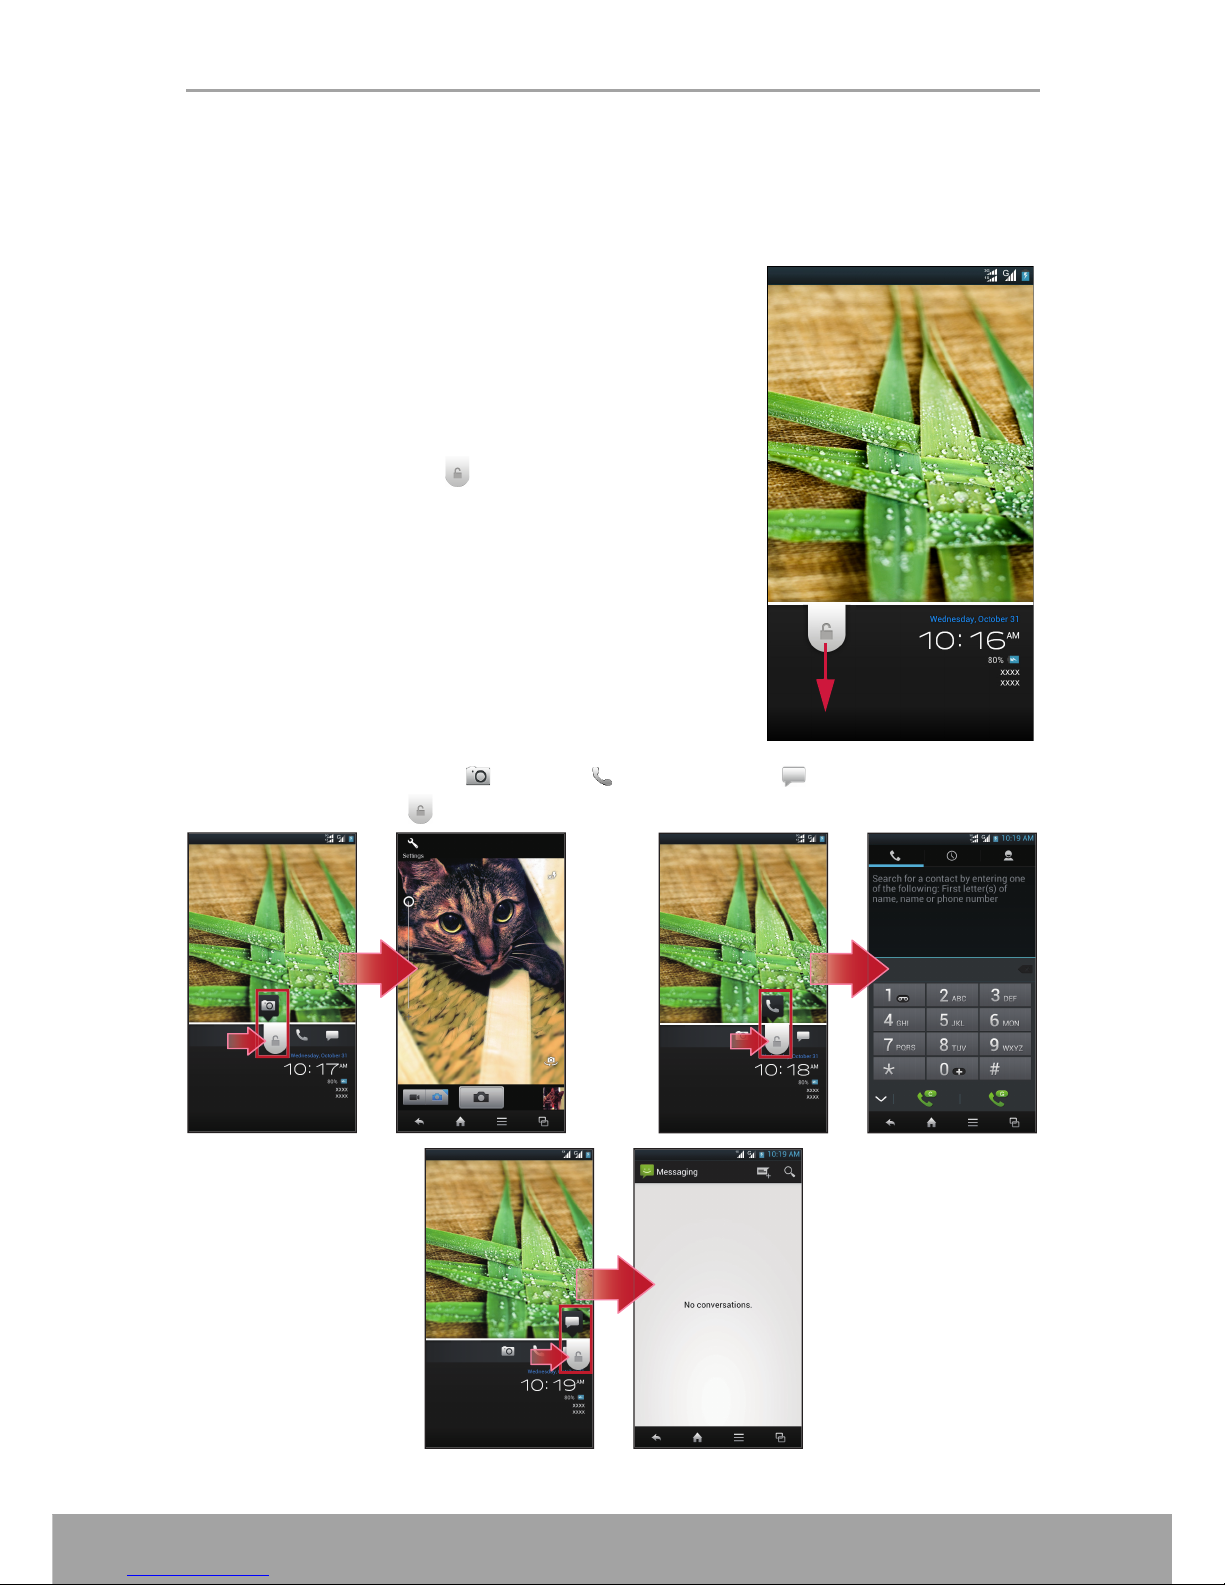
1.6 Locking and Unlocking the Screen
Lock the screen to prevent it from accidentally being touched. By default, the screen
locks after being idle for a period of time (see “Sleep” on page 100).
• Lock the screen
To manually lock the screen and turn off the display,
press the Power button.
• Unlock the screen
1. If the display is turned off, press the Power
button.
2. Drag the lock icon ( ) downwards to unlock the
screen.
NOTE: To use the Camera ( ), Phone ( ), or Messaging ( ) function directly, drag
the lock icon ( ) upwards, then drag it to the respective icon.
Page 13
Chapter 1: Getting Started
7
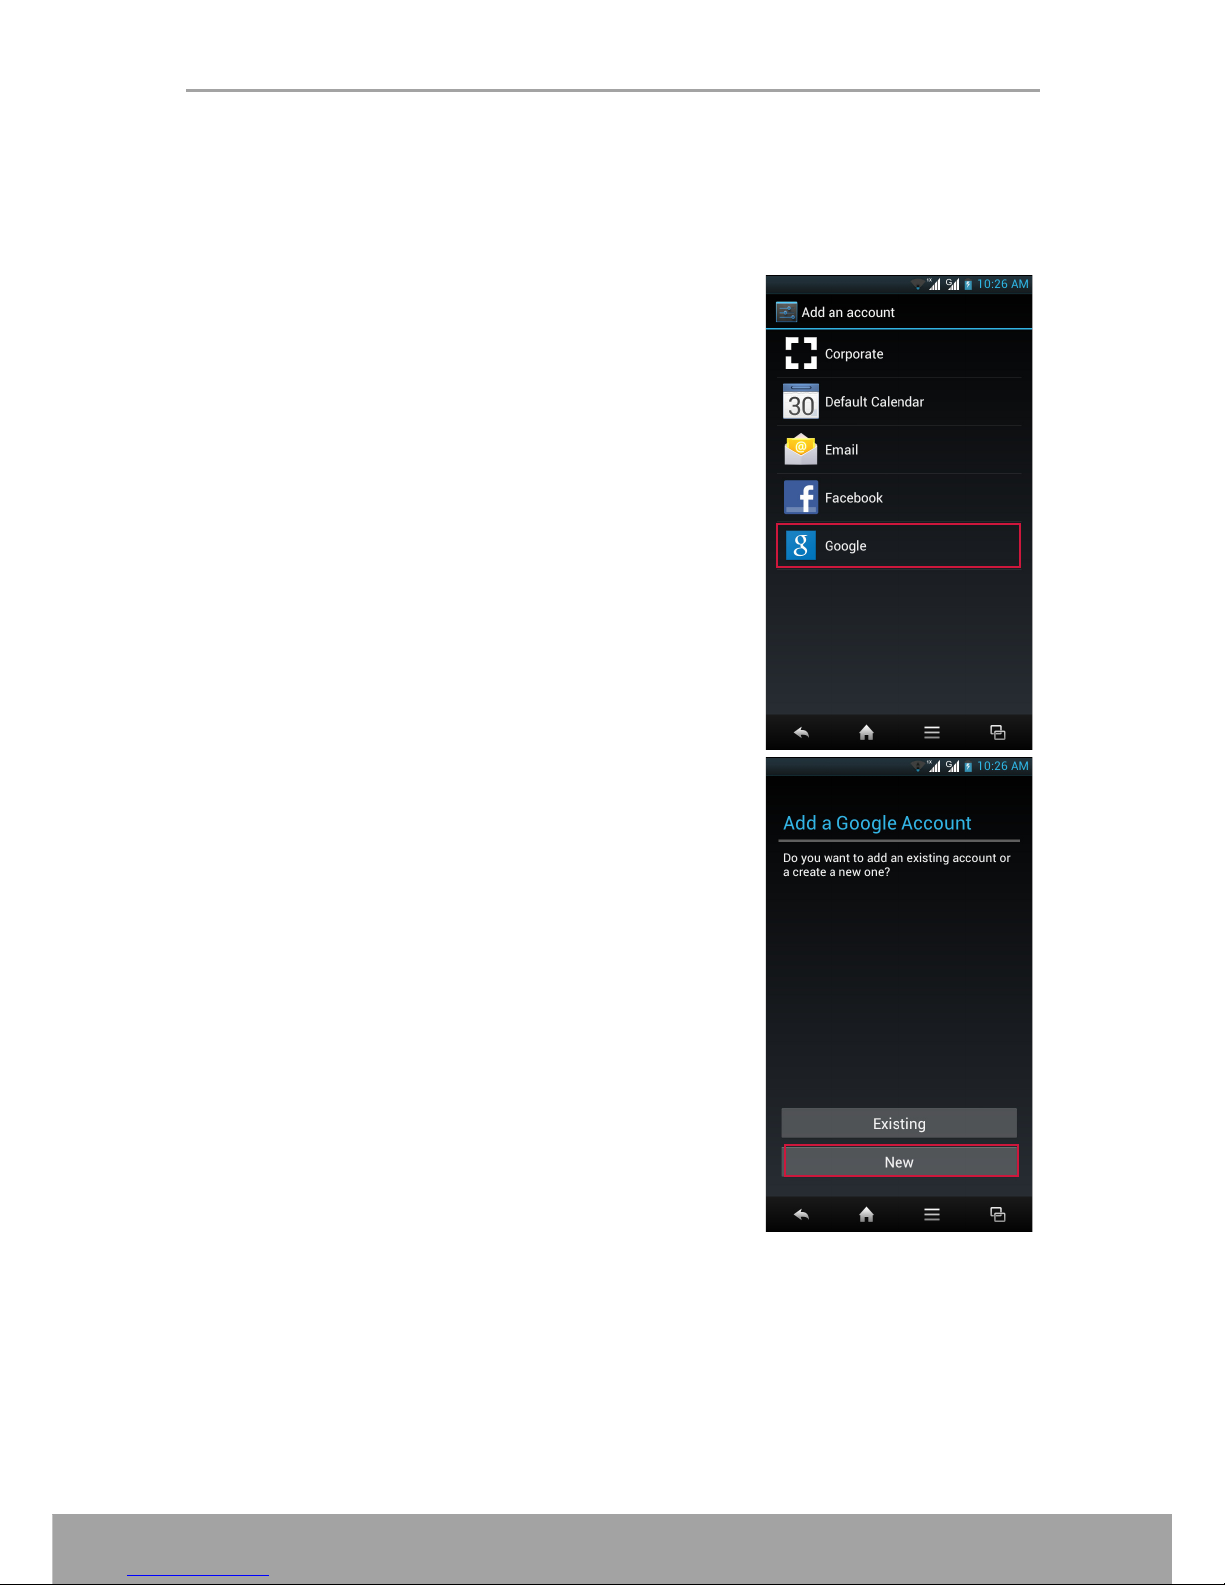
1.7 Creating a Google Account
1. Tap Settings.
2. In PERSONAL, tap Accounts & sync.
3. Tap ADD ACCOUNT > Google to create a google
account.
4. Tap New to create a new account.
5. Enter your name and tap Next.
Page 14
Chapter 1: Getting Started
8
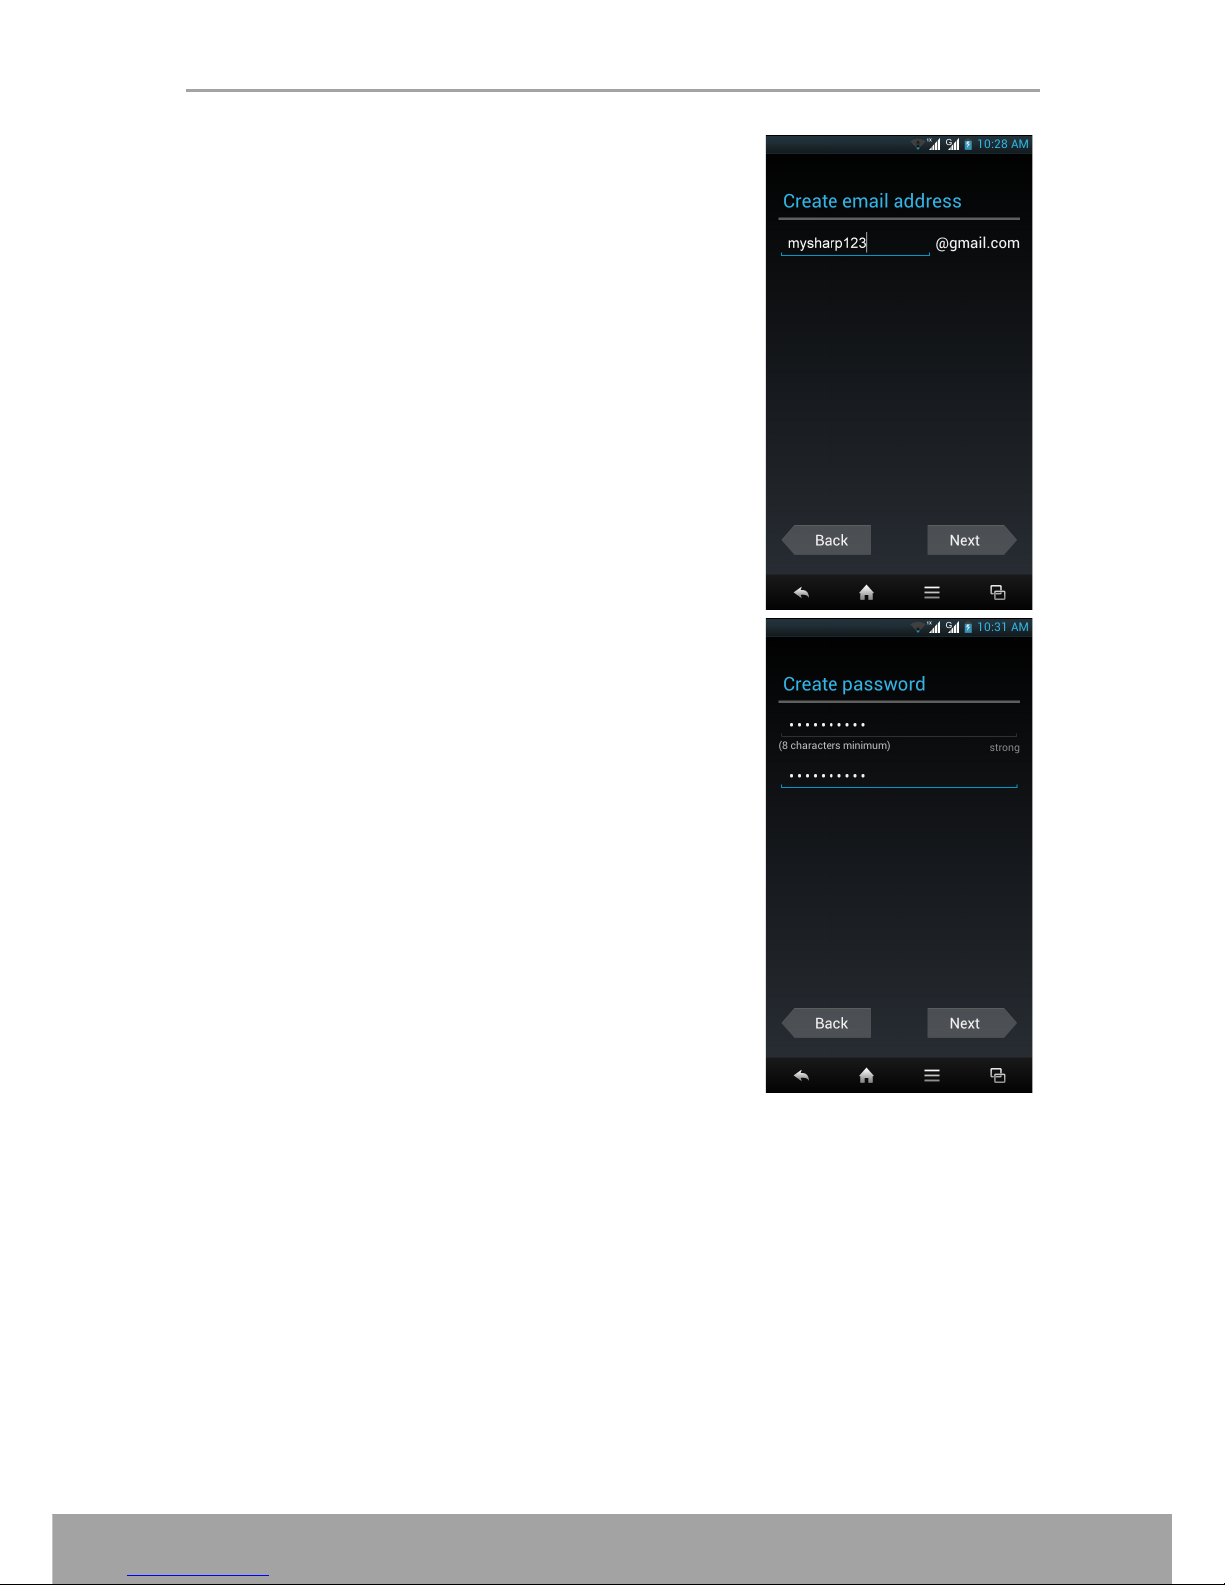
6. Enter the account name and tap Next.
The system will automatically check the availability
of the account name.
7. Create your password and tap Next.
Page 15
Chapter 1: Getting Started
9
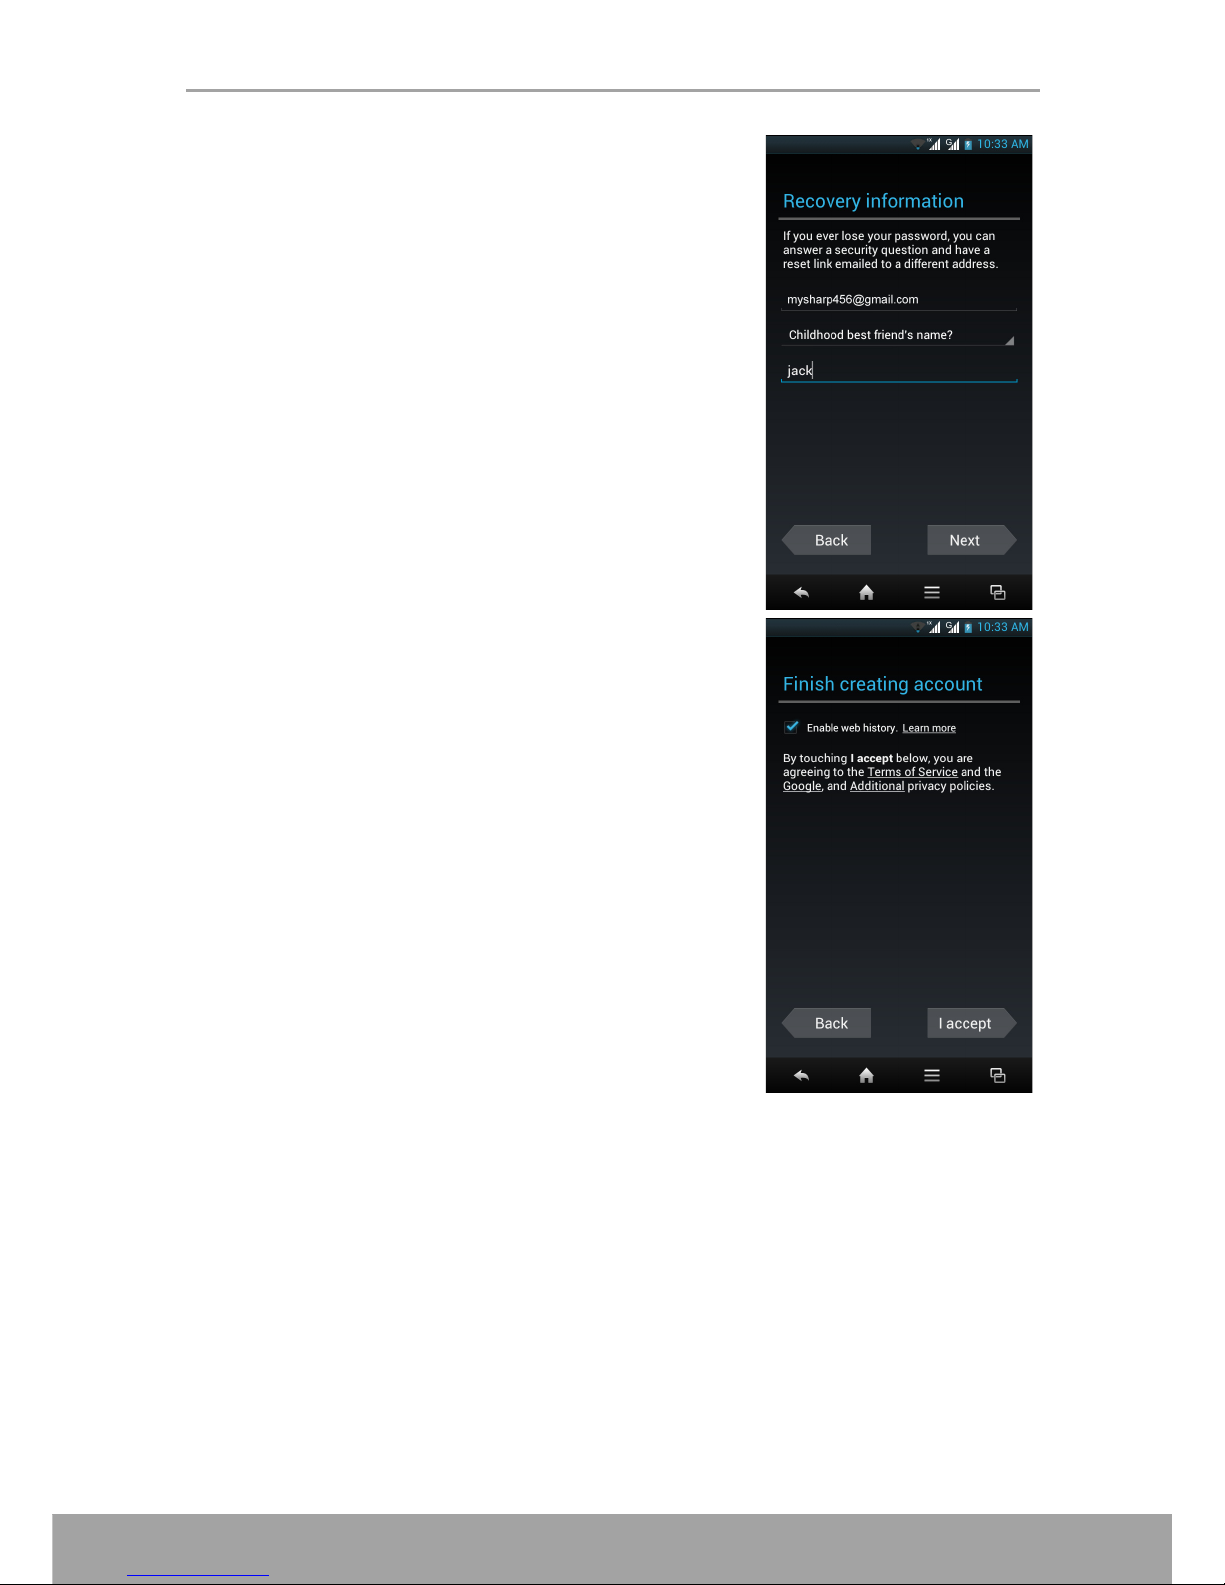
8. Set the recovery information (i.e. alternative email
account and security question) and tap Next.
9. Tap Join Google+ if you want to join the Google+
or Not now if you want to skip this step.
10.Read the agreement and tap I accept to complete
the account setup.
1.8 Using the Headset
For hands-free conversation or listening to music, plug a headset to the headset jack.
NOTE:
• When using a headset, your ability to hear outside sounds may be limited.
Do not use a headset if it will endanger you.
• Do not set the headset volume to its maximum as it may damage your
hearing.
Page 16
Chapter 1: Getting Started
10
1.9 Adjusting the Volume
There are two ways to adjust the volume:
• Press the volume (+/-) button repeatedly to adjust
the volume.
• Press the volume button once.
Drag the volume slider to adjust the volume.
Page 17
Chapter 2: The Basics
11
Chapter 2: The Basics
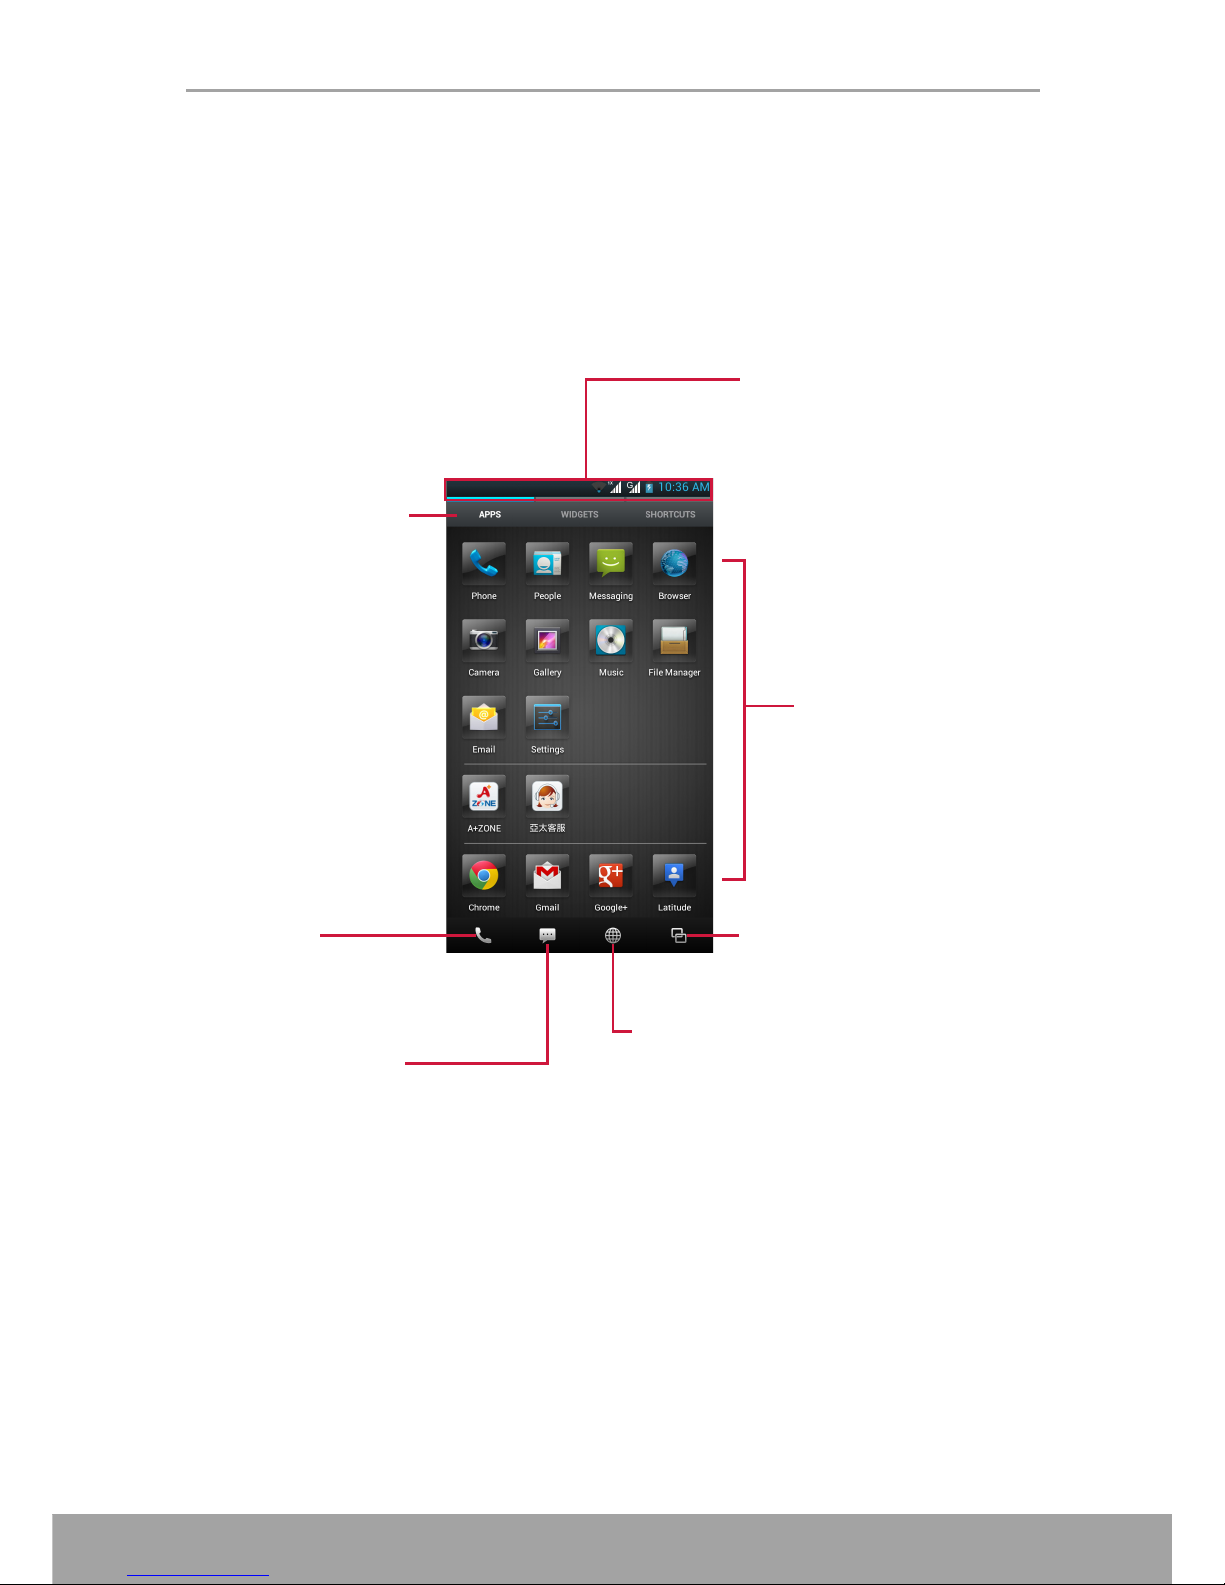
2.1 Home Screen
From the Home screen, you can quickly access common features and view
notifications of missed calls, received messages, check battery, and connection
status.
TIP: Swipe your finger up/down to view more applications.
Status bar
• Displays status and
notification icons and
clock.
• Message, connection, and
other notifications are also
displayed here.
APPS / WIDGETS /
SHORTCUTS tab
Phone
Tap to make calls.
Recent Apps
Tap to view recent
applications.
Browser
Tap to browse a web page.
Messaging
Tap to send messages.
Tap an icon to access
the application.
Page 18
Chapter 2: The Basics
12
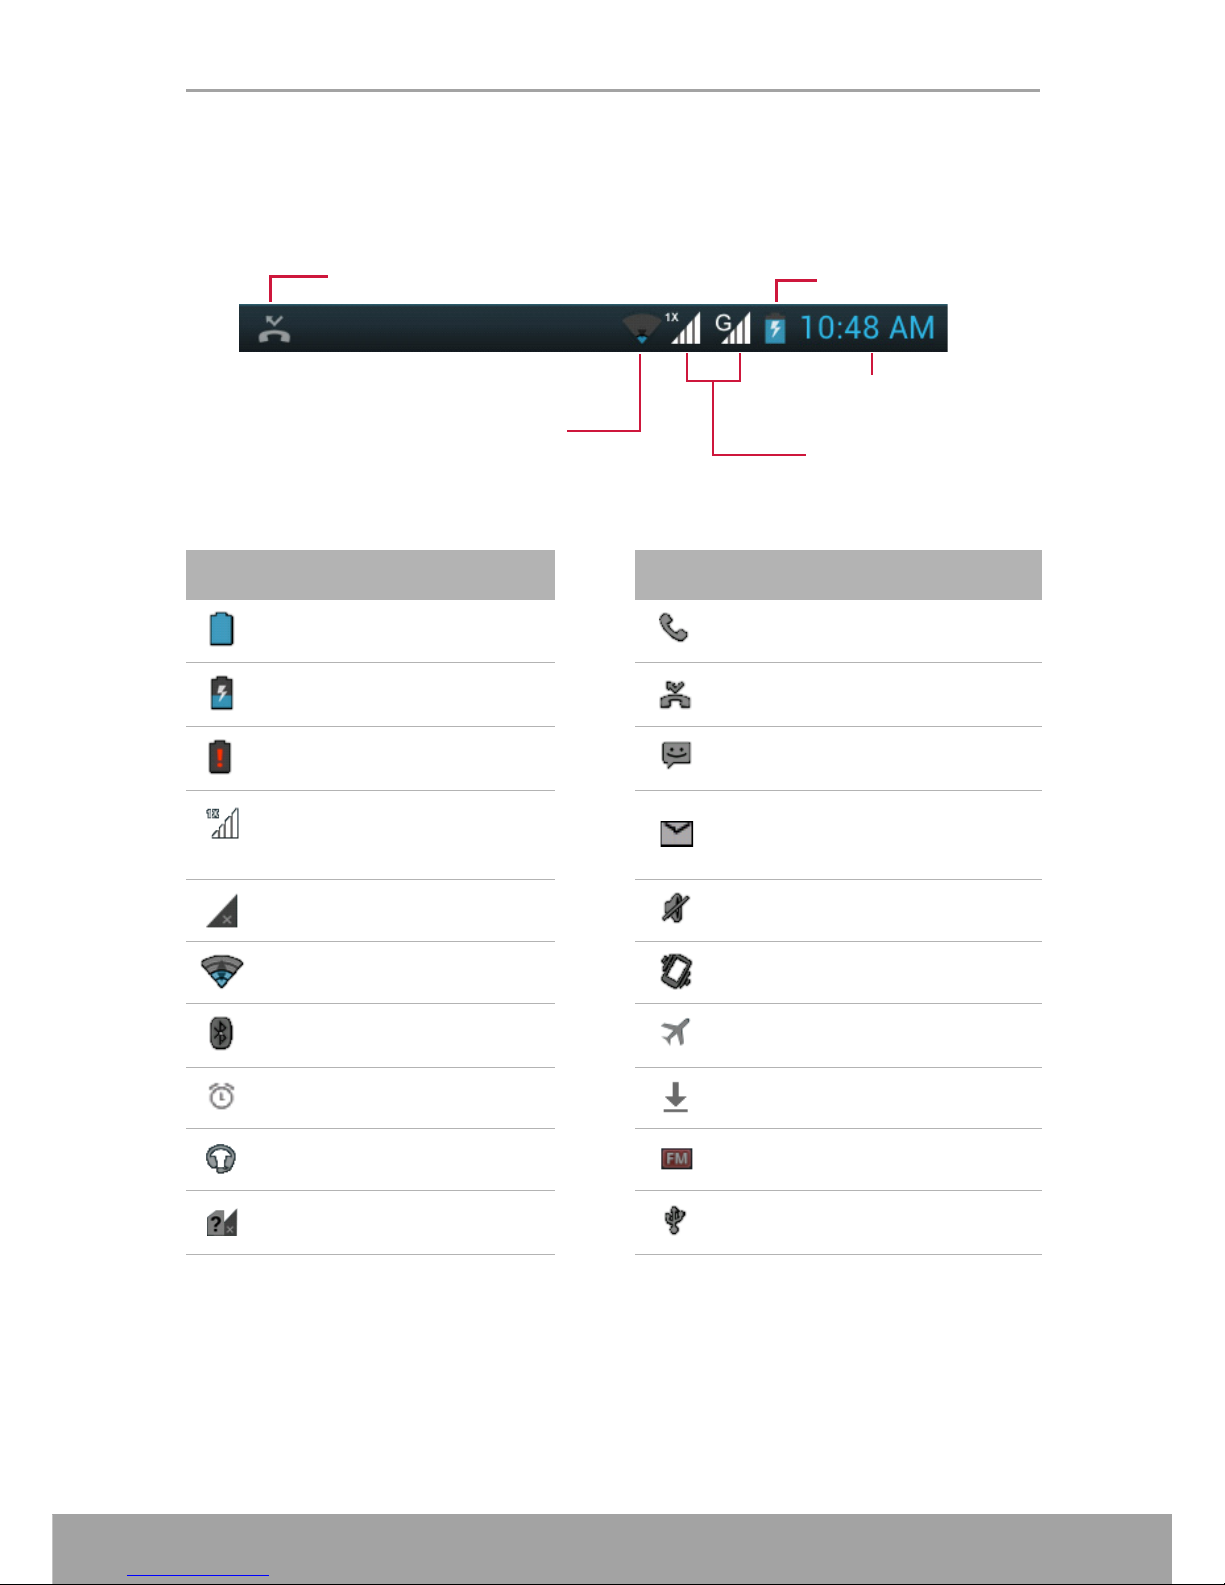
2.1.1 Status Bar
Status bar icons indicate different types of information.
The icons on the status bar indicate the following information:
Icon Description Icon Description
Battery is full. Incoming call.
Battery is charging. Missed call notification.
Battery is completely
discharged.
New text message notification.
Maximum signal strength.
Fewer bars indicate lower
signal strength.
New email notification.
No network signal. Silent mode is activated.
WiFi is connected. Vibrate mode is activated.
Bluetooth connection is
active.
Airplane mode is activated.
An alarm is set. File has been downloaded.
A headset is connected. FM radio is on.
No SIM card is inserted.
Device is connected to PC via
USB connector.
Battery icon
Network icons
Wi-Fi icon
Missed call icon
Current time
Page 19
Chapter 2: The Basics
13
2.1.2 Notifications Panel
The notifications panel displays the device activities,
details of status or other notifications.
• Open the notifications panel
Tap and slide the status bar downwards.
To open related applications, touch a notification.
• Close the notifications panel
Tap or slide the status bar upwards to close the
notifications panel.
2.1.3 Open Applications
Tap an icon to open the application.
2.1.4 View Recently-Used Applications
Tap . The recently-used applications are displayed.
Page 20
Chapter 2: The Basics
14
2.1.5 Shortcut Icons
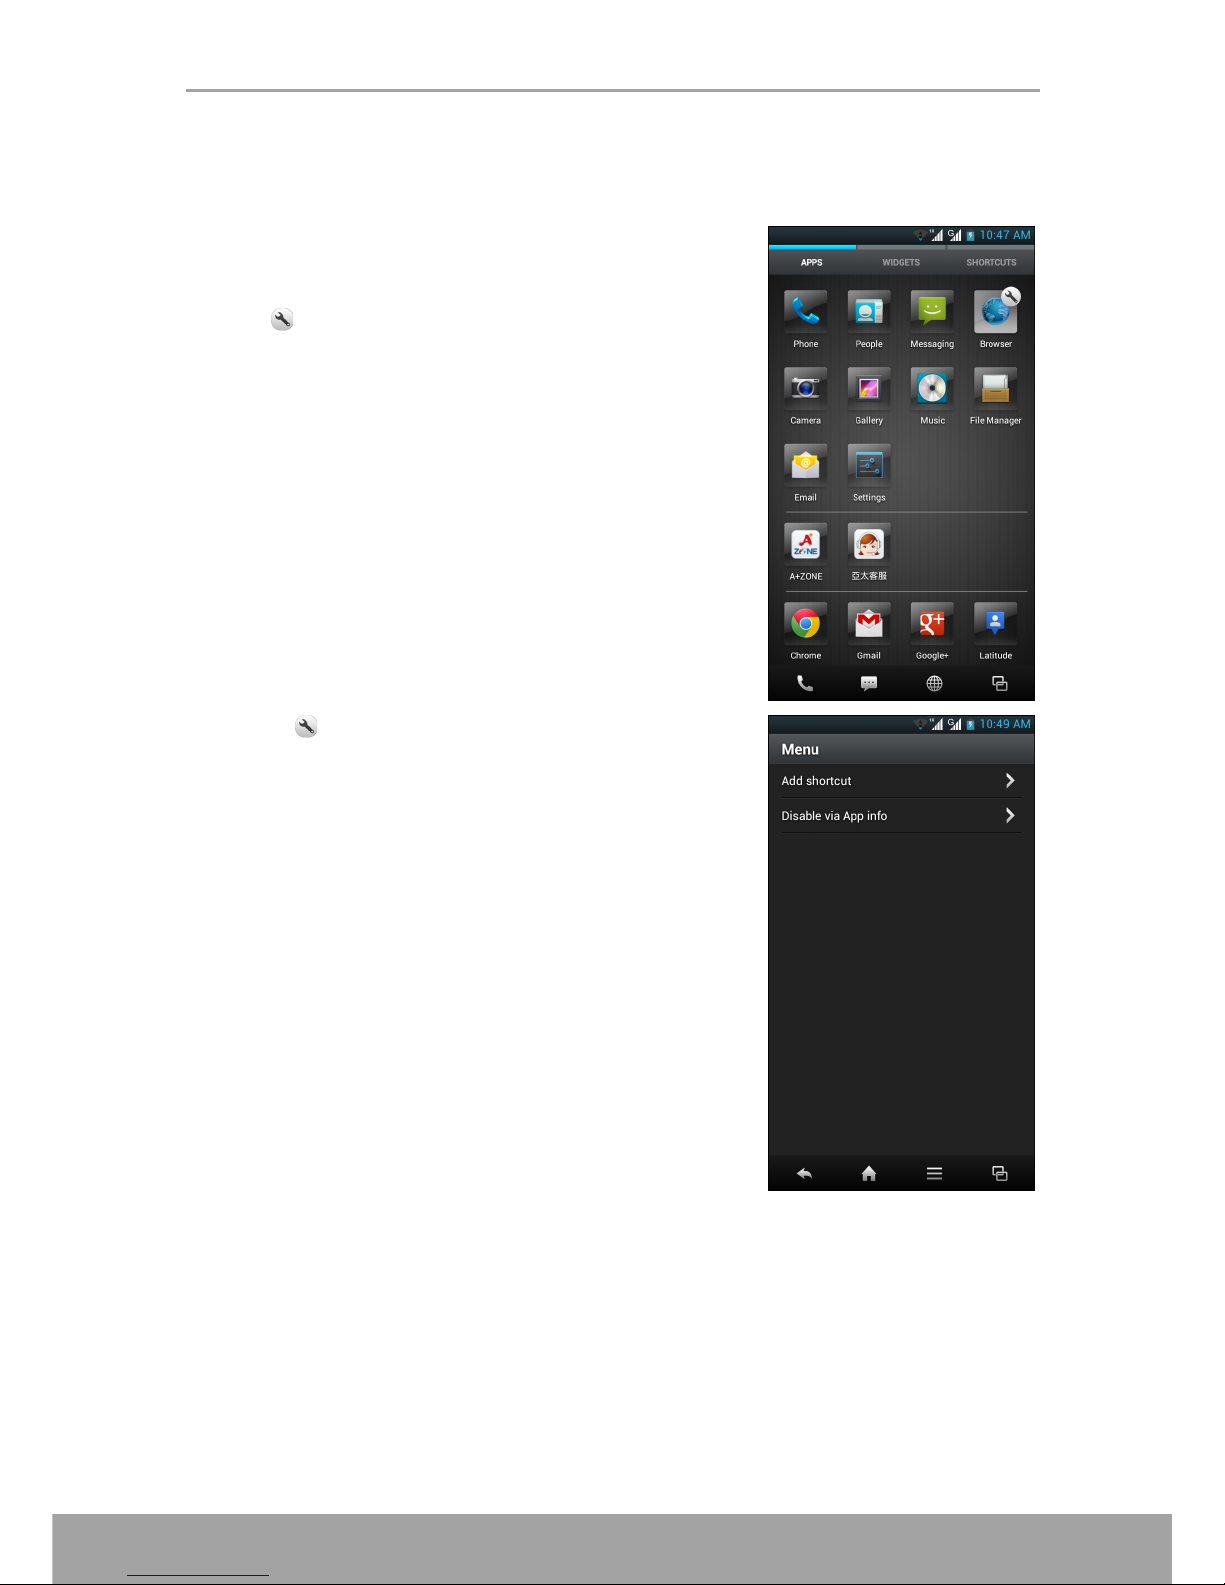
• Add a shortcut icon
1. From the Home screen, tap APPS tab to display
the applications.
2. To add an item, tap and hold the application icon.
A appears on the application icon.
3. Tap and select Add shortcut.
The application icon appears on the
SHORTCUTS tab.
Page 21

Chapter 2: The Basics
15
An alternative way to add a shortcut, slide the Home screen panel downwards, then
tap Add shortcut. Select one of the categories and select the item to add on the
SHORTCUTS list.
• Remove a shortcut icon
1. Tap SHORTCUTS tab.
2. Tap and hold the application icon that you want to
delete.
A appears on the application icon.
3. Tap to delete.
The application icon is removed from the
SHORTCUTS list.
Page 22
Chapter 2: The Basics
16
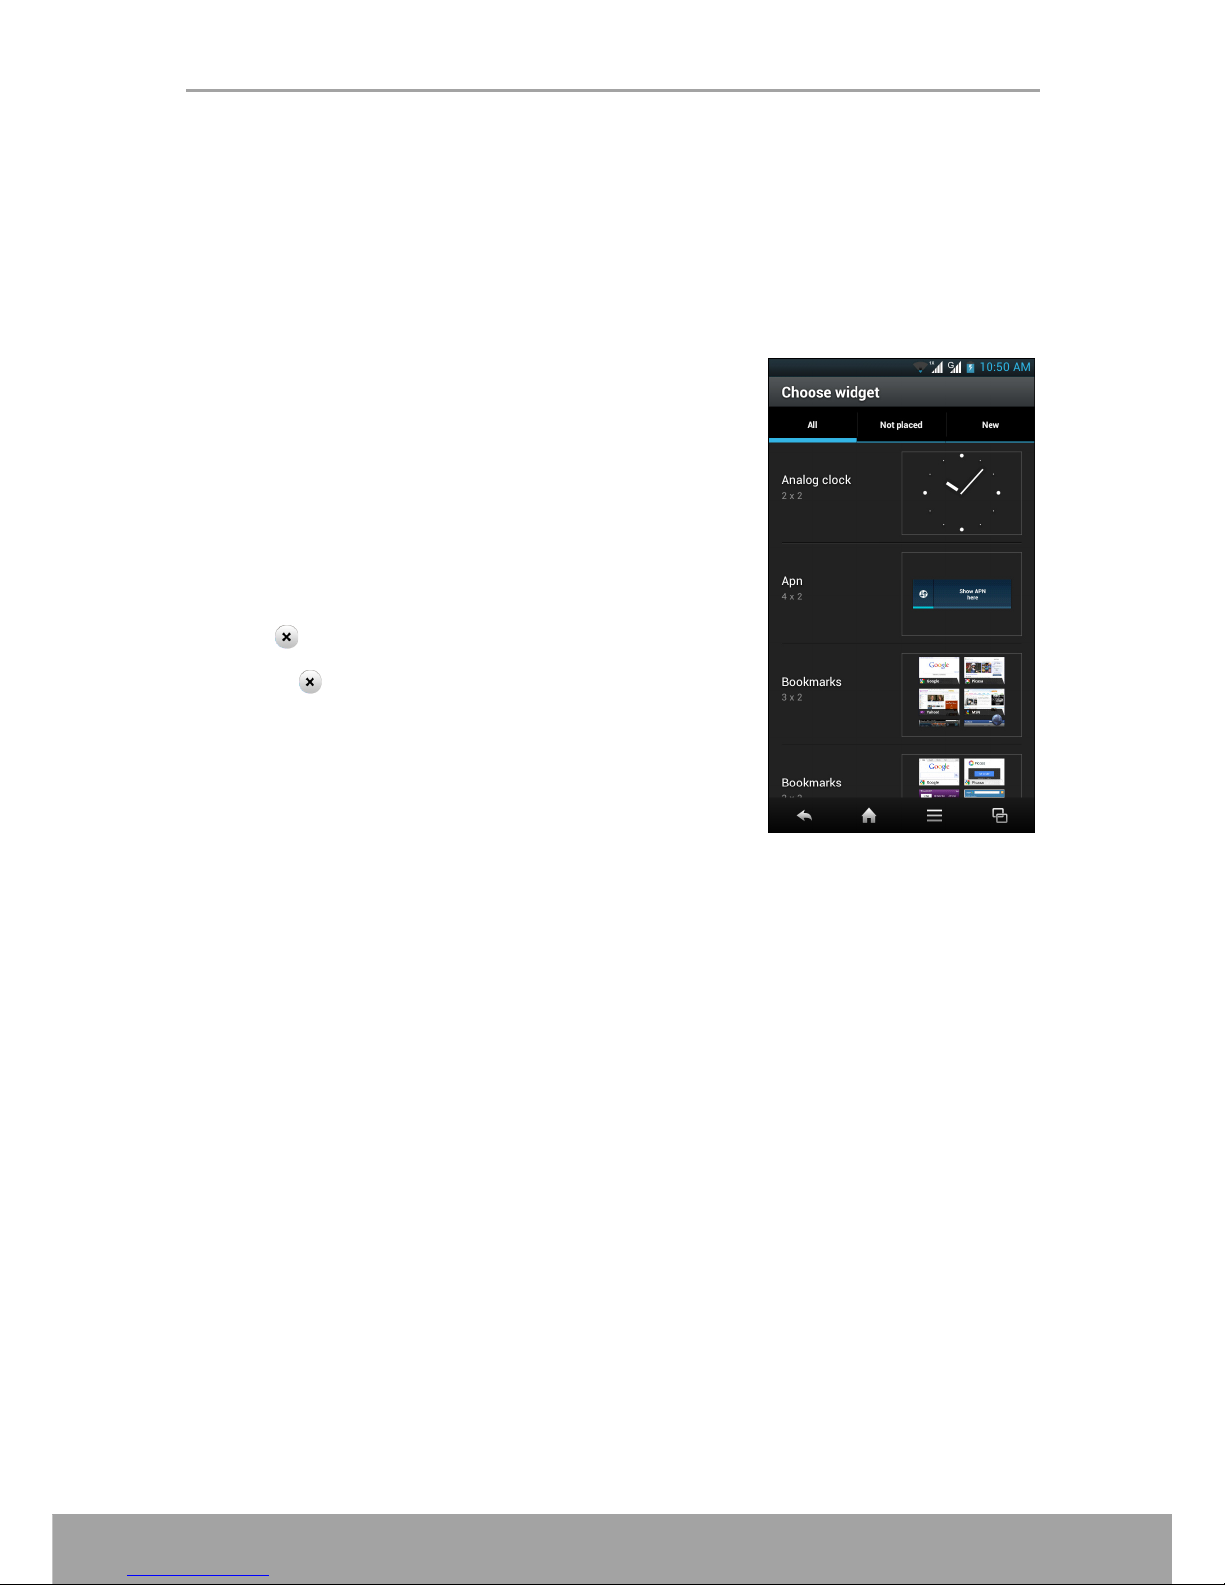
2.1.6 Widgets
Save time with live updates right on the Home screen and get all your personalized
updates in one place.
• Add a widget
You may add and customize the Widgets on the Home screen as you like.
1. Slide the Home screen panel downwards, then tap Add widget.
A list of all available widgets is displayed.
2. To add a widget, tap the desired widget icon.
The widget icon appears on the WIDGETS tab.
• Remove a widget
1. Tap WIDGETS tab.
2. Tap and hold the widget icon that you want to
delete.
A appears on the widget icon.
3. Tap to delete.
The widget icon is removed from the WIDGETS
list.
Page 23
Chapter 2: The Basics
17
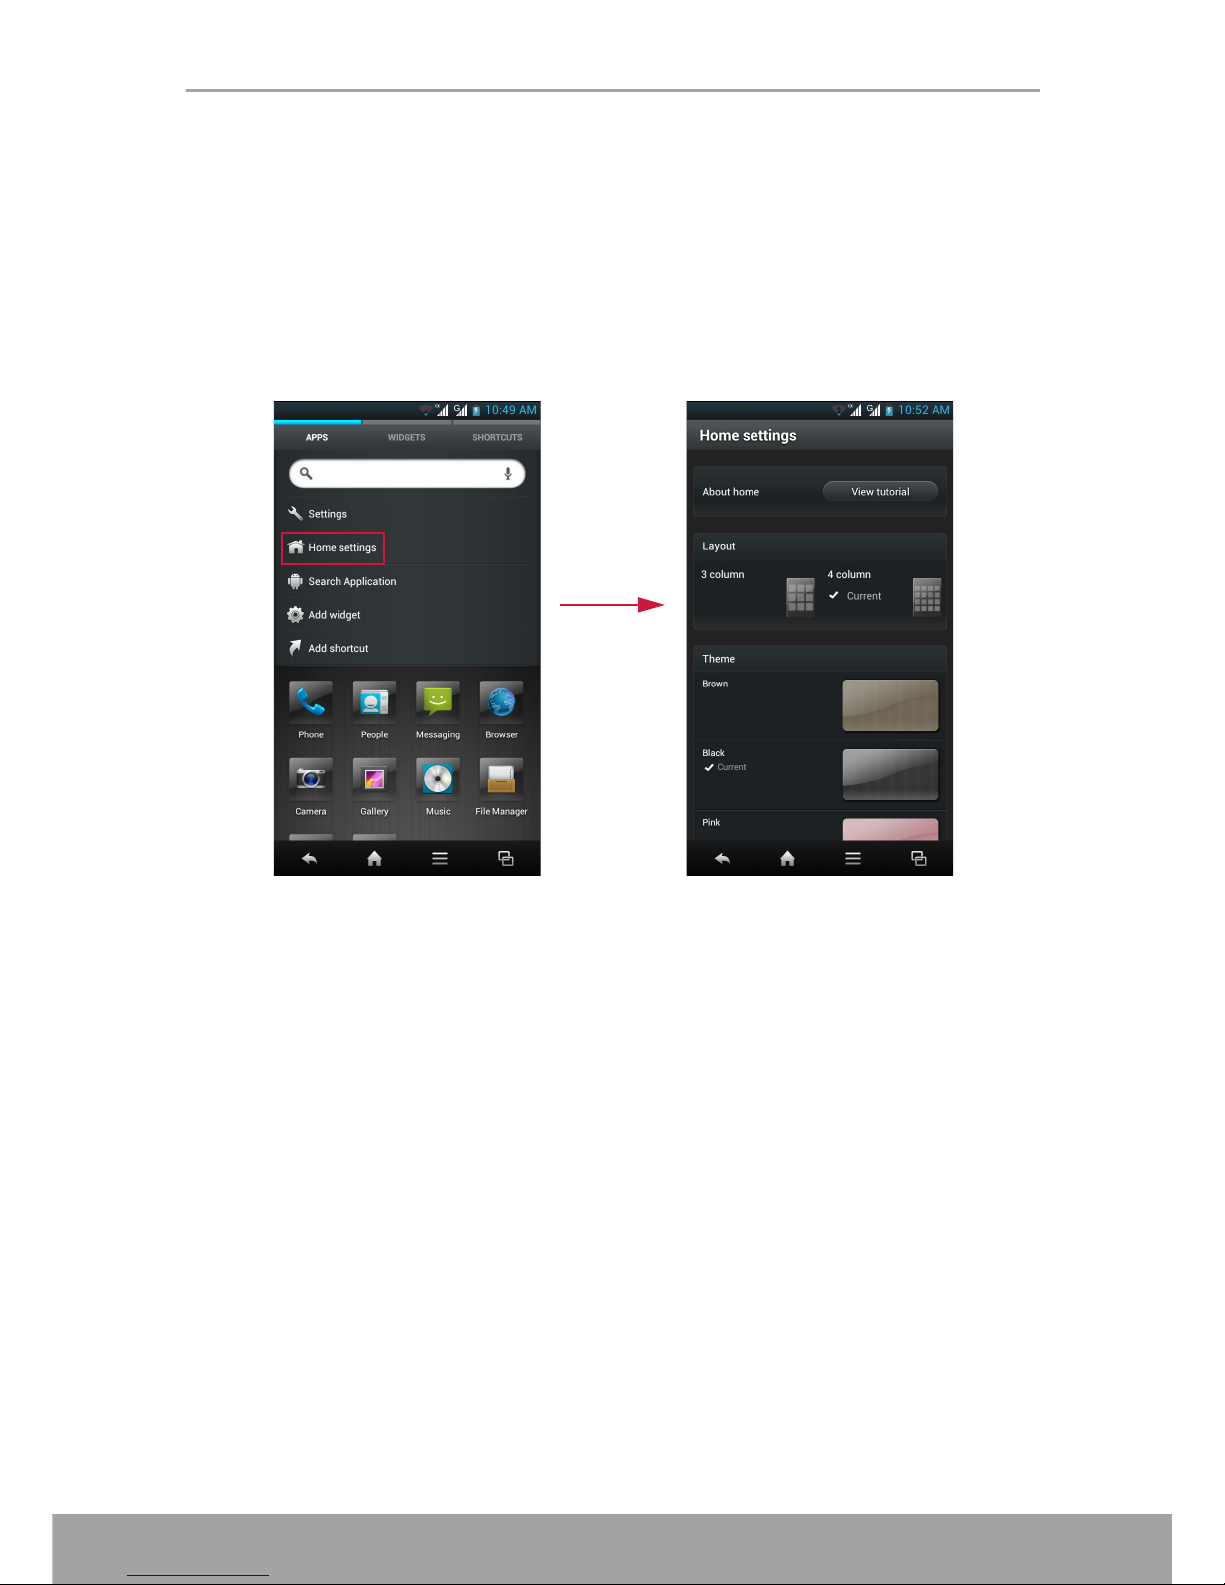
2.1.7 Change Home Settings
You can customize the layout and the theme of your Home screen.
1. Slide the Home screen panel downwards, then tap Home settings.
2. To customize the Home screen settings, do the following:
• To change the layout: Tap the desired display mode.
• To change the theme: Tap the desired background.
Page 24
Chapter 2: The Basics
18
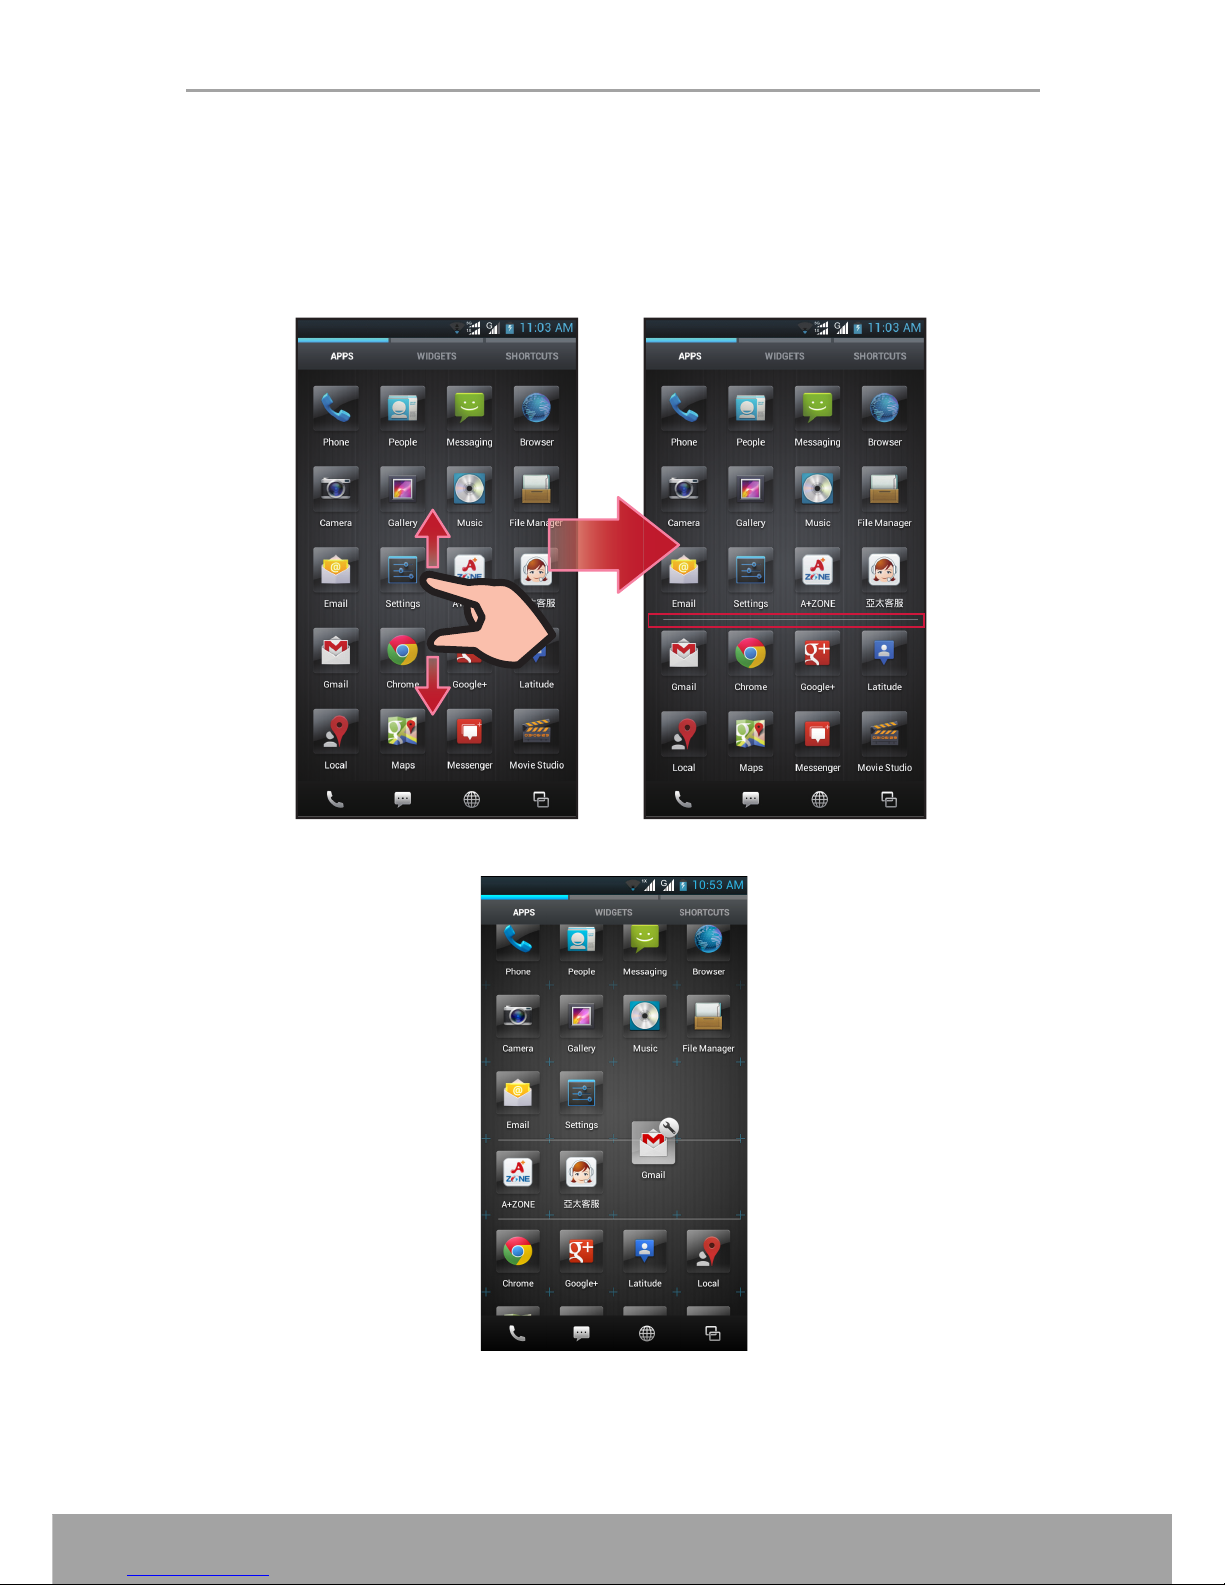
2.1.8 Organize the Applications
You can organize the applications according to your preference.
To split the display on the screen into categories, move two fingers apart (up and
down) at the area of the display where you want to separate.
A border line appears on the screen.
Then tap and hold the application icon and drag it to the desired area on the screen.
Page 25
Chapter 2: The Basics
19
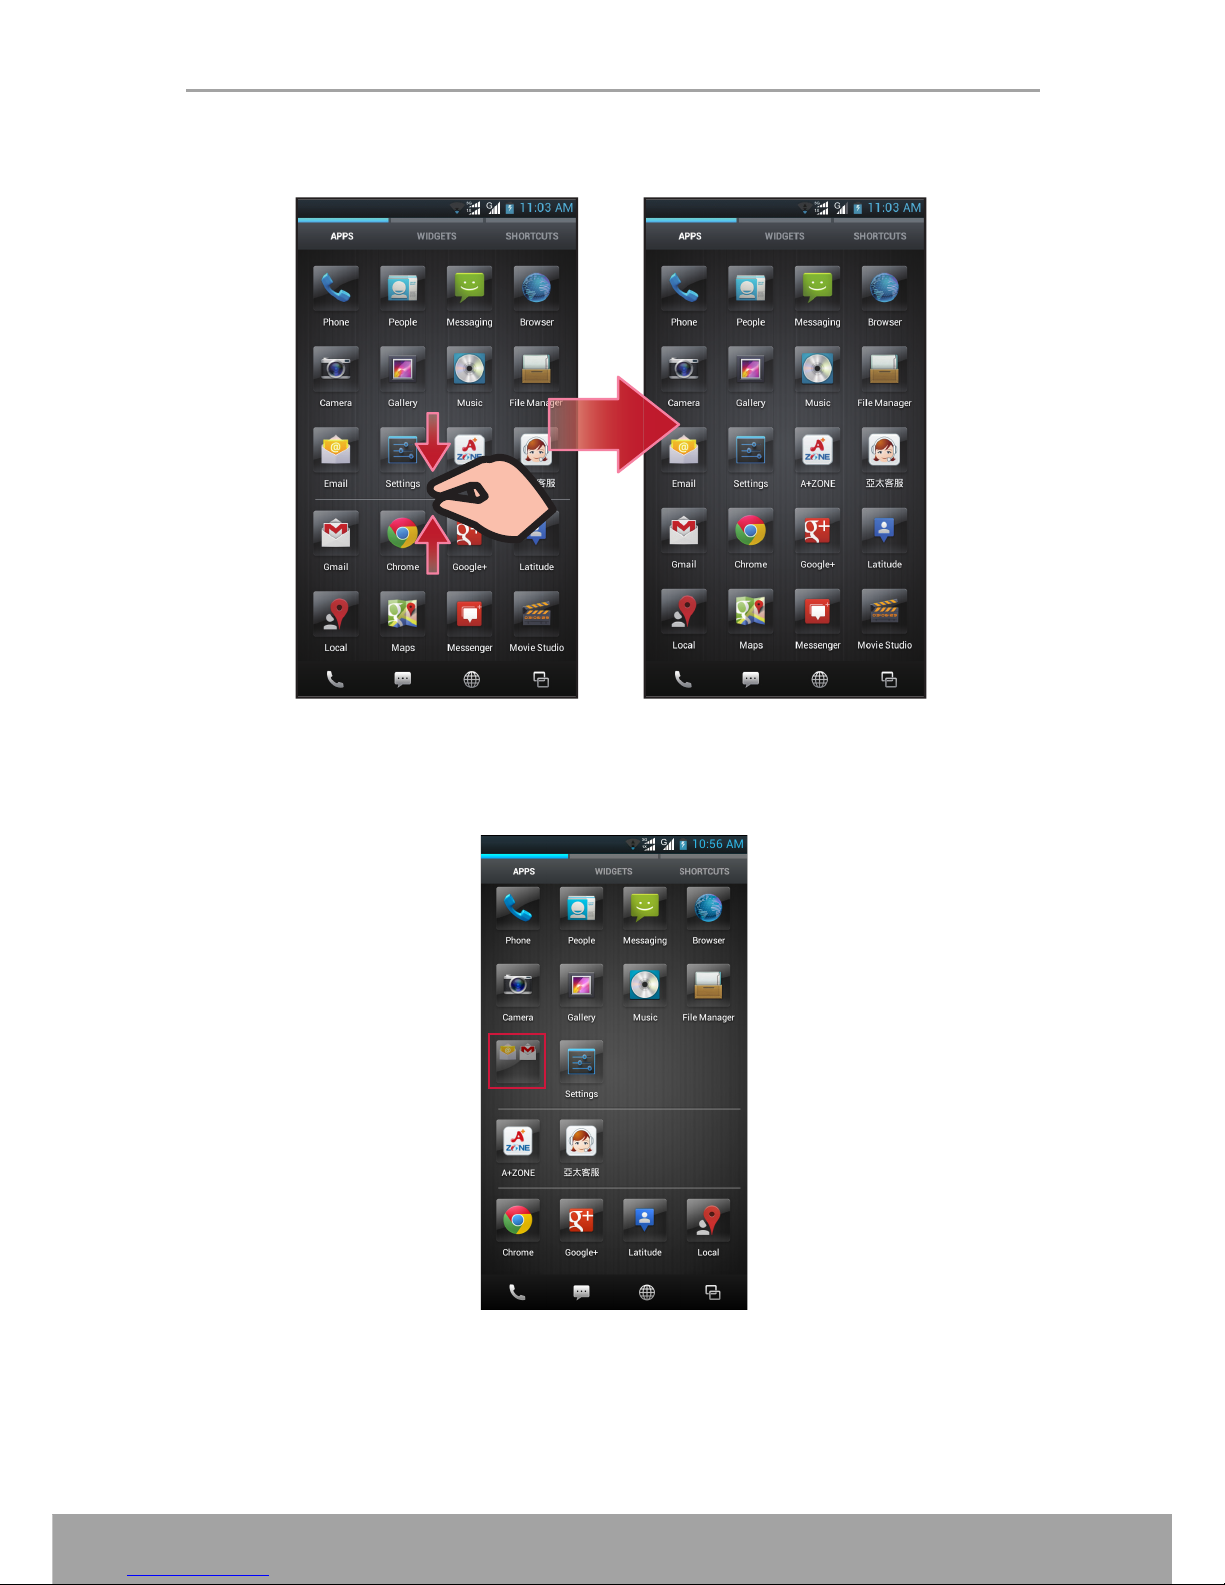
To merge the two categories applications, move two fingers towards each other at the
border line area of the display.
Organize into Folders
You can use folders to group related applications and other shortcuts. Drag the
application icon or shortcut and drop it on top of the similar applications.
Page 26
Chapter 2: The Basics
20
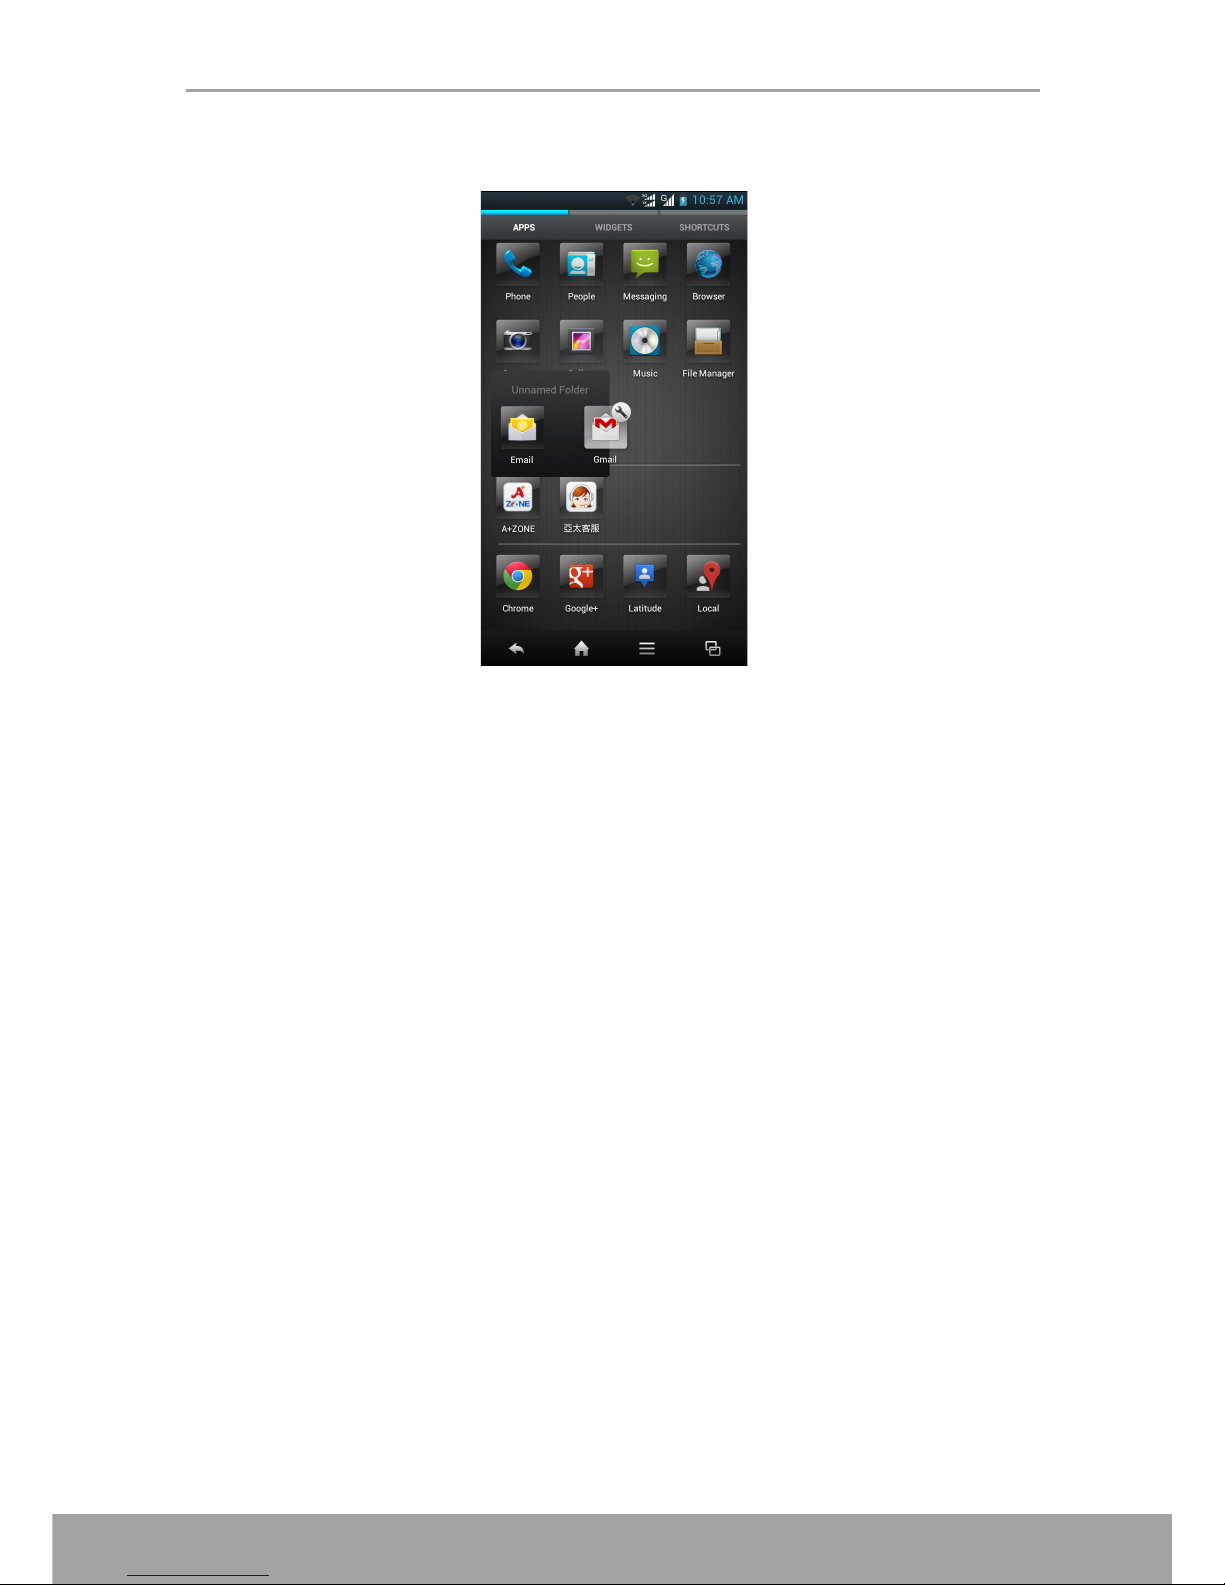
NOTE: To remove an item from the folder, tap the folder and then drag and drop the
item out of the folder area.
Page 27
Chapter 2: The Basics
21
2.2 Lock Screen
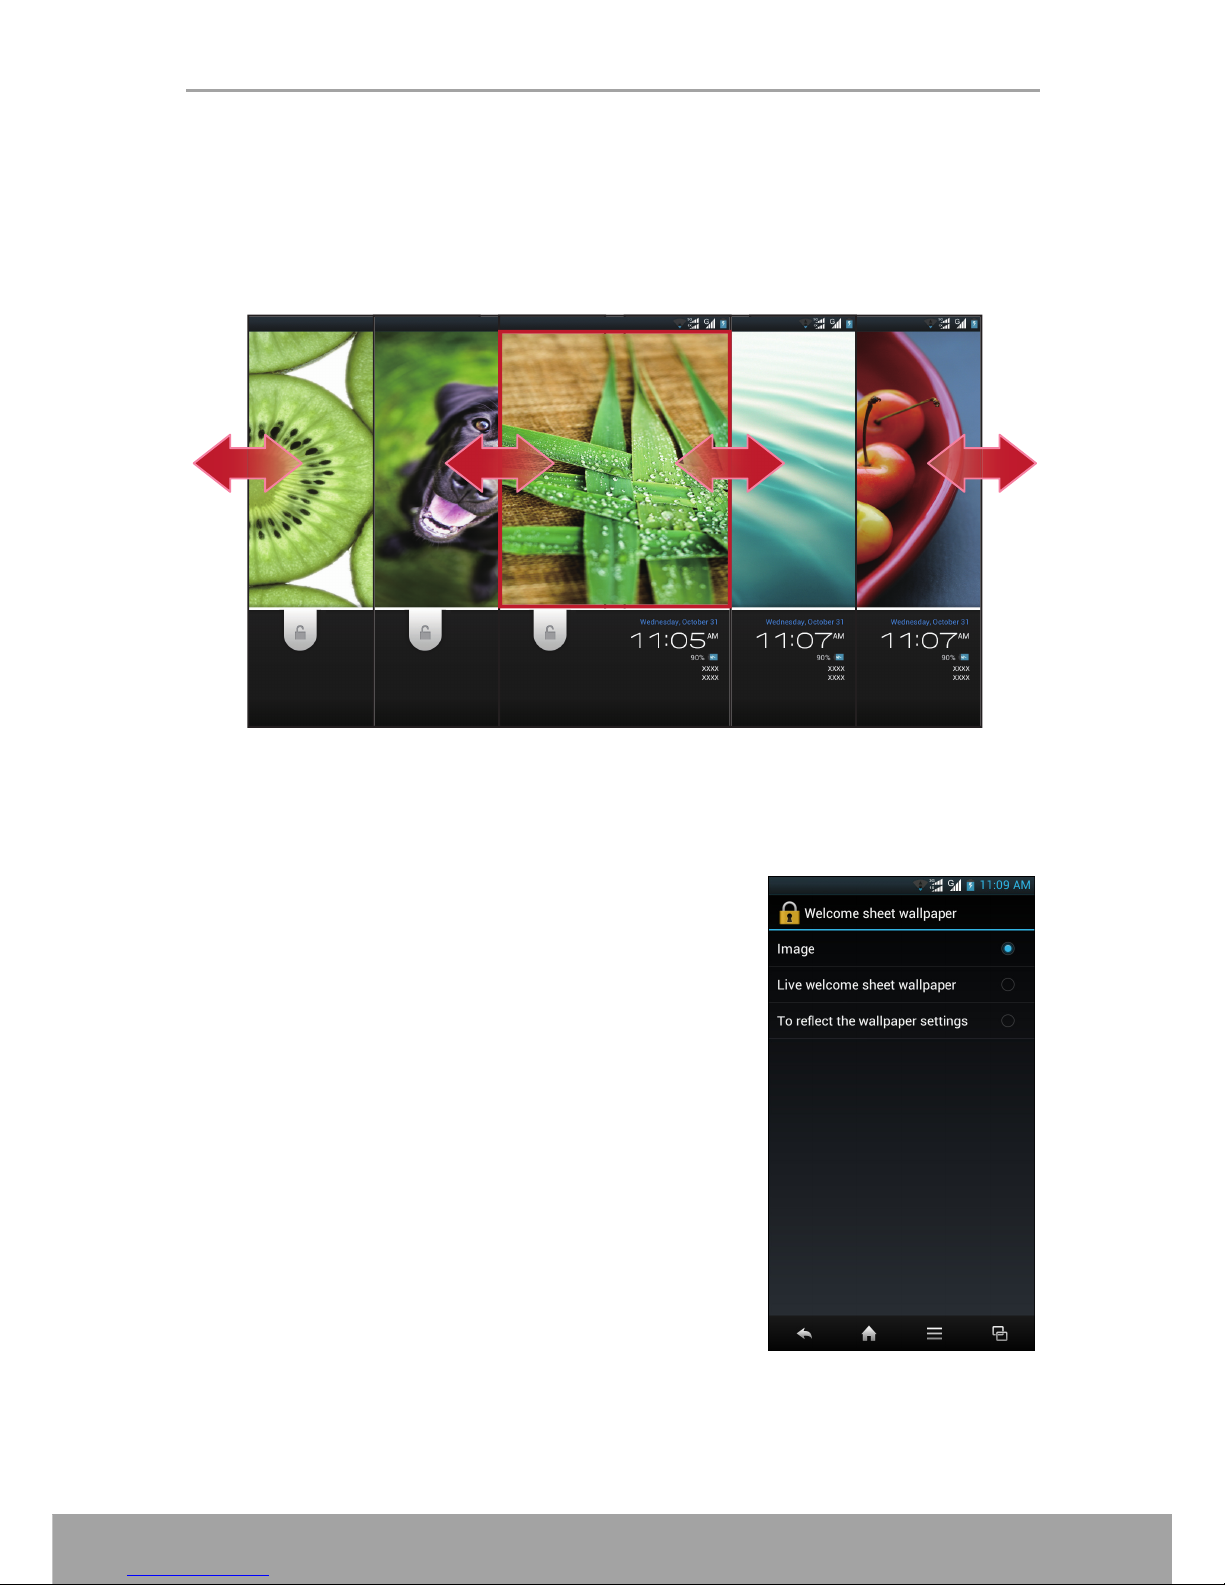
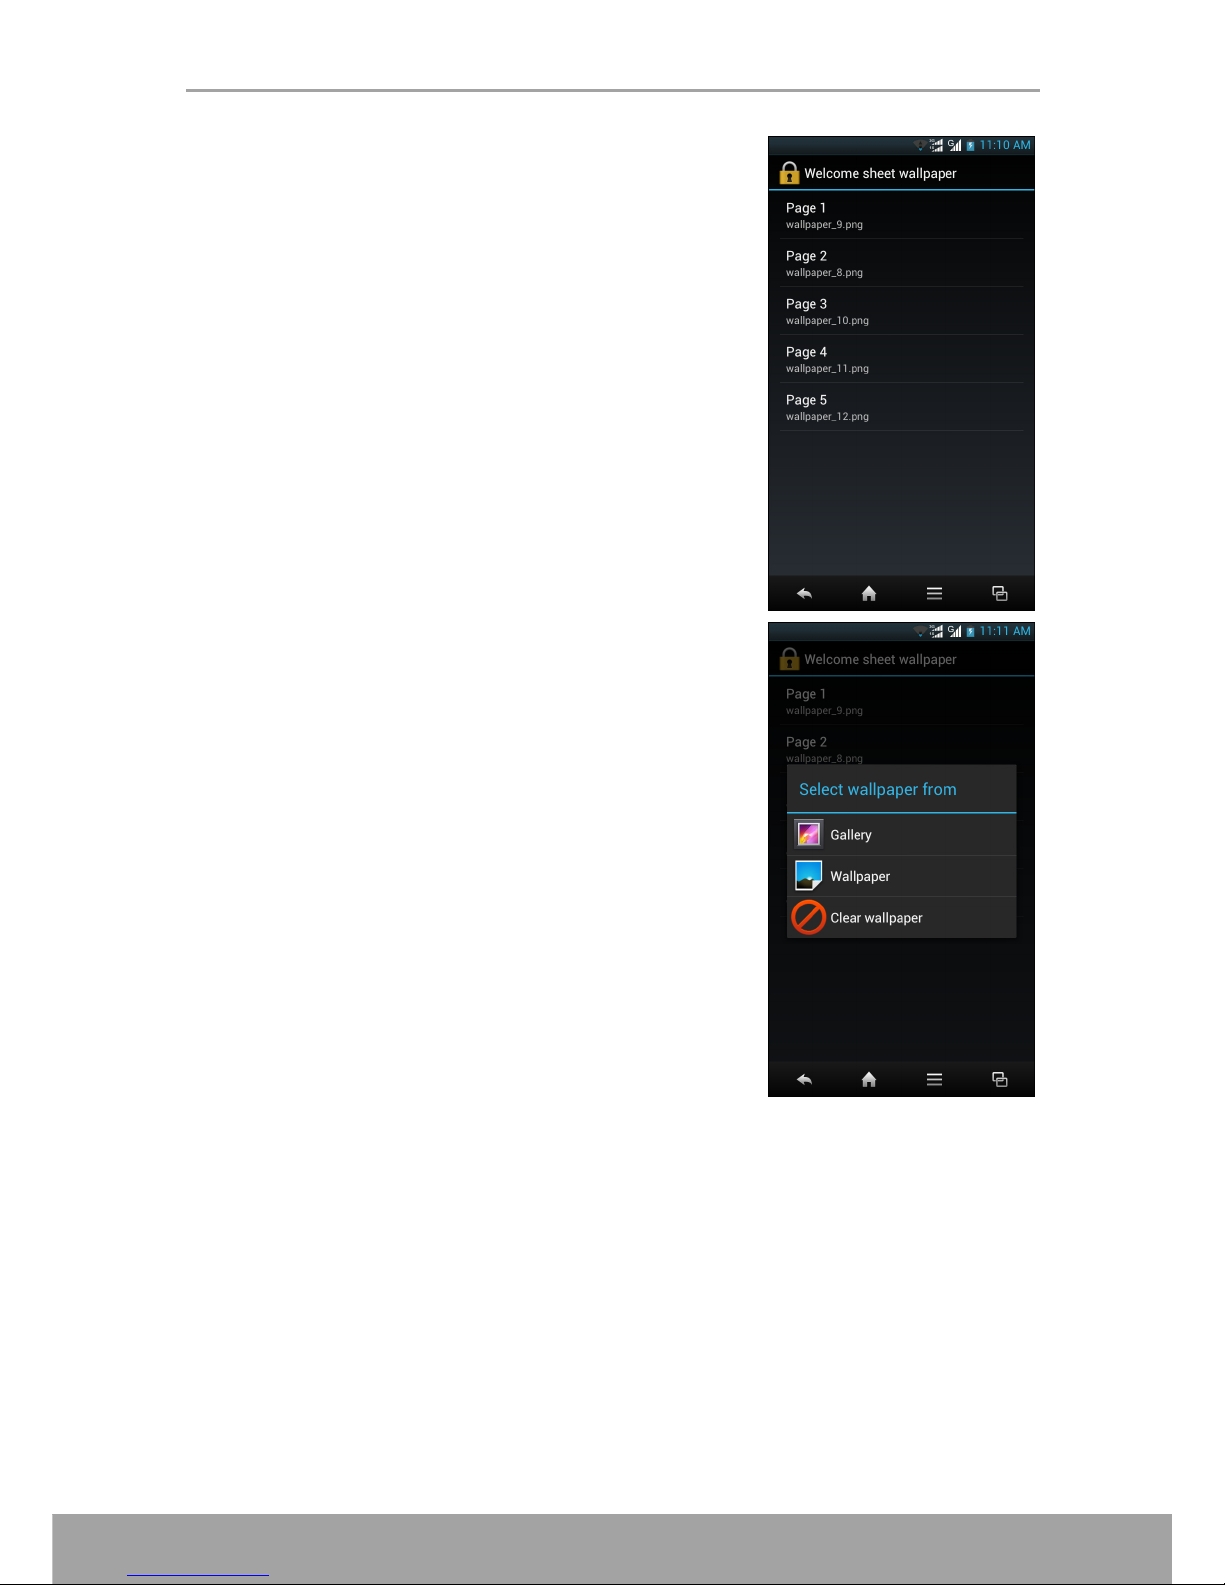
2.2.1 Change the Welcome Sheet Wallpaper
Swipe your finger to the left/right to select the desired welcome sheet from the five
preset photos.
Customize the Welcome Sheet wallpaper from Gallery
You can customize the Welcome Sheet screen with pictures stored in your phone.
1. Tap Settings.
2. In DEVICE, tap Display.
3. Tap Welcome sheet(lock screen) > Welcome
sheet wallpaper > Image.
Page 28
Chapter 2: The Basics
22
4. Select the page that you want to customize.
5. Tap Gallery.
6. You will see thumbnail images of all pictures. Tap to
select the picture you want to use as wallpaper.
7. Drag your finger to select the crop area.
8. Tap CROP to set the cropped photo as wallpaper.
Page 29
Chapter 2: The Basics
23
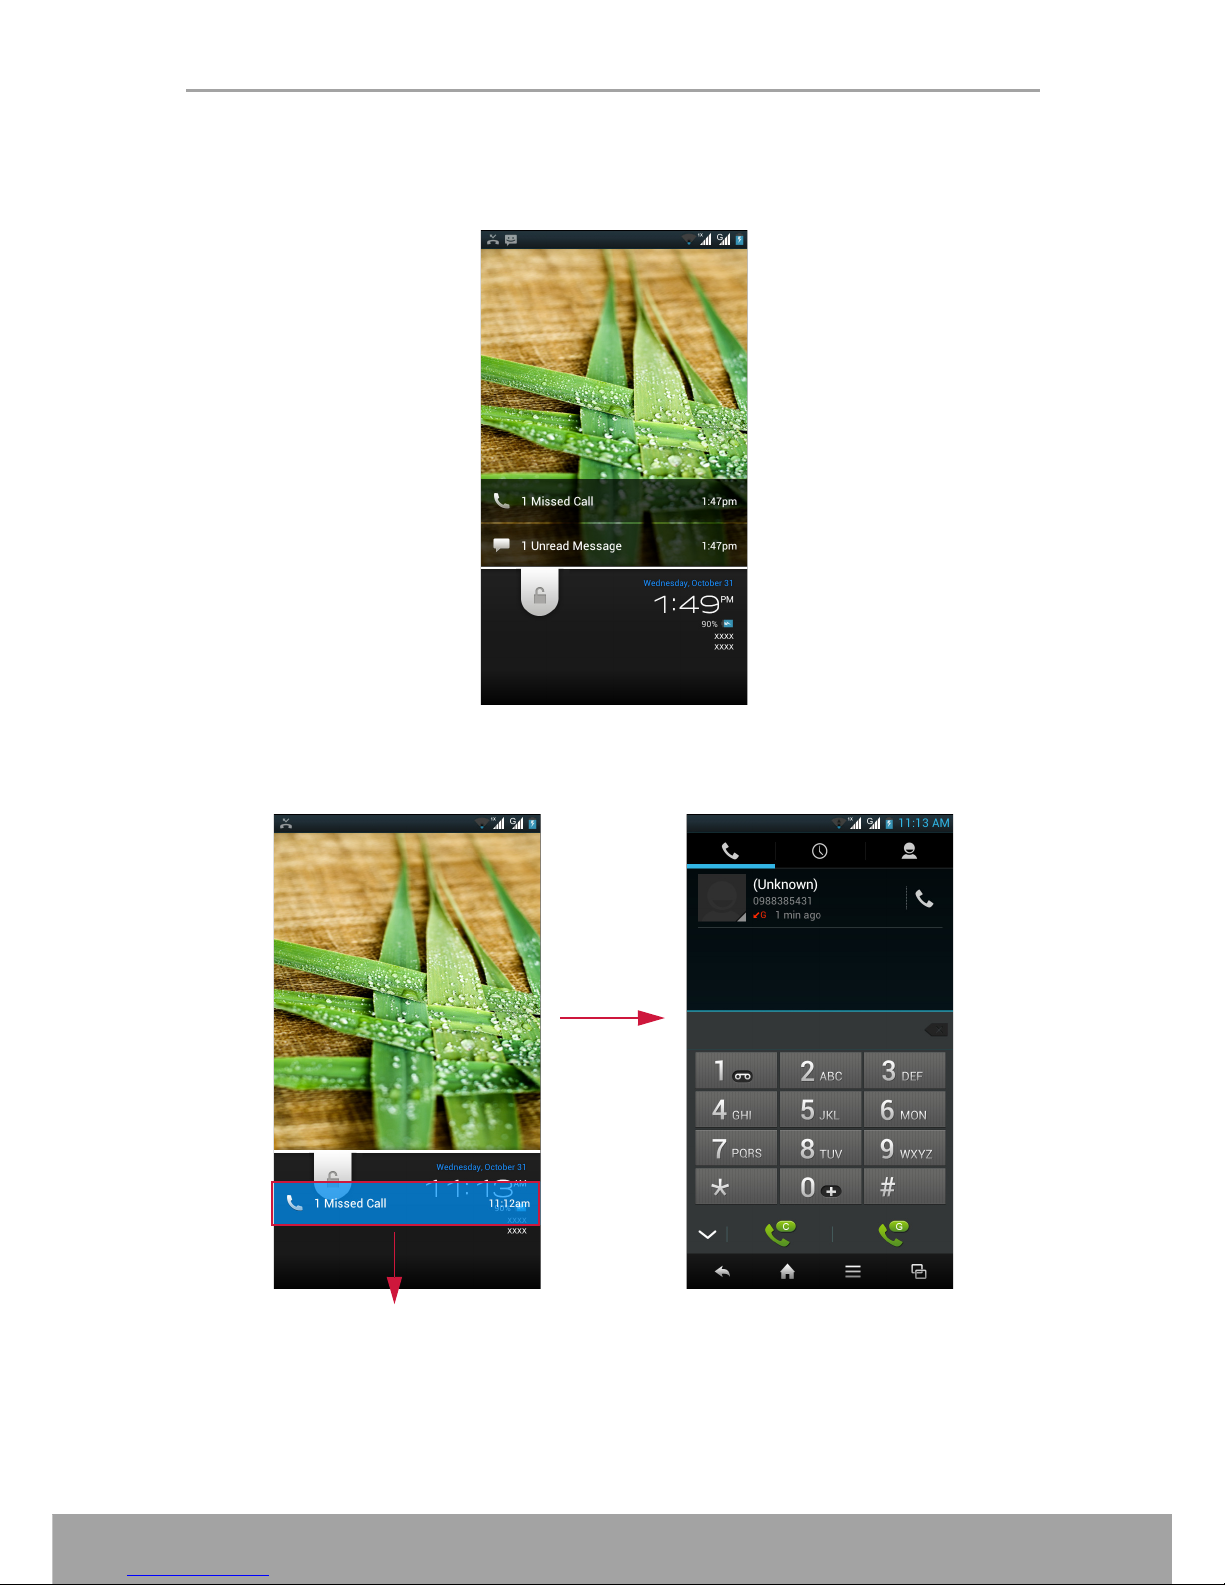
2.2.2 Notification Reminder
When you have missed calls or new messages, emails, and events, the reminder will
appear on the locked screen.
To retrieve the new notification directly (for example, the missed call), drag the
notification bar downward and the phone screen is automatically launched. The
missed call information is displayed on the screen.
Page 30
Chapter 2: The Basics
24
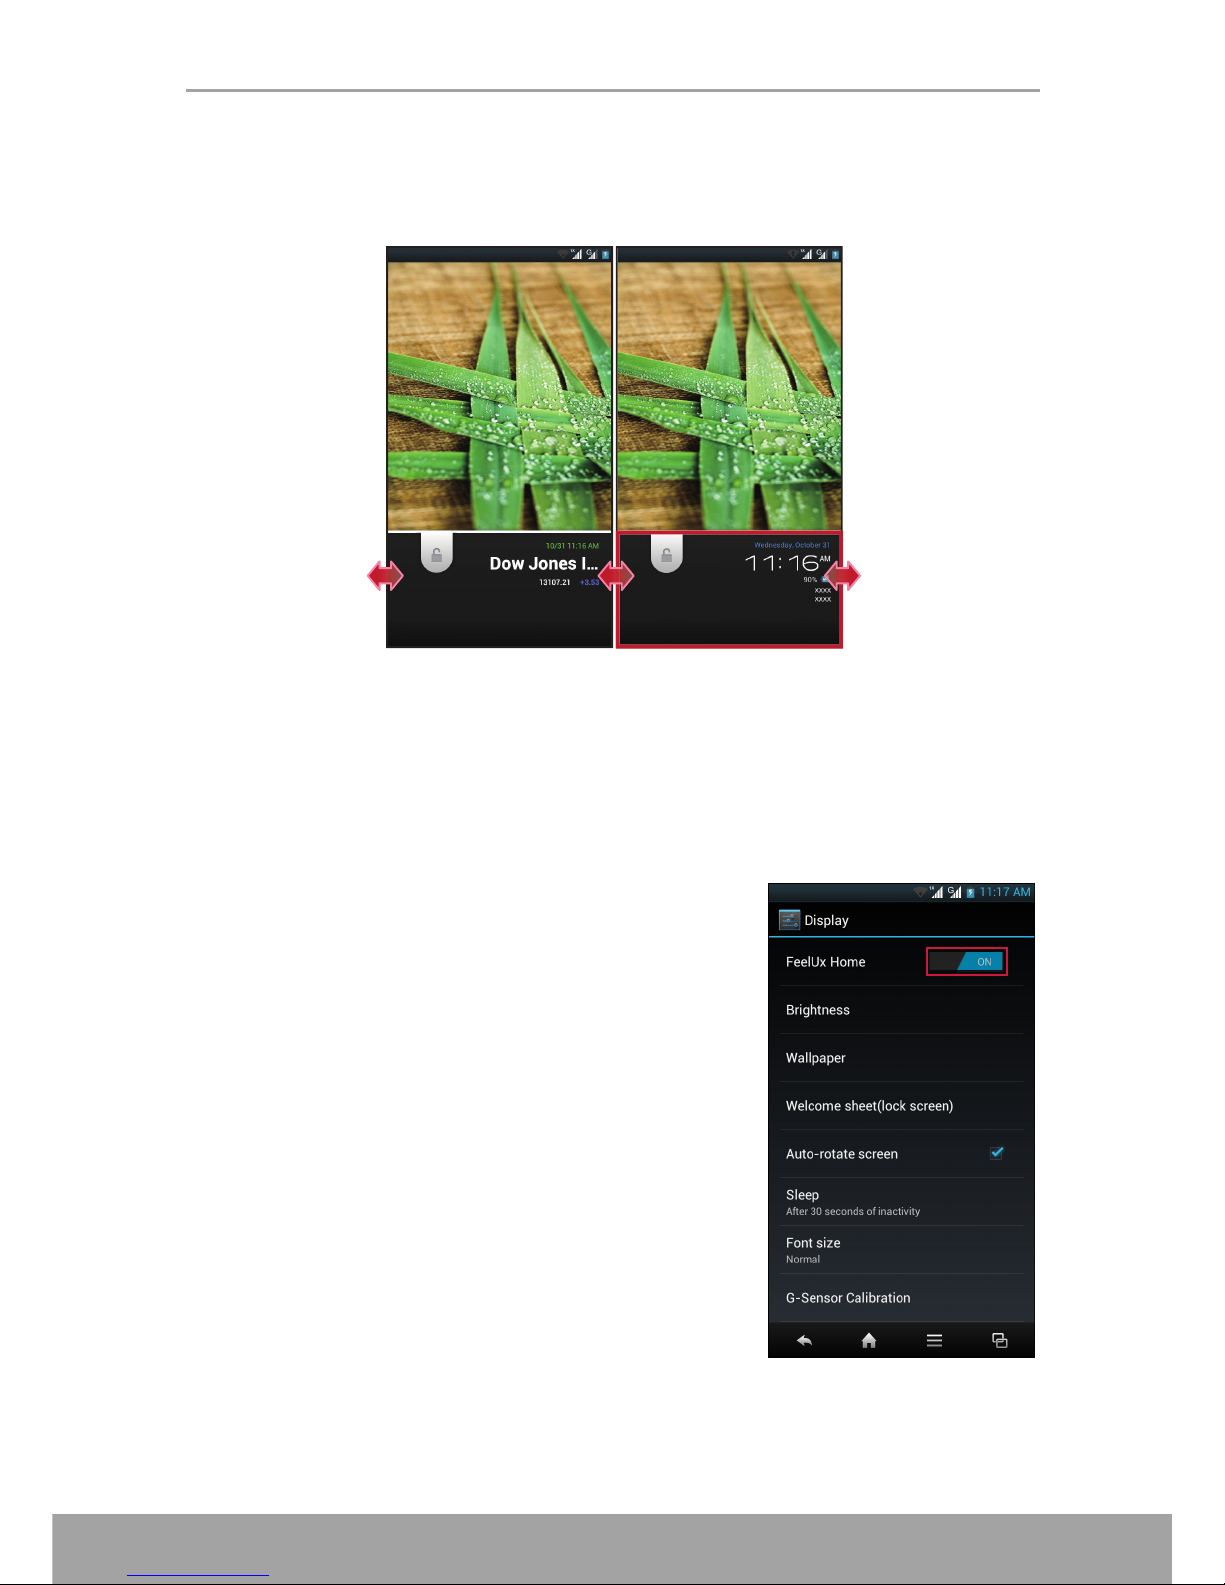
2.2.3 View Current Stock Information
On the locked screen, swipe left or right to view various information on the bottom
screen section.
2.2.4 Switch Different User Interface
This device supports two types of Home screens: FeelUx and Android 4.0.
By default, the system uses the FeelUx user interface. See “Home Screen” on
page 11.
To switch to Android 4.0 user interface, do the following:
1. Tap Settings.
2. In DEVICE, tap Display.
By default, the FeelUx Home setting is set to ON.
Page 31

Chapter 2: The Basics
25
3. Tap FeelUx Home to set the setting to OFF.
The user interface is automatically switch to Android
4.0 home screen.
Page 32

Chapter 3: Using On-screen Keyboard
26
Chapter 3: Using On-screen
Keyboard
3.1 On-Screen Keyboard
On-screen keyboard appears when an application requires text input, such as
messaging, and writing emails. The keyboard input method is activated by default.
TouchPal Keyboard Overview
English and other Western languages input support the
following Quick setting options: Alternative symbols,
Mixed language input, and Curve.
Tap to display the Quick settings dialog box and
tap the desired option to enable the function.
If the function is disabled, the respective keyboard icon
will be displayed in gray.
To install TouchPal Dialer application, tap Enjoy
TouchPal Dialer? and follow the on-screen instruction
to complete the installation.
Tap to erase a wrong input.
Tap to switch to numeric and
symbols keyboard.
Tap to toggle
between upper
case or lower case
text input method.
Tap to configure the
keyboard settings.
Tap to enter Quick
settings menu.
Page 33

Chapter 3: Using On-screen Keyboard
27
3.1.1 Use the On-Screen Keyboard
Tap the screen to display the on-screen keyboard.
• Use the on-screen keyboard as you would a computer keyboard.
• Tap the keys to enter characters.
• To toggle between upper and lower case letter display, tap .
• To display the numeric and symbols keyboard, tap . Tap to toggle back.
3.1.2 Select Layout
The English input provides three different layouts. QWERTY is the default layout. You
can select the one that you are used to. Slide horizontally on the screen to switch the
layouts.
3.1.3 Switch Language
Tap the language button (i.e. [EN]), the keyboard automatically switches to userdefined Chinese input. Tap the language button again to switch back to English input.
Lower case keyboard Upper case keyboard Numbers and symbols
QWERTY CooTek T+ 12-Key PhonePad
Page 34

Chapter 3: Using On-screen Keyboard
28
3.1.4 Switch Input Method
1. Tap and hold the language button (i.e. [EN]), an input method dialog box appears
on the screen.
2. Select the desired input method that you want to use.
3.1.5 English Input
• Predictive Input
By default, English input prediction function is enabled. For example, when you
enter [a][c][k], a suggestion bar appears on the top of the keyboard.
Tap the desired word that you want to add or if the
desired word is highlighted, you can also select it by
tapping or .
Tap to view more word suggestions.
Page 35

Chapter 3: Using On-screen Keyboard
29
• Upper case Input
To toggle between upper and lower case letter display, tap .
In this mode, only the first letter is in upper case format. Then the keyboard will
automatically switch to lower case display.
To lock the upper case input mode, tap .
• Quick Abbreviated Words Input
You can input abbreviated English words without inputting the apostrophe or dash.
For example: a. Type “im” to get “I’m”.
b. Type “ill” to get “I’ll”.
Note: This feature is only available if the prediction function is turned on.
• Spell check
With this function, the system can check spelling mistakes.
For example, you want to enter "Government" but missed the letter 'r', the input
method can still predict "Government".
To enable this function, do one of the following:
a. Tap > Smart input, then check Spellcheck option.
b. Tap Settings > Language & input, then check Spelling correction option.
Page 36

Chapter 3: Using On-screen Keyboard
30
• Advanced Prediction
With this function, the system learns from input context (the words you have typed)
to improve prediction quality.
For example, if you have inputted “hi”, then input “me”. The next time you input
"hi", "me” will appear as a word suggestion.
To enable this function, tap > Smart input, then check Advanced
prediction option.
• Fast Symbols Input
Tap to display the Quick settings dialog box and
check Alternative symbols option to enable the
function. You will see symbols and numbers shown
at the bottom of each key.
You can press the desired key and slide to select the
corresponding symbol.
• Using Curve Input
Tap to display the Quick settings dialog box and
check Curve option to enable the function. With
Curve input method, it allows you to enter a word by
sliding your finger from letter to letter to input words,
as opposed to tapping the keys.
For example, to enter "apple", put your finger down
on the “a”, and without lifting, slide it to the “p” and
make a circle on “p”, then slide to the “l” and over to
the “e”.
Page 37

Chapter 3: Using On-screen Keyboard
31
3.1.6 Voice Input Method
You can input words without clicking the character key
by using the voice input function.
TouchPal supports voice input in Android 2.2 platform
devices and above. To use the voice input function, tap
on the main keyboard.
3.1.7 Configure the Input Method
Use keyboard aids to set up various input settings. By default, this device uses
TouchPal keyboard.
1. Tap Settings > Language & input.
2. In KEYBOARD & INPUT METHODS, tap Default >
Configure input methods.
3. To configure the input method, tap on the desired
option and change the necessary settings.
Page 38

Chapter 4: Contacts
32
Chapter 4: People
People is your phonebook that lets you store names, phone numbers, email
addresses and other information. You can also add the frequently used contacts to
the favorites list. See “Favorite Contacts” on page 36.
4.1 Adding Contacts
1. Tap People.
2. Tap .
3. Enter contact information such as name, phone
number, email address, etc.
To add a contact picture, tap the photo icon.
4. Tap to save the contact.
4.2 Importing Contacts
You can copy contacts from the SIM cards, internal
storage, or memory card.
1. Tap People.
2. Tap > Import/export and do one of the following:
• To import contacts from the SIM card:
Tap Import from UIM card / Import from SIM
card > select location to store > select contacts
to import > OK.
• To import contacts from the internal storage or
memory card:
Tap Import from storage > select location to
store > Internal storage / SD card.
Page 39

Chapter 4: Contacts
33
4.3 Backing up Contacts
You can copy contacts to the internal storage or
memory card to back up your contacts information.
1. Tap People.
2. Tap > Import/export > Export to storage >
Internal storage / SD card.
3. A confirmation message pops up, tap OK to
proceed. All contacts are copied to the memory card.
4.4 Sharing Contacts
You can share contacts information to other devices via a sharing application such as
Bluetooth, Email, Gmail, or Messaging.
1. Tap People.
2. Tap > Import/export > Share visible contacts.
3. Tap a sharing application to send the contacts
information.
Page 40

Chapter 4: Contacts
34
4.5 Communicating with Contacts
4.5.1 Call Contacts
NOTE: The available call options vary depending on the phone number(s) saved for a
specific contact and the number of SIM card installed on the device.
1. Tap People.
2. Tap a contact.
3. Tap the phone number to call the contact. See
“Making a Call” on page 37.
4.5.2 Text Contacts
1. Tap People.
2. Tap a contact.
3. Tap .
4. Compose and send your message. See “Create and
Send Text Messages” on page 40.
4.5.3 Email Contacts
1. Tap People.
2. Tap a contact.
3. Tap the email address.
4. Select the email account that you want to use.
5. Compose and send your email. See “Compose and
Send Emails” on page 48.
Page 41

Chapter 4: Contacts
35
4.6 Managing Contacts
4.6.1 Edit Contacts
1. Tap People.
2. Tap the contact that you want to modify.
3. Tap > Edit.
4. Modify the necessary information.
5. Tap to save changes.
4.6.2 Delete Contacts
1. Tap People.
2. Tap the contact that you want to delete.
3. Tap > Delete.
4. Tap OK to confirm.
4.6.3 Share Contact Information
You can send contact information to other devices via a sharing application such as
Bluetooth, Email, Messaging, or etc.
1. Tap People.
2. Tap a contact.
3. Tap > Share.
4. Tap a sharing application to send the contact information.
4.6.4 Send Contact Information
You can send contact information to other devices via Messaging.
1. Tap People.
2. Tap a contact.
3. Tap > Send contact via SMS.
4. Compose and send your message. See “Create and Send Text Messages” on
page 40.
4.6.5 Assign Contact Ringtone
1. Tap People.
2. Tap a contact that you want to assign a ringtone to.
3. Tap > Set ringtone.
4. Tap desired ringtone.
5. Tap OK.
Page 42

Chapter 4: Contacts
36
4.7 Favorite Contacts
Add the most frequently called contacts to Favorites to
access contacts quickly and easily.
4.7.1 View Favorites
Tap People, then tap the FAVORITES tab.
4.7.2 Add to Favorites
1. Tap People.
2. Tap the contact you want to add to the FAVORITES
list.
3. Tap and the icon turns white ( ).
4.7.3 Remove from Favorites
1. Tap People.
2. Tap the contact that you want to remove.
3. Tap .
The contact is removed from the FAVORITES list.
4.8 Searching for Contacts
On the Contacts screen, do any of the following to easily search for contacts:
• Flick your finger up or down the screen to scroll the
contacts list.
• Tap . In the search box, type the first few letters
of the contact to search or enter an alphabetical
index to view contact names that start with the letter.
For example, to view names that start with “a”, tap
“A” and the list of contacts will be displayed.
Page 43

Chapter 5: Using the Phone
37
Chapter 5: Using the Phone
To open the Phone screen, tap Phone.
5.1 Making a Call
• Make a call from the Phone screen
1. Tap Phone. If necessary, tap the Phone tab.
2. Tap the phone number on the keypad.
TIP: As you enter the number, matching contacts appear. To call a contact, tap
the contact from the list. Tap to erase a wrong number. Tap and hold
to erase the entire number.
3. Tap or to call the number.
NOTE: The type of icon shown on the screen depends on the available
network.
4. To end the call, tap .
Phone tab
Tap to erase a
wrong number.
Tap to hide the
on-screen
keypad.
Page 44

Chapter 5: Using the Phone
38
• Make a call from Contacts
1. Tap Phone, then tap the People tab.
2. Tap the desired contact phone number to make a
call.
NOTE: If you have inserted two SIM cards, tap
or to call the number.
3. To end the call, tap .
5.2 Answering a call
When an incoming call is received, the device may ring
or vibrate and the screen displays an incoming call
message. If the caller is listed in your Contacts, the
contact’s name appears. You may also see the caller’s
phone number, if available.
Accept or reject an incoming call
• To answer a call, tap and drag it to the right
().
• To reject the call, tap and drag it to the left
().
NOTE: When you tap , it automatically changes to
.
5.3 Ending a call
To end a call, tap .
Page 45

Chapter 5: Using the Phone
39
5.4 In-Call Options
• To display the on-screen keypad, tap .
• To activate or deactivate the Speakerphone, tap .
• To mute or unmute the microphone, tap .
• To put the call on hold, tap .
• To set up a conference call, tap and enter the
second phone number.
5.5 Call Log
The Call Log screen displays the most recent outgoing, received, or missed calls.
To view the Call Log screen, tap Phone, then tap the Call Log tab.
• To call an entry, tap the corresponding icon.
• To remove the entry from the list, select the entry that you want to delete and tap
> Remove from call log.
• To clear the call log, tap > Clear call log > OK.
Tap to filter list
according to type of
call.
Tap to find contacts.
Indicates type of call:
missed, outgoing,
received.
Page 46

Chapter 6: Email & Messaging
40
Chapter 6: Email & Messaging
Use Messaging to send and receive text and multimedia messages. Use Email to
send and receive email messages using your internet email accounts.
6.1 Text Message
A text message can only contain letters, numbers, and symbols.
6.1.1 Create and Send Text Messages
1. Tap Messaging.
2. Tap .
3. In the To field, enter the recipient’s phone number.
TIP: To add recipients from your contacts, tap
and select the desired contact(s). Then tap OK.
4. Compose your message.
5. Tap or to send your
message.
NOTE:
• The type of icon shown on the screen depends
on the available network.
• If you close Messaging before sending your
message, the unsent message will be
automatically saved as a draft.
• You can also send text messages via People
application. See “Text Contacts” on page 34.
6.1.2 Receive and Manage Messages
When you send and receive messages from a contact, these messages are grouped
as a message thread. A message thread looks like an exchanged conversation.
• Reply to a text message
1. Tap Messaging.
2. Tap a message thread to open it.
3. Compose your message.
4. Tap or to send your message.
Page 47

Chapter 6: Email & Messaging
41
• Delete a message thread
1. Tap Messaging.
2. Tap a message thread to open it.
3. Tap > Delete messages > select the
message that you want to delete > Delete.
4. Tap Delete to confirm.
• Delete all message threads
1. Tap Messaging.
2. Tap > Delete all threads.
3. Tap Delete to confirm.
Page 48

Chapter 6: Email & Messaging
42
6.2 Multimedia Message
A multimedia message or MMS can contain letters, images, an audio or video file.
6.2.1 Create and Send MMS Messages
1. Tap Messaging.
2. Tap .
3. In the To field, enter the recipient’s phone number or email address.
TIP: To add recipients from your contacts, tap and select the desired
contact(s). Then tap OK.
4. Tap > Add subject.
The message automatically converts to an MMS message.
5. Enter a subject.
6. Compose your message.
7. To attach files to your message, tap , then tap one
of the following:
• Pictures: Attach pictures from Gallery.
• Capture picture: Take a picture to attach.
• Videos: Attach a video file.
• Capture video: Record a video to attach.
• Audio: Attach an audio file.
• Record audio: Record your voice to attach.
• Contact (vCard): Attach a contact information.
• Appointment (vCalendar): Attach an event
information.
• Slideshow: Attach a slideshow.
8. Tap or to send your
message.
Page 49

Chapter 6: Email & Messaging
43
6.3 Voice Message
The device supports sending of voice messages.
Create a voice message
1. Tap Messaging.
2. Tap .
3. Tap > Record audio.
4. Tap to record your message.
5. Tap to stop recording.
6. Tap Done to proceed or Discard to return to the
compose message screen.
7. Tap Play to listen to your recording.
8. Enter the recipient’s phone number in the To field.
9. If necessary, compose your message.
10.Tap or to send your
message.
Page 50

Chapter 6: Email & Messaging
44
6.4 Customizing Message Settings
1. Tap Messaging.
2. Tap > Settings.
The following message settings are available:
• STORAGE: Use this setting to enable Delete old
messages, set Text message limit, and
Multimedia message limit.
• TEXT (SMS) MESSAGES: Use this setting to
enable Delivery reports, set the message
template, and manage UIM/SIM card messages.
• MULTIMEDIA (MMS) MESSAGES: Use this
setting to enable Delivery reports, Read reports,
Send delivery report, Auto-retrieve, and
Roaming auto-retrieve of MMS messages. You
can also set maximum picture resolution and
message size, and specify the validity time for
MMS.
• NOTIFICATIONS: Use this setting to display
new message notification on the status bar,
select a ringtone, and enable the device to
vibrate for new messages.
• SERVICE SETTINGS: Use this setting to enable the device to receive
browser message.
Page 51

Chapter 6: Email & Messaging
45
6.5 Email Accounts
The device can send and receive emails just as you do with a computer. It supports
Internet emails, email accounts that are provided by an Internet Service Provider (ISP)
or web-based emails, such as Gmail, Hotmail, Yahoo! Mail, etc.
6.5.1 Set Up Email Account
1. Tap Email.
2. Enter your Email address and Password.
3. Tap Next.
The device will automatically retrieve the email
settings.
To manually set up the email, tap Manual setup.
4. Select an email connection protocol which best suits
your needs.
• POP3: Select to download all emails from the
mail server and save locally on the device. Your
email cannot be accessed via any webmail or
any separate client on other computers.
• IMAP: Select to keep all emails stored on the
mail server whereas the Sent emails are still
stored locally on the device. Your Incoming
emails are always available on multiple
computers and/or webmail.
• Exchange: Select to keep the Incoming and
Sent emails always available on multiple
computers and/or webmail (mail is synced
between mailserver and client).
5. Follow the on-screen instructions and enter all the
server information, Domain, Username, Password,
and other related information. Tap Next to continue.
NOTE: Your account settings may vary, depending on the kind of email service for
the account. For setup parameter details, please check with your service provider.
Page 52

Chapter 6: Email & Messaging
46
6. Set the Inbox checking frequency settings and tap Next.
7. Enter Name and Account display name.
NOTE: The Account display name is the name
shown on the Home screen and the Email screen.
8. Tap Next.
Once the account setup is complete, the device will
automatically retrieve your emails.
Page 53

Chapter 6: Email & Messaging
47
6.5.2 Add More Email Accounts
1. Tap Email.
2. Tap > Settings > ADD ACCOUNT.
3. Enter your Email address and Password.
Select Send email from this account by default to set this account as the default
email account.
4. Tap Next.
5. Set the Inbox checking frequency settings and tap Next.
6. Enter Name and Account display name.
7. Tap Next.
Once the account setup is complete, the device will automatically retrieve your
emails.
6.5.3 Select Email Accounts
1. Tap Email.
2. Tap > Settings.
3. Tap the account you want to access.
6.5.4 Delete Email Accounts
1. Tap Email.
2. Tap > Settings.
3. Tap the account to delete.
4. Tap Remove account.
5. Tap OK to confirm.
Page 54

Chapter 6: Email & Messaging
48
6.6 Using Email
6.6.1 Compose and Send Emails
1. Tap Email.
2. Tap .
3. In the To field, enter the recipient’s email address.
4. Tap Subject then type a subject.
5. Compose your email.
6. Tap .
• Add attachments to email messages
1. Before sending your message, tap > Attach
file.
2. Select the type of file then select the file you want
to attach.
6.6.2 Receive Emails
Emails are automatically received in the Inbox folder when the device connects to a
network.
• Manually receive e-mails
1. Tap Email, then tap an email account.
2. On the Inbox screen, tap .
Indicates this email
message has been added
to the Starred folder.
Indicates email
attachment.
Page 55

Chapter 6: Email & Messaging
49
6.6.3 Read and Reply to Emails
The Inbox displays the email headers. Open the email to view the complete content.
• Download attachments
1. Tap Email.
2. On the Inbox screen, tap an email to open it.
3. Tap the Attachments tab and do any of the
following:
• Tap LOAD to load the attachment.
• Tap VIEW to view the attachment.
• Tap SAVE to save the attachment.
NOTE: Only supported file types can be opened
on the device.
• Reply or forward e-mails
1. Open the message.
2. Do any of the following:
• Tap or tap > Reply all to reply the email.
• Tap > Forward. Then enter the recipient in the To field.
3. Compose your message.
4. Tap .
6.6.4 Manage Email Folders
• Delete emails
1. Tap Email, then tap an email account.
2. On the Inbox screen, open the message that you
want to delete.
3. Tap to delete the message.
• View other folders
If you are viewing the Inbox or a messaging list
screen, tap , then tap the folder that you want to
view.
Page 56

Chapter 6: Email & Messaging
50
• Move between email accounts
If you are viewing the Inbox or messaging list screen
of one account and you want to view the list of
another account, tap the account selection box at the
top left of the screen, then tap the account that you
want to view.
6.6.5 Customize Email Settings
You can configure the settings of your email account such as account name, email
checking frequency, default account, notifications, and server settings.
• Set up your account name
1. Tap Email > > Settings, then tap an email
account.
2. Tap Account name to change the account name.
3. Tap OK to confirm.
• Set up the email checking frequency
1. Tap Email > > Settings, then tap an email
account.
2. Tap Inbox check frequency.
3. Tap an option.
• Set up default account
1. Tap Email > > Settings, then tap an email
account.
2. Tap Default account to send email from this account by default.
Page 57

Chapter 6: Email & Messaging
51
6.7 Gmail
Gmail is the email service provided by Google.
6.7.1 Sign in to Gmail
1. Tap Gmail.
2. Follow the on-screen instructions to login or create
your Gmail account.
3. Once logged in, you can begin reading and sending
emails from your Gmail account.
6.7.2 Refresh Gmail
1. Tap Gmail.
2. Tap .
Page 58

Chapter 6: Email & Messaging
52
6.7.3 Create and Send Emails
1. Tap Gmail.
2. Tap .
3. In the To field, enter the recipient’s email address.
4. Enter a Subject.
5. Compose your email.
6. If necessary, do any of the following:
• To add Cc/Bcc, tap > Add CC/Bcc.
• To attach files, tap > Attach file.
• To save as draft, tap > Save draft.
7. Tap to send the email.
6.7.4 Read and Reply to Emails
1. Tap Gmail.
2. Tap an email to read.
3. Do any of the following:
• Tap or tap > Reply all to reply the email.
• Tap > Forward. Then enter the recipient in
the To field.
4. Compose your message.
5. Tap to send the email.
To preview and download attachments
1. Tap Gmail.
2. Tap an email to read.
3. Scroll to the end of the email and do any of the
following:
• To preview an attachment, tap VIEW.
• To download an attachment, tap SAVE.
NOTE: Only supported file types can be opened on the device.
Page 59

Chapter 6: Email & Messaging
53
6.7.5 Manage Emails
• To delete emails
1. Tap Gmail.
2. Select the email that you want to delete, then tap .
• To mark emails as unread
1. Tap Gmail.
2. Select the email, then tap .
• To place emails in archive
1. Tap Gmail.
2. Select the email, then tap .
6.7.6 Configure Gmail Settings
1. Tap Gmail.
2. Tap > Settings > General preferences or email
account.
3. Tap one of the following settings:
• Confirm before deleting: Select to prompt for
confirmation before deleting the conversations
or messages.
• Confirm before archiving: Select to prompt for
confirmation before archiving the conversations
or messages.
• Confirm before sending: Select to prompt for
confirmation before sending the messages.
• Reply all: Select to make “Reply all” as the
default for message replies.
• Auto-advance: Select which screen to show
after you delete or archieve a conversation.
• Message text size: Set the font size used in
emails.
• Hide checkboxes: Select to use “touch and hold” action to select the email.
• Message actions: Select to always show message actions at the top of the
screen.
• Clear search history: Remove all the searches you have performed.
• Hide pictures in messages: Restore default for all senders (not to show
pictures automatically).
• Priority Inbox: Select to set Inbox as your Priority Inbox for this account.
Page 60

Chapter 6: Email & Messaging
54
• Email notifications: Displays a notification icon on the status bar when an
email is received.
• Ringtone & vibrate: Select email notification ringtone and enable the device
to vibrate when an email is received.
• Signature: Add a text signature to your outgoing emails.
• Gmail sync is ON: Change the sync settings or remove this account.
• Days of mail to sync: Change sync preferences.
• Manage labels: Choose which labels are synced and trigger the notification.
• Download attachments: Select to automatically download file attachment
when connected via Wi-Fi.
Page 61

Chapter 7: Using Internet
55
Chapter 7: Using Internet
7.1 Connecting to Internet
The device connects to Internet via:
•Wi-Fi
• Cellular Data Networks
7.1.1 Wi-Fi
• Turn Wi-Fi on
1. Tap Settings.
2. In WIRELESS & NETWORKS, tap Wi-Fi and set it
to ON.
• Connect to a Wi-Fi network
1. Turn on Wi-Fi.
2. The available networks are listed. Tap a network
to connect to.
NOTE: You can also tap ADD NETWORK to
manually add a connection. See “Add Wi-Fi
network” on page 56.
3. If you select an unsecured network, the
connection is automatically established.
Otherwise, proceed to the next step.
4. When connecting to a secured network, you will
be prompted for the password. Enter the
password, then tap Connect.
When Wi-Fi is connected, the connection icon is
displayed on the status bar.
Page 62

Chapter 7: Using Internet
56
• Add Wi-Fi network
1. Tap Settings.
2. Tap Wi-Fi and set it to ON.
3. In Wi-Fi networks, tap ADD NETWORK. A new
window is displayed.
4. Follow the on-screen instructions and enter the
necessary information, then tap Save to save the
settings.
• Advanced Wi-Fi settings
1. Tap Settings.
2. Tap Wi-Fi and set it to ON.
3. In Wi-Fi networks, tap > Advanced to access
and set up more advanced options.
NOTE: If both Wi-Fi and data connection (3G) are
enabled, the device uses Wi-Fi connection to
retrieve your emails, browse web pages, and
synchronize other information. If you want to
switch to 3G connection, set Wi-Fi setting to OFF.
Page 63

Chapter 7: Using Internet
57
7.1.2 Cellular Data Network
The device supports dual-SIM technology which allows you to switch between two
network operators simultaneously. Check the availability of service and plan rates of
data connections with your network service provider.
• Customize the network setting
To set up the SIM card installed on the SIM1 card slot, do the following:
1. Tap Settings > Dual Card Settings.
2. Tap SLOT1 tab to customize the SIM1 card
settings.
• In SLOT1, select the desired network for the
SIM card.
• Tap Current netw ork information to view the
current network status.
• Tap Roaming auto-retrieve to enable to
automatically receive MMS while roaming.
To set up the SIM card installed on the SIM2 card slot, do the following:
1. Tap Settings > Dual Card Settings.
2. Tap SLOT2 tab to customize the SIM2 card
settings.
• Tap GSM network selection to specify the
desired network or enable the system to
automatically select the preferred network.
• Tap Current network inf ormation to view the
current network status.
• Tap Roaming auto-retrieve to enable to
automatically receive MMS while roaming.
Page 64

Chapter 7: Using Internet
58
• Customize the mobile network settings
1. Tap Settings.
2. In WIRELESS & NETWORKS, tap More > Mobile
networks.
The following mobile network settings are
available:
• Data enabled (only on CDMA/UIM network):
Check to enable data access over mobile
network.
• System select (only on CDMA/UIM network):
Use this setting to specify the CDMA roaming
mode.
• Access Point Names: Use this setting to set
up data connection. Obtain the following
information from your network service provider:
Access Point Names, Proxy, Port, User name,
and Password.
• CDMA network setting manually (only on
CDMA/UIM network): Use this setting to manually configure the CDMA
network settings.
• Network operators (only on GSM network): Use this setting to select a
network operator.
Page 65

Chapter 7: Using Internet
59
7.2 Browsing a Web Page
1. Tap Browser.
2. Tap the address bar.
3. Type the URL then tap Go.
Viewing the page
• To scroll the page, swipe your finger up or down.
• To zoom in on the page, move your two fingers apart from each other at the
location of the screen where you want to zoom in. In zoom mode, swipe your finger
up or down and left or right.
• To zoom out on the page, move your two fingers closer together at the location of
the screen where you want to zoom out.
7.2.1 Manage Web Page
While viewing a web page, tap to change view settings or apply other functions.
The following table lists the setting options. Depending on the function, some options
may be not be available.
Menu Description
Refresh Reload the current web page.
Forward Go to the next page.
Homepage Return to the home page.
Bookmarks Select bookmarks, history, or saved favorite web page to visit.
Address bar
Tap to display active
web pages in
windows.
Page 66

Chapter 7: Using Internet
60
Menu Description
Save to bookmarks Save favorite web pages.
Share page Send this web page via one of the sharing applications.
Find on page Find the text on the web page.
Request desktop
site
Open the current web page in desktop viewing mode.
Save for offline
reading
Save the current web page to be available even when the data
network is not available.
About View Browser version.
Settings Configure browser settings:
• General: Select to set home page and autofill settings.
• Privacy & security: Select to configure privacy and security
settings including cache, history, cookies, form data, location,
and password.
• Accessibility: Select to configure text size, zoom, and inverted
screen rendering settings.
• Advanced: Select to set search engine, open in background,
enable JavaScript, enable plug-ins, advanced settings for
individual website, page content settings, and reset all settings to
the factory default.
• Bandwidth management: Select to allow browser to preload high
confidence search results in the background and display images
on the web pages.
• Labs: Select to set quick control access or use fullscreen mode
to hide the status bar.
Exit Exit Browser and return to Home screen.
Page 67

Chapter 7: Using Internet
61
7.3 Google Maps
Use Google Maps to find places, view traffic and direction information, and find your
friends’ location.
NOTE: The Google Maps application is not available in every country or city.
Before starting Maps, do the following:
1. Tap Settings > Location services.
2. Tap GPS satellites to enable the function.
• Viewing Map
1. Tap Maps.
2. Tap to show your current location. Your current location is indicated by the
blue marker ( or ).
• Searching for a location
1. While viewing a map, tap .
2. Enter the place you want to search in the search box.
3. Tap on the on-screen keyboard to search for the location. You can also
select from the suggestions list.
4. Tap a marker ( ). Then it displays the location name. If it is the correct location,
tap the marker ( ).
5. Tap the on-screen buttons to view the location on the map, get directions, and
more. Scroll down the screen to view more options.
• Getting directions
Google Maps can provide directions to your destination.
1. While viewing a map, tap .
2. Enter the starting point and the ending point, or tap the corresponding and
select an option.
3. Select a way to get to your destination.
4. Tap GET DIRECTIONS.
5. If you are driving or walking, tap DIRECTIONS LIST to view the directions.
Page 68

Chapter 7: Using Internet
62
• Finding your friends with Google Latitude
Latitude allows you to keep track of your friends’ location and share your location
to them. You have to join Latitude and invite your friends to view your location.
Only friends who have accepted your invitation can see your location.
1. Tap Maps.
2. While viewing a map, tap > Join Latitude.
After you have joined Latitude and exit Maps application, do any of the
following to launch Latitude application:
• Tap Latitude.
• Tap Maps, and then tap > Latitude.
7.4 Using Turn-By-Turn Navigation
NOTE:
• This application is not available in all countries.
• Before using this application, the GPS satellites option in Settings >
Location services needs to be enabled.
1. Tap Navigation.
2. If you are using this application for the first time, tap Accept.
3. Select your destination with one of the following methods:
• Speak destination: Say your destination, for example: "First Street to Wall
Street".
• Type destination: Enter your destination with the on-screen keyboard.
• Contacts: Select your destination from your contacts’ addresses.
• Starred Places: Select your destination from your starred places.
Page 69

Chapter 7: Using Internet
63
7.5 Google Play Store
Play Store allows you to purchase and download games and other applications to your
phone.
• Downloading applications
1. Tap Play Store.
2. Search for desired application.
3. Tap the application that you want to download.
4. Tap Install.
• Uninstalling an application
1. Tap Play Store.
2. Tap > My Apps.
3. Tap the application you want to uninstall, and then tap Uninstall.
7.6 YouTube
YouTube allows you to watch, upload, and download videos to your phone.
• Watching videos
1. Tap YouTube.
2. Scroll through the list of videos, and then tap a video to start playback.
• Searching for videos
1. On the main screen, tap .
2. Enter a keyword to search, and then tap on the on-screen keyboard.
3. Scroll through the results and tap a video to start playback.
TIP: You also have the option to view results of recently posted videos. Tap All
time, and then select one of the available options.
• Clearing the search history
1. Tap > Settings.
2. Tap Search > Clear search history.
• Sharing a video link
1. On the video playback screen, tap .
2. Tap an application for sharing the video link from the available options.
Page 70

Chapter 8: Using Bluetooth
64
Chapter 8: Using Bluetooth
• To turn Bluetooth on
1. Tap Settings.
2. In WIRELESS & NETWORKS, tap Bluetooth and
set it to ON.
NOTE: When the Bluetooth is turned on, your
device detects other Bluetooth devices, but your
device is not visible to others.
3. To make your phone visible to others, tap
SHP-SH630E to make this device visible to other
devices.
8.1 Connecting to Bluetooth Devices
A connection to a Bluetooth device is called a partnership. You need to pair and
create a partnership with a Bluetooth device to exchange information.
1. Tap Settings.
2. In WIRELESS & NETWORKS, tap Bluetooth and set it to ON.
3. To search for a new device, tap SEARCH FOR DEVICES.
4. Tap a detected device.
5. To start pairing, enter the PIN and tap OK.
NOTE:
• The PIN of the device must be the same PIN on the other bluetooth
device.
• On some devices, tap Pair to start pairing.
6. The paired bluetooth device name is displayed.
NOTE: Once a partnership has been created, connecting to that device again will
no longer require entering the PIN.
Page 71

Chapter 8: Using Bluetooth
65
8.2 Transferring Files to Bluetooth
Devices
This device supports Bluetooth File Transfer. With this function, it allows your phone
and the other Bluetooth-enabled device to exchange files.
To send an image or a video between two smartphones, do the following:
1. Turn on Bluetooth.
2. Tap File Manager and browse the file that you want
to transfer.
3. Tap an image or a video to view in full screen.
4. To send a file via Bluetooth, tap > Bluetooth.
5. Tap the desired destination device.
NOTE: Be sure you have successfully paired with the
device that you want to send the file to. See
“Connecting to Bluetooth Devices” on page 64.
6. When the destination device receives an incoming
file from your phone, a pop-out message appears on
the screen. Tap Accept to receive the file.
Page 72

Chapter 8: Using Bluetooth
66
8.3 Receiving Files to Bluetooth
Devices
When a new file is received from another device, an “Incoming file request” message
is displayed on the Notification panel. To accept the file, tap the notification bar and
then tap Accept.
Page 73

Chapter 9: Connectivity
67
Chapter 9: Connectivity
9.1 Connecting to Computer or
Notebook
When connecting the phone to a computer or notebook for the first time, the computer
will install the necessary drivers automatically. The driver installation may take a few
minutes to complete.
However, refer to the List of Software table (see “List of Software” on page 68) to
check if your computer or notebook operating system needs to download necessary
files first.
If the connection is successful, the computer will recognize your phone as SH630E
and show that it is available to be accessed.
In the PC file manager, there will be a folder named SH630E where you can access
the data stored in your phone memory or the memory card installed in your phone.
Then you can manage or transfer the files to your computer.
If everything above is checked and the connection is failed (i.e.the folder is still not
seen or nothing happens) after a few tries (plug and unplug), please check the
Settings > Developer options > USB debugging option. And try to connect your
phone with the computer again. If it is successful, please uncheck the USB
debugging option.
If it still does not work, you may need to seek a professional for help. Be sure to bring
along your phone and notebook/computer.
Page 74

Chapter 9: Connectivity
68
9.1.1 List of Software
Note1: Only Windows Media Transfer Protocol (MTP) is supported for file transfer
between mobile phones and PCs. Windows Media Player 11 or above is
needed to support MTP.
Windows Media Player is built in Windows Vista and Windows 7 OS.
However, Windows XP (32) users must install it separately.
Note2: To avoid problems when using the USB modem/binding applications,
Windows XP SP1/SP2 users must upgrade to Windows XP SP3 for normal
operation.
Warning:
This device does not guarantee compatibility with all Micro-SIM adapter cards. Be
careful when using such adapter cards. If the adapter card is not compatible, do not
insert it by force.
Mobile
phone OS
version
PC OS version Software to be installed to PC Mobile
phone USB
driver
4.0.4 Windows 7 32bit/64 bit No need Supported
4.0.4
Windows Vista 32bit/
64 bit
No need Supported
4.0.4 Windows XP 32bit SP3 Install Windows Media Player 11
Supported
4.0.4
Windows XP 32bit
SP1/SP2
1. Update Windows XP Service
Pack 3
2. Install Windows Media Player
11
Supported
4.0.4 Windows XP 64 bit Supported
Only
supports
Android 3.0
or above
Apple PC/laptop Go to Android to download
Android File Transfer
Not supported
... Tablet Not supported
Page 75

Chapter 9: Connectivity
69
9.1.2 Driver Installation
1. Turn on your device, and connect it to your computer using the USB cable.
2. From the Windows desktop, double click on My Computer and locate the CD
drive.
3. Browse and double click setup.exe.
4. Follow the on-screen instructions to complete the driver installation.
Page 76

Chapter 9: Connectivity
70
9.2 Factory Data Reset
You can reset your phone to its factory defaults.
1. Tap Settings.
2. In PERSONAL, tap Backup & reset.
3. Tap Factory data reset.
4. Tap Reset phone to reset.
The factory data reset may take about 3 minutes. All data stored in the phone memory
will be erased. But, data stored in the memory card will be kept.
However, OTA (Over-The-Air) software upgrade will not erase anything in the phone
memory and memory card. No data will be lost.
NOTE: The factory reset method will not remove the data in the memory card installed
in your phone. If you like to delete the data stored in the memory card, you can do it
via the File Manager application or the computer.
Page 77

Chapter 9: Connectivity
71
9.3 OTA Software Update
NOTE: OTA requires Wi-Fi or 3G connection, however Wi-Fi connection is strongly
recommended due to the file size.
1. Tap Settings.
2. In SYSTEM, tap About Phone > System update.
3. Tap Auto check interval and select the desired
length of time. Your setting is automatically saved.
4. Check Auto download to enable the system to
automatically download the new software at the
specified time interval.
Page 78

Chapter 9: Connectivity
72
5. Tap Download setting and select the download
method. Your setting is automatically saved.
6. Tap Check now to start checking the latest software
version.
Page 79

Chapter 9: Connectivity
73
7. If a new software version is detected, the below screens appear during the
updating process.
NOTE: The time needed for an OTA varies depending on the file size. For example, if
the software is 18.5MB, it will take 4 minutes 15 seconds. Please follow the on-screen
instructions to complete the procedures. When OTA is complete, the system normally
will reboot itself. It may take a few minutes to complete the reboot from the booting
screen. If the screen turns white, green, black or blue for more than 1 minute and the
procedure stops, please perform force-power-off to recover the phone system.
Page 80

Chapter 10: Multimedia Applications
74
Chapter 10:
Multimedia Applications
10.1 Photos and Videos
This device is equipped with rear and front cameras to take photos and videos. By
default, your device uses the rear camera to take photos or record videos.
10.1.1 Take Photos
1. Tap Camera.
NOTE: To switch between front and rear cameras, tap .
2. Aim the device at the subject.
Drag to zoom in/out on the subject.
3. Tap to take the shot.
Tap to take a photo.
Tap to switch
between front and
rear cameras.
Tap to preview
the latest
recorded file.
Page 81

Chapter 10: Multimedia Applications
75
10.1.2 Record Videos
1. Tap Camera.
2. Tap to enter video mode.
NOTE: To switch between front and rear cameras, tap .
3. Aim the device at the subject.
4. Tap to start recording.
Drag to zoom in/out on the subject.
5. Tap to stop recording.
Tap to record video.
Tap to switch
between front and
rear cameras.
Tap to preview
the latest
recorded file.
Page 82

Chapter 10: Multimedia Applications
76
10.1.3 Take Panorama Shots
1. Tap Camera.
2. Tap > Switch to panorama to enter panorama mode.
3. Hold your device horizontally and aim the device at the subject.
4. Tap to take the shot.
5. Move the device in one direction.
6. When the shooting guide reaches the end of the shooting point, the shooting ends.
You can also manually stop recording by tapping .
Tap to take
the shot.
Tap to preview
the latest
recorded file.
Shooting guide
Page 83

Chapter 10: Multimedia Applications
77
10.1.4 Review Photos
After taking a photo, tap the mini window to preview the latest captured photo on the
screen.
• To view other photos and videos in Gallery, tap .
• To share the photo, tap an application for sharing.
10.1.5 Review Videos
After recording a video, tap the mini window to preview the latest recorded video on
the screen.
• To view other photos and videos in Gallery, tap .
• To share the video, tap an application for sharing.
• To play the video, tap .
Page 84

Chapter 10: Multimedia Applications
78
10.1.6 Configure Camera Settings
Tap to access the camera/video/panorama menu. Tap the menu item icon to
open the respective menu and select the desired setting.
NOTE: To exit the menu mode, tap again.
Camera menu options
Video menu options
Panorama menu options
Page 85

Chapter 10: Multimedia Applications
79
Mode Setting Available options
Camera mode
Shooting mode Normal, Panorama.
Scenes
Auto, Night, Sunset, Party, Portrait, Landscape,
Sport, Snow, Firework, Candle light, Back light,
Night Portrait, Beach, Theatre, Steady Photo.
Resolution
5M pixels, 3M pixels, 2M Wide Screen,
2M pixels, 1M Wide Screen, 1M pixels, VGA,
QVGA.
Exposure value -2, -1, 0, 1, 2
ISO
Auto, ISO100, ISO200, ISO400, ISO800,
ISO1600.
White balance
Auto, Incandescent, Daylight, Fluorescent,
Cloudy.
Effect None, Mono, Sepia, Negative, Aqua.
Review duration No review, 3 seconds, 5 seconds, No limit.
Store location Off, On.
Data storage Phone, SD card.
Shutter sound Off, On.
Restore defaults OK, Cancel
Video mode
Scenes
Auto, Night, Sunset, Party, Portrait, Landscape,
Sport, Snow, Firework, Candle light, Back light,
Night Portrait, Beach, Theatre, Steady Photo.
Video quality SD, CIF, QCIF.
Exposure value -2, -1, 0, 1, 2
White balance
Auto, Incandescent, Daylight, Fluorescent,
Cloudy.
Effect None, Mono, Sepia, Negative, Aqua.
Review duration No review, 3 seconds, 5 seconds, No limit.
Store location Off, On.
Data storage Phone, SD card.
Shutter sound Off, On.
Restore defaults OK, Cancel
Panorama mode
Shooting mode Normal, Panorama.
Restore defaults OK, Cancel
Page 86

Chapter 10: Multimedia Applications
80
10.1.7 Capture Screenshots
To capture screenshots, press and hold the Volume down button and the Power
button for a second. You will see the flash screen where the screenshot is captured
and a message “Saving screenshot” appears on the status bar.
NOTE: The captured screenshots are stored in the device memory
(Folder name: \Pictures\Screenshots\)
To directly view the screenshot, do the following:
1. Tap and slide the status bar downwards to open the notification panel.
2. Tap Screenshot captured notification bar to view
the captured screenshot.
Page 87

Chapter 10: Multimedia Applications
81
10.2 Viewing Photos & Videos
1. Tap Gallery.
2. Tap a folder to view the recorded files in thumbnails.
3. Tap an image or a video to view in full screen.
4. Swipe your finger to the left/right to view the
previous/next file.
• To share the photo, tap , then tap an
application for sharing.
• To zoom in on the image, move your two fingers
apart from each other at the location of the
screen where you want to zoom in. In zoom
mode, swipe your finger up or down and left or
right.
• To play the video, tap .
• To delete the photo, play the slideshow, edit the
image, or show more options, tap .
Page 88

Chapter 11: Music
82
Chapter 11: Music
11.1 Using Music Player
With Music, you can listen to your favorite songs on your phone.
11.1.1 Play Songs
1. Tap Music.
2. Tap SONGS tab to display all songs.
3. Tap a song to play.
11.1.2 Playback Screen
Tap to show more options.
Tap to search a song,
album or artist.
Tap to pause the playback.
Tap to play songs in shuffle
order.
Tap to skip to the next
track.
Tap to skip to the
previous track.
Slide to go forward or
backward.
Tap to toggle repeat
options.
Page 89

Chapter 11: Music
83
11.1.3 Create Playlists
1. Tap Music.
2. Tap and hold the song you want to add.
3. Tap Add to playlist.
4. Select a playlist or tap New to create a new playlist.
NOTE: If you create a new playlist, enter the playlist
name, then tap Save.
Page 90

Chapter 11: Music
84
11.1.4 Customize Ringtone
1. Tap Music.
2. Tap and hold the song you want to set as a ringtone.
3. Tap Use as phone ringtone.
4. Select the desired ringtone type.
Your setting is automatically saved.
11.1.5 Delete Songs
1. Tap Music.
2. Tap and hold the song you want to delete.
3. Tap Delete.
4. Tap OK to confirm deletion.
Page 91

Chapter 11: Music
85
11.1.6 Customize the Sound Effects
1. Tap Music.
2. Tap > Sound effects.
3. Tap Equalizer and set it to ON.
4. Tap an option and change the necessary settings.
11.1.7 Enable Sleep Mode
1. Tap Music.
2. Tap > Settings > Sleep Mode.
3. Set the desired length of time and tap Save.
Your setting is automatically saved.
Page 92

Chapter 11: Music
86
11.2 FM Radio
FM Radio lets you listen to the FM radio with your phone when the headset is
plugged.
NOTE: You must connect the headset to use the FM Radio.
11.2.1 Listen to Radio
1. Tap FM Radio.
2. Do any of the following:
• To select the radio station to listen to, tap or
.
• To manually tune to a frequency, tap or .
• To add the current radio station to the Favorite
list, tap . Then enter the station name and tap
OK.
• To view the Favorite List, tap > Fav orite
List.
• To turn on the speaker, tap > Speaker on.
• To scan for all available channels, tap >
Scan.
• To change the other radio settings, tap >
Settings.
• To turn off the radio, tap .
11.2.2 Record the Radio
• To record the radio, tap > Record and the
recording automatically starts.
• To stop recording, tap .
• To listen to the recorded file, tap > Recorded
Files and select the file you want to play.
Page 93

Chapter 12: Programs
87
Chapter 12: Programs
This device comes with the following pre-installed programs.
12.1 Browser
Open the Browser to view web pages. See “Connecting to Internet” on page 55.
12.2 Calculator
With Calculator, you can perform basic arithmetic
functions on this device.
Tap Calculator.
12.3 Camera
Capture images with this device. See “Photos and Videos” on page 74.
Page 94

Chapter 12: Programs
88
12.4 Clock
Set alarm clock with this device.
1. Tap Clock.
2. Tap .
3. To add an alarm, tap Add alarm.
4. To set the time, tap Time. Tap S or T to set the
alarm time, and tap Set.
5. To set repeat mode, tap Repeat. Tap one or more
options, then tap OK.
6. To set the ringtone, tap Ringtone. Tap an option,
then tap OK.
7. To vibrate when the alarm sounds, check Vibrate.
8. To add an alarm label, tap Label.
9. After all settings are complete, tap OK.
12.5 Email
Use Email to connect to your remote mailbox to retrieve new e-mail messages, or
view previously retrieved e-mail messages offline. See “Using Email” on page 48.
Page 95

Chapter 12: Programs
89
12.6 File Manager
File Manager lets you browse the contents of your phone.
1. Tap File Manager.
2. Tap the folder list and tap the folder you want to
explore.
Managing files and folders
• To open a folder or file, tap the file or folder.
• To copy, move, delete, rename or view file or folder
details, tap and hold to view the options. Then tap a
desired option.
• To create a new folder, tap . Enter the folder
name and tap OK.
• To switch to thumbnail view display, tap .
• To sort items, tap > Sort, then tap a sorting
option.
• To search for a file, tap > Search, then enter the
filename and tap Go.
• To copy all files or folders, tap > . To paste all files or folders, select the
destination location to copy all files or folders to and tap .
• To delete all files and folders, tap > . Tap OK to confirm the deletion.
12.7 Messaging
Use Messaging to send or receive text and MMS messages. See “Text Message” on
page 40.
12.8 Gallery
You can view your captured images, recorded video clips, and downloaded images in
Gallery. See “Viewing Photos & Videos” on page 81.
12.9 People
View or manage your contact list. See “People” on page 32.
Page 96

Chapter 12: Programs
90
12.10 Phone
Use Phone to make phone calls or manage contact list. See “Making a Call” on
page 37.
12.11 Date and Time Settings
To automatically set the date and time
1. Tap Settings.
2. In SYSTEM, tap Date & time.
3. Tap Automatic date & time to automatically set the date and time according to
the network.
To manually set the date and time
1. Tap Settings.
2. In SYSTEM, tap Date & time.
3. Tap Set date to set the date.
• To adjust the date, tap the month, day, or year
field, and tap S or T to increase or decrease the
value. Tap Set to apply the values.
• To change the date format, tap Select date
format, and select the date format from the list.
4. Tap Select time zone to select the time zone from
the list.
5. Tap Set time to set the time.
• Tap S or T to adjust the time. Tap Set to apply
the values.
• To use a 24-hour format, tap Use 24-hour
format.
Page 97

Chapter 12: Programs
91
12.12 Voice Note
Use Voice Note to record a voice memo.
To record a voice note
1. Tap Voice Note.
The recording screen is displayed.
2. Tap to record your voice.
3. To stop recording, tap .
4. Tap OK to save the file.
To play a voice note
1. Tap Voice Note.
2. Tap .
A list of voice notes is displayed.
3. Select the voice note you want to play and tap Play.
Page 98

Chapter 13: Managing Your Phone
92
Chapter 13: Managing Your
Phone
13.1 Wireless and Networks Settings
13.1.1 Wi-Fi
Manage Wi-Fi connections, scan and connect to available Wi-Fi networks. See “Wi-Fi”
on page 55.
13.1.2 Bluetooth
Manage Bluetooth connections, set device name, and discoverability of the device.
See “Connecting to Bluetooth Devices” on page 64.
13.1.3 Data usage
Configure and view data usage used by the applications.
• Configuring Mobile Data Limit
You can set the data usage limitation for the device to warn you when you reach
the maximum limit.
1. Tap Settings.
2. In WIRELESS & NETWORK, tap Data usage.
3. Check Set mobile data limit to enable this
function.
Page 99

Chapter 13: Managing Your Phone
93
4. A warning message appears on the screen. Tap
OK to continue.
5. To set up the limit for warning, tap the yellow
line.Tap S or T to set the limit, and tap Set.
Page 100

Chapter 13: Managing Your Phone
94
6. To set up the limit for stopping data usage, tap the
red line.Tap S or T to set the limit, and tap Set.
7. Scroll down to view data usage used the
applications.
13.1.4 Dual Card Settings
Manage the data network for the SIM card(s). See “Customize the network setting” on
page 57.
13.1.5 Airplane Mode
Disable all wireless connections.
To set the device to airplane mode, tap Settings > More > Airplane mode.
 Loading...