

Page 1

ケータイ
SH-06G
INSTRUCTION MANUAL
’15.6
Page 2
Introduction
Thank you for purchasing "SH-06G".
Be sure to read this manual before and during use to ensure proper operation.
Checking operation method
Quick Start Guide (Basic package)
(in Japanese only)
This guide describes operations of basic functions.
Instruction Manual (App of the handset)
(in Japanese only)
This manual describes detailed guidance and operations
of functions.
In the standby screen, z/[Tools]/[Instruction Manual]
Instruction Manual (in PDF format)
This manual describes detailed guidance and operations
of functions.
Download from the DOCOMO website
https://www.nttdocomo.co.jp/english/support/trouble/
manual/download/index.html
* The URL and contents are subject to change without
prior notice.
z The screens and illustrations in this manual are shown as
examples. The actual screens and illustrations may differ.
z Key illustrations in this manual differ from the actual design of
the keys.
z The explanations in this manual are based on the case for the
handset color "Black".
z Note that "SH-06G" is referred to as "handset" in this manual.
z This manual refers to microSD Card or microSDHC Card as
"microSD Card" or "microSD".
z Reproduction of this manual in part or in whole without prior
permission is prohibited.
z The contents of this manual are subject to change without
prior notice.
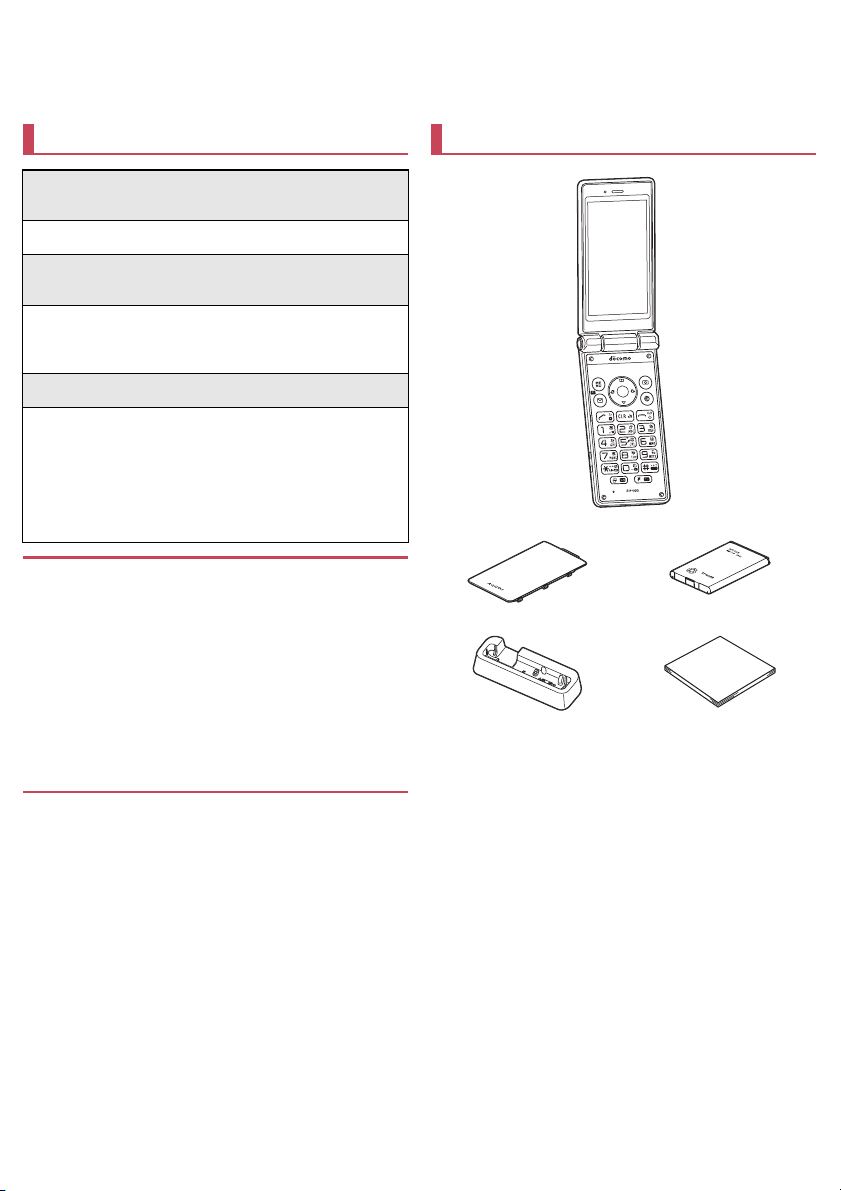
Basic package
SH-06G (includes warranty)
Back Cover SH74 Battery Pack SH43
Desktop Holder SH48 Quick Start Guide
(in Japanese only)
z For optional parts (sold separately) compatible with the handset,
refer to the DOCOMO website.
https://www.nttdocomo.co.jp/product/option/ (in Japanese only)
Page 3

Contents
Using the handset ........................................................... 2
Precautions (ALWAYS FOLLOW THESE DIRECTIONS)
..................................................................................... 3
Handling precautions ...................................................... 7
Waterproof ...................................................................... 9
Before Using the Handset
Part names and functions .....................................................12
Basic operation .....................................................................13
docomo nano UIM card ........................................................18
Battery pack ..........................................................................19
Charging ...............................................................................19
Turning power on/off .............................................................21
Character entry .....................................................................21
Initial settings ........................................................................25
Call
Making a call .........................................................................26
Answering a call ...................................................................27
Operations during a call ........................................................28
Redial/Call history .................................................................28
Voice Memo/Answering Memo .............................................29
Call log/Call settings .............................................................29
Phonebook ...........................................................................30
Mail/Web browser
docomo mail .........................................................................32
SMS ......................................................................................33
Web browser ........................................................................34
Camera
Before using camera ............................................................36
Shooting still pictures ............................................................37
Shooting video ......................................................................38
Barcode Reader ...................................................................39
Translation finder ..................................................................39
Tools/Apps
TV (1Seg) .............................................................................40
Music ....................................................................................41
Album ...................................................................................42
LINE ......................................................................................43
Alarm ....................................................................................43
World clock ...........................................................................44
Timer ....................................................................................44
Stop watch ............................................................................44
Calculator .............................................................................44
Schedule ...............................................................................44
Memo ....................................................................................45
PASSNOW ...........................................................................45
Data transfer .........................................................................47
SD card backup ....................................................................47
Instruction Manual ................................................................47
Widget Sheet ........................................................................47
Handset Settings
Setting menu ........................................................................48
Wallpaper/display .................................................................48
Sound/lamp ..........................................................................48
Lock/security .........................................................................49
Energy saving/battery ...........................................................51
Communication/network .......................................................51
docomo service ....................................................................53
Data transfer/reset ................................................................53
Other settings .......................................................................55
Data management
Handset memory (internal storage) ......................................58
microSD Card (external storage) ..........................................58
Operating files ...................................................................... 59
PC connection ...................................................................... 59
Data communication
Infrared communication ........................................................61
®
Bluetooth
communication ................................................... 62
Safety and security services
Disaster Message Board ......................................................64
Disaster Voice Messaging ....................................................64
Early warning "Area Mail" .....................................................64
International roaming
Outline of international roaming (WORLD WING) ................66
Available services overseas .................................................66
Before use overseas .............................................................66
Settings for use overseas .....................................................66
Making/Receiving a call in your country of stay ....................67
Setting international roaming ................................................68
Checking after homecoming .................................................68
Appendix/Index
Menu list ...............................................................................69
Troubleshooting (FAQ) .........................................................71
Warranty and After-Sales Service ........................................74
Updating software .................................................................75
Main specifications ............................................................... 77
Specific Absorption Rate (SAR) of Mobile Phones ...............78
Export Administration Regulations .......................................79
Intellectual Property Right ....................................................79
Unlocking SIM lock ...............................................................80
Index .....................................................................................81
1
Contents/Precautions
Page 4

Using the handset
z The handset supports W-CDMA systems.
z Because the handset relies on radio signals, it cannot be used in
a place with no signal (such as tunnels, underground or in
buildings), in places with a weak signal or outside the FOMA
service area. You may not use the handset in the upper floors of
a building even with no obstructions in sight. There may also be
times when the signal is strong and you are not moving but the call
is interrupted.
z Because the handset uses radio waves, it is possible for a third
party to listen in on a conversation. However, since the W-CDMA
systems automatically apply a private call feature to every call, a
third party that tries to listen in only hears noise.
z The handset converts conversations into a digital signal and
sends it to the other party over the radio. If the signal cannot be
reconverted properly by such as moving to an area with a weak
signal, the voice may not be heard correctly.
z Take notes of information (e.g. the phonebook, schedule, note,
voice memo, answering memo) stored on the handset or save the
information to external memory devices such as microSD Cards
and PCs periodically. DOCOMO shall not be liable for any loss of
content due to a failure, repair, model change or other handling of
the handset.
z As with PCs, some user-installed apps etc. may disrupt the
stability of your handset performance or unexpectedly transmit
information via the Internet causing improper use of your location
information, personal information stored on the handset, etc.
Therefore, verify the supplier and operating conditions of the apps
etc. to be used before using them.
z The handset supports the FOMA Plus-Area and the FOMA HIGH-
SPEED Area.
z When the available space on the microSD Card or the handset is
insufficient, apps in use may not work properly. In this case,
delete saved data.
z The handset does not support connection to i-mode website
(program), i-αppli, etc.
z The handset does not support providers other than sp-mode,
mopera U and Business mopera Internet.
z In the standby screen, z
(own number).
z The handset does not support Public Mode (Drive Mode).
z Setting the handset to the manner mode does not mute sounds
(camera shutter sound etc.) other than the ringtone, operation
sound, and various notification sounds.
z The handset automatically performs communication for some
functions, for example, to synchronize data, check the latest
software version or maintain connection with the server. Also,
making a communication with large-volume data such as
downloading apps or watching videos will lead to higher packet
communication charges. Subscription to Packet Pack/flat-rate
packet communication services is highly recommended.
z Software on the handset can be updated to up-to-date status
(nP.75 "Updating software").
z For details on software version of your handset nP.56 "Device
info"
z Secure the security of the handset by setting Screen lock in case
you lose it (nP.49 "Lock/security").
z If your handset is lost, change your password for each account
using a PC to prevent other persons from using services such as
SNS.
z Apps and their service contents are subject to change without
prior notice.
z For details on usage fees etc., refer to the DOCOMO website.
/
[Profile] to check your phone number
z The display is manufactured using high-precision technology, but
it may contain dots that fail to light or that remain permanently lit
on some areas. This is a characteristic of the display and not a
malfunction.
z Note that DOCOMO shall not guarantee operation of
commercially available optional parts.
2
Contents/Precautions
Page 5
Precautions (ALWAYS FOLLOW THESE DIRECTIONS)
z Before use, read these "Precautions" carefully and use your
handset properly.
Keep this manual in a safe place for future reference.
z These precautions contain information intended to prevent bodily
injury to the user and to surrounding people, as well as damage
to property, and must be observed at all times.
The following symbols indicate the different degrees of injury
or damage that may occur if information provided is not
observed and the handset is used improperly.
This symbol indicates that
Danger
Warning
Caution
The following symbols indicate specific directions.
Don't
No disassembly
No liquids
No wet
hands
Instruction
Unplug
"Precautions" is explained in the following seven sections.
z Handling the handset, battery pack, adapters, desktop holder and
docomo nano UIM card (general) . . . . . . . . . . . . . . . . . . . . . . P.3
z Handling the handset . . . . . . . . . . . . . . . . . . . . . . . . . . . . . . . P.4
z Handling the battery pack . . . . . . . . . . . . . . . . . . . . . . . . . . . . P.5
z Handling adapters or the desktop holder . . . . . . . . . . . . . . . . P.5
z Handling docomo nano UIM card . . . . . . . . . . . . . . . . . . . . . . P.6
z Handling near electronic medical equipment . . . . . . . . . . . . . P.6
z Material list . . . . . . . . . . . . . . . . . . . . . . . . . . . . . . . . . . . . . . . P.7
Indicates a prohibited action.
Indicates not to disassemble the device.
Indicates not to use the device near water or
get it wet.
Indicates not to handle the device with wet
hands.
Indicates that instructions specified are
compulsory (must be followed).
Indicates that the power cord must be
unplugged from the outlet.
"death or serious bodily injury
may directly and immediately
result from improper use".
This symbol indicates that
"death or serious bodily injury
may result from improper use".
This symbol indicates that
"minor injury and/or property
damage may result from
improper use".
Handling the handset, battery pack, adapters,
desktop holder and docomo nano UIM card
(general)
Danger
Do not use, store or leave the equipment in
locations subject to high temperatures (near a fire
or heating unit, in a kotatsu, under direct sunlight,
Don't
inside a vehicle on a hot day, etc.).
May cause fires, burns or bodily injury.
Do not place the equipment inside cooking
appliances such as microwave ovens or pressure
cookers.
Don't
May cause fires, burns, bodily injury or electric shock.
Do not attempt to disassemble or modify the
equipment.
No disassembly
No liquids
No liquids
Instruction
May cause fires, burns, bodily injury or electric shock.
Do not get the equipment wet with water, drinking
water, pet urine, sweat, etc.
May cause fires, burns, bodily injury or electric shock.
Refer to the following for details on waterproofness.
nP.9 "Waterproof"
Do not allow liquids (water, drinking water, pet
urine, sweat, etc.) to get inside the charger terminal
or external connector terminal.
May cause fires, burns, bodily injury or electric shock.
Refer to the following for details on waterproofness.
nP.9 "Waterproof"
Use only optional parts specified by NTT DOCOMO
for use with the handset.
May cause fires, burns, bodily injury or electric shock.
Warning
Do not subject the equipment to strong force or
impacts or throw it.
May cause fires, burns, bodily injury or electric shock.
Don't
Do not allow conductive materials (such as metal
objects and pencil lead) to come into contact with
the charger terminal or external connector terminal.
Don't
In addition, do not insert such objects.
May cause fires, burns, bodily injury or electric shock.
Do not cover or wrap the equipment with bedding
etc. when using or charging.
May cause fires or burns.
Don't
Be sure to turn off the handset and not to charge the
battery in locations such as gas stations where
Instruction
Instruction
flammable gas may be generated.
May cause a gas explosion or fire.
If you notice anything unusual, such as an unusual
odor, overheating, discoloration or deformation
during use, charging or storage, immediately follow
the instructions below.
z Unplug the power plug from the outlet or cigarette
lighter socket.
z Turn off the handset.
z Remove the battery pack from the handset.
May cause fires, burns, bodily injury or electric shock.
3
Contents/Precautions
Page 6
Caution
Do not leave the equipment on unstable surfaces,
such as on a wobbly table or sloped surface.
May fall and cause injury.
Don't
Do not store the equipment in locations that are
subject to humidity, dust or high temperatures.
May cause fires, burns or electric shock.
Don't
If being used by a child, have a guardian teach him/
her the proper handling procedures. In addition,
Instruction
Instruction
Instruction
check that the child is using the equipment as
directed.
May result in bodily injury etc.
Keep the equipment out of the reach of young
children.
A young child may swallow the equipment, or suffer bodily
injury or electric shock.
Be very careful when using the handset connected
to an adapter continuously for a long time.
The handset, battery pack or adapter may become warm if
you operate app, watch a video or TV, etc. for a long time
while charging.
Directly touching a warmed part for a long time may cause
redness, itching, rashes, etc. on your skin, or result in lowtemperature burns depending on your constitution or health
condition.
Handling the handset
Warning
Do not aim the infrared port towards the eyes.
May have harmful effects on the eyes.
Don't
Do not aim the infrared port towards home electric
appliances with an infrared device during infrared
communication.
Don't
May interfere with the operation of infrared devices and
cause an accident.
Do not allow water or other liquids, metal,
flammable material or other foreign objects to enter
the docomo nano UIM card slot or microSD Card
Don't
slot on the handset.
May cause fires, burns, bodily injury or electric shock.
Turn off the handset or set it to Airplane mode
before going aboard an airplane.
Instruction
Instruction
Since using the handset on airplanes is restricted, follow the
instructions given by the respective airlines.
May interfere with the operation of electronic devices
installed on the airplane.
If you commit a prohibited act while using the handset on an
airplane, you may be punished by law.
Follow the instructions given by the respective
medical facility regarding the use of the handset in
a hospital.
Turn off the handset in areas where the use of mobile
phones is prohibited.
May interfere with the operation of electronic devices and
electronic medical equipment.
Instruction
Instruction
Instruction
Instruction
Instruction
Don't
Don't
Don't
Don't
Keep the handset away from the ears during a call in
which hands-free is set or while the ringtone is
ringing.
When you attach the earphone/microphone etc. to
the handset to play games, music, etc., do not make
the volume too loud.
Excessively high volume may damage your hearing.
Also, it may prevent you from hearing ambient sounds and
cause an accident.
If you have a weak heart, take extra precautions
when setting functions such as the vibrator and
ringtone volume for incoming calls.
May have harmful effects on your heart.
If you are using electronic medical equipment etc.,
contact the respective manufacturer or dealer to
check whether the operation of the equipment is
affected by signals.
May interfere with the operation of electronic medical
equipment etc.
Turn off the handset near high-precision electronic
devices or devices that use weak electronic signals.
May interfere with the operation of electronic devices.
* Take particular care with the following devices
Hearing aids, implanted cardiac pacemakers, implanted
cardioverter-defibrillators or other electronic medical
equipment. Fire alarms, automatic doors, and other
equipment controlled by electronic signals. If you use an
implanted cardiac pacemaker, implanted cardioverterdefibrillator or other electronic medical equipment, contact
the respective manufacturer or dealer to check whether the
operation of the equipment is affected by signals.
If the display part or camera lens is damaged, be
careful of broken glass and the exposed inside of
the handset.
Tape is pasted on the back of the display while the surface
of the display and camera lens are made with plastic panel
so as to minimize the possibility of glass scattering.
However, touching the broken or exposed parts may cause
bodily injury.
Caution
Do not swing the handset by its strap etc.
May hit you or others around you, resulting in an accident
such as bodily injury.
Do not use a damaged handset.
May cause fires, burns, bodily injury or electric shock.
For using a motion sensor, check the safety around,
hold the handset and do not swing it more than
necessary.
May cause an accident such as bodily injury.
If the display is broken and the internal substance
such as liquid crystal then leaks, do not get the
internal substance on your skin (face, hands, etc.).
May result in loss of eyesight or harm to your skin.
If the internal substance such as liquid crystal comes into
contact with your eyes or mouth, immediately rinse the
contacted area with clean water and seek medical treatment.
If the internal substance such as liquid crystal comes into
contact with your skin or clothes, immediately wipe the
internal substance off with alcohol etc., and rinse the
contacted area with soap etc.
4
Contents/Precautions
Page 7
If you use the handset in a vehicle, contact the vehicle
manufacturer or dealer to check whether the operation
Instruction
Instruction
Instruction
Instruction
of the vehicle is affected by signals.
May interfere with the operation of electronic equipment in
some vehicle models. In this case, stop using the handset.
Use of the handset may cause itching, rashes,
eczema, etc. depending on your constitution or
health condition. If this occurs, immediately stop
using the handset and seek medical treatment.
For details on materials of each part nP.7 "Material list"
Do not get your finger or a strap caught when
opening/closing the handset.
May cause an accident such as bodily injury.
Look at the display in a well-lit place, keeping a
certain distance from the screen.
Otherwise, eyesight may be weakened.
Handling the battery pack
Check the type of battery using the information printed on the battery
pack label.
Label Battery type
Li-ion00 Lithium-ion battery
Caution
Do not dispose of the battery packs in ordinary
garbage.
May cause fires or damage to the environment. Place tape
Don't
over the terminals to insulate unnecessary battery packs,
and take them to a sales outlet such as a docomo Shop or
follow the instructions by a local institution that handles used
handsets.
Do not use or charge a wet battery pack.
The battery pack may catch fire, explode, overheat or leak.
Don't
If the battery fluid etc. leaks, do not get the liquid on
your skin (face, hands, etc.).
Instruction
Handling adapters or the desktop holder
May result in loss of eyesight or harm to your skin.
If the liquid etc. comes into contact with your eyes, mouth,
skin or clothes, immediately rinse the contacted area with
clean water.
If the liquid etc. comes into contact with your eyes or mouth,
seek medical treatment immediately after rinsing the
contacted area.
Don't
Don't
Don't
Don't
Instruction
Don't
Instruction
Instruction
Danger
Do not touch terminals with metallic objects such as
wires. In addition, do not carry or store the battery
pack with metallic necklaces, etc.
The battery pack may catch fire , explode, overheat or lea k.
Check that the battery pack is facing the correct
direction before you attach it to the handset. If you
are having difficulty fitting the battery pack to the
handset, do not use excessive pressure to force the
battery into place.
The battery pack may catch fire , explode, overheat or lea k.
Do not throw the handset into a fire or heat it.
The battery pack may catch fire , explode, overheat or lea k.
Do not apply excessive force on the handset such
as by puncturing it, hitting it with a hammer or
stepping on it.
The battery pack may catch fire , explode, overheat or lea k.
If the battery fluid etc. comes into contact with your
eyes, do not rub your eyes but immediately rinse
your eyes with clean water. Then seek prompt
medical treatment.
May result in loss of eyesight.
Warning
If any trouble such as a deformation or scratches
caused by a drop is found, never use it.
The battery pack may catch fire , explode, overheat or lea k.
If the battery pack leaks or emits an unusual odor,
immediately stop using the handset and move it
away from any naked flames or fire.
The battery fluid is flammable and could ignite, causing a fire
or explosion.
Prevent your pet from biting the battery pack.
The battery pack may catch fire , explode, overheat or lea k.
Warning
Do not use if the cord of the adapter is damaged.
May cause fires, burns or electric shock.
Don't
Never use the AC adapter and the desktop holder in
humid locations such as a bathroom.
May cause fires, burns or electric shock.
Don't
The DC adapter should only be used in negative
grounded vehicles. Never use it in positive
grounded vehicles.
Don't
May cause fires, burns or electric shock.
Do not touch adapters if you hear thunder.
May cause electric shock.
Don't
Do not short-circuit the charger terminal when
connected to an outlet or cigarette lighter socket.
Also, do not allow any part of your body (hands,
Don't
fingers, etc.) to come into contact with the charger
terminal.
May cause fires, burns or electric shock.
Do not place heavy objects on the cord of the
adapter.
May cause fires, burns or electric shock.
Don't
When plugging/unplugging an AC adapter into/from
the outlet, do not allow metallic straps or other
metallic objects to come into contact with the
Don't
prongs of the plug.
May cause fires, burns or electric shock.
Do not apply excessive force on an adapter by
moving it up/down or to the left/right with the
adapter connected to the handset.
Don't
May cause fires, burns, bodily injury or electric shock.
5
Contents/Precautions
Page 8
Don't
No wet
hands
Instruction
Instruction
Instruction
Instruction
Instruction
Instruction
Unplug
Unplug
Unplug
Never try to connect the microUSB plug when the
handset or AC adapter is wet.
Inserting the microUSB plug while the equipment is wet may
cause short circuit when you charge the battery and lead to
abnormal overheat, malfunction, fires or burns due to water,
foreign objects, etc. adhering to the handset or microUSB
plug though the handset provides waterproof performan ce.
Do not handle the cord or charger terminal of the
adapters, the desktop holder or outlet with wet
hands.
May cause fires, burns or electric shock.
Always use the specified power supply and voltage.
When using overseas, use the AC adapter that is
available overseas.
Using the incorrect voltage may cause fires, burns or electric
shock.
AC adapter: 100V AC
DC adapter: 12/24V DC (for negative grounded vehicles
only)
AC adapter available overseas: 100 to 240V AC (Connect
only with a household AC outlet)
If the fuse in the DC adapter blows, always replace it
with a specified fuse.
May cause fires, burns or electric shock. Refer to the
respective manuals for information on specified fuses.
Wipe off any dust on the power plug.
May cause fires, burns or electric shock.
Fully plug the AC adapter into the outlet.
May cause fires, burns or electric shock.
Always grasp the adapters when unplugging the
power plug from the outlet or cigarette lighter
socket. Do not forcibly pull by the cord of the
adapter.
May cause fires, burns or electric shock.
When plugging/unplugging an adapter into/from the
handset, plug/unplug the adapter horizontally and
straightly, not applying excessive force on it.
May cause fires, burns, bodily injury or electric shock.
Unplug the power plug from the outlet or cigarette
lighter socket when not using for a long time.
May cause fires, burns or electric shock.
Should water or other liquids enter the equipment,
remove the power plug from the outlet or cigarette
lighter socket immediately.
May cause fires, burns or electric shock.
Always unplug the power plug from the outlet or
cigarette lighter socket before cleaning the
equipment.
May cause fires, burns or electric shock.
Handling docomo nano UIM card
Caution
Be careful with the cutting surface when handling
the docomo nano UIM card.
Instruction
May cause bodily injury.
Handling near electronic medical equipment
Warning
If you have electronic medical equipment such as an
implanted cardiac pacemaker or an implanted
Instruction
Instruction
Instruction
Instruction
cardioverter-defibrillator, always carry or use your
handset at least 15 cm away from your implant.
Electromagnetic signals may have harmful effects on the
operation of the electronic medical equipment.
Patients receiving medical treatment away from a
medical facility (e.g. home treatment) who are using
electronic medical equipment other than implanted
cardiac pacemakers or implanted cardioverterdefibrillators should consult the respective
manufacturers etc. for information regarding the
effects of signals on the equipment.
Electromagnetic signals may have harmful effects on the
operation of the electronic medical equipment.
If there is any chance that the distance between the
handset and a person closest to you may get
shorter than 15 cm such as when you cannot freely
move around, set the handset not to emit radio wave
in advance (by setting Airplane mode, turning the
power off, etc.).
Somebody nearby may be equipped with electronic medical
equipment such as an implanted cardiac pacemaker or an
implanted cardioverter-defibrillator. Electromagnetic signals
may have harmful effects on the operation of the electronic
medical equipment.
Follow the instructions given by the respective
medical facilities regarding the use of the handset
on their premises.
Caution
Do not touch an adapter for a long time when
connected to an outlet or cigarette lighter socket.
May result in burns etc.
Don't
6
Contents/Precautions
Page 9
Material list
Handset
Part Material/Surface treatment
Main display
side
Sub display
side
Side surface of
main display
side
Side surface of
Surface of the
handset
Camera panel PC, PMMA resin/Hard coating
Operation key (including
ornament)
Side Key PC resin/UV coating
Quick open button
Charging terminal SUS/au plating
External connector terminal Copper alloy/Gold plating
Infrared port ABS resin/Hard coating
microSD Card
slot
docomo nano UIM card tray POM
Battery storage
side
Battery storage
section
Battery terminal
Fitting cover UV cured resin
sub display
side
Keyboard side UV cured resin
Side surface of
keyboard side
Back of
keyboard side
Hinge
Side surface of
hinge section
Metal part STAINLESS
Resin section LCP
Sticker PET
Resin section PC+ABS-GF20 resin
Metal part Nickel silver
Surrounding
area of battery
storage section
Screw SUS/Passivation coating
Battery terminal
connector
Battery terminal Copper alloy/Gold plating
PC, PMMA resin/Hard coating
PC, PMMA resin/Hard coating
Polyamide resin with glass/UV
coating
Aluminum/Anodizing
Polyamide resin with glass/UV
coating
PC+ABS-GF20 resin/UV coating
Polyamide resin with glass/UV
coating
ABS resin/UV coating
UV cured resin
PC resin
Aluminum/Anodizing
PC+ABS-GF20 resin
PA4T
Back Cover SH74
Part Material/Surface treatment
Back cover PC+ABS-GF20 resin/UV coating
Gasket EPDM/Low friction coating
Battery Pack SH43
Part Material/Surface treatment
Battery pack PC resin
Terminal section Copper alloy/Gold plating
Water wet determination seal High quality paper/PET
Label PET/mat varnish paper
Desktop Holder SH48
Part Material/Surface treatment
Desktop holder (top case/bottom
case)
Terminal lever POM resin
Lock lever POM resin
Charging terminal Phosphor bronze/Gold plating
Metal section of connecting
terminal
Screw
Rubber base Foamed urethane
Production lot label Polyester film
ABS resin/Grain finish
SUS
Carbon steel for cold heading/
Trivalent black chromate
Handling precautions
General notes
z SH-06G is waterproof, however, do not allow water to get
inside the handset and do not allow accessories or optional
parts to get wet.
The battery pack, adapter, desktop holder and docomo nano UIM
card are not waterproof. Do not use in humid or steamy areas
such as bathrooms and avoid exposing to rain and other forms of
moisture. If they are carried close to the skin, perspiration may
cause internal components to corrode and result in malfunction.
Note that if a problem is found to be due to moisture, the handset
and parts are not covered by warranty and in some cases may be
irreparable. Even when repairs are possible, repair charges will
be incurred, since the damage is not covered by warranty.
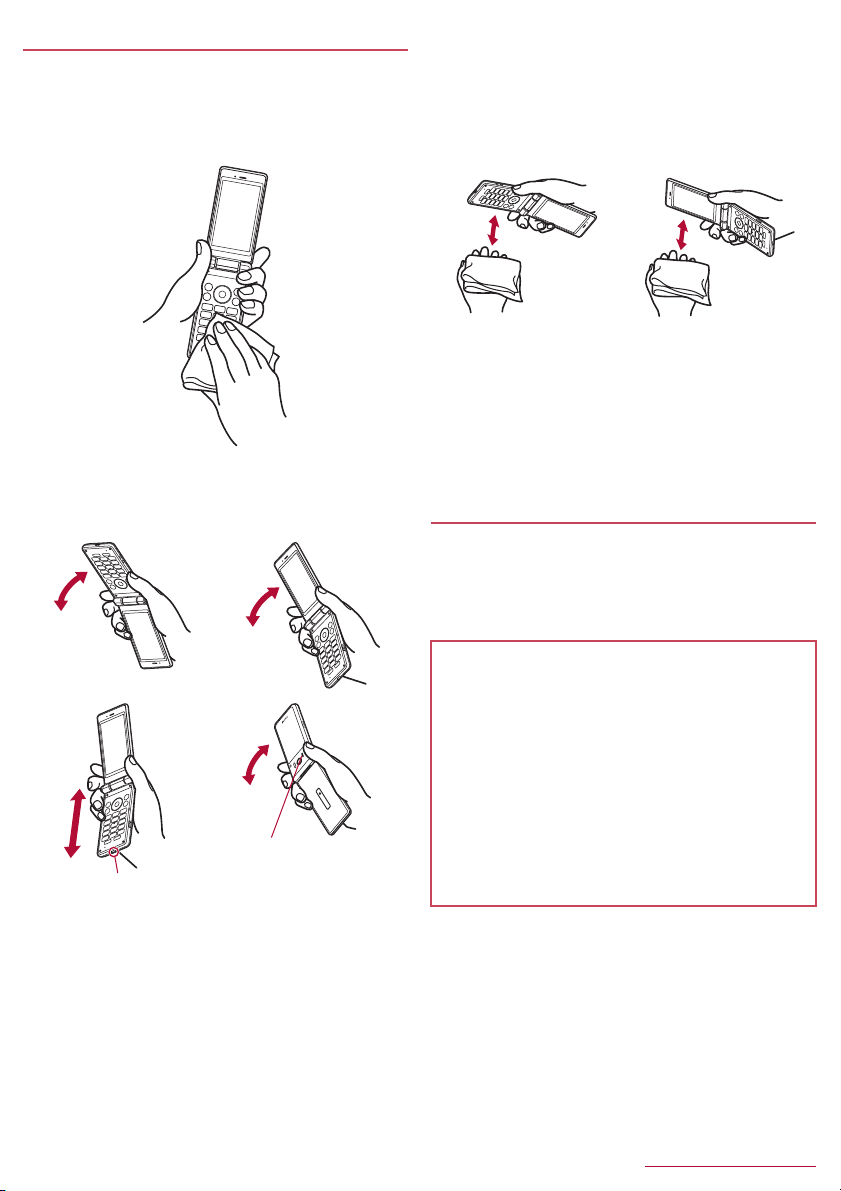
z Clean only with a soft and dry cloth (such as the type used
for eyeglasses).
・ Forceful rubbing of the display with a dry cloth etc. may scratch
its surface.
・ Water drops, dirt, etc. left on the display may cause stains to
form on its surface.
・ Never use chemicals such as alcohol, thinners, benzene or
detergents, as these agents may erase the printing or cause
discoloration.
z Occasionally clean terminals with a dry cotton swab etc.
Dirty terminals may result in poor connections and loss of power
or insufficient battery charge. Keep the terminals clean with a dry
cotton swab etc.
Be careful with the terminals while cleaning them.
7
Contents/Precautions
Page 10

z Do not place the equipment near an air conditioning vent.
Condensation formed due to rapid changes in temperature may
cause internal corrosion and lead to a malfunction.
z Do not apply excessive force on the handset, battery pack,
etc. when using it.
Carrying the equipment in a tightly packed bag or sitting on it put
in your pocket may cause damage to the display, internal
components, battery pack, etc. or result in a malfunction.
Keeping an external connector device plugged into the external
connector terminal may cause damage or a malfunction.
z Do not rub or scratch the display with metal etc.
May scratch it and cause a malfunction or damage.
z Read the respective user’s guides supplied with supported
optional parts carefully.
Notes about the handset
z Avoid using the handset in extremely high or low
temperatures.
Use the handset within the range of a temperature between 5℃
and 35℃ and a humidity between 45% and 85%.
z Using the handset close to land-line phones, TVs, radios, etc.
may have harmful effects on the operation of such
equipment. Move as far away as possible from such items
before use.
z Keep a separate memo noting information stored on the
handset.
DOCOMO shall not be liable for any loss of content.
z Do not drop or otherwise subject the handset to severe
impact.
May cause a malfunction or damage.
z When connecting an external connector device to the
external connector terminal, do not put it in obliquely and do
not pull it while it is plugged in.
May cause a malfunction or damage.
z Do not close the handset on strap, etc.
May cause a malfunction or damage.
z The handset becomes warm during use or charging but this
is not a malfunction.
z Do not leave the camera in direct sunlight.
May cause discoloration or burn-in of pixels.
z Do not use the handset without the back cover.
May detach the battery pack or cause malfunction or damage.
z Do not cover the surface of the display or keys with an
extremely thick sticker.
May cause a malfunction, damage or error.
z Do not turn off the handset when microSD card is used.
May cause data loss or a malfunction.
z Never place a magnetic card near the handset or pinch it.
The stored magnetic data in cash cards, credit cards, telephone
cards, floppy disks, etc. may be erased.
z Never place magnetized items near the handset.
Putting highly magnetized items closer may cause an error.
z The surface of the handset uses the aluminum material. Note
that dent and abrasion are easily remained as aluminum is a
soft material.
Notes about battery pack
z Battery pack is a consumable product.
Though the battery life varies with use, change the battery pack if
the battery life is extremely short even after being fully charged.
Purchase a specified new battery pack.
z Charge battery in areas where ambient temperature is
between 5℃ and 35℃.
z The battery life depends on the usage and deterioration of
the battery pack.
z Depending on usage, the battery pack may swell as it
approaches the end of its service life but this will not cause
problems.
z Avoid the following situations when the battery pack is
stored.
■ Storage with the battery fully charged (immediately after
charging is completed)
■ Storage with no battery level (cannot turn the handset on)
May lower the performance or shorten the usable life of the
battery pack.
Approximately 40% is recommended as the proper battery level
for storage.
Notes about adapters
z Charge battery in areas where ambient temperature is
between 5℃ and 35℃.
z Do not charge the battery in the following locations.
■ Areas with high humidity or dust, or in areas exposed to
frequent vibrations
■ Close to land-line phones, TVs, radios, etc.
z Adapters may become warm during charging but this is not
a malfunction.
z Do not use the DC adapter to charge the battery when the car
engine is not running.
May cause the car battery to run down.
z When using an outlet with a feature to prevent the plug from
being removed accidentally, follow the instructions in the
outlet user's guide.
z Do not subject to strong impacts. Also, do not deform the
charger terminals.
May cause malfunction.
Notes about docomo nano UIM card
z Do not apply unnecessary force when inserting/removing the
docomo nano UIM card.
z Customer is responsible for malfunctions arising from
inserting docomo nano UIM card into a different IC card
reader/writer etc.
z Always keep IC area clean.
z Clean only with a soft and dry cloth (such as the type used
for eyeglasses).
z Keep a separate memo and note information stored on the
docomo nano UIM card.
DOCOMO shall not be liable for any loss of content.
z To protect the environment, please take any unneeded
docomo nano UIM cards to a sales outlet such as a docomo
Shop.
z Do not damage, touch haphazardly or short-circuit the IC.
May cause data loss or a malfunction.
z Do not drop or otherwise subject the docomo nano UIM card
to severe impact.
May cause malfunction.
z Never bend the docomo nano UIM card or place heavy
objects on it.
May cause malfunction.
z Do not insert the docomo nano UIM card to the handset with
a label, sticker, etc. attached on the card.
May cause malfunction.
8
Contents/Precautions
Page 11
Notes on using Bluetooth function
z The handset supports the security function that meets the
Bluetooth specification for security during communication
using Bluetooth functions. However, the security may not be
sufficient depending on the configuration etc. Take care of
the security while making communication using Bluetooth
function.
z Even if any leak of data or information occurs while making
communication using Bluetooth function, DOCOMO shall
not be liable for any loss of content.
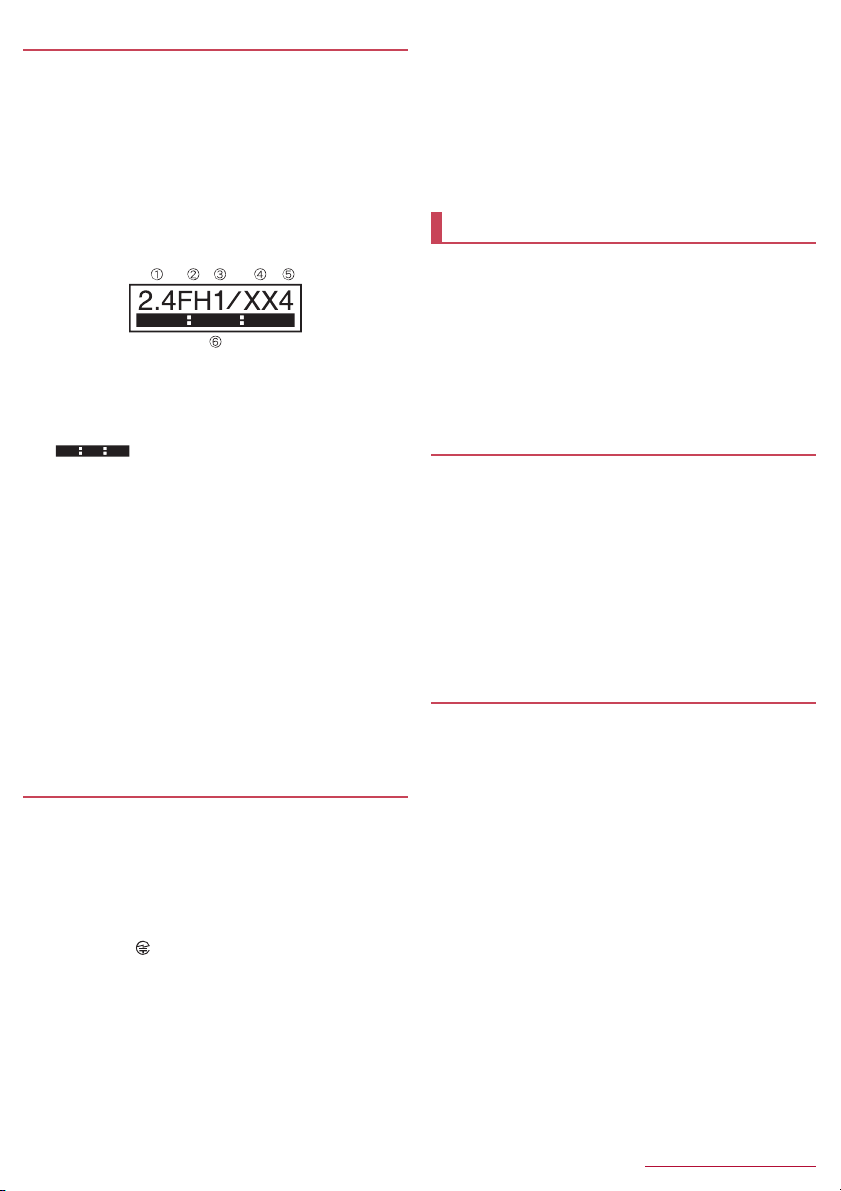
z Radio frequencies
The radio frequencies the Bluetooth function of the handset
uses are as follows.
① 2.4: This radio equipment uses the 2,400 MHz band.
② FH: The modulation system is the FH-SS system.
③ 1: The estimated coverage distance is 10 m or less.
④ XX: Another modulation system is used.
⑤ 4: The estimated coverage distance is 40m or less.
⑥ : All radio frequencies between 2,400 MHz and
2,483.5 MHz are used and the frequencies for mobile object
identifiers cannot be avoided.
z Cautions on using Bluetooth devices
Bluetooth operates at radio frequencies assigned to the inhouse radio stations for a mobile object identifier that have
to be licensed and are used in production lines of a factory,
specific unlicensed low power radio stations, and amateur
radio stations (hereafter, referred to as "another radio
station") in addition to industrial, scientific and medical
devices or home electric appliances such as microwave
ovens.
1. Before using the handset, make sure that "another radio
station" is not operating nearby.
2. If radio interference between the handset and "another
radio station" occurs, avoid interference by moving
immediately to another place or "turning off the power".
3. Contact the number listed in "General Inquiries" on the
last page for further details.
Caution
z Never use the handset that is modified. Using a modified
device violates the Radio Law and/or the
Telecommunications Business Law.
The handset follows the regulations regarding the certification of
conformity with technical regulations for specific radio stations
etc. based on the Radio Law and authentication of conformity with
technical regulations for devices etc. based on the
Telecommunications Business Law, and the "Technical
Conformity Mark " can be displayed on the nameplate of the
handset as a proof.
If the screws of the handset are removed and a modification is
given to the inside, the certification of conformity with technical
regulations etc. will become invalid.
Never use the handset without the valid certification etc. Doing so
violates the Radio Law and/or the Telecommunications Business
Law.
z Be careful when using the handset while driving a motor
vehicle.
Using the handset in hand while driving is regarded as a
punishable act.
However, the punishment has no application in some cases such
as when rescuing sick and injured people or maintaining public
safety.
z Never change the basic software improperly.
This may be regarded as a conversion of software and repairs
may be refused.
Waterproof
*1
SH-06G is waterproof to IPX5
cover is attached.
*1 IPX5 means that phone keeps functioning after being
subjected to a jet flow (12.5 liters/min) discharged from a
nozzle (inner diameter: 6.3 mm), from all directions
(approximately 3 m from the handset) for 3 minutes or more.
*2 IPX7 means that SH-06G phone keeps functioning after it is
slowly submerged to depth of 1 m in static tap water at room
temperature, left there for approximately 30 minutes and then
taken out.
What you can do with waterproof of SH-06G
z You can call and watch TV without using an umbrella in the rain
(for rainfall of approximately 20 mm per hour).
z You can rinse off dirt from the handset. Wash the handset with
low-pressure water flow (6 liters/min or lower and tap water at
room temperature (between 5℃ and 35 ℃)), holding it
approximately 10 cm below faucet or shower head. Wash by
using only your hands, not a brush or sponge, with the back cover
attached. Drain the handset before use (nP.11 "Draining water
when the handset gets wet").
z You can use the handset at a poolside. Do not throw water in a
swimming pool on the handset or soak the handset in the water of
a swimming pool.
Things to keep in mind
To maintain waterproof performance, check the followings.
z Securely close the back cover. Be careful not to apply excessive
force on the rubber gasket when opening and closing.
z Make sure that the back cover is completely closed without
floating.
z To maintain waterproof performance, the handset has the back
cover that allows you to close securely. Note that opening it
forcibly may cause injuries to your nails, fingers, etc.
, IPX7*2 standards if the back
9
Contents/Precautions
Page 12
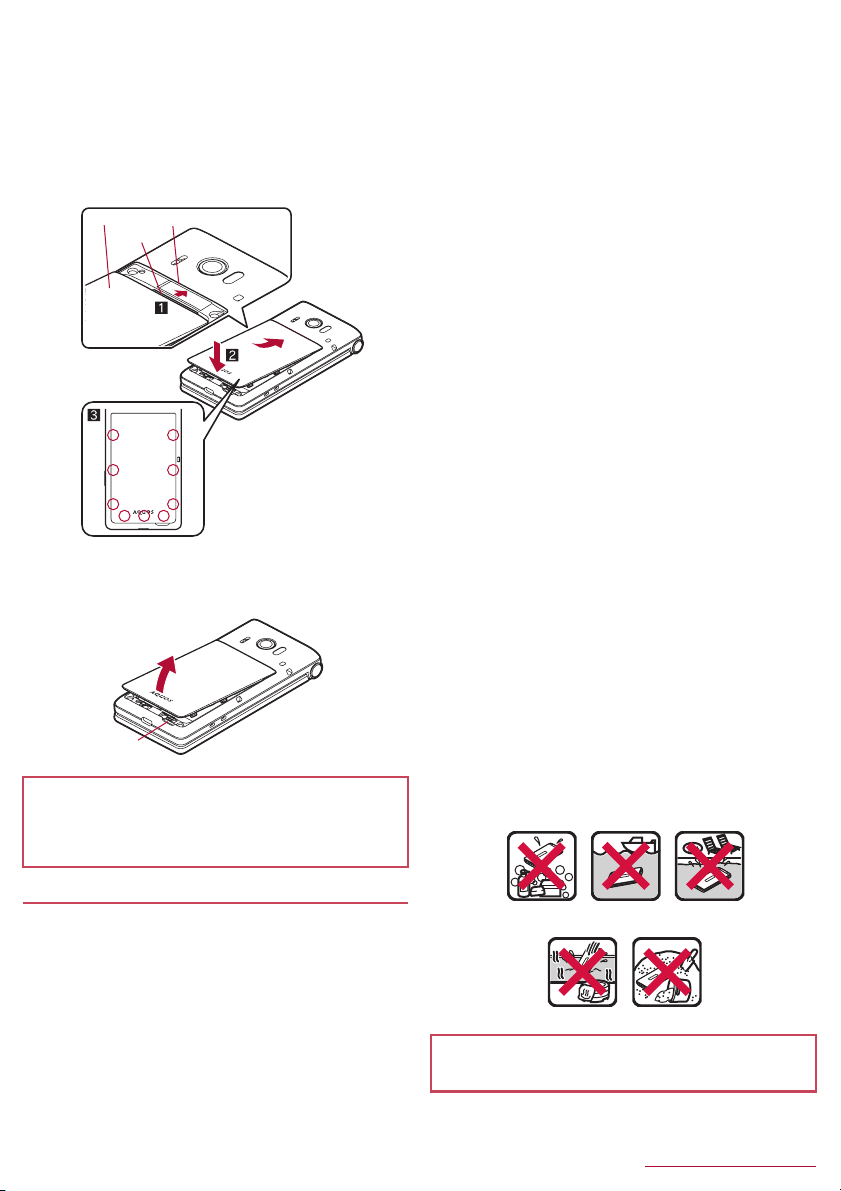
■ Installing the back cover
Insert the tab of the top of the back cover into
1
the handset slot (1), attach it in the direction of
the arrow (2) and securely push down with
both hands (3)
z The back of the back cover has also nine tabs to insert the
back cover. Securely push tab areas down with both hands so
that gaps are not left between the handset and the back
cover.
Back cover Slot
Ta b
Securely push down
each tab point with
both hands
■ Removing back cover
Hook the tip of a finger into the handset slot to
1
remove the back cover upward
Slot
z To maintain waterproof performance, replacement of parts is
recommended every 2 years regardless of whether the handset
appears normal or abnormal. DOCOMO replaces the parts as a
chargeable service. Bring the handset to a repair counter that
DOCOMO specifies.
z The rubber gasket of the contact surface between the main body
and the back cover plays an important role in maintaining
waterproof performance. Do not remove or scratch it. Also,
prevent dust from adhering to it.
If the rubber gasket is damaged or deformed, contact a repair
counter that DOCOMO specifies.
z Do not insert a pointed object through the back cover gaps. It may
cause damage to the rubber gasket and allow water to get inside.
z If the back cover is damaged, replace it. Water may seep inside
from a damaged section causing troubles such as electric shocks
or corrosion of the battery.
z Do not use the handset underwater (including opening/closing
and key operations). May cause malfunction.
z Do not directly apply water flow stronger than allowed (nP.9
"What you can do with waterproof of SH-06G") (over 6 liters/min).
May cause malfunction though SH-06G provides waterproof
performance of IPX5.
z Do not let the handset get wet with liquids other than water at
room temperature (between 5℃ and 35 ℃) or do not soak the
handset in the liquids. If you let the handset get wet with liquids
other than water at room temperature or soak the handset in the
liquids, stop using the handset and wash it with water at room
temperature.
z Do not wash the handset in a washing machine etc.
z To prevent condensation, do not bring the handset from a cold
place to a warm place without letting the handset warmed to room
temperature.
z Never soak the handset in hot spring water or water containing
soap, detergent or bath powder.
z Do not soak the handset in hot water, use it in a sauna or apply
hot air (from a hair dryer etc.) to it.
z Do not soak the handset in seawater.
z Do not put the handset directly on sand/dirt.
z Do not leave the handset wet. In cold places, water may freeze
and cause malfunction.
z The handset does not float on water.
z Do not let the handset fall. It may become scratched and cause
the waterproof performance to degrade.
z Do not leave water on the mouthpiece/microphone, earpiece or
speaker. Such water may interfere with talking.
z Do not poke the mouthpiece/microphone, earpiece, speaker, air
hole, external connector terminal, etc. with a pointed object.
z Accessories and optional parts are not waterproof. Do not use
them if the handset is inserted into the desktop holder in rooms
where water is regularly in use such as bathroom, shower room,
kitchen or lavatory even when AC adapter (sold separately) is not
connected to.
Precautions
z When your hands or the handset is wet, do not attach/remove the
back cover.
z Securely close the back cover. Even a fine obstacle (one hair, one
grain of sand, tiny fiber, etc.) put between contact surfaces may
allow water to get inside.
z If the handset gets wet with water or other liquids with the back
cover opened, the liquid may get inside causing electric shocks or
malfunction. Stop using the handset, turn off the power, remove
the back cover from the handset and contact a repair counter that
DOCOMO specifies.
Soap/Detergent/
Bath powder
z DOCOMO does not guarantee actual operations under all
states. Malfunctions deemed to be caused by inappropriate
operation by the customer are not covered by the warranty.
Seawater
Hot spring
10
Swimming
pool
Sand/Dirt
Contents/Precautions
Page 13
Draining water when the handset gets wet
When the handset is wet, water may flow out after wiping it off.
Drain the water by following the steps below.
Wipe off water on the handset surface with dry
1
and clean cloth etc.
z If a strap is attached, dry the strap as well.
Shake the handset approximately 20 times,
2
securely holding on the hinge section, until
there is no more water splattering
Softly press the handset against dry and clean
3
cloth etc. to wipe off water remaining in the
grooves of the mouthpiece/microphone,
earpiece, speaker, keys, air hole, hinge section,
external connector terminal, strap hole, etc.
z Pat the opening with cloth etc. to remove water because there
may be any water remaining in the grooves of each part.
Wipe off water oozing from the handset with dry
4
and clean cloth etc. and leave it for a while to dry
it
z Water, if any, remaining in the main body may ooze after
wiping off.
z Pat the opening with cloth etc. again to remove water because
you may not be able to hear sounds well if drainage is
insufficient.
Charging
Accessories and optional parts are not waterproof. Check the
followings before and after charging.
z Make sure that the handset is not wet. If the handset is wet or after
the handset is wet, adequately drain it and wipe off water with dry
and clean cloth etc. then leave it for a while to dry it before
inserting to the desktop holder.
To drain water off the external
connector terminal, shake the
handset with the external
connector terminal turned
down
To drain water off the speaker,
shake the handset with the
speaker turned up
Warning
Never try to connect the microUSB plug when the handset is
wet.
z Inserting the microUSB plug while the equipment is wet may
cause short circuit when you charge the battery and lead to
abnormal overheat, malfunction, fires or burns due to water,
foreign objects, etc. adhering to the handset or microUSB plug
though the handset provides waterproof performance.
z Do not touch an AC adapter (sold separately) or desktop holder
with your hands wet. May cause electric shock.
z Do not use the AC adapter or desktop holder in a place subject
to water. Do not use it in rooms where water is regularly in use
such as bathroom, shower room, kitchen or lavatory. May cause
fires or electric shock.
11
Contents/Precautions
Page 14
Before Using the Handset
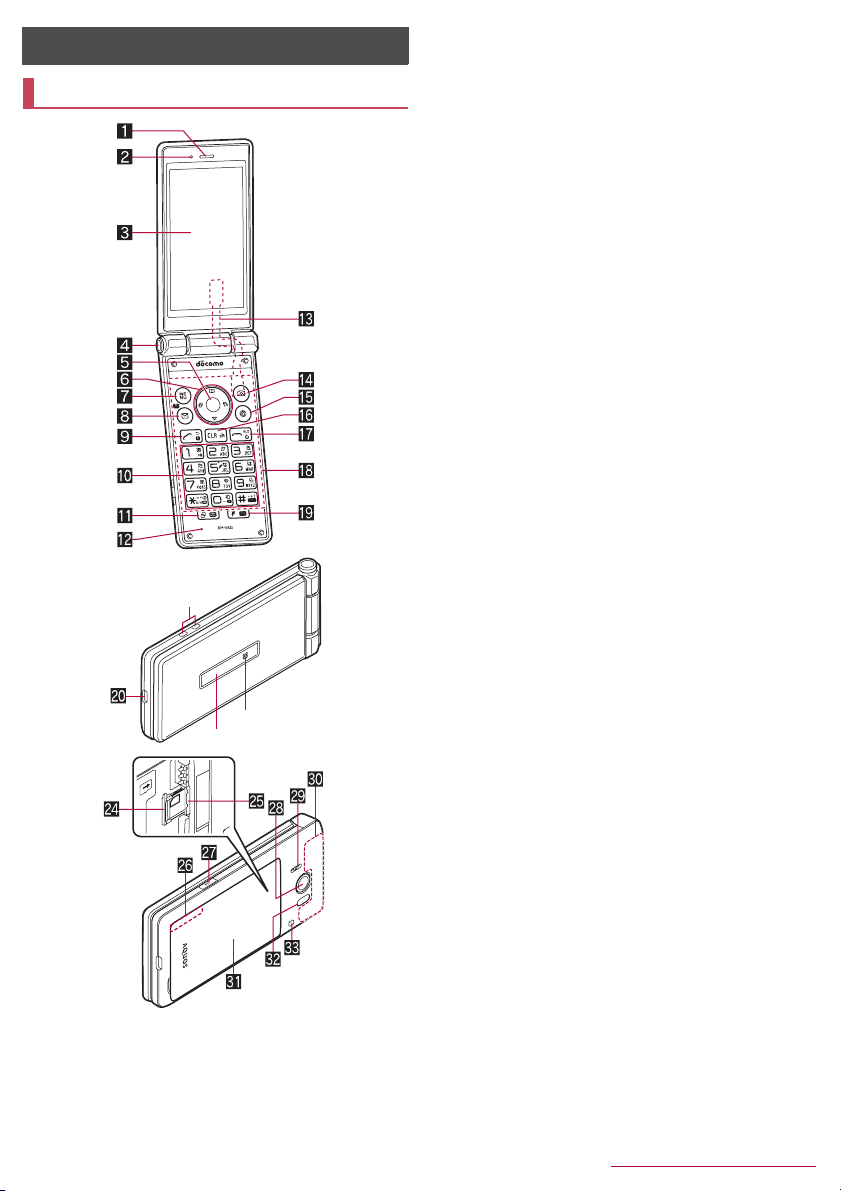
Part names and functions
l
n
m
1 Earpiece
z Use to hear the other party's voice during a call, or playback of
answering memo.
2 Air vent
z Use to ventilate air in the handset.
3 Main display
4 Quick open button
z Press the button to open the handset.
5 t: Center key
z Use to select/determine an item.
z Press in the standby screen to activate focus mode.
6 qrop: Direction key
z Use to move the cursor to select an item.
z May be described as u, v, w in operation steps.
z Press the following keys in the standby screen to activate the
following functions.
・ q: Displays Call history list
・ r: Displays Redial list
・ o: Displays the phonebook
・ p: Use the focus mode
7 z: MENU key
z Use to display the menu, or use menu function in the operation
guidance.
8 m: Mail key
z Use to activate mail app, or use menu function in the operation
guidance.
z Press for at least 1 second in the standby screen to check new
mails.
9 s: Call key
z Use to place/receive calls.
z Press in the standby screen to display the dial screen.
z Press for at least 1 second to enable/disable the TOUCH
CRUISER EX when you use the corresponding function or
app.
a 1 - 9, *, 0, #: Dial keys
z Use to enter phone numbers or characters.
z As for Normal menu, press the dial key (1, 2, 3, etc.)
corresponding the item number for the menu to select function
or app.
z Press the following keys for at least 1 second in the standby
screen to activate the following functions.
・ 4: Bluetooth ON/OFF
・ 5: Power saving mode ON/OFF
・ 9: Enables infrared communication
・ 0: Enters "+"
・ *: Activates/cancels drive manner
・ #: Displays the setting menu for the manner mode
b $: History key
z Displays recently used app history.
z Press for at least 1 second to enable/disable the peep
prevention.
c Mouthpiece/Microphone
z Use to emit your voice during a call, or use when recording
sound.
d TV antenna
e C: Camera key
z Use to activate the camera, or use menu function in the
f i: Browser key
z Use to activate the browser, or use menu function in the
g c: Clear key
z Deletes entered characters or numbers, or returns to the
z Press in the standby screen to display a channel list.
*
operation guidance.
operation guidance.
previous screen.
12
Before Using the Handset
Page 15
h H: Power/End key
z Press for at least 2 seconds to turn the power on.
z Press for at least 1 second to turn the power off, set/cancel the
airplane mode or manner mode.
z Ends running function and display the standby screen.
z Press while a call is incoming to put the call on hold.
i Touch area (TOUCH CRUISER EX)
z Touch the handset touch area with your finger to operate like
using a touch pad.
j y: Favorites key
z Displays the Favorites list.
z Press for at least 1 second to activate TV.
k External connector terminal
z Use to charge the battery or connect a PC.
l Charging terminal
z Use to charge the battery with included desktop holder.
m Sub display
n Incoming/Charging lamp
z Lights/Blinks when incoming or charging.
o docomo nano UIM card tray/slot
p microSD Card slot
q GPS/Bluetooth antenna
r &: Side key
z Press this key while the camera is activated to shoot still
pictures or videos.
z Press with the handset closed to display clock, battery level,
notifications, etc. on the sub display.
z Press for at least 1 second with the handset closed to set/
cancel manner mode. When setting, manner mode type is the
one which is previously set.
s Camera
z Use to shoot still pictures or videos.
t Speaker
z Emits ringtone, music sound, or the other party's voice during
a hands-free call.
u FOMA antenna
v Back cover
w Infrared port
z Use for infrared communication.
x Strap hole
* The antenna is built into the main body. Covering the antenna
area with your hand may influence the quality.
*
*
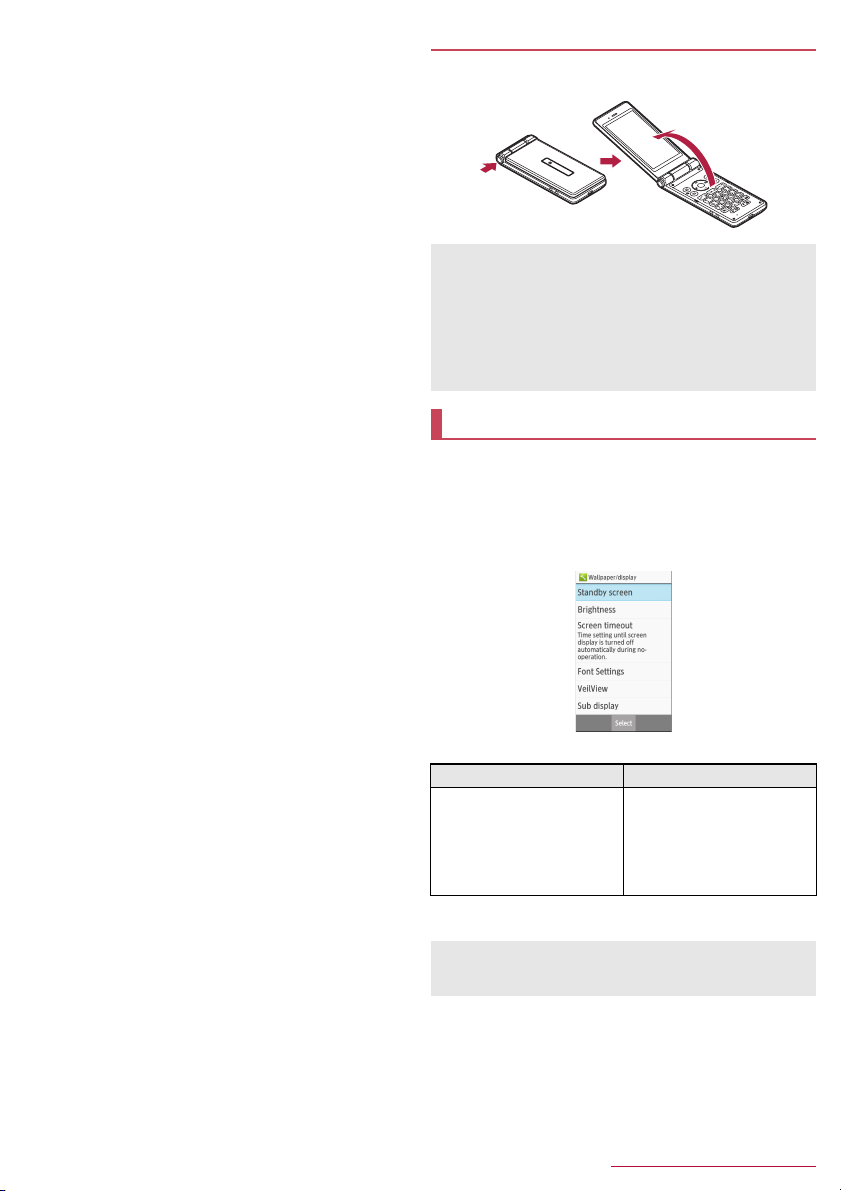
Quick open button
Press the button to open the handset.
z You can also open the handset without pressing the button.
z Hold the handset with your hand to operate. Do not open the
handset nearby your face, a person, or object. Also, take care
not to drop the handset by opening recoil.
z The handset may not be opened when you press the quick open
button depending on the handset orientation.
z To close the handset, use your hands. If you cannot close the
handset, once open the handset completely, then close the
handset again.
Basic operation
The followings describe basic operations of the handset such
as selecting items, or viewing screen display or icons.
■ Selecting an item (moving the cursor)
Use w to point the cursor to an item, and then press t to select the
item. An item that the cursor is pointed to is marked with a frame or
whose color is changed.
z Description of operation steps and the meaning are as follows.
Description Meaning
/
In the standby screen, z
[Settings]/[Wallpaper/display]
In this manual, for the operation ended with t pressed after an item
z
is selected/entered, pressing
z The explanations in this manual are based on the default status
of handset. The actual menu and items may differ depending on
the settings you made.
In the standby screen, press
z/point the cursor to [Settings]
using w and then press t
point the cursor to [Wallpaper/
display] using u and then press
t
t
description is omitted.
/
13
Before Using the Handset
Page 16
■ Menu operations
In the standby screen, pressing z displays Normal menu/Simple
menu with which you can set or change functions, or activate apps.
z For the menu nP.69 "Menu list"
z Select with w, or in Normal menu, press a dial key corresponding
to the menu item number (1, 2, 3, etc.) to select the menu
item.
z Press c to return to the previous screen.
z Press H to return to the standby screen.
Switching the menu screen
Switch the menu screen between Normal menu and Simple menu.
In the standby screen, z/C/[Yes]
1
[Yes]/[No]
2
z When the confirmation screen for font size is displayed, select
the font size.
Normal menu Simple menu
■ Operation guidance
Operation guidance displays menu or functions that can be operated
by pressing the function key (z, m, C, i), or the select key
(t).
z Displayed items vary by screen.
z Ct
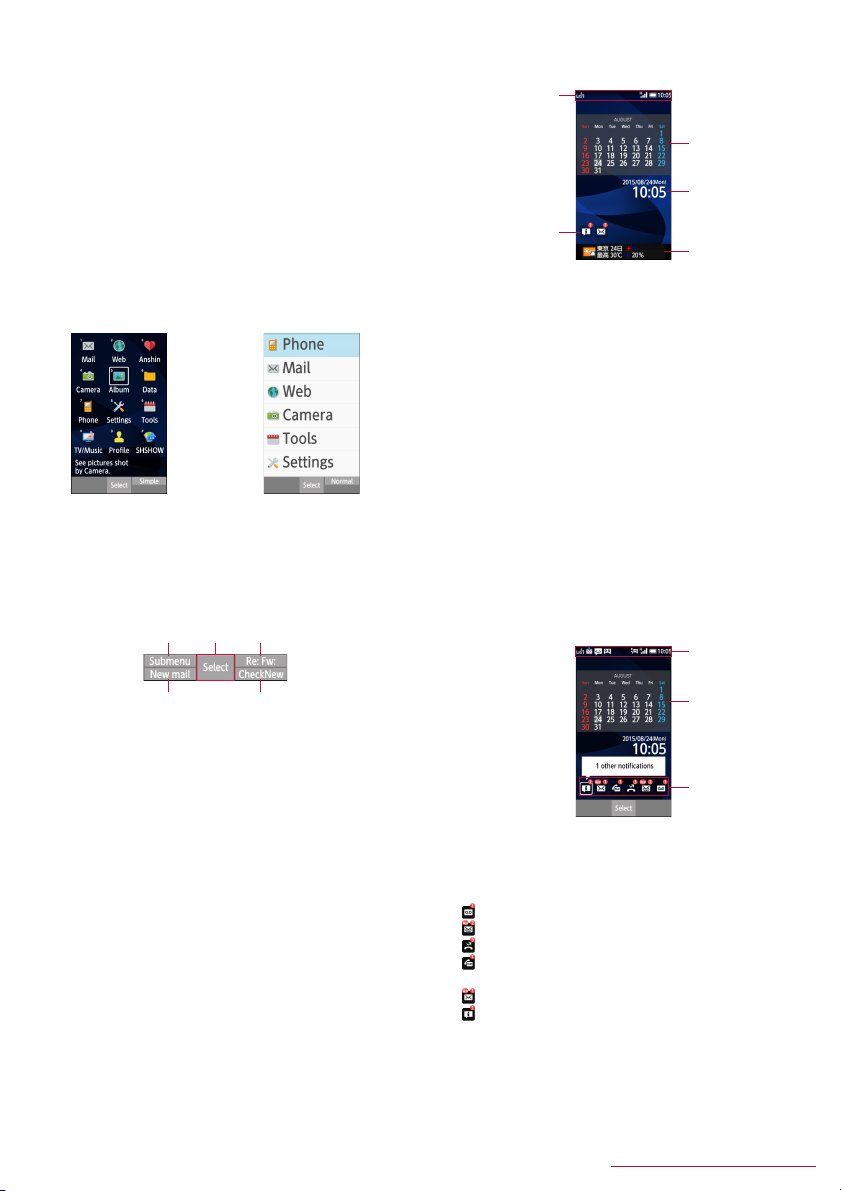
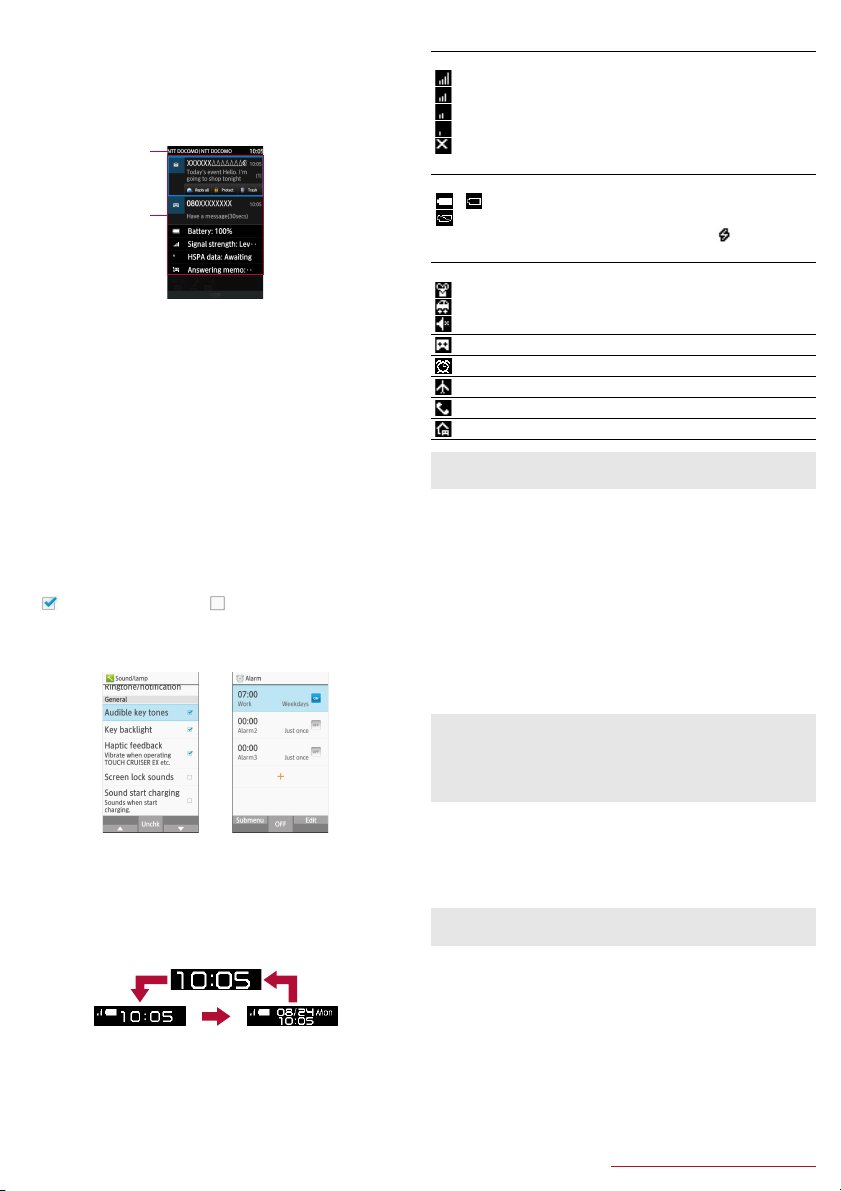
■ Viewing standby screen
In the standby screen, you can check the current status and new
arrival information.
1
3
4
2
1 Status bar
z Various information such as handset status or notifications is
displayed.
2 Stock icon
z Appears when there is a missed call or new mail.
3 Calendar
4 Clock
5 i-channel ticker
z i-channel information appears automatically for i-channel
subscribers.
5
■ Using the focus mode
Select the status bar, calendar or stock icon on the standby screen
to activate the corresponding app or check the information.
In the standby screen, p/t
1
z Focus mode activates.
Select status bar/calendar/stock icon
2
z To cancel the focus mode: c/H
z In the focus mode, displaying the menu by pressing z is
unavailable.
Status bar
m i
z Main menu or functions are as follows.
■ Done: Determine a selected item
■ Submenu: Display submenu (available functions)
■ Back: Go back to the previous screen
■ Close: Close the submenu etc.
■ Check all/UnchkAll: Select/Cancel selecting all items
■ View: Display a selected image etc.
■ Play/Stop: Play/Stop video or music
■ Full: Display a selected image etc. in full screen
■ Send: Send mail or SMS
■ Stop: Stop operation such as receiving mails etc.
■ ▲Page/▼ Page, ▲/ ▼, ↑ /↓ : Scroll by page
■ Create new/New message: Create new memo, schedule event,
SMS, etc.
■ Settings: Display setting items
Calendar
Stock icon
Checking notification details from stock icons
Stock icons appear in the standby screen and notify you when a call
is missed, a new mail is received, etc.
z Main stock icons and the operations are as follows.
■ (Answering memo): Display the Answering memo list.
■ (Incoming notification/New SMS): Display the SMS list.
■ (Missed call): Display the incoming call list.
■ (Recorded messages of voicemail): Display the
confirmation screen for dialing to voicemail center.
■ (New mail): Display Inbox.
■ (Notification information): Display the status panel.
z A stock icon will disappear when you check the content. An icon
for voicemail service will disappear when you delete the recorded
message.
14
Before Using the Handset
Page 17

■ Status bar
z Displayed icons are in two types as follows.
■ Notification icon: Notifies answering memos or SMS.
■ Status icon: Indicates the handset status such as battery level
or signal strength.
Status bar
Notification icons
Status icons
Main notification icons
z Some notification icons appear with their number accompanied.
: New SMS
: Sending a message failed
: New mail
: New Area Mail
: Error
z Displayed when an error has occurred.
: Data communication disabled
z Displayed when a data communication limit has been reached.
: Alarm sounding/Snooze enabled
: Schedule event notification
- : Watching TV/Receiving TV signal
: Playing music with Music
Calling
: Receiving a call/During a call
: Putting a call on hold
: Answering memo
microSD Card
: Preparing microSD Card
: Unmounted
: Available space on the handset memory being run out
: Data reception request for Bluetooth communication
: USB connection (in Card reader mode connecting)
Data transmission and reception
: Transmission
: Reception
: i-channel information
: Power saving mode request
: Saving screenshot
: TOUCH CRUISER EX enabled
: Location provision is set
: VPN connected
: Software update available
: Omakase Lock is set
: Notification icon (not appearing)
* Appeared when being switched to the other screen such as the
phonebook.
*
*
/Making a call
*
Main status icon list
Battery level
- : Approx. 100 - 16%
: Approx. 15% or less
: Approx. 4% or less
z While charging, the battery icon appears with [ ]
superimposed.
Signal strength
: Level 4
: Level 3
: Level 2
: Level 1
: Level 0
: Outside the service area
z During international roaming, [R] appears on the upper left of the
signal icon.
: In Airplane mode
3G data communication status
: 3G available
: Receiving data via 3G
: Sending data via 3G
: Sending/Receiving data via 3G
HSPA data communication status
: HSPA available
: Receiving HSPA data
: Sending HSPA data
: Sending and receiving HSPA data
Character input mode
: Hiragana/Kanji
: Half Alphabet
: Half Numeric
: Half Katakana
: Full Alphabet
: Full Numeric
: Full Katakana
: Kuten code
Manner mode status
: Standard manner
: Drive manner
: Silent manner
: Ringtone volume is set to [Silent]
: Talking with handsfree
*
: Mute set
: Alarm set
Bluetooth
: Connection stand-by
: Connected
Answering memo
: 0 answering memos when the answering memo is set
: 1 to 9 answering memos when Answering memo is set
: 10 answering memos when the answering memo is set
: Parental mode set
* Appeared when being switched to the other screen such as the
phonebook.
*
15
Before Using the Handset
Page 18
■ Using the status panel
You can check the detail information of notification icon or status
icon or activate corresponding functions or apps.
In the standby screen, p/Select the status bar
1
Using the status panel
2
1
2
1 Network operator name/Service provider name
2 Detailed information on notifications
z Select a notification icon to check by activating a
corresponding function or app.
・ When [Delete one item] is displayed when pressing z,
deleting the notification is available. Select [Delete all] to
delete all notification information.
・ Some notification may not be deleted.
・ Replying or sharing operation by pressing C with a
notification icon selected may be available for some
notifications.
z Select a status icon to check or change the settings.
■ Switching setting
When a checkbox appeared for an item, enabling/disabling the
setting or switching [ON]/[OFF] by pointing the cursor to the item and
then pressing t.
z [ ] indicates "enabled" and [ ] indicates "disabled".
z When [Check All]/[UnchkAll] appears in the operation guidance,
press a corresponding function key to select/deselect all items.
Example: Sound/lamp screen, Alarm screen
■ Viewing the sub display
In the sub display, time or date, signal strength or battery level,
notification such as missed call or new mail, or sender information is
displayed.
z Press & with the handset closed to display them. The display
switches by pressing &.
&&
Main icon list
Signal strength
: Level 4
: Level 3
: Level 2
: Level 1
: Outside the service area
z Not appeared in Airplane mode.
Battery level
- : Battery level
: Charge the battery
z While charging, the battery icon appears with [ ]
superimposed.
Manner mode status
: Standard manner
: Drive manner
: Silent manner
: Answering memo is set/Answering memo
: Alarm sounding/Snooze enabled
: In Airplane mode
: Missed calls
: Voice mail message
z For some stock icons, number of items or notification details
may be displayed.
■ Incoming/Charging lamp
z Incoming/Charging lamp illuminates or flashes when incoming
call/mail or charging.
■ Illuminating in red: Charging (Battery level: Approx. 94% or
less)
■ Illuminating in green: Charging (Battery level: Approx. 95% or
more)
■ Flashing in green: Incoming call/Missed calls/Answering
memos
■ Flashing in blue: New mail/Notification of schedule event
■ Flashing in white: New SMS
■ Flashing in light blue: Alarm sounding
z In the main display, the incoming lamp for missed calls,
answering memos, new mails or new SMS does not flash.
Check them with notification icons or stock icons. If notification
icons and stock icons are not displayed, check them in a screen
where they can be available.
■ Shooting screenshots
Press H and $ for at least 1 second to shoot the screen as an
image.
z The shot image is saved to the handset memory and it can be
viewed in "Picture" in Databox.
z Saving TV screen etc. is unavailable.
z All or a part of image may not be saved depending on app.
&
16
Before Using the Handset
Page 19
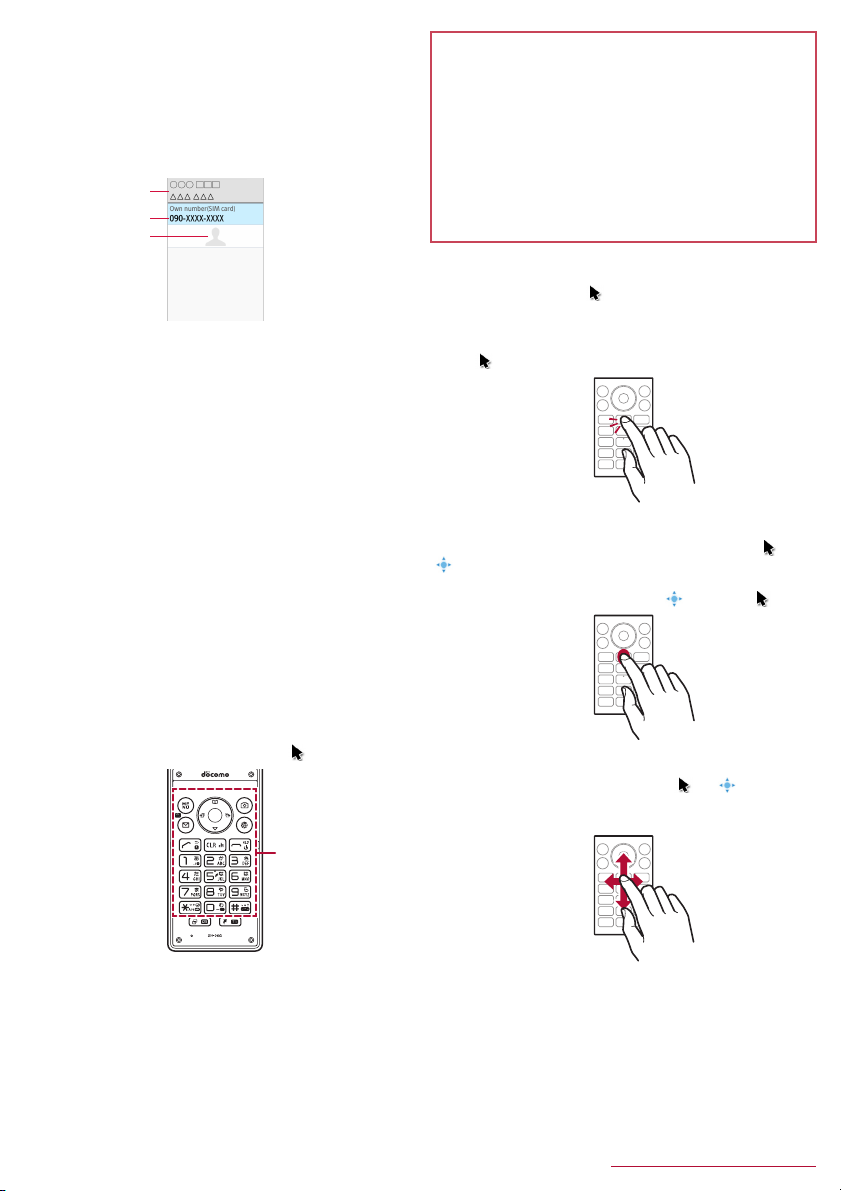
■ Profile
Display your own phone number registered to the docomo nano UIM
card. You can register a name, mail address, etc.
z By default, only phone number which is registered to the installed
docomo nano UIM card is displayed.
In the standby screen, z/[Profile]
1
Check/use the profile
2
1
2
3
1 Name/Reading
z Displayed when a name is registered.
2 Own phone number
3 Image
Editing/Using profile
In the standby screen, z/[Profile]
1
z/[Edit profile]/set each item/C
2
z For items that can be set nP.30 "Adding contacts to
phonebook"
z To send the profile: z
(share)]
/
z To copy an item: Point the cursor to an item to copy
Checking mail address
In the standby screen, m
1
[Mail settings]/[My address]
2
z Select [Update] to update My address information.
follow the instructions on the screen and operate
/
[Send via infrared]/[Send data
/
m
■ Using TOUCH CRUISER EX
When operating the camera, browser, etc., touch the handset touch
area with your finger to operate like using a touch pad. Activating a
function/app corresponding to TOUCH CRUISER EX enables
TOUCH CRUISER EX. You can operate with [ ] (pointer).
Touch
area
Cautions when using the touch area
z The touch area is designed to be lightly touched with your finger.
Do not forcefully press with your finger or a pointed object
(fingernail, ballpoint pen, pin, etc.).
z In the following cases, the touch area may not work even if you
touch it. May cause a malfunction.
■ Operation with a gloved finger
■ Operation with the tip of a fingernail
■ Operation with foreign objects placed on the operation pad
■ Operation on the touch area on which a sticker, etc. is put
■ Operation while the touch area is wet
■ Operation with fingers wet with sweat, water, etc.
Tap/Double-tap
Touch the touch area lightly and then release your finger from it to
select an item or icon that [ ] is pointed to. Double-tap is an
operation of tapping the same point twice consecutively.
z While a still picture is displayed etc., the screen can be zoomed
in/out by double-tapping. Zooming in/out operations can be done
with [ ] on the screen as a start point.
Touch and hold
Keep touching the touch area with your finger to change [ ] to
[ ]. Menu appears depending on function or screen in use.
z When you touch the touch area, or perform no operation for a few
seconds after your finger is released, [ ] returns to [ ].
Slide
Touch and hold the touch area to change [ ] to [ ], and then
trace with your finger to a target direction or point to scroll the
screen, or switch pages.
z When the TOUCH CRUISER EX operation guide screen appears,
read the content and then follow the instructions on the screen.
z Each pressing s for at least 1 second switches TOUCH
CRUISER EX enabled/disabled.
z
When TOUVH CREUISER EX is disabled, activating a function/app
corresponding TOUCH CRUISER EX (Camera, Browser, Databox,
LINE) does not enable TOUCH CRUISER EX.
z Even when TOUCH CRUISER EX is enabled, key operations are
available (except for some apps).
17
Before Using the Handset
Page 20
Flick
Touch and hold the touch area to change [ ] to [ ], and then flick
the touch area up/down/left/right with your finger to scroll a screen
or switch pages quickly, etc.
Pinch
For the function or screen in use, zooming in/out etc. is available by
putting two fingers on the touch area and moving them with putting
a distance between two fingers apart (pinch out)/closer (pinch in).
Zooming in/out operations can be done with [ ] on the screen as a
start point.
z Zoom in/out the browser screen, still picture, etc.
docomo nano UIM card
A docomo nano UIM card is an IC card that records personal
information, such as your phone number.
z You cannot use functions such as the phone or packet
communication without inserting a docomo nano UIM card.
z In Japan, you cannot call to the emergency number (110, 119 or
118) without inserting a docomo nano UIM card.
z A docomo nano UIM card has a security code called PIN code
(nP.51 "PIN code").
z The handset supports only docomo nano UIM card. If you have a
docomo mini UIM card, UIM or FOMA card, bring it to a docomo
Shop to replace.
z
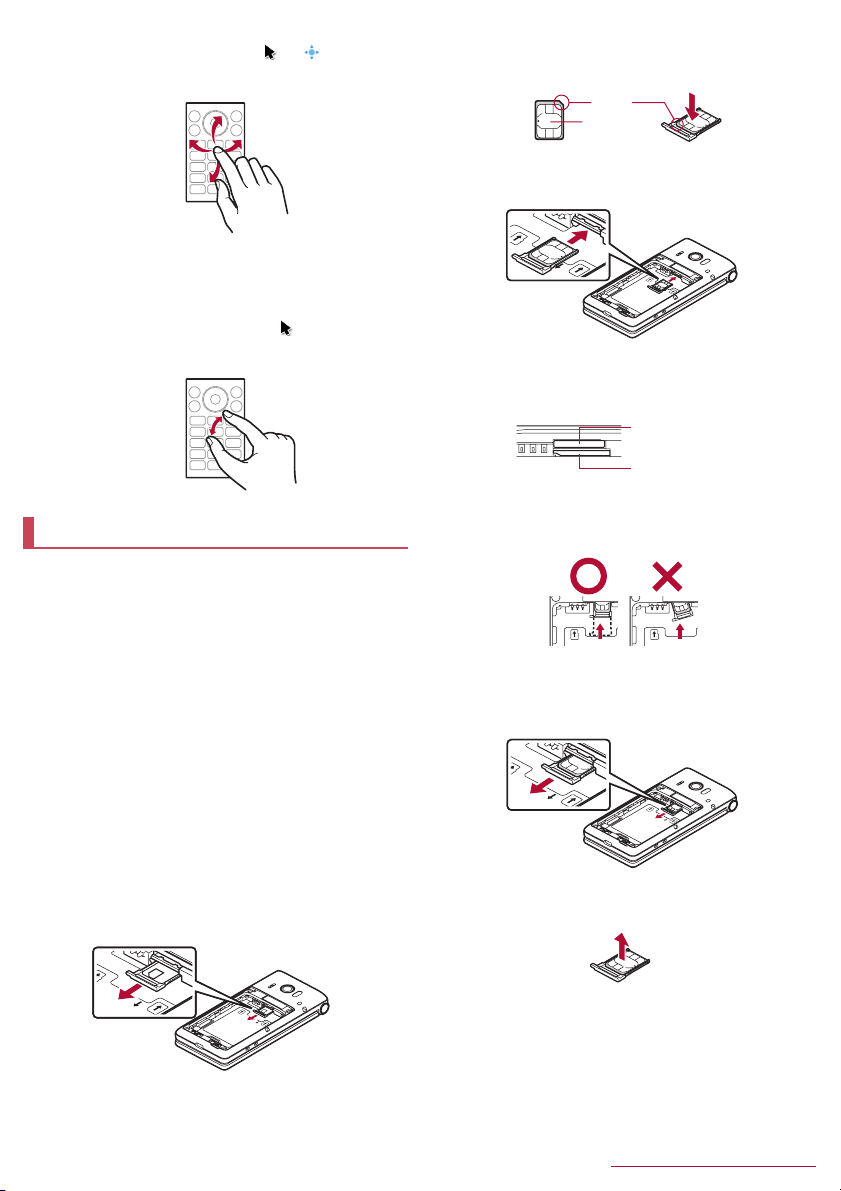
Before inserting or removing the docomo nano UIM card, turn off the
power, turn the back side up and then remove the back cover (
battery pack (
securely with your hand. After inserting or removing, attach the back
cover (
nP.10
nP.19
) and microSD Card (
), battery pack (
nP.19
) and microSD Card (
nP.58
■ Inserting docomo nano UIM card
Remove the tray from the docomo nano UIM
1
card slot
z Hook the tip of a finger into the tray to remove it by slowly
pulling it straight out.
nP.10
). Hold the handset
nP.58
Hold the docomo nano UIM card with the IC
2
(gold) side turned up and set it on the tray
z Check the notch orientation to set.
Notch
IC (Gold)
Insert the tray slowly into the docomo nano UIM
3
card slot
z The docomo nano UIM card slot is below the microSD Card
slot. When you insert the tray, be careful not to insert it to the
microSD Card slot.
Back side
z Do not forcibly insert the tray at an angle or with the wrong
side up. The docomo nano UIM card slot or tray may be
damaged.
microSD Card slot
docomo nano UIM
card slot
■ Removing docomo nano UIM card
Remove the tray from the docomo nano UIM
1
card slot
),
).
Remove the docomo nano UIM card from the
2
tray
18
Before Using the Handset
Page 21
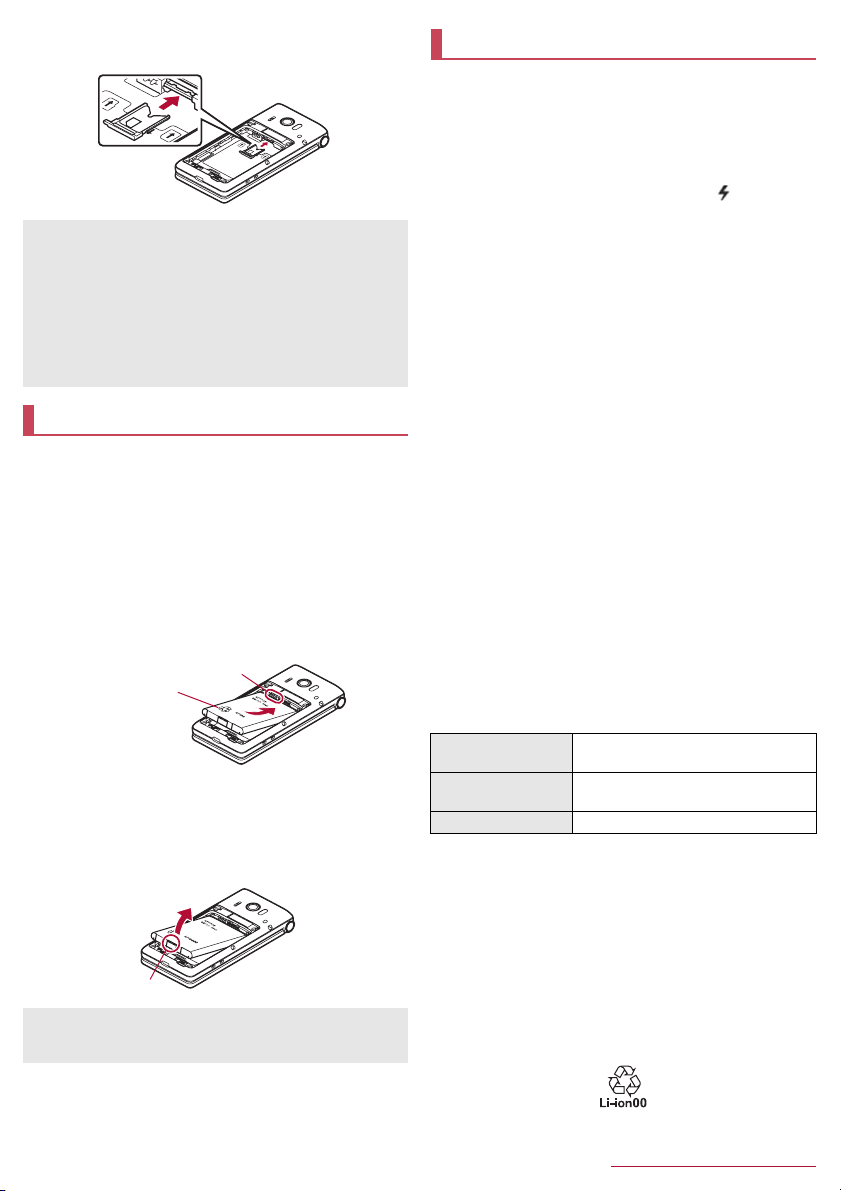
Insert the tray slowly into the docomo nano UIM
3
card slot
z Do not allow the docomo nano UIM card or tray to fall when
removing them.
z Make sure not to touch or damage the IC (gold) of the docomo
nano UIM card when handling it. Also, note that inserting or
removing the docomo nano UIM card forcibly may damage it or
deform the tray.
z Refer to the docomo nano UIM card user's guide for more
information on the docomo nano UIM card.
z Do not misplace the docomo nano UIM card once it is removed.
Battery pack
Use Battery Pack SH43 dedicated to the handset.
z The battery pack is not waterproof.
z Before attaching or removing the battery pack, turn off the power,
turn the back side up and then remove the back cover (nP.10).
Hold the handset securely with your hand. After attaching or
removing, attach the back cover (nP.10).
■ Attaching the battery pack
Attach the battery pack
1
z With the recycle mark side turned up, place the connecting
terminal of the handset to those of the battery pack and attach
the battery pack.
Connecting terminal
Turn up the the
recycle mark side
■ Removing the battery pack
Remove the battery pack
1
z
Use the tab on the battery pack for removing. Hook the tip of a
finger into the tab without applying excessive force to remove it
up.
Tab
z Using unnecessary force when attaching or removing the
battery pack may damage the connector terminal on the
handset.
Charging
The battery pack is not fully charged at the time of purchase. Be
sure to charge the battery before use.
■ Cautions while charging
z For details on the estimated charge time nP.77 "Main
specifications"
z The battery can also be charged with the handset turned on
(While charging, the battery icon appears with [ ]
superimposed).
z Do not charger for a long time with the power left turned on. If the
handset is left turned on after charging is complete, the battery
pack charge level decreases.
In this case, an AC or DC adapter (sold separately) charges the
battery again. However, depending on the time when the handset
is disconnected from the AC or DC adapter, the battery charge
level may be lower or the battery pack may only be usable for a
short time.
z If the handset is left for a long time even after the charging is
completed, the battery level may decrease.
z When the battery is empty and the handset is being charged, the
charging lamp may not illuminate immediately. However,
charging is in progress.
z If the battery empty alert is displayed and the power cannot be
turned on, charge the battery for a while.
z While charging, the handset may not be turned on even when the
charging lamp is illuminated in red. Charge longer and try turning
the power on again.
z Frequently recharging the battery when its power is still remaining
enough may shorten the usable life of the battery pack. It is
recommended to use the battery to a certain level (e.g. after the
battery level decreases) before recharging.
z When the battery becomes warm, charging may automatically
stop even if the battery has not been fully charged. Charging
automatically resumes after the temperature lowers to an
appropriate temperature.
z If you watch TV etc. while charging, move the handset as far away
as possible form the power plug section of the AC adapter.
■ Estimated battery life when fully charged
Continuous talk time FOMA/3G
Continuous stand-by
time
TV watching time Approx. 360 min.
z For battery life nP.77 "Main specifications"
■ Battery pack usable life
z Battery pack is a consumable product. Battery life power charge
is gradually reduced every time the battery is charged.
z When battery life per charge is reduced to approximately half of
the default time, this means that the battery pack is approaching
the end of its usable life. In this case, it is recommended to replace
the batter pack as soon as possible. Depending on usage, the
battery pack may swell as it approaches the end of its service life
but this will not cause problems.
z If you watch TV etc. while charging for a long time, the usable life
of the battery pack may become shorter than estimated.
Approx. 400 min.
FOMA/3G
At rest: Approx. 610 hours
19
Before Using the Handset
Page 22
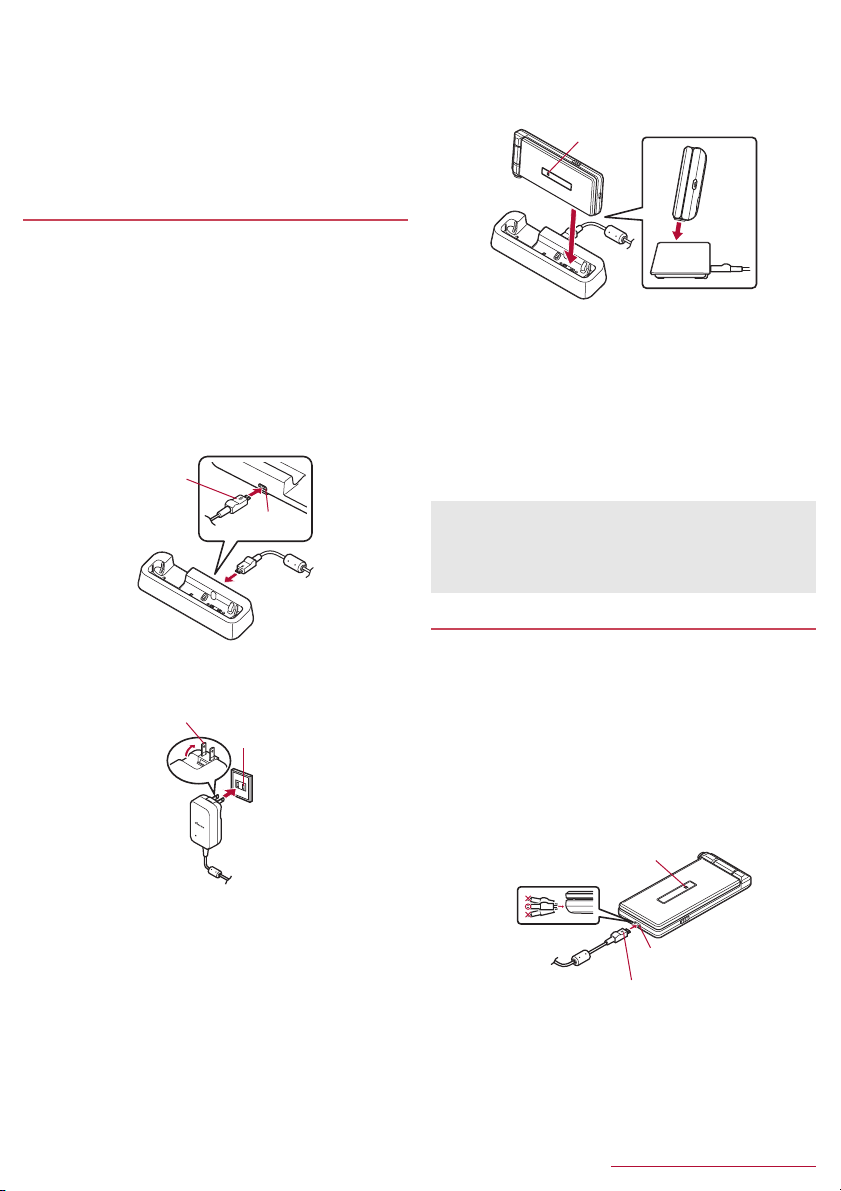
■ AC adapter and DC adapter
z Refer to user's guide of AC Adapter 05 (sold separately) or DC
Adapter 04 (sold separately).
z AC Adapter 05 covers from 100 to 240 V AC.
z The shape of the plug for the AC adapter is for 100V AC (for
domestic use). To use the AC adapter of 100 to 240V AC
overseas, a conversion plug adapter applicable to your country of
stay is required. Do not use a voltage converter for overseas
travel to charge the battery.
Charging with desktop holder
z It is recommended to use AC Adapter 05 (sold separately) for
charging with desktop holder. Following operations describe how
to charge using AC Adapter 05.
z Use the desktop holder with the handset closed.
Turn the "B" side of the microUSB plug of AC
1
adapter up and insert it horizontally into the
connector terminal of the desktop holder
z Check the direction of the microUSB plug and insert it
horizontally.
z Do not forcibly insert or remove the microUSB plug. The
connector terminal or microUSB plug may cause damage or
malfunction.
microUSB plug
(Keep side marked
with "B" up)
Connector
terminal
Unfold the power plug of AC adapter to insert
2
into a power outlet
Power plug
100V AC
outlet
When the handset is placed into the desktop
3
holder, the charging lamp lights and charging
starts
z Place the handset tilting along the slant of desktop holder
recess in the direction of arrow until it clicks.
Charging lamp
When charging is complete, the charging lamp
4
turns off
z Lift up the handset while holding the desktop holder.
Remove the power plug of AC adapter from the
5
outlet
Remove the microUSB plug of the AC adapter
6
from the connector terminal of the desktop
holder horizontally
z When the charging lamp does not illuminate, the handset may
not be placed into the desktop holder correctly. Remove and
place it again correctly.
z When placing the handset on the desktop holder, be careful not
to let a strap etc. caught.
Charging with AC adapter/DC adapter
z Following operations describe how to charge with AC Adapter 05
(sold separately) or DC Adapter 04 (sold separately).
Inset the microUSB plug of the AC adapter/DC
1
adapter horizontally into the external connector
terminal on the handset with the side marked
with "B" turned up
z Check the direction of the microUSB plug and insert it
horizontally.
z Do not forcibly insert or remove the microUSB plug. The
external connector terminal or microUSB plug may be
damaged or malfunction.
Charging lamp
20
External connector
terminal
microUSB plug
(Keep side marked with "B" up)
Before Using the Handset
Page 23
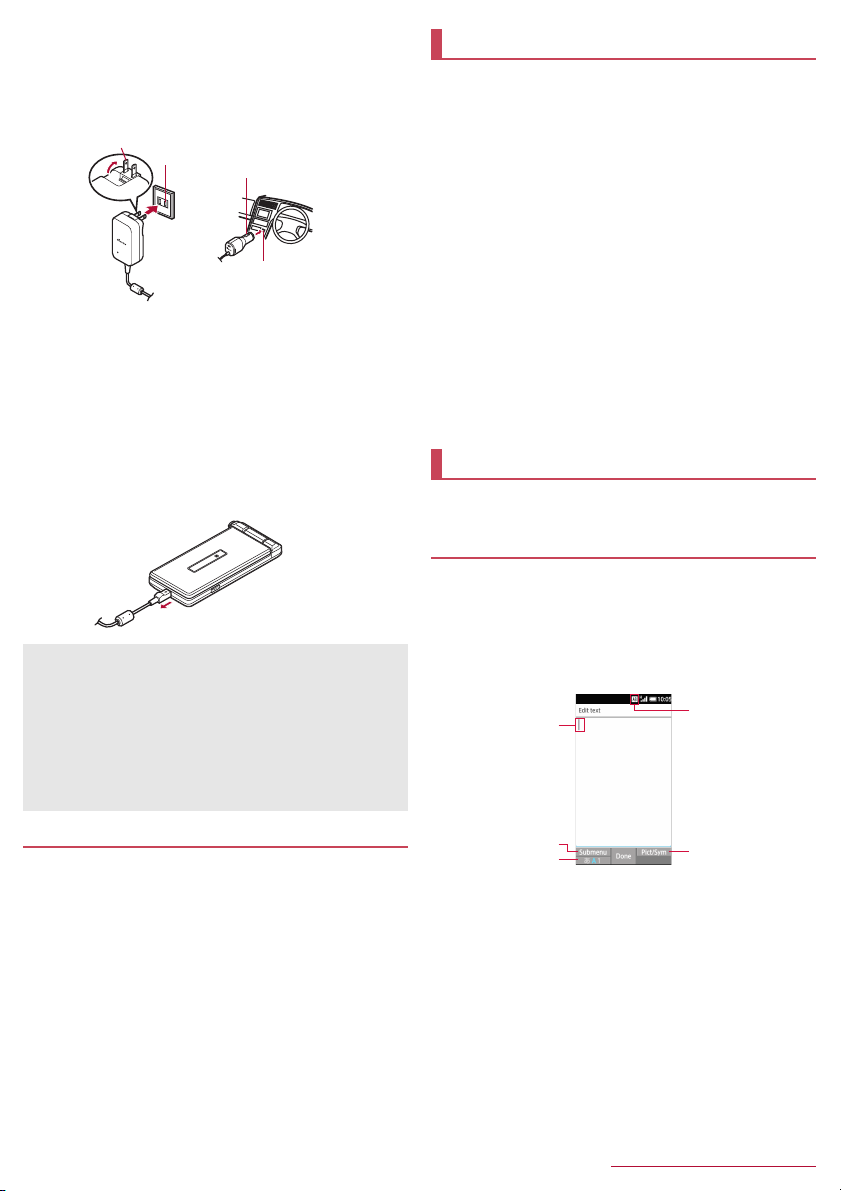
When you erect the AC adapter power plug and
2
insert it into an outlet or insert the DC adapter
power plug into a car cigarette lighter socket,
the charging lamp illuminates and charging
starts
Power plug
AC adapter DC adapter
When charging is complete, the charging lamp
3
turns off
Remove the AC adapter power plug from the
4
outlet, or remove the DC adapter power plug
100V AC
outlet
Power plug
Cigarette lighter
socket
from the car cigarette lighter socket
Remove the microUSB plug of the AC adapter/
5
DC adapter horizontally from the external
connector terminal of the handset
When using a DC adapter
z The DC adapter should only be used in negative grounded
vehicles (12 and 24V DC).
z Do not use with the car engine shut off. May drain the car
battery.
z The DC adapter fuse is a consumable product. For
replacement, purchase a new fuse at a nearest auto parts
retailer etc.
z Refer to the user's guide of DC Adapter 04 for details.
Charging with Micro USB Cable 01
You can charge the handset by connecting the handset to a PC
with Micro USB Cable 01 (sold separately).
z For details on connecting to a PC nP.59 "Connecting the
handset and PC"
Turning power on/off
■ Turning power on
H (for at least 2 seconds)
1
z When you turn the power on for the first time, make the initial
settings (nP.25 "Initial settings").
■ Turning power off
H (for at least 1 second)/[Power off]
1
■ Turning power off forcibly
You can forcibly turn the power off if the screen does not respond or
the power cannot be turned off.
H (for at least 8 seconds)
1
z Release your finger after the vibrator is activated to turn the
power off.
■ Showing/Hiding the main display
The main display is turned off when the handset is not in use for a
set length of time.
Press any of key to turn on the display while the main display is
turned off.
Character entry
Enter characters for functions or apps such as phonebook and
mail on the handset.
Mechanism of character entry
Multiple characters are assigned to each dial key. Character
switches by pressing a key.
z There are two types character input modes as follows.
■ Full-width characters: Kanji, Hiragana, Katakana, upper case
alphabet, lower case alphabet, number, symbol
■ Half-width characters: Katakana, upper case alphabet, lower
case alphabet, number, symbol
1
2
3
1 Cursor
z Point the cursor to a position to add.
2 Submenu
z Use to make entry settings or register words to the user
dictionary (nP.22 "Submenu operations for character entry").
3 Switch input mode
z Switch the input mode.
・ Press m to switch input mode in the order of Half alphabet
→Half numeric→Hiragana.
4 Input mode
z You can check the input mode by the status icon.
5 Pict/Sym
z Displays pictograms/Deco-mail picture/symbol/emoticons list.
・ They may not be entered depending on app.
4
5
21
Before Using the Handset
Page 24

■ Submenu operations for character entry
z Menu items vary by usage function, app, or condition.
In character entry screen, z
1
Select an item
2
■ Select area (Copy etc): Select entered characters to copy, cut
and paste (nP.24 "Editing characters").
■ Paste: Paste copied/cut characters (nP.24 "Editing
characters").
■ Copy history: Paste copied/cut characters by selecting the
history.
z History can be deleted (nP.24 "Deleting history").
■ Input mode: Select the character input mode to switch.
■ Phrase: Select a phrase to enter (nP.23 "Common
phrase").
z New phrase can be created to enter (nP.23 "Registering
phrase").
■ Regist user dic. (En): Register words to the user dictionary
(nP.22 "Registering to the user dictionary").
z You can register to the user dictionary by selecting entered
characters in the character entry screen.
■ Quote apps: Quote using the bar code reader or Google™
Search (nP.23 "Quote apps").
z You can operate by selecting entered characters in the
character entry screen.
■ Change settings: Make the settings for character entry
(nP.22 "Setting character entry").
■ Cancel editing: Cancel entry to return to app.
*
■ D-Pict
: Enter Deco-mail picture.
*
■ Deco
: Decorate characters.
*
■ Insert
: Quote the phonebook or enter phrases or a signature
set in Mail.
* Appeared when using Mail.
Setting character entry
■ Input assistance / Conversion
In the character entry screen, z/[Change
1
settings]
Select an item
2
■ Word predictions: Set whether to use word predictive
■ Next word guess: Display guessed words immediately after
■ Wildcard prediction: Set whether to use wildcard prediction.
■ Auto cursor move: Set a speed for moving the cursor
■ Beginning prediction for mail: Display commonly used words
■ Extra conversion engine: Use external conversion engine to
■ Auto capitalization: Automatically capitalize the first character
■ Auto space input: Automatically insert a space after a word in
/
[Input assistance / Conversion]
conversion.
an entry is fixed.
automatically after entering character.
at the beginning of the mail body.
display conversion candidates.
of a sentence in half alphabet mode.
half alphabet mode.
■ Dictionary
In the character entry screen, z/[Change
1
settings]
Select an item
2
■ User dictionary: Edit words in the user dictionary (nP.22
■ Download dictionary: Register/cancel/delete download
■ Area dictionary: Set whether to use a more detailed place
■ Contacts name collaboration: Add contacts name to the
/
[Dictionary]
"Registering to the user dictionary").
dictionaries.
name etc. as a suggestion for conversion.
dictionary or initialize the dictionary.
■ Reset
In the character entry screen, z/[Change
1
settings]
Select an item
2
■ Set the default settings: Set the default settings for SH Input.
■ Clear learning dictionary: Reset the learning dictionary.
■ Reset facemark list: Reset the contents of the emoticon list.
/
[Reset]
■ Registering to the user dictionary
You can register frequently-used words and the readings up to 500
in Japanese and English, respectively. When the reading that is
registered to the user dictionary is entered, the registered word is
displayed in candidates list.
In the character entry screen, z/[Change
1
settings]
z Use v to switch Japanese/English user dictionaries.
z To register to English user dictionary, in the character entry
z/[Add]/Enter a reading and word/[Add]
2
z To edit: Point the cursor to as user dictionary/z/[Edit]/edit
z To delete an item: Point the cursor to a phrase
z To delete all: z
/
[Dictionary]/[User dictionary]
/
screen, z
the reading and word
[Delete]/[Yes]
select [Regist user dic. (En.)].
/
[Initialize]/[Yes]
/
[Add]
/z/
22
Before Using the Handset
Page 25
Entering characters
Example: When entering "文字"
In the character entry screen, enter "もじ "
1
2
1
1 Kana and alphanumeric
z Display katakana of the entered characters or conversion
candidates (katakana and alphanumeric conversion
candidates) of alphanumerics or symbols assigned to a
touched key.
2 Conversion candidates field
z Displayed when [Word prediction] is enabled.
z Select with w to enter.
z If you set an external conversion engine, [Extra conv] is
displayed. Select it to display conversion candidates
searched by the external conversion engine.
3 Convert/Predict
z Switch predictive candidates to conversion candidates.
C
2
In the conversion candidates field, select "文字"
3
1
2
6 6
1 Commit
z Determine the conversion.
2 ←Range
z Narrow range of text to convert.
z Displayed only when available.
3 Conversion candidates field
z Select with w to enter.
z If you set an external conversion engine, [Extra conv] is
displayed. Select it to display conversion candidates
searched by the external conversion engine.
4 Predict/Convert
z Switch conversion candidates to predictive candidates.
5 Range→
z Widen range of text to convert.
z Displayed only when available.
6 ▲Page/▼Page
z Switch pages of the candidates list.
z You can search with the browser, use Quote apps or delete
learned candidates by pressing s when a candidate is
selected. For Quote apps nP.23 "Quote apps"
3
3
4
5
z Register user dictionary or downloaded dictionaries to display
them in candidates list.
■ Common phrase
Enter pre-registered common phrases or phrases that you
registered.
In the character entry screen, z/[Phrase]
1
Select a phrase
2
Registering phrase
You can register frequently-used text as phrase.
In the character entry screen, z/[Phrase]
1
[User original]
z/[Add]/enter a phrase/[Save]
2
z To edit: Point the cursor to a phrase/z/[Edit]/edit the
phrase
/
z To delete an item: Point the cursor to a phrase
z To delete all: z
■ Quote apps
Enter using Barcode Reader, Common phrase, Copy History,
Google search.
In the character entry screen, z/[Quote apps]
1
Select an item
2
■ Barcode Reader: Enter a content read by Barcode Reader.
■ Common phrase: Enter phrases.
■ Copy History: Enter from the copied/cut text history.
■ Google Search: Search with Google™.
■ Wildcard prediction
Conversion candidates are predicted according to the number of the
entered characters and appear.
z Enable [Wildcard prediction] in advance (nP.22 "Input
assistance / Conversion").
z Available in Hiragana/kanji input mode, and half-width alphabet
input mode.
Example: When entering "アナウンス"
In the character entry screen, enter "あな"
1
r/r/r
2
z Each time you press r to enter [*] to display the predictive
In the predictive candidates field, select "アナウ
3
ンス"
■ Entering with Kuten code
Use four-digit Kuten code assigned to each character to enter kanji/
hiragana, katakana, symbol, alphanumeric, etc.
In the character entry screen, z/[Input
1
mode]
Enter kuten code
2
z When the fourth-digit character is entered, the code input
z After four-digit character is entered, the input mode returns to
[Save]
[Delete]/[Yes]
z Alternatively, in the character entry screen, z
candidates according to number of entered character.
/
character is displayed.
the one that is used before using kuten code.
/
[Delete all]/[Yes]
[区点] (Kuten)
/z/
/
[Phrase].
/
23
Before Using the Handset
Page 26

■ Editing characters
Select characters to cut, copy, or paste.
In the character entry screen, enter a character
1
i
z Alternatively, in the character entry screen, z/[Select area
(Copy etc)] to select.
Select a start point/select an end point
2
z To select all entered characters: C
[Copy]/[Cut]
3
Select a point to paste
4
z/[Paste]
5
z Press * for at least 1 second to paste immediate copied/cut
characters.
Deleting history
You can delete copied/cut characters.
In the character entry screen, z/[Copy
1
history]
Point the cursor to a history item/z/[Delete]
2
z To delete all: z/[Delete all]
[Yes]
3
z Copied/cut characters can be recorded up to 10. If the number
of history items of cut and copied characters exceeds 10, they
are deleted from the oldest one.
■ Entering a space
At the end of the character entry screen, r
1
z Half-width space is entered regardless of input mode. Half-
width space is counted as one character.
z To enter in text: Move the cursor
half-width space
■ Switching characters
In the character entry screen, enter a character
1
*
z You can switch upper case/lower case or voiced sound mark/
semi-voiced sound mark.
■ Entering previously appeared character
Go back to a character before the entered one assigned to the same
key.
In the character entry screen, enter a character
1
s
■ Undoing
Undo the last operation, or cancel fixedness.
In the character entry screen, s
1
z After a character is deleted, undo operations can be done up
to 5 times.
/#/s/
select full-width/
■ Deleting a character
In the character entry screen, c
1
z A character on the right of cursor is deleted.
/
z If the cursor is placed at end of a sentence, a character on the
left of cursor is deleted.
z When a character is pointed by the cursor, the pointed
character is deleted.
■ Deleting characters
In the character entry screen, c (for at least 1
1
second)
z When there are characters after the cursor, all characters
after the cursor are deleted.
z If the cursor is placed at end of a sentence, all characters
before the cursor are deleted.
Changing screen display to English
In the standby screen, z/[設定] (Settings)/[そ
1
の他] (Other settings)
(Select language)
/
/
/
[言語(Language)を選択]
/
[English]
24
Before Using the Handset
Page 27

Initial settings
When you turn the power on for the first time, the initial settings
screen (Japanese) is displayed. Follow the instructions on the
screen and operate.
z To make initial settings in English, press z
the initial settings screen, then change the language to English
from 設定 (Settings) menu, and then reboot the handset. The
initial settings screen in English is displayed.
z For changing display language, nP.24 "Changing screen
display to English"
z When the handset log acquisition screen or software update
screen is displayed, read the content and select [OK].
■ Initial settings of security key
z
For security key, there are two types. Set either passcode or
password.
■ For passcode, set four- to sixteen-digit number.
■
For password, set four- to sixteen-digit alphanumeric and halfwidth symbol
* Some half-width symbols are not available.
z For security key settings nP.51 "Security key setting"
When the initial settings screen is displayed,
1
[Set]
z Moving to setting of docomo service: C/C
z To finish the initial settings: H/z
Enter the security key [0000]
2
z When an information screen is displayed, select [OK].
[Passcode]/[Password]
3
z Enter a new [Passcode]/[Password] and then enter
[Passcode]/[Password] again.
C/C
4
*
including at least one or more alphabets.
■ Initial settings for docomo service
z Alternatively, in the standby screen, z/[Settings]/[docomo
service].
When the Setting of docomo service screen is
1
displayed, [Start setting]
/
[はい] (Yes) to skip
/
[Yes]
Make the initial settings
2
z The setting items are as follows.
■ docomo apps password
■ docomo location information
■ Remote initialization
* Not appeared when docomo apps password is not set.
[OK]
3
*
Using running apps
You can switch apps with several apps activated at the same
time, or enable/disable Bluetooth function.
$
1
z You can operate even when using function or app.
1
2
3
1 Bluetooth function
: Enable Bluetooth function/ : Disable Bluetooth
function
2 Close app
z To end app, press z while a running app is selected.
3 Favorites
z Register functions or apps to activate (nP.25 "Using
Favorites").
4 Running apps
z You can switch apps while several apps are activated.
5 App list
z You can select a function or app from App list to activate.
4
5
Using Favorites
Register frequently-used functions and apps to Favorites so
that you can activate them quickly.
y
1
z Alternatively, press $/m to display.
z Registered functions or apps can be displayed by pressing
the key while other function or app is used.
2
1 Submenu
2 Registered items
25
1
z You can register/cancel functions or apps.
z Functions or apps can be newly registered to [ ] - [ ].
Before Using the Handset
Page 28

Call
You can use the phone and phonebook, and make settings for
voice/answering memo, operations available when calls are
received, etc.
Making a call
In the standby screen, enter a phone number
1
z Always enter the city code, even when it is a local number.
z You can set to notify/not to notify the other party of your phone
number for each call by adding "186"/"184"to the head of the
phone number.
z To delete the last entered number: c
z To delete all entered number: c (for at least 1 second)
z To move the cursor and delete a number: v
s
2
z To use a call option and dial: z/[Call option]/set each
/
s/z
item
z To create/send SMS: z
C
z To register to the phonebook: t
set each item/C
To end a call, H
3
z You can quickly activate functions such as "Calculator", "Timer"
or "Alarm" by entering a number in the input number screen
After a number is entered, follow the instructions on the screen.
Available functions vary by entered number.
/
[Send SMS]/enter a message
/
select a contact to register
Entering touch-tone signals
When using services in which you are required to enter
numbers additionally during a call, such as inquiry about the
balance in your bank account or ticket reservation, enter pause
(,)/wait (;) after entering a phone number to make a call with an
additional number added to the main phone number.
■ Adding 2 seconds pause
After making a call to a main phone number, the handset
automatically pauses for 2 seconds and an additional number is
sent.
In the standby screen, enter a phone number
1
# (for at least 1 second)
Enter a number to send/s
2
■ Adding wait
After making a call to a main phone number, the handset
automatically waits and then a screen asking whether to send an
additional number is displayed. Select [Yes] to send an additional
number.
/
c
/
/
In the standby screen, enter a phone number
1
* (for at least 1 second)
Enter a number to send/s
2
[Yes] during the call
3
Making a call with Speed dial
You can make a call quickly to the other party who is registered
to the speed dial.
z Register a contact in advance (nP.30 "Adding contacts to
phonebook").
■ Registering Speed dial
In the standby screen, z/[Phone]/[Speed
1
dial]
Select [<Not registered>] of any number to
2
register
/
select a contact
■ Dialing with speed dial
In the standby screen, enter a number of speed
1
dial (0 - 99)
z If multiple phone numbers are registered in a contact, a
screen for selecting call number appears.
z To display the speed dial list, enter a unregistered speed dial
number in the standby screen and then press s. You can
make a call by selecting a contact from the speed dial list, or
register a new speed dial.
z When a mail address is registered to the contact of speed dial,
mail can be created by entering the speed dial number in the
/
standby screen and then pressing m.
/
s
Making a call with Kantan Hasshin (speech
recognition)
Use Kantan Hasshin (speech recognition) to make a call to the
other party whose contact is registered to Speed dial by voice.
z Enable [Kantan Hasshin] in advance (nP.55 "Kantan Hasshin").
Open the handset/When the handset is opened,
1
&
z [ ] is displayed.
z Operate in the standby screen or menu list screen.
Speak a name of the other party toward the
2
mouthpiece/microphone to make a call to
z Speak "Denwa" or "Hasshin" following a name of the other
party to call.
Example: ○○○ san ni denwa, △△△ san ni hasshin
Confirm the other party's name/[Yes]
3
z If multiple phone numbers are registered in a contact, a
screen for selecting call number appears.
z It may not work correctly if a name is registered to several speed
dials.
z To recognize names correctly, speak up the last name or first
name, or first name and last name consecutively registered in
the contact. If it is not recognized correctly, check first name and
last name registered in the contact (nP.31 "Checking/Using
phonebook").
/
26
Call
Page 29

Emergency call
Emergency calls Phone number
Police 110
Fire and ambulance 119
Marine emergency 118
z The handset supports "Emergency call location notification".
When you make a call to an emergency number such as 110,
119 and 118, the information of your location (location
information) is automatically notified to the agency that has
received the emergency call (e.g. the police station). Depending
on your location and the reception status of the signal, the
agency that has received the emergency call may not be able to
confirm the exact location.
If you are not sending your caller ID by calling with "184" added
or other means, your location information and phone number
are not notified. However, if the agency that has received the
emergency call considers your location information and phone
number necessary for important purposes, such as life saving,
the agency may retrieve them regardless of your settings.
In addition, the area/timing to introduce "Emergency call
location notification"depends on the state of preparation in each
agency that receives emergency calls.
z In Japan, you cannot make a call to the emergency number
(110, 119 or 118) when a docomo nano UIM card is not inserted,
while the PIN code is locked, from the PUK (PIN Unlock Key)
entry screen or from the password entry screen for decrypting
the storage.
z When calling 110, 119 and 118 from your handset, the police or
fire stations may return your call for verification purposes. State
that you are calling from a mobile phone, and give your phone
number and exact present location.
Remain stationary to ensure that the call is not disconnected
while you are on the line, and keep the handset turned on to
receive calls for approximately 10 minutes afterwards.
z Depending on the region, calls to the police or fire station of the
local area may not be made.
z When you make a call to the emergency number (110, 119 or
118) while Reject call setting is set, items of Reject call setting
are set to [OFF].
z Even with [Restrict calls] enabled, when you make call to
emergency number (110, 119 or 118), the handset accepts
incoming calls from the other party who is not registered in the
phonebook for approximately 5 minutes in order to receive callback from the agency.
That includes when you make a call to emergency number (110,
119 or 118) with prefix "184" or "186" registered in the
phonebook.
International call (WORLD CALL)
WORLD CALL is an international calling service available from
DOCOMO devices in Japan.
z To make an international call through a company other than
DOCOMO, contact the respective companies for instructions.
z The caller ID may not be notified or displayed correctly depending
on overseas network operators. In this case, making a call with
incoming call history is not available.
[Calling Method]
z When calling to a land-line phone: 010/country code/area code
(city code)/the other party's phone number/s
z When calling to a mobile phone: 010
party's mobile phone number
・ As for the other parties' mobile phone numbers and area codes
(city codes) that begin with "0", omit the first "0" when entering
(except some countries or regions such as Italy).
・ Alternatively, enter "009130-010" as usual or "+" instead of
"010".
/
country code/the other
/
s
Answering a call
When a call is received, the ringtone sounds and
1
the incoming lamp flashes
s
2
z Alternatively, press t, 1 - 9, *, 0, # to answer calls.
To end a call, H
3
■ Placing a call on hold
When a call is received, the ringtone sounds and
1
the incoming lamp flashes
H
2
■ Adjusting ringtone volume
When a call is received, the ringtone sounds and
1
the incoming lamp flashes
u
2
■ Rejecting an incoming call
When a call is received, the ringtone sounds and
1
the incoming lamp flashes
z/[Reject call]
2
■ Answering by answering memo
When a call is received, the ringtone sounds and
1
the incoming lamp flashes
z/[Absence Memo]
2
Playing an answering memo
In the standby screen, p/select the stock icon
1
[]
z Alternatively, in the standby screen, z/[Phone]/[Call/Ans
Memo]
/
[Answering Memo List] to check answering memos.
Select an answering memo
2
27
Call
Page 30

Missed calls
When you cannot answer an incoming call, the stock icon [ ]
appears on the standby screen.
In the standby screen, p/select the stock icon
1
[]
z Call history list is displayed.
z Alternatively, in the standby screen, press q to check the call
history.
Operations during a call
You can carry out operations such as using a hands-free call
and adjusting the in-call volume according to the usage
condition during a call.
1 3
2
1 Submenu
z Display the redial/call history list screen, or record the call as a
voice memo.
2 Ph. book
z Display the phonebook.
3 ON/OFF
z Enable or disable hands-free on a current call.
4 Mute ON/OFF
z Enable or disable mute.
5 Hold
z Hold/Unhold a call.
z Note the followings to use hands-free.
・ Speak approximately 20 to 40 cm away from the mouthpiece.
When the surroundings are noisy, the sound may break up
and the call may not be satisfactory.
・ When calling outdoors, in a location where surroundings are
noisy or where the sound echoes loudly, use an earphone/
microphone.
・ If the sound breaks up during a hands-free call, lower the in-
call volume.
■ Adjusting the in-call volume
During a call, u
1
■ Adding a call
Place a current voice call on hold and make a call to another party.
z Subscription to Call Waiting Service is required to add a call.
Example: Displaying the phonebook to add a call
During a call, m/[Search contacts]
1
z As for Group list, selecting a group is required.
Point the cursor to a contact//s
2
z If multiple phone numbers are registered in a contact, a
screen for selecting call number appears.
z To switch the party to call, during a call, press m.
4
5
■ Displaying Redial/Call history list screen
During a call, z/[Incoming history]/[Redial]
1
z Alternatively, during a call, press q/r to display them.
■ Switching voice output
You can only operate when Bluetooth device is connected.
During a call, z/[Switch to terminal call]/
1
[Switch to Bluetooth call]
■ Checking own number
During a call, z/[Profile]
1
■ Answering memo
During a call, z/[Sound Memo]
1
z Recording starts after the start sound is heard.
t
2
z Stop sound is heard and recorded sound memo is saved.
Redial/Call history
The handset memory keeps a record of the 50 most recent
outgoing and incoming call history items each.
In the standby screen, q/r
1
1
2
Call history list screen
1 Date and time of outgoing/incoming call
2 The other party’s name/phone number
3 Missed call
Point the cursor to a call history
2
z Redial/Call history list screen: i
s
3
z To create/send SMS: C/enter a message/C
z To create/send mail: z
z To make a call by setting condition such as caller ID
notification: z
z To check location: z
・ The handset accesses [imadoco search] or [imadoco
kantan search] website. For details on Imadoco search/
Imadoco kantan search, refer to the DOCOMO website.
・ Packet communication charge is incurred for using the
service.
z To register to the phonebook: z
registering destination
/
[Call option]/set each item/s/z
Deleting items of Redial/Call history
In the standby screen, q/r
1
Point the cursor to a history item/z/[Delete]
2
[Delete 1]/[OK]
z To delete selected items: z/[Delete]/[Delete selection]
select a call history item/C/[OK]
z To delete all call history items: z
1
2
3
Redial list screen
/
[Create mail]/create a mail/C
/
/[Verify location]
/
/
set each item/C
[Register]/select a
/
[Delete]/[Delete all]/[OK]
/
/
28
Call
Page 31

Voice Memo/Answering Memo
You can play or set the voice memo/answering memo. If you set
the answering memo, the handset answers a call and records
the caller’s message when you cannot answer.
z Up to 10 voice memos and answering memos (approximately 60
seconds per memo) can be recorded respectively.
In the standby screen, z/[Phone]/[Call/Ans
1
Memo]
Select an item
2
■ Answering Memo List: Play or delete answering memos etc.
■ Voice Memo Memo List: Play or delete voice memos etc.
■ Answering memo setting: Make settings for operations of the
answering memo.
■ Answering message setting: Make settings for the reply
message of the answering memo.
■ Answer time setting: Make settings for how long before the
answering memo answers a call.
z If the number of saved answering memos exceeds the
maximum number to be saved, answering memos which have
been played are deleted from the oldest one. If no answering
memo has been played, the handset does not answer calls by
the answering memo.
z If the number of saved voice memos exceeds the maximum
number to be saved, they are deleted from the oldest one.
Call log/Call settings
In the standby screen, z/[Phone]/[Call log/
1
Call settings]
Select an item
2
■ Network service: For details nP.29 "Network service"
■ Roaming settings: For details nP.68 "Roaming settings"
■ Incoming call settings: For details nP.29 "Incoming call
settings"
■ Outgoing call setting: For details nP.30 "Outgoing call
settings"
■ Other settings: For details nP.30 "Other settings"
Network service
In the standby screen, z/[Phone]/[Call log/
1
Call settings]
Select an item
2
■ Voicemail service: A service to answer calls with a reply
message and record callers’ messages for you.
■ Call forwarding service: A service to forward calls.
■ Call waiting: A service to place the current call on hold and
answer a new incoming call when receiving a call during
another call.
■ Caller ID notification: Display your phone number on the other
party's phone when you make a call.
■ Nuisance call blocking: Register and reject phone numbers of
"nuisance calls" such as prank calls.
■ Caller ID request: Answer calls without notifications of phone
number and play the guidance for asking notifications of the
numbers.
■ Second call settings: Set whether to notify you of another
incoming call during a call.
/
[Network service]
■ Call notification: Notify you of incoming call information with
SMS.
■ English guidance: Play the guidance for setting each network
service and the voice guidance stating that the handset is
outside the service area etc. in English.
■ Remote operation: Operate Voice Mail Service, Call
Forwarding Service, etc. from a touch-tone land-line phone,
pay phone, mobile phone provided by DOCOMO, etc.
■ Public mode (power OFF): Play a message stating that you
are unable to answer because you are in a place that does not
allow the use of mobile phone and automatically disconnect
the call when receiving a call with the handset turned off.
Incoming call settings
In the standby screen, z/[Phone]/[Call log/
1
Call settings]
Select an item
2
■ Reject call setting: For details nP.29 "Reject call setting"
■ Set ring start time: Set to sound ringtone after specified
seconds have passed when incoming a call from the other
party who is not registered to the phonebook.
■ Call/Ans Memo: For details nP.29 "Voice Memo/Answering
Memo"
■ Quick silent: Set whether to stop ringtone, vibration, blinking
lamp for notification temporarily by pressing & when the
handset is closed.
■ Open to answer: Set whether to answer a call by opening the
handset during a call.
■ Reject call setting
In the standby screen, z/[Phone]/[Call log/
1
Call settings]
call settings]
Enter the passcode
2
Select an item
3
■ Reject specified: Set to reject incoming calls only from the
specified callers.
z To edit a specified number: C
■ Reject unregistered call: Set to reject incoming calls from
callers not registered in the phonebook.
■ Reject anonymous call: Set to reject incoming calls from
callers not notifying their phone numbers.
■ Reject payphone call: Set to reject incoming calls from pay
phones.
■ Reject unknown call: Set to reject incoming calls from callers
whose phone numbers cannot be notified.
[Reject unregistered call]
z Even if you set Reject unregistered call, calls from contacts for
whom the secrecy setting is set are received. The names
registered in the phonebook do not appear and only the phone
numbers appear.
/
[Incoming call settings]
/
[Incoming call settings]/[Reject
/
edit the phone number
29
Call
Page 32

Outgoing call settings
In the standby screen, z/[Phone]/[Call log/
1
Call settings]
Select an item
2
■ Sub address settings: Set whether to set "*" included to
phone numbers as a delimiter for sub address.
■ Prefix settings: Set prefix number.
/
[Outgoing call settings]
Other settings
In the standby screen, z/[Phone]/[Call log/
1
Call settings]
Select an item
2
■ Call time: For details nP.30 "Call time"
■ Contact docomo: For details nP.30 "Contact docomo"
■ Open source licenses: Display open source licenses.
■ Call time
In the standby screen, z/[Phone]/[Call log/
1
Call settings]
Select an item
2
■ Cumulated call time: Display the cumulated call time.
■ Reset cumulated call time: Reset the cumulated call time.
■ Auto-reset: Set whether to automatically reset the cumulated
call time on the first day of every month.
■ Contact docomo
In the standby screen, z/[Phone]/[Call log/
1
Call settings]
docomo]
Select an item
2
■ ドコモ故障問合せ (Inquiries to DOCOMO about
malfunctions): Make a call for inquiries about malfunctions.
■ ドコモ総合案内・受付 (General inquiries to DOCOMO):
Make a call for general inquiries.
■ 海外紛失・盗難等 (Inquiries about loss, theft, etc. while
overseas): Make a call for inquiries about loss, theft, etc. from
overseas.
■ 海外故障 (Inquiries about malfunctions while overseas): Make
a call for inquiries about malfunctions from overseas.
/
[Other settings]
/
[Other settings]/[Call time]
/
[Other settings]/[Contact
Phonebook
You can manage contacts.
Adding contacts to phonebook
In the standby screen, z/[Phone]
1
[Phonebook]/[Add to Phonebook]
[Add new contact]/[Add to the existing contact]
2
z When [Add to the existing contact] is selected, select a
contact.
Set each item
3
■ First name: Enter a first name.
■ Last name: Enter a last name.
■ Phonetic first name: Enter a reading of the first name.
■ Phonetic last name: Enter a reading of the last name.
■ Phone: Register a phone type and the phone number.
■ Mail: Register a mail address type and the mail address.
■ Favorites: Set whether to register to Favorites.
■ Group: Register by group.
z Displayed only when you are using the group function.
■ Illumination: Set a lamp lighting pattern and the color.
■ Ringtone: Set a ringtone.
z You can set ringtone from [Preset]/[Phone/SD].
■ Event: Register a birthday, anniversary, etc.
■ Address: Register a postal code and address.
■ Memo: Register memo.
■ Nickname: Register a nickname.
■ Organization: Register an organization.
■ Website: Register a URL.
■ Image: Register an image.
z Set an image to be displayed when checking the contact or
using SNS.
C
4
Search contacts
In the standby screen, z/[Phone]
1
[Phonebook]/[Search contacts]
z When the confirmation screen for use of cloud appears, read
the content and then select [Use]/[Do not use].
■ Switching display method
Switch phonebook displaying method between all contacts/Group
list.
In the standby screen, z/[Phone]
1
[Phonebook]/[Search contacts]
z As for Group list, selecting a group is required.
z/[Verify/setting]/[Switch display method]
2
Point the cursor to a display method/z
3
/
/
/
30
Call
Page 33

Checking/Using phonebook
You can retrieve registered contacts from the phonebook to
make calls and send mails.
In the standby screen, z/[Phone]
1
[Phonebook]/[Search contacts]
z The phonebook list screen is displayed.
z As for Group list, selecting a group is required.
z Alternatively, in the standby screen, press o.
1
2
Phonebook contacts
1 Index tab
z Switching tabs with v.
2 Contacts
3 Group name
Select a name
2
Check/Use registered information
3
3
2
/
Group list
Deleting contact
In the phonebook list screen, point the cursor to
1
a name
/z/
z To delete selected items: in the phonebook list screen, z
[Delete contact]/[Delete selection]/select a name/C/[OK]
z To delete all: In the phonebook list screen, z
contact]
[Delete contact]/[Delete 1]/[OK]
/
[Delete all]/[OK]
/
[Delete
Backing up/Restoring phonebook
In the phonebook list screen, z/[SD/SIM card/
1
common]
Select an item
2
■ Backup/restore to SD: For details nP.47 "SD card backup"
■ Restore from SIM card: Import contacts from SIM card.
■ Send all data (common): Send contacts via mail or Bluetooth
communication.
Using groups
In the standby screen, z/[Phone]
1
[Phonebook]/[Group list]
z As for Group list, in the standby screen, press o.
Use groups
2
/
/
Contact detail screen
■ Making a call
In the contact detail screen, select a phone
1
number
■ Creating/Sending SMS
In the contact detail screen, point the cursor to
1
a phone number
■ Creating/Sending mail
In the contact detail screen, select a mail
1
address
■ Editing phonebook
In the contact detail screen, z/[Edit contact]
1
set each item/C
z For items that can be set nP.30 "Adding contacts to
/
phonebook"
/C/
enter a message/C
create a mail/C
1
2
Group list screen
1 Group
2 Group name
3 Number of contacts registered in the group
■ Editing groups
In the group list screen, z/[Add group]/enter
1
a group name
z To rename group: In the group list, point the cursor to a
group
z To delete group: In the group list, point the cursor to a group
z/[Delete group]/[OK]
z To rearrange groups: In the group list, point the cursor to a
group
position down]
/
■ Registering/Canceling group
In the group list screen, point the cursor to a
1
group
z/[Add, delete to group]/select names/C
2
z You cannot change group name, delete group, etc. of [No group
set] and [Favorites].
/
[OK]
/z/
[Chg. group name]/enter a group name/[OK]
/z/
[Move the display position up]/[Move the display
3
/
31
Call
Page 34

Mail/Web browser
Use docomo mail or SMS to send/receive messages, and use
the web browser to view web pages.
docomo mail
You can send and receive mails using mail address of
DOCOMO (@docomo .ne.jp). Pictograms and Deco-mail are
available. Automatic reception is also supported. Mails can be
easily transferred when you have lost the handset or changed
models since sent and received mails are saved on the docomo
mail server. Moreover, you can use the mailing function on
PCs, tablets, etc. if you use a docomo ID.
z For details on docomo mail, refer to the DOCOMO website.
z When you use for the first time, read "License agreement"
(Japanese), then select [Agree] (if "use of cloud license
agreement" appears, read it and select [Agree]). When Welcome
to docomo mail! screen is displayed, press C.
Creating/sending docomo mail
In the standby screen, m
1
[Create new mail]
2
z Alternatively, press m to display the mail creation screen.
Mail creation screen
Select the Recipient field
3
Select recipient adding option/enter a
4
recipient
z To add recipient: m/select an adding recipient method
z To delete one recipient: Point the cursor to a recipient/
z To delete selected recipients: i
z To delete all recipients: i
Select the Subject filed/enter a subject
5
Select the Message field/enter a message
6
C
7
z To save as draft: m
/C/
C
enter a recipient/C/C
[Delete 1]/[Yes]/C
/C/
recipients
[Yes]/C
/
[Delete selection]/select
/
[Delete all]/[Yes]/C
/
/i/
■ Attachment
Attach still pictures, videos, etc. to docomo mail to send.
z Some files cannot be attached depending on the file format.
In the mail creation screen, select Attachment
1
field
Select a file to attach
2
■ Picture/Image: Attach shot still pictures, or downloaded
images.
■ Video: Attach videos.
■ Phonebook: Attach the phonebook contacts.
■ Run camera: Activate the camera to shoot still pictures for
attaching.
■ Other files: Attach various format files saved in the handset or
microSD card.
C
3
Adding an attachment file
In the mail creation screen, select Attachment
1
field
m/select a file to attach/C
2
Deleting an attachment file
In the mail creation screen, select Attachment
1
field
Point the cursor to an attachment file/i
2
[Delete 1]/[Yes]/C
z To delete selected files: i/[Delete selection]/select
attachment files
z To delete all files: i
■ Decorating message (Deco-mail)
You can decorate a mail message by inserting images, changing
text color, font size, or background color, etc.
In the mail creation screen, select the message
1
field
z/[Deco]/select a decoration/decorate
2
z To decorate entered text: i/select a start point to
decorate
decoration
/C/
[Yes]/C
/
[Delete all]/[Yes]/C
Decoration menu
/
select a end point to decorate/[Deco]/select a
/
decorate
/
32
Mail/Web browser
Page 35

■ Submenu operations on mail creation screen
In the mail creation screen, z
1
Select an item
2
■ Switch to view screen: Switch to docomo mail menu screen.
■ Preview: Display a docomo mail that is being created in
preview.
■ Save as draft: Save a docomo mail that is being created as a
draft in "Drafts".
■ Template: Use templates to create Deco-mails or save a
docomo mail that is being created as a template.
■ End editing without saving: End docomo mail without saving
docomo mail that is being created.
Receiving docomo mail
docomo mail is automatically received.
Receive docomo mail automatically
1
z The stock icon [ ] and [ ] appear in the standby screen
and the status bar, respectively.
z Not receiving automatically: In the standby screen, m
settings]
/
[Communication setting]/[Auto reception setting]
[Confirm every time]/[OFF]
In the standby screen, p/select the stock icon
2
[]
z Alternatively, in the standby screen, m/[Inbox] to check.
Select a folder/select an unread docomo mail
3
■ Checking new mails/SMS
You can retrieve new docomo mail or SMS that is sent when you are
out of service area, the handset is turned off, etc. from the center.
In the standby screen, m (for at least 1 second)
1
z Alternatively, m/select [Check new mail/Update].
/
[Mail
SMS
You can send and receive text messages with mobile phone
numbers serving as destinations.
* For details on the number of characters which can be sent and
received etc., refer to "Short Message Service (SMS)" on the
DOCOMO website.
z You can also exchange messages with those who use network of
overseas network operators. Refer to the DOCOMO International
Services website for information on countries where this service
is available and available overseas network operators.
In the standby screen, z/[Mail]/[SMS]
1
C/enter a recipient and message/C
2
z If destinations are devices owned by those who use network of
overseas network operators, enter "+", the country code and the
recipient's mobile phone number. If the phone number begins
with "0", omit the first "0". Alternatively, enter "010", the country
code and the phone number.
z Half-width katakana and special symbols in SMS messages
may not appear correctly for recipient.
z SMS cannot be sent when "186" or "184" is added.
Displaying a message
In the standby screen, z/[Mail]/[SMS]
1
z Messages are grouped into threads according to their
destinations/senders and displayed.
1
1 Image
z Displayed if an image of the other party is registered in the
phonebook.
2 Number of unread messages
3 Destination/Sender
4 Number of messages in thread
5 Date and time of the message exchange
/
Select a thread
2
1
1 Destination/Sender
2 Message
3 Date and time of the message exchange
Check the message
3
z Call to sender: z/[Call sender]/s
z Registering sender to the phonebook: z
Address Book]
/
select an item to register/set each item/C
Replying message
In the standby screen, z/[Mail]/[SMS]
1
Select a thread
2
Enter a message/C
3
Forwarding message
In the standby screen, z/[Mail]/[SMS]
1
Select a thread
2
Point the cursor to a message/z/[Forward]
3
Enter a recipient and message/C
4
2
3
4
5
2
3
/
[Register to
33
Mail/Web browser
Page 36

Deleting message
In the standby screen, z/[Mail]/[SMS]
1
Select a thread
2
Point the cursor to a message/z/[Delete
3
messages]
/
[Yes]
Deleting thread
In the standby screen, z/[Mail]/[SMS]
1
z/[Delete selected]/select threads/C/[Yes]
2
z To delete all threads: z/[Delete all threads]/[Yes]
Setting message
In the standby screen, z/[Mail]/[SMS]
1
z/[Settings]
2
Select an item
3
■ Change SMS app: Check an app to send and receive SMSs
with.
■ Delete old messages: When the number of saved messages
reaches its limit, old messages are automatically deleted.
■ Text message limit: Set the number of messages to be saved
by thread.
■ Delivery reports: Notify you that sent messages have been
received every time a message is received.
■ Manage SIM card messages: Manage messages saved on
the docomo nano UIM card.
■ Notifications: Notify you that messages have been received
on the status bar.
■ Sound: Set the ringtone to be rung when a message is
received.
■ Vibrate: Set the vibrator to be activated when a message is
received.
[Delivery reports]
z When you send a message to mobile phones of other carriers,
the notification for confirming that it has been received may not
be sent to you.
Web browser
You can display websites via packet communication.
z When web page is opened, TOUCH CRUISER EX is enabled. For
TOUCH CRUISER EX operations nP.17 "Using TOUCH
CRUISER EX"
z If w does not work when using the web browser, enabling
TOUCH CRUISER EX may enable the cursor operations
(nP.17 "Using TOUCH CRUISER EX").
z Websites may not be displayed correctly.
dmenu
In dmenu, you can easily access websites recommended by
DOCOMO or the customer support.
In the standby screen, i/[dmenu/Search]
1
z Web browser activates and "dmenu" is displayed.
z When Confirm screen appears, read the content and then
select [Yes].
z Internet connection via packet communication (3G) to use
dmenu.
z Packet communication charge is incurred separately for
connecting to dmenu.
z Websites introduced on dmenu include charged ones.
■ Operations on websites
z To reload web page: z/[Reload]/[Stop]
z To change sound volume: z
・ Alternatively, press 7/9 while playing to adjust.
z To zoom in/out: z
・ Alternatively, press 3/1 to adjust.
z To change font size: z
・ Alternatively, press 4/6 to adjust.
z To display web page details: z
z To display Help: z
■ Searching websites
Select the search field
1
/
/
[Zoom]/v/t
/
[Font Size]//v/t
/
[Help]
[VolumeChange]/v/t
/
[Page info]
Enter a keyword/[検索] (Search)
2
■ Opening new tabs
In a website screen, z/[New tab]
1
z When several tabs are opened, in a website screen, z/[Tab
/z/
select [New tab].
list]
■ Switching tabs
In a website screen, z/[Tab list]
1
Select a tab
2
■ Closing tabs
In a website screen, z/[Tab list]/point the
1
cursor to a tab
34
/
C
Mail/Web browser
Page 37

■ Input URL/Search
Directly input URL to display a website. Also, enter a keyword to
search web page information.
In a website screen, z/[Input URL/Search]
1
Enter URL/keyword
2
z To search by entering keywords, use the search engine set in
[Set search engine] of [Advanced] in Browser settings.
■ Saving images
In a website screen, z/[Save images]
1
z Switches to image saving mode.
Select an image with the pointer
2
z It is not TOUCH CRUISER EX pointer. Operate with w.
■ Copying text
In a website screen, z/[Text Copy]
1
Select a start point with the pointer
2
z It is not TOUCH CRUISER EX pointer. Operate with w.
Specify a range to copy
3
z/[Copy]
4
■ Using links
Open a selected link page in a new tab, or save the link page.
In a website screen, point the cursor to a link
1
z/[This link]
[Open in new tab]/[Save link]/[Copy URL]
2
■ Searching words in web page
In a website screen, z/[Find on page]
1
Search
2
1 432
1 End search
2 Keyword entry
z Enter a keyword to search.
3 Next
4 Back
Using bookmarks
■ Saving bookmarks
In a website screen, z/[Add bookmark]/C
1
■ Displaying by bookmarks
In the standby screen, i/[Bookmarks]
1
z Alternatively, z/[Bookmark list]
Select a bookmark
2
z When Confirm screen appears, read the content and then
select [Yes].
Using Site viewing history
In the standby screen, i/[Site viewing history]
1
z Alternatively, in a website screen, z/[History].
Select a day of viewing/[Most visited]/select a
2
history.
z When Confirm screen appears, read the content and then
select [Yes].
Google Search
Enter URL or a keyword to search websites.
In the standby screen, i/[Google Search]
1
z When Confirm screen appears, read the content and then
select [Yes].
Select the search box/enter a keyword/URL
2
Start Browser
You can access the page set in [Home page setting] of Browser
settings.
In the standby screen, i/[Start Browser]
1
z When Confirm screen appears, read the content and then
select [Yes].
z Alternatively, in a website screen, z
/
Browser settings
Set Browser.
In the standby screen, i/[Browser settings]
1
z Alternatively, in a website page, z/[Settings].
Select an item
2
■ Home page setting: Set home page.
■ Load images: Set whether to display images on a web page.
■ Download data to: Set saving destination for downloaded
files.
■ Privacy & security: Set functions using viewing information for
the purpose of convenience improvement.
■ Accessibility: Set text scaling and minimum font size.
■ Advanced: Set information used for the purpose of
convenience improvement.
/
[Home page].
Displaying download history
Check history of downloaded images etc.
In the standby screen, i/[Downloads]
1
z Alternatively, in a website screen, z/[Downloads].
Select a history
2
/
35
Mail/Web browser
Page 38

Camera
You can shoot still pictures and videos. Also, you can switch
settings of the camera according to the subject to shoot.
Before using camera
z Fingerprints, fats, etc. on the lens cause the image to be out of
focus or blurred. Wipe the lens with a soft cloth before shooting
images.
z You cannot shoot when the battery level is insufficient. When you
use the camera, charge the battery sufficiently in advance.
z Although the camera is made with high-precision technology,
some pixels or lines look constantly dark or bright. Further, white
lines and other noise increase in images especially when shooting
images in dimly lit surroundings.
z If the camera lens is exposed to direct sunlight for a long time, the
internal color filter may discolor, creating a discoloration of shot
images.
z The quality of images may deteriorate when shot or saved after
the handset has been left in a warm location for a long time.
z Images shot in shooting conditions which include strong light
source such as the sun or a lamp may appear dark or distorted.
z Shooting the sun directly may impair the performance of the
CMOS.
z If you keep using the camera with the handset temperature high,
the alert screen appears, the shot data is saved, and then the
camera ends automatically.
z When the focus settings are switched, sounds are heard from the
camera lens. This is not a malfunction.
z The color and brightness of the subject in images shot with the
camera may differ from the actual color and brightness.
z Make sure that your fingers, hair, handset strap, etc. do not
obscure the camera lens when shooting images.
z Because a larger picture size requires more data, movement in
the image on the handset display may appear slow.
z Indoor fluorescent lighting etc. may create flickering or streaky
shading on the screen. This flickering or shading may be reduced
by changing the lighting conditions and brightness of the room or
adjusting the camera brightness and white balance.
z Shot still pictures are saved in DCF1.0 (ExifVer.2.3, JPEG)
format.
z The camera is not available while watching TV.
Copyrights and rights of portrait
Images and audio recorded with the handset are for personal use
and must not be used for any other purposes without the consent
of the rightful person in accordance with the Copyright Act. Please
note that acts such as the use or defacement of the likeness or
name of other individuals without their consent may infringe on an
individual's rights of portrait. Please be aware of copyrights and
rights of portrait when posting images and audio recorded with the
handset on the Internet or similar media. The recording of images
or audio may be restricted at stage performances, shows,
exhibitions, etc. even when the images or audio is recorded for
personal use etc. Do not use the handset to send copyrighted
images for uses other than those permitted under the Copyright
Act.
If you cause the public any trouble using the handset, you may be
punished under law or regulations (for example, nuisance
prevention ordinance).
Please be considerate of the privacy of individuals around you
when shooting and sending pictures using camera-enabled mobile
phones.
Holding the handset
Hold the handset to shoot as shown.
Operations while using camera
z In each camera mode, if no operations are performed for
approximately 3 minutes, the camera mode automatically ends.
When scanning with Barcode Reader, the scan results are
deleted.
z The shutter sound volume cannot be changed.
Picture size of camera
■ Shoot still picture
Aspect ratio Picture size
16 : 9 FullHD: 1920
HD: 1280
4 : 3 5M: 2576
2M: 1600
VGA: 640
■ Shoot video
Aspect ratio Picture size
16 : 9 HD: 1280
4 : 3 VGA: 640
QVGA: 320
×1080
×720
×1932
×1200
×480
×720
×480
×240
36
Camera
Page 39

Shooting still pictures
z When the camera is activated, TOUCH CRUISER EX is enabled.
For TOUCH CRUISER EX operations nP.17 "Using TOUCH
CRUISER EX"
In the standby screen, C
1
Point the handset camera at the subject
2
z To adjust the brightness: u
z To zoom: v
*
・ Maximum magnification (zoom step) is approximately 16.0-
fold (120 steps).
z To display the camera setting menu: z
z To display a shot still picture: C
z To lock the focus: m
・ When Auto focus is set to [AF OFF], locking the focus is
disabled.
z To switch video camera: i
z To show/hide screen icon: *
* When shooting in horizontal display, operations for v and u
are switched.
t/&
3
z The shutter sounds and the shot still picture is automatically
saved.
Still picture shooting screen
1
2
3
1 Voice recognition
z Shoot by voice recognition. When Voice recognition is set to
[ON], you can shoot by speaking any of "Shutter"/"Hi cheese"/
"Hi pose" toward the speaker/microphone.
2 Focus frame
z When "Face AF" is set, the camera detects person's face to
focus. Tap a subject point with TOUCH CREUISER EX pointer
to specify the focus point.
3 Zoom
4 Shooting mode
z Switching shooting modes (nP.37 "Settings for shooting still
pictures").
5 Location Info (Auto)
6 Picture size
7 Adjust brightness
8 Remaining number for shooting
z Displayed when the remaining number for shooting decreases
to 99 or less as for the still picture shooting mode.
9 Mini preview
z Displays thumbnail of last shot still pictures.
z Select each icon or mini preview thumbnail with TOUCH
CRUISER EX pointer to activate the function corresponding to
the icon, or display the shot still picture.
*
4
5
6
7
8
9
z When you rotate to horizontal display in the still picture shooting
mode, the orientation of TOUCH CRUISER EX pointer does not
change.
Settings for shooting still pictures
z Menu items may vary by usage function or condition.
In the standby screen, C/z
1
Select an item
2
■ change to videocamera: Switch to video camera shooting.
■ change mode: Switch shooting mode according to shooting
environment or subject.
z Alternatively, in the still picture shooting screen, press 2
to set.
z Camera: When "change mode" is set to "Continuous shot",
"Fisheye", "Miniature", "Panorama", switch the mode to the
standard camera.
z Auto: A mode to automatically adjust the camera according
to the subject.
z Standard: A standard mode.
z Portrait: A mode suitable for portrait shot.
z Night Portrait: A mode suitable for portrait shot against a
night view.
z Scenery: A mode suitable for landscape shot.
z Night Scenery: A mode suitable for night view shot.
z Food: A mode suitable for food shot.
z Text: A mode suitable for character shot.
z Sepia: A mode for shooting with a sepia effect applied.
z Monochrome: A mode for monochrome shot.
z Continuous shot: A mode for shooting 18 - 50 pictures per
one shot.
z Fisheye: A camera for shooting distorted photos as if you
used a fisheye lens.
z Miniature: A camera for shooting landscape photos as if the
scenes were replicated in miniature size.
z Panorama: A camera for shooting in panorama size.
z Barcode Reader: For details nP.39 "Barcode Reader"
■ Location Info(Auto): Set whether to add location information
automatically.
z Alternatively, in the still picture shooting screen, press 4.
■ Resolution: Set picture size. For Resolution nP.36 "Picture
size of camera"
z Alternatively, in the still picture shooting screen, press 1.
■ Continuous shot: Set continuous shot type when "change
mode" is set to "Continuous shot".
■ Auto Framing: Switch grid line or guide type according to the
shooting scene.
z Alternatively, in the still picture shooting screen, press 8.
■ Miniature: Set effect pattern when "change mode" is set to
"Miniature".
■ Voice recognition: Set whether to use voice recognition.
z Alternatively, in the still picture shooting screen, press 5.
■ Detail setting: For details nP.38 "Detail setting"
■ Help: Display the help of key operations or how to use the
framing advisor.
z Alternatively, in the still picture shooting screen, press 0
to display.
z Before switching to another mode, some shooting modes or
cameras to shoot with may make it necessary to reactivate the
camera after ending it.
37
Camera
Page 40

■ Detail setting
In the standby screen, C/z/[Detail setting]
1
Select an item
2
■ ISO: Set the sensitivity for incorporation of light according to
the ambient brightness.
■ White Balance: Set whether to adjust color of the subject
against the ambient light source.
■ Shutter mode: Set whether to automatically shoot the subject
when he/she smiles or looks back on the camera.
■ Self-timer: Set whether to automatically shoot with a timer set.
z Alternatively, in the still picture shooting screen, press 3.
■ Auto focus: Set the focus according to the subject.
■ Anti shake: Set whether to use a function to reduce blurring.
z Alternatively, in the still picture shooting screen, press 7.
■ Anti Flicker: Set to make the screen less susceptible to
streaky shading when you shoot in a place with fluorescent
lighting.
■ Save to: Set a save destination.
z Some functions may not be set at the same time.
About [ISO]
z When "ISO" is set to high sensitivity, the shutter speed is faster
so that blurring the subject or hand shake is reduced, or the
subject is shot brightly even in a dark place, but the image
becomes coarse.
Shooting video
z When the camera is activated, TOUCH CRUISER EX is enabled.
For TOUCH CRUISER EX operations nP.17 "Using TOUCH
CRUISER EX"
In the standby screen, C/i
1
Point the handset camera at the subject
2
z To adjust the brightness: v
z To zoom: u
・ Maximum magnification (zoom step) is approximately 16.0-
fold (120 steps).
z To display the camera setting menu: z
z To display a shot video: C
z To switch to still picture shooting: i
z To show/hide screen icon: *
t/&
3
z Shooting starts after the shooting start sound is heard.
z To shoot still pictures: C
t/&
4
z The shot video is saved after the shooting end sound is heard.
Video shooting screen
45 67 8 9 a
1
2
3
1 Focus frame
z When "Standard AF" is set, tapping a subject point with
TOUCH CREUISER EX pointer specifies the focus point.
2 Zoom
3 Shooting time
4 Mode change
z Switching shooting modes (nP.38 "Settings for shooting
videos").
5 Location Info(auto)
6 Video size
7 Remaining time for shooting
8 Battery level
9 Adjust brightness
a Mini preview
z Displays thumbnail of last shot videos.
z Select each icon or mini preview thumbnail with TOUCH
CRUISER EX pointer to activate the function corresponding to
the icon, or display the shot video.
z It is recommended to shoot with the horizontal display for video
shooting.
Settings for shooting videos
z Menu items may vary by usage function or condition.
In the standby screen, C/i/z
1
Select an item
2
■ Change camera: Switch to still picture shooting.
■ Mode change: Switch shooting mode according to shooting
environment or subject.
z Alternatively, in the video shooting screen, press 2.
z Easy auto: A mode to automatically adjust the camera
according to the subject.
z Standard: A standard mode.
z Portrait: A mode suitable for portrait shot.
z Scenery: A mode suitable for landscape shot.
z For "Rapid Shooting", "Fish Eye", "Miniaturize",
"Panorama" nP.37 "Settings for shooting still pictures"
z Barcode Reader: For details nP.39 "Barcode Reader"
■ Location Info(auto): Set whether to add location information
automatically.
z Alternatively, in the video shooting screen, press 4 to set.
■ Video Size: Set video size. For Video Size nP.36 "Picture
size of camera"
z Alternatively, in the video shooting screen, press 1 to set.
■ Detail setting: For details nP.38 "Detail setting"
■ Help: Display the help of key operations.
z Alternatively, in the video shooting screen, press 0 to
display.
z Before switching to another mode, some shooting modes or
cameras to shoot with may make it necessary to reactivate the
camera after ending it.
■ Detail setting
In the standby screen, C/i/z/[Detail
1
setting]
Select an item
2
■ White Balance: Set whether to adjust color of the subject
against the ambient light source.
■ Mic Setting: Set whether to use microphone.
■ Self-timer: Set whether to automatically shoot with a timer set.
z Alternatively, in the video shooting screen, press 3 to set.
■ Focus settings: Set the focus according to the subject.
■ Anti Flicker: Set to make the screen less susceptible to
streaky shading when you shoot in a place with fluorescent
lighting.
38
Camera
Page 41

■ Save to: Set a save destination.
■ Time Lapse: Set shooting interval.
z Some functions may not be set at the same time.
Barcode Reader
Hold the camera over bar codes (JAN code, QR codes) to scan
the information.
JAN code
z JAN code is a bar code expressing a number with the vertical lines
of different width.
z The camera can scan JAN8 and JAN13 codes.
QR code
z QR code is a 2-dimensional code expressing data in vertical and
horizontal directions.
In the standby screen, z/[Camera]/[Barcode
1
Reader]
z To adjust the brightness: u
Display a bar code to scan on the main display
2
10 cm or more
z Display the bar code in the center of the main display.
z Keep a distance of approximately 10 cm between a bar code
and the camera with their position stabilized as much as
possible to recognize easily.
z When scanning is complete, completion sound is heard and
the scan result screen is displayed.
z To cancel scanning temporarily, press C. To resume
scanning, press t.
z Setting Barcode Reader: z
For divided data
z Some QR codes require of multiple divided data scanning (up
to 16 codes) to merge them into one. Repeat the operation
until all data is scanned. The scan result is displayed.
Use the scan result
3
z When a phone number, URL, or mail address is scanned,
select the scan result to use.
z To register the scan result: z
z To copy the scan result: z
z Scanning may fail depending on bard code type or size.
z Scanning may fail when multiple bar codes are displayed on the
main display.
z Scanning may fail depending on condition such as scratch, dirt,
damage, print quality, light reflection, or QR code version.
/
set each item
/
[Entry data]
/
[Copy All]
Translation finder
You can have English texts translated into Japanese in real
time just by holding the camera over English texts.
z Translation finder can be used in the vertical display.
In the standby screen, z/[Camera]
1
[Translation finder]
Display English texts to translate on the main
2
display
/
t
z Make sure that the entire English texts to translate are
displayed on the screen. Translated Japanese text is
displayed.
z The shutter sounds and the untranslated and translated still
pictures are automatically saved.
z To make settings for Translation finder: z
Settings]
/
set each item
Use the shot still picture
3
z To display/hide translated texts: C
z To zoom in/out: i/m
z To copy the characters: Display the translated Japanese texts
or untranslated English texts
z To send the characters: Display the translated Japanese texts
or untranslated English texts
sending method/
operate
z You can only have English texts translated into Japanese.
z Texts may not be scanned or translated correctly depending on
the English font, background, text color, text size, layout, etc.
z You can only copy or send texts which are translated into
Japanese.
z You may be able to have texts translated correctly by adjusting
angles of the screen to get the texts laid out horizontally.
/
/z/
[Copy text]
/z/
follow the instructions on the screen and
[Send text]/select a
/
/
[Detail
39
Camera
Page 42

Tools/Apps
TV (1Seg)
1Seg is a terrestrial digital TV broadcasting service for mobile
devices. You can receive data broadcasting besides TV image
and audio. Also, interactive services by communication
function of mobile devices, and detailed information via the
communication are available.
For details on the "1Seg" service, see the following website.
The Association for Promotion of Digital Broadcasting: http://
www.dpa.or.jp/english/
■ Using 1Seg
1Seg is a service provided by TV broadcasters (broadcast stations)
etc. Communication charges are not incurred for receiving image
and audio. Contact NHK for details on viewing fees of NHK.
Available information in the area of the data broadcasting is "data
broadcasting" information and "data broadcasting website"
information.
"Data broadcasting" information is carried by broadcast wave
together with image and audio. "Data broadcasting website"
information is used to access and display websites provided by TV
broadcasters (broadcast stations) etc. from the information on data
broadcasting.
Packet communication charges are incurred when accessing a
website such as a "data broadcasting website".
Some websites require information charges to use.
■ Broadcast wave
The radio wave received via 1Seg differs from that received via
FOMA service. Therefore, it cannot be received at a place where the
broadcast wave for 1Seg does not reach or while the broadcasting
is out of service, regardless of whether the handset is outside or
inside the FOMA service area.
Also, in the following places, the reception status may become weak
or the signal may not be received even if the handset is inside the
area of a terrestrial digital TV broadcasting service.
■ Place that is far from the base station/radio tower which sends the
signal
■ Place where the signal is interrupted due to the landscape or
buildings such as mountainous areas or behind a building
■ Place where the signal is weak or does not reach, such as a
tunnel, basement or an inner area of a building
Changing direction of the antenna or moving to other location may
improve signal reception.
Creating channel lists
To watch TV, you need to create one or more channel lists and
select one in advance.
z You can register up to three channel lists.
z Create channel lists within a terrestrial digital TV broadcasting
service area.
In the standby screen, z/[TV/Music]/[TV (One
1
Seg)]
z Alternatively, press y for at least 1 second to activate.
z If the confirmation screen for the license agreement is
displayed, check the content and select [Agree].
z Only when channels are not set, the channel list creating
screen appears.
z To add a channel list: In the TV watching screen, z
[Channel settings]/[Edit channel list]/z/[New]
/
Select an item
2
■ Create by selecting the area: Search for broadcast stations
set in each area.
■ Create by searching channels: Search for channels available
in the present location.
C
3
z You cannot use TV overseas due to difference of the broadcast
format or broadcast-radio-wave frequency.
Watching TV (One Seg)
Watch TV.
In the standby screen, z/[TV/Music]/[TV (One
1
Seg)]
z Alternatively, press y for at least 1 second to activate.
Watch TV
2
1
2
3
4
1
2
3
1 Program information
z The program name and broadcast station name are
displayed.
2 Image
3 Captions
4 Information displaying area
5 Volume
z While watching TV, colors in the screen may appear different.
z If you receive a call while watching TV, TV will resume after the
call is terminated.
■ Operations when watching TV
Switch operation modes or screens, or end TV.
z To switch data operation mode/TV operation mode: In vertical
display, C
z To switch vertical/horizontal watching screen: i
z To end TV: H
/
[Yes]
■ Key operations in TV operation mode
You can adjust audio volume or watch channels.
z To adjust volume: u
z To switch channels: v/0 - 9, *, #
z Channel search: v (for at least 1 second)
* When watching in horizontal display, operations for v and u
are switched.
5
5
40
Tools/Apps
Page 43

■ Key operations in data operation mode
You can use data broadcasting in the information displaying area.
z To move the cursor or scroll: u
z To select an item assigned in content: 0 - 9, *, #
z To select an item: t
z To go back to the previous page of data broadcasting: c
■ Submenu operations on the TV watching screen
z Menu items may vary by usage function or condition.
In the TV watching screen, z
1
Select an item
2
■ Exit TV: Ends TV.
■ Rotate: Switch vertical/horizontal displays.
■ Channel list: Display the channel list.
■ EPG: For details nP.41 "Using program guide"
■ Audio/Subtitles: For details nP.41 "Setting Audio/Subtitles"
■ Channel settings: Make the following settings.
z Search channels: Search channels.
z Select service: When multiple services are available for the
currently receiving channel, you can select a service to
watch.
z Switch channel list: Switch created channel lists according
to an area you use.
z Edit channel list: Change channel allocation, or create,
delete, re-scan or rename channel list.
z Register this channel: Register the currently watching
channel to a selected remote control number.
■ Reload data broadcasting: Reload data broadcasting.
■ General settings: For details nP.41 "Setting TV (One Seg)"
■ TV Links: For details nP.41 "TV Links"
■ Operation guide: Display operation method for the watching
screen.
Using program guide
Select an item
2
■ Data broadcasting settings: Make settings for data
broadcasting.
■ TV off timer: Set the timer for existing TV automatically.
■ Closing behavior setting: Make settings for operations when
the handset is closed while watching TV.
■ Product information: Confirm the version of this app.
[Data broadcasting settings]
z When [Confirmation] is disabled, the confirmation screen for
data broadcasting does not appear and information of data
broadcasting/data broadcasting websites may be automatically
updated. Note that packet communication charges may be
incurred.
TV Links
You can register memo information and URLs of related
websites as TV link in some data broadcasting. If they are
registered as TV link, you can check them from the TV link
screen.
z You can register up to 50 TV links.
z Procedures for registering TV links may differ depending on the
program.
In the TV watching screen, z/[TV Links]
1
z Display the registered TV links.
Select a TV link/C
2
z If the confirmation screen for accessing is displayed, check
the content, follow the instructions on the screen and operate.
■ Deleting TV links
In the TV watching screen, z/[TV Links]
1
Select a TV link//z/[Delete]/[OK]
2
In the TV watching screen, z/[EPG]
1
z A program guide screen for watching channel is displayed.
Select a TV program
2
z The program detail screen is displayed.
Setting Audio/Subtitles
Change audio language or display subtitle while watching TV.
z Availability of each function differs depending on TV program.
In the TV watching screen, z/[Audio/Subtitles]
1
Select an item
2
■ Switch audio: Set audio language.
■ Switch sound-multiplex: Make settings for main audio/sub
audio.
■ Switch subtitles: Make settings for subtitle to display.
Setting TV (One Seg)
You can make settings for data broadcasting,
In the TV watching screen, z/[General
1
settings]
Music
Play music data and playlists saved on the handset memory or
a microSD Card.
z The followings are the main file formats of playable music data.
AAC LC, AAC+, enhanced AAC+, AMR-NB, AMR-WB, FLAC,
MP3, Vorbis, PCM/WAVE
In the standby screen, z/[TV/Music]/[Music]
1
1
2
1 Category
z Use v to switch category tabs.
2 Title/Artist name/Album title
3 Data being played/paused
4 Total playback time
41
3
4
Tools/Apps
Page 44

Select music data
2
6
7
1
2
3
4
5
1 Jacket image
2 Title
3 Album title
4 Artist name
5 Playback time
6 Shuffle
: Shuffle OFF/ : Shuffle ON
7 Repeat
: Repeat one song/ : Repeat all songs/ : Repeat
OFF
8 : Playing/ : Paused
9 Total playback time
■ Operations while playing music data
You can adjust playback sound, play the previous/next music data,
or play in background.
z To adjust volume: u
z To play/cue the previous music data
z To play the next music data: r
z To rewind: q (for at least 1 second)
z To fast-forward: r (for at least 1 second)
z To play in background: While playing, H
* When the play back time is approximately 0 second, the previous
music data is played.
■ Submenu operations for Music data list screen
z Menu items may vary by usage function or condition.
In the music data list screen, z
1
Select an item
2
■ Play all: Play all displayed music data.
■ Shuffle all: Shuffle and play all music data.
■ Save as playlist: Save the currently displayed music data to a
new playlist.
■ Play: Play music data at the cursor position.
■ Add to playlist: For details nP.42 "Creating playlists"
■ Remove from list: Remove music data at the cursor position
from a playlist.
■ Set as ringtone: Set music data at the cursor position as
ringtone.
■ Delete: Delete music data at the cursor position.
■ Search: Search music data at the cursor position with the web
browser, or search within "Music" of the handset.
*
: q
8
9
/
[Yes]
Managing playlists
■ Creating playlists
In the music data list screen, point the cursor to
1
music data
[New]/enter a playlist name/[Save]
2
/z/
[Add to playlist]
■ Changing a playlist name
In the music data list screen, point the cursor at
1
"Playlists" tab
Point the cursor at a playlist/z/[Rename]
2
Enter a playlist/[Save]
3
■ Sorting music data
In the music data list screen, point the cursor at
1
"Playlists" tab
Select a playlist/point the cursor at music data
2
C/select a destination to change to/C
3
■ Deleting playlists
In the music data list screen, point the cursor at
1
"Playlists" tab
Point the cursor at a playlist/z/[Delete]/[Yes]
2
Album
Use album for still pictures shot by the camera.
z When Album is activated, TOUCH CRUISER EX is enabled. For
TOUCH CRUISER EX operations nP.17 "Using TOUCH
CRUISER EX"
In the standby screen, z/[Album]
1
Select a still picture
2
z To change a saving storage of still pictures: C/select a
saving storage
Check the still picture
3
z To display the previous/next still picture (at the same
magnification): v
z To magnify a still picture: t
z To change a viewing position of still picture for magnification
(when magnified): w
z To cancel magnification and view still picture at the same
magnification (when magnified): c
z To end viewing still picture (at the same magnification): c
■ Submenu operations on the still image viewing
screen
z Menu items may vary by usage function or condition.
In the still image viewing screen, z
1
Select an item
2
■ Send: Send a selected still picture by attaching to mail, via
infrared, Bluetooth, PASSNOW, etc.
z When the handset is paired with a tablet by PASSNOW,
press * to send a selected still picture to the paired tablet.
■ Delete: Delete a still picture.
■ Slideshow: Display slideshow.
■ Edit image: For details nP.43 "Editing a still picture"
■ Register image: Register a still picture to the phonebook entry
or as wallpaper.
■ Settings: Make settings for slideshow or display sharpness.
■ Details: Display detail information of still picture.
[Register image]
z Copyrighted data may not be used as registered data.
42
Tools/Apps
Page 45

Editing a still picture
In the standby screen, z/[Album]
1
Select a still picture
2
z/[Edit image]/z
3
Select an item
4
■ Trimming: Crop a still image.
■ Resize: Change size of still picture.
■ Rotate: Rotate a still picture.
■ Mirror: Invert a still picture up/down/left/right to an image like
in a mirror.
■ Effect: Give an effect such as monochrome, fisheye,
miniature on still picture.
■ Adjustments: Adjust brightness or sharpness of still picture.
■ Date stamp: Add a date stamp to still picture.
■ Hide face: Process still picture for hiding face if it is
recognized.
t
5
z Images in "Photo" and "Picture" in Data can be edited in the
same way (nP.59 "Operating files").
LINE
LINE is a communication app with which you can enjoy
messaging or talking anywhere at any time.
z To use LINE, register an account in advance. For details on how
to use, refer to LINE website or from the More screen of LINE,
[Settings]
/
z When LINE is activated, TOUCH CRUISER EX is enabled. For
TOUCH CRUISER EX operations nP.17 "Using TOUCH
CRUISER EX"
1
z Some functions such as games, etc. are not available for the
select [Help] to refer the help.
In the standby screen, z/[Tools]/[LINE]
z Top page of LINE appears.
z When you use the app for the first time, the terms and
conditions and login screen appear. Confirm the content and
follow the instructions on the screen after this step.
handset.
Alarm
Activate an alarm tone or vibration at a specified time.
In the standby screen, z/[Tools]/[Alarm]
1
Point the cursor to a register destination/C
2
z To add a register destination: [+]
Set a time/C
3
Set each item
4
1
2
3
4
5
6
1 Name
z Enter a name.
2 Repeat
z Set the repetition of the alarm.
3 Alarm sound
z Set the alarm sound.
4 Vibration
z Set whether to use the vibrator.
5 Snooze
z Set whether to use the snooze.
6 Snooze/Advanced settings
z Set the interval and number of repetition of the snooze,
and ring duration.
z An alarm is not activated when the handset is turned off at the
time for the alarm to ring.
z An alarm is not activated when the time for the alarm to ring
arrives during a call. Upon the end of the call, the alarm is
activated.
z When the time for an alarm to ring arrives while another alarm
is ringing, the former alarm is delayed.
When the latter one stops or the duration has elapsed, the
delayed alarm starts to ring.
z The alarm does not sound if Alarm volume is set to "Silence" or
if you set Setting for manner mode to [Do not Ring] while the
manner mode is set.
■ Stopping an alarm sounding
When the time for an alarm to ring arrives, alarm sound and vibrator
activates.
Press any key
1
z When the snooze is set, t/[OK] to stop the snoozing. If you
press other key, the alarm stops but snooze is not canceled.
■ Sounding settings in the manner mode
In the Alarm screen, z/[Settings]
1
[Setting for manner mode]/[Ring]/[Do not ring]
2
■ Setting Alarm volume
In the Alarm screen, z/[Settings]
1
[Alarm volume]/u/t
2
■ Deleting register destination
In the Alarm screen, z/[Delete selected]
1
z To delete an item: Point the cursor to a phrase/z/[Delete
one alarm]
Select a register destination/C/[Yes]
2
/
[Yes]
43
Tools/Apps
Page 46

■ Resetting registration
In the alarm screen, point the cursor to a register
1
destination
In the Alarm screen, z/[Reset]/[OK]
2
■ Setting/canceling alarm
In the alarm screen, select a register destination
1
World clock
World Clock can display clocks for up to 10 cities.
In the standby screen, z/[Tools]/[World
1
clock]
[+]
2
Select a city
3
■ Switching daylight saving time
In the World clock screen, point the cursor to a
1
city
/z/
z [ ] appears on cities for which daylight saving time is set.
z You may not be able to switch to daylight saving time
■ Deleting a city
In the World clock screen, z/[Delete selected]
1
z To delete an item: Point the cursor to a phrase/z
Select a city/C/[Yes]
2
■ Sorting cities
In the World clock screen, z/[Sort]
1
Select a city to rearrange/use u to select a
2
position to change to
[Daylight-saving time]
depending on the city.
[Delete]/[Yes]
/
/
C
Timer
Activate an alarm tone or vibration after the specified length of
time passes.
In the standby screen, z/[Tools]/[Timer]
1
Enter the time
2
t
3
z To stop countdown: t
z To reset countdown: C
z Activate an alarm tone or vibration after the specified length
of time passes. To stop, press t.
■ Changing alarm sound
In the Timer screen, z/[Alarm Sound]
1
Select the alarm sound/C
2
■ Setting the vibrator
In the Timer screen, z/[Vibration]
1
■ Changing names
In the Timer screen, z/[Name]
1
Enter a name
2
Stop watch
You can use the Stop watch to measure lap time and split time.
In the standby screen, z/[Tools]/[Stop watch]
1
t
2
z To record the lap time and split time: C
t
3
z To reset the measured time: C
z You can record up to 99 history items of lap time and split time.
When the number exceeds 99, they are deleted from the oldest
one.
Calculator
In the standby screen, z/[Tools]/[Calculator]
1
Calculate
2
■ Copying the calculation result
In the calculation result screen, z/[copy]
1
z Results or history information may be deleted while Calculator
is activated in the background.
Schedule
You can create or manage schedule.
In the standby screen, z/[Tools]/[Schedule]
1
Check schedules
2
1
2
1 Year and month
2 Registered event
■ Operations on the schedule screen
z To display registered events: Select a date that schedule event is
registered.
z Jump to the previous/next month: m/i
■ Submenu operations on the schedule screen
In the Schedule screen, z
1
Select an item
2
■ Register event: For details nP.45 "Registering events"
■ Event list: Display registered event list.
■ Move to present month: Move to the current month.
■ Search: Search registered events.
44
Tools/Apps
Page 47

■ SD card: Back up/restore schedules. For SD card nP.47
"SD card backup"
■ Settings: For details nP.45 "Settings of Schedule"
■ App info: Display app information.
■ Registering events
In the Schedule screen, z/[Register event]
1
Set each item/C
2
■ Deleting events
In the Schedule screen, select a date/select a
1
schedule
■ Settings of Schedule
In the Schedule screen, z/[Settings]
1
Select an item
2
■ Weekly start day settings: Set the starting day of a week on
■ Notification tone settings: Set the notification tone.
■ Vibration settings: Set a vibrator operation for notification.
/C/
the calendar.
[Yes]
Memo
Create and manage memos.
Registering a memo
In the standby screen, z/[Tools]/[Memo]/C
1
Enter a subject and details/C
2
Checking memos
In the standby screen, z/[Tools]/[Memo]
1
Select a memo
2
■ Editing a memo
In the memo details screen, i
1
Edit the content/C
2
■ Deleting a memo
In the memo details screen, C/[Yes]
1
■ Sorting memos
In the memo list screen, z/[Sort]
1
[From the latest one]/[From the oldest one]
2
■ List setting of Memo
In the memo list screen, z/[List settings]
1
[Subject only]/[Date and Subject]
2
■ SD card backup/restoration of Memo
In the memo list screen, z/[SD card]
1
[Yes]
2
z SD card backup activates. For SD card backup nP.47 "SD
card backup"
PASSNOW
By pairing with a tablet, you can make still pictures shot by the
handset widely displayed and save them on the tablet, or make
websites which you are viewing on the handset displayed on
the tablet. In addition, notifications or incoming notice received
by the handset or tablet can be notified each other, or you can
make the handset or paired tablet sounded if it is nearby for
searching.
This feature uses Bluetooth function for linking with tablets.
Turn on the Bluetooth function on both the handset and the
tablet in advance.
z When Bluetooth connection is used for other than PASSNOW,
PASSNOW linkage feature may not be used.
z If PASSNOW linkage feature does not work, turn off the
Bluetooth function on both the handset and the tablet, then turn
them on again
z For details on PASSNOW, refer to Sharp Corporation website
(http://www.sharp.co.jp/k-tai/). (in Japanese only)
Pairing
Install PASSNOW to a tablet before pairing.
In the standby screen, z/[Tools]
1
[PASSNOW]/C
z The camera activates.
Activate PASSNOW on the tablet
2
z QR code appears on the display.
Hold the handset camera over the QR code on
3
the tablet
z When you focus the QR code with the frame of the main
display, the information is read automatically.
Follow the instructions on the screen and
4
operate the handset and tablet to pair
z When a request screen is displayed, follow the instructions on
the screen and operate after this step.
z After they are paired, in the standby screen, z/[Tools]/select
[PASSNOW] to display the name of the paired tablet. Select
[Cancel pairing]
/
[Yes] to cancel pairing.
Sending still pictures from Databox
You can send still pictures saved on the handset to the paired
tablet to display/save.
In the standby screen, z/[Data]
1
z Alternatively, in the standby screen, z/[Album].
[Photo]/[Picture]
2
Select a still picture/z/[Send]/[PASSNOW]
3
z Alternatively, in the still picture list screen, point the cursor to a
still picture, z
z Alternatively, when displaying a still image/in the still picture list
screen, point the cursor to a still picture and press * to send.
/
[Send]/ select [PASSNOW] to send.
/
45
Tools/Apps
Page 48

Sharing displayed or bookmarked websites
with the paired tablet
You can share displayed or bookmarked websites on the
handset with the paired tablet.
■ Sharing displayed websites with the paired tablet
In a website screen, z/[Page info]/[Share
1
page]
[Show all]/[PASSNOW]
2
■ Sharing bookmarked websites with the paired tablet
In the standby screen, i/[Bookmarks]
1
z Alternatively, in a website screen, z/[Bookmark list] to
operate.
Point the cursor to a bookmark/z
2
[Property]/[Send bookmark]
[Show all]/[PASSNOW]
3
/
Calling to a phone number received from a
paired tablet
You can send phone number to the handset only when a paired
tablet is not compatible with voice calling. For example, when
you browse restaurant websites on a tablet and you want to
make a call to a restaurant to reserve, touch the phone number
on the tablet screen to make a call with the handset without
inputting the number separately.
Send a phone number from a paired tablet
1
When a phone number is displayed on the main
2
display of the handset, s
z The handset calls to a phone number which is received from
a paired tablet
z Linking phone numbers may not be set depending on your
tablet/browser app/website.
Displaying incoming notice/notifications on a
paired tablet
You are notified with incoming notice/notifications on a paired
tablet when the handset receives incoming calls or mails.
In the standby screen, z/[Tools]/[PASSNOW]
1
[Notification link]/[OK]/[Notification link
2
(PASSNOW)]
[Notification link (PASSNOW)]/[Yes]
3
z "Notification link" is switched to [ON].
z When a notification for incoming call or mail arrives to the
handset, it is also notified to a paired tablet automatically.
z To cancel the notification link, [Notification link]
[Notification link (PASSNOW)]/[Notification link
(PASSNOW)]
/
select [Yes].
/
[OK]
/
Making incoming notice/notifications from a
paired tablet displayed on the handset
When notifications of incoming call or mail arrive to a paired
tablet, you can make them displayed on the handset. In
addition, notifying/not notifying can be set per notification.
Activate PASSNOW on a paired tablet
1
Activate "Settings" to link notifications
2
[Notify]/[Not notify] for each app
3
Set ON/OFF switch to ON/[OK]
4
[Notification link (PASSNOW)]/set "Notification
5
link (PASSNOW)" to ON
z "Notification link" is switched to [ON].
z When a notification for incoming call or mail arrives to a paired
tablet, it is also notified to the handset automatically.
z To cancel the notification link, activate "Settings" for linking
notification again
[Notification link (PASSNOW)]/set [Notification link
(PASSNOW)] to OFF
z Some notifications may not be linked depending on application
that sends notifications.
z Notification may not be linked when the paired tablet is in silent
manner mode.
/
set ON/OFF switch to OFF/[OK]
/
select [OK].
/
[OK]
/
Sending SMS from a paired tablet
You can send SMS (common phrase) from a paired tablet when
there is an incoming call to the handset and you cannot answer
the call
A call comes in on the handset
1
On the paired tablet, [Quick responses]/select
2
the message
z SMS is sent to the caller.
Searching the paired handset and tablet by
sounding
You can check if the paired handset or tablet is nearby by
sounding each other to find.
In the standby screen, z/[Tools]/[PASSNOW]
1
z To call out the handset from a tablet: Activate PASANOW on
a paired tablet
[Call paired device]/[Call]
2
z The handset or tablet which is called up sounds. Select [Stop]
to stop the call sound.
z When calling up failed, a failure screen appears.
z The calling up sound volume cannot be changed.
46
Tools/Apps
Page 49

Data transfer
You can import backup data of your previous phone/
smartphone to the handset memory, or back up/restore the
handset data using a microSD Card.
In addition, you can import phonebook data from feature
phones using infrared communication function or from
smartphones using the Bluetooth function.
In the standby screen, z/[Tools]/[Data
1
transfer/Save]
z For Data transfer/Save nP.53 "Data transfer"
SD card backup
You can move and back up data such as phonebook entries
and docomo mails by using an external memory device such as
a microSD Card.
z Data which can be backed up to/restored from microSD Cards is
as follows.
■ Phonebook
■ docomo mail
■ Image
■ Video
■ Music data
■ Bookmarks
■ Call log
■ Schedule/Memo
z When a microSD Card is not inserted, image, video, music data is
saved to the handset memory. When you use Backup/restore to
microSD, only the data saved on the handset memory are backed
up. Data saved to the microSD Card cannot be backed up.
In the standby screen, z/[Tools]/[SD card
1
backup]
z When you use this for the first time, you must agree to
"License agreement(Translation)".
z Do not remove the battery pack from the handset while backing
up or restoring data. Data on the handset may be damaged.
z When the battery level is low, backing up or restoring may be
failed. In that case, charge the handset and then back up or
restore.
Backing up data to microSD card
z Insert a microSD Card in advance.
In the SD card backup screen, [Backup]
1
Select a data category to save
2
C/[Backup]
3
Enter the docomo apps password/C
4
t
5
z When you back up phonebook to a microSD Card, you cannot
copy phonebook data without name.
z When the memory space of microSD card is insufficient,
backing up or restoring may be failed. In this case, secure
enough space by deleting unnecessary files from the microSD
Card.
Restoring data to the handset
z Insert a microSD Card that includes backup files created via
Backup/restore to microSD in advance.
z When restoring phonebook entries, you can also restore files
created with PhoneBookCopy or with a function in an i-modeenabled device which allows you to back up data to a microSD
Card.
In the SD card backup screen, [Restore]
1
[Select] of a data category to restore
2
Select backup files/C
3
[Add]/[Overwrite]
4
C/[Restore]
5
Enter the docomo apps password/C
6
t
7
Instruction Manual
Use when you do not know handset operation steps.
Instruction Manual is displayed and you can check
descriptions or operation steps of each function. (In Japanese
only) Function can be activated directly from the descriptions.
In the standby screen, z/[Tools]/[Instruction
1
Manual]
Check the instruction manual
2
z Search by the index: z/[索引検索] (Search by index)
z Search by keyword: z
/
[検索] (Search)
word
z Register to favorites: z
z Checking favorites: z
z Search by contents: C
z Go back to the previous page: m
z Go to the next page: i
/
favorites)
select an item in the favorites
[はい] (Yes)
/
[検索] (Search)/Enter a search
/
[お気に入り登録 ] (Register to
/
[お気に入り確認] (Check favorites)
Widget Sheet
You can add widgets to use.
In the standby screen, z/[Tools]/[Widget
1
Sheet]
z/[Add]/select widgets
2
■ Moving widgets
In the Widget Sheet screen, z/[Move]
1
Select a widget/select a moving destination
2
■ Peeling off widgets
In the Widget Sheet screen, z/[Peel off]
1
Select a widget
2
■ Changing size of widget
In the Widget Sheet screen, z/[Change size]
1
Select a widget/use w to change the size/t
2
/
47
Tools/Apps
Page 50

Handset Settings
Setting menu
In the standby screen, z/[Settings] to display the menu and
make various settings for the handset.
■ Wallpaper/display: Make settings for the screen display etc.
■ Sound/lamp: Make settings for the manner mode, ringtone,
incoming lamp, etc.
■ Lock/security: Make settings for the security lock.
■ Energy saving/battery: Make the energy saving settings, check
the battery level, etc.
■ Bluetooth: Connect the handset and Bluetooth devices wirelessly.
■ Communication/network: Make settings for Airplane mode or
VPN.
■ docomo service: Make settings for the docomo service.
■ Data transfer/reset: Transfer data to/from among devices, or
perform Reset all.
■ Other settings: Make settings for the date and time, self check,
etc.
Wallpaper/display
You can make settings for the screen display etc.
In the standby screen, z/[Settings]
1
[Wallpaper/display]
Select an item
2
■ Standby screen: For details nP.48 "Standby screen"
■ Brightness: For details nP.48 "Brightness"
■ Screen timeout: Set the light duration of the backlight.
■ Font Settings: Make settings for the text size or text font.
■ VeilView: For details nP.48 "VeilView"
■ Sub display: For details nP.48 "Sub display"
[Screen timeout]
z Note that the continuous stand-by time is shortened when
increasing the light duration.
[Font Settings]
z Font may not appear correctly when activating a downloaded
app.
Standby screen
In the standby screen, z/[Settings]
1
[Wallpaper/display]/[Standby screen]
Select an item
2
■ Wallpaper: Set an image for the standby screen.
z To make the wallpaper changed each time you open the
handset: [Live Wallpapers]/[Favorite]/[草原] (Grassland)
follow the instructions on the screen and operate after this
step.
■ Clock display: Make settings for clock type or the display.
■ Calendar display: Make settings for calendar type or the
display.
■ iChanneldisplay: Set whether to display i-channel.
/
/
Brightness
In the standby screen, z/[Settings]
1
[Wallpaper/display]/[Brightness]
v/C
2
z Note that the continuous stand-by time is shortened when
increasing the brightness of the screen.
VeilView
You can prevent others from seeing the display.
In the standby screen, z/[Settings]
1
[Wallpaper/display]/[VeilView]
Select an item
2
■ VeilView: Set whether to enable VeilView.
■ Pattern setting: Set the display pattern.
■ Improve appearance: Make an adjustment for how the display
looks like when it faces you.
[VeilView]
z [VeilView] is disabled if the power is turned off.
[Pattern setting]
z The effect of preventing others from seeing may differ
depending on the selected patterns.
Sub display
You can make settings for the sub display.
In the standby screen, z/[Settings]
1
[Wallpaper/display]/[Sub display]
Select an item
2
■ Display time setting: Set the display duration of the sub
display.
■ Caller display: Set whether to display a caller of incoming call.
■ Close light setting: Set whether to light the sub display when
the handset is closed.
Sound/lamp
You can make settings for the manner mode, ringtone,
incoming lamp, etc.
In the standby screen, z/[Settings]/[Sound/
1
lamp]
Select an item
2
■ Mode Settings: For details nP.49 "Mode Settings"
■ Volume: Set the volume of the ringtone, alarm sound,
/
playback sound for music or videos, etc.
■ Ringtone/notification: Make settings for operations for when
receiving calls or notifications.
z To set blinking pattern and blinking color for incoming calls:
[For incoming call]
select a pattern/color/C
z To set blinking lamp for notifications: [For notification]
[Notify by blinking]
■ Audible key tones: Set whether or not to enable operation
sounds for when selecting menus etc.
■ Key backlight: Set whether to light the key backlight.
■ Haptic feedback: Set whether or not to vibrate for operating
TOUCH CREUISER EX.
/
[Blinking pattern]/[Blinking color]
/
/
/
/
/
48
Handset Settings
Page 51

■ Screen lock sounds: Set whether or not to enable sounds for
when locking/unlocking the screen.
■ Sound start charging: Set whether to ring sounds when
charging starts.
Mode Settings
You can set to avoid disturbing others when in public.
In the standby screen, z/[Settings]/[Sound/
1
lamp]
/
[Mode settings]
Select the type of the manner mode
2
■ Standard: The ringtone and operation sound are silenced,
and the vibrator is activated when receiving a call or others.
When Answering memo setting is set to [Mannermode], the
answering memo is enabled and operated according to its
setting.
■ Drive: The ringtone and operation sound are silenced, and
even the vibrator is not activated when receiving a call or
others. The answering memo is enabled and operated with
Answering message setting set to [Drive].
■ Silent: The ringtone and operation sound are silenced, and
even the vibrator is not activated when receiving a call or
others When Answering memo setting is set to
[Mannermode], the answering memo is enabled and operated
according to its setting.
■ OFF: Disable the manner mode.
■ Activating/canceling the manner mode through one-
touch operation
In the standby screen, # (for at least 1
1
second)
z When the handset is closed: & (for at least 1 second)
z Alternatively, H (for at least 1 second)
z The following sounds are not silenced even when the manner
mode is set.
■ Shutter sound of shooting still pictures
■ Focus locking sound of shooting still pictures
■ Record start/end sound of shooting videos
■ Ringer of PASSNOW
z While the manner mode is set, media playback sound (music,
video, TV, etc.) is muted. You can increase the volume by
pressing o on the each screen.
z While the manner mode is set, the ringtone volume cannot be
changed by pressing u.
/
select the type
・ When setting, manner mode type is the one which is
previously set.
to activate/cancel the manner mode.
/
[ ]/[ ]/[ ]/[ ]
Lock/security
You can make settings for the security lock.
In the standby screen, z/[Settings]/[Lock/
1
security]
Select an item
2
■ Screen lock: Make settings for the unlock method for when
the power or the main display is turned on.
■ Security key setting: For details nP.51 "Security key setting"
■ Parental mode: For details nP.49 "Parental mode"
■ Restrict calls: For details nP.50 "Restrict calls"
■ Contacts data access monitor: Restrict apps or services
which use the phonebook information.
■ Secrecy settings: For details nP.50 "Secrecy settings"
■ Set up SIM card lock: For details nP.51 "Set up SIM card
lock"
■ Unknown sources: Allow installation of apps received via
unknown sources.
[Screen lock]
z If you enter wrong security keys five times continuously, you
cannot enter it for 30 seconds.
z The setting items are as follows.
■ None: The lock screen is not displayed.
■ Lock No.: Set four- to sixteen-digit number.
Password: Set four- to sixteen-digit alphanumeric and half-width
■
*
symbols
* Some half-width symbols are not available.
[Unknown sources]
z Apps you download from the websites may be of unknown
origin. To protect your handset and personal data, download
apps only from trusted sources.
Parental mode
You can restrict operations or settings for some functions.
1
2
3
including at least one or more alphabets.
In the standby screen, z/[Settings]/[Lock/
security]
/
[Parental mode]/[Parental mode]
Enter the passcode
Select an item
■ Parental mode: Set whether or not to use the parental mode.
■ Restrict calls: Set whether or not to allow the other party
registered to the phonebook to send or receive calls.
z To check permitted contacts: Point the cursor to [Restrict
calls]/C
・ Alternatively, in the standby screen, z
[Lock/security]/[Parental mode]/[Permitted contacts] to
check them.
・ To update contacts information, point the cursor to
[Restrict calls]
■ Restrict Mails: Set whether or not to restrict use of mails or
SMS.
■ Restrict One Seg: Set whether or not to restrict watching TV.
■ Restrict Camera: Set whether or not to use the camera.
■ Restrict Browser: Set whether or not restrict use of the
browser.
■ Restrict LINE: Set whether or not to use LINE.
/C/C/
select [Yes].
/
[Settings]
/
49
Handset Settings
Page 52

[Restrict calls]
z You can call to the emergency number (110, 119 or 118) even
when you set Restrict calls. Receiving all incoming calls are
allowed for approximately 5 minutes after an emergency call is
made. If you turn off the handset before approximately 5
minutes have passed, calls are restricted again.
z If you registered many contacts in the phonebook, setting
Restrict calls and displaying the confirmation screen for the
available contacts may take time.
z When contacts are added or changed in the phonebook after
Parental mode is set, make sure to update contacts information
in Parental mode.
Restrict calls
You can set not to make calls.
In the standby screen, z/[Settings]/[Lock/
1
security]
Enter the security key/[Restrict calls]
2
z If you have set Restrict calls, you need to enter the security key
to temporarily disable the restriction.
z You can call to the emergency number (110, 119 or 118) even
when you set Restrict calls.
/
[Restrict calls]
Secrecy settings
You can set contacts in the phonebook not to be displayed in
the phonebook by setting the secrecy setting for the contacts.
z Usually, the handset is in secret mode.
z When you temporarily disable the secret mode, both normal
contacts and contacts for which the secrecy setting is set are
displayed.
z If the main display is turned off while the secret mode is
temporarily disabled, the secret mode is enabled.
In the standby screen, z/[Settings]/[Lock/
1
security]
Enter the passcode
2
z The secret mode is temporarily disabled.
[OK]
3
Select an item
4
■ Set contact secrecy: Set the secrecy setting for contacts in the
■ Disable secret mode temporarily: Change the security key for
■ Guide: Display how to temporarily disable the secret mode
Operations in the secret mode
z In the following cases, the names registered in the phonebook
do not appear and only the phone numbers appear.
■ Call screen
■ Redial/Call history list screen
z In the following cases, the names registered in the phonebook
do not appear and only the mail addresses or phone numbers
appear.
■ Recipient/sender of docomo mail
■ Recipient/sender of SMS
/
[Secrecy settings]
phonebook.
temporary cancellation of the secret mode.
and explanation for contacts in the phonebook for which the
secrecy setting is set.
Backing up/Data transferring
z In the following cases, all contacts can be backed up/data-
transfered including contacts for which the secrecy setting is set
when secret mode is temporarily disabled.
■ Backup via SD card backup
■ All contacts are sent from the phonebook
■ Contacts are sent via infrared communication
* Available in the secret mode.
z Secrecy setting is not taken over to the backed-up/data-
transfered contacts.
z In the secret mode, contacts with secrecy setting set are not
synchronized to the phonebook cloud. To synchronize contacts
with secrecy setting set with the phonebook cloud, stop
synchronizing with the cloud in the phonebook. And then start
the use of cloud in the phonebook, and select [Use device data]
to synchronize.
*
Security codes used on the handset
Some functions for convenient use of the handset require
security codes. In addition to security code used for various
handset operations, use security codes such as the network
security code when using network services. Use security
codes properly according to the purposes to fully utilize the
handset.
z Entered security code for various functions and PIN code turn into
[・].
Precautions about various security codes
z Do not use easily predictable numbers for security codes to be set
such as "birthday", "part of a phone number", "address or room
number", "1111" or "1234". Keep a separate memo of security
codes.
z Keep security codes private. If the security codes are found and
improperly used by others, DOCOMO shall not be liable for any
damages incurred on the users.
z If you forget your security codes, you are required to bring your
identification (a driver’s license etc.), your handset and your
docomo nano UIM card to a docomo Shop.
For details, contact the number listed in "General Inquiries" on the
last page.
z PUK (PIN Unlock Key) is described in the agreement form
(customer copy) you received at the time of subscription at a
docomo Shop. If you made a subscription at a shop other than a
docomo Shop, bring your identification (a driver’s license etc.) and
your docomo nano UIM card to a docomo Shop or contact the
number listed in "General Inquiries" on the last page.
■ Security key (security code for various functions)
If you set any restrictions, you need to enter the security key to
temporarily disable them. [Passcode] ([0000]) is set as a security
key by default but you can change it (nP.51 "Security key setting").
z If you enter wrong security keys five times continuously, you
cannot enter it for 30 seconds.
■ Network security code
Network security code is a four-digit code required for confirming the
subscriber’s identity when an order is received at a docomo Shop,
docomo Information Center or "お客様サポート " (Support), used for
accessing various network services, etc. You can set any code at
the time of subscription but you can change the code.
z For details on network security code, refer to the DOCOMO
website.
50
Handset Settings
Page 53

■ PIN code
A docomo nano UIM card has a security code called PIN code. This
security code is set to [0000] by default but you can change the code
(nP.51 "Set up SIM card lock").
The PIN code is a four- to eight-digit security code that needs to be
entered for recognizing the user of the handset every time a docomo
nano UIM card is inserted or when a device is turned on to prevent
unauthorized use of the docomo nano UIM card by a third party.
Making/Receiving a call and the device operation are enabled by
entering PIN code.
z Use the previously set PIN code when inserting a docomo nano
UIM card that has been used in another device. It is [0000] if the
setting has not been changed.
z If you enter wrong PIN codes three times continuously, it is locked
and the docomo nano UIM card becomes unavailable. In this
case, unlock with "PUK" (PIN Unlock Key).
■ PUK (PIN Unlock Key)
PUK (PIN Unlock Key) is an eight-digit number used to disable the
PIN code lock. You cannot change the code.
z If you enter wrong codes 10 times continuously, the docomo nano
UIM card is completely locked. In this case, contact a docomo
Shop.
Security key setting
In the standby screen, z/[Settings]/[Lock/
1
security]
Enter the passcode
2
z When an information screen is displayed, select [OK].
Select an item
3
■ Passcode: Set four- to sixteen-digit number.
■ Password:
* Some half-width symbols are not available.
/
[Security key setting]
Set four to sixteen alphanumerics or half-width
*
including at least one alphabet.
symbols
Set up SIM card lock
You can make settings for the PIN code.
In the standby screen, z/[Settings]/[Lock/
1
security]
Select an item
2
■ Lock SIM card: Set whether to enter the PIN code when the
■ Change SIM PIN: Change the PIN code.
z In Japan, you cannot make a call to the emergency number
(110, 119 or 118) when a docomo nano UIM card is not inserted,
while the PIN code is locked or from the PUK (PIN Unlock Key)
entry screen.
z The setting is saved on the docomo nano UIM card.
/
[Set up SIM card lock]
power is turned on.
Disabling PIN lock
In the PIN locking screen, enter PUK (PIN Unlock
1
Key)
Enter a new PIN code
2
Enter the new PIN code again
3
Energy saving/battery
You can make settings for the energy saving, or check the
battery level.
In the standby screen, z/[Settings]/[Energy
1
saving/battery]
Select an item
2
■ Energy saving settings: For details nP.51 "Energy saving
settings"
■ Battery: Visually check changes in the remaining battery
level, battery consumption level, etc.
Energy saving settings
You can make settings for the energy saving mode. You can
also set to switch to the energy saving mode according to the
battery level and the time.
In the standby screen, z/[Settings]/[Energy
1
saving/battery]
Select an item
2
■ Energy saving: Set whether to use the energy saving mode.
■ Switch by batt.: Set the battery level to switch to the energy
saving mode at.
■ Switch by time: Set whether to switch to the energy saving
mode when specified time arrives.
z To change switch time: Point the cursor at the time to
switch
z To switch to Energy saving: Point the cursor at the switch
time
When Energy saving is [ON] by Switch by batt.
z Energy saving does not change to [OFF] even when the time set
for [Switch time] arrives.
z Energy saving changes to [OFF] when the battery level exceeds
the battery level set for [Switch by batt.] to switch.
z Energy saving is not disabled even if [Switch by batt.] is [OFF].
■ Advanced settings for Energy saving
Set functions to the energy saving individually.
In the standby screen, z/[Settings]/[Energy
1
saving/battery]
Set each item
2
z To reset the advanced settings: C/[OK]
/
[Energy saving settings]
/C/
[Switching time]/set a time/C
/C/
[Switch energy saving]/[ON]/[OFF]
/
[Energy saving settings]/C
Communication/network
You can make settings for Airplane mode, VPN, or other
network.
In the standby screen, z/[Settings]
1
[Communication/network]
Select an item
2
■ Airplane mode: Restrict the use of some functions using
communication such as call/mail function.
■ Data usage: For details nP.52 "Data usage"
■ Network settings: Make the following settings.
z VPN settings: For details nP.52 "VPN (Virtual Private
Network)"
z Mobile networks: For details nP.52 "Mobile networks"
/
51
Handset Settings
Page 54

z Default SMS app: Set an app to send and receive SMSs
with.
[Airplane mode]
z You can call to the emergency number (110, 119 or 118) even
in Airplane mode. If you call to the emergency number, [Airplane
mode] is disabled and the call is made.
z The Bluetooth function can be set to [ON] even when [Airplane
mode] is enabled.
Data usage
You can measure the volume of data communicated via mobile
networks and display it on a diagram. Also, you can set the
handset to give you a warning or make data communication no
longer available once the communication volume reaches its
set limit.
In the standby screen, z/[Settings]
1
[Communication/network]/[Data usage]
Check the data usage
2
1
1 Submenu
z Set the limit on the data communication volume to suspend
data communication once the limit is reached, or restrict
data communication by app running in background.
2 Data usage cycle
z Set the date on which the display of the data
communication volume will be reset.
3 Diagram
z Display the data communication volume.
4 Data communication volume during a set period
5 App having used data communication
z Display apps having used data communication.
/
2
3
4
5
VPN (Virtual Private Network)
■ Adding VPN
VPN (Virtual Private Network) is a connection method to prepare
and connect safely to a virtual dedicated line on the network of a
household PC or in an office from outside etc.
z Acquire information about the security from network
administrators to set VPN connection from the handset.
z Set Screen lock to Pattern, Lock No. or Password in advance
(nP.49 "Lock/security").
In the standby screen, z/[Settings]
1
[Communication/network]/[Network settings]
[VPN settings]
z/[Add VPN profile]
2
Set each item/C
3
/
■ Connecting VPN
In the standby screen, z/[Settings]
1
[Communication/network]/[Network settings]
[VPN settings]
Select a VPN to connect to
2
Enter connecting information of the VPN/C
3
■ Disconnecting VPN
In the standby screen, p/select the status bar
1
Select the notification indicating that VPN has
2
been enabled
/
[Disconnect]
Mobile networks
You can make settings for data communication, data roaming,
access point, etc.
In the standby screen, z/[Settings]
1
[Communication/network]/[Network settings]
[Mobile networks]
Select an item
2
■ Data enabled: Set whether to use data communication.
■ Data roaming: For details nP.66 "Data roaming"
■ Preferred network mode: For details nP.66 "Preferred
network mode"
■ Access Point Names: For details nP.52 "Setting an access
point"
■ Network operators: For details nP.67 "Network operators"
■ Setting an access point
An access point (sp-mode) for Internet connection is registered by
default. You can add other access points and change them if
necessary.
For details on sp-mode, refer to the DOCOMO website.
If you want to use mopera U or Business mopera Internet, add an
access point of either provider manually.
For details on mopera U, refer to the mopera U website.
Checking the access point that is currently used
In the standby screen, z/[Settings]
1
[Communication/network]/[Network settings]
[Mobile networks]/[Access Point Names]
Setting additional access points
z Never set the MCC to a figure other than 440 or the MNC to a
figure other than 10. Otherwise the added access point
disappears from the screen.
In the standby screen, z/[Settings]
1
[Communication/network]/[Network settings]
[Mobile networks]/[Access Point Names]
z/[New APN]
2
/
[Name]/enter the name of the network profile to
3
create
/
C
[APN]/enter the access point name/C
4
Enter other items required by network
5
operators
/z/
[Save]
/
/
/
/
/
/
/
/
52
Handset Settings
Page 55

z If the settings of MCC and MNC are changed and the added
access point disappears from the screen, reset the settings or
set the access point manually.
■ Resetting an access point
Reset an access point to default setting.
In the standby screen, z/[Settings]
1
[Communication/network]/[Network settings]
/
[Mobile networks]/[Access Point Names]
z/[Reset to default]
2
z When sp-mode is not subscribed or if you fail to make automatic
setting of an access point due to signal status such as outside
the service area, you are required to set the access point again
manually.
docomo service
You can make settings for the docomo service.
In the standby screen, z/[Settings]/[docomo
1
service]
Select an item
2
■ docomo apps password: Set a password to use for apps
provided by DOCOMO.
■ docomo location information: Make settings for the location
information service function such as Imadoco search,
Imadoco kantan search, Keitai-Osagashi Service.
■ SD card backup: For details nP.47 "SD card backup"
■ Send device error information: Set whether to send error
information to the server.
■ Remote initialization: Make settings to use services which
enable you to initialize data on the handset etc. by remote
control.
■ USB debug switch: Set whether to enable USB debugging.
z Some apps displayed in docomo service can be disabled. The
disabled apps may not be displayed in docomo service.
[docomo apps password]
z docomo apps password is set to [0000] by default.
Data transfer/reset
You can transfer data among devices, or resetting the handset.
In the standby screen, z/[Settings]/[Data
1
transfer/reset]
Select an item
2
/
■ Data transfer: For details nP.53 "Data transfer"
■ Reset all: For details nP.54 "Reset all"
Data transfer
You can import backup data of your previous phone/
smartphone to the handset memory, or back up/restore the
handset data using a microSD Card.
In addition, you can import phonebook data from feature
phones using infrared communication function or from
smartphones using the Bluetooth function.
z Data which can be backed up to/restored from microSD Cards is
as follows.
■ Phonebook
■ SMS
■ Bookmarks
■ Calendar
■ User dictionary/learning dictionary (SH Input)
z While you are backing up data to a microSD Card, [Airplane
mode] is enabled.
z When the available space on the handset memory is less than 11
MB, you cannot back up data to a microSD Card.
z Insert a microSD Card in advance when using one.
In the standby screen, z/[Settings]/[Data
1
transfer/reset]
Select an item
2
■ Start: Save data to microSD Card, or import data via microSD
Card, infrared communication, Bluetooth function.
z Other mobile phone: Use infrared communication, microSD
Card, docomo backup.
z From smartphone: Use microSD Card, Bluetooth function.
z Save data: Save data to microSD Card.
■ Preparation to import: Display how to prepare before using
Data transfer.
■ Saving backup file to microSD Card
In the standby screen, z/[Settings]/[Data
1
transfer/reset]
[Start]/[Save data]/enter the passcode
2
Select a data category to save
3
C/[Yes]
4
t
5
z You cannot save when the battery level is insufficient.
/
[Data transfer]
/
[Data transfer]
53
Handset Settings
Page 56

■ Setting/Managing backup file
In the standby screen, z/[Settings]/[Data
1
transfer/reset]
Select an item
2
■ Organize saved files: Delete saved backup data.
■ Save Addr.book pics: Set whether to back up images
registered in a phonebook when backing up the phonebook.
■ View result screen: Display the latest result of saving/
restoring backup files.
■ Importing backup file in microSD Card
In the standby screen, z/[Settings]/[Data
1
transfer/reset]
[Start]
2
[Other mobile phone]/[From smartphone]
3
[microSD]/[Via microSD]
t/enter the passcode
4
Select a backup file to import
5
C
6
z The confirmation screen is displayed. Follow the instructions
on the screen and operate after this step.
z You cannot import the data when the battery level is insufficient.
z Note that, when you import User/Learning dictionary (SH Input)
data, User/Learning dictionary (SH Input) data saved on the
handset memory is deleted.
■ Importing data from other mobile phone using the
infrared communication
z For infrared communication nP.61 "Infrared communication"
In the standby screen, z/[Settings]/[Data
1
transfer/reset]
[Start]/[Other mobile phone]/[Infrared]
2
t/[Receive]/[Receive all]
3
z Follow the instructions on the screen and operate after this
step.
[docomo backup]
z The SD card backup screen is displayed. For SD card backup
nP.47 "SD card backup"
■ Importing phonebook data from smartphones using
Bluetooth function
In the standby screen, z/[Settings]/[Data
1
transfer/reset]
[Start]/[From smartphone]/[Via Bluetooth]
2
t
3
Enable the Bluetooth function of the device from
4
which you import data
/
[Data transfer]/C
/
[Data transfer]
/
[Data transfer]
/
[Data transfer]
/
t
/
Select the device from which you import data
5
t
z When the confirmation screen about the settings on pairing
appears, select [Pair].
z When the device from which you import data is Android™, set
the device to be displayed on the handset.
t
6
[Add registration]/[Delete before registration]
7
z When the confirmation screen is displayed, check the content
and select [Yes].
[OK]
8
Reset all
You can erase all data on the handset memory.
In the standby screen, z/[Settings]/[Data
1
transfer/reset]
[Reset phone]/enter the passcode/[Erase
2
everything]
z You can also erase data on a microSD Card at the same time
by enabling [Delete data in microSD as well.].
z The following data are erased.
■ Data that are created, saved or registered
■ Contents that are set in the Settings menu
■ Downloaded apps
z When the battery level is less than 19%, resetting all is not
available.
/
[Reset all]
/
54
Handset Settings
Page 57

Other settings
You can make settings for Date & time, Self check, etc.
In the standby screen, z/[Settings]/[Other
1
settings]
Select an item
2
■ Kantan Hasshin: For details nP.55 "Kantan Hasshin"
■ Application: For details nP.55 "Application"
■ Date & time: For details nP.55 "Date & time"
■ Self check: For details nP.55 "Self check"
■ Storage: For details nP.55 "Storage"
■ Select language: Select Japanese/English.
■ Text input: For details nP.56 "Text input"
■ Device info: For details nP.56 "Device info"
■ Encrypt phone: For details nP.56 "Encrypt phone"
■ Device administrator: Set whether to give administrative
privileges to the device administrator.
■ Credential storage: For details nP.56 "Credential storage"
■ Location: For details nP.57 "Location services"
■ Daydream: Set whether to use daydream.
■ Accessibility: For details nP.57 "Accessibility"
■ Accounts: Check accounts to use.
[Select language]
z It may take time for changing the language.
Kantan Hasshin
Make settings for Kantan Hasshin.
In the standby screen, z/[Settings]/[Other
1
settings]
Select an item
2
■ Kantan Hasshin settings: Set whether to use Kantan Hasshin.
■ Register recognition targets (speed dial): Display the speed
■ How to use: Display how to use Kantan Hasshin.
[Kantan Hasshin settings]
z When [When opening phone] or [When pressing side key] is
enabled, you can use Kantan Hasshin.
Application
You can check names, versions, memory usage, etc. of apps,
enable/disable apps, uninstall them, etc.
In the standby screen, z/[Settings]/[Other
1
settings]
Select an app
2
■ Disabling an app
Terminate operations of an app and set it not to be displayed on the
app screen without uninstalling it.
z You can disable apps which cannot be uninstalled.
In the standby screen, z/[Settings]/[Other
1
settings]
Select an app/[Disable]/[Yes]
2
z If you disable an app, other apps which link up with the disabled
app may not work properly. In this case, enable the app.
/
[Kantan Hasshin]
dial list to register or cancel.
/
[Application]
/
[Application]
■ Enabling an app
In the standby screen, z/[Settings]/[Other
1
settings]
Select an app/[Enable]
2
/
[Application]
Date & time
You can make settings for the date and time and their format.
In the standby screen, z/[Settings]/[Other
1
settings]
Select an item
2
■ Auto date & time: Set whether to automatically adjust the date
■ Auto timezone: Set whether to use the time zone provided via
■ Set date: Set the date manually.
■ Set time: Set the time manually.
■ Select time zone: Set the time zone manually.
■ Use 24-hour format: Switch 12-hour format/24-hour format.
■ Choose date format: Set the date format to display.
When [Auto date & time] is enabled
z If the handset does not adjust the time for a while after the power
is turned on, turn off the power and restart it.
z Time may not be adjusted depending on the signal status.
z The clock may gain or lose a few seconds.
and time.
a network.
/
[Date & time]
Self check
You can perform Self check of the handset.
In the standby screen, z/[Settings]/[Other
1
settings]
C/select an item/C
2
z To restart the handset in safe mode: m/[OK]
t
3
z To make a diagnosis on a displayed item: t
z To stop a diagnosis: c
z Select the diagnosis history to check the result.
/
[Self check]
/
[Yes]/[Next item]
Storage
You can check the available space on a microSD Card, the
handset, etc., update information.
In the standby screen, z/[Settings]/[Other
1
settings]
Select an item
2
■ Mount microSD/Unmount microSD: Mount/Unmount the
■ Erase microSD: Format the microSD Card.
■ Information Update: Update content information.
■ USB Connection: For details nP.56 "USB connection"
[Mount microSD], [Unmount microSD]
z Unmount the microSD Card and turn off the power before
inserting/removing the microSD Card.
[Erase microSD]
z Note that all the data on the microSD Card will be deleted when
formatted.
/
[Storage]
microSD Card.
55
Handset Settings
Page 58

■ USB connection
You can change the settings for connecting the handset to a PC
using Micro USB Cable 01 (sold separately).
In the standby screen, z/[Settings]/[Other
1
settings]
Select an item
2
■ MTP mode: This is a mode for transferring data to the handset
■ PTP mode: This is a mode for transferring still pictures to the
■ Card reader mode: This is a mode for using a microSD Card
z When you transfer a great deal of data, the transference may be
interrupted. In this case, split the data into several files and send
them separately.
/
[Storage]/[USB Connection]
memory or a microSD Card using a PC compatible with MTP.
handset memory using a PC compatible with PTP.
inserted into the handset as an external memory for a PC.
Text input
You can make settings for SH Input, text-to-speech output, etc.
In the standby screen, z/[Settings]/[Other
1
settings]
Select an item
2
■ Android Keyboard (AOSP): Set whether to use Android
■ SH Input: Set whether to use SH Input. For items that can be
■ Text-to-speech output: Make settings for the voice for reading
■ Pointer speed: Set the speed of the pointer.
■ Character code setting: Set a character code to use when
■ Current Keyboard: Set the input software to use when
Keyboard
z When you enter Japanese, use SH Input.
[Android Keyboard (AOSP)]
z Android Keyboard (AOSP) does not support Japanese input.
Entering characters may not be available.
/
[Text input]
keyboard (AOSP).
set by pressing C nP.22 "Setting character entry"
the characters displayed on the handset.
sending data from an app.
entering characters.
Device info
You can check the information about the handset.
In the standby screen, z/[Settings]/[Other
1
settings]
Select an item
2
■ Build number: Check the build number.
■ Status: Check the battery level, network in use, etc.
■ Software update: For details nP.75 "Updating software"
■ Legal information: Check copyright notice, open source
■ Model number: Check the model number.
■ Android version: Check the Android version.
■ Baseband version: Check the baseband version.
■ Kernel version: Check the kernel version.
/
licenses, etc.
[Device info]
Encrypt phone
You can encrypt data on the handset.
z If you carry out Encrypt phone, the password entry screen for
decrypting the storage is displayed every time the power is turned
on. Enter the lock No. or password set in Screen lock.
z Carry out Reset all to disable Encrypt phone (nP.54 "Reset all").
z Carry out the operations while charging the battery with its battery
level still left sufficiently.
z Set Screen lock to Pattern, Lock No. or Password in advance
(nP.49 "Lock/security").
In the standby screen, z/[Settings]/[Other
1
settings]
[Encrypt phone]/enter the lock number/
2
password
[Encrypt phone]
3
z In the password entry screen for decrypting the storage, you
cannot make a call to the emergency number (110, 119 or 118).
z Note that all data on the handset are deleted if Encrypt phone is
interrupted.
z If you enter wrong lock numbers/passwords 10 or 20 times in a
row when decrypting the storage, you cannot enter the lock
number/password for 30 seconds. Note that if you enter wrong
lock numbers/passwords 30 times in a row, the handset is
initialized.
z If you have carried out Encrypt phone, you cannot exchange
data while USB connection is made with a PC.
/
[Encrypt phone]
Credential storage
You can make settings for credential storage.
In the standby screen, z/[Settings]/[Other
1
settings]
Select an item
2
■ Storage type: Display the storage type.
■ Use secure credentials: Allow access to secure certificates
■ Install certificates: Install encrypted certificates.
■ Clear credentials: Delete all credentials.
[Use secure credentials]
z If you delete a certificate, you cannot refer to the certificate from
[Use secure credentials] but it can be referred to from other
functions. If you want to delete the certificate completely, carry
out Clear credentials.
[Clear credentials]
z Settings for VPN are also deleted.
/
[Credential storage]
and other credentials.
56
Handset Settings
Page 59

Location services
You can make settings for measuring location information.
In the standby screen, z/[Settings]/[Other
1
settings]
Select an item
2
■ Location services: Set whether to use location services.
z If there are recent location requests, select them to check the
z It is necessary to set Location to [ON] to measure the present
location. Some apps require that settings be made for location
information by using the apps.
■ Using GPS function
z GPS is a function to retrieve location information of devices by
receiving radio wave from GPS satellites. It is necessary to set
Location to [ON] to measure the present location (nP.57
"Location services".
z You cannot use the handset as a navigation system for
professional use of aircrafts, vehicles, person, etc. or surveying
GPS of high accuracy. Note that DOCOMO shall not be liable for
the pure economic losses such as ones caused by using the GPS
for these purposes or by failing to confirm a positioning result or
to communicate due to handset failure, malfunction or external
factors such as power failure (including battery exhaustion).
z GPS is a service administered by the U.S. Department of
Defense. Therefore, GPS radio wave condition may be controlled
(accuracy degradation, radio wave abort, etc.) for US national
security reasons. In addition, the same results may not be
retrieved even when positioned in the same location and
environment, since the radio wave conditions may change
depending on the location of the GPS satellites.
z Note that GPS uses the radio waves from artificial satellites,
therefore the following conditions may prevent the radio waves
from being received or prevent the reception status of the radio
waves from being satisfactory, resulting in an error of 300 m or
more for location information.
■ In or under a dense forest, in density area with buildings or
residence
■ In or under buildings
■ In a basement, tunnel, underground or underwater
■ Near high-tension line
■ Inside cars, trains, etc.
■ In bad weather with heavy rain/snow etc.
■ In bags or boxes
■ When people or objects are blocking the handset
■ When hands are covering the GPS antenna area
z When using a GPS function overseas, the content based on the
acquired location information (latitude and longitude information)
may not be accurate because of the legal system etc. in each
country and the area.
z Assisted GPS data such as satellites information may be
automatically retrieved when you measure present location.
/
[Location]
z When the confirmation screens are displayed, select
[Agree]/[Disagree].
information on the app.
Accessibility
You can make settings for accessibility options.
In the standby screen, z/[Settings]/[Other
1
settings]
Select an item
2
■ Notification link (PASSNOW): Set whether to use the
■ KeyTranslator: Set whether to use KeyTranslator.
■ Captions: Make settings for displaying captions.
■ Large text: Set whether to display fonts on the handset in
■ Speak passwords: Set whether to use voice output for
■ Text-to-speech output: Make settings for the voice for reading
/
[Accessibility]
notification link (PASSNOW).
large size.
passwords.
the characters displayed on the handset.
57
Handset Settings
Page 60

Data management
Handset memory (internal storage)
The folder structure, types of data to be saved in each folder,
etc. of the default handset memory are as follows.
■ Alarms: Alarm tones etc. are saved.
■ Android: Temporary files etc. of installed apps are saved.
■ DCIM: Still pictures and videos shot with the handset are saved.
■ Download: Files downloaded on Web browser are saved.
■ Movies: Videos etc. are saved.
■ Music: Music data etc. is saved.
■ Notifications: Notification sounds etc. are saved.
■ Pictures: Still pictures etc. are saved.
■ Podcasts: Music data etc. transferred from a podcast is saved.
■ PRIVATE: Still pictures, videos, music data, etc. are saved.
■ Ringtones: Ringtones etc. are saved.
microSD Card (external storage)
You can save data on the handset to microSD Card or import
data on microSD Card to the handset.
z SH-06G is compatible with commercially available microSD Card
of up to 2 GB and microSDHC Card of up to 32 GB. Also, as for
Speed Class
* Speed class as stated above indicates the performance of a
For information on the microSD Card, refer to the following
website.
http://k-tai.sharp.co.jp/support/d/sh06g/peripherals.html#!/
microsd_support (in Japanese only)
z The size of a file that can be used is up to 2 GB.
z Do not turn off the handset immediately after inserting the
microSD Card in the handset (while writing information needed for
the handset operation) or while editing data on the microSD Card.
Data may be damaged or the handset may not work properly.
z Format unformatted microSD Cards on the handset before use
(nP.55 "Storage"). microSD Cards formatted by PCs or other
devices may not be used properly on the handset.
z Data saved on the microSD Cards from other devices may not be
displayed or played on the handset. Some data saved on the
microSD Card from the handset may not be displayed or played
on other devices.
z Back up the data saved on a microSD Card and store in another
place. DOCOMO shall not be liable for any loss or change of the
saved data.
z Before inserting or removing the microSD Card, turn off the
power, turn back side of the handset up, and remove the back
cover (nP.10) and the battery pack (nP.19). Hold the handset
securely with your hand. After inserting or removing, attach the
back cover (nP.10) and the battery pack (nP.19) to the
handset.
*
, Class 10 or lower is available (as of May 2015).
microSD Card. Note that all the operations related to the
performance indicated by Speed Class are not completely
guaranteed.
■ Inserting microSD Card
Insert the microSD Card slowly into the microSD
1
Card slot with the metal terminal side turned
down
z microSD Card slot is above the docomo nano UIM card slot.
Be careful not to insert a microSD Card into the docomo nano
UIM card slot mistakenly if you insert it before docomo nano
UIM card insertion.
Back side
microSD Card slot
docomo nano UIM
card slot
z Insert the microSD Card slowly with your finger until a click is
heard.
z Do not force the microSD Card in at an angle or with the
wrong side up. The microSD Card slot may be damaged.
■ Removing microSD Card
Gently push the microSD Card towards inside
1
(1)
z Push the microSD Card until a click is heard. It will come out
towards you. Pulling it forcibly may damage the handset or the
microSD Card.
Remove the microSD Card (2)
2
z Remove the microSD Card by slowly pulling it straight out.
58
Data management
Page 61

Operating files
You can classify data that is saved on the handset memory or
a microSD Card and play/view or manage them.
z Activating Databox enables TOUCH CRUISER EX. For TOUCH
CRUISER EX operations nP.17 "Using TOUCH CRUISER EX"
In the standby screen, z/[Data]
1
Select a category
2
■ Photo: Display still pictures shot by the camera.
■ Picture: Display still pictures shot by Translation finder,
downloaded images, etc.
■ Music: Display music etc.
■ Movie: Display videos.
■ Doc.: Display Microsoft Word/Excel/PowerPoint document
created on a PC etc., or display PDF data or text data.
■ Others: Display other data.
Select data
3
z App corresponding to the data type activates to play/display
the data.
z Some data in Databox may not be displayed or played.
z It may take time for displaying or all of data may not be displayed
depending on data size.
Changing storage
In the standby screen, z/[Data]
1
Select a category
2
C/[Phone+microSD]/[Phone]/[microSD]
3
Submenu operations for Data
z Menu items may vary by usage function or condition.
In the data list, z
1
Select an item
2
■ Change view: Switch List/Grid/Preview view.
■ Edit image: For details nP.43 "Editing a still picture"
■ Send: Send a selected still picture by attaching to mail, via
infrared, Bluetooth, PASSNOW, etc.
z For PASSNOW paired tablet, press * to send selected
images to the tablet.
■ Move/copy: For details nP.59 "Moving/Copying data"
■ Delete one item: Delete a selected item.
■ Delete selected: Delete selected items.
■ Sort: Change order of saved data.
■ Register image: Register a still picture to the phonebook entry
or as wallpaper.
■ Register: Register music data to ringtone etc.
■ Memory status: Display available memory space of microSD
Card and handset memory.
■ Details: Display detail information of selected data.
[Register image]
z Copyrighted data may not be used as registered data.
Moving/Copying data
You can move or copy saved data in the handset memory or
microSD Card.
In the data list, z
1
[Move/copy]
2
[Move to microSD]/[Copy to microSD]/[Move to
3
phone]/[Copy to phone]
Select data to move/copy
4
z Selecting all data: i
z Cancel selecting all data: m
C
5
PC connection
You can use a microSD Card as an external memory for a PC or
transfer data by connecting the handset and the PC.
Connecting the handset and PC
Insert the microUSB plug of Micro USB Cable 01
1
(sold separately) horizontally into the external
connector terminal on the handset with the side
marked with "B" turned up (1)
Insert the USB plug of Micro USB Cable 01
2
horizontally into the USB connector on a PC (2)
z For details on the mode of USB connection nP.56 "USB
connection"
Micro USB
Cable 01
z Use Micro USB Cable 01 as a USB cable. USB cables for PC
are not available, since the plug shape is different.
z Using a USB HUB may prevent the equipment from working
normally.
z Do not remove Micro USB Cable 01 while exchanging data with
PC. Data may be damaged.
z Windows Vista, Windows 7, Windows 8 and Windows 8.1 all of
which are Japanese version are available OS of PCs for the
connection.
Keep side marked
with "B" up
59
Data management
Page 62

microSD reader/writer
You can use a microSD Card as an external memory for a PC.
z Insert a microSD Card and set the mode of USB connection to
[Card reader mode] in advance (nP.56 "USB connection").
Connect the handset to a PC via Micro USB
1
Cable 01
z The USB mass storage screen appears. If the screen does
not appear, in the standby screen, p
[USB connected].
[Turn on USB storage]
2
z When the confirmation screen is displayed, check the content
and select [OK].
Use as a microSD reader/writer
3
Perform secure hardware removal on the PC
4
after use
[Turn off USB storage]
5
Disconnect Micro USB Cable 01 from the
6
handset and the PC
z While using as a microSD reader/writer, microSD Card cannot
be used by apps. In addition, microSD Card may not be used as
a microSD reader/writer while it is used by apps.
/
select the status bar
Transferring data
Transfer data from a PC to the handset memory or a microSD
Card.
z Set the mode of USB connection to [MTP mode] or [PTP mode] in
advance (nP.56 "USB connection").
Connect the handset to a PC via Micro USB
1
Cable 01
Transfer data
2
Disconnect Micro USB Cable 01 from the
3
handset and the PC after use
/
60
Data management
Page 63

Data communication
Infrared communication
You can send and receive data to and from other devices such
as mobile phones.
When using infrared communication
z Face the infrared ports of the receiver's and sender's devices with
each other and set the distance between them to approximately
20 cm or less as shown.
15°
15°
Approx. 20 cm or less
z The handset infrared communication function complies with
IrMC™ 1.1 standard. However, some data may not be sent or
received even when the other party’s device complies with IrMC™
1.1 standard.
z You can send and receive phonebook entries, still pictures,
videos, etc.
z Infrared communication is not available in Airplane mode.
z Entering the authentication password is required for sending all
data. The authentication password is a password exclusive to
infrared communication. Before starting data communication, the
sender and receiver must enter the same user-specified four-digit
code.
z If either of the infrared ports is dirty, infrared communication will
become difficult. Take care not to scratch the ports, and wipe off
any dirt with a soft cloth.
z Infrared communication may not function properly in areas
exposed to direct sunlight, directly under fluorescent lights or near
equipment using infrared signals.
z Keep the infrared ports facing each other and do not move the
devices until sending and receiving of data are completed.
z Communication may take long depending on data volume or
condition of sender's/receiver's device.
Infrared communication
Infrared port
■ Receiving all data
In the standby screen, z/[Tools]/[Infrared]
1
[Receive all]
2
Enter the authentication password/[OK]
3
Perform sending operation on sender's device
4
Face the infrared ports of the receiver's and
5
sender's devices
z After the operation for receiving, the handset waits to receive
data. Infrared communication automatically begins when data is
sent from sender's device within approximately 60 seconds.
z Note that if you select [Save] when receiving all data, all data
registered to the target function are deleted.
z Receiving all data may not be available depending on the data
type.
z When available space in the save destination becomes
insufficient while receiving data, the data being received to that
point are saved and receiving ends.
■ Selecting data and sending
Example: Still picture
In the standby screen, z/[Album]
1
Select a still picture
2
z/[Send]/[Infrared]
3
Perform receiving operation on receiver's
4
device
Face the infrared ports of the handset and
5
receiver's devices
■ Sending all data
Example: Phonebook entries
In the standby screen, z/[Tools]/[Infrared]
1
[Send all]/[Phonebook]
2
[Start]/enter the authentication password/[OK]
3
Perform receiving operation on sender's device
4
Face the infrared ports of the handset and
5
receiver's devices
/
[OK]/[OK]/[Save]
/
[OK]/[OK]
/
[OK]/[OK]
■ Sending an item
In the standby screen, z/[Tools]/[Infrared]
1
[Receive]
2
Perform sending operation on sender's device
3
Face the infrared ports of the receiver's and
4
sender's devices
/
[OK]/[OK]/[OK]
61
Data communication
Page 64

Bluetooth communication
You can connect the handset to Bluetooth devices wirelessly.
z Wireless communications with all the Bluetooth devices are not
completely guaranteed.
■ Specifications
■ Supported version
Bluetooth standard Ver.4.0
■ Output
Bluetooth standard Power Class 1
■ Supported profiles
HSP: Headset Profile
HFP: Hands Free Profile
A2DP: Advanced Audio Distribution Profile
AVRCP: Audio/Video Remote Control Profile
HID: Human Interface Device Profile
OPP: Object Push Profile
SPP: Serial Port Profile
PBAP: Phone Book Access Profile
PAN: Personal Area Networking Profile
HOGP: HID Over GATT Profile
*1 The handset and all Bluetooth function-installed devices have
ensured that they conform to the Bluetooth specification
according to the rules that the Bluetooth SIG defines, and are
all authenticated. However, operating methods might differ or
data might not be exchanged even when a connection is made,
depending on the features or specifications of the connected
device.
*2 Standardizes the communication procedures of Bluetooth
device by feature.
*3 Connect a commercially available Bluetooth compatible
headset to the handset to talk wirelessly.
*4 Connect a commercially available Bluetooth compatible hands-
free device such as a car navigation system to the handset to
talk during hands-free operation using the car navigation
system etc.
*5 Connect a commercially available Bluetooth compatible audio
device to the handset to play music, TV audio, etc. wirelessly.
Also, remote control operation may be available from Bluetooth
devices. However, compatible devices may be limited
depending on the data type.
*6 Connect a commercially available Bluetooth compatible input
device such as a keyboard and mouse to the handset to
operate the handset from the device.
*7 Connect a Bluetooth device to the handset with the file transfer
service to send and receive data between them.
*8 Set the virtual connection with a serial cable and interconnect
between devices.
*9 Transfer phonebook data on the handset memory to a
Bluetooth device. Data may not be displayed correctly on the
other party's device depending on the contents of the
transferred phonebook data.
*10 Join a PC network etc. and share the Internet connection.
*11 Connect a Bluetooth Smart device such as a keyboard and
mouse to the handset to operate the handset from the device.
z Refer to manuals of Bluetooth devices as well.
z TV audio etc. may not be output with Bluetooth devices which
are not compatible with SCMS-T.
*1
*2
(Supported services)
*3
*4
*7
*8
*6
*9
*11
*5
*5
*10
Precautions about handling Bluetooth devices
Note the followings when using Bluetooth devices.
z Note the followings to make good connection.
■ Keep the distance between the handset and another
Bluetooth device within approximately 10 m with no
obstructions in sight. The distance within which you can make
connection may be shorter when there are obstructions
between them or depending on the conditions of the
surroundings (such as walls or furniture) and the structure of
a building. Especially when there is a wall, floor or ceiling of
reinforced concrete between them, they may be unable to
connect with each other. Note the above mentioned distance
is not guaranteed.
■ Move the handset and another Bluetooth device as far away
as possible from home electric appliances, AV devices, OA
devices, etc. before connection. Bluetooth devices are liable
to be adversely affected by a microwave oven, so move them
as far away as possible from the microwave oven while using
them. Otherwise, normal connection cannot be performed
when other electric devices are powered on or Bluetooth
devices may cause noises or reception failure on a TV or
radio set.
■ Move the other party's Bluetooth device to a place where
connection is possible when there is a broadcast station,
radio, etc. near the Bluetooth device and the handset cannot
be connected to the device. Strong radio waves may prevent
connection between Bluetooth devices.
■ Wireless connection is available with Bluetooth devices put in
a bag or pocket. However, lowering of communication speed
or noise may result when you are in between the Bluetooth
device and the handset.
z Electromagnetic signals from Bluetooth devices may affect the
operation of electronic medical equipment etc. As some cases
may result in accident, turn off the handset and other Bluetooth
devices in the following places.
■ On trains
■ On airplanes
■ In hospitals
■ Near automatic doors or fire alarms
■ In places such as gas stations where flammable gas is
generated
Radio interference with Wi-Fi compatible devices
z The Bluetooth devices use the same frequency band (2.4GHz)
as wireless LANs (IEEE 802.11b/g/n). Therefore, using a
Bluetooth device near a wireless LAN device may cause the
radio interference, lowering of communication speed, noise or
connection failure. In this case, turn off the wireless LAN device
or keep the handset and the other party’s Bluetooth device at
least approximately 10 m away from the wireless LAN.
62
Data communication
Page 65

Using Bluetooth function
z To register/connect a Bluetooth device, the Bluetooth passkey
may need to be entered. Before starting the registration, decide
one- to sixteen-digit number.
z Enter the same number on the handset and the other party's
Bluetooth device.
In the standby screen, z/[Settings]
1
[Bluetooth]
[Bluetooth]
2
Select a Bluetooth device/[Pair]
3
z The confirmation screen for connection may be displayed.
z Entering the Bluetooth passkey may be necessary depending
on the other party's Bluetooth device. Also, some Bluetooth
devices may start connection after completing registration.
z To display/hide the handset's information on other Bluetooth
devices: [SH-06G]
・ The handset's information is automatically hidden when the
period of time set for Visibility timeout has passed.
z To search for Bluetooth devices: z
z Press C of a paired Bluetooth device to change the name
and the connection type of the other party's Bluetooth device.
z You can connect up to 7 Bluetooth devices at the same time.
Bluetooth devices may not work properly or the number of
Bluetooth devices which can be connected at the same time
may differ depending on the profile.
z If you fail to connect a Bluetooth device, connection may
become available after re-registering it.
z When the Bluetooth function is set to [ON], the handset is set to
receive registration requests/connection requests from other
Bluetooth devices. Make the setting for displaying the handset's
information on other Bluetooth devices in advance to allow the
handset to be searched for by other Bluetooth devices.
z While in connection stand-by, even if a connection request from
a Bluetooth device is received, connection may not be made
depending on the signal status etc.
z For details on the operations of the other party's Bluetooth
device, refer to the manuals of the Bluetooth device to be used.
■ When receiving registration request from Bluetooth
device or connection request from unregistered
Bluetooth device
Registration request/Connection request from
1
Bluetooth device
In the standby screen, p/select the stock icon
2
[]
/
[Pairing request]/[Pair]
z When the confirmation screen about the settings on pairing
appears, select [Pair].
z Entering the Bluetooth passkey may be necessary depending
on the other party's Bluetooth device.
z The confirmation screen for connection may be displayed.
■ Unregistering Bluetooth device
In the Bluetooth screen, point the cursor to the
1
Bluetooth device to unregister
■ Disconnecting Bluetooth device
In the Bluetooth screen, select the Bluetooth
1
device to disconnect
/
/
[OK]
/
[Search for devices]
/C/
[Unpair]
■ Submenu operations on the Bluetooth screen
z Set Bluetooth to [ON] beforehand.
In the Bluetooth screen, z
1
Select an item
2
■ Search for devices: Search Bluetooth devices nearby.
■ Rename phone: Change the handset's name.
■ Visibility timeout: Set how long the handset's information will
be displayed on other Bluetooth devices.
■ Handsfree setting: Set whether to always have voices output
from the connected Bluetooth compatible hands-free device
during a voice call.
■ Show received files: Display the history of data received via
Bluetooth connection.
Sending/Receiving via Bluetooth
communication
■ Sending data
Example: Still picture
In the standby screen, z/[Album]
1
Select a still picture
2
z/[Send]/[Bluetooth]
3
z Set the receiver's Bluetooth device to the reception stand-by
status.
Select a Bluetooth device to connect to
4
■ Receiving data
Data is sent from the sender's Bluetooth device
1
In standby screen, p/select the status bar
2
select the incoming notification/[Accept]
In standby screen, p/select the status bar
3
select the receiving notification/select the
received data
z Note that if you select [Delete and register] when receiving all
data, all data registered to the target function are deleted.
z Receiving all data may not be available depending on the data
type.
z When available space in the save destination becomes
insufficient while receiving data, the data being received to that
point are saved and receiving ends.
/
/
63
Data communication
Page 66

Safety and security services
Disaster Message Board
Disaster Message Board is a service which enables you to
register or check information about the well-being in case of
large-scale disaster such as earthquake with a seismic
intensity of over 6 lower.
Register information about the well-being of you in characters
from the handset. The information can be checked from your
family's mobile phones, PCs.
For Disaster Message Board, refer to the DOCOMO website.
In the standby screen, z/[Anshin]/[Disaster
1
Message Board]
z Follow the instructions on the screen and operate after this
step.
Disaster Voice Messaging
Disaster Voice Messaging is a service which enables you to
deliver information about the well-being as voice message in
case of large-scale disaster such as earthquake with a seismic
intensity of over 6 lower.
Record information about the well-being of you by voice on the
handset and deliver the message to your family etc.
For details on Disaster Voice Messaging, refer to the DOCOMO
website.
Sending message
In the standby screen, z/[Anshin]/[Disaster
1
Voice Messaging]
z When the screen of confirmation before use is displayed,
confirm the content and press z.
[Send voice message]/select a recipient
2
selection method
z Follow the instructions on the screen and operate after this
step.
Checking messages
In the standby screen, z/[Anshin]/[Disaster
1
Voice Messaging]
z When the screen of confirmation before use is displayed,
confirm the content and press z.
[Check voice message]
2
z Follow the instructions on the screen and operate after this
step.
/
enter a phone number/C
Early warning "Area Mail"
Area Mail is a service which enables you to receive earthquake
early warnings etc. sent from the Japan Meteorological
Agency.
z When an Area Mail is sent to you, it is automatically received and
the content is displayed regardless of the main display condition
or whether or not Screen lock is set.
z Area Mail may not be received or automatically displayed
depending on the condition of the handset.
・ In the following cases, you cannot receive Area Mail.
■ While the power is turned off
■ While outside the service area
■ During international roaming
■ In Airplane mode
・ In the following cases, you may not be able to receive Area Mail.
■ During packet communication
■ During software update
・ In the following cases, you can receive Area Mail but the special
buzzer or special ringtone does not sound and the handset
does not vibrate.
■ During a call
・ In the following cases, you can receive Area Mail but it may not
be automatically displayed.
■ During packet communication
■ During software update
z Area Mail is a free service that does not require a subscription.
Automatically receive an Area Mail
1
When the Area Mail is received, the special
2
buzzer or special ringtone sounds, and the Area
Mail message appears.
■ Checking received Area Mail later
In the standby screen, p/select the stock icon
1
[]
z Alternatively, in the standby screen, z/[Anshin]/[Early
Warning "Area Mail"].
Select the received Area Mail
2
z You can receive Area Mail without subscription to sp-mode.
z You cannot receive the Area Mail that failed to be received
again.
z You can save up to 50 Area Mails
z If the number of Area Mails saved on the handset memory
exceeds the maximum number to be saved, they are deleted
from the oldest one.
64
Safety and security services
Page 67

Setting Early warning "Area Mail"
Whether to receive Area Mail, operations for when receiving
Area Mail, etc. can be set.
In the standby screen, z/[Anshin]/[Early
1
Warning "Area Mail"]
z/[Settings]
2
Select an item
3
■ Receive setting: Set whether to receive Area Mail.
■ Beep tone: Make settings for the ring duration and operations
in the manner mode.
■ Check screen image and beep tone: Confirm the reception
screen and the ringtone for earthquake early warning,
tsunami warning, and disaster and evacuation information.
z Settings of the earthquake early warning buzzer, ringtone
dedicated to tsunami warning, and disaster and evacuation
information, ringtone volume and vibrator cannot be changed.
Deleting Early warning "Area Mail"
In the standby screen, z/[Anshin]/[Early
1
Warning "Area Mail"]
Point the cursor to an Area Mail/C
2
z To select all Area Mails: m
i/[OK]
3
65
Safety and security services
Page 68

International roaming
You can make a call using the handset while staying overseas
or make settings for international roaming, network services,
etc.
Outline of international roaming (WORLD WING)
International roaming (WORLD WING) is a service that enables
you to use the same phone number and mail address of the
handset as you use in Japan in the service area of DOCOMO
affiliated overseas network operators. You can use calls and
SMS without any changes in settings.
Available network
The handset is rated as Class 2. You can use it in the 3G network
service area. In addition, it is available in countries and regions
supporting 3G 850 MHz. Check the available area.
Refer to the followings before using the handset
overseas.
■ DOCOMO website
z For country codes, international call access number, universal
number international prefix and information on countries and
regions where connections are available and available network
operators, refer to the DOCOMO website.
Available services overseas
Main
communication
service
Call
SMS
*
Mail
Web browser
* Enable [Data roaming] to use data communication when
roaming (nP.66 "Data roaming").
z Some services may not be available depending on the network
operator or network to connect to.
z You can check a name of network operator currently connected
in the status panel (nP.16 "Using the status panel").
*
Before use overseas
■ Checking before departure
Check the followings in Japan before using the handset overseas
Subscription
z Check the status of a subscription to WORLD WING. For details,
contact the number listed in "General Inquiries" on the last page.
Charging battery
z For charging, refer to the DOCOMO website.
3G 3G 850
○○
○○
○○
○○
Charge
z Overseas charges (call charges, packet communication charges)
differ from those in Japan. For details, refer to the DOCOMO
website.
z Packet communication charge may be higher since some apps
may perform communication automatically. For operations for
each app, ask the app provider.
■ Setting before departure
Network service settings
If you subscribed to network services, network services such as
Voice Mail Service, Call Forwarding Service and Caller ID Display
Request Service are available from overseas. However, some
network services are not available.
z To use network services overseas, setting the remote operation
settings to "Activate" is required. The remote operation settings
can be set in your country of stay (nP.68 "Network services
during roaming"). For details on the remote operation settings in
Japan nP.29 "Network service"
z Some network services that can be set/disabled etc. may not be
available depending on overseas network operators.
■ Checking in your country of stay
The handset automatically connects to the available network
operator when you turn the power on in your country of stay.
Connection
When Network operators (nP.67 "Network operators") is set to
[Select automatically], the suitable network is automatically
selected.
Settings for use overseas
Data roaming
Set whether to use data communication when roaming.
z To perform packet communication overseas, set Data roaming to
[ON].
In the standby screen, z/[Settings]
1
[Communication/network]/[Network settings]
[Mobile networks]/[Data roaming]
[ON]/[OFF]
2
z When the confirmation screen is displayed, check the content
and select [OK].
Preferred network mode
You can check a network to use.
In the standby screen, z/[Settings]
1
[Communication/network]/[Network settings]
[Mobile networks]/[Preferred network mode]
Check the items
2
■ 3G: Use 3G network.
/
/
/
/
66
International roaming
Page 69

Network operators
The handset searches available network to switch it
automatically by default setting. To switch network manually,
set in the following steps.
In the standby screen, z/[Settings]
1
[Communication/network]/[Network settings]
/
[Mobile networks]/[Network operators]
z When the confirmation screen is displayed, check the content
and select [OK].
z Search for networks and a list of network operators is
displayed.
z When an error occurs during the network search, disable
[Data enabled] (nP.52 "Mobile networks") and try again.
Select a network operator
2
z To search for network operators again: [Search networks]
z To automatically select a network operator: [Select
automatically]
z If you manually set network operators overseas, set to [Select
automatically] after returning to Japan.
Date & time
If [Automatic date & time] and [Auto timezone] of Date & time
are enabled, the handset receives information on time and time
differences from the network of a connected overseas network
operator, then time and time differences are corrected.
z Time and time differences may not be adjusted correctly
depending on the network of an overseas network operator. In
this case, set time zone manually.
z The correction timing may differ depending on the network
operator.
z For details on Date & time nP.55 "Date & time"
Inquiries
z When the handset or the docomo nano UIM card is lost or stolen
overseas, promptly contact DOCOMO and conduct a procedure
for canceling the use of service from your country of stay. Refer to
the last page for inquiries. Note that call/communication charges
after the handset or the docomo nano UIM card is lost or stolen
are incurred to the subscriber.
z As for land-line phone etc., "International call access number" of
your country of stay or "Universal number international prefix" is
required.
Making/Receiving a call in your country of stay
Making a call outside your country of stay
(including Japan)
/
In the standby screen, "+" (press 0 for at least
1
1 second), enter country code, area code (city
code) and the other party's phone number
z When the area code (city code) begins with "0", omit the first
"0" when dialing (Include the "0" when making a call to some
countries or regions such as Italy).
z Alternatively, enter a phone number
[International call]/[ON]/[Country code] to enter a country
code.
・ The first "0" of the area code (city code) will be omitted.
z Even if you notify the caller ID, [Unknown], [Private number],
etc. may appear depending on the network operator, and the
caller ID may not be displayed correctly.
/z/
[Call option]
Making a call using International Dial Assist
When you make a call to other countries from your country of
stay, you can make an international call with simple operation
using International Dial Assist.
z Set International dial assist in advance.
z The first "0" of a phone number will be automatically converted to
the country code you set in Country code.
In the standby screen, enter a phone number
1
s
[Converted number]
2
■ Setting of International Dial Assist
In the standby screen, z/[Phone]/[Call log/
1
Call settings]
/
[Roaming settings]/[Int'l dial
assistance]
Select an item
2
■ Automatic conversion: Set whether to make calls using
International dial assistance.
■ Country code: Set a country code to use when using
International dial assistance.
■ International prefix: Set an international prefix to use when
using International dial assistance.
Making a call in your country of stay
You can make a domestic call in your country of stay in the
same way as you do in Japan.
z Always enter the area code (city code), even when the number is
in the same area.
/
s
/
/
67
International roaming
Page 70

Making a call to a WORLD WING subscriber
overseas
When you make a call to a WORLD WING subscriber overseas,
the call is made as an international call to Japan regardless of
whether the call is made to the inside or outside of your country
of stay.
In the standby screen, "+" (press 0 for at least
1
1 second), enter country code "81" (Japan) and
the other party's mobile phone number
excluding the first "0"
/
s
Receiving a call overseas
You can receive a call overseas in the same way as you do in
Japan.
z When a call is received during international roaming, the call is
forwarded from Japan. Charges for connecting a call to Japan
are incurred by the caller and receiving charges by the receiver.
■ Having calls made to your handset
When having calls made to your handset from Japan, have your
phone number entered just as a domestic call in Japan.
When having calls made to your handset from countries other than
Japan, have the international call access number and country code
"81" (Japan) added to the beginning of your phone number with the
first "0" excluded as an international call to Japan regardless of your
country of stay.
International call access number of the country of the caller-81-90
(or 80/70)-XXXX-XXXX
Setting international roaming
Roaming settings
You can make settings for international roaming.
In the standby screen, z/[Phone]/[Call log/
1
Call settings]
Select an item
2
■ Bar incoming on roam: Set whether to reject incoming calls
during international roaming.
■ Missed call notice on roam: Set whether to notify you of
incoming call information (date and time of calls or caller ID)
by SMS, when you are in a place with no signal, the handset
is turned off or you fail to answer an incoming call during
international roaming.
■ Roaming guidance: Set whether to play the guidance
notifying the other party who makes a call to you during
international roaming that you are using international
roaming.
■ Int'l dial assistance: Make settings for International dial
assistance. For International dial assistance nP.67 "Setting
of International Dial Assist"
■ Network service: Make settings for using network services
available during international roaming. For network service
nP.68 "Network services during roaming"
Network services during roaming
You can use network services such as Voice Mail Service or
Call Forwarding Service overseas.
In the standby screen, z/[Phone]/[Call log/
1
Call settings]
service]
Select an item
2
■ Remote operation (paid): Make settings for remote
operations.
■ Caller ID request (paid): Make settings for Caller ID Display
Request Service.
■ Missed call notice (paid): Make settings for Incoming
notification while roaming.
■ Roaming guidance (paid): Make settings for Roaming
guidance.
■ Voicemail (paid): Make settings for Voice Mail Service.
■ Call forwarding (paid): Make settings for Call Forwarding
Service.
/
[Roaming settings]
/
[Roaming settings]/[Network
Checking after homecoming
The handset automatically connects to the DOCOMO network
after returning to Japan. If it fails, make the following settings.
z Set Network operators to [Select automatically] (nP.67
"Network operators").
68
International roaming
Page 71

Appendix/Index
Menu list
Normal menu list
z For menu with item number, press the item number dial key to
select menu.
■ Mail
Function menu Page
Mail P.32
SMS P.33
■ Phone
Function menu Page
Phonebook P.30
Call/Ans Memo P.29
Redial P.28
Received Calls P.28
Network service P.29
Roaming settings P.68
Call log/Call settings
Speed dial P.26
Incoming call settings P.29
Outgoing call settings P.30
Other settings P.30
■ Web
Function menu Page
dmenu/Search P.34
Bookmarks P.35
Site viewing history P.35
Google Search P.35
Start Browser P.35
Browser settings P.35
Downloads P.35
■ Anshin
Function menu Page
Disaster Message Board P.64
Disaster Voice Messaging P.64
Early warning "Area Mail" P.64
Energy saving P.51
Parental mode P.49
■ Camera
Function menu Page
Camera P.37
Video Camera P.38
Barcode Reader P.39
Translation finder P.39
■ Album
z For Album nP.42 "Album"
■ Data
z For Data nP.59 "Operating files"
■ Settings
Function menu Page
Standby screen P.48
Brightness P.48
Wallpaper/display
Sound/lamp
Lock/security
Energy saving/
battery
Bluetooth P.62
Communication/
network
Screen timeout P.48
Font Settings P.48
VeilView P.48
Sub display P.48
Mode settings P.49
Volume P.48
Ringtone/notification P.48
Audible key tones P.48
Key backlight P.48
Haptic feedback P.48
Screen lock sounds P.48
Sound start charging P.48
Screen lock P.49
Security key setting P.51
Parental mode P.49
Restrict calls P.50
Contacts data access
monitor
Secrecy settings P.50
Set up SIM card lock P.51
Unknown sources P.49
Energy saving settings P.51
Battery P.51
Airplane mode P.51
Data usage P.52
Network settings P.51
P.49
69
Appendix/Index
Page 72

Function menu Page
docomo apps password P.53
docomo location information P.53
docomo service
Data transfer/reset
Other settings
SD card backup P.47
Send device error
information
Remote initialization P.53
USB debug switch P.53
Data transfer P.53
Reset all P.54
Kantan Hasshin P.55
Application P.55
Date & time P.55
Self check P.55
Storage P.55
Select language P.55
Text input P.56
Device info P.56
Encrypt phone P.56
Device administrator P.55
Credential storage P.56
Location P.57
Daydream P.55
Accessibility P.57
Accounts P.55
P.53
■ Tools
Function menu Page
LINE P.43
Alarm P.43
World clock P.44
Timer P.44
Stop watch P.44
Calculator P.44
Schedule P.44
Memo P.45
PASSNOW P.45
Data transfer/Save P.53
SD card backup P.47
Infrared P.61
Instruction Manual P.47
Widget Sheet P.47
■ Profile
z For Profile nP.17 "Profile"
■ SHSHOW
z Download or view contents.
Simple menu list
■ Phone
Function menu Page
View phonebook P.30
Add to phonebook P.30
Redial P.28
Received Calls P.28
Call/Ans Memo P.29
Profile P.17
Voicemail P.29
■ Mail
Function menu Page
Create mail P.32
Inbox P.32
Sent P.32
Check new mail/message P.33
Create SMS P.33
SMS list P.33
■ Web
Function menu Page
dmenu/Search P.34
Bookmarks P.35
Site viewing history P.35
■ Camera
Function menu Page
Take a photo P.37
View photos P.42
■ TV/Music
Function menu Page
TV (One Seg) P.40
Music P.41
70
Appendix/Index
Page 73

■ Tools
Function menu Page
LINE P.43
Barcode Reader P.39
Calculator P.44
Alarm P.43
Infrared P.61
Schedule P.44
Memo P.45
Instruction Manual P.47
■ Settings
Function menu Page
Mode settings P.49
Volume P.48
Ringtone/notification P.48
Sound/lamp
Wallpaper/display
Lock/security
Audible key tones P.48
Key backlight P.48
Haptic feedback P.48
Screen lock sounds P.48
Sound start charging P.48
Standby screen P.48
Brightness P.48
Screen timeout P.48
Font Settings P.48
VeilView P.48
Sub display P.48
Screen lock P.49
Security key setting P.51
Parental mode P.49
Restrict calls P.50
Contacts data access
monitor
Secrecy settings P.50
Set up SIM card lock P.51
Unknown sources P.49
P.49
Troubleshooting (FAQ)
Troubleshooting
z First, check whether the software update is required. If it is
required, update the software (nP.75 "Updating software").
z If there is no improvement on the problems even after checking
the following items, feel free to contact the number listed in
"Repairs" (in Japanese only) on the last page or a repair counter
that DOCOMO specifies.
■ Power
z The handset is not turned on
・ Is the battery pack installed correctly? nP.19 "Battery pack"
・ Make sure the battery has not run out. nP.19 "Charging"
z The screen does not respond or the handset cannot be turned off
・ You can turn the power off forcibly by pressing H for at least 8
seconds. nP.21 "Turning power off forcibly"
* Note that data, contents you have set, etc. may be deleted
since the power is turned off forcibly.
■ Charging
z Cannot charge the battery
The charging lamp does not illuminate or it flashes
・ Is the battery pack installed correctly? nP.19 "Battery pack"
・ Is the power plug of the adapter inserted into the outlet or
cigarette lighter socket properly? nP.20 "Charging with AC
adapter/DC adapter"
・ Are the adapter and the handset set properly? nP.20
"Charging with AC adapter/DC adapter"
・ When using an AC adapter (sold separately), are the
microUSB plug of the AC adapter and the handset securely
connected? nP.20 "Charging with desktop holder", P.20
"Charging with AC adapter/DC adapter"
・ For using the desktop holder, make sure that the charging
terminal of the handset is not dirty. If it is dirty, clean the
terminal with a dry cotton swab etc.
・ If a call, communication or another function is performed for a
long time while charging, the handset may become warm and
charging may stop. Charge again after the handset
temperature lowers. nP.19 "Cautions while charging"
・ Is an adapter specified by NTT DOCOMO being used for
charging? Contact the number listed in "Repairs" (in Japanese
only) on the last page or a repair counter that DOCOMO
specifies if you cannot charge the battery even when using a
specified one.
■ Handset operation
z Apps do not work properly (e.g. inability to activate them,
frequent errors)
・ Make sure there is no disabled app. Try again after enabling a
disabled app, if any. nP.55 "Enabling an app"
z Becomes hot while operating/charging
・ The handset, battery pack or adapter may become warm while
you are operating or charging the handset, when you watch
TV, etc. for a long time while charging, etc. There is no
operational problem. nP.19 "Cautions while charging"
71
Appendix/Index
Page 74

z Battery life is short
・ Make sure the handset is not left for a long time outside the
service area. Outside the service area, since radio waves are
searched to make communication available, more electric
power than usual is used.
・ The battery life depends on the usage environment and
deterioration level. nP.77 "Main specifications"
・ Battery pack is a consumable product. Battery life per charge is
gradually reduced every time the battery is charged. If the
battery life becomes extremely shorter than at the time of
purchase even after fully charged, purchase a new specified
battery pack. nP.19 "Battery pack usable life"
z Unintended handset power off or restart occurs
・ When the terminal of battery pack is dirty, the connection
become bad and the handset may turn off. If it is dirty, clean
the terminal of the battery pack with a dry cotton swab etc.
・ Is IC area of docomo nano UIM card dirty? nP.18 "docomo
nano UIM card"
z Not activated by pressing keys
・ Make sure the handset is not turned off. nP.21 "Turning
power on"
z Screen response is slow when pressing keys
・ This may happen when a great deal of data is saved on the
handset, when a large amount of data is being transferred
between the handset and the microSD Card, etc. nP.55
"Storage"
z docomo nano UIM card is not recognized
・ Is the docomo nano UIM card inserted facing right direction?
nP.18 "docomo nano UIM card"
z Clock is incorrect
・ Clock may become incorrect if the power is left turned on for a
long time. Make sure [Auto date & time] is enabled and turn the
power on again in a location with good signal conditions.
nP.55 "Date & time"
z Handset operation is unstable
・ The apps installed on the handset after purchase may become
a cause. If you can improve the symptoms by activating the
handset with the safe mode set, you may be able to improve
the symptoms by uninstalling the installed apps.
* The safe mode is a function to activate the handset nearly in
the state of default.
・ For activating the safe mode
Turn the power on again when the power is turned off, then
keep pressing & on the screen during activation until the
standby screen is displayed.
* Alternatively, H while the power is turned on (for at least
* When the safe mode is activated, [セーフモード ]/[Safe
* To deactivate the safe mode, turn the power on again.
/
1 second)
1 second)
mode] is displayed at the bottom left of the screen.
point the cursor to [Power off]/t (for at least
/
[OK] to activate the safe mode.
・ Back up the necessary data in advance before using the safe
mode.
・ Widgets created by yourself may disappear.
・ The safe mode is not an ordinary activating state and thus
deactivate the safe mode if you want to use in an ordinary
way.
■ Calling
z Calls cannot be made by pressing key
・ Make sure [Restrict calls] is not set. nP.50 "Restrict calls"
・ Make sure Airplane mode is not set. nP.51 "Communication/
network"
z Ringtone does not sound
・ Make sure In Calling in Volume is not set to "Silent". nP.48
"Sound/lamp"
・ Make sure Public mode (power OFF), the manner mode or
Airplane mode is not activated. nP.29 "Network service" ,
P.49 "Mode Settings", P.51 "Communication/network"
・ Make sure Set ring start time or Reject call setting is not set.
nP.29 "Incoming call settings", P.29 "Reject call setting"
・ Is Answer time setting set to "0sec"? nP.29 "Voice Memo/
Answering Memo"
・ Make sure the ringing time for Voicemail service or Call
forwarding service is not set to "0sec". nP.29 "Network
service"
z Calls are not available ([ ] does not disappear even after
moving to another place or calls cannot be made/received even
though signal status is not bad)
・ Turn the power on again or attach the battery pack or docomo
nano UIM card again. nP.18 "docomo nano UIM card", P.19
"Battery pack", P.21 "Turning power on/off"
・ Depending on the signal type, even though status is "inside the
service area" or "[ ] (indicating signal status) appears",
making/receiving a call may not be available. Move to another
place and call again.
・ Make sure the call restriction such as Reject call setting is not
set.nP.29 "Reject call setting"
・ In a crowded place, heavy telephone/mail traffic may make it
difficult to get a connection depending on how congested the
radio waves are. In this case, a busy tone is played. Move to
another place or call again later.
■ Screen
z Main display is dark
・ Make sure Screen timeout is not set to a short duration.
nP.48 "Wallpaper/display"
・ Make sure the setting of Brightness is not changed. nP.48
"Brightness"
・ Make sure [VeilView] is not enabled. nP.48 "VeilView"
■ Sound
z The other party's voice is not heard well or is too loud during a
call
・ Make sure you have not changed the in-call volume. nP.48
"Sound/lamp"
■ Mail
z Mail is not automatically received
・ Is Auto reception setting set to [Confirm every time] or [OFF]?
nP.33 "Receiving docomo mail"
72
Appendix/Index
Page 75

■ Camera
z Still picture or video shot by the camera is blurred
・ For shooting a nearby subject, switch Focus settings in Detail
setting to [Macro AF]. nP.38 "Detail setting", nP.38 "Detail
setting"
・ Make sure the camera lens is neither misted up nor exposed to
dirt. nP.36 "Before using camera"
・ When shooting a person in the still picture shooting mode,
switch Auto focus in Detail setting to [Face AF]. nP.38 "Detail
setting"
・ In the still picture shooting mode, set Anti shake to [ON].
nP.38 "Detail setting"
■ TV
z Cannot watch TV
・ Make sure the handset is not outside the area of a terrestrial
digital TV broadcasting service or in a place with weak signal.
nP.40 "Broadcast wave"
・ Make sure a channel list is created. nP.40 "Creating channel
lists"
■ International roaming
z Cannot use the handset overseas (The signal icon appears)
・ Make sure you have subscribed to "international roaming
service (WORLD WING)". Check the status of a subscription to
"international roaming service (WORLD WING)". nP.66
"Outline of international roaming (WORLD WING)"
z Cannot use the handset overseas ([ ] appears)
・ Make sure the handset is not outside the service area of
international roaming or in a place with weak signal. Refer to
"Mobile Phone User's Guide [International Services]" or the
DOCOMO International Services website to check if the
service area or network operator is available one. nP.66
"Outline of international roaming (WORLD WING)"
・ Change the network setting or network operator setting. Set
Network operators to [Select automatically]. nP.67 "Network
operators"
・ Turn the power on again. The handset may recover. nP.21
"Turning power on/off"
z Cannot use data communication overseas
・ Enable [Data roaming]. nP.66 "Data roaming"
z Suddenly the handset becomes unavailable during overseas use
・ Make sure the approximate limit of usage fee is not exceeded.
As for "international roaming service (WORLD WING)", the
approximate limit of usage fee is set in advance. Pay off the
usage fee to resume services if usage fee exceeds the limit.
z The other party's phone number is not notified/A different phone
number from that of the other party is notified/Functions to use
details saved in the phonebook or Caller ID notification are not
activated
・ The caller ID is not displayed on the handset even though the
other party makes a call with the caller ID set to be notified if
the used network or network operator does not notify. In
addition, a different phone number from that of the other party
may be notified depending on the used network or network
operator.
■ Data management
z Data is not transferred
・ Make sure a USB HUB is not used. If used, the transference
may not be carried out normally. nP.59 "Connecting the
handset and PC"
z Data saved on the microSD Card is not displayed
・ Remove the microSD Card and insert it again. nP.58
"microSD Card (external storage)"
z Images are not displayed correctly
・ [ ] is displayed when the image data is damaged.
■ Bluetooth function
z Cannot connect with Bluetooth connection compatible device/
Cannot find it even if searching
・ Set the Bluetooth connection compatible device (commercially
available) side to the registration stand-by status and register it
from the handset side. To delete the registered device once
and register it again, both the Bluetooth connection compatible
device (commercially available) and the handset are required
to be deleted on each side. nP.63 "Using Bluetooth function"
z Calls cannot be made from the handset with an external device
such as a car navigation system or hands-free device connected
・ Making a call to a phone number may become unavailable if
you make multiple calls to the phone number in the condition
that the other party does not answer or outside the service
area. In this case, turn off the handset power and turn it on
again. nP.21 "Turning power on/off"
Error messages
z [Enter passcode.]
・ Appears when an operation for the restricted function was
attempted while the handset lock is set. Enter the passcode to
temporarily disable handset lock and continue operation.
・ Appears when attempting to use a function that requires the
passcode to be entered.
z [Low on space]
・ Available space on the handset memory is decreasing. Some
functions or apps may not work properly. Uninstall unneeded
apps or move/delete files.
z [Please wait for a while(data)]
・ Packet communication network is extremely congested. Try
again later.
z [Please wait for a while(voice call)]
・ Audio line network is extremely congested. Try again later.
z [Utilizing the production number information. Continue?]
・ May appear while watching TV. Select [OK] to send
manufacture number of the handset and docomo nano UIM
card.
73
Appendix/Index
Page 76

Warranty and After-Sales Service
Warranty
z Make sure that your handset is accompanied by a warranty card
at the time of purchase. Check that the name of the retailer, the
date of purchase, and the necessary details have been filled in on
the warranty card. Be sure to keep it in a safe place.
Contact the retailer if any necessary details on the warranty card
are not completed.
The warranty period without charge is 1 year from the date of
purchase.
* Battery Pack SH43, Back Cover SH74 and Desktop Holder
SH48 are not covered by the warranty.
z For the purpose of improvement, the specifications for this
product and its accessories are subject to complete or partial
change without prior notice.
z Information registered in your handset, such as phonebook, may
be lost or changed if your handset is damaged, repaired or
mishandled. It is recommended that backup be kept of information
such as phonebook.
* The handset allows you to save phonebook data etc. to microSD
Cards.
* The handset allows you to back up data such as phonebook
entries by using docomo cloud.
After-Sales Services
■ If you have problems with your handset
Refer to "Troubleshooting" on this manual before requesting repairs.
Contact the number listed in "Repairs" (in Japanese only) on the last
page if problems persist.
■ If your handset needs repairs after contacting
DOCOMO
Bring your handset to a repair counter that DOCOMO specifies.
However, repair counters are only open during business hours.
Make sure to bring your warranty card with you. Note that it may take
several days to repair depending on the condition on the
malfunctions.
During the warranty period
z The handset will be repaired without charge in accordance with
the terms of the warranty.
z When bringing the handset in for repairs, be sure to bring the
warranty card. Even during the warranty period, a fee will be
charged if no warranty certificate is presented, for repairs of
malfunctions, damage, etc. caused by your improper handling
(damage of external connector terminal, LCD, etc.), or when the
handset has been repaired at a repair counter other than those
specified by DOCOMO.
z Repairs for malfunctions caused by the use of devices and
consumable products other than those specified by DOCOMO will
also incur a fee, even during the warranty period.
Repairs may not be possible in the following
circumstances.
z When, as a result of inspection, a corrosion resulted from water
exposure, condensation, sweat or other liquids is found or when
the internal circuit board is damaged or deformed (Repairs may
not be possible when external connector terminal, LCD, etc. is
damaged or when a housing is cracked)
z When the handset has been repaired at a repair office other than
those specified by DOCOMO.
* Even when repairs are possible, repair charges will be incurred
because the warranty does not cover such damage.
After the warranty period has expired
Charged repairs will be carried out upon request.
Replacement parts
Replacement parts (required to maintain the functionality of the
handset) will be kept in stock basically for at least 4 years following
the halt of production. However, note that there may be a case when
repair is not possible for the shortage of replacement parts etc.
depending on the faulty part. Repairs may be possible even after this
period has passed, depending on the faulty part. Contact the
number listed in "Repairs" (in Japanese only) on the last page for
details.
■ IMPORTANT!
z Never attempt to modify the handset or its accessories.
■ May cause fire, bodily injury or malfunction.
■ If your device has been modified previously, it will only be
accepted for the repair as long as you agree that we restore the
device to its original state. However, repairs may be refused
depending on the extent of the modification.
The following cases may be considered as a modification.
・ Stickers etc. are applied to the LCD or keys
・ Decorations are made to the handset with adhesive agent
etc.
・ Exterior parts etc. are replaced with those which are not
standard DOCOMO products
■ Repairs for any malfunction or damage caused by such
modifications will incur fees, even during the warranty period.
z Do not peel off the model nameplate attached to the handset.
The nameplate functions as a certification that the equipment
conforms to the prescribed technical standards. If the contents of
the nameplate cannot be conformed such as when it is removed
or replaced on purpose, repairs may be refused because
conformity to the standards cannot be determined.
z Information stored in your handset, such as the settings of various
functions, may be cleared or reset if your handset is damaged,
repaired or mishandled. If this occurs, please re-enter the
information or re-specify the settings.
z When the handset is repaired, Bluetooth address may be
changed regardless of the faulty part.
z The following sections of the handset contain parts that generate
magnetic waves. Keep cash cards and other objects likely to be
affected by magnetic waves away from the handset. They may
become unusable.
■ Sections: Speaker, earpiece
z If the inside of the handset gets wet or becomes moist,
immediately turn off the power though the handset provides
waterproof performance. Then, visit a repair counter. The handset
may not be repaired depending on its condition.
■ Memory dial (Phonebook) and downloaded
information
z Created, imported, downloaded data, etc. may be modified or
deleted when changing models or repairing the handset.
DOCOMO shall not be liable for any modification or deletion of
content. DOCOMO may, at our convenience, exchange your
handset for a substitute in lieu of repairs. However, in this case,
we cannot transfer these data etc. to replaced products except for
some data.
74
Appendix/Index
Page 77

Updating software
Connect SH-06G to the network and check for software update.
If necessary, download update files and update software.
z If updating software is necessary, check the DOCOMO website
for updates.
z The following three kinds of update methods are available.
Auto-update: Automatically download new update files and
rewrite at the set time.
Now update: Immediately update.
Reserve update: Automatically update at the set time.
z You can update software even if the handset contains
phonebook, camera image, mail, downloaded data, etc.
However, DOCOMO may not be able to protect data that could
be lost due to malfunction, damage, water exposure and so on.
It is recommended that important data be backed up before
software update. Note that some data, such as downloaded
data, cannot be backed up.
Using software update
z Do not remove the battery pack while updating software. Updating
may fail.
z Fully recharge battery before updating software. It is
recommended to connect a charger cable to the handset when
updating.
z Software cannot be updated in the following cases.
■ During a call
■ When [ ] is displayed
■ During international roaming
■ In Airplane mode
■ When date and time are set incorrectly
■ When battery level is insufficient for software update
■ When the basic software is changed improperly
z Updating (downloading and rewriting) software may take time.
z Making or receiving calls, each communication function and other
functions cannot be used while updating software. However,
receiving calls is possible during download.
z It is recommended to update software at a location with good
signal conditions while you are not moving. Software update may
be interrupted if signal is weak.
z If software has already been updated, [No update is needed.]
appears when software update is checked.
z [When docomo network is not available, or during roaming,
software update is not available.] appears during international
roaming or outside the service area.
z While updating software, sent SMSs are held at SMS center.
z When updating software, the information unique to SH-06G
(model, serial number, etc.) is automatically sent to the DOCOMO
software update server. Sent information is only used for software
update.
z If software update fails, the handset may not be activated, or
[Software Update failed.] may appear and no operations may be
available. In this case, bring the handset to a repair counter that
DOCOMO specifies.
z When PIN code is set, the PIN code entry screen appears during
restart after rewriting and you are required to enter PIN code.
z While updating software, do not activate other apps.
Auto-update of software
You can automatically download new update files and rewrite
the software at the set time.
■ Auto-update setting of software
z The automatic update setting is set to [Automatic Update] by
default.
In the standby screen, z/[Settings]/[Other
1
settings]
[Configure the software update]
[Automatic Update]/[Manual Update]
2
■ When software update is required
When an update file is automatically downloaded, [ ] (Update
available) appears on the status bar.
z If the time for the rewrite arrives with [ ] (Update available)
displayed, the software is automatically rewritten and [ ]
(Update available) disappears.
In the standby screen, p/select the status bar
1
select the notification
z The rewrite notice screen is displayed and you can confirm
Select the rewrite method
2
■ OK: The update starts when the set time arrives.
■ Set Time: For details nP.76 "Reserve update of software"
■ Start update: For details nP.76 "Now update of software"
z If software cannot be updated when update notification is
received, [ ] (Update available) appears on the status bar.
z If software cannot be rewritten at the time for the rewrite,
software is rewritten at the same time of the following day.
z Software cannot be automatically updated when the automatic
update setting is set to [Manual Update] or while updating
software by Now update.
/
[Device info]/[Software update]
the time for the rewrite.
/
/
75
Appendix/Index
Page 78

Now update of software
You can update software immediately.
z You can update software from the rewrite notice screen or the
menu.
In the standby screen, z/[Settings]/[Other
1
settings]
[Start the software update]/[Yes]
z To update software from the rewrite notice screen: Display
Approximately 10 seconds after the software
2
update screen appears, the rewrite
automatically starts
z Select [OK] to start the rewrite immediately.
z During update, no key operations are available. It is not
z When the update is complete, the handset restarts and the
z When software update is not necessary, [No update is needed.]
appears.
/
[Device info]/[Software update]
the rewrite notice screen
possible to cancel update.
home screen is displayed.
/
[Start update]
/
■ When reserved time arrives
When the start time arrives, the rewrite screen appears. The
software rewrite automatically starts after approximately 10
seconds.
z During update, no key operations are available. It is not possible
to cancel update.
z If software cannot be updated at the start time, software is
updated at the same time of the following day.
z Software is updated even if the alarm or another function is
activated at the same time as the reserved time.
z When SH-06G is turned off at the start time, software is updated
at the same time as reserved time after turning on the power.
■ Post-update display
When the software update is complete, the notification appears on
the status bar. In the standby screen, p
select the notification to display the completion screen.
/
select the status bar
/
Reserve update of software
You can change a time for software rewrite if you want to set a
different time for installing update files.
Display the rewrite notice screen/[Set Time]
1
Enter the time/[OK]
2
76
Appendix/Index
Page 79

Main specifications
■ Handset
Product name SH-06G
Approx. 112 mm (H)
Size
Weight Approx. 123 g (When battery pack installed)
Memory
Continuous
talk time
Continuous
stand-by
*2, 3
time
TV watching
*3, 5
time
Charge time
Display
Image pickup
device
Camera
Recording
Memory
capacity
16.4 mm (D) (Center part of the handset (excluding
speaker hole projection))
ROM: 4GB
RAM: 1GB
FOMA/3G
*1, 2, 3
Approx. 400 min.
FOMA/3G
At rest: Approx. 610 hours
Approx. 360 min.
AC Adapter 05: Approx. 120 min (Desktop Holder
SH48 use: Approx. 130 min.)
DC Adapter 04: Approx. 120 min
Type
Main display: TFT 16,777,216 colors
Sub display: Organic EL 1 color
Size
Main display: Approx. 3.4 inches
Sub display: Approx. 0.9 inches
Pixels
Main display: 518,400 pixels (QHD: horizontal
540 pixel
Sub display: 4,608 pixel (horizontal 36
×vertical 128 pixel)
pixel
Type: Surface-illuminated CMOS
Size: 1/4.0 inches
Effective pixels: Approx. 5 million pixels
Recorded pixels (Max.): Approx. 5 million pixels
Zoom (Digital): Up to approx. 16.0× (Still picture)/
Up to approx. 16.0× (Video)
Number of recordable still pictures
Approx. 3,000 (when saved on the handset)
Approx. 1,800 (when saved on 1GB microSD
*7
Card)
Continuous shooting of still pictures
*8
50
File format for still picture
JPEG
Recording time for video
Up to approx. 41 min each/Up to approx. 41 min
in total (when saved on the handset)
Up to approx. 22 min/Up to approx. 22 min in
total
(when saved on 1 GB microSD Card)
File format for video
MP4
Approx. 1.9 GB
×Approx. 51 mm(W)×Approx.
*4
×vertical 960 pixel)
*6
*9
*10
Supported version
Bluetooth standard Ver.4.0
Output
Bluetooth
Languages
*1 Continuous talk time is an estimate of the time during which
you can talk on a phone in a status where signals are sent and
received normally.
*2 Talk (Communication)/Stand-by time is shortened with the
frequent use of each function such as data communications,
Multiaccess, camera function, TV function or Bluetooth
function. Actual usage time is the combination of talk
(communication) and stand-by time. The longer the talk time is,
the shorter the stand-by time becomes.
*3 Talk (Communication)/Stand-by time may be reduced by
approximately half or TV watching time may be shortened
depending on conditions including the battery level status of
battery pack, functions used, temperature or other
environmental conditions, and signal strength (no signal or
weak signal).
*4 This is the average usage time during which the handset is
closed and not carried with you and in a status where signals
are received normally.
*5 TV watching time is an estimate of watching time in a status
where signals are received normally.
*6 CMOS (Complementary metal-oxide semiconductor) is an
image device equivalent to the film of silver salt cameras.
*7 Picture size: FullHD (1920
*8 Picture size: VGA (640
*9 Picture size: Full HD (1280
Image + voice
*10 Depending on usage of apps which use common memory, the
memory capacity of each data may be reduced.
Bluetooth standard Power Class 1
Supported profiles (Supported service/versions)
HSP (1.2), HFP (1.6), A2DP (1.2), AVRCP (1.3),
HID (1.0), OPP (1.1), SPP (1.1), PBAP (1.0),
PAN (PAN-NAP) (1.0), PAN (PANU) (1.0),
HOGP (1.0)
Displayed languages: Japanese and English
Input languages (for typing): Japanese and English
×1080)/File size: Approx. 550 KB
×480)
×720)/File size limit: 2 GB/Type:
■ Battery pack
Product name Battery Pack SH43
*7
Battery Lithium-ion battery
Nominal voltage DC 3.8 V
Nominal capacity 1410 mAh
■ Desktop holder
Product name Desktop Holder SH48
Input DC 5.0 V, 1.8 A
*9
Output DC 5.0 V, 1.8 A
77
Appendix/Index
Page 80

Specific Absorption Rate (SAR) of Mobile Phones
This model SH-06G mobile phone complies with Japanese
technical regulations and international guidelines regarding
exposure to radio waves.
This mobile phone was designed in observance of Japanese
technical regulations regarding exposure to radio waves(*1) and
limits to exposure to radio waves recommended by a set of
equivalent international guidelines. This set of international
guidelines was set out by the International Commission on NonIonizing Radiation Protection (ICNIRP), which is in collaboration with
the World Health Organization (WHO), and the permissible limits
include a substantial safety margin designed to assure the safety of
all persons, regardless of age and health condition.
The technical regulations and international guidelines set out limits
for radio waves as the Specific Absorption Rate, or SAR, which is
the value of absorbed energy in any 10 grams of tissue over a 6minute period. The SAR limit for mobile phones is 2.0 W/kg. The
highest SAR value for this mobile phone when tested for use at the
ear is 0.900 W/kg and when worn on the body is 0.498 W/kg(*2).
There may be slight differences between the SAR levels for each
product, but they all satisfy the limit.
The actual SAR of this mobile phone while operating can be well
below that indicated above. This is due to automatic changes to the
power level of the device to ensure it only uses the minimum
required to reach the network. Therefore in general, the closer you
are to a base station, the lower the power output of the device.
This mobile phone can be used in positions other than against your
ear. Please keep the mobile phone farther than 1.5 cm away from
your body by using such as a carrying case or a wearable accessory
without including any metals. This mobile phone satisfies the
technical regulations and international guidelines.
The World Health Organization has stated that "a large number of
studies have been performed over the last two decades to assess
whether mobile phones pose a potential health risk. To date, no
adverse health effects have been established as being caused by
mobile phone use."
Please refer to the WHO website if you would like more detailed
information.
http://www.who.int/docstore/peh-emf/publications/facts_press/
fact_english.htm
Please refer to the websites listed below if you would like more
detailed information regarding SAR.
Ministry of Internal Affairs and Communications Website:
http://www.tele.soumu.go.jp/e/sys/ele/index.htm
Association of Radio Industries and Businesses Website:
http://www.arib-emf.org/01denpa/denpa02-02.html (in Japanese
only)
NTT DOCOMO, INC. Website
https://www.nttdocomo.co.jp/english/product/sar/
SHARP Corporation Website:
http://k-tai.sharp.co.jp/support/sar/ (in Japanese only)
*1 Technical regulations are defined by the Ministerial Ordinance
Related to Radio Law (Article 14-2 of Radio Equipment
Regulations).
*2 Not including other radio systems that can be simultaneously
used with FOMA.
European RF Exposure Information
Your mobile device is a radio transmitter and receiver. It is designed
not to exceed the limits for exposure to radio waves recommended
by international guidelines. These guidelines were developed by the
independent scientific organization ICNIRP and include safety
margins designed to assure the protection of all persons, regardless
of age and health.
The guidelines use a unit of measurement known as the Specific
Absorption Rate, or SAR. The SAR limit for mobile devices is 2 W/
kg and the highest SAR value for this device when tested at the ear
is 0.738 W/kg
For body-worn operation, this mobile device has been tested and
meets the RF exposure guidelines when used with an accessory
containing no metal and positioning the handset a minimum of 1.5
cm from the body. Use of other accessories may not ensure
compliance with RF exposure guidelines.
As SAR is measured utilizing the devices highest transmitting power
the actual SAR of this device while operating is typically below that
indicated above. This is due to automatic changes to the power level
of the device to ensure it only uses the minimum level required to
reach the network.
* The tests are carried out in accordance with international
guidelines for testing.
Declaration of Conformity
Hereby, Sharp Telecommunications of Europe Ltd, declares that this
SH-06G is in compliance with the essential requirements and other
relevant provisions of Directive 1999/5/EC.
A copy of the original declaration of conformity can be found at the
following Internet address:
http://www.sharp.co.jp/k-tai/ (in Japanese only)
FCC Notice
z This device complies with part 15 of the FCC Rules.
Operation is subject to the following two conditions:
(1) This device may not cause harmful interference, and (2) this
device must accept any interference received, including
interference that may cause undesired operation.
z Changes or modifications not expressly approved by the
manufacturer responsible for compliance could void the user's
authority to operate the equipment.
Information to User
This equipment has been tested and found to comply with the limits
of a Class B digital device, pursuant to Part 15 of the FCC Rules.
These limits are designed to provide reasonable protection against
harmful interference in a residential installation. This equipment
generates, uses and can radiate radio frequency energy and, if not
installed and used in accordance with the instructions, may cause
harmful interference to radio communications.
However, there is no guarantee that interference will not occur in a
particular installation; if this equipment does cause harmful interference
to radio or television reception, which can be determined by turning the
equipment off and on, the user is encouraged to try to correct the
interference by one or more of the following measures:
1. Reorient/relocate the receiving antenna.
2. Increase the separation between the equipment and receiver.
3. Connect the equipment into an outlet on a circuit different from
that to which the receiver is connected.
4. Consult the dealer or an experienced radio/TV technician for help.
*
and when worn on the body is 0.479 W/kg*.
78
Appendix/Index
Page 81

FCC RF Exposure Information
Your handset is a radio transmitter and receiver.
It is designed and manufactured not to exceed the emission limits for
exposure to radio frequency (RF) energy set by the Federal
Communications Commission of the U.S. Government.
The guidelines are based on standards that were developed by
independent scientific organizations through periodic and thorough
evaluation of scientific studies. The standards include a substantial
safety margin designed to assure the safety of all persons,
regardless of age and health.
The exposure standard for wireless handsets employs a unit of
measurement known as the Specific Absorption Rate, or SAR. The
SAR limit set by the FCC is 1.6 W/kg.
The tests are performed in positions and locations (e.g., at the ear
and worn on the body) as required by the FCC for each model. The
highest SAR value for this model handset when tested for use at the
ear is 0.95 W/kg and when worn on the body, as described in this
user guide, is 0.92 W/kg.
For body worn operation, this phone has been tested and meets the
FCC RF exposure guidelines. Please use an accessory designated
for this product or an accessory which contains no metal and which
positions the handset a minimum of 1.5 cm from the body.
The use of accessories that do not satisfy these requirements may
not comply with FCC RF exposure requirements, and should be
avoided.
The FCC has granted an Equipment Authorization for this model
handset with all reported SAR levels evaluated as in compliance
with the FCC RF emission guidelines. SAR information on this
model handset is on file with the FCC and can be found under the
Display Grant section of http://transition.fcc.gov/oet/ea/fccid/ after
searching on FCC ID APYHRO00219.
Additional information on Specific Absorption Rates (SAR) can be
found on the FCC website at http://www.fcc.gov/encyclopedia/radiofrequency-safety.
Export Administration Regulations
The Japan Export Administration Regulations ("Foreign
Exchange and Foreign Trade Act" and its related laws) may be
applied to this product and its accessories under certain
conditions. The Export Administration Regulations may also be
applied. To export or reexport the handset and its accessories,
conduct all legally required procedures at your own risk and
expense. For details on the procedures, contact the Ministry of
Economy, Trade and Industry or the US Department of
Commerce.
Intellectual Property Right
Copyrights and rights of portrait
z Data with third party copyrights such as text, images, music and
software that is downloaded via Internet websites, acquired by
TV, video, etc. or shot by the handset cannot be duplicated,
altered or publicly transmitted without rightful party's consent.
Only duplicating, quoting, etc. for personal use are permitted
under the Copyright Act.
Even if for personal use, filming and recording may be prohibited
for stage performances, shows, exhibitions, etc. Also, shooting
another's image or posting another's image on Internet websites
without his/her consent may constitute a violation of one's right to
his/her image.
Registered trademarks and trademarks
z
"FOMA", "dmenu", "mopera U", "
"Deco-mail", "
"
公共モード
"i
チャネル
せロック
logo, the "docomo mail" logo, and the "Phonebook" logo are
trademarks or registered trademarks of NTT DOCOMO, INC.
z "Catch Phone (Call waiting service)" is a registered trademark of
Nippon Telegraph and Telephone Corporation.
z LINE is a trademark or registered trademark of LINE Corporation.
z of Advanced Media, Inc. is used for the internal
voice recognition engine.
z Microsoft
PowerPoint
Microsoft Corporation in the United States and/or other countries.
z Microsoft Excel and Microsoft Word are product names of
Microsoft Corporation in the U.S.A.
z Oracle and Java are registered trademarks of Oracle and/or its
affiliates.
Other names may be trademarks of their respective owners.
z QR code is a registered trademark of Denso Wave Inc.
z microSD Logo and microSDHC Logo are trademarks of SD-3C,
LLC.
z The handset features LCFONT, developed by Sharp Corporation,
to make the LCD easier to view and read. LCフォン ト/LCFONT
and are registered trademarks of Sharp Corporation.
z OBEX™ is a trademark of Infrared Data Association
z Wi-Fi
z
This product includes software developed by the OpenSSL Project
for use in the OpenSSL Toolkit. (http://www.openssl.org/)
z This product includes cryptographic software written by Eric
Young(eay@cryptsoft.com)
z Portions Copyright © 2004 Intel Corporation
This product partly uses the software of Intel Corporation.
z iWnn of OMRON SOFTWARE Co., Ltd. is used for conversion
methods for Japanese language, and for phrase prediction
methods for English.
iWnn © OMRON SOFTWARE Co., Ltd. 2008-2015 All Rights
Reserved.
iWnn IME © OMRON SOFTWARE Co., Ltd. 2009-2015 All Rights
Reserved.
z Shin Go M, the font type installed in this product, is provided by
Morisawa & Company, Ltd.
* Shin Go is a registered trademark of Morisawa & Company,
Ltd.
z "翻訳ファインダー ", "AQUOS", "AQUOS" logo, "SHSHOW"
logo, "フレーミングアドバイザー /FramingAdviser",
"PASSNOW", and "タッチクルーザー EX" are trademarks or
registered trademarks of Sharp Corporation.
z All other company names and product names are trademarks or
registered trademarks of the respective companies.
デコメ絵文字®", "i-αppli", "i-mode", "WORLD WING",
", "WORLD CALL", "
", "
イマドコサーチ
", the "dmenu" logo, the "Area Mail" logo, the "i-channel"
®
, Windows®, Windows Media®, Windows Vista® and
®
are trademarks or registered trademarks of
®
is a registered trademark of Wi-Fi Alliance®.
ビジネス
mopera", "
エリアメール
", "
イマドコかんたんサーチ
", "sp-mode",
デコメ®",
", "
®
.
おまか
79
Appendix/Index
Page 82

Others
z Under the MPEG-4 Visual Patent Portfolio License, customers
have licensed permission for the following use of this product to
engage in non-profit personal use. Other uses are not permitted.
■ Encoding MPEG-4 standard video (henceforth referred to as
MPEG-4 video).
■ Decoding an MPEG-4 video that a customer not engaged in
personal commercial activities has encoded.
■ Decoding an MPEG-4 video obtained from a licensed provider.
For details on other intended uses, contact MPEG LA, LLC.
z This product is licensed under the MPEG-4 Systems Patent
Portfolio License for encoding in compliance with the MPEG-4
Systems Standard. An additional license and payment of royalties
are necessary in the following cases.
■ Data stored or replicated in physical media which is paid for on
a title by title basis.
■ Data which is paid for on a title by title basis and is transmitted
to an end user for permanent storage and/or use.
Such additional license may be obtained from MPEG LA, LLC.
Contact MPEG LA, LLC for additional details.
z This product is licensed under the AVC patent portfolio license for
the personal and noncommercial use of a consumer to (i) encode
video in compliance with the AVC standard (henceforth referred
to as AVC video) and/or (ii) decode AVC video that was encoded
by a consumer engaged in a personal and noncommercial activity
and/or was obtained from a video provider licensed to provide
AVC video. No license is granted or shall be implied for any other
use. Additional information may be obtained from MPEG LA,
L.L.C.
See http://www.mpegla.com.
z This product is licensed under the VC-1 Patent Portfolio License
for the personal and noncommercial use of a consumer to (i)
encode video in compliance with the VC-1 standard (henceforth
referred to as VC-1 video) and/or (ii) decode VC-1 video that was
encoded by a consumer engaged in a personal and
noncommercial activity and/or was obtained from a video provider
licensed to provide VC-1 video. No license is granted or shall be
implied for any other use. Additional information may be obtained
from MPEG LA, L.L.C.
See http://www.mpegla.com.
z The abbreviations of operating systems (Japanese versions)
below are used in this manual.
■ Windows 8.1 stands for Microsoft
■ Windows 8 stands for Microsoft
■ Windows 7 stands for Microsoft
■ Windows Vista stands for Windows Vista
z The Bluetooth word mark and logos are owned by the Bluetooth
SIG, INC. and any use of such marks by NTT DOCOMO, INC. is
under license. Other trademarks and trade names are those of
their respective owners.
z Google, Google logo, Android, Google Search and Google
Search logo are trademarks of Google Inc.
®
Windows
Windows
Basic, Home Premium, Professional, Enterprise and Ultimate).
Premium, Business, Enterprise and Ultimate).
8.1 Pro and Microsoft® Windows® 8.1 Enterprise.
®
8 Pro and Microsoft® Windows® 8 Enterprise.
®
Windows® 8.1, Microsoft®
®
Windows® 8, Microsoft®
®
Windows® 7 (Starter, Home
®
(Home Basic, Home
Open source software
z This product includes software based on GNU General Public
License (GPL), GNU Lesser General Public License (LGPL) and
other licenses.
For details on licenses of related software, in the standby screen,
z
/
[Settings]/[Other settings]/[Device info]/[Legal
information]
z Source codes of software based on GPL, LGPL and Mozilla
Public License (MPL) can be referred to on the following website
for free. For details, refer to the following website.
https://sh-dev.sharp.co.jp/android/modules/oss/) (in Japanese
only)
/
[Open source licenses].
Unlocking SIM lock
z The handset can unlock the SIM lock. Unlock the SIM lock to use
non-DOCOMO SIM cards.
z Some services, functions, etc. may be unavailable. DOCOMO
shall not guarantee any operation of the handset.
z For details on unlocking SIM lock, refer to the DOCOMO website.
Insert non-DOCOMO SIM card
1
Turn the power on
2
In the screen of unlocking PIN from the SIM
3
network, enter an unlock code
[Unlock]/t
4
80
Appendix/Index
Page 83

Index
Numerics
1Seg . . . . . . . . . . . . . . . . . . . . . . . . . . . . . . . . . . . . . . . . . . . . . . .40
3G . . . . . . . . . . . . . . . . . . . . . . . . . . . . . . . . . . . . . . . . . . . . . . . . .66
A
Accessibility
Other settings . . . . . . . . . . . . . . . . . . . . . . . . . . . . . . . . . . . . . .57
Web browser . . . . . . . . . . . . . . . . . . . . . . . . . . . . . . . . . . . . . . .35
Accounts . . . . . . . . . . . . . . . . . . . . . . . . . . . . . . . . . . . . . . . . . . . .55
Add to playlist . . . . . . . . . . . . . . . . . . . . . . . . . . . . . . . . . . . . . . . .42
Adding contacts to phonebook . . . . . . . . . . . . . . . . . . . . . . . . . . .30
Adjustments . . . . . . . . . . . . . . . . . . . . . . . . . . . . . . . . . . . . . . . . .43
Advanced . . . . . . . . . . . . . . . . . . . . . . . . . . . . . . . . . . . . . . . . . . .35
Airplane mode . . . . . . . . . . . . . . . . . . . . . . . . . . . . . . . . . . . . . . . . 51
Alarm. . . . . . . . . . . . . . . . . . . . . . . . . . . . . . . . . . . . . . . . . . . . . . .43
Album . . . . . . . . . . . . . . . . . . . . . . . . . . . . . . . . . . . . . . . . . . . . . . 42
Android Keyboard (AOSP) . . . . . . . . . . . . . . . . . . . . . . . . . . . . . . 56
Android version . . . . . . . . . . . . . . . . . . . . . . . . . . . . . . . . . . . . . . .56
Answer time setting. . . . . . . . . . . . . . . . . . . . . . . . . . . . . . . . . . . .29
Answering a call . . . . . . . . . . . . . . . . . . . . . . . . . . . . . . . . . . . . . . 27
Answering Memo List . . . . . . . . . . . . . . . . . . . . . . . . . . . . . . . . . .29
Answering memo setting. . . . . . . . . . . . . . . . . . . . . . . . . . . . . . . .29
Answering message setting . . . . . . . . . . . . . . . . . . . . . . . . . . . . .29
Anti Flicker
Settings for shooting still pictures . . . . . . . . . . . . . . . . . . . . . . .38
Settings for shooting videos. . . . . . . . . . . . . . . . . . . . . . . . . . . .38
Anti shake . . . . . . . . . . . . . . . . . . . . . . . . . . . . . . . . . . . . . . . . . . .38
App info . . . . . . . . . . . . . . . . . . . . . . . . . . . . . . . . . . . . . . . . . . . . . 45
Application. . . . . . . . . . . . . . . . . . . . . . . . . . . . . . . . . . . . . . . . . . . 55
Area dictionary . . . . . . . . . . . . . . . . . . . . . . . . . . . . . . . . . . . . . . .22
Audible key tones . . . . . . . . . . . . . . . . . . . . . . . . . . . . . . . . . . . . .48
Audio/Subtitles . . . . . . . . . . . . . . . . . . . . . . . . . . . . . . . . . . . . . . .41
Auto
Settings for shooting still pictures . . . . . . . . . . . . . . . . . . . . . . .37
Auto capitalization . . . . . . . . . . . . . . . . . . . . . . . . . . . . . . . . . . . . . 22
Auto cursor move . . . . . . . . . . . . . . . . . . . . . . . . . . . . . . . . . . . . . 22
Auto date & time . . . . . . . . . . . . . . . . . . . . . . . . . . . . . . . . . . . . . . 55
Auto focus
Settings for shooting still pictures . . . . . . . . . . . . . . . . . . . . . . .38
Auto Framing. . . . . . . . . . . . . . . . . . . . . . . . . . . . . . . . . . . . . . . . . 37
Auto space input . . . . . . . . . . . . . . . . . . . . . . . . . . . . . . . . . . . . . .22
Auto timezone . . . . . . . . . . . . . . . . . . . . . . . . . . . . . . . . . . . . . . . .55
Automatic conversion . . . . . . . . . . . . . . . . . . . . . . . . . . . . . . . . . .67
Auto-reset . . . . . . . . . . . . . . . . . . . . . . . . . . . . . . . . . . . . . . . . . . . 30
Available services overseas . . . . . . . . . . . . . . . . . . . . . . . . . . . . .66
B
Backing up data to microSD card . . . . . . . . . . . . . . . . . . . . . . . . . 47
Backing up/Restoring phonebook . . . . . . . . . . . . . . . . . . . . . . . . .31
Bar incoming on roam . . . . . . . . . . . . . . . . . . . . . . . . . . . . . . . . . . 68
Barcode Reader
Camera . . . . . . . . . . . . . . . . . . . . . . . . . . . . . . . . . . . . . . . . . . .39
Character entry . . . . . . . . . . . . . . . . . . . . . . . . . . . . . . . . . . . . .23
Baseband version . . . . . . . . . . . . . . . . . . . . . . . . . . . . . . . . . . . . .56
Basic operation . . . . . . . . . . . . . . . . . . . . . . . . . . . . . . . . . . . . . . .13
Battery. . . . . . . . . . . . . . . . . . . . . . . . . . . . . . . . . . . . . . . . . . . . . .51
Battery pack . . . . . . . . . . . . . . . . . . . . . . . . . . . . . . . . . . . . . . . . .19
Beep tone
Setting Early warning "Area Mail" . . . . . . . . . . . . . . . . . . . . . . . 65
Before use overseas . . . . . . . . . . . . . . . . . . . . . . . . . . . . . . . . . . .66
Before using camera . . . . . . . . . . . . . . . . . . . . . . . . . . . . . . . . . . . 36
Beginning prediction for mail. . . . . . . . . . . . . . . . . . . . . . . . . . . . .22
Bluetooth communication. . . . . . . . . . . . . . . . . . . . . . . . . . . . . . . 62
Bookmarks . . . . . . . . . . . . . . . . . . . . . . . . . . . . . . . . . . . . . . . . . . 35
Brightness . . . . . . . . . . . . . . . . . . . . . . . . . . . . . . . . . . . . . . . . . . 48
Browser settings . . . . . . . . . . . . . . . . . . . . . . . . . . . . . . . . . . . . . 35
Build number . . . . . . . . . . . . . . . . . . . . . . . . . . . . . . . . . . . . . . . . 56
C
Calculator. . . . . . . . . . . . . . . . . . . . . . . . . . . . . . . . . . . . . . . . . . . 44
Calendar display . . . . . . . . . . . . . . . . . . . . . . . . . . . . . . . . . . . . . 48
Call. . . . . . . . . . . . . . . . . . . . . . . . . . . . . . . . . . . . . . . . . . . . . . . . 26
Call forwarding service. . . . . . . . . . . . . . . . . . . . . . . . . . . . . . . . . 29
Call forwarding (paid). . . . . . . . . . . . . . . . . . . . . . . . . . . . . . . . . . 68
Call history . . . . . . . . . . . . . . . . . . . . . . . . . . . . . . . . . . . . . . . . . . 28
Call log/Call settings . . . . . . . . . . . . . . . . . . . . . . . . . . . . . . . . . . 29
Call notification. . . . . . . . . . . . . . . . . . . . . . . . . . . . . . . . . . . . . . . 29
Call time . . . . . . . . . . . . . . . . . . . . . . . . . . . . . . . . . . . . . . . . . . . . 30
Call waiting. . . . . . . . . . . . . . . . . . . . . . . . . . . . . . . . . . . . . . . . . . 29
Caller display . . . . . . . . . . . . . . . . . . . . . . . . . . . . . . . . . . . . . . . . 48
Caller ID notification. . . . . . . . . . . . . . . . . . . . . . . . . . . . . . . . . . . 29
Caller ID request . . . . . . . . . . . . . . . . . . . . . . . . . . . . . . . . . . . . . 29
Caller ID request (paid) . . . . . . . . . . . . . . . . . . . . . . . . . . . . . . . . 68
Calling to a phone number received from a paired tablet . . . . . . 46
Camera
Camera. . . . . . . . . . . . . . . . . . . . . . . . . . . . . . . . . . . . . . . . . . . 36
Settings for shooting still pictures . . . . . . . . . . . . . . . . . . . . . . . 37
Cancel editing . . . . . . . . . . . . . . . . . . . . . . . . . . . . . . . . . . . . . . . 22
Captions. . . . . . . . . . . . . . . . . . . . . . . . . . . . . . . . . . . . . . . . . . . . 57
Card reader mode . . . . . . . . . . . . . . . . . . . . . . . . . . . . . . . . . . . . 56
Change camera . . . . . . . . . . . . . . . . . . . . . . . . . . . . . . . . . . . . . . 38
change mode
Settings for shooting still pictures . . . . . . . . . . . . . . . . . . . . . . . 37
Change settings . . . . . . . . . . . . . . . . . . . . . . . . . . . . . . . . . . . . . . 22
Change SIM PIN . . . . . . . . . . . . . . . . . . . . . . . . . . . . . . . . . . . . . 51
Change SMS app. . . . . . . . . . . . . . . . . . . . . . . . . . . . . . . . . . . . . 34
change to videocamera . . . . . . . . . . . . . . . . . . . . . . . . . . . . . . . . 37
Change view . . . . . . . . . . . . . . . . . . . . . . . . . . . . . . . . . . . . . . . . 59
Changing storage. . . . . . . . . . . . . . . . . . . . . . . . . . . . . . . . . . . . . 59
Channel list . . . . . . . . . . . . . . . . . . . . . . . . . . . . . . . . . . . . . . . . . 41
Channel settings . . . . . . . . . . . . . . . . . . . . . . . . . . . . . . . . . . . . . 41
Character code setting. . . . . . . . . . . . . . . . . . . . . . . . . . . . . . . . . 56
Character entry
Character entry. . . . . . . . . . . . . . . . . . . . . . . . . . . . . . . . . . . . . 21
Charging . . . . . . . . . . . . . . . . . . . . . . . . . . . . . . . . . . . . . . . . . . . 19
Charging with AC adapter/DC adapter . . . . . . . . . . . . . . . . . . . . 20
Charging with desktop holder . . . . . . . . . . . . . . . . . . . . . . . . . . . 20
Charging with Micro USB Cable 01 . . . . . . . . . . . . . . . . . . . . . . . 21
Check screen image and beep tone . . . . . . . . . . . . . . . . . . . . . . 65
Checkbox . . . . . . . . . . . . . . . . . . . . . . . . . . . . . . . . . . . . . . . . . . . 16
Checking after homecoming . . . . . . . . . . . . . . . . . . . . . . . . . . . . 68
Checking memos . . . . . . . . . . . . . . . . . . . . . . . . . . . . . . . . . . . . . 45
Checking messages. . . . . . . . . . . . . . . . . . . . . . . . . . . . . . . . . . . 64
Checking new mails/SMS . . . . . . . . . . . . . . . . . . . . . . . . . . . . . . 33
Checking/Using phonebook . . . . . . . . . . . . . . . . . . . . . . . . . . . . . 31
Choose date format . . . . . . . . . . . . . . . . . . . . . . . . . . . . . . . . . . . 55
Clear credentials . . . . . . . . . . . . . . . . . . . . . . . . . . . . . . . . . . . . . 56
Clear learning dictionary . . . . . . . . . . . . . . . . . . . . . . . . . . . . . . . 22
Clock display . . . . . . . . . . . . . . . . . . . . . . . . . . . . . . . . . . . . . . . . 48
Close light setting. . . . . . . . . . . . . . . . . . . . . . . . . . . . . . . . . . . . . 48
Closing behavior setting. . . . . . . . . . . . . . . . . . . . . . . . . . . . . . . . 41
Common phrase
Common phrase . . . . . . . . . . . . . . . . . . . . . . . . . . . . . . . . . . . . 23
Communication/network . . . . . . . . . . . . . . . . . . . . . . . . . . . . . . . 51
Connecting the handset and PC . . . . . . . . . . . . . . . . . . . . . . . . . 59
Contact docomo. . . . . . . . . . . . . . . . . . . . . . . . . . . . . . . . . . . . . . 30
Contacts data access monitor . . . . . . . . . . . . . . . . . . . . . . . . . . . 49
81
Appendix/Index
Page 84

Contacts name collaboration. . . . . . . . . . . . . . . . . . . . . . . . . . . . . 22
Contents . . . . . . . . . . . . . . . . . . . . . . . . . . . . . . . . . . . . . . . . . . . . .1
Continuous shot . . . . . . . . . . . . . . . . . . . . . . . . . . . . . . . . . . . . . .37
Copy History . . . . . . . . . . . . . . . . . . . . . . . . . . . . . . . . . . . . . . . . . 23
Copy history . . . . . . . . . . . . . . . . . . . . . . . . . . . . . . . . . . . . . . . . .22
Country code. . . . . . . . . . . . . . . . . . . . . . . . . . . . . . . . . . . . . . . . .67
Create by searching channels. . . . . . . . . . . . . . . . . . . . . . . . . . . . 40
Create by selecting the area . . . . . . . . . . . . . . . . . . . . . . . . . . . . .40
Creating channel lists . . . . . . . . . . . . . . . . . . . . . . . . . . . . . . . . . .40
Creating/Sending docomo mail . . . . . . . . . . . . . . . . . . . . . . . . . . . 32
Credential storage. . . . . . . . . . . . . . . . . . . . . . . . . . . . . . . . . . . . .56
Cumulated call time. . . . . . . . . . . . . . . . . . . . . . . . . . . . . . . . . . . . 30
Current Keyboard . . . . . . . . . . . . . . . . . . . . . . . . . . . . . . . . . . . . .56
D
Data broadcasting settings . . . . . . . . . . . . . . . . . . . . . . . . . . . . . . 41
Data enabled. . . . . . . . . . . . . . . . . . . . . . . . . . . . . . . . . . . . . . . . .52
Data roaming. . . . . . . . . . . . . . . . . . . . . . . . . . . . . . . . . . . . . . . . . 66
Data transfer . . . . . . . . . . . . . . . . . . . . . . . . . . . . . . . . . . . . . . . . .53
Data transfer/reset . . . . . . . . . . . . . . . . . . . . . . . . . . . . . . . . . . . .53
Data usage . . . . . . . . . . . . . . . . . . . . . . . . . . . . . . . . . . . . . . . . . .52
Date stamp . . . . . . . . . . . . . . . . . . . . . . . . . . . . . . . . . . . . . . . . . .43
Date & time
Other settings . . . . . . . . . . . . . . . . . . . . . . . . . . . . . . . . . . . . . .55
Settings for use overseas . . . . . . . . . . . . . . . . . . . . . . . . . . . . .67
Daydream . . . . . . . . . . . . . . . . . . . . . . . . . . . . . . . . . . . . . . . . . . . 55
Deco . . . . . . . . . . . . . . . . . . . . . . . . . . . . . . . . . . . . . . . . . . . . . . .22
Deco-mail . . . . . . . . . . . . . . . . . . . . . . . . . . . . . . . . . . . . . . . . . . . 32
Default SMS app . . . . . . . . . . . . . . . . . . . . . . . . . . . . . . . . . . . . . . 52
Delete
Album. . . . . . . . . . . . . . . . . . . . . . . . . . . . . . . . . . . . . . . . . . . . .42
Music . . . . . . . . . . . . . . . . . . . . . . . . . . . . . . . . . . . . . . . . . . . . .42
Delete old messages. . . . . . . . . . . . . . . . . . . . . . . . . . . . . . . . . . . 34
Deleting call history item . . . . . . . . . . . . . . . . . . . . . . . . . . . . . . . .28
Deleting contact . . . . . . . . . . . . . . . . . . . . . . . . . . . . . . . . . . . . . .31
Deleting Early warning "Area Mail" . . . . . . . . . . . . . . . . . . . . . . . .65
Deleting message . . . . . . . . . . . . . . . . . . . . . . . . . . . . . . . . . . . . .34
Deleting redial item . . . . . . . . . . . . . . . . . . . . . . . . . . . . . . . . . . . .28
Deleting thread . . . . . . . . . . . . . . . . . . . . . . . . . . . . . . . . . . . . . . .34
Delivery reports . . . . . . . . . . . . . . . . . . . . . . . . . . . . . . . . . . . . . . . 34
Detail setting
Settings for shooting still pictures . . . . . . . . . . . . . . . . . . . . . . .38
Settings for shooting videos. . . . . . . . . . . . . . . . . . . . . . . . . . . .38
Details
Album. . . . . . . . . . . . . . . . . . . . . . . . . . . . . . . . . . . . . . . . . . . . .42
Operating files . . . . . . . . . . . . . . . . . . . . . . . . . . . . . . . . . . . . . .59
Device administrator . . . . . . . . . . . . . . . . . . . . . . . . . . . . . . . . . . .55
Device info . . . . . . . . . . . . . . . . . . . . . . . . . . . . . . . . . . . . . . . . . .56
Dictionary . . . . . . . . . . . . . . . . . . . . . . . . . . . . . . . . . . . . . . . . . . .22
Disable secret mode temporarily. . . . . . . . . . . . . . . . . . . . . . . . . . 50
Disabling PIN lock . . . . . . . . . . . . . . . . . . . . . . . . . . . . . . . . . . . . . 51
Disaster Message Board. . . . . . . . . . . . . . . . . . . . . . . . . . . . . . . .64
Disaster Voice Messaging. . . . . . . . . . . . . . . . . . . . . . . . . . . . . . . 64
Display time setting . . . . . . . . . . . . . . . . . . . . . . . . . . . . . . . . . . . . 48
Displaying a message . . . . . . . . . . . . . . . . . . . . . . . . . . . . . . . . . . 33
Displaying download history . . . . . . . . . . . . . . . . . . . . . . . . . . . . . 35
Displaying incoming notice/notifications on a paired tablet . . . . . .46
dmenu/Search. . . . . . . . . . . . . . . . . . . . . . . . . . . . . . . . . . . . . . . .34
docomo apps password . . . . . . . . . . . . . . . . . . . . . . . . . . . . . . . .53
docomo location information . . . . . . . . . . . . . . . . . . . . . . . . . . . . .53
docomo mail . . . . . . . . . . . . . . . . . . . . . . . . . . . . . . . . . . . . . . . . .32
docomo nano UIM card. . . . . . . . . . . . . . . . . . . . . . . . . . . . . . . . .18
docomo service . . . . . . . . . . . . . . . . . . . . . . . . . . . . . . . . . . . . . . . 53
Download data to . . . . . . . . . . . . . . . . . . . . . . . . . . . . . . . . . . . . .35
Download dictionary . . . . . . . . . . . . . . . . . . . . . . . . . . . . . . . . . . .22
D-Pict . . . . . . . . . . . . . . . . . . . . . . . . . . . . . . . . . . . . . . . . . . . . . .22
Drive . . . . . . . . . . . . . . . . . . . . . . . . . . . . . . . . . . . . . . . . . . . . . . .49
E
Early warning "Area Mail" . . . . . . . . . . . . . . . . . . . . . . . . . . . . . . 64
Easy auto
Settings for shooting videos . . . . . . . . . . . . . . . . . . . . . . . . . . . 38
Edit image . . . . . . . . . . . . . . . . . . . . . . . . . . . . . . . . . . . . . . . . . . 43
Editing a still picture . . . . . . . . . . . . . . . . . . . . . . . . . . . . . . . . . . . 43
Effect . . . . . . . . . . . . . . . . . . . . . . . . . . . . . . . . . . . . . . . . . . . . . . 43
Emergency call . . . . . . . . . . . . . . . . . . . . . . . . . . . . . . . . . . . . . . 27
Encrypt phone . . . . . . . . . . . . . . . . . . . . . . . . . . . . . . . . . . . . . . . 56
End editing without saving . . . . . . . . . . . . . . . . . . . . . . . . . . . . . . 33
Energy saving . . . . . . . . . . . . . . . . . . . . . . . . . . . . . . . . . . . . . . . 51
Energy saving settings. . . . . . . . . . . . . . . . . . . . . . . . . . . . . . . . . 51
Energy saving/battery . . . . . . . . . . . . . . . . . . . . . . . . . . . . . . . . . 51
English guidance . . . . . . . . . . . . . . . . . . . . . . . . . . . . . . . . . . . . . 29
Entering characters . . . . . . . . . . . . . . . . . . . . . . . . . . . . . . . . . . . 23
Entering touch-tone signals . . . . . . . . . . . . . . . . . . . . . . . . . . . . . 26
Erase microSD. . . . . . . . . . . . . . . . . . . . . . . . . . . . . . . . . . . . . . . 55
Event list . . . . . . . . . . . . . . . . . . . . . . . . . . . . . . . . . . . . . . . . . . . 44
Exit TV . . . . . . . . . . . . . . . . . . . . . . . . . . . . . . . . . . . . . . . . . . . . . 41
Export Administration Regulations. . . . . . . . . . . . . . . . . . . . . . . . 79
Extra conversion engine . . . . . . . . . . . . . . . . . . . . . . . . . . . . . . . 22
F
Fisheye . . . . . . . . . . . . . . . . . . . . . . . . . . . . . . . . . . . . . . . . . . . . 37
Focus settings
Settings for shooting videos . . . . . . . . . . . . . . . . . . . . . . . . . . . 38
Font Settings . . . . . . . . . . . . . . . . . . . . . . . . . . . . . . . . . . . . . . . . 48
Food. . . . . . . . . . . . . . . . . . . . . . . . . . . . . . . . . . . . . . . . . . . . . . . 37
Forwarding message . . . . . . . . . . . . . . . . . . . . . . . . . . . . . . . . . . 33
G
General inquiries to DOCOMO . . . . . . . . . . . . . . . . . . . . . . . . . . 30
Google Search
Character entry. . . . . . . . . . . . . . . . . . . . . . . . . . . . . . . . . . . . . 23
Web browser . . . . . . . . . . . . . . . . . . . . . . . . . . . . . . . . . . . . . . 35
Guide . . . . . . . . . . . . . . . . . . . . . . . . . . . . . . . . . . . . . . . . . . . . . . 50
H
Handling precautions . . . . . . . . . . . . . . . . . . . . . . . . . . . . . . . . . . . 7
Handset memory (internal storage) . . . . . . . . . . . . . . . . . . . . . . . 58
Handsfree setting. . . . . . . . . . . . . . . . . . . . . . . . . . . . . . . . . . . . . 63
Haptic feedback . . . . . . . . . . . . . . . . . . . . . . . . . . . . . . . . . . . . . . 48
Help
Settings for shooting still pictures . . . . . . . . . . . . . . . . . . . . . . . 37
Settings for shooting videos . . . . . . . . . . . . . . . . . . . . . . . . . . . 38
Hide face . . . . . . . . . . . . . . . . . . . . . . . . . . . . . . . . . . . . . . . . . . . 43
Holding the handset . . . . . . . . . . . . . . . . . . . . . . . . . . . . . . . . . . . 36
Home page setting. . . . . . . . . . . . . . . . . . . . . . . . . . . . . . . . . . . . 35
How to use . . . . . . . . . . . . . . . . . . . . . . . . . . . . . . . . . . . . . . . . . . 55
I
iChanneldisplay . . . . . . . . . . . . . . . . . . . . . . . . . . . . . . . . . . . . . . 48
Improve appearance . . . . . . . . . . . . . . . . . . . . . . . . . . . . . . . . . . 48
Incoming call settings. . . . . . . . . . . . . . . . . . . . . . . . . . . . . . . . . . 29
Incoming/Charging lamp . . . . . . . . . . . . . . . . . . . . . . . . . . . . . . . 16
Information Update . . . . . . . . . . . . . . . . . . . . . . . . . . . . . . . . . . . 55
Infrared communication . . . . . . . . . . . . . . . . . . . . . . . . . . . . . . . . 61
Initial settings . . . . . . . . . . . . . . . . . . . . . . . . . . . . . . . . . . . . . . . . 25
Input assistance / Conversion . . . . . . . . . . . . . . . . . . . . . . . . . . . 22
Input mode . . . . . . . . . . . . . . . . . . . . . . . . . . . . . . . . . . . . . . . . . . 22
Inquiries . . . . . . . . . . . . . . . . . . . . . . . . . . . . . . . . . . . . . . . . . . . . 67
Inquiries about loss, theft, etc. while overseas . . . . . . . . . . . . . . 30
Inquiries about malfunctions while overseas . . . . . . . . . . . . . . . . 30
82
Appendix/Index
Page 85

Inquiries to DOCOMO about malfunctions . . . . . . . . . . . . . . . . . .30
Insert . . . . . . . . . . . . . . . . . . . . . . . . . . . . . . . . . . . . . . . . . . . . . . .22
Install certificates. . . . . . . . . . . . . . . . . . . . . . . . . . . . . . . . . . . . . . 56
Instruction Manual. . . . . . . . . . . . . . . . . . . . . . . . . . . . . . . . . . . . .47
Intellectual Property Right . . . . . . . . . . . . . . . . . . . . . . . . . . . . . . . 79
International call (WORLD CALL) . . . . . . . . . . . . . . . . . . . . . . . . .27
International prefix. . . . . . . . . . . . . . . . . . . . . . . . . . . . . . . . . . . . . 67
International roaming . . . . . . . . . . . . . . . . . . . . . . . . . . . . . . . . . .66
ISO . . . . . . . . . . . . . . . . . . . . . . . . . . . . . . . . . . . . . . . . . . . . . . . . 38
J
JAN code. . . . . . . . . . . . . . . . . . . . . . . . . . . . . . . . . . . . . . . . . . . . 39
K
Kantan Hasshin. . . . . . . . . . . . . . . . . . . . . . . . . . . . . . . . . . . . . . .55
Kantan Hasshin settings . . . . . . . . . . . . . . . . . . . . . . . . . . . . . . . .55
Kernel version . . . . . . . . . . . . . . . . . . . . . . . . . . . . . . . . . . . . . . . .56
Key backlight. . . . . . . . . . . . . . . . . . . . . . . . . . . . . . . . . . . . . . . . .48
KeyTranslator . . . . . . . . . . . . . . . . . . . . . . . . . . . . . . . . . . . . . . . .57
Kuten code . . . . . . . . . . . . . . . . . . . . . . . . . . . . . . . . . . . . . . . . . . 23
L
Large text . . . . . . . . . . . . . . . . . . . . . . . . . . . . . . . . . . . . . . . . . . .57
Legal information. . . . . . . . . . . . . . . . . . . . . . . . . . . . . . . . . . . . . . 56
LINE . . . . . . . . . . . . . . . . . . . . . . . . . . . . . . . . . . . . . . . . . . . . . . .43
Load images . . . . . . . . . . . . . . . . . . . . . . . . . . . . . . . . . . . . . . . . . 35
Location Info(Auto)
Settings for shooting still pictures . . . . . . . . . . . . . . . . . . . . . . .37
Location Info(auto)
Settings for shooting videos. . . . . . . . . . . . . . . . . . . . . . . . . . . .38
Location services . . . . . . . . . . . . . . . . . . . . . . . . . . . . . . . . . . . . .57
Lock SIM card . . . . . . . . . . . . . . . . . . . . . . . . . . . . . . . . . . . . . . . .51
Lock/security . . . . . . . . . . . . . . . . . . . . . . . . . . . . . . . . . . . . . . . . .49
M
Mail . . . . . . . . . . . . . . . . . . . . . . . . . . . . . . . . . . . . . . . . . . . . . . . . 32
Mail creation screen . . . . . . . . . . . . . . . . . . . . . . . . . . . . . . . . . . . 32
Main specifications . . . . . . . . . . . . . . . . . . . . . . . . . . . . . . . . . . . .77
Making a call . . . . . . . . . . . . . . . . . . . . . . . . . . . . . . . . . . . . . . . . .26
Making a call in your country of stay . . . . . . . . . . . . . . . . . . . . . . . 67
Making a call outside your country of stay (including Japan) . . . .67
Making a call to a WORLD WING subscriber overseas . . . . . . . .68
Making a call using International Dial Assist . . . . . . . . . . . . . . . . . 67
Making a call with Kantan Hasshin (speech recognition) . . . . . . .26
Making a call with Speed dial . . . . . . . . . . . . . . . . . . . . . . . . . . . .26
Making incoming notice/notifications from a paired tablet displayed
on the handset . . . . . . . . . . . . . . . . . . . . . . . . . . . . . . . . . . . . . . .46
Manage SIM card messages . . . . . . . . . . . . . . . . . . . . . . . . . . . .34
Managing playlists. . . . . . . . . . . . . . . . . . . . . . . . . . . . . . . . . . . . . 42
Mechanism of character entry. . . . . . . . . . . . . . . . . . . . . . . . . . . .21
Memo . . . . . . . . . . . . . . . . . . . . . . . . . . . . . . . . . . . . . . . . . . . . . .45
Memory status. . . . . . . . . . . . . . . . . . . . . . . . . . . . . . . . . . . . . . . . 59
Menu list . . . . . . . . . . . . . . . . . . . . . . . . . . . . . . . . . . . . . . . . . . . .69
Menu operations . . . . . . . . . . . . . . . . . . . . . . . . . . . . . . . . . . . . . .14
Message . . . . . . . . . . . . . . . . . . . . . . . . . . . . . . . . . . . . . . . . . . . . 33
Mic Setting . . . . . . . . . . . . . . . . . . . . . . . . . . . . . . . . . . . . . . . . . .38
microSD Card (external storage) . . . . . . . . . . . . . . . . . . . . . . . . .58
microSD reader/writer . . . . . . . . . . . . . . . . . . . . . . . . . . . . . . . . . .60
Miniature . . . . . . . . . . . . . . . . . . . . . . . . . . . . . . . . . . . . . . . . . . . .37
Mirror. . . . . . . . . . . . . . . . . . . . . . . . . . . . . . . . . . . . . . . . . . . . . . .43
Missed call notice on roam . . . . . . . . . . . . . . . . . . . . . . . . . . . . . . 68
Missed call notice (paid) . . . . . . . . . . . . . . . . . . . . . . . . . . . . . . . . 68
Missed calls. . . . . . . . . . . . . . . . . . . . . . . . . . . . . . . . . . . . . . . . . . 28
Mobile networks . . . . . . . . . . . . . . . . . . . . . . . . . . . . . . . . . . . . . .52
Mode change
Settings for shooting videos . . . . . . . . . . . . . . . . . . . . . . . . . . . 38
Mode Settings
Sound/lamp . . . . . . . . . . . . . . . . . . . . . . . . . . . . . . . . . . . . . . . 49
Mode settings
OFF . . . . . . . . . . . . . . . . . . . . . . . . . . . . . . . . . . . . . . . . . . . . . 49
Model number . . . . . . . . . . . . . . . . . . . . . . . . . . . . . . . . . . . . . . . 56
Monochrome . . . . . . . . . . . . . . . . . . . . . . . . . . . . . . . . . . . . . . . . 37
Mount microSD . . . . . . . . . . . . . . . . . . . . . . . . . . . . . . . . . . . . . . 55
Move to present month . . . . . . . . . . . . . . . . . . . . . . . . . . . . . . . . 44
Moving the cursor . . . . . . . . . . . . . . . . . . . . . . . . . . . . . . . . . . . . 13
Moving/Copying data . . . . . . . . . . . . . . . . . . . . . . . . . . . . . . . . . . 59
MTP mode . . . . . . . . . . . . . . . . . . . . . . . . . . . . . . . . . . . . . . . . . . 56
Music . . . . . . . . . . . . . . . . . . . . . . . . . . . . . . . . . . . . . . . . . . . . . . 41
N
Network operators . . . . . . . . . . . . . . . . . . . . . . . . . . . . . . . . . . . . 67
Network service
Call log/Call settings . . . . . . . . . . . . . . . . . . . . . . . . . . . . . . . . . 29
Network services during roaming . . . . . . . . . . . . . . . . . . . . . . . 68
Network settings . . . . . . . . . . . . . . . . . . . . . . . . . . . . . . . . . . . . . 51
Next word guess . . . . . . . . . . . . . . . . . . . . . . . . . . . . . . . . . . . . . 22
Night Portrait . . . . . . . . . . . . . . . . . . . . . . . . . . . . . . . . . . . . . . . . 37
Night Scenery . . . . . . . . . . . . . . . . . . . . . . . . . . . . . . . . . . . . . . . 37
Normal menu . . . . . . . . . . . . . . . . . . . . . . . . . . . . . . . . . . . . . . . . 14
Normal menu list . . . . . . . . . . . . . . . . . . . . . . . . . . . . . . . . . . . . . 69
Notification icon . . . . . . . . . . . . . . . . . . . . . . . . . . . . . . . . . . . . . . 15
Notification link (PASSNOW) . . . . . . . . . . . . . . . . . . . . . . . . . . . . 57
Notification tone settings . . . . . . . . . . . . . . . . . . . . . . . . . . . . . . . 45
Notifications . . . . . . . . . . . . . . . . . . . . . . . . . . . . . . . . . . . . . . . . . 34
Nuisance call blocking . . . . . . . . . . . . . . . . . . . . . . . . . . . . . . . . . 29
O
Open source licenses . . . . . . . . . . . . . . . . . . . . . . . . . . . . . . . . . 30
Open to answer . . . . . . . . . . . . . . . . . . . . . . . . . . . . . . . . . . . . . . 29
Operating files . . . . . . . . . . . . . . . . . . . . . . . . . . . . . . . . . . . . . . . 59
Operation guidance . . . . . . . . . . . . . . . . . . . . . . . . . . . . . . . . . . . 14
Operation guide . . . . . . . . . . . . . . . . . . . . . . . . . . . . . . . . . . . . . . 41
Operations during a call . . . . . . . . . . . . . . . . . . . . . . . . . . . . . . . . 28
Operations while using camera . . . . . . . . . . . . . . . . . . . . . . . . . . 36
Organize saved files . . . . . . . . . . . . . . . . . . . . . . . . . . . . . . . . . . 54
Other files. . . . . . . . . . . . . . . . . . . . . . . . . . . . . . . . . . . . . . . . . . . 32
Other setting . . . . . . . . . . . . . . . . . . . . . . . . . . . . . . . . . . . . . . . . 55
Other settings. . . . . . . . . . . . . . . . . . . . . . . . . . . . . . . . . . . . . . . . 30
Outgoing call settings. . . . . . . . . . . . . . . . . . . . . . . . . . . . . . . . . . 30
Outline of international roaming (WORLD WING) . . . . . . . . . . . . 66
P
Pairing . . . . . . . . . . . . . . . . . . . . . . . . . . . . . . . . . . . . . . . . . . . . . 45
Panorama . . . . . . . . . . . . . . . . . . . . . . . . . . . . . . . . . . . . . . . . . . 37
Parental mode . . . . . . . . . . . . . . . . . . . . . . . . . . . . . . . . . . . . . . . 49
Part names and functions . . . . . . . . . . . . . . . . . . . . . . . . . . . . . . 12
Passcode . . . . . . . . . . . . . . . . . . . . . . . . . . . . . . . . . . . . . . . . . . . 51
PASSNOW. . . . . . . . . . . . . . . . . . . . . . . . . . . . . . . . . . . . . . . . . . 45
Password . . . . . . . . . . . . . . . . . . . . . . . . . . . . . . . . . . . . . . . . . . . 51
Paste . . . . . . . . . . . . . . . . . . . . . . . . . . . . . . . . . . . . . . . . . . . . . . 22
Pattern setting . . . . . . . . . . . . . . . . . . . . . . . . . . . . . . . . . . . . . . . 48
PC connection . . . . . . . . . . . . . . . . . . . . . . . . . . . . . . . . . . . . . . . 59
Phonebook
docomo mail . . . . . . . . . . . . . . . . . . . . . . . . . . . . . . . . . . . . . . . 32
Phonebook . . . . . . . . . . . . . . . . . . . . . . . . . . . . . . . . . . . . . . . . 30
Phrase
Quote apps . . . . . . . . . . . . . . . . . . . . . . . . . . . . . . . . . . . . . . . . 23
Picture size of camera . . . . . . . . . . . . . . . . . . . . . . . . . . . . . . . . . 36
Picture/Image. . . . . . . . . . . . . . . . . . . . . . . . . . . . . . . . . . . . . . . . 32
83
Appendix/Index
Page 86

Play . . . . . . . . . . . . . . . . . . . . . . . . . . . . . . . . . . . . . . . . . . . . . . . .42
Play all. . . . . . . . . . . . . . . . . . . . . . . . . . . . . . . . . . . . . . . . . . . . . . 42
Pointer speed . . . . . . . . . . . . . . . . . . . . . . . . . . . . . . . . . . . . . . . . 56
Portrait
Settings for shooting still pictures . . . . . . . . . . . . . . . . . . . . . . .37
Settings for shooting videos. . . . . . . . . . . . . . . . . . . . . . . . . . . .38
Precautions (ALWAYS FOLLOW THESE DIRECTIONS) . . . . . . .3
Preferred network mode . . . . . . . . . . . . . . . . . . . . . . . . . . . . . . . . 66
Prefix settings . . . . . . . . . . . . . . . . . . . . . . . . . . . . . . . . . . . . . . . . 30
Preparation to import. . . . . . . . . . . . . . . . . . . . . . . . . . . . . . . . . . . 53
Preview . . . . . . . . . . . . . . . . . . . . . . . . . . . . . . . . . . . . . . . . . . . . .33
Privacy & security . . . . . . . . . . . . . . . . . . . . . . . . . . . . . . . . . . . . . 35
Product information . . . . . . . . . . . . . . . . . . . . . . . . . . . . . . . . . . . . 41
Profile . . . . . . . . . . . . . . . . . . . . . . . . . . . . . . . . . . . . . . . . . . . . . . 17
PTP mode . . . . . . . . . . . . . . . . . . . . . . . . . . . . . . . . . . . . . . . . . . .56
Public mode (power OFF) . . . . . . . . . . . . . . . . . . . . . . . . . . . . . . . 29
Q
QR code . . . . . . . . . . . . . . . . . . . . . . . . . . . . . . . . . . . . . . . . . . . . 39
Quick open button . . . . . . . . . . . . . . . . . . . . . . . . . . . . . . . . . . . . . 13
Quick silent . . . . . . . . . . . . . . . . . . . . . . . . . . . . . . . . . . . . . . . . . . 29
Quote apps . . . . . . . . . . . . . . . . . . . . . . . . . . . . . . . . . . . . . . . . . . 23
R
Receive setting . . . . . . . . . . . . . . . . . . . . . . . . . . . . . . . . . . . . . . . 65
Receiving a call overseas . . . . . . . . . . . . . . . . . . . . . . . . . . . . . . .68
Receiving docomo mail . . . . . . . . . . . . . . . . . . . . . . . . . . . . . . . . . 33
Redial . . . . . . . . . . . . . . . . . . . . . . . . . . . . . . . . . . . . . . . . . . . . . . 28
Regist user dic. (En) . . . . . . . . . . . . . . . . . . . . . . . . . . . . . . . . . . . 22
Register. . . . . . . . . . . . . . . . . . . . . . . . . . . . . . . . . . . . . . . . . . . . .59
Register image
Album. . . . . . . . . . . . . . . . . . . . . . . . . . . . . . . . . . . . . . . . . . . . .42
Operating files . . . . . . . . . . . . . . . . . . . . . . . . . . . . . . . . . . . . . .59
Register recognition targets (speed dial) . . . . . . . . . . . . . . . . . . .55
Register this channel. . . . . . . . . . . . . . . . . . . . . . . . . . . . . . . . . . . 41
Registering a memo . . . . . . . . . . . . . . . . . . . . . . . . . . . . . . . . . . . 45
Registering events . . . . . . . . . . . . . . . . . . . . . . . . . . . . . . . . . . . .45
Reject anonymous call . . . . . . . . . . . . . . . . . . . . . . . . . . . . . . . . . 29
Reject call setting . . . . . . . . . . . . . . . . . . . . . . . . . . . . . . . . . . . . . 29
Reject payphone call. . . . . . . . . . . . . . . . . . . . . . . . . . . . . . . . . . .29
Reject specified. . . . . . . . . . . . . . . . . . . . . . . . . . . . . . . . . . . . . . .29
Reject unknown call . . . . . . . . . . . . . . . . . . . . . . . . . . . . . . . . . . .29
Reject unregistered call. . . . . . . . . . . . . . . . . . . . . . . . . . . . . . . . . 29
Reload data broadcasting . . . . . . . . . . . . . . . . . . . . . . . . . . . . . . .41
Remote initialization . . . . . . . . . . . . . . . . . . . . . . . . . . . . . . . . . . . 53
Remote operation . . . . . . . . . . . . . . . . . . . . . . . . . . . . . . . . . . . . . 29
Remote operation (paid) . . . . . . . . . . . . . . . . . . . . . . . . . . . . . . . .68
Remove from list . . . . . . . . . . . . . . . . . . . . . . . . . . . . . . . . . . . . . .42
Rename phone . . . . . . . . . . . . . . . . . . . . . . . . . . . . . . . . . . . . . . . 63
Replying message. . . . . . . . . . . . . . . . . . . . . . . . . . . . . . . . . . . . . 33
Reset. . . . . . . . . . . . . . . . . . . . . . . . . . . . . . . . . . . . . . . . . . . . . . .22
Reset all . . . . . . . . . . . . . . . . . . . . . . . . . . . . . . . . . . . . . . . . . . . .54
Reset cumulated call time . . . . . . . . . . . . . . . . . . . . . . . . . . . . . . . 30
Reset facemark list . . . . . . . . . . . . . . . . . . . . . . . . . . . . . . . . . . . . 22
Resetting an access point . . . . . . . . . . . . . . . . . . . . . . . . . . . . . . . 53
Resize . . . . . . . . . . . . . . . . . . . . . . . . . . . . . . . . . . . . . . . . . . . . . .43
Restore from SIM card . . . . . . . . . . . . . . . . . . . . . . . . . . . . . . . . . 31
Restoring data to the handset . . . . . . . . . . . . . . . . . . . . . . . . . . . . 47
Restrict Browser . . . . . . . . . . . . . . . . . . . . . . . . . . . . . . . . . . . . . .49
Restrict calls . . . . . . . . . . . . . . . . . . . . . . . . . . . . . . . . . . . . . .49
Restrict Camera . . . . . . . . . . . . . . . . . . . . . . . . . . . . . . . . . . . . . .49
Restrict LINE . . . . . . . . . . . . . . . . . . . . . . . . . . . . . . . . . . . . . . . . . 49
Restrict Mails. . . . . . . . . . . . . . . . . . . . . . . . . . . . . . . . . . . . . . . . . 49
Restrict One Seg. . . . . . . . . . . . . . . . . . . . . . . . . . . . . . . . . . . . . .49
Ringtone/notification . . . . . . . . . . . . . . . . . . . . . . . . . . . . . . . . . . . 48
Roaming guidance . . . . . . . . . . . . . . . . . . . . . . . . . . . . . . . . . . . .68
Roaming guidance (paid) . . . . . . . . . . . . . . . . . . . . . . . . . . . . . . . 68
, 50
Roaming settings . . . . . . . . . . . . . . . . . . . . . . . . . . . . . . . . . . . . . 68
Rotate . . . . . . . . . . . . . . . . . . . . . . . . . . . . . . . . . . . . . . . . . . 41
Run camera . . . . . . . . . . . . . . . . . . . . . . . . . . . . . . . . . . . . . . . . . 32
, 43
S
Save Addr.book pics . . . . . . . . . . . . . . . . . . . . . . . . . . . . . . . . . . 54
Save as draft . . . . . . . . . . . . . . . . . . . . . . . . . . . . . . . . . . . . . . . . 33
Save as playlist . . . . . . . . . . . . . . . . . . . . . . . . . . . . . . . . . . . . . . 42
Save to
Settings for shooting still pictures . . . . . . . . . . . . . . . . . . . . . . . 38
Settings for shooting videos . . . . . . . . . . . . . . . . . . . . . . . . . . . 39
Scenery
Settings for shooting still pictures . . . . . . . . . . . . . . . . . . . . . . . 37
Settings for shooting videos . . . . . . . . . . . . . . . . . . . . . . . . . . . 38
Schedule . . . . . . . . . . . . . . . . . . . . . . . . . . . . . . . . . . . . . . . . . . . 44
Screen lock . . . . . . . . . . . . . . . . . . . . . . . . . . . . . . . . . . . . . . . . . 49
Screen lock sounds . . . . . . . . . . . . . . . . . . . . . . . . . . . . . . . . . . . 49
Screen timeout. . . . . . . . . . . . . . . . . . . . . . . . . . . . . . . . . . . . . . . 48
SD card backup . . . . . . . . . . . . . . . . . . . . . . . . . . . . . . . . . . . . . . 47
Search
Music . . . . . . . . . . . . . . . . . . . . . . . . . . . . . . . . . . . . . . . . . . . . 42
Schedule. . . . . . . . . . . . . . . . . . . . . . . . . . . . . . . . . . . . . . . . . . 44
Search channels . . . . . . . . . . . . . . . . . . . . . . . . . . . . . . . . . . . . . 41
Search contacts . . . . . . . . . . . . . . . . . . . . . . . . . . . . . . . . . . . . . . 30
Search for devices . . . . . . . . . . . . . . . . . . . . . . . . . . . . . . . . . . . . 63
Searching the paired handset and tablet by sounding . . . . . . . . . 46
Second call settings . . . . . . . . . . . . . . . . . . . . . . . . . . . . . . . . . . . 29
Secrecy settings. . . . . . . . . . . . . . . . . . . . . . . . . . . . . . . . . . . . . . 50
Security codes used on the handset . . . . . . . . . . . . . . . . . . . . . . 50
Security key setting . . . . . . . . . . . . . . . . . . . . . . . . . . . . . . . . . . . 51
Select area (Copy etc) . . . . . . . . . . . . . . . . . . . . . . . . . . . . . . . . . 22
Select language . . . . . . . . . . . . . . . . . . . . . . . . . . . . . . . . . . . . . . 55
Select service. . . . . . . . . . . . . . . . . . . . . . . . . . . . . . . . . . . . . . . . 41
Select time zone . . . . . . . . . . . . . . . . . . . . . . . . . . . . . . . . . . . . . 55
Selecting an item . . . . . . . . . . . . . . . . . . . . . . . . . . . . . . . . . . . . . 13
Self check . . . . . . . . . . . . . . . . . . . . . . . . . . . . . . . . . . . . . . . . . . 55
Self-timer
Settings for shooting still pictures . . . . . . . . . . . . . . . . . . . . . . . 38
Settings for shooting videos . . . . . . . . . . . . . . . . . . . . . . . . . . . 38
Send
Album . . . . . . . . . . . . . . . . . . . . . . . . . . . . . . . . . . . . . . . . . . . . 42
Operating files . . . . . . . . . . . . . . . . . . . . . . . . . . . . . . . . . . . . . 59
Send all data (common). . . . . . . . . . . . . . . . . . . . . . . . . . . . . . . . 31
Send device error information . . . . . . . . . . . . . . . . . . . . . . . . . . . 53
Sending message . . . . . . . . . . . . . . . . . . . . . . . . . . . . . . . . . . . . 64
Sending SMS from a paired tablet . . . . . . . . . . . . . . . . . . . . . . . . 46
Sending still pictures from Databox . . . . . . . . . . . . . . . . . . . . . . . 45
Sending/Receiving via Bluetooth communication . . . . . . . . . . . . 63
Sepia . . . . . . . . . . . . . . . . . . . . . . . . . . . . . . . . . . . . . . . . . . . . . . 37
Set as ringtone. . . . . . . . . . . . . . . . . . . . . . . . . . . . . . . . . . . . . . . 42
Set contact secrecy . . . . . . . . . . . . . . . . . . . . . . . . . . . . . . . . . . . 50
Set date . . . . . . . . . . . . . . . . . . . . . . . . . . . . . . . . . . . . . . . . . . . . 55
Set ring start time. . . . . . . . . . . . . . . . . . . . . . . . . . . . . . . . . . . . . 29
Set the default settings . . . . . . . . . . . . . . . . . . . . . . . . . . . . . . . . 22
Set time . . . . . . . . . . . . . . . . . . . . . . . . . . . . . . . . . . . . . . . . . . . . 55
Set up SIM card lock . . . . . . . . . . . . . . . . . . . . . . . . . . . . . . . . . . 51
Setting an access point . . . . . . . . . . . . . . . . . . . . . . . . . . . . . . . . 52
Setting character entry. . . . . . . . . . . . . . . . . . . . . . . . . . . . . . . . . 22
Setting Early warning "Area Mail" . . . . . . . . . . . . . . . . . . . . . . . . 65
Setting menu . . . . . . . . . . . . . . . . . . . . . . . . . . . . . . . . . . . . . . . . 48
Setting message . . . . . . . . . . . . . . . . . . . . . . . . . . . . . . . . . . . . . 34
Setting of International Dial Assist . . . . . . . . . . . . . . . . . . . . . . . . 67
Setting TV (One Seg). . . . . . . . . . . . . . . . . . . . . . . . . . . . . . . . . . 41
Settings
Album . . . . . . . . . . . . . . . . . . . . . . . . . . . . . . . . . . . . . . . . . . . . 42
Schedule. . . . . . . . . . . . . . . . . . . . . . . . . . . . . . . . . . . . . . . . . . 45
Settings for shooting still pictures . . . . . . . . . . . . . . . . . . . . . . . . 37
Settings for shooting videos. . . . . . . . . . . . . . . . . . . . . . . . . . . . . 38
84
Appendix/Index
Page 87

Settings for use overseas . . . . . . . . . . . . . . . . . . . . . . . . . . . . . . . 66
SH Input . . . . . . . . . . . . . . . . . . . . . . . . . . . . . . . . . . . . . . . . . . . .56
Sharing displayed or bookmarked websites with the paired tablet
.............................................46
Shooting screenshots . . . . . . . . . . . . . . . . . . . . . . . . . . . . . . . . . . 16
Shooting still pictures . . . . . . . . . . . . . . . . . . . . . . . . . . . . . . . . . .37
Shooting video . . . . . . . . . . . . . . . . . . . . . . . . . . . . . . . . . . . . . . .38
Show received files . . . . . . . . . . . . . . . . . . . . . . . . . . . . . . . . . . . .63
Shuffle all . . . . . . . . . . . . . . . . . . . . . . . . . . . . . . . . . . . . . . . . . . .42
Shutter mode. . . . . . . . . . . . . . . . . . . . . . . . . . . . . . . . . . . . . . . . . 38
Silent . . . . . . . . . . . . . . . . . . . . . . . . . . . . . . . . . . . . . . . . . . . . . . .49
Simple menu . . . . . . . . . . . . . . . . . . . . . . . . . . . . . . . . . . . . . . . . .14
Simple menu list . . . . . . . . . . . . . . . . . . . . . . . . . . . . . . . . . . . . . .70
Slideshow . . . . . . . . . . . . . . . . . . . . . . . . . . . . . . . . . . . . . . . . . . .42
SMS . . . . . . . . . . . . . . . . . . . . . . . . . . . . . . . . . . . . . . . . . . . . . . .33
Sort . . . . . . . . . . . . . . . . . . . . . . . . . . . . . . . . . . . . . . . . . . . . . . . . 59
Sound
Settings for messaging . . . . . . . . . . . . . . . . . . . . . . . . . . . . . . .34
Sound start charging . . . . . . . . . . . . . . . . . . . . . . . . . . . . . . . . . . . 49
Sound/lamp . . . . . . . . . . . . . . . . . . . . . . . . . . . . . . . . . . . . . . . . . . 48
Speak passwords . . . . . . . . . . . . . . . . . . . . . . . . . . . . . . . . . . . . .57
Specific Absorption Rate (SAR) of Mobile Phones . . . . . . . . . . . .78
Standard . . . . . . . . . . . . . . . . . . . . . . . . . . . . . . . . . . . . . . . . . . . . 49
Settings for shooting still pictures . . . . . . . . . . . . . . . . . . . . . . .37
Settings for shooting videos. . . . . . . . . . . . . . . . . . . . . . . . . . . .38
Standby screen . . . . . . . . . . . . . . . . . . . . . . . . . . . . . . . . . . . . . . .48
Start. . . . . . . . . . . . . . . . . . . . . . . . . . . . . . . . . . . . . . . . . . . . . . . . 53
Start Browser . . . . . . . . . . . . . . . . . . . . . . . . . . . . . . . . . . . . . . . .35
Status . . . . . . . . . . . . . . . . . . . . . . . . . . . . . . . . . . . . . . . . . . . . . . 56
Status bar . . . . . . . . . . . . . . . . . . . . . . . . . . . . . . . . . . . . . . . . . . .15
Status icon . . . . . . . . . . . . . . . . . . . . . . . . . . . . . . . . . . . . . . . . . .15
Still picture shooting screen . . . . . . . . . . . . . . . . . . . . . . . . . . . . .37
Still pictures. . . . . . . . . . . . . . . . . . . . . . . . . . . . . . . . . . . . . . . . . .42
Stock icon . . . . . . . . . . . . . . . . . . . . . . . . . . . . . . . . . . . . . . . . . . . 14
Stop watch . . . . . . . . . . . . . . . . . . . . . . . . . . . . . . . . . . . . . . . . . .44
Storage . . . . . . . . . . . . . . . . . . . . . . . . . . . . . . . . . . . . . . . . . . . . . 55
Storage type . . . . . . . . . . . . . . . . . . . . . . . . . . . . . . . . . . . . . . . . .56
Sub address settings. . . . . . . . . . . . . . . . . . . . . . . . . . . . . . . . . . . 30
Sub display . . . . . . . . . . . . . . . . . . . . . . . . . . . . . . . . . . . . . . . . . . 48
Submenu operations for character entry. . . . . . . . . . . . . . . . . . . .22
Submenu operations for Data . . . . . . . . . . . . . . . . . . . . . . . . . . . .59
Switch audio . . . . . . . . . . . . . . . . . . . . . . . . . . . . . . . . . . . . . . . . .41
Switch by batt.. . . . . . . . . . . . . . . . . . . . . . . . . . . . . . . . . . . . . . . .51
Switch by time . . . . . . . . . . . . . . . . . . . . . . . . . . . . . . . . . . . . . . . . 51
Switch channel list. . . . . . . . . . . . . . . . . . . . . . . . . . . . . . . . . . . . . 41
Switch sound-multiplex . . . . . . . . . . . . . . . . . . . . . . . . . . . . . . . . .41
Switch subtitles . . . . . . . . . . . . . . . . . . . . . . . . . . . . . . . . . . . . . . .41
Switch to view screen . . . . . . . . . . . . . . . . . . . . . . . . . . . . . . . . . . 33
Switching setting . . . . . . . . . . . . . . . . . . . . . . . . . . . . . . . . . . . . . .16
T
Template . . . . . . . . . . . . . . . . . . . . . . . . . . . . . . . . . . . . . . . . . . . .33
Text . . . . . . . . . . . . . . . . . . . . . . . . . . . . . . . . . . . . . . . . . . . . . . . .37
Text input
Other settings . . . . . . . . . . . . . . . . . . . . . . . . . . . . . . . . . . . . . .56
Text message limit . . . . . . . . . . . . . . . . . . . . . . . . . . . . . . . . . . . .34
Text-to-speech output
Accessibility . . . . . . . . . . . . . . . . . . . . . . . . . . . . . . . . . . . . . . . .57
Text Input. . . . . . . . . . . . . . . . . . . . . . . . . . . . . . . . . . . . . . . . . .56
Time Lapse . . . . . . . . . . . . . . . . . . . . . . . . . . . . . . . . . . . . . . . . . .39
Timer . . . . . . . . . . . . . . . . . . . . . . . . . . . . . . . . . . . . . . . . . . . . . . . 44
Touch area . . . . . . . . . . . . . . . . . . . . . . . . . . . . . . . . . . . . . . . . . . 17
Transferring data. . . . . . . . . . . . . . . . . . . . . . . . . . . . . . . . . . . . . .60
Translation finder . . . . . . . . . . . . . . . . . . . . . . . . . . . . . . . . . . . . .39
Trimming . . . . . . . . . . . . . . . . . . . . . . . . . . . . . . . . . . . . . . . . . . . .43
Troubleshooting (FAQ) . . . . . . . . . . . . . . . . . . . . . . . . . . . . . . . . . 71
Turning power off . . . . . . . . . . . . . . . . . . . . . . . . . . . . . . . . . . . . .21
Turning power off forcibly . . . . . . . . . . . . . . . . . . . . . . . . . . . . . . .21
Turning power on . . . . . . . . . . . . . . . . . . . . . . . . . . . . . . . . . . . . . 21
TV Links . . . . . . . . . . . . . . . . . . . . . . . . . . . . . . . . . . . . . . . . . . . . 41
TV off timer . . . . . . . . . . . . . . . . . . . . . . . . . . . . . . . . . . . . . . . . . 41
TV (1Seg). . . . . . . . . . . . . . . . . . . . . . . . . . . . . . . . . . . . . . . . . . . 40
U
Unknown sources . . . . . . . . . . . . . . . . . . . . . . . . . . . . . . . . . . . . 49
Unlocking SIM lock . . . . . . . . . . . . . . . . . . . . . . . . . . . . . . . . . . . 80
Unmount microSD . . . . . . . . . . . . . . . . . . . . . . . . . . . . . . . . . . . . 55
Updating software . . . . . . . . . . . . . . . . . . . . . . . . . . . . . . . . . . . . 75
USB connection . . . . . . . . . . . . . . . . . . . . . . . . . . . . . . . . . . . . . . 56
USB debug switch . . . . . . . . . . . . . . . . . . . . . . . . . . . . . . . . . . . . 53
Use 24-hour format . . . . . . . . . . . . . . . . . . . . . . . . . . . . . . . . . . . 55
Use secure credentials . . . . . . . . . . . . . . . . . . . . . . . . . . . . . . . . 56
User dictionary . . . . . . . . . . . . . . . . . . . . . . . . . . . . . . . . . . . . . . . 22
Using Bluetooth function . . . . . . . . . . . . . . . . . . . . . . . . . . . . . . . 63
Using Favorites . . . . . . . . . . . . . . . . . . . . . . . . . . . . . . . . . . . . . . 25
Using GPS function . . . . . . . . . . . . . . . . . . . . . . . . . . . . . . . . . . . 57
Using groups . . . . . . . . . . . . . . . . . . . . . . . . . . . . . . . . . . . . . . . . 31
Using program guide . . . . . . . . . . . . . . . . . . . . . . . . . . . . . . . . . . 41
Using running apps . . . . . . . . . . . . . . . . . . . . . . . . . . . . . . . . . . . 25
Using Site viewing history . . . . . . . . . . . . . . . . . . . . . . . . . . . . . . 35
Using the focus mode . . . . . . . . . . . . . . . . . . . . . . . . . . . . . . . . . 14
Using the handset . . . . . . . . . . . . . . . . . . . . . . . . . . . . . . . . . . . . . 2
Using the status panel . . . . . . . . . . . . . . . . . . . . . . . . . . . . . . . . . 16
Using TOUCH CRUISER EX . . . . . . . . . . . . . . . . . . . . . . . . . . . . 17
V
VeilView
VeilView . . . . . . . . . . . . . . . . . . . . . . . . . . . . . . . . . . . . . . . . . . 48
Wallpaper/display . . . . . . . . . . . . . . . . . . . . . . . . . . . . . . . . . . . 48
Vibrate . . . . . . . . . . . . . . . . . . . . . . . . . . . . . . . . . . . . . . . . . . . . . 34
Vibration settings . . . . . . . . . . . . . . . . . . . . . . . . . . . . . . . . . . . . . 45
Video . . . . . . . . . . . . . . . . . . . . . . . . . . . . . . . . . . . . . . . . . . . . . . 32
Video shooting screen . . . . . . . . . . . . . . . . . . . . . . . . . . . . . . . . . 38
View result screen . . . . . . . . . . . . . . . . . . . . . . . . . . . . . . . . . . . . 54
Viewing standby screen . . . . . . . . . . . . . . . . . . . . . . . . . . . . . . . . 14
Viewing the sub display . . . . . . . . . . . . . . . . . . . . . . . . . . . . . . . . 16
Visibility timeout . . . . . . . . . . . . . . . . . . . . . . . . . . . . . . . . . . . . . . 63
Voice Memo List . . . . . . . . . . . . . . . . . . . . . . . . . . . . . . . . . . . . . 29
Voice Memo/Answering Memo . . . . . . . . . . . . . . . . . . . . . . . . . . 29
Voice recognition . . . . . . . . . . . . . . . . . . . . . . . . . . . . . . . . . . . . . 37
Voicemail service . . . . . . . . . . . . . . . . . . . . . . . . . . . . . . . . . . . . . 29
Voicemail (paid) . . . . . . . . . . . . . . . . . . . . . . . . . . . . . . . . . . . . . . 68
Volume. . . . . . . . . . . . . . . . . . . . . . . . . . . . . . . . . . . . . . . . . . . . . 48
VPN . . . . . . . . . . . . . . . . . . . . . . . . . . . . . . . . . . . . . . . . . . . . . . . 52
W
Wallpaper. . . . . . . . . . . . . . . . . . . . . . . . . . . . . . . . . . . . . . . . . . . 48
Wallpaper/display. . . . . . . . . . . . . . . . . . . . . . . . . . . . . . . . . . . . . 48
Warranty and After-Sales Service . . . . . . . . . . . . . . . . . . . . . . . . 74
Watching TV (One Seg). . . . . . . . . . . . . . . . . . . . . . . . . . . . . . . . 40
Waterproof . . . . . . . . . . . . . . . . . . . . . . . . . . . . . . . . . . . . . . . . . . . 9
Web browser . . . . . . . . . . . . . . . . . . . . . . . . . . . . . . . . . . . . . . . . 34
Weekly start day settings . . . . . . . . . . . . . . . . . . . . . . . . . . . . . . . 45
When using infrared communication . . . . . . . . . . . . . . . . . . . . . . 61
White Balance
Settings for shooting still pictures . . . . . . . . . . . . . . . . . . . . . . . 38
Settings for shooting videos . . . . . . . . . . . . . . . . . . . . . . . . . . . 38
Widget Sheet . . . . . . . . . . . . . . . . . . . . . . . . . . . . . . . . . . . . . . . . 47
Wildcard prediction
Change settings . . . . . . . . . . . . . . . . . . . . . . . . . . . . . . . . . . . . 22
Entering method . . . . . . . . . . . . . . . . . . . . . . . . . . . . . . . . . . . . 23
Word prediction . . . . . . . . . . . . . . . . . . . . . . . . . . . . . . . . . . . . . . 22
WORLD CALL . . . . . . . . . . . . . . . . . . . . . . . . . . . . . . . . . . . . . . . 27
85
Appendix/Index
Page 88

World clock . . . . . . . . . . . . . . . . . . . . . . . . . . . . . . . . . . . . . . . . . . 44
WORLD WING . . . . . . . . . . . . . . . . . . . . . . . . . . . . . . . . . . . . . . . 66
86
Appendix/Index
Page 89

Using mobile phone with your manners!
Please be considerate of those around you when using the
handset.
Turn off your handset in the following places
■ When in an area where use is prohibited
When you are on an airplane or in a hospital, follow the
instructions given by the respective airlines or medical facilities.
Turn off the handset in areas where the use of mobile phones is
prohibited.
Set Public Mode in the following places
■ While driving
Using the handset in hand while driving is regarded as a
punishable act.
However, some cases such as when rescuing sick and injured
people or maintaining public safety are exempted.
■
When in public places such as theaters, movie theaters or
museums
Using the handset in public places where you should be quiet
results in disturbing others.
Be aware of the place to use a mobile phone
and the volume of your voice and ringtone
■ Be aware of the volume of your voice when using the
handset in quiet places such as restaurant and hotel
lobby.
■ Use in places where you do not block a passage in the
town.
Be considerate of the privacy of the
individuals around you
■
Please be considerate of the privacy of individuals around you
when shooting and sending pictures using camera-enabled
mobile phones.
These functions ensure manners in public
The handset has convenient functions such as setting not to
answer a call and setting to mute sound of the handset.
z Manner mode (nP.49 "Mode Settings")
Mutes sound of the handset.
However, the manner mode cannot mute camera shutter sound.
*
z Public Mode (Phone OFF) (nP.29 "Network service")
When a call is received, a message stating that you are in a place
that does not allow the use of mobile phone is played and the call
is automatically disconnected.
z Phone vibration (nP.48 "Sound/lamp")
Notifies you of incoming call with vibration.
z Answering memo (nP.29 "Voice Memo/Answering Memo")
Records callers’ messages when you cannot answer the call.
*
Additionally, optional services such as Voice Mail Service (
"Network service"
service"
), Call Forwarding Service (
) are available.
We collect your unnecessary mobile phones and
other devices irrespective of carrier. Bring them to a
docomo Shop near you.
* Intended devices: Mobile phone, PHS, battery
pack, charger and desktop holder
(irrespective of carrier)
nP.29
nP. 2 9 "N e tw o rk
Check/Change the subscription, apply for various services, and request various information materials online.
z From the handset, "MENU" key/Web/dmenu/Search/お客様
サポート (Customer support)
(docomo Online Application) (in Japanese only)
z From a PC
mydocomo/)
change my address or subscriptions) (in Japanese only)
* You may not be able to access some website services due to
system maintenance, your subscription, etc.
* To use "ドコモオンライン手続き (docomo Online Application)",
"docomo ID/Password" is required.
My docomo (https://www.nttdocomo.co.jp/
/
住所や契約内容の変更手続きがしたい (I want to
/
ドコモオンライン手続き
Page 90

General Inquiries
<docomo Information Center>
(Business hours: 9:00 a.m. to 8:00 p.m.)
0120-005-250 (toll free)
※ Service available in: English, Portuguese, Chinese,
Spanish.
※ Unavailable from part of IP phones.
(Business hours: 9:00 a.m. to 8:00 p.m. (open all year
round))
From DOCOMO mobile phones
(In Japanese only)
(Business hours: 24 hours (open all year round))
From DOCOMO mobile phones
(In Japanese only)
(No prefix) 113 (toll free)
※ Unavailable from land-line phones, etc.
From land-line phones (In Japanese only)
0120-800-000 (toll free)
※ Unavailable from part of IP phones.
Repairs
(No prefix) 151 (toll free)
※ Unavailable from land-line phones, etc.
From land-line phones (In Japanese only)
0120-800-000 (toll free)
※ Unavailable from part of IP phones.
Please confirm the phone number before you dial.
For Applications or Repairs and After-Sales Service, please contact the above-mentioned information center or the docomo
Shop etc. near you on the NTT DOCOMO website.
NTT DOCOMO website https://www.nttdocomo.co.jp/english/
For loss, theft, malfunction, and inquiries while overseas (24-hour reception)
From DOCOMO mobile phones
International call access code
for the country you stay
* You are charged a call fee to Japan when calling from a land-line phone, etc.
※
If you use SH-06G, you should dial the number +81-3-6832-6600 (to enter “+”, press and hold “0”).
-81-3-6832-6600
From land-line phones <Universal number>
Universal number
international prefix
* You might be charged a domestic call fee according to the call rate for the country you stay.
※ For international call access codes for major countries and universal number international prefix, refer to DOCOMO
International Services website.
If you lose your handset or have it stolen, immediately take the steps necessary for suspending the use of
the handset.
If the handset you purchased is damaged, bring your handset to a repair counter specified by DOCOMO
after returning to Japan.
Don’t forget your mobile phone… or your manners!
When using your mobile phone in a public place, don’t forget to show common courtesy and consideration for others around you.
-8000120-0151
*
*
(toll free)
Sales:
Manufacturer: SHARP Corporation
’15.6 (1st Edition)
15G SM90
1
 Loading...