

Page 1

1 of 36
SH0037D
SH0037D
SH0037D
User
User
User
Manual
Manual
Manual
Page 2

2 of 36
111
INTRODUCTION
INTRODUCTION
INTRODUCTION
Congratulations and thank you for choosing the SH0037D phone.
About
About
About
This
This
This
User
User
User
Guide
Guide
Guide
This user guide is carefully designed to help you learn about your phone ’ s features and operations quickly and effectively.
NOTICE
NOTICE
NOTICE
• We strongly recommend that you keep separate permanent written records of all important data. Data may be lost or altered
in virtually any electronic memory product under certain circumstances. Therefore, we assume no responsibility for data lost
or otherwise rendered unusable, whether as a result of improper use, repairs, defects, battery replacement, use after the
specified battery life has expired or any other cause.
• We assume no responsibility, directly or indirectly, for financial losses or claims from third parties resulting from the use of
this product and any of its functions, such as stolen credit card numbers, the loss or alteration of stored data, etc.
• All company and/or product names are trademarks and/or registered trademarks of their respective holders.
• The s creen layout illustrated in this user guide may differ from the actual one.
• The information described in this user guide is subject to change without notice.
• All of the functions described in this user guide may not be supported by all networks.
• We cannot guarantee access to services of downloaded contents, information, etc. from the network.
• Occasionally, a few black or bright pixels may appear on the screen. Please note that this will not have any impact on any of
the features or on performance.
1.1
1.1
1.1
Intellectual
Intellectual
Intellectual
Property
Property
Property
Rights
Rights
Rights
ororor
Copyright
Copyright
Copyright
According to copyright law, the reproduction, alteration and use of material which is protected by copyright (music, pictures,
etc.) is only permitted for personal or private use. If the user is not in possession of more extensive copyright or has not
received explicit permission from the copyright owner to reproduce, alter or use a copy which has been made or modified in
this way, this is considered to be a violation of the law and gives the copyright owner the right to claim for damages. For this
reason, avoid the illegal use of material which is protected by copyright.
Page 3
3 of 36
T9 ® is a trademark and/or a registered trademark of Nuance Communications Inc. and/or its affiliates in the United States
and/or other countries.
T9 Text Input is licensed under one or more of the following: U.S. Pat. Nos. 5,187,480, 5,818,437, 5,945,928, 5,953,541,
6,011,554, 6,286,064, 6,307,548, 6,307,549, and 6,636,162, 6,646,573, 6,970,599; Australia Pat. Nos. 727539, 746674,
747901; Austria P at. Nos.AT225534, AT221222; Brazil P.I. No. 9609807-4; Canada Pat. Nos. 1,331,057, 2,227,904,
2,278,549, 2,302,595; Japan Pat. Nos. 3532780, 3492981; United Kingdom Pat. No.2238414B; Hong Kong Standard Pat. No.
HK1010924; Republic of Singapore Pat. Nos.51 383, 66959, 71979; European Pat. Nos. 1 010 057 (98903671.0), 1 018 069
(98950708.2);Republic of Korea Pat. Nos. KR201211B1, KR226206B1, 402252; People's Republic of China Pat. No.
ZL96196739.0; Mexico Pat. Nos. 208141, 216023, 218409; Russian Federation Pat. Nos. 2206118, 2214620, 2221268; and
additional patents are pending worldwide.
Powered by JBlend ™ Copyright 1997-20 10 Aplix Corporation. All rights reserved.
JBlend and all JBlend-based
Trademarks and logos are
trademarks or registered trademarks of Aplix Corporation in Japan and other countries.
Powered by Mascot Capsule ® /Micro3D Edition ™
Mascot Capsule ® is a registered trademark of HI Corporation
© 2002-2010 HI Corporation. All Rights Reserved.
Bluetooth is a trademark of the Bluetooth SIG, Inc.
The Bluetooth word mark and logos are owned by the Bluetooth SIG, Inc. and any use of such marks by Sharp is under
license. Other trademarks and trade names are those of their respective owners.
Page 4
4 of 36
microSD Logo and microSDHC Logo are trademark s of SD-3C, LLC.
This product is licensed under the MPEG-4 Visual Patent Portfolio License for the personal and non-commercial use of a
consumer to (i) encode video in compliance with the MPEG-4 Video Standard ( “ MPEG-4 Video ” ) and/or (ii) decode MPEG4 Video that was encoded by a consumer engaged in a personal and non-commercial activity and/or was obtained from a
licensed video provider. No license is granted or implied for any other use. Additional information may be obtained from
MPEG LA.
See http://www.mpegla.com.
This product is licensed under the MPEG-4 Systems Patent
Portfolio License for encoding in compliance with the MPEG-4 Systems Standard, except that an additional license and
payment of royalties are necessary for encoding in connection with (i) data stored or replicated in physical media which is
paid for on a title by title basis and/or (ii) data which is paid for on a title by title basis and is transmitted to an end user for
permanent storage and/or use. Such additional license may be obtained from MPEG LA, LLC.
See http://www.mpegla.com for additional details.
MPEG Layer-3 audio coding technology licensed from Fraunhofer IIS and
Thomson.
1.2
1.2
1.2
Useful
Useful
Useful
Functions
Functions
Functions
and
and
and
Services
Services
Services
Your phone offers the following features:
• A built-in digital camera for taking pictures and video clips.
• Java ™ games. You can also download various games and applications via the mobile Internet.
• A message function for reading and creating SMS messages.
• MMS (Multimedia Messaging Services) for personali z ing your phone in various ways.
Page 5

5 of 36
• A WAP browser for accessing information o n the wireless internet.
• Java ™ applications. You can also download various applications via the mobile Internet.
• A melody editing function for creating original ringtones using up to 10 voices.
• A sound recorder function for recording and playing back sound clips.
• A Bluetooth ® wireless technology interface for establishing contact and transmitting data with certain devices.
• A music player that can play back MP3, MPEG-4 and 3GPP format sound files ( the supported codec s of MPEG-4 or 3GPP
are AMR, AAC, AAC+).
• A Playback function for playing downloaded sound and video files.
• A schedule alarm for creating and sending schedule entries with alarm settings.
• A microSD ™ memory card slot that allows you to transfer files to the phone from your PC using the memory card.
Page 6

6 of 36
TTT
able
able
able
ofofof
CCC
ontents
ontents
ontents
111
INTRODUCTION
INTRODUCTION
INTRODUCTION
………………………………
………………………………
………………………………
...
………
222
222
YOUR
YOUR
YOUR
PHONE
PHONE
PHONE
……………………………………
……………………………………
……………………………………
.7.7.7
333
GETTING
GETTING
GETTING
STARTED
STARTED
STARTED
……………………………
……………………………
……………………………
......
888
444
HOME
HOME
HOME
SCREEN
SCREEN
SCREEN
…………………………………
…………………………………
…………………………………
...
111111
555
USING
USING
USING
THE
THE
THE
MAIN
MAIN
MAIN
MENU
MENU
MENU
…………
…………
…………
………
………
………
...
………
......
121212
666
CALL
CALL
CALL
FUNCTION
FUNCTION
FUNCTION
………………………………
………………………………
………………………………
......
141414
777
ENTERING
ENTERING
ENTERING
CHARACTERS
CHARACTERS
CHARACTERS
……………………
……………………
……………………
...
141414
888
CALL
CALL
CALL
MANAGER
MANAGER
MANAGER
………………………………
………………………………
………………………………
......
151515
999
CAMER
CAMER
CAMER
AAA
…………………………………………
…………………………………………
…………………………………………
...
171717
101010
MESSAGE
MESSAGE
MESSAGE
………………………………………
………………………………………
………………………………………
181818
111111
SERVICES
SERVICES
SERVICES
………………………………………
………………………………………
………………………………………
202020
121212
GALLERY
GALLERY
GALLERY
………………………………………
………………………………………
………………………………………
...
202020
131313
GAMES
GAMES
GAMES
…………………………………………
…………………………………………
…………………………………………
...
222222
111
444
MULTIMEDIA
MULTIMEDIA
MULTIMEDIA
…………………………………
…………………………………
…………………………………
......
232323
111
555
ORGANIZER
ORGANIZER
ORGANIZER
……………………………………
……………………………………
……………………………………
242424
111
666
SETTINGS
SETTINGS
SETTINGS
………………………………………
………………………………………
………………………………………
272727
111
777
.CONNECTIVITY
.CONNECTIVITY
.CONNECTIVITY
………………………………
………………………………
………………………………
......
282828
111
888
TROUBLESHOOTING
TROUBLESHOOTING
TROUBLESHOOTING
……………………
……………………
……………………
......
………
.30
.30
.30
191919
SAFETY
SAFETY
SAFETY
PRECAUTIONS
PRECAUTIONS
PRECAUTIONS
AND
AND
AND
CONDITIONS
CONDITIONS
CONDITIONS
OFOFOF
USE
USE
USE
……
……
……
......
………………
………………
………………
....
....
....
313131
202020
LIMITED
LIMITED
LIMITED
WARRANTY
WARRANTY
WARRANTY
………………………
………………………
………………………
...31
...31
...31
212121
OUT
OUT
OUT
OFOFOF
WARRANTY
WARRANTY
WARRANTY
LIST
LIST
LIST
…………………
…………………
…………………
......
363636
Page 7

7 of 36
222
YOUR
YOUR
YOUR
PHONE
PHONE
PHONE
Please make sure that all of the following items are included in your package:
• GSM /GPRS/EDGE phone
• Rechargeable Li-ion battery
• AC Adapter
• Stereo Headset
• User Manual
• Warranty Card
• Stylus with lanyard
• USB Data Cable
Page 8

8 of 36
333
GETTING
GETTING
GETTING
STARTED
STARTED
STARTED
3.1
3.1
3.1
Insert
Insert
Insert
your
your
your
SIM
SIM
SIM
ccc
ard
ard
ard
,,,
MicroSD
MicroSD
MicroSD
card
card
card
and
and
and
bbb
attery
attery
attery
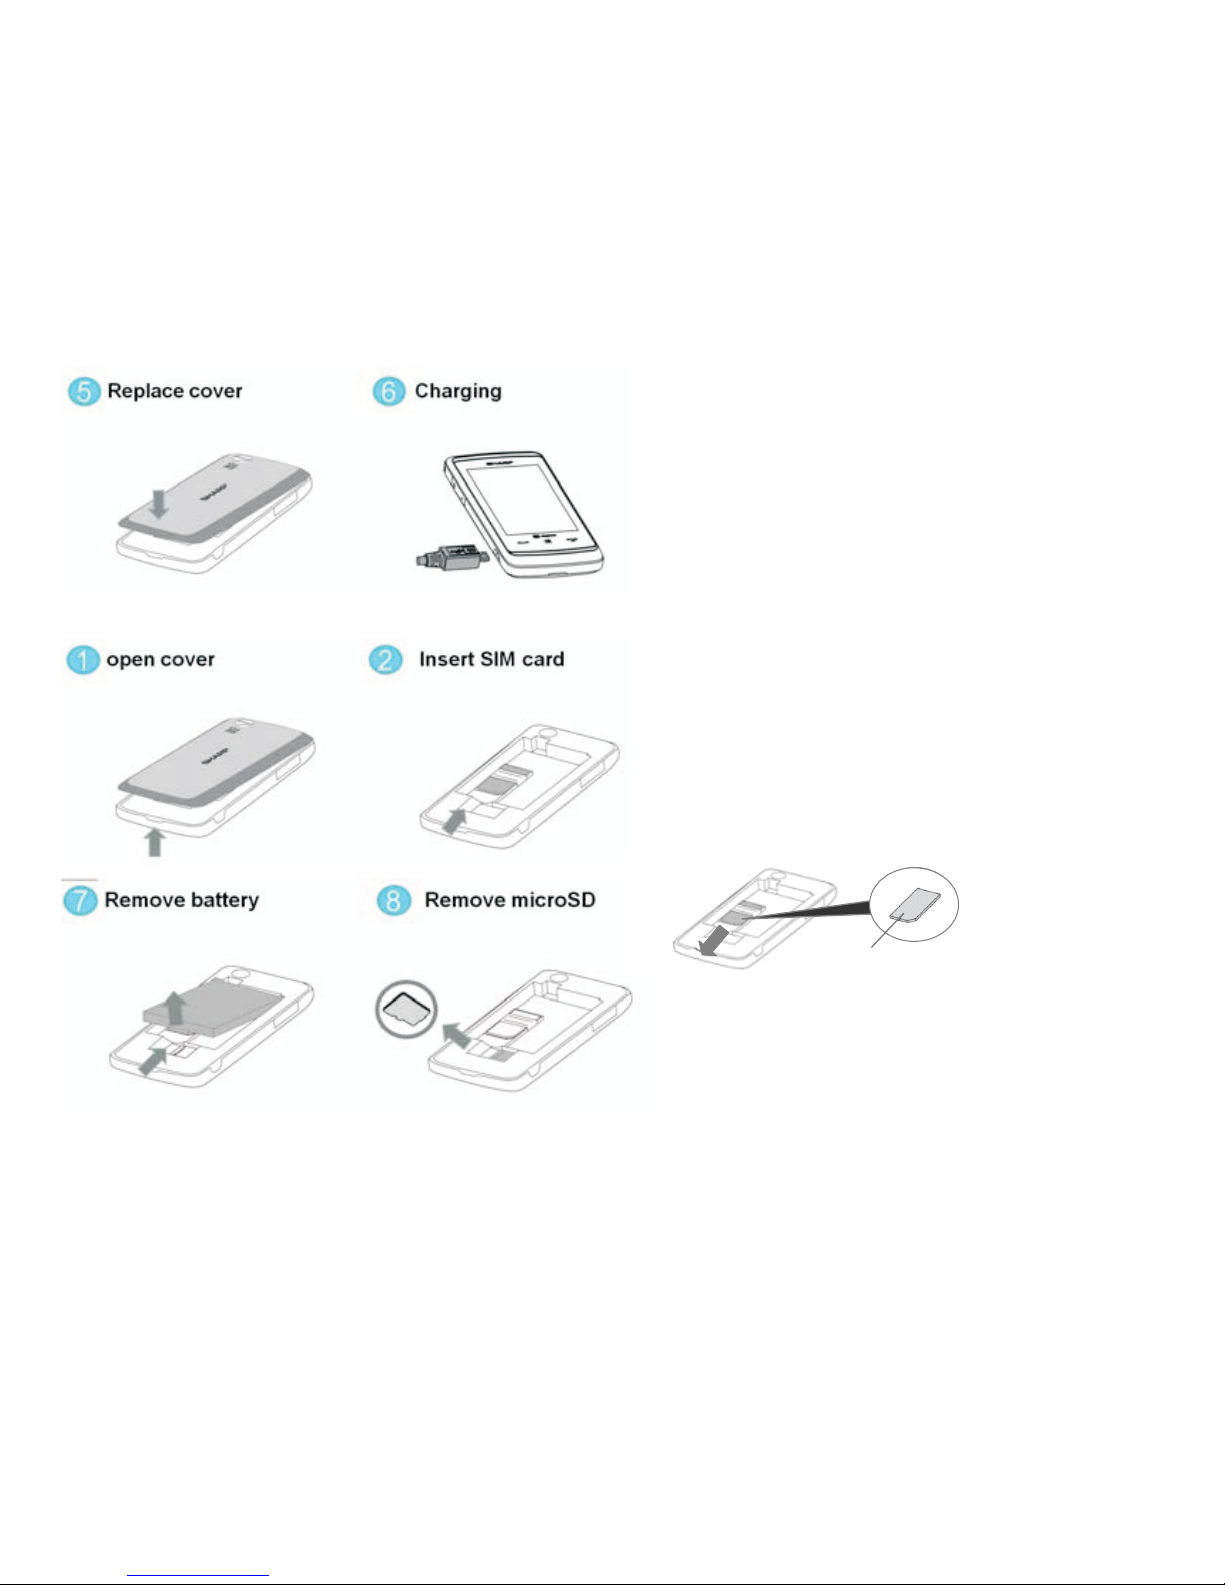
Pull
Pull
Pull
off
off
off
the
the
the
battery
battery
battery
cover
cover
cover
...
Slide
Slide
Slide
the
the
the
SIM
SIM
SIM
card
card
card
into
into
into
the
the
the
SIM
SIM
SIM
holder.
holder.
holder.
Slide
Slide
Slide
the
the
the
MicroSD
MicroSD
MicroSD
memory
memory
memory
card
card
card
into
into
into
the
the
the
MicroSD
MicroSD
MicroSD
card
card
card
slot
slot
slot
...
Hold
Hold
Hold
the
the
the
battery
battery
battery
sososo
that
that
that
the
the
the
metal
metal
metal
contacts
contacts
contacts
ofofof
the
the
the
battery
battery
battery
are
are
are
facing
facing
facing
down,
down,
down,
slide
slide
slide
the
the
the
guides
guides
guides
ononon
the
the
the
top
top
top
ofofof
the
the
the
battery
battery
battery
into
into
into
the
the
the
battery
battery
battery
slot
slot
slot
and
and
and
then
then
then
insert
insert
insert
ititit
...
Replace
Replace
Replace
the
the
the
battery
battery
battery
cover
cover
cover
and
and
and
slide
slide
slide
ititit
ininin
asasas
shown
shown
shown
below.
below.
below.
SIM
SIM
SIM
Card
Card
Card
Micro
Micro
Micro
SDSDSD
memory
memory
memory
ccc
ard
ard
ard
Page 9
9 of 36
Note
Note
Note
•••
Make
Make
Make
sure
sure
sure
that
that
that
only
only
only
3V3V3V
SIM
SIM
SIM
cards
cards
cards
are
are
are
used.
used.
used.
•••
Make
Make
Make
sure
sure
sure
that
that
that
the
the
the
standard
standard
standard
accessory
accessory
accessory
battery
battery
battery
isisis
used
used
used
...
3.2
3.2
3.2
Remove
Remove
Remove
your
your
your
SIM
SIM
SIM
ccc
ard
ard
ard
,,,
MicroSD
MicroSD
MicroSD
memory
memory
memory
card
card
card
and
and
and
bbb
attery
attery
attery
Pull
Pull
Pull
off
off
off
the
the
the
battery
battery
battery
cover
cover
cover
...
Pick
Pick
Pick
upupup
the
the
the
battery
battery
battery
using
using
using
the
the
the
protruding
protruding
protruding
edge
edge
edge
and
and
and
remove
remove
remove
the
the
the
battery
battery
battery
from
from
from
the
the
the
phone.
phone.
phone.
NOTE:
NOTE:
NOTE:
***
When
When
When
changing
changing
changing
the
the
the
MicroSD
MicroSD
MicroSD
memory
memory
memory
card,
card,
card,
first
first
first
make
make
make
sure
sure
sure
that
that
that
the
the
the
phone
phone
phone
has
has
has
been
been
been
turned
turned
turned
off
off
off
and
and
and
then
then
then
change
change
change
out
out
out
the
the
the
card.
card.
card.
IfIfIf
the
the
the
MicroSD
MicroSD
MicroSD
memory
memory
memory
card
card
card
isisis
changed
changed
changed
while
while
while
the
the
the
phone
phone
phone
isisis
still
still
still
turned
turned
turned
on,
on,
on,
the
the
the
data
data
data
stored
stored
stored
ononon
the
the
the
card
card
card
may
may
may
bebebe
destroyed
destroyed
destroyed
ororor
become
become
become
unreadable.
unreadable.
unreadable.
Slide
Slide
Slide
the
the
the
SIM
SIM
SIM
card
card
card
out.
out.
out.
Slide
Slide
Slide
the
the
the
MMM
iii
ccc
rrr
oSD
oSD
oSD
memory
memory
memory
card
card
card
out
out
out
ofofof
the
the
the
MicroSD
MicroSD
MicroSD
memory
memory
memory
card
card
card
slot.
slot.
slot.
SIM
SIM
SIM
Card
Card
Card
Page 10
10 of 36
******
When
When
When
cleaning
cleaning
cleaning
the
the
the
screen,
screen,
screen,
gently
gently
gently
wipe
wipe
wipe
ititit
with
with
with
aaa
soft
soft
soft
piece
piece
piece
ofofof
cotton
cotton
cotton
...
3.3
3.3
3.3
Charge
Charge
Charge
the
the
the
Battery
Battery
Battery
You
You
You
must
must
must
charge
charge
charge
the
the
the
battery
battery
battery
for
for
for
atatat
least
least
least
2.5
2.5
2.5
hours
hours
hours
before
before
before
using
using
using
your
your
your
phone
phone
phone
for
for
for
the
the
the
first
first
first
time.
time.
time.
Connect
Connect
Connect
the
the
the
charger
charger
charger
horizontally
horizontally
horizontally
tototo
the
the
the
external
external
external
socket
socket
socket
located
located
located
ononon
the
the
the
side
side
side
ofofof
the
the
the
phone
phone
phone
until
until
until
ititit
clicks.
clicks.
clicks.
Connect
Connect
Connect
the
the
the
charger
charger
charger
tototo
ananan
ACACAC
outlet.
outlet.
outlet.
NOTE:
NOTE:
NOTE:
Fully
Fully
Fully
charge
charge
charge
the
the
the
battery
battery
battery
before
before
before
using
using
using
the
the
the
phone.
phone.
phone.
When
When
When
the
the
the
phone
phone
phone
isisis
charging,
charging,
charging,
the
the
the
battery
battery
battery
status
status
status
icon
icon
icon
ininin
the
the
the
upper
upper
upper
right
right
right
ofofof
the
the
the
screen
screen
screen
displays
displays
displays
the
the
the
current
current
current
status.
status.
status.
Note:
Note:
Note:
Charging
Charging
Charging
time
time
time
may
may
may
vary
vary
vary
depending
depending
depending
ononon
the
the
the
state
state
state
ofofof
the
the
the
battery
battery
battery
and
and
and
other
other
other
conditions
conditions
conditions
...
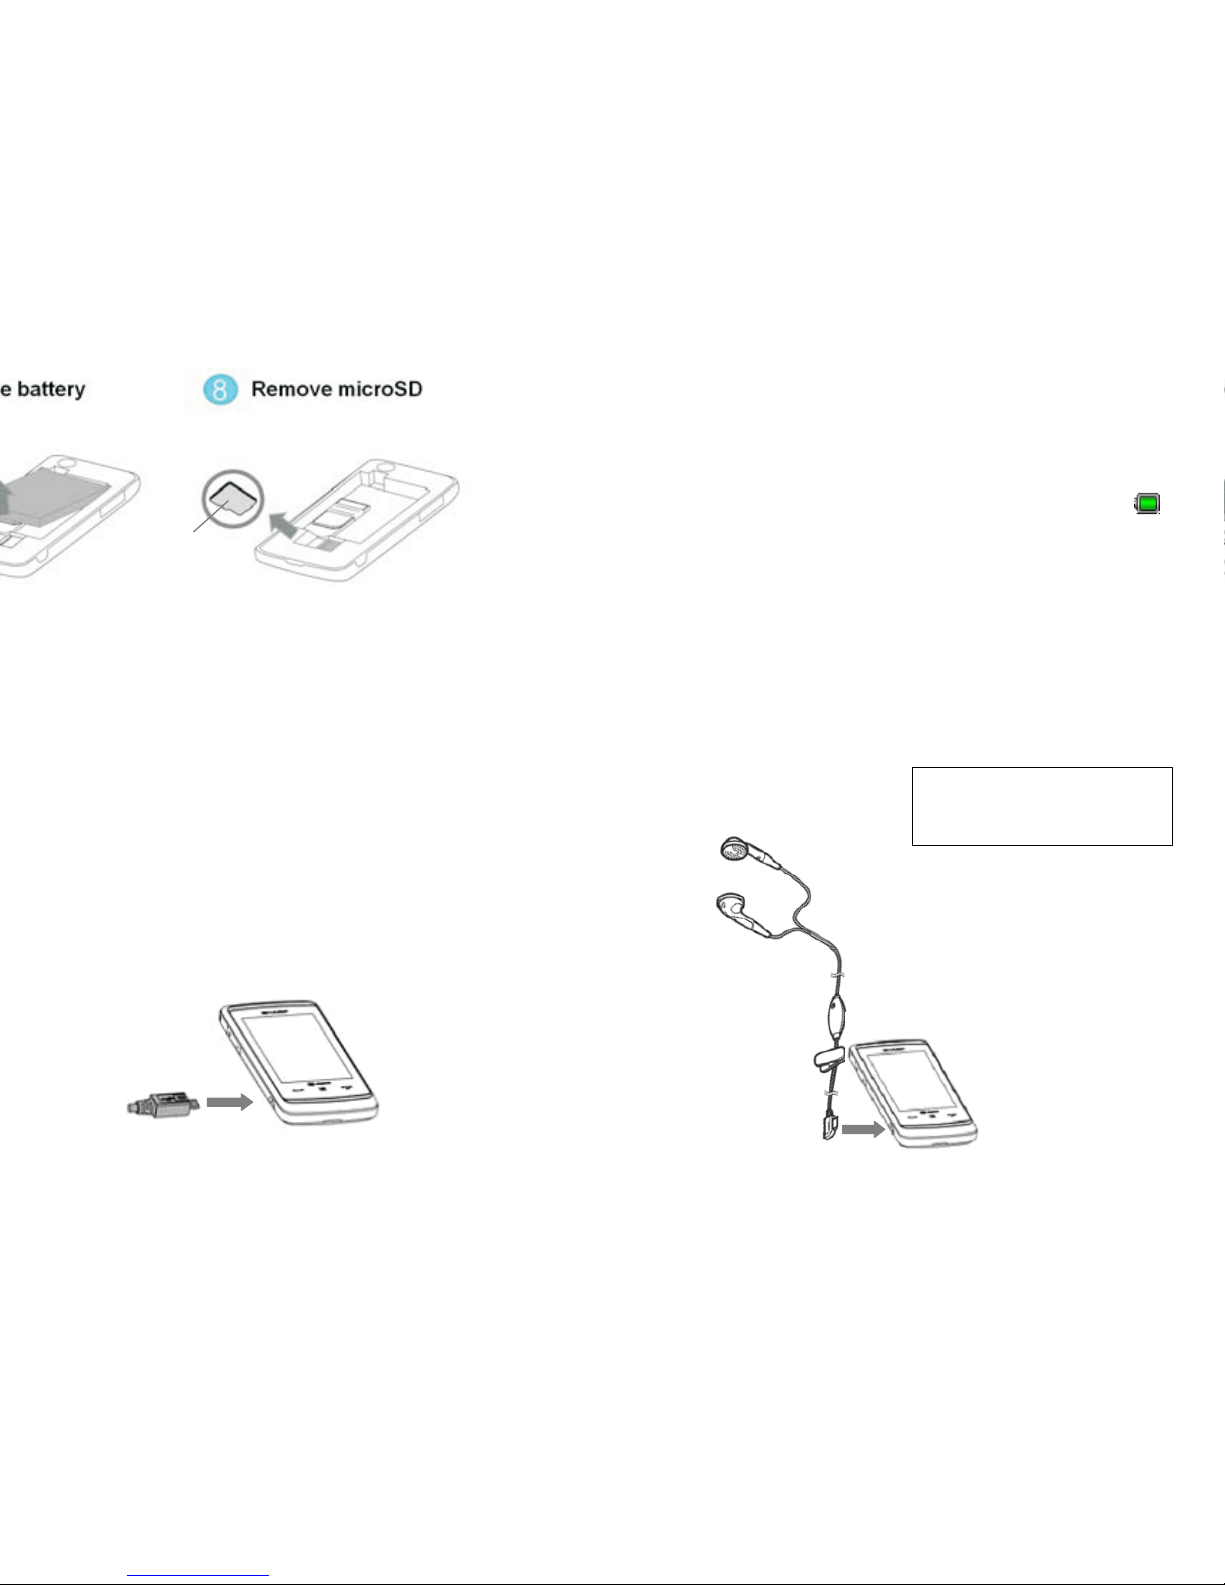
3.4
3.4
3.4
Connecting
Connecting
Connecting
the
the
the
Stereo
Stereo
Stereo
Headset
Headset
Headset
MicroSD
MicroSD
MicroSD
Card
Card
Card
Make sure the icon on
the underside of the plug
Page 11
11 of 36
444
HOME
HOME
HOME
SCREEN
SCREEN
SCREEN
4.1
4.1
4.1
WWW
idgets
idgets
idgets
The following widgets can be add ed to the Home Screen,
CCC
lock
lock
lock
,,,
CCC
alendar
alendar
alendar
,,,
Event
Event
Event
inbox,
inbox,
inbox,
Signal
Signal
Signal
indicator,
indicator,
indicator,
User
User
User
profiles,
profiles,
profiles,
MMM
emo
emo
emo
,,,
Radio,
Radio,
Radio,
Alarm,
Alarm,
Alarm,
Date,
Date,
Date,
Screen
Screen
Screen
saver
saver
saver
toys,
toys,
toys,
Music
Music
Music
Play
Play
Play
List,
List,
List,
Pictures
Pictures
Pictures
and
and
and
Video
Video
Video
Gallery.
Gallery.
Gallery.
To open a widget list , pull out or tap the arrow on the left
side of the idle screen.
Scroll and select the widget and drag it anywhere on the
screen.
The white dots at the bottom right of the screen show
that the home screen extends beyond what you see. There
are three panels in total to give you more room for adding
widgets .
4.2
4.2
4.2
Shortcut
Shortcut
Shortcut
Icons
Icons
Icons
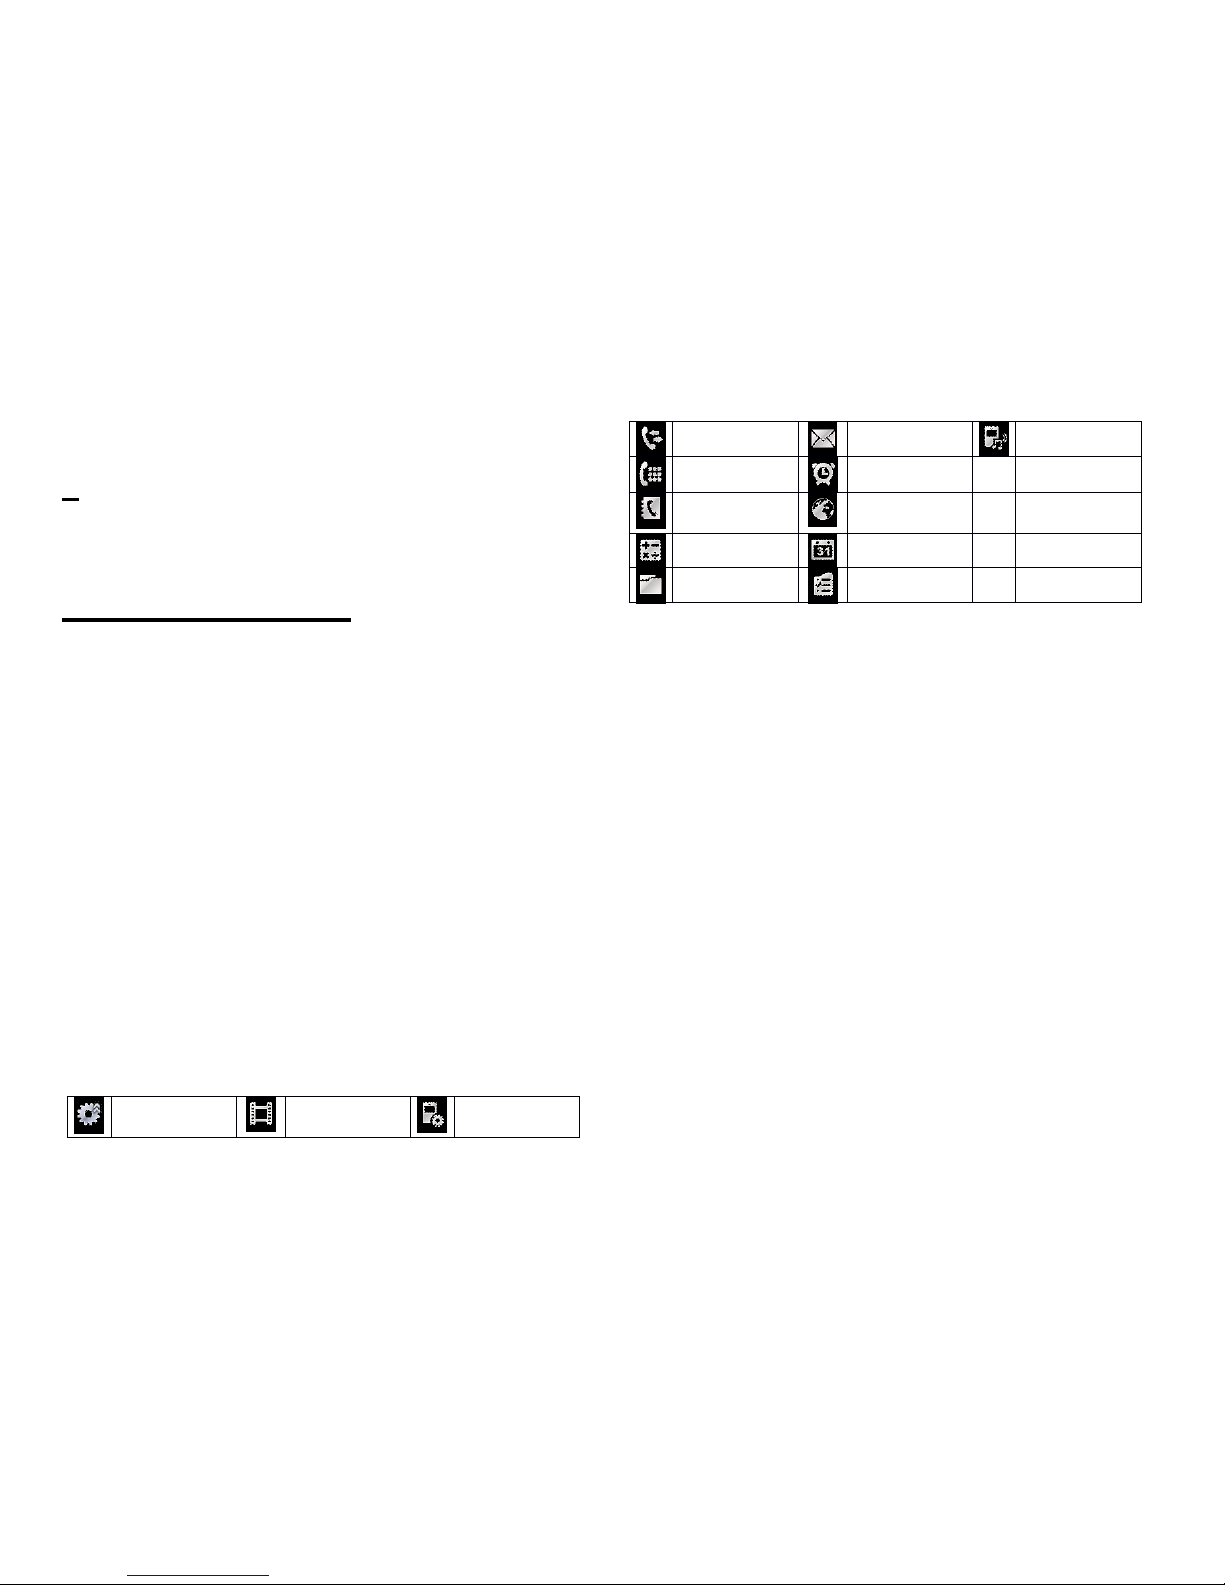
. The following optional menu icons can be used as
shortcuts by dragging them to the shortcut key bar at
the bottom of the screen :
Shortcut key
Media player
Phone
s etting s
All calls
Message
User p rofiles
Dial Pad
Alarm
Call manager
Internet
service
Calculator
Calendar
Gallery
Tasks
Page 12

12 of 36
555
USING
USING
USING
THE
THE
THE
MAIN
MAIN
MAIN
MENU
MENU
MENU
5.1
5.1
5.1
AAA
ccess
ccess
ccess
the
the
the
MMM
ain
ain
ain
MMM
enu
enu
enu
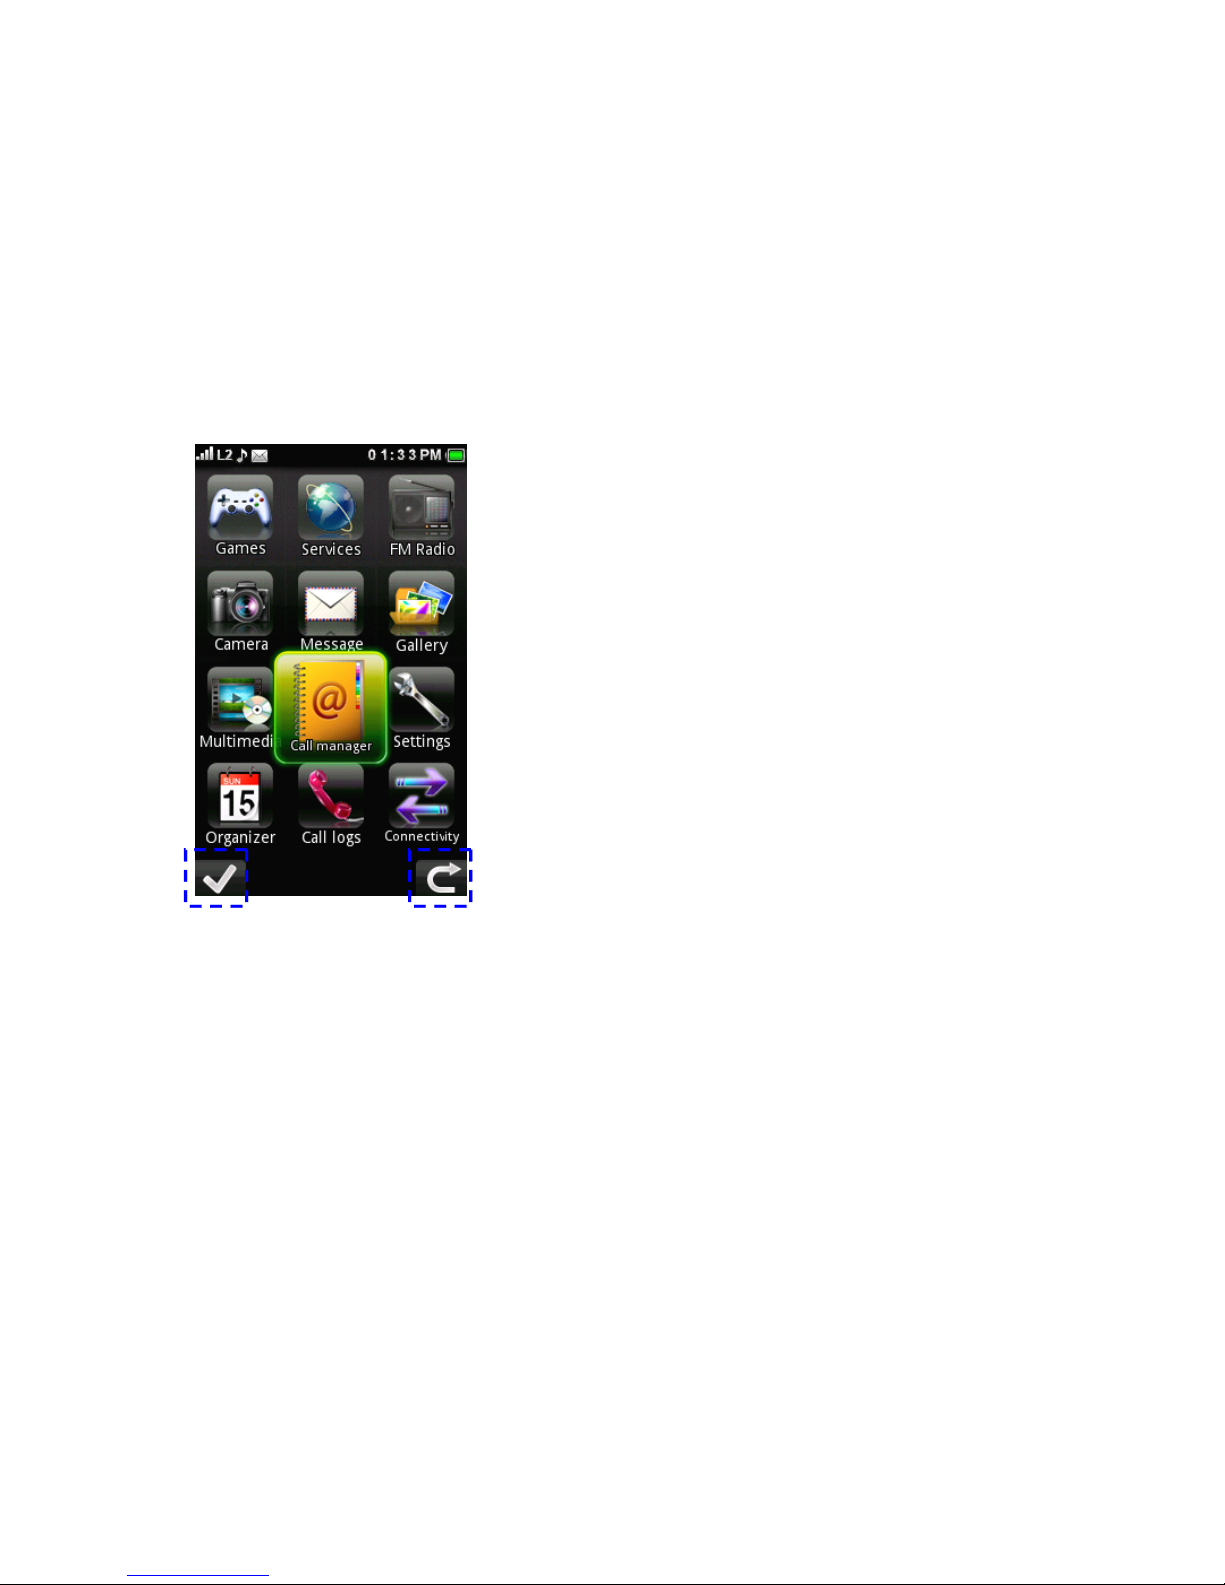
On the home screen, tap to open the Main Menu.
Tap any of the onscreen menu buttons.
You can tap Next/Enter
Next/Enter
Next/Enter
Key
Key
Key
/ Back
Back
Back
/Exit
/Exit
/Exit
Key
Key
Key
to move to the next/ previous screen . You also can
press the Back/End
Back/End
Back/End
Key
Key
Key
to return to the home
screen at any time.
5.2
5.2
5.2
SSS
tatus
tatus
tatus
indicators
indicators
indicators
Status indicators show at the top of the screen.
* Line switch function allows you to operate data
transportation and voice communication functions in the
same SIM card, please contact your service provider to
check if they support this feature.
S ignal S trength
G eneral P rofile
Active V oice C all
M eeting P rofile
Phone L ock
O utdoor P rofile
A larm C lock
H eadset
R oaming S ervice
Bluetooth
N ew M essage
B attery L evel
*Line1
*Line2
WWW
idgets
idgets
idgets
SSS
tatus
tatus
tatus
Shortcut
Shortcut
Shortcut
Keys
Keys
Keys
Page 13
13 of 36
Enter
Enter
Enter
Back/Exit
Back/Exit
Back/Exit
Page 14

14 of 36
5.3
5.3
5.3
Menu
Menu
Menu
Function
Function
Function
1.1.1.
Games
Games
Games
1. Java
2.
Java settings
3.
Java network
4. Games
5.
Motion games
2.2.2.
Services
Services
Services
1. SIM Application tool*
2.
Internet service
3. Opera Mini ™
4. License manager
3.3.3.
FMFMFM
radio
radio
radio
1.
FM radio
2.
Schedule FM record
4.4.4.
Camera
Camera
Camera
1.
Switch to Still
camera/Video camera
2.
Miscellaneous settings
5.5.5.
Messa
Messa
Messa
gegege
1. Write message
2.
Inbox
3.
Drafts
4. Outbox
5.
Sent messages
6. Delete messages
7. Email
8.
Broadcast message
9.
Templates
10. Message settings
6.6.6.
Gallery
Gallery
Gallery
1.
Phone
2. Memory card
7.7.7.
Multimedia
Multimedia
Multimedia
1.
Media player
2. Sound recorder
3.
Melody composer
4. Image viewer
5. Slide show
8.8.8.
Call
Call
Call
manager
manager
manager
1.
Phonebook
2. A dd new contact
3. Caller groups
4.
Speed dial
5.
My number
6. Service Dialing
Number*
7. Advanced
8. Memory status
9.9.9.
Settings
Settings
Settings
1. User profiles
2. Phone settings
3.
Display
4.
Call settings
5. Network settings
6.
Security settings
7. Sound effects
8. Restore f actory
s ettings
10.
10.
10.
Organizer
Organizer
Organizer
1.
Calendar
2. Tasks
3. Alarm
4.
W orld clock
5.
Notes
6. Calculator
7.
Currency converter
8. Ebook reader
11.
11.
11.
Call
Call
Call
logs
logs
logs
1.
Missed calls
2. Dialled calls
3. Received calls
4.
Delete call logs
5.
Call timers
6. Call cost
7.
Text msg. counter
8. GPRS counter
12.
12.
12.
Connectivity
Connectivity
Connectivity
1.
Bluetooth
2. Conn. management
3. Data account
* Different text or nothing will be shown depend on your SIM card
Page 15
15 of 36
666
CALL
CALL
CALL
FUNCTION
FUNCTION
FUNCTION
6.1
6.1
6.1
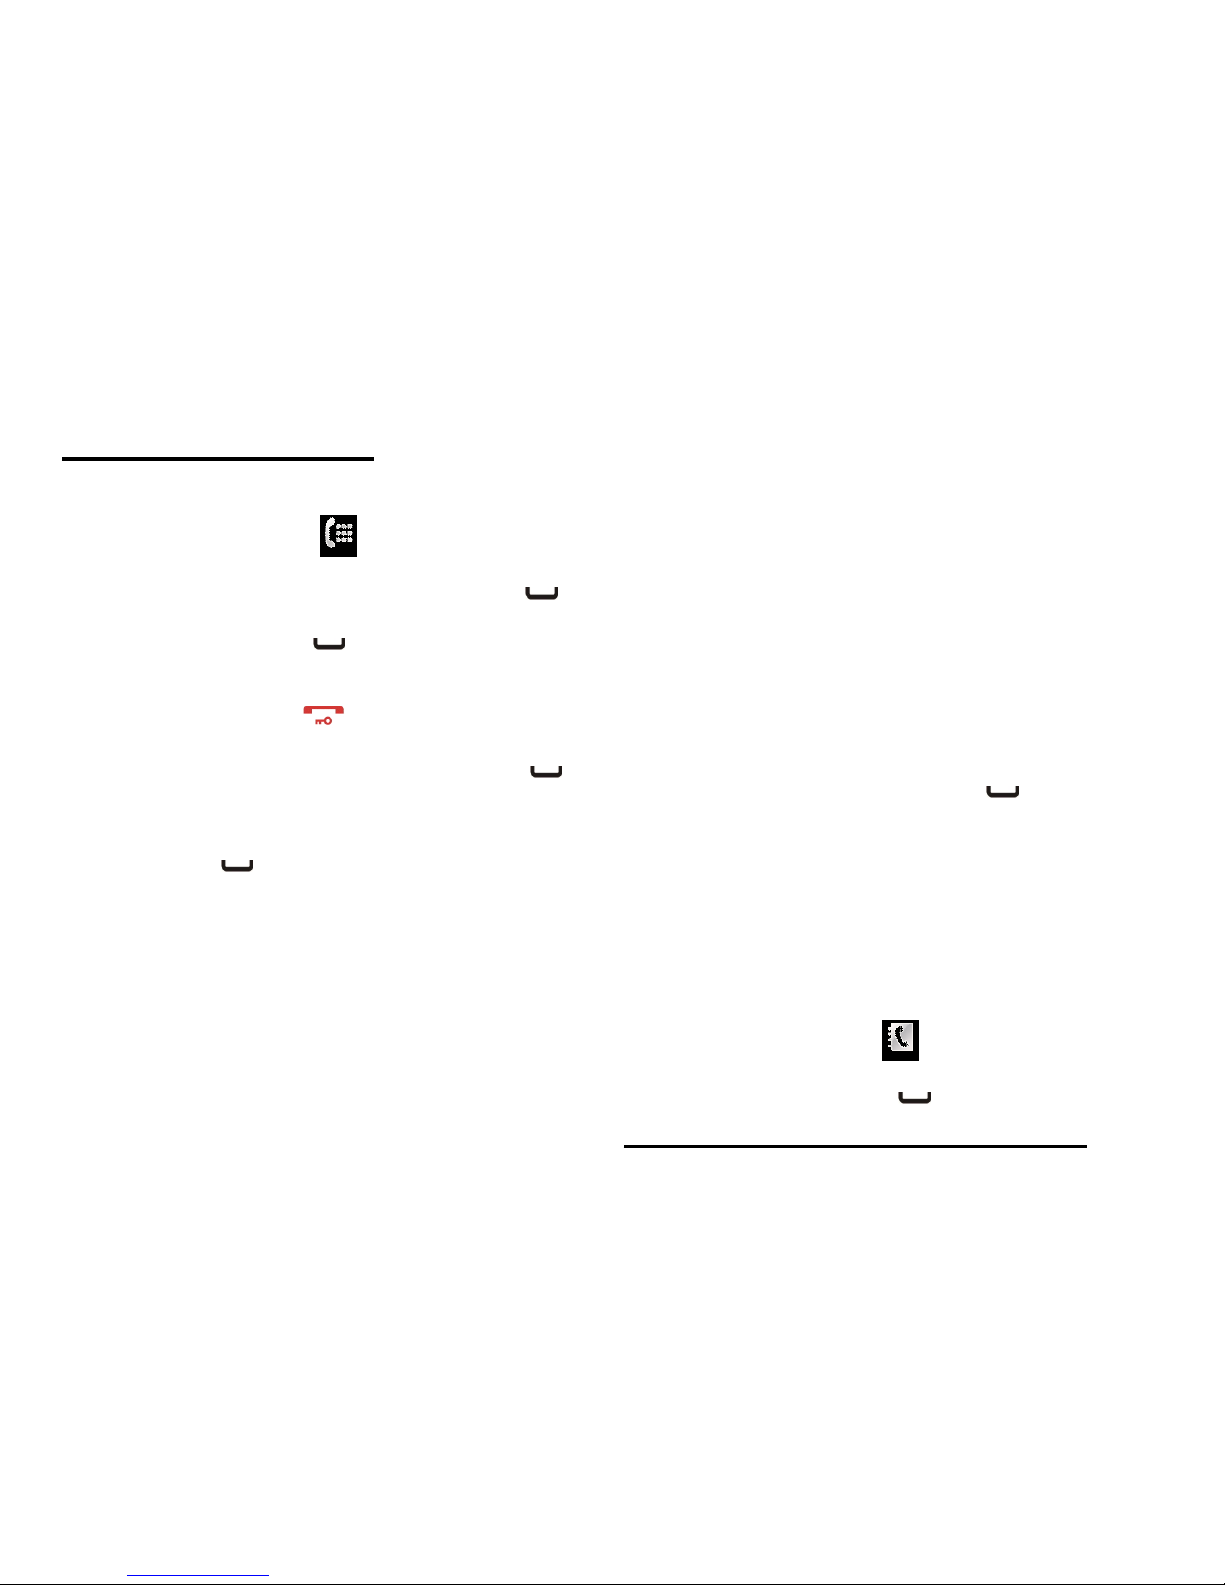
MMM
ake
ake
ake
calls
calls
calls
On the home screen, tap to open the onscreen dial
keypad.
Enter a number and press the Call/Answer Key. .
6.2
6.2
6.2
AAA
nswer
nswer
nswer
calls
calls
calls
Press the Call/Answer Key when your phone rings or
vibrates.
6.3
6.3
6.3
EEE
ndndnd
calls
calls
calls
Press the End/Back Key .
6.4
6.4
6.4
RRR
edial
edial
edial
aaa
number
number
number
On the home screen, press the Call/Answer Key to
see the All Calls list showing recent missed calls, dial l ed
calls and received calls.
Scroll to the entry you want to call and press the
Call/Answer Key .
6.5
6.5
6.5
GGG
ooo
handsfree
handsfree
handsfree
During an active call, tap H-Free to turn the handsfree
speaker on. Tap H-Held to turn the handsfree speaker off.
Note: You can also use a wired headset to go handsfree.
6.6
6.6
6.6
III
n-call
n-call
n-call
options
options
options
During an active call, you can access features by tapping
the following onscreen buttons:
Mute:
Mute:
Mute:
silence your microphone
Hold:
Hold:
Hold:
put a call on hold
Dialler:
Dialler:
Dialler:
Show the dial l er
End
End
End
Call
Call
Call
: End the call
Y ou can also acce ss the in-call menu by tapping Options
Options
Options
:::
Hold single call
End single call
New Call
Phonebook
Message
Sound recorder
Mute
DTMF
Note:
Note:
Note:
This is the standard main menu layout. Your
Your
Your
phone
phone
phone
’’’
sss
menu
menu
menu
may
may
may
bebebe
different.
different.
different.
6.7
6.7
6.7
Emergency
Emergency
Emergency
calls
calls
calls
To call an emergency number, enter the emergency
number and press the Call/Answer Key .
Your service provider programs emergency phone numbers
( such as 112 or 911 ) that you can call under any
circumstances , even when your phone is locked.
Emergency numbers vary by country. Your phone ’ s preprogrammed emergency number(s) may not work in all
locations, and sometimes an emergency call cannot be
placed due to network, environment, or interface issues.
6.8
6.8
6.8
CCC
all
all
all
aaa
contact
contact
contact
On the home screen, tap to open your phonebook.
Flick through the list to highlight a contact.
Press the Call/Answer Key .
777
ENTERING
ENTERING
ENTERING
CHARACTERS
CHARACTERS
CHARACTERS
Page 16

16 of 36
For
For
For
comfortable
comfortable
comfortable
and
and
and
quick
quick
quick
typing
typing
typing
www
ith
ith
ith
your
your
your
phone
phone
phone
’’’
sss
touch
touch
touch
screen,
screen,
screen,
you
you
you
can
can
can
enter
enter
enter
text
text
text
and
and
and
create
create
create
messages
messages
messages
ororor
notes.
notes.
notes.
When you open the text input field, an onscreen keypad
appears at the bottom of the screen.
You can change the text input method by tapping
Settings
Settings
Settings
>>>
Phone
Phone
Phone
sesese
ttings
ttings
ttings
>>>
Pref.
Pref.
Pref.
iii
nput
nput
nput
mmm
ethod
ethod
ethod
sss
...
Your
phone provides many input methods .
Smart
Smart
Smart
ABC
ABC
ABC
/abc/Abc
/abc/Abc
/abc/Abc
ABC/abc/Abc
ABC/abc/Abc
ABC/abc/Abc
Numeric
Numeric
Numeric
To delete letters, tap onscreen “ b ack key ” .
To enter a space, tap onscreen “ space key ” .
Note:
Note:
Note:
This is the standard input method layout. Your
Your
Your
phone
phone
phone
may
may
may
bebebe
different
different
different
.
888
CALL
CALL
CALL
MANAGER
MANAGER
MANAGER
You
You
You
can
can
can
store
store
store
the
the
the
phone
phone
phone
numbers
numbers
numbers
and
and
and
e-mail
e-mail
e-mail
addresses
addresses
addresses
ofofof
friends,
friends,
friends,
family
family
family
and
and
and
colleagues
colleagues
colleagues
ininin
the
the
the
Phonebook.
Phonebook.
Phonebook.
Depending on the size of the entry, your phone can store
up to 100 0 entries. You can store the following information
in the p honebook:
Items
Items
Items
stored
stored
stored
ininin
the
the
the
handset
handset
handset
memory
memory
memory
Name
Number
E-mail address
Caller picture
Caller ringtone
Pressing Options > Add Detail will reveal additional storage
options .
Home number
Office number
Fax number
Company name
Caller video
Birthday
Items
Items
Items
stored
stored
stored
ininin
the
the
the
SIM
SIM
SIM
memory
memory
memory
Name: The number of characters that can be stored differs
depending on the SIM card you use.
Phone number: Up to 40 digits .
8.1
8.1
8.1
Selecting
Selecting
Selecting
the
the
the
Storage
Storage
Storage
Memory
Memory
Memory
Call
Call
Call
mmm
anager
anager
anager
>>>
Advanced
Advanced
Advanced
>>>
Preferred
Preferred
Preferred
storage
storage
storage
Select Phonebook location “ SIM ” , “ Phone ” or “ Both ” .
8.2
8.2
8.2
Add
Add
Add
New
New
New
Contact
Contact
Contact
You can choose either the Handset Memory or SIM
Memory to store the new entry.
The number of entries which can be stored depends on the
capacity of the SIM card.
Call
Call
Call
mmm
anager
anager
anager
>>>
Add
Add
Add
New
New
New
Contact
Contact
Contact
\ Highlight the field you wish to fill in, and enter the
information.
Page 17

17 of 36
Press “ OK ” and “ Yes ” , when finished .
Adding Pictures or Ringtones to Entries (only valid when
storing a contact to the phone) .
Call
Call
Call
mmm
anager
anager
anager
>>>
Add
Add
Add
New
New
New
Contact
Contact
Contact
Select the desired entry “ Caller picture ” & “ Caller
ringtone ” .
S elect one picture or ringtone.
Select “ Op tions ” and press “ Done ” , touch “ Yes ” in order
to save the entry data .
8.3
8.3
8.3
Copying
Copying
Copying
Phonebook
Phonebook
Phonebook
Entries
Entries
Entries
between
between
between
SIM
SIM
SIM
and
and
and
Phone
Phone
Phone
Call
Call
Call
mmm
anager
anager
anager
>>>
Advanced
Advanced
Advanced
>>>
Copy
Copy
Copy
contacts
contacts
contacts
Select “ SIM to phone ” or “ Phone to SIM ” .
8.4
8.4
8.4
Finding
Finding
Finding
aaa
Name
Name
Name
and
and
and
Number
Number
Number
Call
Call
Call
mmm
anager
anager
anager
>>>
Phonebook
Phonebook
Phonebook
Enter the first few letters of the name. Search results are
displayed in alphabetical order.
8.5
8.5
8.5
Dialing
Dialing
Dialing
from
from
from
the
the
the
Phonebook
Phonebook
Phonebook
Call
Call
Call
mmm
anager
anager
anager
>>>
Phonebook
Phonebook
Phonebook
Highlight the desired entry and Press .
8.6
8.6
8.6
Caller
Caller
Caller
Groups
Groups
Groups
You can set group icons to stor e Phonebook
entries so that you can easily find and edit them.
8.6.1
8.6.1
8.6.1
Create
Create
Create
aaa
Caller
Caller
Caller
Group
Group
Group
Call
Call
Call
mmm
anager
anager
anager
>>>
Caller
Caller
Caller
groups
groups
groups
>>>
Add
Add
Add
new
new
new
group
group
group
Edit the desired entry and select “ Done ”
8.6.2
8.6.2
8.6.2
Add
Add
Add
aaa
contact
contact
contact
into
into
into
aaa
Caller
Caller
Caller
Group
Group
Group
Call
Call
Call
mmm
anager
anager
anager
>>>
Caller
Caller
Caller
groups
groups
groups
S elect a group.
Press Options
Options
Options
>>>
View
View
View
members
members
members
and select a name.
Press Options
Options
Options
>>>
Add
Add
Add
members
members
members
and select a name
8.7
8.7
8.7
Speed
Speed
Speed
Dial
Dial
Dial
You can view and perform other operations for phone
n umbers registered in the Speed Dial List.
Call
Call
Call
mmm
anager
anager
anager
>>>
Speed
Speed
Speed
ddd
ial
ial
ial
Set up Speed Dial
Call
Call
Call
mmm
anager
anager
anager
>>>
Speed
Speed
Speed
ddd
ial
ial
ial
>>>
Set
Set
Set
numbers
numbers
numbers
8.8
8.8
8.8
MyMyMy
nnn
umber
umber
umber
You can edit your Name, Number, Home number,
Company name, Email address, Office number, Fax
number by:
Call
Call
Call
mmm
anager
anager
anager
>>>
MyMyMy
Number
Number
Number
8.9
8.9
8.9
Memory
Memory
Memory
sss
tatus
tatus
tatus
This function allows you to check the SIM and Phone
memory used in the Phonebook.
Call
Call
Call
mmm
anager
anager
anager
>>>
Memory
Memory
Memory
status
status
status
Page 18

18 of 36
999
CAMERA
CAMERA
CAMERA
Your phone has an integrated digital camera.
This allows you to take and send pictures or video clips
wherever you are.
9.1
9.1
9.1
Digital
Digital
Digital
Camera
Camera
Camera
Put the phone into the digital camera mode to take a
picture. Pictures are saved in the Picture Gallery in JPEG
format in the following three picture sizes.
Wallpaper
WQVGA
VGA
1 MP
2 MP
3 MP
9.1.1
9.1.1
9.1.1
Taking
Taking
Taking
Pictures
Pictures
Pictures
You can using a shortcut on the screen or
Camera
Camera
Camera
>>>
sesese
tting
tting
tting
>>>
Camera
Camera
Camera
Select “ Camera ” In “ Switch to ” .
Press Camera key to take the picture.
The shutter sounds and the still image of the picture taken
is displayed.
9.1.2
9.1.2
9.1.2
Selecting
Selecting
Selecting
the
the
the
Picture
Picture
Picture
Size
Size
Size
Camera
Camera
Camera
>>>
sesese
tting
tting
tting
>>>
Camera
Camera
Camera
Select the desired picture size in “ Image size ” .
9.1.3
9.1.3
9.1.3
Selecting
Selecting
Selecting
the
the
the
Picture
Picture
Picture
Quality
Quality
Quality
Camera
Camera
Camera
>>>
sesese
tting
tting
tting
>>>
Misc.
Misc.
Misc.
Select “ Fine ” , “ Good ” or “ Normal ” in Image quality.
9.1.4
9.1.4
9.1.4
Selecting
Selecting
Selecting
the
the
the
Anti-flicker
Anti-flicker
Anti-flicker
Camera
Camera
Camera
>>>
sesese
tting
tting
tting
>>>
Misc.
Misc.
Misc.
Select “ 50 Hz ” or “ 60 Hz ” in Anti-flicker.
9.1.5
9.1.5
9.1.5
Continuous
Continuous
Continuous
sss
hot
hot
hot
Setting
Setting
Setting
BBB
rightness
rightness
rightness
Zooming
Zooming
Zooming
Scene
Scene
Scene
Mode
Mode
Mode
Memory
Memory
Memory
Status
Status
Status
Switch
Switch
Switch
tototo
Digital/Video
Digital/Video
Digital/Video
Camera
Camera
Camera
Exit
Exit
Exit
Status
Status
Status
Indicators
Indicators
Indicators
Self-timer
Self-timer
Self-timer
Page 19

19 of 36
For continuously taking shots, you can select:
Camera
Camera
Camera
>>>
sesese
tting
tting
tting
>>>
Camera
Camera
Camera
Select “ Continuous s hot ” in “ Capture mode ” .
9.2
9.2
9.2
Video
Video
Video
Camera
Camera
Camera
Video clips are saved in “ .3gp ” format in the following two
modes:
9.2.1
9.2.1
9.2.1
Recording
Recording
Recording
Video
Video
Video
Clips
Clips
Clips
Camera
Camera
Camera
>>>
You can use a shortcut on the screen or
Camera
Camera
Camera
>>>
sesese
tting
tting
tting
Select “ Video camera ” in “ Switch to ” .
Press Camera key to start/end.
9.2.2
9.2.2
9.2.2
Selecting
Selecting
Selecting
RRR
ecording
ecording
ecording
Size
Size
Size
You can select the recording size mode.
Camera
Camera
Camera
>>>
sesese
tting
tting
tting
>>>
Video>
Video>
Video>
Record
Record
Record
size
size
size
The following video sizes are available:
176 × 144 (QCIF)
320 × 240 (QVGA)
640 × 480 (VGA)
720 × 480 (D1)
9.2.3
9.2.3
9.2.3
Selecting
Selecting
Selecting
Video
Video
Video
Quality
Quality
Quality
Camera
Camera
Camera
>>>
sesese
tting
tting
tting
>>>
Misc.
Misc.
Misc.
Select “ Fine ” , “ Good ” or “ Normal ” in “ Video quality ” .
9.2.4
9.2.4
9.2.4
Recording
Recording
Recording
Video
Video
Video
Clips
Clips
Clips
with
with
with
Sound
Sound
Sound
Camera
Camera
Camera
>>>
sesese
tting
tting
tting
>>>
Misc.
Misc.
Misc.
Select “ On ” or “ Off ” in “ Record audio ” .
101010
MESSAGE
MESSAGE
MESSAGE
Your
Your
Your
phone
phone
phone
allows
allows
allows
you
you
you
tototo
send
send
send
and
and
and
receive
receive
receive
text
text
text
(S(S(S
MS)
MS)
MS)
,,,
Multimedia
Multimedia
Multimedia
(MMS)
(MMS)
(MMS)
and
and
and
eee
mail
mail
mail
messages
messages
messages
...
SMS
SMS
SMS
SMS allows you to send concatenated text messages. If
you send a message of more than160 characters, it is split
into several segments.
MMS
MMS
MMS
With MMS, you can send picture, sound and video
messages to brighten someone ’ s day. Messages of up to
300 KB with images, sound, or video clips can be sent
and received.
Email
Email
Email
Email allows you to send messages of up to 1 00 KB.
10.1
10.1
10.1
Create
Create
Create
&&&
send
send
send
aaa
SMS/MMS
SMS/MMS
SMS/MMS
message
message
message
Main
Main
Main
Menu
Menu
Menu
>>>
Messag
Messag
Messag
eee
>>>
Write
Write
Write
Message
Message
Message
Page 20

20 of 36
To enter a message, use the onscreen keypad at the
bottom of the screen.
To insert a picture, sound, video or subject, tap Options.
Options.
Options.
When you finish the message, tap Options
Options
Options
>>>
Send
Send
Send
to.
to.
to.
You can enter one or more recipients or choose from your
phonebook.
10.2
10.2
10.2
RRR
eceive
eceive
eceive
&&&
read
read
read
aaa
SMS/MMS
SMS/MMS
SMS/MMS
message
message
message
When you receive a message, your phone plays an alert
and shows a message indicator at the top of the
screen. You can read the message from using notification
on the screen, or y ou can also read all received messages
in your inbox by tapping Main
Main
Main
Menu
Menu
Menu
>>>
Messag
Messag
Messag
eee
>>>
Inbox.
Inbox.
Inbox.
10.3
10.3
10.3
CCC
reate
reate
reate
&&&
send
send
send
aaa
nnn
eee
mail
mail
mail
Messag
Messag
Messag
eee
>>>
Email
Email
Email
>>>
Write
Write
Write
Email
Email
Email
.
E nter the e mail address , subject and message.
Tap in the lower left of the screen to send your
email.
111111
SERVICES
SERVICES
SERVICES
11.1
11.1
11.1
Internet
Internet
Internet
Service
Service
Service
Your
Your
Your
phone
phone
phone
contains
contains
contains
aaa
WAP
WAP
WAP
browser
browser
browser
used
used
used
for
for
for
surfing
surfing
surfing
ononon
the
the
the
Mobile
Mobile
Mobile
Internet.
Internet.
Internet.
You can also browse the I nternet using Opera Mini ™
application .
11.2
11.2
11.2
STK
STK
STK
application
application
application
The STK application did not appear in Services when our
STK-enabled Vodafone SIM was inserted This is
dependent on the SIM card you are using.
121212
GALLERY
GALLERY
GALLERY
Gallery
Gallery
Gallery
contains
contains
contains
all
all
all
your
your
your
picture
picture
picture
(photo)
(photo)
(photo)
,,,
music
music
music
(sound)
(sound)
(sound)
video
video
video
and
and
and
Ebook
Ebook
Ebook
files
files
files
...
You
You
You
can
can
can
also
also
also
transmit
transmit
transmit
pictures,
pictures,
pictures,
sounds
sounds
sounds
and
and
and
video
video
video
clips
clips
clips
via
via
via
Bluetooth
Bluetooth
Bluetooth
wireless
wireless
wireless
technology
technology
technology
tototo
other
other
other
Bluetooth-enabled
Bluetooth-enabled
Bluetooth-enabled
devices.
devices.
devices.
***
***
***
The
The
The
file
file
file
categories
categories
categories
above
above
above
can
can
can
bebebe
found
found
found
ininin
the
the
the
"Phone"
"Phone"
"Phone"
memory.
memory.
memory.
They
They
They
can
can
can
also
also
also
bebebe
saved
saved
saved
asasas
ananan
extension
extension
extension
ininin
the
the
the
“““
Memory
Memory
Memory
card
card
card
”””
memory
memory
memory
ififif
aaa
memory
memory
memory
card
card
card
isisis
inserted
inserted
inserted
...
12.1
12.1
12.1
Audio
Audio
Audio
The
The
The
sound
sound
sound
files
files
files
and
and
and
the
the
the
AMR
AMR
AMR
data
data
data
recorded
recorded
recorded
bybyby
Sound
Sound
Sound
rrr
ecorder
ecorder
ecorder
are
are
are
managed
managed
managed
ininin
“““
Audio
Audio
Audio
”””
...
12.1.1
12.1.1
12.1.1
Using
Using
Using
Sound
Sound
Sound
Files
Files
Files
asasas
Ring
Ring
Ring
TTT
one
one
one
sss
Page 21

21 of 36
Gallery
Gallery
Gallery
>>>
Phone
Phone
Phone
(((
ororor
Memory
Memory
Memory
card
card
card
)))
>>>
Audio
Audio
Audio
Highlight the file you wish to use as a ringtone.
Press [ Options
Options
Options
] >>>
Use
Use
Use
asasas
>>>
User
User
User
profiles.
profiles.
profiles.
Select “ OK ” .
12.2
12.2
12.2
Photos
Photos
Photos
Pictures
Pictures
Pictures
that
that
that
are
are
are
taken
taken
taken
bybyby
your
your
your
camera
camera
camera
phone
phone
phone
ororor
images
images
images
can
can
can
bebebe
viewed,
viewed,
viewed,
edited
edited
edited
and
and
and
organi
organi
organi
zzz
ed.
ed.
ed.
12.2.1
12.2.1
12.2.1
Viewing
Viewing
Viewing
Pictures
Pictures
Pictures
Gallery
Gallery
Gallery
>>>
Phone
Phone
Phone
(((
ororor
Memory
Memory
Memory
card
card
card
)))
>>>
PPP
icture
icture
icture
Gallery
Gallery
Gallery
Select the file you wish to view. The selected picture will be
display ed.
12.2.2
12.2.2
12.2.2
Using
Using
Using
Images
Images
Images
asasas
Wallpaper
Wallpaper
Wallpaper
Gallery
Gallery
Gallery
>>>
Phone
Phone
Phone
(((
ororor
Memory
Memory
Memory
card
card
card
)))
>>>
PPP
icture
icture
icture
Gallery
Gallery
Gallery
The list of pictures will display.
Highlight the file you wish to use as wallpaper.
Press [ Options
Options
Options
] >>>
Use
Use
Use
asasas
>>>
Wallpaper.
Wallpaper.
Wallpaper.
Select “ OK ” .
12.2.3
12.2.3
12.2.3
Editing
Editing
Editing
Pictures
Pictures
Pictures
Gallery
Gallery
Gallery
>>>
Picture
Picture
Picture
Highlight the file you wish to edit.
Press [Options] and select “ Edit ” .
12.3
12.3
12.3
Video
Video
Video
Video
Video
Video
clips
clips
clips
that
that
that
are
are
are
recorded
recorded
recorded
bybyby
your
your
your
phone
phone
phone
’’’
sss
video
video
video
camera
camera
camera
ororor
video
video
video
clips
clips
clips
that
that
that
are
are
are
downloaded
downloaded
downloaded
from
from
from
mobile
mobile
mobile
Internet
Internet
Internet
sites
sites
sites
can
can
can
bebebe
viewed
viewed
viewed
and
and
and
organi
organi
organi
zzz
ed.
ed.
ed.
12.3.1
12.3.1
12.3.1
Playing
Playing
Playing
Back
Back
Back
Video
Video
Video
Clip
Clip
Clip
Files
Files
Files
Gallery
Gallery
Gallery
>>>
Video
Video
Video
Gallery
Gallery
Gallery
Select the file you wish to play back.
12.3.2
12.3.2
12.3.2
Using
Using
Using
aaa
Video
Video
Video
Clip
Clip
Clip
asasas
aaa
Caller
Caller
Caller
Video
Video
Video
Clip
Clip
Clip
Gallery
Gallery
Gallery
>>>
Video
Video
Video
Gallery
Gallery
Gallery
Y ou can set your video clip to play back when the phone
rings.
Highlight the file you wish to use as Caller video .
Press [Options] -> Use as -> Caller video
Select OK
131313
GAMES
GAMES
GAMES
Page 22

22 of 36
13.1
13.1
13.1
Java
Java
Java
games
games
games
Enjoy games and Java A pplications by tapping to
open the Main Menu, then tap
Games > Java
Highlight the desired Java ™ application and start to play.
13.2
13.2
13.2
Java
Java
Java
settings
settings
settings
You can change audio, backlight and vibration settings for
your Java game.
13.3
13.3
13.3
Games
Games
Games
Highlight the desired game and start to play.
111
444
MULTIMEDIA
MULTIMEDIA
MULTIMEDIA
14.1
14.1
14.1
Media
Media
Media
player
player
player
Make
Make
Make
your
your
your
own
own
own
media
media
media
library
library
library
...
14.1.1
14.1.1
14.1.1
Create
Create
Create
aaa
playlist
playlist
playlist
On the home screen, tap to open the Main Menu,
then tap Multimedia
Multimedia
Multimedia
>>>
Media
Media
Media
ppp
layer
layer
layer
>>>
MyMyMy
ppp
laylists
laylists
laylists
>>>
Options
Options
Options
>>>
New
New
New
...
Enter a name for the playlist, then tap Options
Options
Options
>>>
Done.
Done.
Done.
Tap the playlist you want to edit, then tap Options
Options
Options
>>>
Add
Add
Add
to add music or video files from your phone or memory
card.
14.1.2
14.1.2
14.1.2
Play
Play
Play
aaa
playlist
playlist
playlist
In MyMyMy
Playlists
Playlists
Playlists
, tap the playlist you want to play, then tap
one of the music or video file s .
14.1.3
14.1.3
14.1.3
Delete
Delete
Delete
aaa
playlist
playlist
playlist
In MyMyMy
Playlists
Playlists
Playlists
, scroll to the playlist you want to delete,
then tap Options
Options
Options
>>>
Delete.
Delete.
Delete.
14.1.4
14.1.4
14.1.4
Player
Player
Player
setting
setting
setting
sss
When using the media player, you can tap >>>
Settings
Settings
Settings
>>>
Player
Player
Player
sss
ettings
ettings
ettings
to set these options:
Shuffle
Shuffle
Shuffle
:::
Set all songs to play in a random order or one
by one.
Repeat
Repeat
Repeat
:::
Repeat all songs or one selected song.
Motion
Motion
Motion
sss
ensor:
ensor:
ensor:
Switch the motion sensor.
Sound
Sound
Sound
eee
ffects:
ffects:
ffects:
Set the equalizer mode to Bass,
Classical, Party, etc .
Bass
Bass
Bass
eee
nhancement:
nhancement:
nhancement:
Change the bass enhancement
effect .
14.1.5
14.1.5
14.1.5
Media
Media
Media
player
player
player
tips
tips
tips
You can use other phone features while playing music , b ut
using applications like Game
Game
Game
or FMFMFM
radio
radio
radio
turns the media
player off.
If you receive a call while playing music, the music pauses
automatically. You can answer or reject the call and send
the caller to voicemail. Playing will resume when you end
the call.
14.2
14.2
14.2
FMFMFM
Radio
Radio
Radio
LLL
isten
isten
isten
tototo
your
your
your
favorite
favorite
favorite
channels
channels
channels
...
Page 23

23 of 36
Plug a wired headset into your phone .
Note:
Note:
Note:
The FM radio works only when the headset is
plugged in.
On the home screen, tap to open the Main Menu,
then tap FMFMFM
radio
radio
radio
>>>
FMFMFM
radio.
radio.
radio.
Tap to set these options :
Channel
Channel
Channel
lll
ist:
ist:
ist:
Bookmark up to 30 radio channels.
Manual
Manual
Manual
iii
nput
nput
nput
: Key in channel frequency.
Auto
Auto
Auto
sss
earch:
earch:
earch:
Automatically search for available radio
channels and store them to the channel list.
Settings:
Settings:
Settings:
Change the switch of the loudspeaker button ,
the record ing format and the audio quality .
Record:
Record:
Record:
Record your favorite radio programs.
Append:
Append:
Append:
Access a previously recorded file in order to
edit it.
File
File
File
List:
List:
List:
Manage the previous ly recorded files .
111
555
ORGANIZER
ORGANIZER
ORGANIZER
MMM
anage
anage
anage
your
your
your
life
life
life
with
with
with
these
these
these
handy
handy
handy
tools
tools
tools
...
15.1
15.1
15.1
CCC
alendar
alendar
alendar
Calendar
Calendar
Calendar
allows
allows
allows
you
you
you
tototo
easily
easily
easily
schedule
schedule
schedule
appointments
appointments
appointments
ororor
events
events
events
atatat
any
any
any
given
given
given
date
date
date
ororor
time.
time.
time.
Main
Main
Main
Menu
Menu
Menu
>>>
Organizer
Organizer
Organizer
>>>
Calendar.
Calendar.
Calendar.
Tap Options
Options
Options
to add, delete or view the event. You can
set six types of event including Reminder, Meeting, C ourse.
Date, Call and Anniversary.
When you highlight an event in the calendar, more
details appear at the bottom.
15.2
15.2
15.2
Tasks
Tasks
Tasks
You can register your schedule as task entries for a given
date or time.
15.2.1
15.2.1
15.2.1
Creating
Creating
Creating
aaa
New
New
New
Entry
Entry
Entry
Main
Main
Main
Menu
Menu
Menu
>>>
Organizer
Organizer
Organizer
>>>
Tasks
Tasks
Tasks
Select “ Add ” . (When one or more entries are already
registered, Option must be selected before selecting the
“ Add ” menu.)
Enter the due date and then due time.
Enter the subject.
Select the reminder time.
Press [Save].
15.3
15.3
15.3
Alarm
Alarm
Alarm
The
The
The
alarm
alarm
alarm
function
function
function
allows
allows
allows
you
you
you
tototo
bebebe
alerted
alerted
alerted
atatat
aaa
specified
specified
specified
time.
time.
time.
Note
Note
Note
that
that
that
you
you
you
need
need
need
tototo
set
set
set
the
the
the
current
current
current
date
date
date
and
and
and
time
time
time
before
before
before
setting
setting
setting
the
the
the
alarm
alarm
alarm
function
function
function
ififif
ititit
has
has
has
not
not
not
been
been
been
done
done
done
already.
already.
already.
15.3.1
15.3.1
15.3.1
Setting
Setting
Setting
the
the
the
Alarm
Alarm
Alarm
Main
Main
Main
Menu
Menu
Menu
>>>
Organizer
Organizer
Organizer
>>>
Alarm
Alarm
Alarm
Page 24

24 of 36
Select an available setting.
Enter the desired time.
Press “ Done ” and t ouch “ Yes ” in order to save the entry
data
15.4
15.4
15.4
WWW
orld
orld
orld
clock
clock
clock
15.4.1
15.4.1
15.4.1
Setting
Setting
Setting
the
the
the
Time
Time
Time
Zone
Zone
Zone
Main
Main
Main
Menu
Menu
Menu
>>>
Organizer
Organizer
Organizer
>>>
World
World
World
clock
clock
clock
...
Y ou can press and to select the time zone and
city .
15.4.2
15.4.2
15.4.2
Set
Set
Set
the
the
the
Daylight
Daylight
Daylight
Saving
Saving
Saving
Time
Time
Time
Main
Main
Main
Menu
Menu
Menu
>>>
Organizer
Organizer
Organizer
>>>
World
World
World
clock
clock
clock
...
P ress [ Options ] and you can switch On/Off by clicking
“ Daylight s aving time for foreign city ” .
You can also s elect “ On ” or “ Off ” by left software key .
15.5
15.5
15.5
Notes
Notes
Notes
You
You
You
can
can
can
take
take
take
notes
notes
notes
here.
here.
here.
Main
Main
Main
Menu
Menu
Menu
>>>
Organizer
Organizer
Organizer
>>>
Note
Note
Note
sss
P ress “ Add ” to start tak ing notes.
When finished, select “ Option ” and press “ Done ” .
15.6
15.6
15.6
Calculator
Calculator
Calculator
The calculator function performs the 4 arithmetic
calculations using up to 12 digits.
Main
Main
Main
Menu
Menu
Menu
>>>
Organizer
Organizer
Organizer
>>>
Calculator
Calculator
Calculator
T he calculator will display on the screen .
The k ey operations for calculation are as follows.
15.7
15.7
15.7
Currency
Currency
Currency
ccc
onverter
onverter
onverter
You
You
You
can
can
can
also
also
also
use
use
use
the
the
the
currency
currency
currency
ccc
onverter
onverter
onverter
tototo
convert
convert
convert
from/to
from/to
from/to
aaa
home
home
home
currency
currency
currency
using
using
using
aaa
conversion
conversion
conversion
rate
rate
rate
that
that
that
you
you
you
enter.
enter.
enter.
Page 25

25 of 36
Main
Main
Main
Menu
Menu
Menu
>>>
Organizer
Organizer
Organizer
>>>
Currency
Currency
Currency
ccc
onvert
onvert
onvert
eee
rrr
Enter “ Exchange Rate ” and press “ OK ” .
Enter local currency amount to be exchanged and press
” OK ” .
To delete all digits, press [C lear ].
15.8
15.8
15.8
Ebook
Ebook
Ebook
reader
reader
reader
This
This
This
function
function
function
allows
allows
allows
you
you
you
tototo
view
view
view
E-Book
E-Book
E-Book
files
files
files
(XMDF
(XMDF
(XMDF
ororor
Text
Text
Text
files)
files)
files)
stored
stored
stored
ooo
nnn
aaa
memory
memory
memory
card.
card.
card.
Organizer
Organizer
Organizer
>>>
Ebook
Ebook
Ebook
reader
reader
reader
Select the desired file and you can read the text file.
15.8.1
15.8.1
15.8.1
Adding
Adding
Adding
aaa
Bookmark
Bookmark
Bookmark
You
You
You
can
can
can
add
add
add
upupup
tototo
two
two
two
bookmarks
bookmarks
bookmarks
tototo
each
each
each
E-Book
E-Book
E-Book
file.
file.
file.
Organizer
Organizer
Organizer
>>>
Ebook
Ebook
Ebook
reader
reader
reader
Select the desired file.
Press “ Options ” and select “ Add Bookmark ” .
Select “ Bookmark1 ” or “ Bookmark2 ” .
Press “ Options ” and select “ OK ” .
111
666
SETTINGS
SETTINGS
SETTINGS
CCC
reate
reate
reate
your
your
your
own
own
own
personal
personal
personal
style
style
style
...
16.1
16.1
16.1
User
User
User
profiles
profiles
profiles
Your phone provides 6 different profiles to adapt to different
environment s conditions. In each profile, you can set the
desired ring tones and alert types.
On the home screen, tap to open the Main
Menu,, tap Settings
Settings
Settings
>>>
User
User
User
ppp
rofiles
rofiles
rofiles
.
General:
General:
General:
The General profile is the default setting. After
activating this profile, your phone shows an indicator .
Meeting:
Meeting:
Meeting:
Turns the Ring tone off. Only vibrator is
activated. After activating this profile, your phone shows
an indicator .
Outdoor:
Outdoor:
Outdoor:
The volume of the r ing tone and key tone is
set to maximum. After activating this profile, your phone
shows an indicator .
Indoor:
Indoor:
Indoor:
Turns the Vibrator off. Only ring tone is
activated. After activating this profile, your phone shows
an indicator .
Silent
Silent
Silent
:::
Turn the ring tone and vibration off. After
activating this profile, your phone shows an indicator
Headset:
Headset:
Headset:
After plugging a wired headset into your
phone, your phone shows an indicator .
Bluetooth:
Bluetooth:
Bluetooth:
You can set the desired ring tone and alert
type when using Bluetooth headset or hands-free car kit.
Select a profile and tap Options
Options
Options
>>>
Customize
Customize
Customize
to set the
desired ring tones and alert types.
Tone
Tone
Tone
sss
ettings:
ettings:
ettings:
Set the ring tones of incoming call s and
message s . You can also select different types of ring
tone s for power on/off .
Page 26

26 of 36
Volume:
Volume:
Volume:
Adjust the volume of ring tone s and key tone s .
Alert
Alert
Alert
ttt
ype:
ype:
ype:
Select an alert type (Ring only, Vib . only,
Vibrate and Ring, Vibrate then ring).
Ring
Ring
Ring
ttt
ype:
ype:
ype:
Select a ring type (Single, Repeat,
Ascending).
Extra
Extra
Extra
ttt
one
one
one
: Allows you to turn the Warning, Error, Camp
on and Connect" tones on/off.
Answer
Answer
Answer
mode:
mode:
mode:
Allows you to turn if you can an swer call
by any key.
16.2
16.2
16.2
Display
Display
Display
settings
settings
settings
You can set display settings such as Wallpaper, Screen
Saver by tapping Settings
Settings
Settings
>>>
Display.
Display.
Display.
16.3
16.3
16.3
Time
Time
Time
and
and
and
date
date
date
You can set the time, time zone and format by tapping
>>>
Settings
Settings
Settings
>>>
Phone
Phone
Phone
sesese
ttings
ttings
ttings
>>>
Time
Time
Time
and
and
and
date.
date.
date.
16.4
16.4
16.4
Enabling/Disabling
Enabling/Disabling
Enabling/Disabling
the
the
the
PIN
PIN
PIN
Code
Code
Code
If the PIN code is enabled you are asked to enter the PIN
code each time the phone is switched on. Your PIN code is
stored on the SIM card and you should have been made
aware of the code when you purchased the SIM card.
Contact your service provider for further details.
Settings
Settings
Settings
>>>
Security
Security
Security
sesese
ttings
ttings
ttings
>>>
SIM
SIM
SIM
lock
lock
lock
Select “ On ” to enable the PIN code. Select “ Off ” to
disable it.
Enter your PIN code.
16.5
16.5
16.5
Change
Change
Change
Handset
Handset
Handset
Code
Code
Code
(Handset
(Handset
(Handset
lock)
lock)
lock)
The default handset code is “ 0000 ” .
Settings
Settings
Settings
>>>
Security
Security
Security
sesese
ttings
ttings
ttings
>>>
Change
Change
Change
password
password
password
>>>
Phone
Phone
Phone
password
password
password
Enter the old handset code.
Enter a new handset code.
Enter the new handset code again.
Note: This is the standard main menu layout. Your
Your
Your
phone
phone
phone
’’’
sss
menu
menu
menu
may
may
may
bebebe
different.
different.
different.
111
777
...
CONNECTIVITY
CONNECTIVITY
CONNECTIVITY
17.1
17.1
17.1
Bluetooth
Bluetooth
Bluetooth
By configuring the settings in this menu, you can use
Bluetooth wireless technology to connect to PCs, as well as
to Bluetooth enabled phones.
In order to use the Bluetooth wireless function, you must
search for other Bluetooth enabled devices, then establish
a connection. You should be within 10 meters of the other
device before searching.
17.1.1
17.1.1
17.1.1
UsUsUs
eee
the
the
the
Bluetooth
Bluetooth
Bluetooth
Wireless
Wireless
Wireless
Function
Function
Function
Connectivity
Connectivity
Connectivity
>>>
Bluetooth
Bluetooth
Bluetooth
>>>
Power
Power
Power
Select “ On ” or “ Off ” .
When “ On ” is selected, the Bluetooth wireless setting is
activated, and is displayed in the top-left corner of the
screen.
Page 27

27 of 36
17.1.2
17.1.2
17.1.2
ToToTo
Show
Show
Show
ororor
Hide
Hide
Hide
Your
Your
Your
Phone
Phone
Phone
Connectivity
Connectivity
Connectivity
>>>
Bluetooth
Bluetooth
Bluetooth
>>>
Visibility
Visibility
Visibility
Select “ On ” to a llow other devices to recogni z e your phone
or “ Off ” to hide it.
17.1.3
17.1.3
17.1.3
ToToTo
Search
Search
Search
for
for
for
Devices
Devices
Devices
tototo
bebebe
Pair
Pair
Pair
...
Connectivity
Connectivity
Connectivity
>>>
Bluetooth
Bluetooth
Bluetooth
>>>
Search
Search
Search
audio
audio
audio
ddd
evices
evices
evices
Select the desired device for pairing.
Enter the device passcode.
17.2
17.2
17.2
ToToTo
transfer
transfer
transfer
files
files
files
ininin
Mass
Mass
Mass
storage
storage
storage
mode
mode
mode
using
using
using
aaa
USB
USB
USB
cable
cable
cable
Connect the USB cable to the phone and the computer.
Select “ Mass storage ” in your mobile phone.
Wait until the phone memory and memory card appear
as external disks in your computer.
Transfer files to your desired folder in phone memory
and memory card.
Note: Do not remove the USB cable from the phone or
computer during transfer, as this may corrupt the memory
card and the phone memory.
181818
TROUBLESHOOTING
TROUBLESHOOTING
TROUBLESHOOTING
111
8.1
8.1
8.1
CCC
rash
rash
rash
recovery
recovery
recovery
In the unlikely event that your phone stops responding to
taps and key presses, try a quick reset. Remove the back
cover and battery, then replace and turn your phone on as
usual.
111
8.2
8.2
8.2
Reset
Reset
Reset
On the home screen, tap to open the Main Menu,
then tap Settings
Settings
Settings
>>>
Restore
Restore
Restore
fff
actory
actory
actory
sss
ettings.
ettings.
ettings.
Your
phone will be reset to factory settings, and all data on your
phone will be deleted after the password has been entered.
Page 28

28 of 36
191919
SAFETY
SAFETY
SAFETY
PRECAUTIONS
PRECAUTIONS
PRECAUTIONS
AND
AND
AND
CONDITIONS
CONDITIONS
CONDITIONS
OFOFOF
USE
USE
USE
Your phone conforms to international regulations insofar as it is used under normal conditions and in ac cordance with the
following instructions.
19.1
19.1
19.1
Conditions
Conditions
Conditions
ofofof
Use
Use
Use
Electromagnetic
Electromagnetic
Electromagnetic
waves
waves
waves
• Do not switch on your phone aboard an aircraft (as your
phone may interfere with the aircraft ’ s electronic systems).
Current legislation forbids this use and legal action can be
taken against the user.
• Do not switch on your phone in a hospital, except in
designated areas.
• Use of your phone ’ s function may affect the performance of
medical electronic units (pacemakers, hearing aids, insulin
pumps, etc.).
• When the phone function is on, do not bring it near medical
equipment or into areas in which medical equipment is being
used. If you have a hearing aid or a pacemaker, only use the
phone on the opposite side of your body from where it is
located. The phone should be kept at least 6 inches (15.24 cm )
from a pacemaker ANYTIME the phone is switched on.
• Do not switch on your phone near gas or flammable
substances.
• Observe the rules concerning the use of mobile phones at
petrol stations, chemical plants and at all sites where a risk of
explosion exists.
19.2
19.2
19.2
Caring
Caring
Caring
for
for
for
your
your
your
phone
phone
phone
• Do not allow children to use your phone without
supervision.
• Do not open or attempt to repair your phone yourself.
The product can only be repaired by authorized service
personnel.
• Do not drop your phone or subject it to severe impacts.
Bending the body and pushing the display or keys with
extreme force could damage the phone.
• Do not use solvents to clean your phone. Use only a soft,
dry cloth.
• Do not carry your phone in your back pocket as it could
break when you sit down. The display is made of glass and is
particularly fragile.
• Avoid touching the external connector on the underside of
the phone, since the delicate components within can be
damaged by static electricity.
19.3
19.3
19.3
Battery
Battery
Battery
• Use your phone only with batteries, chargers and
accessories recommended by the manufacturer. The
manufacturer disclaims any liability for damage caused by
the use of other chargers, batteries or accessories.
Page 29

29 of 36
• Network configuration and phone usage will affect talktime and stand-by time.
• Using the camera or playing games will hasten battery
consumption.
• When the battery charging alert is displayed on the screen,
charge the battery as soon as possible. If you continue using
your phone ignoring the alert, the phone may cease to
function, and all data and settings you have stored may be
lost at any moment.
• Before removing the battery from the phone, make sure the
phone is switched off.
• Replace and charge the new battery as soon as possible
after removing the old one.
• Do not touch the battery terminals. Batteries can cause
damage, injury or burns if a conductive material touches
exposed terminals. When the battery is detached from the
phone, use a cover made of nonconductive material for
keeping and carrying the battery safely.
• The r ecommended temperature for using and storing
batteries is approximately 20 ° C.
• The batter y ’ s performance is limited in low temperatures,
particularly below 0 ° C and the phone may not work
temporarily regardless of the amount of remaining battery
power.
• Exposing the phone to extreme temperatures will shorten
battery life.
• The battery can be charged and discharged hundreds of
times but it will eventually wear out. When the operating
time (talk-time and stand-by time) is noticeably shorter than
normal, it is time to buy a new battery.
• Your device uses a removable lithium-ion battery.
• Lithium-ion batteries are recyclable.
• Never dispose of the battery or the unit by incineration or
ordinary waste.
• Always turn off your device before removing the battery.
• Never attempt to disassemble or modify the battery.
• Never touch any fluid that may leak from the removable
battery, because doing so may result in injury to the skin or
eyes.
• Never drop your device or subject it to severe shock. This
may cause the removable battery to leak, ignite, and/or
rupture.
• Always immediately remove your device from the vicinity
of any open flame in the event the built-in battery leaks or
emits an unusual odor.
CAUTION
CAUTION
CAUTION
RISK OF EXPLOSION IF BATTERY IS REPLACED
BY AN INCORRECT TYPE,
DISPOSE OF USED BATTERIES ACCORDING
TO THE INSTRUCTIONS
See “ Battery Disposal ” .
Battery
Battery
Battery
Disposal
Disposal
Disposal
The device is supported by a battery. In order to protect the
environment, please read the following points concerning
Page 30

30 of 36
battery disposal:
• Take the used battery to your local waste depot, dealer or
customer service centre for recycling.
• Do not expose the used battery to an open flame, into water
or dispose with the household waste.
191919
.4.4.4
ACACAC
Adapter
Adapter
Adapter
• Do not unplug the AC Adapter with wet hands. Doing so
may cause electric shock.
• Do not place containers with liquids on or next to the AC
Adapter or main unit. Fire or electric shock may result if the
container tips over and water or another liquid is spilled
inside either the AC Adapter or main unit.
• Do not attempt to modify, disassemble, or repair the AC
Adapter .
• When not in use, disconnect the AC Adapter from the wall
outlet and the main unit for safety reasons.
• Continuing to use the AC Adapter when it is exhibiting
abnormal behavior, such as getting too hot, emitting smoke,
or giving off an abnormal smell, may lead to fire or electric
shock. In such cases, unplug the AC Adapter from the wall
outlet and turn off power to the main unit immediately.
• If planning to leave the main unit unused for long periods
of time, unplug the AC Adapter from both the wall outlet and
the main unit for safety reasons.
• Do not place paper, cloth, bedding, or any other materials
over the AC Adapter . Doing so may cause the main unit to
malfunction .
• The AC Adapter that came with the main unit is
specifically designed for that unit. Do not attempt to use it
with other devices.
19.
19.
19.
555
Aerial
Aerial
Aerial
Care
Care
Care
• Use only the aerial supplied or one approved by Sharp for
your mobile phone. Using unauthori z ed or modified aerials
may damage the mobile phone.
Moreover, since the mobile phone may violate the
appropriate regulations, it may lose performance or exceed
the limitation of SAR levels.
• To avoid impaired performance, do not damage the aerial
of the mobile phone.
• While talking directly to the microphone, please hold the
mobile phone so that the aerial is upwards over your shoulder .
• To avoid interfering with blasting operations, please turn
off the mobile phone in a blasting area or in a place where a
“ turn off two-way radio ” sign is posted.
19.
19.
19.
666
Camera
Camera
Camera
Operation
Operation
Operation
• Learn picture quality, file formats, etc. beforehand.
The taken pictures can be saved in JPEG format.
• Be careful not to move your hand while taking pictures.
If the phone moves while taking a picture, the picture can be
blurred. When taking a picture, hold the phone firmly to
prevent it from moving, or use the delay timer.
• Clean the lens cover before taking a picture. Fingerprints,
oils, etc. on the lens cover hinder clear focusing. Wipe them
Page 31

31 of 36
off with a soft cloth before taking a picture.
19.
19.
19.
777
Others
Others
Others
• As with any electronic storage unit, data may be lost or
corrupted under various circumstances.
• Before connecting the phone to a PC or a peripheral unit,
read the operation manual for the other unit carefully.
• If the phone ’ s battery has been removed for some time, or if
the phone has been reset, the unit ’ s clock and calendar may
be reinitiali z ed. The date and time should be updated in this
case.
• Use only the specified headset . Some functions may not
work when an unauthori z ed handsfree kit is used.
• Using this device for long periods of time (e.g., playing
games) may cause the device and the battery charger to get
warm. If you feel the device or the battery charger is too
warm, avoid sustained contact with exposed skin otherwise
this might cause discomfort, or eventually a burn .
19.
19.
19.
888
Environment
Environment
Environment
• Keep your phone away from extreme heat. Do not leave it
on the dashboard of a car or near a heater. Do not leave it in
any place that is extremely damp or dusty.
• Since this product is not waterproof, do not use it or store it
where fluids such as water can splash onto it.
Raindrops, water spray, juice, coffee, steam, perspiration, etc .
will also cause a malfunction.
• Charge the battery at a temperature between 0 ° C and 45 ° C.
If in a place where the temperature exceeds this range, move
to a cooler place, etc. before reconnecting the AC Adapter
and charging the battery.
19.
19.
19.
999
Precautions
Precautions
Precautions
Concerning
Concerning
Concerning
Vehicle
Vehicle
Vehicle
Use
Use
Use
• It is the user ’ s responsibility to check the local laws
governing the use of a mobile phone in vehicles. Pay full
attention to driving. Pull off to the side of the road, park the
car, and switch off the engine before making or answering a
call.
• Use of your phone ’ s function may interfere with the
vehicle ’ s electronic systems, such as the ABS antilock brakes
or the air-bag. To ensure no such problem occurs, please
check with your dealer or car
manufacturer before connecting your phone.
• Only allow qualified service maintenance personnel
to install the vehicle accessories.
The manufacturer disclaims any liability for damage
which may result as a consequence of improper use or
use contrary to the instructions contained herein.
19.
19.
19.
101010
Specific
Specific
Specific
Absorption
Absorption
Absorption
Rate
Rate
Rate
(((
SAR
SAR
SAR
)))
Your Sharp mobile phone has been designed, manufactured
and tested so as not to exceed the limits for exposure to
electromagnetic fields as required by the FCC .
These limits are part of comprehensive guidelines developed
Page 32

32 of 36
by independent scientific organi z ations. The guidelines
include a substantial safety margin designed to assure the
safety of the phone user and others and to take into account
variations in age and health, individual sensitivities and
environmental conditions. The exposure standards provide
for the amount of radio frequency electromagnetic energy
absorbed by the body when using a mobile phone to be
measured by reference to the Specific Absorption Rate
(SAR). The SAR limit for the general public is currently 1.6
W/kg averaged over 1 grams of body tissue. Your Sharp
mobile phone SAR value is 1.41 W/kg. This has been tested
to ensure that this limit is not exceeded even when the phone
is operating at its highest certified power. In use however
your Sharp mobile phone may operate at less than full power
because it is designed to use only sufficient power to
communicate with the network.
19.11
19.11
19.11
FCC
FCC
FCC
NOTICE
NOTICE
NOTICE
This device complies with part 15 of the FCC Rules.
Operation is subject to the following two conditions:
(1) This device may not cause harmful interference, and
(2) T his device must accept any interference received,
including interference that may cause undesired operation.
Changes or modifications not expressly approved by the
manufacturer responsible for compliance could void the
user ’ s authority to operate the equipment.
The use of accessories that do not satisfy these requirements
may not comply with FCC RF exposure requirements, and
should be avoided. While there may be differences between
the SAR levels of various phones and at various positions,
they all meet the government requirement for safe exposure.
The FCC has granted an Equipment Authorization for this
model phone with all reported SAR levels evaluated as in
compliance with the FCC RF emission guidelines. SAR
information on this model phone is on file with the FCC and
can be found under the Display
Grant section of http://www.fcc.gov/oet/fccid after searching
on FCC ID APYNAR0073.
This equipment complies with FCC RF radiation exposure
limits set forth for an uncontrolled environment.
This equipment should be installed and operated with a
minimum distance of 1.5 centimeters between the radiator
and your body.
This equipment has been tested and found to comply with the
limits for a Class B digital device, pursuant to Part 15 of the
FCC Rules. These limits are designed to provide reasonable
protection against harmful interference in a residential
installation. This equipment generates, uses and can radiate
radio frequency energy and, if not installed and used in
accordance with the instructions, may cause harmful
interference to radio communications. However, there is no
guarantee that interference will not occur in a particular
installation.
Page 33

33 of 36
If this equipment does cause harmful interference to radio or
television reception which can be determined by turning the
equipment off and on, the user is encouraged to try to correct
the interference by one or more of the following measures:
-- Reorient or relocate the receiving antenna.
-- Increase the separation between the equipment and eceiver.
-- Connect the equipment into an outlet on a circuit different
from that to which the receiver is connected.
-- Consult the dealer or an experienced radio/TV technician
for help.
222
000
LIMITED
LIMITED
LIMITED
WARRANTY
WARRANTY
WARRANTY
This Limited Warranty is in addition to, and does not affect
your legal (Statutory) rights under your applicable national
laws relating to sale of Consumer Products.
Sharp Business Systems (India) Limited ( “ SHARP ” )
provides this Limited Warranty to person who has purchased
the SHARP Product(s) included in the sales package
( “ Product ” ).
SHARP Warrants to you that during the warranty period
SHARP or SHARP authorised service provider will in a
commercially reasonable time remedy defects in material,
design and workmanship free of charge by repairing or
should SHARP in its absolute discreti on deem it necessary to ,
replacing the product in accordance with this limited
warranty (Unless otherwise required by law). This Limited
Warranty is only valid and enforceable in the country where
you have purchased the product provided that it is intended
for sale in that country.
Warranty Period : Mobile Phones
Warranty period commences from the date of purchase by
the first end-user.
Duly filled up warranty card and original invoice should be
presented to avail warranty benefits.
The warranty is confined to the first end-user purchaser of
the product only and is not transferable.
Repairs under warranty period shall be carried out by the
company authorised personnel only. The details of service
centres / support required are available at the company
website www.sbsil.com or in the centralised helpline (1800
4254322).
It is responsibility of the purchaser to contact the nearest
authorised service centre and bring the unit to the authorised
service centre at purchaser's cost and risk.
Calls registered with the centralised helpline / authorised
Product
Product
Product
Warranty
Warranty
Warranty
Period
Period
Period
Part
Part
Part
Not
Not
Not
Covered
Covered
Covered
GSM Mobile
Phones
GSM - Handset : 12 Months
Battery, Headset, Data Cable, AC
adapter : 6 Months
Page 34

34 of 36
service centre, wherein only cleaning of the unit / parts in the
unit due to dust gathering on portions of the unit, general
explanations / returning, particular software not being read /
installed, are not to be construed as defects. The company
does not undertake responsibility on the quality of software
been installed by purchaser.
In the event of repairs of any part/s of the unit, this warranty
will thereafter continue and remain in force only for the
unexpired period of the warranty. The time taken for repair
and in transit whether under the warranty or otherwise shall
not be excl uded from the warranty period.
Any change of address by the original purchaser shall be
intimated to the concerned authorised service centre by the
purchaser, and warranty will be applicable only after
inspection of the unit and clearance of c ondition by
Authorised Service Centre personnel.
In case of any damage to the product / misuse detected by the
authorised service centre personnel, the warranty conditions
are not applicable and repairs will be done subject to
availability of parts and on chargeable basis only.
The company's obligation under this warranty shall be
limited to repair or providing replacement of part/s only. The
maximum claim/s if entertained by the company will be
subject to the maximum retail price of the product purchased
at prevailing rate as o n the date of the claim settlement or the
original purchase price as depreciated up to the date of claim
settlement, whichever is lower.
In the event of any unforeseen circumstance, and spares not
being available, the company ’ s prevailing depreciation rules
will be binding on the purchaser to accept as a commercial
solution in lieu of repairs.
In the event of the company offering EXTENDED
WARRANTY period for any specific product / period, it is
the RESPONSIBILITY OF THE PURCHASER to get the
warranty card duly registered with the nearest Authorised
Service Centre of the company within 2 weeks of purchasing
under such an offer, at the purchaser ’ s own cost and risk.
THIS WARRANTY IS NOT APPLICABLE IN ANY OF
THE FOLLOWING CASES:
The counterfoil of warranty card is not duly filled and mailed
back / submitted to the nearest Authorised Service Centre of
the company within 2 weeks of purchase.
The completed warranty card is not presented to the service
engineer at the time of repairs being undertaken / requested.
The product is not purchased from an Authorised SHARP
sales dealer.
The product purchased is not used according to instructions
given in the USER MANUAL, as determined by the
authorised service centre / company personnel.
Defects caused by improper use, as determined by the
Authorised Service Centre / Company personnel.
Modification or alterations of any nature made in the
circuitry by the purchaser or unauthorised personnel, as
determined by the company personnel.
Site (premises where the product is kept) conditions that do
not confirm to the recommended operating conditions of the
Page 35

35 of 36
Product.
The original serial number is removed, obliterated or altered
from the product.
Defects due to causes beyond control like lightning,
abnormal voltage, acts of God or while in transit to service
centre or to the purchaser's residence.
Defects caused by accident, impact, dropped on floor, Fire,
Water, damage to Product kept under heavy objects, Unit
exposed to moisture, dampness, extreme thermal or
environmental conditions, corrosion, oxidation, spillage of
food/liquid or influence from chemical products, household
pets, rats or any other animals or insects.
Under no circumstance the company is liable for loss directly
or indirectly for any of the following:
Third party claims against customer for losses or damages.
Loss or damages to records, information or data.
Economic consequential damages including lost profits.
Customer is advised to take back up of data/ contents before
handing over the unit for repair. The company shall not
provide data/content backup service. In case of repair, hard
disk contents may be destroyed and customer will not be
informed in advance. The company shall not be liable for any
data, records or program lost due to repair.
Warranty does not cover user manuals or any third party
software, settings, content, data or links, whether
included/downloaded in product.
Warranty does not cover normal wear and tear (including,
without limitation, wear and tear of camera lenses, batteries
or displays).
Warranty does not cover defects or alleged defects caused by
the fact that the product was used with, or connected to, a
product, accessories, software and/or service not
manufactured, supplied or authorised by SHARP or was used
otherwise than for its int ended use, Defects can be caused by
viruses from your or from third party ’ s unauthorised access
to services, other accounts, computer systems or networks.
This unauthorised access can take place through hacking,
password-mining or through a variety of mea ns.
Warranty does not cover defects caused by the fact that the
battery has been short-circuited or by the fact that the seals of
the battery enclosure or the cells are broken or show
evidence of tampering or by the fact that the battery has been
used in equi pment other than those for which it has been
specified.
222
111
OUT
OUT
OUT
OFOFOF
WARRANTY
WARRANTY
WARRANTY
LIST
LIST
LIST
This limited warranty shall not apply in respect of the
following:
(i) Any deterioration due to normal wear and tear including
all plastic surfaces and all other externally exposed parts that
are scratched or damaged due to normal customer use.
(ii) Defects caused by the Product being subjected to any of
the following: use in contradiction with the user guide, rough
Page 36

36 of 36
handling, exposure to moisture, dampness or extreme thermal
or environmental conditions or rapid changes in such
conditions, corrosion, oxidation, unauthori z ed modifications
or connections, unauthori z ed opening or repair, repair by use
of unauthori z ed spare parts, misuse, improper installation,
accident, forces of nature, spillage of food or liquid,
influence from chemical products or other acts beyond
Sharp's reasonable control (including but not limited to
lifetime, and breakage of or damage to antennae) unless the
defect was caused directly by defects in materials or
workmanship.
(iii) Products in respect of which the product serial number
or the IMEI number has been removed, erased, defaced,
altered or made illegible.
(iv) Defects caused by the fact that the p roduct was used with
or connected to a product or an accessory not manufactured
or supplied by Sharp or was used other than for its intended
use.
(v) Defects caused by a defective function of the cellular
network.
(vi) Defects caused by the fact that the battery was shortcircuited or seals of the battery enclosure or cells were
broken or show evidence of tampering or the battery was
used in equipment other than for which it has been specified.
(vii)Defects caused by the need to upgrade the p roduct ’ s
software due to changes in cellular network parameters.
(viii)Products operated outside published maximum ratings.
(ix) Products rented on a monthly basis.
Charger Plug:
Do not use the AC Adapter if the plug does not fit the socket
WARRANTY
WARRANTY
WARRANTY
CARD
CARD
CARD
*Please fill in all the items.
Handset Model No: ----------------------- ------------------------------------------------ ----------------------------------
Handset I MEI No:---- (Please refer to the rating label.) ------------------------------------------------------------
Date of Purchase: -------------------------------------- -------------------------------------------- --------------------------
Seller ’ s Name & A ddress with Rubber Stamp
Mobile No:
Buyer ’ s Name & Address
Mobile No:
 Loading...