

Page 1
These buttons currently appear greyed out and cannot be clicked upon. When stock appears in
the list, the buttons will appear in black and can then be clicked on.
Click on ‘OK’.
If you want to print a report, click on ‘YES’. If you do not want to print a report, click on
‘NO’.
From here, click on either screen or printer. After you have done this, click on ‘OK’.
Set Stock Transfer:
Click here if you want to save the details of your transfer and update your stock.
Clear Stock Transfer Values:
Click here if you want to clear the details you have entered and not update your stock.
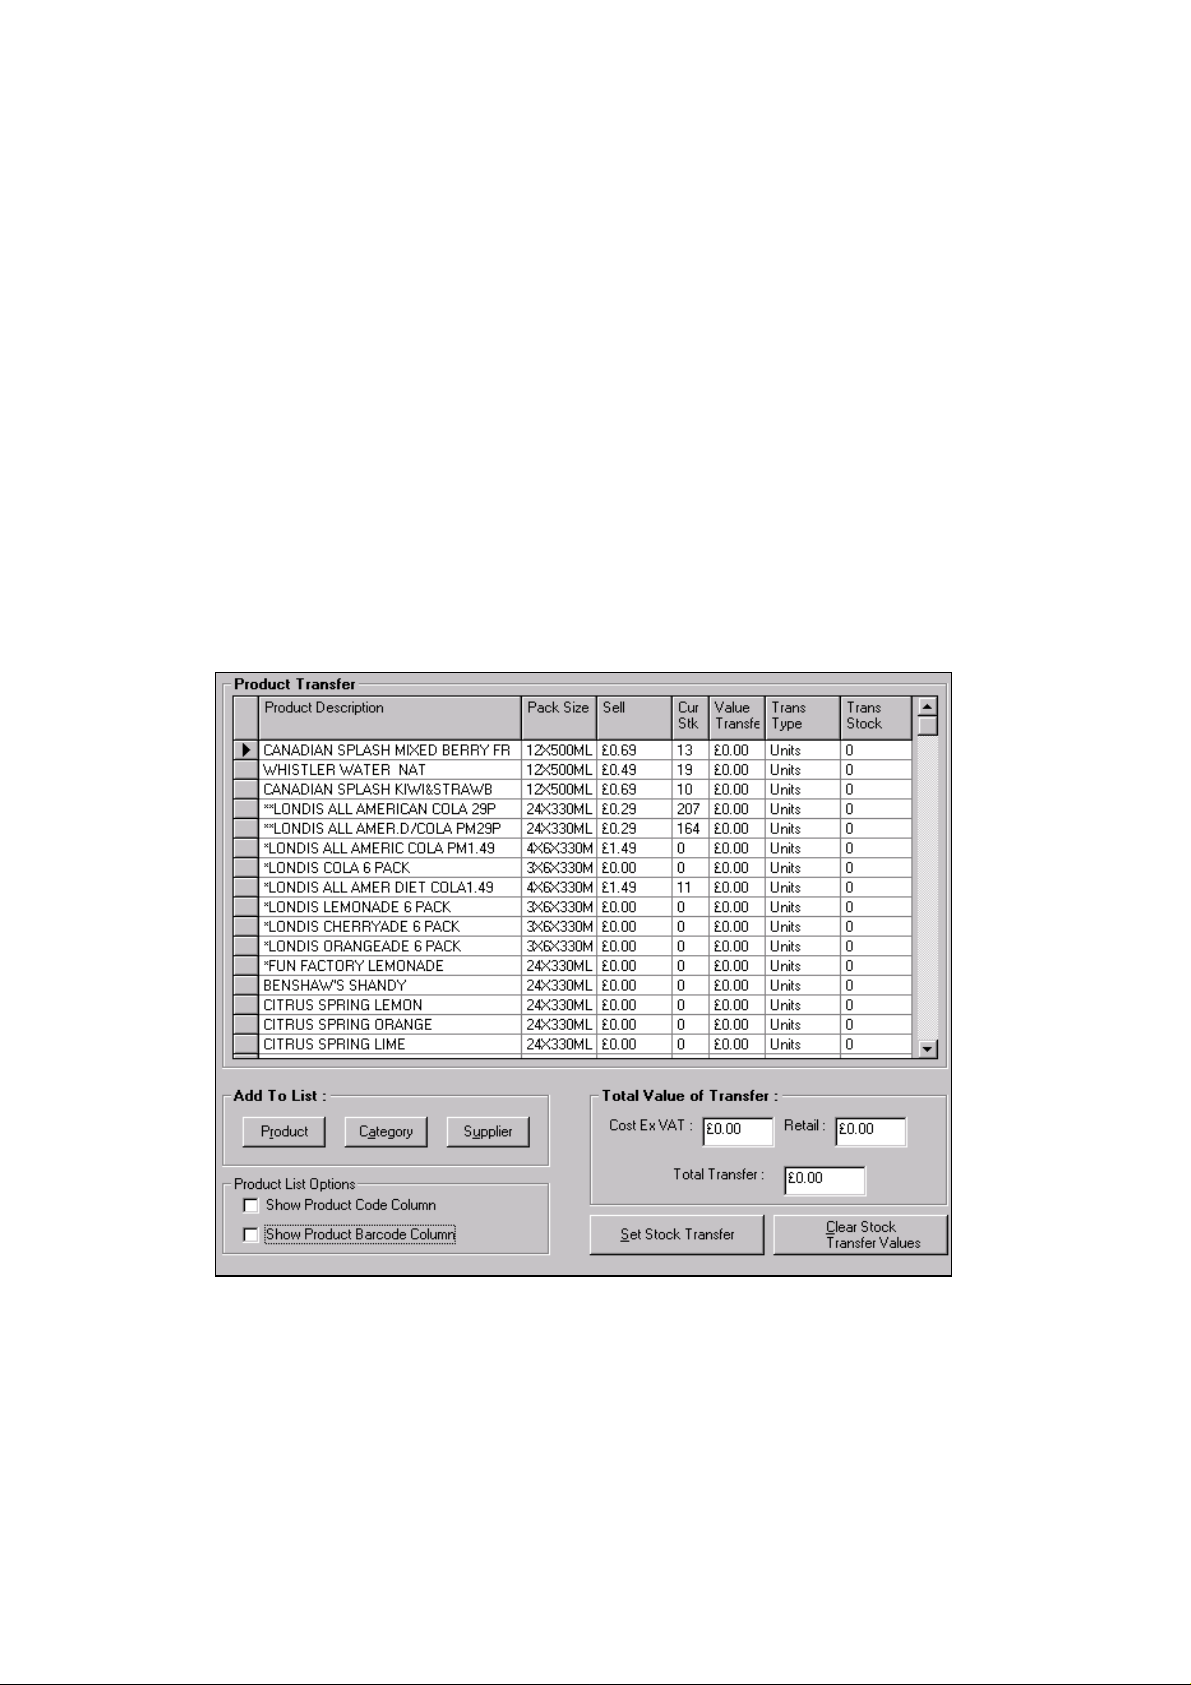
Once you have added the relevant products to your list, your screen will look something like
this:
From here, you can enter the quantity of stock that you want to transfer. To do this, click on
‘TAB’ on the keyboard until the ‘trans stock’ column is highlighted, and then type in the
quantity being transferred.
As you do this the ‘total value of transfer’ amounts and the ‘current stock’ total will be
automatically updated.
Sharp Electronics (UK) Ltd – Back Office User Manual 1999
Page 2
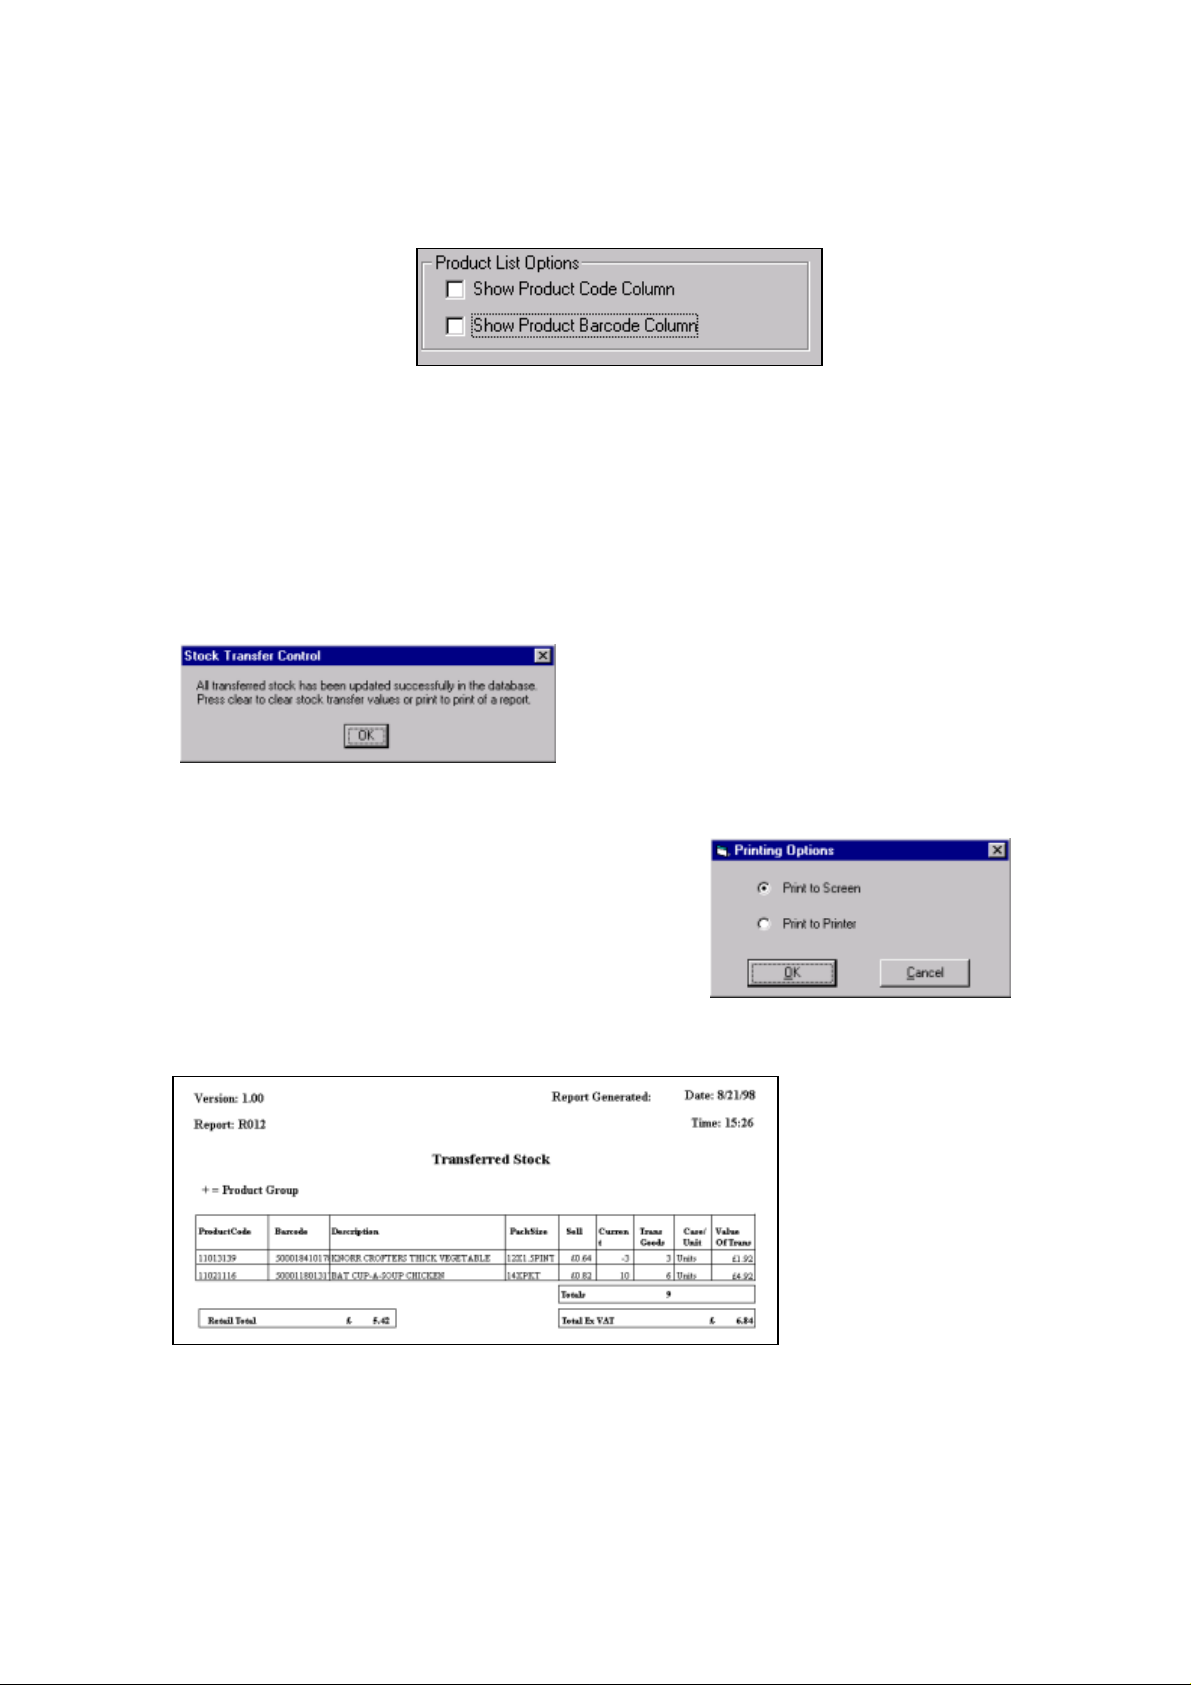
• The Product List Options also be used to show the Product Code, Barcode or Both, as
shown below:
Once you have entered all of the stock to be transferred, you can either:
• Click on the Set Stock Transfer button to save the changes you have made. This
displays the following pop-up screen:
If you choose to print a report, another pop-up screen appears:
An example of a stock transfer report is shown below:
OR
• Click on the Clear Stock Transfer Values to delete the changes you have made.
Sharp Electronics (UK) Ltd – Back Office User Manual 1999
Page 3
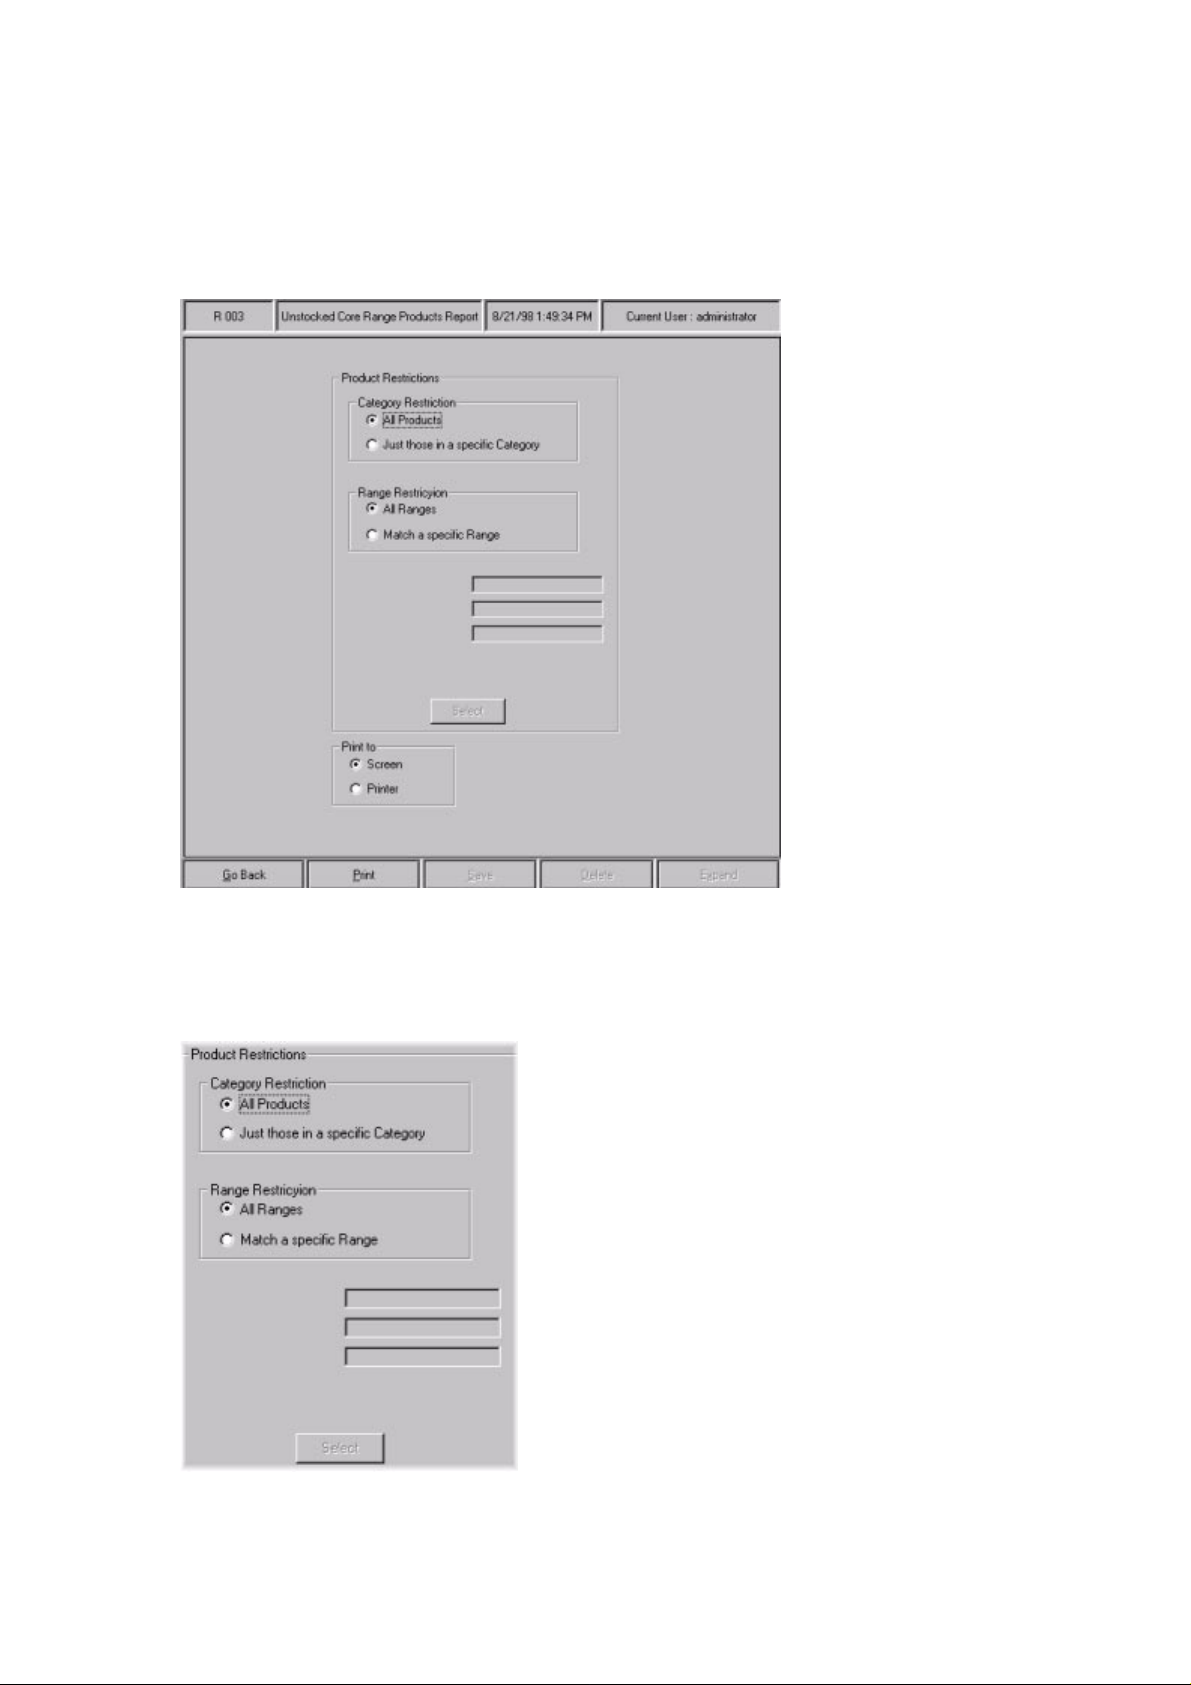
8.6 Run an Unstocked Core Range Products Report
To get to the
Core Range
unstocked core range products report
. This displays the following screen:
screen, navigate to
Stock→Unstocked
Lets look at this screen in more detail:
•
Product restrictions
Sharp Electronics (UK) Ltd – Back Office User Manual 1999
Page 4
If you want to run the report on products in a particular category, click on ‘just those in a
specific category’, and then click on the Select button. This displays the category selection
common function screen. For more details on the category selection common function
screen, refer to page 13.
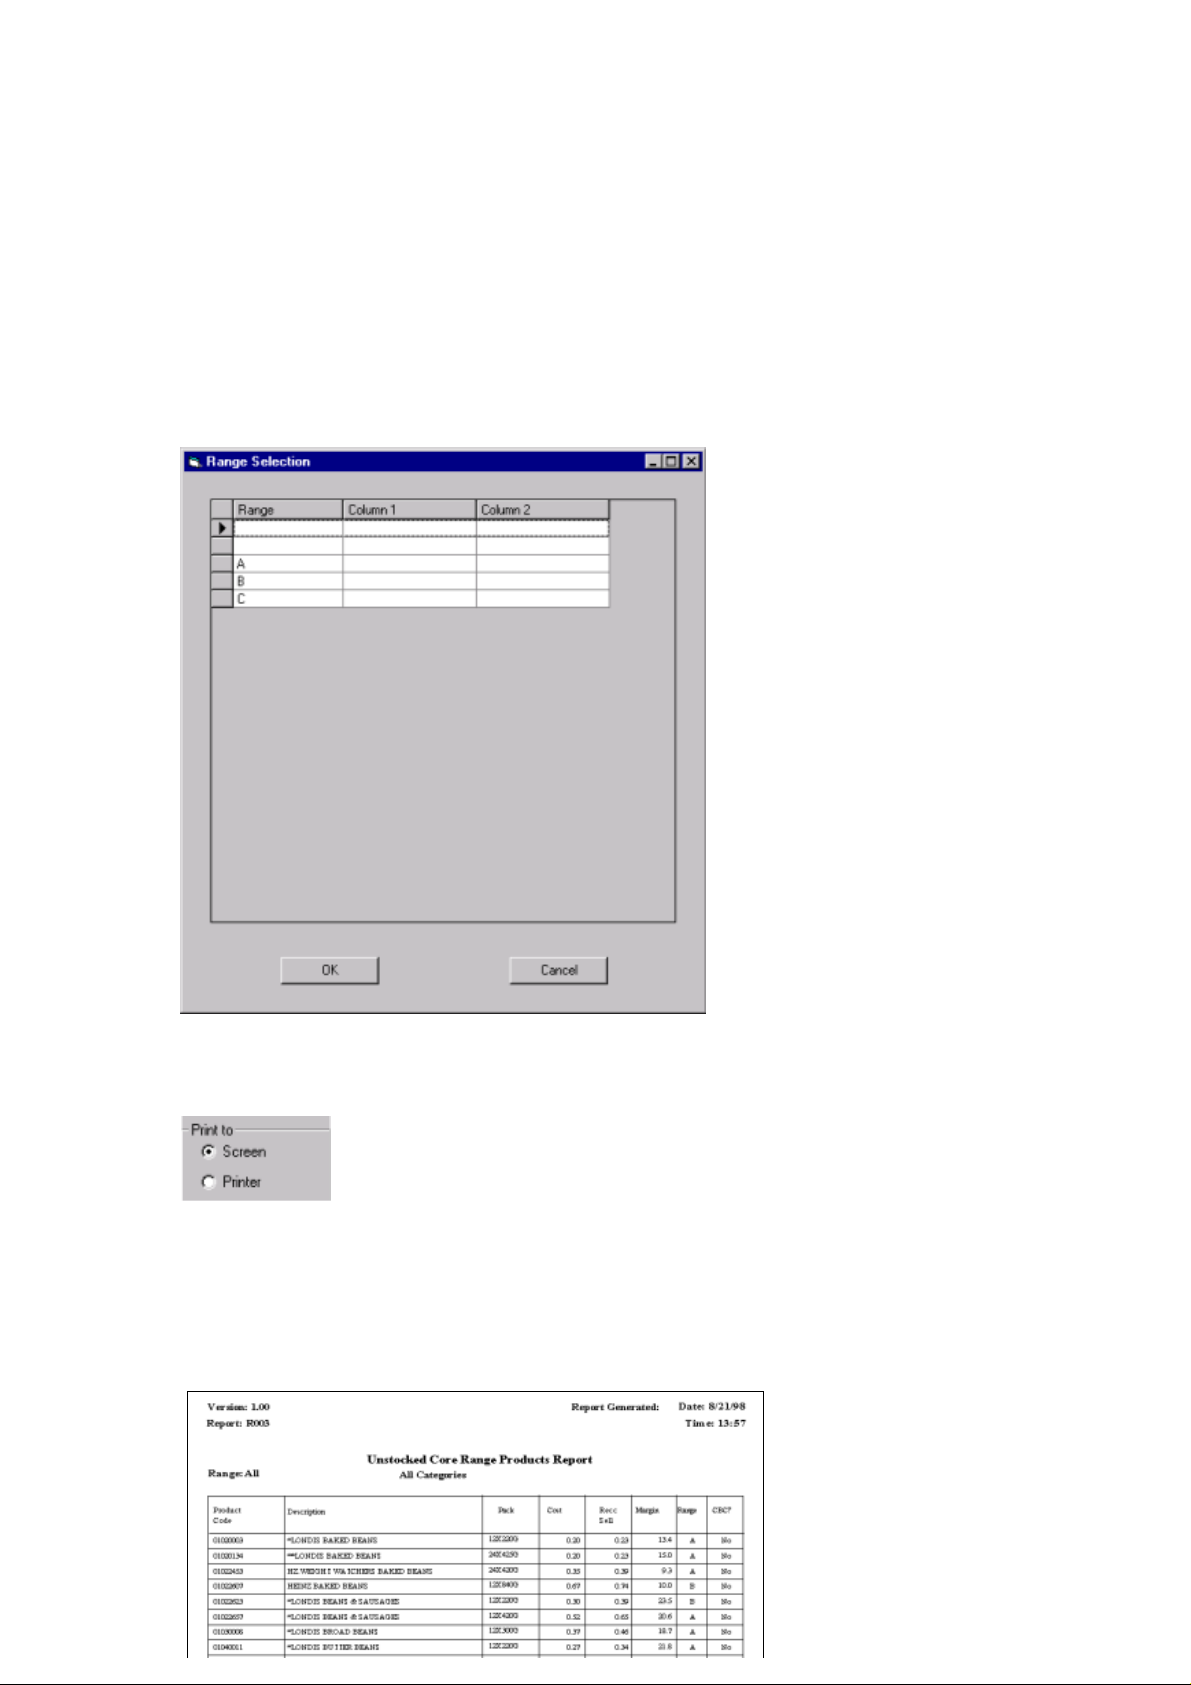
If you want to run the report on a specific range, click on ‘match a specific range’, and then
click on the Select button.
This displays the pop-up screen below:
• Print to
The unstocked core range products report can either be printed to the screen or to a printer.
From here, click on either screen or printer, and then click on the Print button at the bottom
of the screen.
This displays a report similar to the one below:
Sharp Electronics (UK) Ltd – Back Office User Manual 1999
Page 5

8.7 View the Suggested Deletions Product List
This section displays a list of products suggested for deletion by your preferred supplier.
To get to the
displays the following screen:
suggested deletions
screen, navigate to
Stock→Suggested Deletions
. This
If the screen is blank, it means that your preferred supplier suggests that no products should
be deleted at this time.
NOTE: The yellow colour change indicates that there are some products still in stock.
Sharp Electronics (UK) Ltd – Back Office User Manual 1999
Page 6
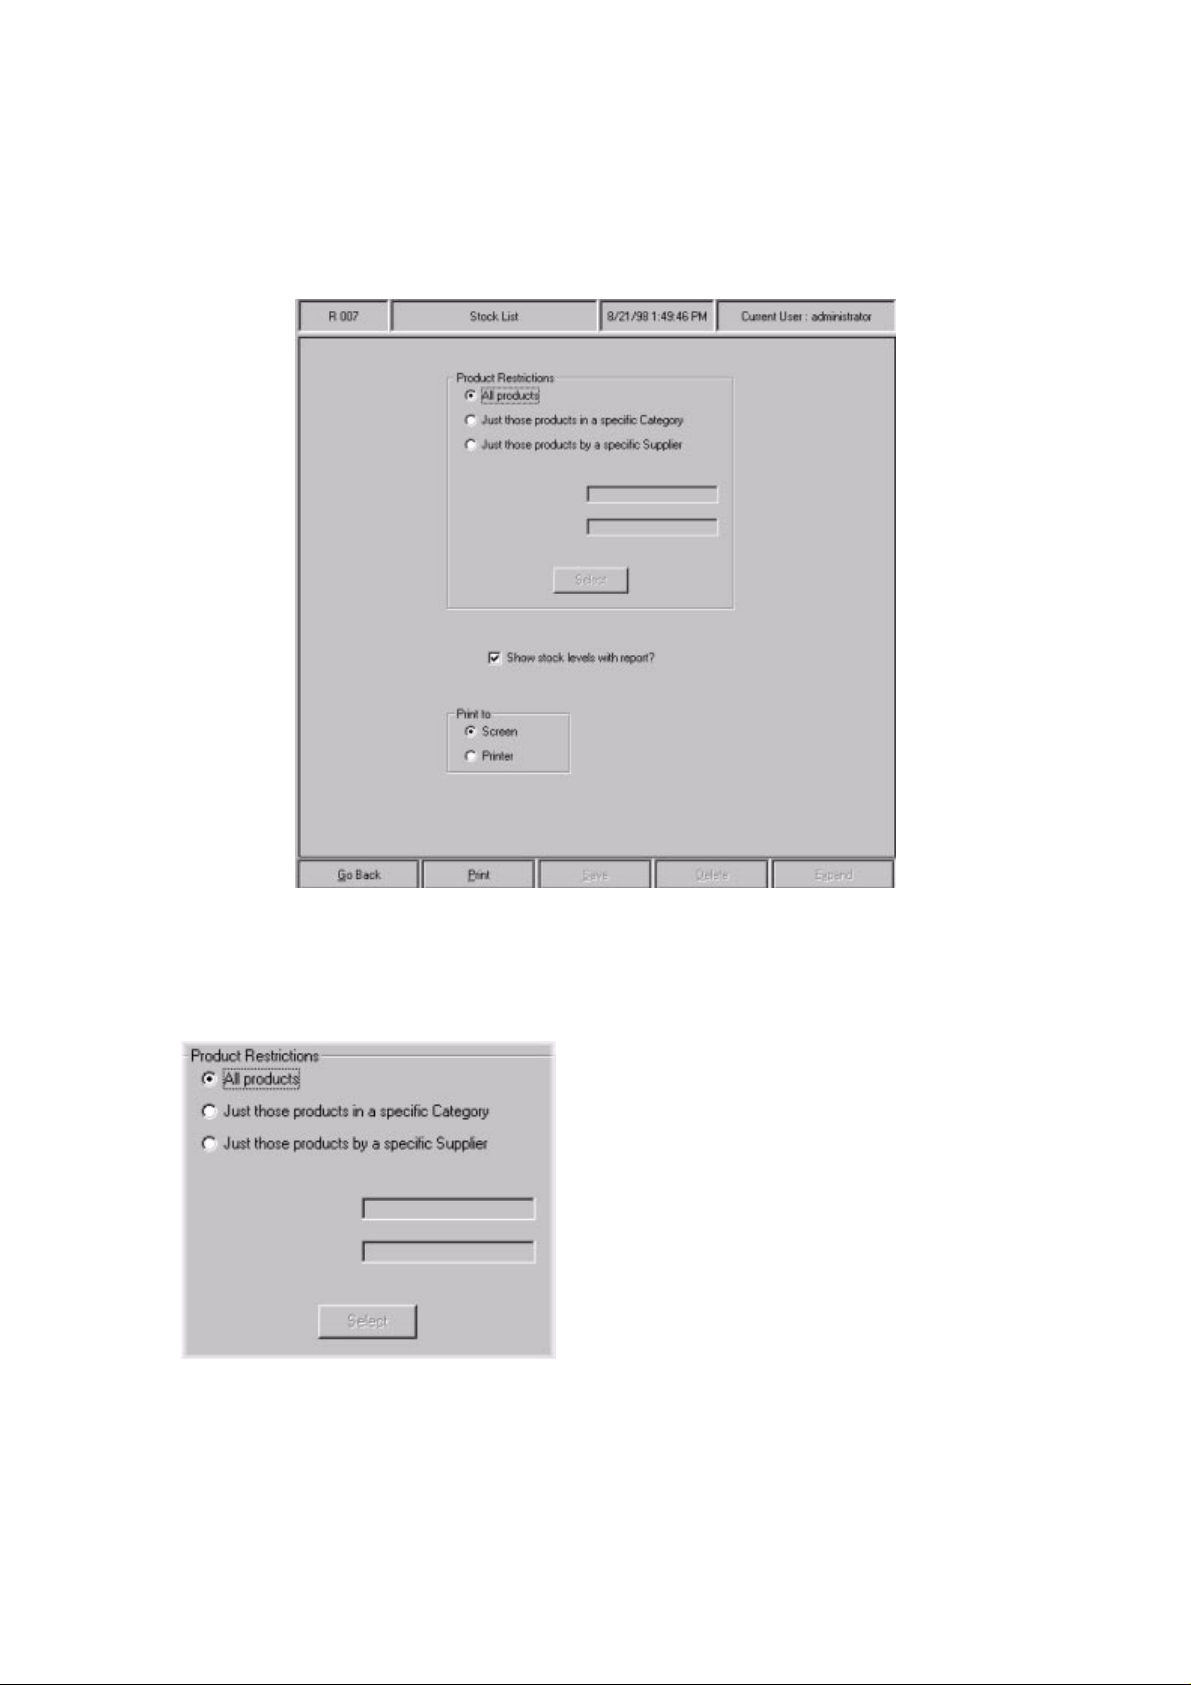
8.8 Run a Stock List Report
To get to the
screen:
stock list
screen, navigate to
Stock→Stock List
. This displays the following
Lets look at this screen in more detail:
•
Product restrictions
From here you can choose what products you want to appear in the
list to show products in a specific category, or products supplied by a particular supplier, just
click on the respective button.
• If you selected
products in a specific category
, click on the
stock list
Select
. If you want the
button.
Sharp Electronics (UK) Ltd – Back Office User Manual 1999
Page 7
This displays the category selection common function screen. For more details on common
functions and how to use them, refer to Chapter 2 – ‘COMMON FUNCTIONS’.
• If you selected products by a particular supplier, click on the Select button.
This displays the supplier box pop-up screen. For more details on how to use the supplier
box, refer to page 31.
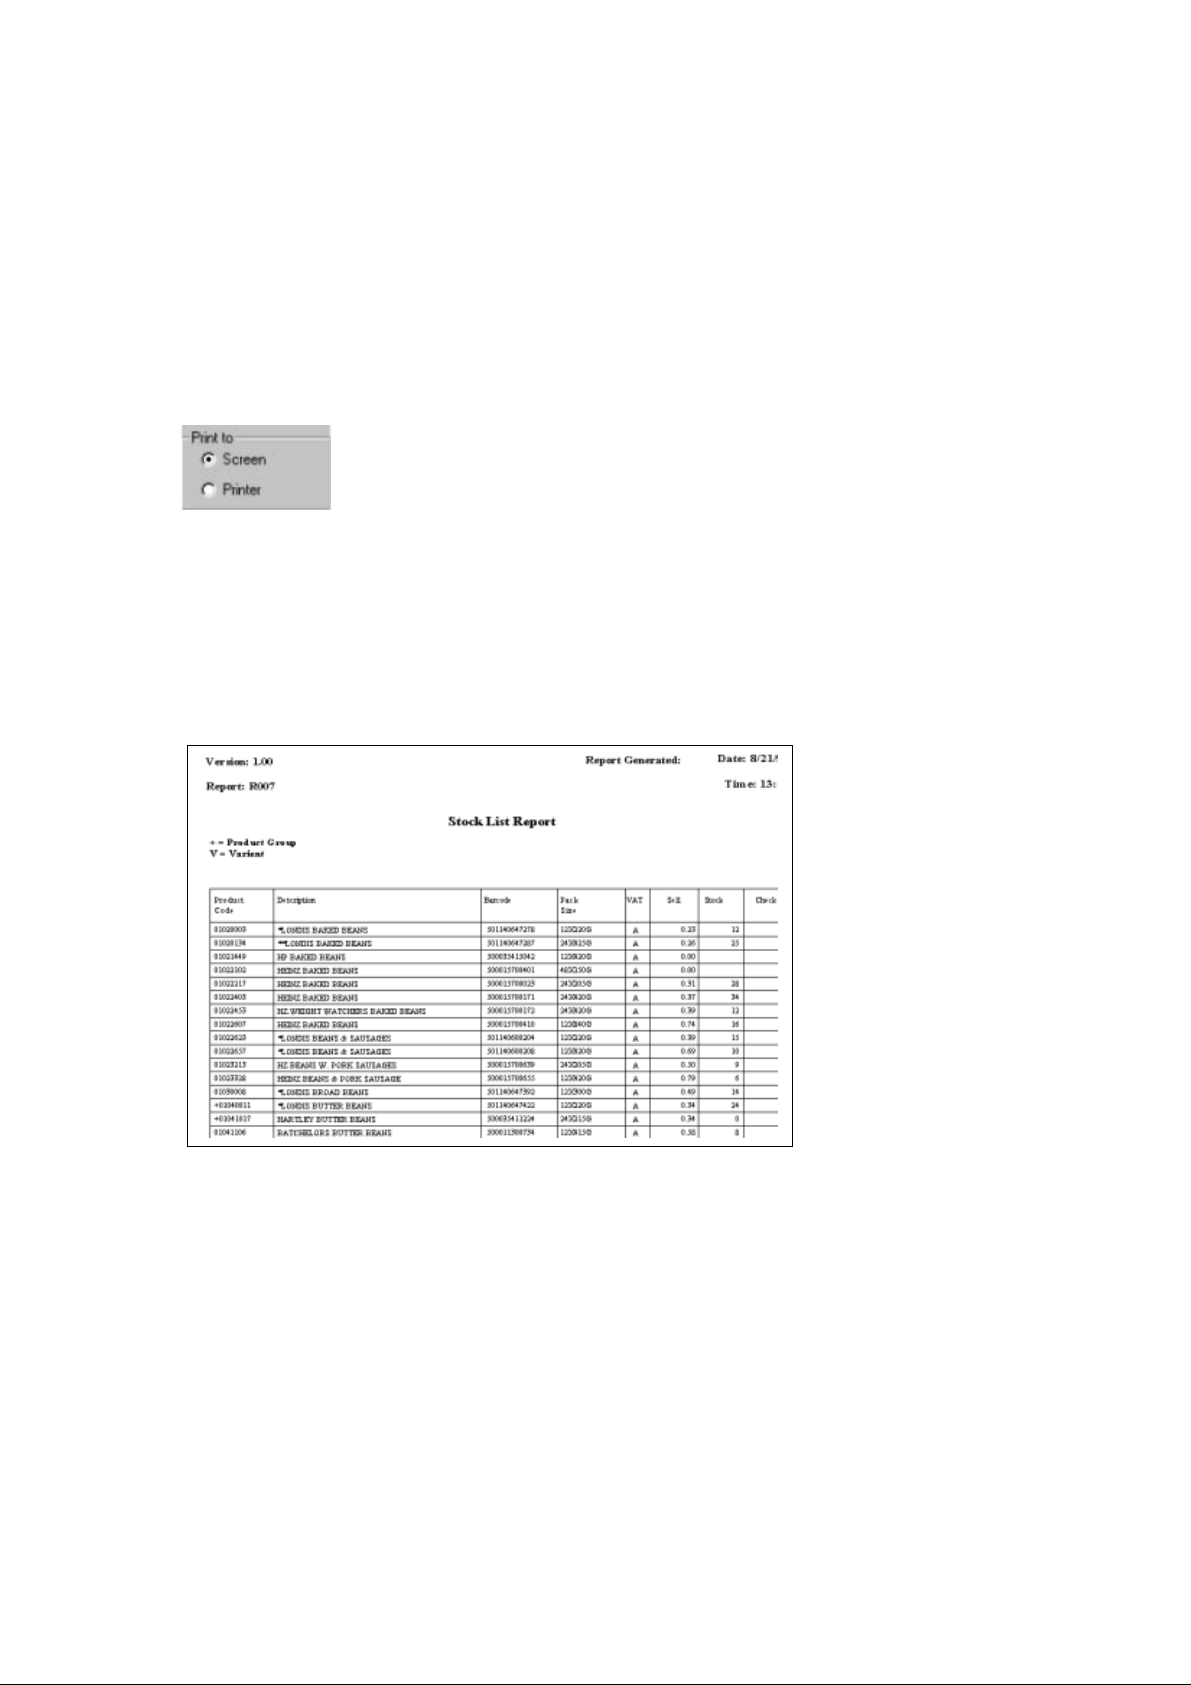
• Print to
The stock list can either be printed to the screen or to a printer. From here, click on either
screen or printer, and then click on the Print button at the bottom of the screen.
If you wish to show the existing level of stock in the report, click on the ‘show stock levels
with report’ box.
A list similar to the one below is then displayed:
Sharp Electronics (UK) Ltd – Back Office User Manual 1999
Page 8
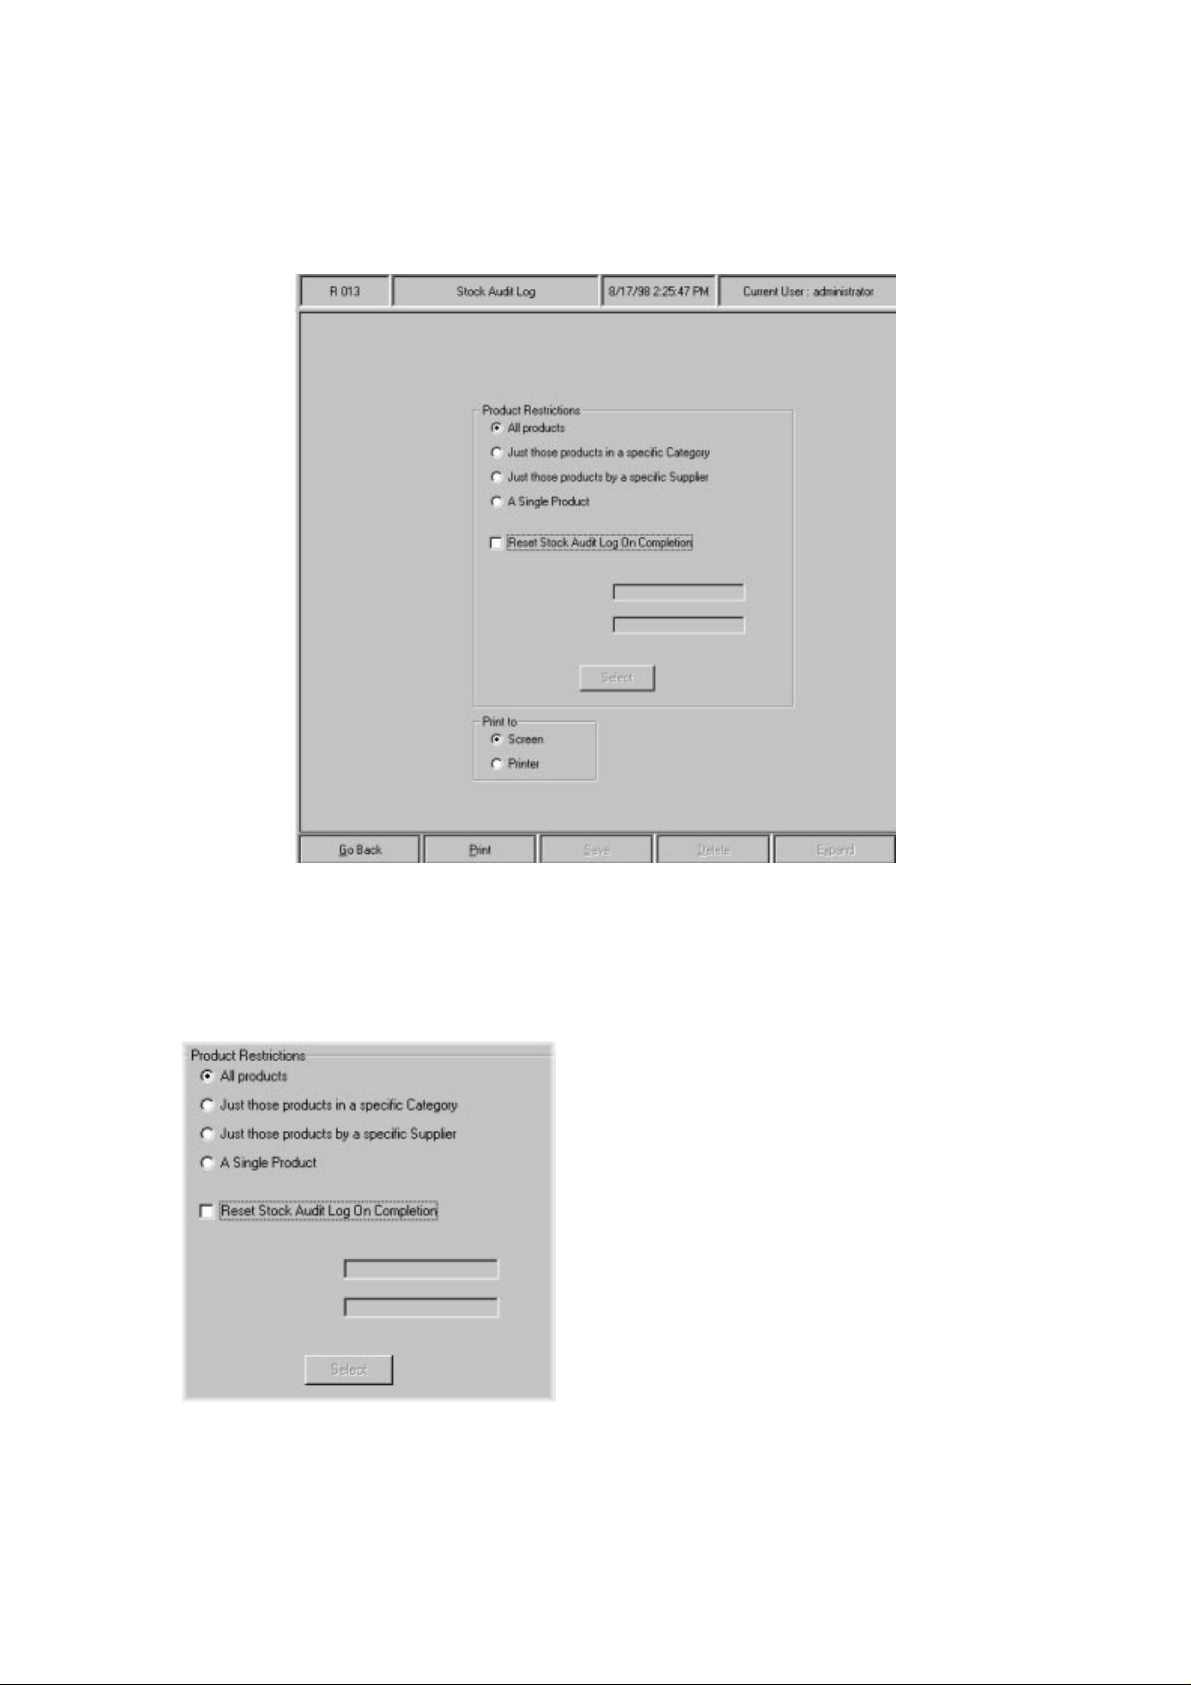
8.9 Run a Stock Audit Report
To get to the
following screen:
stock audit
screen, navigate to
Stock→Stock Audit
. This displays the
Lets look at this screen in more detail:
•
Product restrictions
From here you can choose what products you want to appear in the
want the report to show products in a specific category, products supplied by a particular
supplier, or even a single product, just click on the respective button.
• If you selected
products in a specific category
, click on the
stock audit
button.
Select
report. If you
Sharp Electronics (UK) Ltd – Back Office User Manual 1999
Page 9
This displays the category selection common function screen. For more details on common
functions and how to use them, refer to Chapter 2 – ‘COMMON FUNCTIONS’.
• If you selected products by a particular supplier, click on the Select button.
This displays the supplier box pop-up screen. For more details on how to use the supplier
box, refer to page 31.
• If you selected a single product, click on the Select button.
This displays the products search common function screen. For more details on how to use
the product search common function, refer to page 8.
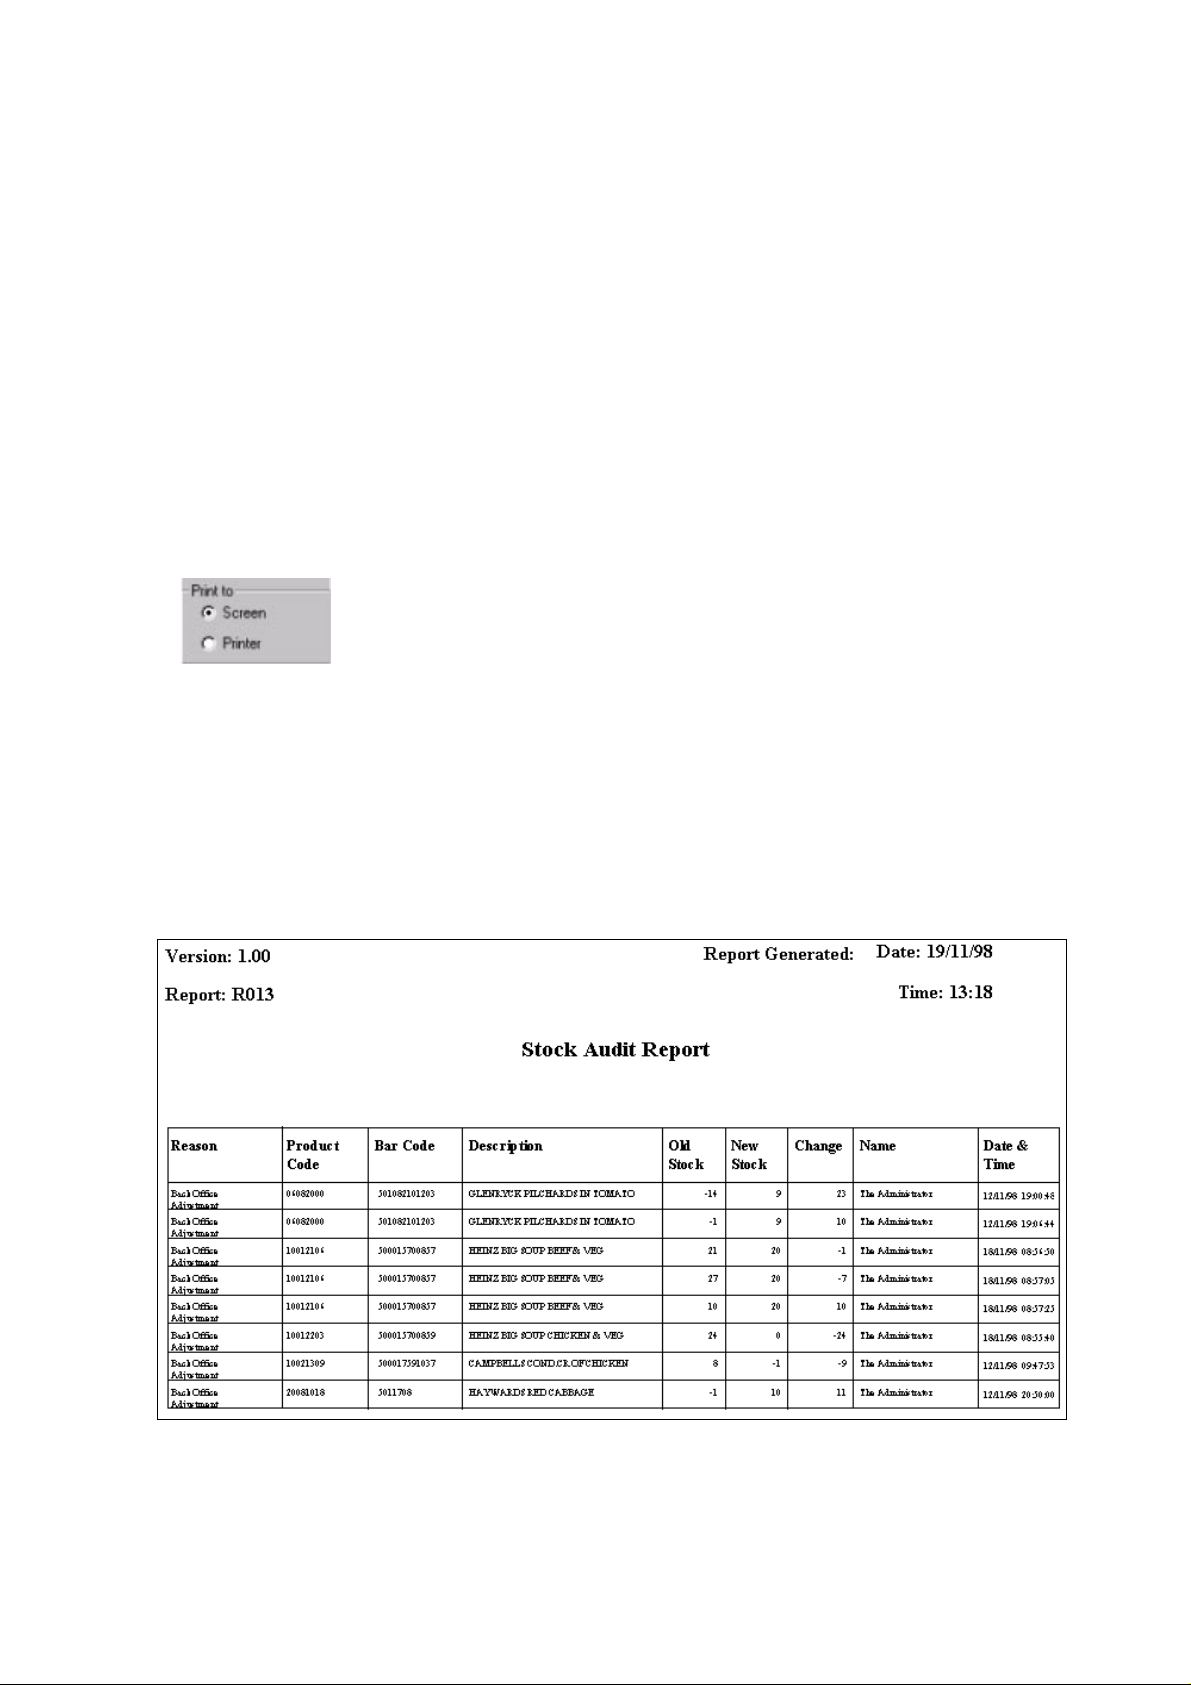
• Print to
The stock audit report can either be printed to the screen or to a printer. From here, click on
either screen or printer, and then click on the Print button at the bottom of the screen.
This displays a report similar to the one below:
Sharp Electronics (UK) Ltd – Back Office User Manual 1999
Page 10
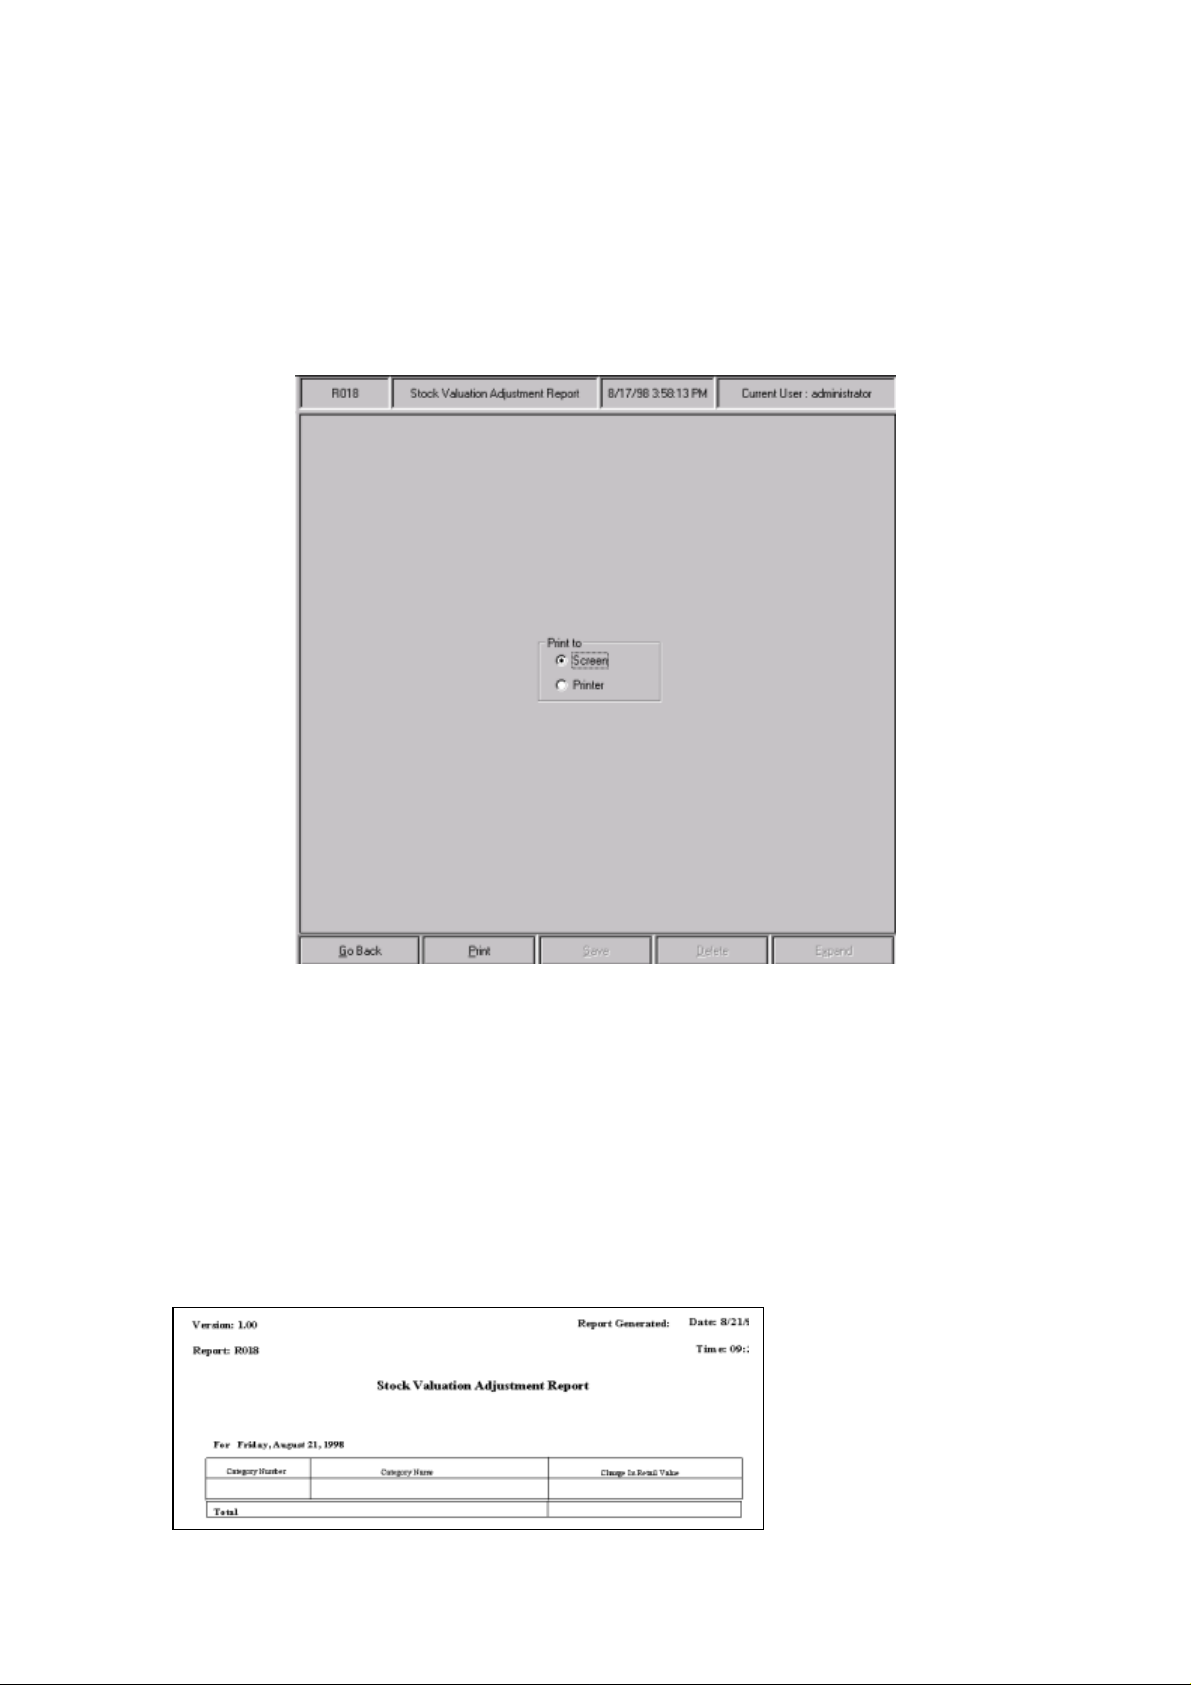
8.10 Run a Stock Value Adjustment Report
To get to the
This displays the following screen:
stock value adjustment
screen, navigate to
Stock→Stock Value Adjustment
.
To print the stock value adjustment report, click on either screen or printer, and then click on
the
Click on ‘OK’.
From here, click on either screen or printer. After you have done this, click on ‘OK’.
To select a range, click on its left-hand box (next to
This returns you to the
If you want the reports to show the Current stock prices, Click on:
If you want the report to show the old stock prices, Click on:
button. This displays the report below:
Print
unstocked core range products
), and then click on ‘OK’.
range
screen.
Sharp Electronics (UK) Ltd – Back Office User Manual 1999
Page 11

8.11 View a PLU List
To get to the
screen:
PLU list
screen, navigate to
Stock→PLU List
. This displays the following
Lets look at this screen in more detail:
•
Product restrictions
From here you can choose what products you want to appear in the
list to show products in a specific category, or products supplied by a particular supplier, just
click on the respective button.
• If you selected
This displays the
functions
and how to use them, refer to
category selection common function
products in a specific category
Chapter 2
, click on the
screen. For more details on
– ‘
COMMON FUNCTIONS
PLU list
Select
. If you want the
button.
common
’.
Sharp Electronics (UK) Ltd – Back Office User Manual 1999
Page 12
• If you selected products by a particular supplier, click on the Select button.
This displays the supplier box pop-up screen. For more details on how to use the supplier
box, refer to page 31.
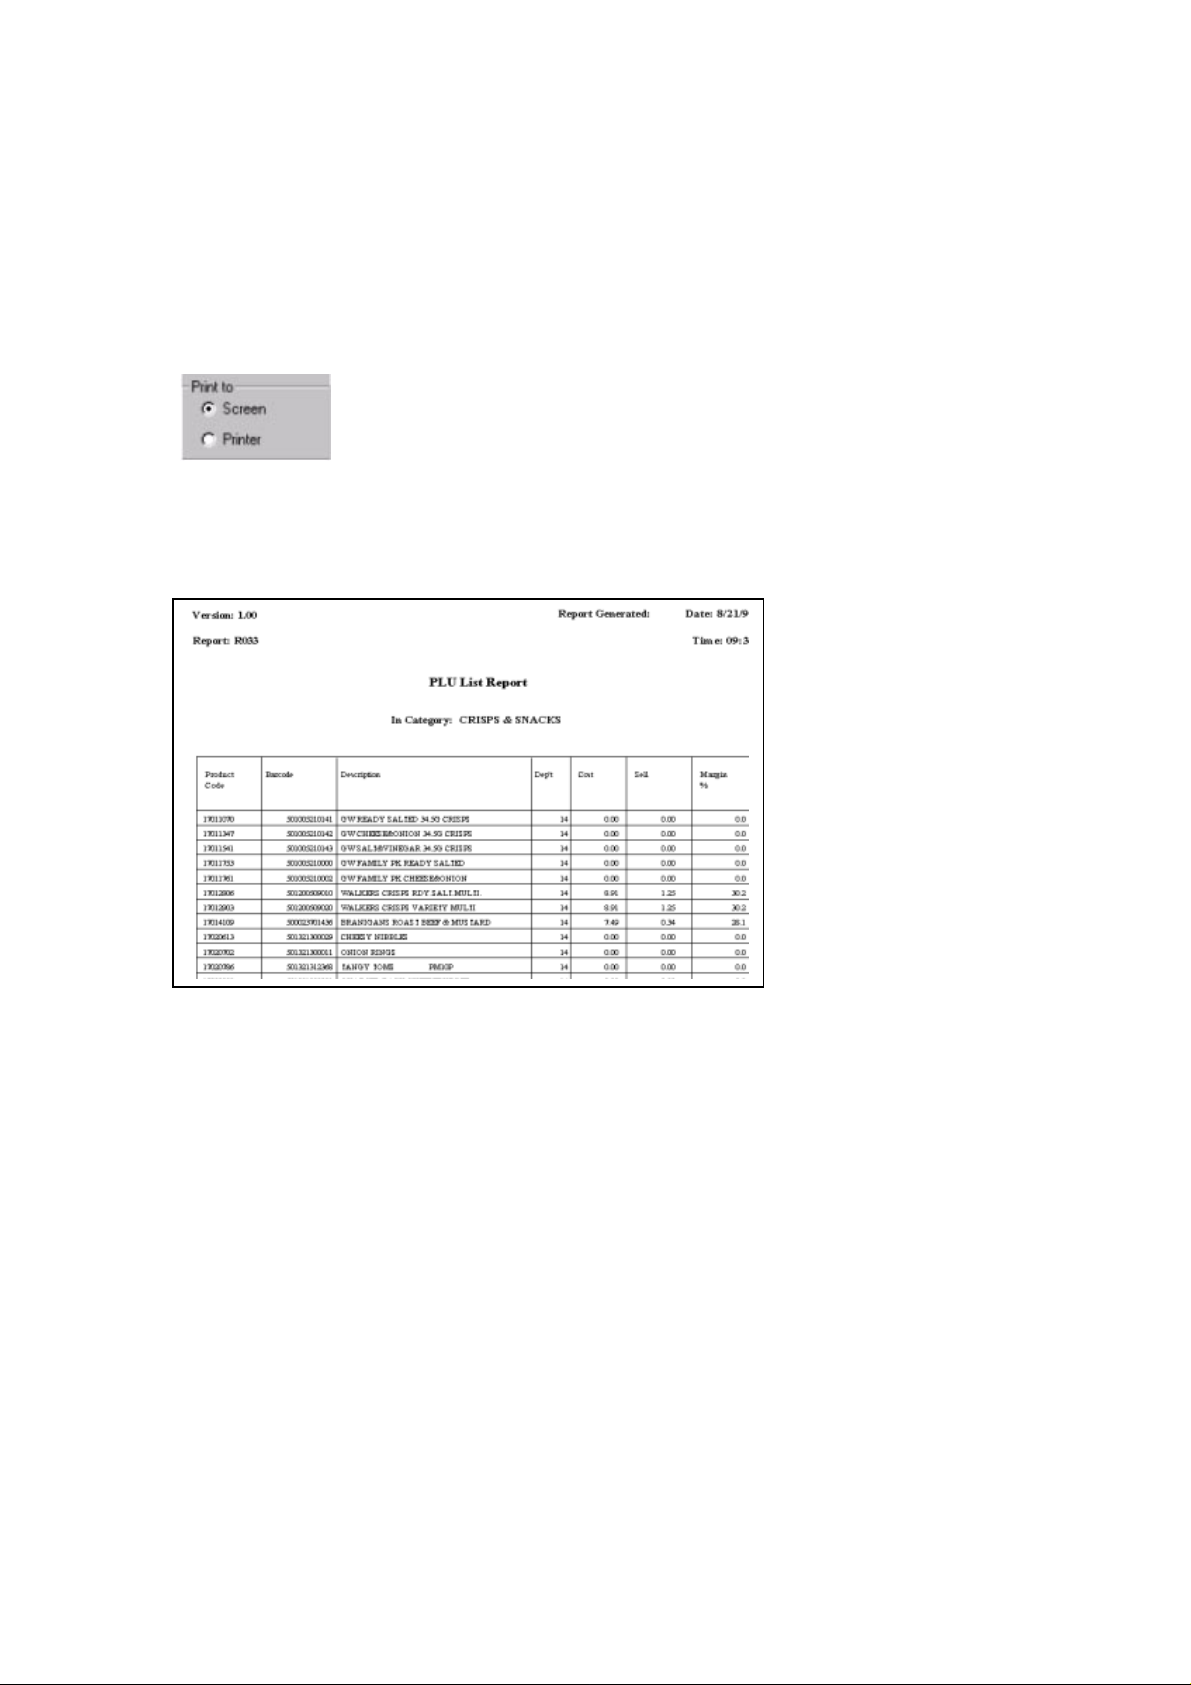
• Print to
The PLU list can either be printed to the screen or to a printer. From here, click on either
screen or printer, and then click on the Print button at the bottom of the screen.
A list similar to the one below is then displayed:
Sharp Electronics (UK) Ltd – Back Office User Manual 1999
Page 13
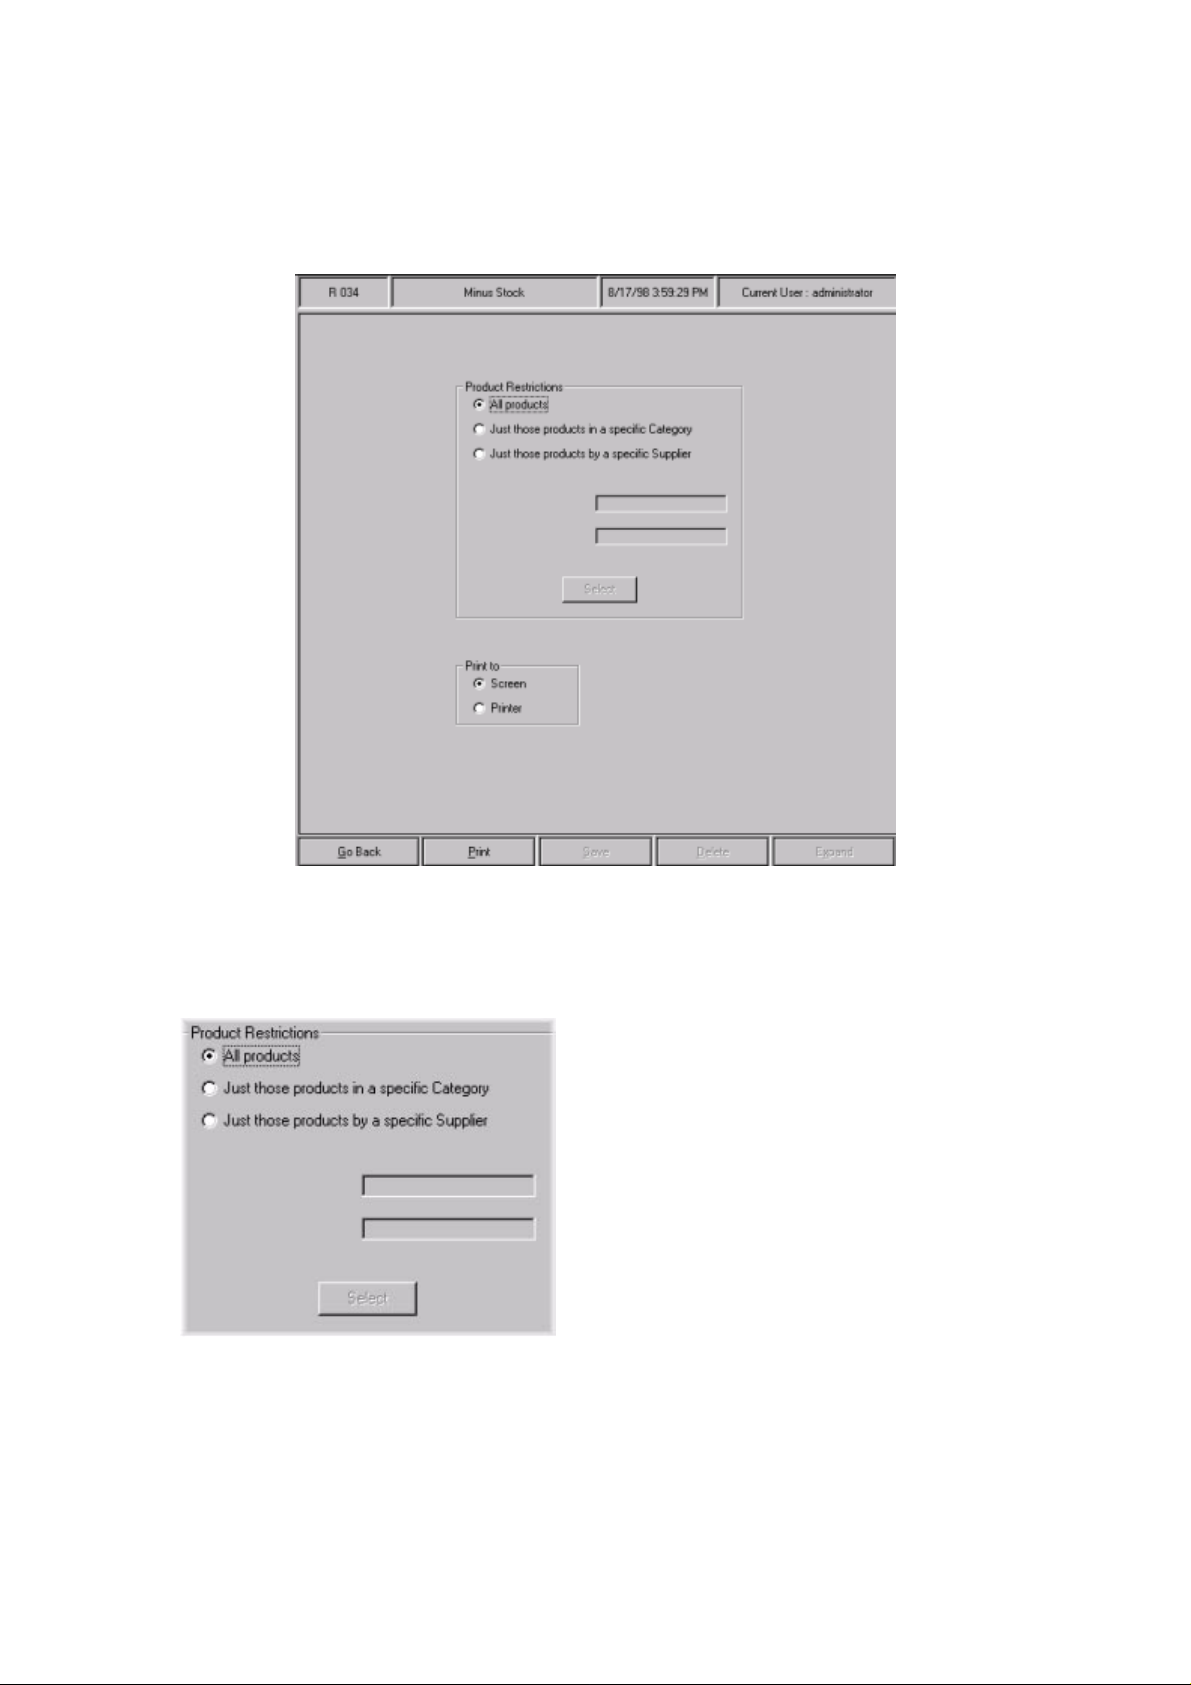
8.12 Run a Minus Stock Report
To get to the
following screen:
minus stock
screen, navigate to
Stock→Minus Stock
. This displays the
Lets look at this screen in more detail:
•
Product restrictions
From here you can choose what products you want to appear in the
you want the report to show products in a specific category, or products supplied by a
particular supplier, just click on the respective button.
• If you selected
products in a specific category
, click on the
minus stock
button.
Select
report. If
Sharp Electronics (UK) Ltd – Back Office User Manual 1999
Page 14
This displays the category selection common function screen. For more details on common
functions and how to use them, refer to Chapter 2 – ‘COMMON FUNCTIONS’.
• If you selected products by a particular supplier, click on the Select button.
This displays the supplier box pop-up screen. For more details on how to use the supplier
box, refer to page 31.
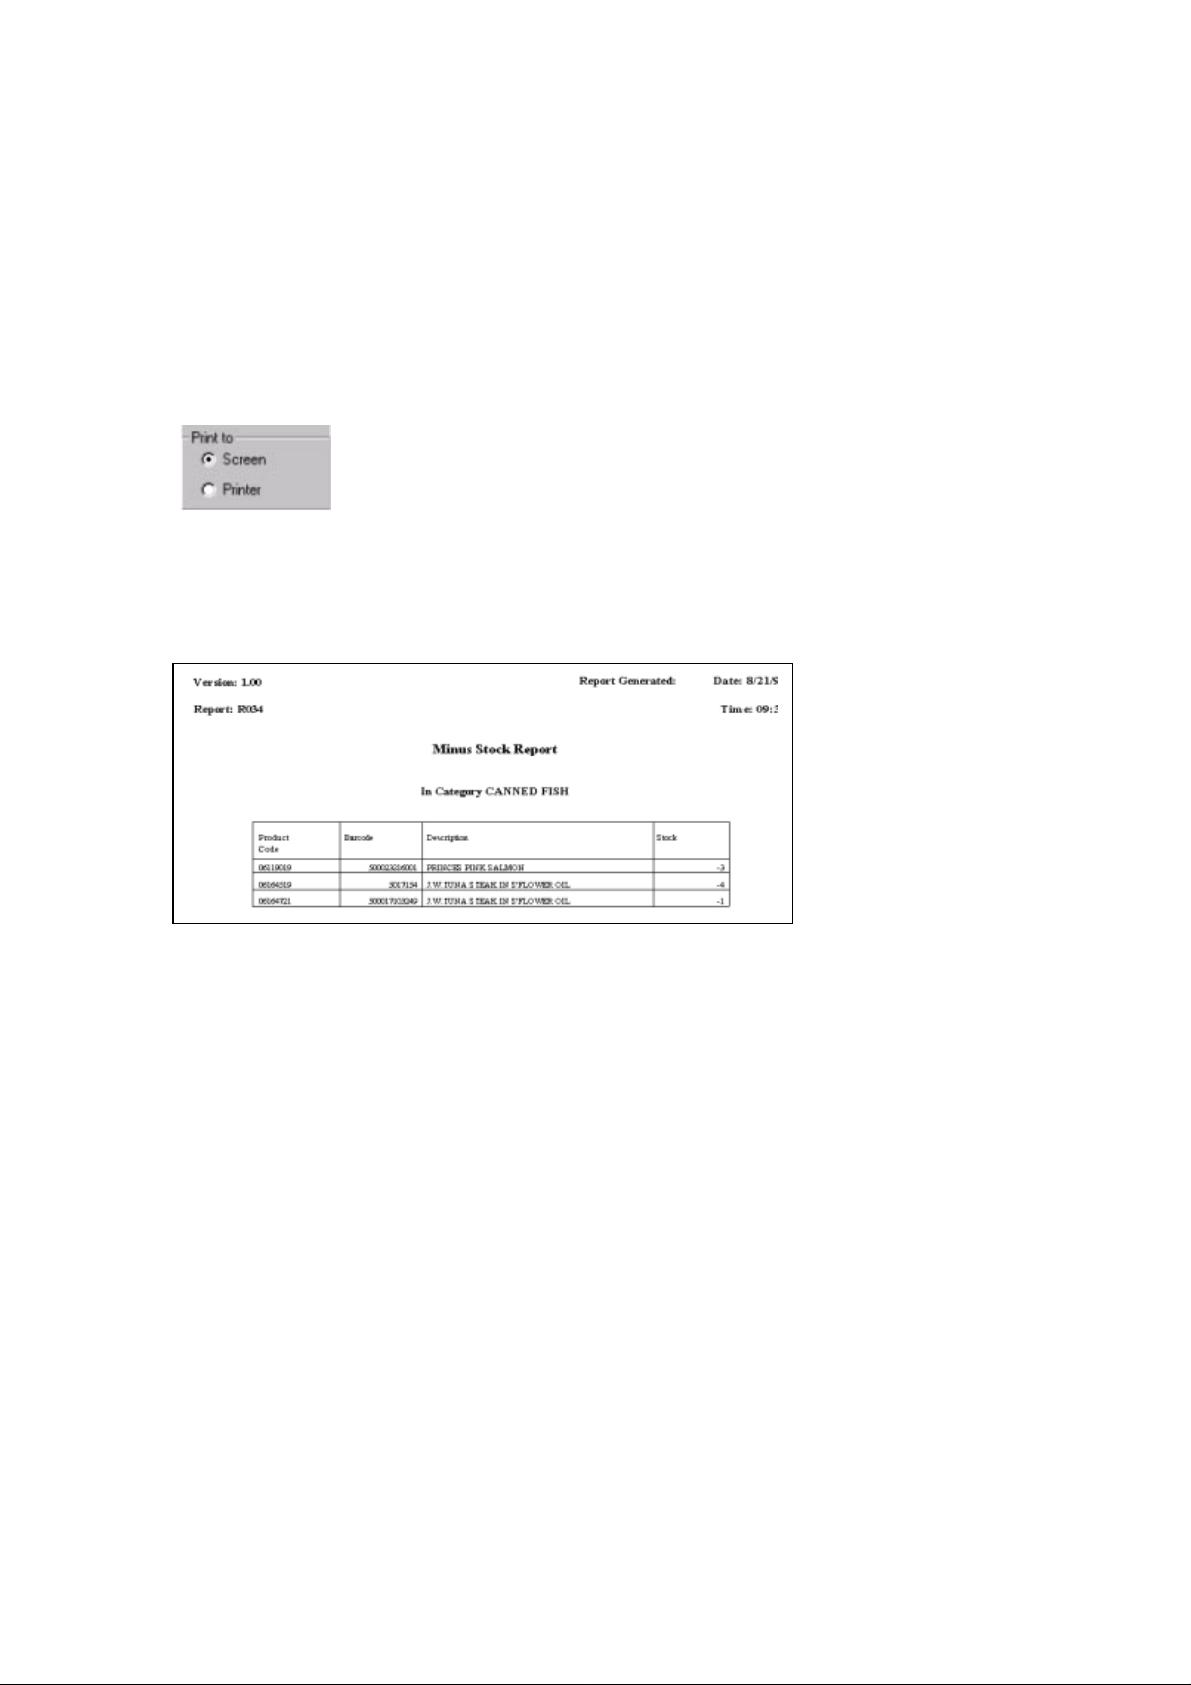
• Print to
The minus stock report can either be printed to the screen or to a printer. From here, click on
either screen or printer, and then click on the Print button at the bottom of the screen.
A report similar to the one below is then displayed :
Sharp Electronics (UK) Ltd – Back Office User Manual 1999
Page 15
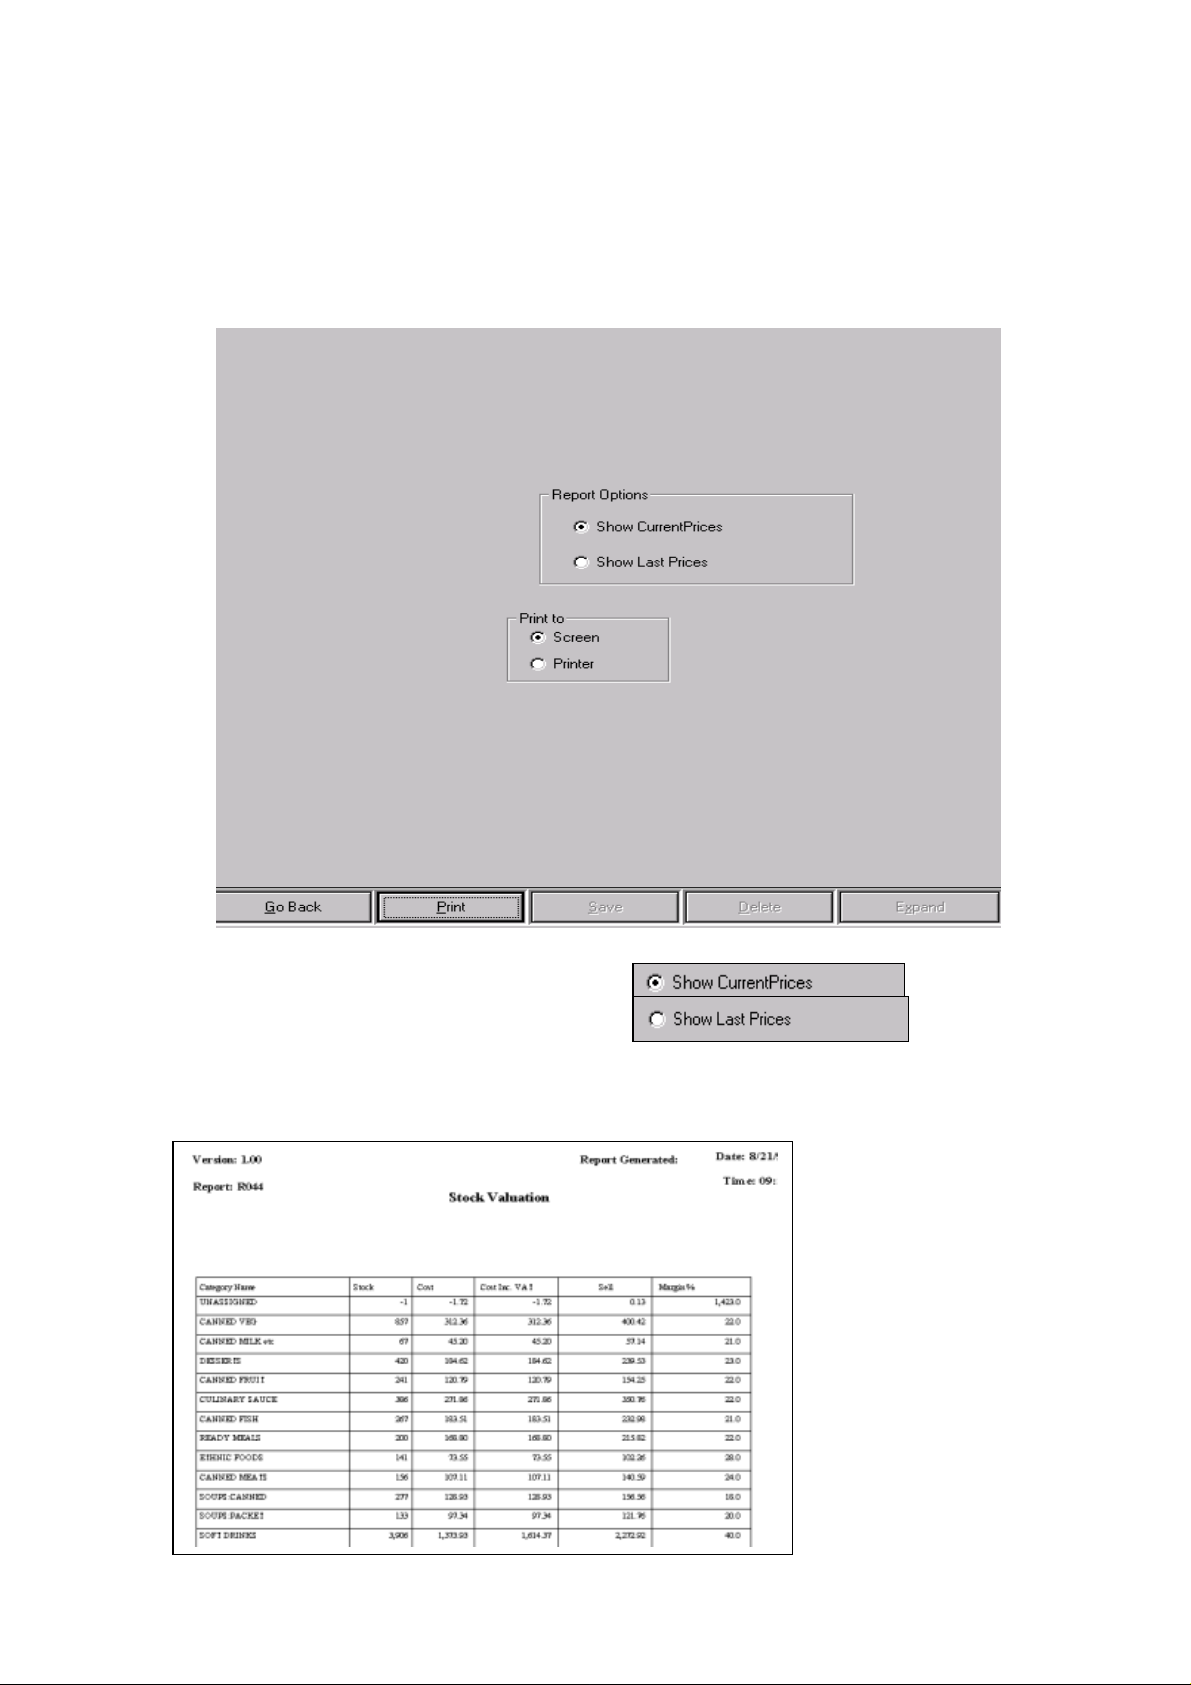
8.13 Run a Stock Valuation Report
To get to the
following screen:
stock valuation
screen, navigate to
Stock→Stock Valuation
. This displays the
To print the stock valuation report, click on either screen or printer, and then click on the
button.
Print
An example of a stock valuation report is shown below:
Sharp Electronics (UK) Ltd – Back Office User Manual 1999
Page 16
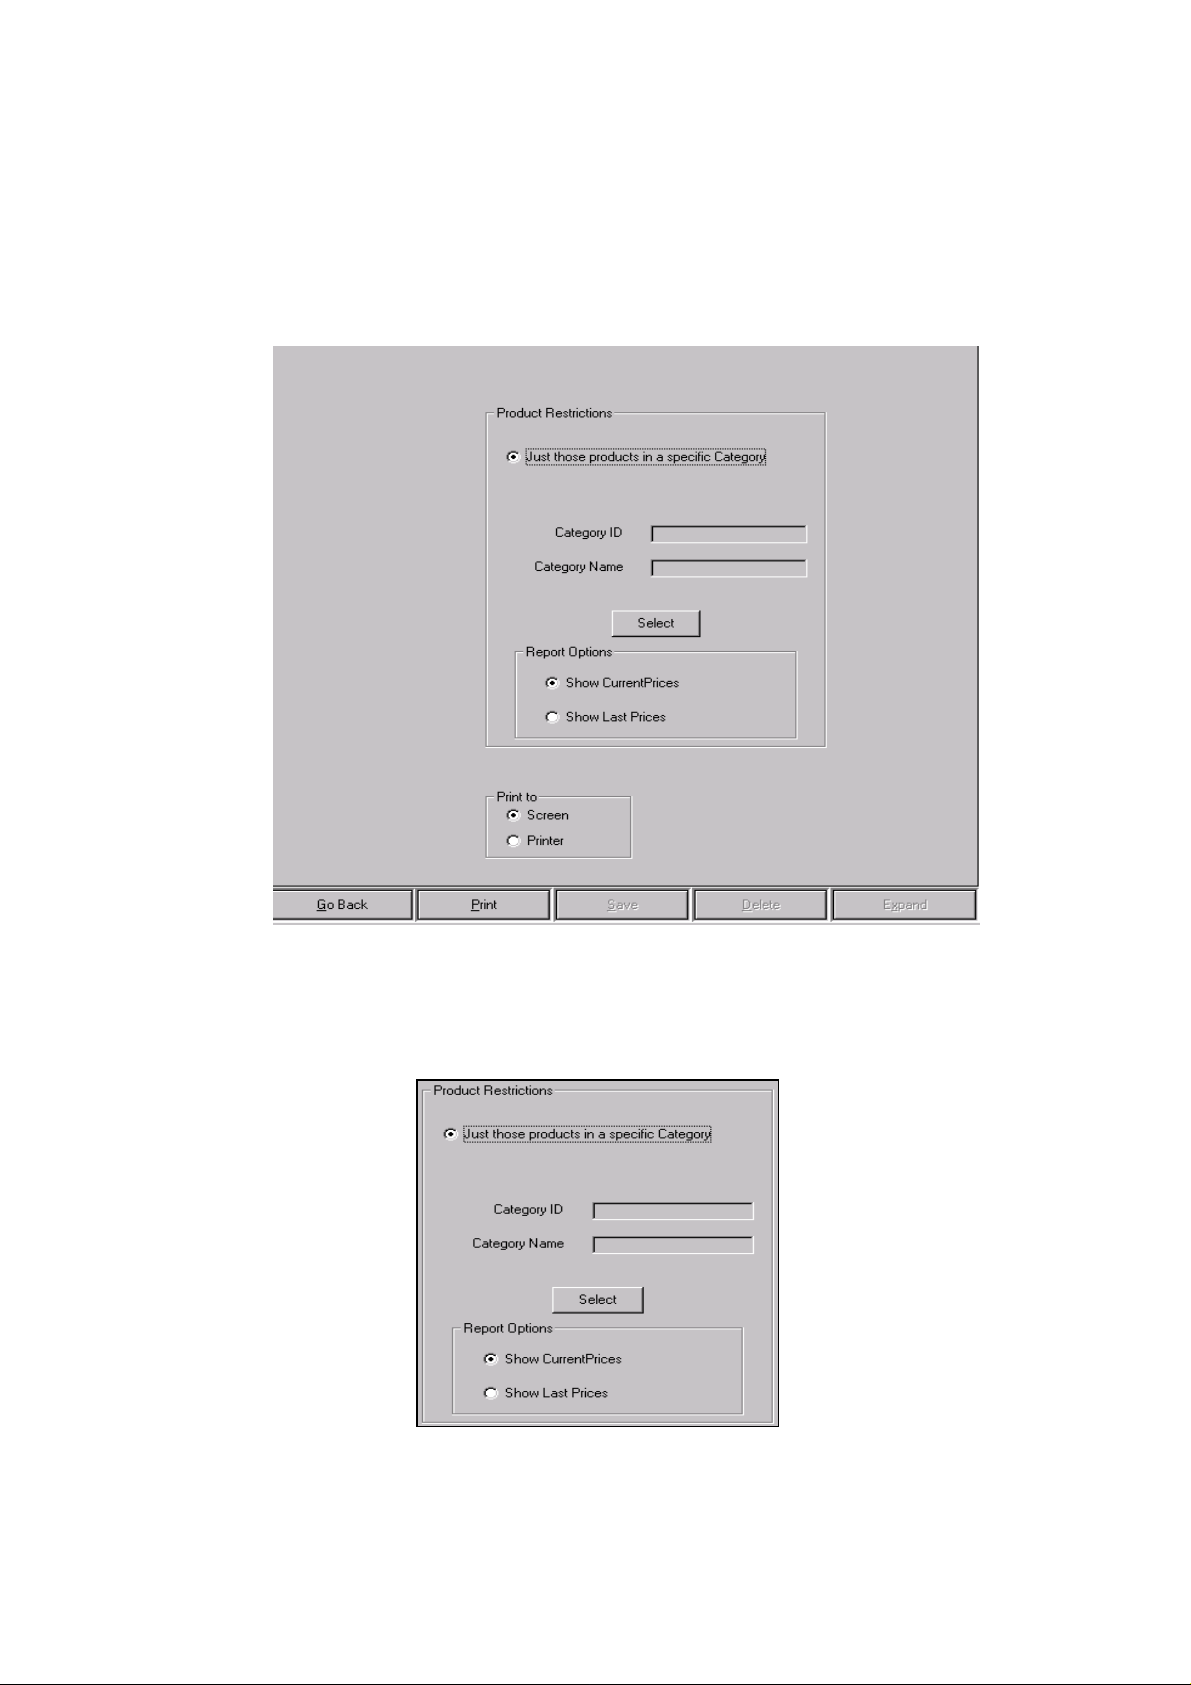
8.14 Run a Stock Valuation (Individual Category) Report
To get to the
Valuation (Individual Category)
stock valuation individual category
screen, navigate to
. This displays the following screen:
Stock→Stock
Lets look at this screen in more detail:
•
Product restrictions
Click on the
For more details on the
button. This displays the
Select
category selection common function
category selection common function
screen, refer to
page 13
screen.
.
Sharp Electronics (UK) Ltd – Back Office User Manual 1999
Page 17
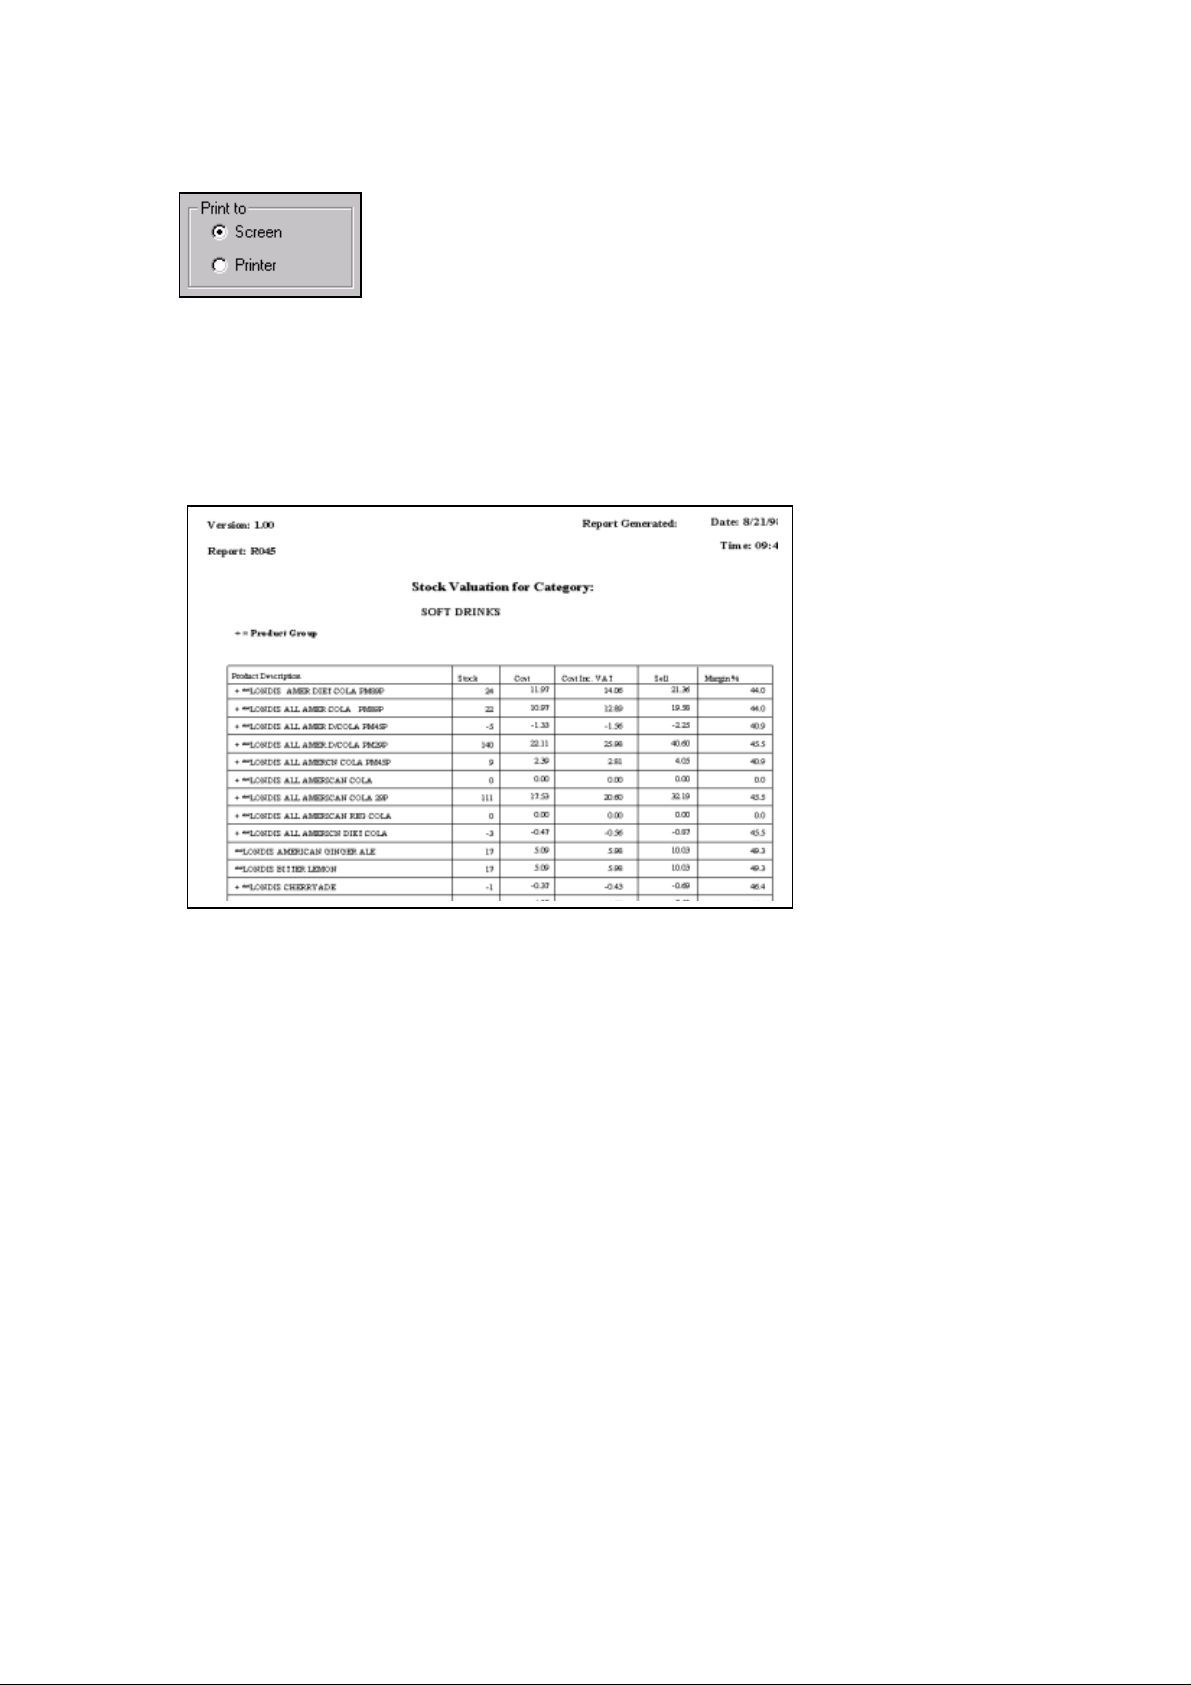
• Print to
The stock valuation individual category report can either be printed to the screen or to a
printer. From here, click on either screen or printer, and then click on the Print button at the
bottom of the screen.
A report similar to the one below is then displayed :
Sharp Electronics (UK) Ltd – Back Office User Manual 1999
Page 18
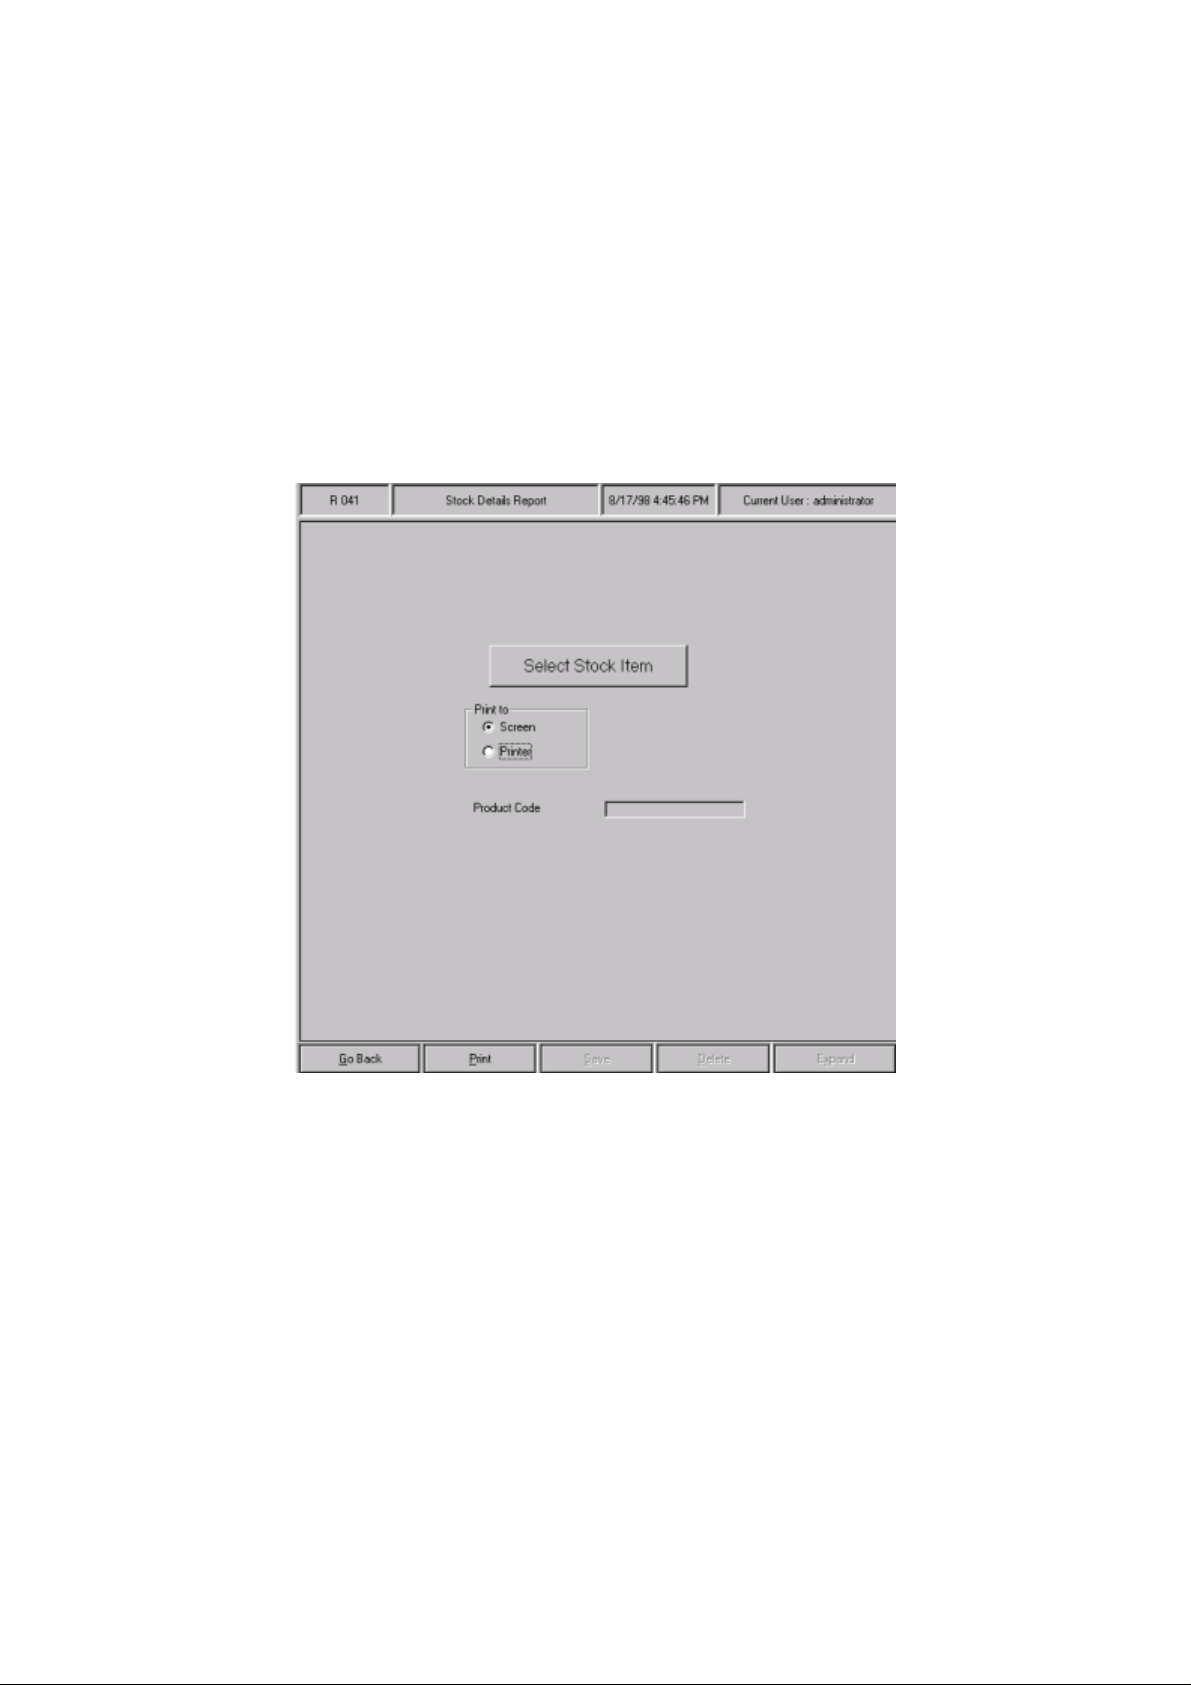
8.15 View Stock Details
The stock details section enables you to find out information about a particular product,
including:
• The product’s supplier
• How many you currently have in stock
• How many you should have in stock
• How many are on order
To get to the
the following screen:
stock details report
screen, navigate to
Stock→Stock Details
. This displays
From here, you can select if you want the report to be printed to the screen or to a printer. To
do this, click on the relevant button in the ‘
After you have done this, click on the
search common function
Sharp Electronics (UK) Ltd – Back Office User Manual 1999
screen:
print to
Select Stock Item
’ box.
button. This displays the
product
Page 19
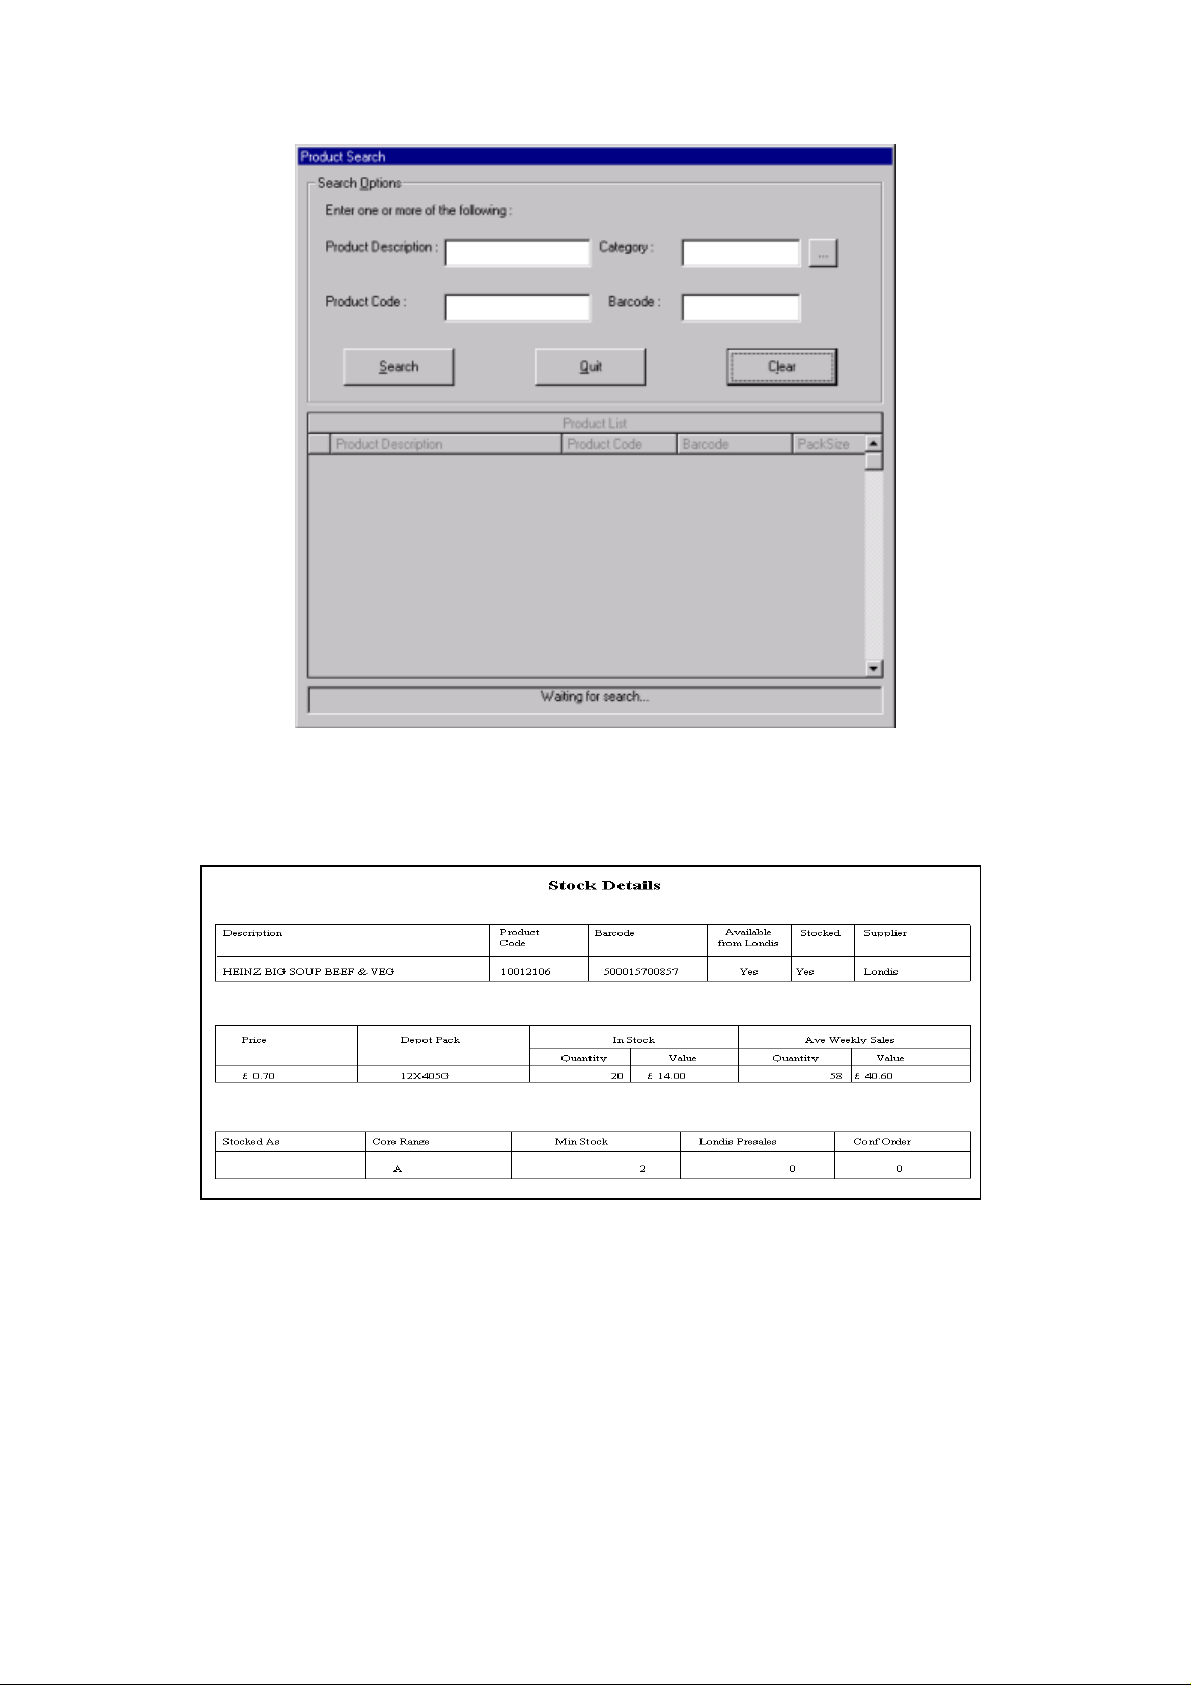
Once you have selected a product, click on the Print button at the bottom of the screen. A
report will be printed similar to the one below:
Sharp Electronics (UK) Ltd – Back Office User Manual 1999
Page 20

8.16 Summary
Well done, in this section of the User Manual you have covered the following sections:
• Recorded DAMAGED STOCK into the system
• GENERATED a REPORT on DAMAGED STOCK
• INPUT STOCK AMOUNTS after a STOCK TAKE
• TRANSFERRED STOCK to another store
• VIEWED the SUGGESTED DELETIONS list
• DELETED products from the SUGGESTED DELETIONS list
• GENERATED the STOCK LEVEL REPORT
• GENERATED the UNSTOCKED CORE RANGE PRODUCTS REPORT
• GENERATED the STOCK LIST REPORT
• GENERATED the STOCK AUDIT REPORT
• GENERATED the STOCK VALUE ADJUSTMENT REPORT
• GENERATED the PLU LIST REPORT
• GENERATED the MINUS STOCK REPORT
• GENERATED the STOCK VALUATION REPORT
• GENERATED the STOCK VALUATION by INDIVIDUAL CATEGORY REPORT
• VIEWED details on an item of stock (enquiry on an item of stock)
• PRINTED details about an item of stock
.
Sharp Electronics (UK) Ltd – Back Office User Manual 1999
Page 21

9 Suppliers
9.1 Introduction
As you are already aware, not all goods required for selling in your store are available from
your preferred supplier. Retail PLUS has completely taken care of that aspect of your
business by including the
component you are able to add new suppliers to the system so that you can use your
within many of the back office processes such as ordering and receiving deliveries.
box
suppliers
component in the Back Office. Within the
suppliers
supplier
You can have an
system.
You can allocate specific products to a supplier which will save you time and effort when
placing orders or performing various process involving stock. As new products or
promotions are released you can also add these to different suppliers.
Once a supplier has been added to the system you can make changes to their details as many
times as required.
Should you cease to use a supplier you can delete their details from the system
Within this section of the User Manual you will find a step-by-step guide on how to
perform the following func ti on s:
• ADD a NEW SUPPLIER to the system
• VIEW/MODIFY an EXISTING SUPPLIER’S details
• DELETE a SUPPLIER from the system
• ADD PRODUCTS to a SUPPLIER
unlimited
number of suppliers other than your preferred supplier on the
• DETETE PRODUCTS from a SUPPLIER
• REPORT on a SUPPLIER’S PRODUCTS
Sharp Electronics (UK) Ltd – Back Office User Manual 1999
Page 22
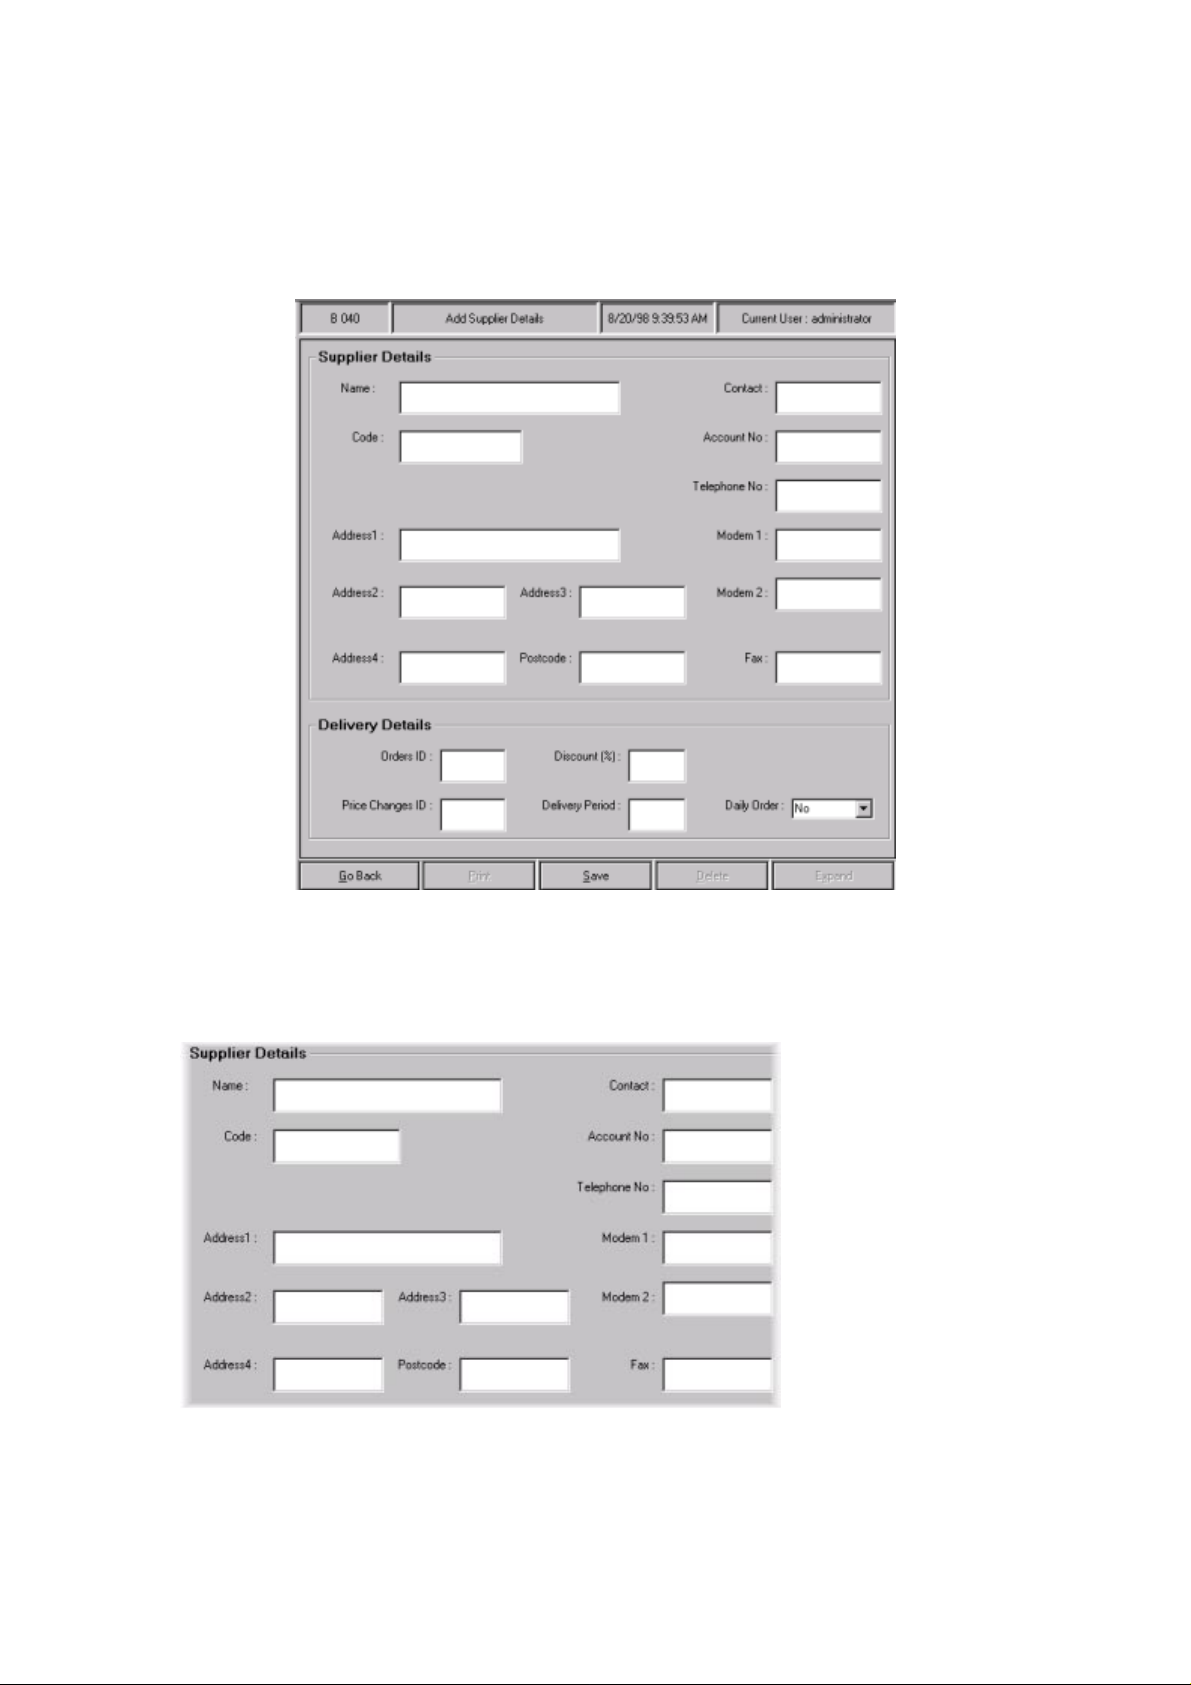
9.2 How to Add a New Supplier
To get to the ‘
displays the following screen:
add supplier details
’ screen, navigate to
Suppliers→New Supplier
. This
Lets look at this screen in more detail:
•
Supplier details
From here, you can enter the supplier’s details. Press ‘
forwards through the fields.
The fields that
must be completed
are:
’ on the keyboard to move
TAB
Sharp Electronics (UK) Ltd – Back Office User Manual 1999
Page 23
• Name - The supplier’s full name.
• Code - A shortened version of the supplier name for use in
the
supplier list.
The fields that do not have to be completed are:
• Contact - The name of the person who is the main
contact for the
supplier.
• Account No - The supplier’s account number.
• Telephone No - The supplier’s telephone number for voice calls.
• Address - The supplier’s full postal address.
• Modem 1 - The supplier’s telephone number to use for modem
calls.
• Modem 2 - The supplier’s telephone number to use for modem
calls, if the
main modem number fails or is busy.
• Fax - The supplier’s fax number to use for faxing orders.
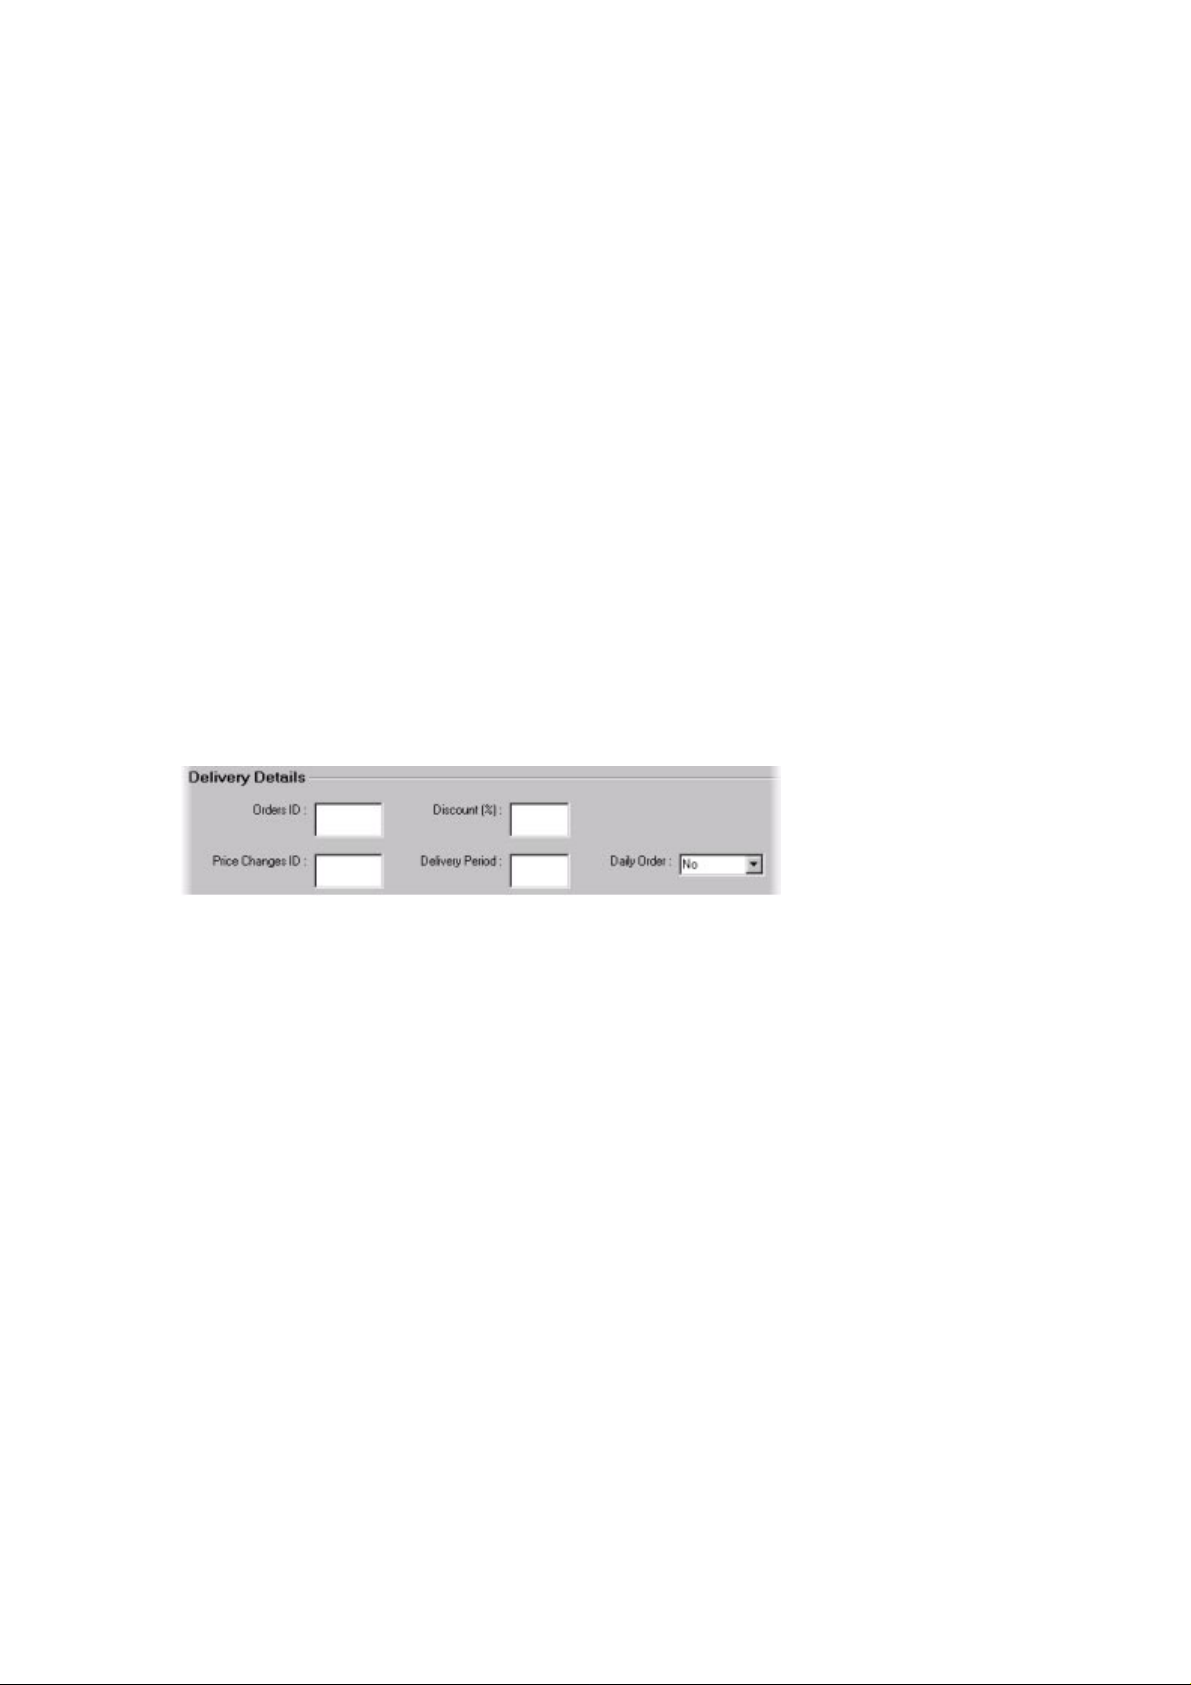
• Delivery details
The fields that must be completed are:
• Delivery period - How frequently the supplier delivers to the
store. This is
measured in number of weeks between visits.
• Daily order - Whether or not the supplier delivers on a daily basis
The fields that do not have to be completed are:
• Orders ID - The service command for electronic order
communication
with the supplier.
• Discount (%) - The discount given by the supplier.
• Price changes ID - The service command for electronic order
communication
with the supplier.
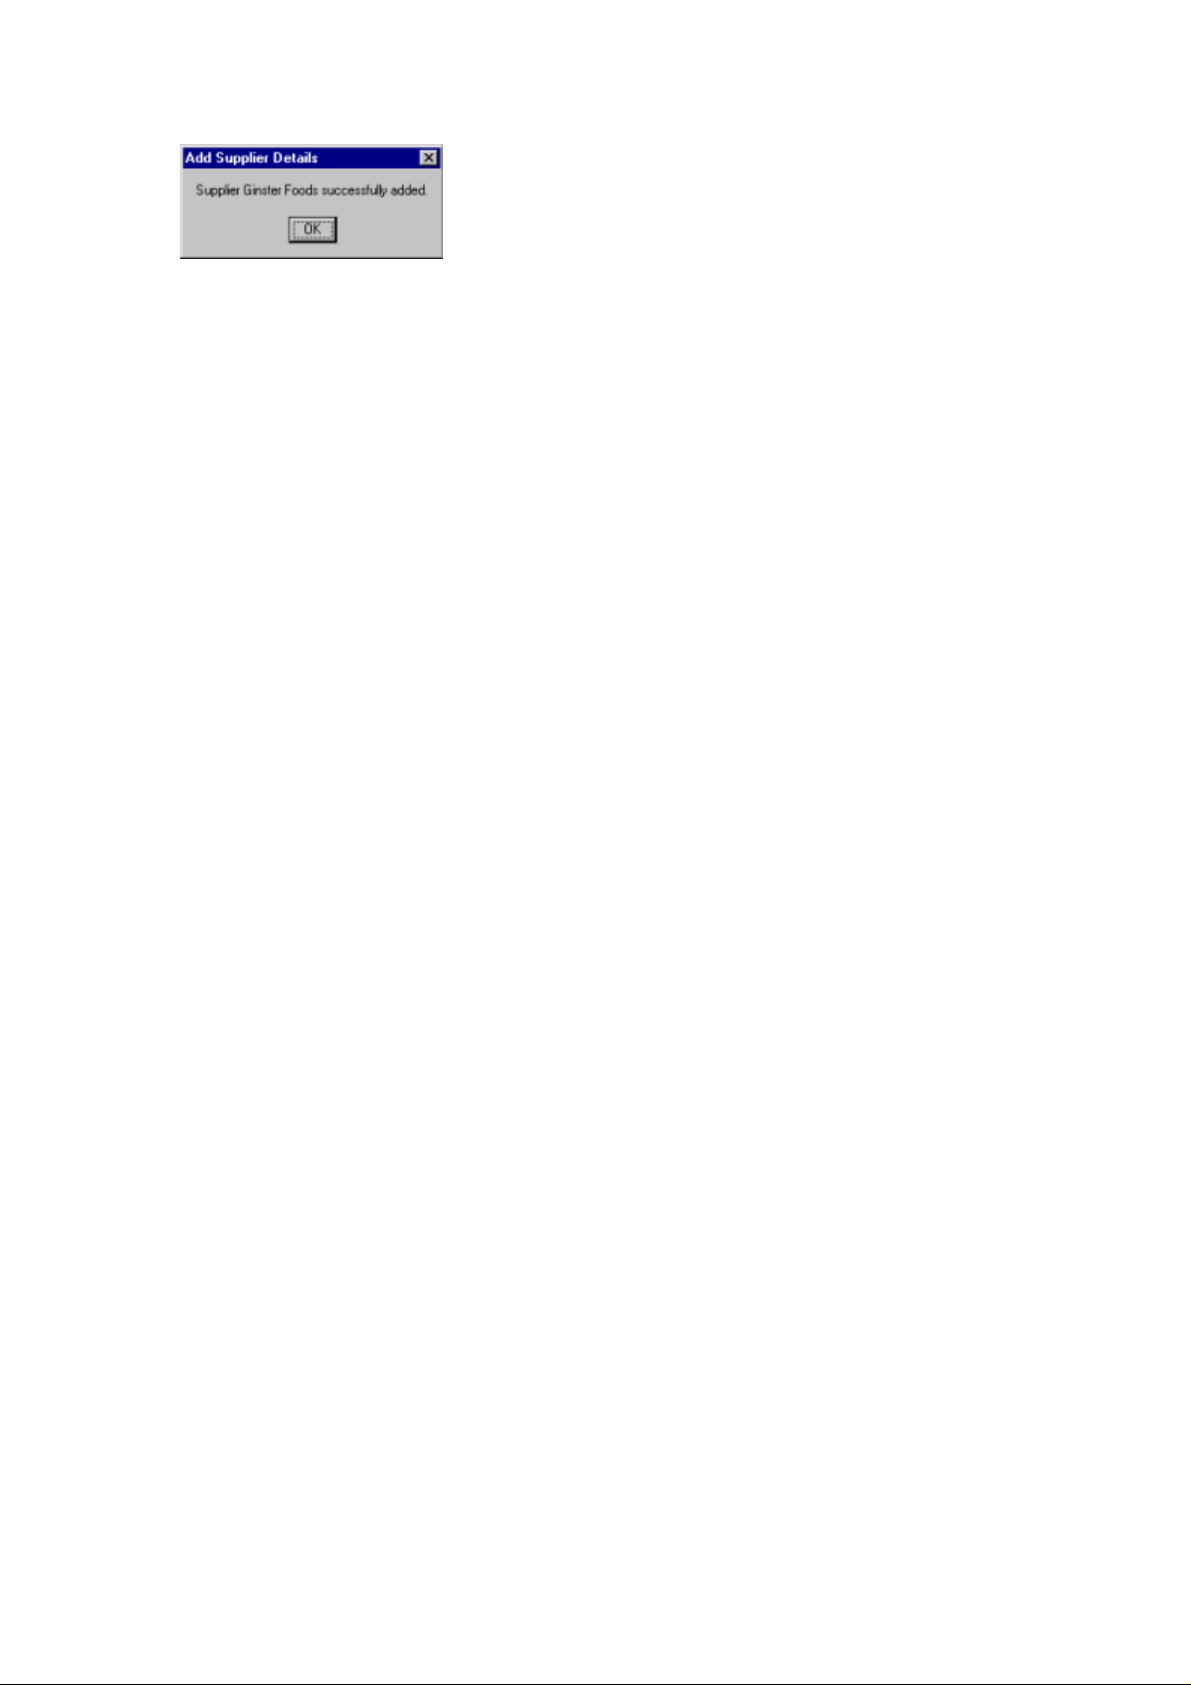
Once all of the details have been entered, click on the Save button to add the supplier to the
system. This displays the pop-up screen below:
Click on ‘OK’.
Sharp Electronics (UK) Ltd – Back Office User Manual 1999
Page 24
Click on the Go Back button to return to the main navigation screen.
Sharp Electronics (UK) Ltd – Back Office User Manual 1999
Page 25
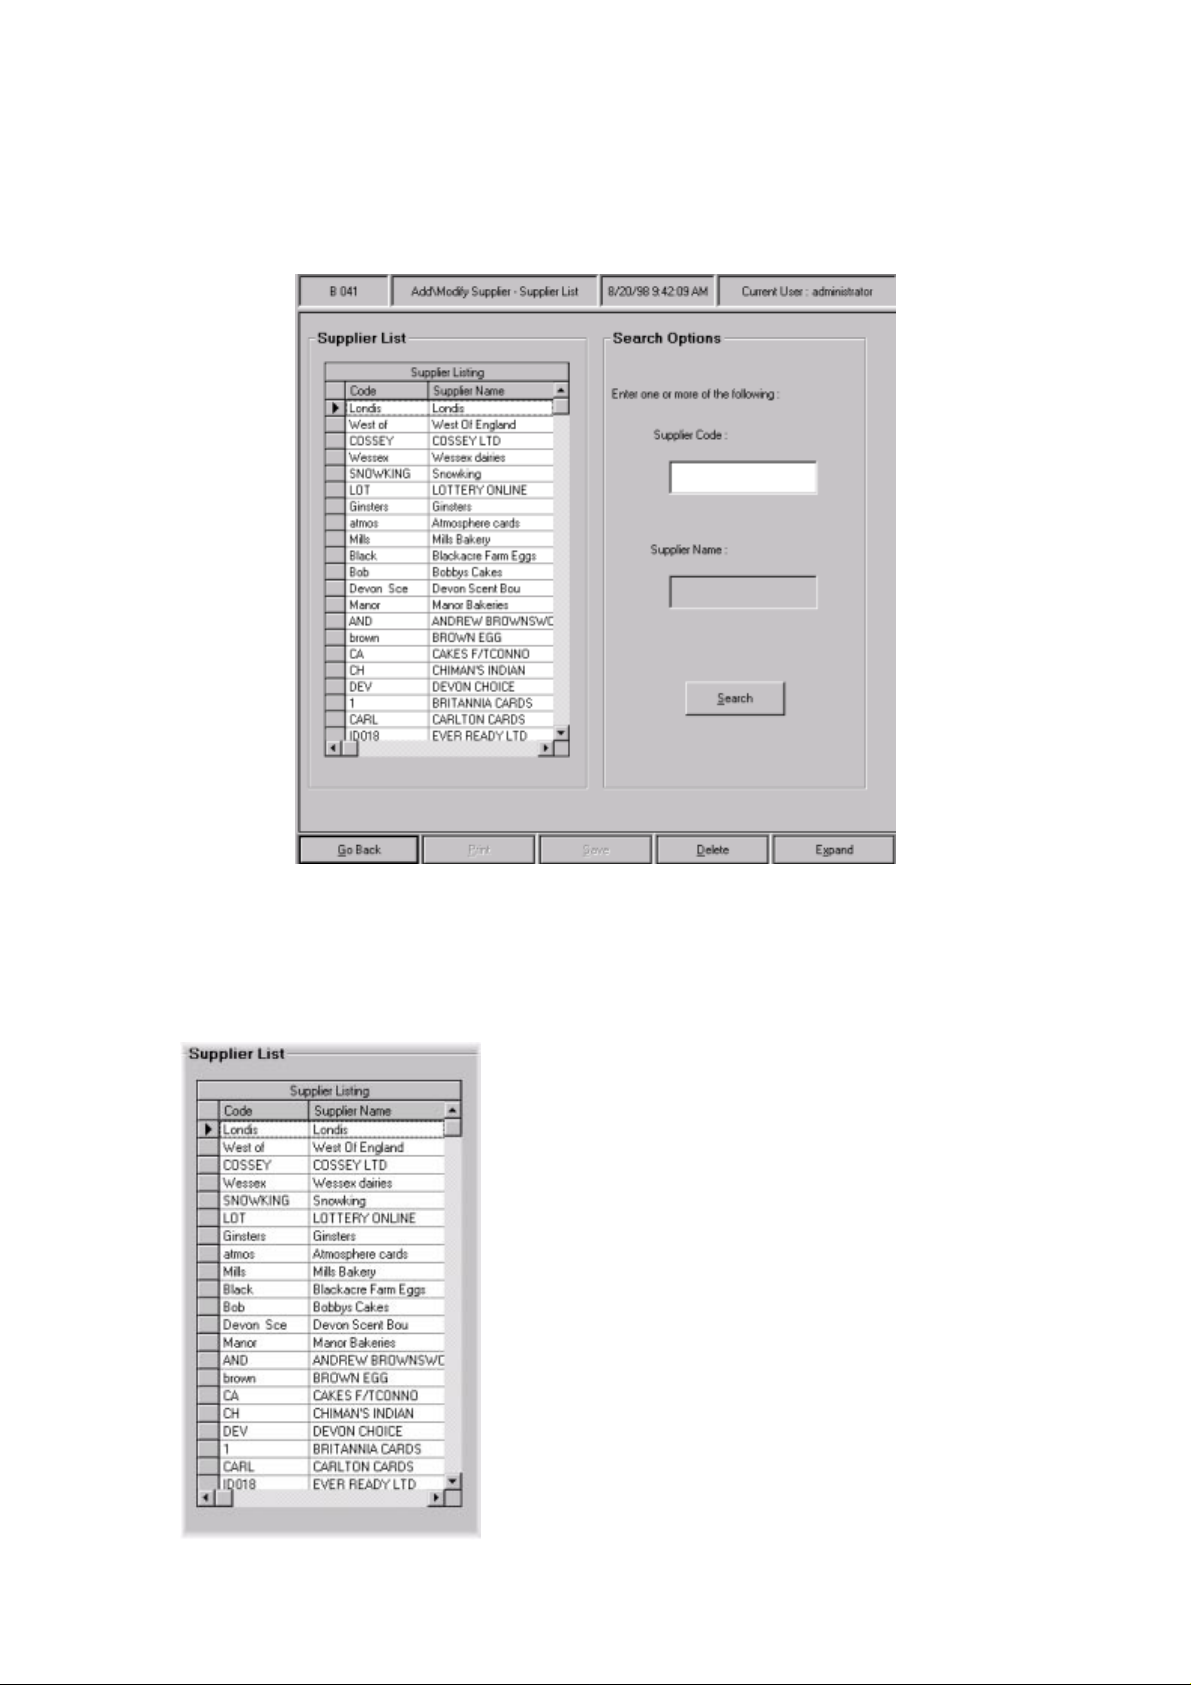
9.3 How to View / Modify Existing Suppliers
To get to the ‘
Maintenance
add/ modify supplier – supplier list
. This displays the following screen:
’ screen, navigate to
Suppliers→Supplier
Lets look at this screen in more detail:
•
Supplier list
Sharp Electronics (UK) Ltd – Back Office User Manual 1999
Page 26
The supplier list appears whenever there is the option to choose a supplier other than your
preferred supplier for various processes. You can use the scroll bar to view all suppliers in
the supplier list.
The list displays the supplier code, which is the short name that you gave the supplier when
adding it to the system.
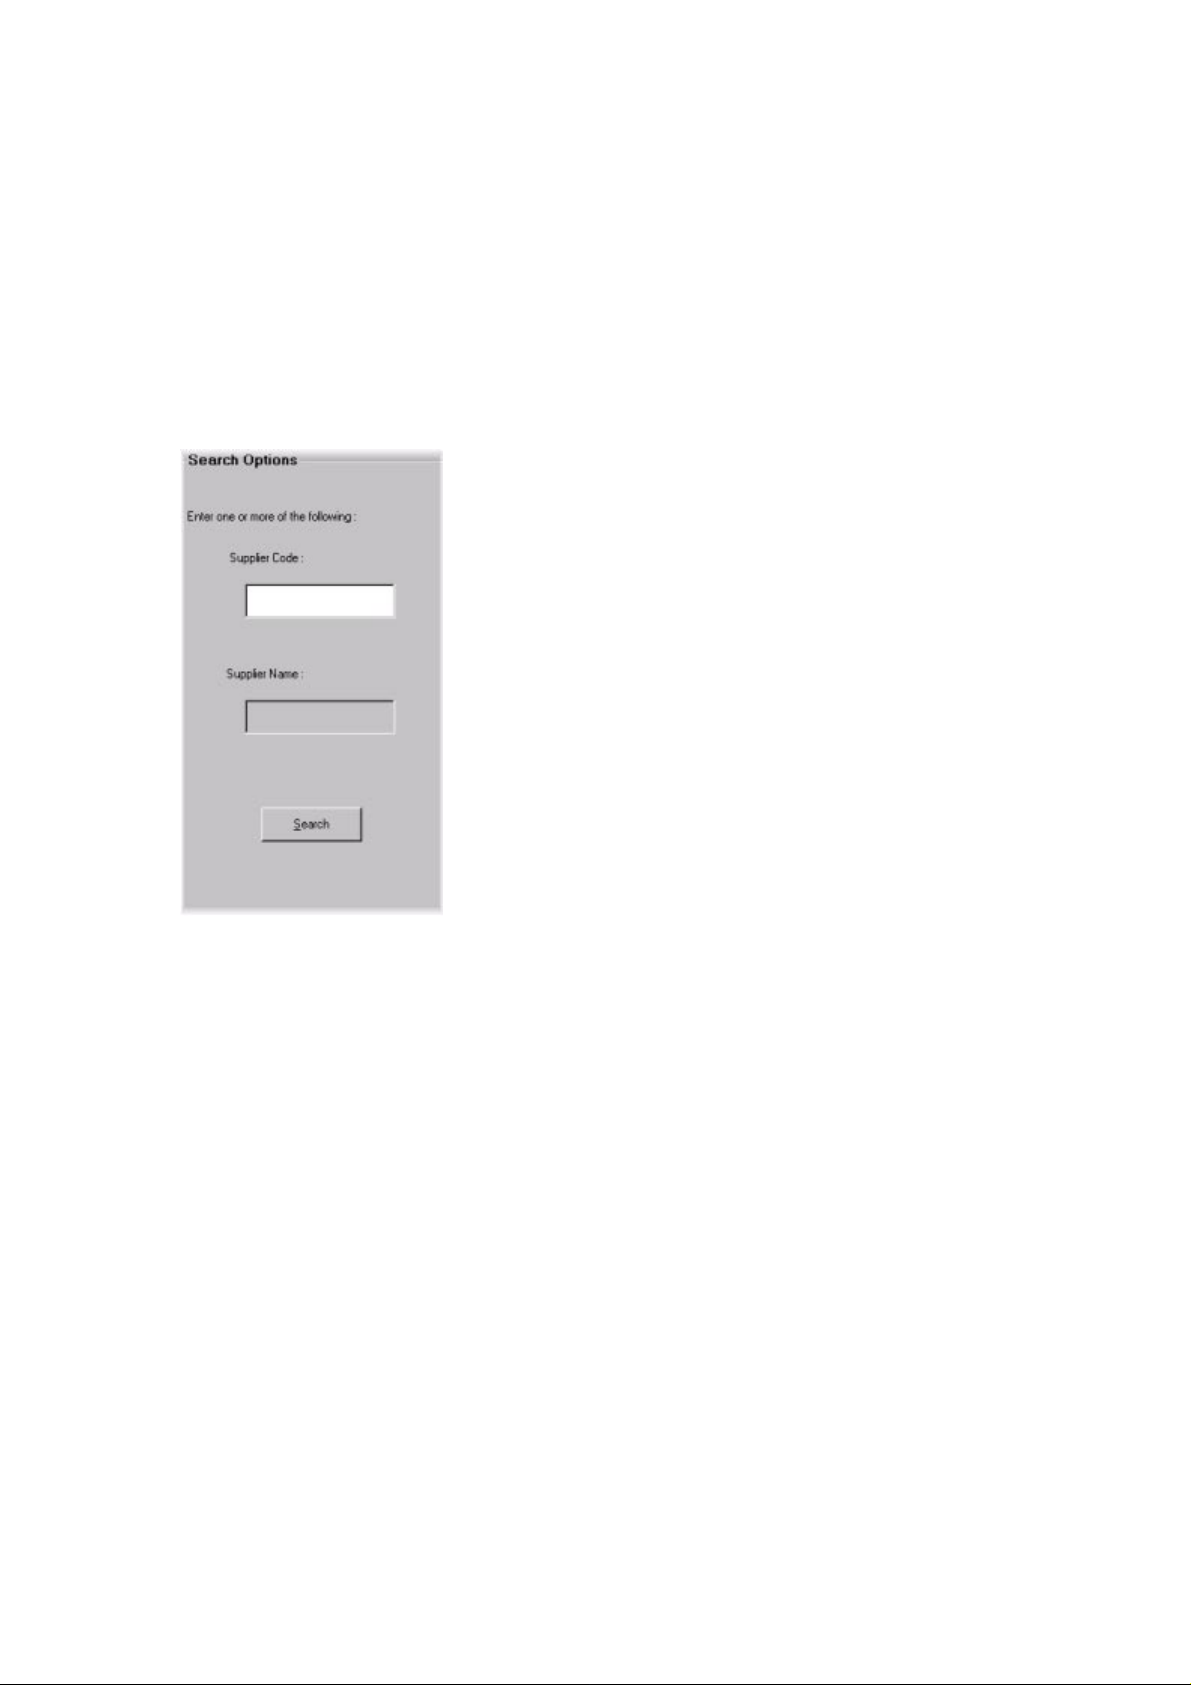
• Search options
The search options box is used to search for suppliers that do not appear in the list of the left-
hand side of the screen.
From here, either type in the supplier code or supplier name, and then click on the Search
button.
The system then displays the supplier in the supplier list:
Sharp Electronics (UK) Ltd – Back Office User Manual 1999
Page 27
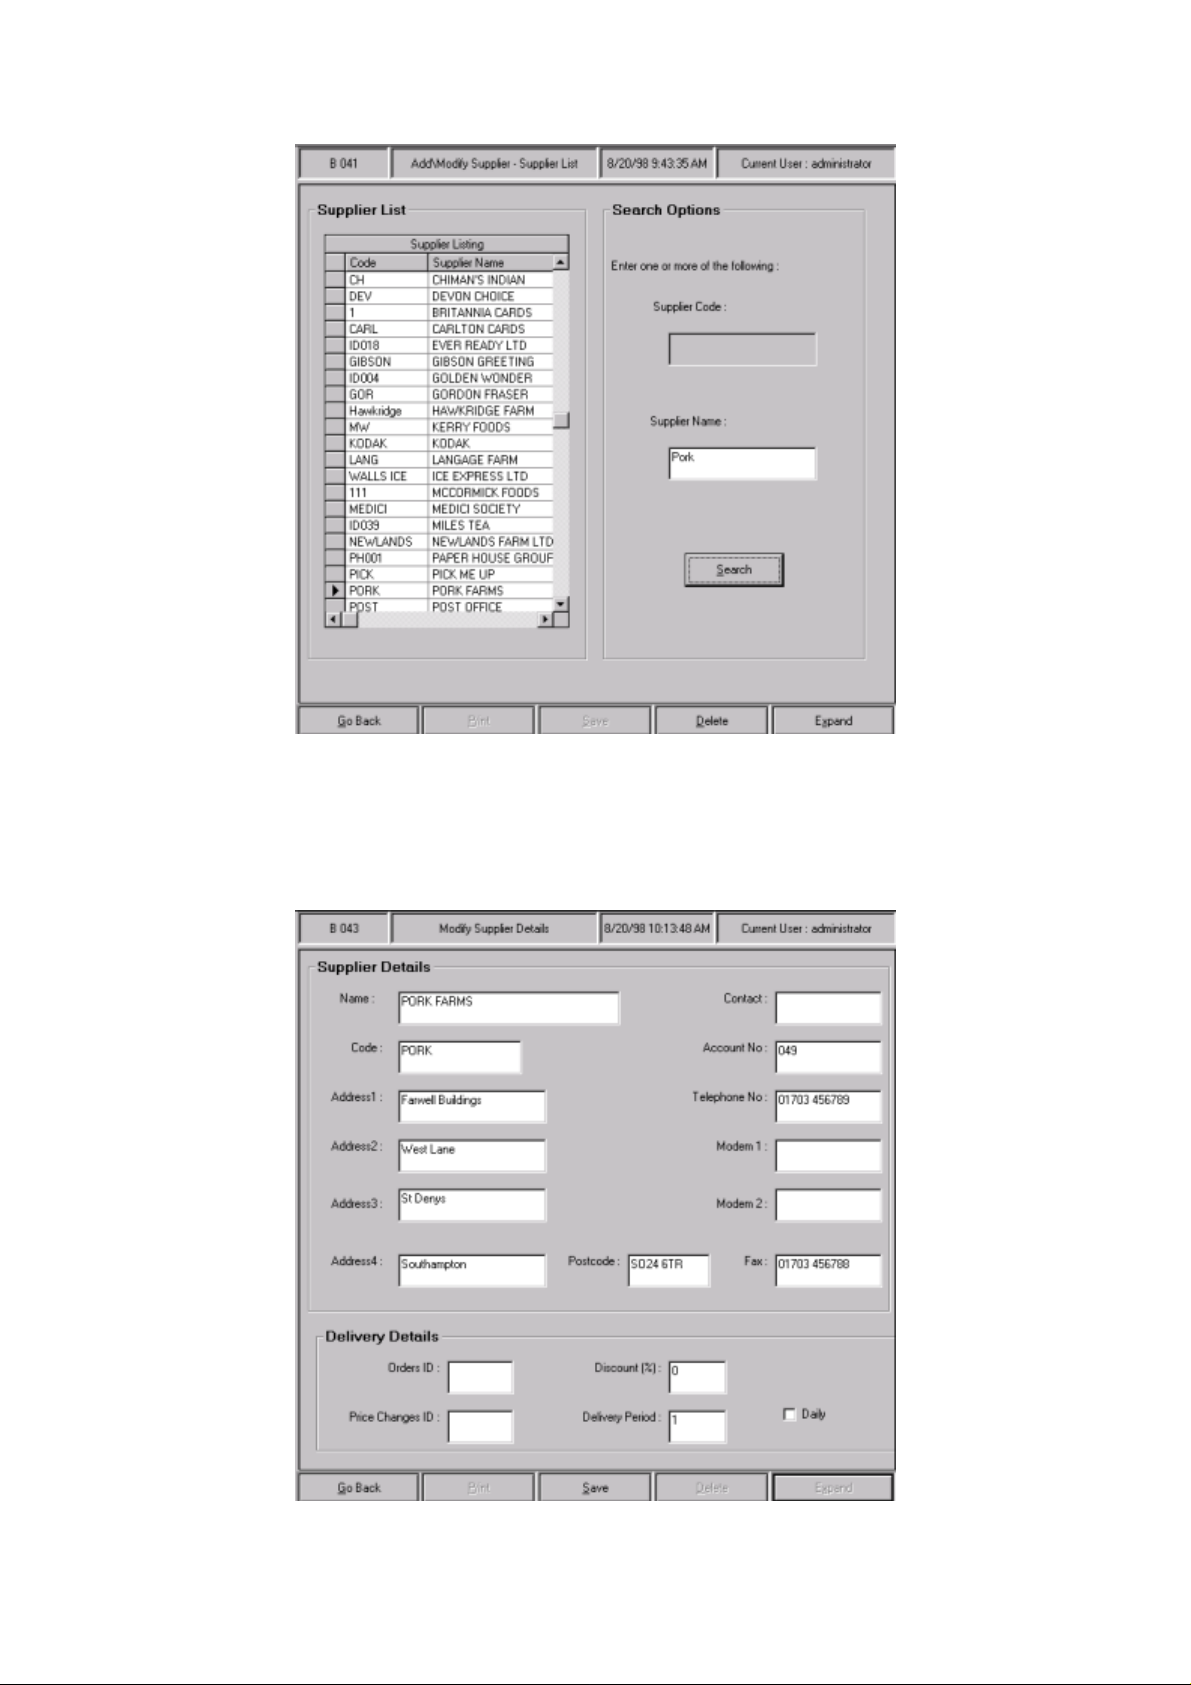
To view further information about a supplier, click on the supplier’s left-hand column, and
then on the Expand button.
This displays the modify supplier details screen:
Sharp Electronics (UK) Ltd – Back Office User Manual 1999
Page 28

Here you can view the supplier details and make changes if required to any of the fields on
screen.
Click on the Save button to save any changes made to the supplier’s details.
Click on the Go Back button to return to the main navigation screen,
Sharp Electronics (UK) Ltd – Back Office User Manual 1999
Page 29
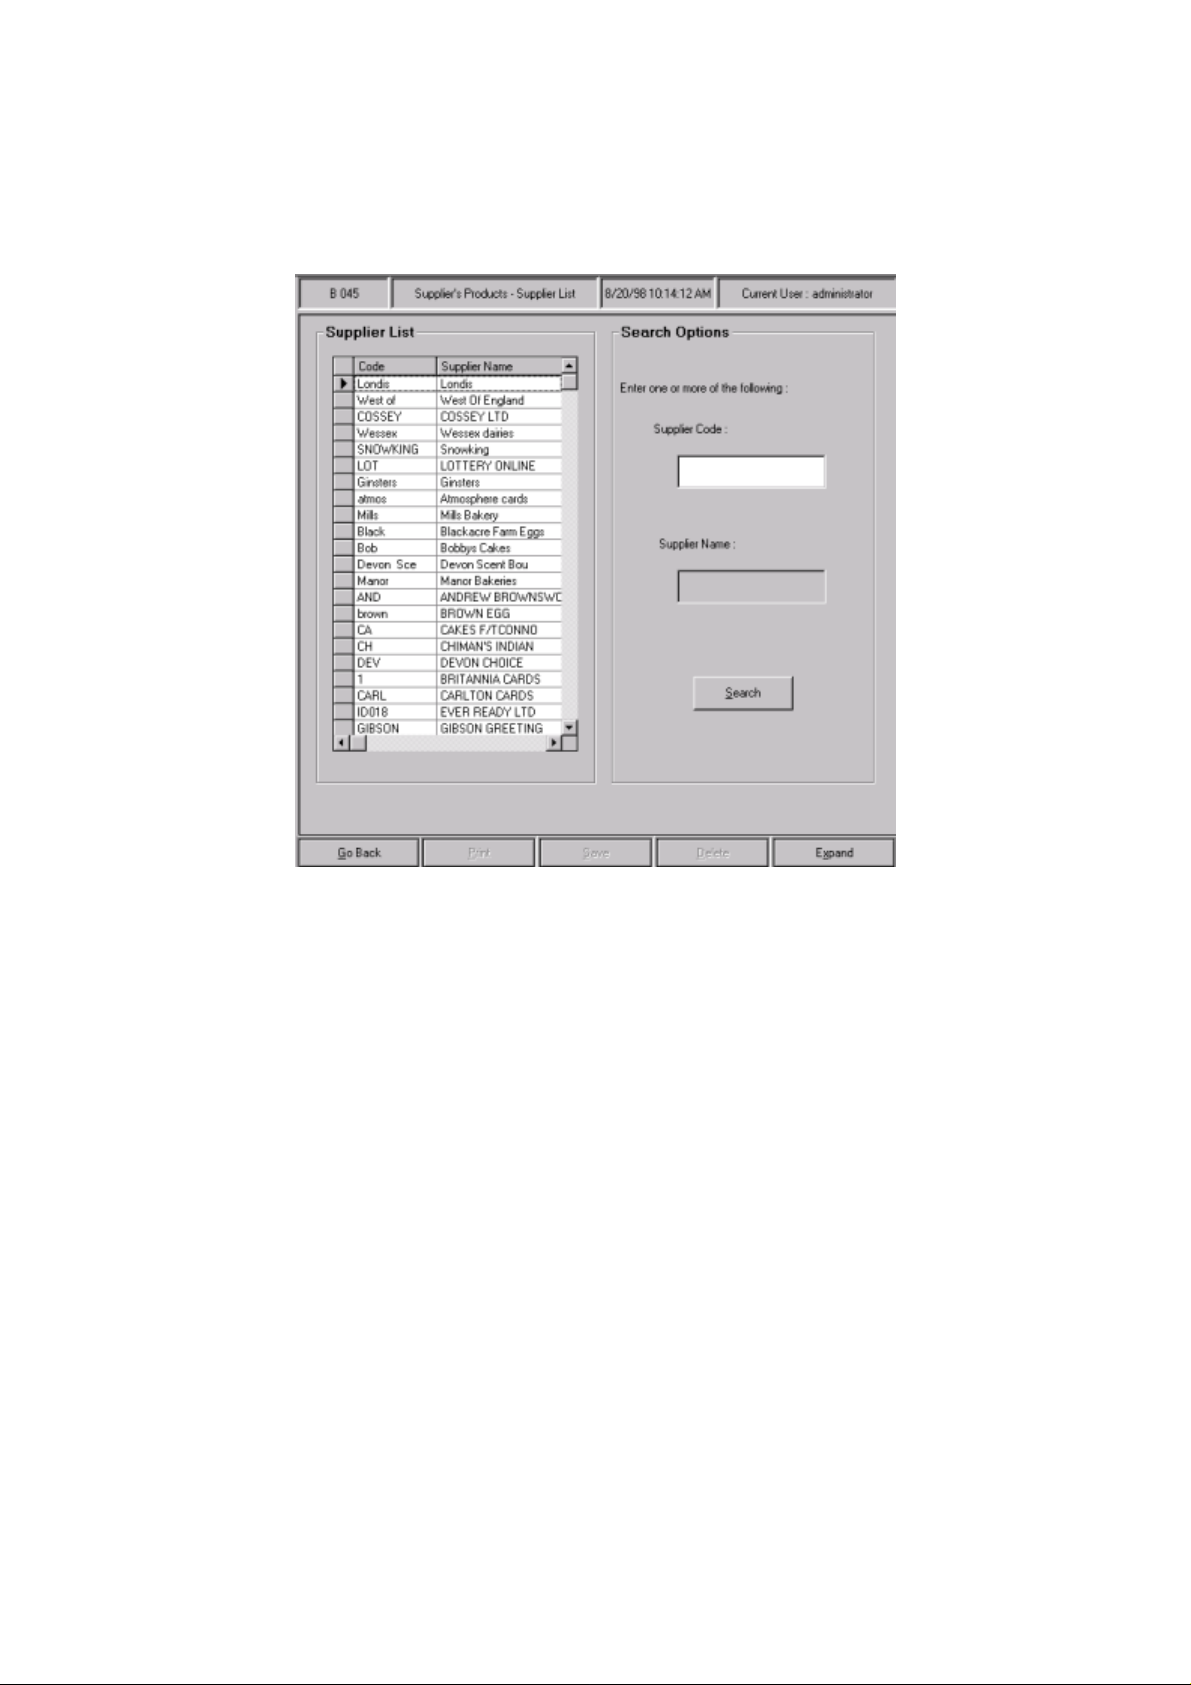
9.4 How to Add Products to a Supplier
To get to the ‘
Products
. This displays the following screen:
supplier’s products – supplier list
’ screen, navigate to
Suppliers→Suppliers
For more details on the supplier list and the search options, refer to
From here, select a supplier that you want to add products to by clicking on its left-hand
column (next to
This displays the
), and then click on the
code
supplier’s products
screen:
Expand
button.
page 31
for more details.
Sharp Electronics (UK) Ltd – Back Office User Manual 1999
Page 30
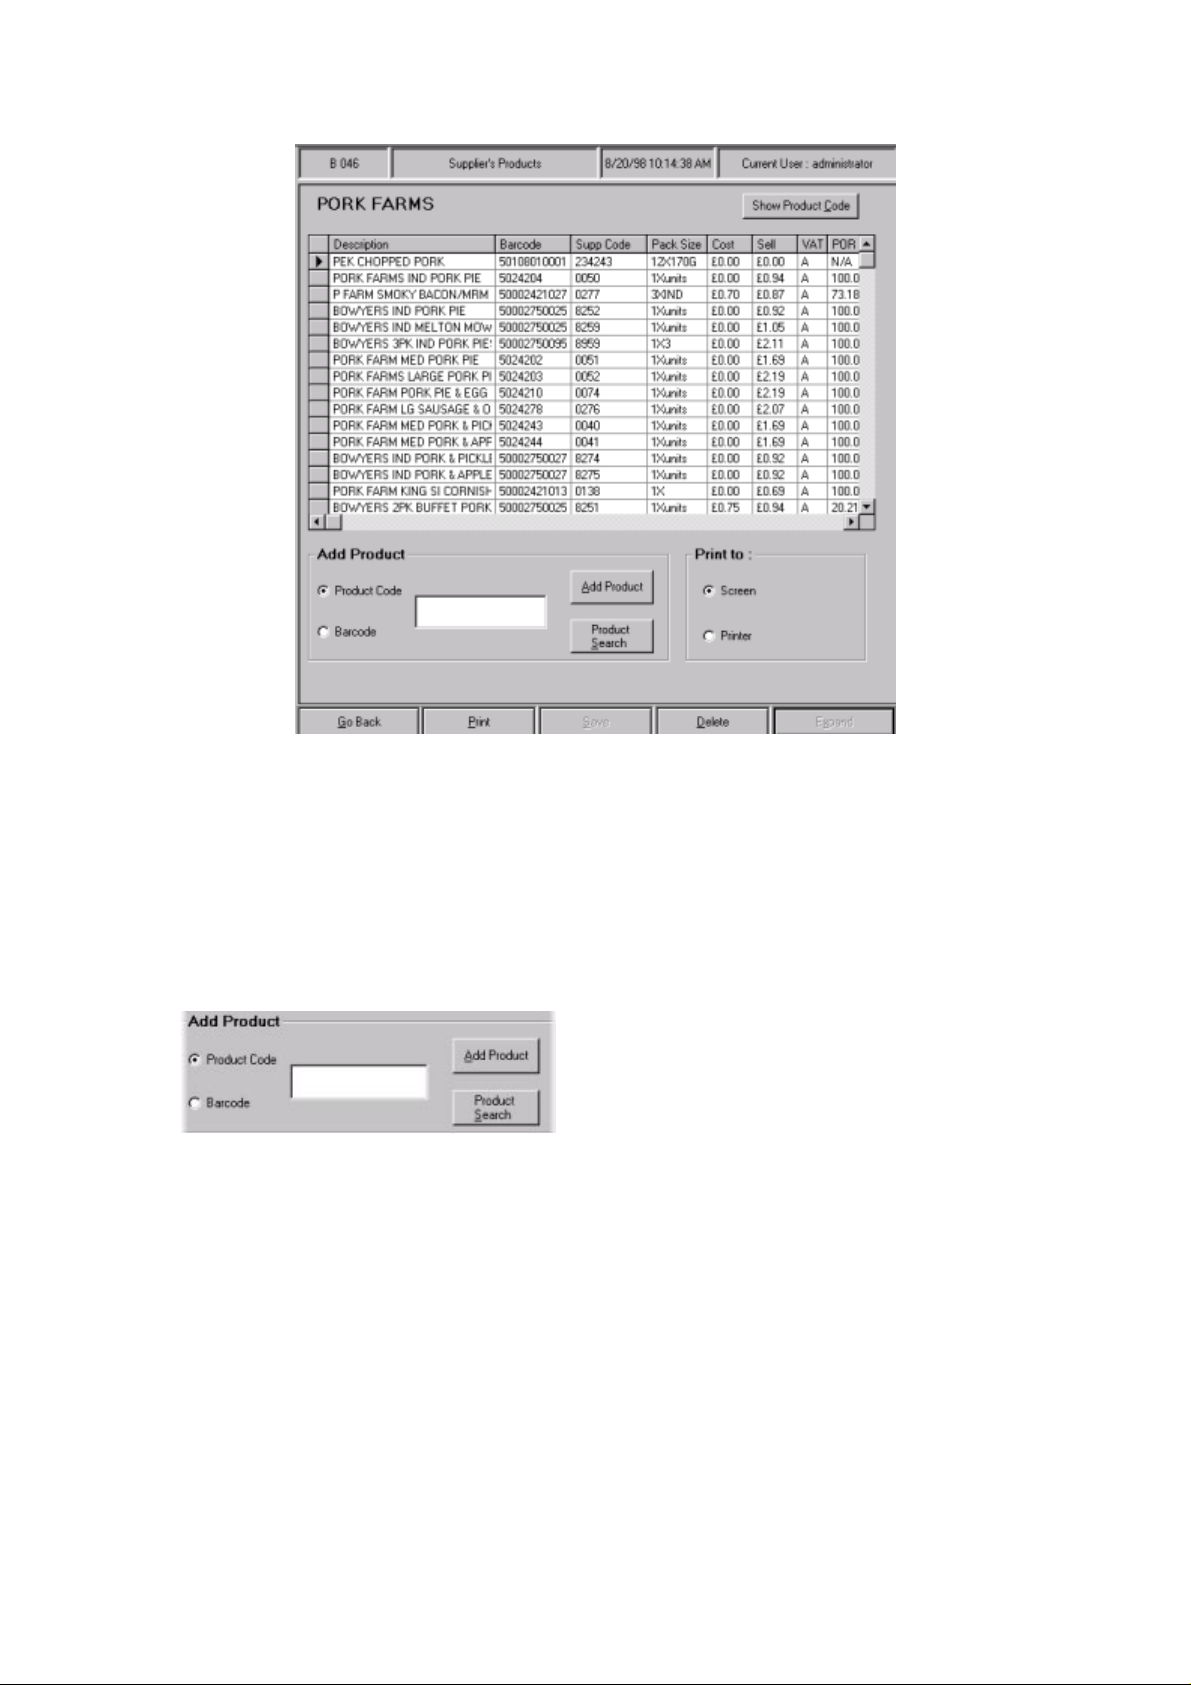
This displays a list of products belonging to that supplier.
If you wish to show the product codes, click on the Show Product Code button.
If you then wish to remove the product codes, simply click on the Show Product Code
button again.
This box is used to add a product to the supplier. There are two ways of doing this.
• If you do not know the product code/ barcode, click on the Product Search button.
This displays the product search common function screen:
For more details on the product search common function, refer to page 8.
Sharp Electronics (UK) Ltd – Back Office User Manual 1999
Page 31

Once you have selected a product, click on the Add Product button.
• If you know the product code/ barcode, type it in the blank ‘add product’ box. From
here, click on the Add Product button.
Once you have clicked on the Add Product button, the data entry pop-up screen is
displayed:
From here, type in the supplier code in the first blank field.
You can also change the pack size and supplier cost.
Once you have entered the supplier code, click on ‘OK’.
Sharp Electronics (UK) Ltd – Back Office User Manual 1999
Page 32

The following pop-up screen is then displayed:
Click on ‘OK’.
Click on the Go Back button to return to the main navigation screen.
Sharp Electronics (UK) Ltd – Back Office User Manual 1999
Page 33

9.4.1 How to Print a Supplier Product List
To get to the ‘supplier’s products – supplier list’ screen, navigate to Suppliers→Suppliers
Products. This displays the following screen:
From here, select a supplier by clicking on its left-hand box (next to code) and click on the
Expand button.
This displays the suppliers products screen:
Sharp Electronics (UK) Ltd – Back Office User Manual 1999
Page 34

From here, either click on screen or printer in the ‘print to’ box, depending upon where you
want to print the report to. Once you have done this, click on the Print button.
This displays the supplier product list:
Sharp Electronics (UK) Ltd – Back Office User Manual 1999
Page 35

9.4.2 How to Delete a Product from a Supplier
To get to the ‘supplier’s products – supplier list’ screen, navigate to Suppliers→Suppliers
Products. This displays the following screen:
From here, select a supplier by clicking on its left-hand box (next to code) and click on the
Expand button.
This displays the suppliers products screen:
Sharp Electronics (UK) Ltd – Back Office User Manual 1999
Page 36

From here, select the product that you want to delete by clicking on its left-hand box (next to
description). Click on the Delete button. This displays the following pop-up screen:
Click on ‘YES’ to delete the product from the supplier, or click on ‘NO’ to cancel the
process.
Click on the Go Back button to return to the main navigation screen.
Sharp Electronics (UK) Ltd – Back Office User Manual 1999
Page 37

9.5 Summary
Well done, in the section of the User Manual you have covered the following functions.
• ADDED a NEW SUPPLIER to the system.
• VIEWED/MODIFIED an EXISTING SUPPLIER’S details.
• DELETED a SUPPLIER from the system.
• ADDED PRODUCTS to a SUPPLIER.
• DETETED PRODUCTS from a SUPPLIER.
• REPORTED on a SUPPLIER’S PRODUCTS.
Sharp Electronics (UK) Ltd – Back Office User Manual 1999
Page 38

10 Staff
10.1 Introduction
Within the
your staff. You have to add a member of staff to the system before they can start operating
the till so the
use.
You can store personal information on a member of staff including their telephone number,
address, shift details and when they joined you. Passwords for each member of staff are also
set. These are extremely important and they must not be shared between two staff members.
Within the
along with the reason for the time off. This helps you keeps correct records with little effort.
You can run reports on staff performance to see how well they are doing; the report range can
be from the
manage your people more effectively.
There is also a ‘built-in’ securi ty to protect the st af f deta ils. To access the
you must either be a manager or an owner. Operators are denied access to the
component.
Within this section of the User Manual you will find a step-by-step guide on how to perform
the following functions:
• ADD a new member of staff to the system
component of the Back Office you can manage personnel issues relating to
staff
component will be one of the first components of the Back Office that you
staff
component you can record the amount of time off a member of staff takes,
staff
last hour
right up to the last year. All these functions that are available help you
component
staff
staff
• SET a password for a member of staff
• VIEW personal details of an existing staff member
• CHANGE a staff members personal details
• CHANGE the password for a member of staff
• PREVENT a member of staff from using the till
• DELETE a staff members details
• RECORD and MAINTAIN staff time off for both sickness and holidays
• RUN management reports on staff performance
Sharp Electronics (UK) Ltd – Back Office User Manual 1999
Page 39

10.2 How to Add a New Member of Staff
To get to the ‘
following screen:
add staff member
’ screen, navigate to
Staff→New Staff
. This displays the
Not all of the fields in the
of staff. If you cannot enter all of the information at once for whatever reason, you can go
back at a later stage and complete it in ‘
You will need the following information to
• First name
• Last name
• Staff access group
All other information is optional and can be added at another time if necessary.
Lets look at the screen in more detail:
From here, enter the staff member’s
entered as dd/mm/yyyy).
To select a sex, click on the
‘add staff member’
staff mainte na nce
first name, last name
down arrow
screen need to be filled to add a new member
’.
add a member of staff
and
next to the ‘
’ field and click on either ‘M’ or ‘F’.
sex
.
date of birth
(this must be
Sharp Electronics (UK) Ltd – Back Office User Manual 1999
Page 40

In the ‘logon name’ field, enter the name that the staff member will use to sign on with.
To select a staff group for the staff member, click on the down arrow to reveal the staff
group list and click on the staff group required.
tbd – passwords are essential
Click on the Add Password button. This displays the add password pop-up screen.
Either you or the staff member must enter the password in each field.
To save the password, click on OK.
To cancel the process, click on Cancel.
This returns you to the add staff member screen. You would have now entered enough
information for the member of staff to start to use the till.
If you wish to save details now and fill in the rest of the screen at a later date within ‘view/
modify staff’, click on the Save button at the bottom of the screen. As you save the staff
member, a record is written to the audit log.
Here you can enter the full postal address and telephone number of the staff member.
Sharp Electronics (UK) Ltd – Back Office User Manual 1999
Page 41

Here you can enter when the staff member joined the store.
The ‘end date’ field should be left blank until the member of staff leaves the store.
You can also enter the time that their shift starts and ends. The system automatically works
out the length of their shift for you.
The ‘comments’ box can be used for any comments of your choice.
Once you have completed the screen, click on the Save button at the bottom of the screen.
You can now repeat the process to add further staff members if required, or click on the Go
Back button to return to the main navigation screen.
Sharp Electronics (UK) Ltd – Back Office User Manual 1999
Page 42

10.3 How to View Personal Details of an Existing Staff Member
To view information about a member of staff you must be either an owner or a manager. If
you are an operator you will be denied access to the
view/ modify staff
screen.
To get to the
displays the following screen:
view/ modify staff list
screen, navigate to
Staff→Staff Maintenance
. This
From here, click on the left-hand box (next to
you wish to view. Click on the
This displays the staff member’s details in the
Sharp Electronics (UK) Ltd – Back Office User Manual 1999
Expand
first name
button.
view/ modify staff
) of the staff member whose details
screen:
Page 43

Once you have finished viewing the details on screen, click on the Go Back button. This
returns you to the v ie w/ mod i fy sta ff li st scr een.
Sharp Electronics (UK) Ltd – Back Office User Manual 1999
Page 44

10.4 How to Change Personal Details of an Existing Staff Member
This section is particularly useful if you were unable to enter all the necessary information
about a member of staff at the time of adding them to the system.
To modify information about a member of staff you must either be an owner or a manager. If
you are an operator you will be denied access to the
view/ modify staff
screen.
To get to the
displays the following screen:
view/ modify staff list
screen, navigate to
Staff→Staff Maintenance
. This
From here, click on the left-hand box (next to
you wish to view. Click on the
This displays the staff member’s details in the
Sharp Electronics (UK) Ltd – Back Office User Manual 1999
Expand
first name
button.
view/ modify staff
) of the staff member whose details
screen:
Page 45

When all the changes have been made, click on the Save button at the bottom of the screen.
The following pop-up screen appears:
Click on ‘OK’. This saves the changes you have made.
One of the features within ‘view/ modify staff’ is that you can prevent a member of staff
logging onto the system without deleting their records.
You would benefit from this feature if you wanted to retain information about an ex-member
of staff but did not want to run the risk of them being able to log onto the system.
To do this, click on the down arrow next to the staff group field. This displays the staff
group list:
Click on the Save button to save the changes made.
Click on the Go Back button to return to the v ie w/ mod i fy staff li st screen.
Sharp Electronics (UK) Ltd – Back Office User Manual 1999
Page 46

10.5 How to Delete an Existing Staff Member
It is worth noting that the deletion of staff is irreversible. Staff must only be deleted if you
will not require their details at any point in the future.
To delete a staff member, navigate to
modify staff list
screen:
Staff→Staff Maintenance
. This displays the
view/
From here, select a member of staff and click on the
The following pop-up message appears:
Click on the staff group ‘
system.
Click on ‘
chosen the wrong member of staff and re-select the correct one.
The following message then appears:
Click on ‘OK’. The member of staff has now been deleted.
’ if you have chosen the correct member of staff, or click on ‘NO’ if you have
YES
NONE
’. By doing this you prevent them from logging on to the
button at the bottom of the screen.
Delete
Sharp Electronics (UK) Ltd – Back Office User Manual 1999
Page 47

Click on the Go Back button to return to the main screen.
Sharp Electronics (UK) Ltd – Back Office User Manual 1999
Page 48

10.6 How to Record Staff Holidays / Time Off
To record a staff holiday/ time off, navigate to
screen:
off list
Staff→Time Off
. This displays the
staff time
From here, select a member of staff and click on the
time off
screen:
Expand
button. This displays the
staff
Sharp Electronics (UK) Ltd – Back Office User Manual 1999
Page 49

Lets look at this screen in more detail:
This shows when the staff member has had time off in the past. It shows when their leave of
absence began and ended, and the reason for the absence.
This shows the time off the staff member will have in the future. Again, it shows the length
of the leave of absence, and the reason for the absence.
Here you can enter the start and end dates of the time off and the reason for the time off.
You can also record notes about the time off for that staff member if required.
To add a new staff time off period, click on Add New Staff Time-Off Period near the bottom
of the screen. This displays the following pop-up screen:
Sharp Electronics (UK) Ltd – Back Office User Manual 1999
Page 50

To select a reason for the staff time off period, click on the down arrow next to the ‘leave
type’ field. This displays the following list of options:
Once you have finished entering details on this screen, you can:
• Click on the Save button to record the time off for the staff member
OR
• Click on the Cancel button if you do not want to record the time off for the staff member.
If you recorded the time-of f for the staff member, the staff time-off screen appears as
follows:
From the staff time off screen you can also record the number of days holiday a staff member
has in a year. To do this, press ‘TAB’ on the keyboard until the cursor appears in the ‘total
yearly time off allowance’ box, and type in the number of days of using the keyboard.
Sharp Electronics (UK) Ltd – Back Office User Manual 1999
Page 51

To save any changes made, click on the Save button at the bottom of the screen.
Click on the Go Back button to return to the main navigation screen.
Sharp Electronics (UK) Ltd – Back Office User Manual 1999
Page 52

10.7 How to View a Staff Sales Summary
To display a staff sales summary, navigate to
screen:
Staff→Staff Sales
. This displays the following
This screen shows the staff sales for that day. If there have been no sales, the screen appears
blank (as shown above).
From here, click on one of the reasons for the time off. The selected reason appears in the
‘
leave type
Change / Select Summary Period
Click on this button if you wish to change the time period over which the report is run.
’ field.
:
Sharp Electronics (UK) Ltd – Back Office User Manual 1999
Page 53

From here, click on one of the options available. This will show each staff member’s sales
over the selected period of time.
Once you have selected a time period, click on ‘OK’.
This displays the staff sales summary screen:
Once you have viewed the staff sales summary, click on the Go Back button to return to the
main navigation screen.
Sharp Electronics (UK) Ltd – Back Office User Manual 1999
Page 54

10.8 Summary
Well done, in this section of the User Manual you have covered the following sections:
• ADDED a new member of staff to the system
• SET a password for a member of staff
• VIEWED personal details of an existing staff member
• CHANGED a staff members personal details
• CHANGED the password for a member of staff
• PREVENTED a member of staff from using the till
• DELETED a staff members details
• RECORDED and MAINTAINED staff time off for both sickness and holidays
• RAN management reports on staff performance.
Sharp Electronics (UK) Ltd – Back Office User Manual 1999
Page 55

11 Customers
11.1 Introduction
Retail PLUS Back Office allows you to set up
use their
The customers’ details are entered onto the system in the menu option
Within this screen you can store their personal details with details of their account, including
status, card expiry, balance and credit limit. Once a customer has been added to the system
you can print their
account number
the operator. The customer can make purchases in your store and have the whole transaction
put onto their account.
Payments
key
You can view details of your customer accounts from the
maintenance’
search facility
accounts that are
You can only delete a customer account from the system if their balance is at £0.00.
Sometimes you may want to close a customer account because they have not been into the
store for some time and only have a very small amount owing. You can do this using the
‘
customer write off/ forgive balance’
£0.00 it can be deleted from the system.
customer account
customer account card
and has a unique
can be made by a customer at any time, this is done at the
‘pay account’
. As customers make payments their accounts are updated accordingly.
screen. As your customer list grows it will take longer to search through, so a
has been included to help you locate specific customer accounts, or view
‘overdue’
when making purchases in store, as a form of payment at the till.
barcode
or
‘expired’
function, once the customer account has a balance of
customer accounts.
for the customer to keep. This card contains their
that can be scanned at the till on presentation to
customer list
.
The customer can then
‘New Customer’
using the function
till
within the
.
‘customer
Once a customer has reached their
customer account card as payment until the balance has been reduced.
As with most of the components of the Back Office you can run reports. Within
you can run any or all of the three
History Report
’,
‘Detailed Transaction History Report
credit limit
Customer Reports
the till application will not accept their
, ‘
Customer Summary Transaction
’ or ‘
Customer Invoice Report
customers
’.
Sharp Electronics (UK) Ltd – Back Office User Manual 1999
Page 56

The following information can be stored on a customer:
• Name
• Full postal address
• Telephone number
• Account number
• Account status
• Card expiry date
• Current balance
• Credit limit
You do not have to keep all of the above information on a customer, only the following is
compulsory:
• First name
• Last name
• Account number
• Current balance
• Account status
Sharp Electronics (UK) Ltd – Back Office User Manual 1999
Page 57

11.2 Overview of this Chapter
Within this section of the User Manual you will find a detailed description of:
• How to
• How to
• How to
• How to
• How to
• How to
• How to
a new customer
add
a customer account card
print
a customer’s account
view
change
write off / forgive
delete
run
the details of an account
a customer account
the customer reports
a customer balance
Sharp Electronics (UK) Ltd – Back Office User Manual 1999
Page 58

11.3 How to Add a New Customer
To get to the
the following screen:
add customer
screen, navigate to
Customers→New Customer
. This displays
The screen is divided into three areas which are headed as follows:
• Personal details
• Address
• Account details
Not all of the fields you can see within the above three areas of the screen need to be
completed to add a new customer to your system.
The fields where entry is compulsory are as follows:
• First name
• Last name
• Expiry date
Sharp Electronics (UK) Ltd – Back Office User Manual 1999
Page 59

The system will automatically generate the following for you:
• Account number
• Account status
• Current balance
• Credit limit
The remaining fields are optional but you are strongly advised to keep all of the personal
details as your customer base grows.
The following guide will show you how to complete all of the fields available, if you only
want to enter the ‘compulsory’ information required on a customer please refer to the above
list.
The cursor will appear in the first name field in the ‘personal details’ box.
• Type in the first name of the customer you are adding.
• Press ‘Tab’ to the next field and type in their last name.
• Press ‘Tab’ to the next field and choose ‘M’ or ‘F’ for sex.
• Press ‘Tab’ to the next field and enter the date of birth of the customer.
• Press ‘Tab’ to the ‘address’ box, and type in the customer’s full postal address
and telephone number.
• Press ‘Tab’ to the ‘account details’ box.
The cursor will appear to skip the ‘account number’ field and go directly to ‘account
status’. This is because the system automatically gives the customer you are adding an
account number.
The ‘account status’ will default to ‘normal’. This enables a customer to use their account.
If required, you can change the account status, but this would not normally be necessary
when adding a new customer, as the other options available actually prevent a customer from
using their account.
• If you need to prevent a customer from using their account at this stage you should:
Click on the down arrow next to the ‘account status’ field, to reveal the following list:
From here, click on the account status option you want to set for that customer.
• If you want the customer to start using their
account instantly, leave the ‘Account Status’
set at ‘Normal’.
Sharp Electronics (UK) Ltd – Back Office User Manual 1999
Page 60

From here, press ‘Tab’ to the ‘card expiry’ field and type in the date you want the
customers’ card to expire, for example, six months time.
The date used must be after today’s date and in a string of ‘dd/mm/yy’. The ‘balance’ field
will read £0.00, and the ‘credit li mi t’ field will default to the amount you have set using the
configuration tool. When all the fields conta in the cor rec t info rmation, click on ‘Save’ on the
framework.
The system will attempt to add the new customer account into the system, if this is successful
a message will appear over your completed screen, naming the new customer that has been
added successfully.
Click on ‘OK’. (NB: On saving the customers details a record is also written to the audit log.)
A pop-up screen appears asking you if you wish to print a customer card.
If you want to print a customer card now, click on Yes. If you do not want to print a customer
card at this point, click on No.
Customer details are then cleared, ready for you to add another customer.
If you do not wish to add another customer, click on the Go Back button to return you to the
main screen, otherwise enter the next customer’s details and save them as before.
Sharp Electronics (UK) Ltd – Back Office User Manual 1999
Page 61

11.4 How to Search for and View an Existing Customer’s Details
To get to the
This displays the following screen:
‘customer list’
screen, navigate to
Customers→Customer Maintenan ce
.
Lets look at this screen in more detail:
•
Search/View
Here you can carry out searches for specific customers from your customer list. You are also
able to re-arrange the way in which customers appear in your list.
•
Customer List
In this part of the screen your customer list is displayed in the order you have requested. If
your list is longer than the viewing window, you can use the
screen to move forwards and backwards throughout your list.
Sharp Electronics (UK) Ltd – Back Office User Manual 1999
scroll bar
at the right of the
Page 62

11.4.1 How to Search for an Existing Customer’s Details
In the Search/View section of the screen you see the following:
The first field ‘search for’ is where you type in what you want to search for. You can search
for anything that appears in the customer list.
To reveal the options of where you can search, click on the down arrow at the end of the ‘in’
field. This displays the list of options.
• Example of how to search for a customer by last name:
• Type in the first few letters of the customer’s last name in the ‘search for’ field.
• Click on last name in the list displayed below. As you click on ‘last name’ the
name you are searching for will instantly appear as follows:
Sharp Electronics (UK) Ltd – Back Office User Manual 1999
Page 63

If you want to view further detail, select the customer in question, then click on the Expand
button after selecting the customer of interest from the list.
When you have finished viewing, click on the Go Back button to return to the cus to mer list
screen.
Sharp Electronics (UK) Ltd – Back Office User Manual 1999
Page 64

11.4.2 To Re-Order Your Customer List for Viewing
Whilst you are in the customer list screen, you can re-order your entire customer list instantly
by changing the option in the ‘order by’ box.
To reveal a list of options of where you can search, click on the down arrow at the end of the
‘in’ field. This displays a list of options.
By selecting any one of the above options, your entire customer list is instantly re-ordered as
follows:
• By selecting First Name your list is re-ordered alphabetically by first name.
• By selecting Account Number, your list is re-ordered in numerical order by
account number.
• By selecting Account Status, your list is re-ordered in groups of customers by
account status.
• Example of RE-ORDERING your customer list by ‘account status’
• In the ‘order by’ box, click on account status. As you select ‘account status’, your
customer list instantly appears in a re-ordered list, as shown below:
Sharp Electronics (UK) Ltd – Back Office User Manual 1999
Page 65

This would allow you to see at a glance how many customers have ‘normal’, ‘overdue’,
‘suspended’, or ‘expired’ accounts.
Sharp Electronics (UK) Ltd – Back Office User Manual 1999
Page 66

11.4.3 How to Delete an Existing Customer
When you are in the customer li st screen, you are able to delete any customer from the list
AS LONG AS their account balance is £0.00. To do this, select a customer by clicking on
their left-hand column (next to last name) and click on the Delete button.
• If their account balance is £0.00, a pop up box will appear asking you if you are sure you
wish to delete the customer.
If you do wish to delete the customer, click on ‘YES’. If you choose not to delete the
customer, click on ‘NO’.
If you clicked on ‘YES’, the system will inform you that the customer has successfully been
deleted.
Click on ‘OK’. This returns to the customer list screen with the customer having been
deleted from the list.
• If they have a positive account balance, a pop-up box appears warning you of this fact,
as well as displaying their current balance.
Click on ‘OK’. The customer cannot be deleted from the list whilst their account balance is
positive.
X
However, if you do still wish to delete that customer, you can do so by writing off that
customer balance.
To do this, navigate to Customers→Payment. This displays the customer payment screen:
This screen displays a list of customers along with their account balance. Click on a
customer’s left-hand column (next to last name) and then click on the Forgive Balance /
Write Off button.
The following pop-up screen appears asking you to confirm whether you wish to write off the
customer’s balance.
If you want to write off the customer balance, click on ‘YES’. If you choose not to forgive
the balance, click on ‘NO’.
If you clicked on ‘YES’ a message will appear informing you that the customer’s balance has
been written off. Click on ‘OK’. This restores the custom er balanc e to £0.00.
From here, navigate to Customers→Customer Maintenance. This takes you to the
customer list screen. You should now be able to delete the customer from the customer list.
Sharp Electronics (UK) Ltd – Back Office User Manual 1999
Page 67

11.4.4 How to Change an Existing Customer’s Details
To get to the customer modification screen, navigate to Customers→Customer
Maintenance. This displays the following screen:
To view the details about a customer, click on the customer’s left-hand column (next to last
name) and then click on the Expand button. This displays the customer modification
screen:
Sharp Electronics (UK) Ltd – Back Office User Manual 1999
Page 68

From here, click on any one of the fields and change the customer details as required. After
you have done this, click on the Save button to save the changes made. A pop up message
will appear informing you that changes to the customer have been save successfully.
Click on ‘OK’. This displays the customer modification screen with changes having been
made.
Click on the Go Back button to return to the main screen.
Sharp Electronics (UK) Ltd – Back Office User Manual 1999
Page 69

11.4.5 How to Print a Customer Card
To print a customer card (if you have not already done so), navigate to
Customers→Customer Maintenance. This displays the following screen:
• If you wish to print a single customer card, click on the customer’s left-hand column
(next to last name), and then click on the Print Selected Customer Card button. The
customer card then prints to the on-line printer.
• If you wish to print all customer cards, simply click on the Print All Shown Customer
Cards button. All customer cards then print to the on-line printer.
Sharp Electronics (UK) Ltd – Back Office User Manual 1999
Page 70

11.5 Run a Customer Report
To get to the
displays the following screen:
customer report
screen, navigate to
Customers→Customer Reports
. This
Lets look at this screen in more detail:
•
Search/View
Here you can carry out searches for specific customers from your customer list. You are also
able to re-arrange the way in which customers appear in your list.
Sharp Electronics (UK) Ltd – Back Office User Manual 1999
Page 71

Customer List
In this part of the screen your customer list is displayed in the order you have requested. If
your list is longer than the viewing window, you can use the scroll bar at the right of the
screen to move forwards and backwards throughout your list.
• Printing options and report typ e
Here you can choose which type of report you wish to run, and whether to print the report to
the screen or a printer.
Sharp Electronics (UK) Ltd – Back Office User Manual 1999
Page 72

11.5.1 Print a Customer Summary Transaction History Report
This report displays transactions at the till over a selected period of time for a selected
customer.
To print a customer summary transaction history report, select a customer by clicking on
their left-hand column (next to last name), and then click on the ‘customer summary
transaction history’ box.
Click on the Print button. The following pop-up message appears on screen:
From here, click on the time period you wish to run the report for. After you have done this,
click on ‘OK’ to run the report, or on ‘CANCEL’ to return to the custo mer repor t scre en.
If you select for example ‘Report Period’: This Week on ‘OK’, a report is printed.
Sharp Electronics (UK) Ltd – Back Office User Manual 1999
Page 73

11.5.2 Print a Detailed Transaction History Report
This report displays all transactions made at the till by a selected customer.
To print a detailed transaction history report, select a customer by clicking on their left-
hand column (next to last name), and then click on the ‘detailed transaction history’ box.
Click on the Print button. This prints the report below:
Sharp Electronics (UK) Ltd – Back Office User Manual 1999
Page 74

11.5.3 Print a Customer Invoice
This report displays Customer Invoices for a selected customer.
To print a Customer Invoice report, select a customer by clicking on their left-hand column
(next to last name), and then click on the ‘detailed transaction history’ box.
Click on the Print button. This prints the report below:
Sharp Electronics (UK) Ltd – Back Office User Manual 1999
Page 75

11.6 Summary
Well done, in this section of the User Manual you have covered the following sections:
• ADDED a new customer
• PRINTED a customer account card
• VIEWED a customers’ account
• CHANGED the details on a customer account
• WRITTEN OFF/ FORGIVEN a customer balance
• DELETED a customer account
• RAN a customer TRANSACTION REPORT.
Sharp Electronics (UK) Ltd – Back Office User Manual 1999
Page 76

12 Messages
12.1 Introduction
The
messages
communication between you and your staff within your store.
It is an excellent way of ensuring that
happening on a daily basis. All you have to do is
all staff
You can also send
needed someone to work late or take on extra hours that week.
Any member of staff can use the
• Arranging meetings with staff.
• Requesting staff to carry out specific tasks as required.
• Informing staff of issues involving customers e.g. underage customers that have
You can use the
It can be particularly useful for when staff are on holiday or off sick. Important information
arising during their absence can be sent to their mailbox where it will be stored until they
return – the
as they log on.
component of Retail PLUS is an internal e-mailing system which improves the
all staff
at a
attempted to make cigarette or alcohol purchases and who may try again.
messages
click
messages
of a button.
messages
to
individual members of staff
messages
component as little or as often as you wish.
component even informs them that they have messages to read as soon
can be kept up to date with things that are
type the message once
. This could be useful if you
component. This can be used for:
and it can be sent to
The system also sends messages to managers and owners, such as status of End of Day or
EFT Reconciliation as well as warning of overdue price changes and orders, overdue account
statuses, new VAT periods and zero stock level warnings.
Within this section of the User Manual you will find a step-by-step guide on how to perform
the following functions:
• How to SEND a mail message
• How READ a mail message
• How to DELETE a mail message
Sharp Electronics (UK) Ltd – Back Office User Manual 1999
Page 77

12.2 How to Send a New Mail Message
To get to the
the following screen:
send message
screen, navigate to
Messages→Send a Message
. This displays
The cursor automatically appears in the
you and the recipient can identify what the message is about.
From here, press ‘
arrow to reveal the list of staff names or groups of staff:
From here, select a staff group/ member by clicking on the respective name from the list.
This returns you to the
message to
You can now type in your message. There is a large amount of space available for your
message that automatically expands to accommodate the text if necessary.
Once your message is complete, click on the
your message
box.
.
’ on the keyboard to get to the
TAB
send message
subject
screen with the staff group/ member name in the
box. Type in a title for your message so that
message to
button at the bottom of the screen to
Save
box. Click on the down
send
Sharp Electronics (UK) Ltd – Back Office User Manual 1999
Page 78

If your message has been sent successfully a pop-up screen will appear informing you of the
date and time that the message was sent.
Click on ‘OK’. Your recipient should then receive the message in their mailbox.
Click on the Go Back button to return you to the main screen. Alternatively, another
message can be sent.
Sharp Electronics (UK) Ltd – Back Office User Manual 1999
Page 79

12.3 How to Read a Message
To get to the
following screen:
read message
screen, navigate to
Messages→Read Message
. This displays the
This displays a list of your messages. Unread mail messages appear in red text until they
have been selected, at which point the text changes to black.
To read a message, click on the message’s left-hand box (next to
button. This displays the whole message on screen:
). Click on the
date
Expand
Sharp Electronics (UK) Ltd – Back Office User Manual 1999
Page 80

Please note that changes cannot be made to the message as this is a read-only screen.
Once you have read the message, click on the Go Back button. This returns you to the
message list screen.
If you have more than one message to read, repeat the above process until all of your
messages have been read. Once you have read all of your messages, click on the Go Back
button to return to the main navigation screen.
Sharp Electronics (UK) Ltd – Back Office User Manual 1999
Page 81

12.3.1 How to Delete a Message
You can delete messages that are no longer required from the mess age li st screen. To do this,
click on the message’s left-hand column (next to date). Click on the Delete button. This will
display a message asking you if you are sure you want to delete the message.
To delete the message, click on ‘YES’. To cancel the process, click on ‘NO’.
Click on the Go Back button to return to the main screen.
Sharp Electronics (UK) Ltd – Back Office User Manual 1999
Page 82

12.4 Summary
Well done, in this section of the User Manual you have covered the following sections:
• SENT a mail message
• READ a mail message
• DELETED a mail message.
Sharp Electronics (UK) Ltd – Back Office User Manual 1999
Page 83

13 System
13.1 Introduction
The
system
of your store.
This allows you to view all till transactions after they have taken place, as well as monitor
what is being sold at the till as it happens.
A range of reports can also be run at the end of each day and week.
Within this section of the User Manual you will find a step-by-step guide on how to perform
the following functions:
• SEND PRICE CHANGES and GOODS FOR RETURN to your preferred supplier
• RECEIVE DISPATCH NOTES and PRICE CHANGES
• VIEW the AUDIT LOG
• VIEW the ELECTRONIC JOURNAL
• UPDATE the TILLS
• RUN the END OF DAY REPORTS
component of the Back Office enables you to overlook and run many key features
• RUN the END OF WEEK REPORTS
• BACKUP the Sales Audit
• BACKUP the SYSTEM
Sharp Electronics (UK) Ltd – Back Office User Manual 1999
Page 84

13.2 Download a Product File to the LDT
To get to the
the following screen:
LDT Download
screen, navigate to
System→LDT Download
. This displays
To download a product file to the LDT, simply follow instructions 1-4 and click on
‘
START
Click on the
’.
Go Back
button to return to the main navigation screen.
Sharp Electronics (UK) Ltd – Back Office User Manual 1999
Page 85

13.3 View the Audit Log
This shows a list of all the messages that have been sent to the audit log.
To get to the
screen:
audit log
screen, navigate to
System→Audit Log
. This displays the following
Lets look at this screen in more detail:
•
Log
Sharp Electronics (UK) Ltd – Back Office User Manual 1999
Page 86

This shows the messages themselves, along with their date, time, reason, and the name of the
operator.
• Reason/ message order box
The ‘reason’ box enables you to select an reason as to why a message was sent to the audit
log. To display a list of reasons, click on the down arrow on the end of the reasons box to
display a list of reasons to choose from.
The ‘message order ’ box allows you to select how you want the messages to appear on
screen. This option allows you either to select the newest or oldest messages to appear at the
top of the screen. To change the order, click on the down arrow at the end of the message
order box.
Click on the Go Back button to return to the main navigation screen.
Sharp Electronics (UK) Ltd – Back Office User Manual 1999
Page 87

13.4 Run the EOD Reports
To get to the
following screen:
EOD reports
screen, navigate to
System→EOD Reports
. This displays the
Lets look at this screen in more detail:
•
Reports to print
Sharp Electronics (UK) Ltd – Back Office User Manual 1999
Page 88

From here, you can select which reports you wish to print. If you do not wish to print any of
the above reports, click on the respective boxes so that there is not a tick in that box.
• For when?
This is where you select whether you want the reports run for today or yesterday.
• The user may also choose a date by clicking the Day for till Fina n cial Report button.
• Print to
The stock list can either be printed to the screen or to a printer. From here, click on either
screen or
printer, and then click on the Print button at the bottom of the screen.
An example of an EOD report is shown below:
Sharp Electronics (UK) Ltd – Back Office User Manual 1999
Page 89

13.5 View the Electronic Journal
The electronic journal is a copy of every till transaction that goes through the till. This is
useful for showing what has been brought so that any complaints from customers about being
‘over-charged’ can be dealt with.
To get to the
following screen:
journal
screen, navigate to
System→Electronic Journal
. This displays the
Lets look at this screen in more detail:
•
Filters
The ‘
day. If you are unsure of the actual date, click on ‘
to choose from.
Sharp Electronics (UK) Ltd – Back Office User Manual 1999
’ box allows you to enter a
date
particular date
DATE SEARCH
to view transactions made only on that
’ to display a list of dates
Page 90

The ‘operator’ box enables you to select an operator to view transactions made only by that
operator. To display a list of operators, click on the down arrow on the end of the
operators box to display a list of operators to choose from.
• Details
In the ‘transactions in range’ box, a list of till transactions will appear. To select one, click
on one of the arrows in the list.
In the ‘receipt’ box, the receipt of the selected till transaction will appear. Use the scroll bar
on the right of the ‘receipt’ box to move up and down the receipt.
Once you have viewed the till transactions, click on the Go Back button to return to the main
navigation screen.
Sharp Electronics (UK) Ltd – Back Office User Manual 1999
Page 91

13.6 How to Monitor the Tills
Tbd – Real-time terminal monitoring
The terminal monitoring enables you to view what is happening at any of the tills. This
allows you to check on any of the tills as tills transactions are taking place.
To get to the
displays the following screen:
terminal monitoring
screen, navigate to
System→Terminal Monitoring
. This
Lets look at this screen in more detail:
•
Options
From here, you can select a
the end of the terminal ID box
•
Monitor
Sharp Electronics (UK) Ltd – Back Office User Manual 1999
list of terminals
, and a
to monitor by clicking on the
time to start monitoring
down arrow at
.
Page 92

Clicking on this button ‘plays’ what takes place at the till.
This ‘pauses’ (at a certain point) the monitoring of what takes place at the till.
This takes you to the start of the transaction.
This rewinds the monitoring of the till.
This forwards the monitoring of the till.
This takes you to the end of the transaction.
• Details
The left-hand side of the screen shows the monitoring of the transactions. On the right-hand
side of the screen the operator, date and time are displayed.
Once you have viewed the monitoring of the transactions, click on the Go Back button to
return to the main navigation screen.
Sharp Electronics (UK) Ltd – Back Office User Manual 1999
Page 93

13.7 Update the Tills
This allows you to update your tills to record any changes that have been made in the back
office.
To get to the
following screen:
To update your tills, simply click on the ‘
Another screen to confirm your choice is shown below click ‘YES’ to continue:
update tills
screen, navigate to
UPDATE TILLS
System→Update Tills
’ button.
. This displays the
The progress bar at the bottom gives an indication of the progress being made.
Click on the
Sharp Electronics (UK) Ltd – Back Office User Manual 1999
Go Back
button to return to the main navigation screen.
Page 94

13.8 Run the EOW Reports
To get to the
following screen:
EOW reports
screen, navigate to
System→EOW Reports
. This displays the
Lets look at this screen in more detail:
•
Reports to print
From here, you can select which reports you wish to print. If you
the above reports, click on the respective boxes so that
there is not a tick in that box
do not wish to print
any of
.
Sharp Electronics (UK) Ltd – Back Office User Manual 1999
Page 95

• Print to
The stock list can either be printed to the screen or to a printer. From here, click on either
screen or printer, and then click on the Print button at the bottom of the screen.
An example of an EOW report is shown below:
Sharp Electronics (UK) Ltd – Back Office User Manual 1999
Page 96

13.9 Sales Audit Backup
This option in the system menu is used to back up the files containing the till receipts.
To get to the
displays the following screen:
Sales Audit Backup
screen, navigate to
System→Sales Audit Backup
. This
Lets look at this screen in more detail:
Location Of Backup:
This determines where the Backup will be made to either A floppy disk, The Hard drive or a
ZIP Drive if one is present.
Load File/ Save file:
These two button “
repectively.
Load File”
and “
Save File”
are used to load and save the Audit Backup
Sharp Electronics (UK) Ltd – Back Office User Manual 1999
Page 97

When the “Load File” button is clicked and more then one file is detected a message box is
displayed as shown below:
Here the back up file and date are displayed and can be selected to be loaded.
Transactions:
The loaded files are then displayed in the Transactions section displaying the date of the
backup as shown below:
To backup the Audit files simply click on to back up the Audit
files.
Sharp Electronics (UK) Ltd – Back Office User Manual 1999
Page 98

13.10 System Backup
To get to the
This option in the system menu is used to Backup the Database and can also be used to
Recover the database.
This displays the following screen:
System Backup
screen, click on . From here, click on:
Lets look at this screen in more detail:
Location of Backup:
This determines where the database is backed up from or retrieved.
Start Backup:
Sharp Electronics (UK) Ltd – Back Office User Manual 1999
Page 99

This button is used to start the back up of the database to the location specified in the
“Location of Backup” section.
Remove Backup:
This button is used to remove any backups that are already there in the location specified in
the
“Location of Backup” section.
Start Recovery:
This button is used to recover the backed up data from the location specified in the
“Location of Backup” section.
Click on the Go Back button to return to the main navigation screen.
Sharp Electronics (UK) Ltd – Back Office User Manual 1999
Page 100

13.11 Summary
Well done, in this section of the User Manual you have covered the following sections:
• SENT PRICE CHANGES and GOODS FOR RETURN to your preferred supplier
• RECEIVED DISPATCH NOTES and PRICE CHANGES from the tills
• VIEWED the AUDIT LOG
• VIEWED the ELECTRONIC JOURNAL
• UPDATED the TILLS
• RAN the END OF DAY REPORTS
• RAN the END OF WEEK REPORTS
• RAN the Sales Audit Backup
• RAN the System Backup.
Sharp Electronics (UK) Ltd – Back Office User Manual 1999
 Loading...