This Manual has been prepared to provide Sharp Corp. Service
Personnel with complete Operation and Service Information for
the SHARP CONVECTION MICROWAVE oven, R-8580.
It is recommended that service personnel carefully study the
entire text of this manual so they will be qualified to render
satisfactory customer service.
Check interlock switches and door seal carefully. Special at-
tention should be given to avoid electrical shock and microwave
radiation hazard.
CAUTION
MICROWAVE RADIATION
(RD36102U)
PRODUCT DESCRIPTION
Personnel should not ,be exposed to the microwave energy
which ‘may radiate from the magnetron or other microwave
generating devices if it is improperly used or connected. All
input and output microwave connections, waveguides,flanges
and gaskets must be secured. Never operate the device without
a microwave energy absorbing load attached. Never look into
an open waveguide or antenna while the device is energized.
Note( Parts List)
: The parts marked ,,+I’ are used in voltage
more than 25OV.
(RD36202U)
SHARPCORPORATK)N
OSAKA, JAPAN
(RD37201 U)
1
Page 3
R-8580
PRODUCT DESCRIPTION
SPECIFICATION
ITEM
Power Requirements
Power Consumption
Power Output
Convection Heater Power Output
Case Dimensions
Cooking Cavity Dimensions
Control Complement
Set Weight
DESCRIPTION
240 Volts
50 Hertz
Single phase, 3 wire earthed
14OOW (Microwave)
1600W (Convection)
700 watts normal of RF microwave energy (2 liter water load)
Operating frequency of 2450M Hz
increase by 1 minute mult
this pad is touched during
cooking.
NUMBER AND TEMPERATURE PADS
Touch to enter cooking times, clock time,
convection temperature or to select the
Sensor or Compu Cook categories.
CONVECTION COOKING FUNCTION PADS
Touch to cook for each function
VARIABLE COOKING CONTROL PADS
Touch to select microwave power setting. If
not touched, HIGH is automatically selected.
Touch to select food doneness setting for
Compu Cook. If not touched, Med Done is
automatically selected.
TIMER/HOLD PAD
/
Touch to set minute timer or HOLD function
-AUTO START/CLOCK PAD
Touch to set clock or auto start time
,---STOP/CLEAR PAD
Touch to erase during programming.
Touch once to stop operation of oven during
cooking;, touch twice to cancel cooking
R-8580
entering
minute at HIGH or
:iples each time
HIGH/VARIABLE
Touch to start oven after setting programme.
Page 5
OPERATION
DESCRIPTION OF OPERATING SEQUENCE
The following is a description of component functions
during oven operation.
OFF CONDITION
Closing the door
switches: upper latch switch, lower latch switch and
stop switch.
(In this condition, the monitor switch
contacts are opened.)
When oven is plugged in, 240 volts A.C. is supplied to
the relay unit. (Figure O-l).
1. The display will show flashing “88:88”.
To set any program or set the clock;- you must first
touch the STOP/CLEAR pad. The display will clear,
and I:00 will appear and count up every minute.
Note: When the door is opened, the oven lamp comes
2. A si;al is input to the control unit, energizing the
coil of shut-off relay (RY6).
RY6 contacts close, completing a circuit to the
damper motor.
The damper motor now operates moving the damper
to the open position, thereby closing the contacts
of the damper switch inputs a signal to the control
unit.
The coil of relay RY6 is de-energized, opening its
contacts, thereby turning off the damper motor.
activates both door interlock
COOKING CONDITION
HIGH COOKING
Program desired cooking time and Variable Cooking
Control by touching the NUMBER pads and the HIGH
pad of the Variable Cooking Control. When the START
pad is touched, the following operations occur:
The contacts of relays are closed and components
1.
connected to the relays are turned on as follows.
(For details, refer to Figure O-2)
RELAY
RY-1
RY-2
RY-3
RY-4
RY-5
RY-6
2.
240 volts A.C. is supplied to the primary winding
of the power transformer and is converted to about
3.3 volts A.C. output on the filament winding, and
approximately 2043 volts A.C. on the high voltage
winding.
The filament winding voltage heats the magnetron
3.
filament and the H.V. winding voltage is sent to a
voltage doubler circuit.
The microwave energy produced by the magnetron
4.
is channeled through the waveguide into the cavity
feed-box, and then into the cavity where the food
is placed to be cooked.
CONNECTED COMPONENTS
power transformer
oven lamp/turntable motor
convection motor
convection heater
fan motor
damper motor
(RD71101 U)
’
(RD71207U)
5.
Upon completion of the cooking time, the power
transformer, oven lamp, etc. are turned off, and the
generation of microwave energy is stopped. The
oven will revert to the OFF condition.
6.
When the door is opened during a cook cycle,
monitor switch, upper latch switch, lower latch
switch and stop switch. are activated with the following results. The circuits to the turntable motor,
the cooling fan motor, and the high voltage components are deenergized, the oven lamp remains on,
and the digital readout displays the time still remaining in the cook cycle when the door was
opened.
The monitor switch is electrically monitoring the
7 .
operation of the upper latch switch and is mechan-
ically associated with the door so that it will function in the following sequence.
(1) When the door opens from a closed position,
the upper latch switch and lower latch switch
open their contacts, and then the monitor
switch contacts close.
(2) When the door is closed from the open posi-
tion, the monitor switch contacts first open,
and then the contacts of the upper latch switch
and lower latch switch close.
the common and normal open contacts of upper
If
latch switch fail with their contacts closed when the
door is opened, the closing of the monitor switch
contacts will form a short circuit through the fuse and
upper latch switch, causing the monitor fuse to blow.
MED HIGH, MED, MED LOW (DEFROST), LOW,
HOLD COOKING
When Variable Cooking Power is programed, the 240
volts A.C. is supplied to the power transformer
intermittently through the contacts of relay( RY-2)
which is operated by the control unit within a 32 sec-
ond time base. Microwave power operation is as fol-
lows:
VARI-MODE
HIGH
(100% power)
MED HIGH
(approx. 70% power)
MED
(approx. 50% power)
MED LOW (DEFROST)
(approx. 30% power)
LOW
(approx. 10% power)
HOLD
(0% power)
ON TIME
32 sec.
24 sec.
18 sec.
12 sec.
6 sec. 26 sec.
0 sec.
OFF TIME
0 sec.
8 sec.
14 sec.
20 sec.
32 sec.
Note: The ON/OFF time ratio does not correspond
with the percentage of microwave power, because approx. 2 seconds are needed for heating
of the magnetron filament.
(RD71401 U)
Page 6
R -8580
CONVECTION COOKING CONDITION
PREHEATING CONDITION
Program desired convection temperature by touching
the CONVECTION pad and the temp. pad.
When the START pad is touched, the following operations occur:
1. The coil of shut-off relays (RY2, RY3 and RY5) are
energized, the oven lamp, cooling fan motor,
turntable motor and convection motor are turned
2. y:k coil of relay (RY6) is energized by the CPU
unit, The damper is moved to the closed position,
opening the damper switch contacts.
The opening of the damper switch contacts sends
a signal to the LSI on the CPU unit de-energizing
the relay (RY6) and opening the circuit to the
damper motor.
3. The coil of heater relay (RY4) is energized by the
CPU unit and the main supply voltage is added to
the convection heater.
4. When the oven temperature reaches the selected
preheat temperature, the following operations oc-
cur:
4-l. The heater relay (RY4) is de-energized by
the CPU unit temperature circuit and
thermistor, opening the circuit to the convection heater.
4-2. The oven will continue to function for 15
minutes, turning the convection heater on
and off, as needed to maintain the selected
preheat temperature.
The oven will shut-down completely after
15 minutes.
CONVECTION COOKING CONDITION
When the preheat temperature is reached, a beep signal
will sound indicating that the holding temperature has
been reached in the oven cavity. Open the door and
place the food to be cooked in the oven.
Program desired cooking time and convection temperature by touching the NUMBER pad, CONVECTION
pad and Temperature pad.
When the START pad is touched, the following operations occur:
1.
The numbers of the digital readout. start the count
down to zero.
2.
The oven lamp, turntable motor, cooling fan motor
and convection motor are energized.
Heater relay (RY4) is energized (if the cavity tem-
3.
perature is lower than the selected temperature)
and the main supply voltage is applied to the convection heater to return to the selected cooking
temperature.
4.
Upon completion of the cooking time, the audible
signal will sound, and oven lamp, turntable motor,
cooling fan motor and convection motor are
de-energized. At the end of the convection cycle,
if the cavity air temperature is above 118 OC., the
circuit to RY5 will be maintained (by the thermistor
circuit) to continue operation of the cooling fan
motor until the temperature drops below 118 OC.,
at which time the relay will be de-energized, turning off the fan motor. Relay RY3 will however,
open as soon as the convection cycle has ended,
turning off the convection fan motor.This will now
cool and allow the damper door to open.
5. At the end of the convection cook cycle, shut-off
relay (RY6) is energized turning on- the damper
motor. The damper is returned to the open position,
closing the damper switch contacts which send a
signal to the control unit, de-energizing shut-off
relay (RY6).
AUTOMATIC MIX COOKING CONDITION
Program desired cooking time and temperature by
touching the number pads and the LOW MIX/BAKE
or HIGH MIX/ROAST pad
When the START pad is touched, the following operations occur:
1.
The numbers of the digital readout start the count
down to zero.
2.
The shut-off relay (RY2, RY3 and RY5) are energized, turning on the oven lamp, turntable motor,
and cooling fan motor.
3.
The shut-off relay (RY6) is energized.
The damper door is closed from the open position.
4.
The heater relay (RY4) is energized, adding the
mains supply voltage to the convection heater.
5.
Now, the oven is in the convection cooking condition.
6.
When the oven temperature reaches the selected
temperature, the following operations occur:
6-l. The power supply voltages is added to the
convection heater and power transformer alternately.
6-2. The convection heater operates through the
heater relay (RY4) contacts and the power
transformer operates through the cook relay
(RYI ) contacts.
6-3. These are operated by the CPU unit to sup-
ply alternately within a 32 second time base,
convection heat and microwave energy.
The relationship between the
wave power operations are as
convection
follows.
Note: The ON and OFF time ratio does not correspond
with the percentage of microwave power, because approx. 2 seconds are needed for heating
of the magnetron filament.
MICROWAVE POWER
- Appmx. 10%
I
ICONVECJ
1
im
I
r
t
OFF
‘ON
I
I I
&gjggg&
32~
HIGH MIX
-ROAST
CONVECTION
TEMPERATURE
I
I
MICROWAVE POWER
CONVECTION
TEMPERATURE
i
- leo°C
- A6wrcuc. 30%
-200%
and
micro-
Page 7
R-8580
Note: During alternate Microwave/Convection opera-
tion, the convection heater is energized only if
the cavity temperature drops below the set temperature.
SENSOR COOKING CONDITION
Using the SENSOR COOK function, the foods are
cooked without figuring time, power level or quantity.
When the oven senses enough steam from the food, it
relays the information to its microprocessor which will
calculate the remaining cooking time and power level
needed for best results.
When the food is cooked, water vapor is developed.
The sensor “senses” the vapor and its resistance increases gradually. When the resistance reaches the
value set according to the menu, supplementary cook-
ing is started.
The time of supplementary cooking is’.determined by
experiment with each food category and inputted into
the LSI.
An example of how sensor works:
1. Broccoli at room temperature.
Vapor is emitted very slowly.
2. Heat broccoli. Moisture and humidity is emitted
rapidly. You can smell the aroma as it cooks.
3. Sensor detects moisture and humidity and calcu-
lates cooking time and variable power.
Cooking Sequence.
1. Touch SENSOR COOK pad.
NOTE:The oven should not be operated on SEN-
SOR COOK immediately after plugging in
the unit. Wait five minutes before cooking
on SENSOR COOK.
2.
Select desired Sensor setting.
3. Touch START pad.
The coil of shut-off relays(RY2,RY5) are energized,
the oven lamp and cooling fan motor are turned
on, but the power transformer is not turned on,
4.
After about 16 seconds, the cook relay (RYI) is
energized. The power transformer is turned on,
microwave energy is produced and first stage is
started.
The 16 seconds is the cooling time required to remove any vapor from the oven cavity and sensor.
NOTE: During this first stage, do not open the door
or touch STOP/CLEAR pad.
5.
When the sensor detects the vapor emitted from the
food, the display switches over to the remaining
cooking time and the timer counts down to zero.
At this time, the door may be opened to stir food,
turn it or season, etc.
When the timer reaches zero, an audible signal
6.
sounds. The shut-off relay and cook relay are
de-energized and the power transformer, oven
lamp, etc. are turned off,
Opening the door or touching the STOP/CLEAR
7.
pad, the time of day will reappear on the display
and the oven will revert to an OFF condition.
COMPU COOK
COMPU COOK will automatically compute the oven
temperature, microwave power and cooking time for
baking, roasting and broiling.
Set the desired program by touching the COMPU
COOK pad, and number pad.
Enter the weight by touching the Number pads
When the START pad is touched, the following operations occur:
1.
The COOK indicator will light and the Convection
Fan Symbol will rotate.
2.
The cooking time will appear on the display and
start counting down to zero.
The cooking time is adjusted automatically according to the weight of the food.
The shut-off relays (RY2, RY3, RY4 and RY5) are
3.
energized, turning on the oven lamp, turntable
motor, cooling fan motor and convection motor.
The power supply voltage is added to the con-
vection heater.
4.
Now, the oven is in the convection cooking mode.
5.
When the oven temperature has reached the programmed convection temperature, the oven goes
into the programmed cooking mode.
6.
At the end of the COMPU COOK cycle, the damper
is returned to the open position and the oven will
go to the off condition.
The cooling fan will remain on until the oven has
cooled.
EASY DEFROST COOKING
The EASY DEFROST key is a special function key to
defrost meats and poultry faster and better.
EASY DEFROST key has 4 defrost stages.
EASY DEFROST automatically defrosts roast beef, etc.
When EASY DEFROST is selected and the food weight
is entered by using the number pads, the oven will
cook according to the special cooking sequence.
Page 8
240V-50Hz
G-4
MBA
AC CORD CONNECTION
BRN BROWN
BLU : BLUE
G-Y GREEN AND
YELLOW STRIPE
I17 : SECTIONAL AREA
OF l.Omm’ MIN.
1 DOOR CLOSE0
LOWER
LATCH
SWITCH
MONITOR RESISTOR O.B/2OW MON,TOR SW,TCH
OVEN LAMP
FAN MOTOR
n
RELAY-UNIT A-3
-______
DAMPER MOTOR
-
CONVECTION HEATER
TURNTABLE MOTOR
TEMP.
FUSE
142’C
UPPER
LATCH
SWITCH
NC
?
AC CORD CONNECTION
BRN BROWN
BLU BLUE
G-Y GREEN AND
YELLOW STRIPE
/I7
SECTIONAL AREA
OF l.Omm’ MIN
SENSOR COOKING
NOTE CONDITION
1 DOOR CLOSED
2 ‘SENSOR COOK”
PAD TOUCHED
3 START’ PAD
HIGH COOKING
1 DOOR CLOSED
2 COOKING TIME
PROGRAMMED
3 VARIABLE COOKING
LOWER
I ATI
-. -. .
SWITCH
I,
I
d ^-^^
MONITOR RESISTOR D.B/2DW
OVEN LAMP
CONVECTION%EATER
RELAY-UNIT
-_-
MONITOR SWITCH
w. +A-7
I i
RW
l-6
A
RV6
A-5
I
1
-
c
TEMP.
FUSE
142’C
I
UPPER
LATCH
SWITCH
NC
I
; POWER TRANSFORMER
I 1
HIGH VOLTAGE
RECTIFIER
MAGNETRON
A
Figure O-l. Oven Schematic-OFF Condition
I
RECTIFIER ,
POWER TRANSFORMER
I
HIGH VOLTAGE
RECTIFIER
t
MAGNETRON
Figure O-2. Oven Schematic-High and Sensor Cooking Condition
The thermistor is a negative temperature coefficient
type. The temperature in the oven cavity is detected
through the resistance of the thermistor, and then the
CPU unit causes the heater relay to operate, thus the
current to the convection heater is turned ON/OFF.
OVEN THERMAL CUT-OUT
The oven thermal cut-out located on the bottom side
of the thermal protection plate is designed to prevent
damage to the convection heater unit if an overheated
condition develops in the tube due to cooling fan failure, obstructed air ducts, dirty or blocked air intake, etc.
Under normal operation, the oven thermal cut-out remains closed. However, when abnormally high temperatures are reached within the heater unit, the oven
thermal cut-out will open, causing the oven to shut
down.
When the oven has cooled temperature, the oven
thermal cut-out closes.
MONITOR SWITCH
The monitor switch is mounted on the upper latch
hook. It is activated (the contacts opened) by the upper latch head when the door is closed. The switch is
intended to render the oven inoperative by means of
blowning the fuse when the contacts of the common
and normal open contacts of upper latch switch fail to
open when the door is opened.
R -8580
CAUTION:BEFORE REPLACING A BLOWN FUSE
TEST THE UPPER LATCH SWITCH AND
MONITOR
SWITCH
FOR
PROPER
OPERATION.(REFER TO CHAPTER “TEST
PROCEDURE”).
AFTER REPLACING FUSE ALSO REPLACE
MONITOR SWITCH.
STOP SWITCH
The stop switch is activated by the lower latch head.
When the door is opened while the oven is in cook
cycle, the stop switch contacts open to de-energize the
relay(RY-l,RY-2,RY-3,RY-4,RY-5).
Then the cook cycle is stopped.
UPPER AND LOWER LATCH SWITCHES
The lower latch switch is mounted in the lower latch
hook and the upper latch switch is mounted in the
upper latch hook.
heads on the door.
They are activated by the latch
When the door is opened, the
switches interrupt the’crrcuit to all components except
CPU unit and relay unit and oven lamp. A cook cycle
cannot take place until the door is firmly closed thereby
activating both interlock switches.
P
’ UPPER
A
LATCH
HOOK
Functions:
1.
When the door is opened, the monitor switch contacts close (to the ON condition) due to their being
normally closed. At this time the the common and
normal open contacts of upper latch switch are in
the OFF condition (contacts open) due to their
being normally open contacts switch.
2.
As the door goes to a closed position, the monitor
switch contacts are first opened and then the
common and normal open contacts of upper latch
switch close. (On opening the door, each of these
switches operate inversely.)
3.
If the door is opened during cooking, and the
common and normal open contacts of upper latch
switch fail to open, the monitor fuse blows simultaneously with closing of the monitor switch contacts.
Figure D-l. Upper Latch Switch, Lower Latch
Switch, Monitor Switch and Stop Switch
Page 11
R-8580
CONVECTION HEATER Microwave Cooking:
The convection heater is located at the left side of the
oven cavity.
It is intended to heat air driven by the
convection fan. The heated air is kept in the oven and
force-circulated and reheated by the convection heater.
Damper is in the open position, because a portion of
cooling air is channeled through the cavity to remove
steam and vapors given off from the heating foods.
It is then exhausted at the top of the oven cavity into
a condensation compartment.
CONVECTION COOKING SYSTEM
This oven is designed with a hot air heating system
where food is not directly heated by the convection
heater, but is heated by forced circulation of the hot
Convection Cooking:
Damper is in the closed position, so that no hot air will
be allowed to leak out the oven cavity.
air produced by the convection heater.
The air heated by the convection heater is circulated
through the convection passage provided on the outer
casing of the oven cavity by means of the convection
fan which is driven by the convection motor. It then
enters the inside of the oven through the vent holes
provided on the left side of the oven. Next,the hot air
heats the food on the turntable and leaves the oven
cavity through the vent in the oven cavity left side wall.
Without leaving the oven, this hot air is reheated by the
convection heater, passes through the convection
passage and enters the inside of the oven cavity again,
in a continuing cycle.
In this way, the hot air circulates inside the oven cavity
to raise its temperature and, at the same time, comes
into contact with the food being cooked.
When the temperature inside the oven cavity reaches
the selected temperature,
the convection heater is
de-energized. When the temperature inside the oven
cavity drops below the selected temperature, the convection heater is energized again. In this way, the inside of the oven cavity is maintained at approximately
the selected temperature.
When the convection time reaches 0, the convection
heater is deenergzed and the convection fan stops op-
erating and the oven shutts off.
Upon completion of the cooking time, the audible sig-
nal will sound, and oven lamp, turntable motor, cooling
fan motor and convection motor are de-energized. At
the end of the convection cycle, if the cavity air tem-
perature is above 118 OC., the circuit to RY5 will be
maintained (by the thermistor circuit) to continue operation of the cooling fan motor until the temperature
drops below 118 OC., at which time the relay will be
de-energized, turning off the fan motor. Relay RY3 will
however, open as soon as the convection cycle has
ended, turning off the convection fan motor.This will
now cool and allow the damper door to open.
DAMPER OPEN-CLOSE MECHANISM
Usually, the damper is in the open position except
during convection cooking.
Damper position is set automatically by damper motor,
damper switch, motor cam and damper shaft.
These components are operated by a signal that judges
if microwave cooking or convection cooking operation
Damper Operation
I, When power supply cord is plugged in:
l-l.
When power supply cord is plugged in, a sig-
nal is sensed in the control unit, and operates
shut-off relay (RY6).
Contacts of shut-off relay (RY6) close, the
1-2.
damper motor is energized, opening the
damper door.
When the damper is moved to the open posi-
1-3.
tion by the damper cam dampe switch is
closed (ON position).
The signal of damper switch is re-sensed in
1-4.
the control unit and shut-off relay (RY6) is
turned off.
The 240 volts A.C. to the damper motor is
1-5.
stopped and the motor turns off.
2. When oven is microwave cooking:
Damper is in the open position.
3. When oven is convection cooking:
3-l.
Damper motor is energized by touching the
convection, temperature and START pads.
3-2.
When damper is in the closed position
(damper switch is OFF), its signal is sensed
by the control unit, and shut-off relay (RY6)
is de-energized.
The damper is held in the closed position
3-3.
during the convection cooking operation.
3-4.
At the end of the convection cooking, shut-off
relay (RY6) is energized, and the damper is
returned to the open position.
NOTE: If the damper door is not in the proper position,
closed durin convection or open durning
microwave, the control unit will stop oven operation after 1 minute.
Cooking Mode Operation of Damper
Microwave cooking OPEN
Convection cooking CLOSE
Sensor cooking OPEN
Automatic mix cooking CLOSE
Grill cooking
Slow cooking CLOSE
is selected by the CPU unit.
CLOSE
10
Page 12
SERVICING
TROUBLESHOOTING GUIDE
When troubleshooting the microwave oven, it is
helpfull to follow the Sequence of Operation in per-
forming the checks. Many of the possible causes of
trouble will require that a specific test be performed.
These tests are given a procedure letter which will be
found in the “Test Procedure”section.
PROBLEM
POSSIBLE CAUSE
OFF CONDJTION
Home fuse blows when power
cord is plugged into wall recepta-
cle.
Fuse blows when power cord is
plugged into wall receptacle.
88:88 do not appear in display No power at outlet.
when power cord is first plugged
into wall outlet.
Display does not operate properly
when STOP/CLEAR
touched. (B
and time of day should appear in
display.)
Oven lamp does not light with No power in home.
door opened.
uzzer should sound
key is
Shorted wire in power cord or wire harness.
Shorted wire in power cord or wire harness.
Defective monitor switch.
Blown fuse.
Blown magnetron temp. fuse.
Defective thermal cut-out.
Open wire in power cord, wiring harness,
or wrrrng between control panel assembly
units.
Defective CPU unit.
Defective relay unit.
Defective key unit.
Defective CPU unit.
Defective relay unit.
Defective stop switch.
, Open wire in power cord or wire harness. , Replace same or repair wir- 1
Open or loose wire connection to the Check wiring.
above components.
IMPORTANT: lf the oven becomes inoperative be-
cause of a blown fuse in the monitor
switch and upper latch switch circuit,
check the monitor switch and upper
latch switch before replacing the fuse.
If the fuse is replaced, the monitor
switch should be replaced at same
time.
-*
TEST PROCEDURE OR
CORRECTION
Replace cord or check wiring.
Replace power cord or check
and repair harness.
Procedure F.
Check home fuse.
Procedure G.
Procedure H.
Procedure I.
Replace or repair wiring.
Procedure 0.
Procedure N.
Procedure P.
Procedure 0.
Procedure N.
Procedure E.
Check wall outlet.
rng.
Replace.
Procedure E.
Procedure G.
Procedure I.
Procedure H.
(RD8’ll OZU)
11
Page 13
R -8580
PROBLEM POSSIBLE CAUSE
COOKING CONDITION
Oven lamp does not light in cook
cycle.
(Does light when door is opened) Defective CPU unit.
Oven lamp does not light at all.
Oven lamp lights, but turntable
motor does not operate.
Turntable motor operates normally Defective cooling fan motor.
but cooling fan motor does not
operate
MICROWAVE
Oven does not go into a cook cycle when START pad is touched.
Oven seems to be operating but Defective magnetron.
little or no heat is produced in
oven
load.( Food
incompletely Defective power transformer.
cooked or not cooked at all at end
of cook cycle.)
Oven goes into a cook cycle but
extremely
uneven
heating is
produced in oven load(food).
Oven does not cook properly Defective CPU unit.
when programed for MEDIUM Defective key unit.
etc. cooking powers.
(Operates properly on HIGH)
Oven does not cook properly
when programed in EASY DE-
FROST cooking mode.
Defective shut-off relay (RY2) on relay Procedure N.
unit.
Burned out bulb. Replace
Open wiring of oven lamp.
Open or loose wiring to turntable motor. Check and repair wiring
Defective turntable motor.
Defective shut-off relay (RY5) on relay Procedure N.
unit.
Open or loose wiring to fan motor
Upper latch switch and/or lower latch Procedure E.
switch defective or out adjustment.
Defective cook relay (RYI ) on relay unit.
Defective CPU unit.
Defective key unit.
Open or loose wiring to above components.
Defective cook relay (RYI ) on relay unit.
Defective high voltage rectifier.
Defective high voltage capacitor.
Defective CPU unit.
Open or loose wiring to above compo-
nents.
Turntable motor does not operate.
Open or loose wiring to above compo-
I nents.
Defective EASY DEFROST function.
TEST PROCEDURE OR
CORRECTION
Procedure 0.
Check and repair wiring
Replace
Replace.
Check and repair wiring
Procedure N.
Procedure 0.
Procedure P.
Check and repair wiring
Procedure A.
Procedure N.
Procedure B.
Procedure C.
Procedure 0.
Procedure 0.
Check and repair wiring
Replace turntable motor or
check and repair wiring.
Procedure 0.
Procedure P.
Check and repair wiring
Refer to EASY DEFROST
section in operation manual
and check CPU unit.
12
Page 14
R -8580
PROBLEM
CONVECTION
CONV indicator light but oven
r
does not go into a cook cycle
when START pad is touched.
CONV indicator lights, but heating
element does not heat.
Temperature in the oven cavity is
lower or higher than preset.
Lower than preset temperature.
Cooling fan motor, turntable mo-
tor and oven lamp run
intermitantly or all the time.
Convection cycle runs 3 minutes
then shuts down.
POSSIBLE CAUSE
Defective heater relay(RY4) on relay unit. Procedure N.
Defective key unit.
Defective thermistor. procedure K.
Open wiring in circuit to above components.
Defective convection heater. Procedure J.
Defective heater relay(RY4) on relay unit.
Defective CPU unit.
Open or loose wire connection to the Check and repair wiring.
above components.
Defective convection heater.
Defective CPU unit.
Defective convection motor.
Defective thermistor.
Defective cooling fan motor.
Defective dumper motor.
Defective drive mechanism of convection Check.
fan.
Low power supply voltage.
Thermistor shorted.
Thermistor open.
TEST PROCEDURE OR
CORRECTION
Procedure P.
Check and repair wiring.
Procedure N.
Procedure 0.
Procedure J.
Procedure 0.
Replace motor.
Procedure K.
Replace fan motor.
Procedure L.
Check voltage.
Procedure K.
Procedure K.
SENSOR
Oven is in the sensor cooking AH sensor open and/or short.
condition but AH sensor does not
end stage 1 or does not stop
cooking cycle or the oven stops above components.
soon.
Defective CPU unit.
0
pen or loose wire connection to the Check and repair wiring.
AH sensor assembly and/or steam duct Check and repair them.
are not re-installed correctry.
Procedure 0.
Procedure 0.
13
Page 15
R-8580
PROCEDURE
LETTER
TEST PROCEDURES
COMPONENT TEST
MAGNETRON ASSEMBLY TEST
DISCHARGE THE HIGH VOLTAGE CAPACITOR BEFORE TOUCHING ANY OVEN COMPONENTS OR WIRING.
To test for an open filament, isolate the magnetron from the high voltage circuit. A continuity
check across the magnetron filament leads should indicate less than 1 ohm.
To test for a shorted magnetron, connect the ohmmeter leads between the magnetron filament
leads and chassis ground. This test should indicate an infinite resistance. If there is little or no
’ resistance, the magnetron is grounded and must be replaced.
Power output of the magnetron can be measured by performing a water temperature rise test.
This test should only be used if above rests do not indicate a faulty magnetron and there is no
defect in the following components or wiring: high voltage rectifier, rectifier, high voltage
capacitor, and power transformer.
MICROWAVE OUTPUT POWER
Microwave output power from the magnetron can be measured by way of substitution, i.e. it can
be measured by using water load how much it can be absorbed by the water load. To measure
the microwave output power in the microwave oven, the relation of calorie and watt is used.
When P(W) heating works for t(second), approximately P x t/4.2 calorie is generated. On the
other hand, if the temperature of the water with V(ml) rises AT ( “C) during this microwave
heating period, the calorie of the water is V x AT.
The formular is as follows;
Pxt/4.2=Vx AT
P(W)=4.2xVx AT/t
Our condition for the water load is as follows:
Water load . . .
2000 ml, Heating time . ..I 20 seconds
P=7Ox AT
Measuring method;
1. Put the water load of two (2) litres on the center of the oven shelf. The water load should
be arranged in two (2) Pyrex beakers, the size of which is one (1) litre, and be placed at right
and left, side by side, on the oven shelf.
2. Measure the temperature of water before heating and also after heating during 120 seconds
by microwave, and calculate the temperature rise. The temperature rise should be the average
of temperature differences measured in each beaker.
3. The output power should be calculated as follows.
In case the measuring result is not satis-
factory, execute the measurement several times and judge the result from the synthetic point
of view. Microwave output power should be within + 15% of the nominal one.
Calculation of output power;
Microwave output power
. ..P(W)=7Ox AT(%)
AT = ( ATL + ATR) / 2 : average temperature rise
ATL = (TL2 - TLI),
ATR = (TR2 - TRI)
TL2 : water temperature after heating in left beaker
TLI : water temperature before heating in left beaker
TR2 : water temperature after heating in right beaker
TRI : water temperature before heating in right beaker
Measuring condition;
As the microwave output is affected by several conditions, the measurement should be made
carefully with following attentions.
1. Initial temperature of salt water should be 10 + 1 “C. Well and quickly stir the water and the
temperature measurement should be done immediately after heating.
2. The graduation of thermometer should be scaled by 0.1 “C at minimum and an accurate mer-
cury thermometer is recommended.
14
Page 16
TEST PROCEDURES (CONT’D)
PROCEDURE
LETTER
COMPONENT TEST
3. Water container should be one (1) litre beaker made of Pyrex glass and its diameter approximately 12 cm.
4. Room temperature should be around 20 “C.
5. Power supply voltage should be specification voltage.
POWER TRANSFORMER TEST
DISCHARGE THE HIGH VOLTAGE CAPACITOR BEFORE TOUCHING ANY OVEN COMPONENTS OR WIRING.
Disconnect the primary input terminals and measure the resistance of the transformer with an
ohmmeter. Check for continuity of the coils with an ohmmeter. On the R x 1 scale, the resistance
of the primary coil should be approx. 1.6 ohm and the resistance of the high voltage coil should
be approximately 74 ohms; the resistance of the filament coil should be less than 1 ohm.
(HIGH VOLTAGES ARE PRESENT TO HIGH VOLTAGE TERMINAL, SO DO NOT ATTEMPT TO
MEASURE THE FILAMENT AND HIGH VOLTAGE.)
C HIGH VOLTAGE RECTIFIER AND RECTIFIER TEST
R-8680
E
D
DISCHARGE THE HIGH VOLTAGE CAPACITOR BEFORE TOUCHING ANY OVEN COMPONENTS OR WIRING.
HIGH VOLTAGE RECTIFIER TEST
Isolate the high voltage rectifier from the circuit. Using the highest ohm scale of the meter read
the resistance across the terminals and observe, reverse the leads to the high voltage rectifier
terminals and observe meter reading.
If a short is indicated in both directions, or if an infinite
resistance is read in both directions, the high voltage rectifier is probably defective and should
be replaced.
RECTIFIER TEST
Isolate the rectifier from the circuit. Using the highest ohm scale of the meter, read the resistance
across the terminals, reverse the leads to the rectifier terminals and observe meter reading.
If an
infinite resistance is read in both directions, the rectifier is good.
If a short is indicated in either direction, the one is probably defective and should be replaced.
HIGH VOLTAGE CAPACITOR TEST
DISCHARGE THE HIGH VOLTAGE CAPACITOR BEFORE TOUCHING ANY OVEN COMPO-
NENTS OR WIRING.
If the capacitor is open, no high voltage will be available to the magnetron. Disconnect input
leads and check for short or open, between the terminals using an ohmmeter.
Checking with a high ohm scale, if the high voltage capacitor is normal, the meter will indicate
continuity for a short time and should indicate approximately IOM R once the capacitor is
charged.
If the above is not the case, check the capacitoi’with an ohmmeter to see if it is shorted
between the terminals. If it is shorted, replace the capacitor.
(RD82603U)
SWITCH TEST
Isolate the switch and check the contacts by using an ohmmeter using the following table.
If improper operation is indicated, make the necessary switch adjustment or replacement.
Table: Switch Connection
Connection
Operation
Plunger released
Plunger pushed
Common Terminal-Normally Open Terminal
(COM)
Open circuit
Closed circuit
(NO)
Common Terminal-Normally Close Terminal
(COW
Close circuit
Open circuit
(NC)
(RD82701U)
15
Page 17
R-8580
PROCEDURE
LETTER
TEST PROCEDURES (CONT’D)
COMPONENT TEST
MONITOR SWITCH TEST
Before performing this test, disconnect oven from power supply and make sure that the upper
latch switch is operating properly referring to the above Switch Test Procedure.
Disconnect the wire lead from the monitor switch (NC) terminal.
Check the monitor switch operation by using the ohmmeter as follows.
When the door is open, the meter should indicate a closed circuit.
When the monitor switch actuater is pushed by a screw driver through the upper latch hole on
the front plate of the oven cavity with the door opened (in this condition the plunger of the
monitor switch is pushed in), the meter should indicate an open circuit.
If improper operation is indicated, replace the defective switch..
After testing the monitor switch, re-connect the wire lead to the monitor switch (NC) terminal.
G
H
SCREW.
\
UPPER ’
LACCH
HOLE
BLOWN FUSE
If the fuse in the upper latch-monitor switch circuit is blown when the door is opened, check the
upper latch switch and monitor switch according to the Test Procedure for those switches, before
replacing the blown fuse.
If the fuse is replaced, the monitor switch should be replaced at the same time.
If the fuse is blown by improper switch operation, adjust or replace the defective switch, fuse at
the same time.
Replace the fuse and monitor switch, even if the switches operate normally
CAUTION; REPLACEMENT FUSE MUST BE THE LISTED FUSE IN PARTS LIST.
TEMP. FUSE TEST
A continuity check across the temp. fuse terminals should indicate a closed circuit.
If the temperature of the magnetron reaches 142 ‘C, the temp. fuse opens. If the temp. fuse has
opened, replace the fuse. An open temp. fuse indicates overheating of the magnetron assembly.
Check for restricted air flow to the magnetron through the opening in the chassis, especially the
cooling duct and tolling fan.
I
THERMAL CUT-OUT
A continuity check across the thermal cut-out terminals should indicate a closed circuit unless
the temperature of the thermal cut-out reaches approximately 140 “C. The termal cut-out resets
automatically at approximately 115 “C.
If the thermal cut-out has opened under the normal condition, replace the same one is parts list.
An open thermal cut-out indicates overheating of the heater unit. Check for restricted air flow
to the heater unit through the vent holes of the oven cavity, especially the heater duct and con-
.
vection fan
16
Page 18
R -8580
PROCEDURE
LETTER
K
L
M
TEST PROCEDURES (CONT’D)
\
COMPONENT TEST
CONVECTION HEATER TEST
Make sure the convection heater is fully cooled and test as follows;
a. Disconnect wire leads and measure the resistance with an ohmmeter. On the R x 1 scale, the
resistance between the convection heater terminals should be approximately 38 ohms.
b. Disconnect wire leads and measure the insulation resistance with 500V - IOOM R insulation
resistance meter.
The insulation resistance between convection heater terminal and cavity should be more than
0.5M R.
THERMISTOR TEST
Disconnect connector-E from the control unit. Measure the resistance of the thermistor with an
ohmmeter. Connect the ohmmeter leads to Pin No’s E-3 and E-4.
If the meter does not indicate above resistance, replace the thermistor.
DAMPER MOTOR TEST
When the power cord is plugged into the wall receptacle, and 240 volts A.C. is supplied to the
damper motor the motor operates until the damper is opened and the damper switch closes. Then
the damper motor stops operation.
If the damper motor does not operate, check for input voltage by A.C. volt-meter at the motor.
1. Disconnect the power cord from the wall receptacle.
2. Disconnect the wire leads of motor and connect the meter leads to the wire leads of main wire
harness.
3. Reconnect the power cord into the wall receptacle.
If 240 volts A.C. is indicated at the wire leads, replace the motor.
Not indicated, check the wire harness and the relay unit.
(RD82EOl U)
DAMPER SWITCH TEST
Disconnect the wire leads from the switch terminals and connect ohmmeter leads to the common
(COM) and normally open (NO) terminals of the switch.
When switch actuator is pushed by the damper motor cam, the meter should indicate a closed
1.
circuit.
2. When the power cord is plugged into the wall receptacle, the damper motor operates and
damper cam starts to rotate.
The switch actuator is released the meter should indicate an open circuit.
If improper operation is indicated, replace the damper switch.
(RD82702U)
17
Page 19
R-8580
TEST PROCEDURES (CONT’O)
PROCEDURE
LETTER COMPONENT TEST
N
RELAY UNIT TEST
The relay unit consists of circuits including the shut-off relays, buzzer, transformer, etc.
Plug power cord into wall receptacle “88:88” will be flashing in the display.
Remove the outer case and check voltage between Pin Nos. 1 and 3 of the 6-pin connector (A)
on the relay unit with an A.C. voltmeter.
The meter should indicate 240 volts, if not check oven circuit.
Shut-off, Cook and Heater Relay Test
These relays are operated by D.C. voltage.
Check voltage at the relay coil with a D.C. voltmeter during the microwave or convection cooking
operation.
DC. voltage indicated
DC. voltage not indicated
.,........ Defective relay.
. . . . . . ..Check diode which is connected to the relay coil. If diode is
good, control unit is defective.
RELAY SYMBOL
I
RYl (COOK)
RY2
RY3
RY4 (HEATER)
RY5
RY6
OPERATIONAL
I
VOLTAGE
Approx. 14 V. D. C.
Approx. 14 V.D.C.
Approx. 14 V.D.C.
Approx. 14 V.D.C.
Approx. 14 V. D. C.
Aoorox. 14 V.D.C.
CONNECTED COMPONENTS
I
Power transformer
Oven lamp/Turntable motor
Convection motor
Heating element
Cooling fan motor
DamDer motor
(RD82R02U)
18
Page 20
TEST PROCEDURES (CONT’O)
PROCEDURE
LETTER
COMPONENT TEST
TOUCH CONTROL PANEL ASSEMBLY TEST
The touch control panel consists of circuits including semiconductors such as LSI, ICs, etc.
Therefore, unlike conventional microwave ovens, proper maintenance cannot be performed with
only a voltmeter and ohmmeter.
In this service manual, the touch control panel assembly is divided into three units Control Unit, Key Unit and Relay Unit and troubleshooting by unit replacement is described according to the symptoms indicated.
1. Key Unit.
The following symptoms indicate a defective key unit. Replace the key unit.
a) When touching the pads, a certain pad produces no signal dt all.
b) When touching a number pad, two figures or more are displayed.
c) When touching the pads, sometimes a pad produces no signal.
2. Control Unit
The following symptoms indicate a defective control unit. Replace the control unit.
2-1 In connection with pads.
a) When touching the pads;a certain group of pads do not produce a signal.
b) When touching the pads, no pads produce a signal.
2-2 In connection with indicators
a) At a certain digit, all or some segments do not light up.
b) At a certain digit, brightness is low.
c) Only one indicator does not light up.
d) The corresponding segments of all digits do not light up; or they continue to light up.
e) Wrong figure appears.
A certain group of indicators do not light up.
f)
g) The figure of all digits flicker.
2-3 Other possible troubles caused by defective control unit.
Buzzer does not sound or continues to sound.
a)
b) Clock does not operate properly.
c) Cooking is not possible.
d) Proper temperature measurement is not obtained.
Note: When defective components, the Control Unit, Key Unit or Relay Unit are replaced, the
defective part or parts must be properly packed for return in the shipping carton, with its
cushion material, in which the new replacement part was shipped to you.
P KEY UNIT TEST
(RD82SOl U)
If the indicator does not respond to touching a key Pad use the following matrix and place a
jumper wire between the proper pin connections making momentary contact with the cable
connector disconnected from the control unit.
If the indicator responds and oven goes into operation, the key unit was faulty.
If there is no response, replace the control unit,
-9
3 160°C 4 150°C 3 13o”c 2 70°C 1
5-l
I I
0 250°C 9 230-C 8 220°C 7 200% 6 180% LowM’
HIGH MED HIGH MED
CLOCK
1 CLEAR 1
I
I I
MU) Low
COOK 1
1 KEY UNIT ‘]
40%
LOW F
HOU) DI
I
19
Page 21
PROCEDURE
LETTER
0
TEST PROCEDURES (CONT’O)
COMPONENT TEST
AH SENSOR TEST
Checking the initial sensor cooking condition
(1) The oven should be plugged in at least five minutes befor sensor cooking.
(2) Room temperature should not exceed 35 “C.
(3) The unit should not be installed in any area where heart and steam are generated. The
unit should not be installed, for example, next to a conventional surface unit. Refer to the
“INSTALLATION Instruction”.
(4) Exhaust vents are providend on the back of the unit for proper cooling and air flow in the
cavity.To permit adequate ventilation, be sure to install so as not to block these vents,
There should besome space for air circulation.
(5) Be sure the exterior of the cooking container and the interior of the oven are dry. Wipe
off any moisture with a dry cloth or paper towel.
(6) The Sensor works with food at normal storage temperature.For example, chicken pieces
would be at refrigerator temperature and canned soup at room temperature.
(7) Avoid using aerosol sprays or cleaning solvents near the oven while using Sensor set-
tings. The sensor will detect the vapor given of by the spray and turn off befor food is
properly cooked.
(8) After 30 minutes if the sensor has not detected the vapor of the food, ERROR will appear
and the oven will shut off.
Water load cooking test
Make sure the oven has been plugged in at least five minutes before checking sensor cook operation The cabinet should be installed and screws tightened.
(1) Fill approximately 200 milliliters (7.2 oz) of tap water in a 1000 milliliter measuring cup.
(2) Place the container on the center of tray in the oven cavity.
(3) Close the door.
(4) Touch SENSOR COOK pad and number pad I. Now, the oven is in the sensor cooking
condition and SC-l will appear in the display.
(5) Touch Start pad.The oven will operate for the first 16 seconds, without generating micro-
wave energy.
When the AH sensor is defective (open or short), ERROR will appear in the display after 16
seconds cooling time.
If ERROR appears check sensor wire connections and/or AH sensor.
NOTE: ERROR will appear if the door is opend or STOP/CLEAR pad is touched during first
stage of sensor cooking.
(6) After approximately 16 seconds, microwave energy is produced, oven should turn off when
water is boiling (bubling).
If the oven does not turn off, replace the AH sensor or check the control unit, refer to expla-
nation below:
TESTING METHOD FOR AH SENSOR AND/OR CONTROL UNIT
To determine if the sensor is defective, the simplest method is to replace it with a new replacement sensor.
(1) Disconnect oven from power supply and remove outer case.
(2) Discharge the high voltage capacitor.
(3) Remove the AH sensor.
(4) Install the new AH sensor.
(5) Re-install the outer case.
(6) Reconnect the oven to the power supply andcheck the sensor cook operation proceed as
follows:
6-1. Touch SENSOR COOK pad and number 0 pad.
6-2. Touch Start pad. The control panel is in automatic Sensor operation.
6-3. The oven will turn off automatically when the water is boiling (bubling).
If new sensor dose not operate properly, the problem is with the control unit.
20
Page 22
TEST PROCEDURES (CONT’D)
PROCEDURE
LETTER COMPONENT TEST
CHECKING CONTROL UNIT
(1) Disconnect oven from power supply and remove outer case.
(2) Discharge the high voltage capacitor.
(3) Disconnect the wire leads from the cook relay.
(4) Disconnect the sensor connector that is mounted to lower position of control panel.
(5) Then connect the dummy resistor circuit (see fig.) to the sensor connector of control panel.
(6) Reconnect the oven to the power supply and check the sensor cook operation proceed as
follows:
6-1. Touch SENSOR COOK pad and number 0 pad.
6-2. The control panel is in the sensor cooking operation.
6-3. After approximately 20 seconds, push plunger of select switch.
This condition is same as judgement by AH sensor.
6-4. After approximately 3 seconds, cooking operation turns off, an audible signal will
sound, and the display will then revert to the time of day.
If the above is not the case, the control unit is probably defective.
If the above is proper, the AH sensor is probably defective.
To Connector (F)
Rl, R2 : loon t 1% 1/2w
R3 : 10kR ? 5% 1/4W
R4 : 12kR * 5% 1/4W
on Control Untt
F-l F-2..-F-3 rc-
CONNECTOR
R-8580
Plunger
0-J
NC
NO
R4
R2
iNO.
I Switch
-2
Sensor Dummy Resistor Circuit
R PROCEDURES TO BE TAKEN WHEN THE FOIL PATTERN ON THE PRINTED WIRING
BOARD(PWB) IS OPEN.
To protect the electronic circuits, this model is provided with a fine foil pattern added to the
primary on the PWB, and this fine pattern service as a substitute coil. If the foil pattern is open,
follow the troubleshooting guide given below for repair.
Problem: POWER C
STEPS
1 The rated voltage is not applied to POWER terminal Check supply voltage and oven main unit.
of CPU connector (CN-A)
2 The rated voltage is applied to primarv side of Dower Power
NOTE:* At the time of these repairs, make visual in-
_ .--
JN, indicator does not light up.
OCCURANCE
CAUSE OR CORRECTION
transformer or secondarv circuit defective.
spection of the varistor for burning damage
and examine the transformer with tester for the
presence of layer short-circuit (check primary
coil resistance).
If any abnormal condition is detected, replace
the defective parts.
21
Page 23
R-8580
TOUCH CONTROL PANEL ASSEMBLY
OUTLINE OF TOUCH CONTROL PANEL
The touch control section consists of the following
units as shown in the touch control panel circuit.
(1) Relay Unit
(2) Key Unit
(3) Control Unit
The principal functions of these units and the signals
communicated among them are explained below.
(RD911 A4U)
Relay Unit
Relay unit consists of six relays (RYI -RY6), power
source circuit and buzzer circuit.
(RD914BlU)
Key Unit
The key unit is composed of a matrix, signals generated
in the LSI are sent to the key unit through E7,E8,
El 1 -El 3and El 5-E17.
When a key pad is touched, a signal is completed
through the key unit and passed back to the LSI
through AN4-AN7 to perform the function that was
requested.
(RD913Al U)
Control Unit
Control unit consists of LSI, power source circuit,
synchronizing signal circuit, ACL circuit, buzzer circuit,
temperature measurement circuit, absolute humidity
sensor circuit and indicator circuit.
(RD915Bl U)
LSI
This LSI controls the temperature measurement
signal, AH sensor signal, key strobe signal, relay
driving signal for oven function and indicator signal.
(RD916Al U)
Power Source Circuit
This circuit generates voltages necessary in the
control unit.
Symbol Voltage Application
VC -5v
LSI (ICI ), ACL circuit and temperature measurement circuit
Buzzzer circuit and IC2
IC2
Fluorescent display tube : Grid
it
VP
-16V
+0.5v
-34v
and anode voltage
VFI
-25V
Filament of fluorescent display
tube
VF2
-28V
VFI - VF2 voltage
(RD917Al U)
Synchronizing Signal Circuit
3)
The power source synchronizing signal is available
in order to compose a basic standard time in the
clock circuit.
It accompanies a very small error because it works
on commercial frequency.
ACL Circuit
4)
A circuit to generate a signal which resets the LSI
to the initial state when power is supplied.
Buzzer Circuit
5)
The buzzer is responsive to signals from the LSI
to emit noticing sounds (key touch sound and
completion sound).
Temperature
6)
Measurement Circuit: Oven
temp.
The temperature in the oven cavity is sensed by the
thermistor.
The variation of resistance according to sensed
temperature is detected by the temperature measurement circuit and the result applied to LSI.
The result of detecting is given to LSI controlling
the relay and display.
Absolute Humidity Sensor Circuit
7)
The circuit detects absolute humidity of a food
which is under cooking, to allow its automatic
cooking.
Door Sensing Switch
8)
A switch to “tell” the LSI if the door is open or
closed.
Relay Circuit
9)
To drive the magnetron, heating element, fan motor, convection motor,damper motor, turntable
motor and light the oven lamp.
10) Indicator Circuit
Indicator element is a Fluorescent Display.
Basically, a Fluorescent Display is triode having a
cathode, a grid and an anode. Usually, the cathode
of a Fluorescent Display is directly heated and the
filament serves as cathode.
The Fluorescent Display 7-digits, 15-segments are
used for displaying figures.
(RD918Al U)
(RD919Al U)
(RD91 AA1 U)
(RD91 FBI U)
(RD91 GA1 U)
(RD91 BAZU)
(RD91 CBI U)
(RD91 DA1 U)
22
Page 24
DESCRIPTION OF LSJ
LSI( IZA096DR)
The I/O signal of the LSI(IZA096DR) is detailed in the following table.
(RD93101 U)
PIN NO.
Digit selection signal.
Refer to the touch control panel circuit about the relation between signals and digits.
Normally, one pulse is output in every synchronized signal period, and input to the grid of the fluorescent disrla[.
PIN NO. 7
Segment data signals.
Refer to the touch control panel circuit for the relationship between signals and indicators,
Normally, one pulse is output in every synchronized signal period, and input to the anode of the fluorescent dis..lax.
PIN NO. / 8
Segment data siqnal.
Signal similar to E6.
Key strobe signal.
Signal applied to touch-key section.
A pulse signaLis input to AN4-AN7 terminal while one of G-l line keys on key matrix is touched.
PIN NO. j 9 1 SIGNAL j E8
Segment data sianal.
Signal similar to E6.
Key strobe signal.
Signal applied to touch-key section.
A pulse signal is input to AN4-AN7 terminal while one of G-2 line keys on key matrix is touched.
PIN NO. / IO,11
Segment data sianal.
Signal similar to E6.
PIN NO. j 12 1 SIGNAL /
Segment data signal.
Signal similar to E6.
Key strobe sianal.
Signal applied to touch-key section.
A pulse signal is input to AN4-AN7 terminal while one of G-3 line keys on key matrix is touched.
PINNO. j 13
Segment data siganal.
Signal similar to E6.
Kev strobe signal.
Signal applied to touch-key section.
A pulse signal is input to AN4-AN7 terminal while one of G-4 line keys on key matrix is touched.
PIN NO. 14
Seament data signal.
Signal similar to E6.
Kev strobe signal.
Signal applied to touch-key section.
A pulse signal is input to AN4-AN7 terminal while one of G-5 line keys on key matrix is touched.
l-6
1 SIGNAL ) EO-E5
1 SIGNAL j E6
1 SIGNAL / E7
1 SIGNAL !
1 SIGNAL ( El2
1 SIGNAL j
I
E9,ElO
El 1
El3
-s
I
I
I
I
I
I
I
I
I/O
I/O
I/O
l/O
I/O
I/O
I/O
l/O
/ OUT
(RDS f3Al
j OUT
(RDS SAl )
j OUT
(RD939A3U)
j OUT
(RD939A3U)
/ OUT
(RD939AZU)
1 OUT
(RD939A3U)
1 OUT
(RD939A3U)
) OUT
(RD939A3U)
)
23
Page 25
R-8580
PIN NO. 15
Segment data signal.
Signal similar to E6.
PIN NO. / 16
Seqment data siqnal.
Signal similar to E6.
Kev strobe siqnal.
Signal applied to touch-key section.
A pulse signal is input to AN4-AN7 terminal while one of G-6 line keys on key matrix is touched.
PINNO. I17
Segment data siqnal.
Signal similar to E6.
Kev strobe siqnal.
Signal applied to touch-key section.
A pulse signal is input to AN4-AN7 terminal while one of G-7 line keys on key matrix is touched.
PIN NO. / 18
Seqment data siqnal.
Signal similar to E6.
Kev strobe siqnal.
Signal applied to touch-key section.
A pulse signal is input to AN4-AN7 terminal while one of G-8 line keys on key matrix is touched.
PIN NO. 1 19,20
Seqment data signal.
Signal similar to E6.
PIN NO. / 21-24
Used for initial balancing of the bridge circuit(absolute himidity sensor).
PIN NO. ) 25
Internal clock oscillation frequency input settinq.
The internal clock frequency is set by inserting the ceramic filter oscillation circuit with respect to X terminal.
PIN NO. j 26
Internal clock oscillation frequency control output.
Output to control oscillation input of EX.
PIN NO. j 27
Auto clear terminal.
Signal is input to reset the LSI to the initial state when power is supplied.
Temporarily set to “L” level the moment power is supplied, at this time the LSI is reset,
Thereafter set at “H” level.
1 SIGNAL / El4
1 SIGNAL j El5
1 SIGNAL 1
--
1 SIGNAL 1 El7
1 SIGNAL j El 8,E19
1 SIGNAL 1 E20-E23
1 SIGNAL j EX
1 SIGNAL j X
1 SIGNAL /
El 6
RESET
I
I
I
I
I
I
I
I
I
I/O
I/O
I/O
I/O
I/O
I/O
l/O
I/O
I/O
j OUT
(RD939A2U)
1 OUT
(RD939A3U)
) OUT
(RD939A3U)
1 OUT
(RD939A3U)
j OUT
(RD939A2U)
; OUT
(RD936Al U)
IN
(RD93EA2U)
/ OUT
(RD93EAl U)
1 IN
(RD93MA2U)
PIN NO. 1 28
Segment data siqnal.
Signal similar to E6.
1 SIGNAL / SO E24
24
I
I/O
/ OUT
(RD939A2U)
Page 26
R -8580
PIN NO. 1 29
Used for initial balancing of the bridge circuit(absolute himidity sensor).
PIN NO. / 30
Signal to sound buzzer.
A: Key touch sound.(O.l sec.)
B: Completion sound.(2.0 sec.)
C: When the temperature of the oven cavity reaches the preset temperature in the preheating mode, or when the
preheating hold time (15 minutes) is elapsed.
(I .O sec. ON-l .O sec. OFF repeat)
PIN NO. 1 31
Signal svnchronized with commercial source frequencv(50Hz).
This is the basic timing for time processing of LSI.
PIN NO. 32
Power source voltage: -5V.
VC voltage of power source circuit input.
PIN NO. j 33 1 SIGNAL / RO
Magnetron high-voltaae circuit driving signal.
To turn on and off the cook relay.
In HIGH operation, the signals holds “L” level during microwave cooking and “H” level while not cooking. In other
cooking modes (MED. HIGH, MED., MED. LOW, LOW) the signal turns to “H” level and “1” level in repetition
according to the power level.
PIN NO. 1 34 1 SiGNAL ( RI
Oven lamp and turntable motor driving siqnal.(Square Waveform:fiOHz)
To turn on and off the control relay.
The pulse signal(50Hz) is delivered to the control relay driving circuit and cook relay, heater relay control circuit.
PIN NO. 35
Heating element driving signal.
To turn on and off the heater relay.
“1” level during convection cooking; “H” level otherwise.
During convection cooking or mix cooking, the signal becomes “H” level when the temperature of the oven cavity
exceeds the predetermined temperature.
PIN NO. j 36
Coolinrr fan motor driving signal.
To turn on and off the cooling fan motor relay,
otherwise.
PIN NO. 1 37
Convection motor driving sianal.
To turn on and off the convection motor.
1 SIGNAL
1 SIGNAL /
SIGNAL j IRQ E27
SIGNAL
SIGNAL / R2
1 SIGNAL / R3
1 SIGNAL j R4
“1” level during CONVECTION or MIX COOK; “H” level otherwise.
j SI E25
E26
vss
“1” level during both microwave and convection cooking; “H” level
I
I
I
I
I
I
I
I
I
I/O
I/O
l/O
I/O
I/O
I/O
l/O
I/O
I/O
/ OUT
(RD936Al U)
/ OUT
(RD93LA2U)
/ IN
(RD93FEl U)
IN
(RD93GAl U)
j OUT
(RD933A2U)
j OUT
(RD932Fl U)
j OUT
(RD93464U)
j OUT
fRD934B2Ul
j OUT
(RD93468U)
25
Page 27
R -8580
PIN .NO. / 38 1 SIGNAL / R5
Damper motor relav driving signal.
To turn on and off the damper motor relay.
PIN NO. 1 39
Digit selection signal.
Signal similar to EO.
PIN NO. j 40
Input signal which communicates the damper open/close information to LSI.
Terminal to change functions acccirdinq to the model.
Signal in accordance with the model in operation is applied to set up its function.
PIN NO. 1 42
Input signal which communicates the door open/close information to LSI.
Door closed; “H” level signal.
Door opened; “1” level signal.
PIN NO. / 43
Connected to VC.
PIN NO. / 44
Reference voltage input terminal.
A reference voltage applied to the A/D converter in the LSI.
The reference voltage is generally maintained at -5V.
PIN NO. 45
Reference voltage input terminal.
A reference voltage applied to the A/D converter in the LSI.
Connectd to GND.
PIN NO. ) 46
Connected to GND.
PIN NO. / 47
Signal cominq from touch kev.
When either one of G-l 2 line keys on key matrix is touched, a corresponding signal out of E7,E8,Ell -El3 and
El 5-El7 will be input into AN7.
When no key is touched, the signal is held at “1” level.
PIN NO. 48
Signal coming from touch key.
When either one of G-l 1 line keys on key matrix is touched, a corresponding signal will be input into AN6.
PIN NO. / 49
Signal coming from touch key.
When either one of G-l 0 line keys on key matrix is touched, a corresponding signal will be input into AN5.
PIN NO. / 50
Signal coming from touch key.
When either one of G-9 line keys on key matrix is touched, a corresponding signal will be input into AN4.
1 SIGNAL / R6
1 SIGNAL 1 R7
1 SIGNAL 1 E37 1 . I/O
1 SIGNAL / E36
1 SIGNAL j AVss
1 SIGNAL j
1 SIGNAL j AVR+
1 SIGNAL AVcc
1 SIGNAL 1 AN7
SIGNAL 1 AN6
1 SIGNAL j AN5
1 SIGNAL / AN4
AVR-
I
I
I
I
I
I
I
I
I
I
I
I
I/O
l/O
I/O
I/O
I/O
l/O
l/O
I/O
I/O
l/O
l/O
l/O
j OUT
(RD93466UI
1 OUT
(RD938A2U)
/ IN
(RD937Bl U)
1 IN
(Rd93JAl U)
/ IN
(RD937Al U)
j IN
(RD93KA3U)
/ IN
(RD93GA4U)
1 IN
(RD93GAW)
1 IN
(RD93KAl U)
/ IN
(RD93CAl UI
IN
(RD93CA2U)
IN
(RD93CA2U)
IN
(RD93CA2U)
26
Page 28
PIN NO. / 51
Used for initial balancing of the bridge circuit (absolute humidity sensor).
This input is an analog input terminal from the AH sensor circuit,and connected to the A/D converter built into the
PIN NO. ( 52
AH sensor inuut.
This input is an analog input terminal from the AH sensor circuit, and connected to the A/D converter built into the
LSI.
PIN NO. 1 53
Temperature measurement input: OVEN THERMISTOR.
By inputting DC voltage corresponding to the temperature detected by the thermistor, this input is converted into
temperature by the A/D converter built into the LSI.
PIN NO. 1 54
Terminal not used.
PIN NO. 1 55
Terminal not used.
PIN NO. 1 56-60 ) SIGNAL / R9-RI3
Terminal not used.
PIN NO. ) 61 SIGNAL j RI4
Terminal not used. Connected to GND.
PIN NO. 1 62
Terminal for manufacture test.
Normally terminal not used.
PIN NO. 63
Terminal not used.
PIN NO. j 64
Connected to GND.
1 SIGNAL /
SIGNAL / AN2
1 SIGNAL j AN1
1 SIGNAL j AN0
1 SIGNAL j R8
1 SIGNAL j RI5
1 SIGNAL 1 NC
1 SIGNAL ) vcc
AN3
I/O
I
I/O
I
I/O
I
I/O
I
I/O
I
l/O
I
I/O
I
1 l/O
I/O
I
l/O
I
/ IN
(RD936A3U)
IN
(RD936A2U)
j IN
(RD935Al U)
j IN
(RD93KA2U)
/ OUT
(RD93KA2U)
1 IN
(RD93KA2U)
1 IN
(RD93KAW)
j IN
(RD93lA3U)
/ NC
(RD93KA2U)
j IN
(RD93KAl U)
27
Page 29
R-8580
ABSOLUTE HUMIDITY SENSOR CIRCUIT
(1) Structure of Absolute Humidity Sensor
The absolute humidity sensor includes two
thermistors as shown in the illustration. One
thermister is housed in the closed vessel filled with
dry air while another in the open vessel. Each
sensor is provided with the protective cover made
of metal mesh to be protected from the external
airflow.
Internal Structure of Sensor
(2) Operational Principle of Absolute Humidity
Sensor
The figure below shows the basic structure of an
absolute humidity sensor. A bridge circuit is
formed by two thermistors and two resistors (Rl
and R2).
The output of the bridge circuit is to be amplified
by the operational amplifier.
Each thermister is supplied with a current to keep
it heated at about 150 “C (302 “F) and the resultant
heat is dissipated in the air and if the two
thermistors are placed in different humidity conditions they show different degrees of heat
conductivity leading to potentiaJ difference between them causing an output voltage from the
bridge circuit, the intensity of which is increased
as the absolute humidity of the air increases. Since
the output is very minute, it will be amplified by the
operational amplifier.
Absolute humidity vs.
C
T
I
sit : RI -
R3
GIP-
Operational
amplifier
RI
.
output
vottaga
S: Thhenms
C: Thermistor
closed vessl
IDetector Circuite of
t
H
=
e
5
0.
2
\JJj\i
1
Absolute Humidity
output voltage characteristic
Absolute humidity (g/m’ 1
Sensor Circuit
This detector circuit is used to detect the output
voltage of the absolute humidity circuit to allow the
LSI to control sensor cooking of the unit.
When the unit is set in the sensor cooking mode,
16 seconds later the detector circuit starts to func-
tion and the LSI observes the initial voltage
availabel at its AN2 terminal. With this voltage
given, the switches SW1 to SW5 in the LSI are
turned on in such a way as to change the resistance
values in parallel with R50.
-1. Changing the resistance values results in that
there is the same potential at both F-3 terminal of
the absolute humidity sensor and AN3 terminal of
the LSI. The voltage of AN2 terminal will indicate
about -2.5V. This initial balancing is set up about
16 seconds after the unit is put in the Sensor
Cooking mode.
As sensor cooking proceeds, the food is heated to
generate moisture by which the resistance balance
of the bridge circuit to deviate increasing the volt-
age available at AN2 terminal of the LSl. Then the
LSI observes that voltage at AN2 terminal and
compares it with its initial value, and when the
comparison rate reaches the preset value (fixed for
each menu to be cooked), the LSI causes the unit
to stop sensor cooking; thereafter, the unit goes
into the next necessary operation automatically.
When the LSI starts to detect the initial voltage at
AN2 terminal 16 seconds after the unit has been
put in the Sensor Cooking mode, if it is im possible
to take a balance of the bridge circuit due to disconnection of the absolute humidity sensor, ER-
ROR will reappear on the display and the cooking
is stopped.
(RD72001 U)
1 )Absolute humidity sensor circuit
Q!3l
RSO R.watOr Block
swt
-.,mJ
! *.*
Thcrmlrtor m
c
closed vessel
S Thcrmlrtor In
open vessel
b
2)lnternal equivalent circuit of 12
I,
0
0
,C
RsO-4)6
RSO-III7
RSO&
”
RSO-7&
c.
I
Top View
24
23
22
2l
_ ma--I
E23d “’
SW301
E22^I
SW47
EZl/
WC-J
7
28
Page 30
SERVICING
R -8580
1. Precautions for Handing Electronic
Components
This unit uses PMOS LSl in the integral part of the
circuits. When handing these parts, the following
precautions should be strictly followed.
PMOS LSI have extremely high impedance at its
input and output terminals. For this reason, it is
easily influenced by the surrounding high voltage
power source, static electricity charged in clothes,
etc,and sometimes it is not fully protected by the
built-in protection circuit.
,
order to protect PMOS LSI.
:;
When storing and transporting, thoroughly
wrap them in aluminum foil.
Also wrap PW boards containing them in
aluminium foil.
When soldering, ground the technician as
2)
shown in the figure
soldering iron and work table.
and use grounded
. .
appror.lMSl
/
k
2. Shapes of Electronic Components
Transistor Transistor Transistor
2SB793
3. Servicing of Touch Control Panel
We describe the procedures to permit servicing the
touch control panel of the microwave oven and the
cautions you must consider when doing so.
To carry the servicing, power supply to the touch
control panel is available either from the power line
of the oven proper itself of from an external power
source.
(I ) Servicing the touch control panel with
power supply from the oven proper:
CAUTION:
THE HIGH VOLTAGE TRANSFORMER OF
THE MICROWAVE OVEN IS STILL ALIVE
TO GIVE YOU DANGER DURING SERVICING.
Therefore, when checking the performance of
the touch control panel,put the outer cabinet
on the oven proper to keep from touching the
high voltage transformer, or unplug the primary
terminal (connector) of the high voltage transformer to turn it off; and the end of such connector shall be insulated with an insulating
tape. After servicing, be sure to replace the
leads to their original locations.
A. On some models, the power supply cord be-
tween the touch control panel and the oven
proper is so short that they can’t be separated
from each other.
2SA937 DTA143ES
DTD143A DTA114YS
DTC114ES
1
Resistor Block.
R50, R90, R 110
R112
AT
16 (R112)
For those models, therefore, check and repair
all the controls (with the sensor-related ones
included) of the touch control panel while
keeping it in contact with the oven proper.
B. On some models, on the other hand, the power
supply cord between the touch control panel
and the oven proper is so long that they may
be separated from each other. For those models, therefore, it is allowed to check and repair
the controls of the touch control panel while
keeping it apart from the oven proper;in this
case you must short both ends of the door
sensing switch (on PWB) of the touch control
panel with a jumper, which brings about an
operational state that is equivalent to that with
the oven door being closed.
As to the sensor-related controls of the touch
control panel, their checking is allowed if the
dummy resistor(s) whose resistance is equal to
that of those controls is used.
(2) Servicing the touch control panel with
power supply from an external power
source:
Disconnect the touch control panel completely
from the oven proper,and short both ends of
the door sensing switch (on PWB) of the touch
control panel,which brings about an operational state that is equivalent with the oven
door being closed. And connect an external
power source to the power input terminal of the
touch control panel, and then it is allowed to
check and repair the controls of the touch
control panel;as in the case of (1 )-B above, it
is here also possible to check the sensor-related
controls of the touch control panel by using the
dummy resistor(s).
4. Servicing Tools
Tools required when servicing the touch control
panel assembly.
1) Soldering iron: 30W
(To prevent leaking current, it is recommended to
use a soldering iron with a grounding terminal.)
2) Oscilloscope: Single beam, frequency range:
DC - IOMHz type or more ad-
vanced model.
3) Others:
5. Other Precautions
Before turning on the power source of the
1)
control unit, remove the aluminum foil applied
for preventing static electricity.
Connect the connectors of the indicator and
2)
key units to the control unit taking care that the
lead wires are not twisted.
After aluminum foil is removed, take extra care
3)
that abnormal voltage due to static electricity
etc. is not applied to the input or output terminals.
Attach connectors, electrolytic capacitors, etc.
4)
to PWB, taking care that all connections are
tight.
Be sure to use specified components where
5)
high precision is required.
Hand tools
(RD94ZAZU)
29
Page 31
R -8580
COMPONENT REPLACEMENT AND ADJUSTMENT PROCEDURE
WARNING: To avoid possible exposure to microwave
energy;
Before operating the oven
A.
1.
Make sure that unlatching the door slowly is
accompanied by a click indicating actuation of
the monitor switch and latch switches.
Check visually the door seal for arcing and
2.
damage.
B.
not operate the oven until after repair if any of
Do
following conditions exist;
the
1.
Door does not close firmly against the front of
appliance.
There iS a broken door hinge or support.
2.
The door is bent or warped.
3.
-
POWER TRANSFORMER REMOVAL
1.
Disconnect oven from power supply and remove
outer case.
2.
Discharge high voltage capacitor.
3.
Disconnect filament leads of transformer from the
magnetron.
4.
Disconnect wire leads from the transformer.
5.
Remove two (2) screws and one (I) washer holding the transformer to the cabinet base.
Re-install
1.
Rest the transformer on the base cabinet with its
primary terminals toward rear cabinet.
2.
Insert the two edges of the transformer into two
metal tabs of the base cabinet.
4. There is any defective parts in the interlock,
oven door or microwave generating and transmission assemblv.
5.
There is any other visible damage to the oven.
C. Do not operate the oven
1. Without the RF gasket.
2. If the door is not closed.
CAUTION: DISCONNECT OVEN FROM POWER
3.
Make sure the transformer is mounted correctly
to the corners underneath those tabs
After re-installing the transformer, secure the
4.
transformer with two screws to the cabinet base,
one is with outertooth washer and the other is
without outer-tooth washer.
5
Re-connect the wire leads (primary and high
voltage) to the transformer and filament leads of
transformer to the magnetron, referring to the
“Pictorial Diagram”.
6.
Re-install the outer case and check that the oven
is operating properly.
------ ---I.
SUPPLY
OUTER CASE. DISCHARGE HIGH
VOLTAGE CAPACITOR
TOUCHING ANY OVEN COMPO-
NENTS OR WIRING.
BEFORE
REMOVING
BEFORE
(RDA? 203U)
HIGH VOLTAGE RECTI
1.
Disconnect oven from power suppply and remove
outer case.
2.
Discharge the high voltage capacitor.
Remove one (1) screw holding the rectifier to the
3.
capacitor holder.
4.
Disconnect the rectifier from the capacitor.
HIGH VOLTAGE CAPACITOR REMOVAL
Disconnect oven from power supply and remove
I.
outer case.
2.
Discharge the high voltage capacitor.
Disconnect the high voltage wire leads from high
3.
voltage capacitor.
4.
Remove one (1) screw holding capacitor mounting
bracket.
TURNTABLE MOTOR AND/OR COUPLING REMOVAL
Disconnect the oven from power supply.
::
Remove one (I ) screw holding the turntable motor
cover to the base cabinet and take off the turntable
motor cover.
3.
Disconnect 2-pin connector from the turntable motor.
Ii FIER REMOVAL
CAUTION: WHEN REPLACING THE SILICON
RECTIFIER, THE GROUND SIDE
TERMINAL MUST BE SECURED
FIRMLY WITH A GROUNDING
SCREW.
5. Disconnect rectifier and high voltage rectifier from
the capacitor. .br
6. Remove one (1) screw holding the high voltage
rectifier and the capacitor holder.
7. Remove the capacitor from the holder.
4.
Remove the two (2) screws holding the turntable
motor to the mounting plate of the oven cavity.
5
Pull the turntable coupling out of the oven cavity.
The turntable motor is now free.
6.
30
Page 32
MAGNETRON REMOVAL
Disconnect oven from power supply and remove
1.
outer case.
Discharge the high voltage capacitor.
2.
Disconnect wire leads from the magnetron.
3.
Remove the magnetron temp. fuse fitted to
waveguide flange. And release the wire leads from
the hole of magnetron cooling duct (B). And re-
lease the AH sensor harness from hole of chassis
support.
chassis support to cooling duct (A), waveguide,
rear cabinet, control back plate.
Release the tab on cooling duct (B) to hold cooling
4.
duct (A).
Carefully remove four (4) mounting screws holding
5.
the magnetron to waveguide, when remove the
Remove four (4) screws holding the
CONVECTION MOTOR REMOVAL
Disconnect oven from power supply and remove
outer case.
Disharge the high voltage capacitor.
Remove sliding the thermal cut-out with its wire
lead on.
Disconnect wire leads from the convection motor
and convection heater.
5.
Disconnect the 2-pin connector from thermistor.
6.
Remove eleven (11) screws holding the heater duct
to the oven cavity.
Remove two (2) screws holding the heater duct to
thermal protection plate (bottom).
The heater unit is now free.
8.
9.
Remove the four (4) screws holding the thermal
protection plate(left) to the heater duct.
1 O.The thermal protection plate(left) and sheet( left)
are now free.
11 .Remove three (3) screws holding the convection
motor mounting plate to the heater duct.
12.Pull the convection motor shaft out of convection
fan.
13.Now the convection motor with the motor mounting plate is free.
screws, a carefull attention should be necessary to
prevent the magnetron fall away.
6. Remove the magnetron (with magnetron cooling
duct(B)) from the unit with a careful attention the
magnetron tube should not hit by any metal object
around the tube.
7. Remove one (1) screw holding cooling duct (B) to
the magnetron.
8. Remove cooling duct (B) from the magnetron.
9. Now the magnetron is free.
CAUTION:
14.Remove two (2) nuts holding the motor mounting
plate to the convection motor.
15.Convection motor is now free.
Re-install
1. Re-install the convection motor mounting plate to
the convection motor by the two (2) nuts.
2. Put the convection fan to the motor shaft.(fit with a
E-ring.)
3. Re-install the heater duct to the convection motor
mounting plate by the three (3) screws.
4. Make sure the rotation of the convection motor.
5. Re-install the thermal protection plate to cover the
heatewr duct with sandwiching the thermal protection sheet.
6. Re-install the heater unit to the left side of the oven
cavity by the eleven (11) screws.
heater unit to thermal protection plate (buttom) by
two (2) screws.
7. Re-install the wire leads to the convection motor,
convection heater, thermister connector.
Refering to “Pictorial diagram”.
8. Re-install the thermal cut-out.
WHEN REPLACING THE MAGNETRON,
BE SURE THE R.F. GASKET IS IN
PLACE
MOUNTING SCREWS ARE TIGHTENED
SECURELY.
AND THE MAGNETRON
Re-install the
COOLING FAN MOTOR REMOVAL
1.
Disconnect oven from power supply and remove
outer case.
2.
Discbarge the high voltage capacitor.
3.
Disconnect wire leads from the cooling fan motor.
4.
Release AH sensor harness from chassis support
and cooling duct (A).
5.
Remove four (4) screws holding the chassis support to rear cabinet, cooling duct
flange and control panel back plate.
(A), waveguide
6. Release the tab on cooling duct (B) holding cooling
duct (A). -
7. Remove duct (A) with the cooling fan motor from
the unit.
The cooling fan motor assembly is now free.
8. Remove the fan blade from the cooling fan motor
shaft by pulling out the fan retainer clip.
9. Remove two (2) screws and nuts holding cooling
fan motor to the cooling duct (A).
The cooling fan motor is now free.
31
Page 33
R -8580
DAMPER ASSEMBlY REMOVAL
1. Disconnect oven from power supply and remove 7. Raise the stopper of the damper shaft, and pull out
outer case.
2. Discharge the high voltage capacitor.
3. Disconnect wire leads from damper motor and
damper switch.
4. Do above the MAGNETRON REMOVAL from No.3
to No.6.
5. Remove one (1) screw holding the magnetron air
guide to waveguide flange.
6. Remove the magnetron air guide.
the damper shaft.
8. Pull the damper ass’y out of the thermal protection
plate( right).
9. Remove one (1) screw holding the motor to the
damper.
1 O-The damper is now free.
11 .Remove one (1) screw holding the damper switch
to the damper.
12.Now, the damper switch is free.
CONVECTION HEATER OR CONVECTION FAN REMOVAL
I. Do CONVECTION MOTOR REMOVAL from No.1
8. Now the convection heater is free.
to No.10.
2. Remove five (5) screws holding the convection air
guide (4-40,4-41,4-42,4-45) to the heater duct.
3. Remove four (4) screws holding the convection air
guide (4-38) to the heater duct.
4. The convection air guide is now free.
5. Remove two (2) screws holding heating element
holders to the heater duct and remove them.
6. Remove two (2) screws holding convection heater
to heater duct.
7. Pull the convection heater out of the heater duct.
CONVECTION FAN
1. Do CONVECTION MOTOR REMOVAL from No.1
to No.13.
2. Remove two (2) screws holding the shaft mounting
plate ass’y to the heater duct.
3. Pull the convection fan and washer out of the
heater duct.
4. Convection fan is now free.
UPPER LATCH SWITCH / MONITOR SWITCH REMOVAL
1. Disconnect oven from power supplv and remove Re-install
outer case.
2. Discharge the high voltage capacitor.
3. Disconnect the wire leads from the switches.
4. Remove the one (1) screw holding the upper latch
hook to the oven flange.
5. Remove the upper latch hook assembly from oven
flange.
6. Push outward on the two (2) retaining tabs holding
the switch in place.
7. The switch is now free.
. . .
1. Re-install each interlock switch in its place. The
monitor switch is in the upper position and the upper latch switch is in the lower position.
2. Re-connect the wire leads to each switch.
Refer to the pictorial diagram.
3. Secure the upper latch hook (with the one (‘I )
mounting screw) to the oven flange.
4. Make sure that the monitor switch and upper latch
switch are operating properly.
Refer to chapter “Test Procedure” and “Adjustment
procedure”.
. _
( RDA1203tJ)
LOWER LATCH SWITCH AND STOP SWITCH REMOVAL
1. Disconnect the oven from the power supply and
remove the outer case.
2. Discharge the high voltage capacitor.
3. Disconnect the wire leads from the switches.
4. Remove the one (1) screw holding the lower latch
hook to the oven cavity front frange.
5. Remove the lower latch hook from the flange by
moving it downward.
6. To remove the individual switch from the lower
latch hook, push outward the two (2) retaining tabs
holding the switch in place.
7. The switch is now free.
Re-install
1. Re-install each interlock switch in its place. The
stop switch is in the upper position and the lower
latch switch is in the lower position.
2. Re-connect the wire leads to each switch.
Refer to the pictorial diagram.
3. Secure the lower latch hook (with the one (1)
mounting screws) to the oven flange.
4. Make sure that the lower latch switch and stop
switch are operating properly.
Refer to chapter “Test Procedure” and “Adjustment
procedure”.
(RDAl203U)
(RDA1203U)
32
Page 34
CONTROL PANEL ASSEMBLY AND CPU UNIT REMOVAL
The complete control panel should be removed for replacement of components except the relay unit.
To remove the control panel, proceed as follows:
1, Disconnect oven from power supply and remove
outer case.
2. Discharge the high voltage capacitor.
3. Disconnect the wire connectors and wire leads from
the relay unit and CPU unit.
4. Disconnect a connector from the CPU unit.
5. Remove one (I ) screw holding the control panel
back plate to the chassis support.
6. Remove the two (2) screws holding the bottom
edge of the back plate to the cabinet base.
7. Remove one (I) screw holding the back plate to the
oven cavity flange.
8. Lift up and pull the control panel forward. rated.
Replacement of individual component is as follows:
CPU UNIT AND KEY UNIT
I, Disconnect the wire connector of CPU unit from the
relay unit.
2. Remove the four (4) screws holding the panel
frame to the back plate.
3. Separate the panel frame and back plate.
4. Remove the three (3) screws holding the CPU unit
to the panel frame.
5. Lift up the control unit and disconnect the key
connector from the CPU unit.
6. Now, the CPU unit and frame assembly are sepa-
UPPER LATCH/LOWER LATCH/STOP SWITCHES
AND MONITOR SWITCH ADJUSTMENT
If the upper latch,lower latch switches stop switch and
monitor switch do not operate properly due to a
mis-adjustment, the following adjustment should be
made.
1. Loosen the one (1) screw holding the upper Jatch
book to the oven cavity front flange and the one (1)
screw holding the lower latch hook to the same
flange.
2. With the door closed, adjust the lower latch book
by moving it back and forth and then adjust the
upper latch hook by moving it back and forth, or
up and down.
by the upper and lower latch hooks should be less
than 0.5 mm. The vertical position of the upper
latch hook should be placed where the upper latch
switch and monitor switch have activated with the
door closed. Vertical adjustment of the lower latch
book is not possible.
3. Secure the screws with washers firmly.
4. Now, make sure of the upper latch switch operation. If the upper latch switch has not, activated with
the door closed, loose the one (1) screw holding
the upper latch book to the oven cavity front flange
and adjust the upper latch hook position.
In and out play of the door allowed
2. The upper latch and lower latch switches interrupt
the circuit before the door can be opened.
3. The monitor switch contacts close when the door
is opened.
4. Re-install the outer case and check for microwave
leakage around the door with an approved micro-
wave survey meter. (Refer to Microwave Measurement Procedure.)
After the adjustment, make sure of the following:
1. The in and out play of the door remains less than
0.5 mm at latched position. First check the upper
latch hook position, pushing and pulling the upper
portion of door toward the oven face. Then check
the lower latch hook position, pushing and pulling
the lower portion of door toward the oven face.
Both results (plays of the door) should be less than
0.5mm.
33
Figure C-l. Latch Switches Adjustment
(RDAl203U)
Page 35
R -8580
DOOR REPLACEMENT AND ADJUSTMENT
DOOR REPLACEMENT
1. Disconnect oven from power supply and remove
outer case.
2. Holding the door, remove three (3) screws securing
the upper door hinge to the oven cavity. The door
assembly is nowfree from the oven cavity.
3. On re-installing new door assembly, secure the door
assembly with the three (3) mounting screws to the
oven cavity.
Make sure the door is parallel with the bottom line
of the oven face plate and the latch heads pass
through the latch holes correctly.
Note: After any service to the door, .-an approved
microwave survey meter should be used to assure
compliance
with proper
microwave
rediation standard.
(Refer to Microwave Measurement Procedure).
Note: If the Latch Heads Need Removal, “TORX T-20”
or “LHXTIX LR-3” Type screwdriver should be
used.
TORX screw
DOOR ADJUSTMENT
When removing and/or loosening hinges such as in the
case of a door replacement, the following adjustment
criteria are taken.
Door is adjusted to meet the following three conditions before tightening the binge
screws.
I. Adjust door latch heads at a position where they
smoothly catch the latch hooks through the latch
holes. Refer to upper latch and lower latch switches
adjustments.
2. Deviation of the door alignment from the horizontal
line of cavity face to be less than 1 mm.
3. Door should be adjusted with its face depressed
toward cavity face.
After hinge screws are tightened under foregoing conditions, recheck 1 and 2.
Note: The door on a microwave oven is designed to
act as an electronic seal preventing the leakage
of microwave energy from the oven cavity during
the cookcycle.
This function does not require
that the door be airtight, moisture condensation
tight or light-tigbt. Therefore, the occasional
appearance of moisture, light or the sensing of
gentle air movement around the oven door is not
abnormal and do not of themselves, indicate a
leakage of microwave energy from the oven
cavity. If such were the case, your oven could
not be equipped with a vent, the very purpose
of which is to exhaust the vapor-laden air from
the oven cavity.
TORX SCREW
LATCH HEADS
DOOR ASSEMBL
(T-20)
OUTER CASE CABINET
OVEN FACE PLATE
Figure C-2. Door Assembly Replacement and Adjustment
(RDA1203U)
34
Page 36
MICROWAVE MEASUREMENT
R -8580
After adjustment of door latch switches, monitor
switch and door are completed individually or collectively, the following leakage test must be performed
with a survey instrument and it must be confirmed that
the result meets the requirements of the performance
standard for microwave oven.
REQUIREMENT
The safety switch must prevent microwave radiation
emission in excess of 5mW/cm2 at any point 5cm or
more from external surface of the oven.
PREPARATION FOR TESTING:
Before beginning the actual test for leakage, proceed
as follows;
1. Make sure that the test instrument is operating
normally as specified in its instruction booklet.
Important:
Survey instruments that comply with the require-
ment for instrumentations as prescribed by the performance standard for microwave ovens must be
used for testing.
Recommended instruments are:
NARDA 8100
NAR DA 8200
HOLADAY HI 1500
SIMPSON 380M
2.
Place the oven tray into the oven cavity.
Place the load of 275 +15ml of water initially at
3.
20 &5 “C in the center of the oven tray. The water
container should be a low form of 600 ml beaker
with inside diameter of approx. 8.5cm and made of
an electrically non-conductive material such as
glass or plastic.
The placing of this standard load in the oven is im-
portant not only to protect the oven, but also to in-
sure that any leakage is measured accurately.
4.
Close the door and turn the oven ON with the timer
set for several minutes. If the water begins to boil
before the survey is completed, replace it with
275ml of the cool water.
Move the probe slowly (not faster that 2.5cm/sec.)
5.
along the gap.
6.
The microwave radiation emission should be measured at any point of 5cm or more from the external
surface of the oven,
(RDBl103U)
35
Page 37
R -8580
5
I 1
l---lIIIII I II
6
c
r
II I I I
3
11 II II II II
1
I
2
I
II-
4
OIL>
I I I
E
it-
P
.P
5
8 E
2
a
.
z
B
g
ii
t
F
1
I
2 3
4
I
5
6
36
Page 38
R -8580
1
A
6
C
2
3
4
5
6.
A
1
IB
/
/
lC
D
E
F
G
D
H
1
I
2
I
3
4
5
6
37
Page 39
R -8580
1
2 3 4 5
6
1
0 L. T.TM
F M. CONV M OAMPM
I I I I
5
(dir
2
t
SW -*
Relay Unit
P0Wef.q
Control Unit
I
Figure S-3. Printed Wiring Board
I
38
I
I
I
Page 40
PARTS LIST
Note : The voltage supplied to the parts ‘I*” are greater than 250V.
* Refer to “REPLACEMENT PARTS LIST” described at after PARTS LIST.
REF. NO. 1 PART NO.
I
ELECTRICAL PARTS
DESCRIPTION
1 Q’TY ICODE
l- 1
l- 2
;I ;
l- 5
l- 6
l- 7
l- 8
l- 9
l-10
l-11
l-12
l-13
l-14
l-15
l-16
l-17
l-18
l-19
QACCA0032WREO Power supply cord
QSW-MA017WREO Monitor switch
To have your order filled promptly and correctly, please furnish the following information.
1. MODEL NUMBER
3. PART NO.
2. REF. NO.
4. DESCRIPTION
(RDP1303U)
43
Page 45
R -8580
REPLACEMENT PARTS LIST
This replacement parts list shows interchangeability of marked ( * ) parts on the control panel parts to the alterations
of product locations.
This list has been prepared to show LISTED PART NO. along with the USED PART NO. side by side.
NOTE :
Common resistors have been omited from this parts list, such as 1/4W and 1/2W carbon resistors below is a compatibility list and cross referrence information.
(RDQI 101 U)
1 PART CODE LISTED
I
A
I I
I I
PART CODE LISTED
“1.D : Carbon film resistor.
“2.N :
“3.D : Carbon film resistor.
“4.D : 1/4W and small shape.
RR-DZl03NDREO
I
0 / RR-DZ102DDREO
C RR-DZl 01 PDREO
t i
1/4W and small shape.
1/4w.
D:
P: 1/2w.
E: 1/4W.
H: 1/2w.
1 PART CODE COMPATIBLE 1 DESCRIPTION
VRO-ST2OF103J 1/4W 1 Ok Q small shape carbon film
I
1 VRD-ST2EF102J
VRD-ST2HAlOl J 1/2W 100 f2 carbon film.
1 t
3
I
I
/ 1/4W 1 .Ok R carbon film.
I
I
(RDQ1102U)
44
Page 46
R-8580
-
A
BI
C
-1
1 2 3 4 I
!
5
6 -
x
9
a
D
E
F
1
2
3
4
,
I
5
6
, ,
45
Page 47
R-8580
\\
1
CONTROL PANEL PARTS
DOOR ASSEMBLY
2
3
‘Y
\
‘\
k4
4
J/I
I”
/’
/
4
3-r
9
3-2
0 I
1, *
0
5
p
0
8
II
i I
P
1
ri
6
MISCELLANEOUS
6- I
P
46
Trans.
6-3
i;
6-10
(3
Page 48
R-8580
1
2
3
4
5
PACKING AND ACCESSORIES
6 \
I
,
I
[TRAY PACKING FOAM
a (SPADP0328WREO)
WI Not Redaceble Item
L
1 2 I 3 4 5 6
/
47
Page 49
R -8580
48
Page 50
R -8580
49
Page 51
R -8580
(RDXI 101 U)
SHARP
‘87 0 SHARP CORP. (9U0.75E) Printed in Australia
Loading...
+ hidden pages
You need points to download manuals.
1 point = 1 manual.
You can buy points or you can get point for every manual you upload.


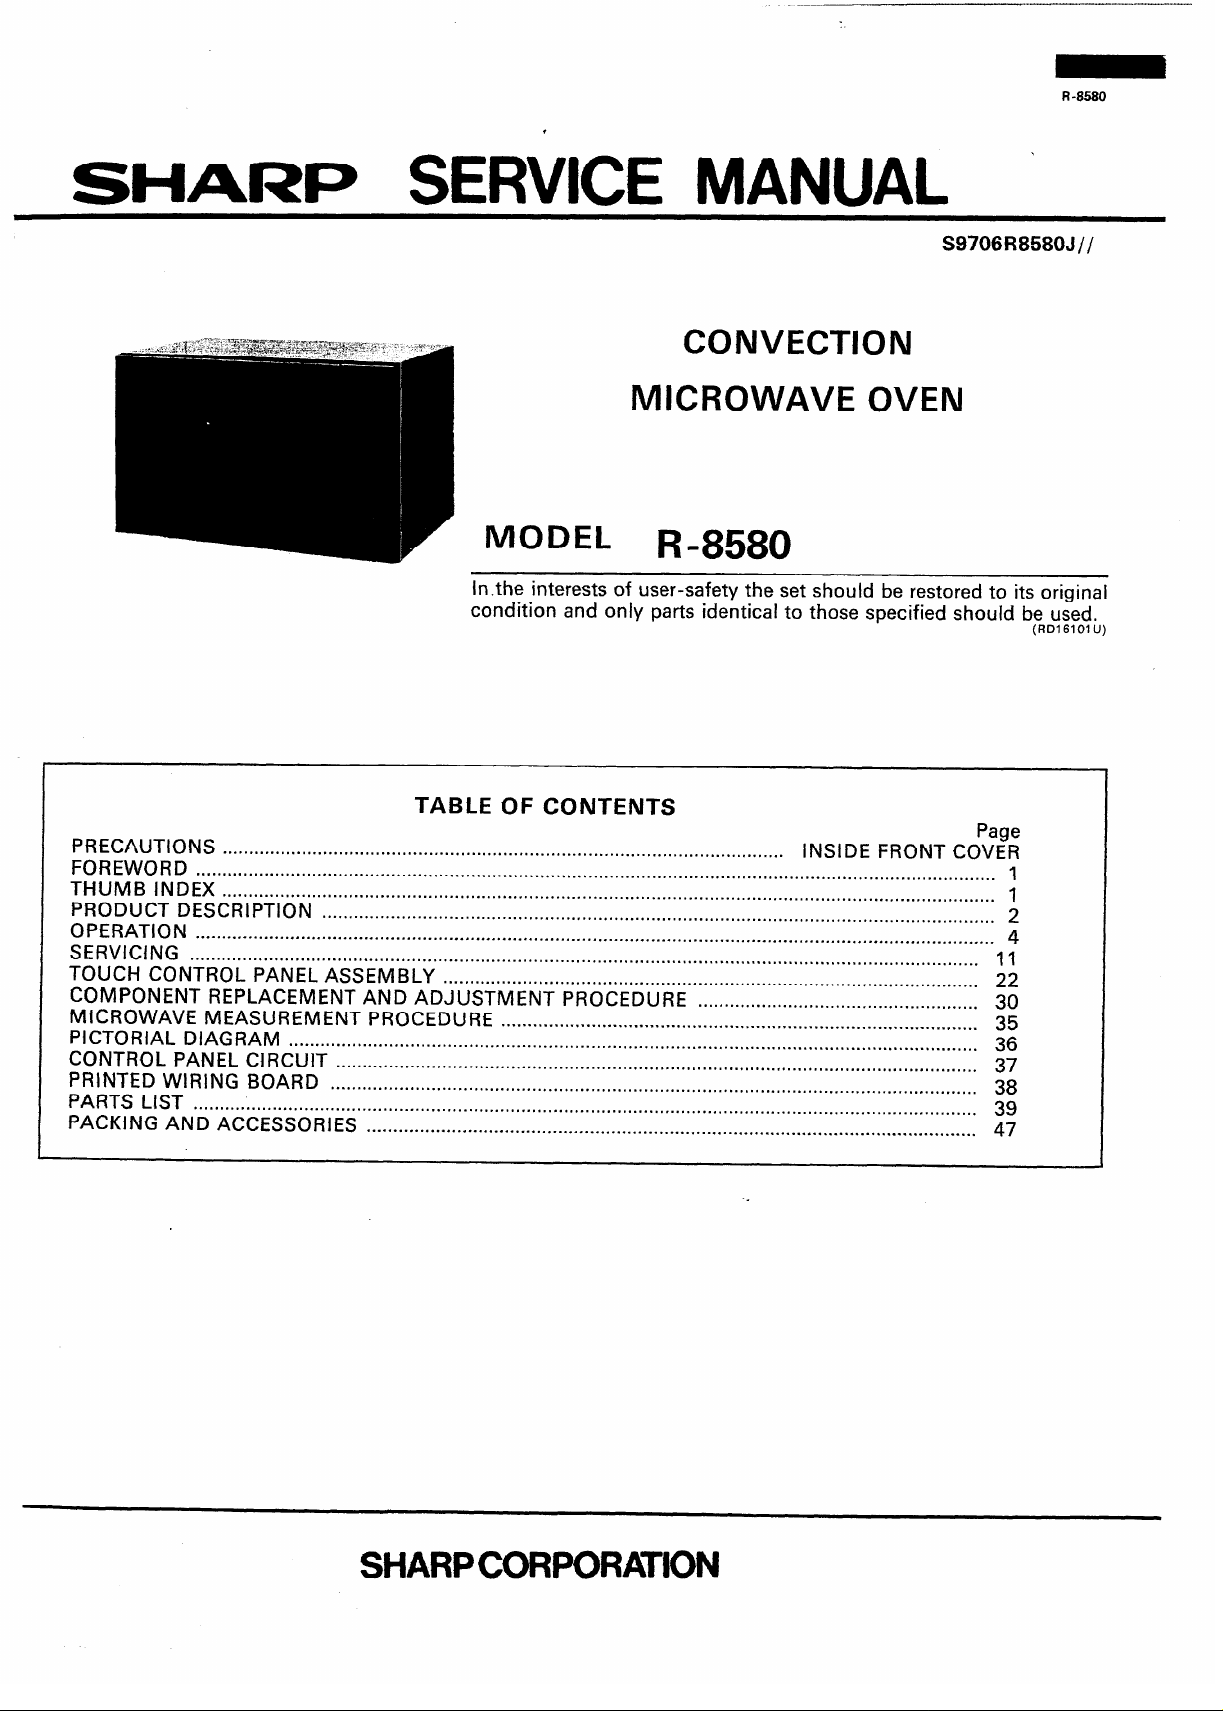
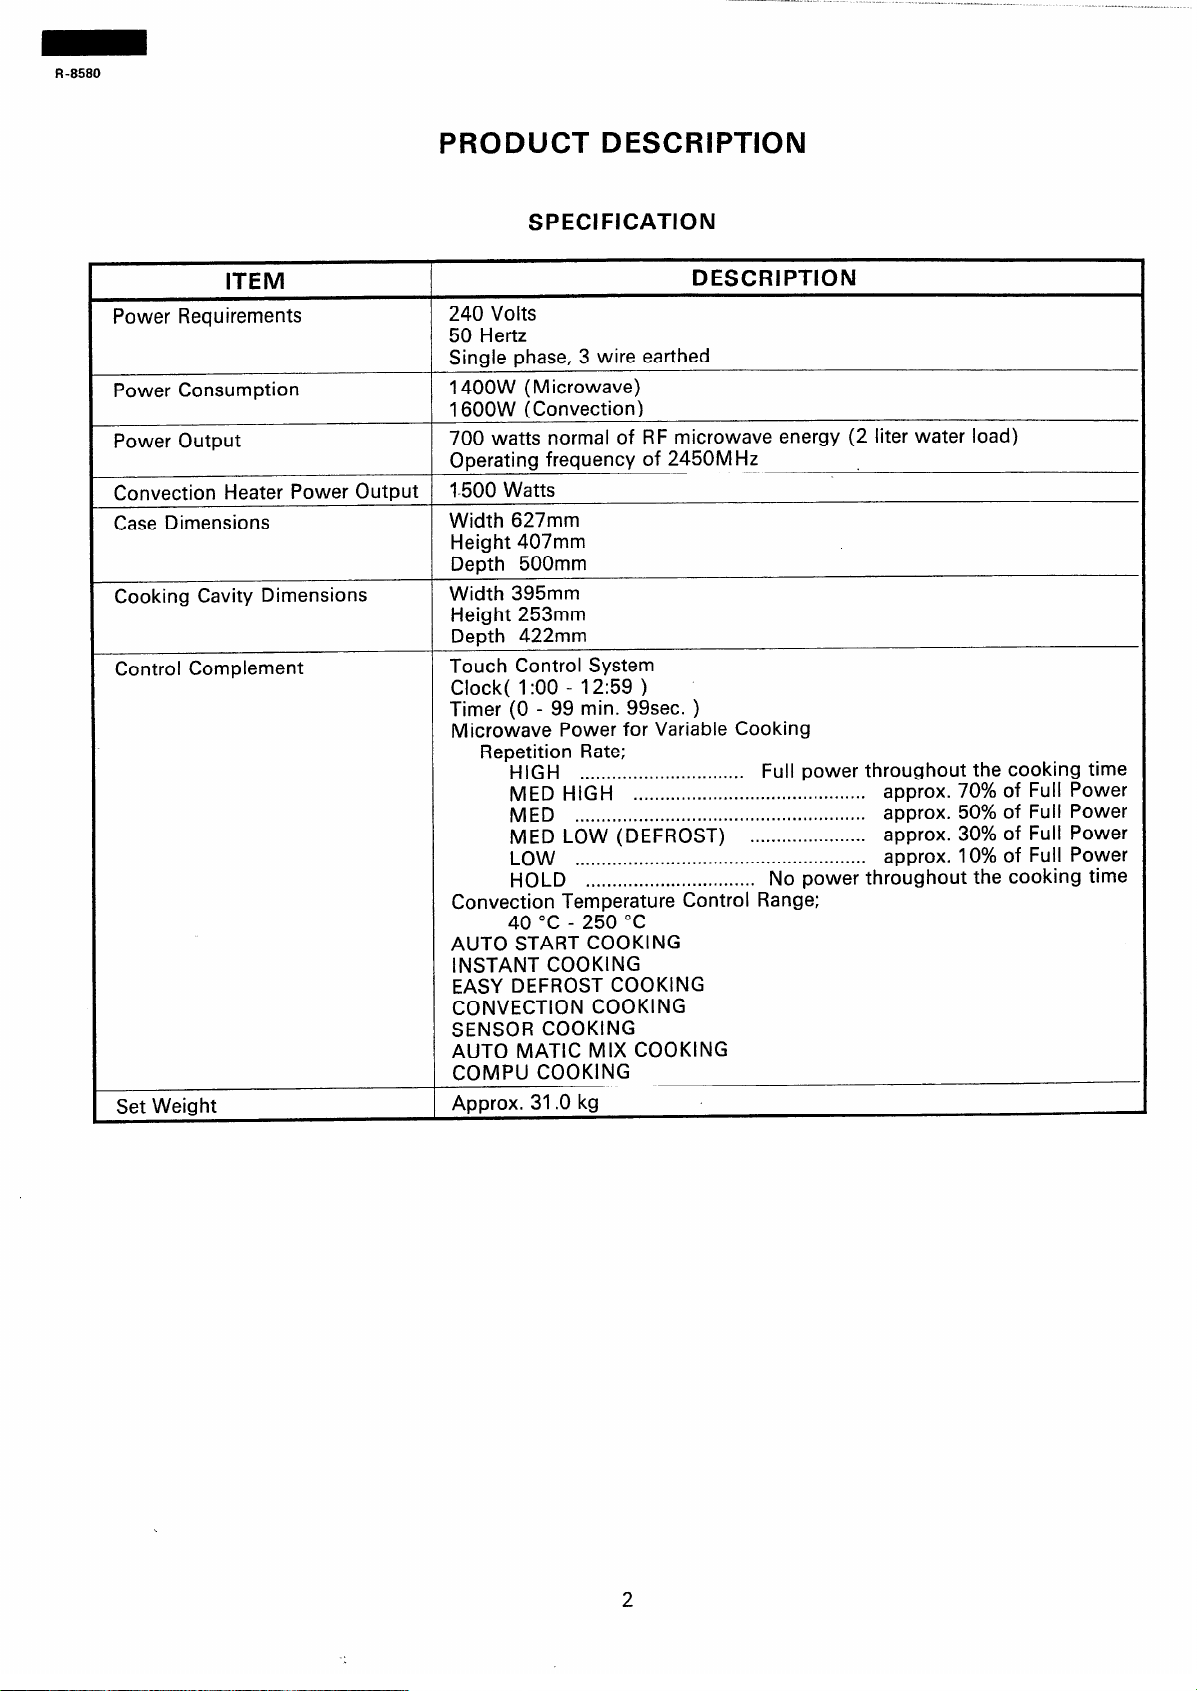
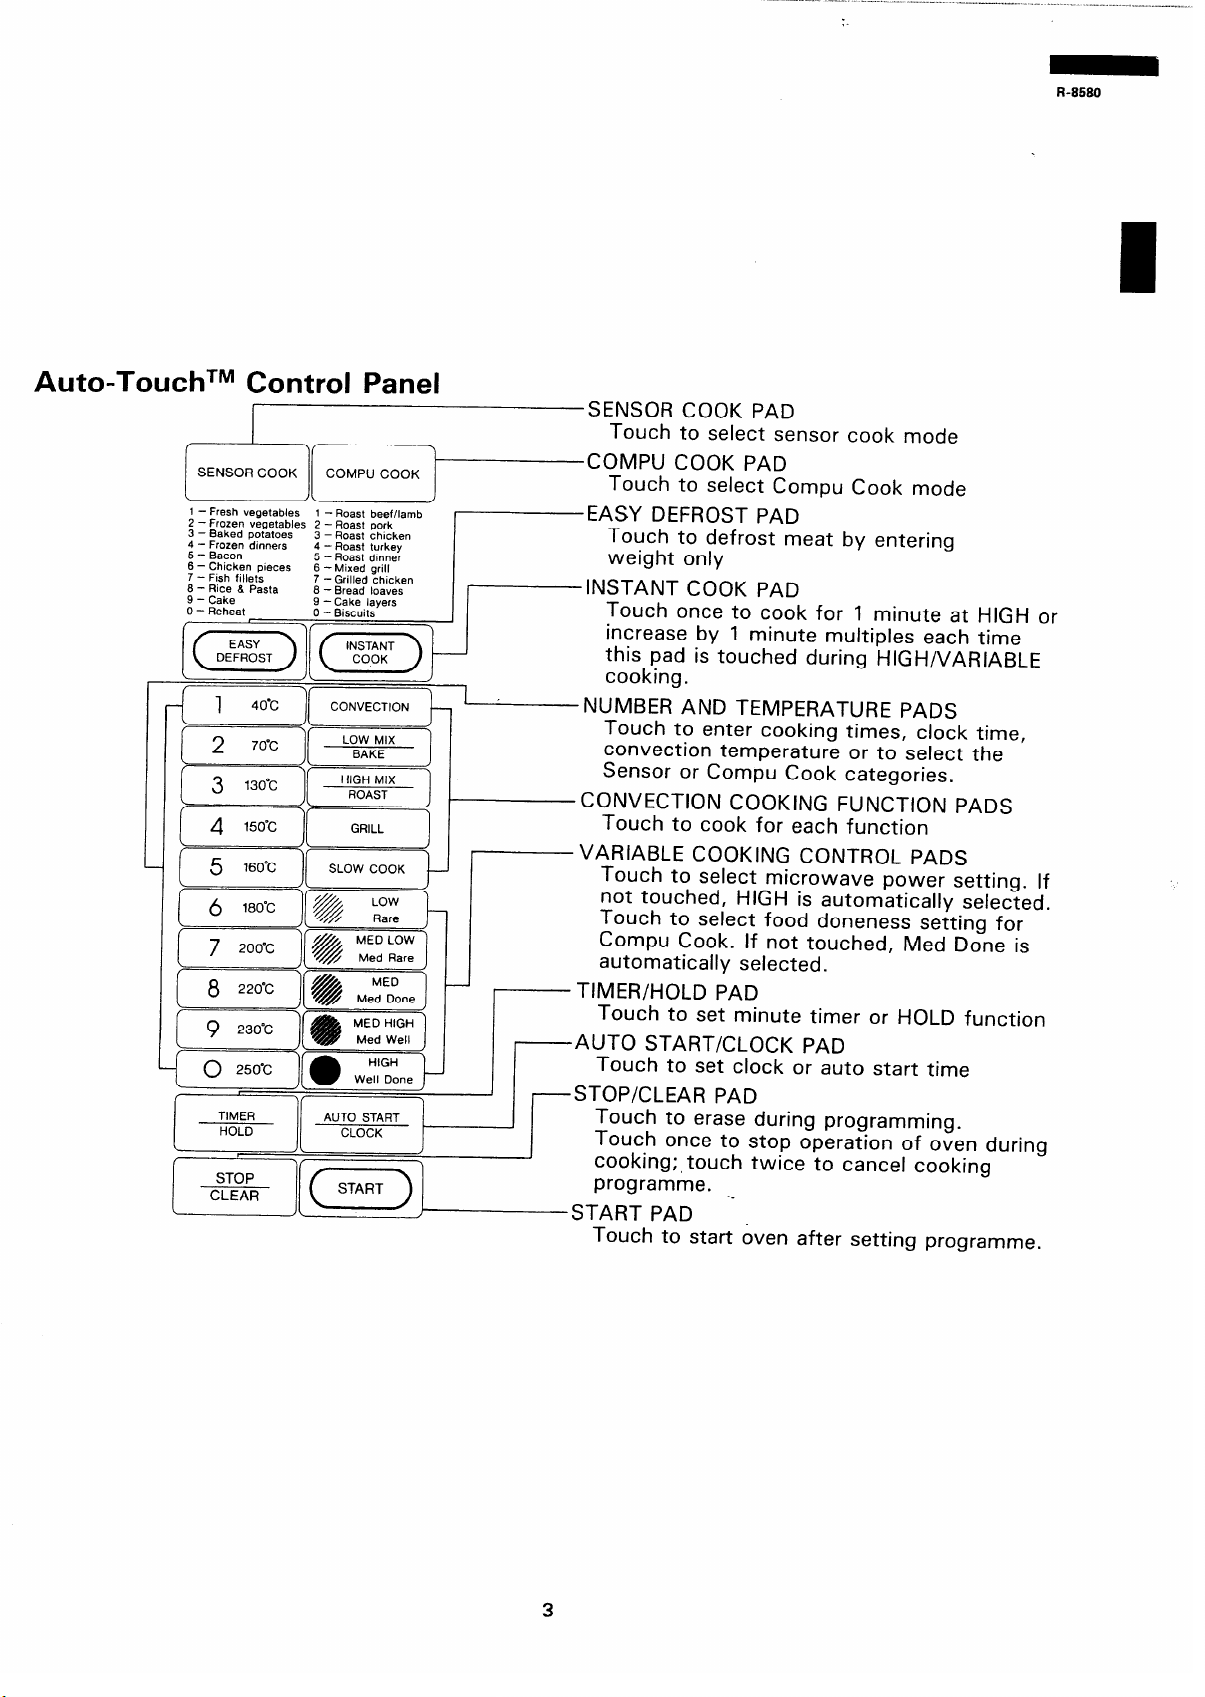
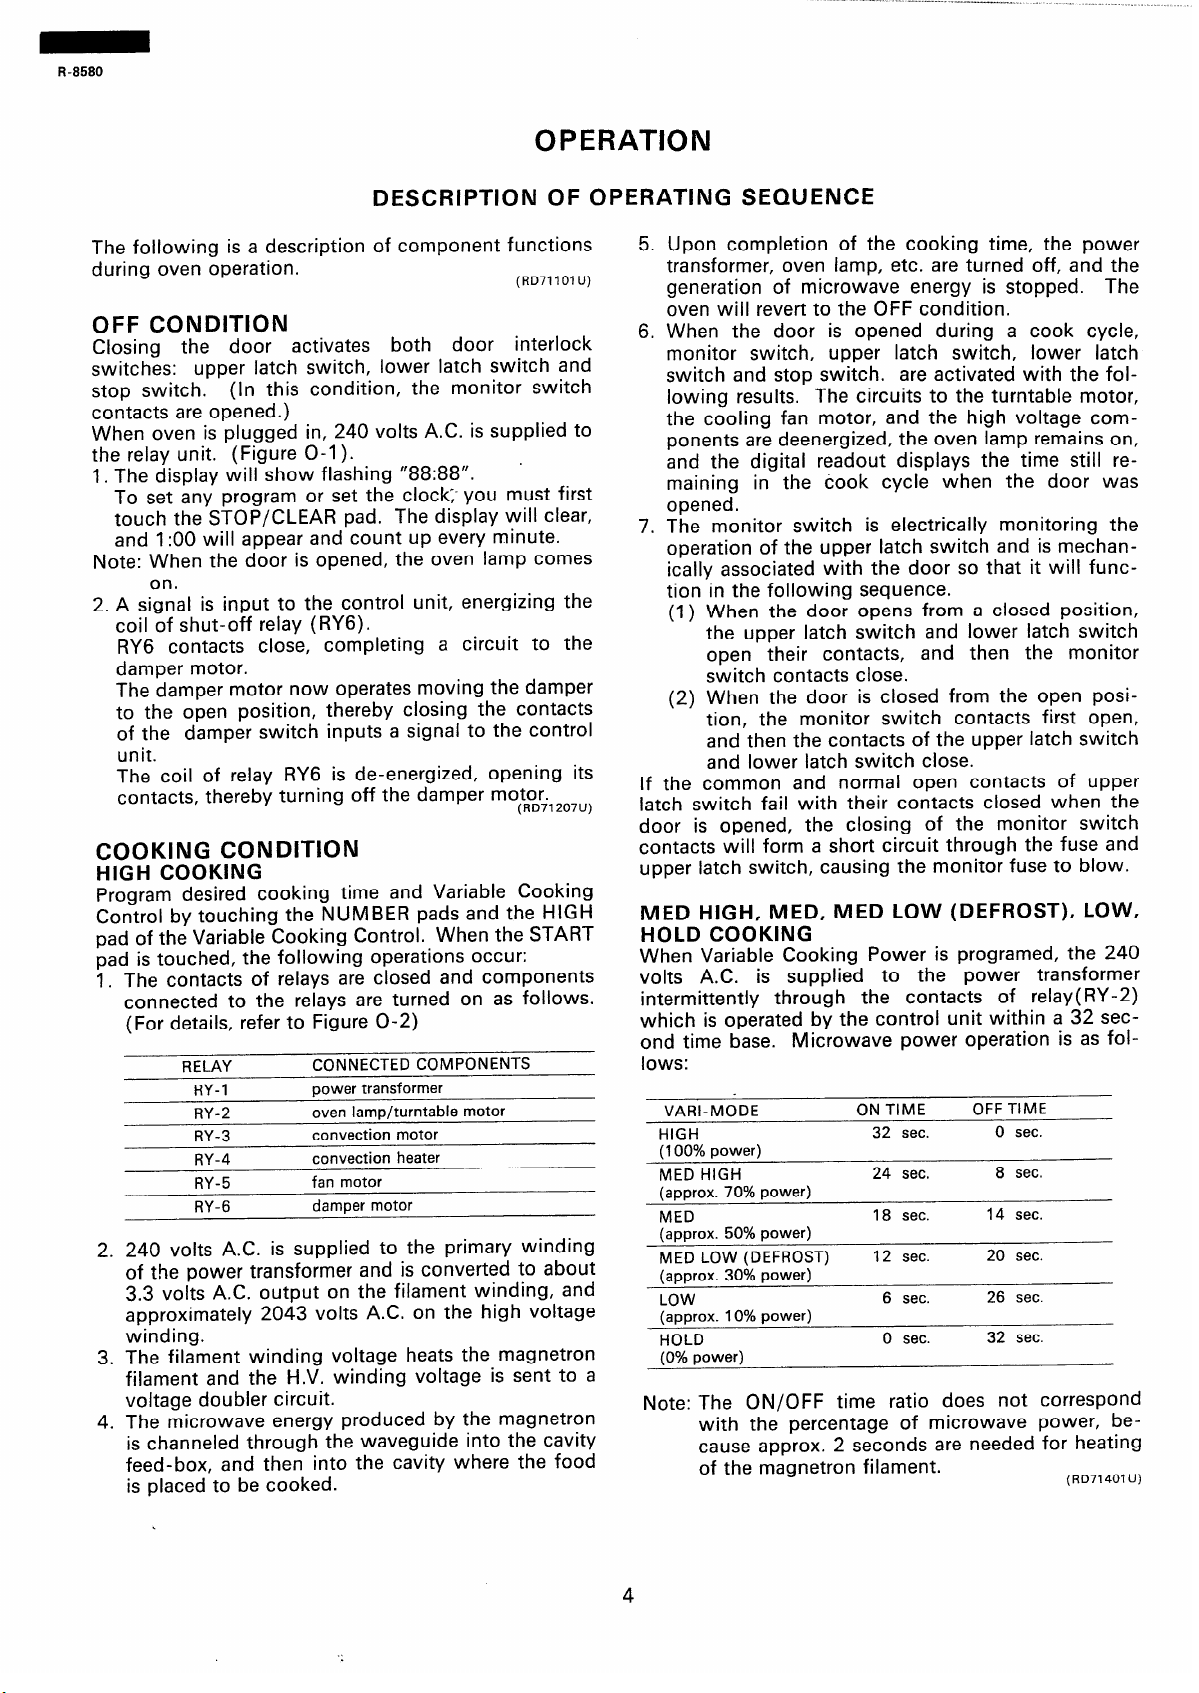
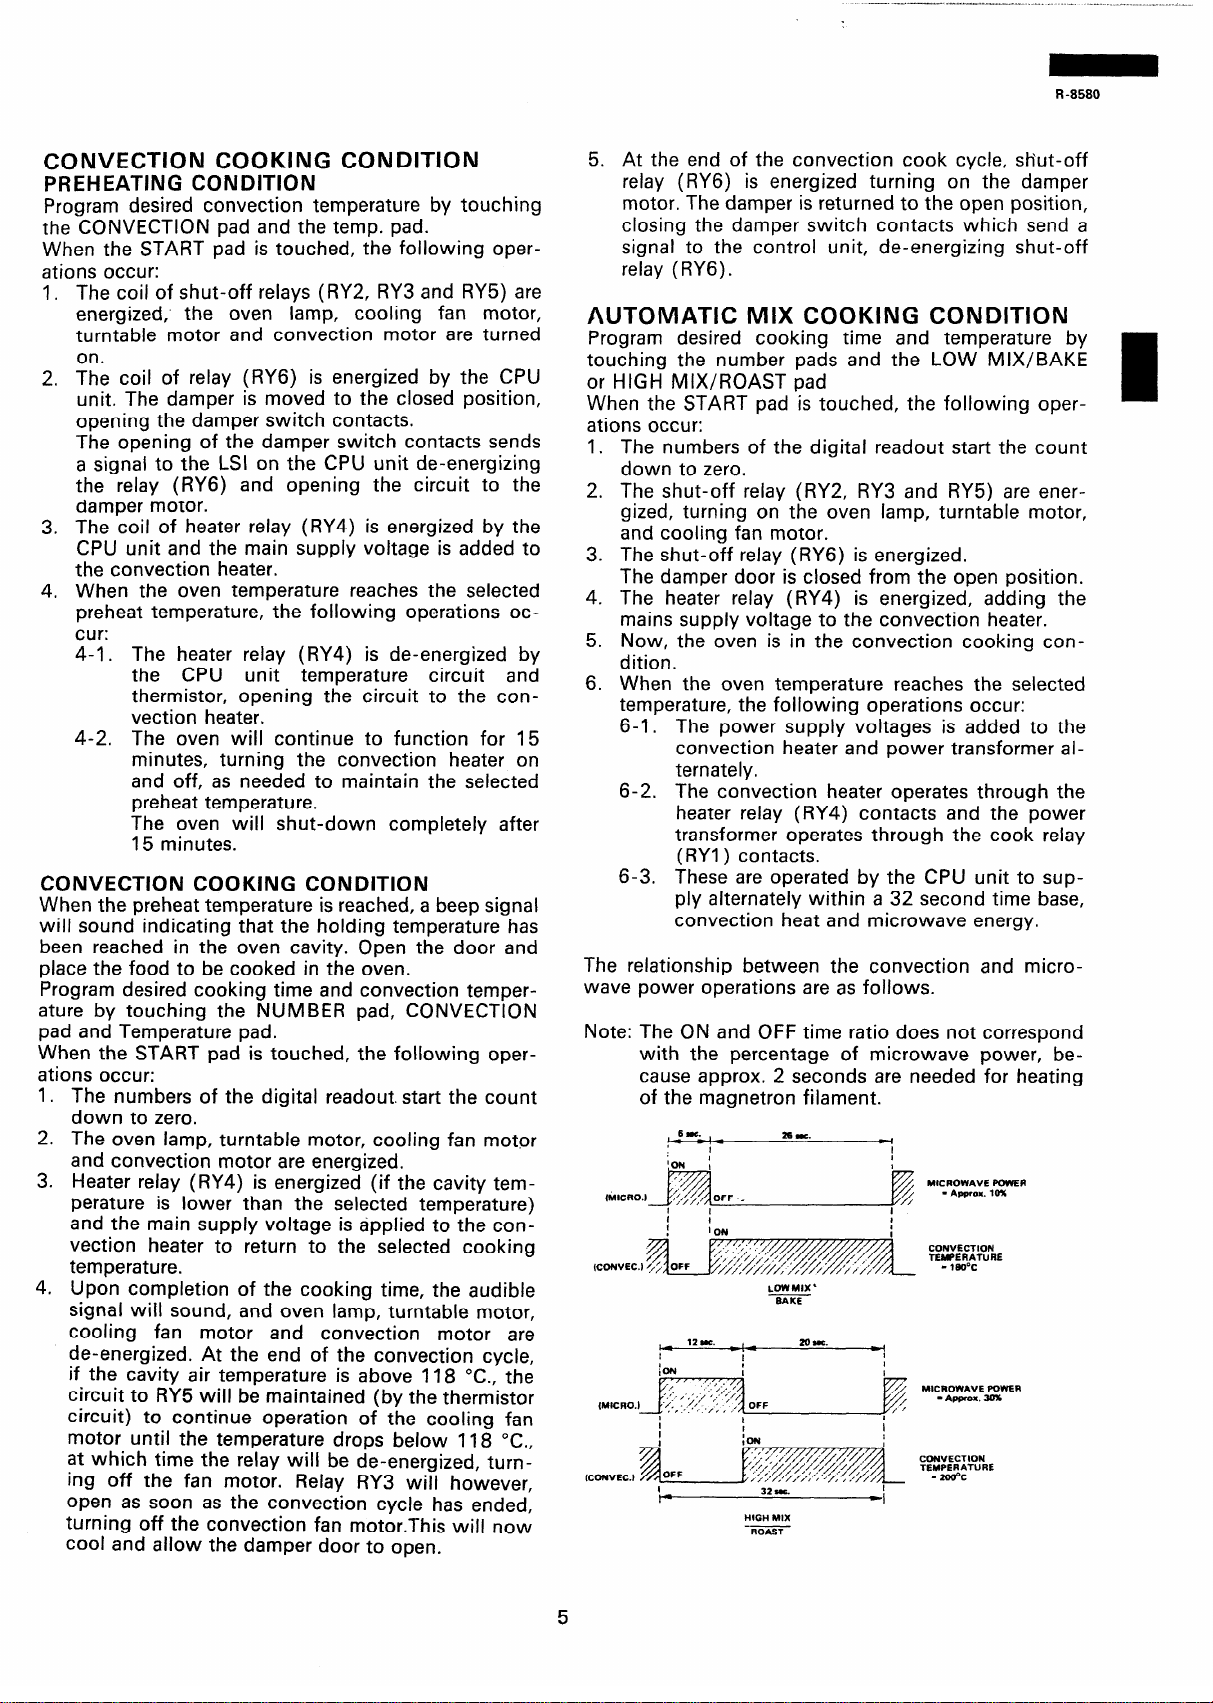
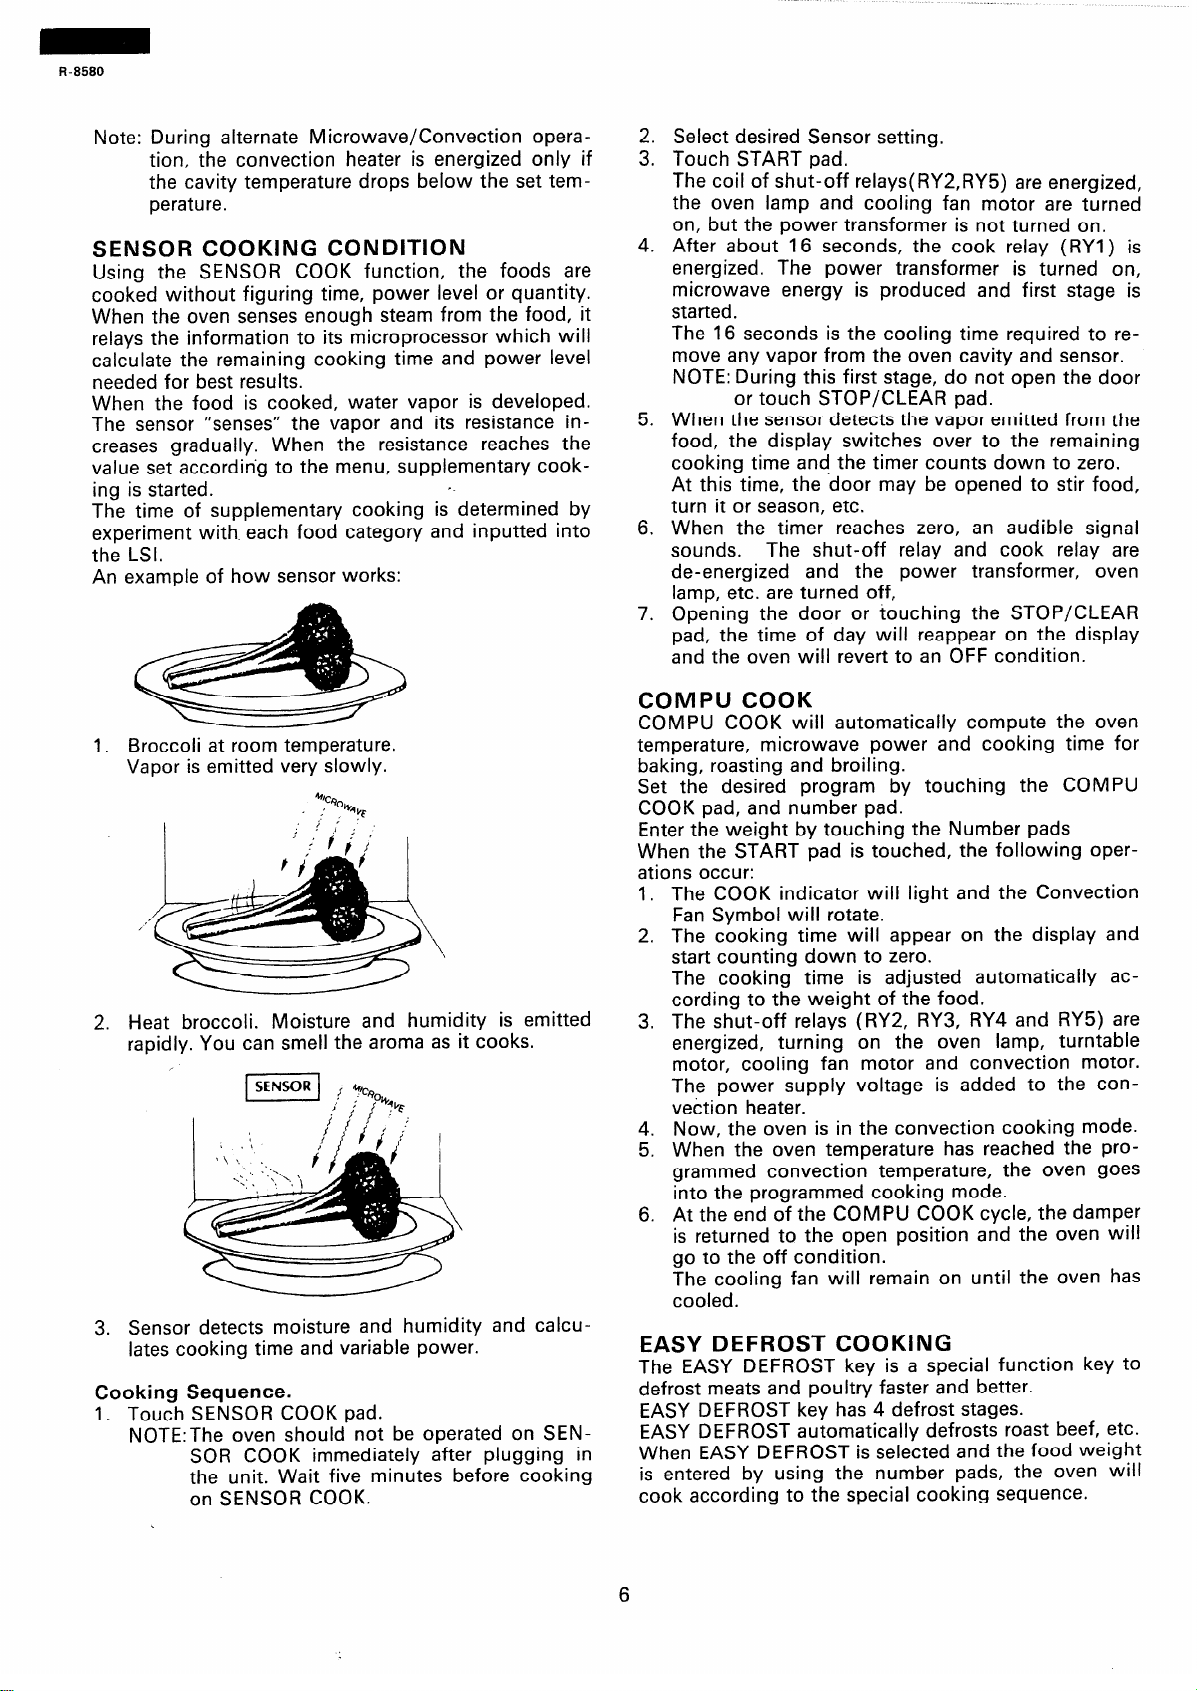
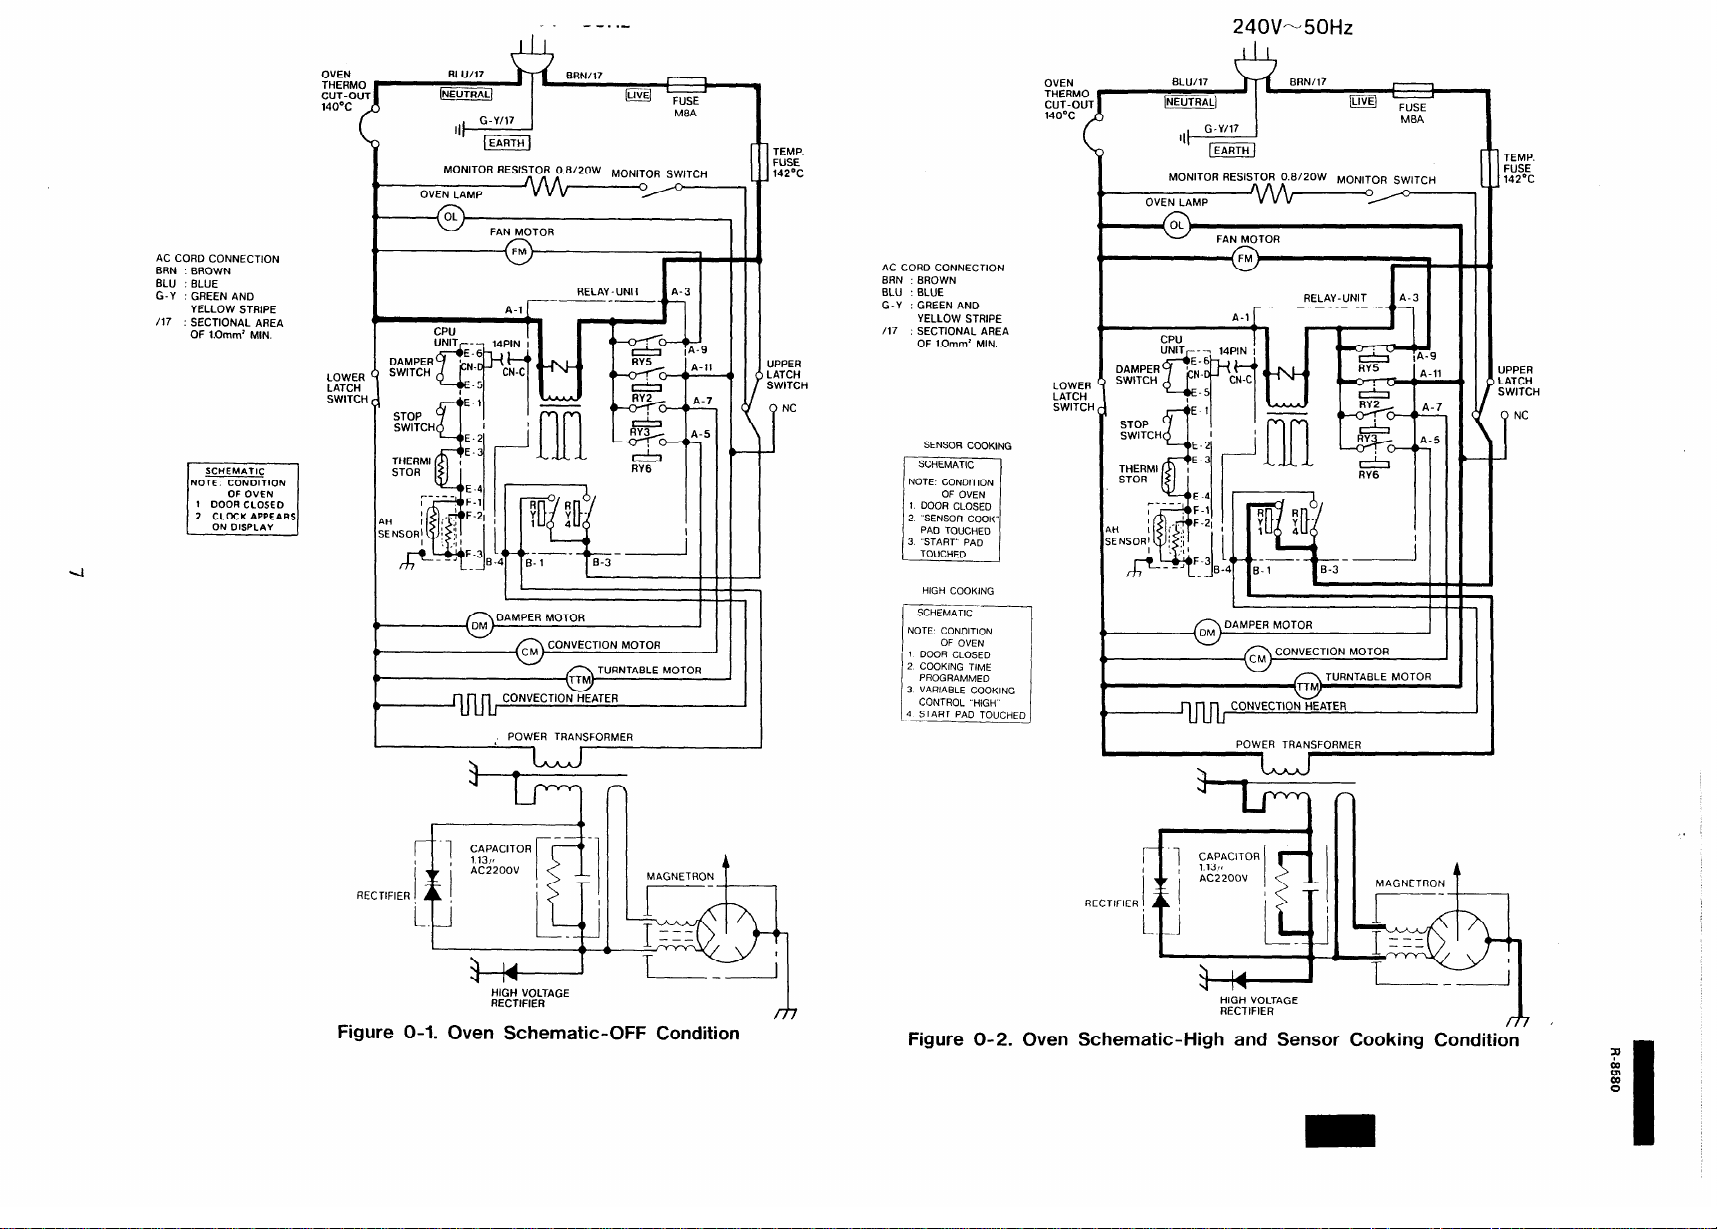
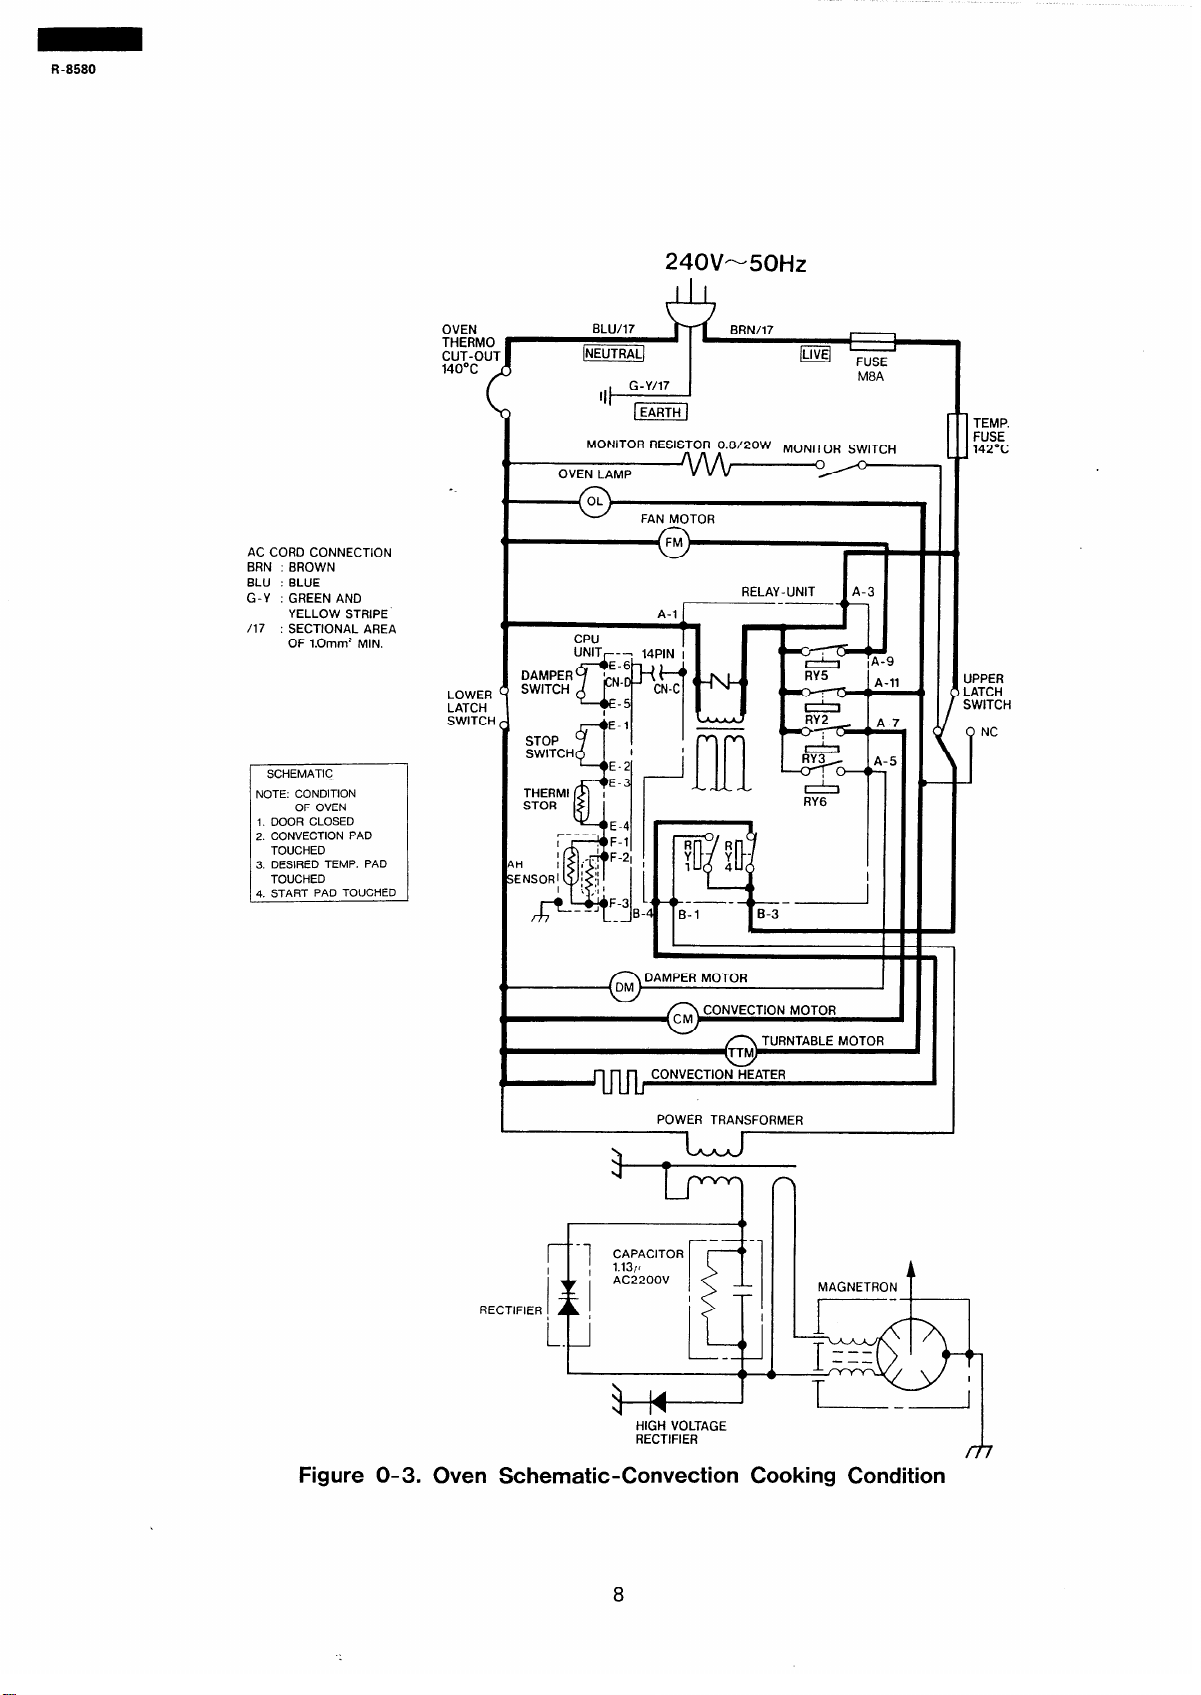
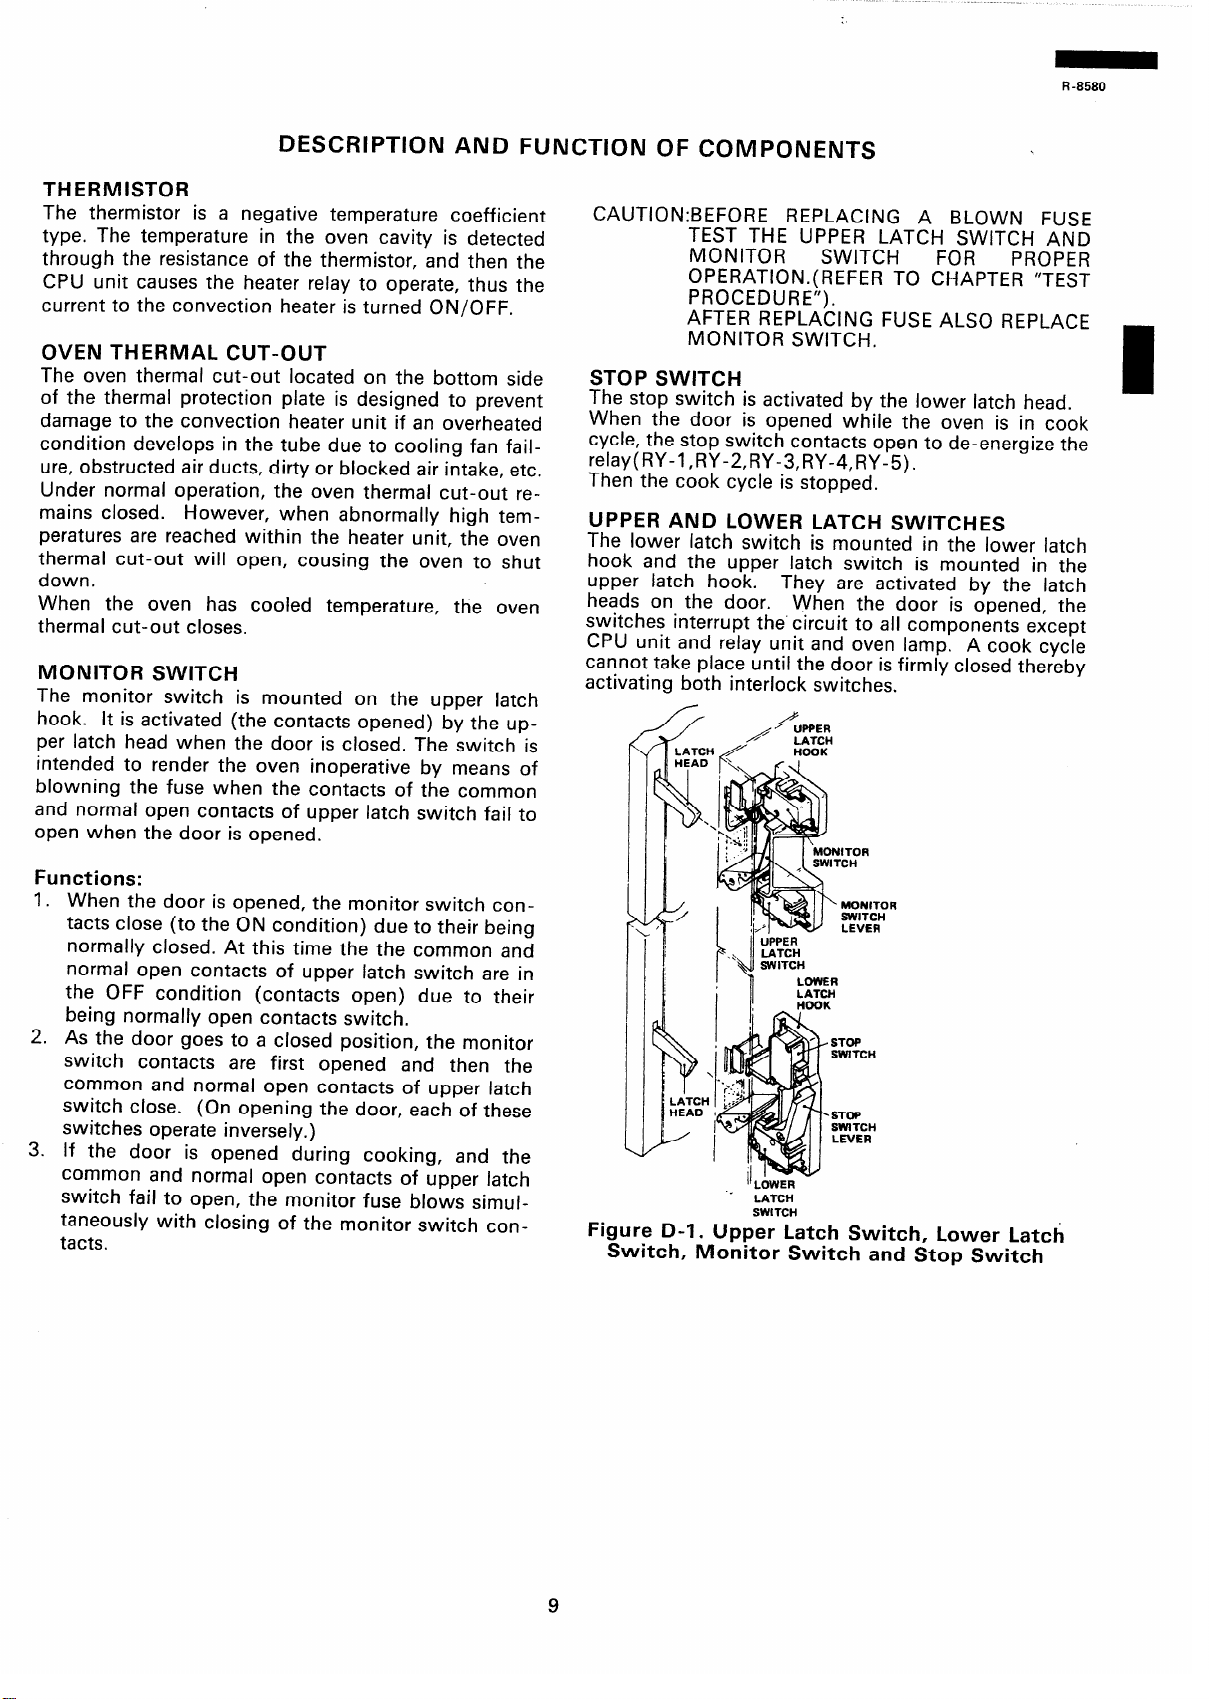

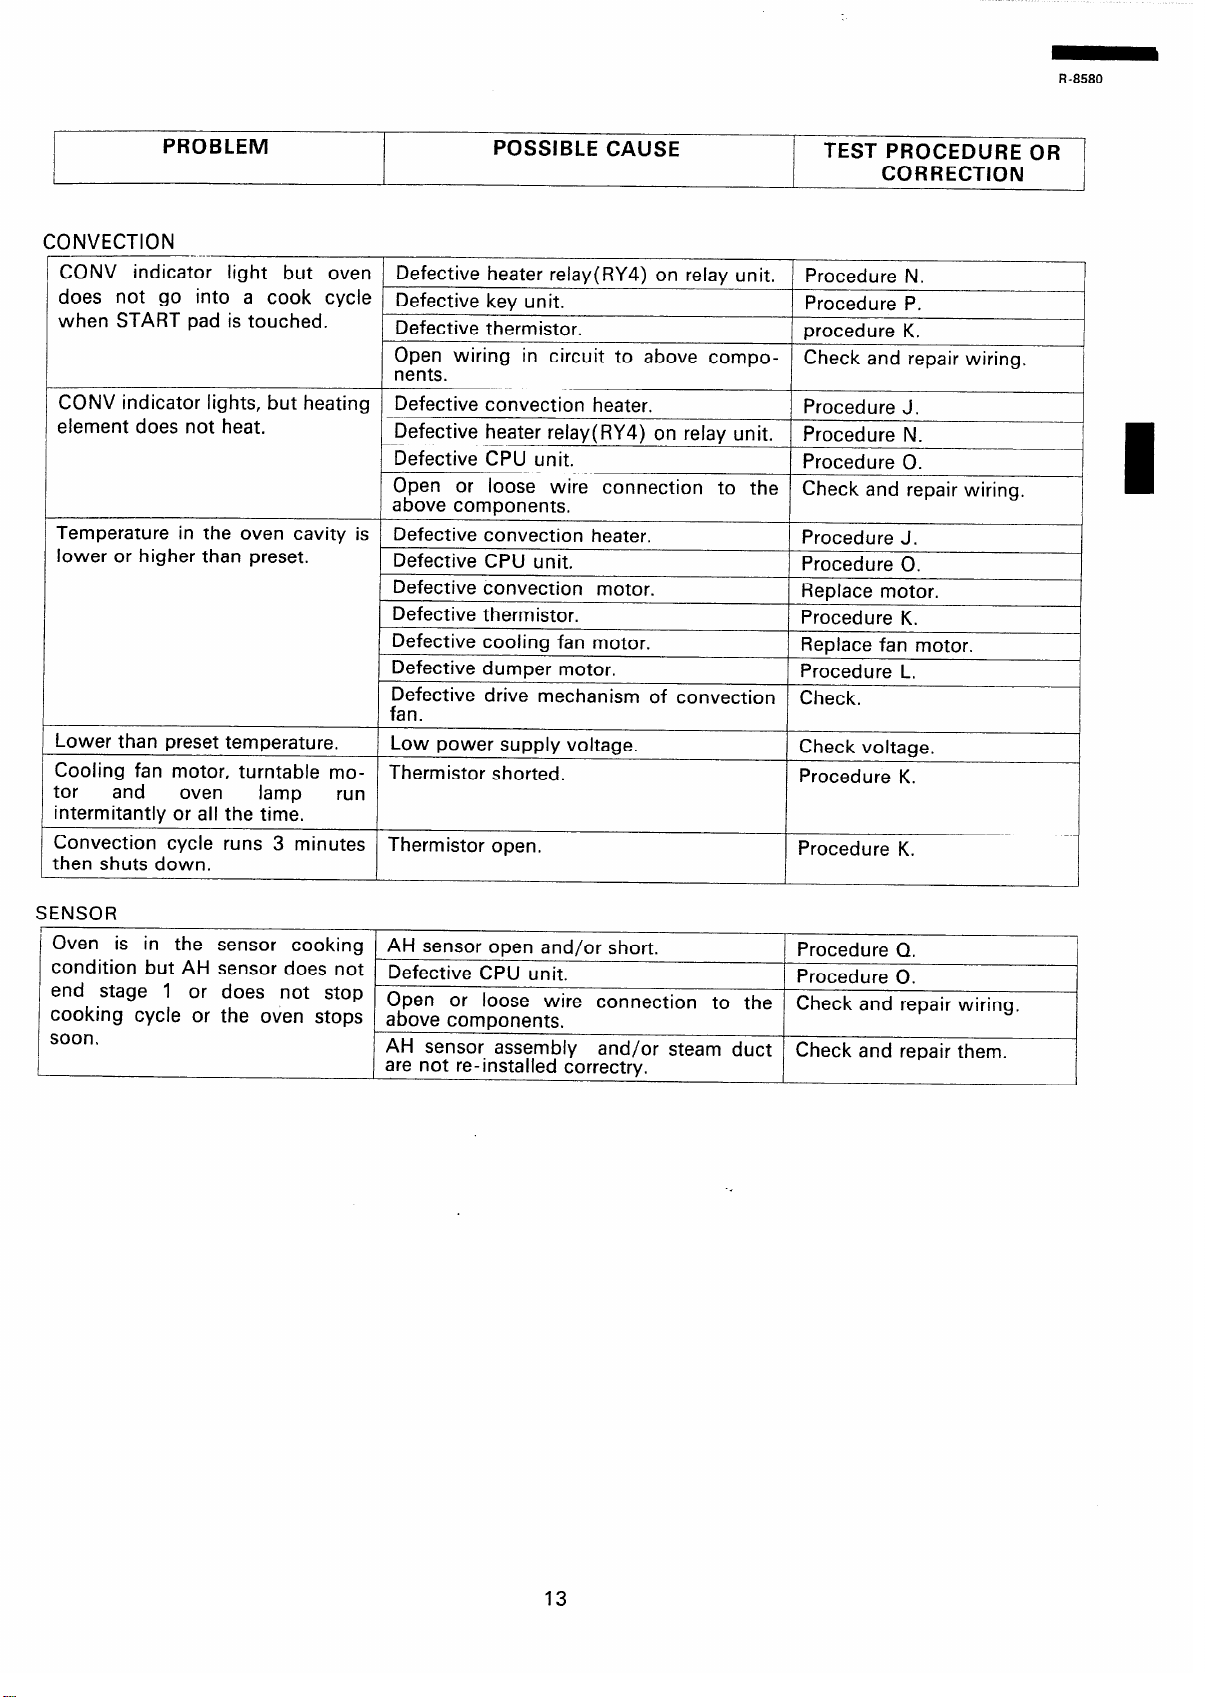
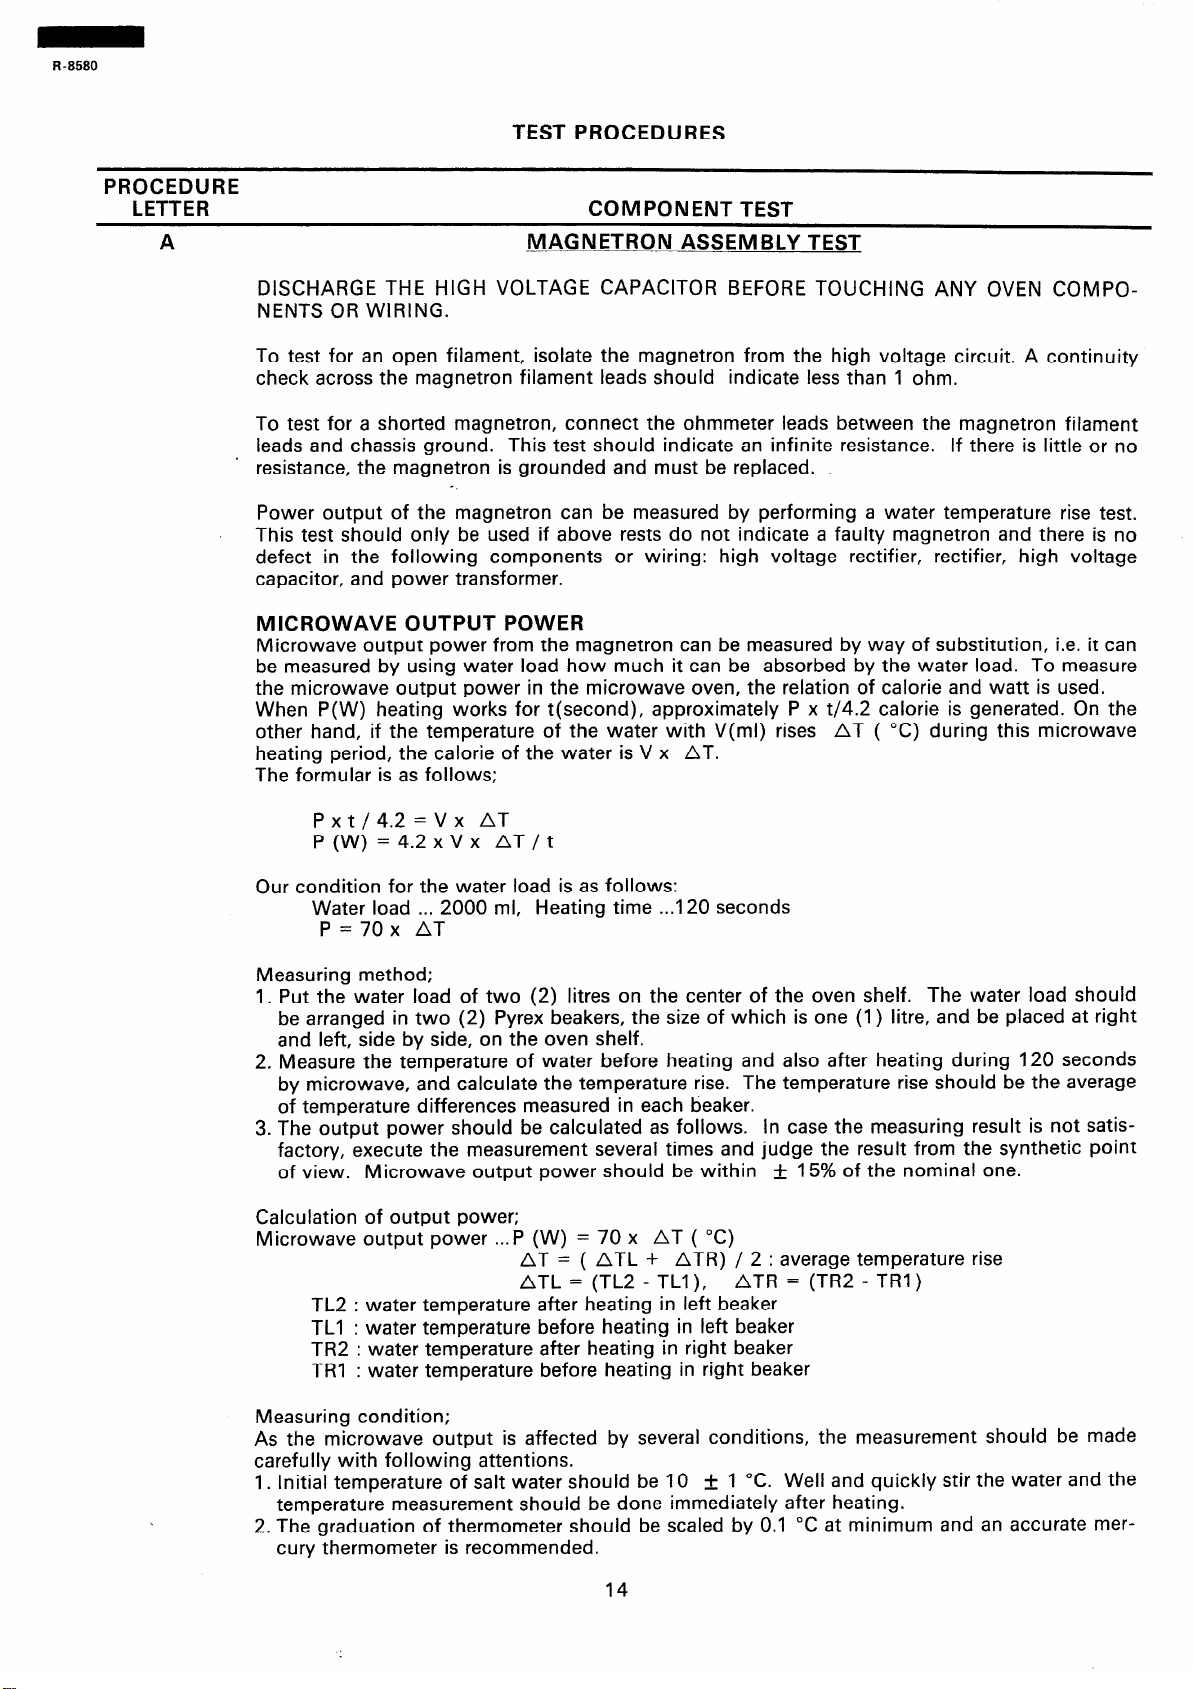
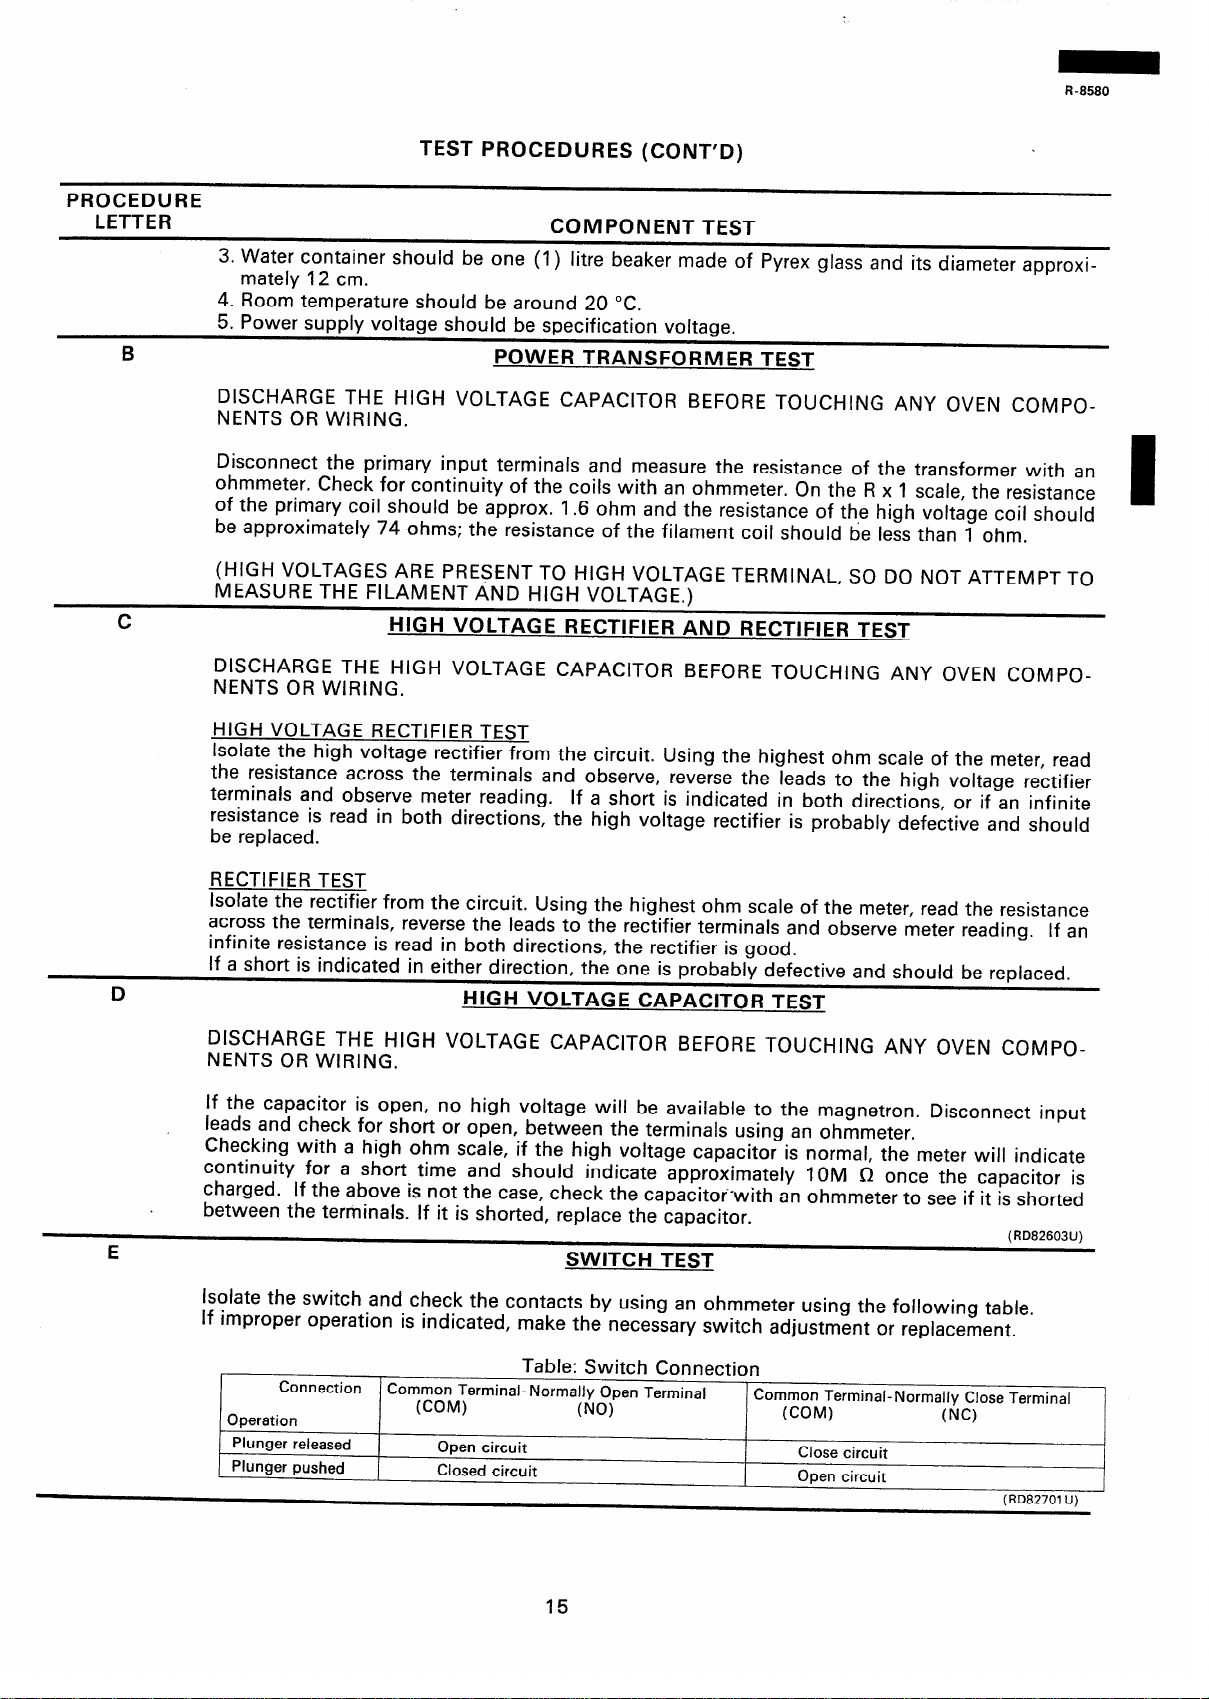


 Loading...