

Page 1
Kg
%
Important
Vigtigt
ENGLISH
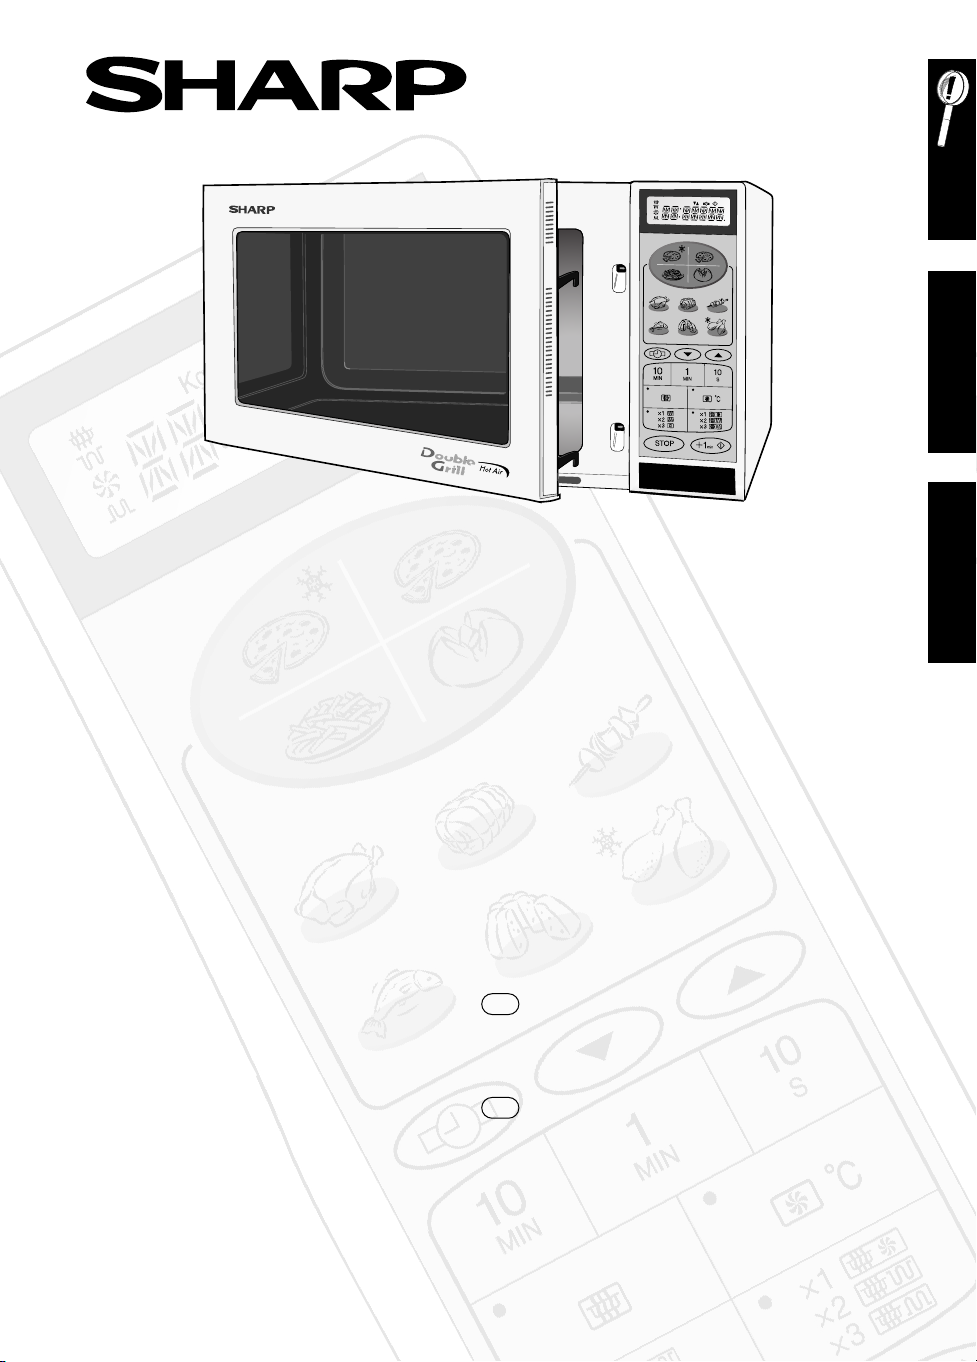
R-82STN
MICROWAVE OVEN WITH TOP & BOTTOM GRILLS AND CONVECTION
OPERATION MANUAL WITH COOKBOOK
MIKROVÅGSUGN MED ÖVER- OCH UNDERGRILL OCH KONVENTIONELL UGNSVÄRME
BRUKSANVISNING MED KOKBOK
GB
This operation manual contains important information which you should read carefully before using your microwave oven.
IMPORTANT: There may be a serious risk to health if this operation manual is not followed or if the oven is modified
so that it operates with the door open.
Den här instruktionsboken innehåller viktig information. Läs igenom den noga innan du använder din mikrovågsugn.
VIKTIGT! Om du inte följer instruktionsboken eller om ugnen modifieras så att den kan användas med luckan
öppen, finns det risk för allvarliga personskador.
S
SVENSKA
900 W (IEC 60705)
Page 2

Page 3

GB
Operation Manual
OVEN AND ACCESSORIES . . . . . . . . . . . . . . . . . . .2
CONTROL PANEL . . . . . . . . . . . . . . . . . . . . . . . . . .3
IMPORTANT SAFETY INSTRUCTIONS . . . . . . . . . . .4-6
INSTALLATION . . . . . . . . . . . . . . . . . . . . . . . . . . . .6
BEFORE OPERATION . . . . . . . . . . . . . . . . . . . . . . . .7
USING THE STOP KEY . . . . . . . . . . . . . . . . . . . . . . .7
SETTING THE CLOCK . . . . . . . . . . . . . . . . . . . . . . .8
MICROWAVE POWER LEVELS . . . . . . . . . . . . . . . . .8
MICROWAVE COOKING . . . . . . . . . . . . . . . . . . . . .9
HEATING WITHOUT FOOD . . . . . . . . . . . . . . . . . . .9
GRILL COOKING . . . . . . . . . . . . . . . . . . . . . . . . .10
CONVECTION COOKING . . . . . . . . . . . . . . . .11-12
DUAL COOKING . . . . . . . . . . . . . . . . . . . . . . .12-13
OTHER CONVENIENT FUNCTIONS . . . . . . . . . .14-16
PIZZA/QUICHE/POTATO/INSTANT ACTION . . .17-18
PIZZA/QUICHE CHART . . . . . . . . . . . . . . . . . . .18-19
S
Bruksanvisning
UGN OCH TILLBEHÖR . . . . . . . . . . . . . . . . . . . . . .2
KONTROLLPANEL . . . . . . . . . . . . . . . . . . . . . . . . . .3
VIKTIGA SÄKERHETSFÖRESKRIFTER . . . . . . . . . .61-63
INSTALLATION . . . . . . . . . . . . . . . . . . . . . . . . . . .63
FÖRE ANVÄNDNING . . . . . . . . . . . . . . . . . . . . . .64
ATT ANVÄNDA STOPP-KNAPPEN . . . . . . . . . . . . .64
STÄLLA KLOCKAN . . . . . . . . . . . . . . . . . . . . . . . .65
MIKROVÅGEFFEKTNIVÅER . . . . . . . . . . . . . . . . . .65
TILLAGNING MED MIKROVÅGOR . . . . . . . . . . . . .66
UPPVÄRMNING UTAN MAT . . . . . . . . . . . . . . . . .66
GRILLNING . . . . . . . . . . . . . . . . . . . . . . . . . . . . .67
TILLAGNING MED KONVENTIONELL UGNSVÄRME . .68-69
KOMBINATIONSTILLAGNING . . . . . . . . . . . . . .69-70
ANDRA PRAKTISKA FUNKTIONER . . . . . . . . . . .71-73
PIZZA/PAJ/POTATIS/AUTOMATIK . . . . . . . . . . .74-75
CONTENTS / INNEHALL
POTATO CHART . . . . . . . . . . . . . . . . . . . . . . . . . .20
INSTANT ACTION CHART . . . . . . . . . . . . . . . .20-22
CARE AND CLEANING . . . . . . . . . . . . . . . . . . . . .23
SERVICE CALL CHECK . . . . . . . . . . . . . . . . . . . . . .24
CookBook . . . . . . . . . . . . . . . . . . . . . . .25-60
SPECIFICATIONS . . . . . . . . . . . . . . . . . . . . . . . .122
SERVICE ADDRESSES . . . . . . . . . . . . . . . . . .118-121
PIZZA/PAJ TABELL . . . . . . . . . . . . . . . . . . . . . . . . .76
POTATIS TABELL . . . . . . . . . . . . . . . . . . . . . . . . . .77
AUTOMATIKTABELL . . . . . . . . . . . . . . . . . . . . .77-79
UNDERHÅLL OCH RENGÖRING . . . . . . . . . . . . . .80
INNAN DU RINGER SERVICE . . . . . . . . . . . . . . . . .81
Kokbok . . . . . . . . . . . . . . . . . . . . . . . .82-117
SPECIFIKATIONER . . . . . . . . . . . . . . . . . . . . . . . .122
SERVICEADRESSER . . . . . . . . . . . . . . . . . . . .118-121
1
Page 4
Kg
%
10
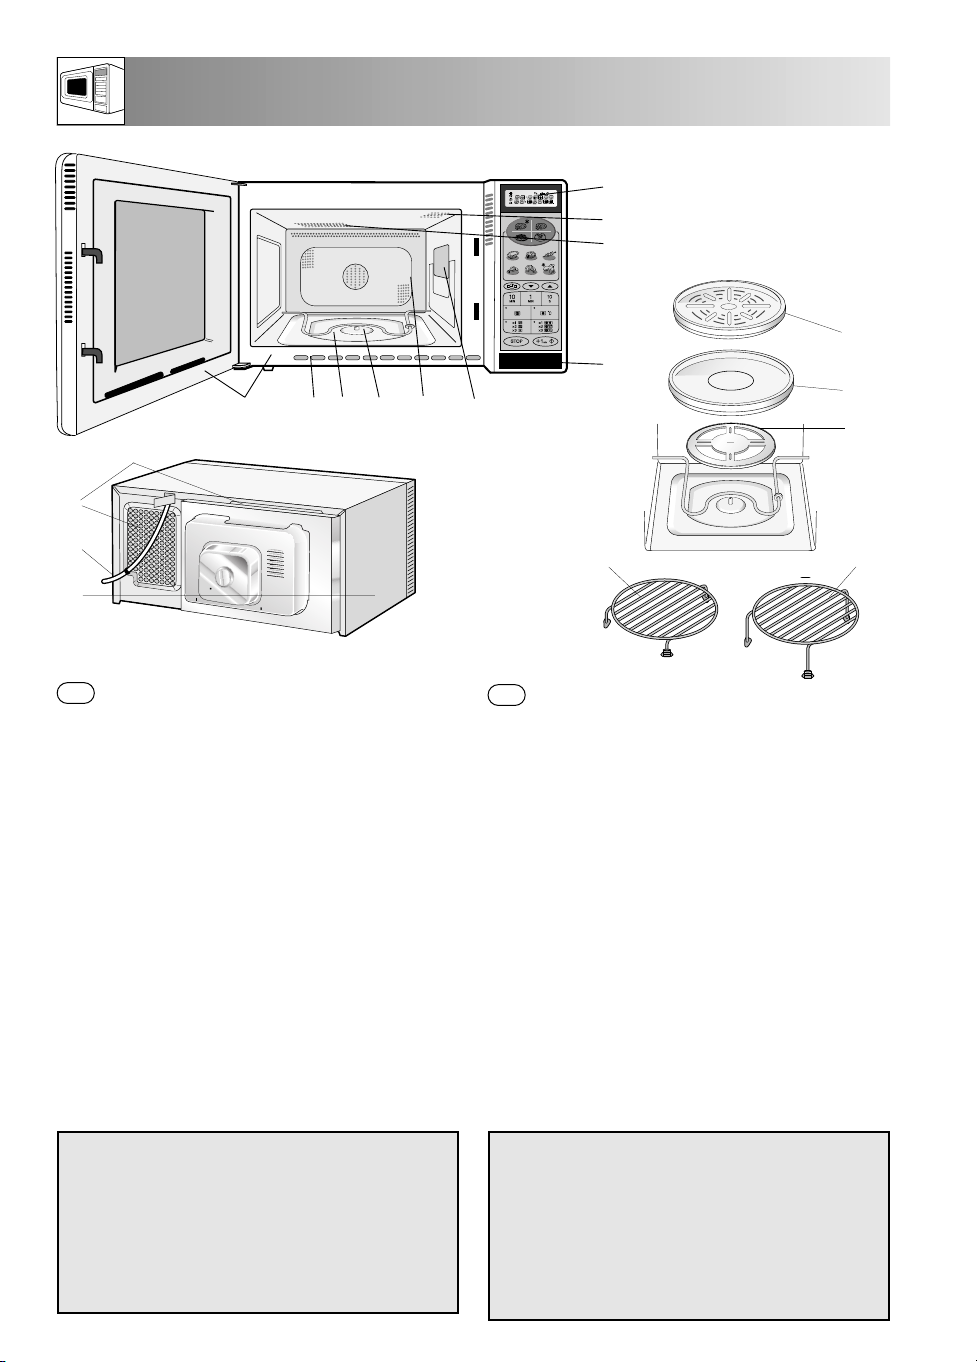
OVEN AND ACCESSORIES / UGN OCH TILLBEHÖR
1
2
3
13
4
14
9 10 8 7 6 5
15
11
12
1 Control panel
GB
2 Oven lamp
3 Grill heating element (top grill)
4 Door open button
5 Waveguide cover
6 Oven cavity
7 Turntable motor shaft
8 Grill heating element (bottom grill)
9 Door seals and sealing surfaces
10 Ventilation openings
11 Power cord
12 Outer cabinet
ACCESSORIES:
Check to make sure the following accessories are provided:
13. Splash gaurd 14. Turntable 15. Turntable support
16. Low rack 17. High rack
Ensure that the bottom grill is in the lowest position as shown in
the diagram as it is possible to move it up and down for easy
cleaning. Place the turntable support over the turntable motor
shaft on the floor of the cavity. Then place the turntable on to the
turntable support.
Before first using the turntable and racks, clean with mild soapy water.
Do not cut or scratch the turntable.
16 17
1 Kontrollpanel
S
2 Ugnslampa
3 Grillelement (övergrill)
4 Knapp för lucköppning
5 Stänkskydd
6 Ugn
7 Drivanordning
8 Grillelement (undergrill)
9 Dörrtätningar och tätande ytor
10 Ventilationsöppningar
11 Nätsladd
12 Yttersida
ACCESSORIES:
Kontrollera att följande tillbehör finns med:
13. Stänkskyddet 14. Roterande tallrik 15. Stöd för roterande tallrik
16. Lågt stöd 17. Högt stöd
Kontrollera att undergrillen är placerad i nedersta läget (se figuren),
så att den kan flyttas upp och ned. Det underlättar rengöringen. Sätt
den roterande tallrikens stöd på drivanordningen i botten av ugnen.
Placera sedan den roterande tallriken på stödet.
Diska den roterande tallriken och gallren innan du använder dem
första gången.
Skär eller repa inte den roterande tallriken.
Warning:
The accessories (e.g. turntable) will become very hot during
GRILL, DUAL, CONVECTION, PIZZA, POTATO and
INSTANT ACTION (except Easy Defrost) modes. Always use
thick oven gloves when removing the food or turntable from
the oven to prevent burns.
NOTE: When you order accessories, please mention the
following two items: Part name and model name to your
dealer or SHARP authorised service agent.
Varningar:
Tillbehören (t.ex. den roterande tallriken) blir mycket varma när
du använder GRILLEN, AUTOMATIK, KONVENTIONELL
UGNSVÄRME SAMT FUNKTIONERNA PIZZA, POTATIS
och AUTOMATIK. Undvik att bränna dig genom att alltid
använda tjocka grytlappar när du tar ut mat eller den roterande
tallriken ur ugnen.
OBS: Glöm inte att ange följande uppgifter när du beställer
tillbehör: Delens namn och modellbeteckning. Vänd dig till
din återförsäljare eller SHARP:s auktoriserade serviceställen.
2
Page 5
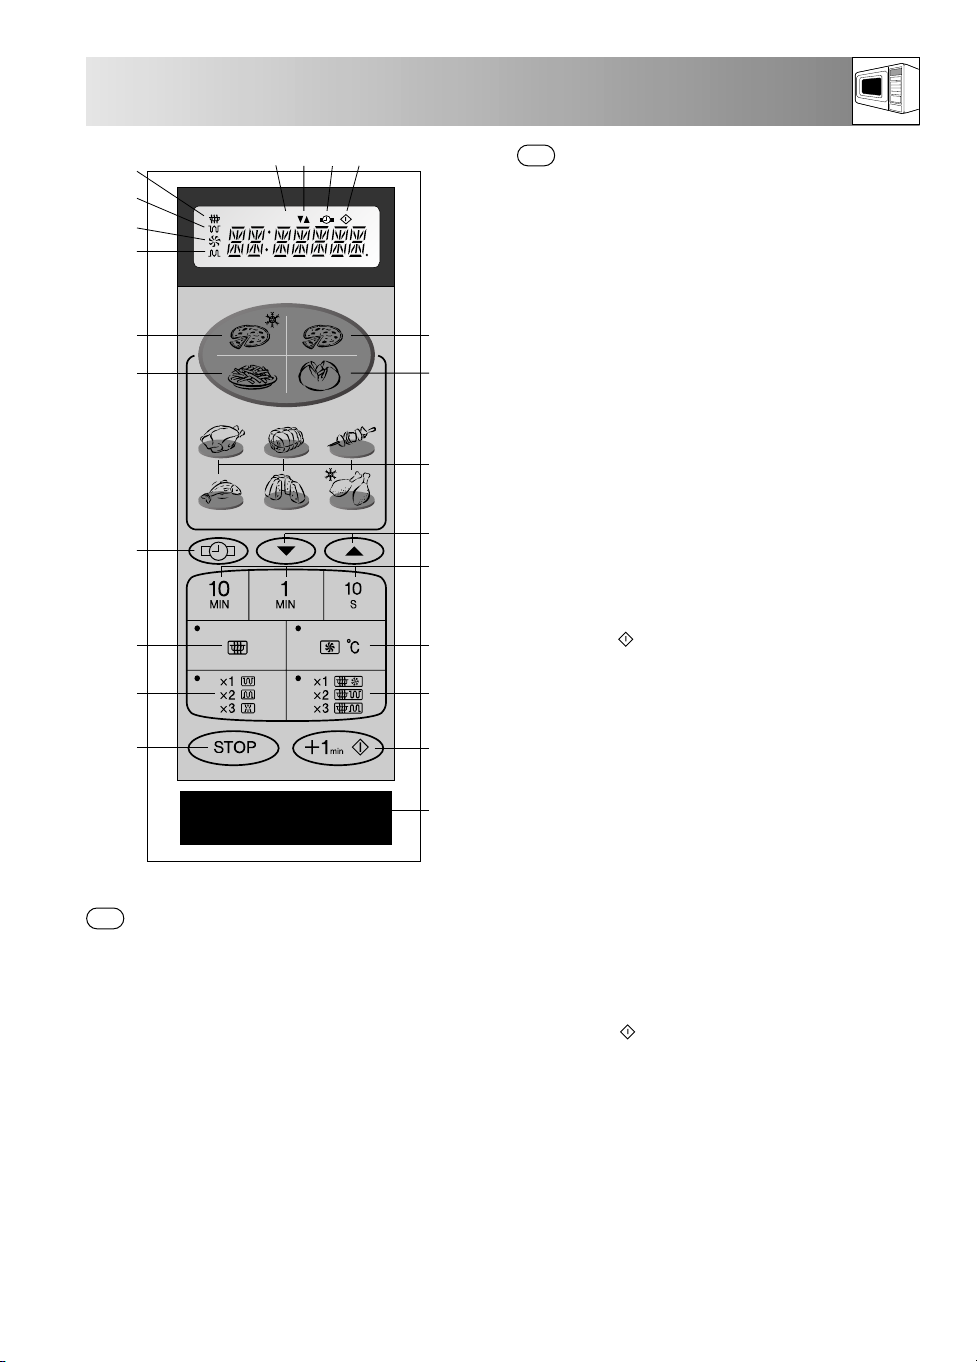
CONTROL PANEL / KONTROLLPANEL
%
R-82ST
23.
22.
21.
20.
19.
18.
4.
3.
2.
1.
5. 6. 7. 8.
GB
Digital display and indicators:
1. BOTTOM GRILL indicator
2. CONVECTION indicator
3. TOP GRILL indicator
4. MICROWAVE indicator
5. POWER LEVEL indicator
6. LESS/MORE indicators
9.
10.
7. CLOCK SET indicator
8. COOKING IN PROGRESS indicator
Operating keys:
9. FRESH PIZZA/FRESH QUICHE key
10. BOILED/JACKET POTATOES key
11.
11. INSTANT ACTION keys
12. LESS/MORE keys
13. TIME keys
12.
13.
14. CONVECTION key
Press to change the convection setting
15. DUAL MODE key:
1 PRESS = MICROWAVE & CONVECTION
2 PRESSES = MICROWAVE & TOP GRILL
3 PRESSES = MICROWAVE & BOTTOM GRILL
14.
16. +1 min /START key
17. DOOR OPEN button
15.
18. STOP key
19. GRILL MODE key:
1 PRESS = TOP GRILL
16.
2 PRESSES = BOTTOM GRILL
3 PRESSES = TOP & BOTTOM GRILL
20. MICROWAVE POWER LEVEL key
17.
Press to change the microwave power setting
21. CLOCK SETTING key
22. FRENCH FRIED POTATO key
23. FROZEN PIZZA/FROZEN QUICHE key
S
Digital display och indikeringar:
1. UNDERGRILL-indikering
2. KONVENTIONELL UGNSVÄRME-indikering
3. ÖVERGRILL-indikering
4. MIKROVÅGOR-indikering
5. EFFEKT-indikering
6. MINDRE/MER-indikering
7. INSTÄLLNING AV KLOCKAN-indikering
8. TILLAGNING PÅGÅR-indikering
Kontrollknappar:
9. FÄRSK PIZZA/FÄRSK PAJ-knapp
10. KOKT/BAKAD POTATIS-knapp
11. AUTOMATIK-knapp
12. MINDRE/MER-knapp
13. TID-knapp
14. KONVENTIONELL UGNSVÄRME-knapp
Du ändrar temperaturen genom att trycka på den
här knappen
15. KOMBINATION-knapp
1 TRYCK = MIKROVÅGOR OCH
KONVENTIONELL VÄRME
2 TRYCK = MIKROVÅGOR OCH ÖVERGRILLEN
3 TRYCK = MIKROVÅGOR OCH UNDERGRILLEN
16. +1min /START-knapp
17. LUCKÖPPNING-knapp
18. STOPP-knapp
19. GRILL-knapp
1 TRYCK = ÖVERGRILLEN
2 TRYCK = UNDERGRILLEN
3 TRYCK = ÖVER- OCH UNDERGRILLEN
20. EFFEKT-knapp
Du ändrar effekten genom att trycka på den här
knappen
21. INSTÄLLNING AV KLOCKAN-knapp
22. POMMES FRITES-knapp
23. FRYST PIZZA/FRYST PAJ-knapp
3
Page 6

IMPORTANT SAFETY INSTRUCTIONS
IMPORTANT SAFETY INSTRUCTIONS: READ CAREFULLY AND KEEP FOR FUTURE REFERENCE
To avoid the danger of fire
The microwave oven should not be left
unattended during operation. Power
levels that are too high or cooking times
that are too long may overheat foods
resulting in a fire.
In cases where the oven is to be installed into
kitchen cabinet, the installation frame EBR-47ST
licensed by SHARP must be used. This is available
from your dealer. Refer to the frame installation
instructions or ask your dealer for the proper
instruction procedure. Only the use of this frame will
guarantee the safety and quality of the product.
The electrical outlet must be readily accessible so that
the unit can be unplugged easily in an emergency.
The AC power supply must be 230 V, 50 Hz, with
a minimum 16 A distribution line fuse, or a
minimum 16 A distribution circuit breaker.
It is recommended that a separate circuit serving
only this appliance be provided.
Do not place the oven in areas where heat is
generated. For example, close to a conventional oven.
Do not install the oven in an area of high humidity
or where moisture may collect.
Do not store or use the oven outdoors.
If food being heated begins to smoke,
DO NOT OPEN THE DOOR. Turn off and
unplug the oven and wait until the food
has stopped smoking. Opening the door
while food is smoking may cause a fire.
Use only microwave-safe containers and
utensils. See Page 26.
Do not leave the oven unattended when
using disposable plastic, paper or other
combustible food containers.
Clean the waveguide cover, the oven
cavity and the turntable after use. These
must be dry and free from grease. Builtup grease may overheat and begin to
smoke or catch fire.
Do not place flammable materials near the oven or
ventilation openings. Do not block the ventilation
openings.
Remove all metallic seals, wire twists, etc., from
food and food packages. Arcing on metallic
surfaces may cause a fire.
Do not use the microwave oven to heat oil for deep
frying. The temperature cannot be controlled and
the oil may catch fire.
To make popcorn, use only special microwave
popcorn makers.
Do not store food or any other items inside the oven.
Check the settings after you start the oven to ensure
the oven is operating as desired.
See the corresponding hints in the cookery book section.
To avoid the possibility of injury
WARNING:
Do not operate the oven if it is damaged or
malfunctioning. Check the following before use:
a)The door; make sure the door closes properly and
ensure it is not misaligned or warped.
b) The hinges and safety door latches; check to make sure
they are not broken or loose.
c) The door seals and sealing surfaces; ensure that they
have not been damaged.
d) Inside the oven cavity or on the door; make sure there
are no dents.
e) The power supply cord and plug; ensure that they are
not damaged.
Never adjust , repair or modify the oven
yourself. It is hazardous for anyone
other than a competent person to carry
out any service or repair operation
which involves the removal of a cover
which gives protection against exposure
to microwave energy.
Do not operate the oven with the door open or
alter the door safety latches in any way.
Do not operate the oven if there is an object
between the door seals and sealing surfaces.
Do not allow grease or dirt to build up
on the door seals and adjacent parts.
Follow instructions for “Care and
Cleaning”, Page 23.
Individuals with PACEMAKERS should check with
their doctor or the manufacturer of the pacemaker
for precautions regarding microwave ovens.
To avoid the possibility of electric shock
Under no circumstances should you remove the
outer cabinet.
Never spill or insert any objects into the door lock
openings or ventilation openings. In the event of a
spill, turn off and unplug the oven immediately, and
call an authorised SHARP service agent.
Do not immerse the power supply cord or plug in
water or any other liquid.
Do not let the power supply cord hang over the
edge of a table or work surface.
4
Page 7

IMPORTANT SAFETY INSTRUCTIONS
Keep the power supply cord away from heated
surfaces, including the rear of the oven and it
must not be run underneath the oven.
Do not attempt to replace the oven lamp yourself or
allow anyone who is not an electrician authorised by
SHARP to do so. If the oven lamp fails, please consult
your dealer or an authorised SHARP service agent.
If the power supply cord of this appliance is
damaged, it must be replaced with a special cord.
The exchange must be made by an authorised
SHARP service agent.
To avoid the possibility of explosion and
sudden boiling:
WARNING: Liquids and other foods must
not be heated in sealed containers since
they are liable to explode.
Never use sealed containers. Remove seals and
lids before use. Sealed containers can explode due
to a build up of pressure even after the oven has
been turned off.
Take care when microwaving liquids. Use a widemouthed container to allow bubbles to escape.
Never heat liquids in narrow necked
containers such as baby bottles, as this
may result in the contents erupting from the
container when heated and cause burns.
To prevent sudden eruption of boiling liquid and
possible scalding:
1. Stir liquid prior to heating/reheating.
2. It is advisable to insert a glass rod or similar utensil
into the liquid whilst reheating.
3. Let liquid stand in the oven at the end of cooking
time to prevent delayed eruptive boiling.
Do not cook eggs in their shells, and whole
hard boiled eggs should not be heated in
microwave ovens since they may explode
even after microwave cooking has ended.
To cook or reheat eggs which have not
been scrambled or mixed, pierce the yolks
and the whites, or the eggs may explode.
Shell and slice hard boiled eggs before
reheating them in the microwave oven.
Pierce the skin of such foods as potatoes, sausages
and fruit before cooking, or they may explode.
To avoid the possibility of burns
Use pot holders or oven gloves when removing food
from the oven to prevent burns.
Always open containers, popcorn makers, oven
cooking bags, etc., away from the face and hands to
avoid steam burns.
To avoid burns, always test food
temperature and stir before serving and
pay special attention to the temperature
of food and drink given to babies,
children or the elderly.
Temperature of the container is not a true
indication of the temperature of the food or drink;
always check the food temperature.
Always stand back from the oven door when opening
it, to avoid burns from escaping steam and heat.
Slice stuffed baked foods after heating to release
steam and avoid burns.
Keep children away from the door to prevent them
burning themselves.
Do not touch the oven door, outer cabinet, rear cabinet,
oven cavity, ventilation openings, accessories and dishes
during GRILL, DUAL, CONVECTION,
PIZZA/QUICHE, POTATO and INSTANT ACTION
(except for Easy Defrost) mode as they will become hot.
Before cleaning make sure they are not hot.
To avoid misuse by children
WARNING: Only allow children to use
the oven without supervision when
adequate instructions have been given
so that the child is able to use the oven
in a safe way and understands the
hazards of improper use.
Do not lean or swing on the oven door. Do not
play with the oven or use it as a toy.
Children should be taught all important safety
instructions: use of pot holders, careful removal of
food coverings; paying special attention to
packaging (e.g. self-heating materials) designed to
make food crisp, as they may be extra hot.
Other warnings
Never modify the oven in any way.
Do not move the oven while it is in operation.
This oven is for home food preparation only and
may only be used for cooking food. It is not
suitable for commercial or laboratory use.
To promote trouble-free use of your oven
and avoid damage.
Never operate the oven when it is empty except
where recommended in the operation manual, see
Page 9. Doing so may damage the oven.
When using a browning dish or self-heating
material, always place a heat-resistant insulator
such as a porcelain plate under it to prevent
damage to the turntable due to heat stress. The
preheating time specified in the dish’s instructions
must not be exceeded.
5
ENGLISH
Page 8

IMPORTANT SAFETY INSTRUCTIONS
19 cm
20 mm
Clear
0
2
3
1
4
5
8
9
10
11
12
13
14
15
20
25
30
7
6
Do not use metal utensils, which reflect microwaves
and may cause electrical arcing. Do not put cans
in the oven.
Use only the turntable designed for this oven.
Do not place anything on the outer cabinet during
operation.
Do not use plastic containers for microwaving if the
oven is still hot from using the GRILL, DUAL,
CONVECTION, PIZZA/QUICHE, POTATO and
INSTANT ACTION (except for Easy Defrost) mode
because they may melt. Plastic containers must not
be used during above modes unless the container
manufacturer says they are suitable.
INSTALLATION
1. Remove all packing materials from the inside of
the oven cavity. Discard the loose polythene sheet
from between the door and cavity. Remove the
feature sticker, if attached, from the outside of the
oven door.
Remove this film
2. Check the oven carefully for any signs of damage.
NOTE:
If you are unsure how to connect your oven, please
consult an authorised, qualified electrician.
Neither the manufacturer nor the dealer can accept
any liability for damage to the oven or personal
injury resulting from failure to observe the correct
electrical connection procedure.
Water vapour or drops may occasionally form on
the oven walls or around the door seals and
sealing surfaces. This is a normal occurrence and is
not an indication of microwave leakage or a
malfunction.
4. The oven door may become hot during
cooking. Place or mount the oven so
that the bottom of the oven is 85 cm or
more above the floor. Keep children
away from the door to prevent them
burning themselves.
5. Ensure there is a minimum free space above the
oven of 19 cm. This oven has been specifically
designed to be operated away from the wall
with a minimum clearance of 20mm between
one side of the oven and adjacent wall. The
other side of the oven should be left clear of
any obstruction.
3. Place the oven on a flat, level surface strong
enough to support the oven’s weight plus the
heaviest item likely to be cooked.
6. Securely connect the plug of the oven to a
standard earthed (grounded) household electrical
outlet.
6
Page 9
1. Plug in the oven.
The oven display will show
2. Press the STOP key.
The oven display will show:
3. Set the clock (See page 8).
4. Heat the oven without food (See page 9).
BEFORE OPERATION
ENGLISH
USING THE STOP KEY
Use the STOP key to:
1. Erase a mistake during programming.
2. Stop the oven temporarily during cooking.
3. Cancel a programme during cooking, press
the STOP key twice.
7
Page 10
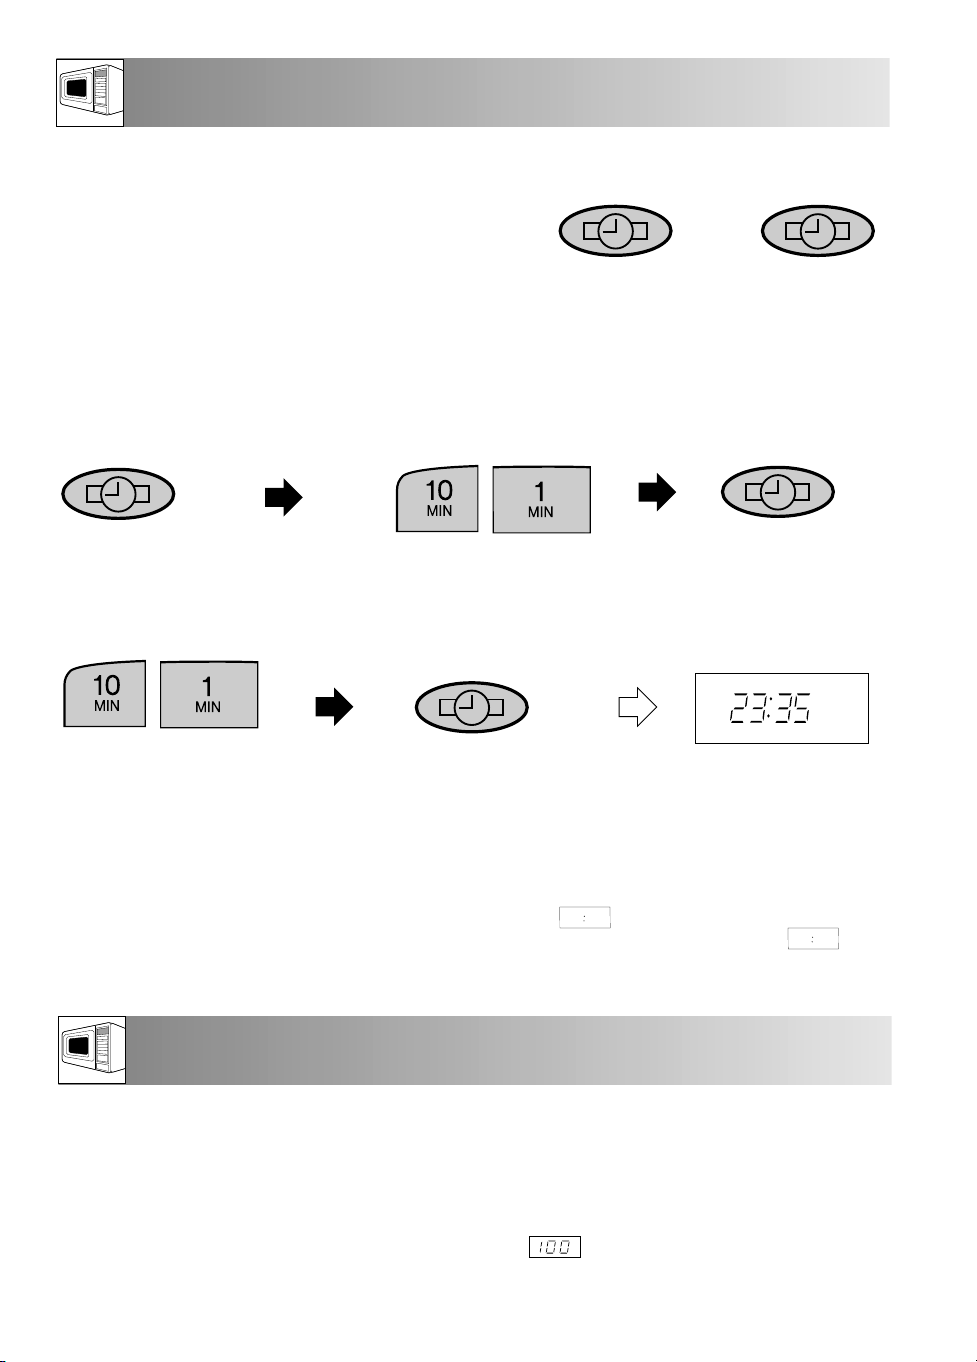
SETTING THE CLOCK
There are two setting modes: 12-hour clock and 24-hour clock.
1. To set the 12-hour clock, press the CLOCK
SETTING key once, as in Step 1 opposite.
2. To set the 24-hour clock, press the CLOCK
SETTING key twice, as in Step 2 opposite.
Example:
To set the 24-hour clock to 23:35:
Step 1.
x1
Step 2.
x2
Choose the 24-hour clock
by pressing the CLOCK
SETTING key twice.
x2
Set the minutes:
Press 10 MIN key three times
Press 1 MIN key five times
x3
NOTES:
1. Press the STOP key if you make a mistake during
programming.
2. If the oven is in cooking mode and you wish to
know the time of day, touch the CLOCK SETTING
key. As long as your finger is touching the key, the
time of day will be displayed.
3. If the electrical power supply to your microwave
oven is interrupted, the display will intermittently
show PRESS STOP after the power is reinstated.
x5
Set the hours:
Press the 10 MIN key twice
Press the 1 MIN key three times
Change from hours to mins
by pressing the CLOCK
SETTING key once.
x2
Start the clock
If this occurs during cooking, the programme will
be erased. The time of day will also be erased.
4. When you want to reset the time of day, follow the
above example again.
5. If you do not set the clock, press the STOP key
once. will appear on the display. When
the operation of the oven is finished, will
reappear on the display instead of the time of day.
x3
Check the display.
x1
x1
MICROWAVE POWER LEVELS
Your oven has 5 power levels. To choose the power level, follow the advice given in the cookbook.
100 % output = 900 WATT
70 % output = 630 WATT
50 % output = 450 WATT
• To set the power, touch the MICROWAVE POWER LEVEL key until the desired level is displayed.
• If the MICROWAVE POWER LEVEL key is touched once, will be displayed. If you miss your desired
level, continue touching the MICROWAVE POWER LEVEL key until you reach the level again.
• If the level is not selected, the level 100 % is automatically set.
30 % output = 270 WATT
10 % output = 90 WATT
8
Page 11

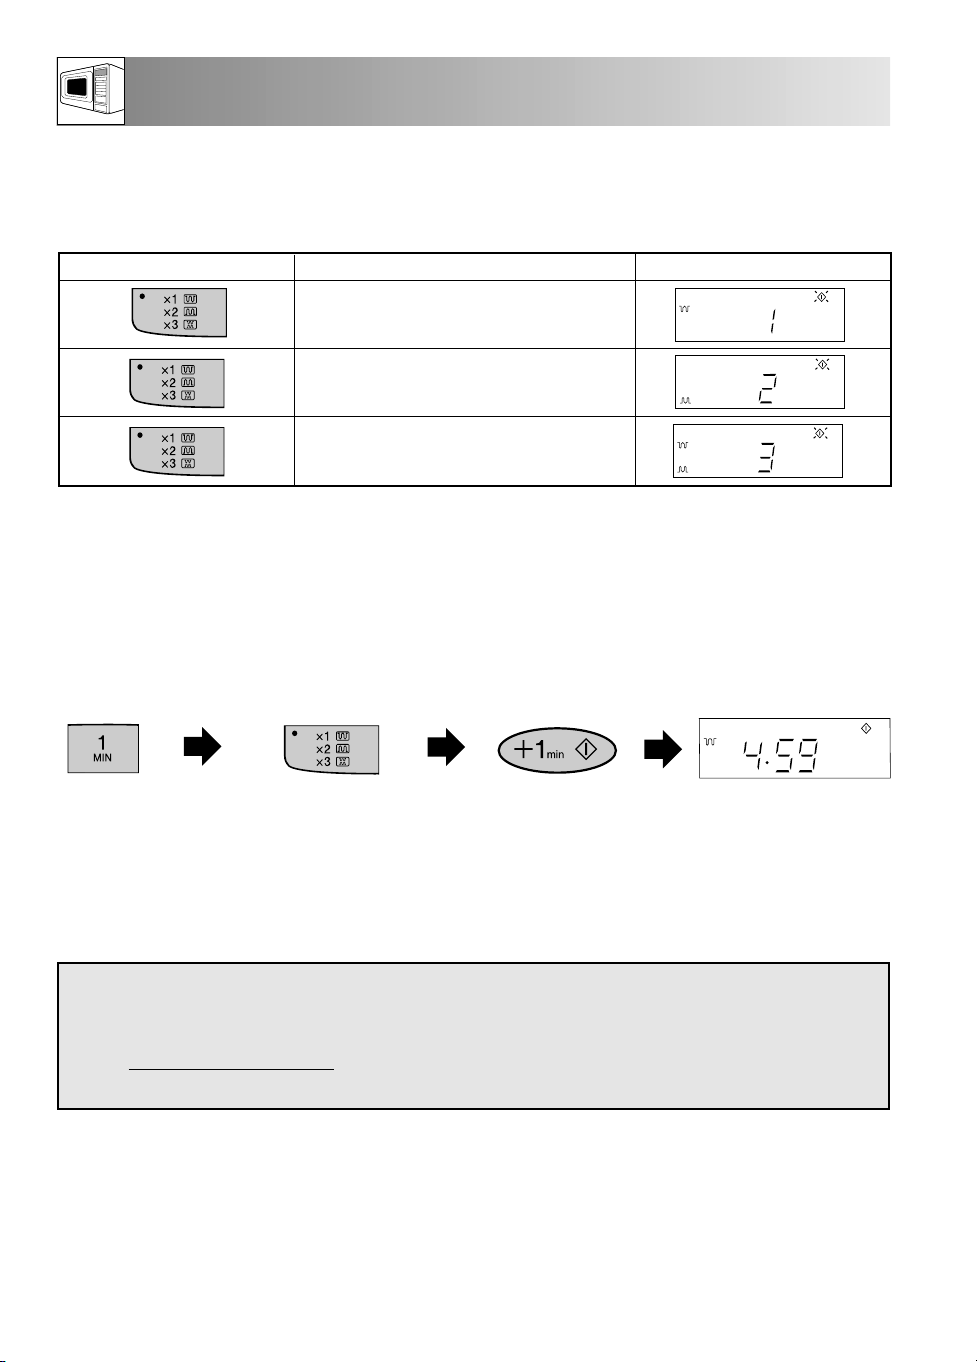
MICROWAVE COOKING
Your oven can be programmed for up to 99.90 minutes. (99.90).
Example: Suppose you want to heat soup for 2 minutes and 30 seconds on 70 % microwave power.
Set the time:
Press 1 MIN key
twice and the 10 SEC
key three times.
x3x2
NOTES:
1. When the door is opened during the cooking
process, the cooking time on the digital display
stops automatically. The cooking time starts to count
down again when the door is closed and the
+1 min /START key is pressed.
Choose desired power 70 %
by pressing MICROWAVE
POWER LEVEL key twice.
x2
Start cooking
x1
2. If you wish to know the power level during
cooking, press the MICROWAVE POWER
LEVEL key. As long as your finger is pressing the
MICROWAVE POWER LEVEL key, the power
level will be displayed.
3. When the operation of the oven is finished, the
time of day will reappear, if set, on the display.
Check the display
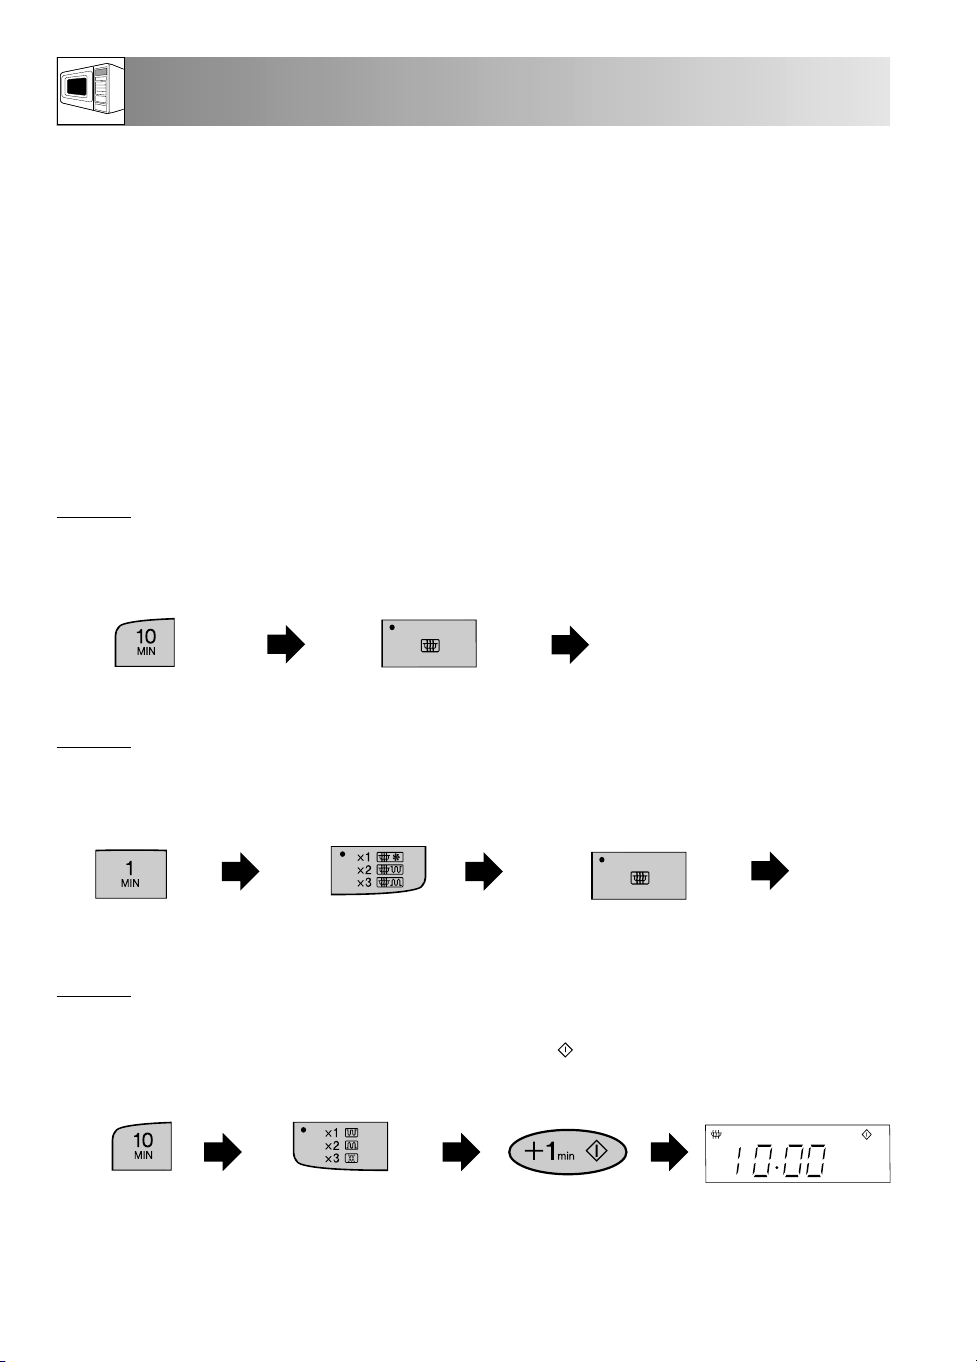
HEATING WITHOUT FOOD
You may detect smoke or a burning smell when using the grill(s), dual grill or convection for the first time. This is
normal and not a sign that the oven is out of order.
To avoid this problem, when first using the oven, operate both top and bottom grills without food for 20 minutes.
IMPORTANT: During grill operation, to allow smoke or smells to disperse open a window or switch the kitchen
ventilation on.
Make sure there is no
food in the oven. Enter
the required heating time
by pressing the 10 MIN
key twice.
Press the GRILL
MODE key
three times.
Start heating.
Check the display
ENGLISH
x3
The oven will count down. When the oven has finished cooking, open the door to cool the oven cavity.
WARNING:
The oven door, outer cabinet, ventilation openings and oven cavity will become hot. Take care to avoid burns
when cooling the oven down after operation.
x1x2
9
Page 12
GRILL COOKING
Your oven has 2 grill heating elements, and a combination of 3 grill cooking modes. Input the time first then
select the desired grill mode by pressing the GRILL MODE key as indicated below.
Press GRILL MODE key
x1
x2
x3
Example:
Suppose you want to cook cheese on toast for 5 minutes using the TOP GRILL only. Place toast on the high rack.
Enter the desired
cooking
time by pressing the
1 MIN key five
times
x5
Choose TOP GRILL
function by pressing
GRILL MODE key once.
GRILL HEATING ELEMENT IN USE
Top Grill
Bottom Grill
Top & Bottom Grill together
Start cooking
x1
x1
DISPLAY
Check the display
1. The high or low racks are recommended when grilling (see auto cook charts pages 18 - 22 ).
2. You may detect smoke or a burning smell when using the grill for the first time, this is normal and not a sign that the
oven is out of order. Please see heating without food on the previous page.
WARNING:
The oven cavity, door, outer cabinet, ventilation openings, turntable, splashguard,
turntable support, racks, dishes and especially the bottom grill will become very
hot, use thick oven gloves
prevent burns.
when removing the food of turntable from the oven to
10
Page 13
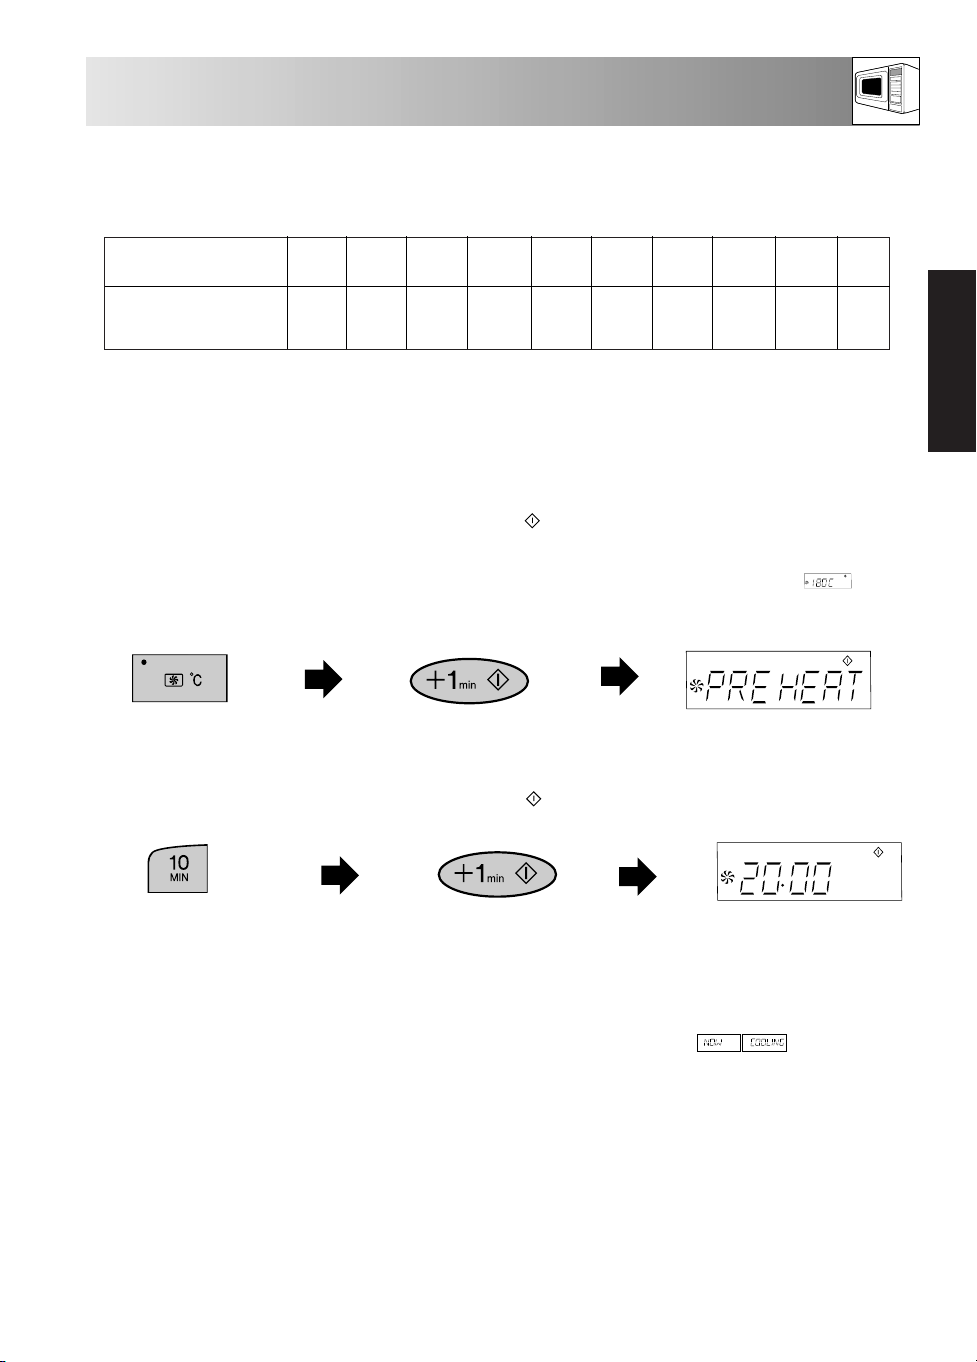
CONVECTION COOKING
This microwave oven has 10 pre-set oven temperatures which use a combination of the top and
bottom grills.
x2
Press CONVECTION key
Oven Temp (° C)
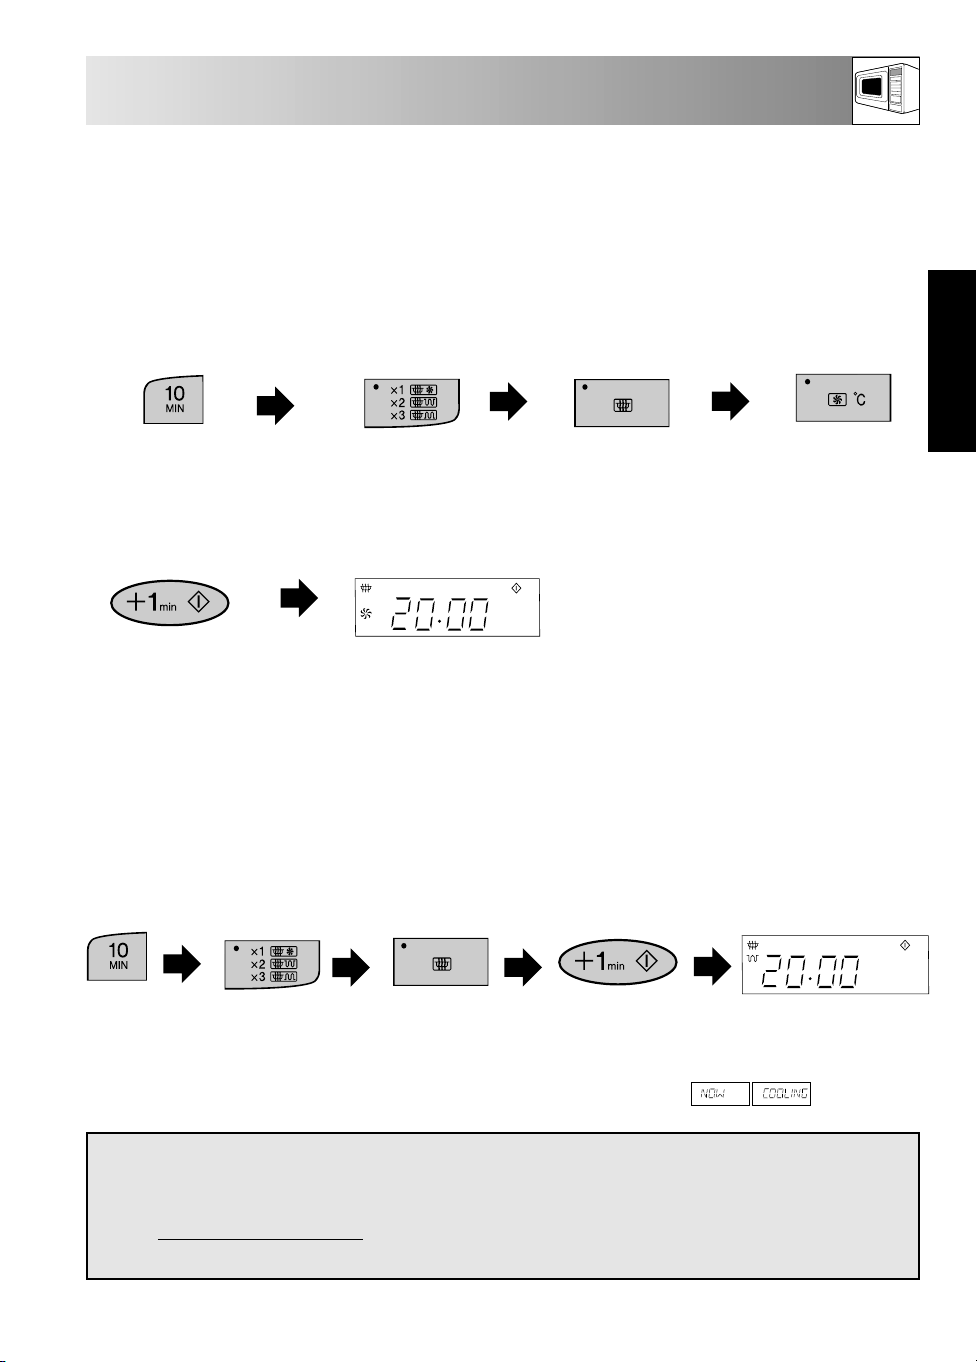
Example 1: To cook with preheating
Suppose you want to pre-heat to 180o C and cook for 20 minutes at 180o C.
Enter the desired convection
temperature by pressing the
CONVECTION key five times.
The display will show 180° C.
x5
Enter the cooking time.
Press the 10 MIN key twice
x1
250
x4
230x3220
Press the +1 min /START
key to start pre-heating.
Press the +1 min /START
key
200x5180
x1
x6
160x7130x8100x970
When the pre-heated
temperature has been reached
the audible signal sounds. The
display will show . Open
the door and place the food
inside the oven. Close the door.
x10
40
ENGLISH
Check the display
x2
NOTES:
• After cooking, the oven will automatically cool and the display will show:
• After preheating, if you want to cook at a different temperature press the CONVECTION key until the
desired setting appears on the display. In the example above, to change the temperature you would
press the CONVECTION key after entering the cooking time.
• When the oven reaches the programmed temperature, it will automatically hold at the pre-heated
temperature for 30 minutes. After 30 minutes the display will change to time of day, if set and the convection
temperature will be cancelled.
x1
11
Page 14
CONVECTION COOKING
Example 2: To cook without preheating
Suppose you want to cook at 250° C for 20 minutes.
x2
Enter the desired
cooking time (20 min.)
by pressing the 10
MIN key twice.
NOTES:
•After cooking the oven will automatically cool and the display will show:
•To change the convection temperature, press the CONVECTION key until the desired temperature
appears on the display.
WARNING:
The oven cavity, door, outer cabinet, ventilation openings, turntable, splashguard,
turntable support, racks, dishes and especially the bottom grill will become very
hot, use thick oven gloves
prevent burns.
Select the desired
cooking temperature.
(250° C).
x1
Press the +1 min /START
key.
when removing the food of turntable from the oven to
x1
Check the display.
DUAL COOKING
Your oven has 3 DUAL cooking modes combining the heat of the grill(s) with the power of the microwave.
To select the DUAL cooking mode, press the DUAL MODE key until the desired setting appears in the display.
Generally, dual cooking time shortens the total cooking time.
Press DUAL MODE key
DUAL 1 x1
DUAL 2 x2
DUAL 3 x3
NOTES:
• To adjust the microwave power, press the MICROWAVE POWER LEVEL key.
• To adjust the convection temperature, press the CONVECTION key until the desired temperature appears
on the display.
Cooking method
MICRO 30 %
CONV 250° C
MICRO 30 %
TOP GRILL
MICRO 30 %
BOTTOM GRILL
Microwave Power
10 % - 50 %
10 % - 100 %
10 % - 100 %
Display
12
Page 15
DUAL COOKING
Example 1:
Suppose you want to cook for 20 minutes using DUAL MODE 1 (10 % microwave power and 200o C
CONVECTION).
Enter the desired
cooking time (20 min.)
by pressing the 10 MIN
key twice.
x2
Start cooking.
x1
Example 2:
Suppose you want to cook for 20 minutes using DUAL COOK 2 (10 % microwave power and TOP GRILL).
Enter the
desired
cooking time
by pressing
the 10 MIN
key twice.
Press DUAL MODE
key twice.
Press the DUAL
MODE key once.
x1
Check the display
Press the
MICROWAVE
POWER LEVEL key
once (10 %).
Press the MICROWAVE
POWER LEVEL key once
(10 %).
x1
Start cooking
Press the
CONVECTION
key four times
(200o C).
x4
Check the display
ENGLISH
x2
NOTE:
•After cooking the oven will automatically cool and the display will show:
WARNING:
The oven cavity, door, outer cabinet, ventilation openings, turntable, splashguard,
turntable support, racks, dishes and especially the bottom grill will become very
hot, use thick oven gloves
prevent burns.
x2
x1
when removing the food of turntable from the oven to
x1
13
Page 16
OTHER CONVENIENT FUNCTIONS
1. MULTIPLE SEQUENCE COOKING.
A sequence of 4 stages (maximum) can be programmed which may combine the MICROWAVE, GRILL,
DUAL or CONVECTION modes.
EXAMPLES OF SEQUENCE COOKING:
1. Micro or Preheat + Micro + Micro + Dual or Convection or Grill or Micro
2. Micro or Preheat + Dual or Convection or Grill + Dual or Convection or Grill or Micro
3. Dual or Convection or Grill + Micro + Dual or Convection or Grill or Micro
Example:Stage 1: 10 minutes at 50 % power
Stage 2: 5 minutes Dual 2 at 10 %
Stage 3: 20 minutes using the TOP GRILL.
ST
AGE 1
Enter the desired cooking
time (10 minutes) by pressing
the 10 MIN key once.
Select 50 % microwave
power by pressing the
MICROWAVE POWER
LEVEL key three times.
x1
ST
AGE 2
Enter the desired cooking
time (5 minutes) by pressing
the 1 MIN key five times.
x5
AGE 3
ST
Enter the desired cooking
time (20 minutes) by
pressing
the 10 MIN twice.
x2
You can delete any one of the three stages in the above example.
Select DUAL MODE 2
only, by pressing the
DUAL MODE key twice.
x2
Select TOP GRILL by
pressing the GRILL
MODE key once.
x1
x3
Select 10 % power by
pressing the MICROWAVE
POWER LEVEL key once.
Start to cook by
pressing the
+1 MIN /START
key.
x1
x1
Check the display
NOTE: To select the level 100% power in the final sequence, it is not necessary to touch the MICROWAVE
POWER LEVEL key.
14
Page 17
OTHER CONVENIENT FUNCTIONS
2. LESS / MORE keys.
The LESS ( ) and MORE ( ) keys allow you to easily decrease or increase programmed setting times,
(for a less well or more well cooked result), used for INSTANT ACTION OPERATION or when cooking is
underway.
a) Changing the pre-programmed time setting.
Example:
Suppose you want to cook 0,9 kg grilled chicken using the INSTANT ACTION and MORE ( ) keys.
ENGLISH
Choose the INSTANT
ACTION menu for grilled
chicken by pressing the
INSTANT ACTION key
once.
x1
NOTES:
To cancel LESS or MORE press the same key again.
To change MORE to LESS simply press the LESS ( ) key.
To change LESS to MORE simply press the MORE ( ) key.
b) Changing the heating time while the oven is operating:The cooking time can be decreased or increased in 1 minute steps each time the LESS ( ) and
MORE ( ) keys are pressed.
Choose the desired
result (well cooked)
by pressing the
MORE key once.
x1
The oven will start to cook
automatically.
15
Page 18
OTHER CONVENIENT FUNCTIONS
3. +1 min /START key.
The + 1 min function allows you to operate the
following functions:
A Direct Start. You can start to cook directly on 100 % microwave power and in 1 minute steps by pressing
the + 1 min /START key.
B Extending the cooking time. You can extend the cooking time in multiples of 1 minute, by pressing the
+ 1 min /START key, during the cooking process.
NOTE: To avoid children’s misuse, the + 1 min /START key for direct start can be used only within 1 minute
after a preceding operation.
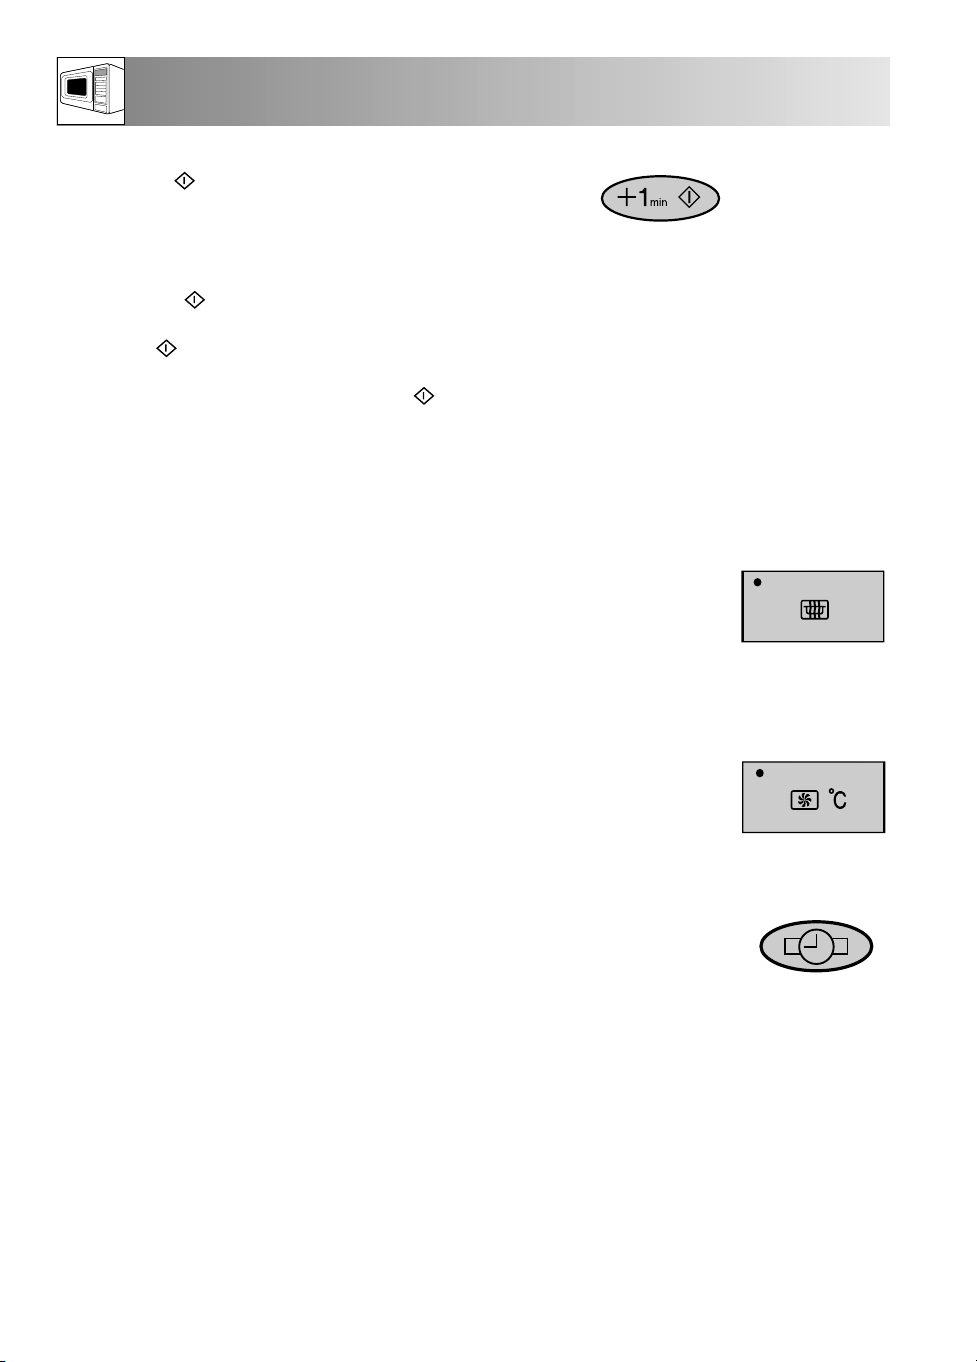
4. TO CHECK SETTINGS WHILE THE OVEN IS OPERATING
You can check the power level, oven temperature, the programmed and actual oven temperatures ie:
when pre-heating.
TO CHECK THE POWER LEVEL:
To check the microwave power level during cooking
press the MICROWAVE POWER LEVEL key.
The oven continues to count down, although the
display shows the power level.
TO CHECK THE CONVECTION TEMPERATURE:
To check the convection temperature during cooking
press the CONVECTION key.
TO CHECK THE TIME OF DAY:
Firstly, the clock must already be set, see page 8.
To check the time of day during cooking, press the
CLOCK SETTING key.
As long as your finger
is pressing the key, the
power level will be
displayed.
As long as your finger
is pressing the key, the
convection temperature
in ° C will be displayed.
As long as your finger is
pressing the key, the
time of day will be
displayed.
16
Page 19
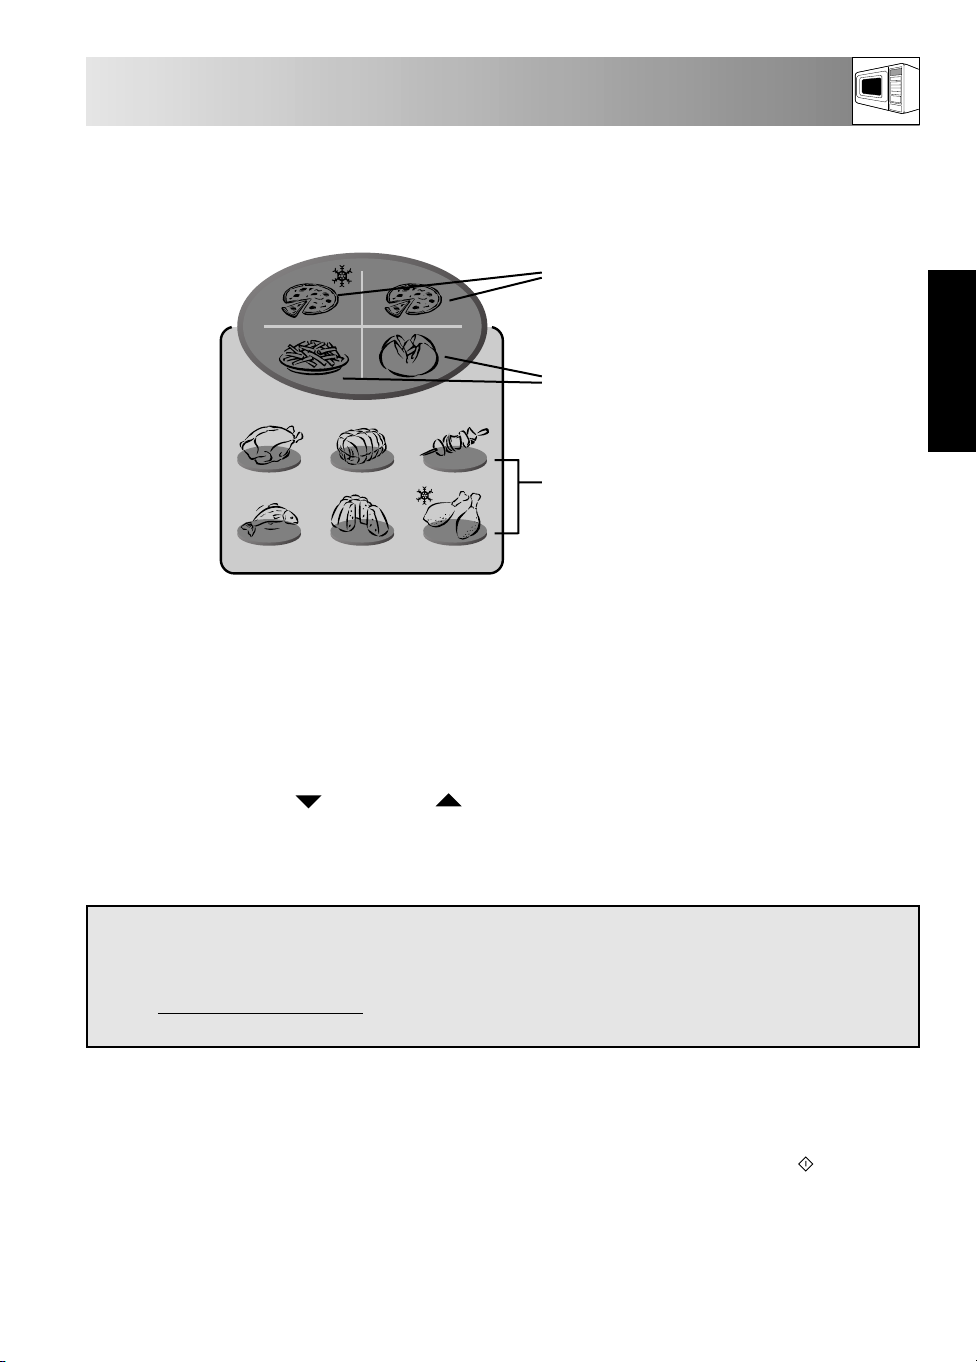
PIZZA/QUICHE/POTATO/INSTANT ACTION
PIZZA, QUICHE, POTATO AND INSTANT ACTION functions automatically work out the correct cooking mode
and cooking time of the foods illustrated below.
PIZZA/QUICHE keys
POTATO keys
INSTANT ACTION keys
1. Input the menu by pressing the desired PIZZA, POTATO or INSTANT ACTION key.
2. To increase the weight press the INSTANT ACTION key until the desired weight is displayed. Enter the weight of
the food only. Do not include the weight of the container.
For food weighing more or less than the weights/quantities given in the cooking charts (see separate cookery
book) cook using manual operation.
3. The programmed cooking times are average times. If you want to alter the cooking times of the INSTANT
ACTION, use the LESS ( ) or MORE ( ) keys. For best results use the cooking chart instructions (see
separate cookery book).
4. The oven will start to cook instantly after the weight has been input.
ENGLISH
WARNING:
The oven cavity, door, outer cabinet, ventilation openings, turntable, splashguard,
turntable support, racks, dishes and especially the bottom grill will become very
hot, use thick oven gloves
prevent burns.
NOTES:
When manipulation is required (eg: to turn food over) the oven will stop and the audible signal will sound, any
messages will appear on the display (e.g. “TURN OVER”). To continue cooking, press the +1 min /START
key. The final temperature of the food will vary according to its initial temperature. Check food is piping hot after
cooking. If necessary, you can extend the cooking time. Always refer to the cooking charts given in the separate
cookery book.
when removing the food of turntable from the oven to
17
Page 20
PIZZA/QUICHE/POTATO/INSTANT ACTION
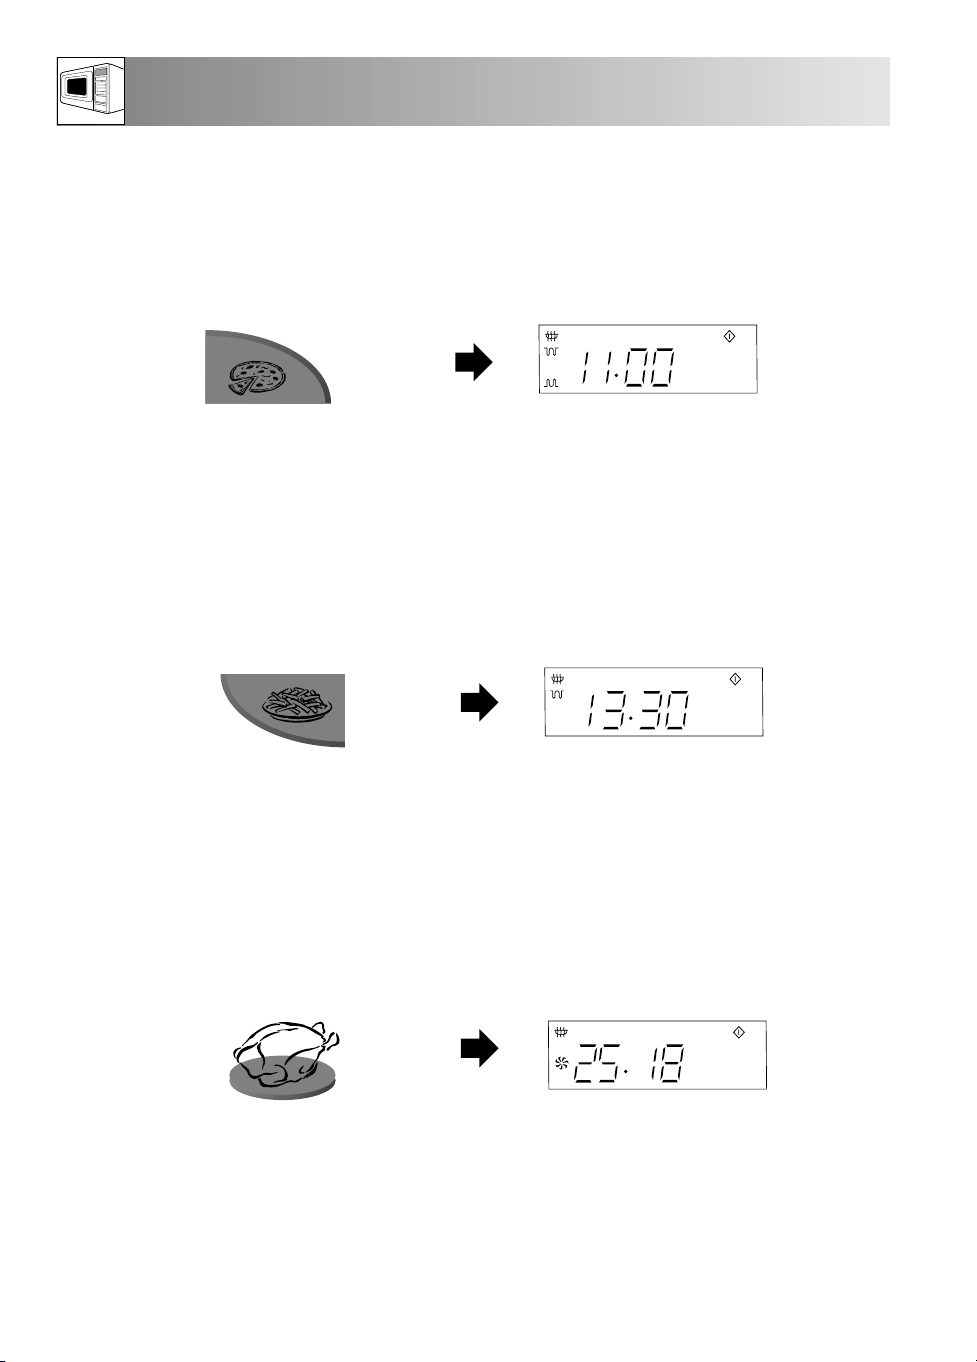
Example 1: Suppose you want to cook 800 g of Fresh Pizza using the FRESH PIZZA/FRESH QUICHE key.
Choose the menu and enter the amount by pressing
the FRESH PIZZA/FRESH QUICHE key twice.
0.8 KG will appear on the display.
x2
Example 2: Suppose you want to cook French Fried Potatoes weighing 400 g.
Choose the menu and enter the amount by
pressing the FRENCH FRIED POTATO key five
times. 0.4 KG will appear on the display.
x5
The oven will instantly
begin to cook.
The oven will instantly
begin to cook.
Example 3: Suppose you want to cook Grilled Chicken weighing 900 g.
Choose the menu and enter the amount by
pressing the GRILLED CHICKEN key once.
0.9 KG wil appear on the display.
x1
The oven will instantly
begin to cook.
18
Page 21
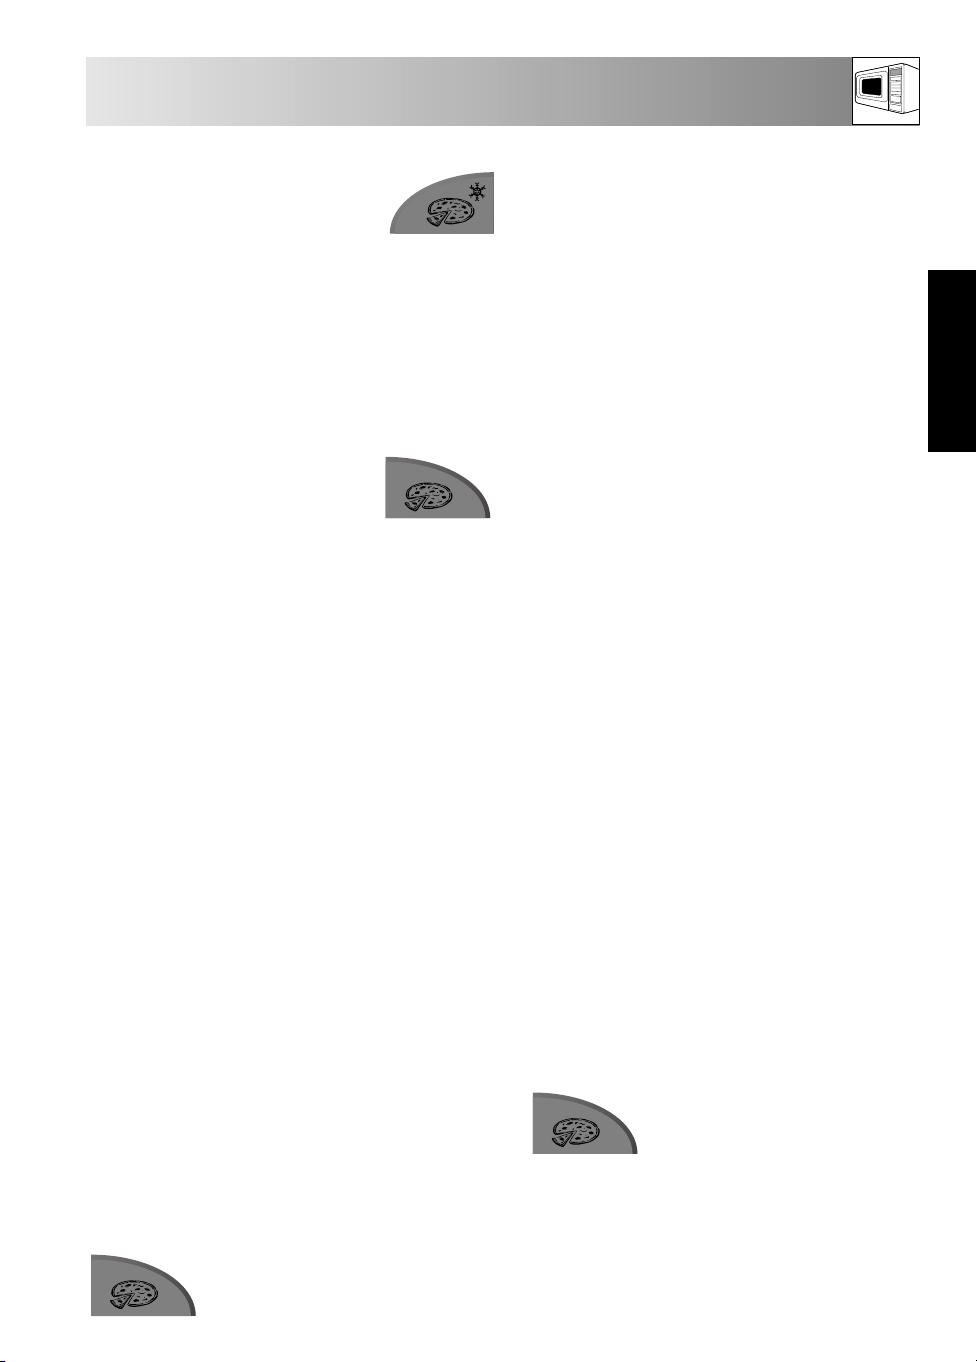
PIZZA/QUICHE CHART
Frozen Pizza, Frozen Quiche
Quantity: 0,15 - 0,6 kg Pizza
0,15 - 0,5 kg Quiche
Utensils: Directly on the turntable
Increasing unit: 50 g
Initial food Temp: -18o C, Frozen
Recommended
menus: Frozen pizzas, frozen quiches
Fresh Pizza, Fresh Quiche
Quantity: 0,7 - 1,0 kg Pizza,
0,7 kg Quiche
Utensils: Directly on the turntable
Increasing unit: 100 g
Initial food Temp: 20o C, Room temperature
Recommended
menus: Homemade pizza/Quiche
PIZZA RECIPE
Ingredients:
300 g Approx. Ready prepared dough.
(Ready mix or roll out dough)
200 g Approx. Tinned tomatoes
150 g Topping as desired
(eg. corn, ham, salami,
pineapple)
50 g Grated cheese
Basil, oregano, thyme,
salt, pepper
Procedure:
1.
Prepare the dough according to the
manufacturer’s instructions. Roll out to the size of
the turntable.
2.
Lightly grease the turntable and place the pizza
base on it.
3.
Drain the tomatoes and cut them into pieces.
Season the tomatoes with the spices and
spread on the dough. Put all other ingredients
on the pizza and finally cover with the cheese.
Cook the pizza using the FRESH
PIZZA/FRESH QUICHE key.
Procedure:
• Remove the ready prepared frozen pizza/
quiche from the packaging and place on the
turntable. For thick base Pizzas, press the
LESS ( ) button. When cooking ready prepared
▼
frozen quiches, press the MORE ( ) key before
pressing the FROZEN PIZZA/FROZEN
QUICHE key.
• After cooking, place on a plate for serving.
Procedure:
• Prepare the pizza/quiche according to the
recipe below.
• Place directly on the turntable.
• After cooking, place on a plate for serving.
QUICHE RECIPE
Ingredients:
200-250 g Puff pastry (frozen or chilled)
3 Eggs (size medium)
200 g Cream or milk
100 g Grated cheese (Emmenthal)
50 g Ham
Procedure:
1.
Defrost the pastry and roll it out to the size of the
turntable and place on.
2.
Mix the eggs with the cream and the cheese
together. Season with salt and pepper, and
pour over the pastry.
3.
Sprinkle the ham over and cook the
quiche using the FRESH
PIZZA/FRESH QUICHE key.
▲
ENGLISH
19
Page 22
POTATO CHART
French Fried Potatoes
Quantity: 0,2 - 0,4 kg
Utensils: Directly on the turntable
Increasing unit: 50 g
Initial food Temp: -18o C, Frozen
Recommended
menus: French Fried potatoes, potato
croquettes or pommes noisettes.
For thick French fried potatoes,
use MORE ( ) key.
Boiled Potatoes /
Jacket Potatoes
Quantity: 0,1 - 0,8 kg
Utensils: Bowl & lid
Increasing unit: 100 g
Initial food temp: 20° C (room temperature)
Recommended
menus: Potatoes with or without skins.
▲
Procedure:
• Remove the deep-frozen, French-fried potatoes
(recommended for conventional ovens) from the
package and place them on the turntable.
• If required, press the MORE ( ) key.
• After cooking, remove from the turntable and put
on a plate for serving.
Procedure:
Boiled Potatoes: Peel the potatoes and cut them
into similar sized pieces.
Jacket Potatoes: Choose potatoes of similar size
and wash them.
• Put the boiled or jacket potatoes into a bowl.
• Add the required amount of water (per 100 g)
approx 2 tbsp and a little salt.
• Cover with a lid.
• When the oven stops and the audible signals
sound, stir and re-cover.
• After cooking, let the potatoes stand for 1-2
minutes.
▲
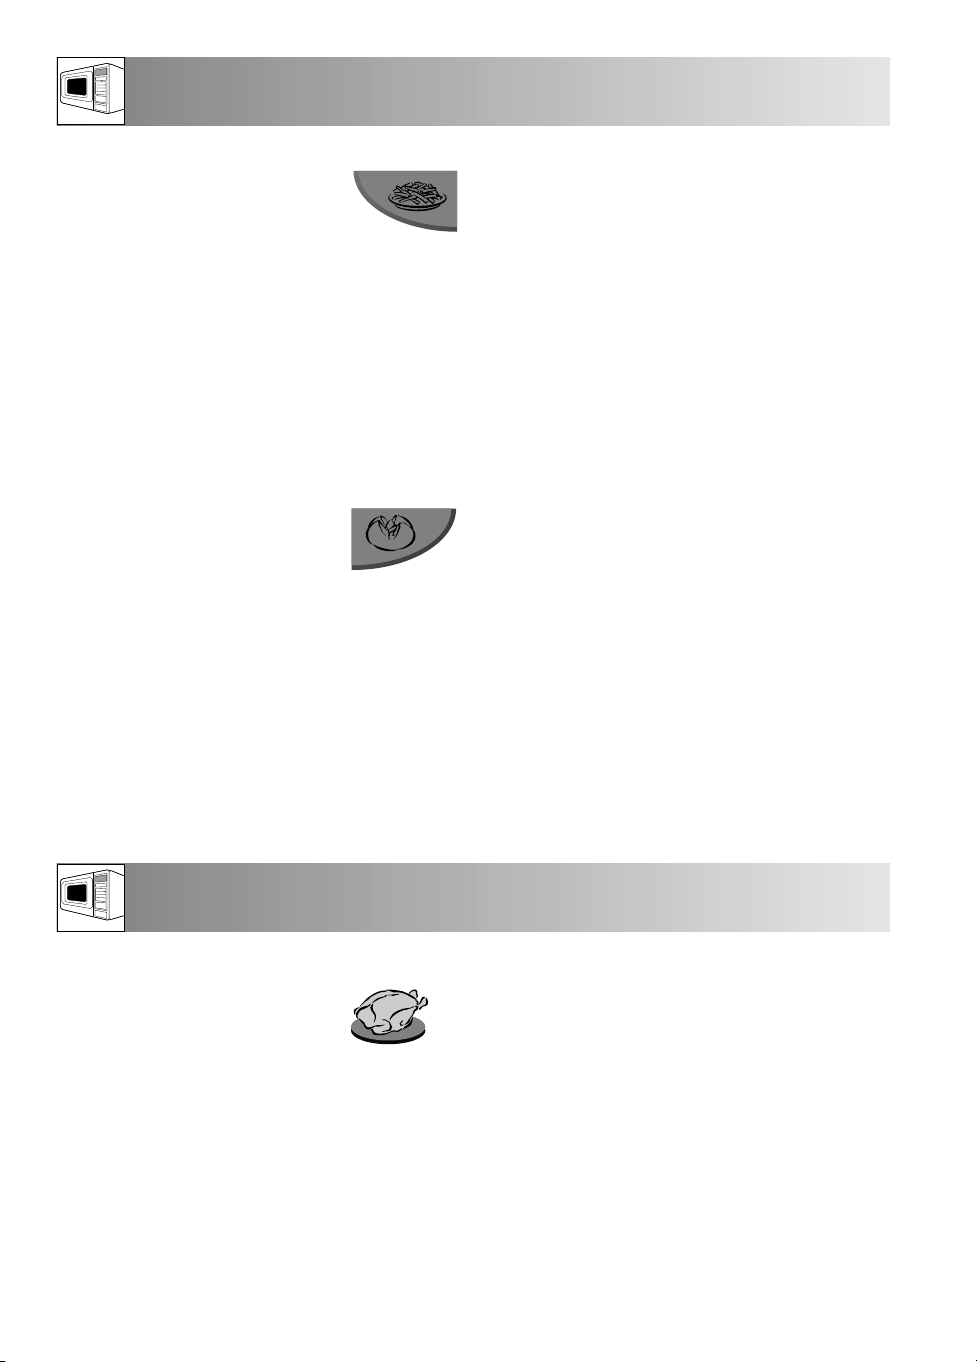
INSTANT ACTION CHART
Grilled Chicken
Quantity: 0,9 - 1,8 kg
Utensils: Low Rack &
Splashguard
Increasing unit: 100 g
Initial food Temp: 5° C, Chilled
Ingredients: for 1,0 kg grilled chicken:
1/2 tsp salt and pepper.
1tsp paprika, sweet.
2 tbsp oil.
Recommended
menus: Grilled chicken
Procedure:
• Mix the ingredients and spread on chicken.
• Pierce the skin of the chicken.
• Place the chicken on the low rack with breast side
down.
• When audible signals sound, turn the chicken
over.
• After cooking, let the chicken stand for approx. 5
minutes.
NOTE:
For using the splashguard, see HINT on page 22.
20
Page 23
INSTANT ACTION CHART
Roast Pork
Quantity: 0,6 - 2,0 kg
Utensils: Low Rack & Splashguard
Increasing unit: 100 g
Initial food Temp: 5° C, Chilled
Ingredients: for 1000 g rolled lean pork
1 garlic clove crushed
2 tbsp oil
1 tbsp paprika, sweet
a little cumin powder
1 tsp salt
Recommended
menus: Rolled lean pork
Grill skewers
Quantity: 0,2 - 0,8 kg
Utensils: High Rack
Increasing unit: 100 g
Initial food Temp: 5° C, Chilled
Recommended
menus: Assorted meat skewers
Procedure:
• Lean roast pork is recommended.
• Mix all ingredients and spread them onto the pork.
• Place the pork on the low rack.
• When audible signal sounds, turn the food over.
• After cooking, let the food stand wrapped in
aluminium foil for approx. 10 minutes.
NOTE:
For using the splashguard, see HINT on page 22.
Procedure:
• Prepare the skewers. (You can refer to the attached
SHARP cookery book).
• Put the skewers on the high rack.
• When audible signal sounds, turn the food over.
• After cooking place on a plate and serve.
ENGLISH
Fish fingers, chicken nuggets
Quantity: 0,2 - 0,5 kg
Utensils: Direct on the turntable
Increasing unit: 100 g
Initial food Temp: -18° C, Frozen
Recommended
menus: Poultry meat pieces ie: (chicken
nuggets), fish fingers
Cake
Quantity: 0,5 - 1,5 kg
Utensils: Cake Dish & Low Rack
Increasing unit: 100 g
Initial food Temp: 20° C
Recommended
menus: Carrot cake, Applecake with
Calvados, Cherry cake.
Procedure:
• Grease the turntable with 1 tsp of oil.
• Remove deep frozen fish fingers/chicken nuggets
from the packaging.
• Brush a little oil on the topside of the fish finger/
chicken nuggets and place them on the turntable.
• After cooking, place on a plate for serving. (No
standing time is necessary).
Procedure:
• Prepare the cake. (You can refer to the attached
SHARP cookery book).
• Place mixture in an adequately-sized cake dish.
• After cooking, stand until cooled before removing
from the container.
HINT: You can use ordinary black metal cake tins. If
arcing occurs, put a saucer between the rack and tin.
21
Page 24
INSTANT ACTION CHART
Easy Defrost Poultry
Quantity: 0,9 - 2,0 kg
Utensils: (see note below)
Units per press: 100 g,
Initial food Temp: -18o C, Frozen.
Easy defrost Chicken Legs
Quantity: 0,2 - 1,0 kg
Utensils: (see note below.)
Increasing unit: 100 g
Initial food Temp: -18° C, Frozen.
Easy defrost Steak, Chops,
Fish Fillet
Quantity: 0,2 - 1,0 kg
Utensils: (see note below.)
Increasing unit: 100 g
Initial food Temp: -18° C, Frozen.
Procedure:
• Position a plate up side down on the turntable and place
the poultry on it.
• When audible signal sounds, turn over.
• When audible signal sounds, turn over again.
• After defrosting, let the food stand, wrapped in aluminium
foil for 30-90 minutes, until thoroughly defrosted.
Procedure:
• Put the chicken legs on a plate.
• When the audible signal sounds, turn the chicken legs
over and re-arrange.
• When the audible signal sounds, turn the chicken legs
over again.
• After defrosting, let the chicken stand, wrapped in
aluminium foil for 10-30 minutes, until thoroughly
defrosted.
Procedure:
• Position the food on a plate in a single layer. If portions are
frozen together, try to separate before defrosting.
• When the audible signal sounds, turn the food over and rearrange.
• When the audible signal sounds turn the food over again.
• After defrosting, let the food stand, wrapped in aluminium
foil for 10-30 minutes, until thoroughly defrosted.
NOTE:
1 Steaks, Chops, Fish fillets and Chicken legs should be frozen in one layer.
2 After turning the food over, shield the defrosted portions with small, flat pieces of aluminium foil.
3 The poultry should be cooked immediately after defrosting.
4 Arrange the food in the oven as shown below:
Chicken legs, Steaks, Chops and Fish fillet. Poultry
HINT:
In order to reduce splashes of fat inside the oven, when cooking joints of
meat or poultry, use the splash guard provided. Assemble as shown in the
diagram opposite.
Food
Dish
Turntable
Meat or Poultry
Low Rack
Splash Guard
Turntable
22
Page 25
CARE AND CLEANING
Kg
%
CAUTION: DO NOT USE COMMERCIAL
OVEN CLEANERS, ABRASIVE, HARSH
CLEANERS OR SCOURING PADS ON ANY
PART OF YOUR MICROWAVE OVEN.
WARNING!
After GRILL, DUAL, CONVECTION, PIZZA/
QUICHE, POTATO and INSTANT ACTION (except
for Easy Defrost) menus, the oven cavity, door, oven
cabinet and accessories will become very hot. Before
cleaning, make sure they have cooled down.
Oven exterior
The outside of your oven can be cleaned easily with
mild soap and water. Make sure the soap is wiped off
with a moist cloth, and dry the exterior with a soft towel.
Oven controls
Open the door before cleaning to de-activate the oven
controls. Care should be taken when cleaning the
oven control. Using a moist cloth dampened with
water only, gently wipe the panel until it becomes
clean. Avoid using excessive amounts of water.
Do not use any sort of chemical or abrasive cleaner.
Oven Interior
1. For cleaning, wipe any splatters or spills with a soft
damp cloth or sponge after each use while the
oven is still warm. For heavier spills, use a mild
soap and wipe several times with a damp cloth
until all residues are removed.
Do not remove the waveguide cover. You can hold
the bottom grill up by hand for cleaning only. After
cleaning place the bottom grill down in the lowest
position, see the diagram below.
2. Make sure that mild soap or water does not
penetrate the small vents in the walls which may
cause damage to the oven.
3. Do not use spray type cleaners on the oven interior.
4. Heat up your oven regularly by using both heating
elements, refer to “Heating without food” on page
9. Remaining food or fat splashed can cause smoke
or bad smell.
Turntable and Turntable support
Remove the turntable and turntable support from the
oven. Wash the turntable and turntable support in mild
soapy water. Dry with a soft cloth. Both the turntable
and the turntable support are dishwasher safe.
Splashguard
Wash the splashguard in mild soapy water. Dry with a
soft cloth. The splash guard is dishwasher safe.
Low Rack and High Rack
These should be washed in a mild washing up liquid
solution and dried. High and Low racks are
dishwasher safe.
Door
To remove all trace of dirt, regularly clean both sides
of the door, the door seals and sealing surfaces with a
soft, damp cloth.
ENGLISH
23
Ensure the Bottom Grill heating
element is in the raised position
during cleaning.
Page 26
SERVICE CALL CHECK
PLEASE CHECK THE FOLLOWING BEFORE CALLING FOR SERVICE:
1. Power Supply:
Check the power plug is properly connected to a suitable wall outlet.
Check the line fuse/circuit breaker is functioning properly.
2. When the door is opened, does the oven lamp light? YES NO
3. Place a cup of water (approx. 150 ml) in the oven and close the door securely.
Set the cooking mode to microwave cooking mode.
Programme the oven for one minute on 100 % power and start the oven.
Does the oven lamp light? YES NO
Does the turntable rotate? YES NO
NOTE: The turntable turns in either direction.
Does the ventilation work? YES NO
(Place your hand over the ventilation openings and check for air flow.)
After 1 minute does the signal sound? YES NO
Does the cooking in progress indicator go off? YES NO
Is the cup of water warm after the above operation? YES NO
4. Set the GRILL cooking mode using the top grill and bottom grill for 3 minutes.
After 3 minutes do both GRILL heating elements become red? YES NO
(x3 )
If you answer “NO” to any of the above questions, call a Service Technician appointed by SHARP and report the
results of your check. See inside back cover for details of address.
NOTES:
1. If you cook the food over the standard time with only the same cooking mode, the power of the oven will
lower automatically to avoid overheating. (The microwave power level will be reduced and the grill heating
elements will begin to light on and off.)
Cooking mode
Microwave 100 % cooking
Grill cooking
TOP GRILL
BOTTOM GRILL
TOP and BOTTOM GRILL
Dual 2
Dual 3
2. After the GRILL, DUAL, CONVECTION, PIZZA/QUICHE, POTATO and INSTANT ACTION (except for
Easy Defrost) menus, the cooling fan will run until the oven has cooled down. Also, when you press the
STOP key and open the door during the GRILL, DUAL, CONVECTION, PIZZA/QUICHE, POTATO and
INSTANT ACTION (except for Easy Defrost) menus, the cooling fan will run; you may, therefore, feel air
blowing from the ventilation openings.
Standard time
20 min.
30 min.
45 min.
Top grill - 15 min.
Bottom grill - 15 min.
Micro - 20 min.
Top grill - 15 min.
Micro - 20 min.
Bottom grill - 15 min.
24
Page 27

WHAT ARE MICROWAVES?
Like radio and television waves, microwaves are
electromagnetic waves.
Microwaves are produced by a magnetron inside the
microwave oven, and these vibrate the molecules of
water present in the food. The friction this causes produces heat, which ensures that the food is defrosted,
heated or cooked through.
The secret of the reduced cooking times is the fact
that the microwaves penetrate the food from every
direction. Energy is used to the full. In comparison,
the energy from a conventional hob passes from the
burner through the pan and so to the food. This
method wastes a great deal of energy.
THIS IS WHAT YOUR NEW COMBINATION
MICROWAVE COOKER CAN DO
MICROWAVE OPERATION
By using the microwave facility in your new combination microwave oven you can, for example,
quickly heat up ready-prepared meals or drinks, or
melt butter or chocolate in no time at all.
The microwave oven is equally good at defrosting
food.
Sometimes, however, it is better to combine the
microwave with convection heating or grilling (combined operation). You can then cook the food
rapidly and brown it at the same time. Cooking
times are generally much shorter than in conventional food preparation.
COMBINED OPERATION
(MICROWAVE OPERATION WITH
CONVECTION OR GRILL)
By combining two modes of operation the benefits
of your oven are cleverly linked together.
You are able to choose between
● microwave + convection (ideal for joints of meat,
poultry, puddings, bread and cakes) and
● microwave + grill (ideal for pizzas, snacks, quick
fry-ups, joints, poultry, chicken legs, kebabs, Welsh
rarebit and cooking au gratin).
THE CHARACTERISTICS OF MICROWAVES
Microwaves penetrate all non-metal objects made of
glass, china, earthenware, plastic, wood or paper.
This is why the microwaves never make these materials hot. Dishes become hot only because the food
inside them is hot.
The food absorbs the microwaves and is heated.
Microwaves cannot pass through objects made of
metal and so they are deflected. For this reason metal
objects are not normally suitable for microwave cookery. There are exceptions where you can actually
make use of the fact that the microwaves cannot pass
through metal. If you cover food with aluminium foil
at specific points while it is defrosting or cooking, you
can prevent those parts from getting too warm, too
hot, or overcooked. Please check out the advice
given in the guide.
Using the combination facility you can cook and
brown food at the same time.
The advantage is that the convected heat or the
heat from the grill quickly seals the pores in the
outer layers of the food. The microwaves ensure a
short and gentle cooking period. The juices are
preserved inside the food and the outside is crisp.
CONVECTION MODE
You can use the convection facility by itself without
microwave operation. The results are the same as
those provided by a conventional oven.
GRILL OPERATION
Your microwave oven is fitted with a quartz grill
above the cooking area. Like any conventional
grill it can be used without operating the
microwave. Dishes can be rapidly browned or
grilled in this mode.
In addition your oven has a second grill under the
turntable. This facility can be used to brown food
from below.
ENGLISH
25
Page 28

SUITABLE OVENWARE
SUITABLE OVENWARE FOR MICROWAVE COOKING
GLASS AND CERAMIC GLASS
Heat-resistant glass utensils are very
suitable. The cooking process can be
observed from all sides. They must
not, however, contain any metal (e.g.
lead crystal), nor have a metallic overlay (e.g. gold
edge, cobalt blue finish).
CERAMICS
Generally very suitable. Ceramics must be glazed,
since with unglazed ceramics moisture can get into the
ceramic. Moisture causes the material to heat up and
may make it shatter. If you are not certain whether
your utensil is suitable for the microwave, carry out the
utensil suitability test.
PORCELAIN
Very suitable. Ensure that the porcelain does not have
a gold or silver overlay and that it does not contain any
metal.
PLASTIC AND PAPER UTENSILS
Heat resistant plastic utensils which are suitable for use
in the microwave can be used to thaw, heat and cook
food. Follow the manufacturer's recommendations.
Heat-resistant paper made for use in a microwave oven
is also suitable. Follow the manufacturer's recommendations.
MICROWAVE FOIL
This, or heat-resistant foil, is very suitable for covering
or wrapping. Please follow the manufacturer's recommendations.
ROASTING BAGS
Can be used in a microwave oven. Metal clips are not
suitable for fastening them since the roasting bag foil
might melt. Fasten the roasting bag with string and
pierce it several times with a fork. Non heat-resistant
food wraps are not recommended for use in a
microwave oven.
METAL
Generally speaking, metal should not be used, since
microwaves do not pass through metal and therefore
cannot reach the food. There are, however, exceptions:
small strips of aluminium foil may be used to cover certain parts of the food, so that these do not thaw too
quickly or begin to cook (e.g. chicken wings).Small
metal skewers and aluminium containers (e.g. of readycooked meals) can be used. They must, however, be
small in relation to the food, e.g. aluminium containers
must be at least
2/
3/
3
4
to
filled with food. It is recom-
mended that you transfer the food into a dish suitable
for use in the microwave. When using aluminium containers or other metal utensils there must be a gap of
approx. 2 cms between them and the walls of the cooking area, otherwise the walls could be damaged by
possible arcing.
NO UTENSIL SHOULD HAVE A METAL OVERLAY
metal parts such as screws, bands or handles.
UTENSIL SUITABILITY TEST
If you are not sure whether your utensil is suitable for
utensil. Switch on the oven at 100 % power for 1 to 2
minutes. If the utensil stays cool or just warm to the
touch, it is suitable. Do not use this test on a plastic
utensil. It could melt.
SUITABLE UTENSILS FOR COMBINED
OPERATION
In general all heat-resistant microwave utensils are also
suitable for combined operation. However you should
be aware that the hot air or the grill makes the crockery very hot. Plastic utensils and film are therefore not
suitable.
SUITABLE UTENSILS FOR CONVECTION
AND GRILL OPERATION
When cooking with convection and grill, without
microwave mode, you can use the same utensils you
would use for any conventional oven or grill cookery.
Ovenproof glassware is very suitable for convection
and grill operation and also Heat-resistant china.
Pottery is generally very suitable provided that it is
glazed. Metal baking trays, tins, clips, skewers and
aluminium foil can be used as in conventional ovens.
Roasting bags can be used in convection mode. They
are not suitable for use under the grill. Please note the
maximum temperature stated on the packaging. Pierce
the bag several times with a fork on the upper surface
of the bag.
26
use in your microwave oven, carry out
the following test: Place the utensil into
the oven. Place a glass container filled
with 150 ml of water on or next to the
Page 29

TIPS AND ADVICE
BEFORE YOU START....
To make it as easy as possible to use the microwave
oven we have put together a few hints and tips for you.
Only switch on the oven when the food is already inside.
SETTING THE COOKING TIME
Defrosting, re-heating and cooking times are generally much shorter than in a conventional oven or
hob. So you will need to consult this book for the
recommended cooking times. It is better to set shorter rather than longer cooking times. Always test the
food after the cooking time has elapsed. It is better
then to continue cooking it for a little longer, than to
have overcooked food.
STARTING TEMPERATURE
Defrosting, re-heating and cooking times depend on
the temperature of the food when you start. For
example, deep frozen and refridgerated food will
need longer than food that is at room temperature.
Standard storage temperaturs of food are assumed
for re-heating and cooking times (refridgerator temperature of 5oC, Room temperature of approximately 20oC). For defrosting food a starting temperature of -18oC is assumed.
Do not cook eggs in the unbroken shells. Pressure
builds up inside the shell and this may result in the
egg exploding.
Do not heat oil or fat for deep-frying inside the
microwave oven. It is impossible to control the temperature of the oil and it may suddenly splash out of
the pan.
Do not heat sealed containers such as jars or
tins. The pressure inside the container could cause
the container to explode. (The exception is when
you are making preserves).
COOKING TIMES
All the times given in this cookery book are guidelines, which can be varied according to the initial
temperature, weight and condition of the food
(water or fat content etc.).
SALT, SPICES AND HERBS
Food cooked in your microwave retains its individual
flavour better than it does when conventional preparation methods are used. For this reason you should use
salt sparingly and normally add it only after cooking.
Salt absorbs liquid and dries out the outer layer of food.
Herbs and spices can be used as normal.
ADDITION OF WATER
Vegetables and other foods with a high water content can be cooked in their own juice or with the
addition of a little water. This ensures that many vitamins and minerals are preserved.
FOOD IN SKINS OR SHELLS
Foods such as sausages, chickens, chicken legs,
baked potatoes, tomatoes, apples, egg yolks or such
like should be pricked or pierced with a fork or small
wooden skewer. This will enable the steam which
forms to dissipate without splitting the skin or shell.
FATTY FOODS
Fatty meat and layers of fat cook better than lean
portions of meat. Before cooking, cover the fatty
portions with a piece of aluminium foil or place the
food with the fat side down.
LARGE AND SMALL QUANTITIES
Microwave times are directly dependent upon the
amount of food which you would like to thaw, heat
or cook. This means that small portions cook more
quickly than larger ones. As a rule of thumb:
TWICE THE AMOUNT = ALMOST TWICE THE TIME
HALF THE AMOUNT = HALF THE TIME
DEEP AND SHALLOW CONTAINERS
Both containers have the same capacity, but the
cooking time is longer for the deeper one. You
should therefore choose as flat a container as possible with a large surface area. Only use deep containers for dishes where there is a danger of
overcooking, e.g. for noodles, rice, milk etc..
ROUND AND OVAL CONTAINERS
Food cooks more evenly in round or oval containers
than in containers with corners, since the
microwave energy concentrates in the corners and
the food in these areas could become overcooked.
COVERING
Covering the food retains the moisture within it and
shortens the cooking time. Use a lid, microwave foil
or a cover. Foods which are to be crispy, e.g.
roasts or chickens, should not be covered. As a
general rule, whatever would be covered in a conventional oven should also be covered in a
microwave oven. Whatever would be uncovered in
an ordinary oven can also be left uncovered in a
microwave oven.
ENGLISH
27
Page 30

TIPS AND ADVICE
IRREGULAR SHAPED FOOD
Place the thicker, more compacted end of the food
pointing towards the outside. Place vegetables (such
as broccoli) with the stalks pointing outward.
STIRRING
Stirring the food is necessary, since the microwaves
begin by heating the outer areas. The temperature
is thereby equalised and the food heats up evenly.
ARRANGEMENT OF FOOD
Place a number of individual portions, such as
small pudding moulds, cups or potatoes in their
jackets, in a circle on the turntable. Keep the portions at a distance from each other so that the
microwave energy can reach the food from all
sides.
TURNING
Medium-sized items, such as hamburgers and
steaks, should be turned over once during cooking,
in order to shorten the cooking process. Large items,
such as roasts and chickens, must be turned, since
the upper side receives more microwave energy
and could dry out if not turned.
STANDING TIME
Keeping to the standing time is one of the most important rules with microwaves. Almost all foods, which
are thawed, heated or cooked in the microwave,
require a certain amount of time to stand, during
which temperature equalisation takes place and the
moisture in the food is evenly distributed.
HEATING
● Ready-prepared meals in aluminium containers
should be removed from the aluminium container
and heated on a plate or in a dish.
● Remove the lids from firmly closed containers.
● Food should be covered with microwave foil, a
plate or cover (obtainable from stores), so that
the surface does not dry out. Drinks need not be
covered.
● When boiling liquids such as water, coffee, tea
or milk, place a glass stirrer in the container.
● If possible, stir large quantities from time to time,
to ensure that the temperature is evenly distributed.
● The times are for food at a room temperature of
20° C. The heating time for food stored in a
refrigerator should be increased slightly.
● After heating allow the food to stand for 1-2 min-
utes, so that the temperature inside the food can
be evenly distributed (standing time).
● The times given are guidelines which can be var-
ied according to the initial temperature, weight,
water content, fat content or the result which you
wish to achieve.
DEFROSTING
Your microwave is ideal for thawing. Thawing times
are usually considerably shorter than in traditional
methods. Here are a few tips. Take the frozen item out of
its packaging and place on a plate for thawing.
Boxes and Containers
Boxes and containers suitable for microwaves are
particularly good for thawing and heating food,
since they can withstand temperatures in a deep
freeze (down to approx. –40oC) as well as being
heat-resistant (up to approx. 220oC). You can
therefore use the same container to freeze, thaw,
heat and even cook the food, without having to
transfer it.
Covering
Cover thin parts with small strips of aluminium foil before
thawing. Thawed or warm parts should likewise be covered
with aluminium strips during thawing. This stops the thin parts
becoming too hot while thicker parts are still frozen.
Correct setting
It is better to choose a setting which is too low rather
than one which is too high. By so doing you will ensure
that the food thaws evenly. If the microwave setting is
too high, the surface of the food will already have
begun to cook while the inside is still frozen.
Turning/stirring
Almost all foods have to be turned or stirred from time
to time. As early as possible, separate parts which are
stuck together and rearrange them.
Small amounts...
thaw more quickly and evenly than larger ones. We
recommend that you freeze portions which are as small
as possible. By so doing you will be able to prepare
whole menus quickly and easily.
Foods requiring careful handling
Foods such as gateaux, cream, cheese and bread
should only be partially thawed and then left to thaw
completely at room temperature. By so doing you will
avoid the outer areas becoming too hot while the inside
is still frozen.
28
Page 31

TIPS AND ADVICE
Standing time
This is particularly important after thawing food, as the
thawing process continues during this period. In the
thawing table you will find the standing times for various foods. Thick, dense foods require a longer standing time than thinner foods or food of a porous nature.
If the food has not thawed sufficiently, you may continue thawing it in the microwave oven or lengthen the
standing time accordingly. At the end of the standing
time you should process the food as soon as possible
and not re-freeze it.
COOKING FRESH VEGETABLES
● When buying vegetables try to ensure that, as far as
possible, they are of similar size. This is particularly
important when you want to cook the vegetables
whole (e.g. boiled potatoes).
● Wash the vegetables before preparing them, clean
them and only then weigh the required quantity for
the recipe and chop them up.
● Season them as you would normally, but as a rule
only add salt after cooking.
● Add about 5 tbsps of water for 500 g of vegetables.
Vegetables which are high in fibre require a little
more water. You will find information about this in
the table.
● Vegetables are usually cooked in a dish with a lid.
Those with a high moisture content, e.g. onions or
boiled potatoes, can be cooked in microwave foil
without adding water.
● After half the cooking time has elapsed vegetables
should be stirred or turned over.
● After cooking allow the vegetables to stand for
approx. 2 minutes, so that the temperature disperses
evenly (standing time).
● The cooking times given are guidelines and depend
upon the weight, initial temperature and condition of
the type of vegetable in question. The fresher the vegetables, the shorter the cooking times.
COOKING MEAT, FISH AND POULTRY
● When buying food items, try to ensure that, as far as
possible, they are of similar size. This will ensure
that they are cooked properly.
● Before preparation wash meat, fish and poultry thor-
oughly under cold running water and pat them dry
with kitchen paper. Then continue as normal.
● Beef should be well hung and have little gristle.
● Even though the pieces may be of a similar size,
cooking results may vary. This is due, amongst other
things, to the kind of food, variations in the fat and
moisture content as well as the temperature before
cooking.
● After the food has been cooking for 15 minutes it
acquires a natural brownness, which may be
enhanced by the use of a browning agent. If, in
addition, you would like the surface to be crisp you
should either use the browning dish or sear the food
on your cooker and finish cooking it in your
microwave. By doing this you will simultaneously
obtain a brown base for making a sauce.
● Turn large pieces of meat, fish or poultry half way
through the cooking time, so that they are cooked
evenly from all sides.
● After cooking cover roasts with aluminium foil and
allow them to stand for approx. 10 minutes (standing
time). During this period the roast carries on cooking
and the liquid is evenly distributed, so that when it is
carved a minimum amount of juice is lost.
DEFROSTING AND COOKING
Deep-frozen dishes can be thawed and cooked at the
same time in one process in your microwave. You will
find some examples in the table. Do take note, however, of the general advice given on "heating" and "thawing" food. Please refer to the manufacturer's instructions
on the packaging when preparing deep- frozen dishes.
These usually contain precise cooking times and offer
advice on preparation.
ENGLISH
29
Page 32

SYMBOL EXPLANATION
MICROWAVE POWER
Your microwave has a power of 900 W and five
power settings. To select the required power level
consult the recipe guide. In general we recommend the following:
100 % Power = 900 Watt
Used to cook or heat up quickly, e.g. ready
meals, hot drinks, vegetables, fish etc.
70 % Power = 630 Watt
Reduce the power to achieve longer cooking
times when compact food such as roasts, or
delicate foods such as cheese sauce. At the
lower power setting liquids do not boil over,
and meat cooks evenly, without overcooking
at the edges.
50 % Power = 450 Watt
For compact foods that require longer cooking times by conventional methods, e.g. beef
casseroles, we recommend that you reduce
the power and increase the cooking time.
This makes the meat more tender.
30 % Power = 270 Watt
Select this power llevel to defrost. This
ensures that the food defrosts evenly. This
level is also ideal for simmering rice, noodles
and dumplings.
10 % Power = 90 Watt
This level is used for defrosting delicate foods
(which must not get hot) e.g. cream cakes.
W = WATT
Symbol Explanation
Top grill (x1)
A versatile attachment for browning and
grilling meat, poultry and fish.
Bottom grill (x2)
This mode can be used to brown food
from below.
Top and bottom grill (x3)
Simultaneous operation of the grill from
above and from below. This combination is particularly suitable for e.g. toasted bread, quiches and rissoles.
Convection
In this mode you can choose between
10 heat settings (40oC - 250oC).
DUAL: microwave and
convection (x1)
In this mode you can combine certain
microwave power settings with a
selected convected air temperature
(40oC - 250oC).
Microwave power is limited to 50 % in
combination mode.
DUAL: microwave and top grill
(x2)
DUAL: microwave and bottom
grill (x3)
In these two modes a variety of
microwave power settings can be combined with the top grill or bottom grill.
30
Page 33

Food
Goulash
Ham or sausage unsliced
Sliced cold meat
Sausages x 8
x 4
Chicken breast
Whole fish
Fish fillets
Crab
Bread rolls x 2
Slices of toast
White bread, whole
Wholemeal bread, sliced
Mixed flour bread, whole
Cake, per piece
Fruit flan, per piece
Cream gateau, per piece
Gateau, whole, Ø 28 cm
Butter
Cream
Cheese in slices
Fruit, eg strawberries,
raspberries, cherries, plums
Quantity
-g-
500
200
200
600
300
450
800
400
300
80
250
500
250
1000
150
150
250
200
200
250
TABLE :TO DEFROST
Output
-%-
30 %
30 %
30 %
30 %
30 %
30 %
30 %
30 %
30 %
30 %
30 %
30 %
30 %
30 %
30 %
30 %
30 %
30 %
30 %
30 %
30 %
30 %
Defrost time
-min-
8-9
2-3
2-4
6-8
3-5
7-9
12-13
5-7
6-8
1
/
1-1
ca. 2
3-5
2-3
8-10
1-3
2-3
ca. 1
9-11
1-3
2+2
1-2
3-5
TABLES
Instructions
separate/stir halfway through defrost time
first stage of defrost only
remove outer slices every minute
place sausages side by side, turn halfway
through defrost time
turn halfway through defrost time
turn halfway through defrost time
turn halfway through defrost time
turn halfway through defrost time and
remove defrosted parts
2
first stage of defrost only
place slices side by side, first stage of defrost only
turn halfway through defrost time, centre still frozen
place slices side by side, first stage of defrost only
turn halfway through defrost time, centre still frozen
place on a cake rack
place on a cake rack
place on a cake rack
place on a cake rack
first stage of defrost only
remove lid; pour into a dish after 2 min defrosting,
and then continue to let it defrost
first stage of defrost only
place side by side at equal intervals and turn
halfway through defrost time
Standing time
-min-
10-15
5-10
5-10
30-90
10-15
5-10
30
30
30
10
60
5-10
10
5
5
ENGLISH
-
5
5
5
-
5
5
TABLE :TO DEFROST AND COOK
Food Quantity Output
-g- -%- -Min- Water -Min-
Fish fillets
Trout x 1
One-course meal
Leaf spinach
Broccoli
Peas
Kohlrabi
Mixed vegetables
Brussels sprouts
Red cabbage
Green cabbage
400
250
400
300
300
300
300
500
300
450
600
100 %
100 %
100 %
100 %
100 %
100 %
100 %
100 %
100 %
100 %
100 %
Cooking time
9-11
6-8
8-10
7-10
6-8
6-8
7-8
9-11
6-8
10-12
13-15
Added Instructions
-
-
-
3-5 tbsp
3-5 tbsp
3-5 tbsp
3-5 tbsp
3-5 tbsp
3-5 tbsp
3-5 tbsp
cover
cover
cover, stir after approx. 6 minutes
cover, stir once or twice during cooking
cover, stir halfway through cooking time
cover, stir halfway through cooking time
cover, stir halfway through cooking time
cover, stir halfway through cooking time
cover, stir halfway through cooking time
cover, stir halfway through cooking time
cover, stir halfway through cooking time
31
Standing time
1-2
1-2
2
2
2
2
2
2
2
2
2
Page 34

TABLES
TABLE : HEATING OF FOOD AND DRINK
Food/drink
Coffee, 1 cup
Milk, 1 cup*
Water 1 cup
One-course meal
(vegetables, meat and side dishes)
Stew
Soup, clear
Cream soup
Vegetables
Side dishes
Meat, 1 slice*
Fish fillet*
Sausages, x2*
Cake, x1
Baby food, 1 glass
To melt margarine or butter*
To melt chocolate
To dissolve 6 cubes of gelatine
Glaze for
*straight from the freezer
6 cups
1 bowl
1
/
l. of liquid
4
Quantity
-g/ml-
150
150
150
900
1000
500
200
200
200
200
500
200
500
200
200
180
150
190
50
100
10
10
Output
-%-
100 %
100 %
100 %
100 %
100 %
100 %
100 %
100 %
100 %
100 %
100 %
100 %
100 %
100 %
100 %
100 %
50 %
50 %
100 %
50 %
50 %
50 %
-min-
ca. 1
ca. 1
ca. 2
1
1-1
1
1
ca. 3
ca. 2
1-1
ca. 1
ca.
Instructions
Time
do not cover
do not cover
do not cover, bring to the boil
do not cover, bring to the boil
8-10
cover, bring to the boil
9-11
sprinkle water over the sauce, cover, stir during
3-4
cooking
1
2
cover, stir after heating
/
-2
1
2
cover, stir after heating
/
1
2
2
cover, stir after heating
/
-2
/
add a little water if necessary, cover, stir halfway through the
2-3
heating period
3-5
sprinkle with a little water, cover, stir during
2-3
cooking
4-5
sprinkle with a little sauce, cover
cover
1
2
prick the skin several times
/
1
2
place on a cake rack
/
-1
1
2
remove the lid, stir well after heating and test the
/
-1
temperature
stir during cooking
3-4
1
2
soak in water, squeeze dry and place in a soup plate; stir
/
during cooking
mix in sugar and 250 ml. of liquid, cover, stir well during
4-6
and after heating
Vegetable
Artichokes
Leaf spinach
Cauliflower
Broccoli
Mushrooms
Chinese cabbage
Peas
Fennel
Onions
Kohlrabi
Carrots
Peppers
Potatoes in jackets
Leeks
Red cabbage
Brussels sprouts
Boiled potatoes
Celery
White cabbage
Courgettes
Quantity
-g-
300
300
800
500
500
500
300
500
500
250
500
500
500
500
500
500
500
500
500
500
TABLE : TO COOK FRESH VEGETABLES
Output
-%-
100 %
100 %
100 %
100 %
100 %
100 %
100 %
100 %
100 %
100 %
100 %
100 %
100 %
100 %
100 %
100 %
100 %
100 %
100 %
100 %
100 %
Time
min
5-7
4-5
12-15
6-8
6-8
6-8
5-7
6-8
6-8
4-5
7-9
9-11
6-8
6-8
7-9
15-17
7-9
7-9
7-9
15-17
6-8
Instructions
remove from stalks, cover
dry thoroughly after washing, cover, stir once or
twice during cooking
1 whole head, cover
divide into florets, cover, stir during cooking
divide into florets, cover, stir during cooking
use whole, cover, stir during cooking
cut into strips, cover, stir during cooking
cover, stir during cooking
cut into quarters, cover, stir during cooking
use whole, cook in microwave foil
cut into cubes, cover, stir during cooking
cut into slices, cover, stir during cooking
cut into cubes, cover, stir during cooking
cover, stir during cooking
cut into rings, cover, stir during cooking
cut into strips, cover, stir once or twice during
cooking
use whole, cover, stir during cooking
cut into equal portions, add a little salt, cover, stir
during cooking
cut into small cubes, cover, stir during cooking
cut into strips, cover, stir during cooking
cut into slices, cover, stir during cooking
32
Added water
3-4 tbsp
-
5-6 tbsp
4-5 tbsp
4-5 tbsp
4-5 tbsp
4-5 tbsp
4-5 tbsp
-
50 ml
4-5 tbsp
4-5 tbsp
4-5 tbsp
4-5 tbsp
50 ml
50 ml
150 ml
50 ml
50 ml
4-5 tbsp
Page 35

Meat, fish and
poultry
Roast meat
(pork,
veal, lamb)
Roast beef
(medium )
Cooked mince
Chicken
Chicken thighs
Trout
Quantity
-g-
500
1000
1500
1000
1500
1000
1200
200
250
Setting
TABLE :TO COOK MEAT
Output
100 %
100 %
-%-
50 %
50 %
50 %
50 %
50 %
50 %
50 %
50 %
50 %
50 %
50 %
50 %
70 %
70 %
70 %
70 %
70 %
70 %
70 %
70 %
70 %
70 %
30 %
30 %
10 %
10 %
Time
-Min-
4-6
5-7
4-6
4-5
14-16
4-6
12-14
3-5
25-27
4-6
25-27
3-5
5-8
7-10
2-5
12-14
12-14
4-5
20-23
6-9
9-11
5-7
9-11
3-5
5-7
4-5
6-8
3-5
Instructions Stand time
Season to taste, place on the bottom rack,
(*)
turn after (*).
(*)
(*)
Season to taste, place on the bottom rack with the fat side-
(*)
downwards, turn after (*).
(*)
Prepare mince (half pork/half beef), place in an ovenproof
dish on the bottom rack.
Season to taste, place on the bottom rack with the breast
(*)
downwards, turn after (*).
(*)
Season to taste, place on the bottom rack with the skin
downwards, turn after (*).
(*)
Wash, sprinkle with lemon juice, add salt to interior and
exterior of the fish, place on the top rack, turn after (*).
TABLES
-min-
10
10
10
10
10
10
ENGLISH
3
2
TABLES :TO GRILL BROWN MEAT, PUDDINGS AND CHEESE-ON-TOAST
Dish Quantity
Rump steak
-g-
400
x2, medium rare
Fillet steak,
200
x2, medium rare
Lamb chops
300
x2, medium
Grilled sausages
400
x5
To brown puddings
etc...
Cheese on x1
toast
x4
Setting
Output
-%-
50 %
50 %
Time
-Min-
10-11
5-7
10-11
6-7
13-14
9-10
9-11
6-7
8-10
5-6
5-6
Instructions
(*)
Place on the top rack, turn after (*), season after grilling.
(*)
Place on the top rack, turn after (*), season after grilling.
(*)
Place on the top rack, turn after (*), season after grilling.
(*)
Place on the top rack, turn after (*).
Place oven-proof dish on the bottom rack.
1
/
Toast the bread and spread it with butter; top with a slice of cooked
2
ham, a slice of pineapple and a slice of cheese; place on the top rack.
1
/
Prick the centre before grilling.
2
33
Page 36

RECIPES
ADAPTING RECIPES FOR THE
MICROWAVE OVEN
If you would like to adapt your favourite recipes for the
microwave, you should take note of the following:
Shorten cooking times by a third to a half. Follow
the example of the recipes in this cookery book.
Foods which have a high moisture content such as
meat, fish, poultry, vegetables, fruit, stews and soups
can be prepared in your microwave without any difficulty. Foods which have little moisture, such as
platters of food, should have the surface
moistened prior to heating or cooking.
The amount of liquid to be added to raw foods, which
are to be braised, should be reduced to about two
thirds of the quantity in the original recipe. If necessary, add more liquid during cooking.
The amount of fat to be added can be reduced considerably. A small amount of butter, margarine or
oil is sufficient to flavour food. For this reason your
microwave is excellent for preparing low-fat foods
as part of a diet.
FOR COMBINED OPERATION
In general the same rules apply as for microwave
operation. The following additional tips should be
borne in mind:
1. Refer to the appropriate recipe in this cookbook
when selecting the convection temperature. Do
not select too high a temperature for long cooking
times, otherwise the food will brown too quickly
on the outside and the inside will not be cooked.
2. The microwave power setting must match the type
of food and the cooking time. Consult the recipes
in this cookbook.
3. When preparing food in microwave-grill combination mode remember that microwave times are
longer for large, bulky food, such as roast pork,
than for small flat food. As far as grilling is concerned the situation is quite the opposite. The
nearer the food is to the grill, the quicker it
browns. This means that when you cook large
pieces of meat, for example, in combination
mode, the grilling time needs to be shorter than
for smaller pieces of meat.
4. For cooking in combination mode or by convection only the bottom rack is generally used. Use
the top rack for normal grilling to get quick and
even browning (exceptions are large, bulky foods
and puddings, which are also grilled on the bottom rack).
HOW TO USE RECIPES
● All the recipes in this cookery book are calculat-
ed on the basis of 4 servings - unless otherwise
stated.
● Recommendations relating to suitable utensils
and the total cooking times are given at the
beginning of every recipe.
● As a rule the quantities shown are assumed to be
wholly consumable, unless specifically indicated
otherwise.
● When eggs are given in the recipes they are assumed
to have weight of approx. 55 g (grade M).
tbsp = tablespoon
tsp = teaspoon
Cup = cupful
kg = kilogram
g = gram
ABBREVIATIONS USED
l = litre
ml = millilitre
cm = centimetre
DFC = dry fat content
DF = deep frozen
34
min = minutes
sec = seconds
dm = diameter
app. = approximate
sach. = sachet
Page 37

RECIPES
France
Onion soup
Soupe à l'oignon et au fromage
Total cooking time: approx. 14-17 minutes
Utensils required: bowl with lid (2 litres size)
4 soup bowls (x 200 ml)
Ingredients
1 tbsp butter or margarine
2 onions (100 g), sliced
800 ml meat stock
salt, pepper
2 slices of bread for toasting
4 tbsp grated cheese
Preparation
1. Place the butter cut up into pieces in the bowl. Add
the sliced onion, the meat stock and the seasoning.
Cover and microwave.
9-11 min 100 %
2. Toast the slices of bread, cut them into cubes and
divide them among the soup bowls. Pour the soup
over the toast cubes and sprinkle on the cheese.
3. Place the bowls on the turntable, use the top grill
and brown the cheese topping.
5-6 min
Sweden
Crab soup
Kräftsoppa
Total cooking time: approx. 11-15 minutes
Utensils required: bowl with lid (2 litres size)
Ingredients
1 onion (50 g), finely chopped
50 g carrots, sliced
3 tbsp butter or margarine (30 g)
500 ml meat stock
100 ml white wine & 100 ml Madeira wine
200 g tinned crab meat
1/2 bay leaf
3 white peppercorns
thyme
3 tbsp flour (30 g)
100 ml cream
Preparation
1. Place the vegetables with 2 tbsp of the fat in the
bowl. Cover and microwave.
2-3 min 100 %
2. Add the meat stock, wine and Madeira together with
the crab meat and the seasoning to the vegetables.
Cover and microwave.
7-9 min 50 %
3. Remove the bay leaf and the peppercorns from the
soup. Blend the flour with a little cold water and add
to the soup. Add the cream, stir it in and reheat.
2-3 min 100 %
4. Stir the soup and leave it to stand for about 5 minutes. Add the butter shortly before serving.
Switzerland
Barley soup from the Grisons Canton
Bündner Gerstensuppe
Total cooking time: approx. 27-34 minutes
Utensils required: bowl with lid (3 litres size)
Ingredients
2 tbsp butter or margarine (20 g)
1 onion (50 g), finely chopped
1-2 carrots (130 g), sliced
15 g celery, diced
1 leek (130 g), cut in rings
3 white cabbage leaves (100 g), shredded
200 g veal bones
50 streaky bacon, shredded
pepper
50 g barleycorns
700 ml meat stock
4 frankfurters
Preparation
1. Put the butter and the onion in the bowl. Cover and
cook.
1-2 min 100 %
2. Put the vegetables in the bowl. Add the bones,
streaky bacon and barley and top up with meat
stock. Season with salt. Cover and microwave.
1. 9-11 min 100 %
2. 17-21 min 50 %
3. Cut up the sausages in small pieces and heat them in
the bowl for the last 5 minutes.
4. Let the soup stand for about 5 minutes after cooking.
Remove the bones from the soup shortly before serving.
ENGLISH
35
Page 38

RECIPES
Germany
Mushrooms on toast
Champignontoast
Total cooking time: approx. 3-4 minutes
Utensils required: top grill
Ingredients
2 tbsp butter or margarine
2 garlic cloves, crushed
salt
4 slices of bread for toasting
75 g mushrooms, sliced
salt & pepper
75 g grated cheese
4 tbsp parsley, finely chopped
sweet paprika
Preparation
1. Combine the butter, garlic and salt.
2. Toast the bread and spread with the garlic butter. Lay
the mushrooms on top and season with salt and pepper.
3. Mix the cheese and parsley and arrange on top of the
mushrooms. Sprinkle with paprika.
4. Place the toast and mushrooms on the top grill and
microwave.
3-4 min 30 %
Spain
Mushrooms with rosemary
Champiñonés rallenos al romero
Total cooking time: approx. 11-17 minutes
Utensils required: bowl with lid (1 litre size)
shallow round oven-proof dish
(dm. approx. 26 cm), microwave
foil
Ingredients
8 large mushrooms (ca. 500 g), whole
2 tbsp butter or margarine (20 g)
1 onion (50 g), finely chopped
50 g ham, cut into small cubes
milled black pepper
rosemary, bruised
125 ml dry white wine
125 ml cream
2 tbsp flour (20 g)
Preparation
1. Remove the stalks from the mushrooms and chop
the stalks into small pieces.
2. Put the butter in the bowl and spread it over the
bottom. Add the onions and the diced ham and
the mushroom stalks and season with pepper and
rosemary. Cover and microwave.
3-5 min 100 %
Austria
Sausage rolls
Würstchen im Teigmantel gives 8 servings
Total cooking time: app. 23-26 minutes
Utensils required: baking tray (dm. approx. 32 cm)
greaseproof paper
Ingredients
8 small sausages (x50 g)
300 g frozen puff pastry
1 egg yolk
a little water
salt
caraway seeds
Preparation
1. Carefully prick the sausages several times.
2. Defrost the puff pastry following the instructions on the
package and roll it out thinly. Divide the pastry into 8
squares and roll a sausage up into each piece of pastry.
3. Blend the yolk in a little water. Brush this over the
pastry rolls and season with salt and caraway.
4. Line the baking tray with greaseproof paper, place
the rolls on the tray and cook on convection.
23-26 min 230oC
Allow to cool.
3. Heat 100 ml of the wine and the cream in the ovenproof dish covered with microwave foil.
1-3 min 100 %
4. Blend the flour with the rest of the wine, stir into
the heated liquid, cover and microwave. Stir once
during cooking.
app. 1-3 min 100 %
5. Fill the mushrooms with the ham mixture, add them
to the sauce, cook using microwave and top grill.
6-8 min 30 %
Let the mushrooms stand for approx. 2 minutes
when cooked.
36
Page 39

RECIPES
Germany
Spicy Turkey
Pikante Putenpfanne (for 2 servings)
Total cooking time: approx. 22-27 minutes
Utensils required: shallow oval oven-proof dish with
lid (26 cm)
Ingredients
1 cup long-grain rice, parboiled (120 g)
1 sachet of saffron strands
300 g turkey breast, diced
250 ml meat stock
1 onion (50 g), sliced
1 red pepper (100 g), shredded
1 small leek (100 g), shredded
pepper and paprika
2 tbsp butter or margarine (20 g)
Preparation
1. Mix the rice with the saffron and put it in the ovenproof dish with the diced meat. Pour the meat stock
over, cover and microwave.
4-6 min 100 %
2. Add the vegetables and seasoning and stir. Distribute
the butter over the top. Cover and microwave.
1. 1-2 min 100 %
2. 17-19 min 30 %
Allow the Spicy Turkey to stand for 2-3 minutes after
cooking.
Greece
Aubergines stuffed with minced meat
Melitsénes jemistés mé kimá
Total cooking time: approx. 17-22 minutes
Utensils required: bowl with lid (1 litre size)
shallow oval oven-proof dish with lid
(approx. 32 cm long)
Ingredients
2 aubergines, less stalks (x ca. 250 g)
3 tomatoes (ca. 200 g)
1 tbsp olive oil to grease the dish
2 onions (100 g), chopped
4 mild green chillies
200 g mince (beef or lamb)
2 garlic cloves, crushed
2 tbsp parsley, chopped
salt and pepper
pink paprika
60 g Feta cheese, diced
Tip:
You can substitute courgettes for the aubergines.
Preparation
1. Cut the aubergines in half lengthways. Scoop out
the flesh with a teaspoon to leave a shell about 1 cm
thick. Sprinkle the aubergines with salt and dice the
scooped-out flesh.
2. Remove the skin from two of the tomatoes and chop
them up, having first cut out the stalks.
3. Grease the bottom of the bowl with the olive oil.
Add the onions. Cover and cook.
app. 2 min 100 %
4. Remove the stalks and seeds from the chillies and cut
them into rings. Retain a third for the garnish. Mix
the minced meat with the diced aubergines, onions
and tomatoes, the chilli rings, the crushed garlic
clove and the parsley. Season to taste.
5. Dry the aubergine halves. Fill with half of the mince
mixture, spread the sheep's cheese on top, and then
add the rest of the filling.
6. Arrange the aubergine halves in the greased ovenproof dish, place the dish on the turntable and cook
using bottom grill and microwave.
ENGLISH
11-13 min 70 %
Garnish the aubergine halves with the chilli rings and
slices of tomato and continue cooking.
4-7 min 70 %
Allow the aubergines to stand for about 2 minutes
after cooking.
37
Page 40

RECIPES
Spain
Stuffed ham
Jamón relleno
Total cooking time: approx. 13-18 minutes
Utensils required: bowl with lid (2 litres size)
shallow oval oven-proof dish
(approx. 26 cm long)
8 small wooden skewers
Ingredients
150 g leaf spinach with stalks removed
150 g quark, 20 % fat content
50 g grated Emmenthal cheese
pepper
sweet paprika
8 slices of cooked ham (400 g)
125 ml water
125 ml cream
2 tbsp flour (20 g)
2 tbsp butter or margarine (20 g)
1 tsp butter or margarine to grease dish
Preparation
1. Cut up the spinach finely, blend it with the quark and
the cheese and season to taste.
2. Cover each slice of cooked ham with a tablespoon of the
filling and roll it up. Insert a skewer into each roll.
3. To make a béchamel sauce, pour the liquid into the
bowl, cover and heat.
2-4 min 100 %
Mix the butter with the flour, add it to the liquid and
stir with a whisk until smooth and dissolved. Cover
and bring it to the boil so that it thickens.
app. 1-2 min 100 %
Austria
Stuffed roast chicken
Gefülltes Brathendl (for 2 servings)
Total cooking time: approx. 25-28 minutes
Utensils required: string
Ingredients
1 chicken (1000 g)
salt
rosemary, bruised
marjoram, bruised
1 stale bread (bread roll 40 g)
salt
1 bunch of parsley, finely chopped (10 g)
1 pinch nutmeg
2 tbsp butter or margarine (20 g)
1 egg yolk
3 tbsp butter or margarine (30 g)
1 tbsp sweet paprika
salt
Preparation
1. Wash the chicken, dry it and season it internally with
salt, rosemary and marjoram.
2. For the filling soak the bread roll in cold water for
about 10 minutes and then squeeze the water out.
Mix with salt, parsley, nutmeg, butter (20 g) and egg
yolk and stuff the chicken with the mixture. Tie up
the opening with string.
3. Heat the butter (30 g).
1/2 -1 min 100 %
Stir the paprika and salt into the butter and spread
over the chicken.
4. Place the chicken breast-side downwards on the low
rack. Cook using bottom grill and microwave.
Stir and taste.
4. Place the rolls of ham in the greased oven-proof dish,
pour the sauce over and microwave on the turntable.
10-12 min 70 %
Allow the rolls to stand for about 5 minutes after
cooking.
Tip:
You can also use shop-bought ready-made béchamel
sauce.
INSTANT COOK
Turn the chicken when the beeps sound.
After cooking stand for 10 minutes.
38
Page 41

RECIPES
Italy
Quails in cheese and herb sauce
Quagile in salsa vellutata
Total cooking time: approx. 16-19 minutes
Utensils required: thread
shallow square oven-proof dish
(approx. 20 x 20 x 6 cm)
bowl with lid
Ingredients
4 quails (600 g)
salt & pepper
200 g streaky bacon, thinly sliced
1 tsp butter or margarine to grease dish
per 1 tbsp fresh parsley
sage, rosemary
basil, finely chopped
150 ml port wine
250 ml meat stock
2 tbsp butter or margarine (20 g)
2 tbsp flour (20 g)
50 g grated Emmenthal cheese
Preparation
1. Wash the quails and carefully dry them. Apply salt
and pepper to the inside and outside of the quails.
Wrap them in slices of bacon and secure with thread.
2. Place the quails into the greased dish, put on the
turntable and cook using bottom grill and
microwave.
8-10 min 70 %
Germany
Fillet of beef in puff pastry
Rinderfilet in Blätter teig
Total cooking time: approx. 31-36 minutesn
Utensils required: bowl with lid (2 litres size)
oven-proof dish (approx. 26 cm long)
Ingredients
300 g frozen puff pastry
1 tbsp butter or margarine
150 g streaky bacon, diced
4-5 spring onions (150 g), cut in rings
300 g mushrooms, sliced
1 kg fillet of beef
1 tbsp vegetable oil
1 tbsp parsley, finely chopped
1 garlic clove, crushed
1 egg
salt & pepper
1-2 milk
Preparation
1. Defrost the puff pastry following the instructions on
the packet. Divide the butter in the bowl and
distribute the bacon, onions and mushrooms on top.
Cover and cook. Stir once during cooking.
4-5 min 100 %
Pour off the liquid.
2. Wash the fillet of beef, dry it with kitchen paper and
brush with oil. Place it on the high rack. Cook using
the top grill and microwave. Turn once.
ENGLISH
3. Place the quails in the dish with the grilled side downwards. Finely chop the herbs, scatter over the quails
and pour over the port wine.
4-5 min 70 %
Remove the quails from the broth and wrap them in
aluminium foil.
4. To make the sauce, heat the meat stock in the covered bowl.
app. 2 min 100 %
Mix the butter into the flour, stir it into the liquid,
bring it to the boil and microwave.
Stir once during cooking.
app. 2 min 100 %
5. Stir the cheese into the sauce. Add the cheese sauce
to the broth and mix everything thoroughly together.
Add the quails to the sauce and serve.
13-15 min 30 %
3. Mix the parsley and the garlic with the steamed vegetables and season to taste with salt and pepper.
4. Roll out the puff pastry into a square (35 x 35 cm).
Retain some of the pastry for garnishing.
5. Separate the egg. Brush the edges of the pastry with
the egg white and put half the vegetable mixture in
the centre of the pastry.
6. Season the meat with salt and pepper and place it on top
of the vegetables. Arrange the remaining vegetables on
the fillet. Fold the pastry over the meat and press down
the edges. Prick the pastry several times with a fork.
7. Rinse the oven-proof dish in cold water and place the
pastry in it with the seam downwards.
8. Cut out shapes from the remaining pastry for the
garnish and decorate.
9. Whisk the egg yolk with the milk, brush it over the
pastry. Cook using Dual Convection.
14-18 min 50 % + 230oC
Let the fillet of beef in puff pastry stand for 10 minutes
after cooking.
39
Page 42

RECIPES
Switzerland
Zurich creamed meat
Züricher Geschnetzeltes
Total cooking time: approx. 9-14 minutes
Utensils required: bowl with lid (2 litres size)
Ingredients
600 g fillet of veal
1 tbsp butter or margarine
1 onions (50 g), finely chopped
100 ml white wine
dark sauce binder with seasoning for about
litre of sauce
300 ml cream
1 tbsp parsley, chopped
Preparation
1. Cut the fillet into finger-sized strips.
2. Spread the butter evenly over the dish. Put the
onion and the meat in the dish. Cover and
microwave. Stir once during cooking.
6-9 min 100 %
3. Add the white wine, sauce binder and cream and stir.
Cover and microwave further. Stir once during cooking.
3-5 min 100 %
4. Taste, stir once more and leave standing for about 5
minutes. Serve garnished with parsley.
Italy
Veal cutlet with mozzarella
Scaloppe all pizzalola
Total cooking time: approx. 24-31 minutes
Utensils required: shallow square oven-proof dish with
lid (approx. 25 cm long)
Ingredients
2 mozzarella cheese (x 150 g)
500 g peeled tinned tomatoes (less liquid)
4 veal cutlets (600 g)
20 ml olive oil
2 cloves of garlic, sliced
freshly milled pepper
2 tbsp capers (20 g)
oregano, salt
Preparation
1. Cut the mozzarella into slices. Puree the tomatoes
with the puree attachment of a hand mixer.
2. Wash the cutlets, dry them and beat them flat.
Distribute the oil and the garlic slices over the bottom of the oven-proof dish. Add the cutlets and
pour over the tomato puree. Sprinkle with pepper,
capers and oregano and cover and cook.
15-19 min 70 %
Turn the meat slices.
3. Place a few slices of mozzarella on each piece of
meat, add salt and grill uncovered on the top grill.
9-12 min.
After cooking allow to stand for about 5 minutes.
Tip:
Spaghetti and a fresh salad can be served with this dish.
40
Page 43

RECIPES
Germany
Pork kebabs
Bunte Fleischspiesse
Total cooking time: approx. 17-18 minutes
Utensils required: the top grill
four wooden skewers (approx. 25 cm
long)
Ingredients
400 g escalope of pork
100 g smoked belly of pork
2 onions (100 g), in quarters
4 tomatoes (250 g), in quarters
1/2 green pepper (100 g), in eight pieces
4 tbsp oil
2 tsp sweet paprika
salt
1/2 tsp cayenne pepper
1 tsp Worcester sauce
Preparation
1. Cut the escalope of pork and the pork belly into 2-3
cm cubes.
2. Thread meat and vegetables alternately on four
wooden skewers.
3. Combine the oil with the spices and brush over the
kebabs. Place the kebabs on the high rack and cook.
INSTANT COOK
2. Mix the meat stock with the tomato puree.
3. Arrange the potatoes and carrots around the meat
loaf together with the liquid. Cover and microwave.
Turn once during cooking.
20-23 min 100 %
Give the contents of the dish a final adjustment and
leave to stand for about 5 minutes. Serve sprinkled
with parsley.
ENGLISH
France
Fillets of sole
Filets de sole (for 2 servings)
Total cooking time: approx. 11-13 minutes
Utensils required: shallow oval oven-proof dish with lid
(approx. 26 cm long)
Ingredients
400 g sole fillets
1 lemon, untreated
2 tomatoes (150 g)
1 tsp Butter or margarine to grease dish
1 tbsp vegetable oil
1 tbsp parsley, chopped
salt & pepper
4 tbsp white wine (30 ml)
2 tbsp butter or margarine (20 g)
Netherlands
Meat loaf
Gehacktschotel
Total cooking time: approx. 20-23 minutes
Utensils required: bowl with lid (2 litres size)
Ingredients
500 g minced meat (half pork, half beef)
3 onions (150 g), finely chopped
1 egg
50 g breadcrumbs
salt & pepper
350 ml meat stock
70 g tomato puree
2 potatoes (200 g), diced
2 carrots (200 g), diced
2 tbsp parsley, chopped
Preparation
1. Knead the minced meat, onion cubes, egg and
breadcrumbs into a dough and season with salt and
pepper. Place the meat loaf in the dish.
Preparation
1. Wash the sole fillets and dab them dry. Remove
bones.
2. Thinly slice the lemon and the tomatoes.
3. Grease the oven-proof dish with butter. Place the
fish fillets in the dish and sprinkle vegetable oil over
them.
4. Sprinkle the parsley over the fish fillets, arrange the
tomato slices on them and season. Top the tomatoes
with the slices of lemon and pour over the white
wine.
5. Dot the lemons with flakes of butter. Cover and
microwave.
11-13 min 70 %
Allow the fish fillets to stand for about 2 minutes
after cooking.
You can also use bass, halibut, grayling, plaice or cod for
this dish.
41
Page 44

RECIPES
Switzerland
Fish fillets with cheese sauce
Fischfilet mit Käsesauce
Total cooking time: approx. 21-25 minutes
Utensils required: bowl with lid (1 litre size)
shallow oval oven-proof dish
(approx. 25 cm long)
Ingredients
4 fish fillets (app. 800 g)
(e.g. perch, flounder or cod)
2 tbsp lemon juice
salt
1 tbsp butter or margarine
1 onion (50 g), finely chopped
2 tbsp flour (20 g)
100 ml white wine
1 tsp vegetable oil to grease the dish
100 ml grated Emmental cheese
2 tbsp chopped parsley
Preparation
1. Wash the fillets, dry them and sprinkle with lemon
juice. Leave to stand for about 15 min, dry them
again and sprinkle with salt.
2. Spread the butter on the bottom of the bowl. Add
the chopped onion, cover and cook.
1-2 min 100 %
3. Coat the onion with flour and stir. Pour on the
white wine and mix together.
4. Grease the oven-proof dish and put in the fillets.
Pour the sauce over the fillets and sprinkle with
cheese. Place on the turntable and cook.
1. 6-7 min 50 %
Germany
Almond trout
Mandelforellen
Total cooking time: approx. 16-19 minutes
Utensils required: shallow oval oven-proof dish
(approx. 30 cm long)
Ingredients
4 trout (x 200 g), trimmed
juice of one lemon
salt
30 g butter or margarine
5 tbsp flour (50 g)
1 tsp butter or margarine to grease dish
50 g almond flakes
Preparation
1. Wash and dry the trout and sprinkle with lemon
juice. Apply salt to the interior and exterior of the fish
and leave to stand for 15 minutes.
2. Melt the butter.
1 min 100 %
3. Dry the fish, spread on the butter and roll in the flour.
4. Grease the dish. Put the trout in the dish and cook.
Two thirds through the cooking period turn the trout
and scatter the almonds over them.
15-18 min 50 %
Allow the almond trout to stand for 2 minutes after
cooking.
Tip:
Suitable accompanying dishes are parsley potatoes and a
green salad.
2. 14-16 min 50 %
Let the fish fillets stand for about 2 minutes after
cooking. Serve garnished with chopped parsley.
42
Page 45

RECIPES
Russia
Ricotta pasties
Total cooking time: approx. 11-17 minutes
Ingredients
250 g flour
1/2 tsp baking powder
50 g butter or margarine
1/2 tsp salt
1 egg
90 ml sour cream
40 g parmesan, grated
175 g ricotta ( or soft cheese)
1 small egg
salt & pepper, milled
For coating:
1 egg yolk
1 tbsp milk
Preparation
1. For the pastry knead the flour, baking powder, margarine, salt, egg and sour cream to form a smooth
dough. Keep the pastry in a cool place for about 1
hour.
2. Combine the parmesan with the ricotta and the egg.
Season well with salt and pepper.
3. Roll out the pastry to a thickness of about 3 mm on a
floured surface. Cut out circles approx. 10 cm in
diameter. In the centre of each circle place a heaped
teaspoon of the filling.
4. Whisk the egg yolk with the milk and use it to brush
the edges of the pastry. Fold each circle of pastry in
half over the filling to form a semicircle. Press down
the edges with the prongs of a fork. Brush the
pasties with the remaining egg and milk mixture.
5. Cover the turntable with greaseproof paper, place the
pasties on it and cook. Yields about 12-13 pasties.
1. 5-8 min 30 %
2. 6-9 min 30 %
Tip:
The pasties should be eaten when hot and fresh.
Germany
Rissoles
Frikadellen
Total cooking time: 11-15 minutes
Ingredients
400 g minced meat (half pork, half beef)
4 tbsp breadcrumbs
1 tbsp cornflour
50 ml milk
50 ml water
1 egg
50 g onion, chopped
1 tsp mustard
salt, pepper, paprika
Preparation
1. Make a smooth meat loaf mixture from the above
ingredients.
Let the mixture stand for 5-10 minutes.
2. Then form about 8 similarly sized rissoles. Place the
rissoles on the turntable and cook.
7-9 min 50 %
3. Turn the rissoles.
4-6 min
France
Toasted ham and cheese sandwich
Croque monsieur
Total cooking time: approx. 10 minutes
Ingredients
2 slices of toast
20 g butter
1-2 cheese slices
(depending on the size of the toast)
1 slice of cooked ham
1 tbsp crème fraiche
ca. 30 g grated cheese
ENGLISH
Preparation
1. Spread butter on the slices of toast.
2. Place the cheese on a slice of toast followed by the
ham. Spread with creme fraiche.
3. Top with the other slice of toast and sprinkle with the
grated cheese..
Place the sandwich on the turntable and cook.
1. app. 2 min 10 %
2. app. 4 min.
43
Page 46

RECIPES
France
Prawn quiche
Quiche aux crevettes
Total cooking time: 13-20 minutes
Utensils required: bowl with lid (1 litre.)
Ingredients
100 g flour
60 g butter or margarine
1 tbsp cold water
1 tbsp butter or margarine
1 onions (100 g), finely chopped
75 g bacon, finely diced
75 g prawns, less shells
1 eggs
50 ml thick sour cream
salt, pepper, nutmeg
1 tbsp parsley, chopped
Preparation
1. Knead together the flour, butter and water and leave
the pastry in a cool place for 30 minutes.
2. Divide the butter in the dish. Put the onions, bacon and
prawns in the dish. Cover and cook. Stir once during
cooking.
2-3 min 100 %
Germany
Scrambled egg with onions and bacon
Rührei mit Zwiebeln und Speck
Total cooking time: 4-5 minutes
Ingredients
5-10 g margarine
25 g onion, finely chopped
40 g bacon
3 eggs
3 tbsp milk
salt, pepper
Preparation
1. Distribute the fat, onion and bacon over the turntable
and lightly braise.
2-3 min 50 %
2. Beat the eggs with the milk and the seasoning.
Pour the egg and milk mixture over the onion and
bacon and microwave to set it.
app. 2 min 100 %
Stir the scrambled egg once during cooking.
3. Pour off the liquid when it has cooled. Beat the eggs
with the sour cream and the herbs and spices.
4. Roll out the pastry a little larger than the turntable.
Place it on the turntable. Fold the excess pastry to form
the sides of the quiche. Prick the base of the pastry several times with a fork.
5. Mix the ingredients for the filling, distribute it over the
base and bake.
1. 6-8 min 30 %
2. 3-5 min 30 %
3. 2-4 min
Hamburgers
Hamburger
Total cooking time: 9-13 minutes
Ingredients
400 g minced beef
salt, pepper
Preparation
1. Knead the ingredients into a smooth meat loaf mixture. With cold hands divide the mixture into four
similarly sized, flat meat patties. Place the patties on
the turntable and cook.
5-7 min 30 %
2. Turn the meat patties.
4-6 min
44
Page 47

RECIPES
Italy
Artichoke pizza
Pizza al carciofi
Total cooking time: 12-13 minutes
Utensils required: turntable
Ingredients
150 g flour
4 g dried yeast
1 tsp sugar
2 tsp oil
90 ml lukewarm water
300 g tinned tomatoes, drained
100 g artichoke hearts
1 tsp olive oil to grease the turntable
1 tbsp tomato puree
30 g salami, sliced
50 g cooked ham
10 olives
100 g grated cheese
Preparation
1. Mix the flour with the dried yeast, sugar and salt (
2. Chop the peeled tomatoes and cut the artichoke
3. Grease the turntable with the oil. Roll out the bread
4. Spread the tomato puree on the dough and cover it
salt
basil, oregano, thyme
salt, pepper
1
/
tsp.).
Add the oil and water and knead to make a workable
dough. Place in the microwave oven and cook.
2
2-3 min 10 %
Then let the dough stand covered for a further 10-15
minutes.
hearts in quarters.
dough and place it on the turntable.
with the tomatoes.
Season to taste and top with the remaining ingredients. Finally arrange the olives on the pizza and
sprinkle on the cheese.
The recipe yields approx. 0.9 kg.
France
Onion tart
Tarte à l'oignion
Total cooking time: approx. 29-39 minutes
Utensils required: bowls with lid (2 litres.)
Ingredients
15 g yeast
185 g flour
60 ml oil
1 tsp salt
30 g margarine or butter
800 g onions, chopped
3 eggs
150 g crème fraiche
salt, paprika
freshly milled nutmeg
50 g streaky bacon
marjoram or thyme
Preparation
1. Crumble the yeast and dissolve in 75 ml of lukewarm
water. Put the flour, oil, salt and dissolved yeast into
a bowl and knead it to a smooth dough.
Place in the microwave oven.
2-3 min 10 %
Then let the dough stand for 10-15 minutes.
2. Divide the margarine in another bowl and sweat the
onions until transparent.
Stir halfway through the cooking period.
11-15 min 100 %
3. Allow the onions to cool and then pour off the liquid.
Gradually mix in the eggs and the crème fraiche.
Season with salt, pepper and nutmeg.
4. Roll out the dough on a floured surface the size of
the turntable.
Grease the turntable. Place the dough on the
turntable and fold up the edges.
Leave the dough for a further 10 minutes.
5. Cut the bacon into small cubes. Spread the onion
mixture over the dough and dot with cubes of
bacon, sprinkle over marjoram or thyme and cook.
ENGLISH
INSTANT COOK
1. 7-10 min 70 %
2. 9-11 min 70 %
45
Page 48

RECIPES
Austria
Baked spinach
Spinatauflauf
Total cooking time: approx. 37-42 minutes
Utensils required: bowl with lid (1 litre size)
shallow oval oven-proof dish (approx.
25 cm long)
Ingredients
2 tbsp butter or margarine (20 g)
1 onion (50 g), finely chopped
600 g leaf spinach, frozen
salt & pepper
nutmeg
garlic powder
1 tsp butter or margarine to grease dish
400 g boiled potatoes, sliced
200 g cooked ham, diced
3 eggs
100 ml cream (crème fraiche)
100 g grated cheese (e.g. gouda)
paprika
Preparation
1. Divide the butter on the bottom of the bowl, add the
chopped onion, cover and lightly cook.
2-3 min 100 %
Germany
Baked broccoli and potato with
mushrooms
Broccoli-Kartokkelauflauf mit Champignons
Total cooking time: approx. 31-37 minutes
Utensils required: bowl with lid (2 litres size)
round oven-proof dish (dm. 26 cm)
Ingredients
400 g potatoes, peeled and optionally halved
400 g broccoli, in florets
6 tbsp water (60 ml)
1 tsp butter or margarine to grease dish
400 g mushrooms, sliced
1 tbsp parsley, finely chopped
salt & pepper
3 eggs
125 ml cream
125 ml milk
salt
pepper
nutmeg
100 g grated gouda cheese
Preparation
1. Put the potatoes and broccoli in the bowl. Add the
water, cover and microwave.
Stir once during cooking.
2. Add the spinach, cover the bowl and microwave. Stir
once or twice during cooking.
12-14 min 100 %
Pour off the liquid and season the spinach.
3. Grease the oven-proof dish. Place the slices of pota-
to, the diced ham and the spinach alternately in the
dish in layers, finishing with potatoes.
4. Blend the eggs with the cream, season and pour over
the vegetables. Sprinkle grated cheese over the dish
and top with a sprinkling of paprika.
The recipe yields approx. 1.5 kg.
23-25 min 70 %
Allow the dish to stand for approx. 10 minutes after
cooking.
Tip:
You can vary the ingredients for this dish according to
taste, e.g. with broccoli, salami or pasta.
11-13 min 100 %
3. Grease the oven-proof dish. Put in the broccoli, the
mushrooms and the potatoes alternately in layers.
Sprinkle over parsley and season with salt and pepper.
4. Combine the eggs with the liquid and seasoning and
pour over the vegetables. Sprinkle the cheese over
the dish and microwave.
The recipe yields approx. 1.5 kg.
25-27 min 50 % + 220oC
Allow the dish to stand for approx. 10 minutes after
cooking.
46
Page 49

RECIPES
Germany
Baked courgettes and pasta
Zucchini-Nudel-Auflauf
Total cooking time: approx. 34-42 minutes
Utensils required: bowl with lid (2 litres size)
oven-proof dish (approx. 26 cm long)
Ingredients
500 ml water
1/2 tsp oil
80 g macaroni
400 g tinned tomatoes, chopped
3 onions (150 g), finely chopped
basil, thyme, salt, pepper
1 tbsp oil to grease the dish
450 g courgettes, sliced
150 g sour cream
2 eggs
100 g grated cheddar cheese
Preparation
1. Put the water, oil and salt in the bowl, cover and
bring to the boil.
3-4 min 100 %
2. Break the macaroni into pieces and add them to the
dish. Stir and allow to soak.
9-11 min 30 %
Austria
Bread dumplings
Semmelknödel
Total cooking time: approx. 7-10 minutes (for 6 servings)
Utensils required: bowl with lid (1 litre size)
6 cups or blancmange moulds
Ingredients
2 tbsp butter or margarine (20 g)
1 onion (50 g), finely chopped
500 ml milk
200 g dried bread cubes
(from approx. 5 bread rolls)
3eggs
Preparation
1. Cut the bread rolls into small cubes and soak in the
milk.
2. Divide the fat on the bottom of the bowl and add
the chopped onion. Cover and cook.
1-2 min 100 %
3. Add the onion to the bread cubes. Beat the eggs,
add them and mix well to form a workable paste. If
necessary add a little milk.
4. Divide the paste equally into 5 cups or blancmange
moulds, cover with microwave foil, arrange on the
edge of the turntable and cook.
ENGLISH
Drain the pasta and allow to cool.
3. Mix the tomatoes with the onions and season well.
Add the macaroni and pour over the tomato sauce.
Divide the courgette slices on top.
4. Beat the sour cream and the eggs and pour over the
dish. Sprinkle the grated cheese on top and cook.
The recipe yields approx. 1.5 kg
1. 15-18 min 100 %
2. 7-9 min 70 %
Allow the dish to stand for about 5-10 minutes after
cooking.
6-8 min 100 %
Allow the dumplings to stand for about 2 minutes
after cooking. Turn the dumplings into a plate before
serving.
47
Page 50
RECIPES
Italy
Oven-baked lasagne
Lasagne al forno
Total cooking time: approx. 16-21 minutes
Utensils required: bowl with lid (2 litres size)
shallow square oven-proof dish
(approx. 20 x 20 x 6 cm)
Ingredients
300 g tinned tomatoes
50 g ham, finely diced
1 onion (50 g), finely chopped
1 garlic clove, crushed
250 g beef mince
2 tbsp tomato puree
salt
pepper
oregano
thyme
basil
150 ml cream (crème fraiche)
100 ml milk
50 g grated parmesan cheese
1 tsp mixed chopped herbs
1 tsp olive oil
salt
pepper
nutmeg
1 tsp vegetable oil to grease the dish
125 g lasagne verde (green sheet pasta)
1 tbsp grated parmesan cheese (5 g)
1 tbsp butter or margarine
Preparation
1. Slice the tomatoes, mix with the diced ham and
chopped onion, the garlic, the beef mince and the
tomato puree. Season, cover and lightly braise.
5-8 min 100 %
Italy
Tagliatelle with cream and basil
Tagliatelle alla panna e basilico (for 2 servings)
Total cooking time: approx. 16-22 minutes
Utensils required: bowl with lid (2 litres size)
round soufflé dish (dm. ca. 20 cm)
Ingredients
1 l water
1 tsp salt
200 g tagliatelle (ribbon pasta)
1 garlic clove
15-20 basil leaves
200 g cream (crème fraiche)
30 g grated parmesan cheese
salt/pepper
Preparation
1. Put the water and salt in the bowl, cover and bring
to the boil.
9-11 min 100 %
2. Add the pasta, bring once more to the boil and simmer.
1. 1-2 min 100 %
2. 6-9 min 30 %
3. Meanwhile rub the soufflé dish with the clove of garlic. Cut up the basil leaves. Set some of the basil
aside for garnishing.
4. Drain the pasta thoroughly. Stir in the cream and
sprinkle the basil on the pasta.
5. Add the parmesan cheese, salt and pepper. Put the
mixture into the soufflé dish and give it a stir.
Finally garnish with the remaining basil.
2. Combine the cream with the milk, parmesan cheese,
herbs and oil and season.
3. Grease the oven-proof dish. Lay a third of the pasta
on the base of the dish. Cover the pasta with one
half of the minced beef and pour on a little of the
sauce. Form a layer with the second third of the
mince, some sauce and the remainder of the pasta.
Finally cover the pasta thoroughly with sauce and top
with a sprinkling of parmesan cheese. Dot with flakes
of butter and cook.
11-13 min 50 % + 230oC
Allow the lasagne to stand about 5 to 10 minutes
after cooking.
48
Page 51

RECIPES
Austria
Cauliflower with cheese sauce
Karfiol mit Käsesauce
Total cooking time: approx. 18-21 minutes
Utensils required: bowl with lid (1 litre size)
bowl with lid (1 litre size)
Ingredients
800 g cauliflower (1 head)
1 cup of water (150 ml)
125 ml milk
125 ml cream
75-100 g cooking cheese
2-3 tbsp light sauce binder (20-30 g)
Preparation
1. Cut through the stalks of the cauliflower. Place the
cauliflower upright in one of the bowls. Add water,
cover and microwave.
15-17 min 100 %
Let the cauliflower stand covered for several minutes
and then drain the liquid.
2. Put the milk and the cream in the other bowl. Grate
the cheese coarsely and add to the bowl. Cover and
microwave.
France
Dauphine potatoes
Gratin dauphinois
Total cooking time: approx. 25-27 minutes
Utensils required: shallow oval oven-proof dish (approx.
26 cm long)
Ingredients
1 tbsp butter or margarine
500 g potatoes, peeled and thinly sliced
salt
pepper
2 garlic cloves, crushed
300 g cream (crème fraiche)
200 ml milk
50 g grated cheese (gouda)
Preparation
1. Divide the butter in the dish. Put in the potato slices
in layers. Season each layer with salt, pepper and
garlic.
2. Blend the cream and the milk and pour over the pota-
toes. Sprinkle with cheese and bake on the bottom grill.
25-27 min 50 % + 200oC
Allow to stand for 10 minutes after cooking.
ENGLISH
app. 2-3 min 100 %
3. Stir in the sauce binder, cover and reheat.
app. 1 min 100 %
Stir the sauce thoroughly and pour over the cauliflower.
Tip:
You can sprinkle the cauliflower with chopped parsley
before serving.
49
Page 52
RECIPES
Switzerland
Ticino risotto
Tessiner risotto
Total cooking time: approx. 20-25 minutes
Utensils required: bowl with lid (2 litres size)
Ingredients
50 g streaky bacon
2 tbsp butter or margarine (20 g)
1 onion (50 g), finely chopped
200 g round-grain (Arborio) rice
400 ml meat stock
70 g Brienz cheese, grated (an alternative is grated
Emmental cheese)
pinch of saffron
1 salt & pepper
Preparation
1. Dice the bacon. Spread the butter on the bottom of
the bowl. Put in the chopped onion and the bacon,
cover and lightly braise.
2-3 min 100 %
2. Add the rice and meat stock, bring to the boil and
allow to simmer.
1. 3-5 min 100 %
2. 15-17 min 30 %
Preparation
1. Put the kohlrabi with the water in one of the bowls,
cover and cook. Stir once during cooking.
9-10 min 100 %
Drain the liquid.
2. Divide the butter in the other bowl, add the cream
and heat uncovered. Do not let it boil!
1
app. 1
/
min 100 %
2
3. Season the sauce to taste with the salt, spice and
lemon juice. Fold in the dill and pour the sauce over
the kohlrabi. Leave the kohlrabi to stand for about 2
minutes after cooking.
Tip:
Salsify can be substituted for the kohlrabi.
Greece
Potato and garlic pasta
Skordalía mé patates
Total cooking time: approx. 8-10 minutes
Utensils required: bowl with lid (1 litre size)
Leave the rice to stand for about 2 minutes after
cooking.
3. Mix in the cheese and the saffron and taste.
Tip:
Suitable accompaniments are braised chanterelles or button mushrooms and a mixed salad.
Switzerland
Kohlrabi in dill sauce
Kohlrabi in Dillsauce (2 servings)
Total cooking time: approx. 101/2 - 111/2minutes
Utensils required: 2 bowls with lids (1 litre size)
Ingredients
400 g kohlrabi, sliced (approx. 2 heads)
4-5 tbsp water
2 tbsp butter or margarine (20 g)
150 ml cream (crème fraiche)
salt, pepper, nutmeg & paprika
a few drops of lemon juice
1 bunch of dill, finely chopped
Ingredients
400 g whole potatoes
2-3 tbsp water
2-3 garlic clove
6 tbsp olive oil
6 tbsp meat stock
salt
juice of one lemon
1 mild chilli
Preparation
1. Put the potatoes and the water in the bowl, cover
and cook. Stir once during cooking.
8-10 min 100 %
2. Peel the potatoes and press them while still hot
through a potato press or fine sieve.
3. Crush the garlic clove in a garlic press and add to the
potatoes.
4. Mix the olive oil, meat stock, salt and lemon juice to
taste with the potatoes to form a workable mixture.
Add a little more oil or meat stock if necessary.
5. Serve the pasta garnished with chilli rings.
50
Page 53
RECIPES
Great Britain
Cherry cake
Total cooking time: approx. 25-27 minutes
Utensils required: flan ring
(dm. approx. 28 cm)
Ingredients
1 tsp butter or margarine to grease tin
200 g butter
200 g sugar
3 eggs
200 g flour
1 level tsp baking powder
1 glass morello cherries (350 g)
Preparation
1. Grease the tin.
2. Soften the butter in a mixing bowl.
1 min 70 %
3. Add the sugar and stir it in until it has completely
dissolved and no longer sounds crunchy. Gradually
stir in the eggs. Mix the flour and baking powder
and add it a spoonful at a time.
4. Drain the cherries in a sieve.
5. Spread the cake mix evenly in the flan ring. Arrange
the cherries evenly on top. Place the cake on the
turntable and bake.
24-26 min 30 % + 200oC
Germany
Cherry layer cake
Kirschenmichel
Total cooking time: approx. 23-25 min
Utensils required: deep round oven-proof dish
(dm. approx. 20 cm)
Ingredients
4 stale bread rolls (160 g)
375 ml milk
60 g butter or margarine
8 tbsp sugar (80 g)
4 egg yolks
1 tbsp flour
30 g chopped almonds
grated lemon peel
4 egg whites
1 tsp butter or margarine to grease dish
500 g stoned sour cherries
2 tbsp breadcrumbs
1 tbsp butter or margarine
Preparation
1. Cut the bread into small pieces and soak in the milk.
2. Beat the butter, sugar and egg yolks to a creamy con-
sistency with a hand mixer. Soak and squeeze out the
bread rolls. Add them with the flour, almonds, lemon
peel and the bread rolls and stir.
3. Beat the egg whites until stiff and fold them in.
4. Grease the dish. Put the bread mixture and the
drained cherries alternately in layers in the dish, finishing with the bread mixture.
5. Sprinkle breadcrumbs over the dish and dot with
flakes of butter, and cook.
ENGLISH
23-25 min 50 % + 200oC
Allow the dish to stand for about 5-10 minutes after
cooking.
51
Page 54

RECIPES
Germany
Advocaat gateau
Eierlikör-Torte
Total cooking time: approx. 21-23 minutes
Utensils required: flan ring
(dm. approx. 28 cm)
Ingredients
100 g cooking chocolate
5 eggs
100 g butter or margarine
100 g sugar
1 pack. vanilla sugar
200 g ground hazel nuts
1 pacl. baking powder
1 tbsp rum
Topping:
400 g cream
2 tbsp sugar
1 pack. cream setting agent
4-5 tbsp advocaat
30 g chocolate strands
Preparation
1. Line the baking tin with greaseproof paper.
2. Finely grate the cooking chocolate. Separate the eggs
and beat the egg whites until they form stiff peaks.
3. Soften the butter in a mixing bowl.
1 min 50 %
4. Add the sugar and vanilla sugar to the butter and stir
until creamy. Gradually mix in the egg yolks. Stir the
chocolate, hazel nuts, baking powder and rum into
the mixture. Carefully fold in the beaten white of
egg.
5. Spread the mix evenly in the baking tin. Place the tin
on the turntable and bake. (The recipe yields approx.
0.8 kg of cake mix.)
INSTANT COOK
Allow the cake to cool.
6. Beat the cream with the sugar and setting agent until
stiff. Carefully fold the advocaat into the cream mixture. Spread the mixture evenly over the cake and
finish with a sprinkling of chocolate strands.
7. Allow the gateau to cool before serving.
France
Apple tart with Calvados
Tarte aux pommes avec calvados About 12-16 portions
Total cooking time: approx. 22-24 minutes
Utensils required: flan ring
(dm. approx. 28 cm)
Ingredients
200 g flour
1 tsp baking powder
100 g sugar
1 pack. vanilla sugar
1 pinch salt
1 egg
3-4 drop bitter almond oil
125 g butter
1 tsp butter or margarine to grease tin
50 g ground hazel nuts
600 g apples (russets x 3-4)
cinnamon
2 eggs
1 pinch salt
4 tbsp sugar
1 pack. vanilla sugar
4 tbsp Calvados (apple liqueur)
1 1/2tbsp cornflour
125 g double cream
icing sugar for dusting
Preparation
1. Mix the flour with the baking powder. Add the
sugar, vanilla sugar, salt, the egg, bitter almond oil
and butter and knead to a paste with the kneading
hook of a hand mixer. Cover the pastry dough and
leave in a cool place for about 30 minutes.
2. Line the tin with greaseproof paper. Roll out the pastry
dough between two sheets of foil and place it in the tin.
Form an edge to the pastry dough approx. 3 cm high.
3. Distribute the hazel nuts over the pastry shell.
4. Peel the apples, cut them in quarters, remove the
core and cut them in slices. Arrange the slices to
overlap each other on top of the hazel nuts and lightly dust them with cinnamon.
5. Separate the eggs. Beat the egg whites until stiff, gradually
trickling in a pinch of salt and 1 tbsp sugar. Stir the egg
yolk, the remaining sugar and the vanilla sugar until
creamy. Add Calvados, cornflour and double cream and
mix them in. Fold in the beaten egg whites and spread
the mixture evenly over the apple slices. Place the tart on
the turntable and bake. (The recipe yields approx. 1.3 kg).
INSTANT COOK
Tip:
Allow the tart to cool in the tin and dust it with icing sugar.
52
Page 55

RECIPES
Austria
Hazelnut cake
Nusskuchen
Total cooking time: approx. 23-26 minutes
Utensils required: square baking tin 30 cm
Ingredients
250 g butter or margarine
175 g sugar
1 pack. vanilla sugar
4 eggs
200 g ground hazel nuts
1 tbsp almond liqueur
250 g flour
2 level tsp baking powder
100 g chocolate glaze with a few hazel nuts
1 tsp butter or margarine to grease the tin
breadcrumbs
Preparation
1. Grease the tin and sprinkle it with breadcrumbs.
2. Put the butter in a mixing bowl to soften.
1 min 100 %
3. Add the sugar and vanilla sugar to the butter and mix to
a creamy consistency. Put in the eggs, stirring well as
each one is added. Fold in the ground nuts and the
liqueur. Mix the flour and the baking powder together
and fold them in. Spread the mixture evenly in the baking tin. Place the cake on the turntable and bake. (The
recipe yields approx. 1.0 kg)
INSTANT COOK
4. Allow the cake to cool for about 5 minutes. Put the
glaze in a bowl and melt it.
3-4 min 30 %
5. Coat the cake with the glaze and garnish with hazel
nuts.
Holland
Double crust apple tart
Total cooking time: approx. 23-24 minutes
Utensils required: flan ring (dm. approx. 28 cm)
Ingredients
90 g butter or margarine
90 g sugar
1 pack. vanilla sugar
1 tbsp lemon peel (natural)
1 pinch salt
2eggs
200 g flour
1/2 pack. baking powder
4-5 medium-sized apples
lemon juice
50 g sugar
1 tsp cinnamon
50 g rum raisins
1 egg yolk
1 tbsp milk
Preparation
1. Cream the butter for about half a minute in the mixer
at the highest setting.
2. Fold in the sugar, vanilla sugar, lemon peel and salt to
give a creamy consistency. Fold in the eggs one by
one. Combine the flour and the baking powder and
fold it in.
3. Line the flan ring with greaseproof paper and fill it
with 2/3 of the pastry dough.
4. Peel the apples, cut them in quarters and remove the
cores. Cut into thin slices and sprinkle with lemon.
Mix in the sugar and cinnamon and leave to stand for
about 10 minutes. Add the raisins and cover the pastry dough with the fruit.
5. Combine the remaining pastry dough and 50 g of the
flour and roll it out to the size of the flan ring. Lay it
on the apple filling and press it down lightly. Prick
the pastry top with a fork several times.
6. Beat the egg yolk with the milk and brush the pastry
top with it.
(The recipe yields approx. 1.1 kg).
7. Place the tart on the turntable in the cooker.
ENGLISH
53
INSTANT COOK
Page 56

RECIPES
Switzerland
Carrot cake
Möhrentorte
Total cooking time: approx. 22-24 minutes
Utensils required: round baking tin (dm. approx.
28 cm)
Ingredients
5 egg yolks
250 g sugar
250 g carrots, finely grated
juice of a lemon
250 g ground almonds
80 g flour
1 tbsp baking powder
5 egg whites
Preparation
1. Line the tin with greaseproof paper.
2. Cream the egg yolks and sugar with a hand mixer. Add
the carrots, lemon juice and almonds. Combine the flour
and the baking powder, add it and give it a good stir.
3. Beat the egg white until stiff and carefully fold it in.
Put the mixture in the baking tin, place it on the
turntable and bake.
(The recipe yields approx. 1.1 kg).
INSTANT COOK
4. Allow to cool in the tin for 5 minutes after baking.
1/2 pack. vanilla sugar
1 tbsp cornflour
540 g tinned pears, drained
120 g gooseberry jelly
1 tbsp candied fruits
1 tbsp almond flakes
Preparation
1. Knead together the flour, butter, icing sugar, salt and
egg with a kneading hook in a hand mixer. Cover
and leave in a cool place for 30 minutes.
2. Grease the baking tin. Roll out the pastry dough and
place it in the tin. Turn up the edges of the pastry
and prick it several times with a fork.
Bake on the turntable.
1. 8-10 min 30 % + 200oC
2. 5-7 min 200oC
3. Take the pastry case out of the tin and let it cool on a rack.
4. Heat the milk and salt in a covered bowl.
app. 2 min 100 %
5. Stir the egg yolk with the sugar and vanilla sugar to a
light creamy consistency. Mix in the cornflour.
Slowly pour in the hot milk. Pour the mixture back
into the bowl, cover and microwave. Stir during and
after cooking.
France
Pear tart
Tarte aux poires about 12-14 servings
Total cooking time: approx. 17-22 minutes
Utensils required: round baking tin (dm. app. 28 cm)
bowl with lid (2 litres size)
small bowl with lid
Ingredients
150 g flour
75 g butter or margarine
30 g icing sugar
1 pinch salt
1 egg
1 tsp butter or margarine
250 ml milk
1 pinch salt
2 egg yolks
20 g sugar
1-2 min 100 %
6. Spread the cream over the pastry case. Arrange the
drained pears on top. Put the gooseberry jelly in the
small bowl, cover and heat.
app. 1 min 100 %
7. Drip the hot jelly over the pears and garnish with the
candied fruits and almond flakes.
Tip:
Do not fill the pastry case until shortly before serving to
avoid it becoming soggy.
54
Page 57

RECIPES
Germany
Four-fruit flan
Vierfruchttorte
Total cooking time: approx. 19-24 minutes
Utensils required: round fruit cake tin (dm. app. 28 cm)
two bowls with lids (2 litres size)
Ingredients
75 g butter or margarine
75 g sugar
1 tsp vanilla essence
2 eggs
150 g flour
1 tsp baking powder
4 tbsp milk
1 tsp butter or margarine to grease tin
150 g marzipan paste
1/2 pack. custard powder (20 g)
2 tbsp sugar (20 g)
250 ml milk
1 banana (100 g), sliced
50 g grapes, halved, less seeds
150 g tinned mandarin oranges, drained
100 g sliced tinned peaches, drained
1 pack. clear glaze powder (11 g)
250 ml unsweetened fruit juice
Preparation
1. Cream the butter, sugar, vanilla essence and eggs
with a hand mixer for about 3 minutes. Combine
the flour and baking powder. Mix the flour and the
milk alternately into the butter mixture.
2. Grease the tin and spread the mixture evenly in it.
Bake the flan case on the turntable.
6. Dissolve the glaze powder in the fruit juice, put it in a
bowl and microwave. Stir well during and after cooking.
4-6 min 50 %
Pour the glaze over the fruit and leave to cool.
Tip:
The taste of the marzipan will be brought out best if you
leave the flan to stand for a couple of hours
ENGLISH
Spain
White peach mounds
Melocotones nevados approx. 8 servings
Total cooking time: approx. 3-5 minutes
Utensils required: round shallow glass dish
(dm. approx. 24 cm)
Ingredients
470 g tinned peach halves, drained
2 egg whites
70 g sugar
75 g ground almonds
2 egg yolks
2 tbsp cognac
1 tsp butter or margarine to grease dish
9-11 min 30 % + 200oC
app. 3 min 200oC
Turn the flan case out of the tin and allow it to cool.
3. Roll out the marzipan paste between two sheets of
foil to the size of the flan case. Lay it on the flan
case.
4. Put the custard powder in a bowl with the sugar and
milk. Stir until free of lumps, cover and microwave.
Stir once during and after cooking.
3-4 min 100 %
5. Spread the custard over the flan case. Distribute the
fruit on top.
Preparation
1. Dry off the peach halves.
2. Beat the egg whites until stiff. Then trickle in a little
sugar (35 g).
3. Mix together the almonds, the remaining sugar (35
g), the egg yolks and the cognac.
4. Fill each peach half with the mixture. Pipe the beaten egg whites over the filling.
5. Grease the dish. Place the peaches in the glass dish
and grill on the bottom grill.
app. 3 min 70 %
55
Page 58

RECIPES
Denmark
Party bread
Total cooking time: 16-18 minutes
Utensils needed: pizza tin (dm. approx. 30 cm)
Ingredients
190 g wheat flour (type 550)
190 g rye flour (type 1150)
40 g yeast
1/4 l buttermilk
125 g quark
1 1/2 tsp salt
ca. 50 ml buttermilk
poppy, sesame and caraway seeds
Preparation
1. Make a bread dough from the above ingredients.
Cover it and let it rise for about 30 minutes.
2. Line the pizza tin with greaseproof paper.
3. Knead the dough and divide it into 2-3 rolls. Cut into
19 similarly sized pieces and shape them into bread
rolls. Place one roll at the centre and the others in a
circular pattern around it. Brush the rolls with buttermilk and sprinkle over alternately with poppy seeds,
sesame seeds and caraway seeds.
4. Let the dough prove for another 30 minutes or so.
5. Preheat the oven to 230oC.
Place the baking tin on the bottom grill in the oven
and bake.
(The recipe yields approx. 0.8 kg).
16-118 min 10 % + 230oC
Great Britain
Raisin bread
Total cooking time: approx. 25-29 minutes
Utensils required: rectangular baking tin
Ingredients
15 g fresh yeast
1 tbsp sugar
275 ml lukewarm water
450 g wheat flour
1 tsp salt
25 g margarine or butter
100 g raisins
200 ml water
2 tbsp rum (or a few drops of rum essence)
1 tsp butter to grease the baking tin
For coating
1 egg yolk
1 tbsp water
Preparation
1. Dissolve the yeast in the lukewarm water.
2. Mix the flour and salt in a large bowl. Make a
depression in the centre and pour in the yeast mixture. Stir in a little flour. Dot the flour around the
edges with flakes of butter. Work all the ingredients
into a smooth dough.
3. Cover the bowl with a tea-towel and leave to rise in a
warm place for 30 minutes.
4. Meanwhile wash the raisins and soak them for 5-10
minutes in water and dry them thoroughly. Stir the
rum into the raisins and let it permeate them.
Thoroughly knead the dough once more, working
the raisins into it.
5. Put the bread dough in the greased baking tin, cover
it and let it prove in a warm spot for 15
minutes.
6. Combine the egg yolk and the water. Make a single
cut lengthways in the top of the raisin bread and
brush with the egg yolk mixture.
7. Place the tin on the turntable and cook.
(approx. 25 x 11 x 8 cm)
56
1. 19-21 min 10 % + 200oC
2. 6-8 min 200oC
Page 59

RECIPES
Great Britain
White tin loaf
Total cooking time: 25-29 minutes
Utensils required: rectangular tin (approx. 25 x 11 x 9
cm)
Ingredients
25 g fresh yeast
1 tsp sugar
250 ml lukewarm water
500 g wheat flour
1 tsp salt
15 g butter
1 tsp butter to grease the tin
1 egg yolk
1 tbsp water
Preparation
1. Dissolve the yeast and sugar in the lukewarm water.
2. Combine the flour and salt in a large bowl. Make a
depression in the centre, pour the yeast mixture into
it and mix in a little flour. Dot flakes of butter
around the edge. Knead all the ingredients thoroughly.
3. Cover the bowl with a tea-towel and leave the dough
to rise in a warm place for 30 minutes.
4. Knead the dough once more and place it in the
greased rectangular tin.
5. Cover the bowl and leave the dough to rise a second
time in a warm spot for 30 minutes until it has doubled in height.
6. Mix the egg yolk with the water. Make a single cut
lengthways on top of the bread and brush it with the
egg yolk mixture.
7. Place the tin in the oven and cook.
Germany
Multigrain bread
Dreikornbrot
Total cooking time: 27-30 minutes
Utensils required: pizza tin (dm. approx. 30 cm)
Ingredients
100 g rye flour
550 g wheat flour (type 550)
100 g linseed
100 g sesame seeds
60 g fresh yeast
1/2 l water
1 tbsp
Preparation
1. Make bread dough from the ingredients and let it rise
for approx. 30 minutes.
2. Lightly grease the pizza tin and dust with a little flour.
3. Thoroughly knead the dough once more and form it
into an elongated shape. Place it on the pizza tin,
cover it and let it prove for approx. 30-40 minutes.
Preheat the oven to 230oC.
4. Brush the bread with a little water and prick it several
times with a fork.
5. Place the bread on the turntable in the preheated
oven and cook.
(The recipe yields approx. 1.3 kg).
27-30 min 10 % + 230oC
ENGLISH
1. 18-20 min 10 % + 200oC
2. 7-9 min 200oC
57
Page 60

RECIPES
Denmark
Fruit jelly with vanilla sauce
Rødgrød med vanille sous
Total cooking time: approx. 8-12 minutes
Utensils required: bowl with lid (2 litres size)
Ingredients
150 g redcurrants, washed and sorted
150 g strawberries, washed and sorted
150 g raspberries, washed and sorted
250 ml white wine
100 g sugar
50 ml lemon juice
8 sheets of gelatine
300 ml milk
pith of half a vanilla pod
30 g sugar
15 g cornflour
Preparation
1. Retain some of the fruit for garnishing. Puree the
remaining berries with the white wine. Put the mixture in the bowl, cover and heat.
5-7 min 100 %
Fold in the sugar and lemon juice.
2. Soak the gelatine sheets in cold water for approx. 10
minutes, then take them out and squeeze them dry.
Stir the gelatine into the hot fruit puree until it dissolves. Put the jelly in the refrigerator to set.
3. For the vanilla sauce pour the milk into a bowl. Slit
open the vanilla pod and scrape out the pith.. Stir
the vanilla pith, the sugar and the cornflour into the
milk, cover and microwave. Stir it again once during
and after cooking.
Germany
Semolina pudding with raspberry sauce
Griessflammeri mit Himbeersauce
Total cooking time: approx. 15-20 minutes
Utensils required: bowl with lid (2 litres size)
Ingredients
500 ml milk
40 g sugar
15 g chopped almonds
50 g semolina
1 egg yolk
1 tbsp water
1 egg white
250 g raspberries
50 ml water
40 g sugar
Preparation
1. Put the milk, sugar and almonds into the bowl, cover
and heat.
3-5 min 100 %
2. Add the semolina and stir. Cover and microwave.
Stir once during cooking.
10-12 min 30 %
3. Mix the egg yolk with the water in a cup and fold
into the hot semolina. Beat the egg white until stiff
and lightly fold it in. Transfer the pudding to small
bowls.
4. For the sauce wash the raspberries, dry carefully and put
into a bowl with water and sugar. Cover and heat.
3-5 min 100 %
4. Turn the jelly out on to a plate and garnish with the
whole fruits. Serve with the vanilla sauce.
Tip:
An excellent accompaniment to the fruit jelly is chilled
cream or yoghurt.
2-3 min 100 %
5. Puree the raspberries and serve either hot or cold
with the semolina pudding.
58
Page 61
RECIPES
Sweden
Pistachio rice with strawberries
Pistaschris med zordgubbe
Total cooking time: approx. 27-31 minutes
Utensils required: bowl with lid (2 litres size)
Ingredients
125 g long grain rice
150 ml milk
175 ml water
1 vanilla pod
1 salt
50 g sugar
250 g strawberries
40 g sugar
40 ml cointreau (orange liqueur, 40 vol - %)
200 ml cream
1 egg white
50 g pistachio
Preparation
1. Put the rice and the liquid in the bowl. Slit open the
vanilla pod and add it to the rice with the salt and sugar.
Cover and microwave. Stir once during cooking.
1. 3-5 min 100 %
France
Pears in chocolate sauce
Poires au chocolat
Total cooking time: approx. 8-13 minutes
Utensils required: bowl with lid (2 litres size)
bowl with lid (1 litres size)
Ingredients
4 pears (500 g)
60 g sugar
1 pack. vanilla sugar (10 g)
1 tbsp pear liqueur, 30 vol - %
150 ml water
130 g plain chocolate
100 g cream (crème fraiche)
Preparation
1. Peel the pears whole.
2. Put the sugar, the vanilla sugar, the liqueur and the
water in the larger bowl and stir. Cover and heat.
1-2 min 100 %
3. Lay the pears in the liquid, cover and microwave.
5-8 min 100 %
ENGLISH
2. 24-26 min 30 %
Leave the rice to stand for 5 minutes after cooking.
2. Cut the strawberries in half and mix with sugar and
the orange liqueur.
3. Remove the vanilla pod from the rice and cool the
rice by stirring it in a bain-marie. Beat the cream and
the egg white separately until stiff. Fold first the pistachios, then the cream and finally the egg white into
the cold rice.
4. Put the rice in a large bowl, make a depression in the
rice and fill it with strawberries.
Remove the pears from the liquor and leave to cool.
4. Put 50 ml of the pear liquor in the smaller bowl. Add
the grated chocolate and the cream and stir. Cover
and heat.
2-3 min 100 %
5. Give the sauce a good stir. Pour it over the pears and
serve.
Tip:
Can be served with a scoop of vanilla ice-cream.
59
Page 62

RECIPES
Germany
Hot lemon
Heisse Zitrone 1 serving
Total cooking time: approx. 1 minute
Utensils required: tea glass (150 ml size)
Ingredients
100 ml water
juice of a lemon
2-3 tsp sugar
Preparation
1. Pour the water and the lemon juice in a cup and
heat.
1 min 100 %
Stir in sugar to taste.
Austria
Chocolate with cream
Schokolade mit Schlagobers
Netherlands
Fiery potion
Vuurdrank 10 servings
Total cooking time: approx. 8-10 minutes
Utensils required: bowl with lid (2 litres size)
Ingredients
500 ml white wine
500 ml dry red wine
500 ml rum, 54 vol - %
1 fresh orange
3 sticks of cinnamon
75 g sugar
10 tsp rock candy
Preparation
1. Pour the alcohol into the bowl. Thinly peel the
orange and add the orange peel to the alcohol with
the cinnamon and the sugar. Cover and heat.
8-10 min 100 %
2. Remove the orange peel and the cinnamon. Put a
teaspoonful of rock candy into each grog glass, add
some of the fiery potion and serve.
Total cooking time: approx. 1 minute
Utensils required: large cup (200 ml size)
Ingredients
150 ml milk
30 g plain chocolate, grated
30 ml cream
chocolate strands
Preparation
1. Pour the milk into the cup. Add the grated plain
chocolate to the milk. Stir and heat. Stir again during cooking.
app. 1 min 100 %
2. Beat the cream until stiff, pour it on the chocolate
and serve garnished with chocolate strands.
60
Page 63

VIKTIGA SÄKERHETSFÖRESKRIFTER
VIKTIGA SÄKERHETSFÖRESKRIFTER: LÄS IGENOM DESSA NOGA OCH SPARA DEM FÖR FRAMTIDA BRUK.
Minska eldfaran!
Mikrovågsugnen får inte lämnas utan
uppsikt under drift. För hög styrka eller
för lång matlagningstid leder till att
maten överhettas och kan fatta eld.
Om ugnen skall installeras i ett köksskåp, måste
SHARPS installationsram EBR-47ST användas. Den
finns hos din återförsäljare. Titta i instruktionerna för
raminstallation eller fråga efter en utförlig
installationsanvisning hos din återförsäljare.
Produktens säkerhet och kvalitet garanteras bara om
du använder ramen.
Du ska lätt kunna nå nätuttaget, så att ugnen lätt kan
kopplas ur i en nödsituation.
Nätanslutningen måste vara 230 V, 50 Hz, med
minst en 16 A säkring på distributionsledningen
eller minst ett 16 A distributionsrelä.
Vi rekommenderar att utrustningen ansluts till ett
separat uttag.
Placera inte ugnen nära platser med hög värme, t
ex vid en vanlig ugn.
Installera inte ugnen på en plats med hög fuktighet
eller där fukt lätt kan bildas.
Ugnen får inte förvaras eller användas utomhus.
ÖPPNA INTE LUCKAN om maten överhettas
och börjar ryka. Stäng av ugnen, koppla
bort den från vägguttaget och vänta tills
maten har slutat ryka. Öppna inte luckan
medan maten fortfarande ryker. Detta kan
orsaka eldsvåda.
Använd endast mikrovågssäkra
behållare och material. Se sidan 83.
Lämna inte ugnen utan uppsikt om du
använder engångsmaterial, papper eller
andra lättantändliga matförpackningar.
Rengör vågledarskyddet, ugnsutrymmet,
tallriken och valsstöden efter varje
användning. Dessa delar måste vara torra
och fria från fett. Ansamlat fett kan
överhettas och börja ryka eller fatta eld.
Placera inte lättantändligt material nära ugnen eller
ventilöppningarna. Blockera inte ventilöppningarna.
Avlägsna alla förseglingar, påsklämmor, m.m. av
metall från maten och matförpackningarna. Metall
kan skapa elektriska bågar som kan orsaka
eldsvåda.
Värm inte frityrolja i mikrovågsugnen.
Temperaturen kan inte kontrolleras och oljan kan
fatta eld.
Poppa endast popcorn i förpackning som är
speciellt avsedd för mikrovåg.
Förvara inte mat eller andra föremål inuti ugnen.
Kontrollera inställningarna när du slår på ugnen,
så att den genomför önskat program.
Se tipsen i denna handledning och i
receptavsnittet.
Minska skaderisken!
VARNING!
Använd inte ugnen om den är skadad eller inte
fungerar ordentligt. Kontrollera följande detaljer
före drift:
a)Luckan: Kontrollera att luckan stängs ordentligt
och inte är ur läge eller skev.
b)Gångjärn och säkerhetsspärrar: Kontrollera att
de inte har skadats eller lossnat.
c)Luckans tätningslister och kontaktytor:
Kontrollera att de är oskadade.
d)I ugnsutrymmet eller på luckan: Kontrollera att
det inte finns några hack.
e)Nätsladden och stickproppen: Kontrollera att
de är oskadade.
Du får aldrig själv justera, reparera eller
modifiera ugnen. Det kan utgöra en risk
om ej utbildad personal avlägsnar hölje
eller skydd mot mikrovågsenergi i avsikt
att serva eller reparera utrustningen.
Använd inte ugnen om luckan är öppen. Du får
inte heller påverka säkerhetsspärren på något sätt.
Använd inte ugnen om det finns något föremål
mellan luckans tätningslister och kontaktytorna.
Låt inte fett och smuts ansamlas på
luckans tätningslister och intilliggande
delar. Följ instruktionerna i “Vård och
rengöring”, sidan 80.
Personer med PACEMAKER skall rådfråga läkare
eller tillverkaren av pacemakern för
säkerhetsföreskrifter avseende mikrovågsugnar.
Undvik elektriska stötar!
Du får under inga omständigheter avlägsna ytterhöljet.
Du får aldrig spilla eller sticka in föremål i luckans
låsöppningar eller i ventilöppningarna. Om du skulle
spilla något, skall du omedelbart slå av ugnen och
koppla bort den från vägguttaget. Ring därefter till en
av SHARP auktoriserad serviceperson.
Sänk inte ned nätsladden eller stickproppen i
vatten eller annan vätska.
Låt inte nätsladden hänga ned över kanten på ett
bord eller arbetsbänk.
SVENSKA
61
Page 64

VIKTIGA SÄKERHETSFÖRESKRIFTER
Låt inte nätsladden komma i kontakt med varma
ytor, t ex ugnens baksida.
Försök inte byta ugnslampa. Endast en av SHARP
auktoriserad elektriker får byta lampa. Om ugnslampan
skulle gå sönder, skall du kontakta din återförsäljare
eller en av SHARP auktoriserad serviceperson.
Om utrustningens nätsladd skulle skadas, måste
den ersättas med en speciell sladd. Endast en av
SHARP auktoriserad serviceperson får utföra bytet.
Undvik explosion och plötslig överkokning
VARNING! Vätskor och andra livsmedel
får inte värmas i slutna behållare
eftersom de kan explodera.
Använd aldrig slutna behållare. Avlägsna
tillslutningar och lock före tillagning. Förseglade
behållare kan explodera av övertrycket även efter
det att ugnen har stängts av.
Var försiktig vid mikrovågsuppvärmning av vätskor.
Värm vätskan i en behållare med stor öppning så
att bubblor kan tränga ut.
Värm aldrig vätskor i behållare med
små öppningar, t ex nappflaskor. Detta
kan leda till att vätskan sprutar ut ur
behållaren vid uppvärmningen och
orsakar brännskador.
Förebygg att kokande vätska sprutar ut och
eventuellt orsakar skållning!
1. Vispa vätskan före uppvärmning/återuppvärmning
2. Det är tillämpligt att placera en glasstav eller
liknande föremål i vätskan under
uppvärmningen.
3. Låt vätskan stå kvar i ugnen efter
uppvärmningen för att förebygga eventuella
fördröjda eruptioner.
Värm inte upp ägg med skal eller hela
hårdkokta ägg i en mikrovågsugn,
eftersom de kan explodera även efter det
att uppvärmningen har avslutats. Om
äggen inte har vispats eller blandats upp,
skall du sticka håll på gulan och vitan före
uppvärmningen/återuppvärmningen så
att äggen inte exploderar. Skala och skiva
hårdkokta ägg före återuppvärmning i
mikrovågsugn.
Stick hål på matvaror typ potatis, korv och frukt
före uppvärmningen, så att de inte exploderar.
För att undvika brännskador
Flytta eller rör aldrig undergrillen när den är varm.
Använd alltid grytlappar eller ugnsvantar när du tar ut
mat ur ugnen, så att du inte bränner dig.
Öppna alltid kärl, popcornpåsar,
ugnstillagningspåsar etc. så att ansikte och händer
skyddas, för att undvika brännskador av ångan.
Prova alltid temperaturen på maten och rör
om i den innan du serverar, så att du
undviker brännskador. Var särskilt försiktig
med temperaturen på mat och dryck som
serveras till bebisar, småbarn och äldre.
Temperaturen på kärlet stämmer inte alltid med
temperaturen på maten eller drycken; kontrollera
alltid temperaturen på maten.
Stå alltid en bit ifrån ugnsluckan när du öppnar den,
så att du inte bränner dig på utströmmande ånga och
värme.
Skär upp fylld, bakad mat efter uppvärmning, så
släpper du ut ångan och undviker brännskador.
Rör inte vid ugnsluckan, yttersidan, undergrillen,
ventilationsöppningarna, tillbehören eller kärlen när
du använder lägena GRILL, KOMBINATION,
PIZZA/POTATIS och AUTOMATIK (förutom
Upptining) De blir mycket varma. Se till att de har
svalnat innan du gör rent dem.
För att undvika att barn använder ugnen
VARNING: Låt aldrig barn använd ugnen
på egen hand utan tillsyn om de inte vet
hur en mikroågsugn skall användas på ett
säkert sätt och är medvetna om riskerna
vid felaktig hantering av ungen.
Lär barnen alla viktiga säkerhetsinstruktioner: att
använda grytlappar, försiktigt öppna kärl; var särskilt
försiktig med förpackningar som gör maten krispig
(t.ex. självuppvärmande material), eftersom de kan bli
mycket varma.
Övriga varningar
Lyft inte upp undergrillen annat än vid rengöring.
Modifiera aldrig ugnen på något vis.
Flytta aldrig på ugnen när den är igång.
Ugnen är bara till för matlagning i hemmet och ska
bara användas för det. Den är inte till för kommersiellt
bruk eller laboratoriebruk.
Så här gör du för att undvika problem
och skador på din ugn.
Använd aldrig ugnen när den är tom, förutom när
det rekommenderas i instruktionsboken. (Se
”Uppvärmning utan mat”, sidan 66.) Om du gör
det kan ugnen skadas.
När du använder ett stekfat eller material som upphettas, isolera då den roterande tallriken och stödet
t.ex. med ett porslinsfat, så att de inte skadas p.g.a.
värmeledning. Överskrid inte uppvärmningstiden i
recepten.
62
Page 65

VIKTIGA SÄKERHETSFÖRESKRIFTER
0
2
3
1
4
5
8
9
10
11
12
13
14
15
20
25
30
7
6
19 cm
20 mm
Clear
Använd inte redskap av metall som reflekterar
mikrovågorna och orsakar gnistor. Ställ inte
konservburkar i ugnen.
Använd bara den roterande tallriken och det stöd
som hör till ugnen.
Lägg inte plastförpackningar i ugnen om den
fortfarande är varm efter användning av läge
GRILL, KOMBINATION, PIZZA/POTATIS och
AUTOMATIK (förutom Upptining. De kan smälta.
Använd inte plastförpackningar när du kör i
lägena ovan, om inte tillverkaren garanterar att de
klarar det.
Ställ inte något på yttersidan när ugnen är igång.
1. Tag ut allt emballage ur ugnen. Släng den lösa
polytenskivan som sitter mellan luckan och
ugnsutrymmet. Tag bort dekalen på utsidan av
luckan, om den sitter kvar.
OBS!
Om du är osäker på hur du skall koppla in ugnen,
kontakta en auktoriserad, behörig elektriker.
Varken tillverkaren eller återförsäljaren accepterar
skadeståndskrav som rör ugnen eller personliga
skador om de uppkommit pga att elinstallationen
inte gått rätt till.
Vattenånga eller droppar kan ibland bildas på
ugnens sidor eller på dörrtätningarna och de
tätande ytorna. Det är fullt normalt och betyder inte
att det läcker ut mikrovågor eller att ugnen är
trasig.
INSTALLATION
SVENSKA
4. Ugnsluckan kan bli het när ugnen
används. Placera eller montera ugnen
så att dess underkant befinner sig
minst 85 cm över golvet. Håll barn
borta från luckan så att de inte
riskerar att bränna sig.
5. Kontrollera att frihöjden ovanför ugnen är 19
cm. Ugnen ska placeras minst 20 mm från
omkringliggande väggar. Placera ugnen så att
en kortsida inte vetter mot en vägg.
Remove this film
2. Kontrollera noga att ugnen inte är skadad.
3. Ställ ugnen på en jämn yta som håller för ugnens
vikt plus det tyngsta du kan komma att tillaga.
6. Anslut nätsladden till ett vanligt jordat uttag.
63
Page 66

FÖRE ANVÄNDNING
1. Anslut ugnen.
Displayen visar:
2. Tryck på STOPP-knappen
Displayen visar:
3. Ställ klockan (se sidan 65).
4. Värm upp ugnen utan mat (se sidan 66).
ATT ANVÄNDA STOPP-KNAPPEN
Använd STOPP-knappen för att:
1. Radera fel vid programmering.
2. Tillfälligt stänga av ugnen under tillagning.
3. Avbryta ett program under tillagning. Tryck då två
gånger på STOPP-knappen.
64
Page 67

STÄLLA KLOCKAN
Det finns två sätt att ställa klockan: 12-timmarsvisning eller 24- timmarsvisning.
1. För att ställa in 12-timmarsvisning, tryck en gång
på KLOCK-knappen, som visas i Steg 1 till höger.
2. För att ställa in 24-timmarsvisning, tryck en gång
på KLOCK-knappen, som visas i Steg 2 till höger.
Exempel:
För att ställa 24-timmarsvisning på 23:35:
Steg 1.
x1
Steg 2.
x2
Välj 24-timmarsvisning
genom att trycka på
KLOCK-knappen två
gånger.
x2
Ställ in minuterna:
Tryck på 10 MIN-knappen tre gånger.
Tryck på 1 MIN-knappen fem gånger.
x3
NOTES:
1. Tryck på STOPP-knappen om du gör fel under
programmeringen.
2. Om ugnen är i tillagnings- eller minuttimerläge och
du vill veta vad klockan är, rör vid KLOCK-knappen.
Så länge ditt finger rör vid knappen visas hur
mycket klockan är.
3. Om ugnens strömförsörjning bryts visar
displayen TRYCK PÅ STOPP med jämna
mellanrum när strömmen kommit tillbaka.
Ställ in timmarna:
Tryck på 10 MIN-knappen två gånger.
Tryck på 1 MIN-knappen tre gånger.
Starta klockan.
x5
Ändra från timmar till
minuter genom att trycka en
gång på KLOCK-knappen.
x2
4. Följ exemplet ovan när du vill ställa om klockan.
5. Om du inte ställer klockan, tryck på STOPP-
x3
Kontrollera
teckenfönstret.
x1
Om strömmen bryts när du tillagar något
raderas programmeringen. Även klockans
inställning raderas.
knappen en gång. visas i teckenfönstret.
När ugnsprogrammet är klart kommer. att
visas i teckenfönstret istället för tiden.
x1
SVENSKA
MIKROVÅGSEFFEKTNIVÅER
Din ugn har 5 effektnivåer. För att välja effektnivå, följ instruktionerna i receptdelen.
900 W = 100 % - läge 270 W = 30 % - läge
630 W = 70 % - läge 90 W = 10 % - läge
450 W = 50 % - läge
• För att ställa in effekten, tryck på EFFEKT-knappen tills önskad effekt visas.
• Om du trycker en gång på EFFEKT-knappen kommer att visas. Om du missar önskad effekt,
fortsätt att trycka på EFFEKT-knappen tills önskad effekt visas igen.
• Om du inte väljer effekt kommer 100 % läget att väljas automatiskt.
65
Page 68

TILLAGNING MED MIKROVÅGOR
Din ugn kan programmeras upp till 99.90 minuter. (99.90).
Exempel: Antag att du vill värma soppa i 2 minuter och 30 sekunder på 70 % effektnivå.
Ställ in time:
Tryck på 10 MIN-
knappen två
gånger & på 1
MIN-knappen tre
gånger.
x3x2
OBS:
1. Om luckan öppnas under tillagning stannar tillag-
ningstiden automatiskt i teckenfönstret. Tillagningstiden
fortsätter att räknas ned när du stängt luckan och
tryckt på +1min /START-knappen.
Välj 70 % genom att trycka
på EFFEKT-knappen två
gånger.
x2
Starta tillagningen.
x1
2. Om du vill veta vilken effekt som används under
tillagningen, tryck på EFFEKT-knappen. Så länge
du trycker på EFFEKT-knappen visas effekten.
3. När ugnsprogrammet är klart visas klockan i
teckenfönstret (om den är inställd).
Kontrollera displayen
UPPVÄRMNING UTAN MAT
En svag rök- eller brandlukt kan kännas när du använder grillelementen eller kombinationsgrillen första gången.
Det är helt normalt och betyder inte att ugnen är trasig.
Du kan undvika det här om du använder både över- och undergrillen utan mat i 20 minuter första gången du
använder ugnen.
VIKTIGT: Öppna ett fönster eller slå på köksfläkten när du använder grillen, så försvinner eventuell rök
och lukt.
Ange
uppvärmningstiden
(20 min) genom att
trycka på 10 MIN-
knappen två gånger.
Ugnen börjar räkna ned. När ugnen är klar, öppna luckan så att ugnsutrymmet kyls ned.
VARNING:
Ugnsluckan, yttersidan och ugnsutrymmet blir mycket varma. Var försiktig så du inte bränner dig när ugnen
svalnar efter tillagning
Tryck på GRILL-
knappen tre
gånger.
x3
Starta uppvärmningen.
x1x2
Kontrollera displayen
66
Page 69

GRILLNING
Ugnen har en undergrill och en övergrill och du kan grilla på tre olika sätt genom att trycka på GRILL-
knappen en, två eller tre gånger.
Trycka på GRILL-knappen
x1
x2
x3
Exempel:
Så här gör du om du vill grilla i fem minuter och enbart använda ÖVERGRILLEN.
Ange grilltiden
genom att trycka
på 1 MIN-
knappen fem
gånger.
x5
Välj övergrillen genom
att trycka på GRILL-
knappen en gång.
Grillelement
Övergrill
Undergrill
Over och Undergrill
x1
Starta grillen.
x1
DISPLAY
Kontrollera displayen
SVENSKA
1. De övre eller undre gallren rekommenderas vid grillning.
2. En svag rök- eller brandlukt kan kännas när du använder grillen första gången. Det är helt normalt och
betyder inte att ugnen är trasig. Information om hur du värmer ugnen utan mat finns på föregående sida.
3. Efter tillagningen visar displayen eventuellt "SVALNAR".
VARNING: Ugnen, den roterande tallriken, kärlen som ställts in i ugnen och undergrillen
blir mycket varma. Undvik att bränna dig genom att alltid använda tjocka
grytlappar när du tar ur mat eller den roterande tallriken ur ugnen.
67
Page 70

TILLAGNING MED KONVENTIONELL UGNSVÄRME
Ugnen har 10 förinställda temperaturer som uppnås genom en kombination av över- och undergrillen.
x2
Tryck på VÄRME-knappen
Ugnstemperatur (° C)
Exempel 1: Tillagning med föregående uppvärmning
Så här gör du om du vill värma upp ugnen till 180° C och laga maten under 20 minuter vid 180° C.
Ange önskad temperatur genom
att trycka på VÄRME-knappen
fem gånger. Displayen visar
180° C.
x5
Ange tillagningstid. Tryck
på 10 MIN-knappen två
gånger.
x1
250
x4
230x3220
Tryck på START-knappen .
Displayen visar
"UPPVÄRMNING".”
200x5180
x1
Tryck på START-
knappen .
x6
160x7130x8100x970
När temperaturen värmts upp
till 180° C hörs en ljudsignal.
Displayen visar . Öppna
luckan, ställ in maten och
stäng luckan.
Kontrollera displayen
x10
40
x2
OBS!
• Om du har värmt upp ugnen men vill ändra temperaturen trycker du på VÄRME-knappen och
anger den nya temperaturen. Om du följt exemplet ovan kan du ändra temperaturen när du har
angivit tillagningstiden.
• Ugnen håller den inprogrammerade temperaturen i 30 minuter när den värmts upp. Efter 30 minuter
visar displayen klockan, om denna har ställts in, och uppvärmningen avslutas.
• Efter tillagningen visar displayen eventuellt .
x1
68
Page 71

TILLAGNING MED KONVENTIONELL UGNSVÄRME
Exempel 2: Tillagning utan föregående uppvärmning
Så här gör du om du vill laga en rätt i 20 minuter vid 250° C.
Ange tillagningstiden
(20 min) genom att
trycka på 10 MIN-
knappen två gånger.
x2
OBS!
• Efter tillagning svalnar ugnen automatiskt. Meddelandet "SVALNAR" visas eventuellt på displayen.
• Du ändrar ugnstemperaturen genom att trycka på VÄRME-knappen tills den önskade temperaturen
visas på displayen.
VARNING: Ugnen, den roterande tallriken, kärlen som ställts in i ugnen och undergrillen
blir mycket varma. Undvik att bränna dig genom att alltid använda tjocka
grytlappar när du tar ur mat eller den roterande tallriken ur ugnen.
Välj
tillagningstemperatur
(250° C).
x1
Tryck på START-
knappen .
x1
Kontrollera displayen
KOMBINATIONSTILLAGNING
Du kan laga mat genom att använda tre olika kombinationer av grillvärme och mikrovågor. Tryck på
KOMBINATIONS-knappen om du vill kombinera grillvärme och mikrovågor tills den önskade kombinationen
visas på displayen. I de flesta fall förkortas tillagningstiden om du använder kombinationstillagning.
SVENSKA
Tryck på KOMBINATIONS-knappen
KOMBI 1 x1
KOMBI 2 x2
KOMBI 3 x3
OBS!:
• Tryck på EFFEKT-knappen om du vill justera mikrovågseffekten.
• Du ändrar ugnstemperaturen genom att trycka på VÄRME-knappen tills den önskade temperaturen
visas på displayen.
TILLAGNINGSMETOD
MIKRO 30 %
VÄRME 250° C
MIKRO 30 %
ÖVERGRILL
MICRO 30 %
UNDERGRILL
Effektnivå
10 % - 50 %
10 % - 100 %
10 % - 100 %
Display
69
Page 72

KOMBINATIONSTILLAGNING
Exempel 1:
Så här gör du om du vill laga till en rätt i 20 minuter genom att använda KOMBINATION 1 (10 %
mikrovågseffekt och 200° C UGNSVÄRME).
Ange tillagningstiden
(20 min) genom att
trycka på 10 MIN-
knappen två gånger.
x2
Starta tillagningen.
x1
Exempel 2:
Så här gör du om du vill laga till en rätt i 20 minuter genom att använda KOMBINATION 2 (10 %
mikrovågseffekt och ÖVERGRILLEN).
Ange
tillagningstiden
(20 min) genom
att trycka på 10
MIN-knappen
två gånger.
Tryck på
KOMBINATIONS-
knappen två
gånger.
Tryck en gång på
KOMBINATIONSknappen.
x1
Kontrollera displayen
Tryck en gång på
EFFEKT-knappen
(10 %).
Tryck en gång på
EFFEKT-knappen
(10 %).
x1
Starta tillagningen.
Tryck på VÄRME-
knappen tre gånger
(200° C).
Kontrollera displayen
x4
x2
OBS! Efter tillagningen visas eventuellt meddelandet "SVALNAR" på displayen.
VARNING: Ugnen, den roterande tallriken, kärlen som ställts in i ugnen och undergrillen
blir mycket varma. Undvik att bränna dig genom att alltid använda tjocka
grytlappar när du tar ur mat eller den roterande tallriken ur ugnen.
x2
x1
x1
70
Page 73

ANDRA PRAKTISKA FUNKTIONER
1. TILLAGNING I FLERA SEKVENSER.
Du kan programmera in olika steg (max 4) och kombinera MIKROVÅGOR, GRILLEN,
KOMBINATIONSTILLAGNING och UGNSVÄRME.
EXEMPEL:
1.
Mikro eller uppvärmning + mikro + mikro + kombination eller ugnsvärme eller grill eller mikro
2.
Mikro eller uppvärmning + kombination eller ugnsvärme eller grill eller mikro + kombination
eller ugnsvärme eller grill eller mikro
3. Kombination eller ugnsvärme eller grill eller mikro + mikro + kombination eller ugnsvärme
eller grill eller mikro
Exempel:
Steg 1: 10 minuter, 50 % effekt
Steg 2: 5 minuter kombination, 10 % effekt
Steg 3: 20 minuter, använda ÖVERGRILLEN
STEG 1
Ange tillagningstiden (10 minuter)
genom att trycka en gång på
10 MIN knappen
Ange 50 % mikrovågseffekt
genom att trycka på EFFEKT-
knappen tre gånger.
SVENSKA
x1
STEG 2
Ange tillagningstiden (5
minuter) genom att trycka fem
gånger på 1 MIN-knappen.
x5
STEG 3
Ange tillagningstiden
(20 minuter) genom att
trycka två gånger på
10 MIN-knappen.
x2
Du kan ta bort ett av de tre stegen i exemplet ovan.
Obs! Du behöver inte trycka på EFFEKT-knappen om du vill att effekten ska ökas till 100 % i det sista
steget.
Välj KOMBINATION 2 genom
att trycka två gånger på
KOMBINATIONS-knappen.
Välj ÖVERGRILLEN
genom att trycka en
gång på GRILL-
knappen.
x1
x2
x3
Tryck på START-
knappen .
Ange 10 % (låg effekt) genom
att trycka en gång på EFFEKT-
knappen.
x1
Kontrollera displayen
x1
71
Page 74
ANDRA PRAKTISKA FUNKTIONER
2. Knapparna MER/MINDRE
Med knapparna MER ( ) och MINDRE ( ) är det lätt att öka eller minska de programmerade
tidsinställningarna som används för PIZZA, POTATIS och AUTOMATIK. Knapparna kan även användas under
tillagning.
a) Ändra de programmerade tidsinställningarna.
Exempel:
Så här gör du om du vill grilla en kyckling som väger 0,9 kilo genom att använda knapparna AUTOMATIK
och MER ( ).
1. Välj AUTOMATIK-menyn
för grillad kyckling genom
att trycka en gång på
AUTOMATIK-knappen.
x1
OBS!
Tryck på samma knapp (MER eller MINDRE) om du vill upphäva inställningen.
Ändra från MER till MINDRE genom att trycka på knappen MINDRE ().
Ändra från MINDRE till MER genom att trycka på knappen MER ().
b) Ändra tillagningstiden när ugnen är igång:
Du kan minska eller öka tillagningstiden med en minut i taget genom att trycka på knapparna
MINDRE ( ) och MER ().
2. Ange att du vill att
kycklingen ska bli väl
genomstekt genom att
trycka på MER-knappen
inom två sekunder.
x1
3. Ugnen startas
automatiskt.
72
Page 75

ANDRA PRAKTISKA FUNKTIONER
3. Startknappens funktioner
Startknappen har två funktioner:
a) Direktstart. Tryck på START-knappen om du vill starta tillagningen direkt med full effekt (100 %). Ange
tillagningstidens längd genom att trycka på knappen. Varje tryck motsvarar en minut.
OBS! Ugnen har en barnsäkerhetsfunktion. START-knappen kan endast användas under två minuter efter
att luckan har stängts eller STOPP-knappen tryckts in.
b) Förlänga tillagningstiden. Du kan förlänga tillagningstiden med en minut åt gången genom att trycka på
START-knappen när tillagningen startats.
4. KONTROLLERA INSTÄLLNINGARNA NÄR UGNEN ÄR IGÅNG
Du kan kontrollera effektnivån samt den inprogrammerade och faktiska ugnstemperaturen (vid
uppvärmning).
KONTROLLERA EFFEKTNIVÅN:
Under tillagning kontrollerar du effektnivån hos
mikrovågorna genom att trycka på EFFEKT-knappen.
Ugnen fortsätter nedräkningen även om effektnivån
visas på displayen.
KONTROLLERA UGNSTEMPERATUREN:
Under tillagning kontrollerar du ugnstemperaturen
genom att trycka på EFFEKT-knappen. När ugnen
värms upp kan du kontrollera den faktiska
ugnstemperaturen.
KONTROLLERA ATT KLOCKAN VISAR RÄTT TID:
Klockan måste vara ställd (se sidan 65). Under
tillagning kontrollerar du att klockan visar rätt tid genom
att trycka på KLOCK-knappen.
Effektnivån visas så länge
som du håller knappen
nedtryckt.
Ugnstemperaturen visas så
länge som du håller
knappen nedtryckt.
Tiden visas så länge som
du håller knappen
nedtryckt.
SVENSKA
73
Page 76

PIZZA/PAJ/POTATIS/AUTOMATIK
Funktionerna PIZZA, POTATIS och AUTOMATIK räknar automatiskt ut hur maträtterna som visas nedan ska
tillagas och hur länge de ska stå i ugnen.
PIZZA/PAJ knappar
POTATIS knappar
AUTOMATIK knappar
Tänk på följande när du använder funktionerna PIZZA, POTATIS och AUTOMATIK:
1.
Välj en meny genom att trycka på motsvarande knapp. AUTOMATIK-knapparna kan endast användas under två
minuter efter en avslutad tillagning, eller efter att luckan har stängts eller STOPP-knappen tryckts in.
2.
Öka vikten genom att trycka på den redan valda knappen tills rätt vikt visas. Ange endast matens vikt, inte kärlets
vikt.
Använd manuell tillagning om maten som ska tillagas väger mer eller mindre än de vikter/mängder som anges i
tillagningstabellen (se den separata kokboken).
3.
De förprogrammerade tillagningstiderna är genomsnittstider. Använd knapparna MINDRE och MER om
du vill ändra tillagningstiderna för PIZZA, POTATIS och AUTOMATIK. Följ instruktionerna i tillagningstabellen
(se den separata kokboken) för att uppnå bästa resultat.
4.
Ugnen startas omedelbart när matens vikt har angivits.
VARNING:
Ugnen, den roterande tallriken, kärlen som ställts in i ugnen och undergrillen
blir mycket varma. Undvik att bränna dig genom att alltid använda tjocka
grytlappar när du tar ur mat eller den roterande tallriken ur ugnen.
OBS!
När något behöver göras (t.ex. vända på maten) stannar ugnen och en ljudsignal hörs. Displayen visar
vad som måste utföras. Displayen visar vad som måste utföras. Fortsätt tillagningen genom att trycka på START-
knappen . Matens slutgiltiga temperatur beror på vilken temperature den hade när den ställdes in i ugnen.
Kontrollera att maten är genomvarm efter tillagningen och förläng om nödvändigt tillagningstiden. Följ alltid
instruktionerna i tillagningstabellen (se den separata kokboken).
74
Page 77

PIZZA/PAJ/POTATIS/AUTOMATIK
Exempel 1 : Så här gräddar du 800 g färsk pizza genom att använda knappen FÄRSK
PIZZA/FÄRSK PAJ.
Välj meny och ange vikten genom att trycka på
knappen FÄRSK PIZZA/FÄRSK PAJ två
gånger. Displayen visar nu 0,8 KG.
x2
Exempel 2: Så här lagar du till 400 g pommes frites.
Ugnen startas omedelbart.
Välj meny och ange vikten genom att trycka
på knappen POMMES FRITES fem gånger.
Displayen visar nu 0,4 KG.
x5
Exempel 3: Så här grillar du en kyckling som väger 900 g.
Välj meny och ange vikten genom att
trycka på knappen GRILLAD KYCKLING
en gång. Displayen visar nu 0,9 KG.
x1
Ugnen startas omedelbart.
SVENSKA
Ugnen startas omedelbart.
75
Page 78

PIZZA/PAJ TABELL
Fryst pizza, fryst paj
Mängd: 0,15 - 0,6 kg pizza
0,15 - 0,5 kg paj
Redskap: Direkt på den roterande tallriken
Steg: 50 g
Ursprungling
mattemperatur: -18° C, fryst
Rekommenderade
menyer: Fryst pizza, fryst paj
Färsk pizza eller paj
Mängd: 0,7 - 1,0 kg pizza
0,7 kg paj
Redskap: Direkt på den roterande tallriken
Steg: 100 g
Ursprungling
mattemperatur: 20° C, rumstemperatur
Rekommenderade
menyer: Hemlagad pizza, paj. Använd MER-
knappen ( ) om du ska tillaga en paj.
PIZZARECEPT
Ingredienser:
Ca. 300 g färdig deg (mix eller färdigkavlad)
Ca. 200 g tomater på burk
Ca. 150 g fyllning (t.ex. majs, skinka, salami,
ananas)
Ca. 50 g riven ost
Basilika, oregano, timjan, salt, peppar
▲
Gör så här:
• Ta ur den frysta pizzan/pajen ur förpackningen
och lägg den på den roterande tallriken. Tryck på
MER ( )-knappen innan du trycker på FRYST
▲
PIZZA/FRYST PAJ-knappen om pizzan har en
tjock botten.
• Flytta över pizzan/pajen på ett serveringsfat efter
tillagningen. Låt pizzor och pajer med tjock botten
stå kvar i ugnen i två minuter avslutad tillagning.
Gör så här:
• Gör pizzan/pajen enligt recepten nedan.
• Placera den direkt på den roterande tallriken.
• Flytta över pizzan/pajen på ett serveringsfat efter
tillagningen.
PAJRECEPT
Ingredienser:
200 - 250 g pajdeg (fryst eller kyld)
3 ägg
200 g grädde eller mjölk
100 g riven ost (gärna emmenthaler)
50 g skinka
Gör så här:
1.
Tillred degen enligt instruktionerna på
förpackningen. Kavla ut degen till samma
storlek som den roterande tallriken.
2.
Smörj den roterande tallriken, placera degen
ovanpå och nagga den med en gaffel.
3.
Låt tomaterna rinna av och skär dem i bitar.
Krydda och lägg tomaterna på degen. Lägg
alla andra ingredienser på pizzan och strö
slutligen över den rivna osten.
4.
Tillaga pizzan genom att trycka
på FÄRSK PIZZA/FÄRSK PAJ-
knappen.
Gör så här:
1.
Tina upp degen och kavla ut den till samma storlek
som den roterande tallriken. Placera degen på
tallriken och nagga den med en gaffel.
2.
Blanda äggen, grädden/mjölken och osten. Krydda
med salt och peppar och häll smeten över degen.
3.
Strö över skinkan och tillaga pajen
genom att trycka på FÄRSK
PIZZA/FÄRSK PAJ-knappen.
76
Page 79

POTATIS TABELL
Pommes frites
Mängd: 0,2 - 0,4 kg
Redskap: Direkt på den roterande tallriken
Steg: 50 g
Ursprungling
mattemperatur: -18° C, fryst
Rekommenderade
menyer: Pommes frites
Kokt potatis/bakad potatis
Mängd: 0,1 - 0,8 kg
Redskap: skål och lock
Steg: 100 g
Ursprungling
mattemperatur: 20° C, rumstemperatur
Rekommenderade
menyer: Potatis med eller utan skal
Gör så här:
• Ta de djupfrysta pommes frites-bitarna
(rekommenderade för vanliga ugnar) ur
förpackningen och lägg dem på den roterande
tallriken.
• Tryck på MER-knappen ( ) om du tillagar tjocka
pommes frites.
• Lägg över på ett serveringsfat när tillagningen är
avslutad.
Gör så här:
Kokt potatis: Skala potatisen och skär till dem så att
bitarna blir lika stora.
Bakad potatis: Välj lika stora potatisar och tvätta
dem.
• Lägg potatisen i en skål.
• Tillsätt rätt mängd vatten (per 100 g), ca. 2 msk,
och litet salt.
• Täck över skålen med locket.
• Rör om och sätt tillbaka locket när ugnen
stannar och en ljudsignal hörs.
• Låt potatisen vara kvar under locket i 1-2
minuter efter tillagningen.
▲
SVENSKA
Grillad kyckling
Mängd: 0,9 - 1,8 kg
Redskap: Lågt stöd
Stänkskyddet
Steg: 100 g
Ursprunglig
mattemperatur: 5° C, kall
Ingredienser: till 1,0 kg grillad kyckling:
1/2 tsk salt och peppar
1 tsk paprika, söt
2 msk olja
Rekommenderade
menyer: Grillad kyckling
AUTOMATIKTABELL
Gör så här:
• Blanda ingredienserna och bred över kycklingen.
• Gör hål i skinnet på kycklingen.
• Lägg kycklingen på det nedre gallret med bröstet
nedåt.
• Vänd på kycklingen när du hör ljudsignalen.
• När kycklingen är klar, låt den värmeutjämna ca
3 minuter.
OBS!
Läs om hur du använder stänkskyddet på sidan 79
under Tips-rubriken.
77
Page 80

AUTOMATIKTABELL
Skinkstek
Mängd: 0,6 - 2,0 kg
Redskap: lågt stöd & stänkskyddet
Steg: 100 g
Ursprungling
mattemperatur: 5° C, kall
Ingredienser: för 1 kg mager skinkstek
1 pressad vitlöksklyfta
2 tsk olja
1 tsk paprika
lite malen kummin
1 tsk salt
Rekommenderade
menyer: Mager skinkstek
Grillspett
Mängd: 0,2 - 0,8 kg
Redskap: högt stöd
Steg: 100 g
Ursprungling
mattemperatur: 5° C, kall
Rekommenderade
menyer: Grillspett
Gör så här:
• Mager skinkstek rekommenderas.
• Blanda alla ingredienser och bred dem över
skinkan.
• Placera skinkan på det nedre gallret.
• Vänd på skinksteken när en ljudsignal hörs.
Vira in skinsteken i aluminiumfolie efter tillagningen
och låt stå i ca. 10 minuter.
OBS!
Läs om hur du använder stänkskyddet på sidan 79
under Tips-rubriken.
Gör så här:
• Förbered grillspetten (se den medföljande
kokboken).
• Placera grillspetten på det övre gallret.
• Vänd på spetten när en ljudsignal hörs.
• Flytta över på ett serveringsfat när spetten är klara.
Fiskpinnar, fågelbitar
Mängd: 0,2 - 0,5 kg
Redskap: Direkt på den roterande tallriken
Steg: 100 g
Ursprungling
mattemperatur: -18° C, fryst
Rekommenderade
menyer: Fågelbitar (t.ex. panerade
kycklingbitar eller fiskpinnar)
Kaka
Mängd: 0,5 - 1,5 kg
Redskap: Kakform & lågt stöd
Steg: 100 g
Ursprungling
mattemperatur: 20° C, rumstemperatur
Rekommenderade
menyer: Morotskaka
Äppelpaj med täcke
Sockerkaka
TIPS!
Du kan använda en vanlig kakform av metall. Placera ett tefat mellan den roterande tallriken och formen
om missfärgning uppstår.
Gör så här:
• Smörj den roterande tallriken.
• Ta ur fågelbitarna/fiskpinnarna ur förpackningen
och lägg dem på den roterande tallriken.
• Pensla lite olja på fiskpinnarna/de panerade
kycklingbitarna och lägg dem på den roterande
tallriken.
• Flytta över på ett serveringsfat efter tillagningen
(maten kan serveras direkt).
Gör så här:
• Förbered kakan (se den medföljande kokboken).
• Häll smeten i en kakform av passande storlek.
• Låt kakan svalna innan du tar den ur formen.
78
Page 81

AUTOMATIKTABELL
Enkel upptining, fågel
Mängd: 0,9 - 2,0 kg
Redskap: (se anmärkning nedan)
Steg: 100 g
Ursprungling
mattemperatur: -18° C, fryst
Enkel upptining, kycklingben
Mängd: 0,2 - 1,0 kg
Redskap: (se anmärkning nedan)
Steg: 100 g
Ursprungling
mattemperatur: -18° C, fryst
Enkel upptining av stekar, kotletter och
fiskfilé
Mängd: 0,2 - 1,0 kg
Redskap: (se anmärkning nedan)
Steg: 100 g
Ursprungling
mattemperatur: -18° C, fryst
OBS!
1. Stekar, kotletter, fiskfilé och kycklingben bör frysas i ett lager.
2. Använd små, platta bitar av aluminiumfolie för att skydda de upptinade delarna.
3. Fågel bör tillagas omdelbart efter upptining.
4. Placera maten i ugnen enligt illustrationen nedan.
Kycklingben, stekar, kotletter och fiskfilé Fågel
Gör så här:
• Ställ en uppochnedvänd tallrik på den roterande
tallriken och placera kycklingen ovanpå.
• Vänd på kycklingen när en ljudsignal hörs. Skydda om
nödvändigt de upptinade delarna med aluminiumfolie.
• Vänd på kycklingen igen när en ljudsignal hörs
(skydda de upptinade delarna med aluminiumfolie).
• Efter upptiningen, vira in kycklingen i aluminiumfolie
och låt stå i 30-90 minuter tills den är helt upptinad.
Gör så här:
• Lägg kycklingbenen på en tallrik.
• Vänd på kycklingbenen och flytta om dem när en
ljudsignal hörs. Skydda om nödvändigt de
upptinade delarna med aluminiumfolie.
• Vänd på kycklingbenen och flytta om dem igen när
en ljudsignal hörs (skydda de upptinade delarna
med aluminiumfolie).
• Efter upptiningen, vira in kycklingbenen i
aluminiumfolie och låt stå i 10-30 minuter till de är
helt upptinade.
Gör så här:
• Lägg maten i ett lager på en tallrik. Försök att
separera bitar som fryst samman.
• Vänd på bitarna och flytta om dem när en ljudsignal
hörs. Skydda om nödvändigt de upptinade delarna
med aluminiumfolie.
• Vänd på bitarna och flytta om dem igen när en
ljudsignal hörs (skydda de upptinade delarna med
aluminiumfolie).
• Efter upptiningen, vira in maten i aluminiumfolie och
låt stå i 10-30 minuter till den är helt upptinad.
Mat
SVENSKA
Tallrik
Roterande
tallrik
TIPS:
Använd stänkskyddet så reducerar du den mängd fett som stänker upp i
ugnen när du tillagar kött eller fågel. Montera stänkskyddet enligt bilden
här intill.
79
Fågel
lågt stöd
Stänkskyddet
Roterande tallriken
Page 82

UNDERHÅLL OCH RENGÖRING
Kg
%
VARNING! ANVÄND INTE VANLIGA
RENGÖRINGSMEDEL, SLIPANDE
RENGÖRINGSMEDEL ELLER SKURSVAMPAR
PÅ NÅGON DEL AV DIN MIKROVÅGSUGN.
VARNING!
Ugnen, luckan, yttersidan och tillbehören blir mycket
varma när du använder läge GRILL,
KOMBINATION, PIZZA/POTATIS och
AUTOMATIK (förutom Upptining). Se till att de har
svalnat när du skall göra rent dem.
Ugnens yttersida
Utsidan av ugnen gör du lätt ren med milt tvålvatten.
Torka bort tvålen med en fuktig trasa och torka
yttersidan torr med en mjuk handduk.
Ugnskontrollerna
Öppna luckan för att avaktivera ugnskontrollerna före
rengöring. Var försiktig vid rengöring av
ugnskontrollerna. Använd en lätt fuktad trasa och
torka försiktigt tills panelen är ren. Använd inte för
mycket vatten. Använd inte något kemiskt eller
slipande rengöringsmedel.
Ugnens insida
1. Torka upp stänk eller spill med en mjuk, fuktig trasa
direkt efter användning när ugnen fortfarande är
varm. Använd en mild tvål och torka flera gånger
med en fuktig trasa vid kraftigare spill tills alla
rester är borta.
Tag inte bort stänkskyddet. Lyft bara upp det nedre
gallret för hand vid rengöring. Ställ undergrillen i
det nedersta läget efter rengöring (se illustration
nedan).
2. Se till att tvål eller vatten inte kommer in genom de
små ventilationshålen på sidoväggarna eftersom
det kan skada ugnen.
3. Använd inte rengöringsmedel på sprayflaska inuti
ugnen.
4. Värm upp ugnen regelbundet med båda
grillelementen, se ”Uppvärmning utan mat” på
sidan 66. Matrester eller matstänk på ugnens
insida kan orsaka rök eller dålig lukt.
Den roterande tallriken och stödet
Tag ur den roterande tallriken och stödet ur ugnen.
Diska den roterande tallriken och stödet i vatten med
milt rengöringsmedel. Torka med en mjuk handduk.
Både den roterande tallriken och stödet kan diskas i
diskmaskin.
Lågt och högt stöd
De bör diskas med ett milt diskmedel och torkas. Det
övre och undre gallret kan diskas i diskmaskin.
Luckan
Torka regelbundet bort smuts från luckans ut- och
insida, dörrtätningarna och de tätande ytorna med
en mjuk fuktig trasa.
80
Se till att undergrillens
värmeelement lyfts upp vid
rengöring.
Page 83

INNAN DU RINGER SERVICE
KONTROLLERA FÖLJANDE INNAN DU RINGER SERVICE:
1. Strömförsörjning:
Kontrollera att sladden sitter i ordentligt i uttaget.
Kontrollera att proppen/automatsäkringen fungerar ordentligt.
2. Tänds ugnslampan när luckan öppnas? JA NEJ
3. Ställ en kopp med vatten (ca 150 ml) i ugnen och stäng luckan ordentligt.
Ställ in tillagningsläge med mikrovågor.
Programmera ugnen för 1 minut med 100 % effekt och starta ugnen.
Tänds ugnslampan? JA NEJ
Snurrar den roterande tallriken? JA NEJ
OBS! Den roterande tallriken snurrar åt båda hållen.
Fungerar ventilationen? JA NEJ
(Håll handen över ventilationsöppningarna och känn efter luftflöde.)
Låter signalen efter 1 minut? JA NEJ
Slocknar indikeringen för tillagning? JA NEJ
Är vattnet i koppen varmt efter tillagningen ovan? JA NEJ
4. Ställ FUNKTIONSVÄLJAREN i läge ÖVER OCH UNDERGRILL i 3 minuter.
Blir båda grillelementen röda efter 3 minuter? JA NEJ
(x3 )
Om du svarar ”NEJ” på någon av ovanstående frågor, ring en behörig SHARP-tekniker och berätta om
kontrollresultatet. Se omslagets baksida för adresser.
SVENSKA
OBS!
1. Om du tillagar maten längre än standardtiden med samma tillagningsläge, kommer ugnens effekt automatiskt
att sänkas för att undvika överhettning. (Effektnivån kommer att sänkas och grillelementen börjar blinka.)
Tillagningsläge
Effektnivå 100 % tillagning
Grillning
ÖVERGRILL
UNDERGRILL
ÖVER- och UNDERGRILL
Kombination 1
Kombination 2
2. Efter användning av läge GRILL, KOMBINATION, PIZZA/POTATIS och AUTOMATIK (förutom
Upptining) kommer fläkten att gå tills ugnen har kylts ned. Fläkten kommer också att gå om du trycker på
STOPP-knappen och öppnar luckan vid användning av läge GRILL, KOMBINATION, PIZZA/POTATIS
och AUTOMATIK (förutom Upptining). Det kan därför hända att du känner luft strömma från
ventilationsöppningarna.
Standardtid
20 min.
30 min.
45 min.
Övergrill - 15 min.
Undergrill - 15 min.
Mikro - 20 min.
Övergrill - 15 min.
Mikro - 20 min.
Undergrill - 15 min.
81
Page 84

VAD ÄR MIKROVÅGOR?
Mikrovågor är elektromagnetiska vågor, precis
som radio- och TV-vågor.
Din mikrovågsugn har en magnetron monterad som
skapar mikrovågorna och de gör att
vattenmolekylerna i maten oscillerar. Friktionen
alstrar hetta och hettan gör att maten i din
mikrovågsugn tinas, värms upp och/eller kokas.
Anledningen till att maten kokar så snabbt i en
mikrovågsugn är att vågorna tränger igenom maten
från alla sidor, vilket gör att energin används så
effektivt som möjligt. Som en jämförelse, när du
lagar mat på en vanlig spis passerar energin från
spisen via plattan genom kastrullen och till slut når
den maten. En stor mängd energi förloras när maten
lagas på detta sätt.
DET HÄR KAN DIN NYA KOMBINATIONSUGN GÖRA
ANVÄNDA MIKROVÅGSUGNEN
Genom att använda mikrovågsläget i vår nya
kombinerade ugn kan du till exempel snabbt
värma upp färdiglagade rätter eller drycker, eller
smälta smör eller choklad på nolltid. Det går lika
snabbt och lätt att tina upp mat med mikovågorna.
Ibland är det dock bäst att kombinera
mikrovågorna med konventionell ugnsvärme eller
grill (kombinationstillagning). Med din nya ugn
kan du tillaga mat snabbt och samtidigt få en
stekyta. Dessutom förkortar du tillagningstiden
rejält jämfört med om du skulle ha använt en
vanlig ugn.
KOMBINATIONSTILLAGNING
(MIKROVÅGOR MED KONVENTIONELL
UGNSVÄRME ELLER GRILL)
Ett smartare sätt att laga mat på! Kombinera två
olika tillagningssätt och få ut det bästa av
mikrovågor och konventionell ugnsvärme. Välj
mellan
● Mikrovågor + konventionell ugnsvärme (utmärkt
för kött, fågel, efterrätter, bröd och kakor) och
MIKROVÅGORNAS EGENSKAPER
Mikrovågor tränger igenom alla icke-metalliska
föremål gjorda av glas, porslin, keramik, plast, trä
och papper. Därför värms dessa molekyler inte
upp i mikrovågsugnen. Redskapen värms endast
indirekt, genom värmen i maten.
Maten absorberar mikrovågorna och det är
anledningen till att den värms upp.
Mikrovågor kan inte tränga igenom metall; de
studsar bort från metallföremålet (reflekteras) och
därför lämpar de sig inte för användning i en
mikrovågsugn. Det finns några fall då denna
egenskap kan användas till sin fördel. Du kan t.ex.
använda aluminiumfolie för att täcka vissa delar
på en stek. Det hindrar att dessa områden blir för
varma eller heta om du tinar upp eller att maten
värms ojämnt om du kokar eller värmer upp.
Informationen nedan kan vara till hjälp i dessa fall.
● Mikrovågor + grill (utmärkt för pizza, snacks,
snabbstekning, kött, fågel, kycklinglår, kebab,
varma mackor och gratinering).
Genom att använda kombinationstillagning kan du
både laga maten och få en stekyta. Den
konventionella ugnsvärmen täpper till porerna på
matens utsida samtidigt som mikrovågorna ser till
att maten lagas snabbt och omsorgsfullt. Maten
blir saftig inuti och krispig utanpå.
KONVENTIONELL UGNSVÄRME
Du kan avända den konventionella ugnsvärmen
utan mikrovågor om du så önskar. Resultatet blir
detsamma som när du använder en vanlig ugn.
GRILL
Mikrovågsugnen är utrustad med en quartz-grill.
Den kan användas på egen hand utan mikrovågor
precis som en vanlig grill. På så sätt kan du snabbt
bryna och grilla mat.
Dessutom finns det en undergrill under den
roterande tallriken. Med undergrillen kan du bryna
maten underifrån.
82
Page 85

LÄMPLIGA TILLAGNINGSKÄRL
LÄMPLIGA TILLAGNINGSKÄRL FÖR MIKROVÅGOR TILLAGNING
GLAS OCH KERAMISKT GLAS
Värmetåliga glaskärl är mycket
lämpliga, eftersom man kan iaktta
tillagningen från alla håll. Kärlen får
emellertid inte innehålla metall (t.ex.
blykristall) eller ha metalldekor (t.ex. guldkant,
koboltblå yta).
KERAMIK
Passar i allmänhet bra. Keramikformar måste vara
glaserade, eftersom fukt kan tränga in i oglaserad
keramik. Fukten får materialet att hettas upp och kan
göra att det spricker. Är man osäker på om ett kärl
passar för mikrovågsugnen kan man göra ett test.
PORSLIN
Går bra, men se till att porslinet inte har en dekor
av guld eller silver och att det inte innehåller
metall.
PLAST OCH PAPPERSKÄRL
Värmetåliga plastkärl lämpliga för mikrovågsugn
kan användas till att tina, värma och tillaga mat.
Följ tillverkarens anvisningar.
Värmetåligt papper som tillverkats för användning
i mikrovågsugn passar också. Följ tillverkarens
anvisningar.
MIKROVÅGSFOLIE
Denna folie, eller värmetålig folie, används för att
täcka över eller svepa in mat. Följ tillverkarens
anvisningar.
STEKPÅSAR
Kan användas i mikrovågsugn. Metallklämmor bör
inte användas för tillslutning eftersom folien i
stekpåsen kan smälta. Tillslut stekpåsen med snöre
och stick några hål i den med en gaffel.
Matemballage som inte är värmetåliga bör inte
användas i mikrovågsugnen.
METALL
Metall bör i allmänhet inte användas eftersom
mikrovågor inte kan passera genom metall och
därför inte kommer in i maten. Det finns emellertid
undantag: små remsor av aluminiumfolie kan
användas för att täcka vissa delar av maten så att
dessa inte tinar för snabbt eller börjar tillagas
(t.ex. kycklingvingar). Små steknålar av metall och
aluminiumkärl (t.ex. för färdiglagad mat) kan
användas. De måste dock vara små i förhållande
till maten, aluminiumkärl måste t.ex. fyllas minst till
2/
kärl som är lämpligt för mikrovågsugnen. När
aluminiumkärl eller andra metallkärl används
måste det finnas ett mellanrum på ca 2 cm mellan
kärlet och ugnens insida, i annat fall kan insidan
skadas av eventuell ljusbågsbildning.
Kärlen får inte ha metallöverdrag eller
metalldelar som skruvar, band eller handtag.
TESTA KÄRLETS LÄMPLIGHET
Är man osäker på om ett kärl kan användas i
100 % i 1 till 2 minuter. Om kärlet förblir kallt eller
bara känns handvarmt, kan det användas. Testa
aldrig ett plastkärl, eftersom det kan smälta.
LÄMPLIGA KÄRL FÖR
KOMBINATIONSTILLAGNING
Alla värmetåliga kärl som kan användas i
mikrovågsugnen passar i allmänhet också bra för
kombinationstillagning. Men kom ihåg att
tillagning med varmluft eller grillen gör kärlen
mycket varma och därför kan plastkärl eller
plastfolie inte användas.
LÄMPLIGA KÄRL FÖR KONVENTIONELL
UGNSVÄRME OCH GRILL
När du tillagar mat med konventionell ugnsvärme
eller grillen, utan att använda mikrovågor, kan du
använda samma typ av kärl som passar till en
vanlig ugn. Eldsfast glas och porslin passar bra för
tillagning med konventionell ugnsvärme eller
grillning. Keramik går också bra, under
förutsättning att den är glaserad. Bakformar,
bakplåtar, klämmor och grillspett av metall samt
aluminiumfolie kan användas på samma sätt som i
vanliga ugnar. Grillpåsar kan användas med
konventionell ugnsvärme, men inte med grillen.
Kontrollera hur hög temperatur påsen tål genom
att läsa på förpackningen. Perforera påsen längst
upp med en gaffel.
3
3/
4
eller
. Det bästa är att lägga över maten i ett
mikrovågsugnen kan man göra
följande test: Sätt kärlet i ugnen.
Placera ett glas med 150 ml vatten på
eller bredvid kärlet. Sätt på ugnen på
SVENSKA
83
Page 86

TIPS OCH RÅD
INNAN DU BÖRJAR …
Vi vill att det ska vara så enkelt som möjligt att
använda din mikrovågsugn, därför följer en
sammanfattning av den viktigaste informationen
och olika råd nedan. Starta aldrig mikrovågsugnen
om det inte finns mat i kokutrymmet.
STÄLL IN KOKTIDER
Tiderna för upptining, värmning och tillagning är i
allmänhet mycket kortare än de för vanliga spisar
eller ugnar, därför bör du följa koktiderna som
anges i denna bok. Använd alltid en kortare koktid
istället för en längre. Prova rätten när den kokats.
Det är bättre att prova rätten och koka den några
extra minuter om det behövs än att överkoka den.
STARTTEMPERATUR
Tiderna för upptining, värmning och tillagning beror
på rättens temperatur när behandlingen börjar.
Djupfrysta och kylskåpskalla rätter tar t.ex. lite längre
tid än de som börjar kokas på rumstemperatur.
Uppvärmnings- och koktiderna baseras på normal
förvaringstemperatur (kylskåpstemperatur ca. 5° C,
rumstemperatur ca. 20° C). För upptining av djupfryst
mat förutsätter vi en inledande temperatur på -18° C.
Ägg får ej kokas i sina skal. Trycket byggs upp inuti
skalet och till slut exploderar det. Pricka hål i äggulor
innan tillagning.
Olja och fett ska inte användas för stekning i
mikrovågsugnen. Oljans temperatur kan inte
kontrolleras och den kan plötsligen börja stänka.
Stängda behållare, t.ex. glasburkar eller andra
burkar, ska inte sättas i mikrovågsugnen för
uppvärmning. Trycket kan byggas upp inuti dem och
göra att glaset splittras. (Undantag: konservering)
TILLAGNINGSTIDER
Alla tider som anges i kokboken är riktlinjer som
kan varieras beroende på matens grundtemperatur,
vikt och tillstånd (vatten- eller fetthalt osv.).
SALT OCH KRYDDOR
Mat som tillagas i mikrovågsugn behåller sin
individuella smak bättre än vid konventionell
tillagning. Därför bör salt användas sparsamt och
normalt tillsättas efter tillagningen. Salt absorberar
vätska och torkar ut matens yttre skikt. Kryddor
kan användas på vanligt sätt.
TILLSATS AV VATTEN
Grönsaker och annan föda med hög vattenhalt
kan tillagas i sin egen vätska eller med tillsats av
litet vatten. Detta garanterar att många vitaminer
och mineraler bevaras.
MAT MED SKINN ELLER SKAL
Mat som korv, kyckling, kycklinglår, bakad potatis,
tomater, äpplen, äggulor eller liknande bör prickas
eller genomborras med en gaffel eller liten trästicka.
Detta gör att den ånga som bildas kan försvinna
utan att spränga sönder skinnet eller skalet.
FET MAT
Fett kött tillagas snabbare än magert kött. Före
tillagningen bör man täcka de feta delarna med
en bit aluminiumfolie eller placera maten med den
feta sidan neråt
.
STORA OCH SMÅ MÄNGDER
Mikrovågstider är direkt beroende av den mängd
mat som ska tinas upp, värmas eller tillagas. Det
innebär att små portioner tillagas snabbare än
stora. Tumregeln är:
DUBBLA MÄNGDEN = NÄSTAN DUBBLA TIDEN
HALVA MÄNGDEN = HALVA TIDEN
DJUPA OCH FLATA KÄRL
Båda typerna av kärl har samma kapacitet, men
tillagningstiden är längre för de djupa. Därför bör
man välja så flata kärl som möjligt med en stor yta.
Använd djupa kärl bara för rätter där det finns risk
för överkokning, t.ex. för nudlar, ris, mjölk osv.
RUNDA OCH OVALA KÄRL
Tillagningen blir jämnare i runda eller ovala kärl
än i kärl med hörn, eftersom mikrovågsenergin
koncentreras i hörnen och gör att maten i dessa
områden kan tillagas för länge.
PLACERING AV MAT
Placera ett antal enskilda portioner, t.ex. små
puddingformar, koppar eller potatisar med skal, i
en cirkel på den roterande skivan. Sätt dem på
avstånd från varandra så att mikrovågsenergin
kan nå maten från alla håll.
84
Page 87

TIPS OCH RÅD
ÖVERTÄCKNING
Övertäckning av maten håller kvar fukten och
förkortar tillagningstiden. Använd lock eller
mikrovågsfolie. Mat som ska vara knaprig, t.ex. stek
eller kyckling, bör inte täckas över. Den allmänna
regeln är att det som täcks över i en vanlig ugn bör
också täckas över i en mikrovågsugn. Det som inte
skulle täckas över i en vanlig ugn kan också lämnas
utan övertäckning i mikrovågsugnen.
VÄNDNING
Medelstora köttbitar som hamburgare och biffar
bör vändas en gång under tillagningen så att
tillagningstiden förkortas. Stora köttbitar som stek
och kyckling måste vändas, eftersom överdelen får
ta emot mer mikrovågsenergi och kan torka ut om
man inte vänder köttet.
OMRÖRNING
Maten måste röras om, eftersom mikrovågorna
börjar med att värma upp de yttre delarna.
Därigenom jämnas temperaturen ut och maten
värms upp jämnt.
UTJÄMNINGSTID
Att låta maten få en utjämningstid är en av de
viktigaste reglerna för mikrovågstillagning. Nästan
all mat som tinas, värms eller tillags i
mikrovågsugnen kräver en viss tid för utjämning,
under vilken temperaturen och vätskan i maten
fördelas jämnt.
UPPVÄRMNING
● Färdiglagade rätter i aluminiumformar bör tas ut
ur aluminiumformen och värmas på en tallrik
eller i en skål.
● Ta av locket på tätt tillslutna kärl.
● Mat bör täckas över med mikrovågsfolie, en
tallrik eller lock (finns att köpa), så att inte ytan
torkar ut. Drycker behöver inte täckas över.
● När man kokar vätskor som vatten, kaffe, te
eller mjölk, placeras en glassked i kärlet.
● Om möjligt bör stora mängder röras om då och
då så att temperaturen fördelas jämnt.
● Tiderna gäller för mat med rumstemperatur på
20° C. Uppvärmningstiden för mat som
förvarats i kylskåp bör ökas något.
● Efter uppvärmning bör maten få stå i 1-2
minuter, så att temperaturen inne i maten kan
fördelas jämnt (utjämningstid).
● Angivna tider är riktlinjer som kan variera
beroende på matens grundtemperatur, vikt,
vattenhalt, fetthalt eller det resultat man vill
uppnå.
UPPTINING
Mikrovågsugnen är idealisk för upptining.
Upptiningstiderna är vanligen betydligt kortare än
vid traditionella metoder. Här är några tips. Ta ut
den frysta enheten ur sin förpackning och lägg den
på en tallrik för upptining.
Burkar och kärl
Burkar och kärl som passar för mikrovågsugnen är
särskilt bra för upptining och uppvärmning av mat,
eftersom de tål temperaturer i frysen (ner till ca –40° C)
samtidigt som de tål värme (upp till ca 220° C). Man
kan därför använda samma kärl att frysa, tina, värma
och t.o.m. tillaga maten i, utan att behöva byta.
Övertäckning
Täck över tunna delar med små remsor
aluminiumfolie före upptining. Tinade eller varma
delar bör också täckas med aluminiumremsor under
upptining. Detta hindrar de tunna delarna att bli för
varma medan tjockare delar fortfarande är frusna.
Korrekt inställning
Det är bättre att välja en för låg inställning än en
för hög. På det sättet kan man se till att maten tinas
jämnt. Om mikrovågsinställningen är för hög
kommer ytan på maten att redan ha börjat tillagas
medan insidan fortfarande är frusen.
Vändning/omrörning
Nästan all mat måste vändas eller röras om då och
då. Så snart som möjligt bör man sära delar som
sitter ihop och flytta om dem.
Små mängder
Tinar snabbare och jämnare än större mängder. Vi
rekommenderar att man fryser in så små portioner
som möjligt. På det sättet kan man snabbt och lätt
laga till hela menyer.
Mat som kräver försiktig hantering
Mat som tårtor, grädde, ost och bröd bör man
bara halvtina och därefter låta dem tina helt i
rumstemperatur. På så sätt undviker man att de
yttre delarna blir alltför varma medan insidan
fortfarande är frusen.
SVENSKA
85
Page 88

TIPS OCH RÅD
Utjämningstid
Detta är särskilt viktigt efter upptining av mat,
eftersom tiningsprocessen fortsätter under denna
period. I upptiningstabellen anges utjämningstider
för olika mattyper. Tjock, kompakt mat kräver en
längre utjämningstid än mat i mindre delar eller
med porös konsistens. Om maten inte tinat
tillräckligt, kan man fortsätta tina den i
mikrovågsugnen eller förlänga utjämningstiden efter
behov. Efter utjämningstiden bör maten tillagas så
snabbt som möjligt och den bör inte frysas om.
TILLAGNING AV FÄRSKA GRÖNSAKER
● När man köper grönsaker bör man försöka se
till att de är ungefär lika stora. Detta är särskilt
viktigt när man tänker tillaga grönskaerna hela
(t.ex. kokt potatis).
● Tvätta grönsakerna innan de tillagas, rensa dem
och väg först därefter upp den mängd som
behövs enligt receptet och dela dem.
● Krydda dem som vanligt, men ta som regel att
inte salta förrän efter tillagningen.
● Tillsätt 5 msk vatten till 500 g grönsaker.
Fiberrika grönsaker kräver litet mera vatten.
Information om detta finns i tabellen.
● Grönsaker tillagas vanligen i en skål med lock.
De med hög vattenhalt, t.ex. lök eller kokt
potatis kan tillagas i mikrovågsfolie utan tillsats
av vatten.
● Efter halva tillagningstiden bör grönsakerna
röras om eller vändas.
● Efter tillagningen låter man grönsakerna stå i ca
2 minuter, så att temperaturen fördelas jämnt
(utjämningstid).
● Tillagningstiden som anges är riktlinjer och
beror på vikt, grundtemperatur och tillstånd hos
den aktuella grönsakssorten. Ju färskare
grönsak, desto kortare tillagningstid.
TILLAGNING AV KÖTT, FISK OCH FÅGEL
● Vid matinköp bör man försöka se till att de olika
delarna så långt möjligt är av samma storlek.
Detta gör att de tillagas på rätt sätt.
● Innan beredningen sköljs kött, fisk och fågel
noga under kallt rinnande vatten och klappas
torra med hushållspapper. Fortsätt därefter som
vanligt.
● Kött bör vara välhängt och broskfritt.
● Även om bitarna är av samma storlek kan
tillagningsresultatet variera. Detta beror bland
annat på vilken typ av mat det gäller,
variationer i fett- och vätskehalt liksom på
temperaturen före tillagningen.
● När maten tillagats i 15 minuter börjar den få
färg naturligt, och detta kan förhöjas ytterligare
med hjälp av färgsättningsmedel. För att
dessutom få en knaprig yta, bör du använda
speciella mikrovågskärl eller börja med att
bryna maten på spisen och avsluta tillagningen
i mikron. På det sättet får du samtidigt en sky att
göra sås av.
● Vänd stora bitar av kött, fisk eller fågel efter
halva tillagningstiden, så att de tillagas jämnt
från alla sidor.
● Efter tillagningen täcks stekar med
aluminiumfolie och får vila i ca 10 minuter
(utjämningstid). Under tiden fortsätter steken att
tillagas och vätskan fördelas jämnt, så att
minimalt med köttsaft går till spillo vid
uppskärningen.
UPPTINING OCH TILLAGNING
Djupfrysta rätter kan tinas och tillagas samtidigt i
en enda process i mikrovågsugnen. Det finns
några exempel i tabellen. Observera de allmänna
råd som ges om “uppvärmning“ och “upptining“
av mat. Följ alltid tillverkarens anvisningar på
förpackningen vid beredning av djupfrysta rätter.
Dessa brukar innehålla exakta tillagningstider och
råd om beredning.
86
Page 89
SYMBOLFÖRKLARING
MIKROVÅGSEFFEKT
Mikrovågsugnens uteffekt är 900 W, och ugnen
har 5 olika nivåer. Bekanta dig med informationen
i denna bok så att du lär dig välja rätt effektnivå
för uppgiften. Vi rekommenderar följande:
100 % Effekt = 900 Watt
är avsett för snabb kokning eller
uppvärmning, t.ex. färdiglagade rätter på
tallrik, varma drycker, grönsaker, fisk etc.
70 % Effekt = 630 Watt
Minska mikrovågsugnens uteffekt för
kompakta matvaror, t.ex. stekar, eller rätter
som kräver en viss tillsyn, t.ex. ostsås. När
effekten är lägre kommer maten inte att koka
över och kött kokas jämnt utan att sidorna blir
överkokta.
50 % Effekt = 450 Watt
Om du lagar en “solid” rätt som kräver lång
och långsam tillagning om du lagade den på
vanligt sätt, t.ex. köttgrytor, ska du minska
uteffekten och koka den längre. På detta sätt
blir köttet mörare och faller inte sönder.
30 % Effekt = 270 Watt
Välj en låg uteffekt för upptining eftersom det
gör att maten tinas jämnt. Denna nivå är
också idealisk för att koka ris, pasta och
klimp.
10 % Effekt = 90 Watt
Välj den lägsta inställningen för försiktig
upptining, t.ex. av tårtor.
Symboler
Övre grill (x1)
Praktisk för att bryna och grilla kött, fågel
och fisk.
Undre grill (x2)
Denna inställning används för att bryna
undersidan på rätter.
Över- och undergrill (x3)
Båda delarna av grillen, över- och
undergrill, används samtidigt. Denna
kombination är speciellt användbar för
maträtter som t.ex. varma smörgåsar,
quiche och köttbullar (hamburgare).
KONVENTIONELL UGNSVÄRME
Du kan välja mellan 10 lägen (40º C till
250º C).
KOMBINATION: mikrovågor och
konventionell ugnsvärme. (x1)
I det här läget kan du kombinera en viss
effekt hos mikrovågorna med en viss
konventionell ugnstemperatur (40º C till
250º C).
Mikrovågseffekten kan bara uppgå till
max. 50 % vid kombinationstillagning.
Kombi - mikrovågsugn och
övergrill (x2)
Kombi - mikrovågsugn och
undergrill (x3)
Använd denna metod för att kombinera
olika mikrovågsnivåer med över- och
undergrillen.
SVENSKA
W = WATT
87
Page 90

TABELL
Mat
Gulash
Hel skinka eller korv
Skivat kallt kött
Korv x 8
x 4
Kycklingbröst
Hel fisk
Fiskfiléer
Krabba
Frallor x 2
Brödskivor
Vitt bröd, helt
Grovt bröd, skivat
Halvgrovt bröd, helt
Kaka, per bit
Fruktpaj, per bit
Gräddtårta, per bit
Tårta, hel, Ø 28 cm
Smör
Grädde
Ost i skivor
Frukt, t.ex. jordgubbar,
hallon, körsbär, plommon
Mängd
-g-
500
200
200
600
300
450
800
400
300
80
250
500
250
1000
150
150
250
200
200
250
TABELL: UPPTINING
-%-
Upptining
stid -min-
8-9
2-3
2-4
6-8
3-5
7-9
12-13
5-7
6-8
1
/
1-1
2
ca. 2
3-5
2-3
8-10
1-3
2-3
ca. 1
9-11
1-3
2+2
1-2
3-5
Effekt
30 %
30 %
30 %
30 %
30 %
30 %
30 %
30 %
30 %
30 %
30 %
30 %
30 %
30 %
30 %
30 %
30 %
30 %
30 %
30 %
30 %
30 %
Instruktioner
dela på/rör om bland bitarna efter halva
tiden under det första upptiningsstadiet.
ta bort de yttre skivorna en gång i minuten
placera korven sida vid sida och vänd
efter halva tiden
vänd efter halva tiden
vänd efter halva tiden
vänd efter halva tiden
vänd efter halva tiden och ta bort de
upptinade bitarna
endast det första upptiningsstadiet
placera skivorna sida vid sida, endast det första upptiningsstadiet
vänd när det tinat upp till hälften, mitten ej upptinad
placera skivorna sida vid sida, endast det första upptiningsstadiet
vänd när det tinat upp till hälften, mitten ej upptinad
placera på ett kakstöd
placera på ett kakstöd
placera på ett kakstöd
placera på ett kakstöd
endast det första upptiningsstadiet
häll grädden i ett fat efter 2 min och fortsätt
upptiningen
endast det första upptiningsstadiet placera sida
vid sida jämt fördelade och vänd efter halva tiden
Vilotid
-min-
10-15
5
5
5-10
5-10
30-90
10-15
5-10
30
5
30
5
30
5
10
60
5
5-10
10
5
Använd det automatiska upptiningsprogrammet för fågel, kycklinglår, kotletter, stekar och stekt kött.
TABELL: UPPTINING OCH TILLAGNING
Mat Mängd Effekt Tillagningstid Instruktioner Vilotid
-g- -%- -Min- -Min-
Fiskfiléer
Forell x 1
Måltid för en person
Bladspenat
Broccoli
Ärtor
Kålrabbi
Blandande grönsaker
Brysselkål
Rödkål
Grönkål
400
250
400
300
300
300
300
500
300
450
600
100 %
100 %
100 %
100 %
100 %
100 %
100 %
100 %
100 %
100 %
100 %
9-11
6-8
8-10
7-10
6-8
6-8
7-8
9-11
6-8
10-12
13-15
-
-
-
3-5 msk
3-5 msk
3-5 msk
3-5 msk
3-5 msk
3-5 msk
3-5 msk
88
täck över
täck över
täck över, rör om efter ca. 6 minuter
täck över, rör om en eller två gånger
täck över, rör om efter halva tillagningstiden
täck över, rör om efter halva tillagningstiden
täck över, rör om efter halva tillagningstiden
täck över, rör om efter halva tillagningstiden
täck över, rör om efter halva tillagningstiden
täck över, rör om efter halva tillagningstiden
täck över, rör om efter halva tillagningstiden
1-2
1-2
2
2
2
2
2
2
2
2
2
Page 91

TABELL: UPPVÄRMING AV DRYCK OCK MAT/FAT
Mat/dryck
Kaffe, 1 kopp
Mjölk, 1 kopp *
Vatten 1 kopp
6 koppar
1 skål
Måltid för en person
(grönsaker, kött och tillbehör)
Gryta
Soppa, klar
Soppa, redd
Grönsaker
Tillbehör
Kött, 1 skiva*
Fiskfilé*
Korv, x2*
Kaka, x1
Barnmat, 1 burk
Smälta margarin eller smör*
Smälta choklad
Lösa upp 6 gelatinkuber/blad
Glasyr med 2,5 dl vätska
*direkt från frysen
TABELL: TILLAGA FÄRSKA GRÖNSAKER
Grönsak
Kronärtskocka
Bladspenat
Blomkål
Broccoli
Svamp
Kinakål
Ärtor
Fänkål
Lök
Kålrabbi
Morötter
Paprika
Bakad potatis
Purjolök
Rödkål
Brysselkål
Kokt potatis
Selleri
Vitkål
Zucchini
Mängd
-g-
300
300
800
500
500
500
300
500
500
250
500
500
500
500
500
500
500
500
500
500
Mängd
-g/ml-
Effekt
-%-
100 %
100 %
100 %
100 %
100 %
100 %
100 %
100 %
100 %
100 %
100 %
100 %
100 %
100 %
100 %
100 %
100 %
100 %
100 %
100 %
100 %
150
150
150
900
1000
500
200
200
200
200
500
200
500
200
200
180
150
190
50
100
10
10
Tid
-min-
5-7
4-5
12-15
6-8
6-8
6-8
5-7
6-8
6-8
4-5
7-9
9-11
6-8
6-8
7-9
15-17
7-9
7-9
7-9
15-17
6-8
Effekt
-%-
100 %
100 %
100 %
100 %
100 %
100 %
100 %
100 %
100 %
100 %
100 %
100 %
100 %
100 %
100 %
100 %
50 %
50 %
Tid
-min-
ca. 1
ca. 1
ca. 2
8-10
9-11
3-4
1
1
1-1
1
/
1
2-3
3-5
2-3
4-5
ca. 3
ca. 2
1-1
1
1
Instruktioner
täck inte över
täck inte över
täck inte över, koka upp
täck inte över, koka upp
täck över, koka upp
stänk vatten över såsen, täck över, rör om
under tillagningen
/
-2
täck över, rör om efter uppvärmningen
2
1
/
täck över, rör om efter uppvärmningen
2
1
/
-2
täck över, rör om efter uppvärmningen
2
2
tillsätt ev. lite vatten, täck över, rör efter halva
uppvärmningen
stänk över lite vatten, täck över, rör om
under tillagningen
häll över lite sås, täck över
täck över
1
/
gör flera hål i skinnet
2
/
-1
placera på ett kakstöd
2
/
-1
ta bort locket, rör om väl efter uppvärmningen och
2
kontrollera temperaturen
100 %
50 %
50 %
ca. 1
3-4
ca.
rör om under tillagningen
lägg i vatten, krama ur och placera
1
/
kuberna/bladen i en sopptallrik; rör om under
2
tillagningen
50 %
4-6
blanda socker och 2,5 dl vätska, täck över, rör om
väl under och efter uppvärmningen
Instruktioner
ta bort bladen från stjälken, täck över
skölj och torka noga, täck över, rör om en eller två
gånger under tillagning
1 helt huvud, täck över
dela upp i buketter, täck över, rör om under tillagningen
dela upp i buketter, täck över, rör om under tillagningen
dela inte svampen, täck över, rör om under tillagningen
strimla, täck över, rör om under tillagningen
täck över, rör om under tillagningen
skär i fyra delar, täck över, rör om under tillagningen
använd hela lökar, lägg i folie för mikrovågsugn
skär i bitar, täck över, rör om under tillagningen
skär i bitar, täck över, rör om under tillagningen
skär i bitar, täck över, rör om under tillagningen
täck över, rör om under tillagningen
skär i bitar, täck över, rör om under tillagningen
strimla, täck över, rör om en eller två gånger under
tillagningen
dela ej, täck över, rör om under tillagningen
skär i lika stora bitar, tillsätt lite salt, täck över, rör om
under tillagningen
skär i små bitar, täck över, rör om under under
tillagningen
strimla, täck över, rör om under tillagningen skär i bitar,
täck över, rör om under tillagningen
TABELL
SVENSKA
Tillsätt
vatten
3-4 msk
-
5-6 msk
4-5 msk
4-5 msk
4-5 msk
4-5 msk
4-5 msk
-
50 ml
4-5 msk
4-5 msk
4-5 msk
4-5 msk
50 ml
50 ml
150 ml
50 ml
50 ml
4-5 msk
89
Page 92

TABELL
Kött, fisk och
fågel
Stekt kött
(gris,
kalv, lamm)
Rostbiff (jämnt
rosafärgad)
Köttfärs
Kyckling
Kycklinglår
Forell
Mängd
-g-
500
1000
1500
1000
1500
1000
1200
200
250
Inställ-
ning
TABELL: TILLAGA KÖTT
Effekt
50 %
50 %
50 %
50 %
50 %
50 %
50 %
50 %
50 %
50 %
50 %
50 %
70 %
70 %
70 %
70 %
70 %
70 %
70 %
70 %
100 %
70 %
100 %
70 %
30 %
30 %
10 %
10 %
-%-
Tid
-min-
4-6
5-7
4-6
4-5
14-16
4-6
12-14
3-5
25-27
4-6
25-27
3-5
5-8
7-10
2-5
12-14
12-14
4-5
20-23
6-9
9-11
5-7
9-11
3-5
5-7
4-5
6-8
3-5
Instruktioner Vilotid
Krydda, placera på nedre gallret, vänd efter (*).
(*)
(*)
(*)
Krydda, placera på nedre gallret med den feta sidan
(*)
nedåt, vänd efter (*).
(*)
Förbered köttfärsen (hälften fläskfärs/hälften nötfärs), lägg i
en ugnssäker form på nedre gallret.
Krydda, placera på nedre gallret med bröstsidan nedåt,
vänd efter (*).
(*)
Krydda, placera på nedre gallret med skinnet nedåt, vänd
(*)
efter (*).
(*)
Skölj, droppa över citronsaft, salta ovanpå och inuti fisken,
placera på övre gallret, vänd efter (*).
-min-
10
10
10
10
10
10
3
2
TABELLER: STEK OCH BRYNA KÖTT; GRÄDDA EFTERRÄTTER OCH VARMA MACKOR
Rätt Mängd
Fransyska
-g-
400
x2, jämnt rosafärgad
Fillet steak
200
x2, jämnt rosafärgad
Lammkotletter
300
x2, genomstekt
Grillkorv
400
x5
Grädda efterrätt, etc.
Varm macka x1
x4
Instäl-
lning
Effekt
-%-
50 %
50 %
Tid
-Min-
10-11
5-7
10-11
6-7
13-14
9-10
9-11
6-7
8-10
1
5-6
1
5-6
Instruktioner
(*)
Placera på övre gallret, vänd efter (*), krydda efteråt.
(*)
Placera på övre gallret, vänd efter (*), krydda efteråt.
(*)
Placera på övre gallret, vänd efter (*), krydda efteråt.
(*)
Placera på övre gallret, vänd efter (*).
Placera en ugnssäker form på nedre gallret.
/
Rosta brödet och bred på smör. Lägg på t.ex. skinka, en skiva
2
ananas och ostskivor; placera på övre gallret. Nagga i mitten på
/
mackan före grillningen
2
90
Page 93

RECEPT
ANPASSA VANLIGA RECEPT
Informationen som följer hjälper dig att anpassa
dina favoritrecept för tillagning i din
mikrovågsugn:
Minska koktiderna med
1/3 till 1/2. Använd
recepten i denna bok som vägledning.
Matvaror med hög vattenhalt, t.ex. kött, fisk, fågel,
grönsaker, frukt, grytor, soppor och stuvningar, kan
enkelt lagas i mikrovågsugnen. Droppa vatten på
ytan på rätter med lägre vattenhalt, t.ex.
förberedda rätter på tallrik, innan uppvärmning
eller tillagning.
Minska mängden vatten som tillsätts okokta
matvaror som du vill ångkoka till ca. 2/3 av
mängden i originalreceptet. Tillsätt mer vätska
under kokningen om det behövs.
Mycket mindre fett ska tillsättas eller behövs. Du
behöver bara tillsätta en aning smör, margarin
eller olja för att ge din mikrovågstillagade rätt en
massa smak. Mikrovågsugnen är idealisk för att
laga hälsosamma rätter med låg fetthalt som en del
i en kalorifattig diet.
KOMBINATIONSTILLAGNING
Samma regler som för tillagning med mikrovågor
gäller i princip även här. Tänk dock på följande:
1. Följ instruktionerna i kokboken när du lagar mat
med konventionell ugnsvärme. Om
temperaturen är för hög kommer maten att
brynas snabbt på utsidan, medan insidan
fortfarande är rå.
2. Mikrovågseffekten och tillagningstiden måste
passa för den mat som ska tillagas. Följ
instruktionerna i kokboken.
3. När du lagar mat med kombinationen
mikrovågor+grill måste du tänka på att
storleken spelar roll för tillagningstiden. Det tar
t.ex. längre tid att laga till en grisstek jämfört
med tunnare skivor kött. För grillen gäller det
motsatta; ju närmare köttet befinner sig grillen,
desto snabbare bryns det. Ett stort köttstycke
behöver alltså grillas lika länge som mindre
köttbitar vid kombinationstillagning.
I princip ska du bara använda det låga stödet
vid kombinationstillagning. Använd det höga
stödet för vanlig grillning så får du snabbt en fin
stekyta. Använd det låga stödet när du lagar till
större köttstycken eller gratinerar efterrätter.
RECEPTENS ANVÄNDNING
● Om inte annat anges är recepten i denna bok
avsedda för 4 portioner.
● Rekommenderade redskap och koktider anges i
början på varje recept.
● Mängderna som anges i recepten är vanligtvis
redo för förtäring om inte annat anges.
● I recept som innehåller ägg, avses vanligtvis
ägg av standardstorlek 3 eller 4 med en vikt på
ca. 55 g (medelstora).
SVENSKA
msk = matsked
tsk = tesked
Kopp = 1 standardkopp
kg = kilogram
g = gram
FÖRKORTNINGAR
l = liter
ml = milliliter
cm = centimeter
DFC = dry fat content
DF = djupfryst/fryst produkt
91
min = minuter
sek = sekunder
dia = diameter
paket. = litet paket eller påse
Page 94

RECEPT
Frankrike
Löksoppa
Soupe à l’oignon et au fromage
Total tillagningstid: 14-17 minuter
Kärl: kärl med lock (2 liter)
4 sopptallrikar (200 ml var)
Ingredienser:
1 msk smör eller margarin
2 hackade lökar (100 g)
800 ml köttbuljong
2 skivor vitt bröd
4 msk riven ost (40 g)
Salt, peppar
Gör så här:
1. Fördela smöret på kärlbottnen. Lägg till löken,
köttbuljongen och kryddorna. Lägg på locket och
tillaga.
9-11 min. 100 %
2. Rosta brödskivorna och skär i fyrkanter och lägg i
sopptallrikarna. Häll soppan på brödtärningarna och
strö på ost.
3. Placera sopptallrikarna överst så att osten
får färg.
5-6 min.
Sverige
Hummersoppa
Total tillagningstid: 11 - 15 minuter
Kärl: kärl med lock (2 liter)
Ingredienser:
1 finhackad lök (50 g)
50 g skivade morötter
3 msk smör eller margarin (30 g)
500 ml köttbuljong
100 ml vitt vin och 100 ml Madeira
200 g konserverat hummerkött
1
/
2
3 vita pepparkorn
3 msk mjöl (30 g)
100 ml grädde
Gör så här:
1. Lägg grönsakerna och fettet (2 msk) i kärlet.
lagerblad
timjansk
Lägg på locket och stek upp.
2-3 min. 100 %
2. Tillsätt köttbuljong, vin, Madeira, hummerkött och
kryddorna. Lägg på locket och koka.
7-9 min. 50 %
3. Ta bort lagerblodet och pepparkornen från soppan.
Rör mjölet i lite kallt vatten och slå över soppan.
Lägg till grädden, rör om och koka igen. 2-3 min.
2-3 min. 100 %
4. Rör om soppan och låt stå i 5 minuter. Lägg till en
smörklick (1 msk.) precis innan du serverar soppan.
Schweiz
Kornsoppa från Grisons-kantonen
Bündner Gerstensuppe
Total tillagningstid: ca. 27-34 minuter
Redskap: skål med lock (3-liters)
Ingredienser
2 msk smör eller margarin (20 g)
1 lök (50 g), finhackad
1-2 morot (130 g), skivad
15 g selleri, tärnad
1 purjolök (130 g), i ringar
3 vitkål (100 g), strimlad
200 g kalvben
50 g strimmig bacon, strimlad
peppar
50 g sädeskorn
7 dl köttbuljong
4 wienerkorvar
Gör så här:
1. Lägg smöret och löken i skålen. Täck över och låt
löken svettas.
ca. 1-2 min. 100 %
2. Lägg grönsakerna i skålen. Tillsätt kalvbenen, bacon
och sädeskornen och häll i köttbuljongen. Salta.
Täck över och kör i mikrovågsugnen.
1. 9-11 min. 100 %
2. 17-21 min. 50 %
3. Skär korven i små bitar och lägg dem i skålen när 5
minuter kvarstår av tillagningstiden.
4. Låt soppan vila i ca. 5 minutes efter tillagningen. Ta
bort benen från soppan innan servering.
92
Page 95
RECEPT
Tyskland
Svamptoast
Champignontoast
Total tillagningstid: ca. 3-4 minuter
Utrustning: övergrill
Ingredienser
2 tsk smör eller margarin
2 vitlöksklyftor, pressade
salt
4 brödskivor
75 g svamp, skivad
salt
peppar
75 g riven ost
4 msk persilja, finhackad
paprikapulver
Gör så här:
1. Blanda smör, vitlök och salt.
2. Rosta brödet och bred på vitlökssmöret.Lägg på
svampskivorna och krydda med salt och peppar.
3. Blanda osten och persiljan och lägg ovanpå
svampen. Pudra över paprikapulver.
4. Placera mackorna på övergrillen och kör i
mikrovågsugnen.
3-4 min. 30 %
Österrike
Inbakad korv
Würstchen im Teigmantel 8 portioner
Total tillagningstid: ca. 23-26 minuter
Redskap: ugnsform (ca. 32 cm i diameter)
bakplåtspapper
Ingredienser
8 små korvar (x50 g)
300 g fryst smördeg
1 äggula
litet vatten
salt
kumminfrön
Gör så här:
1. Nagga korvskinnet på flera ställen.
2. Tina upp smördegen enligt instruktionen på paketet
och kavla ut den tunnt. Dela degen i 8 fyrkanter och
rulla in en korv i varje degbit.
3. Blanda äggulan med litet vatten. Pensla över
degknytena och krydda med salt och kumminfrön.
4. Klä ugnsformen med bakplåtspapper, placera
degknytena i formen och tillaga på undergrillen.
Spanien
Rosmarinfyllda Champinjoner
Champiñones rellenos al romero
Total koktid: ca. 11-17 minuter
Redskap: Form med lock (1 l kapacitet)
Låg rund form med lock (ca. 22 cm diameter)
Ingredienser:
8 stora champinjoner (ca. 225 g), hela
2 msk smör eller margarin (20 g)
1 lök (50 g), finhackad
50 g skinka i små tärningar
Mald svartpeppar
Torkad rosmarin
125 ml torrt vitt vin
125 ml grädde (kaffegrädde eller vispgrädde)
2 msk mjöl (20 g)
Gör så här:
1. Ta bort skaften på champinjonerna och hacka dem.
2. Smöra formens botten. Lägg i den hackade löken,
champinjonskaften, tärnade skinkan och krydda med
peppar och rosmarin. Täck över och koka.
3-5 min. 100 %
Låt svalna.
3. Häll i 100 ml av vinet och grädden i den andra
formen, täck över och värm upp.
1-3 min. 100 %
4. Blanda resten av vinet med mjölet och häll i den
varma vätskan.
ca. 1-3 min. 100 %
5. Fyll champinjonhattarna med skinkblandningen,
placera de fyllda hattarna i såsen och ställ på gallret
för kokning.
6-8 min. 30 %
Låt de tillagade svamparna stå i ca. 2 minuter.
SVENSKA
23-26 min. 230oC
93
Page 96

RECEPT
Tyskland
Kryddig kalkon
Pikante Putenp fanne (2 portioner)
Total tillagningstid: ca. 22-27 minuter
Redskap: låg oval eldfast form med lock
(26 cm)
Ingredienser
1 kopp långkornigt ris, förvällt (120 g)
1 paket saffran
300 g kalkonbröst, tärnat
250 ml köttbuljong
1 lök (50 g), skivad
1 röd paprika (100 g), strimlad
1 liten purjolök (100 g), strimlad
peppar och paprikapulver
2 msk smör eller margarin (20 g)
Gör så här:
1. Blanda ris och saffran och lägg i den ugnssäkra
formen tillsammans med det tärnade köttet. Häll
över köttbuljongen, täck över och kör i
mikrovågsugnen.
4-6 min. 100 %
2. Tillsätt grönsakerna och kryddorna och rör om.
Klicka ut smöret ovanpå, täck över och kör i
mikrovågsugnen.
1. 1-2 min. 100 %
2. 17-19 min. 30 %
Låt rätten vila i 2 till 3 minuter efter tillagningen.
Grekland
Fyllda auberginer
Melitsánes jemistés mé kimá
Total koktid: ca. 17-22 minuter
Redskap: Form med lock (1 l kapacitet)
Låg rund ugnsform med lock (ca. 25 cm
diameter)
Ingredienser:
2 auberginer med bladdelen borttagen (per
styck ca. 250 g)
3 tomater (ca. 200 g)
1 msk olivolja (för att smörja formen)
2 lökar, hackade (100 g)
4 milda gröna chillipeppar
200 g nöt- eller lammfärs
2 vitlöksklyftor, krossade
2 msk persilja, hackad
Salt och peppar
Paprikapulver
60 g grekisk fårost i kuber
Förslag:
Du kan använda zucchini istället för auberginer.
Gör så här:
1. Dela auberginerna i två delar på längden. Gröp ur
större delen av fruktköttet med en tesked, lämna
kvar ett ca. 1 cm tjockt skal. Salta auberginerna.
Hacka aubergineköttet.
2. Avlägsna skinnet på två tomater, ta bort skaften och
hacka.
3. Smörj formen med olivoljan och tillsätt löken. Täck
över formen och koka löken.
ca. 2 min. 100 %
4. Ta bort skaften och fröhusen från chillipepparn och
skär dem i ringar. Spar 1/3 som dekoration. Blanda
färsen med de hackade auberginerna, löken och
tomaterna, den krossade vitlöken och persiljan.
Krydda efter smak.
5. Torka aubergineskalen med hushållspapper. Fyll dem
med hälften av köttblandningen, strö över fårost
och täck med resten av köttblandningen.
6. Lägg aubergineskalen i den smorda formen, ställ
formen på den roterande tallriken och koka.
11-13 min. 70 %
Dekorera aubergineskalen med chillipeppar och
tomatskivor och fortsätt att koka.
4-7 min. 70 %
Låt de färdiglagade auberginerna stå i ca. 2 min.
94
Page 97

RECEPT
Spanien
Skinkrullader
Jamón relleno
Total tillagningstid: 13-18 minuter
Kärl: kärl med lock (2 liter)
låg oval suffléform
(ca 26 cm på längden)
Ingredienser
150 g spenat utan stjälkar
150 g kesella med 20 % fetthalt
50 g riven Emmenthalost
peppar
paprikapulver, mild
8 skivor kokt skinka (400 g)
125 ml vatten
125 ml grädde
2 msk mjöl (20 g)
2 msk smör eller margarin (20 g)
1 tsk smör eller margarin till formen
Gör så här:
1. Hacka spenaten och blanda den i kesella och
ost. Salta och peppra efter smak.
2. Fördela en matsked av fyllningen per skinkskiva
och rulla ihop. Fäst med en tandpetare.
3. Gör en bechamelsås genom att hälla
vätskan i kärlet, lägg på locket och värm upp.
2-4 min. 100 %
Blanda smör och mjöl i vätskan och rör om så att
smöret smälter och såsen blir jämn, lägg på locket
och koka tills såsen tjocknar.
ca 1-2 min. 100 %
Österrike
Fylld grillad kyckling
Gefülltes Brathendl (2 portioner)
Total koktid: ca. 25-28 minuter
Redskap: Quicheform, snöre
Ingredienser:
1 kyckling (1000 g)
Salt
orkad rosmarin och mejram
1 dagsgammalt franskbröd (40 g)
1 knippe persilja, finhackad (10 g)
1 nypa muskotnöt
2 msk smör
5 msk smör eller margarin (50 g)
1 äggula
1 msk paprikapulver
Gör så här:
1. Tvätta kycklingen, torka med hushållspapper och
krydda insidan med salt, rosmarin och mejram.
2. Till fyllningen: Blötlägg franskbrödet i kallt vatten i
ca. 10 minuter och krama sedan torrt. Tillsätt salt,
persilja, muskotnöt, smör (20 g) och äggula. Blanda
ordentligt och fyll kycklingen.
Använd snöre eller tandpetare för att stänga
öppningen.
3. Värm upp det återstående smöret (30 g)
1/2 - 1 min. 100 %
Tillsätt paprikapulver och salt i smöret och smörj in
kycklingen.
4. Placera kycklingen i quicheformen (täck ej) och
koka.
SVENSKA
Rör om, salta och peppra.
4. Häll såsen i en smord form, placera skinkrulladerna i
såsen och tillaga.
10-12 min. 70 %
Låt skinkrulladerna stå i 5 minuter innan du serverar
dem.
Tips:
Du kan även använda färdig bechamelsås som kan
köpas i livsmedelsaffärer.
Automatikinställningar
Låt den grillade kycklingen stå i ca. 10 minuter efter
tillagning.
95
Page 98

RECEPT
Italien
Vaktlar i ost- och örtsås
Quagile in salsa vellutata
Total tillagningstid: ca. 16-19 minuter
Redskap: tråd
låg fyrkantig eldfast form
(ca. 20 x 20 x 6 cm)
skål med lock
Ingredienser
4 vaktlar (600 g)
salt
peppar
200 g strimmig bacon, tunt skivad
1 tsk smör eller margarin till formen
per 1 msk färsk persilja
salvia
rosmarin
basilika, finhackad
1,5 dl portvin
2,5 dl köttbuljong
2 msk smör eller margarin (20 g)
2 msk mjöl (20 g)
50 g riven emmenthaler-ost
Gör så här:
1. Skölj vaktlarna och torka dem omsorgsfullt. Salta
och peppra utanpå och inuti vaktlarna. Linda in dem
i baconskivorna och fäst med tråd.
2. Placera vaktlarna på undergrillen och kör i
mikrovågsugnen.
8-10 min. 70 %
3. Smörj den ugnssäkra formen och lägg i vaktlarna
md den grillade sidan nedåt. Hacka kryddorna fint
och strö över vaktlarna. Häll över portvinet. Fortsätt
att tillaga vaktlarna på den roterande tallriken.
4-5 min. 70 %
Flytta vaktlarna från formen och svep in dem i
aluminiumfolie. Spar stekskyn.
4. Tillred såsen genom att värma upp köttbuljongen i
en täckt skål.
ca. 2 min. 100 %
Knåda samman smöret och mjölet och rör ner
klumpen i vätskan. Koka upp och kör i
mikrovågsugnen.
Rör en gång under tillagningen.
ca. 2 min. 100 %
5. Rör ned osten i såsen. Blanda samman ostsåsen och
stekskyn. Servera vaktlarna tillsammans med såsen.
Tyskland
Inbakad oxfilé
Rinderfilet in Blätter teig
Total tillagningstid: ca. 31-36 minuter
Redskap: skål med lock (2-liters)
eldfast form (ca. 26 cm lång)
Ingredienser
300 g fryst smördeg
1 msk smör eller margarin
150 g strimmig bacon, tärnad
4-5 vårlökar (150 g), skurna i ringar
300 g svamp, skivad
1 kg oxfilé
1 msk vegetabilisk olja
1 msk persilja, finhackad
1 vitlöksklyfta, pressad
1 ägg
salt
peppar
1-2 mjölk
Gör så här:
1. Tina upp smördegen enligt instruktionerna på
förpackningen. Klicka ner smöret i skålen och lägg
bacon, lök och svamp ovanpå. Täck över och
bräsera. Rör om en gång under tillagningen.
4-5 min. 100 %
Häll av vätskan.
2. Skölj av oxfilén, torka den med hushållspapper och
pensla med oljan. Placera köttet på övergrillen och
bryn det. Vänd en gång.
13-15 min. 30 %
3. Blanda persiljan och vitlöken med de ångkokta
grönsakerna och krydda med salt och peppar.
4. Kavla ut smördegen till en fyrkant (35 x 35 cm).
Lägg lite deg åt sidan för garnering.
5. Separera äggulan och äggvitan. Pensla kanterna på
smördegen med äggvitan och lägg hälften av
grönsaksblandningen mitt på degen.
6. Krydda köttet med salt och peppar och lägg det på
grönsakerna. Lägg resten av grönsakerna på köttet.
Vik degen över köttet och tryck till kanterna. Nagga
degen med en gaffel.
7. Skölj den ugnssäkra formen i kallt vatten och lägg i
degpaketet med skarven nedåt.
8. Skär ut figurer av degen som lades åt sidan och
dekorera degpaketet.
9. Vispa äggulan och mjölken och pensla degpaketet
med blandningen. Tillaga på undergrillen.
14-18 min. 50 % + 230oC
Låt den inbakade oxfilén vila i tio minuter innan
serveringen.
96
Page 99
RECEPT
Schweiz
Köttspecialitet från zürich
Züricher geschnetzeltes
Total koktid: ca. 9-14 minuter
Redskap: Form med lock (2 l kapacitet)
Ingredienser:
600 g kalvfilé
1 msk smör eller margarin (10 g)
1 lök (50 g), finhackad
100 ml vitt vin
Mörk köttskymix (till ca. 1/2 l sås) som redning
300 ml grädde (kaffegrädde eller vispgrädde)
1 msk persilja, hackad
Gör så här:
1. Skär köttet i strimlor (ungefär fingerstorlek).
2. Bred smöret jämnt i botten på formen. Lägg löken
och köttet i formen, täck över och koka. Rör en gång
under tillagningen.
6-9 min. 100 %
3. Tillsätt vitt vin, redning och grädde. Rör ordentligt,
täck över och fortsätt att koka, rör om en gång.
3-5 min. 100 %
Italien
Kalvschnitzel med mozzeralla
Scaloppe all pizzaiola
Total koktid: ca. 24-31 minuter
Redskap: Låg rund form med lock (ca. 25 cm lång)
Ingredienser:
2 Mozzarellaostar (ca. 150 g st.)
500 g skalade och avrunna tomater i burk
4 kalvschnitzel (600 g)
20 ml olivolja
2 vitlöksklyftor, skivade
Färskmalen peppar
2 msk kapris (20 g)
Oregano och salt
Gör så här:
1. Skiva mozzarellan. Puréa tomaterna i en blandare
(eller använd en handblandare).
2. Rengör schnitzlarna, torka med hushållspapper och
bulta tills de är platta. Häll oljan och den skivade
vitlöken i botten på formen. Lägg schnitzlarna i
formen och täck med tomatpuré. Krydda med
peppar, kapris och oregano, täck över under
kokningen.
SVENSKA
4. Provsmaka och krydda den färdiga rätten. Rör om
igen och låt stå i ca. 5 minuter. Dekorera med
persilja innan servering.
15-19 min. 70 %
Vänd på schnitzlarna.
3. Lägg några skivor mozzarella på varje schnitzel, salta
och placera utan lock, på gallret för grillning.
9-12 min.
Låt stå i ca. 5 minuter efter tillagning.
Förslag:
Servera med spaghetti och färsk sallad.
97
Page 100

RECEPT
Tyskland
Grillspett i granna färger
Bunte Fleischspieße
Total tillagningstid: 17-18 minuter
Kärl: högst upp i ugnen
fyra grillspett av trä (ca. 25 cm långa)
Ingredienser:
400 g benfritt svinkött
100 g bacon
2 lökar i klyftor (100 g)
4 tomater i klyftor (250 g)
1/2 grön paprika i 8 delar (100 g)
2 msk olja
4 tsk paprikapulver
salt
1 tsk Cayennepeppar
1 tsk Worcestersås
Gör så här:
1. Tärna fläskkött och bacon i ca. 2-3 cm.
2. Trä köttbitarna och grönsakerna på grillspetten.
3. Blanda olja och kryddor och pensla på grillspetten.
Placera grillspetten överst i grillen och koka.
Automatik-inställningar
Nederländerna
Köttgryta
Gehaktschotel
Total koktid: ca. 20-23 minuter
Redskap: Form med lock (2 l kapacitet)
Ingredienser:
500 g köttfärs (hälften fläskkött, hälften nötkött)
3 lökar (150 g), finhackade
1 ägg
50 g brödsmulor
Salt och peppar
350 ml buljong
70 g tomatpuré
2 potatisar (200 g), tärnade
2 morötter (200 g), tärnade
2 msk persilja, hackad
3. Tillsätt potatisen och morötterna i köttblandningen
och buljongen, rör om ordentligt, täck över och
koka.
Rör om en gång under kokningen.
20-23 min. 100 %
Rör om i rätten igen och låt den stå i ca. 5 minuter.
Dekorera med persilja innan servering.
Frankrike
Sjötungsfiléer
Filets de sole (2 portioner)
Total tillagningstid: ca. 11-13 minuter
Redskap: låg oval eldfast form med lock
(ca. 26 cm lång)
Ingredienser
400 g sjötungsfiléer
1 citron, obehandlad
2 tomater (150 g)
1 tsk smör eller margarin till formen
1 msk vegetabilisk olja
1 msk persilja, hackad
salt & peppar
4 msk vitt vin (30 ml)
2 msk smör eller margarin (20 g)
Gör så här:
1. Skölj sjötungsfiléerna och torka dem. Ta bort
eventuella ben.
2. Skär citronen och tomaterna i tunna skivor.
3. Smöra formen. Lägg i fiskfiléerna och häll den
vegetabiliska oljan över dem.
4. Strö över persiljan, lägg på tomatskivorna och
krydda. Lägg sedan på citronskivorna och häll vitt
vin över alltsammans.
5. Lägg smörklickar ovanpå citronerna. Täck över och
kör i mikrovågsugnen.
11-13 min. 70 %
Låt fiskfiléerna vila i 2 minuter efter tillagningen.
Du kan även använda aborre, hälleflundra, harr,
spätta eller torsk i det här receptet.
Gör så här:
1. Blanda kött, lök, ägg och brödsmulor och krydda
efter behov med salt och peppar. Lägg i skålen.
2. Tillsätt tomatpurén i buljongen och rör tills den lösts
upp.
98
 Loading...