

Page 1

FROZEN
READY MEALS
CASSEROLE
JACKET
POTATOES
FRESH VEG.
PORRIDGE
CHILLED
READY MEALS
STOP
CLEAR
START
AUTO MINUTE
SET
UP
SENSOR
REHEAT
VIEW
MENUS
R-793
DEFROST
COOK
231
564
897
0
POWER
12 : 30
MODE
GRILLING
231
564
897
0
POWERMODE
4 . 00
DUAL 10% DUAL 30%
DUAL 50% DUAL 70%
GRILL
4 . 00
Touch here to go to
NEXT STAGE
4 . 00
Press the START key
GRILL
4 . 00
-1 MIN +1 MIN
GRILL
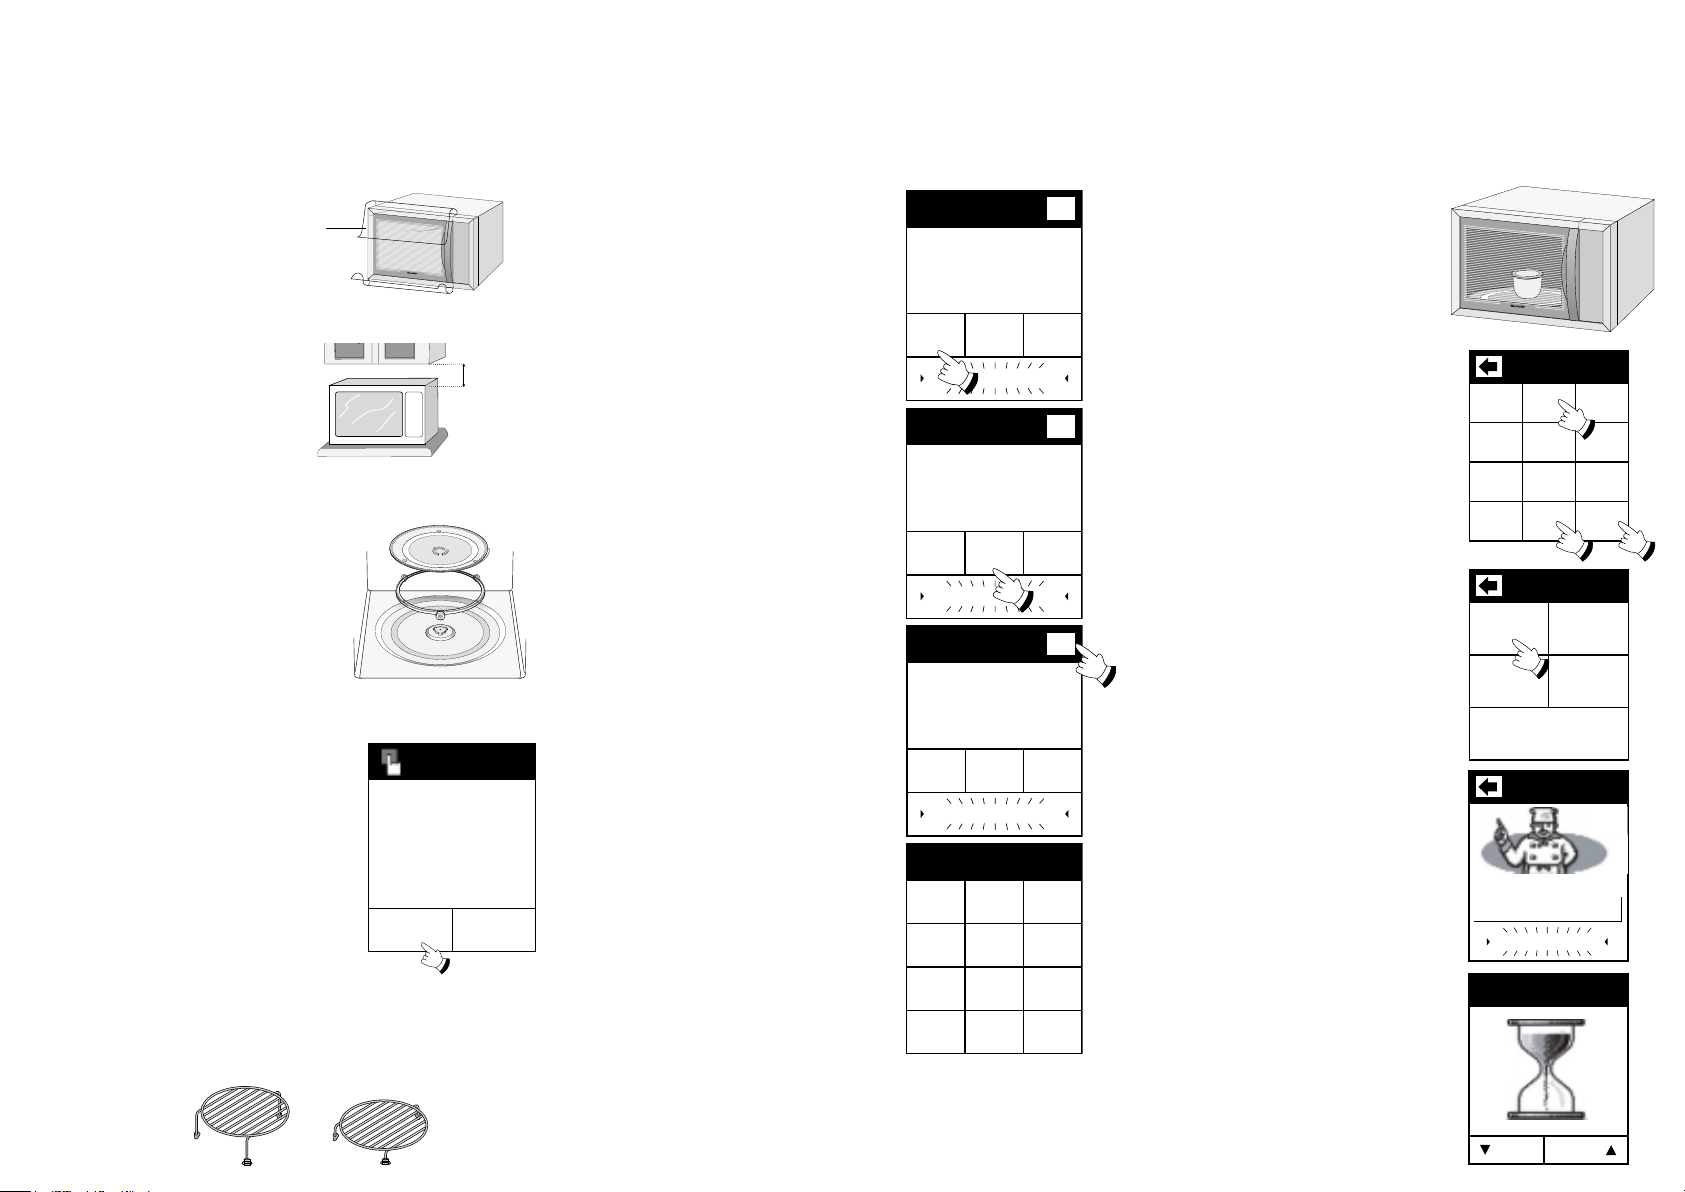
Example of basic grilling:
To grill for 4 minutes, using the high rack.
Place the food on top of
the high rack, in the centre
1.
of the turntable and close
the door.
Enter the cooking time,
4, 0, 0 by touching the
2.
numbers on the screen.
Note the top line of the
display and then touch
MODE.
Choose desired cooking
mode by pressing GRILL.
3.
R-793M
QUICK START GUIDE
1
11
10
9
8
2
3
4
5
Press the START/AUTO
MINUTE key once to start
4.
cooking.
The display will count
down through cooking
5.
time.
TINS-A223URR0
6
7
1. TOUCH SCREEN
2. POWER
3. START/AUTO MINUTE key
4. EXPRESS DEFROST key
5. SENSOR REHEAT key
6. SensNcook keys
Read SAFETY WARNINGS in the manual before operating
7. SET UP key
8. VIEW MENUS key
9. EXPRESS COOK key
10. STOP/CLEAR key
11. MODE
Page 2
INSTALLATION MICROWAVING
10 MIN 1 MINHOUR
12 : 00 AM
Enter time of day and then
touch AM or PM.
Press START to confirm
AM/PM
10 MIN 1 MINHOUR
12 : 30 AM
Enter time of day and then
touch AM or PM.
Press START to confirm
AM/PM
10 MIN 1 MINHOUR
12 : 30 PM
Enter time of day and then
touch AM or PM.
Press START to confirm
AM/PM
231
564
897
0
POWERMODE
12 : 30 PM
231
564
897
0
POWERMODE
2 . 00
100 %
10 % 30 %
50 % 70 %
2 . 00
MICRO 10 %
Touch here to go to
NEXT STAGE
2 . 00
Press the START key
MICRO 10 %
2 . 00
-1 MIN +1 MIN
MICRO 10 %
SETTING THE CLOCK
Remove all packaging and accessories from the
oven, including the feature sticker fixed to the
1.
outside of the door and the wrapping shown in the
diagram.
INSTALLATION
2.
Ensure there is at least
19.5cm of free space
above the oven.
Turntable Assembly
3.
Place the turntable support in
the centre of the oven floor so
that it can freely rotate around
the coupling.
Then place the turntable onto
the turntable support so that it
locates firmly into the coupling.
Plug in the oven. Select SET CLOCK or DEMO MODE.
To set the clock, touch SET CLOCK
4.
and follow the instructions opposite.
NOTE: If no choice is made for 30
seconds, the Demo Mode will begin
automatically. To cancel the Demo
Mode, press the STOP/CLEAR key
and the screen will return to the Home
Page. To set the clock, press the SET
UP key, touch CLOCK and follow the
directions on the Touch screen.
Other Accessories
Low and high rack - use for grilling / dual grilling
5.
food.
REMOVE THIS FILM
19.5cm
TOUCH SCREEN
Demo Mode provides a
summary of oven features.
SET CLOCK
DEMO MODE
Your oven is fitted with a 12 hour clock.
To set the time of day, follow the guidelines given below:
EXAMPLE: To set the time of day to 12:30 PM:
After touching SET
CLOCK, enter the time of
1.
day (hour) by touching
HOUR 11 times.
Enter the time of day
(minutes) by touching 10
2.
MIN 3 times.
Select AM or PM, then
press the START/AUTO
3.
MINUTE key to set the
clock.
The clock will start and the display
will return to the Home Page.
4.
The Home Page is the opening
screen, from this screen a variety of
functions can be carried out.
• Touch POWER after entering
cooking time to select one of five
microwave power levels.
• Touch MODE after entering
cooking time to select cooking
mode using the grill heating
element.
• The time of day is also displayed
at the top of the screen. (If the
clock has been set).
Example of basic microwaving:
To heat a cup of water on 10 % power for 2
minutes.
Place the cup of water in
the centre of the turntable
1.
and close the door.
Enter the cooking time,
2, 0, 0 by touching the
2.
numbers on the screen.
Note the top line of the
display. And then touch
POWER.
Choose desired power by
pressing 10 %.
3.
Press the START/AUTO
MINUTE key once to start
4.
cooking
The display will count
down through cooking
5.
time.
 Loading...