

Page 1

VBRHJDJKZJDFY GTXM C UHBKTV
Herjdjlcndj gj ärcgkefnfwbb b htwtgns
Z
R-6571L
CONTENTS
Bzajhvfwby j cthnbabrfwbb ghjlerwbb
Warning ............................................................................ 1
Special Notes and Warning ............................................. 2
Installation Instructions .................................................... 3
Oven Diagram .................................................................. 3
Operation of Control Panel .............................................. 4
Control Panel Display ..................................................... 4
Control Panel Layout ...................................................... 4
Before Operating .............................................................. 5
Getting Started ................................................................ 5
Stop/Clear ....................................................................... 5
To Cancel a Programme During Cooking ........................ 5
Heating without Food ....................................................... 5
Manual Operations ........................................................... 6
Microwave Time Cooking ................................................ 6
Sequence Cooking .......................................................... 7
Instant Cook .................................................................... 7
Grill Cooking .................................................................... 8
Grill Mix Cooking ............................................................. 9
Automatic Operations ..................................................... 10
Notes for Automatic Operations .................................... 10
Russian Menu/Auto Cook/Express Defrost ................... 11
Russian Menu Guide .................................................... 12
Auto Cook Menu Guide ................................................. 13
Express Defrost Menu Guide ........................................ 14
Other Convenient Features ............................................ 15
Less/More Setting ......................................................... 15
Adjust Time During Cooking ......................................... 15
Timer ............................................................................. 16
Care and Cleaning ......................................................... 17
Service Call Check ......................................................... 18
Specifications ................................................................. 18
Page 2

BZAJHVFWBY J CTHNBABRFWBB GHJLERWBB
VT10
cthnbabwbhjdfzf jhufzjv gj cthnbabrfwbb <snjdjq
(Htubcnhfwbjzzsq zjvth d Ujchttcnht — HJCC RU.0001.11ME10)
VJLTKM R-6571L IFHG
cjjndtncndetn nht<jdfzbyv
zjhvfnbdzsü ljrevtznjd:
Dj bcgjkztzbt Cnfnmb 5 Pfrjzf Hjccbqcrjq Atlthfwbb ≤J pfobnt ghfd gjnht<bntktq≥, f nfröt Erfpf
Ghfdbntkmcndf Hjccbqcrjq Atlthfwbb @ 720 jn 16 b+zy 1997 u. ecnfzfdkbdftncy chjr ckeö<s lfzzjq
vjltkb 7 ktn c vjvtznf ghjbpdjlcndf ghb eckjdbb bcgjkmpjdfzby d cnhjujv cjjndtncndbb c
bzcnherwbtq gj ärcgkefnfwbb b ghbvtzytvsvb ntüzbxtcrbvb cnfzlfhnfvb.
Cnhfzf-bpujnjdbntkm: Ghjbpdtltzj d Nfbkfzlt
Abhvf-bpujnjdbntkm: IFHG Rjhgjhtqiz
*hblbxtcrbq flhtc bpujnjdbntky:
22-22 Zfufqrt-xj, F<tzj-re, Jcfrf 545-8522, Ygjzby
VBRHJDJKZJDFY GTXM C UHBKTV
VJLTKM R-6571L IFHG
äktrnhjzbrb “NTCN>ÄN“
Gj <tpjgfczjcnb — UJCN H VÄR 335-2-25-97
Gj ÄVC — UJCN H 51318.11-99
UJCN H 51318.14.1-99, UJCN H 51317.3.2-99
UJCN H 51318.14.2-99, UJCN H 51317.3.3-99
Page 3

WARNING
IMPORTANT SAFETY INSTRUCTIONS : READ CAREFULLY AND KEEP FOR FUTURE REFERENCE.
1. To reduce the risk of fire in the oven cavity:
a. Do not overcook food.
b. Remove wire twist-ties from paper or plastic bags before placing bag in the oven.
c. Do not heat oil or fat for deep frying. The temperature of the oil cannot be controlled.
d. Look at the oven from time to time when food is heated in disposable containers made of plastic, paper
or other combustible materials for signs of smoke or burning.
e. If materials inside the oven should ignite, or smoke is observed, keep oven door closed, turn oven off,
and disconnect the power plug, or shut off power at the fuse or circuit breaker panel.
2. To reduce the risk of an explosion or delayed eruptive boiling when handling the container.
Your microwave oven is capable of heating food and beverages very quickly therefore, it is very important
that you select the appropriate cooking time and power level for the type and quantity of food to be heated.
If you are unsure of the cooking time and power level required, begin with low cooking times and power
levels until the food is sufficiently heated evenly throughout.
Additionally:
a. Do not place sealed containers in the oven. Babies bottles fitted with a screw cap or teat are considered
to be sealed containers.
b. Do not use excessive amount of time.
c. When boiling liquids in the oven, use a wide-mouthed container.
d. Stand at least for 20 seconds at the end of cooking to avoid delayed eruptive boiling of liquids.
e. Stir the liquid before and during cooking. Use extreme care when handling the container or inserting
a spoon or other utensil into the container.
3. This oven is for home food preparation only and should only be used for heating, cooking and defrosting
food and beverage.
It is not suitable for commercial, laboratory use, or heating therapeutic devices eg. Wheat bags.
4. Never operate the oven whilst any object is caught or jammed between the door and the oven.
5. Do not try to adjust or repair the oven yourself.
It is hazardous for anyone other than a qualified service technician trained by SHARP to carry out any
service or repair operation. Especially those which involve the removal of a cover which gives protection
against exposure to microwave energy are very hazardous.
6. Do not operate the oven if it is not working correctly or damaged until it has been repaired by a qualified
service technician trained by SHARP. It is particularly important that the oven door closes properly and
that there is no damage to:
(1) Door (warped), (2) Hinges and Latches (broken or loosened), (3) Door Seals, Sealing Surfaces and
oven cavity (buckled or deformed), (4) Burn marks on the door seal faces.
7. Handle with care when removing items from the oven so that the utensil, your clothes or accessories do
not touch the safety door latches.
8.
Never poke an object, particularly a metal object, through a grille or between the door and the oven while the oven is operating.
9. Never tamper with or deactivate the door safety latches.
10. Always use oven gloves to prevent burns when handling utensils that are in contact with hot food. Enough
heat from the food can transfer through utensils to cause skin burns.
11. Should the power supply cord become damaged, it must be replaced with a special cord supplied by a
SERVICE CENTRE APPROVED BY SHARP. And it must be replaced by a qualified service technician
trained by SHARP in order to avoid a hazard.
12. If the oven lamp fails please consult your dealer or a qualified service technician trained by SHARP.
13. Avoid steam burns by directing steam away from the face and hands.
Slowly lift the furthest edge of a dish's cover including microwave plastic wrap etc., and carefully open
popcorn and oven cooking bags away from the face.
14. Make sure that the power supply cord is undamaged, and that it does not run under the oven or over any
hot surfaces or sharp edges.
15. To prevent the turntable from breaking:
a. Before cleaning the turntable with water, leave the turntable to cool.
b. Do not place anything hot on a cold turntable.
c. Do not place anything cold on a hot turntable.
16. Do not place anything on the outer cabinet.
17. Do not store food or any other items inside the oven.
18. Make sure the utensil does not touch the interior walls during cooking.
19. This appliance is not intended for use by persons (including children) with reduced physical, sensory or
mental capabilities, or lack of experience and knowledge, unless they have been given supervision or
instruction concerning use of the appliance by a person responsible for their safety.
20. Young children should be supervised to ensure that they do not play with the appliance.
21.
Accessible parts (e.g. oven door, oven cavity, dishes and accessories) may become hot during use. To avoid
burns young children should be kept away. Always use thick oven gloves to prevent yourself from getting burnt.
22. When the appliance is operated in the combination mode (Mix Cooking), Grill Cooking or Automatic
Operations, children should only use the oven under adult supervision due to the temperature generated.
1
Page 4
SPECIAL NOTES AND WARNING
DO DON’T
Eggs, fruits,
nuts, seeds,
vegetables,
sausages and
oysters
Popcorn
Baby food
General
* Puncture egg yolks and whites and
oysters before cooking to prevent
"explosion".
* Pierce skins of potatoes, apples,
squash, hot dogs, sausages and
oysters so that steam escapes.
* Use specially bagged popcorn for the
microwave oven.
* Listen while popping corn for the
popping to slow to 1-2 seconds.
* Transfer baby food to small dish and
heat carefully, stirring often. Check for
suitable temperature to prevent burns.
* Remove the screw cap and teat
before warming baby bottles. After
warming shake thoroughly. Check for
suitable temperature.
* Food with filling should be cut after
heating, to release steam and avoid
burns.
* Use a deep bowl when cooking liquids
or cereals to prevent boiling over.
* Cook eggs in shells. This prevents
"explosion", which may damage the
oven or injure yourself.
* Cook hard/soft boiled eggs.
* Overcook oysters.
* Dry nuts or seeds in shells.
* Pop popcorn in regular brown bags or
glass bowls.
* Exceed maximum time on popcorn
package.
* Heat disposable bottles.
* Overheat baby bottles.
Only heat until warm.
* Heat bottles with nipples on.
* Heat baby food in original jars.
* Heat or cook in closed glass jars or
airtight containers.
* Deep fat fry.
* Heat or dry wood, herbs, wet papers,
clothes or flowers.
* Operate the oven empty except the di-
rected case in the operation manual.
Liquids
(Beverages)
Canned foods
Sausage rolls,
Pies, Christmas
pudding
Meats
Utensils
Aluminium foil
Browning dish
* For boiling or cooking liquids see
WARNING on page 1 to prevent
explosion and delayed eruptive
boiling.
* Remove food from can.
* Cook for the recommended time.
(These foods have high sugar and/or
fat contents.)
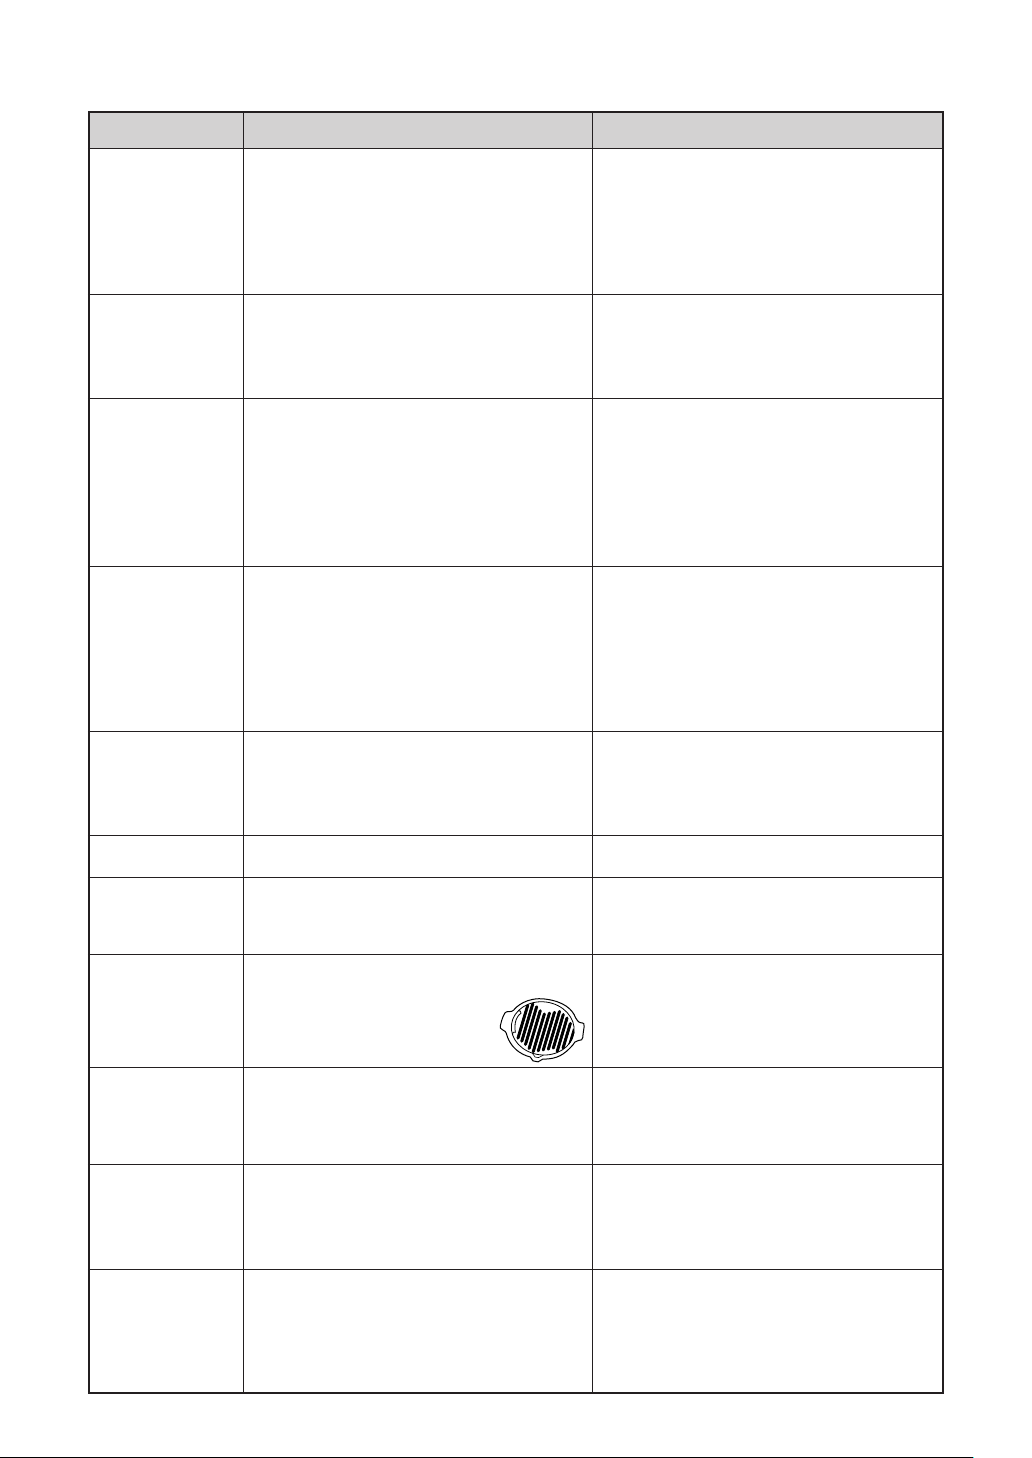
* For microwave cooking, use a
microwave proof roasting rack
to collect drained juices.
Roasting rack:
* Check the utensils are suitable for
MICROWAVE cooking before you use
them.
* Use to shield food to prevent over
cooking.
* Watch for sparking. Reduce foil or
keep clear of cavity walls.
* Place a suitable insulator such as a
microwave and heat proof dinner plate
between the turntable and the
browning dish.
* Heat for longer than recommended time.
* Heat or cook food while in cans.
* Overcook as they may catch fire.
* Place meat directly on the turntable for
cooking.
* Use metal utensils for MICROWAVE
cooking. Metal reflects microwave
energy and may cause an electrical
discharge known as arcing.
* Use too much.
* Shield food close to cavity walls.
Sparking can damage the cavity.
* Exceed the preheating time recom-
mended by the manufacturer. Excessive preheating can cause the glass
turntable to shatter and/or damage
internal parts of the oven.
2
Page 5
INSTALLATION INSTRUCTIONS
1. Remove all packing materials from the oven cavity, (do not remove the waveguide cover), and
the feature sticker from the outside of the door, if there is one. Check the unit for any damage, such
as a misaligned door, damaged door seals around the door or dents inside the oven cavity or on the
door. If there is any damage, please do not operate the oven until it has been checked by a SERVICE
CENTRE APPROVED BY SHARP and repaired, if necessary.
2. Accessories provided
1) Turntable tray
2) Roller stay
3) Rack
4) Operation manual
5) 2 Cook books
6) Warranty card
3. Since the door may become hot during cooking, and in order to avoid its accidental touch, the oven
should be placed at least 80 cm or more above floor. You should also keep Children away from the
door to prevent them burning themselves.
4. Place the roller stay in the coupling on the oven floor, then place the turntable on to the roller stay,
ensuring it is located firmly. Refer to OVEN DIAGRAM below. NEVER OPERATE THE OVEN WITHOUT
THE ROLLER STAY AND TURNTABLE.
5. This oven is designed to be used on a countertop only. It should not be installed in any area where
excessive heat and steam are generated, for example, next to a conventional oven unit. The oven
should be installed so as not to block ventilation openings.
Allow at least 40 cm on the top of the oven for adequate air circulation. This oven is not designed to
be built-in to a wall or cabinet.
6. Neither the manufacturer nor the distributors can accept any liability for damage to the machine or
personal injury for failure to observe the correct electrical connecting procedure.
The A.C. voltage must be single phase 220- 230V, 50Hz, with a minimum 10A distribution line fuse,
or a minimum 10A distribution circuit breaker.
7. THIS APPLIANCE MUST BE EARTHED.
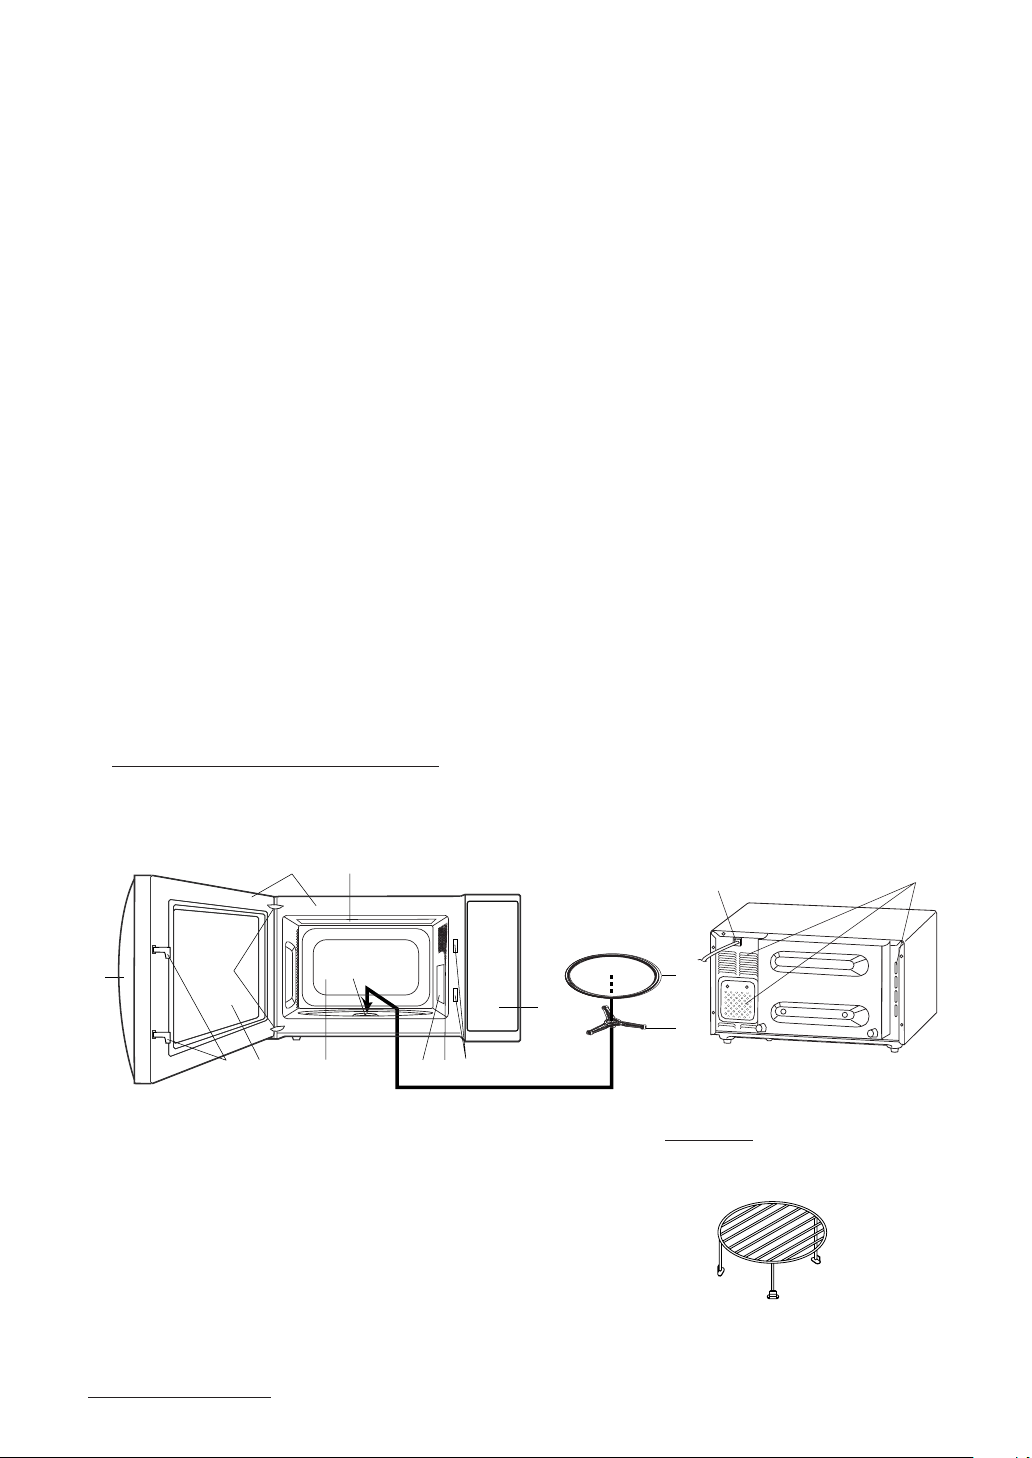
OVEN DIAGRAM
6
7
B
1
3
8
C
0
D
4
5E
4
1. Door open handle
2. Oven lamp
3. Door hinges
4. Door safety latches
5. See through door
6. Door seals and sealing surfaces
7. Top grill heater (top heater)
8. Coupling
WARNING:
The accessories will become very hot during Grill, Grill Mix, Russian Menu and Auto Cook modes, and
use thick oven gloves when removing the food or turntable from the oven to PREVENT BURNS.
9
2
9. Waveguide cover
(Do not remove)
10. Control panel (See page 4)
11. Ventilation openings
12. Power supply cord
13. Turntable
14. Roller stay
15. Oven cavity
Metal rack
The rack is for Grill, Grill Mix, Russian Menu and Auto Cook.
A
3
Page 6
OPERATION OF CONTROL PANEL
The operation of the oven is controlled by pressing the appropriate buttons arranged on the surface of the control
panel.
An entry signal tone should be heard each time you press the control panel to make a correct entry.
In addition the oven will beep for approximately 2 seconds at the end of the cooking cycle, or 4 times when
cooking procedure is required.
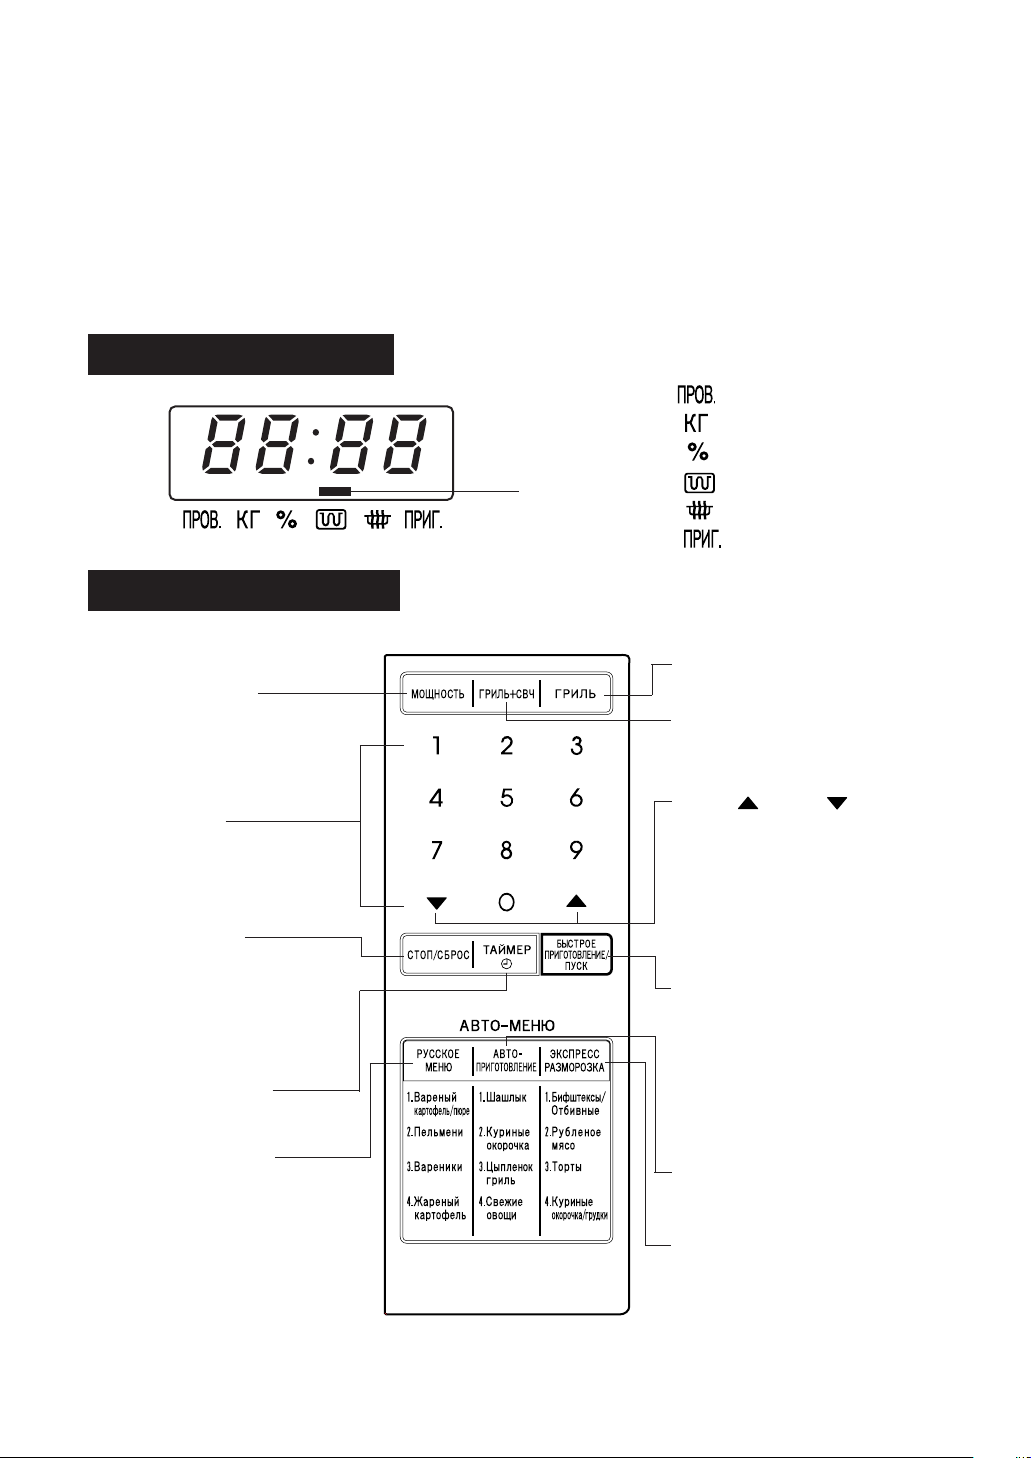
Control Panel Display
: CHECK
: KG
: %
Indicators
Control Panel Layout
POWER LEVEL PAD
Press to select microwave
power setting.
If not pressed, HIGH is
automatically selected.
NUMBER PADS
Press to enter cooking times,
clock time, weight or quantity
of food.
STOP/CLEAR PAD
Press to clear during
programming. Press once to
stop operation of oven during
cooking; Press twice to cancel
cooking programme.
KITCHEN TIMER PAD
Press to set timer.
RUSSIAN MENU PAD
Press to select the Russian
Menu.
: GRILL
: MICRO
: COOK
GRILL PAD
Press to select GRILL mode.
GRILL MIX PAD
Press to select GRILL MIX
mode.
MORE(
Press to adjust the doneness of
food in one minute
increments/decrements during
manual cooking or to increase/
decrease the time whilst
programming the automatic
operations.
INSTANT COOK/START PAD
Press once to cook for 1
minute at HIGH or increase by
1 minute multiples each time
this pad is pressed during
manual cooking. Press to start
oven after setting
programmes.
AUTO COOK PAD
Press to select 4 popular
menus.
EXPRESS DEFROST PAD
Press to select the Express
Defrost menu.
), LESS( ) PADS
4
Page 7
BEFORE OPERATING
Getting Started
Step
Plug the oven into a power point.
Ensure the oven door is closed.
Procedure Pad Order Display
1
Flashing eights.
Press the STOP/CLEAR pad so that the
oven beeps.
2
Only the dots will remain.
Stop/Clear
Use the STOP/CLEAR pad to:
1. Stop the oven temporarily during cooking.
2. Clear if you make a mistake during programming.
To Cancel a Programme During Cooking
Press the STOP/CLEAR pad twice.
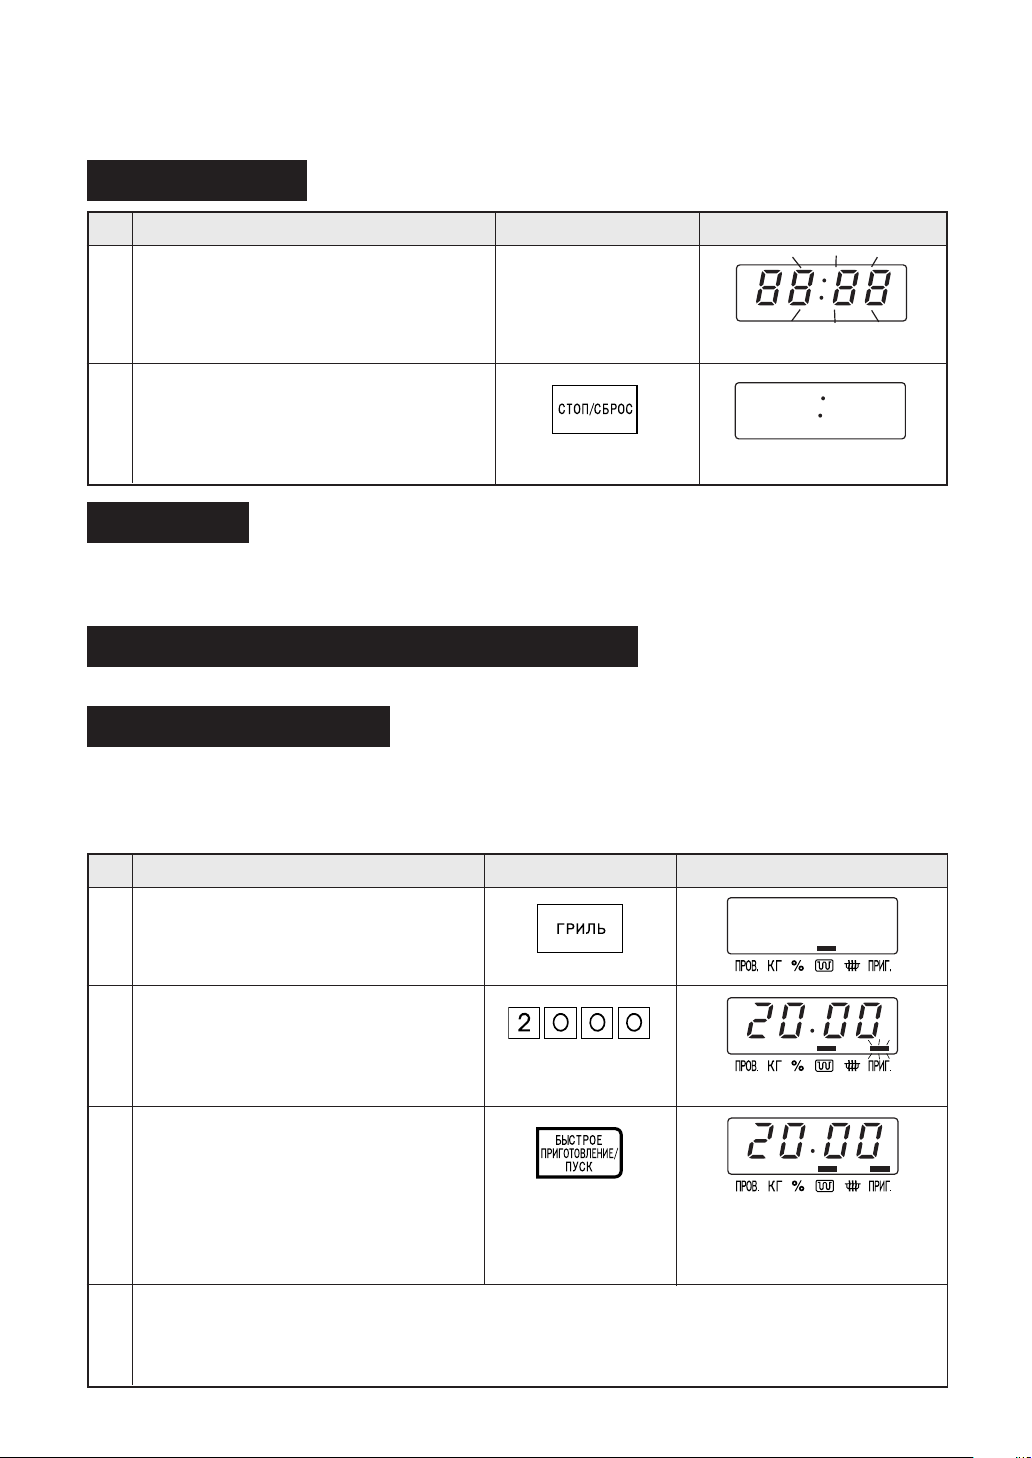
Heating without Food
Some smoke and odor may occur for a while at the beginning of GRILL, GRILL MIX, RUSSIAN MENU
or AUTO COOK mode, but the oven is not out of order.
To remove the cause of the smoke and odor, operate the oven without food for 20 min. on Grill before
the first use and after cleaning.
Step
Ensure that no food is in the oven.
Press the GRILL pad.
1
Enter the heating time (20 min.).
Procedure Pad Order Display
2
COOK is flashing.
Press the INSTANT COOK/START pad.
IMPORTANT:
During this operation, some smoke and
3
odor will occur. Therefore open the windows or run the ventillation fan in the
room.
Open the door to cool the oven cavity.
WARNING:
4
The oven door, outer cabinet and oven cavity will become hot and pay attention to avoid burn
when cooling the oven.
5
The timer will begin to count
down. When it reaches zero,
all indicators will go out and
audible signal will sound.
Page 8
MANUAL OPERATIONS
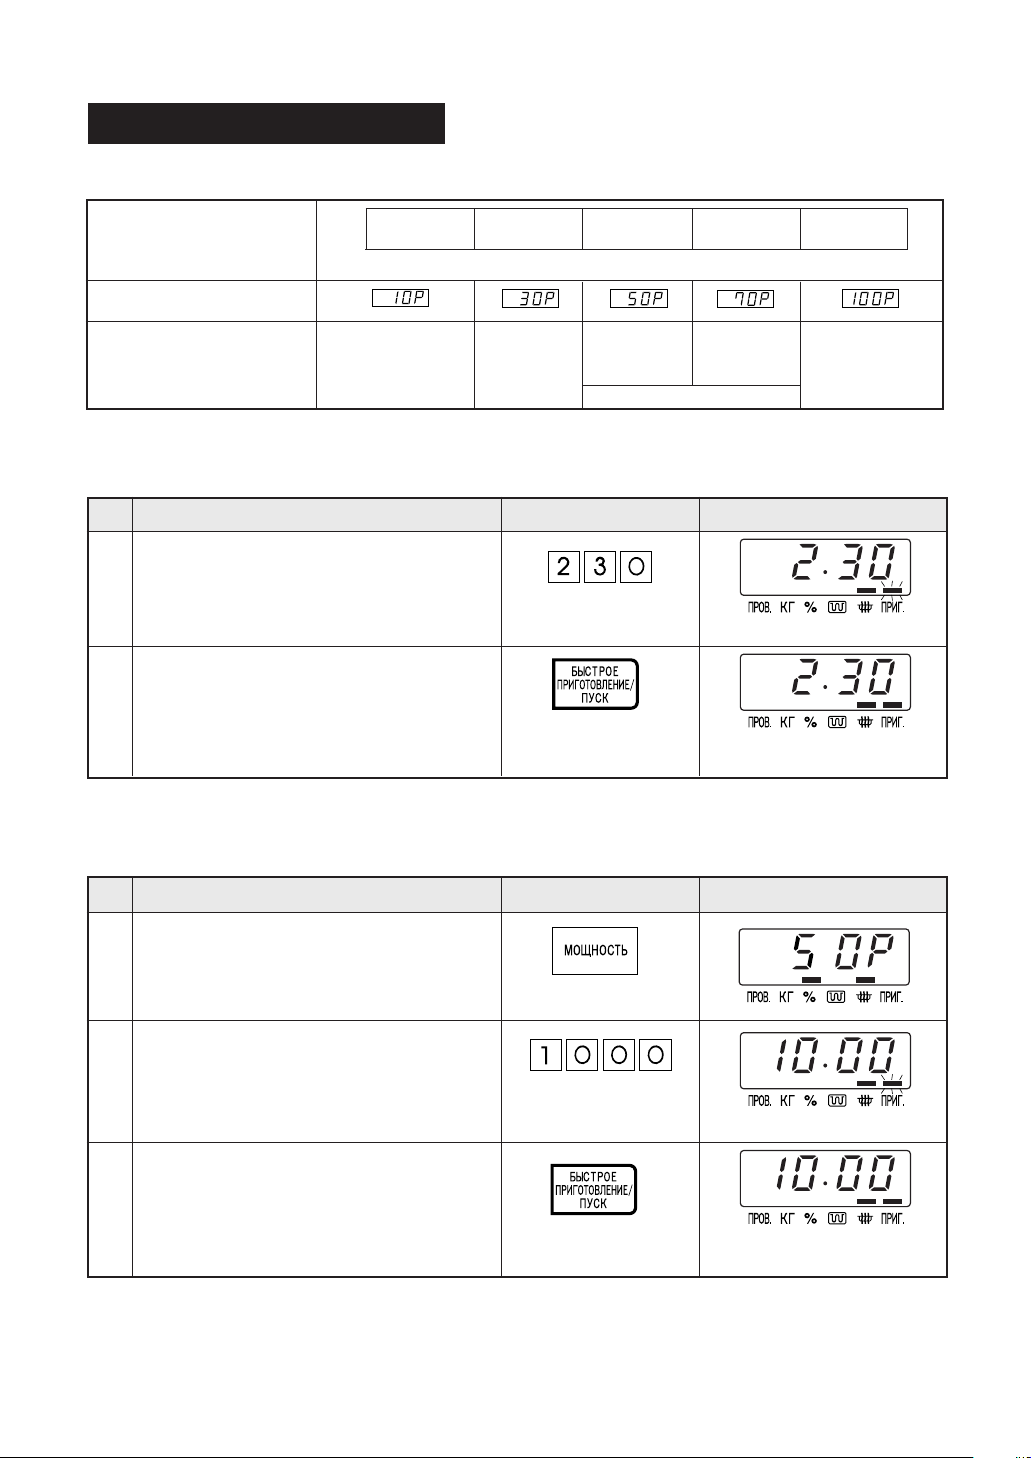
Microwave T ime Cooking
This is a manual cooking feature, first enter the cooking time then the power level.
You can programme up to 99 minutes, 99 seconds. There are five different power levels.
Power level
Approximate percentage
of microwave power
Display
Examples of foods typically cooked on microwave oven power level
This variable cooking control allows you to select the rate of microwave cooking.
If a power level is not selected, then HIGH power is automatically used.
*Suppose you want to time cook for 2 minutes 30 seconds on HIGH power.
Step
Enter desired cooking time.
Keeping food
warm
Procedure Pad Order Display
LOW HIGHMEDIUM
10% 30% 50% 70% 100%
M•LOW M•HIGH
–
–
–
–
–
Defrost
–
–
Softening
–
–
––
butter
–
––
–
–
–
–
–
Casseroles
–
–
–
–
––
––
–
–
–
––
––
–
–
–
–
–
–
–
–
–
–
––
–
–
–
–
–
–
–
Seafood
Cakes
Muffins
Slices
–
–
–
–
–
–
–
–
–
Fruit
–
–
Vegetable
–
–
Rice/Pasta
––
–
–
–
–
–
–
–
–
––
––
1
COOK will flash on and off.
Press the INSTANT COOK/START pad.
2
The timer begins to count
down.
To lower the power press the POWER LEVEL pad once. Note the display will indicate “100%”. To lower
to “70%” press the POWER LEVEL pad again. Repeat as necessary to select “50%”, “30%” or “10%”
power levels.
* Suppose you want to cook Fish Fillets for 10 minutes on MEDIUM power.
Step
Select power level by pressing the POWER LEVEL pad as required (for MEDIUM
1
press three times).
Enter desired cooking time.
Procedure Pad Order Display
x 3
2
COOK will flash on and off.
Press the INSTANT COOK/START pad.
3
The timer begins to count
down.
If the door is opened during cooking process, the cooking time in the readout automatically stops. The cooking
time starts to count down again when the door is closed and the INSTANT COOK/START pad is pressed.
If you want to check the power level during the cooking, press POWER LEVEL pad.
As long as your finger is pressing the POWER LEVEL pad, the power level will be displayed.
If more than 20 minutes on HIGH power is entered, the microwave power will be reduced after 20 minutes
to avoid overheating.
6
Page 9

Sequence Cooking
Your oven can be programmed for up to 3 automatic cooking sequences, switching from one variable
power setting to another automatically.
Note that POWER LEVEL must be entered first when programming sequence cooking.
* Suppose you want to cook for 10 minutes on MEDIUM followed by 5 minutes on HIGH.
Step
Select desired power level by pressing
the POWER LEVEL pad (for MEDIUM press
three times).
1
Enter desired cooking time.
Procedure Pad Order Display
2
For second sequence, select microwave
cooking and power level (for HIGH press
3
the POWER LEVEL pad once).
Enter desired cooking time.
4
Press the INSTANT COOK/START pad.
5
x 3
COOK will flash on and off.
x 1
COOK will flash on and off.
The timer begins to count
down to zero. When it
reaches zero,
the second sequence will
appear and the timer will
begin counting down to
zero again.
Instant Cook™
For your convenience Sharp’s Instant Cook allows you to easily cook for one minute on HIGH power.
Step
Press the INSTANT COOK/START pad.
Within 3 minutes of closing the door.
Procedure Pad Order Display
1
The timer begins to count
down.
Press the INSTANT COOK/ START pad until desired time is displayed.
Each time the pad is pressed, the cooking time is increased by 1 minute.
7
Page 10
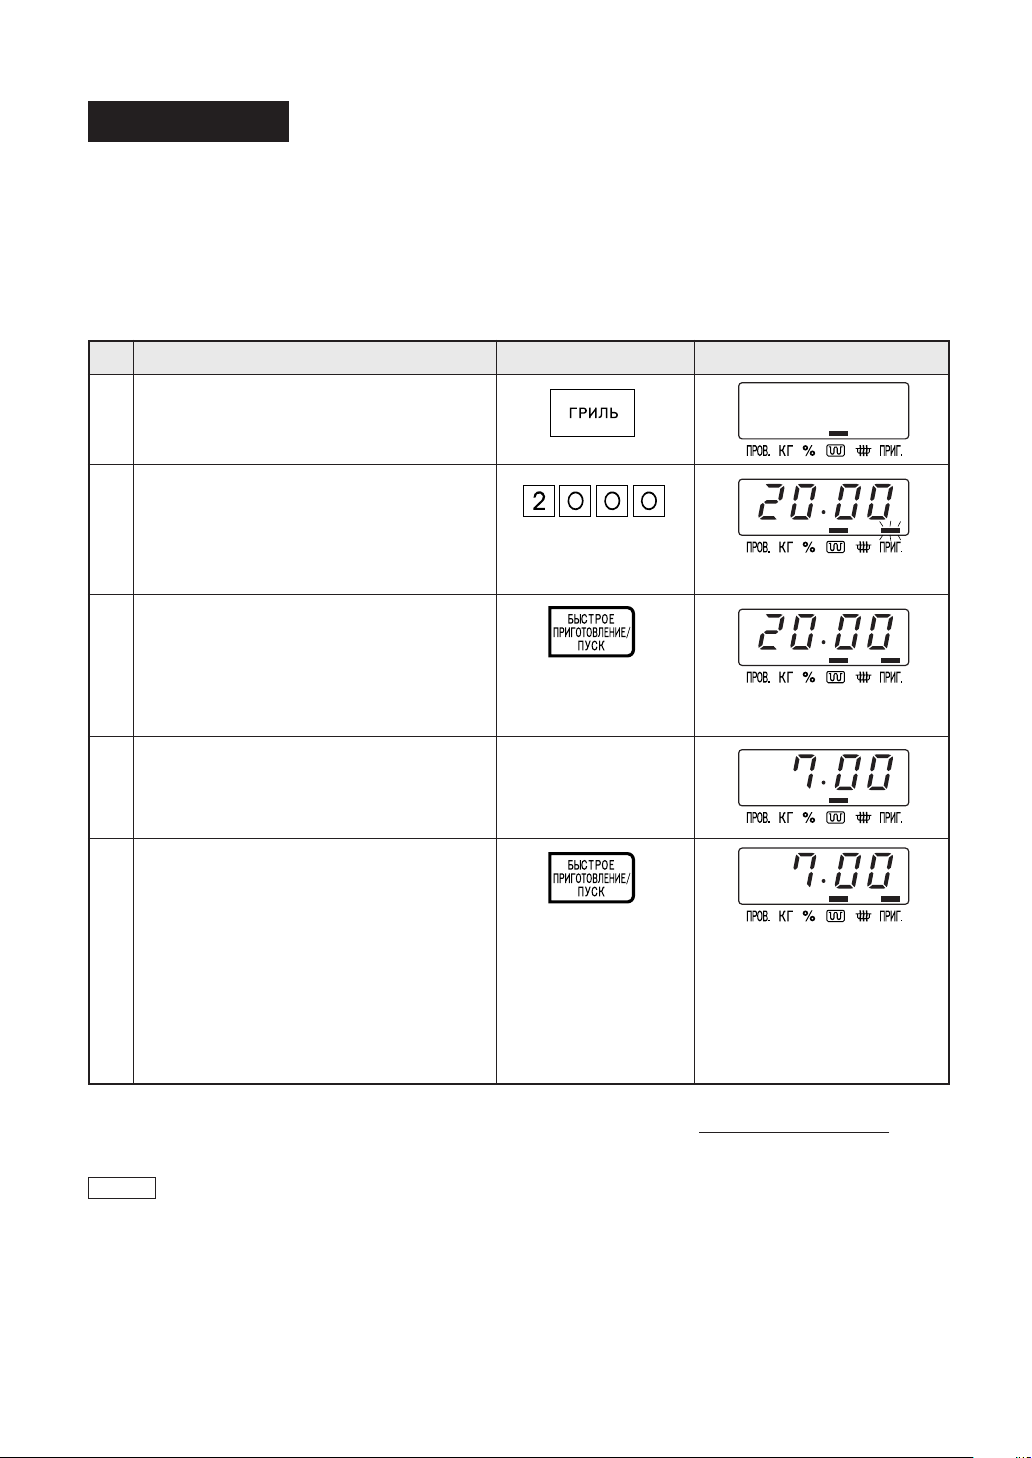
Grill Cooking
The top heater has one power setting and cannot be adjusted. Use appropriate time for steaks, chops,
chicken pieces or other grilled food to achieve opimum results of cooking.
Recommended Utensils:
Rack Aluminium foil container Heat resistant cookware
* Suppose you want to cook for 20 minutes on Grill.
Step
Press the GRILL pad.
Procedure Pad Order Display
1
Enter desired cooking time.
2
Press the INSTANT COOK/START pad.
3
When the timer reaches about 2/3 of the
way through the cooking time, open the
4
door and turn over the steak. And then
close the door.
Press the INSTANT COOK/START pad.
5
COOK will flash on and off.
The timer begins to count
down.
The timer begins to count
down again. When it reaches
zero, all indicators will go off
and the oven will "beep". The
cooling fan will remain on
until the oven cavity has
cooled.
Warning:
The oven cavity, door, accessories and dishes will become very hot, use thick oven gloves when
removing the food or turntable from the oven to PREVENT BURNS.
NOTE 1.Place food on the rack. Set the rack on the turntable.
2.Check the recommended cooking time given in the recipes.
3.After 2/3
of the cooking time turn the food over and grill the other side.
8
Page 11
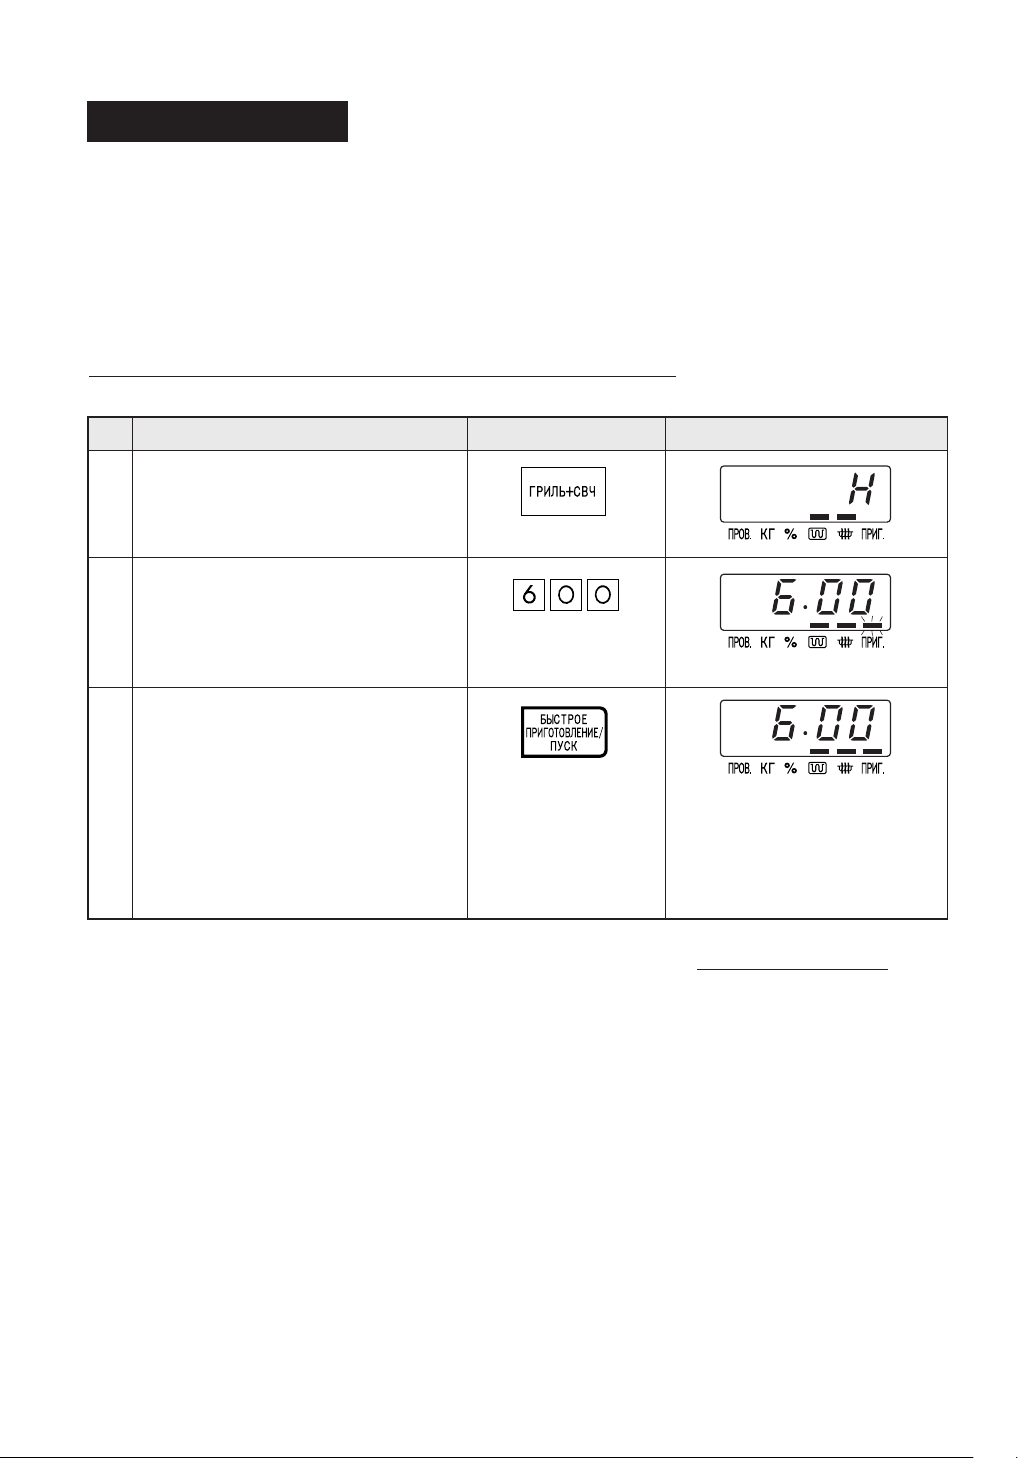
Grill Mix Cooking
Your Grill Microwave Oven has two programmed settings that make it easy to cook with both grill heater
and microwave automatically.
The GRILL MIX-HIGH is programmed with 50% microwave power, while the GRILL MIX-LOW is
programmed with 10% microwave power.
To select GRILL MIX-HIGH, press the GRILL MIX pad once.
To select GRILL MIX-LOW, press the GRILL MIX pad twice.
Recommended Utensils:
Rack Aluminium foil container Heat resistant cookware
IT IS NOT NECESSARY TO PREHEAT FOR THE MIX COOKING.
* Suppose you want to reheat for 6 minutes on GRILL MIX-HIGH.
Step
Press the GRILL MIX pad once.
Procedure Pad Order Display
1
x 1
Enter desired cooking time.
2
COOK will flash on and off.
Press the INSTANT COOK/START pad.
3
Warning:
The oven cavity, door, accessories and dishes will become very hot,
removing the food or turntable from the oven to PREVENT BURNS.
The timer begins to count down.
When it reaches zero, all indicators will go off and the oven will
"beep". The cooling fan will remain on until the oven cavity
has cooled.
use thick oven gloves when
9
Page 12

AUTOMATIC OPERATIONS
Notes for Automatic Operations
1. "Err" will be displayed if:
more or less than the quantity or weight of foods suggested in each MENU GUIDE is programmed
when the INSTANT COOK/START pad is pressed.
To clear, press the STOP/CLEAR pad and reprogramme.
2. When using the automatic features, carefully follow the details provided in each MENU GUIDE to
achieve the best result.
If the details are not followed carefully, the food may be overcooked or undercooked or "Err" may be
displayed.
3. Food weighing more or less than the quantity or weight listed in each MENU GUIDE, cook manually.
Refer to cook book.
4. When entering the weight of the food, round off the weight to the nearest 0.1kg(100g). For example,
0.65kg would become 0.7kg.
5. To change the final cooking or defrosting result from the standard setting, press the MORE(
(PLUS) or LESS(
6. The final cooking result will vary according to the food condition (e.g. initial temperature, shape,
quality). Check the food after cooking and if necessary continue cooking manually.
) (LESS) pad prior to pressing the INSTANT COOK/START pad. See page 15.
)
10
Page 13

Russian Menu/Auto Cook/Express Defrost
Russian Menu/Auto Cook/Express Defrost will automatically compute the cooking mode and cooking/
defrosting time.
Follow the instructions provided in the Menu Guide on page 12-14.
* Suppose you want to cook 0.5 kg of Boiled Potato.
Step
Select the menu by pressing the desired
pad (for Boiled Potato press the RUSSIAN MENU pad once).
1
Press number pads to enter weight.
Procedure Operation Display
2
Press the INSTANT COOK/START pad.
3
Open the door. Rearrange.
Close the door.
4
x 1
KG will flash on and off.
KG stops flashing and remains on display.
COOK flashes on and off.
The cooking time will
begin counting down.
When a 4 times "beep"
sound is heard, the oven
stops. CHECK will flash
on and off.
COOK will flash on and off.
Press the INSTANT COOK/START pad.
5
Warning for Russian Menu and Auto Cook:
The oven cavity, door, accessories and dishes will become very hot, use thick oven gloves when
removing the food or turntable from the oven to PREVENT BURNS.
11
The cooking time will continue counting down.
When it reaches zero, the
oven will "beep".
Page 14

Russian Menu Guide
Pad
У-1
Boiled Potato
X1
У-2
Pelmeny Boiled
(Thin type)
X2
У-3
Vareniki Boiled
X3
Menu
Weight
0.3 - 1.0 kg
(Initial temp 20˚C)
0.1 - 0.5 kg
(Initial temp
pelmeny -18˚C,
water 20˚C)
0.1 - 0.5 kg
(Initial temp
vareniki -18˚C,
water 20˚C)
Procedure
• Peel the potatoes and cut them into similar
sized pieces.
• Put the potato into a casserole. Add 2 tbsp
water per 100 g and a little salt.
• Cover with a glass lid.
• When the oven stops, rearrange the potato,
cover and continue to cook.
• After cooking, let the potatoes stand covered for 2 minutes.
NOTE: For PUREE, use the MORE setting.
After cooking, mash potatoes.
• Put the required water in a suitable sized
casserole.
For 100 g, 400 ml water. For 300 g, 700 ml
water. For 500 g, 1000 ml water.
• Heat water uncovered.
• When the oven stops, add frozen pelmeny
in a casserole, stir and continue to cook.
• When the oven stops again, rearrange the
pelmeny and continue to cook.
NOTE: For thick type, use the MORE setting.
After cooking, let stand for 2 - 5
minutes.
• Put the required water in a suitable sized
casserole.
For 100 g, 400 ml water. For 300 g, 700 ml
water. For 500 g, 1000 ml water.
• Heat water uncovered.
• When the oven stops, add frozen vareniki
and a little salt in a casserole, stir and
continue to cook.
• When the oven stops again, rearrange the
vareniki and continue to cook.
X4
У-4
Fried Potato
0.2 - 0.6 kg
(Initial temp 20˚C)
12
• Peel the potatoes and cut them into small
pieces. Do not cut very thin pieces.
• Put the potatoes in a flan dish not to be
overlaped. Brush potato with vegetable oil.
• Place on the rack, uncovered.
• When oven stops, turn potato over and
continue to cook.
Page 15
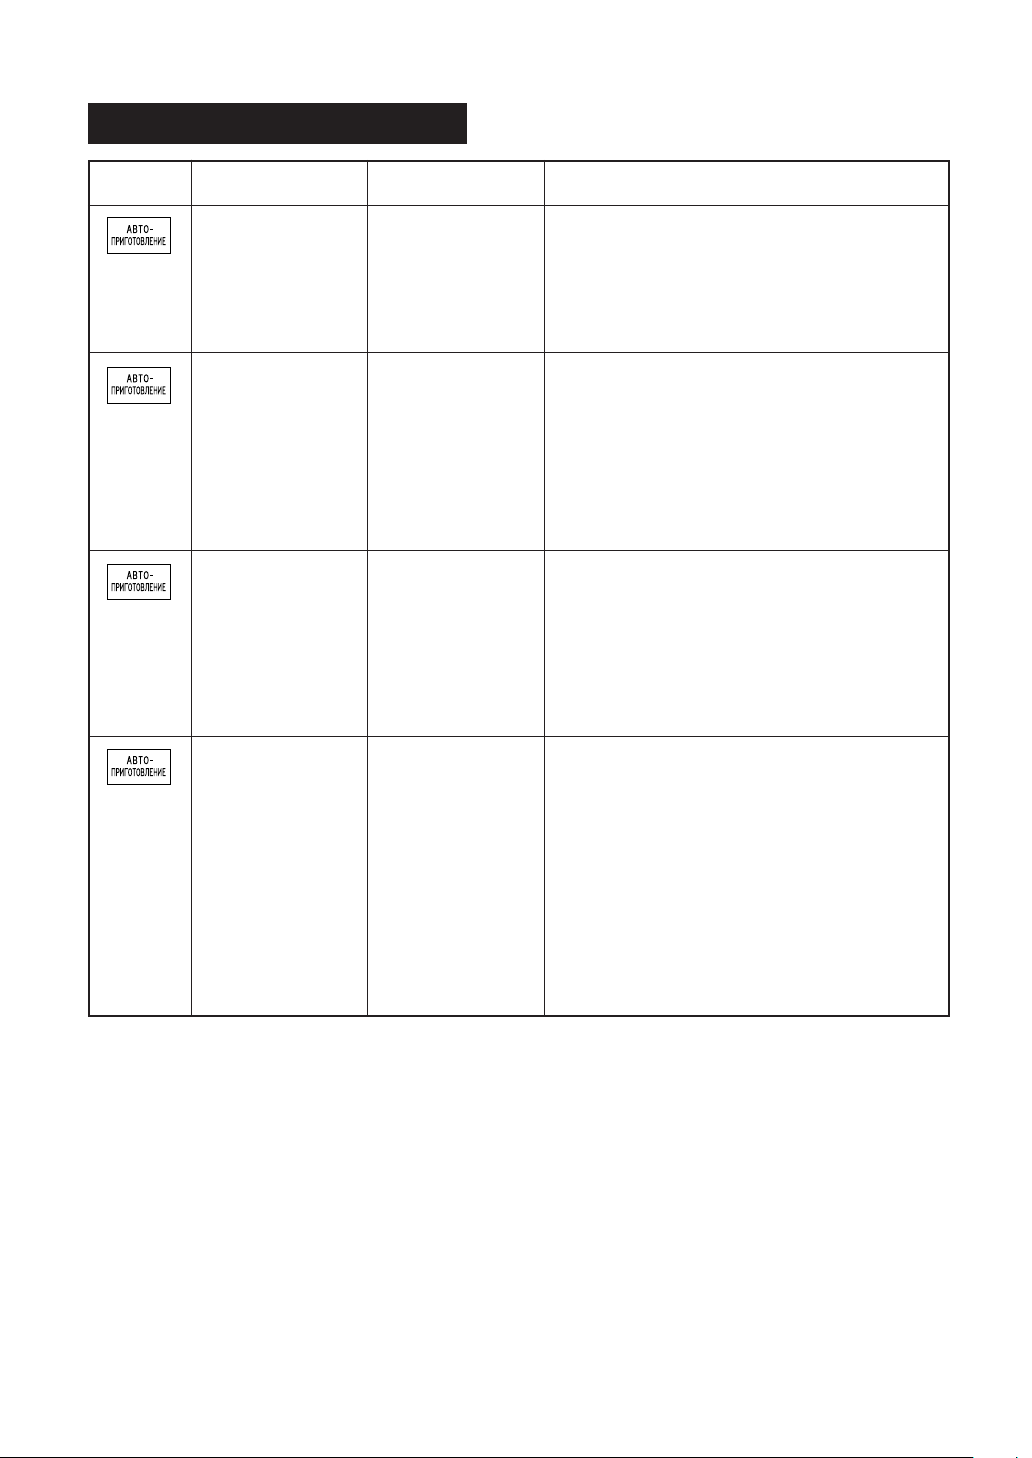
Auto Cook Menu Guide
Pad
А-1
Grill Skewers
X1
А-2
Chicken Legs
X2
Ingredients for 0.6
kg chicken legs:
3 pieces, 1-2 tbsp
1
/2 tsp salt, 1 tsp
oil,
sweet paprika, 1
tsp rosemary
А-3
Grilled Chicken
X3
Ingredients for 1,2
kg grilled chicken:
Salt and Pepper, 1
tsp sweet paprika,
2 tbsp oil
А-4
Fresh Vegetables
X4
Menu
Weight
0.2 - 0.6 kg*
(Initial temp 5˚C)
* Total weight of
all ingredients.
0.2 - 0.6 kg
(Initial temp 5˚C)
0.9 - 1.4 kg
(Initial temp 5˚C)
0.1 - 0.6 kg
(Initial temp 20˚C)
Procedure
• Prepare the grill skewers referring to the
recipe below.
• Place on the rack and cook.
• When the oven stops, turn over.
• After cooking, remove and put on a plate for
serving. (No standing time necessary).
•Mix the ingredients and spread on the chicken legs.
• Pierce the skin of the chicken legs.
•
Put the chicken legs on the rack, skin side
down, with the thin ends towards the centre.
• When the oven stops, turn over.
• After cooking, let stand for approx. 3 minutes.
•
Mix the ingredients and spread on the chicken.
• Pierce the skin of the chicken.
• Put chicken breast side down on an upturned saucer in a flan dish.
• Place directly on the turntable and cook.
• When the oven stops, turn over.
• After cooking, let stand for approx. 3 minutes.
• Cut into small pieces, eg. strips, cubes or
slices.
• Put the vegetables in a suitable sized bowl.
• Add 1 tbsp water per 100 g and salt as
desired. (For mushrooms no additional
water is necessary).
• Cover with a lid.
•
When the oven stops, stir and continue to cook.
• After cooking, let stand covered for
approx.
2 minutes.
NOTE: For GREEN BEANS, use the MORE
setting.
GRILL SKEWERS (А-1) RECIPE
COLOURED MEAT KEBABS
Ingredients (for 0.6 kg)
250 - 300 g pork cutlets
60 g bacon
1 - 2 onions (75 g), cut in quarters
3 tomatoes (150 g), cut in quarters
1
/2
3 tbsp oil
2 tsp paprika
1
/2 tsp cayenne pepper
1 tsp Worcester sauce
Utensils: 3 wooden skewers
green pepper (75 g), cut into 8 pieces
salt
(approx. 20 - 25 cm long)
Procedure
1. Cut the pork and the bacon into cubes approximately 2 - 3 cm in size.
2. Skewer the meat the vegetables alternately on the
wooden skewer.
3. Mix the oil with the spices and brush over the
kebabs. Place the kebabs on the rack and cook on
AUTO COOK А-1, "Grill Skewers".
4. When the oven stops, turn over.
5. After cooking, remove and put on a plate for serving. (No standing time necessary).
13
Page 16

Express Defrost Menu Guide
Pad
-1
Steaks and Chops
X1
-2
Minced Meat
X2
-3
Cake
X3
Menu
Weight
0.2 - 0.8 kg
(Initial temp -18˚C)
0.2 - 0.8 kg
(Initial temp -18˚C)
0.1 - 1.4 kg
(Initial temp -18˚C)
Procedure
• Place the food in a flan dish in the centre of
the turntable.
• When the oven stops, turn the food over,
rearrange and separate. Shield thin parts
and warm spots with small pieces of aluminium foil. Continue to defrost.
• After defrosting, wrap in aluminium foil for
10 - 15 minutes, until thoroughly defrosted.
• Place the block of minced meat in a flan dish
in the centre of the turntable.
• When the oven stops, turn the food over.
Remove the defrosted parts if possible. Continue to defrost.
• After defrosting, cover with aluminium foil,
stand for 5 - 10 minutes, until thoroughly
defrosted.
• Remove all packaging from the cake.
• Place directly on the turntable, or on a plate
in the middle of the turntable.
• After defrosting, cut the cake into similar
sized pieces keeping space between each
piece and let stand for 10 - 30 minutes until
evenly defrosted.
-4
Chicken Legs/
Breasts
X4
NOTE:
1. Steaks and Chops should be frozen in one layer.
2. Minced meat should be frozen in a thin shape.
3. After turning over, shield the defrosted portions with small, flat pieces of aluminium foil.
4. The chicken legs/breasts should be processed immediately after defrosting.
0.2 - 1.0 kg
(Initial temp -18˚C)
CHICKEN LEGS:
• Place the chicken legs in a flan dish in the
centre of the turntable.
•
When the oven stops, turn over, rearrange and
shield thin parts and warm spots with small
pieces of aluminium foil. Continue to defrost.
• After defrosting, cover with aluminium foil
and stand for 10 - 20 minutes until thoroughly defrosted.
• Finally clean the chicken legs under running
water.
CHICKEN BREASTS: Use the MORE setting.
• Place the chicken breasts with skin and bone
in a flan dish in the centre of the turntable.
When the oven stops, turn over, rearrange and
•
shield thin parts and warm spots with small
pieces of aluminium foil. Continue to defrost.
• After defrosting, cover with aluminium foil
and stand for 10 - 30 minutes until thoroughly defrosted.
• Finally clean the chicken breasts under run-
ning water.
14
Page 17
OTHER CONVENIENT FEATURES
Multi Cook
Less/More Setting
To adjust the cooking time to your individual preference -use the "more" or
"less" feature to either add (more) or reduce (less) cooking time.
The LESS/MORE pads can be used to adjust the cooking time of the following features
– Russian Menu – Auto Cook – Express Defrost
To adjust cooking time, press the LESS or MORE pad prior to pressing the INSTANT COOK/START pad.
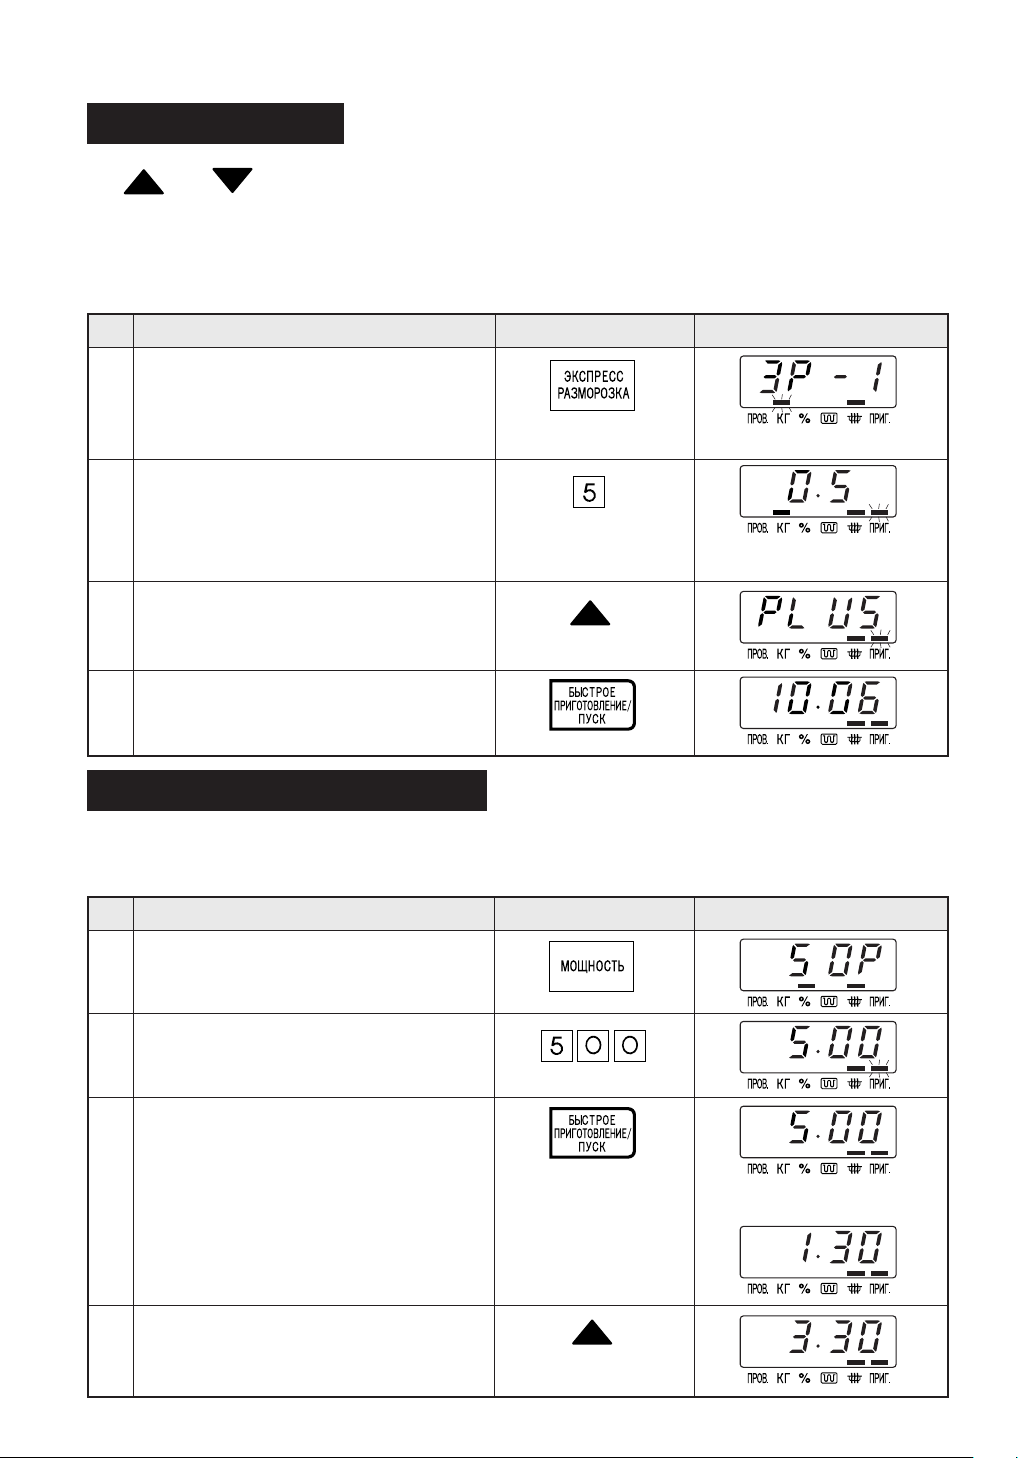
* Suppose you want to defrost 0.5 kg Stakes for a longer time.
Step
Press the EXPRESS DEFROST pad once.
Procedure DisplayPad Order
1
x 1
Press number pads to enter weight.
KG flashes on and off.
2
KG stops flashing and
COOK will flash on and off.
Press the MORE pad.
3
Press the INSTANT COOK/ START pad.
4
Adjust Time During Cooking
Multi Cook
Cooking time can be added or decreased during a cooking programme using the "MORE" or "LESS"
pads. (Manual cooking only)
* Suppose you want to increase cooking time by 2 minutes during 5 minutes on MEDIUM cooking.
Step
Select power level by pressing the POWER LEVEL pad as required.
1
(for MEDIUM press three times)
Enter desired cooking time.
Procedure DisplayPad Order
x 3
2
Press the INSTANT COOK/ START pad.
3
The timer starts to count
down.
Press the MORE pad twice to increase
time by two minutes.
4
x 2
15
Page 18
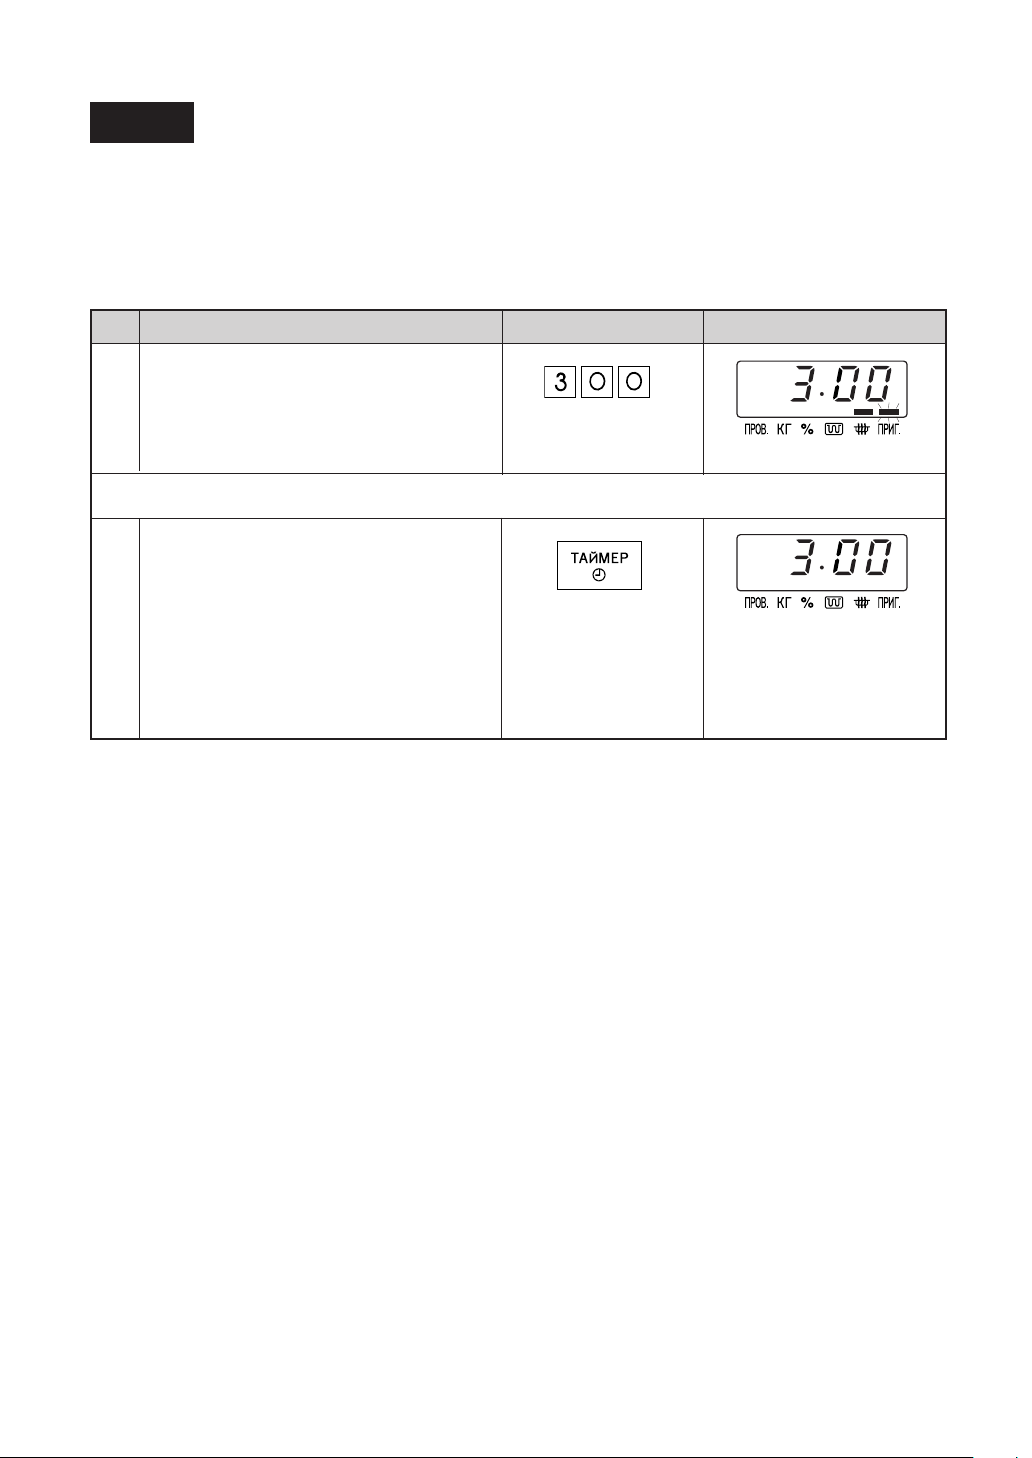
Timer
Use this feature as a general purpose timer. Example include:
timing boiled eggs cooked on the stove top.
timing the recommended standing time of food.
You can enter any time up to 99 minutes, 99 seconds. If you want to cancel the timer during the count
down phase simply press STOP/CLEAR pad.
* Suppose you want to set the timer for 3 minutes to boil an egg on the stove top.
Step
Enter desired time.
Procedure Pad Order
1
Once the egg has come to the boil in the saucepan you can start the timer.
Press the TIMER pad.
2
Display
The timer begins to count
down. When the timer
reaches zero, the oven
will "beep".
16
Page 19

CARE AND CLEANING
Disconnect the power supply cord before cleaning or leave the door open to inactivate the oven
during cleaning.
Before cleaning , make sure the oven door, outer cabinet, oven cavity, air vent openings and
accessories are not hot.
CLEAN THE OVEN AT REGULAR INTERVALS - Keep the oven clean and remove any food deposits, or
it could lead to deterioration of the surface. This could adversely affect the life of the appliance and
possibly result in a hazardous situation.
Exterior:
The outside may be cleaned with mild soap and warm water, wipe clean with a damp cloth. Avoid the
use of harsh abrasive cleaners. Keep the ventilation openings free of dust.
Door:
Wipe the door and window on both sides, the door seals and adjacent parts frequently with a damp cloth
to remove any spills or spatters. Do not use harsh abrasive cleaners or sharp metal scrapers to clean the
oven door glass since they can scratch the surface, which may result in shattering of the glass.
Control Panel:
Wipe the panel with a cloth dampened slightly with water only.
Do not scrub or use any sort of chemical cleaners. Avoid the use of excess water.
Interior walls:
Wipe spatters and spills with a little dishwashing liquid on a soft damp cloth. For heavier stains inside
the oven cavity only, use a mild stainless steel cleaner applied with a soft damp cloth. Do not apply to
the inside of the door. Wipe clean ensuring all cleaner is removed. After use wipe the waveguide cover
in the oven with a soft damp cloth to remove any food splashes. Built-up splashes may overheat and
begin to smoke or catch fire. Do not remove the waveguide cover.
Do not use caustic cleaners (including alkali, acid, thinner, benzin, alcohol or oven cleaner),
abrasive or harsh cleaners or scouring pads on your oven. Never spray oven cleaners directly
onto any part of your oven. Do not use a steam cleaner.
Avoid using excess water. After cleaning the oven, ensure any water is removed with a soft cloth.
Note: At regular intervals, heat the oven referring to "Heating without Food" on page 5. Because,
the splashed dirt or food oil remained around oven walls may cause the smoke and odour.
Accessories:
Wash with mild soapy water and dry thoroughly.
Note: Keep the waveguide cover and accessories clean at all times. If you leave grease or fat in the
cavity or accessories, it may overheat, cause arcing, smoke or even catch fire when next using
the oven.
17
Page 20

SERVICE CALL CHECK
Check the following before calling service:
1. Does the display light? Yes
2. When the door is opened, does the oven lamp come on? Yes No
3. Place one cup of water (approx. 250 ml) in a glass measuring cup in the oven and close the door
securely. Oven lamp should go off if door is closed properly.
Programme the oven for one minute on HIGH. At this moment:
A. Does the oven lamp light? Yes
B. Does the cooling fan work? Yes No
(Put your hand over the rear ventilation openings.)
C. Does the turntable rotate? Yes No
(The turntable can rotate clockwise or counterclockwise. This is quite normal.)
D. Do the microwave symbol and COOK indicator light? Yes
E. After one minute, did an audible signal sound? Yes No
F. Is the water inside the oven hot? Yes No
4. Remove water from the oven and programme the oven for 3 minutes on GRILL mode.
A. Does the GRILL and COOK indicator light? Yes
B. After 3 minutes, does the heater become red? Yes No
If "NO" is the answer to any of the above questions, please check your wall socket and the fuse in your
meter box.
If both the wall socket and the fuse are functioning properly, CONTACT YOUR NEAREST SERVICE
CENTER APPROVED BY SHARP.
NOTE: The following things are not trouble;
1. After any cooking for 3 minutes or more,the cooling fan will remain on until the oven cavity
has cooled. Therefore you may feel air blowing from the ventilation openings.
2. Each cooking mode has a maximum cooking time. If you operate the oven longer than the
maximum time, the power will automatically be reduced. The table below shows the
maximum time for each cooking mode.
Cooking mode
Microwave 100% cooking
Grill cooking/Grill Mix-Low cooking
Maximum cooking time
20 min.
10 min.
No
No
No
No
SPECIFICATIONS
AC Line Voltage : Single phase 220-230V, 50Hz
AC Power Required :
Microwave 1.25 kW
Grill 0.95 kW (at 220V)
1.05 kW (at 230V)
Output Power :
Microwave 800W* (IEC test procedure)
Grill Heater 900W (at 220V)
1000W (at 230V)
Microwave Frequency : 2450 MHz **(Class B/Group 2)
Outside Dimensions : 450mm(W) x 320mm(H) x 362mm(D)
Cavity Dimensions : 285mm(W) x 202mm(H) x 298mm(D)***
Oven Capacity : 17 liters (0.6 cu.ft)***
Cooking Uniformity : Turntable (272mm tray) system
Weight : Approx. 13kg
* This measurement is based on the International Electrotechnical Commission's standardised
method for measuring output power.
** This is the classification of ISM (Industrial, Scientific and Medical) equipment described in the
International Standard CISPR11.
*** Internal capacity is calculated by measuring maximum width, depth and height.
Actual capacity for holding food is less.
SHARP CORPORATION OSAKA, JAPAN
18
TINSRA613WRRZ-Z72
 Loading...