

DATA PROJECTOR
MODEL
PG-LX2000
PG-LS2000
Initial setup guide
Contents
Introduction ................................................4
IMPORTANT SAFEGUARDS ......................6
Accessories ..............................................10
Inserting the Batteries ..............................11
Easy Start .................................................12
How to Access the PDF Operation
Manuals .................................................14
Deutsch
Einführung ................................................15
WICHTIGE SICHERHEITSHINWEISE .......16
So greifen Sie auf die
PDF-Benutzerhandbücher zu ................18
Français
Introduction ..............................................19
MESURES DE SÉCURITÉ IMPORTANTES .....
Comment accéder aux modes
d'emploi de format PDF .........................22
Español
Introducción .............................................23
IMPORTANTES MEDIDAS DE SEGURIDAD ...
Cómo acceder a los manuales de
manejo PDF ...........................................26
Italiano
Introduzione ..............................................27
NORME DI SICUREZZA IMPORTANTI
Come accedere alla versione in PDF
dei manuali di istruzioni .........................30
.....
20
24
28
Nederlands
Inleiding ....................................................31
BELANGRIJKE
VEILIGHEIDSVOORSCHRIFTEN
Toegang krijgen tot de
PDF-gebruiksaanwijzingen ....................34
Svenska
Introduktion ..............................................35
VIKTIGA SÄKERHETSFÖRESKRIFTER
Att tillgå bruksanvisningarna PDF ............38
Português
Introdução ................................................39
INFORMAÇÕES DE SEGURANÇA
Como acessar os Manuais de
Operação PDF .......................................42
...........................................................43
..........................................44
............................46
47...........................................................
48................................................
50...........
............
....
...........
32
36
40
IMPORTANT
• For your assistance in reporting the loss
or theft of your Projector, please record
the Model and Serial Number located on
the bottom of the projector and retain this
information.
• Before recycling the packag ing, please
ensure that you have checked the contents of the carton thoroughly against the
list of “Supplied accessories” on page 10.
SPECIAL NOTE FOR USERS IN THE U.K.
The mains lead of this product is fi tted with a non-rewireable (moulded) plug incorporating
a 10A fuse. Should the fuse need to be replaced, a BSI or ASTA approved BS 1362 fuse
marked
of the plug, must be used.
Always refi t the fuse cover after replacing the fuse. Never use the plug without the fuse
cover fi tted.
In the unlikely event of the socket outlet in your home not being compatible with the plug
supplied, cut off the mains plug and fi t an appropriate type.
or and of the same rating as above, which is also indicated on the pin face
Model No.:
Serial No.:
DANGER:
The fuse from the cut-off plug should be removed and the cut-off plug destroyed immediately and disposed of in a safe manner.
Under no circumstances should the cut-off plug be inserted elsewhere into a 13A socket
outlet, as a serious electric shock may occur.
To fi t an appropriate plug to the mains lead, follow the instructions below:
WARNING:
THIS APPARATUS MUST BE EARTHED.
IMPORTANT:
The wires in this mains lead are coloured in accordance with the following code:
Green-and-yellow : Earth
Blue : Neutral
Brown : Live
As the colours of the wires in the mains lead of this apparatus may not correspond with
the coloured markings identifying the terminals in your plug proceed as follows:
The wire which is coloured green-and-yellow must be connected to the terminal in the
x
plug which is marked by the letter E or by the safety earth symbol
or green-and-yellow.
The wire which is coloured blue must be connected to the terminal which is marked
x
with the letter N or coloured black.
The wire which is coloured brown must be connected to the terminal which is marked
x
with the letter L or coloured red.
or coloured green
IF YOU HAVE ANY DOUBT, CONSULT A QUALIFIED ELECTRICIAN.
Authorized representative responsible for the European Union Community Market
SHARP ELECTRONICS (Europe) GmbH
Sonninstraße 3, D-20097 Hamburg
2
E.U. ONLY
The supplied CD-ROM contains operation instructions in several languages. Carefully read
through the operation instructions before operating the projector.
Die mitgelieferte CD-ROM beinhaltet Betriebsanweisungen in mehreren Sprachen. Bitte lesen
Sie die Bedienungsanleitung vor der Verwendung des Projektors sorgfältig durch.
Le CD-ROM fourni contient des instructions d'opération dans plusieurs langues. Veuillez lire
attentivement ces instructions avant de faire fonctionner le projecteur.
El CD-ROM suministrado contiene las instrucciones de funcionamiento en varios idiomas.
Lea cuidadosamente las instrucciones de operación antes de utilizar el proyector.
Il CD-ROM in dotazione contiene istruzioni per l'uso in diverse lingue. Leggere attentamente
le istruzioni per l’uso prima di usare il proiettore.
De bijgeleverde CD-ROM bevat bedieningsinstructies in diverse talen. Lees de handleiding
zorgvuldig door voor u de projector in gebruik neemt.
CD-ROM-skivan som erhålls innehåller bruksanvisningen på fl era språk. Läs noga igenom
bruksanvisningen innan projektorn tas i bruk.
O CD-ROM fornecido contém instruções para a realização de operações em várias línguas.
Leia cuidadosamente todas as instruções de operação antes de operar o projetor.
3

Before using the projector, please read the projector's operation manual
carefully.
Introduction
ENGLISH
There are two important reasons for prompt warranty registration of your new
SHARP Projec tor, using the REGISTRATION CARD packed with the projector.
1. WARRANTY
This is to assure that you immediately receive the full benefi t of the parts,
service and labor warranty applicable to your purchase.
2. CONSUMER PRODUCT SAFETY ACT
To ensure that you will promptly receive any safety notifi cation of inspection,
modifi cation, or recall that SHARP may be required to give under the 1972
Consumer Product Safety Act, PLEASE READ CAREFULLY THE IMPORTANT
“LIMITED WARRANTY” CLAUSE.
WARNING:
WARNING:
High brightness light source. Do not stare into the beam of light, or view
directly. Be especially careful that children do not stare directly into the
beam of light.
To reduce the risk of fi re or electric shock, do not
U.S.A. ONLY
expose this product to rain or mois ture.
See bottom of projector.
CAUTION
RISK OF ELECTRIC SHOCK.
DO NOT REMOVE SCREWS
EXCEPT SPECIFIED USER
SERVICE SCREW.
CAUTION: TO REDUCE THE RISK OF ELECTRIC SHOCK,
DO NOT REMOVE COVER.
NO USER-SERVICEABLE PARTS EXCEPT LAMP UNIT.
REFER SERVICING TO QUALIFIED SERVICE
PERSONNEL.
The lightning fl ash with arrowhead symbol, within an equilateral triangle, is intended to alert the user to the presence
of uninsulated “dangerous voltage”
within the product's enclosure that may
be of suffi cient magnitude to constitute
a risk or electric shock to persons.
The exclamation point within a triangle
is intended to alert the user to the presence of important operating and maintenance (servicing) instructions in the
literature accompanying the product.
WARNING:
This is a Class A product. In a domestic environment this product may cause
radio interference in which case the user may be required to take adequate
measures.
WARNING:
FCC Regulations state that any unauthorized changes or modifi cations
to this equipment not expressly approved by the manufacturer could
void the user's authority to operate this equip ment.
U.S.A. ONLY
The enclosed computer cable must be used with the device. The cable is
provided to ensure that the device complies with FCC Class A verifi cation.
4
U.S.A. ONLY
INFORMATION
This equipment has been tested and found to comply with the limits for a Class A
digital device, pursuant to Part 15 of the FCC Rules. These limits are designed to
provide reasonable protection against harmful interference when the equipment is
operated in a commercial environment. This equipment generates, uses, and can
radiate radio frequency energy and, if not installed and used in accordance with
the operation manual, may cause harmful interference to radio communications.
Operation of this equipment in a residential area is likely to cause harmful
interference, in which case the user will be required to correct the interference at
his own expense.
U.S.A. ONLY
PRODUCT DISPOSAL
This product utilizes lamp containing a small amount of mercury.
Disposal of these materials may be regulated due to environmental
considerations. For disposal or recycling information, please contact
your local authorities, the Electronics Industries Alliance: www.eiae.org,
the lamp recycling organization www.lamprecycle.org, or Sharp at
1-800-BE-SHARP.
U.S.A. ONLY
Caution Concerning Lamp Replacement
This projector utilizes a pressurized mercury lamp. A loud sound may indicate lamp failure. Lamp
■
failure can be attributed to numerous sources such as: excessive shock, improper cooling, surface
scratches or deterioration of the lamp due to a lapse of usage time.
The period of time up to failure largely varies depending on the individual lamp and/or the condition
and the frequency of use. It is important to note that failure can often result in the bulb cracking.
When the lamp replacement indicator and on-screen display icon are illuminated, it is recommended
■
that the lamp be replaced with a new one immediately, even if the lamp appears to be operating
normally.
Should the lamp break, there is also a possibility that glass particles may spread inside of the
■
projector. In such a case, it is recommended you contact your nearest Sharp Authorized Projector
Dealer or Service Center to assure safe operation.
Should the lamp break, the glass particles may spread inside the lamp cage or gas contained in the
■
lamp may be vented into the room from the exhaust vent. Because the gas in this lamp includes
mercury, ventilate the room well if the lamp breaks and avoid all exposure to the released gas. In
case of exposure to the gas, consult a doctor as soon as possible.
Caution
•
Do not remove the lamp unit from the projector right after use. The lamp will be very hot and may
cause burns or injury.
Wait at least one hour after the power cord is disconnected to allow the surface of the lamp unit to
•
fully cool before removing the lamp unit.
Do not touch the glass surface of the lamp unit or the inside of the projector.
•
Do not loosen other screws except for the lamp unit cover and lamp unit.
•
Make sure to reset the lamp timer only when replacing the lamp. If you reset the lamp timer and
•
continue to use the same lamp, this may cause the lamp to become damaged or explode.
Carefully change the lamp by following the instructions described on the projector's
■
operation manual.
* If you wish, you may have the lamp replaced at your nearest Sharp Authorized Projector
Dealer or Service Center.
* If the new lamp does not light after replacement, take your projector to the nearest Sharp Authorized
Projector Dealer or Service Center for repair.
5

IMPORTANT SAFEGUARDS
CAUTION: Please read all of these instructions before you operate this
product and save these instructions for later use.
Electrical energy can perform many useful functions. This product has been engineered
and manufactured to assure your personal safety. BUT IMPROPER USE CAN RESULT IN
POTENTIAL ELECTRICAL SHOCK OR FIRE HAZARDS. In order not to defeat the
safeguards incorporated in this product, observe the following basic rules for its
installation, use and servicing.
1. Read Instructions
All the safety and operating instructions
should be read before the product is
operated.
2. Retain Instructions
The safety and operating instructions
should be retained for future reference.
3. Heed Warnings
All warnings on the product and in the
operating instructions should be adhered to.
4. Follow Instructions
All operating and use instructions should
be followed.
5. Cleaning
Unplug this product from the wall outlet before
cleaning. Do not use liquid cleaners or aerosol
cleaners. Use a damp cloth for cleaning.
6. Attachments
Do not use attachments not recommended by the
product manufacturer as they may cause hazards.
7. Water and Moisture
Do not use this product near water–for
example, near a bath tub, wash bowl, kitchen
sink, or laundry tub; in a wet basement; or
near a swimming pool; and the like.
8. Accessories
Do not place this product on an unstable
cart, stand, tripod, bracket, or table. The
product may fall, causing serious injury to a
child or adult, and serious damage to the
product. Use only with a cart, stand, tripod,
bracket, or table recommended by the
manufacturer, or sold with the product. Any
mounting of the product should follow the
manufacturer's instructions, and should use a
mounting accessory recom mended by the
manufacturer.
9. Transportation
A product and cart
combination should be
moved with care. Quick
stops, excessive force, and
uneven surfaces may
cause the product and cart
combination to overturn.
10. Ventilation
Slots and openings in the cabinet are provided
for ventilation to ensure reliable operation of
the product and to protect it from overheating,
and these openings must not be blocked or
covered. The open ings should never be
blocked by placing the product on a bed, sofa,
rug, or other similar surface. This prod uct
should not be placed in a built-in installation
such as a book case or rack unless proper
ventilation is provided or the manufacturer's
instruc tions have been adhered to.
11. Power Sources
This product should be operated only from
the type of power source indicated on the
marking label. If you are not sure of the
type of power supply to your home, consult
your product dealer or local power
company. For products intended to operate
from battery power, or other sources, refer
to the operating instructions.
12. Grounding or Polarization
This product is provided with one of the
following types of plugs. If the plug should
fail to fi t into the power outlet, please contact
your electrician.
Do not defeat the safety purpose of the plug.
a. Two-wire type (mains) plug.
b. Three-wire grounding type (mains) plug
with a grounding terminal.
This plug will only fi t into a grounding
type power outlet.
13. Power-Cord Protection
Power-supply cords should be routed so
that they are not likely to be walked on or
pinched by items placed upon or against
them, paying particular attention to cords
at plugs, convenience receptacles, and the
point where they exit from the product.
14. Lightning
For added protection for this product during
a lightning storm, or when it is left
unattended and unused for long periods of
time, unplug it from the wall outlet and
disconnect the cable system. This will
pre vent damage to the product due to
lightning and power-line surges.
6

15. Overloading
Do not overload wall outlets, extension cords,
or integral convenience receptacles as this
can result in a risk of fi re or electric shock.
16. Object and Liquid Entry
Never push objects of any kind into this
product through openings as they may touch
dangerous voltage points or short-out parts
that could result in a fi re or electric shock.
Never spill liquid of any kind on the product.
17. Servicing
Do not attempt to service this product
yourself as opening or removing covers
may expose you to dan ger ous voltage or
other hazards. Refer all servicing to
qualifi ed service personnel.
18. Damage Requiring Service
Unplug this product from the wall outlet
and refer servicing to qualifi ed service
personnel under the following conditions:
a. When the power-supply cord or plug is
damaged.
b. If liquid has been spilled, or objects
have fallen into the product.
c. If the product has been exposed to rain
or water.
d. If the product does not operate normally
by following the operating instructions.
Adjust only those con trols that are
covered by the operating instructions,
as an improper adjustment of other
controls may result in damage and will
often require extensive work by a
qualifi ed technician to restore the
product to normal operation.
e. If the product has been dropped or
damaged in any way.
f. When the product exhibits a distinct
change in performance, this indicates a
need for service.
19. Replacement Parts
When replacement parts are required, be
sure the service technician has used
replace ment parts specifi ed by the
manufacturer or have the same
characteristics as the original part.
Unauthorized substitutions may result in
fi re, electric shock, or other hazards.
20. Safety Check
Upon completion of any service or repairs
to this product, ask the service technician
to per form safety checks to determine that
the product is in proper operating
condition.
21. Wall or Ceiling Mounting
This product should be mounted to a wall
or ceiling only as recommended by the
manufacturer.
22. Heat
This product should be situated away from
heat sources such as radiators, heat
registers, stoves, or other products
(including amplifi ers) that produce heat.
•
DLP® and the DLP logo are registered trademarks of Texas Instruments and
BrilliantColor
•
Microsoft
TM
and DLP® LinkTM are trademarks of Texas Instruments.
®
and Windows® are registered trademarks of Microsoft Corporation in the
United States and/or other countries.
•
PC/AT is a registered trademark of International Business Machines Corporation in the
United States.
•
Adobe
•
Macintosh
®
Reader® is a trademark of Adobe Systems Incorporated.
®
is a registered trademark of Apple Computer, Inc. in the United States and/or
other countries.
•
All other company or product names are trademarks or registered trademarks of their
respective companies.
Some IC chips in this product include confi dential and/or trade secret property belonging
•
to Texas Instruments. Therefore you may not copy, modify, adapt, translate, distribute,
reverse engineer, reverse assemble or discompile the contents thereof.
7
Observe the following safeguards when setting up your
projector.
Caution concerning the lamp unit
■
Potential hazard of glass particles if lamp
ruptures. In case of lamp rupture, contact
your nearest Sharp Authorized Projector
Dealer or Service Center
for replacement.
See “Regarding the Lamp”
of the projector's operation
manual.
Caution concerning the setup of the
projector
For minimal servicing and to maintain high
■
image quality, SHARP recommends that
this projector be installed in an area free
from humidity, dust and cigarette smoke.
When the projector is subjected to these
environments, the vents and lens must be
cleaned more often. As long as the
projector is regularly cleaned, use in these
environments will not reduce the overall
operation life of the unit. Internal cleaning
should only be performed by a Sharp
Authorized Projector Dealer or Service
Center.
Rest your eyes occasionally.
Continuously watching the screen for long
■
hours will cause eye strain. Take regular
breaks to rest your eyes.
Do not set up the projector in places
exposed to direct sunlight or bright light.
■
Position the screen so that it is not in direct
sunlight or room light. Light falling directly
on the screen washes out the colors,
making viewing diffi cult. Close the curtains
and dim the lights when setting up the
screen in a sunny or bright room.
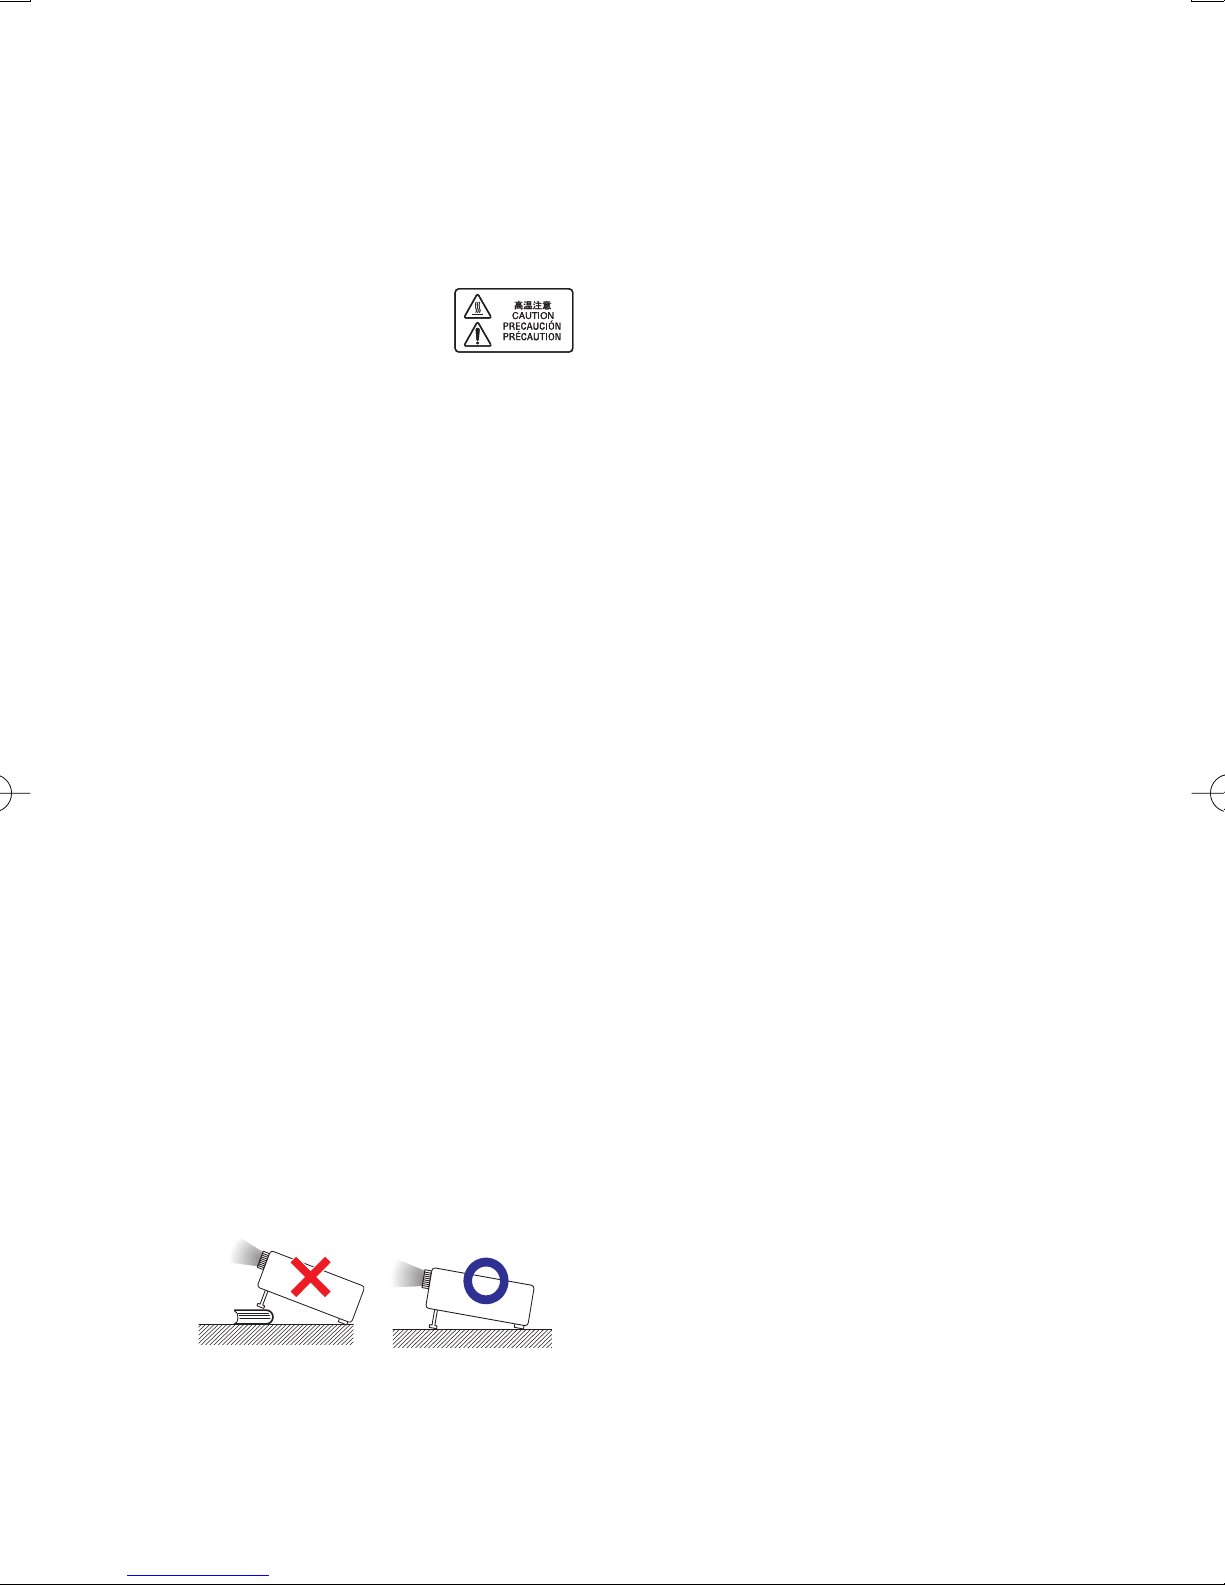
Caution regarding placing of the projector
■
Place the projector on a level site within the
adjustment range (9 degrees) of the
adjustment foot.
After the projector is purchased, a faint
■
smell from the vent may appear when the
power is fi rst turned on. This is normal and
is not a malfunction. It will disappear after
the projector is used for a while.
When using the projector in highaltitude areas such as mountains (at
altitudes of approximately 1,500
meters (4,900 feet) or more)
When you use the projector in high-altitude
■
areas with thin air, set “Fan Mode” to
“High”. Neglecting this can affect the
longevity of the optical system.
Use the projector at altitudes of 2,300
■
meters (7,500 feet) or less.
Warning about placing the projector in
a high position
When placing the projector in a high
■
position, make certain it is carefully secure
to avoid personal injury caused by the
projector falling down.
Do not subject the projector to hard
impact and/or vibration.
■
Protect the lens so as not to hit or damage
the surface of the lens.
Avoid locations with extremes of
temperature.
■
The operating temperature of the projector
is from 41°F to 95°F (+5°C to +35°C).
■
The storage temperature of the projector is
from –4°F to 140°F (–20°C to +60°C).
Do not block the exhaust and intake
vents.
■
Allow at least 11 13/16 inches (30 cm) of
space between the exhaust vent and the
nearest wall or obstruction.
■
Ensure that the intake vent and the exhaust
vent are not obstructed.
■
If the cooling fan becomes obstructed, a
protection circuit will automatically put the
projector into Standby mode to prevent
overheat damage. This does not indicate a
malfunction. (See the projector's operation
manual.)
Remove the projector power cord from the
wall outlet and wait at least 10 minutes.
Place the projector where the intake and
exhaust vents are not blocked, plug the
power cord back in and turn on the
projector. This will return the projector to
the normal operating condition.
8
Caution regarding usage of the projector
If you are not to use the projector for a long
■
time or before moving the projector, make
certain you unplug the power cord from the
wall outlet, and disconnect any other
cables connected to it.
Do not carry the projector by holding the
■
lens.
Do not expose the projector to direct
■
sunlight or place next to heat sources.
Doing so may affect the cabinet color or
cause deformation of the plastic cover.
Other connected equipment
When connecting a computer or other
■
audio-visual equipment to the projector,
make the connections AFTER unplugging
the power cord of the projector from the
AC outlet and turning off the equipment to
be connected.
Please read the operation manuals of the
■
projector and the equipment to be
connected for instructions on how to make
the connections.
Using the projector in other countries
The power supply voltage and the shape of
■
the plug may vary depending on the region
or country you are using the projector in.
When using the projector overseas, make
sure you use an appropriate power cord for
the country you are in.
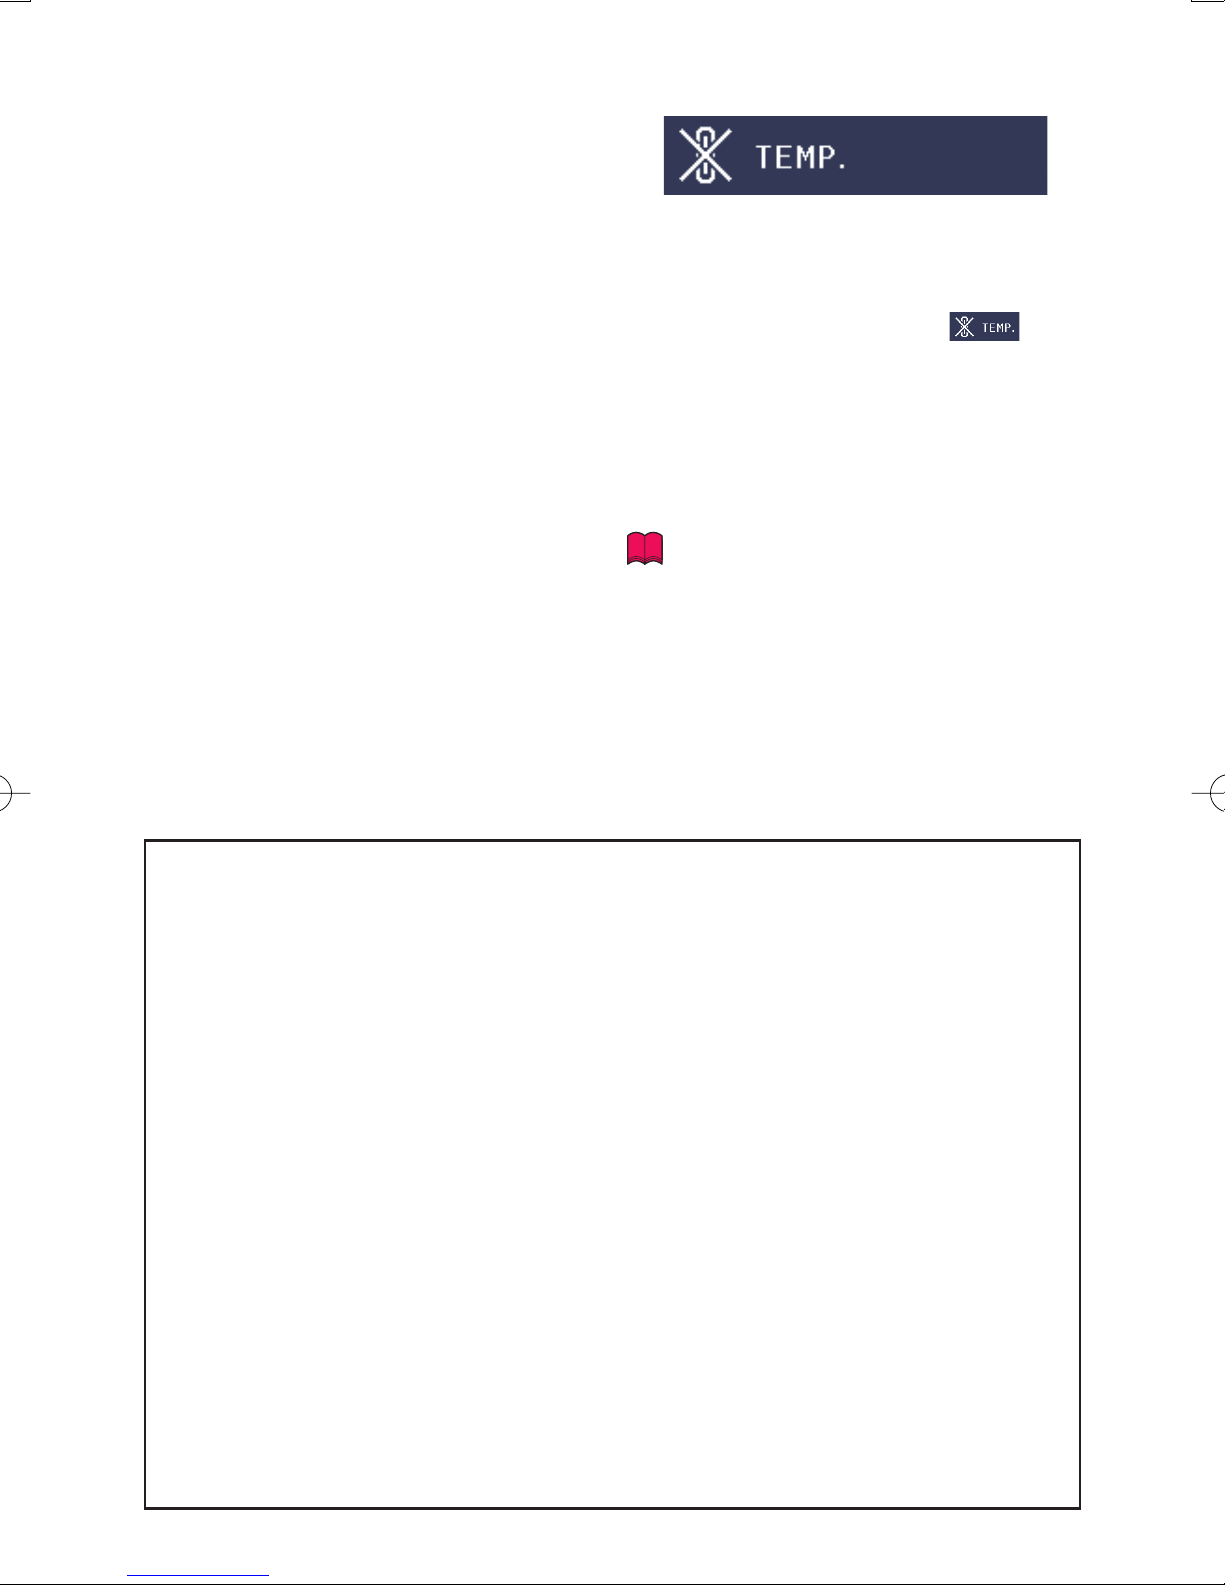
Temperature monitor function
If the temperature inside the projector
■
increases, due to blockage of the air vents,
or the setting location, the temperature
warning indicator will blink. And if the
temperature keeps on rising, “
” will
illuminate in the lower left corner of the
picture with the temperature warning
indicator blinking. If this state continues,
the lamp will turn off, the cooling fan will
run and then the projector will enter
Standby mode. Refer to “Maintenance
Indicators” of the projector's operation
manual.
Info
The cooling fan regulates the internal
•
temperature, and its performance is automatically
controlled. The sound of the fan may change
during projector operation due to changes in the
fan speed. This does not indicate malfunction.
Closed Caption uses Bitstream Vera fonts
Copyright (c) 2003 by Bitstream, Inc. All Rights Reserved. Bitstream Vera is a trademark of Bitstream, Inc.
Permission is hereby granted, free of charge, to any person obtaining a copy of the fonts accompanying this
license (“Fonts”) and associated documentation fi les (the “Font Software”), to reproduce and distribute the
Font Software, including without limitation the rights to use, copy, merge, publish, distribute, and/or sell
copies of the Font Software, and to permit persons to whom the Font Software is furnished to do so, subject
to the following conditions:
The above copyright and trademark notices and this permission notice shall be included in all copies of one
or more of the Font Software typefaces.
The Font Software may be modifi ed, altered, or added to, and in particular the designs of glyphs or
characters in the Fonts may be modifi ed and additional glyphs or characters may be added to the Fonts,
only if the fonts are renamed to names not containing either the words “Bitstream” or the word “Vera”.
This License becomes null and void to the extent applicable to Fonts or Font Software that has been
modifi ed and is distributed under the “Bitstream Vera” names.
The Font Software may be sold as part of a larger software package but no copy of one or more of the Font
Software typefaces may be sold by itself.
THE FONT SOFTWARE IS PROVIDED “AS IS”, WITHOUT WARRANTY OF ANY KIND, EXPRESS OR
IMPLIED, INCLUDING BUT NOT LIMITED TO ANY WARRANTIES OF MERCHANTABILITY, FITNESS FOR A
PARTICULAR PURPOSE AND NONINFRINGEMENT OF COPYRIGHT, PATENT, TRADEMARK, OR OTHER
RIGHT. IN NO EVENT SHALL BITSTREAM OR THE GNOME FOUNDATION BE LIABLE FOR ANY CLAIM,
DAMAGES OR OTHER LIABILITY, INCLUDING ANY GENERAL, SPECIAL, INDIRECT, INCIDENTAL, OR
CONSEQUENTIAL DAMAGES, WHETHER IN AN ACTION OF CONTRACT, TORT OR OTHERWISE, ARISING
FROM, OUT OF THE USE OR INABILITY TO USE THE FONT SOFTWARE OR FROM OTHER DEALINGS IN
THE FONT SOFTWARE.
Except as contained in this notice, the names of Gnome, the Gnome Foundation, and Bitstream Inc., shall
not be used in advertising or otherwise to promote the sale, use or other dealings in this Font Software
without prior written authorization from the Gnome Foundation or Bitstream Inc., respectively. For further
information, contact: fonts at gnome dot org.
9
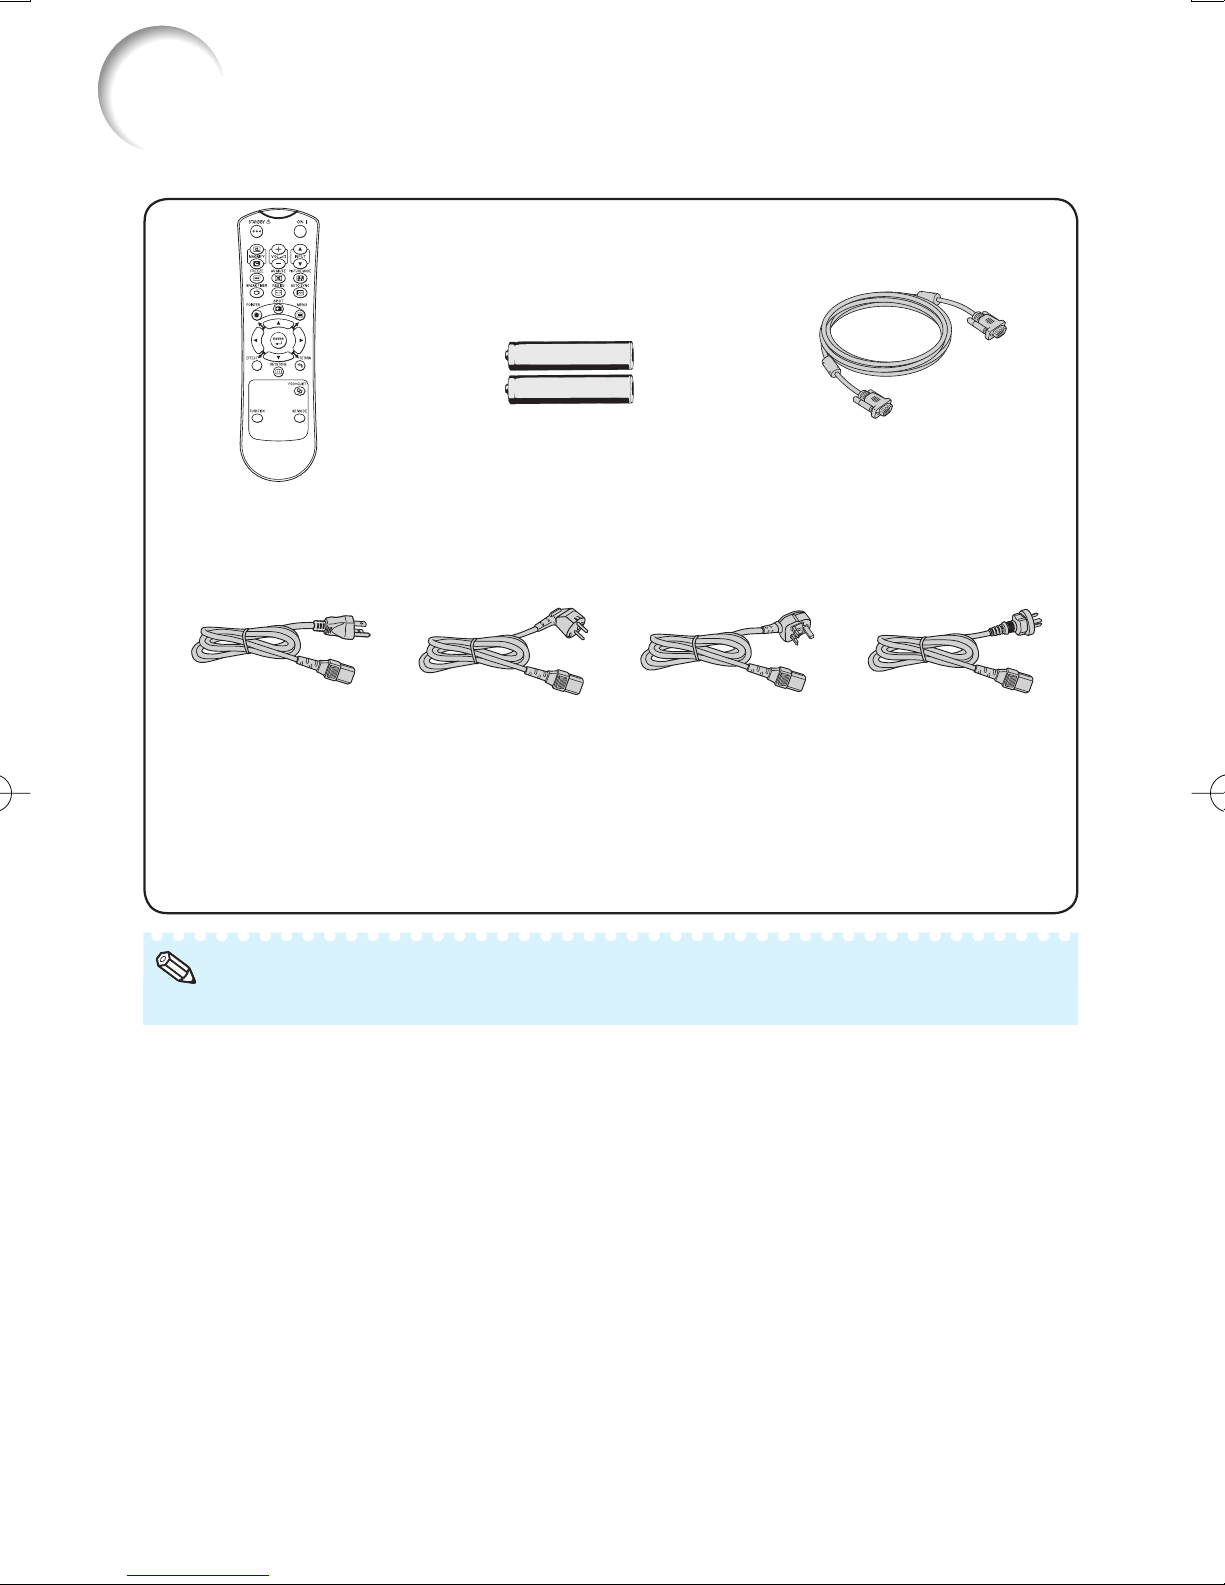
Accessories
Supplied accessories
Two LR03 batteries
(“AAA” size, UM/SUM-4,
HP-16 or similar)
Remote control
<RRMCGB015WJSA>
Power cord*
(1) (2) (3) (4)
For U.S. and
Canada, etc.
(6' (1.8 m))
<QACCDA083WJPZ>
* Which power cords are supplied along with your projector depends on the region. Use the power
cord that corresponds to the wall outlet in your country.
Initial setup guide <TINS-F443WJZZ>
•
CD-ROM <UDSKAA137WJZZ>
•
Note
Codes in “< >” are Replacement parts codes.•
For Europe,
except U.K.
(6' (1.8 m))
<QACCVA025WJPZ>
For U.K. and
Singapore
(6' (1.8 m))
<QACCBA105WJPZ>
RGB cable
(6' (1.8 m))
<QCNWGA173WJPZ>
For Australia, New
Zealand and Oceania
(6' (1.8 m))
<QACCLA056WJPZ>
10
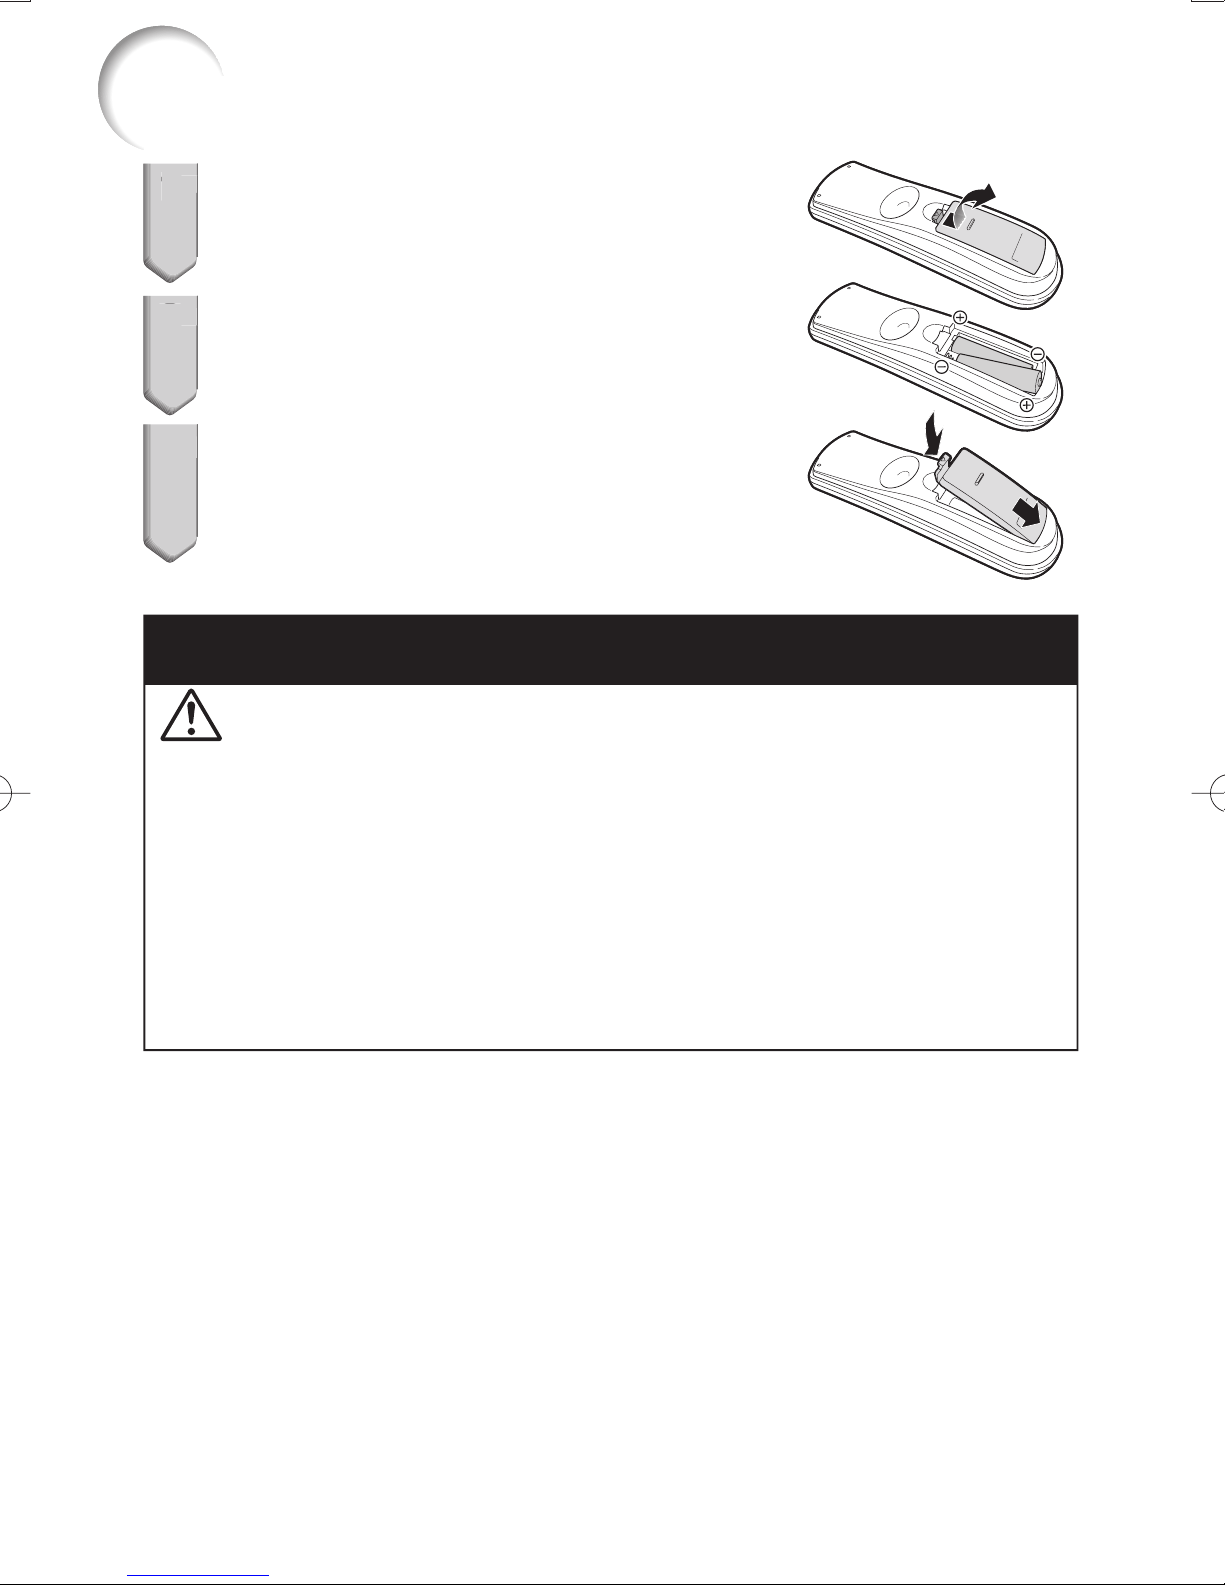
Inserting the Batteries
2
3
Pull down the tab on the cover and remove the
1
1
cover towards the direction of the arrow.
Insert the batteries.
2
Insert the batteries making sure the polarities correctly match the
•
m and n marks inside the battery compartment.
Insert the lower tab of the cover into the opening,
3
and lower the cover until it clicks in place.
Incorrect use of the batteries may cause them to leak or explode.
Please follow the precautions below
Caution
Danger of explosion if battery is incorrectly replaced.
•
Replace only with alkaline or manganese batteries.
Insert the batteries making sure the polarities correctly match the m and n marks inside the battery
•
compartment.
Batteries of different types have different properties, therefore do not mix batteries of different types.
•
Do not mix new and old batteries.
•
This may shorten the life of new batteries or may cause old batteries to leak.
Remove the batteries from the remote control once they have run out, as leaving them in can cause them to leak.
•
Battery fl uid from leaked batteries is harmful to skin, therefore ensure you wipe them fi rst and then
remove them using a cloth.
The batteries included with this projector may run down in a short period, depending on how they are kept.
•
Be sure to replace them as soon as possible with new batteries.
Remove the batteries from the remote control if you will not be using the remote control for a long time.
•
Comply with the rules (ordinance) of each local government when disposing of worn-out batteries.
•
11

Easy Start
This section shows the basic operation (projector connecting with the computer). For details,
see the projector's operation manual.
Setup and Projection
In this section, connection of the projector and the computer is explained using one example.
3
8
6
6
4
4
4
STANDBY/ON
button
O/Q buttons
INPUT buttons
Zoom ring
Focus ring
HEIGHT
ADJUST lever
STANDBY button
8
ON button
3
INPUT buttons
6
5
6
5
Adjustment
buttons
(P/R/O/Q)
KEYSTONE button
1. Place the projector facing a wall or a screen
2. Connect the projector to the computer and plug the power
cord into the AC socket of the projector
When connecting equipment other than a computer, see the projector's operation manual.
3. Turn the projector on
Press STANDBY/ON on the projector or ON on the remote control.
12
4. Adjust the projected image with the Setup Guide
1 After the projector turns on, the Setup Guide appears.
(When “Setup Guide” is set to “On”. See the projector's operation manual.)
2
Follow the steps in the Setup Guide and adjust the focus, height (angle) and picture size.
3 After adjusting the focus, height (angle) and picture size, press ENTER to fi nish the
Setup Guide.
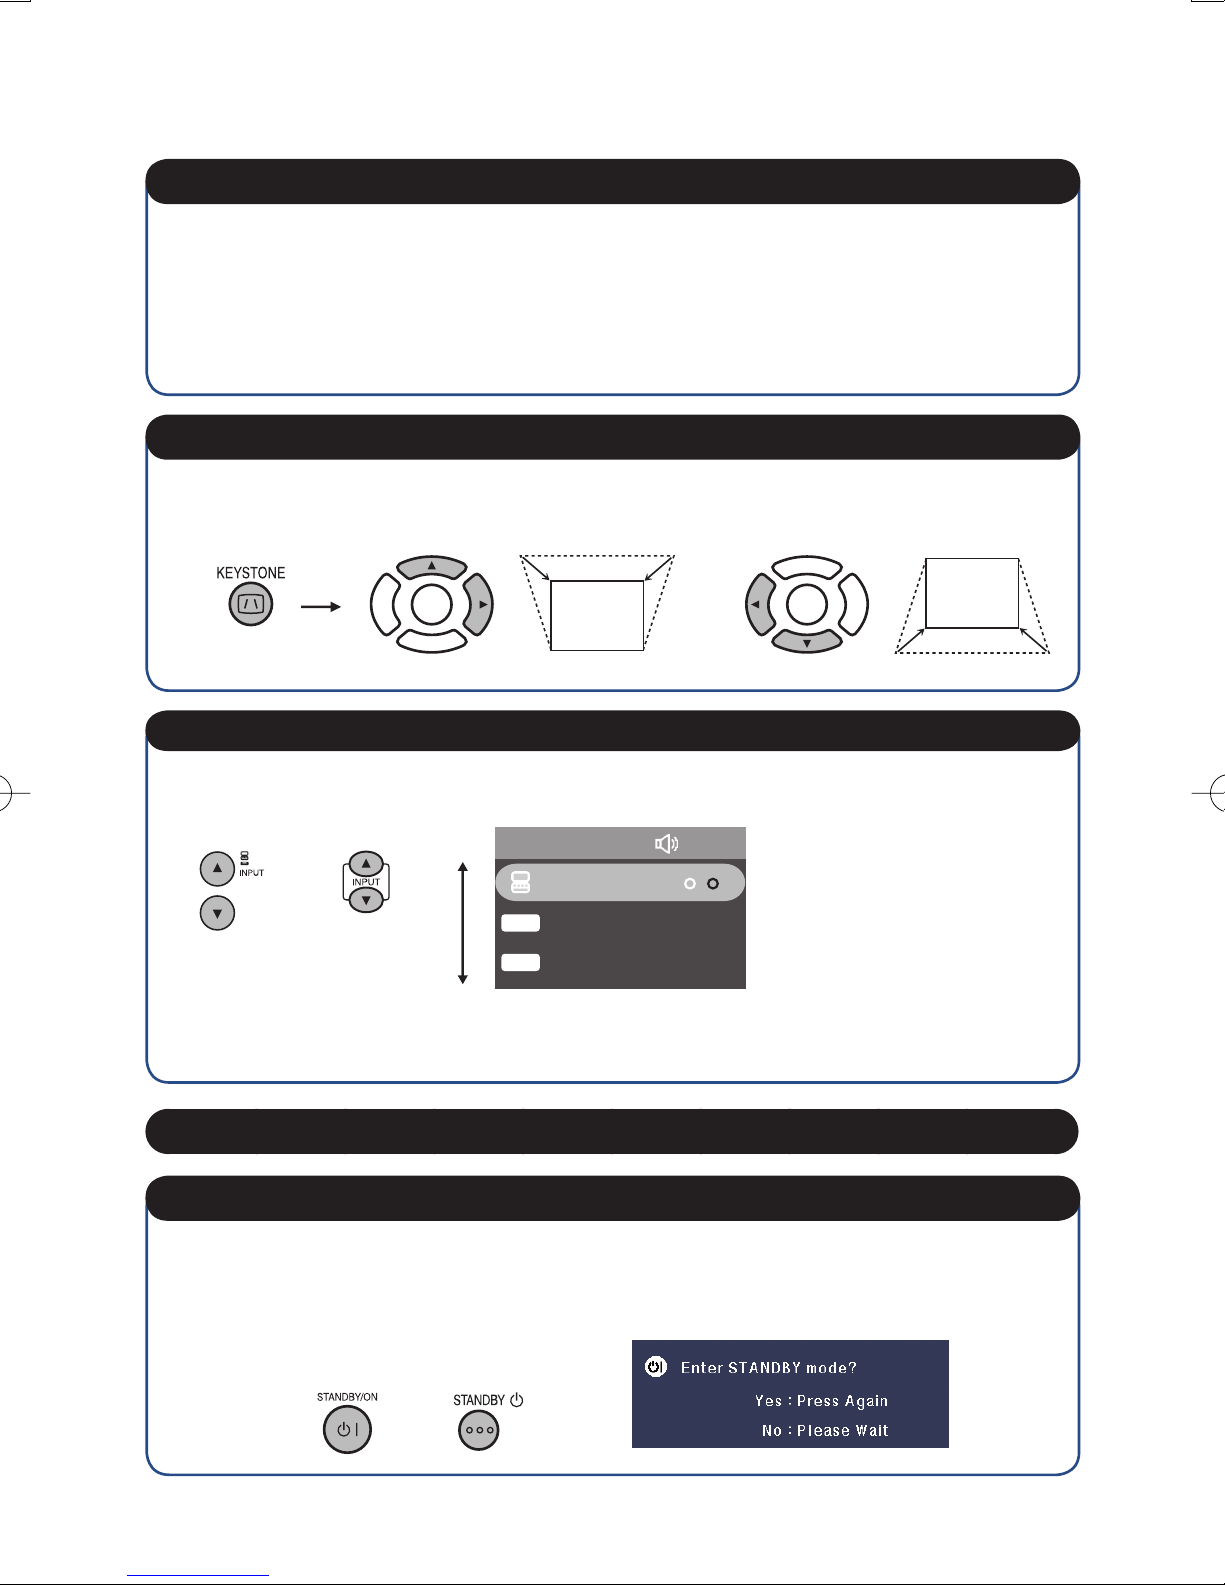
5. Correct trapezoidal distortion
Correcting trapezoidal distortion using Keystone Correction.
On the remote control
Shrinks
upper side.
Shrinks
lower side.
6. Select the Input mode
Press INPUT P/R to display the INPUT list. Use INPUT P/R to select the Input mode.
On the
projector
[PG-LX2000 only]
When you select HDMI input, use O/Q to select the audio input terminal (HDMI or AUDIO).
On the remote
control
INPUT list (e.g. PG-LX2000)
INPUT
COMPUTER
H
HDMI
V
VIDEO
Audio
7. Turn the computer on
8. Turn the power off
Press STANDBY/ON on the projector or STANDBY on the remote control, and then press
the button again while the confi rmation message is displayed to put the projector into
Standby mode.
On-screen display
On the
projector
On the remote
control
13
How to Access the PDF Operation Manuals
PDF operation manuals in several languages are included in the CD-ROM. To
utilize these manuals, you need to install Adobe
®
Reader® on your computer
(Windows® or Macintosh®).
®
Please download Adobe
Reader® from the Internet (http://www.adobe.com).
Accessing the PDF Manuals
®
For Windows®:
Insert the CD-ROM in the CD-ROM drive.
Double click the “Computer” icon.
Double click the “CD-ROM” drive.
When you want to view the operation
manual
1) Double click the “MANUALS” folder.
2) Double click the language (name of the
folder) that you want to view.
3) Double click the pdf fi le to access the
projector manuals.
Note
If the desired pdf fi le cannot be opened by double clicking the mouse, start Adobe® Reader® fi r s t ,
•
then specify the desired fi le using the “File”, “Open” menu.
For Macintosh
Insert the CD-ROM in the CD-ROM drive.
Double click the “CD-ROM” icon.
When you want to view the operation
manual
1) Double click the “MANUALS” folder.
2) Double click the language (name of the
folder) that you want to view.
3) Double click the pdf fi le to access the
projector manuals.
:
14

Bevor Sie den Projektor verwenden, lesen Sie sich bitte die Bedienungsanleitung des
Projektors sorgfältig durch .
Einführung
WARNUNG:
WARNUNG:
RISIKO VON ELEKTRISCHEM SCHLAG. NICHT
DIE SCHRAUBEN ENTFERNEN, AUSGENOMMEN
SERVICESCHRAUBEN FÜR DEN BENUTZER.
VORSICHT: ZUR VERRINGERUNG DES RISIKOS VON
ELEKTRISCHEM SCHLAG NICHT DIE ABDECKUNG ENTFERNEN.
KEINE DURCH DEN BENUTZER ZU WARTENDEN BAUTEILE AUSSER
DER LAMPENEINHEIT. DIE WARTUNG SOLLTE NUR DURCH
QUALIFIZIERTES WARTUNGSPERSONAL AUSGEFÜHRT WERDEN.
Helle Lichtquelle. Nicht in den Lichtstrahl schauen oder ihn direkt
anschauen. Besonders Kinder sollten nicht direkt in den Lichtstrahl
schauen.
Um das Risiko von elektrischem Schlag zu verringern, sollte dieses
Gerät nicht Regen oder Feuchtigkeit ausgesetzt werden.
VORSICHT
DIE BESONDERS AUSGEWIESENEN
DEUTSCH
Der Blitz mit dem Pfeilsymbol innerhalb eines
gleichseitigen Dreiecks warnt den Benutzer
vor dem Vorhandensein unisolierter, potentiell
gefährlicher Stromspannung im Geräteinneren,
die ein Risiko darstellt bzw. elektrische Schläge
verursachen kann.
Das Ausrufezeichen innerhalb eines gleichseitigen Dreiecks macht den Benutzer auf wichtige
Anweisungen zu Bedienung und Wartung
(Service) des Gerätes in der mitgelieferten Dokumentation aufmerksam.
WARNUNG:
Dies ist ein Gerät der Klasse A. Dieses Gerät kann im Wohnbereich Funkstörungen verursachen; in diesem Fall
kann vom Betreiber verlangt werden, angemessene Gegenmaßnahmen durchzuführen und dafür aufzukommen.
ENTSORGUNG DES GERÄTES
Dieses Produkt enthält eine quecksilberarme Lampe. Die besondere Entsorgung dieser
Materialien kann aufgrund von Gesetzen zum Umweltschutz vorgeschrieben sein.
Wenden Sie sich hinsichtlich Entsorgungs- und Recycling-Informationen an die örtlichen
Behörden, die Electronics Industries Alliance: www.eiae.org, die Lampen-RecyclingOrganisation www.lamprecycle.org oder an Sharp unter der Nummer 1-800-BE-SHARP.
NUR USA
Geräuschpegel LpA: <70 dB
Gemessen nach EN ISO 7779:2001
15
WICHTIGE SICHERHEITSHINWEISE
1. Lesen Sie die Anleitungen
Alle Sicherheitshinweise und Bedienungsanleitungen sollten
vor der Verwendung des Gerätes gelesen werden.
2. Bewahren Sie die Anleitungen auf
Die Sicherheitshinweise und Bedienungsanleitungen sollten
für zukünftige Bezugnahme aufbewahrt werden.
3. Beachten Sie die Warnungen
Alle Warnungen auf dem Gerät und in der
Bedienungsanleitung sollten beachtet werden.
4. Folgen Sie den Anleitungen
Alle Bedienungs- und Gebrauchsanleitungen sollten befolgt
werden.
5. Reinigung
Den Stecker dieses Gerätes vor dem Reinigen von der Steckdose
abtrennen. Keine fl üssigen Reinigungsmittel oder Sprühreiniger
verwenden. Zum Reinigen ein angefeuchtetes Tuch verwenden.
6. Zubehör
Vom Geräte-Hersteller nicht empfohlenes Zubehör sollte
nicht verwendet werden, da es eine Gefahrenquelle
darstellen kann.
7. Wasser und Feuchtigkeit
Dieses Gerät nicht in der Nähe von Wasser verwenden - z.B.
in der Nähe einer Badewanne, eines Waschbeckens, einer
Küchenspüle oder einer Waschmaschine, in einem feuchten
Keller oder in der Nähe eines Schwimmbeckens usw.
8. Zubehör
Das Gerät nicht auf einen instabilen Wagen, einem Ständer, einem
Stativ, einer Halterung oder auf einem Tisch aufstellen. Das Gerät
kann herunterfallen und es können ernsthafte Körperverletzungen bei
Kindern oder Erwachsenen auftreten oder es kann zu Beschädigungen
des Gerätes kommen. Nur Wagen, Ständer, Stativ, Halterung oder
einen Tisch verwenden, der vom Hersteller empfohlen wird oder
zusammen mit dem Gerät verkauft wird. Bei Befestigung an einer
Wand oder in einem Regal den Anleitungen des Herstellers folgen und
einen vom Hersteller empfohlenen Befestigungssatz verwenden.
9. Transport
Das auf einem Regal aufgestellte Gerät
sollte zusammen mit dem Regal vorsichtig
bewegt werden. Ein schnelles Anhalten,
übermäßige Gewalt und unebene
Oberfl ächen können zum Umstürzen des
Gerätes oder des Regals führen.
10. Belüftung
Schlitze und Öffnungen im Gehäuse sind für die Belüftung
vorgesehen, stellen den Betrieb des Gerätes sicher und schützen
vor Überhitzen. Diese Öffnungen sollten niemals blockiert werden,
indem das Gerät auf einem Bett, Sofa, Teppich oder einer ähnlichen
Oberfl äche aufgestellt wird. Das Gerät sollte nur in einem anderem
Gehäuse, z.B. einem Bücherregal oder Schrank eingebaut werden,
wenn eine ausreichende Belüftung sichergestellt ist oder den
Anleitungen des Herstellers Folge geleistet wurde.
11. Stromversorgung
Dieses Gerät sollte nur mit der auf dem Aufkleber bezeichneten
Stromquelle betrieben werden. Falls Fragen über die Art der
Stromversorgung auftreten, wenden Sie sich an den Händler
oder das örtliche Energieversorgungsunternehmen. Bei
Geräten, die mit Batterien oder anderen Stromquellen
betrieben werden, siehe die Bedienungsanleitung.
12. Erdung oder Polarisierung
Dieses Produkt ist mit einer der folgenden Arten von
Steckern ausgestattet. Sollte es nicht möglich sein, den
Stecker in die Netzsteckdose einzustecken, lassen Sie sich
bitte von Ihrem Elektriker beraten.
Umgehen Sie jedoch auf keinen Fall den Sicherheitszweck
des Steckers.
a. Zweidraht (Netz)-Stecker.
b. Dreidraht-Erde (Netz)-Stecker mit einem
Erdungsanschluss.
Dieser Stecker passt ausschließlich in eine Erdungs-
16
Netzsteckdose.
13. Schutz des Netzkabels
Netzkabel sollten nicht im Durchgangsbereich von Personen
verlegt werden oder an Orten, an denen Gegenstände auf
sie gestellt oder gelegt werden. Besondere Beachtung
sollten die Stecker der Kabel, Verlängerungskabel mit
Steckdosen und die Stellen fi nden, an denen die Kabel aus
dem Gerät austreten.
14. Blitzschlag
Als zusätzlicher Schutz dieses Gerätes während eines
Gewitters, oder wenn es für längere Zeit unbeaufsichtigt
steht und nicht verwendet wird, sollte der Netzstecker von
der Steckdose abgetrennt werden. Dadurch wird eine
Beschädigung des Gerätes durch Blitzschlag und
Spannungsstöße in der Stromleitung vermieden.
15. Überladung
Nicht die Netzsteckdosen, die Verlängerungskabel oder
Verlängerungskabel mit Steckdosen überladen, da dies
Feuer oder elektrischen Schlag verursachen kann.
16.
Eindringen von Gegenständen und Flüssigkeiten
Niemals Gegenstände durch die Öffnungen in das Gerät
einführen, da dies zum Kontakt mit stromführenden Teilen
und zu Kurzschlüssen führen und Feuer oder elektrischen
Schlag zur Folge haben kann. Keine Flüssigkeiten auf dem
Gerät verschütten.
17. Wartung
Nicht versuchen, das Gerät selbst zu warten, da beim
Öffnen oder Entfernen der Abdeckungen gefährliche
Stromspannungen oder anderen Gefahren vorhanden sind.
Alle Wartungsarbeiten dem Kundendienst überlassen.
18. Wartung durch den Kundendienst
Das Gerät sofort von der Steckdose abtrennen und den
Kundendienst benachrichtigen, falls folgende Situationen
eintreten:
a.
Wenn das Netzkabel oder der Netzstecker beschädigt ist.
b. Wenn Flüssigkeit in das Gerät eingedrungen ist oder
Gegenstände hineingefallen sind.
c. Wenn das Gerät mit Regen oder Wasser in Kontakt
gekommen ist.
d.
Wenn das Gerät nicht normal betrieben werden kann,
selbst wenn die Bedienungsanweisungen befolgt werden.
Nur diejenigen Regler einstellen, die in der
Bedienungsanleitung beschrieben werden, da die falsche
Einstellung anderer Regler eine Beschädigung zur Folge
haben kann, und umfangreiche Reparaturarbeiten durch
einen qualifi zierten Techniker zur Wiederherstellung des
Gerätes für einen normalen Betrieb notwendig werden.
e. Wenn das Gerät fallengelassen und beschädigt wurde.
f. Wenn eine Änderung des normalen Betriebs festgestellt
wird, die eine Wartung notwendig macht.
19. Austauschteile
Falls Austauschteile benötigt werden, ist sicherzustellen,
dass der Wartungstechniker die vom Hersteller
vorgeschriebenen Bauteile verwendet, welche die gleichen
Eigenschaften wie die Original-Bauteile aufweisen. Die
Verwendung von anderen als Original-Bauteilen kann Feuer,
elektrischen Schlag oder andere Gefahren zur Folge haben.
20. Sicherheitsprüfung
Nach Beendigung einer Wartung oder Reparatur dieses
Gerätes den Wartungstechniker mit der Durchführung einer
Sicherheitsprüfung beauftragen und überprüfen lassen,
dass das Gerät in einem sicheren Betriebszustand ist.
21. Wand- oder Deckenmontage
Dieses Gerät sollte nur so an eine Wand oder Decke
montiert werden, wie es vom Hersteller empfohlen wird.
22. Wärmequellen
Dieses Gerät sollte nicht in der Nähe von Wärmequellen wie
Heizkörpern, Heizern, Öfen oder anderen Geräten (einschließlich
Verstärkern) aufgestellt werden, die Wärme produzieren.
 Loading...