

Page 1

Functions of the machine and procedures
for placing originals and loading paper
BEFORE USING THE MACHINE
COPIER
Using the copy function
PRINTER
Using the printer function
FACSIMILE
Using the fax function
SCANNER / INTERNET FAX
Using the scan / Internet fax function
DOCUMENT FILING
Storing jobs as files on the hard
drive
SYSTEM SETTINGS
Configuring settings to make the
machine easier to use
Click to jump to the table of contents of the
desired chapter.
User's Manual
DIGITAL FULL COLOUR MULTIFUNCTIONAL SYSTEM
MODEL : MX-2630N
Page 2

HOW TO USE THIS MANUAL
Click a button below to move to the page that you wish to view.
The following explanation assumes that Adobe Reader XI is being used (Some buttons do not appear in the default
state.).
(1) (2) (3) (4)
(5)
(6)
(1) Return to top page button
If an operation does not proceed as expected, click this
button to start over again.
(2) Back one page button
Displays the previous page.
(3) Forward one page button
Displays the next page.
If a button does not appear, refer to Adobe Reader Help to display the button.
(4) Return to previously displayed page button
Displays the page that was displayed before the current
page.
(5) Title button
Displays the page of the title indicated by the button.
(6) Contents button
Displays the contents of each chapter.
For example, if the current page is part of the printer
chapter, the table of contents of the printer chapter
appears.
i
Page 3

ABOUT OPERATION MANUAL
This manual explains how to use the MX-2630N/MX-3050N/MX-3060N/MX-3070N/MX-3550N/MX-3560N/MX-3570N/
MX-4050N/MX-4060N/MX-4070N/MX-5050N/MX-5070N/MX-6050N/MX-6070N digital full colour multifunctional
system.
Please note
• For information on installing the drivers and software cited in this manual, please refer to the Software Setup Guide.
• For information on your operating system, please refer to your operating system manual or the online Help function.
®
• The explanations of screens and procedures in a Windows environment are primarily for Windows
different depending on the version of the operating system or the software application.
• The explanations of screens and procedures in a Macintosh environment are based on Mac OS X v10.10 in the case of Mac OS
X. The screens may be different depending on the version of the operating system or the software application.
• Wherever "MX-xxxx" appears in this manual, please substitute your model name for "xxxx".
• This manual contains references to the fax function. However, please note that the fax function is not available in some
countries and regions.
• Considerable care has been taken in preparing this manual. If you have any comments or concerns about the manual, please
contact your dealer or nearest authorised service representative.
• This product has undergone strict quality control and inspection procedures. In the unlikely event that a defect or other problem
is discovered, please contact your dealer or nearest authorised service representative.
• Aside from instances provided for by law, SHARP is not responsible for failures occurring during the use of the product or its
options, or failures due to incorrect operation of the product and its options, or other failures, or for any damage that occurs due
to use of the product.
8.1. The screens may be
Warning
• Reproduction, adaptation or translation of the contents of the manual without prior written permission is prohibited, except as
allowed under copyright laws.
• All information in this manual is subject to change without notice.
Illustrations and the operation panel and touch panel shown in this manual
The peripheral devices are generally optional, however, some models include certain peripheral devices as standard equipment.
The explanations in this manual assume that a paper drawer is installed on the MX-6070N.
For some functions and procedures, the explanations assume that devices other than the above are installed.
The display screens, messages, and key names shown in the manual may differ from those on the actual machine
due to product improvements and modifications.
Icons used in the manuals
The icons in the manuals indicate the following types of information:
This alerts you to a situation that could result in
death or serious personal injury. This alerts
you to a situation that could result in personal
injury or damage to properties.
This alerts you to a situation where there is a
risk of machine damage or failure.
This explains how to stop or correct an operation.
This describes a routine work relevant to setting mode.
This supplements function or operation
procedure.
ii
Page 4

BEFORE USING THE MACHINE
BEFORE USING THE MACHINE
PART NAMES AND FUNCTION . . . . . . . . . . . . . . . 1-3
• EXTERIOR . . . . . . . . . . . . . . . . . . . . . . . . . . . . 1-3
• INTERIOR . . . . . . . . . . . . . . . . . . . . . . . . . . . . . 1-5
• AUTOMATIC DOCUMENT FEEDER AND
DOCUMENT GLASS. . . . . . . . . . . . . . . . . . . . . 1-6
• SIDE AND BACK . . . . . . . . . . . . . . . . . . . . . . . . 1-7
• OPERATION PANEL. . . . . . . . . . . . . . . . . . . . . 1-8
TURNING ON THE POWER. . . . . . . . . . . . . . . . . . . 1-10
TOUCH PANEL . . . . . . . . . . . . . . . . . . . . . . . . . . . . 1-11
• TOUCH TYPES . . . . . . . . . . . . . . . . . . . . . . . . . 1-11
• HOME SCREEN . . . . . . . . . . . . . . . . . . . . . . . . 1-14
• PREVIEW SCREEN . . . . . . . . . . . . . . . . . . . . . 1-17
OPERATION OF FREQUENTLY USED KEYS . . .
•
• ACTION PANEL . . . . . . . . . . . . . . . . . . . . . . . . 1-24
• CONFIRMATION SCREEN FOR FAVOURITE
MENUS AND SETTINGS . . . . . . . . . . . . . . . . . 1-24
Eco . . . . . . . . . . . . . . . . . . . . . . . . . . . . . . . . . . . . . . 1-26
• ECO FUNCTIONS OF THE MACHINE . . . . . . . 1-26
• AUTO POWER SHUT-OFF MODE . . . . . . . . . . 1-27
• PREHEAT MODE . . . . . . . . . . . . . . . . . . . . . . . 1-28
• ECO RECOMMENDATION FUNCTION
DISPLAY . . . . . . . . . . . . . . . . . . . . . . . . . . . . . . 1-28
• AS SOON AS THE REMOTE JOB IS
FINISHED, ENTER AUTO POWER SHUT OFF
MODE . . . . . . . . . . . . . . . . . . . . . . . . . . . . . . . . 1-29
• ECO SCAN . . . . . . . . . . . . . . . . . . . . . . . . . . . . 1-29
• POWER ON/OFF SCHEDULE SETTING . . . . . 1-30
• SPECIFIC DATE OPERATION SETTINGS . . . 1-30
• MOTION SENSOR
(MX-3060N/MX-3070N/MX-3560N/
MX-3570N/MX-4060N/MX-4070N/MX-5070N/M
X-6070N only) . . . . . . . . . . . . . . . . . . . . . . . . . . 1-31
USER AUTHENTICATION . . . . . . . . . . . . . . . . . . . . 1-32
• AUTHENTICATION BY USER NUMBER . . . . . 1-32
• AUTHENTICATION BY LOGIN
NAME/PASSWORD . . . . . . . . . . . . . . . . . . . . . 1-34
• ACTIVE DIRECTORY LINKING FUNCTION. . . 1-37
BILLING CODE . . . . . . . . . . . . . . . . . . . . . . . . . . . . 1-40
• BILLING CODE . . . . . . . . . . . . . . . . . . . . . . . . . 1-40
• USE BILLING CODE . . . . . . . . . . . . . . . . . . . . . 1-41
• REGISTERING A NEW BILLING CODE . . . . . . 1-44
1-23
• EDITING OR DELETING THE REGISTERED
BILLING CODE . . . . . . . . . . . . . . . . . . . . . . . . 1-47
CLOUD LINK. . . . . . . . . . . . . . . . . . . . . . . . . . . . . . 1-50
• BEFORE USING THE CLOUD LINK
FUNCTION . . . . . . . . . . . . . . . . . . . . . . . . . . . . 1-50
• UPLOADING SCANNED DATA TO A CLOUD
SERVICE . . . . . . . . . . . . . . . . . . . . . . . . . . . . . 1-51
• PRINTING DATA IN A CLOUD SERVICE . . . . 1-51
AirPrint . . . . . . . . . . . . . . . . . . . . . . . . . . . . . . . . . . 1-53
EASY CONNECTION WITH A MOBILE DEVICE
(EASY CONNECT) . . . . . . . . . . . . . . . . . . . . . . . . . 1-55
• CONNECTING BY NFC CARD READER . . . . 1-55
• CONNECTING BY QR CODE . . . . . . . . . . . . . 1-56
REMOTE OPERATION OF THE MACHINE . . . . . . 1-57
UNIVERSAL DESIGN IN THE MACHINE. . . . . . . . 1-58
• UNIVERSAL DESIGN RELATED TO
OPERATION . . . . . . . . . . . . . . . . . . . . . . . . . . 1-58
UNIVERSAL DESIGN RELATED TO VISION . . .
•
UNIVERSAL DESIGN RELATED TO HEARING . . .
•
•
UNIVERSAL DESIGN FEATURES. . . . . . . . . . . . . .
ITEMS RECORDED IN THE JOB LOG . . . . . . . . . 1-62
LOADING PAPER
IMPORTANT POINTS ABOUT PAPER . . . . . . . . . 1-65
• NAMES AND LOCATIONS OF TRAYS . . . . . . 1-65
• THE DEFINITION OF "R" IN PAPER SIZE . . . 1-65
• APPLICABLE PAPER TYPES . . . . . . . . . . . . . 1-66
TRAY 1 - 4 (when a low stand/550 sheet paper
drawer or stand/550/2x550/3x550/ 550&2100
sheet paper drawer is installed) . . . . . . . . . . . . . . 1-69
TRAY 3 - 4 (when a stand/550&2100 sheet paper
drawer is installed) . . . . . . . . . . . . . . . . . . . . . . . . 1-72
LOADING PAPER IN THE LARGE-CAPACITY
TRAY (when a large capacity tray is installed) . . 1-74
LOADING PAPER INTO THE BYPASS TRAY. . . . 1-76
HOW TO PLACE THE LONG PAPER GUIDE . . . . 1-80
1-59
1-59
1-60
1-1
Page 5

BEFORE USING THE MACHINE
HOW TO PLACE THE ORIGINAL
SELECTING A PROCEDURE FOR PLACING THE
ORIGINAL DEPENDING ON THE TYPE AND
STATUS OF THE ORIGINAL. . . . . . . . . . . . . . . . . . 1-81
AUTOMATIC DOCUMENT FEEDER . . . . . . . . . . . . 1-82
DOCUMENT GLASS . . . . . . . . . . . . . . . . . . . . . . . . 1-84
STOPPING/DELETING A JOB, PRIORITY
PROCESSING AND CHECKING THE STATUS
TYPES OF JOB STATUS SCREENS . . . . . . . . . . . 1-86
STOPPING/DELETING A JOB IN PROGRESS OR
RESERVED . . . . . . . . . . . . . . . . . . . . . . . . . . . . . . . 1-88
PRIORITY PROCESSING OF A RESERVED JOB . . .
CHECKING A RESERVED JOB OR THE JOB IN
PROGRESS . . . . . . . . . . . . . . . . . . . . . . . . . . . . . . . 1-91
CHECKING COMPLETED JOBS. . . . . . . . . . . . . . . 1-92
READING THE JOB LIST . . . . . . . . . . . . . . . . . . . . 1-93
1-89
ADDRESS BOOK
ADDRESS BOOK. . . . . . . . . . . . . . . . . . . . . . . . . . . 1-96
ADDRESS BOOK SCREEN. . . . . . . . . . . . . . . . . . . 1-97
STORING ADDRESSES THROUGH DIRECT
ENTRY . . . . . . . . . . . . . . . . . . . . . . . . . . . . . . . . . . . 1-100
STORING ADDRESSES THROUGH GLOBAL
ADDRESS SEARCH . . . . . . . . . . . . . . . . . . . . . . . . 1-101
STORING ADDRESSES FROM FAX OR IMAGE
SEND LOGS. . . . . . . . . . . . . . . . . . . . . . . . . . . . . . . 1-103
STORING GROUPS . . . . . . . . . . . . . . . . . . . . . . . . . 1-104
EDITING/DELETING ADDRESSES IN ADDRESS
BOOK . . . . . . . . . . . . . . . . . . . . . . . . . . . . . . . . . . . . 1-106
SETTING THE SCOPE FOR PUBLICIZING
CONTACTS AND GROUPS. . . . . . . . . . . . . . . . . . . 1-108
DELETING THE TRANSMISSION HISTORY . . . . . 1-109
PERIPHERAL DEVICES
PERIPHERAL DEVICES . . . . . . . . . . . . . . . . . . . . . 1-110
INNER FINISHER . . . . . . . . . . . . . . . . . . . . . . . . . . . 1-112
• PART NAMES . . . . . . . . . . . . . . . . . . . . . . . . . . 1-112
• HOW TO STAPLE MANUALLY. . . . . . . . . . . . . 1-113
• SUPPLIES . . . . . . . . . . . . . . . . . . . . . . . . . . . . . 1-114
• INNER FINISHER MAINTENANCE. . . . . . . . . . 1-114
FINISHER . . . . . . . . . . . . . . . . . . . . . . . . . . . . . . . . . 1-116
• PART NAMES . . . . . . . . . . . . . . . . . . . . . . . . . . 1-116
• SUPPLIES . . . . . . . . . . . . . . . . . . . . . . . . . . . . . 1-117
• FINISHER MAINTENANCE. . . . . . . . . . . . . . . . 1-117
FINISHER (LARGE STACKER) . . . . . . . . . . . . . . . 1-119
• PART NAMES . . . . . . . . . . . . . . . . . . . . . . . . . 1-119
• HOW TO STAPLE MANUALLY . . . . . . . . . . . . 1-120
• SUPPLIES . . . . . . . . . . . . . . . . . . . . . . . . . . . . 1-121
• FINISHER (LARGE STACKER)
MAINTENANCE . . . . . . . . . . . . . . . . . . . . . . . . 1-121
SADDLE STITCH FINISHER . . . . . . . . . . . . . . . . . 1-123
• PART NAMES . . . . . . . . . . . . . . . . . . . . . . . . . 1-123
• SUPPLIES . . . . . . . . . . . . . . . . . . . . . . . . . . . . 1-124
SADDLE STITCH FINISHER MAINTENANCE. . .
•
SADDLE STITCH FINISHER (LARGE STACKER) 1-127
• PART NAMES . . . . . . . . . . . . . . . . . . . . . . . . . 1-127
• HOW TO STAPLE MANUALLY . . . . . . . . . . . . 1-128
• SUPPLIES . . . . . . . . . . . . . . . . . . . . . . . . . . . . 1-129
• SADDLE STITCH FINISHER (LARGE
STACKER) MAINTENANCE . . . . . . . . . . . . . . 1-129
PUNCH MODULE . . . . . . . . . . . . . . . . . . . . . . . . . . 1-133
• DISCARDING PUNCH WASTE . . . . . . . . . . . . 1-133
Sharp OSA . . . . . . . . . . . . . . . . . . . . . . . . . . . . . . . 1-139
• APPLICATION COMMUNICATION . . . . . . . . . 1-139
• EXTERNAL ACCOUNT APPLICATION . . . . . . 1-140
REMOVING MISFEEDS
REMOVING MISFEEDS . . . . . . . . . . . . . . . . . . . . . 1-142
MAINTENANCE
REGULAR MAINTENANCE . . . . . . . . . . . . . . . . . . 1-143
• CLEANING THE DOCUMENT GLASS AND
AUTOMATIC DOCUMENT FEEDER. . . . . . . . 1-143
• CLEANING THE MAIN CHARGER OF THE
PHOTOCONDUCTIVE DRUM . . . . . . . . . . . . . 1-146
• CLEANING THE PT CHARGER OF THE
PRIMARY TRANSFER BELT. . . . . . . . . . . . . . 1-149
• CLEANING THE LASER UNIT . . . . . . . . . . . . . 1-151
• CLEANING THE BYPASS FEED ROLLER . . . 1-154
• CLEANING THE PAPER FEED ROLLER
(MX-2630N/MX-3050N/MX-3060N/MX-3550N/
MX-3560N/MX-4050N/MX-4060N/MX-5050N/M
X-6050N only). . . . . . . . . . . . . . . . . . . . . . . . . . 1-154
REPLACEMENT OF TONER CARTRIDGE . . . . . . 1-155
REPLACING THE WASTE TONER BOX . . . . . . . . 1-159
REPLACING THE STAMP CARTRIDGE . . . . . . . . 1-160
CHARACTER ENTRY
NAMES AND FUNCTIONS OF SOFT KEYBOARD
KEYS . . . . . . . . . . . . . . . . . . . . . . . . . . . . . . . . . . . . 1-163
1-124
1-2
Page 6

BEFORE USING THE MACHINE►BEFORE USING THE MACHINE
(3) (7)
(5)(1) (4) (6) (8)
(2)
(9) (10) (11)
(1)
(5)
MX-2630N/MX-3050N/MX-3060N/
MX-3550N/MX-3560N/MX-4050N/
MX-4060N/MX-5050N/MX-6050N
MX-2630N/MX-3050N/MX-3060N/
MX-3070N/MX-3550N/MX-3560N/
MX-3570N/MX-4050N/MX-4060N/M
X-4070N
MX-2630N
BEFORE USING THE MACHINE
PART NAMES AND FUNCTION
EXTERIOR
(1) Automatic document feeder
It automatically feeds and scans multiple originals. 2-sided
originals can be automatically scanned. For the MX-3070N/
MX-3570N/MX-4070N/MX-5070N/MX-6070N, both sides of
2-sided originals can be automatically scanned at one time.
► AUTOMATIC DOCUMENT FEEDER (page 1-82)
(2) Output tray (exit tray cabinet)
Received faxes and printed papers are delivered to this tray.
(3) Job separator tray (upper tray)
Output is delivered to this tray.
You can also output jobs to the job separator (centre
tray) when a relay unit is installed.
(4) USB port (A type)
This is used to connect a USB device such as a USB
memory device to the machine.
Supports USB 2.0 (Hi-Speed).
(5) Operation panel
This panel hosts the [Power] button, [Power Save]
button/indicator, error indicator, [Home Screen] button, main
power button, data notification indicator and touch panel.
Use the touch panel to operate each of these functions.
► OPERATION PANEL (page 1-8)
*1 Peripheral device.
Equipped standard or not available in some countries and regions. Not available on some models. Contact your dealer or
nearest authorised service representative.
(6) Exit tray unit (right tray)
Set this tray as the output tray if needed.
(7) Keyboard
Use this as a substitute for the soft keyboard displayed
on the touch panel. When not being used, it can be
stored under the operation panel.
*1
*1
(8) Inner finisher
This staples paper. A punch module can also be installed to punch
holes in output paper. You can also perform stapling manually.
► INNER FINISHER (page 1-112)
(9)
Toner cover (MX-5050N/MX-5070N/MX-6050N/MX-6070N)
Open to replace a toner cartridge.
►
(10)
Front cover (MX-5050N/MX-5070N/MX-6050N/MX-6070N)
Open to switch the main power switch to "On" or "Off".
► TURNING ON THE POWER (page 1-10)
(11)
Front cover (MX-2630N/MX-3050N/MX-3060N/MX-3070N/
MX-3550N/MX-3560N/MX-3570N/MX-4050N/MX-4060N/
MX-4070N)
Open this cover to switch the main power switch to "On"
or "Off" to replace a toner cartridge.
► TURNING ON THE POWER (page 1-10)
►
*1
*1
*1
REPLACEMENT OF TONER CARTRIDGE (page 1-155)
REPLACEMENT OF TONER CARTRIDGE (page 1-155)
1-3
Page 7

BEFORE USING THE MACHINE►BEFORE USING THE MACHINE
(23)(22)(19) (20) (21) (24)
(25)
(26)
(27)
(14)(13)(12) (15) (16) (18)(17)
(12) Saddle Stitch Finisher (large stacker)
*1
This staples and folds paper. A punch module can also
be installed to punch holes in output paper. You can also
perform stapling manually.
SADDLE STITCH FINISHER (LARGE STACKER) (page 1-127)
►
(13) Paper pass unit
*1
Relay between the machine and the finisher, finisher (large stacker),
saddle stitch finisher or saddle stitch finisher (large stacker).
(14) Motion sensor
*2
This sensor detects the presence of a person that
approaches the machine, and automatically wakes the
machine from sleep mode (Motion Sensor Mode Only).
(15) Utility table
*1
You can use this as a work platform, or temporarily place
originals or a mobile device.
• Do not place anything that weighs more than 5kg or
otherwise apply a load.
• Do not place a container that contains water or
other liquid. Risk of fire and electrical shock if the
liquid spills and enters the machine.
•
Working on the table while the machine is in operation
may cause poor image quality or other problems.
(16) Bypass tray
Use this tray to feed paper manually.
When loading paper larger than A4R or 8-1/2" x 11"R,
pull out the extension guide.
LOADING PAPER INTO THE BYPASS TRAY (page 1-76)
►
(17) Tray 5 (when a large capacity tray is installed)
Store paper in this tray.
LOADING PAPER IN THE LARGE-CAPACITY TRAY
►
(when a large capacity tray is installed) (page 1-74)
(18) Tray 1
Store paper in this tray.
►
TRAY 1 - 4 (when a low stand/550 sheet paper drawer
or stand/550/2x550/3x550/ 550&2100 sheet paper
drawer is installed) (page 1-69)
(19) Finisher
*1
(20) Saddle Stitch Finisher
This staples and folds paper. A punch module can also
be installed to punch holes in output paper.
► SADDLE STITCH FINISHER (page 1-123)
(21) Finisher (large stacker)
This staples paper. A punch module can also be installed
to punch holes in output paper. You can also perform
stapling manually.
FINISHER (LARGE STACKER) (page 1-119)
►
(22) Punch module
*1
This is used to punch holes in output. Requires an inner
finisher, finisher, finisher (large stacker), saddle stitch
finisher or saddle stitch finisher (large stacker).
(23) Tray 3 (when a stand/2x550/3x550 sheet paper
drawer is installed)
Store paper in this tray.
TRAY 1 - 4 (when a low stand/550 sheet paper drawer
►
or stand/550/2x550/3x550/ 550&2100 sheet paper
drawer is installed) (page 1-69)
(24)
Tray 4 (when a stand/3x550 sheet paper drawer is installed)
Store paper in this tray.
►
TRAY 1 - 4 (when a low stand/550 sheet paper drawer
or stand/550/2x550/3x550/ 550&2100 sheet paper
drawer is installed) (page 1-69)
(25)
Tray 2 (when a low stand/550 sheet paper drawer or stand/
550/2x550/3x550/550&2100 sheet paper drawer is installed)
Store paper in this tray.
TRAY 1 - 4 (when a low stand/550 sheet paper drawer
*1
►
or stand/550/2x550/3x550/ 550&2100 sheet paper
drawer is installed) (page 1-69)
(26)
Tray 4 (when a stand/550&2100 sheet paper drawer is installed)
Store paper in this tray.
► TRAY 3 - 4 (when a stand/550&2100 sheet paper
drawer is installed) (page 1-72)
(27)
Tray 3 (when a stand/550&2100 sheet paper drawer is installed)
Store paper in this tray.
► TRAY 3 - 4 (when a stand/550&2100 sheet paper
drawer is installed) (page 1-72)
*1
*1
*1
This staples paper. A punch module can also be installed
to punch holes in output paper.
► FINISHER (page 1-116)
*1 Peripheral device.
Equipped standard or not available in some countries and regions. Not available on some models. Contact your dealer or
nearest authorised service representative.
*2 Can only be used on the MX-3060N/MX-3070N/MX-3560N/MX-3570N/MX-4060N/MX-4070N/MX-5070N/MX-6070N.
*1
*1
*1
*1
1-4
Page 8

BEFORE USING THE MACHINE►BEFORE USING THE MACHINE
(1) (3) (7)(6) (8)(4) (5)
(9)(2) (10)(11)(3) (12)
(2)
MX-2630N/MX-3050N/MX-3060N/
MX-3070N/MX-3550N/MX-3560N/
MX-3570N/MX-4050N/MX-4060N/
MX-4070N
INTERIOR
(1) The main power switch
Use this switch to turn on the power for the machine.
When using the fax or Internet fax functions, always keep
this switch in the “ ” position.
► TURNING ON THE POWER (page 1-10)
(2) Toner cartridge
This cartridge contains toner.
When the toner in a cartridge runs out, replace with new
one.
► REPLACEMENT OF TONER CARTRIDGE (page
1-155)
(3) Waste toner box
This container collects excess toner that remains after
printing.
► REPLACING THE WASTE TONER BOX (page
1-159)
A service technician collects replaced waste toner
box.
(4) Fusing unit
Heat is applied here to fuse the transferred image onto
the paper.
The fusing unit is hot. Take care not to burn yourself
when removing a misfeed.
(5) Transfer belt
During full colour printing, the toner images of the four
colours on the photoconductive drums are combined
together on the transfer belt.
During black and white printing, only the black toner
image is transferred onto the transfer belt.
Do not touch or damage the transfer belt.
This may cause a defective image.
(6) Right side cover release lever
To remove a paper misfeed, pull and hold this lever up to
open the right side cover.
(7) Right side cover
Open this cover to remove a paper misfeed.
(8) Paper reversing section cover
This unit is used for reversing paper when 2-sided printing
is performed. Open this cover to remove a paper misfeed.
(9) Waste toner box release button
Press this button when you need to release the waste
toner box lock to replace the waste toner box or clean the
laser unit.
► CLEANING THE LASER UNIT (page 1-151)
► REPLACING THE WASTE TONER BOX (page
1-159)
(10) Handle
Pull this out and grasp it when moving the machine.
(11)
A low stand/550 sheet paper drawer or stand/550/
2x550/3x550/550&2100 sheet paper drawer right-side cover
Open this to remove a paper misfeed in tray 2, 3 and 4.
(12) Paper tray right side cover
Open this to remove a paper misfeed in tray 1.
1-5
Page 9

BEFORE USING THE MACHINE►BEFORE USING THE MACHINE
(4)(2) (5) (6)
(1) (3)
(7) (8)
(4)(2) (5) (6)
(3)
(7) (8)
AUTOMATIC DOCUMENT FEEDER AND DOCUMENT
GLASS
MX-2630N/MX-3050N/MX-3060N/MX-3550N/MX-3560N/MX-4050N/MX-4060N/
MX-5050N/MX-6050N
MX-3070N/MX-3570N/MX-4070N/MX-5070N/MX-6070N
(1) Paper feed roller
This roller rotates to automatically feed the original.
(2) Document feeding cover
Open this cover to remove an original misfeed.
On the MX-2630N/MX-3050N/MX-3060N/MX-3550N/
MX-3560N/MX-4050N/MX-4060N/MX-5050N/MX-6050N,
this cover is also opened to clean the paper feed roller.
►
CLEANING THE PAPER FEED ROLLER
(MX-2630N/MX-3050N/MX-3060N/MX-3550N/MX-3560
N/MX-4050N/MX-4060N/MX-5050N/MX-6050N only)
(page 1-154)
(3) Original guides
These guides help ensure that the original is scanned
correctly.
Adjust the guides to the width of the original.
(4) Document feeder tray
Place the original.
Place the original with the print side facing up.
► AUTOMATIC DOCUMENT FEEDER (page 1-82)
(5) Original exit tray
The original is discharged to this tray after scanning.
(6) Original size detector
This unit detects the size of an original placed on the
document glass.
► DOCUMENT GLASS (page 1-84)
(7) Scanning area
Originals placed in the automatic document feeder are
scanned here.
► CLEANING THE DOCUMENT GLASS AND
AUTOMATIC DOCUMENT FEEDER (page 1-143)
(8) Document glass
If you want to scan books or other thick originals that
cannot be fed through the automatic document feeder,
place them on this glass.
► DOCUMENT GLASS (page 1-84)
1-6
Page 10

BEFORE USING THE MACHINE►BEFORE USING THE MACHINE
(1)
(4)
(2)
(3)
SIDE AND BACK
(1) LAN connector
Connect the LAN cable to this connector when the
machine is used on a network.
Use a shielded LAN cable.
(2) Extension phone socket (TEL)*
When the fax function of the machine is used, an
extension phone can be connected to this socket.
* Optional
(3) Telephone line socket (LINE)*
When the fax function of the machine is used, the
telephone line is connected to this socket.
(4) Power plug
1-7
Page 11

BEFORE USING THE MACHINE►BEFORE USING THE MACHINE
OPERATION PANEL
This section describes the names and functions of the respective parts of the operation panel.
(1) (2) (3) (4) (5)
(1) Data notification indicator
The indicator lights solidly or blinks to indicate the status
of a job.
When the Job separator or Exit tray unit (right tray) is
used for output, this blinks until the output is removed.
► DATA NOTIFICATION INDICATOR AND ERROR
INDICATOR (page 1-9)
(2) Touch panel
Messages and keys appear on the touch panel display.
Operate the machine by directly tapping the displayed keys.
► TOUCH TYPES (page 1-11)
(3) Error indicator
Lights solidly or blinks to indicate the status of the error.
► DATA NOTIFICATION INDICATOR AND ERROR
INDICATOR (page 1-9)
(4) Main power indicator
This lamp lights up when the machine's main power switch
is in the “ ” position.
Blinks green during the time that the [Power] button does
not operate immediately after the main power switch is
switched on.
► TURNING ON THE POWER (page 1-10)
(6) (7)
(5) [Power] button
Use this button to turn the machine's power on and off.
► TURNING ON THE POWER (page 1-10)
(6) [Power Save] button/indicator
Use this button to set the machine to Sleep mode for
energy saving.
[Power Save] button blinks when the machine is in Sleep
Mode.
► AUTO POWER SHUT-OFF MODE (page 1-27)
(7) [Home Screen] key
Use this button to display the home screen.
► HOME SCREEN (page 1-14)
[Home Screen] key
Use your finger to touch the [Home Screen] key.
If you use a pen or other tool to touch the key, it may not operate properly.
Risk of malfunctioning if you use with jewelry or other accessories.
You can change the angle of the touch panel.
1-8
Page 12

BEFORE USING THE MACHINE►BEFORE USING THE MACHINE
DATA NOTIFICATION INDICATOR AND ERROR INDICATOR
The data notification indicator and the error indicator lights solidly or blinks to indicate the status of the machine.
Error indicator (red) Data notification indicator (green)
Pattern 1 Pattern 2 Pattern 3
Solidly Errors that do not stop machine
operation, such as almost out
of toner.
Blinks Errors that stop machine
operation, such as misfeeds
and out of toner.
On/Blinking
Priority
To set the status indicated by the data notification indicator
•
In "Settings (administrator)", select [System Settings] → [Common Settings]] → [Device Control] → [Data Indicator Setting].
• To set the error indication
Set in "Settings (administrator)" - [System Settings] - [Common Settings] - [Device Control] - [Error Light Setting].
Blinking Priority Blinking Priority Blinking Priority On Priority
Job in progress, such
as paper feeding or
output.
A fax is being received
When the job separator (upper tray) or exit tray unit (right tray) is used for
output, this blinks until the output is removed.
Ready state or other
state where jobs can
be accepted.
An original has been
placed in the
document feeder
1-9
Page 13

BEFORE USING THE MACHINE►BEFORE USING THE MACHINE
Main power indicator [Power] button
The main power switch
TURNING ON THE POWER
This section describes how to turn on/off the machine's power and how to restart the machine.
Operate two power switches: the main power switch inside the front cover, located in the lower left corner, and the
[Power] button on the operation panel.
When a finisher (large stacker) or saddle stitch finisher (large stacker) is installed on the MX-5050N/MX-5070N/MX-6050N/
MX-6070N, open the front cover on the finisher (large stacker), or the front upper cover on the saddle stitch finisher (large
stacker), before opening the front cover of the machine.
Turning on the power
• Turn the main power switch to the " " position.
• When the main power indicator lights in green, press the [Power] button.
Turning off the power
Turn off the power by pressing the [Power] button, then turn the main power switch to the " " position.
Restart the machine
Turn off the power by pressing the [Power] button and then press it again to turn on the power.
• When turning off the main power switch, press the [Power] button on the operation panel and then turn the main power
switch to the " " position.
In a sudden case of main power outage, turn the power for the machine back on and then turn it off in the correct order.
If the machine is left for a long time with the main power having been turned off prior to the [Power] button being turned off,
abnormal noises, degraded image quality or other problems may result.
• Turn off both the [Power] button and the main power switch and unplug the power cord if you suspect a machine failure, if
there is a bad thunderstorm nearby, or when you are moving the machine.
• When using the fax or Internet fax function, always keep the main power switch in the " " position.
• In order for some settings to take effect, the machine must be restarted. In some states of the machine, restarting with the
[Power] button may not make the settings take effect. In this case, turn off the main power switch and then turn it on again.
1-10
Page 14
BEFORE USING THE MACHINE►BEFORE USING THE MACHINE
HDD
File retrieve
Easy
Scan
Others
Margin Shift
Off
Left
Down
Right
( 0~50 )
mm
10
Sharp OSA
No. of copies
1
Text/Printed
Photo
Photo
Text/Photo
3
Easy
Scan
HDD
File retrieve
Data in Folder
Job Status
Send as well as print
Call Eco Program
Store Data Temporarily
LINE PRINTER
Scan Or
Without ch
Quic
Store
File
Scan Or
Without
Store Data
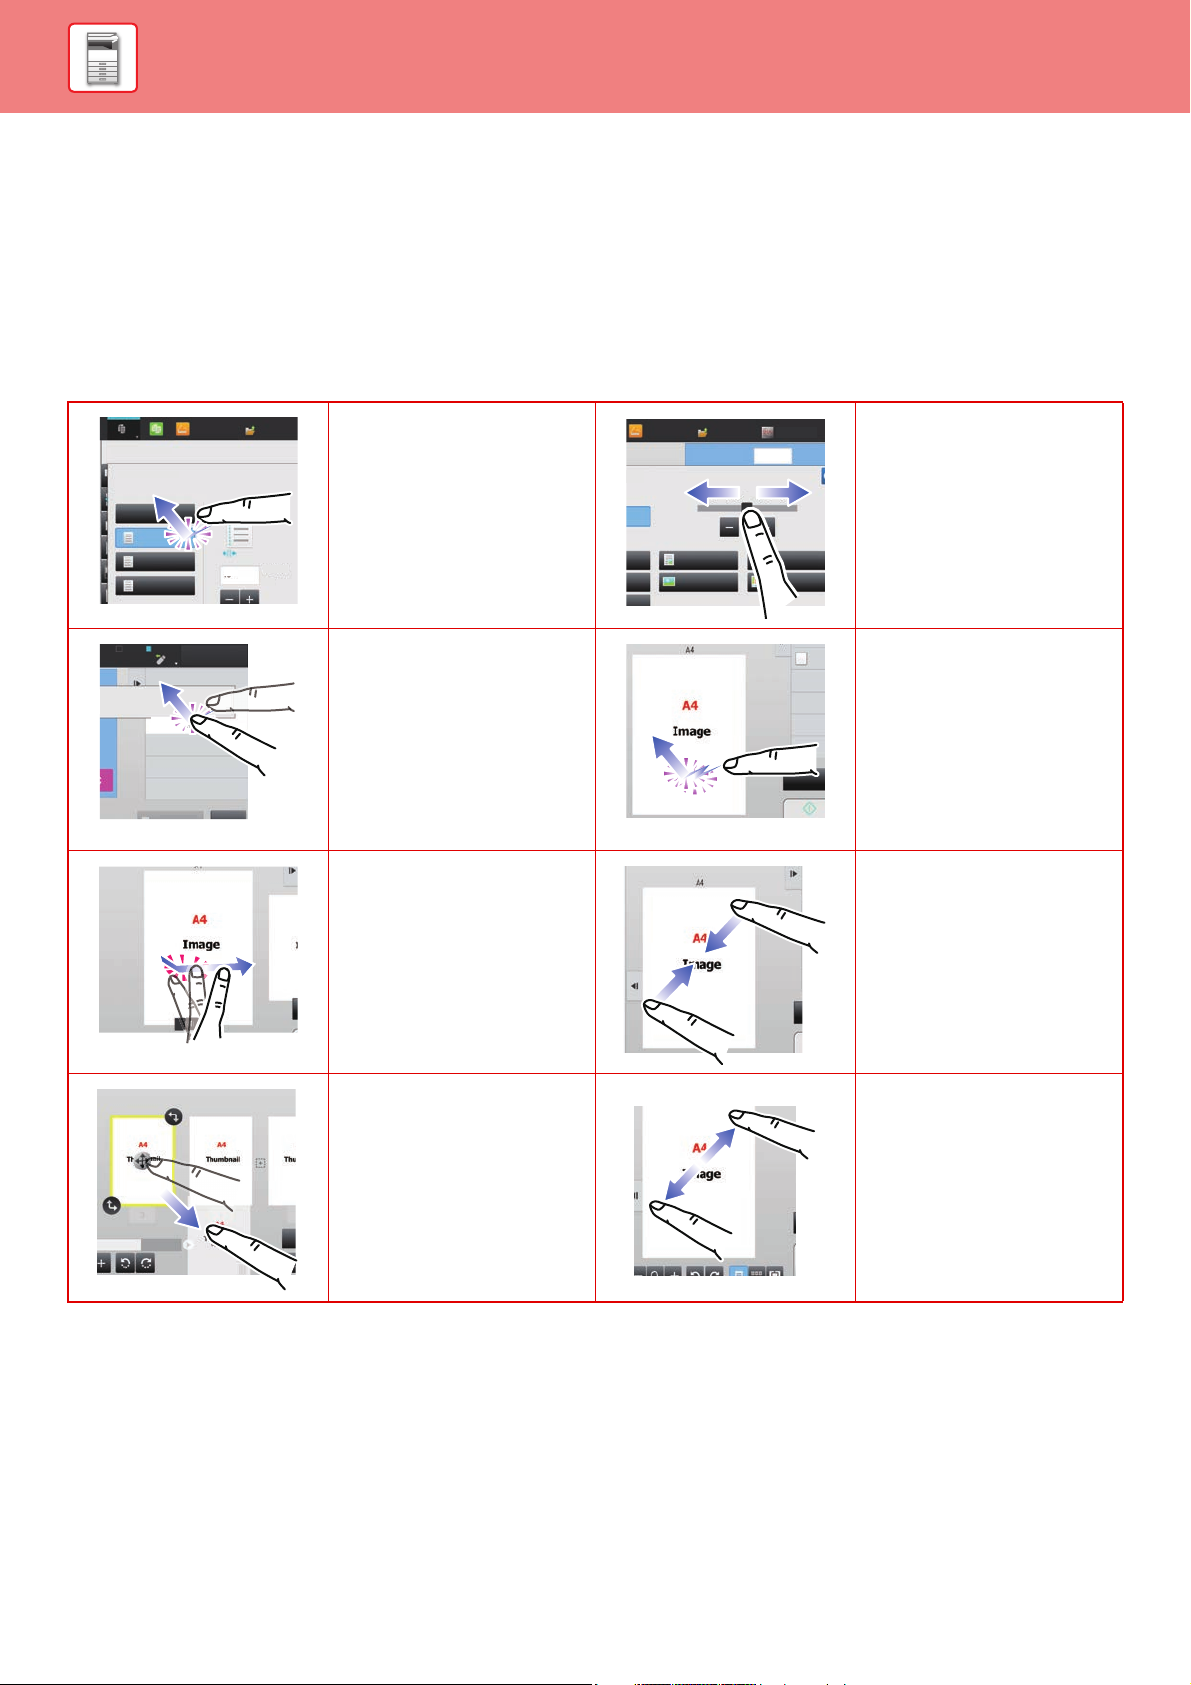
TOUCH PANEL
TOUCH TYPES
In addition to tapping, equivalent to conventional touching, the touch panel of the machine can be operated by long
touching, flicking and sliding.
Operation types
Tapping
Touch the panel with your
finger and then lift it quickly.
Use this method to select a
key, tab or check box.
Long touching
Touch the panel with your
finger and hold it for a while.
Keep holding (long touching)
it on the action panel or
characters in the text box to
display characters in a
balloon.
Flicking
Flick the panel to scroll a
preview image quickly.
Sliding
Slide the scroll bar (with your
finger touching the panel) to
scroll up and down a list with
a large number of items.
Double tapping
Touch the screen twice. Use
this operation to enlarge the
image in the preview.
Pinch
Touch the screen with two
fingers and move them
toward each other. This is
used to reduce the browser
and preview display.
Dragging
Drag (slide your finger
touching the panel in a
random direction) to replace
a page in the original during
preview.
Spread
Touch the screen with two
fingers and move them away
from each other. This is used
to enlarge the browser and
preview display.
1-11
Page 15

BEFORE USING THE MACHINE►BEFORE USING THE MACHINE
Others
Margin Shift
Off
Left
Right
Down
1010
( 0~50 )
mm
( 0~50 )
mm
Fit Back Face to Front Face Value
Back
Preview
Start
A3
Side 1 Side 2
Colour
Start
CA
B/W
(A)
(B) (B)
(E)
(C)
(D)
(C)
Preview
Speaker
Start
W
ABC
Address
All
Frequent
Use
Narrow Down
All
Category
All
Sending History
Call by Search Number
Print Individual List
Call Search Number
Add New
Send Same Image
as Fax Address
Category 0
Category 1
Category 5
Category 3
Category 2
Category 4
Category 6
CA
(A)
(C)
(B)
Others
Background Adjustment
Adjust Original Background Darkness.
Preview
Start
Off
On
Touch [+] darken background.
Touch [-] erase background.
Original
Change Size/Direction.
Erase
Erase Shadow Around
Sharpness
Adjust Outline of Image
Exposure
Select Type/Exposure
Select Type/Exposure
Back
A3
Colour
Start
CA
B/W
(A)
Operation on respective screens
Key (tapping)
A. Tap to select an item. The selected key turns into a different colour.
B. Tap numeric keys to enter numbers.
C. Tap to increase or decrease the value. Long touching causes the value to be increased or decreased until you stop
touching.
D. Tap to enter a checkmark and enable the setting.
E. Tap here to close the screen.
List (tapping, sliding and flicking)
A. Tap to select an item. The selected item turns into a different colour.
B. Slide the bar up and down.
It appears when the item does not fit in the screen.
C. Flick the key upwards or downwards. The item scrolls up or down.
Slider (sliding)
A. Slide the knob from side to side.
1-12
Page 16

BEFORE USING THE MACHINE►BEFORE USING THE MACHINE
Preview
Start
CA
Original
Others
Auto
Direct EntryInchAB Custom Size
Image Orientation
No. of copies
Skip Blank Page in Original
Copy Ratio
Enlarge/Reduce Copy
Blank Page Skip
Background Adjustment
2-Sided Copy
Colour Mode
A3
A5
216 x 343
B5R B4
A5R A4 A3
B5 A4R 216 x 340
Colour
Start
B/W
(A)
Start
Send as well as print
Scan Original Again
Without change Settings
Store Data in Folder
File
Store Data Temporarily
Quick File
Colour
Start
CA
B/W
(A)
Tab (tapping)
A. Tap a tab to switch what is displayed.
Preview screen (Double tapping/ Pinch/ Spread)
A. When a preview screen is "pinched", the screen image is reduced. When "spread", the image is enlarged.
When "Double tapping", the image is also enlarged.
1-13
Page 17

BEFORE USING THE MACHINE►BEFORE USING THE MACHINE
Toner Quantity
M
C
Bk
Y
Easy
Copy
Easy
Fax
Easy
Scan
10:15
Operation
Guide
Enlarge
Display Mode
Settings Total Count Brightness
Adjustment
Easy
Copy
Easy
Scan
HDD
File retrieve
Sharp OSA
LINE PRINTER
Job Status
Job Status
CLOUD PORTAL
Tap a mode to change to
that mode.
►Changing mode
from the mode display
(page 1-16)
Select shortcut keys for
modes or functions.
►Changing mode
from the Home
screen (page 1-16)
Use these keys to select
functions that make the
machine easier to use.
Displays the machine's status other than the job
using icons.
► Icon indicating the status of the machine (page
1-15)
Displays the job in
progress or waiting with
text or icon.
Select functions that can
be utilized in respective
modes.
Tap the tab, and the list of
function keys is
displayed.
► ACTION PANEL
(page 1-24)
Switch the pages for
displaying shortcut keys.
Displays the time.
HOME SCREEN
Pressing the [Home Screen] key on the operation panel displays the home screen on the touch panel. The home screen
displays the keys for selecting modes or functions.
For procedures for adding and deleting shortcut keys, see "U/I Customize Guide".
• To set the home screen for each "Favourite Operation Group List":
In "Settings (Web version)", select [User Control] → [Favourite Operation Group List] → [Home Screen List].
Perform this setting when user authentication is used.
• To display the External Service Connect shortcut keys:
You can add shortcut keys for the External Service Connect functions (Google Drive, OneDrive, SharePoint Online, Gmail,
Exchange (E-Mail)) to the home screen.
These functions can be enabled in the system settings. When a function is enabled in the system settings, you can add a
shortcut key for that function to the home screen.
External Service Connect settings are configured in "Settings (administrator)" - [System Settings] → [Network Settings] →
[External Print Services Settings].
1-14
Page 18

BEFORE USING THE MACHINE►BEFORE USING THE MACHINE
Icon indicating the status of the machine
Icon Machine status Icon Machine status
Printer data is being processed. A USB device is installed.
Printer data is being printed. The field support system is enabled.
Send data exists. Single-byte alphanumeric character entry
Forward error data exists. A data security kit is installed.
Received data exists. Connecting to the access point (Level 4)
Received confidential fax data exists. Connecting to the access point (Level 3)
Received data is held. Connecting to the access point (Level 2)
Received preview data exists. Connecting to the access point (Level 1)
OSA communication is in progress. Not connected to the access point
Enlarge display mode is enabled. Bad connection of the wireless LAN device in
Eco mode is enabled. Waiting for the access point
A maintenance notification is issued. A LAN cable is not connected.
Remote operation is in progress.
* Contact your dealer or nearest authorised service representative.
the machine
*
1-15
Page 19

BEFORE USING THE MACHINE►BEFORE USING THE MACHINE
10:15
Operation
Guide
Enlarge
Display Mode
Settings Total Count Brightness
Adjustment
LINE PRINTER
Easy
Copy
Easy
Scan
HDD
File retrieve
Sharp OSA
Job Status
Easy
Fax
Easy
Scan
Job Status
CLOUD PORTAL
CLOUD PORTAL
Press the [Home Screen] key.
Tap the mode icon.
CA
Preview
Copies
Start
Colour
Start
Original
A4
Paper
Select
Tray 1 1 → 1
A4
2-Sided Copy Copy Ratio Staple / Punch
100%
Detail
LINE PRINTER
Easy
Copy
Easy
Scan
HDD
File retrieve
Sharp OSA
Job Status
B/W
Off
CA
Preview Auto Set
Original
A4
Address Fax Number
Address Book History
Global
Address Search
Scan to HDD/
USB
Detail
LINE PRINTER
Easy
Copy
Easy
Scan
HDD
File retrieve
Sharp OSA
Job Status
Start
Colour
Start
B/W
Tap on the mode display.
CA
Preview Auto Set
Original
A4
Address Fax Number
Detail
LINE PRINTER
Easy
Copy
Easy
Scan
HDD
File retrieve
Sharp OSA
Job Status
Start
Colour
Start
Address Book
Scan to HDD/
USB
Select the mode.
Network Folder
Easy Fax
Easy Scan
Easy Copy
Fax E-Mail
FTP/Desktop
Internet Fax
B/W
Tap the key that shows .
Tap for any mode desired.
CHANGING MODES
Changing mode from the Home screen
Changing mode from the mode display
For procedures for editing the home screen, see "U/I Customize Guide".
1-16
Page 20

BEFORE USING THE MACHINE►BEFORE USING THE MACHINE
B/W
Start
Colour
Start
Preview
Scan
Again
CA
Start
Colour
Start
Send as well as print
Scan Original Again
Without change Settings
Store Data in Folder
File
Store Data Temporarily
Quick File
CA
B/W
In Easy mode In Normal mode
PREVIEW SCREEN
In the preview screen, you can view output images or images stored in the machine using the touch panel.
Keys used in the preview screen
This changes the mode to edit mode.
Pages of the original can be changed,
rotated, or deleted.
* This reduces the image.
* This displays the scroll bar for
enlargement/reduction operations.
Moving the slider to the left reduces the
image, and moving the slider to the right
enlarges the image.
* This enlarges the image. * This displays pages in a 3D view.
* Can also be used in Easy mode.
• The display position of an image can be moved by dragging it while it is enlarged.
• To enlarge an image, double-tap it when the preview image is displayed by page.
* This rotates the preview image of whole
page in the arrow's direction. The
printing result is not rotated.
* This displays preview images of
,
respective pages.
This displays thumbnails of preview
images.
1-17
Page 21

BEFORE USING THE MACHINE►BEFORE USING THE MACHINE
5
Edit End
Move the Page
Rotate 180 Degrees
Specify Chapter Inserts
Insert Blank Page
Delete the Page
Erase Specified Original Area
Erase Specified Range
52341
Deleting a page
In the preview screen, tap to switch to edit mode.
1
2
• You can also delete the page by tapping [Delete the Page] on the action panel.
• You can also delete the page by dragging a page to .
Tap the page you want to delete, and
tap .
Cancel and ReturnSelect the location to move.
21 3 4 5
5
Edit End
• To undo the deletion, tap . To redo the deletion, tap .
Erase Specified Range
Erase Specified Original Area
Delete the Page
Move the Page
Rotate 180 Degrees
Insert Blank Page
4321
4
Edit End
3
Tap the [Edit End] key.
1-18
Page 22

BEFORE USING THE MACHINE►BEFORE USING THE MACHINE
6
Edit End
4 5321
6
Edit End
4 5321
Moving a page
In the preview screen, tap to switch to edit mode.
1
2
Tap the page you want to move, and
drag to move the page.
You can also move the page by tapping [Move the Page] on the action panel and then tap of the destination.
Tap the [Edit End] key.
3
Rotating a page
In the preview screen, tap to switch to edit mode.
1
2
Tap the page you want to rotate, and
drag or to rotate the page.
3
You can also rotate the page by tapping [Rotate 180 Degrees] (Copy mode only) or [Rotate 90 Degrees] (Fax and
scanner mode only) on the action panel.
Tap the [Edit End] key.
1-19
Page 23

BEFORE USING THE MACHINE►BEFORE USING THE MACHINE
6
Edit End
4 5321
6
Edit End
4 5321
Setting chapter inserts
When N-Up or 2-Sided is specified, you can move a page marked with to the first page.
In the preview screen, tap to switch to edit mode.
1
Tap the page you want to set chapter
2
inserts.
3
4
Tap .
is displayed on the page.
• You can also set chapter inserts by tapping [Specify Chapter Inserts] on the action panel.
• To cancel the Chapter Inserts setting:
Tap displayed on the page, or select the page and tap [Cancel Chapter Inserts of Selected Page.] on the action
panel.
Tap the [Edit End] key.
1-20
Page 24

BEFORE USING THE MACHINE►BEFORE USING THE MACHINE
4
Edit End
Cancel and ReturnSelect the location to insert blank
page.
45321
6
Edit End
Move the Page
Rotate 180 Degrees
Specify Chapter Inserts
Insert Blank Page
Delete the Page
Erase Specified Original Area
Erase Specified Range
4 5321
Inserting a blank page
In the preview screen, tap to switch to edit mode.
1
2
Tap , and tap for the location
into which you want to insert a blank
page.
You can also insert a blank page by tapping [Insert Blank Page] on the action panel.
Tap the [Edit End] key.
3
Deleting part of the original image
In the preview screen, tap to switch to edit mode.
1
2
Tap [Erase Specified Range] on the
action panel.
1-21
Page 25

BEFORE USING THE MACHINE►BEFORE USING THE MACHINE
Specify Range2
Specify Range3
Specify Range4
Erase Specified Range
Apply This Erase
Position to This Page.
Reverse Erase Range
Apply This Erase
Position to All Pages.
1 / 6
Start
1 / 6
Colour Mode
Copies
Full Colour
Paper Select
Auto
Exposure
Auto
Original
Auto A4
2-Sided Copy
1-Sided→1-Sided
Sort/Group
Auto
Copy Ratio
100%
Others
Send as well as print
Scan Original Again
Without change Settings
Store Data in Folder
File
Store Data Temporarily
Quick File
Colour
Start
CA
B/W
Start
Colour Mode
Auto/Mono2
Resolution
200x200dpi
File Format
PDF
Original
Auto
Others
Address Book
Subject
File Name
Address Touch to Input Address
Options
Exposure
CA
Sending History
Quick File
Call Search Number
Check Send/Receive
Status
Send Same Image
as Fax Address
Store Data Temporarily
File
Store Data in Folder
Specified by System Settings
3
4
Erase Specified Range
Start Point
X
Y
Height
Width
Clear OK
Specify Range2
Specify Range3
Specify Range4
Exit
53
31
31
97
Follow the on-screen instructions to
specify the erase range.
Specify the erase range and then tap the [OK] key.
To delete the image outside the selected range, tap [Reverse Erase Range] on the action panel.
On the action panel, select [Apply This
Start Point
Height
Width
Erase Position to All Pages.] or [Apply
This Erase Position to This Page.].
As necessary, repeat the steps to specify the erase range and the pages to
5
which it is applied.
Erase Specified Range
Exit
Tap the [Exit] key.
6
Erase Range1
Specify Range2
Specify Range3
Specify Range4
Changing the settings
Tapping the tab on the left of the screen allows you to change the colour mode and other settings.
You cannot tap the keys for functions whose settings cannot be changed.
1-22
Page 26

BEFORE USING THE MACHINE►BEFORE USING THE MACHINE
1
1
47586
9
203
C
No. of copies
Start
Colour
Start
CA
B/W
Cancel Copy
B/W
Start
Colour
Start
CA
OPERATION OF FREQUENTLY USED KEYS
Numeric keys
Tap a number to enter it.
To clear the entered number, tap the [C] key.
On the address screen, you can enter characters other than numbers, and a different key layout is provided. You can also
move the cursor by using the [←] and [→] keys. Tap the [C] key to delete one character to the left of the cursor.
[Start] key ([B/W Start] key and [Colour Start] key)
Tap to perform a print or send job.
In copy mode, [B/W Start] and [Colour Start] keys are displayed.
[Cancel Copy] key, [Storing Cancelled] key, [Cancel Scan] key, [Sending
Cancelled] key
Tap to stop copying, printing, or transmission.
[CA] key
Tap to cancel all settings and restore the initial status in each mode.
1-23
Page 27

BEFORE USING THE MACHINE►BEFORE USING THE MACHINE
Start
Colour
Start
Preview
Others
Copy Like A Pamphlet
Booklet
Change Size/Direction.
Original
2-Sided Copy
Colour Mode
Background Adjustment
Others
Erase
Clear
Outer Frame
Specify Frame+Centre
Reverse erase position of
back face
Up
Down
RightLeft
A3
CA
B/W
Start
Colour
Start
Preview
Colour Mode
Full Colour
Paper Select
Auto
Exposure
Auto
Original
Auto A4
2-Sided Copy
1-Sided→1-Sided
Sort/Group
Auto
Copy Ratio
100%
Others
Plain
Send as well as print
Call Eco Program
Store Data in Folder
File
Store Data Temporarily
Quick File
1
47586
9
203
C
1
A4
B5
B4
A3
2
1
3
4
No. of copies
CA
B/W
A4
ACTION PANEL
Recommended functions are displayed on the action panel when you configure functions in each mode.
From the action panel, you can configure functions or combine the configured function with a function displayed on the
action panel.
If the action panel does not appear, tap the action panel tab.
• The functions displayed on the action panel vary depending on the mode or the functions that have been configured.
• If too many functions have been configured to be displayed on the action panel, you can slide the panel vertically or tap
and to view all.
• In enlarge display mode, part of the text on the action panel may not be displayed. To display the whole text, long-touch
the partially hidden key or slide the tab of the action panel to the left.
To always display the action panel
In "Settings(administrator)", select [System Settings] → [Common Settings] → [Operation Settings] → [Condition Settings]
→ [Display Action Panel as default.].
CONFIRMATION SCREEN FOR FAVOURITE MENUS
AND SETTINGS
When you register frequently used functions you have configured for copying or image sending in favourite, you can
quickly call them.
Favourite can be used in normal mode.
Registering a function in Favourite
Tap .
1
2
Tap [Edit Favorite] on the action panel.
1-24
Page 28

BEFORE USING THE MACHINE►BEFORE USING THE MACHINE
Start
Colour
Start
Preview
Colour Mode
Full Colour
Paper Select
Auto
Exposure
Auto
Original
Auto A4
2-Sided Copy
1-Sided→1-Sided
Sort/Group
Auto
Copy Ratio
100%
Others
Plain
Send as well as print
Call Eco Program
Store Data in Folder
File
Store Data Temporarily
Quick File
1
47586
9
203
C
1
A4
B5
B4
A3
2
1
3
4
No. of copies
CA
B/W
A4
Others
Start
Preview
Erase
Favorite
Edit Favorite
Shift to Icon Mode
B4
A3
3
4
Colour
Start
CA
B/W
/
B4A33
4
Start
Preview
Register Current Settings
Program Registration
Function Review
Original
Paper Select
2-Sided Copy
Exposure
Sort/Group
Image OrientationA4Portrait
Tray 3 PlainB4
1-Sided→2-Sided Tablet:
:Copy of Copy Off : OffColour Tone Enhancement
Tex tOriginal Image Type Exposure 3.0
Group
Others
Colour
Start
CA
B/W
/
Tap the [Register Key] key.
3
Administrator rights are required.
Tap the key for the function you want to register.
4
Calling a function from Favourite
1
Tap .
Tap the key for the function you want
2
• Favourites can be registered or edited only by authenticated users and administrators.
• Unauthenticated users can call and use the favourites registered by administrators.
Settings for calling Favourites and permitting/prohibiting editing can be configured in [User Control] → [Authority
Group List] in "Settings (administrator)".
• To edit favourites, tap and then tap [Edit Favorite] on the action panel.
to call.
Confirmation Screen for Settings
You can display a list of configured functions and check them.
On the initial screen of each mode, tapping displays the setting confirmation screen.
1-25
Page 29

BEFORE USING THE MACHINE►BEFORE USING THE MACHINE
Eco
ECO FUNCTIONS OF THE MACHINE
These functions help save power consumption by managing operations of sections prone to high power consumption.
The machine provides two power-saving modes.
Function Description Page
AUTO POWER SHUT-OFF
MODE
PREHEAT MODE This mode lowers the temperature of the fusing unit and makes the machine
If no operations take place, this mode will turn off the power to the operation
panel and the fusing unit, and makes the machine wait in the lowest power
consumption state.
Although the power-saving rate is higher, the wakeup time is longer.
wait in low power consumption state.
Compared to Auto Power Shut-Off Timer, the power-saving rate is lower, but
the wakeup time is shorter.
In addition to these two modes, using the following functions in conjunction helps reduce even more power
consumption.
Function Description Page
ECO RECOMMENDATION
FUNCTION DISPLAY
AS SOON AS THE REMOTE JOB
IS FINISHED, ENTER AUTO
POWER SHUT OFF MODE
ECO SCAN The machine is operated with the fusing unit turned off for non-printing
POWER ON/OFF SCHEDULE
SETTING
Shows recommended copy/print settings for copy, document filing reprint,
and direct print.
The machine returns from Auto Power Shut-Off and enters Auto Power
Shut-Off mode as soon as printing is completed.
operations (that do not use the fusing unit) such as fax and image
transmission.
Use this function to set the times for turning the power on and off to reduce
power consumption.
1-27
1-28
1-28
1-29
1-29
1-30
SPECIFIC DATE OPERATION
SETTINGS
Toner Save Mode This mode is used to reduce toner consumption. 7-168
MOTION SENSOR
(MX-3060N/MX-3070N/MX-3560N/
MX-3570N/MX-4060N/MX-4070N/
MX-5070N/MX-6070N only)
Sleep Mode Power Level Select whether priority is given to power saving or wakeup time. 7-165
When you must have the machine perform exceptionally many print jobs or
other special operation on a certain day, you can specify the day as a
"Specific Date" and define an energy saving pattern only for that day.
This sensor detects the presence of a person that approaches the machine,
and automatically wakes the machine from sleep mode (Motion Sensor
Mode Only).
Mode Settings
The eco function settings are set in a batch. "Custom" and "Eco" are available.
Setting values applied by each mode is as follows.
Function Custom Eco
Eco Scan On (Sending Modes Only) On (All Modes Except Copy)
Auto Power Shut-Off Timer Fix transition time.: 11min. (for Europe)
1min. (Except for
Europe)
Fix transition time.: 1min.
1-30
1-31
1-26
Page 30

BEFORE USING THE MACHINE►BEFORE USING THE MACHINE
[Power Save] button/indicator
Function Custom Eco
As soon as the remote job is finished,
enter Auto power shut off mode.
Preheat Mode Setting 1min. 1min.
Turn off Panel Display during
pre-heat mode
Sleep Mode Power Level Low Power Low Power
Each Energy Save settings in System Setting is not applied when Eco mode is used.
To set mode settings
"Settings (administrator)" → select [System Settings] → [Energy Save] → [Eco Setting] → [Mode Setting].
On On
On On
AUTO POWER SHUT-OFF MODE
This mode turns off the power to the operation panel and the fusing unit, and makes the machine wait in the lowest
power consumption state.
Auto Power Shut-Off Timer will activate when the set duration of time elapses in waiting status without executing a job.
Compared to preheat mode, the power-saving rate is considerably higher but the wakeup time is longer.
The [Power Save] button blinks when the machine is in Auto Power Shut-Off Timer.
Auto Power Shut-Off Timer is also activated by pressing the [Power Save] button while the [Power Save] button is not lit.
This mode is cleared when print data is being received, fax data is being output, or when the [Power Save] button is
pressed while it is blinking.
To set Auto Power Shut-Off Timer:
In "Settings (administrator)", select [System Settings] → [Energy Save] → [Eco Setting] → [Auto Power Shut-Off].
A message appears 15 seconds before Auto Power Shut-Off Mode is entered.
To close the message and continue normal operation, tap the [Continue] button.
The message appears again 15 seconds before the end of the extension of normal operation time.
If no action is taken within 15 seconds after the message appears, the machine enters auto power shutoff mode.
To set display of the message:
In "Settings (administrator)", select [System Settings] → [Energy Save] → [Eco Setting] → [Display Message When
Extending Transition Time to Preheat/Auto Power Shut-Off Mode].
1-27
Page 31

BEFORE USING THE MACHINE►BEFORE USING THE MACHINE
PREHEAT MODE
This mode lowers the temperature of the fusing unit and makes the machine wait in low power consumption state.
Preheat mode will activate when the set duration of time elapses in waiting status without executing a job.
Compared to Auto Power Shut-Off Mode, the amount of energy saved is less and the wakeup time is shorter.
In the preheat mode, the [Home Screen] key is lit and the light goes off for the touch panel and the [Power Save] button.
The touch panel is cleared when it is tapped or the [Home Screen] button is pressed.
To set preheat mode:
"Settings (administrator)" → select [System Settings] → [Energy Save] → [Eco Setting] → [Preheat Mode Setting].
A message appears 15 seconds before Preheat Mode is entered.
To close the message and continue normal operation, tap the [Continue] button.
If no action is taken within 15 seconds after the message appears, the machine enters preheat mode.
To set display of the message:
In "Settings (administrator)", select [System Settings] → [Energy Save] → [Eco Setting] → [Display Message When
Extending Transition Time to Preheat/Auto Power Shut-Off Mode].
ECO RECOMMENDATION FUNCTION DISPLAY
Shows recommended copy/print settings for copy, document filing reprint, and direct print.
Copying
When you change to copy mode (normal mode), the settings recommended for copy mode appear.
Recommended settings: 2-Sided Copy, N-Up, B/W Copy and Image Orientation
Document filing print
When you tap the [Change Setting to Print] in the action panel on the file list screen of document filing, the settings
recommended for this mode appear.
Recommended settings: 2-Sided Print, N-Up, and Print B/W.
Direct print
When you tap the [Change Setting to Print] in the action panel on the file list screen of direct print, the settings
recommended for this mode appear.
Recommended settings: 2-Sided Print, N-Up and Print B/W.
1-28
Page 32

BEFORE USING THE MACHINE►BEFORE USING THE MACHINE
1
0
0
H
0
Printed
Sleep mode
Print
Sleep mode
Fusing unit is turned
off
Fusing unit is turned
on
Fusing unit is turned
off
Fusing unit is
turned off
Image Send
Document Filing
Copy
Fusing unit is
turned on
Fusing unit is
turned off
Print
Sleep mode
AS SOON AS THE REMOTE JOB IS FINISHED, ENTER
AUTO POWER SHUT OFF MODE
Printing or outputting received fax data in Auto Power Shut-Off Timer turns on the power, and then the machine returns
to Auto Power Shut-Off Mode immediately after completing the print job.
To set "As soon as the remote job is finished, enter Auto power shut off mode.":
In "Settings (administrator)", select [System Settings] → [Energy Save] → [Eco Setting] → [As soon as the remote job is
finished, enter Auto power shut off mode.]
ECO SCAN
Non-print jobs such as sending a scanned original are performed with the fusing unit turned off.
H
0
1
0
To set Eco scan:
"Settings (administrator)" → select [System Settings] → [Energy Save] → [Eco Setting] → [Eco Scan Setting] .
0
1-29
Page 33

BEFORE USING THE MACHINE►BEFORE USING THE MACHINE
Start time
Lunch break
Finish time
POWER ON/OFF SCHEDULE SETTING
Use this function to set the times for turning the power on and off for the machine to reduce power consumption.
9:00
12:00
13:00
18:00
Setting Power ON/OFF Scheduling Function
In "Settings", select [System Settings] → [Energy Save] → [Power ON/OFF Schedule Setting].
OFF
ON
OFF
ON
OFF
SPECIFIC DATE OPERATION SETTINGS
When you must have the machine perform exceptionally many print jobs or other special operation on a certain day, you
can specify the day as a "Specific Date" and define an energy saving pattern only for that day.
To specify operation for the specific date:
"Settings (administrator)" select [System Settings] → [Energy Save] → [Specific Date Operation Settings].
1-30
Page 34

BEFORE USING THE MACHINE►BEFORE USING THE MACHINE
Motion sensor
Near Far
Detection range
Approx.
maximum
1.5 m
60 degrees
MOTION SENSOR (MX-3060N/MX-3070N/MX-3560N/
MX-3570N/MX-4060N/MX-4070N/MX-5070N/MX-6070N only)
This sensor detects the presence of a person that approaches the machine, and automatically wakes the machine from
sleep mode (Motion Sensor Mode Only).
Three settings are available for the detection range ( / / ).
• The motion sensor detects the movement of sources of heat.
• The detection range may vary depending on the installation site and environment (ambient temperature, etc.).
The motion sensor may not operate correctly in the conditions below.
• An object is in front of the motion sensor
• There are scratches or dirt on the motion sensor cover
• The motion sensor is directly exposed to sunlight or air flow
• The motion sensor is damaged
• There is a source of heat such as a heater nearby
• An object is moving in the detection range
To enable the motion sensor
"Settings (administrator)" select [System Settings] → [Energy Save] → [Eco Setting] → [Sleep Mode Power Level].
1-31
Page 35

BEFORE USING THE MACHINE►BEFORE USING THE MACHINE
1
47586
9
203
C
User Authentication
Enter your
user number.
CA
Admin Login
OK
USER AUTHENTICATION
User authentication restricts the use of the machine to users that have been registered. The functions that each user is
allowed to use can be specified, allowing the machine to be customized to meet the needs of your workplace.
When the administrator of the machine has enabled user authentication, each user must log in to use the machine.
There are different types of user authentication, and each type has a different login method.
For more information, see the explanations of the login methods.
► AUTHENTICATION BY USER NUMBER (page 1-32)
► AUTHENTICATION BY LOGIN NAME/PASSWORD (page 1-34)
AUTHENTICATION BY USER NUMBER
The following procedure is used to log in using a user number received from the administrator of the machine.
When starting the machine, the login screen appears.
When controlled by user number
If "A Warning when Login Fails" is enabled in the system settings, the operation panel will be locked for five minutes if an
incorrect user number is entered three times in a row.
Contact the machine administrator to check the user number assigned for you.
Enter your user number (5 to 8 digits) using the numeric keys.
1
Each entered digit will be displayed as " ".
1-32
Page 36

BEFORE USING THE MACHINE►BEFORE USING THE MACHINE
1
47586
9
203
C
User Authentication
Enter your
user number.
CA
Admin Login
OK
(1)
(2)
Exposure
Address Book
Auto
Original
Mixed Size Orig.
Resolution
Super Fine
Job Build
Original Count
Slow Scan Mode
Address Fax Number
Logout
Admin
LINE PRINTER
Job Status
Others
Preview
Speaker
Start
Scan Size
Auto Auto
reception memory
100%
A4 A4
100%
Send Size
Sending History
Call Search Number
Call Program
Call Registered settings
Direct TX
Verification Stamp
Send Same Image
as Fax Address
Easy
Scan
HDD
File retrieve
CA
Tap the [OK] key.
2
• To limit the number of pages that a user can use:
In "Settings (administrator)", select [User Control] → [Pages Limit Group].
• To hide the number of pages that can be used after login:
In "Settings (administrator)", disable [User Control] → [Default Settings] → [Display Usage Status after Login].
• To change the message display time:
In "Settings" (administrator)", select [System Settings] → [Common Settings] → [Operation Settings] → [Condition
Settings] → [Message Time Setting].
If the entered user number is authenticated, the number of
remaining pages that the user can copy or scan is displayed.
When a limitation is set for the number of pages that a user
can use, the use count for the user that has logged in is
displayed.
3
When the user number is an 8-digit number, this step is not necessary. Login takes place automatically after the user
number is entered.
When you have finished using the
machine and are ready to log out, tap
[Logout].
1-33
Page 37

BEFORE USING THE MACHINE►BEFORE USING THE MACHINE
User Authentication
Enter login name and password.
Login Name
Password
Touch to input Log-in Name
Touch to Input Password
Login Locally
CA
Select from List
OK
Auth to
CA
OK
User Authentication
Select from ListLogin Name
E-mail Address
Touch to input Log-in Name
Touch to input E-mail Address
Password
Auth to
Touch to Input Password
Login Locally
Please enter Log-in name/E-mail address/password.
AUTHENTICATION BY LOGIN NAME/PASSWORD
This method enables users to log in using a login name and password received from the administrator of the machine or
the administrator of the LDAP server.
When starting the machine, the login screen appears.
When controlled by login name and password
• Different items may appear in the screen when LDAP authentication is used.
• When LDAP authentication is used, the [E-mail Address] key may appear, depending on the authentication method. Tap
the [E-mail Address] text box and enter your e-mail address.
If "A Warning when Login Fails" is enabled in the system settings, the operation panel will be locked for five minutes if an
incorrect login name or password is entered three times in a row.
Contact the machine administrator to check the login name/password assigned to you.
• To release the operation panel lock:
In "Settings (Web version)", select [User Control] → [Default Settings] to release the lock.
• To set [A Warning when Login Fails]:
In "Settings (administrator)", select [User Control] → [Default Settings] → [A Warning when Login Fails].
• To store a user name:
In "Settings (administrator)", select [User Control] → [User List].
Also register detailed information such as the login name, user number, and password. Ask the administrator of the
machine for the information that you need to use the machine.
1-34
Page 38

BEFORE USING THE MACHINE►BEFORE USING THE MACHINE
User Authentication
Enter login name and password.
Login Name
Password
Touch to input Log-in Name
Touch to Input Password
Login Locally
CA
OK
Select from List
Auth to
User Authentication
Enter login name and password.
Login Name
Password
Touch to input Log-in Name
Touch to Input Password
Login Locally
CA
OK
Select from List
Auth to
Enter the login name.
1
LDAP authentication can be used when the administrator of the server provides LDAP service on the LAN (local area
network).
Entering using the soft keyboard
If user name registration has not been performed in setting
mode, a user only using LDAP authentication should tap the
[Login Name] text box and enter the login name using the
soft keyboard.
Selecting from a list
Tap the [Select from List] key and select a user name from
the User List screen.
Enter the password.
2
Enter the password from the soft keyboard.
If you are logging in to an LDAP server, enter the password
that is stored with your LDAP server login name.
Each entered character will be displayed as " ". After
entering the password, tap the [OK] key.
When authentication is by LDAP server and you have
different passwords stored in "User List" and in the LDAP
server, use the password stored in the LDAP server.
To have the user name and password registered:
In "Settings (administrator)", select [User Control] → [User List].
When registering the LDAP server, change the information for [Auth to] as required.
• When selecting from the User List screen:
The LDAP server you are connecting to has been registered upon user registration, and so the target server to which
authentication should be directed appears when the login name is selected.
Go to step 3.
• When entering from the soft keyboard:
Tap [Auth to] and select the LDAP server to log in.
1-35
Page 39

BEFORE USING THE MACHINE►BEFORE USING THE MACHINE
User Authentication
Enter login name and password.
Login Name
Password
Login Locally
CA
OK
Select from List
Auth to
Exposure
Address Book
Auto
Original
Mixed Size Orig.
Resolution
Super Fine
Job Build
Original Count
Slow Scan Mode
Address Fax Number
Others
Preview
Speaker
Start
Scan Size
Auto Auto
reception memory
A4 A4
100%
100%
Send Size
Sending History
Check Send/Receive
Status
Call Search Number
Call Program
Call Registered settings
Direct TX
Verification Stamp
CA
Usage status : used/remaining pages
Scanner(B&W) : 00,000,000/--,---,--Scanner(Colour) : 00,000,000/--,---,--Internet Fax : 00,000,000/--,---,--Fax : 00,000,000/--,---,---
Exposure
Address Book
Auto
Original
Mixed Size Orig.
Resolution
Super Fine
Job Build
Original Count
Slow Scan Mode
Address Fax Number
Logout
Admin
LINE PRINTER
Job Status
Others
Preview
Speaker
Start
Scan Size
Auto Auto
reception memory
A4 A4
100%
100%
Send Size
Sending History
Call Search Number
Call Program
Call Registered settings
Direct TX
Verification Stamp
Send Same Image
as Fax Address
Easy
Scan
HDD
File retrieve
CA
Tap the [OK] key.
3
If the entered login name and password are authenticated,
the number of remaining pages that the user can copy or
scan is displayed.
4
When a limitation is set for the number of pages that a user can use, the use count for the user that has logged in is
displayed.
• To limit the number of pages that a user can use:
In "Settings (administrator)", select [User Control] → [Pages Limit Group].
• To hide the number of pages that can be used after login:
In "Settings (administrator)", disable [User Control] → [Default Settings] → [Display Usage Status after Login].
• To change the message display time:
In "Settings" (administrator)", select [System Settings] → [Common Settings] → [Operation Settings] → [Condition
Settings] → [Message Time Setting].
When you have finished using the
machine and are ready to log out,
tap [Logout].
1-36
Page 40

BEFORE USING THE MACHINE►BEFORE USING THE MACHINE
ACTIVE DIRECTORY LINKING FUNCTION
You can join the Active Directory domain (AD domain) of the machine, and easily perform user management on the
network.
On a network that does not have Active Directory enabled, you must perform network device authentication for each
device.
For this reason, one user must have multiple domain names and passwords.
When you join an AD domain, you only need to be authenticated once. After you are authenticated, the Active Directory
server automatically authenticates network devices. You can log in to multiple devices on the network with a single
domain name and password.
Joining an AD domain
To have the machine join an AD domain, set the authentication destination to [Active Directory] in "Settings
(administrator)" - [User Control]→[Default Settings]→[Authentication Server Settings].
When the authentication destination is set to Active Directory, the Kerberos setting cannot be used.
Registering the machine in an AD domain
When you join an AD domain, the machine is registered as a printer in the AD domain. Enter the machine information in
setting mode.
Device name of the machine
In "Settings (administrator)", select [System Settings] → [Network Settings] → [Network Name Setting] → [Device Name].
Domain name of the machine
In "Settings (administrator)", select [System Settings] → [Network Settings] → [Active Directory Settings] → [Domain
Name].
Machine user name and password
In "Settings (administrator)", select [System Settings] → [Network Settings] → [Active Directory Settings] → [Device
Registration Account].
DNS domain name
In "Settings (administrator)", select [System Settings] → [Network Settings] → [Services Settings] → [DNS] → [Domain
Name].
1-37
Page 41

BEFORE USING THE MACHINE►BEFORE USING THE MACHINE
User authentication in the AD domain
The following methods can be used for user authentication in the AD domain.
1. Authentication by manual entry on the machine
Perform authentication using the touch panel of the machine. For the authentication method, refer to
"AUTHENTICATION BY LOGIN NAME/PASSWORD (page 1-34)
Configure the following setting in "Settings (administrator)".
Disable "Settings (administrator)"→[User Control]→[Default Settings]→[Use IC Card for Authentication].
2. Login by IC card (Quick Mode)
Use the card ID registered in an IC card to perform AD domain authentication.
When you first perform authentication, you must enter your password. After that you can perform authentication with just
your IC card.
If you change your password on the Active Directory server, your initially entered password information will be
reset and you will need to enter your password again.
Configure the following settings in "Settings (administrator)".
Enable "Settings (administrator)"→[User Control]→[Default Settings]→[Use IC Card for Authentication].
Enable "Settings (administrator)"→[User Control]→[Default Settings]→[Cache Password for Authentication].
".
3. Login by IC card (security card)
Use the card ID registered in an IC card to perform AD domain authentication.
You must always enter your password when you perform authentication using an IC card.
Enable "Settings (administrator)"→[User Control]→[Default Settings]→[Use IC Card for Authentication].
Disable "Settings (administrator)"→[User Control]→[Default Settings]→[Cache Password for Authentication].
• You can use both AD domain authentication users and users set on the machine. In this case, the authentication
destination is set when logging in.
• When an AD domain authentication user reserves a job and logs out before the job is executed, the user information is
temporarily stored in the machine and the reserved job is executed.
1-38
Page 42

BEFORE USING THE MACHINE►BEFORE USING THE MACHINE
Functions that can be used by linking with Active Directory
User accessible network folders
When a user who has logged in to the AD domain accesses a network folder from the machine, the user can only
access a folder for which he has permission.
Shared folder
When a logged in user taps the [Browse] key for a shared folder address, only folders for which the user has permission
are displayed.
Document filing
When a logged in user taps [Select File from Network Folder to Print] on the action panel in document filing and then taps
[Refer to Folders on Network], only folders for which the user has permission are displayed.
Home Directory
Scan to Home Directory
When scanning, a logged in user can use his Home Directory property that is set in the AD domain to send the scanned
file to that folder.
To use this function, enable "Settings (administrator)"→[System Settings]→[Image Send Settings]→[Scan
Settings]→[Default Address]→[Apply Home Directory of The User for Login].
Shared folder
In the shared folder address, the path of the logged in user's Home Directory is automatically entered in [Path Input to
Folder]. The folder that appears after the [Browse] key is tapped is the user's Home Directory.
If the Active Directory server cannot be accessed, the [Path Input to Folder] field will be blank, and when the [Browse] key is
tapped, the search results of the entire network will appear.
Print from Home Directory
The logged in user's Home Directory property that is set in the AD domain can be used to set the print folder for printing
to the Home Directory.
Shared folder
When the user taps [Select File from Network Folder to Print] on the action panel in document filing and then taps [Refer
to Folders on Network], the folder that appears is the user's Home Directory.
• When authentication information is stored in the address book and the user sends a file by specifying an address in the
address book, the file is sent according to the user's permissions in the address book. If authentication information is not
stored in the address book, the file is sent according to the logged in user's authentication permissions.
• In AD domain authentication mode, a file can be sent to a shared folder using the logged in user's authentication
permissions. In this case, a user name and password cannot be entered manually.
E-Mail
Scan to E-Mail
A logged in user can use his mail property set in the AD domain to send a scanned image to himself by e-mail.
To apply the e-mail address of the logged-in user set in the AD domain, tap [Find My Address] which appears on the
action panel when e-mail is sent, or enable [Apply E-mail address of the user for login.] in "Settings (administrator)" →
[System Settings] → [Image Send Settings] → [Scan Settings] → [Default Address].
1-39
Page 43

BEFORE USING THE MACHINE►BEFORE USING THE MACHINE
D
C
B
A
Registering billing
codes
Assigning a billing code
and executing the job
Recording a
billing code in
the job log
Billing by code
Collecting job logs
BILLING CODE
BILLING CODE
A billing code, which is added to a recorded job log when a printing or sending job has been executed, is used to
perform billing processing.
Billing codes are classified into two types: main code and sub code. A billing code is recorded in the job log when it is
entered and a print or send job is executed.
Summing up the amounts by Billing Code based on the job logs will facilitate the subsequent operations, for instance,
when making combined billings.
Types of billing codes
Type Description
Main Code Used to categorize the results of the executed print and send jobs to enable efficient
management. For example, you can assign a code by customer and collect cost
information by customer from job logs.
Code example: Issue of company A
Sub Code Available when the main code alone is not sufficient to enable management of billing
codes. For example, you can assign monthly cost information to a sub code and
collect the total monthly cost information of all customers when the customer name is
assigned to the main code.
Code example: Issue of April, 2015
Default Code Automatically assigned when the main code or sub code has not been specified.
Enable use of billing code
To enable use of the billing code, select "Settings (administrator)" → [User Control] → [Billing Code] → [Administration
Settings], then set [Use Billing Code] to [Enable].
Collecting billing codes
In "Settings (Web version)", select [System Settings] → [System Control] → [Job Log] → [Job Log Operation], and click
[Save] button to download the job logs. Then sum up the data by classifying and arranging the stored job logs.
1-40
Page 44

BEFORE USING THE MACHINE►BEFORE USING THE MACHINE
Billing Code
Please enter Billing Code.
Main Code
Sub Code
AAAA
AAAA
Select from List
Select from List
Bypass Billing Code OKCA
USE BILLING CODE
If the use of billing code is enabled in "Settings (administrator)", the billing code entry window is displayed at the time of
mode transition (at the time of printing/sending in document filing mode).
Enter the main code or sub code as required.
• To enable use of the billing code
Select "Settings (administrator)" → [User Control] → [Billing Code] → [Administration Settings], then set [Use Billing Code]
to [Enable].
• To retain the specified billing code at the time of mode transition
Select "Settings (administrator)" → [User Control] → [Billing Code] → [Administration Settings], then set the [Remember
Billing Code Between Modes] check box to . This eliminates the need to enter billing codes at each mode transition.
You can assign billing codes to reprinting/resending of target files and sending of print jobs from "Settings (Web version)" →
[Document Operations].
Specifying a billing code again
To change the specified billing code to another one, tap [Switch Billing Code.] on the action panel.
When the billing code entry window is displayed, select a new billing code.
Select a billing code from the list
Select the desired billing code from the list of registered billing codes.
You need to register billing codes in advance.
► REGISTERING A NEW BILLING CODE (page 1-44)
When the billing code entry window is
1
When not specifying a billing code
Tap the [Bypass Billing Code] key.
displayed, tap the [Select from List]
key of the main code.
To select the previously used billing code (at the time of user authentication)
Tap [Use Previously-Used Billing Code] on the action panel at the time of user authentication; this displays the main
code and sub code the authenticated user has entered previously.
1-41
Page 45

BEFORE USING THE MACHINE►BEFORE USING THE MACHINE
CA
Cancel and Return
Main Code Main Code Name
MAIN001 Company 1
MAIN002 Company 2
MAIN003 Company 3
MAIN004 Company 4
MAIN005 Company 5
MAIN006 Company 6
MAIN007 Company 7
MAIN008 Company 8
Add/Edit Billing Code
OK
Select Billing Code
Billing Code
Main Code
Sub Code
AAAA
AAAA
Select from List
Select from List
Bypass Billing Code OKCA
Please enter Billing Code.
Billing Code
Main Code
Sub Code
AAAA
AAAA
Select from List
Select from List
Bypass Billing Code OKCA
Please enter Billing Code.
Tap and select the main code from the
2
To search for the main code or main code name
Tap . When the search window is displayed, enter the main code and main code name, then tap the [Search Start]
key. The search result list is displayed.
list.
Tap the [OK] key.
3
Returns the screen to the billing code entry window.
4
5
To cancel the selection from the list
Tap [Cancel and Return] on the action panel. This cancels the selected main code and returns the screen to the billing
code entry window.
To check the details of the main code
Tap [Display Details] on the action panel. The detail window is displayed. Check the details, then tap .
Tap the [Select from List] key of the
sub code.
The sub code list is displayed. Perform the procedure shown
in steps 2 and 3, then specify the sub code.
Tap the [OK] key.
To clear the value of the specified billing code
Tap the [CA] key. Enter the billing code again.
1-42
Page 46

BEFORE USING THE MACHINE►BEFORE USING THE MACHINE
Billing Code
Main Code
Sub Code
AAAA
AAAA
Select from List
Select from List
Bypass Billing Code OKCA
Please enter Billing Code.
Billing Code
Main Code
Sub Code
AAAA
AAAA
Select from List
Select from List
Bypass Billing Code OKCA
Please enter Billing Code.
Billing Code
Main Code
Sub Code
AAAA
AAAA
Select from List
Select from List
Bypass Billing Code OKCA
Please enter Billing Code.
Directly entering a billing code
1
When not specifying a billing code
Tap the [Bypass Billing Code] key. The use code is set to the main code.
2
When the billing code entry window is
displayed, tap the box in [Main Code],
then enter the main code.
Specify the code using up to 32 single-byte characters.
Tap the box of [Sub Code], then enter
the sub code.
Specify the code using up to 32 single-byte characters.
3
To clear the value of the specified billing code
Tap the [CA] key. Enter the billing code again.
Tap the [OK] key.
1-43
Page 47

BEFORE USING THE MACHINE►BEFORE USING THE MACHINE
Billing Code
Please enter Billing Code.
Main Code
Sub Code
AAAA
AAAA
Select from List
Select from List
Bypass Billing Code OKCA
CA
Cancel and Return
Main Code Main Code Name
MAIN001 Company 1
MAIN002 Company 2
MAIN003 Company 3
MAIN004 Company 4
MAIN005 Company 5
MAIN006 Company 6
MAIN007 Company 7
MAIN008 Company 8
Add/Edit Billing Code
OK
Select Billing Code
REGISTERING A NEW BILLING CODE
Register a new billing code.
A billing code can be registered not only from the billing code entry window but also from "Settings".
To register a billing code from Setting Mode
Select "Settings" → [User Control] → [Billing Code] → [Main Code List] or [Sub Code List]. Register a main code in [Main
Code List], and a sub code in [Sub Code List].
A total of up to 2000 main and sub codes can be registered.
Shared range of billing code
The registered billing codes can only be shared in the specified group at the time of user authentication.
If the shared range is not specified, the registered billing codes are shared by all users.
To register a user group
In "Settings (administrator)", select [User Control] → [Organization /Group List].
1
2
When the billing code entry window is
displayed, tap [Select from List] of the
main code.
To register a new sub code, tap the [Select from List] key of
the sub code.
The subsequent steps are the same as the main code.
Tap [Add/Edit Billing Code] on the
action panel
1-44
Page 48

BEFORE USING THE MACHINE►BEFORE USING THE MACHINE
CA
Main Code Main Code Name
Main Code Registration
Add New
CA
Main Code
Main Code Name
Main Code Registration
Cancel and Return
End Registration
Register
Next Billing Code.
(4)
(5)
CA
Main Code
Main Code Name
Available to
Public to All
Specify target public address
Main Code Registration
Cancel and Return
End Registration
Register
Next Billing Code.
Tap [Add New] on the action panel.
3
To return to the billing code selection window
Tap .
Tap the box of [Main Code], then type
4
in the main code.
Specify the code using up to 32 single-byte characters.
5
6
Tap the box of [Main Code Name], then type in the main code name.
Specify the code name using up to 32 double- or single-byte characters.
If necessary, select the share range of
billing code.
Public to All: Registers the billing code as a public code for
all users who use the machine.
Specify target public address: Limits the share range of
billing code to be registered only to the specified group. Up
to eight groups can be specified as a public destination.
For details on how to specify a public destination, refer to
"Shared range of billing code (page 1-44)
The public destination of a billing code is not displayed if user authentication is not performed. The mode is automatically
set to [Public to All].
".
1-45
Page 49

BEFORE USING THE MACHINE►BEFORE USING THE MACHINE
CA
Organization /Group List
Group 1
Group 2
Group 3
Group 4
Group 5
Group 6
Group 7
Group 8
Clear
Designate Public Address
(Selected:1/32)
Tap and select a group as a public
7
To cancel the setting
Tap [Clear] on the action panel. This cancels the registered public destination and returns the screen to the previous
window.
destination
Up to eight groups can be specified. After the settings are
completed, tap .
To continuously register other billing codes, tap [Register Next Billing
8
Code.].
Execute steps 4 to 7 to register the main code.
9
To cancel the registration
Tap [Cancel and Return] on the action panel. This cancels all the registered billing codes and returns the screen to the
previous window.
Tap [End Registration] on the action panel.
This finalizes the registration and returns the screen to the previous window. Tap to finish the registration procedure.
To return to the billing code entry window
Tap the [CA] key.
1-46
Page 50

BEFORE USING THE MACHINE►BEFORE USING THE MACHINE
Billing Code
Please enter Billing Code.
Main Code
Sub Code
AAAA
AAAA
Select from List
Select from List
Bypass Billing Code OKCA
CA
Cancel and Return
Main Code Main Code Name
MAIN001 Company 1
MAIN002 Company 2
MAIN003 Company 3
MAIN004 Company 4
MAIN005 Company 5
MAIN006 Company 6
MAIN007 Company 7
MAIN008 Company 8
Add/Edit Billing Code
OK
Select Billing Code
CA
Add New
Main Code Main Code Name
MAIN001 Company 1
MAIN002 Company 2
MAIN003 Company 3
MAIN004 Company 4
MAIN005 Company 5
MAIN006 Company 6
MAIN007 Company 7
MAIN008 Company 8
Edit
Delete
Main Code Registration
EDITING OR DELETING THE REGISTERED BILLING
CODE
You can change or delete the registered billing code.
The billing code can also be edited or deleted from "Settings".
To edit or register a billing code from Setting mode
Select "Settings" → [User Control] → [Billing Code] → [Main Code List] or [Sub Code List]. Edit or register a main code in
[Main Code List], and a sub code in [Sub Code List].
Editing a billing code
When the billing code entry window is
1
displayed, tap the [Select from List]
key of the main code.
To register a new sub code, tap the [Select from List] key of
the sub code.
The subsequent steps are the same as the main code.
2
3
Tap [Add/Edit Billing Code] on the
action panel.
Tap and select the main code to be
edited, then tap [Edit] on the action
panel.
To return to the billing code selection window
Tap .
1-47
Page 51

BEFORE USING THE MACHINE►BEFORE USING THE MACHINE
CA
Public to All
Main Code Registration
Cancel and Return
End Registration
Register
Next Billing Code.
Main Code
Main Code Name
Available to
Specify target public address
AAAA
AAAA
Edit the main code as required.
4
For information on how to correct the code, refer to steps 4
to 7 in
"
REGISTERING A NEW BILLING CODE (page
1-44)
".
Tap [End Registration] on the action panel.
5
This finalizes the registration and returns the screen to the previous window. Tap to finish the registration procedure.
To return to the billing code entry window
Tap the [CA] key.
1-48
Page 52

BEFORE USING THE MACHINE►BEFORE USING THE MACHINE
Billing Code
Please enter Billing Code.
Main Code
Sub Code
AAAA
AAAA
Select from List
Select from List
Bypass Billing Code OKCA
CA
Cancel and Return
Main Code Main Code Name
MAIN001 Company 1
MAIN002 Company 2
MAIN003 Company 3
MAIN004 Company 4
MAIN005 Company 5
MAIN006 Company 6
MAIN007 Company 7
MAIN008 Company 8
Add/Edit Billing Code
OK
Select Billing Code
CA
Add New
Main Code Main Code Name
MAIN001 Company 1
MAIN002 Company 2
MAIN003 Company 3
MAIN004 Company 4
MAIN005 Company 5
MAIN006 Company 6
MAIN007 Company 7
MAIN008 Company 8
Edit
Delete
Main Code Registration
Deleting a billing code
1
2
When the billing code entry window is
displayed, tap the [Select from List]
key of the main code.
To delete a sub code, tap the [Select from List] key of the
sub code.
The subsequent steps are the same as the main code.
Tap [Add/Edit Billing Code] on the
action panel.
3
4
Tap and select the main code to be
deleted, then tap [Delete] on the action
panel.
To return to the billing code selection window
Tap .
When the confirmation message appears, tap the [Delete] key.
1-49
Page 53

BEFORE USING THE MACHINE►BEFORE USING THE MACHINE
Printing data stored in the cloud
Uploading scanned data
CLOUD LINK
The Cloud Link function is used to connect the machine to a cloud service on the Internet, enabling you to upload
scanned data and print data stored in the cloud.
The machine can connect to the following cloud services:
• Microsoft OneDrive for Business
• Microsoft SharePoint Online
• Google Drive
BEFORE USING THE CLOUD LINK FUNCTION
This section explains settings that must be configured before you can use the Cloud Link function.
Settings required on the machine
Configuring system settings
Configure settings for connection of the machine to the Internet (proxy settings, etc.) as required for your network
environment.
In addition, you must configure the following settings on the machine in order to use the "OneDrive for Business Link"
and "SharePoint Online Link" functions.
Configure these settings in "Settings (administrator)" → [System Settings] → [Network Settings] → [External Service
Connect] → [Cloud Connect Settings].
Set the cloud link icon in the home screen.
Tap [Edit Home] on the action panel.
1
In home edit mode, tap an unused shortcut key.
2
3
4
Tap [Google Drive], [OneDrive], or [SharePoint Online].
Tap [Exit Home Edit Mode] on the action panel.
Exit home edit mode and return to the home screen.
To edit the home screen, refer to the "U/I Customize Guide".
1-50
Page 54

BEFORE USING THE MACHINE►BEFORE USING THE MACHINE
UPLOADING SCANNED DATA TO A CLOUD SERVICE
This section explains how to upload data scanned on the machine to a cloud service.
Tap [Google Drive], [OneDrive], or [SharePoint Online] in the home screen.
1
2
3
• The login screen of the selected cloud service appears.
• When user authentication is enabled on the machine, the login screen will not appear after the first time you
successfully log in to the cloud service.
When using OneDrive or SharePoint Online, you can only login using your standard Office 365 user account for
ID/password authentication.
Enter your user account information for the cloud service.
A screen for selecting tasks appears.
Tap the [Scan a document] key.
• The scan settings screen appears.
• Specify a "File Name", "Address", and "Upload Data Scan Settings".
Execute Scan or Preview.
4
PRINTING DATA IN A CLOUD SERVICE
This section explains how to use the machine to print data in a cloud service.
Tap [Google Drive], [OneDrive], or [SharePoint Online] in the home screen.
1
2
• The login screen of the selected cloud service appears.
• When user authentication is enabled on the machine, the login screen will not appear after the first time you
successfully log in to the cloud service.
When using OneDrive or SharePoint Online, you can only login using your standard Office 365 user account for
ID/password authentication.
Enter your user account information for the cloud service.
A screen for selecting tasks appears.
1-51
Page 55

BEFORE USING THE MACHINE►BEFORE USING THE MACHINE
Tap the [Print a document] key.
3
• The file selection screen appears.
• Tap the [Narrow Down] key to filter files by file extension. Select the file type you want to use to filter the files.
• Select the file and tap the [Change Setting to Print] key to display the print settings screen.
File formats that can be printed are DOCX, PPTX, XLSX, PDF, PS, PRN, PCL, TIFF, TIF, JFIF, JPE, JPEG, JPG, and
PNG. On the MX-2630N/MX-3050N/MX-3550N/MX-4050N/MX-5050N/MX-6050N, the Direct print expansion kit is
required for DOCX, PPTX, and XLSX files.
Execute printing
4
Cautions when using the Cloud Link function
• Print results using the Cloud Link function may not have the same quality as print results using other print methods
(printer driver, etc.).
The contents of some files may cause incorrect printing or prevent printing.
• It may not be possible to use some or all Cloud Link functions in some countries or regions where the machine is
used.
• It may not be possible to use the Cloud Link function in some network environments. Even when the Cloud Link
function can be used, processing may require a longer time or may be interrupted.
• We do not extend any guarantees regarding the continuity or connection stability of the Cloud Link function.
With the exception of instances provided for by law, we bear absolutely no responsibility for any damages or loss
suffered by the customer due to the above.
“DirectOffice™ is a product of CSR Imaging US, LP.
DirectOffice™ is a trademark of CSR Imaging US, LP, registered in the United States and other countries, used with
permission.”
1-52
Page 56

BEFORE USING THE MACHINE►BEFORE USING THE MACHINE
AirPrint
The procedure for printing or sending a file on the machine using AirPrint is explained here.
On the MX-2630N/MX-3050N/MX-3550N/MX-4050N/MX-5050N/MX-6050N, the PS3 expansion kit is required to use
AirPrint. To send a fax by AirPrint, the facsimile expansion kit is required.
To enable AirPrint
In "Settings (administrator)", select [System Settings] → [Network Settings] → [External Print Services Settings] → [AirPrint
Settings].
Before using AirPrint
To use AirPrint on OS X, you must first register the machine's information in your device.
Advance settings are not necessary to use AirPrint on iOS.
Enable AirPrint in the machine's settings, and also enable AirPrint on your device.
(1) Click [Printers & Scanners] ([Print & Scan]) in System Preferences.
(2) Click the [+] button.
(3) Select the name of the machine from the list, select [AirPrint] from the drivers, and click [Add].
Setup starts, and the machine can be used with AirPrint.
Using AirPrint to print
The printing procedure depends on the application. The procedure for printing a Web page viewed in the iOS version of
Safari is explained below as an example.
(1) Open the page that you want to print in Safari.
Use the commands in Safari to open the page you want to print.
(2) Tap .
(3) Tap [Print].
The menu appears. Tap [Print].
(4) Select the printer.
AirPrint compatible printers on the same network as the device are shown. Select the machine.
(5) Select print settings and tap [Print].
Set the number of copies and other settings as needed and tap [Print].
• When you send the print job with a PIN code from your device, the print job is saved in the main folder of document filing.
• The screen that appears varies depending on your OS version.
• The functions that can be used when printing with AirPrint vary depending on the OS and the application.
• To print with AirPrint when the machine’s user authentication function is used, enable [Enable IPP Authentication Except
for Printer Driver] in "Settings (Administrator)" → [System Settings] → [User Control] → [Default Settings].
• To print in colour, you must change the permission of "Other User" to a permission that allows colour printing.
1-53
Page 57

BEFORE USING THE MACHINE►BEFORE USING THE MACHINE
Using AirPrint to send a fax
You can send a file created in an AirPrint compatible application by fax via the machine.
The sending procedure depends on the application.
Refer to the manual for the application to send a file by fax. The procedure for transmission in OS X is explained as an
example.
(1) Open the file you want to send.
(2) Select [Print] from [File] in the application.
(3) Select the machine - fax in [Printer].
(4) Enter the fax number in the address. When finished selecting settings, click [Fax].
Fax transmission starts.
• AirPrint can be used to send a fax even when [Disable PC-Fax Transmission] is enabled.
• Fax jobs sent using AirPrint are managed in the same way as resend jobs in Document Filing.
• To send a fax with AirPrint when the machine’s user authentication function is used, enable [Enable IPP Authentication
Except for Printer Driver] in "Settings (Administrator)" → [System Settings] → [User Control] → [Default Settings].
Using AirPrint to send a scanned document
You can scan a document on the machine using an AirPrint-compatible application, and send the scanned document to
a device.
The sending procedure depends on the application.
Refer to the manual for the application to send a scanned document. The procedure for scanning in OS X is explained
here as an example.
(1) Place the original.
(2) Click [Printers & Scanners] ([Print & Scan]) in System Preferences.
(3) Select the machine from the "Printer" list, click [Scan], and click [Open Scanner].
(4) When you have finished selecting settings, click [Scan].
Scanning starts.
• To send a document using AirPrint, the machine must be in one of the following states:
• Login screen displayed, home screen displayed, brightness adjustment screen displayed, display language being set,
home being edited, custom display pattern being set, home screen text colour being changed, administrator password
being entered for home edit / custom display pattern setting / home screen text colour change, login name / password
being entered, numbers being entered for authentication by number, login user being selected, authentication
destination being selected
• When the machine's user authentication function is used, an image scanned with AirPrint is treated as an invalid user job.
AirPrint and the AirPrint logo are trademarks of Apple Inc.
1-54
Page 58

BEFORE USING THE MACHINE►BEFORE USING THE MACHINE
EASY CONNECTION WITH A MOBILE
DEVICE
(EASY CONNECT)
You can connect a NFC card reader to the machine to easily connect to a smartphone or other mobile device.
By installing the dedicated application in the mobile device in advance, the application will start automatically after the
device connects to the machine, allowing you to print immediately.
You can also connect by displaying a QR code on the machine's touch panel and scanning the code with a mobile
device that has a dedicated application installed.
• For NFC card readers and dedicated applications that can be used, consult your dealer or nearest authorised service
representative.
• For information on connecting the NFC card reader to the machine, refer to the manual for the NFC card reader.
• A wireless LAN adapter is required to use this feature on the MX-2630N/MX-3050N/MX-3550N/MX-4050N/MX-5050N/
MX-6050N.
CONNECTING BY NFC CARD READER
You can easily connect a mobile device to the machine by holding it to the NFC card reader.
In addition, by installing the dedicated application on your mobile device, the application will automatically start when the
device connects to the machine, allowing you to send data and print to the machine right away.
Configure settings on the machine in advance to enable use of an NFC card reader and wireless LAN.
This function can only be used on an Android device.
Hold your mobile device to the NFC card reader
1
If the machine is in the auto power shutoff state, holding your mobile device to the NFC card reader will wake the
machine. However, if [Sleep Mode] is set to [Energy Saving Priority], you must wake the machine manually.
Connecting to the Machine from a Mobile Device
2
The machine and mobile device automatically start the connection.
If a dedicated application is not installed on your mobile device, your mobile device will automatically go to an Android
application store (Google Play, etc.) and download a dedicated application.
If the dedicated application is installed on your mobile device, it will start.
You can print and scan from the application..
1-55
Page 59

BEFORE USING THE MACHINE►BEFORE USING THE MACHINE
CONNECTING BY QR CODE
You can connect by displaying the QR code on the machine's touch panel and then having your mobile device (with the
dedicated application already installed) read the QR code.
The machine sends the information required for connection to the mobile device, and the information is saved. No
settings are required on the mobile device, and setup is quickly accomplished.
Configure settings on the machine in advance to enable connection by QR code.
This function can be used on an Android device and on an iOS device.
Tap the [Easy Connect (QR code)] key in the home screen.
1
The QR code appears on the touch panel.
In advance, enable QR codes in [Easy Connection Setting] in Settings (administrator), and enable display of the [Easy
Connect (QR code)] key in [Home Screen Settings].
Start the dedicated application on your mobile device
2
Read the QR code on the touch panel with your mobile device
3
The QR code is the machine's connection information. This information is saved on your mobile device. You can also set
an external access point as the connection destination.
• To use Easy Connect
Configure in "Settings (administrator)" - [System Settings] - [Network Settings] - [Easy Connection Setting].
• To Show the [Easy Connect (QR code)] key in the home screen
Configure in "Settings (administrator)" - [System Settings] - [Home Screen Settings] - [Condition Settings] - [Home Screen
Registration].
1-56
Page 60

BEFORE USING THE MACHINE►BEFORE USING THE MACHINE
Start
Colour
Start
Preview
Colour Mode
Full Colour
Paper Select
Auto
Exposure
Auto
Original
Auto A4
2-Sided Copy
1-Sided→1-Sided
Sort/Group
Auto
Copy Ratio
100%
Others
Plain
Send as well as print
Call Eco Program
Store Data in Folder
File
Store Data Temporarily
Quick File
1
47586
9
203
C
1
A4
B5
B4
A3
2
1
3
4
No. of copies
CA
B/W
A4
LINE
PRINTER
Easy
Scan
HDD
File retrieve
Sharp OSA
Job Status
Start
Colour
Start
Preview
Colour Mode
Full Colour
Paper Select
Auto
Exposure
Auto
Original
Auto A4
2-Sided Copy
1-Sided→1-Sided
Sort/Group
Auto
Copy Ratio
100%
Others
Plain
Send as well as print
Call Eco Program
Store Data in Folder
File
Store Data Temporarily
Quick File
1
47586
9
203
C
1
A4
B5
B4
A3
2
1
3
4
No. of copies
CA
B/W
A4
LINE
PRINTER
Easy
Scan
HDD
File retrieve
Sharp OSA
Job Status
Operate the machine
using your computer
screen.
Your computer
Network
Operation panel
The machine
REMOTE OPERATION OF THE MACHINE
Remotely operate the machine on your computer.
You can operate the machine from the same panel as the machine's operation panel that is displayed on your PC, with
the same feel as operating in front of the machine.
The remote operation function can only be used on one computer at a time.
Before you can use the remote operation function, the following preparation is required.
•
In "Settings (administrator)", select [System Settings] → [Common Settings] → [Operation Settings] → [Condition
Settings] → [Remote Operation Settings] → [Remote Software Operation] and select [Allow] for [Operational Authority].
• Connect the machine to the network.
• Install a VNC application software (recommended VNC software: RealVNC) in your computer.
After the preparation is completed, follow the operation described below to set up the function.
Example: RealVNC
Start the VNC viewer, enter the IP
1
Check with the administrator of the machine for its IP address.
address of the machine in the "VNC
Server" entry box, and click the
[Connect] button.
Follow the message on the operation panel of the machine to permit the
2
connection.
When the machine is connected to a VNC application software, appears on the system bar of the machine's touch panel.
If you wish to disconnect, exit the VNC application software or tap .
Use the operation panel in the same way as you would on the machine. However, you cannot enter values in series by
continuously clicking the key.
1-57
Page 61

BEFORE USING THE MACHINE►BEFORE USING THE MACHINE
UNIVERSAL DESIGN IN THE MACHINE
The structure of the machine and the software are designed to allow all people to use the machine with ease.
UNIVERSAL DESIGN RELATED TO OPERATION
Adjustment of operation panel angle
The angle of the entire operation panel can be adjusted to enable use even when seated.
Grip handle on paper trays
The grip-type handles allow easy use from above or below. By simply placing your hand on a handle and gently pulling
forward, the lock releases. The trays can be manipulated in a natural manner.
Changing of key response time
The response time of the keys can be changed as needed.
In "Settings" (administrator)", select [System Settings] → [Common Settings] → [Operation Settings] → [Condition
Settings] → [Key Operation Setting].
• Time for Accepting Key Entry
This setting determines how long a key in the touch panel must be tapped until the key input is registered. The time
can be set from 0 to 2 seconds in increments of 0.5 seconds.
By lengthening the time setting, key input can be prevented when a key is tapped accidentally. Keep in mind,
however, that when a longer setting is selected more care is required when tapping keys to ensure that key input is
registered.
• Disable Auto Key Repeat
This is used to disable key repeat.
Key repeat causes a setting to change continuously not only each time the key is tapped but while a key is tapped.
• Long-touch Detection Time
Select a time when a long key touch is detected.
• Double Tap Speed Interval
Select an interval when a double tap is detected.
1-58
Page 62

BEFORE USING THE MACHINE►BEFORE USING THE MACHINE
Confirmation of placement of original in document feeder
You can use the data notification indicator to check if an original has been correctly placed in the auto document feeder.
Select "Settings (administrator)" → [System Settings] → [Common Settings] → [Device Control] → [Data Indicator
Setting], then set to [Pattern 3].
UNIVERSAL DESIGN RELATED TO VISION
Changing of text size
The size of the text on the touch panel can be changed. When the text on the touch panel is small and difficult to read,
the text can be enlarged.
In "Settings" (administrator)", select [System Settings] → [Common Settings] → [Operation Settings] → [Condition
Settings] → [Enlarge Display Mode].
• Enlarge Display Mode
Displays large characters on the screen.
appears in the system area when Enlarge Display Mode is enabled.
UNIVERSAL DESIGN RELATED TO HEARING
Audible alert sounds when changing settings
When moving through copy ratio or exposure settings, the user is alerted by an audible sound at the default setting
(copy ratio 100%, exposure 3).
In "Settings (administrator)", select [System Settings] → [Common Settings] → [Operation Settings] → [Condition
Settings] → [Keys Touch Sound] and [Make Key Touch Sound at Default Setting].
• Keys Touch Sound
Controls the key touch sound level, or turns the sound off. You can also have three peeps sound at initial values when
setting the ratio in copy mode or when adjusting the exposure in any mode.
Screen in which setting is effective Initial value
Ratio setting screen in base screen of copy mode Ratio 100%
Exposure setting screen in base screen of copy mode Exposure level: 3 (medium)
Exposure adjustment screen in base screen of fax, Internet fax, and network scanner modes
Exposure adjustment screen for Scan to HDD in document filing mode
• Make Key Touch Sound at Default Setting
When you specify the exposure in the exposure adjustment screen of each mode, a bleep sounds three times when
the reference value is reached.
1-59
Page 63

BEFORE USING THE MACHINE►BEFORE USING THE MACHINE
UNIVERSAL DESIGN FEATURES
The machine has design features and settings that are compatible with universal design.
Easy-to-use user interface
• Simple mode
This mode shows only frequently used items. Buttons and text are enlarged to increase ease of operation. Almost all
regular operations can be completed using the simple mode screen.
► COPY MODE (page 2-3)
► FAX MODE (page 4-7)
► NETWORK SCANNER MODE (page 5-8)
• Customizing the home screen and adding icons
You can add icons to the home screen. You can also change an icon image to a custom image.
Add an icon image in "Settings (administrator)" - [System Settings] →[Home Screen Settings] →[Icon].
To add an icon to the home screen, add a key in "Settings (administrator)" - [System Settings] →[Home Screen Settings]
→[Condition Settings] →[Home Button]/[Fix Key].
► Home Screen Settings (page 7-80)
• Customizing the home screen - changing the display order
You can change the order of the items in the home screen so that the items you use most frequently appear first.
To change the order of the items in the home screen, change in "Settings (administrator)" - [System Settings]
→[Home Screen Settings] →[Condition Settings] →[Home Button].
► Home Screen Settings (page 7-80)
• Customizing the home screen - intuitive and easy-to-use design
A flat icon design is used to make the screen intuitive and easy to view. The toner level is always shown, eliminating
the need to perform an action to check the toner level.
For the procedures for editing the home screen, see "U/I Customize Guide".
• High-contrast display (UD pattern)
The touch panel image can be set to high contrast.
Select [Pattern 5] in "Settings (administrator)" - [System Settings] →[Common Settings] →[Operation Settings]
→[Condition Settings] →[MFP Display Pattern Setting].
► Operation Settings (page 7-122)
• Multi-language display
The language used in the touch panel can be changed to another language such as English or French.
Select the desired language in "Settings (administrator)" - [System Settings] →[Common Settings] →[Operation
Settings] →[Condition Settings] →[Display Language Setting].
► Operation Settings (page 7-122)
1-60
Page 64

BEFORE USING THE MACHINE►BEFORE USING THE MACHINE
Intuitive operation
• Quick-view operation guide
Touch the [Operation Guide] key in the home screen on the touch panel to display the operation guide. The operation
guide provides simple explanations of how to use the machine.
• Easy operation by storing programs
The program function lets you store groups of settings for copying, fax, and other functions. By storing groups of
settings that you frequently use, you can easily select those settings.
► PROGRAMS (page 2-140)
► STORING FAX OPERATIONS (PROGRAM) (page 4-72)
► STORING SCAN OPERATIONS (PROGRAM) (page 5-69)
• Remote operation
You can display the machine's touch panel on a computer on the same network to operate the machine from the
computer. You can show how to use the machine on a computer, and people who have difficulty using the touch panel
can operate the machine from a computer.
► REMOTE OPERATION OF THE MACHINE (page 1-57)
Easier operation at the machine
• Job separator
Even when a copy job is run while the machine is receiving a fax, you can use the job separator to output the jobs to
separate trays so that the pages are not mixed together.
► PART NAMES AND FUNCTION (page 1-3)
• Darkened output tray colour
Output tray colours are darkened to make it easy to distinguish the tray to which a job has been output.
• On right side of operation panel
Located on the right side of the operation panel, this allows smooth removal of paper without interfering with the
output tray.
• Low Stand/550 Sheet Paper Drawer
Easy to use even when sitting in a wheelchair or chair. Paper can be added or changed with ease.
Simple toner replacement
• Automatic toner cartridge ejection
When a toner cartridge runs out of toner, the cartridge is automatically ejected from the machine. This ensures that
the wrong toner cartridge is not accidentally removed.
► REPLACEMENT OF TONER CARTRIDGE (page 1-155)
• Prevention of toner cartridge mis-installation
To prevent installation of a toner cartridge in the wrong location, each colour of toner cartridge can only be installed in
its own location.
► REPLACEMENT OF TONER CARTRIDGE (page 1-155)
• Toner box can be opened with one hand
The box that contains a toner cartridge can be easily opened with one hand.
Worry-free support
• Sharp Power Net System
This system regularly monitors and diagnoses the condition of the machine via fax or the Internet. This enables toner
and other supplies to be provided in a timely fashion. If a problem occurs, the system helps you to identify and quickly
fix the problem, reducing down time.
1-61
Page 65

BEFORE USING THE MACHINE►BEFORE USING THE MACHINE
ITEMS RECORDED IN THE JOB LOG
The machine records the performed jobs in the job log.
The main information recorded in the job log is described below.
• To make it easy to total the usage counts of differently configured machines, the items recorded in the job log are fixed,
regardless of what peripheral devices are installed or the objective of the recording.
• In some cases, job information may not be correctly recorded, such as when a power failure occurs during a job.
No. Item name Description
1 Main items Job ID The job ID is recorded. Job IDs appear in the log as
consecutive numbers up to a maximum of 999999,
after which the count resets to 1.
2 Account Job ID
The job ID used in the Sharp OSA is recorded.
3 Job Mode
4 Computer Name The name of the computer that sent a print job is
5 User Name The user name when the user authentication
6 Login Name The login name when the user authentication
7 Card ID The card ID when it is used for an authentication
8 Number of Card Issuance The number of times the card has been issued is
9 Main Code Main Code is recorded.
10 Sub Code Sub Code is recorded.
11 Starting Date & Time The date and time the job was started are recorded.
12 Completing Date & Time The date and time the job was completed are
13 Black & White Total Count For a print job, the total count is recorded. For a
The job mode type, such as copy or print is recorded.
recorded.*
function is used is recorded.
function is used is recorded.
process is recorded.
written in an SSFC IC card is recorded.
recorded.
send job, the number of transmitted black & white
pages is recorded. When a broadcast transmission
is summarized, the total number of pages is
recorded. For a scan to HDD job, the number of
stored black & white pages is recorded.
14 Full Colour Total Count The total number of pages in a print job that have
been printed using a full colour is recorded.
15 Count according to size Counts by original/paper size in colour mode and
black & white mode are recorded.
16 Invalid Paper Count(Black &
White)
17 Invalid Paper Count(Colour) The colour invalid sheet count is recorded.
18 Number of Reserved Sets Number of specified sets or reserved destinations is
19 Number of Completed Sets Number of completed sets or number of
The black & white invalid sheet count is recorded.
recorded.
destinations to which transmission was successfully
completed is recorded.
1-62
Page 66

BEFORE USING THE MACHINE►BEFORE USING THE MACHINE
No. Item name Description
20 Main items Number of Reserved Pages Number of reserved original pages of a copy, print,
scan job, or other job is recorded.
21 Number of Completed Pages Number of completed pages of a set is recorded.
22 Result The result of a job is recorded.
23 Error Cause When an error occurs during a job, the cause of the
error is recorded.
24 Print Job Related Item Output The output mode of a printed job is recorded.
25 Staple The status of stapling is recorded.
26 Staple Count The staple count is recorded.
27 Punch Count The punch count is recorded.
28 Punch The status of punching is recorded.
29 Fold A job that uses the fold function is recorded.
30 Fold Count Number of folded pages is recorded.
31 Saddle Fold A job that uses the saddle fold function is recorded.
32 Saddle Fold Count Number of saddle folded pages is recorded.
33 Printer Tone The tone used for a print job is recorded.
34 Image Send Related Item Address Address of an image send job is recorded.
35 Sender Name Sender name of an image send job is recorded.
36 Sender Address Sender address of an image send job is recorded.
37 Transmission Type Transmission type of an image send job is
recorded.
38 Administrative Serial
Number
39 Broadcast number Broadcast number of an image send job is
40 Entry order Reservation order for broadcast transmission of an
41 File Format File format of an image send job or scan to HDD job
42 Sign Records whether or not an electronic signature is
43 Encrypt Records whether or not encryption is used for
44 Compression
Mode/Compression Ratio
Administrative serial number of an image send job
is recorded.
recorded.
image send job is recorded. This is used to link
communication and printing when recording multi
polling jobs.
is recorded.
used in e-mail transmission.
e-mail transmission.
Compression mode and compression ratio of the
file of an image send job or scan to HDD job is
recorded.
45 Communication Time The communication time of image send jobs is
recorded.
46 Fax No. The stored sender's number is recorded.
47 Document Filing Related
48 Storing Mode Document filing storing mode is recorded.
Item
Document Filing Status of document filing is recorded.
1-63
Page 67

BEFORE USING THE MACHINE►BEFORE USING THE MACHINE
No. Item name Description
49 Common Functionality Colour Setting Colour mode selected by user is recorded.
50 Special Modes Special modes selected when the job was executed
is recorded.
51 File Name The stored file name is recorded.*
52 Data Size [KB] The size of a file is recorded.
53 Detailed Items Original Size Size of scanned original is recorded. For a
document filing print job, the paper size of the file is
recorded.
54 Original Type Original type (text, printed photo, etc.) set in the
exposure settings screen is recorded.
55 Original Count Number of scanned original sheets is recorded.
56 Paper Size For a print job, the paper size is recorded. For a
send job, the transmitted paper size is recorded.
For a Scan to HDD job, the paper size of the stored
file is recorded.
57 Paper Type The paper type used for printing is recorded.
58 Paper Property The paper property specified in "Paper Type" is
recorded.
59 Duplex Setup The duplex setting is recorded.
60 Resolution The scanning resolution is recorded.
61 Machine Item Model Name The model name of the machine is recorded.
62 Unit Serial Number The serial number of the machine is recorded.
63 Name The name of the machine that is set in the Web
pages is recorded.
64 Machine Location The installation location of the machine that is set in
the Web pages is recorded.
65 Machine ID Record the Machine ID entered by the service
technician.
* In some environments this is not recorded.
1-64
Page 68

BEFORE USING THE MACHINE►LOADING PAPER
Tray 1
Tray 2
(when a low stand/550 sheet paper drawer or
stand/550/2x550/3x550/550&2100 sheet paper
drawer is installed)
Tray 3
(when a stand/550&2100 sheet paper
drawer is installed)
Tray 5
(when a large capacity
tray is installed)
Tray 4
(when a stand/550&2100 sheet
paper drawer is installed)
Tray 3
(when a stand/2x550/3x550 sheet paper
drawer is installed)
Tray 4
(when a stand/3x550 sheet paper drawer
is installed)
Bypass tray
A4R
(8-1/2" x 11"R)
A4
(8-1/2" x 11")
A3
(11" x 17")
LOADING PAPER
IMPORTANT POINTS ABOUT PAPER
NAMES AND LOCATIONS OF TRAYS
THE DEFINITION OF "R" IN PAPER SIZE
To indicate the landscape setting, "R" is added to the end of the name of a paper size enabled for both landscape and
portrait settings.
Paper that can be set either in the portrait or landscape orientation Paper that can only be set in the
A4, B5, 8-1/2" x 11" SRA3, A3W, A3, SRA4, B4, 12" x 18",
Paper set in the landscape orientation Paper set in the portrait orientation Can be placed only in the landscape
1-65
landscape orientation
11" x 17", 8-1/2" x 14", 8-1/2" x 13"
orientation
Page 69

BEFORE USING THE MACHINE►LOADING PAPER
APPLICABLE PAPER TYPES
This section describes paper types that can be used and those that cannot be used.
All types of paper other than plain paper are referred to as special media.
• Various types of paper are commercially available, some of which cannot be used on the machine.
Before using any paper, consult the dealer or nearest authorised service representative.
• The image quality and toner fusibility of paper may change due to ambient conditions, operating conditions, and paper
characteristics, resulting in image quality inferior to that of Sharp standard paper.
Before using any paper, consult the dealer or nearest authorised service representative.
• The use of non-recommended or non-usable paper may result in skewed feeding, misfeeds, poor toner fusing (the toner
does not adhere to the paper well and can be rubbed off), or machine failure.
• The use of non-recommended paper may result in misfeeds or poor image quality. Before using non-recommended paper,
check whether printing can be performed properly.
Useable paper
Specifications of plain paper, heavy paper and thin paper
• Sharp standard paper: 80 g/m2 (20 lbs)
Plain Paper*
For paper specifications, see the specifications in the "Start Guide".
• Non-Sharp standard plain paper: 60 g/m
2
to 105 g/m2 (16 lbs to 28 lbs)
Heavy paper 1 106 g/m2 to 176 g/m2 (28 lbs. bond to 65 lbs. cover)
Heavy paper
Thin paper 55 g/m2 to 59 g/m2 (13 lbs to 16 lbs)
Heavy paper 2 177 g/m2 to 220 g/m2 (65 lbs. cover to 80 lbs. cover)
Heavy paper 3 221 g/m2 to 256 g/m2 (80 lbs. cover to 140 lbs. index)
Heavy paper 4 257 g/m2 to 300 g/m2 (140 lbs. index to 110 lbs. cover)
* Set a suitable paper weight in "Settings (administrator)" → [System Settings] → [Common Settings] → [Device
Control] → [Plain Paper Weight Settings]. This can only be set on the machine's operation panel.
• Recycled paper, coloured paper and pre-punched paper must meet the same specifications as plain paper.
Before using any paper, consult the dealer or nearest authorised service representative.
• If the paper that was output is significantly curled, remove the paper from the cassette, turn the paper over so it is face
down, and resume use.
Specifications of paper that can be used for two-sided printing
Paper Type Plain, Recycled, Colour, Letter Head, Pre-Printed, Punched,
Heavy Paper (106 g/m
Paper Size SRA3, A3W, A3, B4, SRA4, A4, A4R, B5, B5R, A5R, 12" x 18", 11" x 17", 8-1/2" x 14", 8-1/2" x
13-1/2", 8-1/2" x 13-2/5", 8-1/2" x 13", 8-1/2" x 11", 8-1/2" x 11"R, 5-1/2" x 8-1/2"R
2
(28 lbs. bond) to 256 g/m2 (140 lbs. index))
1-66
Page 70

BEFORE USING THE MACHINE►LOADING PAPER
Types of paper that can be set in each tray
• For detailed information on the sizes and types of paper that can be loaded into each tray of the machine, see
"SPECIFICATIONS" in the "Start Guide" and "Paper Tray Settings (page 7-119)
• Recycled paper, coloured paper and pre-punched paper must meet the same specifications as plain paper.
Before using any paper, consult the dealer or nearest authorised service representative.
".
Tray 1 Tray 2
Tray 3
Tray 4
Plain Paper Permitted Permitted Permitted Permitted Permitted
Heavy Paper 1*
Heavy Paper 2*
Heavy Paper 3*
Heavy Paper 4*
Embossed - - - - Permitted
Thin Paper - - - - Permitted
Pre-Printed Permitted Permitted Permitted Permitted Permitted
Recycle Paper Permitted Permitted Permitted Permitted Permitted
Letter Head Permitted Permitted Permitted Permitted Permitted
Pre-Punched Permitted Permitted Permitted Permitted Permitted
Colour Permitted Permitted Permitted Permitted Permitted
Labels - - - - Permitted
6
6
6
6
Permitted Permitted - Permitted Permitted
Permitted Permitted - Permitted Permitted
Permitted Permitted - - Permitted
Permitted Permitted - - Permitted
*1
*2
*3
Tray 3
Tray 4
*4
Tray 5
*5
Bypass tray
Glossy Paper - - - - Permitted
Transparency - - - - Permitted
Tab Paper - - - - Permitted
Envelope - - - - Permitted
*1 when a low stand/550 sheet paper drawer or stand/550/2x550/3x550/550&2100 sheet paper drawer is installed
*2 when a stand/2x550/3x550 sheet paper drawer is installed
*3 when a stand/3x550 sheet paper drawer is installed
*4 when a stand/550&2100 sheet paper drawer is installed
*5 when a large capacity tray is installed
*6 "Heavy Paper 1" is heavy paper up to 176 g/m
lbs. cover), "Heavy Paper 3" is heavy paper up to 256 g/m
up to 300 g/m
2
(110 lbs. cover).
2
(65 lbs. cover), "Heavy Paper 2" is heavy paper up to 220 g/m2 (80
2
(140 lbs. index), and "Heavy Paper 4" is heavy paper
1-67
Page 71

BEFORE USING THE MACHINE►LOADING PAPER
Setting orientation of the print side
The setting orientation varies for the print side of paper, depending on the tray used. For "Letter Head" and
"Pre-Printed", set the paper in the reverse orientation.
Place with the print side facing the direction indicated below.
Tray In normal status With letter head or pre-printed paper set
Trays 1 - 4 Facing up Facing down
Bypass, Tray 5 Facing down Facing up
When [Disabling of Duplex] is set for "Letter Head" or "Pre-Printed", set the print side in the same orientation as for the
ordinary operation.
To set [Disabling of Duplex]:
In "Settings (administrator)", select [System Settings] → [Common Settings] → [Device Control] → [Disabling of Duplex].
Paper that cannot be used
• Special media for an ink jet printer
(fine paper, glossy paper, glossy film, etc.)
• Carbon paper or thermal paper
• Pasted paper
• Paper with clips
• Paper with fold marks
• Torn paper
• Oil-feed transparency film
• Thin paper less than 55 g/m
• Heavy paper as thick as 300 g/m
• Irregularly shaped paper
• Stapled paper
• Damp paper
• Curled paper
• Paper whose print side or reverse side has been already printed on by another printer or multifunction device.
• Paper with a wave-like pattern due to moisture absorption
• Paper with creases
• Paper with dust
2
(15 lbs)
2
(110 lbs. cover) over
Non-recommended paper
• Iron-on transfer paper
• Perforated paper
1-68
Page 72

BEFORE USING THE MACHINE►LOADING PAPER
A
B
TRAY 1 - 4 (when a low stand/550 sheet
paper drawer or stand/550/2x550/3x550/
550&2100 sheet paper drawer is installed)
A maximum of 550 sheets of paper from size A5R to SRA3 (5-1/2" x 8-1/2"R to 12" x 18") can be loaded into trays 1 to 4.
If you loaded paper of a different type or size from the paper previously loaded, be sure to check the settings in "Settings
(administrator)". Incorrect setting affects automatic paper selection action. It may cause print failure, printing on paper of a
wrong size or type or paper misfeeds.
Do not place heavy objects on the tray or press down on the tray.
To check the type and size of paper:
[Tray Settings] in the home screen or in "Settings", select [Status] → [Machine Identification] → [Paper Input Tray Status] →
[Paper Tray Settings].
To set the type and size of paper:
Set this in [Tray Settings] in the home screen or in “Settings” - [System Settings]→[Common Settings]→[Paper
Settings]→[Paper Tray Settings].
1
2
Pull out the paper tray.
Gently pull the tray out until it stops.
To load paper, go to step 3. To load a different size of
paper, go to the next step.
Pull the handle until the lock is released.
Adjust guide plates A and B to match
the longitudinal and transversal
dimensions of the paper to be loaded.
The guide plates A and B are slidable. Squeeze the
separator plate lever and slide to the desired paper size.
Adjust to the non-standard paper size so that the paper will
not be too loose or too tight.
3
Fan the paper.
Fan the paper well before loading it. If the paper is not
fanned, multiple sheets may feed at once and cause a
misfeed.
1-69
Page 73

BEFORE USING THE MACHINE►LOADING PAPER
Control plate
auxiliary block
4
5
Insert the paper into the tray.
Load the paper with the print side facing up. The stack must
not be higher than the indicator line (maximum of 550
sheets).
Gently push the paper tray into the
machine.
Push the tray firmly all the way into the machine slowly.
Forcefully inserting the paper may cause skewed feeding
and paper misfeeds.
Loading paper in the SRA3
When loading paper in the SRA3, follow the steps below to move the control plate auxiliary block.
Remove the control plate auxiliary
1
2
block.
Attach the control plate auxiliary block
that was removed in step 1.
1-70
Page 74

BEFORE USING THE MACHINE►LOADING PAPER
Control plate
auxiliary block
Loading paper in the 11" x 17" or A3
When loading paper in the 11" x 17" or A3, follow the steps below to move the control plate auxiliary block.
Remove the control plate auxiliary
1
2
block.
Attach the control plate auxiliary block
that was removed in step 1.
1-71
Page 75

BEFORE USING THE MACHINE►LOADING PAPER
TRAY 3 - 4 (when a stand/550&2100 sheet
paper drawer is installed)
A maximum of 1200 sheets of A4 (8-1/2" × 11") paper can be loaded into tray 3 (left).
A maximum of 900 sheets of A4 (8-1/2" × 11") and B5 paper can be loaded into tray 4 (right).
If you loaded paper of a different type or size from the paper previously loaded, be sure to check the settings in "Settings". An
incorrect setting may cause print failure, printing on paper of an incorrect size, or type or paper misfeeds.
To check the type and size of paper:
In "Settings", select [System Settings] → [Common Settings] → [Paper Settings] → [Paper Tray Settings].
Do not place heavy objects on the tray or press down on the tray.
1
Tray 3
Tray 4
Pull the handle until the lock is released.
Pull out the paper tray.
Gently pull the tray out until it stops.
2
Fan the paper.
Fan the paper well before loading it. If the paper is not
fanned, multiple sheets may feed at once and cause a
misfeed.
1-72
Page 76

BEFORE USING THE MACHINE►LOADING PAPER
3
4
Tray 3
Tray 4
Tray 3
Place paper into the tray.
Load the paper with the print side facing up. The stack must
not be higher than the indicator line (maximum of 1200
sheets for tray 3, or maximum of 900 sheets for tray 4).
Gently push the paper tray into the
machine.
Push the tray firmly all the way into the machine slowly.
Tray 4
1-73
Page 77

BEFORE USING THE MACHINE►LOADING PAPER
LOADING PAPER IN THE LARGE-CAPACITY
TRAY (when a large capacity tray is
installed)
The large capacity tray is used for very large print jobs that cannot be handled with a regular tray. Up to 3000 sheets of
A4 or B5 paper (80g/m
If you find it necessary to change the paper size, consult the dealer or nearest authorised service representative.
If you loaded paper of a different type from the paper previously loaded, be sure to check the settings in "Settings".
To check the paper type loaded in the tray
Check in "Settings" - [System Settings] → [Common Settings] → [Paper Settings] → [Paper Tray Settings].
When the tray is open, do not place heavy objects on the tray or press down on the tray.
2
) can be loaded in the tray.
1
2
Open the top cover.
Fan the paper.
Fan the paper well before loading it. If the paper is not
fanned, multiple sheets may feed at once and cause a
misfeed.
1-74
Page 78

BEFORE USING THE MACHINE►LOADING PAPER
3
When adding paper, take care that previously loaded paper does not shift out of place. This may cause misfeeds and
folding back of the front edge of the loaded paper.
4
Place the paper in the paper feed table.
Insert the paper into the tray until it stops.
Place the paper print side down. The stack should not
exceed the indicator line (maximum 3000 sheets).
Gently close the cover.
1-75
Page 79

BEFORE USING THE MACHINE►LOADING PAPER
Side 2
LOADING PAPER INTO THE BYPASS TRAY
Use the bypass tray for printing on plain paper, envelopes, label sheets, tab paper, and other special media.
Up to 100 sheets of paper can be loaded (Heavy paper weighing between 106 g/m
140 lbs. index): 40 sheets, heavy paper weighing between 257 g/m
and envelope: 20 sheets) for continuous printing, just like operation using other trays.
• When using plain paper other than Sharp standard paper or special media other than SHARP-recommended transparency
film, glossy paper, or when printing on the reverse side of paper that has been printed on one side, load paper one sheet
at a time. Loading more than one sheet at a time will cause misfeeds.
• Before loading paper, straighten any curling in the paper.
• When adding paper, remove any paper remaining in the bypass tray, combine it with the paper to be added, and reload as
a single stack. If paper is added without removing the remaining paper, a misfeed may result. Loading more sheets than
the specified number of sheets or the limit may cause paper misfeeds.
2
and 300 g/m2 (140 lbs. index and 110 lbs. cover)
How to place the original
Load paper up to A5 (7-1/4" x 10-1/2") size in landscape orientation.
2
and 256 g/m2 (28 lbs. bond and
Loading tab paper
To print on tab paper, load tab paper into the bypass tray with the print side facing down.
• Use only tab paper that is made of paper. Tab paper made of a material other than paper (film, etc.) cannot be used.
• To print on the tabs of tab paper:
In copy mode, use [Tab Copy] in "Others". In print mode, use the tab print function.
1-76
Page 80

BEFORE USING THE MACHINE►LOADING PAPER
Oriented
horizontally
Oriented
vertically
Inserting transparency film
• Use SHARP-recommended transparency film.
• When loading multiple sheets of transparency film into the bypass tray, fan the sheets several times before loading.
• When printing on transparency film, remove each sheet as it is printed and output from the machine. Allowing sheets to
stack in the output tray may result in curling.
Loading envelopes
When inserting envelopes in the bypass tray, place them aligned to the left side in the orientation shown below.
Only the front side of envelopes can be printed or copied on. Place the front side facing down.
Fold the flap and make a sharp crease at the fold.
1-77
Page 81

BEFORE USING THE MACHINE►LOADING PAPER
Can be used
Cannot be used
Important points when using envelopes
• Do not print on both sides of an envelope. This may result in misfeeds or poor print quality.
• Restrictions apply to some types of envelopes. For more information, consult a qualified service technician.
• Some operating environments may cause creasing, smudging, misfeeds, poor toner fusing, or machine failure.
• Fold the flap of the envelope and make a sharp crease at the fold. A misfeed may occur if the flap is up.
• Do not use the following envelopes:
• Those with a metal piece, a plastic hook or a ribbon hook
• Those with a string for closing
• Those with a window
• Those with a lining
• Those with an uneven surface, finished with titling or emboss
• Duplex envelopes or those with adhesive or other synthetic material for sealing
• Hand-made envelopes
• Those containing air inside
• Those damaged with a crease, fold mark or tear
• Envelopes with the corner gluing position on the back not aligned with the corner edge should not be used as it may
cause creasing.
• Print quality is not guaranteed in the area 10 mm (13/32") around the edges of the envelope.
• Print quality is not guaranteed on parts of envelopes where there is a large step-like change of thickness, such as on
four-layer parts or parts less than three layers.
• Print quality is not guaranteed on envelopes having peel off flaps for sealing the envelopes.
Important points when using embossed paper/label sheets
• The effect of asperity surfaces of embossed paper may affect the print quality depending on the type of embossed
paper.
For more information, consult the dealer or nearest authorised service representative.
• Some labels may have to be loaded into the bypass tray in the specified orientation. Follow such instructions.
If a form is already printed on the labels, and the print images and the preprinted form do not line up, adjust the
application or printer driver settings to rotate the print images.
• Do not use the following types of label sheets.
• Label sheets without an adhesive copy or label copy
• Label sheets with adhesive exposed
• Label sheets with a specified feeding direction that is not supported by the machine
• A label sheet that has already been fed or has some labels removed
• Label sheets consisting of multiple sheets
• Label sheets that do not support laser printing
• Label sheets that cannot withstand heat
• Label sheets that have perforations in the backing paper
• Label sheets with slits in the backing paper
• Non-standard label sheets
• Label sheets with adhesive that has deteriorated due to prolonged storage or otherwise
• Label sheets with cutouts that expose the backing paper
• Curled or otherwise deformed label sheets
• Torn or creased label sheets
1-78
Page 82

BEFORE USING THE MACHINE►LOADING PAPER
1
Open the bypass tray.
When loading paper larger than 8-1/2" x 11"R or A4R, pull
out the extension guide.
Pull the extension guide all the way out.
2
3
Do not place heavy objects on the bypass tray or press down on the tray.
Load the paper with the print side
facing down.
Insert the paper along the bypass tray guides all the way into
the bypass tray until it stops slowly. Inserting the paper with
excessive force may cause the leading edge to fold back.
Inserting the paper too loosely may cause skewed feeding
or misfeeds.
The paper must not exceed the maximum number of sheets
and must not be higher than the indicator line.
Set the bypass tray guides correctly to
the width of the paper.
Adjust the bypass tray guides so that they slightly contact
the loaded paper.
For "Letter Head" and "Pre-Printed", set the paper with the print side up. However, when [Disabling of Duplex] is
enabled, set the print side in the same orientation as in the regular mode (facing down).
• Do not forcefully push in paper that you are loading. This may cause misfeeds.
• If the bypass tray guides are set wider than the paper, move the bypass tray guides in until they correctly fit the width
of the paper. If the bypass guides are set too wide, the paper may skew or be creased.
To display the paper tray settings when paper is detected in the bypass tray
In "Settings", select [System Settings] → [Common Settings] → [Paper Settings] → [Paper Tray Settings] → [Display
Paper Tray Settings when bypass tray detects paper.].
1-79
Page 83

BEFORE USING THE MACHINE►LOADING PAPER
HOW TO PLACE THE LONG PAPER GUIDE
The steps for attaching the optional long paper feeding tray to the bypass tray are explained below.
Extend the auxiliary guide of the long
1
2
paper feeding tray.
Pull out the extension guide of the
bypass tray.
3
4
Attach the long paper feeding tray
onto the extension guide of the bypass
tray.
Replace the extension guide of the
bypass tray.
1-80
Page 84

BEFORE USING THE MACHINE►HOW TO PLACE THE ORIGINAL
HOW TO PLACE THE ORIGINAL
SELECTING A PROCEDURE FOR PLACING
THE ORIGINAL DEPENDING ON THE TYPE
AND STATUS OF THE ORIGINAL
Place the original in the automatic document feeder. Depending the type and status of the original, use the document
glass. Follow the instructions to select the method for placing the original.
To place it in the automatic document feeder, see "AUTOMATIC DOCUMENT FEEDER (page 1-82)
".
1-81
Page 85

BEFORE USING THE MACHINE►HOW TO PLACE THE ORIGINAL
B5 (5-1/2" x 8-1/2")
A4 (8-1/2" x 11")
Hole positions
Feed slot
AUTOMATIC DOCUMENT FEEDER
This section explains how to place originals in the automatic document feeder.
• Place originals of different sizes together, if needed, in the automatic document feeder. In that case, use the "Others"
function in each mode to set [Mixed Size Original]. An original cannot be detected if all pages are of the same size but
some of them are set in a different orientation.
• Before inserting originals into the document feeder tray, be sure to remove any staples or paper clips.
• If originals have damp spots due to correction fluid, ink or paste up glue, wait until the originals are dry before making
copies. Otherwise the interior of the machine or the document glass may be soiled.
• Do not use the following originals. Incorrect original size detection, original misfeeds, and smudges may result.
Transparency film or other transparent material for backup copy, tracing paper, carbon paper, thermal paper or originals
printed with thermal transfer ink ribbon should not be fed through the document feeder. Originals to be fed through the
feeder should not be damaged, crumpled, folded, loosely pasted together, or have cut-out holes. Originals with multiple
punched holes other than two-hole or three-hole punched paper may not feed correctly.
• When using originals with two or three holes, place them so that the punched edge is at a position away from the feed slot
of the document feeder tray. Specify the orientation of the original using [Original].
• For a thin original (35 g/m
scanning is disabled.
2
- 49 g/m2 (9 lbs. to 14 lbs.)), use [Slow Scan Mode] in the "Others". For this type, 2-sided
1-82
Page 86

BEFORE USING THE MACHINE►HOW TO PLACE THE ORIGINAL
Align the edges evenly
and face them up
Insert to the end
Fit to the Original Size
Below the indicator line
Allowed original sizes
Minimum original size Maximum original size
Standard size
(Minimum size that can be automatically detected)
148 mm (longitudinal) × 210 mm, or A5
5-1/2" (longitudinal) × 8-1/2" (transversal)
Non-standard size
(Minimum size that can be specified manually)
131 mm (longitudinal) × 140 mm (transversal)
5-1/8" (longitudinal) × 5-1/2" (transversal)
Standard size
(Maximum size that can be automatically detected)
297 mm (longitudinal) × 420 mm (transversal) or A3
11" (longitudinal) × 17" (transversal)
A3W (12" × 18") cannot be used.
Non-standard size
(Maximum size that can be specified manually)
Copy mode:
297 mm (longitudinal) × 432 mm (transversal)
11-5/8" (longitudinal) × 17" (transversal)
image send mode:
297 mm (longitudinal) × 1000 mm (transversal)
11" (longitudinal) × 39-3/8" (transversal)
When the original is a non-standard size, see the appropriate explanation below for the mode you are using.
► COPIER: "SELECTING THE ORIENTATION AND SIZE OF THE ORIGINAL (page 2-33)"
► FAX: "SPECIFYING THE ORIGINAL SCAN SIZE USING NUMERIC VALUES (page 4-48)"
► IMAGE SEND: "SPECIFYING THE ORIGINAL SCAN SIZE USING NUMERIC VALUES (page 5-51)"
Allowed original weights
MX-2630N/MX-3050N/MX-3060N/
MX-3550N/MX-3560N/MX-4050N/
MX-4060N/MX-5050N/MX-6050N
1-sided scanning: 35 to 128 g/m2 (9 to 32 lbs Bond)
2-sided scanning: 50 to 105 g/m2 (13 to 28 lbs Bond)
MX-3070N/MX-3570N/MX-4070N/
MX-5070N/MX-6070N
1-sided scanning: 35 to 128 g/m2 (9 to 32 lbs Bond)
2-sided scanning: 50 to 128 g/m
2
(13 to 32 lbs Bond)
To scan originals from 35 to 49 g/m2 (9 to 13- lbs Bond), use "Slow Scan Mode" in the "Others" function. Scanning
without using "Slow Scan Mode" may result in original misfeeds.
When "Slow Scan Mode" is selected, automatic 2-sided scanning is not possible.
Make sure that there is no original on the document glass.
1
Place the original.
2
MX-2630N/MX-3050N/MX-3060N/MX-3550N/MX-3560N/
MX-4050N/MX-4060N/MX-5050N/MX-6050N: Up to 100
sheets can be inserted.
MX-3070N/MX-3570N/MX-4070N/MX-5070N/MX-6070N:
Up to 150 sheets can be inserted.
After scanning is finished on the automatic document feeder,
remove originals from the original exit tray.
1-83
Page 87

BEFORE USING THE MACHINE►HOW TO PLACE THE ORIGINAL
X
Y
Original size
detector
Mark
Document glass
scale
DOCUMENT GLASS
This section describes the steps for setting the original on the document glass.
• Close the automatic document feeder slowly. Abruptly closing the automatic document feeder may damage it.
• Take care that your fingers are not pinched when closing the automatic document feeder.
Allowed original sizes
Maximum original size
Standard size
297 mm (longitudinal) x 420 mm (transversal) or A3
11" (longitudinal) x 17" (transversal)
Non-standard size
297 mm (longitudinal) x 432 mm (transversal)
11-5/8" (longitudinal) x 17" (transversal)
When the original is a non-standard size, see the appropriate explanation below for the mode you are using.
► COPIER: "SELECTING THE ORIENTATION AND SIZE OF THE ORIGINAL (page 2-33)"
► FAX: "SPECIFYING THE ORIGINAL SCAN SIZE USING NUMERIC VALUES (page 4-48)"
► IMAGE SEND: "SPECIFYING THE ORIGINAL SCAN SIZE USING NUMERIC VALUES (page 5-51)"
1
2
Open the automatic document feeder.
Load the paper with the print side
facing down.
Place the original face down and align the top left corner of
the original with back left (at the tip of the mark ) of the
document glass.
Do not place any objects under the original size detector.
Closing the automatic document feeder with an object underneath may damage the original size detector or disable
correct detection of the original size.
When placing a non-standard size original on the document glass, the size can be detected easily if a blank sheet of A4
(8-1/2" x 11"), B5 (5-1/2" x 8-1/2"), or other standard size paper is placed on top of the original.
1-84
Page 88

BEFORE USING THE MACHINE►HOW TO PLACE THE ORIGINAL
Close the automatic document feeder.
3
After placing the original, close the automatic document feeder. If the unit is left open, parts outside of the original will be
copied in black, causing excessive use of toner.
• When closing, open the automatic document feeder all the way and then close it.
• If originals have damp spots due to correction fluid, ink or paste up glue, wait until the originals are dry before making
copies. Otherwise the interior of the machine or the document glass may be soiled.
1-85
Page 89

BEFORE USING THE MACHINE►STOPPING/DELETING A JOB, PRIORITY PROCESSING AND CHECKING THE STATUS
Job Queue
Complete
Spool
Internet FaxFaxScanPrint
Job
Job Queue
Progress / Sets
Status
Encrypt PDF
Spooling
User_1_User_1_User ---/0004
---/0004User_2_User_2_User
Back
STOPPING/DELETING A JOB, PRIORITY
PROCESSING AND CHECKING THE STATUS
TYPES OF JOB STATUS SCREENS
When you tap the job status display, the job status screen appears. Tap it again to return to the previous mode.
The job status screen is divided into the following four tabs, enabling you to select a job list by tapping a desired tab.
Internet FaxFaxScanPrint
LINE PRINTER
Status
Encrypt PDF
Spooling
Back
Back
Spool
Job Queue
Complete
Easy
Copy
CLOUD PORTAL
Operation
Guide
Easy
Scan
Enlarge
Display Mode
HDD
File retrieve
Easy
Copy
Sharp OSA
Easy
Scan
Settings Total Count Brightness
LINE PRINTER
Adjustment
Job Status
10:15
Easy
Fax
Job Status
Job Status
Job
Job Queue
User_1_User_1_User ---/0004
Progress / Sets
---/0004User_2_User_2_User
•Print
Lists print jobs such as copying, printing from a PC, USB direct print, and printing for faxed or other received data.
• Scan
Lists send jobs of converted images for e-mail messages and FTP/Desktop send jobs.
•Fax
Lists fax send jobs using a telephone line.
• Internet Fax
Lists fax send jobs using internet.
The background of the job status display changes as follows:
• Green: Job in progress
• Yellow: Warming up/waiting
• Red: Waiting for error clearing
To prohibit the display and changing of job information of other users when user authentication is enabled
Select "Settings (administrator)" → [User Control] → [Default Settings] → [Include Job Status in user authentication] →
[Disable display/change of other users' information in the job status] check box to .
On each tab, jobs are classified into three groups.
Jobs move among the lists according to the processing status, from [Spool], [Job Queue] and [Complete], in that order.
To switch the job list display to the display by processing status, tap the [Spool], [Job Queue] or [Complete] key as
desired.
1-86
Page 90

BEFORE USING THE MACHINE►STOPPING/DELETING A JOB, PRIORITY PROCESSING AND CHECKING THE STATUS
• Spool list (Only displayed when a print-from computer job is received)
Lists print jobs up to the transfer to the machine from a computer. The jobs move to the Job Queue list after the
transfer is completed.
If you printed an encrypted PDF file by direct print, enter the password from here to print the file.
► PRINTING AN ENCRYPTED PDF FILE (page 3-88)
• Job Queue list
Lists jobs in progress and in the queue for copying, printing from a computer and printing of received fax. This list also
displays jobs in progress and in the queue for sending fax data or sending image data converted on the machine. The
jobs move to the Complete list after printing or sending is completed.
• Complete list
Lists jobs through with copying, printing or sending.
1-87
Page 91

BEFORE USING THE MACHINE►STOPPING/DELETING A JOB, PRIORITY PROCESSING AND CHECKING THE STATUS
Job Queue
Complete
Internet FaxFaxScan
Job
Address
Set Time
Status
Print Image Sending
Activity Report
Back
0000/0002 OK
0000/000110:45 07/07Broadcast
Pages
Print
STOPPING/DELETING A JOB IN PROGRESS
OR RESERVED
Tap the job status display and tap the tab for the job that you wish to stop or
1
2
delete.
Tap the [Job Queue] key.
3
When you wish to stop a print job being sent from the computer, tap the [Spool] key.
Tap the job that you wish to stop or delete, and then tap [Stop/Delete] on the
action panel.
When a screen appears that allows you to confirm that you do want to stop the job, tap the [Cancel] key.
If the machine runs out of paper during a copy or print job, you can cancel the job from the job status screen.
To delete more than one job, operate the check box for [Enter Plural Selection Mode] on the action panel so that it looks
like .
• Printing of a received fax or Internet fax cannot be stopped.
• A job set for transfer in "FORWARDING RECEIVED DATA TO PRESET DESTINATIONS (INBOUND ROUTING
SETTINGS) (page 4-64)" cannot be cancelled.
1-88
Page 92

BEFORE USING THE MACHINE►STOPPING/DELETING A JOB, PRIORITY PROCESSING AND CHECKING THE STATUS
Print
Scan Fax Internet Fax
Spool
Complete
Job Queue
Check Details of
Selected Job
Change Job Priority
Stop/Delete
Enter Plural
Selection Mode
Back
Job Job Queue Sets / Progress Status
Paper Empty
Waiting
Waiting
Waiting
Waiting
Waiting
Waiting
Waiting
Waiting
Copy
Copy
Copy
Copy
Copy
Copy
Copy
Copy
Copy
0100/0100
0000/0001
0000/0001
0000/0001
0000/0001
0000/0001
0000/0001
0000/0001
0000/0001
Print
Internet Fax
Copy
Scan Fax
Check Details of
Selected Job
Change Job Priority
Stop/Delete
Enter Plural
Selection Mode
Back
Copy
Copy
Copy
Copy
Copy
Copy
Copy
Copy
Job Job Queue Sets / Progress Status
Paper Empty
Waiting
Waiting
Waiting
Waiting
Waiting
Waiting
Waiting
Waiting
0100/0100
0000/0001
0000/0001
0000/0001
0000/0001
0000/0001
0000/0001
0000/0001
0000/0001
Job Queue
Complete
Spool
PRIORITY PROCESSING OF A RESERVED
JOB
This function gives priority to processing of copied, faxed or image send jobs arising later to jobs already in a queue for
printing or sending.
Priority processing operation varies, as follows, depending on the job type.
• Job on the print tab
The job currently in progress is suspended to let the priority job make interruption.
• Job on the scanner/fax/Internet fax tab
The priority job is moved directly under the job currently in progress.
Tap the job status display and tap the job for priority processing.
1
2
3
Tap the [Job Queue] key.
Tap the job for priority processing and
then tap [Change Job Priority] on the
action panel.
If a job in progress is a "broadcast transmission job" or a "serial polling job", the selected job will be preferentially
transmitted between destinations of the broadcast transmission or serial polling jobs. However, if the priority job is a
"broadcast transmission job" or a "serial polling job", it will be executed after the fax job in progress is completed.
1-89
Page 93

BEFORE USING THE MACHINE►STOPPING/DELETING A JOB, PRIORITY PROCESSING AND CHECKING THE STATUS
Internet FaxFaxScan
Job Job Queue
Copy
Copy
Paper Empty
Waiting
Progress / Sets Status
Job Queue
Complete
Spool
0050/0050
0000/0100
Priority Change
Print
Changing the job order
If there is a job in progress, an interrupt job can be performed, or a job can be moved down in the queue to change the
job order. Tap the key of the job you want to move, and tap the "Priority Change" key.
•key
Moves the selected job to the top of the queue. The current job will be interrupted and the selected job starts.
•key
Moves the selected job up one position. When the second job from the top is selected, tapping this key interrupts the
current job and starts the selected job.
•key
Moves the selected job down one position.
•key
Moves the selected job to the bottom of the queue.
Scanner job with a timer setting
When a scanner job with a timer setting is selected, tapping the order change keys moves the job as follows.
•key
The timer setting is cancelled and the job moves to the position after the job in progress (second from top).
•key
The timer setting is cancelled and the job moves to the lowest position in the queue (if there are 3 jobs, the 4th
position)
•, key
These keys cannot be used.
The jobs below cannot be moved.
Job currently in progress, interrupt copy jobs, list print jobs, and jobs when Passing Prohibited is set in the system settings.
1-90
Page 94

BEFORE USING THE MACHINE►STOPPING/DELETING A JOB, PRIORITY PROCESSING AND CHECKING THE STATUS
Job Job Queue
Copy Paper Empty
Progress / Sets Status
Job Queue
Complete
Spool
0050/0050
Priority Change
Internet FaxFaxScanPrint
Job Job Queue Progress / Sets
Job Queue
Complete
Spool
0100/0100
0000/0001
0000/0001
0000/0001
0000/0001
0000/0001
0000/0001
0000/0001
0000/0001
Copy
Copy
Copy
Copy
Copy
Copy
Copy
Copy
Copy
Status
Paper Empty
Check Details of
Selected Job
Change Job Priority
Stop/Delete
Enter Plural
Selection Mode
Back
Waiting
Waiting
Waiting
Waiting
Waiting
Waiting
Waiting
Waiting
Internet FaxFaxScanPrint
(1)
(2)
In print tab, you can switch the display in the "Job Queue" screen between the number of printed copies and remaining
copies to be printed for each job.
To switch the display between the numbers of printed copies and remaining copies to be printed for each job:
In "Settings (administrator)", select [System Settings] → [Common Settings] → [Operation Settings] → [Condition Settings]
→ [Switch the Number of Sets to be Displayed for Job Status].
CHECKING A RESERVED JOB OR THE JOB
IN PROGRESS
Tap the job status display and tap the tab for the job whose contents you
1
2
3
wish to check.
Tap the job whose contents you wish to check and then tap [Check Details of
Selected Job] on the action panel.
Tap the [Job Queue] key.
• Different job contents appear in different modes.
• For information on the icons displayed on the job keys or the messages displayed in "Status", see "READING THE
JOB LIST (page 1-93)".
1-91
Page 95

BEFORE USING THE MACHINE►STOPPING/DELETING A JOB, PRIORITY PROCESSING AND CHECKING THE STATUS
Job Queue
Complete
Spool
Internet FaxFaxScan
Priority Change
Job Queue
Copy Paper Empty
0001/0001
Progress / Sets StatusJob
Print
(1)
(2)
0001/0001
0001/0001
0001/0001
0001/0001
0001/0001
0001/0001
0001/0001
0001/0001
0001/0001
Job Complete Set Time Number of Prints Status
Job Queue
Complete
Spool
Check Details of
Selected Job
Send
Change Setting to Print
Back
Copy
Copy
Copy
Copy
Copy
Copy
Copy
Copy
Copy
OK
OK
OK
OK
OK
OK
OK
OK
OK
0001/0001
0001/0001
0001/0001
0001/0001
0001/0001
0001/0001
0001/0001
0001/0001
0001/0001
13:43 06/22
13:33 06/22
13:33 06/22
13:33 06/22
13:33 06/22
00:00 05/05
00:00 05/05
00:00 05/05
00:00 05/05
Internet FaxFaxScanPrint
CHECKING COMPLETED JOBS
Tap the job status display and tap the tab for the job whose contents you
1
2
wish to check.
Tap the [Complete] key.
3
Tap the job whose contents you wish
to check and then tap [Check Details
of Selected Job] on the action panel.
Jobs you can check are displayed as keys so that you can
tap them.
• Different job contents appear in different modes.
• For information on the icons displayed on the job keys or
the messages displayed in "Status", see "READING THE
JOB LIST (page 1-93)".
1-92
Page 96

BEFORE USING THE MACHINE►STOPPING/DELETING A JOB, PRIORITY PROCESSING AND CHECKING THE STATUS
READING THE JOB LIST
The meaning of each job icon and message displayed in "Status" is as follows:
Icons indicating the job type
Print job (RGB/CMYK) Copy job
Scan to E-mail job Scan to FTP job
Scan to Network Folder job Scan to Desktop job
Fax transmission job Fax reception job
PC-Fax transmission job Internet fax transmission job (Including
Direct SMTP)
PC-I-Fax transmission job Scan to HDD file print job
Internet fax reception job (Including
Direct SMTP)
Tandem copy/print job OSA Scan Job
* This appears in a multi-mode broadcast job.
Broadcast job* Inbound routing job
1-93
Page 97

BEFORE USING THE MACHINE►STOPPING/DELETING A JOB, PRIORITY PROCESSING AND CHECKING THE STATUS
Messages displayed in "Status"
Job in progress
Display Status
"Printing" Print job in progress
"Copying" Copy job in progress
"Connecting" Connecting
"Sending" Sending
"Receiving" Receiving
"Processing" Processing
"Tel" Speaking with the other party using an extension telephone
"Stopped" The job has been stopped.
"Toner Empty" Toner Empty
"Paper Empty" Paper Empty
"Paper Jam" Paper jam
"Waiting" Waiting
"Warming up" Warming up
"Limit" Having reached the account limit
"Error" An error occurred while the job was being executed.
Reserved job
Display Status
"Waiting" The job is waiting to be executed.
"Retry Mode" The job is being retried due to a communication error or other problem.
"Report Wait" Waiting for confirmation of Internet fax transmission
A day and time is displayed Timer transmission job (the specified time is displayed)
1-94
Page 98

BEFORE USING THE MACHINE►STOPPING/DELETING A JOB, PRIORITY PROCESSING AND CHECKING THE STATUS
Completed job
Display Status
"OK" Normal termination
"Send OK" Transmission was completed.
"NG Ck Line" Fax line cable is not connected
"In Memory" Reception completed but the fax has not been printed.
The received data (each page) has not been printed or forwarded. (The received data has not
been deleted.)
"Received" Printed received fax data.
The fax has been received.
The received data (each file) was stored.
"Forward OK" The received data/received data (each file) has been forwarded.
"Stopped" The job was stopped.
"Delete" Deleted received data in the image check screen.
"Number of successful
transmission
destinations/Total
destinations OK"
"No Response" An error occurred because there was no response from the destination.
"Busy" An error occurred because the other party was busy.
"Received" E-mail other than Internet fax received
"Rejected" A fax was sent from a party that has been blocked by the anti junk fax function.
"NGxxxxxx" Transmission/reception was not successful because a communication error occurred (a 6-digit
"Error" An error occurred while the job was being executed.
"displayed"
"dispatched"
"processed"
"deleted"
"denied"
"failed"
*
*
*
*
*
*
Completion of a broadcast transmission, serial polling, or inbound routing operation.
If transmission to 3 destinations was successful out of a total of 5, "003/005 OK" will appear.
error code appears in xxxxxx.)
Displayed at the receiving machine when delivery confirmation is set
Forwarded elsewhere before being displayed at the receiving machine when delivery
confirmation is set
Processed without being displayed at receiving machine when delivery confirmation is set
Message deleted at receiving machine when delivery confirmation is set
Receiving machine refused to notify sending machine of message processing content when
delivery confirmation is set
An abnormal condition occurred when delivery confirmation is set
* If the receiving machine is a SHARP machine, the receiving machine will return "dispatched" if the fax was received
normally, or "processed" if reception failed.
When delivery confirmation is set for Internet Fax, the disposition feeld value indicated on the delivery confirmation
return e-mail appears.
1-95
Page 99

BEFORE USING THE MACHINE►ADDRESS BOOK
Address Book
Contact: Mr. Yamada
Address 1
Address 2
Address 1
Address 2
Address 3
Contact: Mr. Suzuki
Address 1
Address 2
Address 3
Address 4
yamada@□□□□.□□□
06-1234-1234
suzuki@□□□□.□□□
\\suzuki_smb
192.168.0.XXX
yamada@□□□□.□□□
suzuki@□□□□.□□□
yoshida@□□□□.□□□
\\X-PJ_smb
Group address: X-project members
ADDRESS BOOK
ADDRESS BOOK
"Contacts" and "Group" can be stored in the address book.
For a contact, more than one address can be stored, including fax, e-mail, Internet fax and direct SMTP addresses.
Registering addresses stored as "Contacts" as well as directly entered addresses as "Group" enables you to easily send
messages to multiple destinations simply by specifying a group.
• Up to 2000 entries in all can be stored for "Contacts" and "Group".
• The address book can store up to 6000 addresses.
• One "Contacts" can store up to 500 addresses.
• One "Group" can store up to 500 addresses.
1-96
Page 100

BEFORE USING THE MACHINE►ADDRESS BOOK
Preview
Sending History
Print Individual List
Call Search Number
Start
Speaker
A
D
G
J
M
P
W
Add New
Direct TX
Send Same Image
as Fax Address
Frequent
Use
Fax
Narrow Down
All
Category
Sort
Address
BBB
AAA
CCC
ABC
T
CA
One touch keys of
"Contacts"
One touch keys of "Group"
[Frequent Use] key
[Category] key [Narrow Down] key
ADDRESS BOOK SCREEN
To display the address book, tap the [Address Book] key on the base screen in image send mode such as fax, e-mail, or
Internet fax. You can also display it by tapping the [Address Book] icon in the home screen. "Contacts" and "Group"
registered are enabled for alphabetical search and selected condition-based advanced search.
• When the [Address Book] key is tapped on the e-mail base screen, groups and contacts having e-mail addresses are
displayed.
• If user authentication is enabled, registered contacts can be shared within a specified group or stored as personal contacts
that only you are allowed to access.
► SETTING THE SCOPE FOR PUBLICIZING CONTACTS AND GROUPS (page 1-108)
• You can tap the [Find My Address] key while logging in and select your e-mail address from the user list. This is convenient
when you want to send an e-mail to yourself.
► Disabling of Find My Address (page 7-96)
Selecting "Contacts" or "Group"
Tap a "Contacts" or "Group", and the tapped "Contacts" or "Group" is selected.
After selection, tap .
To add "Contacts" and "Group", refer to the following.
► STORING ADDRESSES THROUGH DIRECT ENTRY (page 1-100)
► STORING ADDRESSES THROUGH GLOBAL ADDRESS SEARCH (page 1-101)
► STORING ADDRESSES FROM FAX OR IMAGE SEND LOGS (page 1-103)
► STORING GROUPS (page 1-104)
A
D
G
J
M
P
T
W
Global Address Search
Sending History
Call Search Number
Direct TX
Add New
Send Same Image
as Fax Address
Preview
Speaker
CA
Start
Address
Frequent
Use
AAA
CCC
DDD
CCC
DDD
BBB
Category
All
Sort
Narrow Down
Fax
ABC
1-97
 Loading...