

Page 1

LC-13C2E
ENGLISH
DEUTSCH
LCD COLOUR TELEVISION
LCD-FARBFERNSEHGERÄT
TÉLÉVISION COULEUR À ÉCRAN
À CRISTAUX LIQUIDES (LCD)
TELEVISORE A COLORI LCD
TELEVISIÓN EN COLOR LCD
LCD-FÄRG-TV
LCD-KLEURENTELEVISIE
OPERATION MANUAL
BEDIENUNGSANLEITUNG
MODE D’EMPLOI
MANUALE DI ISTRUZIONI
FRANÇAIS
ITALIANO
ESPAÑOL
SVENSKA
MANUAL DE MANEJO
BRUKSANVISNING
GEBRUIKSAANWIJZING
NEDERLANDS
Page 2

This equipment complies with the requirements of Directive 89/336/EEC and 73/23/EEC as amended
by 93/68/EEC.
Dieses Gerät entspricht den Anforderungen der EG-Richtlinien 89/336/EWG und 73/23/EWG mit
Änderung 93/68/EWG.
Ce matériel répond aux exigences contenues dans les directives 89/336/CEE et 73/23/CEE modifiées
par la directive 93/68/CEE.
Dit apparaat voldoet aan de eisen van de richtlijnen 89/336/EEG en 73/23/EEG, gewijzigd door 93/68/
EEG.
Dette udstyr overholder kravene i direktiv nr. 89/336/EEC og 73/23/EEC med tillæg nr. 93/68/EEC.
Quest’apparecchio è conforme ai requisiti delle direttive 89/336/EEC e 73/23/EEC come emendata
dalla direttiva 93/68/EEC.
∏ εγκατάσταση αυτή αντα οκρίνεται στις α αιτήσεις των οδηγιών της ∂ υρω αϊκής ∂ νωσης
89/336/∂√∫ και 73/23/∂√∫ , ως οι κανονισµοί αυτοί συµ ληρώθηκαν α την οδηγία 93/68/
∂√∫ .
Este equipamento obedece às exigências das directivas 89/336/CEE e 73/23/CEE, na sua versão
corrigida pela directiva 93/68/CEE.
Este aparato satisface las exigencias de las Directivas 89/336/CEE y 73/23/CEE, modificadas por
medio de la 93/68/CEE.
Denna utrustning uppfyller kraven enligt riktlinjerna 89/336/EEC och 73/23/EEC så som kompletteras
av 93/68/EEC.
Dette produktet oppfyller betingelsene i direktivene 89/336/EEC og 73/23/EEC i endringen 93/68/
EEC.
Tämä laite täyttää direktiivien 89/336/EEC ja 73/23/EEC vaatimukset, joita on muutettu direktiivillä 93/
68/EEC.
SPECIAL NOTE FOR USERS IN THE U.K.
The mains lead of this product is fitted with a non-rewireable (moulded) plug incorporating a 3A fuse.
Should the fuse need to be replaced, a BSI or ASTA approved BS 1362 fuse marked
or
ASA
and of
the same rating as above, which is also indicated on the pin face of the plug, must be used.
Always refit the fuse cover after replacing the fuse. Never use the plug without the fuse cover fitted.
In the unlikely event of the socket outlet in your home not being compatible with the plug supplied, cut
off the mains plug and fit an appropriate type.
DANGER: The fuse from the cut-off plug should be removed and the cut-off plug destroyed immedi-
ately and disposed of in a safe manner.
Under no circumstances should the cut-off plug be inserted elsewhere into a 13A socket
outlet, as a serious electric shock may occur.
To fit an appropriate plug to the mains lead, follow the instructions below:
IMPORTANT: The wires in the mains lead are coloured in accordance with the following code:
Blue : Neutral Brown : Live
As the colours of the wires in the mains lead of this product may not correspond with the coloured
markings identifying the terminals in your plug, proceed as follows;
• The wire which is coloured blue must be connected to the plug terminal which is marked N
or coloured black.
• The wire which is coloured brown must be connected to the plug terminal which is marked
L or coloured red.
Ensure that neither the brown nor the blue wire is connected to the earth terminal in your three-pin plug.
Before replacing the plug cover make sure that:
• If the new fitted plug contains a fuse, its value is the same as that removed from the cut-off
plug.
• The cord grip is clamped over the sheath of the mains lead, and not simply over the lead
wires.
IF YOU HAVE ANY DOUBT, CONSULT A QUALIFIED ELECTRICIAN.
Page 3

Contents
ENGLISH
LC-13C2E
LCD COLOUR TELEVISION
ENGLISH
OPERATION MANUAL
Page Page
Dear SHARP Customer..........................................2
Important Safety Precautions................................. 2
Supplied Accessories ............................................. 4
Preparation ............................................................. 5
Installing Batteries in the Remote Control ...... 5
Using Remote Control ..................................... 5
Power Connection ........................................... 6
Antenna Connection ........................................ 6
First Installation................................................7
Part Names of Main Unit........................................ 9
Part Names of Remote Control............................ 11
Basic Operation .................................................... 12
Turning On and Off the Main Power............. 12
Switching the TV/VIDEO (AV1/AV2/AVS/TV)
Mode........................................................... 12
Sound Volume ...............................................13
ON/OFF Standby ........................................... 13
Changing Channels ....................................... 14
Useful Features .................................................... 15
Adjusting Picture Settings ............................. 15
Adjusting Sound Settings .............................. 16
Using Programme Table ................................ 17
Selecting Menu Items ....................................18
Standard Settings .......................................... 20
Programmes .................................................. 21
AV Connections ............................................. 28
Child Lock ...................................................... 31
On-screen Display ......................................... 36
Timer Functions ............................................. 37
Setting Time and Date (Manual) ................... 38
NICAM Broadcast Selection.......................... 39
IGR (German stereo system) Broadcasts.....40
Teletext ................................................................. 41
Connecting External Devices ............................... 46
Examples of external devices that can be
connected ................................................... 46
21-pin Euro-SCART (RGB) ........................... 47
How to fix the cables ..................................... 49
Troubleshooting .................................................... 50
Specifications........................................................52
Dimensional Drawings.......................................... 53
Page 4

Dear SHARP Customer
Thank you for your purchase of the SHARP LCD Colour TV product. To ensure safety and many
years of trouble-free operation of your product, please read the Important Safety Precautions
carefully before using this product.
Important Safety Precautions
Electricity is used to perform many useful functions, but it can also cause personal injuries and property
damage if improperly handled. This product has been engineered and manufactured with the highest priority
on safety. However, improper use can result in electric shock and/or fire. In order to prevent potential danger,
please observe the following instructions when installing, operating and cleaning the product. To ensure your
safety and prolong the service life of your LCD colour TV product, please read the following precautions
carefully before using the product.
■ Read instructions—All operating instructions must be read and understood before the product is operated.
■ Keep this manual in a safe place—These safety and operating instructions must be kept in a safe place for
future reference.
■ Observe warnings—All warnings on the product and in the instructions must be observed closely.
■ Follow instructions—All operating instructions must be followed.
■ Attachments—Do not use attachments not recommended by the manufacturer. Use of inadequate attach-
ments can result in accidents.
■ Power source—This product must operate on a power source specified on the specification label. If you
are not sure of the type of power supply used in your home, consult your dealer or local power company.
For units designed to operate on batteries or another power source, refer to the operating instructions.
■ Power cord protection—The power cords must be routed properly to prevent people from stepping on them
or objects from resting on them. Check the cords at the plugs and product.
■ If you plan to use a 12-VDC power supply unit other than the AC adapter supplied with the product, make
sure the power supply unit provides stable voltage with minimum fluctuations. Unstable power supply can
cause problems in the product.
■ Overloading—Do not overload AC outlets or extension cords.
Overloading can cause fire or electric shock.
■ Entering of objects and liquids—Never insert an object into the product through vents or openings. High
voltage flows in the product, and inserting an object can cause electric shock and/or short internal parts.
For the same reason, do not spill water or liquid on the product.
■ Servicing—Do not attempt to service the product yourself. Removing covers can expose you to high
voltage and other dangerous conditions. Request a qualified service person to perform servicing.
■ Repair—If any of the following conditions occurs, unplug the power cord from the AC outlet, and request a
qualified service person to perform repairs:
a.When the power cord or plug is damaged.
b.When a liquid was spilled on the product or when objects have fallen into the product.
c.When the product has been exposed to rain or water.
d.When the product does not operate properly as described in the operating instructions.
Do not touch the controls other than those described in the operating instructions. Improper adjustment
of controls not described in the instructions can cause damage, which often requires extensive adjust-
ment work by a qualified technician.
e.When the product has been dropped or damaged.
f. When the product displays an abnormal condition. Any noticeable abnormality in the product indicates
that the product needs servicing.
■ Replacement parts—In case the product needs replacement parts, make sure that the service person uses
replacement parts specified by the manufacturer, or those with the same characteristics and performance
as the original parts. Use of unauthorized parts can result in fire, electric shock and/or other danger.
■ Safety checks—Upon completion of service or repair work, request the service technician to perform safety
checks to ensure that the product is in proper operating condition.
■ Wall or ceiling mounting—When mounting the product on a wall or ceiling, be sure to install the product
according to the method recommended by the manufacturer.
2
Page 5
Important Safety Precautions (Continued)
■ Cleaning—Unplug the power cord from the AC outlet before
cleaning the product. Use a damp cloth to clean the product. Do
not use liquid cleaners or aerosol cleaners.
■ Water and moisture—Do not use the product near water, such
as bathtub, washbasin, kitchen sink and laundry tub, swimming
pool and in a wet basement.
■ Stand—Do not place the product on an unstable cart, stand,
tripod or table. Placing the product on an unstable base can
cause the product to fall, resulting in serious personal injuries as
well as damage to the product. Use only a cart, stand, tripod,
bracket or table recommended by the manufacturer or sold with
the product. When mounting the product on a wall, be sure to
follow the manufacturer’s instructions. Use only the mounting
hardware recommended by the manufacturer.
■ When relocating the product placed on a cart, it must be moved
with utmost care. Sudden stops, excessive force and uneven
floor surface can cause the product to fall from the cart.
■ Ventilation—The vents and other openings in the cabinet are
designed for ventilation. Do not cover or block these vents and
openings since insufficient ventilation can cause overheating
and/or shorten the life of the product. Do not place the product
on a bed, sofa, rug or other similar surface, since they can block
ventilation openings. This product is not designed for built-in
installation; do not place the product in an enclosed place such
as a bookcase or rack, unless proper ventilation is provided or
the manufacturer’s instructions are followed.
■ The LCD panel used in this product is made of glass. Therefore,
it can break when the product is dropped or applied with impact.
Be careful not to be injured by broken glass pieces in case the
LCD panel breaks.
■ Heat sources—Keep the product away from heat sources such
as radiators, heaters, stoves and other heat-generating products
(including amplifiers).
The LCD panel is a very high technology product with 921,600 thin film transistors, giving you fine
picture details.
Occasionally, a few non-active pixels may appear on the screen as a fixed point of blue, green or red.
Please note that this does not affect the performance of your product.
3
Page 6
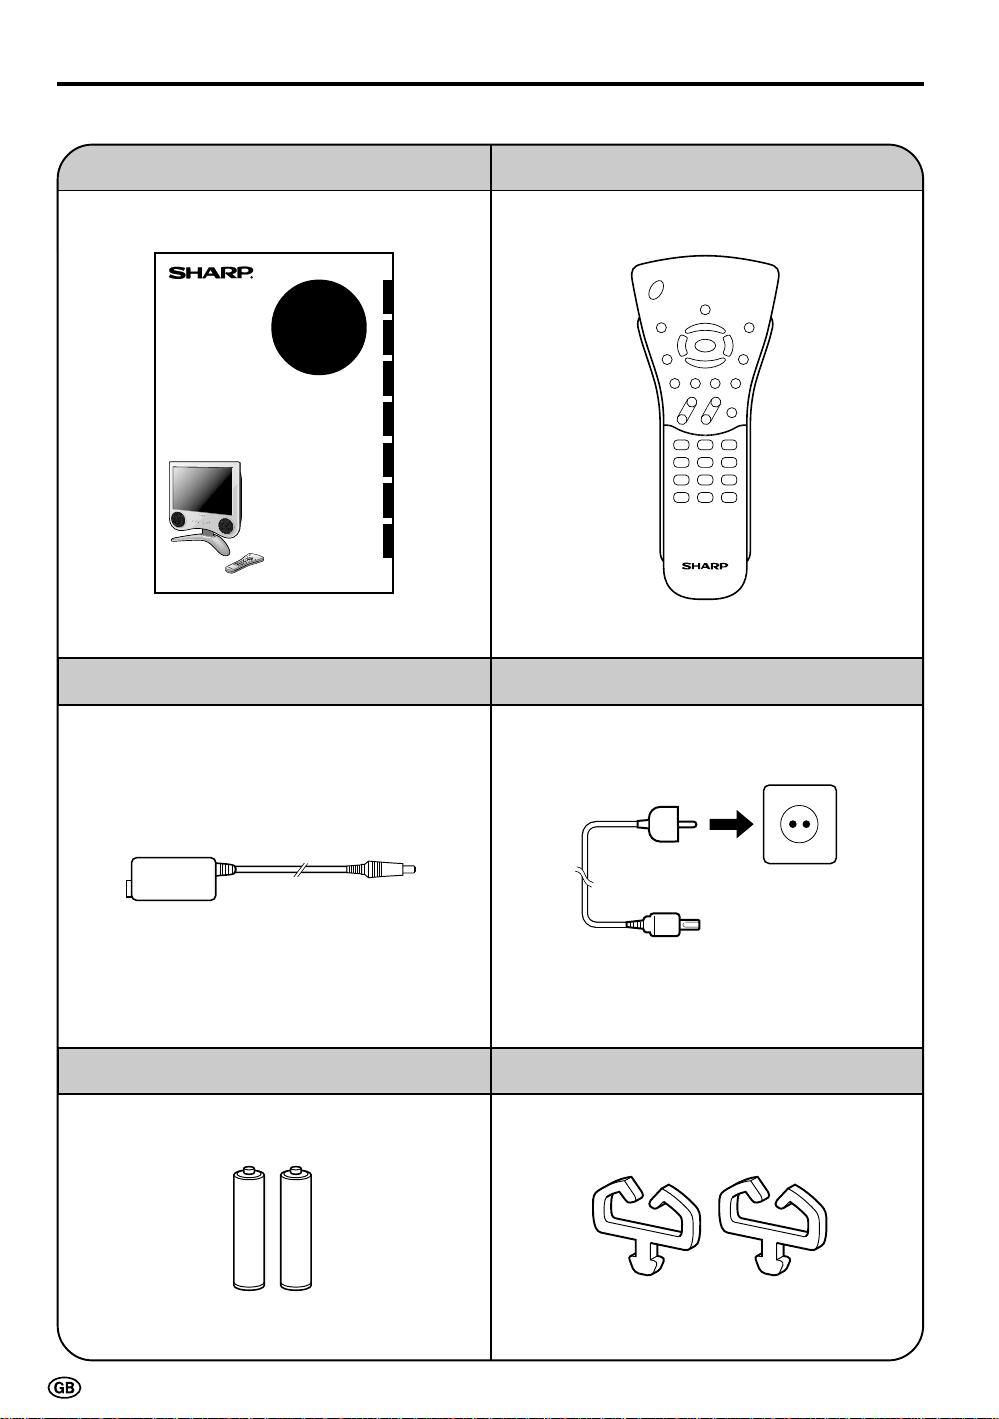
Supplied Accessories
Make sure the following accessories are provided with the product.
Operation manual (×1) Wireless remote control (×1)
ENGLISHDEUTSCHFRANÇAISITALIANOESPAÑOLSVENSKA
LC-15C2E
LCD COLOUR TELEVISION
LCD-FARBFERNSEHGERÄT
TÉLÉVISION COULEUR À ÉCRAN
À CRISTAUX LIQUIDES (LCD)
TELEVISORE A COLORI LCD
TELEVISIÓN EN COLOR LCD
LCD-FÄRG-TV
LCD-KLEURENTELEVISIE
OPERATION MANUAL
BEDIENUNGSANLEITUNG
MODE D’EMPLOI
MANUALE DI ISTRUZIONI
MANUAL DE MANEJO
BRUKSANVISNING
GEBRUIKSAANWIJZING
NEDERLANDS
AC adapter (×1)
Size AAA dry battery (×2)
AC cord (×1)
* Product shape varies in some countries.
Cable clamp (×2)
4
Page 7
Preparation
Remote sensor
window
Power/Standby
indicator
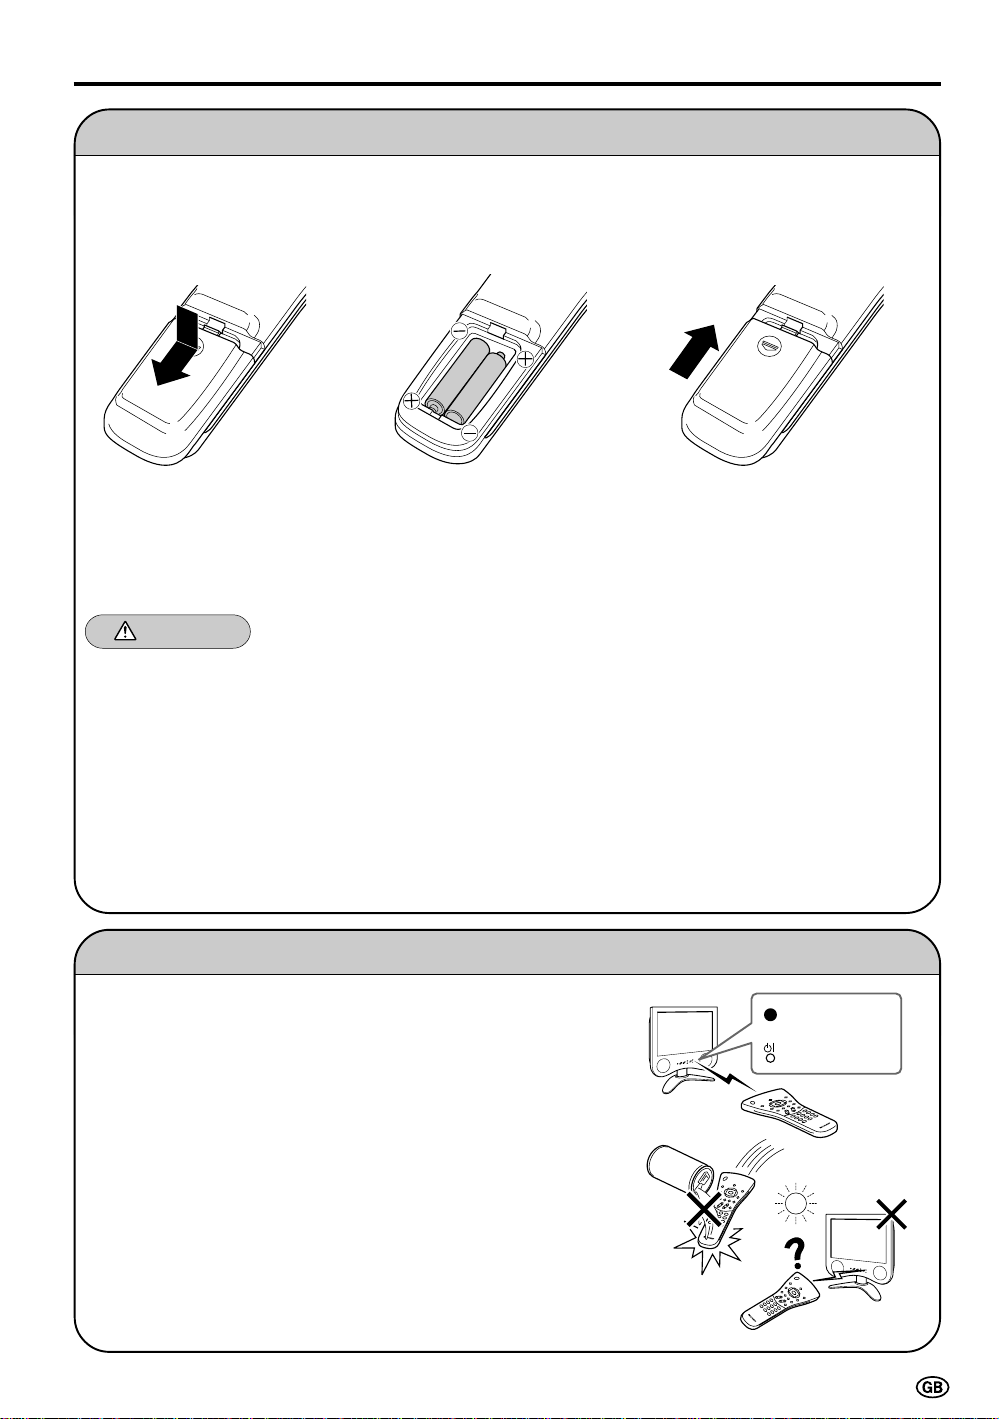
Installing Batteries in the Remote Control
Before using the LCD TV set for the first time, install the two AAA batteries supplied in the remote control.
When the batteries become depleted and the remote control fails to operate, replace the batteries with new
AAA batteries.
1 Open the battery cover. 2 Insert two AAA batteries. 3 Replace the battery cover.
■ Raise the cover while
pressing the ([) part.
■ Position the positive and
negative ends of the
batteries as indicated in
the compartment.
■ Engaging the lower
claw with the remote
control, close the
cover.
Caution!
Precautions regarding batteries
■ Improper use of batteries can result in a leakage of chemicals and/or explosion. Be sure to follow the
instructions below.
• Place batteries with their terminals corresponding to the (+) and (–) indications.
• Different types of batteries have different characteristics. Do not mix batteries of different types.
• Do not mix old and new batteries. Mixing old and new batteries can shorten the life of new batteries and/
or cause old batteries to leak chemicals.
• Remove batteries as soon as they are depleted. Chemicals that leak from batteries can cause a rash. If
chemical leakage is found, wipe it off with a cloth.
• The batteries supplied with the product may have a shorter life expectancy due to storage conditions.
• If the remote control is not to be used for an extended period of time, remove the batteries from the
remote control.
Using Remote Control
■ Use the remote control by pointing it towards the remote sensor
window of the main unit. Objects between the remote control and
sensor window may prevent proper operation.
Cautions regarding use of remote control
■ Do not expose the remote control to shock. In addition, do not
expose the remote control to liquids, and do not place it in an area
with high humidity.
■ Do not install or place the remote control under direct sunlight. The
heat may cause deformation of the unit.
■ The remote control may not work properly if the remote sensor
window is under direct sunlight or strong lighting. In such a case,
change the angle of the lighting or main unit, or operate the remote
control closer to the remote sensor window.
5
Page 8
Preparation (Continued)
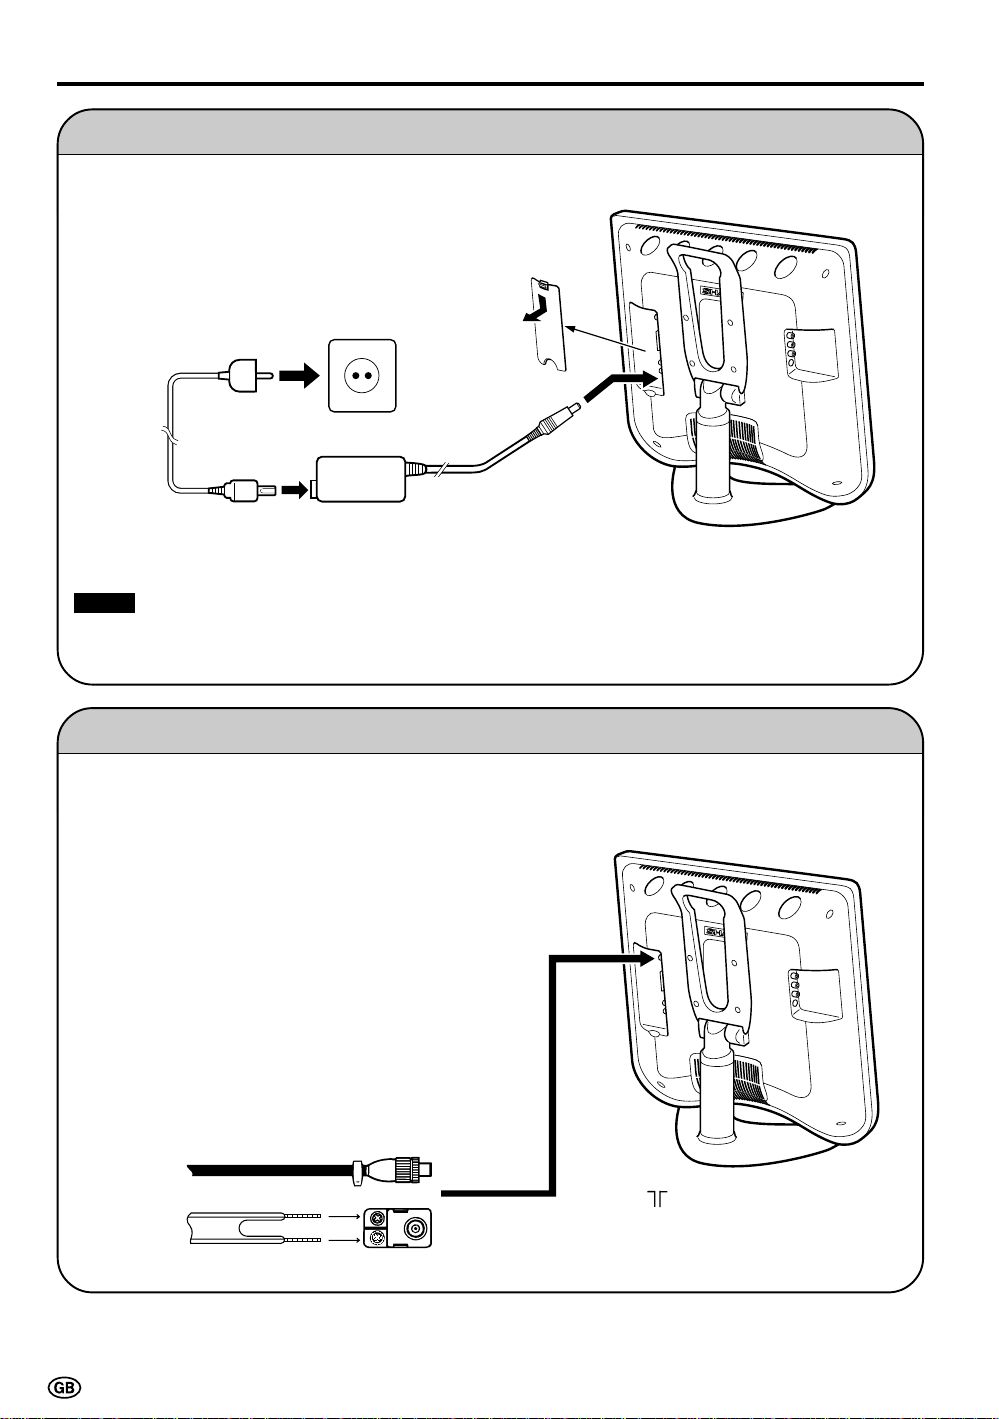
Power Connection
Connect to the DC input terminal of the product.
Household
power outlet
Plug into an AC outlet.
Pull down the hook
to open the cover.
AC cord*
* Product shape varies in some countries.
Notes:
■ Always turn the MAIN POWER switch of the LCD TV set to OFF when connecting the AC adapter.
■ Unplug the AC adapter from the LCD TV set and power outlet when the LCD TV set is not to be used for a long
period of time.
AC adapter
To POWER
INPUT DC 12 V
terminal
Antenna Connection
To enjoy a clearer picture, we recommend that you use
an outdoor antenna. The following is a brief explanation
of the types of connection that are used for coaxial and
feeder cables:
(1) If your outdoor antenna uses a 75-ohm coaxial
cable, change this for a new standard DIN45325
(IEC169-2) plug and plug it into the antenna
terminal at the back of TV set via the antenna cable
(not supplied).
(2) If your outdoor antenna uses a 300-ohm twin-lead
flat feeder, change this for a 300-ohm to 75-ohm
impedance converter and plug it into the antenna
terminal at the back of TV set via the antenna cable
(not supplied).
75-ohm coaxial cable (round cable)
300-ohm twin-lead flat feeder
6
To antenna input
terminal (
)
Page 9
Preparation (Continued)
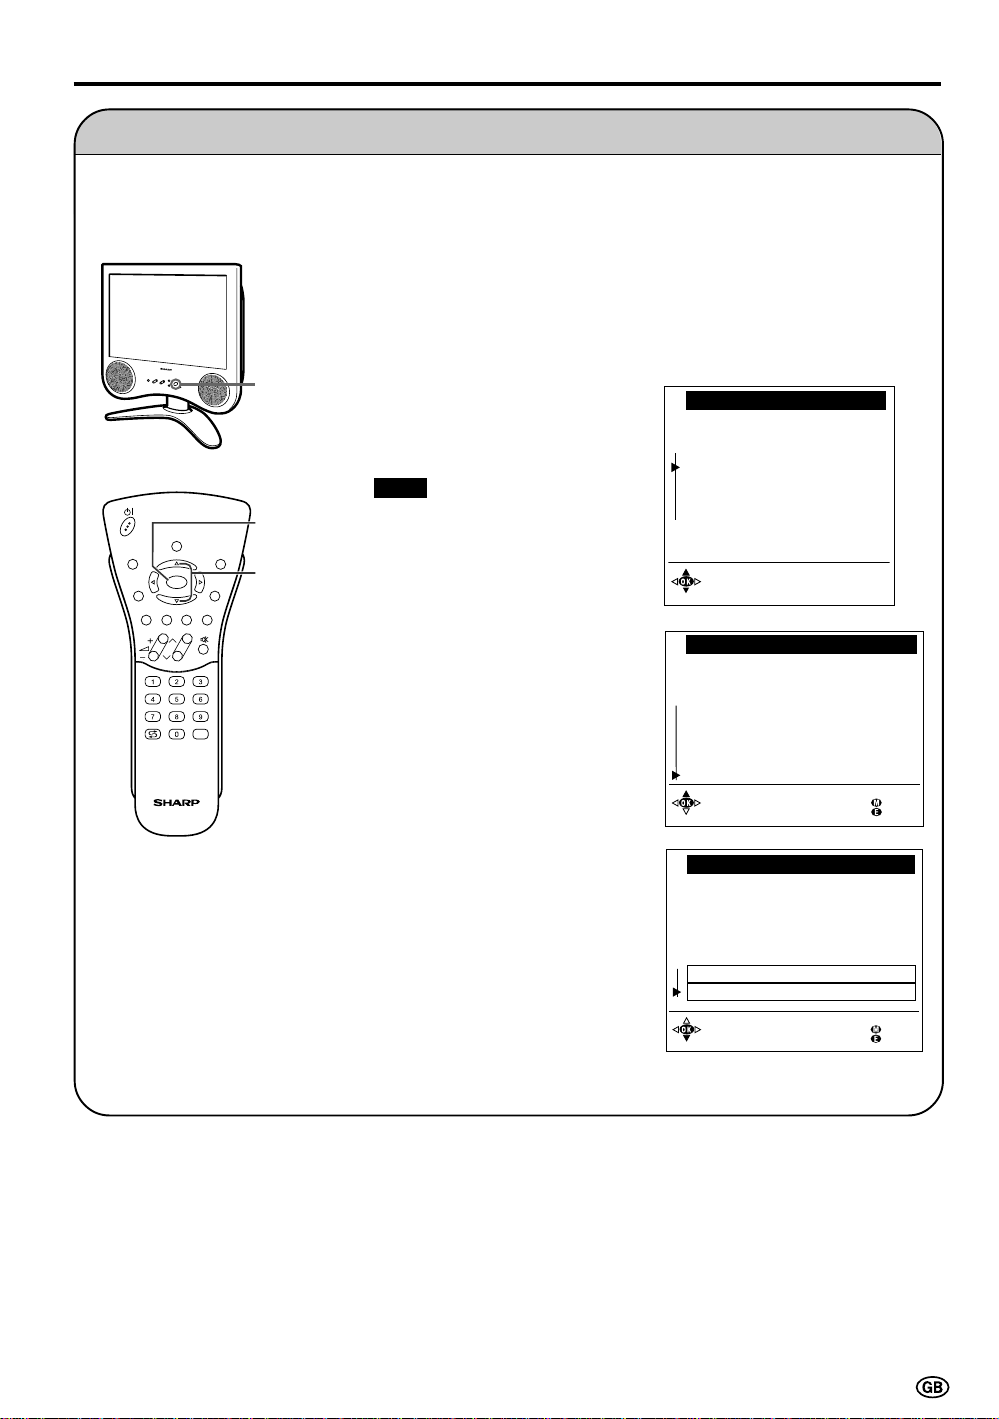
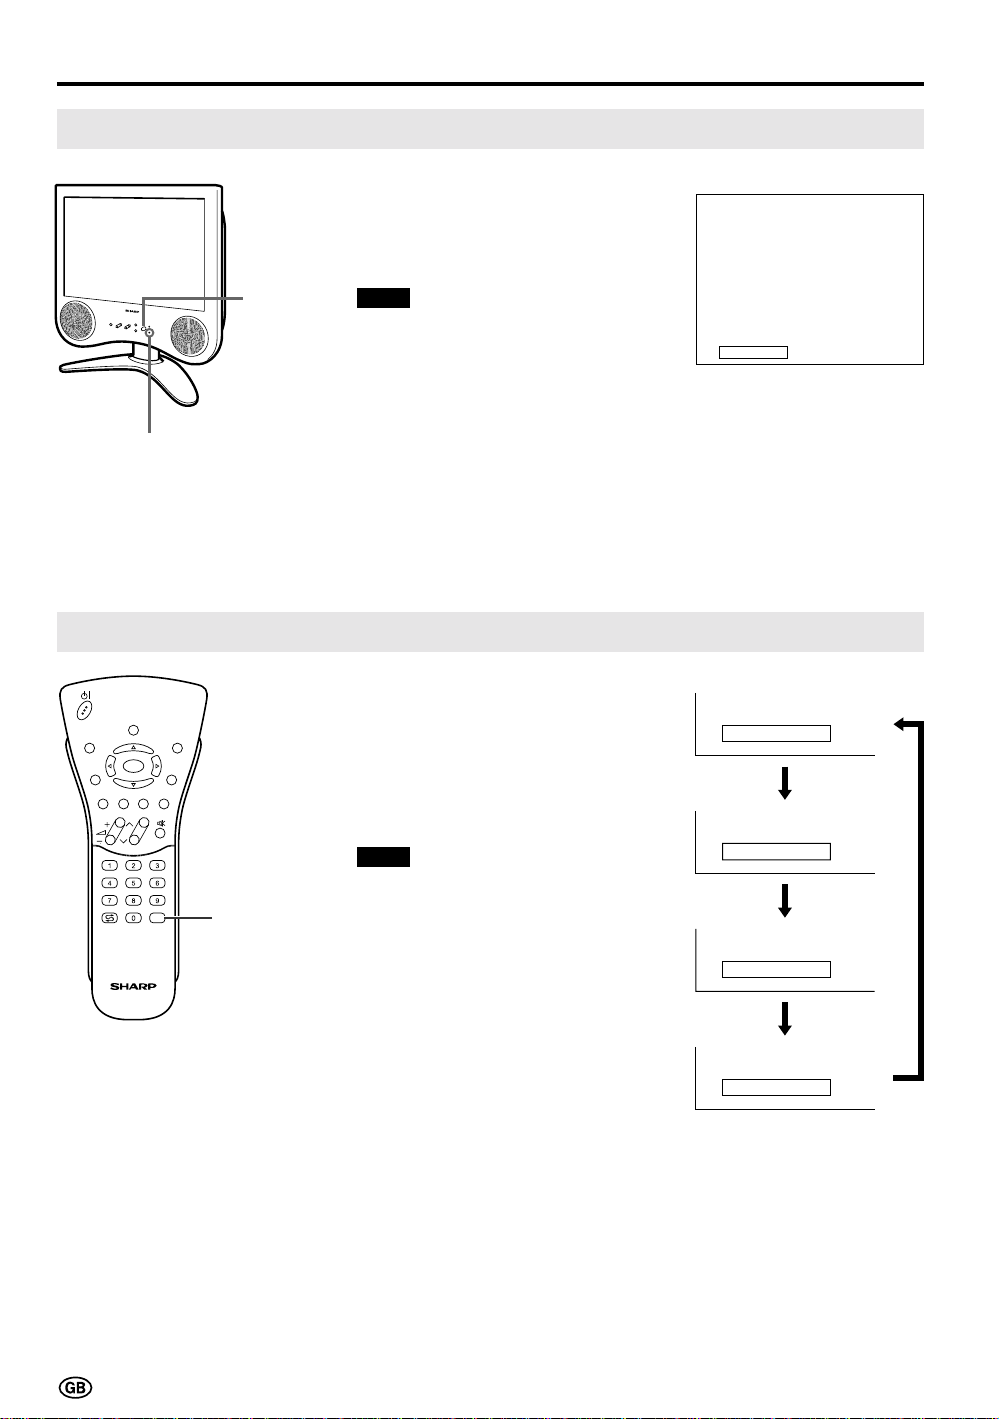
First Installation
When you turn on the LCD TV set for the first time, the First Installation routine, which makes
installation easier, is activated. Using this routine, you can select the on-screen display language,
and automatically search for and store all the receivable channels.
1 Press the MAIN POWER switch.
The “First installation” screen
with a list of the languages for
the on-screen display appears.
MAIN
POWER
SOUND
INFO
iE
OK
T
(
RED)(GREEN)(YELLOW)(CYAN
CH
TV/VIDEO
OK
END
]/[
MENUTEXT
M
)
2 Press ]/[ to select the desired
language, and then press OK.
The “Location of TV set” screen
appears in the language
selected.
Note:
■ You can change the on-screen
display language after the First
Installation routine by selecting
“Language” on the TV menu (see
pages 18 and 19).
3 Press ]/[ to select the TV set
location, and then press OK. The
“Autom. programme search”
screen appears.
4 Press ]/[ to select “Start
search.”
First installat ion
Whi ch l ang uage do you wan t
to use for operat ion?
Deut sch
Engl i sh
Françai s
Español
Italiano
Nede r land s
Svenska
Sel ec t and
proceed
wi t h OK
Locat ion o f TV set
Please enter t he TV set location
fo r the cor rect TV st anda rd and
the app ropri ate programme
c lass if i cat ion f or the countr y:
Othe r . . .
GB
Grea t Bri t ai n
I
Italy
NL
Netherlands
Pol and
PL
Hungar y
HU
SL
Sloveni a
Other countr ies
Se l ect and
pro ceed wi th OK
Autom. pr ogramme sea rch
Your TV se t sear ches wi t h the
fo l lowing se tt i ngs:
Extent of search Al l progr.
Sto re pr ogr. from Programme 001
Loca ti on of TV se t Ot her count r i
(
)
PAL- I
(
)
PAL- BG
(
)
PAL- BG
(
)
PAL- DK
(SECAM- DK)
(
)
PAL- DK
(Auto , -BG)
Back
End
Change set t i ngs
St ar t search
Back
End
7
Page 10
Preparation (Continued)
First Installation (Continued)
SOUND
INFO
iE
T
(
RED)(GREEN)(YELLOW)(CYAN
END
OK
CH
TV/VIDEO
END
MENUTEXT
M
OK
)
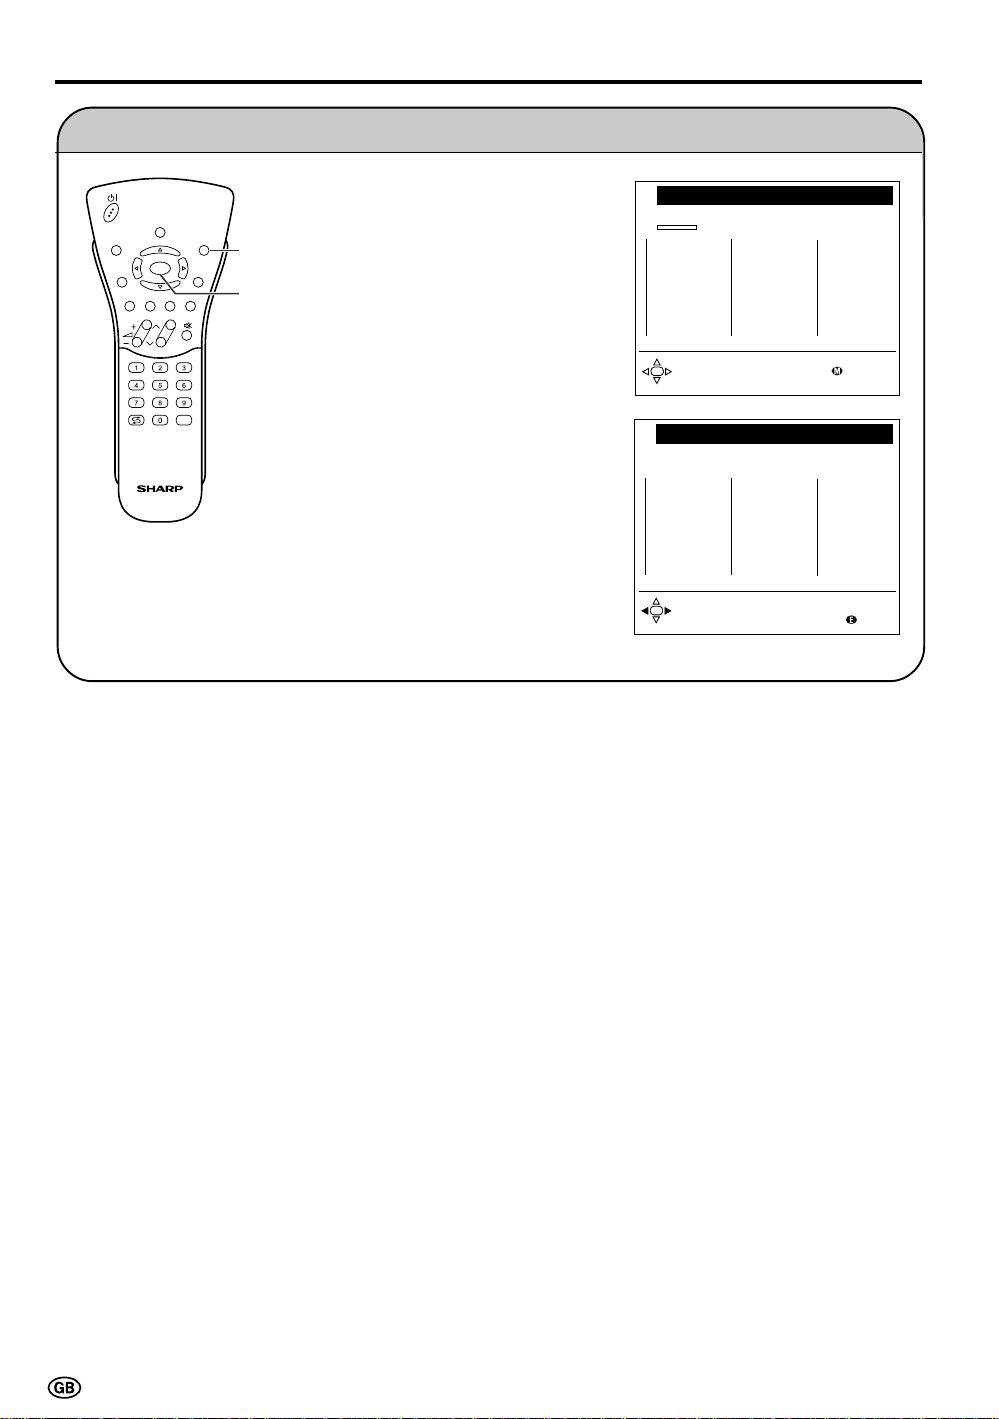
5 Press OK to begin the automatic
programme search. The bar on
the screen shows the progress.
When the search is completed,
the number of the programmes
found is displayed. The new
programmes found are displayed
in blue on the programme list.
6 Press END to exit.
Sta r t sea rch
Search i s act i ve. Plea se wai t !
001 MHz Au to- BG
0
1
2
3
4
5
6
7
8
9
Sta r t sea rch
Search i s compl et ed.
19 Pr ogrammes found.
0
S01
1
S08
2
S10
3
S10
4
S11
5
E03
6
E05
7
E06
8
E09
9
E10
10
11
12
13
14
15
16
17
18
19
10
E11
11
E36
12
E37
13
E38
14
E50
15
E53
16
E54
17
E56
18
E57
19
20
21
22
23
24
25
26
27
28
29
20
21
22
23
24
25
26
27
28
29
Cancel
End
8
Page 11
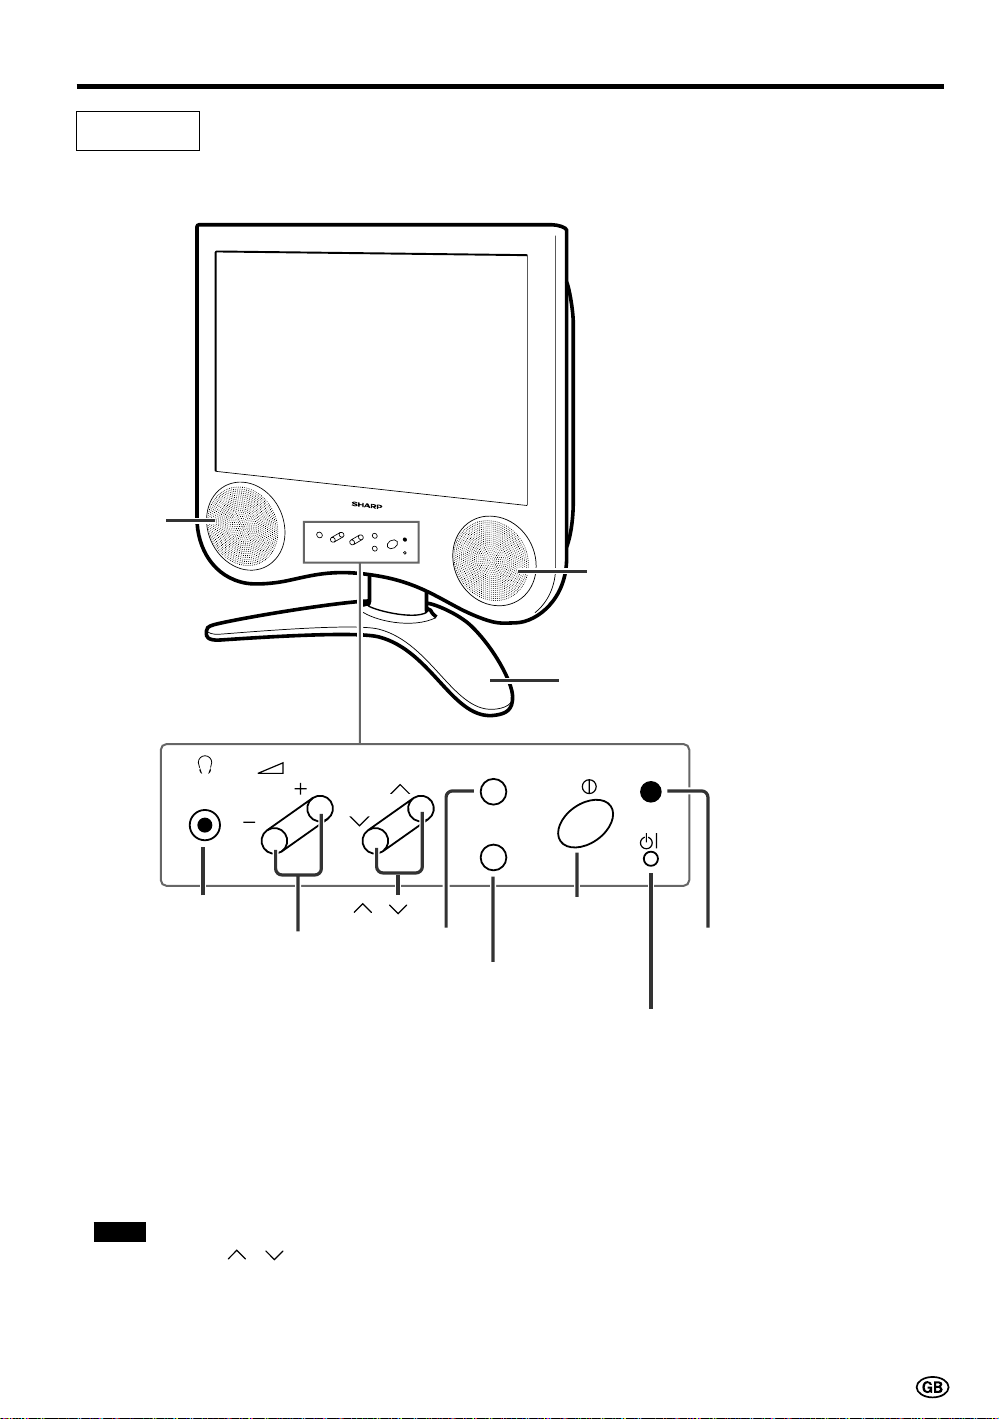
Part Names of Main Unit
Controls
Front view
Speaker
(Left)
To change the vertical angle of the LCD
TV set, tilt the screen up to 5 degrees
forward or 10 degrees backward. The TV
set can also be rotated 40 degrees
horizontally. Please adjust the angle so
that the TV set can be watched most
comfortably.
Speaker (Right)
Table stand
Control panel
CH
Headphones
Volume (+)/(–)
Note:
■ TV/VIDEO, CH( )/( ), and Volume (+)/(–) on the main unit have the same functions as the same buttons on
the remote control. Fundamentally, this operation manual provides a description based on operation using the
remote control.
CH ( )/( )
TV/VIDEO
A green indicator lights when the power is on and a red
indicator lights when in the standby mode (the indicator
will not light when the main power is off).
TV/VIDEO
MENU
MAIN POWER
MENU
Power/Standby indicator
Remote sensor
window
9
Page 12
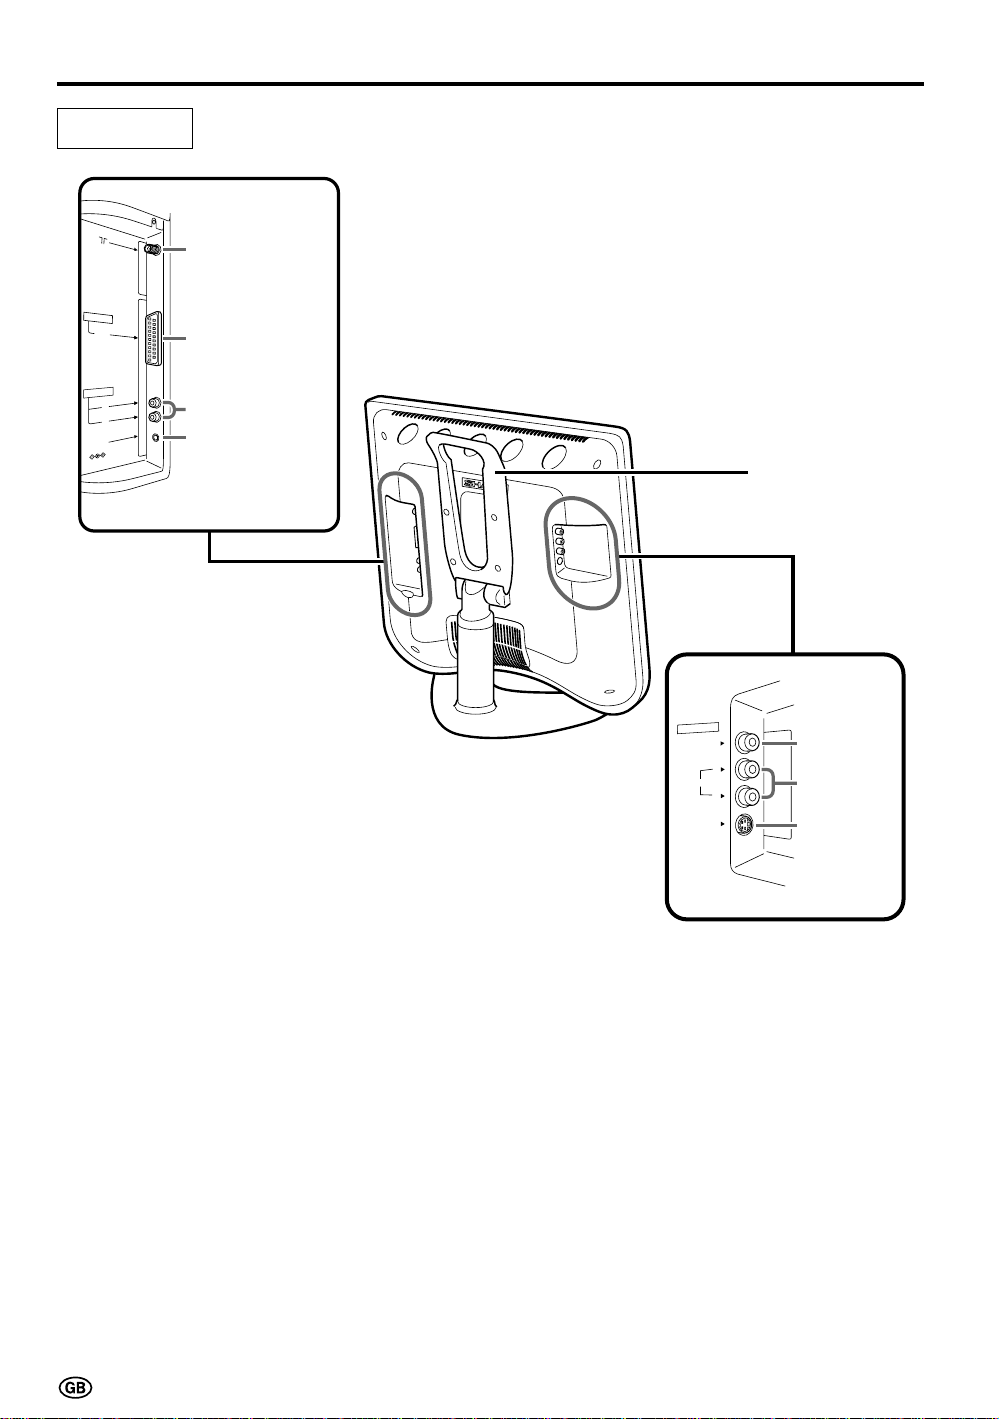
Part Names of Main Unit (Continued)
Terminals
Antenna
A
V
-IN
A
UD
POWER
INPUT
DC12V
1
RG
B
T
U
O
IO
L
R
AV-IN 1
(21-pin EuroSCART)
AUDIO OUT (L)
AUDIO OUT (R)
POWER INPUT
DC 12 V
Rear view
Carring handle
A
VIDEO
AUDIO
S
-V
2
-IN
V
VIDEO
L
R
ID
E
O
AUDIO (L)
AUDIO (R)
S-VIDEO
10
Page 13
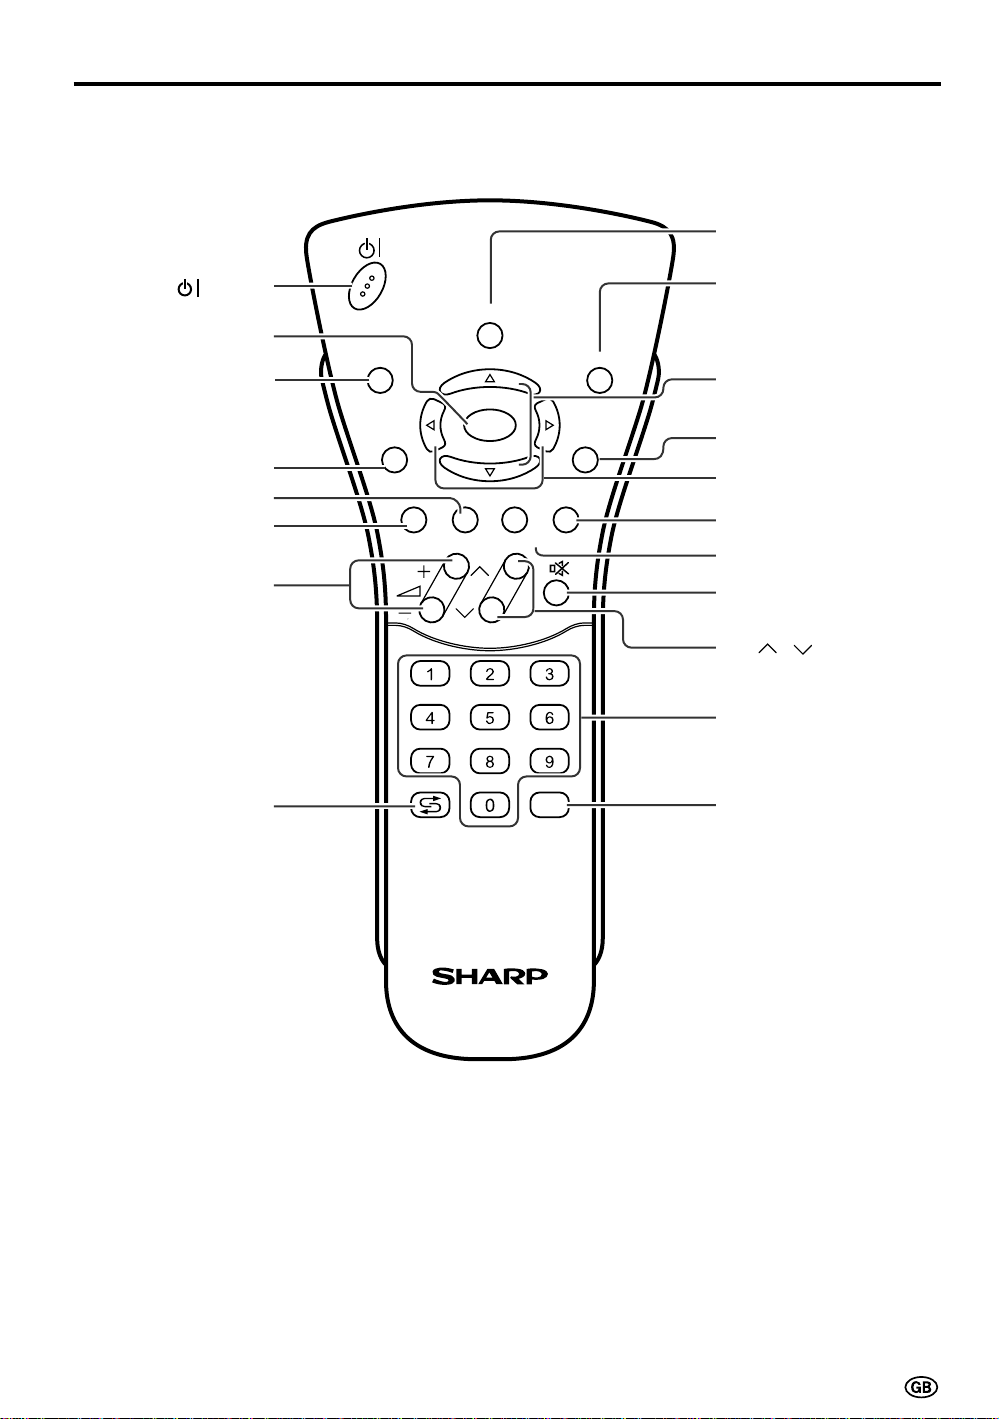
Part Names of Remote Control
(Power)
SOUND
OK, Programme Table
Turns on the menu
INFO
information when
the menu is displayed.
TEXT
GREEN, Sound Menu
RED, Picture Menu
Volume (+)/(–)
INFO
iE
OK
T
(
)(
RED
GREEN)(YELLOW)(CYAN
CH
END
MENUTEXT
M
)
SOUND
Switches the sound mode.
END, Status Display
Turns on the status display
when the menu is not
displayed.
Upward / Downward
Selection
MENU
Right / Left Selection
CYAN, Teletext Subtitle
YELLOW, Standard Value
Mute
Flashback
Returns to the
previous channel.
CH ( )/( )
Channel Select
TV/VIDEO
TV/VIDEO
11
Page 14
Basic Operation
Turning On and Off the Main Power
Press the MAIN POWER switch.
|
The power/standby indicator
instantaneously changes from red
to green and the main unit is
turned on.
MAIN
POWER
Power/Standby indicator
Note:
■ The display time of the on-screen
indicators can be selected with “Onscreen time” for the “On-screen
display” menu item in the TV menu
(see page 36).
To turn off the main power, press
|
the MAIN POWER switch.
Switching the TV/VIDEO (AV1/AV2/AVS/TV) Mode
1 Turn on the power of the
SOUND
INFO
iE
T
(
RED)(GREEN)(YELLOW)(CYAN
END
OK
MENUTEXT
M
)
CH
TV/VIDEO
TV/
VIDEO
connected video equipment.
2 Press TV/VIDEO to select the
applicable input source. The
screen displays AV1, AV2, AVS or
TV mode each time TV/VIDEO is
pressed.
Note:
■ About the video modes
• AV1: Select this when viewing the
signals from the video
equipment connected to the
AV-IN 1 terminal.
• AV2: Select this when viewing the
signals from the video
equipment connected to the
AV-IN 2 terminals using the
VIDEO terminal for video
input.
• AVS: Select this when viewing the
signals from the video
equipment connected to the
AV-IN 2 terminals using the
S-VIDEO terminal for video
input.
On-screen display
1 S08
AV1 mode
199 AV1
AV2 mode
198 AV2
AVS mode
197 AVS
TV mode
1 S08
12
Page 15
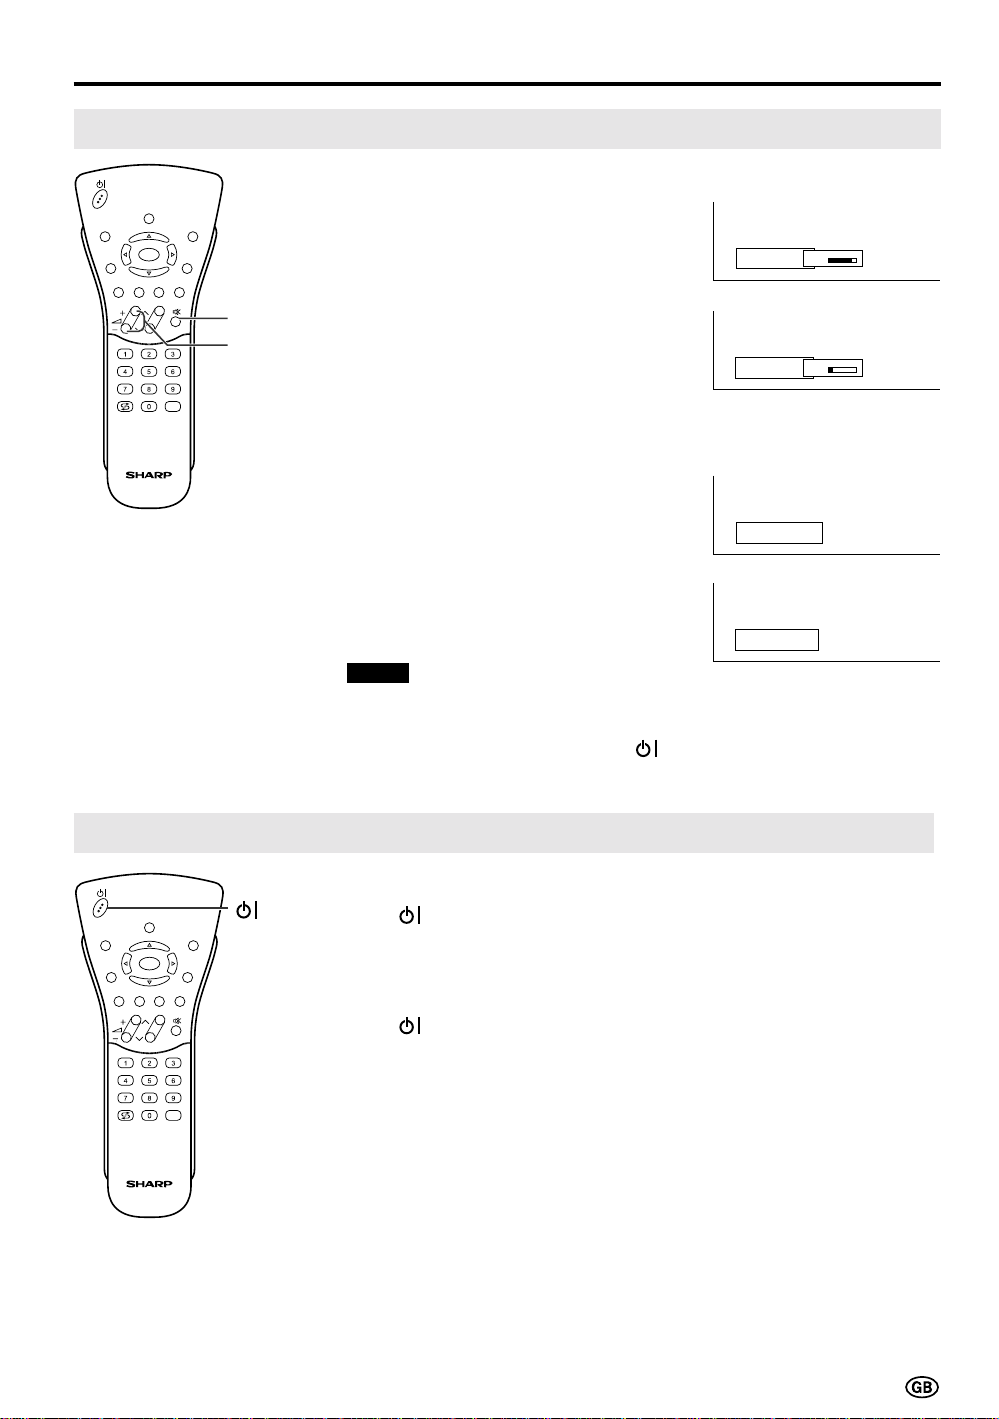
Sound Volume
SOUND
INFO
iE
T
(
RED)(GREEN)(YELLOW)(CYAN
END
OK
MENUTEXT
M
)
CH
Mute
Volume
(+)/(–)
TV/VIDEO
Basic Operation (Continued)
To adjust the volume
Press Volume (+) to increase the
|
sound volume. The numerical
value increases.
Press Volume (–) to decrease the
|
sound volume. The numerical
value decreases.
To mute the sound
Press Mute to temporarily turn off
|
the sound. “Sound off” is
displayed.
Press Mute to turn off the Mute
|
function. “Sound on” is displayed.
Notes:
■ When Volume (+)/(–) is pressed in the
Mute mode, the sound turns on and the
volume indicator is displayed.
■ The Mute function is cancelled when
is pressed.
Volume
Volume
Sound off
Sound on
50
10
ON/OFF Standby
To turn off the LCD TV
SOUND
INFO
iE
T
(
RED)(GREEN)(YELLOW)(CYAN
END
OK
MENUTEXT
M
)
CH
Press
will turn red.
To turn the LCD TV back on
Press
indicator will turn green.
TV/VIDEO
. The power/standby indicator
again. The power/standby
13
Page 16
Basic Operation (Continued)
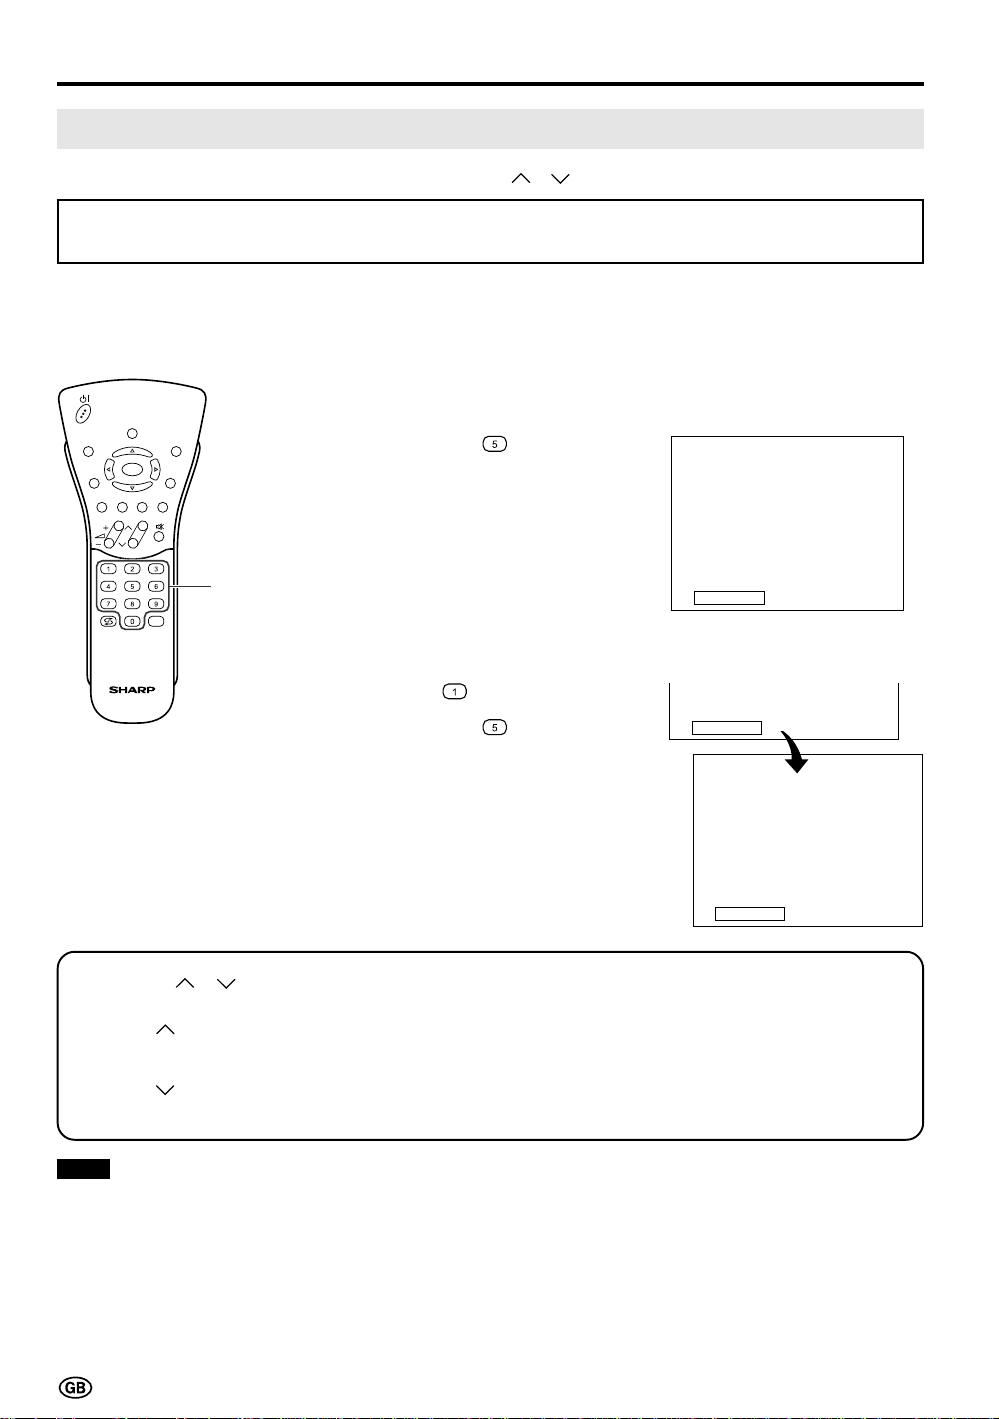
Changing Channels
You can select channels using Channel Select or CH ( )/( ).
• To handle the increasing number of channels available, this LCD TV set allows you to select up to
200 channels (0 to 199).
Using Channel Select
When selecting the channel using Channel Select, finish inputting the channel number by holding down
the button for the last digit for a moment.
To select a one-digit channel
SOUND
INFO
iE
T
(
RED)(GREEN)(YELLOW)(CYAN
END
OK
MENUTEXT
M
)
CH
(e.g. Channel 5):
1 Hold down the
button.
Channel
TV/VIDEO
Select
To select a two/three-digit channel
(e.g. Channel 15):
1 Press the
2 Hold down the button.
Using CH ( )/( )
Press CH (
Press CH (
) and the channels change in the order shown below:
1 → 2 → 3 → . . . → 198 → 199 → 0 → 1 → 2 → 3 → . . .
) and the channels change in the order shown below:
3 → 2 → 1 → 0 → 199 → 198 → . . . → 3 → 2 → 1 → . . .
5
button.
1
15
Note:
■ Channel “0” is prepared for RF output of VCR.
14
Page 17
Contrast
Pi c tu re menu
Col our
Bla ck l evel
Sha rpness
Gree n col our ing
Red-blue col ouri ng
Other . . .
0
Back
End
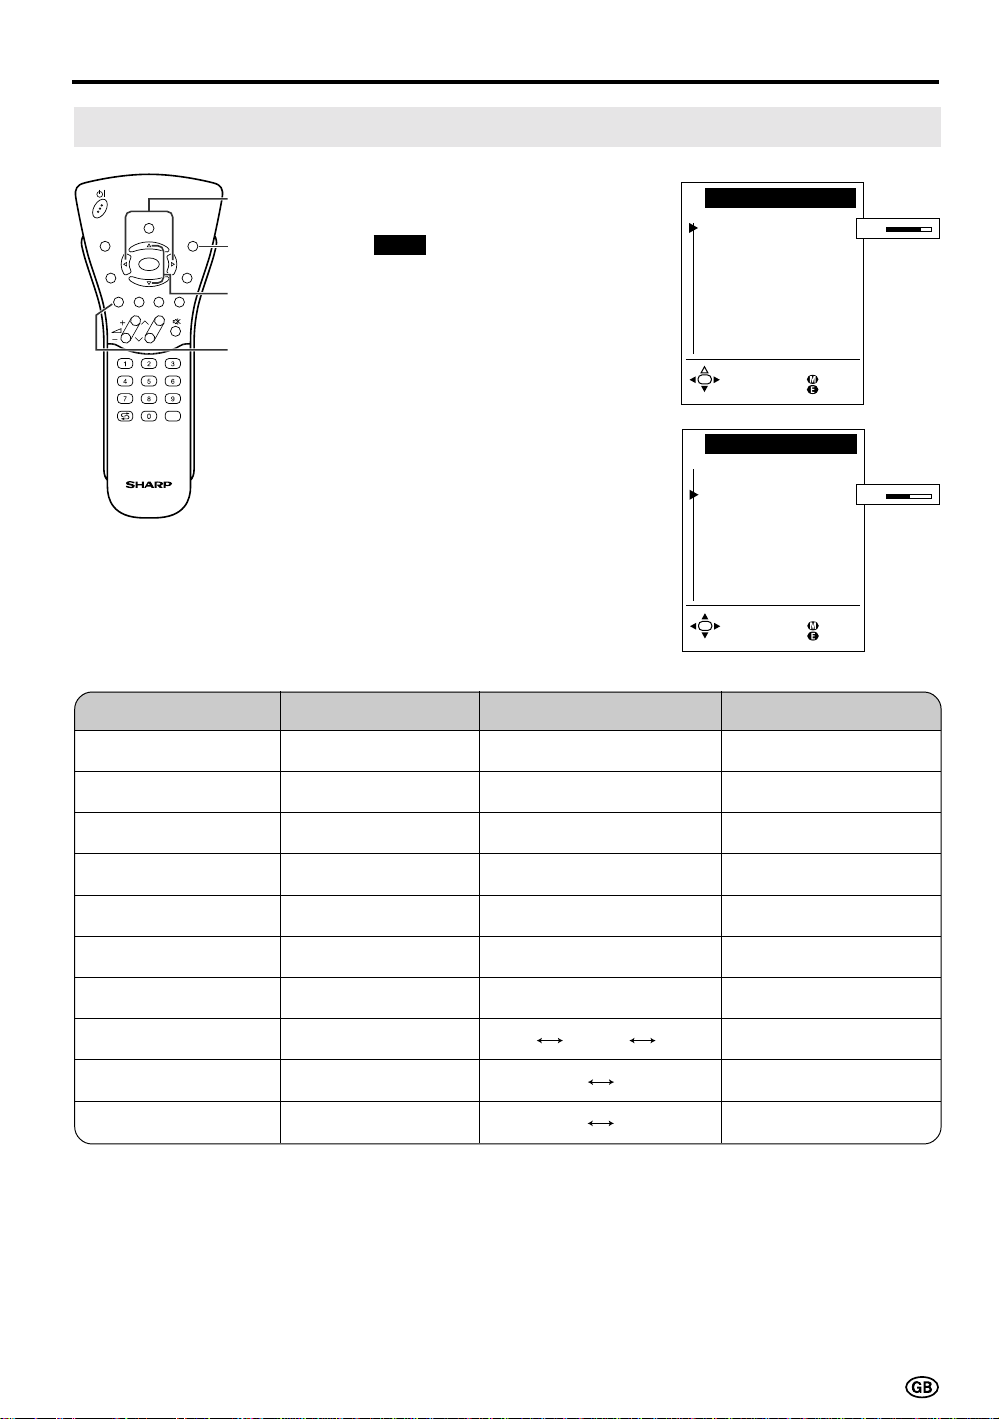
Useful Features
Adjusting Picture Settings
SOUND
INFO
iE
T
(
RED)(GREEN)(YELLOW)(CYAN
END
OK
MENUTEXT
M
)
CH
TV/VIDEO
Adjustment item
Contrast
</>
END
]/[
RED
Press Volume (–)
Decrease contrast
1 Press RED to display the Picture
menu.
Note:
■ The Picture menu can also be
displayed by selecting “Picture” in
the TV menu (see pages 18 and
19).
2 Press ]/[ to select the desired
adjustment item.
• Select “Other...” to display the
other part of the Picture menu.
3 Press </> to make the
adjustment.
4 Press END to exit.
Choice/Value range
0 – 60
Pi c tu re menu
Contrast
Col our
Bla ck l evel
Sha rpness
Gree n col our ing
Red-blue col ouri ng
Other . . .
Back
End
Press Volume (+)
Increase contrast
40
Colour
Black level
Sharpness
Green colouring
Red-blue colouring
Tint
Brightness
Rotate horizontally
Rotate vertically
Lower colour intensity
Less bright
Soft picture
Less green
More red
Toward purple
–
–
–
-30 – 30
-30 – 30
0 – 5
-5 – 5
-5 – 5
-15 – 15
dark medium bright
off on
off on
Higher colour intensity
More bright
Sharp picture
More green
More blue
Toward green
–
–
–
15
Page 18
Useful Features (Continued)
So und vi a
Sound menu
Headph. vol.
Loudsp. sound
Headph. sound
AV aud i o s i g .
Other . . .
TV Hi -f i
Back
End
So und vi a
Sound menu
Headph. vol.
Loudsp. sound
Headph. sound
AV audio sig.
Other . . .
Back
End
20
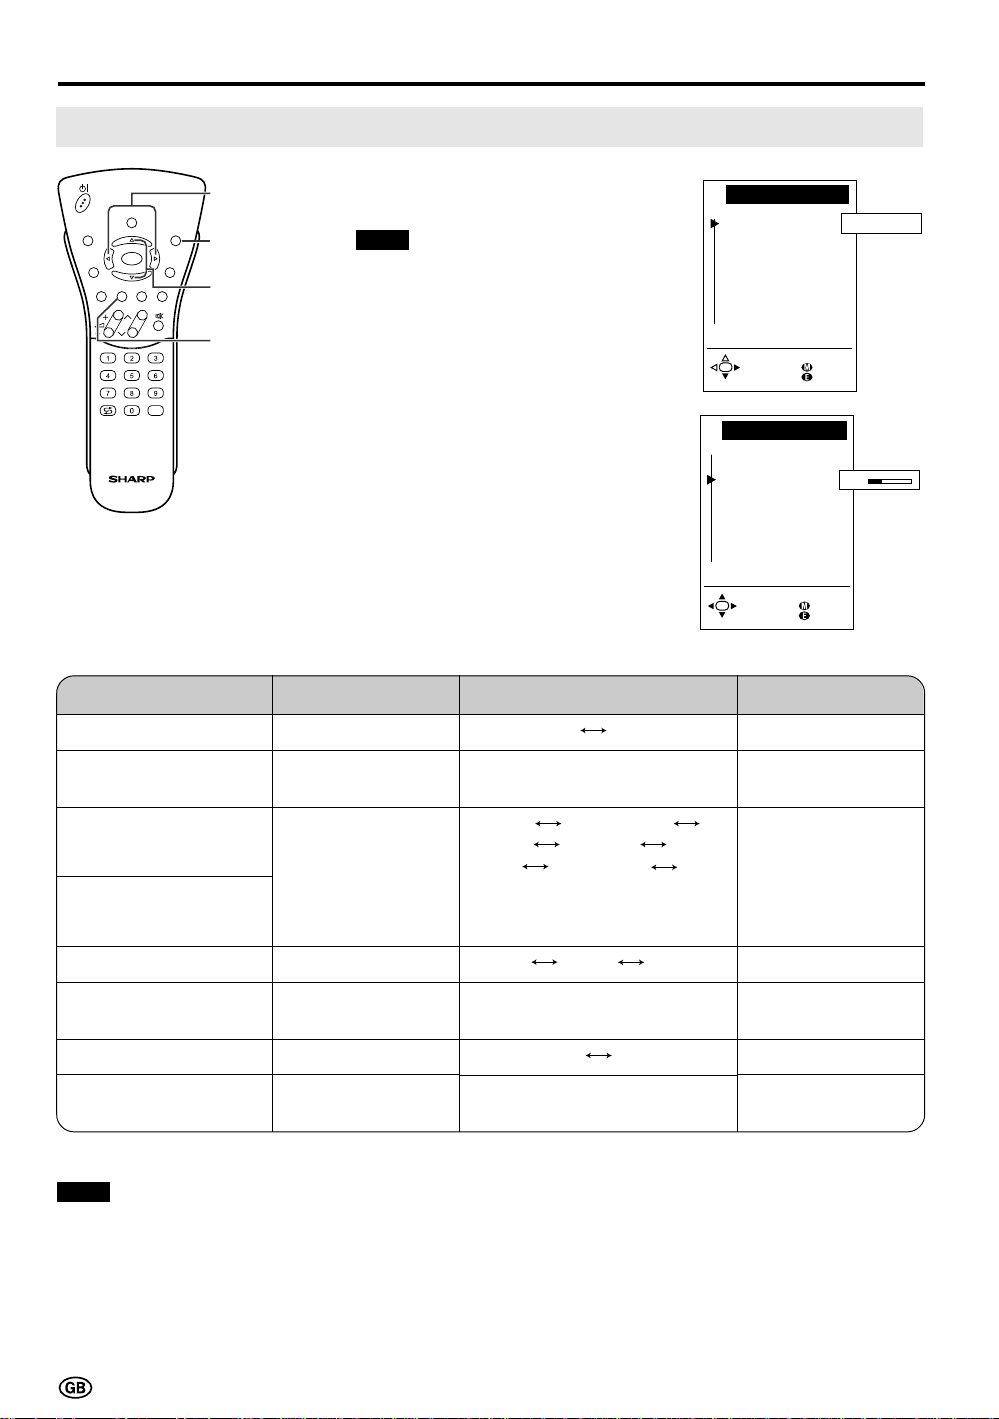
Adjusting Sound Settings
SOUND
INFO
iE
T
(
RED)(GREEN)(YELLOW)(CYAN
END
OK
MENUTEXT
M
)
CH
TV/VIDEO
Adjustment item
Sound via
</>
END
]/[
GREEN
1 Press GREEN to display the
Sound menu.
Note:
■ The Sound menu can also be
displayed by selecting “Sound” in
the TV menu (see pages 18 and
19).
2 Press ]/[ to select the desired
adjustment item.
• Select “Other...” to display the
other part of the Sound menu.
3 Press </> to make the
adjustment.
4 Press END to exit.
Press Volume (–)
–
Choice/Value range
TV Hi-fi
Press Volume (+)
–
Headph. vol.*
Decrease headphones volume
0 – 60
Increase headphones volume
Mono Mono!/Sound1
Loudsp. sound
–
Headph. sound*
AV audio sig.
Maximum volume*
Decrease maximum
volume
Sound wide*
Balance*
* These items are not displayed when the “Sound via” item is set to “Hi-fi”.
Note:
■ In the “AV audio sig.” item, mono-video recorders should select “Sound1” or “Sound2” . Stereo-video recorders should
select “Sound1+2” so that the desired sound can be selected when playing back the video.
Increase the volume
of the left speaker
–
–
Sound2 Sound1+2 Mono!/
Stereo Mono!/Nicam Mono!
(*The choices differ depending on
whether or not a NICAM or IGR
signal is received.)
Sound1 Sound2 Sound1+2
10 – 60
off on
-15 – 15
–
–
Increase maximum
volume
–
Increase the volume
of the right speaker
16
Page 19

Useful Features (Continued)
Using Programme Table
The Programme table shows a list of all receivable programmes. They are located in channels 0 to 199.
The currently selected programme is displayed in blue, and the child-locked programmes are displayed in
red.
SOUND
INFO
iE
T
(
RED)(GREEN)(YELLOW)(CYAN
END
OK
MENUTEXT
M
)
CH
TV/VIDEO
</>
]/[
OK
To select the desired programme
1 Press OK to display the
Programme table.
2 Press ]/[ and/or </> to select
the desired programme.
• To display the next or previous list
of the Programme table, press
]/[ when the cursor is at a
programme in the lower-right or
upper-left position, or press </>
when the cursor is at a programme in the right or left column.
3 Press OK to display the selected
programme.
Programme table
197
AVS
198
AV2
199
AV1
0
S01
1
S08
2
S10
3
S10
4
S11
5
E03
6
E05
7
E06
8
E09
9
E10
E11
10
Se le ct and
pro ceed wi th OK
11
E36
12
E37
13
E38
E50
14
15
E53
16
E54
E56
17
18
E57
19
20
21
22
23
24
25
26
27
28
29
30
31
32
33
34
35
36
37
38
Back
End
17
Page 20

Useful Features (Continued)
Standard set tings
TV menu
Picture
Sound
Programmes
AV connec t i ons
Chi l d l ock
Back
End
Other . . .
Selecting Menu Items
• The menus can be used to adjust the var ious settings of your LCD TV set. Select the desired menu item
by following the steps below.
■ Using TV Menus
SOUND
INFO
iE
OK
T
(
RED)(GREEN)(YELLOW)(CYAN
CH
TV/VIDEO
OK
END
END
MENUTEXT
M
MENU
)
]/[
■ Using Direct Control Menu
Control panel of
the main unit
Volume (+)/(–)
TV/VIDEO
MENU
MENU
CH (
CH
)/( )
1 Press MENU on the remote
control to display the TV menu.
2 Press ]/[ to select the desired
menu item.
• The cursor moves up or down.
• The cursor indicates the selected
menu item.
• Select “Other...” to display the
other part of the menu.
3 Press OK to display the setting
screen for the selected menu
item.
• See the next page for a table of
the setting screens.
4 Press MENU to return to the
previous screen or END to return
to the normal screen.
1 Press MENU on the main unit to
display the Direct Control menu.
2 Press CH (
)/( ) to select the
desired menu item.
• The cursor moves up or down.
• The cursor indicates the selected
menu item.
3 Press Volume (+)/(–) to make the
adjustment.
• See page 15 for details on the use
of each item.
4 Press MENU to turn off the Direct
Control menu.
TV menu
Other . . .
On-screen display
Timer funct ions
Time and date
Fi rst instal lat ion
Language
Back
End
Direct cont rol at TV
Bl ack le vel
Cont r as t
Col ou r
: Sel ec t
: Change
0
M: Back
E: End
Notes:
■ The items displayed differ depending on the setting conditions.
■ The item selected is displayed in blue.
■ The adjustment values and settings which were changed before the screen is restored are saved as is in the
memory.
18
Page 21

Useful Features (Continued)
Selecting Menu Items (Continued)
■ TV Menu Setting Screens
For details on using each setting screen, refer to the page number indicated.
TV menu
Standard set tings
Picture
Sound
Programmes
AV c onnec ti ons
Chi l d l ock
Other . . .
Back
End
(Page 20)
Standard settings
User prefe rences
Sto re
Fact ory set ti ng
(Page 15)
Pi ct ure me nu
Cont ra st
Col our
Black level
Shar pness
Green col ouri ng
Red - bl ue co l our i ng
Other . . .
(Page 16)
Sound menu
Sou nd v i a
Headph. vol.
Loudsp. sound
Headph. sound
AV a ud i o si g .
Other . . .
(Pages 21 – 27)
Programmes
Automatic search
Manua l ad jus tment
Sor t
Era se programme range
Ente r/ change name
Decoder pr og rammes
(Pages 28 – 30)
AV conne ct ions
( programme
At AV1
(programme
At AV2
(programme
At AVS
Decode r pr ogrammes
For progr ammes 1. .. 196
40
TV Hi- f i
)
199
)
198
)
197
TV menu
Other . . .
On- sc re en d is pl ay
Timer functions
Time and date
Fi rst instal lat ion
Language
Back
End
(Page 36)
On- screen di spl ay
On-sc reen
Posi t ion
Sound inf o
Time
Alarm time
Sleep time
time
4
(Page 37)
Timer f unct i ons
Swi t c h o f f
Alarm
Al arm vol ume
(Page 38)
Time and date
Time
Da te
--:--:--
(Page 7)
First installat ion
Whi ch l ang uage do you wan t
t o use f or op er a t i on?
Deutsch
Engl ish
Françai s
Español
Italiano
Nede rl ands
Svenska
(Page 7)
Language
Deutsch
Engl ish
Françai s
Español
Italiano
Nede rl ands
Svenska
no 00: 00
(Pages 31 – 35)
Chi l d lo ck
Pl ease def ine your
PIN .
Chi l d l ock
Pl ease memor ize
your PIN
bef ore proceed ing
wi th OK.
????
19
Page 22

Useful Features (Continued)
Standard set tings
TV menu
Picture
Sound
Programme s
AV c onnec ti ons
Chi l d l ock
Back
End
Other . . .
Standard Settings
You can optionally set the standard settings for the following adjustments. You can also easily call up
those standard settings or factory-preset settings.
• Mute
• Picture menu item: Contrast, Colour, Sharpness, Tint, Brightness
• Sound menu item: Volume, Hi-fi volume, Headph. vol., Balance
SOUND
INFO
iE
T
(
RED)(GREEN)(YELLOW)(CYAN
END
OK
MENUTEXT
M
)
CH
TV/VIDEO
OK
END
MENU
]/[
1 Press MENU to display the TV
menu.
2 Press ]/[ to select “Standard
settings”, and then press OK to
display the “Standard settings”
screen.
3 Press ]/[ to select the desired
function.
■ User preferences: The standard
settings are retrieved.
■ Store: The currently selected
settings are stored as the standard
settings.
■ Factory setting: The factory-preset
settings are retrieved.
4 Press OK to execute the selected
function.
5 Press END to exit.
TV menu
St anda rd set t i ngs
User pref erences
St ore
Fact ory se t t ing
Ca l l
wi t h OK
TV menu
Standard set ti ngs
User pref erences
St ore
Fact ory se t t ing
Back
End
Note:
■ You can also call up the standard settings by pressing YELLOW with the normal screen displayed.
20
Values called!
Back
End
Page 23

Useful Features (Continued)
TV menu
Programmes
Automatic search
Manua l ad ju stment
Sor t
Erase programme range
Ent er / change name
Decoder pr og rammes
Back
End
Programmes
[1] Automatic search
Perform the procedure below to search for and store new programmes after the First Installation
routine.
SOUND
INFO
iE
T
(
RED)(GREEN)(YELLOW)(CYAN
END
OK
MENUTEXT
M
)
CH
TV/VIDEO
OK
MENU
]/[
1 Press MENU to display the TV
menu.
2 Press ]/[ to select
“Programmes”, and then press
OK to display the “Programmes”
screen.
3 Press ]/[ to select “Automatic
search”, and then press OK to
display the “Autom. programme
search” screen.
4 Press ]/[ to select “Change
settings”, and then press OK to
display the “Extent of search”
screen.
TV menu
Standard set tings
Picture
Sound
Programmes
AV c onnec ti ons
Chi l d l oc k
Other . . .
Back
End
Autom. programme search
Your TV set sear ches wi t h the
fol lowing set tings:
Exte nt of sear ch New pr . onl y
Sto re pr og r. from Pr ogramme 019
Loca ti on of TV se t Ot her count ri
Change set t in gs
St ar t search
5 Press ]/[ to select the extent of
the programmes to be searched,
and then press OK to display the
“Store progr. from” screen.
Autom. progr amme sear ch
Extent of search
Pl ease def i ne t he exte nt of
programmes for search:
Al l p rogr ammes
New prog ramme s onl y
Se le ct and
proceed wi t h OK
Back
End
Back
End
21
Page 24

Useful Features (Continued)
Programmes (Continued)
[1] Automatic search (Continued)
SOUND
INFO
iE
T
(
RED)(GREEN)(YELLOW)(CYAN
END
OK
MENUTEXT
M
)
CH
TV/VIDEO
</>
END
]/[
OK
6 Press ]/[ and/or </> to select the
programme position from which the
programmes are to be stored, and
then press OK to display the
“Location of TV set” screen.
7 Press ]/[ to select the TV set
location.
• Select “Other...” to display the other
part of the country list.
8 Press OK. The selected settings are
displayed.
9 Press ]/[ to select “Start search”,
and then press OK to begin the
automatic programme search.
Note:
■ See pages 7 and 8 for details of the
search process.
10 After the search is completed, press
END to exit.
A ut om . pr o g r a mme se a r c h
Sto re pr ogr. f rom
Ple ase sel ect the pr ogramme
position from which the
programmes are to be stored:
0
S01
S02
1
2
S10
3
S10
4
S11
5
E03
6
E05
7
E06
8
E09
9
E10
Se le ct and
pro ceed wi th OK
Autom. progr amme sear ch
Locat ion o f TV set
Ple ase en ter t he TV s et lo cati on
f or the co r rect TV st anda rd and
the app ropri ate programme
cl assi f i cati on fo r t he count r y:
A Aust ri a
B Be lg ium
CH Swi tzer land
CZ Czech Re publ i c
D Ge rmany
E Spai n
F Fra nce
Other .. .
Se le ct and
proceed wi th OK
Autom. programme search
Your TV set sear ches wi t h the
fol lowing set tings:
Exte nt of sear ch Al l progr .
Store progr. from Programme 000
Locat ion o f TV se t D ( PAL- BG)
Change set t in gs
St ar t search
E11
10
11
E36
12
E37
13
E38
E50
14
15
E53
16
E54
E56
17
E57
18
19
(
PAL- BG
(
PAL- BG
(
PAL- BG
(
PAL- DK
(
PAL- BG
(
PAL- BG
(
SECAM- L
20
21
22
23
24
25
26
27
28
29
)
)
)
)
)
)
Back
End
Back
End
)
Back
End
22
Page 25

Programmes (Continued)
[2] Manual adjustment
Individual settings of programmes can be adjusted.
Useful Features (Continued)
SOUND
INFO
iE
OK
T
(
RED)(GREEN)(YELLOW)(CYAN
CH
</>
END
MENUTEXT
M
]/[
)
OK
RED
TV/VIDEO
Channel
Select
1 Perform steps 1 and 2 in [1]
Automatic search to display the
“Programmes” screen.
2 Press ]/[ to select “Manual
adjustment”, and then press OK to
display the “Manual adjustment”
screen.
3 Press ]/[ to select the item, and
then press </> to make the
adjustment. (See the table on the
next page for details.)
• You can also use Channel Select
to adjust the “Channel” and
“Frequency” items.
• To adjust “Name” , first press OK
to activate the text input mode.
Press </> to select the input
position and press ]/[ to select
the desired character. When you
finish inputting, press OK to set
the name.
TV menu
Programmes
Automatic search
Manua l ad j ustment
Sor t
Erase programme range
Ent er / change name
Decoder pr og rammes
Back
End
Manual ad jus tment
Range VHF UHF Ca ble
Channe l E36
Frequency 591.2 5 MHz
Name E 36
TV s tand. B/ G
Col . st. Autom.
Sear ch
Store
Back
End
4 Press RED to store the adjusted
channel. The “Store” screen
appears.
5 Press ]/[ and/or </> to select
the desired programme position to
insert the channel.
Store
0
1
2
3
4
5
6
7
8
9
S01
S08
S10
S10
S11
E03
E05
E06
E09
E10
Insert
Overwr it e
E11
10
11
E36
12
E37
13
E38
E50
14
15
E53
16
E54
E56
17
18
E57
19
20
21
22
23
24
25
26
27
28
29
Back
End
23
Page 26

Useful Features (Continued)
Programmes (Continued)
[2] Manual adjustment (Continued)
6 Press YELLOW to insert a free
SOUND
INFO
iE
T
(
RED)(GREEN)(YELLOW)(CYAN
END
OK
MENUTEXT
M
)
CH
END
RED
YELLOW
programme position for the
channel, or press RED to
overwrite the existing channel on
the marked programme position.
• If you press YELLOW, all
subsequent programmes including
the marked one move one
programme position back.
7 Press END to exit.
TV/VIDEO
Adjustment item
Range
Channel
Frequency
Name
TV stand.
Col. st.
Choice/Value range
VHF, UHF, Cable
E02 – E12 (VHF, B/G)
E21 – E69 (UHF)
S01 – S41 (Cable, B/G)
A – K (VHF, I), etc.
044 – 859 (MHz)
A – Z, +, -, ., !, /, 0 – 9
B/G, I, L, D/K, M, N
Autom., PAL, SECAM,
NTSC-V, PAL-V
NTSC, PAL(Norm
M), etc.
Description
Receivable ranges depending on TV norm
and installation site
Receivable channels depending on TV norm,
installation site, and range
Receivable frequencies depending on TV
norm, installation site, and range
Programme name (up to five characters)
TV norm
Colour norm
24
Page 27

Useful Features (Continued)
TV menu
Programmes
Automatic search
Manua l ad jus tment
Sor t
Era se programme range
Ent er / change name
Decoder pr og rammes
Back
End
Programmes (Continued)
[3] Sort
The programme positions for individual programmes can be freely changed.
SOUND
INFO
iE
T
(
RED)(GREEN)(YELLOW)(CYAN
END
OK
MENUTEXT
M
)
CH
TV/VIDEO
</>
END
]/[
CYAN
YELLOW
OK
RED
1 Perform steps 1 and 2 in [1]
Automatic search to display the
“Programmes” screen.
2 Press ]/[ to select “Sort,” and
then press OK to display the
“Sort” screen.
3 Press ]/[ and/or </> to select
the desired programme, and then
press YELLOW, RED, or CYAN to
sort.
• When YELLOW is pressed, a free
programme position is inserted at
the current cursor position. All
subsequent programmes including
the marked one move one programme position back.
• When RED is pressed, the
currently marked programme is
erased. All subsequent programmes move one programme
position up.
• When CYAN is pressed, the Move
mode is activated. Press ]/[ to
move the currently marked
programme to the desired programme position. The marked
programme is swapped with the
programme at the selected
programme position. Press CYAN
to leave the Move mode.
Sor t
0
1
2
3
4
5
6
7
8
9
S01
S08
S10
S10
S11
E03
E05
E06
E09
E10
Move
Insert
Erase
E11
10
11
E36
12
E37
13
E38
E50
14
15
E53
16
E54
E56
17
18
E57
19
20
21
22
23
24
25
26
27
28
29
Back
End
4 Press END to exit.
25
Page 28

Useful Features (Continued)
TV menu
Programmes
Automatic search
Manua l ad j ustment
Sor t
Erase programme range
Ent er / chan ge name
Decoder pr og rammes
Back
End
Programmes (Continued)
[4] Erase programme range
The individual programmes or programmes in a connected range can be erased.
SOUND
INFO
iE
T
(
RED)(GREEN)(YELLOW)(CYAN
END
OK
MENUTEXT
M
)
CH
TV/VIDEO
</>
END
]/[
OK
1 Perform steps 1 and 2 in [1]
Automatic search to display the
“Programmes” screen.
2 Press ]/[ to select “Erase
programme range,” and then
press OK to display the “Erase
programme range” screen.
3 Press ]/[ and/or </> to select
the programme to be erased, and
then press OK. The selected
programme is shown in blue.
• If you want to erase programmes in
a connected range, select the
programme at the beginning of the
desired range.
4 If you are erasing programmes in
a connected range, press ]/[
and/or </> to select the
programme at the end of the
range. The selected programmes
are shown in blue.
Era se progr amme ra nge
S01
0
1
S08
2
S10
3
S10
S11
4
5
E03
6
E05
7
E06
E09
8
9
E10
Sta rt wi th OK,
select end
and e ra se wi t h OK
Era se progr amme ra nge
S01
0
1
S08
2
S10
3
S10
S11
4
5
E03
6
E05
7
E06
E09
8
9
E10
Sta rt wi th OK,
select end
and e ra se wi t h OK
E11
10
11
E36
12
E37
13
E38
E50
14
15
E53
16
E54
E56
17
18
E57
19
E11
10
11
E36
12
E37
13
E38
E50
14
15
E53
16
E54
E56
17
18
E57
19
20
21
22
23
24
25
26
27
28
29
Back
End
20
21
22
23
24
25
26
27
28
29
Back
End
5 Press OK to erase the selected
programme(s). All the subsequent
programmes move up.
6 Press END to exit.
26
Era se progr amme ra nge
E03
0
1
E05
E06
2
E09
3
E10
4
5
E11
E36
6
E37
7
E38
8
9
E50
Sta rt wi th OK,
select end
and e ra se wi t h OK
E53
10
11
E54
12
E56
13
E57
14
15
16
17
18
19
20
21
22
23
24
25
26
27
28
29
Back
End
Page 29

Useful Features (Continued)
TV menu
Programmes
Automatic search
Manua l ad j ustment
Sor t
Erase programme range
Ent er / chan ge name
Decoder pr og rammes
Back
End
Programmes (Continued)
[5] Enter/change name
The name of an individual programme can be entered or changed.
SOUND
INFO
iE
OK
T
(
RED)(GREEN)(YELLOW)(CYAN
CH
</>
END
END
MENUTEXT
M
]/[
)
OK
TV/VIDEO
1 Perform steps 1 and 2 in [1]
Automatic search to display the
“Programmes” screen.
2 Press ]/[ to select “Enter/
change name,” and then press OK
to display the “Enter/change
name” screen.
3 Press ]/[ and/or </> to select
the desired programme, and then
press OK. An underscore and
question marks are displayed as
an input prompt.
4 Press </> to select the input
position, and then press ]/[ to
select the desired character.
Ent er /c hange name
197 AVS
AV2
198
AV1
199
S01
0
?08
1
S10
2
S10
3
S11
4
E03
5
E05
6
Sta rt wi th OK
then enter/ chang e
and end w i th OK
Ent er /c hange name
197 AVS
AV2
198
AV1
199
S01
0
S02
1
S10
2
S10
3
S11
4
E03
5
E05
6
Sta rt wi th OK
then enter/ chang e
and end w i th OK
10
11
12
13
14
15
16
10
11
12
13
14
15
16
E56
7
E06
8
E09
E10
9
E11
E36
E37
E38
E50
E53
E54
7
E06
8
E09
E10
9
E11
E36
E37
E38
E50
E53
E54
17
E57
18
19
20
21
22
23
24
25
26
Back
End
E56
17
E57
18
19
20
21
22
23
24
25
26
Back
End
5 Press OK to accept the name
entered, and then press END to
exit.
Note:
■ See page 29 for information on how to use the “Decoder programmes” item.
Ent er /c hange name
197 AVS
AV2
198
AV1
199
S01
0
S02
1
S10
2
S10
3
S11
4
E03
5
E05
6
Sta rt wi th OK
then enter/ chang e
and end w i th OK
10
11
12
13
14
15
16
E56
7
E06
E09
8
E10
9
E11
E36
E37
E38
E50
E53
E54
17
E57
18
19
20
21
22
23
24
25
26
Back
End
27
Page 30

AV conne ct ions
Back
End
At AV1 (programme 199)
Si gna l:
Se lec t and
pr oceed wi th OK
Autom.- VHS/ SVHS VCR, camcorde r
Autom. -CVBS/ YC. DVD,SAT, decoder
Standard component (s) :
VHS/ 8mm.. . . . . .. VCR, camcorder
SVHS/H i8. . . . . . . VCR, camcorde r
CVBS.. ... .. ... . DVD,SAT, decoder
YC... ... .. ... .. DVD,SAT,de coder
Useful Features (Continued)
At AV1
( programme
199
)
AV conne ct i ons
At AV2
(programme
198
)
Decode r pr ogr ammes
For pr og rammes 1. .. 196
Back
End
At AVS
(programme
19 7
)
AV Connections
It is possible to manually adjust various settings for connections with external devices on the AV connections screen.
[1] At AV1 (programme 199)/AV2 (programme 198)/AVS (programme 197)
Select the appropriate signal type and colour standard for the signals from the video equipment
connected to the AV1, AV2, or AVS terminal.
SOUND
INFO
iE
T
(
RED)(GREEN)(YELLOW)(CYAN
END
OK
MENUTEXT
M
)
CH
TV/VIDEO
OK
END
MENU
]/[
1 Press MENU to display the TV
menu.
2 Press ]/[ to select “AV
connections,” and then press OK
to display the “AV connections”
screen.
3 Press ]/[ to select “At AV1
(programme 199),” “At AV2
(programme 198),” or “At AVS
(programme 197),” and then press
OK to display the signal type
selection screen.
4 Press ]/[ to select the desired
signal type, and then press OK.
The colour standard selection
screen appears.
TV menu
Standard set tings
Picture
Sound
Programmes
AV c onnec ti ons
Chi l d l oc k
Other . . .
Back
End
5 Press ]/[ to select the desired
colour standard, and then press
OK.
6 Press END to exit.
28
AV conne ct i ons
At AV1 (progr amme 199 )
Col our s tanda rd :
Aut oma ti c
PAL
SECAM
NTSC
NTSC-V
PAL- V
PAL-M
PAL- N
Se l ec t
and a ccept
wi th OK
Back
End
Page 31

Useful Features (Continued)
At AV1
( pr ogramme
199
)
AV conne ct i ons
At AV2
( p r o g r amme
198
)
Decode r p rogr amme s
For pr og rammes 1.. . 1 96
Back
End
At AVS
( p r o g r amme
19 7
)
Decoder progr ammes
For decoder conne cted to AV1
Sound f r om AV1
Back
End
AV Connections (Continued)
[2] Decoder programmes
When connecting a video device to the AV1 terminal, you need to adjust the decoder programme
settings.
SOUND
INFO
iE
T
(
RED)(GREEN)(YELLOW)(CYAN
END
OK
MENUTEXT
M
)
CH
TV/VIDEO
</>
END
MENU
]/[
OK
1 Perform steps 1 and 2 in [1] At
AV1 (programme 199)/AV2
(programme 198)/AVS
(programme 197) to display the
“AV connections” screen.
2 Press ]/[ to select “Decoder
programmes,” and then press OK
to display the “Decoder
programmes” screen.
3 Press ]/[ to select “For decoder
connected to AV1,” and then
press OK to display the decoder
programme selection screen.
4 Press ]/[ and/or </> to select
the programme for the decoder,
and then press OK. Repeat the
same procedure if you want to
specify other decoder
programmes.
5 Press MENU to return to the
“Decoder programmes” screen.
6 Press ]/[ to select “Sound from
AV1”, and then press </> to
select the desired sound source.
7 Press END to exit.
Decoder programmes
For decoder conne cted to AV1
0
S01
1
S08
Sound AV1
2
S10
3
S10
4
S11
5
E03
6
E05
7
E06
8
E09
9
E10
Sel ect decoder
programme
and conf i rm w i th OK
Decoder progr ammes
For decoder conne cted to AV1
Sound f r om AV1 Autom. Dec. TV
10
11
12
13
14
15
16
17
18
19
E11
E36
E37
E38
E50
E53
E54
E56
E57
20
21
22
23
24
25
26
27
28
29
Back
End
Back
End
Back
End
29
Page 32

Useful Features (Continued)
AV conne ct i ons
Back
End
For pr og rammes 1.. . 1 96
AV contr ol vol ta ge
RGB on-screen di splay
no y es
At AV1
( pr og r amme
199
)
AV conne ct i ons
At AV2
(programme
198
)
Decode r p rogr ammes
For pr og rammes 1.. . 1 96
Back
End
At AVS
( p r o g r amme
19 7
)
AV Connections (Continued)
[3] For programmes 1...196
The influence of the AV control voltage and of fast blank at programme positions from 1 to 196
can be set.
SOUND
INFO
iE
T
(
RED)(GREEN)(YELLOW)(CYAN
END
OK
MENUTEXT
M
)
CH
TV/VIDEO
</>
END
]/[
OK
1 Perform steps 1 and 2 in [1] At
AV1 (programme 199)/AV2
(programme 198)/AVS
(programme 197) to display the
“AV connections” screen.
2 Press ]/[ to select “For
programmes 1...196,” and then
press OK to display the “For
programmes 1...196” screen.
3 Press ]/[ to select the desired
item.
4 Press </> to select “yes” or “no.”
Notes:
■ If the item concerned is set to
“yes”, the appropriate picture is
through-connected at all programme positions from 1 to 196
when a control voltage/an RGB
signal is applied.
■ When you use RGB mode
(SCART): In on screen menu AV
connections, selection For
Programmes 1...196. Set “AV
control voltage” to “yes”, and “RGB
on-screen display” to “yes”.
If “AV control voltage” is set to “no”,
the function will not work correctly.
5 Press END to exit.
30
Page 33

Useful Features (Continued)
Standard set tings
TV menu
Picture
Sound
Programme s
AV c onnec ti ons
Chi l d l ock
Back
End
Other . . .
Child Lock
The Child Lock function blocks the viewing of any channel for which the child lock has been set.
To use the Child Lock function, you first need to define your PIN (Personal Identification Number).
[1] Defining a PIN
SOUND
INFO
iE
T
(
RED)(GREEN)(YELLOW)(CYAN
END
OK
MENUTEXT
M
)
CH
TV/VIDEO
OK
MENU
]/[
Channel
Select
1 Press MENU to display the TV
menu.
2 Press ]/[ to select “Child lock.”
3 Press OK to display the PIN input
screen.
4 Input the desired four-digit PIN
(e.g. 1234) with Channel Select.
Notes:
■ Be sure to make a note of your PIN
before pressing OK.
■ The PIN will not be set if MENU or
END is pressed before the fourth
digit has been input.
5 Press OK to accept the entered
PIN.
TV menu
Chi l d l ock
Pl ease def i ne your
PI N.
Chi l d l o ck
Please memorize
your PIN
bef ore pr oceedi ng
wi t h OK .
0- 9 : Inpu t
TV menu
Chi l d l ock
Pl ease def i ne your
PI N.
Chi l d l o ck
Pl ease memor i ze
your PIN
bef ore pr oceedi ng
wi t h OK .
0- 9 : Inpu t
Back
End
Back
End
????
123 4
31
Page 34

Useful Features (Continued)
Child Lock (Continued)
[2] Changing/Cancelling a PIN
To change a PIN
MENUTEXT
M
)
END
OK
END
]/[
Channel
Select
1 Perform steps 1 to 3 in [1]
Defining a PIN to display the PIN
input screen.
2 Enter your four-digit PIN (e.g.
1234) with Channel Select.
Notes:
■ Numbers entered are hidden with
????.
■ If the PIN has been input incorrectly, “Wrong PIN!” is displayed.
SOUND
INFO
iE
OK
T
(
RED)(GREEN)(YELLOW)(CYAN
CH
TV/VIDEO
TV menu
Chi l d l ock
Pl ease ent er your
PI N:
Chi l d l oc k
????
When the PIN is correctly entered,
the “Child lock” screen appears.
3 Press ]/[ to select “Change
PIN.” The currently defined PIN is
displayed.
4 Input the new four-digit PIN (e.g.
5678) with Channel Select.
5 Press END to exit.
To cancel a PIN
| In step 3 above, press ]/[ to
select “Cancel PIN,” and then
press OK to cancel the currently
defined PIN.
0-9: Input
TV menu
Chi l d l ock
For a ll programmes
For i nd iv id ual pr ogr . onl y
Change PI N
Canc el P IN
0- 9: I nput
TV menu
Chi l d l ock
For a ll programmes
For ind iv idual pr ogr. onl y
Change PI N
Canc el P IN
0- 9: I nput
TV menu
Chi l d l ock
For a ll programmes
For ind iv idual pr ogr. onl y
Change PI N
Cancel P IN
Back
End
Back
End
Back
End
1234
5678
32
Erase wi th OK
Back
End
Page 35

Useful Features (Continued)
Child Lock (Continued)
[3] Setting Child Lock
There are four different ways of activating a child lock:
1. General child lock for all programmes immediately
2. General child lock for all programmes with daily time limit
3. General child lock for all programmes with single time limit
4. Programme-position related child lock without time limit
The Child Lock comes into effect only after the LCD TV set has entered the standby mode and is then
turned on again.
To set a Child Lock for all
programmes with a time limit
SOUND
INFO
iE
T
(
RED)(GREEN)(YELLOW)(CYAN
END
OK
MENUTEXT
M
)
CH
TV/VIDEO
</>
END
]/[
OK
Channel
Select
1 Perform steps 1 to 3 in [2]
Changing/Cancelling a PIN to
display the “Child lock” screen.
2 Press ]/[ to select “For all
programmes,” and then press OK
to display the “For all
programmes” screen.
3 Press ]/[ to select the desired
item. (See the table below.)
4 Press </> to select the desired
choice, and, if required, input
digits with Channel Select.
5 Press END to exit.
Notes:
■ If the current clock time is within the time
limit, the Child Lock is activated
immediately after the LCD TV set is
turned off and on again. For example, if
the current clock time is 9:00 and the
time limit is specified from 22:00 to 14:00,
the lock is effective from 9:00 to 14:00.
■ When a Child Lock is set for all programmes with a time limit, the “Time and
date” item is not displayed in the TV
menu and cannot be selected.
TV menu
Chi l d l ock
For a ll programmes
For ind iv idual pr ogr. onl y
Change PI N
Cancel P IN
TV menu
Chi l d l ock
For a ll programmes
Immediate ly
Da i l y
Once
no yes
Back
End
Back
End
Adjustment item
Choice/Input value
Select “yes” to activate the Child Lock immediately (after the
Immediately
no yes
LCD TV set has been turned off and on again). The lock
remains effective until “no” is selected.
Daily
Once
no HH:MM-HH:MM
no HH:MM-HH:MM
Warning:
■ The timer takes its clock information from the Teletext broadcast. The teletext broadcast may be different time zone
and therefore childlock timer may not activate as expected. Concerning this detail, please refer to page 38.
Input the start and end time for a daily-recurring Child Lock.
The lock is activated everyday unless “no” is selected.
Input the start and end time for a once-only Child Lock. The
length of the period should be up to 24 hours.
Description
33
Page 36

Useful Features (Continued)
Child Lock (Continued)
[3] Setting Child Lock (Continued)
SOUND
INFO
iE
T
(
RED)(GREEN)(YELLOW)(CYAN
END
OK
MENUTEXT
M
)
CH
TV/VIDEO
</>
END
]/[
OK
To set a Child Lock for individual
programmes without time limit
1 Perform steps 1 to 3 in [2]
Changing/Cancelling a PIN to
display the “Child lock” screen.
2 Press ]/[ to select “For
individual progr. only,” and then
press OK to display the “For
individual progr. only” screen.
3 Press ]/[ and/or </> to select
the desired programme.
4 Press OK to lock the programme.
The locked programme is
displayed in red.
Notes:
■ To unlock the programme, select
the programme and press OK.
■ The Child Lock remains effective
until it is cancelled.
TV menu
Chi l d l ock
For a ll programmes
For ind iv idual pr ogr. onl y
Change PI N
Cancel P IN
For i ndiv idual pr ogr. onl y
7
197
AVS
198
AV2
199
AV1
0
S01
1
S08
2
S10
3
S10
4
S11
5
E03
6
E05
Sel ect pr ogr amme and
l ock or unl ock
wi t h OK
E06
E09
8
9
E10
E11
10
11
E36
12
E37
13
E38
E50
14
15
E53
16
E54
Back
End
E56
17
E57
18
19
20
21
22
23
24
25
26
Back
End
5 Press END to exit.
Note:
■ When a Child Lock is activated, the “Programmes” item is not displayed in the TV menu and cannot be selected.
34
Page 37

Useful Features (Continued)
Chi l d l ock
Pl ease ent er your
PI N:
0-9: Input
Chi l d l o ck
* * * *
SOUND
Child Lock (Continued)
[4] Temporarily cancelling the Child Lock setting
You can view a programme for which a Child Lock has been set by temporarily cancelling the Child
Lock setting. Perform the procedure below to input your PIN and cancel the Child Lock if you are
prompted to do so.
When the PIN input screen
INFO
iE
T
(
RED)(GREEN)(YELLOW)(CYAN
END
OK
MENUTEXT
M
)
CH
TV/VIDEO
Channel
Select
|
appears, input your PIN with
Channel Select. The normal
screen appears when the PIN is
correctly entered.
Note:
■ If the PIN has been input incorrectly, “Wrong PIN!” is displayed.
35
Page 38

Useful Features (Continued)
On-screen Display
You can adjust various settings for on-screen displays.
SOUND
INFO
iE
T
(
RED)(GREEN)(YELLOW)(CYAN
END
OK
MENUTEXT
M
)
CH
TV/VIDEO
Adjustment item
</>
END
1 Press MENU to display the TV
2 Press ]/[
MENU
]/[
OK
3 Press ]/[
4 Press </> to make the
5 Press END to exit.
Choice/Value range
menu.
to select “On-screen
display,” and then press OK to
display the “On-screen display”
screen.
to select the desired
adjustment item. (See the table
below.)
adjustment.
Other . . .
Description
TV menu
On-screen display
Timer funct ions
Time and date
Fi rst instal lat ion
Language
Back
End
TV menu
On- screen di splay
On-s creen
Posi t ion
Sound inf o
Time
Alarm time
Sleep time
time
4
Back
End
To select display time in seconds for the information
On-screen time
2 – 9
windows (TV status, programme identification, volume,
etc.), Direct Control menu, and certain messages.
Position
Sound info
Time
Alarm time
Sleep time
bottom top
no yes
no yes
no yes
no yes
To select display position of information windows.
To select information displays is selected to be turned
on or off in the TV status window.
36
Page 39

Timer Functions
Useful Features (Continued)
SOUND
INFO
iE
T
(
RED)(GREEN)(YELLOW)(CYAN
END
OK
MENUTEXT
M
)
CH
TV/VIDEO
</>
END
MENU
]/[
OK
Channel
Select
1 Press MENU to display the TV
menu.
2 Press ]/[ to select “Timer
functions,” and then press OK to
display the “Timer functions”
screen.
3 Press ]/[ to select the desired
item. (See the table below.)
4 Press </> to make the
adjustment. If you select “00:00”
for “Switch off” or “Alarm,” input
the desired time with Channel
Select.
5 Press END to exit.
TV menu
Other . . .
On-screen display
Timer funct ions
Time and date
Fi rst instal la tion
Language
TV menu
Timer funct i ons
Switch off
Alarm
Al arm vol ume
0- 9: Input
Back
End
Back
End
no 00: 00
Adjustment item
Switch off
Alarm
Alarm volume
Choice/Input value/Value range
no HH:MM
no HH:MM
0 – 39
Description
The LCD TV set automatically turns off at
the specified time everyday.
The alarm sound turns on at the specified
time everyday.
The volume of the alarm sound is selected.
37
Page 40

Useful Features (Continued)
Setting Time and Date (Manual)
The time and the date can be manually set if the LCD TV set is unable to get these from the Teletext function.
SOUND
INFO
iE
T
(
RED)(GREEN)(YELLOW)(CYAN
END
OK
MENUTEXT
M
)
CH
TV/VIDEO
OK
END
MENU
]/[
Channel
Select
1 Press MENU to display the TV
menu.
2 Press ]/[ to select “Time and
date,” and then press OK to
display the “Time and date”
screen.
3 Press ]/[ to select “Time.”
4 Input the current time
(HH:MM:SS) with Channel
Select.
5 Press ]/[ to select “Date.”
6 Input the current date
(DD:MM:YYYY) with Channel
Select.
TV menu
Other . . .
On-screen display
Timer funct ions
Time and date
Fi rst instal lat ion
Language
TV menu
Time and date
Time
Da te
TV menu
Time and date
Time
Da te
--:--:- -
0- 9: Input
* *.* *.* * * *
Back
End
Back
End
7 Press END to exit.
0- 9: Input
Note:
■ When the LCD TV set receives Teletext signals from broadcasting of other countries, sometimes the time on the
display may be wrong.
38
Back
End
Page 41

Mono!
Stereo
Sound 1
Sound 2
Sound 1+2
Mono!
Useful Features (Continued)
NICAM Broadcast Selection
This enables the selection of the reception mode when receiving a NICAM-I or NICAM-B/G signal. To let
you enjoy NICAM broadcasting, this LCD TV set receives NICAM system stereo, bilingual, and monaural
broadcasts.
Stereo
SOUND
INFO
iE
OK
T
(
RED)(GREEN)(YELLOW)(CYAN
CH
SOUND
END
MENUTEXT
M
)
The LCD TV set is receiving a stereo
broadcast.
• Each time you press SOUND, the
mode changes between “Stereo”
and “Mono!.”
• When “Mono!” is selected, the TV
sound is output monaurally.
TV/VIDEO
Bilingual
When the LCD TV set is receiving a
bilingual programme, the “Sound 1”
mode is automatically selected.
• Each time you press SOUND, the
mode changes as follows:
Sound 1 → Sound 2 → Sound 1+2
→ Mono!
Monaural
The LCD TV set is receiving a
monaural broadcast.
• Each time you press SOUND, the
mode changes between “Nicam”
and “Mono!.”
Ni cam
Mono!
Notes:
■ If approximately 3 seconds pass without a button being pressed, the mode setting is automatically terminated and
the LCD TV set returns to the normal mode.
■ The setting can be individually selected for each channel number.
■ You can also turn off the NICAM mode by setting the “Loudsp. sound” item to “Mono!” in the Sound screen, which is
displayed when you press GREEN (see page 16).
39
Page 42

Useful Features (Continued)
Mono!
Stereo
Sound 1
Sound 2
Sound 1+2
Mono!
IGR (German stereo system) Broadcasts
This enables the selection of the reception mode when receiving an IGR-B/G signal. To let you enjoy IGR
broadcasting, this LCD TV set receives IGR system stereo and bilingual broadcasts.
Stereo
SOUND
INFO
iE
T
(
RED)(GREEN)(YELLOW)(CYAN
END
OK
MENUTEXT
M
)
CH
SOUND
The LCD TV set is receiving a stereo
broadcast.
• Each time you press SOUND, the
mode changes between “Stereo”
and “Mono!.”
• When “Mono!” is selected, the TV
sound is output monaurally.
TV/VIDEO
Bilingual
When the LCD TV set is receiving a
bilingual programme, the “Sound 1”
mode is automatically selected.
• Each time you press SOUND, the
mode changes as follows:
Sound 1 → Sound 2 → Sound 1+2
→ Mono!
Notes:
■ If approximately 3 seconds pass without a button being pressed, the mode setting is automatically terminated and
the LCD TV set returns to normal mode setting.
■ The setting can be selected individually for each channel number.
■ You can also turn off the IGR mode by setting the “Loudsp. sound” item to “Mono!” in the Sound screen, which is
displayed when you press GREEN (see page 16).
40
Page 43

Teletext
■ What is Teletext?
Teletext is an information service organized like a magazine,
which is provided by some TV stations in addition to regular
television broadcasting. Your LCD TV set receives special
Teletext signals broadcast by a TV station, processes the
information and displays it graphically on the screen. News,
weather and sports information, stock exchange prices,
programme reviews and closed captioning for the deaf are
among the many services available through Teletext.
■ Teletext mode
Teletext is activated with TEXT on the remote control and is
also closed with it. The LCD TV set can be controlled in Teletext mode directly by inputting commands with the remote
control and indirectly through the on-screen display (menu
system).
■ Operating instructions in Teletext mode
Only lines 0 to 23 (one transmitted Teletext page) can be
displayed on the screen simultaneously. When you turn on a
control line holding the operating instructions for TOP text or
subpages, it is superimposed on line 23. Only one control line
can be displayed at one time.
• If FLOF Teletext is broadcast, a control line is transmitted as
the 24th line, which cannot be displayed on the screen, so it
is superimposed on line 23. To prevent constant loss of
information on line 23, the control line is turned off.
The appear time is depend on “On-screen time”. (refer to
page 36.)
• The FLOF system for teletext is transmits in UK currently.
• The TOP system for teletext is transmits in Germany
currently.
• If TOP Teletext is broadcast, a control line, TOP line, can be
displayed on the screen. The TOP line involves the operating
instructions associated with all of the coloured buttons if TOP
text is transmitted, or the operating instructions for only RED
and GREEN if TOP text is not being transmitted.
• If there are subpages, a control line holding the operating
instructions for subpages can be displayed on line 23.
369 SHARP- TEXT
1
2
3
4
5
6
7
8
9
10
11
12
13
14
15
16
17
18
19
20
21
22
23
369 SHARP- TEXT
1
2
3
4
5
6
7
8
9
10
11
12
13
14
15
16
17
18
19
20
21
22
---
--- ---
02 :52 :06
02:52:21
P6FE
Note:
■ The subtitles page may differ according to the country of operation and therefore must be set accordingly (e.g. page
No. 150 in Germany, page No. 888 in UK.). And please confirm page 51.
41
Page 44

Teletext (Continued)
[1] Turning on and off Teletext mode
369 SHARP- TEXT
1
2
3
4
5
6
7
8
9
10
11
12
13
14
15
16
17
18
19
20
21
22
23
SOUND
INFO
iE
T
(
RED)(GREEN)(YELLOW)(CYAN
END
OK
MENUTEXT
M
)
CH
TV/VIDEO
TEXT
1 Select a TV channel that is
broadcasting the Teletext
programme.
2 Press TEXT. The Teletext screen
appears.
To turn off Teletext mode, press
|
TEXT again.
[2] Using the TOP line
When TOP Teletext is being broadcast, you can display the TOP line, which contains the operating
instructions on the screen.
369 SHARP- TEXT
1
2
3
4
5
6
7
8
9
10
11
12
13
14
15
16
17
18
19
20
21
22
---
--- ---
P6FE
SOUND
INFO
iE
T
(
RED)(GREEN)(YELLOW)(CYAN
END
OK
MENUTEXT
M
)
CH
END
Coloured
buttons
1 Press any Coloured button to
display the TOP line.
2 Use the Coloured buttons to
operate the Teletext screen.
• Press RED to display the previous
page and GREEN to display the
next page. YELLOW and CYAN
are as indicated on the TOP line.
3 Press END to turn off the TOP
TV/VIDEO
line.
02:52:06
02:52:21
42
Page 45

Teletext (Continued)
[3] Changing subpages
If a page has been selected from among several subpages, you can display a control line which
contains the subpage numbers.
1 Press </>. The control line with
the subpage numbers is
superimposed on line 23, and the
number of the currently selected
subpage is displayed in blue.
Note:
■ Page numbers can be displayed for
up to eight subpages simultane-
SOUND
INFO
iE
T
(
RED)(GREEN)(YELLOW)(CYAN
END
OK
MENUTEXT
M
)
CH
</>
END
ously. If there are more than eight
subpages attached to a page, the
TV/VIDEO
existing subpages are repeatedly
overwritten.
2 Press </> to select the desired
subpage number. The selected
subpage is displayed.
3 Press END to turn off the control
line.
[4] Using the TOP table
When TOP Teletext is being broadcast, you can display the TOP table with the current programme
data if one exist.
1 Press OK to display the TOP
table. The Teletext page is
temporarily turned off.
2 Press ]/[ to select the desired
item. Press </> to select topics
(column 1) or subtopics (column
2) if they exist.
3 Press OK. A page associated with
the selected item is displayed.
SOUND
INFO
iE
T
(
RED)(GREEN)(YELLOW)(CYAN
END
OK
MENUTEXT
M
)
CH
TV/VIDEO
</>
]/[
OK
43
Page 46

Teletext (Continued)
News f l a sh
Teletext menu
Re vea l
Subpage
Sub - t i t le page s
Charac te r set
Back
End
Act iv at e
wi t h OK
[5] Using Teletext menu
SOUND
INFO
iE
T
(
RED)(GREEN)(YELLOW)(CYAN
END
OK
MENUTEXT
M
)
CH
TV/VIDEO
Item
Newsflash
Reveal
</>
END
MENU
]/[
OK
You can activate Newsflash mode by pressing OK. To turn off Newsflash
mode, press OK or MENU.
You can reveal hidden information (application e.g. in puzzle solutions or VPS
times). Press </> to select “yes,” and then press OK. The last Teletext page
is displayed with the Reveal function activated. The Reveal function applies to
this page only once.
display the Teletext menu.
2 Press ]/[ to select the desired
item.
3 Perform the required operation for
the item. (See the table below.)
4 Press MENU or END to exit.
Description
1 Press MENU in Teletext mode to
Subpage
Character set
Sub-title pages
44
You can display the desired subpage by directly inputting a four-digit subpage
number with number keys.
Press OK to display the “Character set” screen.
Press OK to display the “Sub-title pages” screen.
Page 47

[5] Using Teletext menu (Continued)
Teletext (Continued)
SOUND
INFO
iE
OK
T
(
RED)(GREEN)(YELLOW)(CYAN
CH
</>
END
END
MENUTEXT
M
]/[
)
OK
TV/VIDEO
To select the character set
1 With the “Character set” screen
displayed, press ]/[ to select
the desired character set, and
then press OK.
2 Press END to exit.
To use the Sub-title pages screen
1 With the Sub-title pages screen
displayed, press ]/[ and/or </>
to select the desired programme.
2 Press END to exit.
Notes:
■ To obtain the correct sub-title in other
countries (page 150 default), it is
necessary to input the transmittingstation-dependent numbers for these
pages beforehand.
■ Moving the programme position in the
Programme table also moves the subtitle page.
Te let ex t menu
Charac ter set
St andar d
Po l i sh
Tur ki sh
Accept
wi t h OK
Back
End
[6] Useful Features for Teletext
1 The “0” key on the remote control
can be used to hold the current
teletext page.
2 The “9” key on the remote control
can be used to zoom the current
teletext page as below.
ABC
DEF
* The screen displays each mode
each time “9” is pressed.
ABC DEF
45
Page 48
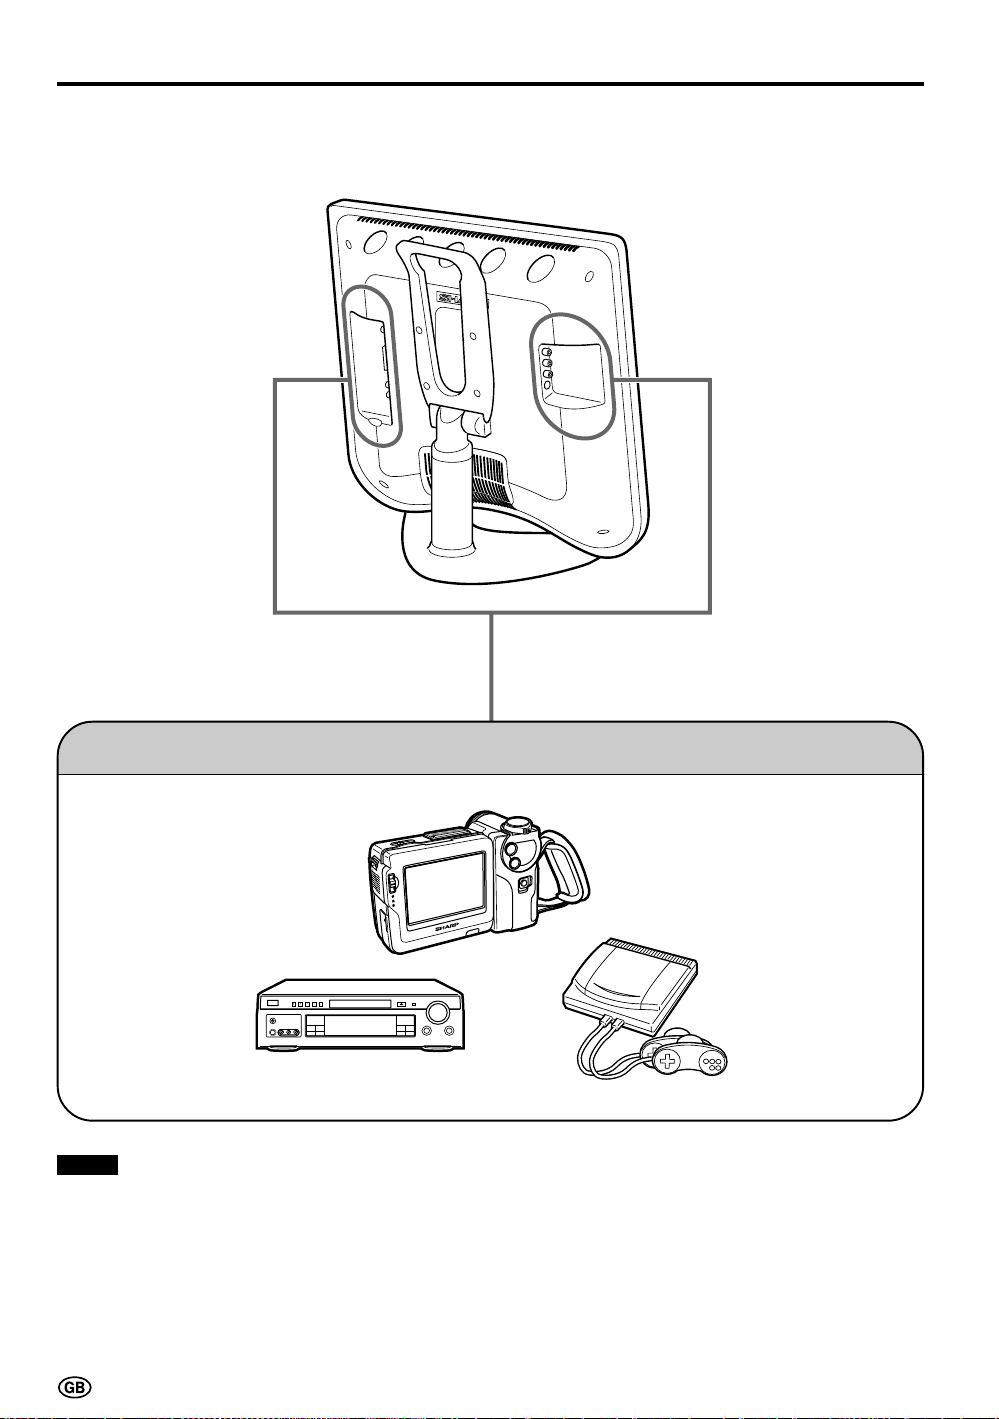
Connecting External Devices
It is possible to enjoy video and sound by connecting a VCR and home video game system to the terminals located on the rear of the main unit.
When connecting an external device, turn off the power of the main unit and connecting device to prevent
any possible damage.
To AV-IN 1 or 2
terminal
Examples of external devices that can be connected
• Video camera
• Home video game system
• VCR
• Laser disc player
• DVD
AUX 1
TUNER/BAND
AUX 2
AUX 3
DVD
SURROUND
ON/OFF
* PC connection is not possible.
Notes:
■ Use a commercially available audio/video cord for the cable.
■ Only connect audio/video signals to AV-IN 1 and 2 terminals. Connecting other signals may result in a malfunction.
■ The VIDEO input terminal and the S-VIDEO input terminal on the AV-IN 2 side are shared connections with priority
given to the S-VIDEO terminal. If both terminals are connected, the video signals from the S-VIDEO input terminal
are selected for the AV-IN 2 input.
When viewing video from the VIDEO input terminal, do not connect anything to the S-VIDEO input terminal.
■ For details concerning usage and connection of external devices, see the respective instruction manuals.
46
Page 49

Connecting External Devices (Continued)
Connecting a Decorder through the 21-pin Euro-SCART (AV-IN 1/RGB)
21
20
19
18
17
16
15
14
13
12
11
10
9
8
7
6
5
4
3
2
1
21-pin Euro-SCART (RGB)
A
V
-
IN
1
RGB
T
U
O
IO
UD
A
L
R
R
E
W
O
P
T
U
P
N
I
V
2
1
C
D
1. Audio right output 8. Audio-video control 15. RED input
2. Audio right input 9. Earth for green 16. RED/GREEN/BLUE control
3. Audio left output 10. Not used 17. Earth for video
4. Common earth for audio 11. GREEN input 18. Earth for RED/GREEN/BLUE control
5. Earth for blue 12. Not used 19. Video output
6. Audio left input 13. Earth for red 20. Video input (PAL/SECAM/NTSC)
7. BLUE input 14. Not used 21. Plug shield
To AV-IN 1
(21-pin
Euro-
21-pin Euro-SCART
connector
Decoder
SCART)
terminal
A
V-
IN
1
RGB
UT
O
IO
UD
A
L
R
R
E
W
O
P
T
U
P
IN
V
2
1
C
D
47
Page 50

Connecting External Devices (Continued)
Connecting a VCR or a home video game system (AV-IN 2)
2
IN
-
V
A
O
E
ID
V
L
AUDIO
R
S
-V
ID
E
O
To S-VIDEO
input terminal
S-Video cord
To S-Video
output terminal
Video
Audio/video cord
To audio/video
output terminals
Audio
Audio
(R)
(L)
To AV-IN 2
terminals
Video
Audio
Audio/video cord
(R)
To AV-IN 2
terminals
To audio/video
output terminals
Audio
(L)
Home video
game system
VCR
Note:
■ When connecting to both the VIDEO input and S-VIDEO input terminals for AV-IN 2, priority is given to the S-VIDEO
input terminal.
48
Page 51

Connecting External Devices (Continued)
Outputting audio (AUDIO OUT)
It is possible to output audio from the LCD TV set through the AUDIO OUT terminals.
A
V
-IN
1
RGB
T
U
O
IO
D
U
A
L
R
R
E
W
O
P
T
U
P
N
I
V
2
1
C
D
Connect an audio amplifier, etc.
How to fix the cables
• Secure cables and cords with the supplied
cable clamps so that they do not get caught
when mounting the cover.
Cable clamps
49
Page 52

Troubleshooting
Before calling for repair services, make the following checks for possible remedies to the symptoms
encountered.
LCD TV set
Sound
Problem Check item
• Make sure the AC adapter is properly inserted in the
Picture
Picture
There is no
picture or sound.
There is no
picture.
There is no
picture from AVIN 2.
There is no
sound.
There is no
picture or sound,
just noise.
Picture is not
clear.
power outlet.
• Reception other than that of broadcasting stations can
be considered.
• Make sure the input mode is set to TV.
• Make sure the main power switch of the main unit is on.
• Make sure Picture adjustment is properly adjusted.
• The fluorescent lamp may have reached the end of its
service life.
• Make sure the S-Video terminal has nothing connected.
• Make sure the volume is not set to minimum.
• Make sure the sound is not set to mute.
• Make sure the headphones are not connected.
• Make sure the antenna cable is properly connected.
• Bad reception should be considered.
• Make sure the antenna cable is properly connected.
• Bad reception can be considered.
Reference
page
6
12
12
15
–
48
13
13
9
6
–
6
–
• Check the colour adjustment.
Picture is too
light or
improperly
tinted.
The picture is
too dark.
Remote control does not work.
(NTSC mode)
• Check if “Brightness” is set to “dark.”
• Check “Contrast” and “Black level.”
• The fluorescent lamp may have reached the end of its
service life.
• Check if batteries in the remote control have sufficient
power.
• Make sure the remote sensor window is not under
strong lighting.
50
15
15
15
–
5
5
Page 53

LCD TV set
Troubleshooting (Continued)
On-screen message Check item
No subtitles available!
Antenna
Problem Check item
The picture is
not sharp.
The picture
shakes.
• Referring to the “Sub-title pages” screen of the Teletext
menu check if the channel for the sub-title is set for your
country.
• Check if a programme having sub-titles is received.
• The reception may be weak.
• The quality of the broadcast may also be bad.
• Make sure the antenna is facing the correct direction.
• Make sure the outside antenna has not been disconnected.
Reference
page
45
–
The picture has
ghosts.
The picture is
spotted.
There are
stripes on the
screen or
colours fade.
• Make sure the antenna is facing the correct direction.
• Broadcast waves may be reflected from adjacent mountains or
buildings.
• There may be interference from automobiles, trains, high-voltage
lines, neon lights, etc.
• There may be interference between the antenna cable and power
cable. Try positioning them further apart.
• Is the unit receiving interference from other devices?
Transmission antennas of radio broadcasting stations and
transmission antennas of amateur radios and cellular phones may
also cause interference.
• Use the unit as far apart as possible from devices that may cause
possible interference.
51
Page 54

Specifications
Items 13" LCD COLOUR TV, Model: LC-13C2E
LCD panel 13" BLACK TFT LCD
Number of dots 921,600 dots
Video colour system PAL/SECAM/NTSC
TV TV-Standard (CCIR) BG/L/DK, I, M, N
Function TV-Tuning System Auto preset 197 ch.
STEREO/BILINGUAL NICAM, IGR
AUTO PRESET Yes
CATV ~Hyper Band
Brightness 430 cd/m
Lamp life 60,000 hours
Viewing angles H: 160° V: 160°
Audio amplifier 2.1 W × 2
Speakers 5 cm ø 2 pcs.
Terminals AV-IN 1 RGB
AV-IN 2 S-VIDEO, VIDEO, AUDIO
OUT AUDIO
Antenna DIN
Headphones 3.5 mm ø jack (Front)
OSD language English/German/French/Spanish/Italian/Swedish/Dutch
Power requirement DC 12 V, AC 110 – 240 V, 50/60 Hz
Weight X.Xkg, incl. stand, excl. accessories
Accessories Remote Control, Batteries, AC adapter, AC cord,
Cable clamp
2
■ Design and specifications are subject to change without notice.
52
Page 55

Dimensional Drawings
Unit: mm
177.8
59.3
271.2
334
128.5
200.8
198.72
264.96
398.7
267
214
270.2
80.2
1
51
9
0.5
6
137.3
18
9
40.5
74.4
102.9
1
177.8
AV-IN 1
AUDIO OUT
POWER
INPUT
DC12V
AV-IN 2
VIDEO
15
L
AUDIO
15
RGB
L
R
100
2.4
S-VIDEO
6.8
100
R
16
8.4
28 15 49 66.5
53
Page 56

IMPORTANT NOTE ON DISENGAGING ADVANCED CHILD LOCK
If you have forgotten your personal code number and cannot disengage ADVANCED CHILD LOCK, follow
the procedure below.
1. Press MENU to display the TV menu.
2. Press ]/[ to select “Child lock,” then press OK.
3. The PIN input menu appears.
4. Input “3001” with Channel Select.
The Child lock setting menu appears and the PIN is cleared.
A new PIN can now be input.
ADVANCED CHILD LOCK will now be disengaged.
We suggest that you remove this instruction from the manual to prevent children from reading it. Keep it in a
safe space for future reference.
54
Page 57

Printed in Japan
Gedruckt in Japan
Imprimé au Japon
Stampato in Giappone
Impreso en Japón
Tryckt i Japan
Gedrukt in Japan
TINS-xxxxxxxx
SHARP CORPORATION
OSAKA, JAPAN
Printed on post-consumer recycled paper.
Gedruckt auf Nachverbraucher-Recyclingpapier.
Imprimé sur du papier recyclé.
Stampato su carta riciclata.
Impreso en papel reciclado.
Tryckt på slutkonsumerat återanvänt papper.
Gedrukt op na-verbruik recycled papier.
Page 58

documentation manual, user maintenance, brochure, user reference, pdf manual
This file has been downloaded from:
User Manual and User Guide for many equipments like mobile phones, photo cameras, monther board, monitors, software, tv, dvd, and othes..
Manual users, user manuals, user guide manual, owners manual, instruction manual, manual owner, manual owner's, manual guide,
manual operation, operating manual, user's manual, operating instructions, manual operators, manual operator, manual product,
 Loading...