

Page 1
BasicManual
CellphoneandPHSoperatorscollectandrecycleunused
telephones,batteriesandbatterychargersatstoresbearing
thelogoregardlessofbrandandmanufacturertoprotect
theenvironmentandreusevaluableresources.
濡れた状態での充電は、
異常な発熱・焼損などの
原因となり大変危険です。
CustomerServiceCenter
Forinquiries,call:
Forgeneralinformation,charges,andoperationassistance
(tollfree)
Fromfixed-linephones: Fromaucellphones:
areacodenotrequired
areacodenotrequired
Fromfixed-linephones: Fromaucellphones:
Incaseabovenumbersarenotavailable,calltoll-free:
0120-977-033
(exceptOkinawa)
0120-977-699(Okinawa)
Forservicecancelationprocedureincaseoflossortheft
(tollfree)
onyouraucellphone.
KeitaiGuaranteeServiceCenter
Forloss,theftordamage(tollfree)
Fromfixed-linephones/aucellphones:
Businesshours:9:00to20:00(7daysaweek)
Businesshours:9:00to20:00(7daysaweek)
Businesshours:24hours(7daysaweek)
0120-925-919
• The company names and product names appearing in this manual are
trademarks or registered trademarks of their respective holders.
• For exemptions, refer to “Notes on Usage” available on the au homepage.
May2016,1stEdition
Soldby:KDDICORPORATION,
OKINAWACELLULARTELEPHONECOMPANY
Manufacturedby:SHARPCORPORATION
SHV38
Page 2
Preface
Thank you for buying the “AQUOS SERIE SHV38” (simply called the “SHV38”
or the “product” from here on).
Before using the product, be sure to
“Notes on Usage”/“Setting Guide” available on the au homepage to ensure
correct use. After you have finished reading the manuals, be sure to keep them
accessible and store the printed manuals (“取扱説明書” (Basic Manual), “ご利
用にあたっての注意事項” (Notes on Usage) and “設定ガイド” (Setting Guide))
(Accessories) in safe places so that you can refer to them whenever you need
them. If you lose the printed manuals (Accessories), contact an au shop or
Customer Service Center.
read the “Basic Manual” (this manual) and
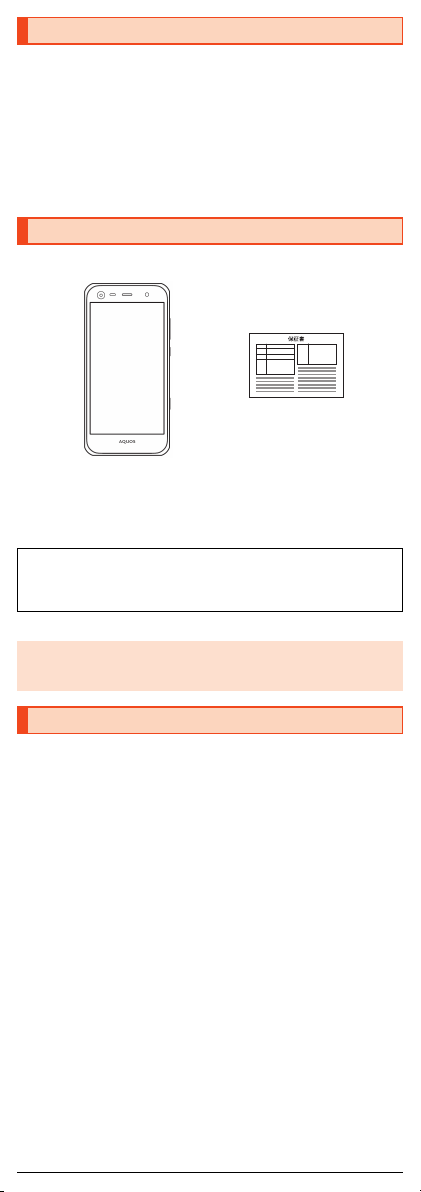
List of Packaged Items
Before you start using the product, make sure that you have all the following
packaged items with the product.
保証書 (Warranty)
(Japanese)
SHV38
• 取扱説明書 (Basic Manual) (Japanese)
• ご利用にあたっての注意事項 (Notes on Usage) (Japanese)
• 設定ガイド (Setting Guide) (Japanese)
The following items are not included in the package.
• microSD memory card
• AC adapter
• Purcha
se a specified charger (sold separately).
◎ The battery is built into the product.
◎ Illustrations of cell phones in this manual are only for reference. They may
look different from the actual product.
• Earphone
• microUSB cable
Operating Instructions
■ “Basic Manual” and “Setting Guide”
The “Basic Manual” (this manual) and “Setting Guide” available on the au
homepage describe basic operations of major functions.
For detailed descriptions of various functions, refer to the “Instruction Manual
application” (Japanese version) that can be used on the product or “Full
Instruction Manual” (Japanese) available on the au homepage:
(http://www.au.kddi.com/english/support/manual/)
• The company names and product names appearing in this manual are
trademarks or registered trademarks of their respective holders. Also, ™ and
® marks are sometimes omitted.
■ “Instruction Manual Application” (Japanese/English
Version)
You can use the “Instruction Manual application” (Japanese version) on the
product to check detailed operational procedures.
Also, you can activate intended functions from an explanation screen
depending on the functions.
On the home screen, “Apps Sheet” [[取扱説明書] (Instruction Manual).
Also, you can use the “Instruction Manual application” (English version) on the
product to check operational procedures.
On the home screen, “Apps Sheet” [[Basic Manual] after switching the
display language to English (zP.12).
• To use the application for the first time, you need to download and install it by
following on-screen instructions.
1
Page 3
Cell Phone Etiquette
■ Use of cell phones is not allowed in the following
places!
• Do not listen to music or watch videos/TV while driving a car or riding a
motorbike or bicycle. Use of a cell phone while driving a car or riding a
motorbike is prohibited by law. (Use of a cell phone while riding a bicycle
may be punishable by some regulations.) Be attentive to traffic around you
while walking. Not being able to hear surroundings or looking only at the
display may cause a traffic accident. Be careful especially at train crossings,
on station platforms, and at crosswalks.
• Since using the product on airplanes is restricted, follow the instructions
given by the respective airlines.
■ Be considerate of people around you
• Do not make calls in theaters, museums, libraries, and other similar places.
Turn power off or turn on manner mode so as not to disturb others around
you with your ringtones.
• Do not use the cell phone outside in town where you might hinder other
pedestrians.
• Viewing a cell phone screen while walking is a serious hazard. Do not
suddenly stop to talk on/operate the cell phone or do so while walking.
• Move to areas where you will not inconvenience others on bullet trains, in
hotel lobbies, etc.
• Refrain from talking in a loud voice.
• Check whether sound from earphones, etc. is audible when near others on a
train.
• Obtain the permission of other people before you take their photos with the
cell phone's camera.
• Keep general morals when you use the camera function.
• Some people close to you in crowded places such as packed trains may be
using a cardiac pacemaker. Turn on “Airplane mode” or turn the cell phone
off in such places.
• Abide by the rules of hospitals and other medical institutions where it is
forbidden to use or carry cell phones.
Illustrations and Descriptions in This
Manual
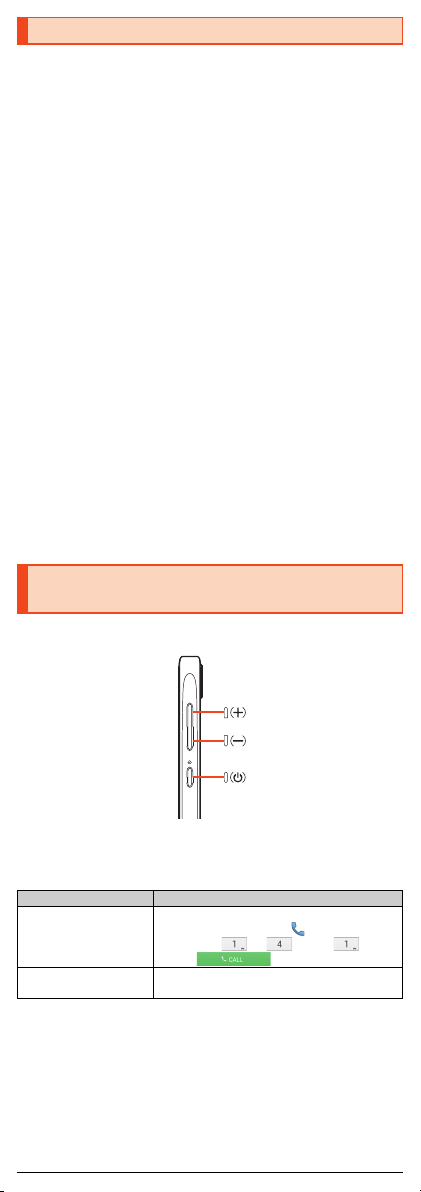
■ Note on Key Illustrations
In this manual, the key illustrations are simplified as shown below.
■ Description of Operations for Selecting Item/Icon/Key
etc.
In this manual, operation procedures are described as below.
Description Explanation
On the home screen,
“Apps Sheet” [[Phone]
[Enter “141”
[[CALL].
f (hold down for at
least 2 seconds).
* Tapping is to select a key or icon display ed on the screen by lightly tapping it with
your finger.
Slide/flick the Feel Home screen to switch to the
Apps Sheet, and then tap “ Phone”. Continue
by tapping “ ”, “ ”, and “ ”, and
finally “ ”.
Hold f down for at least 2 seconds.
2
Page 4
■ Notes on Illustrations/Screenshots
Screenshots and operations in this maul are based on attaching an au Nano IC
Card 04 to the product.
Screenshots may differ from actual screen. Portions of the screen are
sometimes omitted.
In this manual, part of the
screen such as icons are
omitted.
Actual screen
◎ Explanations of this manual are based on the case when the color of the
main unit is “White” as an example.
◎ Explanations of this manual are based on the case when the product is
held vertically. If you hold it horizontally, menu items/icons/on-screen
keys etc. may be different.
◎ Descriptions in this manual are based on operation in Feel Home.
Operations may be different if home applications have been changed (by
using “Home applications”, etc.).
◎ Menu items, layers and icons described in this manual may be different
according to functions being used and conditions.
◎ In this manual, “m icroSD™ memory card (commercially available)”,
“microSDHC
memory card (commercially available)” are abbreviated as “microSD
memory card” or “microSD”.
◎ All of the indicated amounts exclude tax unless otherwise specified.
™
memory card (commercially available)” and “microSDXC™
In this manual
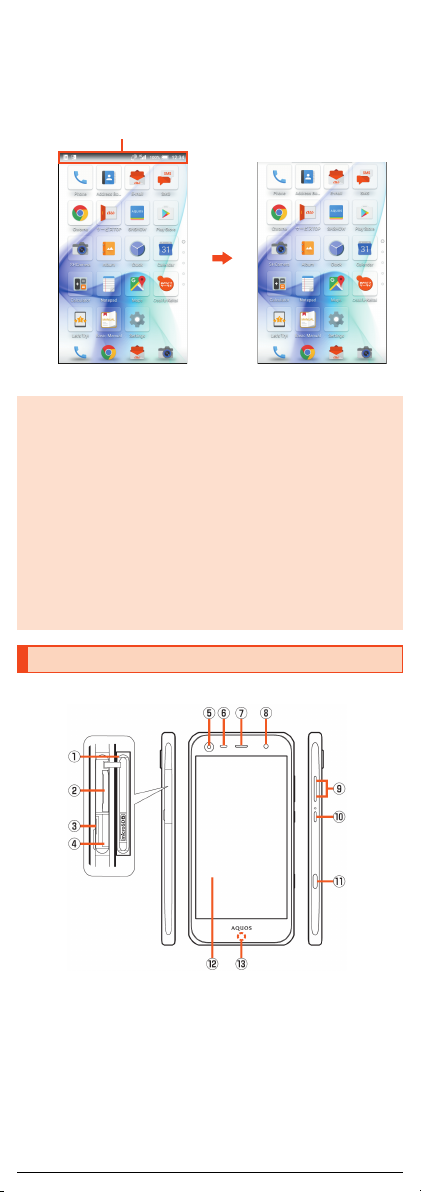
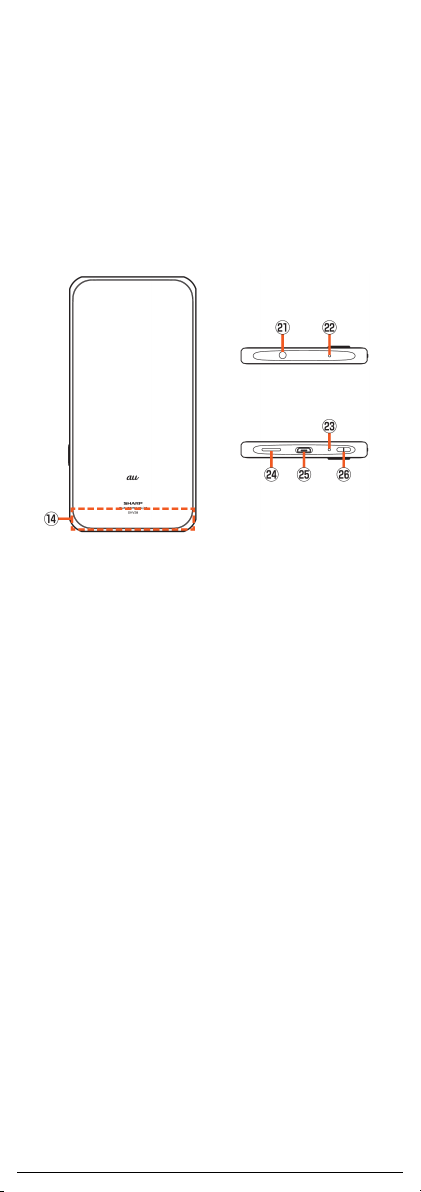
Names and Functions of Parts
■ Front/Left Side/Right Side
A au Nano IC Card 04/microSD memory card cover
B au Nano IC Card 04 tray slot
C IMEI tra y
Allows you to confirm the product's IMEI.
D microSD memory card slot
E In camera lens
F
Proximity sensor/Light sensor
Proximity sensor prevents inadvertent operations of the touch panel during
a call.
ght sensor detects the ambient brightness and adjusts the brightness of
Li
display.
3
Page 5
G
Earpiece (Receiver)
Mobile light
H
I ud Volume up/down key
Adjust the volume.
Hold down d on the lock screen to set/disable the manner mode.
f Power key
J
Turn the screen on/off.
Hold it down to turn on/off the power, restart the product, etc.
K Shutter Key
L Display (Touch panel)
The protective film is pasted on the surface of the display. When you use
commercially available protective films, remove the protective film.
Charging/Incoming indicator
M
The brightness of the indicator is suppressed automatically while sleeping
(23:00 to 6:30) by default.
( )
In camera
■ Back/Top and Bottom
N Internal antenna
O Out camera lens
P Mobile light
Q
TV antennas
R
GPS antennas
S
Wi-Fi®/Bluetooth® antennas
T & mark
Hold it over a reader/writer when using Osaifu-Keitai
U Earphone/Microphone jack
When you use (watch/record) TV, connect SHARP TV antenna cable 02 to
the earphone/microphone jack of the product (zP.5).
V Sub microphone
W Mouthpiece (Microphone)
X Speaker
Y External connection jack
Use when connecting the common AC adapter 05 (sold separately), the
microUSB cable 01 (sold separately), USB cable for peripherals
(commercially available), etc. to the product.
When you connect the common AC adapter 05 (sold separately), the
microUSB cable 01 (sold separately), etc. to the product, some applications
may not function properly since the geomagnetic sensor is affected by the
magnetism of connected devices. Use the product after removing the
cable.
Z Strap eyelet/Air vent
There is an air vent to maintain the product performance inside it.
®
/NFC.
4
Page 6

◎ The back cover of the product cannot be removed. Removing it forcibly
may cause damage or a fault.
◎ The battery is built into the product, and cannot be removed by the
customer. To force the power off, refer to “Turning the Power Off Forcibly”
(zP. 11).
au Nano IC Card 04/microSD memory card cover
◎ Note that pulling or applying excessive force on an au Nano IC Card 04/
microSD memory card cover may cause damage.
IMEI tray
◎ An IMEI (international mobile station equipment identity) is a special
identification code assigned to each phone. You can pull the IMEI tray out
to confirm the IMEI of the product.
◎ The IMEI is information required when requesting servicing or repairs.
◎ The IMEI tray cannot be removed from the main unit. Take care not to
apply force when handling.
◎ You can also operate the product to confirm the IMEI.
On the home screen, “Apps Sheet” [[Settings] [[About phone]
[[Status] [[SIM status] and confirm the IMEI field.
Display (Touch panel)
◎ If the product is equipped with a commercially available corresponding
flip cover, you can turn the display on/off by opening/closing the flip
cover. If you close the equipped flip cover obliquely, the display may not
be turned off.
Proximity sensor /Light sensor, proximity sensors , earpiece
(receiver), mouth
(inside of the strap eyelet)
◎
Placing stickers, etc. over the proximity sensor (upper part of the
display)/
Covering earpiece (receiver), mouthpiece (microphone), speaker or sub
◎
microphone, strap eyelet with stickers, fingers, etc. may hinder product
performance.
◎ Be careful not to cover the earpiece (receiver) by a strap attached to the
product during a call etc.
Internal antenna, Wi-Fi®/Bluetooth® antennas, Wi-Fi®/GPS/TV antennas
◎ Antennas are built into the product. Do not cover with hand during calls or
data communication. Doing so may affect call/communication quality.
piece (microphone), speaker, sub microphone, air vent
light sensor, proximity sensors
5
Page 7
Using the au Nano IC Card 04
IC (metal) part
au Nano IC Card 04
Front Back
au Nano IC Card 04
The au Nano IC Card 04 records your personal information such as phone
numbers.
This product supports au Nano IC Card 04.
◎ Make sure to unplug the microUSB plug of the common AC adapter 05
(sold separately) etc. from the product when attaching or removing the au
Nano IC Card 04.
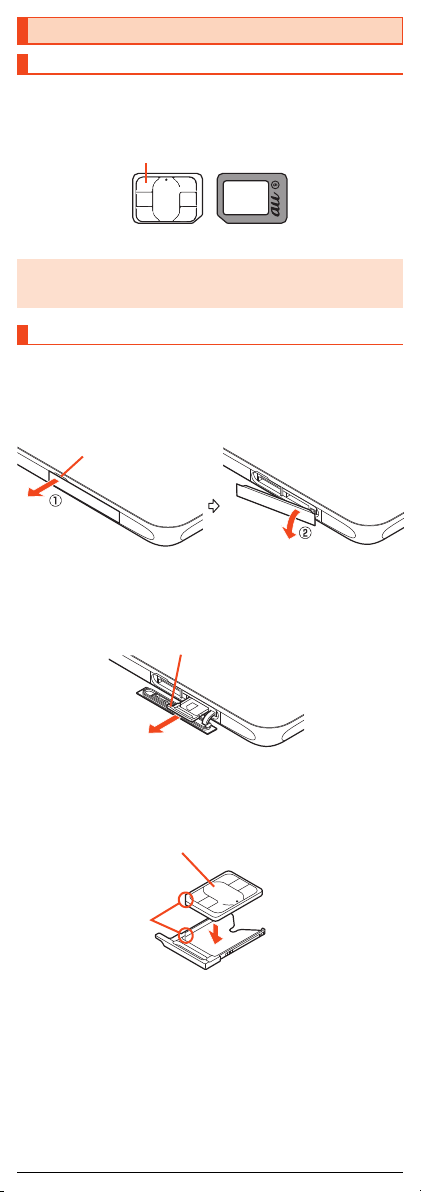
Attaching the au Nano IC Card 04
Before attaching the au Nano IC Card 04, turn the product off.
A Open the au Nano IC Card 04/microSD memory card cover.
Hook the tip of a finger into the slot and pull out it forward (A), and then
rotate it in the direction of the arrow to open (B).
Slot
B Slowly pull the au Nano IC Card 04 tray straight out by
hooking a finger on it.
au Nano IC Card 04 tray
C Put the au Nano IC Card 04 on the au Nano IC Card 04 tray.
Make sure the notches on the au Nano IC Card 04 and au Nano IC Card
04 tray face the proper orientation and put the card slowly on the tray.
IC (metal) part up
au Nano IC Card 04
Notches
au Nano IC Card 04 tray
D Slowly insert the au Nano IC Card 04 tray into the au Nano
IC Card 04 tray slot, taking care not to let the tray be
caught on the metal parts on both sides of the slot.
Confirm the position of the au Nano IC Card 04 tray slot and the orientation
of the au Nano IC Card 04 tray carefully, and insert the tray all the way into
the slot in the direction of the arrow. Inserting the tray forcibly may
damage the tray.
6
Page 8
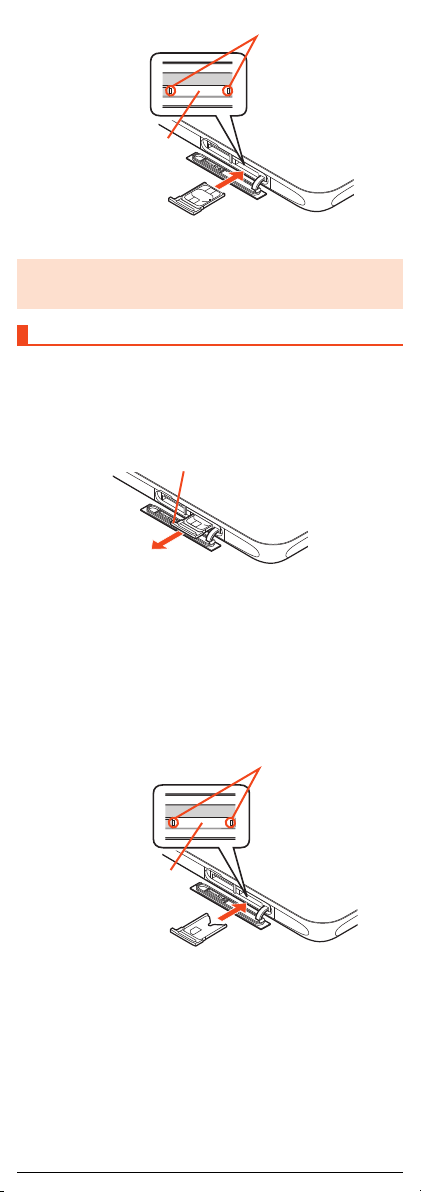
Metal parts
au Nano IC Card 04 tray
au Nano IC Card
04 tray slot
E Close the au Nano IC Card 04/microSD memory card cover.
◎ Inserting the au Nano IC Card 04 tray not deeply enough may prevent the
product from functioning properly.
◎ Take care not to lose or damage the removed au Nano IC Card 04 tray.
Removing the au Nano IC Card 04
Before removing the au Nano IC Card 04, turn the product off.
A Open the au Nano IC Card 04/microSD memory card cover
(zP. 6).
B Slowly pull the au Nano IC Card 04 tray straight out by
hooking a finger on it.
C Remove the au Nano IC Card 04 from the au Nano IC Card
04 tray.
D Slowly insert the au Nano IC Card 04 tray into the au Nano
IC Card 04 tray slot, taking care not to let the tray be
caught on the metal parts on both sides of the slot.
Confirm the position of the au Nano IC Card 04 tray slot and the orientation
of the au Nano IC Card 04 tray carefully, and insert the tray all the way into
the slot in the direction of the arrow. Inserting the tray forcibly may
damage the tray.
au Nano IC Card
04 tray slot
Metal parts
E Close the au Nano IC Card 04/microSD memory card cover.
7
Page 9
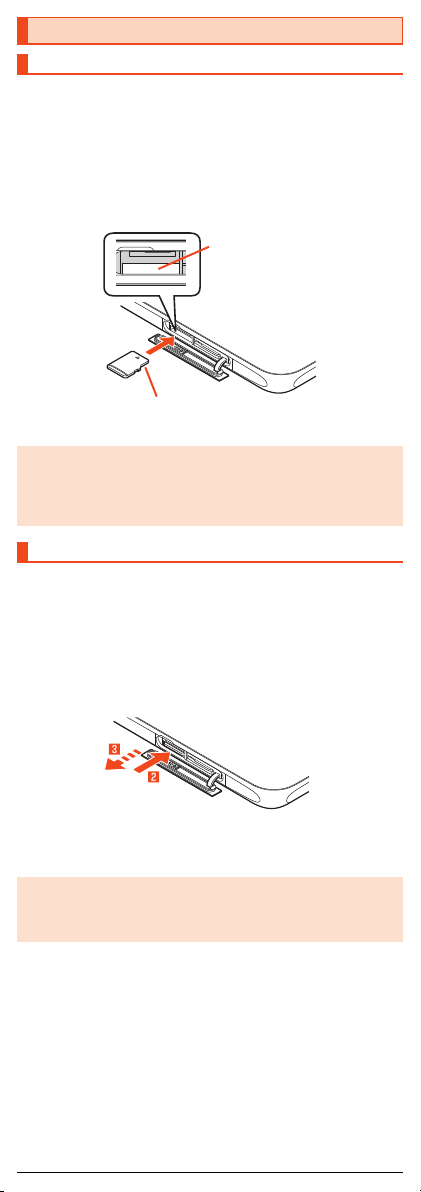
Using a microSD Memory Card
Attaching a microSD Memory Card
A Open the au Nano IC Card 04/microSD memory card cover
(zP. 6).
B Slowly insert the microSD memory card into the microSD
memory card slot.
Confirm the orientation for inserting, then insert in the direction of the arrow
until it clicks and is locked.
Releasing the microSD memory card before it is locked may cause it to
pop out.
microSD
memory card slot
Metal part down
C Close the au Nano IC Card 04/microSD memory card cover.
◎ Make sure that the top/bottom and front/rear of the microSD memory card
are facing correctly.
Trying to force a wrongly oriented card into the slot could make it
impossible to remove the card or result in damage.
◎ Do not touch the terminal part of a microSD memory card.
Removing the microSD Memory Card
Be sure to unmount microSD card before removing. Not doing so may corrupt
data or card may no longer operate properly.
A Open the au Nano IC Card 04/microSD memory card cover
(zP. 6).
B Slowly push the microSD memory card in all the way.
After it clicks, let the microSD memory card come back out a little without
releasing it. Releasing the card when it is pushed deeply into the slot may
cause it to pop out.
C Slowly pull the microSD memory card straight out.
D Close the au Nano IC Card 04/microSD memory card cover.
◎ Do not remove the microSD memory card forcefully. Doing so may result
in damage or data loss.
◎ The microSD memory card may become warm after a long time use, but
this is not a fault.
8
Page 10

Charging
Common AC adapter 05
(sold separately)
Charging
When you purchase the product, the internal battery is not fully charged. Be
sure to charge the internal battery before use.
• If the performance of the battery does not recover (e.g. the usable time after
each charge has become extremely short), the internal battery may be at the
end of service life. On the home screen, “Apps Sheet” [[Settings]
[[About phone] [[Status] [[Battery status] to check the charging
performance of the internal battery.
• While charging, the charging/incoming indicator illuminates in red, and the
battery icon is displayed with superimposed. When the battery is charged
to approximately 95%, the charging/incoming indicator illuminates in green.
When charging is finished, the charging/incoming indicator goes out.
◎ The product may become warm while charging, but this is normal.
◎ Depending on the operation procedure and usage environment, the
temperature inside the product may get high and the product may even
get heated. In such case, charging may stop for security reasons.
◎ Charging the internal battery while using the camera function etc. may
lengthen the charging time.
◎ If you perform various operations with a specified charger (sold
separately) connected to the product, charging/discharging may take
place repeatedly in a short time. Frequently charging the internal battery
shortens its service life.
◎ If you charge the internal battery when the battery has run out, the
charging/incoming indicator may not illuminate soon. However, charging
is in progress.
◎ If the charging/incoming indicator flashes in red, force the power off
(zP. 11) and turn the product on again. If the indicator continues to flash,
stop charging the internal battery and contact an au shop or the Keitai
Guarantee Service Center.
◎ If you stop charging while the charging/incoming indicator still illuminates
during charging, the cell phone may be left not fully charged even if
is displayed on it. In such case, the usage times shorten.
Charging with the Specified AC Adapter (Sold
Separately)
The followings are the explanation of how to connect the common AC adapter
05 (sold separately) to charge. For details on the specified AC adapter (sold
separately), refer to “Introduction of Peripheral Devices” (zP.17).
A Confirm the direction of the microUSB plug of the common
AC adapter 05 (sold separately) and insert it in the
direction of the arrow to the external connection jack of the
product
.
External
Protruding
edges
connection jack
Common AC adapter 05 (sold separately)
B Plug the common AC adapter 05 (sold separately) power
plug into a 100 V AC power outlet.
9
Page 11
C When charging is finished, pull the microUSB plug of the
common AC adapter 05 (sold separately) straight out from
the external connection jack of the product.
D Unplug the common AC adapter 05 (sold separately) power
plug from the power outlet.
◎ Although you can charge the internal battery while the power is turned on,
charging time lengthens.
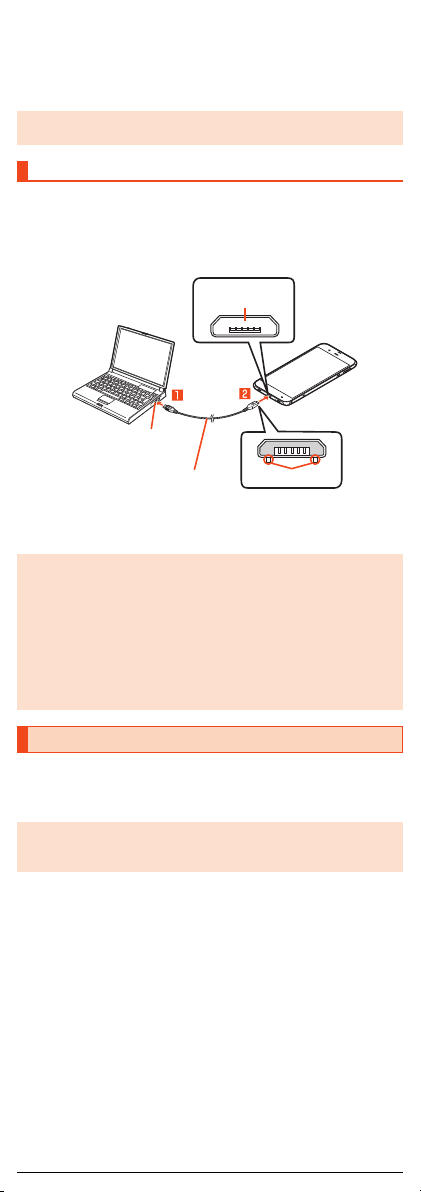
Charging with a PC
The followings are the explanation of how to charge the internal battery by
connecting the product to a USB port of a PC through which the battery can be
charged.
A Connect the microUSB cable 01 (sold separately) to a USB
port of a PC after the PC is activated completely.
External
connection jack
USB port of a PC
microUSB cable 01
(sold separately)
Protruding edges
B Connect the microUSB cable 01 (sold separately) to the
product.
◎ If you use the microUSB cable to charge the internal battery, it may take
the internal battery longer to be fully charged than if you use the specified
AC adapter (sold separately).
◎ Turn the protruding side of the microUSB plug down and insert the
microUSB plug to the external connection jack of the product straightly.
Inserting the microUSB plug in the wrong direction may result in damage
to the external connection jack of the product.
◎ If you charge the internal battery when the battery has run out, the
charging/incoming indicator may not illuminate. In such case, use the
specified AC adapter (sold separately) for charging.
Turning the Power On/Off
■ Turning the Power On
A f (hold down for at least 2 seconds) while the product is
turned off.
◎ The initial setting of the touch panel will be executed until “AQUOS”
disappears from the screen after the power is turned on. Do not touch the
screen, otherwise touch panel operations may not be performed properly.
■ Turning the Power Off
A f (hold down for at least 2 seconds).
B [Power off].
■ Restarting the Product
You can restart the product after turning it off.
A f (hold down for at least 2 seconds).
B [Reboot].
10
Page 12

■ Turning the Power Off Forcibly
You can force the product to turn off if the screen freezes or you are unable to
turn the product off.
A f (hold down for at least 8 seconds).
Release your finger after the product vibrates to turn the power off.
◎ If the power is turned off forcibly, unsaved data will be deleted. Do not
turn the power off forcibly unless you cannot operate the product.
■ Booting in Safe Mode
Turn the product off then boot it in a state close to that at time of purchase.
If operation of the product is unstable, it may be due to applications installed
after purchasing the product. If symptoms improve when booted in safe mode,
uninstalling the applications you installed may remedy symptoms.
A f (hold down for at least 2 seconds).
B Long touch “Power off” [[OK].
“Safe mode” is displayed at the bottom of the screen.
To end safe mode, reboot the product.
◎ When the product is turned off, you can boot it in safe mode by f (hold
down for at least 2 seconds) to turn it on, and then holding down d
until the lock screen is displayed after the SHARP logo appears.
◎ It is recommended that you back up your data on the product before
booting in safe mode.
◎ Widgets that you yourself created may be deleted.
◎ Safe mode is not a normal state for the product to be booted in. End safe
mode before normal use.
Turning the Screen On/Off
If you press f or no operation is made for a specified time, the screen is
turned off.
■ Turning the Screen On
A f while the screen is turned off.
◎ When you put the product in your pocket, bag, etc., turn the screen off.
Putting the product in while the screen is turned on may cause
inadvertent operations.
Lock Screen
The lock screen is displayed if you turn the screen on.
If you use the function of Unlock with your eyes, you can unlock the lock screen
immediately just by looking at the lock screen so that your eyes are scanned
(recognized) by the in camera.
《Lock screen》
A Wallpaper
B Address Book Plus
Display information registered in the address book. Frequently used
contacts such as favorites can be displayed in the notifications area.
C Notifications area
Notifications for missed calls, new e-mail/SMS, etc. appear as a pop-up.
Double-tap notification for corresponding screen.
Drag notifications area down for list of notifications. Tap notifications for
corresponding screen.
11
Page 13

D Shortcuts
《Apps Sheet》《Desktop Sheet》
Switching sheets
Slide “ ” to top of screen for shortcuts.
E Clock/emopa area
F Screen lock
Slide “ ” to top of screen to unlock the screen.
• If a password, etc. is set in “Screen lock”, it is displayed as .
G Activate camera
Slide “ ” to top of screen to activate SHCamera.
Switching the Display Language to
English
You can switch the display language for function names and other items to
English.
A On the home screen, “Apps Sheet”.
B [設定] (Settings).
C [言語と入力] (Language & input).
D [言語] (Language).
E [English].
Using the Feel Home
Feel Home is a home screen that consists of the Desktop Sheet, the Apps
Sheet, and the dock.
You can tap widgets/shortcuts on the Desktop Sheet and icons on the Apps
Sheet to use functions. You can also register shortcuts for favorite apps in the
dock.
• Slide/flick the home screen to the left/right to switch between the Desktop
and Apps Sheets.
■ Viewing the Feel Home
A Status bar
B Desktop Sheet/Apps Sheet
C Dock
You can register a shortcut for the application in the dock, to start quickly.
D Navigation Bar
12
Page 14

E Guide Tab
When you switch the Desktop Sheet/Apps Sheet, the sheet name will be
displayed.
F Page Indicator
The current position of the Desktop Sheet/Apps Sheet will be displayed.
◎ Slide/flick the Desktop and Apps Sheets up/down to switch pages.
◎ Long touch “#” to activate the Google™ application and you can search
the internal memory and websites for information.
• You can change the application to activate by long touching “#” after
operating the following.
On the home screen, “Apps Sheet” [[Settings] [[Apps] [[]
[[Default Apps] [[Assist & voice input] [[Assist app] [select
an application to activate
Using the Status Bar
Icons
The notification icons to notify you of a missed call, a new mail message, a
running operation, etc. are displayed on the left side of the status bar, while the
status icons to show the status of the product are on the right side.
■ Main Notification Icons
Icon Description
Missed call
New E-mail message
New SMS message
New PC-mail message
New Gmail™ message
Making a call, talking, receiving a call
Talking in high quality sound with a model supporting VoLTE
provided by au.
Call on hold
Answering memo inform ation
Available space on the internal memory being run out
Update available
Installation completion of application
Software update available
Icons collected
■ Main Status Icons
Icon Description
Time
〜 Battery level
〜 Signal strength (Receiving electric field)
* Both “LTE” and “WiMAX 2+” networks are available . “4G” is displayed for either
network. Your cell phone connects to the netw ork deemed to be the least congested
according to the network traffic.
〜 : Battery level display : No battery
• While charging, the battery icon is displayed with
superimposed.
• Percentage of the remaining battery level appears on the left
side of the battery icon
Airplane mode set
〜 : Level display : Out of service area
• The icon indicating network is displayed at the upper left.
: LTE/WiMAX 2+ available
• During a communication, the icon is displayed with
superimposed.
Roaming
Manner mode status
: Standard manner mode : Total silence mode
: Alarms only mode : Priority only mode
During a call using hands-free
Microphone set to “Mute” during a call
Answering memo set
: No Answering memo
: Answering memo (one to nine entries)
: Answering memo (ten entries)
*
13
Page 15

Using the Notification/Status Panel
In the notification/status panel, you can check the details on notification icons
and status icons or activate an application corresponding to the icon.
You can also set the manner mode, VeilView, etc.
■ Displaying the notification panel
A Slide the status bar down.
■ Displaying the status panel
A Drag the status bar down with your two fingers.
Alternatively, long touch “$” to display the status panel.
■ Viewing the Notification/Status Panel
《Notification panel》 《Status panel》
A Notifi cation
Check the status of the product and notifications as well as make settings
for Address Book Plus. Tap notifications to activate corresponding
application.
• Flick notifications to the left or right to delete them. Some notifications
cannot be deleted.
• Slide the displayed area up to view hidden notifications.
• Slide notifications up or down using two fingers or pinch in/pinch out to
switch between detailed and simple views.
• Long touch notification [Tap [ ] to make notification settings for the
application.
B Clear all
Tap it to clear all the notifications. You may not be able to delete a
notification depending on the notification.
C Brightness adjusting bar
Drag it to adjust the brightness of the screen.
D Function buttons
Change settings of the frequently used function. Operations are different
depending on the functions.
E Setting s
Tap it to make various settings for the product.
F Customize
Change or rearrange the displayed function buttons.
G Battery level
Tap it to check the battery usage.
◎ Slide the screen up/down or tap the top of the screen to switch the
notification panel/status panel.
14
Page 16
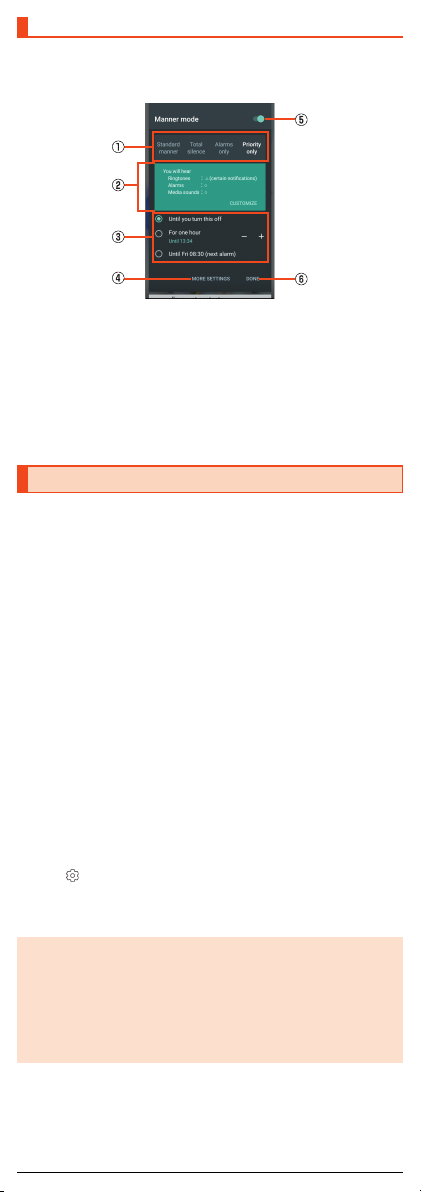
Setting the Manner Mode
Set not to disturb others around you in public.
A Display the status panel [Tap “Manner mode” in function
buttons.
《Manner mode setting screen》
A Type of manner mode
B Explanation of operations
C Duration until disabling manner mode
D More settings
E ON/OFF setting
Tap it to disable the manner mode.
F Done
Finish the manner mode setting.
Setting App Permissions
When you activate applications/functions to access to the function or
information of the product for the first time, the confirmation screen for
requesting the permission of access authority is displayed.
Example: Activating Album
A On the confirmation screen of “First things first”
[[NEXT].
B [DENY]/[ALLOW].
In general, tap “ALLOW” and allow the application to use the functions.
If there are multiple functions to use, operate in the same way.
■ Setting Functions to Use
You can make settings for the functions to use by following steps below as
well.
■ Setting functions to use by application
A On the home screen, “Apps Sheet” [[Settings]
[[Apps].
B Select an application [[Permissions].
C Select a function.
■ Setting applications to use by function
A On the home screen, “Apps Sheet” [[Settings] [[Apps]
[[] [[App permissions].
B Select a function.
C Select an application.
◎ If you deny the permission, the application/function may not be activated
or the use of function may be restricted.
◎ The explanation screen for permissions may be displayed depending on
the applications/functions. Also, multiple confirmation screens may be
displayed or the displayed contents may differ. Check the displayed
contents carefully and follow the on-screen instructions.
◎ In this manual, some description of the confirmation screens may be
omitted.
15
Page 17
Switching Input Methods
You can switch input methods for character entry.
• Following operation explanations use “Japanese - S-Shoin”.
A On the home screen, “Apps Sheet” [[Settings].
B [Language & input] [[Current Keyboard].
C [CHOOSE KEYBOARDS].
D [Google Keyboard]/[S-Shoin]/[Google voice typing].
Switching Software Keyboards
A On the character entry screen, [ ] [[Input UI]
[[QWERTY keyboard]/[12 keyboard].
Checking Your Own Phone Number
A On the home screen, “Apps Sheet” [[Settings]
[[Profile].
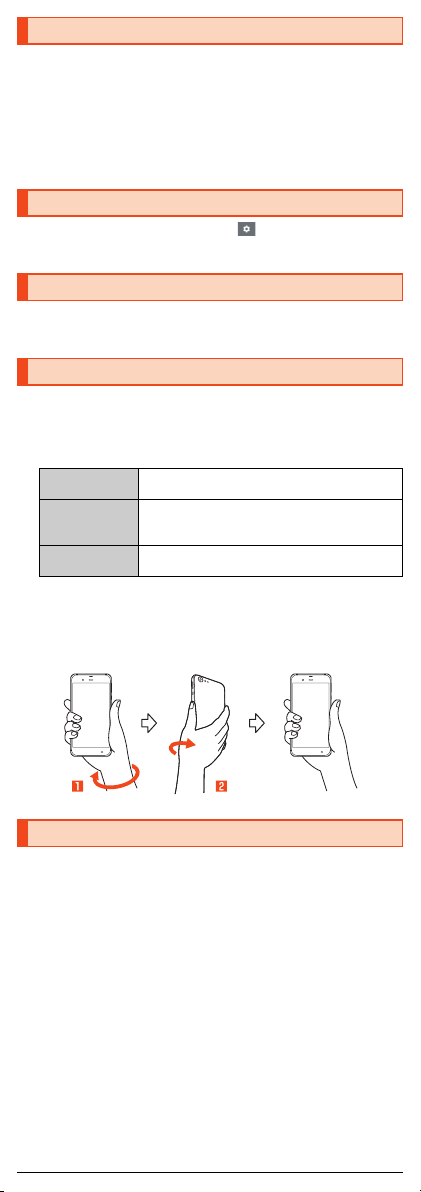
Setting Twist magic
You can switch to the previous application that you have used by twisting your
wrist with the product held.
A On the home screen, “Apps Sheet” [[Settings]
[[Useful] [[Twist magic].
B
Turn on/off Twist
magic
Settings to restrict
operation
Let's Try! Check how to use “Twist magic” by “Let's Try!”
■ Using Twist magic
A Twist your wrist holding the product.
B Return your wrist to the original position.
Switch to the previous application that you have used.
Set whether to use Twist magic.
Set applications in which operations of Twist magic
are restricted. Twist magic is not operated while
using the set application.
application.
Setting Airplane mode
A On the home screen, “Apps Sheet” [[Settings] [[More]
[[Airplane mode].
16
Page 18
Introduction of Peripheral Devices
■ SHARP TV antenna cable 02 (02SHHSA)
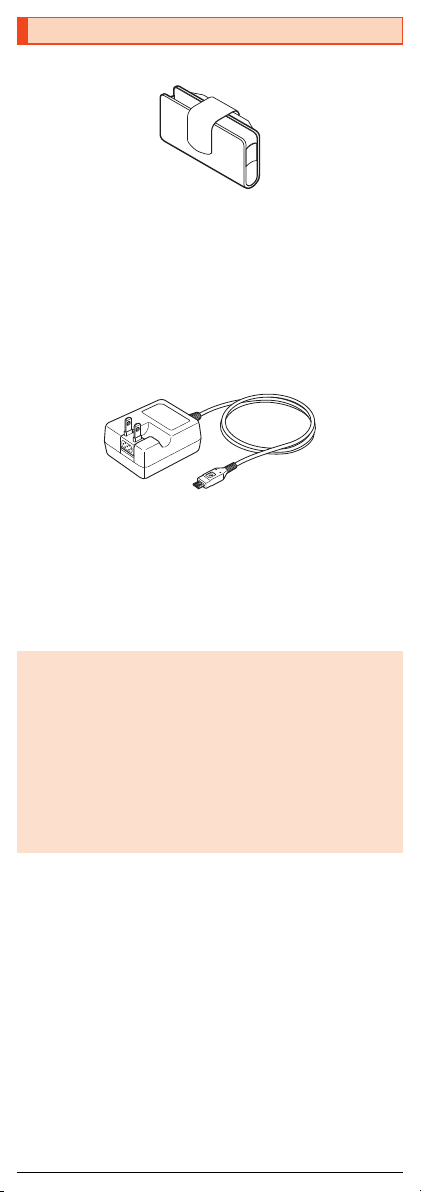
■ au Carrying Case G Black (0106FCA) (sold separately)
■ Common AC Adapter 03 (0301PQA) (sold separately)
Common AC Adapter 05 (0501PWA) (sold separately)
Common AC Adapter 03 Navy (0301PBA) (sold separately)
Common AC Adapter 03 Green (0301PGA) (sold separately)
Common AC Adapter 03 Pink (0301PPA) (sold separately)
Common AC Adapter 03 Blue (0301PLA) (sold separately)
AC Adapter JUPITRIS (White) (L02P001W) (sold separately)
AC Adapter JUPITRIS (Red) (L02P001R) (sold separately)
AC Adapter JUPITRIS (Blue) ( L02P001L) (sold separately)
AC Adapter JUPITRIS (Pink) (L02P001P) (sold separately)
AC Adapter JUPITRIS (Champagne) (L02P001N) (sold
separately)
Common AC adapter 05
• Illustrations and forms may not match depending on the AC adapter you
use.
■ Portable charger 02 (0301PFA) (sold separately)
■ microUSB cable 01 (0301HVA) (sold separately)
microUSB cable 01 Navy (0301HBA) (sold separately)
microUSB cable 01 Green (0301HGA) (sold separately)
microUSB cable 01 Pink (0301HPA) (sold separately)
microUSB cable 01 Blue (0301HLA) (sold separately)
◎ It may not be possible to adequately charge the product with the portable
charger 02 (sold separately).
◎ For the latest information about available peripheral devices, check the
au homepage (http://www.au.kddi.com/english/) or contact Customer
Service Center.
◎ The product does not support ASYNC/Fax transmission.
◎ The above-mentioned peripheral devices can be purchased from au
Online Shop. You may not be able to purchase one depending on the
stock status.
(http://auonlineshop.kddi.com/)
Earphone/Microphone
◎ An earphone/microphone with the switch or depending on the type of the
earphone/microphone, it may not be available with the product.
17
Page 19

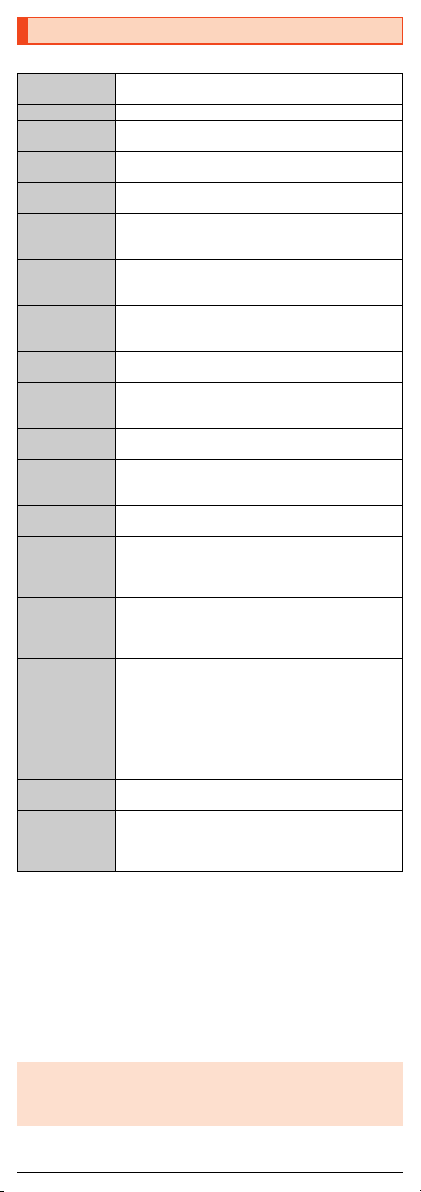
Troubleshooting
Before you assume that the product is malfunctioning, check the following:
Trouble Detail
Battery usage time is
short.
Cannot make calls. • Is an au Nano IC Card 04 inserted? (zP.6)
Cannot receive calls. • Is reception good enough? (zP. 13)
Cannot hear the other
party.
Cannot recognize a
microSD memory card/
Cannot find target data.
Cannot operate the
keys/touch panel.
Cannot charge the
battery.
Cannot turn on the
power.
Cannot operate/The
screen does not
respond/Cannot turn off
the power.
Cannot operate the
touch panel as
intended.
Screen response is
slow when you tap on
the screen/press the
keys.
An error of the au IC
card (UIM) or a
message indicating
that the card is not
inserted is displayed.
The power is turned off
automatically.
The power is turned off
while the wake-up logo
is displayed.
(out of service area
icon) is displayed.
The display or
charging/incoming
indicator illuminates/
flashes, but the
ringtone does not ring.
A message indicating
that charging is
necessary is displayed.
• Make sure you do not often use the product in
places where (out of service area) is
displayed. (zP. 13)
• Make sure the internal battery does not
approach the end of its service life. Check the
battery status. (zP.9)
• Is the internal battery charged enough? (zP.9)
• Suspend the functions not being used. (zP.14)
• Make sure “Airplane mode” is not set. (zP. 16)
• Is the power turned on? (zP.10)
• Is the product within the service area? (z P. 13)
• Make sure “Airplane mode” is not set. (zP. 16)
• Is the power turned on? (zP.10)
• Is an au Nano IC Card 04 inserted? (zP.6)
• Make sure you are not covering the earpiece
with your ear.
Place the earpiece over your earhole.
• Is a microSD memory card inserted properly?
(zP. 8)
• Make sure data is not saved on the internal
memory. Data can be saved on the internal
memory besides a microSD memory card.
• Turn off the power and then turn it on.
• Is the power turned on? (zP.10)
• Is the power plug of the specified charger (sold
separately) securely plugged into an outlet?
(zP. 9)
• Is the internal battery charged? (zP.9)
• Did you hold f down? (zP. 10)
• You can force the power off by holding down
f for at least 8 seconds and releasing your
finger after the product vibrates. Turn the
product on again after a while. (zP. 11)
• Make sure you are not operating with the tip of a
fingernail or with foreign object between the
screen and your fingers.
• Restart the product. (zP.10)
• Screen response may be slowed down when a
large amount of data is stored in the product or
being transmitted between the internal memory
and a microSD memory card.
• Is an au Nano IC Card 04 inserted? (zP.6)
• Make sure the battery has not run out. (zP.9)
• Make sure the battery has not run out. (zP.9)
• Is reception good enough? (zP. 13)
• Is the product within the service area? (z P. 13)
• Is your hand off the area around the internal
antenna? (zP. 4)
• Is an au Nano IC Card 04 inserted? (zP.6)
• Make sure the manner mode is not set. (zP.15)
• The battery is almost empty. (zP.9)
18
Page 20

Trouble Detail
When making a call, a
beeping sound is heard
from the earpiece and
a connection cannot be
established.
If symptoms do not improve after checking each of the above, information is
provided through au Customer Support on the au homepage below.
(http://www.au.kddi.com/english/support/)
• Is reception good enough? (zP. 13)
• Is the product within the service area? (z P. 13)
• The wireless line is busy or the other party is on
another line. Try again later.
Updating Software
The product supports the software update.
The software update function can also be used for operating system updates.
An operating system update is a software update which also includes updating
of the product's operating system.
A On the home screen, “Apps Sheet” [[Settings] [[About
phone] [[Software update].
Start to check whether software update is necessary or not. Tap “OK” to
check it in the background. When it is necessary, you can download and
install data for software update.
• When “Software update” appears in the notification panel, tap it and
follow the on-screen.
B [YES] [[OK].
If you install it later, [LATER] [[OK]. The confirmation screen for
installing will appear after approximately 24 hours.
■ Notes on Software Update
• You are charged for data communication when connecting to the Internet
from the product by using packet communication. Large-volume data
communication occurs in particular for operating system updates. Use of
®
is recommended.
Wi-Fi
•
When software update is necess
etc. For details, contact an au shop or Customer Service Center (call tollfree 157). In addition, users of the SHV38 will receive a notice from au, when
software update is necessary to improve the functionality of the SHV38.
• It is recommended to back up your data before updating software.
• If the software update is performed, the product will restart before and after
the update.
• If the software update has failed or stopped, perform the same procedures
again.
• If the software update fails, it may become impossible to operate the product.
If this happens, bring it to an au shop or PiPit (not accepted by some shops).
• Charge the battery sufficiently before starting update. If the battery level is
insufficient or the battery runs out during the update, the software update will
fail.
• Check out the signal reception status. The software update may fail if the
product is in a place with bad signal reception status.
• Various data registered on the product (address books, mails, still pictures,
music data, etc.) and information of settings will not be changed even after
software is updated. However, note that data may not be protected
depending on the state of the product (fault, damage, getting wet with water,
etc.).
• After software is updated, the download of next update software may
automatically start (consecutive update).
• During international roaming, the software update function can only be used
• After you have updated the operating system, you cannot return it to the
Do not conduct the following operations during the software update
• Do not move during software update.
The following operations are not available during the software update
• Operations are not available during software update. Making a call to 110
®
with a Wi-Fi
connection, be sure to first connect via Wi-Fi
previous version.
(Police), 119 (Fire and Ambulance), 118 (Regional Coast Guard
Headquarters) or 157 (Customer Service Center) is not available either. Also,
the alarm etc. does not function.
connection. As this function cannot be used without a Wi-Fi
ary, you will be informed on au homepage,
®
before updating software.
®
19
Page 21
After-Sales Service
■ When Asking for Repair
For repair, contact Keitai Guarantee Service Center.
During the
warranty period
Outside the
warranty period
◎ Before handing in the product for repair, make a backup of the contents
of memory since they may disappear during repair. Note that the
Company shall not be liable for any damages and loss of income should
the contents of memory be altered or lost.
◎ Recycled parts that meet the Company's quality standards are
sometimes used for repair.
◎ au cell phones collected by Replacement mobile phone delivery service
which you used before are recycled to cell phones for replacement after
repairs. Also parts replaced by au after-sales service are collected and
recycled by the Company. They are not returned to customers.
◎ Instances where the product has been changed, modified, or analyzed
(including software modification or analysis (including rooting, etc.)
reverse-engineered, reverse-compiled, or reverse-assembled) or has
been repaired at a location other than an authorized repair location
designated by the company may not be covered by warranty or may
prevent the product from being accepted for repairs.
■ Performance Parts for Repair
The Company retains performance parts for repair of the SHV38 main unit
and its peripheral devices for 4 years after discontinuation of production.
“Performance parts for repair” refers to parts required for maintaining the
functions of the product.
■ Warranty Card
At the store of purchase, thoroughly check and read the name of the retailer,
date of purchase and other necessary details filled in on the warranty card,
and be sure to keep it in a safe place.
■ Keitai Guarantee Service Plus LTE
An after-sales service membership program on a monthly basis called “Keitai
Guarantee Service Plus LTE” (monthly fee: 380 yen, tax excluded) is available
for using your au cell phone for a long time without worries. This service
expands coverage for many troubles including malfunction, theft and loss. For
details of this service, check on the au homepage or contact Keitai Guarantee
Service Center.
◎ You can apply for membership only at the time of purchasing your au cell
phone.
◎ Once you cancel the membership, you cannot reapply for it until you
purchase an au cell phone next time.
◎ Note that when changing the model or purchasing an extra cell phone,
this service only covers the most recently purchased au cell phone.
◎ When an au cell phone is handed over to you or someone else, the “Keitai
Guarantee Service Plus LTE” membership is also handed over to the
successor of the cell phone.
◎ When you get a new au cell phone by changing the model, purchasing
an extra cell phone, etc., the “Keitai Guarantee Service Plus” or “Keitai
Guarantee Service Plus LTE” membership for the old au cell phone is
automatically canceled.
◎ Service contents are subject to change without notice.
■ au Nano IC Card 04
The au Nano IC Card 04 is lent to you by au. In case of loss or damage, the
card will be replaced at your expense. When malfunction is suspected, or in
case of theft or loss, contact an au shop or PiPit.
Repairs will be done based on the Company's terms of
services of the free-of-charge repair warranty described
on the warranty card.
We shall repair the product for a charge as requested by
the customer if repair renders it usable.
20
Page 22

■ After-Sales Service
If you are unsure about anything regarding after-sales service, contact the
following service counter.
Customer Service Center (service cancelation procedure in case of loss
or theft)
From a fixed-line phone, 0077-7-113 (toll free)
From an au cell phone, 113 without area code (toll free)
Business hours: 24 hours (7 days a week)
Keitai Guarantee Service Center (for loss, theft or damage)
From a fixed-line phone/an au cell phone,
0120-925-919 (toll free)
Business hours 9:00 to 20:00 (7 days a week)
Online Replacement Desk (24 hours)
* From PCs and smartphones only
(https://cs.kddi.com/support/n_login.html)
• Applications for servicing can be made via the Internet for “damage”, “water
seepage”, “theft”, or “loss”. Naturally-occurring malfunction (power does not
turn on, the screen is frozen, etc. due to causes other than damage or water
seepage) require consultation by telephone.
• Applications via the Internet require that you provide your e-mail address.
■ au After-Sales Service Information
Service contents
Replacement mobile phone
delivery service
(spontaneous failure: 1st year)
Replacement mobile phone
delivery service
(spontaneous failure: 2nd year
and later)
Replacement mobile phone
delivery service
(partial damage, water soak,
irreparable damage, theft and
loss)
Holding over and repair
(spontaneous failure: 1st year)
Holding over and repair
(spontaneous failure: 2nd year
and later)
Holding over and repair
(partial damage)
Holding over and repair
(water soak and irreparable
damage)
Holding over and repair
(theft and loss)
* Charge amounts are all tax excluded.
Keitai Guarantee
Service Plus LTE
member
Free N/A
Refer to the
following charges
list of “Replacement
mobile phone
delivery service”
(membership)
Refer to the
following charges
list of “Replacement
mobile phone
delivery service”
(membership)
Free Free
Free (three-year
warranty)
Customer charge
Upper limit: 5,000
yen
Customer charge
10,000 yen
N/A
■ Charges list of “Replacement mobile phone delivery service”
(membership)
Applied condition First use Second use
General 5,000 yen/
Both “Discount for web
*2
application”
nonuse of substitute”
applied
Only “Discount for nonuse of
substitute”
/“Discount for
*3
is applied
*3
are
Benefit for longtime
Benefit for longtime
Benefit for longtime
au user
3,000 yen
4,000 yen/
au user
2,000 yen
4,500 yen/
au user
2,500 yen
*1
*1
*1
Non-Keitai
Guarantee Service
Plus LTE member
N/A
N/A
Actual cost
Actual cost
Actual cost
N/A
(By model
replacement)
8,000 yen/
Benefit for longtime
Benefit for longtime
Benefit for longtime
au user
6,000 yen
7,000 yen/
au user
5,000 yen
7,500 yen/
au user
5,500 yen
*1
*1
*1
21
Page 23

* Charge amounts are all tax excluded.
*1 This discount applies to customers who ha ve used au for 3 years (25 months) or
more, and all the lines within that customer's Family Discou nt. For customers using
a data communication device or tablet, this discount applies to custome rs who are
subscribed to a set discount (WIN Single Set Disco unt or Smartphone Set
Discount) and have been under the contract of the line eligible for the set dis count
for 3 years or more.
*2 Discount for web application: If you apply for th e “Replacement mobile phone
delivery service” through the au homepage, you get a d iscount of 500 yen on the
fee.
“Discount for nonuse of substitute” can be applied automatically at the same time
since a substitute mobile phone is not borrowed if y ou apply for “Discount for web
application”.
*3 Discount for nonuse of substitute: When using the “Replacement mobile phone
delivery service” and you do not borrow a substit ute mobile phone, you get a
discount of 500 yen on the fee.
For details, check on the au homepage.
Replacement mobile phone delivery service
◎ When you have trouble with your au cell phone, you can have a cell
phone for replacement (same model and color as your old one
delivered to any destination that you specify by calling us. Please return
your old faulty au cell phone within 14 days after the cell phone for
replacement is delivered to you.
* If the same model in the same color is difficult to prov ide, a replacement cell
phone of a model and a color that are specified by K DDI is provided.
◎ You can use this service up to twice within one year starting from the day
when you first use this service. If you have not used this service over the
past one year at the time of your application for this service, the
application will be regarded as your first time. If you have, the application
will be regarded as your second time.
* For details, check on the au homepage.
◎ In the event of theft or loss, an au IC card has to be reissued when using
this service. In such a case, the au IC card reissue fee of 1,900 yen is
separately required.
Holding over and repair
◎ Damages and malfunctions intentionally caused by the customer as well
as those due to modification (e.g. disassembly, change of parts, painting,
etc.) by the customer are not covered by this service.
◎ You cannot receive a refund for replacement of the outer casing due to
stains, scratches, paint removal, etc. on the outer casing.
*
)
SIM-Unlocking the Product
This product can be SIM-unlocked. SIM-unlocking the product allows
other-carrier SIM cards to be used with it.
• Requests can be made for SIM-unlocking on the au homepage or at an au
shop.
• Some services, functions, etc. may have restrictions when an other-carrier
SIM card is used. The Company does not guarantee operation whatsoever.
• Setting after SIM-unlocking the product: On the home screen, “Apps Sheet”
[[Settings] [[About phone] [[Status] [[SIM status] [[SIM lock
status].
• For details, refer to the au homepage.
(https://cs.kddi.com/support/simcard/)
22
Page 24
Main Specifications
■
n unit (SHV38)
Mai
Display
Weight Approx. 135 g (including the internal battery)
Size (W×H×D)
Memory (built-in)
Continuous talk
time (in Japan)
ntinuous talk
Co
ime (overseas
t
GSM))
(
ntinuous
Co
standby tim
(in Japan)
Continuous
y time
standb
(overseas (GSM))
Continuous
tethering time
Maximum Wi-Fi®
tethered
connections
Charging time Common AC adapter 05 (sold separately): Approx. 140
Full Seg
continuous
watching time
1Seg continuous
watching time
Camera device Out camera
Effective pixels Out camera
Bluetooth®
function
Network
environment
Interface microUSB jack, 3.5φ (quadrupoles) earphone/
*1 The Full Seg/1Seg continuous watching time var ies depending on the usage.
*2 It changes according to objects obstructing devices and signal reception.
*3 This is the specification provided i n Bluetooth
communication between Bluetooth
intended use.
*4 Some contents of address books data may not be p roperly displayed on the
device of the other party.
*5 This profile supports Bluetooth
*6 Supported for some car navigation systems only. See the au homepage for usage.
*7 Supports MIMO.
*8 Supports MU-MIMO (Client mode).
(Refer to the respective companies' websites for information on supported
products.)
◎ The continuous talk time and continuous standby time may drop to less
than half depending on the battery charging status, usage environment
such as temperature, reception condition at the location where the
product is used, and the function settings.
Approx. 5.0 inches, approx. 16.77 million colors,
IGZO, 1,920×1,080 (FHD)
Approx. 67 mm×135 mm×8.6 mm (thickest point:
Approx. 9.43 mm)
RAM: Approx. 3 GB
Internal Storage: Approx. 16GB
Approx. 1,590 min.
Approx. 1,000 min.
prox. 500 hours
Ap
e
Approx. 560 hours
Approx. 700 min.
10 devices
min.
Approx. 8 hours and 10 min.
*1
Approx. 12 hours and 10 min.
*1
CMOS image sensor
In camera
CMOS image sensor
Approx. 21.00 millio
pixels In camera
Approx. 8.00 million
Communication method: Bluetooth® Standard Ver.4.2
Output: Bluetooth
Communication distance
obstacles in the range
Compatible Bluetooth
A2DP, AVRCP, OPP, SPP, PBAP
PANU, aptX, SCMS-T, HOGP
Frequency bands: 2.4 GHz band
IEEE802.11a/b/g/n (2.4 GHz/5 GHz)*7/ac
microphone jack (supported earphones: tripolar
headphone (Lch/Rch/GND) and quadrupolar earphone
with microphone (Lch/Rch/GND/MIC))
®
®
Standard Ver.4.0.
n
pixels
®
Standard Power Class 1
*2
: Within 10 m with no
®
profiles*3: GATT, HSP, HFP,
*4
, HID, PAN, PAN NAP,
*5
*6
, DUN
®
standards for making
-compatible devices in accordance with their
*7*8
conformant
23
Page 25

Specific Absorption Rate (SAR) of Cell
Phones
This model【SHV38】 cell phone complies with Japanese technical regulations
for exposure to radio waves and international guidelines on radio wave
protection.
This cell phone has been designed in observance of the Japanese technical
regulations regarding exposure to radio waves (*1) and limits to exposure to
radio waves recommended by equivalent international guidelines.
These international guidelines were set out by the International Commission
on Non-Ionizing Radiation Protection (ICNIRP), which is in collaboration with
the World Health Organization (WHO), and the permissible limits include a
substantial safety margin designed to assure the safety of all persons,
regardless of age and health condition. The Japanese technical regulations
and international guidelines define the limits using a unit of measurement
known as the Specific Absorption Rate (SAR), which represents the average
amount of radio frequency energy absorbed by the human body. The SAR
limit for cell phones is 2.0 W/kg. The highest SAR value for this cell phone
when tested for use near the head is
the body, is 0.669
among individual products, but they all satisfy the limit.
The actual SAR of this cell phone while talking on the phone can be well
below that indicated above. This is due to the cell phone being designed to
only output the minimum power required to communicate with a base
station. Therefore in general, the closer you are to a base station, the lower
the power output of the cell phone.
This cell phone can be used in positions other than against your head. Use a
carrying case or similar accessory that holds the phone at least 1.5 cm
separated from the body and ensure no metal parts are located between you
and the cell phone. Under these conditions, this cell phone satisfies Japanese
technical regulations and international guidelines for radio wave protection.
The World Health Organization has stated that “a large number of studies
have been performed over the last two decades to assess whether mobile
phones pose a potential health risk. To date, no adverse health effects have
been established as being caused by mobile phone use”.
If you would like to know more detailed information, please refer to the WHO
website.
(http://www.who.int/docstore/peh-emf/publications/facts_press/
fact_english.htm )
Please refer to the websites listed below if you would like to know more
detailed information regarding SAR.
W/kg (*2). There may be slight differences in SAR levels
W /kg (*2), and when worn on
0990
○ Ministry of Internal Affairs and Communications website:
(http://www.tele.soumu.go.jp/e/sys/ele/index.htm)
○ Association of Radio Industries and Businesses website:
(http://www.arib-emf.org/01denpa/denpa02-02.html)
○ SHARP homepage:
(http://k-tai.sharp.co.jp/support/sar/)
○ au hom epage:
(http://www.au.kddi.com/english/)
*1 Technical regulations are defined by the Ministerial Ordinance Rel ated to the Radio
Law (Article 14-2 of Radio Equipment Regulations ).
*2 The value is including other radio sy stems that can be simultaneously used.
24
 Loading...