

Page 1

MODEL
FO-475
FACSIMILE
OPERATION MANUAL
1. Installation
2. Using the Answering Machine
3. Sending Documents
4. Receiving Documents
5. Making Copies
6. Making Telephone Calls
7. Special Functions
8. Option Settings
9. Printing Reports and Lists
10. Maintenance
11. Troubleshooting
Page 2

WARRANTY
Facsimile Products
Congratulations on Your Purchase!
This Sharp product is warranted against manufacturing defects for a period of twelve (12) months from
the date of original purchase.
In the event of any defect arising in the equipment during the warranty period, such repairs should only
be carried out by the Dealer from which the unit was originally purchased or a Service Centre approved
by Sharp to service this type of equipment. These repairs would be carried out at no charge to the
owner, subject to the conditions specified herein.
The owner is responsible for any transportation and insurance costs if the product has to be returned
for repair.
This warranty does not extend to accessories or defects or injuries caused by or resulting from causes
not attributable to faulty parts or the manufacture of the product, including but not limited to, defect or
injury caused by or resulting from misuse, abuse, neglect, accidental damage, improper voltage, liquid
spillage, vermin infestation, software, use of consumables other than those approved by Sharp, or any
alterations made to the product which are not authorised by Sharp.
Please retain your sales documentation, as this should be produced to validate a warranty claim.
This warranty is in addition to and in no way limits, varies or excludes any express and implied rights
and remedies under any relevant legislation in the country of sale. However, to the extent permitted by
such legislation, Sharp excludes any liability for any indirect or consequential damages arising from the
purchase or use of the product.
To the extent permitted by law, Sharp excludes all implied warranties and conditions and where the
product is one that is not normally required for personal, domestic or household use, Sharp limits its
liability to the repair or replacement (at Sharp's option) of materials or workmanship which are found by
Sharp to be defective.
For your reference, please enter the particulars of your purchase below and retain, with your purchase
documentation.
Model No.
Serial No.
Date of Purchase
Place of Purchase
SPform046 (2Sept97)
FOR LOCATION ENQUIRIES WITHIN
AUSTRALIA
REGARDING YOUR LOCAL
SHARP APPROVED SERVICE CENTRE
SHARP SERVICE REFERRAL CENTRE
FREECALL:
DURING NORMAL BUSINESS HOURS
SHARP CORPORA TION OF A USTRALIA PTY. LIMITED
1 Huntingwood Drive, Huntingwood NSW 2148
CALL THE
FACSIMILE: (02) 9672 1210
1 800 807 820
A.C.N. 003 039 405
FOR THE SERVICING OF PRODUCTS
PURCHASED IN
CONT ACT Y OUR SELLING DEALER/RETAILER
SHARP CORPORA TION OF NEW ZEALANDLIMITED
NEW ZEALAND
OR FOR REFERRAL TO A
SERVICE CENTRE,
CALL SHARP CUSTOMER SERVICES
TELEPHONE:
FACSIMILE: 09 636 6972
Cnr Mahunga Drive & Hastie Avenue,
09 634 2059
Mangere, AUCKLAND
Important Notice: This warranty applies only to products sold in Australia & New Zealand
Page 3
QUICK REF ERENCE GUIDE
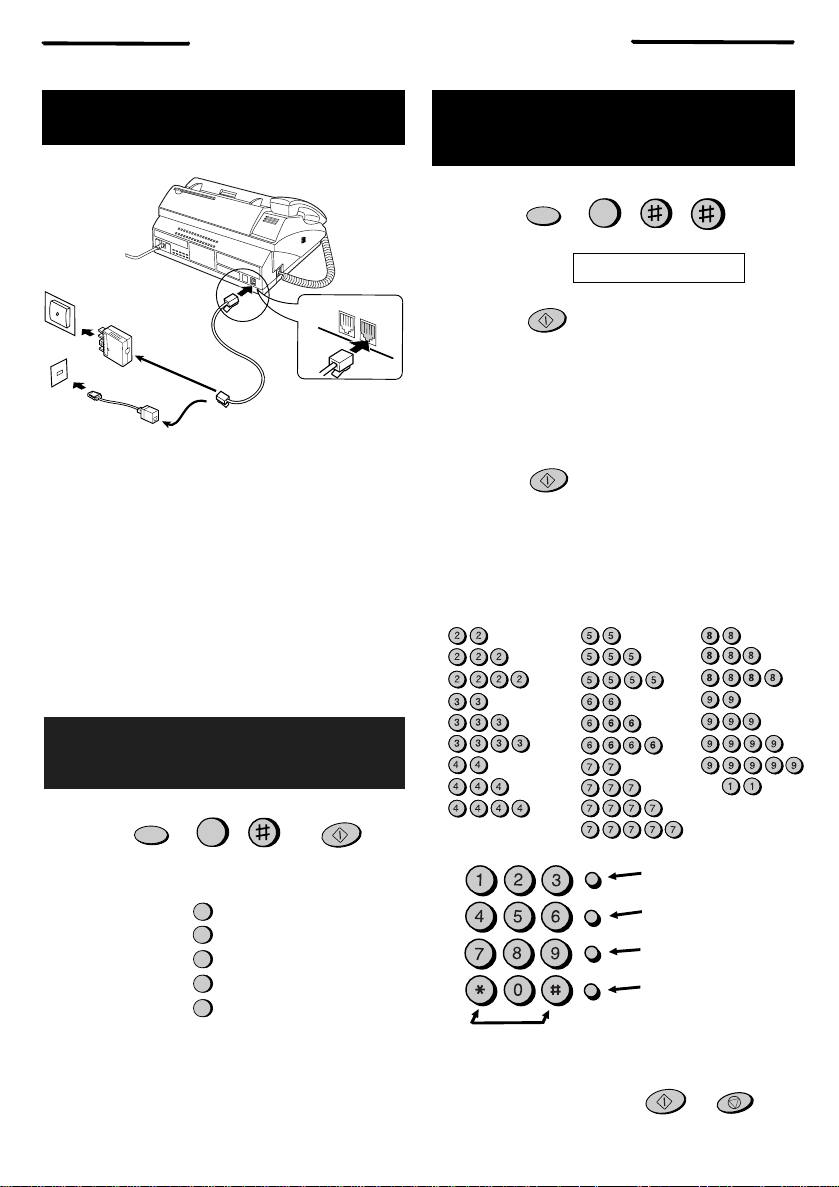
INSTALLATION
Australia
New Zealand
1. Connect the handset as shown.
2. Plug the power cord int o an earthed, 230-240 V
outlet.
3.
Plug one end of the telephone line into the
LINE
socket on the rear of the fax, and the
other end into yo ur tele ph on e wall socket .
Caution : When disconnecting the fax, unplug
the telephone line before the power cord.
4. If desired, connect an extension phone to the
TEL. SET socket on the rear of the fax.
TEL.
SET
TEL.
LINE
TEL.
RECORDING AN OUTGOING
MESSAGE
1. Press:
FUNCTION
0
2. Press a number to select the type of outgoing
message (OGM):
General OGM:
Box 1 OGM:
Box 2 OGM:
Box 3 OGM:
Transfer OGM:
3.
Pick up the handset, press the
0
1
2
3
4
START/MEMORY key, and speak into the
handset.
4. When finished, replace the handset or press
the
STOP key. Press the STOP key twice to
return to the date and time display.
START/MEMORY
ENTERING YOU R
NAME AND NUMBER
1. Press:
Display shows:
2. Press:
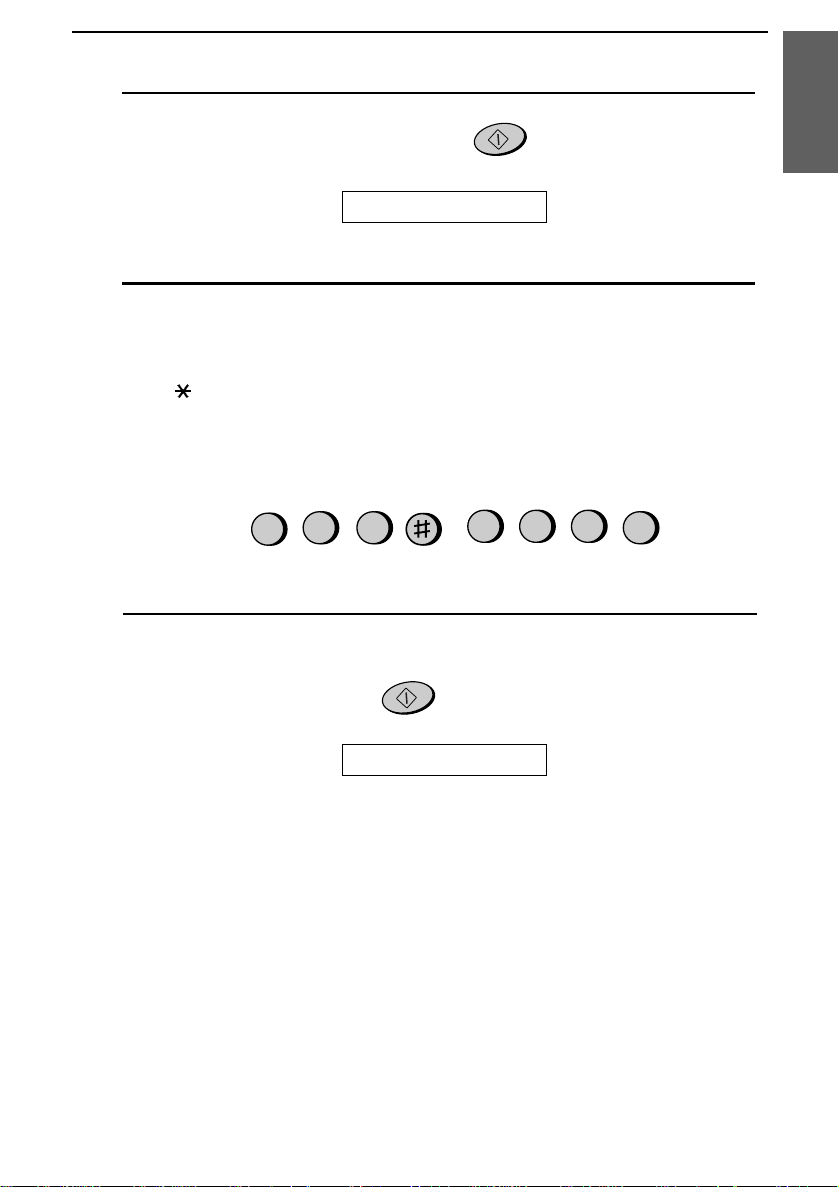
3. Enter your fax number (max. of 20 digits) by
pressing the numb er keys.
♦If you make a mistake, press the HOLD/SEARCH
key to move the cursor back to the mistake, then
enter the correct number or letter.
4. Press:
5. Enter your name by pressing the appropriate
number keys as shown below.
♦To enter two letters in succession that require
the same key, press the
entering the first letter.
A =
B =
C =
D =
E =
F =
G =
H =
I =
GHI
PQRS
Press either key one or more times
to select and enter a symbol.
6. When finished, press:
FUNCTION
START/MEMORY
START/MEMORY
ABC
JKL
TUV
3
OWN NUMBER SET
SPEAKER key after
J =
K =
L =
M =
N =
O =
P =
Q =
R =
S =
DEF
SPEED DIAL
MNO
REDIAL
WXYZ
HOLD/
SEARCH
SPEAKER
START/MEMORY
T =
U =
V =
W =
X =
Y =
Z =
SPACE =
Deletes highlighted
letter
Upper/lower case
shift key
Moves cursor to the
left.
Moves cursor to the
right.
STOP
Page 4
QUICK REF ERENCE GUIDE
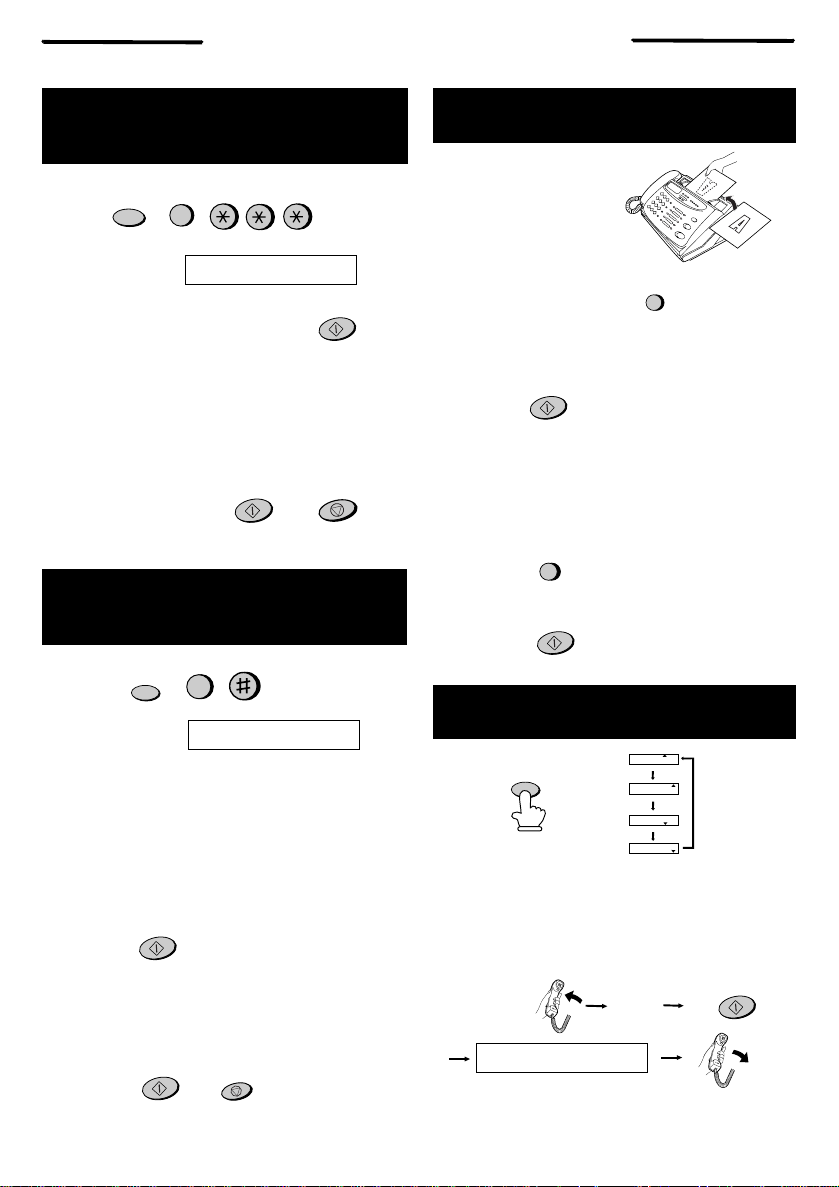
SETTING THE
DATE AND TIME
Press:
Press the
Enter two digits for the Day (01 through 31).
Enter two digits for the Mont h (01 thro ug h 12).
Enter four digit s for the Year (Ex: 1998).
Enter two digits for the Hour (00 throu gh 23).
Enter two digits for the Minute (00 throu gh 59).
When finished, press:
FUNCTION
Display shows:
START/MEMORY key:
3
DATE & TIME SET
START/MEMORY
START/MEMORY
STOP
STORING AND CLEARING
NUMBERS FOR AUTO DIALLING
1. Press:
Display shows:
2.
Press
number.
3. Enter a 2-digit Speed Dial number (from 01 to
10 for Rapid Key Dial lin g, or 11 to 30 for Speed
Dialing). (If you are clearing a number, go to
Step 7.)
4. Enter the full telep hone /fax number.
5. Press:
6. Enter the name of the location by pressing
number keys (max. of 20 characters). (Refer to
the letter entr y table in
NAME AND NUMBER
7. Press:
FUNCTION
3
FAX/TEL # MODE
1 to store a number or 2 to clear a
START/MEMORY
ENTERING YOUR
.)
START/MEMORY
STOP
SENDING DOCUMENTS
Place your document
(up to 10 pages) face
down in the document
feeder.
Normal Dialling
1. Lift the handset or press
SPEAKER
2. Dial the fax number.
3. Wait for the reception tone (if a person answers,
ask them to press their Start key).
4. Press:
START/MEMORY
Rapid Key Dial ling
Press the appropriate Rapid Key. Transmission
will begin automati cally.
Speed Dialling
1. Press:
SPEED DIAL
2. Enter 2-digit Speed Dial number.
3. Press:
START/MEMORY
RECEIVING DOCUMENTS
FAX
TEL
20-FEB 10:30
TEL/FAX
RECEPTION
Press:
MODE
FAX mode: The fax automatically answers on two
rings and receives the incoming document.
TEL/FAX mode: The fax automatically answers
and receives incoming documents. Voice calls are
signalled by a special ringing soun d.
TEL mode:
RECEIVING
ANS. mode: Select this mode when you want to re-
ceive voice messages in the answering machi ne .
20-FEB 10:30
20-FEB 10:30
20-FEB 10:30
Fax
tone
ANS
FAX
TEL
ANS
TEL/FAX
FAX
TEL
ANS
TEL/FAX
FAX
TEL
ANS
TEL/FAX
START/MEMORY
Page 5

Introduction
Welcome, and thank you for
choosing a Sharp facsim ile!
The features and specificat ions
of your new Sharp fax are
shown below.
Automa tic dialling Rapid Key Dialling: 10 numbers
Speed Dia ll ing : 20 numb ers
Memor y siz e* : 512 KB (approx. 20 avera ge page s with no voi ce
messages rec ord ed, or 24 minut es of voic e messages (including OGMs) with no documents in
memory)
Fax paper Initial starter roll (included with fax machine):
10 m roll
Recommended replacement roll:
FO-40PR 50 m roll
Automatic document
feeder
Paper cutting me thod: Autom a ti c cu tt er
Modem speed 9600 bps with automatic fallback to 7200, 4800,
Transmissi on time * Approx. 15 seco nds (Sha rp speci al mode)
Display 16-digi t LCD disp lay
Reception mode s FAX, TEL, TEL/FAX, ANS.
Resolutio n Horizontal:
* Based on ITU-T Test Chart #1 at standa rd re solu tion in Sharp specia l mode ,
excluding time for protocol signals (i.e., ITU-T phase C time only).
10 sheets m ax .
or 2400 bps
8 lines/mm
Vertical:
Standard: 3.85 lines/mm
Fine/Halfto ne: 7.7 lines/ m m
Super fine (transm ission only):
15.4 lines/mm
Page 6

Halftone (g reysca le ) 64 levels
Recording syste m Therma l re cor din g
Applicable telephone line Public switched telephon e networ k
Compatibility IT U-T (CCIT T ) G3 mode
Configuratio n Half-duplex, desktop transceiver
Compression sche me MH, MR, Sharp
Scanning method Sheet-feeder CIS (Co ntact Im age Sensor)
Effective pri nting width 210 mm max.
Input document size Autom atic feeding:
Width: 148 to 216 m m
Length: 140 to 297 mm
Manual feeding:
Width: 148 to 216 m m
Length: 140 to 600 mm
Effective scanni ng width 210 mm max.
Contrast control Automatic/Dar k sel ec table
Copy function Standard
Telephone function Standard (Ca nno t be used i f powe r fails)
Power requirements 230-240 V AC, 50 Hz
Operating temperature 5 to 35°C
Humidity Maximum : 85 %
Power consumption Stand-by: 6.0 W
Maximum: 120 W
Dimensions Width: 3 0 8 mm
Depth: 256 mm
Height: 138 mm (wit hou t handse t in cradle )
Weight Approx. 2.6 kg
As a part of our policy of continuous improv em ent, SHARP rese rve s the
right to make desig n and specifi cati on c han ges fo r product impro vem ent
without prio r notic e. Th e perfor ma nce spe cific at ion fig ure s indi ca ted ar e
nomina l va lu es of pr oduc ti on un it s. T he re m ay be some de vi at ion s from the se
values in ind ivi dual units.
Page 7

Important safety information
• For your safety, if any of your equipment is not operating properl y or should any
physical damage occur to the equipment where internal parts may become
exposed, the equipment should be immediately disconnected from the phone
line and then t he power line and r eturned to a SHARP authorised Service Centre
for inspection, repair, or disposal.
• In Australia, installing or modifying telephone lines should only be done by an
ACA licensed serviceman. In New Zealand, installing or modifying telephone
lines shoul d be done i n accor dan ce with Tele com wir ing prac tice s.
• Do not disassemble this machin e or attempt any procedures no t described in this
manual. Refe r all servic in g to qualifi ed service personne l.
• This machine must only be conn ected to a 230-240 V, 50 Hz, g rounded ( 3-prong)
outlet. Connecting it to any other kind of outlet may damage the machine.
• Do not install or use the machine near water, or when you are wet. Take care
not to spill any liquid s o n the ma ch ine .
• Unplug the machine from the Telephone socket and then the power outlet and
consult a qua lified servi ce represen tative if any of the fo llowing situa tions occur:
- Liquid ha s bee n spi ll ed into the machine or the mach ine has been
exposed to rain or water.
- The machine produc es od ors, smo ke, or un usua l noises.
- The power cord is fray ed or damag ed.
- The machine has been droppe d or the housing damag ed.
• Do not allow anyt hi ng t o r est on the power co rd, and do not i nst al l the m a chi ne
where people may walk on the powe r cord.
• Never insert objects of any kind into slots or ope nings on the machine. This co uld
create a risk of fire or elec tric sh ock. If an obj ect fall s int o the mach ine that you
cannot safely remove, unplug the machine and consult a qualified service
representative.
• Do not place this machi ne on an unstab le cart, stand or table. Th e machine co uld
be seriously dama ged if it falls.
• Never install telep hone wiring durin g a light ni ng sto rm .
Page 8

• Never install telepho ne socke ts in wet loca tions unl ess the socket is spe cifical ly
designed for wet location s.
• Never touch uninsula te d tele pho ne wires or ter mina ls unl ess t he tel ep hone line
has been disconn ecte d at the network i nterface.
• Use caution when insta llin g or modifying telepho ne line s.
• Avoid using a teleph one (othe r than a cor dle ss t ype ) durin g a n ele ctric al st orm .
There may be a remo te risk of electri c shoc k from lightning.
• Do not use a telephone in th e vici nit y of a gas le ak .
• The socket-outlet must be installed near the equipment and must be easily
accessible.
• To make emergency call s, any ot her calls i n prog ress m ust first be release d.
Important:
•• This fac sim i le ma chi ne is not desi gne d for use on a line which ha s cal l
waiting, call forwa rdi ng, or cert ain oth er special servic es offere d by your
telephone comp any . If you attem pt to use t he fax mac hin e on a telep hone line
using any of these servi ce s, you may ex per ience err ors dur ing transm issi on
and reception of facsimile messages.
•• This facsimile machine is not compatible with digital telephone systems.
•• This facsim i le machine is desi gne d to oper at e in Austra li a and New Zea la nd
only.
Page 9

WARNING NOTICE:
NO calls can be made to or fro m this fa x during a main s power failur e.
WARNING Australian Com m uni cati ons Aut hor ity (ACA) regul at io ns
state that no un aut hor ise d cha nge s or m odificatio ns to this e qui pment are
permitted.
Note: Complies with ACA and NZ TELE COM standa rd AS/NZS35 48
regarding emissi on of e lect rom ag netic inter fer enc e.
These limits ar e design ed to prov ide reasona bl e protect ion against
interfer ence in an install ation. This equ ipm e nt ge ne rat es, use s and c an ra di at e
radio frequ enc y en erg y and , if not instal led and used i n accor dan ce with the
instructions, may cause interfer enc e. However, there is no guarantee that
interfer ence will not occu r in a part ic ular installat io n.
If this equip me nt does cause inter ference to radio or tel ev isi on re ce pti on,
which can be det erm i ned by tur nin g the equ ipm e nt of f and on, the user is
encourage d to try t o cor rect t he inte rference by one or more of the fol lowi ng
measures:
Reorient or re loc at e t he re ce iv ing ant enn a.
Increase the sepa ration bet wee n th e eq uip me nt and the rece iv er.
Connect t he e qui pm ent to an outlet on a diff ere nt cir cui t t o tha t whi ch
the receiver is connected.
Consult the deale r or an exp eri en ce d radio/ T V tec hni cian for he lp.
For Australia: The Ringer Equivalence Number (RE N) for t his e qui pm ent is
written on t he ba ck of the machine.
The sum of all the Ringe r Equi val en ce Numb ers (R EN’ s) on you r tele phon e
line should not exceed 3 to assure correct servic e from your telepho ne
company.
Page 10

IMPORTANT NOTICE FOR NEW ZEALAND USERS
Please note:
The grant of a Telepermit for any item of terminal equipment indi c ates
only that Telecom has a ccepted that the item compl ies wit h th e minimu m
conditions for connection to its network.
It indicates no endorsement of the product by Telecom, nor does it
provide any sort of warranty. Above all, it provides no assurance that any
item will work correctly in all respects with another item of
Telepermitted equipment of a different make or model, nor does it imply
that any product is compatible with all of Telecom’s network services.
This equipment is not capable, under all operating condi tions, of correct
operation at the higher speeds for which it is designed. Telecom will
accept no responsibility shoul d difficulti es arise in such circumstances.
This equipment shall not be set up to make automati c calls to the
Telecom ’111’ Emergency Service.
To avoid telephone charges for local calls, be sure to store numb ers
"without area code in your rapid or speed dial locations.
If a charge for local calls is unacceptable, the "Dial" button should NOT
be used for local calls. Only the 7-digi ts of the lo cal numb er shoul d be
dialled from your telepho ne. DO NOT dial the area code digit or "0"
prefix.
This equipment may not provid e for the effective hand-over of a call to
another device connected to th e same l ine.
This device may be subject to ringin g or bell tinkle when certai n other
devices are connected to the same line. If this occurs, the problem sho uld
not be referred to the Telecom Faults Service.
All persons using this device for recording telephone conv ersatio ns shall
comply with New Zealand law. This requires that at least one party to the
conversation is to be aware that it is being recorded. In addition , the
Principles enumerated i n the Privacy Act 1993 shall be compli ed wit h in
respect to the nature of the personal in formati on coll e cted, the purpose
for its collection, how it is used and what is discl osed to any other party.
Page 11

Table of Contents
1 Installation 1
Unpacking Checklist. . . . . . . . . . . . . . . . . . . . . . . . . . . . . . . . . . . . . . . . 1
A Look at the Operation Panel . . . . . . . . . . . . . . . . . . . . . . . . . . . . . . . . 2
Connections. . . . . . . . . . . . . . . . . . . . . . . . . . . . . . . . . . . . . . . . . . . . . . . 5
Original Document Suppo rt . . . . . . . . . . . . . . . . . . . . . . . . . . . . . . . . . 10
Loading the Fax Paper . . . . . . . . . . . . . . . . . . . . . . . . . . . . . . . . . . . . . 10
Entering Your Name and Fax Number. . . . . . . . . . . . . . . . . . . . . . . . . 14
Setting the Date and Time. . . . . . . . . . . . . . . . . . . . . . . . . . . . . . . . . . . 17
Selecting the Reception Mode . . . . . . . . . . . . . . . . . . . . . . . . . . . . . . . 19
Volume Adjustment . . . . . . . . . . . . . . . . . . . . . . . . . . . . . . . . . . . . . . . 20
2 Using the Answering Machine 22
Recording an Outgoing Message . . . . . . . . . . . . . . . . . . . . . . . . . . . . . 22
Operating the Answering Machine. . . . . . . . . . . . . . . . . . . . . . . . . . . . 25
Optional Answering Machine Set ti ngs. . . . . . . . . . . . . . . . . . . . . . . . . 29
Transfer Function . . . . . . . . . . . . . . . . . . . . . . . . . . . . . . . . . . . . . . . . . 33
Override Ringing. . . . . . . . . . . . . . . . . . . . . . . . . . . . . . . . . . . . . . . . . . 36
Remote Operations . . . . . . . . . . . . . . . . . . . . . . . . . . . . . . . . . . . . . . . . 38
3 Sending Documents 46
Transmittable Documents. . . . . . . . . . . . . . . . . . . . . . . . . . . . . . . . . . . 46
Loading the Document . . . . . . . . . . . . . . . . . . . . . . . . . . . . . . . . . . . . . 48
Resolution and Contr ast . . . . . . . . . . . . . . . . . . . . . . . . . . . . . . . . . . . . 50
Sending a Fax by Normal Dialling. . . . . . . . . . . . . . . . . . . . . . . . . . . . 52
Sending a Fax by Automati c Diall ing. . . . . . . . . . . . . . . . . . . . . . . . . . 54
4 Receiving Documents 63
Using TEL/FAX Mode. . . . . . . . . . . . . . . . . . . . . . . . . . . . . . . . . . . . . 63
Using ANS. Mode. . . . . . . . . . . . . . . . . . . . . . . . . . . . . . . . . . . . . . . . . 64
Using FAX Mode . . . . . . . . . . . . . . . . . . . . . . . . . . . . . . . . . . . . . . . . . 64
Using TEL Mode . . . . . . . . . . . . . . . . . . . . . . . . . . . . . . . . . . . . . . . . . 65
5 Making Copies 67
6 Making Telephone Calls 68
Page 12

7 Special Functions 70
Caller ID . . . . . . . . . . . . . . . . . . . . . . . . . . . . . . . . . . . . . . . . . . . . . . . . 70
Distinctive Ring. . . . . . . . . . . . . . . . . . . . . . . . . . . . . . . . . . . . . . . . . . . 75
Blocking Reception of Unwanted Faxes. . . . . . . . . . . . . . . . . . . . . . . . 77
Polling (Req uesti ng a Fax Transm iss ion ). . . . . . . . . . . . . . . . . . . . . . . 79
Timer Operations. . . . . . . . . . . . . . . . . . . . . . . . . . . . . . . . . . . . . . . . . . 82
Memory . . . . . . . . . . . . . . . . . . . . . . . . . . . . . . . . . . . . . . . . . . . . . . . . . 84
Broadcasting . . . . . . . . . . . . . . . . . . . . . . . . . . . . . . . . . . . . . . . . . . . . . 87
Reminder Function . . . . . . . . . . . . . . . . . . . . . . . . . . . . . . . . . . . . . . . . 89
8 Option Settings 92
9 Printing Reports and Lists 98
10 Maintenance 103
11 Troubleshooting 105
Problems and Sol utions. . . . . . . . . . . . . . . . . . . . . . . . . . . . . . . . . . . . 105
Messages and Signals . . . . . . . . . . . . . . . . . . . . . . . . . . . . . . . . . . . . . 110
Clearing Paper Jams . . . . . . . . . . . . . . . . . . . . . . . . . . . . . . . . . . . . . . 112
Index 114
Page 13
1
Chapter
Installation
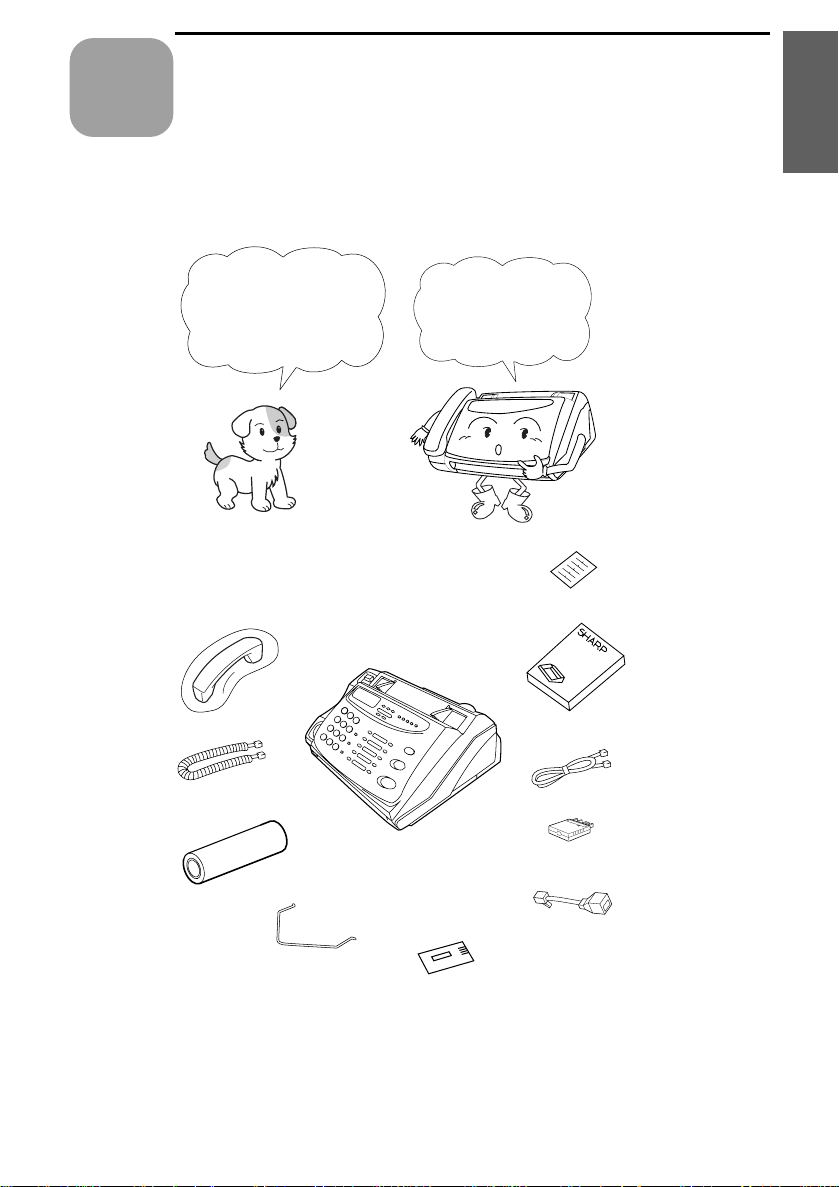
Unpacking Checklist
Before setting up,
make sure you have
all of the following
items.
Handset
1. Installation
If any are missing,
contact your d ealer
or retailer.
Rapid key
labels
Operation
manual
Handset
lead
Fax pap er
(sample roll)
Telephone
line cord
Adapter
(for Australia)
Adapter
(for New Zealand)
Paper guide
Business products
dealer insta l lation
report
1
Page 14
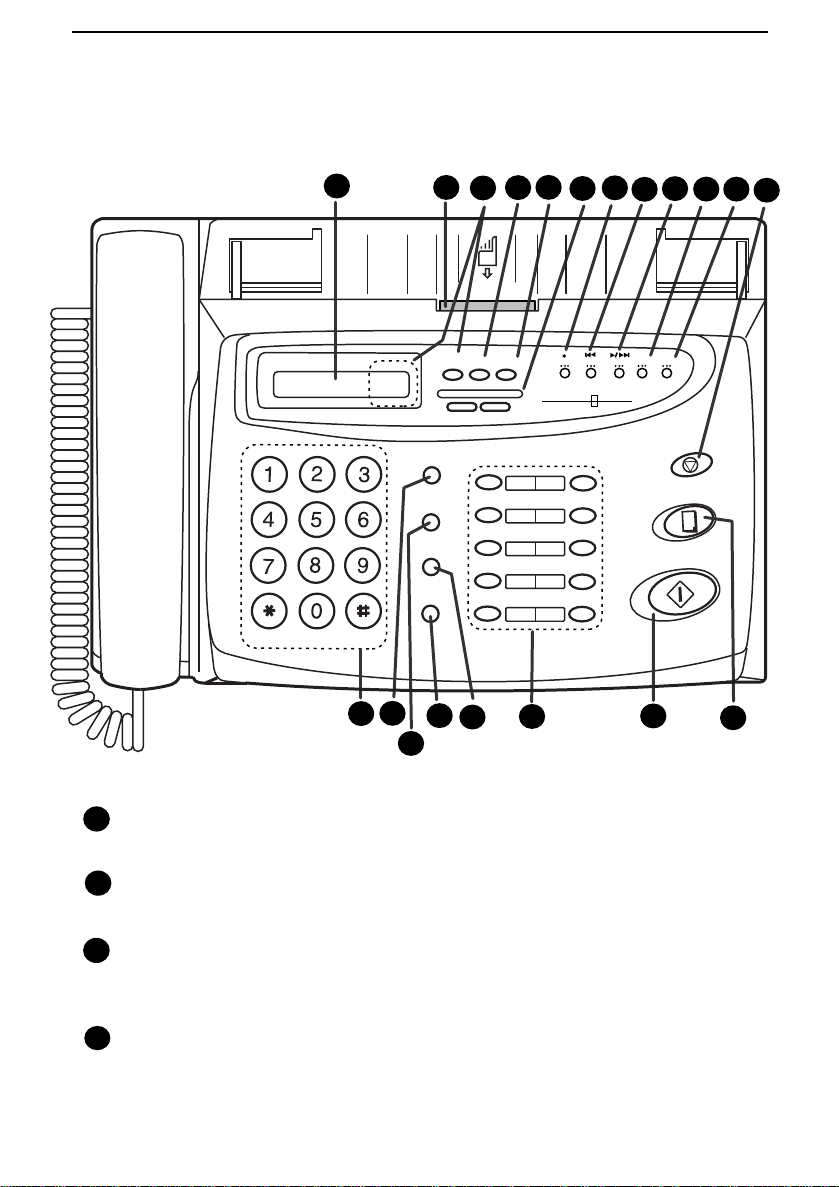
A Look at the Operation Panel
A Look at the Operation Panel
GHI
PQRS
1
TEL/FAX
DEF
ABC
MNO
JKL
WXYZ
TUV
13
TEL FAX
14
ANS
SPEED DIAL
HOLD/SEARCH
2
RECEPTION
MODE
DOWN VOLUME UP
REDIAL
SPEAKER
16
3
PANEL RELEASE
17
5
4
RESOLUTIONFUNCTION
DIGITAL
01
02
03
04
06
05
08
07
10/POLL
09
18
7
6
REPEAT
PLAY/SKIP
REC
ANSWERING
SYSTEM
9
8
REMINDER
DELETE
STOP
COPY/HELP
START/MEMORY
19
10
20
11
12
15
Display
1
This displa ys messages and promp ts dur ing oper ation and pr ogra m ming.
2
PANEL RELEASE
Pull this release t owar d you t o open the operat io n pan el.
RECEPTION MODE ke y
3
Press this key to select the recep ti on m ode . An arrow in the displa y wil l point
to the current ly sele ct ed rece pt ion mod e.
4
FUNCTION key
Press this key to select variou s spec ial fun ction s.
2
Page 15

A Look at the Operation Panel
5
RESOLUTION key
Press this key to adjust t he resol uti on a nd co ntr ast befo re sendi ng or
copying a document.
VOLUME keys
6
Press these keys to adjust the volum e of the speak er whe n the SPEAK ER
key has been presse d, or the volum e of the ringe r at all other time s.
REC key
7
Press this key to record a phone conver sation or a message.
REPEAT key
8
Press this key to repeat playba ck of a message.
PLAY/SKIP key
9
Press this key to play recorded messa ge s. Dur ing playba ck, pre ss it to skip
forward to the next messa ge.
DELETE key
10
Press this key to erase re cor ded message s.
REMINDER key
11
Press this key to send a fax and/or voi ce messag e to anothe r par ty or to
yourself at a preset time.
1. Installation
12
STOP key
Press this key to stop op erati ons be for e they are com plete d.
Number keys
13
Use these keys t o dia l numb ers, and enter num ber s and l et te rs duri ng
number/n am e storing procedure s.
14
SPEED DIAL key
Press this key to dial a 2-digit Speed Dia l numbe r.
15
REDIAL key
Press this key to autom atic ally redi al the last num ber dia lled .
3
Page 16

A Look at the Operation Panel
16
SPEAKER key
Press this key to hear the li ne and fa x tones th roug h the speake r bef ore
sending a docum ent , or diall in g a voice num be r.
Note: This is not a speakerphone. You must pick up the handset to talk
with the other party.
HOLD/SEARCH key
17
Press this key to search fo r an automa ti c dialli ng nu mb er, or, during a phone
conversat ion , press th is ke y to put th e other party on ho ld.
18
Rapid Dial Keys
Press one of these key s to dial a fax or voice number autom at ical ly. (Note
that you must attach the Rapid Key lab el s.)
19
START/MEMORY key
Press this key to send or recei ve a docu ment manua ll y when off hook.
20
COPY/HELP key
When a docu me nt is in t he fe ed er, press thi s key to make a co py. At an y
other time, pres s thi s key to pri nt out the He lp List, a quick refe ren ce guid e
to the operati on of your fa x.
4
Page 17
Connections
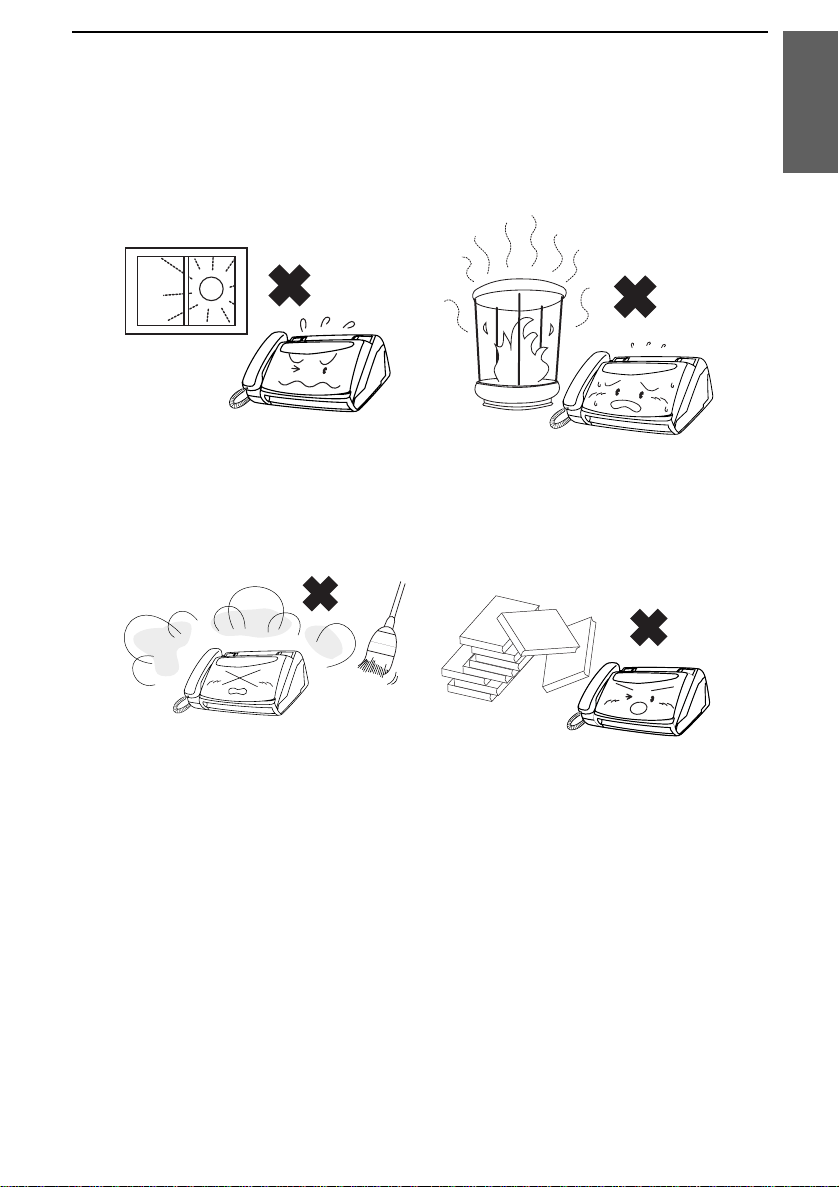
Points to keep in mind w hen setting u p
Connections
1. Installation
Do not place the machine in dire ct
sunlight.
Keep dust away from the m achine .
Do not place the machine near
heaters or air conditioners.
Keep the area around the machine
clear.
About condensation
If the machine is moved from a cold to a warm place, it is possible that
condensat io n may form on the scannin g gla ss, prevent in g proper sc ann ing of
documen ts for transmission. To remove the condensation , t urn on the power
and wait approxim ately two hours befor e usi ng the machin e.
5
Page 18
Connections
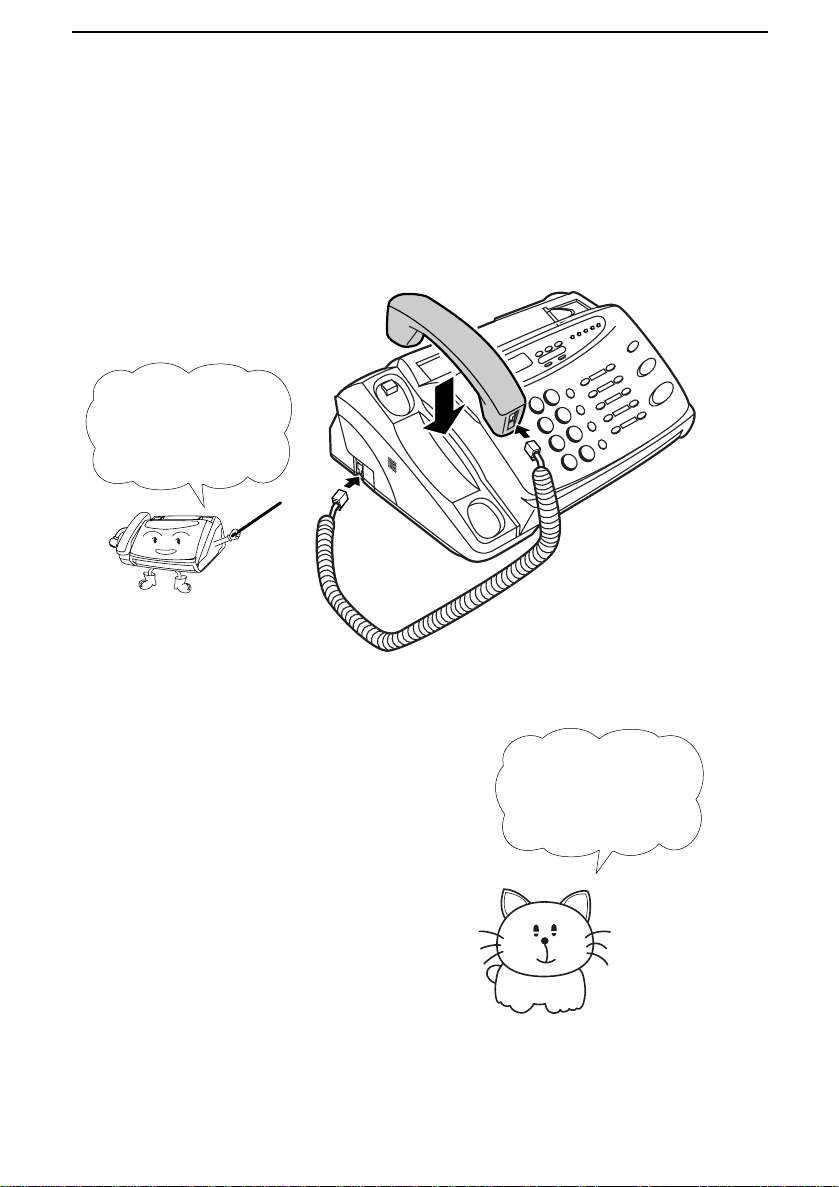
Handset
Connect the handse t as shown and place it on the handset rest.
♦ The end s of the handset lead are identical, so they will go into either
socket.
Make sur e t he
handset cord goes
into the unmar ked
socket on the side of
the machine!
Use the handset to
make ordinary phone
calls, or to trans m it
and receive
documents manually.
6
Page 19
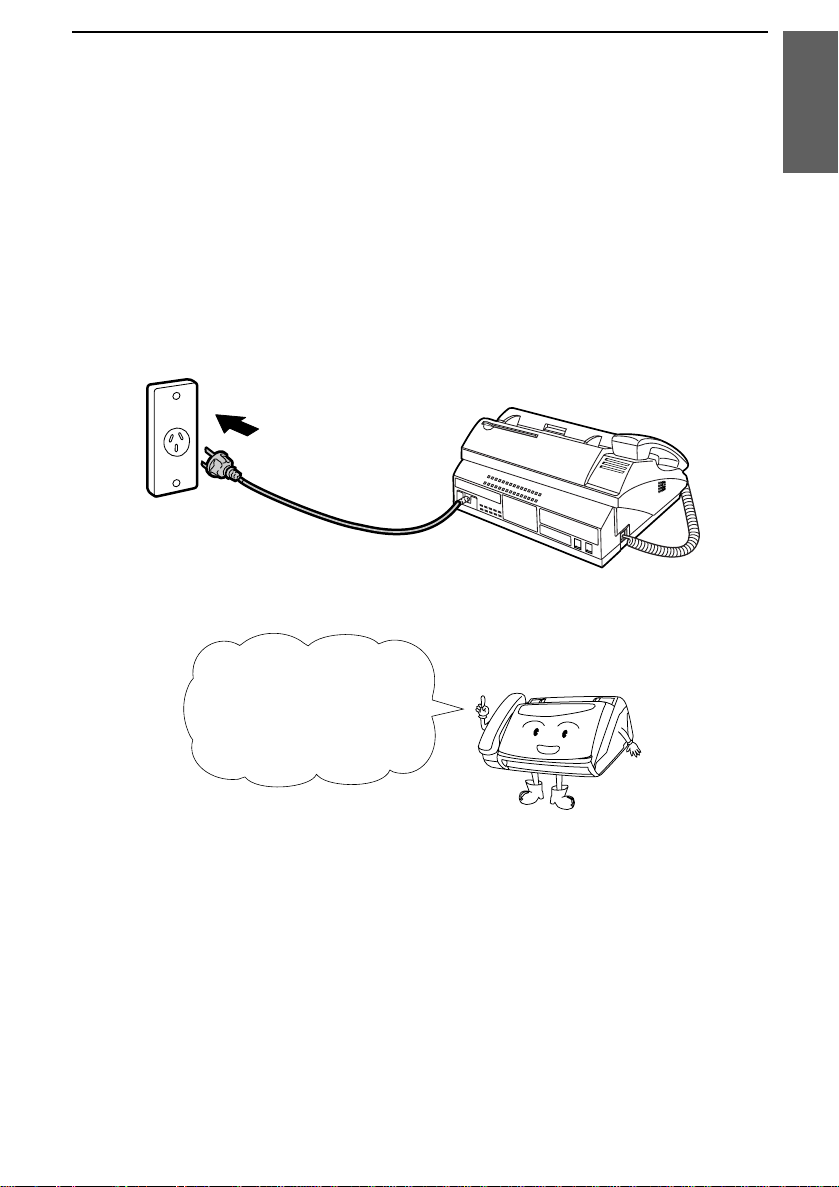
Power lead
Connections
Plug the power l ead into a 230-24 0 V, 50 Hz, earthe d (3-pron g) AC out le t.
♦ Caution: When disconnecting the fax, unplug the telephone line cord
before unplugging the power lead.
♦ Caution: The mains outlet (socket outlet) should be installed near the
equipment and be easily accessable.
The machine does not have
a power on/off switch, so
the power is turned on and
off by simply plugging or
unplugging the power lead.
1. Installation
Note: If your area experiences a high incidence of lightning or power
surges, we recommend that you install surge protectors for the power and
telephone lines. Surge protectors can be purchased at most telephone
specialty stores.
Moving your fax and reconne c ting
Should it be necessary to move your fa x to a new locati on, fi rst disconnect
the telephone line c ord be for e discon nec ting t he po wer lea d. When
reconnect in g, it is necessa ry to connec t the power lead befo re conne ct in g the
telephone line cord.
7
Page 20

Connections
Telephone line cord
Insert one end of the telephone line cord into the adapt er. Inse rt the other en d
of the line c ord into the socket on the back of th e fa x marke d TEL. LINE.
Plug t he a dap te r into the tele ph o ne s oc ket on the wall .
For Australia
For New Zealand
Be sure to inser t the
telep ho n e lin e cord into
the
TEL. LINE socket.
TEL.
SET
TEL.
LINE
Do not insert it into th e
TEL. SET socket.
Comments:
•• Your fa x is set for t one diall ing . If you ar e on a pulse only dia l l ine , you must
set the fax for pulse dialling by chan gin g Opti on Se tt ing 7. Thi s proc edu re i s
described in Cha pt er 8, Option Settings.
•• If you inte nd t o use a com put er fax mode m on the sam e phone lin e, you m ust
reset Optio n Setti ng 12 (Fa x Sig nal Rec ei ve ) to NO in orde r to preve nt
transmission a nd rece ption e rror s. Thi s proc edu re is desc rib ed in Cha pte r 8,
Option Settings.
8
Page 21
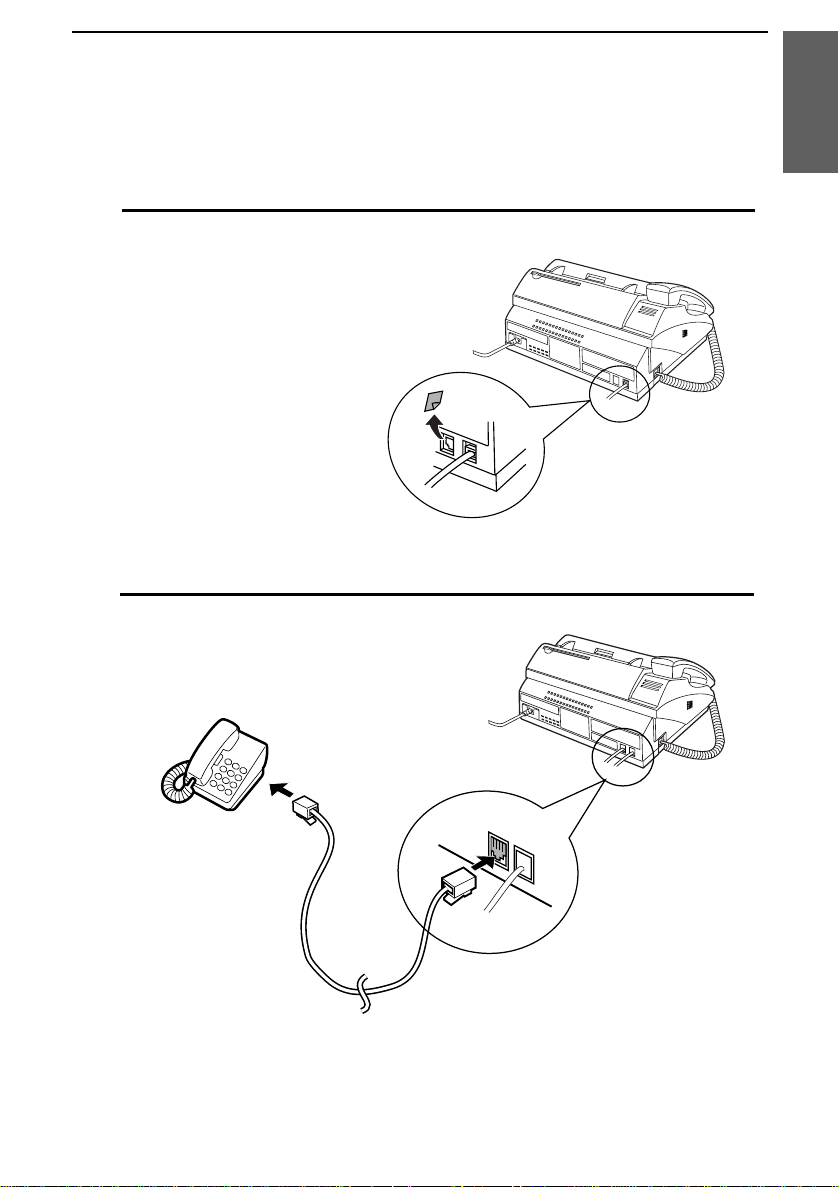
Extension phone (optional)
Connections
If desired, you can conne ct an extensio n phon e to the TEL. S E T socket on
the fa x.
1
Remove the seal covering the TEL. SET
socket.
2
Connect the extension phone line to the
TEL. SET socket.
1. Installation
TEL.
SET
TEL.
LINE
Important: In New Zealan d, not all standar d telephones and answering
machines wi ll respond to inc om ing ringing when connected to the ex tensio n
socke t of the e quipment.
9
Page 22
Loading the Fax Paper
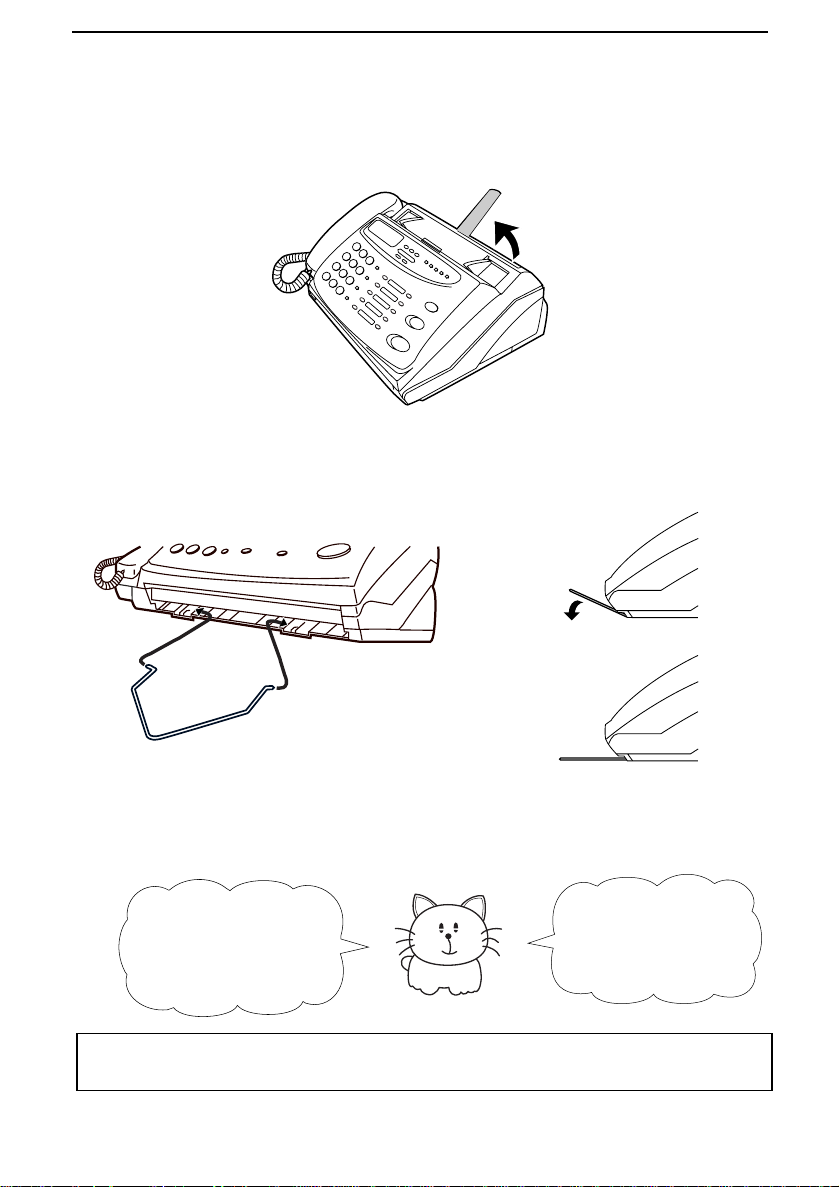
Original Document Support
Rotate the original document sup port so that it points stra igh t out .
Paper Guide
Attach the pap er guide by insertin g the end s int o the hol es in the front of the
fax as shown.
Loading the Fax Paper
Your fax machine prin ts
incoming faxes on a
special kind of paper
called thermal paper .
Note: The power must be on (plu g in the power cord) when loading fax
paper in the fax machine.
10
The fax’s prin t head
creates text and
images by applying
heat to the thermal
paper.
Page 23
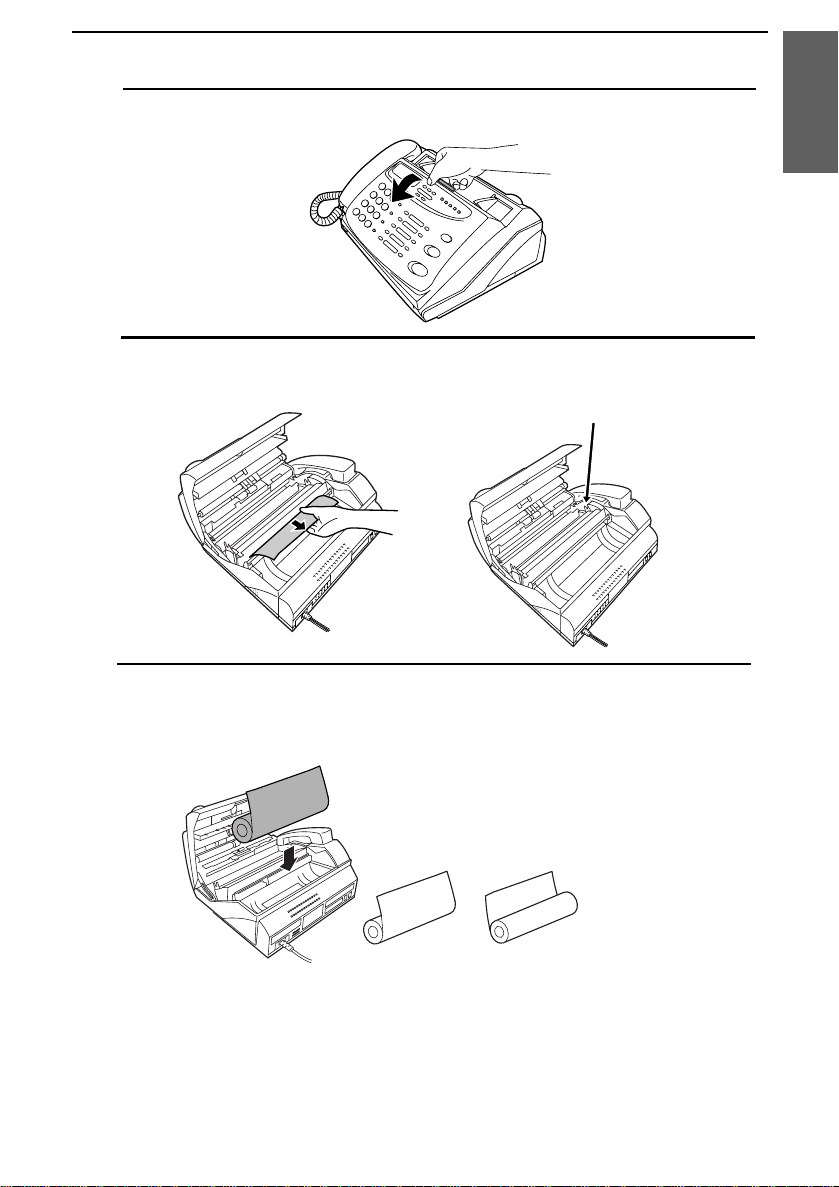
Loading the Fax Paper
1
Pull the release marked PANEL RELEASE toward you and open the
operation panel.
2
Remove the packing paper from the paper compart ment .
Remove cardboard
and tape
1. Installation
3
Unwrap the roll of fax paper and place it in the compartment.
YES NO!
•• Important: The roll must be placed so that the leading edge of the pap er
unrolls as shown. (The paper is only coated on one side for printing. If
the roll is placed backwards, the paper will come out blank after printing.)
11
Page 24
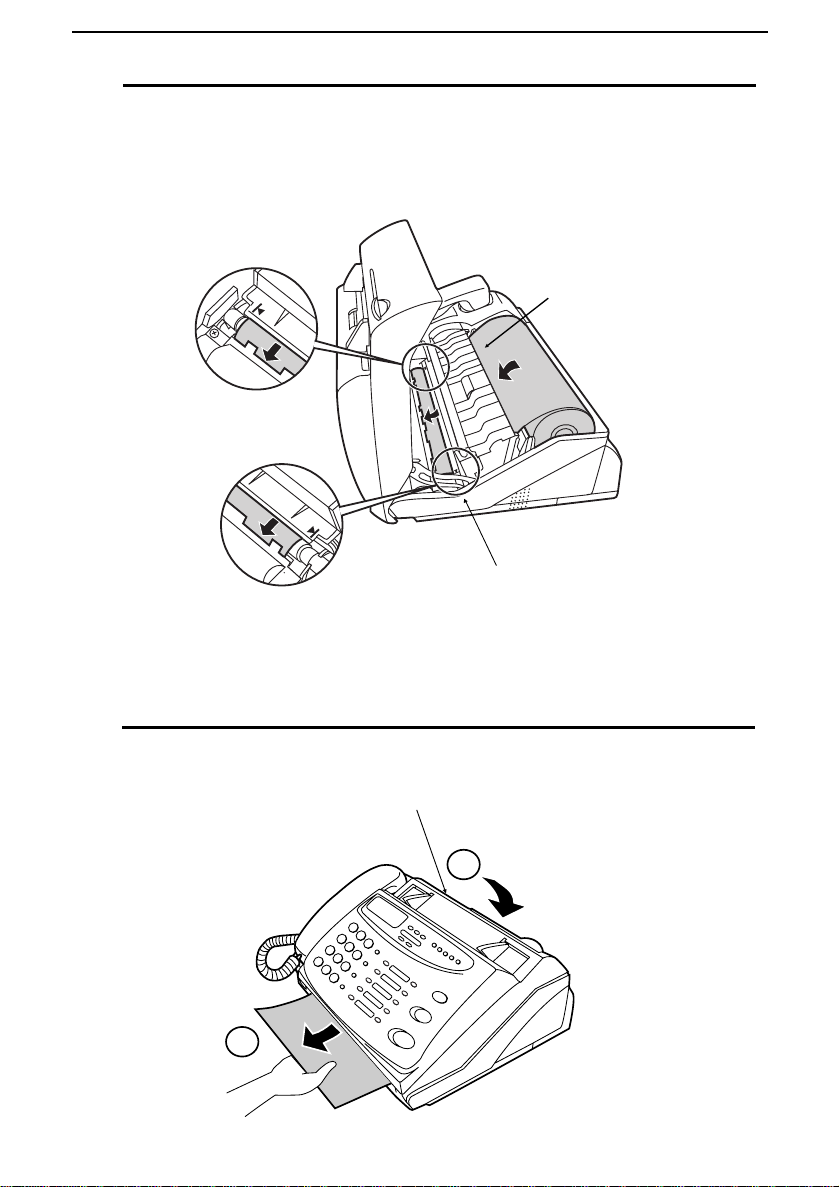
Loading the Fax Paper
4
Insert the leading edge of the paper into the paper inlet. Continue to push
the paper through the inlet until it comes out of the opening in the front of
the fax.
Paper inlet
The paper will reappear
here. Make sure it is aligned
between the arr ows on
each side of the guide, and
then passes under the plate
and out the f ro nt of the fax.
5
Close the operation panel, making sure it clicks into place.
Press here to close
2
1
12
Click!
Page 25

Loading the Fax Paper
6
A short length of the fax paper will feed out and be cut off. (If this doesn’t
happen, repeat the loading procedure.)
Note: The fax has a built-in anti-curl mechanism that will help to reduce
paper curling problems. The anti-curl mechanism will be more effective at
the beginning of the paper roll and less effective towards the end.
Replacing the fax paper
When the paper runs out, OUT OF PAPER will appear in the display.
Receptio n and copy ing will no longe r be possibl e. T o repla ce the pape r, fir st
take out the old roll , then loa d th e ne w roll as de scri bed above.
To assure a long life for your fax and obtai n the best reprod uct io n quali ty, we
recom mend t hat you use the followi ng Sha rp fa x (t her ma l) pape r whi ch i s
avail abl e from your dealer :
1. Installation
FO-40PR THERMAL PAP ER (50 m roll)
♦ The use of any other paper may result in poor copy quality and excessive
build-up of residue on the head. This is due to the different thermal
reactive characteristics of each manufacturer’s paper.
Handling fax pape r
Do not unpac k th e pa per unti l yo u are rea dy t o use it. It may bec om e
discolo ured if:
♦ It is sto red at high humidity or high temperature.
♦ It is expo sed to direct sunlight.
♦ It comes in contact w ith glue, thinner, or a freshly copied blueprint.
♦ A rub ber eraser or adhesive tape is used on it, or it is scratched.
13
Page 26
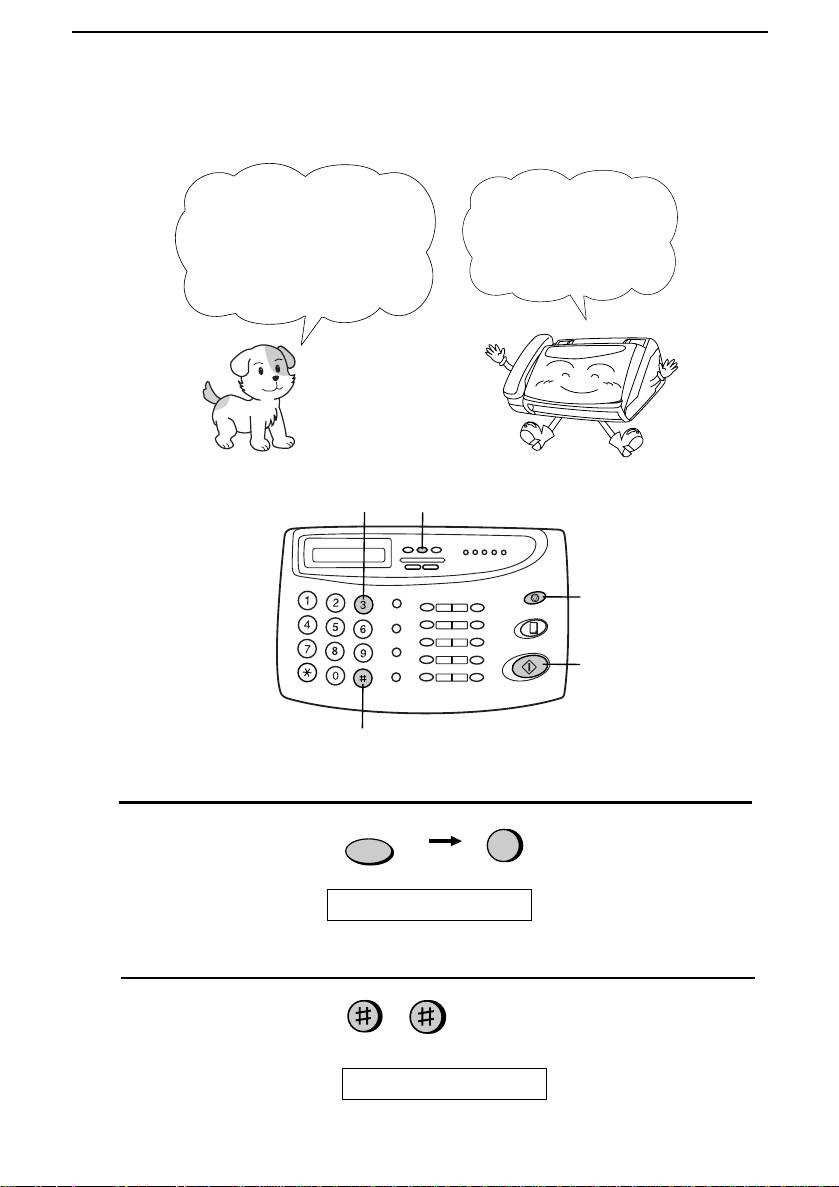
Entering Your Name and Fax Number
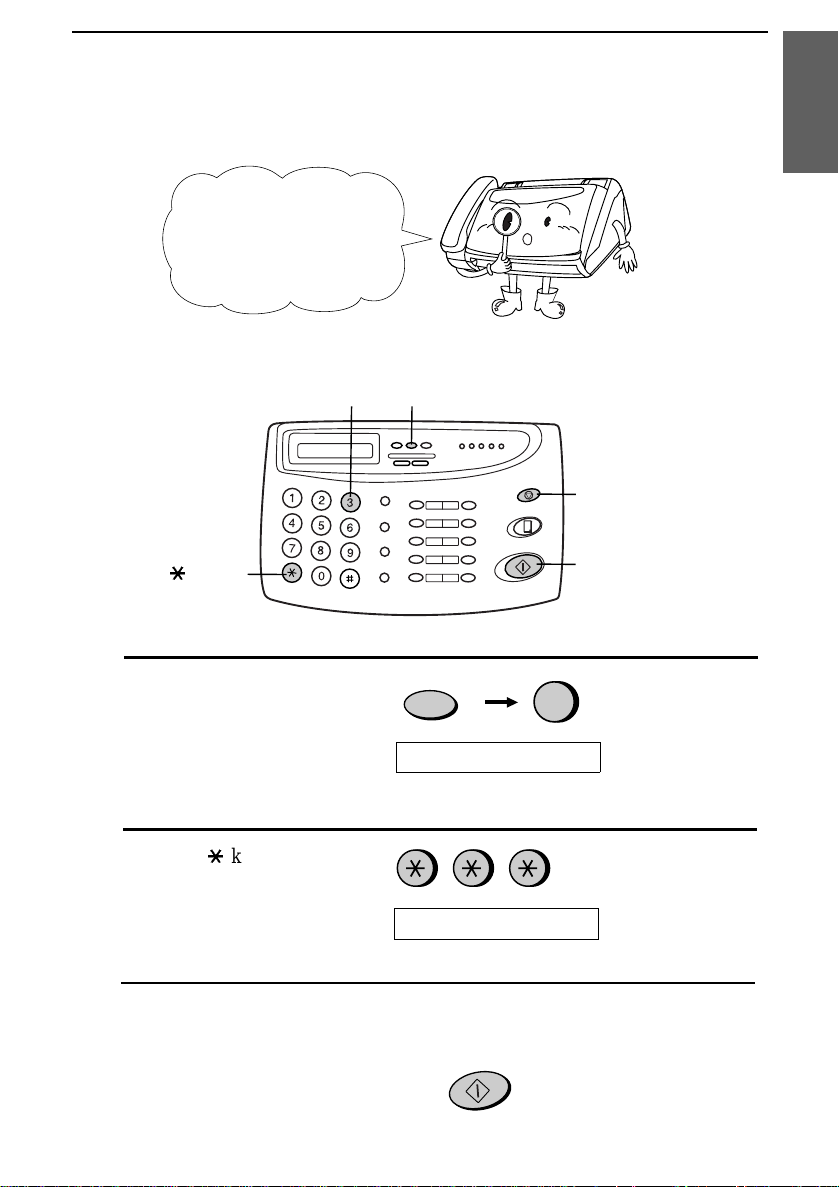
Entering Your Name and Fax Number
Before you can begin using
your fa x, you ne e d to e nt er
your nam e a n d th e telephone
number of your fax. You also
need to set t he dat e an d tim e.
3 key
# key
FUNCTION key
Once you ent er this
information, it will
automa tica lly appear at
the top of each fax page
you send.
STOP key
START/MEMORY
key
1
Press these keys:
The display will show:
2
Press the # key twice:
FUNCTION
ENTRY MODE
The display will show: OWN NUMBER SET
14
3
Page 27
Entering Your Name and Number
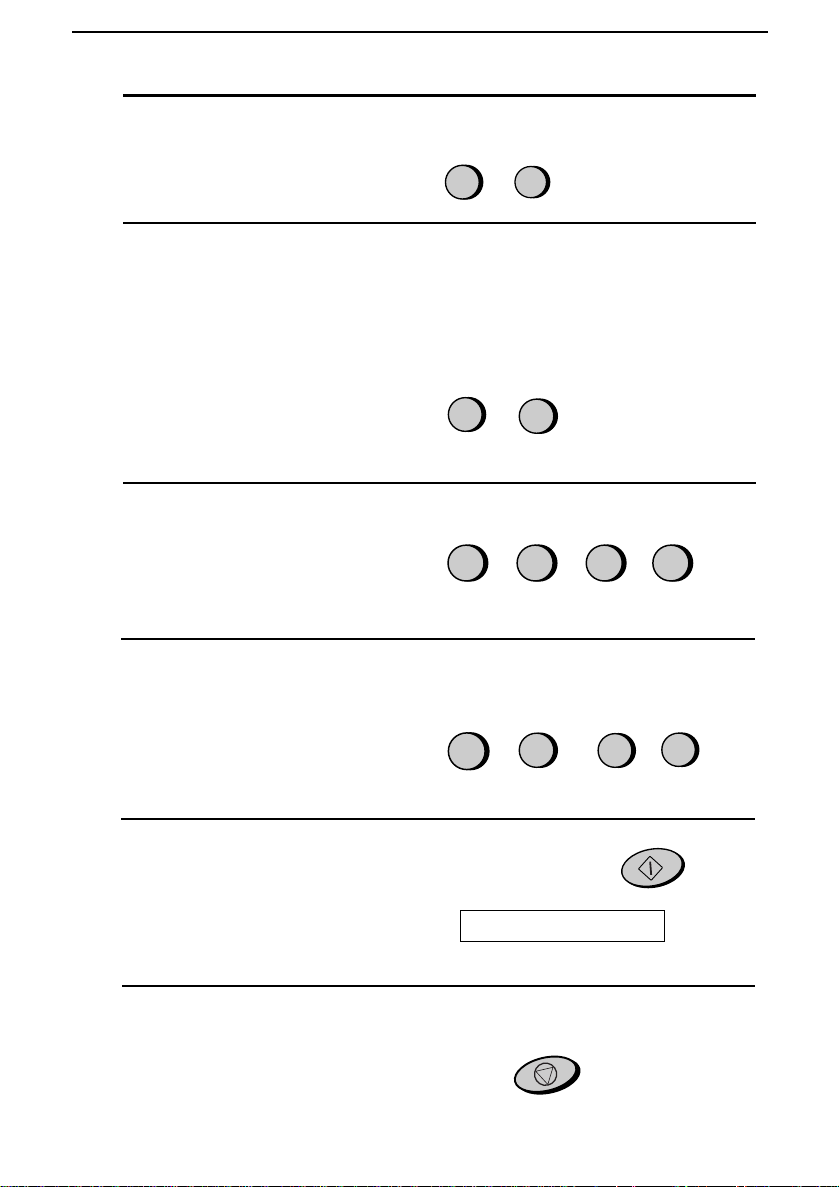
3
Press the START/MEMORY key.
The display will show: ENTER FAX #
4
Enter your fax number by pressing the number keys. Up to 20 digits can be
entered.
•• To insert a space between digits, press the # key. To insert a "+", press
the * key.
•• If you make a mistake, press the HOLD\SEARCH key to move the
cursor back to the mistake and then enter the correct number. The new
number will replace the old number.
Example:
5
Press START/MEMORY to enter the fax number in memory.
5
55
START/MEMOR Y
START/MEMOR Y
21
3
4
1. Installation
The display will show:
Cursor: A dark squar e mark in the di spla y that indica tes wher e a numb er or
letter will be entered.
ENTER YOUR NAME
15
Page 28
Entering Your Name and Fax Number
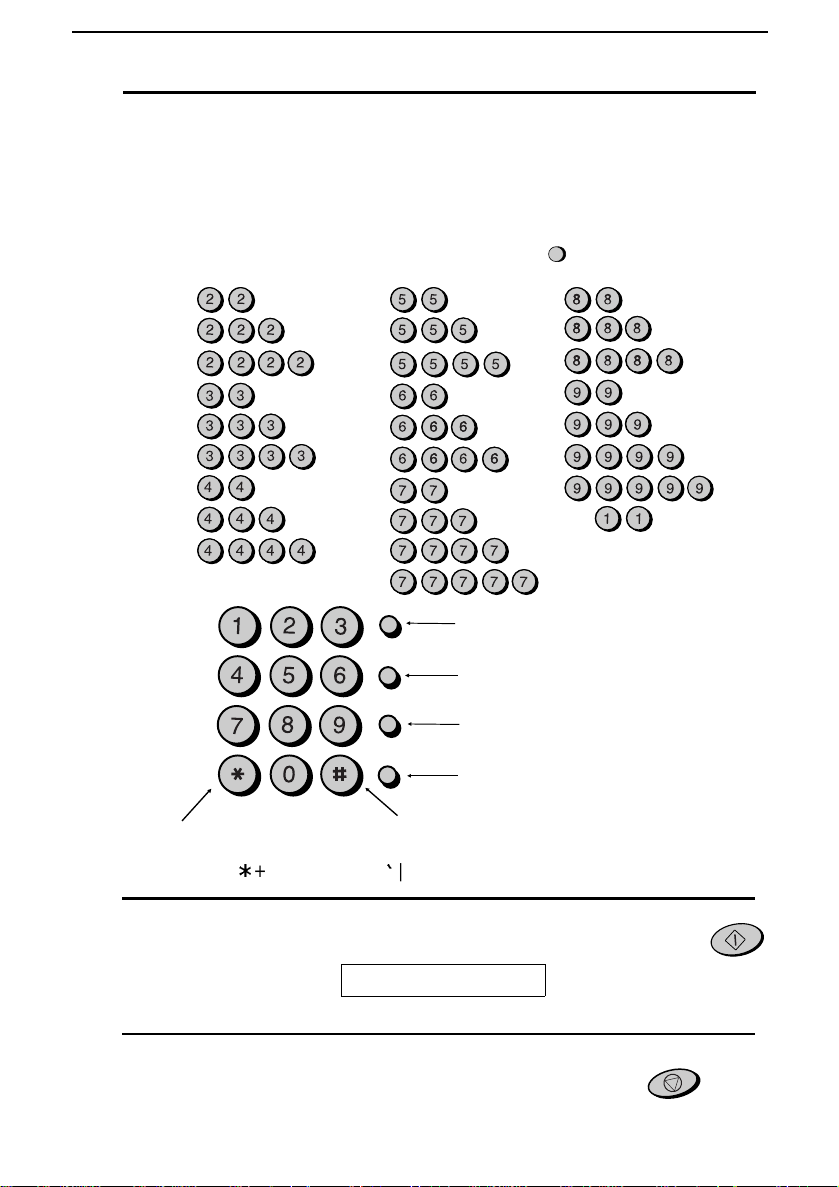
6
Enter your name by pressing the number keys as shown in the chart below.
Up to 24 characters can be entered.
•• To enter two letters in succession that require the same key, press the
SPEAKER key after entering the first letter to advance the cursor.
Example: SHARP = 7 7 7 7 7 4 4 4 2 2 7 7 7 7 7 7
A =
B =
C =
D =
E =
F =
G =
H =
I =
ABC
GHI
JKL
DEF
MNO
J =
K =
L =
M =
N =
O =
P =
Q =
R =
S =
SPEED DIAL
REDIAL
Press this key to delete the
letter highlighted by the cursor.
SPEAKER
T =
U =
V =
W =
X =
Y =
Z =
SPACE =
Press this key to cha nge ca se.
PQRS
WXYZ
TUV
HOLD/
SEARCH
Press this key to mov e the
cursor to the lef t.
SPEAKER
Press this key to move the
cursor to the right.
Press either key rep eat edly t o select
one of the fol low ing sym bo ls :
./!"#$%&’()++,- :;<=>?@[ ¥]^_p{|}→←
7
Press the START/MEMORY key to save your name in memory.
The display will show:
8
Press the STOP key to return to the date and time display.
SECURITY SELECT
16
START/MEMOR Y
STOP
Page 29
Setting the Date and Time
The date and time appear
in the display and report s,
and ar e pr in te d at the top
of every page you tran smit.
3 key FUNCTI ON key
Setting the Date and Time
1. Installation
STOP key
*
key
1
Press these keys:
The display will show:
2
Press the * key three times.
The display will show:
3
Press the START/MEMORY key.
•• The currently set date will appear in the display.
FUNCTION
ENTRY MODE
DATE & TIME SET
START/MEMORY
START/MEMORY
key
3
17
Page 30
Setting the Date and Time
4
Enter a two-digit number for the day ("01" to "31").
Example: th e 5t h
5
Enter a two-digit number for the month ("01" for January, "02" for
February, "12" for December, etc.).
•• To correct a mistake, press the SPEED DIAL key to move the cursor
back to the mistake, and then enter the correct number.
Example: January
6
Enter the year (four digits).
Example: 1998
7
Enter a two-digit number for the hour ("00" to "23") and a two-digit
number for the minute ("00" to "59").
Example: 9:25
0
0
1
0
5
1
9
9
9
2
8
5
8
Press the START/MEMORY key to start the clock.
The display will show:
9
Press the STOP key to return to the date and time display.
18
STORE JUNK #
START/MEMORY
STOP
Page 31

Selecting the Reception Mode
Selecting the Reception Mode
Your fax has four mode s for re ce iv ing inc om ing calls and fa xes:
TEL mode:
This is the most conveni en t mode for re ceivi ng ph one calls. You can also
receive faxes; howeve r, all calls must be answered first by picking up the
fax’s handset or an extensi on ph one conn ecte d to the same line.
FAX mode:
Select this m ode when yo u onl y want to rece iv e faxes on your line. The fax
will automa tica lly answe r all cal ls an d recei ve incom ing faxes sent
automatically .
TEL/FAX mode:
This mode is con ven ie nt fo r rec ei vi ng bot h fa xes a nd voi ce call s. W he n a call
comes in, the fax will detec t whether it is a voice call (incl udi ng m an ually
dialled fax transmissions), or an autom atic ally dial led fa x. If it is a voice call ,
the fax will make a special ringi ng sound to alert you to answer. If it is an
automatical ly dia lled fax tr ansm ission, reception will beg in auto mati call y.
ANS. mode: Select this mo de when you are out and want the built-i n
answering mac hin e to answer all call s. Voice messa ges wi ll be recor ded , and
fax messages wil l be recei ved autom at ical ly.
Setting the reception mode
Press the RECEPTIO N M ODE key until the arrow in the display points to
the desired mode.
RECEPTION MODE key
RECEPTION
MODE
20-FEB 10:30
20-FEB 10:30
20-FEB 10:30
20-FEB 10:30
TEL/FAX
TEL/FAX
TEL/FAX
TEL/FAX
1. Installation
FAX
TEL
ANS
FAX
TEL
ANS
FAX
TEL
ANS
FAX
TEL
ANS
Note: ANS. mode cannot be selected unl ess a genera l outgoi ng message has
been rec ord ed as described in Chapter 2.
For more information on receiving faxes in TEL, TEL/FAX mo de and FAX
mode, see Chapter 4, Receiving Documents. For more informa ti on on usi ng
ANS. mode, see Chapter 2.
19
Page 32

Volume Adjustment
Volume Adjustment
You can adjust the
volume of the speake r
and ringer using the
and DOWN keys on the
operation panel.
UP
Speaker
1
Press the SPEAKER key.
2
Press the UP or DOWN key.
DOWN key
DOWN
SPEAKER
or
UP key
UP
3
When the display shows the desired volume level, press the SPEAKER
key to turn off the speaker.
SPEAKER
20
Page 33

Volume Adjustment
Ringer
1
Press the UP or DOWN key. (Make sure the SPEAKER key has not been
pressed and the handset is not lifted.)
•• The ringer will ring once at the selected level, then the date and time will
reappear in the display.
Display:
DOWN
2
If you selected RINGER: OFF OK?, press the START/MEMORY key.
or
UP
RINGER: HI GH
RINGER: MI DDLE
RINGER: LO W
RINGER OFF: OK?
1. Installation
START/MEMORY
Silent ring fax detection sy stem
You can also set your fax machin e to recei ve fa xe s sile nt ly, but rin g to ale rt
you to a voice call. To do so, set the ringer volume to OFF and set the
receptio n mode to TEL /FAX. When a voice call comes in , a special ri nge r on
the fax will ring . Note that exten sion telep hone s wil l not rin g.
Note: During intial ringing before the fax picks up the call, the fax will be
silent but extension telephones will ring.
21
Page 34

2
Using the
Chapter
The FO-475’s built-in answeri ng machin e allows you to receive both voice
messages and fax transm issi ons whi le you are out.
When the reception mod e is set to ANS., the answe ri ng mac hin e will
automatical ly answe r incom in g calls and pl ay your outgo ing message. Voice
callers can leave a message just as wit h any reg ula r answeri ng m ac hi ne. If the
call is a fax transmission, the FO-475 will automatically receive it.
Recording an Outgoing Message
The outgoing messa ge (OGM) is the gre etin g whic h is play ed after th e
machine answers a call to inform callers th at they can leave a message or
send a fax.
The answering m achi ne has a ge ner al message box a nd th ree per sona l
message boxes. To use the answering machine, you must record an OGM for
the general box. To use a persona l box, you must re co rd an OGM for that box.
Example of an OGM for the general box:
"Hello, this is t he Jon es fa mily . We are not at hom e right now. If you would
like to leave a general message , please speak aft er the beep. If you wou ld like
to leave a private messa ge, press "1" for J oh n, "2" for Jan e, or "3" for Billy
before the beep. If you wou ld l ike to send a fa x, press y our fa csi m il e Start
button."
Answering Machine
Machine
2. Answering
Example of an OGM for a personal bo x:
"This is Jane’ s perso nal box. Please leave a messa ge afte r the beep. "
1
Press these keys:
The display will show:
2
Press the # key.
The display will show:
22
FUNCTION
0
ANS. SETTINGS
OGM RECORDING
Page 35

3
Press the START/MEMORY key.
4
Press a number key to select the outgoing
message you want to record:
•• 0: General outgoing message
•• 1: Box 1 outgoing message
•• 2: Box 2 outgoing message
•• 3: Box 3 outgoing message
•• 4: Transfer outgoing message
(This is used for the Transfer
function, which is described in Transfer
Function in this Chapter.)
5
Pick up the handset, press the
START/MEMORY key, and speak into
the handset.
•• The general outgoing message can be
up to 60 seconds long. A pers onal
outgoing message can be up to 30
seconds long.
Recording an Outgoing Message
START/MEMORY
0
1
2
3
4
Boxes 1, 2, and 3 are
personal bo xes. A caller
accesses a pe rsonal box
by pressing its numb er (for
example,
listening to the general
outgoing mes sage.
1 for Box 1) after
START/MEMORY
•• While recording, the display will show
the time remaining to record.
6
When finished, press the STOP key and
replace the handset.
STOP
23
Page 36

Recording an Outgoing Message
7
Go back to Step 4 to record an outgoing
message for another box, or press th e
STOP key twice to return to the date and
time display.
STOP ST OP
To listen to or erase an outgoing message
To listen to or erase an outgoi ng m essa ge, fo llow Ste ps 1 thr ough 4 of the
above procedure to sele ct the message , and then press the PLAY/ SKIP key
to listen to it, or the DELETE key to erase it. To return to the date and time
display , press the STOP key twic e. Note that the ge ne ral out goi ng m essa ge
cannot be erased. If you need to chang e it , simply repeat the rec ord ing
procedu re.
24
Page 37

Operating the Answering Machine
Operating the Answering Machine
Activating the answering machine
Activate the answering machine before you go out as follows:
Press the RECEPTION MODE key until
FAX
the arrow in the display points t o ANS..
•• Each outgoing message will play (you
RECEPTION
MODE
TEL
TEL/FAX
ANS.
can stop playback by pressing the
STOP key).
•• It will not be possible to set the
reception mode to ANS. if a general
outgoing message has not been
recorded.
When the reception mode is set to ANS., the FO-475 will answer incom ing
calls afte r two ring s if it has re ceiv ed at least one incom ing message , or after
four rings if no m essa ges ha ve been receive d. (For more info rmat ion , see Toll
Saver in Remote Operations in th is ch apt er.)
Note: If the memory is full from messages prev iously recorded, MEMORY
IS FULL will appear in the display. To set the reception mode to ANS.,
you must first erase some or all of the s tored messages.
Note: In ANS. mode, the machine will automatically switch to fax
reception if it detects a period of silence longer than six seconds after
answering a call. For this reason, if a caller pauses for this length of time
while leaving a message, they will be cut off and hear fax reception tones.
Machine
2. Answering
Listening to received messages
When you return, the di spla y will sho w the num ber of messages re cor ded in
each box. Listen to them as follows:
25
Page 38

Operating the Answering Machine
1
Press the PLAY/SKIP key.
•• If you only want to listen to new
messages (messages not previously
listened to), continue to hold the
PLAY/SKIP key dow n for at least two
seconds.
2
If you want to listen to the messages in a
personal box, enter the number of that
box by pressing the app ropriate number
key.
3
If the box (general or perso nal) has a
passcode, enter the passcode by pressing
the appropriate number keys.
4
The messages will play.
•• As each message plays, the date and
time of recording will appear briefly in
the display. If no messages were
received, NO MESSAGES will appear.
PLAY/SKIP
2
4 3
(Example)
2
(Example)
•• To listen to a message a second time,
press the REPEAT key before
playback of that message end s.
•• To move back to the previous message,
press the REPEAT key within 3
seconds of the beginning of the current
message.
•• To skip forward to the next message,
press the PLAY/SKIP key.
•• To increase playback speed, press the #
key. To decrease playback speed, press
the * key.
Note: Playback will stop if you receiv e a call, lift the handset, press t h e
STOP key, or open the paper compartment cover.
26
REPEAT
REPEAT
PLAY/SKIP
Page 39

Operating the Answering Machine
Erasing received messages
It is important to erase receive d messag es af ter you list en t o them to ensure
that the memory does no t become full. This is done as follows:
•• Erasing general messages: To erase all
messages in the Genera l Box, press and
hold down the DELETE key for at
least 2 seconds. If the General Box has
a passcode, press the DELETE key and
then enter the passcode .
•• Erasing personal messages: To erase
all messages in a personal box, press
the DELETE key (do not hold it
down), enter the number of the box,
and then enter its passcode (if it has
one).
•• Erasing a single message: To erase
only a single message, press the
DELETE key while the message is
being played.
DELETE
Machine
2. Answering
Using the R EC key
You can use the REC key to record t eleph one conversations and m essa ges
for other users of the FO-475. These wil l be recorde d in the Gene ral Box, an d
played back toget her with any inco ming m essa ge s in that box when the
PLAY/SKIP key is presse d.
•• Recording messages: To record a
message, press the REC key for at least
1 second, and then pick up the handset,
press the START/MEMORY key, and
speak into the handset . When you have
finished speaking, press the STOP key
and replace the handset.
•• Recording phone conversations: To
record a phone conversation, hold down
the REC key during the conversation
you want to record (while recording,
you will hear a beep every 15 seconds).
When you are finished, release the key.
REC
27
Page 40

Operating the Answering Machine
Date and time of ICMs
You can check the date and time of your received messages by pressing the
panel keys as sho wn bel ow.
♦ The dates and times are also shown in the Message List, which can be
printed out as described in Chapter 9.
1
Press these keys:
The display will show: ANS. SETT INGS
2
Press these keys:
FUNCTION
0
The display will show:
3
Press the START/MEMORY key. The
number of messages recorded will appear
in the display.
4
Press # or * one or more times to show
the date and time of each of the messages.
•• The message number will appear first,
and then the date and time several
seconds later.
5
Press the STOP key.
Note: The recorded dates and times are cleared each time you erase the
messages.
ICM CONFIRM ATION
START/MEMORY
or
STOP
28
Page 41

Optional Answering Machine Settings
Optional Answering Machine Settings
Programming a passcode
A 3-digit passcode can be progra mme d for e ach of th e boxes. If th is is do ne,
the passcode must be ente red bef ore message s in the bo x can be list ened to or
erased. Prog ram a new passc ode or clear a previousl y progra mm e d passcode
by pressing the panel keys as shown below.
♦ The numbers "1", "2", and "3" cannot be selected for the first digit of the
passcode.
Machine
2. Answering
1
Press these keys:
The display will show:
2
Press 1 to enter a passcode, or 2 to clear a
previously programmed passcode.
3
Enter the number of the box for which
you want to program or clear a passcode
by pressing the appropriate numeric key.
If you are clearing a passcode, go to Step
5.
4
Enter a 3-digit passcode by pressing the
number keys.
5
Press the START/MEMORY key and
then the STOP key.
FUNCTION
BOX PASSCODE
0
1 2
4 1 2
START/MEMORY
or
1
(Example)
(Example)
STOP
Note: To ensure confidentiality, passcodes cannot be checked. If you have
forgotten a passcode, clear it and program a new one.
29
Page 42

Optional Answering Machine Settings
Fax recep tion in boxes
If desired, you can tu rn on t he Fax Box fu nct io n to receiv e faxes i n per sona l
boxes.
When a fax is sent to a personal box, it will not be printe d out imm ediat ely.
Instead , it will pr int out when yo u play back t he messa ge s lef t in the box. If
you progra m a passc ode for th e box, you wil l be able to receive c onfi de ntial
faxes. When a fa x is sen t to the Gene ral Box, it will be prin te d out
immedi atel y unless a passco de ha s been pro gra mme d for the Ge ner al Box, in
which case it wil l be prin te d out after m essa ge playba ck.
If the caller wants to send a fax to a personal box, they should enter the
number of the box ("1 " for Box 1, "2" for Box 2, or "3" fo r Box 3) by
pressing t he appro pri ate ke y on thei r telephon e before the beep. Th e outgoi ng
message for t he select ed box wil l play, and the call er can then press thei r
Sta rt key to s end a fax.
Foll ow the ste ps bel ow to turn the Fax box function on or off (i t ha s b een
turned off at the factory).
1
Press these keys:
The display will show:
2
Press these keys:
The display will show:
3
Press 1 to turn the Fax box function on, or
2 to turn it off.
4
Press the STOP key.
30
FUNCTION
0
ANS. SETTINGS
FAX BOX FUNCTION
or
1 2
STOP
Page 43

Optional Answering Machine Settings
Setting ICM time
Incoming m essa ge s (ICMs) are the messa ge s whic h callers l eave for you on
the built-in answering machine. The answering machine is set at the factory
to allow each caller a maximu m of 4 minut es to leave a message. If desire d,
you can ch ang e this setting to 15, 30, or 60 se con ds.
•• Note that with all the settings, the machine will stop recording if it detects a
period of sil enc e or the calle r ha s hung up or the re is a fax machine calling
automat ic al ly.
1
Press these keys:
The display will show:
2
Press a numeric key to select the desired
ICM recording time:
•• 1: 15 seconds
•• 2: 30 seconds
•• 3: 60 seconds
•• 4: 4 minutes
3
Press the STOP key.
FUNCTION
ICM RECORD TIME
1
2
3
4
0
STOP
31
Page 44

Optional Answering Machine Settings
Fax receptio n on ANS. failu re
If the memory fo r record ing incom ing message s bec omes full while you are
out, the answering machine will no longer be able to record messages. The
ON ANS. FAILURE setting is used to choose the response of the machine to
incoming calls when this happens:
♦ Automatic fax reception NO: The FO-475 will answer after 20 rings,
after which it will wait to receive a remote command. Most callers will
hang up before it answers; however, when you call the FO-475 from a
remote location, you can wait until it answers, listen to your messages ,
and then erase them (see Remote Operations in this chapter).
♦ Auto matic fax reception YES: The reception mode will switch to FAX
mode, allowing the FO-475 to continue to receive faxes automatically
without broadcasting an OGM on answering. With this setting, you can
still use the remote commands to listen to your mess ages and erase the
message memory (see Remote Operations in this chapter).
Autom a tic fa x rec ep ti on is se t to NO at the fa ct ory be for e shi ppi ng. If you
want to set it to YES, press th e panel keys as fol lows:
1
Press these keys:
FUNCTION
0
The display will show:
2
Press these keys:
The display will show:
3
Press 1 to turn automatic fax reception on,
or 2 to turn it off.
4
Press the STOP key.
32
ANS. SETTINGS
ON ANS. FAILURE
or
1 2
STOP
Page 45

Transfer Function
Transfer Function
The Transfer function is used to make the FO-475 automatically call you at a
specified num be r every t im e it rece ives an incoming message in a select ed
box. This allows you t o hear your messag es imm ed iate ly after they com e in,
even when you a re at a rem ote loc at io n.
When you answer the telephone, you will hear your record ed messa ge telling
you that the call is a transfer cal l. Ente r "#", the box number, the box’ s
passcode (or yo ur remo te code num be r if the box has no passc ode ), and "#".
The FO-475 will then play back your messages. You can also per form an y of
the remote operations descr ibed in Remote Operations in this chapter.
Note: When you hang up after a transfer call, the FO-475 will not
immediately resume normal operation. If you want the FO -475 to accept
calls immediately after a transfer call, enter "*" twice before hanging up
(if you want to hang up during message playback, first enter " 0" and " #"
to stop playback, then enter "*" twice).
Programming the transfer number
To use the Transfer func tion, you must first giv e the FO-475 the num be r to
call (the transfer numbe r). This is done by pre ssing the panel keys as foll ows:
1
Press these keys:
FUNCTION
0
The display will show:
ANS. SETTINGS
Machine
2. Answering
2
Press these keys:
The display will show:
TRANSFER # ENTRY
33
Page 46

Transfer Function
3
Press the START/MEMORY key.
4
Enter a transfer number (max. of 32 digits
including pauses ) by pressing the number
keys.
5 5 215 43
5
Press the START/MEMORY key and
then the STOP key.
Recording the transfer message
START/MEMORY
START/MEMORY
(Example)
STOP
The transfer messa ge plays when you answer t he tel eph one , and informs you
that the call is a transfer call. It can be up to 15 secon ds lon g. To reco rd a
transfer message, follow the steps described in Recording a n Out goi ng
Message in this chapter. The following is an example:
"Hello. This is a transfe r call for (YOUR NAME ). Ente r your remot e code
number now."
34
Page 47

Turning the Transfe r function on and o ff
Transfer Function
1
Press these keys:
The display will show:
2
Press these keys:
The display will show:
3
Press "1" to tur n the Transfer function on,
or "2" to turn it off . (If you pressed "2",
go to Step 5.)
4
Enter the number of the box for which
you want the Transfer function to operate
(for the General Box, enter "0").
ANS. SETTINGS
TRANSFER FUNC
FUNCTION
0
or
1 2
1
(Example)
Machine
2. Answering
5
Press the STOP key.
STOP
35
Page 48

Override Ringing
Override Ringing
This function allows sel ecte d caller s using a touch- ton e telephone to override
the answering machin e’s ou tgo ing message and cause the FO-475 to mak e a
special ringi ng s ou nd, alerting you t hat the y ar e call in g. This is use ful when
you are near the ma chi ne but on ly wa nt to ta lk wi th cert ai n ca llers, taking a ll
other calls on the answering machine.
Programming the override code
To overrid e the answeri ng m achi ne, your ca llers m ust enter a 3-digit ove rri de
code from thei r tele pho ne. This c ode has be en set to "009" at the factory. If
you want to change it, press th e panel keys as shown be lo w.
Important!
•• Make sure the override code is different from the remot e code or any
passcodes pro gra mme d for bo xes.
1
Press these keys:
The display will show:
2
Press these keys:
The display will show:
3
Enter a 3-digit code number by pressing
the number keys.
4
Press the START/MEMORY key and
then the STOP key.
ANS. SETTINGS
OVERRIDE CODE
FUNCTION
0
5
5
(Example)
START/MEMORY
4
STOP
36
Page 49

Overriding the answ er ing ma c hine
Your callers should fol lo w the steps bel ow to overr ide the answe ri ng
machine.
1
Your caller calls the FO-475 from a
touch-tone telephone. When the outgoing
message begins, they should press the "#"
key on their telephone.
•• The caller will hear a short beep, and
the outgoing message will stop.
2
The caller should enter the override code
and "#" by pressin g the appropriate keys
on their telephone.
•• If an incorrect code is entered, the
caller will hear four beeps. He or she
must re-enter the correct code within
60 seconds or the line will be
disconnected.
5
Override Ringing
45
(Example)
Machine
2. Answering
3
The FO-475 will make a special ringing
sound. Pick up the handset to answer the
call. (Note that an extension telephone
connected to the same line will not ring.)
•• If you do not answer within 30 seconds,
the outgoing message will play again
and the caller can then leave a message.
37
Page 50

Remote Operations
Remote Operations
You can call the FO-475 from any tone dial tel eph one and play back your
messages using the remote commands. You can also use these commands to
change the recep ti on m ode and othe r set ti ngs.
Remote code numbe r
When you call the FO-475, you must enter the passcode for th e box you wan t
to listen to, or a remote code num be r if the box doe s not have a passcode .
One remote code num be r can be progr amm ed, an d it is used to access all
boxes which do not ha ve passco des. This prevents unauthorized people from
listenin g to your m essa ges. You can use any 3-di git num be r as the re mote
code numbe r.
The remote code numbe r has be en set to "001" at the fact ory. If yo u want to
change it, press the pa nel key s as shown belo w.
1
Press these keys:
FUNCTION
0
The display will show:
2
Press these keys:
The display will show:
3
Enter a 3-digit number by pressing the
number keys. ("1","2" and "3" cannot be
selected for the first digit.)
4
Press the START/MEMORY key and
then the STOP key.
38
ANS. SETTINGS
REMOTE CODE
2 2
START/MEMORY
2
(Example)
STOP
Page 51

Remote Operations
Toll Saver
When you call the FO-475 t o liste n to your messages, it will answer afte r two
rings if it has received at least one message in any of the boxes, or after four
rings if no messages are receive d.
This allo ws you to save money on telep hone cha rge s, particul arl y if you ar e
calling long dist anc e. If t he machi ne do es not answe r afte r the sec ond ri ng,
you can simply hang up befo re it answers, sav ing yourself the cost of that call.
If you do not want to use the Toll Sa ver func ti on, you can turn i t off by
following t he steps be lo w. In this case , the FO-475 wi ll answer after the
number of ri ngs set with Opti on Se tt ing 2 (see Chap ter 8), the rin g set ti ng for
FAX reception mode.
1
Press these keys:
FUNCTION
0
Machine
2. Answering
The display will show:
2
Press these keys:
The display will show:
3
Press "1" to turn Toll Saver on, or "2" to
turn it off.
4
Press the STOP key.
ANS. SETTINGS
TOLL SAVER
1
STOP
or
2
39
Page 52

Remote Operations
Retrieving your messages
Follow the steps be low t o liste n to your m essa ges fr om a remot e locati on.
Note that you can only access o ne box per call; if you want to access more
than one box, you must make a separate call fo r ea ch box.
Note: You can also access the FO-475 for remote operation when the
reception mode is set to FAX or TEL/FAX. In this case, call the FO-475,
press the "#" key immediately after it answers, or during pseudo ringing in
TEL/FAX mode (before you hear the fax tone in either case), and then
continue from Step 2 below.
1
Call the FO-475 from a touch-tone
telephone. When your outgoing message
begins, press the "#" key on the telephone.
•• You will hear a short beep, and the
outgoing message will stop.
2
Enter the number of the box you want to
listen to. If you want to listen to the
General Box, skip this step.
2
(Example)
3
Enter the box’s passcode, or your remote
code number if the box does not have a
passcode. When finished, press "#" on the
telephone.
•• You will hear a series of beeps equal to
the number of messages recorded in the
box, or one long beep if four o r more
messages have been received. The
machine will then play back the
messages, beeping once at the end of
each message. When all messages have
been played back, you will hear a long
beep.
40
25
2
(Example)
Page 53

•• If no messages have been received in
the box, you will hear a short beep.
You can either hang up, or perform any
of the operations described in the
following section "Other remote
operations".
4
While the messages are playing, you can
do any of the following:
•• Repeat: To listen to a message a
second time, press "2" and "#" on the
telephone before that message ends. To
move back to the previous message,
press "2" and "#" within the first 3
seconds of the current message .
Remote Operations
Machine
2. Answering
2
•• Skip forward: To skip forward to the
next message, press "5" and "#" on the
telephone.
•• Stop: To stop playback, press "0" and
"#" on the telephone. Af ter this, you
can enter any of the commands
described in the following section,
"Other remote operations".
•• Play new messages: To listen to only
your new messages , first stop playback
by pressing "0" and "#", and then press
"6" and "#".
•• Erase a message: To erase the
message you are currently listening to,
press "3" and "#" before it ends.
5
0
0
6
3
41
Page 54

Remote Operations
5
When you have finished listening to your
messages, you can do any o f the
following:
•• Erase all messages: To erase all of the
messages in the box, press "3", "3",
and "#".
3
3
•• Repeat playback: To listen to your
messages again, press "7" and "#".
•• Perform other operations: You can
enter any of the commands described in
the following section, "Other remote
operations".
•• Hang up: If you do not eras e your
messages first, they will be saved and
any new messages will be recorded
after them. If you want the FO-475 to
resume normal operation immediately,
press "*" twice before hanging up (in
some cases, particularly when the
Transfer function is u sed, the FO-475
may not accept new calls for one or
two minutes after you hang up unless
you first press "*" twice).
Comments:
7
•• When a rem ot e co mm a nd is a cc ept ed by the mach ine , you wil l he ar one
beep. If an inc orrect comma nd is e nte re d, you wil l he ar four be ep s. In the
latter case , re-enter the correct com m an d.
•• When enteri ng a com ma nd, do not pa use l onge r than 10 seco nds be twe en
each digit. If you do, a 4-beep error signal will be issued and the digits
entered up to that point wi ll be disreg ard ed. In this c ase , re-e nte r the
comma nd from the begi nni ng.
•• If you make two errors (causi ng t wo 4-be ep signa ls to be issued ) while
entering your remote code numb er, the line will be disco nne cted. This
prevents un author iz ed peopl e from attem ptin g to guess you r rem ote code
number.
•• If you pause for longe r th an 60 seco nds be fore enter ing a comman d, you wil l
be disconnected.
42
Page 55

Remote Operations
Other remote opera tions
After listening t o your message s, you can do any of the operations de scr ibe d
below by pressing t he appro pri at e keys on th e telepho ne.
Note: The following commands cannot be entered while messages a r e
being played back. If you do not want to wait until playback end s to enter a
command, first stop playback by p ressing "0" and "#", and then enter the
command.
Changing the fax reception mode
Select a new reception mode by pressing
the keys as follows:
•• ANS. mode: "8", "1", and "#".
•• FAX mode: "8", "2", and "#".
•• TEL mode: "8", "3", and "#".
Caution: In TEL mode, you will not be
able to further change the reception
mode.
•• TEL/FAX mode: "8", "4", and "#".
8
(Example)
Machine
2. Answering
1
Recording a new outgoing message
Note: A new outgoing message can only be recorded for the box you
selected at the beginning of the remote operation procedure.
1
Press "4" and "*" on the telephone.
2
When you hear a short beep, speak into
the telephone to record the new message.
•• The message (including the general
outgoing message) can be up to 15
seconds long. After 15 seconds (or
earlier if the machine detects silence
after you finish speaking), you will
hear a beep, and the new message will
be played back.
4
43
Page 56

Remote Operations
Turning the Transfer function on or off
To turn Transfer on: Press "9", "1", and
"#", followed by the number of the box
("0" for the General Box) and "#".
To turn Transfer off: P ress "9", "2", and
"#" on the telephone .
Changing the transfer telephone number
1
Press "9", "0", and "#" on the telephone.
2
After you hear a short beep, enter the new
telephone number. When finished, press
"#".
•• To insert a pause between any two
digits of the number, press "*".
5
Recording a new transfer message
9
1
1
(Example)
1
0
1
3
(Example)
4
9
6
4
1
Press "9", "3", and "#" on the telephone.
2
When you hear a short beep, speak into
the telephone to record the new message.
•• The time for the transfer message is
fixed at 15 seconds. After 15 s econds
(or earlier if the machine detects
silence after you finish speaking), you
will hear a beep, and the new message
will be played back automatically.
44
9
3
Page 57

Remote Operations
Recording a "Memo"
You can leave a "memo" for your sel f or other users of the machine . It wil l be
recorded in the Genera l Box, and pl ayed ba ck when m essa ges in tha t box are
listened to.
1
Press "*" and "#" on the telephone.
2
When you hear a short beep, speak into
the telephone to record the memo.
3
When you are finished, press "0" and "#".
•• If the FO-475 detects a certain period
of silence, it will stop recording
automatically.
0
Machine
2. Answering
45
Page 58

3
Sending
Chapter
Transmittable Documents
Size and weight
The size and weight of documents that you can load in the document feeder
depend on whether you load one page at a time or several pages at onc e.
Loading one page at a time:
Documents
Minimum size
148 mm
140 mm
Maximum size
216 mm
600 mm
Minimum weight
52 g/m²
Loading seve ra l pages at onc e:
Minimum size
148 mm
140 mm
Minimum weight
52 g/m²
Maximum weight
Maximum size
Maximum weight
157 g/m²
216 mm
80 g/m²
297 mm
46
Page 59

Transmittable Documents
Note: Letters or graphics on the edges of a document will not be scanned.
Letters in the
shaded area will
not be scanned.
4 mm
4 mm
Other restrictions
♦ The scann er cannot recognise yellow, greenish yellow, or light blue ink.
3. Sending
Documents
♦ Ink , glue, and correcting fluid on documents must be dry befo re they
pass through the document feeder.
♦ All clips, staples, and pins must be removed from documents before
loading in the feeder. If these are not removed, they may damage the
machine.
♦ Documents w hich are patched, taped, torn, smaller than the minimum
size, carbon backed, or easily smudged should be photocopied, and the
copy loaded in the feeder.
47
Page 60

Loading the Document
Loading the Document
Up to 10 pages can be placed in the feeder at one time. The pages will
autom at ic al ly fe ed int o the ma ch ine sta rti ng f r om the bott om pag e.
♦ If you need to send or copy more than 10 pages, place the additional
pages gently and carefully in the feeder just before the last page is
scanned. Do not try to force them in, as this may cause double-feeding
or jamming.
♦ If you r document consists of several large or thick pages which mus t be
loaded one at a time, insert each page into the feeder as the previous
page is being scanned. Insert gently to prevent double-feeding.
1
Adjust the document guides to the width
of your document.
2
Place the document face down and push it
gently into the document feeder. The top
edge of the document should enter the
machine first.
•• The feeder will draw the leading edge
of the document into the machine. The
display will show:
READY TO SEND
3
Adjust the resolution an d/or contrast
setting (if desired) as explained in the
section Resolution and Contrast, then dial
the receiving machine as explained in
Sending a Fax by Normal Dialling.
48
RESOLUTION
Page 61

Loading the Document
Removi ng a document from the feeder
If you ne e d to
remove a docum ent
from the feeder, open
the operation panel.
Important:
Do not try to remove a document without opening the operation panel. This
may damage the feeder mechanism.
1
Pull the release marked PANEL
RELEASE toward you and open the
operation panel.
3. Sending
Documents
2
Remove the document.
3
Close the operation panel, making sure it
clicks into place.
Click!
49
Page 62

Resolution and Contrast
Resolution and Contrast
If desired, you can adjust t he re sol uti on a nd co ntr ast befo re se ndi ng a
document.
The default reso lu tion
setting is STANDARD
and the defa ult co nt ra st
setting is AUTO.
You must adjust the
settings each time
you don’t want to use
the default sett ings.
Note: The resolution and contrast settings are only effective for
transmitting a document. They are not effective for receiving a document.
Resolution settings
STANDARD: Use STANDARD for ordinary documents. This setting
gives you the fastest and most economical transmission.
FINE: Use FINE for documents containing small letters or fine
drawings.
SUPER FINE: Use SUPER FINE for documents containing very small
letters or very fine drawings.
HALF TONE: Use HALF TONE for photographs and illustrations.
The original will be reproduced in 64 shades of grey.
Note: In order to transmit in FINE or SUPER FINE resolution, the
receiving fax machine must also have that resolution. If it doesn’t, your
machine will automatically step down to the next best available setting.
Contrast settings
AUTO Use AUTO for normal documents.
DARK U se DARK for faint documents.
50
Page 63

1
Load the document(s).
•• The document must be loaded before
the resolution and contrast can be
adjusted.
2
Press the RESOLUTION key one or
more times until the desired resolution
and contrast settings appear in the display.
•• The first time you move through the list
of resolution settings, the contrast
setting AUTO will appear next to each
resolution setting. The second time you
move through the list, the contrast
setting DARK will appear.
Resolution and Contrast
RESOLUTION
Display:
STANDARD :AUTO
3. Sending
Documents
FINE :AUTO
SUPER FINE :AUTO
HALF TONE :AUTO
STANDARD :DARK
FINE :DARK
SUPER FINE :DARK
HALF TONE :DARK
51
Page 64

Sending a Fax by Normal Dialling
Sending a Fax by Normal Dialling
With Normal Dialling, you pick up the handset (or press the SPEAK E R ke y )
and dial by pressing the num be r keys.
♦ I f a person answers, you can talk with them through the handset before
sending the fax. (If you pressed the SPEAKER key, you must pick up
the handset to talk.)
♦ Normal Dialling allows you to listen to the line and make sure the other
fax machine is responding.
1
Load the document(s).
The display will show:
READY TO SEND
•• Set the resolution and/or contrast if
desired.
RESOLUTION
2
Pick up the handset or press the
SPEAKER key. Listen for the dial tone.
3
Dial the number of the receiving machine
by pressing the numeric keys.
52
GHI
PQRS
SPEAKER
or
ABC
DEF
3
2
1
JKL
MNO
TUV
6
5
WXYZ
9
8
4
7
Page 65

4
Wait for the connection. Depending on
the setting of the receiving machine, you
will either hear a facsimile reception tone
or the other person will answer.
•• If the other party answers, (lift the
handset if the SPEAKER key was
pressed) ask them to pres s their
START/MEMORY key. This causes
the receiving machine to issue a
reception tone.
5
When you hear the reception tone, press
the START/MEMORY key. Replace the
handset if you used it.
•• When transmission is completed, the
fax will beep once.
Sending a Fax by Normal Dialling
Beep
START/MEMORY
3. Sending
Documents
Using the REDIAL ke y
You can press the REDIAL key to redi al the last num ber dialle d. To se nd a
documen t, procee d fro m Step 4 of Norm al Dialli ng. Not e that the spea ker
will be automatical ly activ ated whe n you press the REDIAL.
Facsimil e recepti on tone : Thi s is a pronoun ce d, high -pi tc hed tone tha t the
receivin g mach ine send s to the transm i tt ing machi ne to indic at e that it is
ready to receive.
53
Page 66

Sending a Fax by Automatic Dialling
Sending a Fax by Automatic Dialling
You can dial a fax or telephone num ber by si mp ly pressi ng a Rapi d Key, or
by pressing the SPEED DIAL key and enteri ng a two-di gi t numbe r.
♦ To us e Automatic Dialling, you must first store the full fax or telephone
number in your fax machine.
♦ When you store a fax or telephone number, you select a two-digit Speed
Dial number for it. 30 Speed Dial numbers are available.
Speed Dial numbe rs
01 through 10 are
for Rapid Key
(one- touch) Dialling.
Speed Dial numbers
11 throu gh 30 ar e
for dialling with the
SPEED DIAL key.
Attach ea ch st r ip
of Rapid Key
labels between
the Rapid Keys.
SPEED DIAL
SPEED DIAL key
Rapid keys
01
START/MEMORY
1 1
54
When you store a
number in a Rapid Key,
write the name of the
party on the label.
Page 67

Sending a Fax by Automat ic Dialling
Storing fax and telephone numbers for Automatic Dialling
1
Press these keys:
The display will show:
2
Press 1 to select SET.
The display will show:
3
Enter a two-digit Speed Dial number by pressing the number keys (01 to
10 for Rapid Key Dialling, 11 to 30 for Speed Dialling).
4
Enter the fax or voice number by pressing the number keys (max. of 32
digits including pauses). (Note: A space cannot be entered.)
•• Press the SPEED DIAL key to clear a mistake.
•• If a pause is required between any of the digits to access a special service
or an outside line, press the REDIAL key. The pause will appear as a
hyphen. Several pauses can be entered in a row.
FUNCTION
3
FAX/TEL. # MODE
1
FAX/TEL. # SET
ENTER SPEED #
0
1
(Example)
3. Sending
Documents
5
5
5
Press the START/MEMORY key.
1
5
3
2
START/MEMORY
4
(Example)
55
Page 68

Sending a Fax by Automatic Dialling
6
Enter the name of the party by pressing the number keys as shown in the
chart below. Up to 10 characters can be entered.
•• If you don’t want to enter a name, skip this step.
•• To enter two letters in succession that require the same key, press the
SPEAKER key after entering the first letter to advance the cursor.
Example: SHARP = 7 7 7 7 7 4 4 4 2 2 7 7 7 7 7 7
SPEAKER
A =
B =
C =
D =
E =
F =
G =
H =
I =
7
Press the START/MEMORY key.
8
Return to Step 3 to store another number, or press STOP to exit. If the
K =
M =
N =
O =
Q =
R =
J =
L =
P =
S =
T =
U =
V =
W =
X =
Y =
Z =
SPACE =
START/MEMORY
number will be used for Rapid Key Dialling , yo u can write the name on the
appropriate Rapid Key label.
STOP
Step 3 or
Note: To confirm that Automatic Dialling numbers have been stor ed
correctly, print out the Telephone List. The procedure fo r doing this is
explained in Chapter 9, Printing Reports and Lists.
Storing area codes and a cc es s codes
You can also store an area code or access c ode in a Rapid Key or Spee d Dial
number. To use this number to dial, see Chain Dialing in Chapter 5, Making
Telephone Call s.
Note: An area code or access code stored in a Rapid Key or Speed Dial
number can only be used if the handset is lifted or the SPEAKER key
pressed before dialling.
56
Page 69

Clearing numbe rs
Sending a Fax by Automat ic Dialling
1
Press these keys:
The display will show:
2
Press 2 to select CLEAR.
3
Enter the Speed Dial number that you want to clear by pressing the number
keys.
4
Press the START/MEMORY key.
5
Return to Step 3 to clear another number, or press STOP to exit.
FUNCTION
FAX/TEL. # MODE
2
0
STOP
Step 3 or
3
1
START/MEMORY
(Example)
3. Sending
Documents
Making change s
To make changes in a number pre vio usly store d, repea t the sto rin g proc ed ure .
Select the Spee d Dial nu mb er fo r whic h you want to make cha nge s in St ep 3,
and then change the num ber and/ or na m e when the y appea r in the displ ay
(Steps 4 and 6, respectively).
♦ A lithi um bat tery kee ps autom ati c diall ing number s in memo ry
The machine uses a lithi um batte ry to keep autom at ic dia ling nu mb ers a nd
other progra mm ed dat a in mem ory whe n the power is t urne d off . Batter y
power is consum ed prim aril y when the power is off. Wit h the power kep t
continuousl y off , the life of the battery is abo ut 5 years. If the battery di es,
have your deale r or reta il er repl ace it. Do not try to replace it you rsel f.
57
Page 70

Sending a Fax by Automatic Dialling
Rapid Key Dialling
If the numbe r you want to dial has be en st ore d for Aut om at ic Dia ll ing as a
Speed Dial numb er from 01 to 10, you can dial it by pressi ng th e
correspondi ng Ra pi d Key.
1
Load the document(s).
The display will show:
READY TO SEND
•• Set the resolution and/or contrast if
desired.
2
Press the Rapid Key corr esponding to the
desired Speed Dial number.
•• The name of the receiving party will
appear in the display. If no name was
stored, the fax number will appear. (If
the name or number is incorrect, press
the STOP key.)
RESOLUTION
01
03
02
04
06
•• The document will be automatically
transmitted once the connection is
made.
58
Example: To dial Speed
Dial number 03, press Rapid
Key 03.
Page 71

Sending a Fax by Automat ic Dialling
Speed Dialling
Speed Dialli ng c an be used to dial any numb er t hat has be en store d for
Automat ic Dialling.
1
Load the document(s).
The display will show:
READY TO SEND
•• Set the resolution and/or contrast if
desired.
2
Press the SPEED DIAL key and then
enter the two digits of the Speed Dial
number by pressing the number k eys.
•• To enter numbers 1 through 9, first
enter 0 and then the number.
SPEED DIAL
RESOLUTION
2 0
3. Sending
Documents
3
Check the display. If the name or number
shown is correct, press the
START/MEMORY key. (If not, press
the STOP key and then repeat Step 2.)
(Example)
START/MEMORY
59
Page 72

Sending a Fax by Automatic Dialling
Direct Keypad Dialling
You can also enter a full num be r with the numbe r key s and t hen press the
START/MEMORY key to begin dial ling. You c an use this me th od to dial a
full number when yo u don’t ne ed to spea k to the othe r party befo re faxi ng.
1
Load the document(s).
The display will show:
READY TO SEND
•• Set the resolution and/or contrast if
desired.
2
Enter the number of the receiving
machine by pressing the numeric keys.
•• If a pause is required between any of
the digits to access a special service or
an outside line, press the REDIAL key.
The pause will appear as a hyphen.
Several pauses can be entered in a row.
3
Check the display. If the number of the
receiving machine shown is correct, press
the START/MEMORY key.
•• If it is not correct, press the STOP key
to backspace and clear one digit at a
time, and then re-enter the correct
digit(s).
RESOLUTION
1
GHI
4
PQRS
7
STAR T/MEMORY
ABC
JKL
TUV
DEF
3
2
MNO
6
5
WXYZ
9
8
60
Page 73

Sending a Fax by Automat ic Dialling
Using the HOLD\SEARCH ke y
If you don’t remembe r the Rapid Ke y or Speed Dial num ber in which you
have store d a pa rt ic ula r fa x num be r, you ca n sea rc h for t he nu mb er by
following the steps bel ow. Once you ha ve found the num ber , you can dial it
and transm it the lo aded doc um en t by simp ly pr essi ng th e
START/MEMORY key.
1
Load the document(s).
The display will show:
READY TO SEND
3. Sending
Documents
•• Set the resolution and/or contrast if
desired.
2
Press the HOLD\SEARCH key and press
1 key.
3
Enter the first letter of the stored name by
pressing the appropriate number key (the
key which corresponds to the required
letter) one or more times until the letter
appears in the display. If the name begins
with a special character or number, press
1.
•• If you don’t remember the first letter,
go to Step 4 (you will scroll through the
list from the beginning).
•• If a name wasn’t stored for the number,
press 0. This will cause numbers, not
names, to appear when you scroll.
RESOLUTION
HOLD
SEARCH
GHI
PQRS
1
ABC
DEF
3
2
1
JKL
MNO
4
TUV
7
6
5
WXYZ
9
8
61
Page 74

Sending a Fax by Automatic Dialling
4
Press the # key or the * key to scroll
through the names (numbers if you
pressed 0) . Stop when the desired name
appears in the display.
•• If no names have been stored that begin
with the entered letter, you will scroll
from the next name, in alphabetical
order, in the list. If no names/numbers
have been stored at all, NO DATA will
appear.
or
5
Press the START/MEMORY key. The
document will be automatically
transmitted once the connection is made.
START/MEMORY
Automatic redia ll ing
If you use autom atic diall ing (inclu din g Dire ct Keypad Di alli ng) a nd th e line
is busy, the mach ine will autom a ti call y redia l the num be r. Up to 2 redi alli ng
attempts will be made at intervals of 5 minutes.
♦ To stop automatic redialling, press the STOP key.
62
Page 75

4
Receiving
Chapter
Using TEL/FAX Mode
Documents
Press the
RECEPTION MODE
key until the arrow in
the display points to
TEL/FAX.
RECEPTION
MODE
TEL/FAX
When the reception mode is set to TEL/FAX, your fax automa ti cally answe rs
all calls on 2 rings (See Option Se tt ing 2 in Chapter 8) . After answe rin g, your
fax monitors the line for abo ut 5 secon ds to se e if a fax tone is being sent.
♦ If your fax detects a fax tone (this means that the call is an automatically
dialled fax), it will automatically begin reception of the incoming
document.
♦ If you r fax doesn’t detect a fax tone (this means that the call is a voice
call or manually dialled fax), it will make a ringing sound (called ps eudo
ringing) for 15 seconds to alert you to answer. If you don’t answer
within this time, your fax will send a fax tone to the oth er machine to
allow the calling party to send a fax manually if they desire.
Comments:
TEL
FAX
ANS.
•• Only the fax wil l alert yo u to voice call s or m anu ally di alle d faxes by pseudo
ringing. An extensi on phone connecte d to the same line wi ll not ring a fte r th e
connecti on has been made .
•• The durati on of pseud o ringin g ca n be adju ste d with Opti on Se tt ing 8. See
Chapte r 8, Opti on Setting s.
Documen ts
4. R e c eiving
•• You can change the num ber of rings on whi ch the machine answers call s by
changing Opt ion Setting 2. (See Cha pte r 8, Option Setting s .)
63
Page 76

Using TEL mode
Using ANS. Mode
In ANS. mode, your fax will automatically receive voice and fax message s.
See Chapte r 2 for more det ai ls.
Using FAX Mode
Press the
RECEPTION MODE
key until the arrow in
the display points to
FAX.
RECEPTION
MODE
TEL/FAX
TEL
FAX
ANS.
When the receptio n mode is set to FAX, the machi ne will automat ical ly
answer all calls on 2 ring s and re ceiv e in com ing fa xes.
2
Fax reception
♦ You can change the number of rings on which the machine answers calls
by changing Option Setting 2. (See Chapter 8, Option Settings.)
♦ If you pick up the handset before the machine answers, you can talk to
the other party and/or receive a document as described in Using TEL
mode.
64
Page 77

Using TEL Mode
Using FAX mode
Press the
RECEPTION MODE
key until the arrow in
the display points to
TEL.
RECEPTION
MODE
When the reception mode is set to TEL, you must answer all calls using th e
fax machi ne’ s hand set or an exte nsi on phone connected to the sam e lin e.
Answer ing wi th the fax’ s ha ndse t
1
Pick up the handset when the machine rin gs.
2
If you hear a fax tone, wait until the display shows RECEIVING and then
replace the handset.
Beep
RECEIVING
Note: If you have set Option Settin g 12 (Fax sign a l
receiv e) to NO, press t he
begin recept ion.
START/MEMORY key to
TEL
TEL/FAX
FAX
ANS.
Documen ts
4. R e c eiving
3
If the other party first talks and then wants to send a fax, press the
START/MEMORY key after speaking (press your START/MEMORY
key before the sender presses their Start key).
•• Make sure that the display shows RECEIVIN G, then replace the handset.
START/MEMOR Y
RECEIVING
65
Page 78

Using TEL mode
Answering with an ex tens i on phone
1
Answer the extension phone when it rings.
2
If you hear a fax tone when you answer an extension phone, wait until your
fax answers (the extension phone will go dead), and then hang up.
Beep
Phone goes dead
3
If the fax doesn’t respond, or if the other party first talks to you and then
wants to send a fax, press 5, *, and * on the extension phone (only on a
tone dial phone). Hang up.
5
Comments:
•• Your fa x wil l not ac ce pt the si gna l to begi n re ce pti on (5
loaded in its feeder.
**
) if a docum en t is
•• If you have set Opt ion Set ti ng 12 t o NO and hear a fax tone when you an swer
the extension phone, you must press 5, *, and * if you are on a tone dial
phone, or walk over to the fax, pick up the hand set , and pre ss the
START/MEMORY key if y o u are on a pulse dia l only phone.
•• In New Zealand, not all sta nda rd tele pho nes a nd an sweri ng m achi nes wi ll
respond to incom ing rin gin g when connec ted to the socke t of the equi pm ent .
Paper cutting
After rec ei vi ng a do cum e nt, you r fax aut om atic al ly cuts t he fa x pa per to a
length slightly longer than the ori gi nal.
66
Page 79

5
Making
Chapter
Your fax can also be used to ma ke copi es. You can use this func ti on to ma ke
a sample copy of a docum ent bef ore transm it ti ng it to se e if the resol ut ion or
contrast ne ed s adj ustm e nt.
♦ The def ault resolution for copying is FINE.
1
Load the document(s) face down .
(Maximum of 10 pages.)
The display will show:
Copies
READY TO SEND
•• Set the resolution and/or contrast if
desired. (The default setting for
copying is FINE.)
2
Press the COPY/HELP key.
Incoming cal ls during c opyi ng
The fax go es into manual rec ep ti on m ode during copyi ng, so if a call comes
in at this time, pick up the handset to answer.
To rece ive a docum ent, press the START/M EM OR Y key after c opyi ng i s
finished. If you want to begin reception i mme diately , press th e STOP key to
stop copyi ng, and then pre ss the START/M EM OR Y key as soon as the
docume nt ha s fed out and th e fa x has re tu rne d to st and by m ode .
RESOLUTION
COPY/HELP
Copies
5. Making
67
Page 80

6
Making
Chapter
Your fax can be used like a regul ar tel eph one to make and recei ve vo ice call s.
♦ To make or receiv e a phone call, the power must be on.
1
Pick up the handset or press the
SPEAKER key. Listen for the dial tone.
Telephone Calls
or
SPEAKER
GHI
PQRS
ABC
2
1
JKL
4
5
TUV
7
8
2
Dial the number using one of the
following methods:
•• Normal Dialling: Enter the full
telephone number with the numeri c
keys.
•• Rapid Key Dialling: Press the
appropriate Rapid Ke y .
•• Speed Dialling: Press the SPEED
DIAL key, and enter the 2-digit Speed
Dial number with the numeric keys.
3
Speak with the other party when they
answer.
•• If you pressed the SPEAKER key, pick
up the handset to talk.
Comments:
•• While the han dset of th e fax is li ft ed (o ff hoo k), an exte nsi on phone
connected direc tly to the fax cann ot be used to speak wi th the othe r party.
DEF
3
MNO
6
WXYZ
9
68
Page 81

Making Telephone Calls
Chain Diall ing
After liftin g the han dset , you can di al any combination of Normal Dia ll ing ,
Rapid Key Dia ll in g and Spee d Dia lling numbers. Fo r examp le , if you ha ve
stored an area code or an access c ode for a special serv ice in a Rapid Key,
you can press the Rapid Key fo r that area code or acc ess code, then dial the
remainder of the numbe r by pressing a Rapid Key, pressing num ber keys, or
pressing the SPEED DIAL key and entering a two-digit Speed Dial number .
Using the HOLD/SEARCH k ey
You can use the HOLD/SEARCH key to searc h for a Rapi d Key or Spee d
Dial numb er. Fir st sea rc h for t he number as described i n Using the
HOLD/SEARCH key in Sending a F ax by Automat ic Dialling in Chapter 3,
then pick up the handset or pre ss the SPE AKE R key. T he number wi ll be
dial led auto m atical ly (do not press th e START/M EMO RY key ).
Redial
The last number called can be redial led by pressi ng th e REDIAL key (it is
not necessary to pick up the handse t or press the SP EAKE R key). When the
other party answers, pi ck up the hand set to talk.
Hold
You can put the other party on ho ld durin g a conve rsat io n by pressin g the
HOLD/SEARCH key. When th is is do ne, they c ann ot hear you. You can put
the handset back in the cradl e withou t bre aking the connection. When yo u are
ready to speak with them agai n, pick up the handse t. If you did not put the
handset back in the cradl e, pre ss the HOLD/SEARCH key agai n to resum e
conversat ion.
Calls
6. Making Pho ne
69
Page 82

7
Special
Chapter
Caller ID
If you subscribe to a caller id entif ic ation servi ce from you r telephon e
company, you can set yo ur fax to displ ay t he name and num be r of th e ca ll er
while the fax rings.
Important:
•• To use this function, you must subscribe to a caller identification ser vice
•• Your fax may not be compati ble wit h som e caller identifi ca tion ser vic es.
Functions
from your telephone com pan y.
1
Press these keys:
The display will show: OPTION SETTING
2
Press the * key.
The display will show:
3
Press 1 to turn on Caller ID, or 2 to turn it
off.
FUNCTION
CALLER-ID
YES
1
4
Press 1 if you are in Australia or 2 if you
are in New Zealand.
Australia New Zealand
1
5
Press the STOP key to return to the date
and time display.
STOP
or
or
4
NO
2
2
70
Page 83

How Caller ID oper ate s
When you recei ve a call, th e name and phone numbe r of th e call er will
alter nat el y ap pea r in the displ ay , be gi nni ng just before the sec ond ri ng. The
informat ion will con tinue to be displayed until you pick up th e handse t, or
until the fax answers automatically if it is in FAX mode.
Note: Some caller ID services may not provide the name of the caller. In
this case, only the phone number will app ear.
Display example:
DOE JOHN 444-555 -6 666
Caller’s name Caller’s number
Display messages
Caller ID
One of the following messages will appear while the fax rings if caller
information is not available.
NO SERVICE No caller information w as received from your telephone
company. Make sure that the telephone company has
activated your service.
CALLER-ID
ERROR
Noise on the telephone line prevented reception of
caller information.
OUT OF AREA The call was made from an area which does not have a
caller identification service, or the caller’s service is not
compatible with that of your local phone company.
PRIVATE CALL Caller information was not provided by the telephone
company at the caller’s request.
71
Functions
7. Special
Page 84

Caller ID
Viewing the Call er ID list
If you subscribe to a Caller ID serv ice an d have turne d on th e Caller ID
function, you r fax machi ne will kee p in form a tion on t he m ost recent 20
unanswered calls and/or unsuccessful faxes you have receive d. You can view
this informat io n, whic h con sist s of the name and numb er of each caller , in the
Caller ID L ist .
Note: For all units installed in New Zealand, the direct use of the displayed
number for call back does not operate properly and must not be used. It is
necessary to manually enter the verified correct number for the party
called. This will often require the addition or deletion o f leading digits from
the number shown on the display when dialling manually.
♦ After you have received 20 unanswered calls, each new call will delete
the oldest call.
Follow the ste ps be low t o vie w the Cal ler ID L ist in the di spla y. If de sire d,
you can immediately dial a numb er when it app ears.
To print out the list, see Chapter 9, Printing Report s and Lists.
1
Press the keys shown at right.
REVIEWING CALLS will appear in the
display.
2
Press the # key to scroll through the list
from the most recent call, or the * key to
scroll through the list from the oldest call.
3
If you want to dial one of the numbers in
the list, scroll through the list until the
number appears in the display.
•• If you want to send a fax, load the
document and then press t he
START/MEMORY key.
•• If you want to make a voice call, pick
up the handset or press the SPEAKER
key. Dialing will begin automatically.
(If you pressed the SPEAKER key,
pick up the handset when the other
party answers.)
72
HOLD
SEARCH
START/MEMORY
2
or
Page 85

Caller ID
4
Press the STOP key when you have
finished viewing the list.
STOP
To delete calls from the calle r lis t
If you want to delete a single call from the caller list, press the "0" key while
the call appears in th e display. If you want to dele te all calls from the list,
hold the "0" key down for at least 3 seconds wh ile you are viewing any
numbe r in t he l is t .
Priority Cal l
If desired, you can se t your fax to make a special ringing so und whe n you
receive a call from a designat ed ph one number . Thi s lets you know
immediatel y who is cal ling without having to look at the displ ay. To use this
function, en ter the desi re d phon e numbe r by fo llowin g the ste ps bel ow (on ly
one phone num be r can be entered).
1
Press the keys shown at right.
PRIORITY CALL # will appear in the
display.
FUNCTION
3
2
Press 1 to enter a number, or 2 to clear a
number. (If you pressed 2, go to Step 4.)
3
Enter the phone number by pressing the
number keys .
3 4 5
4
Press the START/MEMORY key and
then the STOP key.
1
7
START/MEMORY
3
or
(Example)
2
2
STOP
1
Functions
7. Special
73
Page 86

Caller ID
Direct Call
If desired, you c an allow a design at ed phone num ber to access a persona l box
directly when the answerin g mach ine is acti vate d. In this case the call er will
immediatel y hear the ou tgo ing message of the persona l bo x instea d of that of
the general box. You can desi gna te one phone numbe r for e ach per sona l box.
Note: This function cannot be used if you are using Distinctive Ring.
5
START/MEMORY
FUNCTION
1
3
4 3
or
(Example: "3" for
personal box 3)
(Example)
1
Press the keys shown at left. "DIRECT
CALL #" will appear in the display.
2
Press 1 to enter a number, or 2 to clear a
number. (If you pressed 2, go to Step 5.)
3
Enter the number of the personal box to
be accessed directly.
4
Enter the phone number, including the
area code, by pressing the number keys
(the number must be 20 digits lo ng).
5
Press the START/MEMORY key and
then the STOP key.
Blocking voi c e calls
With Calle r ID turned on, you can use the Anti Ju nk Fax func tion de scribed
in Blocking Reception of Unwanted Faxes in this chapt er to pre vent voice
calls as well as fax re cepti ons (t he Anti Junk Fax func ti on can nor ma lly onl y
prevent faxes) .
7
0
2
STOP
4
5 3
In this case, when a voice call or a fax transmissi on c omes in from a number
you have specified as a "Junk Numb er", your fax will bre ak the conne ct io n as
soon as it receives the calling phon e numbe r from the cal ler ID serv ice
(before the third ring).
To use this function, set Option Setting 13 to YES as described in Chapter 8,
Option Settings, a nd th en e nte r the number in the Anti Ju nk Nu m be r Li st a s
explaine d in Blocking Reception of Unwanted Faxes in th is ch apt er.
74
Page 87

Note: The blocked number must be input in the same format as Caller I.D.
to be recognised, including applicable area codes.
Note: Blocking will not operate for numbers stored as priority or d irect call
numbers.
Note: B locking voice calls will not operate if the number is already se t as a
direct or priority call number.
Distinctive Ring
If you subscribe to a distinc tive ring servi ce from you r tele phon e comp any ,
you will need to turn on the dist inc ti ve ring func ti on. When t his i s done , your
fax machine will sign al voic e calls by the no rmal ring pattern, and fax
transmissions by a special ring pa tter n. In the case of a fax transmissio n, your
fax machine will automatically answer the call and receive the fax.
The distinctiv e ring funct ion is used with the recept ion mo de set to FAX or
ANS.. When your fa x numbe r is di al led, your fax mac hi ne will signa l the cal l
with a special ring ing sound, th en answer autom at ical ly and be gin recept io n
after the number of rings set with Opti on Set ti ng 2 (t he factor y set ti ng is 2
rings). Wh en your voi ce num be r is dial le d, the fax machi ne wi ll signa l the
call with the normal ringing to alert you to answer the call or allow the
answering machine to take the call (when in ANS. mode).
Distinctive Ring
The factory setting is "NO". If set to "YES", both Aust ralia n (Fax Duet ) and
New Zealand (Fa xAbi li ty) Disti nc tive Ri ng are sup ported.
Important:
•• The distinctive ring function can only be used if you subscribe to a
distinct ive ring servic e from your t el eph one com pa ny. Do not turn on
distinctive ring if you ar e on a norm al line, as t he fa x m ac hin e wil l no t
operate properly.
•• If you turn on distinct ive rin g, the fax will not opera te in TE L/F AX
recepti on m ode .
75
Functions
7. Special
Page 88

Distinctive Ring
1
Press these keys:
FUNCTION
4
The display will show:
2
Press these keys:
The display will show:
3
Press 1 (YES) to turn on distinctive ring, or 2 (NO) to turn it off.
The display will show:
4
Press the STOP key.
OPTION SETTING
DISTINCTIVE RI NG
or
NO
2
YES
1
FAX SIGNAL RX
STOP
5
Set the reception mode to FAX or ANS. .
RECEPTION
MODE
76
TEL/FAX
or
TEL/FAX
TEL
TEL
FAX
ANS.
FAX
ANS.
Page 89

Blocking Reception of Unwanted Faxes
Blocking Reception of Unwanted Faxes
The Anti Junk Fax function allows you to block receptio n of faxes fr om
parties which yo u spec ify. This save s pap er by not printin g out unwante d
"junk" faxes.
To use this function, first turn it on by setting Option Setting 13 to YES as
described in Cha pt er 8, an d the n en te r the fax numbers from which you do
not want to receive faxes as shown below.
Comments:
•• The call will be termi na ted by th e fax, howev er, the conne ct ion will rema in
until the caller hangs up or the line tim es ou t.
•• Up to 5 numbers can be entered in the Anti Junk Num be r List .
•• The Anti Junk function will not operate for a number which has been stored
as a priorit y or direct call number.
•• To clear a number from the Anti Junk Number List , you need to know the
1-digit numb er which identifi es it . If you have forgo tten t his nu mber, print
out the Anti Junk Numbe r L ist as descri bed in Chapt er 9.
1
Press the keys shown at right.
STORE JUNK # will appear in the
display.
2
Press 1 to store a number in the Ant i Junk
Number List, or 2 to clear a number from
the list.
3
Storing: Enter a 1-digit number from 1 to
5. This number identifies the fax/voice
number you will store in the next step.
Clearing: Enter the number which
identifies the fax/voice number you want
to clear, and go to Step 5.
FUNCTION
1
1
3
or
2
(Example)
tions
7. Special Func-
77
Page 90

Blocking Reception of Unwanted Faxes
4
Enter the full number you want to block
(max. of 20 digits).
5
5
5
21
3
(Example)
4
5
Press the START/MEMORY key.
6
Return to Step 3 to enter (or clear)
another number, or press STOP to exit.
START/MEMORY
STOP
Step 3 or
78
Page 91

Polling (Requesting a Fax Trans mission)
Polling (Requesting a Fax Transmission)
Polling allows yo u to call anoth er fax m achin e and hav e it send a docum ent
(previousl y loade d in its fe eder) t o your machi ne without oper at or assi sta nc e.
In other words, the rec eivi ng fa x ma ch ine , not the t ran smi tt in g fax ma chine ,
initiates the transmission. You can use yo ur mac hin e to both poll and be
polled by ot her s.
To use the polling fu nct io n, you must fi rst set Rapi d Key 10 /POL L for use as
a polling key. Th is is do ne by changing Option Sett in g 14, as de scri be d in
Chapte r 8, Opti on Setting s. (No te that when Rap id Key 10/ POLL is set as a
polling key, it cannot be used for Ra pid Key Diall in g. )
Requesting transm iss ion
Note: Rapid Dial Keys cannot be used for polling. To dial a Rapid Dial
location, press the SPEED DIAL key and then enter the 2-digit nu mber
corresponding to the Rapid Key.
1
Dial the fax machine you want to poll
using one of the follo wing methods:
•• Pick up the handset (or press the
SPEAKER key) and dial the full
number. Wait for the fax answerback
tone.
SPEED DIAL
(Example)
0 1
•• Press the SPEED DIAL key and enter
a 2-digit Speed Dial number.
•• Enter the full number using the numeric
keys.
2
Press Rapid Key 10/POLL.
•• If you used the hands et, replace it when
POLLING appears in the display.
Reception will begin.
Note: When requesting a transmission from a facsimile information service
(computer polling). Push the START/MEMORY key instead of the POLL
key and make sure there are no documents loaded for sending.
10/POLL
tions
7. Special Func-
79
Page 92

Polling (Requesting a Fax Transmission)
Turnaround polling
After polli ng a fax m achi ne, you can send a docu me nt to that machine on the
same conne ction. Simply place the docu ment to be sent in the feeder and
follow the steps de scr ibe d above in "Requesting tr ansm i ssion ". Whe n pol ling
is finished, the docum en t will be autom atic ally transm it ted.
♦ The oth er fax machine must also have Turnaround Polling capability.
♦ Tur naround Polling cannot be perfor med when a timer transmission
operation is set.
Being polled (polling standby)
To let anothe r fax machine pol l your machine , sim ply set t he re ce pt ion mod e
to FAX, and load the document(s) t o be sent.
Transmission will take plac e when the other fax machi ne calls you r machine
and activates pol li ng. Aut om atic recept io n is possibl e whi lst your fax is on
polling sta ndb y.
Polling security
Polling Sec uri ty allows you t o pre ven t una uthorized polling of your mac hi ne.
When this funct io n is tu rne d on, polli ng wil l on ly take place when the fax
number of the polli ng fax mac hin e has been ent ered i n your machi ne ’s list of
permitted fax numb ers (c alle d "passcod e numbe rs"). The nu mber of the
polling fax mu st also be corr ectl y prog ramm ed into it sel f for iden ti fic atio n.
To use Polli ng Security, fo ll ow the ste ps bel ow to turn the function on, an d
then enter permitted number s as shown on the followi ng page.
1
Press the keys shown at right.
ENTRY MODE will appear in the
display.
2
Press the # key three times.
SECURITY SELECT will appear in the
display.
3
Press 1 to turn polling security on, or 2 to
turn it off.
80
FUNCTION
1
or
3
2
Page 93

Polling (Requesting a Fax Trans mission)
4
Press the START/MEMORY key and
then the STOP key.
START/MEMORY
STOP
Storing and clearing fax numbers for polling permission
You can store up to 10 fax numbe rs in your mac hi ne’ s list of perm it ted
numbers.
1
Press the keys shown at right.
ENTRY MODE will appear in the display.
2
Press the # key four times.
PASSCODE # MODE will appear in the
display.
3
Press 1 to store a number, or 2 to clear a
number.
4
Storing: Enter a 2-digit number from 01
to 10. This number identifies the fax
number you will store in the next step.
Clearing: Enter the number which
identifies the fax number you want to
clear, and go to Step 6.
FUNCTION
1
0
or
1
(Example)
3
2
5
Enter the fax number (max. of 20 digits).
6
Press the START/MEMORY key.
7
Return to Step 4 to enter (or clear)
another number, or press STOP to exit.
5
5 5 1 2 3 4
(Example)
START/MEMORY
STOP
Step 4 or
tions
7. Special Func-
81
Page 94

Timer Operations
Timer Operations
The Timer func tion allo ws you to set a transmission and/or polling ope ra ti on
to be performed autom at ical ly at a time you specify. One tran smi ssio n
operation and one polling operation can be set at the same time, and the times
they will be perform e d can be speci fi ed up to 24 hours in adva nc e.
As an example, you can use this func ti on t o take adva nta ge of off-pea k
telephone rates with out havi ng to be ther e when the ope rat ion is performed.
Note: Only a Sp eed Dial number can be used to dial the receiving machine.
Setting a timer operation
1
Press the keys shown at right.
TIMER MODE will appear in the display.
2
Press # to set a transmiss ion operation
(SEND MODE), or * to set a polling
operation (POLLING MODE).
FUNCTION
or
1
3
Press 1 to select SET.
4
Enter the time at which you want the
operation to take place in 24-hour format
(2 digits for the hour and 2 digits for the
minute).
5
Press the START/MEMORY key.
82
1
0
START/MEMORY
9
2
Example: 9:25
5
Page 95

6
Enter the Speed Dial number of the
receiving fax machine.
•• If this is a polling operation, go to Step
9.
0
Timer Operations
5
(Example)
7
Press the START/MEMORY key.
8
Adjust the resolution and /or contrast if
desired (skip to the next step if you don’t
want to change settings).
9
Press the START/MEMORY key and
then the STOP key. If this is a
transmission operation, load the
document in the feeder sometime before
the specified time of transmission.
START/MEMORY
RESOLUTION
START/MEMORY
To cancel an operation
If you need to canc el an op era ti on a fte r it has be en set, follow the steps bel ow.
1
Press the keys shown at right.
TIMER MODE will appear in the display.
FUNCTION
STOP
1
2
Press # to cancel a transmission
operation, or * to cancel a polling
operation.
3
Press 2 to select CLEAR.
4
Press the START/MEMORY key and
then the STOP key.
2
START/MEMORY
or
STOP
83
Functions
7. Special
Page 96

Memory
Memory
Your fax has a memory whi ch can be used to tem por arily store bot h
incoming and outgoing documents.
♦ Approximately 20 pages of average content can be held in memory
when no voice messages (including outgoing messages) have been
recorded. Less can be held if any pages were scanned using fine or
halftone resolution.
♦ To see the percentage of memory that is currently occupied, press the
START/MEMORY key with no document in the feeder. The
percentage will appear in the display.
Sending documents from me m ory
With this f unction, the ori ginal document is scanned immedi at el y, stored in
memory, and the n tr ansm i tt ed on ce the conn ecti on to the recei vin g ma ch ine
is made. This is co nve nie nt when tran smi tt in g to pl ac es w he re the lin e is
often bus y, as it saves you from wa it ing to coll ec t th e original docum ent and
frees the feede r for othe r opera ti ons.
♦ Only one memory transmission can be set at a time.
♦ The amount of memory currently occupied appears as a percentage in
the display while the document is being scanned.
1
Load the document(s).
•• Set the resolution and/or contrast if
desired.
RESOLUTION
2
Press the START/MEMORY key and
then 1.
84
START/MEMORY
1
Page 97

3
Enter the number of the receiving
machine using one of the follo wing
methods:
•• Press a Rapid Key.
•• Press the SPEED DIAL key and enter
a Speed Dial number.
•• Enter a full telephone number by
pressing the number keys.
4
Press the START/MEMORY key if you
entered a Speed Dial number or a full
number.
•• The document is first scanned and
stored in memory. The other machine is
then dialled (redialling will be
performed automatically if necessary).
When the connection is made,
transmission begins. Afterwards, the
document is cleared from memory and
your fax returns to standby mode.
Memory
010302
04
06
(Example)
START/MEMORY
If the memory becom e s full ...
If the memory becomes full while the document is being scanned, MEMORY
IS FULL will appear in the di spla y.
♦ Press the START/MEMORY key if you want to transmit the pages
which have been stored up to that point in memory. The remaining pages
will be ejected from the feeder. After transmission, the memory will be
cleared and you can transmit the remaining pages. You will also need to
transmit the page which was being scanned when the memory filled up.
♦ Press the STOP key if you want to cancel the entire transmission.
85
Functions
7. Special
Page 98

Memory
Substitute recepti on in to memory
This is a back-up functi on whi ch is aut om atic ally a ctiva ted if your fax run s
out of paper or the paper jams.
When you have received a document in memory, FAX RX IN MEMOR Y
will appear in the display, altern ating with OUT OF PAPER or PAPER
JAMMED. When you add paper or clear the paper jam, the stored documents
will autom a ti ca ll y be printed out.
86
Page 99

Broadcasting
This function allows you to send the sam e docume nt to as many as 10
different loc at io ns wit h just one oper at ion . First store the docume nt in
memory, then e nte r th e num be rs of t he re ce iv ing ma chi ne s. T he docu me nt
will be tra ns m it te d to e ac h location.
♦ You can only use Rapid Keys or Speed Dial numbers to dial the
numbers of the receiving machines.
1
Load the document(s).
Broadcasting
2
Press the START/MEMORY key and
then 2.
3
Dial the receiving machines by using one
or both of the following methods. (a
maximum of 10 stations can be selected)
•• Enter one or more Speed Dial numbers
by pressing the nu mer ic keys.
•• Press one or more Rapid Key s.
4
Press the START/MEMORY key.
•• Set the resolution and/or contrast if
desired.
START/MEMORY
2
010302
START/MEMORY
RESOLUTION
2
2
04
06
(Example)
tions
7. Special Func-
87
Page 100

Broadcasting
5
Press the START/MEMORY key.
Transmission will begin.
•• A Transaction Report is automatically
printed out after Broadcasting is
completed. Check the "Note" column of
the report to see if any of the locations
are marked "Busy" or have a
communication error code. If so, send
the document to those locations again.
START/MEMORY
88
 Loading...