

Page 1
MODEL
FO-4650
FO-4970
FACSIMILE
OPERATION MANUAL
1. Installation
2. Sending Documents
3. Receiving Documents
4. Making Copies
5. Special Functions
6. Option Settings
7. Printing Reports and Lists
8. Maintenance
9. Troubleshooting
Page 2

WARNING - FCC Regulations state that any unauthorized changes or modifications to this equipment not
expressly approved by the manufacturer could void the user’s authority to operate this equipment.
Note: This equipment has been tested and found to comply with the limits for a Class B digital
device, pursuant to Part 15 of the FCC Rules.These limits are designed to provide reasonable
protection against harmful interference in a residential installation.This equipment generates, uses
and can radiate radio frequency energy and, if not installed and used in accordance with the
instructions, may cause harmful interference to radio communications. However, there is no
guarantee that interference will not occur in a particular installation. If this equipment does cause
harmful interference to radio or television reception, which can be determined by turning the
equipment off and on, the user is encouraged to try to correct the interference by one or more of the
following measures:
- Reorient or relocate the receiving antenna.
- Increase the separation between the equipment and the receiver.
- Connect the equipment into an outlet on a circuit different from that to which the receiver is
connected.
- Consult the dealer or an experienced radio/TV technician for help.
ABOUT THE TELEPHONE CONSUMER PROTECTION ACT OF 1991
"The Telephone Consumer Protection Act of 1991 makes it unlawful for any person to use a
computer or other electronic device to send any message via a telephone facsimile machine unless
such message clearly contains in a margin at the top or bottom of each transmitted page or on the
first page of the transmission the following information:
(1) The date and time of transmission.
(2) Identification of either the business, business entity or individual sending the message.
(3) Telephone number of either the sending machine, business, business entity or individual.
In order to program this information into your facsimile machine, please refer to the appropriate
instructions in the operation manual."
As an ENERGY STAR
partner, SHARP has determined
that this product meets the ENERGY STAR guidelines for
energy efficiency.
Page 3
1
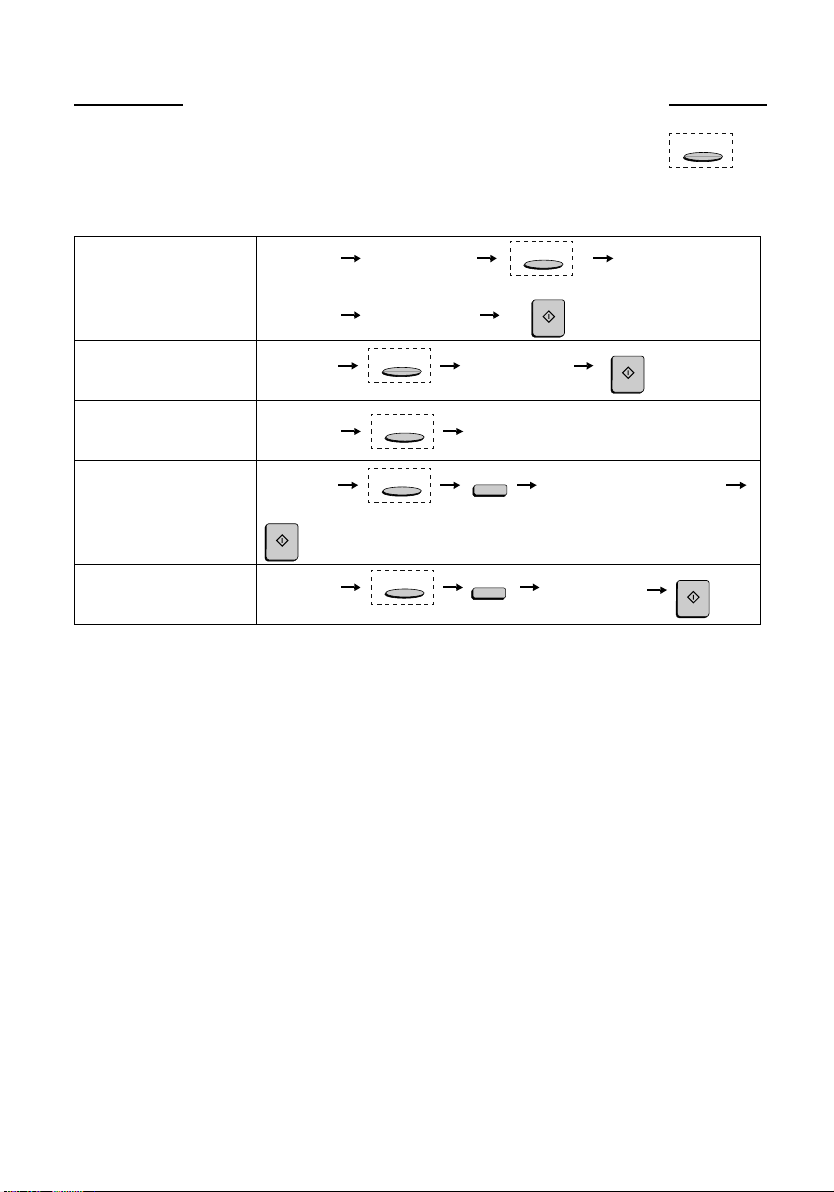
Transmitting documents
Normal Dialing
Direct Keypad
Dialing
Rapid Key Dialing
Speed Dialing
Redialing
REDIAL
START
Note: Steps which are optional are enclosed in a dotted frame:
QUICK REFERENCE GUIDE
RESOLUTION
Load
document
RESOLUTION
press
SPEAKER
Dial (press
numeric keys)
Wait for
reception tone
Load
document
RESOLUTION
Dial (press
numeric keys)
Load
document
RESOLUTION
START
Load
document
RESOLUTION
Press Rapid
Key
SPEED DIAL
Load
document
RESOLUTION
Enter Speed Dial number
(press numeric keys, - if less
than 3 digits, press START
to complete entry)
START
Wait fo r
reception tone
START
Page 4
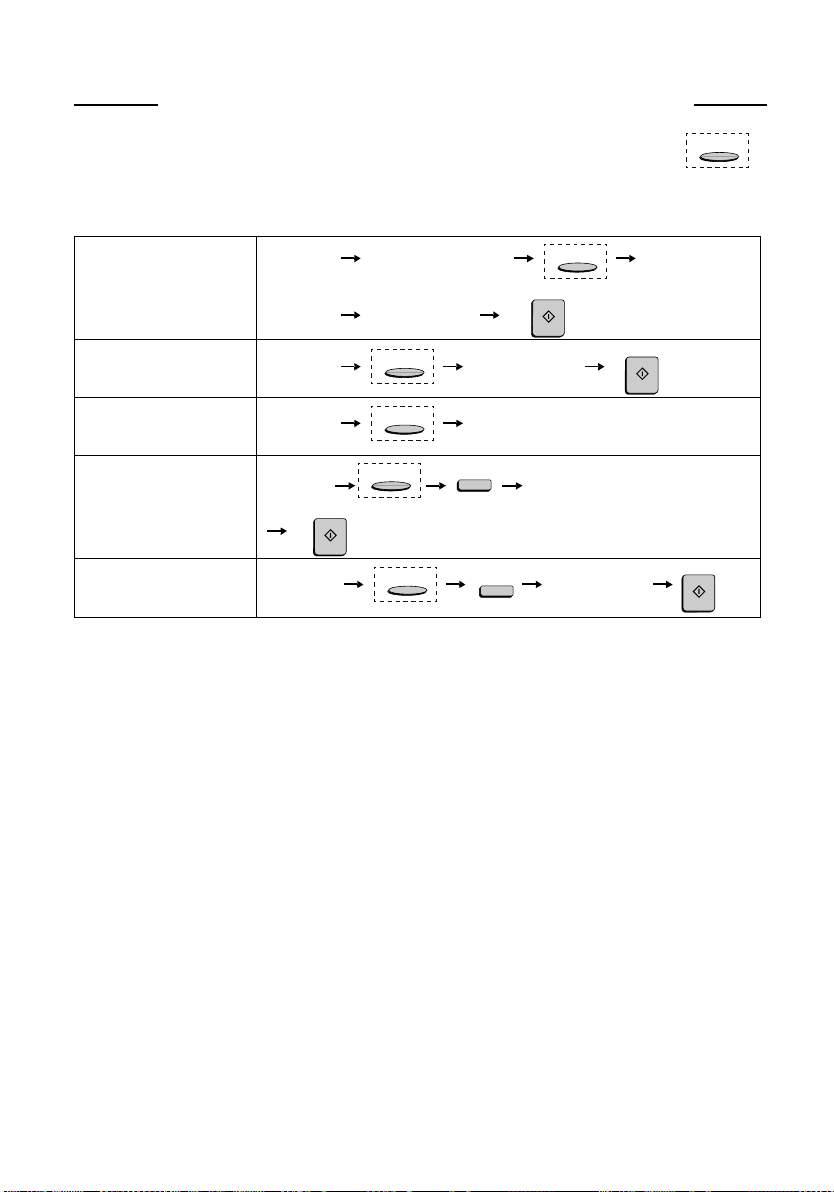
2
Transmisión de documentos
Marcación normal
Marcación directa
con el teclado
Marcación con
Teclas Rápidas
Marcación Veloz
Remarcación
REDIAL
START
Nota: El marco punteado significa que el procedimiento puede ser opcional:
GUIA DE CONSULTA RAPIDA
RESOLUTION
Colocar el
documento
RESOLUTION
pulse
SPEAKER
Marque (pulse
teclas numéricas)
Espere el tono
recepción
Colocar el
documento
RESOLUTION
Marque (pulse
teclas numéricas)
Colocar el
documento
RESOLUTION
Pulse la Tecla
Rápida
SPEED DIAL
Colocar el
documento
RESOLUTION
Introduzca el número de discado r
pido (presione las teclas numéricas,
si fueran menos de 3 digitos, para
completar el procedimiento presione
START.)
START
Colocar el
documento
RESOLUTION
Espere el tono
recepción
START
START
Page 5

3
Introduction
Welcome, and thank you for choosing a Sharp facsimile machine! The
features and specifications of your new Sharp fax machine are shown
below.
Automatic dialing Rapid Key Dialing: 48 numbers
Speed Dialing:
FO-4650: 75 numbers
FO-4970: 100 numbers
Memory size* FO-4650: 1 MB (approx. 56 pages )
FO-4970: 2 MB (approx. 116 pages)
Modem speed FO-4650: 14,400 bps (max.)
FO-4970: 33,600 bps (max.)
Automatic fallback to lower speeds.
Transmission time* FO-4650: Approx. 6 seconds
FO-4970: Approx. 2 seconds
Toner cartridge yield
(4% page coverage, letter
paper)
Initial starter cartridge (included with fax
machine): Approx. 3000 pages
Replacement cartridge (FO-47ND):
Approx. 6000 pages
Drum cartridge yield Initial starter cartridge (included with fax
machine): 20,000 pages (ave.)
Replacement cartridge (FO-47DR): 20,000
pages (ave.)
Resolution Horizontal: 203 pels/inch (8 pels/mm)
Vertical:
Standard: 98 lines/inch (3.85 lines/mm)
Fine /Halftone:
196 lines/inch (7.7 lines/mm)
Super fine: 391 lines/inch (15.4 lines mm)
*Based on I TU-T Test Chart #1 a t standard resol ution in Sharp speci al mode,
excluding time for protocol signals (i.e., ITU-T phase C time only).
Page 6

4
Automatic document
feeder
Letter paper (20 lb): Max. 50 pages
Legal paper: Max. 20 pages
(Note: 11” x 17” paper must be loaded one
page at a time.)
Paper capacity 250 sheets (500-sheet cassette available as
option)
Compression scheme MMR, MR, MH, Sharp (H2)
(FO-4970: Also supports JBIG)
Halftone (grayscale) 64 levels
Applicable telephone line Public switched telephone network
Compatibility ITU-T (CCITT) G3 mode
Printing resolution Horizontal: 406 lines/inch (16 lines/mm)
Ve rt i ca l: 391 lines/inch (15.4 lines/mm)
Input document size Automatic feeding:
Width: 5.8 to 10.1" (148 to 256 mm)
Length: 5.0 to 14.3" (128 to 364 mm)
Manual feeding:
Width: 5.8 to 11.0" (148 to 279 mm)
Length: 5.0 to 17.0" (128 to 432 mm)
Effective Scanning width 8.3" (210 mm) max.
Effective Printing width 8.0" (203 mm) max.
Reception modes Auto/Manual
Instascan speed 30 ppm (letter paper)
Full Dual Access Ye s
Copy function Single/Multi/Sort (99 copies/page)
Power requirements 120 V AC, 60 Hz
Operating temperature 50 - 86°F (10 - 30°C)
Humidity 20 to 85% RH
Page 7

5
Power consumption Standby: 10 W
Maximum: 580 W
Dimensions Width: 18.1" (460 mm)
Depth: 15.2" (385 mm)
Height: 10.6" (270 mm)
Wei ght
Approx. 27.8 lbs. (12.6 kg)
As a part of our policy of continuous improvement, SHARP reserves the right to
make design and specification changes for product improvement without prior notice.
The performance specification figures indicated are nominal values of production
units. There may be some deviations from these values in individual units.
Important safety information
Be sure to save these instructions!
When using your facsimile equipment, basic safety precautions
should always be followed to reduce the risk of fire, electric shock and
injury to persons, including the following:
• CAUTION: To reduce the risk of fire, use only No. 26 AWG or larger
telecommunication line cord.
• Do not disassemble this machine or attempt any procedures not
described in this manual. Refer all servicing to qualified service personnel.
• This machine must only be connected to a 120 V, 60 Hz, grounded (3prong) outlet. Connecting it to any other kind of outlet will damage the
machine and invalidate the warranty.
• Do not install or use the machine near water, or when you are wet. For
example, do not use the machine near a bath tub, wash bowl, kitchen
sink or laundry tub, in a wet basement, or near a swimming pool. Take
care not to spill any liquids on the machine.
Page 8

6
• Use only the power cord provided with the facsimile machine. Do not
use an AC extension cord.
• Unplug the machine from the telephone jack and then the power outlet
and consult a qualified service representative if any of the following
situations occur:
- Liquid has been spilled into the machine or the machine has been
exposed to rain or water.
- The machine produces odors, smoke, or unusual noises.
- The power cord is frayed or damaged.
- The machine has been dropped or the housing damaged.
• Do not allow anything to rest on the power cord, and do not install the
machine where people may walk on the power cord.
• Never insert objects of any kind into slots or openings on the machine.
This could create a risk of fire or electric shock. If an object falls into
the machine that you cannot safely remove, unplug the machine and
consult a qualified service representative.
• Do not place this machine on an unstable cart, stand or table. The
machine could be seriously damaged if it falls.
• Avoid using a telephone (other than a cordless type) during an electrical storm. There may be a remote risk of electric shock from lightning.
• Do not use a telephone to report a gas leak in the vicinity of the leak.
• The power outlet must be installed near the equipment and must be
easily accessible.
Important:
• This facsimile machine is not designed for use on a line which has call
waiting, call forwarding, or certain other special services offered by
your telephone company. If you attempt to use the fax machine in conjunction with any of these services, you may experience errors during
transmission and reception of facsimile messages.
• This machine is not compatible with digital telephone systems.
Page 9

7
Table of Contents
QUICK REFERENCE GUIDE . . . . . . . . . . . . . . . . . . . . . . . . . . 1
GUIA DE CONSULTA RAPIDA . . . . . . . . . . . . . . . . . . . . . . . . 2
Introduction . . . . . . . . . . . . . . . . . . . . . . . . . . . . . . . . . . . . . . . 3
Important safety information . . . . . . . . . . . . . . . . . . . . . . . . . . . . . 5
Table of Contents . . . . . . . . . . . . . . . . . . . . . . . . . . . . . . . . . . 7
1. Installation. . . . . . . . . . . . . . . . . . . . . . . . . . . . . . . . . . . . . . 9
Unpacking Checklist . . . . . . . . . . . . . . . . . . . . . . . . . . . . . . . . . . . 9
A Look at the Operation Panel . . . . . . . . . . . . . . . . . . . . . . . . . . 10
Connections . . . . . . . . . . . . . . . . . . . . . . . . . . . . . . . . . . . . . . . . 16
Installing the Print Cartridges . . . . . . . . . . . . . . . . . . . . . . . . . . . 20
Loading Printing Paper . . . . . . . . . . . . . . . . . . . . . . . . . . . . . . . . 25
Entering Your Name and Fax Number . . . . . . . . . . . . . . . . . . . . 28
Setting the Date and Time. . . . . . . . . . . . . . . . . . . . . . . . . . . . . . 31
Volume Adjustment . . . . . . . . . . . . . . . . . . . . . . . . . . . . . . . . . . . 33
2. Sending Documents. . . . . . . . . . . . . . . . . . . . . . . . . . . . . 35
Transmittable Documents . . . . . . . . . . . . . . . . . . . . . . . . . . . . . . 35
Loading the Document . . . . . . . . . . . . . . . . . . . . . . . . . . . . . . . . 37
Adjusting the Resolution and Contrast . . . . . . . . . . . . . . . . . . . . 38
Sending a Fax by Normal Dialing . . . . . . . . . . . . . . . . . . . . . . . . 40
Programming Auto-Dial Numbers . . . . . . . . . . . . . . . . . . . . . . . . 42
Sending a Fax by Automatic Dialing . . . . . . . . . . . . . . . . . . . . . . 48
Cover Sheet . . . . . . . . . . . . . . . . . . . . . . . . . . . . . . . . . . . . . . . . 59
Batch Page Numbering . . . . . . . . . . . . . . . . . . . . . . . . . . . . . . . . 61
3. Receiving Documents . . . . . . . . . . . . . . . . . . . . . . . . . . . 63
Using AUTO Reception Mode. . . . . . . . . . . . . . . . . . . . . . . . . . . 64
Using MANUAL Reception Mode . . . . . . . . . . . . . . . . . . . . . . . . 64
Substitute Reception to Memory . . . . . . . . . . . . . . . . . . . . . . . . . 65
Page 10

Table of Contents
8
4. Making Copies. . . . . . . . . . . . . . . . . . . . . . . . . . . . . . . . . . 66
5. Special Functions . . . . . . . . . . . . . . . . . . . . . . . . . . . . . . .69
Broadcasting . . . . . . . . . . . . . . . . . . . . . . . . . . . . . . . . . . . . . . . . 69
Confidential Operations . . . . . . . . . . . . . . . . . . . . . . . . . . . . . . . . 74
Relay Request . . . . . . . . . . . . . . . . . . . . . . . . . . . . . . . . . . . . . . . 80
Polling . . . . . . . . . . . . . . . . . . . . . . . . . . . . . . . . . . . . . . . . . . . . . 88
Power Save Mode . . . . . . . . . . . . . . . . . . . . . . . . . . . . . . . . . . . . 96
Timer Operations . . . . . . . . . . . . . . . . . . . . . . . . . . . . . . . . . . . . 102
Batch Transmission . . . . . . . . . . . . . . . . . . . . . . . . . . . . . . . . . . 113
Entering and Using Programs . . . . . . . . . . . . . . . . . . . . . . . . . . 116
Duplex Scanning for Two-sided Documents . . . . . . . . . . . . . . . 131
Print Hold . . . . . . . . . . . . . . . . . . . . . . . . . . . . . . . . . . . . . . . . . . 133
Department Control . . . . . . . . . . . . . . . . . . . . . . . . . . . . . . . . . . 135
Blocking Reception of Unwanted Faxes . . . . . . . . . . . . . . . . . . 138
Telephone Billing . . . . . . . . . . . . . . . . . . . . . . . . . . . . . . . . . . . . 140
Distinctive Ring . . . . . . . . . . . . . . . . . . . . . . . . . . . . . . . . . . . . . 142
6. Optional Settings . . . . . . . . . . . . . . . . . . . . . . . . . . . . . . 144
7. Printing Lists and Reports. . . . . . . . . . . . . . . . . . . . . . .154
8. Maintenance . . . . . . . . . . . . . . . . . . . . . . . . . . . . . . . . . .162
Cleaning the Scanning Glass and Rollers . . . . . . . . . . . . . . . . . 162
The Housing . . . . . . . . . . . . . . . . . . . . . . . . . . . . . . . . . . . . . . . 163
Replacing the Verification Stamp. . . . . . . . . . . . . . . . . . . . . . . . 163
9. Troubleshooting . . . . . . . . . . . . . . . . . . . . . . . . . . . . . . .165
Problems and Solutions . . . . . . . . . . . . . . . . . . . . . . . . . . . . . . . 165
Messages and Signals. . . . . . . . . . . . . . . . . . . . . . . . . . . . . . . . 169
Clearing Paper Jams . . . . . . . . . . . . . . . . . . . . . . . . . . . . . . . . . 172
FCC Regulatory Information . . . . . . . . . . . . . . . . . . . . . . . . . . . 176
Index . . . . . . . . . . . . . . . . . . . . . . . . . . . . . . . . . . . . . . . . . . .179
Page 11
9
1. Installation
1. Installation
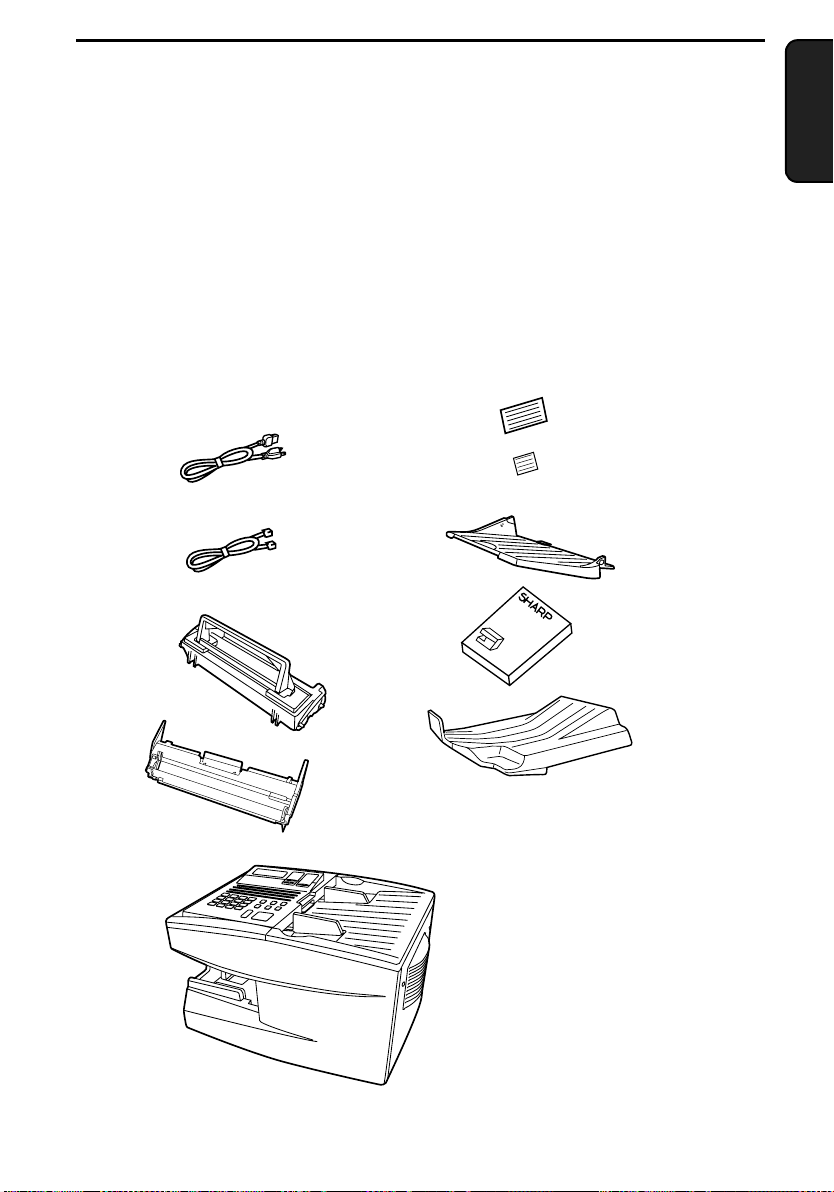
Unpacking Checklist
Before setting up, make sure you have all of the following items. If
any are missing, contact your dealer.
Telephone
line cord
Toner cartridge
Rapid Key
labels
Document
OUT tray
Operation
manual
Received
document tray
Power cord
Paper size
labels
Drum cartridge
Page 12

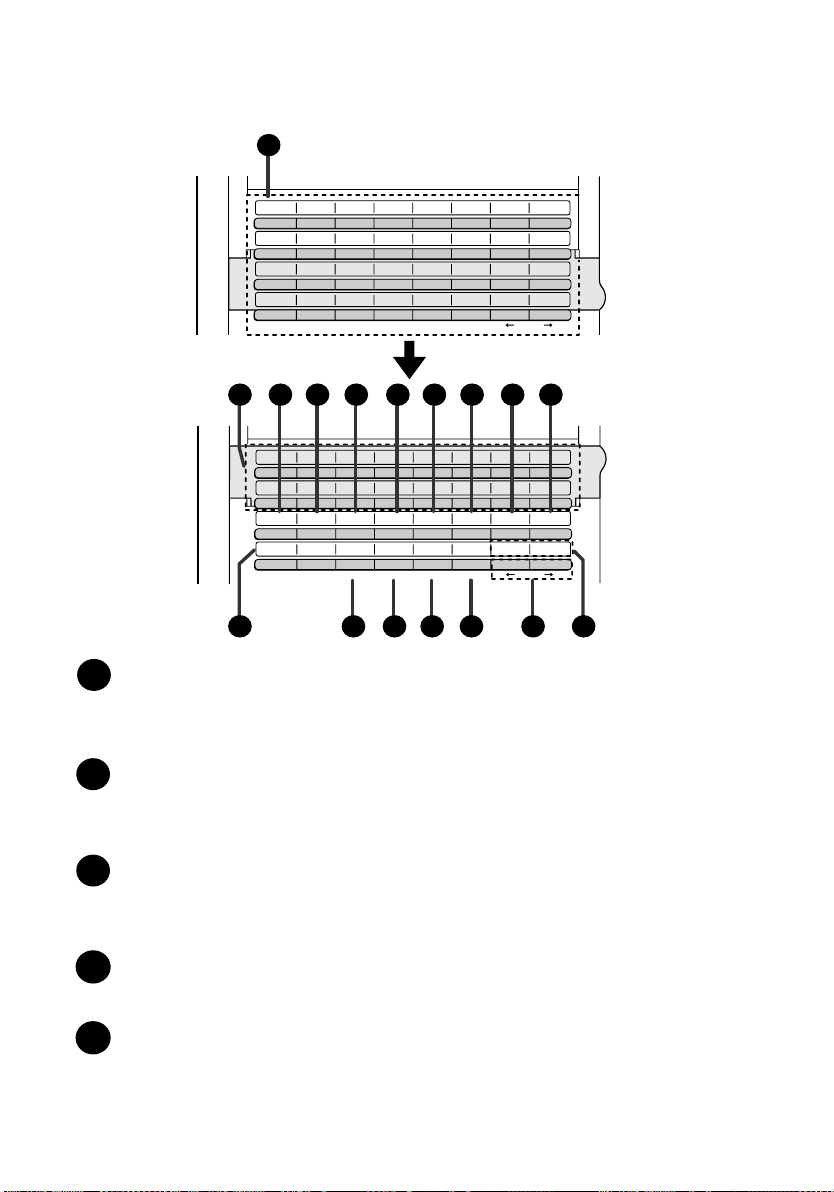
A Look at the Operation Panel
10
RESOLUTION
STANDARD
FINE
SUPER FINE
HALF TONE
LINE IN USE
CHANGEOVER
POWER SAVE
STATUS CHECK
1
4 5 8 9 106 7
2 3
Display
This displays messages and prompts during operation and
programming.
LINE IN USE light
This lights when the fax machine is using the telephone line.
STATUS CHECK light
This lights when a paper size error or paper jam occurs, or when the
print compartment cover is open. A message will appear in the display
to indicate the problem. (The indicator also lights steadily when the
received document tray is not properly installed.)
Service indicator
This lights when a problem occurs which must be fixed by a service
technician.
A Look at the Operation Panel
1
2
3
3
4
Page 13

A Look at the Operation Panel
11
1. Installation
Paper out indicator
This lights when the fax machine is out of paper. If the machine has a
paper cassette, the indicator blinks when one of the paper sources
(tray or cassette) is out of paper, and lights steadily when all sources
are out of paper.
Toner cartridge indicator
This blinks when the toner cartridge nears empty, and lights steadily
when the toner cartridge needs replacement.
Drum cartridge indicator
This blinks when the drum cartridge needs replacement.
CHANGEOVER key
Two types of information appear in the display: prompts related to
operations you are performing, and information about how the fax is
using the telephone line (transmitting, receiving, etc.). Press this key
to switch between the two types of information.
POWER SAVE key
Press this key to turn on Power Save Mode, or set the Power Save
Mode timer if TIMER has been selected with Option Setting 34
(Power Save Type).
RESOLUTION key
Press this key to adjust the resolution before sending or copying a
document.
5
6
6
7
7
8
8
9
9
10
Page 14
A Look at the Operation Panel
12
CLEARSPSHIFTSPACE
A
I
Q
Y
B
J
R
Z
C
K
S
D
L
T
E
M
U
F
N
V
G
O
W
H
P
X
01
09
17
25
02
10
18
26
03
11
19
04
12
20
05
13
21
06
14
22
07
15
23
08
16
24
27 28 29 30 31 32
CLEARSPSHIFTSPACE
A
I
Q
Y
B
J
R
Z
C
K
S
D
L
T
E
M
U
F
N
V
G
O
W
H
P
X
33
41
CONTRAST
SEARCH DIAL
34
42
PAGE COUNTER
35
43
CONFIDENTIAL
36
44
TIMER
37
45
RELAY
384639
47
MEM.STATUS
40
48
LIFE
DOWN UP
COVER SHEET
11
11 12
20 21 22 23 24 25 26
13 14 15 16 17 18 19
Rapid Dial Keys
Press one of these keys to dial a fax number automatically. (Note that
you must attach the Rapid Key labels.)
CONTRAST key
Press this key to adjust the contrast before sending or copying a
document.
PAGE COUNTER key
Press this key to include a slash and the total number of pages after
each page number on the pages of a transmitted document.
CONFIDENTIAL key
Press this key to send or print out a confidential document.
TIMER key
Press this key to set an operation to be performed automatically at a
later time.
15
13
12
11
14
Rapid Key
overlay down
Rapid Key
overlay up
Page 15

A Look at the Operation Panel
13
1. Installation
RELAY key
Press this key to send a document to another Sharp fax machine and
have that machine in turn relay the document to one or more end
receiving machines.
LIFE key
Press this key, followed by 1, to check the total number of pages
printed by the fax machine.
MEM. STATUS key
Press this key to check the status of documents waiting in memory for
transmission.
SEARCH DIAL key
Press this key to search through your auto dial fax numbers by name.
COVER SHEET key
Press this key to include a cover sheet when sending a fax.
SPACE key
Press this key to enter a space when programming a name.
SHIFT key
Press this key to switch between upper and lower case letters when
programming a name.
SP key
Press this key to enter a symbol when programming a name.
CLEAR key
Press this key to clear a mistake when programming a name or fax
number.
Arrow keys
Press these keys to move the cursor forward or backward when
programming a name or fax number.
UP and DOWN keys
Press these keys to adjust the volume of the speaker when the
SPEAKER key has been pressed, or the volume of the ringer at all
other times.
25
24
23
17
18
19
20
21
22
26
16
Page 16
A Look at the Operation Panel
14
123
456
789
0
ABC
GHI
DEF
FUNCTION
COPY
DOCUMENT DUPLEX SCAN
BROADCAST
STOP START
REPORT
SPEED DIAL
REDIAL
SPEAKER
JKL MNO
PRS
TUV
OPER
WXY
PRIORITY
27 28 29 30
33 35 36 37 38 3934
31 32
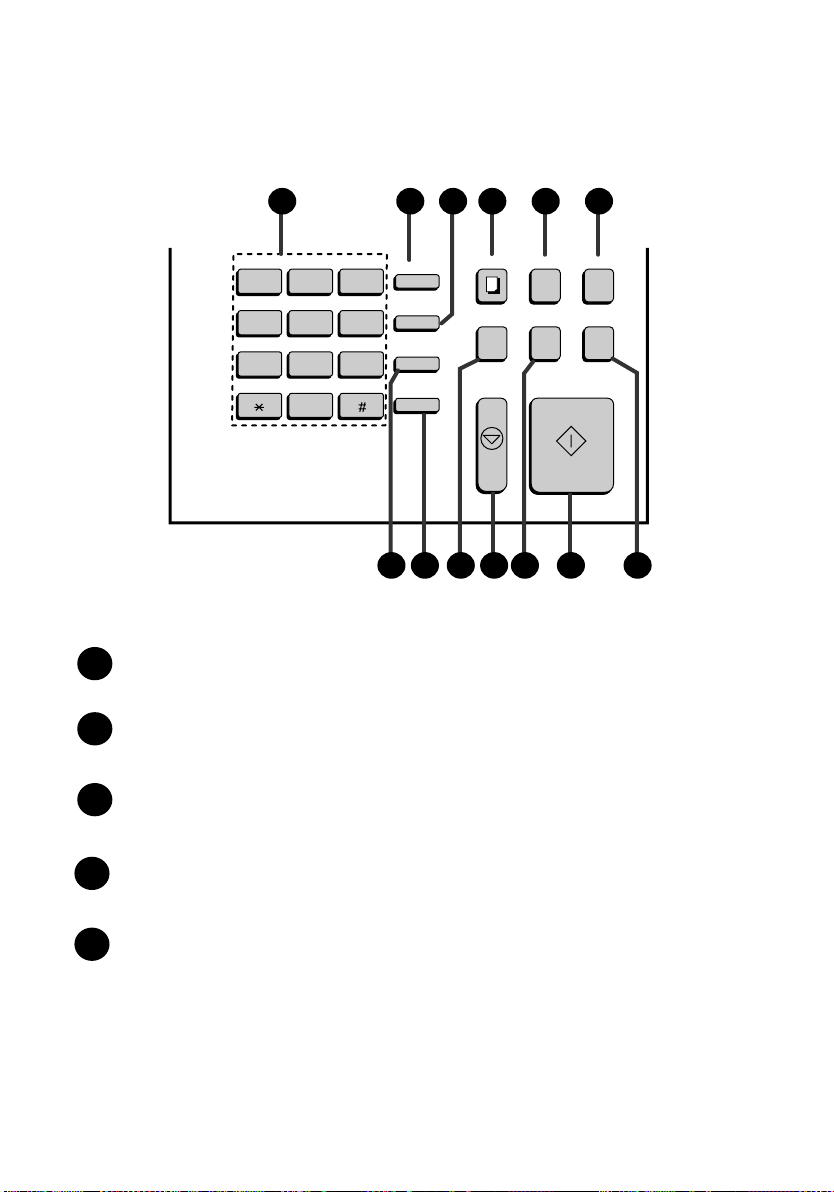
Dial keypad (numeric keys)
Use these keys to dial and program fax numbers.
FUNCTION key
Press this key to select various special functions.
SPEED DIAL key
Press this key to dial a Speed Dial number.
COPY key
Press this key to make a copy of a document.
DOCUMENT key
Press this key to transmit a document without reading it first into
memory.
27
28
29
30
31
Page 17

A Look at the Operation Panel
15
1. Installation
DUPLEX SCAN key
Press this key to transmit or copy a two-sided document.
REDIAL key
Press this key to automatically redial the last number dialed.
SPEAKER key
Press this key when transmitting a document by Normal Dialing to
listen to the line and verify the response of the receiving fax machine.
BROADCAST key
Press this key to send a document to a group of receiving fax
machines.
STOP key
Press this key to cancel an operation before it is completed.
PRIORITY key
Press this key when you need to transmit a document ahead of other
documents waiting in memory for transmission.
START key
Press this key to begin transmission when using Speed Dialing, Direct
Keypad Dialing, or Normal Dialing.
REPORT key
Press this key to print out a report on the most recently completed
transmission or reception.
39
37
36
35
33
32
34
38
Page 18
Connections
16
Connections
Points to keep in mind when setting up
♦
Do not place the machine in direct sunlight.
♦
Do not place the machine near heaters or air conditioners.
♦
Keep dust away from the machine.
♦
Install the machine on a level surface.
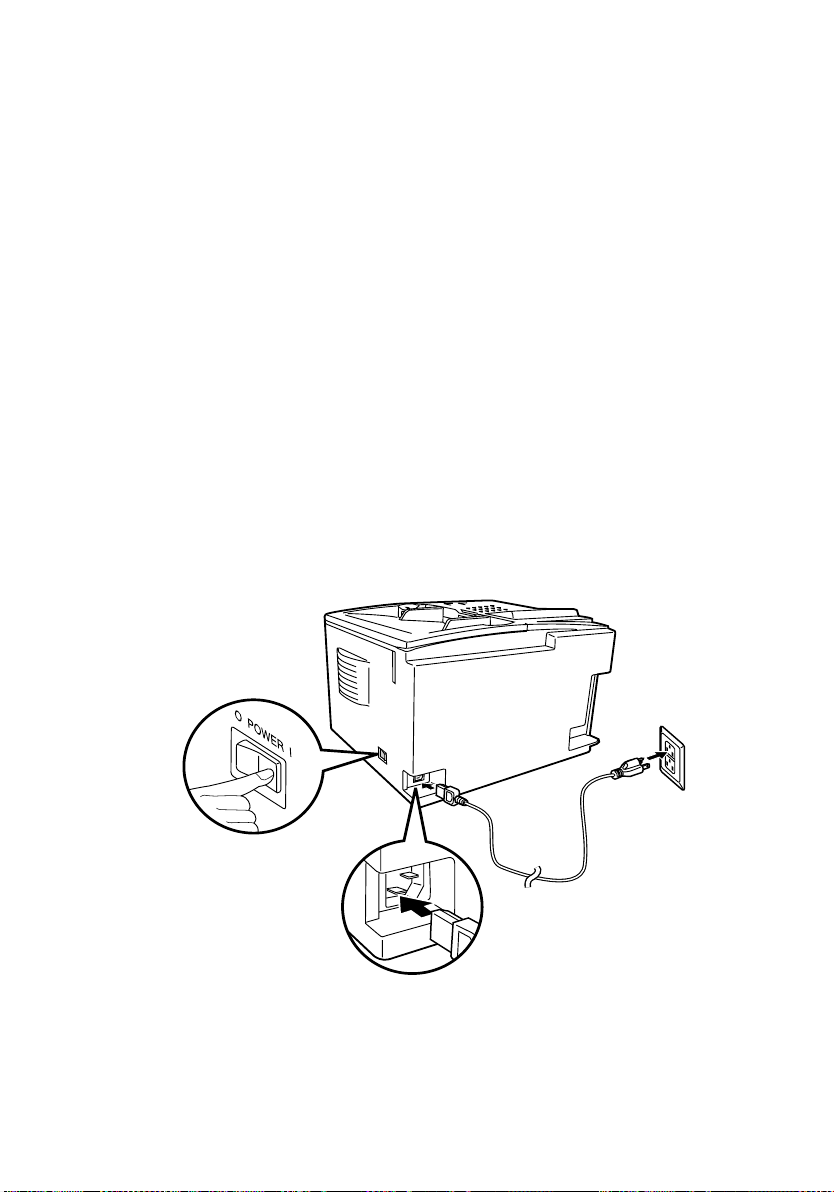
Connecting the power cord
Connect the female end of the power cord to the fax machine as
shown. Insert the male end into a 120 V, 60 Hz, grounded (3-prong)
AC outlet.
Note: If your area experiences a high incidence of lightning or power
surges, we recommend that you install surge protectors for the power and
telephone lines. Surge protectors can be purchased at most telephone specialty stores.
Press the power
switch to turn on
the power.
Page 19
Connections
17
1. Installation
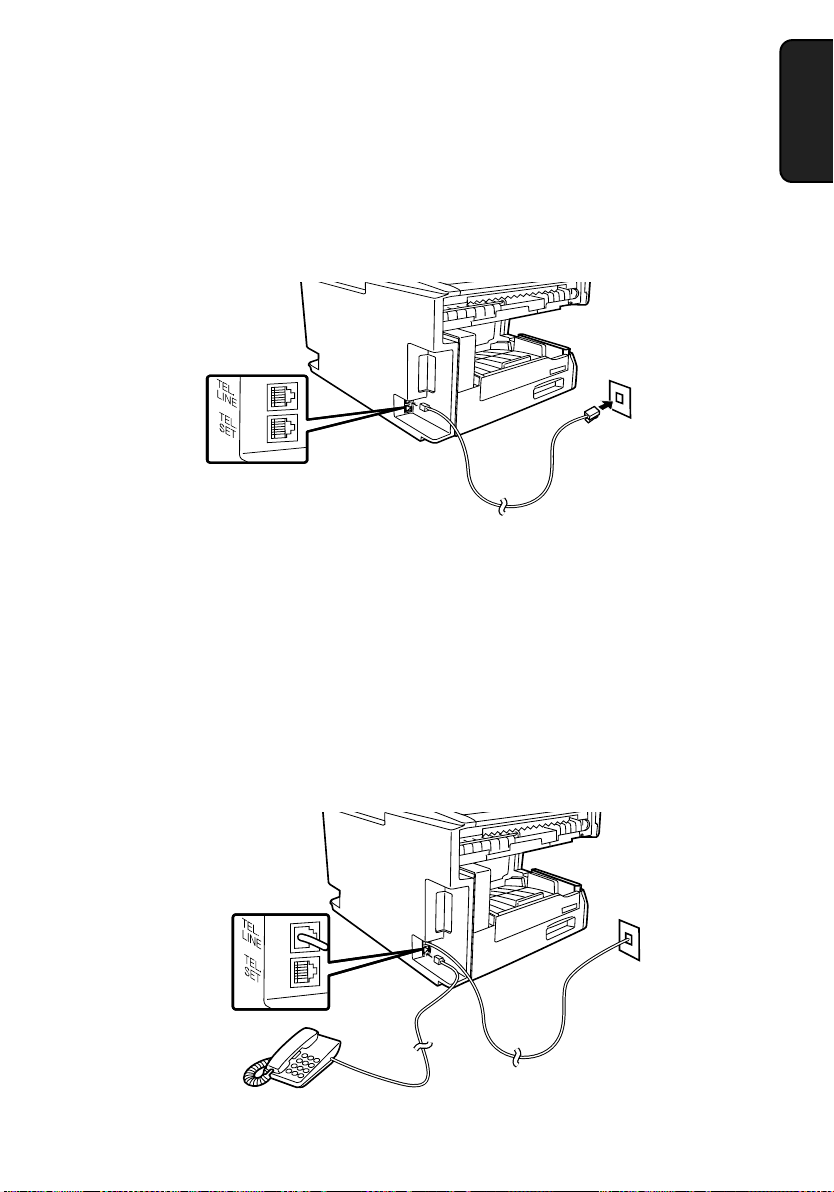
Connecting the telephone line cord
Insert one end of the line cord into the jack on the back of the machine
marked TEL. LINE. Insert the other end into a standard (RJ11C)
single-line wall telephone jack.
Note: The fax machine is set for touch-tone dialing. If you are on a pulse
dial (rotary) line, you must set the fax machine for pulse dialing by
changing Option Setting 22. This procedure is described in Chapter 6,
Optional Settings.
Connecting a telephone (optional)
If desired, you can connect a telephone to the TEL. SET jack on the
back of the machine.
Page 20
Connections
18
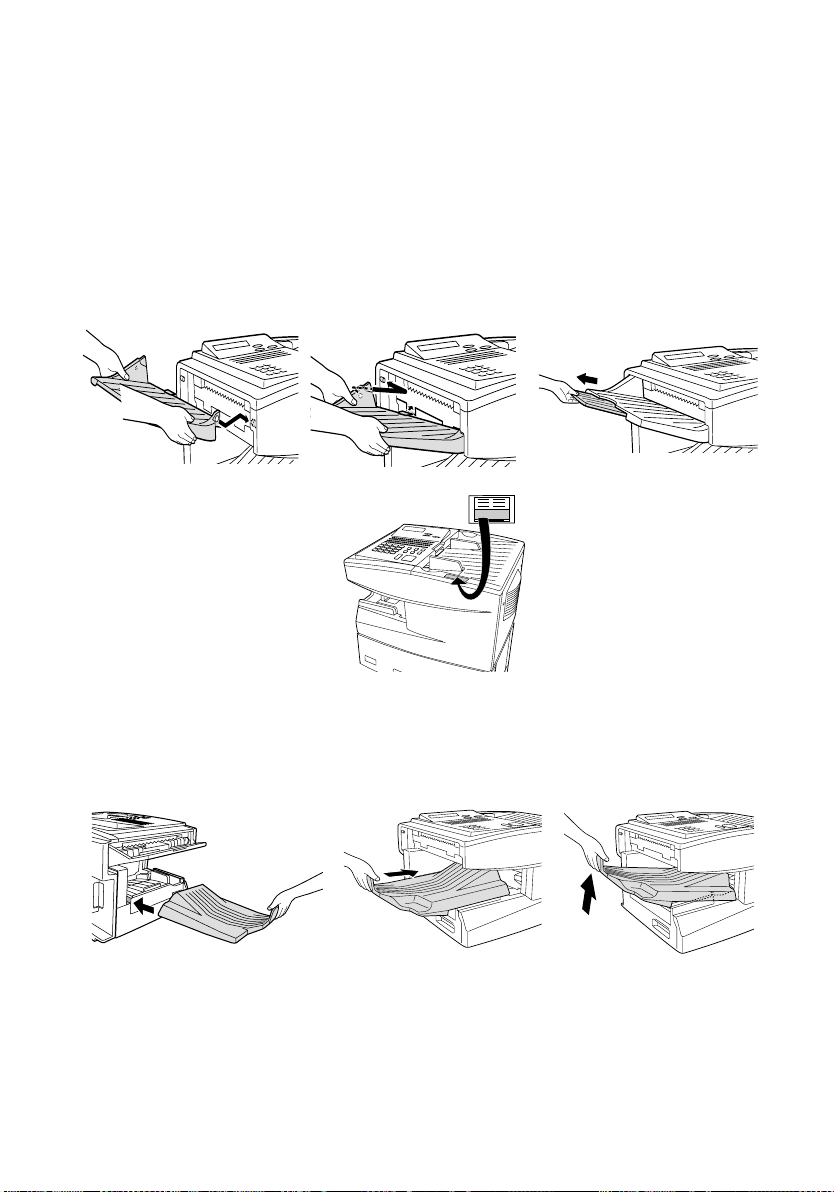
Attaching the document OUT tray
Insert the protrusion on the right side of the machine into the hole in
the right side of the document OUT tray as shown, then bend the tray
slightly and insert so that the protrusion on the left side of the machine
goes into the hole on the left side of the document OUT tray.
Pull out the tray
extension.
Attaching the received document tray
Slide the received document tray into the machine as shown. When it
stops, lift the end slightly and push in so that the tray locks into place.
Important!
The received document tray must be attached for the fax machine to
operate properly.
Make sure the left edge of
the tray fits into the slot.
Attach the Automatic
Document Feeder label
to the top of the machine.
Automatic Document Feeder
LETTER : MAX 50 SHEETS
LEGAL : MAX 20SHEETS
Page 21

Connections
19
1. Installation
Verification Stamp (option)
Note: This function is available as an option. Consult your dealer if you
wish to use it.
When transmitting a document, you can have your fax stamp each
document page as it is scanned. After scanning, you can check to see
if all documents have been stamped to verify that no double feeds
occurred. (A double feed is when two pages are fed through the
scanner at once, which means that one of the pages is not scanned.)
To use this function, have your dealer install the Verification Stamp
option, and then set Option Setting 29 to ON as explained in Chapter
6, Optional Settings.
Page 22
Installing the Print Cartridges
20
Installing the Print Cartridges
Follow the steps below to install or replace the toner and drum
cartridges.
♦
The initial starter toner cartridge included with the fax machine can
print approximately 3000 letter-size pages (4% coverage of each
page).
♦
The replacement toner cartridge (FO-47ND) can print approximately 6000 letter-size pages.
♦
The drum cartridge (FO-47DR) can print approximately 20,000 letter-size pages.
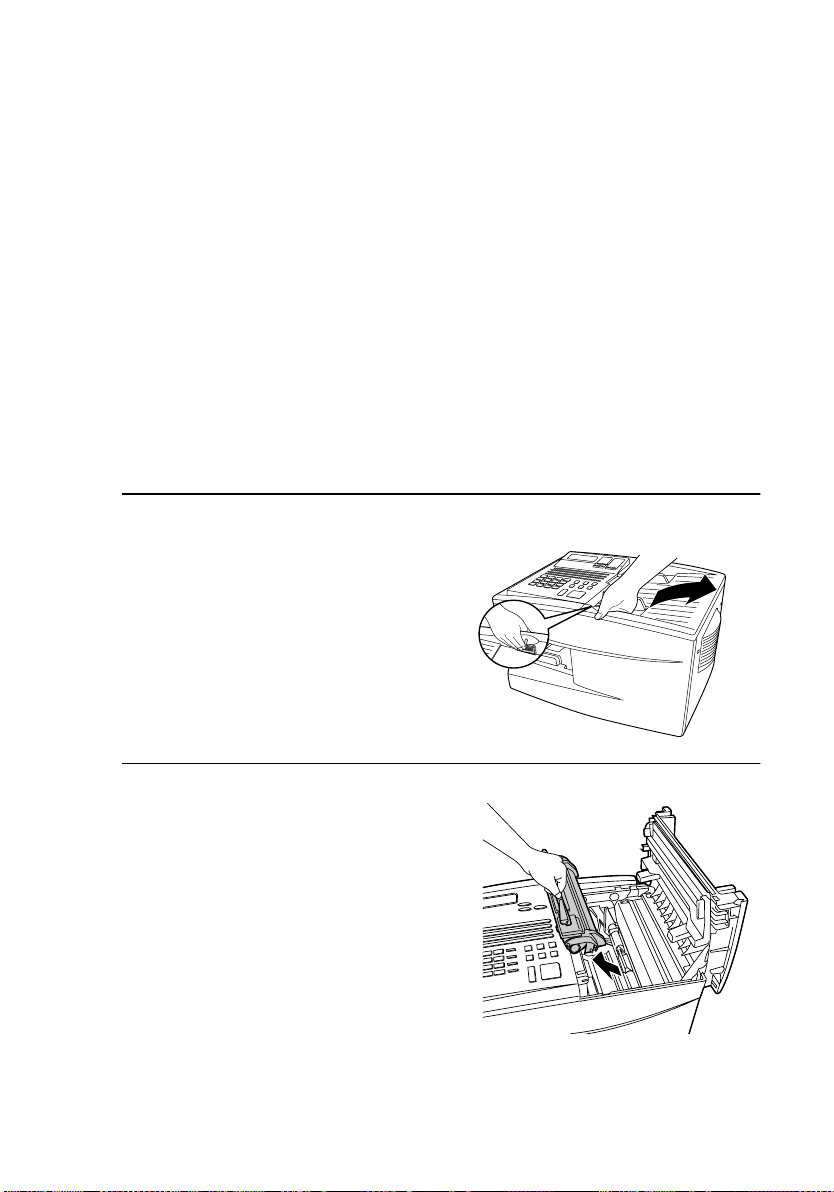
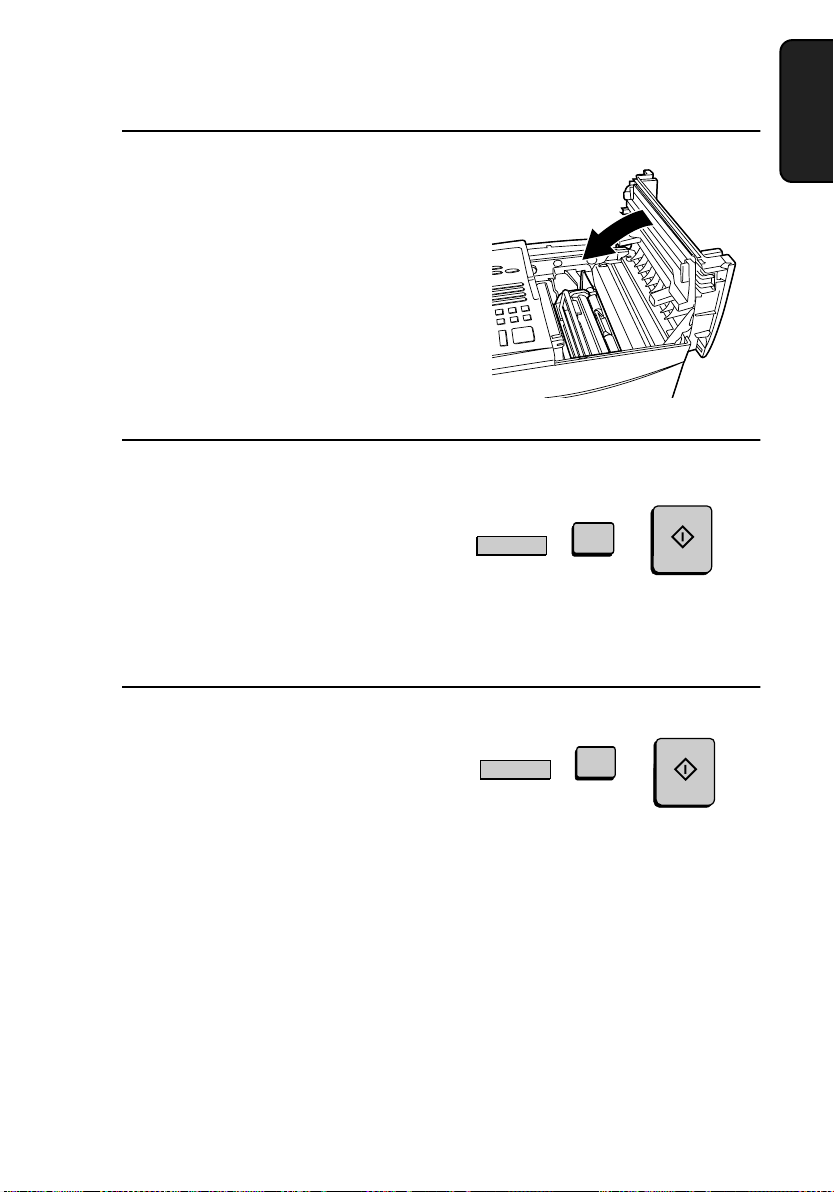
1
Press the green release and open the
print compartment cover.
•
Caution!
The fusing unit inside the print
compartment becomes very hot
during operation. Be careful not to
touch the inside of the compartment.
2
If you are replacing the toner
cartridge, remove the old cartridge
and dispose of it according to local
regulations. Go directly to Step 6 if
you are only replacing the toner
cartridge and not the drum cartridge.
•
If you are replacing the drum cartridge but not the toner cartridge,
remove the toner cartridge and
place it on a sheet of paper.
Page 23
Installing the Print Cartridges
21
1. Installation
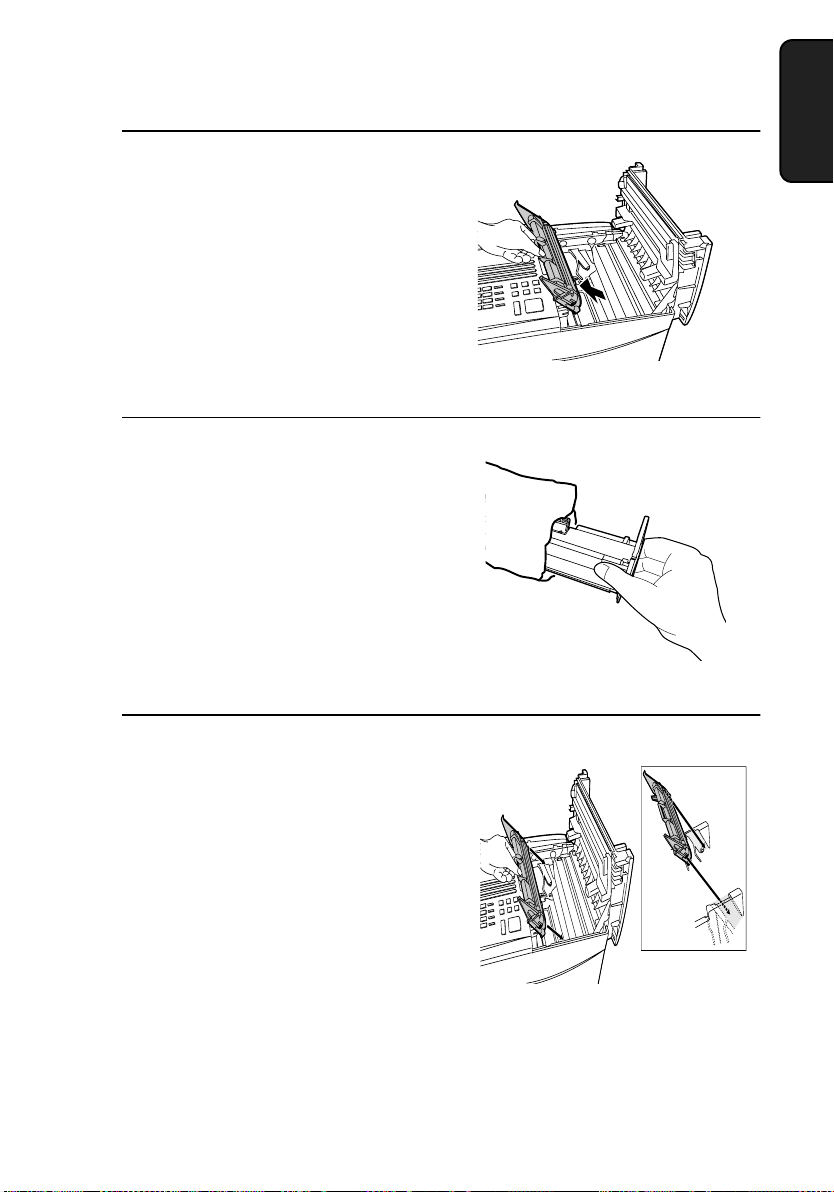
3
If you are replacing the drum
cartridge, remove the old cartridge
and dispose of it according to local
regulations.
4
Remove the new drum cartridge from
its packaging.
•
Caution! Excessive exposure to
light will damage the drum cartridge. Install the cartridge
promptly after removing it from its
packaging.
5
Insert the drum cartridge into the print
compartment, aligning the guides on
the cartridge with the grooves on the
sides of the compartment.
•
Insert the cartridge by aligning the
colored “1” labels on the cartridge
and the sides of the compartment.
•
Make sure the drum cartridge is
inserted in as far as it will go.
Blue
Green
Page 24
Installing the Print Cartridges
22
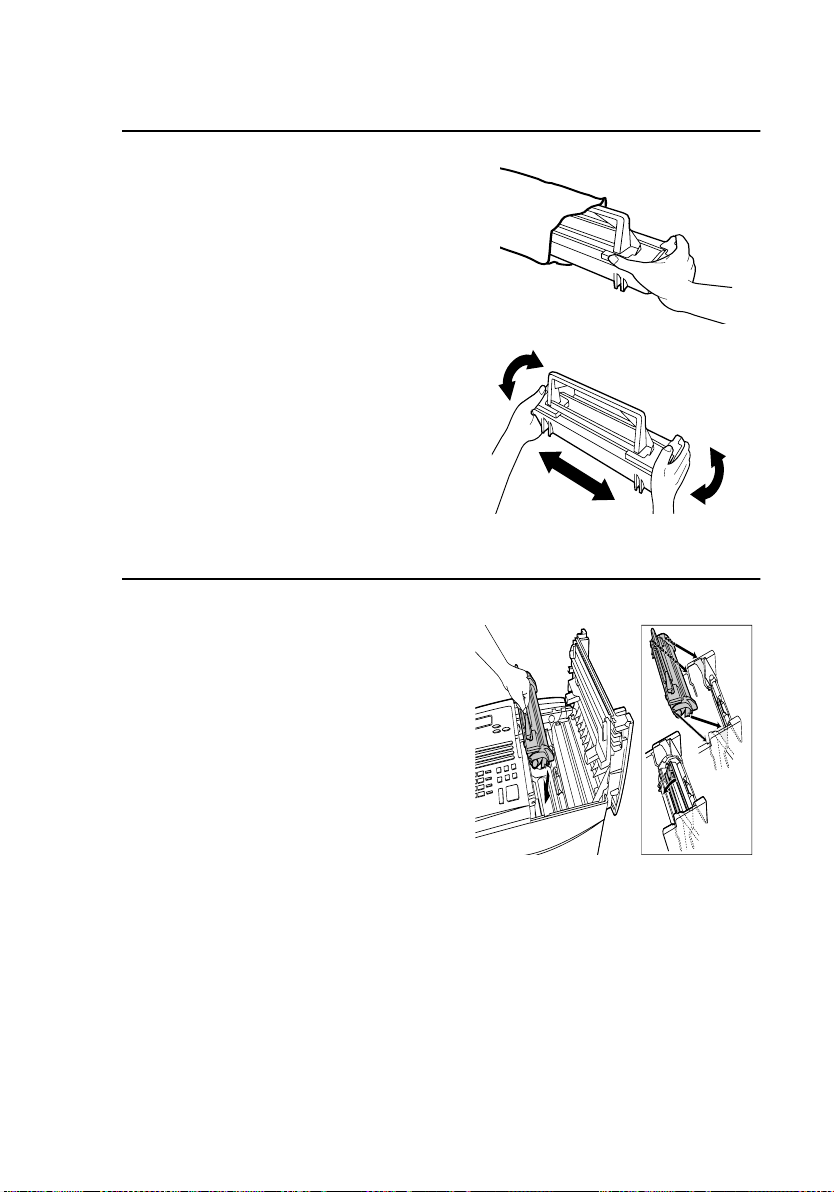
6
If you are installing a new toner
cartridge, remove the new toner
cartridge from its packaging. Shake as
indicated by the arrows to distribute
the toner evenly within the cartridge.
•
If the toner is still lumpy after shaking, the gears in the cartridge may
make a noticeable sound when the
print compartment cover is closed
after installing the cartridge. This is
normal and does not indicate a
problem in the machine.
7
Hold the toner cartridge by the handle
and lower it into the print
compartment. Make sure that the four
pins (two on each side) fit into the
grooves on the sides of the
compartment.
•
Insert the cartridge by aligning the
colored “2” labels on the cartridge
and the side of the compartment
•
Make sure the toner cartridge clicks
into place.
Blue
Green
Page 25
Installing the Print Cartridges
23
1. Installation
9
Reset the toner counter by pressing
the LIFE key (flip up the Rapid Key
overlay), 2, and the START key.
LIFE
V
2
START
8
Close the print compartment cover.
•
Press down on the dot markings at
the left edge to make sure the cover
is completely closed.
10
Reset the drum counter by pressing
the LIFE key (flip up the Rapid Key
overlay), 3, and the START key.
LIFE
V
3
START
Note: The print compartment cover may become noticeably warm if a
large number of pages are successively printed. This is normal and does
not indicate a problem in the machine.
Page 26

Installing the Print Cartridges
24
When to replace the toner cartridge
When the toner cartridge nears empty (about 100 pages can still be
printed), the toner cartridge indicator on the operation panel will
blink. When the toner cartridge is empty, the toner cartridge indicator
will light steadily and REPLACE TONER will appear in the display.
Printing will no longer be possible. Use the following replacement
toner cartridge:
Sharp FO-47ND toner cartridge
When to replace the drum cartridge
When the drum cartridge life is over, the drum cartridge indicator on
the operation panel will blink and DRUM LIFE OVER will appear in
the display. Use the following replacement drum cartridge:
Sharp FO-47DR drum cartridge
♦ Caution!
Be sure to use only genuine Sharp supplies.
Page 27
Loading Printing Paper
25
1. Installation
Loading Printing Paper
You can load up to 250 sheets of letter or legal paper (max. 20 lbs.) in
the paper tray. You can load up to 500 sheets of letter paper in the
paper cassette.
Note: The paper cassette is available as an option. To have the
cassette installed, consult your dealer.
Note: To use A4 paper in the paper cassette, you must have a service
technician adjust the cassette.
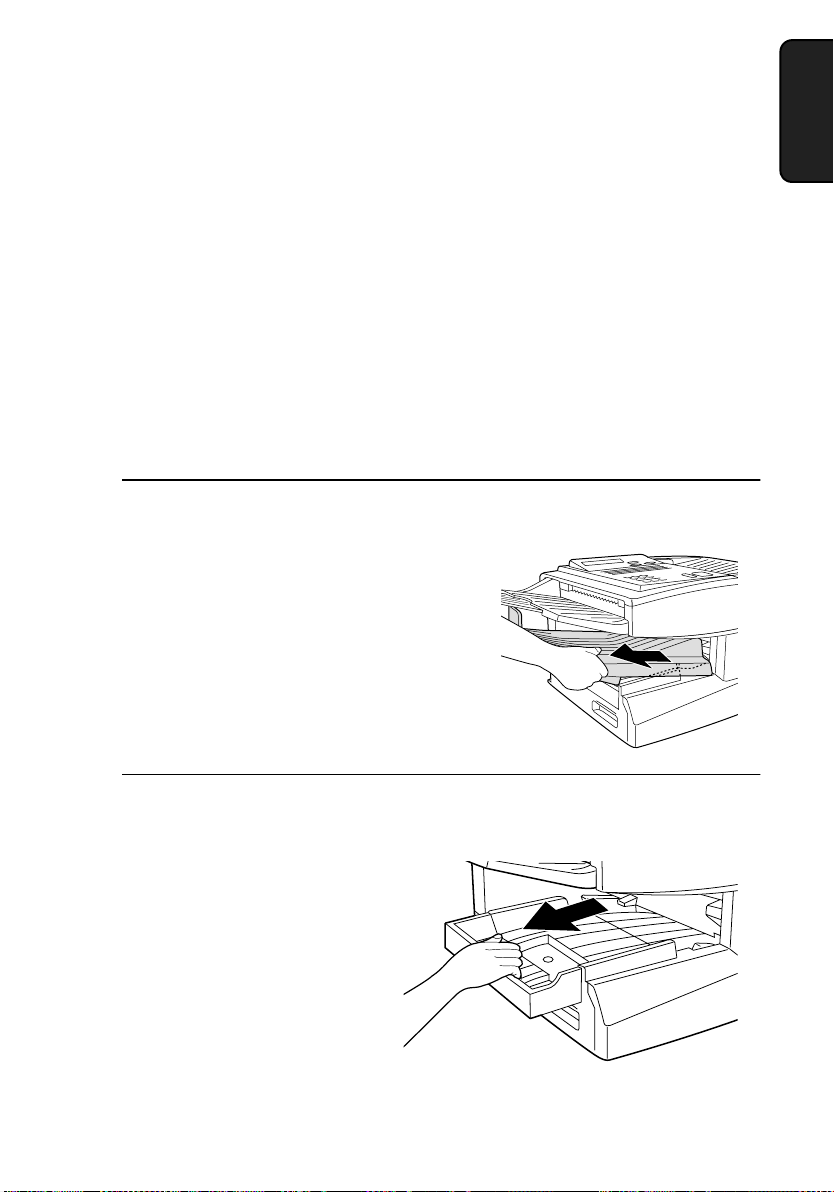
Loading paper in the paper tray
1
Remove the received document tray.
2
If you are loading legal paper, grasp
the end of the paper tray and pull it
out.
Page 28
Loading Printing Paper
26
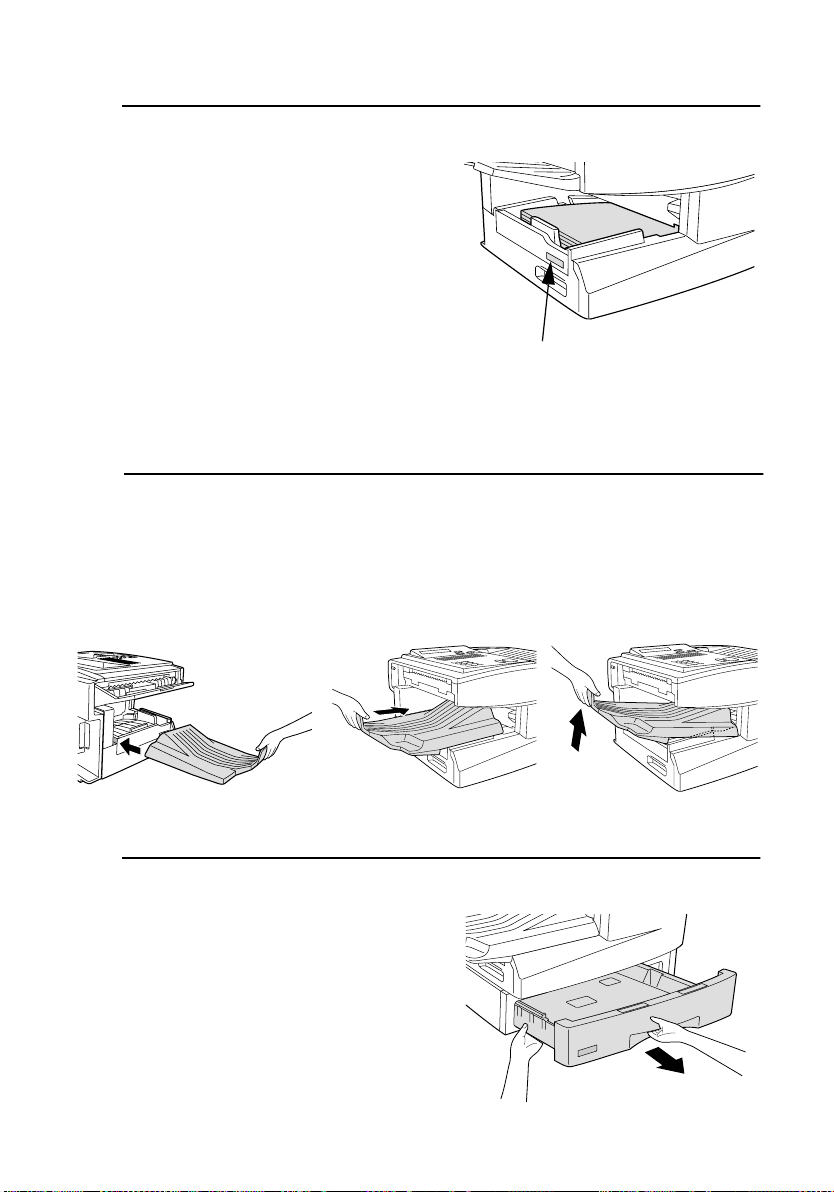
4
Replace the received document tray.
•
The received document tray must
be attached for the fax machine to
operate properly.
3
Insert a stack of paper into the tray,
print side up.
•
If you loaded letter paper, make
sure the end of the tray is pushed in.
Otherwise a size error will result.
•
Caution!
This paper tray is designed to
accomodate 250 sheets of paper.
[See the Red line in the tray.]
Loading more than 250 sheets may
damage the machine.
Loading paper in the paper cassette (if installed)
1
Grasp the hand-hold on the cassette
and pull out the cassette until it stops.
Attach a letter or legal label
here to indicate the paper size.
Page 29
Loading Printing Paper
27
1. Installation
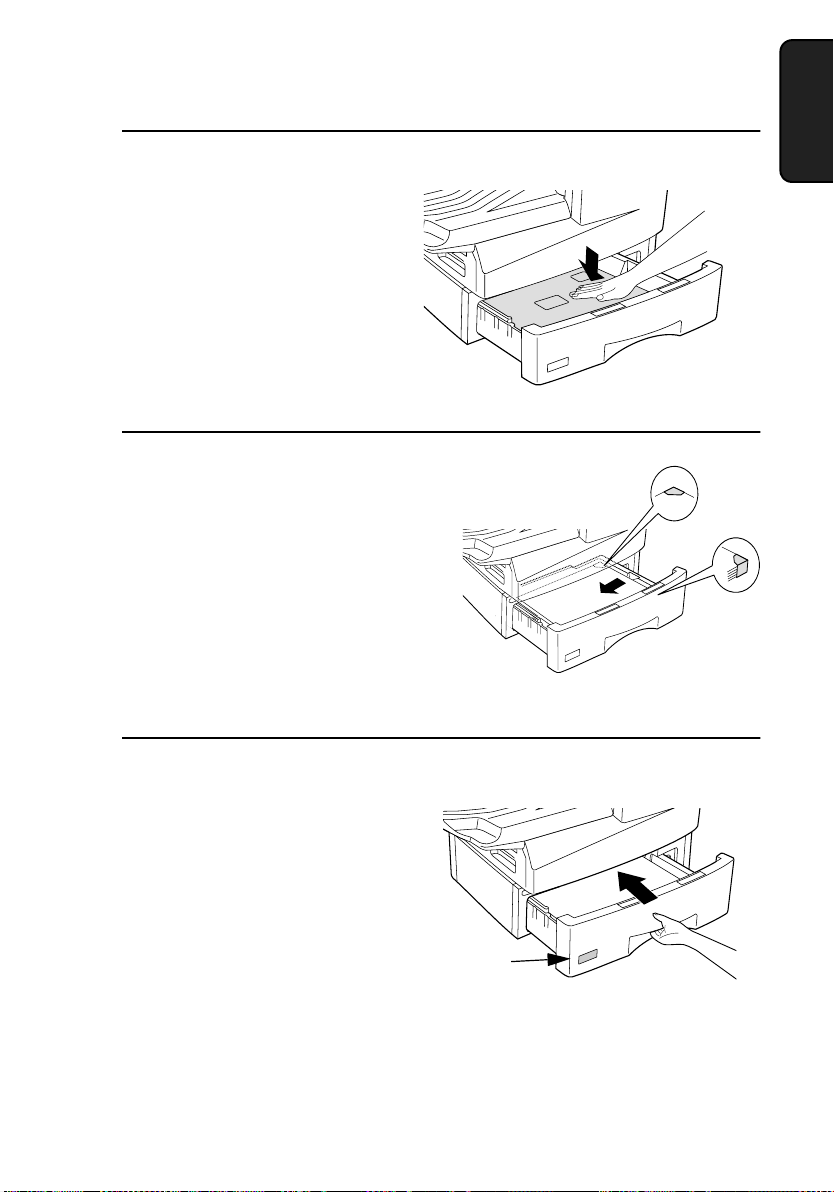
2
Push the pressure plate down until it
locks into position.
3
Place a stack of paper in the cassette,
print side up.
•
Make sure the stack of paper is not
higher than the two tabs on the
paper guide and the two metal tabs.
If it is, remove some of the paper.
4
Push the cassette back into the
machine, making sure it clicks into
place.
Attach a LETTER label here
to indicate the paper size.
Note: We recommend that you do not add paper to the tray or cassette while
paper still remains. This may result in double feeds.
Page 30
Entering Your Name and Fax Number
28
Entering Your Name and Fax Number
Before you can begin using the fax machine, you must program your
name and fax number. Once you program this information, it will
appear automatically at the top of each fax page you send.
Important!
The law requires that your name, telephone/fax number, and the date and
time appear on each fax message you send. Enter your name and fax
number here and set the date and time as explained in the following section to have the fax machine include this information automatically at the
top of your fax messages.
Note: Make sure the display shows the date and time before beginning a
programming operation. If the display shows the telephone line status,
press the CHANGEOVER key to switch to the date and time.
1
Press these keys:
The display will show:
FUNCTION
3
2
Press the 3 key.
The display will show:
3
3:ENTRY MODE
ENTER #(1-9,*,#)
3:OWN PASSCODE SET
ENTER FAX #
Page 31

Entering Your Name and Fax Number
29
1. Installation
5 Flip the Rapid Key overlay down (if it
is up), and enter your name by
pressing the appropriate letter keys as
shown below. (Max. of 24
characters.)
4 Press the START key.
The display will show:
ENTER SENDER’S NAME
CLEARSPSHIFTSPACE
A
I
Q
Y
B
J
R
Z
C
K
S
D
L
T
E
M
U
F
N
V
G
O
W
H
P
X
START
3 Enter your fax number (max. of 20
digits) by pressing the numeric keys.
• To insert a space between digits,
press the # key.
• To clear a mistake, press the STOP
key.
Example: SHARP =
(Example)
A
S
H
R
P
4
5
2
4
3
2
5
3
2
8
Page 32

Entering Your Name and Fax Number
30
6 Press the START key.
The display will show:
7 Press the STOP key twice to return to
the date and time display.
4:DATE &TIME SET MODE
PRESS START KEY
START
STOP STOP
♦ Press the SPACE key to enter a space. To change case, press the
SHIFT key.
♦ To clear a mistake, press the CLEAR key.
♦ To enter a number as part of a name, press the appropriate numeric
key. To select one of the following special symbols, press the SP
key one or more times: !"#$%&’()++,-/:;<=>?[¥]^_'{|}→←@.
Page 33

Setting the Date and Time
31
1. Installation
Setting the Date and Time
The date and time appear in the display, in reports, and at the top of
each page you transmit. Set the date and time by pressing the keys on
the operation panel as shown below.
Note: Make sure the display shows the date and time before
beginning a programming operation. If the display shows the
telephone line status, press the CHANGEOVER key to switch to the
date and time.
1 Press these keys:
The display will show:
2 Enter a two-digit number for the
month (“01” for January, “02” for
February, “12” for December, etc.).
• To correct a mistake, press the STOP
key to move the cursor back to the
mistake and then enter the correct
number.
FUNCTION
3
3 Enter a two-digit number for the day
(“01” to “31”).
4
Example: January
4:DATE&TIME SET MODE
DATE 06-08-2001
(Note: the currently set
date will appear to the
right of “DATE”)
0
1
Example: the 5th
0
5
4 Enter the year (four digits).
Example: 2001
1
00
2
Page 34

Setting the Date and Time
32
5 Enter a two-digit number for the hour
(“01” to “12”) and a two-digit number
for the minute (“00” to “59”).
6 Press the * key to select A.M. or the
# key to select P.M.
7 Press the START key to start the
clock.
Example: 9:25
or
Daylight Saving Time
If desired, you can set the clock to move forward and backward
automatically at the beginning and end of Daylight Saving Time.
1 Press these keys:
0
5
2
9
A.M. P.M.
8 Press the STOP key twice to return to
the date and time display.
FUNCTION
3
5
2 Press 1 to turn on the Daylight Saving
Time function, or 2 to turn it off.
or
YES NO
1
2
3 Press the STOP key twice to return to
the date and time display.
STOPSTOP
STOP
STOP
START
Page 35

Volume Adjustment
33
1. Installation
Volume Adjustment
You can adjust the volume of the speaker and ringer using the UP and
DOWN keys.
Speaker
1 Press the SPEAKER key.
2 Press the UP or DOWN key.
3 When the display shows the desired
volume level, press the SPEAKER
key to turn off the speaker.
Display:
SPEAKER
SPEAKER
DOWN
UP
or
SPEAKER VOLUME
LOW
SPEAKER VOLUME
MIDDLE
SPEAKER VOLUME
HIGH
Page 36

Volume Adjustment
34
Ringer
1 Press the UP or DOWN key. (Make
sure the SPEAKER key has not been
pressed.)
• The ringer will ring once at the
selected level, then the date and
time will reappear in the display.
2 If you selected RINGER OFF: OK?,
press the START key.
Display:
RINGER VOLUME
LOW
RINGER VOLUME
MIDDLE
RINGER VOLUME
HIGH
RINGER VOLUME
OFF OK?(PRESS START)
DOWN
UP
or
START
Page 37

35
2. Sending
Documents
5.0"
(128 mm)
5.8"
(148 mm)
11"
(279 mm)
17"
(432 mm)
14 lbs.
(52 g/m²)
36 lbs.
(157 g/m²)
14.3"
(364 mm)
10.1"
(256 mm)
20 lbs.
(80 g/m²)
2. Sending Documents
Transmittable Documents
Size and weight
The size and weight of documents that you can load in the document
feeder depend on whether you load one page at a time or several pages
at once.
Loading one page at a time:
Loading multiple pages at once (letter-size: max. 50 pages, legalsize: max. 20 pages):
Minimum
size
Maximum
size
Minimum
weight
Maximum
weight
Minimum
size
Maximum
size
Minimum
weight
Maximum
weight
5.0"
(128 mm)
5.8"
(148 mm)
14 lbs.
(52 g/m²)
Note: 11” x 17” paper must be loaded one page at a time.
Page 38

Transmittable Documents
36
Maximum scanning area
The area of the document that the fax machine can scan is slightly
smaller than the actual document size. Any letters or graphics outside
this area will not be scanned.
Maximum scanning width: 8.3 inches (210 mm)
Maximum scanning length: The length of the document minus
0.16 inches (4 mm) from the top and
bottom of the document.
Other restrictions
♦ The scanner cannot recognize yellow, greenish yellow, or light blue
ink.
♦ Ink, glue, and correcting fluid on documents must be dry before
they pass through the document feeder.
♦ All clips, staples, and pins must be removed from documents before
loading in the feeder. If these are not removed, they may damage
the machine.
♦ Documents which are patched, taped, torn, smaller than the mini-
mum size, carbon backed, easily smudged, or have a slippery
coated surface should be photocopied, and the copy loaded in the
feeder.
Page 39

Loading the Document
37
2. Sending
Documents
Loading the Document
Up to 50 letter-sized pages (20 legal-sized pages) can be placed in the
feeder at one time. The pages will automatically feed into the machine
starting from the bottom page.
♦ If you need to send or copy more than 50 pages, place the additional
pages gently and carefully in the feeder just before the last page is
scanned. Do not try to force them in, as this may cause double-feeding or jamming.
♦ If your document consists of several large or thick pages which
must be loaded one at a time, insert each page into the feeder as the
previous page is being scanned. Insert gently to prevent doublefeeding.
1 Adjust the document guides to the
width of your document.
2 Place the document face down and
push it gently into the document
feeder. The top edge of the document
should enter the machine first.
• The feeder will draw the leading
edge of the document into the
machine. SEND READY will
appear in the display.
Note: When inserting a large
number of pages in the feeder,
slant the front end of the stack so
that the bottom pages enter first.
Page 40

Adjusting the Resolution and Contrast
38
Adjusting the Resolution and Contrast
If desired, you can adjust the resolution and contrast before sending a
document.
Resolution
The fax machine has four resolution settings:
The default resolution setting is STANDARD. If you don’t adjust the
resolution before sending a document, the fax machine will
automatically use STANDARD resolution.
♦ In order to transmit in FINE or SUPER FINE resolution, the receiv-
ing fax machine must also have that resolution. If it doesn’t, the
next best available setting will be used.
♦ The resolution settings are only effective for transmitting and copy-
ing a document. They are not effective for receiving a document.
STANDARD Use STANDARD for ordinary documents.
This setting gives you the fastest and most
economical transmission.
FINE Use FINE for documents containing small
letters or fine drawings.
SUPER FINE Use SUPER FINE for documents containing
very small letters or very fine drawings.
HALF TONE Use HALF TONE for photographs and
illustrations. The original will be reproduced
in 64 shades of gray.
3 Adjust the resolution and/or contrast
settings (if desired) and then dial the
receiving machine as explained in the
following sections.
Page 41

Adjusting the Resolution and Contrast
39
2. Sending
Documents
RESOLUTION
STANDARD
FINE
SUPER FINE
HALF TONE
To adjust the resolution setting, press the RESOLUTION key one or
more times until the indicator light next to the desired setting comes
on.
Contrast
The fax machine has three contrast settings:
The default setting is AUTO.
To adjust the contrast, flip up the Rapid Key overlay (if necessary)
and press the CONTRAST key until the desired setting appears in the
display.
AUTO Use AUTO for normal documents.
DARK Use DARK for faint documents.
LIGHT Use LIGHT for documents with a dark
background.
RESOLUTION
Q
CONTRAST
(LIGHT)
M:00% SEND READY
( DARK)
M:00% SEND READY
( AUTO)
M:00% SEND READY
Page 42

Sending a Fax by Normal Dialing
40
Sending a Fax by Normal Dialing
With Normal Dialing, you press the SPEAKER key and then dial by
pressing the numeric keys.
♦ Normal Dialing allows you to listen to the line through the speaker
to make sure the other fax machine is responding. (Note that the
speaker is not a speakerphone; it cannot be used for talking.)
♦ If you have connected an extension telephone to the fax machine,
you can also pick up the extension phone and dial using the extension phone (do not press the SPEAKER key on the fax machine). If
a person answers, you will be able to speak to them through the
phone before sending a fax.
Note: If you press the SPEAKER key to dial, you will not be able to
speak using an extension phone connected to the fax machine in the event
that a person answers.
1 Load the document(s). (Note: If
desired, you can load the document
after dialing in Step 3, below.)
• SEND READY will appear in the
display.
• Set the resolution and/or contrast if
desired.
RESOLUTION
SPEAKER
2 Press the SPEAKER key or pick up
an extension phone connected to the
fax machine. Listen for the dial tone.
Q
CONTRAST
Page 43

Sending a Fax by Normal Dialing
41
2. Sending
Documents
3 If you pressed the SPEAKER key,
dial the number of the receiving
machine by pressing the numeric
keys on the fax machine.
If you are using an extension phone,
dial using the keypad on the extension
phone.
• If Option Setting 26 (TEL.
BILLING CODE) has been set to
ON and BILLING CODE DIAL
has been set to AFTER, press the
REDIAL key after dialing.
4 Wait for the connection. When you
hear a fax tone, press the START key
on the fax machine.
• If a person answers and you are
using an extension phone, ask them
to press their Start key. When you
hear the fax tone, press the START
key on your fax machine.
Using the REDIAL key
You can press the REDIAL key to redial the last number dialed. To
send a document, press the START key when you hear the fax tone
after the connection is made. Note that the speaker is automatically
activated when you press the REDIAL key.
(Example)
3
2
1
4 4
1 1
START
Page 44

Programming Auto-Dial Numbers
42
Programming Auto-Dial Numbers
You can dial a fax number by simply pressing a Rapid Key, or by
pressing the SPEED DIAL key and entering an abbreviated Speed
Dial number.
To use a Rapid Key or Speed Dial number, you must first program the
full fax number in the Rapid Key or Speed Dial number. It is usually
convenient to program your most frequently dialed numbers in Rapid
Keys.
♦ Forty-eight Rapid Keys are available. Rapid Dial Keys also allow
you to program a backup fax number, which is automatically dialed
if the first fax number is busy.
♦ Seventy-five Speed Dial numbers are available on the FO-4650,
and one hundred Speed Dial numbers are available on the FO-4970.
1 Press these keys:
The display will show:
2 Press the 1 key.
The display will show:
FUNCTION
3
1
3 Press the 1 key to select SET.
1
3:ENTRY MODE
ENTER #(1-9,*,#)
1:FAX/TEL. # MODE
1=SET, 2=CLEAR
Page 45

Programming Auto-Dial Numbers
43
2. Sending
Documents
4 To program a Rapid Key number,
press a Rapid Key (to select Rapid
Keys 33 through 48, flip up the Rapid
Key overlay).
To program a Speed Dial number,
press the SPEED DIAL key and then
enter a number from “1” to “75” on
the FO-4650, or “1” to “100” on the
FO-4970. (If you enter less than two
digits on the FO-4650, or three digits
on the FO-4970, press the START
key to complete the entry.)
Example: Rapid Key 02
or
Speed Dial 1
5 Enter the fax number by pressing the
numeric keys (max. of 34 digits
including pauses).
• To clear a mistake, press the
CLEAR key.
• If a pause is required between any
of the digits to access a special
service or an outside line, press the
REDIAL key (two seconds per
pause). The pause will appear as a
hyphen. Several pauses can be
entered in a row.
6 Press the START key.
(Example)
1
SPEED DIAL
B
02
3
2
1
4 4
1 1
START
START
Page 46

Programming Auto-Dial Numbers
44
7 Enter the name of the party by
pressing the letter entry keys
(max.of 20 characters). (Make sure
the Rapid Key overlay is flipped
down.)
• If you don’t want to enter a name,
go directly to Step 8.
8 Press the START key.
Example: SHARP
9 Press 1 if the number programmed is
an area code or access code to be used
for Chain Dialing (see Chain Dialing
at the end of this procedure). Press 2
(or START) if the number is a regular
fax number.
• If you pressed 1 or are
programming a Speed Dial number,
go to Step 14. (Note: A backup fax
number cannot be entered in a
Rapid Key used for Chain Dialing.)
SET CANCEL
or
10 Enter a backup fax number to be
dialed if the first number is busy.
(If you don’t want to enter a backup
number, go directly to Step 13.)
(Example)
11 Press the START key.
A
S
H
R
P
1
2
3
2
1
4 4
1 1
START
START
Page 47

Programming Auto-Dial Numbers
45
2. Sending
Documents
12 Enter a name for the backup fax
number. (If you don’t want to
enter a name, go directly to
Step 13.)
Example: SHARP2
13 Press the START key.
14 Return to Step 4 to program another
number, or press the STOP key
repeatedly to return to the date and
time display.
• If you programmed a Rapid Key
number, you can write the name of
the party on the label above the
Rapid Key.
Step 4 or
Chain Dialing for area and access codes
You can also program an area code or access code in a Rapid Key or
Speed Dial number using the above programming procedure. In Step
9, press 1 to set the number as a Chain Dialing number.
After you dial an area code or access code using a Rapid Key or Speed
Dial number set for Chain Dialing, the fax machine will wait for you
to dial the remainder of the number (you can dial the remainder of the
number by pressing a Rapid Key, by pressing the Speed Dial key and
entering a Speed Dial number, or by pressing numeric keys). Note that
the remainder of the number should not be set as a Chain Dial number
if programmed in a Rapid Key or Speed Dial number.
♦ The maximum number of digits that can be dialed at one time by
Chain Dialing is 50.
A
S
H
R
P
2
START
STOP
Page 48

Programming Auto-Dial Numbers
46
Clearing auto-dial numbers
Note: You cannot clear a number if it is used in a program or timer operation, if it is used to specify the relay fax machine in a relay group, or if it
is included in a Group Key. First clear the number from the operation or
group, then perform the following clearing procedure. To check where
the number is used, print out the Program/Group List, the Timer List,
and/or the Relay Group List as explained in Chapter 7.
1 Press these keys:
The display will show:
2 Press 2 to select CLEAR.
3 To clear a Rapid Key, press the Rapid
Key.
To clear a Speed Dial number, press
the SPEED DIAL key and then enter
the number with the numeric keys. (If
you enter less than 2 digits on the FO4650, or 3 digits on the FO-4970,
press the START key to complete the
entry.)
Example: Rapid Key 02
4 Press the START key.
FUNCTION
3
1
1:FAX/TEL. # MODE
1=SET, 2=CLEAR
B
02
2
START
Page 49

Programming Auto-Dial Numbers
47
2. Sending
Documents
Making changes
To make changes in a number previously stored, repeat the
programming procedure. Select the Rapid Key or Speed Dial number
for which you want to make changes in Step 4, and then change the
number(s) and/or name(s) when they appear in the display (Steps 5, 7,
10 and 12).
5 Return to Step 3 to clear another
number, or press the STOP key
repeatedly to return to the date and
time display.
Step 3 or
STOP
Page 50

Sending a Fax by Automatic Dialing
48
Sending a Fax by Automatic Dialing
Dual Access
The fax machine features full dual access, which means that you can
load a document and dial by automatic dialing even when the fax
machine is occupied with another operation. After you dial, your
document will be immediately scanned into memory and then
transmitted once all previously set operations have been completed.
If more than one document has been scanned into memory for
transmission, the documents will be transmitted in the order in which
they were scanned. If you have an urgent transmission and do not
want to wait until previously scanned documents are transmitted, you
can press the PRIORITY key after loading your document. Your
document will be transmitted immediately after the current document
has completed transmission.
If you don’t want the document to be transmitted from memory, you
can press the DOCUMENT key after loading the document. In this
case, the document will not be scanned until all previously set
operations are completed and the connection to the receiving party is
established. (To transmit the document ahead of any documents
waiting in memory for transmission, press the PRIORITY key.)
♦ The FO-4650 can hold approximately 56 pages of average content
in memory. The FO-4970 can hold approximately 116 pages. Less
pages can be held if any were scanned using fine or halftone resolution.
♦ The amount of memory currently occupied appears as a percentage
("M:00%") in the display.
Page 51

Sending a Fax by Automatic Dialing
49
2. Sending
Documents
If the memory becomes full...
If the memory becomes full while a document is being scanned,
MEMORY FULL will appear in the display. If Option Setting 23
(Quick On-line) is set to YES, scanning will automatically resume
when memory becomes free again as pages are transmitted. (Note:
Quick On-Line is initially set to YES at the factory. To change the
setting, see Chapter 6, Optional Settings.)
If Quick On-Line is set to NO, MEMORY FULL ERROR will appear
in the display. Press the START key or the STOP key as follows:
♦ Press the START key if you want to transmit the pages which have
been stored up to that point in memory. The remaining pages will be
ejected from the feeder. After transmission, the memory will be
cleared and you can transmit the remaining pages. You will also
need to transmit the page which was being scanned when the memory filled up.
♦ Press the STOP key if you want to cancel the entire transmission.
If you do not press the START key or the STOP key within one
minute, the transmission will be canceled and the pages already
scanned cleared from memory. You will need to retransmit all pages
of the document.
Page 52

Sending a Fax by Automatic Dialing
50
2 Press the appropriate Rapid Key.
• The name of the receiving party
will appear in the display. If no
name was stored, the fax number
will appear. (If the name or number
is incorrect, press the STOP key.)
• The document will be
automatically transmitted once the
connection is established.
Rapid Key Dialing
If the number you want to dial has been programmed in a Rapid Key,
you can dial it by pressing the Rapid Key.
1 Load the document(s).
SEND READY will appear in the
display.
• Set the resolution and/or contrast if
desired.
• To send the document ahead of
other documents waiting for
transmission, press the PRIORITY
key.
• To send the document directly from
the feeder (not through memory),
press the DOCUMENT key.
RESOLUTION
Q
CONTRAST
DOCUMENT
Example: Rapid Key 02
B
02
PRIORITY
Page 53

Sending a Fax by Automatic Dialing
51
2. Sending
Documents
Speed Dialing
If the number you want to dial has been programmed in a Speed Dial
number, you can dial it by pressing the SPEED DIAL key and then
entering the Speed Dial number.
1 Load the document(s).
SEND READY will appear in the
display.
• Set the resolution and/or contrast if
desired.
• To send the document ahead of
other documents waiting for
transmission, press the PRIORITY
key.
• To send the document directly from
the feeder (not through memory),
press the DOCUMENT key.
2 Press the SPEED DIAL key and then
enter the Speed Dial number by
pressing the numeric keys.
• If you enter less than 2 digits for the
Speed Dial number on the FO4650, or 3 digits on the FO-4970,
press the START key to complete
the entry.
Example: Speed Dial 1
1
SPEED DIAL
RESOLUTION
Q
CONTRAST
DOCUMENT
PRIORITY
START
Page 54

Sending a Fax by Automatic Dialing
52
3 Check the display. If the name or
number shown is correct, press the
START key. (If not, press the STOP
key and then repeat Step 2.)
Direct Keypad Dialing
You can also enter a full number with the number keys and then press
the START key to begin dialing.
1 Load the document(s). (Note: If
desired, you can load the document
after dialing in Step 2, below.)
SEND READY will appear in the
display.
• Set the resolution and/or contrast if
desired.
• To send the document ahead of
other documents waiting for
transmission, press the PRIORITY
key.
• To send the document directly from
the feeder (not through memory),
press the DOCUMENT key.
RESOLUTION
Q
CONTRAST
DOCUMENT
PRIORITY
START
Page 55

Sending a Fax by Automatic Dialing
53
2. Sending
Documents
2 Enter the number of the receiving
machine by pressing the numeric
keys.
• If a pause is required between any
of the digits to access a special
service or an outside line, press the
REDIAL key (two seconds per
pause). The pause will appear as a
hyphen. Several pauses can be
entered in a row.
3 Check the display. If the number of
the receiving machine shown is
correct, press the START key.
• If it is not correct, press the STOP
key to backspace and clear one
digit at a time, and then re-enter the
correct digit(s).
Searching for an auto-dial number
If you don’t remember the Rapid Key or Speed Dial number in which
you have programmed a particular fax number, you can search for the
number by following the steps below. Once you have found the
number, you can dial it and transmit the loaded document by simply
pressing the START key.
Note: Only names programmed for auto-dial numbers will appear when
you search; the full numbers themselves will not appear. You cannot
search for a number if a name has not been associated with it.
3
2
1
4 4
1 1
(Example)
START
Page 56

Sending a Fax by Automatic Dialing
54
X
SEARCH DIAL
1 Load the document(s).
SEND READY will appear in the
display.
• Set the resolution and/or contrast if
desired.
3 Enter the first letter of the stored
name by pressing the appropriate
letter entry key.
• If you don’t remember the first
letter, go to Step 4 (you will scroll
through the list from the
beginning).
4 Press either arrow key to scroll
through the names. Stop when the
desired name appears in the display.
• If no numbers have been stored
under the entered letter or you have
reached the end of the list, NOT
FOUND will appear.
or
Example: A
A
RESOLUTION
Q
CONTRAST
2 Press the SEARCH DIAL key (flip
up the Rapid Key overlay).
Page 57

Sending a Fax by Automatic Dialing
55
2. Sending
Documents
5 Press the START key. The document
will be automatically transmitted
once the connection is established.
Chain Dialing
An auto-dial number set for Chain Dialing can be combined with
another auto-dial number or digits entered manually with the numeric
keys to dial one phone number up to 50 digits long. The following are
some examples of how this can be done:
♦ Press appropriate Rapid Keys in the proper order. For example,
press Rapid Key 01 (set for Chain Dialing), then Rapid Key 02 (not
set for Chain Dialing).
♦ Press a Rapid Key (set for Chain Dialing) and then manually enter a
number by pressing appropriate numeric keys. Press the START
key after the final numeric key to begin transmission.
Checking the telephone line status
The display normally shows the date and time and prompts related to
operations you are performing. To check and see what number the fax
machine is currently calling or transmitting to, or what number the fax
machine is currently receiving a document from (if this information is
available), press the CHANGEOVER key. Information on the
current call will appear in the display. To switch back to the date and
time display, press the CHANGEOVER key again.
To cancel a fax transmission or reception
To cancel a fax transmission or reception which is currently in
progress, press the CHANGEOVER key so that the status of the
transmission or reception appears in the display, and then press the
STOP key.
START
Page 58

Sending a Fax by Automatic Dialing
56
Automatic redialing
If you use automatic dialing (including Direct Keypad Dialing) and
the line is busy, the fax machine will automatically redial the number.
The fax machine is set at the factory to make 2 redialing attempts at
intervals of 5 minutes.
To stop automatic redialing, press the CHANGEOVER key to show
the telephone line status in the display (make sure that RECALL
MODE appears on the top line of the display and the number of the
receiving party appears on the bottom line to the right), and then press
the STOP key.
If desired, you can change the number of redial attempts with Option
Setting 6, and the interval at which redialing takes place with Option
Setting 7. See Chapter 6, Optional Settings.
♦ Under certain conditions (for example if a person answers the call
on a telephone), automatic redialing may stop before the set number
of redialing attempts are made.
Memory Retransmission
If a line error occurs during any type of memory transmission, your
fax will automatically redial the number and attempt to complete the
transmission. Retransmission will begin from the page which was
being transmitted when the error occurred.
The fax machine has been set at the factory to make 10 attempts at
retransmission, with each attempt made immediately after the
previous attempt. If desired, you can change the number of attempts
by changing Option Setting 17, and have the fax wait a selected
number of minutes between each attempt by changing Option Setting
18. See Chapter 6, Optional Settings.
♦ To stop retransmission, press the CHANGEOVER key to show the
telephone line status in the display (make sure that RETRY MODE
appears on the top line of the display and the number of the receiving party appears on the bottom line to the right), and then press the
STOP key.
Page 59

Sending a Fax by Automatic Dialing
57
2. Sending
Documents
♦ The numbering of pages retransmitted will begin from "1" again.
♦ If an error or power failure occurs during transmission of a cover
sheet, retransmission will not take place.
Checking documents in memory
To display information on documents that are waiting in memory for
transmission, follow the steps below. You can also cancel a
transmission with this procedure.
1 Press the MEM. STATUS key (flip
up the Rapid Key overlay) and then 2.
TX STATUS will appear in the
display.
2 Press the #
##
# key or the * key to scroll
through the list of transmissions. The
name (or number) of each receiving
party will appear in the display,
together with the 3-digit memory
number assigned to the transmission.
To cancel a transmission, press the
CLEAR key and then the START
key while the transmission appears in
the display.
3 When you have finished checking the
list, press the STOP key twice to
return to the date and time display.
Note: To print out a list of the documents waiting in memory for transmission, press the MEM. STATUS key and then the 5 key.
W
MEM.STATUS
2
or
STOP STOP
Page 60

Sending a Fax by Automatic Dialing
58
To cancel a memory transmission
If you know the memory number assigned to a memory transmission,
you can cancel it with the following procedure. (If you don’t know the
memory number, use the preceding procedure.)
1 Press the MEM. STATUS key (flip
up the Rapid Key overlay) and then 4.
The display will show:
2 Enter the 3-digit memory number
assigned to the transmission you want
to cancel.
(Example)
3 Press the START key to cancel the
transmission.
4:MESSAGE CLEAR
ENTER MESSAGE #
W
MEM.STATUS
0
4
1
0
START
Page 61

Cover Sheet
59
2. Sending
Documents
Cover Sheet
You can have the fax machine generate a cover sheet and send it as the
last page of your fax transmission. The cover sheet includes the date
and time, the receiver’s name and number if a Rapid Key or Speed
Dial number is used, the sender’s name and number, and the total
number of pages.
♦ Your name and number must be programmed in order for them to
appear on the cover sheet. (See Entering Your Name and Fax Num-
ber in Chapter 1.)
♦ To have the recipient’s name appear, you must dial using a Rapid
Key or Speed Dial number with the name programmed.
♦ Cover Sheet cannot be selected when you use the Relay Request
function.
1 Load the document(s).
SEND READY will appear in the
display.
(Example)
Page 62

Cover Sheet
60
2 Press the COVER SHEET key.
• The display will briefly show
COVER SHEET MODE
ENTERED and then revert to
SEND READY.
• To cancel the cover sheet selection,
press the STOP key.
3 Dial the receiving party and transmit
the fax.
If desired, you can set your fax to automatically send a cover sheet
with every transmission (you do not have to press the COVER
SHEET key each time). This is accomplished by setting Option
Setting 10 (Auto Cover Sheet) to YES as explained in Chapter 6,
Optional Settings.
Y
COVER SHEET
Page 63

Batch Page Numbering
61
2. Sending
Documents
Batch Page Numbering
You can change the page numbering of the transmitted document from
simple numbering ("P.01", "P.02", etc.) to batch numbering, which
means that a slash and the total number of pages being sent are added
after each page number (for example, "P. 01/05", "P.02/05", etc.). This
allows the receiver to check for missing pages.
1 Load the document(s).
SEND READY will appear in the
display.
2 Press the PAGE COUNTER key.
The display will show:
ENTER # OF PAGE(S)
ENTER # (01-99)
3 Enter the total number of pages (“01”
to “99”) by pressing the numeric
keys.
• If you are sending a cover sheet, do
not include it in the total number of
pages (the number will be adjusted
automatically).
0
8
Example: 8 pages
R
PAGE COUNTER
Page 64

Batch Page Numbering
62
4 Dial the receiving machine and
transmit the document.
Comments:
♦ If you need to cancel a batch number entry, remove the document
from the feeder or press the STOP key.
♦ If the number of pages actually transmitted does not coincide with
the batch number entered, the alarm will sound and PAGE COUNT
ERROR will appear in the display. PAGE E. will also appear in the
NOTE column of the Transaction Report if printed.
Page 65

63
3. Receiving
Documents
3. Receiving Documents
The fax machine has two modes for receiving calls:
AUTO mode:
Select this mode when you only want to receive faxes on the line
connected to the fax machine. The fax machine will answer all calls
automatically and receive incoming faxes.
MANUAL mode:
Select this mode when you have an extension phone connected to the
same line as the fax machine and you want to receive both faxes and
voice calls. All calls, including faxes, must be answered by picking
up the extension phone.
Setting the reception mode
1 Press these keys:
The display will show:
2 Press the 1 key to select AUTO, or
the 2 key to select MANUAL.
FUNCTION
1
1:RECEIVE MODE
1=AUTO, 2=MANUAL
or
AUTO MANUAL
1
2
Page 66

Using AUTO Reception Mode
64
2 If you hear a fax tone, press the
START key on the fax machine.
• If the other party first speaks with
you, press the START key after
speaking. (Press your START key
before the sender presses their Start
key.)
Using MANUAL Reception Mode
1 When the fax machine rings, answer
the call on an extension phone
connected to the same line.
Using AUTO Reception Mode
In AUTO reception mode, the fax machine automatically answers all
calls on one ring and receives incoming faxes.
♦ You can change the number of rings on which the machine answers
calls by changing Option Setting 2. (See Chapter 6, Optional Set-
tings.)
♦ If you pick up an extension phone before the fax machine answers,
you can talk to the other party and/or receive a fax as explained
below in Using MANUAL Reception Mode.
START
3 When RECEIVING appears in the
display, hang up.
Page 67

Substitute Reception to Memory
65
3. Receiving
Documents
1 Press the MEM. STATUS key (flip
up the Rapid Key overlay) and the 3
key.
RX STATUS will appear in the
display.
Substitute Reception to Memory
If the fax machine runs out of paper, toner, or the paper jams,
incoming documents will be automatically stored in memory.
When you have received a document in memory, FAX RCVD IN
MEMORY will appear in the display, alternating with NO PAPER,
REPLACE TONER, or PAPER JAM. When you add paper, replace
the toner cartridge, or clear the jam, the stored documents will
automatically print out.
You can display information on the documents received to memory by
following these steps:
2 Press the #
##
# key or the * key to scroll
through the list of received
documents. The name (or number) of
the sender of each document will
successively appear in the display.
3 When you have finished checking the
list, press the STOP key twice to
return to the date and time display.
W
MEM.STATUS
or
3
STOP
STOP
Page 68

66
4. Making Copies
Your fax machine can also be used to make copies. Single and
multiple copies (up to 99 per original) can be made, enabling the fax
machine to double as an office copier.
♦ You can perform all steps of a copy operation even when the fax
machine is busy printing other copy jobs, or when it is printing a
received document after the line has been disconnected. Your copy
job will be automatically stored in memory and then printed when
all previous printing jobs are completed.
♦ The default resolution for copying is FINE. If desired, you can
change the default resolution to SUPER FINE by changing Option
Setting 32 (see Chapter 6, Optional Settings).
1 Load the document.
• SEND READY will appear in the
display.
• If desired, adjust the resolution and/
or contrast.
2 Press the COPY key.
The display will show:
• If you are only making a single
copy of the original (or of each
original), press the START key.
Copying will begin.
COPY MODE
ENTER #(01-99) 01
RESOLUTION
Q
CONTRAST
COPY
Page 69

Making Copies
67
4. Making
Copies
A
B
C
A
B
C
A
B
C
A
B
C
C
C
C
B
B
B
A
A
A
Originals
Sorted
(SORT COPY)
Not sorted
(MULTI COPY)
3 Enter the desired number of copies
per original with the numeric keys.
• If the desired number of copies is
from 1 to 9, enter “0” first.
• The display will show:
4 Press 1 (MULTI) if you do not want
the copies sorted, or 2 (SORT) if you
want the copies sorted.
• Copying will begin.
MULTI/SORT COPY MODE
1=MULTI, 2=SORT
or
1
2
Example: Three
copies per original
MULTI SORT
Example of three copies
each of three originals
0
3
Page 70

Making Copies
68
Checking copy jobs in memory
You can display the status of copy jobs in memory by following the
steps below. You can also cancel copy jobs with this procedure.
1 Press the MEM. STATUS key (flip
up the Rapid Key overlay) and then
the 1 key.
COPY STATUS will appear in the
display.
2 Press the #
##
# key or the * key to scroll
through the list of copy jobs. The time
the original was scanned into memory
will appear in the display, together
with the 3-digit memory number
assigned to the job. To cancel a copy
job, press the CLEAR key and then
the START key while the copy job
appears in the display.
3 When you have finished checking the
list, press the STOP key twice to
return to the date and time display.
W
MEM.STATUS
or
1
STOP STOP
Page 71

69
5. Special
Functions
5. Special Functions
Broadcasting
The Broadcasting function allows you to send the same document to
multiple locations with just one operation. First load the document,
then enter the numbers of the receiving machines. The document will
be automatically transmitted to each location.
1 Load the document (s).
• SEND READY will appear in the
display.
2 Press the BROADCAST key.
The display will show:
3 Dial the receiving machines using one
or more of the following methods:
• Press one or more Rapid Keys.
• Enter one or more Speed Dial
numbers, pressing the SPEED
DIAL key before each number. (If
you enter less than 2 digits for a
number on the FO-4650, or 3 digits
on the FO-4970, press the START
key to complete the entry.)
BROADCAST MODE
ENTER STATION #
(Example)
1
SPEED DIAL
B
02
COPY DOCUMENT DUPLEX SCAN
BROADCAST
REPORT
PRIORITY
FUNCTION
STOP START
SPEED DIAL
REDIAL
SPEAKER
START
Page 72

Broadcasting
70
• Enter one or more full fax numbers
(max. of 20) with the numeric keys,
pressing the START key after each
full number.
• Press one or more Group Keys.
(See Storing numbers in Group
Keys at the end of this section.)
4 Press the START key.
The display will show:
BROADCAST MODE
SELECT THE MODE
• If desired, adjust the resolution and/
or contrast.
5 Press the START key twice.
Transmission will begin.
• A Transaction Report is
automatically printed out after
Broadcasting is completed. Check
the "Note" column of the report to
see if any of the locations are
marked "Busy" or have a
communication error code. If so,
send the document to those
locations again.
RESOLUTION
Q
CONTRAST
START
START
Page 73

Broadcasting
71
5. Special
Functions
Broadcasting using a Group Key
If the fax machines to which you want to broadcast have all been
programmed into one Group Key (see Storing numbers in Group Keys
which follows), you can perform the broadcasting operation using the
following simplified procedure:
1 Load the document(s).
• SEND READY will appear in the
display.
• If desired, adjust the resolution and/
or contrast
(Example)
2 Press the appropriate Group Key.
Transmission will begin.
.
RESOLUTION
Q
CONTRAST
CLEARSPSHIFTSPACE
A
I
Q
Y
B
J
R
Z
C
K
S
D
L
T
E
M
U
F
N
V
G
O
W
H
P
X
01
09
17
25
02
10
18
26
03
11
19
04
12
20
05
13
21
06
14
22
07
15
23
08
16
24
27 28 29 30 31 32
Page 74

Broadcasting
72
1 Press these keys.
The display will show:
2:GROUP ENTRY MODE
1=SET, 2=CLEAR
2 Press 1 (SET) to program a Group
Key, or 2 (CLEAR) to clear a Group
Key.
or
SET CLEAR
3 Press any Rapid Key not already
programmed to select it as a Group
Key.
If you are clearing a Group Key, press
it and go to Step 5.
(Example)
1
2
Storing numbers in Group Keys
Group Keys allow you to dial a group of fax numbers by simply
pressing the appropriate Group Key once. To store a group of numbers
in a Group Key, follow the steps below.
♦ Any Rapid Key that is not already programmed as a Rapid Key or a
Program Key can be used as a Group Key.
♦ Up to 122 numbers can be stored in one Group Key on the FO-
4650, or 147 numbers on the FO-4970.
♦ Only Rapid Key and Speed Dial numbers (excluding numbers set
for Chain Dialing) can be stored in a Group Key. Full numbers cannot be stored.
CLEARSPSHIFTSPACE
A
I
Q
Y
B
J
R
Z
C
K
S
D
L
T
E
M
U
F
N
V
G
O
W
H
P
X
01
09
17
25
02
10
18
26
03
11
19
04
12
20
05
13
21
06
14
22
07
15
23
08
16
24
27 28 29 30 31 32
7
FUNCTION
2
Page 75

Broadcasting
73
5. Special
Functions
5 Press the START key.
6 Return to Step 3 to program another
Group Key, or press the STOP key
repeatedly until you return to the date
and time display.
Step 3 or
4 Enter fax numbers using one or both
of the following methods:
• Press one or more Rapid Keys.
• Enter one or more Speed Dial
numbers with the numeric keys,
pressing SPEED DIAL before
each number (if you enter less than
2 digits for a number on the FO4650, or 3 digits on the FO-4970,
press START to complete the
entry).
(Example)
1
SPEED DIAL
B
02
START
START
STOP
Editing a group
If necessary, you can add numbers to or delete numbers from a group
by repeating the programming procedure for the Group Key. Press 1
for SET in Step 2 and select the Group Key in Step 3. Add or delete
numbers in Step 4. To add a number, press a Rapid Key or enter a
Speed Dial number. To delete a number, move the cursor to the
number with the UP or DOWN key and then press the CLEAR key.
Page 76

Confidential Operations
74
Confidential Operations
The Confidential function can be used to transmit and receive
confidential documents.
Confidential transmission
When you send a document using the Confidential function, the
receiving machine holds it in memory instead of immediately printing
it out. When the receiving party enters the correct passcode, the
document is printed out.
♦ Confidential transmission is only possible when the receiving
machine is a Sharp model with confidential reception capability.
♦ To use this function, your name and fax number (OWN PASS-
CODE) must be entered in your fax machine as explained in Chapter 1.
♦ Some fax machines have multiple mailboxes for receiving confi-
dential faxes. If you are sending to a machine with multiple confidential mailboxes, contact the receiving party in advance for the
appropriate mailbox number.
1 Load the document (s).
• SEND READY will appear in the
display.
• Set the resolution and/or contrast if
desired.
1:CONF. TX
ENTER BOX # OR START
2 Press the CONFIDENTIAL key and
then 1.
The display will show:
S
CONFIDENTIAL
Q
CONTRAST
RESOLUTION
1
Page 77

Confidential Operations
75
5. Special
Functions
3 If the receiving machine has multiple
confidential mailboxes, enter the
appropriate mailbox number with the
numeric keys (this step is required for
machines with multiple mailboxes).
If the receiving machine doesn’t have
multiple mailboxes, go directly to
Step 4.
4 Press the START key.
5 Dial the receiving machine using one
of the following methods:
• Press a Rapid Key.
• Press the SPEED DIAL key and
enter a Speed Dial number (if you
enter less than 2 digits on the FO4650, or 3 digits on the FO-4970,
press the START key to complete
the entry). Check the name or
number that appears, and then press
the START key.
• Enter a full telephone number with
the numeric keys, and press the
START key.
Transmission will take place once the
connection is established.
(Example)
0
1
SPEED DIAL
1
(Example)
START
START
START
Page 78

Confidential Operations
76
2 Enter a 2-digit number (from "00" to
"99") by pressing the numeric keys.
This number identifies the mailbox.
1 Press the CONFIDENTIAL Key and
then 3.
The display will show:
Confidential reception
When another fax machine sends you a document by confidential
transmission, your fax machine holds it in memory instead of
immediately printing it out. The document cannot be printed out until
you enter the correct passcode.
Your fax has 10 "mailboxes" in which confidential documents can be
received. Each mailbox has its own passcode, allowing up to 10
different people or groups to each receive their own confidential
documents. The mailboxes are identified by 2-digit numbers.
Programming the confidential passcode
To receive a confidential document, you must first program a 2-digit
mailbox number and a 4-digit passcode.
Note: Be sure to inform the transmitting party of your 2-digit mailbox
number in advance. The transmitting party will need this number to send
you confidential faxes.
(Example)
.
3:CONF. CODE SET
ENTER BOX # (00-99)
0
1
S
CONFIDENTIAL
3
Page 79

Confidential Operations
77
5. Special
Functions
3 Enter the 4-digit passcode with the
numeric keys.
4:CONF. CODE CLEAR
ENTER BOX # (00-99)
4 Press the START key.
5 Enter a name for the mailbox by
pressing the letter entry keys (make
sure the Rapid Key overlay is down).
6 Press the START key.
(Example)
0
3
1
2
Example: SHARP
Note: After entering the passcode, your fax will print it out for your
records. If you forget the passcode and have kept no record, contact your
Sharp dealer.
Clearing the passcode
1 Press the CONFIDENTIAL Key and
then 4.
The display will show:
4
S
CONFIDENTIAL
A
S
H
R
P
START
START
Page 80

Confidential Operations
78
2 Enter the 2-digit number that
identifies the mailbox you want to
clear.
3 Enter the 4-digit passcode of the
mailbox with the numeric keys.
(Example)
0
1
(Example)
0
3
1
2
4 Press the START key.
Printing out received documents
When you have received a confidential document, RCVD CONF.
FAX will appear in the display. Print out the Confidential Reception
List as explained in Chapter 7 to see which mailbox has received the
document, and then follow the steps below to print out the document.
1 Press these keys:
The display will show:
2:CONF. DATA PRINT
ENTER BOX # (00-99)
S
CONFIDENTIAL
2
2 Enter your mailbox number.
(Example)
0
1
START
Page 81

Confidential Operations
79
5. Special
Functions
3 Enter your confidential passcode.
(Example)
0
3
1
2
4 Press the START key.
• Printing will begin. After printing,
the document will be erased from
memory.
START
Page 82

Relay Request
80
Relay Request
Relay Request allows you to send a document to another fax machine
and have that fax machine in turn broadcast the document to a group
of other fax machines. This function is useful when the relay fax
machine is closer to the end fax machines than your fax machine, as it
reduces telephone line costs.
Important:
Relay Request can only be used if the intermediate relay machine is a
Sharp machine having the Relay Broadcast function.
Storing a relay group
To make a relay request, you must first store a relay group. This
consists of the fax number of the intermediate relay machine and the
fax numbers of the end receiving machines. Up to 10 different relay
groups can be stored.
♦ Fax numbers of the end receiving machines can be entered as Rapid
Key numbers, Speed Dial numbers, and/or Group Key numbers if
they have been programmed as such in the relay machine (not in
your fax machine). Check with the operator of the relay machine for
these numbers.
♦ The total number of end receiving machines which can be entered
varies with the model used as the intermediate relay machine.
Check with the operator of the relay machine to find out how many
receiving machines can be entered.
♦ A maximum of 400 digit spaces are available in your fax machine’s
memory for storing the numbers of end receiving machines. The
number of spaces occupied by each number depends on what kind
of number it is:
Page 83

Relay Request
81
5. Special
Functions
♦ Only 2-digit Speed Dial numbers for end receiving machines can be
entered in the relay group. If the receiving machine has 3-digit
Speed Dial numbers that you want to enter, ask the operator of the
relay machine to store them in a Group Key, and then enter the
Group Key in the relay group.
1 Press the RELAY key and then 2.
The display will show:
Rapid Key number 4 spaces
Speed Dial number 2 spaces
Group Key number 4 spaces (for one group)
Full number Number of digits in number
(max. of 30 per number)
2:RELAY GROUP SET
ENTER #(01-10)
2 Enter a 2-digit number from “01” to
“10”. This number identifies the relay
group.
3 Press the START key.
U
RELAY
2
(Example)
0
1
START
Page 84

Relay Request
82
6 Press numeric keys (not Rapid Keys)
to enter Rapid Key numbers for the
end receiving machines that are
programmed in the relay machine.
If you don’t want to enter Rapid Key
numbers, go directly to Step 7.
5 Press the START key.
4 Enter the fax number of the relay
machine using one of the following
methods:
• Press a Rapid Key.
• Press the SPEED DIAL key and
enter a Speed Dial number (if you
enter less than 2 digits on the FO4650, or 3 digits on the FO-4970,
press the START key to complete
the entry).
• Enter the full fax number with the
numeric keys.
Example: Rapid
Keys 01 and 33
.
0
1
3
(Example)
SPEED DIAL
1
3
7 Press the START key.
START
START
START
Page 85

Relay Request
83
5. Special
Functions
8 Press numeric keys to enter Speed
Dial numbers (2-digit numbers only)
for the end receiving machines that
are programmed in the relay machine.
If you don’t want to enter Speed Dial
numbers, go directly to Step 9.
9 Press the START key.
10 Press numeric keys (not Group Keys)
to enter Group Key numbers for end
receiving machines that are
programmed in the relay machine.
If you don’t want to enter Group Key
numbers, go directly to Step 11.
Example: Speed Dial
numbers 10 and 23
0
3
1
2
(Example)
11 Press the START key.
12 Enter full fax numbers of the end
receiving machines, pressing the
START key after each fax number.
Include the area code if the number is
outside the local dialing area of the
relay machine.
Example: Group Key 30
0
3
13 When finished, press the START key.
3
2
1
4 4
1 1
START
START
START
START
Page 86

Relay Request
84
14 Return to Step 2 to enter another relay
group, or press STOP repeatedly to
return to the date and time display.
Clearing a relay group
To clear a relay group, you need to know the 2-digit number that
identifies it. You can check the number by printing out the Relay
Group List as explained in Chapter 7.
Step 2 or
1 Press the RELAY key and then 3.
The display will show:
2 Enter the 2-digit number that
identifies the group you want to clear.
3:RELAY GROUP CLEAR
ENTER # (01-10)
3 Press the START key.
0
1
U
RELAY
3
4 Return to Step 2 to clear another relay
group, or press STOP repeatedly to
return to the date and time display.
Step 2 or
(Example)
STOP
START
STOP
Page 87

Relay Request
85
5. Special
Functions
Requesting a relay transmission
Important:
To request a relay transmission, your fax number must be entered into the
Relay Passcode List of the relay fax machine by the operator of that fax
machine. (Your number must also be entered in your fax machine as
explained in Entering Your Name and Fax Number in Chapter 1.)
1 Load the document(s).
SEND READY will appear in the
display.
(Example)
2 Press the RELAY key and then the 1
key.
1:RELAY TX
ENTER # (01-10)
3 Enter the 2-digit number of the relay
group by pressing the numeric keys.
0
1
4 Press the START key.
• Adjust the resolution and contrast if
desired.
5 Press the START key.
1
U
RELAY
Q
CONTRAST
RESOLUTION
START
START
Page 88

Relay Request
86
Relay Broadcast
The fax machine can also act as a relay station. It will receive a
document from a fax machine requesting a relay transmission, and
automatically broadcast it to the stations that the requesting machine
specifies.
To enable a fax machine to request a relay transmission, you must first
enter its fax number in the Relay Passcode List. Follow the steps
below to enter or clear a fax number.
♦ When your fax receives a relay request from another fax machine,
RCVD RELAY REQUEST will appear in the display.
♦ If the telephone billing function is turned on, the fax machine can-
not act as a relay station.
♦ To clear a fax number from the Relay Passcode List, you need to
know the 2-digit number which identifies it. You can check this
number by printing out the Passcode List (see Chapter 7).
1 Press these keys:
The display will show:
4:RELAY PASSCODE
1=SET, 2=CLEAR
U
RELAY
4
6 Press the START key to send the
document through memory, or the
DOCUMENT key to send the
document directly from the feeder.
DOCUMENT
or
START
Page 89

Relay Request
87
5. Special
Functions
3 Entering: Enter a 2-digit number
("01" to "10"). This identifies the fax
number you will enter in the next
step.
Clearing: Enter the 2-digit number
that identifies the fax number you
want to clear, and go to Step 5.
(Example)
0
1
4 Enter the fax number of the machine
to be added to the list (max. 20
digits).
5 Press the START key.
6 Return to Step 3 to enter or clear
another number, or press the STOP
key repeatedly to return to the date
and time display.
(Example)
3
2
1
4 4
1 1
Step 3 or
START
STOP
2 Press 1 to enter a number, or 2 to clear
a number.
or
SET CLEAR
1
2
Page 90

Polling
88
Polling
Polling allows you to call another fax machine and have it send a
document to your machine without operator assistance. In other
words, the receiving fax machine, not the transmitting fax machine,
initiates the transmission. You can use your fax machine to both poll
and be polled by others.
Polling others
To poll another fax machine, follow the steps below.
♦ If desired, you can dial more than one fax number to receive docu-
ments consecutively from a group of fax machines (this is called
"Serial Polling").
1 Press the FUNCTION key and 8.
The display will show:
2 Dial the number(s) of the fax
machine(s) you want to poll using one
(or more) of the following methods:
• Press one or more Rapid Keys.
• Enter one or more Speed Dial
numbers, pressing the SPEED
DIAL key before each number. (If
you enter less than 2 digits on the
FO-4650, or 3 digits on the FO4970, press the START key to
complete the entry.)
• Press one or more Group Keys.
8:SERIAL POLL. MODE
ENTER STATION #
1
8
FUNCTION
SPEED DIAL
(Example)
START
Page 91

Polling
89
5. Special
Functions
• Enter one or more full fax numbers
with the numeric keys, pressing the
START key after each full number.
3 Press the START key. Reception will
begin.
Serial Polling using a Group Key
If the fax machines you want to poll have all been programmed into
one Group Key, you can poll them by simply pressing that Group Key.
(The procedure for programming Group Keys is explained in
Broadcasting in this chapter.)
♦ Make sure no documents are in the feeder before you press the
Group Key.
Being polled (Memory polling)
To let another fax machine poll your fax machine, you must first store
the document(s) in memory using the following procedure.
Transmission will take place when the other fax machine calls your
fax machine and activates polling. You can choose whether to allow
polling only once, or an unlimited number of times. In the latter case,
your fax machine can be used as an electronic "bulletin board".
♦ Multiple documents can be stored for memory polling. To add a
document to others already stored, simply repeating the storing procedure (note that if Department Control is activated, documents
cannot be added by a department other than that which stored the
first document). When polling is initiated, the polling machine will
receive all documents stored.
♦ If you allow polling only once, the document(s) will be automati-
cally cleared from memory after polling. If you allow polling an
unlimited number of times, the document will remain in memory
until you clear it as explained in the following section, Clearing a
document.
START
Page 92

Polling
90
4 Press 1 to select SET.
• If another document has already
been stored, press 1 to select
APPEND, and go to Step 6.
3 Press these keys:
The display will show:
1 Load the document.
.
9:MEMORY POLL MODE
ENTER #(1-2,*,#)
1
2 Set the reception mode to AUTO
(press the FUNCTION key, 1 and 1).
FUNCTION
1 1
9
FUNCTION
5 Press 1 to allow polling only once, or
2 to allow polling an unlimited
number of times.
or
1 TIME REPEAT
1
2
7 Press the START key.
• The document will be scanned into
memory, and your fax will go on
polling standby.
START
6 Adjust the resolution and or contrast
if desired, and then press the START
key.
RESOLUTION
Q
CONTRAST
START
Page 93

Polling
91
5. Special
Functions
Clearing a document
To clear a memory poll document (or documents) from memory,
follow the steps below:
1 Press these keys:
The display will show:
2 Press 2 to select CLEAR.
3 Press START to clear the documents.
2
Polling Security
Polling Security allows you to prevent unauthorized polling of your
fax. When this function is activated, polling will only take place when
one of the following conditions is met:
♦ The fax number of the polling fax machine has been stored in your
fax’s list of permitted fax numbers (called "passcode numbers").
The polling fax must also have its fax number programmed in itself,
as described in Entering Your Name and Fax Number in Chapter 1.
♦ A System number has been programmed in the polling fax machine
which matches your fax’s System number or one of your ID numbers.
♦ An ID number has been programmed in the polling fax machine
which matches your fax’s System number.
9
FUNCTION
9:MEMORY POLL MODE
ENTER #(1-2,*,#)
START
Page 94

Polling
92
System and ID numbers are 4-digit numbers which provide you with
an alternate means of giving and receiving polling permission when
you don’t want to use fax numbers. The steps for programming these
numbers are described in the following pages.
Note: System and ID numbers can only be used if the other fax machine
is also a Sharp machine.
Turning Polling Security on and off
Polling Security is turned on or off with Option Setting 8. This
procedure is explained in Chapter 6, Optional Settings.
Storing and clearing fax numbers for polling permission
You can store up to 10 fax numbers in your fax’s list of permitted
numbers.
1 Press these keys:
The display will show:
2 Press 1 to set a number, or 2 to clear a
number..
3 Storing: Enter a 2-digit number
(from 01 to 10).This number
identifies the fax number you will
enter in the next step.
Clearing: Enter the 2-digit number
which identifies the fax number you
want to clear, and go to Step 5.
2:PASSCODE # MODE
1=SET, 2=CLEAR
(Example)
0
1
or
SET CLEAR
1
2
FUNCTION
3
2
Page 95

Polling
93
5. Special
Functions
Programming and clearing a System number
One 4-digit System number can be programmed in your fax machine
for giving and receiving polling permission. Polling will take place if
your System number matches the other fax machine’s System number
or one of its ID numbers.
1 Press these keys:
The display will show:
7
4 Enter the fax number (max. 20 digits)
by pressing the numeric keys.
(Example)
5 Press the START key.
3
2
1
4 4
1 1
6 Return to Step 3 to enter (or clear)
another number, or press STOP
repeatedly to return to the date and
time display.
Step 3 or
7:SYSTEM # MODE
1=SET, 2=CLEAR
FUNCTION
3
2 Press 1 to program the System
number, or 2 to clear it.
• If you pressed 2, go to Step 4.
or
SET CLEAR
1
2
START
STOP
Page 96

Polling
94
3 Enter the number (4 digits) with the
numeric keys.
4 Press the START key.
5 Press the STOP key repeatedly to
return to the date and time display.
(Example)
0
3
1
4
Storing and clearing ID numbers for polling permission
Up to five 4-digit ID numbers can be programmed in your fax
machine for giving and receiving polling permission. Polling will take
place if one of your ID numbers matches the other fax machine’s
System number.
1 Press these keys:
The display will show:
6:ID # MODE
1=SET, 2=CLEAR
FUNCTION
3
2 Press 1 to program an ID number, or 2
to clear an ID number.
or
SET CLEAR
1
2
6
START
STOP
Page 97

Polling
95
5. Special
Functions
3 Storing: Enter a number from 1 to 5.
This number identifies the ID number
you will enter in the next step.
Clearing: Enter the number which
identifies the ID number you want to
clear, and go to Step 5.
(Example)
1
4 Enter the ID number (4 digits) by
pressing the numeric keys.
(Example)
0
3
1
4
5 Press the START key.
6 Return to Step 3 to enter (or clear)
another number, or press STOP
repeatedly to return to the date and
time display.
Step 3 or
START
STOP
Page 98

Power Save Mode
96
Power Save Mode
Power Save Mode allows you to conserve power by turning off the
laser printer heater in the fax machine. While Power Save Mode is on,
the laser printer heater remains off and incoming faxes are received to
memory. When Power Save Mode is turned off, the printer heater
turns on and the faxes received to memory are printed out.
♦ Power Save Mode can be turned on and off manually by pressing
the POWER SAVE key.
♦ If desired, you can also set Power Save Mode to turn on and off
automatically at specified times of the day, on specified days of the
week, and on specified dates during the year.
Note: If the memory becomes full while Power Save Mode is on, the fax
machine will automatically turn on the laser printer, print the faxes
received to memory, and then return to Power Save Mode.
Note: Power Save Mode cannot be turned on when the Print Hold function is on.
Selecting the Power Save Type
Before turning on Power Save Mode, you will need to select the
method by which it is turned on and off. There are two selections:
REAL TIME, which means that you turn Power Save Mode on and
off by simply pressing the POWER SAVE key, and TIMER, which
means that Power Save Mode turns on and off automatically at preset
times.
♦ The initial setting is REAL TIME.
1 Press these keys:
The display will show:
4:OPTIONAL SETTING
ENTER #(01-34,*,#)
4
FUNCTION
Page 99

Power Save Mode
97
5. Special
Functions
2 Enter 34 by pressing the numeric
keys.
The display will show:
3 Press 1 to select REAL TIME, or 2 to
select TIMER.
34:POWER SAVE TYPE
1=REAL TIME, 2=TIMER
or
REAL TIME TIMER
2
1
4
3
4 Press the STOP key twice to return to
the date and time display.
Turning on Power Save Mode when REAL TIME is selected
To turn on Power Save Mode when REAL TIME is selected, simply
press the POWER SAVE key. POWER SAVE MODE will appear in
the display.
POWER SAVE MODE
ON
To turn off Power Save Mode, press the POWER SAVE key once
again. POWER SAVE MODE OFF will appear briefly, followed by
the normal date and time display.
POWER SAVE
STOP STOP
POWER SAVE MODE
Note: Power Save Type cannot be
selected if Power Save Mode is on.
To turn off Power Save Mode, simply press the Power Save key once.
Page 100

Power Save Mode
98
Turning on Power Save Mode when TIMER is selected
When TIMER is selected, Power Save Mode turns on and off
automatically at the times you specify. Follow the steps below to set
the on and off times.
1 Press the POWER SAVE key.
The display will show:
2 Press 2 to select SET.
• Note: If you have already entered
the timer settings and simply wish
to turn on the timer, press 1
(TIMER ON).
POWER SAVE MODE
1=TIMER ON, 2=SET
2
3 Enter the time you want Power Save
Mode to turn on every day (START
TIME). Enter two digits for the hour
(01 to 12) and two digits for the
minute (00 to 59). When finished,
enter * for A.M. or # for P.M.
0
5
0 0
Example: 5:00 P.M.
POWER SAVE
 Loading...