

Page 1

Table of Contents
Part I:
Printing, Faxing, and Copying with the Colour MFP
Introduction . . . . . . . . . . . . . . . . . . . . . . . . . . . . . . . . . . . . . i
Using Print Ca rtridges. . . . . . . . . . . . . . . . . . . . . . . . . . . 1-1
Sending Paper Faxes From the Sharp MFP . . . . . . . . . 2-1
Receiving Documents . . . . . . . . . . . . . . . . . . . . . . . . . . . 3-1
Printing With the Sharp Colour MFP . . . . . . . . . . . . . . . 4-1
Making Copies . . . . . . . . . . . . . . . . . . . . . . . . . . . . . . . . . 5-1
Using as a Telephone
and Connecting an Answering Machine . . . . . . . . . . . . 6-1
Special Fax Functions. . . . . . . . . . . . . . . . . . . . . . . . . . . 7-1
Option Settings . . . . . . . . . . . . . . . . . . . . . . . . . . . . . . . . 8-1
Printing List s and Reports . . . . . . . . . . . . . . . . . . . . . . . 9-1
Maintenance . . . . . . . . . . . . . . . . . . . . . . . . . . . . . . . . . . 10-1
Troubleshooting. . . . . . . . . . . . . . . . . . . . . . . . . . . . . . . 11-1
Setup Guide . . . . . . . . . . . . . . . . . . . . . . . . . . . . . . . . . . 12-1
Index to Part I . . . . . . . . . . . . . . . . . . . . . . . . . . . . . . Index-1
Page 2

Part II:
Using the Sharp Multifunction Interface for
Windows
Introduction . . . . . . . . . . . . . . . . . . . . . . . . . . . . . . . . . . 1-1
Software Setup . . . . . . . . . . . . . . . . . . . . . . . . . . . . . . . 2-1
Windows Messaging . . . . . . . . . . . . . . . . . . . . . . . . . . . 3-1
Copying Paper Documents. . . . . . . . . . . . . . . . . . . . . . 4-1
Scanning Documents . . . . . . . . . . . . . . . . . . . . . . . . . . 5-1
Fax/Image E-mail Application. . . . . . . . . . . . . . . . . . . . 6-1
Sharp Message Center . . . . . . . . . . . . . . . . . . . . . . . . . 7-1
Address Book. . . . . . . . . . . . . . . . . . . . . . . . . . . . . . . . . 8-1
Viewing Documents. . . . . . . . . . . . . . . . . . . . . . . . . . . . 9-1
Optical Character Recognition. . . . . . . . . . . . . . . . . . 10-1
®
95
Annotating Documents . . . . . . . . . . . . . . . . . . . . . . . . 11-1
Entering and Changing Colour MFP Settings from
Your Computer. . . . . . . . . . . . . . . . . . . . . . . . . . . . . . . 12-1
Index to Part II . . . . . . . . . . . . . . . . . . . . . . . . . . . . Index-1
Page 3

Introduction
Introduction . . . . . . . . . . . . . . . . . . . . . . . . . . . . . . . . . . . . . . . ii
Specifica tio ns. . . . . . . . . . . . . . . . . . . . . . . . . . . . . . . . . . . . . . iii
Important safety inf ormati on. . . . . . . . . . . . . . . . . . . . . . . . . vii
A Look at the Operation Panel . . . . . . . . . . . . . . . . . . . . . . . . x
i
Page 4

Introduction
Welcome to the Sharp Colour MFP! Colour printin g and monochrome
faxing, copyi ng, and sc annin g—t he Col our MFP does it all.
What would you like to
do? For instructions,
just click on a topic.
•
Print from a softwa re application
• Send a paper fax from the Colour MFP
• Send a fax directly from your computer
• Fax to an E-mail address
• Set up fax rec eption
• Mak e a copy
• Scan a document or picture
• Use as a telephone
For a more detailed list of the to pics i n this manu al, go to the
Table of C ont en ts.
ii
Page 5

Specifications
Printing specifications
Print cartrid ge s Colour: Sharp FO-25CC
Black: Sharp FO-21BC
Print resolution High: 600 x 600 dpi (both colour and black)
Normal: 300 x 300 dpi
Print speed Colour: 1 page per minute
Black: Up to 3 pages per minute
Paper types Index cards, envelopes, labels, transparen-
cies, glossy film, greeting cards, iron-on
transfers, plain, coated, and glossy paper.
Paper margins Left/right: 3.4 mm (A4 paper)
Top: 5.5 mm
Bottom: 20.6 mm
Fax specifications
Automatic dialling Rapid Key Dialling: 38 numbers
Speed Dialling: 61 numbers
Memory size* : 512 KB (approx. 42 average pages in recep-
tion mode, 32 pages in transmission mode)
Automatic document
feeder
Modem speed 14400 bps with automatic fallback to 12000,
Transmission time* Approx. 6 seconds (Sharp special mode)
Display 16-digit LCD display
Reception modes FAX, TEL, TEL/FAX, ANS.
* Based on ITU-T Test Chart #1 at standard resolution in Sharp
special mode, excluding time for protocol signals (i.e., ITU-T phase C
time only).
Note: The Sharp Colour MFP is Year 2000 compliant.
20 sheets max.
9600, 7200, 4800, or 2400 bps
iii
Page 6

Specifications
Resolution Horizontal:
8 lines/mm
Vertical:
Standard: 3.85 lines/mm
Fine/Halftone: 7.7 lines/mm
Super fine (transmission only):
15.4 lines/mm
Halftone (greyscale) 64 levels
Applicable telephone line Public switche d tel e ph on e net wor k
Compatibility ITU-T (CCITT) G3 mode
Configuration Half-duplex, desktop transceiver
Compression scheme MH, MR, MMR
Scanning method Sheet-feeder CIS (Contact Image Sensor)
Effective printing width 203 mm max.
Paper margins Top: 5.5 mm
Bottom: 23.7 mm
Input document size Automatic feeding:
Width: 148 to 216 mm
Length: 140 to 297 mm
Manual feeding:
Width: 148 to 216 mm
Length: 140 to 1000 mm
Effective scanning width 210 mm max.
Contrast control Automatic/Dark selectable
Note: The Sharp Colour MFP is not able to send or receive colour
faxes.
iv
Page 7

Copying specifications
Resolution 300 dpi
Multiple copies Up to 99 (monochrome copying only)
Specifications
Copy reduction/
enlargement
Monochrome: 50%, 75%, 120%, 150%
Colour: 50%, 70%, 80%, 90%, 200%
PC scanning specifications
Resolution Enhanced 600 dpi
Scanning modes Colour/monochrome/greyscale (64 levels)
General specifications
Power requirements 230-240 V AC, 50 Hz
Operating temperature 10 to 35°C
Operating humidity 30 - 80%RH
Power consumption Stand-by: 7.0 W
Maximum: 40 W
Dimensions Width: 406 mm
Depth: 306 mm
Height: 255 mm
(Without attachments)
Weight Approx. 5.9 kg
(Without attachments)
As a part of our policy of continuous improvement, SHARP reserves the
right to make design and specification changes for product improvement
without prior notice. The performance specification figures indicated are
nominal values of production units. There may be some deviations from
these values in individual units.
v
Page 8

Specifications
Important:
This facsimile machine is not designed for use on a line which has
•
call waiting, call forwarding, or certain other special services offered
by your telephone company. If you attempt to use the fax machine on
a telephone line using any of these services, you may experience
errors during transmission and reception of facsimile messages.
This facsimile machine is not compatible with digital telephone
•
systems.
This facsimile machine is designed to operate in Australia and New
•
Zealand only.
vi
Page 9

Important safety information
• For your safety, if any of your equipment is not operating properly or
should any physical damage occur to the equipment where internal parts
may become exposed, the equipment should be immediately disconnected from the phone line and then the power line and returned to a
SHARP authorised Servi ce Cent r e for inspectio n, repair, or disposal.
• In Australia, in stalling o r modifyi ng telepho ne lines shoul d onl y be don e
by an ACA licensed serviceman. In New Zealand, installing or modifying
telephone lines should be done in accordance with Telecom wiring
practices.
• Do not disassemble this machi ne or attempt any procedures not described
in this manual. Refer all servicin g to qu alified service personnel.
• This machine must only be connected to a 230-240 V, 50 Hz, grounded
(3-prong) outlet. Connecting it to any other kind of outlet may damage
the machine.
• Do not install or use the machine n e ar wat er, or when you a re wet . T ake
care not to spill any liquids on the machine.
• Unplug the machine from the telephon e socket and then the po wer out let
and consult a qualified service representative if any of the following
situations occur:
- Liquid has been spilled i nto the machine or the machine has b een
exposed to rain or water.
- The machine produces odors, smoke, or unusual noises.
- The power cord is frayed or damaged.
- The machine has been dropped or the housing damaged.
• Do not allow anything to rest on the power cord, and do not install the
machine where people may walk on the power cord.
vii
Page 10

Important Safety Information
• Never insert objects of any kind into slots or openings on the machine.
This could create a risk of fire or electric shock. If an object falls int o the
machine that yo u cannot safely remove, unplug the machine and consult
a qualified service representative.
• Do not place this machine on an unstable ca rt, stand or table. The machine
could be seriously damaged if it falls.
• Never install telephone wiri ng duri ng a lig htn ing storm .
• Never install telephone sockets in wet locations unless the socket is
specifically designed for wet locations .
• Never touch uninsulated telephone wires or terminals unless the tele-
phone line has been disconnected at the network interface.
• Use caution when installing or modifying telephone lines.
• Avoid using a telephone (other than a cordless type ) during an electrical
storm. There may be a remote risk of electric shock from lightning .
• Do not use a telephone to report a gas leak in the vicinity of the leak.
• The socket-outlet must be installed near the equipment and must be easily
accessible.
• To make emergency calls, any other calls in progress must first be
released.
viii
Page 11

Important Safety Information
WARNING NOTICE:
NO calls can be made to or from this fax during a mains power failure.
WARNING Australian Communications Authority (ACA)
regulations state that no unauthori sed ch anges or modi ficati ons t o thi s
equipment are permitted.
Note: Complies with ACA and NZ TELECOM stan da rd AS/NZS3 548
regarding emission of electromagnetic interference.
These limits are designed to provid e reasonabl e protectio n against
interference in an installation. This equipment generates, uses and can
radiate radio frequency energy and, if not ins tall ed and used in
accordance with the instructions, may cause interference. However,
there is no guarantee that interference will not occur in a particular
installati on.
If this equipment does cause interference to radio or television
reception, which can be determined by turning the equip ment off and
on, the user is encouraged to try to correct the interference by one or
more of the following measures:
Reorient or relocate the receiving antenna.
Increase the separation between the equipment and the receiver.
Connect the equipment to an outlet on a different circuit to that
which the receiver is connected.
Consult the dealer or an experienced radio/TV technician for help.
For Australia: The Ringer Eq uiv alence Number (R EN) for this
equipment is written on t he back of th e machine.
The sum of all the Ringer Equivalence Numbers (REN’s) on your
telephone line should not exceed 3 to assure correct service from your
telephone company.
ix
Page 12
A Look at the Operation Panel
TEL
FAX
TEL/FAX
ANS.
SPEED DIAL key
1
Press this key to dial a 2-digit Speed Dial number.
2
REDIAL key
Press this key to automatically redial the last number dialled.
VOLUME keys
3
Press these keys to adjust the volume of the speaker when the
SPEAKER key has been pressed, or the volume of the ringer at all
other times.
Display
4
This displays m essa ge s an d pr om p ts du ri n g op er at io n an d
programming.
x
Page 13

A Look at the Operation Panel
COLOUR CARTRIDGE light
5
This lights when a colour print cartridge is installed. Faxes are received
to memory when this light is on.
6
LINE IN USE light
This lights while the Sharp Colour MFP is using the telephone line.
PRINTER key
7
Press this key to eject paper from the machine, or reset the machine
after clearing a paper jam or other printer error.
8
CARTRIDGE key
Press this key to change a print cartridge or install a new print cartridge.
Number keys
9
Use these keys to dial numbers, and enter numbers and letters during
number/nam e st o rin g pr oc ed ur es.
10
SPEAKER key
Press this key to hear the line and fax tones through the speaker before
sending a document, or dialling a voice number.
Note: This is not a speakerphone. You must pick up the handset to
talk with the other party.
11
HOLD/SEARCH key
Press this key to search for an automatic dialling number, or, during a
phone conversation, press this key to put the other party on hold.
12
RECEPTION MODE key
Press this key to select the reception mode. An arrow in the display
will point to the currently selected reception mode.
13
COPY/HELP key
When a document is in the feeder, press this key to make a copy. At
any other time, press this key to print out the Help List, a quick
reference guide to the operation of your fax.
14
START key
Press this key to send or receive a document manually when off hook.
xi
Page 14

A Look at the Operation Panel
15
PANEL RELEASE
Pull this release up to open the operation panel.
16
STOP key
Press this key to stop operations before they are completed.
17
RESOLUTION key
Press this key to adjust the resolution and contrast before sending or
copying a docu m en t.
18
MEMORY key
Press this key to scan a document into memory before transmitting it.
19
FUNCTION key
Press this key to select various special functions.
20
Rapid Dial Keys
Press one of these keys to dial a fax or voice number automatically. To
dial the bottom number on a Rapid Key, press the SHIFT key before
pressing the Rapid Key. (Note that you must attach the Rapid Key
labels.)
xii
Page 15

Using Print Cartridges
Using Print Cartridges . . . . . . . . . . . . . . . . . . . . . . . . . . . . . . 1-2
Repla ce men t print cart ridg e s . . . . . . . . . . . . . . . . . . . . . . . . . . . . 1-2
Monitorin g the ink level. . . . . . . . . . . . . . . . . . . . . . . . . . . . . . . . . 1-2
Changing Print Cartrid ges. . . . . . . . . . . . . . . . . . . . . . . . . . . 1-3
Changin g a cart ridg e with the CARTRI DGE key . . . . . . . . . . . . . 1-3
Changin g a cartridg e from th e Colo u r MFP Prin ter Ma na ger. . . . 1-9
Aligning the Printhead. . . . . . . . . . . . . . . . . . . . . . . . . . . . . 1-14
Checkin g alig n men t with the pan el keys . . . . . . . . . . . . . . . . . . 1-14
Alignin g the prin t hea d from Prin ter Man ag er . . . . . . . . . . . . . . . 1-16
Selecting Black Print Quality for Faxes . . . . . . . . . . . . . . . 1-18
Maintaini ng Print Cartridge s . . . . . . . . . . . . . . . . . . . . . . . . 1-19
Disposin g of use d print cart ridg e s . . . . . . . . . . . . . . . . . . . . . . . 1-19
Cleaning Print Cartri dges . . . . . . . . . . . . . . . . . . . . . . . . . . 1-20
Cleaning the print nozzle s . . . . . . . . . . . . . . . . . . . . . . . . . . . . . 1-20
Cleaning the print nozzle s with th e panel ke ys. . . . . . . . . . . . . . 1-20
Cleaning the print nozzle s fro m Print e r Ma nag er. . . . . . . . . . . . 1-21
Checkin g the test patte rn . . . . . . . . . . . . . . . . . . . . . . . . . . . . . . 1-21
Wiping the pri n t no z z le s . . . . . . . . . . . . . . . . . . . . . . . . . . . . . . . 1-23
Cleaning th e print cart ridge carrier conta cts. . . . . . . . . . . . . . . . 1-25
1-1
Page 16
Using print cartridges
Using Print Cartridges
Y our Sharp Colour MFP can use either a colour print cartridge or a
black print cartridge.
W e recommend that you keep a black cartridge installed for normal
use, and change to a colour cartridge only when you need to print a
colour job.
Note:
If you receive a fax when a colour print cartridge is installed, the
fax will be held in memory and printed out when a black cartridge
is installed.
Replacement print cartridges
When the display of the Sharp Colour MFP shows the following
alternating messages, the print cartridge is low on ink and must be
replaced.
LOW INK!
CHANGE CARTRIDGE
Use the following replacement print cartridges, which are available
from your dealer or retailer .
Colour: Sharp FO-25CC
Black: Sharp FO-21BC
Monitoring the ink level
From the Colour MFP Printer Manager, click the Status or the
Cartridges tab. The ink cartridge image shows the amount of ink
remaining in the cartridge.
1-2
Page 17
Using print cartridges
Changing Print Cartridges
T o change or replace a print cartridge, you can use either the
Colour MFP Printer Manager on your computer or the CAR-
TRIDGE key on the Sharp Colour MFP .
Important!
T o change a print cartridge, you must first move it to the centre of
the compartment using the CARTRIDGE key or the Colour MFP
Printer Manager. Moving the cartridge by hand may damage the
machine.
Note:
Do not replace a print cartridge when there are print jobs
waiting to be printed.
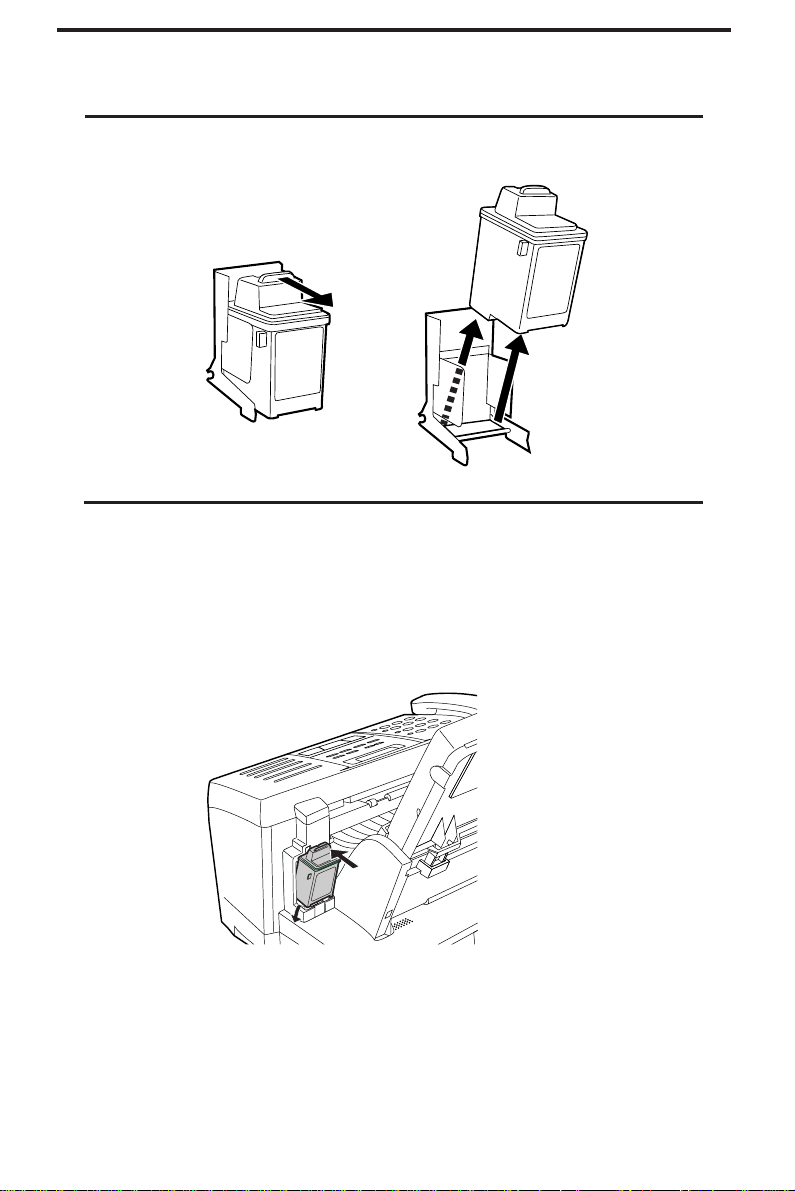
Changing a cartridge with the CARTRIDGE key
1
Press the CARTRIDGE key .
Important:
When you press the CARTRIDGE key , the print cartridge moves
to the centre of the compartment. It will dry out if left in this
position, so complete the replacement procedure promptly.
1-3
Page 18
Using print cartridges
2
Open the front cover of the Sharp Colour MFP.
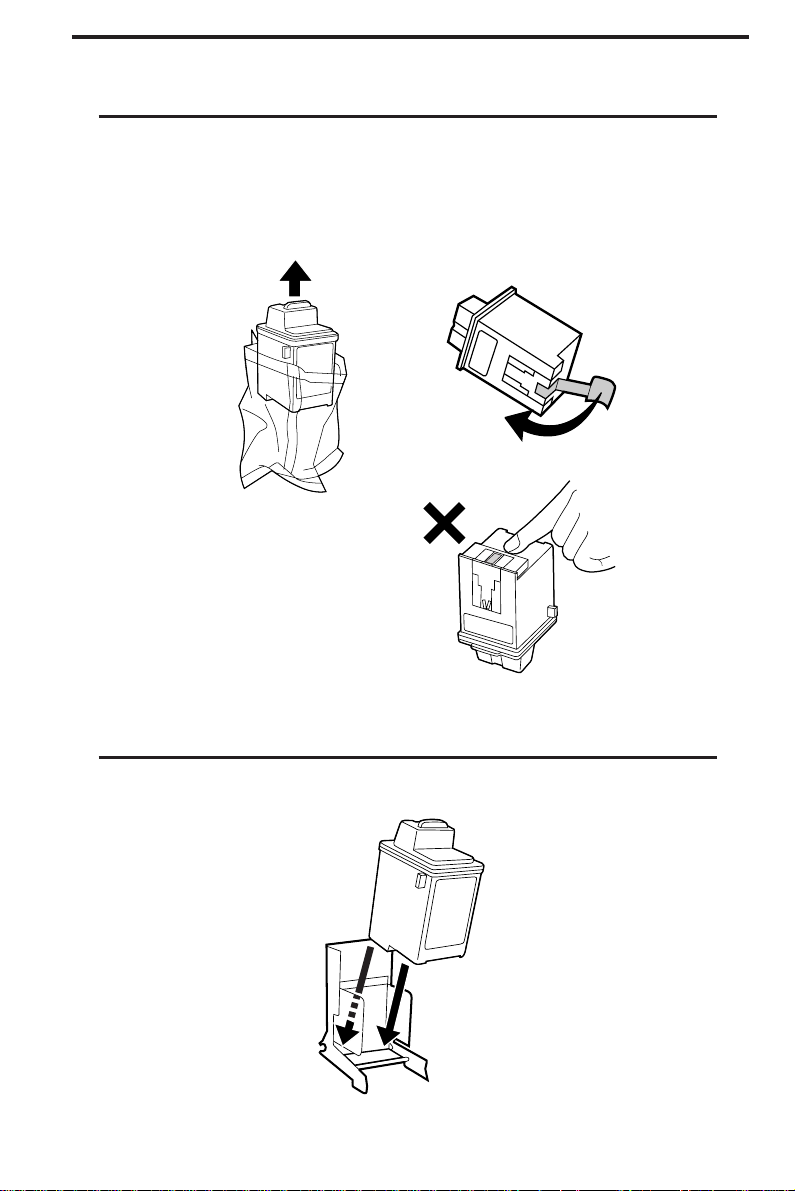
3
Pull the knob of the currently installed print cartridge toward you
until you hear a click. Remove the cartridge.
1-4
4
If the print cartridge just removed is still useable, insert it into the
cartridge holder on the back of the machine. Push back on the
cartridge until it clicks into place.
• To prevent the used print cartridge from drying out, be sure to
store it in the cartridge holder on the back of the machine.
Page 19
Using print cartridges
5
If you are installing a new print cartridge, remove it from its
packaging. Gently remove the sticker and transparent tape covering
the copper printhead.
Do not touch the copper-coloured area!
6
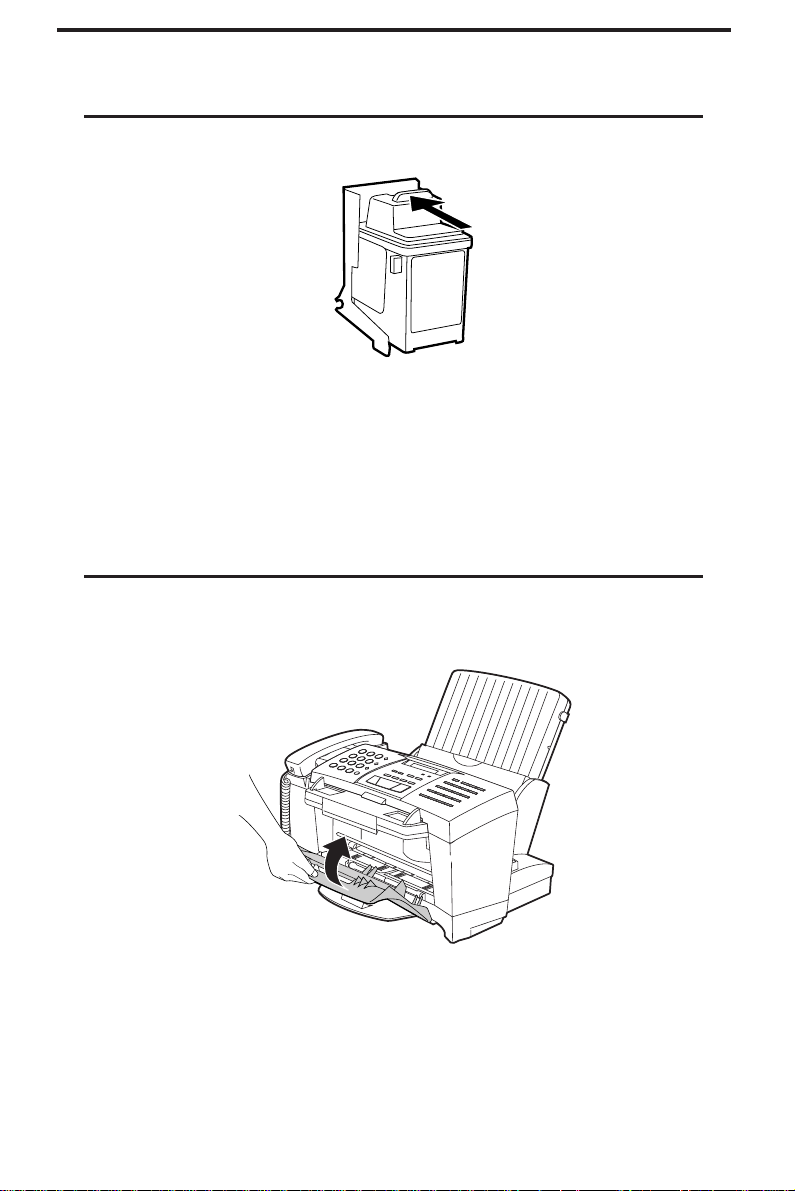
Insert the print cartridge into the cartridge carrier.
1-5
Page 20
Using print cartridges
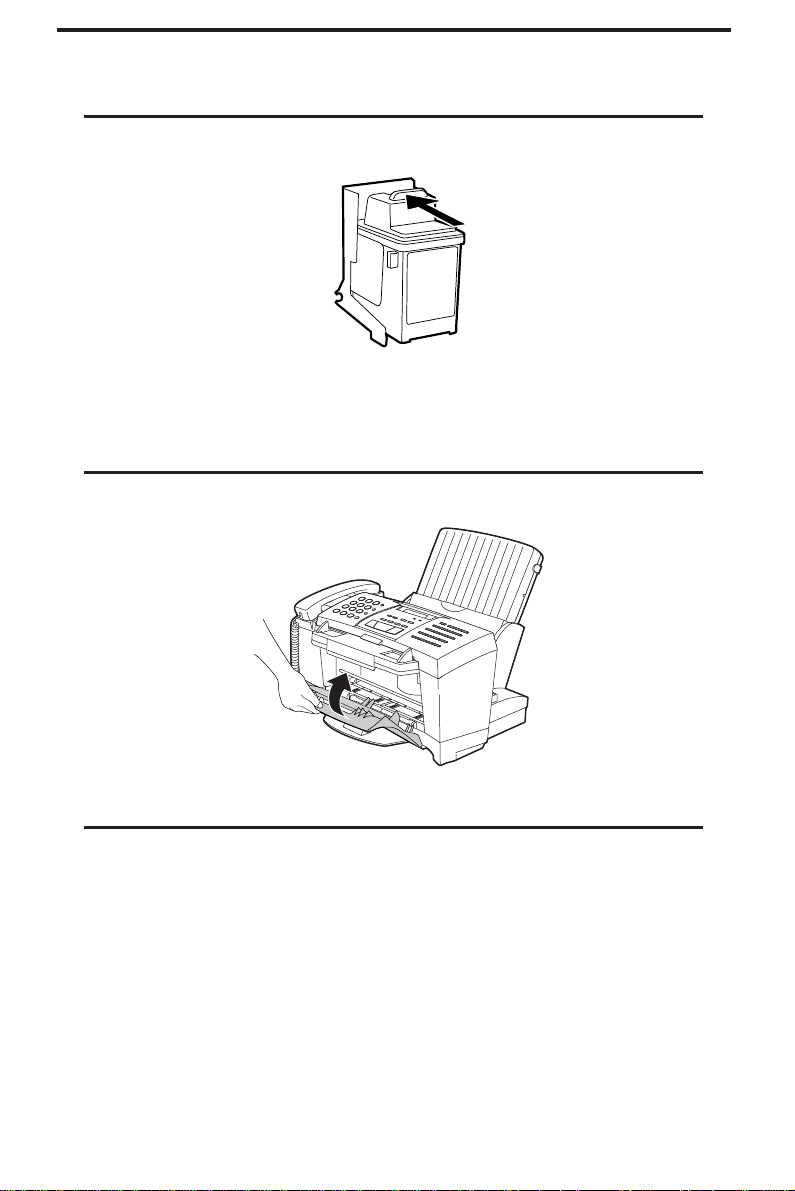
7
Push back on the cartridge until it clicks into place.
Note:
If the print cartridge moves loosely in the carrier, it is not locked
into place. Repeat this step.
Close the front cover.
8
1-6
Page 21
Using print cartridges
9
Press a number key to set the type of cartridge you installed:
Old black cartridge
Old colour cartridge
New black cartridge
New colour cartridge
• Be sure to press the correct key. Otherwise, out-of-ink detection
will not operate properly .
• The cartridge will return to its home position. If you installed a
new print cartridge, the Sharp MFP will print a test page for
printhead alignment.
• If you installed an old print cartridge, this completes the installa-
tion procedure.
10
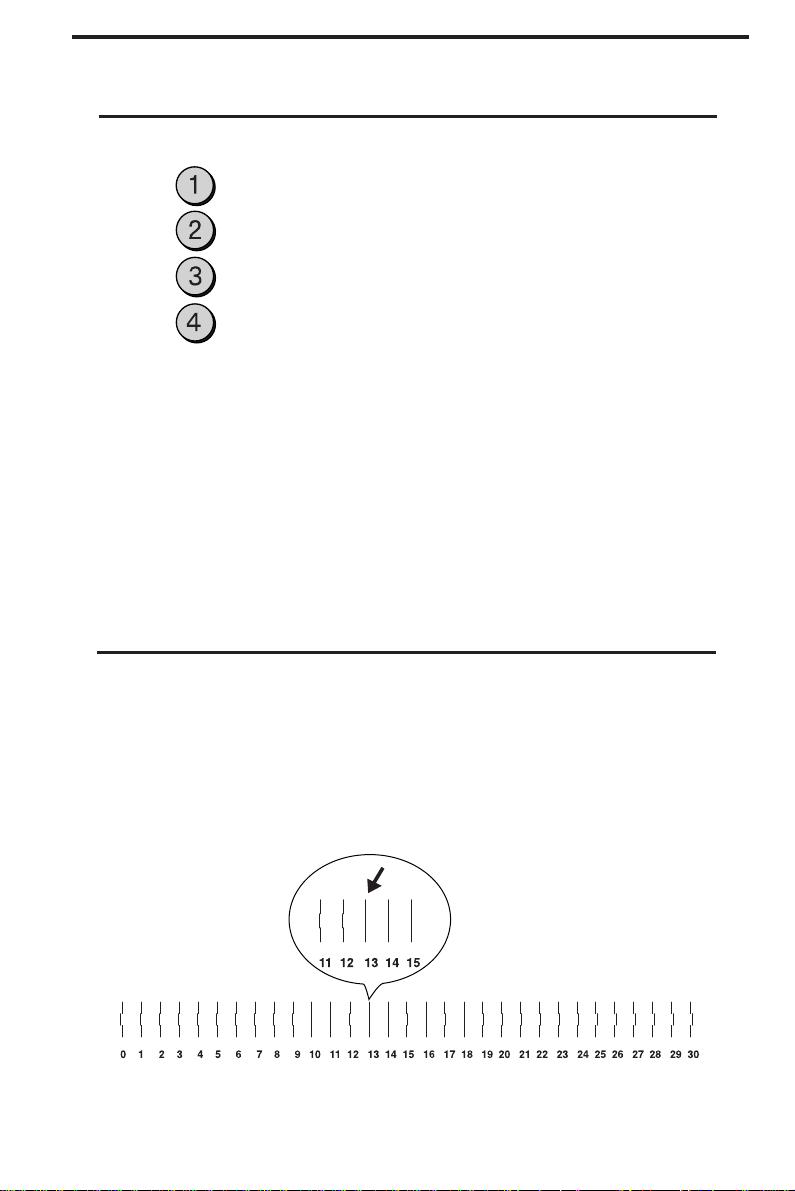
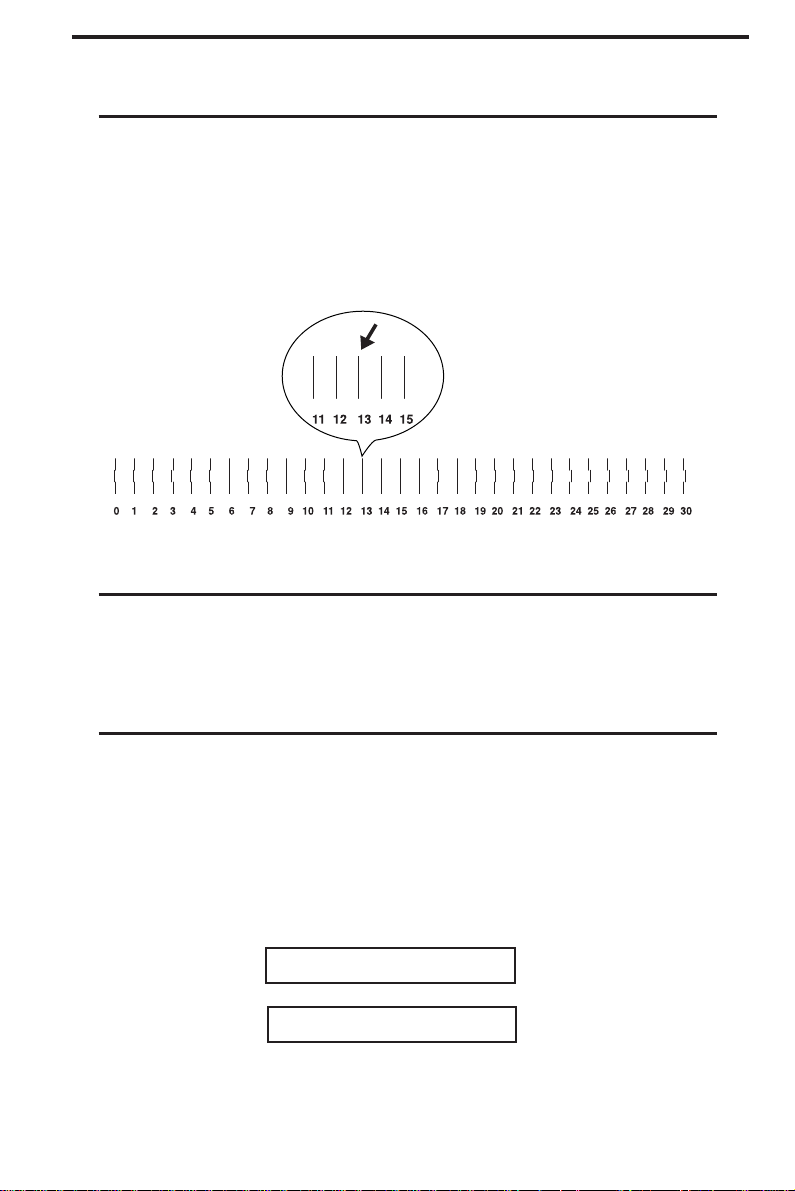
If you installed a new print cartridge, look at the test page and
locate the line that comes closest to forming a perfectly straight line.
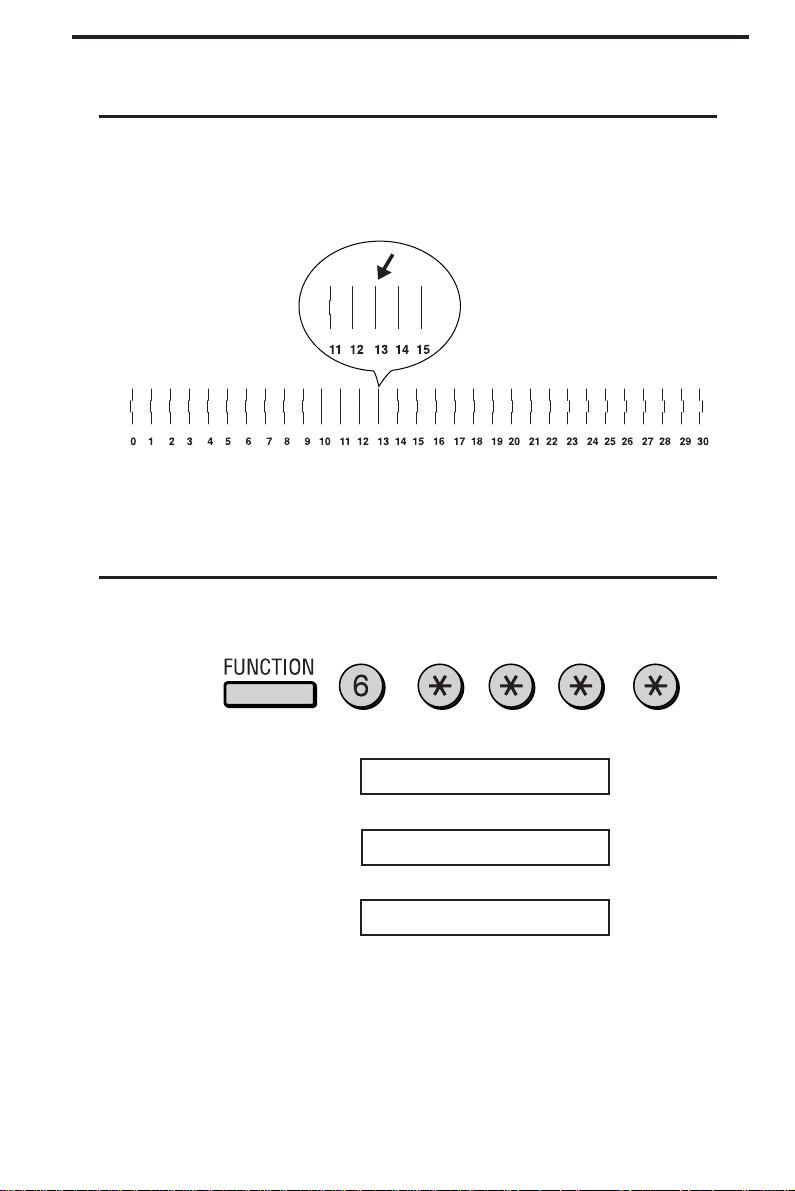
In this example, Line 13 comes
closest to forming a straight line.
1-7
Page 22

Using print cartridges
11
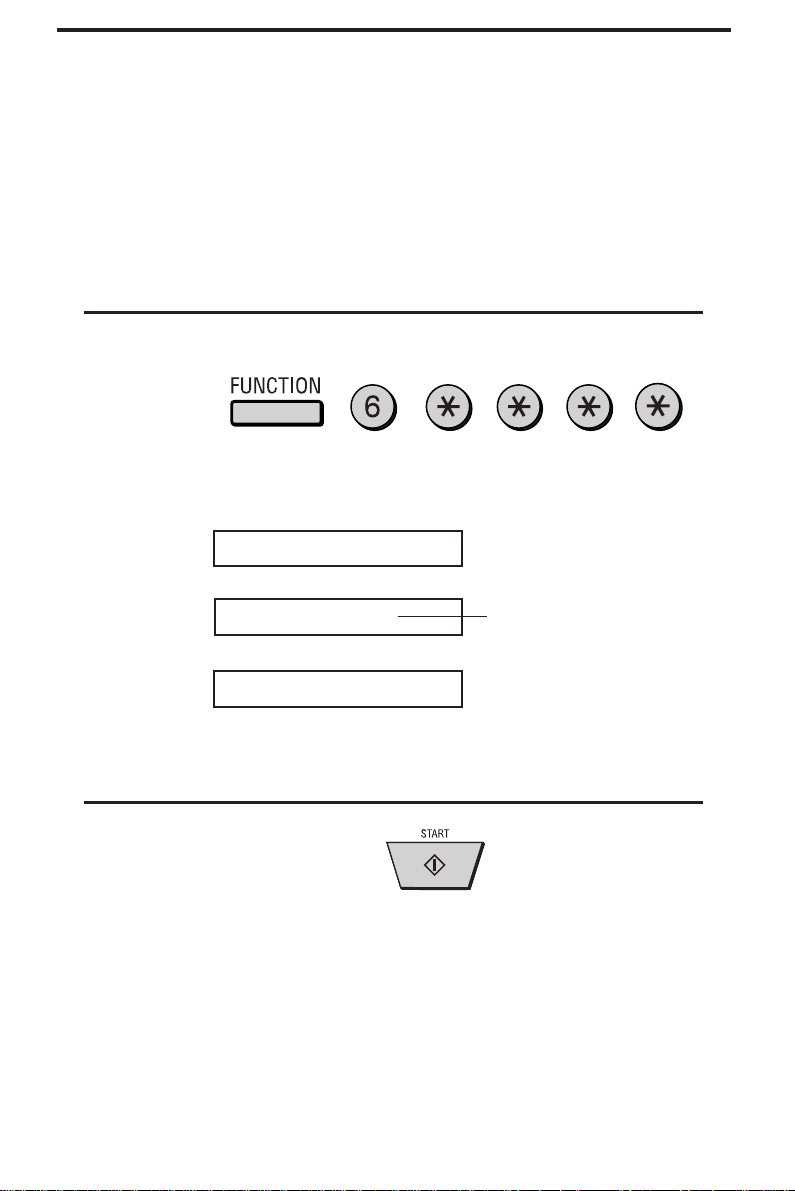
Press these keys on the Colour MFP:
The display will show:
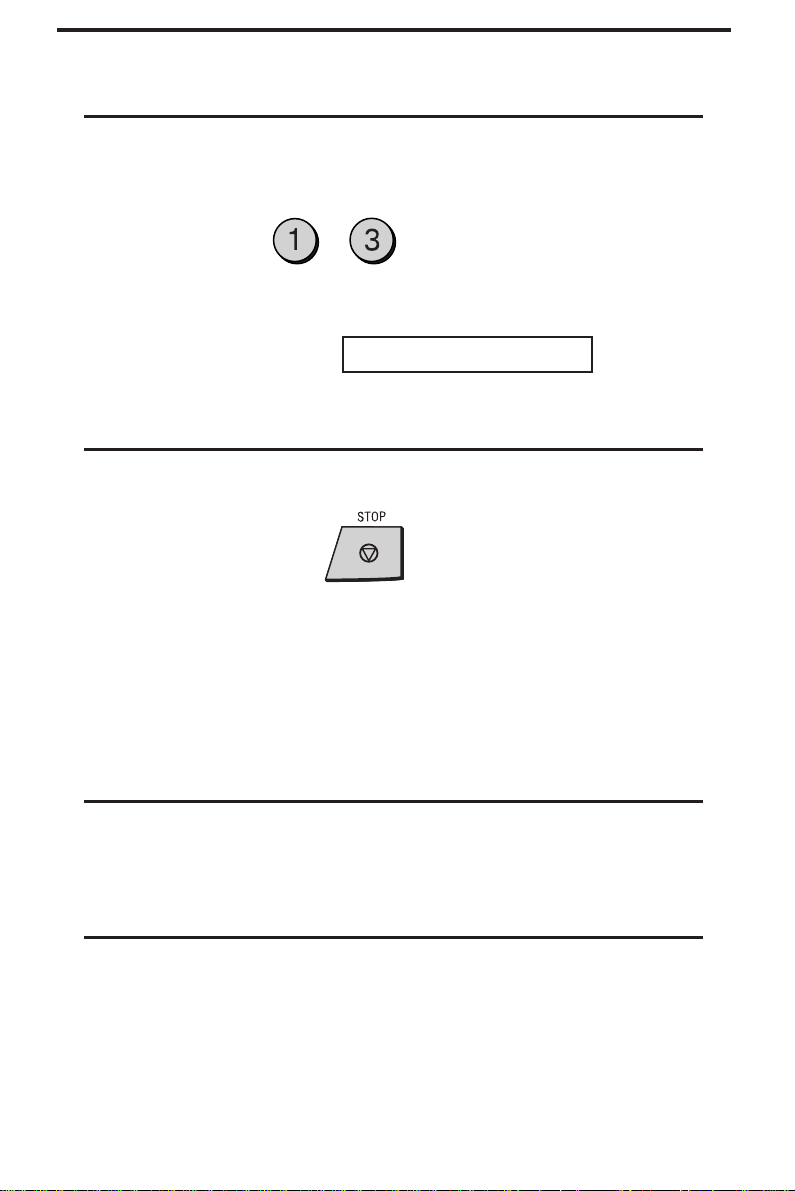
12
Enter the two-digit number of the straightest line on the test page.
(If the number is less than 10, enter a 0 before the number .)
The display will show:
13
Press the STOP key to return to the time and date display .
ALIGN CARTRIDGE
ENTER (00-30) 15
ST ART : PRINT
(Example)
CLEAN NOZZLES
1-8
Note:
If you have installed a colour cartridge, the display will show the
following alternating messages:
COL CARTRIDGE!
USE BLACK FOR RX
Page 23

Using print cartridges
Changing a print cartridge from the Colour MFP Printer
Manager
1
From your computer, open Printer Manager (click Start, point to
Programs and then Colour Multifunction Interface, and select
Printer Manager on...).
2
From Printer Manager, click the Cartridges tab.
3
From the Cartridges tab, click Install Cartridge.
• The print cartridge moves to the centre of the compartment. It
will dry out if left in this position, so complete the replacement
procedure promptly. The Change Cartridge dialog box appears
on your computer screen.
4
Open the front cover of the Sharp Colour MFP.
1-9
Page 24
Using print cartridges
5
Pull the knob of the currently installed print cartridge toward you
until you hear a click. Remove the cartridge.
6
If the print cartridge just removed is still useable, insert it into the
cartridge holder on the back of the machine.
• To prevent the used print cartridge from drying out, be sure to
store it in the cartridge holder.
1-10
Page 25
Using print cartridges
7
If you are installing a new print cartridge, remove it from its
packaging. Gently remove the sticker and transparent tape covering
the copper printhead.
Do not touch the
copper-coloured area!
8
Insert the print cartridge into the cartridge carrier.
1-11
Page 26
Using print cartridges
9
Push back on the cartridge until it clicks into place.
Note:
If the print cartridge moves loosely in the carrier, it is not locked
into place. Repeat this step.
10
Close the front cover.
1-12
11
Choose the appropriate selection from the Change Cartridge dialog
box depending on the type of cartridge you installed. (Note: If you
select the wrong button, out-of-ink detection will not operate
properly):
• If you installed an old print cartridge, this completes the installa-
tion procedure.
Page 27
Using print cartridges
12
If you installed a new print cartridge, the Sharp Colour MFP will
print a test page. Locate the line on the test page that comes closest
to forming a perfectly straight line.
In this example, Line 13 comes
closest to forming a straight line.
13
In the Align Cartridge dialog box, click the up or down arrows to
select the number of the straightest line.
14
Click OK.
Note:
If you have installed a colour cartridge, the display on the Sharp
Colour MFP will show the following alternating messages:
COL CARTRIDGE!
USE BLACK FOR RX
1-13
Page 28
Using print cartridges
Aligning the Printhead
Y ou can check and adjust printhead alignment using either the panel
keys on the Sharp Colour MFP or Printer Manager on your
computer.
Checking alignment with the panel keys
1
Press these keys on the Sharp MFP:
The display will show:
ALIGN CARTRIDGE
1-14
ENTER (00-30)15
ST ART : PRINT
Press the START key.
2
Current alignment
setting (example: 15)
• The Sharp Colour MFP will begin printing a test sheet.
Page 29
Using print cartridges
3
Locate the straightest line on the test sheet.
In this example, Line 13 comes
closest to forming a straight line.
4
If you need to change the alignment setting, press these keys on the
Sharp MFP:
The display will show:
ALIGN CARTRIDGE
ENTER (00-30)15
ST ART : PRINT
1-15
Page 30
Using print cartridges
5
Enter the two-digit number of the straightest line on the test sheet.
(If the number is less than 10, enter a 0 before the number .)
(Example)
The display will show:
Press the STOP key to return to the time and date display .
6
Aligning the printhead from Printer Manager
1
From Printer Manager, click the Cartridge tab.
CLEAN NOZZLES
1-16
2
Click the Align Cartridge button.
Page 31

Using print cartridges
3
The Sharp Colour MFP will print a test page. Locate the line on the
test page that comes closest to forming a perfectly straight line.
In this example, Line 13 comes
closest to forming a straight line.
4
In the Align Cartridge dialog box, click the up or down arrows to
select the number of the straightest line.
5
Click OK.
Note: If you print a test page from the General tab of the Colour
MFP Properties sheets, the bottom line of the page may not print
completely . This is normal and does not indicate that anything is
wrong with the Colour MFP. We recommend that you print a test
page from the Printer Manager or from the panel of the Colour
MFP.
1-17
Page 32

Using print cartridges
Selecting Black Print Quality for Faxes
Your Sharp Colour MFP has been set at the factory to print faxes
and copies at standard print quality . If desired, you can change the
print quality to DRAFT to increase printing speed.
Note:
The following procedure is only for changing the print quality of
faxes and copies. T o change the print quality for print jobs from
your computer, see Selecting Print Quality in Chapter 4.
1
Press these keys on the Sharp Colour MFP:
The display will show:
2
Press 1 for normal or 2 for draft.
The display will show:
3
Press the STOP key to return to the date and time display.
B/W PRINT QL TY
NORMAL DRAFT
or
COPY RA TIO
1-18
Page 33

Using print cartridges
Maintaining print cartridges
Follow these print cartridge maintenance tips to ensure the longest
life from your print cartridge and optimum performance from your
printer.
• Keep a print cartridge in its packaging until you are ready to
install it. Cartridges exposed for extended periods may dry out or
clog.
• Remove a print cartridge from the printer only to replace or clean
it. Replace or reinstall the print cartridge immediately, or return it
to its packaging or storage unit. Do not leave the cartridge
exposed for an extended period.
• A void refilling print cartridges. Refilling empty print cartridges
invalidates your warranty. Incompatible inks can cause damage
to the printhead or to the printer. For best results, use Sharp
supplies with the printer.
• Store the print cartridge in the same environment as the printer.
• The Sharp FO-25CC colour cartridge is capable of printing
approximately 300 pages (standard color chart).
The Sharp FO-21BC black cartridge is capable of printing
approximately 900 pages with 4% ink coverage on each page.
Disposing of used print cartridges
• Do not shake used print cartridges. The remaining ink can leak.
• Before discarding the used print cartridge, put it in a leak-proof
bag.
1-19
Page 34

Using print cartridges
Cleaning Print Cartridges
Cleaning the print nozzles
If characters are not printing completely or you suspect the print
nozzles are clogged, clean the nozzles.
Y ou can clean the print nozzles using either the panel keys on the
Sharp Colour MFP or Printer Manager on your computer.
Cleaning the print nozzles with the panel keys
1
Make sure there is paper in the paper tray .
Press these keys on the Colour MFP:
2
1-20
The display will show:
3
Press the STAR T key .
CLEAN NOZZLES
PRESS ST ART KEY
• The Sharp Colour MFP will clean the print nozzles and print a
test pattern for you to check the result.
Page 35

Using print cartridges
Cleaning the print nozzles from Printer Manager
1
Make sure there is paper in the paper tray .
2
From Printer Manager, click the Cartridges tab.
Click the Clean Print Nozzles button. The Sharp Colour MFP will
3
clean the print nozzles and print a test pattern for you to check the
result.
Checking the test pattern.
This example shows a test pattern of a black nozzle functioning
correctly.
1-21
Page 36

Using print cartridges
This example shows a test pattern of a colour nozzle functioning
correctly.
Compare the diagonal line above the printed bars to the diagonal line
below the printed bars.
• Look for a break in the diagonal lines. A broken line indicates clogged
nozzles.
• If the bottom line has fewer breaks, or better print quality than the top
line, run the test two more times. If the print quality is satisfactory
after running the test three times, the print nozzles are clean.
If the print quality of both lines is not satisfactory after running the test
three times, continue with the following steps.
Remove the print cartridge.
1
• To remove the print cartridge, first press the CARTRIDGE key on
the Sharp Colour MFP, or click the Cartridges tab then the Install
Cartridge button in Printer Manager.
2
Reinstall the print cartridge.
• If you removed the print cartridge by pressing the CARTRIDGE
key, press 1 for OLD BLACK CART or 2 for OLD COLOUR
CART on the Sharp Colour MFP.
• If you removed the cartridge by clicking the Install Cartridge button
in Printer Manager, click Old Black Cartridge Installed or Old
Colour Cartridge Installed.
1-22
Page 37

Using print cartridges
2
Repeat the nozzle test.
3
If the lines are still broken, wipe the print cartridge nozzles. See the
following section, Wiping the print nozzles.
Wiping the print nozzles
Wipe the print nozzles only if you have already run the print nozzle
test and the print quality is still not satisfactory.
Wiping the print nozzles removes dried ink from the nozzles. T o
wipe the print nozzles:
1
Remove the print cartridge from the printer .
• To remove the print cartridge, first press the CAR TRIDGE key
on the Sharp Colour MFP, or click the Cartridges tab then the
Install Cartridge button in Printer Manager.
1-23
Page 38

Using print cartridges
2
Use a clean cloth dampened with water only to gently clean the
entire copper-coloured area, including the nozzles and contacts.
• When cleaning the colour print cartridge, wipe the nozzles in one
direction so the colours do not mix.
• To dissolve dried ink, hold the damp cloth against the nozzles for
about three seconds. Gently blot and wipe dry.
3
Allow the copper-coloured area to dry.
1-24
Reinstall the print cartridge. (If the cartridge holder has moved back
4
to its home position, press the CARTRIDGE key again or click
Install Cartridge to move it to the centre.)
• If you removed the print cartridge by pressing the
CARTRIDGE key , press 1 for OLD BLA CK CAR T or 2 for
OLD COLOUR CART on the Sharp Colour MFP.
• If you removed the cartridge by clicking the Install Cartridge
button in Printer Manager, click Old Black Cartridge Installed or
Old Colour Cartridge Installed.
5
Repeat the nozzle test.
• If the nozzle test line is still broken, clean the print cartridge
carrier contacts. For instructions, see the following section,
Cleaning the print cartridge carrier contacts.
Page 39

Using print cartridges
Cleaning the print cartridge carrier contacts
Clean the print cartridge carrier contacts only if you have run the
print cartridge nozzle test and wiped the print nozzles and print
quality is not yet satisfactory.
1
Remove the print cartridge.
• To remove the print cartridge, first press the CAR TRIDGE key
on the Sharp Colour MFP, or click the Cartridges tab then the
Install Cartridge button in Printer Manager.
2
Unplug the printer power cord. This forces the print cartridge
carrier to remain in the load position.
3
Use a clean, dry cloth to wipe the cartridge carrier contact inside
the print compartment and the contact on the print cartridge. (The
contacts are shaded in the illustration below .)
1-25
Page 40

Using print cartridges
4
Plug the Colour MFP power cord into an electrical outlet.
5
Press the CARTRIDGE key on the Sharp Colour MFP, or click
the Cartridges tab then the Install Cartridge button in Printer
Manager.
6
Replace the print cartridge.
• If you pressed the CARTRIDGE key in Step 5, press 1 for OLD
BLACK CAR T or 2 for OLD COLOUR CART on the Sharp
Colour MFP.
• If you clicked the Install Cartridge button in Printer Manager in
Step 5, click Old Black Cartridge Installed or Old Colour
Cartridge Installed.
1-26
The print cartridge will return to its home position.
7
Repeat the nozzle test.
If the print quality has not improved after this cleaning process,
replace the print cartridge. If print quality still does not improve,
your Sharp Colour MFP may require service.
Page 41

Sending Pap er Faxes Fro m the Shar p MFP
Document s You Can Fax, Cop y, and Scan . . . . . . . . . . . . . 2-2
Size an d weig ht. . . . . . . . . . . . . . . . . . . . . . . . . . . . . . . . . . . . . . . 2-2
Other restrict io ns . . . . . . . . . . . . . . . . . . . . . . . . . . . . . . . . . . . . . 2-3
Loading the Documen t. . . . . . . . . . . . . . . . . . . . . . . . . . . . . . 2-4
Removin g a docume nt from the feed e r . . . . . . . . . . . . . . . . . . . . 2-5
Resolut ion and Con trast . . . . . . . . . . . . . . . . . . . . . . . . . . . . 2-6
Reso lu tio n s et tin g s. . . . . . . . . . . . . . . . . . . . . . . . . . . . . . . . . . . . 2-6
Contr a st settings. . . . . . . . . . . . . . . . . . . . . . . . . . . . . . . . . . . . . . 2-7
Sending a Fax by Normal Dialling . . . . . . . . . . . . . . . . . . . . 2-8
Using the REDIAL ke y . . . . . . . . . . . . . . . . . . . . . . . . . . . . . . . . . 2-9
Sending a Fax by Automat ic Dialling. . . . . . . . . . . . . . . . . 2-10
Storing fax and tele phon e numbe rs for Automa t ic Diallin g . . . . 2-11
Clearing numb e rs. . . . . . . . . . . . . . . . . . . . . . . . . . . . . . . . . . . . 2-13
Making changes . . . . . . . . . . . . . . . . . . . . . . . . . . . . . . . . . . . . . 2-13
Rapid Key Diallin g . . . . . . . . . . . . . . . . . . . . . . . . . . . . . . . . . . . 2-15
Speed Diallin g. . . . . . . . . . . . . . . . . . . . . . . . . . . . . . . . . . . . . . . 2-16
Direct Keypad Diallin g . . . . . . . . . . . . . . . . . . . . . . . . . . . . . . . . 2-17
Using the HOLD/SEARCH ke y. . . . . . . . . . . . . . . . . . . . . . . . . . 2-18
Automa tic redia llin g . . . . . . . . . . . . . . . . . . . . . . . . . . . . . . . . . . 2-19
Volume Adjust ment . . . . . . . . . . . . . . . . . . . . . . . . . . . . . . . 2-20
Spea ke r. . . . . . . . . . . . . . . . . . . . . . . . . . . . . . . . . . . . . . . . . . . . 2-20
Ring e r. . . . . . . . . . . . . . . . . . . . . . . . . . . . . . . . . . . . . . . . . . . . . 2-21
2-1
Page 42

Documents You Can Fax, Copy, and Scan
Size and w eight
The size and weight of documents that you can load in the docum ent
feeder depend on whether you load one page at a time or several pages
at once.
Loading one page at a time:
Minimum size
148 mm
140 mm
Minimum weight
52 g/m²
Loading several pages at once:
Minimum size
148 mm
140 mm
Maximum size
Maximum weight
Maximum size
216 mm
157 g/m²
216 mm
1 m
297 mm
2-2
Minimum weight
14 lbs.
(52 g/m²)
Maximum weight
80 g/m²
Page 43

Documents You Can Fax, Copy and Scan
Note: Letters or graphics on the edges of a document will not be
scanned.
Letters in the
shaded area will
not be scanned.
4 mm
4 mm
Other restrictions
♦ The scanner cannot recognise yellow, greenish yellow, or light
blue ink.
♦ Ink, glue, and correcting fluid on documents must be dry before
they pass through the document feeder.
♦ All clips, staples, and pins must be removed fro m documents
before loading in the feeder. If these are not removed, they may
damage the machine.
♦ Documents which are patched, taped, torn, smaller than the
minimum size, carbon backed, or easily smudge d should be
photocopied, and the copy loaded in the feeder.
2-3
Page 44

Loading the Document
Up to 20 pages can be placed in the feeder at one time. The pages will
automaticall y feed into the machine sta rting from the botto m page.
♦ If you need to send or copy more than 20 pages, place the
additional pages gently and carefully in the feeder just before the
last page is scanned. Do not try to force them in, as this may cause
double-feeding or jamming.
♦ If your document consists of several large or thick pages which
must be loaded one at a time, insert each page into th e feed er as
the previous page is being scanned. Insert gently to prevent
double-feeding.
1
Adjust the document guides to the
width of your document.
2
Place the document face down and
push it gently into the document
feeder. The top edge of the document
should enter the machine first.
•• The feeder will draw the leading
edge of the document into the
machine. The display will show:
READY TO SEND
3
Proceed with the fax, copy, or sca n
operation.
2-4
Important: To prevent the
document from skewing, be sure
the document is straight in the
feeder and the document guides
touch each side of the document.
Page 45

Loading the Docume nt
Removi ng a document from the feeder
If you need to
remove a document
from the feeder,
open the operation
panel.
Important:
Do not try to remove a document without opening the operation
panel. This may damage the feeder mechanism.
1
Pull the relea se marked PANEL
RELEASE up and open the operation
panel.
2
Remove the document.
3
Close the operation panel, making
sure it clicks into place.
Click!
2-5
Page 46

Resolution and Contrast
Before faxing a document, you can use the RESOLUTION key on
the Sharp Colour MFP to adjust the resolutio n and contrast . (To adjust
the resolution and contrast when scanning a document into your
computer, use your Sharp Multifun ction Interface software.)
The default resolution
setting is STANDARD
and the default contrast
setting is AUT O.
You must adjust the
settings each time
you don’t want to use
the default settings.
Note: The resolution and contrast settings are only effective for
transmitting a document. They are not effective for receiving a
document.
Resolution settings
STANDARD: Use STANDARD for ordinary documents. This
setting gives you the fastest and most economical
transmission.
FINE: Use FINE for documents containing small letters
or fine drawings.
SUPER FINE: Use SUPER FINE for documents containing very
small letters or very fine drawings.
HALF TONE: Use HALF TONE for photographs and
illustrations. The original will be reproduced i n 64
shades of grey.
Note: In order to transmit in FINE or SUPER FIN E resolution, the
receiving fax machine must also have that resolution. I f it doesn’t,
your machine will automatically step down to the next best available
setting.
2-6
Page 47

Contrast settings
AUTO Use AUTO for normal documents.
DARK Use DARK for fa int documents.
1
Load the document(s).
•• The document must be loaded
before the resolution and contrast
can be adjusted.
2
Press the RESOLUTION key one or
more times until the desired resolution
and contra st settings appear in the
display.
•• The first time you move through the
list of resolution settings, the
contrast se tting AUTO will appear
next to each resolution setting. The
second time you mov e through the
list, the contrast setting DARK will
appear.
Resolution and Contrast
STANDARD :AUTO
FINE :AUTO
SUPER FINE :AUTO
HALF TONE :AUTO
STANDARD :DARK
FINE :DARK
SUPER FINE :DARK
HALF TONE :DARK
2-7
Page 48

Sending a Fax by Normal Dialling
With Normal Dial ling, you pi ck up th e handset (or press the
SPEAKER key) and dial by pr essing the number keys.
♦ If a person answers, you can talk with them through the handset
before sen ding the fax. (If you pressed the SPEAKER key, you
must pick up the handset to talk.)
♦ N ormal Dialling allows you to listen to the line and make sure the
other fax machine is responding.
1
Load the document(s).
The display will show:
READY TO SEND
••
Set the resolution and/or contrast if
desired.
2
Pick up the handset or press the
SPEAKER key. Listen for the dial
tone.
3
Dial the number of the receiving
machine by pressing the numeric keys.
2-8
or
Page 49

4
Wait for the connection. Depending
on the setting of the receiving
machine, you will either hear a
facsimile reception tone or the other
person will answer.
•• If the other party answers, (lift the
handset if the SPEAKER key was
pressed) ask them to press their
START key. This causes the
receiving machine to issue a
reception tone.
5
When you hear the reception tone,
press the START key. Replace the
handset if you used it.
•• When transmission is completed,
the fax will beep once.
Sending a Fax by Normal Dialing
Beep
Using the REDIAL ke y
You can press the REDIAL key to redi al the last number dialled. To
send a document, proceed from Step 4 of Normal Dialling . Note that
the speaker will be automatically activated when you press the
REDIAL key.
Facsimile reception tone: This is a pronounced, high-p itched tone
that the receiving machine sends to the transmitti ng machine to
indicate that it is ready to receive.
2-9
Page 50

Sending a Fax by Automatic Dialling
You can dial a fax or telephone num ber by simply pressing a Rapid
Key, or by pressing the SPEED DIAL key and entering a two-di gi t
number.
♦ To use Automatic D ialling, you must first store the full fax or
telephone number in the Sharp Colour MFP.
♦ When you store a fax or telephone number, you select a two-digit
Speed Dial number for it. 99 Speed D ial numbers are available.
Speed Dial numbers
01 through 38 are
for Rapid Key
(one-touch) Dialling.
Speed Dial numbers
39 through 99 are
for dialling with the
SPEED DIAL key.
Attach each strip
of Rapid Key
labels as shown
here.
2-10
SPEED DIAL key
Rapid keys
When you store a
number in a Rapid
Key, write the name of
the party on the label.
Page 51

Sending a Fax by Automatic Dialing
Storing fax and telephone numbers for Automatic Dialling
1
Press these keys:
The display will show:
2
Press 1 to se lect SET.
The display will show:
3
Enter a two-digit Speed Dia l number by pressing the number keys
(01 to 38 for Ra pid Key Dialling, 39 to 99 for Speed Dialling).
4
Enter the fax or voice number by pressing the number keys (max. of
32 digits including pauses). (Note: A space cannot be entered.)
•• If you make a mistake, press the HOLD/SEARCH key to move
the cursor back to the mistake and then enter the correct number.
The new number will replace the old number.
FAX/TEL # MODE
FAX/TEL # SET
ENTER SPEED #
(Example)
•• If a pause is required between any of the digits to acce ss a spe ci al
service or an outside line, press the REDIAL key. The pause will
appear as a hyphen. Several pauses can be entered in a row.
(Example)
5
Press the START key.
2-11
Page 52

Sending a Fax by Automatic Dialing
6
Enter the name of the party by pressing the number keys as shown in
the chart below. Up to 20 characters can be entered.
•• If you don’t want to enter a name, skip this step.
•• To enter two lette rs in succession that require th e same key, pres s
the SPEAKER key after entering the first letter to advance the
cursor.
Example: SHARP = 7 7 7 7 7 4 4 4 2 2 7 7 7 7 7 7
A =
B =
C =
D =
E =
F =
G =
H =
I =
7
Press the START key.
8
Return to Step 3 to store another number, or press STOP to exit. If
22
22 2
22 2 2
33
33 3
33 3 3
44
44 4
44 4 4
J =
K =
L =
M =
N =
O =
P =
Q =
R =
S =
55
55 5
55 5 5
66
66 6
66 6 6
77
77 7
77 7 7
77 7 7 7
T =
U =
V =
W =
X =
Y =
Z =
SPACE =
88
88 8
88 8 8
99
99 9
99 9 9
99
the number will be used for Rapid Key Dialling, you can write the
name on the appropriate Rapid Key label.
99 9
11
2-12
Step 3 or
Page 53

Clearing numbe rs
1
Press these keys:
Sending a Fax by Automatic Dialing
The display will show:
2
Press 2 to select CLEAR .
3
Enter the Speed Dial number that you want to clear by pressing the
number keys.
4
Press the START key.
5
Return to Step 3 to clear another number, or press STOP to exit.
FAX/TEL # MODE
(Example)
Step 3 or
Making change s
To make changes in a number previously stored, repeat the storing
procedure. Select the Speed Dial num be r for which you want to make
changes in Step 3, and then change the number and/or name when they
appear in the display (St eps 4 and 6, respect ivel y).
2-13
Page 54

Sending a Fax by Automatic Dialing
♦ A lithium battery keeps automatic dialling numbe rs in memory
The machine uses a lithi um battery to keep automat ic dial ing numb ers
and other programmed data in memory when the power is turned off.
Battery power is consumed primarily when the power is off. With the
power kept continuousl y off, the life of the batt ery is about 5 years. If
the battery dies, have your de aler or retail er replace it. Do not try to
replace it yourself.
2-14
Page 55

Sending a Fax by Automatic Dia ll ing
Rapid Key Dialling
If the number you want to dial has been stored for automat ic di alin g as
a Speed Dial number from 01 to 38, you can dial it by pressi ng th e
corresponding Rapid Key. (If the Speed Dial numbe r is from 20 to 38,
press the SHIFT key and then press t he Rapid key.)
1
Load the document(s).
The display will show:
READY TO SEND
Set the resolution and/or contrast if
••
desired.
2
Press the Rapid Key corresp onding to
the desired Speed Dial number. (If the
Speed Dial numb er is from 20 to 38,
press the SHIFT key an d then press
the Rapid Key).
•• The name of the receiving party will
appear in the display. If no name
was stored, the fax number will
appear. (If the name or number is
incorrect, press the STOP key.)
•• The document will be automatically
transmitted once the connection is
made.
Exampl e: To dial Speed
Dial number 02, press
Rapid Key 02/21.
Exampl e: To dial Speed Dial
number "21", press the
key and then press Rapid Key
02/21.
SHIFT
2-15
Page 56

Sending a Fax by Automatic Dialling
Speed Dialling
Speed Dialling can be used to dial any numb er that has been stored for
Automatic Dial ling.
1
Load the document(s).
The display will show:
READY TO SEND
••
Set the resolution and/or contrast if
desired.
2
Press the SPEED DIAL key and then
enter the two digits of the Speed Dial
number by pressing the number keys.
•• T o enter numbers 1 through 9, first
enter 0 and then the number.
3
Check the display. If the name or
number shown is correct, press the
START key. (If not, press the STOP
key and then repeat Step 2.)
2-16
(Example)
Page 57

Sending a Fax by Automatic Dia ll ing
Direct Keypad Dialling
You can also enter a full number with th e number keys and th en press
the START key to begin diall ing . You can use th is method to dial a
full number when you don’t need to speak to the other party before
faxing.
1
Load the document(s).
The display will show:
READY TO SEND
Set the resolution and/or contrast if
••
desired.
2
Enter the number of the receiving
machine by pressing the numeric keys.
•• If a pause is required between any
of the digits to access a special
service or an outside line, press the
REDIAL key. The pause will
appear as a hyphen. Several pauses
can be entere d in a row.
3
Check the display. If the number of
the receiving machine shown is
correct, press the START key.
•• If it is not correct, press the STOP
key to backspace and clear one digit
at a time, and then re-enter the
correct digit(s).
2-17
Page 58

Sending a Fax by Automatic Dialling
Using the HOLD/SEARCH ke y
If you don’t remember the Rapid Key or Speed Dial number in whic h
you have stored a particular fax number, you can se arch for the
number by followi ng th e steps below. Once you have found the
number, you can dial i t and transmit the load ed document by simpl y
pressing the START key.
1
Load the document(s).
The display will show:
READY TO SEND
Set the resolution and/or contrast if
••
desired.
2
Press the HOLD/SEARCH key.
3
Enter the first letter of the stored
name by pressing the appropriate
number key (the key which
corresponds to the required letter) one
or more times until the letter appears
in the display. If the name begins with
a special character or number, press 1.
•• If you don’t remember the first
letter, go to Step 4 (you will scroll
through the list from the beginning).
•• If a name wasn’t stored for the
number, press 0. This will cause
numbers, not names, to appear when
you scroll.
2-18
Page 59

4
Press the # key or the * key to scroll
through the names (numbers if you
pressed 0). Stop when the desired
name appears in the display.
•• If no names have been stored that
begin with the entered letter, you
will scroll from the next name, in
alphabetical order, in the list. If no
names/numbers have been stored at
all, NO DATA will appear.
5
Press the START key. The document
will be automatically transmitted once
the connection is made.
Sending a Fax by Automatic Dia ll ing
or
Automatic redia ll ing
If you use automatic diallin g (inclu din g Direct Keypad Diallin g) and
the line is busy, the machine wil l aut omat icall y redial th e number. Up
to 2 redialling attemp ts will be made at intervals of 5 minutes.
♦ To stop automatic redialling, press the STOP key.
2-19
Page 60

Volume Adjustment
DOWN key UP key
Speaker
You can adjust the
volume of the speaker
and ringer using the
UP and DOWN keys
on the operation panel.
1
Press the SPEAKER key.
2
Press the UP or DOWN key.
or
3
When the display shows the desired volume level, press the
SPEAKER key to turn off the speaker.
2-20
Display:
SPEAKER: HIGH
SPEAKER: MIDDLE
SPEAKER: LOW
Page 61

Volume Adjustment
Ringer
1
Press the UP or DOWN key. (Make sure the SPEAKER key has not
been pressed and the handset is not lifted.)
•• The ringer will ring once at the selected le vel, then the date and
time will reappe ar in the display.
Display:
RINGER: HIGH
or
2
If you selected RINGER OFF: OK?, press the START key.
RINGER: MIDDLE
RINGER: LOW
RINGER OFF: OK?
Silent ring fax detection sy stem
You can also set your fax machine to receive faxes silently, but ring to
alert you to a voice call. To do so, set the ringer volume to OFF and
set the reception mode to TEL/F AX. When a voice call comes in, a
special ringer on t he fax will ring. Note that extensi on tel ephones wi ll
not rin g.
Note:During intial ringing before the fax picks up the call, the fax
will be silent but extension telephones will ring.
2-21
Page 62

Receiving Documen ts
Select ing the Recep ti on Mode . . . . . . . . . . . . . . . . . . . . . . . 3-2
Sett ing the reception mode. . . . . . . . . . . . . . . . . . . . . . . . . . . . . . 3-2
Selectin g the rece ivin g unit. . . . . . . . . . . . . . . . . . . . . . . . . . . . . . 3-3
Using TEL/FAX Mode. . . . . . . . . . . . . . . . . . . . . . . . . . . . . . . 3-4
Using FAX Mode. . . . . . . . . . . . . . . . . . . . . . . . . . . . . . . . . . . 3-5
Using ANS. Mode . . . . . . . . . . . . . . . . . . . . . . . . . . . . . . . . . . 3-6
Using TEL Mode . . . . . . . . . . . . . . . . . . . . . . . . . . . . . . . . . . . 3-7
Answering with the Sha rp Colo u r MFP’s han ds et . . . . . . . . . . . . 3-7
Answering with an extension pho ne. . . . . . . . . . . . . . . . . . . . . . . 3-8
Rece p tio n Rat i o . . . . . . . . . . . . . . . . . . . . . . . . . . . . . . . . . . . . . . 3-9
Substit ute Recept io n to Memory . . . . . . . . . . . . . . . . . . . . 3-10
3-1
Page 63

Selecting the Reception Mode
The Sharp MFP has four modes for receiving incoming calls and faxes:
TEL mode:
This is the most convenient mode for receiving phone cal ls. You can
also receive faxes; however, all calls must first be answered by picking
up the fax’s handset or an extension phone connected to the same line.
FAX mode:
Select this mode when you only want to receive faxes on your line.
The fax will automatically answer all calls and receive incoming faxes.
TEL/FAX mode:
This mode is convenient for receiving bot h faxes and voice calls.
When a call comes in, the fax will detect whether it is a voice call
(including manually di all ed fax transmis sio ns), or an automatic ally
dialled fax. If it is a voice call, the fax will make a special ringing
sound to alert you to answer. If it is an automatically dialled fax
transmission, receptio n wil l begin autom ati cally.
ANS. mode:
Select this mode when an answering machine is connected as
explained in Connecti ng an Answeri ng Machin e in Chapter 6, and you
want the answering machine to answer all calls. This allows you to
receive both voice messages and faxes while you are out.
Setting the reception mode
Press the RECEPTION MODE key until the arrow in the display
points to the desired mode.
RECEPTION MODE key
3-2
20-FEB 10:30
20-FEB 10:30
20-FEB 10:30
20-FEB 10:30
TEL/FAX
TEL/FAX
TEL/FAX
TEL/FAX
FAX
TEL
ANS.
FAX
TEL
ANS.
FAX
TEL
ANS.
FAX
TEL
ANS.
Page 64

Selecting the Reception Mode
Selecting the receivi ng unit
If you have connected the Sharp Colour MFP to a comput er and
installed the Sh arp Colour MFP software, you can choose whether to
have incoming faxes received to the Sharp Colour MFP or your
computer.
♦ T he initial setting is FAX (r eception to the Sharp Colour M F P).
1
Press these keys:
The display will show:
2
Press 1 (FAX) to select the Sharp Colour MFP, or 2 (PC) to select
your computer.
FAX (Sharp MFP) PC
If you select reception to your computer and the reception mode is
••
set to TEL, you must answer all calls by picking up the Sharp
MFP’s handset. If you hear a fax tone through the handset when
you answer , the computer will automatically begin reception.
•• If you have selected reception to your computer and the reception
mode is set to FAX or TEL/FAX, all calls will be answered
automatica lly by the Sharp MFP and faxes received to the
computer. Note that if your Multifunction Interface software isn’t
running, faxes will be received to the Sharp MFP.
RECEIVE UNIT
or
3-3
Page 65

Using TEL/FAX Mode
Press the
MODE
arrow in the display
points to TEL/FAX.
RECEPTION
key until the
TEL
TEL/FAX
FAX
ANS.
When the reception mode is set to TEL/FAX, your fax automatically
answers all calls on 2 rings. After answering, your fax monitors the
line for about 5 seconds to see if a fax tone is being sent.
If your fax detects a fax ton e (this mea ns that the call is an
♦
automatically dialled fax) , it will automatica lly be gin recep tion of
the incoming document.
If your fax doesn’t detect a fa x ton e (th is mea ns that the call is a
♦
voice call or manually dialled fax), it will make a ringing sound
(called pseudo ringing) for 15 seconds to alert you to answer. If
you don’t answer within this time, your fax will send a fax tone to
the other machine to allow the calling party to send a fax manually
if they desire.
3-4
Comments:
Only the fax will alert you to voice calls or manually dialled faxes by
•
pseudo ringing. An extension phone connected to the same line will
not ring after the connection has been made.
The duration of pseudo ringing can be adjusted with Option Setting 8.
•
See Chapter 8, Option Settings.
You can change the number of rings on which the machine answers
•
calls by changing Option Setting 2. (See Chapter 8, Option Settings.)
Page 66

Using FAX Mode
Press the
MODE
arrow in the display
points to FAX.
RECEPTION
key until the
FAX
TEL
TEL/FAX
ANS.
When the reception mode is set to FAX, the machine will
automatically answer all calls on 2 rings and receive incoming faxes.
2 rings Fax reception
You can change the number of rings on which the machine
♦
answers calls by changing Option Setting 2. (See Chapter 8,
Option Settings.)
If you pick up the handset before the machine answers, you can
♦
talk to the other party and/or receive a document as described in
Using TEL mode.
3-5
Page 67

Using ANS. Mode
Press the
MODE
RECEPTION
key until the
arrow in the display
points to ANS.
FAX
TEL
TEL/FAX
ANS.
In ANS. mode, your fax will automatically receive voice and fax
messages if you have connected an answering machine to the Sharp
MFP. See Chapter 6 for more details.
3-6
Page 68

Using TEL Mode
Press the
RECEPTION MODE
key until the arrow in
the display points to
TEL.
FAX
TEL
TEL/FAX
ANS.
When the reception mode is set to TEL, you must answer all ca lls
using the Sharp Colour MFP’s handset or an extension phone
connected to the same line.
Answering with the Sharp Colour MFP’s handset
Pick up the handset when the machine ring s.
1
If you hear a fax tone, wait un til the displa y sh ows RECEIVING an d
2
then replace the handset.
Beep
If the other party first talks and then wants to send a fax, press the
3
RECEIVING
If you have set Option Setting
Note:
12 (Fax signal receive) to NO, press
the
START
key to begin reception.
START key after speaking (press your START key before the
sender presse s the ir Sta rt ke y) .
Make sure that the display shows RECEIVING, then replace the
•
handset.
RECEIVING
3-7
Page 69

Receiving Documents
Answering with an extension phone
Answer the extension phone when it rings.
1
If you hear a fax tone when you answer an extension phone, wait
2
until your fax answers (th e exten sio n ph one will go de ad ), and then
hang up.
Beep
If the fax doesn’t respond, or if the other party first talks to you and
3
then wants to send a fax, press 5, *, and * on the extension phone
(only on a tone dial phone). Hang up.
Comments:
Your fax will not accept the signal to begin reception (5**) if a
•
document is loaded in its feeder.
If you have set Option Setting 12 to NO and hear a fax tone when you
•
answer the extension phone, you must press 5, *, and * if you are on
a tone dial phone, or walk over to the fax, pick up the handset, and
press the START key if you are on a pulse dial only phone.
Phone goes
dead
3-8
Page 70

Receiving Documents
Reception Ratio
The Sharp Colour MFP has been set at the factory to automatically
reduce the size of received documents to fit the size of the printing
paper. This ensures that data on the edges of the document are not cut
off. If desired, you can turn this function off and have received
documents printed at full size.
Note:If a document is too long to fit on the printing paper, the
remainder will be printed on a second page. In this case, the cut-off
point may occur in the middle of a line.
Note:Automatic reductio n may not be possib le if the rec eived
document is too large, contains too many fine graphics or images, or
is sent at high resolution. In this case , the rema ind er of the doc ument
will be printed on a second page.
Press these keys:
1
The display will show:
Press 1 to turn automatic reduction on, or 2 to turn it off.
2
The display will show:
Press the STOP key.
3
RECEPTION RATIO
AUTO 100%
or
ALIGN CARTRIDGE
3-9
Page 71

Substitute Reception to Memory
In situations where printing is impossible or not recommended, faxes
will be received to the memory of the Sharp Colour MFP. Wh en the
situati on is resol ved, the Sha rp Colour MF P will autom ati cal ly pri nt
the faxes.
Do not unplug the Sharp
Colour MFP when faxes
are received in memory.
This will erase the
memory!
Important!
Once the memory becomes full, fax reception will no longer be
possible. When substitute reception to memory occurs, resolve the
situation as soon as possible to allow normal fax reception and
printing to continue.
Paper jam
CAN’T PRINT DATA
Printing is impo ssible due to a paper
jam. Clear the jam as described in
Clearing Pap er Jams in Chapter 11, and
PAPER JAM
Pri nt cartr idge not i nstalle d or out o f ink
CAN’T PRINT DATA
printing will begin automat icall y.
Install or replace the print cartri dge as
described in Chapter 1, and printing will
begin automatic ally.
OUT OF INK!
Note: This message will also app ear if
you mistakenly set the cartridge type to
"black" after install in g a colour
cartridge. To correct the setting, press
the CARTRIDGE key and then 2
(OLD COLOUR) or 4 (NEW
COLOUR).
3-10
Page 72

Out of printing paper
Substitute Reception to Memor y
CAN’T PRINT DATA
OUT OF PAPER
and printing wi ll begin automat icall y.
♦ If you received documents in
memory because the fax ran out of
paper, be sure to add paper which is
the same size as the paper previously
used. If not, the document print-out
size may not match the size of the
printing paper.
The paper tray has no paper. Load paper
Print cartridge almost out of ink
CAN’T PRINT DATA
The print cartridge is low on ink and
should be replaced. You can print the
LOW INK!
CHANGE CARTRIDGE
received document one page at a time
by pressing the followin g keys:
Caution!
If the ink runs out while a page is being
printed, th e remaind e r of the page will
be lost.
A colour cartridge is installed
CAN’T PRINT DATA
We recommend that you change to a
black print cartridge to avoid the
expense of using colour ink to print
COL CARTRIDGE!
black images. A black print cartridge
also provides the best quali ty for faxes.
CHANGE TO BLACK
If needed, you can press the following
keys to print the fax one page at a time
using the colou r print cartridg e:
3-11
Page 73

Substitute Reception to Memor y
Paper is l oaded in the manual feeder
CAN’T PRINT DATA
Press the PRINTER key to eject th e
paper from the manual feeder and
printing will begin automat icall y. If
CHECK MAN FEEDER
desired, you can print the first page of
the fax on the paper in the manual
REMOVE PAPER
feeder by pressing the following keys:
Note: If faxes received in memory are lost due to a power failure or
other interruption of the power supply, a CLEAR REPORT will be
printed out when the power is restored. This gives information about
the faxes lost, including the fax numbers of the transmitting
machines if they are available.
3-12
Page 74

Printing With the S harp Colo ur MFP
Printing With the Sharp Colo ur MFP . . . . . . . . . . . . . . . . . . 4-3
The Printer Software . . . . . . . . . . . . . . . . . . . . . . . . . . . . . . . . . . 4-3
Setting the default printer . . . . . . . . . . . . . . . . . . . . . . . . . . . . . . . 4-5
Running Printer Manager as an icon . . . . . . . . . . . . . . . . . . . . . . 4-5
Canceling a print job . . . . . . . . . . . . . . . . . . . . . . . . . . . . . . . . . . 4-5
Printing a test page . . . . . . . . . . . . . . . . . . . . . . . . . . . . . . . . . . . 4-6
Changing Printer Settings . . . . . . . . . . . . . . . . . . . . . . . . . . 4-7
Selecting print quality . . . . . . . . . . . . . . . . . . . . . . . . . . . . . . . . . . 4-7
Choosing a paper type . . . . . . . . . . . . . . . . . . . . . . . . . . . . . . . . 4-8
Choosing portrait or landscape page orientation . . . . . . . . . . . . . 4-8
Choosing a paper size . . . . . . . . . . . . . . . . . . . . . . . . . . . . . . . . . 4-9
Choosing manual/specialty or automatic/normal media . . . . . . 4-10
Increasing print speed . . . . . . . . . . . . . . . . . . . . . . . . . . . . . . . . 4-10
Preventing print from smearing . . . . . . . . . . . . . . . . . . . . . . . . . 4-12
Printing copies . . . . . . . . . . . . . . . . . . . . . . . . . . . . . . . . . . . . . . 4-12
Printing in reverse page order (last page first) . . . . . . . . . . . . . 4-13
Printing colour pages before black . . . . . . . . . . . . . . . . . . . . . . 4-13
Printing black pages before colour . . . . . . . . . . . . . . . . . . . . . . 4-14
Printing on Special Media Usin g the Manual Feed er . . . . 4-15
Removing media from the manual sheet feeder . . . . . . . . . . . . 4-17
Printing on banner paper . . . . . . . . . . . . . . . . . . . . . . . . . . . . . . 4-18
Printing From DOS Applications . . . . . . . . . . . . . . . . . . . . 4-21
Printing from DOS applications in Windows . . . . . . . . . . . . . . . 4-21
4-1
Page 75

Printin g from no n -Wind ows DOS applications . . . . . . . . . . . . . . 4-22
Changin g prin t sett ings for DO S applica t ions . . . . . . . . . . . . . . 4-23
Enablin g Sharp MFP DOS prin tin g . . . . . . . . . . . . . . . . . . . . . . 4-23
Enablin g DOS Prin tin g to oth e r prin t ers . . . . . . . . . . . . . . . . . . . 4-24
Printing a DOS fonts list . . . . . . . . . . . . . . . . . . . . . . . . . . . . . . . 4-24
Adjus tin g the amo u n t of ink u se d for e a ch DOS p rin t job . . . . . 4-24
Printing Media Speci ficati on s . . . . . . . . . . . . . . . . . . . . . . 4-25
Pape r t yp e s . . . . . . . . . . . . . . . . . . . . . . . . . . . . . . . . . . . . . . . . 4-25
Pape r s izes . . . . . . . . . . . . . . . . . . . . . . . . . . . . . . . . . . . . . . . . 4-26
Envelope types . . . . . . . . . . . . . . . . . . . . . . . . . . . . . . . . . . . . . 4-27
Tran sp arency and glo ss y pa pe r types . . . . . . . . . . . . . . . . . . . 4-28
Lab el ty pe s . . . . . . . . . . . . . . . . . . . . . . . . . . . . . . . . . . . . . . . . 4-28
Reco mm e n de d me d ia. . . . . . . . . . . . . . . . . . . . . . . . . . . . . . . . . 4-29
4-2
Page 76

Printing With the Sharp Colour MFP
Follow the steps below to print with the Sharp Colour MFP.
1.
From your software application’s File menu, select Print.
2.
Make sure that Colour MFP is the selected printer, then select the
range of pages you want to print.
3.
Click OK (or Print) to begin printing.
Note: If you attempt a print job when PC faxing is in progress, or
attempt PC faxing when printing is in progress, the initial job may be
interrupted.
The Printer Software
The Sharp Colour MFP printer software consists of Printer Manager
and the printer driver.
Colour MFP Printer Manager
Printer Manager lets you monitor and control the operation of the
Sharp Colour MFP. Printer Manager includes five tabs: Status,
Options, Cartridges, DOS Printing and About. From these tabs, you
can:
Install and replace print cartridges
♦
Clean and align print cartridges
♦
View print job progress and print cartridge ink levels
♦
Cancel a print job
♦
Control how and when the Sharp Colour MFP Printer Manager
♦
window appears on your computer screen
Print a test page
♦
To open the Colour MFP Printer Manager, click Start on your
computer screen, point to Programs an d th en Colour Multifunction
Interface, and select Printer Manager on....
4-3
Page 77

Printing With the Sharp Colour MFP
Printer driver
The printer driver includes two tabs: Paper and Document /Quality.
Each tab contains settings relating to printer operations and the
appearance of your print jobs.
From the printer driver setup tabs, you can:
Select a document print option
♦
Change paper type and print quality
♦
Choose dry time delay
♦
Select the paper size, orientation, and paper source
♦
Specify the number of copies to pr int
♦
You can open the printer driver by clicking on the Print Setup or
equivalent command in an application.
You can also access the Paper and Document/Quality tabs from the
Sharp MFP Properties window. Click Start, Settings, and then
Printers. Right-click the Colour MFP icon and select Properties in the
sidebar menu.
4-4
Page 78

Printing With the Sharp Colour MFP
Setting the default printer
Set the Sharp Colour MFP as the default printer so that it is
automatically selected when you select the Print command in an
application.
Note: If you have just installed the Sharp Multifunc tion Sof twar e,
the Sharp Colour MFP is already set as the default printer.
1.
From the Start menu, click Settings.
2.
Click Printers. The Printers dialog box appears.
3.
Click the Colour MFP printer icon once to select it.
4.
From the File menu, click Set As Default.
Running Printer Manager as an icon
1.
From Printer Manager, click the Options tab.
2.
Make sure Run Minimized is checked.
When you send a job to print, Printer Mana ge r will open as an
•
icon instead of a window.
Canceling a print job
1.
From Printer Manager, click the Status tab.
2.
Click the Cancel Print button.
4-5
Page 79

Printing With the Sharp Colour MFP
Printing a test page
To make sure that the Sharp Colour MFP is operating properly, print a
test page. You can print a test page using either the panel keys on the
Sharp Colour MFP or Printer Manager on your computer.
Note: The contents of the panel key tes t page an d the Printer
Manager test page are different.
Printing a test page using the panel keys
Press these keys on the Colour MFP:
1
The display will show:
Press the START key.
2
If the test page does not prin t, se e Test Page Does Not Print in
•
Printing Problems in Chapter 12.
Printing a test page from Printer Manager
1.
From Printer Manager, click the Status tab.
2.
Click the Print Test Page button.
If the test page does not prin t, se e Test Page Does Not Print in
•
Printing Problems in Chapter 12.
TEST PRINT
PRESS START KEY
4-6
Page 80

Changing Printer Settings
Use the Sharp Colour MFP printer driver software to change printer
settings for Windows applications. The method you use to open the
driver software determines how the changes are applied to your print
jobs.
You can open the printer software from:
The Windows 95/98 Start menu
♦
The Print command in an application’s File menu
♦
The Printer Setup (or equiva lent) co mman d in an app lication ’s
♦
File menu.
If you open the printer
Then changes you make are:
software from the:
Windows 95/98 Start menu Applied to all print jobs
Print command in an
Applied to that print job only
application’s File menu
Printer Setup (or equivalent)
Stored with the document
command in an application’s
File menu
Selecting print quality
1.
Open the application’s File menu.
2.
Choose Print (or Printer Setup).
3.
In the Printer Setup dialog box, click the Properties button.
4.
Click the Document/Quality tab to open it.
5.
From the Print Quality selection, click the option you want.
For high quality graphics, select Normal or High.
•
For fast printing, select Fast Draft.
•
4-7
Page 81

Changing Printer Settings
Choosing a paper type
1.
Open the application’s File menu.
2.
Choose Print (or Printer Setup).
3.
In the Printer Setup dialog box, click the Properties button. The
Colour MFP property sheets appear.
4.
Click the Document/Quality tab to open it.
5.
From the Paper Types area, click the paper type you want to use.
Choosing portrait or landscape page orientation
1.
Open the application’s File menu.
2.
Choose Print (or Printer Setup).
3.
In the Printer Setup dialog box, click the Properties button. The
Colour MFP property sheets appear.
4.
Click the Paper tab to open it.
5.
Select the appropriate orientation for your print job.
The image beside your selection reflects the choice you made.
•
4-8
Page 82

Changing Printer Settings
Choosing a paper size
1.
Open the application’s File menu.
2.
Choose Print (or Printer Setup).
3.
In the Printer Setup dialog box, click the Properties button. The
Colour MFP property sheets appear.
4.
Click the Paper tab to open it.
5.
From the Paper Size list box, click the paper size you want.
To choose a Custom Paper size:
1.
Open the application’s File menu.
2.
Choose Print (or Printer Setup).
3.
In the Printer Setup dialog box, click the Properties button. The
Colour MFP property sheets appear.
4.
Click the Paper tab to open it.
5.
From the Paper Size list box, select Custom. A dialog box appears.
6.
Enter the width and height of your paper.
7.
Click OK.
4-9
Page 83

Changing Printer Settings
Choosing manual/specialty media or automatic/nor m al media
1.
Open the application’s File menu.
2.
Choose Print (or Printer Setup).
3.
In the Printer Setup dialog box, click the Properties button. The
Colour MFP property sheets appear.
4.
Click the Paper tab to open it.
5.
From Paper Source, select Manual/Specialty Media or
Automatic/Normal Media.
Increasing print speed
There are four procedures that increase the print speed. Perform
Procedure 1 and then send a job to print. If the print speed is not
satisfactory, perform Procedure 2 and send the job again. Continue
performing these procedures and resending the job until print speed is
satisfactory.
Performing these procedures may affect print quality.
♦
Procedure 1
Use this procedure to free memory.
1.
Close other applications not in use.
2.
Close all other open files within your application.
Procedure 2
Use this procedure to change the Print Quality setting to a lower
quality, faster setting.
1.
Open the application’s File menu.
2.
Choose Print (or Printer Setup).
4-10
Page 84

Changing Printer Settings
3.
In the Printer Setup dialog box, click the Properties button. The
Colour MFP property sheets appear.
4.
On the Document/Quality tab, click Normal or Fast Draft.
Procedure 3
Make sure the Dry Time Delay setting on the Document/Quality tab is
disabled.
Procedure 4
Use this procedure to change the Document Print option to Colour
Sort.
1.
Open the application’s File menu.
2.
Choose Print (or Printer Setup).
3.
In the Printer Setup dialog box, click the Properties button. The
Colour MFP property sheets appear.
4.
On the Document/Quality tab, click Colour Sort.
4-11
Page 85

Changing Printer Settings
Preventing print from smearing
1.
Open the application’s File menu.
2.
Choose Print (or Printer Setup).
3.
In the Printer Setup dialog box, click the Properties button. The
Colour MFP property sheets appear.
4.
Click the Document/Quality tab to open it.
5.
Make sure Dry Time Delay is checked.
Dry Time Delay tells the printer to print a page and wait briefly
•
for the ink to dry before printing another page.
Printing copies
1.
Open the application’s File menu.
2.
Choose Print (or Printer Setup).
3.
In the Printer Setup dialog box, click the Properties button. The
Colour MFP property sheets appear.
4.
Click the Paper tab to open it.
5.
In the Copies section, enter the number of copies you wish to print.
If you print copies of a multiple pag e docu men t, the prin ter doe s
♦
not automatically collate the copies. For example, if you print ten
copies of a ten-page document, the printer prints ten copies of
page one, ten copies of page two, and so on. To collate the copies,
click Collate. To change the order in which the co pie s pr int, click
Reverse Page Order.
4-12
Page 86

Changing Printer Settings
Printing in reverse page order (last page first)
1.
Open the application’s File menu.
2.
Choose Print (or Printer Setup).
3.
In the Printer Setup dialog box, click the Properties button. The
Colour MFP property sheets appear.
4.
Click the Paper tab to open it.
5.
On the Paper tab, click the Reverse Page Order option.
Printing colour pages before black
To reduce the number of times you switch between colour and black
print cartridges during a mixed print job:
1.
Make sure you have the colour cartridge installed.
2.
Open the application’s File menu.
3.
Choose Print (or Printer Setup).
4.
In the Printer Setup dialog box, click the Properties button.
5.
Click the Document/Quality tab to open it.
6.
From the Document Print section, click Colour Sort.
7.
Send the print job.
8.
When the printer software prompts you, remove the colour cartridge
and replace it with the black cartridge.
4-13
Page 87

Changing Printer Settings
Printing black pages before colour
To reduce the number of times you switch between colour and black
print cartridges during a mixed print job:
1.
Make sure you have the black cartridge installed.
2.
Open the application’s File menu.
3.
Choose Print (or Printer Setup).
4.
In the Printer Setup dialog box, click the Properties button.
5.
Click the Document/Quality tab to open it.
6.
From the Document Print section, click Colour Sort.
7.
Send the print job.
8.
When the printer software prompts you, remove the black cartridge
and replace it with the colour cartridge.
4-14
Page 88

Printing on Special Media Using the Manual Feeder
Use the manual feeder to print on envelopes, index cards, postcards,
transparencies, glossy paper, and any other media that cannot be
loaded in the paper tray.
Only one sheet of media can be loaded at a time in the manual
♦
feeder.
Flip up the document tray.
1
Insert one sheet of media into the manual feeder, print side up, so
2
that the right edge of the media is again st the righ t guide. Push the
media in until the feeder draws the leading edge in slightly.
Insert envelopes length wise so that the re tur n addr es s is in the
•
upper right-hand corner.
The display will show:
CHECK MAN FEEDER
USE AUTO FOR RX
4-15
Page 89

Printing on Special Media
Note: If the media is skewed, pull it out of the feed er and then
reinsert it.
Adjust the paper guide to match the width of the media.
3
From the application’s File menu, choose Print (or Printer Setup).
4
In the Printer Setup dialog box, click the Properties button. The
5
Colour MFP property sheets appear.
Click the Paper tab to open it.
6
4-16
Page 90

Printing on Special Media
From Paper Source, se lec t Manual/Specialty Media.
7
Select the appropriate paper size.
8
Click the Document/Quality tab.
9
10
11
12
Select the paper type.
Click OK.
Send the job to print.
Note: Faint horizontal lines may appear on some types of envelopes.
Removing media from the manual s heet feeder
If you need to remove a sheet of media from the manual sheet feeder,
press the PRINTER key. The media will feed out automatically.
4-17
Page 91

Printing on Special Media
Printing on banner paper
To print on banner paper, use the manual feeder.
Place the stack of banner paper behind your Sharp Colour MFP.
1
Flip up the document tray.
2
4-18
Page 92

Printing on Special Media
Grasp the leading edge of the banner paper, pull it up and over the
3
paper tray, and inser t it into the manua l fee de r. The pr int sid e mus t
be up and the right edge of the paper should be against the right
guide. Push the paper in until the feeder draws the leading edge in
slightly.
The display will show:
Adjust the paper guide to match the width of the banner paper
4
Flip the original document output suppo rt ba ck down.
5
CHECK MAN FEEDER
USE AUTO FOR RX
4-19
Page 93

Printing on Special Media
From your application’s File menu, select Print (or Print Setup)
6
In the Printer Setup dialog box, click the Properties button. The
7
Colour MFP property sheets appear.
Click the Paper tab to open it.
8
From the Paper Source box, select Manual/Specialty Media.
9
10
11
12
From the Paper Size scroll box, select Banner Ltr or Banner A4
depending on the size of banner paper (letter or A4) you are using.
Click OK.
Send the job to print.
4-20
Page 94

Printing From DOS Applications
Printing from DOS applications in Windows
Use these instructions only if your application runs from the DOS
prompt in Windows. When you print from a DOS application, your
printer uses PCL 3 emulation. You must install a printer driver for
PCL 3 emulation in each DOS application.
To print from DOS applications that run from the Windows DOS
prompt:
1.
From the Colour MFP Printer Manager, click the Options tab.
2.
Make sure Disable Colour MFP DOS Printing (Enable DOS Printing
to other Printers) is not checked.
3.
Make sure you are in Windows, not native DOS.
4.
Click the Start button, point to Programs, and then click MS-DOS
Prompt.
5.
Start your application from the MS-DOS prompt.
6.
Install the HP DeskJet 500C as the current printer in the DOS
application from which you are printing.
Some applications offer a colour or black (mono) version of the
•
HP DeskJet 500C driver. Choose the black (mono) version if you
are printing in black only. Choose the colour version if you are
printing in colour and bla ck.
If your application does not offer the HP DeskJet 500C printer
•
driver, install the DeskJet 500 pr inte r dr ive r. You will not be able
to print in colour with the DeskJet 500 prin ter driver .
For help installing a printer, see your application user’s documenta-
•
tion.
7.
If you need to change printer settings that are not in your application,
use the DOS Printing tab in Printer Manager.
8.
Print as you normally would from your application.
4-21
Page 95

Printing From DOS Applications
Printing from non-Windows DOS applications
Follow these steps if your application runs from the native DOS
prompt, but does not run from the DOS prompt in Windows.
1.
From Printer Manager, click the Options tab.
2.
Make sure Disable Colour MFP DOS Printing (Enable DOS Printing
to other Printers) is not checked.
3.
Start your DOS application.
4.
Install the HP DeskJet 500C as the current printer in the DOS
application from which you are printing.
Some applications offer a colour or black (mono) version of the
•
HP DeskJet 500C driver. Choose the black (mono) version if you
are printing in black only. Choose the colour version if you are
printing in colour and bla ck.
If your application does not offer the HP DeskJet 500C printer
•
driver, install the DeskJet 500 pr inte r dr ive r. You will not be able
to print in colour with the DeskJet 500 prin ter driver .
For help installing a printer, see your application user’s documenta-
•
tion.
5.
Create a print file using the "Print To File" function of your
application. For help on printing to a file, see your application user’s
documentation.
6.
Exit the DOS application.
7.
Start Windows.
8.
Start MS-DOS from Windows.
4-22
Page 96

Printing From DOS Applications
9.
Use this DOS command to copy the print file to the port where the
printer is connected:
copy filename lptn /b
In the above example,
copy is the DOS copy command.
•
filename is the name of the print file created in step 3.
•
lptn is the port where your printer is connected. For example,
•
lpt1 or lpt2.
/b instructs the computer to send the data in binary form.
•
Note: Avoid using the DOS Print command to send a job to the printer
port. The Print command causes printing delays.
Changing print settings for DOS applications
If possible, use options in your DOS application to change printer
settings. Use the steps below only if you want to change a printer
setting that does not exist in your DOS application.
1.
From Printer Manager, click the DOS Printing tab.
2.
Change settings as needed.
Enabling Sharp MFP DOS printing
To enable DOS printing to the Sharp Colour MFP:
1.
From Printer Manager, click the Options tab.
2.
Make sure Disable Colour MFP DOS Printing (Enable DOS Printing
to other Printers) is not checked.
4-23
Page 97

Printing From DOS Applications
Enabling DOS Printing to other printers
To enable DOS printing to other printers:
1.
From Printer Manager, click the Options tab.
2.
Make sure Disable Colour MFP DOS Printing (Enable DOS Printing
to other Printers) is selected.
Printing a DOS fonts list
1.
From Printer Manager, click the DOS Printing tab.
2.
Click the Print Fonts button.
Adjusting the amount of ink used for each DOS print job
1.
From Printer Manager, click the DOS Printing tab.
2.
In the Print Quality setting, click the appropriate Ink Saver option.
4-24
Page 98

Printing Media Specifications
Paper types
You can get good print qualit y on man y typ es of plain paper. Sin ce the
quality of plain paper varies widely, you should test the print qualit y
before buying large quantit ies of paper.
Most papers have a preferred print side indicated on the paper
package. Load the paper so the preferre d prin t side faces up.
The printer uses a variety of papers including:
• Xerographic paper
• Bond paper
• Dual-p urpose pape r
• Recycled bond paper
Because all paper varies in physical characteristics, you can receive
mixed results from different packages of paper even though the
packages contain the same type of paper. If you encounter undesirable
results, try the other side of the paper, a different type, or another
package of the same kind of paper.
Do not use the following types of paper with the printe r:
• Erasable bond paper
• Synthetic paper
• Thermal pa per
• Multi-sheet forms and documents
• Chemically treated paper (carbonless paper)
• Papers printed with a printing process using chemicals will con-
taminate the paper feed mecha nism components (paper with
raised, embossed lettering)
4-25
Page 99

Printing Media Speci fic ati ons
Most papers have a preferred print side indicated on the paper
package. Load the paper so the preferred print side faces you.
The following paper sizes can be used in the manual feeder:
Length: 127 to 432 mm 5.0 to 17 in.
Width: 88 to 215 mm 3.5 to 8.5 in.
Weight: 76 to 90 g/s qm 20 to 24 lb.
Thickness: 0.1 to 0.178 mm 0.0004 to 0.007 in.
Paper sizes
The Paper Size list in the printer driver includes t hese settings :
Letter 8. 5 x 11.0 in.
A4 210 x 297 mm
Legal 8.5 x 14.0 in.
B5 (JIS) 182 x 257 mm
Executive 7.25 x 10.5 in.
A5 148 x 210 mm
A6 105 x 148 mm
Index card 3.0 x 5.0 in.
Post ca r d 4. 0 x 6. 0 in.
Envelope 6 3/4 6 3/4 x 3 5/8 in.
Envelope #9 3-7/8 x 8-7/8 in.
Envelope #10 4-1/8 x 9-1/2 in.
Envelope DL 110 x 220 mm
4-26
Page 100

Printing Media Speci fic ati ons
Envelope C5 162 x 229 mm
Envelope C6 114 x 162 mm
Envelope B5 176 x 250 mm
Envelope 7-3/4 3.88 x 7.5 in.
Baronial 5.63 x 4.38 in.
Banner Ltr 8.5 x 11 in., continuous forms
Banner A4 210 x 297 mm, continuous forms
Custo m Width: 3.5 to 8.5 in.
Length: 5 to 17 in.
When you select the User-Defined option from the Paper Size list, a
popup window appears. Enter the full size (width and height) of the
paper. The actual printable area is slightly less than the dimensi ons
you enter.
Note: Card stoc k must be loaded as envelopes.
Envelope ty pe s
Load envelopes in the manual feeder. The acceptable dimension s for
envelopes loaded in the manual feeder are:
Length: 127 to 432 mm 5.0 to 17.0 in.
Width: 76.2 to 203 mm 3.0 to 8.0 in.
Weight: 76 to 90 g/s qm 20 to 24 lb.
Thickness: 0.178 to 0. 635 m m 0.007 to 0.025 i n.
Do not use the following ty pes of env elopes:
• Envelopes with windows, holes, perforations, cutouts, or deep em-
bossing
• E nvelopes with a metal clasp, a string tie, or metal folding bars
4-27
 Loading...