

Page 1

MODEL
FO-2081
DIGITAL MULTIFUNCTIONAL
SYSTEM
OPERATION GUIDE
(for general information)
Page 2

CONTENTS
INTRODUCTION .............................................................................................. 4
MAIN FEATURES ............................................................................................. 5
1 PREPARATIONS
PART NAMES ................................................................................................... 7
POWER ON AND OFF ................................................................................... 10
SETTING THE DATE AND TIME .................................................................... 11
2 LOADING PAPER
PAPER ............................................................................................................ 16
LOADING THE PAPER TRAY ........................................................................ 17
BYPASS FEED (including special paper) ....................................................... 19
CHANGING A TRAY'S PAPER SIZE SETTING ............................................. 21
3 MAKING COPIES
NORMAL COPYING ....................................................................................... 22
SELECTING THE TRAY ................................................................................. 25
MAKING A COPY DARKER OR LIGHTER .................................................... 26
REDUCTION/ENLARGEMENT/ZOOM .......................................................... 27
4 CONVENIENT COPY FUNCTIONS
AUTOMATIC TWO-SIDED COPYING ............................................................ 28
SORT COPY .................................................................................................. 31
COPYING MULTIPLE ORIGINALS ONTO A SINGLE SHEET OF PAPER
(2 IN 1 copy) ................................................................................................... 33
CREATING MARGINS WHEN COPYING (Margin shift) ................................ 36
ID CARD COPY .............................................................................................. 38
5 INSTALLING THE SOFTWARE
SOFTWARE ................................................................................................... 39
BEFORE INSTALLATION ............................................................................... 40
INSTALLING THE SOFTWARE ...................................................................... 41
CONFIGURING THE PRINTER DRIVER ...................................................... 53
SETTING UP BUTTON MANAGER ............................................................... 55
1
Page 3

6 PRINTER FUNCTIONS
PRINTER/SCANNER FUNCTIONS ............................................................... 57
USING THE PRINTER MODE ....................................................................... 58
BASIC PRINTING ........................................................................................... 59
OPENING THE PRINTER DRIVER FROM THE "START" BUTTON ............. 61
PRINTER DRIVER SETTINGS ...................................................................... 62
TWO-SIDED PRINTING ................................................................................. 63
PRINTING MULTIPLE PAGES ON ONE PAGE .............................................. 65
FITTING THE PRINTED IMAGE TO THE PAPER ......................................... 66
ROTATING THE PRINT IMAGE 180 DEGREES ............................................ 67
PRINTING A WATERMARK ........................................................................... 68
PRINTING TEXT AND LINES/GRAPHICS IN BLACK ................................... 69
PRINTER UTILITY ......................................................................................... 70
USING THE PRINTER UTILITY ..................................................................... 71
ABOUT THE WEB PAGES ............................................................................. 76
ABOUT THE WEB PAGES (FOR USERS) ..................................................... 77
CONFIGURING THE PRINTER CONDITION SETTINGS ............................. 78
ABOUT THE WEB PAGES
(FOR THE ADMINISTRATOR) ....................................................................... 81
PROTECTING INFORMATION PROGRAMMED IN THE WEB PAGE
([Passwords]) .................................................................................................. 82
KEY OPERATOR PROGRAMS ...................................................................... 83
E-MAIL STATUS AND E-MAIL ALERT SETTINGS ........................................ 85
REMOVING THE SOFTWARE ....................................................................... 88
PRINTER SPECIFICATIONS ......................................................................... 88
PRINTER DRIVER SPECIFICATIONS ........................................................... 89
USING THE SCANNER MODE ...................................................................... 90
7 SCANNER AND FAX FUNCTIONS
ABOUT THE SCAN TO USB AND NETWORK SCANNER FUNCTION ........ 91
SETTINGS AND PROGRAMMING REQUIRED FOR THE NETWORK
SCANNER FEATURE ..................................................................................... 92
ABOUT THE WEB PAGE (FOR USERS) ....................................................... 93
ABOUT THE WEB PAGE (FOR THE ADMINISTRATOR) ............................ 112
SCANNING USING THE KEYS ON THE MACHINE ................................... 117
TRANSMISSION METHODS FOR SCAN TO E-MAIL ................................. 120
SCANNING FROM YOUR COMPUTER ...................................................... 128
8 USER SETTINGS
USER PROGRAMS ...................................................................................... 134
SELECTING A SETTING FOR A USER PROGRAM ................................... 140
2
Page 4

9 TROUBLESHOOTING AND MAINTENANCE
DISPLAY MESSAGES .................................................................................. 142
TROUBLESHOOTING THE MACHINE ........................................................ 147
PROBLEMS DURING SETUP THE SOFTWARE ........................................ 154
MISFEED REMOVAL ................................................................................... 157
TD (TONER/DEVELOPER) CARTRIDGE REPLACEMENT ........................ 161
DRUM CARTRIDGE REPLACEMENT ......................................................... 163
CHECKING THE TOTAL COUNT AND DRUM CARTRIDGE LIFE .............. 165
CLEANING THE MACHINE ......................................................................... 166
TRANSFER CHARGER ............................................................................... 168
ABOUT SUPPLIES AND OPTIONS ............................................................. 169
10
OPTIONAL EQUIPMENT
250-SHEET PAPER FEED UNIT (MX-CS10) ............................................... 170
3
Page 5

INTRODUCTION
Some model may not be available in some countries.
Conventions used in this manual and online manual
• The illustrations in this manual show the FO-2081. The appearance of your
machine may be different depending on the model and options installed, however,
the basic operations are the same.
• Where "FO-XXXX" appears in this manual, please substitute the name of your
model for "XXXX". For the name of your model, see the operation panel on the
machine.
• Illustrations of driver screens and other computer screens show the screens that
appear in Windows Vista. Some of the names that appear in these illustrations may
differ slightly from the screens that appear in other operating systems.
• The explanations in this manual assume that the person who will install the product and
the users of the product have a working knowledge of Microsoft Windows.
• This operation guide refers to the Reversing Single Pass Feeder as the "RSPF".
• In this manual, the following icons are used to provide the user with information
pertinent to the use of the machine.
Warns that injury may result if the contents of the warning are
not properly followed.
Cautions that damage to the machine or one of its components may
result if the contents of the caution are not properly followed.
Notes provide useful information on the specifications, functions,
performance, and operation of the machine.
The display screens, messages, and key names shown in the manual may differ
from those on the actual machine due to product improvements and modifications.
4
Page 6
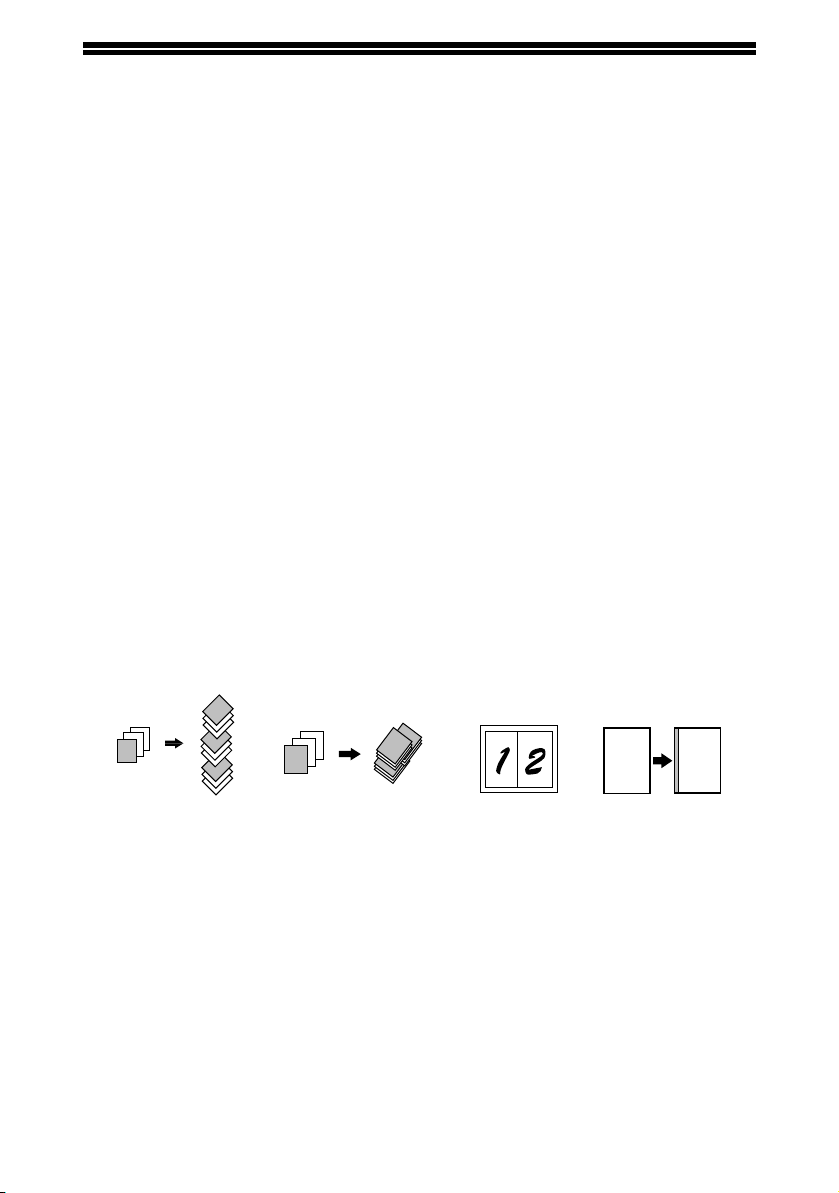
MAIN FEATURES
A
Margin shift
Sort copy Offset function
2 IN 1 copy
2
1
3
2
1
3
1
2
3
2
1
3
1
1
1
2
3
A
High-speed laser copying
First-copy time*1 is only 8.0*2 seconds.
Copying speed is 20 copies per minute. This is ideal for business use and provides a
big boost to workplace productivity.
*1The first-copy time is measured after the power save indicator turns off following
power on, using the document glass with the polygon rotating in the copy ready state
and "LSU SETTING" set to ON in the user programs (8-1/2" x 11", paper fed from
paper tray).
*2When user program 24 is set to OFF.
High-quality digital image
• High-quality copying at 600 dpi is performed.
• In addition to automatic exposure adjustment, two original modes can be selected:
"TEXT" for text-only originals, and "PHOTO" for photographs. The exposure can be
adjusted to five levels in each mode.
• The photo mode copying function allows clear copying of delicate halftone original
images such as monochrome photos and color photos.
Enhanced copying features
• Zoom copies can be made from 25% to 400% in increments of 1%. (When the
RSPF is being used, the zoom copy ratio range is 50% to 200%.)
• Continuous copying of up to 99 copies is possible.
• Sets of output can be offset from each other for easy separation (offset function).
• Sorting by sets is possible without the need for a sorter or other special device
(Sort copy).
• Includes convenient features such as margin shift, 2 IN 1 copy, and automatic twosided copying.
Scan once/Print many
• The machine is equipped with a memory buffer allowing the machine to scan an
original once and make up to 99 copies of the scanned image. This improves
workflow, reduces operating noise from the machine and reduces wear and tear on
the scanning mechanism, which provides for a higher reliability.
5
Page 7

LCD panel displays messages
The LCD panel displays messages that show function settings and the status of the
machine.
Laser printer function
• Printer function
The accompanying printer driver can be installed to enable use of the machine as a
printer.
• Network printer function
A LAN connector is provided as a standard feature that allows the machine to be
used as a network printer.
Color scanner function
• The accompanying scanner driver can be installed and the machine connected to
a computer using a USB cable to enable use as a scanner.
Environment and people friendly design
• Preheat mode and auto power shut-off mode are provided to reduce power
consumption when the machine is not in use.
• A universal design has been implemented in the product whereby the height of the
operation panel and shape of the keys are designed to be usable by as many
people as possible.
6
Page 8
1
RSPF
Exit area
2
3
4
1
5
7
6
9
8
10
11
12
14
15
Bypass tray
Original guides
Document feeder tray
Document
feeder cover
5
3
13
12
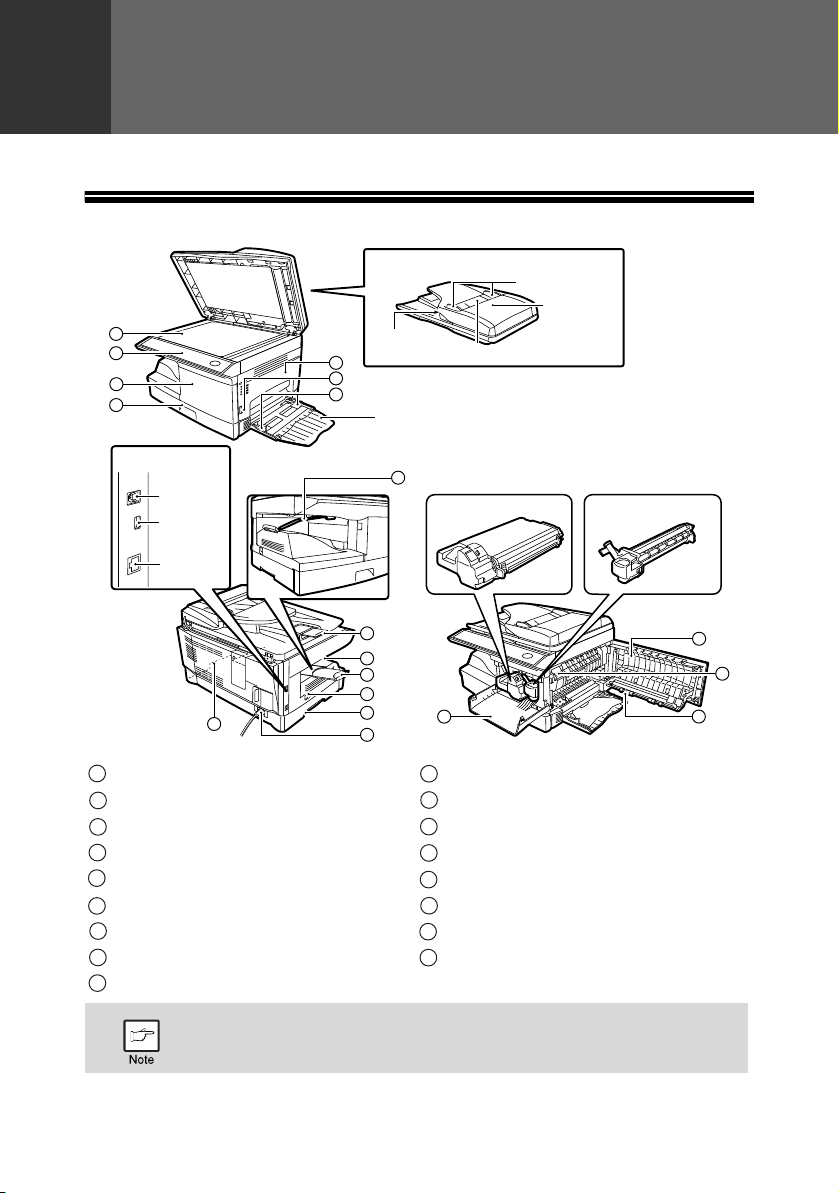
Drum cartridge
TD (Toner/Developer)
cartridge
Interface
USB
connector
(Device)
USB
connector
(Host)
LAN
connector
17
1
10
2
11
3
12
4
13
5
14
6
15
7
16
8
17
9
Chapter 1
PREPARATIONS
This chapter provides basic information that you should know before using the machine.
PART NA MES
Document glass Paper output tray extension
Operation panel Power switch
Front cover Handles
Paper tray Power cord
Side cover
Fusing unit release lever
Side cover open button Transfer charger
Bypass tray paper guides Charger cleaner
Original output tray extension Paper holder arm
Paper output tray
The paper output tray has a paper holder arm. The paper holder arm
presses gently on the output paper to stack it.
7
Page 9
PREPARATIONS
111
2
333
444
555
666
777
888
999
101010
111111
121212
131313
141414
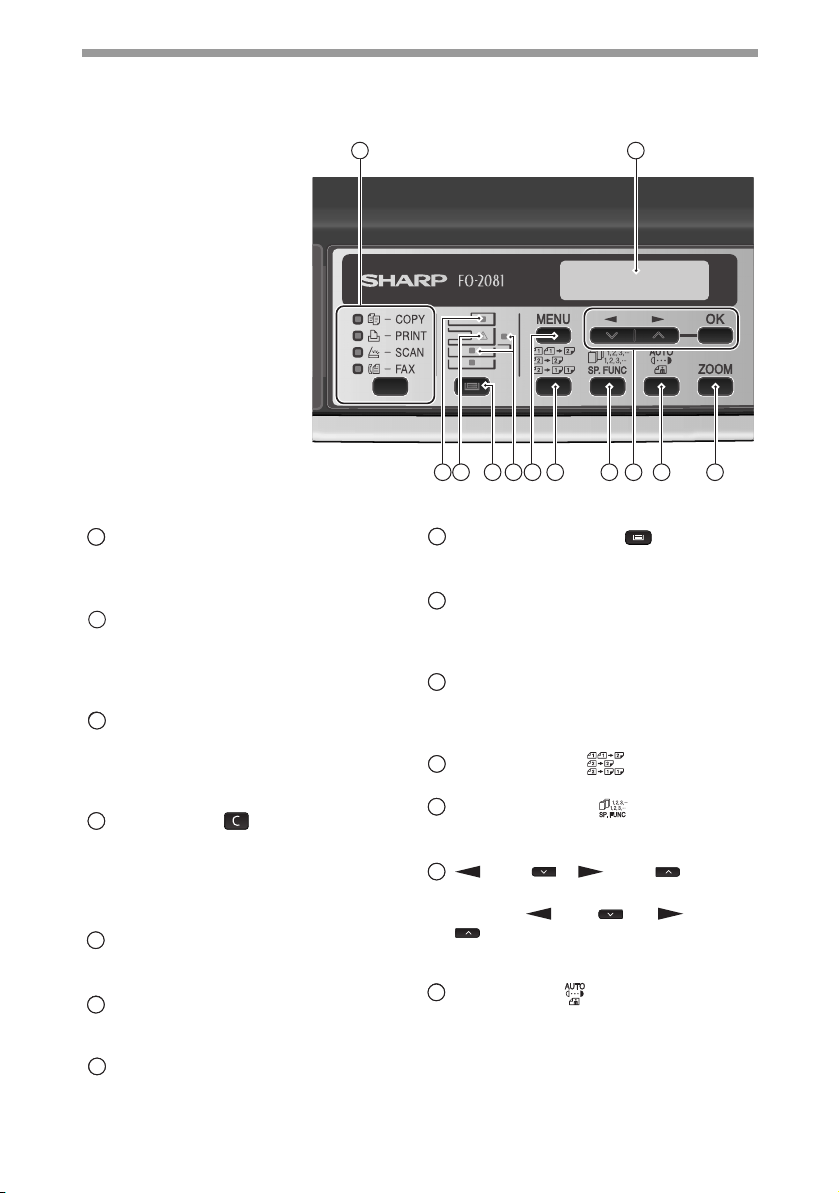
Operation panel
1 2
[MODE SELECT] key / Mode indicators
Press this key to select the mode. The
indicator of the selected mode lights (copy,
printer, scanner mode indicators).
Display
This shows messages indicating the
machine status and any problems that
occur, as well as user programs and
function setting menus.
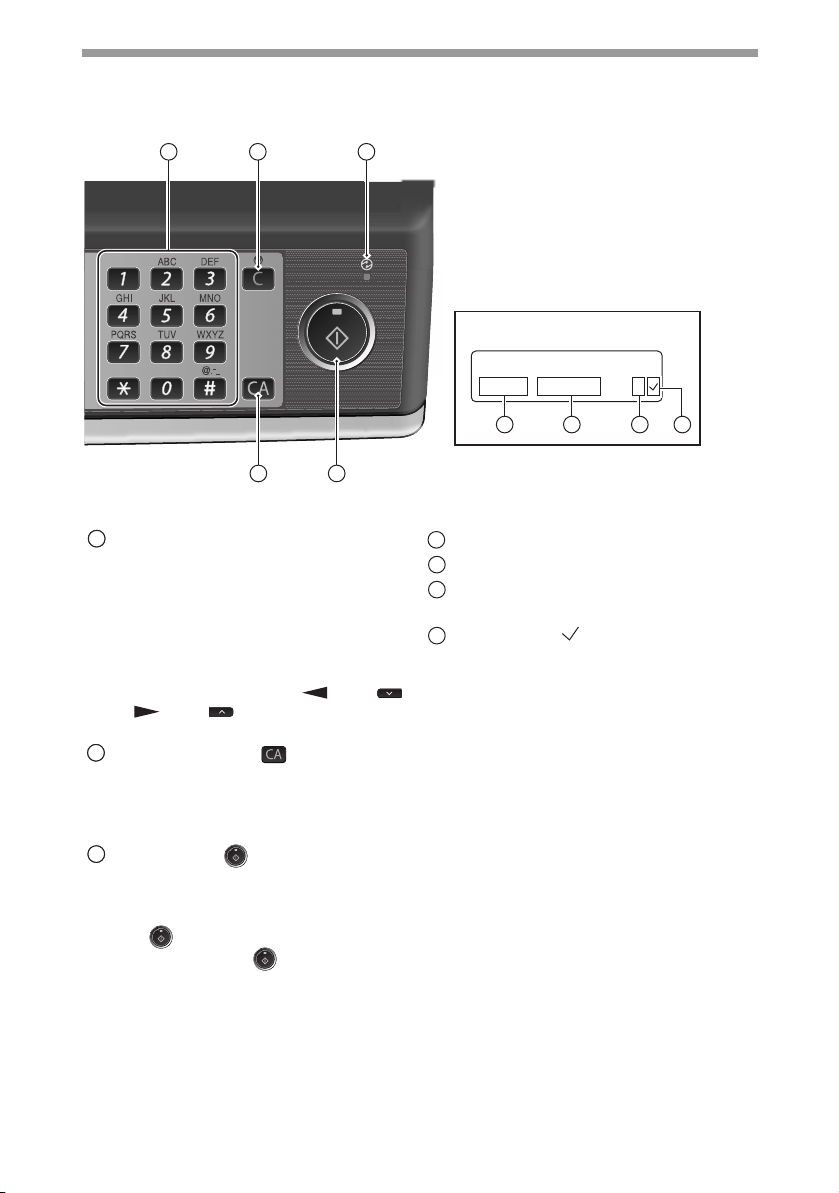
Numeric keys
Use these to enter the number of copies
and other numerical settings.
The keys can also be used to select
items in function setting menus.
[CLEAR] key ( )
Use this to clear the set number of
copies, as well as cancel a job that is in
progress. When a setting menu appears,
use this key to move back to the
previous menu level.
Power save indicator
This lights up when the power save
function is activated.
RSPF indicator
This lights up when an original is placed
in the RSPF.
Error indicator
This lights steadily or blinks when a
paper misfeed or other error occurs.
6 7 8
10 11 1312 14 15
9
[TRAY SELECT] key ( )
Use to select the paper tray that has the
desired paper for copying.
Tray location indicator
Indicates the selected paper tray. The
indicator blinks when the tray is out of
paper or is not closed.
[MENU] key
Press this key to select the paper size for
copying, to configure a user program or
to display the total count.
[2-SIDED COPY ( )] key
Use to copy both sides of an original.
[E-SORT/SP.FUN ( )] key
Press to select the sort function, 2 IN 1
copy function, or margin shift function.
[ ] key ( ), [ ] key ( ), [OK]
key
Press the [ ] key ( ) or [ ] key
( )to select an item in a function setting
menu.
Press the [OK] key to enter a selection.
[EXPOSURE ( )] key
Use to switch from auto exposure
adjustment to text mode or photo mode.
8
Page 10
PREPARATIONS
151515
161616
171717
18
19
20
21
READY TO COPY.
100% 8.5x11 0
Display
16
3 4 5
17
18 19
20
21
[ZOOM] key
Press to select an enlargement or
reduction ratio.
To select a preset ratio setting, press the
[ZOOM] key and select the desired
preset ratio. To select a ratio that is not
preset, press the [ZOOM] key, select the
preset ratio that is closest to the desired
ratio, and then press the [ ] key ( )
[ ] key ( ) to increase or
or
decrease the ratio in increments of 1%.
[CLEAR ALL] key ( )
This returns all functions to the default
settings. When pressed in a setting menu,
this returns the settings and display to the
initial state.
[START] key ( ) / Ready indicator
The ready indicator lights up when
copying or scanning is possible.
To begin copying, press the [START]
key ( ).
The [START] key ( ) is also pressed
to return to normal operation from auto
power shut-off mode.
Shows the current copy ratio.
Shows the selected paper size.
Shows the number of copies that has
been entered with the numeric keys.
A checkmark " " appears when the
exposure has been changed, or when
two-sided copying, sort, 2 IN 1, or
margin shift is selected.
9
Page 11

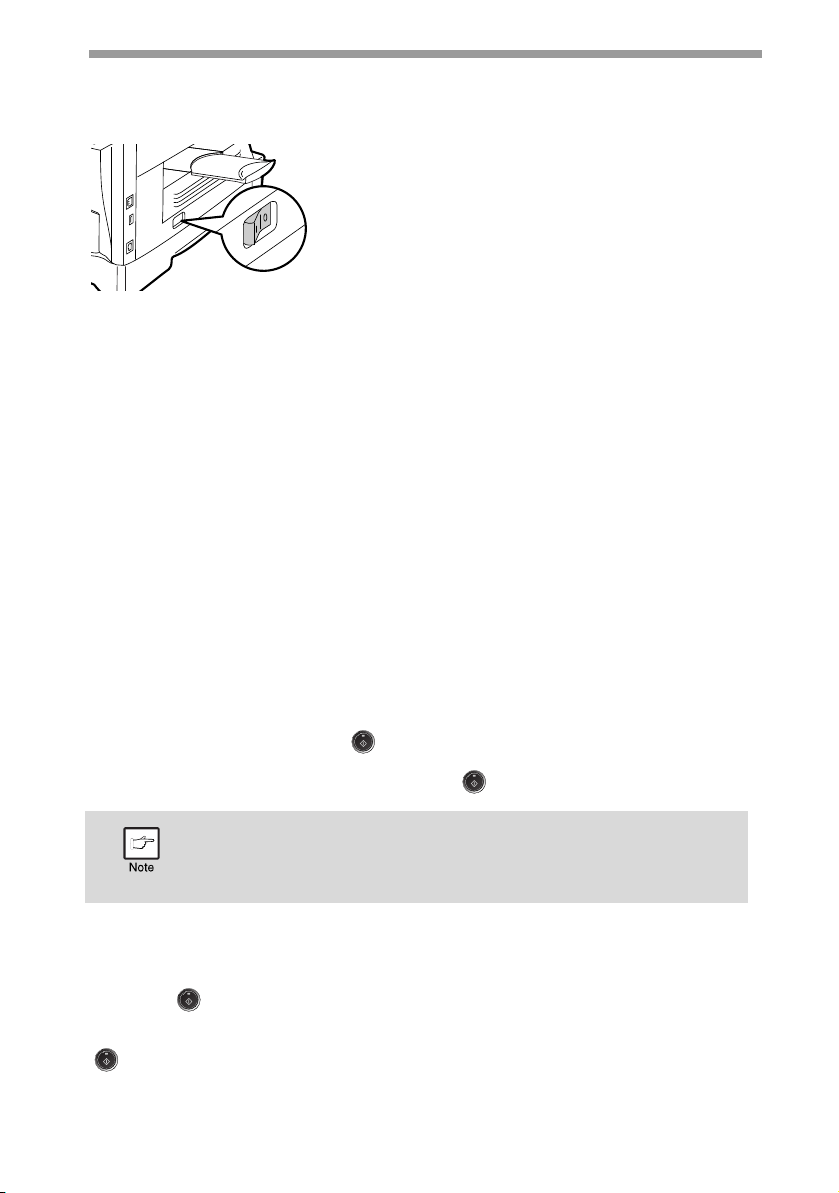
POWER ON AND OFF
The power switch is located on the left side of the machine.
If you use the machine in a country other than the country
where the machine was purchased, you will need to make sure
that your local power supply is compatible with your model. If
you plug the machine into an incompatible power supply,
irreparable damage to the machine will result.
Power on
Turn the power switch to the "ON" position.
The ready indicator will light up and other
indicators which show the initial settings of the
display will also light up to indicate the ready
condition. For the initial settings, see the
"Initial settings" (below).
You can select copy settings and press the [START] key ( ) after the power
switch is turned on. Copying will start automatically.
Only insert the power cord into a properly grounded wall socket.
Do not use extension cords or power strips.
Language setting
The first time the power is turned on after shipment from the factory, a message will
appear in English in the display asking you to select the language. Select the
language with the [ ] key ( ) or [ ] key ( ) and then press the [OK] key.
The language can also be changed in the user programs (p.137).
10
Page 12
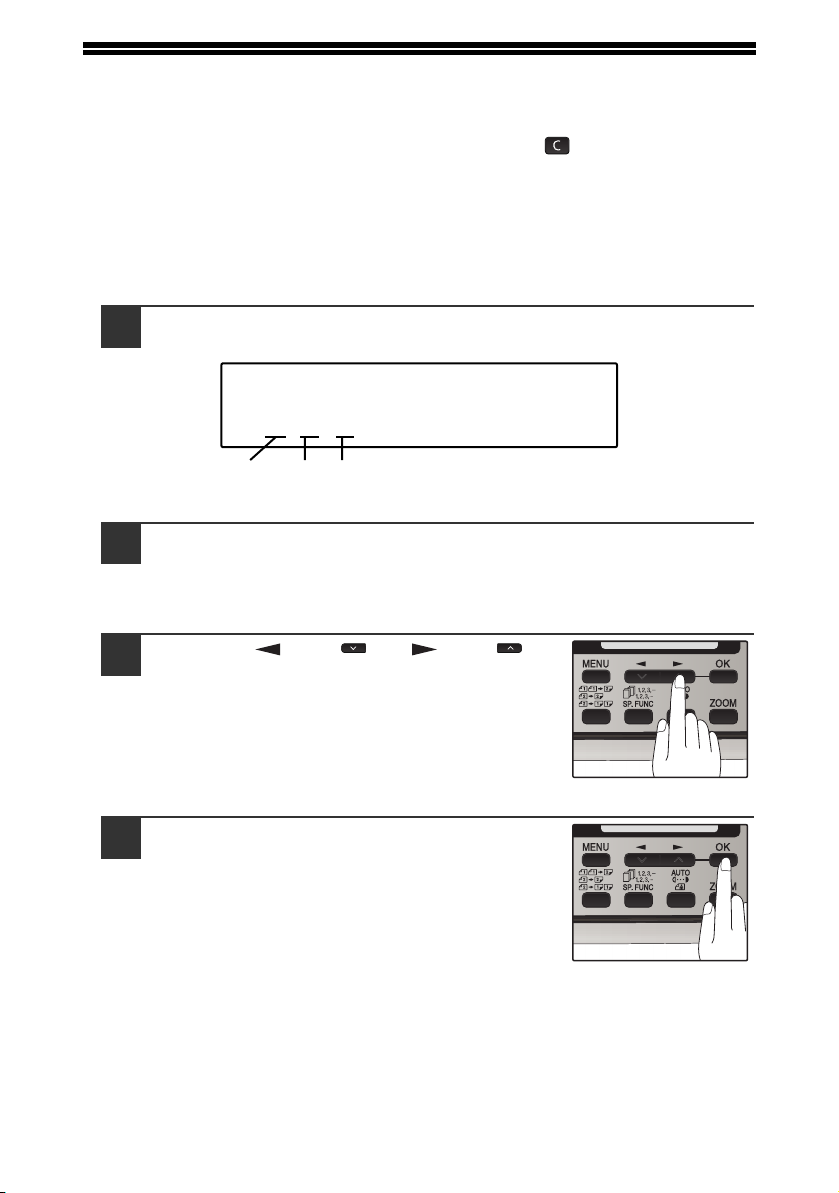
SETTING THE DATE AND TIME
ENTER DATE (2010-)
2011/05/02
Year
Month Day
The year can be entered from 2010.
Following to the language setting, Date and Time setting screen appears. Set the
date and time by pressing the keys on the operation panel as shown below.
If you enter an incorrect number, press the [CLEAR] key ( ) and re-enter the
number.
The time can be displayed in 12-hour or 24-hour format. "Month/Day/Year", "Day/
Month/Year" or "Year/Month/Day" can be selected for the order of display of the
date.
Use the following procedure to set the date and time:
Enter the year (two digits), month (two digits), and day (two
1
digits) with the numeric keys and then press the [OK] key.
Enter the time (hour (two digits) and minute (two digits)) with
2
the numeric keys.
Enter the hour in the following range:
When 12-hour format is selected: 01 to 12
When 24-hour format is selected: 00 to 23
Press the [ ] key ( ) or [ ] key ( ) to
3
select "AM" or "PM".
When 24-hour format is selected, do not perform
this step.
Press the [OK] key.
4
11
Page 13
PREPARATIONS
"1:USER PROGRAM"
Selection
"32:DATE&TIME FORMAT"
Selection
"1:TIME FORMAT"
Selection
To change the display format to 12-hour or 24-hour format, follow the steps below:
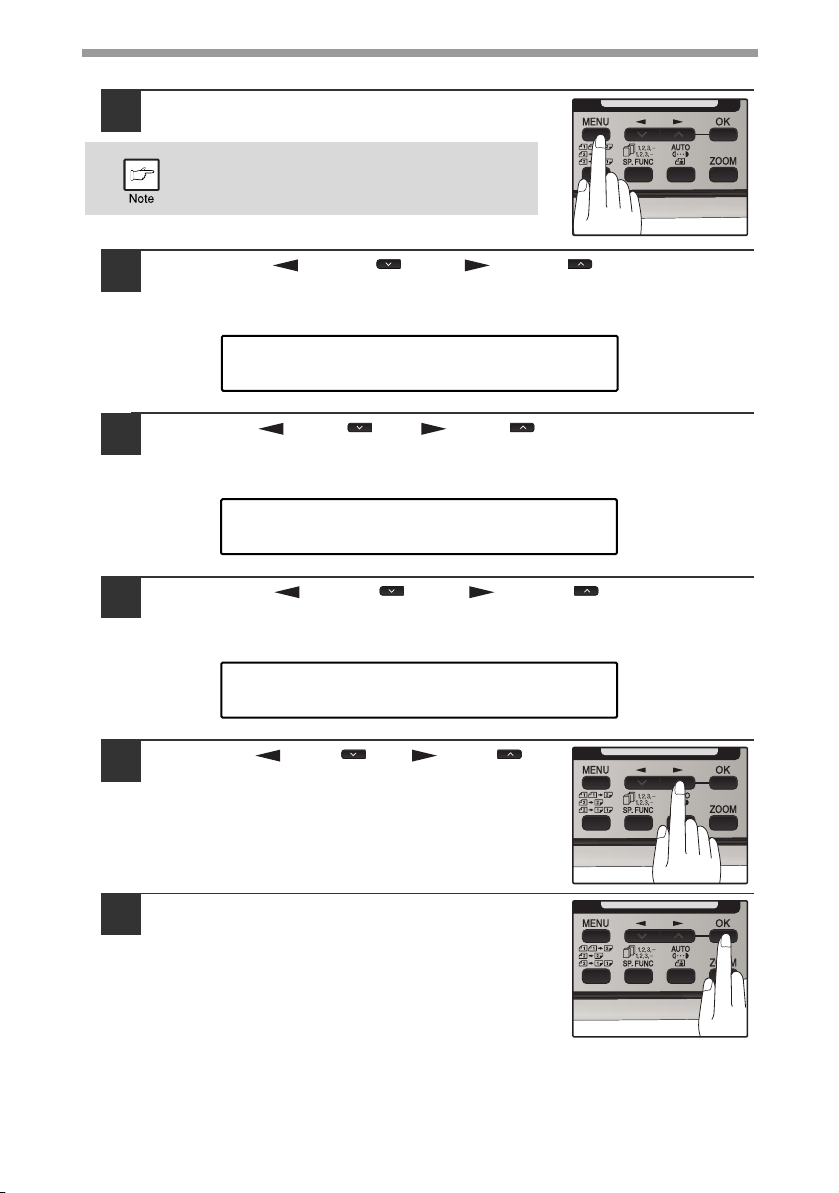
Press the [MENU] key.
1
Be sure that the COPY mode is selected
before pressing [MENU] key.
Press the [ ] key ( ) or [ ] key ( ) until "1:USER
2
PROGRAM" appears, and then press the [OK] key.
Press the [ ] key ( ) or [ ] key ( ) until "32:DATE&TIME
3
FORMAT" appears, and then press the [OK] key.
Press the [ ] key ( ) or [ ] key ( ) until "1:TIME
4
FORMAT" appears, and then press the [OK] key.
Press the [ ] key ( ) or [ ] key ( ) to
5
select "1:12HOUR" or "2:24HOUR".
Press the [OK] key.
6
12
Page 14
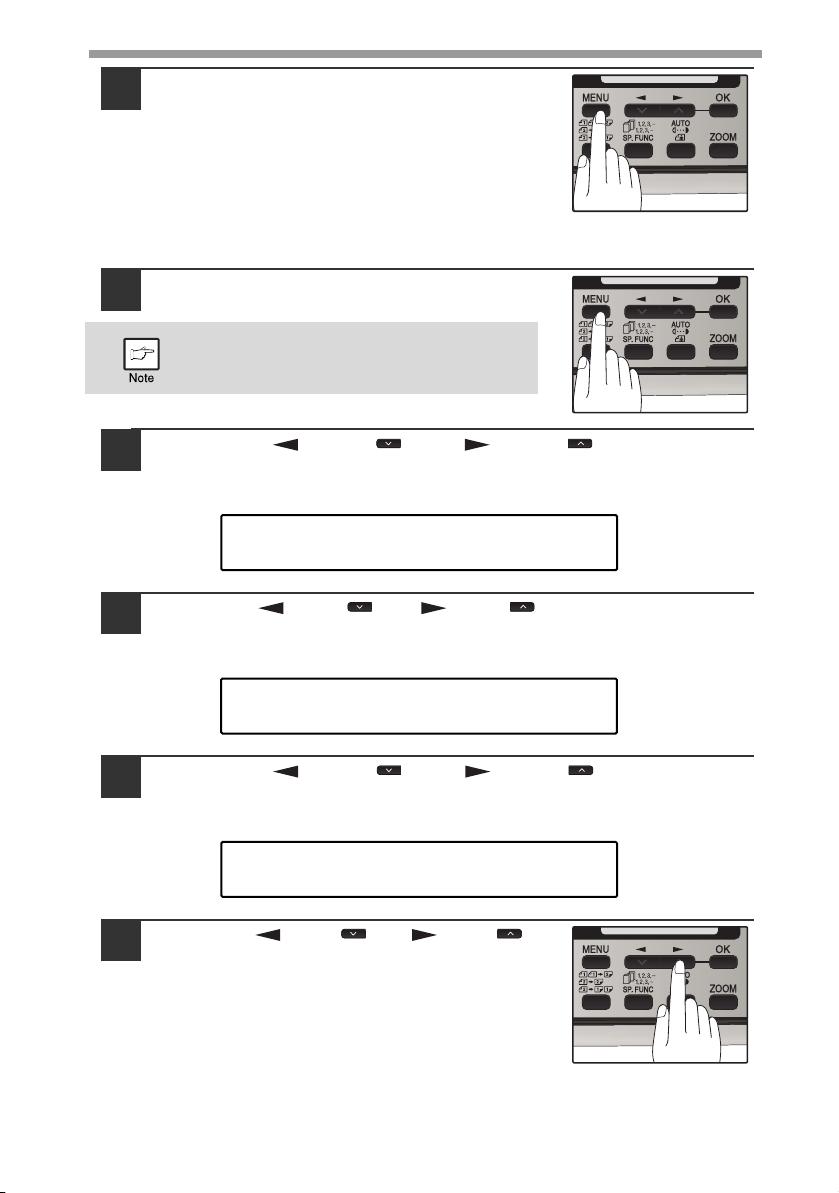
Press the [MENU] key.
"1:USER PROGRAM"
Selection
"32:DATE&TIME FORMAT"
Selection
"2:DATE FORMAT"
Selection
7
Press the [MENU] key to exit.
To change the order of display of the date, follow the steps below:
Press the [MENU] key.
1
Be sure that the COPY mode is selected
before pressing [MENU] key.
Press the [ ] key ( ) or [ ] key ( ) until "1:USER
2
PROGRAM" appears, and then press the [OK] key.
Press the [ ] key ( ) or [ ] key ( ) until "32:DATE&TIME
3
FORMAT" appears, and then press the [OK] key.
PREPARATIONS
Press the [ ] key ( ) or [ ] key ( ) until "2:DATE
4
FORMAT" appears, and then press the [OK] key.
Press the [ ] key ( ) or [ ] key ( ) to
5
select the display order.
The selections are as follows:
1:MMDDYYYY
2:DDMMYYYY
3:YYYYMMDD
13
Page 15

PREPARATIONS
The main screen of
copy mode appears
READY TO COPY.
100% 8.5x11 0
When in the copy mode
This selection does not affect the order of the date that appears in
"SETTING THE DATE AND TIME" in step 1 on page 11.
The date in this step always appears in the format "YYYYMMDD".
Press the [OK] key.
6
Press the [MENU] key.
7
Press the [MENU] key to exit.
To change the date and time or the format after once they are set, see
page 134 (USER PROGRAMS) and select program number 31 or 32 of
copy mode.
Initial settings
The machine reverts to the initial settings when it is first turned on, when the [CLEAR
ALL] key ( ) is pressed, or when no keys are pressed for the preset "AUTO
CLEAR" time following the end of a copy job. When the machine reverts to the initial
settings, all settings and functions selected to that point are canceled. The "AUTO
CLEAR" can be changed in the user programs. (p.134)
Copy ratio: 100%, Exposure: Automatic
Copy quantity: 0, All special copier modes: Off
Scanning unit (scan head)
When the machine is able to copy or scan (the ready indicator is on), the scanning
unit is lit.
14
Page 16
PREPARATIONS
Power off
Make sure that the machine is not in operation and then turn the power
switch to the "OFF" position.
If the power switch is turned off while the machine is
in operation, a misfeed may occur and the job that
was in progress will be canceled.
In cases where the machine will not be used for a
long time, turn off the power switch and remove the
power cord from the outlet.
Check the following to make sure the machine is not in operation:
• The ready indicator is lit. (Initial state)
• The power save indicator is lit. (preheat mode or auto shut-off mode)
Power save modes
The machine has two power save modes to reduce overall power consumption and
thereby reduce the cost of operation. In addition, these modes conserve natural
resources and help reduce environmental pollution. The two power save modes are
preheat mode and auto power shut-off mode.
Preheat mode
This function automatically switches the machine to a low power consumption state if
the set duration of time elapses without the machine being used when the power is
on. In this mode, the power save indicator lights up. Normal operation automatically
resumes when a key on the operation panel is pressed, an original is placed, a print
job is received.
Auto power shut-off mode
This function automatically switches the machine to a state that consumes even less
power than preheat mode if the set duration of time elapses without the machine being
used when the power is on. The power save indicator lights up, the display shows a
message indicating that the machine is in auto power shut-off mode. To resume normal
operation, press the [START] key ( ). Normal operation also resumes automatically
when a print job is received or scanning is begun from a computer. While in auto power
shut-off mode, no keys (except the [START] key ( )) can be used.
The preheat activation time and the auto power shut-off time can be
changed with "PREHEAT MODE" and "AUTO SHUT-OFF TIME" in the
user programs. It is suggested that you set times that are appropriate
for your usage of the machine. (p.134 and p.135)
Check RSPF open function
When enabled, this function may help prevent wasteful use of toner that occurs
when the RSPF cover is not completely closed.
If the start ( ) key is pressed when the RSPF cover is not completely closed,
"CLOSE THE SPF/RSPF COVER." will appear in the display and copying may not take
place. If copying does not take place, copying can be performed by pressing the start
( ) key again, however, the scan size set in "CHANGING A TRAY'S PAPER SIZE
SETTING" (p.21) or "VALID COPY WIDTH" (program number 25) (p.137) will be used.
If the RSPF cover is completely closed after "CLOSE THE SPF/RSPF COVER."
appears, copying will take place at the normal size.
15
Page 17
2
Chapter 2
LOADING PAPER
The tray location indicator will blink when there is no paper in the selected paper
tray, or when the selected paper tray is not closed or is improperly closed.
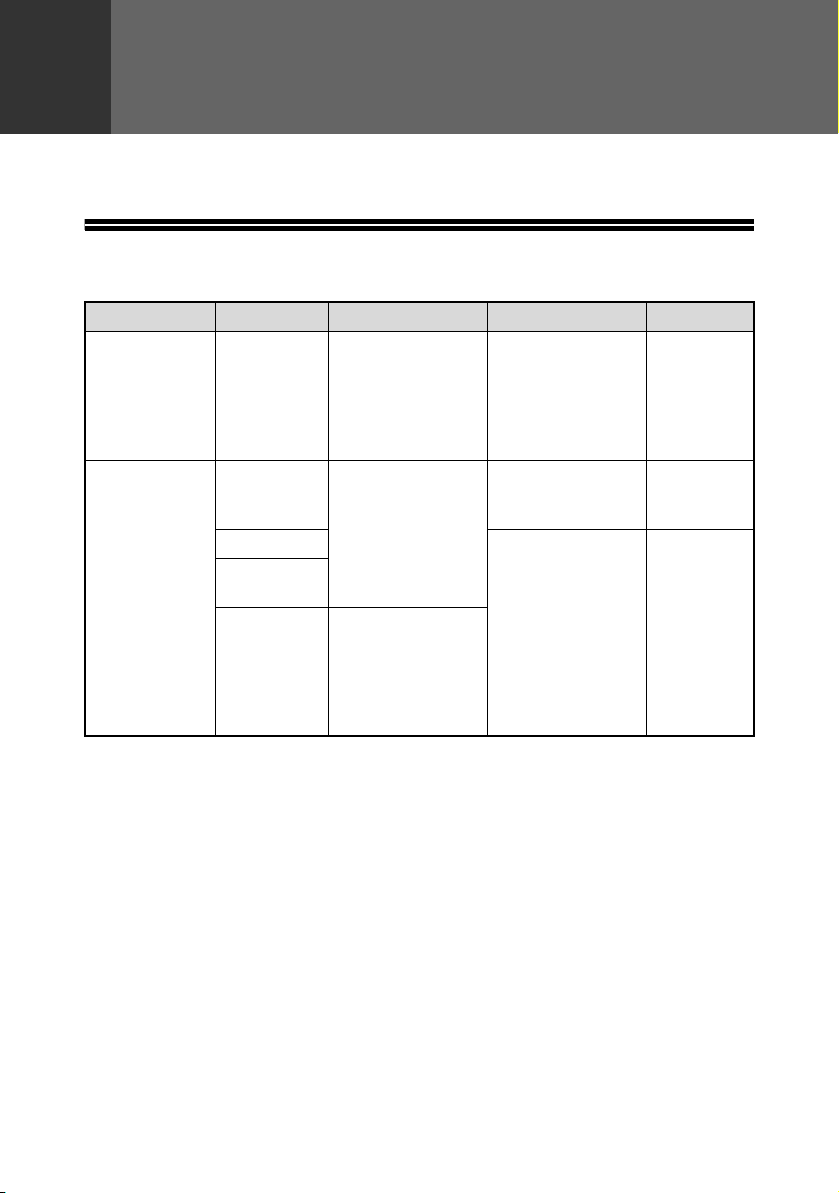
PAPE R
For best results, use only SHARP recommended paper.
Paper tray type Paper type Size Weight Capacity
Paper tray Standard paper
Recycled
paper
Bypass tray Standard paper
Recycled
paper
Thick paper
Transparency
film/Labels
Envelopes *
*1The number of sheets of paper that can be loaded varies depending on the weight of
the paper.
2
Do not use non-standard envelopes or envelopes that have metal clasps, plastic
*
snappers, strings, windows, linings, self-adhesive strips, patches or synthetic materials.
Do not use envelopes that are filled with air or envelopes that have labels or stamps
attached. These will damage the machine.
3
When using paper heavier than 28lbs. (104 g/m2), use paper that is 8-1/2" x 11" or
*
smaller.
5-1/2" x 8-1/2" (Invoice)
8-1/2" x 11" (Letter)
8-1/2" x 13" (Foolscap)
8-1/2" x 14" (Legal)
3-1/2" x 5-1/2" to
8-1/2" x 14"
2
Monarch
(3-7/8" x 7-1/2")
Commercial 9
(3-7/8" x 8-7/8")
Commercial 10
(4-1/8" x 9-1/2")
15 lbs. to 21 lbs.
2
to 80 g/m2)
(56 g/m
15 lbs. to 21 lbs.
2
to 80 g/m2)
(56 g/m
28 lbs. to 34.5 lbs.
(106 g/m2 to 128 g/m2)*
250 sheets *
(The paper
should not
exceed the
line on the
tray)
50 sheets *
Load one
3
sheet at a time
in the bypass
tray.
1
1
16
Page 18
LOADING PAPER
Special papers
Follow these guidelines when using special papers.
● Use SHARP recommended transparency film and label sheets. Using other
than SHARP recommended paper may result in misfeeds or smudges on
the output. If other than SHARP recommended media must be used, feed
each sheet one at a time using the bypass tray (do not attempt continuous
copying or printing).
● There are many varieties of special paper available on the market, and
some cannot be used with this machine. Before using special paper,
contact a SHARP service center.
● Before using other than SHARP recommended paper, make a test copy to
see if the paper is suitable.
LOADING THE PAPER TRAY
Make sure that the paper is not torn, is free of dust, and has no wrinkles
or curled edges.
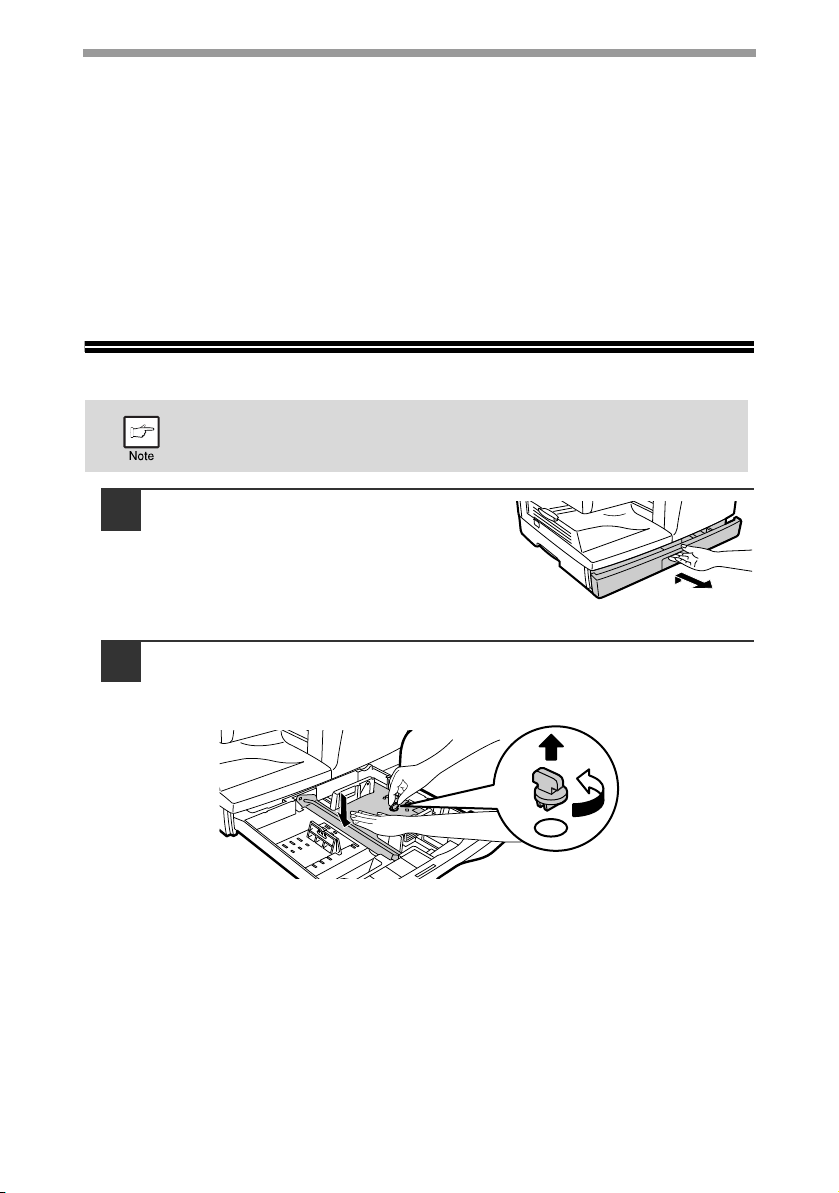
Raise the handle of the paper tray
1
and pull the paper tray out until it
stops.
Remove the pressure plate lock. Rotate the pressure plate lock
2
in the direction of the arrow to remove it while pressing down
on the pressure plate of the paper tray.
17
Page 19
LOADING PAPER
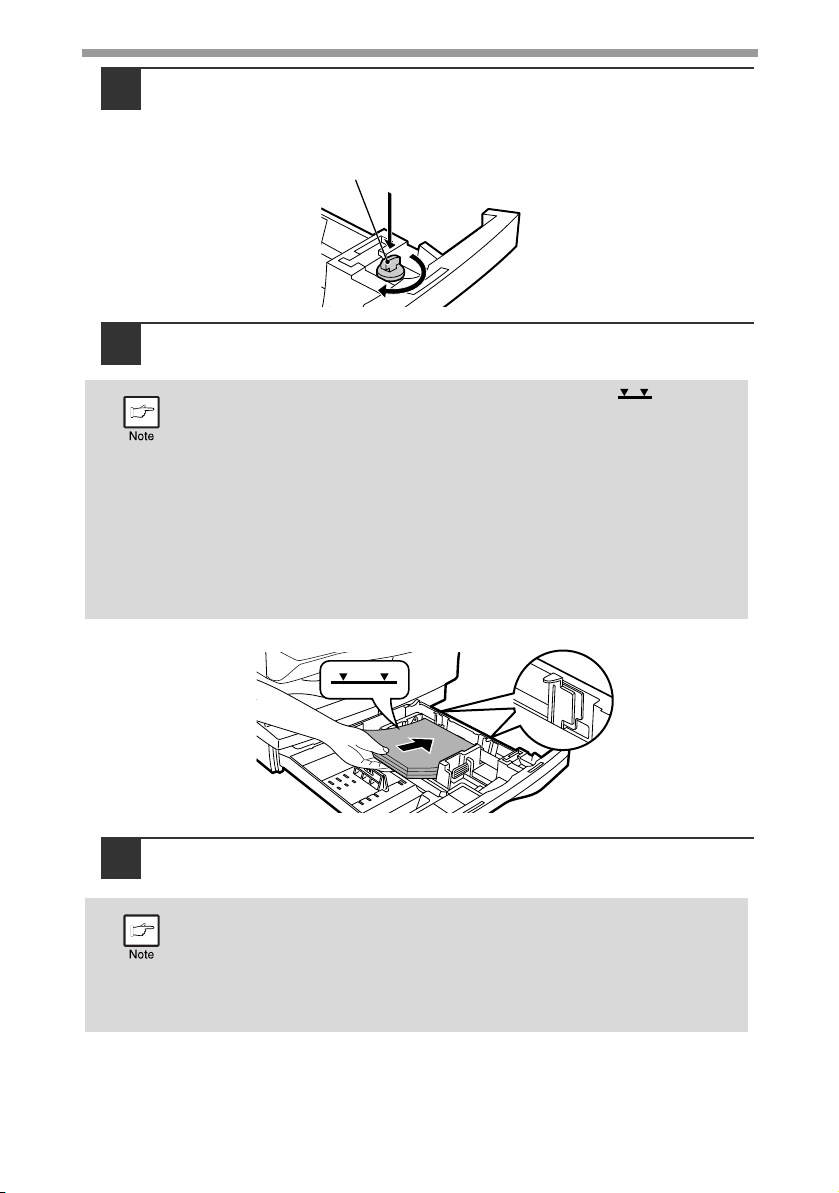
Pressure plate lock
Store the pressure plate lock which has been removed in step
3
2. To store the pressure plate lock, rotate the lock to secure it
as shown below.
Fan the paper and insert it into the tray. Make sure that the
4
edges go under the corner hooks.
• Do not load paper above the maximum height line ( ).
Exceeding the line will cause a paper misfeed.
• If the paper is not fanned, double-feeds or misfeeds may occur.
• Make sure the stack of paper is straight before loading it. When
adding paper, take the remaining paper out and combine it into a
single stack with the new paper.
• Make sure that all the paper in the stack is the same size and type.
• When loading paper, ensure that there is no space between the
paper and the guide, and make sure that the guide is not set too
narrow and causes the paper to bend. Incorrect loading will cause the
paper to skew or misfeed.
5
18
Gently push the paper tray back into the machine.
• If you loaded a different size of paper than was loaded previously in
the tray, go to "CHANGING A TRAY'S PAPER SIZE SETTING" (p.21)
• When not using the machine for an extended period, remove all
paper from the paper tray and store it in a dry place. If paper is left in
the machine for an extended period, the paper will absorb moisture
from the air, resulting in paper jams.
Page 20

BYPASS FEED (including special paper)
Available
Not
Available
The bypass tray can be used to feed standard paper, transparency film, labels,
envelopes, and other special purpose paper.
Important points when inserting paper in the bypass tray
Up to 50 sheets of standard copy paper can be inserted in the bypass tray. (Capacity
will vary depending on the type of paper loaded.)
Be sure to place envelopes horizontally as shown in the following diagram.
• When loading envelopes, make sure that they are straight and flat and do not have
loosely glued construction flaps (not the closure flap).
• Special papers except SHARP recommended transparency film, labels, and
envelopes must be fed one sheet at a time through the bypass tray.
• When adding paper, first remove any paper remaining in the tray, combine it with
the paper to be added and then reload as a single stack. The paper to be added
must be the same size and type as the paper already in the tray.
• Do not use paper that is smaller than the original. This may cause smudges or
unclean images.
• Do not use paper that has already been printed on by a laser printer or plain paper
fax machine. This may cause smudges or unclean images.
Envelopes
Do not use the following envelopes, as misfeeds will occur.
• Envelopes with metal tabs, clasps, strings, holes, or windows.
• Envelopes with rough fibers, carbon paper, or glossy surfaces.
• Envelopes with two or more flaps.
• Envelopes with tape, film, or paper attached to the flap.
• Envelopes with a fold in the flap.
• Envelopes with glue on the flap to be moistened for sealing.
• Envelopes with labels or stamps.
• Envelopes that are slightly inflated with air.
• Envelopes with glue protruding from the seal area.
• Envelopes with part of the seal area peeled off.
• Be sure to select com9, com10 or Monarch in the paper size setting of the printer
driver. (For detailed information on the printer driver, refer to the online manual.)
19
Page 21
LOADING PAPER
Print face
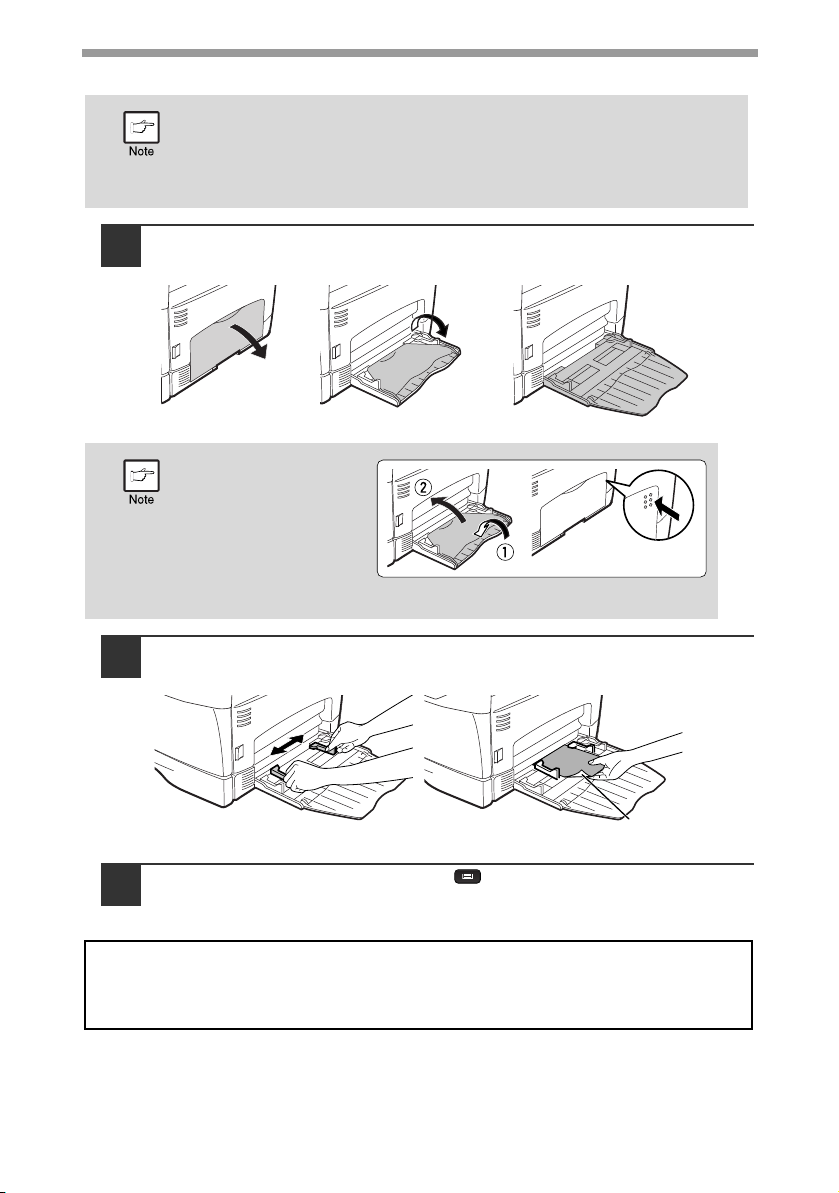
Loading paper in the bypass tray
• Paper must be fed narrow side first into the feed slot.
• Special papers such as transparency film, labels, and envelopes
must be fed one sheet at a time through the bypass tray.
• When copying onto transparency film, remove each copy promptly.
Do not let copies stack up.
Open the bypass tray and extend the tray.
1
To close the bypass
tray, perform step 1
and then step 2 in
the illustration and
push the round
projections at the
right of the tray until
they click.
20
Set the bypass tray paper guides to the paper width. Insert the
2
paper (print face down) all the way into the bypass tray.
Press the [TRAY SELECT] key ( ) to select the bypass tray.
3
Note for loading thick paper
Copying on thick paper requires higher fusing temperature setting. Set the user
program 29 to "2 (HEAVY PAPER)" when using thick paper. (See page 137.)
Page 22
CHANGING A TRAY'S PAPER SIZE SETTING
PAPER SIZE
1:TRAY1
TRAY1
1:8.5x11
Left
guide
Front
guide
Follow these steps to change a tray's paper size setting.
• The paper size setting cannot be changed when the machine has
stopped temporarily due to running out of paper or a misfeed.
• During printing (even in copy mode), the paper size setting cannot be
changed.
Press the [MENU] key.
1
Press the [ ] key ( ) or [ ] key ( ) until "PAPER SIZE"
appears, and then press the [OK] key.
Press the [ ] key ( ) or [ ] key ( ) to
2
select the tray, and then press the [OK]
key.
Press the [ ] key ( ) or [ ] key ( ) to
3
select the paper size, and then press the
[OK] key.
The paper size changes as follows each time the
[ ] key ( ) or [ ] key ( ) is pressed:
"8.5 x 14"→"8.5 x 13"→"8.5 x 11"→"5.5 x 8.5"→
"A4"→"B5"→"A5".
When you have finished configuring the tray's paper size setting,
press the [MENU] key.
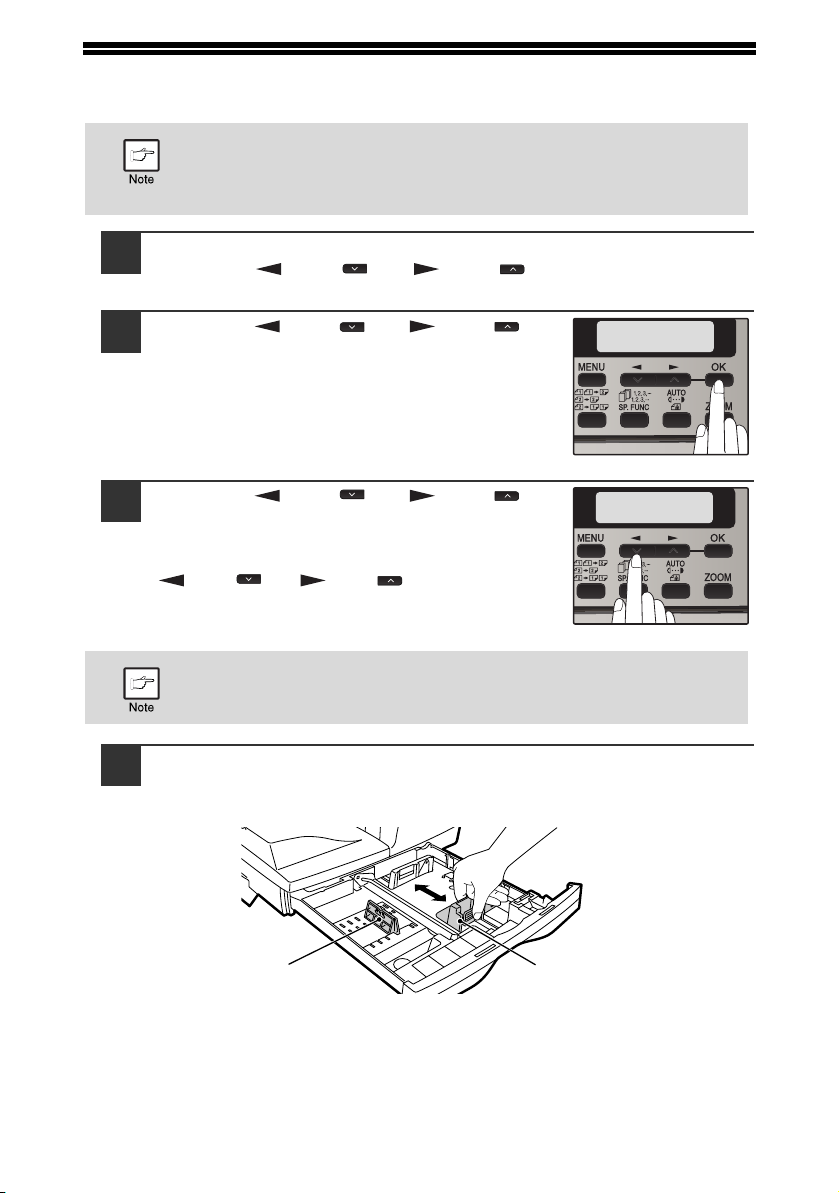
Squeeze the lock lever of the front guide and slide the front
4
guide to match the width of the paper, and move the left guide
to the appropriate slot as marked on the tray.
• The front guide is a slide-type guide. Grasp the locking knob on the guide
and slide the guide to the indicator line of the paper to be loaded.
• The left guide is an insert-type guide. Remove it and then insert it at the
indicator line of the paper to be loaded.
21
Page 23
3
mark
Original scale
Chapter 3
MAKING COPIES
This chapter explains basic copying functions.
NORMAL COPYING
Using the document glass
• The document glass can scan up to an 8-1/2" x 14 original.
• When a copy is made, the edges will not be copied (image loss).
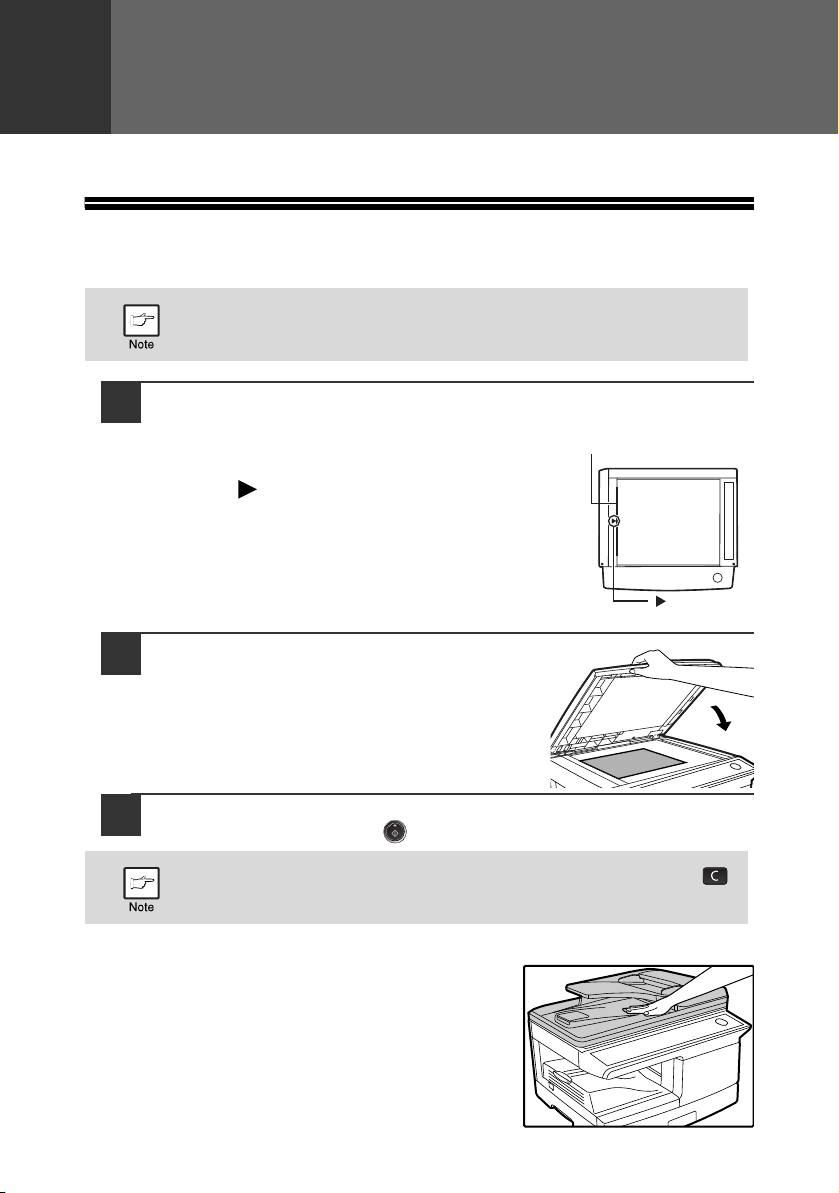
Open the RSPF, and place the original face down on the
1
document glass.
[How to place the original]
Align the original with the original scale and the
centering ( ) mark.
Copying books or originals with folds or creases
Press down on the RSPF while copying as shown. If
the RSPF is not completely closed, shadows may
appear on the copy or it may be fuzzy. Straight
originals with folds or creases well before placing.
22
Gently close the RSPF.
2
Select the number of copies and other copy settings, and then
3
press the [START] key ( ).
• To stop copying in the middle of a run, press the [CLEAR] key ( ).
• For the copy settings, see pages
25
through 37.
Page 24
Using the RSPF
Original face up
MAKING COPIES
• Originals that are 5-1/2" x 8-1/2" to 8-1/2" x 14" and 14 lbs. to 24 lbs.
• Straighten curled originals before placing them in the document
• Place originals horizontally.
• Before placing originals in the document feeder tray, be sure to
• When a copy is made, the edges will not be copied (
• When using the margin shift function, check the position of the
Make sure that an original has not been left on the document
1
2
(56 g/m
placed at once.
feeder tray. Curled originals may cause misfeeds.
remove any staples or paper clips from them.
margins carefully. (p.36)
to 90 g/m2) can be used. A maximum of 50 pages can be
image loss).
glass.
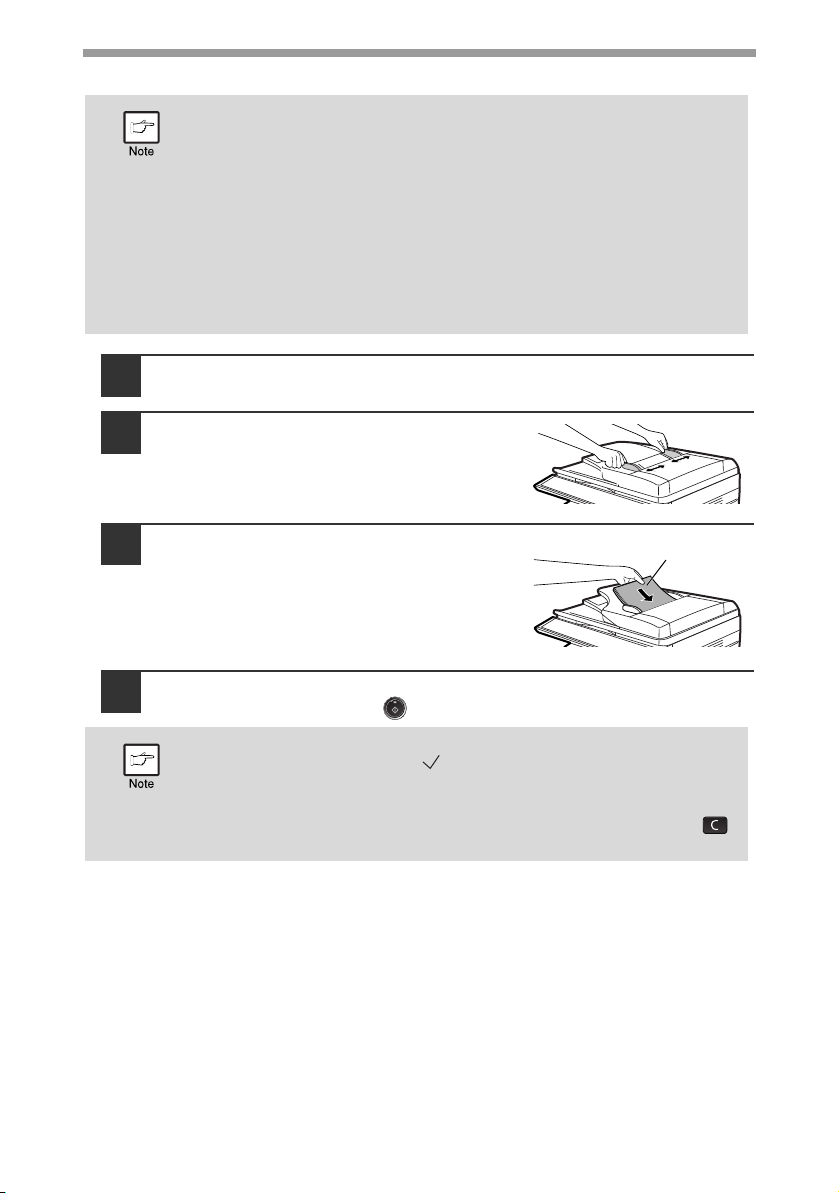
Adjust the original guides to the size
2
of the originals.
Set the original(s) face up in the
3
document feeder tray.
The RSPF indicator on the operation panel
will light up. If this indicator does not light up,
the originals are not properly set or the RSPF
is not properly closed.
Select the number of copies and other copy settings, and then
4
press the [START] key ( ).
• The default output mode for copying from the RSPF is sort mode
(P.31), and a checkmark " " will automatically appear in the display
(P.9). If "SORT AUTO SELECT" is disabled in the user programs, the
default output mode will be non-sort mode. (P.137)
• To stop copying in the middle of a run, press the [CLEAR] key ( ).
• For the copy settings, see pages
25
through 37.
23
Page 25
MAKING COPIES
The paper output tray can hold a
maximum of 200 pages. If more
than 200 pages are allowed to
accumulate, a paper jam may occur.
Originals that cannot be used in the RSPF
The following originals cannot be used. These may cause misfeeds or smudging and
unclear images.
• Transparencies, tracing paper, other transparent or translucent paper, and
photographs.
• Carbon paper, thermal paper.
• Originals that are creased, folded, or torn.
• Glued originals, cut-out originals.
• Originals with binder holes.
• Originals printed using an ink ribbon (thermal transfer printing), originals on
thermal transfer paper.
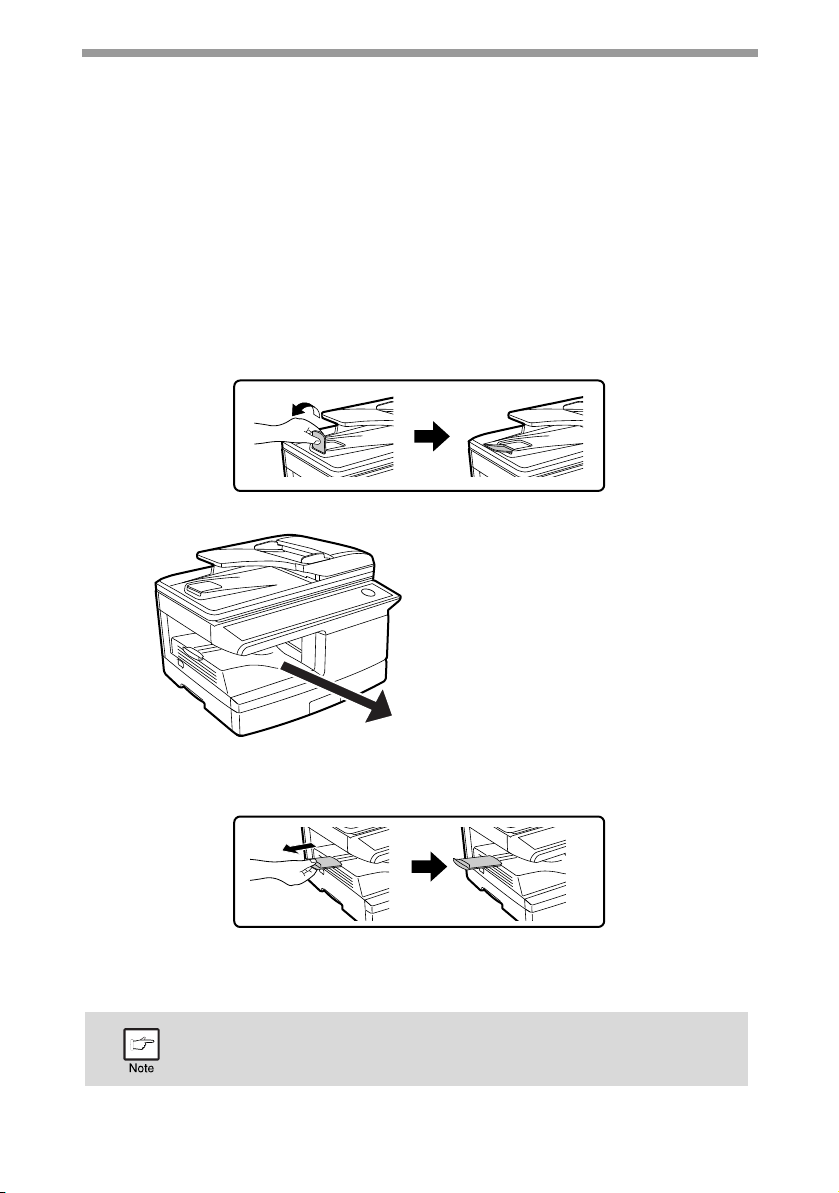
Original output tray extension
When placing an original of 8-1/2" x 14" paper size maximum, pull out the original
output tray extension.
Capacity of paper output tray
24
Paper output tray extension
When copying onto paper larger than 8-1/2" x 14" size, pull out the paper output tray
extension.
Paper holder arm
The paper output tray has a paper holder arm. The paper holder arm presses gently
on the output paper to stack it (p.7).
After removing paper, if you need to return the paper to the paper
output tray, lift up the paper holder arm and place the paper under
the arm.
Page 26

MAKING COPIES
Setting the number of copies
Press the numeric keys to set the number of copies.
PY.
5 55
The set number of copies appears in the display. A maximum of 99 copies can be set.
If you wish to make only a single copy, copying is possible with the display
showing "0".
If you enter the wrong number, press the [CLEAR] key ( ) and
enter the correct number.
SELECTING THE TRAY
Press the [TRAY SELECT] key ( ).
Each time, you press the [TRAY SELECT] key ( ),
the location indicated by the tray location indicator
changes in the following order : paper tray→bypass
tray.
READY TO COPY.
100% EXTRA
The tray location indicator will blink when there is no paper in the paper
tray, or when the tray is not closed or is improperly closed.
25
Page 27
MAKING A COPY DARKER OR LIGHTER
TEXT
| | | | |
TEXT
| | | | |
Normal originals
Colored text or text written in pencil
Dark originals like newspapers
| | | | |
Automatic exposure adjustment is initially enabled. This function automatically
adjusts the copy image according to the original being copied. If you wish to select
the exposure level yourself, follow the steps below. (Select from two original types
and five exposure levels for each original type.) The exposure level used in
automatic exposure adjustment can also be changed with "AE LEVEL ADJUST" in
the user programs (p.136).
Original types
● AUTO ...... Automatic exposure adjustment is enabled and the exposure is
automatically adjusted according to the original being copied. The
exposure is lowered for colored areas and background shadows.
● TEXT ....... The exposure is raised for light areas and lowered for dark
● PHOTO ...Halftones in the photo are reproduced with greater clarity.
1
2
backgrounds to make text easier to read.
Check the original and place the original(s).
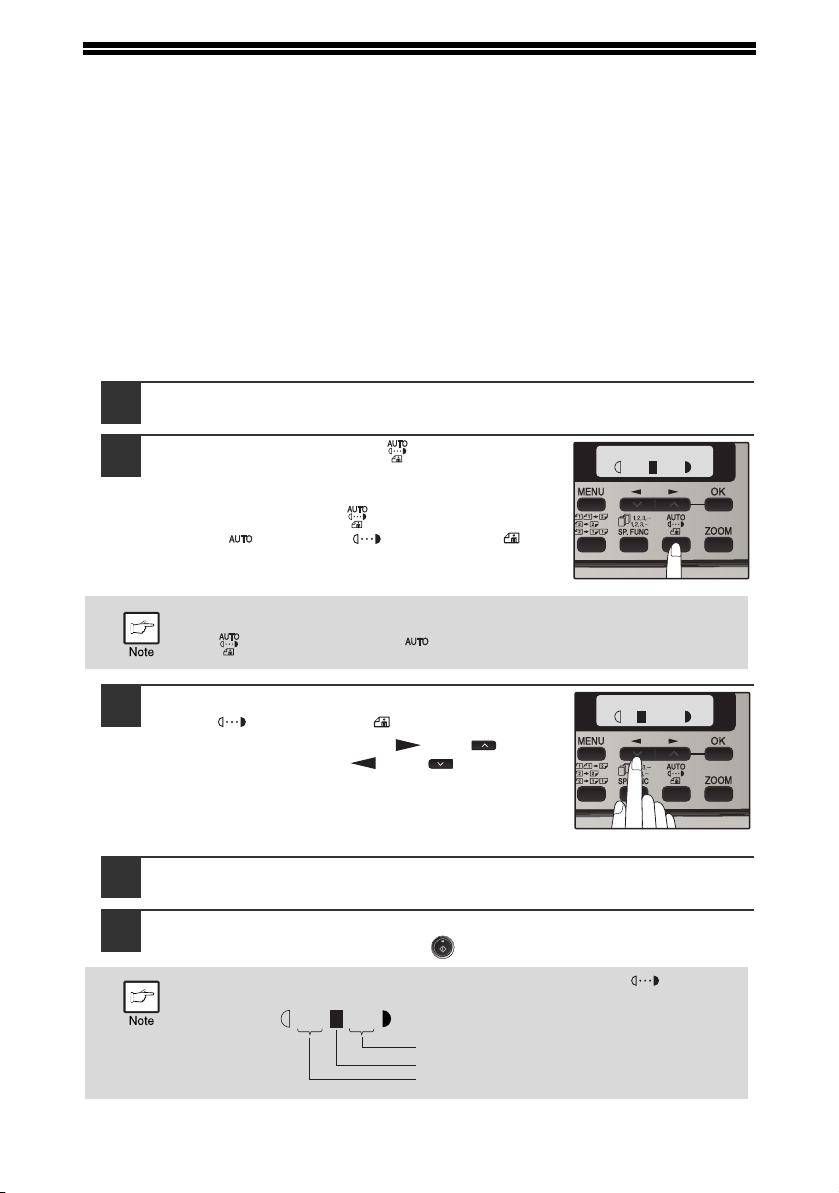
Press the [EXPOSURE ()] key to select
the original type.
The original image type changes as follows each
time the [EXPOSURE ()] key is pressed:
"AUTO" ( ) → "TEXT"( ) → "PHOTO"( ).
To return to auto exposure adjustment, press the [EXPOSURE
] key until "AUTO" ( ) appears.
()
3
4
5
26
If needed, adjust the exposure level for
TEXT ( ) or PHOTO ( ).
For a darker image, press the [ ] key ( ). For a
lighter image, press the [ ] key ( ).
Press the [OK] key.
Select the number of copies and any other copy settings, and
then press the [START] key ( ).
Exposure value guidelines (When in "TEXT"( ) setting)
Page 28
REDUCTION/ENLARGEMENT/ZOOM
COPY RATIO
- 100% +
8.5x14 TO 8.5x11
- 78% +
ZOOM
- 99% +
Copies can be reduced down to 25% or enlarged up to 400%. (When the RSPF is
being used, the zoom copy ratio range is 50% to 200%.) The [ZOOM] key can be
pressed to quickly select a ratio from among eight preset ratios. In addition, the [ ]
key ( ) and [ ] key ( ) can be pressed to select the ratio in increments of 1%.
Check the original and paper size, and place the original(s).
1
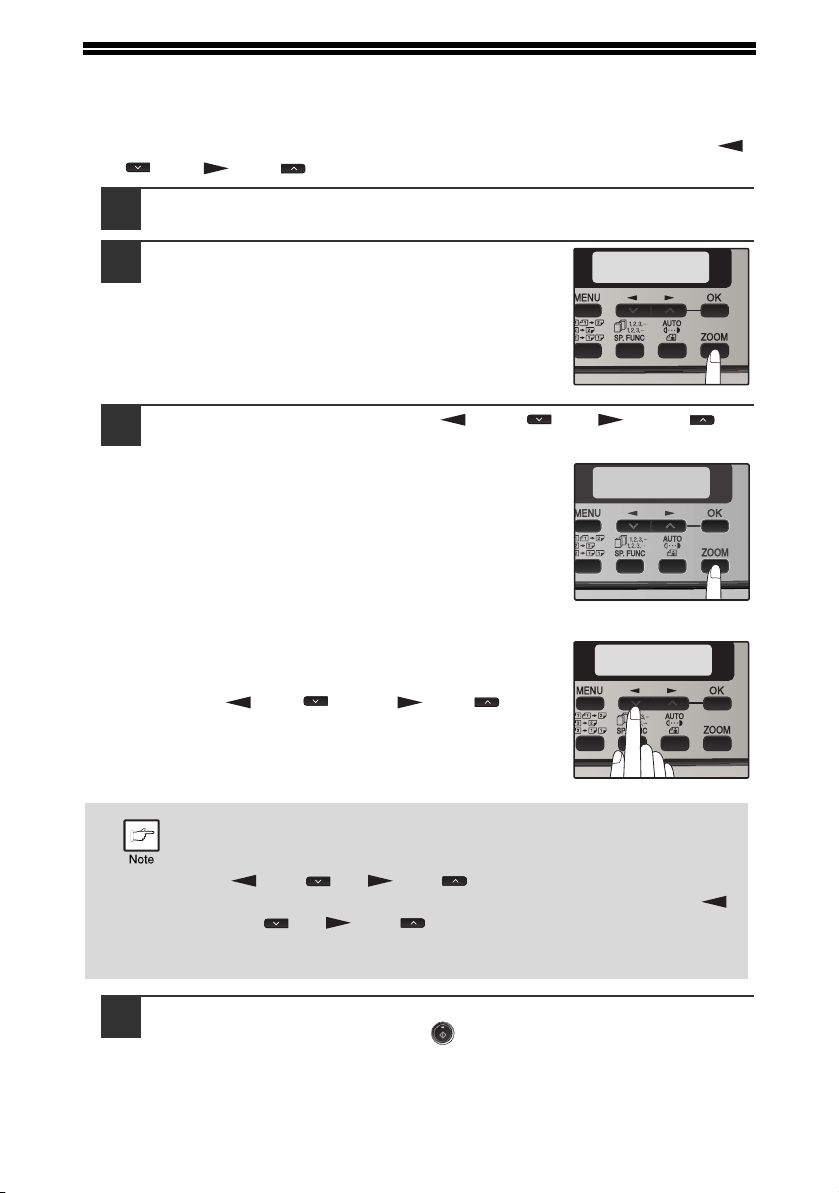
Press the [ZOOM] key.
2
Press the [ZOOM] key and/or [ ] key ( ) or [ ] key ( ) to
3
select the desired copy ratio and then press the [OK] key.
Selecting a preset ratio
The preset ratios change as follows each time the
[ZOOM] key is pressed:
"100%" → "78%" → "64%" → "50%" → "25%" →
"400%" → "200%" → "129%".
Fine adjustment of the ratio
The ratio can be adjusted from 25% to 400% in
increments of 1%.
Use the [ ] key ( ) or the [ ] key ( ) for
fine adjustment.
• To return the ratio to 100%, press the [ZOOM] key until 100%
appears.
• Press the [ZOOM] key to set the approximate ratio, then press the
[ ] key ( ) or [ ] key ( ).
• To decrease or increase the zoom ratio rapidly, hold down the [ ]
key ( ) or [ ] key ( ).
The ratio will stop changing at each of the preset ratios. To continue
changing the ratio, release the key and then hold it down again.
Select the number of copies and any other copy settings, and
4
then press the [START] key ( ).
The copy will be delivered to the paper output tray.
27
Page 29
Chapter 4
AB
A
B
A
B
AB
CONVENIENT COPY
4
FUNCTIONS
AUTOMATIC TWO-SIDED COPYING
Two originals can be automatically copied onto both sides of a single sheet of paper.
When the RSPF is used, two-sided copies of two-sided originals can easily be made.
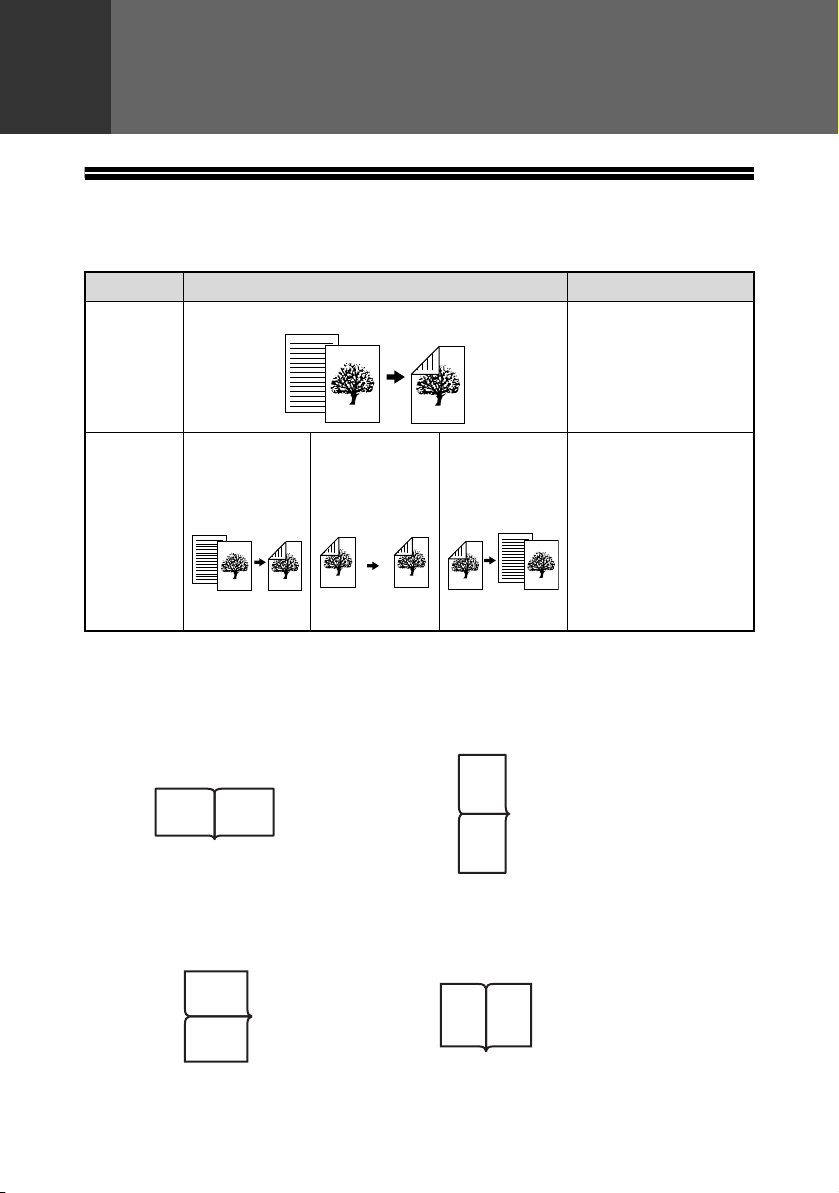
Original → Paper Usable paper
One-sided original → Two sides
Document
glass
One-sided
original →
Two sides
RSPF
When performing automatic two-sided copying of one-sided originals, the orientation
of the copied image can be selected according to the binding position of the paper.
Two-sided
original →
Two sides
Two-sided
original →
One side
5-1/2" x 8-1/2",
8-1/2" x 11",
8-1/2" x 13",
8-1/2" x 14"
• The bypass tray
cannot be used.
5-1/2" x 8-1/2",
8-1/2" x 11",
8-1/2" x 13",
8-1/2" x 14"
• Special paper cannot
be used.
• The bypass tray can
only be used when
making one-sided
copies from twosided originals.
SHORT EDGE: Select when binding the paper at the short edge.
(Paper orientation: Landscape) (Paper orientation: Portrait)
LONG EDGE: Select when binding the paper at the long edge.
(Paper orientation: Landscape) (Paper orientation: Portrait)
28
Page 30
Using the document glass
2-SIDED COPY
1 TO 2
BINDING EDGE
LONG EDGE
1
2
The first original
The second original
Place the original that you wish to copy onto the front side of
1
the paper on the document glass and close the RSPF.
Press the [2-SIDED COPY ()] key until
2
"1 TO 2" appears, and then press the [OK]
key.
Press the [ ] key ( ) or [ ] key ( ) to
3
select the binding edge and then press the
[OK] key.
Select "LONG EDGE" or "SHORT EDGE".
The "LONG EDGE" and "SHORT EDGE" are
shown in the illustration on the preceding page.
Select the number of copies and any other settings, and then
4
press the [START] key ( ).
"[START] : NEXT SCAN [#] : START PRINT" appears and the original is
scanned into memory.
To immediately print the scanned image, press the [ ] key.
CONVENIENT COPY FUNCTIONS
Replace the original with the next
5
original and close the RSPF, and
then press the [START] key ( ).
Repeat step 5 until all originals have been
scanned.
Copies will be output each time two originals
have been scanned.
When the number of original pages is odd
and "[START] : NEXT SCAN [#] : START
PRINT" appears, press the [ ] key after all pages have been scanned.
• If you need to clear the data scanned into memory, press the
[CLEAR] key ( ). When the [CLEAR] key ( ) is pressed, the
number of copies setting is also cleared.
• To cancel automatic two-sided copying, press the [CLEAR ALL] key
( ) or press the [2-SIDED COPY ( )] key, select the "1 TO 1",
and then press the [OK] key.
• If the special function sort mode was selected in step 4, copying will
not begin until the [ ] key is pressed.
29
Page 31

CONVENIENT COPY FUNCTIONS
2-SIDED COPY
2 TO 1
ORIG. SIZE ENTER
5.5x8.5
Using the RSPF
Place the original(s) in the RSPF. (p.23)
1
If you place an odd number of originals for one-sided to two-sided copying,
the last page will be one-sided.
Press the [2-SIDED COPY ()] key and
2
select the two-sided copy mode that you
wish to use.
The mode changes as follows each time you press
the [2-SIDED COPY
2", "2 TO 2", "2 TO 1"
• "1 TO 2": Two-sided copies from one-sided originals
• "2 TO 2":Two-sided copies from two-sided originals
• "2 TO 1": One-sided copies from two-sided originals
Press the [OK] key.
3
If you selected "1 TO 2" in step 2, select "LONG EDGE" or "SHORT EDGE"
and press the [OK] key. LONG EDGE and SHORT EDGE are shown in the
illustration on page 28.
If you selected "2 TO 2" or "2 TO 1", press
4
the [ ] key ( ) or [ ] key ( ) to select
the original size and then press the [OK]
key.
The following original sizes can be selected:
"8.5 x 14", "8.5 x 13", "8.5 x 11", "5.5 x 8.5", "A4",
"B5", "A5"
()] key: "1 TO 1", "1 TO
30
Select the number of copies and any other copy settings, and
5
press the [START] key ( ).
The copy will be delivered to the paper output tray.
To cancel automatic two-sided copying, press the [CLEAR ALL] key
( ) or press the [2-SIDED COPY ()] key, select the "1 TO 1",
and then press the [OK] key.
Page 32

SORT COPY
2
1
3
2
1
3
1
2
3
2
1
3
Sort copy
SPECIAL FUNCTION
SORT
SORT
ON OFF
Copies of multiple original pages can sorted into sets.
The number of pages that can be scanned varies depending on the
original type (photo, text, etc.) and the amount of memory allocated to
the printer. The amount of memory allocated to the printer can be
changed with "MEM. FOR PRINTER" in the user programs. (p.136)
Using the document glass
Place the first original. (p.22)
1
Press the [E-SORT/SP.FUN ( )] key
2
until "SORT" appears and then press the
[OK] key.
Press the [ ] key ( ) to move " " to
3
the "ON" position and then press the [OK]
key.
4
5
6
Select the number of copies and any other settings, and then
press the [START] key ( ).
"[START] : NEXT SCAN [#] : START PRINT" appears and the original is
scanned into memory.
Replace the original with the next original, and then press the
[START] key ( ).
Repeat step 5 until all originals have been scanned into memory.
To clear the data in memory, press the [CLEAR] key ( ). When the
[CLEAR] key ( ) is pressed, the number of copies setting is also cleared.
When all originals have been scanned, press the [ ] key.
The copies are delivered to the paper output tray.
• To cancel the sort copy job, press the [CLEAR] key ( ).
• To cancel sort copy mode, press the [CLEAR ALL] key ( ).
31
Page 33

CONVENIENT COPY FUNCTIONS
SPECIAL FUNCTION
SORT
SORT
ON OFF
1
1
1
2
3
1
1
2
3
Offset function When offset function is disabled
Using the RSPF
Place the originals. (p.23)
1
• If "SORT AUTO SELCT" is enabled in the user programs, the default output
mode for copying from the RSPF is sort mode (p.135). In this case go directly
to step 4. A checkmark
• If "SORT AUTO SELECT" is disabled, the default output mode will be
non-sort mode. Follow the steps below to select sort mode.
Press the [E-SORT/SP.FUN ( )] key
2
until "SORT" appears and then press the
[OK] key.
Press the [ ] key ( ) to move " " to
3
the "ON" position and then the [OK] key.
Select the number of copies and any other settings, and then
4
press the [START] key ( ).
The copies are delivered to the paper output tray.
""
will automatically appear in the display (p.9).
• To cancel the sort copy job, press the [CLEAR] key ( ).
• To cancel sort copy mode, press the [CLEAR ALL] key ( ).
If the memory becomes full
• If the memory becomes full while scanning the originals, "MEMORY FULL, PRESS
START TO RESUME" will appear in the display, and the machine will stop copying.
• To copy the originals that have been scanned up to that point, press the [START]
key ( ).
• To clear the data that has been scanned into memory, press the [CLEAR ALL]
key ( ) or the [CLEAR] key ( ).
Offset function during sort copy
The offset function shifts the position of each set of copies in the paper output tray
for easy separation.
The offset function can be changed with "OFFSET FUNCTION" in the user programs. (p.135)
32
Page 34

COPYING MULTIPLE ORIGINALS ONTO A SINGLE
Pattern 2
Pattern 1
SPECIAL FUNCTION
2IN1
2IN1
ON OFF
SHEET OF PAPER
Multiple originals can be copied onto a single sheet of paper in a selected layout
pattern.
This function is convenient for compiling multi-page reference materials into a
compact format, or for providing an overview of all pages of a document on a single
page.
• An appropriate ratio setting will be automatically selected based on
the size of the originals, the size of the paper. When using the
document glass, reduction is possible to 25%. When using the RSPF,
reduction is possible to 50%. Certain combinations of original size
and paper size.
• 2 IN 1 copying cannot be used in combination with the margin shift
copying.
• The 2 IN 1 layout pattern can be changed with "LAYOUT IN 2IN1" in
the user programs (p.135).
• The bypass tray cannot be used for 2 IN 1 copying.
Using the document glass
(2 IN 1 copy)
Place the first original. (p.22)
1
Press the [E-SORT/SP.FUN ()] key
2
until "2IN1" appears and then press the
[OK] key.
Press the [ ] key ( ) to move " " to
3
the "ON" position and then press the [OK]
key.
33
Page 35

CONVENIENT COPY FUNCTIONS
ORIG. SIZE ENTER
5.5x8.5
Press the [ ] key ( ) or [ ] key ( ) to
4
select the original size and then press the
[OK] key.
The following original sizes can be selected:
"8.5 x 14", "8.5 x 13", "8.5 x 11", "5.5 x 8.5", "A4",
"B5", "A5"
Set the number of copies and any other settings, and then
5
press the [START] key ( ).
"[START] : NEXT SCAN [#] : START PRINT" appears and the original is
scanned into memory.
To immediately print the scanned image, press the [ ] key.
Replace the original with the next original, and then press the
6
[START] key ( ).
Repeat step 6 until all originals have been scanned.
Copies will be output each time two originals have been scanned.
When the number of original pages is odd and "[START] : NEXT SCAN [#] :
START PRINT" appears, press the [ ] key after all pages have been
scanned.
• To clear the data in memory, press the [CLEAR] key ( ).
When the [CLEAR] key ( ) is pressed, the number of copies
setting is also cleared.
• To cancel 2 IN 1 copying, press the [CLEAR] key ( ).
• To cancel 2 IN 1 copy mode, press the [CLEAR ALL] key ( ).
34
Page 36

Using the RSPF
2IN1
ON OFF
ORIG. SIZE ENTER
5.5x8.5
Place the originals. (p.23)
1
Press the [E-SORT/SP.FUN ()] key until
2
"2IN1" appears and then press the [OK]
key.
Press the [ ] key ( ) to move " " to
3
the "ON" position and then press the [OK]
key.
Press the [ ] key ( ) or [ ] key ( ) to
4
select the original size and then press the
[OK] key.
The following original sizes can be selected:
"8.5 x 14", "8.5 x 13", "8.5 x 11", "5.5 x 8.5", "A4",
"B5", "A5"
CONVENIENT COPY FUNCTIONS
SPECIAL FUNCTION
2IN1
5
Select the number of copies and other settings, and press the
[START] key ( ).
The copy is delivered to the paper output tray.
• To cancel 2 IN 1 copying, press the [CLEAR] key ( ).
• To cancel 2 IN 1 copy mode, press the [CLEAR ALL] key ( ).
35
Page 37

CREATING MARGINS WHEN COPYING
LONG EDGESHORT EDGE
RSPF
Document glass
Margin
Margin
Original
Copy
AB
AB
AB
AB
SPECIAL FUNCTION
MARGIN SHIFT
The margin shift function is used to automatically shift the text or image or the copy
paper approximately 10 mm.
As shown below, LONG EDGE or SHORT EDGE can be selected.
• This feature cannot be used with the 2 IN 1 feature.
• The margin width can be changed with "MARGIN WIDTH" in the user
programs. (p.136)
• Note that a margin is created by shifting the image, and thus if the
image is shifted too far, the edge of the image may be cut off.
(Margin shift)
1
2
36
Place the original(s).
Press the [E-SORT/SP.FUN ( )] key
until "MARGIN SHIFT" appears and then
press the [OK] key.
Page 38

CONVENIENT COPY FUNCTIONS
MARGIN SHIFT
LONG EDGE
Press the [ ] key ( ) to move " " to
3
the "ON" position and then press the [OK]
MARGIN SHIFT
ON OFF
key.
Press the [ ] key ( ) or [ ] key ( ) to
4
select the margin position and then press
the [OK] key.
Select "LONG EDGE" or "SHORT EDGE".
For the margin position, see the previous page.
Select the number of copies and other settings, and then press
5
the [START] key ( ).
The copy is delivered to the paper output tray.
• To cancel margin shift copying, press the [CLEAR] key ( ).
• To cancel margin shift, press the [CLEAR ALL] key ( ).
37
Page 39

ID CARD COPY
Originals Copies
Front
Back
ID CARD mark
You can copy the front and reverse sides of ID card onto a page through this
function.
The ID card print image is shown as follows.
• ID card copy feature cannot be used in combination with two-sided
copy and sort functions.
• The following paper sizes can be used: 8.5"x5.5"R, 8.5"x11",
8.5"x14", A5R, A4, B5 and 16K. (8.5"x5.5"R and A5R can only be
used in bypass tray.)
• The image may cut off even if using standard paper size.
• In ID card copy mode, scan area and scan number (1 page) cannot
be changed. Scan area is:
X: 2-1/8" + 1/4" (54 + 5 mm) (margin),
Y: 3-3/8" + 3/8" (86 + 10 mm) (top margin 1/4" (5 mm) and bottom
margin 1/4" (5 mm)).
• Only making a single copy is available (Number of copies cannot be
set.).
38
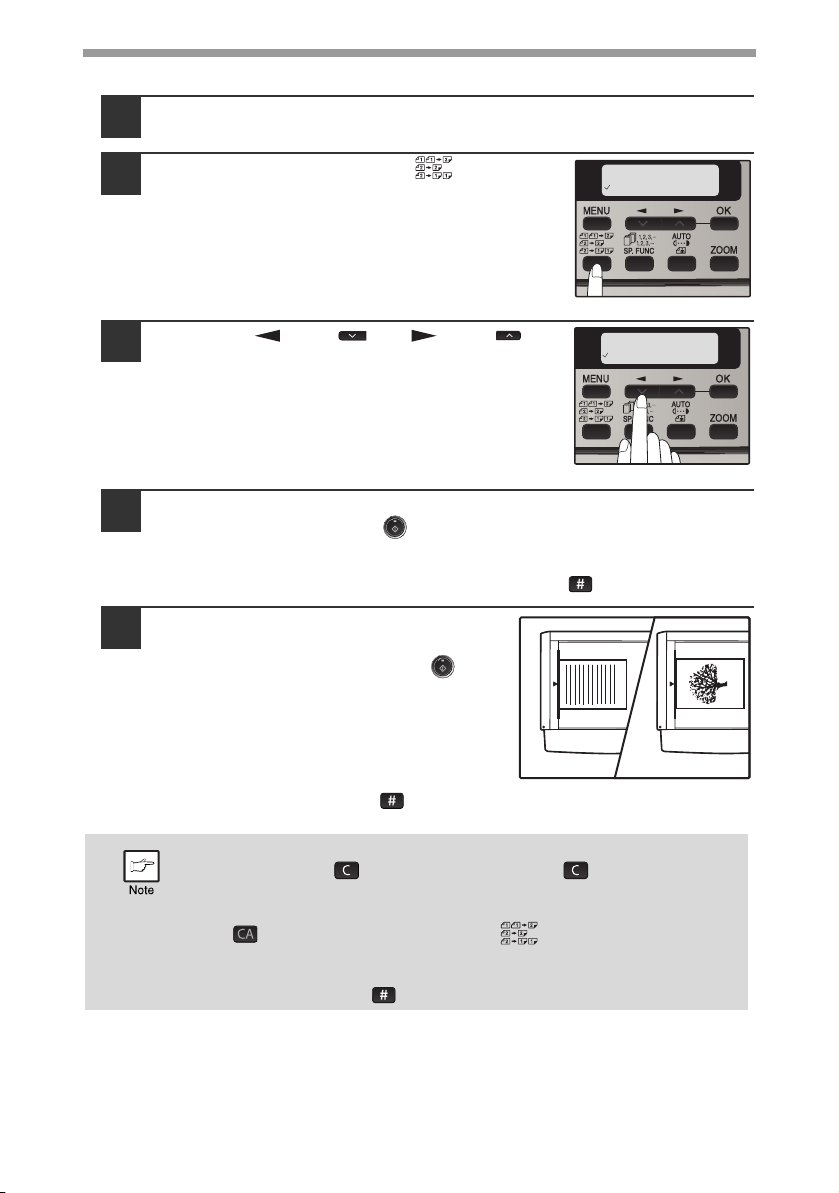
Press the [E-SORT.SP.FUNC] key until "ID CARD COPY"
1
appears and the press the [OK] key.
Press the [ ] key ( ) to move " " to the "ON" position and
2
then press the [OK] key.
Place the ID card on the document glass,
3
align with the ID card mark, and press the
[START] ( ) key. When scan is finished,
[START] ( ) key indicator will blink and
one side of the ID card is scanned into
memory. (In this case, print will start if
pressing READ-END (#) key.)
Turn and replace the ID card on the document glass, and press
4
the [START] ( ) key. When scan is finished, copy will begin.
To cancel ID card copy, press the [CLEAR] ( ) key and make sure the
[START] ( ) key indicator is off.
Page 40

5
Chapter 5
INSTALLING THE SOFTWARE
This chapter explains how to install and configure the software that is required for the
printer and scanner functions of the machine. The procedure for viewing the Online
Manual is also explained.
• The screen images in this manual are mainly for Windows XP. With
other versions of Windows, some screen images may be different
from those in this manual.
• Where "FO-XXXX" appears in this manual, please substitute the
name of your model for "XXXX". For the name of your model, see the
operation panel on the machine.
• This manual refers to the CD-ROM that accompanied the machine
simply as "CD-ROM".
SOFTWARE
The CD-ROM that accompanies the machine contains the following software:
MFP driver
Printer driver
The printer driver enables you to use the printer function of the machine.
Scanner driver*
The scanner driver allows you to use the scanning function of the machine with
TWAIN-compliant and WIA-compliant applications.
Printer Status Monitor
"Printer Status Monitor" allows the user to check on the computer screen whether or
not the machine is able to print.
It provides information on error states such as paper misfeeds and shows the
configuration of the machine (number of trays, etc.) by means of illustrations.
Available paper sizes are also indicated.
Button Manager*
Button Manager allows you to use the scanner menus on the machine to scan a
document.
Sharpdesk/Network Scanner Tool
Sharpdesk is an integrated software environment that makes it easy to manage
documents and image files, and launch applications. Network Scanner Tool is a
utility that helps you use Scan to Desktop. Those are contained in the separate
Sharpdesk CD-ROM.
PC-Fax driver
This enables you to send a fax from your computer to a fax machine via the
machine.
* The scanning feature can only be used with computers that are connected to the
machine by a USB cable. If you are connected to the machine by a LAN connection
only the printer function can be used.
39
Page 41

BEFORE INSTALLATION
Hardware and software requirements
Check the following hardware and software requirements in order to install the
software.
Computer type IBM PC/AT or compatible computer equipped with a
USB2.0*
2 *3 *4
Operating system*
Display 1024 x 768 dots resolution and 16-bit color or higher is
Hard disk free space 150 MB or more
Other hardware
requirements
*1Compatible with Windows 2000 Professional, Windows XP Professional/Home Edition,
Windows Vista or Windows 7 preinstalled model standardly equipped with a USB port.
2
*
Printing is not available in MS-DOS mode.
3
*
The machine does not support printing from a Macintosh environment.
4
*
Administrator's rights are required to install the software using the installer.
Windows 2000 Professional, Windows XP,
Windows Server 2003, Windows Vista,
Windows Server 2008, Windows 7
recommended.
An environment on which any of the operating systems
listed above can fully operate
Installation environment and usable software
The following table shows the drivers and software that can be installed for each
version of Windows and interface connection method.
Windows
MFP Printer
Driver
MFP Scanner
Driver
Button
Manager
Sharpdesk
Status Monitor
Cable
USB Yes Yes Yes Yes
LAN Yes Yes Yes Yes Yes Yes
USB Yes Yes Yes Yes
LAN N.A. N.A. N.A. N.A. N.A. N.A.
USB Yes Yes Yes Yes
LAN
USB
LAN
USB
LAN Yes Yes Yes Yes Yes Yes
2000
N.A. N.A. N.A. N.A. N.A. N.A.
N . A . Ye s Ye s Ye s N.A. N.A.
N . A . Ye s Ye s Ye s N.A. N.A.
N.A. N.A. N.A. N.A. N.A. N.A.
1
or 10Base-T/100Base-TX LAN interface
Operating System
XP Vista 7
Server
2003
N.A. N.A.
N.A. N.A.
N.A. N.A.
Server
2008
40
Page 42

INSTALLING THE SOFTWARE
• If you need to use a different connection method after installing the
software using a USB or network connection, you must first uninstall
the software and then install it using the new connection method.
• In the following explanations it is assumed that the mouse is
configured for right hand operation.
• The scanner feature only works when using a USB cable.
• If an error message appears, follow the instructions on the screen to
solve the problem. After the problem is solved, the installation
procedure will continue. Depending on the problem, you may have to
click the "Cancel" button to exit the installer. In this case, reinstall the
software from the beginning after solving the problem.
• The PC-Fax driver uses the printer driver port. Before installing the
PC-Fax driver, be sure to install the MFP driver (printer/scanner).
Using the machine with a USB connection
The USB cable must not be connected to the machine. Make
1
sure that the cable is not connected before proceeding.
If the cable is connected, a Plug and Play window will appear. If this
happens, click the "Cancel" button to close the window and disconnect the
cable.
The cable will be connected in step 13.
Insert the CD-ROM into your computer's CD-ROM drive.
2
Click the "start" button, click "My Computer" ( ), and then
3
double-click the CD-ROM icon ( ).
• On Windows Vista/7, click the "Start" button, click "Computer", and then
double-click the CD-ROM icon.
• On Windows 2000, double-click "My Computer", and then double-click the
CD-ROM icon.
Double-click the "setup" icon ( ).
4
On Windows Vista/7, if a message screen appears asking you for
confirmation, click "Allow".
The "SOFTWARE LICENSE" window will appear. Make sure
5
that you understand the contents of the software license, and
then click the "Yes" button.
You can show the "SOFTWARE LICENSE" in a different language by
selecting the desired language from the language menu. To install the
software in the selected language, continue the installation with that
language selected.
41
Page 43

INSTALLING THE SOFTWARE
Read the "Readme First" in the "Welcome" window and then
6
click the "Next" button.
To install all of the software, click
7
the "Standard" button of
"Connected to this computer"
and go to step 12.
To install particular packages,
click the "Custom" button and go
to next step.
Click the "MFP Driver" button.
8
Click the "Display Readme" button to
show information on packages that are
selected.
42
The files required for installation of the MFP driver are copied.
9
Follow the on-screen instructions.
When "The installation of the SHARP software is complete." appears, click
the "OK" button.
• If you are using Windows Vista or 7 and a security warning window
appears, be sure to click "Install this driver software anyway".
• If you are running Windows 2000/XP and a warning message
appears regarding the Windows logo test or digital signature, be sure
to click "Continue Anyway" or "Yes".
Page 44

INSTALLING THE SOFTWARE
You will return to the window of step 8. If you wish to install
10
Button Manager, click the "Button Manager" button.
If you do not wish to install Button Manager, click the "Close" button and go
to step 12.
After the installation, a message prompting you to restart your computer
may appear. In this case, click the "Yes" button to restart your computer.
If you wish to install the PC-Fax driver, click the "PC-Fax
11
Driver" button in step 8.
In the port selection screen that appears when the PC-Fax driver is being
installed, select the same port as the MFP driver that is already installed.
When installing is finished, click the "Close" button.
12
• If you are using Windows Vista or 7 and a security warning window
appears, be sure to click "Install this driver software anyway".
• If you are running Windows 2000/XP and a warning message
appears regarding the Windows logo test or digital signature, be sure
to click "Continue Anyway" or "Yes".
A message will appear instructing you to connect the machine to your
computer. Click the "OK" button.
After the installation, a message prompting you to restart your computer
may appear. In this case, click the "Yes" button to restart your computer.
Make sure that the power of the machine is turned on, and then
13
connect the USB cable (p.44).
Windows will detect the machine and a Plug and Play screen will appear.
Follow the instructions in the plug and play window to install
14
the driver.
Follow the on-screen instructions.
• If you are using Windows Vista or 7 and a security warning window
appears, be sure to click "Install this driver software anyway".
• If you are running Windows 2000/XP and a warning message
appears regarding the Windows logo test or digital signature, be sure
to click "Continue Anyway" or "Yes".
This completes the installation of the software.
If you installed Button Manager, set up Button Manager as explained in "SETTING
UP BUTTON MANAGER" (p.55).
43
Page 45

INSTALLING THE SOFTWARE
Connecting a USB cable
Follow the procedure below to connect the machine to your computer.
A USB cable for connecting the machine to your computer is not included with the
machine. Please purchase the appropriate cable for your computer.
• USB is available with a PC/AT compatible computer that was
originally equipped with USB and had Windows 2000 Professional,
Windows XP, Windows Vista or Windows 7 preinstalled.
• Do not connect the USB cable before installing the printer driver. The
USB cable should be connected during installation of the printer
driver.
• If the machine will be connected using a USB 2.0 port of your
computer, please purchase a USB cable that supports USB 2.0.
• Use the machine's "HI-SPEED" mode only when using a computer
that is running Windows 2000/XP/Vista or 7.
• Even when the Microsoft USB 2.0 driver is used, it may not be
possible to obtain full USB 2.0 speed if a PC card supporting USB 2.0
is used. To obtain the latest driver (which may enable a higher
speed), contact the manufacturer of your PC card.
• Connection is also possible using a USB 1.1 port on your computer.
However, the specifications will be USB 1.1 specifications (FullSpeed).
Insert the cable into the USB
1
connector on the machine.
44
Insert the other end of the cable into your computer's USB port.
2
Page 46

INSTALLING THE SOFTWARE
Using the machine as a network printer
Interface cables for connecting the machine to your computer are not
included with the machine. Please purchase the appropriate cable for
your computer.
Insert the LAN cable into the LAN
1
connector on the machine.
Use a network cable that is shielded.
Turn on the machine.
2
Insert the "Software CD-ROM" into your computer's CD-ROM
3
drive.
Click the "start" button, click "My Computer" ( ), and then
4
double-click the CD-ROM icon ( ).
• In Windows Vista/7, click the "Start" button, click "Computer", and then
double-click the "CD-ROM" icon.
• In Windows 2000, double-click "My Computer" and then double-click the
CD-ROM icon.
Double-click the "setup" icon ( ).
5
In Windows Vista/7, if a message screen appears asking you for
confirmation, click "Allow".
The "SOFTWARE LICENSE" window will appear. Make sure
6
that you understand the contents of the license agreement, and
then click the "Yes" button.
You can show the "SOFTWARE LICENSE" in a different language by
selecting the desired language from the language menu. To install the
software in the selected language, continue the installation with that
language selected.
Read the message in the "Welcome" window and then click the
7
"Next" button.
45
Page 47

INSTALLING THE SOFTWARE
Click the "Standard" button of the
8
"Connect via the network" menu.
Printers connected to the network
9
are detected. Select the machine
and click the "Next" button.
If the machine is not found, make sure that the machine is powered on
and connected to your computer and then search again. If the machine
is still not found, use the custom installation procedure to directly
specify the IP address.
46
A confirmation window appears. Check the contents and then
10
click the "Next" button.
Select whether or not you wish the printer to be your default
11
printer and click the "Next" button.
If you are installing multiple printer drivers, select the printer that you wish to
use as your default printer.
If you do not wish to set either printer driver as the default printer, select
"No".
If you clicked the "Custom installation" button in step 7, the following
windows will appear.
• Printer name window
If you wish to change the printer name, enter the desired name and
click the "Next" button.
• Window confirming installation of the display fonts
To install the display fonts for the PCL printer driver, select "Yes" and
click the "Next" button.
Page 48

INSTALLING THE SOFTWARE
Follow the on-screen instructions.
12
Read the message in the window that appears and click the "Next" button.
Installation begins.
• If you are using Windows 2000/XP/Server 2003
If a warning message regarding the Windows logo test or digital
signature appears, be sure to click the "Continue Anyway" or "Yes"
button.
• If you are using Windows Vista/7/Server 2008
If a security warning window appears, be sure to click "Install this
driver software anyway".
When the installation completed screen appears, click the "OK"
13
button.
Click the "Close" button.
14
After the installation, a message prompting you to restart your computer
may appear. In this case, click the "Yes" button to restart your computer.
This completes the installation of the software.
• After installation, see "CONFIGURING THE PRINTER DRIVER" (p.53) to check
the printer driver settings.
• To install the Printer Status Monitor, see "Installing the printer status monitor"
(p.51).
47
Page 49

INSTALLING THE SOFTWARE
Sharing the printer using windows networking
If the machine will be used as a shared printer on a network, follow these steps to
install the printer driver in the client computer.
To configure the appropriate settings in the print server, see the
operation guide or help file of your operating system.
"Print server" as explained here, is a computer that is directly connected
to the machine, and a "Client" is any other computer that is connected
to the same network.
Insert the "Software CD-ROM" into your computer's CD-ROM
1
drive.
Click the "start" button, click "My Computer" ( ), and then
2
double-click the CD-ROM icon ( ).
• In Windows Vista/7, click the "Start" button, click "Computer", and then
double-click the "CD-ROM" icon.
• In Windows 2000, double-click "My Computer" and then double-click the
CD-ROM icon.
Double-click the "setup" icon ( ).
3
In Windows Vista/7, if a message screen appears asking you for
confirmation, click "Allow".
The "SOFTWARE LICENSE" window will appear. Make sure
4
that you understand the contents of the license agreement, and
then click the "Yes" button.
You can show the "SOFTWARE LICENSE" in a different language by
selecting the desired language from the language menu. To install the
software in the selected language, continue the installation with that
language selected.
48
Read the message in the "Welcome" window and then click the
5
"Next" button.
Click the "Custom" button of the
6
"Connect via the network" menu.
Page 50

INSTALLING THE SOFTWARE
Click the "Printer Driver" button.
7
To view information on the software,
click the "Display Readme" button.
To install the PC-Fax driver, click the
[PC-Fax Driver] button.
Select "Shared Printer" and click the "Next" button.
8
For the port to be used, select the
9
machine set as a shared printer,
and click the "Next" button.
If you are using Windows 2000/XP, you
can also click the "Add Network Port"
button and select the printer to be
shared by browsing the network in the
window that appears. (In Windows Vista/
7, the "Add Network Port" button does
not appear.)
If the shared printer does not appear in the list, check the settings in the
printer server.
When the model selection window appears, select model name
10
of your machine and click the "Next" button.
Follow the on-screen instructions.
11
• If you are using Windows 2000/XP/Server 2003
If a warning message regarding the Windows logo test or digital
signature appears, be sure to click the "Continue Anyway" or "Yes"
button.
• If you are using Windows Vista/7/Server 2008
If a security warning window appears, be sure to click "Install this
driver software anyway".
When the installation completed screen appears, click the "OK"
12
button.
49
Page 51

INSTALLING THE SOFTWARE
Click the "Close" button in the window of step 6.
13
After the installation, a message prompting you to restart your computer
may appear. If this message appears, click the "Yes" button to restart
your computer.
This completes the installation of the software.
• After installation, see "CONFIGURING THE PRINTER DRIVER" (p.53) to check
the printer driver settings.
• To install the Printer Status Monitor, see "Installing the printer status monitor"
(p.51).
50
Page 52

INSTALLING THE SOFTWARE
Installing the printer status monitor
Insert the "Software CD-ROM" (Disc 1) into your computer's
1
CD-ROM drive.
Click the "start" button, click "My Computer" ( ), and then
2
double-click the CD-ROM icon ( ).
• In Windows Vista/7, click the "Start" button, click "Computer", and then
double-click the "CD-ROM" icon.
• In Windows 2000, double-click "My Computer" and then double-click the
CD-ROM icon.
Double-click the "setup" icon ( ).
3
In Windows Vista/7, if a message screen appears asking you for
confirmation, click "Allow".
The "SOFTWARE LICENSE" window will appear. Make sure
4
that you understand the contents of the license agreement, and
then click the "Yes" button.
You can show the "SOFTWARE LICENSE" in a different language by
selecting the desired language from the language menu. To install the
software in the selected language, continue the installation with that
language selected.
Read the message in the "Welcome" window and then click the
5
"Next" button.
Click the "Custom" button of the
6
"Connect via the network" menu.
51
Page 53

INSTALLING THE SOFTWARE
Click the "Printer Status Monitor"
7
button.
To view information on the software,
click the "Display Readme" button.
Follow the on-screen instructions.
8
When the installation completed screen appears, click the
9
"Finish" button.
To have the Printer Status Monitor start automatically when your computer
is started, select the "Add this program to your Startup folder" checkbox.
Click the "Close" button in the window of step 6.
10
After the installation, a message prompting you to restart your computer
may appear. If this message appears, click the "Yes" button to restart
your computer.
52
This completes the installation.
For the procedures for using the Printer Status Monitor, see the Help file. Follow
these steps to view the Help file:
Click the Windows "start" button, select "All Programs" ("Programs" in Windows 2000),
select "SHARP Printer Status Monitor" and then select "Help".
Page 54

CONFIGURING THE PRINTER DRIVER
After installing the printer driver, you must configure the printer driver settings
appropriately for the number of paper trays on the machine and the size of paper
loaded in each tray.
Click the "start" button, click "Control Panel", click "Printers
1
and Other Hardware", and then click "Printers and Faxes".
• In Windows Vista/7, click the "Start" button, click "Control Panel" and then
click "Printer".
• In Windows Server 2003/ Server 2008, click the "Start" button and then
click "Printers and Faxes".
• In Windows 2000, click the "Start" button, select "Settings", and then click
"Printers".
Click the "SHARP XX-XXXX"
2
printer driver icon and select
"Properties" from the "File"
menu.
• In Windows Vista/7, from the
"Organize" menu select "Properties".
Click the "Configuration" tab and
3
set the printer configuration
based on the options that have
been installed.
Set the printer configuration properly.
Otherwise, printing may not take place
correctly.
To automatically configure the settings based on the detected machine
status, click the "Auto Configuration" button.
53
Page 55

INSTALLING THE SOFTWARE
Click the "Set Tray Status" button
4
and select the size of paper that is
loaded in each tray.
Select a tray in the "Paper source"
menu, and select the size of paper
loaded in that tray from the "Set Paper
Size" menu. Repeat for each tray.
Click the "OK" button in the "Set Tray Status" window.
5
Click the "OK" button in the printer properties window.
6
54
Page 56

SETTING UP BUTTON MANAGER
Button Manager is a software program that works with the scanner driver to enable
scanning from the machine.
To scan using the machine, Button Manager must be linked with the scan menu on
the machine. Follow the steps below to link Button Manager to scanner events.
Windows XP/Vista/7
Click the "Start" button, click "Control Panel", click "Hardware
1
and Sound", and then click "Scanners and Cameras".
• In Windows 7, click the "start" button and then click "Devices and
Printers".
• In Windows XP, click the "start" button, select "Control Panel" and click
"Printers and Other Hardware", and then click "Scanners and Cameras".
Click the "SHARP FO-xxxx" icon and select "Properties".
2
• In Windows 7, right-click the "SHARP FO-xxxx" icon and select "Scan
properties".
• In Windows XP, select "Properties" from the "File" menu.
In the "Properties" screen, click the "Events" tab.
3
Select "SC1:" from the "Select an event" pull-down menu.
4
Select "Start this program" and then select "Sharp Button
5
Manager Z" from the pull-down menu.
Repeat Steps 4 and 5 to link Button Manager to "SC2:" through
6
"SC6:".
Select "SC2:" from the "Select an event" pull-down menu. Select "Start this
program", select "Sharp Button Manager Z" from the pull-down menu. Do
the same for each ScanMenu through "SC6:".
Click the "OK" button.
7
Button Manager is now linked to the scan menu (1 through 6).
The scan settings for each of scan menu 1 through 6 can be changed with
the setting window of Button Manager.
For the factory default settings of the scan menu and the procedures for
configuring Button Manager settings, see "Button Manager settings"
(p.125).
55
Page 57

INSTALLING THE SOFTWARE
Windows 2000
Click the "Start" button, select "Settings", and then click
1
"Control Panel".
Double-click the "Scanners and Cameras" icon.
2
Select "SHARP FO-xxxx" and click the "Properties" button.
3
In the "Properties" screen, click the "Events" tab.
4
Select "SC1:" from the "Scanner events" pull-down menu.
5
Select "Sharp Button Manager Z" in "Send to this application".
6
If other applications are shown, deselect the checkboxes for the other
applications and leave only the Button Manager checkbox selected.
Click the "Apply" button.
7
Repeat Steps 5 through 7 to link Button Manager to "SC2:"
8
through "SC6:".
Select "SC2:" from the "Scanner events" pull-down menu. Select "Sharp
Button Manager Z" in "Send to this application" and click the "Apply" button.
Do the same for each ScanMenu through "SC6:".
When the settings have been completed, click the "OK" button to close the
screen.
56
Button Manager is now linked to the scan menu (1 through 6).
The scan settings for each of scan menu 1 through 6 can be changed with
the setting window of Button Manager.
For the factory default settings of the scan menu and the procedures for
configuring Button Manager settings, see "Button Manager settings"
(p.125).
Page 58

6
Chapter 6
PRINTER FUNCTIONS
PRINTER/SCANNER FUNCTIONS
The machine includes a USB connector and a LAN connector as standard equipment.
The printer and scanner functions can be used through the USB connector and the
LAN connector. (Scan using TWAIN and Button Manager can only be used through
USB connector.)
The machine has the following features:
• High-speed data transfer (when connected to a USB 2.0 connector)
• ROPM* function
* ROPM is an acronym for "Rip Once Print Many" processing. The ROPM function stores
multiple pages of print data in memory before printing. When printing multiple copies,
this eliminates the need for the computer to repeatedly transmit the print data.
To use the machine as a printer or scanner, the printer driver or scanner driver must
first be installed as explained in the "SET UP THE SOFTWARE".
• If a problem occurs in printer or scanner mode, see page 151.
• When using USB 2.0 (Hi-Speed mode), be sure to read "System
requirements for USB 2.0 (Hi-Speed mode)" (below) to verify that
your system and the machine settings are configured appropriately.
System requirements for USB 2.0 (Hi-Speed mode)
The following system is required to use USB 2.0 (Hi-Speed mode):
• Your computer must be running Windows 2000 Professional/XP/Vista/7 and the
Microsoft USB 2.0 driver must be installed.
• The "USB 2.0 MODE SWITCH" setting in the machine's user programs must be
set to "Hi-Speed". To change the setting, see "USB 2.0 MODE SWITCH" in the
user programs (p.139).
* Even when the Microsoft USB 2.0 driver is installed, some USB 2.0 expansion cards
are not capable of attaining the speed stipulated by the Hi-Speed standard. This
problem can often be fixed by installing a more recent driver for the card. To obtain
the most recent driver for your card, contact the card's manufacturer.
57
Page 59

USING THE PRINTER MODE
The procedure for loading paper for printing is the same as for loading copy paper.
See "LOADING PAPER" (p.16).
• Print jobs received while the machine is copying will be stored in
memory. When the copy job is finished, the print jobs will begin
printing.
• Printing is not possible when the front or side cover is opened for
machine maintenance, or when a misfeed occurs or the machine
runs out of paper or toner, or when the drum cartridge reaches its
replacement time.
58
Page 60

BASIC PRINTING
The following example explains how to print a document from WordPad.
Before printing, make sure that the correct size of paper for your document has been
loaded in the machine.
Start WordPad and open the document that you wish to print.
1
Select "Print" from the application's
2
"File" menu.
The "Print" dialog box will appear.
Make sure that "SHARP XX-XXXX" is selected as the printer. If
3
you need to change any print settings, click the "Preferences"
button to open the printer driver setup screen.
The printer driver setup screen will appear.
Windows 2000 does not have the "Preferences" button in this dialog box.
Select settings as needed on each of the tabs in the setup screen.
☞"PRINTER DRIVER SETTINGS" (p.62), "TWO-SIDED PRINTING" (p.63),
"PRINTING MULTIPLE PAGES ON ONE PAGE" (p.65),
"FITTING THE PRINTED IMAGE TO THE PAPER" (p.66),
"ROTATING THE PRINT IMAGE 180 DEGREES" (p.67),
"PRINTING A WATERMARK" (p.68)
Click the "Print" button.
4
Printing begins.
The print job is delivered to the output tray, with the position of the paper
offset slightly from the previous job (offset function).
59
Page 61

PRINTER FUNCTIONS
If the tray runs out of paper during printing
Printing will automatically resume when paper is loaded in the tray.
When using the bypass tray, select printer mode with the mode select key on the
machine, load paper as instructed by the message in the display, and then press the
[START] key to resume printing.
When the 250-sheet paper feed unit is installed:
Note that if the "AUTO TRAY SWITCH" setting in the user programs is enabled and
there is the same size of paper in another tray, the machine will automatically switch
to the other tray and continue printing.
Cancel a print job
To cancel a print job that is already in progress, select printer mode with the mode
select key on the machine and then press the [CLEAR] key ( ) or the [CLEAR
ALL] key ( ).
"CANCEL PRINT JOB?" will appear in the display. Select "YES" and press the [OK]
key.
When "Paper Source" is set to "Auto Select"
If "Paper Source" is set to "Auto Select" in the "Paper" tab of the printer driver setup
screen and the correct size of paper for a print job is not loaded in the machine, the
printing procedure will vary depending on the "FORCED OUTPUT" setting in the
user programs (see "USER PROGRAMS" in the Operation Guide).
60
When "FORCED OUTPUT" is set to "OFF"
Select printer mode with the mode select key on the machine, check the message in
the display, load paper in the bypass tray, and then press the [START] key to begin
printing.
When "FORCED OUTPUT" is set to "ON"
Printing takes place on the paper loaded in the machine, even though the paper size
is different from the print image size.
Page 62

OPENING THE PRINTER DRIVER FROM THE "START" BUTTON
Printer driver settings can be configured by opening the printer driver from the
Windows "start" button. Settings adjusted in this way will be the initial settings when
you print from an application. (If you change the settings in the printer driver setup
screen at the time of printing, the settings will revert to the initial settings when you
quit the application.)
Click the "start" button, and then click "Control Panel".
1
• On Windows 2000, click the "Start" button and select "Settings".
• On Windows Server 2003/Server 2008, click the "Start" button and then
click "Printers and Faxes". Go to step 3.
Click "Printers and Other Hardware", and then click "Printers
2
and Faxes".
• On Windows Vista/7, click "Printer".
• On Windows 2000, click "Printers".
Click the "SHARP XX-XXXX" printer
3
driver icon and select "Properties"
from the "File" menu.
On Windows Vista/7, select "Properties"
from the "Organize" menu.
Click the "Printing Preferences" button in the "General" tab.
4
The printer driver setup screen will appear.
☞"PRINTER DRIVER SETTINGS" (p.62)
61
Page 63

PRINTER DRIVER SETTINGS
1
2
3
4
5
6
7
8
10
9
1
2
3
4
5
6
7
8
9
10
To view Help for a setting, click the button in the upper right-hand corner of the
window and then click the setting.
Some restrictions exist on the combinations of settings that can be selected in the
printer driver setup screen. When a restriction is in effect, an information icon ( )
will appear next to the setting. Click the icon to view an explanation of the restriction.
62
Tab
The settings are grouped on tabs. Click
on a tab to bring it to the front.
Drop-down list
Allows you to make a selection from a
list of choices.
Print setting image
This shows the effect of the selected
print settings.
Checkbox
Click on a checkbox to activate or
deactivate a function.
Machine image
The paper tray (in blue) selected in
"Paper selection" on the "Paper" tab.
You can also click on a tray to select it.
Check button
Allows you to select one item from a list
of options.
"OK" button
Click this button to save your settings
and exit the dialog box.
"Cancel" button
Click this button to exit the dialog box
without making any changes to the
settings.
"Apply" button
Click to save your settings without
closing the dialog box.
"Help" button
Click this button to display the help file
for the printer driver.
Page 64

PRINTER FUNCTIONS
The settings and the image of the machine will vary depending on the
model.
The printer driver setup screen allows you to select various functions.
For information on the printer functions, see "PRINTER DRIVER
SPECIFICATIONS" (p.89).
TWO-SIDED PRINTING
The printer driver setup screen of
models that support two-sided printing
contains a "Document Style" setting in
the "Main" tab. This feature allows you to
print on both sides of the paper.
To use this function, open the printer
driver setup screen and select "2-Sided
(Book)" or "2-Sided (Tablet)" from
"Document Style" in the "Main" tab.
See "BASIC PRINTING" (p.59) for
details on how to open the printer driver.
• Paper sizes that can be used for two-sided printing are Letter, Legal,
Folio*, Invoice, A4, A5, B5, Foolscap, and 16K.
• When using two-sided printing, select a source other than "Bypass
Tray" for the "Paper Source" in the "Paper" tab.
* For two-sided printing on Folio size paper, "Tray 1" or "Tray 2" (if
Tray 2 has been installed) must be selected in the "Paper Source"
on the "Paper" tab.
The following example shows the result when portrait data is printed on both sides of
the paper.
Print data
Printing result
2-Sided (Book) 2-Sided (Tablet)
The pages are
printed so that they
can be bound at the
side.
The pages are
printed so that they
can be bound at
the top.
63
Page 65

PRINTER FUNCTIONS
Pamphlet style
Pamphlet style prints two pages each on
the front and back of each sheet of paper
(four pages total on one sheet) so that the
sheets can be folded down the center and
bound to create a pamphlet. This function
is convenient when you wish to compile
printed pages into a pamphlet.
To use this function, open the printer driver
and select "Pamphlet Style" in "Document
Style" in the "Main" tab.
The direction of opening of the pamphlet can be selected with the "Right Turning
Pamphlet" checkbox in the "Advanced" tab. The following examples show how 8
pages are printed when pamphlet style is selected.
Printing result
Print data
Right Turning
Pamphlet
Right Turning
Pamphlet
64
• Only letter, invoice, A4 and A5 size paper can be used for pamphlet
style printing.
• Because four pages are printed on each sheet of paper, blank pages
are automatically added at the end when the total number of pages is
not a multiple of four.
• When "Tiled Pamphlet" is selected, printing will take place on paper
that is twice the size of the paper size specified in the application.
• When "2-Up Pamphlet" is selected, each page is reduced in the same
way as for 2-Up and printed on the size of paper that is specified in
the application.
• When using Pamphlet style, N-up and Fit to Page function can not be
selected.
Page 66

PRINTING MULTIPLE PAGES ON ONE PAGE
This feature allows you to reduce and print two, four, six, eight or sixteen document
pages on a single sheet of paper.
To use this function, open the printer driver setup screen and select the number of
pages per sheet (2-Up, 4-Up, 6-Up, 8-Up, 9-Up, or 16-Up) in "N-Up Printing" in the
"Main" tab.
The order of the pages can be changed in the "Order" menu.
☞ See "BASIC PRINTING" (p.59) for details on how to open the printer driver.
The "N-Up Printing" setting is not available when "Zoom" is selected.
☞"FITTING THE PRINTED IMAGE TO THE PAPER" (p.66)
For example, when "2-Up" or "4-Up" is selected, the result will be as follows
depending on the selected order.
N-Up Left to Right Right to Left
[2-Up]
N-Up
[4-Up]
If you select the "Border" checkbox, borderlines will be printed around each page.
Right , and Down Down , and Right
Examples for 2-Up and 4-Up are shown here. The order of 6-Up, 8-Up,
9-Up, and 16-Up is the same as 4-Up. The order can be viewed in the
print setting image in the printer driver setup screen.
☞"PRINTER DRIVER SETTINGS" (p.62)
Left , and Down Down , and Left
65
Page 67

FITTING THE PRINTED IMAGE TO THE PAPER
Paper Size: Letter
Fit To Paper Size: Invoice
Letter size document
(Paper Size)
Invoice size paper
(Fit To Paper Size)
The printer driver can adjust the size of the printed image to match the size of the
paper loaded in the machine.
Follow the steps shown below to use this function. The explanation below assumes
that you intend to print a letter or A4 size document onto an invoice or B5 size paper.
☞ See "BASIC PRINTING" (p.59) for details on how to open the printer driver.
The "Fit To Paper Size" setting is not available when "Zoom" is selected.
☞"PRINTING MULTIPLE PAGES ON ONE PAGE" (p.65)
Click the "Paper" tab in the printer driver setup screen.
1
Select the original size (Letter (A4)) of the print image in "Paper
2
Size".
Check the "Fit to Paper Size" box.
3
Select the actual size of paper to be used for printing (Invoice).
4
The size of the printed image will be automatically adjusted to match the
paper loaded in the machine.
66
If "A3 [Fit to Page]", "B4 [Fit to Page]", or "Ledger [Fit to Page]" is
selected, the print image is fit to the letter size even if "Fit to Page" is not
selected.
Page 68
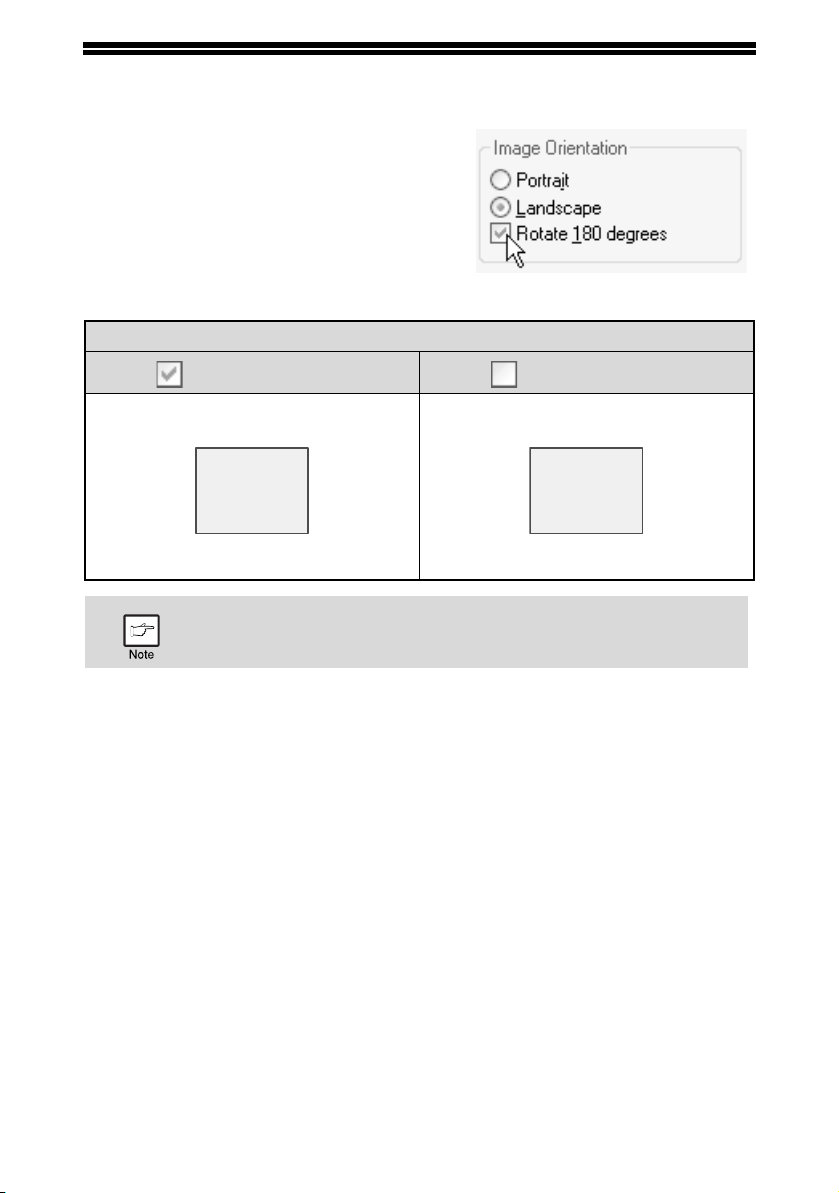
ROTATING THE PRINT IMAGE 180 DEGREES
ABCD
ABCD
The print image can be rotated 180 degrees.
This feature is used to enable correct printing
on envelopes and other paper with flaps that
can only be loaded in one orientation.
To use the feature, select the image orientation
in "Image Orientation" on the "Main" tab, and
then select the "Rotate 180 degrees"
checkbox.
☞See "BASIC PRINTING" (p.59) for details on
how to open the printer driver.
Printing result
Rotate 180 degrees Rotate 180 degrees
The procedure for loading paper is explained in the operation guide for
the machine.
67
Page 69

PRINTING A WATERMARK
You can print a watermark such as "CONFIDENTIAL" on your document. To print a
watermark, open the printer driver, click the "Watermarks" tab, and follow the steps
below.
☞ See "BASIC PRINTING" (p.59) for details on how to open the printer driver.
How to Print a Watermark
From the "Watermark" drop-down list, select the watermark that you wish to print (for
example "CONFIDENTIAL"), and start printing.
Print sample
You can enter text to create your own custom watermark. For details on watermark
settings, view printer driver Help.
☞ "PRINTER DRIVER SETTINGS" (p.62)
68
Page 70

PRINTING TEXT AND LINES/GRAPHICS IN BLACK
ABCD
EFGH
ABCD
EFGH
ABCD
EFGH
Color text, lines and vector graphics that are faint when printed normally can be
printed in black to improve legibility.
Printing text in black
Text that is any color other than white is printed in black.
To use this function, open the printer driver setup screen and select the "Text To
Black" checkbox in the "Advanced" tab.
Printing result
Print data
When using the PCL6 printer driver, if "Print as graphics" is selected in
"TrueType Mode" of "Font" in the "Advanced" tab, this function cannot
be used.
Printing lines and vector graphics in black
Lines and vector graphics that are any color other than white are printed in black.
To use this function, open the printer driver setup screen and select the "Vector To
Black" checkbox in the "Advanced" tab.
Text To Black Text To Black
Print data
If "Raster" is selected in "Graphics mode" in the "Advanced" tab, this
function cannot be used.
Vector To Black Vector To Black
Printing result
69
Page 71

PRINTER UTILITY
Printer Status Monitor (for general users)
"Printer Status Monitor" is on the "Software CD-ROM" (Disc 1).
This allows the user to check on the computer screen whether or not the machine is
able to print.
It provides information on error states such as paper misfeeds and shows the
configuration of the machine (number of trays, etc.) by means of illustrations.
Available paper sizes and paper remaining are also indicated.
• In order to use the Printer Status Monitor, the machine must be
connected to a network.
• To install the Printer Status Monitor, see page 51.
Before using the Printer Status Monitor
Note the following points before using the Printer Status Monitor.
Printing via a server
When the first print job is executed after starting up the Printer Status Monitor, the
machine's IP address is automatically set in the Printer Status Monitor.
Direct printing without a server
Install and configure the software as explained in "INSTALLING THE PRINTER
DRIVER" in the software setup guide for network printer. (This is not necessary if the
software has already been installed and configured.)
70
Page 72

USING THE PRINTER UTILITY
Starting up the printer utility
If the Printer Status Monitor is not running, use the following procedure to start the
utilities.
Printer Status Monitor
Click the "Start" button, point to "All Programs" ("Programs" in Windows 2000) and
then "SHARP Printer Status Monitor". Select "Printer Status Monitor".
Using the printer utilities
For information on using the Printer Status Monitor, see the Help files. The Help files
can be viewed as follows:
Click the "Start" button, point to "All Programs" ("Programs" in Windows 2000) and
then "SHARP Printer Status Monitor". Select "Help".
71
Page 73

PRINTER FUNCTIONS
Changing the Printer Status Monitor settings
Once installed, the Printer Status Monitor normally runs in the background in
Windows. If you need to change the Printer Status Monitor settings, follow the steps
below.
Right-click the Printer Status
1
Monitor icon ( ) on the task bar,
and select "Preferences" from the
pop-up menu.
Change the Printer Status Monitor settings as desired.
2
For information on the Printer Status Monitor settings, see Printer Status
Monitor Help. (Click the "Help" button in the settings window.)
72
Page 74

PRINTER FUNCTIONS
Checking the printer status
The Printer Status Monitor allows you to check whether or not toner and paper
remain in the machine.
Right-click the Printer Status
1
Monitor icon ( ) on the task bar,
and select "SHARP XX-XXXX
Status" from the pop-up menu.
The icon turns red when printing is not possible due to a machine error
or other problem.
Click the "Detail" button.
2
The window expands to show machine status details.
73
Page 75

PRINTER FUNCTIONS
To collapse the window, click the "Hide detail" button.
By default, the collapsed window initially appears when "SHARP XXXXXX Status" is selected in Step 1. If desired, you can change the
setting to have the expanded window initially appear.
☞"Changing the Printer Status Monitor settings" (p.72)
74
Page 76

PRINTER FUNCTIONS
When "Paper Feed" is set to "Auto Select"
If "Paper Feed" is set to "Auto Select" in the Print window and the correct size of
paper for a print job is not loaded in the machine, the printing procedure will vary
depending on the "FORCED OUTPUT" setting in the user programs (see "USER
PROGRAMS" in the Operation Guide).
When "FORCED OUTPUT" is set to "OFF"
Select printer mode with the mode select key on the machine, check the message in
the display, load paper in the bypass tray, and then press the [START] key to begin
printing.
When "FORCED OUTPUT" is set to "ON"
Printing takes place on the paper loaded in the machine, even though the paper size
is different from the print image size.
75
Page 77

ABOUT THE WEB PAGES
The Web server is accessed using a Web browser on your computer. The Web
pages include both pages for users and pages for the administrator. In the user Web
pages, users can monitor the machine, directly print a file specified on a computer,
and select printer configuration settings. In the administrator Web pages, the
administrator can configure the machine's e-mail settings, settings for print by e-mail,
and passwords. Only the administrator is allowed to configure these settings.
How to access the Web page and view help
Use the following procedure to access the Web pages. [Help] can be clicked at the
bottom of the menu frame to view information on the various function settings that
can be configured remotely over the network from the machine's Web pages. For the
settings of each function, see the explanations in Help.
Open the Web browser on your computer.
1
Supported browsers:
Internet Explorer 5.5 or later
Safari 1.5 or later
Firefox 2.0 or later
In the "Address" field of your Web
2
browser, enter the IP address that
has been configured in the
machine.
When the connection is completed, the
Web page will appear in your Web
browser.
☞"ABOUT THE WEB PAGES (FOR
USERS)" (p.77)
76
Click the [Help] button at the
3
bottom of the menu frame.
To view information on a function setting,
click the corresponding item in the Help
screen.
When finished, close the Web
4
pages.
When you have finished using the Web
pages, click the (close) button in the
top right corner of the page.
Page 78

ABOUT THE WEB PAGES (FOR USERS)
1
234
5
When you access the user Web pages in the machine, the following page will appear
in your browser.
A menu frame appears on the left side of the page. When you click an item in the
menu, a screen appears in the right frame that allows you to configure settings for
that item.
1
2
3
4
5
Menu frame
Click a setting in the menu to configure
it.
System Information
Shows the current status of the machine
and model name.
• Device Status
Shows the current status of the
machine, paper trays, output trays,
toner and other supplies, and page
counts.
Out of paper and other warnings
appear in red.
• Device Configuration
Shows what options are installed.
• Network Status
Shows the network status. Information
on "General", "TCP/IP", "NetWare",
"AppleTalk", and "NetBEUI" is shown
on the respective pages.
Printer Test Page
The "Printer Settings List" and various
font lists can be printed.
Condition Settings
Configure basic printer settings.
☞"CONFIGURING THE PRINTER
CONDITION SETTINGS" (p.78)
Admin Mode
To open the Web pages for the
administrator, click here and then enter
the administrator's user name and
password.
☞"ABOUT THE WEB PAGES (FOR
THE ADMINISTRATOR)" (p.81)
☞"PROTECTING INFORMATION
PROGRAMMED IN THE WEB PAGE
([PASSWORDS])" (p.82)
77
Page 79

CONFIGURING THE PRINTER CONDITION
1
2
3
4
SETTINGS
The printer condition settings allow basic printer settings to be configured. The
following items can be set:
• Default Settings: Basic settings that are mainly used when the printer driver is
not used.
• PCL Settings: PCL symbol set, font, line feed code, and other settings.
When the printer driver is used and the same settings are configured
both in the printer driver and in the above screens, the settings
configured in the printer driver override the settings in the above
screens. If a setting is available in the printer driver, use the printer
driver to configure the setting.
How to configure the settings
To display the Condition Settings screen, click [Condition Settings] in the menu
frame.
For detailed explanations of the procedures for establishing settings, click [Help] in
the menu frame.
2
3
1
Condition Settings
This displays the page for configuring
the printer condition settings.
Default / PCL
Select the type of condition settings that
you wish to configure.
Settings
The factory default settings are
displayed.
Change the settings as desired by
selecting from drop-down lists and by
directly entering settings.
For information on the settings, see
"Printer condition settings" (p.79).
Submit
Click to store the Web page settings in
the machine.
4
78
Page 80

PRINTER FUNCTIONS
Printer condition setting menu
Click on a setting to view an explanation of the setting.
Condition Settings
Default Settings Factory default settings
Copies 1
Orientation Por trait
Default Paper Size Letter
Default Paper Source Auto
2-Sided Print 1-Sided
ROPM (Rip Once, Print Many) Enable
Condition Settings
PCL Settings Factory default settings
Symbol Set PC-8
Font 0: Courier (internal font)
Line Feed Code CR=CR; LF=LF; FF=FF
Wide A4 Disable
Printer condition settings
Factory default settings are indicated in bold.
Default Settings
Item Selections Description
Copies 1 - 999 This is used to select the number of copies.
This sets the orientation of the printed page.
Select [Portrait] when the image is longer in
the vertical direction, or [Landscape] when the
image is longer in the horizontal direction.
This sets the default paper size used for the
printed image. Even if the set size of paper is
not in any of the trays, the printed image is
formed in accordance with this setting.
Orientation
Default Paper
Size
Portrait,
Landscape
Invoice, A5, B5,
A4, Letter,
Foolscap, Legal
79
Page 81

PRINTER FUNCTIONS
Item Selections Description
Default Paper
Source
2-Sided Print
ROPM (Rip
Once, Print
Many)
Auto,
Tray 1 ,
Tray 2*,
Bypass (Auto)
1-Sided,
2-Sided (Book),
2-Sided (Tablet)
Enable, Disable
Set the default paper tray.
* Selections available depend on the trays that
are installed.
When [2-Sided (Book)] is selected, two-sided
printing takes place so as to allow binding at
the left side. When [2-Sided (Tablet)] is
selected, two-sided printing takes place so as
to allow binding at the top.
This enables the ROPM function. When
enabled, multi-page print jobs are stored in
memory before printing, and thus the computer
does not need to repeatedly send the print
data when multiple copies are printed.
PCL Settings
Item Selections Description
This specifies which country's characters (PCL
Symbol Set
Font
Line Feed
Code
Wide A4 Enable, Disable
Select one of 35
sets.
Select one
internal or one
external font.
CR=CR; LF=LF;
FF=FF,
CR=CR+LF;
LF=LF; FF=FF,
CR=CR;
LF=CR+LF;
FF=CR+FF,
CR=CR+LF;
LF=CR+LF;
FF=CR+FF
symbol set) are assigned to certain of the
symbols in the character code list. The factory
default setting is [PC-8].
This specifies which PCL font to use for
printing. One font can be specified from among
the internal fonts. The factory default setting is
[0: Courier].
This specifies the line break code by means of
a combination of the "CR" (return) code, "LF"
(line break) code, and "FF" (page break) code.
The factory default setting is printing based on
the transmitted code. The setting can be
changed by selecting one of four combinations.
This setting can be enabled to print 80 lines on
A4 size paper with each line 10CPI font
(English characters). When the setting is
disabled (a checkmark does not appear), each
line is 78 characters long.
80
Page 82

ABOUT THE WEB PAGES
1
2
3
4
5
6
7
8
1
2
3
4
5
6
7
8
(FOR THE ADMINISTRATOR)
In addition to the menus that appear for users, other menus that can only be used by
the administrator appear in the administrator Web pages.
A menu frame appears on the left side of the page. When you click an item in the
menu, a screen appears in the right frame that allows you to configure settings for
that item. Settings that can only be configured by the administrator are explained
here.
Information
Configure machine identification
information for the status & alert E-mail
function.
☞"Information setup" (p.85)
Passwords
To protect the Web site, the system
administrator can establish passwords.
Enter a password that you would like to
establish and click the [Submit] button.
One password can be established for the
administrator and one password can be
established for users.
☞"PROTECTING INFORMATION
PROGRAMMED IN THE WEB PAGE
([PASSWORDS])" (p.82)
Key Operator Programs
Setting changes can be prohibited and
interface settings can be configured.
☞"KEY OPERATOR PROGRAMS"
(p.83)
Status Message
Configure parameters required for
sending status messages, such as
destination addresses and time
schedules.
☞"Status message setup" (p.86)
Alerts Message
Store destination addresses for alert
messages.
☞"Alerts message setup" (p.87)
Security
Unused ports can be disabled for greater
security and port numbers can be
changed.
Services
Configure information concerning the email system.
☞"SMTP setup" (p.85)
Print Port
Configure settings for LPD and Raw
print.
81
Page 83

PROTECTING INFORMATION PROGRAMMED IN THE WEB PAGE ([Passwords])
Passwords can be set (click [Passwords] in the menu frame) to restrict Web page
access and protect settings. The administrator must change the password from the
factory default setting. The administrator must also take care to remember the new
password. The next time the Web pages are accessed, the new password must be
entered.
A password can be set for the administrator and a password can be set for users.
Click [Passwords] in the menu
1
frame.
Enter the current password in "Admin Password".
2
When establishing a password for the first time, enter "Sharp" in "Admin
Password".
Be sure to enter "S" in upper case and "harp" in lower case (passwords
are case sensitive).
Enter passwords in "User Password" and "Admin Password".
3
A maximum of 7 characters and/or numbers can be entered for each
password (passwords are case sensitive).
Be sure to enter the same password in "Confirm Password" as you did in
"New Password".
82
When you have finished entering all items, click [Submit].
4
The entered password is stored.
After setting the password, turn the machine power off and then back
on.
When prompted to enter a password, a user should enter "user" and an
administrator should enter "admin" in "User Name". In "Password", the
respective password for the entered user name should be entered.
For more information, click [Help] in the upper right-hand corner of the
window.
Page 84

KEY OPERATOR PROGRAMS
The key operator programs are used to prohibit changes to the [Condition Settings]
and to configure interface settings.
• Default Settings (p.79): Select the setting for which you wish to prohibit changes.
• Interface settings (p.84): Enable monitoring of data sent to the network port and
set restrictions.
Configuring a setting in the key operator programs
Click [Key operator programs] in
1
the menu frame.
The "Default Settings" screen of the [Key
operator programs] will appear. If you wish
to select a setting in the "Default Settings"
screen, go to step 3.
Click the desired setting.
2
Make a selection for the setting in the screen that appears.
3
See "Key operator programs" (p.84) for descriptions of the settings.
Click [Submit] to store the entered information.
4
83
Page 85

PRINTER FUNCTIONS
Key operator programs
When "YES, NO" appears in the "Settings" column, "YES" is selected when a
checkmark appears in the checkbox of the item, and "NO" is selected when
checkmark does not appear.
Default settings
Item Settings Description
Prohibit Test
Page Printing
Disable
Default
Setting
Changes
YES, NO
YES, NO
Interface settings
Item Settings Description
Hexadecimal
Dump Mode
I/O Timeout 1- 60 - 999 (sec)
Emulation
Switching
Port Switching
Method
YES, NO
Auto*, PCL
Switch at End of
Job, Switch after
I/O Timeout
This setting is used to prohibit printing of a
printer test page.
This setting is used to prohibit changes to the
default condition settings.
This program is used to print out the print data
from the computer in hexadecimal and in the
corresponding text characters (based on ASCII
code). This allows you to check whether or not
print data is being correctly sent from the
computer.
During reception of a print job, if remaining
data is not received after the time set here
elapses, the port connection is broken and the
next print job is begun.
Select the printer language. When [Auto] is
selected, the language is automatically
selected from the data sent to the printer.
Unless errors occur frequently, do not change
the setting from [Auto] to another setting.
Select the method for switching network ports.
84
Page 86

E-MAIL STATUS AND E-MAIL ALERT SETTINGS
These functions send information on machine use (print count, copy count, etc.) and
error conditions (paper misfeed, out of paper, out of toner, etc.) via e-mail to the
administrator of the machine or the dealer.
Information setup
Machine identification information for the status and alert e-mail functions is
configured in the "Information Setup" screen. The entered information will be
included in status and alert e-mail messages.
Click [Information] in the menu
1
frame.
The "Information Setup" screen will
appear.
Enter the machine information.
2
For detailed information, click the [Help] button in the upper right-hand
corner of the window.
Click [Submit] to store the entered information.
3
SMTP setup
The Status and alert e-mail functions use SMTP (Simple Mail Transport Protocol) to
send e-mail. The following procedure is used to set up the e-mail environment. This
must be done by the system administrator or other person familiar with the network.
Click [Services] in the menu frame.
1
The "Services Setup" screen will appear.
Click [SMTP].
2
Enter the information required to set up the e-mail
3
environment.
For detailed information, click the [Help] button in the upper right-hand
corner of the window.
Click [Submit] to store the entered information.
4
85
Page 87

PRINTER FUNCTIONS
Status message setup
Use the status message function to send the current counter information, including
the copy count, print count, and total output count, basis on the specified schedule.
The destinations can be set for administrators and dealers respectively.
To set up the status message, follow these steps.
Click [Status Message] in the menu
1
frame.
The "Status Message Setup" screen will
appear.
Enter the required information, including the destination
2
addresses and time schedule.
For detailed information, click the [Help] button in the upper right-hand
corner of the window.
86
Click [Submit] to store the entered information.
3
When the E-mail Status settings are completed, printer count information will be sent
periodically by e-mail to the specified e-mail addresses.
If you quit the browser before clicking [Submit], the settings will be
canceled. To send printer information immediately to the specified email addresses, click [Send Now].
Page 88

PRINTER FUNCTIONS
Alerts message setup
Use the alert message function to send alert information, such as empty toner and
paper and trouble including paper misfeeds, to specified destinations when such
problems occur. The destinations can be set for administrators and dealers
respectively.
To set up the alert message, follow the procedure below.
Click [Alerts Message] in the menu
1
frame.
The "Alerts Message Setup" screen will
appear.
Enter the destination addresses.
2
For detailed information, click the [Help] button in the upper right-hand
corner of the window.
Click [Submit] to store the entered information.
3
If these parameters are set, event information for the printer will be transmitted to the
specified addresses via E-mail each time a specified event occurs. The meaning of
each event item is shown below.
(Example)
Paper Jam: A paper misfeed has occurred.
Toner Low: Toner is low.
Toner Empty: Toner must be added.
Paper Empty: Paper must be loaded.
If you quit the browser before clicking [Submit], the settings will be
canceled.
87
Page 89

REMOVING THE SOFTWARE
In the event that you need to remove the printer driver or utilities, follow these steps:
Windows
Click the "start" button, and then click "Control Panel".
1
On Windows 2000, click the "Start" button, select "Settings", and then click
"Control Panel".
Click "Add or Remove Programs".
2
• On Windows Vista/7, click the "Uninstall a program".
• On Windows 2000, double-click the "Add/Remove Programs" icon.
Select the driver or utility that you wish to remove from the list,
3
and click the appropriate button to remove it.
For more information, refer to your operating manual or to the help files for
your operating system.
Restart your computer.
4
When reinstalling the software, install it correctly as explained in
software setup guide.
PRINTER SPECIFICATIONS
88
Printing speed Max. 20 ppm (when printing on A4 size paper)
Resolution 600 dpi / 300 dpi
Memory Standard memory: 128 MB
Emulation PCL6
Installed fonts PCL6 compatible: 80 outline fonts and 1 bitmap font
Interface 10Base-T/100Base-TX Ethernet
As a part of our policy of continuous improvement, SHARP reserves the
right to make design and specification changes for product
improvement without prior notice. The performance specification figures
indicated are nominal values of production units. There may be some
deviations from these values in individual units.
Page 90

PRINTER DRIVER SPECIFICATIONS
Function PCL6
Number of copies 1 to 999
Printing orientation Yes
Two-sided printing Yes
Frequently used
functions
Paper
Graphics
Fonts
Other functions
Binding Style Book/Tablet
Pamphlet Style Yes
Number 2, 4, 6, 8, 9, 16
N-up
Paper Size Yes
Custom Paper Size 1 size
Source Selection Yes
Cover Settings Yes
Resolution 600/300 dpi
Graphics Mode Yes
Zoom Yes
Fit to Page Yes
Resident fonts 80 fonts
Selectable download
fonts
Auto configuration
Settings
ROPM Yes
Overlay Yes
Watermark Yes
Bitmap Compression Yes
Order Selectable
Border Yes/No
Yes (only when connected via network)
bitmap,
TrueType,
Graphics
89
Page 91

USING THE SCANNER MODE
The procedure for placing the original is the same as for copying. See "NORMAL
COPYING" (p.22).
Scanner mode cannot be used at the following times:
• A misfeed has occurred (paper misfeed or original misfeed in the RSPF).
• The user programs are being used.
• The tray paper size is being set.
• The machine is being used in copy mode.
• The front cover or side cover is open.
90
Page 92

7
Chapter 7
SCANNER AND FAX FUNCTIONS
ABOUT THE SCAN TO USB AND NETWORK SCANNER FUNCTION
With this machine, in addition to Fax function, a document or photo can be scanned
into an image file and sent over a network or the Internet to a file server, e-mail
destination, your own computer or USB memory installed on the machine. You can
select from the following transmission methods as the destination where you wish to
send the scanned image, depending on where you wish to send the scanned image
data.
1 The scanned image can be sent to a
memory storage device on a network
(a designated directory on an FTP
server). (This is called "Scan to FTP"
in this manual.)
When sending a scanned image to an
FTP server, an e-mail message can
also be sent to a preset e-mail
address to inform the recipient of the
location of the scanned image data.
(This is called "Scan to FTP
(Hyperlink)" in this manual.)
4 The scanned image can be
sent to a USB memory
installed on the machine. (This
is called "Scan to USB" in
this manual.)
2 A scanned image can be sent to a
computer connected to the same
network as the machine. (This is
called "Scan to Desktop" in this
manual.)
* Before Scan to Desktop can be
performed, the software in the CDROM that accompanies the
machine must be installed. For the
procedure for installing the
software, see the Sharpdesk
Information Guide.
3 The scanned image can be sent to an
e-mail recipient. (This is called "Scan
to E-mail" in this manual.)
91
Page 93

SETTINGS AND PROGRAMMING REQUIRED FOR THE NETWORK SCANNER FEATURE
To use the Network Scanner feature, settings for the SMTP server, DNS server, and
destination addresses must be configured.
To configure the settings, use a computer that is connected to the same network as
the machine to access the machine's Web server. The Web page can be viewed with
your Web browser (Internet Explorer 5.5 or later (Windows), or Netscape Navigator
6.0 or later).
How to access the web page and view help
Use the following procedure to access the Web pages. [Help] can be clicked at the
bottom of the menu frame to view information on the various function settings that
can be operated remotely over the network from the machine's Web pages. For the
settings of each function, see the explanations in Help.
Open the Web browser on your computer.
1
Supported browsers:
Internet Explorer 5.5 or later (Windows)
Netscape Navigator 6.0 or later
In the "Address" field of your Web
2
browser, enter the IP address of
the machine.
When the connection is complete, the
Web page will appear in your Web
browser.
"ABOUT THE WEB PAGE (FOR
USERS)" (p.93)
92
Click [Help] under the menu
3
frame.
For an explanation of a function or
setting in the Web page, click the
corresponding item in the Help screen.
Close the Web page.
4
When you have finished using the Web
page, click the (close) button in the
top right corner of the page.
Page 94

ABOUT THE WEB PAGE (FOR USERS)
1
2
3
4
1
2
3
4
When you successfully connect to the Web server in the machine, the following page will
appear in your browser.
A menu frame appears on the left side of the page. When you click an item in the menu,
a screen appears in the right frame that allows you to establish settings for that item.
For detailed explanations of the procedures for configuring settings, click [Help] in the
menu frame.
Menu frame
The various settings appear in this
frame. Click a menu item to configure
the corresponding setting.
System Information
This shows the model name and current
status of the machine.
• Device Status
This shows information on the
machine's paper trays and output
trays, toner and other supplies, and
the total sheet usage count.
Out of paper and other warnings
appear in red.
• Device Configuration
Shows what options are installed.
• Network Status
Shows general information as well as
the status of TCP/IP.
Image Send Management
This is the base screen for storing,
editing, and deleting destination
information.
• Scan to USB
Store scanning settings for Scan to
USB.
• Destination (p.98)
Store destinations for Scan to FTP,
Scan to FTP (Hyperlink), Scan to
Desktop, Scan to E-mail, and Fax. You
can also edit or delete previously
stored destination information.
• Network Scanning
This section explains how to edit the
scan mode and custom indexes.
- Scan Mode
Scanning settings appropriate for
the use can be stored.
☞"Storing scanning settings -
Network Scanning" (p.96)
- Custom Index
This enables to change custom
index names. Click the [Submit]
button to store the entered
information as index names.
The custom index consists of six
indexes. A 6-character index name
can be stored for each index,
allowing destinations to be grouped.
Admin Mode
Click here to open the adminstrator Web
page and enter the administrator user
name and password.
☞"Protecting information programmed
in the web page ([Passwords])"
(p.116)
☞"ABOUT THE WEB PAGE (FOR THE
ADMINISTRATOR)" (p.112)
93
Page 95

SCANNER AND FAX FUNCTIONS
Storing scanning settings - Scan to USB
Sets of scan settings (color mode, resolution, file type, etc.) can be stored for use in
various scanning applications. Each set of settings is called a "Scan Mode". When
storing a destination, you can select one of the stored scanned modes. The settings
of the selected scan mode will be used when you scan an image and send it to that
destination (p.98 to p.104) including Scan to USB.
Click "Scan to USB" in the menu
1
frame of the Web page.
Select the desired scanning settings.
2
Refer to the following table for information on each setting.
94
When you have finished selecting the settings, click "Submit".
3
The selected settings are stored.
Page 96

Scan Mode settings
SCANNER AND FAX FUNCTIONS
Item Description
Color Mode
Select Full Color, Grayscale, or Mono 2 gradation for
the color mode.
Default
setting
Full Color
Resolution Select the resolution. 150 dpi
Void Area
Select "On" to not scan the 4 mm around the edges
of the image and instead attach a white border.
Off
When "Mono 2 gradation" or "Grayscale" is selected
Light Source
for "Color Mode", select "Red", "Green", or "Blue" for
Green
the light source.
File Type
Compression
Mode
Pages Per
File
Select "PDF", "JPG" or "TIFF" for the file type of the
scanned image.
Select "None", "MH (G3)", or "MMR (G4)" for the
compression mode of the scanned image.
PDF
None
Select the number of pages per image file. ALL
• For normal text originals, a sufficiently legible image is produced
when the color mode is set to "Mono 2 gradation" and the resolution
is 200 dpi or 300 dpi. The 600 dpi setting should only be used in
cases where high-clarity image reproduction is required, such as a
photograph or an illustration. Note that a high resolution setting will
result in a larger file size, and transmission may not be successful if
there is insufficient memory or disk capacity in the server to which the
image is sent (or if the administrator of the server has restricted the
file size). If transmission is not successful, you can try such measures
as reducing the number of scanned pages in the file or reducing the
scan size setting for the original.
• To open the scanned image without using the software program in the
CD-ROM that accompanies the machine, the recipient must have a
viewer program that can open the image format (file type) that was
selected as explained above.
• The factory default setting for the image format is PDF. If the recipient
cannot open the image, try sending the image in a different format.
• If the number of scanned originals is not divisible by the number set in
"Pages Per File", the last file will have less pages.
• The scan settings stored in a scan mode cannot be edited or deleted
if the scan mode has been selected for a destination.
95
Page 97

SCANNER AND FAX FUNCTIONS
Storing scanning settings - Network Scanning
Click "Network Scanning" in the
1
menu frame of the Web page.
Click "Add" below the scan list.
2
If you need to change the settings in a
previously stored scan mode, select the
scan mode and click "Edit". To delete a
scan mode, select the scan mode and click
"Delete".
Select the desired scanning settings.
3
Refer to the following table for information on each setting.
96
When you have finished selecting the settings, click "Submit".
4
The selected settings are stored.
Scan Mode settings
Item Description
Name
Color Mode
Resolution Select the resolution. 150 dpi
Void Ar ea
Enter a name for the scan mode (up to 32
characters).
Select Full Color, Grayscale, or Mono 2 gradation for
the color mode.
Select "On" to not scan the 4 mm around the edges
of the image and instead attach a white border.
Default
setting
—
Full Color
Off
Page 98

SCANNER AND FAX FUNCTIONS
Item Description
When "Mono 2 gradation" or "Grayscale" is selected
Light Source
for "Color Mode", select "Red", "Green", or "Blue" for
the light source.
File Type
Compression
Mode
Pages Per
File
Select "JPG", "PDF", or "TIFF" for the file type of the
scanned image.
Select "None", "MH (G3)", or "MMR (G4)" for the
compression mode of the scanned image.
Select the number of pages per image file. ALL
If you wish to use this scan mode as the default scan
mode when storing destinations, select the "Default
Default Scan
Mode
Scan Mode" checkbox.
The "Default Scan Mode" is also used for Scan to E-
mail when the e-mail address is directly entered or
selected from an LDAP server.
• For normal text originals, a sufficiently legible image is produced
when the color mode is set to "Mono 2 gradation" and the resolution
is 200 dpi or 300 dpi.
The 600 dpi setting should only be used in cases where high-clarity
image reproduction is required, such as a photograph or an
illustration. Note that a high resolution setting will result in a larger file
size, and transmission may not be successful if there is insufficient
disk capacity in the server to which the image is sent (or if the
administrator of the server has restricted the file size). If transmission
is not successful, you can try such measures as reducing the number
of scanned pages in the file or reducing the scan size setting for the
original.
• To open the scanned image without using the software program in the
CD-ROM that accompanies the machine, the recipient must have a
viewer program that can open the image format (file type) that was
selected as explained above.
• The factory default setting for the image format produces the smallest
file (File Type: TIFF, Compression Mode: MMR (G4)). If the recipient
cannot open the image, try sending the image in a different format.
• If the number of scanned originals is not divisible by the number set in
"Pages Per File", the last file will have less pages.
• The scan settings stored in a scan mode cannot be edited or deleted
if the scan mode has been selected for a destination.
Default
setting
Green
PDF
None
Not
selected
97
Page 99

SCANNER AND FAX FUNCTIONS
Storing destinations
To store scanning destinations, click [Destination] in the Web page menu frame. This
screen can also be used to edit or delete stored destinations. (p.110)
A total of 200 destinations* can be stored, including E-mail, FTP, Desktop, and
Group destinations. Fax, Speed Dial (up to 100) and Group(Fax) (up to 18 combined
with Rapid Dial) destinations can also be stored.
*Multiple e-mail addresses can be stored as a group (up to 100). Note that this may
reduce the maximum number of destinations (normally 200) that can be stored.
E-mail: See below
FTP: See page 99.
Desktop: See page 102.
Group (E-mail): See page 104.
Fax: See page 106.
Speed Dial: See page 107.
Group(Fax): See page 108.
Storing destinations for Scan to E-mail
Click [Destination] in the menu
1
frame of the Web page.
98
Click [E-mail].
2
Enter the destination information.
3
For each setting, see the following table.
Page 100

SCANNER AND FAX FUNCTIONS
When you have finished entering the information, click
4
[Submit].
The entries will be stored.
To perform Scan to E-mail, the SMTP server settings must first be
established. (p.115)
E-mail destination information
Item Description
Name (Required) Enter the name of the destination (up to 36 characters).
Enter initial text for the destination (maximum of 10
Initial (Optional)
Custom Index
E-mail Address
(Required)
Scan Mode
characters). When the destination list is displayed in the
destination control screen, the initial text is used to group the
destinations.
Names can be assigned to the custom indexes as desired
(p.93), allowing convenient grouping of destinations. Select a
custom index for the destination to be stored.
Enter the e-mail address of the destination (up to 64
characters). If an LDAP server is being used, you can click the
[Global Address Search] button to search for an address on
the LDAP server.
Select the name of the scan mode that you wish to use for the
destination. The scan mode must be previously stored (p.96).
Storing destinations for Scan to FTP
Click [Destination] in the menu
1
frame of the Web page.
Click [FTP].
2
99
 Loading...