

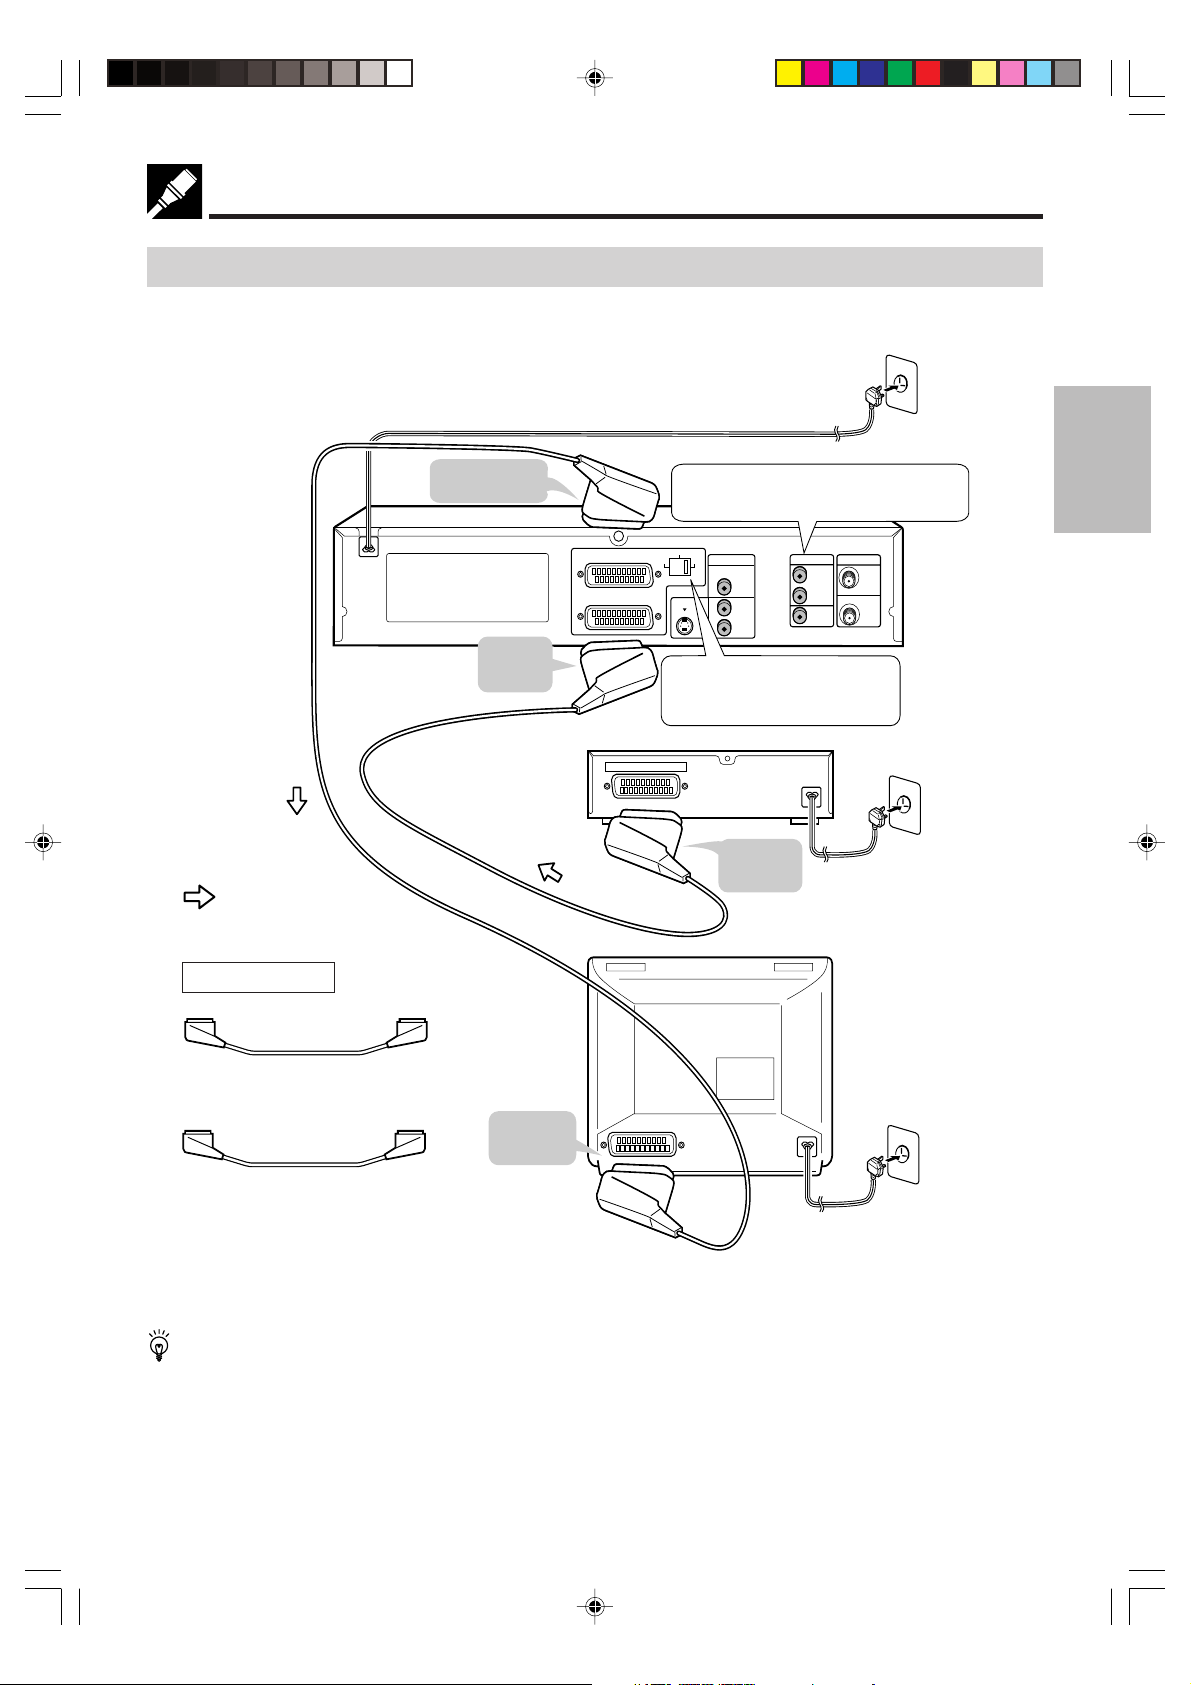
Basic Connection
Connecting a TV with LINE 1 (TV) Output and LINE 2 Input SCARTS
Use the SCART leads (one SCART lead: supplied) to connect the Unit to your TV and VCR.
CONNECTION AND
INITIAL SETTINGS
: Signal flow
Required leads
This Unit
To LINE 1 (TV)
SCART
To LINE 2
SCART
LINE 1(TV
LINE 2
SCART OUTPUT
VCR/DVD OUT jacks can be used instead of
LINE 1(TV), depending on your TV.
S-VIDEO
)
RGB
VIDEO
OUTPUT SELECTOR
S-VIDEO
R
L
DVD OUT
DIGITAL
AUDIO
AUDIO
VCR/DVD OUT
R
L
VIDEO
ANTENNA
IN
AUDIO
OUT
Change the position according to
the signal type (VIDEO/S-VIDEO/
RGB) that is output to TV during
DVD playback.
DECORDER
To SCART
output
TV
SCART lead (one SCART lead:
supplied)
SCART lead (the other SCART
lead: commercially available)
The factory default setting for the OUTPUT SELECTOR is “VIDEO”. If your TV supports the higher quality
modes S-VIDEO or RGB via the SCART, then please set the selector for your preference.
DVNC60H(E)#018_024.pm6 19/09/2001, 10:3519
To SCART
input
19Web-site:www.sharp.co.uk/support Help line:08705 274277 (office hours)
Basic Connection
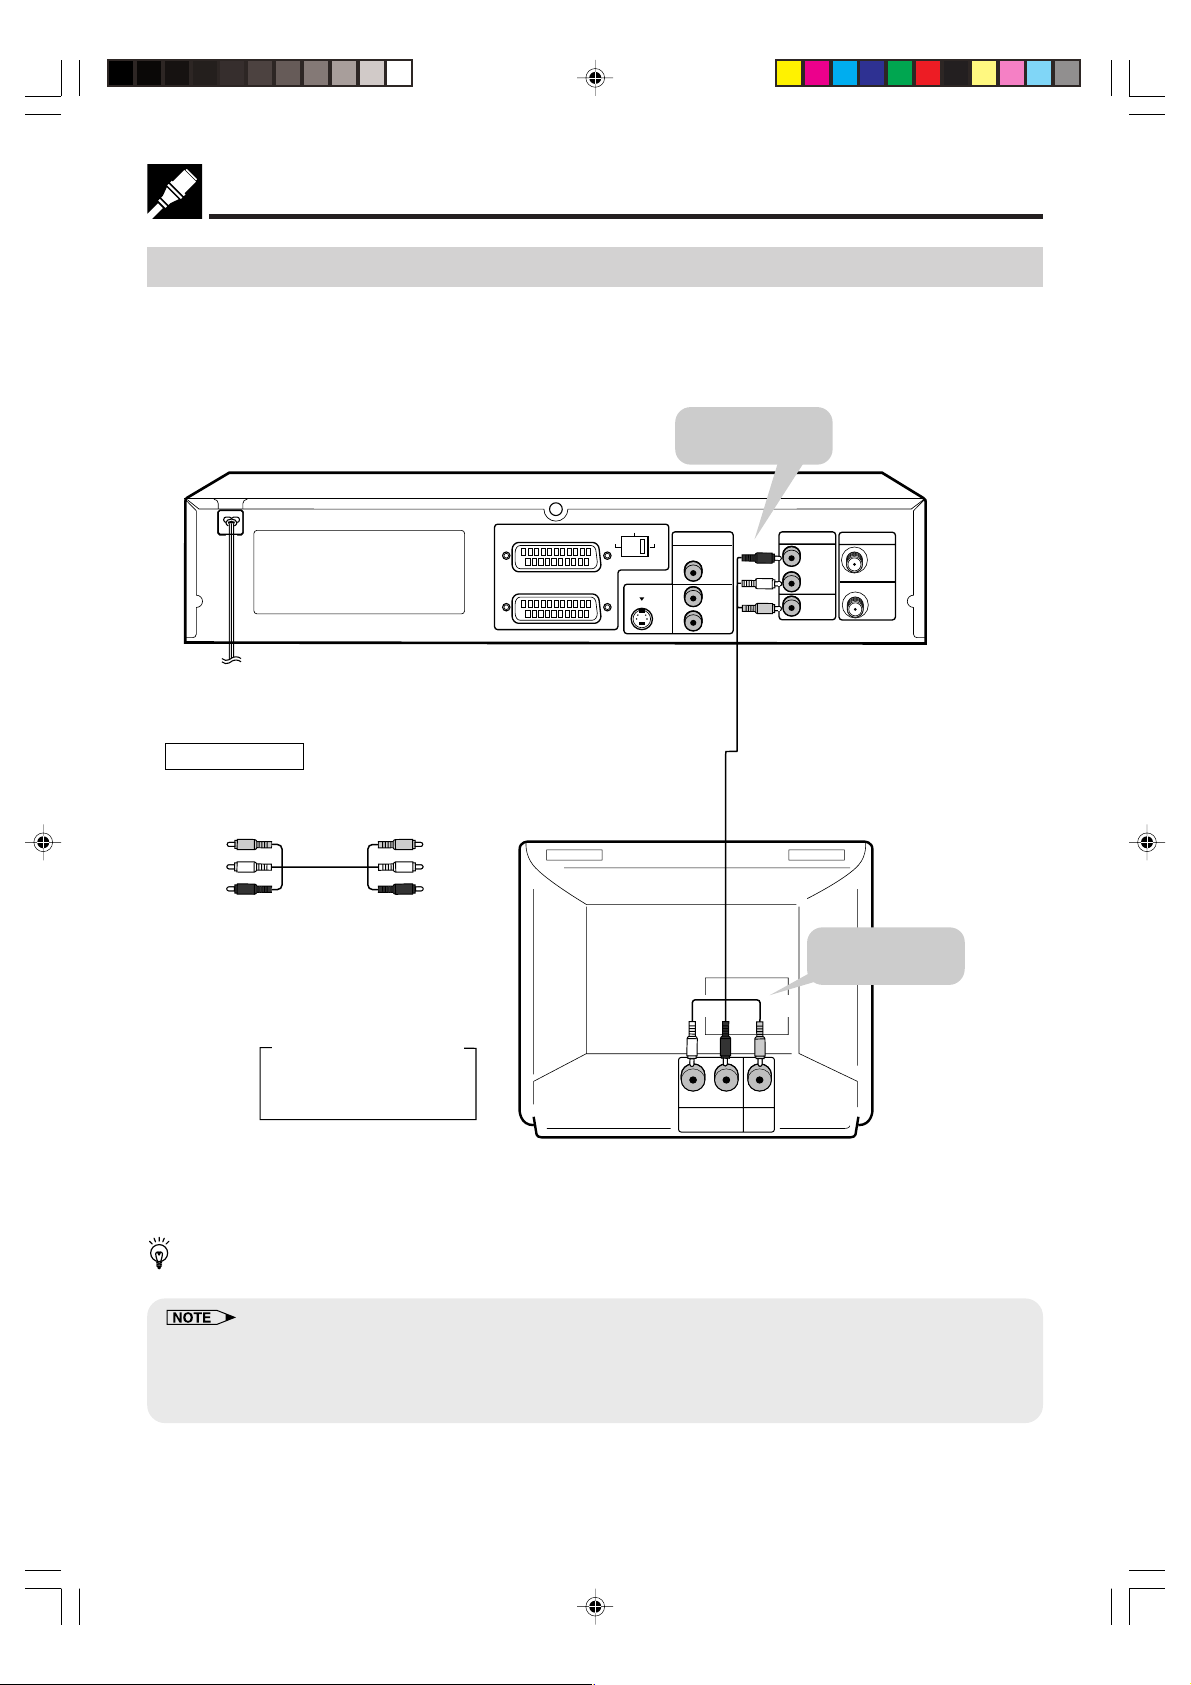
Connecting a TV Equipped with VIDEO/AUDIO Input Jacks
To VIDEO/AUDIO
VIDEO
OUT jacks
DVD OUT
DIGITAL
AUDIO
R
AUDIO
L
VCR/DVD OUT
(Red)
(White)
(Yellow)
R
AUDIO
L
VIDEO
VIDEO/AUDIO lead
(commercially available)
This Unit
Required leads
VIDEO/AUDIO lead
(commercially available)
Yellow
White (L)
Red (R)
Yellow
White (L)
Red (R)
LINE 1(TV
LINE 2
S-VIDEO
)
RGB
OUTPUT SELECTOR
S-VIDEO
ANTENNA
IN
OUT
To VIDEO/AUDIO
input jacks
(White)
(Red) (Yellow)
Jack and Plug Colours
Video: Yellow
Audio Left: White
Audio Right: Red
LR
AUDIO
IN
VIDEO
IN
TV (with external input jacks)
• You will not be able to hear all of the sound being output by the Unit if you use the VIDEO/AUDIO lead
shown above to a monaural TV that has only one AUDIO input jack.
• Be sure that the colours of the jacks and plugs match up when connecting the lead.
• Connect the Unit directly to the TV. If you attempt to view video on a TV connected via a VCR, the copy protection
function will scramble the picture.
• If you want to listen to the audio through audio equipment, connect only VIDEO lead to the TV.
20 Web-site:www.sharp.co.uk/support Help line:08705 274277 (office hours)
DVNC60H(E)#018_024.pm6 19/09/2001, 10:3520

DVD Audio Connections
Connecting a TV Equipped with S-VIDEO Input Jacks
When you want to achieve a better video image by connecting a TV equipped with an S-VIDEO input connector
to the Unit, you should use an S-VIDEO lead (commercially available) to connect the TV to the Unit.
Connecting to Audio Equipment
Connecting the Unit to audio equipment provides normal stereo sound plus powerful stereo sound enhanced
by Dolby Digital (5.1 channel), DTS, and MPEG Audio.
Playing 2 channel audio
■ Analogue Connection
This Unit
Required lead
VIDEO/AUDIO lead (commercially available)
White (L)
Red (R)
S-VIDEO lead (commercially available)
)
LINE 1(TV
LINE 2
RGB
OUTPUT SELECTOR
S-VIDEO lead
(commercially available)
VIDEO/AUDIO lead
(commercially available)
S-VIDEO
VIDEO
S-VIDEO
To S-VIDEO
OUT jack
R
L
DVD OUT
DIGITAL
AUDIO
AUDIO
To AUDIO
OUT jacks
(Red)
(White)
VCR/DVD OUT
R
L
VIDEO
AUDIO
White (L)
Red (R)
ANTENNA
IN
OUT
---- or ---To amplifier
audio input jacks
ANALOG INPUT
To S-VIDEO
input jack
S-VIDEO
INPUT
(White)
(Red)
L
R
Amplifier of stereo system, etc.
TV (with external input jacks)
If the Unit is set to OPERATE ON, the DVD signals will be output from the DVD OUT jacks at all times.
(The DVD signals will be output from the DVD OUT jacks also when using the VCR.)
DVNC60H(E)#018_024.pm6 19/09/2001, 10:3521
Jack and Plug Colours
Audio Left: White
Audio Right: Red
21Web-site:www.sharp.co.uk/support Help line:08705 274277 (office hours)

DVD Audio Connections
Playing Dolby Digital (5.1 channel), DTS or MPEG audio
Connecting an amplifier with a Dolby Digital/DTS/MPEG Audio digital surround processor or a Dolby Digital/
DTS/MPEG Audio surround processor to your Unit’s coaxial digital jack provides richer and more powerful
audio play.
■ Connection to a processor or amplifier with a coaxial digital input jack
You can make this connection
using either a coaxial digital
lead
.
This Unit
LINE 1(TV
LINE 2
To coaxial
digital input jack
Required lead
Coaxial digital lead (commercially available)
S-VIDEO
)
RGB
OUTPUT SELECTOR
S-VIDEO
VIDEO
R
L
DVD OUT
DIGITAL
AUDIO
AUDIO
VCR/DVD OUT
ANTENNA
R
AUDIO
L
VIDEO
To coaxial
DIGITAL OUT jack
Coaxial digital lead
(commercially available)
DIGITAL IN
COAXIAL
IN
OUT
Audio equipment
Digital Connection to an MD to Record a CD
Some Audio CDs have a short silent section between musical tracks. When sound from discs such as these is
digitally recorded by connecting the Unit directly to a digital recorder (such as an MD player), the music may be
recorded continuously and track numbers may be lost.
■ Digital Connection to Audio Equipment or MD Player without a Dolby Digital Decoder
• Audio CD
Play the disc as you normally would, with the audio mode set to “L+R” (see page 84). With a digital
connection, audio of a disc recorded with DTS sounds abnormal in this case.
• DVD
With a digital connection, audio cannot be produced from a DVD recorded with Dolby Digital (5.1 channel),
Dolby Surround (Pro Logic), DTS or MPEG Audio, so you should use an analogue connection to play such
discs. Discs with linear PCM audio should play normally.
• This connection is not possible if the processor or amplifier to which you want to connect does not have a coaxial
digital input jack.
22 Web-site:www.sharp.co.uk/support Help line:08705 274277 (office hours)
DVNC60H(E)#018_024.pm6 19/09/2001, 10:3522

VCR Auto Installation
This Unit automatically tunes the TV channels for your area, then
using Teletext information sorts the TV channels into a standard
order and sets the clock. If the Unit has not previously been tuned-in,
instructions will be given on screen to guide you through this procedure.
1 Press OPERATE.
2 The screen below should now be displayed on your TV screen.
OPERATE
DISPLAY
FUNCTION
CONTROL
TITLE
TIMER
ON/OFF
ON
SCREEN
PROG/
REPEAT
PLUSCODE
VCR/ DVD
SELECTOR
ZOOM
EJECT
VCR MENU
DVD SETUP
OPEN/
CLOSE
DVD MENU
AUTO INSTALLATION
PRESS SET KEY TO START
SET :ENTER MENU:EXIT
• If the AUTO INSTALLATION screen does not appear when you switch on
your VCR or you wish to reset your Unit and start the installation again,
refer to VCR RESET on page 35.
3 Press SET to continue with the installation.
4 Ensure your Aerial/Scart cables are connected to your Unit and
then press SET to confirm.
PLEASE BE SURE THE
AERIAL/SCART CABLE IS
CONNECTED TO YOUR VCR.
PRESS SET TO CONTINUE
SET :ENTER MENU:EXIT
CLEAR
RETURN
SKIP SEARCH
INPUT SELECT
/
REV FWD
PLAY
REC
STOP
TAPE
SPEED
DPSS
SKIP
AUDIO
CH
OUTPUT
VCR DVD
VCR/DVD COMBINATION
SET
ENTER
ZERO BACK
TV/VCR
VCR DVDAM/PM
PAUSE/STILL
SLOW
5 All available terrestrial channels will be automatically installed.
(Auto install may take a few minutes.)
1 CH22
AUTOMATIC TUNING.
PLEASE WAIT.
SET :ENTER MENU:EXIT
6 Once Auto Installation is complete, the MOVE menu screen will
appear showing all the channels the Unit was able to tune in.
DVNC60H(E)#018_024.pm6 19/09/2001, 10:3523
23Web-site:www.sharp.co.uk/support Help line:08705 274277 (office hours)

VCR Auto Installation
\\
7 If you wish to move any channels, press ' / " /
\ /
\\
||
| to
||
highlight the channel to be moved. Then press SET to confirm.
MOVE 1/5
1CH50 7 13
2BBC1 8 14
3BBC2 9 15
4ITV 10 16
5CH4 11 17
6CH5 12 18
:SELECT
SET :ENTER MENU:EXIT
\\
8 Press ' / " /
||
\ /
| to highlight the new position for the channel.
\\
||
Then press SET to confirm.
MOVE 1/5
1BBC1 7 13
2BBC2 8 14
3ITV 9 15
4CH4 10 16
5CH5 11 17
6CH50 12 18
:SELECT
SET :ENTER MENU:EXIT
9 If any more channels are to be moved, repeat this procedure
from step 7.
10Press VCR MENU to exit if you are satisfied with the channel
order.
• The correct time and date should now be displayed on your
TV screen for approximately 2 seconds. If the clock is not
automatically set, the “CLOCK” screen will appear. Refer to
Manual Clock Setting on page 33.
TIMER
OPERATE
DISPLAY
FUNCTION
CONTROL
TITLE
CLEAR
RETURN
ON/OFF
ON
SCREEN
PROG/
REPEAT
PLUSCODE
VCR/ DVD
SELECTOR
ZOOM
INPUT SELECT
/
REV FWD
PLAY
REC
STOP
CH
DPSS
SKIP
AUDIO
OUTPUT
VCR DVD
TAPE
SPEED
EJECT
VCR MENU
DVD SETUP
OPEN/
CLOSE
DVD MENU
SET
ENTER
ZERO BACK
SKIP SEARCH
TV/VCR
VCR DVDAM/PM
PAUSE/STILL
SLOW
VCR/DVD COMBINATION
TIME DATE YEAR
11:03AM 19/02 01
24 Web-site:www.sharp.co.uk/support Help line:08705 274277 (office hours)
DVNC60H(E)#018_024.pm6 19/09/2001, 10:3524
 Loading...