

Page 1
DVD MINI COMPONENT SYSTEM
Thank you for purchasing this SHARP product.
To obtain the best performance from this product, please read
this manual carefully.
It will guide you in operating your SHARP product.
MODEL
CD-DVD500H
OPERATION MANUAL
If you require any advice or assistance regarding
your Sharp product, please visit our web-site
www.sharp.co.uk/support.
Customers without Internet access may telephone
08705 274277 during office hours (or (01) 676 0648
if telephoning from Ireland).
CD-DVD500H DVD Mini Component System consisting of CDDVD500H (main unit), CP-DVD500H (front speaker),
GBOXS0064AWM5 (centre speaker), GBOXS2008AWM5 (right surround speaker) and GBOXS4008AWM5 (left surround speaker).
0101
Page 2

CD-DVD500H
Special notes
NOTES FOR USERS IN THE U.K. AND IRELAND
The mains lead of this product is fitted with a non-rewireable (moulded)
plug incorporating a 3A fuse. Should the fuse need to be replaced, a BSI
or AST A approved BS 1362 fuse marked
above, which is also indicated on the pin face of the plug must be used.
Always refit the fuse cover after replacing the fuse. Never use the plug
without the fuse cover fitted.
In the unlikely event of the socket outlet in your home not being compatible with the plug supplied, cut-off the mains plug and fit an appropriate
type.
DANGER:
The fuse from the cut-off plug should be removed and the cut-off plug
destroyed immediately and disposed of in a safe manner.
Under no circumstances should the cut-off plug be inserted elsewhere
into a 13A socket outlet as a serious electric shock may occur.
To fit an appropriate plug to the mains lead, follow the instructions below:
– Special notes –
Important instruction
IMPORTANT:
The wires in the mains lead are coloured in accordance with the following
code:
Blue : Neutral
Brown : Live
As the colours of the wires in the mains lead of this product may not
correspond with the coloured markings identifying the terminals in your
plug, proceed as follows:
●
The wire which is coloured blue must be connected to the plug terminal
which is marked N or coloured black.
●
The wire which is coloured brown must be connected to the plug termi-
nal which is marked L or coloured red.
or and of the same rating as
Ensure that neither the brown nor the blue wire is connected to the earth
terminal in your three pin plug.
Before replacing the plug cover, make sure that:
●
If the new fitted plug contains a fuse, its value is the same as that
removed from the cut-off plug.
●
The cord grip is clamped over the sheath of the mains lead and not
simply over the lead wires.
IF YOU HAVE ANY DOUBT, CONSULT A QUALIFIED ELECTRICIAN.
SERVICE INFORMATION
In the unlikely event of your equipment requiring repair, please contact
the dealer or supplier from whom it was purchased. Where this is not
possible, please visit our web-site www.sharp.co.uk/support.
Customers without internet access may telephone 08705 274277 during office hours (or (01) 676 0648 if telephoning from lreland).
Please note; all calls will be charged at local rate.
Certain replacement parts and accessories may be obtained from our
main parts distributor.
WILLOW VALE ELECTRONICS LTD.
0121 766 5414
In the unlikely event of this equipment requiring repair during the guarantee period, you will need to provide proof of the date of purchase to the
repairing company.
Please keep your invoice or receipt, which is supplied at the time of purchase.
WARNINGS
When the ON/STAND-BY button is set at STAND-BY position, mains voltage is still
present inside the unit. When the ON/STAND-BY button is set at STAND-BY position, the unit may be brought into operation by the timer mode or remote control.
2
ENGLISH
This unit contains no user serviceable parts. Never remove covers unless qualified
to do so. This unit contains dangerous voltages, always remove mains plug from
the socket before any service operation and when not in use for a long period.
T o prevent fire or shock hazard, do not expose this appliance to dripping or splashing.
No objects filled with liquids, such as vases, shall be placed on the apparatus.
0012
Page 3
Special notes (continued)
Accessories
CD-DVD500H
CAUTION
This product is classified as a CLASS 1 LASER product.
Use of controls, adjustments or performance of procedures other than those speci-
fied herein may result in hazardous radiation exposure.
As the laser beam used in this compact disc player is harmful to the eyes, do not
attempt to disassemble the cabinet. Refer servicing to qualified personnel only.
Laser Diode Properties
Material: AlGaAs/AIGaInP
Wavelength: 785 nm/650 nm
Emission Duration: continuous
Laser Output: max. 0.69 mW
NOTES
Recording and playback of any material may require consent, which SHARP is
unable to give. Please refer particularly to the provisions of the Copyright Act 1956,
the Dramatic and Musical Performers Protection Act 1958, the Performers Protection Acts 1963 and 1972 and to any subsequent statutory enactments and orders.
This equipment complies with the requirements of Directives 89/336/EEC and 73/
23/EEC as amended by 93/68/EEC.
Copyright Information:
Unauthorised copying, broadcast, public display, transmission, public performance
and rental (regardless of whether or not such activities are for profit) of disc contents are prohibited by law.
This device is equipped with copy protection technology that causes substantial
degradation of images when the contents of a disc are copied to video tape.
This device is protected by U.S. patents and other intellectual property rights, the
copyright for which belongs to Macrovision Corporation. The use of Macrovision’s
copy protection technology in the device is authorised by Macrovision and is intended for home use only, unless otherwise authorised in writing by Macrovision.
Reverse engineering or disassembly is prohibited.
DTS is a trademark of Digital Theater Systems.
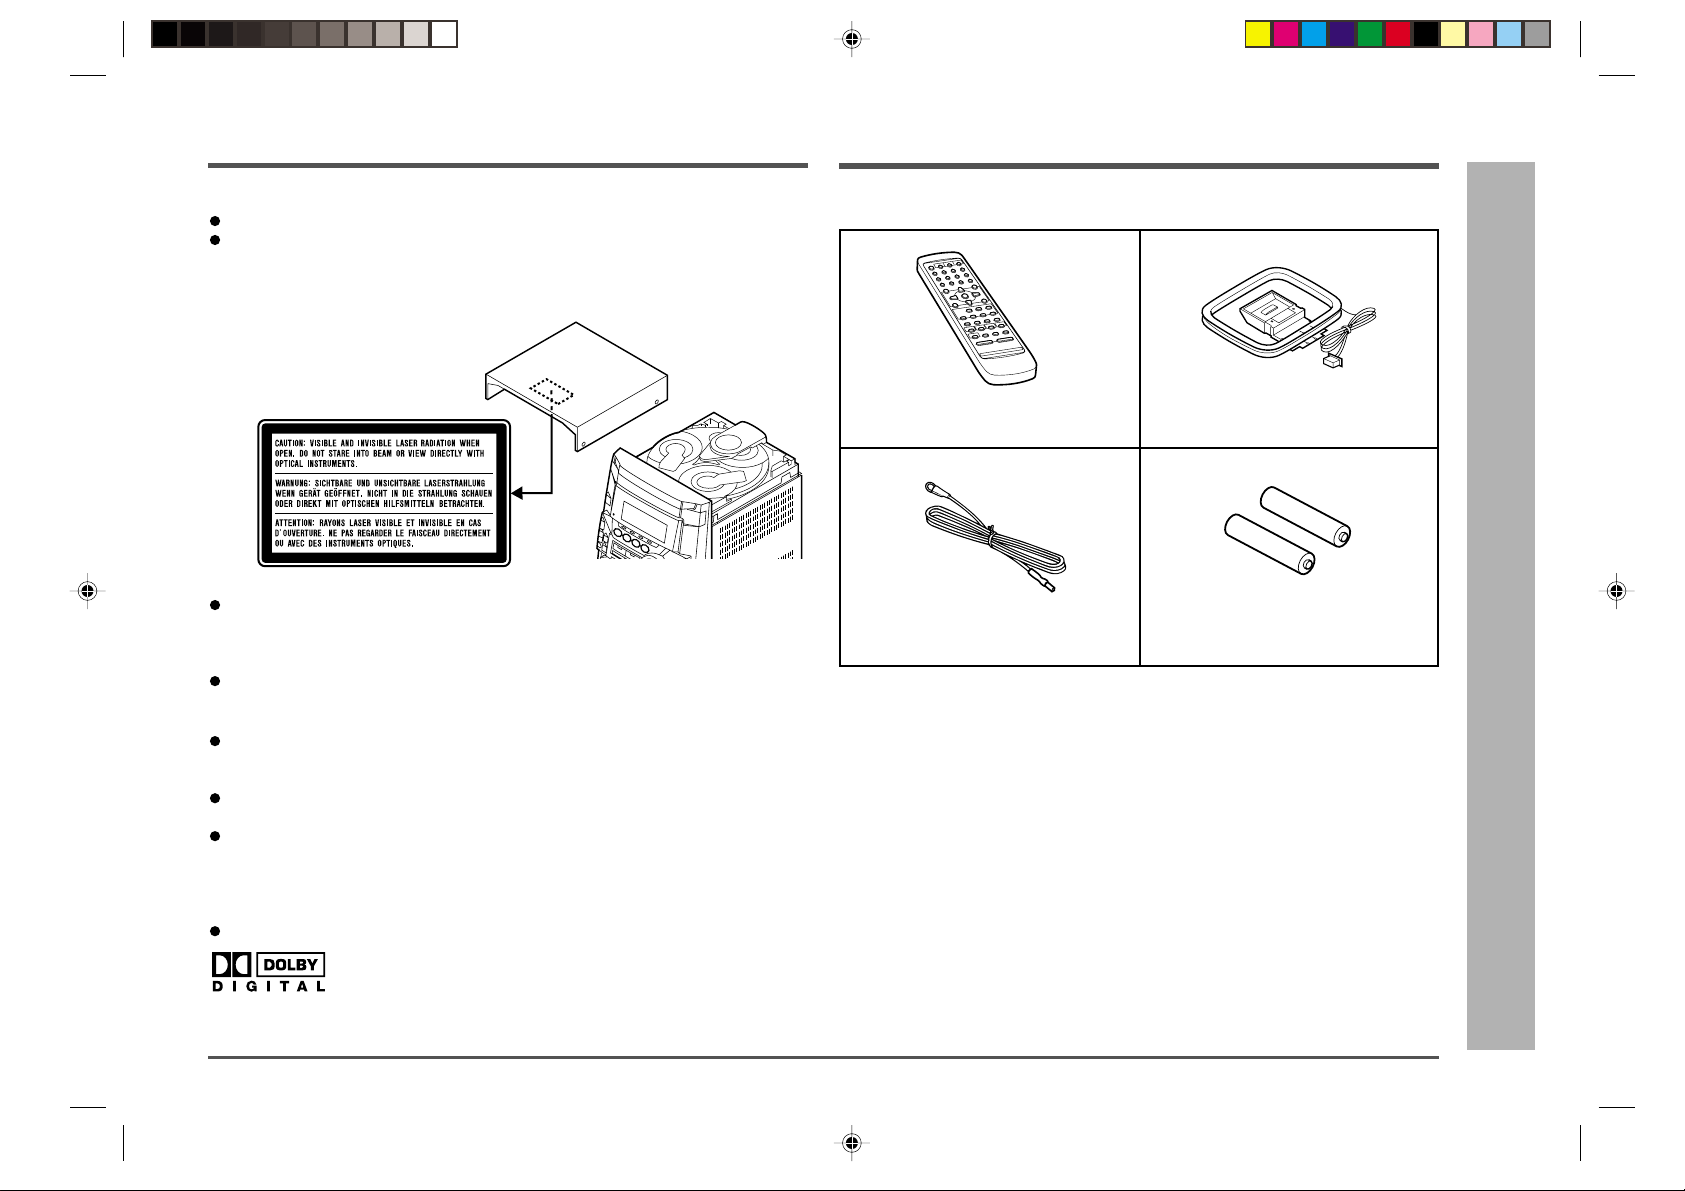
Please confirm that the following accessories are included.
Remote control × 1
FM aerial × 1
Note:
Only the above accessories are included.
(UM/SUM-3, R6, HP-7 or similar) × 2
AM loop aerial × 1
“AA” size battery
1
2
3
4
5
6
7
8
9
– Special notes / Accessories –
10
Important instruction
11
12
13
Manufactured under license from Dolby Laboratories.
“Dolby,” “Pro Logic,” and the double-D symbol are trademarks of Dolby Laboratories.
Confidential unpublished works. © 1992-1997 Dolby Laboratories. All rights reserved.
ENGLISH
14
15
3
Page 4
CD-DVD500H
Contents
General information Page
Precautions .......................................................................................................5
Controls and indicators.............................................................................. 6 - 9
Preparation for use
System connections .................................................................................10, 11
Speakers ....................................................................................................12, 13
Remote control................................................................................................14
General control ...............................................................................................14
Basic operation
Sound control..................................................................................................15
Setting the clock ............................................................................................. 16
DVD explanation
Types of playable discs............................................................................17, 18
Preparing to watch a DVD (DVDs) .................................................................19
DVD setting
Initial setup (OSD language setup) ...............................................................20
Setting up for playback of an NTSC disc......................................................20
TV mode setup ................................................................................................21
– Contents –
General information
Setting the TV mode ....................................................................................... 21
Parental setting .........................................................................................22, 23
Audio setting ...................................................................................................24
Disc language setting ...............................................................................25, 26
Changing the display mode ...........................................................................27
DVD playback
Playing a DVD (DVDs).....................................................................................28
Other disc play features ...........................................................................29, 30
Advanced DVD features
Using the function control ..................................................................... 31 - 35
Zoom function .................................................................................................36
Repeat playback..............................................................................................37
Programmed playback .............................................................................38, 39
Selecting titles from the menu.......................................................................40
Setting parameters using the disc menu......................................................40
Surround operation Page
Enjoying the surround sound ..................................................................41, 42
Changing the speaker setting................................................................ 43 - 46
Description of terminology ............................................................................47
CD playback
Listening to a CD (CDs) .......................................................................... 48 - 50
Repeat or random play ...................................................................................51
Programmed play............................................................................................52
Radio
Listening to the radio .....................................................................................53
Listening to a preset station ..........................................................................54
RDS radio
Using the radio data system (RDS) ....................................................... 55 - 61
Tape playback
Listening to a cassette tape (TAPE 1 or TAPE 2) .........................................62
Tape recording
Recording from a DVD (DVDs).......................................................................63
Recording from a CD (CDs) ...........................................................................64
Recording from the radio ...............................................................................65
Dubbing from tape to tape .............................................................................66
Advanced features
Timer operation .........................................................................................67, 68
Sleep operation ...............................................................................................68
Enhancing your system ...........................................................................69, 70
References
Troubleshooting chart ..............................................................................71, 72
Error indicators and warnings .......................................................................73
Maintenance ....................................................................................................73
Specifications............................................................................................74, 75
Glossary...........................................................................................................75
TERMS OF GUARANTEE .....................................................Back cover
4
ENGLISH
Page 5
Precautions
General
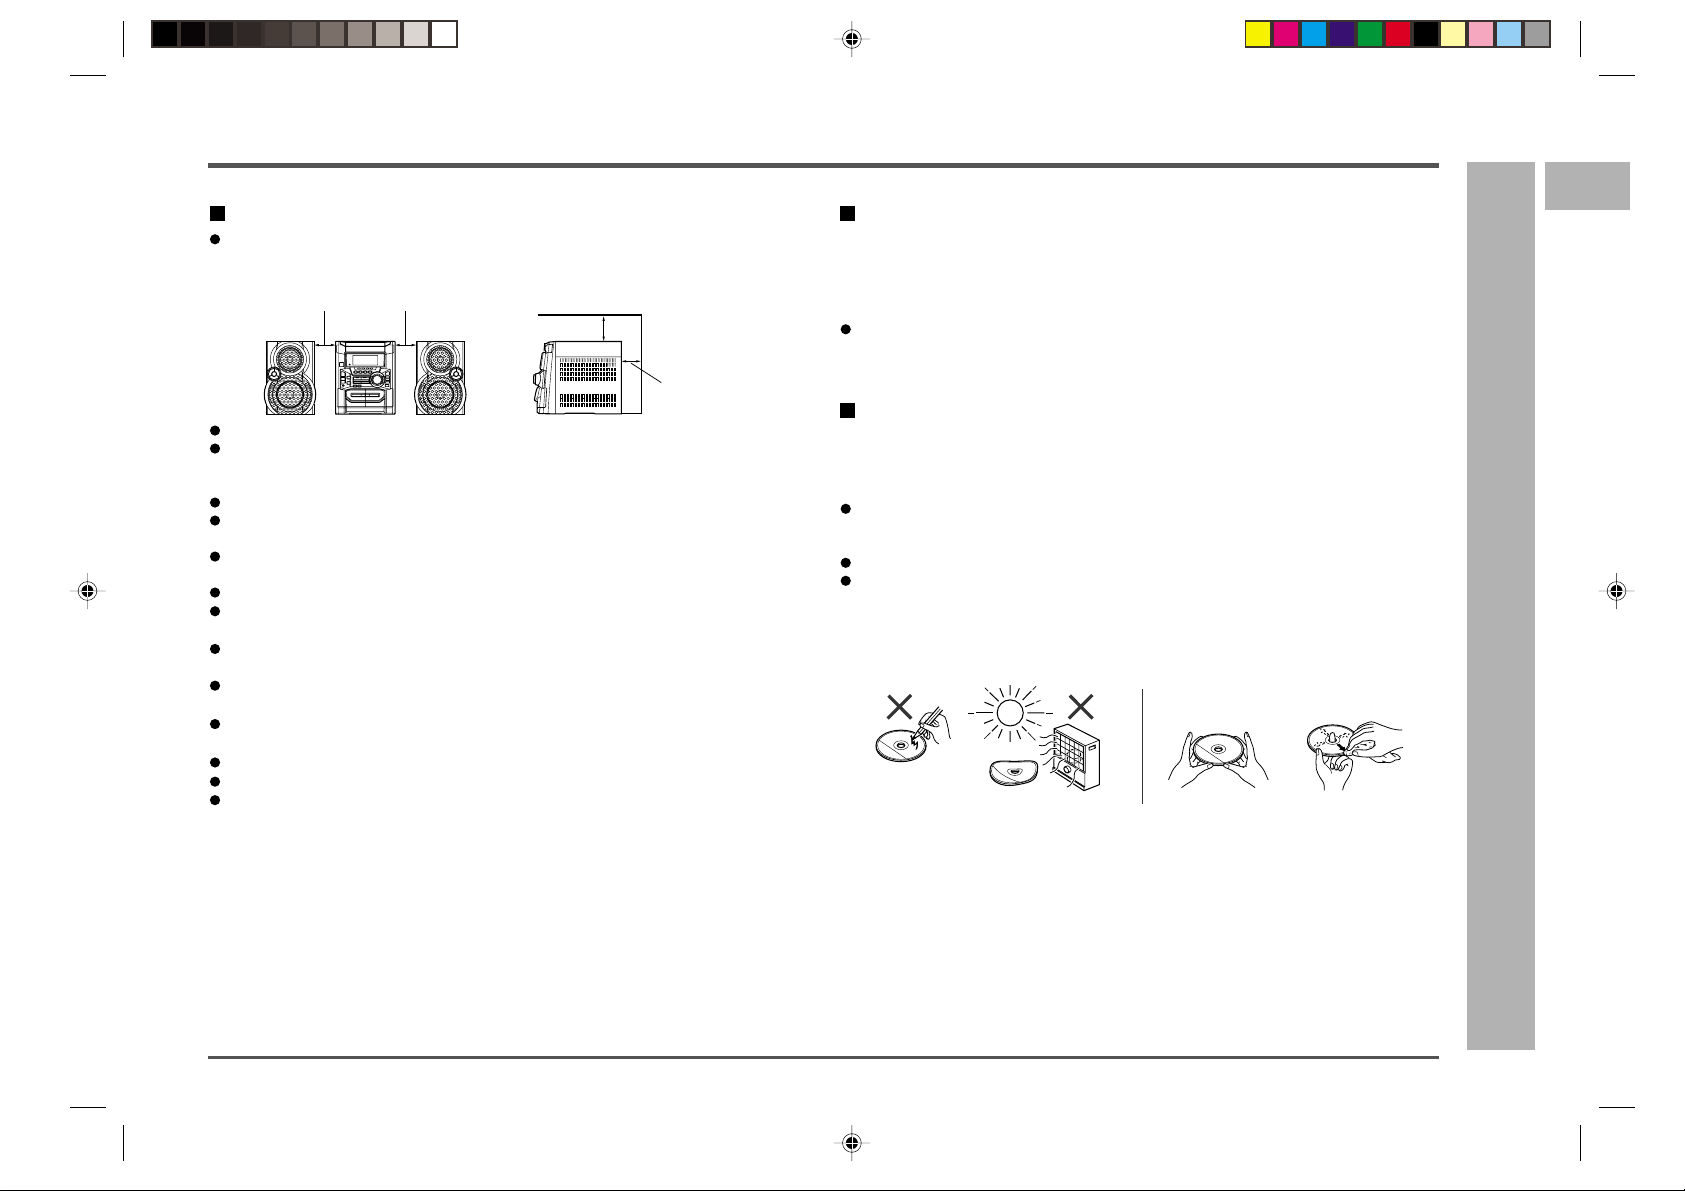
Please ensure that the equipment is positioned in a well-ventilated area and ensure
that there is as least 20 cm (8") of free space along the sides, top and back of the
unit.
20 cm (8”) 20 cm (8”)
Use the unit on a firm, level surface free from vibration.
Keep the unit away from direct sunlight, strong magnetic fields, excessive dust,
humidity and electronic/electrical equipment (home computers, facsimiles, etc.) which
generates electrical noise.
Do not place anything on top of the unit.
Do not expose the unit to moisture, to temperatures higher than 60°C (140°F) or to
extremely low temperatures.
If your system does not work properly, disconnect the AC power lead from the AC
socket. Plug the AC power lead back in, and then turn on your system.
In case of an electrical storm, unplug the unit for safety.
Hold the AC power plug by the head when removing it from the AC socket, as
pulling the lead can damage internal wires.
Do not remove the outer cover, as this may result in electric shock. Refer
internal service to your local SHARP service facility.
The ventilation should not be impeded by covering the ventilation openings with
items, such as newspapers, tablecloths, curtains, etc.
No naked flame sources, such as lighted candles, should be placed on the appara-
tus.
Attention should be drawn to the environmental aspects of battery disposal.
The apparatus is designed for use in moderate climate.
This unit should only be used within the range of 5°C - 35°C (41°F - 95°F).
Warning:
The voltage used must be the same as that specified on this unit.
Using this product with a higher voltage other than that which is specified is dangerous
and may result in a fire or other type of accident causing damage. SHARP will not be
held responsible for any damage resulting from use of this unit with a voltage other
than that which is specified.
20 cm (8”)
20 cm (8”)
Volume control
The sound level at a given volume setting depends on speaker efficiency , location and
various other factors.
It is advisable to avoid exposure to high volume levels, which occurs whilst turning the
unit on with the volume control setting up high, or whilst continually listening at high
volumes.
If you use higher volume, timer indicator flashes and the equipment does not work.
It may malfunction (see page 72).
In this case, listen at a lower volume.
Care of DVD/CD discs
DVD/CD discs are fairly resistant to damage, however mistracking can occur due to an
accumulation of dirt on the disc surface.
Follow the guidelines below for maximum enjoyment from your DVD/CD collection and
player.
Do not write on either side of the disc, particularly the non-label side from which
signals are read.
Do not mark this surface.
Keep your discs away from direct sunlight, heat, and excessive moisture.
Always hold the DVD/CDs by the edges. Fingerprints, dirt, or water on the DVD/
CDs can cause noise or mistracking. If a DVD/CD is dirty or does not play properly,
clean it with a soft, dry cloth, wiping straight out from the centre, along the radius.
NO
YES
Correct
CD-DVD500H
1
2
3
4
5
6
7
8
– Precautions –
9
10
General information
11
12
13
ENGLISH
14
15
5
Page 6
CD-DVD500H
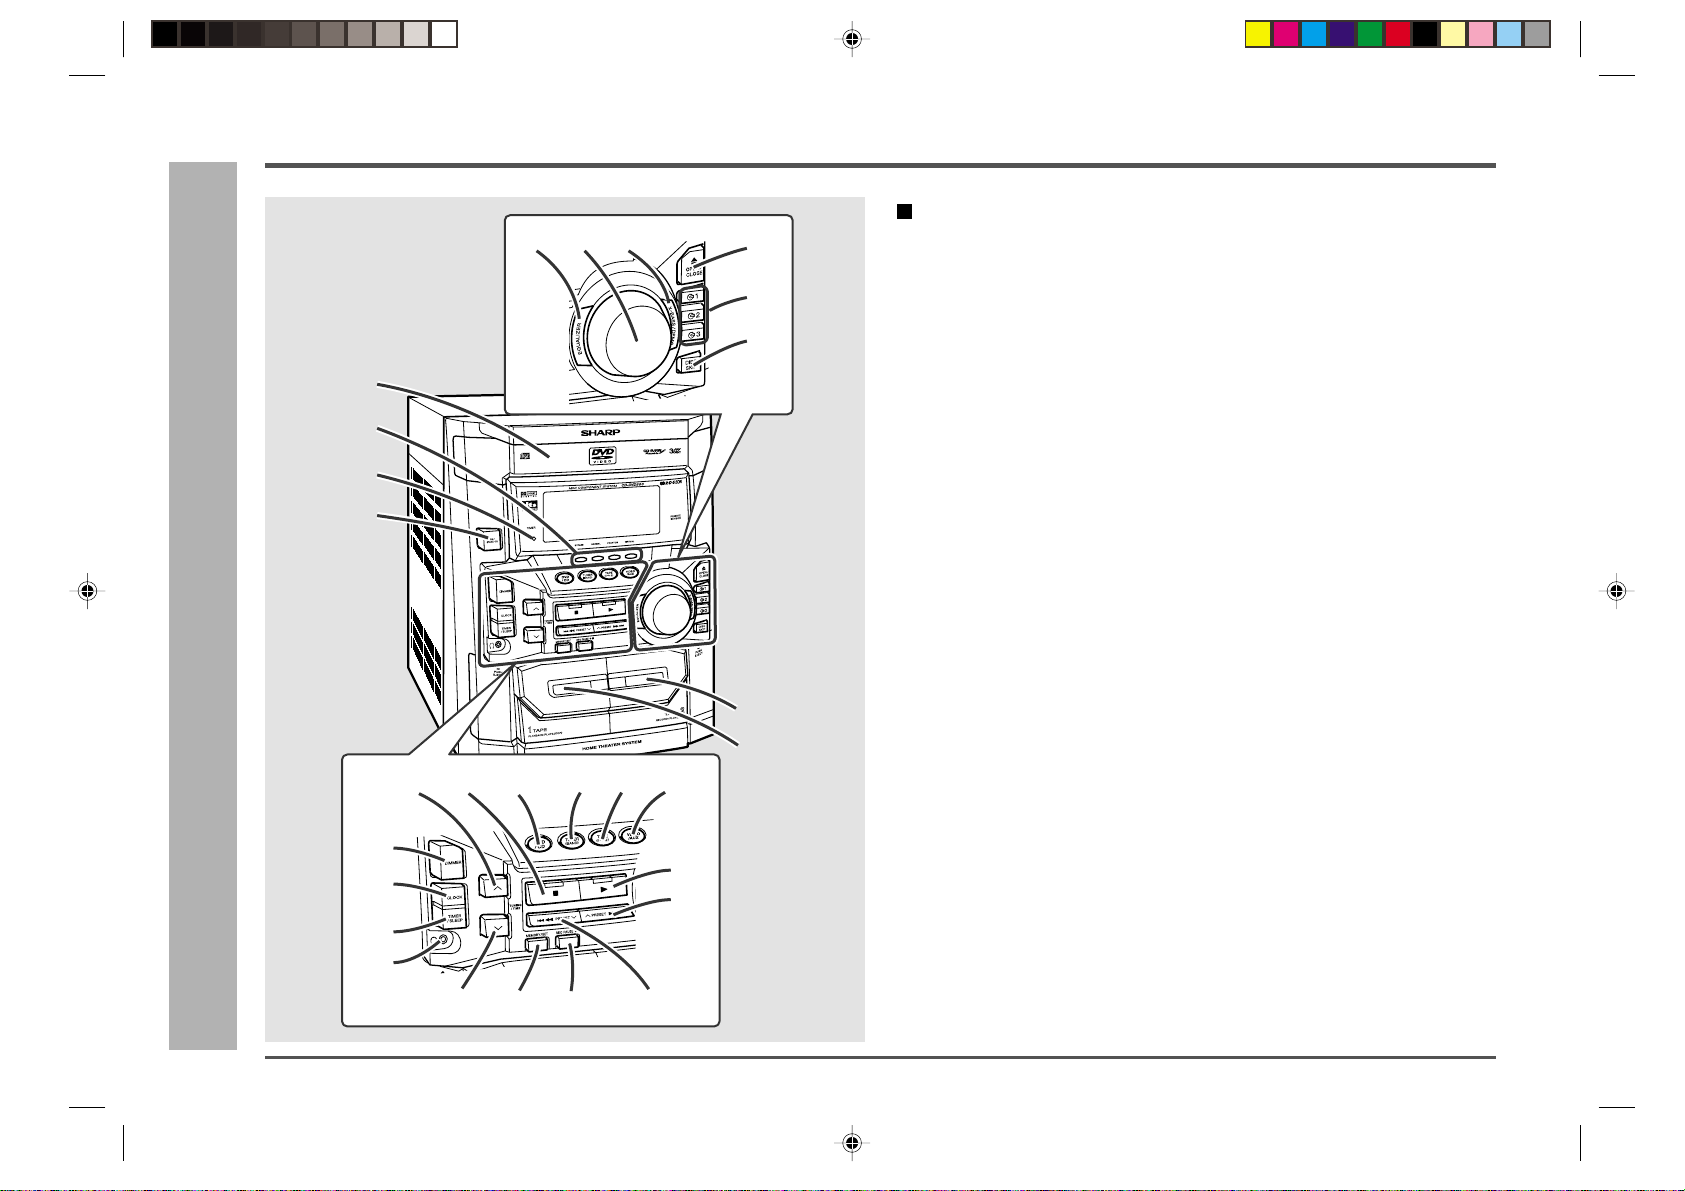
Controls and indicators
1
2
–
3
4
– Controls and indicators
General information
19
20
21
22
25 26 27 28
78
Front panel Reference page
9
10
11
12
5
6
181716151413
23
24
01. Disc Tray ..................................................................................................19, 48
02. Surround Effect Buttons .............................................................................. 42
03. Timer Set Indicator..................................................................................68, 72
04. On/Stand-by Button ................................................................................14, 72
05. Tape 2 Cassette Compartment.....................................................................62
06. Tape 1 Cassette Compartment.....................................................................62
07. Equaliser Mode Select Button ..................................................................... 15
08. Volume Control..............................................................................................15
09. Extra Bass/Demo Mode Button........................................................14, 15, 72
10. Disc Tray Open/Close Button................................................................. 19, 48
11. Disc Number Select Buttons..................................................................28, 48
12. Disc Skip Button ..................................................................................... 19, 49
13. Tuning and Time Up Button ...................................................................16, 53
14. DVD/CD/Tape Stop Button (with Indicator).....................................28, 49, 62
15. DVD/CD Button........................................................................................19, 48
16. Tuner (Band) Button .....................................................................................53
17. Tape (1
18. Video/Auxiliary Button..................................................................................70
19. Dimmer Button ..............................................................................................14
20. Clock Button............................................................................................16, 67
21. Timer/Sleep Button .................................................................................67, 68
22. Headphone Socket........................................................................................69
23. DVD/CD/Tape Play Button (with Indicator) ...............................28, 49, 62, 72
24. DVD Chapter skip, DVD/CD/Tape 2 Fast Forward
25. Tuning and Time Down Button ..............................................................16, 53
26. Memory/Set Button .................................................................................16, 54
27. Tape 2 Record Pause Button .......................................................................63
28. DVD Chapter skip, DVD/CD Fast Reverse,
V V
V 2) Button ...................................................................................... 62
V V
or Tuner Preset Up Button ...................................................29, 30, 49, 54, 62
Tape 2 Rewind or Tuner Preset Down Button ....................29, 30, 49, 54, 62
6
ENGLISH
Page 7
Controls and indicators (continued)
32 4
5
6
819 1011
22
28
29
30
31
12 13 14
7
16 16
17
18 19
2324 25 26 27
11
10
15
20
21
32
33
3837363534
1
2
3
4
5
6
7
8
9
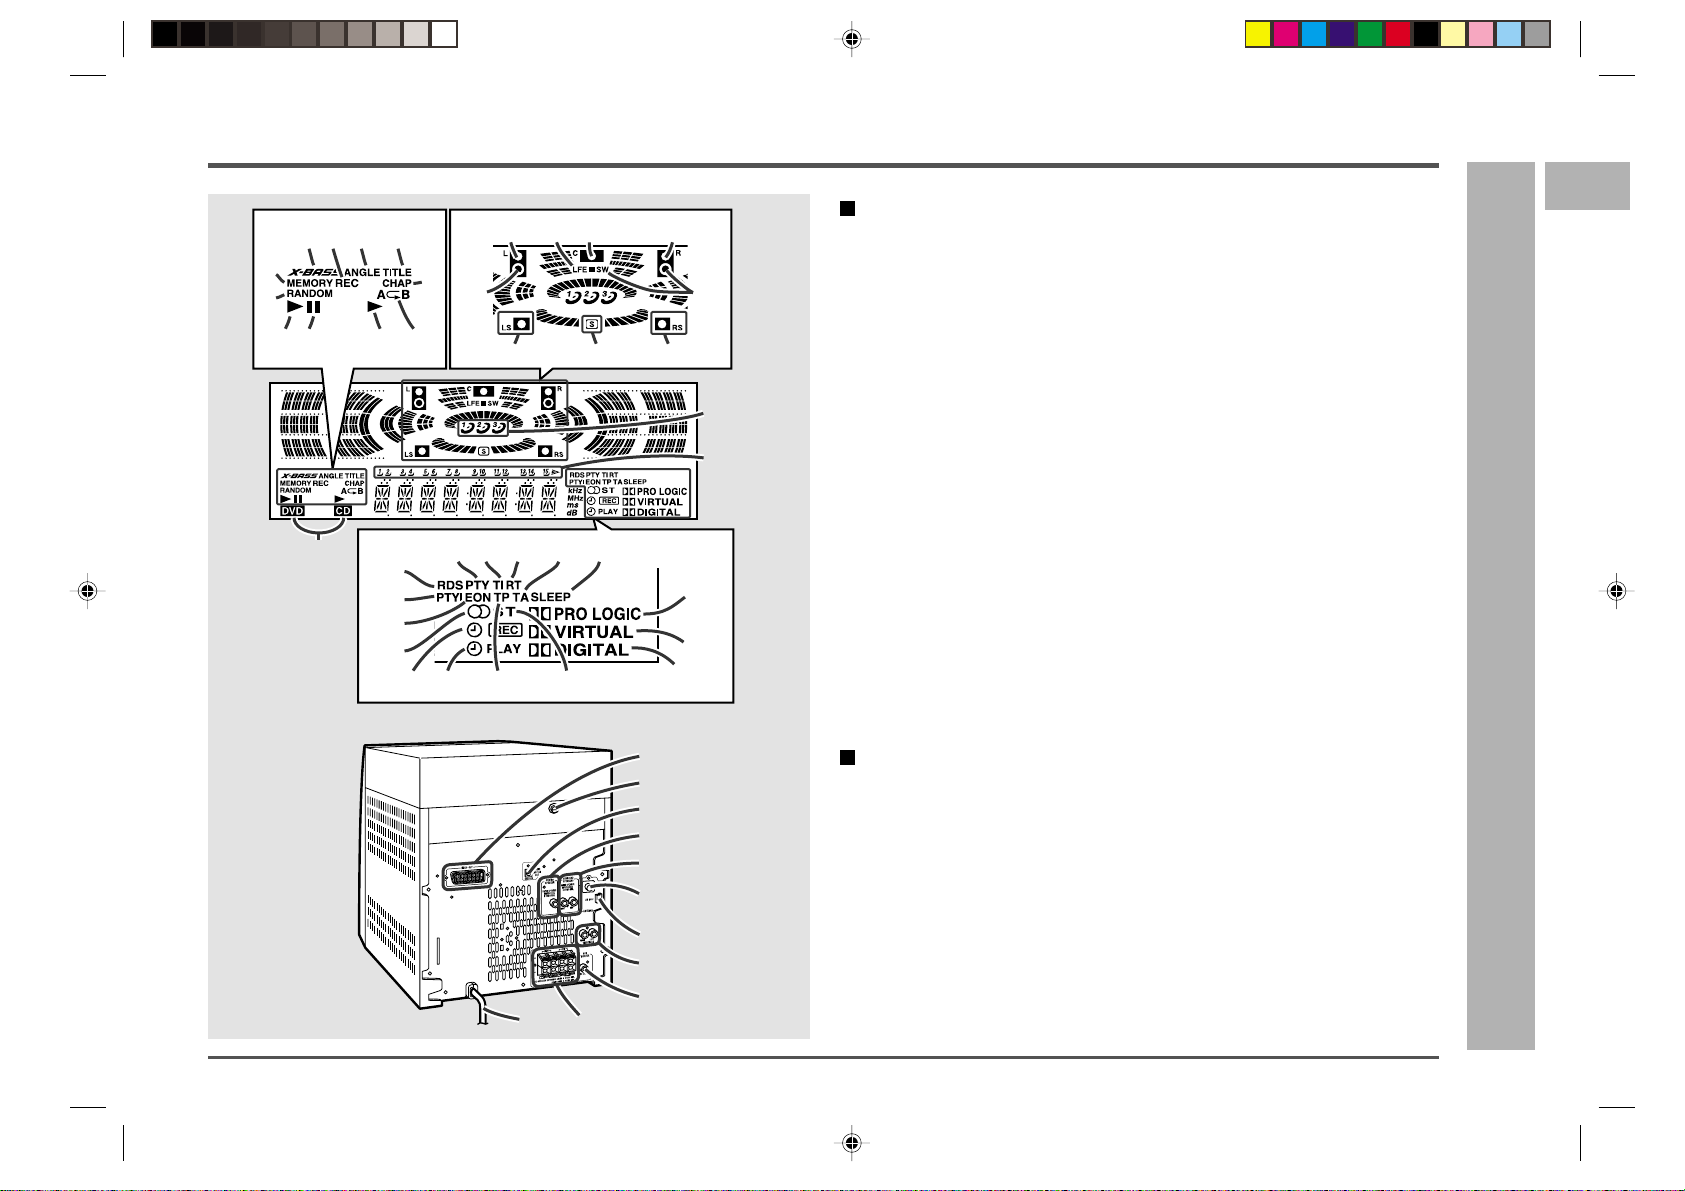
Display
01. Extra Bass Indicator
02. Tape 2 Record Indicator
03. DVD Angle Indicator
04. DVD Title Indicator
05. Memory Indicator
06. CD Random Play Indicator
07. DVD Chapter Indicator
08. DVD/CD Play Indicator
09. DVD/CD Pause Indicator
10. Tape Play Indicator
11. DVD/CD Repeat Indicator
12. Left Front Speaker Indicator
13. Low Frequency Effect Indicator
14. Centre Speaker Indicator
15. Right Front Speaker Indicator
16. Subwoofer Indicators
17. Left Surround Speaker
Indicator
18. Surround Indicator
19. Right Surround Speaker
Indicator
20. Disc Number Indicators
21. CD Music Schedule Indicators
22. Disc Types Indicators
23. Programme Type Indicator
24. Traffic Information Indicator
25. Radio Text Indicator
26. Traffic Announcement Indicator
27. Sleep Indicator
28. RDS Indicator
29. Dynamic PTY Indicator
30. EON Indicator
31. FM Stereo Receiving Indicator
32. Dolby Pro Logic Indicator
33. Dolby Virtual Indicator
34. Timer Recording Indicator
35. Timer Play Indicator
36. Traffic Programme Indicator
37. FM Stereo Mode Indicator
38. Dolby Digital Indicator
Rear panel
01. Video Output Socket.....................................................................................19
02. Transport Screw......................................................................................10, 72
03. Audio Digital Output Socket ........................................................................ 69
04. Centre Speaker Socket ...........................................................................10, 11
05. Surround Speaker Sockets .................................................................... 10, 11
06. FM 75 Ohms Aerial Socket .....................................................................10, 11
07. AM Loop Aerial Socket ...........................................................................10, 11
08. Video/Auxiliary (Audio Signal) Input Sockets ............................................69
09. Subwoofer Pre Output Socket .....................................................................69
10. AC Power Lead..............................................................................................10
11. Front Speaker Terminals ........................................................................ 10, 11
Reference page
CD-DVD500H
1
2
3
4
5
–
6
7
8
9
– Controls and indicators
10
General information
11
12
13
14
15
ENGLISH
7
Page 8
CD-DVD500H
Controls and indicators (continued)
1
✱
2
3
✱
–
4
✱
5
✱
6
✱
7
✱
– Controls and indicators
8
9
General information
✱
✱
10
11
12
13
14
15
✱
16
✱
17
18
19
20
21
22
23
24
25
26
27
28
29
30
31
32
✱
✱
✱
✱
✱
✱
✱
✱
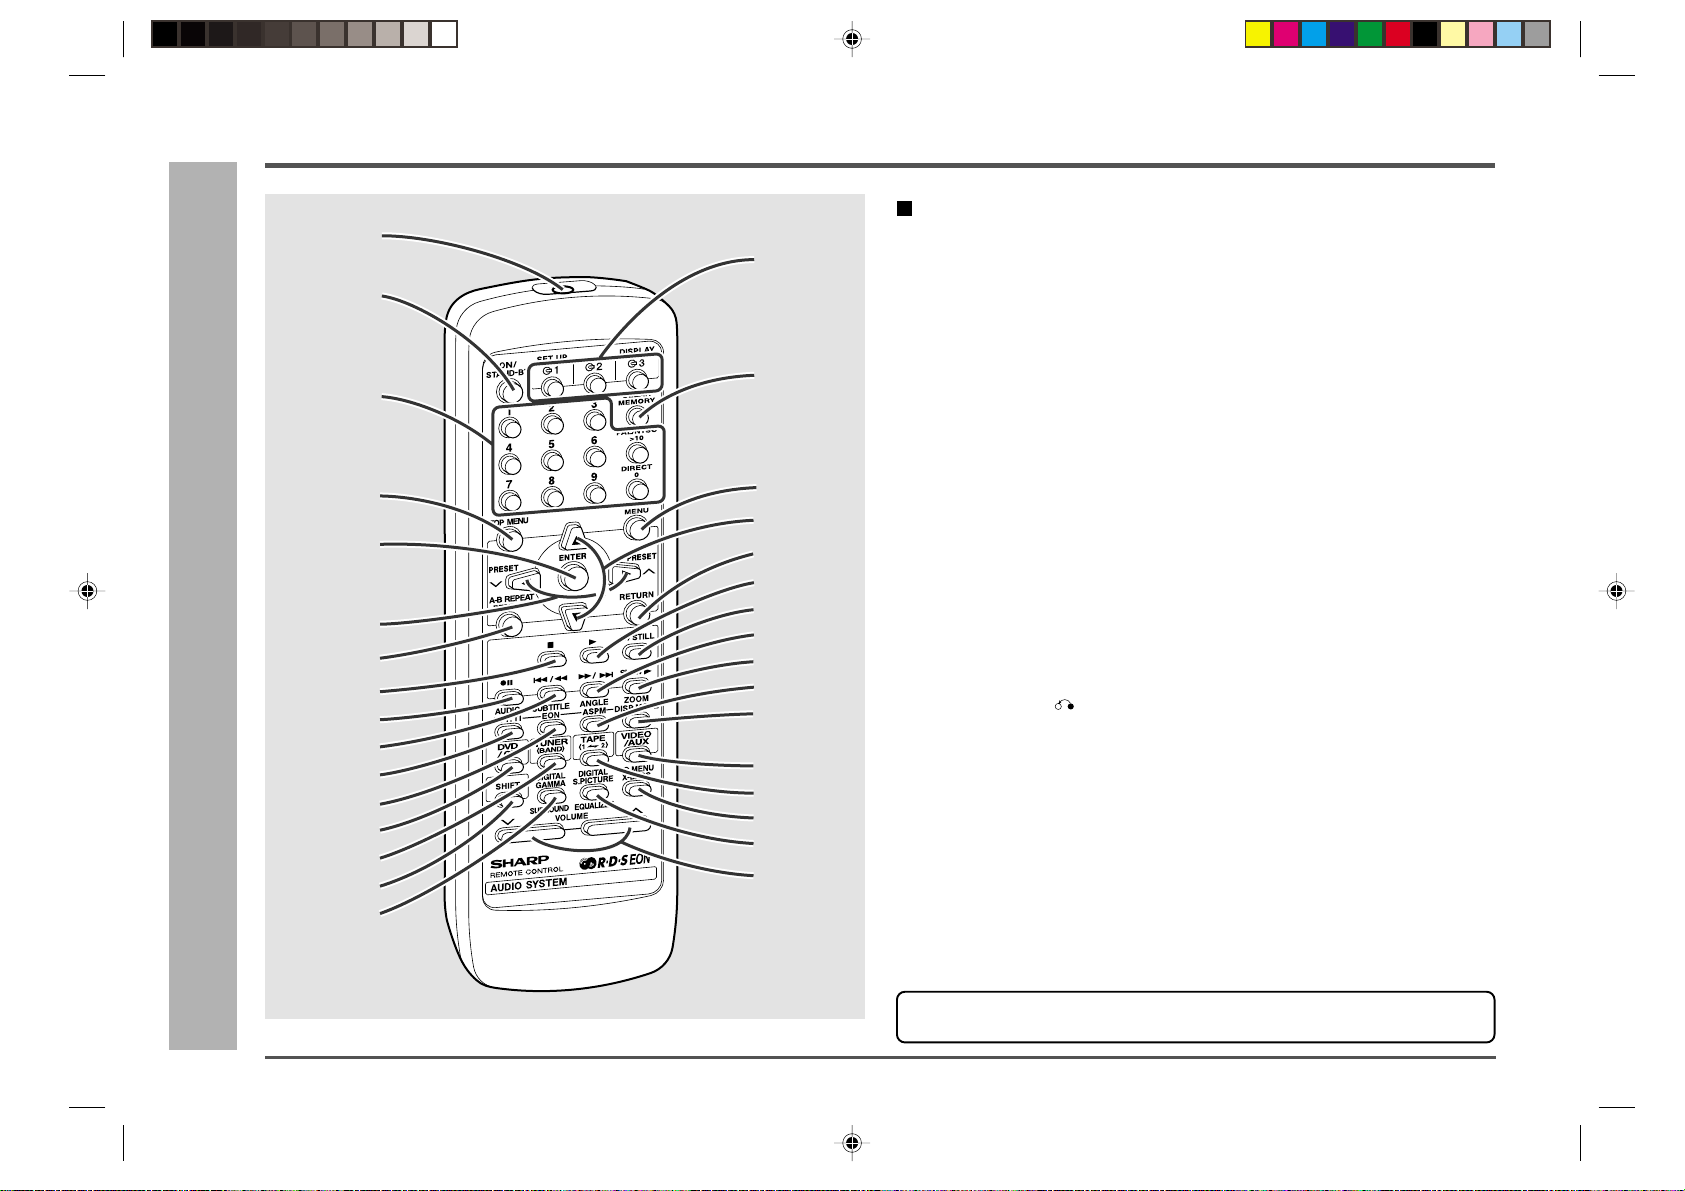
Remote control Reference page
01. Remote Control Transmitter.........................................................................14
02. On/Stand-by Button
03. Direct Buttons ............................................................................................... 23
04. DVD Top Menu Button ..................................................................................40
05. Enter Button .................................................................................................. 20
06. Menu Select or Tuner Preset Buttons ...................................................20, 54
07. DVD/CD Repeat Button........................................................................... 37, 51
08. DVD/CD/Tape Stop Button
09. Tape 2 Record Pause Button
10. DVD Chapter Skip or DVD/CD/Tape Fast Reverse Button
11. DVD Audio or RDS Programme Type/Traffic Information Search
Button.......................................................................................................34, 58
12. DVD Subtitle or RDS EON Button.......................................................... 33, 59
13. DVD/CD Button
14. Tuner (Band) Button
15. Shift Button....................................................................................................20
16. Surround Button ........................................................................................... 42
17. Disc Number Select Buttons
18. DVD/CD Memory Button .........................................................................38, 52
19. DVD Menu Button..........................................................................................40
20. Menu Select Buttons.....................................................................................20
21. Return Button ( )........................................................................................ 20
22. DVD/CD/Tape Play Button
23. DVD/CD Pause Button ............................................................................30, 49
24. DVD Chapter Skip or DVD/CD/Tape Fast Forward Button
25. DVD Slow Button...........................................................................................29
26. DVD Angle or RDS ASPM (Auto Station Programme Memory)
Button.......................................................................................................34, 57
27. DVD Zoom or RDS Display Mode Selector Button...............................36, 55
28. Video/Auxiliary Button
29. Tape (1 V 2) Button
30. Extra Bass Button
31. Equaliser Mode Select Button
32. Volume Up or Down Buttons
Buttons with “✱” mark in the illustration can be operated with the remote control only .
Other buttons can be operated on the main unit and the remote control.
8
ENGLISH
Page 9
Controls and indicators (continued)
1
2
1
2
CD-DVD500H
Remote control with
1
4
5
6
7
8
2
9
3
10
shift button
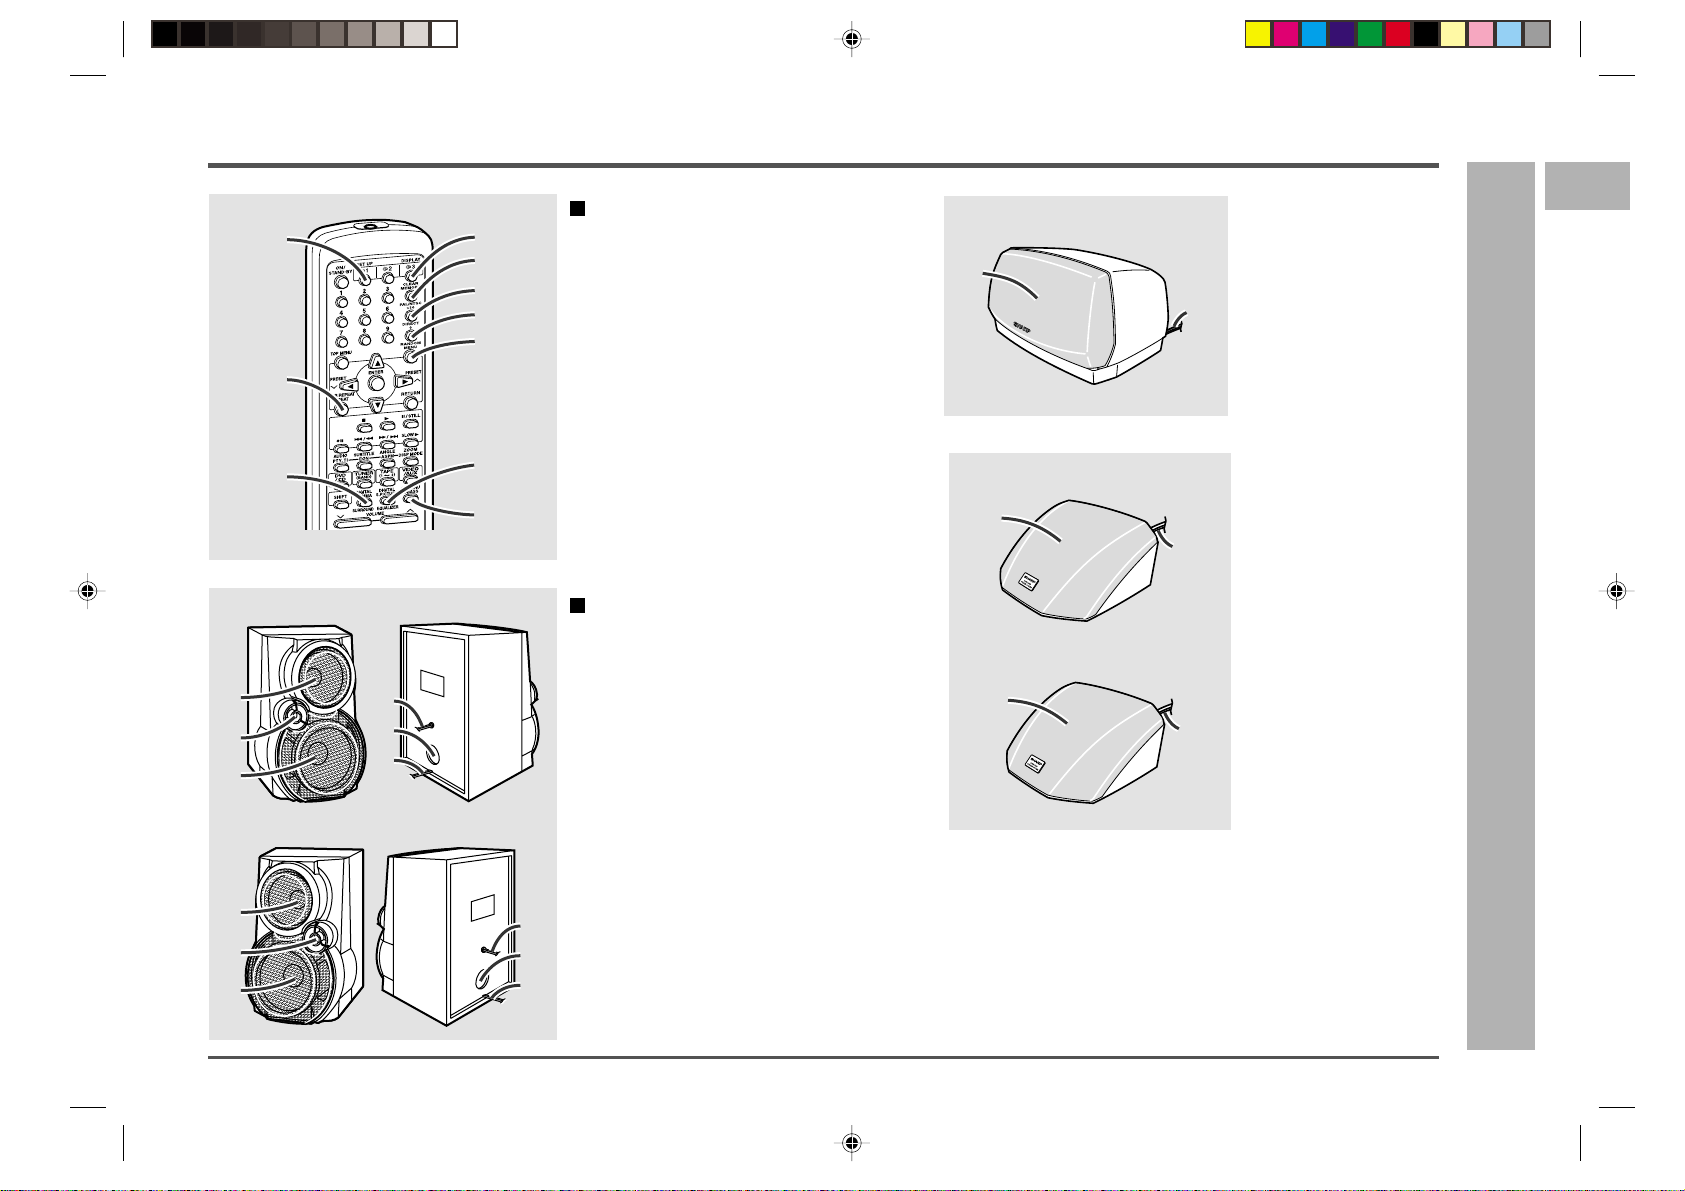
Reference page
01. DVD Setup Button ...............................20
02. DVD/CD A-B Repeat Button .........37, 51
03. DVD Digital Gamma Button ................ 35
04. DVD/CD Display Button ......................27
05. DVD/CD Clear Button .................... 38, 52
06. PAL/NTSC Button................................20
07. DVD Direct Button ............................... 32
08. CD Random Button .............................51
09. DVD Digital Super Picture Button......35
10. Speaker Menu Button .........................43
Centre speaker
1
Surround speaker (left)
01. Full-Range Speaker
02. Speaker Wire
2
01. Full-Range Speaker
02. Speaker Wire
2
3
4
5
–
6
7
1
Front speaker (left)
1
2
3
4
5
6
Speaker system
01. Woofer
02. Tweeter
03. Subwoofer
04. Speaker Wire for SUBWOOFER
Terminals
05. Bass Reflex Duct
06. Speaker Wire for MAIN Terminals
Surround speaker (right)
– Controls and indicators
General information
8
9
10
11
Front speaker (right)
12
1
2
3
4
5
6
13
14
15
ENGLISH
9
Page 10
CD-DVD500H
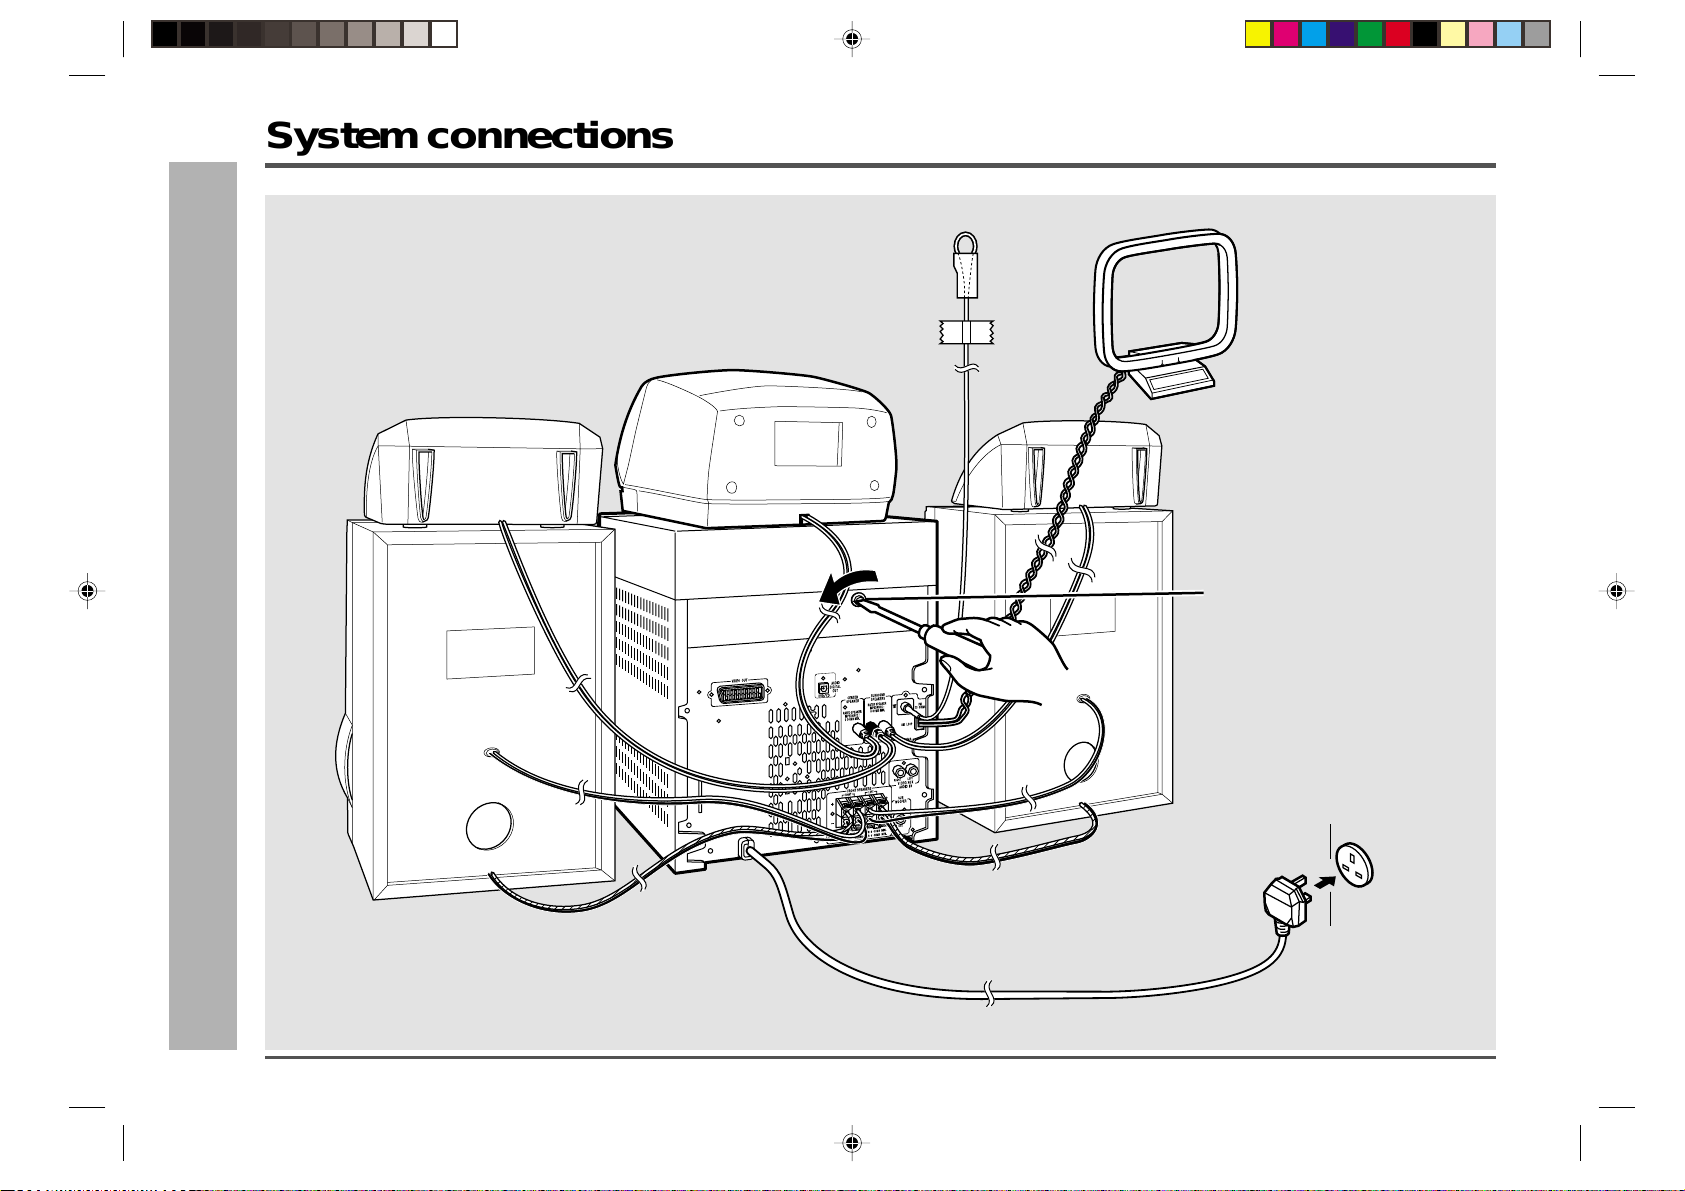
System connections
Surround speaker
– System connections –
Preparation for use
FM aerial
AM loop aerial
Centre speaker
(right)
Surround speaker (left)
Transport screw
Before turning the power on,
be sure to remove this transport screw on the back of the
unit using a flat-blade screwdriver or a coin.
This screw is required when
transporting the unit again.
Please keep it.
10
Front speaker (left)
Front speaker
(right)
Wall socket
(AC 230 V, 50 Hz)
ENGLISH
Page 11
System connections (continued)
;;;;;;;
;;;
;;;
;;;;;;
;;;;;;;;
;;;;;;;;
;;;;;;;
;;;;;;
;;;
CD-DVD500H
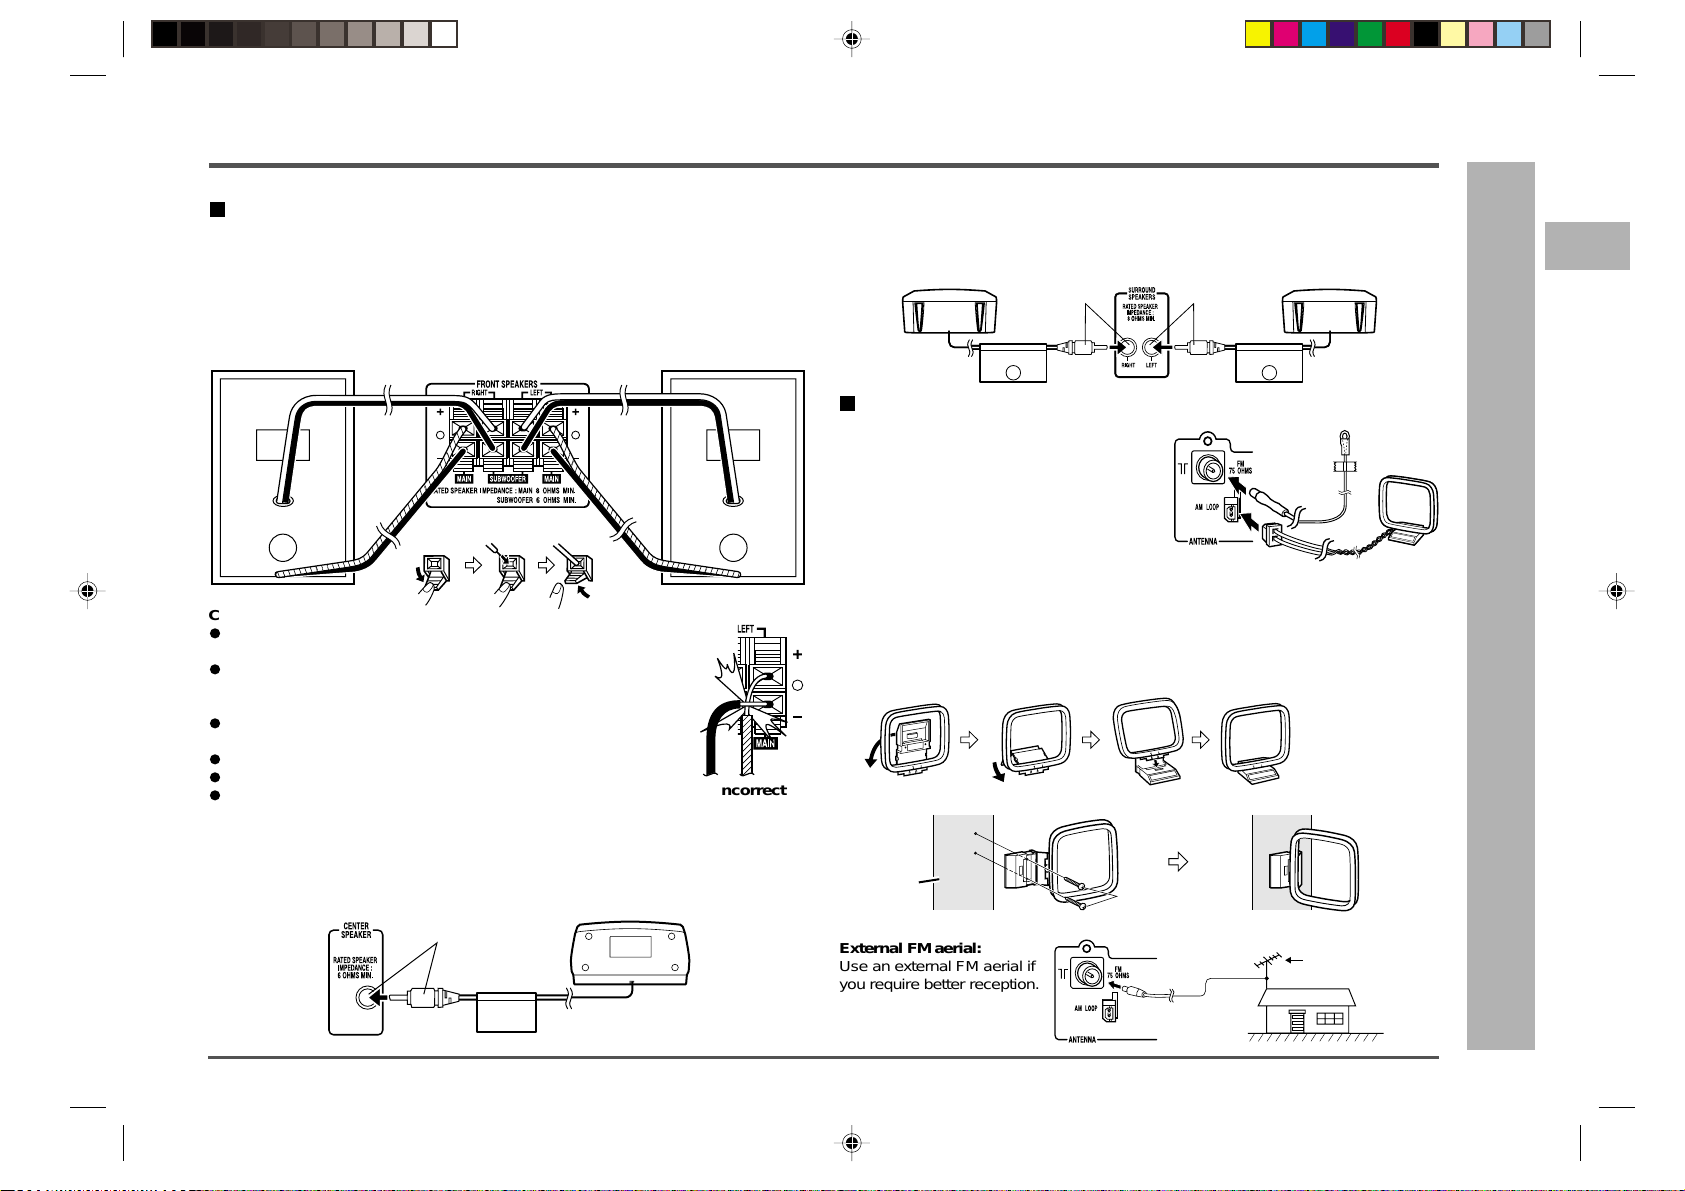
Speaker connection
Front speakers
Main terminals:
Connect the black wire to MAIN(–) terminal and the blue wire to the MAIN(+) terminal.
Subwoofer terminals:
Connect the black wire to the SUBWOOFER(–) terminal and the red wire to the
SUBWOOFER(+) terminal.
Right
Caution:
Never mistake the MAIN and the SUBWOOFER terminals.
The unit or the speakers may be damaged.
Only the included speakers should be used with this product.
Do not use other speakers with this unit or use the supplied speak-
ers with other units.
Do not mistake the right and the left channels.
The right speaker is the one on the right side when you face the unit.
Do not let the bare speaker wires touch each other.
Do not stand or sit on the speakers. You may be injured.
Do not mistake the connection of centre and surround speakers.
Red
Black
Blue
Black
Red
Black
Blue
Black
Left
Incorrect
Surround speakers
Connect each surround speaker wire to the SURROUND SPEAKERS socket as shown.
Use speakers with an impedance of 8 ohms or more, as lower impedance speakers
can damage the unit.
Right Left
Red
White
SURROUNDSURROUND
LR
Aerial connection
Supplied FM aerial:
Connect the FM aerial wire to the FM 75 OHMS
socket and position the FM aerial wire in the
direction where the strongest signal can be received.
Supplied AM loop aerial:
Connect the AM loop aerial to the AM LOOP
socket. Position the AM loop aerial for optimum
reception. Place the AM loop aerial on a shelf, etc., or attach it to a stand or a wall with
screws (not supplied).
Note:
Placing the aerial on the unit or near the AC power lead may cause noise pickup.
Place the aerial away from the unit for better reception.
Installing the AM loop aerial:
< Assembling >
< Attaching to the wall >
1
2
3
4
5
–
6
7
8
9
– System connections
Preparation for use
10
11
Centre speaker
Connect the centre speaker wire to the CENTER SPEAKER socket as shown.
Use speakers with an impedance of 6 ohms or more, as lower impedance speakers
can damage the unit.
Black
CENTER
Wall
External FM aerial:
Use an external FM aerial if
you require better reception.
Consult your dealer.
Screws
(not supplied)
External FM aerial
ENGLISH
12
13
14
15
11
Page 12
CD-DVD500H
Speakers
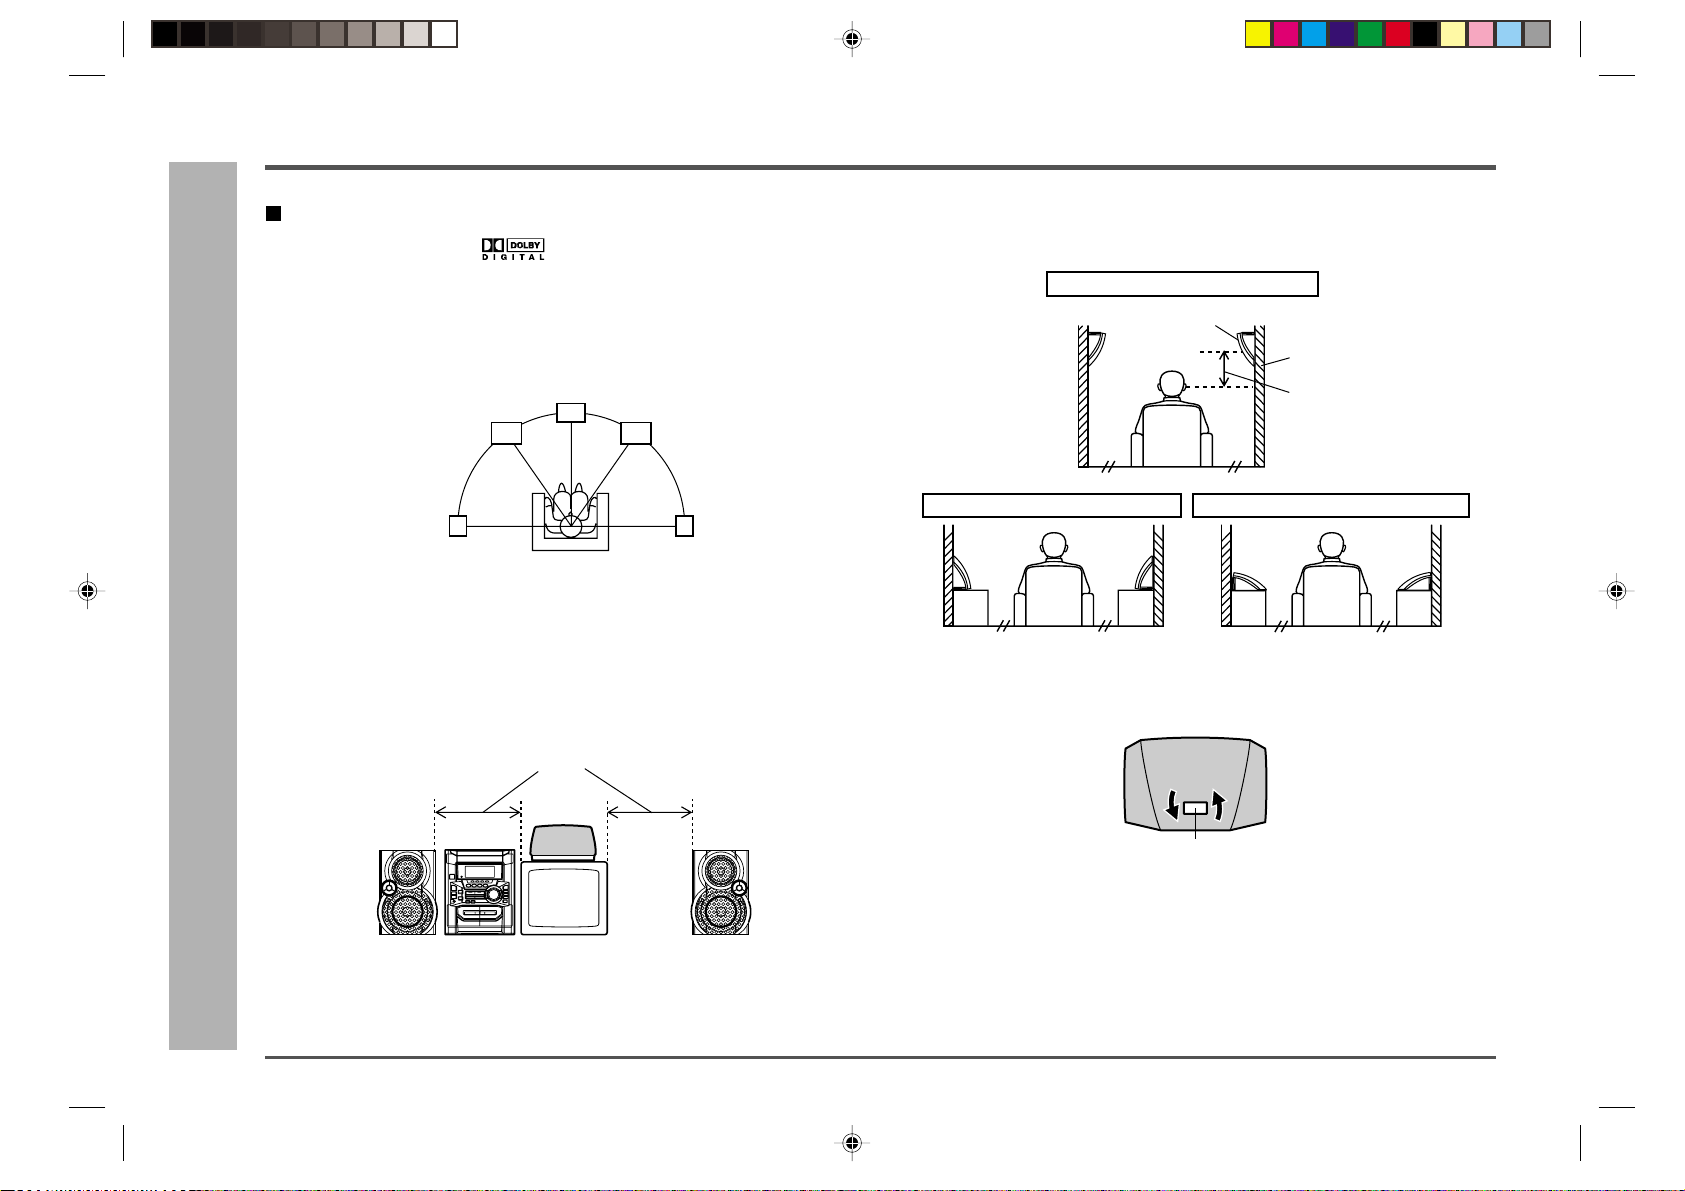
Placing the speakers
When playing a disc with the trademark, you can enjoy realistic, powerful
sound by playing the soundtrack through 5 channels; the front left, front right, centre,
surround left and surround right speakers.
The best sound will be achieved by placing each speaker at the same distance from
the listener. Arrange the speakers so that the layout is as close as possible to the
diagram shown in this illustration.
Front left
Surround left
Front speakers:
The front left and right speakers have individual shapes. For best performance, place
– Speakers –
the speakers as shown in the diagram below.
Place a TV halfway between the front left and front right speakers.
Centre speaker:
Preparation for use
It is recommended that the centre speaker be placed on top of a television.
Same distance
Centre
Front right
Surround right
Surround speakers:
The surround speakers should be installed on the wall. Install them 60 - 90 cm (2’ - 3’)
above the height of your ears when seated, if possible (see page 13).
Example: When installed on the wall
Surround speaker
Wall
60 - 90 cm
(2’ - 3’)
Example: When installed vertically
When the surround speakers are not installed on the wall, the speaker badge will be
upside down.
In this case, you can adjust the badge to face the proper direction.
Just turn it by hand.
Example: When installed horizontally
12
Front
left
Note:
Placing the unit near a TV may cause noise pickup depending on the type of the TV. If
this happens, move the unit away from it.
Centre
Front
right
ENGLISH
Badge
Note:
The front speakers and centre speaker are magnetically shielded. Therefore, they may
be placed alongside a TV.
However colour variations may occur, depending on the type of TV used.
If colour variations occur ....
turn off the TV (using the power switch). After 15 - 30 minutes, turn the TV on again.
If the colour variation is still present ...
move the speakers further away from the TV.
Page 13
Speakers (continued)
CD-DVD500H
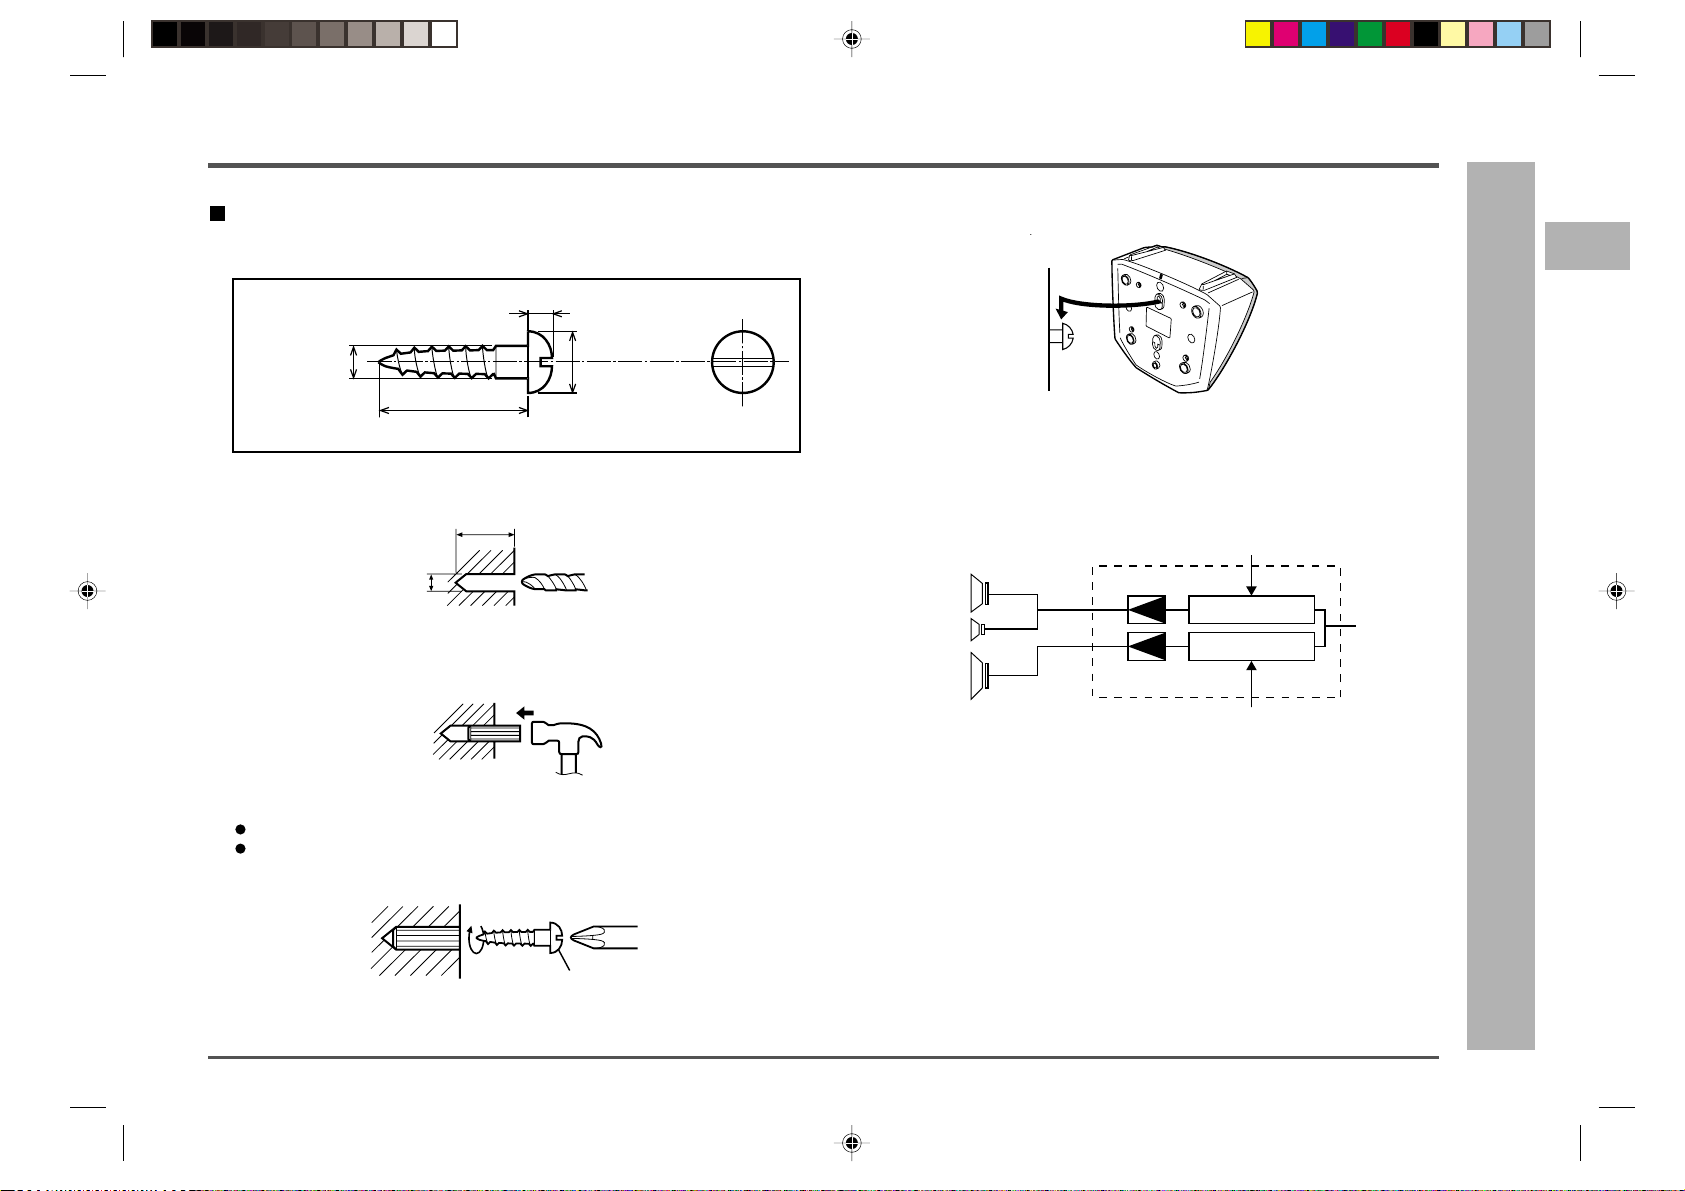
T o install the surround speakers on the wall
Sharp designed the surround speakers so you may hang them on the wall.
Be sure to use the correct type and size of screw, as shown below.
3.2 mm (1/8")
5 mm (3/16")
9 mm (3/8")
Min. 22 mm (7/8")
1. Make a hole in the wall using a drill.
32 mm (1-1/4")
8 - 9 mm (3/8")
2. Drive a wall mount plug into the hole using a hammer, until it is flush with the
wall surface.
4. Install the surround speakers on the wall by inserting the screw heads into
the slots on the back of the speakers.
Wall surface
Bi-amp system:
Each speaker unit has a built-in subwoofer (low frequency range) which is driven separately from the woofer and tweeter (mid-to-high frequency range). Two independent
amplifiers which have individual frequency characteristics are used.
By amplifying separately the two frequency bands, clearer sound is achieved.
Mid-to-high range
(200 Hz - 20 kHz)
Woofer
Tweeter
Subwoofer
Power amplifier
Pre-amplifier
L-ch
Pre-amplifier
Power amplifier
Ultra-low range
(60 Hz - 200 Hz)
1
2
3
4
5
6
7
8
– Speakers –
9
Preparation for use
10
3. Drive one screw into the wall for each speaker, as shown in the illustration.
Make sure that both the screw and the wall can support a load of 20 kg (45 lbs.).
Drive the screws, so the screw head extends about 5 mm (3/16") out from the
wall.
Wall surface
Wall mounting screw
■
Remove the transport screw
Before turning the power on, be sure to remove the transport screw on the back of the
unit using a flat-blade screwdriver or a coin.
Note:
This screw is required when transporting the unit again. Please keep it (see page 72).
■
Connecting the AC power lead
After checking all the connections have been made correctly, plug the AC power lead
of this unit into the AC socket. When you plug in the unit for the first time, the unit will
enter the demonstration mode (see page 14).
Note:
Unplug the unit if it will not be used for a prolonged period of time.
ENGLISH
11
12
13
14
15
13
Page 14

CD-DVD500H
Remote control
Battery installation
1. Remove the battery cover.
2. Insert the supplied batteries according to the direction indicated in the battery compartment.
When inserting or removing the batteries, push them towards the ë terminals.
3. Replace the cover.
General control
–
Preparation for use
– Remote control / General control
Precautions for battery use:
Replace all old batteries with new ones at the same time.
Do not mix old and new batteries.
Remove the batteries if the unit will not be used for long periods of time. This will
prevent potential damage due to battery leakage.
Caution:
Do not use rechargeable batteries (nickel-cadmium battery, etc.).
Installing the batteries incorrectly may cause the unit to malfunction.
Notes concerning use:
Replace the batteries if the operating distance is reduced or if the operation becomes erratic.
Purchase 2 “AA” size batteries (UM/SUM-3, R6,
Periodically clean the transmitter on the remote control and the sensor on the unit
with a soft cloth.
Exposing the sensor on the unit to strong light may interfere with operation. Change
the lighting or the direction of the unit.
Keep the remote control away from moisture, heat, shock, and vibrations.
Test of the remote control
Face the remote control directly to the remote sensor on the unit.
The remote control can be used within the
range shown:
Press the ON/STAND-BY button. Does the power
turn on? Now, you can enjoy your system.
HP-7 or similar).
Remote sensor
0.2 m - 6 m
(8" - 20')
Demonstration mode
The first time the unit is plugged in, the unit will enter the demonstration mode. Y ou will
see words scroll.
To cancel the demonstration mode:
When the unit is in the power stand-by mode (demonstration mode), press the XBASS/DEMO button.
The demonstration mode will be cancelled and the display will disappear.
To return to the demonstration mode:
When the unit is in the power stand-by mode, press the X-BASS/DEMO button again.
Note:
When the power is on, the X-BASS/DEMO button can be used to select the extra bass
mode.
To turn the power on
Press the ON/STAND-BY button.
To set the unit to stand-by mode:
Press the ON/STAND-BY button again.
Display brightness (2 levels)
You can switch the display brightness by pressing the DIMMER button.
14
ENGLISH
Dimmed
Brightened
Page 15
Sound control
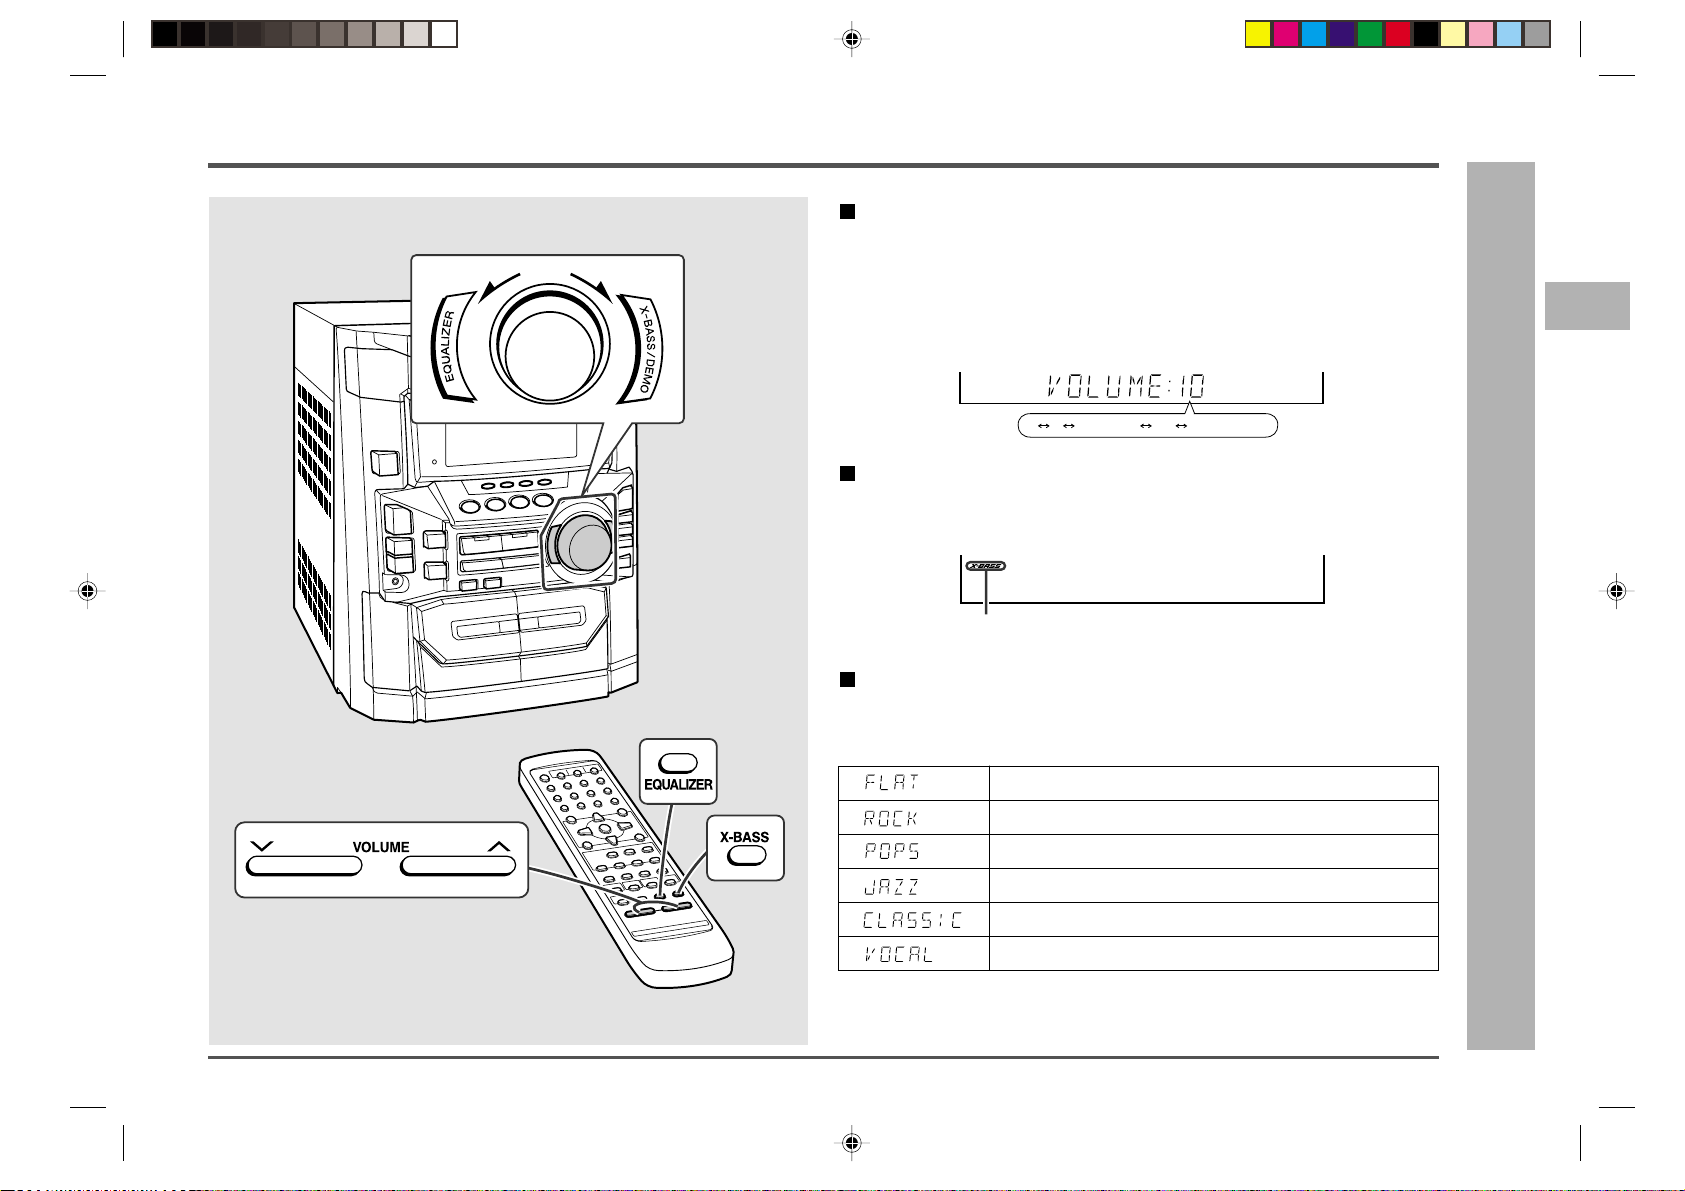
Volume control
Main unit operation:
When the VOLUME control is turned clockwise, the volume will increase. When it is
turned anti-clockwise, the volume will decrease.
Remote control operation:
Press the VOLUME W button to increase the volume and the VOLUME X button to
decrease.
CD-DVD500H
1
2
3
4
012 29 30 MAXIMUM
.....
Bass control
When the power is first turned on, the unit will enter the extra bass mode which
emphasises the bass frequencies, and “X-BASS” will appear.
To cancel the extra bass mode, press the X-BASS/DEMO (X-BASS) button.
X-BASS indicator
Equaliser
When the EQUALIZER button is pressed, the current mode setting will be displayed.
To change to a different mode, press the EQUALIZER button repeatedly until the desired sound mode appears.
The sound is not modified.
Bass and treble are emphasised.
Bass and treble are slightly emphasised.
Treble is cut a little.
Treble is reduced a lot.
Vocals (midrange tones) are emphasised.
Note:
If the EQUALIZER button is pressed in the Normal/Phantom/Virtual mode, the unit is
switched to the Bypass mode automatically.
5
6
7
8
– Sound control –
Basic operation
9
10
11
12
13
14
15
ENGLISH
15
Page 16
CD-DVD500H
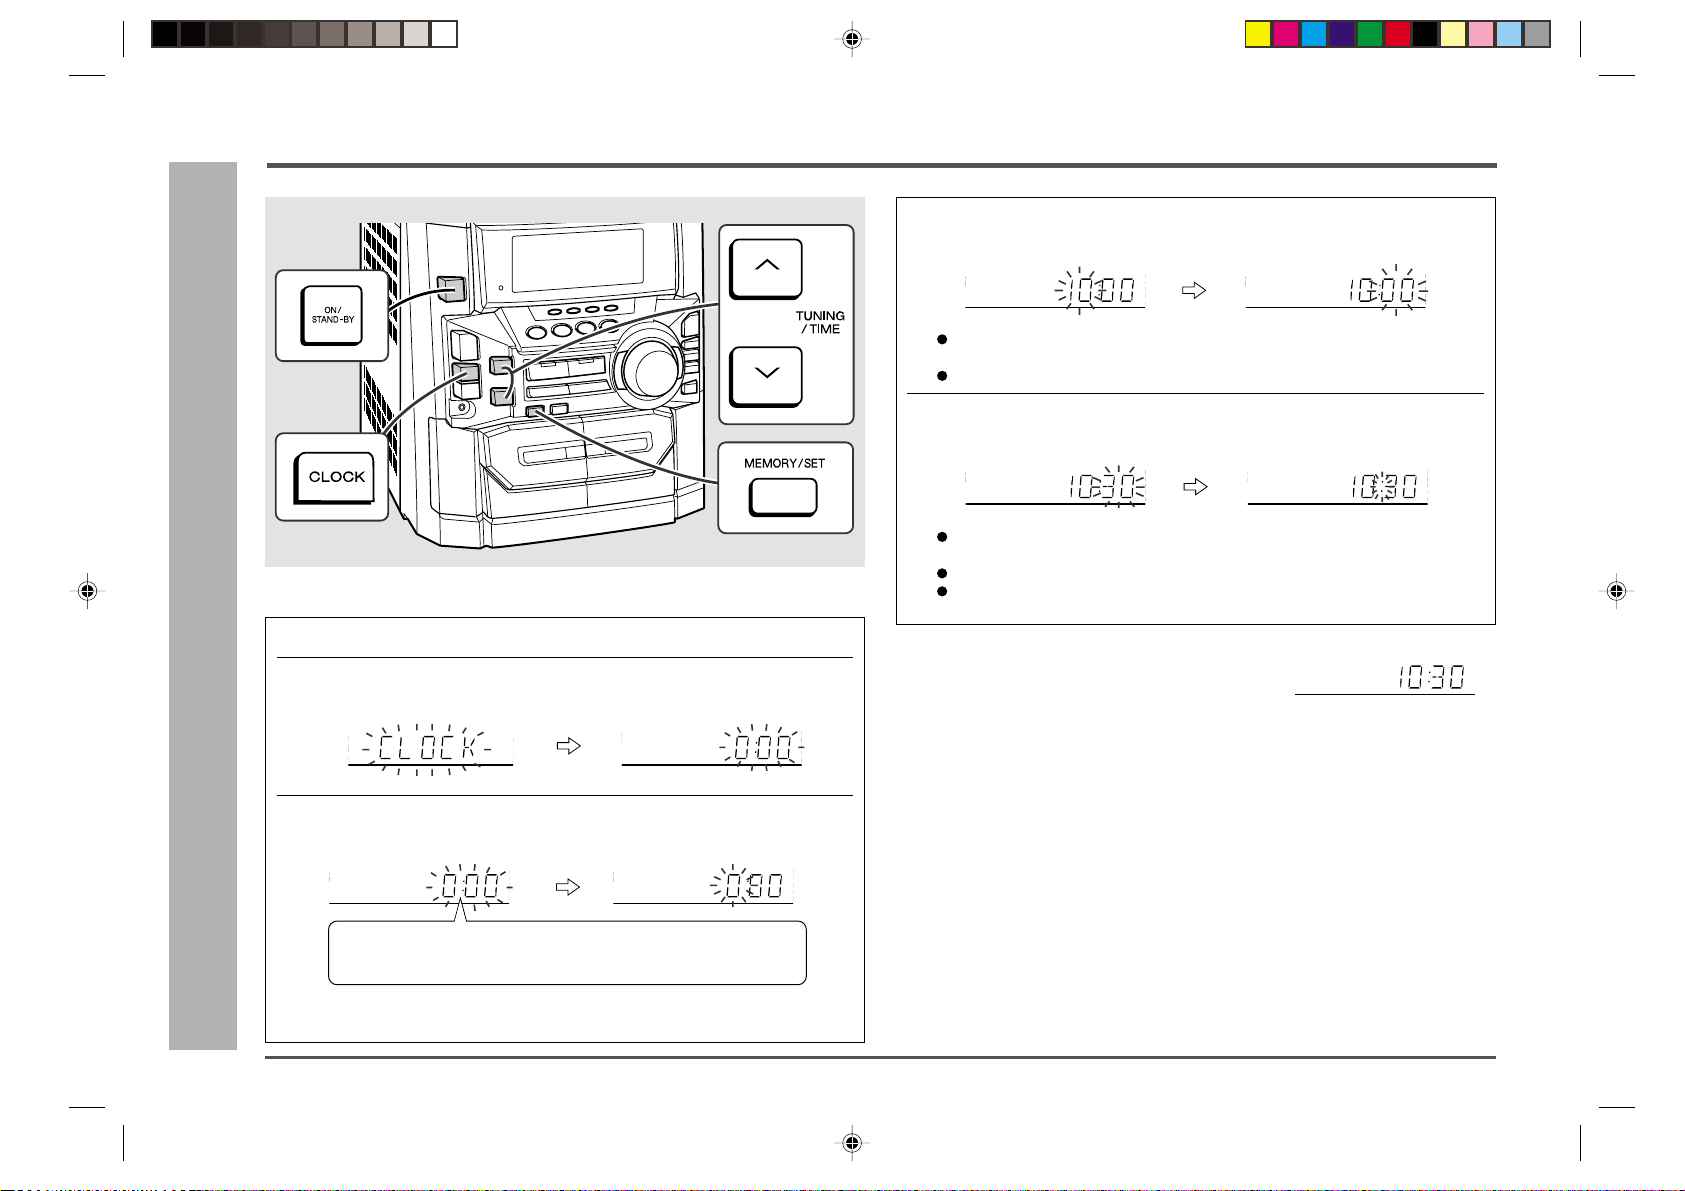
Setting the clock
4 Press the TUNING/TIME (
then press the MEMORY/SET button.
X X
X or
X X
WW
W) button to adjust the hour and
WW
–
In this example, the clock is set for the 24-hour (0:00) display.
1 Press the ON/STAND-BY button to turn the power on.
– Setting the clock
2 Press the CLOCK button and within 5 seconds, press the
Basic operation
MEMORY/SET button.
3 Press the TUNING/TIME (
12-hour display and then press the MEMORY/SET button.
“0:00” → The 24-hour display will appear. (0:00 - 23:59)
“AM 12:00”→ The 12-hour display will appear . (AM 12:00 - PM 1 1:59)
“AM 0:00” →The 12-hour display will appear. (AM 0:00 - PM 11:59)
X X
WW
X or
W) button to select the 24-hour or
X X
WW
Press the
hour. Hold it down to advance continuously.
When the 12-hour display is selected, “AM” will change automatically to “PM”.
5 Press the TUNING/TIME (
and then press the MEMORY/SET button.
Press the
minute. Hold it down to change the time in 5-minute intervals.
The hour will not advance even if minutes advance from “59” to “00”.
The clock begins counting from “0” seconds. (Seconds are not displayed.)
The time display will disappear after a few seconds.
To confirm the time display:
Press the CLOCK button.
The time display will appear for about 5 seconds.
Note:
The “CLOCK” or time will flash at the push of the CLOCK button when the AC power
supply is restored after a power failure or unplugging the unit.
Readjust the clock as follows.
To readjust the clock:
Perform “Setting the Clock” from the beginning.
If the time display is flashing, step 3 (for selecting the 24-hour or 12-hour display) will
be skipped.
To change the 24-hour or 12-hour display:
1. Clear all the programmed contents.
[Refer to “Clearing all the memory (reset)” on page 72 for details.]
2. Perform “Setting the Clock” from the beginning.
TUNING/TIME (X or W)
X X
X or
X X
TUNING/TIME (X or W)
button once to advance the time by 1
WW
W) button to adjust the minutes
WW
button once to advance the time by 1
16
Note that this can only be set when the unit is first installed or it has been reset
(see page 72).
ENGLISH
Page 17
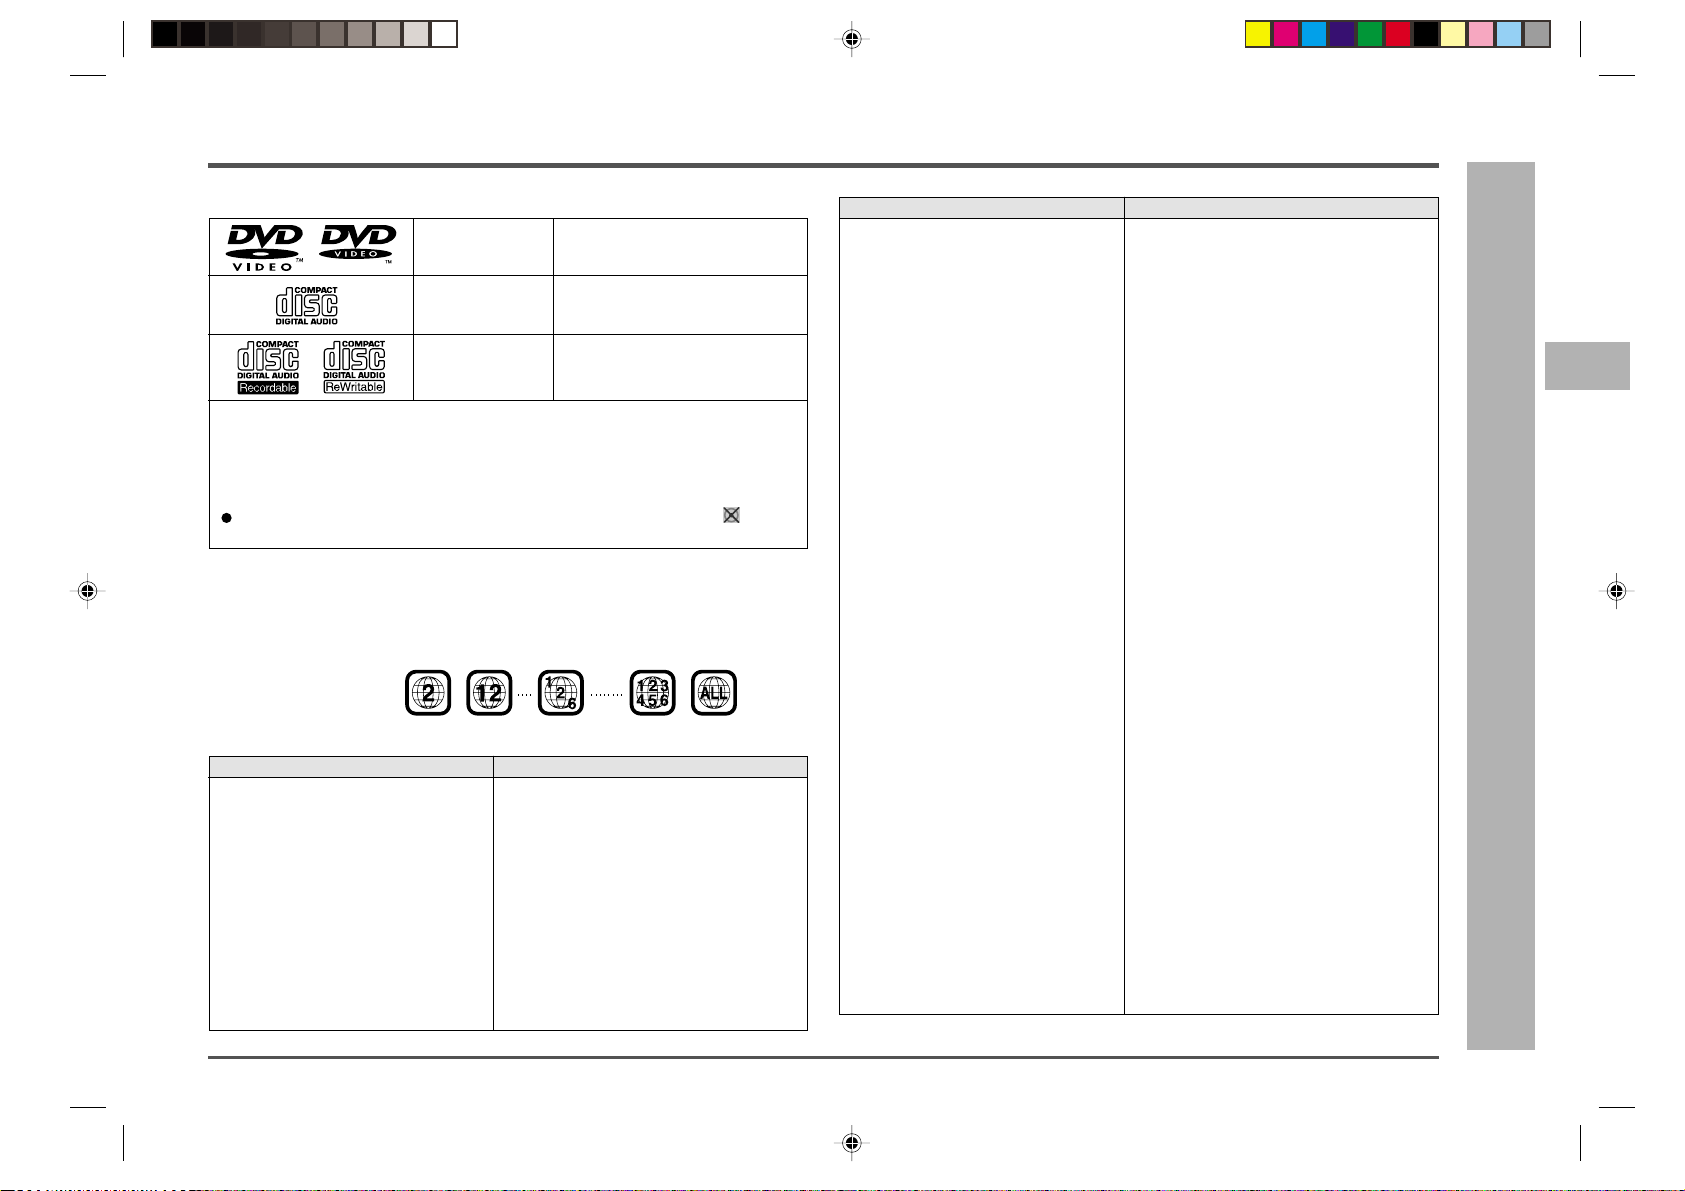
Types of playable discs
CD-DVD500H
The unit can play back discs bearing any of the following marks:
DVD
[8 cm (3") disc/
12 cm (5") disc]
Audio CD
[8 cm (3") disc/
12 cm (5") disc]
CD-R/CD-RW
[8 cm (3") disc/
12 cm (5") disc]
Other discs
1) On CD-G and CD-EXTRA discs, only the sound can be played (no images).
2) Video CD, photo CD, DVD-ROM, DVD-R, DVD-RW, DVD-Audio, SACD and
CD-ROM discs cannot be used.
3) Discs with unusual shapes (heart-shaped or hexagonal discs) cannot be used.
The use of such discs will cause a fault.
When the system detects an incompatible disc, it displays indicator .
When this happens, check the disc type.
Note 1:
DVD video players and discs are designed with region numbers which dictate the
regions in which a disc can be played. If the region number on the disc you want to play
does not match the region number in your system, you will not be able to play the disc.
The region number for this system is 2.
Sample disc display:
The list below shows the countries covered by region number 2.
Common names Names of nations and areas
Albania Republic of Albania
Andorra Principality of Andorra
Austria Republic of Austria
Bahrain State of Bahrain
Belgium Kingdom of Belgium
Bosnia and Herzegovina Bosnia and Herzegovina
Bulgaria Republic of Bulgaria
Channel Islands *Channel Islands
Croatia Republic of Croatia
Cyprus Republic of Cyprus
Czech The Czech Republic
Denmark Kingdom of Denmark
Egypt Arab Republic of Egypt
Faeroe Islands *Faeroe Islands
Finland Republic of Finland
See Note 1. See Note 3.
See Note 2. See Note 4.
Discs recorded in audio format.
Discs cannot perform recording.
Common names Names of nations and areas
France French Republic
Germany Federal Republic of Germany
Gibraltar *Gibraltar
Greece Hellenic Republic
Greenland *Greenland
Hungary Republic of Hungary
Iceland Republic of Iceland
Iran Islamic Republic of Iran
Iraq Republic of Iraq
Ireland Ireland
Isle of Man *Isle of Man
Israel State of Israel
Italy Italian Republic
Japan Japan
Jordan Hashemite Kingdom of Jordan
Kuwait State of Kuwait
Lebanon Republic of Lebanon
Lesotho Kingdom of Lesotho
Liechtenstein Principality of Liechtenstein
Luxembourg Grand Duchy of Luxembourg
Macedonia Republic of Macedonia
Malta Republic of Malta
Monaco Principality of Monaco
Netherlands Kingdom of the Netherlands
Norway Kingdom of Norway
Oman Sultanate of Oman
Poland Republic of Poland
Portugal Portuguese Republic
Qatar State of Qatar
Romania Romania
San Marino Republic of San Marino
Saudi Arabia Kingdom of Saudi Arabia
Slovakia The Slovak Republic
Slovenia Republic of Slovenia
South Africa Republic of South Africa
Spain Kingdom of Spain
Svalbard and Jan Mayen Islands *Svalbard and Jan Mayen Islands
Swaziland Kingdom of Swaziland
Sweden Kingdom of Sweden
Switzerland Swiss Confederation
Syrian Arab Republic Syrian Arab Republic
Turkey Republic of Turkey
United Arab Emirates United Arab Emirates
United Kingdom United Kingdom of Great Britain and
Northem Ireland
Vatican City State State of the City of Vatican
Yemen Republic of Yemen
Yugoslavia Federal Republic of Yugoslavia
* represents area name.
1
2
3
4
5
6
7
8
9
– Types of playable discs –
DVD explanation
10
11
12
13
14
15
ENGLISH
17
Page 18
CD-DVD500H
Types of playable discs (continued)
Note 2:
The specific playback functionality for some DVD discs is determined by the disc manufacturer. Because this system plays disc data in accordance with the disc manufacturer’s
guidelines, some functions may not be available on some discs. Be sure to read the
instructions provided with the disc.
The “Prohibited” indicator or displayed during operation indicates that
such manufacturer-imposed restrictions apply.
Note 3:
This product supports the following modes.
2-channel (L/R) PCM audio
2-channel (L/R) Dolby Digital
5.1 channel Dolby Digital
2-channel MPEG audio
5.1 channel MPEG audio (External decoder is required)
–
DTS audio (External decoder is required)
(It does not support 7.1 channel MPEG audio.)
Note 4:
Since this system is not equipped with a closed caption function, even if you play a disc
with the closed caption function, the subtitles will not be shown.
Discs that cannot be played
1. You cannot play illegally produced discs.
2. You cannot play scratched discs.
3. You cannot play discs that are dusty, soiled or marked with fingerprints.
If the playing surface of a disc is soiled or scratched, the system may display
– Types of playable discs
DVD explanation
indicator on the screen and fail to play the disc correctly.
(Refer to the instructions on page 5 and clean discs before attempting to play
them.)
Whilst a disc is playing, soiling or scratches on the disc may disrupt the image
(appearing as blocks on the screen). When the image is disrupted, the system
automatically restores the correct image after 2 or 3 seconds.
Icons used on DVD discs
Sample Icons
1. English
2.
Japanese
Number of recorded
audio tracks
Type of subtitles
recorded
1. English
2.
Japanese
Video format Disc with
multiple
camera
angles
Region code
indicator
(See page 17.)
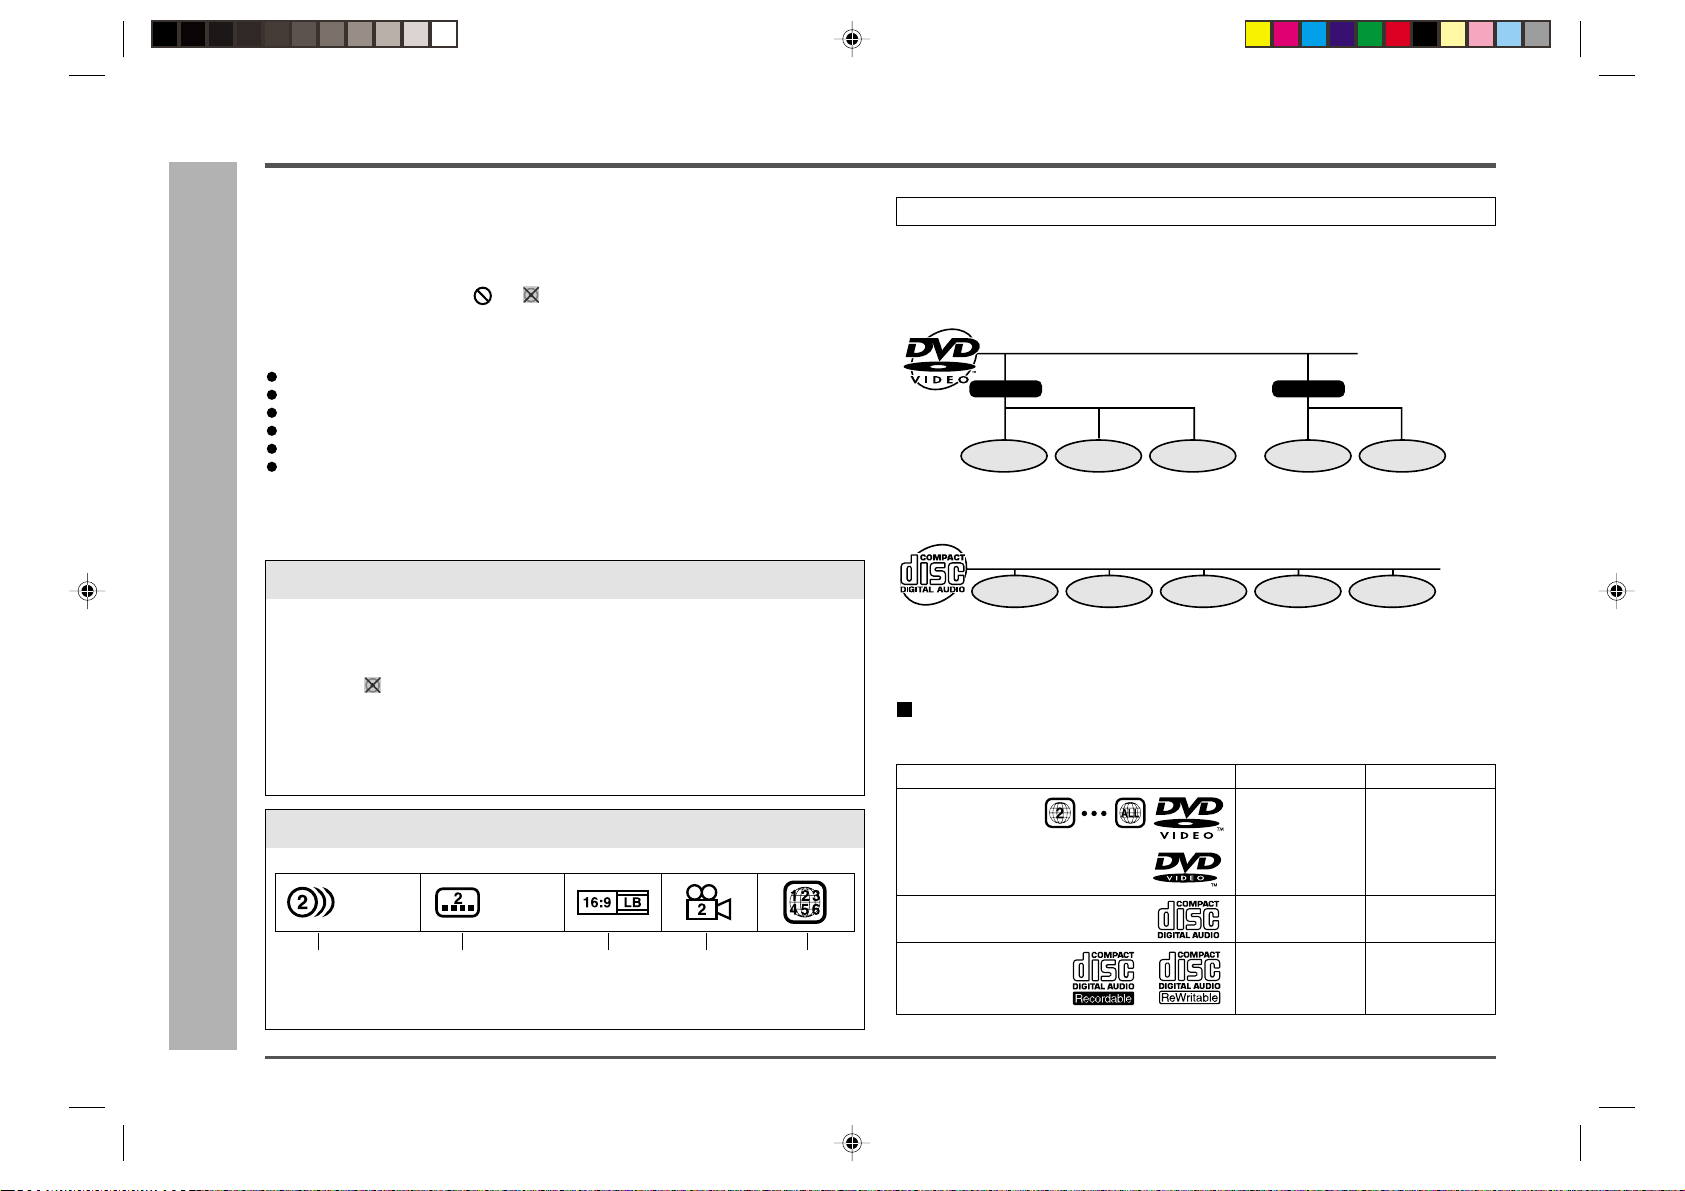
Title, chapter and track
DVDs are divided into “titles” and “chapters”. If the disc has more than one movie on it,
each movie would be a separate “title”. “Chapters” are subdivisions of titles.
Example: DVD
Title 1
Chapter 1
Audio CDs are divided into “tracks”. Y ou can think of a “track” as one tune on an audio CD.
Example: Audio CD
Track 2Track 1 Track 3 Track 4 Track 5
Note:
Numbers identify each title, chapter, and track on a disc. Most discs have these numbers recorded on them.
Chapter 3
Title 2
Chapter 1Chapter 2
Chapter 2
Prepare the disc you want to play
Supported disc types
Disc type
DVD Video Disc
Region Numbers:
DVD discs that conform to the
region numbers noted above
(See page 17.)
Audio CD
CD-R/CD-RW
Discs recorded in
audio format
Disc contents
Audio and
video (movies)
Audio
Audio
Disc size
12 cm (5") /
8 cm (3")
12 cm (5") /
8 cm (3") (single)
12 cm (5") /
8 cm (3")
18
ENGLISH
Page 19
Preparing to watch a DVD (DVDs)
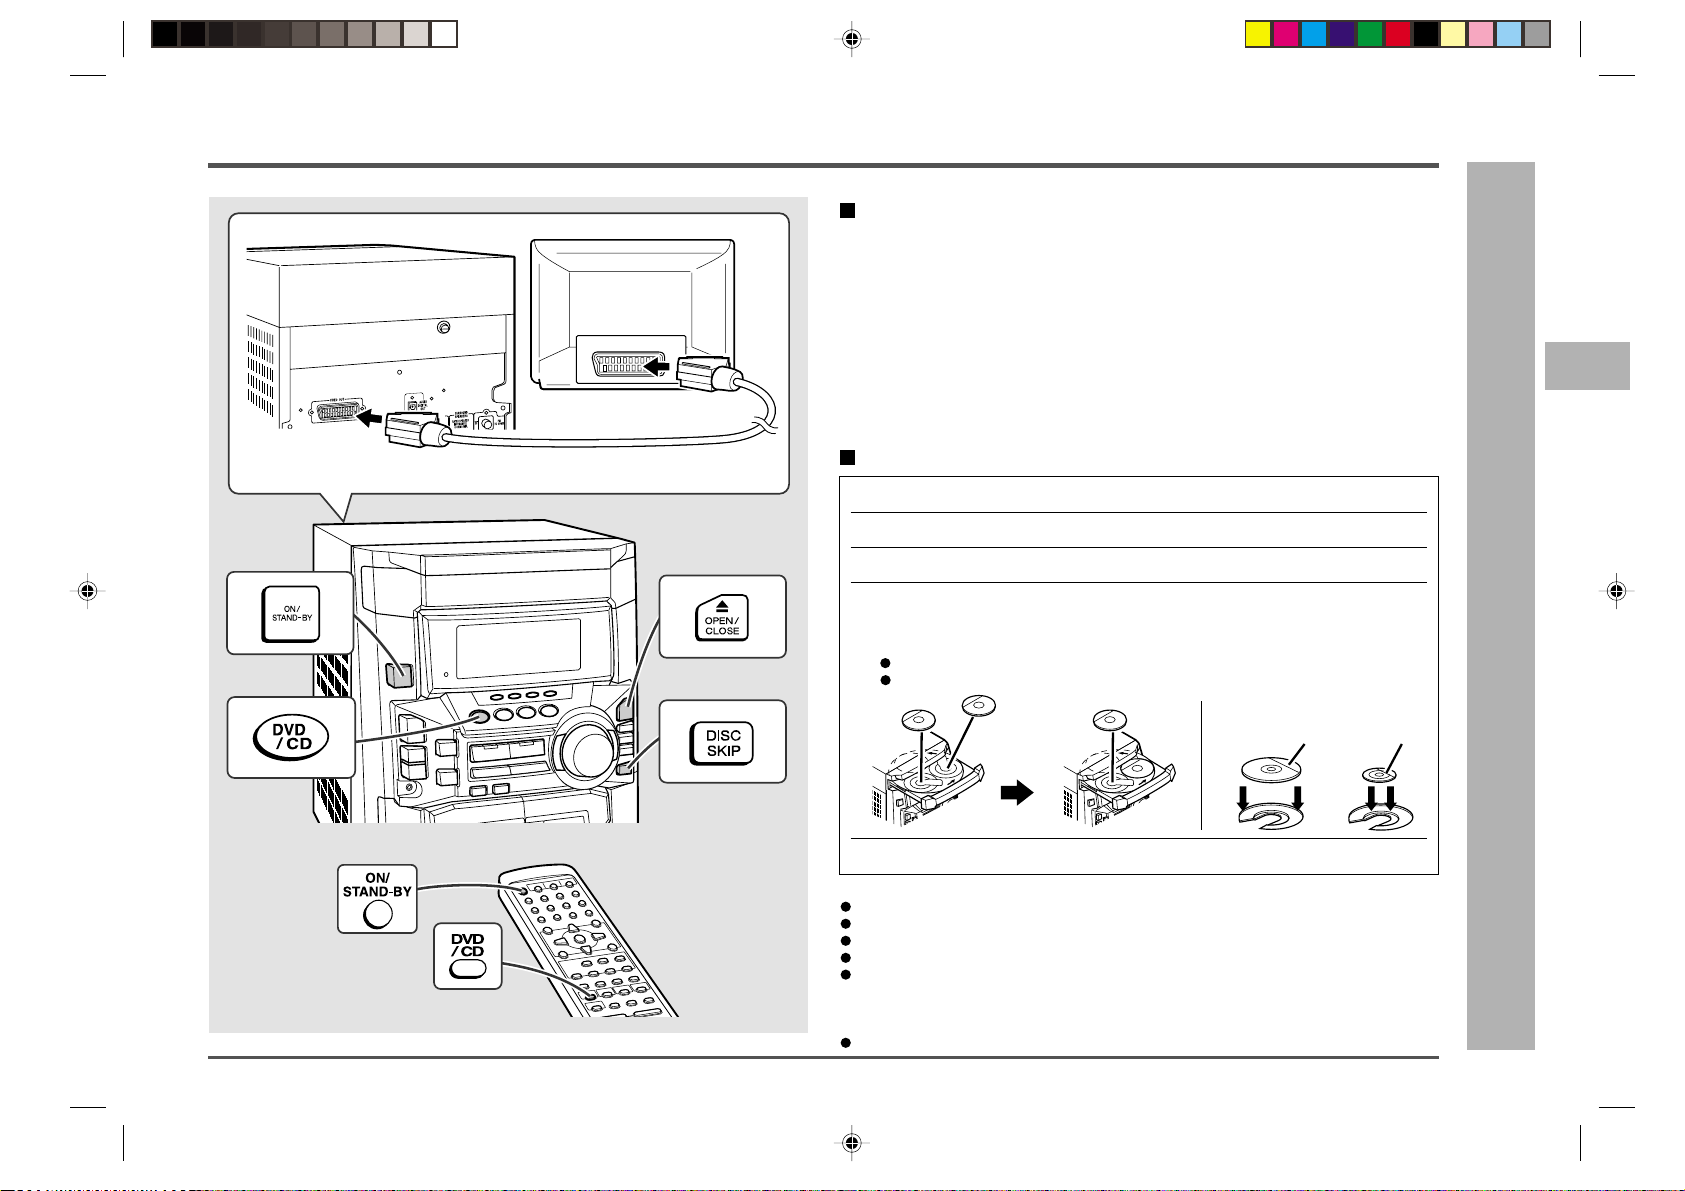
You can use a commercially available SCAR T cable to connect your system to a television equipped with an SCART input socket.
Be sure to turn both the system and the TV equipment off before connecting them.
To watch DVD video images on the TV:
SCART INPUT
To TV with external terminals
SCART cable (commercially available)
1 Turn on the TV.
2 Set the TV to “AV”, “VIDEO”, etc.
3 Turn on the unit and start play.
Note:
There is no audio signal supplied to the TV.
1 Press the ON/STAND-BY button to turn the power on.
Connecting a TV
See page 28 for details on how to play a disc.
Loading a DVD (DVDs)
CD-DVD500H
1
2
3
4
–
5
6
2 Press the DVD/CD button.
3 Press the
7 7
7 OPEN/CLOSE button to open the disc tray.
7 7
4 Place the DVD(s) on the disc tray, label side up.
When loading a third disc, press the DISC SKIP button to turn
the disc tray, then place the DVD in the open position.
DVDs can be placed on any open position on the disc tray.
Be sure to place 8 cm (3") DVD(s) in the middle of the disc positions.
12 cm (5”)
5 Press the
Caution:
Do not place two discs in one disc position.
Do not push the disc tray whilst it is moving.
Do not turn the disc tray by hand. This may cause malfunctions.
If the power fails whilst the tray is open, wait until the power is restored.
If the disc tray is stopped forcibly, “ER-CD10” or “ER-CD20” will appear in the display and the unit will not function.
If this occurs, press the ON/ST AND-BY button to enter the stand-by mode and then
turn the power on again.
If a disc is damaged, dirty, or loaded upside down, the disc will be skipped.
77
7 OPEN/CLOSE
77
button to close the disc tray.
ENGLISH
8 cm (3”)
7
8
9
DVD explanation
– Preparing to watch a DVD (DVDs)
10
11
12
13
14
15
19
Page 20
CD-DVD500H
Initial setup (OSD language setup)
When you use the unit for the first time, you should set the language to be used for the
OSD (On Screen Display).
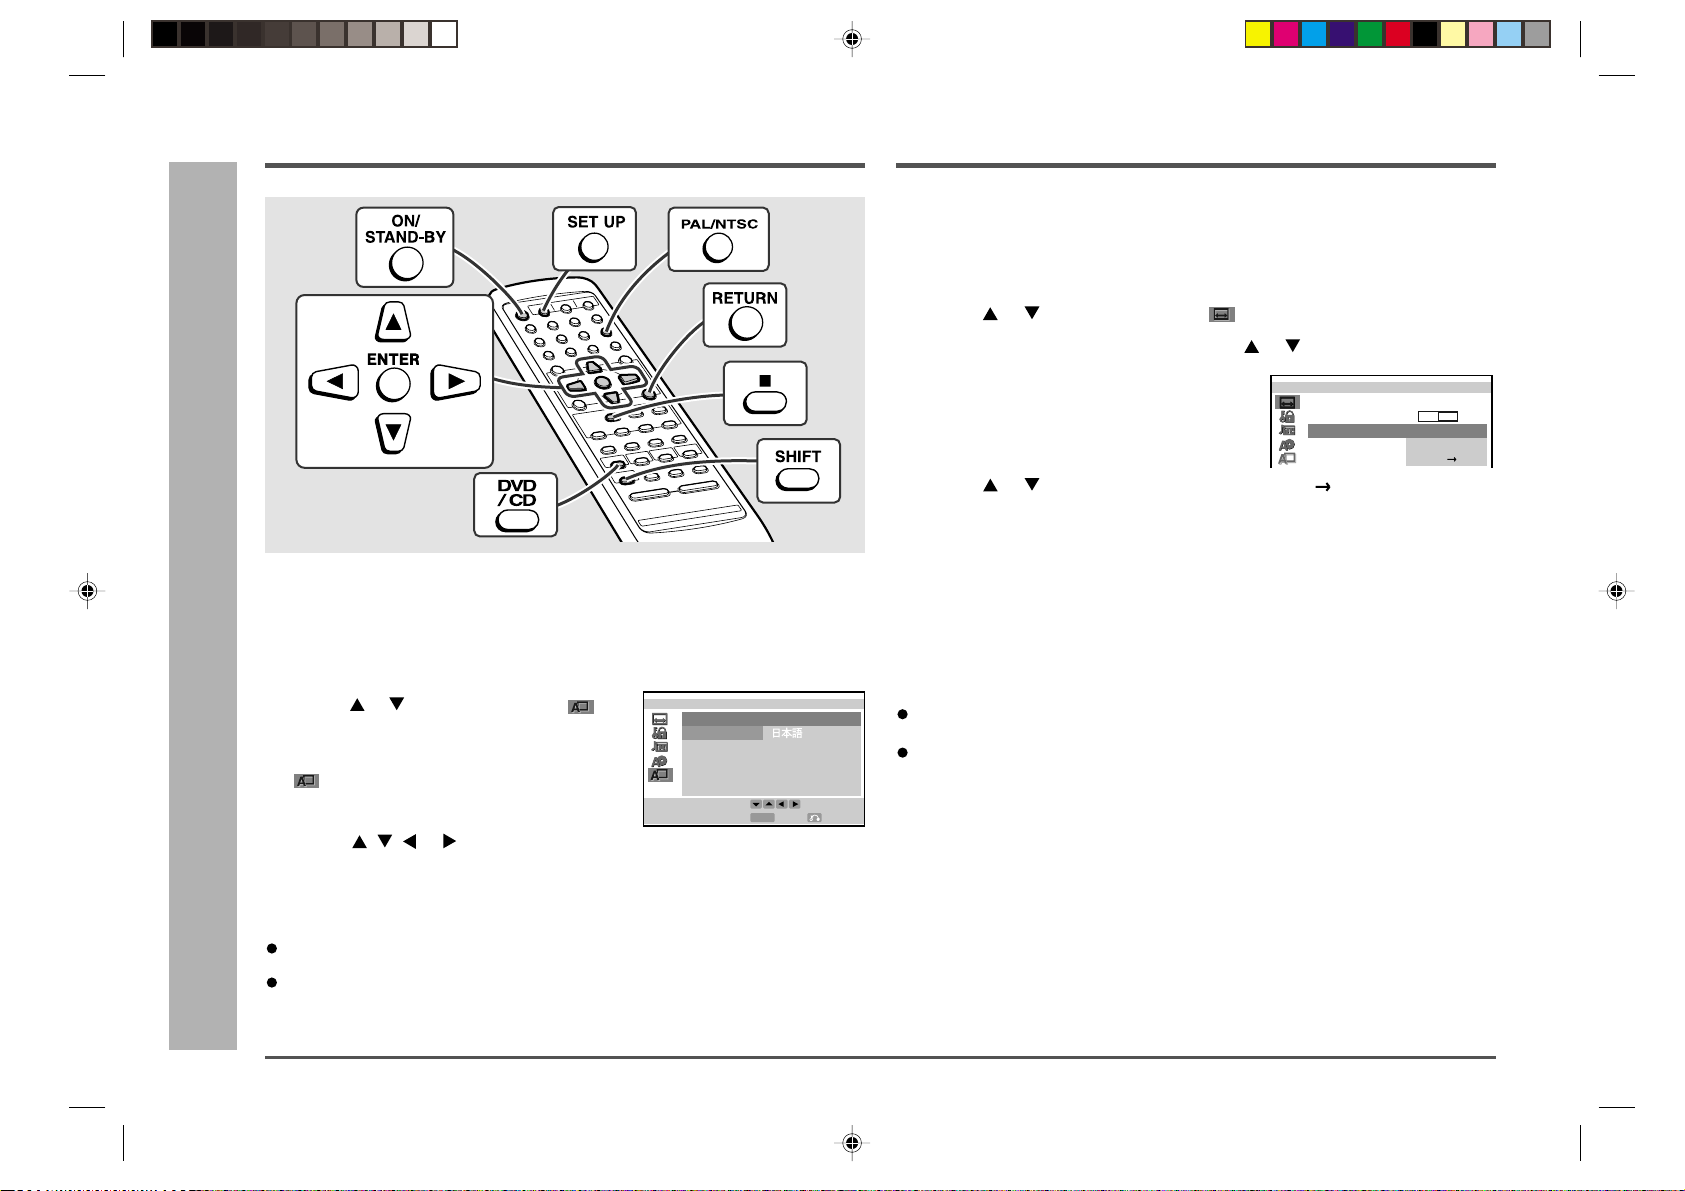
1 Press the ON/STAND-BY button to turn the power on.
2 Press the DVD/CD button.
DVD setting
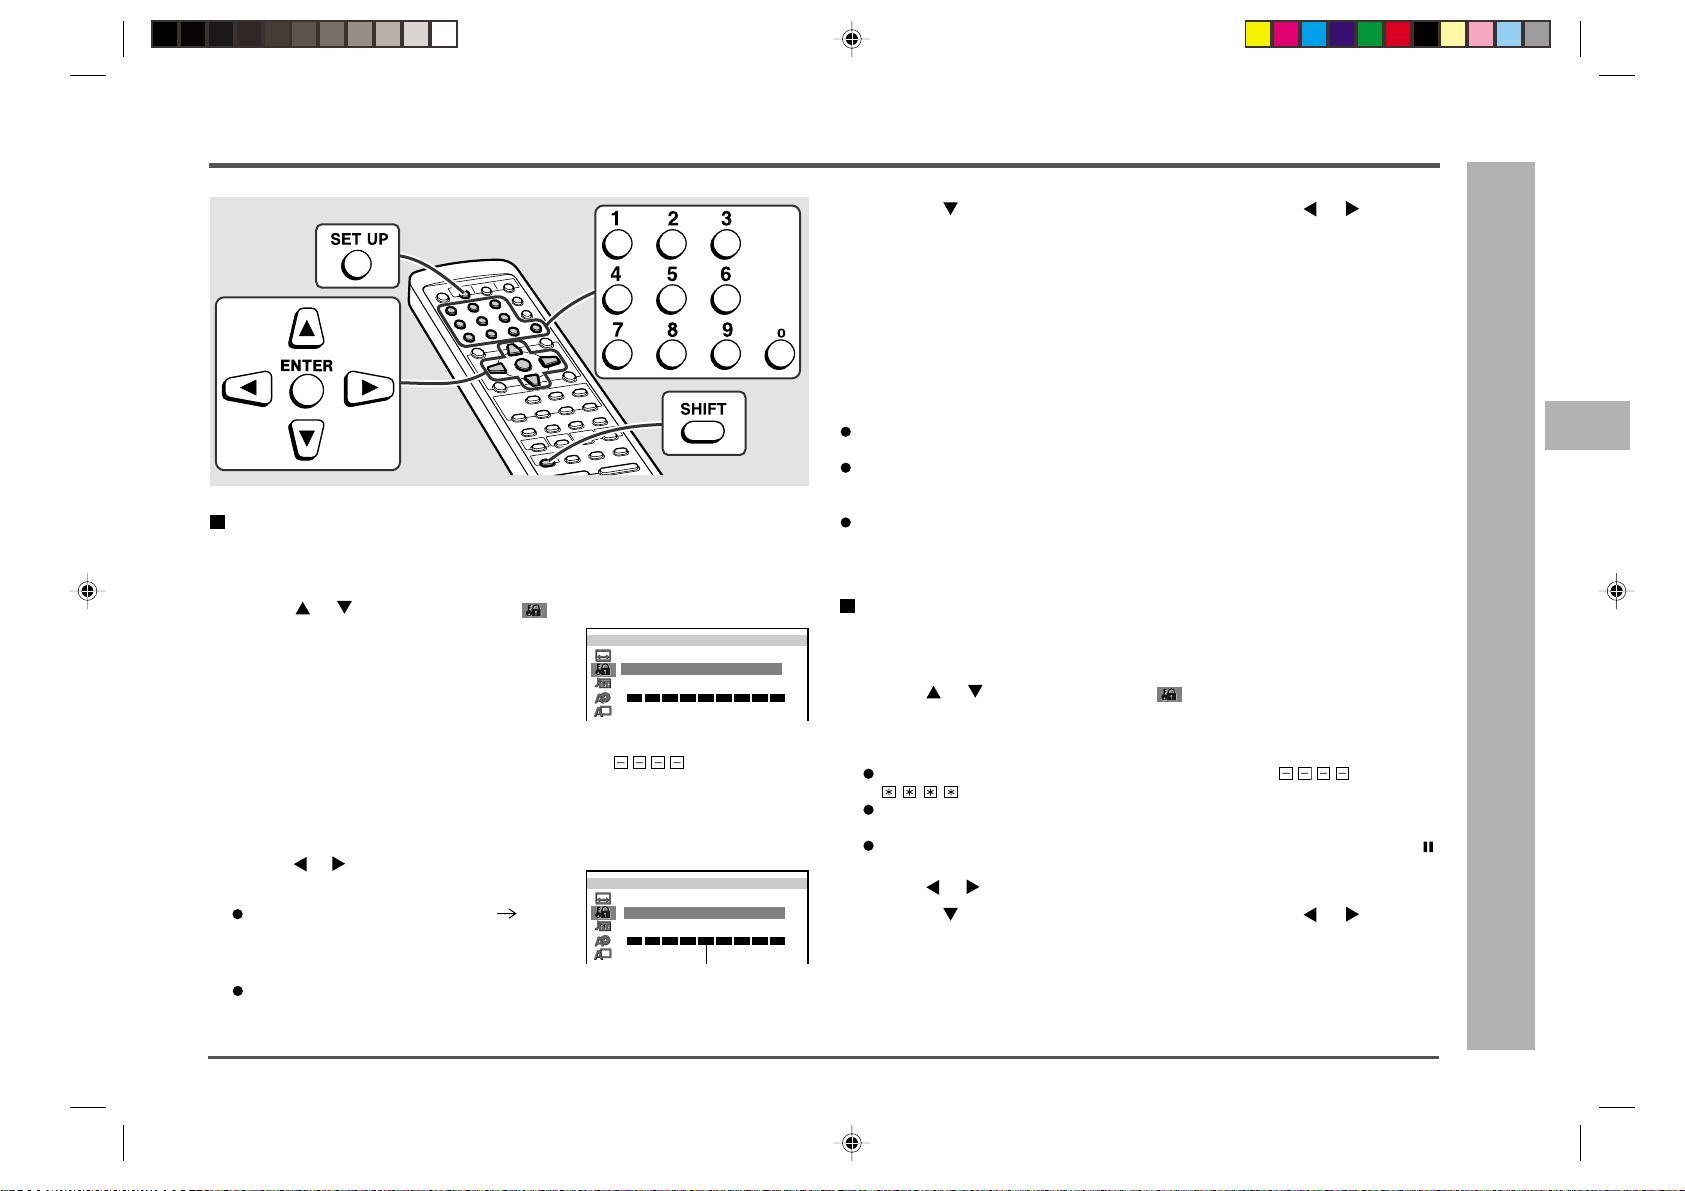
3 Press the SET UP button whilst pressing down the SHIFT button.
4 Use the or button to select the “ OSD
LANGUAGE SETUP” and then press the ENTER button.
“ OSD LANGUAGE SETUP” screen appears.
5 Use the , , or button to select the language you want to use.
6 Press the ENTER button to confirm the setting.
To exit the setup screen and return to the startup screen, press the SET UP button
whilst pressing down the SHIFT button or the RETURN button.
Notes:
Once you go through this procedure, the screen appears in the language se-
– Initial setup (OSD language setup) / Setting up for playback of an NTSC disc –
lected in step 5 above from the next operation.
You cannot open the setup screen whilst a playback operation is in progress. If a
disc is playing, stop playback first.
LSD ANGUAGE ESTUPO
LANGUAGE: ENGL I SH
ENGL I SH
FRANÇAI
DEUTSCH
ITALIANO
ESPAÑOL
SVENSKA
S
NEDERLANDS
ENTER
ENTER
SELECT
RETURN
Setting up for playback of an NTSC disc
Used to specify the colour system in accordance with the TV connected when playing
back an NTSC disc.
1 Whilst a disc is stopped, press the SET UP button whilst pressing down the
SHIFT button to display the setup screen.
2 Use the or button to select the “ TV MODE SETUP”.
3 Press the ENTER button and then use the or button to select “NTSC”.
4 Press the ENTER button to display the set-
ting selection.
5 Use the or button to select “NTSC” or “NTSC PAL”.
About the NTSC settings:
NTSC: Select this setting when you have an NTSC TV or an NTSC-com-
patible Multi-System TV connected to the unit.
NTSC → PAL: Select this setting when you have a PAL TV connected to the unit.
This setting converts the NTSC signal to a modified PAL signal.
6 Press the ENTER button to confirm the setting.
To exit the setup screen and return to the startup screen, press the SET UP button
whilst pressing down the SHIFT button or the RETURN button.
Notes:
When you play back the PAL discs, either setting of “NTSC → PAL” or “NTSC” can
be used on a PAL TV or a Multi-System TV.
You can also select the “PAL” or “NTSC” by pressing the PAL/NTSC button whilst
pressing down the SHIFT button.
MTV ODE ESTUP
:
MTV ODE
:
CNT :SCNTS
4:3
LB
CNTS
LPACNTS
20
ENGLISH
Page 21
TV mode setup
PS
4:3
Setting the TV mode
CD-DVD500H
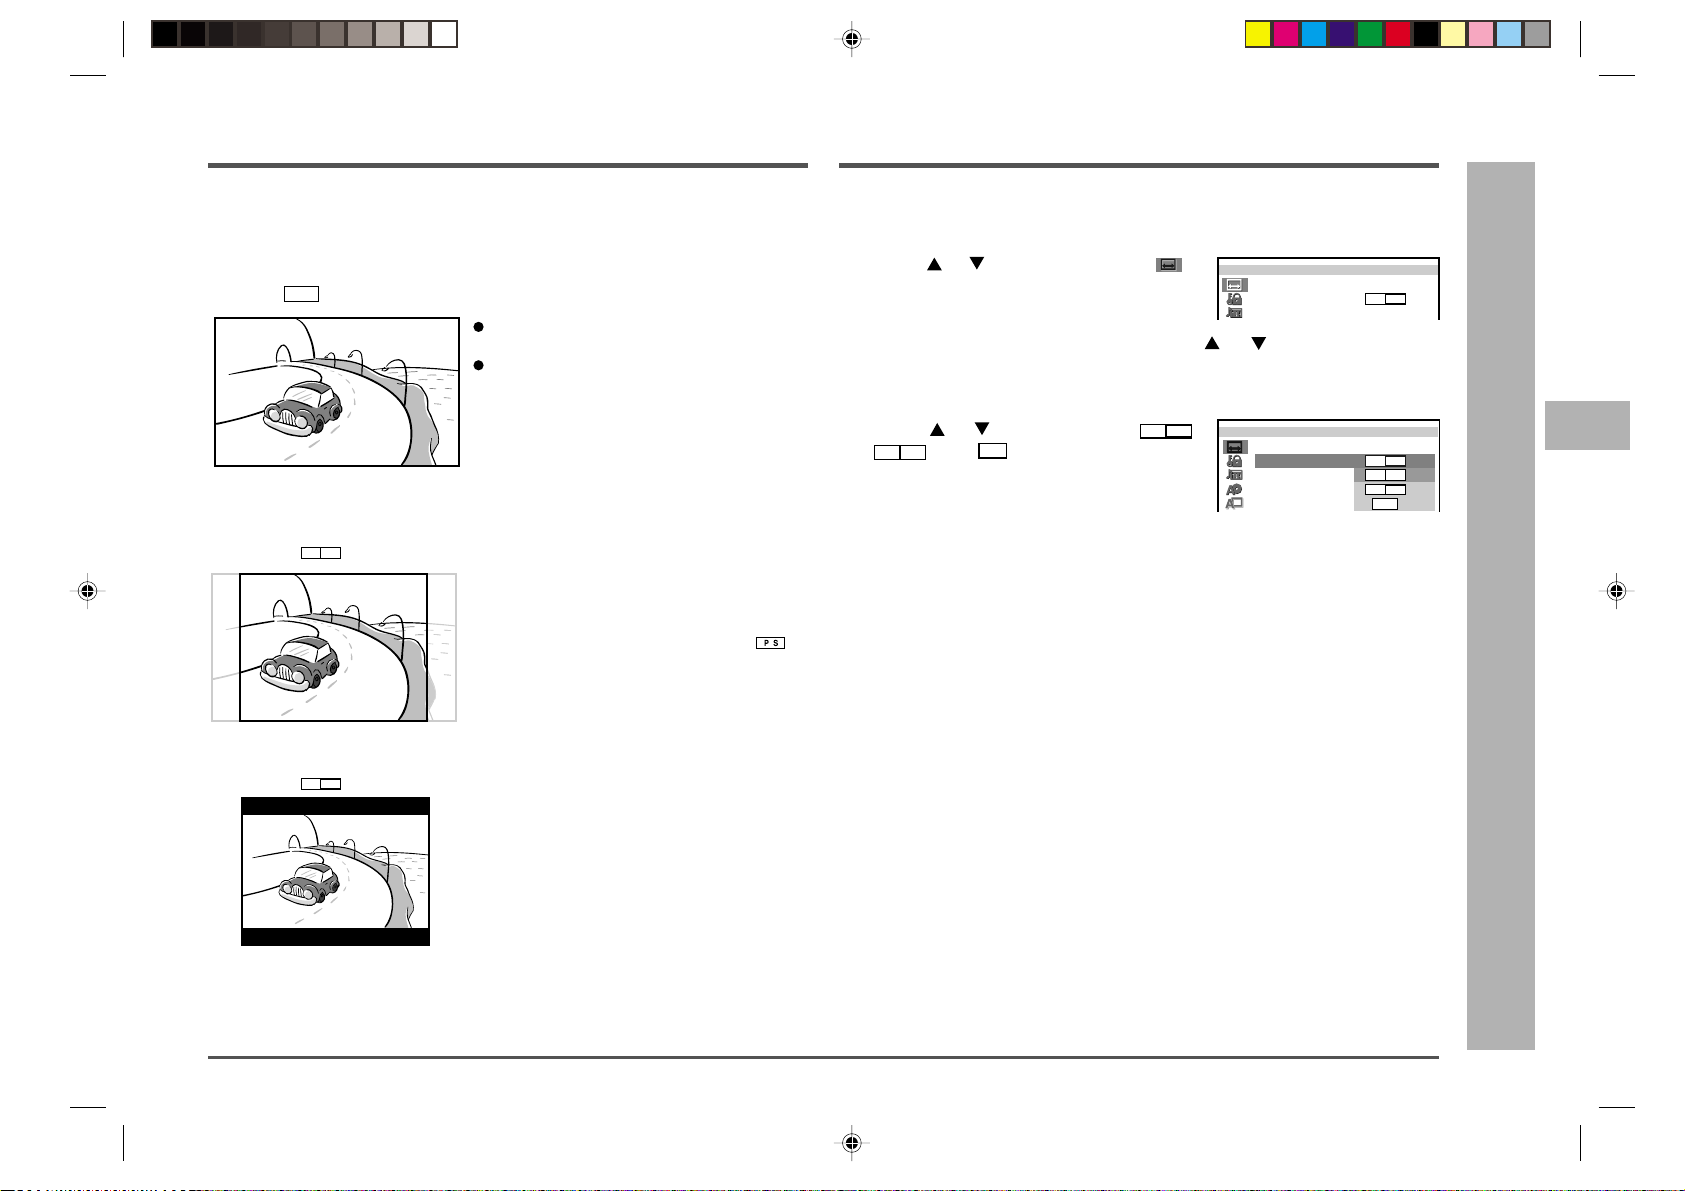
The following describes how to select the DVD playback display format.
A. Viewing on a wide screen TV screen (16:9):
Using a 16:9 wide image
16 : 9
Select
B. Viewing on a normal size TV screen (4:3):
1. Using pan scan
Select
2. Using letter box
Select
for wide DVD video output.
4:3
PS
.
When playing a wide image disc, the left and right
sides of the image are cut (pan scan) to display
a natural-looking 4:3 size image.
A wide image disc without pan scan is
played back in letter box.
A 4:3 disc is played in 4:3.
4:3
LB
.
When playing a wide image disc, black bands
are inserted at the top and bottom to make a 4:3
size image.
A 4:3 disc is played in 4:3.
A wide image size is displayed when playing
a wide image disc.
When playing a 4:3 image disc, you can select the image size you want for the connected
TV.
1 Whilst a disc is stopped, press the SET UP button whilst pressing down the
SHIFT button to display the setup screen.
2 Use the or button to select the “ TV
MODE SETUP”.
MTV ODE ESTUP
MTV
DE :
CNTO:SCNTS
4:3
LB
3 Press the ENTER button and then use the or button to select “TV
MODE”.
4 Press the ENTER button to display the setting selection.
5 Use the or button to select “
“
” or “
16:9
”.
LB
”,
MTV ODE ESTUP
MTV ODE
:
:
4:3
LB
4:3
PS
4:3
LB
16 : 9
4:3
6 Press the ENTER button to confirm the “TV MODE” setting.
To exit the setup screen and return to the startup screen, press the SET UP button
whilst pressing down the SHIFT button or the RETURN button.
Note:
If you select 16:9 whilst a 4:3 TV is connected, playing a 16:9 disc will produce a
vertically stretched image.
1
2
3
4
–
5
6
7
8
DVD setting
9
10
– TV mode setup / Setting the TV mode
11
12
13
14
15
ENGLISH
21
Page 22
CD-DVD500H
Parental setting
Parental level
Certain discs come preset with country codes and parental level settings that are defined
for particular countries. Discs equipped with the parental lock function are rated according to their content. The rated content allowed by a parental lock level and the way a
DVD can be controlled may vary from disc to disc. Some discs, for example, may let you
edit out violent scenes and replace them with scenes more suitable for viewing by children. You can also use the parental lock to disable playback of the DVD entirely.
This system supports the following parental level settings.
Parental level ............Defines the parental level, which controls the types of scenes
Code .........................Allows selection of a country code available on a disc.
Notes:
You can use the parental lock function only with DVDs that are equipped with the
parental lock feature.
–
The parental level depends on countries. If you do not set the country code correctly, it fails to work correctly.
When you cancel parental setting, DVD discs can be played back regardless of the
parental level.
On some DVDs, the parental level setting is fixed and cannot be modified.
– Parental setting
DVD setting
that are played back from a disc.
Country codes:
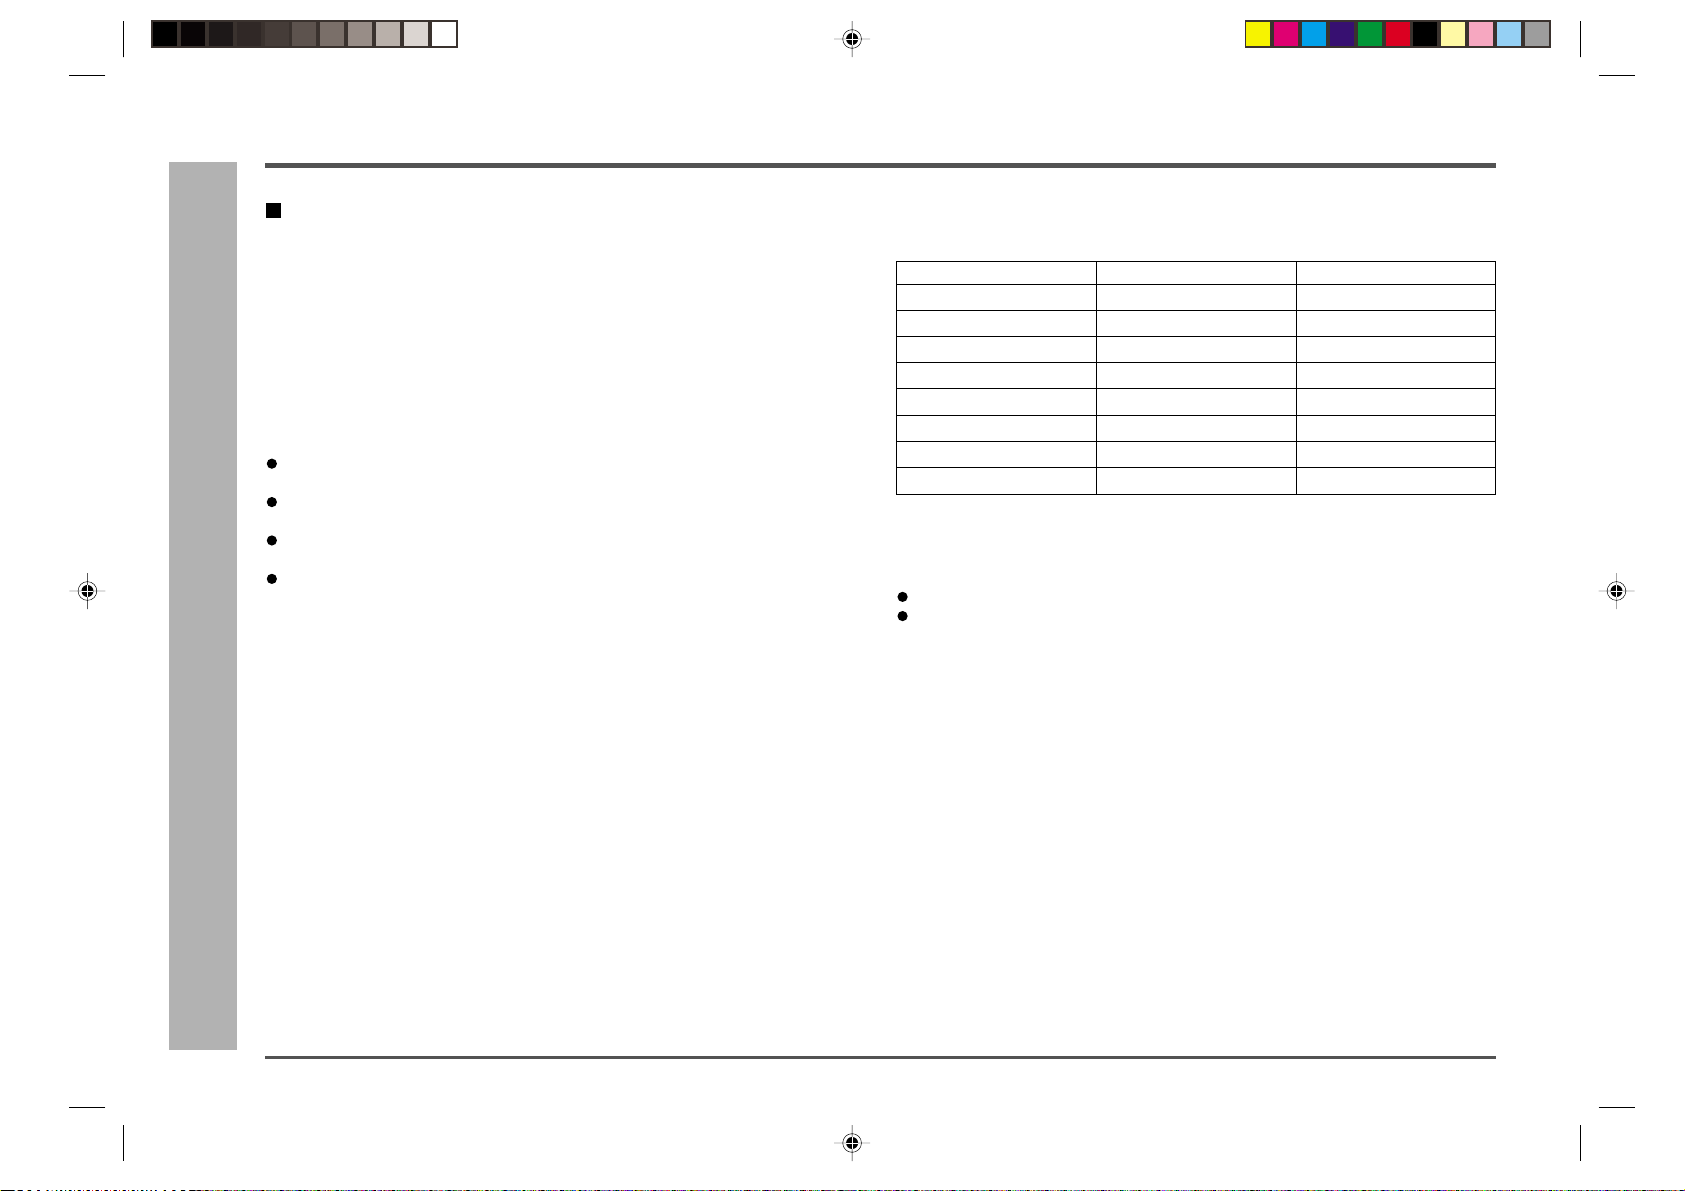
This system supports country codes for the following countries.
Country code list
USA SWEDEN MALAYSIA
CANADA HOLLAND INDONESIA
JAPAN NORWAY TAIWAN
GERMANY DENMARK PHILIPPINE
FRANCE FINLAND AUSTRALIA
UK BELGIUM RUSSIA
ITALY HONG KONG CHINA
SPAIN SINGAPORE –
SWISS THAILAND –
Passwords:
The parental level setting of this system can be protected by a password against
unauthorised changes. Once you set a password, it must be input to perform the following operations.
To change the parental level.
To temporarily change the parental level during playback.
22
ENGLISH
Page 23
Parental Setting (continued)
Setting the parental level for the first time
Whilst a disc is stopped, press the SET UP button whilst pressing down the
1
SHIFT button to display the setup screen.
2 Use the or button to select the “ PARENTAL SETUP”.
3 Press the ENTER button to display the pass-
word specification screen.
4 Use the 0 - 9 buttons to enter a 4-digit password.
When you have finished entering your 4-digit number, (password verification display) appears.
5 Re-enter the numbers you entered in step 4 using the 0 - 9 buttons.
If you enter the wrong number three times in succession, the normal screen reappears.
6 Use the or button to change the parental
level.
Level 1: for most restrictive viewing Level 8:
for adult viewing
(The smaller the number, the greater the level
of restriction.)
When the parental level is set to “OFF”, DVDs
can be played back regardless of the parental
level.
NARE TA L ESTUPP
LANGUAGE : ENGL I SH
PASSWORD :
FRANÇAI S
12345678OFF
DEUTSCH NEDERL ANDS
I
ODE :
NARE TA L ESTUPP
LANGUAGE : ENGL I SH
SELEC VELTLE
FRANÇAI S
12345678OFF
DEUTSCH NEDERL ANDS
I
ODE :
Can be changed to any number between 1 and 8 or OFF.
NO
R
NO
VENSKAS
UKC
VENSKAS
UKC
7 Press the button to select “CODE” and then use the or button to
select the desired country code (see page 22).
8 Press the ENTER button to confirm the setting.
To exit the setup screen and return to the startup screen, press the SET UP button
whilst pressing down the SHIFT button or the RETURN button.
Caution:
Be sure to try playing back the disc to confirm that the parental level setting is
working correctly. If it is not working correctly, try changing the country code.
Notes:
You must input the correct password to make any changes in the parental level.
Be sure to keep a separate record of your password somewhere for later reference.
Some DVDs allow the viewer to temporarily change the parental level setting to
view the original scenes. When this prompt appears, enter the password to view
the original scenes.
You cannot open the setup screen whilst a playback operation is in progress. If a
disc is playing, stop playback first.
Changing the parental level
Whilst a disc is stopped, press the SET UP button whilst pressing down the
1
SHIFT button to display the setup screen.
2 Use the or button to select the “ PARENTAL SETUP”.
3 Press the ENTER button to display the password verification screen.
4 Use the 0 - 9 buttons to enter the 4-digit password that was set previously.
When you have finished entering your 4-digit number, changes to
If you enter the wrong number three times in succession, the normal screen
reappears.
If you forget your password, you can erase your current password by pressing /
STILL button four times.
.
5 Use the or button to change the parental level.
6 Press the button to select “CODE” and then use the or button to
select the desired country code (see page 22).
7 Press the ENTER button to confirm the setting.
To exit the setup screen and return to the startup screen, press the SET UP button
whilst pressing down the SHIFT button or the RETURN button.
CD-DVD500H
–
– Parental setting
DVD setting
1
2
3
4
5
6
7
8
9
10
11
12
13
14
15
ENGLISH
23
Page 24

CD-DVD500H
Audio setting
Setting the digital out
DIGITAL: Use these settings for specifying the type of digital output when play-
When playing a disc recorded using Dolby Digital (5.1ch), you can specify either
“BITSTREAM” or “D-PCM” as the digital type output.
1 Whilst a disc is stopped, press the SET UP button whilst pressing down the
SHIFT button to display the setup screen.
2 Use the or button to select the “ AUDIO SETUP”.
3 Press the ENTER button and then use the or button to select “ DIGI-
– Audio setting –
DVD setting
TAL”.
4 Press the ENTER button to display the set-
tings you can select.
5 Use the or button to select “BITSTREAM” or “D-PCM”.
BITSTREAM: Use this setting for a digital connection of a receiver (amplifier)
D-PCM: Use this setting for a digital connection to the PCM digital input
(Down Mix PCM)
6 Press the ENTER button to confirm the setting.
To exit the setup screen and return to the startup screen, press the SET UP button
whilst pressing down the SHIFT button or the RETURN button.
Note:
If a disc recorded using Dolby Digital (5.1 channel) is played back with “D-PCM” setting, this unit enters the Dolby Pro Logic surround mode.
T o play the disc in the Dolby Digital mode, use “BITSTREAM”. (Refer to page 47 for details.)
ing a disc recorded using Dolby Digital.
IUD O ESTUPA
LANGUAGE : ENGL
COMPRESS I ON : OF F
D
IGITA L:
MPEG :
DEUTSCH
ITALIANO
equipped with a Dolby Digital decoder.
socket of a DAT or MD, or for a digital connection to a receiver
(amplifier) that does not have a Dolby Digital decoder.
BITSTREAM
BITSTREAM
D · PCM
Setting the MPEG audio
1 Whilst a disc is stopped, press the SET UP button whilst pressing down the
SHIFT button to display the setup screen.
2 Use the or button to select the “ AUDIO SETUP”.
3 Press the ENTER button and then use the or button to select “MPEG”.
4 Press the ENTER button to display the settings
you can select.
IUD O ESTUPA
LANGUAGE : ENGL
COMPRESS I ON : OF F
D
IGITA L:
MPEG :
DEUTSCH
ITALIANO
ESPAÑOL
BITSTREAM
BITSTREAM
BITSTREAM
D
PCM
5 Use the or button to select “BITSTREAM” or “PCM”.
BITSTREAM: Use this setting for a digital connection of a receiver (amplifier)
PCM: Use this setting for a digital connection to the PCM digital input
equipped with an MPEG audio decoder.
socket of a DAT or MD, or for a digital connection to a receiver
(amplifier) that does not have an MPEG audio decoder.
6 Press the ENTER button to confirm the setting.
To exit the setup screen and return to the startup screen, press the SET UP button
whilst pressing down the SHIFT button or the RETURN button.
Note:
If the unit is set to “BITSTREAM”, NO SOUND WILL BE HEARD. To play back the
sound with this unit, set it to “PCM”.
24
ENGLISH
Page 25

Disc language setting
CD-DVD500H
Use this setting for selecting languages of subtitle, audio and disc menu.
Note that the language you select is not displayed or does not sound if it is not
recorded on the disc you are playing.
With some discs, it is intentionally disabled by the disc manufacturer to change the
language of the subtitle, audio and disc menu through this setup screen. When
playing such discs, try using the function control (page 31).
Setting SUBTITLE, AUDIO and MENU languages from 8 languages
Example: Selecting “FRENCH”
1 Whilst a disc is stopped, press the SET UP button whilst pressing down the
SHIFT button to display the setup screen.
2 Use the or button to select the “ DISC
LANGUAGE”.
LISC ANGUAGED
LANGUAGE : ENGL I SH
SUB T I ENGL I SH
L
AUDI O
MENU :
CH
LE :T
:
IS
ESTUP
ENGL I SH
ENGL I SH
ENGL I SH
NEDERLANDS
3 Press the ENTER button and then use the or button to select “SUB-
TITLE”, “AUDIO” or “MENU”.
You can set “SUBTITLE”, “AUDIO” and “MENU” individually.
4 After selecting the item, press the ENTER button.
5 Select the language you want to use with the
, , or button.
If you want to use any languages that are not on
OSD, proceed to step 1 to the right “Selecting a
language from others”.
LSUB T I ENGL I SHLE :T
LENG I S J APANESEH
NFRE CH
MGER AN DUTCH
ESTUPLISC ANGUAGED
SWED I SH
6 Press the ENTER button to confirm the setting.
7 Repeat steps 3 to 6 above to go on with other disc language settings in
succession.
T o exit the setup screen and return to the startup screen, press the SET UP button
whilst pressing down the SHIFT button or the RETURN button.
Note:
To set the changed language setting effective, the disc information should be read
again by removing the disc (or loading another disc).
Selecting a language from others
Example: To select “AF” (Afrikaans)
1 In step 5 to the left, select “OTHER” with the
, , or button, then press the ENTER
button to set the “OTHER” input item (two letters).
LSUB T I ENGL I SHLE:T
LENG IS JAPANESEH
NFRE CH
MGER AN DUTCH
LITA IA OTHERN
NSPA I SH
SWED I SH
ENTER
ENTER
ESTUPLISC ANGUAGED
(A)
A
SELECT
RETURN
2 Use the or button to select “A” as the first letter, the or button to
move to the second place, and then the or button to select “F”.
3 Press the ENTER button to confirm the setting.
To exit the setup screen and return to the startup screen, press the SET UP button
whilst pressing down the SHIFT button or the RETURN button.
Notes:
You cannot open the setup screen whilst a playback operation is in progress. If a
disc is playing, stop playback first.
When “A” is selected for the first letter , only letters on the right side of codes beginning with “A” can be selected as the second letter. Refer to the codes beginning
with “A” on “Language code list for disc language” (see page 26).
Example: First letter A
Second letter - A, B, F, M, R, S, Y or Z
OTHER
(A)
A
OTHER
(A)
A
F
1
2
3
4
5
–
6
7
8
DVD setting
– Disc language setting
9
10
11
12
13
14
ENGLISH
15
25
Page 26

CD-DVD500H
Disc language setting (continued)
Language code list for disc language
Code Language name
AA Afar
AB Abkhazian
AF Afrikaans
AM Ameharic
AR Arabic
AS Assamese
AY Aymara
AZ Azerbaijani
BA Bashkir
BE Byelorussian
–
BG Bulgarian
BH Bihari
BI Bislama
BN Bengali;
BO Tibetan
BR Breton
CA Catalan
CO Corsican
CS Czech
DVD setting
CY Welsh
DA Danish
– Disc language setting
DE German
DZ Bhutanese
EL Greek
EN English
EO Esperanto
ES Spanish
ET Estonian
EU Basque
FA Persian
FI Finnish
FJ Fiji
FO Faroese
FR French
Bangla
Code Language name Code Language name
FY Frisian
GA Irish
GD Scots Gaelic
GL Galician
GN Guarani
GU Gujarati
HA Hausa
HI Hindi
HR Croatian
HU Hungarian
HY Armenian
IA Interlingua
IE Interlingue
IK Inupiaq
IN Indonesian
IS Icelandic
IT Italian
IW Hebrew
JA Japanese
JI Yiddish
JW Javanese
KA Georgian
KK Kazakh
KL Greenlandic
KM Cambodian
KN Kannada
KO Korean
KS Kashmiri
KU Kurdish
KY Kirghiz
LA Latin
LN Lingala
LO Laotian
LT Lithuanian
LV Latvian, Lettish
MG Malagasy
MI Maori
MK Macedonian
ML Malayalam
MN Mongolian
MO Moldavian
MR Marathi
MS Malay
MT Maltese
MY Burmese
NA Nauruan
NE Nepali
NL Dutch
NO Norwegian
OC Occitan
OM (Afan) Oromo
OR Oriya
PA Panjabi
PL Polish
PS Pashto, Pushto
PT Portuguese
QU Quechua
RM Rhaeto-Romance
RN Kirundi
RO Romanian
RU Russian
RW Kinyarwanda
SA Sanskrit
SD Sindhi
SG Sango
SH Serbo-Croatian
SI Singhalese
SK Slovak
SL Slovenian
SM Samoan
Code Language name
SN Shona
SO Somali
SQ Albanian
SR Serbian
SS Siswat
ST Sesotho
SU Sundanese
SV Swedish
SW Swahili
TA Tamil
TE Telugu
TG Tajik
TH Thai
TI Tigrinya
TK Turkmen
TL Tagalog
TN Setswana
TO Tonga
TR Turkish
TS Tsonga
TT Tatar
TW Twi
UK Ukrainian
UR Urdu
UZ Uzbek
VI Vietnamese
VO V olapük
WO Wolof
XH Xhosa
YO Yoruba
ZH Chinese
ZU Zulu
26
ENGLISH
Page 27

Changing the display mode
C
C
To change the display mode
You can select “auto”, “on”, or “off” as the display mode. The following shows what
appears on the display when “auto” or “on” is selected.
Press the DISPLAY button whilst pressing down the SHIFT button.
Each press of the DISPLAY button cycles through the display mode settings as
follows:
→ on → off → auto
auto .... Display indicators appear for about three seconds and then disappear.
on ....... Display indicators remain displayed.
off ....... Display indicators are not displayed.
Note:
With some discs, chapter numbers and elapsed playing time may not appear.
DVD
25/
83/
CD
0
01
::23 40
Title number/Chapter number/
Elapsed playing time
3 21/0
50:00
01: :23 40
Track number/Elapsed playing time
DDV
Operation indicator
CD
Operation indicator
DVD mode operation indicators
The following are examples of display indicators that appear during DVD playback.
Play attempted without a disc
15/
NO SDI C
83/
01
::23 40
0
C
Play attempted with a non-compatible
disc
15/
WRO NG D CIS T EYP
83/
0
01
::23 40
C
Loading (data being read from disc)
15/
DA
NOW ERADING…
83/
0
01
::23 40
C
Stop
15/
83/
01
0
::23 40
DDV
Play
15/
83/
01
0
::23 40
DDV
Appears when display mode is “on”.
Pause
01
15/
83/
0
::23 40
C
DDV
Appears when display mode is “on”.
Slow
01
15/
83/
0
::23 40
1
DDV
Appears when display mode is “on”.
Fast Forward
01
15/
83/
0
::23 40
1
DDV
Appears when display mode is “on”.
Fast Reverse
01
15/
83/
0
::23 40
1
DDV
Appears when display mode is “on”.
When resume function can be used
01
15/
83/
0
::23 40
C
DDV
UEMRSE
CD-DVD500H
–
DVD setting
– Changing the display mode
1
2
3
4
5
6
7
8
9
10
11
12
13
14
15
ENGLISH
27
Page 28

CD-DVD500H
C
Playing a DVD (DVDs)
This unit can play a DVD or audio CD in the following procedure.
–
Playing a DVD (DVDs)
DVD playback
–
To play a disc
1 Press the ON/STAND-BY button to turn the power on.
2 Press the DVD/CD button to display the startup screen shown.
3 Load the disc (s) you want to play.
See page 19 for information about loading discs.
4 Press the
Notes:
If the disc you are using supports auto start, it starts to play automatically (even if
you do not press the 0 button), as soon as you close the disc tray.
The indicator “ WRONG DISC TYPE” appears on the display if the disc you are
using is damaged, if you load the disc upside down, or if the region number of the
disc you are using is one that is not supported by this unit. If the above indicator
appears, reload the disc or replace it with another one.
A safety feature automatically sets the unit to the power stand-by mode if you set
the volume level too high whilst playing certain types of discs. If this happens, lower
the volume level and restart playback.
00
0 button to start playback.
00
15/
83/
0
01
::23 40
DDV
To play the desired disc:
Press one of the s 1 - s 3 buttons or DISC SKIP button to select the desired disc and
then press the 0 button.
To stop disc playback:
Press the button.
28
ENGLISH
Page 29

Other disc play features
CD-DVD500H
This section explains how to use skip, resume, slow motion, and other playback features.
Chapter skip
Whilst a disc is playing, press the PRESET X or W PRESET
button.
15/
13/
0
00
::01 23
The W PRESET button skips to the next chapter.
The PRESET X button skips to the beginning of the current chapter.
Press the PRESET X button again to skip to the beginning of the
previous chapter.
Y ou can also press the / or / button on the remote control for the
same operation.
Notes:
Chapter information on some discs may not appear on the screen.
You may not be able to use this function with certain discs.
C
DDV
To resume playback after stopping
1
Whilst the disc is playing, press the button at the point you want to stop.
The system stores the point you stopped.
2 To restart play, press the
Play resumes from a point slightly before the point it was stopped.
Press the 0 button to resume disc play, if auto playback starts from the beginning of the disc when you reload the same disc after removing it.
This resume operation does not work in the following cases:
If you press the button twice.
If you press the button during auto playback.
If you remove a disc and then load another one.
Notes:
Resume playback is disabled on audio CDs.
After you press the button to stop playback, you can press the button again
and 0 button to resume playback from the beginning of the disc.
This operation may not be performed with certain types of discs.
00
0 button.
00
Slow-motion play
1
Whilst a disc is playing, press the SLOW
Three speeds are available. Each time the button is pressed, the speed of slowmotion playback changes in the following sequence:
→1 (about 1/2) → 2 (about 1/8) → 3 (about 1/16)
00
0 button.
00
1
2
3
4
5
–
6
7
8
9
DVD playback
– Other disc play features
10
11
2 Press the
Notes:
On some discs, the slow-motion playback functions are disabled.
Slow-motion playback is disabled on audio CDs.
00
0 button to return to the normal playback.
00
ENGLISH
12
13
14
15
29
Page 30

CD-DVD500H
Other disc play features (continued)
Still (Pause) and frame advance
–
DVD playback
– Other disc play features
1 Whilst a disc is playing, press the /STILL
button.
This freezes the image on the screen.
Each press of the /STILL button advances the frame in the still mode.
2 To cancel still picture and return to normal
play, press the
Notes:
You may not be able to use these functions with some discs.
Frame advance cannot be used with audio CDs.
This operation performs the audio CD pause function.
00
0 button.
00
00
00
15/
13/
15/
13/
0
::01 23
0
::01 23
Fast forward/Fast reverse
1 Press and hold down the PRESET
WW
or
W PRESET button for more than
WW
0.5 seconds whilst a disc is playing.
The disc begins fast scan at x 2 speed (1).
Three speeds are available. Each time the
PRESET X or W PRESET button is pressed, the speed of fast scan changes
in the sequence shown on the right:
You can also press the / or /
button on the remote control for the same operation.
2 Press the
00
0 button to return to normal playback.
00
XX
X
XX
Scanning speed selection
15/
13/
0
00
::01 23
Fast scan image appears here.
1 (about 2)
2 (about 8)
3 (about 32)
C
DDV
1C
DDV
1
C
DDV
↓
↓
30
Notes:
On some discs, the fast scan function is disabled.
On DVD video discs, sound and subtitles are not played back during the fast scan
playback.
With a DVD video disc, you can search within one title only. Playback starts from
the beginning of the title.
ENGLISH
Page 31

Using the function control
CD-DVD500H
About the function control screen
Using function control, you can check at a glance and change the current settings of
the following items: subtitle, angle, audio, digital gamma and digital super picture.
Function control also allows you three ways of direct skips (title, chapter and time).
Whilst the disc is playing, press the SET UP button whilst pressing down the
SHIFT button to display the screen shown below.
Pressing the or button changes the currently selected item.
Note:
To exit the setup operation, press the RETURN button. This returns to the screen that
was shown before the setup screen was displayed.
1. Direct title skip
2. Direct chapter skip
3. Direct time skip
4. Subtitle
5. Angle
6. Audio
7. Digital gamma
8. Digital super picture
1
2
3
4
5
6
7
8
25/
83/
0
01
::30 08
NGL I SH
E
2
1
D
1
G
ON
S
ON
BITRATE indicates the amount of data
that is being transferred to the unit per second.
However, note that picture quality is not
always in proportion to the bit rate.
.
hc15
BITRATE
00 10
SELECT
ENTER
ENTER
DDV
Mbps
RETURN
1 Direct title skip (page 32)
The number of the title currently played back is displayed.
You can skip directly to the desired title.
2 Direct chapter skip (page 32)
The number of the chapter currently played back is displayed.
You can skip directly to the desired chapter.
3 Direct time skip (page 33)
Elapsed time from the beginning of the disc is displayed.
You can skip directly to the point from which you want to start playback.
4 Subtitle language setting (page 33)
The subtitle number and language currently selected are displayed. (When a
disc with only one subtitle is played back, “xx” is displayed.)
You can select the desired subtitle language.
5 Angle setting (page 34)
The current angle is displayed. (When a disc with only one angle is played
back, “xx” is displayed.)
You can select the desired angle.
6 Audio setting (page 34)
The type of audio currently selected is displayed.
You can select the desired type of audio.
7G Digital gamma setting (page 35)
You can make the entire image easier to see by brightening the darker and
obscure portions.
You can activate/deactivate the setting or change the level.
8S Digital super picture setting (page 35)
This function enhances the fine details of the image and outlines of the objects
by reducing the amount of picture noise.
You can activate/deactivate the setting or change the level.
Note:
In function control mode, you can return to the previous setting screen by pressing the
RETURN button or the SET UP button whilst pressing down the SHIFT button.
1
2
3
4
5
6
7
8
9
– Using the function control –
Advanced DVD features
10
11
12
ENGLISH
13
14
15
31
Page 32

CD-DVD500H
–
Using the function control (continued)
3 Press the ENTER button.
The image changes to the beginning of the specified title.
Notes:
The number of titles you can enter depends on that of the titles recorded on a disc
you play.
The direct title skip function is not performed with discs on which no titles are recorded.
Direct chapter skip
Example: Selecting chapter 10
1 Press the DIRECT button twice whilst press-
ing down the SHIFT button to select .
2
5/
–– 3/0
01: :30 08
DDV
Direct title skip
Example: Selecting title 5
– Using the function control
1 Press the DIRECT button whilst pressing
Advanced DVD features
down the SHIFT button to select .
2 Use the 0 - 9 buttons to select the title num-
ber to which you want to skip.
When the >10 button is pressed after the number is entered with the 0 - 9 buttons, the last digit will be erased.
You can also select the title number by pressing the or button.
32
ENGLISH
5/
–
83/0
01
::30 08
5/
5
83/0
01
::30 08
DDV
DDV
2 Use the 0 - 9 buttons to select the chapter
number to which you want to skip.
When the >10 button is pressed after the number is entered with the 0 - 9 buttons, the last digit will be erased.
You can also select the chapter number by pressing the or button.
2
5/
10 3/0
01: :30 08
DDV
3 Press the ENTER button.
The image changes to the beginning of the specified chapter.
Note:
The number of chapters you can enter depends on that of the chapters recorded on
the disc.
Page 33

Using the function control (continued)
Direct time skip
1
Press the DIRECT button three times whilst
pressing down the SHIFT button to select .
2 Use the 0 - 9 buttons to enter the time to which
you want to skip.
When the >10 button is pressed after the number is entered with the 0 - 9 buttons, the last digit will be erased.
You can also enter the time by pressing the or button.
T o do so, press the or button to select the place where you want to enter the
time.
3 Press the ENTER button.
The image jumps to the point you specified.
Notes:
The time you can enter depends on the time recorded on a disc.
The direct time skip function is not performed with discs on which no times are
recorded.
2
5/
10
3/0
––::–– ––
2
5/
10
3/0
01: :06 ––
DDV
DDV
Subtitle language setting
Example: Selecting “3 SPANISH”
1 Press the SET UP button whilst pressing down the SHIFT button during
playback.
The function control screen appears.
2 Use the or button to select and then
press the ENTER button.
3 Press the or button to select the sub-
title language you want to use.
You can also toggle the setting between “ON” and “OFF” by pressing the or
button.
2
5/
10
3/0
06
01: : ––
NGL I SHE
2
2
5/
10
3/0
06
01: : ––
PANI SHS
3
DDV
DDV
4 Press the ENTER button to confirm the setting.
Y ou can exit the function control screen by pressing the SET UP button whilst pressing
down the SHIFT button or the RETURN button.
Notes:
You can also press the SUBTITLE button on the remote control for the same
operation in step 3.
(You do not need to do the steps 1 and 2.)
This function can only be used for discs on which subtitles have been recorded with
multiple subtitles.
Some DVD discs are marked “Forced Display”, indicating that the subtitling cannot
be suppressed. With such discs, the subtitles will be displayed even when you
select “ OFF”. This does not indicate a fault with your unit.
If no subtitles are recorded on the disc, “ xx” is displayed.
CD-DVD500H
1
2
3
4
5
–
6
7
8
9
– Using the function control
Advanced DVD features
10
11
12
ENGLISH
13
14
15
33
Page 34

CD-DVD500H
–
Using the function control (continued)
Notes:
You can also press the ANGLE button on the remote control for the same operation in step 3.
(You do not need to do the steps 1 and 2.)
This function can only be used for discs on which scenes shot from multiple angles
have been recorded.
When scenes recorded from multiple angles are played, “ANGLE” appears in the
display of the unit.
Audio setting
A number of different methods are used to record audio onto a DVD video disc, including multi-channels (used for voiceovers in other languages), Dolby Digital (5.1ch), DTS,
MPEG audio and Linear PCM. Y our system provides a number of different audio modes
from which you can choose to suit the type of disc you are playing.
1 Press the SET UP button whilst pressing down the SHIFT button during playback.
The function control screen appears.
2
2 Use the or button to select and then
press the ENTER button.
5/
10
3/0
06
01: :––
PANI SHS
3
2
D
1
.
DDV
hc15
Angle setting
Y ou can change the angle of view when playing a DVD video disc that contains scenes
– Using the function control
recorded from multiple angles.
1 Press the SET UP button whilst pressing down the SHIFT button during playback.
Advanced DVD features
The function control screen appears.
2 Use the or button to select and then
press the ENTER button.
3 Press the or button to select the angle
number you want.
The number of recorded angles differs depending on the disc used.
4 Press the ENTER button to confirm the setting.
Y ou can exit the function control screen by pressing the SET UP button whilst pressing
down the SHIFT button or the RETURN button.
34
ENGLISH
2
5/
10
3/0
06
01: :––
PANI SHS
3
1
2
5/
10
3/0
06
01: :––
PANI SHS
3
2
DDV
DDV
3 Press the or button to select the audio
format you want to use.
2
5/
10
3/0
06
01: :––
ISH
2
N
CMP
L
2
.
hc15
00 10
4 Press the ENTER button to confirm the setting.
You can exit the function control screen by pressing the SET UP button whilst pressing
down the SHIFT button or the RETURN button.
Notes:
This function can only be used for discs on which the sound has been recorded in
multiple formats.
With certain types of discs, you can change the audio using the disc menu (see
page 40).
Y ou can also press the AUDIO button on the remote control for the same operation
in step 3.
(You do not need to do the steps 1 and 2.)
DDV
Page 35

Using the function control (continued)
Digital gamma setting
Digital gamma is a digital image quality enhancement function that gives a richer image by brightening the darker and more obscure portions of the image without altering
the brightness of the brighter portions, thereby making the entire image easier to see.
Use the following procedure to change the setting between “ON” and “OFF”, and the
level for the digital gamma setting.
Digital super picture setting
Digital super picture is a digital image quality enhancement function that gives a clearer
image by sharpening the details and outlines in the image and reducing the amount of
picture noise.
Use the following procedure to change the setting between “ON” and “OFF”, and the
level for the digital super picture setting.
CD-DVD500H
1
2
3
1 Press the SET UP button whilst pressing down the SHIFT button during
playback.
The function control screen appears.
N2CMP
L
hc15
2 Use the or button to select
press the ENTER button.
G
and then
G
S
ON
ON
.
BITRATE
00 10
SELECT
ENTER
ENTER
Mbps
RETURN
3 Press the or button to select “ON” or “OFF”.
N2CMP
L
hc15
4 Whilst “ON” is selected, use the or but-
ton to change the level setting.
G
S
ON
ON
.
BITRATE
00 10
SELECT
ENTER
ENTER
Mbps
RETURN
5 Press the ENTER button to confirm the setting.
You can exit the function control screen by pressing the SET UP button whilst pressing
down the SHIFT button or the RETURN button.
Note:
You can also press the DIGITAL GAMMA button whilst pressing down the SHIFT
button on the remote control for the same operation in step 3.
(You do not need to do the steps 1 and 2.)
1 Press the SET UP button whilst pressing down the SHIFT button during
playback.
The function control screen appears.
2 Use the or button to select
press the ENTER button.
S
and then
2
5/
10
3/0
06
01: :––
2
L
G
ON
S
ON
DDV
ISH
N2CMP
hc15
.
00 10
BITRATE
ENTER
SELECT
ENTER
Mbps
RETURN
3 Press the or button to select “ON” or “OFF”.
4 Whilst “ON” is selected, use the or but-
ton to change the level setting.
To see more details in very intricate images,
set the level to .
To obtain a subtle softening of the outlines of
the displayed images, set the level to .
Setting the level to for DVD playback
improves image quality.
2
5/
10
3/0
06
01: :––
2
L
G
ON
S
ON
DDV
ISH
N2CMP
hc15
.
00 10
BITRATE
ENTER
SELECT
ENTER
Mbps
RETURN
5 Press the ENTER button to confirm the setting.
Y ou can exit the function control screen by pressing the SET UP button whilst pressing
down the SHIFT button or the RETURN button.
Note:
Y ou can also press the DIGITAL S. PICTURE button whilst pressing down the SHIFT
button on the remote control for the same operation in step 3.
(You do not need to do the steps 1 and 2.)
4
5
–
6
7
8
9
– Using the function control
Advanced DVD features
10
11
12
13
14
ENGLISH
15
35
Page 36

CD-DVD500H
ESPAÑOL
Zoom function
Whilst an image is zoomed, you can press the , , and button to shift the
view and display the part you want.
To zoom an image
Whilst a disc is playing, press the ZOOM button.
– Zoom function –
Each press of the ZOOM button cycles through the zoom settings as follows:
Advanced DVD features
ZOOM: 1 ( 1.2) ZOOM: 2 ( 1.5) ZOOM: 3 ( 2.0) Off.
Note that all of the above zoom factors are approximate only.
When playing a pan scan disc whilst
on the “TV MODE SETUP” screen, each press of the ZOOM button cycles through
zoom settings as follows: ZOOM: 1 ( 1.2) ZOOM: 2 ( 1.5) Off.
ENTER
4:3
ENTER
PS
SELECT
ZOOM:1
RETURN
ZOOM indicator
is selected as the TV mode setting
Press the button.
Press the
ZOOM button.
Press the button.
Notes:
An image may become distorted when zoomed.
When you press the button or the SET UP button whilst pressing down the SHIFT
button, the zoom operation is cancelled and the image returns to normal size.
The zoom setting is cancelled automatically whenever you display a DVD screen
that enables you to change the scene by pressing the , , or button.
Subtitles cannot be zoomed.
The ZOOM indicator changes from white to red to inform you that you are trying to
perform an illegal shift of view. If you are already at the far left side of the image, for
example, the ZOOM indicator will become red when you press the button.
Press the button.
Press the button.
36
ENGLISH
Page 37

Repeat playback
Title repeat
Example: To repeat the title you are currently viewing
1 Play the title you want to repeat.
2 Press the REPEAT button twice to repeat the
title.
To cancel repeat play, press the REPEAT button again. This clears the “
indicator from the display.
01
25/
83/
0
::30 08
CD-DVD500H
1
2
T
DDV
T
”
3
4
Chapter repeat
Example: To repeat the chapter you are currently viewing
1 Play the chapter you want to repeat.
2 Press the REPEAT button to repeat the chap-
ter.
To cancel repeat play, press the REPEAT button twice. This clears the “
indicator from the display.
Note:
You may not be able to use this function with some discs.
01
25/
83/
0
::30 08
Note:
You may not be able to use this function with some discs.
A-B repeat
01
01
25/
83/
25/
83/
0
::30 08
0
::30 08
1
When playback reaches the start point of the
scene, press the A-B REPEAT button whilst
pressing down the SHIFT button.
This displays “A” (repeat) indicator.
This registers the start point (A).
2 When playback reaches the end point of the
scene, press the A-B REPEAT button whilst
pressing down the SHIFT button again.
C
DDV
C
”
This starts A-B repeat from the start point (A) to the end point (B).
To cancel A-B repeat, press the A-B REPEAT button whilst pressing down the
SHIFT button again. This clears the “
Notes:
A-B repeat cannot be used with the multi-angle function (see page 34).
You may not be able to use this function with some discs.
AB
” indicator from the display.
A
DDV
AB
DDV
–
– Repeat playback
Advanced DVD features
5
6
7
8
9
10
11
12
13
14
ENGLISH
15
37
Page 38

CD-DVD500H
Programmed playback
You can programme your system to play titles or chapters in the sequence you want.
–
Title programmed playback
This function can be performed with only discs that have been played once, totally or
partially.
– Programmed playback
For example: To play the 12th title first
1 Start playing the disc and then stop.
Next, press the MEMORY button.
Advanced DVD features
The title programming screen is displayed.
LIT E PROGRAMT
LANGUAGE :
-- -- -- --
T T T T
T--------
T T T T
-- -- -- --
T T T T
=T ITLE
T
2 Use the or button to cycle through num-
bers at the currently selected (highlighted)
position, and then press the ENTER button
to move the highlighting to the right.
You can also select the title number by pressing the 0 - 9 buttons.
Repeat the procedure above if you want to enter other title numbers. You can enter up to 20
titles in the sequence you want to play.
3 Press the
Titles are played in the sequence you specified.
00
0 button to start play.
00
LIT E PROGRAMT
T T T T
12
T T T T
T--------
-- -- -- --
T T T T
LIT E PROGRAMT
LANGUAGE :
12 -- -- --
T T T T
T--------
T T T T
-- -- -- --
T T T T
25/
83/
0
01
::30 08
=T ITLE
T
-- -- --
=T ITLE
T
ROGRAMP
To stop programmed playback:
Press the button.
Notes:
You cannot programme the sequence whilst a disc is playing.
Sequence programming does not work with a disc that does not include title information.
Sequence programming does not work with a disc that disables programming.
The indicator is displayed when playing back such discs.
Sequence programming does not work immediately after you load a disc. It can be
performed with only discs that have been played once, totally or partially.
The number you enter is not stored in memory if there is no corresponding title
number on the disc. Make sure you enter title numbers correctly.
If you enter the wrong number, press the CLEAR button whilst pressing down the
SHIFT button and then re-input.
To exit the programming procedure halfway through, press the RETURN button.
Once programmed, the contents will be memorised. When the unit is stopped and
then the 0 button is pressed, however, normal DVD playback will be resumed. To
play back the memorised programme, press the 0 button after the MEMORY button.
Repeat play of a programmed sequence is not possible.
DDV
38
ENGLISH
Page 39

Programmed playback (continued)
CD-DVD500H
If you have a DVD that includes chapter data, you can programme your system to play
chapters in the sequence you want.
Chapter programmed playback
This function can be performed with only discs that have been played once, totally or partially.
1 Start playing the disc and then stop.
Next, press the MEMORY button twice.
This displays the chapter programming screen.
2 Use the or button to cycle through num-
bers at the currently selected (highlighted)
position, and then press the ENTER button
to move the highlighting to the right.
For example: To play the 12th title first
You can also select the title number by pressing the 0 - 9 buttons.
3 Use the or button to cycle through num-
bers at the currently selected (highlighted)
position, and then press the ENTER button
to move the highlighting to the right.
For example: To play the 15th chapters first
You can also select the chapter number by
pressing the 0 - 9 buttons.
Repeat the procedure above if you want to enter other chapter numbers. Y ou can enter up to
20 chapters in the sequence you want to play.
4 Press the
Chapters are played in the sequence you specified.
00
0 button to start play.
00
PHA T PROER GRAMC
-
C C C C
-- -- -- --
C--------
-- -- -- --
C C C C
PHA T PROER GRAMC
-1 -- -- --
C C C C
C--------
PHA T PROER GRAMC
01 -- -- --
C C C C
C--------
-
C C C
-
-
-
-
5--
-
C C C
5--
-
C C C
PHA T ERC
=
CLI2TE:1T=T
-
-
-
-
-
-
PHA T ERC
=
CLI2TE:1T=T
-
-
-
-
PHA T ERC
=
CLI2TE:1T=T
-
-
-
-
To stop programmed playback:
Press the button.
Notes:
You cannot programme the sequence whilst a disc is playing.
Sequence programming does not work with a disc that does not include chapter
information.
Sequence programming does not work with a disc that disables programming.
The indicator is displayed when playing back such discs.
Sequence programming does not work immediately after you load a disc. It can be
performed with only discs that have been played once, totally or partially.
The number you enter is not stored in memory if there is no corresponding chapter
number on the disc. Make sure you enter chapter numbers correctly.
If you enter the wrong number, press the CLEAR button whilst pressing down the
SHIFT button and then re-input.
To exit the programming procedure halfway through, press the RETURN button.
Once programmed, the contents will be memorised. When the unit is stopped and
then the 0 button is pressed, however, normal DVD playback will be resumed. To
play back the memorised programme, press the 0 button after the MEMORY button.
1
2
3
4
5
–
6
7
8
9
– Programmed playback
10
Advanced DVD features
11
12
ENGLISH
13
14
15
39
Page 40

CD-DVD500H
Selecting titles from the menu
Setting parameters using the disc menu
Some DVDs have a title menu that you use to select the title you want to play.
–
To select a title
This function can be performed with only discs that have been played once, totally or
partially.
1 Whilst the disc is stopped, press the TOP MENU button to display its title
menu.
2 Use the or button to select the title you want.
3 Press the
00
0 or ENTER button to start playing the selected title.
00
Advanced DVD features
Notes:
Some DVDs use the term “top menu” instead of “title menu”.
If the disc you are using does not have a title menu, nothing appears on the screen
even if you press the TOP MENU button.
The procedure shown here provides only general steps. The actual procedure for
using the title menu depends on the disc you are using. See the disc jacket for
details.
The title menu does not appear immediately after you load a disc. It appears only if
– Selecting titles from the menu / Setting parameters using the disc menu
the disc has been played once, totally or partially.
Some DVDs include a disc menu that you can use to select subtitle set, audio channel,
and Dolby Digital (5.1 channel), DTS or MPEG audio. You can also turn disc menu on
and off.
To turn on subtitling (example)
This function can be performed with only discs that have been played once, totally or
partially.
1 Whilst the disc is stopped, press the MENU button to display the disc menu.
2 Use the or button to select the subtitle item on the disc menu.
3 Press the ENTER button to display the subtitle language selection screen.
4 Use the or button to select the desired subtitle language.
5 Press the ENTER button to register your selection and display the subtitles
in the language you have set.
Repeat the above procedure to make other settings (audio channel,
Dolby Digital, DTS, MPEG audio, etc.).
Notes:
The procedure shown here provides only general steps. The actual procedure for
using the disc menu depends on the disc you are using. See the disc jacket for
details.
The disc menu does not appear immediately after you load a disc. It appears only if
the disc has been played once, totally or partially.
During playback, you can also press the SUBTITLE button on the remote control
for the same operation in steps 1 - 3.
40
ENGLISH
Page 41

Enjoying the surround sound
CD-DVD500H
When playing a disc with the trademark, you can enjoy realistic, powerful
sound by playing back the recorded signal through 5 speakers with the sound coming
from the front left, front right, centre, surround left and surround right speakers.
To listen to a disc in the Dolby Digital mode
1
Press the ON/STAND-BY button to turn the power on.
2 Press the DVD/CD button.
3 Load the DVD disc (s).
4 Press the
Note:
When in the Dolby Digital surround mode, the equaliser will be set to FLAT.
00
0 button to start playback.
00
Normal/Phantom/Bypass mode
When playing sound sources that have the or trademark, you
can enjoy Dolby surround sound.
Normal mode:
When you play a sound source that has the (5.1 channels) or
trademark, you can enjoy surround sound using all 5 speakers.
Centre speaker
Front speaker (Left)
Surround speaker
(Left)
Phantom mode:
When you play a sound source that has the or trademark,
you can enjoy surround sound using 4 speakers, but not the centre speaker.
Front speaker (Right)
Surround speaker
(Right)
1
2
3
4
5
6
7
8
9
– Enjoying the surround sound –
Surround operation
10
11
12
Front speaker (Left) Front speaker (Right)
Surround speaker
(Left)
Surround speaker
(Right)
ENGLISH
13
14
15
41
Page 42

CD-DVD500H
Enjoying the surround sound (continued)
To listen in Normal/Phantom/Bypass mode:
1 Press the DVD/CD button.
2 Press the NORMAL, PHANTOM or BYPASS button to select the surround
mode.
(Remote control operation)
Press the SURROUND button repeatedly.
NORMAL:
For a stereo 2 channel input or a Dolby digital 2/0 input, sound will be output from
the front left, front right, centre and surround speakers. The same monaural chan-
–
– Enjoying the surround sound
Surround operation
nel will be output from the left and right surround speakers.
For a Dolby digital 5.1 channel input, sound will be output from the front left, front
right, centre, surround left and surround right speakers.
If the surround signal only contains 1 channel, the same monaural channel will
be output from the left and right surround speakers.
For a Dolby digital 1/0 input, sound will only be output from the centre speaker.
PHANTOM:
The difference between this mode and the normal mode is that no sound is output
from the centre speaker.
The centre speaker signal is split equally and added to the sound for the front left
and front right speakers.
BYPASS:
Sound will only be output from the front left and front right speakers.
For a Dolby digital multichannel input, any centre or rear signals will be mixed
and output from the front speakers.
For a Dolby digital 1/0 input, monaural sound will be output from the front speakers.
3 Start playing.
Notes:
If the EQUALIZER button is pressed in the Normal or Phantom or Virtual mode, the
unit is switched to the Bypass mode automatically.
When in the Normal or Phantom mode, the equaliser will be set to FLAT.
Y ou cannot use the Normal/Phantom and Dolby Digital surround features with headphones.
When headphones are connected to the headphone socket, the Normal or Phantom
and Dolby Digital surround modes will be cancelled. (The NORMAL or PHANTOM
button will not work.)
When the headphones are disconnected, the Normal or Phantom mode will still be
cancelled. In order to activate the Normal or Phantom mode, you must press the
NORMAL or PHANTOM button.
Pressing the REC PAUSE I6 (I6) button cancels the Normal or Phantom or Virtual mode and the unit enters the Bypass mode.
Virtual Dolby Surround
Three-dimensional stereo image processing modifies the sound for the 2 front speakers to make it seem as if surround speakers were sending signals, even though they
are not actually used.
Y ou can enjoy a three-dimensional surround stereo image using just the 2 front speakers.
Virtual Dolby Surround
Front speaker (Left)
To listen to Virtual Dolby Surround sound:
: Indicates a virtual speaker.
Front speaker (Right)
1 Select the desired audio source and begin playback.
2 Press the VIRTUAL button to select “VIRTUAL”.
(Remote control operation)
Press the SURROUND button repeatedly.
When a Dolby digital signal is being input, “ VIRTUAL” and “ DIGITAL” will
appear.
42
ENGLISH
Page 43

Changing the speaker setting
CD-DVD500H
You can change the settings as you like.
The initial setup was made when shipped from the factory.
The unit can be used as it is, straight out of the box.
Speaker size setting
1
Press the SP MENU button repeatedly whilst pressing down the SHIFT button to select “SP SIZE”.
2 Within 8 seconds, press the or button to select “FRONT”.
4 Repeat the operation in steps 2 and 3 above to select “CENTER”, “SUR-
ROUND” and “S-WOOFER”.
Each of these items can be set separately.
Centre speaker:
Surround speakers:
Subwoofers:
disappear
disappear
disappear
disappear
1
2
3
4
–
5
6
7
8
9
– Changing the speaker setting
Surround operation
10
3 Within 8 seconds, use the or button to select “LARGE” or “SMALL”.
LARGE: When the front speakers can reproduce low frequencies (speakers which
can reproduce sounds lower than 60 Hz)
SMALL: When the front speakers cannot reproduce extremely low frequencies
It is recommended to use the supplied front speakers with “F-SMALL” setting.
YES: When the speakers are connected
NO: When no speaker is connected (When NO is selected, the indicator for that
speaker position will go out.)
INT: Setting of the internal subwoofers
EXT: Setting of an external subwoofer (See page 70.)
Notes:
When all 5 speakers have been connected, set each of the items to “YES” and the
subwoofer to “SW-INT”.
The sound is output from the subwoofer when in the Bypass/Virtual mode, even if
the setting of subwoofer is changed.
ENGLISH
11
12
13
14
15
43
Page 44

CD-DVD500H
Changing the speaker setting (continued)
Speaker delay setting
The best sound will be achieved by placing the front speakers, centre speaker and
surround speakers at the same distance from the listener.
When some of the speakers are at a different distance from the listener, you can select
a speaker delay to make it seem as though the speaker distances are the same.
(Factory-shipped settings: CENTRE → 0 ms, SURROUND → 5 ms)
If the settings need to be changed due to the type of sound source being played or the
conditions in the room, change them as follows.
1 Press the SP MENU button repeatedly whilst pressing down the SHIFT but-
ton to select “SP DELAY”.
–
2 Within 8 seconds, press the or button to select “CENT” or “SURR”.
CENT: To delay the sound from the centre speaker
SURR: To delay the sound from the surround speakers
3 Within 8 seconds, use the or button to select a value.
Adjustable range
– Changing the speaker setting
Surround operation
CENTRE: 0 ms - 5 ms
SURROUND: 0 ms - 15 ms
(Can be changed in 1 ms steps.)
Notes:
1 ms indicates approximately 30 cm (12") added to the current distance between
where the speaker and the listener are located.
If the delay time for the surround speakers is set to a large value, a large sound
space will be created. If it is set to a small value, the sound space will be small and
intimate.
Front speaker balance setting
You can adjust the balance between the left and right channels of the front speakers.
1 Press the SP MENU button repeatedly whilst pressing down the SHIFT but-
ton to select “SP LEVEL”.
2 Within 8 seconds, press the or button to select the front speakers as
illustrated.
3 Within 8 seconds, press the button to increase the right speaker level
(the left speaker level will decrease), or press the button to increase the
left speaker level (the right speaker level will decrease).
The speaker balance, as shown in the display, can be changed within the range of
“1” to “10”.
Note:
The surround speaker balance will not be changed.
To balance speaker levels:
In step 3, use the or button to select “F-SP CEN”.
44
ENGLISH
Page 45

Changing the speaker setting (continued)
Speaker level setting
The output level of each speaker can be adjusted.
1 Press the SP MENU button repeatedly whilst pressing down the SHIFT but-
ton to select “SP LEVEL”.
CD-DVD500H
1
2
3
2 Within 8 seconds, press the or button repeatedly to select the speaker
(CENT, RSUR, LSUR or SWFR) you want to adjust.
3 Within 8 seconds, use the or button to adjust the level.
You can change the level within the range of +10dB to –10dB at 1dB intervals.
(The centre speaker level can be changed within the range of +6dB to –10dB.)
4
–
5
6
7
8
9
– Changing the speaker setting
Surround operation
10
11
12
13
ENGLISH
14
15
45
Page 46

CD-DVD500H
Changing the speaker setting (continued)
Test tone
You can check (and adjust) the speaker level by listening to the sound output from
each speaker individually in the actual listening position in the room.
The speaker level can be adjusted using the remote control.
1 Press the SP MENU button repeatedly whilst pressing down the SHIFT but-
ton to select “TEST”.
2 Within 8 seconds, press the or button.
–
The test tone will be heard from each speaker, in order, at about 5-second intervals.
CENTRE → FRONT RIGHT
↑↓
FRONT LEFT R-SURROUND
↑↓
S-WOOFER ← L-SURROUND
When the test tone is being output, the indicator for that speaker will light.
The test tone will be heard until the current menu selection is changed by pressing the SP MENU button again, or by selecting some other function.
3 To adjust the speaker level whilst the test tone is being output from a par-
ticular speaker, press the or button.
– Changing the speaker setting
Surround operation
Dynamic range setting
DVD discs have a wider dynamic range (sound volume range) than existing VHS video
tapes or CD discs. If they are played in home systems, there may be too much difference between the loud and quiet sounds. Therefore, if the volume is set so that the
quiet sounds can be heard clearly, the loud sounds may be far too loud.
On the other hand, if the volume is set so that the loud sounds are not too loud, you
may not be able to hear the quiet sounds. Three settings are available to control the
dynamic range easily.
1 Press the SP MENU button repeatedly whilst pressing down the SHIFT but-
ton to select “D-RANGE”.
2 Within 8 seconds, press the or button.
3 Within 8 seconds, press the or button to select “MAX”, “STD” or “MIN”.
MAX: This setting does not compress the dynamic range of the Dolby digital signal,
allowing you to enjoy the full, powerful sound of Dolby encoded digital signals.
STD: This setting compresses the dynamic range, and may produce a more ap-
propriate volume range for home use.
46
The speaker level can be adjusted within the range of +10dB to –10dB at 1dB
intervals.
Notes:
When the surround mode is not “NORMAL”, no test tone will be output from any
speakers.
If “NO” is selected for any individual speaker’s size setting (page 43), the test tone
will not be heard from that speaker.
Note that the front left and front right speaker levels cannot be adjusted using this
method.
If the subwoofer on a front speaker is set to “EXT” in the speaker size setting procedure, no sound is emitted from it.
ENGLISH
MIN: This setting compresses the dynamic range, allowing you to enjoy movies at
a lower volume.
Page 47

Description of terminology
CD-DVD500H
CLR
S
Dolby Pro Logic Dolby Digital
2
4
Front (L, R) + Centre +
Surround
Matrix processing, Dolby
Surround
16 bits
7 kHz
S
Number of recording
channels
Number of playback
channels
Playback configuration
of channels
Sound processing
Number of signal
processing bits
Surround Sound high-
frequency playback
limit
LS
L
C
R
RS
6
6
Front (L, R) + Centre +
Surround (L, R) + Low
frequency effects
Discrete processing, Dolby
digital encoding/decoding
20 bits
20 kHz
Dolby Pro Logic Surround:
This refers to the Dolby Surround sound decoder system which is used for movies.
Using 4 channels, the sound effects, dialog, sound direction, music, etc. are all reproduced more realistically. Dolby Pro Logic Surround makes the location and movement
of sounds much more natural than the original Dolby Surround system. Y ou can enjoy
a realistic, powerful feeling like being at a live performance or as if you were at a movie
theater or in a concert hall. In order to enjoy this effect, you need at least one pair of
surround speakers.
Dolby Digital:
This is the new digital surround system that was created to reproduce theatre quality
stereophonic Dolby Surround sound at home. Films are now recorded using the 5.1
channel system. Dolby Digital can handle the original soundtrack without modification,
allowing you to enjoy the sound field created by the film maker at home.
Dolby Surround:
This is the encoding/decoding system for general-purpose Dolby Surround. When the
sound from films recorded in Dolby Surround are reproduced, you will have the feeling
of being at a live performance, as if the action is taking place right in front of you.
LFE (Low Frequency Effect):
This refers to the special low-frequency sound effects used in Dolby Digital recordings.
When a signal containing LFE encoding is played by this unit, “LFE” will appear in the
display.
PCM (Pulse Code Modulation):
This is a recording/transmission system used for digital audio signals. This unit can
handle sampling frequencies of 32 kHz, 44.1 kHz and 48 kHz.
Subwoofer:
The subwoofer is a special speaker used to emphasise bass sounds.
In Dolby Digital, this speaker reproduces the LFE signals as well as the low-frequency
signals being sent to the front, centre and surround speakers.
In Dolby Pro Logic, this speaker reproduces the low-frequency signals sent to the front
and centre speakers.
It also reproduces low frequency sounds from ordinary stereo recordings.
1
2
3
4
5
–
6
7
8
9
– Description of terminology
10
Surround operation
11
12
13
ENGLISH
14
15
47
Page 48

CD-DVD500H
Listening to a CD (CDs)
This system can play audio CD-R and CD-RW discs just as CD discs, but cannot
perform recording.
Playback of audio CD-R or CD-RW may not be performed depending on the disc
state or the device you used for recording.
1 Press the ON/STAND-BY button to turn the power on.
2 Press the DVD/CD button.
CD playback
– Listening to a CD (CDs) –
3 Press the
7 7
7 OPEN/CLOSE button to open the disc tray.
7 7
4 Place the CD(s) on the disc tray, label side up.
When loading a third disc, press the DISC SKIP button to turn
the disc tray, then place the CD in the open position.
CDs can be placed on any open position on the disc tray.
Be sure to place 8 cm (3") CD(s) in the middle of the disc positions.
12 cm (5”)
5 Press the
The music schedule will display only the number of tracks on the disc.
If the CD contains more than 15 tracks, “C” will appear.
77
7 OPEN/CLOSE
77
Music schedule
Total number of tracks on the CD
whose number is flashing
button to close the disc tray.
Total playing time of the CD
whose number is flashing
8 cm (3”)
48
ENGLISH
6
To select the CD you want to listen to first, press one of the
s s
s 3
buttons.
s s
s s
s 1 -
s s
Page 49

Listening to a CD (CDs) (continued)
7 Press the
Playback will begin from track 1 on the disc you have selected to play.
After that disc finishes, the next disc will automatically play.
When the last track on the third disc has finished, the CD player will stop
automatically.
When there is no CD in one of the disc 1 - 3 positions, that position will be
skipped and the next CD will be played.
To interrupt playback:
Press the 6/STILL button on the remote control.
To resume playback from the same point, press the 0 button.
To stop playback:
Press the ■ button.
To remove the CDs:
Whilst in the stop mode, press the 7 OPEN/CLOSE button.
The disc tray will open. Remove the two discs. Then, press the DISC SKIP button to
rotate the disc tray and remove the remaining disc.
After use:
Press the ON/STAND-BY button to enter the power stand-by mode.
Caution:
Do not place two CDs in one disc position.
Do not push the disc tray whilst it is moving.
Do not turn the disc tray by hand. This may cause malfunctions.
If the power fails whilst the tray is open, wait until the power is restored.
If the disc tray is stopped forcibly, “ER-CD10” or “ER-CD20” will appear in the dis-
play and the unit will not function.
If this occurs, press the ON/STAND-BY button to enter the stand-by mode and then
turn the power on again.
If TV or radio interference occurs during CD operation, move the unit away from the
TV or radio.
If a disc is damaged, dirty, or loaded upside down, the disc will be skipped.
00
0 button to start playback.
00
Starting playback with a desired track
You can play a disc starting with the desired track.
s s
1 Whilst in the stop mode, press one of the
DISC SKIP button to select the desired disc.
Selected disc number
55
2
Press the
the desired track and its playback starts automatically.
You can also press the 5/3 or 2/4 button on the remote control for
the same operation.
You can also select the desired track by pressing the 0 - 9 buttons, then
press the 0 button on the remote control.
The playback of the selected track is started.
When the last track of the disc with the selected track is finished, the next
disc will be automatically started.
To stop playback:
Press the ■ button.
Notes:
When the DISC SKIP button is pressed during playback, the next disc will begin
automatically.
When one of the s 1 - s 3 buttons is pressed during playback, playback of the
selected disc will begin automatically.
3 3
5
3 PRESET
55
3 3
Selected track number
XX
X
XX
or
W W
W PRESET
W W
2 4 2 4
2 4 button
2 4 2 4
s s
s 1 -
s 3 buttons or
s s
s s
to select
CD-DVD500H
1
2
3
4
5
–
6
7
8
9
CD playback
– Listening to a CD (CDs)
10
11
12
13
14
ENGLISH
15
49
Page 50

CD-DVD500H
–
Listening to a CD (CDs) (continued)
To locate the beginning of a track
To move to the beginning of the next track:
Press the W PRESET 2 4 button for less than 0.5 seconds during playback.
Y ou can skip to any track by pressing the W PRESET 2 4 button repeatedly
until the desired track number appears.
To restart the track being played:
Press the 5 3 PRESET X button for less than 0.5 seconds during playback.
Y ou can skip to any track by pressing the 5 3 PRESET X button repeatedly
until the desired track number appears.
Notes:
You can locate the beginning of a track on a single disc only.
The 5/3 or 2/4 button on the remote control allows you the same operation.
To locate the desired portion
For fast forward:
Press and hold down the W PRESET 2 4 button for more than 0.5 seconds
during playback.
CD playback
– Listening to a CD (CDs)
50
ENGLISH
For fast reverse:
Press and hold down the 5 3 PRESET X button for more than 0.5 seconds
during playback.
Two speeds are available. Each time the
44
4 button is pressed, the speed of fast scan changes in the following sequence:
44
→ 1 (about 2) → 2 (about 8)
Notes:
Normal playback will resume when the 0 button is pressed.
You can locate the desired portion on a single disc only.
When the end of the last track is reached during fast forward, “END” will appear in
the display and CD operation will be paused. When the beginning of the first track
is reached during fast reverse, the unit will enter the playback mode.
The 5/3 or 2/4 button on the remote control allows you the same operation.
55
33
5
3 PRESET X or W PRESET
55
33
22
2
22
Page 51

Repeat or random play
Repeat play
All tracks on up to 3 discs can be continuously repeated.
Press the REPEAT button repeatedly on the remote control.
→ All disc repeat
↓
Normal playback
CD-DVD500H
1
2
3
4
Random play
The tracks on the disc(s) can be played in random order automatically.
Whilst the CD is played or stopped,
press the RANDOM button whilst
pressing down the SHIFT button on
the remote control to begin random
play.
Random playback is disabled whilst the
DVD is played or stopped.
To cancel random play:
Press the RANDOM button whilst pressing down the SHIFT button again.
Notes:
If you press the W PRESET 2 4 (2/4) button during random play, you can
move to the track selected next by the random operation. On the other hand, the
5 3 PRESET X (5/3) button does not allow you to move to the previous
track. The beginning of the track being played will be located.
In random play, the CD player will select and play tracks automatically.
(You cannot select the order of the tracks.)
The DVD disc will be skipped and random playback will be disabled.
Caution:
After using repeat or random play, be sure to press the ■ button.
Otherwise, the disc(s) will play continuously.
To cancel repeat play:
Press the REPEAT button repeatedly to extinguish the “R”.
A-B repeat
1 When play reaches the start point of sound, press the A-B RE-
PEAT button whilst pressing down the SHIFT button.
This displays “AR” (repeat) indicator.
This registers the start point (A).
2 When play reaches the end point of sound, press the A-B RE-
PEAT button whilst pressing down the SHIFT button again.
This starts A-B repeat from the start point (A) to the end point (B).
To cancel A-B repeat, press the A-B REPEAT button whilst pressing down
the SHIFT button again. This clears the “ARB” indicator from the display.
5
–
6
7
8
9
CD playback
– Repeat or random play
10
11
12
13
14
15
ENGLISH
51
Page 52

CD-DVD500H
Programmed play
By specifying discs from 1 to 3, and tracks from 1 to 99, you can choose up to 20
selections for playback in the order you like.
4 Repeat steps 2 - 3 for other tracks. Up to 20 tracks can be pro-
grammed.
If you make a mistake, the programmed tracks can be cleared by pressing the
CLEAR button whilst pressing down the SHIFT button.
–
1 Whilst in the stop mode, press the MEMORY button.
– Programmed play
CD playback
2 Press one of the
buttons to select the desired disc and then press
the ENTER button.
You can also select the disc number by pressing the or button.
3 Press the
select the desired track
and then press the ENTER
button.
or
s s
s s
s 1 -
s 3
s s
s s
button to
Selected disc number
5 Press the
Adding tracks to the programme:
Programme setting has been previously stored.
Follow steps 1 - 3 to add tracks. The new tracks will be stored after the last track of the
original programme.
To clear the programmed selections:
1. Whilst in the stop mode, press the MEMORY button.
2. Press the CLEAR button whilst pressing down the SHIFT button.
Each time the button is pressed, one track or disc will be cleared, beginning with the
last track or disc programmed.
Notes:
If there is no disc to select the disc number or there is a DVD disc, the disc will be
skipped.
Opening the disc tray automatically cancels the programmed sequence.
Even if you press the ON/STAND-BY button to enter the stand-by mode, the programmed selections will not be cleared.
During programme playback, random play is not possible.
Once programmed, the contents will be memorised. When the unit is stopped and
then the 0 button is pressed, however, normal CD playback will be resumed. To
play back the memorised programme, press the 0 button after the MEMORY button.
To exit the programming procedure halfway through, press the RETURN button.
Repeat play of a programmed sequence is not possible.
0 0
0 button to start playback.
0 0
52
Selected track number
You can also select the track number by pressing the 0 - 9 buttons.
Playback order
ENGLISH
Page 53

Listening to the radio
1 Press the ON/STAND-BY button to turn the power on.
2 Press the TUNER (BAND) button repeatedly to select the desired
frequency band (FM or AM).
XX
3 Press the TUNING/TIME (
station.
Manual tuning:
Press the TUNING/TIME button until tuning in to the desired station.
Auto tuning:
When the TUNING/TIME button is pressed for more than 0.5 seconds, scanning will start automatically and the tuner will stop at the first receivable broadcast station.
Notes:
When radio interference occurs, auto scan tuning may stop automatically at
that point.
Auto scan tuning will skip weak signal stations.
To stop the auto tuning, press the TUNING/TIME button again.
When an RDS (Radio Data System) station is tuned in, the frequency will be
displayed first, and then the RDS indicator will light. Finally , the station name
will appear.
Full auto tuning can be achieved for RDS stations “ASPM”, see page 57.
To receive an FM stereo transmission:
Press the TUNER (BAND) button so that the “ST” indicator lights up.
“j” will appear when an FM broadcast is in stereo.
WW
X or
W) button to tune in to the desired
XX
WW
FM stereo mode indicator
CD-DVD500H
1
2
3
4
5
6
7
8
Radio
9
– Listening to the radio –
10
11
FM stereo receiving indicator
If the FM reception is weak, press the TUNER (BAND) button so that the “ST” indicator goes out. The reception changes to monaural, and the sound becomes clearer.
After use:
Press the ON/STAND-BY button to enter the power stand-by mode.
ENGLISH
12
13
14
15
53
Page 54

CD-DVD500H
Listening to a preset station
To preset a station
You can store 40 AM and FM stations in memory and recall them at the push of a
button. (Preset tuning)
1 Perform the steps 1 - 3 in “Listening to the radio” on page 53.
2 Press the MEMORY/SET button to enter the preset tuning saving
mode.
–
3 Within 30 seconds, press the
22
44
2
4 button to select the preset channel number.
22
44
Radio
Store the stations in memory, in order, starting with preset channel 1.
4 Within 30 seconds, press the MEMORY/SET button to store that
station in memory.
– Listening to a preset station
If the “MEMORY” and preset number indicators go out before the station is
memorised, repeat the operation from step 2.
55
33
5
3 PRESET
55
33
XX
X or
XX
WW
W PRESET
WW
To recall a preset station
55
Press the
than 0.5 seconds to select the desired station.
33
5
3 PRESET
55
33
Preset channel Frequency and frequency band
XX
X or
XX
WW
W PRESET
WW
22
44
2
4 button for less
22
44
To scan the preset stations
The stations saved in memory can be scanned automatically. (Preset memory scan)
55
1 Press the
more than 0.5 seconds.
The preset number will flash and the programmed stations will be tuned in
sequentially, for 5 seconds each.
2 Press the
when the desired station is located.
33
5
3 PRESET
55
33
55
33
5
3 PRESET
55
33
XX
X or
XX
XX
X or
XX
WW
W PRESET
WW
WW
W PRESET
WW
22
44
2
4 button for
22
44
22
44
2
4 button again
22
44
To erase entire preset memory
1. Press the ON/STAND-BY button to enter the stand-by mode.
2. Press the ON/STAND-BY button whilst holding down the TUNER (BAND) button
and X-BASS/DEMO button until “TUNER CL” appears.
54
5 Repeat steps 1 - 4 to set other stations, or to change a preset
station.
When a new station is stored in memory, the station previously memorised will
be erased.
Note:
The backup function protects the memorised stations for a few hours should there be
a power failure or the AC power lead disconnection.
ENGLISH
Page 55

Using the radio data system (RDS)
CD-DVD500H
RDS is a broadcasting service which a growing number of FM stations provide.
These FM stations send additional signals along with their regular programme
signals. They send their station names, and information about the type of
programme such as sports or music, etc.
When tuned to an RDS station, “RDS” and the station name will be displayed.
“TP” (Traffic Programme) will appear on the display when the received broadcast carries traffic information, and “TA” (Traffic Announcement) will appear whilst a traffic information is on air (see page 61).
“EON” will appear whilst the EON (Enhanced Other Networks information) data is broadcast.
“PTYI” (Dynamic PTY Indicator) will appear whilst the Dynamic PTY station is received.
“RT” (Radio Text) will appear whilst the unit receives the Radio text data.
Information provided by RDS
Each time the DISP MODE button is pressed, the display will switch as follows:
Station name (PS)
Programme type (PTY)
(8 languages)
Programme type (PTY)
(English fixed)
When you are tuning in to a station other than an RDS station or to an RDS station
which sends weak signal, the display will change in the following order:
NO PS NO PTY
FM 98.80 MHz
NO RT
Frequency
Radio text (RT)
1
2
3
4
5
6
7
8
RDS radio
9
10
- Using the radio data system (RDS) -
11
12
13
ENGLISH
14
15
55
Page 56

CD-DVD500H
Using the radio data system (RDS) (continued)
Descriptions of the PTY (Programme Type) codes, TP (Traffic Programme) and
TA (Traffic Announcement).
You can search for and receive the following PTY, TP and TA signals.
NEWS
AFFAIRS
INFO
SPORT
EDUCATE
DRAMA
CULTURE
SCIENCE
VARIED
POP M
RDS radio
ROCK M
EASY M
- Using the radio data system (RDS) -
LIGHT M
CLASSICS
OTHER M
WEATHER
FINANCE
CHILDREN
Short accounts of facts, events and publicly expressed views, reportage
and actuality.
Topical programme expanding or enlarging upon the news, generally
in different presentation style or concept, including debate, or analysis.
Programmes whose purpose is to impart advice in the widest sense.
Programme concerned with any aspect of sport.
Programme intended primarily to educate, of which the formal element
is fundamental.
All radio plays and serials.
Programmes concerned with any aspect of national or regional culture,
including language, theatre, etc.
Programmes about the natural sciences and technology.
Used for mainly speech-based programmes usually of light-entertain-
ment nature, not covered by other categories. Examples include:
quizzes, panel games, personality interviews.
Commercial music, which would generally be considered to be of current popular appeal, often featuring in current or recent record sales
charts.
Contemporary modern music, usually written and performed by young
musicians.
Current contemporary music considered to be “easy- listening”, as opposed to Pop, Rock or Classical, or one of the specialised music styles,
Jazz, Folk or Country. Music in this category is often but not always,
vocal, and usually of short duration.
Classical music for general, rather than specialist appreciation. Examples
of music in this category are instrumental music, and vocal or choral
works.
Performances of major orchestral works, symphonies, chamber music,
etc., and including Grand Opera.
Musical styles not fitting into any of the other categories. Particularly
used for specialist music of which Rhythm & Blues and Reggae are
examples.
Weather reports and forecasts and meteorological information.
Stock Market reports, commerce, trading, etc.
For programmes targeted at a young audience, primarily for entertain-
ment and interest, rather than where the objective is to educate.
SOCIAL
RELIGION
PHONE IN
TRAVEL
LEISURE
JAZZ
COUNTRY
NATION M
OLDIES
FOLK M
DOCUMENT
TEST
ALARM !
NONE
TP
TA
Note:
When you select a programme in the EON stand-by mode, the unit will display “TI”
instead of “TA”.
Programmes about people and things that influence them individually
or in groups. Includes: sociology, history, geography, psychology and
society.
Any aspect of beliefs and faiths, involving a God or Gods, the nature of
existence and ethics.
Involving members of the public expressing their views either by phone
or at a public forum.
Features and programmes concerned with travel to near and far destinations, package tours and travel ideas and opportunities. Not for use
for announcements about problems, delays, or roadworks affecting immediate travel where TP/TA should be used.
Programmes concerned with recreational activities in which the listener
might participate. Examples include, Gardening, Fishing, Antique collecting, Cooking, Food & Wine, etc.
Polyphonic, syncopated music characterised by improvisation.
Songs which originate from, or continue the musical tradition of the
American Southern States. Characterised by a straightforward melody
and narrative story line.
Current Popular Music of the Nation or Region in that country’s language, as opposed to International ‘Pop’ which is usually US or UK inspired and in English.
Music from the so-called “golden age” of popular music.
Music which has its roots in the musical culture of a particular nation,
usually played on acoustic instruments. The narrative or story may be
based on historical events or people.
Programme concerned with factual matters, presented in an investigative style.
Broadcast when testing emergency broadcast equipment or receivers.
Emergency announcement made under exceptional circumstances to
give warning of events causing danger of a general nature.
No programme type (receive only).
Broadcasts which carry traffic announcements.
Traffic announcements are being broadcast.
56
ENGLISH
Page 57

Using the radio data system (RDS) (continued)
CD-DVD500H
Using the auto station programme memory
(ASPM)
Whilst in the ASPM operation mode, the tuner will automatically search for new RDS
stations. Up to 40 stations can be stored.
If you have already stored some stations in memory, the number of new stations you
can store will be less.
1 Press the TUNER (BAND) button to select the FM band.
2 Press and hold down the ASPM button for at least 3 seconds.
1 After “ASPM” has flashed for about 4 seconds, scanning will start (87.50 -
108.00 MHz).
2 When an RDS station is found, “RDS” will appear for a short time and the
station will be stored in memory.
3 After scanning, the number of stations stored in memory will be displayed for
4 seconds, and then “END” will appear for 4 seconds.
To stop the ASPM operation before it is complete:
Press the ASPM button whilst it is scanning for stations.
The stations which are already stored in memory will be kept there.
Notes:
If the same station is broadcasting on different frequencies, the strongest frequency
will be stored in memory.
Any station which has the same frequency as the one stored in memory will not be
stored.
If 40 stations have already been stored in memory , the scan will be aborted. If you
want to redo the ASPM operation, erase the preset memory.
If no stations have been stored in memory , “END” will appear for about 4 seconds.
If the RDS signals are very weak, station names may not be stored in memory.
To erase all of the contents of preset memory:
1 Press the ON/STAND-BY button to enter the power stand-by mode.
2 Whilst pressing down the TUNER (BAND) button and the X-BASS/DEMO button,
press the ON/STAND-BY button until “TUNER CL” appears.
After performing this operation, all of the preset memory information will be erased.
To store a station name again if the wrong name was stored in memory:
It may be impossible to store station names in memory using the ASPM function if
there is lots of noise or if the signal is too weak. In this case, perform as follows.
1 Press the PRESET X or W PRESET button to check whether the names are cor-
rect.
2 If you find a wrong name during receiving the station, wait until the correct name will
be displayed. And then press the MEMORY/SET button on the main unit.
3 Within 30 seconds, press the MEMORY/SET button on the main unit whilst the
preset channel number is flashing.
The new station name has been stored in memory correctly.
Notes:
The same station name can be stored in different channels.
In a certain area or during certain time periods, the station names may temporarily
be different.
1
2
3
4
5
6
7
8
RDS radio
9
10
- Using the radio data system (RDS) -
11
12
13
ENGLISH
14
15
57
Page 58

CD-DVD500H
Using the radio data system (RDS) (continued)
To recall stations in memory
To specify programmed types and select stations (PTY search):
You can search a station by specifying the programme type (news, sports, traffic
programme, etc. ... see page 56) from the stations in memory.
1 Press the TUNER (BAND) button to select the FM.
2 Press the PTY. TI button.
“SELECT” and “PTY TI” will appear alternately for about 6 seconds.
3 Within 6 seconds, press the PRESET
select the programme type.
RDS radio
Each time the button is pressed, the programme type will appear. If the button
is held down for more than 0.5 seconds, the programme type will appear continuously.
- Using the radio data system (RDS) -
4 Whilst the selected programme type is flashing (within 4 sec-
onds), press the PTY. TI button again.
XX
WW
X or
W PRESET button to
XX
WW
Notes:
If the display has stopped flashing, start again from step 2. If the unit finds out a
desired programme type, corresponding channel number will flash for about 4 seconds, and then the station name will flash for 7 seconds, and then will remain lit.
If you want to listen to the same programme type of another station, press the PTY .
TI button whilst the channel number or station name is flashing. The unit will look
for the next station.
If no station can be found, “NOT FOUND” will appear for 4 seconds.
If you select the traffic programme:
If you select the traffic programme (TP) in step 4, “TP” will appear. (This does not mean
that you can listen to the traffic information at that time.)
When a traffic information is broadcast, “TA” will appear.
To specify station names and select stations manually:
You can select a station by specifying the name (BBC R1, BBC R2, etc.) from the
stations stored in memory.
Before starting this operation, you must store one or more station names in memory.
1 Press the TUNER (BAND) button to select the FM band.
2 Press the PRESET X or W PRESET button to select a desired station.
3 The station name will be displayed for 6 seconds. Then the display will change as
follows.
58
After the selected programme type has been lit for 2 seconds, “SEARCH” will
appear, and the search operation will start.
ENGLISH
Page 59

Using the radio data system (RDS) (continued)
T o automatically play the desired programme
5 When the specified programme starts on an ON (other network)
(EON-PTY)
When the desired type of programme is broadcast, the radio switches to it automatically.
station, the unit will automatically switch to the station and “PTY”
will flash.
1 Tune in to an RDS station (when a station name is displayed).
6 When the programme is over, the unit will automatically return
to the original station.
2 Press the EON button when “EON” appears.
“SELECT” and “PTY TI” will appear alternately for about 6 seconds.
If the EON button is pressed when “EON” is not displayed, “NO EON” will
appear for 5 seconds to indicate that the unit cannot enter the EON stand-by
mode.
3 Whilst they are displayed, select the desired programme type by
XX
pressing the PRESET
The selected programme type will flash.
WW
X or
W PRESET button.
XX
WW
4 Within 4 seconds, press the PTY. TI button.
The selected programme type and “WAITING” will be displayed for 2 seconds each.
“PTY” will appear, and the unit will enter the EON-PTY stand-by mode.
Checking the stand-by mode setting:
When in the EON stand-by mode, press the EON button. (“Programme type” “WAIT-
ING”)
To cancel the EON stand-by mode:
When in the EON stand-by mode, press the EON button. Within 4 seconds, press it
again. (“PTY” will go out.)
About the PTYI (Dynamic PTY Indicator):
“PTYI” (Dynamic PTY Indicator) will appear whilst the Dynamic PTY station is received.
Dynamic PTY indicates that the PTY for the station tuned in, or the PTY referenced in
the EON data, is assessed whenever the programme changes and may be changed.
PTYI
Lights up
Goes out
Note:
When “PTYI” appears, press the DISP MODE button to check the type of the current
programme.
Meaning
Tuned in to a dynamic PTY station.
Tuned in to a static PTY.
CD-DVD500H
RDS radio
- Using the radio data system (RDS) -
1
2
3
4
5
6
7
8
9
10
11
12
13
14
ENGLISH
15
59
Page 60

CD-DVD500H
Using the radio data system (RDS) (continued)
T o automatically play the traffic information
(EON-TI)
When the traffic information is broadcast, the radio will switch to it automatically.
1 Tune in to an RDS station (when a station name is displayed).
2 Press the EON button when “EON” appears.
“SELECT” and “PTY TI” will appear alternately for about 6 seconds.
If the EON button is pressed when “EON” is not displayed, “NO EON” will
appear for 5 seconds to indicate that the unit cannot enter the EON stand-by
mode.
3 Whilst they are displayed, select the TI (Traffic Information) by
pressing the PRESET
XX
X or
XX
RDS radio
4 Within 4 seconds, press the PTY. TI button.
- Using the radio data system (RDS) -
WW
W PRESET button.
WW
5 When a TA specified starts on an ON (other network) station, the
unit will automatically switch to that station, and “TI” will flash.
6 When the traffic information is over, the unit will automatically
return to the original station.
Checking the stand-by mode setting:
When in the EON stand-by mode, press the EON button. (“TI” “WAITING”)
To cancel the EON stand-by mode:
When in the EON stand-by mode, press the EON button. Within 4 seconds, press it
again. (“TI” will go out.)
60
“TI” and “WAITING” will appear for 2 seconds each.
“TI” will appear, and the unit will enter the EON-TI stand-by mode.
ENGLISH
Page 61

Using the radio data system (RDS) (continued)
CD-DVD500H
Notes for RDS operation
If any of the following events occur, it does not mean that the unit is faulty:
“PS”, “NO PS” and a station name appear alternately , and the unit does not operate
properly.
If a particular station is not broadcasting properly or a station is conducting tests,
the RDS reception function may not work properly.
When you receive an RDS station whose signal it too weak, information like the
station name may not be displayed.
“NO PS”, “NO PTY” or “NO RT” will flash for about 5 seconds, and then the fre-
quency will be displayed.
Notes for Radio text:
The radio text for 8 characters will be displayed steadily for 4 seconds and then it
will scroll across the display.
If you tune in to an RDS station which is not broadcasting any radio text, “NO RT”
will be displayed when you switch to the radio text position.
Whilst radio text data is received or when the text contents change, “RT” will be
displayed.
Notes for PTY Languages:
When you press the DISP MODE button after entering the PS (Programme Ser-
vice), PTY Languages mode will be selected. In this mode, PTY names will be
displayed automatically in the local language where an RDS station is located.
Eight languages (including English) are available.
If you tune in to an RDS station which is not broadcasting PTY language data, the
PTY name will be displayed in English.
A PTY name may be displayed in English for a short time, until a signal determining
the local PTY language is received.
PTY languages are also used for PTY -Search and EON-PTY operation at any DIS-
PLAY MODE except PTY English.
About the “TP” and “TA” indicators:
“TP”
Not lit
Not lit
Lit
Lit
In the following cases, the EON stand-by mode will be cancelled.
When you press the ON/STAND-BY button to enter the stand-by mode.
When the unit is switched to another band in the EON stand-by mode.
When you change the FM station whilst in the EON stand-by mode.
When a preset call is made.
Notes:
Whilst the same programme as the specified PTY (or TA) is being broadcast, the
unit will not switch to an ON (other network) station.
If there are more than two other network stations, compare the strength of signal
and tune in to the station with the strongest signal (EON-AF). If other network station has been stored in the preset channel memory, the unit will switch to that channel.
If you want to leave an ON station tuned in by the EON and return to the station you
were receiving, press the EON button.
After the unit returns to the original station, the stand-by mode will still be active.
(The “TI” or “PTY” will remain lit.)
The unit does not switch between ON stations. It returns to the original station.
If there is any problem with the ON station the unit switched to, “WEAK SIG” will
appear and the unit will return to the original station.
If the signal from the ON station the unit switched to is very weak, the unit will
search for another station with the strongest signal. However, if the signals from all
stations are weak or not good (due to electrical noise), the unit displays “WEAK
SIG” and returns to the original station.
“TA”
Not lit
Lit
Not lit
Lit
Does not carry traffic announcements nor does it refer, via
EON, to a programme that does.
Carries EON information about another programme which
gives traffic information.
Carries traffic announcements but not at present and may
also carry EON information about other traffic announcements.
A traffic information is currently on air.
Meaning
1
2
3
4
5
6
7
8
RDS radio
9
10
- Using the radio data system (RDS) -
11
12
13
ENGLISH
14
15
61
Page 62

CD-DVD500H
Listening to a cassette tape (TAPE 1 or TAPE 2)
Before playback:
For playback, use normal or low-noise tapes for the best sound.
(Metal or CrO2 tapes are not recommended.)
Do not use C-120 tapes or poor-quality tapes, as they may cause
malfunctions.
Before loading a tape into the cassette compartment, tighten the slack
with a pen or pencil.
Tape playback
Playback is possible in TAPE 1 compartment as well as in TAPE 2.
1 Press the ON/STAND-BY button to turn the power on.
2 Open the cassette door by pushing the area marked “
EJECT”.
3 Load the cassette into the TAPE 1 or TAPE
2 cassette compartment with the side to be
played facing towards you.
TAPE 1 TAPE 2
4 Press the TAPE (1
listen to.
5 Press the
00
0 button to start playback.
00
VV
V 2) button to select the cassette you want to
VV
7 7
7 PUSH
7 7
62
To stop playback:
– Listening to a cassette tape (TAPE 1 or TAPE 2) –
Press the ■ button.
Fast forward/rewind: (TAPE 2 only)
1.Press the ■ button, then press the TAPE (1 V 2) button to select TAPE 2.
2.To advance the tape, press the W PRESET 2 4 (2/4) button.
To rewind it, press the 5 3 PRESET X (5/3) button.
Caution:
To remove the cassette, press the ■ button, and then open the compartment.
Before changing from one tape operation to another, press the ■ button.
If a power failure occurs during tape operation, the tape head will remain engaged with the tape and the cassette door will not open. Wait until the power is
restored.
ENGLISH
Page 63

Recording from a DVD (DVDs)
CD-DVD500H
Before recording:
When recording important selections, make a preliminary test to ensure that the
desired material is properly recorded.
SHARP is not liable for damage or loss of your recording arising from malfunction of
this unit.
The volume and sound controls can be adjusted with no effect on the recorded
signal (Variable Sound Monitor).
For recording, use only normal tapes. Do not use metal or CrO2 tapes.
1 Press the ON/STAND-BY button to turn the power on.
2 Load a cassette into the TAPE 2 cassette compartment with the
side to be recorded on facing you.
Wind past the leader of the tape, on which recording cannot be performed.
3 Press the DVD/CD button and load the desired disc.
s s
4 Press one of the
corded.
5 Press the
If the disc you are using supports auto start, it starts to play automatically (even
if you do not press the 0 button), as soon as you close the disc tray.
00
0 button to start DVD playback.
00
6 Press the REC PAUSE
Recording will be paused.
7 When DVD playback reaches the desired point, press the
ton to start recording.
To stop recording:
Press the ■ button.
It will stop the tape only. Another press of the ■ button will stop DVD playback.
Even when the DVD playback is finished, the tape will not stop. To stop the tape,
press the ■ button.
s s
s 1 -
s 3 buttons to select the disc to be re-
s s
s s
I6I6
I6I6
I6 (
I6) button.
I6I6
I6I6
00
0 but-
00
1
2
3
4
–
5
6
7
8
9
Tape recording
– Recording from a DVD (DVDs)
10
11
Erase-prevention tab of cassette tapes:
When recording on a cassette tape, make sure
that the erase-prevention tabs are not removed.
Cassettes have removable tabs that prevent
accidental recording or erasing.
To protect the recorded sound, remove the tab
after recording.
Cover the tab hole with adhesive tape to record
on the tape without the tab.
Side A
Tab for side ATab for side B
ENGLISH
12
13
14
15
63
Page 64

CD-DVD500H
–
Recording from a CD (CDs)
You can record 3 CDs continuously.
1 Press the ON/STAND-BY button to turn the power on.
2 Load a cassette into the TAPE 2 cassette compartment with the
side to be recorded on facing you.
Wind past the leader of the tape, on which recording cannot be performed.
3 Press the DVD/CD button and load the desired disc.
s s
4 Press one of the
corded first.
5 Press the REC PAUSE
Recording will be paused.
s s
s 1 -
s 3 buttons to select the disc to be re-
s s
s s
I6I6
I6I6
I6 (
I6) button.
I6I6
I6I6
Tape recording
– Recording from a CD (CDs)
64
ENGLISH
6 Press the
CD playback will start approximately 7 seconds after the tape starts.
Recording is started from the selected CD. When the playback of the last
disc is finished or the end of the tape is reached, the CD and the cassette will
stop automatically.
To perform programmed recording:
1. Programme discs and tracks (page 52).
2. Press the REC PAUSE I6 (I6) button.
3. Press the 0 button.
To stop recording:
Press the ■ button.
The CD and tape will stop.
Note:
If you load a DVD disc(s), it will be skipped.
00
0 button to start recording.
00
Page 65

Recording from the radio
CD-DVD500H
Recording can be operated in the TAPE 2 compartment. The TAPE 1 is for playback
only.
1 Tune in to the desired station (see page 53).
2 Load a cassette into the TAPE 2 cassette compartment with the
side to be recorded on facing you.
Wind past the leader of the tape, on which recording cannot be performed.
I6 I6
3 Press the REC PAUSE
Recording will be paused.
4 Press the
To interrupt recording:
Press the REC PAUSE I6 (I6) button.
To resume recording, press 0 button.
To stop recording:
Press the ■ button.
Note:
If you hear a whistling noise whilst recording an AM station, move the AM loop aerial.
00
0 button to start recording.
00
I6I6
I6 (
I6) button.
I6 I6
I6I6
1
2
3
4
5
–
6
7
8
9
Tape recording
– Recording from the radio
10
11
ENGLISH
12
13
14
15
65
Page 66

CD-DVD500H
Dubbing from tape to tape
You can record from TAPE 1 to TAPE 2.
For recording, use only normal tapes. Do not use metal or CrO2 tapes.
1 Press the ON/STAND-BY button to turn the power on.
2 Load a prerecorded cassette into the TAPE 1 cassette compart-
ment. Insert a blank tape into the TAPE 2 cassette compartment.
It is recommended that the recording tape be the same length as the master
tape.
–
Tape recording
– Dubbing from tape to tape
3 Press the TAPE (1
display.
4 Press the REC PAUSE
Recording will be paused.
5 Press the
To stop dubbing:
Press the ■ button.
TAPE 1 and TAPE 2 will simultaneously stop.
00
0 button to start dubbing.
00
VV
V 2) button until “TAPE 1” appears in the
VV
I6 I6
I6I6
I6 (
I6) button.
I6 I6
I6I6
Erasing recorded tapes
1. Load the tape to be erased into the TAPE 2 cassette compartment.
2. Press the TAPE (1 V 2) button until “TAPE 2” appears in the display.
3. Press the REC PAUSE I6 (I6) button. (“ERASE” will appear.)
4. Press the 0 button to start erasing.
Note:
Make sure that the TAPE 1 is not in use.
66
ENGLISH
Page 67

Timer operation
CD-DVD500H
Timer playback:
The unit turns on and plays the desired source (DVD, CD, tuner, tape) at the preset
time.
Timer recording:
The unit turns on and starts recording from the tuner at the preset time.
■
Timer playback or timer recording
Before setting the timer:
1. Press the CLOCK button to check that the clock is accurate.
2. For timer playback: Load a cassette or discs to be played.
For timer recording: Load a cassette for recording in the TAPE 2
cassette compartment.
1 Press the ON/STAND-BY button to turn the power on.
2 Press the DVD/CD, TUNER (BAND) or TAPE (1
desired function.
To select the timer playback source: DVD/CD, TUNER (BAND) or TAPE (1 V 2)
To select the timer recording source: TUNER (BAND)
When you selected the TUNER (BAND), tune in to the desired station.
VV
V 2) button to select the
VV
3 Adjust the volume using the VOLUME control.
Do not turn the volume up too high.
4 Press the TIMER/SLEEP button repeatedly until “
displayed.
ff
f PLAY” or “
ff
ff
f REC” is
ff
1
2
3
4
5
6
7
8
– Timer operation –
Advanced features
9
10
For timer playback
XX
5 Press the TUNING/TIME (
press the MEMORY/SET button.
The illustrations show the timer playback setting.
WW
X or
W) button to specify the hour to start, then
XX
WW
For timer recording
Continued to the next page
ENGLISH
11
12
13
14
15
67
Page 68

CD-DVD500H
Timer operation (continued)
Sleep operation
6 Press the TUNING/TIME (
the MEMORY/SET button.
WW
W or
WW
7 The unit will enter the timer stand-by mode automatically.
–
To cancel the timer playback/timer recording:
Press the ON/STAND-BY button to turn the power on.
8 When the preset time is reached, playback or recording will start.
The volume will increase gradually until it reaches the volume you were listening
at before your system enters the timer stand-by mode.
The TIMER indicator will flash.
9 In timer playback:
If you select DVD, CD or TAPE, the unit will enter the stand-by mode after 1 hour.
When DVD, CD or TAPE playback is finished before 1 hour, the unit will enter the
stand-by mode at that time. If you select TUNER or VIDEO/AUX, it will enter the
Advanced features
stand-by mode 1 hour after the timer playback starts.
In timer recording:
– Timer operation / Sleep operation
When recording tape reaches its end, the timer recording will end, and the unit will
enter the stand-by mode.
The timer playback/timer recording setting will be cancelled if any other operation
than volume control is performed during its operation.
To reset or change the timer setting:
Perform “Timer playback or Timer recording” from the beginning.
Notes:
Once the time is set, the setting will be retained until a new time is entered.
When performing timer playback or recording using another unit connected to the
VIDEO/AUX IN sockets, select “VIDEO/AUX” in step 2. At this time, only this unit
will be turned on or enter the power stand-by mode automatically. (Another unit will
not be turned on or off.)
DVD timer playback may not be possible with some discs.
XX
X) button to specify the minutes, then press
XX
The radio, DVD, compact disc and cassette tape can all be turned off automatically.
■
Sleep operation
1 Play back the desired sound source.
2 Press the TIMER/SLEEP button repeatedly until “SLEEP” is displayed.
To change the sleep time:
Whilst the sleep time is displayed, press the TUNING/TIME (X or W) button.
(Maximum: 3 hours - Minimum: 1 minute)
3 hours - 5 minutes → 5-minute intervals
5 minutes - 1 minute → 1-minute intervals
3 Press the MEMORY/SET button.
4 Your system will enter the power stand-by mode automatically after the pre-
set time has elapsed.
The volume will be turned down 1 minute before the sleep operation finishes.
To cancel the sleep operation:
Press the ON/STAND-BY button whilst sleep timer is set.
To confirm the remaining sleep time:
Press the TIMER/SLEEP button whilst sleep timer is set.
The remaining sleep time is displayed for about 5 seconds.
Note:
Once the sleep time is set, it will remain unchanged until a new time is entered.
68
ENGLISH
Page 69

Enhancing your system
Leads required to connect external units
When external units are connected, you need commercially available leads.
CD-DVD500H
1
2
Optical digital lead
(not supplied)
To the digital
input socket
MD recorder, Dolby Digital
(5.1 ch)/DTS/MPEG audio
processor or amplifier
To the line output
sockets
Speaker with a
built-in amplifier
RCA lead
(not supplied)
TV
VCR etc.
3
4
5
–
6
7
8
9
– Enhancing your system
Advanced features
10
11
12
ENGLISH
13
14
15
69
Page 70

CD-DVD500H
Enhancing your system (continued)
To record on a tape from VCR etc.
1
Load a cassette in the TAPE 2 cassette compartment.
2 Press the VIDEO/AUX button.
I6I6
3 Press the REC PAUSE
4 Press the
00
0 button.
00
I6I6
I6 (
I6) button.
I6I6
I6I6
5 Play back the VCR etc.
Using alternate subwoofer speakers
When a commercially available speaker with a built-in amplifier is connected to this
–
unit, you can enjoy sound with emphasised bass.
1 Connect an RCA lead from a commercially available speaker with a built-in
amplifier to the SUBWOOFER PRE OUT socket.
2 Set the unit to “SW-EXT” in “Speaker size setting” (see page 43).
– Enhancing your system
Advanced features
Note:
No sound is heard from the external subwoofer when in the Bypass/Virtual mode.
Headphones
Before plugging in or unplugging the headphones, reduce the volume.
Be sure your headphones have a 3.5 mm (1/8") diameter plug and are between 16
ohms and 50 ohms impedance. The recommended impedance is 32 ohms.
Plugging in the headphones disconnects the speakers automatically. Adjust the
volume using the VOLUME control.
Note:
It is not possible to use the Normal/Phantom or Dolby Digital surround mode when
using your headphones.
When headphones are connected to the headphone socket, the Normal/Phantom mode
will be cancelled. (The unit will be set to the Bypass mode automatically.)
Enjoying 2 channel audio with digital connection
Digital connection to audio equipment or MD player without a Dolby digital decoder
Audio CD
Play the disc as you normally would, with the audio mode set (see page 34). With a
digital connection, audio of a disc recorded with DTS sounds abnormal in this case.
DVD video disc
The digital connection is the connection to audio equipment that is not equipped
with a decoder. Because of this, it cannot produce 5.1 channel sound when playing
a DVD whose audio track is recorded in Dolby Digital (5.1 channel), Dolby Surround (Pro Logic), DTS or MPEG audio. T o play the audio on such a DVD, you must
configure a digital connection with an audio processor or amplifier equipped with a
decoder for the type of audio on the DVD. If you do not have such an audio processor or amplifier, use a 2-channel analogue (Down Mix) connection. Discs recorded
with Linear PCM audio should play normally using the digital connection.
Digital connection to an MD to record a CD
When you are using a digital connection to record the contents of a CD on an MD, the
track numbers of the CD may not match the track numbers recorded on the MD.
After making the connection
Set the “ DIGITAL” or “MPEG” in “AUDIO SETUP” to “D-PCM” or “PCM” (see page 24).
Enjoying Dolby Digital (5.1 channel), DTS
and MPEG audio with digital connection
Connecting an amplifier with a Dolby Digital/DTS/MPEG audio digital surround processor or a Dolby Digital/DTS/MPEG audio digital surround decoder to this unit’s
optical digital socket provides richer, more powerful audio play.
To use DTS digital surround, use the disc menu screen (page 40) or the function
control screen (page 31) to select DTS audio.
After making the connection
Set the “ DIGITAL” or “MPEG” in “AUDIO SETUP ” to “BITSTREAM” (see page 24).
Notes:
To play a disc recorded with DTS, you need to use a DTS processor or amplifier.
This connection is not possible if the processor or amplifier to which you want to
connect does not have an optical digital input socket.
Refer to the operation manual for the processor or amplifier for information about
connecting to it.
70
ENGLISH
Page 71

Troubleshooting chart
CD-DVD500H
Many potential “problems” can be resolved by the owner without calling a service technician. If something is wrong with this product, check the following before calling your
authorised SHARP dealer or service centre.
■
General
Symptom
● The clock is not accurate.
●
When a button is pressed, the unit
does not respond.
● No sound is heard.
● The balance between the left and
right channels is bad.
● Hum or excessive noise.
● No sound is heard, or the sound
is too low, from the centre or surround speakers.
● The timer indicator is flashing.
■
DVD/CD player
Symptom
● No image from the DVD video
appears on the screen of a connected device.
● Playback does not start.
● Playback stops in the middle or is
not performed properly.
● Playback sounds are skipped, or
stopped in the middle of a track.
● Did a power failure occur?
Reset the clock. (Refer to page 16.)
● Set this unit to the power stand-by mode
and then turn it back on.
● If the unit still malfunctions, reset it.
(Refer to page 72.)
● Is the volume level set to “0”?
● Are the headphones connected?
● Are the speaker wires disconnected?
● Are the front and surround speakers
connected to the wrong channels?
● If an external unit is connected, are the left
and right channels connected improperly?
● Is the speaker lead plugged in incorrectly?
● Does the speaker lead run past other
electronic equipment?
● Are the plugs or terminals dirty?
● Is the “speaker size” item set to “NO” in
the “setup” operation (page 43)?
● Is the volume too low?
● Is the speaker wire shorted?
● Was the unit used at high volume for
many hours?
● Make sure the channel of the connected
TV is set to VIDEO or AV.
● Make sure video cables are connected
correctly.
● Is the disc loaded upside down?
● Does the disc dissatisfy the standards?
● Is the disc distorted or scratched?
● Is the unit located near excessive vibrations?
● Is the disc very dirty?
● Has condensation formed inside the unit?
Possible cause
Possible cause
■
Tuner
Symptom
● Radio makes constant unusual
noise or static.
■
Cassette deck
Symptom
● Cannot record.
● Cannot record tracks with proper
sound quality.
● Cannot erase completely.
● Sound skipping.
● Cannot hear treble.
● Sound fluctuation.
● Cannot remove the tape.
■
Remote control
Symptom
● The remote control does not op-
erate.
Possible cause
● Is the unit placed near the TV or com-
puter?
● Is the FM aerial or AM loop aerial placed
improperly?
Move the AC power lead away from the
aerial if located near.
Possible cause
● Is the erase-protection tab removed?
● Is it a normal tape?
(You cannot record on a metal or CrO2
tape.)
● Is there any slack?
● Is the tape stretched?
● Are the capstans, pinch rollers, or heads
dirty?
● If a power failure occurs during playback,
the heads remain engaged with the tape.
Do not open the compartment forcibly.
Wait until electricity resumes.
Possible cause
● Is the AC power lead of the unit un-
plugged?
● Is the battery polarity wrong?
● Are the batteries dead?
● Is the distance or angle incorrect?
● Does the remote control sensor receive
strong light?
1
2
3
4
5
6
7
8
References
– Troubleshooting chart –
9
10
11
12
13
14
15
ENGLISH
71
Page 72

CD-DVD500H
Troubleshooting chart (continued)
■ Condensation
Sudden temperature changes, storage or operation in an extremely humid environment may cause condensation inside the cabinet (DVD/CD pickup, tape heads, etc.)
or on the transmitter on the remote control.
Condensation can cause the unit to malfunction.
If this happens, leave the power on with no disc (or cassette) in the unit until normal
playback is possible (about 1 hour). Wipe off any condensation on the transmitter with
a soft cloth before operating the unit.
■ If trouble occurs
When this product is subjected to strong external interference (mechanical shock, excessive static electricity, abnormal supply voltage due to lightning, etc.) or if it is oper-
–
ated incorrectly, it may malfunction.
If such a problem occurs, do the following:
1. Set the unit to the stand-by mode and turn the power on again.
2. If the unit is not restored in the previous operation, unplug and plug in the
unit, and then turn the power on.
Note:
If neither operation above restores the unit, clear all the memory by resetting it.
■ Clearing all the memory (reset)
References
1. Press the ON/STAND-BY button to enter the power stand-by mode.
– Troubleshooting chart
2. Whilst pressing down the
ON/STAND-BY button until “CLEAR AL” appears.
Caution:
This operation will erase all data stored in memory including clock, timer settings and
tuner preset.
00
0 button and X-BASS/DEMO button, press the
00
■ Before transporting the unit
1. Press the ON/STAND-BY button to turn the power on.
2. Press the DVD/CD button.
3. Press the
the disc tray.
Remove all discs from the unit.
4. Press the
the disc tray.
Make sure that “NO DISC” is displayed.
77
7 OPEN/CLOSE button to open
77
77
7 OPEN/CLOSE button to close
77
5. Press the ON/ST AND-BY button to enter the
stand-by mode, “GOOD-BYE” is displayed.
6. When “GOOD-BYE” disappears, unplug
the AC power lead from the AC socket.
7. Insert the transport screw into the back of
the unit and tighten it with a flat-blade
screwdriver.
When timer indicator is flashing
When only TIMER indicator is flashing (other indicators have gone out), the unit is
overheated.
Due to a problem in the speaker circuit, the unit will enter the stand-by mode automatically.
In this case, take the following corrective
actions.
1. Unplug the AC power plug from the AC
socket.
2.
Make sure that the unit vent is not blocked.
3. Make sure that the speaker wires have
been correctly connected to the speaker
terminals.
4. After checking items 2 and 3 above, wait
for 2 or 3 hours before trying to use the
unit.
5. Reconnect the AC power lead.
The higher volume causes to flash the timer indicator. If it happens, lower the
volume.
72
ENGLISH
Page 73

Error indicators and warnings
hc15
.
hc15
.
Maintenance
CD-DVD500H
The error indicators and warnings described below appear on the display whenever
there is a disc play problem, operational problem, etc.
Display
15/
WRO NG D CIS T EYP
83/
0
01
::23 40
15/
REG NIO DCO E RER OR
83/
0
01
::23 40
O1N
G
ON
S
ON
O1N
G
ON
S
ON
BITRATE
ENTER
BITRATE
ENTER
C
C
00 10
Mbps
NOT
SELECT
LAL OWED
ENTER
RETURN
00 10
Mbps
ACC SES
SELECT
NDE I ED
ENTER
RETURN
The disc is not compatible with this unit.
The region number of the DVD is not 2
or ALL.
You are trying to perform an incorrect
operation.
The disc does not support the operation
described in this operation manual.
Meaning
Cleaning the tape-handling parts
Dirty heads, capstans or pinch rollers can cause poor sound and tape jams. Clean
these parts with a cotton swab moistened with commercial head/pinch roller cleaner
or isopropyl alcohol.
When cleaning the heads, pinch rollers, etc., unplug the unit which contains high voltages.
TAPE 1
TAPE 2
A
C
B
E
D
C
B
A Playback head D Erase head
B Capstan E Recording/Playback head
C Pinch roller
After long use, the deck’s heads and capstans may become magnetised, causing
poor sound. Demagnetise these parts once every 30 hours of playing/recording
time by using a commercial tape head demagnetise. Read the demagnetiser’s instructions carefully before use.
Cleaning the cabinet
Periodically wipe the cabinet with a soft cloth and a diluted soap solution, then with a
dry cloth.
Caution:
Do not use oil, solvents, petrol, paint thinners or insecticides on the unit.
1
2
3
–
4
5
6
7
8
References
9
10
11
– Error indicators and warnings / Maintenance
12
13
14
15
ENGLISH
73
Page 74

CD-DVD500H
Specifications
As part of our policy of continuous improvement, SHARP reserves the right to make
design and specification changes for product improvement without prior notice. The
performance specification figures indicated are nominal values of production units.
There may be some deviations from these values in individual units.
General
Power source AC 230 V, 50 Hz
Power consumption Power on: 255 W
Dimensions Width: 270 mm (10-11/16")
Weight 8.8 kg (19.4 lbs)
(*) This power consumption value is obtained when the demonstration mode is can-
–
celled in the power stand-by mode. Refer to page 14 to cancel the demonstration
mode.
Amplifier
Output power
– Specifications
References
Output terminals Front speakers (Main): 8 ohms
Input terminals Video/auxiliary (Audio Input): 500 mV/47 kohms
Power stand-by: 0.6 W (*)
Height: 330 mm (13")
Depth: 372 mm (14-11/16")
Front speakers
RMS
: 60 W (30 W + 30 W) (10
Front speakers
RMS: 80 W (40 W + 40 W)
Centre speaker:
RMS: 30 W
Surround speakers:
RMS: 40 W (20 W + 20 W)
Front speakers (Subwoofer): 6 ohms
Centre speaker: 6 ohms
Surround speakers: 8 ohms
Subwoofer (Pre-out): 10 kohms
Headphones: 16 - 50 ohms (recommended; 32 ohms)
Audio Digital Out: Optical
(Main)
(Subwoofer):
(10
% T.H.D., 1 kHz)
:
% T.H.D., 1 kHz)
(10
% T.H.D., 100 Hz)
(10
% T.H.D., 1 kHz)
DVD/CD player
Signal system NTSC/PAL
Supported disc types
Video output Output socket: SCART
Video signal Horizontal resolution: 500 lines
Audio signals Frequency characteristics:
DVD (Region number 2, ALL), audio CD, CD-R, CD-RW
Output levels: 0.7 Vp-p (75 ohms RGB output)
1.0 Vp-p (75 ohms composite output)
S/N ratio: 60 dB
Linear PCM DVD: 4 Hz to 22 kHz (48 kHz sampling)/
4 Hz to 44 kHz (96 kHz sampling)
CD: 4 Hz to 20 kHz
S/N ratio: 96 dB 1 kHz (CD)
Dynamic range: 96 dB (Linear PCM DVD)
96 dB (CD)
Total harmonic distortion ratio: 0.006 % maximum
Tuner
Frequency range FM: 87.5 - 108 MHz
AM: 522 - 1,620 kHz
Cassette deck
Frequency response 50 - 14,000 Hz (Normal tape)
Signal/noise ratio 55 dB (TAPE 1, playback)
Wow and flutter 0.25 % (WRMS)
50 dB (TAPE 2, recording/playback)
74
ENGLISH
Page 75

Specifications (continued) Glossary
LB
4:3
CD-DVD500H
Front speaker with subwoofer
Type 3-way, 130 mm (5-1/8") subwoofer, 100 mm (4")
Maximum input power
Rated input power
Impedance Subwoofer: 6 ohms/ Main: 8 ohms
Dimensions Width: 220 mm (8-5/8")
Weight 4.1 kg (9.0 lbs.)/each
woofer and 50 mm (2") tweeter
Subwoofer:
Main:
Subwoofer:
Main:
Height: 330 mm (13")
Depth: 245 mm (9-5/8")
80 W
60 W
40 W
30 W
Centre speaker
Type Full range, 100 mm (4")
Maximum input power
Rated input power
Impedance 6 ohms
Dimensions Width: 260 mm (10-1/4")
Weight 1.0 kg (2.2 lbs.)
60 W
30 W
Height: 142 mm (5-5/8")
Depth: 170 mm (6-11/16")
Surround speaker
Type Full range, 100 mm (4")
Maximum input power
Rated input power
Impedance 8 ohms
Dimensions Width: 200 mm (7-7/8")
Weight 0.6 kg (1.3 lbs.)/each
40 W
20 W
Height: 172 mm (6-3/4")
Depth: 95 mm (3-3/4")
Chapter
A section inside a title.
DIGITAL GAMMA
Corrects for gradations in dark areas of images to make them clearer.
DIGITAL SUPER PICTURE
Enhances the fine details of the image and outlines of the objects.
DTS
Theatre audio system by Digital Theater Systems, Inc. Six audio channels are used
to create accurate sound field positioning and realistic sound.
Letter box
Screen size that black bands are inserted at the top and bottom of the image to
allow playing of wide (16:9) software on a connected 4:3 TV.
Linear PCM audio
Audio signal recording system used for audio CDs.
Pan scan
4:3
PS
Screen size that cuts off the sides of the image to allow playing of wide (16:9)
software on a connected 4:3 TV.
Parental level
Setting that makes it possible to control the types of scenes that can be played by
this unit.
This setting helps to keep children from viewing adult material.
Pickup
Laser device that reads the data from a disc for playback.
Region number
Number identifying a geographic region of compatibility for a DVD.
Title
When a DVD contains multiple movies, each movie is called a “title”.
Title menu
This is a menu displayed by some DVDs for selection of chapters and subtitle set.
The title menu is also called a “top menu”.
Track
One tune on an audio CD.
View angle
Some DVDs have recordings from multiple angles, so you can select a view angle
when playing the disc.
Zoom
Allows you to zoom in and enlarge a specific part of an image.
1
2
3
4
5
–
6
7
8
References
– Specifications / Glossary
9
10
11
12
13
14
15
ENGLISH
75
Page 76

TERMS OF GUARANTEE
Sharp Electronics (UK) Ltd. (“Sharp”) guarantees to provide for the repair, or at its option the replacement, of this product subject to the conditions listed below:-
1. This guarantee shall only apply to faults which are due to inferior workmanship or materials. It does
not cover faults or damage caused by accident, misuse, fair wear and tear, neglect, tampering with
the product, or repair other than by a Service Facility appointed by Sharp.
2. As this product is intended for private domestic use only , the guarantee will not apply if the product
is used in the course of a business, trade or profession.
3. To benefit from this guarantee, any fault which occurs must be notified to Sharp, or its appointed
Service Facility within one year from the date this product was purchased. Proof of purchase must
be provided.
4. The guarantee does not cover carriage costs, jewelled styli, audio tapes, compact discs or batteries.
5. In the unlikely event of this product requiring repair, please contact the supplier from whom it was
purchased. Where this is not possible, please contact the Sharp Customer Information Centre on
the telephone number given below.
6. No person has any authority to vary the terms or conditions of this guarantee.
7. This guarantee is offered as an additional benefit to your statutory rights, and does not affect these
rights in any way.
If you have any difficulty operating this product, or would like information on other Sharp products,
please telephone the Sharp Customer Information Centre on the number given below.
Sharp Customer Information Centre - Telephone 08705 274277
SHARP ELECTRONICS (U.K.) LTD.
Sharp House, Thorp Road, Newton Heath, Manchester, M40 5BE
SHARP CORPORATION
9906
0008
TINSE0395AWZZ
A0108.TO
 Loading...