

Page 1
SOFTWARE SETUP GUIDE
(for printer)
MODEL
AR-PK6
PS3 EXPANSION KIT
Page
• INTRODUCTION
• REQUIREMENTS FOR
1
2
WINDOWS
• REQUIREMENTS FOR
MACINTOSH
3
• SECTIONS OF THE
OPERATION MANUALS
THAT ARE RELATED
TO THE PS3
EXPANSION KIT
Be sure to become thoroughly familiar with this manual to gain
the maximum benefit from the product.
12
Before installing this product, be sure to read the installation
requirements and cautions sections of the "Operation manual
(for general information and copier operation)".
Be sure to keep all operation manuals handy for reference
including this manual, the "Operation manual (for general
information and copier operation)" and operation manuals for any
optional equipment which has been installed.
Page 2

Warranty
While every effort has been made to make this document as accurate and helpful as possible, SHARP Corporation
makes no warranty of any kind with regard to its content. All information included herein is subject to change without
notice. SHARP is not responsible for any loss or damages, direct or indirect, arising from or related to the use of this
operation manual.
© Copyright SHARP Corporation 2004. All rights reserved. Reproduction, adaptation or translation without prior
written permission is prohibited, except as allowed under copyright laws.
Trademark Acknowledgments
Microsoft®, Windows®, Windows® 95, Windows® 98, Windows® Me, Windows NT® 4.0, Windows® 2000, Windows
XP, Windows® Server 2003, and Internet Explorer® are registered trademarks or trademarks of Microsoft
Corporation in the U.S.A. and other countries.
Macintosh, Power Macintosh, Mac OS, LaserWriter, and AppleTalk are registered trademarks of Apple Computer,
Inc.
IBM, PC/AT, and PowerPC are trademarks of International Business Machines Corporation.
PCL is a trademark of the Hewlett-Packard Company.
PostScript is a registered trademark of Adobe Systems Incorporated.
Acrobat
®
Reader Copyright © 1987-2002 Adobe Systems Incorporated. All rights reserved.
Adobe, the Adobe logo, Acrobat and the Acrobat logo are trademarks of Adobe Systems Incorporated.
NetWare is a registered trademark of Novell, Inc.
Agfa and the Agfa Rhombus, are registered trademarks of Agfa-Gevaert, A.G. All other product names are the
property of the respective owners.
All other trademarks and copyrights are the property of their respective owners.
®
The display screens, messages, and key names shown in the manual may differ from those on the actual machine
due to product improvements and modifications.
Page 3

INTRODUCTION
The PS3 Expansion Kit AR-PK6 allows the machine to be used as a PostScript-compatible printer.
PostScript compatibility makes it possible to use the machine not only as a printer in Windows, but also as a printer
for the Macintosh. Note that printing from the Macintosh is only possible via a network connection (parallel and USB
connections are not available on the Macintosh).
This manual explains how to install the PS printer driver that comes with the PS3 Expansion Kit (AR-PK6), and
provides information that must be added to the other operation manuals due to the installation of the AR-PK6. When
using the printer function, refer to this manual along with the manuals that come with the machine.
1. Installing the PS printer driver
The PS printer driver is installed from the Software CD-ROM in the PS3 Expansion Kit (AR-PK6).
● To install the printer driver in Windows, see page 2.
● To install the printer driver in Macintosh, see pages 3 to 11.
2. Information that must be added to the other operation manuals due to the
installation of the PS3 Expansion Kit (AR-PK6) can be found on page 12.
NOTE
The PS3 Expansion kit AR-PK6 can only be installed if the machine has the printer function.
Software license
The SOFTWARE LICENSE will appear when you install the software from the CD-ROM. By using all or any portion
of the software on the CD-ROM or in the machine, you are agreeing to be bound by the terms of the SOFTWARE
LICENSE.
This operation manual is described based on the American spelling standard.
1
Page 4
REQUIREMENTS FOR WINDOWS
(For Macintosh requirements, see page 3.)
To use the machine as a PostScript-compatible printer in Windows, the PostScript printer driver or PPD file
(PostScript printer description file) must be installed in your computer. These are installed from the Software CDROM that comes with the PS3 Expansion Kit (AR-PK6).
Installing the PostScript printer driver
Insert the Software CD-ROM into the CD-ROM drive of your computer. With the exception of the items indicated
below, the installation procedure is the same as for installing the PCL printer driver that is included with the machine.
Install the PostScript printer driver as explained on pages 4 to 15 of the "SOFTWARE SETUP GUIDE (for printer)".
Please note the following:
●The CD-ROM to be inserted in your computer's CD-ROM drive is the Software CD-ROM in the PS3 Expansion Kit
(AR-PK6).
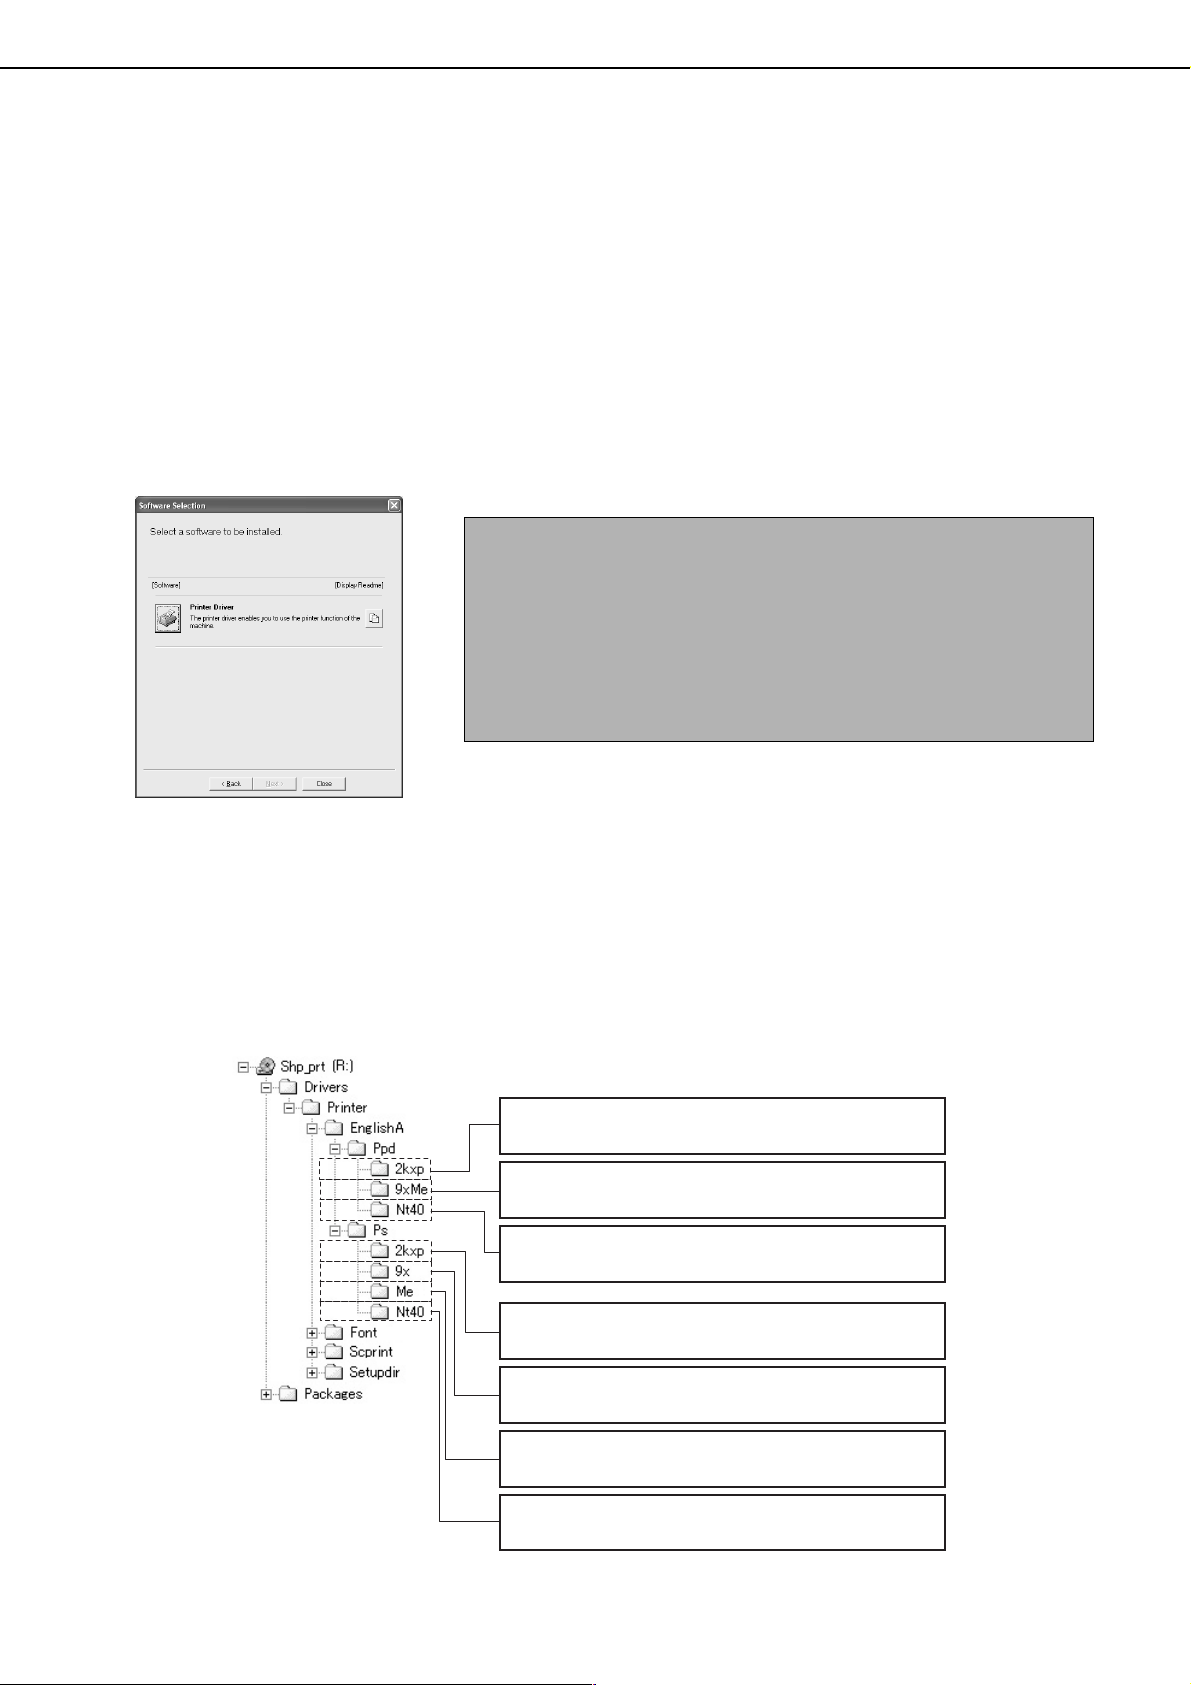
●The "Software Selection" screen described on pages 5, 7, 10, 12 and 14 is different. The following items appear:
NOTES
● Install the PCL5e Printer Driver, PCL6 Printer Driver, PC-FAX
Driver, Printer Status Monitor, Printer Administration Utility, and
other software packages from the CD-ROMs that accompany the
machine and the printer controller.
● During installation of the printer driver at left, a screen will appear
that allows installation of the PS Display font. Install the PS Display
font as needed.
●An explanation of the PCL6/PCL5e selection screen appears on pages 6 and 8 of the "SOFTWARE SETUP GUIDE
(for printer)"; however, this screen does not appear during installation from the Software CD-ROM in the PS3
Expansion Kit (AR-PK6).
If you use the Add Printer wizard to install the PostScript printer driver instead of the installer, or use the PPD file
(PostScript printer description file), specify the following directory as the location from which the files are to be copied.
AR-PK6 Software CD-ROM directory information
(Example: "R" is the CD-ROM drive)
*
Path for using PPD file in Windows XP/2000/Server 2003
R:\Drivers\Printer\EnglishA*\Ppd\2kxp
Path for using PPD file in Windows 95/98/Me
R:\Drivers\Printer\EnglishA*\Ppd\9xMe
Path for using PPD file in Windows NT 4.0
R:\Drivers\Printer\EnglishA*\Ppd\Nt40
Path for using PS driver in Windows XP/2000/Server 2003
R:\Drivers\Printer\EnglishA*\Ps\2kxp
Path for using PS driver in Windows 95/98
R:\Drivers\Printer\EnglishA*\Ps\9x
2
Path for using PS driver in Windows Me
R:\Drivers\Printer\EnglishA*\Ps\Me
Path for using PS driver in Windows NT 4.0
R:\Drivers\Printer\EnglishA*\Ps\Nt40
* "English A" in North America. "English" in Europe.
Page 5

REQUIREMENTS FOR MACINTOSH
(For Windows requirements, see page 2.)
To use the machine as a PostScript-compatible printer for the Macintosh, the PPD file (PostScript printer description
file) must be installed in your computer. This is installed from the Software CD-ROM in the PS3 Expansion Kit ARPK6. Note that printing is only possible in a Macintosh environment via a network connection. Your Macintosh must
be connected to a network by means of an Ethernet port to use the machine as a printer (parallel and USB
connections are not available on the Macintosh).
NOTES
● If this printer is connected to the computer via a cross cable, be sure to turn on the Macintosh computer before
turning on the printer. If not, the printer will not be recognized as a network printer.
● Make sure that "Enable EtherTalk" in "Network settings" in the key operator programs is enabled (a checkmark
appears) (see page 12).
The PS3 Expansion Kit AR-PK6 Software CD-ROM contains the following software.
●●●●
PPD file
The PPD file for Macintosh is the file which a Macintosh computer refers to when using its LaserWriter printer
driver for printing.
●●●●
Screen fonts
The Software CD-ROM contains the screen fonts for Macintosh. If you use the PPD file, install the screen fonts
as needed.
Before installing the PPD file
Before installing the PPD file, check the hardware and software requirements.
• Operating system: Mac OS 8.6 to 9.2.2, 10.1.5 and 10.2 to 10.2.8 (excluding 10.2.2), 10.3 to 10.3.3
• For other conditions such as CPU and RAM capacity, the requirements of the operating system must be
satisfied.
NOTE
If you are using Mac OS 8.6 to 9.2.2, make sure that LaserWriter8 has been installed and that the "LaserWriter8"
checkbox is selected ( ) in "Extensions Manager" in "Control Panels".
3
Page 6

REQUIREMENTS FOR MACINTOSH
Installing the PPD file
In order to print from a Macintosh, the PPD file must be installed. To install the PPD file in your Macintosh computer,
follow the procedure below.
■■■■
Installation in Mac OS X
Insert the PS3 Expansion Kit AR-
1
PK6 Software CD-ROM into your
computer's CD-ROM drive.
Double-click the CD-ROM icon on
2
the desktop.
Double-click the [MacOSX] folder.
3
Double-click the folder of the
4
operating system version you are
using.
● In Mac OS X v10.1.5, double-click the [Version
10.1] folder.
● In Mac OS X v10.2 to 10.2.8 (excluding 10.2.2),
double-click the [Version 10.2] folder.
● In Mac OS X v10.3 to 10.3.3, double-click the
[Version 10.3] folder.
Double-click the [AR-PK6] icon.
5
The installer window will appear.
NOTE
When the "Authenticate" window appears, enter the
password and click the "OK" button.
The Software License Agreement
7
window will appear. Make sure that
you understand the contents of the
license agreement, and then click
the [Continue] button.
A message will appear asking you if you agree to
the terms of the license. Click the [Agree] button.
Select the hard disk in which you
8
wish to install the PPD file, and
click the [Continue] button.
Be sure to select the hard disk in which your
operating system is installed.
Click the [Install] button.
9
Begin installation of the PPD file.
Click the [Continue] button.
6
When the message "The software
10
was successfully installed"
appears in the installation window,
click the [Close] button.
This completes the installation of the PPD file.
4
Page 7

■■■■ Installation in Mac OS 8.6 - 9.2.2
REQUIREMENTS FOR MACINTOSH
Insert the PS3 Expansion Kit AR-
1
PK6 Software CD-ROM into your
computer's CD-ROM drive.
Double-click the CD-ROM icon on
2
the desktop.
Double-click the [MacOS] folder.
3
Double-click the [Installer] icon.
4
The installer window will appear.
Click the [Install] button.
5
The Software License Agreement
6
window will appear. Make sure that
you understand the contents of the
license agreement, and then click
the [Yes] button.
Read the message in the window
7
that appears and click the
[Continue] button.
Begin installation of the PPD file.
After the installation, a message prompting you to
restart your computer will appear. Click the [OK]
button and restart your computer.
This completes the installation of the PPD file.
Installing the screen fonts in Mac OS 8.6 - 9.2.2
The screen fonts for Mac OS 8.6 to 9.2.2 are contained in the [Font] folder in the [MacOS] folder of the PS3 Expansion
Kit AR-PK6 Software CD-ROM. Install the screen fonts as needed. To install the screen fonts, copy the required
screen font suitcase folders to the [Fonts] folder under the [System Folder] of your computer.
NOTE
If any malfunction occurs due to the installation of screen fonts, delete the fonts from the system.
5
Page 8

REQUIREMENTS FOR MACINTOSH
Configuring the printer driver
Follow the steps below to configure the machine's printer driver.
■■■■ Mac OS X v10.2 - 10.3.3
Make sure that the machine is
1
powered on.
Select [Applications] from the [Go]
2
menu.
Double-click the [Utilities] folder.
3
Double-click the [Print Center]
4
icon.
● In Mac OS X v10.3 to 10.3.3, double-click the
[Printer Setup Utility] icon.
● The "Printer List" window appears.
Click the machine's model name in
7
the list.
The name of the machine that appears is the
name that was entered in the AppleTalk settings
when the network settings were configured
("xxxxxx" is a sequence of characters that varies
depending on your machine).
Select [Sharp] in the [Printer
8
Model] menu.
The PPD file selection window appears.
NOTE
If this is the first time you are installing a printer driver
on your computer, a confirmation message will
appear. Click the "Add" button.
Click [Add].
5
Select [AppleTalk] in the menu at
6
the top of the window.
A list of printers connected to the network will
appear.
NOTE
If multiple AppleTalk zones are displayed, select the
zone which includes the printer.
6
Page 9

REQUIREMENTS FOR MACINTOSH
Select the PPD file of the machine.
9
Click the [Add] button.
10
The machine is added to the list of printers.
Click the name of the machine in
11
the "Printer List" window, and
select [Show Info] from the
[Printers] menu.
Set the printer configuration based
13
on the options that have been
installed, and then click the [Apply
Changes] button.
Close the window.
14
This completes the configuration of the printer
driver.
The "Printer info" window will appear.
Select [Installable Options] in the
12
menu.
7
Page 10

REQUIREMENTS FOR MACINTOSH
■■■■ Mac OS X v10.1.5
Make sure that the machine is
1
powered on.
Select [Applications] from the [Go]
2
menu.
Double-click the [Utilities] folder.
3
Double-click the [Print Center]
4
icon.
The "Printer List" window appears.
NOTE
If this is the first time you are installing a printer driver
on your computer, a confirmation message will
appear. Click the "Add" button.
Click the machine's model name in
7
the list.
The name of the machine that appears is the
name that was entered in the AppleTalk settings
when the network settings were configured
("xxxxxx" is a sequence of characters that varies
depending on your machine).
Click the [Printer Model] menu and
8
select [Other] in the list of PPD
files.
The PPD file selection window will appear.
Click [Add Printer...].
5
Select [AppleTalk] in the menu at
6
the top of the window.
A list of printers connected to the network will
appear.
NOTE
If multiple AppleTalk zones are displayed, select the
zone which includes the printer.
Click the startup disk name,
9
[Library], [Printers], [PPDs],
[Contents], [Resources], [en.lproj],
and select the PPD file with your
model name.
Click the [Choose] button.
10
Click the [Add] buton.
11
This completes the configuration of the printer
driver.
8
Page 11

■■■■ Mac OS 8.6 - 9.2.2
REQUIREMENTS FOR MACINTOSH
Select [Chooser] from the Apple
1
Menu.
Click the [LaserWriter 8] icon.
2
● The model name of your network-connected
machine ("SCxxxxxx") appears in the "Select a
PostScript Printer" list on the right.
The name of the machine that appears is the
name that was entered in the AppleTalk
settings when the network settings were
configured ("xxxxxx" is a sequence of
characters that varies depending on your
machine).
● If multiple AppleTalk zones are displayed,
select the zone which includes the printer.
Click the machine's model name
3
("SCxxxxxx") in the "Select a
PostScript Printer" list.
Click the [Create] button.
4
● If the "Select a PostScript™ Printer Description
File" dialog box appears, select the PPD file of
the machine, and then click the [Select] button.
● If the "Select a PostScript™ Printer Description
File" dialog box does not appear, follow these
steps to select the PPD file manually when you
return to the Chooser dialog box.
1) Verify that the machine is selected in the
"Select a PostScript Printer" list, and then
click the [Setup] button and the [Select PPD]
button.
2) Select the PPD file of the machine, and then
click the [Open] (or [Select]) button.
3) Click the [OK] button.
Set the printer configuration based
6
on the options that have been
installed, and then click the [OK]
button.
Click the [OK] button to close the
7
dialog box.
Click the Close box to close the
8
Chooser.
This completes the configuration of the printer
driver.
Verify that the machine is selected
5
in the "Select a PostScript Printer"
list, and then click the [Setup]
button and the [Configure] button.
9
Page 12

REQUIREMENTS FOR MACINTOSH
Configuring the print settings
The contents of the windows that appear when configuring the paper settings and print condition settings vary by
country and region.
■■■■ Paper settings
Before printing, configure the paper settings in the
printer driver.
The File menu of the software application is used to
open the settings. The settings and selections vary
depending on the OS version and software
application.
Select [Page Setup] from the [File]
1
menu of the application.
The following window will appear. (The window
varies depending on the operating system
version, printer driver version, and software
application.)
Adjust each setting.
2
Paper size, reduction/enlargement, and
orientation can be configured.
Click the [OK] button.
3
■■■■ Print condition settings
Select [Print] from the [File] menu
1
of the application.
The following window will appear. (The window
varies depending on the operating system
version, printer driver version, and software
application.)
Adjust the settings.
2
Click next to [Copies &
Pages] ([General] in Mac OS
8.6 to 9.2.2) and select the
settings that you wish to
configure from the pull-down
menu. The corresponding
setting screen will appear.
NOTES
● The items that appear in this menu will vary
depending on the operating system version and
software application.
● To print when auditing mode is enabled, enter
your 5-digit account number in [Account Number]
in the [Job Handling] menu.
When auditing mode is enabled, a print job may
not be printed if an account number is not entered
or an incorrect account number is entered. This
depends on the key operator program settings.
See "Cancel jobs of invalid accounts" in the "Key
operator's guide".
10
Click the [Print] button.
3
Page 13

Uninstalling the PPD file
■■■■ Mac OS 8.6 - 9.2.2
Insert the PS3 Expansion Kit AR-
1
PK6 Software CD-ROM into your
computer's CD-ROM drive.
Double-click the CD-ROM icon on
2
the desktop and double-click the
[MacOS] folder.
Double-click the [Installer] icon.
3
Select [Remove] from the Install
4
menu and then click the [Remove]
button.
REQUIREMENTS FOR MACINTOSH
NOTE
There is no remove tool for Mac OS X. The PPD file
for Mac OS X has been copied to the following folder
in the startup disk. To delete the PPD file, move it to
the Trash.
[Library] - [Printers] - [PPDs] - [Contents] [Resources] - [en.lproj] folder
Delete the SHARP PPD file from this folder.
11
Page 14

SECTIONS OF THE OPERATION MANUALS THAT
ARE RELATED TO THE PS3 EXPANSION KIT
The sections of each operation manual that are related to the PS3 Expansion kit (AR-PK6) are explained below. The
"OPERATION MANUAL (for printer)" is on the "Software CD-ROM (1)" in PDF format.
■■■■ Sections of the "OPERATION MANUAL (for general information and copier
operation)" that are related to the PS3 Expansion kit:
The following custom settings are related to the kit:
● PS Font list
Page 2-14, "PS Font list " in "Printer test page" in "List print"
● Extended font list
Page 2-14, "PS Extended font list" in "Printer test page" in "List print"
■■■■ Sections of the "OPERATION MANUAL (for printer)" that are related to the PS3
Expansion kit:
The following printer configuration settings are related to the kit:
● PostScript Settings
Page 4-5, "PostScript settings" in "MAKING CONFIGURATION SETTING".
When "PostScript settings" is touched, "Print PS Errors" appears. The factory default setting is disabled (no
checkmark). When the checkbox is selected and a PostScript error occurs, the error will be printed.
The following items in CHAPTER 6, KEY OPERATOR PROGRAMS are related to the kit:
Pages 6-2, 6-4, 6-8; the following item in "Network settings":
● "Enable EtherTalk". The factory default setting for this program is enabled (a checkmark appears). This is
required for use in a Macintosh environment.
The following items in "Interface settings" on pages 6-2, 6-4, and 6-6 are related to the kit:
● "PostScript" in the emulated printer language settings in "Parallel port emulation switching" in "Interface
settings".
● "PostScript" in the emulated printer language settings in "USB port emulation switching" in "Interface settings".
● "PostScript" in the emulated printer language settings in "Network port emulation switching" in "Interface
settings".
■■■■ Sections of the KEY OPERATOR'S GUIDE that are related to the PS3 Expansion
kit:
The following program is related:
● PS3 Expansion Kit
Pages 3, 6, and 13; "PS3 expansion kit " in "Product key".
To use the machine as a PostScript compatible printer, the product key (password) must be entered (this is
only required once) using the "PS3 Expansion kit" program. The product key is provided by your dealer.
12
Page 15

Page 16

AR-PK6
This manual has been printed using a vegetable-based soy oil ink
to help protect the environment.
Printed on 100% post-consumer recycled paper
PRINTED IN CHINA
2005A KS1
TINSE2858FCZZ
 Loading...