

Page 1

AR-FR7 U
This manual contains very important information.
Please keep the manual in a safe place where it
will not be lost.
Ce manuel contient des informations très
importantes. Conservez-le précieusement et
veillez à ce qu'il ne soit pas égaré.
Diese Bedienungsanleitung enthält wichtige
Informationen. Bewahren Sie die
Bedienungsanleitung zum späteren Nachschlagen
an einem sicheren Ort auf.
Este manual contiene información muy importante.
Mantenga el manual en un lugar seguro donde sea
fácil de encontrar.
AR-FR7 U
APPLICATION NUMBER
NUMERO D'APPLICATION
ANWENDUNGSNUMMER
NÚMERO DE APLICACIÓN
Data Security Kit
Operation Manual
Kit de sécurité des
données
Mode d'emploi
DatenSicherheitspaket
Bedienungsanleitung
ENGLISH
FRANÇAIS
DEUTSCH
MACHINE SERIAL
NUMBER
NUMERO DE SERIE DE
LA MACHINE
SERIENNUMMER
NÚMERO DE SERIE DE
LA MÁQUINA
PRODUCT KEY
CLE PRODUIT
PRODUKTSCHLÜSSEL
CLAVE DE PRODUCTO
Kit de seguridad de
datos Manual de
instrucciones
This Class A digital apparatus complies
with Canadian ICES-003.
Get appareil numérique de la classe A est
conforme à la norme NMB-003 du Canada.
ESPAÑOL
Page 2

English
Français
Contents
Introduction .................................. 1
When the security kit is installed.. 1
KEY OPERATOR PROGRAMS... 2
●
KEY OPERATOR PROGRAM
LIST
........................................ 2
●
Using the key operator
programs ................................ 2
●
Security settings ..................... 3
●
Product key ............................ 6
Deutsch
Inhalt
Einführung.................................. 13
Bei installiertem Daten-
Sicherheitspaket ........................ 13
GERÄTEBETREUER-
PROGRAMME ........................... 14
●
GERÄTEBETREUERPROGRAMMLISTE
●
Verwendung der Gerätebetreuer-
Programme
●
Einstellung und Verwendung
der Sicherheitsfunktion......... 15
●
Prod.schluess....................... 18
............................. 14
............... 14
Sommaire
Introduction...................................7
Lorsque le kit de sécurité est
installé ..........................................7
PROGRAMMES DU
RESPONSABLE...........................8
●
LISTE DES PROGRAMMES
DU RESPONSABLE ...............8
●
Utilisation des programmes du
responsable
●
Paramétrage et utilisation de la
fonction de sécurité.................9
●
Cles produit...........................12
.............................8
Español
Contenido
Introducción................................19
Cuando se instala el kit de
seguridad....................................19
PROGRAMAS DEL OPERADOR
PRINCIPAL
●
LISTA DE PROGRAMAS DEL
OPERADOR PRINCIPAL
●
Uso de los programas del
operador principal .................20
●
Ajustes y uso de la función de
seguridad ..............................21
●
Clave de producto.................24
.................................20
.......20
Page 3
Introduction
OUTPUT
2 SIDED C
The AR-FR7 U adds a security function to the Digital Full Color Copier/Printer and Digital Full
Color Multifunctional System. When the copy function of a Digital Full Color Copier/Printer and
Digital Full Color Multifunctional System with the security function is used, data held in memory
for the copy job is erased as soon as the job is finished. In addition, when the printer or the
network scanner function (Including the scanner function using the TWAIN driver) is used, the
data of each job is erased from memory or the peripheral hard disk as soon as the job is finished.
The data clearing system of this product clears data by overwriting it with random values,
and thus security is ensured even if data clearing is only performed once.
This operation manual is described based on the American spelling standard.
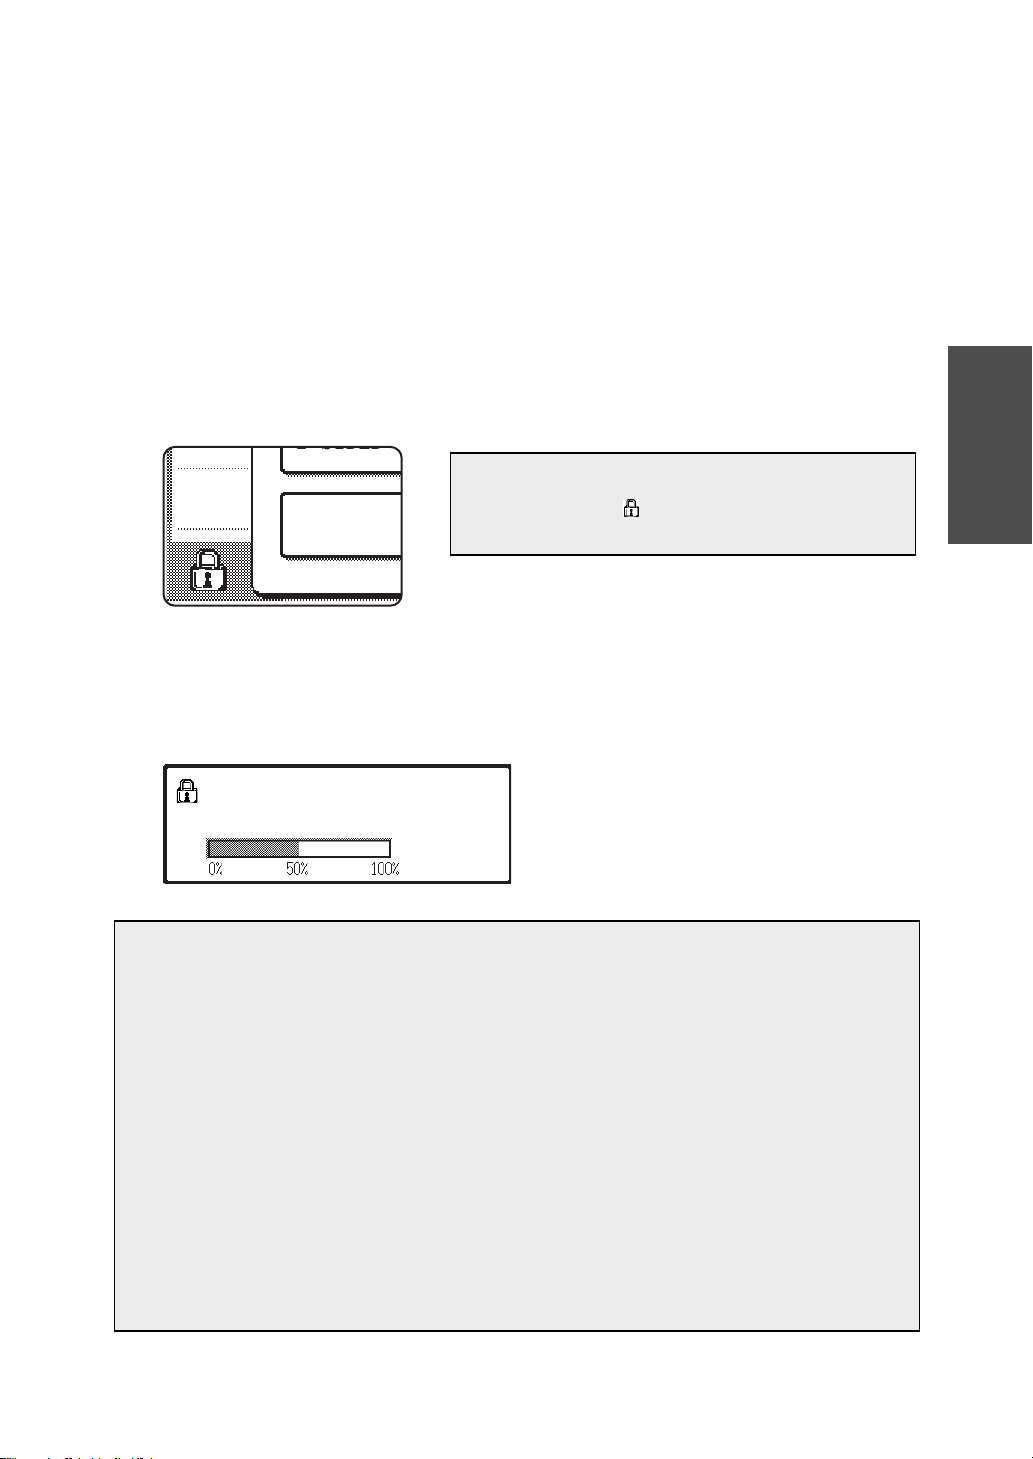
When the security kit is installed
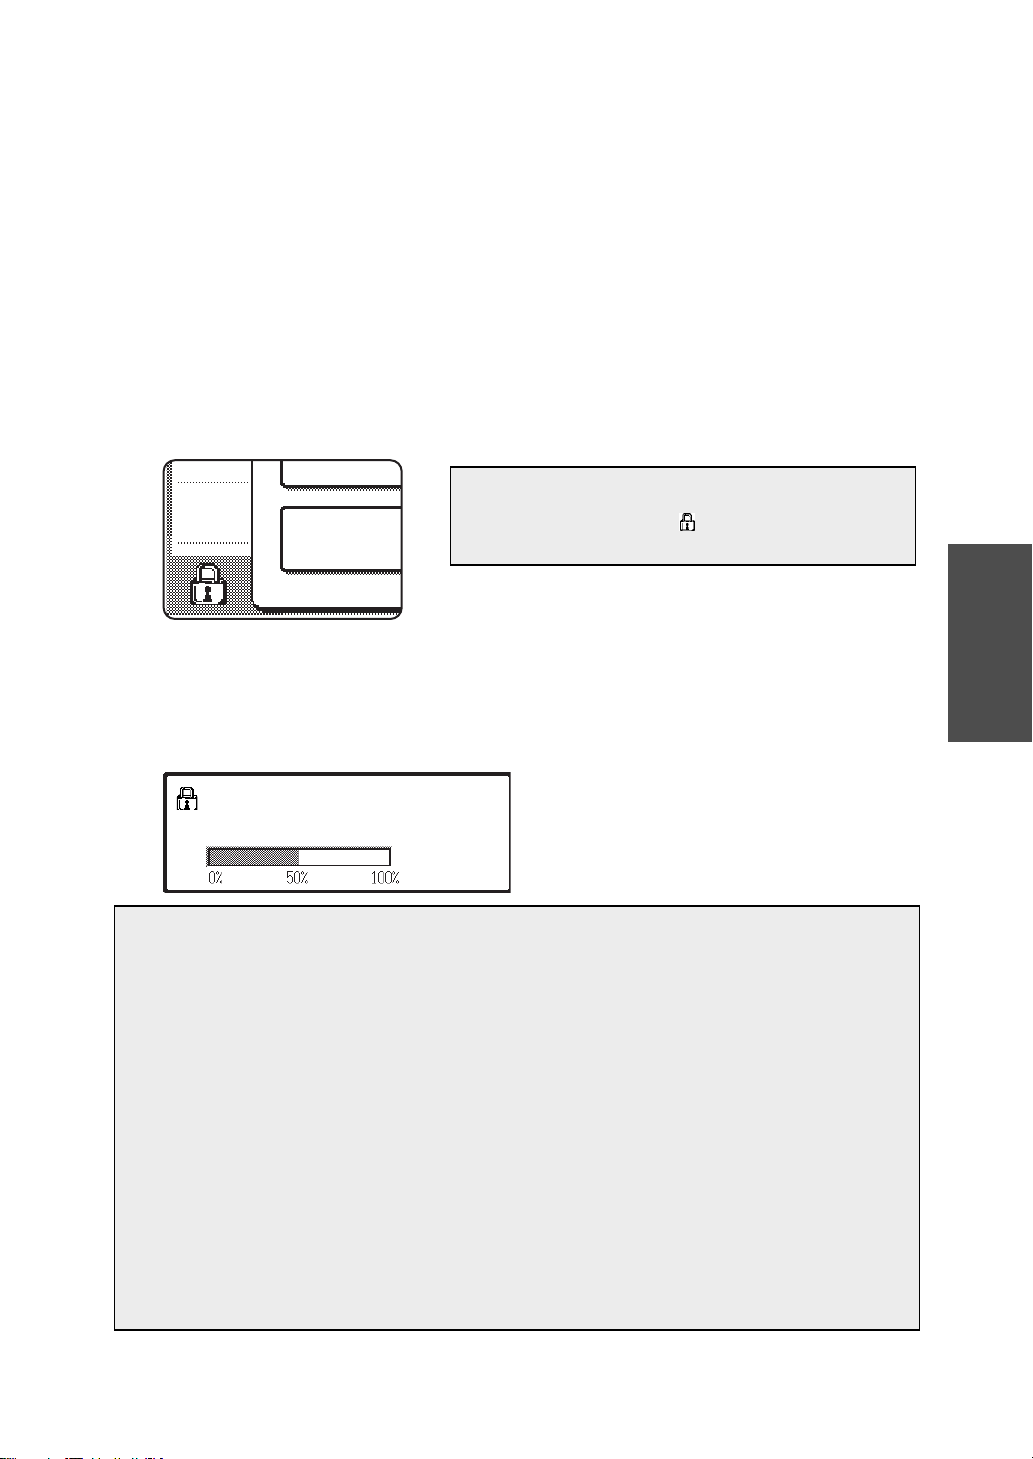
When the security kit is installed, the following icon appears on the touch panel.
NOTE
Touch the icon ( ) to view information on the
security kit version.
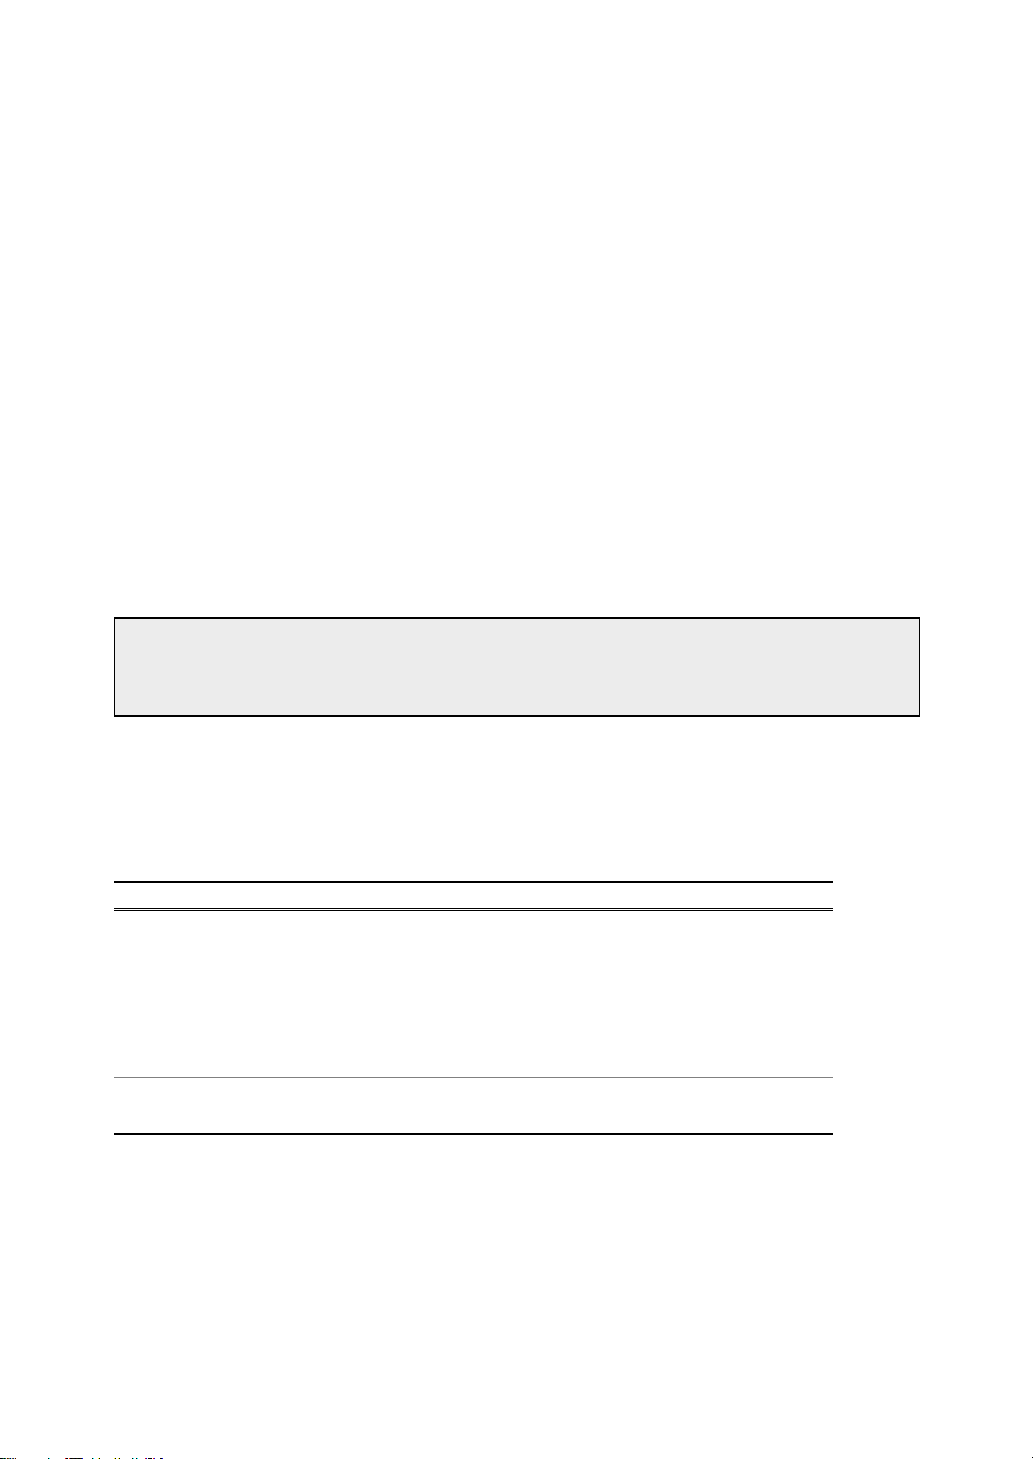
When the security kit is installed, data remaining in the unit is automatically erased
after each copy, print and scan job.
When clearing of the data on the peripheral hard disk drive begins, the following
message appears for 6 seconds*.
Note that if more than 6 seconds* is required to clear the data, the message will be
displayed until data clearing is finished.
*
The duration of the message display can
DATA IS BEING CLEARED.
NOTES
be changed with the key operator program,
"MESSAGE TIME SETTING". (See page 8
of the key operator’s guide.)
ENGLISH
Using the printer function
When printing a normal print job in printer mode, the image data is automatically
●
cleared from memory and the peripheral hard disk after printing is finished. Please
note, however, that when the job retention function (see page 5-2 of the "Operation
Manual for printer" on the "PRINTER UTILITIES" CD-ROM) is used for printing, the
data is retained on the peripheral hard disk. The retained data can be erased from the
Print hold job list display of the touch panel (see page 5-2 of the "Operation Manual for
printer" on the "PRINTER UTILITIES" CD-ROM).
When the security kit is installed, the "DELETE THE PRINT HOLD DATA" key
●
operator program on page 6-5 of the "Operation Manual for printer" cannot be used.
To erase all retained data, use the "CLEAR ALL MEMORY" (page 4 of this manual).
If the unit power is turned off while image data is being cleared from the hard disk
●
drive or before jobs are finished, the data may not be completely erased. If you do not
wish to leave partially cleared data when the power is turned off, it is recommended
that you use the key operator program, "CLEAR ALL MEMORY" (page 4 of this
manual), to complete data clearing before turning off the power.
1
Page 4
Note:
To ensure that the data security function of the machine provides maximum security,
observe the following:
● The key operator plays an important role in maintaining security. Exercise appropriate
care in selecting the person that will assume the job of key operator.
Always keep "POWER UP AUTO CLEAR" (page 5 of this manual) enabled.
●
Be sure to change the key operator code immediately each time a new person takes over
●
as key operator.
Change the key operator code on a regular basis (at least once every 60 days).
●
During the procedure for changing the key operator code, the current key operator code
●
and new key operator code appear in the display. Be sure to complete the procedure
promptly.
Do not select a number for the key operator code that can be easily guessed.
●
● The key operator programs are very important for security management. The
administrator of the machine should inform users that they are not to access the key
operator programs without permission.
If the administrator and users of the machine are to be out of the office, security measures
●
such as locking the machine should be taken to prevent unauthorized access.
The customer bears responsibility for control of copies of documents made on the
●
machine.
CAUTION
When "POWER UP AUTO CLEAR" (explained on page 5 of this manual) is enabled, the
wait time when the machine is powered on may occasionally be very long.
KEY OPERATOR PROGRAMS
This section explains the key operator programs in the unit that are related to the security function.
KEY OPERATOR PROGRAM LIST
Program name Page
DEVICE CONTROL
SECURITY SETTINGS
CLEAR ALL MEMORY 4
NUMBER OF TIMES CLEAR ALL MEMORY PROGRAM IS REPEATED
POWER UP AUTO CLEAR 5
DISABLE PRINTING OF SENDING ADDRESS LIST 5
PRODUCT KEY
DATA SECURITY KIT 6
Using the key operator programs
Follow the procedure on pages 3 and 4 of the key operator's guide to configure the settings
in the key operator programs.
For explanations of each of the settings, see the following pages.
4
2
Page 5
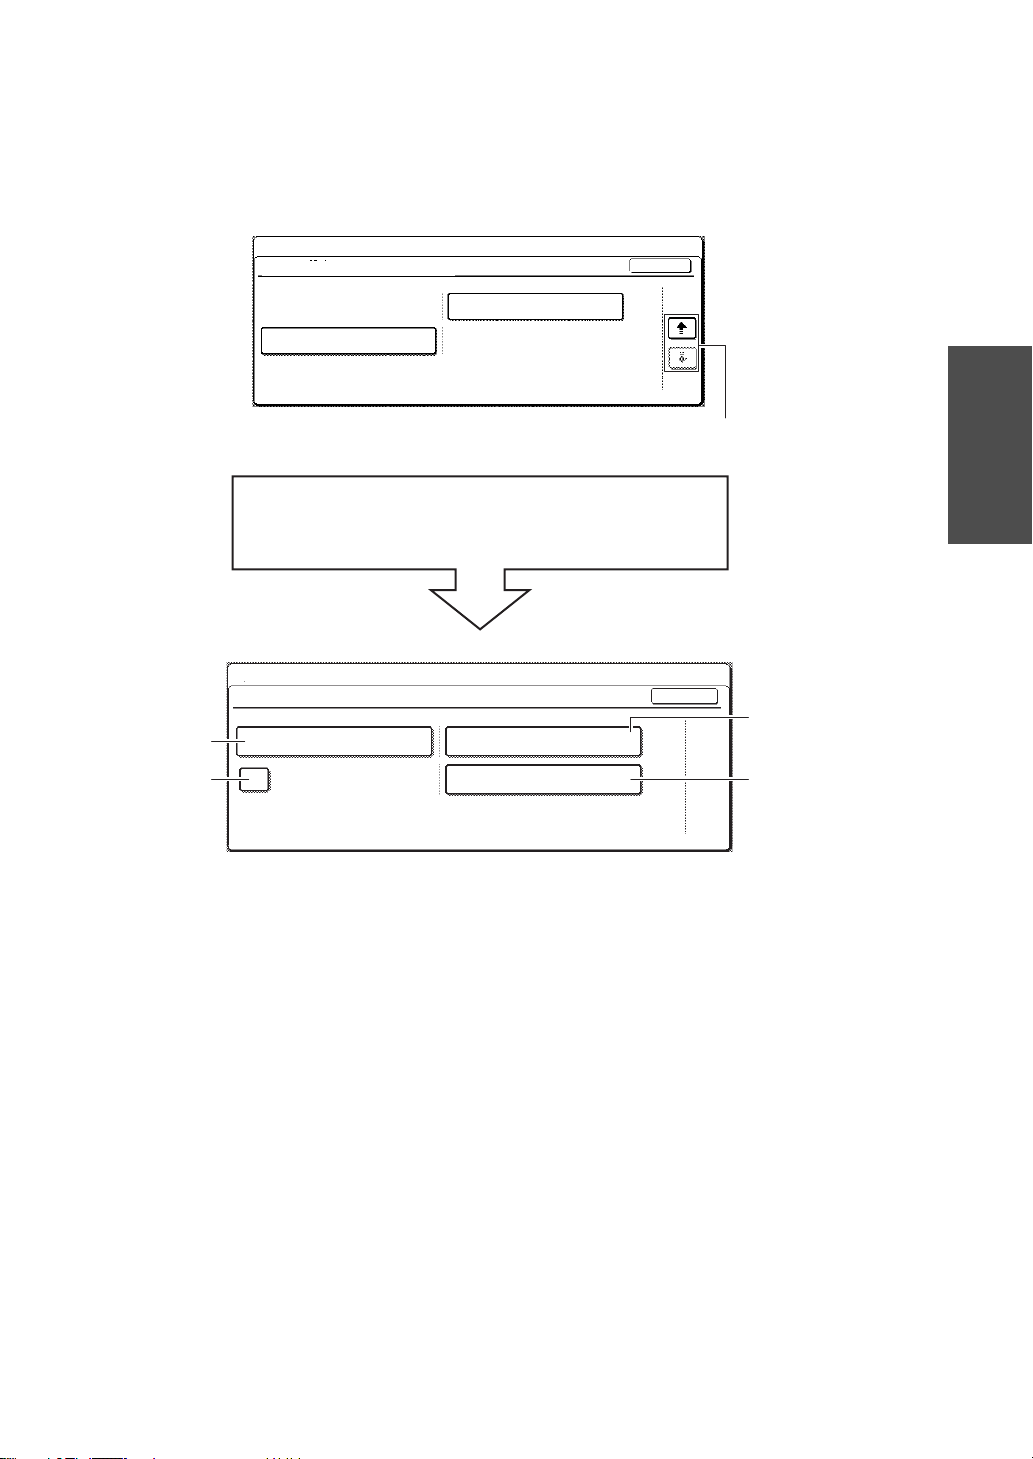
Security settings
When the security kit is installed, the "SECURITY SETTINGS" key is added to the "DEVICE
CONTROL" screen of the key operator programs. Touch this key to display the menu
screen for the security setting programs.
1-(1)
KEY OPERATOR PROGRAMS
DEVICE CONTROL
SECURITY SETTINGS
When the "SECURITY SETTINGS" key is touched,
the following screen appears.
KEY OPERATOR PROGRAMS
SECURITY SETTINGS
CLEAR ALL MEMORY
2
POWER UP AUTO CLEAR
OK
RETURN FROM COPY MODE
TIMING
3/3
Third "DEVICE CONTROL" screen
OK
NUMBER OF TIMES CLEAR ALL
MEMORY PROGRAM IS REPEATED
DISABLE PRINTING OF
SENDING ADDRESS LIST
NUMBER OF TIMES AUTO CLEAR AT
JOB END PROGRAM IS REPEATED
1
1
ENGLISH
1-(2)
3
* The number of display screens and layout of the keys may differ slightly from the
above depending on your machine model and the peripheral devices installed.
3
Page 6

■
SECURITY SETTINGS
1-(1) CLEAR ALL MEMORY
Use this setting when you wish to manually clear data stored in the unit's memory
and on the hard disk.
NOTE
We recommend that you execute this program before turning off the power.
Touch the [CLEAR ALL MEMORY] key. The following screen appears to confirm
your selection.
[Clear screen 1]
● To return to the "SECURITY
CLEAR ALL MEMORY?
(RESERVED JOB DATA WILL BE CLEARED.)
NO YES
[Clear screen 2]
CLEARING ALL MEMORY. AUTO REBOOT IS
IMPLEMENTED AFTER CLEARING.
PROGRESS STATUS
%
CANCEL
50
0
%
%
100
SETTINGS" screen, touch the [NO] key.
● When the [YES] key is touched, the
following screen appears.
The example at left shows the
appearance of the screen when a hard
disk is installed. The screen differs
according to whether a hard disk is
installed.
Each time the top bar reaches all the way
●
to the right, the bottom bar, which
indicates date clearing progress,
advances 1%. (When the bottom bar
reaches 100%, date clearing is finished.)
NOTE
If you wish to cancel after data clearing has begun
Touch the [CANCEL] key. When the [CANCEL] key is touched, the key operator code
entry screen appears. Enter your key operator code with the numeric keys. Note that
data that has already been cleared at the time you enter your 5-digit key operator code
will not be restored. Data already cleared will be lost. When data clearing is canceled,
the machine will power off temporarily and then automatically power back on.
1-(2)
NUMBER OF TIMES CLEAR ALL MEMORY PROGRAM IS REPEATED
This program is used to enhance the security function. The repeat count for "CLEAR
ALL MEMORY" can be set to any number from 1 to 7. The factory setting is 1.
Touch the [NUMBER OF TIMES CLEAR ALL MEMORY PROGRAM IS REPEATED]
key, and set the desired number of times with the or key.
When finished, touch the [OK] key.
(See "About the repeat count setting" on page 5 of this manual.)
4
Page 7
About the repeat count setting
When the repeat count is increased to enhance the security function, the time required for
data clearing will increase. It is recommended that "NUMBER OF TIMES CLEAR ALL
MEMORY PROGRAM IS REPEATED" be set to the most suitable number for your
conditions of use.
2 POWER UP AUTO CLEAR
This program automatically clears all data stored in the unit when the main switch is
turned on.
To enable "POWER UP AUTO CLEAR", touch the checkbox so that a checkmark
appears and then touch the [OK] key.
By default, a checkmark does not appear.
NOTE
Note for models that have the printer function installed
Print hold data that is stored on the hard disk will not be cleared.
NOTE
If you wish to cancel after data clearing has begun
See the explanations in "Clear screen 2" and "NOTE" in "CLEAR ALL MEMORY" on
page 4 of this manual.
ENGLISH
3 DISABLE PRINTING OF SENDING ADDRESS LIST
This program is used to disable printing of the following lists, which are printed using
"LIST PRINT" in the user settings (page 2-14 of the "Operation Manual (for general
information and copier operation)").
"SENDING ADDRESS LIST(SCANNER)"*
* This list can be printed when the network scanner function is enabled.
Touch the checkbox of the list or lists that you wish to disable so that a checkmark
appears and then touch the [OK] key.
By default, a checkmark does not appear.
5
Page 8

Product key
To initially enable the security function, you must use a key operator program to enter the
product key (password). The name of the key operator program used for this purpose is
"DATA SECURITY KIT". Please ask your dealer for the product key. (See page 14 of the
key operator's guide to configure the settings in the key operator programs.)
* After using this program to enter the product key, be sure to power off and then power on
the machine.
6
Page 9
Introduction
SORTIE
RECTO VE
Le kit AR-FR7 U ajoute une fonction de sécurité au copieur/imprimante numérique couleur et
multifonction numérique couleur. Lorsqu’on utilise la fonction copieur du copieur/imprimante
numérique couleur et multifonction numérique couleur avec la fonction de sécurité, les données
stockées en mémoire pour les besoins du travail de copie sont effacées aussitôt le travail
terminé. En outre, lorsque l'imprimante ou la fonction de scanneur réseau est employé (y
compris la fonction de scanneur réseau utilisant le pilote TWAIN), les données de chaque travail
sont effacées de la mémoire ou du disque dur du périphérique dès que le travail est terminé.
Le système d’effacement des données de ce produit supprime les données en les écrasant
par des valeurs aléatoires. La sécurité est donc maintenue même si la suppression des
données n’est effectuée qu’une seule fois.
Lorsque le kit de sécurité est installé
Lorsque le kit de sécurité est installé, l'icône suivante apparaît sur l'écran tactile.
REMARQUE
Appuyez sur cette icône ( ) pour afficher des
informations sur la version de votre kit de sécurité.
Lorsque le kit de sécurité est installé, les données restantes dans l'unité sont
automatiquement effacées après chaque travail de copie, d’impression et de numérisation.
Lorsque l’effacement des données du disque dur du périphérique débute, le message
suivant apparaît pendant 6 secondes*.
Si l’effacement des données prend plus de 6 secondes, un message s’affiche pour
signaler que les données sont en cours d’effacement.
La durée d'affichage de ce message peut être
*
LES DONNEES SONT EFFACEES.
modifiée à l'aide du programme du
responsable intitulé "REGLAGE DE LA
DUREE DES MESSAGES". (Voir page 8 du
manuel du responsable.)
FRANÇAIS
REMARQUES
Utilisation de la fonction imprimante
Lors de l’impression d’un travail d’impression normal en mode imprimante, les données de l’image
●
sont automatiquement effacées de la mémoire et du disque dur du périphérique dès que l’impression
prend fin. Notez cependant que si l’on a choisi d’utiliser la fonction de rétention des données (voir
page 5-2 du "Manuel d'utilisation pour imprimante" fourni sur le CD-ROM "PRINTER UTILITIES"
[Utilitaires d’impression]) pour les opérations d’impression, les données seront alors conservées sur
le disque dur du périphérique. Ces données retenues peuvent ensuite être effacées manuellement à
partir de l’écran d’état des travaux affichable sur l’écran tactile (voir page 5-2 du "Manuel d'utilisation
pour imprimante" fourni sur le CD-ROM "PRINTER UTILITIES").
Lorsque le kit de sécurité est installé, le programme du responsable intitulé "EFFACER
●
LES DONNEES D’IMPRESSION RETENUES" décrit en page 6-5 du "Manuel d'utilisation
pour imprimante" ne peut pas être utilisé. Employez "EFFACER TOUTE LA MEMOIRE"
pour effacer toutes les données conservées (voir page 10 de ce manuel).
Si l’on met la machine hors tension avant la fin de l’effacement des données du disque dur ou avant
●
la fin de l’exécution d’un travail, les données peuvent ne pas être complètement effacées. Pour éviter
tout risque que des données partiellement effacées ne puissent subsister à cause d’une mise hors
tension prématurée, il est conseillé d’utiliser le programme du responsable intitulé "EFFACER
TOUTE LA MEMOIRE" (voir page 10 de ce manuel) après un travail pour effacer manuellement
toutes les données avant que la machine ne puisse être mise hors tension.
7
Page 10

Remarque:
Pour que la fonction de sécurité des données de la machine offre le plus haut niveau de
sécurité possible, veuillez observer les consignes suivantes:
●
Le responsable joue un rôle majeur dans le maintien d'une sécurité constante. Apportez un
soin particulier quant au choix de la personne qui endossera la charge de responsable.
Maintenez toujours activée la fonction "RETOUR A L'ETAT INITIAL A LA MISE SOUS
●
TENSION" (voir page 11 de ce manuel).
Veillez à changer le code du responsable chaque fois qu'une nouvelle personne est
●
nommée en tant que responsable.
Modifiez régulièrement le code (d'accès confidentiel) du responsable (tous les deux mois
●
ou plus souvent);
Au cours de la procédure de modification du code du responsable, l'écran affiche à la fois le
●
code actuel et le nouveau code. Veillez à effectuer cette procédure rapidement.
● Pour le code du responsable, il est recommandé de choisir une valeur difficile à deviner.
Les programmes du responsable sont des éléments très importants pour la gestion de la
●
sécurité. L'administrateur de la machine doit informer les utilisateurs qu'il leur est interdit
d'accéder aux programmes du responsable sans permission.
Si l'administrateur et les utilisateurs de la machine s'absentent du bureau, des mesures
●
de sécurité doivent être prises, telles que le verrouillage de la machine, pour prévenir tout
accès non autorisé.
L’utilisateur porte la responsabilité du contrôle des copies de documents affectuées sur la
●
machine.
ATTENTION
Quand "RETOUR A L'ETAT INITIAL A LA MISE SOUS TENSION" (expliquée à la page 11
de ce manuel) est activé, le temps d'attente de la mise en marche de la machine peut parfois
être très longue.
PROGRAMMES DU RESPONSABLE
Cette section décrit les programmes du responsable de la machine qui sont liés à la
fonction de sécurité.
LISTE DES PROGRAMMES DU RESPONSABLE
Nom du programme Page
CONTROLE DU PERIPHERIQUE
REGLAGES DE SECURITE
EFFACER TOUTE LA MEMOIRE 10
NOMBRE DE REPET. DU PROG. D'EFF. DE TOUTE LA MEMOIRE
RETOUR A L'ETAT INITIAL A LA MISE SOUS TENSION 11
DESACTIVER IMPRESSION D'ENVOI LISTE D'ADRESSE 11
CLES PRODUIT
KIT DE SECURITE DES DONNEES 12
10
Utilisation des programmes du responsable
Observez la procédure détaillée en pages 3 et 4 du manuel du responsable pour
configurer les paramètres des programmes du responsable.
Pour mieux comprendre ces différents réglages, reportez-vous aux pages suivantes.
8
Page 11

Paramétrage et utilisation de la fonction de sécurité
Lorsque le kit de sécurité est installé, la touche "REGLAGES DE SECURITE" est
ajoutée à l’écran "CONTROLE DU PERIPHERIQUE" des programmes du
responsable. Touchez cette clé pour voir l’affichage menu des programmes de
paramétrage de la sécurité.
1-(1)
PROGRAMMES DU RESPONSABLE
CONTROLE DU PERIPHERIQUE
REGLAGES DE SECURITE
Troisiéme écran "CONTROLE DU PERIPHERIQUE"
En appuyant sur la touche "REGLAGE DE SECURITE",
on fait apparaître l’écran suivant.
PROGRAMMES DU RESPONSABLE
REGLAGES DE SECURITE
EFFACER TOUTE LA MEMOIRE
2
RETOUR A L'ETAT INITIAL
A LA MISE SOUS TENSION
TEMPS DE RETOUR
DU MODE COPIE
NOMBRE DE REPET. DU PROG.
D'EFF. DE TOUTE LA MEMOIRE
DESACTIVER IMPRESSION D'ENVOI
LISTE D'ADRESSE
OK
3/3
OK
1-(2)
1
3
FRANÇAIS
* Le nombre d'écrans d’affichage et la disposition des clés peuvent différer légèrement
de ce qui précède selon le modèle de la machine et les périphériques installés.
9
Page 12

■
REGLAGES DE SECURITE
1-(1) EFFACER TOUTE LA MEMOIRE
Utilisez ce réglage si vous voulez contrôler manuellement l'effacement des données
enregistrées dans la mémoire de la machine et sur le disque dur.
REMARQUE
Nous vous conseillons d'exécuter ce programme avant de mettre la machine hors tension.
Appuyez sur la touche [EFFACER TOUTE LA MEMOIRE]. L'écran suivant apparaît
pour confirmer votre sélection.
[Ecran d'effacement 1]
Pour retourner à l'écran "REGLAGES
●
EFFACE TOUTE LA MEMOIRE.
(LES DONNEES DE TRAVAIL RESERVEES
SERONT EFFACEES.)
NON OUI
[Ecran d'effacement 2]
EFFACE TOUTE LA MEMOIRE.
LE REDEMARRAGE AUTO SERA
EFFECTUE APRES L'EFFACEMENT.
ETAT DE LA PROGRESSION
ANNULER
100
50
0
%
%
%
DE SECURITE", appuyez sur la touche
[NON].
Quand la clé [OUI] est enfoncée, l'écran
●
suivant apparaît.
L’illustration ci-contre à gauche montre à
quoi ressemble l’écran lorsqu’un disque
dur est installé. L’écran diffère selon qu'un
disque dur est installé.
Chaque fois que la barre supérieure
●
atteint l’extrémité droite, la barre
inférieure, qui indique la progression de
la suppression des données, avance de
1%. (Quand la barre inférieure atteint
100%, alors l’effacement des données
est terminé.)
REMARQUE
Pour annuler une opération d'effacement de données en cours
Appuyez sur la touche [ANNULER]. En appuyant sur la touche [ANNULER], on fait
apparaître l’écran de saisie du code du responsable. Entrez le code du responsable à l'aide
des touches du pavé numérique. Notez que les données qui étaient déjà effacées au
moment où vous avez entré votre code de responsable à 5 chiffres ne pourront pas être
récupérées. Les données déjà effacées sont perdues. Lorsque la suppression des données
est annulée, la machine se met brièvement hors tension puis se remet en marche
automatiquement.
1-(2) NOMBRE DE REPET. DU PROG. D'EFF. DE TOUTE LA MEMOIRE
Ce programme sert à améliorer la fonction de sécurité. Le nombre de répétitions de
l'opération "EFFACER TOUTE LA MEMOIRE" peut être réglé entre 1 et 7. La valeur
par défaut est 1.
Appuyez sur la touche [NOMBRE DE REPET. DU PROG. D'EFF. DE TOUTE LA
MEMOIRE], puis spécifiez le nombre de répétitions avec les touches et .
Lorsque vous avez terminé, appuyez sur la touche [OK].
(Lisez la section "A propos du réglage du nombre de répétitions" à la page 11 de ce manuel.)
10
Page 13

A propos du réglage du nombre de répétitions
Lorsqu'on augmente le nombre de répétitions d'une opération d'effacement, le temps
d'effacement des données s'en trouve également augmenté. Il est recommandé que le
"
NOMBRE DE REPET. DU PROG. D'EFF. DE TOUTE LA MEMOIRE" soit placé sur le
nombre le plus approprié d’après votre type d'utilisation.
2
RETOUR A L'ETAT INITIAL A LA MISE SOUS TENSION
Ce programme efface automatiquement toutes les données enregistrées dans la
machine lorsqu'on met l'interrupteur marche/arrêt de la machine en position marche.
Pour activer "RETOUR A L'ETAT INITIALA LA MISE SOUS TENSION", appuyez sur la
case à cocher de sorte qu'un crochet apparaisse, puis appuyez sur la clé [OK].
Par défaut, un crochet ne s’y trouve pas.
REMARQUE
Remarque concernant les modèles incorporant la fonction imprimante
Les données d’impression retenues qui ont été enregistrées sur le disque dur ne sont pas
effacées.
REMARQUE
Pour annuler une opération d'effacement de données en cours
Pour plus de précisions à ce sujet, lisez la section "Ecran d’effacement 2" et la
"REMARQUE" de la section "EFFACER TOUTE LA MEMOIRE" en page 10 de ce manuel.
FRANÇAIS
3
DESACTIVER IMPRESSION D'ENVOI LISTE D'ADRESSE
Ce programme est employé pour désactiver l'impression des listes suivantes, qui sont
imprimées en utilisant "IMPRESSION DES LISTES" dans les options utilisateur (page 214 du "Manuel d'utilisation (informations générales et fonctionnement du copieur)").
"LISTE D'ADRESSE D'ENVOI(NUM.)"*
*Cette liste peut être imprimée quand la fonction scanneur réseau est activée.
Appuyez sur la case à cocher de la liste ou des listes que vous souhaitez désactiver de
sorte qu'un crochet apparaisse, puis appuyez sur la clé [OK].
Par défaut, un crochet ne s’y trouve pas.
11
Page 14

Cles produit
Pour activer initialement la fonction de sécurité, vous devez utiliser un programme du
responsable afin de pouvoir entrer la clé (mot de passe) produit. Le nom du programme du
responsable qu'il faut utiliser pour cela est "KIT DE SECURITE DES DONNEES". Si vous
ne connaissez pas la clé produit de votre kit de sécurité, demandez-la à votre distributeur.
(Voir la page 14 du Manuel du responsable pour configurer les options des programmes du
responsable).
* Suite à l’utilisation de ce programme afin d’y saisir la clé produit, assurez-vous de mettre
la machine hors tension puis sous tension.
12
Page 15

Einführung
AUSGAB
KOPIERE
Das AR-FR7U Daten-Sicherheitspaket erweitert Ihr digitales Multifunktionsgerät um eine
zusätzliche Sicherheitsfunktion. Bei Verwendung der Option werden die für den Kopiervorgang
gespeicherten Daten nach Abschluss des Kopierens gelöscht. Außerdem werden bei
Verwendung der Drucker-oder Netzwerkfunktion (einschließlich der Scanner-Funktion mit dem
TWAIN-Treiber) die Daten jedes Auftrags nach Beendigung des Auftrags aus dem Speicher
oder der Peripherie-Festplatte gelöscht.
Das Datenlöschsystem dieses Produktes löscht Daten durch deren Überschreiben mit
Zufallswerten; auf diese Weise kann Sicherheit garantiert werden, selbst wenn die
Datenlöschung nur ein Mal vorgenommen wird.
Bei installiertem Daten-Sicherheitspaket
Bei installiertem Sicherheitskit erscheint auf dem Touchscreens das folgende Symbol.
HINWEIS
Berühren Sie das Symbol ( ), um Informationen
über die Version des Daten-Sicherheitspakets
anzuzeigen.
Bei installiertem Daten-Sicherheitspaket werden im Gerät verbleibende Daten nach
jedem Kopier-, Druck- und Scanauftrag automatisch gelöscht.
Wenn das Löschen der Daten auf der Peripherie-Festplatte beginnt, wird 6 Sekunden*
lang folgende Meldung angezeigt.
Beachten Sie, dass wenn zum Löschen der Daten mehr als 6 Sekunden* benötigt
werden die Anzeige solange angezeigt wird, bis die Daten vollständig gelöscht sind.
* Die Anzeigedauer kann mit dem
DATEN SIND GELÖSCHT.
Gerätebetreuer-Programm
"MELDUNGSZEITDAUER EINSTELLEN"
geändert werden. (Siehe Seite 9 im
Handbuch für Gerätebetreuer.)
DEUTSCH
HINWEISE
Verwendung der Druckerfunktion
●
Beim Ausdrucken eines normalen Druckauftrags in der Druckbetriebsart werden die Bilddaten
nach beendetem Drucken automatisch aus dem Speicher und der Peripherie-Festplatte gelöscht.
Beachten Sie jedoch, dass bei Verwendung der Haltefunktion (siehe Seite 5-2 im
"Bedienungshandbuch für den Drucker" auf der "PRINTER UTILITIES"-CD-ROM) die Daten auf
der Peripherie-Festplatte gespeichert bleiben. Die gespeicherten Daten lassen sich von der
Statusanzeige des Touchscreens löschen (siehe Seite 5-2 im "Bedienungshandbuch für den
Drucker" auf der "PRINTER UTILITIES"-CD-ROM).
●
Bei der Installation des Sicherheitskits lässt sich das auf Seite 6-5 der "Bedienungshandbuch für
den Drucker" beschriebene Gerätebetreuer-Programm "DIE GESPEICHERTEN DRUCKDATEN
LÖSCHEN" nicht verwenden. Um alle zurückgehaltenen Daten zu löschen, verwenden Sie
"GESAMTSPEICHER LÖSCHEN" (Seite 16 in dieser Anleitung).
●
Falls das Gerät ausgeschaltet wird, während die Bilddaten von der Festplatte gelöscht werden
oder bevor andere Aufträge abgeschlossen sind, werden die Daten nicht vollständig gelöscht. Um
nach dem Ausschalten keine unvollständig gelöschten Daten zurückzulassen, wird empfohlen mit
dem Gerätebetreuer-Programm "GESAMTSPEICHER LÖSCHEN" (Seite 16 in dieser Anleitung)
vor dem Ausschalten die Daten vollständig zu löschen.
13
Page 16

Hinweis:
Beachten Sie für eine maximale Sicherheit des Datenschutzes die folgenden Punkte:
●
Der Gerätebetreuer spielt bei der Einhaltung der Sicherheitrichtlinien eine wichtige Rolle.
Aus diesem Grund sollte der Auswahl der geeigneten Person für diese Aufgabe
besondere Beachtung geschenkt werden.
●
Lassen Sie "RÜCKSTELLAUTOMATIK BEIM EINSCHALTEN" (Seite 17 dieses
Handbuchs) immer eingeschaltet.
●
Der Gerätebetreuer-Code muss sofort geändert werden, wenn eine andere Person als
Gerätebetreuer eingesetzt wird.
●
Ändern Sie den Schlüsselcode regelmäßig (mindestens alle 60 Tage).
●
Beim Ändern des Schlüsselcodes wird sowohl der gegenwärtige als auch der neue
Schlüsselcode angezeigt. Beachten Sie deshalb, dass dieser Vorgang richtig
abgeschlossen wird.
●
Verwenden Sie für den Gerätebetreuercode keine leicht zu erratende Zahlenkombination.
●
Die Gerätebetreuer-Programme sind ein wichtiger Bestandteil des Sicherheitsmanagements.
Der Administrator des Geräts sollte die Anwender darüber informieren, dass der Zugriff auf die
Gerätebetreuer-Programme nur mit entprechender Berechtigung zulässig ist.
●
Für den Fall, dass der Administrator und die Geräteanwender nicht anwesend sind,
sollten geeignete Sicherheitsmaßnahmen ergriffen werden, um einen unberechtigten
Zugriff zu verhindern (z.B. Sperren des Geräts).
●
Der Kunde ist für die Überwachung der Kopien von Dokumenten, die auf diesem Gerät
kopiert werden, verantwortlich.
ACHTUNG!
Wenn "RÜCKSTELLAUTOMATIK BEIM EINSCHALTEN" (auf Seite 17 dieses
Handbuchs erläutert) aktiviert ist, kann die Wartezeit beim Hochfahren der Maschine
sehr lang werden.
GERÄTEBETREUER-PROGRAMME
In diesem Abschnitt werden die Gerätebetreuer-Programme erklärt, die für das DatenSicherheitspaket verwendet werden.
GERÄTEBETREUER-PROGRAMMLISTE
Programmbezeichnung Seite
GERÄTESTEUERUNG
SICHERHEITSEINSTELLUNGEN
GESAMTSPEICHER LÖSCHEN 16
ANZAHL, WIE OFT DIE GESAMTSPEICHER-LÖSCHUNG WIEDERHOLT WIRD
RÜCKSTELLAUTOMATIK BEIM EINSCHALTEN 17
DEAKTIVIEREN DES DRUCKS DER SENDEADRESSLISTE 17
PROD.SCHLUESS.
DATEN-SICHERHEITSPAKET 18
16
Verwendung der Gerätebetreuer-Programme
Führen Sie die Anweisungen auf den Seiten 3 und 4 des Handbuchs für Gerätebetreuer aus, um die
Einstellungen für die Gerätebetreuer-Programme zu konfigurieren.
Für die Erklärung der einzelnen Einstellungen wird auf die folgenden Seiten verwiesen.
14
Page 17

Einstellung und Verwendung der Sicherheitsfunktion
Bei der Installation des Sicherheitskits wird die Taste "SICHERHEITSEINSTELLUNGEN" im
Bildschirm "GERÄTESTEUERUNG" der Gerätebetreuer-Programme hinzugefügt. Drücken Sie
diese Taste, um sich den Menübildschirm für die Sicherheitseinstellungsprogramme anzeigen
zu lassen.
GERÄTEBETREUER-PROGRAMME
GERÄTESTEUERUNG
OK
1-(1)
ZEIT FÜR RÜCKKEHR
AUS KOPIERMODUS
SICHERHEITSEINSTELLUNGEN
Dritter "GERÄTESTEUERUNG"-Bildschirm
Bei Drücken der Taste "SICHERHEITSEINSTELLUNGEN"
erscheint der folgende Bildschirm.
GERÄTEBETREUER-PROGRAMME
SICHERHEITSEINSTELLUNGEN
GESAMTSPEICHER LÖSCHEN
2
RÜCKSTELLAUTOMATIK
BEIM EINSCHALTEN
ANZAHL, WIE OFT DIE GESAMTSPEICHER-LÖSCHUNG WIEDERHOLT WIRD
DEAKTIVIEREN DES DRUCKS DER
SENDEADRESSLISTE
ANZAHL DER WIEDERHOLUNGEN DER
RÜCKSTELLAUTOMATIK B. JOBENDE
3/3
OK
1-(2)
1
DEUTSCH
3
1
* Die Anzahl der Anzeigebildschirme und das Tastenlayout kann leicht hiervon
abweichen, je nachdem, welches Modell Sie besitzen und welche Peripheriegeräte
installiert sind.
15
Page 18

■
SICHERHEITSEINSTELLUNGEN
1-(1) GESAMTSPEICHER LÖSCHEN
Verwenden Sie diese Einstellung, um die im Gerät und auf der Festplatte
gespeicherten Daten manuell zu löschen.
HINWEIS
Es wird empfohlen dieses Programm vor dem Ausschalten auszuführen.
Berühren Sie die Schaltfläche [GESAMTSPEICHER LÖSCHEN]. Der folgende
Bildschirm erscheint zur Bestätigung.
[Bildschirm 1 löschen]
●
Berühren Sie die Taste [NEIN], um auf den
GESAMTSPEICHER LÖSCHEN.
(RESERVIERTE JOB-DATEN
WERDEN GELÖSCHT.)
NEIN JA
[Bildschirm 2 löschen]
GESAMTSPEICHER LÖSCHEN.
NACH DEM LÖSCHEN WIRD
EIN NEUSTART AUSGEFÜHRT.
FORTSCHRITT
50
0
%
%
100
ABBRECHEN
%
Bildschirm "SICHERHEITSEINSTELLUNGEN"
zurückzuschalten.
Beim Drücken der Taste [JA] wird
●
folgender Bildschirm angezeigt.
Im linksstehenden Beispiel ist der
Bildschirm bei der Installation einer
Festplatte gezeigt. Je nachdem, ob eine
Festplatte installiert ist oder nicht, kann
die Bildschirmdarstellung abweichen.
Jedes Mal, wenn der obere Balken das
●
rechte Ende erreicht, schreitet der untere
Balken–welcher den Datenlöschprozess
anzeigt–um 1% voran. (Wenn der untere
Balken 100% erreicht, ist die Datenlöschung
abgeschlossen.)
HINWEIS
Abbrechen nachdem die Daten gelöscht werden
Berühren Sie die Schaltfläche [ABBRECHEN]. Beim Berühren der Schaltfläche [ABBRECHEN]
erscheint der Schlüsselcodeeingabebildschirm. Geben Sie ihren Schlüsselcode mit den
Zahlentasten ein. Beachten Sie, dass die Daten, die bis zum Zeitpunkt der Eingabe des 5stelligen Schlüsselcodes gelöscht wurden, nicht wiederhergestellt werden. Bereits gelöschte
Daten lassen sich nicht mehr zurückholen. Wird die Datenlöschung abgebrochen, schaltet sich
das Gerät vorübergehend ab und automatisch wieder ein.
1-(2) ANZAHL, WIE OFT DIE GESAMTSPEICHER-LÖSCHUNG
WIEDERHOLT WIRD
Dieses Programm ist zur Erweiterung der Sicherheitsfunktion. Der Wiederholzähler für
"GESAMTSPEICHER LÖSCHEN" lässt sich auf 1 bis 7 einstellen. Die Voreinstellung ist 1.
Berühren Sie die Schaltfläche [ANZAHL, WIE OFT DIE GESAMTSPEICHER-LÖSCHUNG
WIEDERHOLT WIRD] und stellen Sie die gewünschte Zahl mit oder der Schaltfläche ein.
Drücken Sie am Ende auf die Schaltfläche [OK].
(Siehe "Zur Einstellung der Anzahl automatische Löschvorgänge" auf Seite 17 dieser
Bedienungsanleitung.)
16
Page 19

Zur Einstellung der Anzahl automatische Löschvorgänge
Beim Erhöhen der Anzahl automatischer Löschvorgänge zur Erhöhung der
Sicherheitsfunktion nimmt die zum Löschen der Daten benötigte Zeit zu. Es wird
empfohlen, die "ANZAHL, WIE OFT DIE GESAMTSPEICHER-LÖSCHUNG WIEDERHOLT
WIRD" auf die für Ihre Betriebsbedingungen passendste Anzahl zu stellen.
2 RÜCKSTELLAUTOMATIK BEIM EINSCHALTEN
Mit diesem Programm werden alle im Gerät gespeicherten Daten automatisch beim
Einschalten des Hauptschalters gelöscht.
Drücken Sie zum Aktivieren von "RÜCKSTELLAUTOMATIK BEIM EINSCHALTEN" auf
das Kontrollkästchen, so dass ein Häkchen angezeigt wird; drücken Sie anschließend
die Taste [OK].
Standardmäßig wird kein Häkchen angezeigt.
HINWEIS
Hinweis für Modelle mit installierter Druckerfunktion
Auf der Festplatte gespeicherte Druckdaten werden nicht gelöscht.
HINWEIS
Abbrechen nachdem die Daten gelöscht werden
Siehe die Erklärungen in "Bildschirm 2 löschen" und HINWEIS in "GESAMTSPEICHER
LÖSCHEN" auf Seite 16 dieser Anleitung.
3 DEAKTIVIEREN DES DRUCKS DER SENDEADRESSLISTE
Dieses Programm wird zur Deaktivierung des Druckens der nachfolgenden Listen
verwendet, die normalerweise mittels "LISTENDRUCK" in den Benutzereinstellungen
(Seite 2-14 des "Bedienungshandbuch (allgemeine Hinweise und Kopierbetrieb)")
gedruckt werden.
"ADRESSLISTE (SCN) SENDEN"*
* Diese Liste kann bei aktivierter Netzwerkscannerfunktion gedruckt werden.
Berühren Sie das Kontrollkästchen der Liste oder der Listen, die Sie deaktivieren wollen,
so dass ein Häkchen angezeigt wird; drücken Sie anschließend die Taste [OK].
Standardmäßig wird kein Häkchen angezeigt.
DEUTSCH
17
Page 20

Prod.schluess.
Für das Aktivieren der Sicherheitsfunktion muss der Produktschlüssel (Kennwort) mit einem
Gerätebetreuer-Programm eingegeben werden. Der Name des zu diesem Zweck
verwendeten Gerätebetreuer-Programm ist "DATEN-SICHERHEITSPAKET". Wenden Sie
sich für den Produktschlüssel an Ihren Händler. (Zur Konfiguration der Einstellungen in den
Gerätebetreuerprogrammen siehe Seite 14 im Handbuch für Gerätebetreuer.)
* Nach Verwendung dieses Programmes zur Eingabe des Produktschlüssels schalten Sie
das Gerät unbedingt einmal aus und wieder ein.
18
Page 21

Introducción
SALIDA
DOBLE CA
El AR-FR7 U agrega una función de seguridad a la Copiadora/impresora digital color y
Sistema multifuncional digital color. Cuando se usa la función de copia de la Copiadora/
impresora digital color y Sistema multifuncional digital color, los datos guardados en la
memoria para la tarea de copia son borrados tan pronto como se termina la tarea.
Asimismo, cuando se utiliza la función de impresora o escáner de red (incluida la función
de escáner que utiliza el controlador TWAIN), los datos de cada tarea se borran de la
memoria o del disco duro de los dispositivos periféricos en cuanto se finaliza dicha tarea.
El sistema de borrado de datos de este producto borra los datos sobrescribiéndolos con
valores aleatorios, por lo que se garantiza la seguridad incluso si el borrado de datos sólo
se ejecuta una vez.
Cuando se instala el kit de seguridad
Cuando se instala el kit de seguridad, aparece el siguiente ícono en el panel táctil.
NOTA
Pulse sobre el ícono ( ) para ver la información
sobre la versión del kit de seguridad.
Cuando se instala el kit de seguridad, los datos restantes en la unidad se borran
automáticamente después de cada copia, impresión y tarea de escaneo.
Cuando comienza el borrado de los datos en la unidad de disco duro del dispositivo
periférico, aparece el siguiente mensaje durante 6 segundos*.
Tenga en cuenta que si se necesitan más de 6 segundos* para borrar los datos, el mensaje será
exhibido hasta que se terminan de borrar los datos.
*
La duración de la exhibición del mensaje
LOS DATOS SE ESTAN BORRANDO
puede ser cambiada con la tecla de programa
de operador principal, "CONFIGURACIÓN DE
LA DURACIÓN DEL MENSAJE". (Consulte la
página 8 del manual del operador principal.)
NOTAS
Usando la función de impresora
●
Cuando se imprime una tarea de impresión normal en el modo de impresora, el dato de imagen
se borra automáticamente de la memoria o la unidad de disco duro después de completar la
impresión. Tenga en cuenta, sin embargo, que cuando la función de retención de tarea (página
5-2 del "Manual de instrucciones para impresora" en el CD-ROM "PRINTER UTILITIES") se usa
para imprimir, los datos son mantenidos en la unidad de disco duro del dispositivo periférico. Los
datos retenidos pueden ser borrados de la exhibición de estado de tarea del panel táctil (página
5-2 del "Manual de instrucciones para impresora" en el CD-ROM "PRINTER UTILITIES").
●
Cuando se instala el kit de seguridad, no se puede usar el programa del operador principal
"BORRAR LOS DATOS GUARDADOS DE IMPRESIÓN" en la página 6-5 del "Manual de
instrucciones para impresora". Para borrar todos los datos guardados, use el programa "BORRAR
TODA LA MEMORIA" (página 22 de este manual).
●
Si se desconecta la alimentación de la unidad mientras se borran los datos del disco duro o antes de
que se terminen los trabajos, los datos podrían no ser completamente borrados. Si no desea datos
parcialmente borrados cuando se desconecta la alimentación, le recomendamos que use el
programa del operador principal, "BORRAR TODA LA MEMORIA" (página 22 de este manual), para
completar el borrado de todos los datos antes de desconectar la alimentación.
19
ESPAÑOL
Page 22

Nota:
Para asegurarse que la función de seguridad de datos de la máquina provea del máximo
de seguridad, tenga en cuenta lo siguiente:
●
El operador principal desempeña una función importante en el mantenimiento de la
seguridad. Designe con cuidado a la persona que ejercerá la labor de operador principal.
●
Mantenga siempre activado el programa "BORRADO AUTOMÁTICO AL ENCENDER"
(página 23 de este manual).
●
Asegúrese de cambiar el código del operador principal inmediatamente cada vez que una
persona nueva pase a ocupar esta función.
●
Cambie el código de operador principal regularmente (al menos una vez cada 60 días).
●
Durante el procedimiento para cambiar el código de operador principal, el código de
operador principal actual y el nuevo código de operador aparecerán en la pantalla.
Asegúrese de completar el procedimiento rápidamente.
●
No elija ningún número para el código de operador principal que pueda adivinarse
fácilmente.
●
Los programas del operador principal son muy importantes para la gestión de la
seguridad. El administrador de la máquina tiene que informar a los usuarios de que no
accedan a los programas del operador principal sin permiso.
●
Si el administrador y los usuarios tienen que ausentarse de la oficina, deben tomarse
medidas de seguridad, como cerrar la máquina con llave, para evitar el acceso no
autorizado.
●
Es responsabilidad del cliente controlar las copias de documentos realizadas en la
máquina.
PRECAUCIÓN
Cuando el programa "BORRADO AUTOMÁTICO AL ENCENDER" (explicado en la
página 23 de este manual) se encuentra activado, el tiempo de espera cuando la
máquina esta en marcha podría ser superior.
PROGRAMAS DEL OPERADOR PRINCIPAL
Esta sección explica los programas del operador principal de la unidad que están relacionados
con la función de seguridad.
LISTA DE PROGRAMAS DEL OPERADOR PRINCIPAL
Nombre de programa Página
CONTROL DE DISPOSITIVOS
CONFIGURACION DE SEGURIDAD
BORRAR TODA LA MEMORIA 22
No. VECES QUE REPITE PROGRAMA DE BORRADO TOTAL DE MEMORIA
BORRADO AUTOMATICO AL ENCENDER 23
INHABILITAR IMPRESIÓN DE LISTA DIRECC. ENVÍO23
CLAVE DE PRODUCTO
KIT DE SEGURIDAD DE DATOS 24
Uso de los programas del operador principal
Siga el procedimiento en las páginas 3 y 4 de la manual del operador principal para
configurar los ajustes en los programas de operador principal.
22
Para las explicaciones de los ajustes, consulte las siguientes páginas.
20
Page 23

Ajustes y uso de la función de seguridad
Cuando el kit de seguridad está instalado, la tecla "CONFIGURACION DE SEGURIDAD" se agrega a la
pantalla "CONTROL DE DISPOSITIVOS" de los programas de operador principal.
para mostrar la pantalla de menús de los programas de configuración de seguridad.
PROGRAMAS DE OPERADOR PRINCIPAL
CONTROL DE DISPOSITIVOS
RETORNO SINCRONIZACION
DEL MODO DE COPIA
CONFIGURACION DE SEGURIDAD
OK
3/3
Tercera pantalla "CONTROL DE DISPOSITIVOS"
Cuando se pulsa la tecla "CONFIGURACION DE
SEGURIDAD", aparece la siguiente pantalla.
PROGRAMAS DE OPERADOR PRINCIPAL
1-(1)
CONFIGURACION DE SEGURIDAD
BORRAR TODA LA MEMORIA
2
BORRADO AUTOMATICO
AL ENCENDER
No. VECES QUE REPITE PROGRAMA
DE BORRADO TOTAL DE MEMORIA
INHABILITAR IMPRESIÓN DE LISTA
DIRECC. ENVÍO
No VECES QUE REPITE BORRADO
AUTOM. AL FINALIZAR TRABAJO
OK
1
1
Pulse esta tecla
1-(2)
3
* El número de pantallas de visualización y el aspecto de las teclas pueden diferir
ligeramente de los mostrados anteriormente, dependiendo del modelo de máquina y
de los dispositivos periféricos que se encuentren instalados.
21
ESPAÑOL
Page 24

■■■■ CONFIGURACION DE SEGURIDAD
1-(1) BORRAR TODA LA MEMORIA
Use este ajusta cuando desee borrar manualmente los datos almacenados en la
unidad de memoria y en el disco duro.
NOTA
Recomendamos que ejecute este programa antes de desconectar la alimentación.
Pulse la tecla [BORRAR TODA LA MEMORIA]. La siguiente pantalla aparece para
confirmar su selección.
[Borrar pantalla 1]
●
Para volver a la pantalla
BORRADO DE TODA LA MEMORIA.
(LOS DATOS DE TRABAJOS
RESERVADOS SERAN BORRADOS)
NO SÍ
[Borrar pantalla 2]
BORRANDO TODA LA MEMORIA.
REINICIO AUTOM. DESPUÉS DE BORRAR
ESTADO EN PROGRESO
100
50
0
%
%
%
CANCELAR
"CONFIGURACION DE SEGURIDAD",
pulse la tecla [NO].
●
Cuando se pulsa la tecla [SÍ], aparece
la siguiente pantalla.
El ejemplo a la izquierda muestra el aspecto
de la pantalla cuando se instala un disco duro.
La pantalla puede diferir dependiendo de si se
encuentra instalado un disco duro.
●
Cada vez que la barra superior alcanza el
lado derecho, la barra inferior, que indica el
proceso de borrado de datos, avanza un
1%. (Cuando la barra inferior llega al 100%,
el proceso de borrado de datos se ha
finalizado.)
NOTA
Si desea cancelar después de que se hayan comenzado a borrar los datos.
Pulse la tecla [CANCELAR]. Cuando toque la tecla [CANCELAR], aparecerá la pantalla
de entrada del código de operador principal. Introduzca el código de operador principal
con las teclas numéricas. Tenga en cuenta que los datos que han sido borrados en el
momento que introduce su código de operador de 5 dígitos no podrán ser recuperados.
Los datos borrados se perderán. Cuando se cancela el proceso de borrado de datos, la
máquina se apagará temporalmente y se volverá a encender automáticamente.
1-(2) No. VECES QUE REPITE PROGRAMA DE BORRADO TOTAL DE
MEMORIA
Este programa se usa para mejorar la función de seguridad. El número de
repeticiones para "BORRAR TODA LA MEMORIA" puede ser ajustado a cualquier
número de 1 a 7. El ajuste de fábrica es 1.
Pulse la tecla [No. VECES QUE REPITE PROGRAMA DE BORRADO TOTAL DE
MEMORIA], y ajuste el número deseado de veces con la tecla o .
Al terminar, pulse la tecla [OK].
(Consulte la sección "Acerca del ajuste del número de repeticiones" en la página 23
de este manual.)
22
Page 25

Acerca del ajuste del número de repeticiones
Cuando el número de repeticiones se aumenta para mejorar la función de seguridad, el
tiempo necesario para borrar los datos aumentará. Es recomendable que el programa "No.
VECES QUE REPITE PROGRAMA DE BORRADO TOTAL DE MEMORIA" se ajuste al
número de veces más adecuado para su tipo de utilización.
2 BORRADO AUTOMATICO AL ENCENDER
Este programa borra automáticamente todos los datos almacenados en la unidad
cuando se activa el interruptor principal.
Para activar el programa "BORRADO AUTOMATICO AL ENCENDER", seleccione la
casilla de verificación para que aparezca la marca de verificación y, a continuación, haga
clic en la tecla [OK].
Por defecto, no aparece la marca de verificación.
NOTA
Nota para modelos que tienen la función de impresora instalada
Los datos de impresión que están almacenados en el disco duro no serán borrados.
NOTA
Si desea cancelar después de que se hayan comenzado a borrar los datos.
Consulte las explicaciones en "Borrar pantalla 2" y "NOTA" en "BORRAR TODA LA
MEMORIA" en la página 22 de este manual.
3 INHABILITAR IMPRESION DE LISTA DIRECC. ENVIO
Este programa se utiliza para desactivar la impresión de los siguientes listados, que se
imprimen usando "IMPRESIÓN DE LISTADOS" en la configuración de usuario (página
2-14 del "Manual de Instrucciones (información general y funcionamiento de la
copidora)").
"ENVIAR LISTA DE DIRECCIONES (SCN)"*
* Este listado puede imprimirse cuando la función de escáner de red se encuentra
activada.
Seleccione la casilla de verificación del listado o listados que desea desactivar para que
aparezca la marca de verificación y, a continuación, haga clic en la tecla [OK].
Por defecto, no aparece la marca de verificación.
ESPAÑOL
23
Page 26

Clave de producto
Para habilitar inicialmente la función de seguridad, deberá usar un programa de operador
principal para introducir la clave de producto (contraseña). El nombre del programa de
operador principal usado para este propósito es "KIT DE SEGURIDAD DE DATOS".
Consulte con su distribuidor si no dispone de la clave de producto. (Consulte la página 14
del Manual del operador principal para configurar los ajustes de los programas de operador
principal.)
* Después de utilizar este programa para introducir la clave de producto, asegúrese de
apagar y volver a encender la máquina.
24
Page 27

Page 28

AR-FR7 U
PRINTED IN JAPAN
IMPRIME AU JAPON
GEDRUCKT IN JAPAN
IMPRESO EN JAPÓN
2004G DSC1
CINSZ2597FC51
 Loading...