


FINISHER
AR-FN2
OPERATION MANUAL
Read this operation manual only if you have
installed an optional finisher AR-FN2 to the
AR-280/AR-285/AR-335 copiers.
•INTRODUCTION
•PART NAMES
•OFFSET STACK
•SORT AND GROUP
•STAPLE SORT
•STAPLE CARTRIDGE
REPLACEMENT
•STAPLE JAM REMOVAL
•MISFEED REMOVAL
•SPECIFICATIONS
•KEY OPERATOR PROGRAM
Page
1
1
2
3
4
8
9
10
12
12
Introduction
The copier has two different finisher modes: one sorts copies into sets
matching the sequence of the originals and the second groups copies by
original. When an optional finisher (AR-FN2) is installed, the copier can
automatically staple the sorted copies. Each collated set of copies or
group of copies can be stacked offset from the previous set.
NOTE:
The AR-FN2 finisher is optional equipment for the AR-280/AR-285/
AR-335 Copiers. This manual describes only the features of the
AR-FN2 finisher. For general information on the copier features, see the
Operation Manual of the copiers.
AB series (metric) and inch series references
Both specifications are quoted where applicable.
●
The inch series specifications are quoted in brackets.
For example:
Page 2 ..... A4 (8-1/2" x 11")
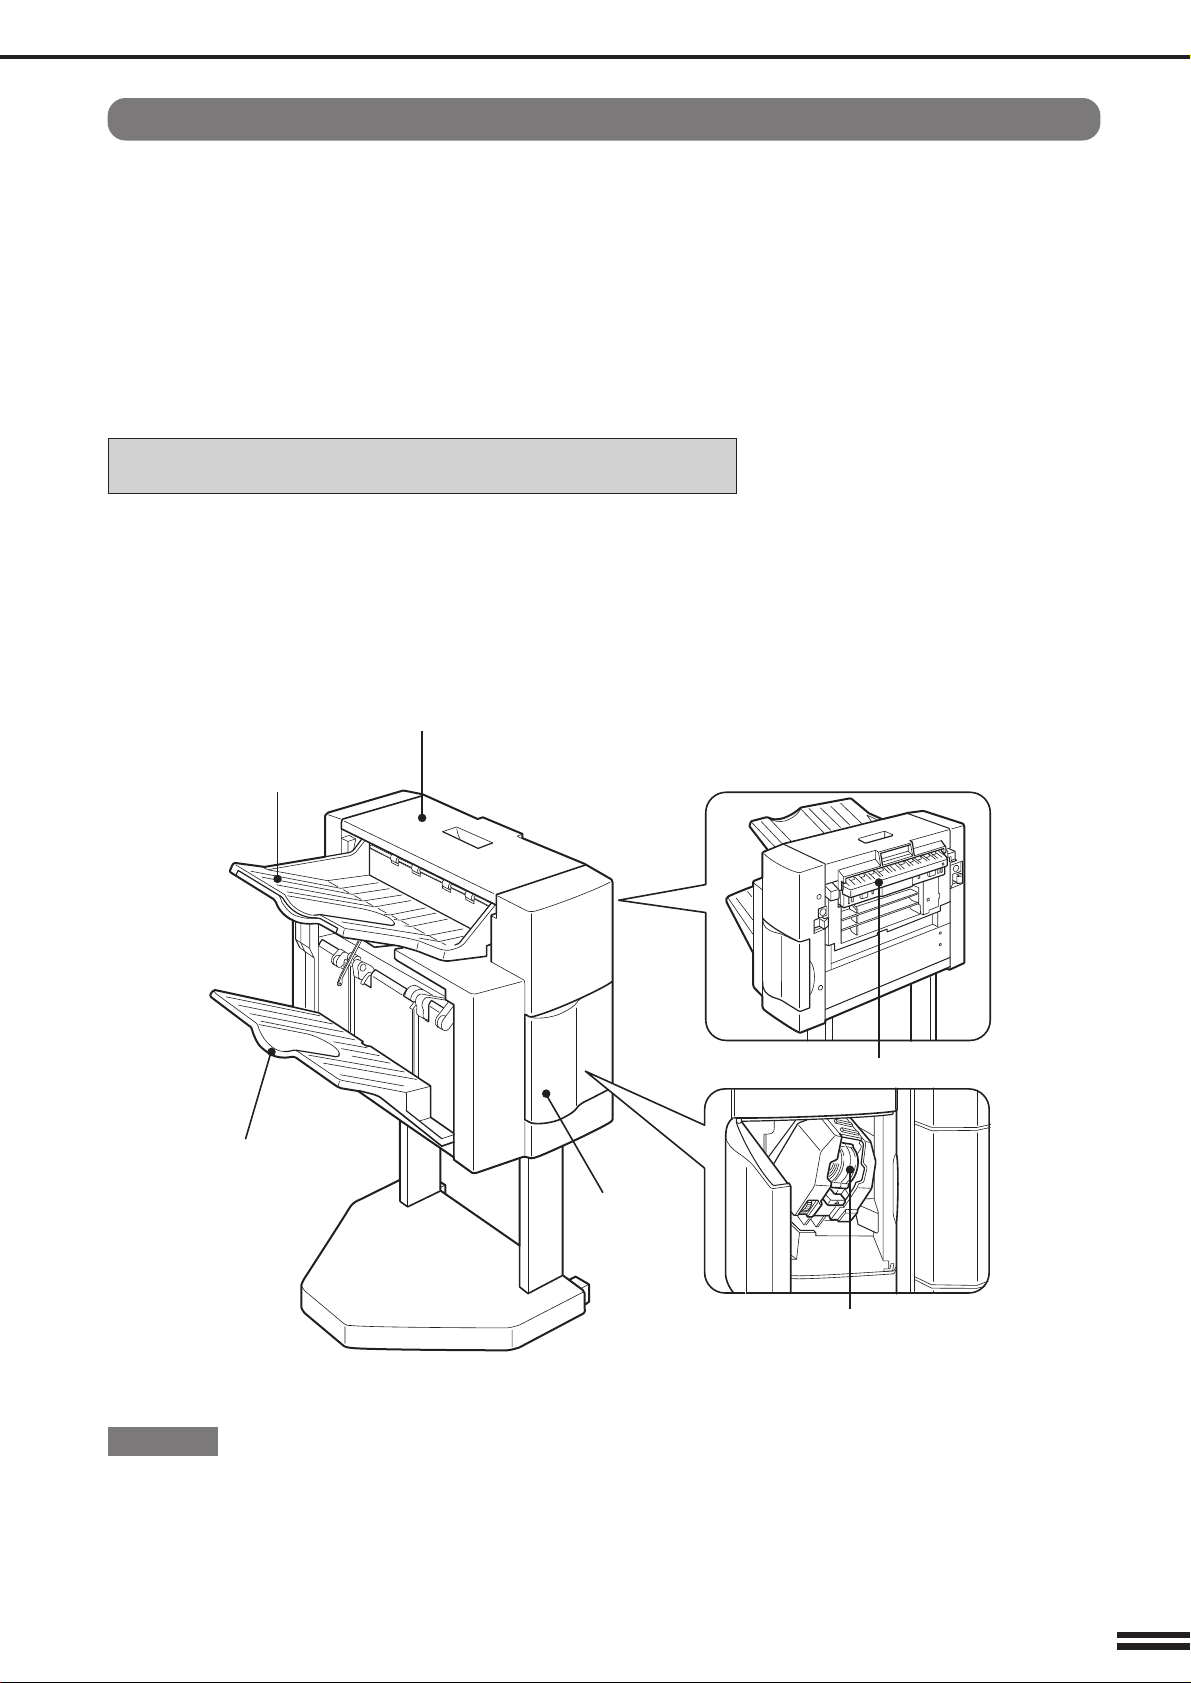
P ART NAMES
Top tray
Offset tray
Top cover
Paper feed area cover
Stapler cover
CAUTION
Do not put pressure on the finisher or subject it to undue force.
Staple cartridge
1

Offset stack
OUTPUT
TOP TRAY
OFFSET
SO
OFFSET
TRAY
AUTO AUTO
In the initial setting, the top tray is selected.
To select the offset tray, press the OUTPUT key and then the
“OFFSET TRAY” key on the touch panel.
If the offset tray is selected, each copy set will be offset by a
minimum of 15 mm for A4 paper (61/64 inch for 8-1/2" x 11" paper).
When the offset stack function is disabled, copies will not be offset.
The offset stack function can be enabled or disabled by pressing the
“OFFSET” check mark box on the touch panel.
When the STAPLE SORT mode is selected, the offset stack function
will be disabled.
If the offset tray is selected, only A4 (8-1/2" x 11") paper can be used.
The top tray cannot be used to offset copies.
1
1
3
2
1
1
1
2
1
OFFSET mode
When copying in the SORT mode, each collated set of
copies will be stacked offset a minimum of 15 mm
for A4 paper (61/64 inch for 8-1/2" x 11" paper) from the
previous set. When copying in the GROUP mode, copies
will be offset and stacked in groups of multiple copies
from the same original.
NON-OFFSET mode
1
3
2
1
1
All copies will be aligned in one stack in the offset tray or
the top tray with no offset.
2

Sort and group
When SORT is selected, the SORT ( ) icon will be indicated and
copies will be collated by sets.
When STAPLE SORT is selected, the STAPLE SORT ( ) icon
will be indicated and collated copies will be stapled automatically.
When the SORT or STAPLE SORT icon is not indicated on the touch
panel, copies will be grouped by originals.
To change the finisher mode, press the OUTPUT key and then
select the desired mode on the touch panel.
●
When an SPF or RADF is used for copying, copies will be collated
at the default setting.
When the document glass is used for copying, copies will be
grouped at the default setting.
●
In the STAPLE SORT mode, only A4 (8-1/2" x 11") paper can be
used.
1
2
3
3
2
1
3
2
1
3
2
1
1
2
3
1
2
3
1
1
1
2
2
2
3
3
3
3
2
1
3
2
1
SORT mode
Each set of copies will be sequentially delivered to the
offset tray or the top tray as selected.
GROUP mode
All copies of the same original will be grouped in the
offset tray or the top tray.
STAPLE SORT mode
Collated sets of copies will be stapled and delivered to the
offset tray.
●
See next page for details.
3
2
1
3

Staple sort
Stapling position
AUTO
EXPOSURE
READY TO COPY.(DOCUMENT FEEDER MODE)
OUTPUT
TOP TRAY
SORT
OFFSET
TRAY
STAPLE
SORT GROUP
OK
AUTO
EXPOSURE PAPER SELECT
100%
COPY RATIO
AUTO
A4
The STAPLE SORT mode staples A4 (8-1/2" x 11") size copies.
Stapled sets cannot be delivered to the top tray.
NOTE:
Different size originals cannot be copied onto copy paper of their
respective sizes in the STAPLE SORT mode. Only A4 (8-1/2" x 11")
size paper can be selected in the STAPLE SORT mode.
Using the SPF/RADF
AR-280
Stapling position
Set the originals in the document feeder tray.
1
●
If the number of copies in one set is more than 30, the copies
will not be stapled.
●
If the orientation of the originals does not match that of the
copy paper, the images of the originals will be rotated. The
stapling position in this case is shown below.
AR-280 AR-285/AR-335
AR-285/AR-335
●
If originals in the landscape orientation are copied, the copies
will be stapled at an improper position.
AR-280 AR-285/AR-335
Press the OUTPUT key.
2
Press the “STAPLE SORT” key on the touch panel.
3
4

READY TO COPY.
(DOCUMENT FEEDER MODE)
OUTPUT
TOP TRAY
SORT
OFFSET
TRAY
STAPLE
SORT GROUP
OK
AUTO
EXPOSURE PAPER SELECT
100%
COPY RATIO
AUTO
1
2 3
4 5
6
7
8
9
0
C
P
CLEAR
PROGRAM
AUDIT CLEAR
INTERRUPT
C
CLEAR
INTERRUPT
CA
CLEAR ALL
START
A4
Press the “OK” key.
4
Set the number of copies.
5
●
If A4 (8-1/2" x 11") paper has not been selected, press the
“PAPER SELECT” key and select a paper tray containing
A4 (8-1/2" x 11") paper.
Press the START ( ) key.
●
6
When copying of one set is completed, the copies will be
automatically stapled and delivered to the offset tray.
5

Stapling position
AUTO
EXPOSURE
READY TO COPY.
OUTPUT
TOP TRAY
SORT
OFFSET
TRAY
STAPLE
SORT GROUP
OK
AUTO
EXPOSURE PAPER SELECT
100%
COPY RATIO
READY TO COPY.
OUTPUT
TOP TRAY
SORT
OFFSET
TRAY
STAPLE
SORT GROUP
OK
AUTO
EXPOSURE PAPER SELECT
100%
COPY RATIO
AUTO
A4
Using the document glass
Set the original on the document glass with the corner
to be stapled to the upper right.
1
●
Copy from the last page to the first page.
●
If the number of copies in one set is more than 30, the copies
will not be stapled.
●
If the orientation of the original does not match that of the copy
paper, the image of the original will be rotated. The stapling
position in this case is shown below.
●
If originals in the landscape orientation are copied, the copies
will be stapled at an improper position.
AUTO
A4
Press the OUTPUT key.
2
Press the “STAPLE SORT” key on the touch panel.
3
Press the “OK” key.
4
6

Set the number of copies.
1
2 3
4 5
6
7
8
9
0
C
P
CLEAR
PROGRAM
AUDIT CLEAR
INTERRUPT
C
CLEAR
INTERRUPT
CA
CLEAR ALL
START
AUTO
EXPOSURE PAPER SELECT
100%
COPY RATIO
READ-END
PLACE NEXT ORIGINAL. PRESS [START].
WHEN FINISHED, PRESS [READ-END].
●
5
If A4 (8-1/2" x 11") paper is not selected, press the “PAPER
SELECT” key and select a paper tray containing A4
(8-1/2" x 11") paper.
Press the START ( ) key.
6
Replace the finished original with the next original
after the START ( ) key indicator lights up, and then
7
press the START ( ) key. Repeat this step until all
originals have been scanned.
After all originals are scanned, press the “READ-END”
key on the touch panel.
8
●
Copying will start and each set of copies will be automatically
stapled and delivered to the offset tray.
AUTO
A4
7

Staple cartridge replacement
The message “ADD STAPLES.” will appear when the staple
cartridge is empty. Replace the staple cartridge as follows:
Open the stapler cover.
1
Lift the green release lever and remove the staple
cartridge from the stapler.
2
●
A few staples will be left in the cartridge. Remove and discard
them.
STAPLE TEAR line
Insert a new sheet of paper (8-1/2” x 11” or A4 size) to
the tray as shown in the picture to make the stapler
3
work properly.
Check that the first staple in the new cartridge is at the
tip of the cartridge.
4
●
If the first staple is not at the tip, pull it to the tip. If any staples
are protruding past the cartridge tip, tear them off at the STAPLE
TEAR line and align the first staple with the tip.
●
A cartridge holds 5,000 staples.
Push the new staple cartridge in until it clicks in place.
5
8
Close the stapler cover.
6
●
The stapler will strike three times without stapling and feed
staples automatically.
●
Remove the paper from the tray.
●
To check that the stapler works properly, copy an original and
staple it.

Staple jam removal
The message “CHECK STAPLER POSITION OR STAPLE
JAM” will appear either when the staple cartridge is
empty or when there is a staple jam. Please proceed as
follows. Open the stapler cover and remove the stapler
cartridge by lifting the green release lever.
Close and open the stapler cover.
1
Remove all copies from the tray.
2
●
If the cartridge is empty (a few staples might remain in
the cartridge), refer to the section entitled “Staple
Cartridge Replacement” on page 8 of this manual.
●
If there are sufficient staples left in the cartridge, the
stapler is jammed. Remove the jammed staples in the
manner described below.
STAPLE TEAR line
Insert a new sheet of paper (8-1/2” x 11” or A4 size) to
the tray as shown in the picture to make the stapler
3
work properly.
Check that the first staple of the cartridge is at the tip of
the cartridge.
4
●
If the first staple is not at the tip, pull it to the tip. If any staples
are protruding past the cartridge tip, tear them off at the STAPLE
TEAR line and align the first staple with the tip.
Push the staple cartridge in until it locks in place.
5
Close the stapler cover.
6
●
The stapler will strike three times, whereupon the jammed
staples will have been removed automatically.
●
Remove the paper from the tray.
●
To check that the stapler works properly, copy an original and
staple it.
9

Misfeed removal
A MISFEED HAS OCCURRED.
CLEAR INDICATED AREA.
PRESS FOR RECOVERY INSTRUCTIONS.
The copier will stop when a misfeed occurs.
The message “A MISFEED HAS OCCURRED. CLEAR INDICATED
AREA. PRESS FOR RECOVERY INSTRUCTIONS.” will appear
along with a display of paper misfeed locations. Press the
INFORMATION ( ) key for more detailed information.
SF-S15 20-bin sorter
If the offset tray has been used, remove the misfed
paper.
1
While holding the finisher release lever, slide the
finisher away from the copier.
2
10
Remove the misfed paper.
3
Open the top cover.
4

Remove the misfed paper.
5
Rotate the paper feed area cover as shown to open it.
6
Remove the misfed paper.
7
8
9
10
Open the paper guide and remove the misfed paper.
Close the paper feed area cover and then close the top
cover.
Push the finisher toward the copier and latch it in
place.
●
Confirm that the misfeed display has cleared.
11

Specifications
Tray capacity Top tray: 250 sheets
Offset tray: 750 sheets
Paper size Top tray: A3 to A6R
(5-1/2" x 8-1/2" to 11" x 17", 12" x 18")
Offset tray: A4 (8-1/2" x 11")
Paper weight Top tray: 52 to 128 g/m2 (14 lbs. to 34 lbs.)
Offset tray: 56 to 128 g/m2 (15 lbs. to 34 lbs.)
For paper weighing more than 105 g/m2 (28 lbs.),
A4 (8-1/2" x 11") is the maximum size.
Offset Min. 15 mm for A4 (61/64 inch for 8-1/2" x 11")
Paper size A4 (8-1/2" x 11")
for stapling
Stapling capacity 30 sheets (80 g/m2 (21 lbs.))
Power supply Drawn from the copier
Weight Approx. 22 kg (49 lbs.)
Dimensions 457 mm (W) x 518 mm (D) x 820 mm (H)
(18"(W) x 20-13/32"(D) x 32-19/64"(H))
Specifications are subject to change for improvement without notice.
Key operator program
The following key operator program can be used when the optional
finisher (AR-FN2) is installed. This program can be selected in the
Enable/Disable Settings category.
Disabling of Bypass-T ray When Offset T ray Selected
This program is used to disable the use of the bypass tray when the
offset tray is selected.
To disable use of the bypass tray when the offset tray is
selected, press the “DISABLING OF BYPASS-TRAY WHEN
OFFSET TRAY SELECTED.” box to display a check mark.
To restore use of the bypass tray, press the checked box
again to clear the check mark.
12

AR-FN2
SHARP CORPORATION
PRINTED IN JAPAN
98G KS➀
TINSE1758FCZZ
 Loading...