

Page 1
• INTRODUCTION
• ABOUT THE CD-ROM
• INSTALLING THE PRINTER
DRIVER AND UTILITIES
(SOFTWARE INSTALLATION)
• UNINSTALLING PRINTER
DRIVERS AND PRINTER
UTILITIES
• INSTALLING PRINTER
DRIVERS USING THE
"ADD PRINTER WIZARD"
• INSTALLING AND USING
THE TWAIN DRIVER
•
CONNECTING THE MACHINE
TO YOUR COMPUTER
1
3
4
16
17
19
24
Page
Be sure to become thoroughly familiar with this manual to gain
the maximum benefit from the product.
Before installing this product, be sure to read the installation
requirements and cautions sections of the "Operation manual
(for general information and copier operation)".
Be sure to keep all operation manuals handy for reference
including this manual, the "Operation manual (for general
information and copier operation)" and operation manuals for any
optional equipment which has been installed.
INSTALLATION/
TWAIN DRIVER
OPERATION MANUAL
DIGITAL FULL COLOUR MULTIFUNCTIONAL
SYSTEM
MODEL
AR-C262M
AR-BC320
AR-C260/BC320 Series
Page 2
The CE mark logo label is affixed on an equipment in case that the directives described in the above sentence are applicable to the product. (This sentence is not applicable in any country where the above directives are not required.)
Warranty
While every effort has been made to make this document as accurate and helpful as possible, SHARP Corporation makes no
warranty of any kind with regard to its content. All information included herein is subject to change without notice. SHARP is not
responsible for any loss or damages, direct or indirect, arising from or related to the use of this operation manual.
© Copyright SHARP Corporation 2004. All rights reserved. Reproduction, adaptation or translation without prior written permission is prohibited, except as allowed under copyright laws.
Trademark Acknowledgments
Sharpdesk is a trademark of Sharp Corporation.
Microsoft
®
, Windows®, Windows® 95, Windows® 98, Windows® Me, Windows NT® 4.0, Windows® 2000, Windows® XP, Windows
®
Server 2003 and Internet Explorer® are registered trademarks or trademarks of Microsoft Corporation in the U.S.A. and other
countries.
Netscape Navigator is a trademark of Netscape Communications Corporation.
Macintosh, Power Macintosh, Mac OS, LaserWriter, and AppleTalk are registered trademarks of Apple Computer, Inc.
IBM, PC/AT, and PowerPC are trademarks of International Business Machines Corporation.
Pentium is a registered trademark of Intel Corporation.
PCL is a trademark of the Hewlett-Packard Company.
PostScript
®
is a registered trademark of Adobe Systems Incorporated.
Acrobat® Reader Copyright © 1987-2002 Adobe Systems Incorporated. All rights reserved.
Adobe, the Adobe logo, Acrobat and the Acrobat logo are trademarks of Adobe Systems Incorporated.
NetWare is a registered trademark of Novell, Inc.
Agfa and the Agfa Rhombus, are registered trademarks of Agfa-Gevaert, A.G. All other product names are the property of the
respective owners.
All other trademarks and copyrights are the property of their respective owners.
Warning:
This is a Class A product. In a domestic environment this product may cause radio interference in which case the user may be required to take adequate measures.
The display screens, messages, and key names shown in the manual may differ from those on the actual machine due to product improvements and modifications.
Page 3

1
INTRODUCTION
Thank you for purchasing this product. This manual explains how to install the printer driver and utilities required for
the printer function, and how to use the "SHARP MFP TWAIN C" scanner driver (hereafter referred to as "TWAIN
driver").
To use the printer function, please read the manual indicated below (online manual) in addition to this manual. To
use the TWAIN driver to scan from a computer, please see "Setup for scanning" (page 2) and then refer to the
indicated pages. (To use the scanner function, the optional devices such as the network scanner expansion kit (ARNS2) are required.)
Installation guide (for printer) (this manual)
Explains the contents of the CD-ROM that is included with the product and the procedure for installing the
software.
Manuals for use of the printer function
●●●●
Operation manual (for printer)
This manual can be found in the "Software CD-ROM".
This contains information on using the printer function, including printer settings, how to print, printing from the
operation panel of the machine, troubleshooting, and key operator programs for the printer function.
Help files installed with the software in the "Software CD-ROM"
●●●●
Printer Status Monitor Help file
●●●●
Printer Administration Utility Help file
Print Server Card Online Manual
●●●●
Print Server Card Online Manual
This manual is on the "Software CD-ROM". Refer to this manual when using the machine in a network
environment.
SOFTWARE LICENCE
The SOFTWARE LICENCE will appear when you install the software from the CD-ROM. By using all or any
portion of the software on the CD-ROM or in the machine, you are agreeing to be bound by the terms of the
SOFTWARE LICENCE.
Manuals for use of the network scanner function
●●●●
Operation manual (for network scanner)
This manual can be found in the "Software CD-ROM".
Read this manual for information on using Scan to FTP, Scan to E-mail, and other network scanner functions.
To use the scanner function, the network scanner expansion kit (AR-NS2) is required. For more information,
see page 1 of the "Operation manual (for network scanner)".
Page 4
INTRODUCTION
2
TWAIN driver
TWAIN is an interface standard for scanners and other image input devices. By installing the TWAIN driver, you can
scan using any application that supports the TWAIN standard.
■■■■ How the TWAIN driver differs from the network scanner
The scanner function of the TWAIN driver differs from the scanner function of the optional network scanner
expansion kit as indicated below (for more information, see page 3 of the "Operation manual (for network
scanner)").
Using the network scanner function
Multiple originals can be scanned continuously.
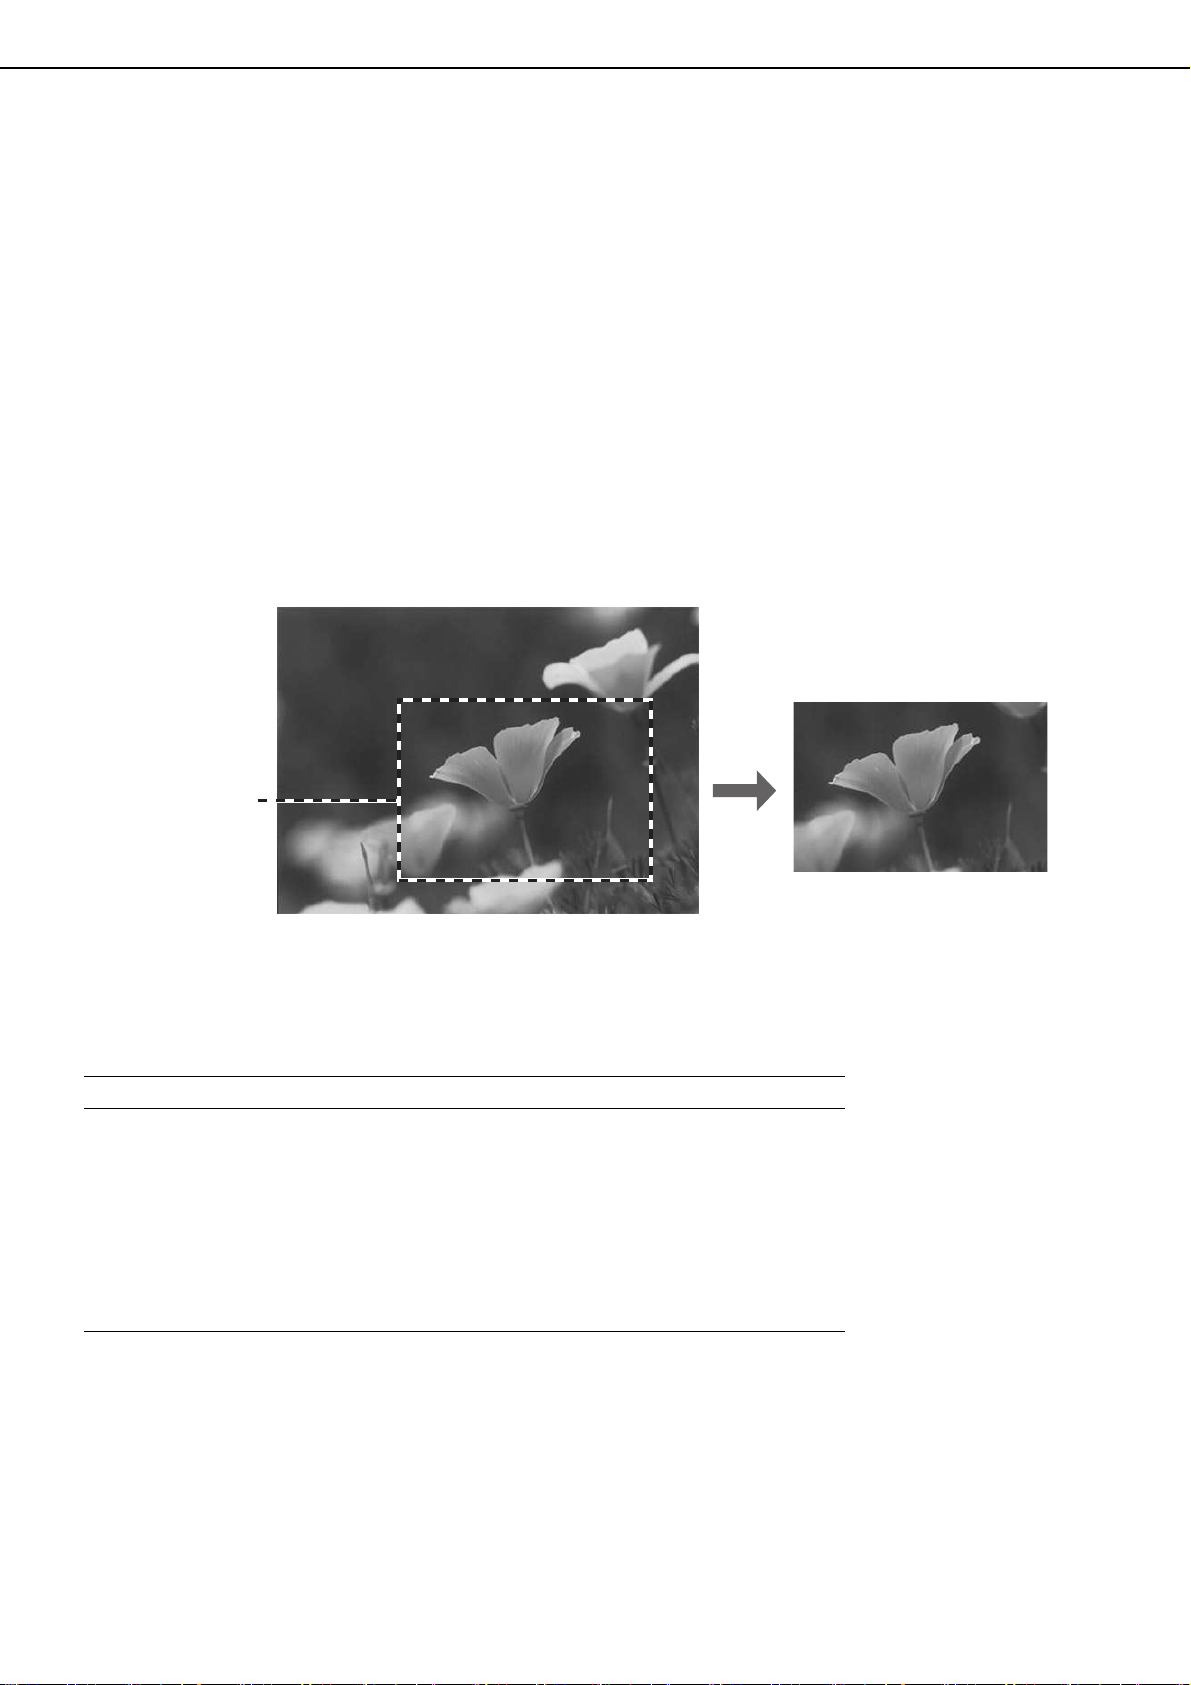
Using the TWAIN driver (SHARP MFP TWAIN C)
Fine adjustments can be made to the image while viewing it on the computer.
Part of a scanned image can be cut out and saved on the computer.
■■■■ Setup for scanning
Perform the following procedures to set up for scanning with the TWAIN driver.
Procedure Page
Installing the TWAIN driver ....................................................................... Page 19
Setting the IP address ............................................................................... Page 21
Scanning with the TWAIN driver ............................................................... Page 22
• Place the original and switch the machine to PC SCAN mode
• Select the device
• Open the TWAIN driver
• Select scan settings
• Scan the original and save the image
Required part
Original
Page 5

3
ABOUT THE CD-ROM
This product includes the "Software CD-ROM". This CD-ROM contains the software indicated below.
■■■■ Integrated wizard-type installer for the utilities below and online manuals
This CD-ROM contains a wizard-type installer for installation of the following utilities, and online manuals.
●●●●
PCL5c Printer Driver:
The printer driver that is required for use of this product.
●●●●
Printer Administration Utility*
1
:
When using the printer in a network environment, this administration utility makes it possible to configure
printer settings and monitor the printer from a computer. (This utility is for use by system administrators.)
●●●●
Printer Status Monitor*1:
When using the printer in a network environment, this provides messages and displays that allow you to
monitor the status of the printer.
●●●● Scanner driver (Twain)
*
2
TWAIN is an interface standard for scanners and other image input devices. By installing the TWAIN driver,
you can scan using any application that supports the TWAIN standard.
●●●●
NICManager
Use this program to configure and check the IP address when the machine is connected to a network.
●●●●
Acrobat Reader 5.0
This program is used to view the online manuals on your computer screen.
●●●●
Online Manuals (see the previous page)
Manuals in PDF format that are viewed using Adobe Acrobat Reader.
To view online manuals, specify the path as follows (where "R" represents the letter of your CD-ROM drive):
R:\Printer_Manual\EnglishA\Prn_AR_C262M_BC320.pdf
R:\Scanner_Manual\EnglishA\Scn_AR_C262M_BC320.pdf
*1 To use the printer status monitor and the printer administration utility, the machine must be connected to a
network.
*2 · The Twain driver (SHARP MFP TWAIN C) can only be used on a network port. A parallel port or USB port
cannot be used.
· When using the Twain driver in Windows NT 4.0, you must log on with administrator's rights.
■■■■ Setup utilities and manuals for use of the machine as a network printer
●●●●
Please read before using (Readme):
Contains information on using the utilities, viewing the online manuals, and restrictions.
●●●●
Print Server Card Quick Setup:
This is a wizard-type utility for Windows 95, Windows 98, Windows Me, Windows NT 4.0, Windows 2000,
Windows XP and Windows Server 2003 that allows you to conveniently configure the print server.
●●●●
Print Server Card Standard Setup:
This installs and launches "NICManager", which enables administration and configuration of advanced print
server settings.
●●●●
SC-Print2000 Install:
This installs software for direct printing from Windows 95, Windows 98 and Windows Me to the machine. LPR
(only for this machine) or IPP can be selected.
●●●●
Online Manual:
This manual in PDF format explains the settings and procedures required for using the machine as a network
printer.
R:\Tool\Manual\English
Page 6
4
INSTALLING THE PRINTER DRIVER AND UTILITIES (SOFTWARE INSTALLATION)
The procedures for installing the printer driver and utilities (hereafter called "software") required for use of the
machine as a printer are explained in this section. There are two ways of installing the printer driver: using the installer
in the "Software CD-ROM", and using the "Add printer wizard".
To print from a Macintosh environment, the optional PS3 Expansion Kit is required.
1. Installation using the installer
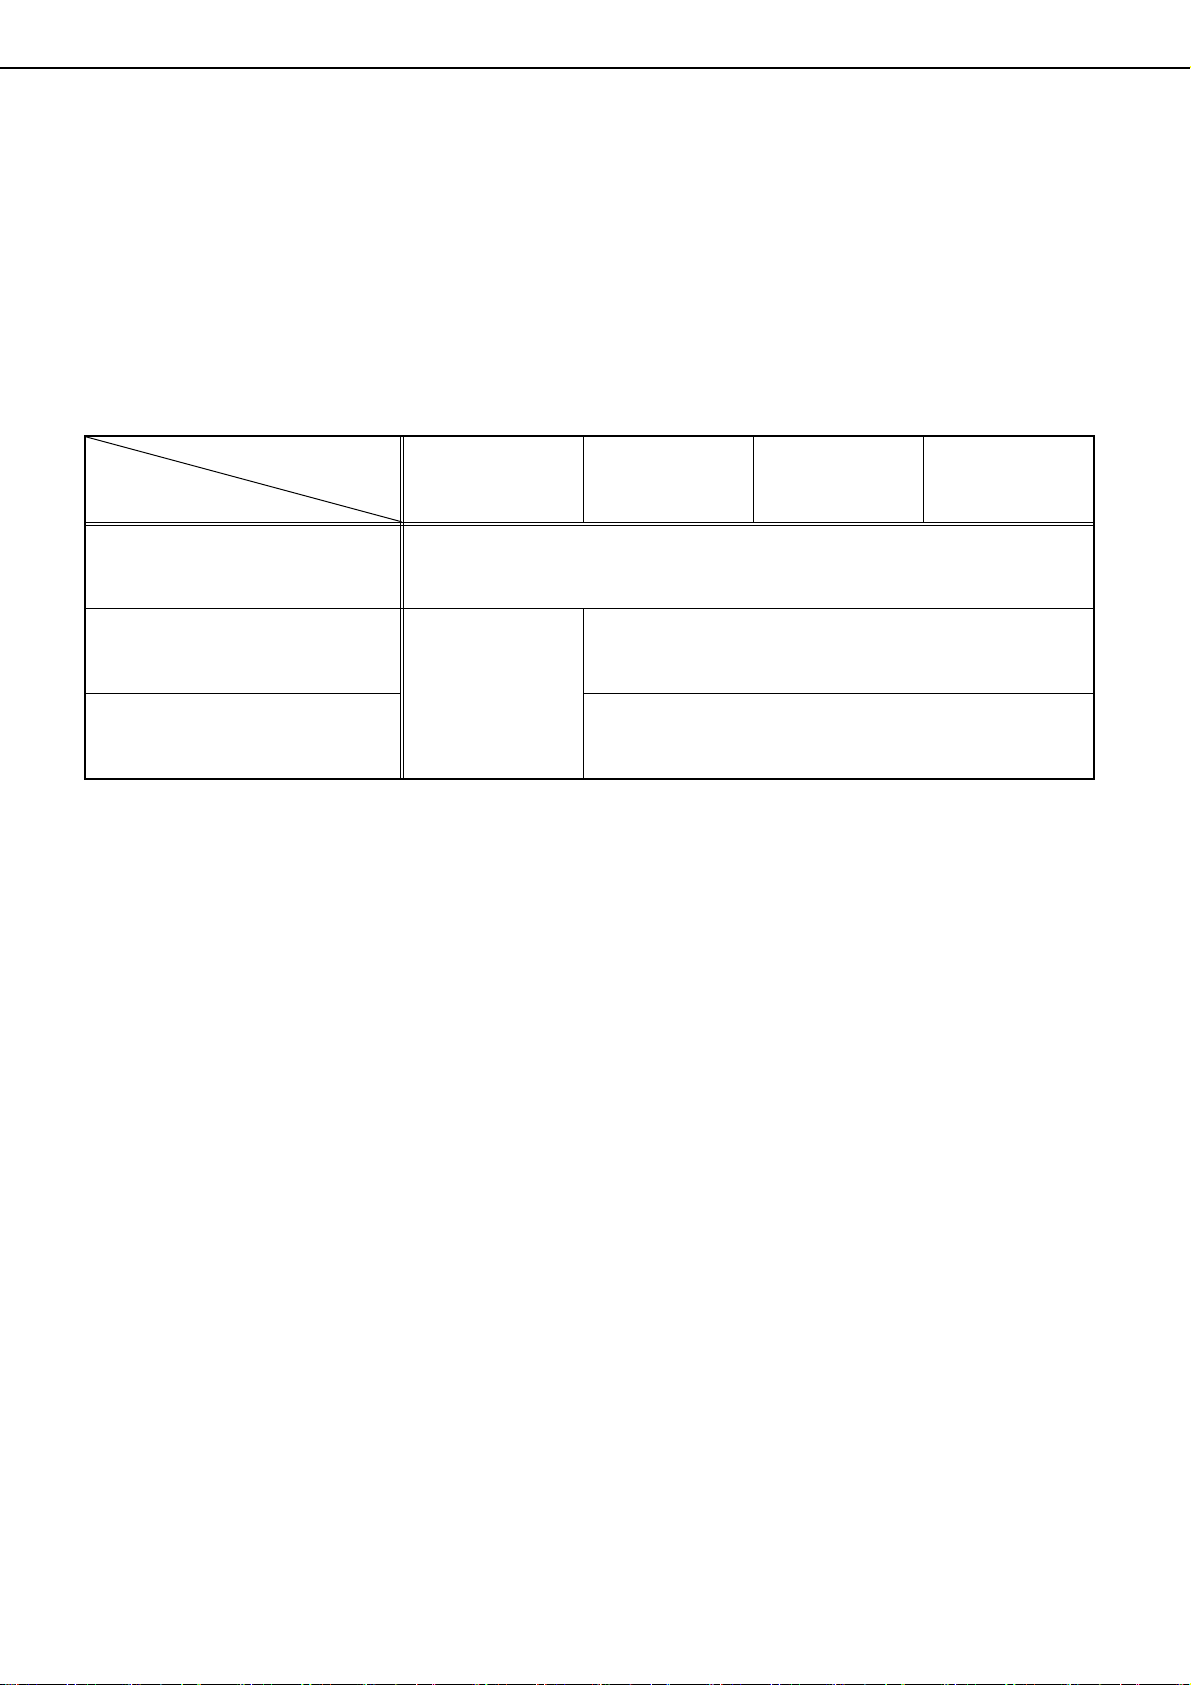
The software programs installed and the steps for installation vary depending on the version of Windows you are
running and the type of connection to your computer. Refer to the table below and select the installation method that
matches your environment.
Installation method 1 Follow the procedure from page 5 to page 10.
Installation method 2 Follow the procedure on page 11 to page 12.
Installation method 3 Follow the procedure on page 13 to page 14.
Installation method 4 Follow the procedure on page 15 to page 16.
*1 To install the software from the CD-ROM, you must have administrator rights.
*2 Windows 95 and Windows NT 4.0 are not supported.
2. Installation of the printer driver using the "Add printer wizard"
Installation of the printer driver using the "Add printer wizard" is performed using basic Windows procedures.
To install the printer driver by this method, see page 17.
In case of upgrading the version of currently installed printer driver, delete the currently installed printer driver first
and then install the new printer driver.
To uninstall the printer driver, see page 16.
3. About network environments
There are several types of network environments. The explanations in this manual assume that your operating
system is Windows and that TCP/IP protocol is used in your network environment.
Windows version
Windows
XP*1/Server 2003
*1
Windows
NT 4.0
*1
/2000
*1
Windows Me Windows
95/98
Type of
connection to printer
LAN cable connection
Installation method 1
USB cable connection
*2
Installation
method 2
Installation method 3
Parallel cable connection
Installation method 4
Page 7
INSTALLING THE PRINTER DRIVER AND UTILITIES (SOFTWARE INSTALLATION)
5
Installation method 1
Use this procedure to install the software in the following environments:
1. Printer connected by LAN cable
2. Windows version: Windows 95/98/Me/NT 4.0/2000/XP/Server 2003
The following procedure uses Windows XP as an example. Follow the same steps to install the software on other
operating systems.
Before installing the software, make sure that the machine is connected to the network with a network cable.
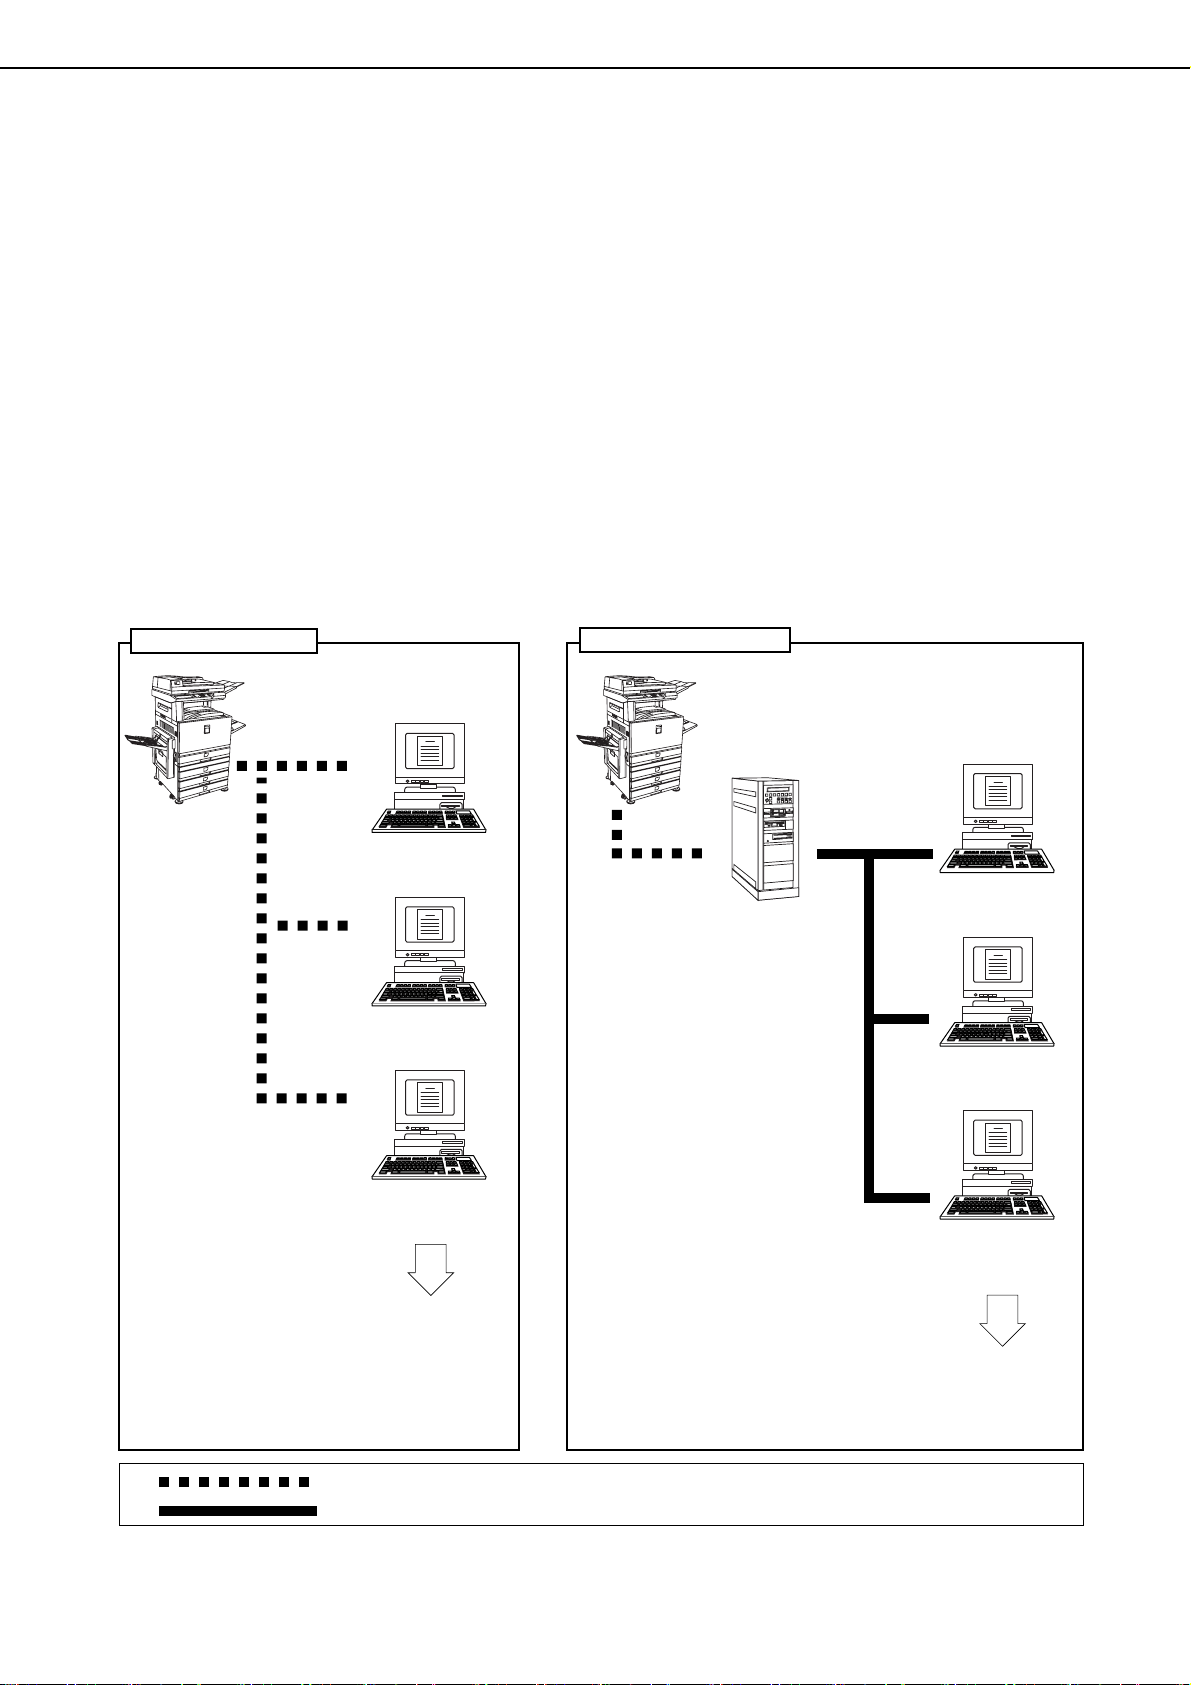
About network environments
There are several types of network environments. Typical environments include the following:
● Windows network environment
● NetWare network environment
● UNIX network environment
● Macintosh network environment
This manual explains peer-to-peer and server-client network connections in a Windows environment. If the machine
is used in a different network environment, see the online manual (Print Server Card User's Manual) on the "Software
CD-ROM".
Network connection examples
Computer running
Windows
Computer running
Windows
Computer running
Windows
Computer running
Windows
Computer running
Windows
Computer running
Windows
Example: Windows Server 2003
environment
To configure server settings
when the machine is used on a
server-client type network, see
the operating system manual or
Help.
To install the printer driver, see "Installing the
printer driver (standard installation)" and
"Installing the printer driver (custom
installation)" on pages 6 to 9.
To install the printer driver, see "Using the machine as a
shared printer via a server" on page 10.
TCP/IP protocol
Microsoft Printing Protocol
Peer-to-peer
Server-client
Page 8
INSTALLING THE PRINTER DRIVER AND UTILITIES (SOFTWARE INSTALLATION)
6
■■■■ Set the IP address of the machine
Before installing the printer driver, set the IP address of the machine using the appropriate key operator
program. For this procedure, see Key Operator Programs (page 6-6) in the "Operation manual (for printer)" (in
PDF format) in the "Software CD-ROM". The factory default setting for the IP address is "DHCP", which means
that the IP address is set automatically.
If you are not using the machine in a DHCP environment, ask your network administrator for the IP address,
Subnet mask, and Default gateway to be used for the machine, and then input this information into the key
operator program.
■■■■ Installing the printer driver (standard installation)
The procedure for a standard installation of the printer driver is explained below. This procedure is normally
used when the printer driver will be used with a network connection.
To use the machine as a network printer in Windows NT 4.0, "TCP/IP Protocol" must be installed on your
computer. If this is not installed, install as explained in Windows NT 4.0 Help.
1
Insert the "Software CD-ROM" that
accompanied the machine into your CDROM drive.
2
Click the [start] button, click [My
Computer], and then double-click the CDROM icon.
In Windows 95/98/Me/NT 4.0/2000, double-click
[My Computer], and then double-click the CDROM icon.
3
Double-click the [SETUP] icon.
4
The Licence Agreement window will
appear. Make sure that you understand
the contents of the licence agreement, and
then click the [Yes] button.
5
After confirming the message in the
"Welcome" window, click the [Next]
button.
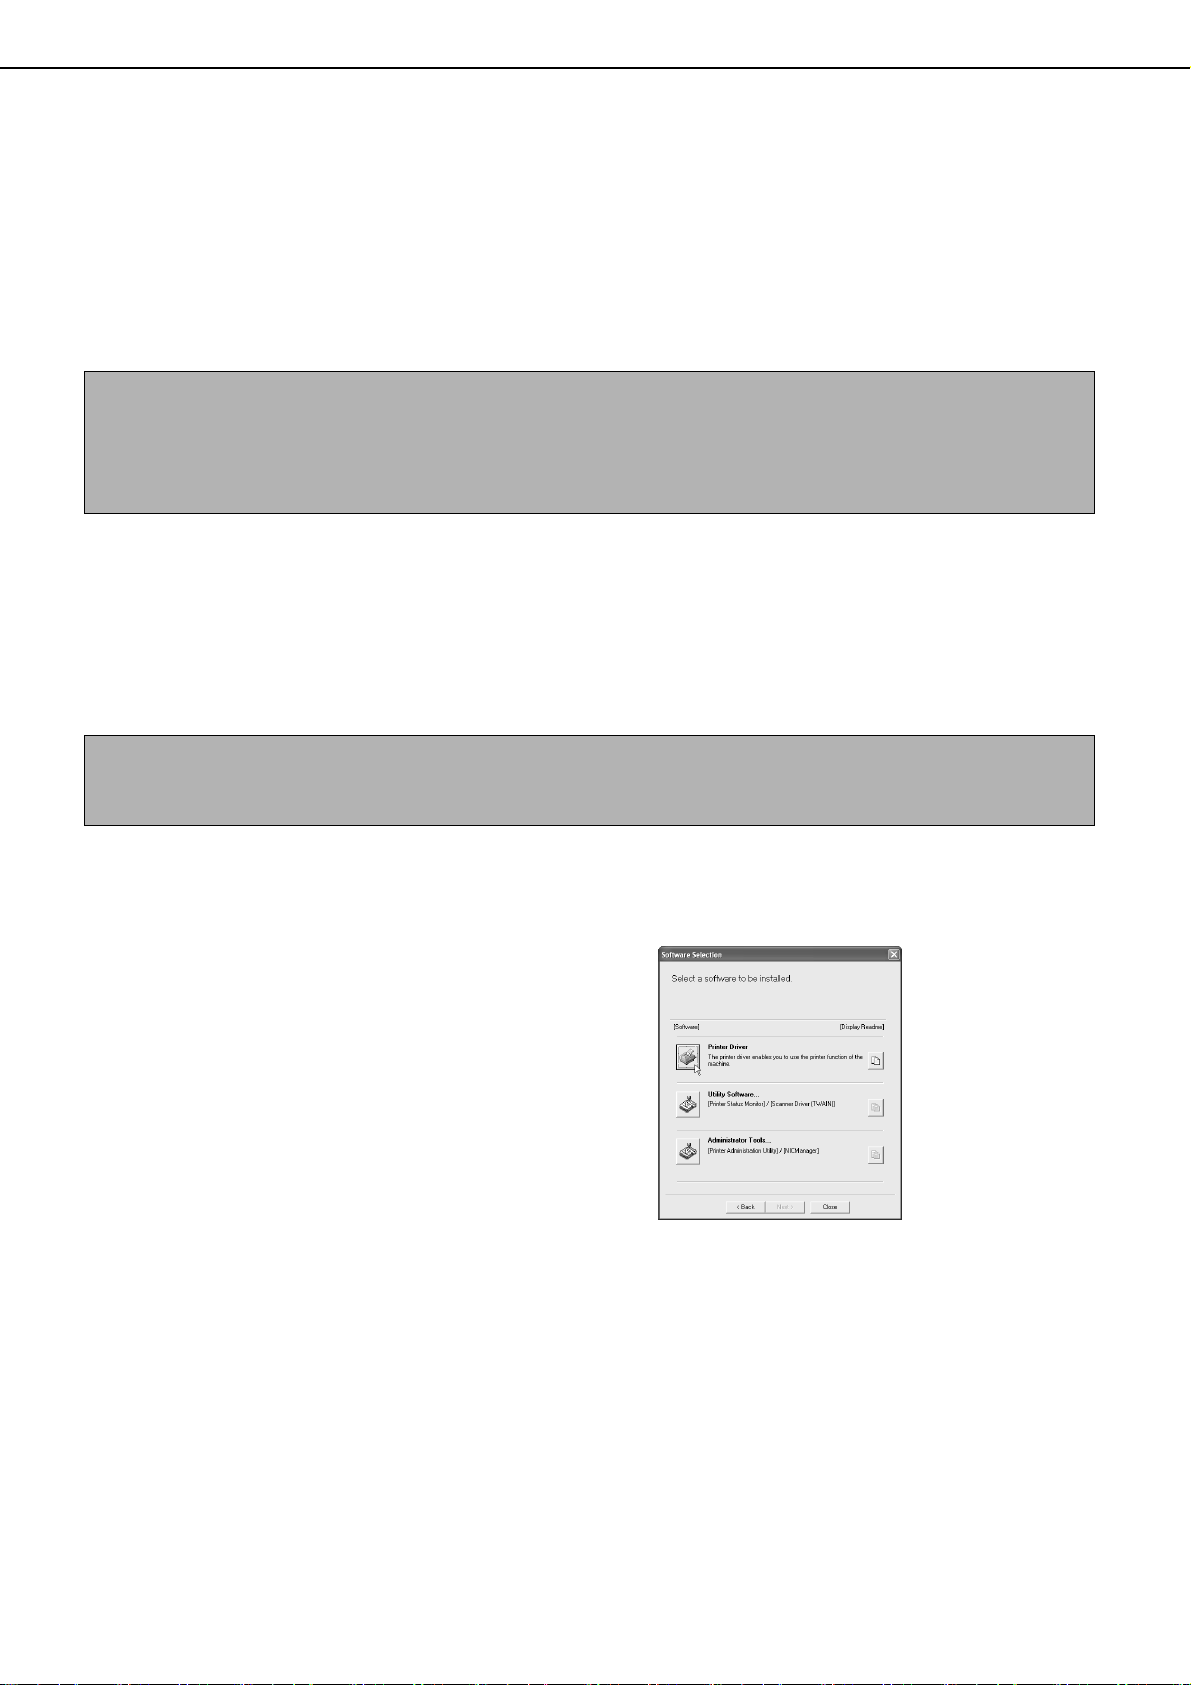
6
Click the [Printer Driver] button.
To view detailed information on the software, click
the [Display Readme] button.
● If you wish to install the printer status monitor or the
Scanner driver, click the [Utility Software] button in
this window and then click the [Printer Status
Monitor] or [Scanner Driver] button and follow the
on-screen instructions.
If you installed the scanner driver, read the
separate supplementary manual after completing
installation.
● If you wish to install the printer administration
utility, click the [Administrator Tools] button in this
window and then click the [Printer Administration
Utility] button and follow the on-screen instructions.
7
Click the [Next] button.
NOTE
If DHCP is used, the IP address assigned to the machine may be changed automatically on occasion. If this
happens, printing will not be possible.
To use DHCP on this machine, please configure a DHCP reservation. Or, if you make fixed IP address setting, the
problem will be resolved.
NOTE
When installing the printer driver, if you wish to install a display font or specify the IP address of the machine by
direct entry, select [Custom installation]. (page 8)
Page 9
INSTALLING THE PRINTER DRIVER AND UTILITIES (SOFTWARE INSTALLATION)
7
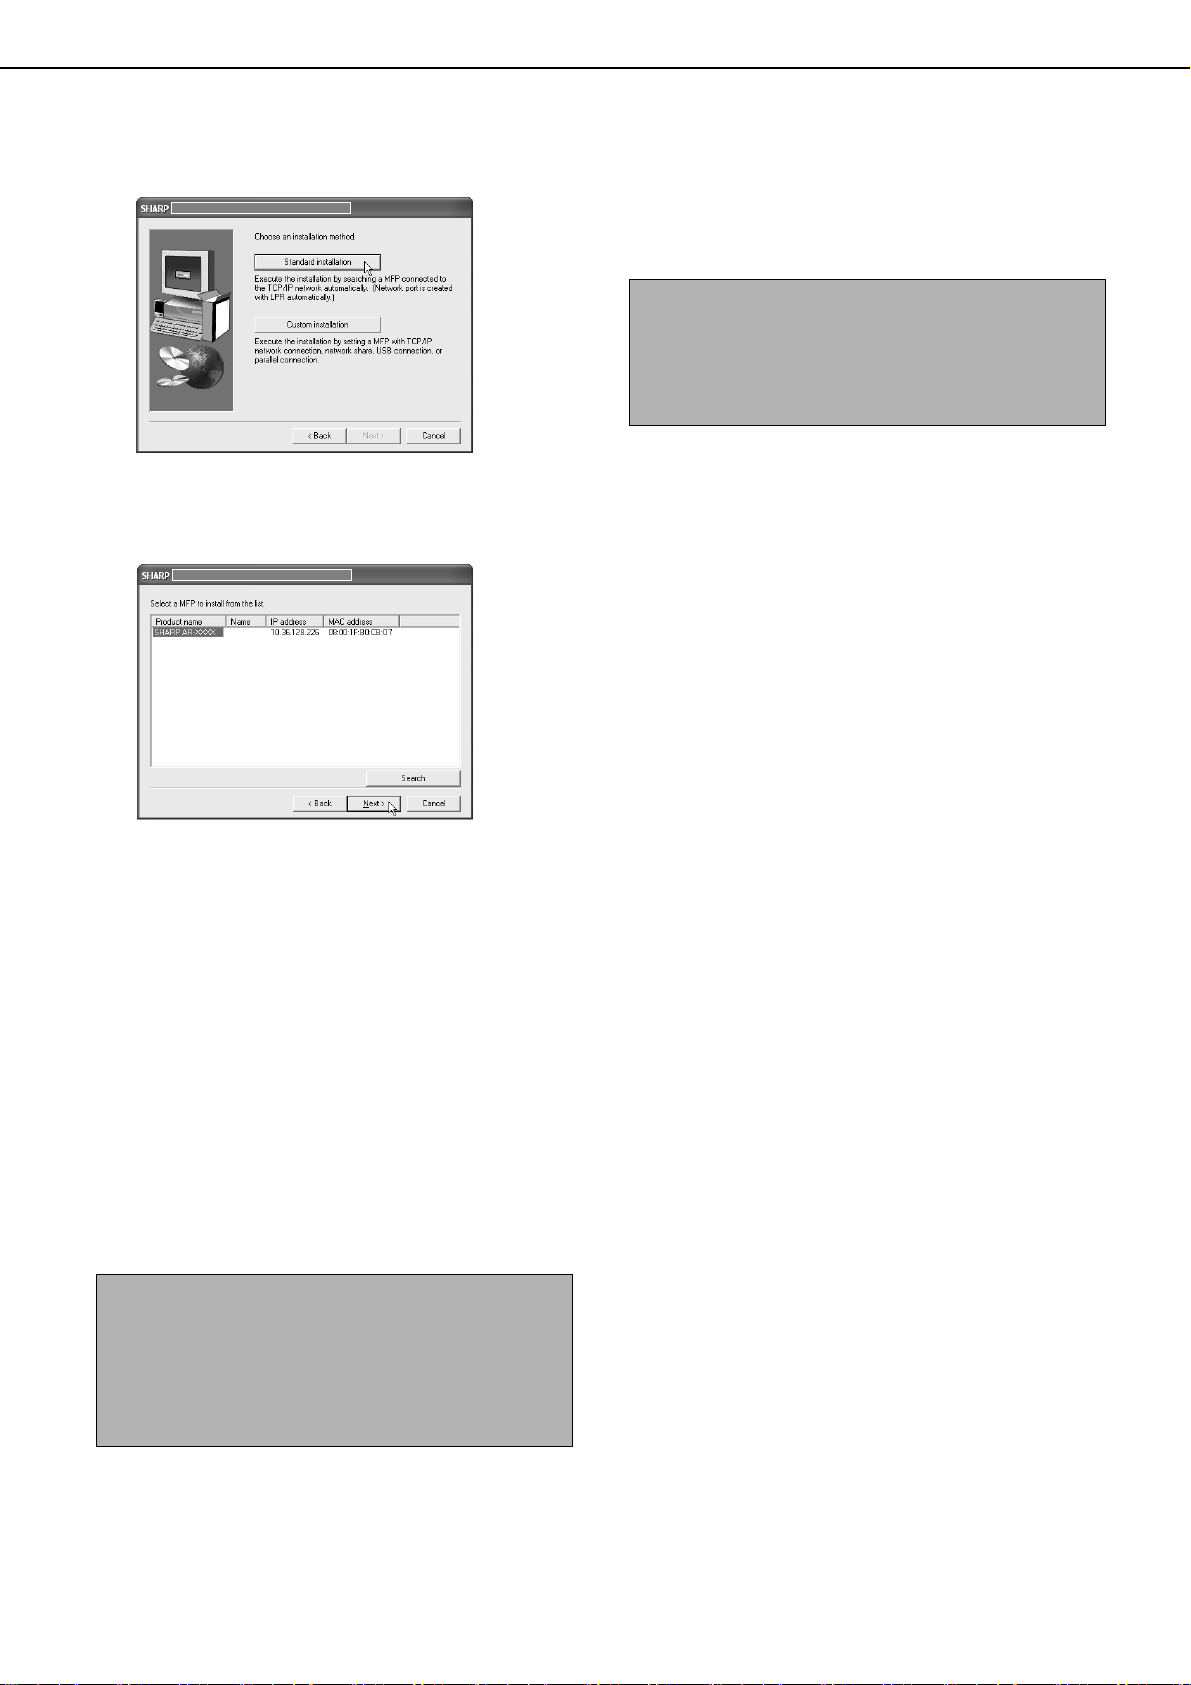
8
Click the [Standard installation] button.
9
The printers that are connected to the
network are found. Select the machine and
click the [Next] button.
If the machine is not found, make sure that the
machine is powered on and connected to your
computer and then search again. If the machine is
still not found, use the custom installation
procedure to directly specify the IP address (page
8).
10
A confirmation window will appear. Read
the contents and click the [Next] button.
11
Select the printer driver being installed as
the default printer and click the [Next]
button.
12
Check the contents of the window and
click the [Next] button.
Installation of the printer driver begins.
13
When the finish setup window appears,
click the [OK] button.
14
Click the [Close] button.
This completes the installation.
NOTE
When you are using Windows 2000/XP/Server
2003
If a warning message regarding the Windows logo
test or digital signature appears, be sure to click the
[Continue Anyway] or [Yes] button.
NOTE
A message prompting you to restart your computer
may appear after installation is finished. If this
message appears, click [Yes] to restart your
computer.
Page 10

INSTALLING THE PRINTER DRIVER AND UTILITIES (SOFTWARE INSTALLATION)
8
■■■■ Installing the printer driver (custom installation)
The procedure for a custom installation of the printer driver is explained here. Select [Custom installation] if you
wish to install a display font or directly specify the IP address of the machine.
1
Insert the "Software CD-ROM" that
accompanied the machine into your CDROM drive.
2
Click the [start] button, click [My
Computer], and then double-click the CDROM icon.
In Windows 95/98/Me/NT 4.0/2000, double-click
[My Computer], and then double-click the CDROM icon.
3
Double-click the [SETUP] icon.
4
The Licence Agreement window will
appear. Make sure that you understand
the contents of the licence agreement, and
then click the [Yes] button.
5
After confirming the message in the
"Welcome" window, click the [Next]
button.
6
Click the [Printer Driver] button.
To view detailed information on the software, click
the [Display Readme] button.
● If you wish to install the printer status monitor or the
Scanner driver, click the [Utility Software] button in
this window and then click the [Printer Status
Monitor] or [Scanner Driver] button and follow the
on-screen instructions.
If you installed the scanner driver, read the
separate supplementary manual after completing
installation.
● If you wish to install the printer administration
utility, click the [Administrator Tools] button in this
window and then click the [Printer Administration
Utility] button and follow the on-screen instructions.
7
Click the [Next] button.
8
Click the [Custom installation] button.
9
Select the [LPR Direct Print] and click the
[Next] button.
10
The printers that are connected to the
network are found. Select the machine and
click the [Next] button.
If you wish to directly specify the IP address, click
the [Specify Address] button, enter the IP address,
and click the [Search] button.
Be sure to ask your network administrator for the
correct IP address to be entered.
11
A confirmation window will appear. Read
the contents and click the [Next] button.
Page 11

INSTALLING THE PRINTER DRIVER AND UTILITIES (SOFTWARE INSTALLATION)
9
12
Select the printer driver being installed as
the default printer and click the [Next]
button.
13
When the printer name window appears,
click the [Next] button.
If you wish to change the printer name, enter the
desired name.
14
When you are asked if you wish to install
the display font, select an answer and
click the [Next] button.
15
Check the contents of the window and
click the [Next] button.
Installation of the printer driver begins.
16
When the finish setup window appears,
click the [OK] button.
17
Click the [Close] button.
This completes the installation.
NOTE
When you are using Windows 2000/XP/Server
2003
If a warning message regarding the Windows logo
test or digital signature appears, be sure to click the
[Continue Anyway] or [Yes] button.
NOTE
A message prompting you to restart your computer
may appear after installation is finished. If this
message appears, click [Yes] to restart your
computer.
Page 12

INSTALLING THE PRINTER DRIVER AND UTILITIES (SOFTWARE INSTALLATION)
10
■■■■ Using the machine as a shared printer via a server
If the printer server in a Windows NT server environment, NetWare server environment, or other environment
is configured to share the printer (the machine), follow the steps below to install the printer driver in each client
computer.
Ask your network administrator for the server name and printer name of the machine on the network.
1
Perform steps 1 through 8 of "Installing
the printer driver (Custom installation)" on
page 8.
2
Select the [Shared Printer] and click the
[Next] button.
3
When you are asked to select the printer
port to be used, click the [Add Network
Port] button.
4
Select the network printer that is shared
and click the [OK] button.
Ask your network administrator for the server
name and printer name of the machine on the
network.
5
In the printer port selection window, verify
the network printer that is shared and click
the [Next] button.
6
When you are asked to select the model
name, select the model that you are using
and click the [Next] button.
7
Perform step 12 through 17 of "Installing
the printer driver (custom installation)" on
page 9.
This completes the installation.
NOTE
For the procedure for configuring settings in the printer server, see the operating system manual or Help. The
"printer server" explained here is a computer that is connected to the machine, and "clients" are other computers
connected to the same network as the printer server.
Page 13

INSTALLING THE PRINTER DRIVER AND UTILITIES (SOFTWARE INSTALLATION)
11
Installation method 2
Use this procedure to install the software in the following environments:
1. The printer is connected by USB cable or parallel cable.
2. Windows version: Windows XP/Server 2003
Installing the software in Windows XP/Server 2003 (USB/parallel interface)
Install the software as follows.
Before starting the installation, make sure the USB or parallel interface cable is not connected to the machine.
1
Insert the "Software CD-ROM" that
accompanied the machine into your CDROM drive.
2
Click the [start] button, select [My
Computer], and then double-click the CDROM icon.
3
Double-click the [SETUP] icon.
4
The Licence Agreement window will
appear. Make sure that you understand
the contents of the licence agreement, and
then click the [Yes] button.
5
After confirming the message in the
"Welcome" window, click the [Next]
button.
6
Click the [Printer Driver] button.
To view detailed information on the software, click
the [Display Readme] button.
7
Click the [Next] button.
8
Click the [Custom installation] button.
9
Click the [Connected to this computer]
and click the [Next] button.
10
When you are asked if you wish to install
the display font, select an answer and
click the [Next] button.
NOTE
To install this software, you must have administrator's rights.
Page 14

INSTALLING THE PRINTER DRIVER AND UTILITIES (SOFTWARE INSTALLATION)
12
11
Follow the on-screen instructions to
install the printer driver.
If a warning message regarding the Windows logo
test appears while the printer driver files are being
copied (the warning message may appear several
times), be sure to click the [Continue Anyway]
button.
12
When the finish setup window appears,
click the [OK] button.
13
When the finish installation window
appears, click the [Close] button.
When the message "Now connect the interface
cable to the PC. This will finalize the driver's
installation and settings." appears, click the [OK]
button.
14
Connect the machine to your computer an
interface cable (page 24).
● If you are using a USB cable, make sure the
machine power is turned on and then connect
the cable.
● If you are using a parallel cable, turn off both the
machine power and the computer power and
then connect the cable. Turn the machine power
on first and then turn on your computer.
The machine is found and a plug and play
window appears.
15
Installation of the printer driver begins.
The printer name will appear in the "Found New
Hardware Wizard". Select "Install the software
automatically (Recommended)" and click the
[Next] button. Follow the on-screen instructions to
install the printer driver.
This completes the installation.
NOTES
A message prompting you to restart your computer
may appear after installation is finished. If this
message appears, click [Yes] to restart your
computer.
Page 15

INSTALLING THE PRINTER DRIVER AND UTILITIES (SOFTWARE INSTALLATION)
13
Installation method 3
Use this procedure to install the software in the following environments:
1. The printer is connected by USB cable.
2. Windows version: Windows 98/Me/2000*
1
Installing the software in Windows 98/Me or Windows 2000 (USB/interface)
Install the software as follows.
Before starting the installation, make sure the USB interface cable is not connected to the machine.
The procedure for installing the printer driver is explained here using Windows Me as an example.
1
Insert the "Software CD-ROM" that
accompanied the machine into your CDROM drive.
2
Double-click [My Computer], and then
double-click the CD-ROM icon.
3
Double-click the [SETUP] icon.
4
The Licence Agreement window will
appear. Make sure that you understand
the contents of the licence agreement, and
then click the [Yes] button.
5
After confirming the message in the
"Welcome" window, click the [Next]
button.
6
Follow the on-screen instructions.
7
Click the [Printer Driver] button.
To view detailed information on the software, click
the [Display Readme] button.
8
Click the [Next] button.
9
Click the [Custom installation] button.
10
Click the [Connected to this computer]
and click the [Next] button.
11
When you are asked to select the
interface, select [USB] and click the [Next]
button.
NOTE
*1 To install the software using the installer, you must have administrator's rights.
Page 16

INSTALLING THE PRINTER DRIVER AND UTILITIES (SOFTWARE INSTALLATION)
14
12
When you are asked if you wish to install
the display font, select an answer and
click the [Next] button.
13
Follow the on-screen instructions to
install the printer driver.
If you are using Windows 2000 and a warning
message regarding the digital signature appears
while the printer driver files are being copied (the
warning message may appear several times), be
sure to click the [Continue Anyway] button.
14
When the finish setup window appears,
click the [OK] button.
15
When the finish installation window
appears, click the [Close] button.
When the message "Now connect the interface
cable to the PC. This will finalize the driver's
installation and settings." appears, click the [OK]
button.
16
Make sure that the machine power is
turned on and connect the machine to
your computer with a USB cable (page 24).
The machine is found and a plug and play window
appears.
17
Follow the instructions in the plug and
play window to install the printer driver.
This completes the installation.
NOTE
A message prompting you to restart your computer
may appear after installation is finished. If this
message appears, click [Yes] to restart your
computer.
Page 17

INSTALLING THE PRINTER DRIVER AND UTILITIES (SOFTWARE INSTALLATION)
15
Installation method 4
Use this procedure to install the software in the following environments:
1. The printer is connected by parallel cable.
2. Windows version: Windows 95/98/Me/NT 4.0*
1
/2000*
1
Installing the software in Windows 95/98/Me or Windows NT 4.0/2000 (Parallel interface)
Install the software as follows.
Before starting the installation, make sure the parallel interface cable is not connected to the machine.
The procedure for installing the printer driver is explained here using Windows Me as an example.
1
Insert the "Software CD-ROM" that
accompanied the machine into your CDROM drive.
2
Double-click [My Computer], and then
double-click the CD-ROM icon.
3
Double-click the [SETUP] icon.
4
The Licence Agreement window will
appear. Make sure that you understand
the contents of the licence agreement, and
then click the [Yes] button.
5
After confirming the message in the
"Welcome" window, click the [Next]
button.
6
Click the [Printer Driver] button.
To view detailed information on the software, click
the [Display Readme] button.
7
Click the [Next] button.
8
Click the [Custom installation] button.
9
Click the [Connected to this computer]
and click the [Next] button.
10
When you are asked to select the
interface, select [Parallel] and click the
[Next] button.
11
Select the printer port and click the [Next]
button.
Select [LPT1] for the printer port.
NOTE
*1 To install the software using the installer, you must have administrator's rights.
Page 18

UNINSTALLING PRINTER DRIVERS AND PRINTER UTILITIES
16
12
When you are asked to select the model
name, select the model that you are using
and click the [Next] button.
13
Check the contents of the window and
click the [Next] button.
Installation of the printer driver begins.
14
Select the printer driver being installed as
the default printer and click the [Next]
button.
15
When the printer name window appears,
click the [Next] button.
If you wish to change the printer name, enter the
desired name.
16
When you are asked if you wish to install
the display font, select an answer and
click the [Next] button.
17
Follow the on-screen instructions to
install the printer driver.
18
When the finish setup window appears,
click the [OK] button.
19
When the finish installation window
appears, click the [Close] button.
When the message "Now connect the interface
cable to the PC. This will finalize the driver's
installation and settings." appears, click the [OK]
button.
20
Turn off both the machine power and the
computer power and then connect the
parallel cable (page 24).
After connecting the cable, turn the machine
power on first and then turn on your computer.
This completes the installation.
UNINSTALLING PRINTER DRIVERS
AND PRINTER UTILITIES
When uninstalling a printer driver that has been installed from the Add Printer wizard, right-click the printer to be
deleted from "Printers" of "Control Panel" and select [Delete]. When uninstalling a printer driver that has been
installed using the installer, the Printer Administration Utility or the Printer Status Monitor, use "Add/Remove
Programs" of "Control Panel". Use the Windows standard operation for each case.
NOTE
When you are using Windows 2000/XP/Server
2003
If a warning message regarding the Windows logo
test or digital signature appears, be sure to click the
[Continue Anyway] or [Yes] button.
NOTE
A message prompting you to restart your computer
may appear after installation is finished. If this
message appears, click [Yes] to restart your
computer.
Page 19

17
INSTALLING PRINTER DRIVERS USING THE "ADD PRINTER WIZARD"
Before installation
Before installing the printer drivers, check the following items.
● Ensure that your computer system meets the following requirements.
Computer type:
IBM PC/AT or compatible computer
Hardware requirements of the operating system
must be satisfied.
Operating system:
Microsoft Windows 95
Microsoft Windows 98
Microsoft Windows Me
Microsoft Windows 2000 Server/Professional
Microsoft Windows NT 4.0 (Service Pack 3 or later)
Microsoft Windows XP Professional/Home Edition
Microsoft Windows Server 2003
When using the "Add Printer Wizard" to install printer drivers, enter the directory name indicated below as a
source directory.
Path for using PCL5c driver in Windows 2000/XP/Server 2003
R:\Drivers\Printer\English\PCL5c\2kxp
Path for using PCL5c driver in Windows 95/98
R:\Drivers\Printer\English\PCL5c\9x
Path for using PCL5c driver in Windows Me
R:\Drivers\Printer\English\PCL5c\me
Path for using PCL5c driver in Windows NT 4.0
R:\Drivers\Printer\English\PCL5c\nt40
Page 20

INSTALLING PRINTER DRIVERS USING THE "ADD PRINTER WIZARD"
18
■■■■
Example of installation of a printer driver using the "Add Printer Wizard" in Windows XP
The method for installing a printer driver using the "Add Printer Wizard" in Windows XP is shown below.
The installation example assumes that the printer is connected as a local printer (see "CONNECTING THE
MACHINE TO YOUR COMPUTER" on page 24) and that the CD-ROM drive is drive "R". The procedure may
differ depending on the system environment.
1
Start Windows XP.
2
Insert the supplied CD-ROM into the CDROM drive.
3
Click the [start] button, click [Control
Panel], click [Printers and Other
Hardware], and then click [Printers and
Faxes].
4
Click [Add a printer] in [Printer Tasks].
5
Follow the on-screen instructions.
To specify the printer driver path, enter the
following path:
R:\Drivers\Printer\English\PCL5c\2kxp
■■■■ Installing PCL Display Fonts
The PCL display fonts are fonts displayed on your computer screen. The "Software CD-ROM" contains the
PCL display fonts that correspond to the resident fonts in the machine. These display fonts can be installed to
your computer (Windows 95/98/Me/NT 4.0/2000/XP/Server 2003) from the installer. When installing the PCL
display fonts using the Windows installation procedure instead of the installer ([Start] - [Settings] - [Control
Panel] - [Fonts] - [Install] - [New Font]), specify the following path.
R:\Drivers\Printer\Font\PCLFont (Where "R" represents the letter of your CD-ROM driver.)
Page 21

19
INSTALLING AND USING THE TWAIN DRIVER
The procedures for installing and using the TWAIN driver are explained below.
Before installation
Check the following before installing the TWAIN driver:
• Make sure that your computer system meets the requirements below.
Computer type:
IBM PC/AT or compatible computer
Hardware requirements of the operating system
must be satisfied.
Operating system:
Microsoft Windows 95
Microsoft Windows 98
Microsoft Windows Me
Microsoft Windows 2000 Server/Professional
Microsoft Windows NT 4.0 (Service Pack 3 or later)
Microsoft Windows XP Professional/Home Edition
Microsoft Windows Server 2003
(Cannot be used on Windows NT 4.0 Terminal Server.)
Installing the TWAIN driver
The procedure for installing the TWAIN driver is explained below.
1
Insert the "Software CD-ROM" that
accompanied the machine into your CDROM drive.
2
Click the [start] button, click [My
Computer], and then double-click the CDROM icon.
In Windows 95/98/Me/NT 4.0/2000, double-click
[My Computer], and then double-click the CDROM icon.
3
Double-click the [SETUP] icon.
4
The Licence Agreement window will
appear. Make sure that you understand
the contents of the licence agreement, and
then click the [Yes] button.
5
After confirming the message in the
"Welcome" window, click the [Next]
button.
6
Click the [Utility Software] button.
To view detailed information on the software, click
the [Display Readme] button.
● If you wish to install the printer driver, see
"INSTALLING THE PRINTER DRIVER AND
UTILITIES (SOFTWARE INSTALLATION)" on
pages 4 through 16.
● If you wish to install the printer administration
utility, click the [Administrator Tools] button in this
window and then click the [Printer Administration
Utility] button and follow the on-screen instructions.
NOTE
● The TWAIN driver can only be used on a network port. It cannot be used on a parallel port or USB port. For
information on network environments, see page 5.
● To use the TWAIN driver in a Windows NT 4.0 environment, you must have administrator rights.
● There are two methods for installing the TWAIN driver: installation using the integrated installer as explained in
this manual, and installation by specifying the INF file (for the WIA/STI driver) from the operating system. If you
will be using the TWAIN driver, it is recommended that you install it using the integrated installer. A driver
installed by specifying the INF file and a driver installed with the integrated installer cannot coexist.
If a driver that was installed by specifying the INF file already exists, delete it before installing the TWAIN driver
with the integrated installer.
Page 22

INSTALLING AND USING THE TWAIN DRIVER
20
7
Click the [Scanner Driver (TWAIN)] button.
8
Click the [OK] button.
9
When the window for finishing setup
appears, click the [Finish] button.
10
Click the [Close] button.
This completes the installation procedure.
Page 23

INSTALLING AND USING THE TWAIN DRIVER
21
Setting the IP address
The "TWAIN IP Selector" application is installed at the same time as the TWAIN driver.
The procedure for setting the IP address using the "TWAIN IP Selector" is explained below.
1
Click the "Start" button and select
"Programs", "SHARP MFP TWAIN C", and
"TWAIN IP Selector".
The "Selector" window appears.
2
Click the "Add" button.
The "Add New Address" window appears and the
machine is automatically detected on the network.
3
Select "IP address" of the machine that
you are using and click the "OK" button.
Be sure to ask your network administrator for the
IP address.
4
Check "IP address" and "Name" shown in
the "Selector" window.
If you need to change the name, click the "Update"
button.
This completes the procedure for setting the IP
address.
Page 24

INSTALLING AND USING THE TWAIN DRIVER
22
Scanning with the TWAIN driver
The TWAIN driver (SHARP MFP TWAIN C) complies with the international TWAIN standard and can be used with
many TWAIN-compliant software applications.
The example of scanning with Imaging* in Windows 2000 is explained below. Follow the same steps to scan with
other applications in other operating systems.
* Imaging is an accessory in Windows.
[Place the original and switch the machine to PC
SCAN mode]
1
Place the original on the document glass
or in the reversing automatic document
feeder.
● For information on placing the original, see page 46 of "Operation Manual (for general information
and copier operation)".
● Only one side of an original can be scanned using
the SHARP TWAIN driver.
● Some versions of Windows and some software
applications may not allow multiple originals to be
scanned.
2
Touch the [PC SCAN] key in the touch
panel.
The display will change to PC SCAN mode and the
TWAIN driver can now be used.
[Select the device]
3
Start Imaging and select "Select Device"
from the "File" menu.
The "Select Device" window appears.
4
Select the TWAIN driver of the machine in
the "Select Device" window and click the
"OK" button.
[Open the TWAIN driver]
5
Select "Acquire Image" from the "File"
menu.
The TWAIN driver settings window appears.
[Select scan settings]
6
Select scan settings for the TWAIN driver.
When finished, click the "Preview" button.
An image of the original will appear in the TWAIN
driver. If the image is not satisfactory, adjust the
settings and then check the preview screen again.
NOTE
When placing the original, make sure that it is
straight.
NOTE
When you switch to PC SCAN mode,
● Operation using the operation panel is disabled,
with the exception of pressing the [CA] key and [C]
key and touching the [EXIT] key in the touch panel.
● New print jobs will not be accepted.
NOTE
The procedure for selecting the device varies by
application. See the manual or Help for the
application you are using.
NOTE
If a window appears prompting you to set the IP
address, set the IP address and then click the "OK"
button to close the window. (See page 21.)
NOTE
For information on selecting scan settings and
specifying the scanning area, click the button to
view Help.
Page 25

INSTALLING AND USING THE TWAIN DRIVER
23
[Scan the original and save the image]
7
When you have finished selecting scan
settings, click the "Scan" button.
The scanned image will appear in Imaging.
If you need to cancel scanning at the machine,
press the [C] key or the [CA] key.
8
Save the scanned image.
Select "Save As" from the "File" menu and save
the image.
9
Touch the [EXIT] key in the touch panel to
quit PC SCAN mode.
This completes the procedure for scanning with the
TWAIN driver.
NOTE
If you scan a large area in full colour at high
resolution, scanning will take a long time. Be sure to
select scan settings that are appropriate for the
original (text, photo, monochrome, etc.).
NOTE
Follow the same procedure to scan using the
Sharpdesk application in the Network Scanner
Expansion Kit (AR-NS2).
Page 26

24
CONNECTING THE MACHINE TO YOUR COMPUTER
■■■■ Connection with a network connector
If you will be using the machine as a network
printer, see the online manual ("Print Server Card
Users Manual") on the "Software CD-ROM".
Use a network cable that is shielded.
■■■■ Connection with a USB cable
Please purchase a USB cable (shielded) that
complies with the following standard.
The USB interface on the machine complies with
the USB1.1 standards.
■■■■ Connection with a parallel interface cable
Please purchase a Centronics cable (shielded) that
complies with the following standard.
The parallel interface on the machine complies
with IEEE-STD-1284-1994 ECP.
Connector type (on machine):
36-pin DDK 57LE-40360-730B (D29) female
connector
Page 27

Page 28

INSTALLATION GUIDE/TWAIN DRIVER OPERATION MANUAL
PRINTED IN CHINA
2004K
KS
1
TINSE2970FCZZ
This manual has been printed using a vegetable-based soy oil ink
to help protect the environment.
Printed on 100% post-consumer recycled paper
Page 29

documentation manual, user maintenance, brochure, user reference, pdf manual
This file has been downloaded from:
User Manual and User Guide for many equipments like mobile phones, photo cameras, monther board, monitors, software, tv, dvd, and othes..
Manual users, user manuals, user guide manual, owners manual, instruction manual, manual owner, manual owner's, manual guide,
manual operation, operating manual, user's manual, operating instructions, manual operators, manual operator, manual product,
 Loading...