

Page 1

KEY OPERATOR'S GUIDE
MODEL
AR-C260P
DIGITAL FULL COLOUR PRINTER
This manual describes programs for use by the key operator. The
key operator should read this manual thoroughly to gain the
maximum value from these programs provide.
Page
• KEY OPERATOR
PROGRAMS
1
• KEY OPERATOR
PROGRAM LIST
2
• DESCRIPTION OF
PROGRAMS
Be sure to become thoroughly familiar with this manual to gain
the maximum benefit from the product.
Before installing this product, be sure to read the installation
requirements and cautions sections of the "Operation manual for
general information".
6
Be sure to keep all operation manuals handy for reference
including this manual, the "Operation manual for general
information" and operation manuals for any optional equipment
which has been installed.
Page 2

KEY OPERATOR PROGRAMS
This guide explains special settings (called "key operator programs") that are used to customize the machine to
better suit the needs of the user. The key operator programs are configured by the administrator of the machine, and
can only be accessed after a key operator code number has been entered.
●
The key operator should change the factory default key operator code to a new code before the machine is used.
●
To change the key operator code, follow the procedure on page 3.
Contents
page
●
KEY OPERATOR PROGRAMS ..........................................................................................................1
●
KEY OPERATOR PROGRAM LIST....................................................................................................2
Using the key operator programs.........................................................................................................3
●
DESCRIPTION OF PROGRAMS ........................................................................................................6
Detailed menu of key operator program settings...............................................................................23
1
Page 3

KEY OPERATOR PROGRAM LIST
The following list shows the key operator programs that are used to change machine settings in the display.
NOTE
The key operator programs that can be accessed depend on the optional equipment that is installed.
●
Key Operator Programs
Program name Page Program name Page
ACCOUNT CONTROL COLOUR ADJUSTMENT
AUDITING MODE 6 TEST PRINT 14
ACCOUNT LIMIT 6 COLOUR BALANCE 16
PRINT PER ACCOUNT 7 EASY CALIBRATION 18
RESET ACCOUNT 7 KEY OPERATOR CODE CHANGE 20
ACCOUNT NUMBER CONTROL 7
NO PRINT IF ACC'T # INVALID 7 SYSTEM SETTINGS
ENERGY SAVE DEFAULT SETTINGS 20
AUTO POWER SHUT-OFF TIMER 8 INTERFACE SETTINGS 21
AUTO POWER SHUT-OFF 8 NETWORK SETTINGS 21
PREHEAT MODE 8 INITIALIZE/STORE SETTINGS 22
TONER SAVE (B/W) 8 PRODUCT KEY
OPERATION PANEL SETTINGS SERIAL NUMBER 22
AUTO CLEAR SETTING 8 E-MAIL ALERT AND STATUS 22
MESSAGE DISPLAY TIME 8 PS3 EXPANSION KIT 22
LANGUAGE SETTING 8 DATA SECURITY KIT 22
DEVICE SETTINGS
DISABLE DUPLEX UNIT 9
DISABLE INVERTER UNIT 9
DISABLE STAPLER UNIT 9
DISABLE PAPER DESK DRAWERS 9
DISABLE FINISHER 9
DISABLE LARGE CAPACITY TRAY 9
DISABLE SHIFTER UNIT 9
SADDLE STITCH ADJUST 9
AUTO PAPER SELECTION SETTING 9
REGISTRATION ADJUSTMENT 9
SECURITY SETTINGS 11
PRINT KEY OPERATOR PROGRAMS LIST
20
2
Page 4

KEY OPERATOR PROGRAM LIST
Using the key operator programs
The general procedure for using key operator programs is explained below, using "KEY OPERATOR CODE
CHANGE" as an example.
NOTE
To use the key operator programs, you must first program a key operator code number. (See steps 3 and 4 below.)
Press the [MENU] key repeatedly until
1
"KEY OPERATOR PROGRAMS" appears.
Press the [OK] key.
2
ENTER KEY OPERATOR
CODE -----
Press the [ ] or [ ] key repeatedly until
3
the first digit of your key operator code
number appears, and then press the [OK]
key.
ENTER KEY OPERATOR
CODE 0----
When you press the [OK] key to enter the first digit
after selecting it, "-" in the first digit will change to
" " and "-" in the second digit will blink. If you need
to correct the previous digit, press the [BACK/C]
key to move back.
This message will
appear.
The factory default
setting for the key
operator code number is
00000.
Press the [ ] or [ ] key to select the
6
desired setting for the program, and then
press the [OK] key.
The settings of each
program are explained
on page 6 and following.
Example:"KEY OPERATOR CODE CHANGE" is
selected
In this example, the key operator code is changed
from 0000 (the factory default code) to 98765.
Select "KEY OPERATOR CODE CHANGE" in step 6
and press the [OK] key. The display shows the
following:
SET CODE
00000 - -----
Follow steps 1 through 5 below to enter 98765.
Press the [ ] or [ ] key until 9 appears and then
1
press the [OK] key. The second "-" begins to
blink.
SET CODE
00000 - 9----
Press the [ ] or [ ] key until 8 appears and then
2
press the [OK] key. The third "-" begins to blink.
SET CODE
00000 - 98---
Press the [ ] or [ ] key until 7 appears and then
3
press the [OK] key. The fourth "-" begins to blink.
SET CODE
00000 - 987--
Repeat step 3 to enter the second through
4
the fifth digits of your key operator code
and then press the [OK] key.
Press the [ ] or [ ] key until the desired
5
program appears and then press the [OK]
key.
Example:
To change the key
operator code number,
select "KEY
OPERATOR CODE
CHANGE" and then
press the [OK] key.
Press the [ ] or [ ] key until 6 appears and then
4
press the [OK] key. The fifth "-" begins to blink.
SET CODE
00000 - 9876-
Press the [ ] or [ ] key until 5 appears and then
5
press the [OK] key.
SET CODE
00000 - 98765
The key operator code changes to the new code.
To exit the program, press the [MENU] key.
7
3
Page 5

KEY OPERATOR PROGRAM LIST
How to enter numbers
When entry of a number is required in a key operator program, enter each digit as follows.
The display shown below is an example. The display will vary depending on the program.
In the number entry screen, press [ ] or
1
[ ] until the desired digit appears.
The blinking "-" will
change to a number
9----
[ ] [ ]
8----
[ ] [ ]
7----
[ ] [ ]
from 0 to 9.
When entering a limit
in the "Account limit"
program, enter "0" for
any upper digits that
you do not need
(entries must be
made for all six digits).
6----
[ ] [ ]
5----
[ ] [ ]
4----
[ ] [ ]
3----
[ ] [ ]
When the desired digit appears, press the
2
[OK] key.
The digit is stored and "-"
0----
If you are entering the key operator code, the
stored digit will change to " ".
If a digit does not store when the [OK] key is
pressed, the digit may be "-" (this appears after 0
through 9 when you press the [ ] or [ ] key).
Check the display and reselect the correct digit.
If you accidentally enter an incorrect digit, press
the [BACK/C] key to move back. The entered digit
will blnk, allowing you to select a new digit.
Repeat steps 1 and 2 until all digits of the
3
number are entered.
01234
in the next digit begins to
blink.
The number of digits to
be entered varies
depending on the type of
number being entered.
2----
[ ] [ ]
1----
[ ] [ ]
0----
[ ] [ ]
-----
4
Page 6

Structure of the key operator program menu
The menu for selecting key operator programs is shown below.
Level 2Level 1 Level 3
KEY OPERATOR PROGRAM LIST
ACCOUNT CONTROL
ENERGY SAVE
OPERATION PANEL
SETTINGS
DEVICE SETTINGS
Enter Key Operator Code
COLOUR ADJUSTMENT
See page 29
KEY OPERATOR CODE
CHANGE
See page 29
PRINT KEY OPERATOR
PROGRAMS LIST
See page 29
SYSTEM SETTINGS
PRODUCT KEY
AUDITING MODE
ACCOUNT LIMIT
PRINT PER ACCOUNT
See page 23
RESET ACCOUNT
ACCOUNT NUMBER CONTROL
NO PRINT IF ACC'T# INVALID
See page 25
AUTO POWER SHUT-OFF TIMER
AUTO POWER SHUT-OFF
PREHEAT MODE
TONER SAVE (B/W)
See page 26
AUTO CLEAR SETTING
MESSAGE DISPLAY TIME
LANGUAGE SETTING
See page 26
DISABLE DUPLEX UNIT
DISABLE INVERTER UNIT
DISABLE STAPLER UNIT
DISABLE PAPER DESK DRAWERS
DISABLE FINISHER
DISABLE LARGE CAPACITY TRAY
DISABLE SHIFTER UNIT
SADDLE STITCH ADJUST
AUTO PAPER SELECTION SETTING
See page 27
REGISTRATION ADJUSTMENT
SECURITY SETTINGS
See page 28
EASY CALIBRATION
COLOUR BALANCE
TEST PRINT
DEFAULT SETTINGS
See page 29
INTERFACE SETTINGS
NETWORK SETTINGS
See page 30
INITIALIZE/STORE SETTINGS
See page 31
SERIAL NUMBER
E-MAIL ALERT AND STATUS
PS3 EXPANSION KIT
DATA SECURITY KIT
See page 31
LIMIT PER ACCOUNT
LIMIT ALL ACCOUNT
PRINT PER ACCOUNT DISPLAY
PRINT PER ACCOUNT PRINT
RESET PER ACCOUNT
RESET ALL ACCOUNTS
See page 24
ENTER NEW ACCOUNT NUMBER
See page 24
DELETE ACCOUNT NUMBER
CHANGE ACCOUNT NUMBER
PRINT ACCOUNT NUMBER
See page 25
Level 4
ENTER ACCOUNT NUMBER
DELETE ALL ACCOUNTS
AUTO
ADJUSTMENT
MANUAL
CLEAR ALL MEMORY
POWER UP AUTO CLEAR
AUTO CLEAR AT JOB END
ADJUSTMENT
Level 4
REPEAT COUNT OF THE
SELECTED PROGRAM.
DISABLE NOTICE PAGE PRINTING
DISABLE TEST PAGE PRINTING
A4/LT AUTO SELECT
DELETE HOLD DATA
OUTPUT METHOD WHEN MEMORY FULL
BYPASS PAPER TYPE
I/O TIMEOUT
PORT SWITCHING
ENABLE PARALLEL PORT
ENABLE USB PORT
ENABLE NETWORK PORT
IP ADRESS SETTING
ENABLE TCP/IP
ENABLE NetWare
ENABLE EtherTalk
ENABLE NetBEUI
RESET THE NIC
RESTORE FACTORY DEFAULTS
STORE CURRENT CONFIGURATION
RESTORE THE CONFIGURATION
5
Page 7

DESCRIPTION OF PROGRAMS
The key operator programs are explained in the following.
Specific procedures and detailed information are provided for programs that typically require adjustment. For
information on the other programs, see "Detailed menu of key operator program settings" on pages 23 to 31.
■
Account control
The program "Auditing mode" is used to set the
internal auditor function. The other programs of this
category can be set only if auditing mode has been
enabled. (See pages 23 to 25)
Auditing mode
When auditing mode is enabled, up to 200 five-digit
account numbers can be stored and assigned to
users. An assigned account number must be
entered to access the machine for printing.
Display "AUDITING MODE" as indicated in the
1
chart on page 23.
AUDITING MODE
Press the [OK] key.
2
The current setting appears.
Press the [ ] or [ ] key to select "COLOUR &
3
B/W" or "COLOUR ONLY", and press the [OK]
key.
If you do not wish to use Account control, select
"DISABLE".
The following programs cannot be used unless
auditing mode is enabled and an account number
is stored.
●
Account limit
●
Print per account
●
Reset account
Account limit
This program is used to set the maximum number
of prints that can be printed by an account. Any
number up to 999,999 can be entered for the
maximum number of prints.
● Limiting the number of prints per account
Display "LIMIT PER ACCOUNT" as indicated in
1
the chart on page 23.
LIMIT PER ACCOUNT
Press the [OK] key.
2
Press the [ ] or [ ] key to select the account
3
number and "B/W" for black and white prints or
"CL" for colour prints, and press the [OK] key.
The [ ] or [ ] key can be held down to scroll
through the accounts.
Enter the limit and press the [OK] key.
4
To enter numbers, see page 4.
You will return to the display of Step 3.
To exit the program, press the [MENU] key.
● Limiting the number of prints of all accounts
Display "LIMIT ALL ACCOUNTS" as indicated in
1
the chart on page 23.
LIMIT ALL ACCOUNTS
Press the [OK] key.
2
Press the [ ] or [ ] key to select "B/W" for black
3
and white prints or "COLOUR" for colour prints,
and press the [OK] key.
6
Enter the limit and press the [OK] key.
4
To enter numbers, see page 4.
You will return to the display of Step 3.
To exit the program, press the [MENU] key.
Page 8

DESCRIPTION OF PROGRAMS
Print per account
This program is used to display or print the total
number of prints of each account. Misfed paper is
not counted.
● Displaying the print count of individual
accounts
Display "PRINT PER ACCOUNT DISPLAY" as
1
indicated in the chart on page 23.
PRINT PER ACCOUNT
DISPLAY
Press the [OK] key.
2
Press the [ ] or [ ] key unitl "B/W" or "CL" of
3
the desired account appears, and check the
count.
The [ ] or [ ] key can be held down to scroll
through the accounts.
To exit the program, press the [MENU] key.
● Printing out the counts of all accounts
Display "PRINT PER ACCOUNT PRINT" as
1
indicated in the chart on page 23.
PRINT PER ACCOUNT
PRINT
● Resetting all accounts
Display "RESET ALL ACCOUNTS" as indicated in
1
the chart on page 24.
RESET ALL ACCOUNTS
Press the [OK] key.
2
Press the [ ] or [ ] key to select "B/W" or
3
"COLOUR", and press the [OK] key.
Press the [OK] key again.
4
The print counts are reset.
You will return to the display of step 3.
To exit the program, press the [MENU] key.
Account number control
This program is used to store, delete, and edit
account numbers, as well as print a list of the
stored account numbers. Up to 200 account
numbers can be stored.
● Enter new account number
Each account number has five digits. When you
have finished storing one account number, you
can continue storing other account numbers.
Press the [OK] key.
2
The print counts of all accounts will be printed.
Printing can be cancelled by pressing the [BACK/C]
key.
Reset account
This program is used to reset the print counts of
individual or all accounts.
● Resetting an individual account
Display "RESET PER ACCOUNT" as indicated in
1
the chart on page 24.
RESET PER ACCOUNT
Press the [OK] key.
2
Press the [ ] or [ ] key unitl "B/W" or "CL" of
3
the desired account appears, and press the [OK]
key.
The [ ] or [ ] key can be held down to scroll
through the accounts.
Press the [OK] key again.
4
The print count is reset to zero.
You will return to the display of step 3 and can reset
the counts of other accounts.
To exit the program, press the [MENU] key.
● Delete account number
Two methods are available for deleting account
numbers: deleting an individual account
number, and deleting all account numbers at
once.
● Change account number
To change an account number, enter the
account number to be changed and then enter a
new account number. After changing one
account number, you can continue changing
other account numbers.
● Print account number
A list of the account numbers can be printed.
"ACCOUNT NUMBER CONTROL" is displayed as
indicated in the chart on pages 24 to 25.
No print if ACC'T # invalid
If "NO PRINT IF ACC'T # INVALID" is enabled and
an invalid account number is entered or no account
number is entered, the print job will not be printed.
If this program is disabled, the job will be printed
and the prints will be included in the "OTHERS"
count.
"NO PRINT IF ACC'T # INVALID" is displayed as
indicated in the chart on page 25.
7
Page 9

DESCRIPTION OF PROGRAMS
■
Energy save
Two programs are provided for the purpose of
saving energy: Auto power shut-off mode and
preheat mode. These programs not only lower your
electricity bill, but also help conserve natural
resources and reduce pollution. Auto power
shut-off mode enables more energy to be saved
than preheat mode, but requires a longer recovery
time.
This program is also provided for reducing toner
consumption.
Auto power shut-off timer
If the printer is not used for a programmed length of
time after printing is finished, it will enter auto
power shut-off mode to save energy.
The length of time until auto power shut-off occurs
can be set to 15 minutes, 30 minutes, 60 minutes,
120 minutes or 240 minutes. For this setting to be
effective, the "Auto power shut-off" program must
be enabled.
"AUTO POWER SHUT-OFF TIMER" is displayed
as indicated in the chart on page 26.
NOTE
Select a suitable time according to your pattern of
use of the machine.
Auto power shut-off
Use this setting to enable or disable auto power
shut-off. If disabled, the time set in the "Auto power
shut-off timer" program will be disregarded.
"AUTO POWER SHUT-OFF" is displayed as
indicated in the chart on page 26.
NOTE
Rather than disabling the auto power shut-off
feature, we suggest that you first try lengthening
the time setting of the auto power shut-off timer. In
most cases a suitable timer setting will allow work
to proceed with minimal delay and still enable you
to enjoy the benefits of power conservation.
Preheat mode
If the printer is not used for a programmed length of
time after printing is finished, it will enter preheat
mode.
The time until the printer enters preheat mode can
be set to 15 minutes, 30 minutes, 60 minutes, 120
minutes, or 240 minutes. "No" can be selected to
disable preheat mode. Select the most suitable
setting to match your pattern of use of the printer.
"PREHEAT MODE" is displayed as indicated in the
chart on page 26.
Toner save (B/W)
Toner save mode can be enabled to reduce black
toner consumption. When toner save is enabled,
black solid areas will be printed in halftone.
"TONER SAVE (B/W)" is displayed as indicated in
the chart on page 26.
Print data
■
Operation panel settings
These programs are used to adjust the display on
the operation panel.
Auto clear setting
The auto clear function will return the printer to the
standby mode or the job status mode if the
operation panel is not used for a programmed
length of time. Auto clear will not function when the
printer is in custom setting mode or key operator
program setting mode. The auto clear time can be
set to 15 seconds, 30 seconds, 60 seconds or
"NO".
"AUTO CLEAR SETTING" is displayed as
indicated in the chart on page 26.
Message display time
This program is used to adjust the time that
messages are displayed (for messages that
automatically disappear).
The time can be set to 3 seconds, 6 seconds, 9
seconds or 12 seconds.
"MESSAGE DISPLAY TIME" is displayed as
indicated in the chart on page 26.
Language setting
This program is used to switch the language of
messages displayed on the operation panel. The
following languages can be selected. :
AMERICAN ENGLISH, ENGLISH, GERMAN,
FRENCH, SPANISH, DUTCH, ITALIAN, SWEDISH,
DANISH, NORWEGIAN, FINISH, and JAPANESE
"LANGUAGE SETTING" is displayed as indicated
in the chart on page 26.
Example of
print in the
toner save
mode
8
Page 10

DESCRIPTION OF PROGRAMS
■
Device settings
These programs are used to enable or disable the
use of a peripheral device, and select other modes,
registration adjustment, and auto paper selection
setting. (See pages 27 to 28)
Disable duplex unit
This program is used to disable duplex printing
when the duplex module malfunctions. When this
program is enabled, only one-sided printing can be
performed.
"DISABLE DUPLEX UNIT" is displayed as
indicated in the chart on page 27.
Disable inverter unit
Use this program when you need to prohibit the
inverter function or when the duplex
bypass/inverter unit has failed. When the program
is enabled, pages are only output face-down to the
centre tray of the machine. Duplex printing is also
prohibited (only one-sided printing is possible).
"DISABLE INVERTER UNIT" is displayed as
indicated in the chart on page 27.
Disable stapler unit
This program is used to disable stapling when the
stapler unit of the saddle stitch finisher
malfunctions.
"DISABLE STAPLER UNIT" is displayed as
indicated in the chart on page 27.
Disable paper desk drawers
This program is used to disable use of the stand/1
x 500 sheet paper drawer, stand/3 x 500 sheet
paper drawer or duplex module/2 x 500 sheet
paper drawer when one of these units
malfunctions.
"DISABLE PAPER DESK DRAWERS" is displayed
as indicated in the chart on page 27.
Disable finisher
This program is used to disable use of the saddle
stitch finisher when it malfunctions.
"DISABLE FINISHER" is displayed as indicated in
the chart on page 27.
Disable large capacity tray
This program is used to disable use of the large
capacity tray when it malfunctions.
Disable shifter unit
Use this program when you need to prohibit the
shifter (offset) function in the centre tray or when
the shifter has failed.
"DISABLE SHIFTER UNIT" is displayed as
indicated in the chart on page 27.
Saddle stitch adjust
This program is used to adjust the stapling position
(folding position) when using the saddle stitch
function of the optional saddle stitch finisher.
The value can be adjusted in 0.1 mm increments
within ±3.0 mm from the reference position for
each paper size.
"SADDLE STITCH ADJUST" is displayed as
indicated in the chart on page 27.
Min. -3 mmMax. +3 mm
Position adjusted
to the plus
direction
1
2
Reference position
Auto paper selection setting
Use this program to select the paper type* for
which the automatic paper selection function
operates. Selections are "PLAIN", "R&P" (recylcled
and plain), and "RECYCLED".
* This is the paper type set for each paper tray in
the paper tray settings of the custom settings
(page 2-11 of the OPERATION MANUAL (for
general information)).
"AUTO PAPER SELECTION SETTING" is
displayed as indicated in the chart on page 27.
Registration adjustment
Use this program when the colour of characters
and lines in colour printing is off. Registration
adjustment can be performed in two ways:
manually and automatically. Normally [AUTO
ADJUSTMENT] should be used.
"REGISTRATION ADJUSTMENT" is displayed as
indicated in the chart on page 28.
Auto adjustment
Use this program to perform automatic registration
adjustment.
When "AUTO ADJUSTMENT HAS COMPLETED.
[OK]" appears, press the [OK] key to end the
program.
"AUTO ADJUSTMENT" is displayed as indicated
in the chart on page 28.
Manual adjustment
Use MANUAL ADJUSTMENT when you require a
higher degree of precision than can be obtained
with AUTO ADJUSTMENT.
See page 10 for the procedure for manually
adjusting the registration.
"MANUAL ADJUSTMENT" is displayed as
indicated in the chart on page 28.
Position adjusted
to the minus
direction
12
11
9
Page 11

DESCRIPTION OF PROGRAMS
● Manually adjusting the registration
The procedure for manually adjusting the registration is explained here.
Display "MANUAL ADJUSTMENT" as indicated in the chart on page 28, and press the [OK] key. Press the [OK] key once
again to print test pages for manual adjustment. Scales appear in the test pages that show the amount of deviation of
each of the colours C (cyan), M (magenta), and Y (yellow). When there is a significant deviation, enter the value of the
deviation to correct it.
Follow the steps below to manually adjust the registration.
Understanding the adjustment pattern
The amount of deviation is given within a range of -60 to 60, where 60 represents the maximum deviation and "0"
represents no deviation. (See the enlarged view of scale B.)
As shown below, the deviation of each colour is indicated by two scales. Scale A shows the "1's" component of the
deviation and scale B shows the "10's" component.
Adjustment pattern
Example: Adjusting cyan (deviation in the primary scanning direction)
Registration adjustment pattern of cyan in the primary scanning direction
9876543210-1-2-3-4-5-6-7-8-9
C1
Identify the peak of the distribution
Registration adjustment pattern of cyan in the secondary scanning direction
9876543210-1-2-3-4-5-6-7-8-9
C2
Scale A Scale B
60 -60
60
-60
60
40
20
0
-20
-40
-60
(Enlarged view of scale B)
The scales are printed twice for each colour, with one pair indicating the deviation in the primary scanning direction and
one pair indicating the deviation in the secondary scanning direction (C1, M1, Y1 and C2, M2, Y2).
Adjustment is performed by entering the deviations. Each deviation is obtained by adding the value of scale A and the
value of scale B. However, in most cases adjustment is possible using just the deviation value from scale A.
Follow these steps to perform adjustment.
Display "MANUAL ADJUSTMENT" as indicated
1
in the chart on page 28.
MANUAL ADJUSTMENT
Press the [OK] key.
2
TEST PAGE PRINT.
-OK?
Press the [OK] key.
3
Printing of the test pages begins. If you need to
cancel printing, press the [BACK/C] key.
After the test pages are printed, the display for
4
adjustment of C1 appears.
MANUAL ADJUSTMENT
C1 0
Press the [ ] or [ ] key until the value equal to the
5
deviation of C1 is displayed, and press the [OK] key.
●
Repeat this step to enter the deviations of M1,
Press the [ ] or [ ] key to select "YES" in the
6
"TEST PRINT." display and press the [OK] key.
In the adjustment pattern printed in step 6, verify
7
that the peak of the distribution in scale A is
between -1 and 1 for each colour, and that the
scale B value overlaps "0". If the patterns are
acceptable, select "YES" in the "COMPLETE"
display and press the [OK] key.
●
If the scale B values do not all overlap "0",
press the [ ] or [ ] key to select "Yes" in the
"COMPLETE" display and press the [OK] key.
Repeat steps 1 through 7.
●
For scale B values that do not overlap zero,
be sure to enter the correct the value for the
"10's" digit of the deviation.
If you need to cancel the corrections that you
8
have made and exit the program, press the
[MENU] key in the display of step 1.
Y1, C2, M2, and Y2. (When all deviations
have been entered, the display will show
"TEST PRINT.")
●
If the printed adjustment pattern is similar to the
example of C2 shown above (the peak in scale
A is between -1 and 1 and the value of scale B
overlaps "0"), correction is not necessary.
10
Page 12

DESCRIPTION OF PROGRAMS
Security settings
These programs are used to clear all data from the
machine's memory and hard disk. The data can be
cleared manually or automatically each time the
power is turned on.
To use these programs, an optional data security
kit is needed.
● Clear all memory
Use this setting when you wish to manually clear
data stored in the unit's memory and on the hard
disk.
NOTE
It is recommended that this program is
executed before turning off the power.
Display "CLEAR ALL MEMORY" as indicated in
1
the chart on page 28.
CLEAR ALL MEMORY
Number of repetitions of clear all memory
This setting is used to enhance the security
function by repeating the data clear operation. The
number of repetitions of "CLEAR ALL MEMORY"
can be set to any value from 1 to 7. The factory
setting is 1.
In the display of step 2 ("CLEAR ALL MEMORY
-OK?"), press the [ ] or [ ] key until "REPEAT
COUNT OF THE SELECTED PROGRAM"
appears and then press the [OK] key. When the
message "SET THE NUMBER 1-7" appears, press
the [ ] or [ ] key to select the number of data clear
repetitions and then press the [OK] key.
● Power up auto clear
When this program is enabled, all data is
automatically cleared each time the power is
turned on. The program is initially disabled.
Display "POWER UP AUTO CLEAR" as indicated
1
in the chart on page 28.
POWER UP AUTO CLEAR
Press the [OK] key.
2
CLEAR ALL MEMORY
-OK?
the [ ] or [ ] key until the desired number appears.
(See "Number of repetitions of clear all memory".)
Press the [OK] key once again.
3
When the data has been cleared, the power briefly
turns off and then automatically turns on again.
NOTE
If you wish to cancel after data clearing has
begun
Press the [BACK/C] key. When the [BACK/C]
key is pressed, the key operator code entry
screen appears. Enter your key operator code
with the [ ] or [ ] keys. If data has already
been cleared when you enter the key operator
code, the data will not be restored. Data
already cleared will be lost.
If you wish to select
the number of
repetitions, press
Press the [OK] key.
2
POWER UP AUTO CLEAR
OFF
Press the [ ] or [ ] key to select ON, and press
3
the [OK] key.
SET THE NUMBER
1-7 1
Press the [ ] or [ ] key to select the desired
4
number of repetitions of power up auto clear, and
press the [OK] key.
This setting is used to enhance the security
function by repeating the data clear operation.
NOTE
If you wish to cancel after data clearing has
begun
Press the [BACK/C] key. When the [BACK/C]
key is pressed, the key operator code entry
screen appears. Enter your key operator code
with the [ ] or [ ] keys. If data has already
been cleared when you enter the key operator
code, the data will not be restored. Data
already cleared will be lost.
NOTE
This program is only effective when "POWER
UP AUTO CLEAR" is enabled.
11
Page 13

DESCRIPTION OF PROGRAMS
● Auto clear at job end
This program is used to enhance the security
function by repeating data clearing after each job is
finished. The number of data clear repetitions can
be set from 1 to 7. The factory default setting is 1.
Display "AUTO CLEAR AT JOB END" as
1
indicated in the chart on page 28.
AUTO CLEAR AT JOB
END
Press the [OK] key.
2
SET THE NUMBER
1-7 1
Press the [ ] or [ ] key to select the desired
3
number of repetitions of auto clear at job end,
and press the [OK] key.
This setting is used to enhance the security function
by repeating the data clear operation. See "About the
number of repetitions setting" below.
NOTE
About the number of repetitions setting
The time required for data clearing increases
when a higher number of repetitions is
selected. Select number of repetition settings
that are suitable for your conditions of use.
12
Page 14

DESCRIPTION OF PROGRAMS
■
Colour adjustment
As the printer is used, ambient conditions and the
depletion of consumables (the toner cartridge and
drum cartridge) can gradually cause changes to
occur in the four colour components of colour
images, cyan, magenta, yellow, and black. This
results in deviations in the colour balance.
These deviations in the colour balance occur
gradually over a long period of time. Ambient
conditions (temperature and humidity) and the
number of times the printer is used can have a
large effect on colour deviation.
When should the colour balance be adjusted?
●
Colour adjustment can also be performed
whenever a noticeable change occurs in the
colour balance.
●
Colour adjustment should always be performed
when one of the toner cartridges (cyan, magenta,
yellow, or black) is replaced.
●
It is recommended that colour adjustment be
performed once every 500 prints.
Colour adjustment functions
The printer has the following two colour adjustment
functions, as well as a test print for colour
adjustment:
Easy calibration
This mode is used for fine adjustment of the grey
balance at the mid density level of the colours
cyan, magenta, and yellow. Use this mode to
correct minor colour deviations. (see page 18)
Colour Balance
This function is used to adjust each of the density
levels (low, mid, and high) of the four colour
components, cyan, magenta, yellow and black.
Use this mode when the colour deviation is
significant. (see page 16)
Test print
This program is used to determine whether "Colour
Balance" or "Easy Calibration" should be
performed on the machine. (see page 14)
● Colour Adjustment Flow Chart
Use the Test Print on the following page to print a test page
Do the colours on the test page match the colours on the standard
colour chart included with the printer? (see page 15)
No Yes
How much do the colours differ?
Large difference Small difference
Using Colour Balance
(see page 16)
Colour balance is successfully adjusted
Using Easy Calibration
(see page 18)
Print a test page (see page 14)
13
Page 15

DESCRIPTION OF PROGRAMS
Test Print
This program is used to determine whether "Colour
Balance" or "Easy Calibration" should be
performed on the machine. (see page 13)
Follow these steps to print a test page from the
operation panel.
Display "TEST PRINT" as indicated in the chart
1
on page 29.
TEST PRINT
Load A4 or letter-size paper in the tray and press
2
the [OK] key.
When the [OK] key is pressed, "PRINTING." appears
in the display. After a brief interval, a colour test page
will be printed (see below).
[Test Page (printed by printer)]
Color Balance Adjustment Level
Low Density
CMYBk CM YBk CM YBk
Easy Calibration Adjustment Level
Low Density Mid Density High Density
Mid Density High Density
The top line of the test page shows the four colours
(C (cyan), M (magenta), Y (yellow), and Bk (black))
at low density, mid density, and high density. The
bottom line shows processed grey* at low density,
mid density, and high density.
* Processed grey is the colour obtained when the
cyan, magenta, and yellow colours on the top line
are combined together.
14
Page 16

DESCRIPTION OF PROGRAMS
● Checking the Colours
The standard colour chart included with the printer is used to check the colours on the printed test page.
Follow the steps below to check the colours.
[Test page (printed by the printer)]
Color Balance Adjustment Level
Low Density Mid Density High Density
CM YBk CM YBk CM YBk
Easy Calibration Adjustment Level
Low Density Mid Density High Density
Standard colour chart
Test page
[Standard colour chart (included with the printer)]
Easy Calibration Adjustment Level
Low Density Mid Density High Density
Place the colour chart on
the printed test page as
shown. Check the density
of the colours on the test
page and see if they are
adjusted to the same level
as the colours on the
standard colour
chart.
If the result of the comparison is that:
●
There is a large deviation in the colour densities, use the Colour Balance (see the
following page).
●
There is a small deviation in the colour densities, use Easy Calibration (see page 18).
15
Page 17

DESCRIPTION OF PROGRAMS
Colour balance
Use Colour Balance when there is a large
difference between the colours in the colour chart
and the test page that was printed as explained on
page 14.
NOTE
●
Keep the colour chart near the printer. Do not
discard it.
●
Do not expose the Colour Chart to direct
sunlight.
Follow the steps below to set the Colour
Balance.
Display "COLOUR BALANCE" as indicated in the
1
chart on page 29.
COLOUR BALANCE
Press the [OK] key.
2
TEST PAGE PRINT
-OK?
This message will
appear.
Press the [OK] key.
6
The low density (L) value of the selected colour starts
blinking.
SELECT LOW DENSITY
CYAN 0
Use the [ ] or [ ] key to select a value from -4 to
7
4 for the low density.
Press the [OK] key.
8
The mid-density (M) value of the selected colour
starts blinking.
SELECT MID DENSITY
CYAN 0
Use the [ ] or [ ] key to select a value from -4 to
9
4 for the mid-density.
Press the [OK] key.
10
The high density (H) value of the selected colour
starts blinking.
SELECT HI DENSITY
CYAN 0
Load A4 or letter-size paper in the tray and press
3
the [OK] key.
When the [OK] key is pressed, "PRINTING." appears
in the display.
After a brief interval, the test page will be printed (see
the following page).
When printing is finished, all adjustment values
return to "0".
Place the colour chart on the test page and
4
compare the colour densities.
For a detailed explanation of adjusting the colour
balance, see "Adjusting the colour balance" on the
following page.
Select the colour that you wish to adjust with the
5
[ ] or [ ] key.
"CYAN", "MAGENTA", "YELLOW" or "BLACK" can
be selected.
CYAN
H: 0 M: 0 L: 0
[ ] [ ]
MAGENTA
H: 0 M: 0 L: 0
[ ] [ ]
YELLOW
H: 0 M: 0 L: 0
[ ] [ ]
BLACK
H: 0 M: 0 L: 0
Use the [ ] or [ ] key to select a value from -4 to
11
4 for the high density.
Press the [OK] key.
12
You will return to the display of step 5.
In step 5, select another colour with the [ ] or
13
[ ] key.
Repeat steps 5 through 12 until you have adjusted all
of the colours.
NOTE
●
Print a test page as explained on page 14 and
verify that the colours match the colours in
the standard colour chart.
●
The processed grey on the bottom line of the
test page provides a good indicator of the
colour balance when performing fine
adjustment of the colour densities.
16
First adjust the density of cyan.
Page 18

DESCRIPTION OF PROGRAMS
Adjusting the colour balance (additional information for Steps 5 through 13 on the previous page)
[Test page (printed by printer)]
Low Density
CMYBk
Mid Density
CMYBk
High Density
CMYBk
Color Balance Test page
[Standard colour chart (included with printer)]
Column 1
Place the colour chart on the test page and
1
compare the colours.
For the placement of the colour chart, see page 15.
In column 1 of the test page, locate the colour
2
density level that is the same as in the colour
chart. Mark that level with a pencil or pen to help
you remember it.
If none of the levels in column 1 match in the
colour chart, do the following:
●
If the density level of in the colour chart is
Column 12
Colour density level
darker than the maximum value (+4) in
column 1, mark "+4" in column 1.
●
If the density level of in the colour chart is
lighter than the minimum value (-4) in column
1, mark "-4" in column 1.
Repeat the above step for columns 2 through 12
3
of the test page, comparing each column with the
corresponding colour in the colour chart.
2
1
In Steps 5 through 13 on the previous page,
4
enter the levels that you marked on the test page
(enter each level as a number from -4 to 4).
If you selected "+4" or "-4" for a colour that does
5
not have a density level that matches the level in
the colour chart, repeat the procedure on the
previous page.
12
17
Page 19

DESCRIPTION OF PROGRAMS
Easy calibration
Use Easy Calibration when there is only a small
difference between the colours in the colour chart
and the test page that was printed as explained on
page 14.
Follow the steps below to set the colour
balance.
Display "EASY CALIBRATION" as indicated in
1
the chart on page 29.
EASY CALIBRATION
Press the [OK] key.
2
TEST PAGE PRINT
-OK?
This message will
appear.
Load A4 or letter-size paper in the tray and press
3
the [OK] key.
When the [OK] key is pressed, "PRINTING." appears
in the display.
After a brief interval, a test page for easy calibration
will be printed (see the following page).
Select the colour of grey that you prefer in the
4
test patterns (Test pattern 2 and Test pattern 3 on
the following page).
For a detailed explanation of this procedure, see
"Easy Calibration" on the following page.
Press the [ ] or [ ] key to enter the X-axis value
5
(-3 to 3) of the preferred grey colour (this is the
magenta component of the colour).
SELECTION X POSITION
0
Press the [OK] key.
6
Press the [ ] or [ ] key to enter the Y-axis value
7
(-3 to 3) of the preferred grey colour (this is the
yellow component of the colour).
SELECTION Y POSITION
0
Press the [OK] key.
8
Your settings will be saved and you will return to the
display of step 1. Print a test page as explained on
page 14 and verify that the colours match the colours
in the standard colour chart.
NOTE
If you cannot find an acceptable colour of grey
in the test patterns, adjust the colour balance
using the Colour Balance settings as explained
on page 16.
18
Page 20

DESCRIPTION OF PROGRAMS
Easy Calibration (additional information for Steps 4 through 8 on the previous page)
Easy Calibration is performed by selecting the desired colour of grey (processed grey), which is a
combination of cyan, magenta, and yellow.
[Test Pattern 2 (printed by printer)] [Test Pattern 3 (printed by printer)]
Easy Calibration Testpage (1/2) Easy Calibration Testpage (2/2)
Yellow
(-3~+3)
Magenta
±
(-3~
Magenta
0)
±
0~+3)
(
Example:if this is
the desired
colour, select
"+1" for X and
"-2" for Y.
Yellow
(-3~+3)
Test patterns 2 and 3 indicate processed grey colours with the current grey colour as the reference
point or origin ("0").
●
The X axis shows the density of magenta in seven increments from -3 to +3 (-3 to 0 in test pattern 2 and 0
to +3 in test pattern 3).
●
The Y axis shows the density of yellow in seven increments from -3 to +3.
●
The density of cyan is constant.
Select the processed grey colour that you prefer
1
from test pattern 2 or test pattern 3.
For example, if you prefer the colour indicated above
in test pattern 3, select "+1" for X and "-2" for Y.
Enter the X and Y coordinates of the colour you
2
prefer in steps 5 through 8 on the previous page.
19
Page 21

DESCRIPTION OF PROGRAMS
■
Key operator code change
This program is used to change the key operator
code.
The key operator must enter the key operator code
to access the key operator programs. Only one key
operator code number can be programmed. The
key operator code is initially set to "00000". It is
recommended that the key operator use this
program to change the key operator code after
accessing the programs with the initial code.
Display "KEY OPERATOR CODE CHANGE" as
indicated in the chart on page 29.
■
Print key operator programs list
This program is used to print a list of the key
operator programs.
"PRINT KEY OPERATOR PROGRAMS LIST" is
displayed as indicated in the chart on page 29.
■
System settings
Default settings
These programs are used to adjust the settings of
various printer functions.
● Disable notice page printing
This program is used to disable notice page printing.
Enable this program when you do not want the
machine to print the notice page explained in
"NOTICE PAGE PRINTING" on page 4-6 of the
Operation Manual (for printer).
"DISABLE NOTICE PAGE PRINTING" is
displayed as indicated in the chart on page 29.
● Disable test page printing
This program is used to disable test page printing.
When the program is enabled, the Print list in the
custom settings cannot be printed. (See page 2-17
of the Operation Manual (for general information).)
"DISABLE TEST PAGE PRINTING" is displayed
as indicated in the chart on page 29.
● A4/LT auto select
When this program is enabled, the printer will
automatically substitute A4 paper if letter size
paper is not available when printing a letter-size
document. Note that letter size paper cannot be
automatically substituted for A4 paper.
"A4/LT AUTO SELECT" is displayed as indicated
in the chart on page 29.
NOTE
When letter size is specified for a document
attached to an E-mail that has been transmitted
from a foreign country and letter size paper is not
loaded in the printer, printing will not be possible
without operator intervention. However, if this
program is enabled, A4 paper will be automatically
substituted for letter size paper and printing will
take place without operator intervention.
● Delete hold data
Use this program to manually delete all print hold
jobs (jobs that are being held by the job retention
function explained on page 4-2 of the OPERATION
MANUAL (for general information).).
"DELETE HOLD DATA" is displayed as indicated
in the chart on page 29.
● Output method when memory full
When the internal memory becomes full, further
print data cannot be stored and the print data
stored to that point must be printed. This program
is used to set the condition for printing. The factory
default setting is "1 SET".
"OUTPUT METHOD WHEN MEMORY FULL" is
displayed as indicated in the chart on page 29.
● Bypass paper type
This program is used to select the default setting of
paper type to be loaded in the bypass tray. The
setting can be selected from "NONE", "PLAIN",
"HEAVY 1", "HEAVY 2", "TRANSPARENCY S" or
"TRANSPARENCY Q".
The factory default setting is "NONE".
20
Page 22

DESCRIPTION OF PROGRAMS
Interface settings
These programs are used to control data
transmission to the parallel port, USB port or
network port of the printer.
● I/O timeout
This program is used to set the length of time the
machine will wait when receiving a print job on the
parallel port, USB port or the network port. If no
data is received for a length of time exceeding the
timeout setting, the job will be cancelled and the
next job will start.
Default setting: 20 seconds
"I/O TIMEOUT" is displayed as indicated in the
chart on page 30.
NOTE
I/O timeout can be set to any number from 1 to 999
seconds.
● Port switching
The machine can use the three ports shown below
for printing. This program is used to select when
switching between ports will take place. "PER
JOB" or "TIMEOUT" can be selected. When "PER
JOB" is selected, the port will be automatically
selected after each print job is completed. When
"TIMEOUT" is selected, the port will be
automatically selected if the time set in the I/O
Timeout program elapses.
•Parallel port
•USB port
•Network port
"PORT SWITCHING" is displayed as indicated in
the chart on page 30.
● Enable parallel port
This program is used to enable or disable printing
from the parallel port.
Default setting: Yes (Enable)
"ENABLE PARALLEL PORT" is displayed as
indicated in the chart on page 30.
● Enable USB port
This program is used to enable or disable printing
from the USB port.
Default setting: Yes (Enable)
"ENABLE USB PORT" is displayed as indicated in
the chart on page 30.
● Enable network port
This program is used to enable or disable printing
from the network port.
Default setting: Yes (Enable)
"ENABLE NETWORK PORT" is displayed as
indicated in the chart on page 30.
Network settings
These programs are required when the machine is
used as a network printer.
After changing the settings of any of these
programs, the power must be turned off and then
turned on to make the new settings take effect.
NOTE
To configure these settings, consult with your
network administrator.
● IP address setting
When using the printer in a TCP/IP network, use
this program to set the IP address (IP address, IP
subnet mask, and IP gateway) of the printer. The
default factory setting is ENABLE DHCP, which
means that the machine obtains an IP address
automatically. To use the printer on a TCP/IP
network, the "Enable TCP/IP" program below must
also be enabled.
"IP ADDRESS SETTING" is displayed as indicated
in the chart on page 30.
NOTE
If DHCP is used, the IP address assigned to the
machine may automatically change on occasion. If
this happens, printing will not be possible.
● Enable TCP/IP
This program must be enabled to use the printer on
a TCP/IP network. The IP address must also be set
using "IP address setting".
Default setting: Yes (Enable)
"ENABLE TCP/IP" is displayed as indicated in the
chart on page 30.
● Enable NetWare
This program must be enabled to use the printer on
a NetWare network.
Default setting: Yes (Enable)
"ENABLE NETWARE" is displayed as indicated in
the chart on page 30.
● Enable EtherTalk
This program must be enabled to use the printer on
an EtherTtalk network.
Default setting: Yes (Enable)
"ENABLE ETHER TALK" is displayed as indicated
in the chart on page 30.
● Enable NetBEUI
This program must be enabled to use the printer on
a NetBEUI network.
Default setting: Yes (Enable)
"ENABLE NETBEUI" is displayed as indicated in
the chart on page 30.
21
Page 23

DESCRIPTION OF PROGRAMS
● Reset the NIC
This program is used to restore the NIC (Network
Interface Card or Print Server Card) settings to the
factory default settings.
"RESET THE NIC" is displayed as indicated in the
chart on page 30.
Initialize/store settings
Use these programs to restore the CONDITION
SETTINGS (page 3-2 of the OPERATION
MANUAL (for general information)) and System
settings (page 20) to the factory default settings.
You can also store the current configuration of
these settings in memory, and restore a stored
configuration at a later time.
● Restore factory defaults
This restores the CONDITION SETTINGS (page
3-2 of the OPERATION MANUAL (for general
information)) and System settings (page 20) to the
factory default settings.
If you need a record of the settings prior to
restoration of the default settings, print the
CUSTOM SETTINGS list (page 2-19 of the
OPERATION MANUAL (for general information))
and the key operator program list (page 2).
This does not affect "Colour adjustments".
"RESTORE FACTORY DEFAULTS" is displayed
as indicated in the chart on page 31.
■
Product key
Use these programs to enter the product keys that
are required to activate the following features.
Serial number
Use this program to check the serial number of the
machine.
"SERIAL NUMBER" is displayed as indicated in
the chart on page 31.
E-mail alert and status
This program is not currently used.
"E-MAIL ALERT AND STATUS" is displayed as
indicated in the chart on page 31.
PS3 expansion kit
This program must be used to activate the PS3
expansion kit. Your dealer will provide you with the
product key to be entered.
"PS3 EXPANSION KIT" is displayed as indicated
in the chart on page 31.
Data security kit
This program must be used to activate the data
security kit. Your dealer will provide you with the
product key to be entered.
"DATA SECURITY KIT" is displayed as indicated
in the chart on page 31.
NOTE
To make the restored settings take effect, you must
turn off the power, wait briefly, and then turn on
power again.
● Store current configuration
This program is used to store the current
CONDITION SETTINGS (page 3-2 of the
OPERATION MANUAL (for general information))
and System settings (page 20) in memory. The
stored settings will remain in memory even if the
power is turned off. To restore the stored settings,
use [RESTORE THE CONFIGURATION] of the
following program.
This does not affect "Colour adjustments".
"STORE CURRENT CONFIGURATION" is
displayed as indicated in the chart on page 31.
● Restore the configuration
This program is used to restore the settings that
were stored using the [STORE CURRENT
CONFIGURATION] .
"RESTORE THE CONFIGURATION" is displayed
as indicated in the chart on page 31.
22
Page 24
DESCRIPTION OF PROGRAMS
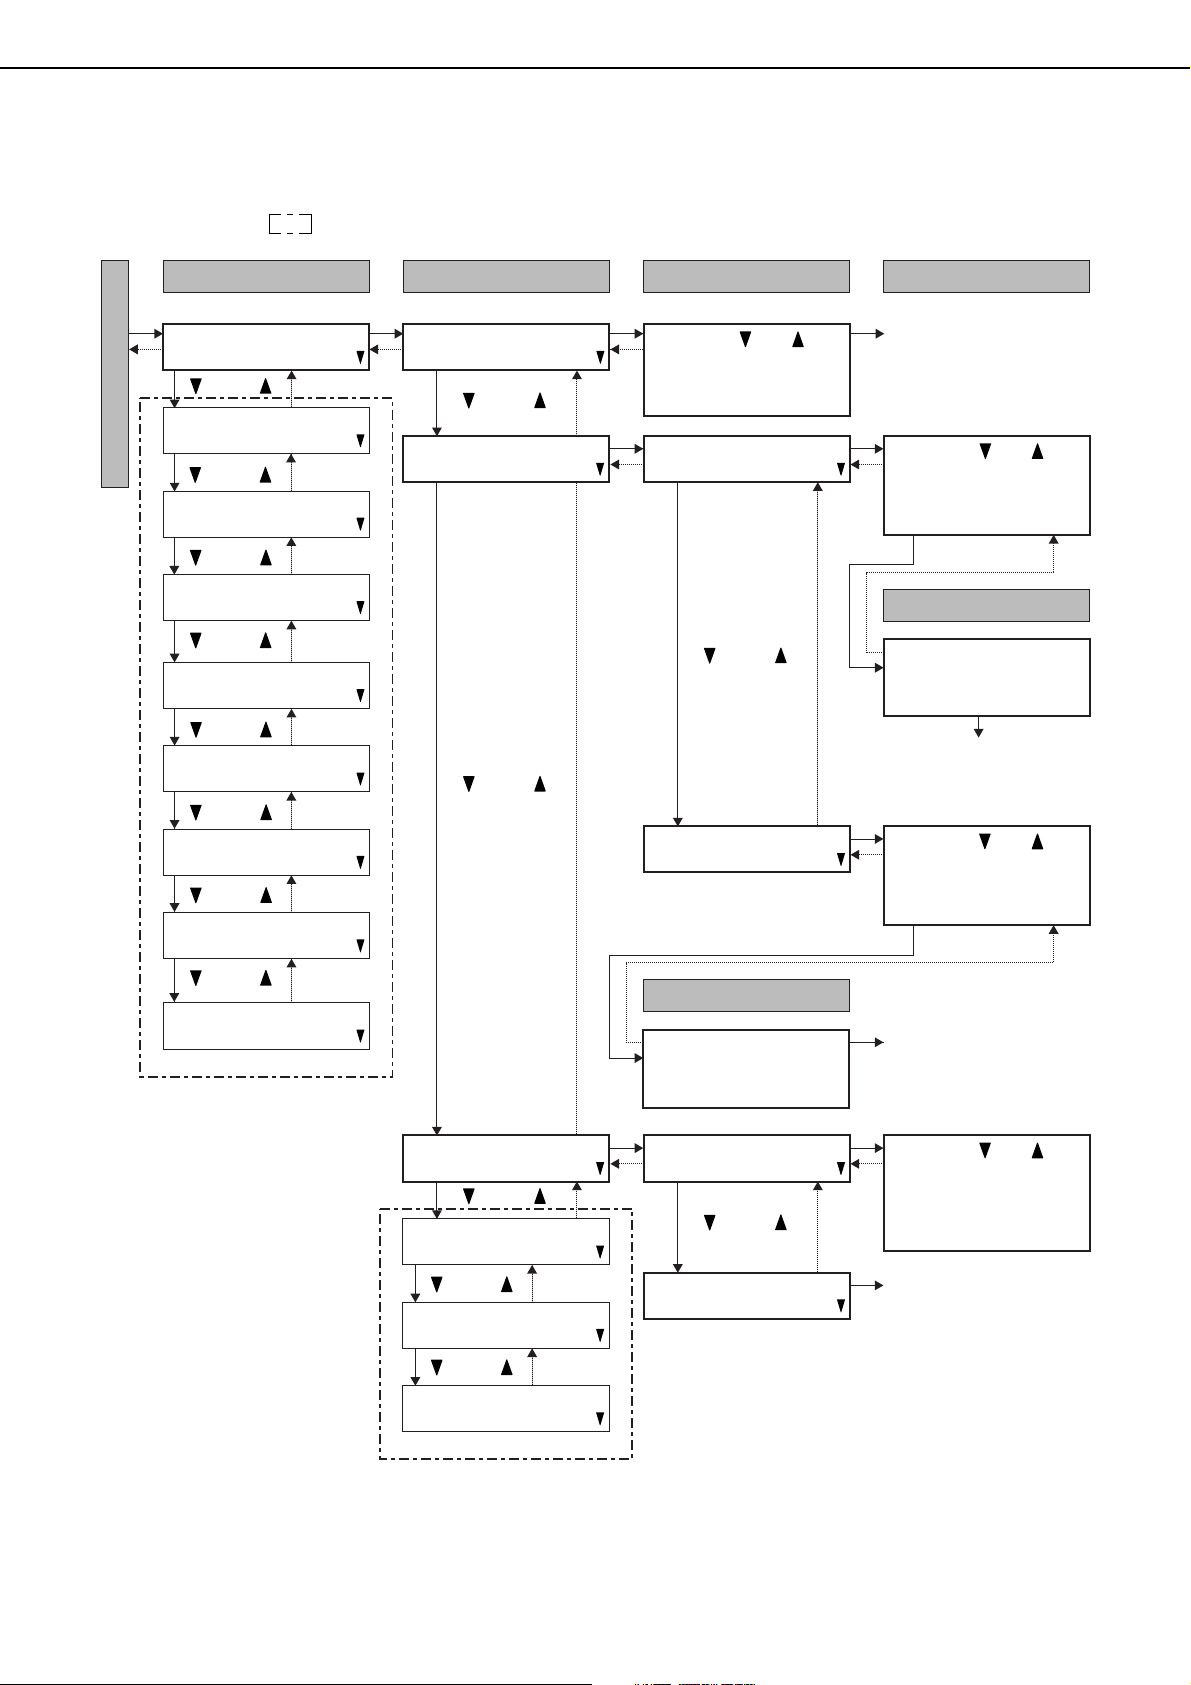
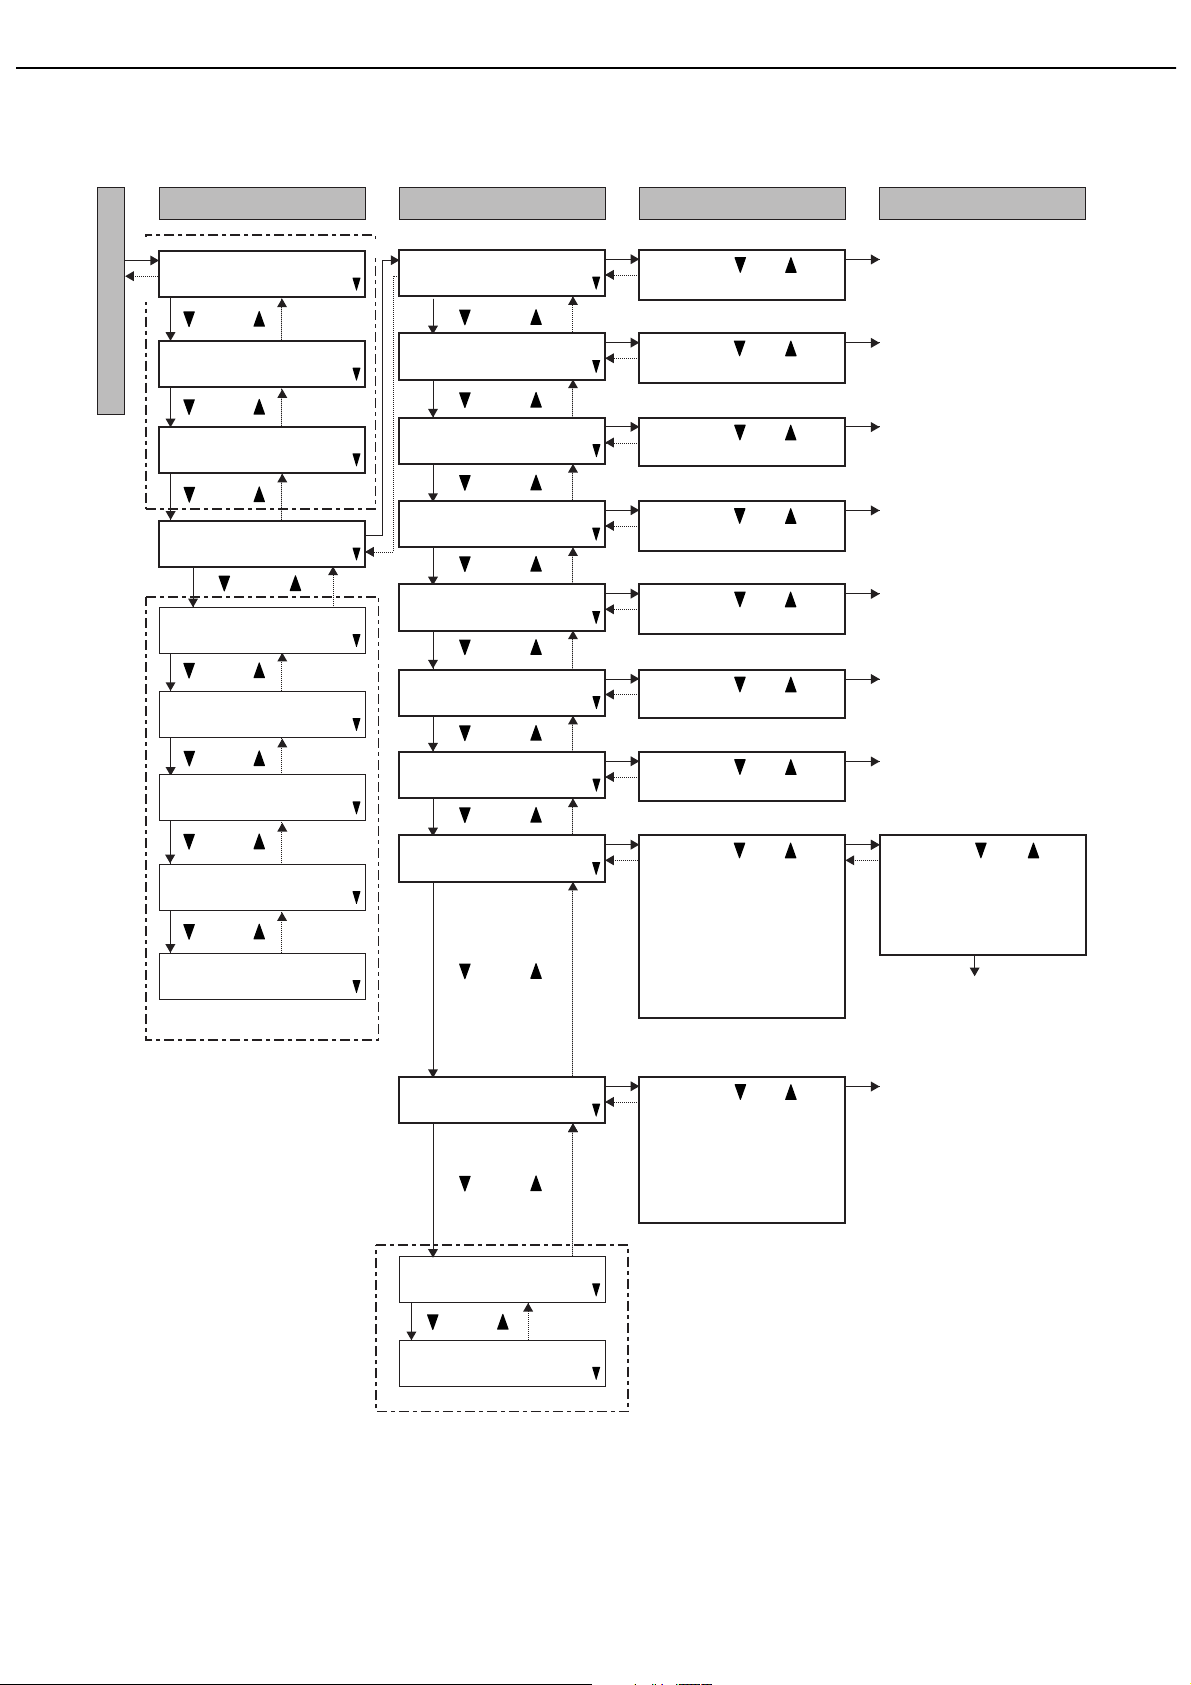
Detailed menu of key operator program settings
The menu is too large to fit on one page, and thus is shown in sections from page 23 to page 31. Items inside a
broken-line frame are explained on the page indicated in the frame.
LEVEL1 LEVEL2 LEVEL3 LEVEL4
[OK]
ACCOUNT CONTROL
[BACK/C]
[ ] [ ]
ENERGY SAVE
Enter Key Operator Code
[ ] [ ]
OPERATION PANEL
SETTINGS
[ ] [ ]
DEVICE SETTINGS
[ ] [ ]
COLOUR ADJUSTMENT
[ ] [ ]
KEY OPERATOR CODE
CHANGE
[ ] [ ]
PRINT KEY OPERATOR
PROGRAMS LIST
[ ] [ ]
SYSTEM SETTINGS
[ ] [ ]
PRODUCT KEY
[OK]
[BACK/C]
See page 26
See page 26
See pages
27 to 28
See page 29
See page 29
See page 29
See pages
29 to 31
See page 31
AUDITING MODE
[ ] [ ]
ACCOUNT LIMIT LIMIT PER ACCOUNT
[OK]
Press the [ ] or [ ] key
to select DISABLE,
[BACK/C]
COLOUR & B/W, or
COLOUR ONLY.
[OK]
[BACK/C]
[ ] [ ]
[ ] [ ]
LIMIT ALL ACCOUNTS
LEVEL5
Enter the count limit.
To enter numbers, see
page 4.
[OK]
The setting is stored.
This program is explained
on page 6.
[OK]
Press the [ ] or [ ] key
to select the account
[BACK/C]
number and colour or
black and white.
[OK]
LEVEL5
Enter the count limit.
To enter numbers, see
page 4.
[OK]
The setting is stored.
This program is explained
on page 6.
[OK]
Press the [ ] or [ ] key
to select the account
[BACK/C]
number and colour or
black and white.
[OK]
[OK]
The setting is stored.
This program is explained
on page 6.
[BACK/C]
[BACK/C]
PRINT PER ACCOUNT
[ ] [ ]
RESET ACCOUNT
[ ] [ ]
See page 24
ACCOUNT NUMBER
CONTROL
[ ] [ ]
See page 24
NO PRINT IF ACC'T #
INVALID
See page 25
[OK]
PRINT PER ACCOUNT
DISPLAY
[BACK/C]
[ ] [ ]
PRINT PER ACCOUNT
PRINT
[OK]
Press the [ ] or [ ] key
to select the account
[BACK/C]
number and colour or
black and white, and
view the count.
[OK]
Printing will start.
This program is explained
on page 7.
23
Page 25

DESCRIPTION OF PROGRAMS
Detailed menu of key operator program settings
LEVEL1 LEVEL2 LEVEL3 LEVEL4
[OK]
ACCOUNT CONTROL
[BACK/C]
[ ] [ ]
ENERGY SAVE
Enter Key Operator Code
[ ] [ ]
OPERATION PANEL
SETTINGS
[ ] [ ]
DEVICE SETTINGS
[ ] [ ]
COLOUR ADJUSTMENT
[ ] [ ]
KEY OPERATOR CODE
CHANGE
[ ] [ ]
PRINT KEY OPERATOR
PROGRAMS LIST
[ ] [ ]
SYSTEM SETTINGS
[ ] [ ]
PRODUCT KEY
[OK]
[BACK/C]
See page 26
See page 26
See pages
27 to 28
See page 29
See page 29
See page 29
See pages
29 to 31
See page 31
AUDITING MODE
[ ] [ ]
See page 23
ACCOUNT LIMIT
[ ] [ ]
See page 23
PRINT PER ACCOUNT
[ ] [ ]
See page 23
RESET ACCOUNT
[ ] [ ]
[OK]
RESET PER ACCOUNT
[BACK/C]
[ ] [ ]
RESET ALL ACCOUNTS
[OK]
Press the [ ] or [ ] key
to select the account
[BACK/C]
number and reset of
colour count or black
and white count.
[OK]
[BACK/C]
LEVEL5
RESET ACCOUNT OK?
[OK]
The setting is stored
(return to level 4).
This program is explained
on page 7.
[OK]
Press the [ ] or [ ] key
to select reset of colour
[BACK/C]
count or black and
white count.
[OK]
[BACK/C]
ACCOUNT NUMBER
CONTROL
[ ] [ ]
NO PRINT IF ACC'T #
INVALID
See page 25
LEVEL5
RESET ACCOUNT OK?
[OK]
ENTER NEW ACCOUNT
NUMBER
[BACK/C]
[ ] [ ]
DELETE ACCOUNT
NUMBER
[ ] [ ]
CHANGE ACCOUNT
NUMBER
[ ] [ ]
PRINT ACCOUNT NUMBER
[OK]
[OK]
[BACK/C]
See page 25
See page 25
See page 25
The setting is stored
(return to level 4).
This program is explained
on page 7.
Enter the new account
number.
To enter numbers, see
page 4.
[OK]
The setting is stored
(return to level 3).
If the entered number is
already in use, the
number will not be stored.
This program is explained
on page 7.
24
Page 26

Detailed menu of key operator program settings
LEVEL1 LEVEL2 LEVEL3 LEVEL4
[OK]
ACCOUNT CONTROL
[BACK/C]
[ ] [ ]
ENERGY SAVE
[ ] [ ]
Enter Key Operator Code
OPERATION PANEL
SETTINGS
[ ] [ ]
DEVICE SETTINGS
See page 26
See page 26
[OK]
AUDITING MODE
[BACK/C]
[ ] [ ]
ACCOUNT LIMIT
[ ] [ ]
PRINT PER ACCOUNT
[ ] [ ]
RESET ACCOUNT
See page 23
See page 23
See page 23
DESCRIPTION OF PROGRAMS
The setting is stored
(return to level 4).
This program is explained
on page 7.
[BACK/C][OK]
LEVEL5
[ ] [ ]
See pages
27 to 28
COLOUR ADJUSTMENT
[ ] [ ]
See page 29
KEY OPERATOR CODE
CHANGE
[ ] [ ]
See page 29
PRINT KEY OPERATOR
PROGRAMS LIST
[ ] [ ]
See page 29
SYSTEM SETTINGS
[ ] [ ]
See pages
29 to 31
PRODUCT KEY
See page 31
[ ] [ ]
See page 24
ACCOUNT NUMBER
CONTROL
[ ] [ ]
[OK]
ENTER NEW ACCOUNT
NUMBER
[BACK/C]
[ ] [ ]
DELETE ACCOUNT
NUMBER
[ ] [ ]
CHANGE ACCOUNT
NUMBER
See page 24
[OK]
[BACK/C]
[OK]
[BACK/C]
Enter the account
number to be deleted.
To enter numbers, see
page 4.
[OK]
[BACK/C]
ENTER ACCOUNT
NUMBER
[ ] [ ]
DELETE ALL ACCOUNTS
[OK]
[BACK/C]
LEVEL5
DELETE ALL ACCOUNTS
-OK?
[OK]
The setting is stored
(return to level 4).
This program is explained
on page 7.
Enter the current account
number.
To enter numbers, see
page 4.
[OK]
[BACK/C]
NO PRINT IF ACC'T #
INVALID
[ ] [ ]
PRINT ACCOUNT NUMBER
[OK]
Press the [ ] or [ ] key
to select YES or NO.
[BACK/C]
LEVEL5
Enter the new account
number.
To enter numbers, see
page 4.
[OK]
The new account number
is stored.
(Return to level 3.)
This program is explained
on page 7.
[OK]
Printing will start.
[OK]
The setting is stored.
This program is explained
on page 7.
25
Page 27

DESCRIPTION OF PROGRAMS
Detailed menu of key operator program settings
LEVEL1 LEVEL2 LEVEL3 LEVEL4
[OK]
ACCOUNT CONTROL
[BACK/C]
[ ] [ ]
ENERGY SAVE
Enter Key Operator Code
See pages
23 to 25
[ ] [ ]
[OK]
AUTO POWER SHUT-OFF
TIMER
[BACK/C]
[ ] [ ]
AUTO POWER SHUT-OFF
[ ] [ ]
PREHEAT MODE
[ ] [ ]
[OK]
Press the [ ] or [ ] key
to select one of the
[BACK/C]
following settings:
• 15min.
• 30min.
• 60min.
• 120min
• 240min.
[OK]
Press the [ ] or [ ] key
to select ENABLE or
[BACK/C]
DISABLE.
[OK]
Press the [ ] or [ ] key
to select one of the
[BACK/C]
following settings:
• NO
• 15min.
• 30min.
• 60min.
• 120min
• 240min.
[OK]
The setting is stored.
This program is explained
on page 8.
[OK]
The setting is stored.
This program is explained
on page 8.
[OK]
The setting is stored.
This program is explained
on page 8.
OPERATION PANEL
SETTINGS
[ ] [ ]
DEVICE SETTINGS
[ ] [ ]
See pages
27 to 28
COLOUR ADJUSTMENT
[ ] [ ]
See page 29
KEY OPERATOR CODE
CHANGE
[ ] [ ]
See page 29
PRINT KEY OPERATOR
PROGRAMS LIST
[ ] [ ]
See page 29
SYSTEM SETTINGS
[ ] [ ]
See pages
29 to 31
PRODUCT KEY
See page 31
TONER SAVE (B/W)
[OK]
AUTO CLEAR SETTING
[BACK/C]
MESSAGE DISPLAY TIME
[ ] [ ]
LANGUAGE SETTING
[OK]
[OK]
Press the [ ] or [ ] key
to select OFF or ON.
[BACK/C]
[OK]
[OK]
Press the [ ] or [ ] key
to select one of the
[BACK/C]
following settings:
• NO
• 15sec.
• 30sec.
• 60sec.
[OK] [OK]
Press the [ ] or [ ] key
to select one of the
[BACK/C]
following settings:
• 3sec.
• 6sec.
• 9sec.
• 12sec.
[OK] [OK]
Press the [ ] or [ ] key
to select one of the
[BACK/C]
following settings:
• AMERICAN ENGLISH
• ENGLISH
• GERMAN
• FRENCH • SPANISH
• DUTCH • ITALIAN
• SWEDISH • DANISH
•
NORWEGIAN
• FINISH • JAPANESE
The setting is stored.
This program is explained
on page 8.
The setting is stored.
This program is explained
on page 8.
The setting is stored.
This program is explained
on page 8.
The setting is stored.
This program is explained
on page 8.
26
Page 28
Detailed menu of key operator program settings
LEVEL1 LEVEL2 LEVEL3 LEVEL4
DESCRIPTION OF PROGRAMS
[OK]
ACCOUNT CONTROL
[BACK/C]
[ ] [ ]
ENERGY SAVE
Enter Key Operator Code
[ ] [ ]
OPERATION PANEL
SETTINGS
[ ] [ ]
DEVICE SETTINGS
[ ] [ ]
COLOUR ADJUSTMENT
[ ] [ ]
KEY OPERATOR CODE
CHANGE
[ ] [ ]
PRINT KEY OPERATOR
PROGRAMS LIST
[ ] [ ]
SYSTEM SETTINGS
[ ] [ ]
PRODUCT KEY
[OK]
See pages
23 to 25
See page 26
See page 26
[BACK/C]
See page 29
See page 29
See page 29
See pages
29 to 31
See page 31
DISABLE DUPLEX UNIT
[ ] [ ]
DISABLE INVERTER
UNIT
[ ] [ ]
DISABLE STAPLER UNIT
[ ] [ ]
DISABLE PAPER DESK
DRAWERS
[ ] [ ]
DISABLE FINISHER
[ ] [ ]
DISABLE LARGE
CAPACITY TRAY
[ ] [ ]
DISABLE SHIFTER UNIT
[ ] [ ]
SADDLE STITCH ADJUST
[ ] [ ]
[OK]
Press the [ ] or [ ] key
to select YES or NO.
[BACK/C]
[OK]
Press the [ ] or [ ] key
to select YES or NO.
[BACK/C]
[OK]
Press the [ ] or [ ] key
to select YES or NO.
[BACK/C]
[OK]
Press the [ ] or [ ] key
to select YES or NO.
[BACK/C]
[OK]
Press the [ ] or [ ] key
to select YES or NO.
[BACK/C]
[OK]
Press the [ ] or [ ] key
to select YES or NO.
[BACK/C]
[OK]
Press the [ ] or [ ] key
to select YES or NO.
[BACK/C]
[OK]
Press the [ ] or [ ] key
to select the paper size.
[BACK/C]
• A3
• B4
• A4R
• LEDGER
• LETTER-R
[OK]
The setting is stored.
This program is explained
on page 9.
[OK]
The setting is stored.
This program is explained
on page 9.
[OK]
The setting is stored.
This program is explained
on page 9.
[OK]
The setting is stored.
This program is explained
on page 9.
[OK]
The setting is stored.
This program is explained
on page 9.
[OK]
The setting is stored.
This program is explained
on page 9.
[OK]
The setting is stored.
This program is explained
on page 9.
[OK]
Press the [ ] or [ ] key
to select the staple
[BACK/C]
position.
+3.0mm to -0.3mm
1step 0.1mm
[OK]
The setting is stored.
This program is explained
on page 9.
AUTO PAPER SELECTION
[OK]
SETTING
[BACK/C]
[ ] [ ]
REGISTRATION
ADJUSTMENT
[ ] [ ]
See page 28
SECURITY SETTINGS
See page 28
Press the [ ] or [ ] key
to select one of the
following settings:
• PLAIN
• R&P
• RECYCLED
The setting is stored.
[OK]
This program is explained
on page 9.
27
Page 29

DESCRIPTION OF PROGRAMS
Detailed menu of key operator program settings
LEVEL1 LEVEL2 LEVEL3 LEVEL4
[OK]
ACCOUNT CONTROL
[BACK/C]
[ ] [ ]
ENERGY SAVE
Enter Key Operator Code
[ ] [ ]
OPERATION PANEL
SETTINGS
[ ] [ ]
DEVICE SETTINGS
[ ] [ ]
COLOUR ADJUSTMENT
[ ] [ ]
KEY OPERATOR CODE
CHANGE
[ ] [ ]
PRINT KEY OPERATOR
PROGRAMS LIST
[ ] [ ]
SYSTEM SETTINGS
[ ] [ ]
PRODUCT KEY
[OK]
See pages
23 to 25
See page 26
See page 26
[BACK/C]
See page 29
See page 29
See page 29
See pages
29 to 31
See page 31
DISABLE DUPLEX UNIT
[ ] [ ]
See page 27
[OK]
DISABLE INVERTER
UNIT
[ ] [ ]
See page 27
DISABLE STAPLER UNIT
[ ] [ ]
See page 27
DISABLE PAPER DESK
DRAWERS
[ ] [ ]
See page 27
DISABLE FINISHER
[ ] [ ]
See page 27
DISABLE LARGE
CAPACITY TRAY
[ ] [ ]
See page 27
DISABLE SHIFTER UNIT
[ ] [ ]
See page27
SADDLE STITCH ADJUST
[ ] [ ]
See page 27
AUTO PAPER SELECTION
SETTING
[ ] [ ]
See page 27
REGISTRATION
ADJUSTMENT
[BACK/C]
[ ] [ ]
SECURITY SETTINGS
AUTO ADJUSTMENT
[ ] [ ]
MANUAL ADJUSTMENT
[OK]
CLEAR ALL MEMORY
[ ] [ ]
POWER UP AUTO CLEAR
[BACK/C]
[OK]
Press [OK] as instructed
by the message to begin
[BACK/C]
auto adjustment (when
adjustment ends, press
[BACK/C] to return to
level 3).
This program is explained
on page 9.
[OK]
Press [OK] as instructed
by the message to print
[BACK/C]
test pages and then
adjust manually. This
program is explained on
pages 9 and 10.
Memory clear begins.
When finished, the
machine restarts. This
program is explained on
[OK]
page 11.
[OK]
CLEAR ALL MEMORY
-OK?
[ ] [ ]
REPEAT COUNT OF THE
SELECTED PROGRAM
[OK]
LEVEL5
Press the [ ] or [ ]
key to select 1 to 7
for the number of
clear repetitions.
[OK]
The setting is stored
(return to level 5).
This program is explained
on page 11.
[OK]
Press the [ ] or [ ]
key to select ON.
[BACK/C]
[OK]
[BACK/C]
[BACK/C]
28
Press the [ ] or [ ]
[OK]
key to select 1 to 7
for the number of
[BACK/C]
clear repetitions.
[OK]
The setting is stored.
This program is
explained on page 12.
[ ] [ ]
AUTO CLEAR AT JOB
END
LEVEL5
Press the [ ] or [ ]
key to select 1 to 7
for the number of
clear repetitions.
[OK]
The setting is stored
(return to level 5).
This program is explained
on page 11.
Page 30

Detailed menu of key operator program settings
LEVEL1 LEVEL2 LEVEL3 LEVEL4
[OK]
ACCOUNT CONTROL
[BACK/C]
[ ] [ ]
ENERGY SAVE
[ ] [ ]
Enter Key Operator Code
OPERATION PANEL
SETTINGS
[ ] [ ]
DEVICE SETTINGS
See pages
23 to 25
See page 26
See page 26
[OK]
EASY CALIBRATION
[ ] [ ]
COLOUR BALANCE
[ ] [ ]
TEST PRINT
DESCRIPTION OF PROGRAMS
[OK]
Press "OK" to print a test page. Select the X axis
position (magenta) and Y axis position (yellow). This
[BACK/C]
program is explained on page 13.
[OK]
Press "OK" to print a test page. Select the low, mid,
and high density values for cyan, magenta, yellow, and
[BACK/C]
black. This program is explained on page 13.
[OK]
Printing will start.
This program is explained on page 13.
[ ] [ ]
See pages
27 to 28
COLOUR ADJUSTMENT
[ ] [ ]
KEY OPERATOR CODE
CHANGE
[ ] [ ]
PRINT KEY OPERATOR
PROGRAMS LIST
[ ] [ ]
SYSTEM SETTINGS
[ ] [ ]
PRODUCT KEY
See page 31
[BACK/C]
[OK]
Enter the current code
number.
[BACK/C]
To enter numbers, see
page 4.
[OK]
Printing will start.
This program is explained
on page 20.
[OK]
DEFAULT SETTINGS
[BACK/C]
[ ] [ ]
INTERFACE SETTINGS
[ ] [ ]
NETWORK SETTINGS
[ ] [ ]
INITIALISE/STORE
SETTINGS
[BACK/C]
[OK]
[BACK/C]
See page 30
See page 30
See page 31
Enter the new code
number.
To enter numbers, see
page 4.
DISABLE NOTICE PAGE
PRINTING
[ ] [ ]
DISABLE TEST PAGE
PRINTING
[ ] [ ]
A4/LT AUTO SELECT
[ ] [ ]
DELETE HOLD DATA
[ ] [ ]
OUTPUT METHOD WHEN
MEMORY FULL
[ ] [ ]
BYPASS PAPER TYPE
[OK][OK]
The setting is stored
(return to level 1).
This program is explained
on page 20.
[OK]
Press the [ ] or [ ] key
to select YES or NO.
[BACK/C]
[OK]
The setting is stored.
This program is explained
on page 20.
[OK]
Press the [ ] or [ ] key
to select YES or NO.
[BACK/C]
[OK]
The setting is stored.
This program is explained
on page 20.
[OK]
Press the [ ] or [ ] key
to select ON or OFF.
[BACK/C]
[OK]
The setting is stored.
This program is explained
on page 20.
[OK]
DELETE HOLD DATA
-OK?
[BACK/C]
[OK]
The data is cleared.
This program is explained
on page 20.
[OK]
Press the [ ] or [ ] key
to select 1SET or MULTI.
[BACK/C]
[OK]
The setting is stored.
This program is explained
on page 20.
[OK]
Press the [ ] or [ ] key
to select the paper type.
[BACK/C]
[OK]
The setting is stored.
This program is explained
on page 20.
29
Page 31

DESCRIPTION OF PROGRAMS
Detailed menu of key operator program settings
LEVEL1 LEVEL2 LEVEL3 LEVEL4
[OK]
ACCOUNT CONTROL
[BACK/C]
[ ] [ ]
ENERGY SAVE
Enter Key Operator Code
[ ] [ ]
OPERATION PANEL
SETTINGS
[ ] [ ]
DEVICE SETTINGS
[ ] [ ]
COLOUR ADJUSTMENT
[ ] [ ]
KEY OPERATOR CODE
CHANGE
[ ] [ ]
PRINT KEY OPERATOR
PROGRAMS LIST
[ ] [ ]
SYSTEM SETTINGS
[ ] [ ]
[OK]
See pages
23 to 25
See page 26
See page 26
See pages
27 to 28
See page 29
See page 29
See page 29
[BACK/C]
[ ] [ ]
See page 29
INTERFACE SETTINGS
[ ] [ ]
NETWORK SETTINGS
[ ] [ ]
INITIALISE/STORE
SETTINGS
See page 31
[OK] [OK]
I/O TIMEOUTDEFAULT SETTINGS
[BACK/C]
[ ] [ ]
[OK]
PORT SWITCHING
[BACK/C]
[ ] [ ]
[BACK/C]
[OK]
ENABLE PARALLEL PORT
[BACK/C]
[ ] [ ]
[OK]
ENABLE USB PORT
[BACK/C]
[ ] [ ]
[OK]
ENABLE NETWORK PORT
[OK] [OK]
[BACK/C]
IP ADDRESS SETTING
[BACK/C][BACK/C]
[ ] [ ]
In all of these programs,
press the [ ] or [ ] key
to select the desired
setting and then press
the [OK] key to store.
These programs are
explained on page 21.
Press the [ ] or [ ] key
to set ENABLE DHCP
to YES or NO.
[OK]
If ENABLE DHCP is set
to YES, press the [OK]
key (return to level 4).
If set to NO, enter the IP
address, IP subnet mask,
and IP gateway. These
settings are explained on
page 21.
PRODUCT KEY
See page 31
ENABLE TCP/IP
[ ] [ ]
ENABLE NetWare
[ ] [ ]
ENABLE EtherTalk
[ ] [ ]
ENABLE NetBEUI
[ ] [ ]
RESET THE NIC
[OK]
In all of these programs,
press the [ ] or [ ] key
[BACK/C]
to select YES or NO and
then press the [OK] key
[OK]
to store the setting.
"COMPLETE THE
[BACK/C]
SETTING BY POWER
OFF/ON" will appear.Turn
[OK]
off the power and then
turn it back on to make
[BACK/C]
the setting take effect.
[OK]
These programs are
explained on page 21.
[BACK/C]
[OK]
RESET THE NIC OK?
[BACK/C]
[OK]
COMPLETE THE SETTING
BY POWER OFF/ON.
Turn off the power and
then turn it back on to
make the setting take
effect. This program is
explained on page 22.
30
Page 32

Detailed menu of key operator program settings
LEVEL1 LEVEL2 LEVEL3 LEVEL4
DESCRIPTION OF PROGRAMS
[OK]
ACCOUNT CONTROL
[BACK/C]
[ ] [ ]
ENERGY SAVE
Enter Key Operator Code
[ ] [ ]
OPERATION PANEL
SETTINGS
[ ] [ ]
DEVICE SETTINGS
[ ] [ ]
COLOUR ADJUSTMENT
[ ] [ ]
KEY OPERATOR CODE
CHANGE
[ ] [ ]
PRINT KEY OPERATOR
PROGRAMS LIST
[ ] [ ]
SYSTEM SETTINGS
[ ] [ ]
[OK]
See pages
23 to 25
See page 26
See page 26
See pages
27 to 28
See page 29
See page 29
See page 29
[BACK/C]
DEFAULT SETTINGS
[ ] [ ]
See page 29
INTERFACE SETTINGS
[ ] [ ]
See page 30
NETWORK SETTINGS
[ ] [ ]
See page 30
INITIALISE/STORE
SETTINGS
[OK]
RESTORE FACTORY
DEFAULTS
[ ] [ ]
STORE CURRENT
[ ] [ ]
CONFIGURATION
[BACK/C]
[ ] [ ]
RESTORE THE
CONFIGURATION
[OK]
RESTORE FACTORY
DEFAULTS-OK?
[BACK/C]
[OK]
COMPLETE THE SETTING
BY POWER OFF/ON.
Turn off the power and
then turn it back on to
make the setting take
effect. This program is
explained on page 22.
[OK]
STORE CURRENT
CONFIGURATION-OK?
[BACK/C]
[OK]
The setting is stored.
(Return to level 3.)
This program is explained
on page 22.
[OK]
RESTORE THE
CONFIGURATION-OK?
[BACK/C]
[OK]
COMPLETE THE SETTING
BY POWER OFF/ON.
Turn off the power and
then turn it back on to
make the setting take
effect. This program is
explained on page 22.
PRODUCT KEY
[OK]
SERIAL NUMBER
[BACK/C]
[ ] [ ]
E-MAIL ALERT AND
STATUS
[ ] [ ]
PS3 EXPANSION KIT
[ ] [ ]
DATA SECURITY KIT
[OK]
The serial number
appears in the display.
[BACK/C]
[OK]
In each of these
programs, enter the
[BACK/C]
product key (see page 4
[OK]
to enter numbers) and
press the [OK] key. The
[BACK/C]
product key is provided
by your dealer. If you
[OK]
enter an incorrect digit,
press the [BACK/C] key
[BACK/C]
to correct it. These
programs are explained
on page 22.
31
Page 33

AR-C260P KEY OPERATOR'S GUIDE
ARC260P-EX1-KEYOPE
 Loading...