

Page 1

SHARP TWAIN
AR/DM
User’s Guide
Page 2

Copyright
© 2001 by Sharp Corporation. All rights reserved. Reproduction, adaptation or translation
without prior written permission is prohibited, except as allowed under copyright laws.
Trademark Acknowledgements
Sharp® is a registered trademark of Sharp Corporation.
Sharpdesk™ is a trademark of Sharp Corporation.
Microsoft® and Windows® are registered trademarks of Microsoft Corporation.
Pentium® is a registered trademark of Intel Corporation.
All other trademarks identified herein are the property of their respective owners.
Page 3

User’s Guide Organization
This user’s guide is organized into the following chapters:
Chapter 1, Introduction
Describes the overview of SHARP TWAIN AR/DM, the definition of terms in this user's
guide, and system requirements.
Chapter 2, Installing SHARP TWAIN AR/DM
Provides information on how to install SHARP TWAIN AR/DM.
Chapter 3, Using SHARP TWAIN AR/DM
Explains functions and its usage on each dialog of SHARP TWAIN AR/DM.
Page 4

Table of Contents
Chapter 1 Introduction.................................................................................................2
About This Guide..............................................................................................3
Definitions of Terms.........................................................................................3
Chapter 2 Installing SHARP TWAIN AR/DM ...............................................................4
Before installing SHARP TWAIN AR/DM ........................................................5
Installing SHARP TWAIN AR/DM......................................................................6
After installing SHARP TWAIN AR/DM............................................................9
Chapter 3 Using SHARP TWAIN AR/DM...................................................................12
Part names and functions of SHARP TWAIN AR/DM ..................................13
Operation flow .................................................................................................17
Changing the resolution of an image data..................................................19
Acquiring a multi-page file.............................................................................19
Deleting the spool data automatically..........................................................20
Acquiring the common cropping area throughout all the pages ..............20
Acquiring a portion of the image data..........................................................21
Exiting SHARP TWAIN AR/DM .......................................................................22
SHARP TWAIN AR/DM User’s Guide Table of Contents - i
Page 5

1.
Chapter 1
Introduction
Welcome to SHARP TWAIN AR/DM! SHARP TWAIN AR/DM is software, which lets you
control the size, resolution, and orientation of monochrome images. This program can also
send monochrome images to a variety of TWAIN-compliant applications.
Working with SHARP TWAIN AR/DM, you can:
• Modify images - SHARP TWAIN AR/DM enables you to change the size, resolution,
and orientation of monochrome images.
• Acquire images - SHARP TWAIN AR/DM enables you to send monochrome images to
a variety of TWAIN-compliant applications .
SHARP TWAIN AR/DM can read the following file format.
• TIFF - uncompressed monochrome images
One dimensional G3, G4 of the FAX image transmission system standard
SHARP TWAIN AR/DM User’s Guide 2
Page 6

About This Guide
This User’s Guide assumes you have a basic understanding of Windows operation and are
familiar with Windows terms. This includes how to start your system and navigate within a
Windows environment, and perform such basic Windows functions as copying, printing and
moving documents.
For assistance in using Windows or Internet Explorer, refer to your Microsoft Windows user
documentation.
Definitions of Terms
As you work with SHARP TWAIN AR/DM, keep in mind how the following terms are used:
TERM DEFINITION
Spool image data Means the data stored in your computer by Scan to Desk that can be
acquired into SHARP TWAIN AR/DM.
Spool folder Means the folder that stores image data scanned through the multi -
function machine.
Cropping area Means a portion of image data that is acquired to an application.
Network scanner tool An application required to acquire the image data scanned through a
multi-function machine onto your computer as Scan to Desk, a function
of network scanner.
SHARP TWAIN AR/DM User’s Guide 3
Page 7

2.
Chapter 2
Installing SHARP TWAIN AR/DM
SHARP TWAIN AR/DM User’s Guide 4
Page 8
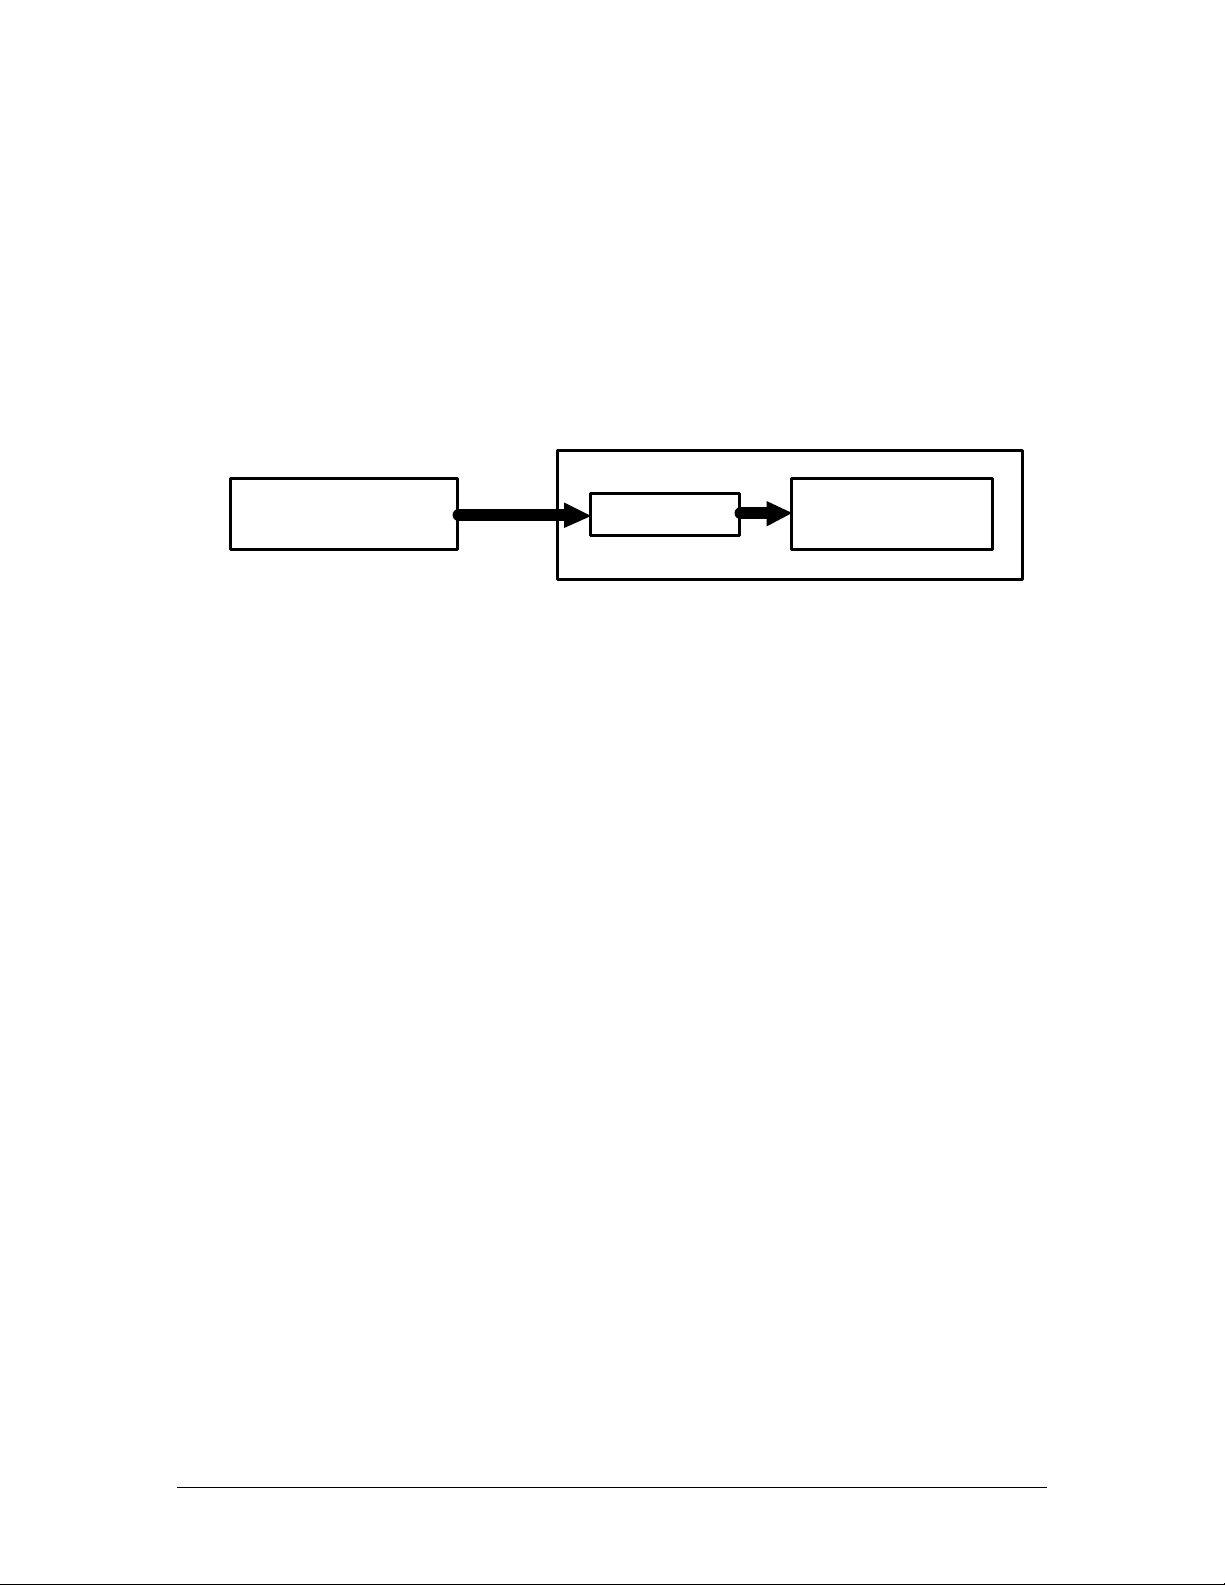
Spool folder
compliant
Before installing SHARP TWAIN AR/DM
SHARP TWAIN AR/DM cannot acquire any image data through a multi-function machine to
your TWAIN-compliant application by itself.
To acquire an image data to your TWAIN compliant application, perform Scan to Desktop by
Network scanner tool, and then locate the image data into the spool folder on your PC.
Then, acquire the image data stored in the spool folder to your TWAIN-compliant application
using SHARP TWAIN AR/DM.
Digital multi-function
machine
To perform Scan to Desk, you must install Network scanner tool onto your computer
beforehand.
Scan to
Desktop
Image data transmission concept
Personal computer
TWAINapplication
For the detail of the installation and setting of Network scanner tool, refer to "Network
scanner tool User's Guide" on the supplied CD-ROM.
SHARP TWAIN AR/DM User’s Guide 5
Page 9

Installing SHARP TWAIN AR/DM
1. Start the installer of SHARP TWAIN AR/DM.
To start SHARP TWAIN AR/DM installer, follow the steps shown below.
Run "\TWAIN\setup.exe" from your CD-ROM drive. The following dialog will appear
when SHARP TWAIN AR/DM installer starts.
[Choose Setup Language] dialog
Select the desired language for the installation, and then click the "OK" button.
SHARP TWAIN AR/DM User’s Guide 6
Page 10

2. When the "Welcome" dialog appears, click the "Next" button.
[Welcome] dialog
3. Read the information in the "ReadMe" file, and then click the "Next" button.
[ReadMe] dialog
SHARP TWAIN AR/DM User’s Guide 7
Page 11

4. The installer will start installing SHARP TWAIN AR/DM. Please wait until the installation
completes.
The following dialog appears when the installation completes.
[Setup Complete] dialog
5. Click the "Finish" button to close the dialog.
SHARP TWAIN AR/DM User’s Guide 8
Page 12

After installing SHARP TWAIN AR/DM
Make sure that the following settings are appropriately specified when using SHARP TWAIN
AR/DM for the first time after the installation. When you intend to acquire an image data
through your multi-function machine, make sure that both SHARP TWAIN AR/DM and
Network scanner tool have selected the same spool folder, following the steps shown below.
Checking the selected spool folder for Network scanner tool
Right-click the icon on the Windows system tray to show the Network scanner tool menu.
Network scanner tool menu
Click "Configure" to open the "Process Definitions" dialog.
[Process Definitions] dialog
SHARP TWAIN AR/DM User’s Guide 9
Page 13

Choose the process definition you want to use, and then click the "Properties" button.
[Properties for Process Definition] dialog
The spool folder of Network scanner tool is shown in the "Move file to this folder" box.
Make sure that this folder is the same one as the spool folder of SHARP
TWAINAR/DM.
Canceling the automatic starting of Sharpdesk programs
When "Sharpdesk Desktop" is selected as the Process Definition, the Sharpdesk starts
automatically as default. If you do not want to start Sharpdesk automatically, remove the
checkmark at "Launch Program" on the "Properties for Process Definition" dialog.
SHARP TWAIN AR/DM User’s Guide 10
Page 14

Checking the SHARP TWAIN AR/DM spool folder
Start the "Main" dialog of SHARP TWAIN AR/DM from your TWAIN-compliant application.
[Main] dialog
Click the "Preference" button on the "Main" dialog to check the selected spool folder.
[Preference] dialog
If the folder s hown in the "Spool folder" box is different from the spool folder of
Network scanner tool, select the same folder.
To change the spool folder, click the "Spool folder" button […] to open the dialog which lets
you select a different folder.
SHARP TWAIN AR/DM User’s Guide 11
Page 15

3.
Chapter 3
Using SHARP TWAIN AR/DM
SHARP TWAIN AR/DM driver conforms to TWAIN, the worldwide standard, which enables
you to use this driver with a variety of TWAIN-compliant applications. This driver includes the
following three dialogs.
• "Main" dialog
• "Preference" dialog
• "Preview" dialog
This chapter describes how to setup each preference on dialogs from scanning an image data
through Network scanner tool to acquiring the data to your TWAIN-compliant application.
SHARP TWAIN AR/DM User’s Guide 12
Page 16

box
Part names and functions of SHARP TWAIN AR/DM
This section describes part names and functions of each dialog.
Part names and functions of "Main" dialog
"Close" button
"Resolution"
"Select Page"
Edit Box
Page
navigation
Spool list
[Main] dialog
"Resolution" box
Specifies the resolution of acquired image data.
Page navigation
Navigates the pages in the previewed multi-page file.
" << " button
Shows the first page.
" < " button
Shows the previous page.
"Select Page" Edit Box
Shows "the serial number of the current page" / "total page number".
Enter the serial number of the page to view.
" > " button
Shows the next page.
" >> " button
Shows the last page.
SHARP TWAIN AR/DM User’s Guide 13
Page 17

"Rotate" button
Rotates the previewed image of the current spool image data clockwise by 90°. This button
rotates only the previewed image. The original image data of the file does not be changed by
this operation.
The previewed image rotates clockwise by 0°, 90°, 180°, 270°,or 0° as you click the "Rotate"
button.
When a cropping area has been selected, the selected area will rotate as the previewed image
rotates.
"Delete" button
Deletes the current spool image data. Once delete d, the file cannot be restored.
"Preview" button
Shows the current spool image data in the preview dialog.
"Acquire" button
Acquires the current spool image data to the application.
Spool list
Lists the spool image data.
Items
Shows icon or file name, native resolution [DPI], size [<width> x <height>], and number of
pages. The newer files are placed upper on the list.
Icon
You can identify the type of spool image data by following icons.
ICON DESCRIPTION
One-page file
Multi-page file
Selecting spool image data
You can select a spool image data by clicking one of the spool image data on the list.
Showing spool image data
You can show the spool image data in the preview dialog by double clicking one of the spool
image data on the list.
The scanned image data does not appear on the spool list when having been acquired through
a multi-function machine with SHARP TWAIN AR/DM being activated. In this case, restart
SHARP TWAIN AR/DM to show the data on the list.
SHARP TWAIN AR/DM User’s Guide 14
Page 18

"Preference" button
Opens the "Preference" dialog.
"Help" button
Shows the help file.
SHARP TWAIN AR/DM User’s Guide 15
Page 19

"Spool folder" button
checkbox
checkbox
Part names and functions of "Preference" dialog
"Unit" box
"Automatic
spool delete"
"General crop
area setting "
[Preference] dialog
"OK" button
Closes the dialog box applying the changed setting values on the dialog box.
"Cancel" button
Closes the dialog box not applying the changed setting values on the dialog box.
"Default" button
Returns all the setting values to the default values.
"Help" button
Shows the help file.
"Spool folder" button
Shows the "Selecting a spool folder" dialog by clicking the "Spool folder" button [...] to specify
the spool folder you want to use.
"Unit" box
Select the unit of measurement from "Inches", "Millimeters", and "Pixel".
The "Size" on the spool list is shown with the unit selected on this box.
"Automatic spool delete" checkbox
Select whether "Delete" or "Not delete" the acquired spool image data.
"General crop area setting " checkbox
Decide whether to " select the cropping area page by page" or "apply the same cropping area
to all the pages" in a multi-page file.
SHARP TWAIN AR/DM User’s Guide 16
Page 20

Preview dialog functions
[Preview] dialog
Setting the cropping area
You can select a portion of an image to be acquired to an application.
Operation flow
This section explains how to acquire the image data through a multi-function machine to a
TWAIN-compliant application.
Before acquiring an image
Before acquiring an image data, make sure that both SHARP TWAIN AR/DM and Network
scanner tool specify the same folder as their spool folder. For the detail, refer to "After
installing SHARP TWAIN AR/DM".
Operation on your multi-function machine
1. Set originals on the machine.
2. Specify the destination computer on the operation panel of the machine, and then scan the
data. (Scan to Desk) (For the detail of the multi-function machine operation, refer to the
network scanner expansion kit operation manual.)
3. The scanned image data will be stored in the spool folder on the destination computer
after scanning.
SHARP TWAIN AR/DM User’s Guide 17
Page 21

Operation on your computer
4. Start a TWAIN-compliant application on your computer.
5. SHARP TWAIN AR/DM will start. Select SHARP TWAIN AR/DM when your
computer has more than one TWAIN-compliant driver.
6. Scan an image with SHARP TWAIN AR/DM after setting preferences as you like on
each dialog.
7. Select the image data you want to acquire on the "Main" dialog of SHARP TWAIN
AR/DM, and then start acquiring the image.
8. The image data will be acquired to your application.
SHARP TWAIN AR/DM User’s Guide 18
Page 22

Changing the resolution of an image data
Choose the resolution of the image to be acquired to the application from the pull-down menu
of the "Resolution" box on the "Main" dialog. The resolution must be lower than the native
resolution.
Acquiring a multi-page file
To acquire data from a multi-page file, click the "Acquire" button on the "Main" dialog.
The "Specify the page to acquire" dialog will appear, which lets you select the pages to be
acquired. You can select the pages in three ways as shown below.
LABEL DESCRIPTION
[All] All the data, starting from the first page to the last page in the file, are to
be acquired.
[Current Page] Only the page currently appears in the preview dialog is to be acquired.
[Select Page] Only the page specified in the "Select page" box is to be acquired.
(EXAMPLE)
Page to be acquired Numbers to be entered
in the box
To acquire page 1, 3, 6 in this order successively
To acquire page 4,5,6,7,8 in this order 4-8
To acquire page 3,2,1 in this order 3-1
1,3,6
When specifying the pages to be acquired, note that:
• "Current Page" setting cannot be selected when no image appears in the preview dialog.
• Use numbers, comma (,), and hyphen (-) to select pages.
• Throughout all the pages, the same values are applied for "Resolution" and "Rotate".
• When "General crop area setting" is not checked, you can select the cropping area for
each page.
• When "General crop area setting" is checked, the cropping area selected for the last time
is applied to all the pages.
SHARP TWAIN AR/DM User’s Guide 19
Page 23

Deleting the spool data automatically
You can delete the spool image data automatically after acquiring the data to your application
by setting preferences on the "File delete confirmation" dialog.
When checking the "Automatic spool delete" checkbox
The image data is automatically deleted after being acquired to the application. If the setting is
enabled, the "File delete confirmation" dialog appears after acquiring the spool image data.
Click the "OK" button to delete the spool image data. If "Delete the spool image file without
showing this message from the next time" box is checked, the spool image data will be deleted
without showing this message from the next time. The deleted file cannot be restored.
When not checking the "Automatic spool delete" checkbox
When the box is not checked, the spool image data does not be deleted after being acquired.
The image data can be acquired after once acquired.
Acquiring the common cropping area throughout all
the pages
You can apply the common cropping area to all the pages in a multi-page file.
When checking the "General crop area setting" checkbox
The cropping area specified on one page will be applied to all other pages.
When not checking the "General crop area setting" checkbox
You can specify individual cropping area on each page.
The cropping area will return to the default size when you change the "General crop area
setting".
SHARP TWAIN AR/DM User’s Guide 20
Page 24

Acquiring a portion of the image data
You can acquire a portion of the spool image data. Without this operation, the entire page is
acquired to your application.
To acquire a portion of the data, follow the steps shown below. If the spool image data has
multiple pages, read "Acquiring a multi-page file" and "Acquiring the common cropping area
throughout all the pages" before this section.
1. Select the image data you want to acquire on the "Main" dialog, and then click the
"Preview" button or double-click the image data. The "Preview" dialog will appear.
2. Place the mouse cur sor onto the "Preview" image.
3. Click the edge of the cropping area. In this process, keep placing the mouse button.
4. Drag the mouse toward right-bottom. A rectangle with dotted lines will appear with its one
edge at the starting point of the drag and the diagonal counterpart at the ending point. The
inside of the rectangle is the cropping area.
5. Release the mouse button to decide the cropping area.
The minimum size of the cropping area is 8 x 8 dots on the "Preview" dialog.
Changing / canceling the cropping area
When the cursor is placed on the cropping area, the shape of the cursor changes as shown
below.
ICON DESCRIPTION
A
B
Changing the cropping area
When placing the cursor on the border you want to move, the shape of the cursor will change
to the icon A shown in the table above. When placing the cursor on the corner you want to
move, the shape of the cursor will change to the icon B shown in the table above. After
pointing a border or a corner to move, drag the cursor to the desired point, and then release
the mouse button. If the cursor goes beyond the opposite side border or corner during this
operation, the entire image is reversed horizontally or vertically depending on the position the
cursor points.
Canceling the cropping area
Click any portion on the cropping area excluding on the dotted lines to cancel the selected
cropping area. The dotted lines will disappear and the cropping area will be canceled. After
the cropping area is canceled, the whole page is assumed to be the selected area.
When placed on borders
When placed on corners
SHARP TWAIN AR/DM User’s Guide 21
Page 25

Exiting SHARP TWAIN AR/DM
To exit SHARP TWAIN AR/DM, click the "Close" button on the "Main" dialog.
SHARP TWAIN AR/DM User’s Guide 22
 Loading...