

Page 1
Page 2
Sharp AR-C240P
2
1
E
Fr
6
3
5
4
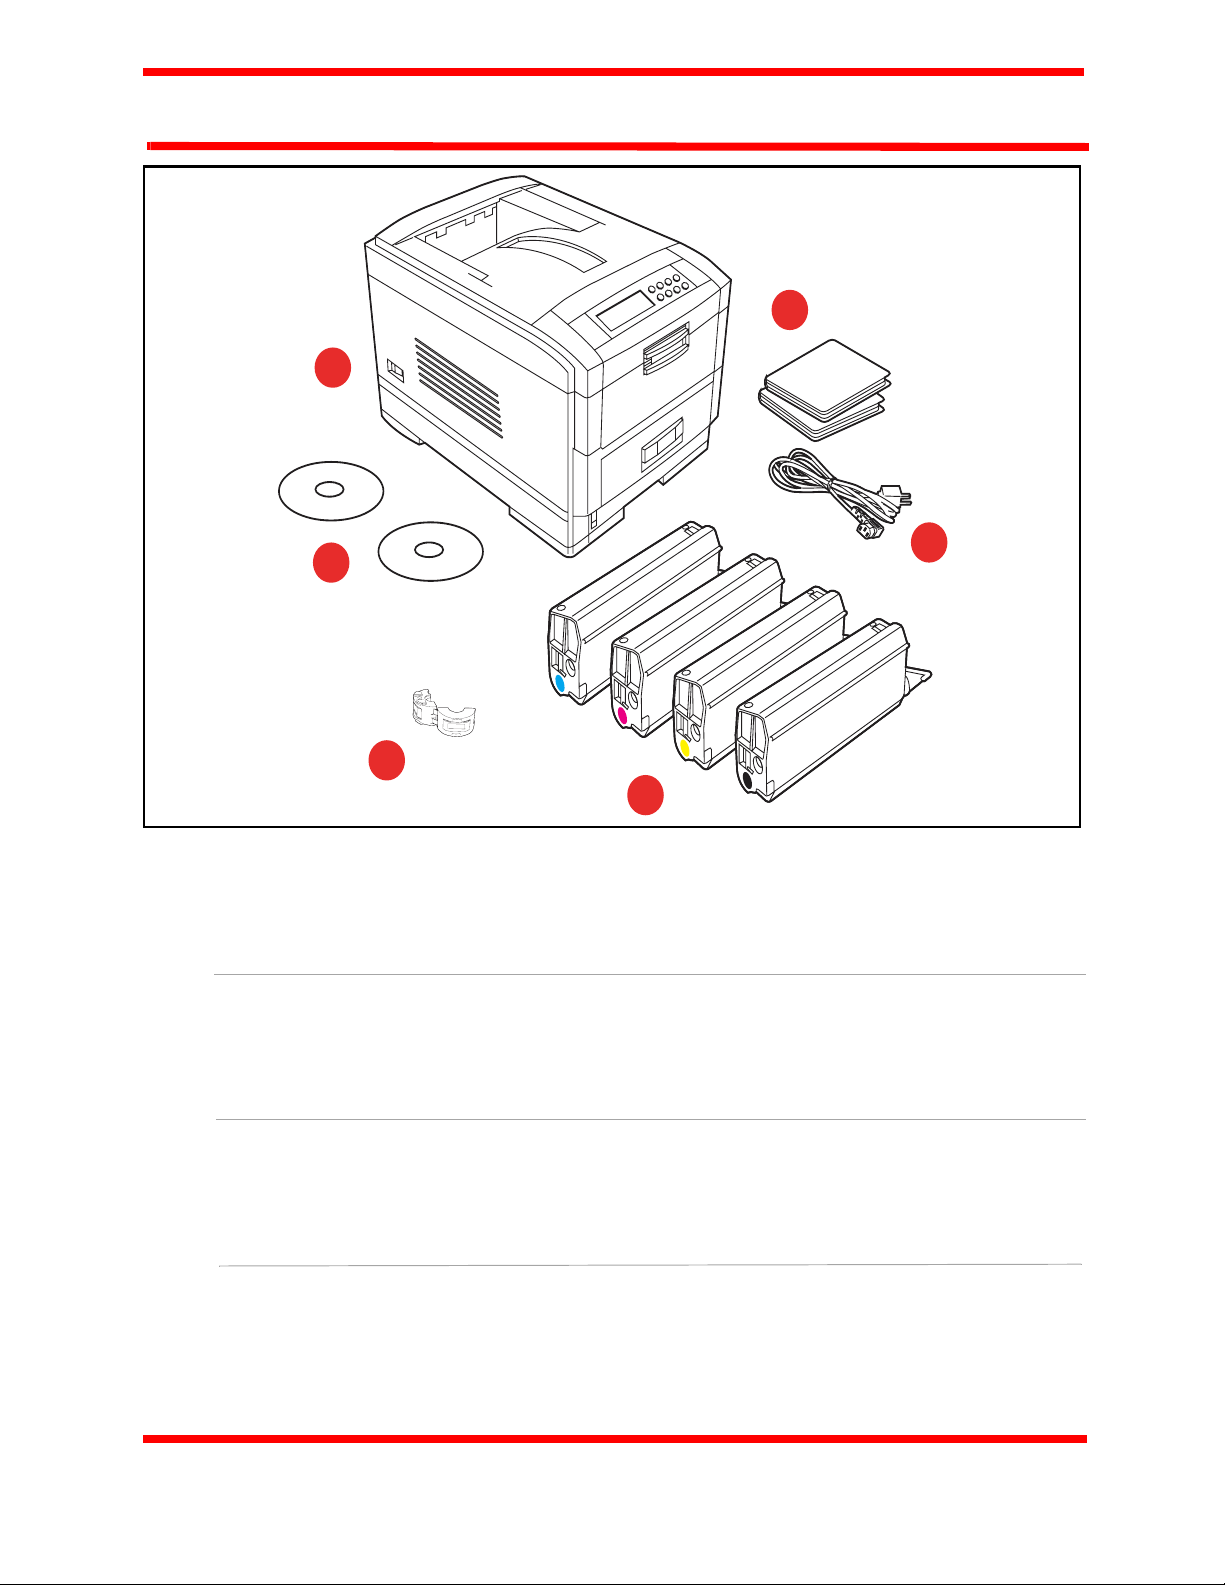
Remove cardboard overpack revealing contents.
(1) Printer, (2) Light-shield bags, (3) Power Cable, (4) Toner Cartridges, (5) Ferrite Core,
(6) CDs.
Retirez l’emballage en carton pour accéder au contenu.
(1) Imprimante, (2) Sac en plastique, (3) Cordon d’alimentation, (4) Cartouche d’encre
sèche, (5) Ferrite Core, (6) CDs.
Es
Es
Pt
Retire el embalaje de cartó para ver el contenido.
(1) Impresora, (2) Bolsa para protección contra la luz, (3) Cable de alimentación,
(4) Cartucho de toner, (5) Ferrite Core, (6) CDs.
Retire a protecção de cartão.
(1) Impressora, (2) Saco preto de proteção contra a luz, (3) Cabo de Energia Elétrica,
(4) Cartucho de toner, (5) Ferrite Core, (6) CDs.
2
Page 3

Sharp AR-C240P
12
E
Fr
Es
Pt
1. Remove top packing pieces.
2. Open protective plastic bag.
1. Retirez les pièces de protection en plastique.
2. Ouvrez le sac de protectoin en plastique.
1. Retire las piezas de embalaje superiores.
2. Abra la bolsa de plástico de protección.
1. Retire as peças de cima de empacotamento.
2. Abra o saco de plástico de protecção.
3
Page 4

40cm
15.75in
20cm
7.875in
Sharp AR-C240P
60cm
23.62in
20cm
7.875in
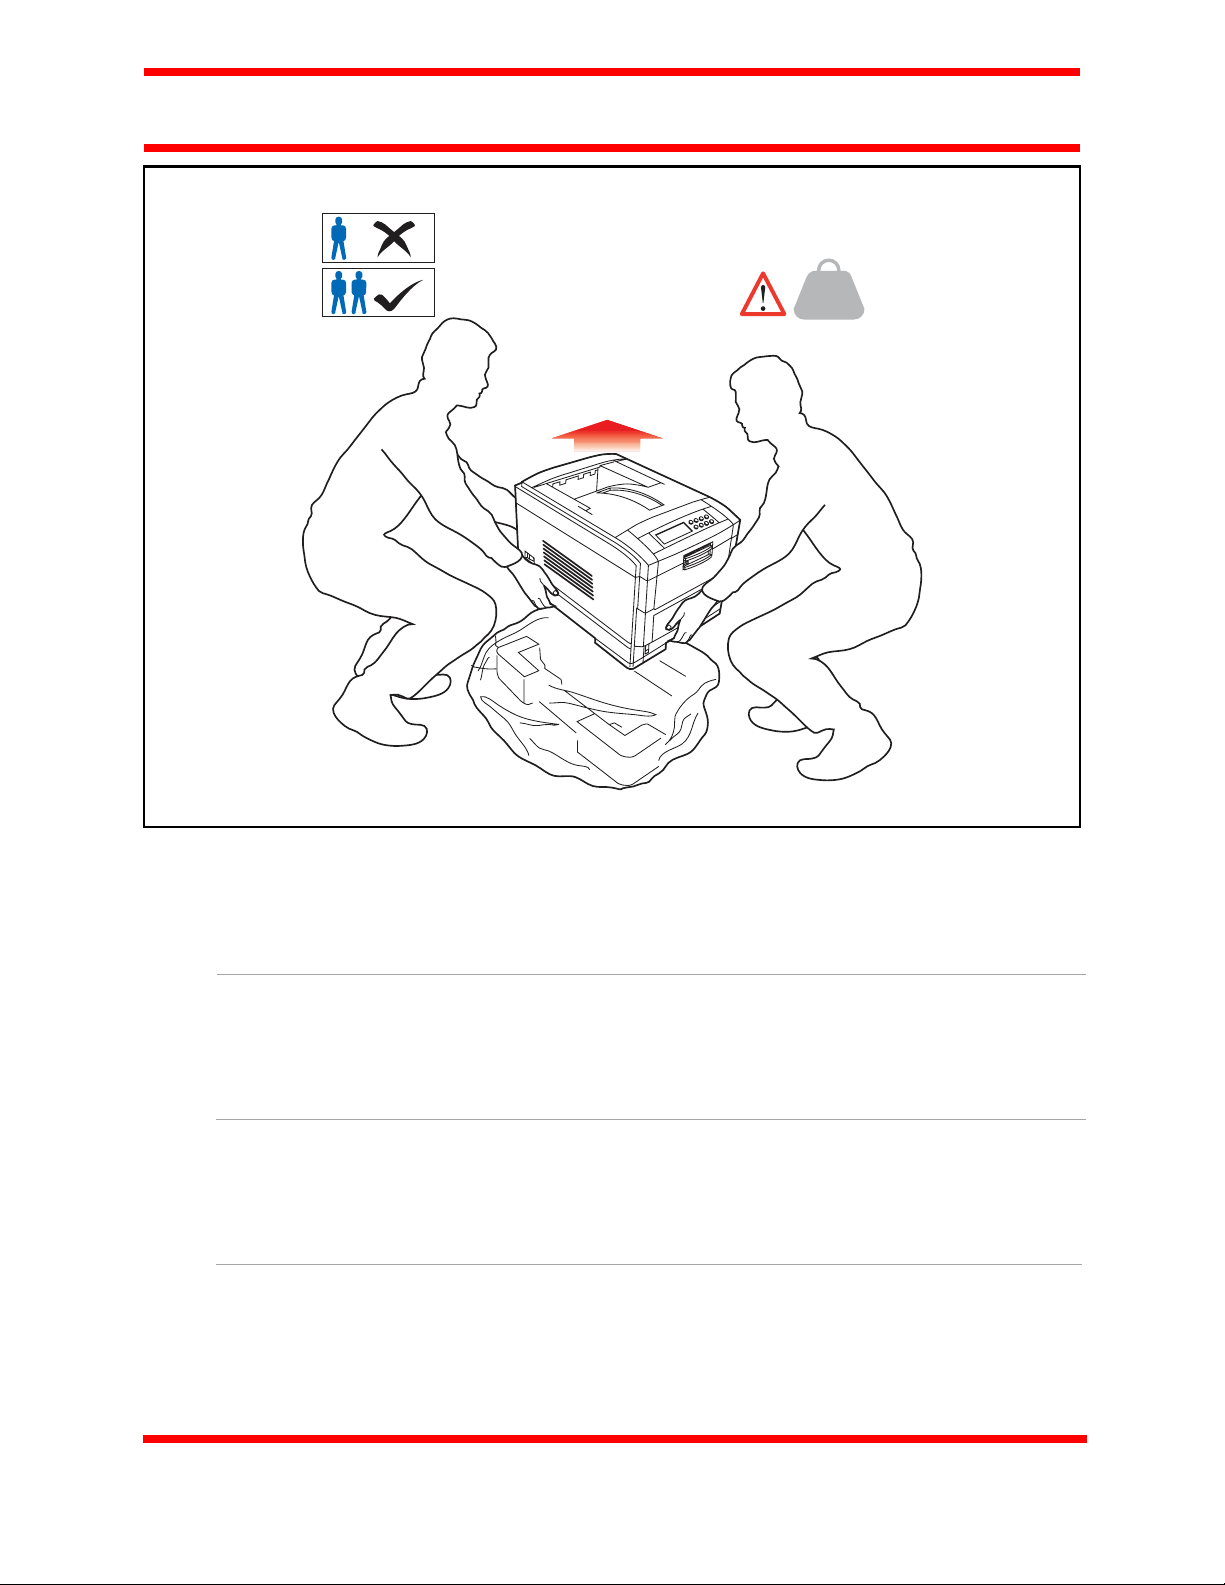
48kg
106lbs
48Kg
106lbs
60cm
23.62
E
Fr
Es
Es
Pt
Select a location.
Choisissez l’endroit de l’installation.
Seleccione la ubicación.
Seleccione o local.
4
Page 5
Sharp AR-C240P
48kg
106lbs
E
Fr
Es
Pt
Lift printer and place on selected location.
Soulevez l’imprimante et placez-la à l’endroit choisi.
Levante la impresora y colóquela en la ubicación seleccionada.
Coloque a impressora no local seleccionado.
5
Page 6
1
2
Sharp AR-C240P
3
E
Fr
Es
Es
Pt
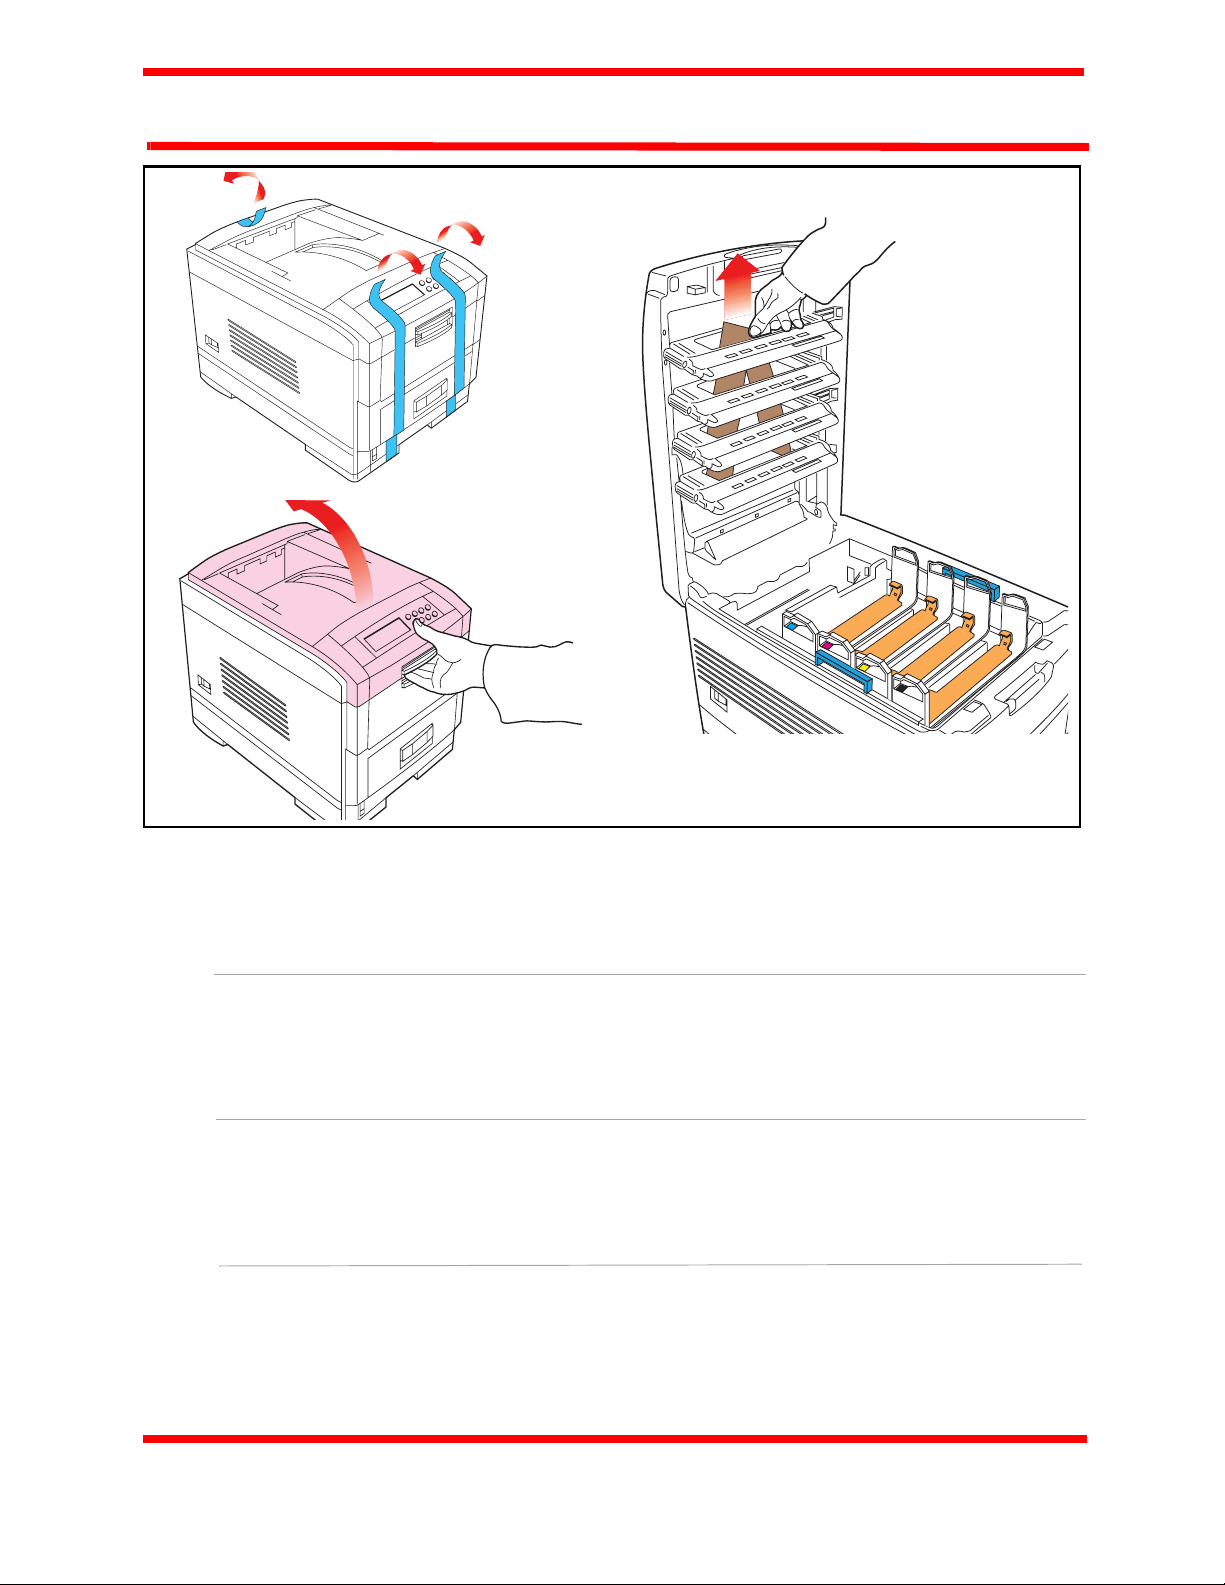
1. Remove shipping tape.
2. Grasp handle and lift top cover.
3. Remove and retain LED array packing strips.
1. Retirez les sangles de manutention.
2. Saisissez la poignée et levez le capot supérior.
3. Retirez et conservez les bandes de protection des têtes LED.
1. Retire las cintas adhevivas de transporte.
2. Levante la cubierta superior tirando del asa.
3. Retire y guarde el material de embalaje de los cabezales LED.
1. Retire as fitas de transporte.
2. Abra a tampa superior.
3. Retire e guarde os protectores das cabeças de LEDs.
6
Page 7

Sharp AR-C240P
E
Fr
Es
Pt
5
Remove Image drums.
Caution!Do not expose drum to direct sunlight or let it sit in room light for more than 5
minutes.
Retirez les tambours d’impression.
Attention! N’exposez pas le tambour à la lumière directe du soleil et ne le laissez pas
exposé à la lumière pendant plus de 5 minuted.
Retire los unidades de imagen.
¡Precaucion! No exponga el cilindro a los rayos directos de luz y no permita que el cilindro permanezca más de 5 minutos bajo la luz ambiental de una habitación.
Retire os tambores de imagens.
Cuidado! Não exponha o cilindro à luz solar direta e não deixe que fique exposto à luz
ambiente por mais de 5 minutos.
7
Page 8
Sharp AR-C240P
E
Fr
Es
Es
Pt
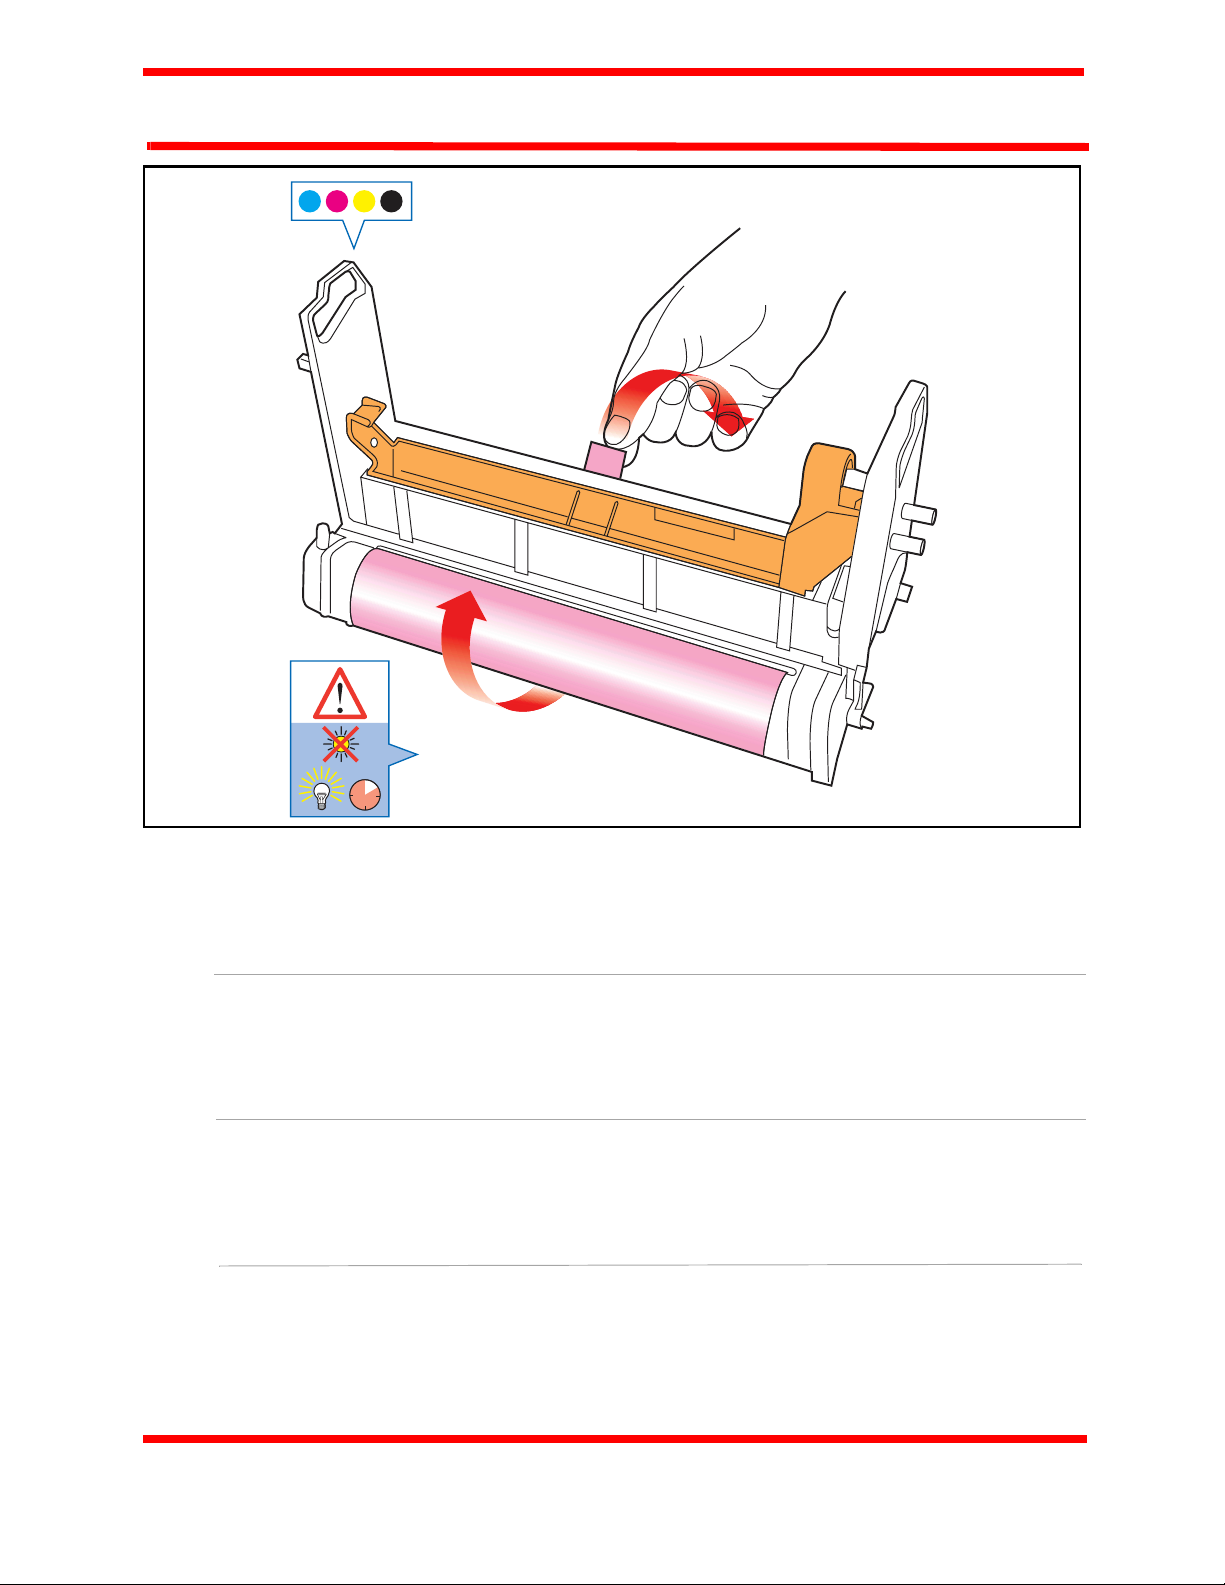
5
Pull out protective paper tab from image drums.
Caution! Do not touch image drum’s green surface.
Tirez sur la languette en papier des tambours d’impression.
Attention! Ne touchez pas la surface verte du tambour.
Saque la lengüeta de papel de protección de los unidades de imagen.
¡Precaucion! No toque la superficie verde del cilindro de imagen
Retire as patilhas protectoras de papel dos tambores de imagens.
Cuidado! Não toque a superfície verde do cilindro.
8
Page 9
Sharp AR-C240P
E
Fr
Es
Pt
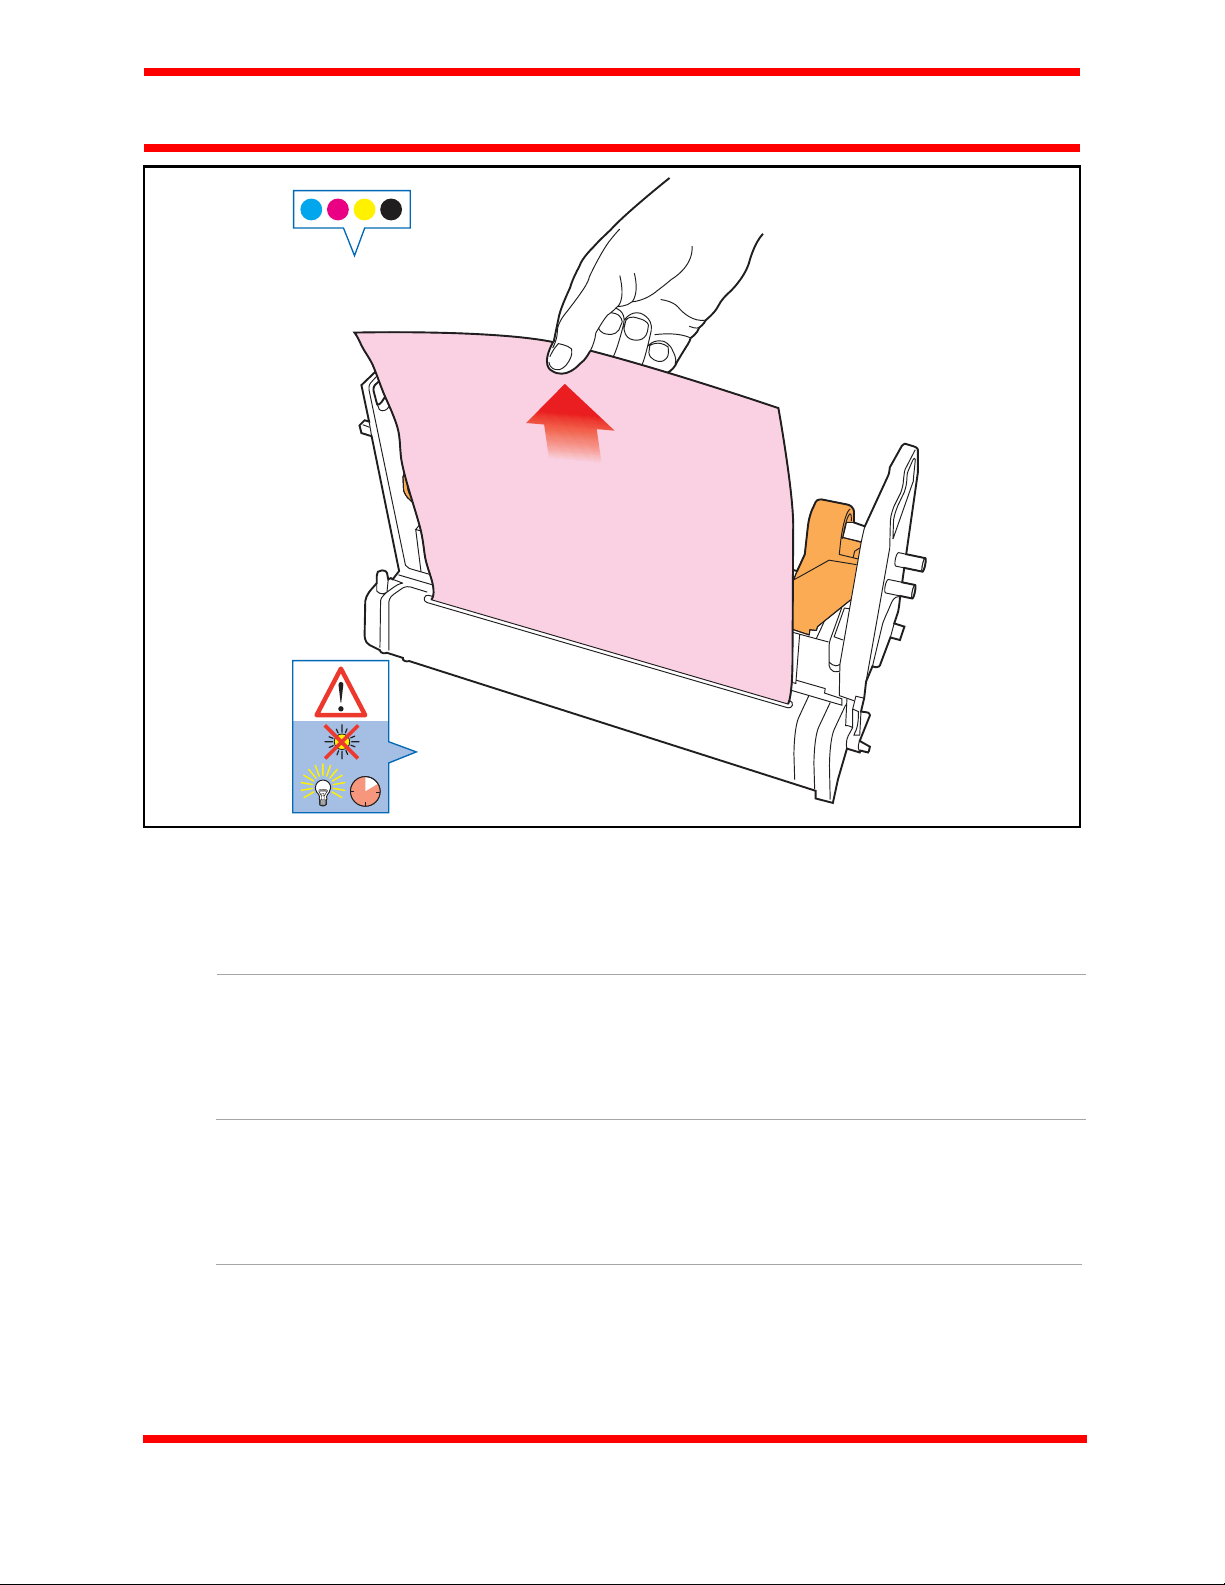
5
Remove protective sheet, then film.
Retirez la feuille de protection puis la pellicule.
Retire la hoja de protección y a continuación la película de las unidades de imagen.
Retire a folha protectora e a seguir, a película.
9
Page 10
Sharp AR-C240P
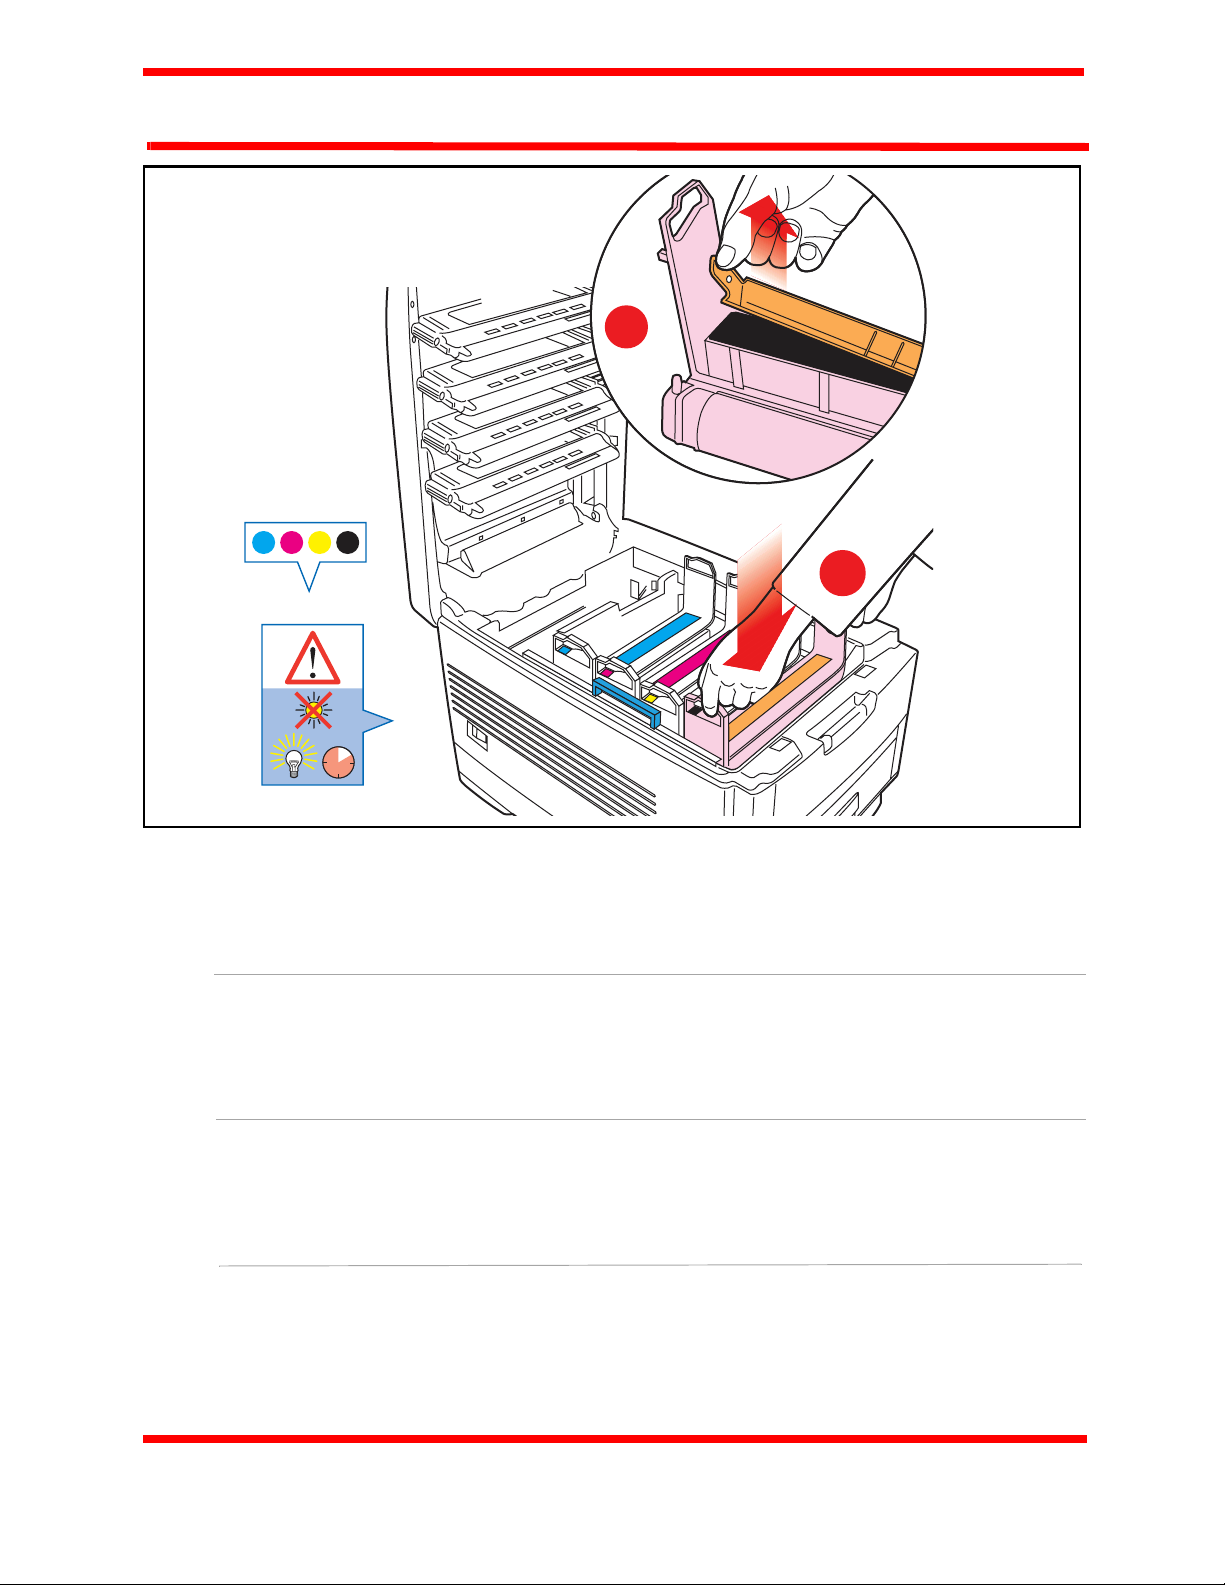
2
1
E
Fr
Es
Es
5
Replace image drums (1). Remove and retain seals (2).
Remettez les tambours d’imprssion en place (1). Retirez les composants
d’obturation et conservez-les (2).
Vuelva a colocar los unidades de imagen (1). Retire y guarde los precintos (2).
Pt
Volte a instalar os tambores de imagens (1). Retire e guarde as vedações (2).
10
Page 11

Sharp AR-C240P
E
Fr
Es
Pt
Grasp the orange clip, squeezing the tab to release it. Slide the clip out and discard.
Saisissez la pince orange et incez la languette pour la dégager. Glissez la pince pour la
sortir et mettez-là au rebut.
Sujete el gancho naranja, y luego apriete la ficha para soltario. Deslice el gancho hacia
fuera y deséchelo.
Segure na presilha laranja, apertando a lingüeta para soltá-la. Retire a presilha deslizandoa para fora e descarte-a.
11
Page 12

Sharp AR-C240P
E
Fr
Es
Es
Pt
Shake toner cartridge.
Secourez la cartouche de toner.
Agite el cartucho de tóner.
Abane o cartucho de toner.
12
Page 13
Sharp AR-C240P
E
Fr
Es
Pt
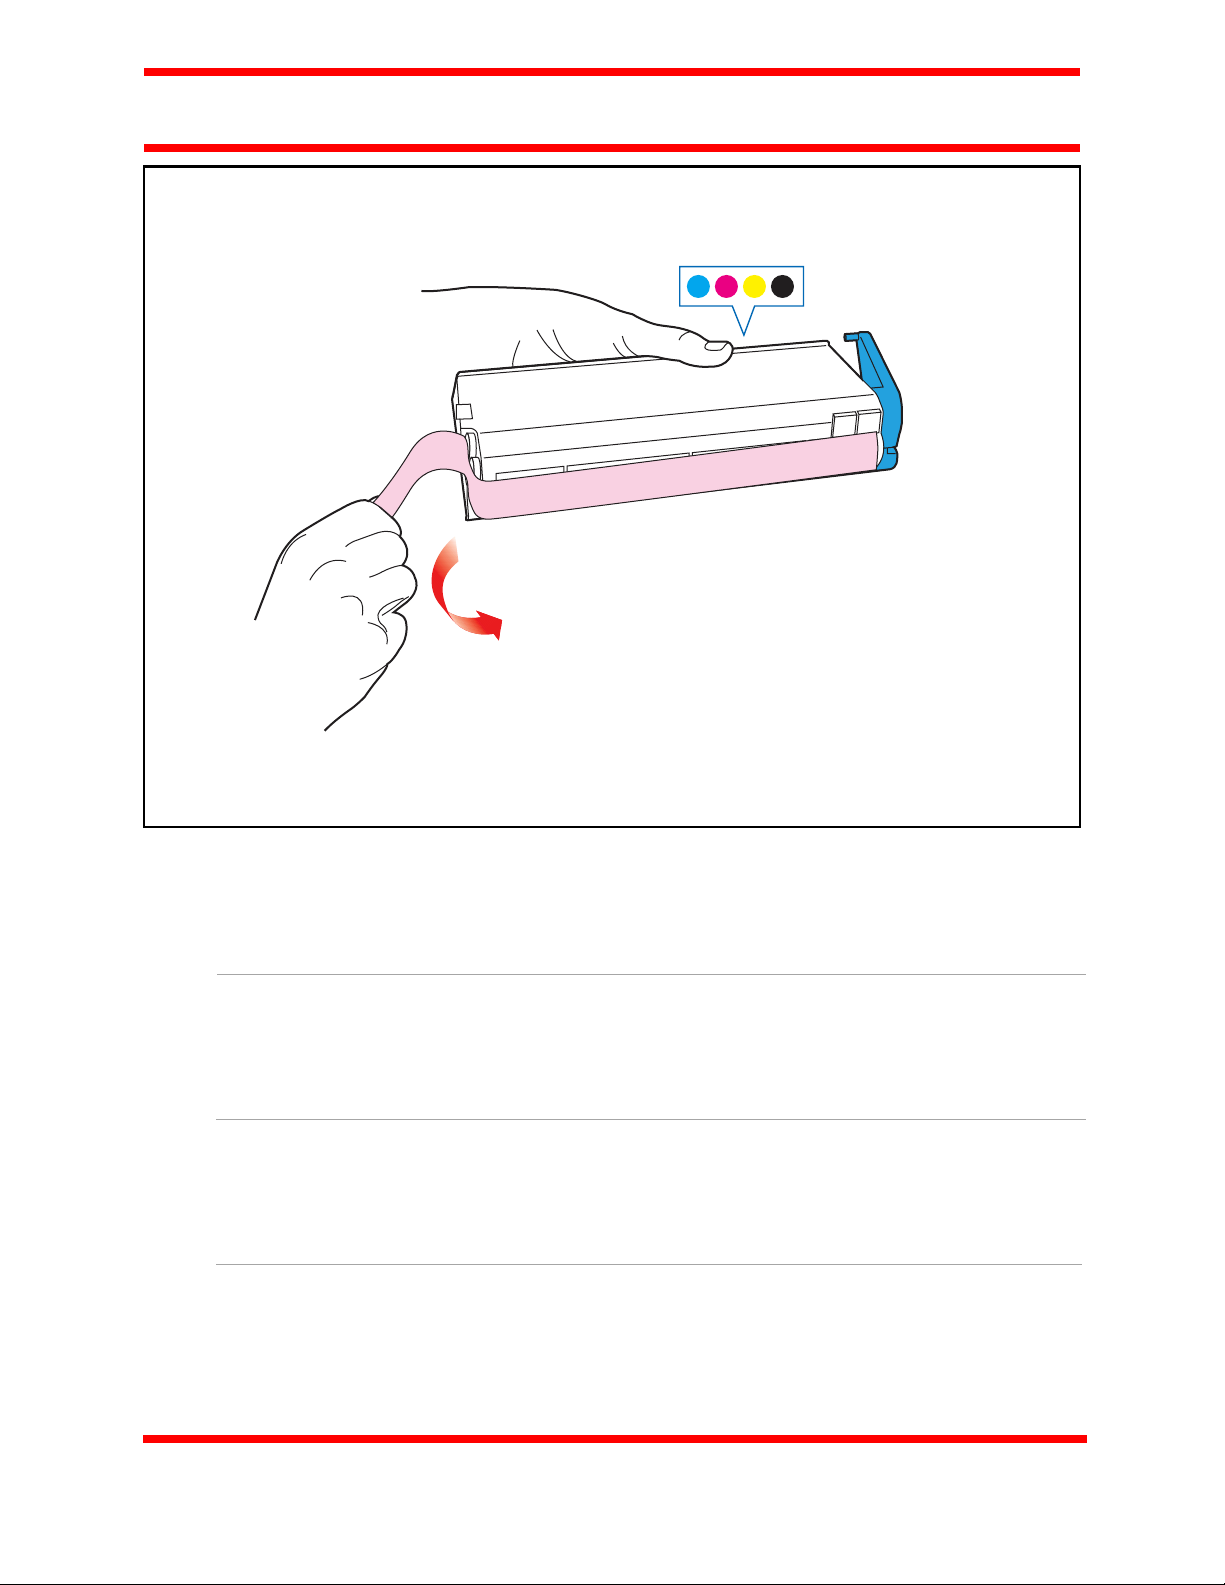
Remove sealing tape from toner cartridge.
Retirez le ruban adhésif d’étanchéité de la cartouche de toner.
Retire la cinta de precinto del cartucho de tóner.
Retire a fita de vedação do cartucho de toner.
13
Page 14

Sharp AR-C240P
E
Fr
Es
Es
Pt
Place opening on left side of toner cartridge on image drum peg.
Installez le côté de la cartouche de toner dans l’ergot de positionnement du tambour
de’impression.
Ponga el lado izquierdo del cartucho de tóner sobre la clavija de colocación del
tambor de imagen.
Posicione o lado esquerdo do cartucho de toner na cavilha de posicionamento do
tambor de imagens.
14
Page 15

Sharp AR-C240P
E
Fr
Es
Pt
Slide right edge of toner cartridge into image drum.
Faites glisser le bord droit de la cartouche de toner dans le tambour d’impression.
Introduzca el cartucho de tóner en la unidad de imagen deslizando su borde derecho.
Deslize o bordo direito do cartucho de toner no tambor de imagens.
15
Page 16

Sharp AR-C240P
E
Fr
Es
Es
Pt
Lock toner cartridge with colored lever.
Enclenchez la cartouche de toner avec le levier de couleur.
Bloquee el cartucho de tóner con la palanca de color.
Bloqueie o cartucho de toner com a alavanca colorida.
16
Page 17

Sharp AR-C240P
E
Fr
Es
Pt
Close top cover.
Refermez le capot supérieur.
Cierre la cubierta superior.
Feche a tampa superior.
17
Page 18

Sharp AR-C240P
E
Fr
Es
Es
Pt
Pull out paper tray.
Sortez le bac à papier.
Saque la bandeja del papel.
Retire o tabuleiro de papel.
18
Page 19

Sharp AR-C240P
E
Fr
Es
Pt
Set guides to paper size.
Réglez les guides suivant le format de papier utilisé.
Ajuste las guías al tamaño del papel.
Ajuste as guias de acordo com o tamanho de papel.
19
Page 20
Sharp AR-C240P
E
Fr
Es
Es
Pt
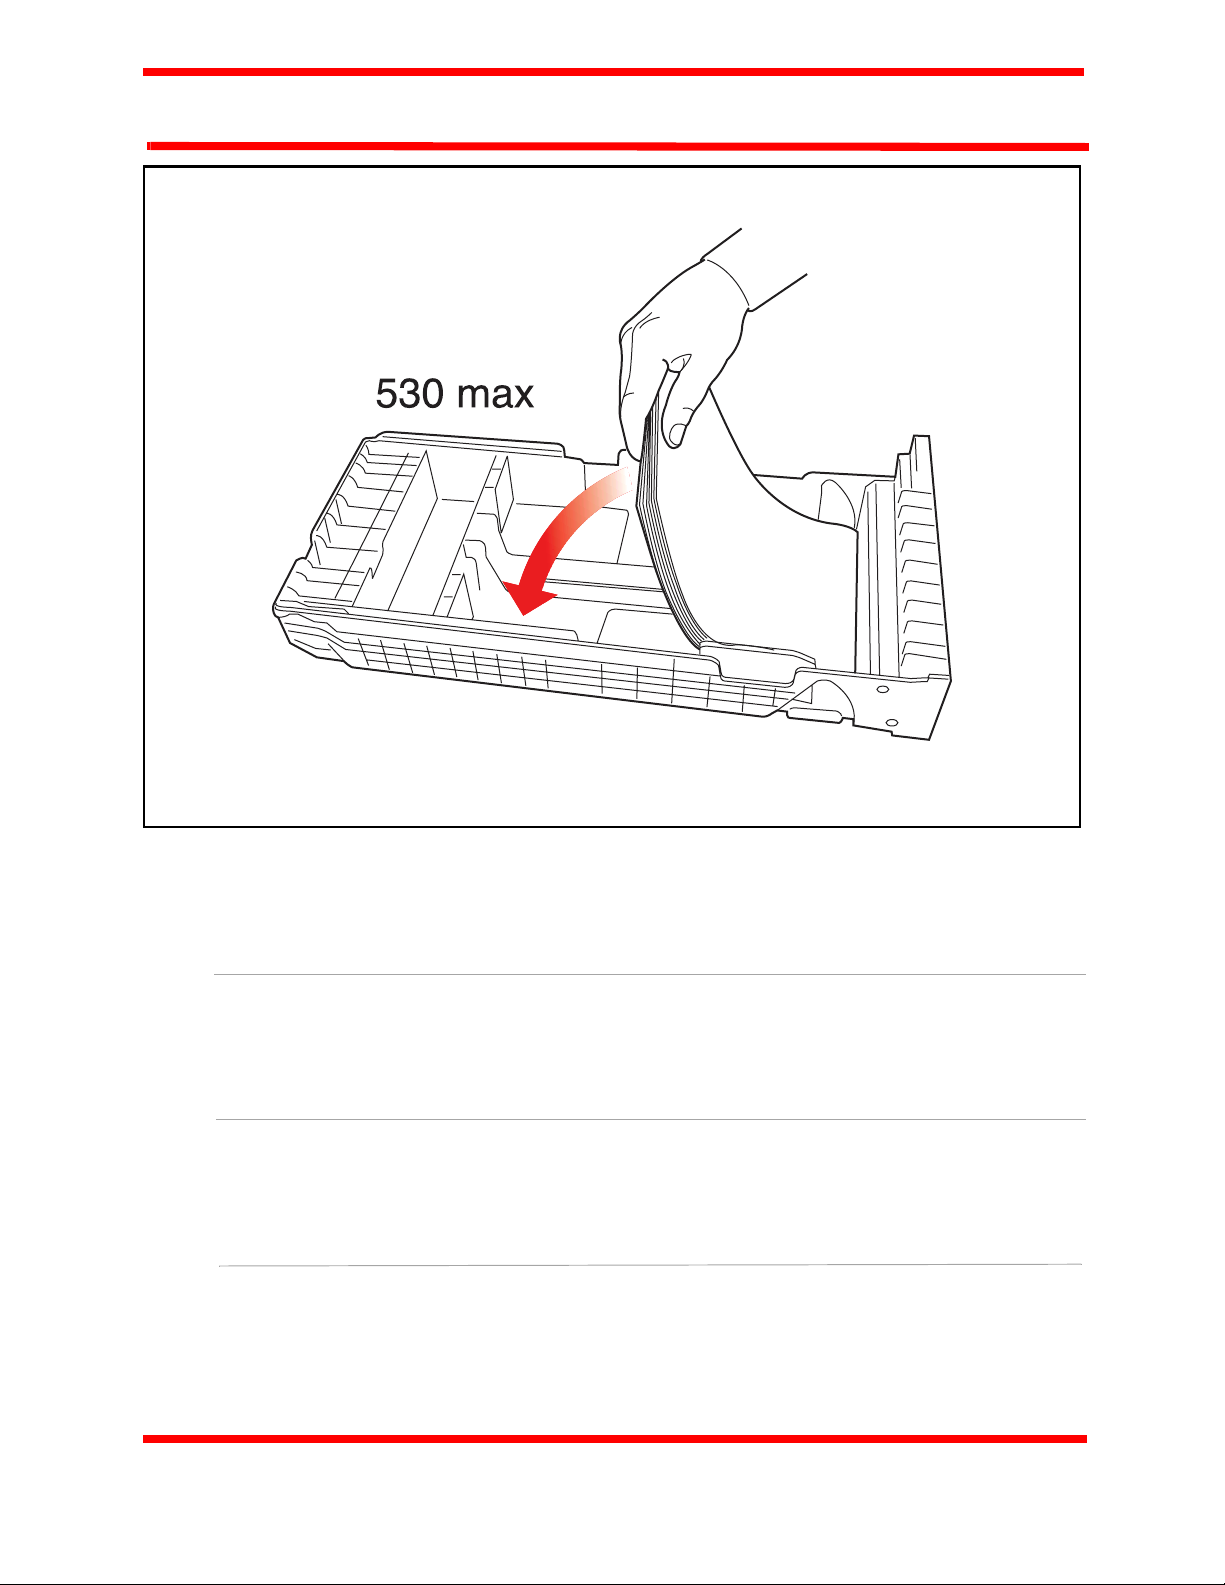
Load paper.
Mettez du papier dedans.
Cargue el papel.
Coloque o papel.
20
Page 21

1
Sharp AR-C240P
2
E
Fr
Es
Pt
1. Check that rear paper guide is against paper stack and locked.
2. Check that side paper guides are against paper stack and locked.
1. Assurez-vous que le guide-papier est bien en contact avec la pile de papier et bloqué.
2. Vérifiez que les guide-papier latéraux sont bien en contact avec la
pile de papier et bloqués.
1. Compruebe que las guía trasera del papel se apoya en la pila del papel
y está fija en su posición.
2. Compruebe que las guías laterales del papel se apoyan en la pila del papel y están
fijas en su posición.
1. Certifique-se que as guia a traseira de paper está encostada à pilha de papel e
bloqueadas.
2. Certifique-se de que as guias laterais de papel estáo encostada à pilha de papel
bloqueada.
21
Page 22

Sharp AR-C240P
E
Fr
Es
Es
Pt
Gently replace paper tray.
Repoussez le bac à papier doucement à sa place.
Vuelva a introducir suavemente la bandeja del papel.
Cuidadosamente volte a instalar o tabuleiro de papel.
22
Page 23

1
Sharp AR-C240P
2
E
Fr
Es
Pt
Insert power cable (1) and then switch on (2).
Introduisez le cordon d’alimentation (1) et mettez l’imprimante sous tension (2).
Enchufe el cable de alimentación (1) y encienda la máquina (2).
Insira o cabo (1) de alimentação e ligue (2).
23
Page 24

Sharp AR-C240P
E
Fr
Es
If you need further assistance or have questions
See our web site: http://www.sharpusa.com
Si vous avez besoin d’une assistance plus approfondie
ou si vous avez des questions
Consultez notre site Web: http://www.sharpusa.com
Si necesita más asistencia o tiene preguntas
Visite nuestro sitio web: http://www.sharpusa.com
Pt
Sharp Electronics Corporation., Sharp Plaza., Mahwah, NJ 07430
Tel: (201) 529-8200 http://www.sharpusa.com
Se precisar de assistência ou tiver perguntas
Consulte o nosso site na Web: http://www.sharpusa.com
Copyright 2004, Sharp Electronics Corporation and its suppliers
59368101
24
Page 25

Ordering Replacement Supplies
How to Order
• Consult the Sharp Authorized
Dealer where you purchased your
printer.
• To find the authorized Sharp
servicing dealer closest to you,
please visit us on-line at
www.SharpUSA.com.
Order Numbers
Important!
Be sure to purchase only
consumables designated for this
printer.
Toner Cartridges
Color Part No.
Black......................... AR-C20TBU
Cyan.......................... AR-C20TCU
Magenta ....................AR-C20TMU
Yellow ....................... AR-C20TYU
Image Drums
Color Part No.
Black......................... AR-C20BDR
Cyan.......................... AR-C20CDR
Magenta ................... AR-C20MDR
Yellow ....................... AR-C20YDR
2
Page 26

Media Settings
Why Change Media
Settings?
Improper media settings:
• cause poor quality printing
• cause flaking
• can damage the printer
Default Media Settings
The Default Setting
The default media weight setting for
all trays (including optional tray 2) is
AUTO.
Changing Defaults
To change the printer’s default settings
for print media, see pages 5 and 6.
Resetting to the Original
Defaults
Note:“…” = keep pressing the button
repetitively until you see the
display indicated.
To reset the printer menu to it’s
original default settings:
1. Press …
MAINTENANCE MENU
2. Press …
EEPROM RESET
EXECUTE
3. Press .
The printer resets and returns to the
on-line state.
3
Page 27

Media Settings (cont.)
Media Settings for
Individual Print Jobs
If you are printing a job on special
media, you can temporarily load the
media in a tray and change the media
settings for that tray in the driver as
you print the job.
Ranges for Printer
Media Weight Settings
Note: To determine if a paper weight
is US Bond or Index, check the
metric equivalent. E.g.,
35 lb. US Bond = 132 g/m
35 lb. Index = 64 g/m2.
For more information, go to
www.paper-paper.com/
weight.html
.
2
MediaWeight Settings,
US Bond
Setting US Bond (Metric)
Auto (default) 17 to 54 lb.
(64 to 203 g/m
Light
Medium Light 18 to 19 lb.
Medium 20 to 24 lb.
Medium Heavy 25 to 27 lb.
Heavy 28 to 32 lb.
Ultra Heavy 33 to 54 lb.
MediaWeight Settings, Index
Setting Index (Metric)
Auto (default) 35 to 113 lb.
Light
Medium Light 37 to 40 lb.
Medium 42 to 50 lb.
Medium Heavy 52 to 56 lb.
Heavy 52 to 67 lb.
Ultra Heavy 69 to 113 lb.
17 lb. (64 g/m
(68 to 71 g/m
(75 to 90 g/m
(94 to 101 g/m
(105 to 120 g/m
(124 to 203 g/m
(64 to 203 g/m
35 lb. (64 g/m
(68 to 71 g/m
(75 to 90 g/m
(75 to 90 g/m
(94 to 120 g/m
(124 to 203 g/m
2
)
2
)
2
)
2
)
2
)
2
)
2
)
2
)
2
)
2
)
2
)
2
)
2
)
2
)
4
Page 28

Changing Default Media Settings:
Trays 1, 2, 3
Note: The “…” in these steps indicates that you should keep pressing the button
repetitively until you see the display indicated.
To Set Transparencies
as the Default Media
Set the Media Type
1. Press …
MEDIA MENU
2. Press …
TRAYZ* MEDIATYPE
XXXX**
3. Press …
TRAYZ* MEDIATYPE
TRANSPARENCY
To Set Labels, Heavy
Paper, etc., as the
Default Media
Set the Media Weight
1. Press …
MEDIA MENU
2. Press …
TRAYZ* MEDIAWEIGHT
AUTO
3. Press …
TRAYZ* MEDIAWEIGHT
YYYY**
4. Press , .
* Z = 1, 2, or 3, depending on which
tray you are changing.
XXXX = current media type
**
setting.
4. Press , .
* Z = 1, 2, or 3 (tray you are using).
**
YYYY = Medium, Medium Heavy,
Heavy, or Ultra Heavy
5
Page 29

Changing Default Media Settings:
Multi-Purpose (MP) Tray
To Set Transparencies
as the Default Media
Note: “…” = keep pressing the button
repetitively until you see the
display indicated.
First, Check/Set the Media
Size to Letter (Default) or A4
1. Press …
MEDIA MENU
2. Press …
MP TRAY PAPERSIZE
XXXX*
3. Press …
4. Press .
Then, Set the Media Type
1. Press …
MP TRAY MEDIATYPE
XXXX*
2. Press …
MP TRAY MEDIATYPE
TRANSPARENCY
3. Press , .
* XXXX = current setting.
MP TRAY PAPERSIZE
LETTER
or
MP TRAY PAPERSIZE
LETTER
6
Page 30

Changing Default Media Settings:
Multi-Purpose Tray (cont.)
To Set Labels or Heavy
Paper as the Default
Media
Note:“…” = keep pressing the button
repetitively until you see the
display indicated.
First, Check/Set the Media
Size (Default = Letter)
1. Press …
MEDIA MENU
2. Press …
MP TRAY PAPERSIZE
XXXX*
Then, Set the Media Weight
1. Press …
MP TRAY MEDIAWEIGHT
XXXX*
2. Press …
MP TRAY MEDIAWEIGHT
ZZZZ
3. Press , .
* XXXX = current setting.
†
YYYY = Letter, Legal-14,
Legal-13.5, Executive, Custom
ZZZZ = Medium, Heavy, or Ultra
**
Heavy
3. Press …
MP TRAY PAPERSIZE
†
YYYY
4. Press .
7
Page 31

Loading Media: Trays 1, 2 & 3
Media Weight Range:
Media Size Range: Tray 1
Capacity: 530 sheets of 20-lb. paper
1
2
2
20 to 54 lb. US Bond (75 g/m
Paper: min. 4.13'' x 5.83''; max. 8.5'' x 14'' (Non-standard
sizes must be defined in driver before printing.)
Transparencies: letter or A4
Trays 2 & 3 (Optional)
Paper: min. 5.83'' x 8.27''; max. 8.5'' x 14'' (Non-standard
sizes must be defined in driver before printing.)
to 203 g/m2)
4
▼ MAX ▼
5
3
8
Page 32

Loading Media:
Multi-Purpose (MP) Tray
Media Weight Range
Media Size Range: min. 3.5" x 5"; max. 8.5" x 14" (Non-standard sizes must
Ta ke s: 100 sheets of 20-lb. US Bond paper
1
2
up to 113 lb. Index (203 g/m
be defined in driver before printing.)
Banners: 8.25 to 8.5" [210 to 216 mm] wide by up to
47.25" [1.2 m] long.
50 transparencies
10 envelopes
Labels: max. feed stack = about 3/8-inch (1 cm) high
4
5
2
)
3
6 For letterhead stationery:
9
Page 33

Selecting/Using Paper
Important Information!
For optimum results make sure that the paper you use conforms to the
specifications outlined in the following pages.
We do not recommend the following paper types for use in your printer:
• Paper with cutouts, perforations, or excessive paper dust.
• Heavily coated, glossy, or smooth paper
• Recycled paper
• Embossed, rough, or heavily textured paper
• Paper, inks and dyes that cannot withstand pressure and heat.
1
Sample Ream Label:
2
1 Media Weight, US Bond (see page 4) [sometimes given as substance]
2 Media Weight, Metric: Look for this to confirm US Bond vs. Index.
10
Page 34

Selecting/Using Paper (continued)
Specifications
Caution!
The ink on pre-printed letterhead stationery must be able to withstand 446°F
(230°C) for 0.2 second, including mechanical pressures to 25 psi (1.8 kg/cm
Note: If you experience curling when printing a file in duplex mode, switch to
28-lb. US Bond paper.
2
).
Sizes Feed Tray
• Letter
• Executive
• Legal-14,
-13.5, -13
•A4, A5, A6
•B5
• Banner
(MP Tray
Only)
• Custom
(MP Tray
Only)
• Letter
• Executive
• Legal-14,
-13.5, -13
• A4, A5, B5
a. 8.25 to 8.5" (210 to 216 mm) wide x up to 47.25" (1.2 m) long.
b. Min. = 3.9" x 3.9" (99 x 99 mm); max. = 8.5" x 14" (216 x 356 mm).
Custom sizes must first be defined in the printer driver: see your on-line
User’s Guide for more information.
Tray 1 Top
MP Tray Rear
a
b
Optional
Trays 2, 3
Exit
Tray
Rear
Only
Top
Rear
Media
Type
Setting
•Plain
(default)
• Letterhead
•Plain
(default)
• Letterhead
•Plain
(default)
• Letterhead
Media
Weight
Setting
Auto
Auto
Auto
Recommended
Papers
•Hammermill
Laser Printer
Radiant White, 24
lb., US Bond
•Sharp SF70A,
20 lb.
For best results:
temperature = 65 to
77°F; humidity = 40
to 65%RH
®
11
Page 35

Selecting/Using Transparencies
Specifications
Caution!
Transparencies must be able to withstand 446°F (230°C) for 0.2 second,
including mechanical pressures to 25 psi (1.8 kg/cm
Important!
Use only recommended transparencies.
2
).
Usable
Sizes
• Letter
•A4
Feed
Tray
• Tray 1
•MP Tray
Exit
Tray
Rear
Only
Media Type
Setting
Transparency Any
Printing Transparencies
For Individual Print Jobs on
Transparencies
Make the following settings in the
printer driver as you print the job:
• Source = Tray1 or MP Tray
• Media Size = Letter or A4
• Media Type = Transparency
•Windows
driver only: deselect Media Check:
Windows 2000/XP
Printing
Preferences → Advanced → D
ocument Options → Printer
Features → Media Check = Off.
Windows Me/98/95
Properties → Setup
tab → Paper Feed
Options → deselect Media
Check.
®
Adobe® PostScript®
Media
Weight
Setting
(Ignored)
Windows NT 4.0
Document Defaults → Input
Slot Option → Media Check =
Off.
Recommended
Transparencies
• Sharp ARC20A
•Folex
®
BG67 (A4)
Making Transparencies the
Default Print Media
Tray 1
If Tray 1 will normally be loaded with
transparencies, set the printer menu as
follows (see page 5):
• Tray1 MediaType = Transparency
MP Tray
If the MP Tray will normally be
loaded with transparencies, set the
printer menu as follows (see page 6):
• MP Tray PaperSize = Letter (the
default) or A4
• MP Tray MediaType =
Transparency
12
Page 36

Selecting/Using Labels
Label Parameters
Important!
Place labels in the MP Tray face up.
Caution!
Labels must be able to withstand 446°F (230°C) for 0.2 second, including
mechanical pressures to 25 psi (1.8 kg/cm
2
).
Usable
Sizes
• Letter
•A4
Feed Tray Exit Tray
MP Tray
Only
Rear Only Labels • Medium
Printing Labels
For Individual Print Jobs on
Labels
Make the following settings in the
printer driver as you print the job:
• Source = MP Tray
• Media Size = Letter or A4
• Media Type = Labels
• Windows® Adobe® PostScript®
driver only: deselect Media Check
(see page 12).
Media
Type
Setting
Media
Weight
Setting
•Heavy
•Ultra
Heavy
Recommended
Labels
Avery 5161 White
Laser Label, Letter
size
Making Labels the Default
Print Media for the MP Tray
If the MP Tray will normally be
loaded with labels, set the printer
menu as follows (see page 6):
• MP Tray PaperSize - Letter or A4
• MP Tray MediaType = Labels
13
Page 37

Selecting/Using Envelopes
Specifications
Caution!
Envelopes must be able to withstand
446°F (230°C) for 0.2 second,
including mechanical pressures to 25
psi (1.8 kg/cm
Size Feed Tray Exit Tray Media Type Media Weight
COM-10 MP Tray Only Rear Only Any Setting Any Setting
2
)
Printing Envelopes
To Print an Individual Job on
Envelopes
Make the following settings in the
printer driver as you print the job:
• Source = MP Tray
• Size = COM-10
Important!
For the best print results, please
order our recommended envelopes
from your Sharp's media provider.
Never use envelopes with metal
clasps, snaps, windows, or V-flap
seals:
No!
Making Envelopes the
Default Print Media for the
MP Tray
Set the printer menu to (see pages 5
and 6):
• PaperSize = COM-10
14
Page 38

Selecting/Using Thick Media
Sample Ream Label:
1
2
1 Media Weight, Index (see page 4).
2 Media Weight, Metric: This
confirms Index vs. US Bond (see
page 4)
Caution!
To prevent damage to the printer, it is
very important to check the printer’s
media settings before printing on
thick paper. It must be set to Medium,
Heavy, or Ultra Heavy—depending
on the thickness of the paper being
used—or to Auto (see page 4 and
“Printing Thick Paper” below).
Parameters
Usable Sizes
• Letter, Executive, Legal-14,
Legal-13.5, Legal-13
• A4, A5, A6, B5
• Custom (minimum = 3'' x 5''; must
be defined in the printer driver).
Feed Tray
• Tray 1, optional Trays 2 and 3 (up to
98 lb. Index)
• MP Tray (up to 113 lb. Index)
Exit Tray
• Rear Only
Media Type Setting
•Card Stock
Media Weight Setting
• Trays 1, 2, 3 = Auto
• MP Tray = Medium Heavy, Heavy,
or Ultra Heavy (see page 4)
Recommended Media*
• Wasau Exact Index
– 49108, 90 lb.
– 49508, 110-lb.
* For best print results:
temperature = 65 to 77°F (18 to
25°C); humidity = 40 to 65%RH
Printing Thick Paper
Printing Individual Jobs
Make the following settings in the
printer driver as you print the job:
• Source = Trays 1, 2 or 3 (
Index)
or MP Tray (to 113 lb. Index)
• Size = see sizes at left
• Type = Medium Heavy, Heavy or
Ultra Heavy (see page 4).
Making Thick Paper the
Default Print Media
Set the printer menu (see pages 5 and
6) to:
• PaperSize = see sizes at left.
• MediaType = Medium Heavy,
Heavy or Ultra Heavy (see page 4)
to 98 lb.
15
Page 39

Ideas for Using Printer Features
Note: For detailed information on
these features, see your on-line
User’s Guide
Secure Print Feature
Ideal for printing confidential
documents on a network system.
Idea!
When printing special media, use this
feature to prevent documents being
sent by other clients on the network
from printing on your media:
• Create your document and store it in
the printer’s memory.
• Load the special media.
• Start printing the document by
accessing it through the front panel
(see page 17).
Proof & Print Feature
Use Proof & Print to proof your
document before printing
multiple copies.
Overlays (Forms)
Note: Overlay elements must be
created in your software
application, then stored on the
printer’s hard drive using
Storage Device Manager
before they can be used.
Great for adding logos, addresses,
letterheads, etc., to your
document, in any combination.
Ideas!
User overlays:
• in place of pre-printed stationery.
• to create forms from pre-stored
modular pieces.
16
Page 40

Secure Print
To print out a secure (confidential)
document, you must know:
• the document name
• your personal password (PIN)
To Print a Confidential
4. Press …
PRINT JOBS MENU
[JOB NAME]
Document Using the
Control Panel
Note: “…” = keep pressing the button
repetitively until you see the
display indicated.
1. Press …
PRINT JOBS MENU
2. Press .
PRINT JOBS MENU
PIN:
3. Enter your PIN using the control
panel:
5. Press .
6. The document prints and is deleted
from the printer’s hard drive.
7. The printer goes back on line.
To Delete the Document
before Printing It
Follow steps 1 through 4 above, then:
1. Press .
2. Press .
3. The document is deleted from the
printer’s hard drive and the printer
goes back on line.
SELECT JOB
ALL JOBS
17
Page 41

Proof & Print
To print a proofed document, you
must know:
• the document name
• your personal password (PIN)
To Print a Proofed
4. Press …
PRINT JOBS MENU
XXXX*
Document Using the
Control Panel
Note: “…” = keep pressing the button
repetitively until you see the
display indicated.
1. Press …
PRINT JOBS MENU
2. Press .
PRINT JOBS MENU
PIN:
3. Enter your PIN using the control
panel:
5. Press .
6. The document prints and is deleted
from the printer’s hard drive.
7. The printer goes back on line.
* XXXX = the name of the job you
wish to print.
To Delete the Document
before Printing It
Follow steps 1 through 4 above, then:
1. Press .
2. Press .
3. The document is deleted from the
printer’s hard drive and the printer
goes back on line.
SELECT JOB
ALL JOBS
18
Page 42

Printing Built-In Reports
Printing the Menu
Defaults (MenuMap)
Note: “…” = keep pressing the button
repetitively until you see the
display indicated.
To print a list of the current menu
settings:
1. Press …
INFORMATION MENU
2. Press …
PRINT MENU MAP
3. Press .
Print the File List
Note: “…” = keep pressing the button
repetitively until you see the
display indicated.
To print a list of the files stored on the
printer’s hard drive:
1. Press …
INFORMATION MENU
2. Press …
PRINT FILE LIST
3. Press .
19
Page 43

Printing Built-In Reports (cont.)
Printing Lists of Fonts
(PCL, PostScript, IBM
Proprinter, or Epson FX
Emulation)
Note: “…” = keep pressing the button
repetitively until you see the
display indicated.
1. Press …
INFORMATION MENU
2. Press …
PRINT XXXX* FONTS
3. Press .
* XXXX = PCL, PS, IBM PPR, or
Epson FX.
20
Page 44

Setting Power Save Parameters
Power Save
Power Save sets how long the printer
waits before going into standby mode.
This saves energy, but the printer
requires time to warm up when it
receives a print job or if you want to
enter the menu and change settings.
Setting the Power Save
Interval
1. Press …
SYSTEM CONFIG MENU
2. Press …
POWER SAVE DELAY TIME
60 MIN
Note: “…” = keep pressing the button
repetitively until you see the
display indicated.
To Disable/Enable
Power Save
1. Press …
MAINTENANCE MENU
2. Press …
POWER SAVE
ENABLE
3. ☛ …
POWER SAVE
DISABLE
†
†
3. Press …
POWER SAVE DELAY TIME
XX* MIN
4. Press , .
* XX = 5, 15, 30, 60 (default), 240
minutes.
4. ☛ , .
† Pressing the ITEM button toggles
back and forth between Enable and
Disable.
21
Page 45

Control Panel Buttons
MENU Button
Printer On Line or Off Line
Press to enter the Menu mode.
Menu Mode
• Press to advance to the next
Category in the Menu
• Press and hold for 2 seconds or
longer to go back to the previous
Category.
Password (PIN) Mode
Press to enter a zero in the password.
ON LINE Button
Printer On Line/Off Line
Press to place the printer off line/on
line.
Menu Mode
Press to exit the Menu mode and go
back on line.
Password (PIN) Mode
Press to enter the number 4 in the
password.
Error Mode
(Attention light blinking)
• If the paper size requested by the
print job is different from the paper
specified as in the tray, press ON
LINE to force the job to print.
• If you have selected manual print in
the driver, load paper in the MP tray,
then press ON LINE to print the job.
22
Page 46

Control Panel Buttons (cont.)
ITEM + Button
Menu Mode
• Press to advance to the next Item in
the Menu.
• Press and hold to advance through
the menu Items quickly.
Password (PIN) Mode
Press to enter the number 1 in the
password
ITEM - Button
VALUE + Button
Menu Mode
Press to advance to the next Value for
an Item in the Menu.
Press and hold to advance through the
Values quickly.
Password (PIN) Mode
Press to enter the number 2 in the
password.
VALUE - Button
Menu Mode
• Press to go back to the previous
Item in the Menu.
• Press and hold to advance backward
through the menu Items quickly.
Password (PIN) Mode
Press to enter the number 5 in the
password.
Menu Mode
Press to go to the previous Value for
an Item in the Menu.
Press and hold to advance backward
through the Values quickly.
Password (PIN) Mode
Press to enter the number 6 in the
password.
23
Page 47

Control Panel Buttons (cont.)
SELECT Button
Menu Mode
• Press to engage a new value for an
Item (An asterisk appears next to the
new setting).
• Press to initiate the action indicated
on the display (e.g., print
MenuMap).
Password (PIN) Mode
Press to enter the number 3 in the
password.
CANCEL Button
Printer On Line
Press to delete a job being processed:
• If the job is being printed, it will be
cancelled and deleted.
• If the job is still being received, it
continues until all the data is
received, then is deleted.
Menu Mode
Press to exit the Menu mode and place
the printer back on line.
Password (PIN) Mode
Press to enter the number 7 in the
password.
Error Mode
(Attention light blinking)
Press to delete a job being processed.
Once the job has been deleted, the
printer will return to the original error
status.
24
Page 48

Control Panel Lights
Ready LED (Green)
On
The printer is on line.
Off
The printer is off line.
Flashing
The printer is receiving data.
Attention LED (Red)
On: Warning!
The printer needs attention, but can
continue to operate.
The display message indicates the
nature of the problem: e.g.,
LOW, PAPER NEAR END, etc.
Off
Normal.
Flashing: Alarm!
The printer needs attention
immediately.
The display message indicates the
nature of the problem: e.g.,
JAM
, TRAY1 EMPTY, etc.
TONER
PAPER
25
Page 49

Clearing Media Jams
Jam 370
CHECK DUPLEX
370: PAPER JAM
1
2
4
5
3
26
Page 50

Clearing Media Jams (cont.)
Jam 371
CHECK DUPLEX
371: PAPER JAM
1
2
3
4
27
5
Page 51

Clearing Media Jams (cont.)
Jam 372
CHECK DUPLEX
372: PAPER JAM
1
2
4
5
3
28
Page 52

Clearing Media Jams (cont.)
Jam 380
OPEN FRONT COVER
380: PAPER JAM
1
2
4
3
29
Page 53

Clearing Media Jams (cont.)
Jam 381
OPEN UPPER COVER
381: PAPER JAM
1
2
3
4
5
Caution!
To avoid damage to the drums:
• Be sure to set the toner/drum
cradle on a flat surface
• Do not touch the shiny green area
on the bottom of the drums.
30
Page 54

Clearing Media Jams (cont.)
Jam 382
OPEN UPPER COVER
382: PAPER JAM
If the sheet is visible:
1
2
If the sheet is inside:
1
Warning!
The fuser may be very hot from
printing.
2
Note: If the sheet is stuck in the fuser,
skip to the next page.
3
31
Page 55

Clearing Media Jams (cont.)
Jam 382 (cont.)
If the sheet is inside and
caught in the fuser:
Warning!
The fuser may be very hot from
printing.
1
Caution!
To avoid damage to the drums:
• Be sure to set the toner/drum
cradle on a flat surface
• Do not touch the shiny green area
on the bottom of the drums.
3
Note: If you need to remove the
fuser:
1. Push back on the blue lock
levers at either end and lift it
out.
2. Remove the sheet.
3. Put the fuser back.
4 Push the fuser roller lock levers at
either end of the fuser back:
2 Pull the fuser roller lock levers (1) at
either end of the fuser forward:
32
Page 56

Clearing Media Jams (cont.)
Jam 382 (cont.)
5
6
Jam 383
OPEN UPPER COVER
383: PAPER JAM
3
4
5
1
2
6
7
33
Page 57

Clearing Paper Jams (cont.)
Jam 390
CHECK MP TRAY
390: PAPER JAM
1
2
Jam 391
CHECK TRAY 1
391: PAPER JAM
1
2
34
3
Page 58

Clearing Paper Jams (cont.)
Jams 392 and 393
CHECK TRAY 2
392: PAPER JAM
CHECK TRAY 3
393: PAPER JAM
1
2
3
35
Page 59

Changing Toner Cartridges
Toner Cartridge Order #s:
• Black = AR-C20TBU
• Cyan = AR-C20TCU
• Magenta = AR-C20TMU
• Yellow = AR-C20TYU
Caution!
Be sure to purchase only
consumables designated for this
printer.
INSTALL NEW TONER
nnn: XXXX* TONER EMPTY
* nnn: XXXX =
410: YELLOW 411: MAGENTA
412: CYAN 413: BLACK
1
4
Important!
Discard toner cartridges in
accordance with local regulation!
5
6
2
7
3
36
Page 60

Changing Toner Cartridges (cont.)
8
9
10
12
13
14
11
Important!
The TONER LOW message should
disappear from the display. If it
doesn’t, try printing a page. If it still
doesn’t disappear, reinstall the
toner cartridge.
37
Page 61

Error Messages
Some of the more common error
messages appear below. For additional
error messages, see your on-line
User’s Guide.
XXX TONER LOW
The Problem
Appears on the second line of the
display to indicate that color
toner cartridge is getting low.
Note: If you have changed the LOW
TONER item in the SYSTEM
CONFIG MENU to STOP, the
ATTENTION light will blink
and you must either replace the
toner cartridge immediately or
press the ON LINE button to
continue printing.
What to Do
Be sure you have a replacement toner
cartridge (see page 36) on hand.
INSTALL NEW TONER
nnn: XXXX TONER EMPTY
The Problem
The toner cartridge indicated (XXX)
has run out of toner.
XXX
XXXX DRUM NEAR LIFE
The Problem
Appears on the second line of the
display to indicate that color
BLACK) image drum needs to be
(e.g,
XXXX
replaced.
What to Do
Replace the XXXX image drum. (See
the instructions supplied with the new
image drum.)
INSTALL ADDITIONAL MEMORY
420: MEMORY OVERFLOW
The Problem
The amount of data in the file being
printed has exceeded the printer’s
memory.
What to Do
• Reduce the size of the file being
printed (e.g., print the file as
separate groups of pages instead of
all the pages at one time).
• Install additional memory in the
printer (see your on-line User’s
Guide for more information).
What to Do
Replace the toner cartridge. See
page 36.
38
Page 62

Error Messages (cont.)
SET XXX ON MPTRAY
AND PUSH ON-LINE SWITCH
The Problem
The printer has received a job for
printing from the Multi-Purpose Tray
and no media is loaded in the tray.
What to Do
Load the requested media (XXX) in
the Multi-Purpose Tray, then press ON
LINE.
t NEAR END
The Problem
Appears on the second line of the
display to indicate that the media in
tray t is almost out.
What to Do
Load more media in the tray before
printing any large print jobs from that
tray.
REMOVE THE PAPER
480: STACKER FULL
The Problem
The stack of paper in the top (face
down) output tray is blocking the
printed sheets trying to exit the printer.
What to Do
Remove the stack of printed sheets
from the top output tray.
REMOVE THE PAPER
nnn: TRAY X UNSUITABLE SIZE
The Problem
The paper in Tray X (e.g., 450: TRAY
1) is not a size that can be fed through
the tray.
What to Do
Replace the paper in the tray with an
appropriate size.
39
Page 63

Error Messages (cont.)
CHECK FUSER UNIT
320: FUSER UNIT MISSING
XXX TONER SENSOR ERROR
The Problem
The fuser is not properly installed.
What to Do
Open the top cover and check the
fuser:
1. Press down on the fuser to be sure it
is firmly locked in place. The
message should disappear.
Note: If the message still appears,
push the blue latches at
either end of the fuser back
(toward the printer cover
hinge) and lift the fuser out,
then lower it back into the
printer, pushing it firmly
down in place. You should
feel the latches at either end
engage.
2. Close the cover.
The Problem
Appears on the second line of the
display to indicate that there is a
problem with the color xxx toner
sensor.
What to Do
Turn the printer off, then on again. If
this does not clear the message, call
your local service dealer.
DISK FILE SYSTEM FULL
The Problem
The printer’s internal hard drive does
not have enough memory to print the
current job.
What to Do
Either print out or delete some of the
files already on the printer’s hard drive
(see pages 17 and 18).
Note: You can also use the Storage
Device Manager utility to clean
up the printer’s hard disk drive.
See your on-line User’s Guide
for more information.
40
Page 64

Error Messages (cont.)
PRESS ONLINE SW
INVALID DATA
The Problem
The hard disk drive is not available
and job spooling cannot take place.
What to Do
Press the ON LINE button.
41
Page 65

Service & Support
Consult the Sharp Authorized Dealer
where you purchased your printer.
To find the authorized Sharp servicing
dealer closest to you, please visit us
on-line at www.SharpUSA.com.
42
Page 66

Adobe, and PostScript are trademarks of Adobe Systems, Inc. which may be
registered in certain jurisdictions.
Avery is a registered trademark of Avery Dennison Corporation.
Folex is a registered trademark of Folex imaging.
HammerMill is a registered trademark of HammerMill.
Windows is either a registered trademark or trademark of Microsoft Corporation in
the United States and other countries.
Copyright 2003, Sharp Electronics Corporation and its suppliers
43
 Loading...