

Sharp AR-C150 User Manual

MODEL
AR-C150
DigitalDigital
DIGITAL FULL COLOUR
COPYING MACHINE
OPERATION MANUAL
• GETTING STARTED
• MAKING COPIES
• SPECIAL FUNCTIONS
• SUPPLIES
• COPIER TROUBLE?
• GENERAL
INFORMATION
• OPTIONAL EQUIPMENT
• KEY OPERATOR’S
GUIDE
Page
1-1
2-1
3-1
4-1
5-1
6-1
7-1
8-1
Do not make copies of anything which is prohibited from copying by law. The
following items are nomally prohibited from copying by national law. Other
items may be prohibited by local law.
●
Money ● Stamps ● Bonds ● Stocks ● Bank drafts
●
Checks ● Passports ● Driver’s licenses
Warning
This is a class A product. In a domestic environment this product may cause radio
interference in which case the user may be required to take adequate measures.
In some areas, the "POWER" switch positions are marked "I" and " " on the copier
instead of "ON" and "OFF".
The symbol " " denotes the copier is not completely de-energized but in a stand-by
condition at this "POWER" switch position.
If your copier is so marked, please read "I" for "ON" and " " for "OFF".
Caution!
For a complete electrical disconnection, pull out the main plug.
The socket-outlet shall be installed near the equipment and shall be easily
accessible.
The CE mark logo label is affixed on an equipment in case that the directives described in the above
sentence are applicable to the product. (This sentence is not applicable in any country where the
above directives are not required.)

COLOUR COPY SAMPLES
The following pages contain samples of the various colour copying functions described in this manual. They are
designed to demonstrate the wide range of capabilities and applications for the Sharp AR-C150 digital full colour
copying machine.
Note that the samples shown on page 1 to 8 are not actual copies from the AR-C150 copier. The colours displayed
may differ from those of actual copies.
Colour Copying with Special Features
1. Single colour copying (See page 3-24.)
The single colour function is used to produce copies using a selected single colour.
Red
Purple
Original
Green
Orange
Blue
Brown
1
2. Neg./Pos. Reverse (See page 3-26.)
The NEG./POS. REVERSE function is used to transform a colour original into its complementary colours. If this
function is selected in the black/white mode, the black and white areas of the original will be reversed.
Original
Colour copy
Black/white copy
3. Photo repeat (See page 3-30.)
PHOTO REPEAT is used to produce multiple copies of a photo on a single sheet of copy paper.
Original
(90mm x 130mm or 3” x 5”)
Original
(100mm x 150mm or 5” x 7”)
Copy (A4 or 8-1/2” x 11”)
Copy (A3 or 11” x 17”)
2
4. Multi-page Enlargement (See page 3-34.)
This function is used to enlarge an original image to a size larger than A3 (11” x 17”) and to print portions of the image
onto multiple sheets of paper.
Copies (2 sheets of A3 or 11” x 17”)
Original (A4 or 8-1/2” x 11”)
Original (A3 or 11” x 17”)
Copies (4 sheets of A3 or 11” x 17”)
3
Adjustments for Colour Copying
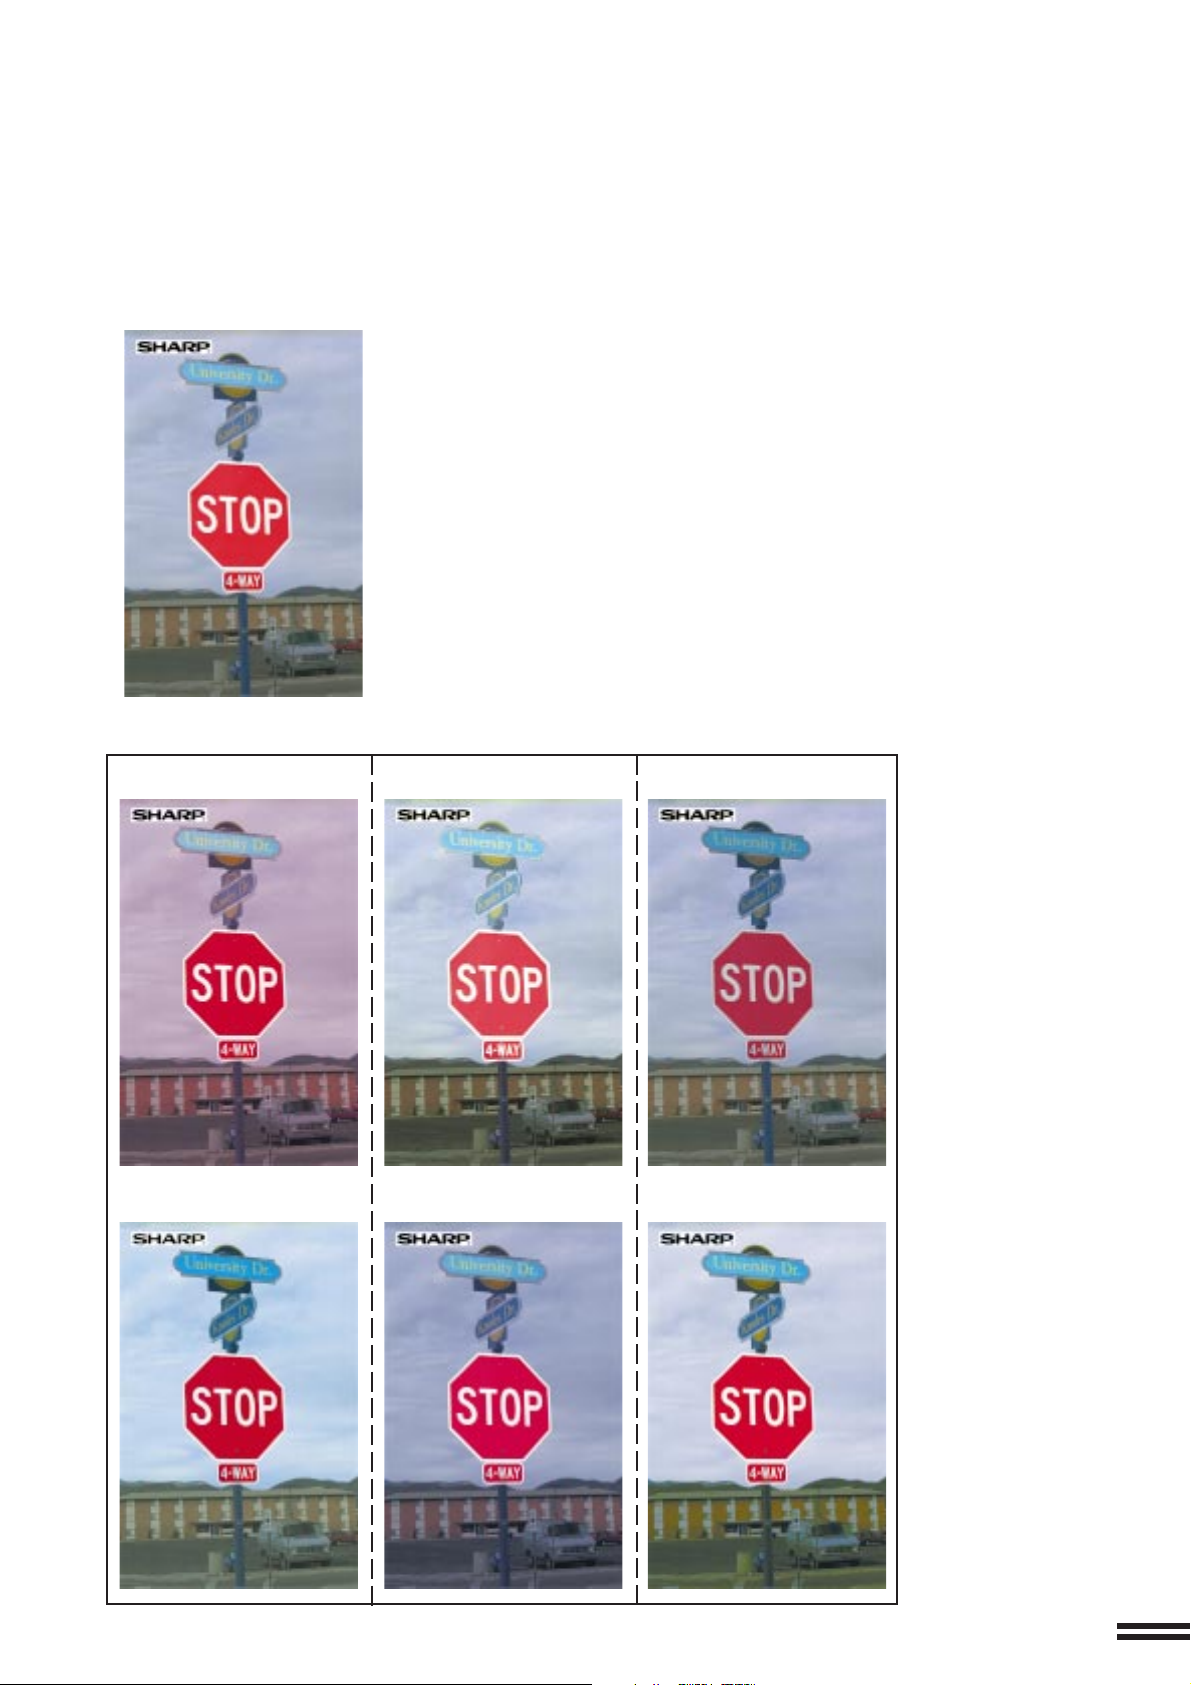
1. Exposure adjustments (See page 2-16.)
Exposure selections for this copier should be selected according to the type of originals being copied: TEXT/PHOTO,
TEXT, PHOTO, PRINTED PHOTO or MAP.
Text/photo mode: Text mode:
This mode provides the best balance
for copying an original which contains
both text and photos.
This mode is useful for enhancing low density areas of
an original or suppressing high density background
areas.
KEY OPERATOR CODE NUMBER
A key operator code number must be registered
before a key operator program can be used. The
key operator must remember this number. Only
this registered number will allow access to
the key operator programs.
Registering the key operator code number.
1 Press the CUSTOM SETTINGS key.
Photo mode:
reproduction of photographs with
fine detail.
Printed photo mode:
K
E
Y
O
P
E
R
A
T
O
R
D
C
A
k
e
y
o
p
r
e
e
g
i
s
t
e
p
r
r
o
g
r
a
m
m
c
u
s
t
r
e
r
m
e
g
i
s
t
e
r
t
e
h
d
e
k
e
y
o
R
p
e
e
g
i
s
t
n
e
r
u
m
b
e
r
1
P
r
e
s
s
t
h
e
O
r
a
t
o
r
c
o
d
u
e
n
e
d
b
e
f
o
r
e
a
a
n
b
e
u
s
e
h
d
T
.
e
m
b
e
r
t
h
i
m
s
u
n
n
u
m
b
e
r
a
w
l
i
l
r
a
t
o
r
p
r
o
g
r
a
.
s
m
i
n
g
t
h
e
k
o
e
y
C
U
S
T
O
M
T
S
T
E
This mode is useful for copying printed photographs .This mode provides the best quality
R
E
B
M
U
N
E
m
e
k
e
b
l
l
p
N
I
r
r
e
o
t
p
o
a
y
r
e
s
p
i
o
h
y
t
e
k
y
o
l
t
n
O
.
s
r
e
s
e
c
c
a
w
o
e
d
o
c
r
o
t
a
r
e
.
y
e
k
S
G
e
b
t
r
s
u
o
m
t
r
e
b
a
P
o
t
h
o
4
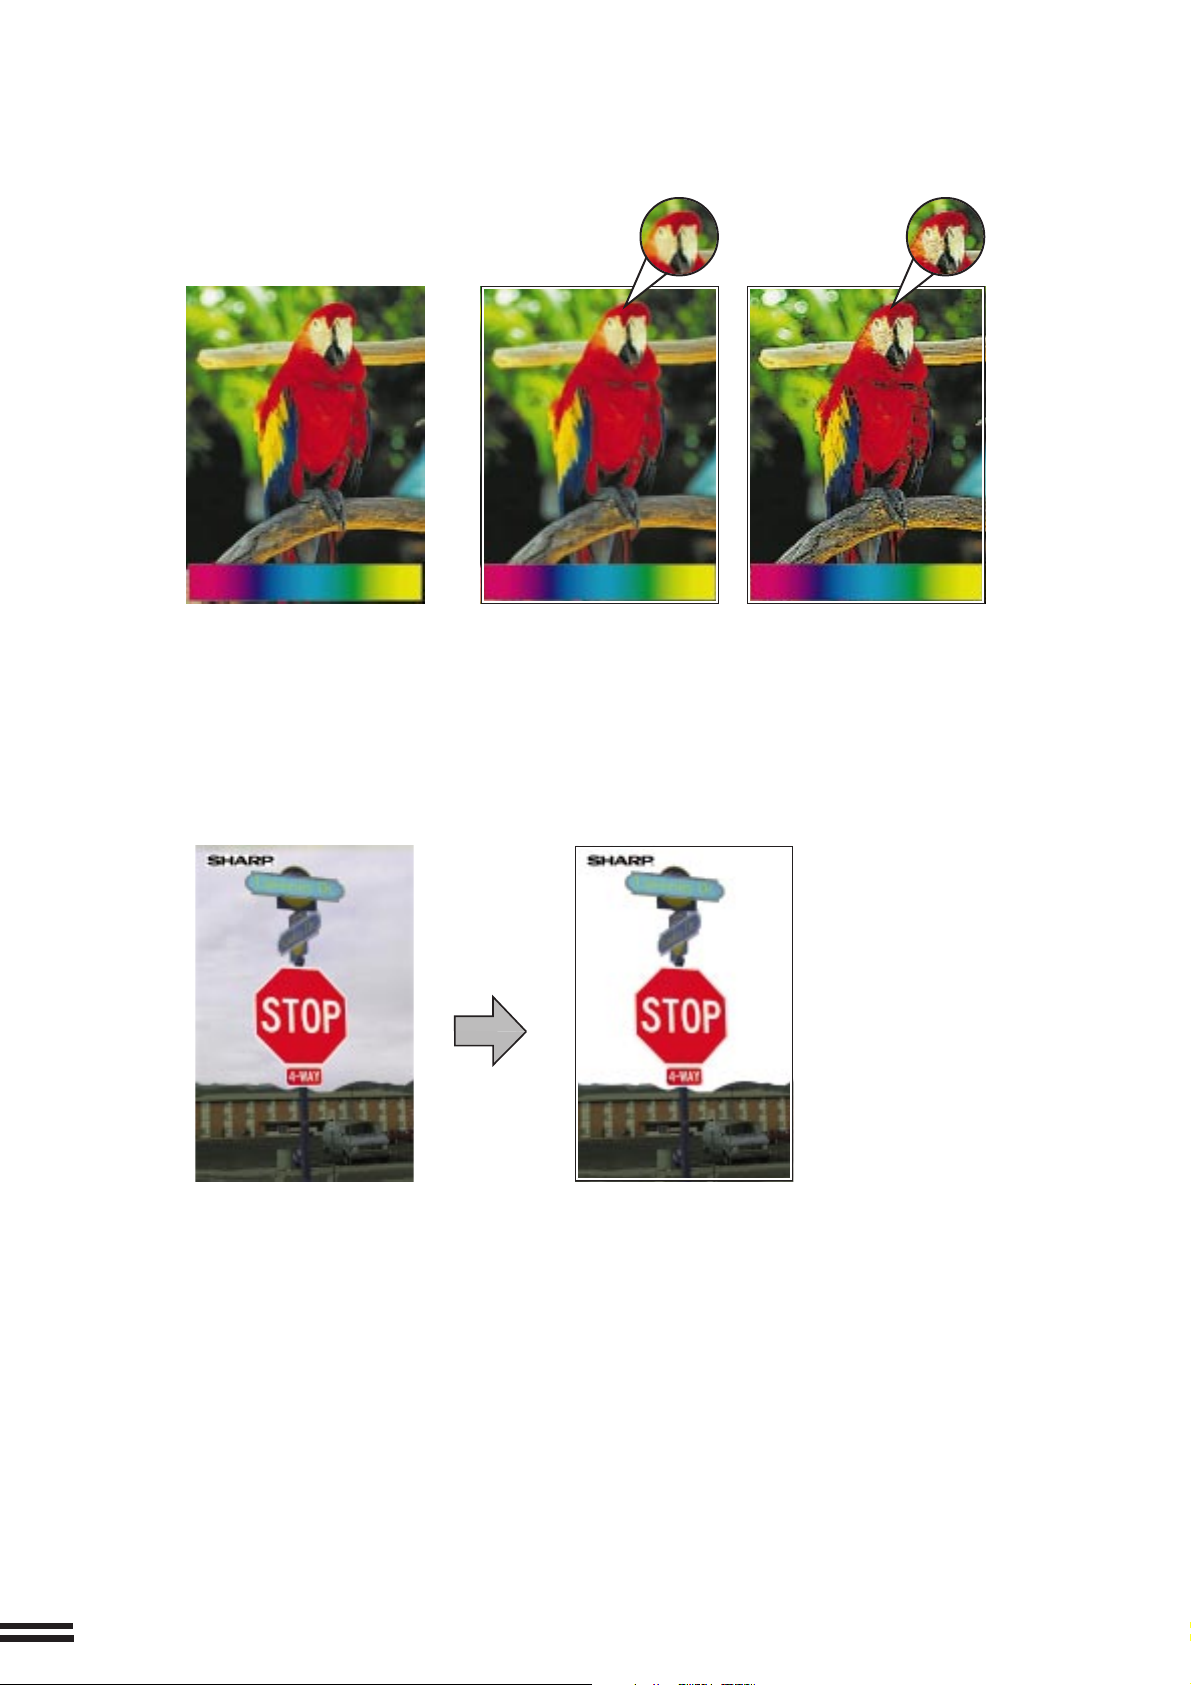
2. RGB Adjust (See page 3-16.)
RGB adjustments function to increase or decrease the overall amount of a single primary colour. The amount of
change depends upon the characteristics of the particular original being copied. Generally, lighter toned areas will
be affected to a greater degree than will darker toned areas.
Original
Red +
Red -
Green +
Green -
Blue +
Blue -
5
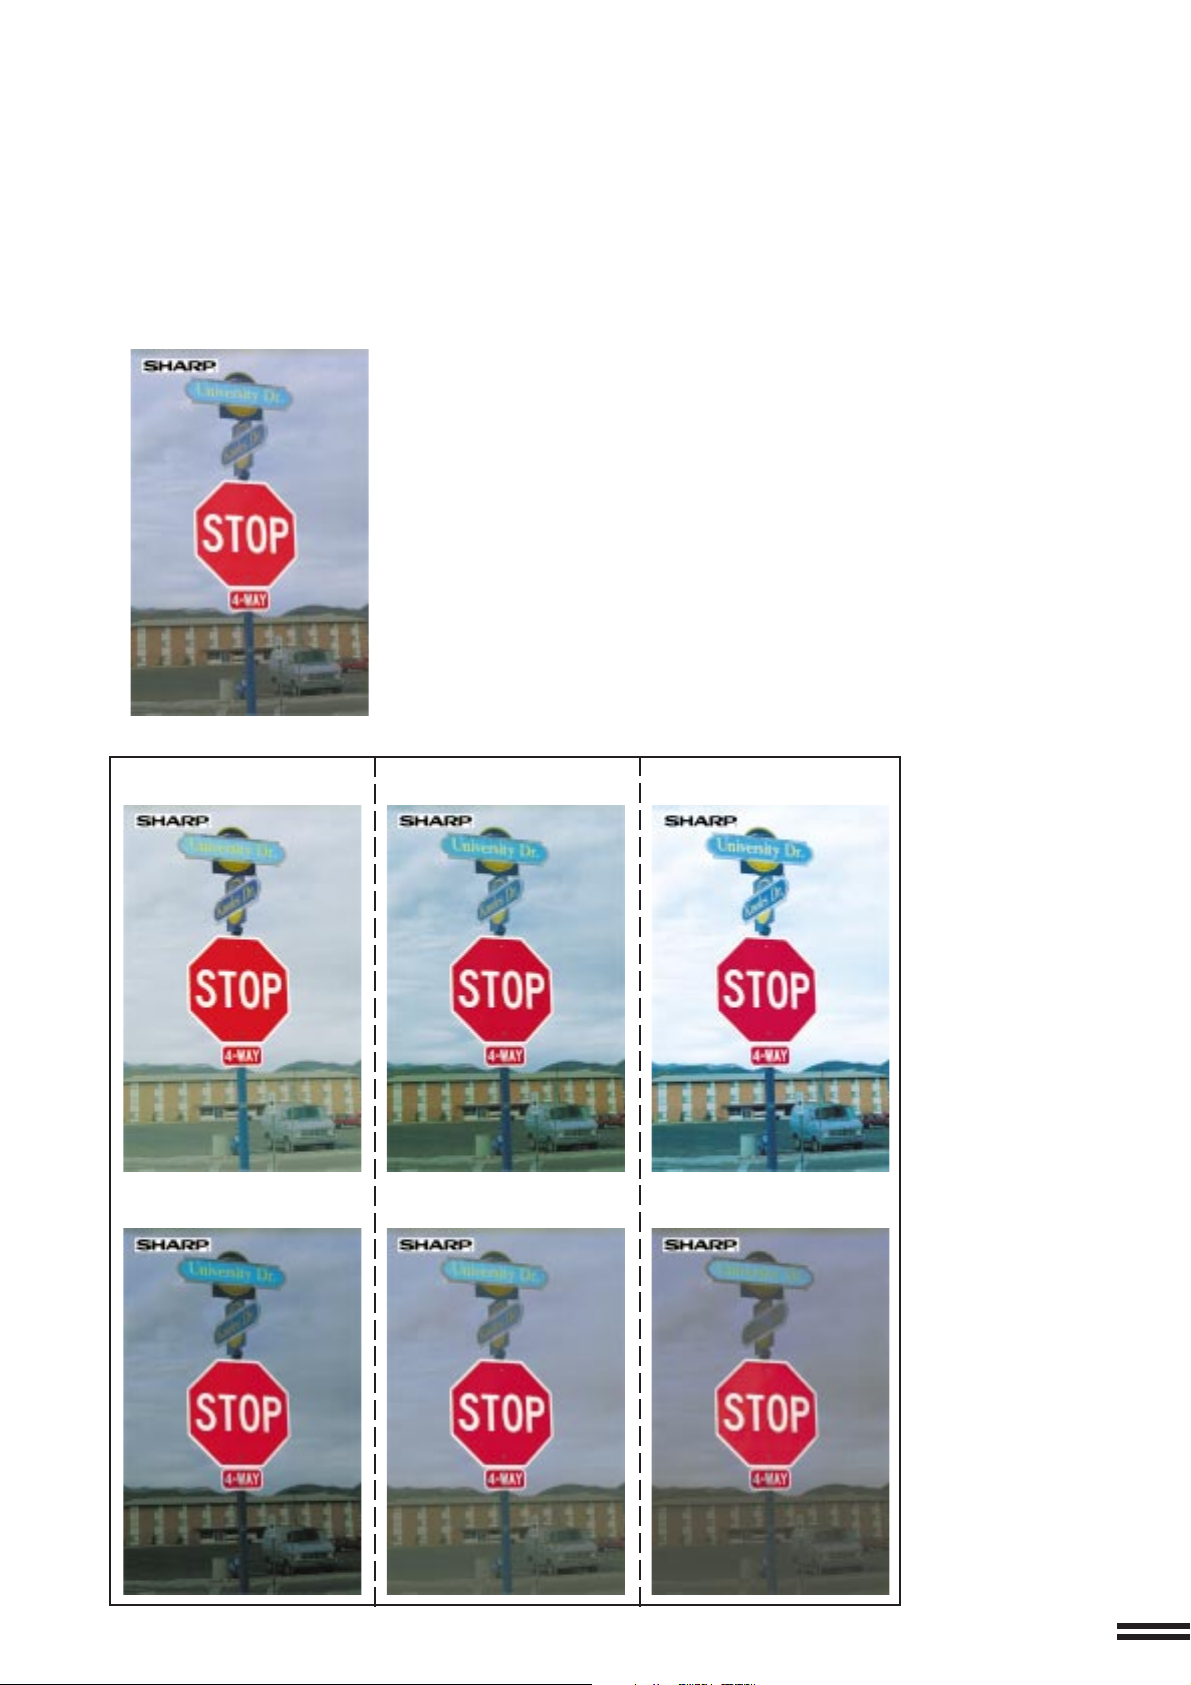
3. Sharpness (See page 3-18.)
This function is used to sharpen or soften image outlines.
Original Softer Sharper
4. Suppress background (See page 3-20.)
This copier can suppress unnecessary background colours on the original image when copying. This function is used
to adjust the density level of background colours to be erased.
Original Copy
6
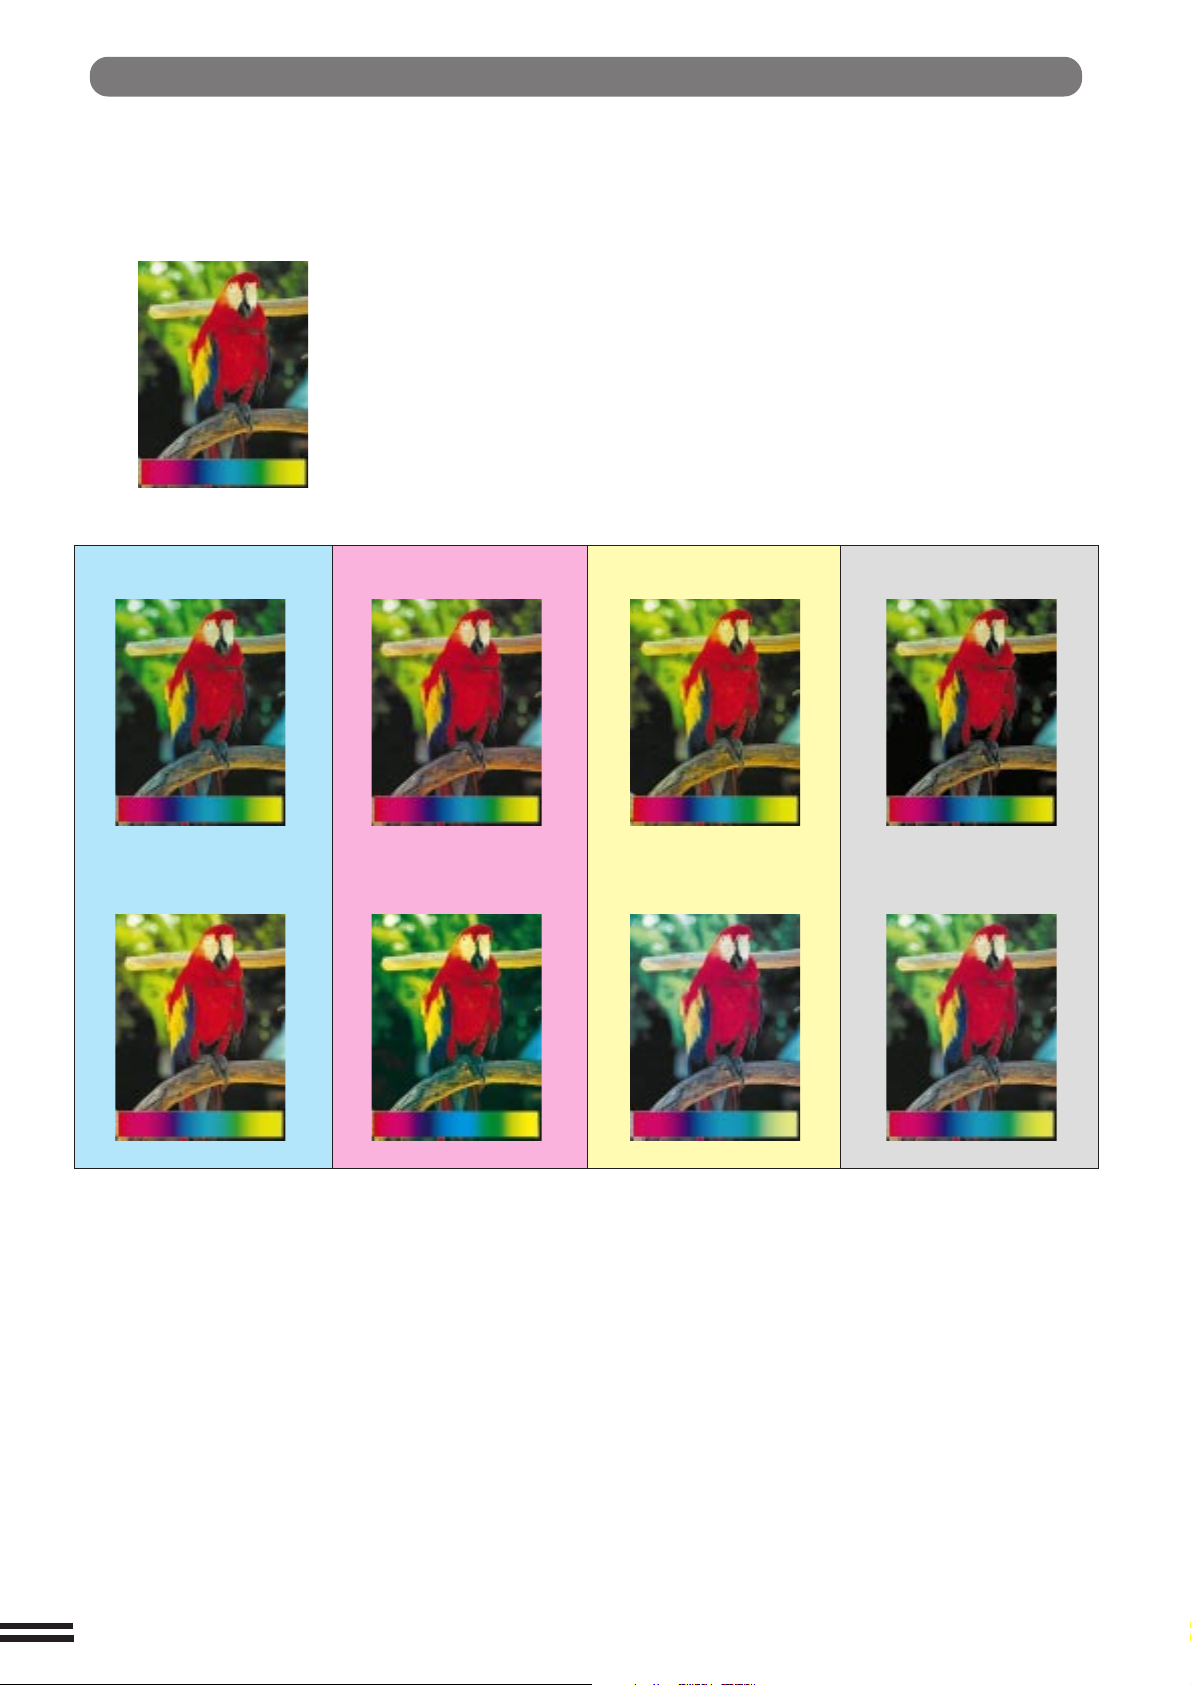
5. Brightness/intensity/contrast (See page 3-22.)
This copier allows the level of brightness, intensity or contrast of images to be adjusted. If brightness is selected, colour
tone can be darkened or lightened. If intensity is selected, the level of colour saturation can be modified between vivid
and dull. If contrast is selected, the contrast between two image areas can be adjusted higher or lower.
Original
Contrast +Brightness + Intensity +
Contrast -Brightness - Intensity -
7
Colour Balance
The key operator program Colour Balance allows the key operator to adjust the density of
colours. Adjusted colour samples are shown below. (See page 8-22.)
Original
Cyan adjustment + Magenta adjustment +
Cyan adjustment -
Magenta adjustment -
Yellow adjustment +
Yellow adjustment -
Black adjustment+
Black adjustment -
8

CONTENTS
●
INTRODUCTION ....................10
●
USING THIS MANUAL................ 10
CHAPTER 1
GETTING STARTED
●
INSTALLATION REQUIREMENTS ...... 1-2
●
CAUTIONS ....................... 1-3
●
POWER ON AND OFF............... 1-5
Power save modes ................. 1-6
●
INFORMATION FUNCTION ........... 1-7
●
USING THE TOUCH PANEL .......... 1-8
How to use the touch panel ........... 1-8
Selection of function................. 1-8
Function setting icons ............... 1-9
CHAPTER 2
MAKING COPIES
●
AUDITING ACCOUNTS .............. 2-2
●
COPYING FROM THE DOCUMENT
GLASS .......................... 2-3
●
USING THE RADF ................. 2-6
●
REDUCTION/ENLARGEMENT/ZOOM .. 2-11
●
SPECIAL PAPERS (manual feed) ...... 2-14
Two-sided copying with bypass tray .... 2-15
●
EXPOSURE ADJUSTMENTS......... 2-16
●
JOB MEMORY ................... 2-18
●
INTERRUPTING A COPY RUN ....... 2-20
CHAPTER 4
SUPPLIES
●
PAPER .......................... 4-2
Types and sizes of copy paper ......... 4-2
Loading copy paper ................. 4-2
●
ADDING TONER ................... 4-5
●
USED TONER DISPOSAL ............ 4-8
●
STORAGE OF SUPPLIES ............ 4-9
CHAPTER 5
COPIER TROUBLE?
●
MISFEED REMOVAL................ 5-2
●
MAINTENANCE REQUIRED ......... 5-11
●
TONER COLLECTING COTAINER OF
TRANSFER UNIT ................. 5-12
●
TROUBLESHOOTING .............. 5-13
CHAPTER 6
GENERAL INFORMATION
●
PART NAMES AND FUNCTIONS....... 6-2
Exterior .......................... 6-2
Interior .......................... 6-3
Operation panel .................... 6-4
Touch panel (Basic screen) ........... 6-5
●
USER MAINTENANCE .............. 6-6
●
TOUCH PANEL CONTRAST
ADJUSTMENT .................... 6-7
●
SPECIFICATIONS .................. 6-8
PagePage
CHAPTER1
CHAPTER2 CHAPTER3
CHAPTER4
CHAPTER5 CHAPTER6 CHAPTER7
CHAPTER 3
SPECIAL FUNCTIONS
●
XY ZOOM ........................ 3-2
●
MARGIN SHIFT.................... 3-4
●
EDGE ERASE ..................... 3-6
●
DUAL PAGE COPYING .............. 3-8
●
CENTRING ...................... 3-10
●
TRANSPARENCY FILM WITH
INSERT SHEETS ................. 3-12
●
COVERS ....................... 3-14
●
COLOUR ADJUSTMENTS........... 3-16
RGB adjust ...................... 3-16
Sharpness....................... 3-18
Suppress background .............. 3-20
Brightness/intensity/contrast .......... 3-22
●
IMAGE EDITING FUNCTIONS ........ 3-24
Single colour ..................... 3-24
Neg./pos. reverse ................. 3-26
Mirror image ..................... 3-28
Photo repeat ..................... 3-30
A3 (11x17) full-bleed ............... 3-32
Multi-page enlargement ............. 3-34
CHAPTER 7
OPTIONAL EQUIPMENT
●
SYSTEM CONFIGURATION .......... 7-2
●
20-BIN STAPLE SORTER (AR-SS2)..... 7-3
●
LARGE CAPACITY TRAY (AR-LC2) .... 7-15
CHAPTER 8
KEY OPERATOR’S GUIDE
●
KEY OPERATOR CODE NUMBER...... 8-2
Registering the key operator
code number ...................... 8-2
●
KEY OPERATOR PROGRAMS ........ 8-4
Using the key operator programs ....... 8-7
●
KEY OPERATOR ASSISTANCE CALL .. 8-32
●
KEY OPERATOR CODE NUMBER:
FACTORY SETTING ............... 8-33
CHAPTER8
9

INTRODUCTION
The AR-C150 copier is a digital colour image processing copier which provides high productivity and convenient
features including intelligent image-editing functions.
Amongst its many useful features and functions are the document feeder (optional), photo copying, internal auditor,
and various special functions such as dual page copying, margin shift, erase, XY zoom, and NEG./POS. reverse
functions. This copier can be equipped with an optional large capacity tray which holds 3,000 sheets of copy paper.
The machine can also be equipped with an optional staple sorter to provide finished copy sets ready for distribution.
This copier was also designed with ease of use in mind. The easy-to-understand operation panel with touch panel
system and INFORMATION function will guide the user through most operations. To gain the maximum benefit of
all the features of the copier, however, it is recommended that users first read this manual to become familiar with
all the features of the copier.
NOTES:
●
This manual describes only copier features. For a description of optional printer features, see the separate relevant
manual.
●
This copier can be equipped with an optional document cover or reversing automatic document feeder (RADF).
The illustrations in this manual are mainly for the copier with an optional RADF installed.
●
The display on the touch panel varies with installation of optional equipment. The illustrations of the touch panel
in this manual are mainly for the copier with an optional RADF (AR-RF1) installed.
USING THIS MANUAL
This manual is intended as an operation guide for both general users and key operators.
For General Users
It is recommended that you read the GETTING STARTED, MAKING COPIES, and SPECIAL FUNCTIONS sections
to become familiar with the available features and functions of your copier. Then refer to the manual as needed to
become thoroughly familiar with those features you will normally use.
For Key Operators
Please read all sections thoroughly to become familiar with all features and functions of your copier. Throughout the
manual, information which is relevant to key operator functions is noted by “★ KEY OPERATOR.” Please pay close
attention to these notes and to the SUPPLIES, COPIER TROUBLE?, GENERAL INFORMATION, and OPTIONAL
EQUIPMENT sections so you can ensure smooth and efficient operation of your machine.
The KEY OPERATOR’S GUIDE section has been written especially for you. It contains the programs and
programming information that will enable you to tailor functions for maximum benefit to your company.
AB series (metric) and inch series references
Both specifications are quoted where applicable.
●
The inch series specifications are quoted in brackets.
For example:
Page 2-6------------------------------------------ B4 to A3 ( 8-1/2" x 14 to 11" x 17")
Page 2-12, step 3, Menu 1-A ---------------- 86%, 81%, and 70% (77% and 64%)
●
Although AB series size indications are shown on the touch panel of this manual,
inch series indications are displayed on the inch series machines.
●
In some regions, the spellings in this manual may be different from the touch panel
display. (colour, centring, etc.)
[AB series]
1.
A4
2.
A3
3.
B4
[Inch series]
Depending on the country or area, some keys of this copier will be indicated with
either an English name or a symbol. ––Example: INFORMATION ( ) key,
PROGRAM (P) key.
10
1
1.8/ 11
2
2.11 17
1
3.8/ 14
2

CHAPTER 1
GETTING STARTED
This chapter describes the basic information on the use of this copier.
Page
●●
●
●●
INST ALLATION REQUIREMENTS ..................... 1-2
●●
●
●●
CAUTIONS ...................................... 1-3
●●
●
●●
POWER ON AND OFF .............................. 1-5
Po w er sa v e modes ................................. 1-6
●●
●
●●
INFORMATION FUNCTION .......................... 1-7
●●
●
●●
USING THE TOUCH P ANEL .......................... 1-8
How to use the touch panel ........................... 1-8
Selection of function ................................ 1-8
Function setting icons ............................... 1-9
CHAPTER1
1-1
CHAPTER
30 cm
(11-13/16")
60 cm
(23-5/8")
60 cm
(23-5/8")
30 cm
(11-13/16")
1
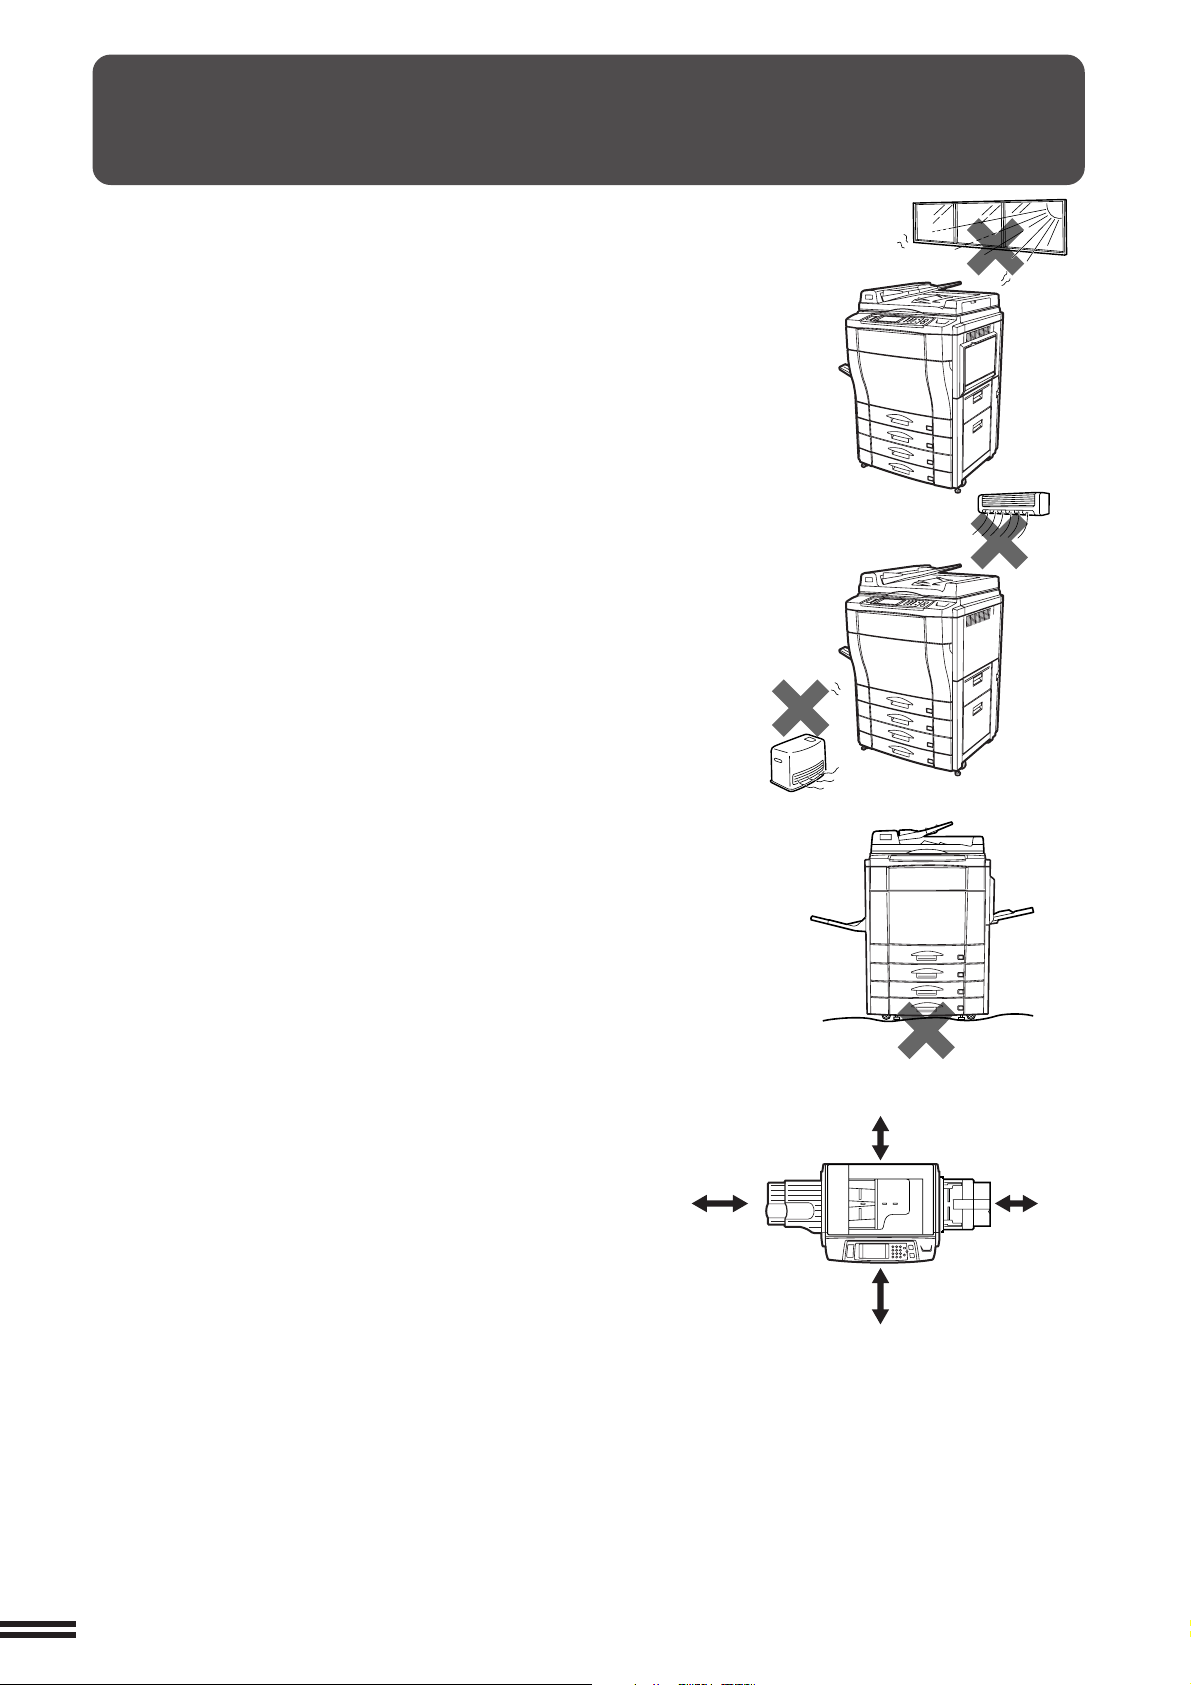
GETTING STARTED Installation requirements
INSTALLATION REQUIREMENTS
To ensure safety and proper machine performance, please note the following
before initial installation and whenever the machine is to be relocated.
1. The copier should be installed near an accessible power outlet for easy
connection.
2. Be sure to connect the power cord only to a power outlet that meets the
specified voltage and current requirements.
Also make certain the outlet is properly grounded.
●
For this copier’s power supply requirements, see the name plate
located on the right hand side at the rear corner of the copier.
3. Do not install the machine where it is:
●
damp or humid,
●
exposed to direct sunlight,
●
extremely dusty,
●
poorly ventilated,
●
subject to extreme temperature or humidity changes (e.g., near an air
conditioner or heater).
4. Ensure that the area chosen for the machine location is level.
5. Be sure to allow the required space around the machine for servicing and
proper ventilation.
1-2
CAUTIONS
1. Do not touch the photoconductive drums or paper transport.
Scratches or smudges on them will cause dirty copies.
2. The fusing unit is extremely hot. Exercise care in this area.
CHAPTER1
GETTING STARTED Cautions
3. Do not look directly at the light source. Doing so may
damage your eyes.
4. Installation adjusters.
When moving the machine, be sure to raise the installation
adjusters. After moving the machine, lower the installation
adjusters until they reach the floor.
This copier contains fusing oil that is very slippery if leaked
on the floor. Ensure that the machine is located at level
position and exercise sufficient care at the time of
transportation not to incur the leakage.
5. This copier is equipped with a forgery prevention feature. If an
original is used whose image closely resembles that of bank
notes, then copying may not be performed correctly.
Fusing unit
Lock
Adjuster
Paper transport
Release
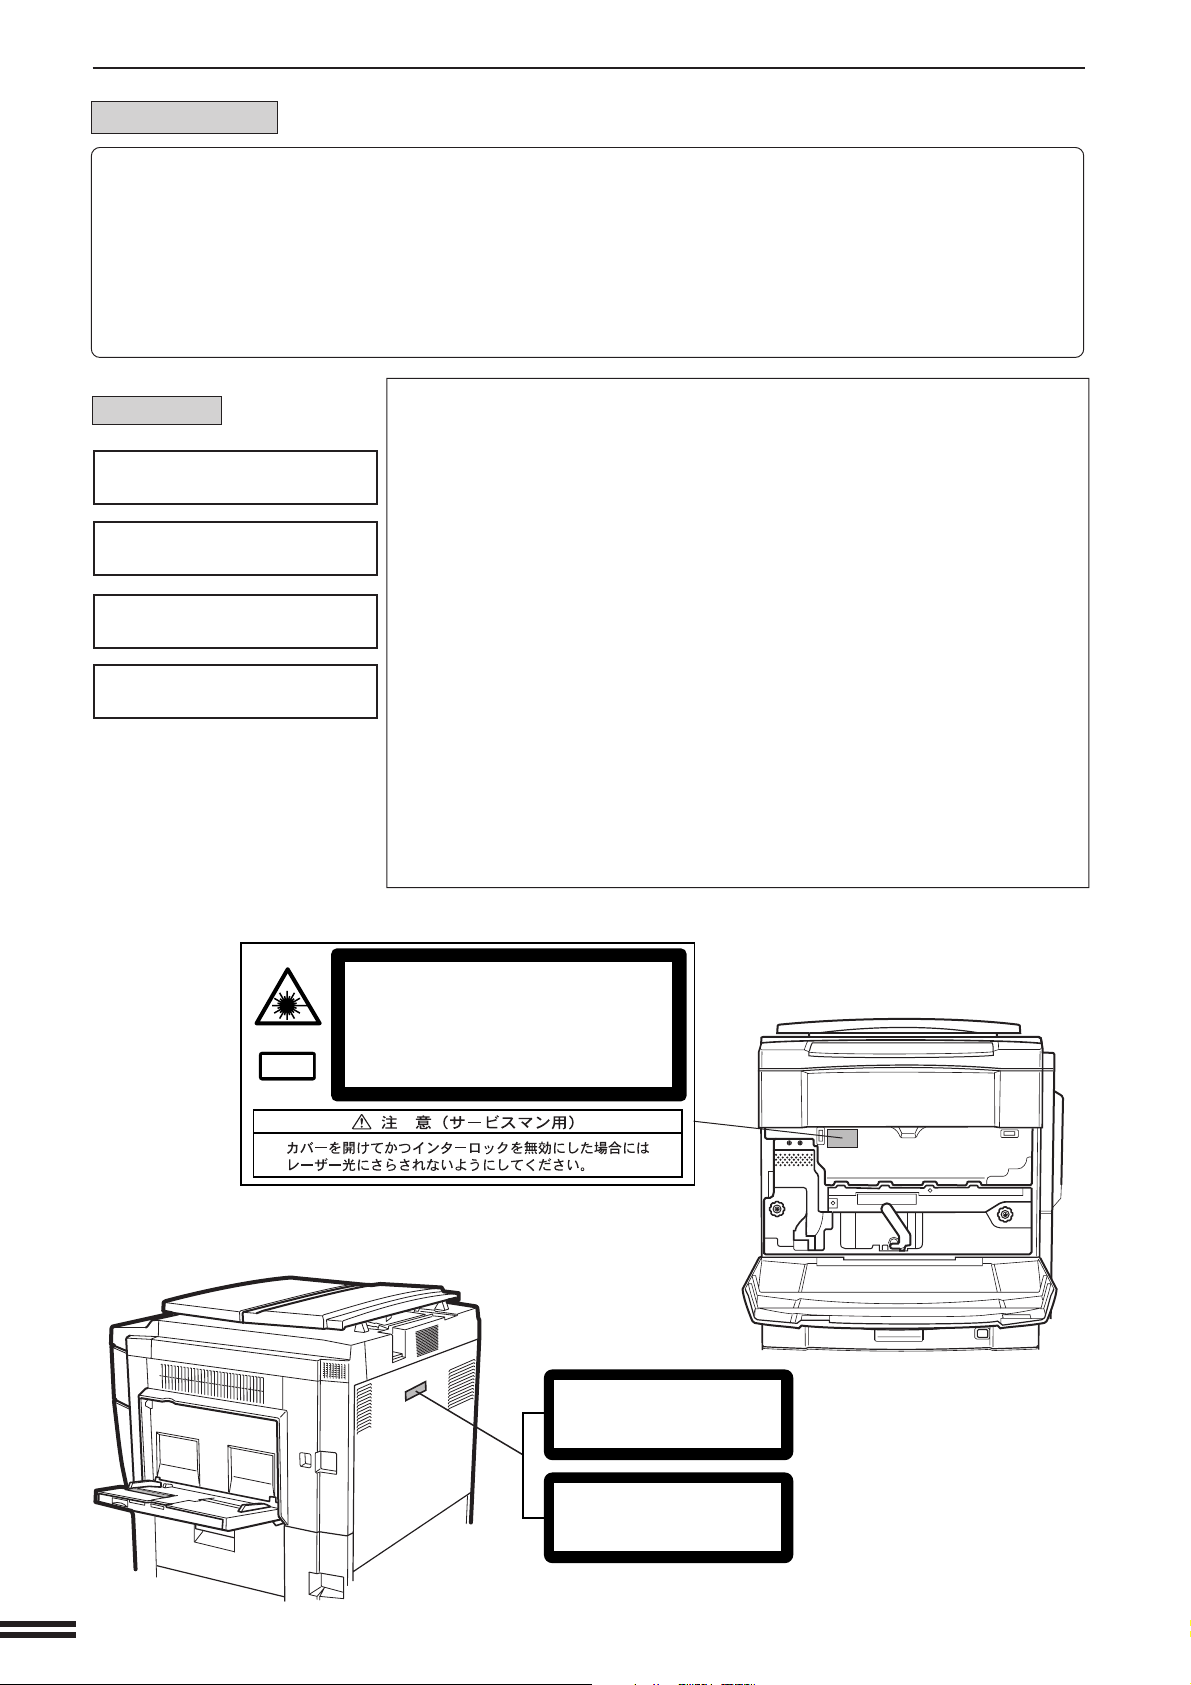
Cautions on laser
Wave length 785 nm
Pulse times
Output power 0.25 - 0.45 mW
Caution
This product contains a low power laser device. To
ensure continued safety do not remove any cover or
attempt to gain access to the inside of the product. Refer
all servicing to qualified personnel.
+10 nm
-15 nm
North America: (4.374 µs ±4.4 ns)/7 mm
Europe: (5.732 µs ±5.7 ns)/7 mm
1-3
CAUTIONS
For North America:
CHAPTER
This Digital Copier is rated Class 1 and complies with 21 CFR 1040.10 and 1040.11 of the CDRH standards.
1
GETTING STARTED Cautions
This means that the copier does not produce hazardous laser radiation. For your safety, observe the
precautions below.
●
●
SAFETY PRECAUTIONS
Do not remove the cabinet, operation panel or any other covers.
The copier’s exterior covers contain several safety interlock switches. Do not bypass any safety interlock by
inserting wedges or other items into switch slots.
For Europe:
CLASS 1 LASER PRODUCT
LASER KLASSE 1
LUOKAN 1 LASERLAITE
KLASS 1 LASERAPPARAT
Laserstrahl
CAUTION
INVISIBLE LASER RADIATION
WHEN OPEN AND INTERLOCKS
DEFEATED. AVOID EXPOSURE
TO BEAM.
VORSICHT
UNSICHTBARE
LASERSTRAHLUNG WENN
ABDECKUNG GEÖFFNET UND
SICHERHEITSVERRIEGELUNG
ÜBERBRÜCKT. NICHT DEM
STRAHL AUSSETZEN.
ADVARSEL
USYNLIG LASERSTRÅLNING
VED ÅBNING, NÅR
SIKKERHEDSBRYDERE ER UDE
AF FUNKTION. UNDGÅ
UDSAETTELSE FOR STRÅLNING.
INVISIBLE LASER RADIATION WHEN OPEN AND INTERLOCKS DEFEATED.
AVOID EXPOSURE TO BEAM.
CAUTION
VORSICHT
AD VARSEL
AD VERSEL
V ARNING
VARO!
UNSICHTBARE LASERSTRAHLUNG WENN ABDECKUNG GEÖFFNET UND
SICHERHEITSVERRIEGELUNG ÜBERERÜCKT. NICHT DEM STRAHL AUSSETZEN.
USYNLIG LASERSTRÅLING VED ÅBNING, NÅR SIKKERHEDSAFBRYDERE ER
UDE AF FUNKTION. UNDGÅ UDSAETTELSE FOR STRÅLNING.
USYNLIG LASERSTRÅLING NÅR DEKSEL ÅPNES OG SIKKERHEDSLÅS BRYTES.
UNNGÅ EKSPONERING FOR STRÅLEN.
OSYNLIG LASERSTRÅLNING NÄR DENNA DEL ÄR ÖPPNAD OCH SPÄRRAR ÄR
URKOPPLADE. STRÅLEN ÄR FARLIG. BETRAKTA EJ STRÅLEN.
AVATTAESSA JA SUOJALUKITUS OHITETTAESSA OLET ALTTIINA NÄKYMÄTÖNTÄ
LASERSÄTEILYLLE. ÄLÄ KATSO SÄTEESEEN.
VAROITUS!
LAITTEEN KÄYTTÄMINEN
MUULLA KUIN TÄSSÄ
KÄYTTÖOHJEESSA MAINITULLA
TAVALLA SAATTAA ALTISTAA
KÄYTTÄJÄN
TURVALLISUUSLUOKAN 1
YLITTÄVÄLLE NÄKYMÄTTÖMÄLLE
LASERSÄTEILYLLE.
VARNING
OM APPARATEN ANVÄNDS PÅ
ANNAT SÄTT ÄN I DENNA
BRUKSANVISNING
SPECIFICERATS, KAN
ANVÄNDAREN UTSÄTTAS FÖR
OSYNLIG LASERSTRÅLNING,
SOM ÖVERSKRIDER GRÄNSEN
FÖR LASERKLASS 1.
1-4
CLASS 1
LASER PRODUCT
LASER KLASSE 1
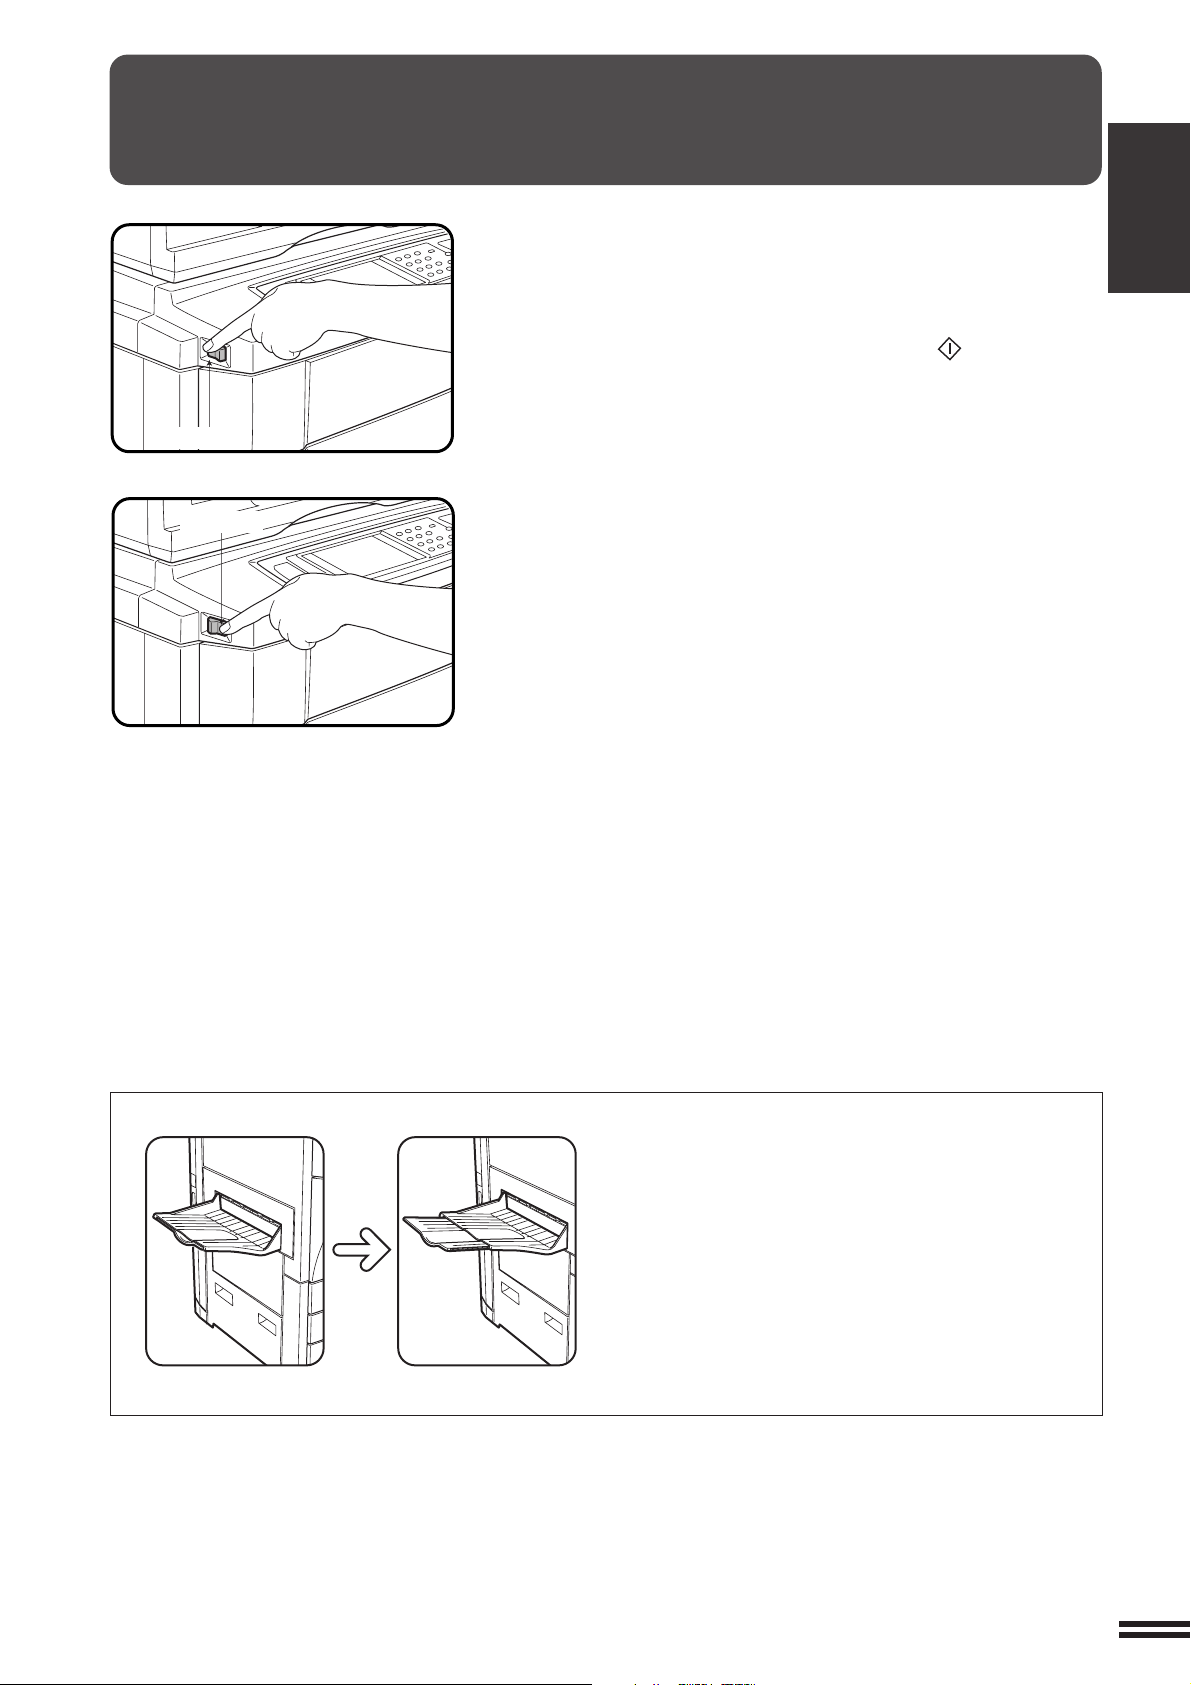
POWER ON AND OFF
The power switch is located on the left side of the copier. When the
power switch is turned to the “ON” position, the message “WARMING
UP. PLEASE WAIT.” will appear in the message display. Warming
up takes about 200 seconds (260 seconds for 200V to 240V power
supply voltage). Once the copier is ready, the message display will
change to “READY TO COPY.”, and the START ( ) key indicators
will light up, indicating that copying is possible.
If the copier has been programmed in the auditing mode, the message
Power on
Power off
“ENTER YOUR ACCOUNT NUMBER. -----” will appear after warming
up. Once a valid account number has been entered, copying will
become possible.
CHAPTER1
GETTING STARTED Power on and off
●
Be sure to extend the tray when feeding larger than
B4 (8-1/2" x 14") sized paper.
1-5

POWER ON AND OFF
CHAPTER
1
GETTING STARTED Power on and off
Power save modes
The copier has two power save modes to reduce overall power
consumption and thereby reduce the cost of operation and to conserve
natural resources to help reduce environmental pollution. The two
power save modes are preheat mode and sleep mode.
★ KEY OPERATOR
The preheat activation time and the sleep activation time have been
preset at the factory to 15 min. for preheat mode and 60 min. for sleep
mode. These times can be changed as described in the key operator’s
guide section. It is suggested that you set appropriate times according to
the actual usage of the copier.
Sleep mode
If the sleep mode is enabled, the copier will enter the mode once a
programmed length of time has elapsed without any copier
operation after the last copy of a run is made or the power is first
turned on. When the copier enters the sleep mode, the display on
the touch panel will disappear. In this condition, power is not
supplied to the fuser in the copier. To exit from the sleep mode,
press the COPY key.
★ KEY OPERATOR See page 8-25 for setting the sleep mode timer. See
page 8-30 for enabling or disabling the sleep mode.
The ENERGY STAR® guidelines are
applied to the products only in
Europe, Australia and New
Zealand. The products that meet
the ENERGY STAR® guidelines carry
the logo shown above. The
products without the logo may not
meet the ENERGY STAR® guidelines.
Preheat mode
The copier will enter the mode once the set time has elapsed without
any copier operation after the last copy of a run is made or power is
turned on.
When the copier enters the preheat mode, the message “PREHEAT
MODE. PLACE ORIGINALS.” will appear.
In this condition, the fuser in the copier is maintained at a lower heat
level thereby saving power. The preheat level is, however, high
enough to allow the copier to come to a ready condition or begin
copying approximately 120 seconds after any key input is made.
To copy from the preheat mode, make desired copier selections and
press a START ( , ) key using the normal copying
procedure.
The Environmental Choice Program
guidelines are applied to the products
only in Canada. The products that
meet the Environmental Choice
Program guidelines carry the logo
shown above. The products without
the logo may not meet the
Environmental Choice Program
guidelines.
1-6
★ KEY OPERATOR See page 8-26 for information on setting the preheat
mode.
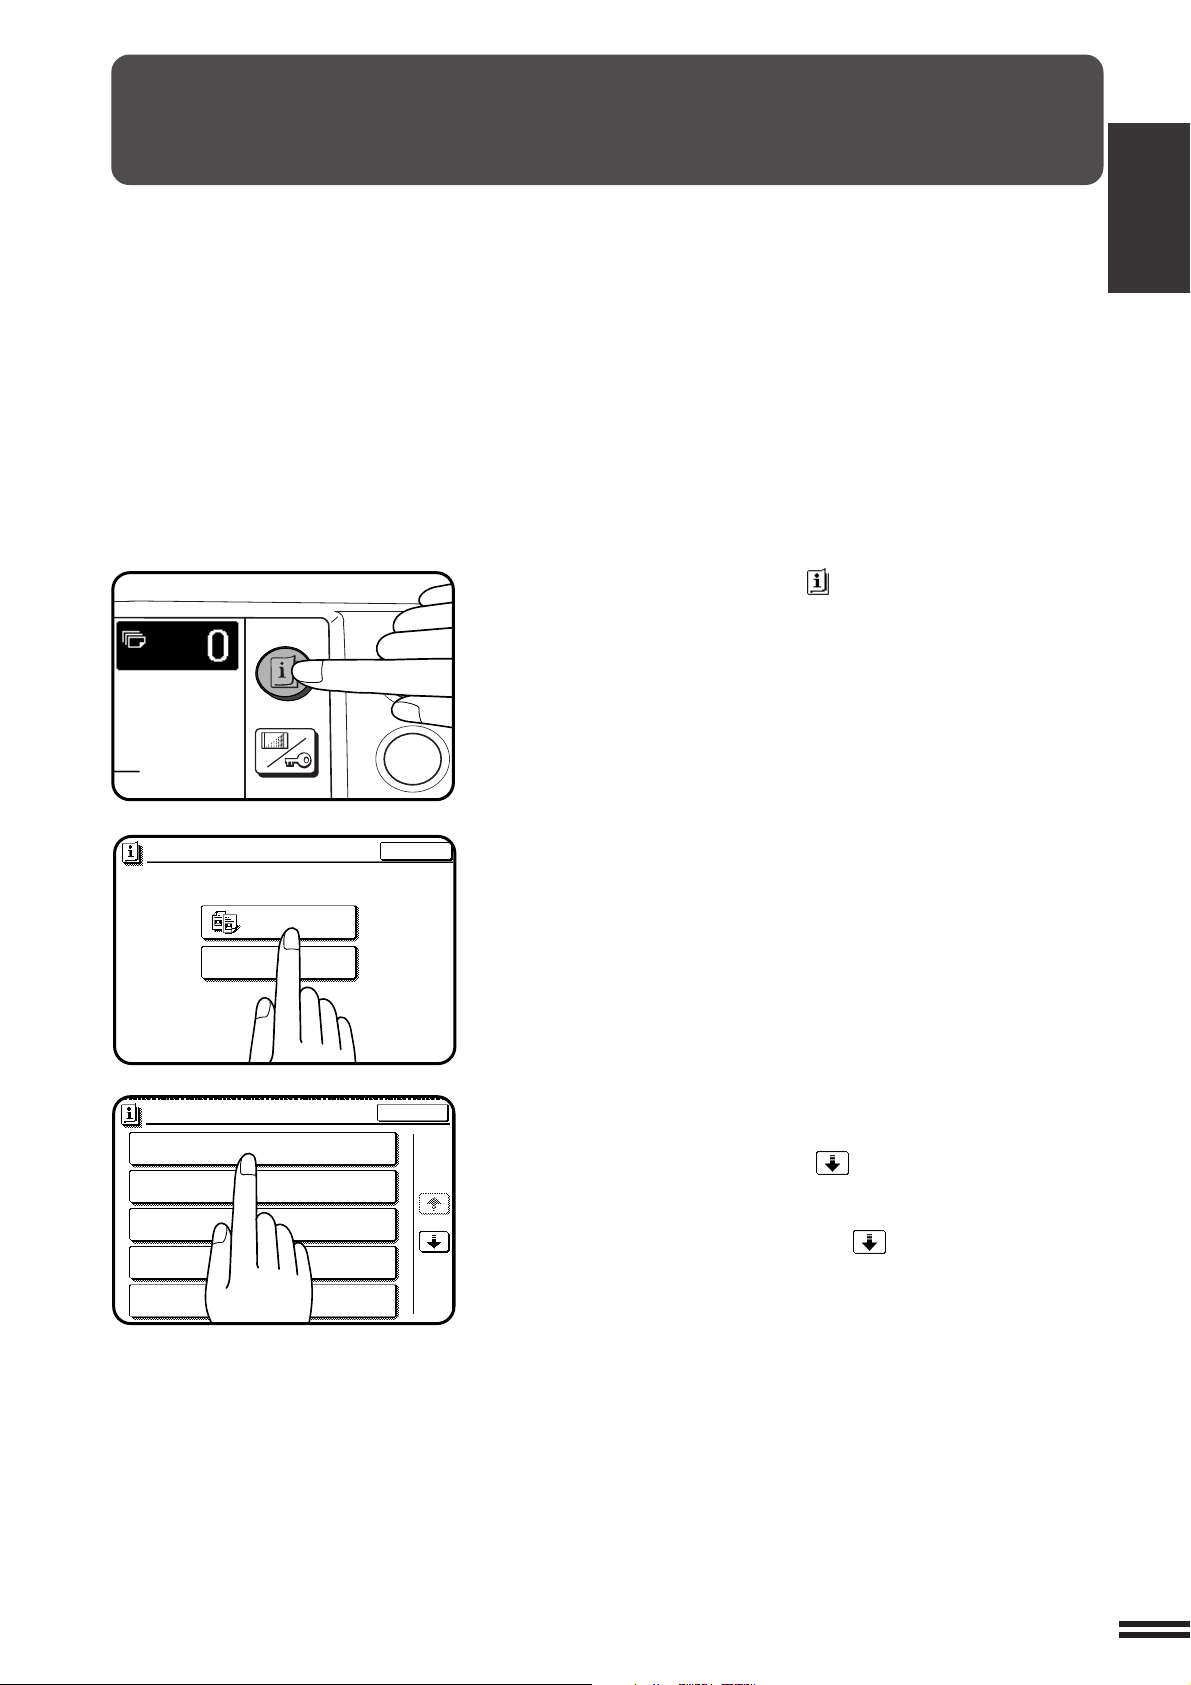
INFORMATION FUNCTION
EXIT
INFORMATION
SELECT INFORMATION.
COPIER
ADDING TONER
EXIT
MAKING 2-SIDED COPIES (2-SIDED COPY)
INFORMATION
SORTING COPIES INTO SETS OR STAPLING
FINISHED SETS OF COPIES (OUTPUT)
USING THE DOCUMENT FEEDER
(
DOCUMENT FEEDER
)
REDUCTION/ENLARGEMENT/ZOOM
(COPY RATIO)
STORING FREQUENTLY USED JOB PROGRAMS
(PROGRAM)
1/5
1
4
INFORMATION
CUSTOM
SETTINGS
The information function provides a quick reference guide to the use
of the various features and functions of this copier. The information
mode can be entered when the copier is in the standby mode.
Press the INFORMATION ( ) key in the standby mode.
1
●
The screen for the information categories will appear.
CHAPTER1
GETTING STARTED Information function
Select the “COPIER” key to display the first screen of
the copier feature items.
2
●
If the toner supply is not low, this screen is not displayed. Please
proceed to step 3.
Select the feature you would like to know about by
pressing a copier feature item key on the touch panel.
3
●
If the feature you would like to know about is not displayed on the
touch panel, press the scroll ( ) key on the touch panel until
the feature is displayed.
●
If a copier feature item key is pressed, the description for that
feature will appear. Use the scroll ( ) key to display additional
information until all information for that feature has been displayed.
●
To return to the copier feature item screen, press the “INDEX”
key.
●
To exit the INFORMATION mode, press the “EXIT” key on the
touch panel.
1-7

CHAPTER
READY TO COPY.
AUTO
EXPOSURE
PAPER SELECT
100%
COPY RATIO
1.
2.
3.
A4
A3
B4
60~105 g/m
2
106~200 g/m
2
TRANSPARENCY
PAPER TYPE
STORE/DELETE
RECALL
READY TO COPY.
SPECIAL MODES
MARGIN SHIFT EDGE ERASE
IMAGE EDITCOVERS
CENTRING
DUAL PAGE
COPY
COLOUR
ADJUSTMENTS
TRANSPARENCY INSERTS
OK
AUTO
EXPOSURE PAPER SELECT
100%
COPY RATIO
AUTO
A4
EDGE ERASE
CANCEL
10
OK
OK
(0~20)
mm
USING THE TOUCH P ANEL
1
How to use the touch panel
GETTING STARTED Using the touch panel
You can set or cancel a function displayed on the touch
panel by pressing (touching) a key with a finger. The touch
key operation can be confirmed with a beep tone (and
highlighting of the touch key).
★★
★ KEY OPERATOR For the beep tone to be heard, the beep tone must be
★★
enabled by a key operator program. See page 8-27.
A grayed out function key indicates that that function has
been disabled.
If a grayed out key is touched, two short beeps will be
sounded.
Selection of function
1-8
To register the selected settings for a function, press the
“OK” key on the setting screen. The settings indicated by
a highlighted display will be registered as a selected function.
Some special functions can be selected by pressing the
relevant keys on the SPECIAL MODES screen (page 3-4) or
on the IMAGE EDIT menu (page 3-24) to highlight the keys.
To cancel these functions, press the relevant keys again to
return the keys to the normal display. These functions are:
Dual page copying, Centring, Transparency inserts, Neg./
pos. reverse, Mirror image, and A3 (11x17) full-bleed.
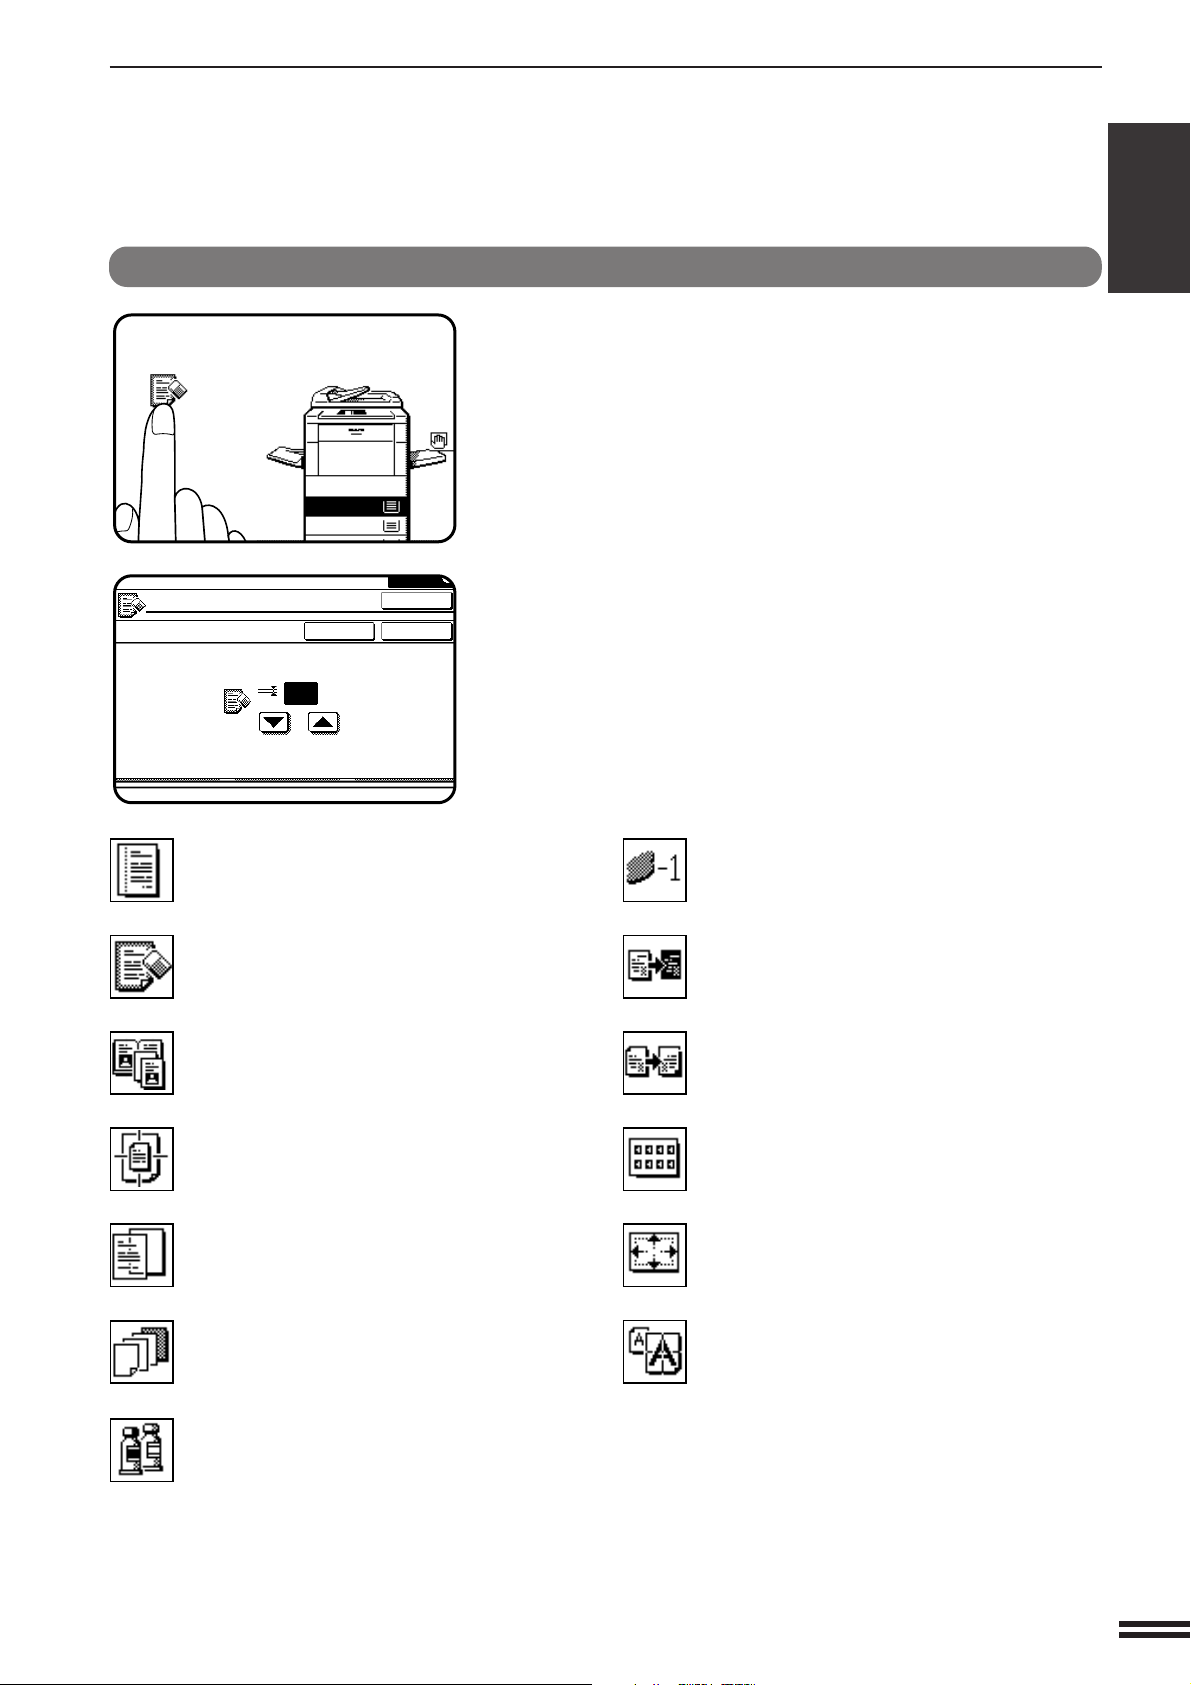
Function setting icons
READY TO COPY.
1.
A4
2.
A3
EDGE ERASE
CANCEL
(0~20)
mm
OK
OK
10
*2Margin shift (p.3-4)
Edge erase (p.3-6)
*
1
Dual page copying (p.3-8)
*
1
Centring (p.3-10)
*
1
Transparency film with insert sheets
(p.3-12)
*
2
Covers (p.3-14)
Colour adjustments (p.3-16)
*
2
Single colour (p.3-24)
*
1
Neg./pos. reverse (p.3-26)
*
1
Mirror image (p.3-28)
*
2
Photo repeat (p.3-30)
*
1
A3 (11 x 17) full-bleed (p.3-32)
Multi-page enlargement (p.3-34)
USING THE TOUCH P ANEL
CHAPTER1
GETTING STARTED Using the touch panel
Selected special functions are indicated with their icons on
the basic screen. The setting screen for a selected function
can be easily recalled by pressing its associated icon. (The
functions indicated below with *1, have no setting screen
and therefore no setting screen can be recalled by pressing
these icons.)
If multiple special functions are selected, up to nine icons
will be displayed.
The function setting icons are listed below. The content of
the icons indicated by *2 will change depending upon the
particular settings for these functions.
1-9


CHAPTER 2
MAKING COPIES
This chapter describes the basic copying functions such as normal
copying, reduction/enlargement, and exposure adjustments.
Page
●●
●
●●
AUDITING A CCOUNTS ............................. 2-2
●●
●
●●
COPYING FROM THE DOCUMENT GLASS .............. 2-3
●●
●
●●
USING THE RADF ................................. 2-6
●●
●
●●
REDUCTION/ENLARGEMENT/ZOOM ................. 2-11
●●
●
●●
SPECIAL PAPERS (manual feed) .................... 2-14
Two-sided copying with bypass tray .................... 2-15
●●
●
●●
EXPOSURE ADJUSTMENTS ........................ 2-16
●●
●
●●
JOB MEMORY................................... 2-18
●●
●
●●
INTERRUPTING A COPY RUN....................... 2-20
CHAPTER2
2-1
AUDITING ACCOUNTS
12
3
456
789
0
P
C
CA
CLEAR
PROGRAM
AUDIT
INTERRUPT
CLEAR
ALL
N
If this copier has been programmed in the auditing mode, it will not function until an assigned 5-digit account number
has been entered.The auditing mode can be set for both the colour and black/white (B/W) copy modes or for only
the colour copy mode.
★ KEY OPERATOR See page 8-9 for setting the auditing mode.
CHAPTER2
If the auditing mode has been set for both the colour and B/W copy
modes, the initial status of the message display will be:
ENTER YOUR ACCOUNT NUMBER. –––––
MAKING COPIES Auditing accounts
If the auditing mode has been set for only the colour copy mode, the
following display will appear when the AUDIT (ACC.#) key or the
COLOUR COPY START ( ) key is pressed.
ENTER YOUR ACCOUNT NUMBER
FOR COLOUR COPYING.
–––––
●
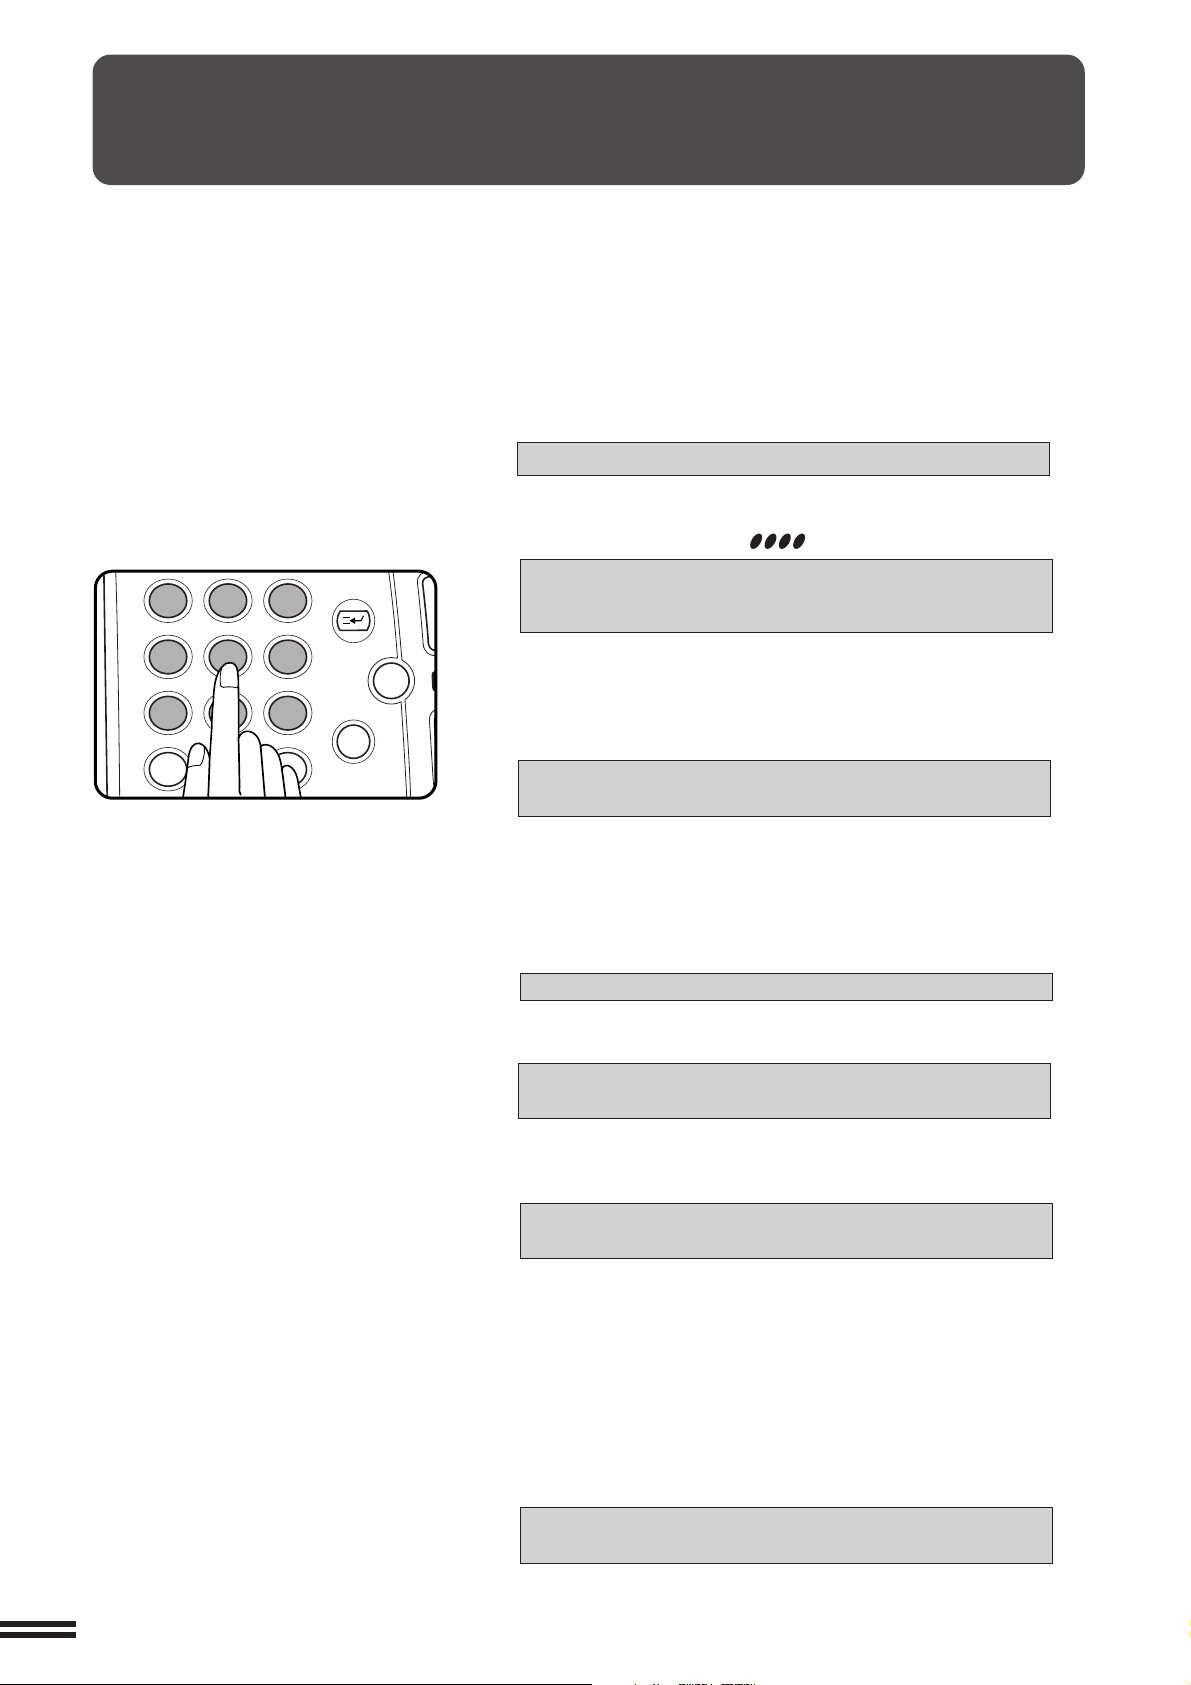
Enter your account number using the 10-key pad.
●
As each digit is entered, the dashes in the display will change to
asterisks.
The following message will appear after the number is entered.
ACCOUNT STATUS: COPIES MADE /REMAINING
B/W: 000,000/000,000 CL: 000,000/000,000
“COPIES REMAINING” will appear only if account limit has been
set using a key operator program.
★★
★ KEY OPERATOR See page 8-16 for account limit settings.
★★
●
The message will be displayed for several seconds, then change
to the following message.
READY TO COPY.
●
When a copy run is performed, the following message will
appear.
READY TO COPY.
PRESS [AUDIT] WHEN FINISHED.
(In some regions, [ACC.#] is displayed in place of [AUDIT].)
●
In the interrupt copy mode (see page 2-20), the following
message will appear instead of the message above.
READY TO COPY. WHEN COPYING IS
FINISHED, PRESS [INTERRUPT].
NOTE:
If an unassigned number is entered, the message display will show
“ENTER YOUR ACCOUNT NUMBER.-----”, indicating that the
number was not accepted.
When the key operator program of account number security has
been set:
2-2
If an unassigned number is entered three successive times, the
copier will not accept another number for one minute, and the
following message will appear.
PLEASE SEE YOUR KEY OPERATOR FOR
ASSISTANCE.
★★
★ KEY OPERATOR See page 8-17 for account number
★★
security.
COPYING FROM THE DOCUMENT GLASS
READY TO COPY.
AUTO
EXPOSURE PAPER SELECT
100%
COPY RATIO
12
3
456
789
0
P
C
CA
CLEAR
PROGRAM
AUDIT
INTERRUPT
CLEAR
ALL
N
Use the document glass for copying single originals,
bound documents, and other originals that cannot be set
in the optional RADF.
●
Only 1-sided to 1-sided and 1-sided to 2-sided
copying can be selected when copying from the
document glass.
●
Duplex copying will not work when a non-standard
sized paper (or 5-1/2" x 8-1/2") paper is used.
●
2-sided to 2-sided or 2-sided to 1-sided copying
cannot be selected when copying from the
document glass. These operations can, however,
be performed simply by turning over the original
manually.
1-sided copies of 1-sided originals
●
Image loss (max. 5 mm (13/64")) can occur along
the leading edge of the copies. Image loss (max.
7mm (9/32")) can occur along the trailing edge of the
copies. Also image loss (max. 6 mm (1/4") in total)
can occur along the other edges of the copies.
CHAPTER2
MAKING COPIES
Copying from the document glass
Original size detector
Centring scale
A4
A3
B4
AUTO
A4
ORIGINAL
A4
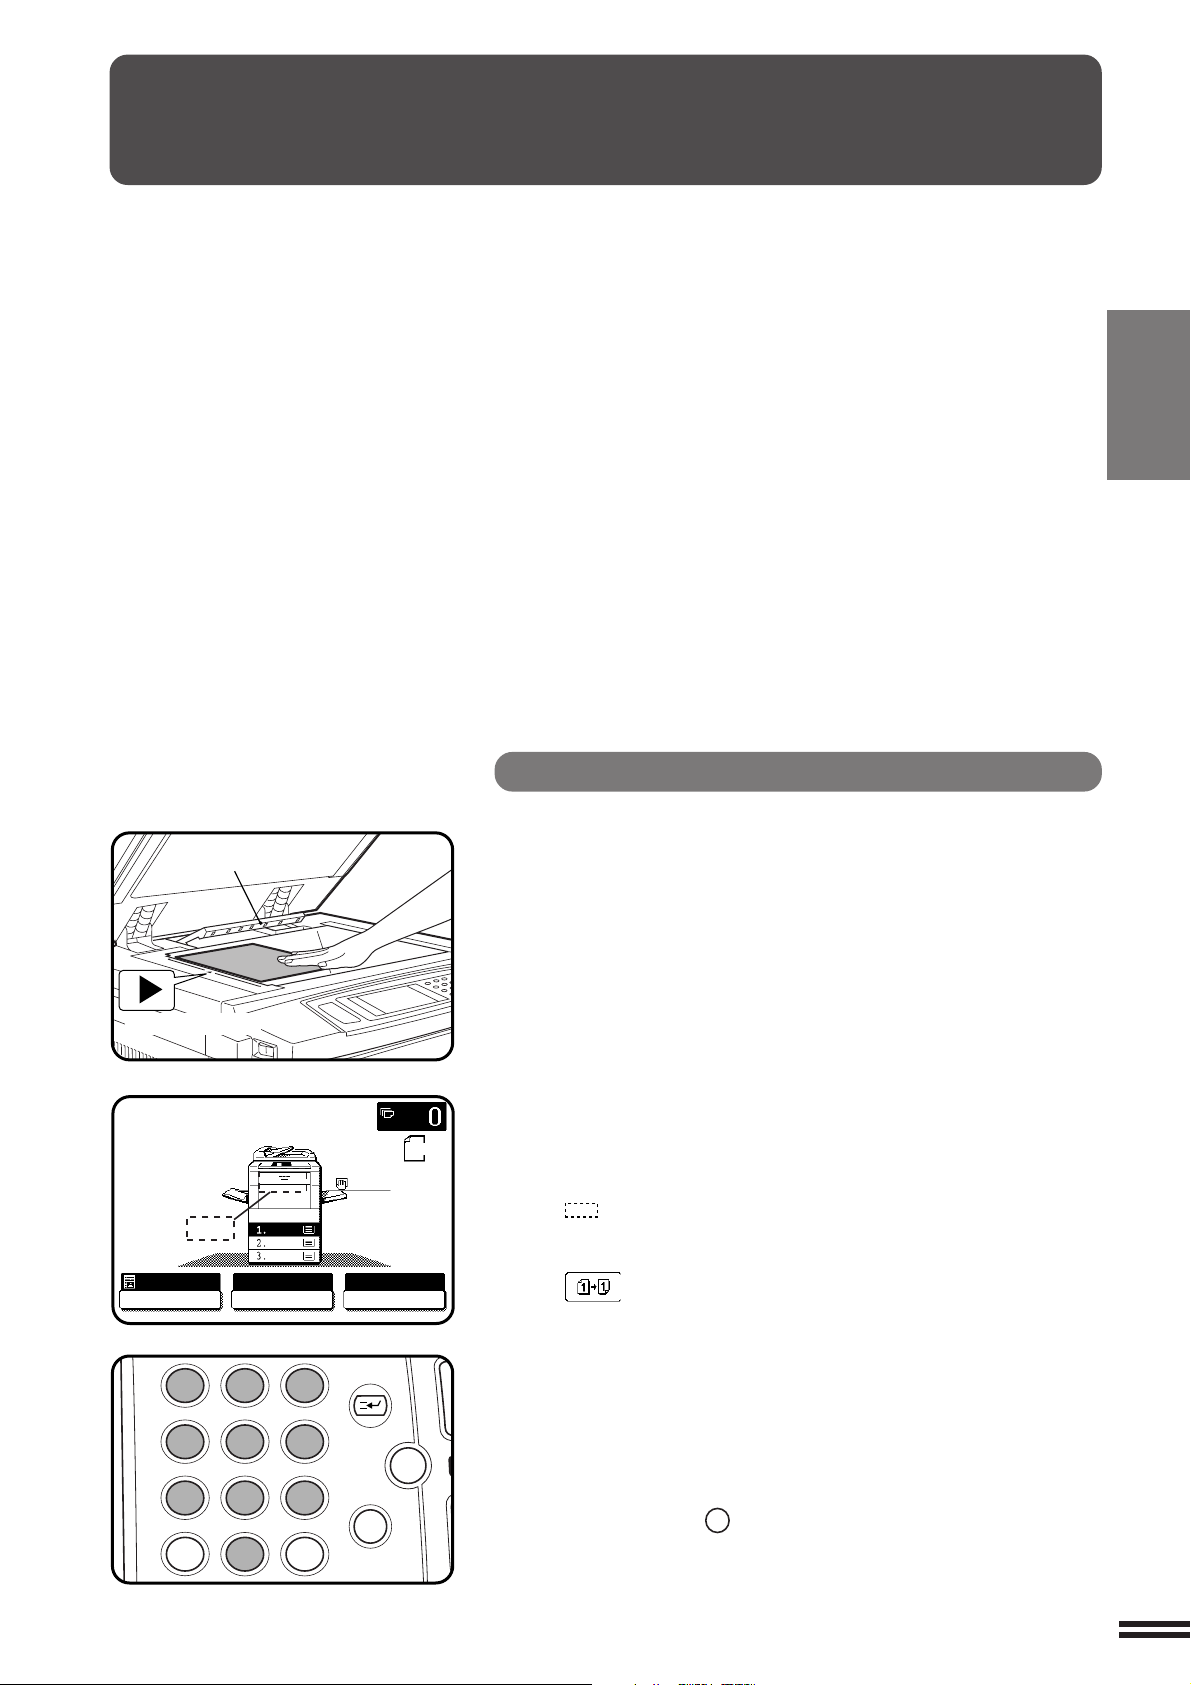
Open the document cover and place an original face
down on the document glass, using the centring scale
1
to position it.
●
When copying multi-page documents, copy from the last page to
the first page.
NOTE:
Do not place objects under the original size detector, because they
may damage it.
Close the document cover.
●
2
The original size will be indicated on the touch panel, and the paper
tray with the corresponding paper size will be automatically selected.
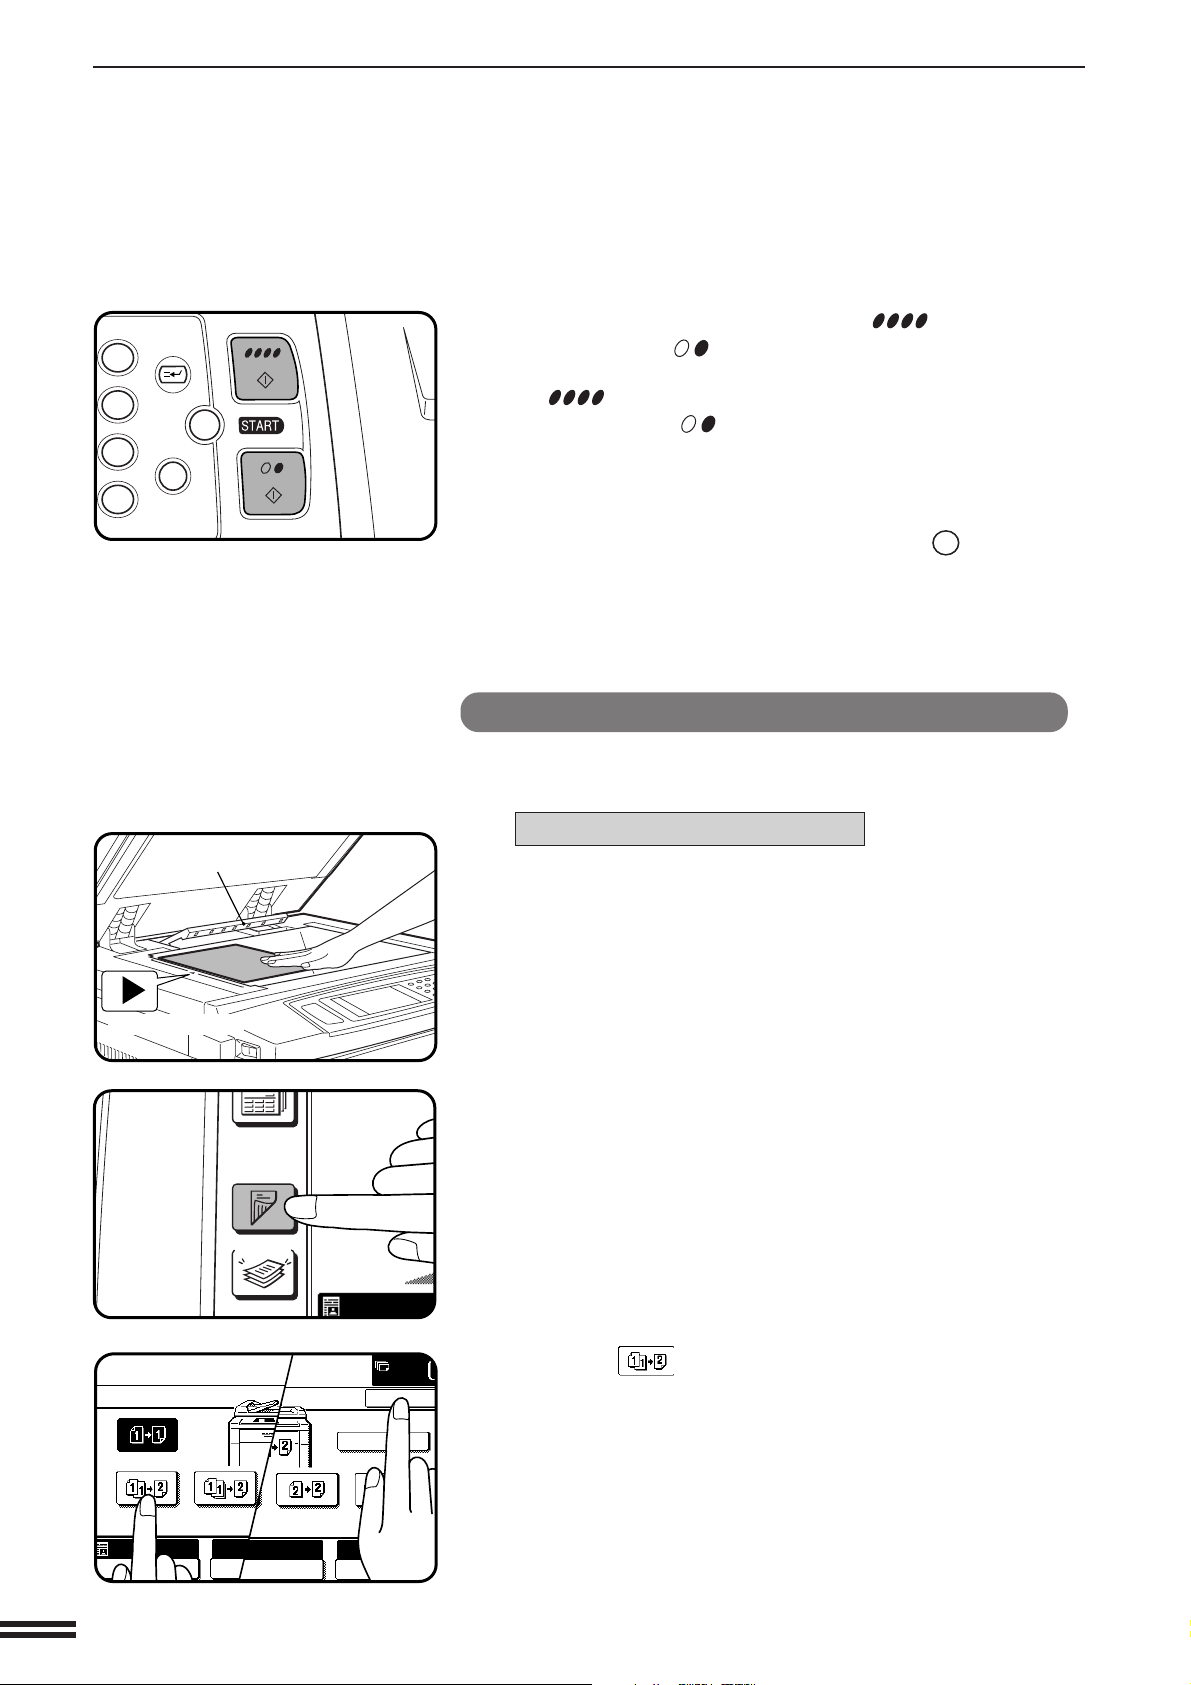
Ensure that the 1-sided to 1-sided copying mode is
selected on the touch panel.
3
●
When no icon is displayed in the area indicated in the illustration
( ), the 1-sided to 1-sided copying mode is selected.
●
If the 1-sided to 1-sided mode is not selected, press the
2-SIDED COPY key and then press the 1-sided to 1-sided key
( ) on the touch panel. Press the “OK” key to return to the
basic screen.
Use the 10-key pad to enter the desired number of
copies.
4
●
The number will be shown in the copy quantity display of the
touch panel.
●
A single copy can be made with the initial setting, i.e., when “0”
is displayed.
●
Use the CLEAR (C) key to cancel an entry if a mistake is made.
2-3
COPYING FROM THE DOCUMENT GLASS
OUTPUT
2-SIDED
COPY
AUTO
PRE-COUNT
OK
100%
COPY RATIO
EVEN NUMBER
ORIGINALS
ODD NUMBER
ORIGINALS
AUTO
EXPOSURE PAPER SELE
AUTO 8/ 1
1
2
3
6
9
P
C
CA
CLEAR
PROGRAM
INTERRUPT
CLEAR
ALL
CHAPTER2
MAKING COPIES Copying from the document glass
Original size detector
Press the COLOUR COPY START ( ) key or BLACK
COPY START (
5
●
To perform colour copying, press the COLOUR COPY START
( ) key. To perform black/white copying, press the BLACK
COPY START ( ) key.
●
The number in the copy quantity display will decrease by 1 each
time a copy is made. To repeat the same copy sequence with a
different original, simply replace the original and press the
START key.
●
To cancel a copy run, press the CLEAR ALL (CA) key. Copying
will stop and the number in the copy quantity display will be reset
to 0.
) key.
2-sided copies from 1-sided originals
To copy in the 1-sided to 2-sided copy mode, an optional duplex module
(AR-DU2) must be installed.
For an odd number of originals:
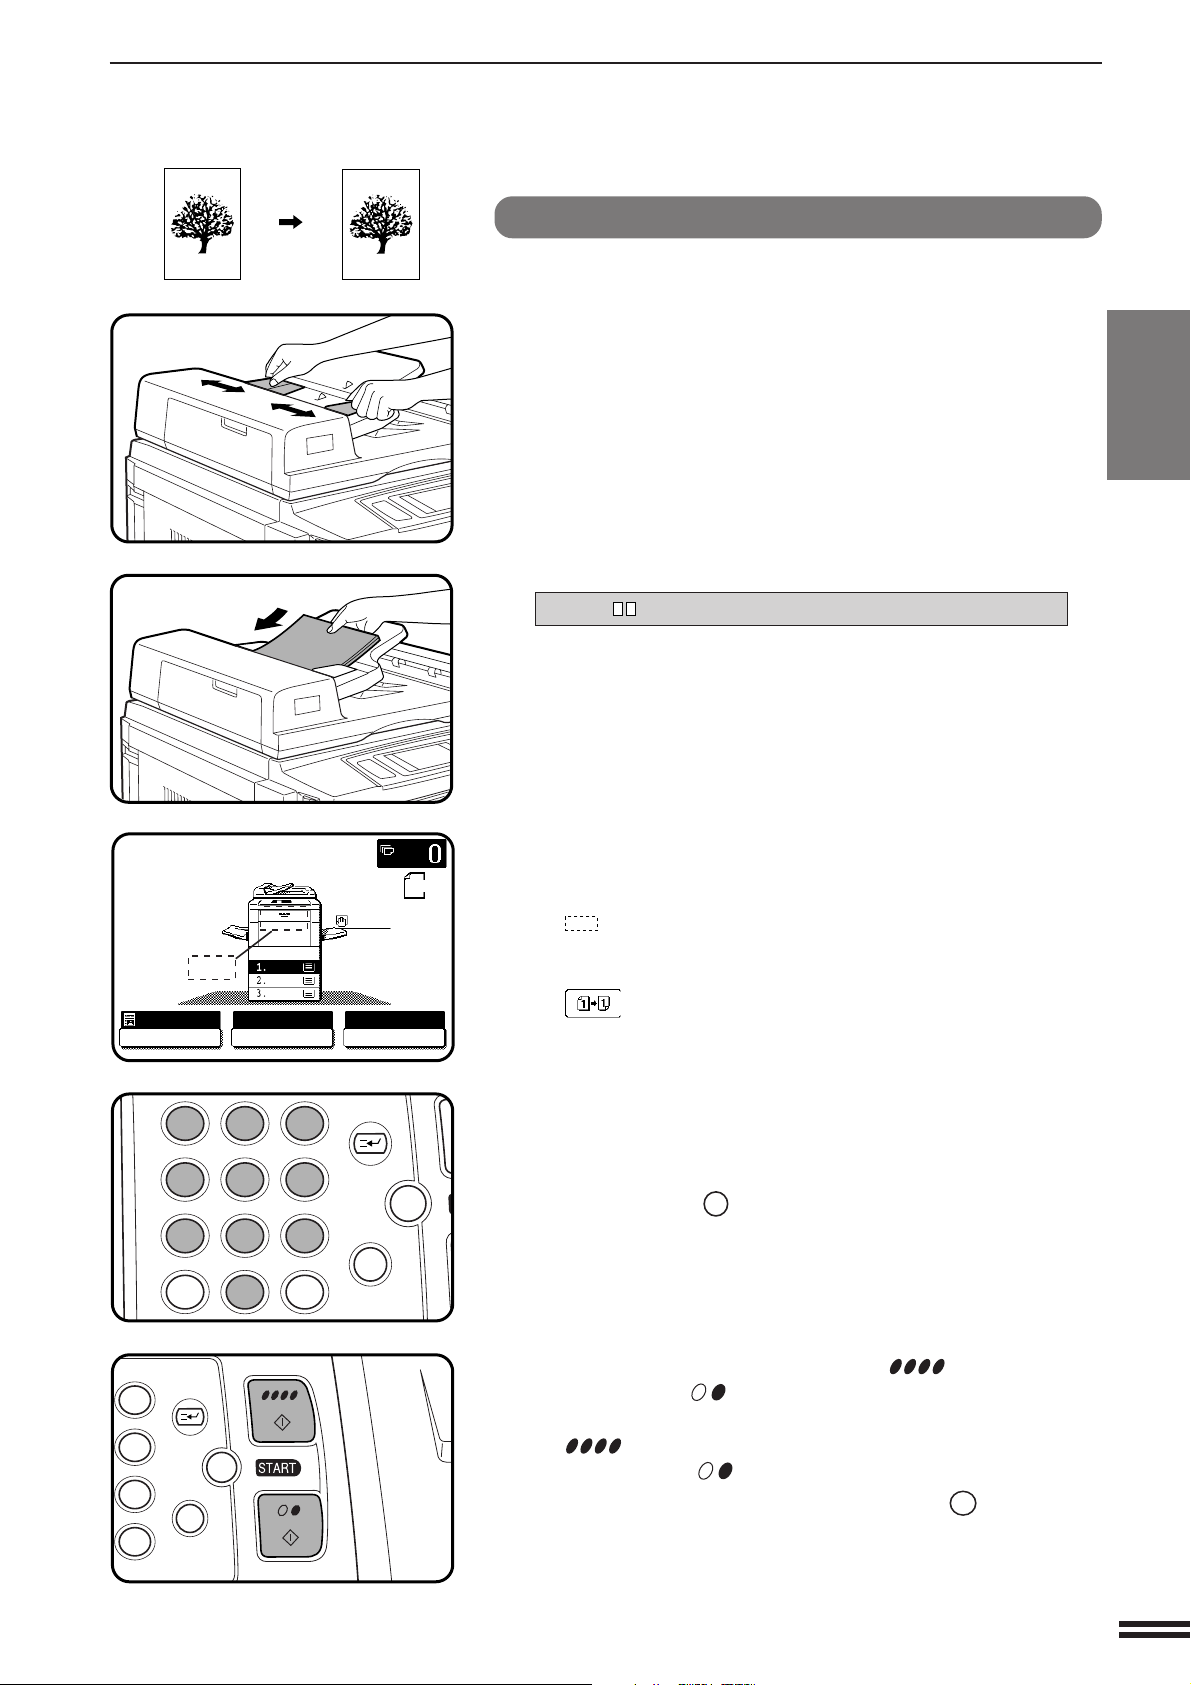
Set the last page of the document onto the document
glass, and copy it in the 1-sided to 1-sided mode.
1
Centring scale
2-4
AUTO
A4
Press the 2-SIDED COPY key.
2
Press the (EVEN NUMBER ORIGINALS) key on the
touch panel and then press the “OK” key.
3
COPYING FROM THE DOCUMENT GLASS
OUTPUT
2-SIDED
COPY
AUTO
3
6
9
P
C
CA
CLEAR
PROGRAM
INTERRUPT
CLEAR
ALL
3
6
9
P
C
CA
CLEAR
PROGRAM
INTERRUPT
CLEAR
ALL
PRE-COUNT
OK
100%
COPY RATIO
EVEN NUMBER
ORIGINALS
ODD NUMBER
ORIGINALS
AUTO
EXPOSURE PAPER SELE
AUTO 8/ 1
1
2
Copy the remainder of the originals in reverse order.
●
4
To perform colour copying in the duplex mode or to perform
B/W copying onto paper larger than A4 (8-1/2" x 11") size in the
duplex mode, only one copy per original can be made. If a
multiple number of copies is set, the number of copies will be set
to 1 when a START ( , ) key is pressed.
For an even number of originals:
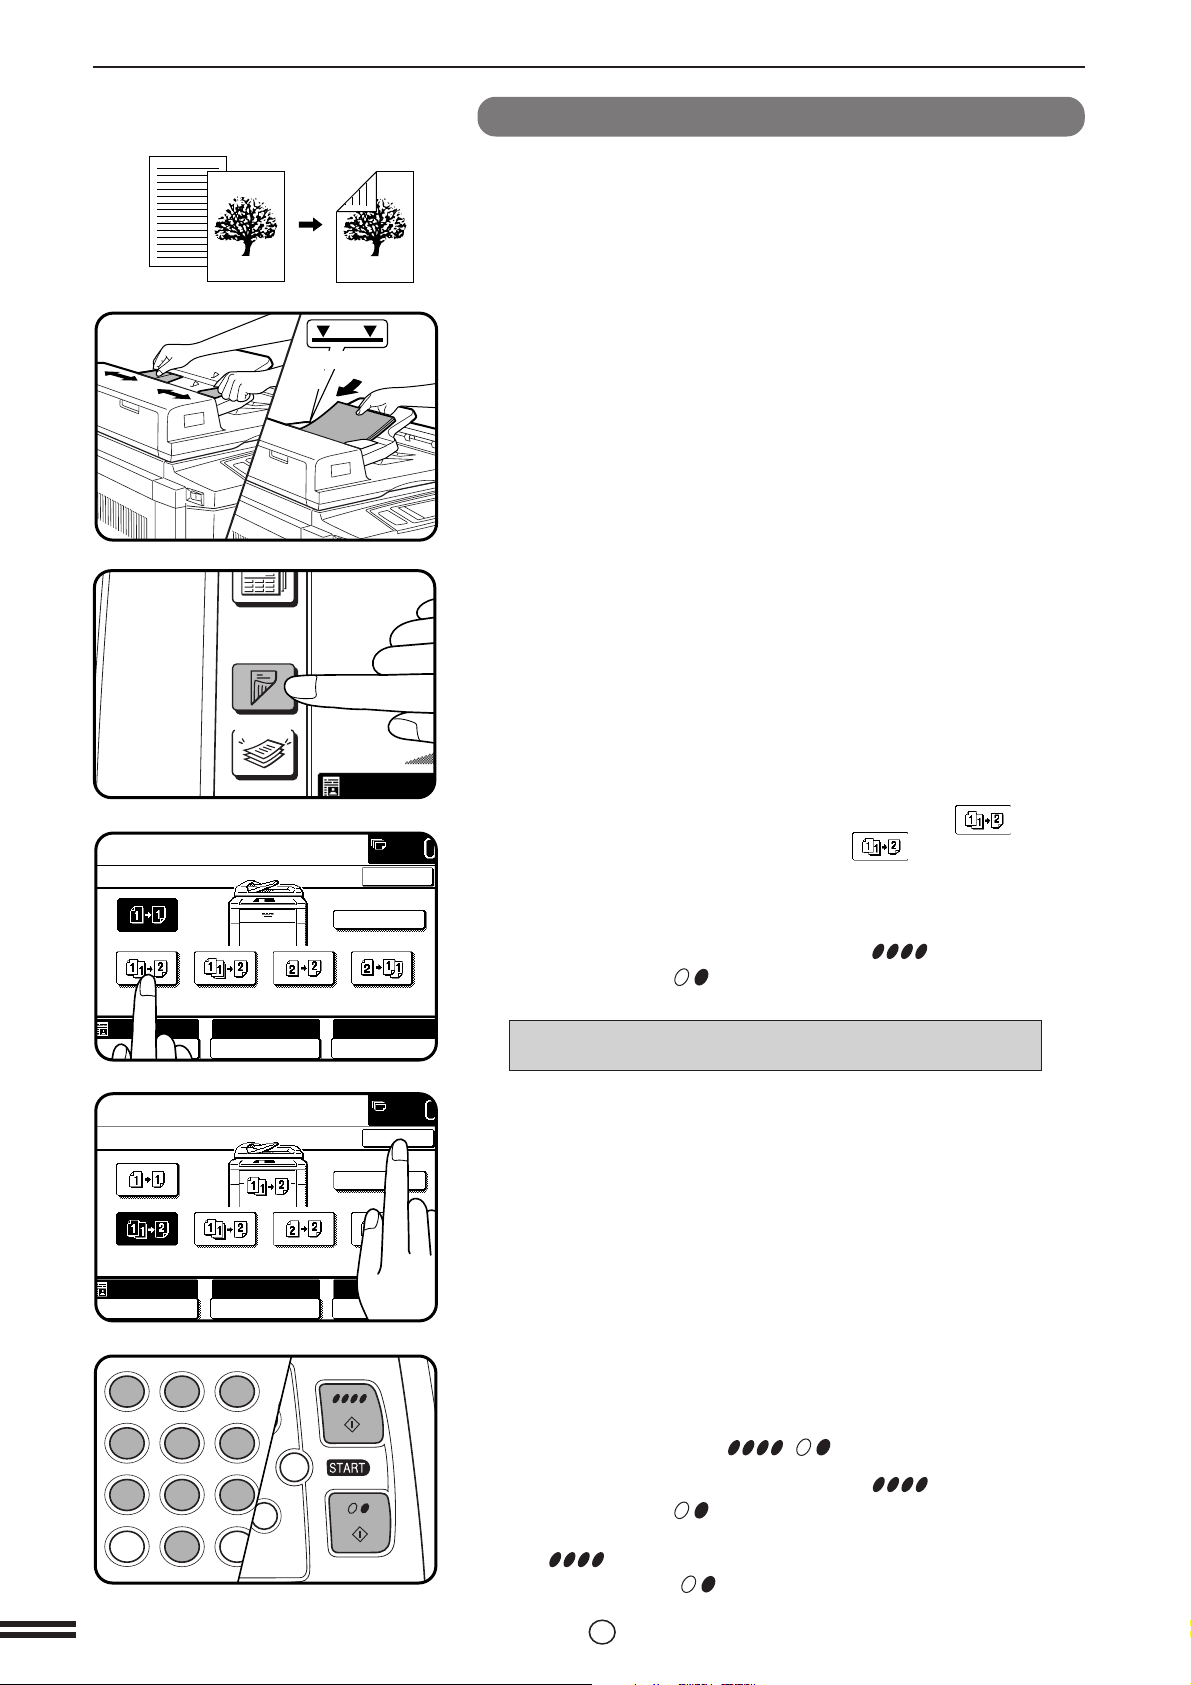
Press the 2-SIDED COPY key.
1
CHAPTER2
MAKING COPIES
Copying from the document glass
AUTO
A4
Press the (EVEN NUMBER ORIGINALS) key on the
touch panel and then press the “OK” key.
2
Copy the originals in reverse order.
●
3
To perform colour copying in the duplex mode or to perform
B/W copying onto paper larger than A4 (8-1/2" x 11") size in the
duplex mode, only one copy per original can be made. If a
multiple number of copies is set, the number of copies will be set
to 1 when a START ( , ) key is pressed.
2-5

USING THE RADF
This copier can be equipped with an optional reversing
automatic document feeder (RADF).
The RADF will handle multiple originals.
●
Before loading originals into the document feeder
CHAPTER2
MAKING COPIES Using the RADF
tray, be sure to remove any staples or paper clips
from them.
●
Damaged or crumpled originals or originals which
have been folded may misfeed in the RADF or cause
incorrect size detection. It is recommended that these
be copied from the document glass and the copies be
used as original documents.
●
When feeding originals which have closely spaced
binding holes punched along an edge, place the
originals so that the punched edge is positioned to the
right or along the side guides.
●
Special originals such as transparency film and tracing
paper should not be fed from the RADF, but should be
placed on the document glass.
●
Duplex copying will not work when a non-standard
sized paper (or 5-1/2" x 8-1/2" paper) is used.
●
Image loss (max. 5 mm (13/64" )) can occur along the
leading edge of the copies. Image loss (max. 7mm (9/32"))
can occur along the trailing edge of the copies. Also
image loss (max. 6 mm (1/4") in total) can occur along
the other edges of the copies.
●
The RADF can handle a maximum of 50 originals of
A5 to A4 (5-1/2" x 8-1/2" to 8-1/2" x 11") sizes and 30
originals of B4 to A3 (8-1/2" x 14" to 11" x 17") sizes.
●
2-sided to 1-sided copying and 2-sided to 2-sided*
copying can be performed.
* For 2-sided to 2-sided copying, an optional duplex
module (AR-DU2) must be installed.
●
The originals must be set face up in the document
feeder tray.
●
Different size originals with the same width can be
placed in the document feeder tray and automatically
copied onto copy paper of their respective sizes.
The automatic copy ratio selection will not function in
this case.
Stream feeding mode
If the stream feeding mode has been enabled using a key operator
program, the message “NEWLY PLACED ORIGINALS WILL BE FED
AND COPIED AUTOMATICALLY.” will appear and the original feed
indicator will continue to blink for approximately 5 seconds after
feeding of all originals is completed. While this message is displayed,
any new originals placed in the document feeder tray will be fed and
copied automatically.
★ KEY OPERATOR See page 8-23 for information on setting the
stream feeding mode.
2-6
USING THE RADF
READY TO COPY.(DOCUMENT FEEDER MODE)
AUTO
EXPOSURE PAPER SELECT
100%
COPY RATIO
12
3
456
789
0
P
C
CA
CLEAR
PROGRAM
AUDIT
INTERRUPT
CLEAR
ALL
3
6
9
P
C
CA
CLEAR
PROGRAM
INTERRUPT
CLEAR
ALL
1-sided copies of 1-sided originals
A4
A3
B4
AUTO
A4
ORIGINAL
A4
Adjust the original guides to the size of the originals and
set the originals face up in the document feeder tray.
1
●
The original size will be indicated on the touch panel, and the
paper tray with the corresponding paper size will be automatically
selected.
●
Be sure to remove any original from the document glass before
setting the originals in the document feeder tray. If an original is
left on the document glass, the original reminder indicator will
blink. Remove the original from the document glass in this case.
●
If copy paper of the required size is not installed in any of the
trays, the following message will appear.
LOAD PAPER.
If a tray of the required size is not installed, use the bypass tray
and press the “PAPER SELECT” key on the touch panel to select
the bypass tray.
●
To copy onto a different size paper, use the “PAPER SELECT”
key to make the selection.
Ensure that the 1-sided to 1-sided copying mode is
selected on the touch panel.
2
●
When no icon is displayed in the area indicated in the illustration
( ), the 1-sided to 1-sided copying mode is selected.
●
If the 1-sided to 1-sided mode is not selected, press the
2-SIDED COPY key and then press the 1-sided to 1-sided key
( ) on the touch panel. Press the “OK” key to return to the
basic screen.
CHAPTER2
MAKING COPIES Using the RADF
Use the 10-key pad to enter the desired number of
copies.
3
●
The number will be shown in the copy quantity display of the
touch panel.
●
Use the CLEAR (C) key to cancel an entry if a mistake has been
made.
Press the COLOUR COPY START ( ) key or BLACK
COPY START (
4
●
To perform colour copying, press the COLOUR COPY START
( ) key. To perform black/white copying, press the BLACK
COPY START ( ) key.
●
To cancel a copy run, press the CLEAR ALL (CA) key. Copying
will stop and the RADF will output any originals which have been
fed. Also, the number in the copy quantity display will be reset to
0.
) key.
2-7
USING THE RADF
OUTPUT
2-SIDED
COPY
AUTO
PRE-COUNT
EVEN NUMBER
ORIGINALS
ODD NUMBER
ORIGINALS
OK
AUTO
EXPOSURE PAPER SELECT
100%
COPY RATIO
PRE-COUNT
EVEN NUMBER
ORIGINALS
ODD NUMBER
ORIGINALS
OK
AUTO
EXPOSURE PAPER SELECT
100%
COPY RATIO
C
CA
CLEAR
INTERRUPT
CLEAR
ALL
12
3
456
789
0
P
C
CL
PROGRAM
AUDIT
INTE
CLE
AL
2-sided copies from 1-sided originals
To copy in the 1-sided to 2-sided copy mode, an optional duplex module
(AR-DU2) must be installed.
CHAPTER2
MAKING COPIES Using the RADF
Maximum height
line
AUTO
A4
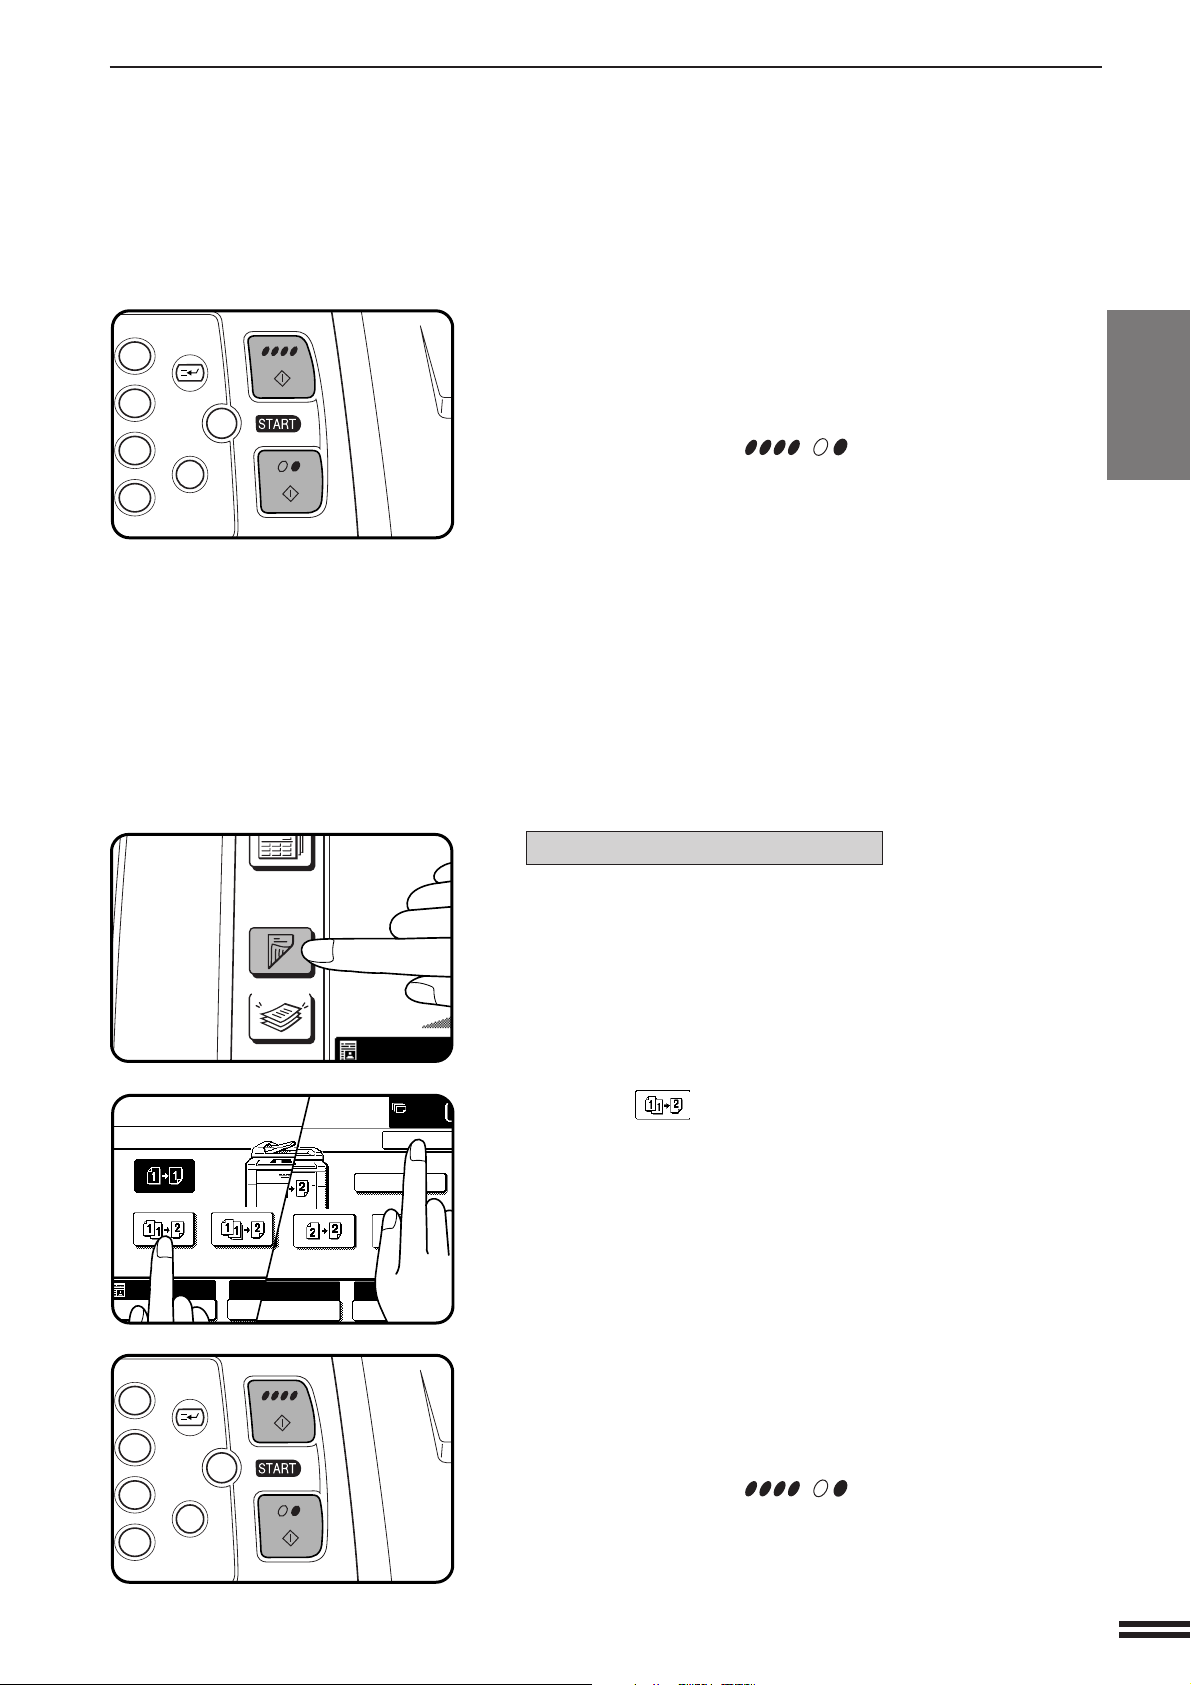
Adjust the original guides to the size of the originals and
set the originals face up in the document feeder tray.
1
Press the 2-SIDED COPY key.
2
If the number of originals is known, use the (EVEN
NUMBER ORIGINALS) key or (ODD NUMBER
3
ORIGINALS) key on the touch panel, then proceed to
step 4. If the number of originals is not known, select
“PRE-COUNT” for an automatic count by the RADF and
press the COLOUR COPY START ( ) key or BLACK
COPY START (
●
The following message will appear.
PRE-COUNT MODE
NUMBER OF ORIGINALS IS
) key.
**.**.
**.
**.**.
2-8
AUTO
A4
If the number of originals exceeds the limit, other messages will
appear.
●
When the count is complete and the number is known, replace
the originals in the document feeder tray and select “EVEN
NUMBER ORIGINALS” or “ODD NUMBER ORIGINALS” as
above.
Press the “OK” key.
4
Enter the desired number of copies.
●
5
6
To perform colour copying in the duplex mode or to perform B/W
copying onto paper larger than A4 (8-1/2" x 11") size in the
duplex mode, only one copy per original can be made. If a
multiple number of copies is set, the number of copies will be set
to 1 when a START ( , ) key is pressed.
Press the COLOUR COPY START ( ) key or BLACK
COPY START (
●
To perform colour copying, press the COLOUR COPY START
( ) key. To perform black/white copying, press the BLACK
COPY START ( ) key.
●
To cancel a copy run during duplex copying, press the CLEAR
ALL (CA) key.
) key.
 Loading...