

Page 1
MODEL
AR-280
AR-285
AR-335
DIGITAL COPYING MACHINE
OPERATION MANUAL
AR-280
• GETTING STARTED
• MAKING COPIES
• SPECIAL FUNCTIONS
• SUPPLIES
• COPIER TROUBLE?
• GENERAL
INFORMATION
• OPTIONAL EQUIPMENT
• KEY OPERATOR'S
GUIDE
Page
1-1
2-1
3-1
4-1
5-1
6-1
7-1
8-1
AR-285/AR-335
Page 2

In some areas, the “POWER” switch positions are marked “ I ” and “ ” on the copier
instead of “ON” and “OFF”.
The symbol “ ” denotes the copier is not completely de-energized but in a stand-by
condition at this “POWER” switch position.
If your copier is so marked, please read “I” for “ON” and “ ” for “OFF”.
Caution!
For a complete electrical disconnection, pull out the main plug.
The socket-outlet shall be installed near the equipment and shall be easily
accessible.
The CE mark logo label is affixed on an equipment in case that the directives described in the above
sentence are applicable to the product. (This sentence is not applicable in any country where the
above directives are not required.)
Page 3

CONTENTS
●
INTRODUCTION .................... 2
●
USING THIS MANUAL................ 2
CHAPTER 1
GETTING STARTED
●
INSTALLATION REQUIREMENTS ...... 1-2
●
CAUTIONS ....................... 1-3
●
POWER ON AND OFF .............. 1-5
Power save modes ................. 1-5
●
INFORMATION FUNCTION ........... 1-7
●
USING THE TOUCH PANEL .......... 1-8
How to use the touch panel ........... 1-8
Selection of function ................ 1-8
Function setting icons ............... 1-9
CHAPTER 2
MAKING COPIES
●
AUDITING ACCOUNTS .............. 2-2
●
USING THE SPF/RADF .............. 2-3
●
COPYING FROM THE DOCUMENT
GLASS .......................... 2-8
●
REDUCTION/ENLARGEMENT/ZOOM .. 2-11
●
SPECIAL PAPERS (manual feed) ..... 2-14
Two-sided copying with bypass tray .... 2-15
●
EXPOSURE ADJUSTMENTS ........ 2-16
●
SORT/GROUP ................... 2-17
●
JOB MEMORY ................... 2-18
●
INTERRUPTING A COPY RUN ....... 2-20
CHAPTER 3
SPECIAL FUNCTIONS
●
XY ZOOM ........................ 3-2
●
MARGIN SHIFT.................... 3-4
●
ERASE .......................... 3-6
●
DUAL PAGE COPYING .............. 3-8
●
MULTI SHOT .................... 3-10
●
COVERS ....................... 3-13
●
TRANSPARENCY FILM WITH
INSERT SHEETS ................. 3-15
●
PAMPHLET COPY ................ 3-17
●
IMAGE EDITING FUNCTIONS ........ 3-20
Centring ........................ 3-20
Repeat copy ..................... 3-22
Hi-Fi ........................... 3-25
B/W reverse ..................... 3-27
Binding change ................... 3-29
●
TEXT STAMP .................... 3-32
Date ........................... 3-32
Select stamp ..................... 3-35
Watermark ...................... 3-38
Page number .................... 3-41
●
SETTING REVIEW ................ 3-44
Page
CHAPTER 4
SUPPLIES
●
PAPER .......................... 4-2
Types and sizes of copy paper ......... 4-2
Loading copy paper ................. 4-2
●
ADDING TONER ................... 4-5
●
USED TONER DISPOSAL ............ 4-7
●
STORAGE OF SUPPLIES ............ 4-8
CHAPTER 5
COPIER TROUBLE?
●
MISFEED REMOVAL ............... 5-2
●
MAINTENANCE REQUIRED ......... 5-12
●
TROUBLESHOOTING .............. 5-13
CHAPTER 6
GENERAL INFORMATION
●
PART NAMES AND FUNCTIONS....... 6-2
Exterior .......................... 6-2
Interior .......................... 6-3
Operation panel.................... 6-4
Touch panel (Basic screen) ........... 6-5
●
USER MAINTENANCE .............. 6-6
●
TOUCH PANEL CONTRAST
ADJUSTMENT .................... 6-7
●
SPECIFICATIONS.................. 6-8
CHAPTER 7
OPTIONAL EQUIPMENT
●
SYSTEM CONFIGURATION .......... 7-2
●
FINISHER (AR-FN1) ................ 7-3
●
LARGE CAPACITY TRAY (AR-LC1).... 7-20
●
STAND/500-SHEET PAPER DRAWER
(AR-DE1) ....................... 7-24
CHAPTER 8
KEY OPERATOR’S GUIDE
●
KEY OPERATOR CODE NUMBER ..... 8-2
Registering the key operator
code number ...................... 8-2
●
KEY OPERATOR PROGRAMS ........ 8-4
Using the key operator programs ....... 8-7
●
KEY OPERATOR ASSISTANCE CALL .. 8-28
●
KEY OPERATOR CODE NUMBER:
FACTORY SETTING ............... 8-29
Page
CHAPTER1
CHAPTER2 CHAPTER3
CHAPTER4
CHAPTER5 CHAPTER6 CHAPTER7 CHAPTER8
1
Page 4
1.8/ 11
2.11 17
1
2
8/ 11R
1
2
1.
A4
2.
A3
ORIGINAL
A4R
INTRODUCTION
The AR-280, AR-285 and AR-335 copiers are digital image processing copiers which provide high productivity and
convenient features including intelligent image-editing functions.
Amongst their many useful features and functions are the document feeder*, various special functions such as dual
page copying, margin shift, erase, XY zoom, and black and white reverse functions, photo copying, and an internal
auditor. The digital processing system of the copier allows multiple sets of copies to be sorted without the aid of a
sorter. These copiers can be equipped with an optional large capacity tray which holds 3,000 sheets of copy paper.
The machines can also be equipped with an optional finisher to provide finished copy sets ready for distribution.
These copiers were also designed with ease of use in mind. The easy-to-understand operation panel with touch
panel system and INFORMATION function will guide the user through most operations. However, to gain the
maximum benefit of all the features of the copier, it is recommended that users first read this manual to become
familiar with all the features of the copier.
* The AR-280 is equipped with a single pass feeder (SPF) and the AR-285 and AR-335 are equipped with a
reversing automatic document feeder (RADF).
NOTES:
●
This manual describes only copier features. For a description of optional printer features, see the separate
relevant manual.
●
The illustrations in this manual are mainly drawn for the AR-280. Note that the AR-280 does not perform all of the
functions of the AR-285 and AR-335.
USING THIS MANUAL
This manual is intended as an operation guide for both general users and key operators.
For General Users
It is recommended that you read the GETTING STARTED, MAKING COPIES, and SPECIAL FUNCTIONS sections
to become familiar with the available features and functions of your copier. Then refer to the manual as needed to
become thoroughly familiar with those features you will normally use.
For Key Operators
Please read all sections thoroughly to become familiar with all features and functions of your copier. Throughout the
manual, information which is relevant to key operator functions is noted by “★ KEY OPERATOR.” Please pay close
attention to these notes and to the SUPPLIES, COPIER TROUBLE?, GENERAL INFORMATION, and OPTIONAL
EQUIPMENT sections so you can ensure smooth and efficient operation of your machine.
The KEY OPERATOR’S GUIDE section has been written especially for you. It contains the programs and
programming information that will enable you to tailor functions for maximum benefit
to your company.
[AB series]
AB series (metric) and inch series references
Both specifications are quoted where applicable.
●
The inch series specifications are quoted in brackets.
For example:
Page 2-3, Notes on the SPF (AR-280) ----A5 to A4 (5-1/2" x 8-1/2" to 8-1/2" x 11")
Page 2-12, step 3, Menu 1-A ----------------86%, 81%, and 70% (77% and 64%)
●
Although AB series size indications are shown on the touch panel of this manual,
inch series indications are displayed on the inch series machines.
[Inch series]
Depending on the country or area, some keys of this copier will be indicated with
either an English name or a symbol. ––Example: INFORMATION ( ) key,
PROGRAM (P) key, START ( ) key.
2
Page 5

CHAPTER
CHAPTER 1
GETTING STARTED
This chapter describes the basic information on the
use of this copier.
Page
●
INSTALLATION REQUIREMENTS.............................. 1-2
●
CAUTIONS ............................................... 1-3
●
POWER ON AND OFF ...................................... 1-5
Power save modes ......................................... 1-5
●
INFORMATION FUNCTION ................................... 1-7
●
USING THE TOUCH PANEL .................................. 1-8
How to use the touch panel ................................... 1-8
Selection of function ........................................ 1-8
Function setting icons ....................................... 1-9
1
1-1
Page 6
CHAPTER
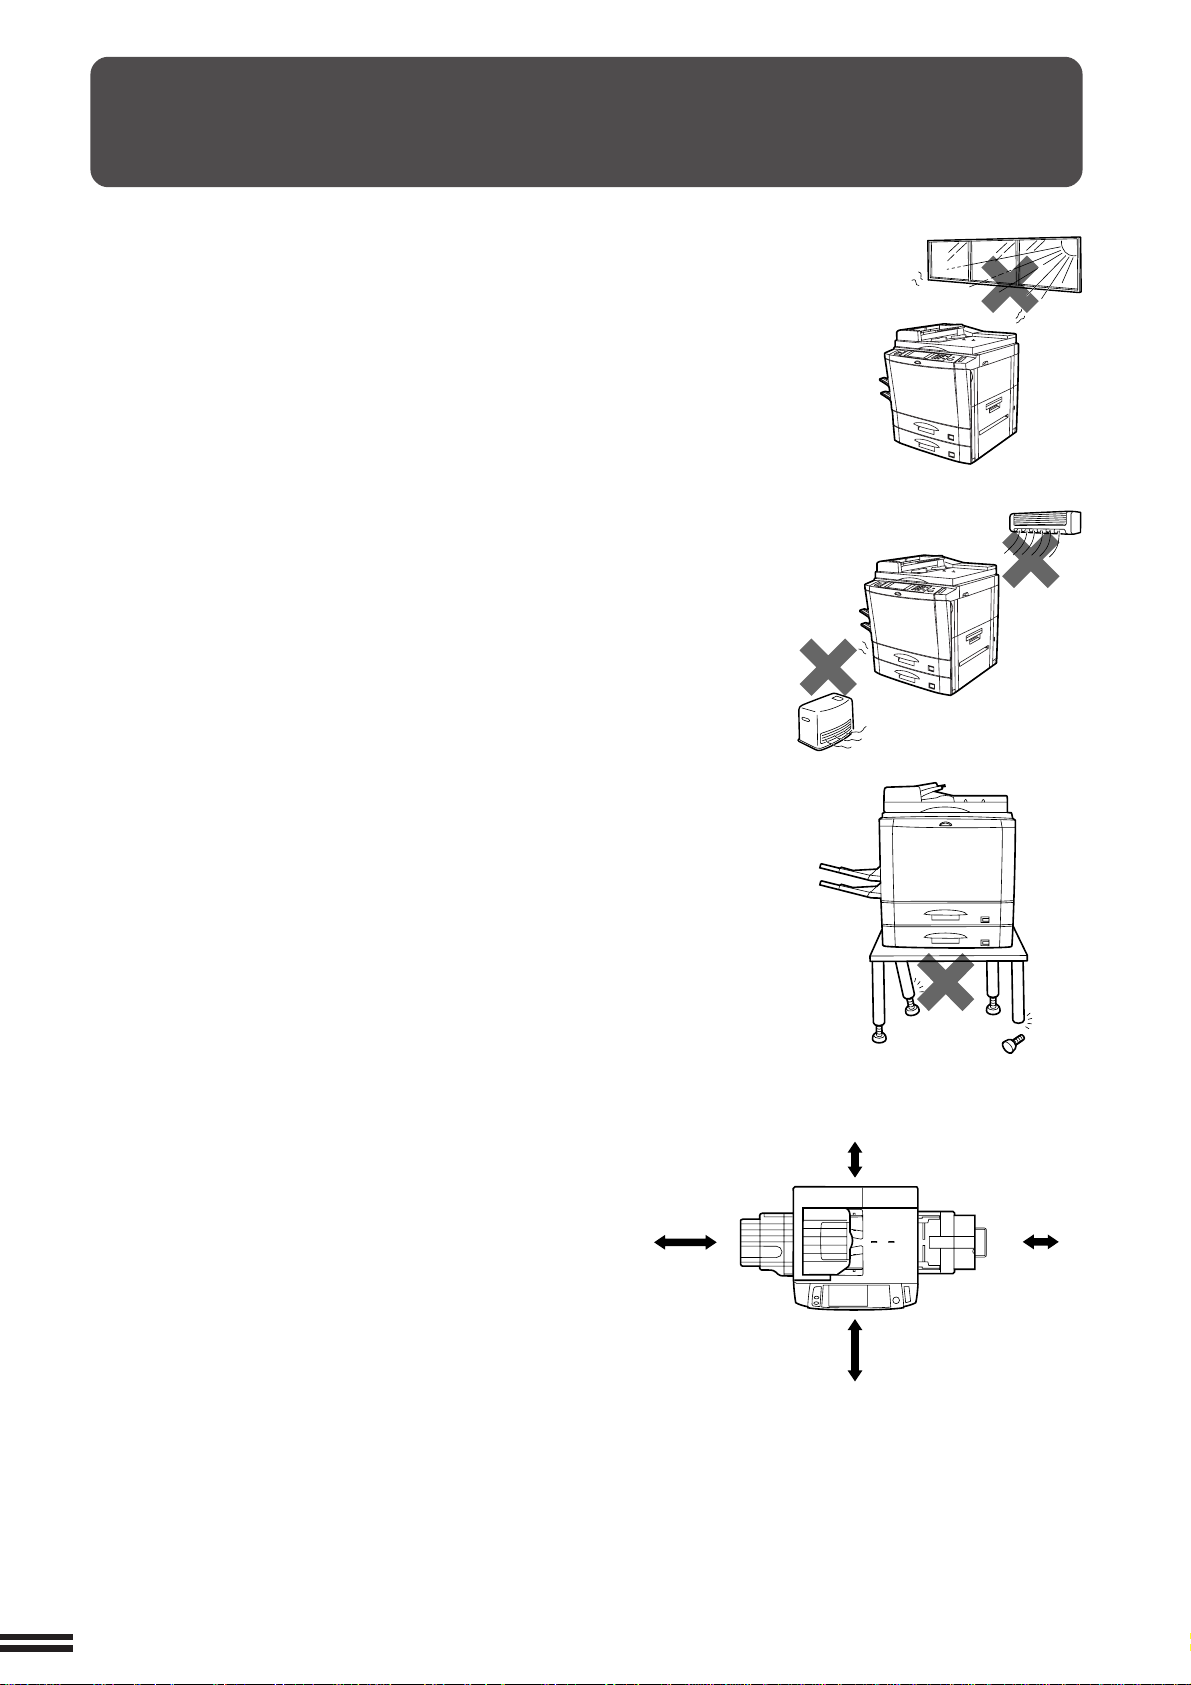
INSTALLATION REQUIREMENTS
1
GETTING STARTED Installation requirements
To ensure safety and proper machine performance, please note the following
before initial installation and whenever the machine is to be relocated.
1. The copier should be installed near an accessible power outlet for easy
connection.
2. Be sure to connect the power cord only to a power outlet that meets the
specified voltage and current requirements.
Also make certain the outlet is properly grounded.
●
For this copier’s power supply requirements, see the name plate
located on the left hand side at the rear corner of the copier.
3. Do not install the machine where it is:
●
damp or humid,
●
exposed to direct sunlight,
●
extremely dusty,
●
poorly ventilated,
●
subject to extreme temperature or humidity changes (e.g., near an air
conditioner or heater).
4. Since a hard disk drive is built into this copier, place the copier on a firm,
level surface. Choose an area which is not subject to any vibration.
5. Be sure to allow the required space around the machine for servicing
and proper ventilation.
60 cm
(23-5/8")
30 cm
(11-13/16")
30 cm
(11-13/16")
60 cm
(23-5/8")
1-2
Page 7
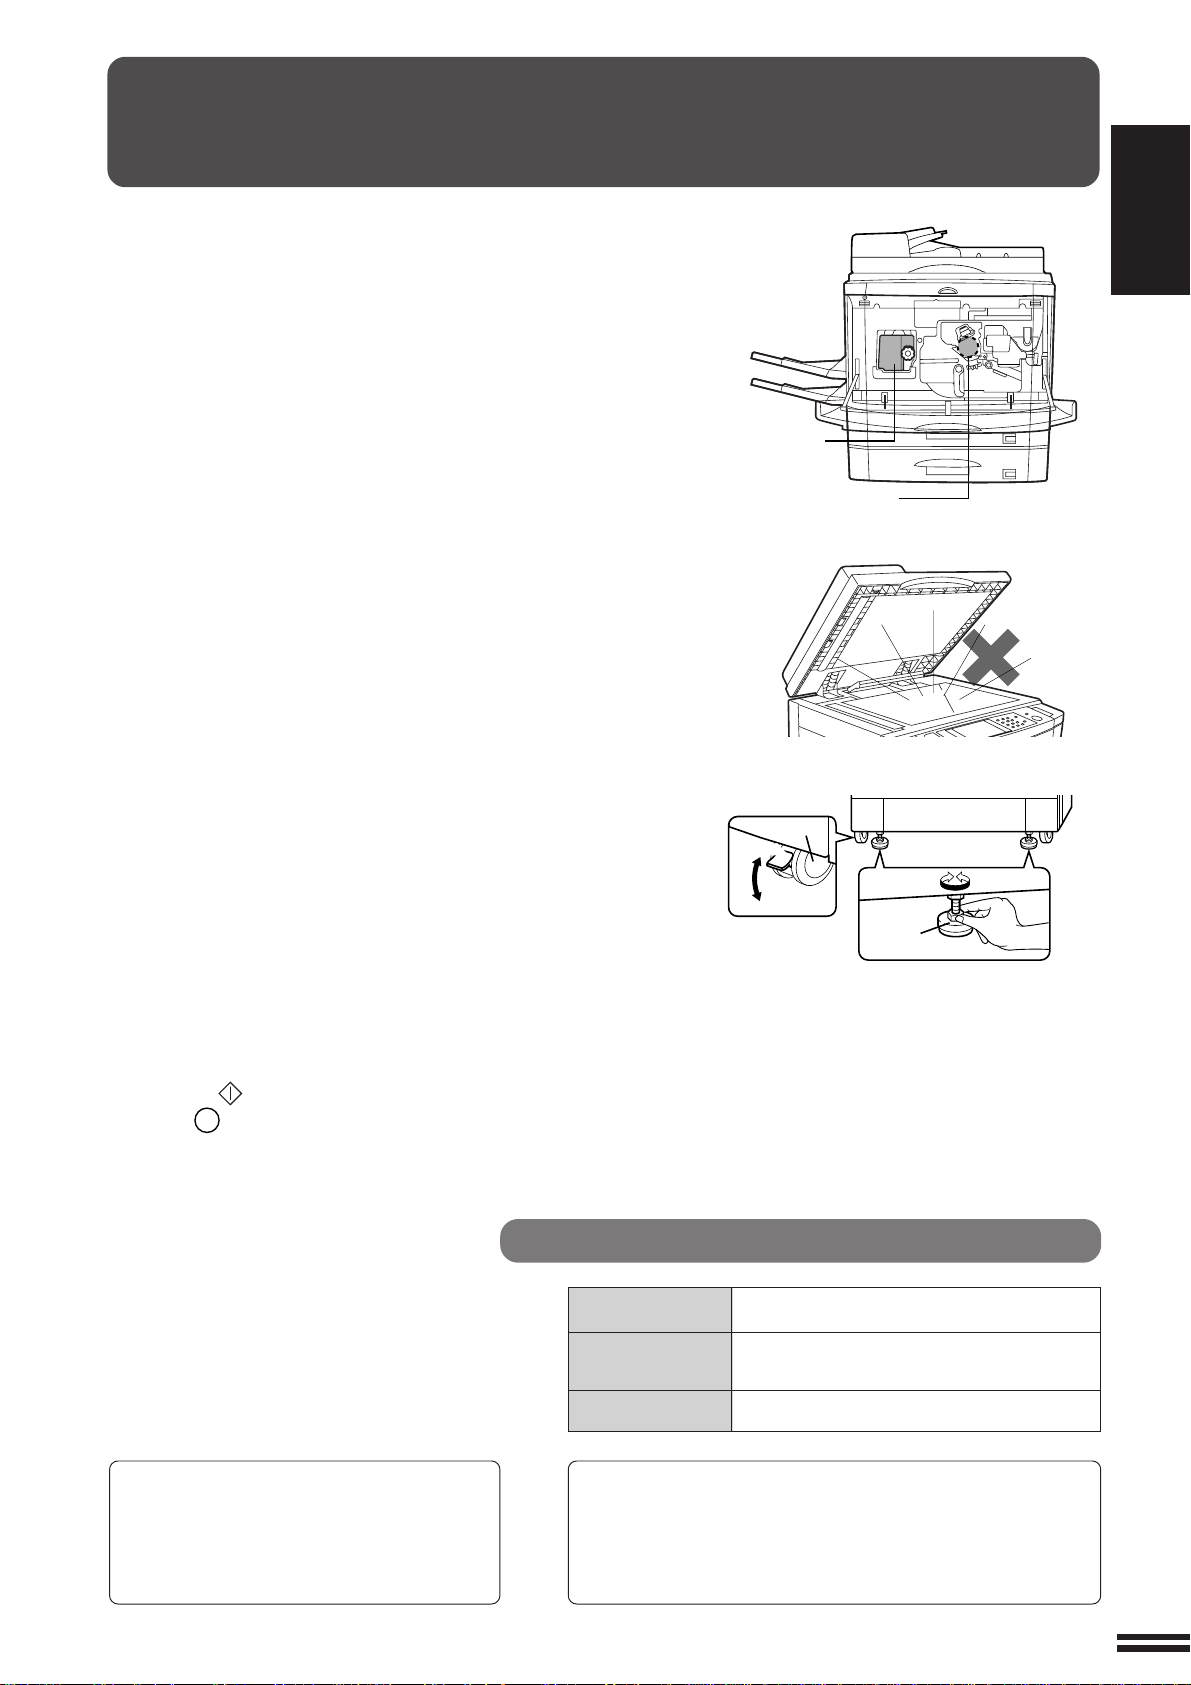
CAUTIONS
CHAPTER
1. Do not touch the photoconductive drum. Scratches or
smudges on the drum will cause dirty copies.
2. The fusing unit is extremely hot. Exercise care in this area.
3. Since a hard disk drive is built into the copier, be sure to turn the
power switch to the “OFF” position when moving the copier.
Take care not to subject the copier to any vibration or shock.
4. Do not look directly at the light source. Doing so may
damage your eyes.
5. Four installation adjusters are provided on the optional
stand/500-sheet paper drawer.
When moving the machine with the optional stand/
500-sheet paper drawer, be sure to raise the installation
adjusters. After moving the machine, lower the four
installation adjusters until they reach the floor and lock the
two casters at the front of the copier.
Fusing unit
Photoconductive
drum
Caster
Release
Lock
1
GETTING STARTED Cautions
Lock Release
6. When copying is interrupted (for example, because the
INTERRUPT function has been used, paper or toner has run out,
a misfeed has occurred, etc.), this copier will store the image
data of the originals read prior to the interruption. If copying of
secret documents is interrupted due to the above reasons, be
sure to either resume the interrupted copying by pressing the
START ( ) key, or clear the image data by pressing the CLEAR
ALL (CA) key after the interrupt copying is completed or the
trouble is cleared, because the stored data may be printed by
other operators.
Cautions on laser
Wave length 785 nm ±15 nm
Pulse times
Output power 0.25 - 0.50 mW
At the production line, the output power of
the scanner unit is adjusted to 0.6 MILLIWATT PLUS 13.4 PCTS and is maintained
constant by the operation of the Automatic
Power Control (APC).
Caution
This product contains a low power laser device. To
ensure continued safety do not remove any cover or
attempt to gain access to the inside of the product. Refer
all servicing to qualified personnel.
Adjuster
North America: (4.0 µs ±4 ns)/7 mm
Europe: (5.4 µs ±5.4 ns)/7 mm
1-3
Page 8
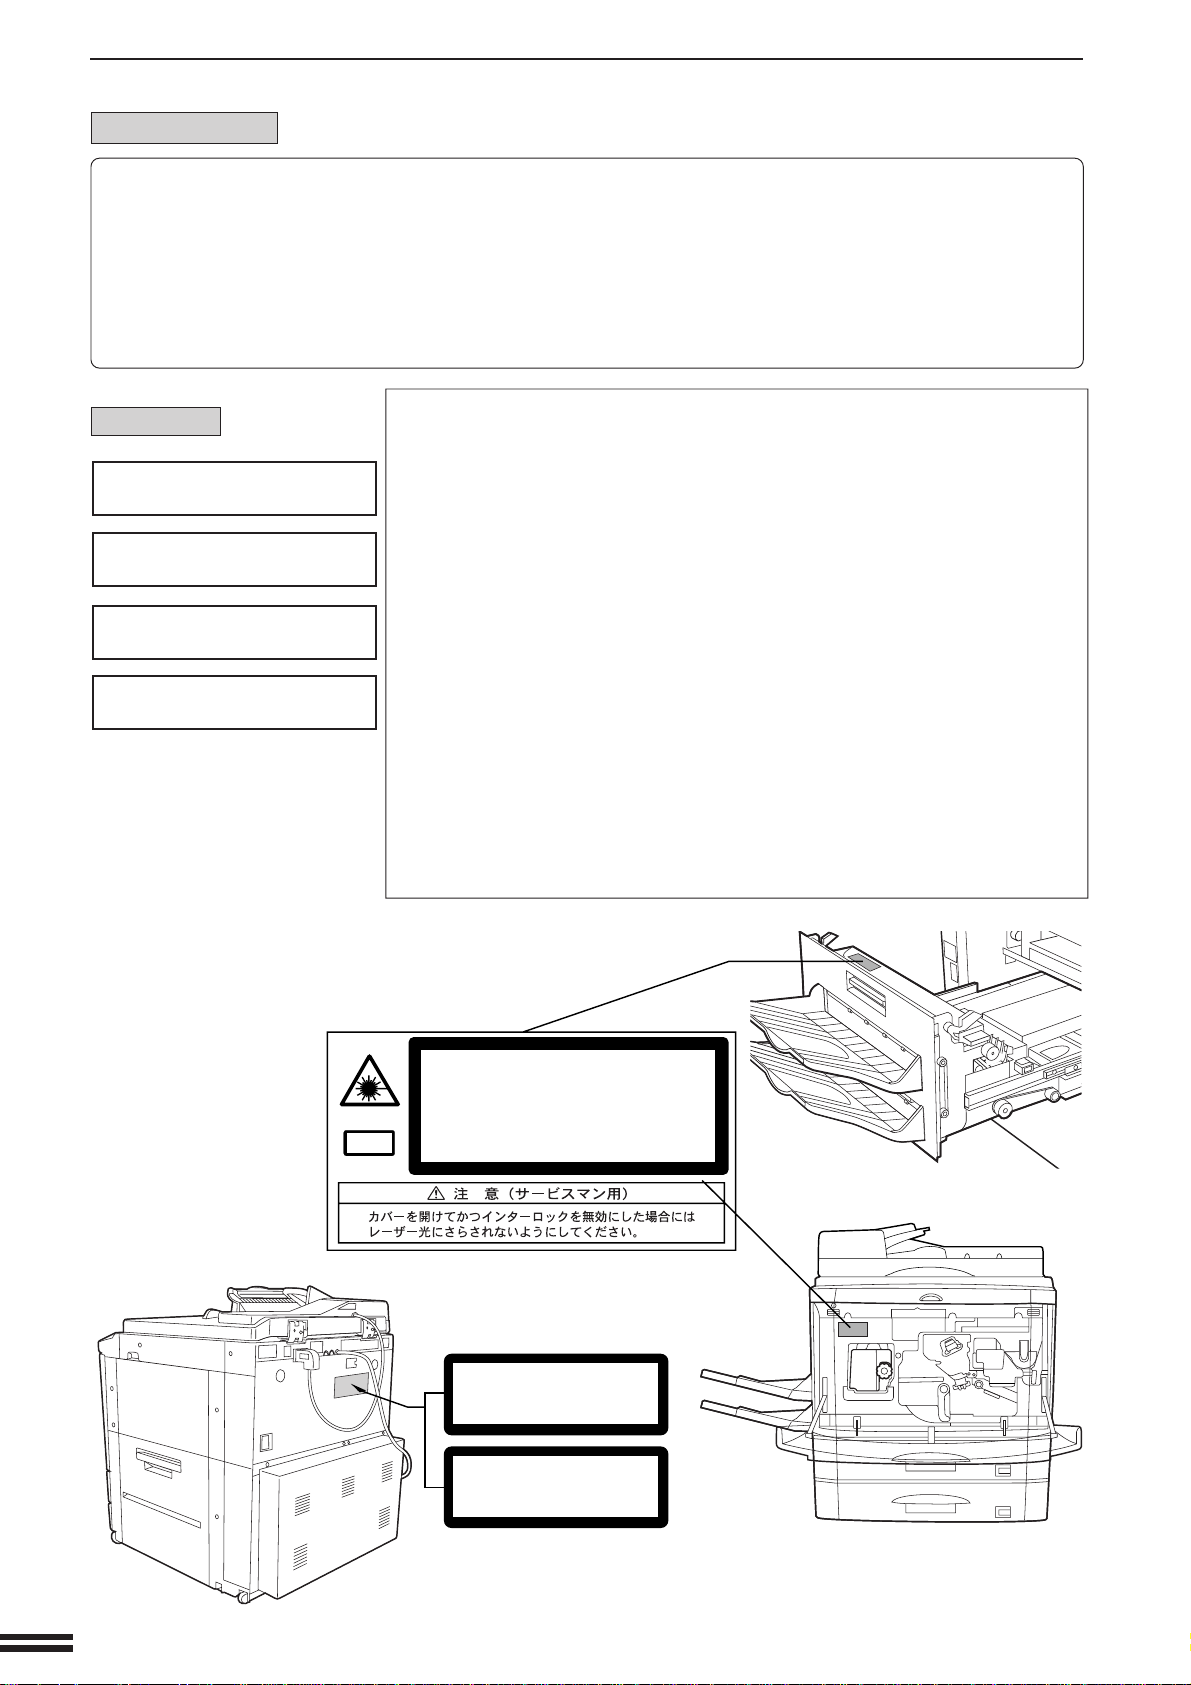
CAUTIONS
CHAPTER
For North America:
1
GETTING STARTED Cautions
For Europe:
CLASS 1 LASER PRODUCT
LASER KLASSE 1
LUOKAN 1 LASERLAITE
KLASS 1 LASERAPPARAT
SAFETY PRECAUTIONS
This Digital Copier is rated Class 1 and complies with 21 CFR 1040.10 and 1040.11 of the CDRH standards.
This means that the copier does not produce hazardous laser radiation. For your safety, observe the
precautions below.
●
Do not remove the cabinet, operation panel or any other covers.
●
The copier’s exterior covers contain several safety interlock switches. Do not bypass any safety interlock by
inserting wedges or other items into switch slots.
CAUTION
INVISIBLE LASER RADIATION
WHEN OPEN AND INTERLOCKS
DEFEATED. AVOID EXPOSURE
TO BEAM.
VORSICHT
UNSICHTBARE
LASERSTRAHLUNG WENN
ABDECKUNG GEÖFFNET UND
SICHERHEITSVERRIEGELUNG
ÜBERBRÜCKT. NICHT DEM
STRAHL AUSSETZEN.
ADVARSEL
USYNLIG LASERSTRÅLNING
VED ÅBNING, NÅR
SIKKERHEDSBRYDERE ER UDE
AF FUNKTION. UNDGÅ
UDSAETTELSE FOR
STRÅLNING.
LAITTEEN KÄYTTÄMINEN
MUULLA KUIN TÄSSÄ
KÄYTTÖOHJEESSA MAINITULLA
TAVALLA SAATTAA ALTISTAA
KÄYTTÄJÄN
TURVALLISUUSLUOKAN 1
YLITTÄVÄLLE
NÄKYMÄTTÖMÄLLE
LASERSÄTEILYLLE.
OM APPARATEN ANVÄNDS PÅ
ANNAT SÄTT ÄN I DENNA
BRUKSANVISNING
SPECIFICERATS, KAN
ANVÄNDAREN UTSÄTTAS FÖR
OSYNLIG LASERSTRÅLNING,
SOM ÖVERSKRIDER GRÄNSEN
FÖR LASERKLASS 1.
VAROITUS!
VARNING
Laserstrahl
INVISIBLE LASER RADIATION WHEN OPEN AND INTERLOCKS DEFEATED.
AVOID EXPOSURE TO BEAM.
CAUTION
VORSICHT
ADVARSEL
ADVERSEL
VARNING
VARO!
UNSICHTBARE LASERSTRAHLUNG WENN ABDECKUNG GEÖFFNET UND
SICHERHEITSVERRIEGELUNG ÜBERERÜCKT. NICHT DEM STRAHL AUSSETZEN.
USYNLIG LASERSTRÅLING VED ÅBNING, NÅR SIKKERHEDSAFBRYDERE ER
UDE AF FUNKTION. UNDGÅ UDSAETTELSE FOR STRÅLNING.
USYNLIG LASERSTRÅLING NÅR DEKSEL ÅPNES OG SIKKERHEDSLÅS BRYTES.
UNNGÅ EKSPONERING FOR STRÅLEN.
OSYNLIG LASERSTRÅLNING NÄR DENNA DEL ÄR ÖPPNAD OCH SPÄRRAR ÄR
URKOPPLADE. STRÅLEN ÄR FARLIG. BETRAKTA EJ STRÅLEN.
AVATTAESSA JA SUOJALUKITUS OHITETTAESSA OLET ALTTIINA NÄKYMÄTÖNTÄ
LASERSÄTEILYLLE. ÄLÄ KATSO SÄTEESEEN.
CLASS 1
LASER PRODUCT
LASER KLASSE 1
1-4
Page 9
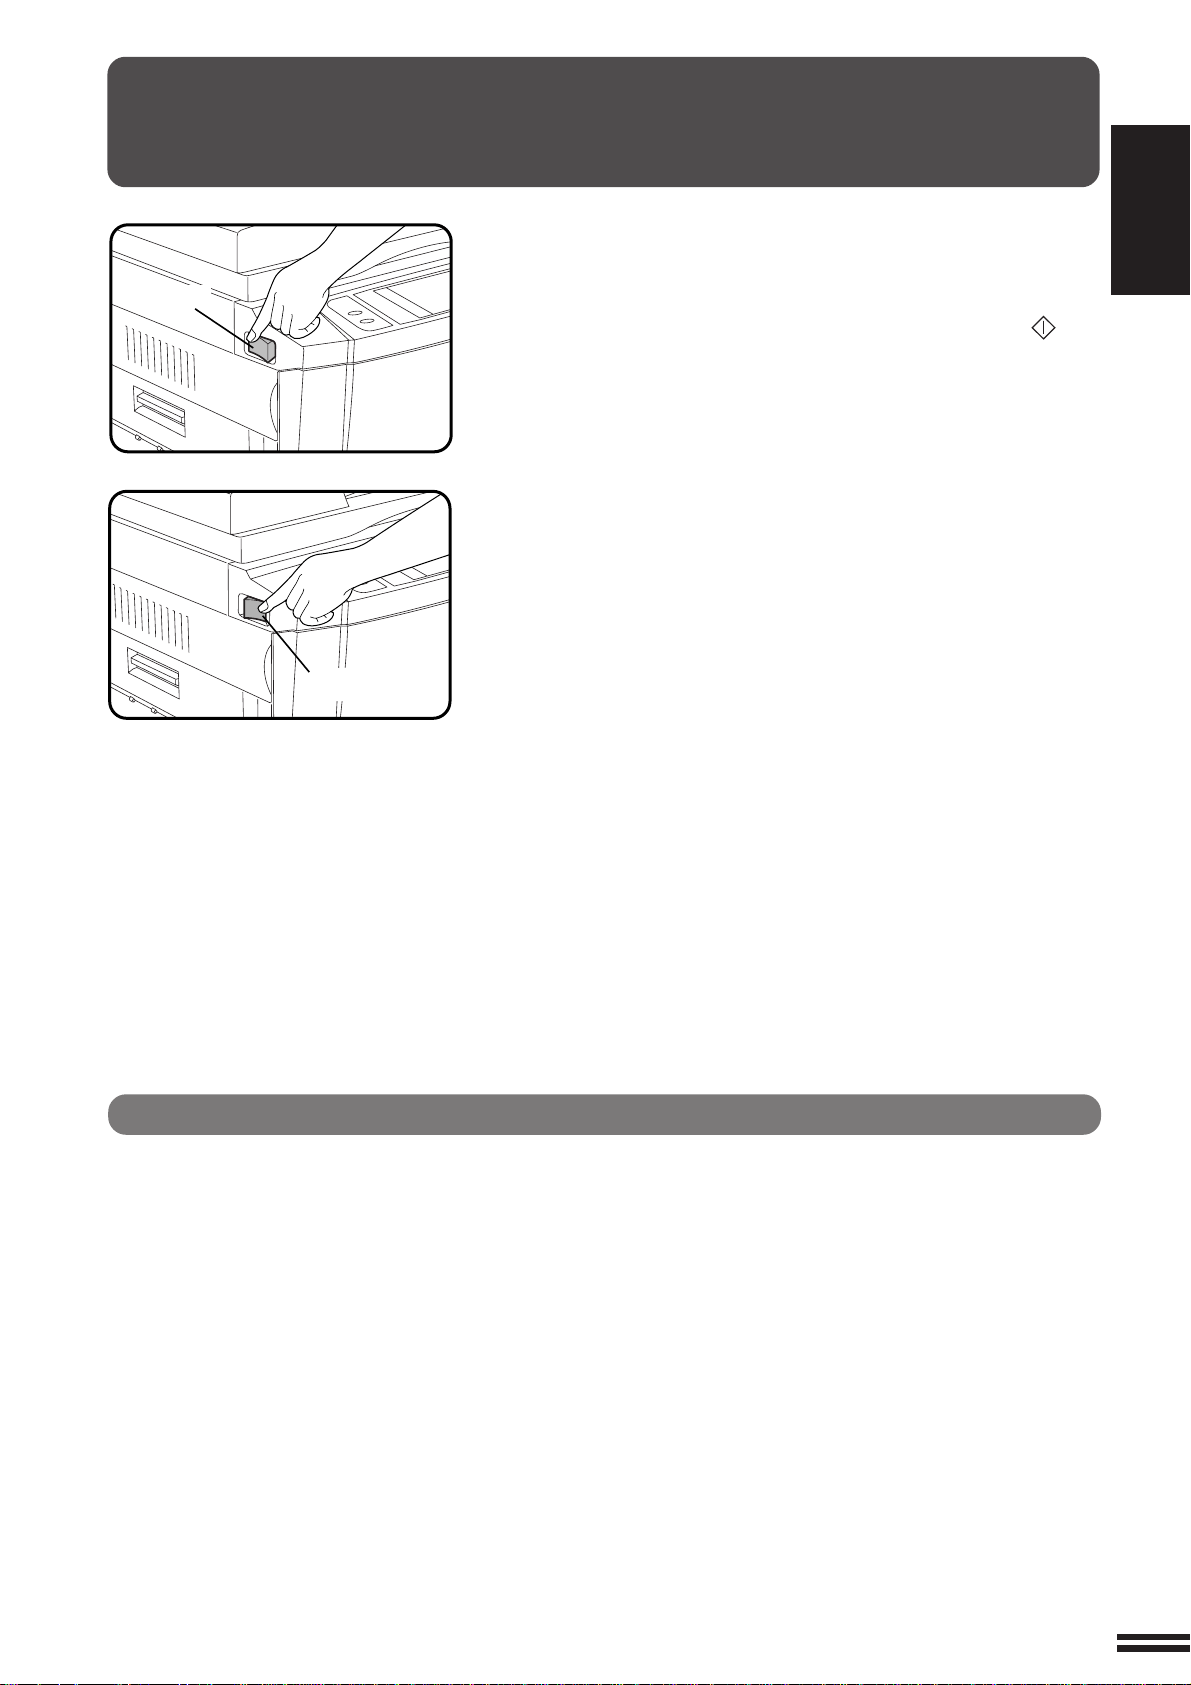
POWER ON AND OFF
Power on
Power off
CHAPTER
The power switch is located on the left side of the copier. When the
power switch is turned to the “ON” position, the message “WARMING
UP. PLEASE WAIT.” will appear in the message display. Warming
up takes about 65 seconds. Once the copier is ready, the message
display will change to “READY TO COPY.”, and the START ( ) key
indicator will light up, indicating that copying is possible.
If the copier has been programmed in the auditing mode, the
message “ENTER YOUR ACCOUNT NUMBER. -----” will appear
after warming up. Once a valid account number has been entered,
copying will become possible.
1
GETTING STARTED Power on and off
Power save modes
The copier has two power save modes to reduce overall power
consumption and thereby reduce the cost of operation and to conserve
natural resources to help reduce environmental pollution. The two
power save modes are preheat mode and auto power shut-off mode.
★ KEY OPERATOR
The preheat activation time and the auto power shut-off time have been
preset at the factory to 15 min. for preheat mode and 60 min. for auto
power shut-off mode. These times can be changed as described in the key
operator’s guide section. It is suggested that you set appropriate times
according to the actual usage of the copier.
1-5
Page 10

POWER ON AND OFF
CHAPTER
1
GETTING STARTED Power on and off
Auto power shut-off mode
If the auto power shut-off mode is enabled, the copier will
automatically turn off the power once a programmed length of time
has elapsed without any copier operation after the last copy of a run
is made or the power is first turned on. The power switch will
automatically be turned to the “OFF” position.
To turn the power back on, simply turn the power switch to the “ON”
position.
★ KEY OPERATOR See page 8-21 for setting the auto power shut-off
timer. See page 8-26 for enabling or disabling the auto power shut-off
mode.
Preheat mode
The copier will enter the mode once the set time has elapsed
without any copier operation after the last copy of a run is made or
power is turned on.
When the copier enters the preheat mode, the message “PREHEAT
MODE. PLACE ORIGINALS.” will appear.
In this condition, the fuser in the copier is maintained at a lower heat
level thereby saving power. The preheat level is, however, high
enough to allow the copier to come to a ready condition or begin
copying approximately 30 seconds after any key input is made.
To copy from the preheat mode, make desired copier selections and
press the START ( ) key using the normal copying procedure.
★ KEY OPERATOR See page 8-22 for information on setting the preheat
mode.
1-6
Page 11
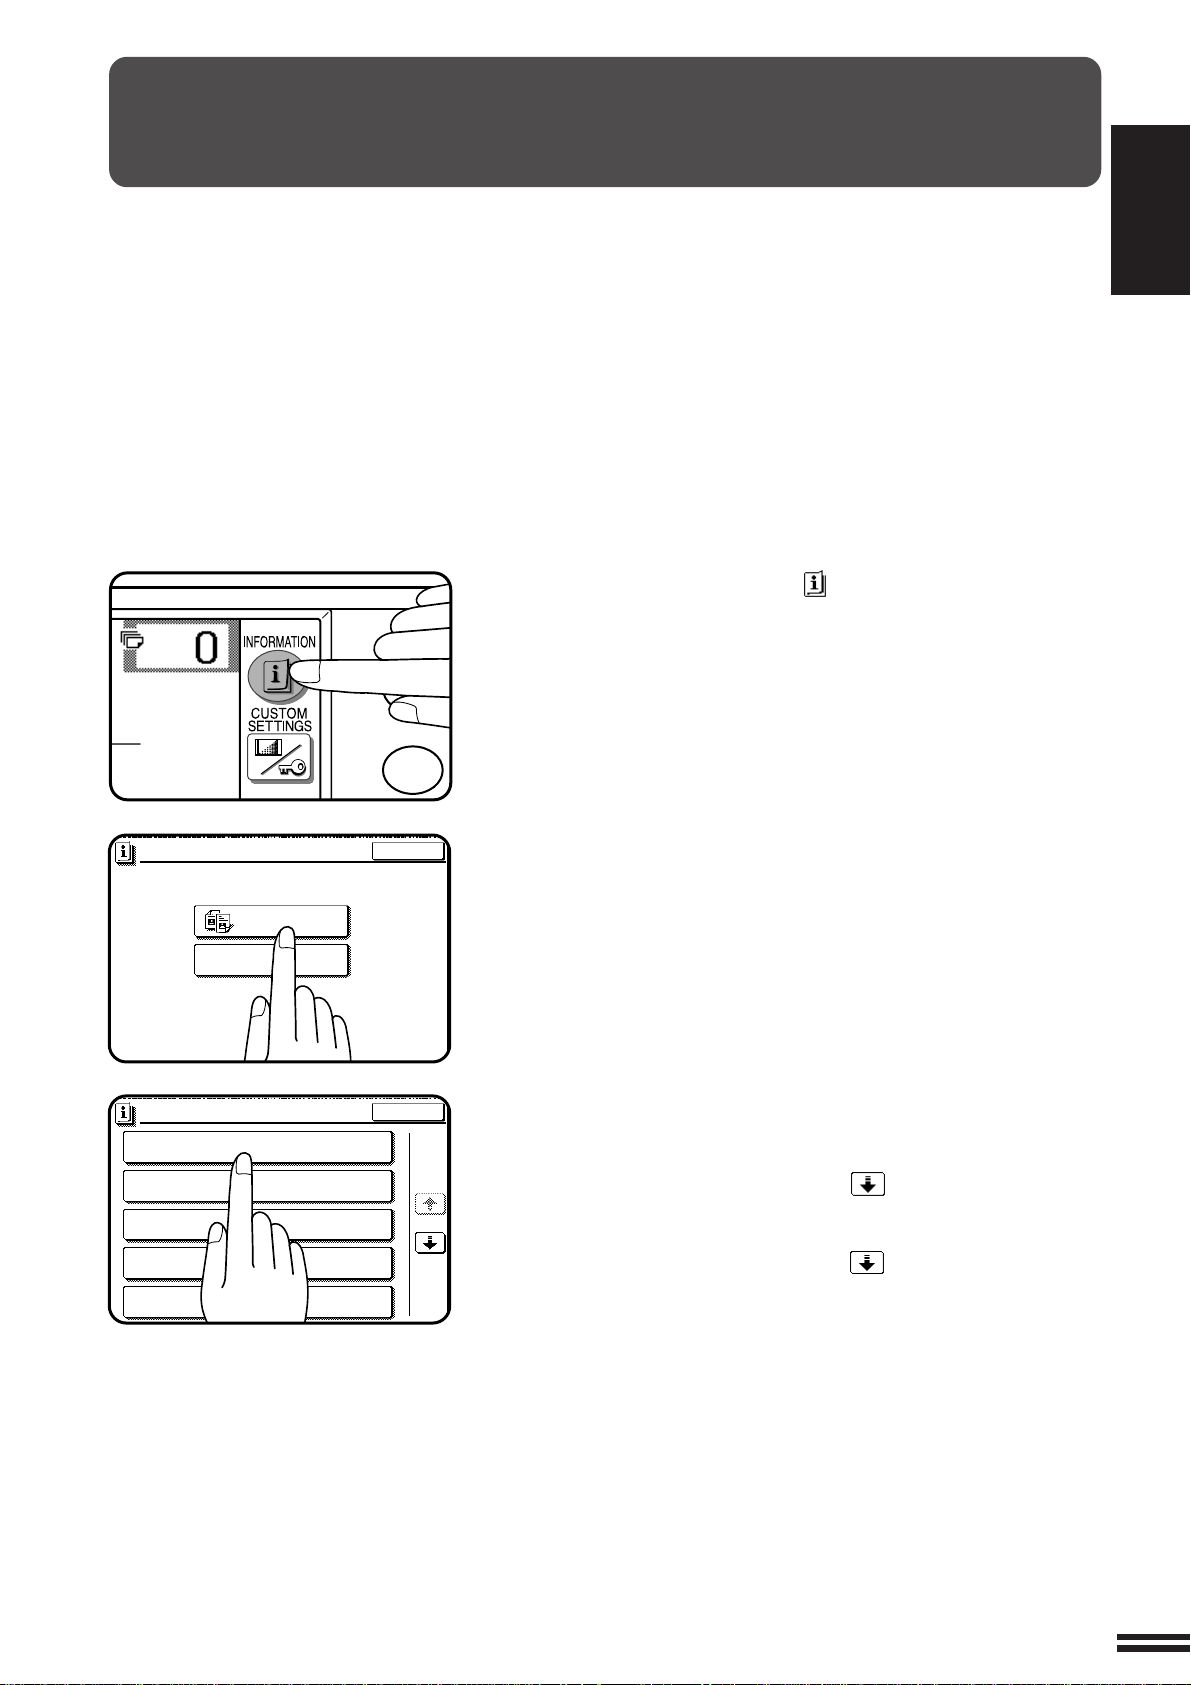
INFORMATION FUNCTION
1
4
EXIT
MAKING 2-SIDED COPIES (2-SIDED COPY)
INFORMATION
SORTING COPIES INTO SETS OR STAPLING
FINISHED SETS OF COPIES (OUTPUT)
USING THE DOCUMENT FEEDER
(
DOCUMENT FEEDER
)
REDUCTION/ENLARGEMENT/ZOOM
(COPY RATIO)
STORING FREQUENTLY USED JOB PROGRAMS
(PROGRAM)
1/5
EXIT
INFORMATION
SELECT INFORMATION.
COPIER
ADDING TONER
INSTRUCTIONS
CHAPTER
The information function provides a quick reference guide to the use
of the various features and functions of this copier. The information
mode can be entered when the copier is in the standby mode.
Press the INFORMATION ( ) key in the standby mode.
1
●
The screen for the information categories will appear.
1
GETTING STARTED Information function
Select the “COPIER” key to display the first screen of
the copier feature items.
2
●
If the toner supply is not low, this step is not needed.
Select the feature you would like to know about by
pressing a copier feature item key on the touch panel.
3
●
If the feature you would like to know about is not displayed on
the touch panel, press the scroll ( ) key on the touch panel
until the feature is displayed.
●
If a copier feature item key is pressed, the description for that
feature will appear. Use the scroll ( ) key to display additional
information until all information for that feature has been
displayed.
●
To return to the copier feature item screen, press the “INDEX”
key.
●
To exit the INFORMATION mode, press the “EXIT” key on the
touch panel.
1-7
Page 12
CHAPTER
READY TO COPY.
AUTO
EXPOSURE PAPER SELECT
100%
COPY RATIO
AUTO 8/ 11
1
2
1.
A4
2.
A3
STORE/DELETE
RECALL
ERASE
EDGE ERASE
CENTRE ERASE
EDGE+CENTRE
ERASE
CANCEL
10
OK
OK
(0~20)
mm
READY TO COPY.
SPECIAL MODES
MARGIN SHIFT
MULTI SHOT
PAMPHLET COPY
ERASE
COVERS
IMAGE EDIT
TEXT STAMP
TRANSPARENCY
INSERTS
DUAL PAGE
COPY
OK
AUTO
EXPOSURE PAPER SELECT
100%
COPY RATIO
AUTO
A4
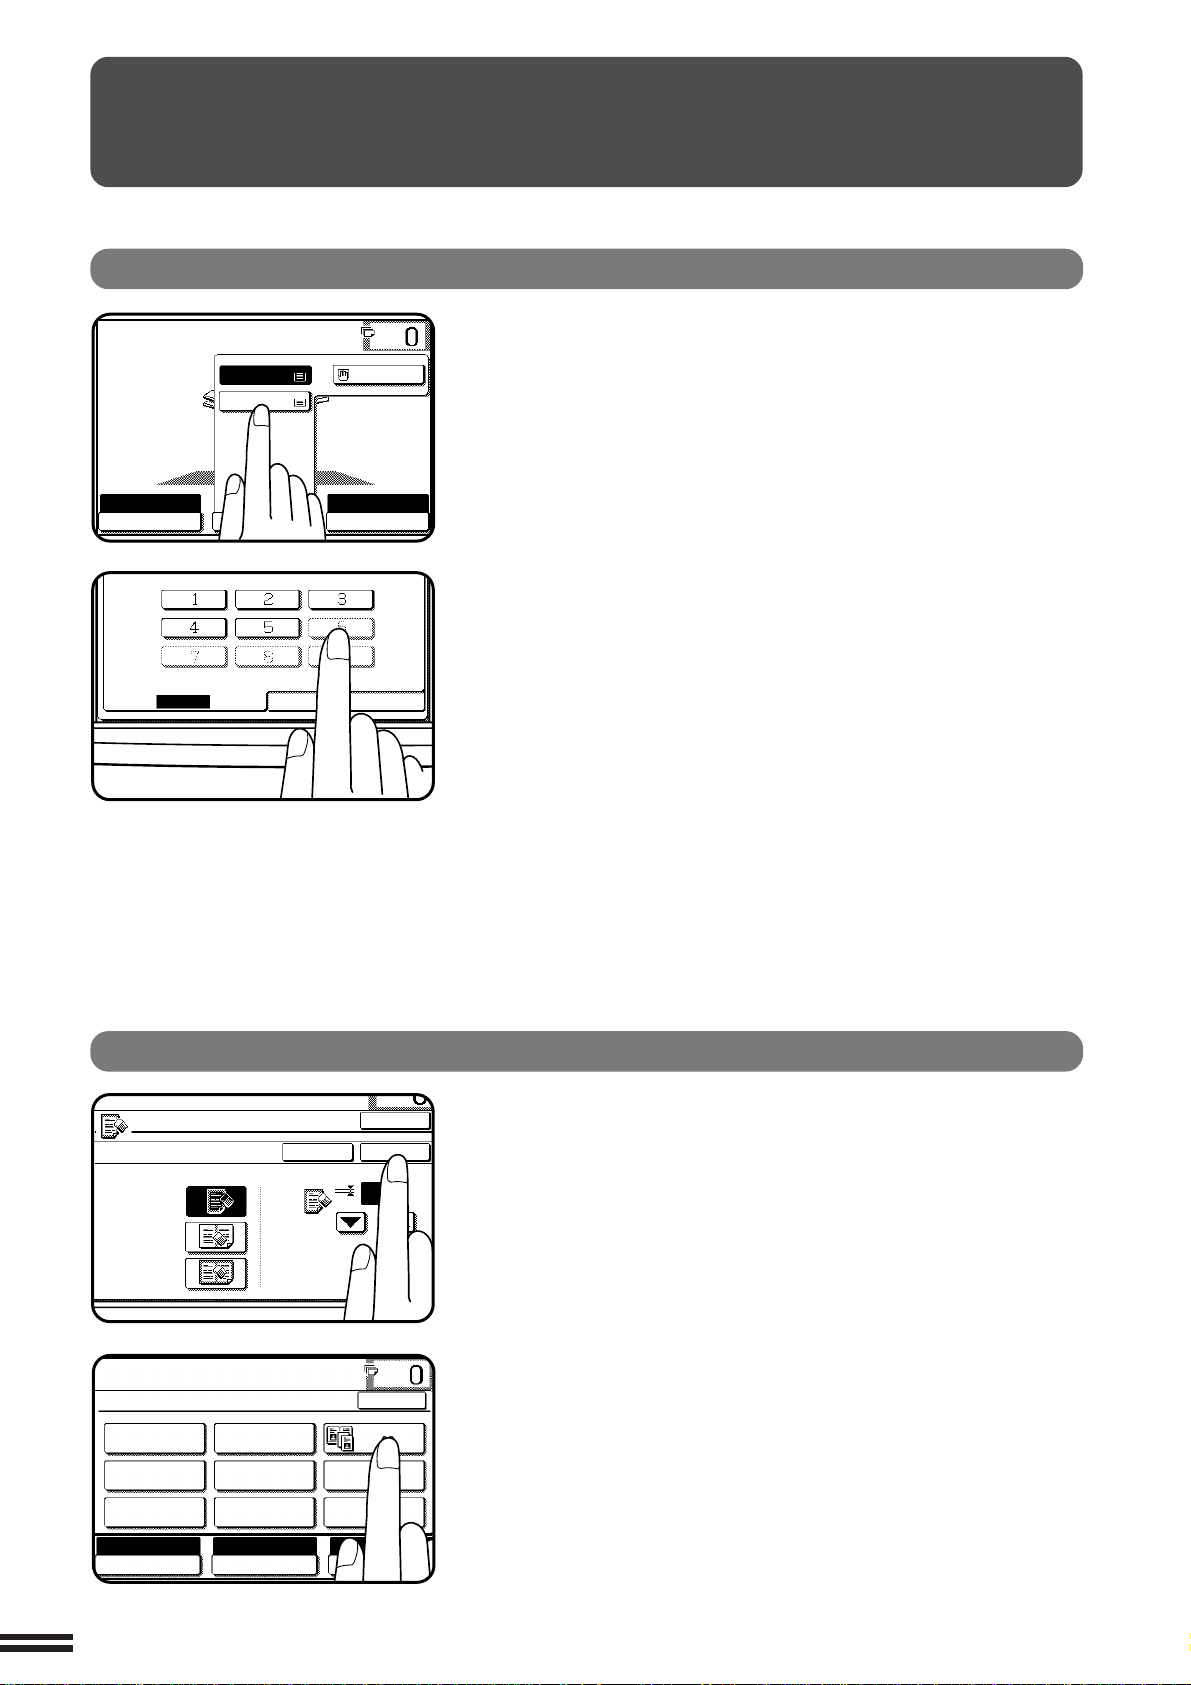
USING THE TOUCH P ANEL
1
How to use the touch panel
GETTING STARTED Using the touch panel
You can set or cancel a function displayed on the touch
panel by pressing (touching) a key with a finger. The touch
key operation can be confirmed with a beep tone (and
highlighted display).
★ KEY OPERATOR For the beep tone to be heard, the beep tone must be
enabled by a key operator program. See page 8-26.
If any keys are displayed gray, the keys have been disabled.
If you press these keys, two short beeps will be sounded.
Selection of function
1-8
To register the selected settings for a function, press the
“OK” key on the setting screen. The settings indicated by
a highlighted display will be registered as a selected function.
Some special functions can be selected by pressing the
relevant keys on the SPECIAL MODES screen (page 3-4) or
on the IMAGE EDIT menu (page 3-21) to highlight the keys.
To cancel these functions, press the relevant keys again to
return the keys to the normal display. These functions are:
Dual page copying, Centring, Hi-Fi copy, B/W reverse, and
Binding change.
Page 13
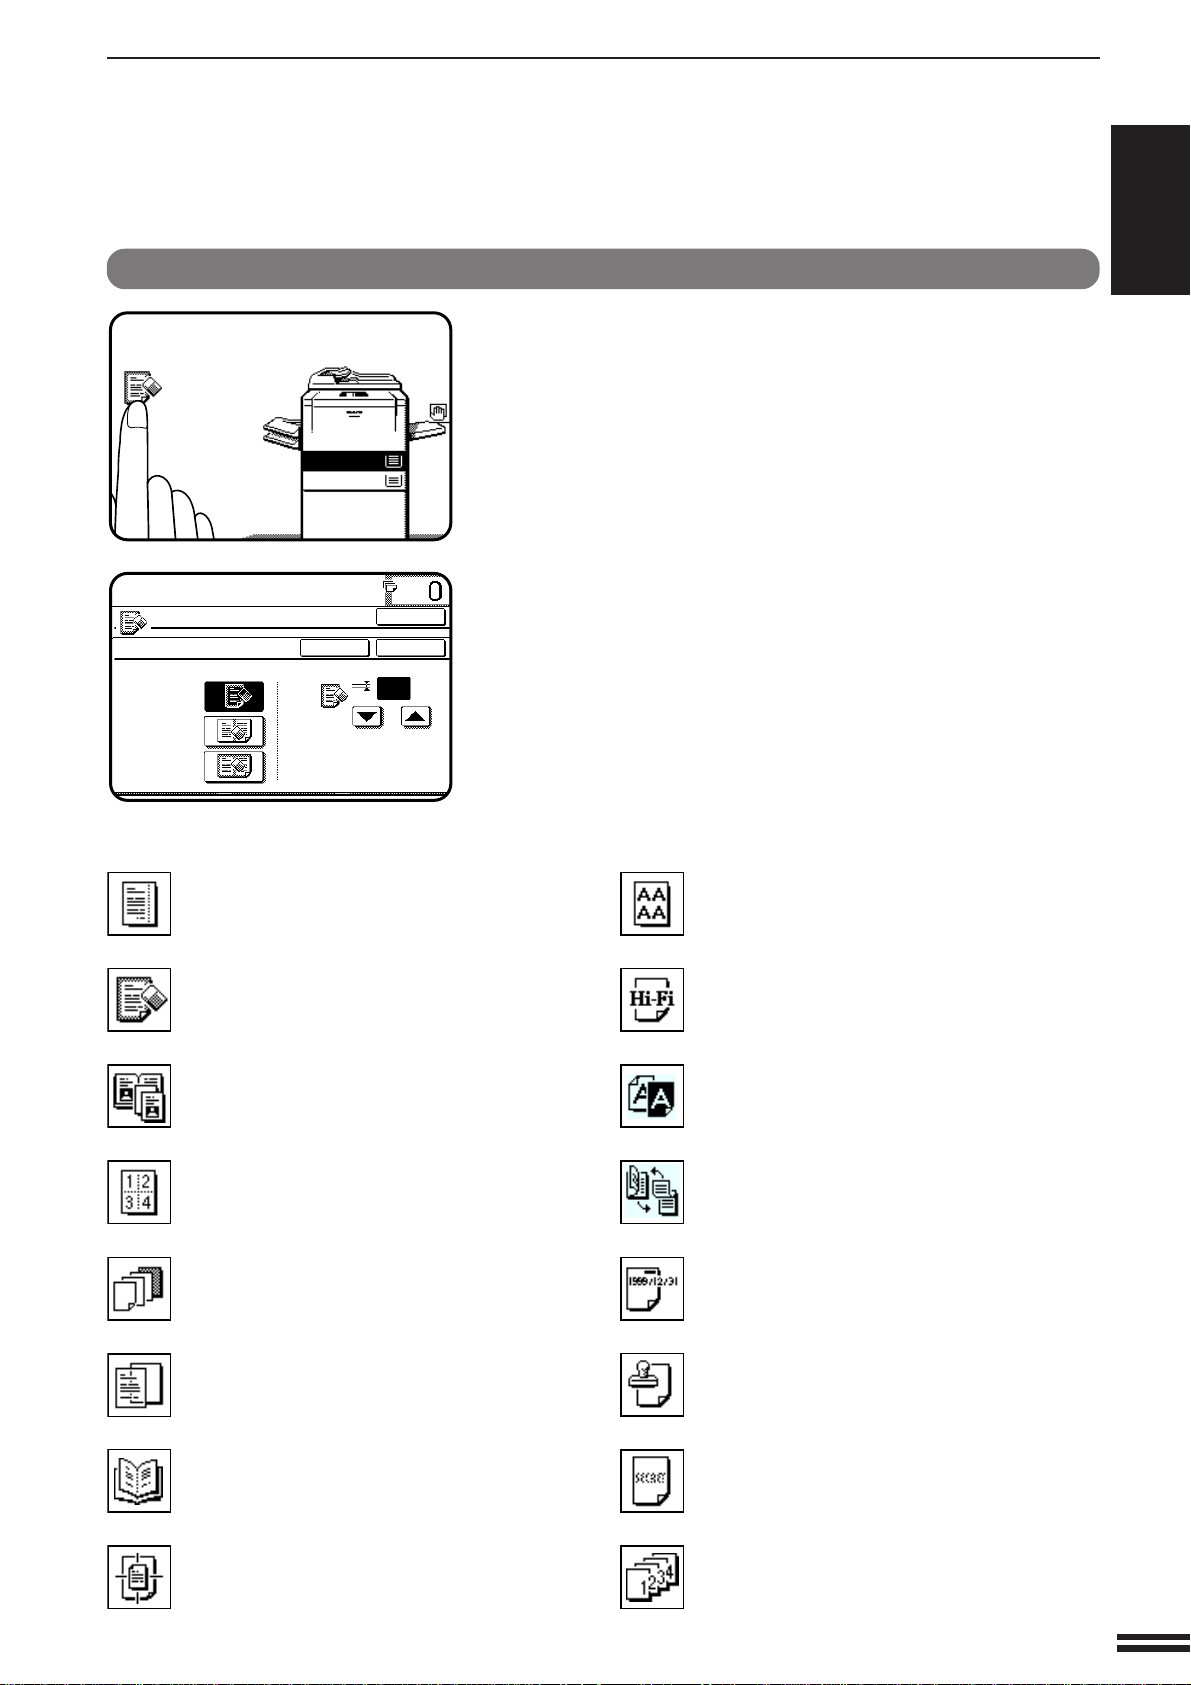
Function setting icons
READY TO COPY.
1.
A4
2.
A3
READY TO COPY.
ERASE
EDGE ERASE
CENTRE ERASE
EDGE+CENTRE
ERASE
CANCEL
10
OK
OK
(0~20)
mm
*2 Margin shift (p.3-4)
*
2
Erase (p.3-6)
*
1
Dual page copying (p.3-8)
*
2
Multi shot (p.3-10)
*
2
Covers (p.3-13)
*
2
Transparency film with insert sheets
(p.3-15)
Pamphlet copy (p.3-17)
*
1
Centring (p.3-20)
*
2
Repeat copy (p.3-22)
*
1
Hi-Fi (p.3-25)
*
1
B/W reverse (p.3-27)
*
1
Binding change (p.3-29)
Date (p.3-32)
Select stamp (p.3-35)
Watermark (p.3-38)
Page number (p.3-41)
USING THE TOUCH P ANEL
CHAPTER
1
GETTING STARTED Using the touch panel
Selected special functions are indicated with their icons on
the basic screen. The setting screen for a selected function
can be easily called by pressing its icon. (The functions
indicated below with *1 have no setting screen and, therefore,
no setting screen can be called.)
If multiple special functions are selected, up to six icons will
be displayed.
The function setting icons are listed below. The content of
the icons indicated by *2 will change depending upon the
particular settings for these functions.
1-9
Page 14

Page 15

CHAPTER 2
MAKING COPIES
This chapter describes the basic copying functions
such as normal copying, reduction/enlargement,
and exposure adjustments.
Page
●
AUDITING ACCOUNTS...................................... 2-2
●
USING THE SPF/RADF...................................... 2-3
●
COPYING FROM THE DOCUMENT GLASS ...................... 2-8
●
REDUCTION/ENLARGEMENT/ZOOM .......................... 2-11
●
SPECIAL PAPERS (manual feed) ............................. 2-14
Two sided copying with bypass tray ............................ 2-15
●
EXPOSURE ADJUSTMENTS ................................ 2-16
●
SORT/GROUP ........................................... 2-17
●
JOB MEMORY ........................................... 2-18
●
INTERRUPTING A COPY RUN ............................... 2-20
CHAPTER
2
2-1
Page 16
If this copier has been programmed in the auditing mode, it will not
1
2 3
4 5
6
7
8
9
0
C
P
CLEAR
PROGRAM
AUDIT CLEAR
INTERRUPT
function until an assigned 5-digit account number has been entered.
★ KEY OPERATOR See page 8-9 for setting the auditing mode.
CHAPTER
2
AUDITING ACCOUNTS
MAKING COPIES Auditing accounts
The initial status of the message display will be:
ENTER YOUR ACCOUNT NUMBER. –––––
●
Enter your account number using the 10-key pad.
●
As each digit is entered, the dashes in the display will change to
asterisks.
The following message will appear after the number is entered.
ACCOUNT STATUS: COPIES MADE 000,000
COPIES REMAINING 000,000
“COPIES REMAINING” will appear only if account limit has been
set using a key operator program.
★ KEY OPERATOR See page 8-12 for account limit settings.
●
The message will be displayed for several seconds, then
change to the following message.
READY TO COPY.
●
When a copy run is performed, the following message will
appear.
READY TO COPY.
PRESS [AUDIT CLEAR] WHEN FINISHED.
2-2
(In some regions, [ACC.#-C] is displayed in place of [AUDIT
CLEAR].)
●
In the interrupt copy mode (see page 2-20), the following
message will appear instead of the message above.
READY TO COPY. WHEN COPYING IS
FINISHED, PRESS [INTERRUPT].
NOTE:
If an unassigned number is entered, the message display will show
“ENTER YOUR ACCOUNT NUMBER.-----”, indicating that the
number was not accepted.
When the key operator program of account number security has
been set:
If an unassigned number is entered three successive times, the
copier will not accept another number for one minute, and the
following message will appear.
PLEASE SEE YOUR KEY OPERATOR FOR
ASSISTANCE.
★ KEY OPERATOR See page 8-13 for account number
security.
Page 17

USING THE SPF/RADF
●
The SPF* (single pass feeder) and the RADF* (reversing
automatic document feeder) will handle multiple
originals.
* The SPF is installed to the AR-280 and the RADF is
installed to the AR-285 and AR-335.
●
Before loading originals into the document feeder
tray, be sure to remove any staples or paper clips
from them.
●
Damaged or crumpled originals or originals which
have been folded may misfeed in the SPF/RADF or
cause incorrect size detection. It is recommended
that these be copied from the document glass and
the copies be used as original documents.
●
When feeding originals which have closely spaced
binding holes punched along an edge, place the
originals so that the punched edge is positioned to
the right or along the side guides.
●
Special originals such as transparency film and tracing
paper should not be fed from the SPF/RADF, but
should be placed on the document glass.
Duplex copying will not work when a non-standard
sized paper (or 5-1/2" x 8-1/2" paper) is used.
●
If the orientation of the originals does not match that
of the copy paper when both the originals and copy
paper are of standard sizes and the auto paper select
mode or automatic copy ratio select mode is on, the
image of the originals will be automatically rotated to
match the copy paper. However, if enlargement
copying onto a paper size larger than A4 (8-1/2" x
11") is performed, the image will not be rotated.
●
Image loss (max. 5mm (13/64")) can occur along the
leading and trailing edges of the copies. Also image
loss (max. 5mm (13/64") in total) can occur along the
other edges of the copies.
CHAPTER
2
MAKING COPIES Using the SPF/RADF
Notes on the SPF (AR-280)
●
The SPF can handle a maximum of 30 originals of A5
to A4 (5-1/2" x 8-1/2" to 8-1/2" x 11") sizes and 15
originals of B4 to A3 (8-1/2" x 14" to 11" x 17") sizes.
●
2-sided to 1-sided copying and 2-sided to 2-sided
copying cannot be performed in this model.
●
The originals must be set face down in the document
feeder tray.
●
Do not place different size originals in the document
feeder tray. Doing so may cause copying onto different
sizes or original misfeeds.
Stream feeding mode
If the stream feeding mode has been enabled using a key operator
program, the message “NEWLY PLACED ORIGINALS WILL BE FED
AND COPIED AUTOMATICALLY.” will appear and the original feed
indicator (AR-285/AR-335 only) will continue to blink for approximately
5 seconds after feeding of all originals is completed. While this
message is displayed, any new originals placed in the document
feeder tray will be fed and copied automatically.
Notes on the RADF (AR-285 and AR-335)
●
The RADF can handle a maximum of 50 originals of
A5 to A4 (5-1/2" x 8-1/2" to 8-1/2" x 11") sizes and 30
originals of B4 to A3 (8-1/2" x 14" to 11" x 17") sizes.
●
2-sided to 1-sided copying and 2-sided to 2-sided
copying can be performed in these models.
●
The originals must be set face up in the document
feeder tray.
●
Different size originals with the same width can be
placed in the document feeder tray and automatically
copied onto copy paper of their respective sizes.
The automatic copy ratio selection will not function in
this case.
★ KEY OPERATOR See page 8-17 for information on setting the
stream feeding mode.
2-3
Page 18
USING THE SPF/RADF
1
2 3
4 5
6
7
8
9
0
C
P
CLEAR
PROGRAM
AUDIT CLEAR
INTERRUPT
C
CLEAR
INTERRUPT
CA
CLEAR ALL
START
1-sided copies of 1-sided originals
CHAPTER
2
MAKING COPIES Using the SPF/RADF
READY TO COPY. (DOCUMENT FEEDER MODE)
AUTO
EXPOSURE PAPER SELECT
1.
A4
2.
A3
A4
AUTO
ORIGINAL
A4
100%
COPY RATIO
Adjust the original guides to the size of the originals and
set the originals face down (AR-280) or face up (AR-285/
1
AR-335) in the document feeder tray.
●
The original size will be indicated on the touch panel, and the
paper tray with the corresponding paper size will be automatically
selected.
●
Be sure to remove any original from the document glass before
setting the originals in the document feeder tray. In the AR-285
and AR-335, if an original is left on the document glass, the
original reminder indicator will blink. Remove the original from
the document glass in this case.
●
If copy paper of the required size is not installed in any of the
trays, the following message will appear.
LOAD PAPER.
If a tray of the required size is not installed, use the bypass tray
and press the “PAPER SELECT” key on the touch panel to
select the bypass tray.
●
To copy onto a different size paper, use the “PAPER SELECT”
key to make the selection.
Ensure that the 1-sided to 1-sided copying mode is
selected on the touch panel.
2
●
When no icon is displayed in the area indicated in the illustration
( ), the 1-sided to 1-sided copying mode is selected.
●
If the 1-sided to 1-sided mode is not selected, press the
2-SIDED COPY key and then press the 1-sided to 1-sided key
( ) on the touch panel. Press the “OK” key to return to the
basic screen.
2-4
Use the 10-key pad to enter the desired number of
copies.
3
●
The number will be shown in the copy quantity display of the
touch panel.
●
Use the CLEAR (C) key to cancel an entry if a mistake has
been made.
●
If you set a multiple number of copies, the copies will be
delivered collated. To deliver in the GROUP mode, press the
OUTPUT key and then select “GROUP” on the touch panel. See
page 2-17.
Press the START ( ) key.
4
●
To cancel a copy run, press the CLEAR ALL (CA) key. Copying
will stop and the SPF/RADF will output any originals which have
been fed. Also, the number in the copy quantity display will be
reset to 0.
Page 19
USING THE SPF/RADF
1
2 3
4 5
6
7
8
9
0
P
PROGRAM
INT
CA
CLEAR ALL
START
READY TO COPY.(DOCUMENT FEEDER MODE)
2-SIDED COPY
OK
AUTO
EXPOSURE PAPER SELECT
100%
COPY RATIO
AUTO
A4
AUTO
EXPOSURE PAPER SELECT
100%
COPY RATIO
OK
AUTO
A4
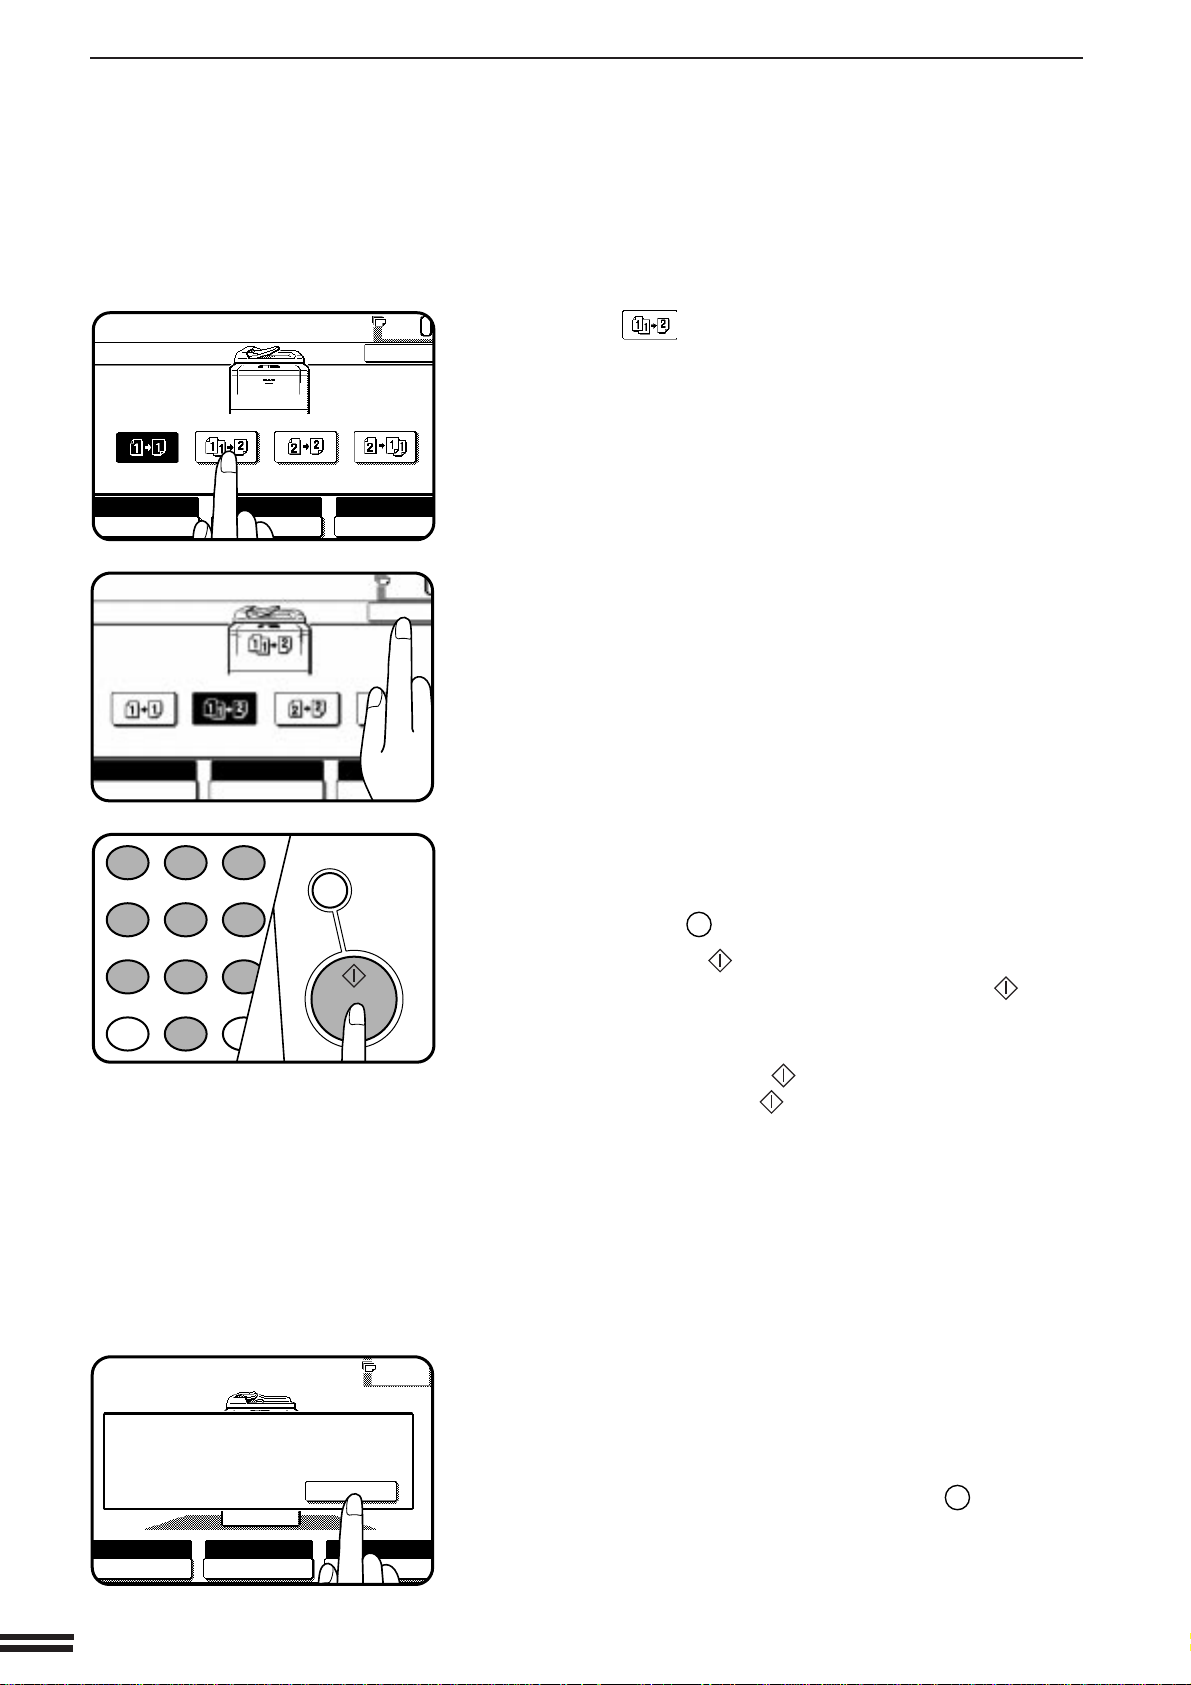
2-sided copies from 1-sided originals
To copy in the 1-sided to 2-sided copy mode with the AR-280, an
optional duplex module (AR-DU1) must be installed.
Adjust the original guides to the size of the originals and
set the originals face down (AR-280) or face up (AR-285/
1
AR-335) in the document feeder tray.
Press the 2-SIDED COPY key.
2
Press the key on the touch panel.
3
CHAPTER
2
MAKING COPIES Using the SPF/RADF
Press the “OK” key.
4
Enter the desired number of copies.
5
Press the START ( ) key.
6
●
To cancel a copy run during duplex copying, press the CLEAR
ALL (CA) key.
2-5
Page 20
USING THE SPF/RADF
1
2 3
4 5
6
7
8
9
0
P
PROGRAM
INT
CA
CLEAR ALL
START
READY TO COPY.(DOCUMENT FEEDER MODE)
2-SIDED COPY
OK
AUTO
EXPOSURE PAPER SELECT
100%
COPY RATIO
AUTO
A4
READY TO COPY.(DOCUMENT FEEDER MODE)
2-SIDED COPY
OK
AUTO
EXPOSURE PAPER SELECT
100%
COPY RATIO
AUTO
A4
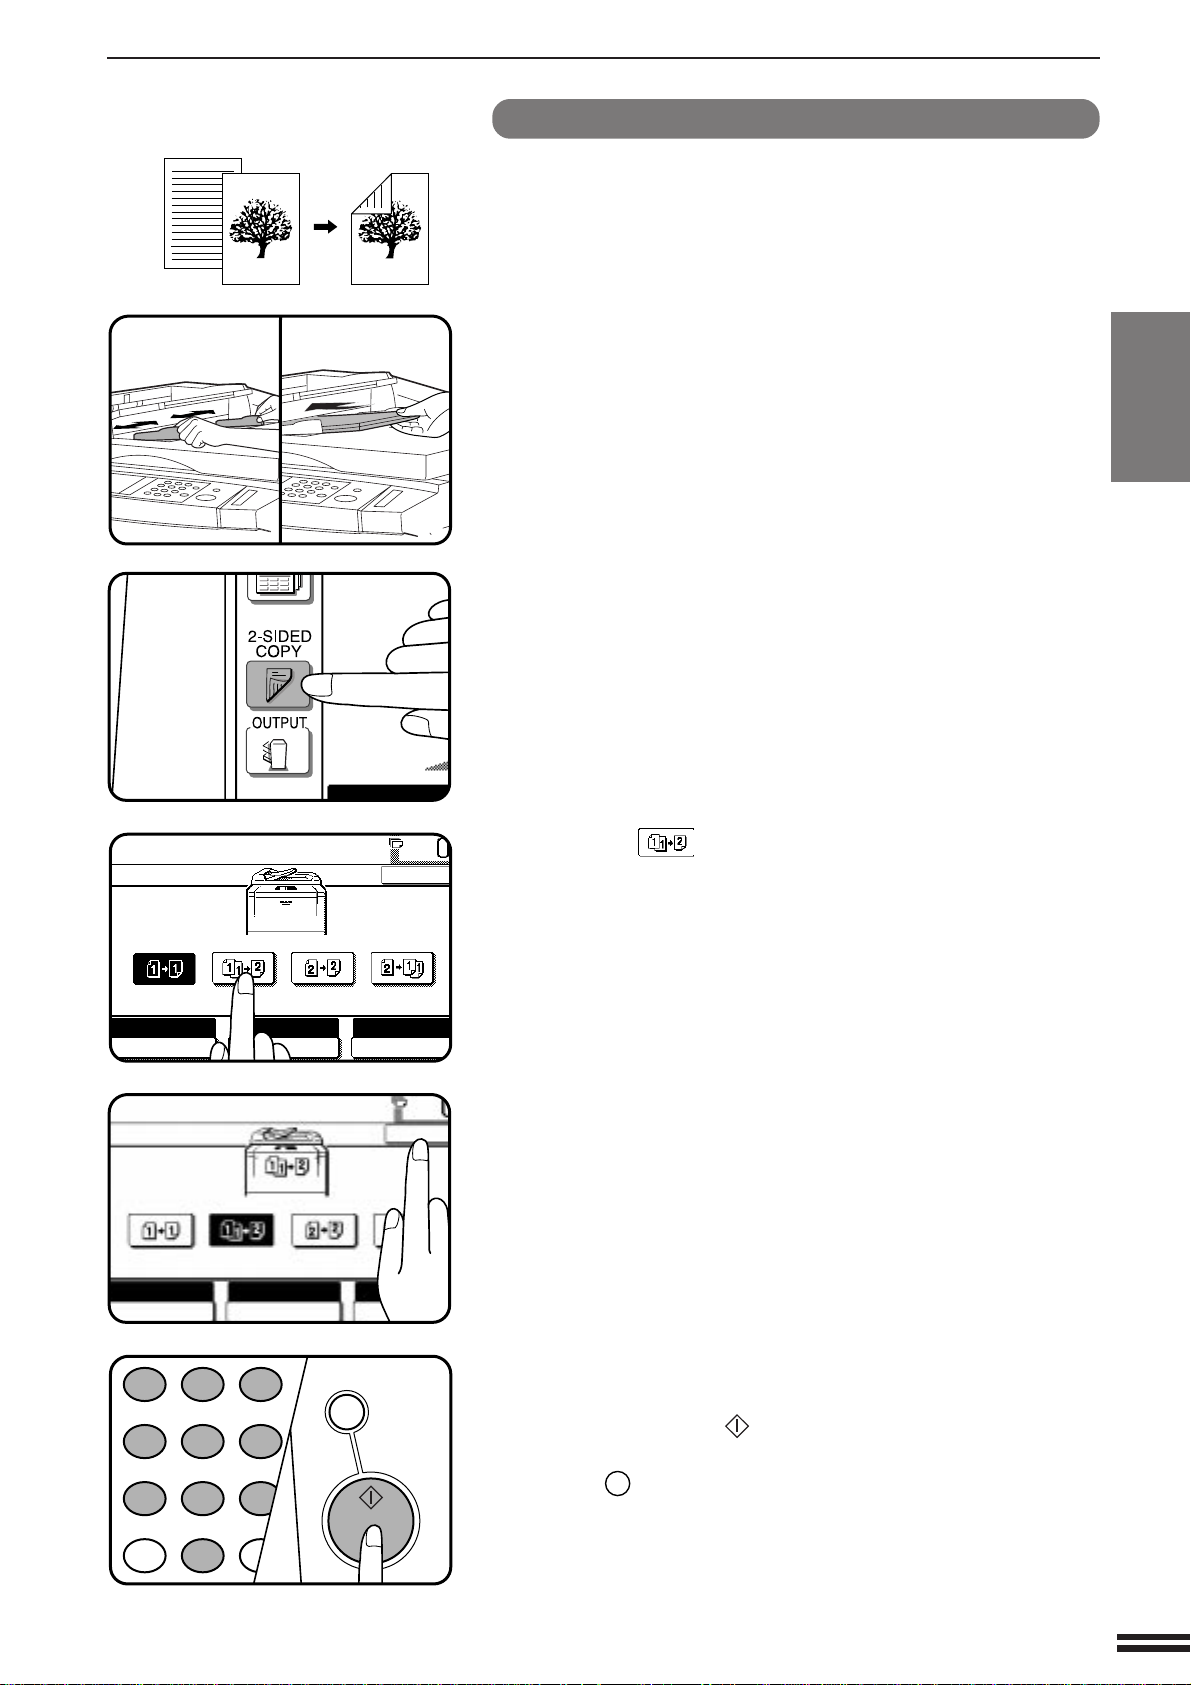
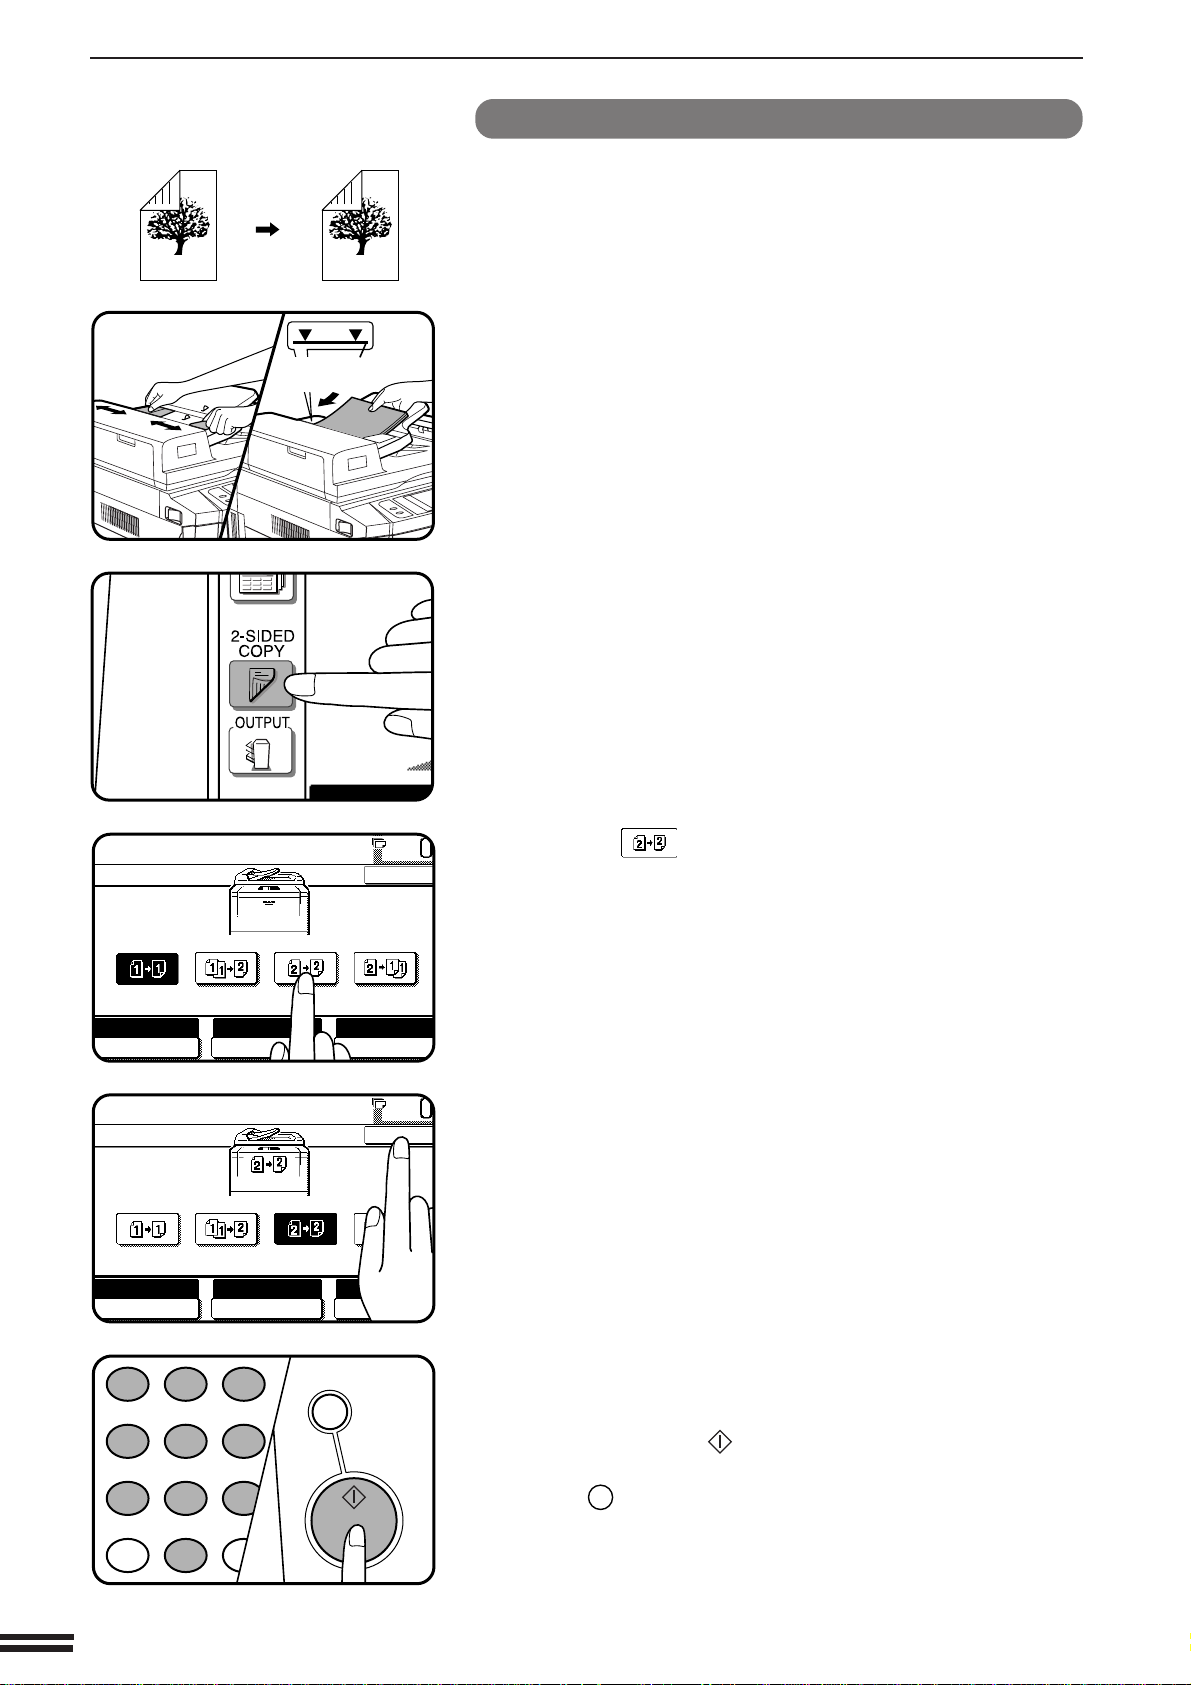
2-sided copies from 2-sided originals
This mode cannot be used in the AR-280 because the RADF is needed
in this mode.
CHAPTER
2
MAKING COPIES Using the SPF/RADF
Maximum height
line
Adjust the original guides to the size of the originals and
set the originals face up in the document feeder tray.
1
Press the 2-SIDED COPY key.
2
Press the key on the touch panel.
3
2-6
Press the “OK” key.
4
Enter the desired number of copies.
5
Press the START ( ) key.
6
●
To cancel a copy run during duplex copying, press the CLEAR
ALL (CA) key.
Page 21
USING THE SPF/RADF
1
2 3
4 5
6
7
8
9
0
P
PROGRAM
INT
CA
CLEAR ALL
START
READY TO COPY.(DOCUMENT FEEDER MODE)
2-SIDED COPY
OK
AUTO
EXPOSURE PAPER SELECT
100%
COPY RATIO
AUTO
A4
READY TO COPY.(DOCUMENT FEEDER MODE)
2-SIDED COPY
OK
AUTO
EXPOSURE PAPER SELECT
100%
COPY RATIO
AUTO
A4
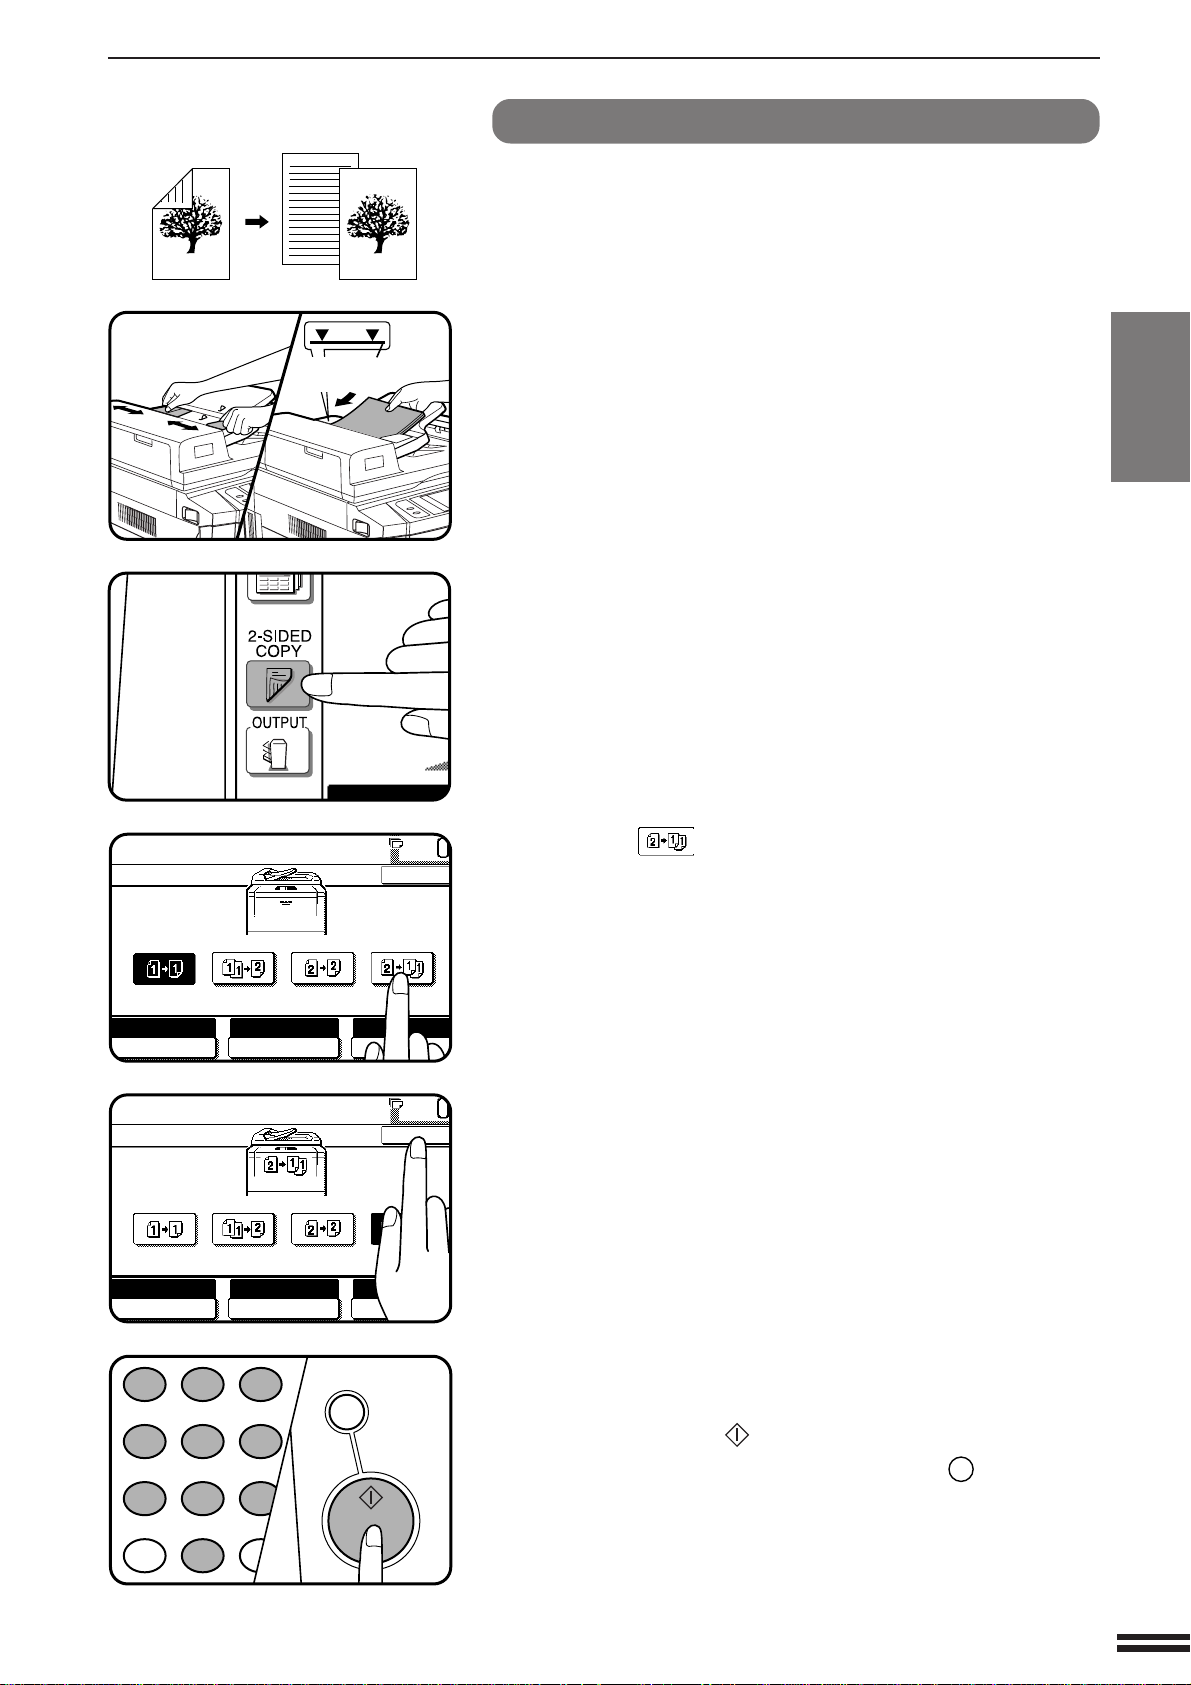
1-sided copies from 2-sided originals
This mode cannot be used in the AR-280 because the RADF is needed
in this mode.
Maximum height
line
Adjust the original guides to the size of the originals and
set the originals face up in the document feeder tray.
1
Press the 2-SIDED COPY key.
2
Press the key on the touch panel.
3
CHAPTER
2
MAKING COPIES Using the SPF/RADF
Press the “OK” key.
4
Enter the desired number of copies.
5
Press the START ( ) key.
6
●
To cancel a copy run, press the CLEAR ALL (CA) key. Copying
will stop and the RADF will output any originals which have been
fed. Also, the number in the copy quantity display will be reset
to 0.
2-7
Page 22
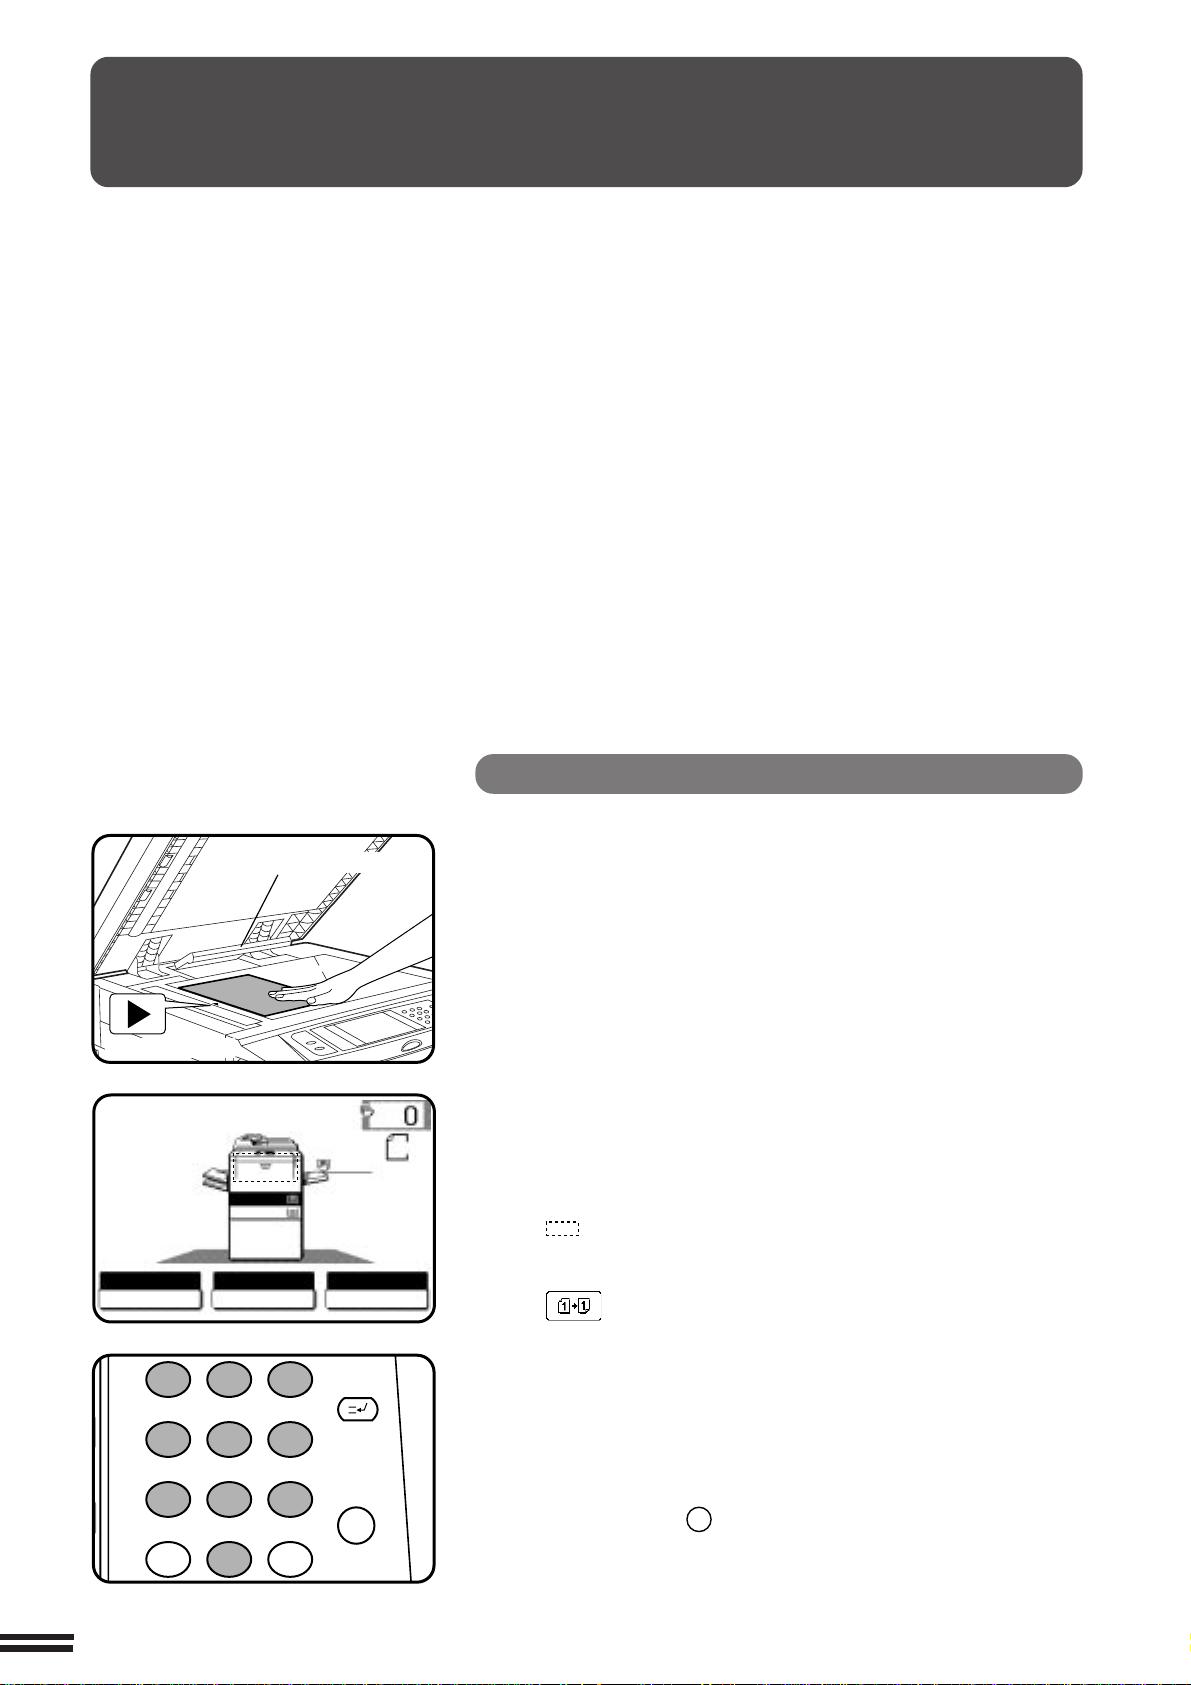
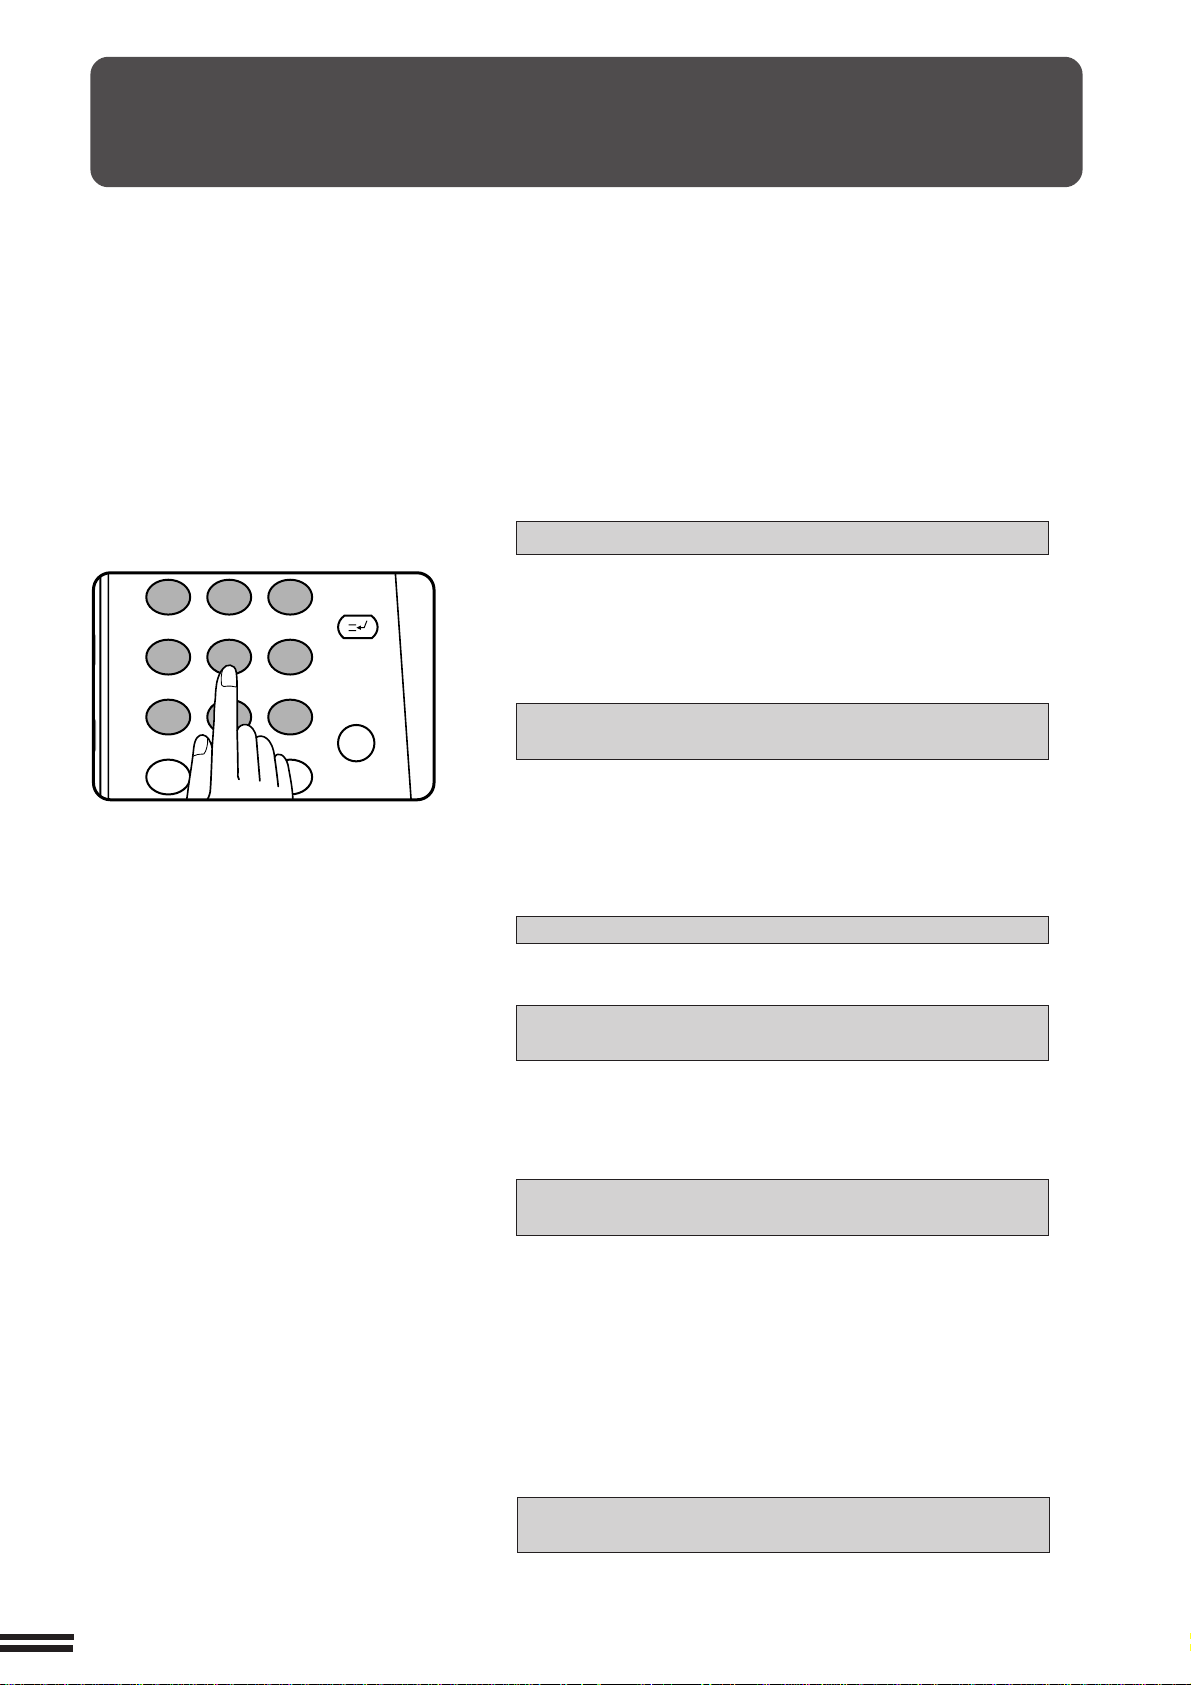
COPYING FROM THE DOCUMENT GLASS
1
2 3
4 5
6
7
8
9
0
C
P
CLEAR
PROGRAM
AUDIT CLEAR
INTERRUPT
Use the document glass for copying single originals,
bound documents, and other originals that cannot be
set in the SPF/RADF.
●
Only 1-sided to 1-sided and 1-sided to 2-sided
CHAPTER
2
MAKING COPIES
Copying from the document glass
copying can be selected when copying from the
document glass.
●
Duplex copying will not work when a non-standard
sized paper (or 5-1/2" x 8-1/2" paper) is used.
●
2-sided to 2-sided or 2-sided to 1-sided copying
cannot be selected when copying from the
document glass. These operations can, however,
be performed simply by turning over the original
manually.
●
If the orientation of the original does not match that
of the copy paper when both the original and copy
paper are of standard sizes and the auto paper
select mode or automatic copy ratio select mode is
on, the image of the original will be automatically
rotated to match the copy paper. However, if
enlargement copying onto a paper size larger than
A4(8-1/2" x 11") is performed, the image will not be
rotated.
●
Image void (max. 5 mm (13/64")) can occur along
the leading and trailing edges of the copies. Also
image void (max. 5 mm (13/64") in total) can occur
along the other edges of the copies.
1-sided copies of 1-sided originals
READY TO COPY.
2-8
Original size detector
Centring scale
1.
A4
2.
A3
AUTO
EXPOSURE PAPER SELECT
A4
AUTO
ORIGINAL
A4
100%
COPY RATIO
Open the document feeder cover and place an original
face down on the document glass, using the centring
1
scale to position it.
●
When copying multi-page documents, copy from the last page
to the first page.
NOTE:
Do not place objects under the original size detector, because they
may damage it.
Close the document feeder cover.
●
2
The original size will be indicated on the touch panel, and the paper
tray with the corresponding paper size will be automatically
selected.
Ensure that the 1-sided to 1-sided copying mode is
selected on the touch panel.
3
●
When no icon is displayed in the area indicated in the illustration
( ), the 1-sided to 1-sided copying mode is selected.
●
If the 1-sided to 1-sided mode is not selected, press the
2-SIDED COPY key and then press the 1-sided to 1-sided key
( ) on the touch panel. Press the “OK” key to return to the
basic screen.
Use the 10-key pad to enter the desired number of
copies.
4
●
The number will be shown in the copy quantity display of the
touch panel.
●
A single copy can be made with the initial setting, i.e., when “0”
is displayed.
●
Use the CLEAR (C) key to cancel an entry if a mistake is made.
●
If you set a multiple number of copies, the copies will not be
delivered collated in the default setting. To deliver in the SORT
mode, press the OUTPUT key and then select the SORT mode
on the touch panel. See page 2-17.
Page 23
COPYING FROM THE DOCUMENT GLASS
C
CLEAR
INTERRUPT
CA
CLEAR ALL
START
AUTO
EXPOSURE PAPER SELECT
100%
COPY RATIO
READ-END
PLACE NEXT ORIGINAL. PRESS [START].
WHEN FINISHED, PRESS [READ-END].
AUTO
A4
3
Press the START ( ) key.
●
5
6
If the copier is in the GROUP mode (the sort icon is not displayed
on the touch panel), copying will start and the number in the copy
quantity display will decrease by 1 each time a copy is made. To
repeat the same copy sequence with a different original, simply
replace the original and press the START ( ) key.
●
If the copier is in the SORT mode, the original will be scanned
when the START ( ) key is pressed but copying will not begin.
Proceed to step 6.
●
To cancel a copy run, press the CLEAR ALL (CA) key. Copying
will stop and the number in the copy quantity display will be reset
to 0.
Remove the first original with the next original after the
START ( ) key indicator lights up, and then press the
START ( ) key. Repeat this step until all the originals
have been scanned. Then, press the “READ-END” key
on the touch panel.
●
Copying will start after the “READ-END” key is pressed.
●
Up to 120 sheets of A4 (8-1/2" x 11") originals or up to 60 sheets
of originals larger than A4 (8-1/2" x 11") can be scanned.
CHAPTER
2
MAKING COPIES Copying from the document glass
Centring scale
Original size detector
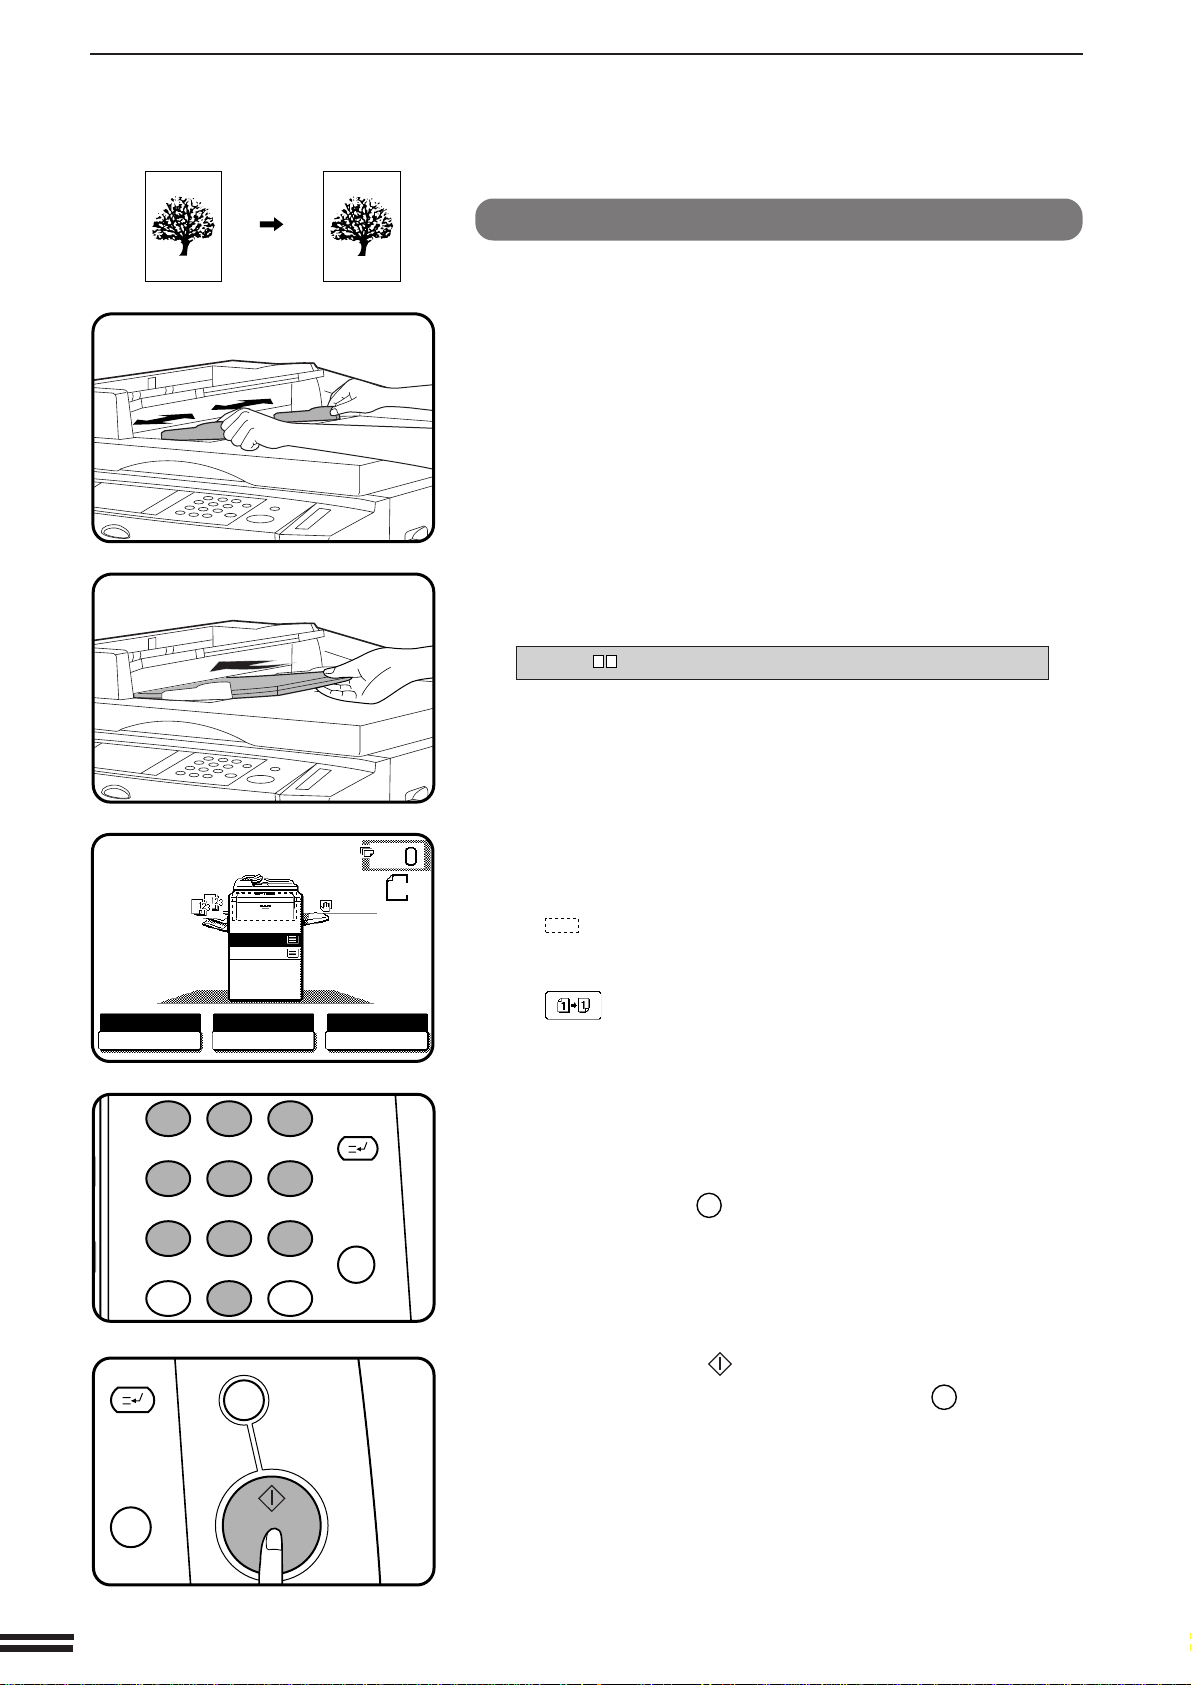
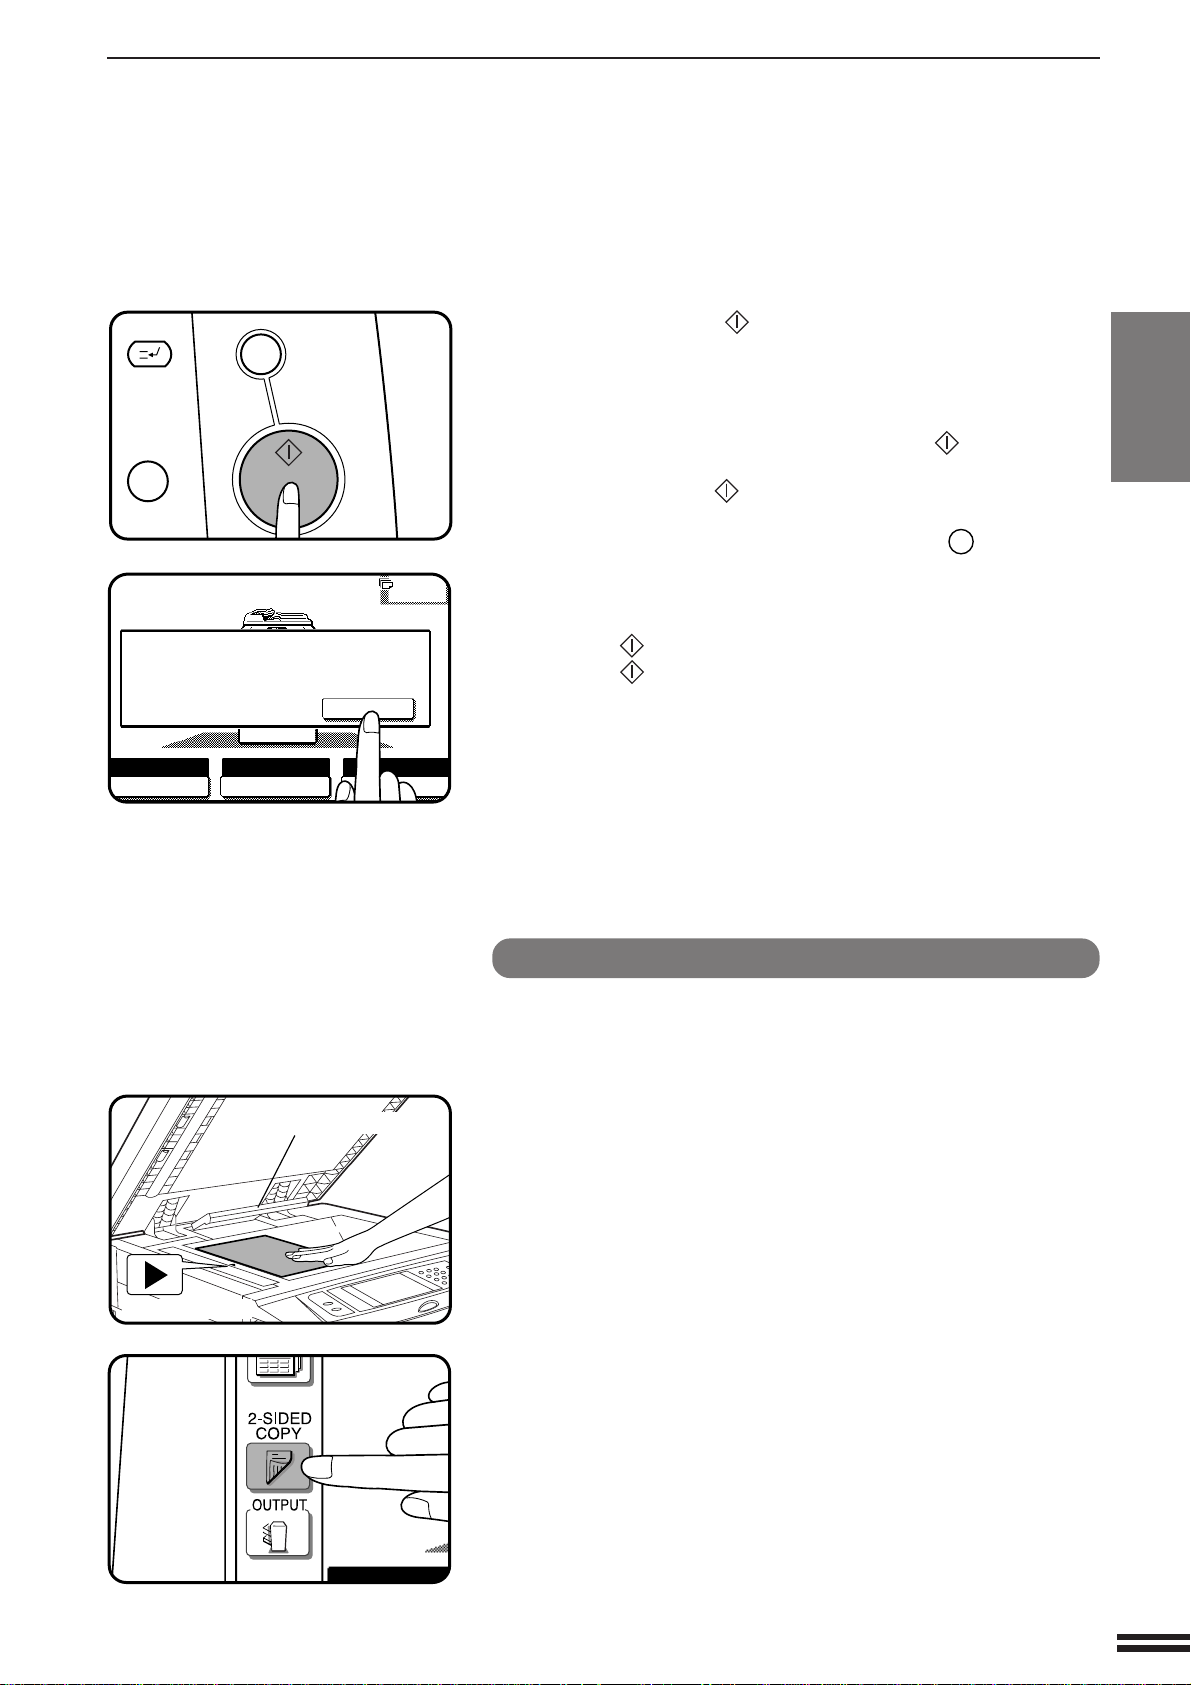
2-sided copies from 1-sided originals
To copy in the 1-sided to 2-sided copy mode with the AR-280, an
optional duplex module (AR-DU1) must be installed.
Set the last page of the document onto the document
glass, using the centring scale to position it.
1
NOTE:
Do not place objects under the original size detector, because they
may damage it.
Close the document feeder cover.
●
2
The original size will be indicated on the touch panel, and the paper
tray with the corresponding paper size will be automatically
selected.
Press the 2-SIDED COPY key.
3
2-9
Page 24
COPYING FROM THE DOCUMENT GLASS
1
2 3
4 5
6
7
8
9
0
P
PROGRAM
INT
CA
CLEAR ALL
START
AUTO
EXPOSURE PAPER SELECT
100%
COPY RATIO
READ-END
PLACE NEXT ORIGINAL. PRESS [START].
WHEN FINISHED, PRESS [READ-END].
AUTO
A4
READY TO COPY.
2-SIDED COPY
OK
AUTO
EXPOSURE PAPER SELECT
100%
COPY RATIO
AUTO
A4
AUTO
EXPOSURE PAPER SELECT
100%
COPY RATIO
OK
AUTO
A4
CHAPTER
2
MAKING COPIES
Copying from the document glass
Press the key on the touch panel.
4
Press the “OK” key.
5
Use the 10-key pad to enter the desired number of
copies.
6
●
The number will be shown in the copy quantity display.
●
Use the CLEAR (C) key to cancel an entry if a mistake is made.
2-10
3
Press the START ( ) key.
●
7
8
9
The original will be scanned each time the START ( ) key is
pressed, but copying will not begin yet.
Remove the first original and replace it with the next
original after the START ( ) key indicator lights up, and
then press the START ( ) key.
●
Copy from the last page to the first page.
Repeat step 8 until all originals have been scanned.
Then, press the “READ-END” key on the touch panel.
●
Copying will start after the “READ-END” key is pressed.
Up to 120 sheets of A4 (8-1/2" x 11") originals or up to 60 sheets
of originals larger than A4 (8-1/2" x 11") can be scanned.
●
To cancel a copy run, press the CLEAR ALL (CA) key.
Page 25
REDUCTION/ENLARGEMENT/ZOOM
READY TO COPY.
AUTO
EXPOSURE PAPER SELECT
100%
COPY RATIO
AUTO 8/ 11
1
2
1.
A4
2.
A3
AUTO IMAGE
100%
COPY RATIO
A3
A4
A3
1
2 3
4 5
6
7
8
9
0
P
PROGRAM
INT
CA
CLEAR ALL
START
Reduction and enlargement ratios can be selected either
automatically with the “AUTO IMAGE” key or manually with the
reduction, enlargement or “ZOOM” keys on the touch panel. The
zoom function enables precise copy ratio selection from 25% to
800% in 1% increments.
★ KEY OPERATOR A total of four extra preset copy ratios, two each
for reduction and enlargement, can be added. See page 8-15.
●
The allowable copy ratio range is limited in the following conditions.
Copying from the SPF in the AR-280 : 25% to 200%
Hi-Fi copying: 50% to 400%
Photo mode, multi shot, pamphlet copy, repeat copy: 25% to 400%
Automatic selection
Place the original in the document feeder tray or on the
document glass.
1
●
The original size will be detected and indicated on the touch
panel.
CHAPTER
2
MAKING COPIES Reduction/Enlargement/Zoom
Press the “PAPER SELECT” key on the touch panel and
select the paper tray with the desired paper size.
2
NOTE:
This feature will not work when original or copy paper is of nonstandard size.
Press the “AUTO IMAGE” key on the touch panel.
3
●
The best reduction or enlargement ratio for the selected paper
size will be automatically set and displayed on the touch panel.
●
If the originals and the selected copy paper are not facing the
same direction, the image will be automatically rotated to match
the copy paper. However, if enlargement copying onto a paper
size larger than A4 (8-1/2" x 11") is performed, the image will not
be rotated.
Enter the desired number of copies.
4
Press the START ( ) key.
5
●
To cancel the automatic reduction/enlargement mode, press
the “AUTO IMAGE” key again.
2-11
Page 26
REDUCTION/ENLARGEMENT/ZOOM
READY TO COPY.
AUTO
XY ZOOM
100%
ZOOM
%
100
MENU 1 2
EXPOSURE PAPER SELECT
100%
COPY RATIO
AUTO IMAGE
AUTO
A4
86%
A4 B5
A3 B4
81%
B5 A5
B4 A4
70%
A4 A5
A3 A4
115%
B5 A4
B4 A3
122%
A5 B5
A4 B4
141%
A5 A4
A4 A3
OK
READY TO COPY.
AUTO
XY ZOOM
100%
ZOOM
%
100
MENU 1 2
EXPOSURE PAPER SELECT
100%
COPY RATIO
AUTO IMAGE
AUTO
A4
50%
25%
98% 60%
200%
400%
101%
800%
110%
OK
PAPER SELECT
100%
COPY RATIO
AUTO
A4
1.
A4
2.
A3
READY TO COPY.
AUTO
XY ZOOM
100%
ZOOM
%
141
MENU 1 2
EXPOSURE PAPER SELECT
100%
COPY RATIO
AUTO IMAGE
AUTO
A3
86%
A4 B5
A3 B4
81%
B5 A5
B4 A4
70%
A4 A5
A3 A4
115%
B5 A4
B4 A3
122%
A5 B5
A4 B4
141%
A5 A4
A4 A3
OK
Manual selection
CHAPTER
2
MAKING COPIES Reduction/Enlargement/Zoom
MENU 1
MENU 2
2-12
Place the original in the document feeder tray or on the
document glass.
1
Press the “COPY RATIO” key on the touch panel.
2
Use the
ratio selection.
3
Menu 1
A.Preset reduction copy ratios are: 86%, 81%, and 70%
(77% and 64%).
B.Preset enlargement copy ratios are: 115%, 122%, and
141% (121% and 129%).
Menu 2
A.Preset reduction copy ratios are: 50% and 25%
(95%, 50%, and 25%).
B.Preset enlargement copy ratios are: 200%, 400%, and
800% (141%, 200%, 400%, and 800%).
Use the reduction, enlargement, and “ZOOM” keys on the
touch panel to set the desired copy ratio.
4
Zoom ratios: Any ratio from 25% to 800% can be set in 1%
increments.
●
Press a reduction or enlargement key to set the approximate
ratio, then press the key to decrease the ratio or the key
to increase the ratio.
●
To set the horizontal and vertical copy ratios separately, use the
XY ZOOM feature. See page 3-2.
●
To reset the copy ratio to 100%, press the “100%” key on the
touch panel.
●
The message “IMAGE IS LARGER THAN THE COPY PAPER.”
may appear, indicating that the selected copy ratio is too large for
the copy paper size. However, if you press the START ( ) key,
a copy will be made.
●
The image of the original may be rotated to match the copy paper
orientation if the original and copy paper are of standard sizes.
Press the “OK” key.
MENU 1 2
key to select menu 1 or menu 2 for copy
5
Page 27
REDUCTION/ENLARGEMENT/ZOOM
READY TO COPY.
AUTO
EXPOSURE PAPER SELECT
141%
COPY RATIO
AUTO 8/ 11
1
2
1.
A4
2.
A3
1
2 3
4 5
6
7
8
9
0
C
P
CLEAR
PROGRAM
AUDIT CLEAR
INTERRUPT
C
CLEAR
INTERRUPT
CA
CLEAR ALL
START
Use the “PAPER SELECT” key to select the paper tray
with the desired paper size.
6
●
If the AUTO PAPER SELECT mode is on, the appropriate copy
paper size will have been automatically selected based on the
original size and selected copy ratio.
●
If a tray of the required size is not installed, use the bypass tray
and press the “PAPER SELECT” key to select the bypass tray.
Enter the desired number of copies.
7
Press the START ( ) key.
8
CHAPTER
2
MAKING COPIES Reduction/Enlargement/Zoom
2-13
Page 28
SPECIAL PAPERS (manual feed)
CA
CLEAR ALL
START
100%
COPY RATIO
A4
A4
A3
A4R
The bypass tray is used to copy onto transparency film, labels,
tracing paper, and other special purpose papers. Up to 50 sheets of
standard copy paper can be set in the bypass tray.
●
Automatic duplex copying will not work when a non-standard
CHAPTER
2
MAKING COPIES Special papers (manual feed)
sized paper is used. If a duplex copying mode is selected and a
non-standard sized paper is used from the bypass tray, the
corresponding one-sided mode will be selected automatically
when the START ( ) key is pressed.
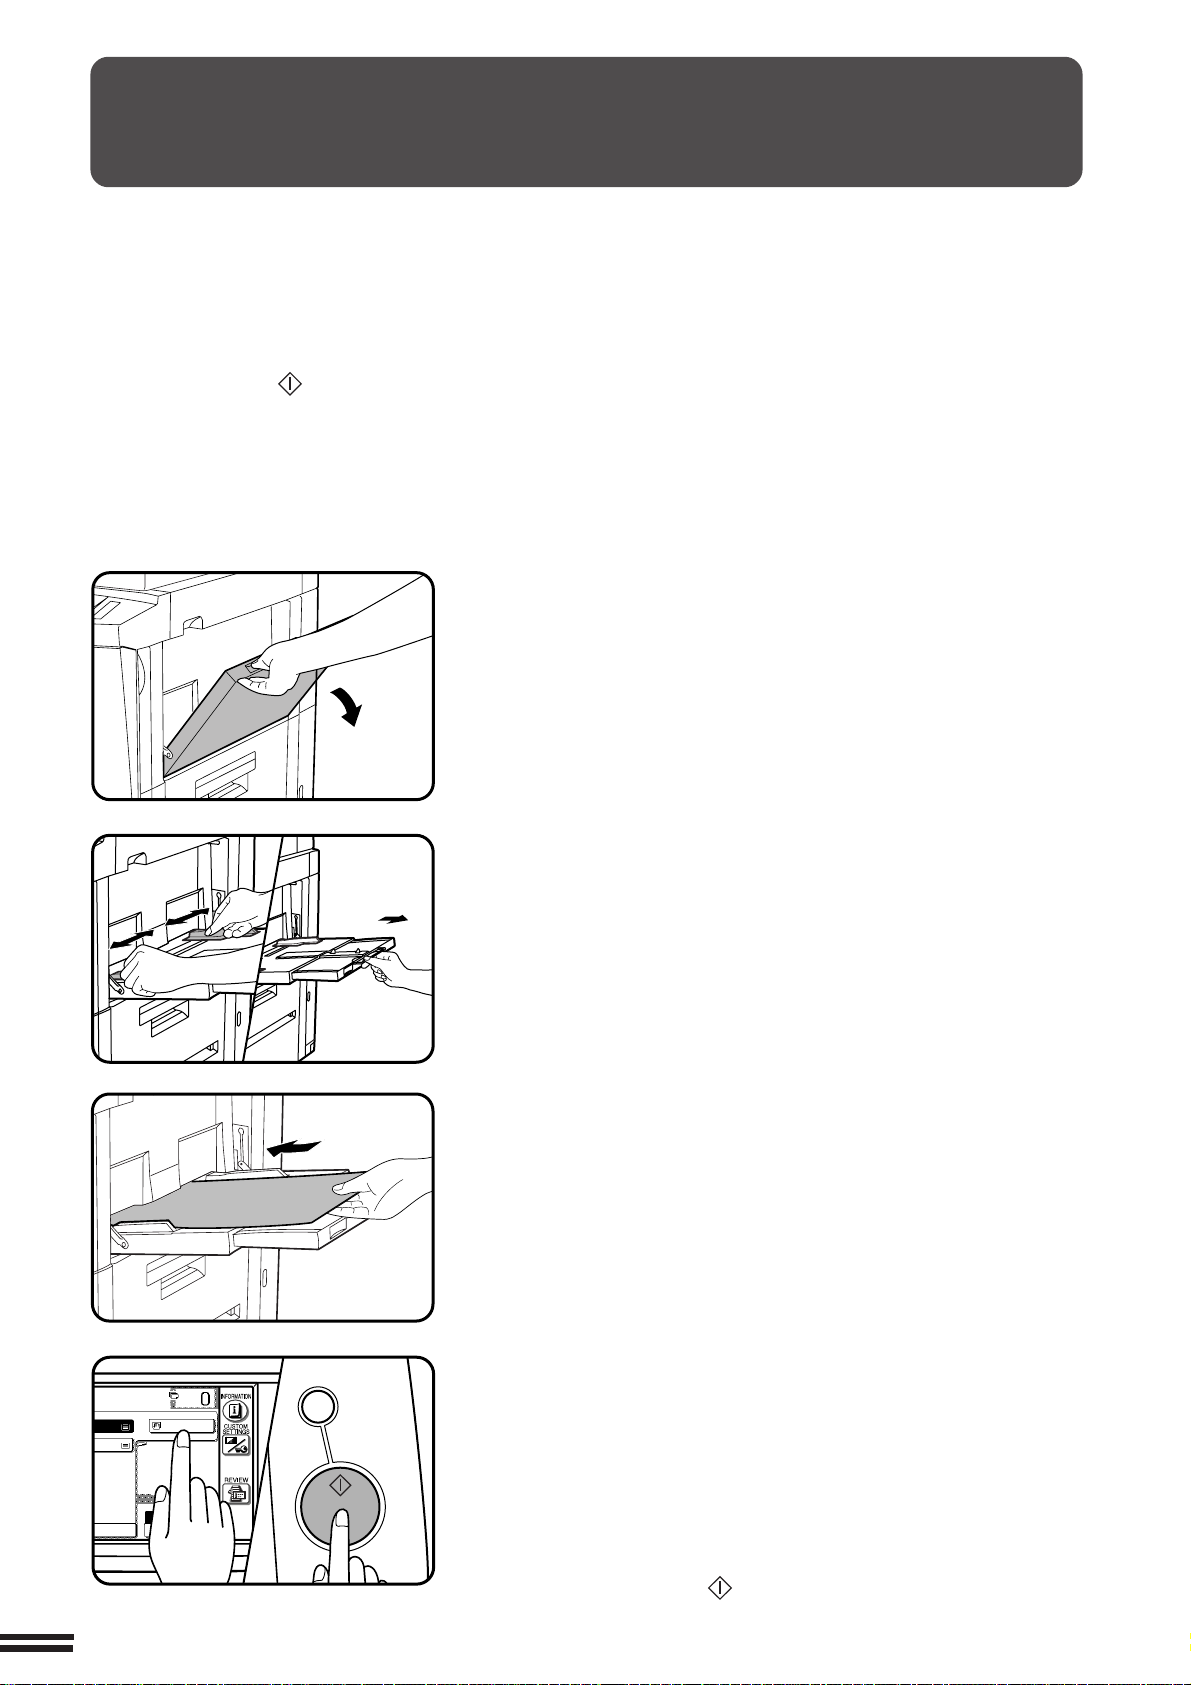
Place the original in the document feeder tray or on the
document glass.
1
Open the bypass tray.
2
Set the bypass tray guides to the width of the copy
paper.
3
●
Be sure to extend the tray when feeding A4R, B4 or A3
(8-1/2" x 11"R, 8-1/2" x 14" or 11" x 17") sized paper.
When feeding A3 (11" x 17") sized paper, pull out the metallic
support.
Insert the copy paper all the way into the bypass tray.
●
4
Labels, tracing paper, and other special purpose papers other
than SHARP recommended transparency film must be fed
individually. Multiple sheets of SHARP recommended
transparency film can be loaded in the bypass tray.
●
Up to 50 sheets of standard copy paper measuring from
A6 to A3 (5-1/2" x 8-1/2" to 11" x 17") can be loaded into the
bypass tray.
●
For automatic two-sided copying of A5 paper, position the side
guides against the copy paper’s longest side.
●
A6 size paper must be fed narrow side into the feed slot and
must be fed individually.
●
When adding paper, first remove remaining paper, combine it
with the paper to be added and then reload as a single stack.
Press the “PAPER SELECT” key on the touch panel and
then select the bypass tray.
5
Set the number of copies.
6
Press the START ( ) key.
7
2-14
Page 29

SPECIAL PAPERS (manual feed)
CA
CLEAR ALL
START
100%
COPY RATIO
A4
A4
A3
A4
Two-sided copying with bypass tray
Two-sided copies can be made manually using the bypass tray. The
procedure described below is useful for users of the AR-280 without
an optional duplex module (AR-DU1).
Place the first original face down on the document glass
and make a copy.
1
●
1 2
1 2
2
3 4
The first side of the copy can be made using any of the paper
feed stations.
Replace the first original with the second original and
close the document cover.
●
Make sure the first and second originals are oriented in the same
way on the document glass.
●
The first and second originals can be set in the document feeder
tray. However, they must be set individually.
CHAPTER
2
MAKING COPIES Special papers (manual feed)
Turn the first copy over without changing its top-bottom
orientation and place it into the bypass tray.
3
●
1 2
Be sure to feed the copies one sheet at a time.
3 4
Press the “PAPER SELECT” key and select the bypass
tray.
4
Press the START ( ) key.
5
2-15
Page 30
EXPOSURE ADJUSTMENTS
AUTO
EXPOSURE
AUTO
EXPOSURE PAPER
AUT
AUTO
TEXT
TEXT/PHOTO
PHOTO
EXPOSURE PAPER SE
AUTO
A
1.
A4
2.
A3
EXPOSURE
TEXT/PHOTO
PAPE
AU
1.
2.
This copier has four exposure modes to choose from: AUTOMATIC,
TEXT, TEXT/PHOTO and PHOTO.
CHAPTER
2
MAKING COPIES Exposure adjustments
Automatic
This is the standard initial setting for this copier. In this mode, the
characteristics of an original being copied are “read” by the exposure
system, and exposure adjustments are made automatically.
This optimizes the contrast of the copied images by reducing the effect
of coloured or shaded background areas.
Text, text/photo, and photo
Text mode: This mode is useful in enhancing very low density
areas of an original or in suppressing unusually
high-density background areas.
Text/photo mode: This mode provides the best balance for copying
an original which contains both text and photos.
This mode is also useful for copying printed
photographs.
Photo mode: This mode provides the best copies of
photographs with fine details.
Press the “EXPOSURE” key on the touch panel.
1
2-16
Select “TEXT”, “TEXT/PHOTO” or “PHOTO” depending
on the original.
2
Use the and keys to adjust the copy density
as desired.
3
NOTE:
When the photo mode is selected, the copy ratio is limited between
25% and 400%.
Page 31

SORT/GROUP
When the SORT ( ) icon is indicated on the touch panel, copies
will be collated by sets and then delivered to the exit tray.
When the SORT ( ) icon is not indicated, copies will be grouped
by originals.
●
When the SPF/RADF is used for copying, copies will be collated
in the default setting. To copy in the GROUP mode, press the
OUTPUT key and then select the GROUP mode on the touch
panel. When the GROUP mode is selected, the GROUP ( )
icon is indicated on the touch panel.
●
When the document glass is used for copying, copies will be
grouped. To copy in the SORT mode, press the OUTPUT key and
then select the SORT mode on the touch panel.
CHAPTER
2
MAKING COPIES Sort/group
1
2
3
3
2
1
3
2
1
1
2
3
1
2
3
1
1
1
2
2
2
3
3
3
SORT mode
Each set of copies will be sequentially delivered to the exit
tray.
GROUP mode
All copies of the same original will be grouped in the exit
tray.
2-17
Page 32

Frequently used job programs can be stored in one of nine storage
8
9
0
C
CLEAR
PROGRAM
STORE/DELETE
RECALL
JOB PROGRAMS
STORE/DELETE
RECALL
PRESS PROGRAM NUMBER.
EXIT
MAKE COPIER SELECTIONS AND PRESS
[OK].
OK
CANCEL
AUTO
EXPOSURE PAPER SELECT
100%
COPY RATIO
AUTO
A4
1.
A4
2.
A3
registers. This is convenient for quick job recall without losing time
manually reprogramming each aspect of the job.
●
All functions that can be set in the copy mode except the copy
CHAPTER
2
MAKING COPIES Job memory
quantity setting can be stored in the job memory.
●
If any function which has been stored in a job program is modified
by a key operator program, the key operator settings will supercede
the previous setting.
★ KEY OPERATOR Job memory replacement/deletion can be
prohibited. See page 8-24.
JOB MEMORY
Storing a job program
P
Press the PROGRAM (
1
●
The JOB PROGRAMS screen will appear on the touch panel.
Press the “STORE/DELETE” key on the touch panel.
2
●
To cancel the job memory mode, press the “EXIT” key or the
CLEAR ALL (CA) key.
Select a program number from 1 to 9 on the touch panel.
3
●
The numbers which are highlighted are program numbers which
have been used.
●
If a program number which has been used is entered, a
message will appear to confirm the selection. To replace with
the new program, press the “STORE” key and proceed to the
next step.
To cancel replacement, press the “CANCEL” key.
P
) key.
2-18
Make all copier selections to be stored.
4
Press the “OK” key to complete the storage.
5
Page 33

JOB PROGRAMS
STORE/DELETE
RECALL
PRESS PROGRAM NUMBER.
EXIT
Deleting a stored job program
JOB PROGRAMS
STORE/DELETE
RECALL
PRESS PROGRAM NUMBER.
EXIT
8
9
0
C
CLEAR
PROGRAM
JOB PROGRAMS
A JOB PROGRAM HAS BEEN ALREADY STORED.
STORE ANOTHER PROGRAM?
CANCEL DELETE STORE
STORE/DELETE
RECALL
PRESS PROGRAM NUMBER.
JOB PROGRAMS
STORE/DELETE
RECALL
PRESS PROGRAM NUMBER.
EXIT
JOB MEMORY
Follow steps 1 and 2 in “Storing a job program” on the
previous page. (1. Press the PROGRAM (
1
2. Press the “STORE/DELETE” key.)
Select the storage register number of the program to be
deleted.
2
●
Be sure to select a number which contains a stored program. If
not, “Storing a job program” operation will start.
Press the “DELETE” key.
3
●
The program will be deleted from memory.
●
To cancel deletion, press the “CANCEL” key.
Press the “EXIT” key to exit the job memory mode.
4
P
) key.
CHAPTER
2
MAKING COPIES Job memory
P
Recalling a job program
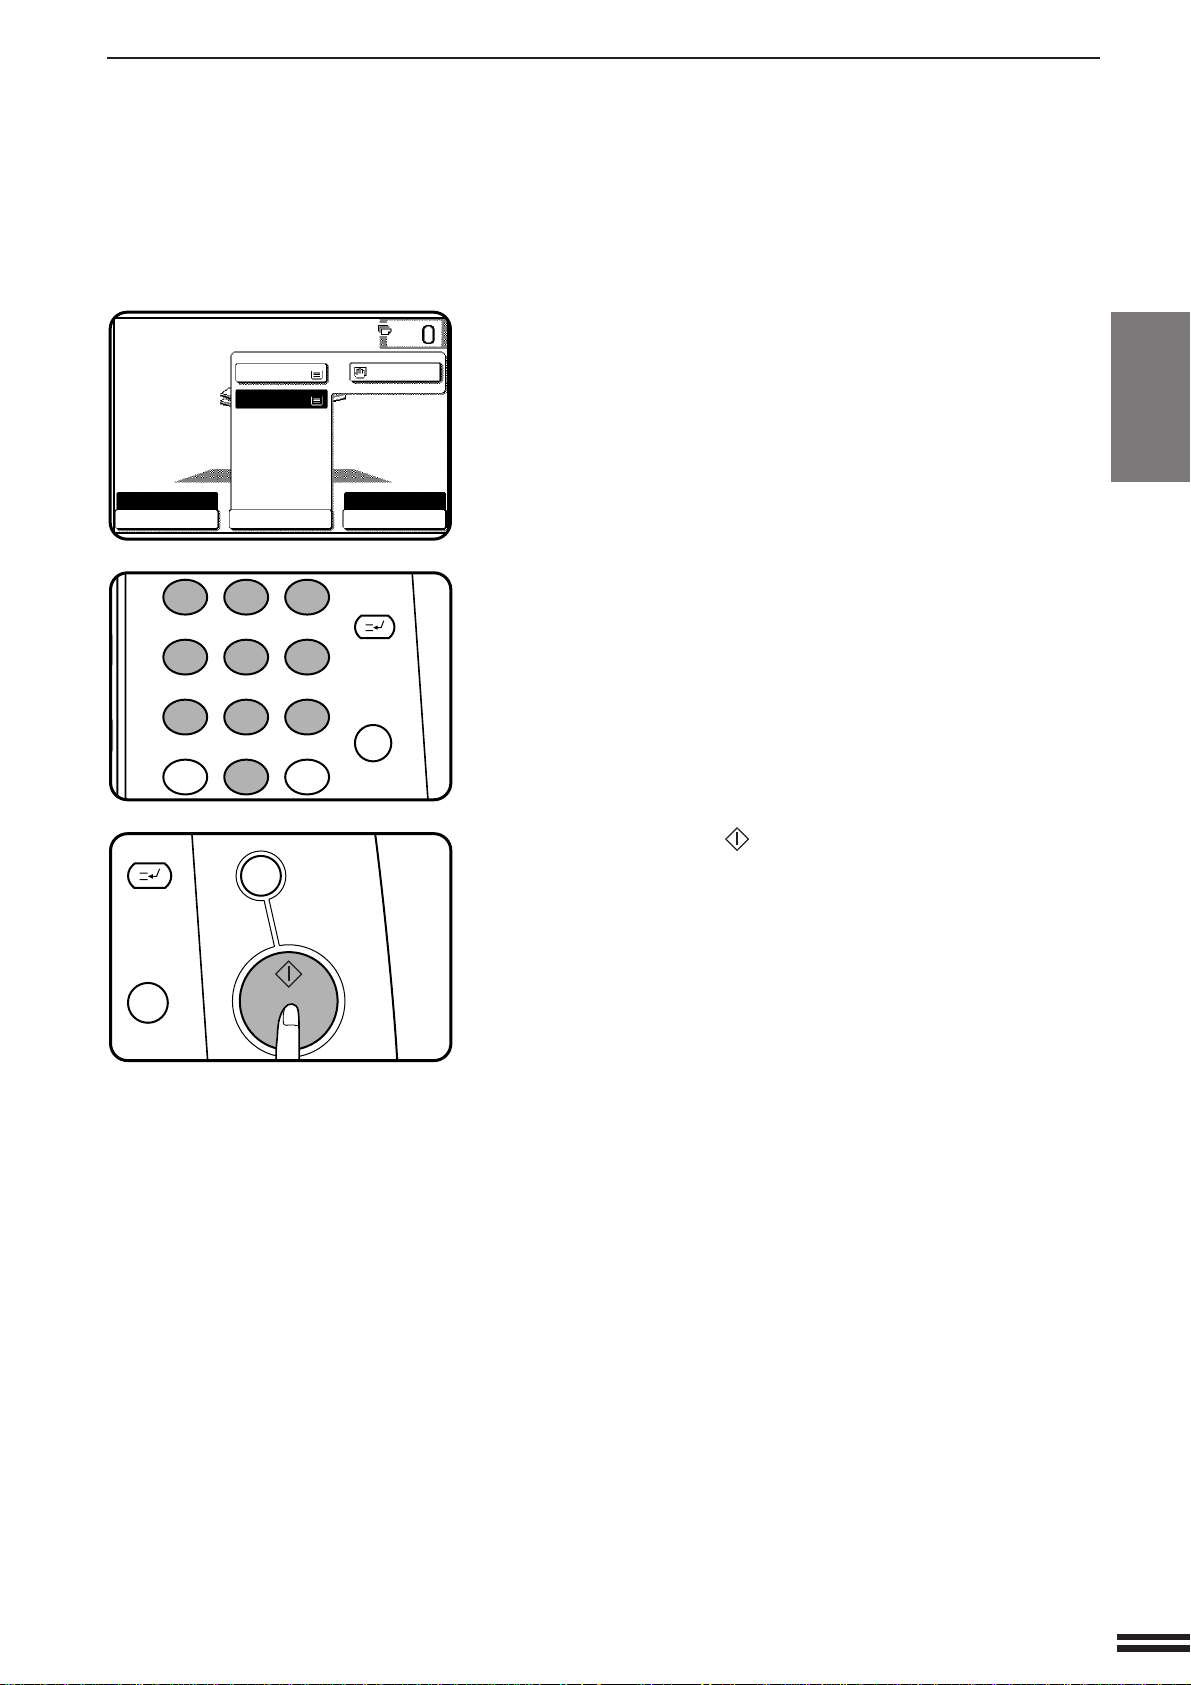
Press the PROGRAM (
1
●
The JOB PROGRAMS screen will appear on the touch panel.
●
The numbers which are indicated are program numbers which
contain stored programs.
Select a stored program from 1 to 9 on the touch panel.
●
2
All selections stored in the program will appear on the touch
panel.
●
The recalled settings may be modified for a particular job run,
but any changes made will not be stored in the job memory. To
store the new settings, follow the “Storing a job program”
procedure.
P
) key.
2-19
Page 34

INTERRUPTING A COPY RUN
3
6
INTERRUPT
CA
CLE
C
CLEAR
INTERRUPT
CA
CLEAR ALL
START
3
6
INTERRUPT
CA
CLE
INTERRUPT can be used to temporarily stop a long copy run so that
another job can be run.
●
INTERRUPT will not function during duplex copying.
●
Duplex copying cannot be selected during interrupt copying.
CHAPTER
2
MAKING COPIES Interrupting a copy run
★ KEY OPERATOR If the second tray is not installed, output of
copies to the second tray must be disabled. See page 8-26.
Press the INTERRUPT ( ) key.
●
1
2
When the document feeder is being used, the copier will stop
after completing the copying of the originals which have been
fed into the document feeder. The INTERRUPT indicator will
blink until the copier becomes ready for interrupt copying.
Then the INTERRUPT indicator will light up.
The copier will return to the initial setting.
●
If the copier has been programmed in the auditing mode, the
account number entry message will appear. Enter your account
number using the 10-key pad. The number of copies of the
interrupt copying will be accumulated against this account
number.
When the copier stops, remove the original(s) and set
the original(s) for interrupt copying in the document
feeder tray or on the document glass.
●
The maximum number of originals for interrupt copying is
restricted.
1-sided originals: 20 sheets (10 sheets for B4 and A3 (8-1/2" x
14" and 11" x 17"))
2-sided originals: 10 sheets (5 sheets for B4 and A3 (8-1/2" x
14" and 11" x 17"))
Select the desired available copier functions.
3
Press the START ( ) key.
4
●
The interrupt copies will be delivered to the second tray.
2-20
When the interrupt copy run is complete, press the
INTERRUPT ( ) key again to cancel the mode and
5
remove the original(s) used for interrupt copying.
●
The copier will reset itself to the functions which were in use
before the INTERRUPT ( ) key was first pressed.
Replace the original(s) for the interrupted job and press
the START ( ) key to resume copying.
6
●
If scanning of originals has been already complete, the original
need not be replaced.
Page 35

CHAPTER 3
SPECIAL FUNCTIONS
This chapter describes the special copying functions
including various image editing functions which
have been made possible by digital image
processing technology.
●
XY ZOOM ................................................ 3-2
●
MARGIN SHIFT ............................................ 3-4
●
ERASE .................................................. 3-6
●
DUAL PAGE COPYING ...................................... 3-8
●
MULTI SHOT ............................................. 3-10
●
COVERS ................................................ 3-13
●
TRANSPARENCY FILM WITH INSERT SHEETS .................. 3-15
●
PAMPHLET COPY......................................... 3-17
●
IMAGE EDITING FUNCTIONS ................................ 3-20
Centring................................................. 3-20
Repeat copy.............................................. 3-22
Hi-Fi ................................................... 3-25
B/W reverse .............................................. 3-27
Binding change ........................................... 3-29
●
TEXT STAMP ............................................ 3-32
Date ................................................... 3-32
Select stamp ............................................. 3-35
Watermark ............................................... 3-38
Page number ............................................. 3-41
●
SETTING REVIEW......................................... 3-44
CHAPTER
3
Page
3-1
Page 36

XY ZOOM
100%
COPY RATIO
AUTO
XY ZOOM
10
ZOO
MENU
EXPOSURE PAPER S
AUTO
81%
B5 A5
B4 A4
70%
A4 A5
A3 A4
READY TO COPY.
AUTO
XY ZOOM
X
Y
100%
ZOOM
100
100
%
%
OK
70
%
64
%
50
%
141
%
200
%
400
%
EXPOSURE PAPER SELECT
100%
COPY RATIO
AUTO
A4
CHAPTER
3
SPECIAL FUNCTIONS XY zoom
Original Copy
The XY ZOOM feature allows the horizontal and vertical copy ratios
to be changed independently. If this feature is selected, the copy ratios
can be set from 25% to 800%.
●
The allowable copy ratio range is limited in the following conditions.
Copying from the SPF in the AR-280: 25% to 200%
Photo mode, multi shot, pamphlet copy, repeat copy: 25% to 400%
Hi-Fi copy: 50% to 400%
Place the original in the document feeder tray or on the
document glass.
1
3-2
CANCEL
Press the “COPY RATIO” key on the touch panel.
2
Press the “XY ZOOM” key.
3
●
The following screen will appear.
READY TO COPY.
X
100
70
%
64
%
50
%
XY ZOOM CANCEL
AUTO
EXPOSURE PAPER SELECT
Use the reduction, enlargement , and ZOOM ( , )
keys to change the copy ratio in the horizontal (X)
4
direction.
●
Press a reduction key or an enlargement key to set the
approximate ratio, then press the key to decrease the ratio
or key to increase the ratio.
Y
100%
A4
AUTO
100
ZOOM
OK
%
141
%
200
400
100%
COPY RATIO
%
%
%
Page 37

TO COPY.
X
Y
100%
ZOOM
%
%
50
100
READY TO COPY.
AUTO
EXPOSURE
PAPER SELECT
X—50% Y—70%
COPY RATIO
AUTO 8/ 11
1
2
1.
A4
2.
A3
1
2 3
4 5 6
7
8
9
0
P
PROGRAM
INT
CA
CLEAR ALL
START
XY ZOOM
READY TO COPY.
AUTO
XY ZOOM
X
Y
ZOOM
50
100
70
%
64
%
50
%
EXPOSURE PAPER SELECT
AUTO
A4
%
%
100%
CANCEL
OK
141
%
200
%
400
%
READ-END
AUTO IMAGE
PLACE NEXT ORIGINAL. PRESS [START].
WHEN FINISHED, PRESS [READ-END].
AUTO
EXPOSURE PAPER SELECT
X—50% Y—70%
COPY RATIO
A4
Press the
5
●
The copy ratio in the vertical (Y) direction will be highlighted.
Use the reduction, enlargement, and ZOOM ( , )
keys to change the copy ratio in the vertical (Y) direction.
6
●
To change the copy ratio in the horizontal direction again, press
the
●
The message “IMAGE IS LARGER THAN THE COPY PAPER.”
may appear, indicating that the selected copy ratio is too large
for the copy paper size. However, if you press the START ( )
key, a copy will be made.
Press the “OK” key.
Y
key.
X
key.
7
Press the “PAPER SELECT” key and select the paper
tray with the desired paper size.
8
●
If the AUTO PAPER SELECT mode is on, the appropriate copy
paper size will have been automatically selected based on the
original size and selected copy ratios.
CHAPTER
3
SPECIAL FUNCTIONS XY zoom
9
10
11
Enter the desired number of copies.
Press the START ( ) key.
●
If the document feeder is used, scanning of originals and
copying will start.
●
If the document glass is used in the SORT mode, proceed to the
next step.
Replace the finished original with the next original after
the START ( ) key indicator lights up, and then press
the START ( ) key. Repeat this step until all originals
have been scanned. Then, press the “READ-END” key
on the touch panel.
●
Copying will start at this time.
●
Up to 120 sheets of A4 (8-1/2" x 11") originals or up to 60 sheets
of originals larger than A4 (8-1/2" x 11") can be scanned.
●
To cancel this function, press the “CANCEL” key or the “XY
ZOOM” key again as in step 3.
3-3
Page 38

MARGIN SHIFT
READY TO CO
CHAPTER
3
SPECIAL FUNCTIONS Margin shift
Original
Expanded margin
(Initial setting:
copy image shifted to the right)
Copy
The MARGIN SHIFT feature, in its initial setting, automatically shifts the
text or image to the right both on one-sided copies and on the front side of
two-sided copies. The text or image is shifted to the left on the reverse side
of two-sided copies. Shift direction can be changed to left, upper or lower
in the manner described below in step 4.
●
The standard shift amount is 10 mm (1/2"), but can be changed from
0 mm to 20 mm in 1 mm increments (from 0" to 1" in 1/8" increments).
★ KEY OPERATOR The initial shift setting can be changed from 0 mm
to 20 mm in 1 mm increments (from 0" to 1" in 1/8" increments). See page
8-16.
NOTE:
The front side and reverse side are referred to as “SIDE 1” and “SIDE 2”
respectively on the touch panel.
Margin is expanded here.
Margin is expanded
here.
Place the original in the document feeder tray or on the
document glass.
1
Press the SPECIAL MODES key.
2
●
The SPECIAL MODES screen will appear.
READY TO COPY.
SPECIAL MODES
MARGIN SHIFT
MULTI SHOT
PAMPHLET COPY
AUTO
EXPOSURE PAPER SELECT
ERASE
COVERS
IMAGE EDIT
A4
AUTO
OK
DUAL PAGE
COPY
TRANSPARENCY
INSERTS
TEXT STAMP
100%
COPY RATIO
3-4
Page 39

MARGIN SHIFT
MARGIN SHIFT
CANCEL
SIDE 1
10
RIGHT LEFT
LOWER UPPER
(0~20)
mm
SIDE 1
10
RIGHT LEFT
LOWER UPPER
(0~20)
mm
SIDE 2
OK
OK
CA
CLEAR ALL
START
READY TO COPY.
SPECIAL MODES
MARGIN SHIFT
MULTI SHOT
PAMPHLET COPY
ERASE
COVERS
IMAGE EDIT
TEXT STAMP
TRANSPARENCY
INSERTS
DUAL PAGE
COPY
OK
AUTO
EXPOSURE PAPER SELECT
100%
COPY RATIO
AUTO
A4
READ-END
PLACE NEXT ORIGINAL. PRESS [START].
WHEN FINISHED, PRESS [READ-END].
AUTO
EXPOSURE PAPER SELECT
100%
COPY RATIO
AUTO
A4
Press the “MARGIN SHIFT” key on the touch panel.
3
●
The setting screen for MARGIN SHIFT will appear.
READY TO COPY.
OK
MARGIN SHIFT
CANCEL
OK
RIGHT LEFT
LOWER UPPER
●
If an optional duplex module (AR-DU1) is not installed in the
AR-280, the margin shift setting for the reverse side will not be
displayed.
Select the shift direction.
4
●
Select “RIGHT”, “LEFT”, “LOWER” or “UPPER” on the touch
panel. The selected shift direction will be highlighted.
Select the desired shift amounts using the and
keys.
5
SIDE 1 SIDE 2
(0~20)
10 10
mm
(0~20)
mm
CHAPTER
3
SPECIAL FUNCTIONS Margin shift
Press the upper “OK” key on the touch panel.
6
Make all other desired copier selections and press the
START ( ) key.
7
●
If the document feeder is used, scanning of originals and
copying will start.
●
If the document glass is used in the SORT mode, proceed to the
next step.
Replace the finished original with the next original after
the START ( ) key indicator lights up, and then press
8
the START ( ) key. Repeat this step until all originals
have been scanned. Then, press the “READ-END” key
on the touch panel.
●
Copying will start at this time.
●
Up to 120 sheets of A4 (8-1/2" x 11") originals or up to 60 sheets
of originals larger than A4 (8-1/2" x 11") can be scanned.
●
To cancel the MARGIN SHIFT function, select the MARGIN
SHIFT function again and press the “CANCEL” key.
3-5
Page 40

ERASE
READY TO CO
READY TO COPY.
SPECIAL MODES
MARGIN SHIFT
MULTI SHOT
PAMPHLET COPY
ERASE
COVERS
IMAGE EDIT
TEXT STAMP
TRANSPARENCY
INSERTS
DUAL PAGE
COPY
OK
AUTO
EXPOSURE PAPER SELECT
100%
COPY RATIO
AUTO
A4
Edge erase
Centre erase
CHAPTER
Edge + Centre erase
3
SPECIAL FUNCTIONS Erase
A
A B
A B
A
A B
A B
This copier has an edge erase mode and a centre erase mode.
●
Edge erase can be used to eliminate shadow lines around the edges of
copies caused when thick paper or a book is used as an original.
●
Centre erase can be used to eliminate the shadow produced by the
bindings of bound documents.
●
Edge + centre erase can be used to eliminate shadow lines around the
edges of copies and to eliminate the shadow at the centre of copies.
●
The standard erase width is 10 mm (1/2"), but can be changed from 0
mm to 20 mm in 1 mm increments (from 0" to 1" in 1/8" increments).
★ KEY OPERATOR The initial setting of the width for edge erase and centre
erase can be changed. See page 8-16.
3-6
Place the original in the document feeder tray or on the
document glass.
1
Press the SPECIAL MODES key.
2
●
The SPECIAL MODES screen will appear.
Press the “ERASE” key on the touch panel.
3
●
The setting screen for ERASE will appear.
READY TO COPY.
OK
ERASE
EDGE ERASE
CENTRE ERASE
EDGE+CENTRE
ERASE
CANCEL
OK
10
(0~20)
mm
Page 41

Select the desired erase mode.
READY TO COPY.
ERASE
EDGE ERASE
CENTRE ERASE
EDGE+CENTRE
ERASE
CANCEL
1
OK
OK
(0~1)
inch
ERASE
EDGE ERASE
CENTRE ERASE
EDGE+CENTRE
ERASE
CANCEL
10
OK
OK
(0~20)
mm
CANCEL
1
OK
OK
(0~1)
inch
C
CLEAR
INTERRUPT
CA
CLEAR ALL
START
READ-END
PLACE NEXT ORIGINAL. PRESS [START].
WHEN FINISHED, PRESS [READ-END].
AUTO
EXPOSURE PAPER SELECT
100%
COPY RATIO
AUTO
A4
4
●
Select “EDGE ERASE”, “CENTRE ERASE” or “EDGE+CENTRE
ERASE” on the touch panel. The selected erase mode will be
highlighted.
Adjust the amount of edge erase and/or centre erase if
needed.
5
●
The amount can be adjusted between 0 mm and 20 mm in 1 mm
increments (0" and 1" in 1/8" increments).
ERASE
CHAPTER
3
SPECIAL FUNCTIONS Erase
Press the upper “OK” key on the touch panel.
6
Make all other desired copier selections and press the
START ( ) key.
7
●
If the document feeder is used, scanning of originals and
copying will start.
●
If the document glass is used in the SORT mode, proceed to the
next step.
Replace the finished original with the next original after
the START ( ) key indicator lights up, and then press
8
the START ( ) key. Repeat this step until all originals
have been scanned. Then, press the “READ-END” key
on the touch panel.
●
Copying will start at this time.
●
Up to 120 sheets of A4 (8-1/2" x 11") originals or up to 60 sheets
of originals larger than A4 (8-1/2" x 11") can be scanned.
●
To cancel the ERASE function, select the ERASE function again
and press the “CANCEL” key.
3-7
Page 42

DUAL PAGE COPYING
READY TO CO
READY TO COPY.
SPECIAL MODES
MARGIN SHIFT
MULTI SHOT
PAMPHLET COPY
ERASE
COVERS
IMAGE EDIT
TEXT STAMP
TRANSPARENCY
INSERTS
DUAL PAGE
COPY
OK
AUTO
EXPOSURE PAPER SELECT
100%
COPY RATIO
AUTO
A4
TRANSPARENCY
INSERTS
DUAL PAGE
COPY
OK
A4
Paper size index
CHAPTER
3
SPECIAL FUNCTIONS Dual page copying
The DUAL PAGE COPY feature produces separate copies of two
documents placed side by side on the document glass. It is especially
useful when copying books and other bound documents.
This feature can be used in the one-sided to two-sided copying mode.
Place the originals on the document glass with the
centre of the two pages aligned with the paper size index
1
A4 ( 81/2). Close the document feeder cover.
●
Set the page to be copied first on the left part of the document
glass.
Press the SPECIAL MODES key.
2
●
The SPECIAL MODES screen will appear.
Press the “DUAL PAGE COPY” key on the touch panel.
●
3
The “DUAL PAGE COPY” key will be highlighted.
●
A4 (8-1/2" x 11") sized copy paper will be automatically selected.
If A4 (8-1/2" x 11") copy paper is not loaded, copying can be
performed with the currently selected tray.
●
To leave a binding margin on the copy, select the MARGIN
SHIFT function. See page 3-4. The MARGIN SHIFT feature
applies only to the left page on the document glass if “RIGHT”
or “LEFT” of MARGIN SHIFT has been selected.
●
To erase shadows caused by document binding, use the EDGE
ERASE feature. See page 3-6.
Press the “OK” key.
4
3-8
Page 43

DUAL PAGE COPYING
1
2 3
4 5
6
7
8
9
0
C
P
CLEAR
PROGRAM
AUDIT CLEAR
INTERRUPT
C
CLEAR
INTERRUPT
CA
CLEAR ALL
START
AUTO
EXPOSURE PAPER SELECT
100%
COPY RATIO
AUTO IMAGE
A4
1.
A4
2.
A3
11 17
ORIGINAL
READ-END
PLACE NEXT ORIGINAL. PRESS [START].
WHEN FINISHED, PRESS [READ-END].
AUTO
EXPOSURE PAPER SELECT
100%
COPY RATIO
AUTO IMAGE
A4
Ensure that the desired tray is selected.
5
CHAPTER
3
Enter the desired number of copies.
6
Press the START ( ) key.
7
●
If the SORT mode has been selected for copying multiple
originals, proceed to the next step. If not, copying will start.
SPECIAL FUNCTIONS Dual page copying
Replace the finished original with the next original after
the START ( ) key indicator lights up, and then press
8
the START ( ) key. Repeat this step until all originals
have been scanned. Then, press the “READ-END” key
on the touch panel.
●
Copying will start at this time.
●
Up to 60 sheets of A3 (11" x 17") originals can be scanned.
●
To cancel the DUAL PAGE COPY function, press the “DUAL
PAGE COPY” key again on the SPECIAL MODES screen.
3-9
Page 44

CHAPTER
READY TO COPY.
AUTO
EXPOSURE PAPER SELECT
100%
COPY RATIO
AUTO 8/ 11
1
2
1.
A4
2.
A3
READY TO CO
3
SPECIAL FUNCTIONS Multi shot
MUL TI SHOT
The MULTI SHOT function is used to copy several originals, collectively in
a specified order, onto one sheet.
1
Place the originals in the document feeder tray or on the
document glass.
●
When using the document glass, place the originals one at a
time in the reverse order, starting with the last original first.
Press the “PAPER SELECT” key on the touch panel and
select the desired paper size.
2
Press the 2-SIDED COPY key and select a duplex mode
if desired. Press the “OK” key to close the duplex
3
selection window.
●
The 2-sided to 1-sided and 2-sided to 2-sided copy modes
cannot be selected on the AR-280.
●
To copy in the 1-sided to 2-sided copy mode with the AR-280,
an optional duplex module (AR-DU1) must be installed.
Press the SPECIAL MODES key.
4
●
The SPECIAL MODES screen will appear.
3-10
Page 45

Press the “MULTI SHOT” key on the touch panel.
MULTI SHOT
LAYOUT
CANCEL
OK
OK
BORDER
2inl 4inl
8inl 16inl
MULTI SHOT
LAYOUT
CANCEL
OK
OK
BORDER
2inl 4inl
8inl 16inl
SHOT
LAYOUT
CANCEL
OK
OK
BORDER LINE
READY TO COPY.
SPECIAL MODES
MARGIN SHIFT
MULTI SHOT
PAMPHLET COPY
ERASE
COVERS
IMAGE EDIT
TEXT STAMP
TRANSPARENCY
INSERTS
DUAL PAGE
COPY
OK
AUTO
EXPOSURE PAPER SELECT
100%
COPY RATIO
A4
5
●
The function setting screen for MULTI SHOT will appear.
READY TO COPY.
OK
MULTI SHOT
2inl 4inl
8inl 16inl
CANCEL
LAYOUT
OK
BORDER LINE
MULTI SHOT
CHAPTER
3
Select the number of originals to be included on one
sheet of copies.
6
●
Select “2in1”, “4in1”, “8in1” or “16in1” on the touch panel.
●
The copy ratio will be calculated automatically.
●
Portions of original images may not be copied depending on the
original and copy paper sizes and the number of images to be
copied onto a page.
●
Depending on the number of originals and the orientation of the
originals and copy paper, the image of the originals may be
rotated.
Select the layout of originals on the copy.
7
●
Select the order of originals which will be arranged on the copy.
●
For example, the following types are provided for “4in1”.
12
34
13
24
1
2
4
3
31
42
SPECIAL FUNCTIONS Multi shot
Select a type of border line.
8
●
Select the solid line, broken line or no border line.
3-11
Page 46

MULTI SHOT
1
2 3
4 5
6
7
8
9
0
C
P
CLEAR
PROGRAM
AUDIT CLEAR
INTERRUPT
C
CLEAR
INTERRUPT
CA
CLEAR ALL
START
SHOT
LAYOUT
CANCEL
OK
OK
BORDER LINE
READ-END
PLACE NEXT ORIGINAL. PRESS [START].
WHEN FINISHED, PRESS [READ-END].
AUTO
EXPOSURE PAPER SELECT
100%
COPY RATIO
AUTO IMAGE
A4
CHAPTER
3
Press the upper “OK” key.
9
Enter the desired number of copies.
10
SPECIAL FUNCTIONS Multi shot
11
12
Press the START ( ) key.
●
If the document feeder is used, copying will start after all
originals are scanned.
●
If the document glass is used, proceed to the next step.
Replace the finished original with the next original after
the START ( ) key indicator lights up, and then press
the START ( ) key. Repeat this step until all originals
have been scanned. Then, press the “READ-END” key
on the touch panel.
●
Copying will start at this time.
●
Up to 120 sheets of A4 (8-1/2" x 11") originals or up to 60 sheets
of originals larger than A4 (8-1/2" x 11") can be scanned.
●
To cancel the MULTI SHOT function, select the MULTI SHOT
function again and press the “CANCEL” key.
3-12
Page 47

COVERS
READY TO CO
READY TO COPY.(DOCUMENT FEEDER MODE)
SPECIAL MODES
MARGIN SHIFT
MULTI SHOT
PAMPHLET COPY
ERASE
COVERS
IMAGE EDIT
TEXT STAMP
TRANSPARENCY
INSERTS
DUAL PAGE
COPY
OK
AUTO
EXPOSURE PAPER SELECT
100%
COPY RATIO
AUTO
A4
The COVERS mode is used to place covers on the front, back, or both
the front and back of multipage documents.
●
Front cover sheets can be copied on, but only on the front side even
in the 1-sided to 2-sided and 2-sided to 2-sided copy modes.
The back side of the original designated as the cover will not be
copied.
●
Back cover sheets cannot be copied on, either on the front side or
on the back side.
●
Cover sheets must be fed from the bypass tray and must be the
same size as the copy paper being used to copy the document.
●
When the COVERS mode is selected, the stream feeding mode of
the SPF/RADF will always be off.
Place the originals in the document feeder tray.
1
CHAPTER
3
SPECIAL FUNCTIONS Covers
Press the 2-SIDED COPY key and select the desired
duplex mode if needed. Press the “OK” key to close the
2
duplex selection window.
●
The 2-sided to 1-sided and 2-sided to 2-sided copy modes
cannot be selected on the AR-280.
●
To copy in the 1-sided to 2-sided copy mode with the AR-280,
an optional duplex module (AR-DU1) must be installed.
Press the SPECIAL MODES key.
3
●
The SPECIAL MODES screen will appear.
Press the “COVERS” key on the touch panel.
4
●
The setting screen for COVERS will appear.
LOAD COVER STOCK INTO BYPASS-TRAY.
OK
COVERS
FRONT
BACK
FRONT+BACK
CANCEL
PRINT ON FRONT COVER?
YES
NO
OK
3-13
Page 48

COVERS
FRONT
BACK
FRONT+BACK
YES
NO
PRINT ON FRONT
CANCEL
O
O
YES
NO
PRINT ON FRONT COVER?
CANCEL
OK
OK
OK
OK
1
2 3
4 5
6
7
8
9
0
P
PROGRAM
INT
CA
CLEAR ALL
START
COVERS
CHAPTER
3
SPECIAL FUNCTIONS Covers
Select cover placement.
5
●
Select “FRONT”, “BACK” or “FRONT+BACK” on the touch
panel.
Indicate whether the front cover sheets are copied on or
not.
6
●
Select “YES” or “NO” on the touch panel. If “YES” is selected, the
first page of the document will be copied onto the front cover
sheet.
●
If “BACK” has been selected in step 5, this selection is not
needed.
Press the upper “OK” key.
7
Load the cover stock into the bypass tray, making sure
that the cover stock is the same size as the copy paper.
8
●
The START ( ) key indicator will light up.
Enter the desired number of copies and press the
START ( ) key.
9
●
To cancel the COVERS function, select the COVERS function
again and press the “CANCEL” key.
3-14
Page 49

TRANSPARENCY FILM WITH INSERT SHEETS
READY TO CO
READY TO COPY.
SPECIAL MODES
MARGIN SHIFT
MULTI SHOT
PAMPHLET COPY
ERASE
COVERS
IMAGE EDIT
TEXT STAMP
TRANSPARENCY
INSERTS
DUAL PAGE
COPY
OK
AUTO
EXPOSURE PAPER SELECT
100%
COPY RATIO
AUTO
A4
4
3
2
1
2
1
3
1
4
2
4
3
2
1
3
1
4
2
1
2
1
INSERTS WITHOUT
PRINTING
4
4
3
3
2
INSERTS WITH
PRINTING
4
3
following each transparent sheet. The insert sheets can be processed
blank or can be copied with the same image as the transparent sheets.
●
This mode can be selected only in the 1-sided to 1-sided and 2-sided
to 1-sided (AR-285/AR-335 only) modes.
●
A multiple number of copies cannot be selected in this mode.
●
Transparency film must be fed from the bypass tray.
●
Insert sheets must be the same size as the transparency film.
CHAPTER
3
SPECIAL FUNCTIONS Transparency film with insert sheets
When copying onto transparency film, insert sheets can be placed
Place the originals in the document feeder tray or on the
document glass.
1
Press the SPECIAL MODES key.
2
●
The SPECIAL MODES screen will appear.
Press the “TRANSPARENCY INSERTS” key on the touch
panel.
3
●
The setting screen for TRANSPARENCY INSERTS will appear.
LOAD TRANSPARENCY STOCK INTO
BYPASS-TRAY.
TRANSPARENCY INSERTS
CANCEL
PRINT ON THE INSERT
SHEETS?
YES
NO
OK
OK
3-15
Page 50

TRANSPARENCY FILM WITH INSERT SHEETS
PAPER SELECT
100%
COPY RATIO
AUTO
A4
1.
A4
2.
A3
A4
ORIGINAL
A4
C
CLEAR
INTERRUPT
CA
CLEAR ALL
START
PRINT ON THE INSERT
SHEETS?
YES
NO
CANCEL
OK
OK
OK
OK
READ-END
PLACE NEXT ORIGINAL. PRESS [START].
WHEN FINISHED, PRESS [READ-END].
AUTO
EXPOSURE PAPER SELECT
100%
COPY RATIO
AUTO
A4
CHAPTER
3
Indicate whether the insert sheets are copied on or not.
4
●
Select “YES” or “NO” on the touch panel.
Press the upper “OK” key.
5
Load transparency film into the bypass tray.
6
SPECIAL FUNCTIONS Transparency film with insert sheets
Ensure that the desired tray is selected for insert sheets.
7
●
The copy paper for insert sheets must be the same size as the
transparency film.
Make all other selections and press the START ( ) key.
8
●
If the document feeder is used, scanning of originals and
copying will start.
●
If the document glass is used in the SORT mode, proceed to the
next step.
3-16
Replace the finished original with the next original after
the START ( ) key indicator lights up, and then press
9
the START ( ) key. Repeat this step until all originals
have been scanned. Then, press the “READ-END” key
on the touch panel.
●
Copying will start at this time.
●
Up to 120 sheets of A4 (8-1/2" x 11") originals or up to 60 sheets
of originals larger than A4 (8-1/2" x 11") can be scanned.
●
When copying is completed, remove remaining transparency
film.
●
To cancel the TRANSPARENCY INSERTS function, select the
TRANSPARENCY INSERTS function again and press the
“CANCEL” key.
Page 51

PAMPHLET COPY
READY TO CO
Originals
(1-sided)
Originals
(2-sided)
The PAMPHLET COPY function is used to arrange copies in proper
order for eventual centre-stapling and folding into a booklet. Four
pages will be copied onto one sheet.
●
To use the PAMPHLET COPY function in the AR-280, an optional
duplex module (AR-DU1) must be installed.
●
Centre stapling cannot be performed by this copier.
Even if PAMPHLET COPY is selected and an optional finisher
(AR-FN1) is installed, centre-stapling cannot be performed.
●
This function will not work when non-standard size originals or copy
paper are used.
●
When the PAMPHLET COPY function is set, the maximum allowable
copy ratio is 400%.
CHAPTER
3
SPECIAL FUNCTIONS Pamphlet copy
Place the originals in the document feeder tray or on the
document glass.
1
●
When using the document glass, place the originals one at a
time in the reverse order, starting with the last original first.
Press the SPECIAL MODES key.
2
●
The SPECIAL MODES screen will appear.
3-17
Page 52

PAMPHLET COPY
READY TO COPY.
SPECIAL MODES
MARGIN SHIFT
MULTI SHOT
PAMPHLET COPY
ERASE
COVERS
IMAGE EDIT
TEXT STAMP
TRANSPARENCY
INSERTS
DUAL PAGE
COPY
OK
AUTO
EXPOSURE PAPER SELECT
100%
COPY RATIO
AUTO
A4
READY TO COPY.
PAMPHLET COPY
ORIGINAL
1-SIDED
2-SIDED RIGHT BINDING
LEFT BINDING
CANCEL
OK
OK
READY TO COPY.
PAMPHLET COPY
ORIGINAL
1-SIDED
2-SIDED RIGHT BINDING
LEFT BINDING
CANCEL
OK
OK
READY TO COPY.
PAMPHLET COPY
ORIGINAL
1-SIDED
2-SIDED RIGHT BINDING
LEFT BINDING
CANCEL
OK
OK
Press the “PAMPHLET COPY” key on the touch panel.
3
●
The setting screen for PAMPHLET COPY will appear.
●
Depending on installation of an optional component, the
“PAMPHLET COPY” function may be included in the “IMAGE
EDIT” menu. In this case, press the “IMAGE EDIT” key and then
press the “PAMPHLET COPY” key.
CHAPTER
3
SPECIAL FUNCTIONS Pamphlet copy
READY TO COPY.
PAMPHLET COPY
●
On the AR-280, the “1-SIDED” and “2-SIDED” keys for the
originals are not displayed.
Select the type of originals.
4
●
Indicate whether the originals are 1-sided or 2-sided using
the “1-SIDED” or “2-SIDED” key on the touch panel.
●
On the AR-280, this selection cannot be performed.
OK
CANCEL
ORIGINAL
1-SIDED
2-SIDED RIGHT BINDING
OK
LEFT BINDING
3-18
Select the binding position.
5
●
Select “LEFT BINDING” or “RIGHT BINDING” on the touch
panel.
Press the upper “OK” key.
6
Page 53

Check the copy paper selection.
1
2 3
4 5
6
7
8
9
0
C
P
CLEAR
PROGRAM
AUDIT CLEAR
INTERRUPT
C
CLEAR
INTERRUPT
CA
CLEAR ALL
START
AUT
A4
AUTO
EXPOSURE PAPER SELECT
70%
AUTO IMAGE
READ-END
PLACE NEXT ORIGINAL. PRESS [START].
WHEN FINISHED, PRESS [READ-END].
7
●
If the AUTO IMAGE function is selected, reduction or enlargement
and image rotation will be automatically performed as required.
●
The AUTO IMAGE function is automatically selected when the
PAMPHLET COPY function is selected.
●
In some regions, the AUTO PAPER SELECT function is
automatically selected in place of the AUTO IMAGE function.
Enter the desired number of copies.
8
PAMPHLET COPY
CHAPTER
3
A4
9
10
Press the START ( ) key.
●
If the document feeder is used, copying will start after all
originals are scanned.
●
If the document glass is used, proceed to the next step.
Replace the finished original with the next original after
the START ( ) key indicator lights up, and then press
the START ( ) key. Repeat this step until all originals
have been scanned. Then, press the “READ-END” key
on the touch panel.
●
Copying will start at this time.
●
Up to 120 sheets of A4 (8-1/2" x 11") originals or up to 60 sheets
of originals larger than A4 (8-1/2" x 11") can be scanned.
●
If originals of different sizes are used, the copy paper size will be
determined based on the original that is scanned first. If originals
larger than the first original are used, a portion of the images
may not be copied.
●
You can make a pamphlet by folding the copies in two and
stapling them.
●
To cancel the PAMPHLET COPY function, select the PAMPHLET
COPY function again and press the “CANCEL” key.
3-19
SPECIAL FUNCTIONS Pamphlet copy
Page 54

READY TO CO
The image editing functions include the following functions.
READY TO COPY.
AUTO
EXPOSURE PAPER SELECT
100%
COPY RATIO
AUTO 8/ 11
1
2
1.
A4
2.
A3
●
●
●
●
●
These functions are selected by pressing the “IMAGE EDIT” key on
the SPECIAL MODES screen and pressing the key of each function.
CHAPTER
IMAGE EDITING FUNCTIONS
Centring: Shifts the image to the centre of copy paper when the
original and the copy paper are of different sizes.
Repeat copy: Produces repeated copies on a single sheet of copy
paper.
Hi-Fi: Produces high image quality copies.
B/W reverse: Reverses the black and white areas.
Binding change: Rotates the image of originals for the second
side in the 1-sided to 2-sided copy mode.
3
CENTRING
SPECIAL FUNCTIONS Image editing functions
When the original and copy paper are of different sizes, CENTRING is
used to shift the image as a whole to the centre of the copy paper.
The image will shift only in the left to right direction, not in the top to
bottom direction.
●
This function will not work when non-standard size originals or copy
paper are used. This function cannot be selected when enlargement
copying has been selected.
Place the originals in the document feeder tray or on the
document glass.
1
Press the “PAPER SELECT” key on the touch panel and
select the desired paper size.
2
3-20
Press the SPECIAL MODES key.
3
●
The SPECIAL MODES screen will appear.
Page 55

1
2 3
4 5
6
7
8
9
0
C
P
CLEAR
PROGRAM
AUDIT CLEAR
INTERRUPT
C
CLEAR
INTERRUPT
CA
CLEAR ALL
START
IMAGE EDITING FUNCTIONS
READY TO COPY.
SPECIAL MODES
IMAGE EDIT
CENTRING
B/W
REVERSE
REPEAT CO
BINDIN
CHANG
Hi-Fi
OK
OK
READY TO COPY.
SPECIAL MODES
MARGIN SHIFT
MULTI SHOT
PAMPHLET COPY
ERASE
COVERS
IMAGE EDIT
TEXT STAMP
TRANSPARENCY
INSERTS
DUAL PAGE
COPY
OK
AUTO
EXPOSURE PAPER SELECT
100%
COPY RATIO
A3
AUTO
EXPOSURE PAPER SELECT
100%
COPY RATIO
AUTO IMAGE
READ-END
PLACE NEXT ORIGINAL. PRESS [START].
WHEN FINISHED, PRESS [READ-END].
A3
Press the “IMAGE EDIT” key on the touch panel.
4
●
The IMAGE EDIT menu will appear.
READY TO COPY.
SPECIAL MODES
IMAGE EDIT
OK
OK
CENTRING
B/W
REVERSE
Press the “CENTRING” key.
5
●
The “CENTRING” key will be highlighted.
Press the upper “OK” key.
REPEAT COPY
BINDING
CHANGE
Hi-Fi
6
Make all other desired copier selections and enter the
desired number of copies.
7
CHAPTER
3
SPECIAL FUNCTIONS Image editing functions
Press the START ( ) key.
●
8
9
If the document feeder is used, scanning of originals and
copying will start.
●
If the document glass is used in the SORT mode, proceed to the
next step.
Replace the finished original with the next original after
the START ( ) key indicator lights up, and then press
the START ( ) key. Repeat this step until all originals
have been scanned. Then, press the “READ-END” key
on the touch panel.
●
Copying will start at this time.
●
Up to 120 sheets of A4 (8-1/2" x 11") originals or up to 60 sheets
of originals larger than A4 (8-1/2" x 11") can be scanned.
●
To cancel the CENTRING function, press the “CENTRING” key
again on the IMAGE EDIT menu screen.
3-21
Page 56

IMAGE EDITING FUNCTIONS
READY TO CO
100
COPY RA
AUTO
A4
1.
A4
2.
A3
8/ 11R
2
REPEAT COPY
C
CHAPTER
3
SPECIAL FUNCTIONS Image editing functions
C
C
B
CBC
B
REPEAT COPY is used to produce repeated images of an original on a
single sheet of paper. Border lines can be drawn to separate repeated
B
images.
●
B
Up to 16 (4 x 4) copies can be made on a single sheet.
However part of the original image may not be copied, depending on the
original size, copy paper size, and the copy ratio.
●
This function will not work when non-standard size paper is used.
Place the originals in the document feeder tray or on the
document glass.
1
3-22
Select the desired copy paper size.
2
●
Press the “PAPER SELECT” key on the touch panel and then
select the desired paper size.
Press the SPECIAL MODES key.
3
●
The SPECIAL MODES screen will appear.
Page 57

READY TO COPY.
SPECIAL MODES
IMAGE EDIT
CENTRING
B/W
REVERSE
REPEAT COPY
Hi-Fi
BINDING
CHANGE
OK
OK
42
168
BORDER L
4
16
BORDER LINE
CANCEL
OK
IMAGE EDITING FUNCTIONS
READY TO COPY.
SPECIAL MODES
MARGIN SHIFT
MULTI SHOT
PAMPHLET COPY
ERASE
COVERS
IMAGE EDIT
TEXT STAMP
TRANSPARENCY
INSERTS
DUAL PAGE
COPY
OK
AUTO
EXPOSURE PAPER SELECT
100%
COPY RATIO
A3
Press the “IMAGE EDIT” key on the touch panel.
4
●
The IMAGE EDIT menu will appear.
CHAPTER
3
Press the “REPEAT COPY” key on the touch panel.
5
●
The setting screen for REPEAT COPY will appear.
READY TO COPY.
OK
REPEAT COPY
Select the number of images to be repeated on a single
sheet of copy paper.
6
●
Select “2”, “4”, “8” or “16” on the touch panel.
CANCEL
42
168
OK
BORDER LINE
SPECIAL FUNCTIONS Image editing functions
Select a type of border line.
7
●
Select the solid line, broken line or no border line.
3-23
Page 58

4
16
BORDER LINE
CANCEL
OK
OK
1
2 3
4 5
6
7
8
9
0
C
P
CLEAR
PROGRAM
AUDIT CLEAR
INTERRUPT
C
CLEAR
INTERRUPT
CA
CLEAR ALL
START
IMAGE EDITING FUNCTIONS
AUTO
EXPOSURE PAPER SELECT
100%
COPY RATIO
AUTO IMAGE
READ-END
PLACE NEXT ORIGINAL. PRESS [START].
WHEN FINISHED, PRESS [READ-END].
A3
CHAPTER
3
Press the upper “OK” key.
8
SPECIAL FUNCTIONS Image editing functions
9
10
Make all other desired copier selections and enter the
desired number of copies.
●
If the required area of the originals is not included on the copies,
select a proper reduction ratio.
Press the START ( ) key.
●
If the document feeder is used, scanning of originals and
copying will start.
●
If the document glass is used in the SORT mode, proceed to the
next step.
3-24
11
Replace the finished original with the next original after
the START ( ) key indicator lights up, and then press
the START ( ) key. Repeat this step until all originals
have been scanned. Then, press the “READ-END” key
on the touch panel.
●
Copying will start at this time.
●
Up to 120 sheets of A4 (8-1/2" x 11") originals or up to 60 sheets
of originals larger than A4 (8-1/2" x 11") can be scanned.
●
To cancel the REPEAT COPY function, select the REPEAT
COPY function again and press the “CANCEL” key.
Page 59

Hi-Fi
READY TO CO
READY TO COPY.
SPECIAL MODES
MARGIN SHIFT
MULTI SHOT
PAMPHLET COPY
ERASE
COVERS
IMAGE EDIT
TEXT STAMP
TRANSPARENCY
INSERTS
DUAL PAGE
COPY
OK
AUTO
EXPOSURE PAPER SELECT
100%
COPY RATIO
AUTO
A4
IMAGE EDITING FUNCTIONS
This function produces high image quality copies.
●
This function cannot be used with duplex (1-sided to
2-sided or 2-sided to 2-sided) copying.
●
Sort cannot be selected with this function. Even if the
document feeder is used, the GROUP mode will be
automatically selected.
●
When the Hi-Fi function is set, the allowable range of
copy ratio will be 50% to 400%.
●
When this function is selected, the exposure mode will
be automatically set to the photo mode. Other exposure
modes cannot be selected.
Even if this function is cancelled, the photo mode will
not automatically be cancelled.
1
●
Image rotation cannot be performed with this function.
●
Some special functions such as MULTI SHOT and
REPEAT COPY cannot be used with this function.
When a function which cannot be used with this
function is selected, the message “THIS FUNCTION
CANNOT BE SELECTED IN THIS MODE.” will
appear.
Place the originals in the document feeder tray or on the
document glass.
●
The single pass feeder (SPF in AR-280) cannot be used for this
function. Use the document glass in the AR-280.
CHAPTER
3
SPECIAL FUNCTIONS Image editing functions
Press the SPECIAL MODES key.
2
●
The SPECIAL MODES screen will appear.
Press the “IMAGE EDIT” key on the touch panel.
3
●
The IMAGE EDIT menu will appear.
3-25
Page 60

1
2 3
4 5
6
7
8
9
0
C
P
CLEAR
PROGRAM
AUDIT CLEAR
INTERRUPT
C
CLEAR
INTERRUPT
CA
CLEAR ALL
START
IMAGE EDITING FUNCTIONS
READY TO COPY.
SPECIAL MODES
IMAGE EDIT
CENTRING
B/W
REVERSE
REPEAT COPY
Hi-Fi
OK
OK
BINDING
CHANGE
REPEAT COPY
Hi-Fi
OK
OK
CHAPTER
3
Press the “Hi-Fi” key on the touch panel.
4
●
The “Hi-Fi” key will be highlighted.
SPECIAL FUNCTIONS Image editing functions
Press the upper “OK” key.
5
Make all other desired copier selections and enter the
desired number of copies.
6
3-26
Press the START ( ) key.
7
●
To cancel the Hi-Fi function, press the “Hi-Fi” key again on the
IMAGE EDIT menu screen.
Page 61

READY TO CO
B/W REVERSE
READY TO COPY.
SPECIAL MODES
MARGIN SHIFT
MULTI SHOT
PAMPHLET COPY
ERASE
COVERS
IMAGE EDIT
TEXT STAMP
TRANSPARENCY
INSERTS
DUAL PAGE
COPY
OK
AUTO
EXPOSURE PAPER SELECT
100%
COPY RATIO
AUTO
A4
READY TO COPY.
SPECIAL MODES
IMAGE EDIT
CENTRING
B/W
REVERSE
REPEAT COPY
Hi-Fi
BINDING
CHANGE
OK
OK
IMAGE EDITING FUNCTIONS
The B/W REVERSE feature is used to reverse black and white areas.
●
When the B/W REVERSE feature is selected, the exposure mode
will be automatically set to the TEXT mode. Other exposure modes
cannot be selected.
Even if this feature is cancelled, the TEXT mode will not automatically
be cancelled.
Place the original in the document feeder tray or on the
document glass.
1
CHAPTER
3
Press the SPECIAL MODES key.
2
●
The SPECIAL MODES screen will appear.
Press the “IMAGE EDIT” key on the touch panel.
3
●
The IMAGE EDIT menu will appear.
SPECIAL FUNCTIONS Image editing functions
Press the “B/W REVERSE” key on the touch panel.
4
●
The “B/W REVERSE” key will be highlighted.
3-27
Page 62

1
2 3
4 5
6
7
8
9
0
C
P
CLEAR
PROGRAM
AUDIT CLEAR
INTERRUPT
C
CLEAR
INTERRUPT
CA
CLEAR ALL
START
IMAGE EDITING FUNCTIONS
REPEAT COPY
Hi-Fi
OK
OK
READ-END
PLACE NEXT ORIGINAL. PRESS [START].
WHEN FINISHED, PRESS [READ-END].
AUTO
EXPOSURE PAPER SELECT
100%
COPY RATIO
AUTO
A4
CHAPTER
3
Press the upper “OK” key.
5
SPECIAL FUNCTIONS Image editing functions
Make all other desired copier selections and enter the
desired number of copies.
6
Press the START ( ) key.
7
●
If the document feeder is used, scanning of originals and
copying will start.
●
If the document glass is used in the SORT mode, proceed to the
next step.
3-28
Replace the finished original with the next original after
the START ( ) key indicator lights up, and then press
8
the START ( ) key. Repeat this step until all originals
have been scanned. Then, press the “READ-END” key
on the touch panel.
●
Copying will start at this time.
●
Up to 120 sheets of A4 (8-1/2" x 11") originals or up to 60 sheets
of originals larger than A4 (8-1/2" x 11") can be scanned.
●
To cancel the B/W REVERSE function, press the “B/W
REVERSE” key again on the IMAGE EDIT menu screen.
Page 63

IMAGE EDITING FUNCTIONS
BINDING CHANGE
This function rotates the image of originals of the second side in the 1-sided to 2-sided copy mode. This function is
useful for copying B4 or A3 (8-1/2" x 14" or 11" x 17") originals in the 1-sided to 2-sided copy mode to allow left side
binding.
Original Setting of originals Copies
Portrait orientation setting Normal 1-sided to 2-sided copying
AB
CD
EF
1
GH
CHAPTER
Top
A
C
E
The binding edge is
at the left side.
G
3
EF
GH
2
Bottom
2
Landscape orientation setting Normal 1-sided to 2-sided copying
Bottom
2
GH
EF
1-sided to 2-sided copying with
binding change
2
H
A
F
C
2
A
H
F
C
Top
1-sided to 2-sided copying with
binding change
SPECIAL FUNCTIONS Image editing functions
The binding edge is
at the top.
The binding edge is
at the top.
A
E
The binding edge is
at the left side.
C
G
●
This function will not work when non-standard size paper (or
5-1/2" x 8-1/2" paper) is used.
●
To use the BINDING CHANGE function in the AR-280, an
optional duplex module (AR-DU1) must be installed.
3-29
Page 64

READY TO CO
READY TO COPY.
SPECIAL MODES
MARGIN SHIFT
MULTI SHOT
PAMPHLET COPY
ERASE
COVERS
IMAGE EDIT
TEXT STAMP
TRANSPARENCY
INSERTS
DUAL PAGE
COPY
OK
AUTO
EXPOSURE PAPER SELECT
100%
COPY RATIO
AUTO
A4
READY TO COPY.
SPECIAL MODES
IMAGE EDIT
CENTRING
B/W
REVERSE
REPEAT COPY
Hi-Fi
OK
OK
BINDING
CHANGE
IMAGE EDITING FUNCTIONS
CHAPTER
3
Place the originals in the document feeder tray or on the
document glass.
1
Press the 2-SIDED COPY key and select the 1-sided to 2sided copy mode.
2
SPECIAL FUNCTIONS Image editing functions
Press the SPECIAL MODES key.
3
●
The SPECIAL MODES screen will appear.
Press the “IMAGE EDIT” key on the touch panel.
4
●
The IMAGE EDIT menu will appear.
3-30
Press the “BINDING CHANGE” key on the touch panel.
5
●
The “BINDING CHANGE” key will be highlighted.
Page 65

1
2 3
4 5
6
7
8
9
0
C
P
CLEAR
PROGRAM
AUDIT CLEAR
INTERRUPT
C
CLEAR
INTERRUPT
CA
CLEAR ALL
START
IMAGE EDITING FUNCTIONS
REPEAT COPY
Hi-Fi
OK
OK
READ-END
PLACE NEXT ORIGINAL. PRESS [START].
WHEN FINISHED, PRESS [READ-END].
AUTO
EXPOSURE PAPER SELECT
100%
COPY RATIO
AUTO
A4
Press the upper “OK” key.
6
Make all other desired copier selections and enter the
desired number of copies.
7
CHAPTER
3
Press the START ( ) key.
8
●
If the document feeder is used, scanning of originals and
copying will start.
●
If the document glass is used, proceed to the next step.
Replace the finished original with the next original after
the START ( ) key indicator lights up, and then press
9
the START ( ) key. Repeat this step until all originals
have been scanned. Then, press the “READ-END” key
on the touch panel.
●
Copying will start at this time.
●
Up to 120 sheets of A4 (8-1/2" x 11") originals or up to 60 sheets
of originals larger than A4 (8-1/2" x 11") can be scanned.
●
To cancel the BINDING CHANGE function, press the
“BINDING CHANGE” key again on the IMAGE EDIT menu
screen.
SPECIAL FUNCTIONS Image editing functions
3-31
Page 66

TEXT STAMP
READY TO CO
The text stamp functions include the following functions.
●
●
●
●
CHAPTER
3
SPECIAL FUNCTIONS Text stamp
Date: Adds the current date to the copies.
Select stamp: Adds a selected stamp to the copies.
The stamp will be printed in white on a shaded
background.
Watermark: Adds a selected watermark to the copies.
The watermark will be printed in gray tone.
Page number: Adds page numbers to the copies.
DATE
These functions are selected by pressing the “TEXT
STAMP” key on the SPECIAL MODES screen and then
selecting from the “TEXT STAMP” menu.
●
These functions will not work when non-standard size
paper is used.
●
Multiple text stamp functions can be selected at the
same time except for SELECT STAMP and
WATERMARK. These functions cannot be selected
together.
●
If the printed text stamp is located on the copy image,
part of the copy image will be covered except for
watermark. Part of watermark may be covered with
the copy image.
●
The size of printed characters is fixed.
The size will not vary even in reduction or enlargement
copying.
23 April, 1998
The DATE function adds the current date to the copies. The date will
be printed at the upper right of the copies.
●
If reduction or enlargement is used with this function, the print
position may move or the date may not be printed.
★ KEY OPERATOR To use the DATE function, set the current date and
time. See page 8-19. The initial setting of the date format can be changed.
See page 8-18.
Place the originals in the document feeder tray or on the
document glass.
1
Press the SPECIAL MODES key.
2
●
The SPECIAL MODES screen will appear.
3-32
Page 67

DATE
SELECT
STAMP
PRINT
DIRECTION
PAGE
NUMBER
WATERMARK
OK
OK
23 April, 1998
April 23, 1998
23/04/98
04/23/98
DATE
1ST
ONL
ALL
CANCEL
23, 1998
1ST PAGE
ONLY
ALL PAGES
CANCEL
OK
1ST PAGE
ONLY
CANCEL
OK
OK
READY TO COPY.
SPECIAL MODES
MARGIN SHIFT
MULTI SHOT
PAMPHLET COPY
ERASE
COVERS
IMAGE EDIT
TEXT STAMP
TRANSPARENCY
INSERTS
DUAL PAGE
COPY
OK
AUTO
EXPOSURE PAPER SELECT
100%
COPY RATIO
AUTO
A4
TEXT STAMP
Press the “TEXT STAMP” key on the touch panel.
3
●
The TEXT STAMP menu will appear.
READY TO COPY.
SPECIAL MODES
TEXT STAMP
DATE
WATERMARK
SELECT
STAMP
PAGE
NUMBER
OK
OK
PRINT
DIRECTION
Press the “DATE” key on the touch panel.
4
●
The setting screen for DATE will appear.
READY TO COPY.
OK
DATE
23 April, 1998
April 23, 1998
23/04/98
04/23/98
Select the desired date format on the touch panel.
5
●
The selected format will be highlighted.
●
The date formats displayed on the touch panel may be different
from the illustration above depending on the country or region.
CANCEL
OK
1ST PAGE
ONLY
ALL PAGES
CHAPTER
3
SPECIAL FUNCTIONS Text stamp
Select the pages to be stamped.
6
●
Indicate whether the date is to be printed only on the first page
or on all pages, by pressing the “1ST PAGE ONLY” or “ALL
PAGES” key.
Press the lower “OK” key.
7
●
The TEXT STAMP menu will appear again.
3-33
Page 68

1
2 3
4 5
6
7
8
9
0
C
P
CLEAR
PROGRAM
AUDIT CLEAR
INTERRUPT
C
CLEAR
INTERRUPT
CA
CLEAR ALL
START
TEXT STAMP
DATE
SELECT
STAMP
PRINT
DIRECTION
PAGE
NUMBER
WATERMARK
READ-END
PLACE NEXT ORIGINAL. PRESS [START].
WHEN FINISHED, PRESS [READ-END].
AUTO
EXPOSURE PAPER SELECT
100%
COPY RATIO
AUTO
A4
STAMP
DATE
SELECT
STAMP
PRINT
DIRECTION
PAGE
NUMBER
WATERMARK
OK
OK
CHAPTER
3
Select the print direction.
8
●
If the PAMPHLET COPY function is used with this function, the
portrait orientation ( ) must be selected.
Press the upper “OK” key.
9
SPECIAL FUNCTIONS Text stamp
10
11
Make all other desired copier selections and enter the
desired number of copies.
Press the START ( ) key.
●
If the document feeder is used, scanning of originals and
copying will start.
●
If the document glass is used, proceed to the next step.
3-34
12
Replace the finished original with the next original after
the START ( ) key indicator lights up, and then press
the START ( ) key. Repeat this step until all originals
have been scanned. Then, press the “READ-END” key
on the touch panel.
●
Copying will start at this time.
●
Up to 120 sheets of A4 (8-1/2" x 11") originals or up to 60 sheets
of originals larger than A4 (8-1/2" x 11") can be scanned.
●
To cancel the DATE function, select the DATE function again
and press the “CANCEL” key.
Page 69

SELECT STAMP
READY TO CO
READY TO COPY.
SPECIAL MODES
MARGIN SHIFT
MULTI SHOT
PAMPHLET COPY
ERASE
COVERS
IMAGE EDIT
TEXT STAMP
TRANSPARENCY
INSERTS
DUAL PAGE
COPY
OK
AUTO
EXPOSURE PAPER SELECT
100%
COPY RATIO
AUTO
A4
DATE
SELECT
STAMP
PRINT
DIRECTION
PAGE
NUMBER
WATERMARK
OK
OK
Urgent
TEXT STAMP
The SELECT STAMP function adds a selected stamp such as
“Confidential” and “Urgent” to the copies. The stamp will be printed in
white on a shaded background.
●
The stamps which can be selected are: “Confidential”, “Urgent”,
“Copy”, “Preliminary”, “Draft”, and “Final”.
●
The darkness of the shaded background can be adjusted in three
levels.
●
The print position can be selected from six positions.
●
If reduction or enlargement is used with this function, the print
position may move or the stamp may not be printed.
Place the originals in the document feeder tray or on
the document glass.
1
CHAPTER
3
Press the SPECIAL MODES key.
2
●
The SPECIAL MODES screen will appear.
Press the “TEXT STAMP” key on the touch panel.
3
●
The TEXT STAMP menu will appear.
SPECIAL FUNCTIONS Text stamp
Press the “SELECT STAMP” key on the touch panel.
4
●
The setting screen for SELECT STAMP will appear.
READY TO COPY.
OK
SELECT STAMP
Confidential
Copy
Draft
OPTION
Preliminary
CANCEL
Urgent
Final
OK
1ST PAGE
ONLY
ALL PAGES
3-35
Page 70

ESS POSITION
CANCEL
OK
OK
SELECT STAMP
Confidential
Copy
Draft
Urgent
Preliminary
Final
OPTION
1
O
A
CANCEL
Urgent
Preliminary
Final
1ST PAGE
ONLY
ALL PAGES
CANCEL
OK
Confidential
Copy
Draft
Urgent
Preliminary
Final
OPTION
O
A
SELECT STAMP
DARKNESS PO
CANC
TEXT STAMP
CHAPTER
3
SPECIAL FUNCTIONS Text stamp
Select the desired stamp to be printed.
5
●
The selected stamp will be highlighted.
Select the pages to be stamped.
6
●
Indicate whether the stamp is to be printed only on the first page
or on all pages, by pressing the “1ST PAGE ONLY” or “ALL
PAGES” key.
3-36
To adjust the exposure and print position, press the
“OPTION” key. Otherwise, proceed to step 10.
7
●
The following screen will appear.
READY TO COPY.
OK
SELECT STAMP
DARKNESS POSITION
Adjust the darkness of the background of the stamp.
8
●
Press the key to darken or the key to lighten.
Select the stamp position.
9
●
The selected position will be highlighted.
●
To return to the previous screen, press the key.
CANCEL
OK
Page 71

10
POSITION
CANCEL
OK
OK
DATE
SELECT
STAMP
PRINT
DIRECTION
PAGE
NUMBER
WATERMARK
DATE
SELECT
STAMP
PAGE
NUMBER
WATERMARK
OK
OK
1
2 3
4 5
6
7
8
9
0
P
PROGRAM
INT
CA
CLEAR ALL
START
READ-END
PLACE NEXT ORIGINAL. PRESS [START].
WHEN FINISHED, PRESS [READ-END].
AUTO
EXPOSURE PAPER SELECT
100%
COPY RATIO
AUTO
A4
11
TEXT STAMP
Press the lower “OK” key.
●
The TEXT STAMP menu will appear again.
Select the print direction.
●
If the PAMPHLET COPY function is used with this function, the
portrait orientation ( ) must be selected.
CHAPTER
3
SPECIAL FUNCTIONS Text stamp
12
13
14
15
Press the upper “OK” key.
Make all other desired copier selections and enter the
desired number of copies.
Press the START ( ) key.
●
If the document feeder is used, scanning of originals and
copying will start.
●
If the document glass is used, proceed to the next step.
Replace the finished original with the next original after
the START ( ) key indicator lights up, and then press
the START ( ) key. Repeat this step until all originals
have been scanned. Then, press the “READ-END” key
on the touch panel.
●
Copying will start at this time.
●
Up to 120 sheets of A4 (8-1/2" x 11") originals or up to 60 sheets
of originals larger than A4 (8-1/2" x 11") can be scanned.
●
To cancel the SELECT STAMP function, select the SELECT
STAMP function again and press the “CANCEL” key.
3-37
Page 72

READY TO CO
READY TO COPY.
SPECIAL MODES
MARGIN SHIFT
MULTI SHOT
PAMPHLET COPY
ERASE
COVERS
IMAGE EDIT
TEXT STAMP
TRANSPARENCY
INSERTS
DUAL PAGE
COPY
OK
AUTO
EXPOSURE PAPER SELECT
100%
COPY RATIO
AUTO
A4
TEXT STAMP
Draft
CHAPTER
3
WATERMARK
Draft
The WATERMARK function adds a selected watermark such as
“Confidential” and “Urgent” to the copies. The watermark will be printed
in gray tone at the centre of copies.
●
The watermarks which can be selected are: “Confidential”, “Urgent”,
“Copy”, “Preliminary”, “Draft”, and “Final”.
●
The darkness of the watermark can be adjusted in two levels.
SPECIAL FUNCTIONS Text stamp
Place the originals in the document feeder tray or on the
document glass.
1
Press the SPECIAL MODES key.
2
●
The SPECIAL MODES screen will appear.
3-38
Press the “TEXT STAMP” key on the touch panel.
3
●
The TEXT STAMP menu will appear.
Page 73

DATE
SELECT
STAMP
PRINT
DIRECTION
PAGE
NUMBER
WATERMARK
OK
OK
WATERMARK
Confidential
Copy
Draft
Urgent
Preliminary
Final
OPTION
1
O
A
CANCEL
Urgent
Preliminary
Final
1ST PAGE
ONLY
ALL PAGES
CANCEL
OK
Confidential
Copy
Draft
Urgent
Preliminary
Final
OPTION
DARKNESS
OK
TEXT STAMP
Press the “WATERMARK” key on the touch panel.
4
●
The setting screen for WATERMARK will appear.
READY TO COPY.
OK
WATERMARK
Confidential
Copy
Draft
OPTION
Preliminary
CANCEL
Urgent
Final
OK
1ST PAGE
ONLY
ALL PAGES
CHAPTER
3
Select the desired watermark to be printed.
5
●
The selected watermark will be highlighted.
Select the pages to be printed with the watermark.
6
●
Indicate whether the watermark is to be printed only on the first
page or on all pages, by pressing the “1ST PAGE ONLY” or “ALL
PAGES” key.
To adjust the exposure, press the “OPTION” key.
Otherwise, proceed to step 9.
7
●
The following screen will appear.
READY TO COPY.
OK
WATERMARK CANCEL
DARKNESS
OK
SPECIAL FUNCTIONS Text stamp
Adjust the darkness of the watermark.
8
●
Press the key to darken or the key to lighten.
●
To return to the previous screen, press the key.
3-39
Page 74

OK
OK
DATE
SELECT
STAMP
PRINT
DIRECTION
PAGE
NUMBER
WATERMARK
DATE
SELECT
STAMP
PAGE
NUMBER
OK
OK
1
2 3
4 5
6
7
8
9
0
P
PROGRAM
INT
CA
CLEAR ALL
START
TEXT STAMP
READ-END
PLACE NEXT ORIGINAL. PRESS [START].
WHEN FINISHED, PRESS [READ-END].
AUTO
EXPOSURE PAPER SELECT
100%
COPY RATIO
AUTO
A4
CHAPTER
3
9
10
Press the lower “OK” key.
●
The TEXT STAMP menu will appear again.
Select the print direction.
●
If the PAMPHLET COPY function is used with this function, the
portrait orientation ( ) must be selected.
SPECIAL FUNCTIONS Text stamp
11
12
13
Press the upper “OK” key.
Make all other desired copier selections and enter the
desired number of copies.
Press the START ( ) key.
●
If the document feeder is used, scanning of originals and
copying will start.
●
If the document glass is used, proceed to the next step.
3-40
14
Replace the finished original with the next original after
the START ( ) key indicator lights up, and then press
the START ( ) key. Repeat this step until all originals
have been scanned. Then, press the “READ-END” key
on the touch panel.
●
Copying will start at this time.
●
Up to 120 sheets of A4 (8-1/2" x 11") originals or up to 60 sheets
of originals larger than A4 (8-1/2" x 11") can be scanned.
●
To cancel the WATERMARK function, select the WATERMARK
function again and press the “CANCEL” key.
Page 75

PAGE NUMBER
READY TO CO
READY TO COPY.
SPECIAL MODES
MARGIN SHIFT
MULTI SHOT
PAMPHLET COPY
ERASE
COVERS
IMAGE EDIT
TEXT STAMP
TRANSPARENCY
INSERTS
DUAL PAGE
COPY
OK
AUTO
EXPOSURE PAPER SELECT
100%
COPY RATIO
AUTO
A4
TEXT STAMP
The PAGE NUMBER function adds page numbers to the copies.
●
The page number format can be selected from three types.
●
The page number print position is automatically selected depending on
the selected page number format.
●
If reduction or enlargement is used with this function, the print position
may move or the page numbers may not be printed.
CHAPTER
3
Place the originals in the document feeder tray or on the
document glass.
1
Press the SPECIAL MODES key.
2
●
The SPECIAL MODES screen will appear.
SPECIAL FUNCTIONS Text stamp
Press the “TEXT STAMP” key on the touch panel.
3
●
The TEXT STAMP menu will appear.
3-41
Page 76

DATE
SELECT
STAMP
PRINT
DIRECTION
PAGE
NUMBER
WATERMARK
OK
OK
CANCEL
-1-,-2-,-3-..
1
1/5,2/5,3/5..
1,2,3....
OK
OK
FIRST PAGE
NUMBER
(0~)
-1-,-2-,-3-..
1
1/5,2/5,3/5..
1,2,3....
OK
OK
CANCEL
FIRST PAGE
NUMBER
(0~)
-1-,-2-,-3-..
1
1/5,2/5,3/5..
1,2,3....
OK
OK
CANCEL
FIRST PAGE
NUMBER
DATE
SELECT
STAMP
PRINT
DIRECTION
PAGE
NUMBER
WATERMARK
TEXT STAMP
CHAPTER
3
Press the “PAGE NUMBER” key on the touch panel.
4
●
The setting screen for PAGE NUMBER will appear.
READY TO COPY.
OK
PAGE NUMBER
-1-,-2-,-3-..
1/5,2/5,3/5..
1,2,3....
CANCEL
FIRST PAGE
NUMBER
OK
1
(0~)
SPECIAL FUNCTIONS Text stamp
Select the desired page number format.
5
●
The selected page number format will be highlighted.
Select the starting page number.
6
●
Use the or key to increment or decrement the page
number.
●
If the page number format “1/5, 2/5, 3/5..” has been selected in
step 5, the starting page number is fixed to 1 and cannot be
changed.
Press the lower “OK” key.
7
●
The TEXT STAMP menu will appear again.
3-42
Select the print direction.
8
●
If the PAMPHLET COPY function is used with this function, the
portrait orientation ( ) must be selected.
Page 77

9
DATE
SELECT
STAMP
PRINT
DIRECTION
PAGE
NUMBER
WATERMARK
OK
OK
1
2 3
4 5 6
7
8
9
0
P
PROGRAM
INT
CA
CLEAR ALL
START
READ-END
PLACE NEXT ORIGINAL. PRESS [START].
WHEN FINISHED, PRESS [READ-END].
AUTO
EXPOSURE PAPER SELECT
100%
COPY RATIO
AUTO
A4
10
TEXT STAMP
Press the upper “OK” key.
Make all other desired copier selections and enter the
desired number of copies.
CHAPTER
3
11
12
Press the START ( ) key.
●
If the document feeder is used, copying will start after all
originals are scanned.
●
If the document glass is used, proceed to the next step.
Replace the finished original with the next original after
the START ( ) key indicator lights up, and then press
the START ( ) key. Repeat this step until all originals
have been scanned. Then, press the “READ-END” key
on the touch panel.
●
Copying will start at this time.
●
Up to 120 sheets of A4 (8-1/2" x 11") originals or up to 60 sheets
of originals larger than A4 (8-1/2" x 11") can be scanned.
●
To cancel the PAGE NUMBER function, select the PAGE
NUMBER function again and press the “CANCEL” key.
SPECIAL FUNCTIONS Text stamp
3-43
Page 78

SETTING REVIEW
100%
COPY RATIO
SIDE 1 SIDE 2
10 mm 10 mm
2inl
NO BORDER
Confidential
1ST PAGE ONLY
EXIT
1/2
SIDE 1 SIDE 2
10 mm 10 mm
2inl
NO BORDER
:
The current settings of copier functions can be displayed on the touch
panel.
CHAPTER
3
SPECIAL FUNCTIONS Setting review
Press the REVIEW ( ) key.
1
●
The REVIEW screen will appear.
The settings of the duplex mode (1-sided to 1-sided, etc.), sort/
group mode, and special functions will be displayed. The
exposure, paper size, and copy ratio which are displayed on the
basic screen will not be displayed on the REVIEW screen.
1/2
Example
REVIEW
1-SIDED COPIES OF 1-SIDED
ORIGINALS
STAPLE SORT
MARGIN SHIFT :
MULTI SHOT :
SELECT STAMP :
To review all setting information, it may be necessary to
scroll between review screens. To scroll between
2
screens, use the or key.
SIDE 1 SIDE 2
10 mm 10 mm
2inl
NO BORDER
Confidential
1ST PAGE ONLY
EXIT
1/2
3-44
To exit the review screen, press the “EXIT” key.
3
●
The basic screen will appear again.
Page 79

CHAPTER 4
SUPPLIES
This chapter describes the supplies for this copier
such as paper and toner.
Page
●
PAPER .................................................. 4-2
Types and sizes of copy paper ................................. 4-2
Loading copy paper ......................................... 4-2
●
ADDING TONER........................................... 4-5
●
USED TONER DISPOSAL.................................... 4-7
CHAPTER
4
●
STORAGE OF SUPPLIES .................................... 4-8
4-1
Page 80

Types and sizes of copy paper
Paper trays A5 to A3 56 to 105 g/m
1 and 2 (5-1/2" x 8-1/2" (15 lbs. to 28 lbs.)
Bypass tray A6 to A3 52 to 128 g/m
●
* For paper weighing from 105 to 128 g/m2 (28 to 34 lbs.), A4 (8-1/2"
** Paper heavier than 128 g/m2 (34 lbs.) must be fed narrow side into the
CHAPTER
PAPER
Size Weight Capacity Special paper
(80 g/m2 (21lb.)
paper)
2
to 11" x 17")
2
(5-1/2" x 8-1/2" (14 lbs. to 34 lbs.)* tracing paper, cover stock**
to 11" x 17") (Ordinary paper) (200 g/m
For best results, use only paper recommended by SHARP.
x 11") is the maximum size that can be fed through the bypass tray.
feed slot of the bypass tray.
500 sheets
50 sheets Transparency film, labels,
2
(110 lbs.)), index
stock** (176 g/m
2
(65 lbs.))
4
SUPPLIES Paper
Loading copy paper
“OPEN TRAY
no copy paper in a selected paper feed station.
When a selected paper tray is not installed or is improperly installed,
“PUSH PAPER TRAY INTO THE MACHINE UNTIL IT
LATCHES.” will be displayed. Install it or push it back firmly into
place.
For best results, use only Sharp recommended paper.
AND ADD PAPER.” will be displayed when there is
4-2
Page 81

Loading paper in paper trays 1 and 2
Maximum height line
Gently lift and pull out the paper tray.
1
PAPER
Only use paper within the Sharp specification and
follow the paper manufacturer’s instructions regarding
2
fanning and loading the paper.
●
The tray holds 500 sheets of paper.
Do not load paper above the maximum height line.
CHAPTER
4
SUPPLIES Paper
Push the paper tray firmly back into the copier.
3
4-3
Page 82

PAPER
Maximum height line
Changing the copy paper size in the tray
Gently lift and pull out the paper tray until it stops.
1
Adjust the paper size indicator to match the paper size
to be set.
2
●
Slide the paper size indicator to the right or left to match the
paper size.
CHAPTER
4
SUPPLIES Paper
Left guide
Paper size indicator
Front guide
Adjust the front guide and left guide while squeezing
their lock levers.
3
●
Slide the front and left guides to match the width and length of
the copy paper.
Load copy paper into the tray.
4
216x330
216x279
B5
A4
B4
8 x11
4-4
x13
8
A3
B5
A5
Paper size
card
Place the paper size card in the front of the paper tray.
5
●
The paper size card has three faces. Fold the card properly to
show the selected paper size. The paper size indication which
shows through the slot on the front of the copier should match
the selected paper size.
Push the paper tray firmly back into the copier.
6
Page 83

ADDING TONER
The message “(TONER SUPPLY IS LOW. PRESS FOR
GUIDANCE.)” will appear in the message display before the toner
supply is completely empty. If copying is continued, copies will
gradually become lighter until the copier stops and the message
display changes to “ADD TONER. PRESS FOR GUIDANCE.”
indicating that the toner supply is empty. Toner can be added any time
after the message “(TONER SUPPLY IS LOW. PRESS FOR
GUIDANCE.)” appears. To add toner, stop the copier and proceed as
below. When either message appears, you can use the INFORMATION
( ) key for detailed information as necessary.
During long copy runs of multiple originals containing many images
and/or dark shades, “TONER REPLENISHMENT IN PROGRESS.” will
appear and the copier will stop making copies even though toner is
left.
The copier will automatically cycle and replenish the toner to the
normal level and then the START ( ) key indicator will light up. Press
the START ( ) key to resume copying.
For best copying results, be sure to use
only Sharp products. The package of
Sharp toner has the Genuine Supplies
label.
GENUINE SUPPLIES
CHAPTER
4
5 x
20 x
Open the front cover.
1
Pull down the toner hopper lock lever and pull the toner
hopper out slowly until it stops.
2
Tap on the top of the toner cartridge 5 times. Hold the
new toner cartridge vertically and vigorously shake it
3
up and down about 20 times, then invert the cartridge
and again shake it up and down about 20 times. This will
loosen the toner and allow it to flow more easily into the
toner hopper.
SUPPLIES Adding toner
4-5
Page 84

ADDING TONER
Place the new toner cartridge with the tabs in the
notches as shown.
4
Slide the toner cartridge along the guides over the toner
hopper.
5
CHAPTER
4
SUPPLIES Adding toner
Sealing tape
Hold the toner cartridge with one hand while pulling on
the sealing tape to remove it.
6
Tap on the top of the toner cartridge 5 times to start the
flow of toner into the toner hopper.
7
●
If the toner cartridge was sufficiently shaken as described in
step 3, it will take about 50 seconds for the cartridge to empty.
Do not remove the cartridge until it is empty. If not empty, tap on
the top of the cartridge again until empty.
Slide the empty toner cartridge back along the guides
and remove it.
8
●
The cartridge opening will be closed as it is moved back along
the guides.
4-6
9
10
Slide the toner hopper into the copier and return the
toner hopper lock lever into place.
Close the front cover.
NOTE:
Add only one cartridge of toner.
Page 85

USED TONER DISPOSAL
“REPLACE USED TONER CONTAINER. PRESS FOR GUIDANCE.”
will appear when the toner collecting container is full.
The copier will stop and will not operate until a new container has been
installed. Replace the toner collecting container as described below.
When the above message is displayed, you can use the INFORMATION
( ) key for detailed information as necessary.
Open the toner collecting container cover.
1
●
Push once on the door to unlatch and open it.
CHAPTER
Disengage and remove the container from the copier.
2
●
Toner cannot be reused. Do not transfer used toner to the toner
hopper.
●
Remove the cap from a new toner collecting container and use
it to cover the full toner collecting container.
●
Keep the full toner collecting container until the next regular
service call. Your authorised Sharp Service Technician will
collect the container for disposal.
Install a new toner collecting container until it clicks into
place.
3
Close the toner collecting container cover.
4
4
SUPPLIES Used toner disposal
4-7
Page 86

STORAGE OF SUPPLIES
The supplies of this copier replaced by the user include copy paper,
toner, toner collecting container, and staple cartridges for an optional
finisher (AR-FN1).
CHAPTER
4
For best copying results, be sure to use
only Sharp products. The package of
Sharp toner has the Genuine Supplies
label.
GENUINE SUPPLIES
Photoconductive drum
The AR-280/AR-285/AR-335 Copiers have advanced process control
technology which improves copy quality uniformity. This feature
stabilizes copy quality throughout the life of the photoconductive
drum by automatically compensating for the changes in drum
characteristics due to wear, operator use patterns, and environmental
conditions. The automatic adjustments are made in response to a
sensor that detects the reflectance characteristics of the drum.
SUPPLIES Storage of supplies
WARNING
This feature requires drums containing the special reflectance area
(recommended Sharp genuine photoconductive drum), to prevent
low image density copies from poor process control and possible
damage to the machine. If you use other drums, the process control
system cannot run properly.
Proper storage
Store the supplies in a location that is:
1
●
clean and dry,
●
at a stable temperature,
●
not exposed to direct sunlight.
Store copy paper in the wrapper and lying flat.
2
●
Paper stored in packages standing up or out of the wrapper may
curl or become damp, resulting in paper misfeeds.
4-8
Page 87

CHAPTER 5
COPIER TROUBLE?
This chapter describes how to remove misfed
originals and paper and other common trouble
remedies.
Page
●
MISFEED REMOV AL ....................................... 5-2
●
MAINTENANCE REQUIRED ................................. 5-12
●
TROUBLESHOOTING...................................... 5-13
CHAPTER
5
5-1
Page 88

MISFEED REMOVAL
When a misfeed occurs, the copier will stop.
The message “A MISFEED HAS OCCURRED. CLEAR
INDICATED AREA. PRESS FOR RECOVERY
INSTRUCTIONS.” will appear with a display of paper
misfeed locations. Press the INFORMATION ( ) key
for more detailed information as necessary.
First confirm the misfeed locations.
For misfeeds in optional equipment, see their respective
sections. (pages 7-14, 7-22, and 7-26)
( P. 5-2, 5-3)
( P. 5-6)
( P. 5-7)
If paper becomes accidentally torn during removal, be
sure to remove all pieces. Be careful not to damage the
photoconductive drum or the corona wires.
( P. 5-4)
CHAPTER
5
COPIER TROUBLE? Misfeed removal
A MISFEED HAS OCCURRED.
CLEAR INDICATED AREA.
PRESS FOR RECOVERY INSTRUCTIONS.
( P. 5-9)
( P. 5-4)
Misfeed in the SPF (AR-280)
When the SPF misfeeds an original sheet, the copier will stop and the
misfeed message will appear.
An original misfeed may occur at location (A).
5-2
A
Page 89

Roller
MISFEED REMOVAL
(A) Open the document feeder cover and remove the original.
●
Rotate the roller in the direction indicated by the arrow to remove
the misfed original.
NOTE:
A message may appear indicating the number of originals which
must be returned to the document feeder tray. Return the originals
and press the START ( ) key to resume copying.
A MISFEED HAS OCCURRED.
CLEAR INDICATED AREA.
PRESS FOR RECOVERY INSTRUCTIONS.
ABC
Feeding roller cover
Misfeed in the RADF (AR-285 and AR-335)
When the RADF misfeeds an original sheet, the copier will stop and
the misfeed message will appear.
An original misfeed may occur at one of three locations:
(A) in the RADF feed section, (B) in the exit roller, or (C)
under the transport belt.
(A) Open the feeding roller cover and pull the original gently
to the right and out from the document feeder tray.
●
Be sure to open and close the document feeder cover to cancel
the misfeed display.
CHAPTER
5
COPIER TROUBLE? Misfeed removal
Exit roller cover
(B) Open the exit roller cover and gently pull the original
out.
●
Be sure to open and close the document feeder cover to cancel
the misfeed display.
5-3
Page 90

MISFEED REMOVAL
(C) Open the feeding roller cover and the document feeder
cover, and remove the original.
NOTE:
After misfed originals are removed from locations A, B and/or C, a
message may appear indicating the number of originals which
must be returned to the document feeder tray. Return the originals
and press the START ( ) key to resume copying.
A MISFEED HAS OCCURRED.
CLEAR INDICATED AREA.
PRESS FOR RECOVERY INSTRUCTIONS.
CHAPTER
5
COPIER TROUBLE? Misfeed removal
Misfeed in the bypass tray
Gently pull the misfed paper out.
1
Open and close the front cover to cancel the misfeed
display.
2
A MISFEED HAS OCCURRED.
CLEAR INDICATED AREA.
PRESS FOR RECOVERY INSTRUCTIONS.
5-4
Misfeed in paper trays 1 and 2
Page 91

Open the right side cover.
1
●
Hold the handle and gently open the cover.
●
If any paper is set in the bypass tray, remove the paper and close
the bypass tray before opening the right side cover.
MISFEED REMOVAL
Remove the misfed paper.
2
●
Be careful not to tear the misfed paper during removal.
If the paper cannot be seen from the side, pull out the
paper tray which was in use and remove the misfed
3
paper.
●
Be careful not to tear the misfed paper during removal.
NOTE:
When the paper was misfed in tray 2 and the paper has dropped
beyond the tray, remove the tray and remove the misfed paper. To
remove the paper tray, pull the paper tray out until it stops and then
lift and remove the paper tray.
Close the paper tray and the side cover.
4
●
Confirm that the misfeed display is cleared.
CHAPTER
5
COPIER TROUBLE? Misfeed removal
5-5
Page 92

MISFEED REMOVAL
Paper guide
CLEAR INDICATED AREA.
PRESS FOR RECOVERY INSTRUCTIONS.
Transport lever
CHAPTER
A MISFEED HAS OCCURRED.
Misfeed in the transport area
Open the front cover.
1
Remove the misfed paper.
2
1
Turn the transport lever to the left.
5
COPIER TROUBLE? Misfeed removal
Roller rotating knob A
CAUTION
The area behind the transport lever is hot.
Use sufficient care in handling this lever.
Turn roller rotating knob A in the direction of the arrow to
2
remove the misfed paper.
●
Push down the paper guide and remove any misfed paper.
5-6
Page 93

Transport lever
3
Turn the transport lever back into place.
Close the front cover.
3
●
Confirm that the misfeed display is cleared.
MISFEED REMOVAL
A MISFEED HAS OCCURRED.
CLEAR INDICATED AREA.
PRESS FOR RECOVERY INSTRUCTIONS.
Misfeed around the fusing unit and exit area
CHAPTER
NOTE:
If an optional finisher (AR-FN1) is fitted, please refer to chapter 7
Optional Equipment for additional misfeed removal help.
5
COPIER TROUBLE? Misfeed removal
Open the front cover.
1
Open the exit area cover carefully.
2
5-7
Page 94

MISFEED REMOVAL
Fusing unit tab
Exit area lever C
Roller rotating knob B
Remove the misfed paper.
3
If the misfed paper is in the inner part of the exit area:
1
Turn roller rotating knob B in the direction of the arrow and
remove the paper.
2
If the misfed paper is deep in the fusing unit, lift the fusing unit
tab and remove any misfed paper.
CAUTION
The fusing unit is hot! Be sure to touch only the green tab or the
green roller rotating knob.
Do not touch these two levers.
CHAPTER
5
COPIER TROUBLE? Misfeed removal
Roller rotating knob C
NOTE:
The levers are operated by service personnel only. The user is not
allowed to touch them.
If the misfed paper is in the exit area:
1
Turn roller rotating knob C in the direction of the arrow and
remove the paper.
2
If the misfed paper cannot be removed in step 1, raise exit
area lever C and remove the paper.
5-8
Close the exit area cover.
4
Page 95

Close the front cover.
5
●
Confirm that the misfeed display is cleared.
MISFEED REMOVAL
A MISFEED HAS OCCURRED.
CLEAR INDICATED AREA.
PRESS FOR RECOVERY INSTRUCTIONS.
Misfeed in the duplex module
In the AR-280, the duplex module is provided as an optional component.
NOTE:
If an optional finisher (AR-FN1) is fitted, please refer to chapter 7
Optional Equipment for additional misfeed removal help.
If the misfed paper is in the section below the exit area:
Open the left side cover below the exit trays.
1
CHAPTER
5
COPIER TROUBLE? Misfeed removal
Remove the misfed paper.
2
Close the side cover.
3
5-9
Page 96

MISFEED REMOVAL
If the misfed paper is in the duplex module:
Open the exit area cover carefully.
1
CHAPTER
5
COPIER TROUBLE? Misfeed removal
Roller rotating knob D
Paper
guide
Remove the misfed paper.
2
1
Open the paper guide, turn roller rotating knob D in the
direction of the arrow and remove the misfed paper.
Close the paper guide.
2
Remove any misfed paper from the duplex module.
●
Be careful not to tear the misfed paper during removal.
Close the exit area cover.
3
5-10
Page 97

MISFEED REMOV AL
Paper feed area open/close lever
If the misfed paper is in the right side of the duplex module:
Open the right side cover.
1
●
Hold the handle and gently open the cover.
●
If any paper is set in the bypass tray, remove the paper and
close the bypass tray before opening the right side cover.
Remove the misfed paper.
2
●
Open the paper feed area open/close lever in the direction of
the arrow and remove the misfed paper.
Close the right side cover.
3
●
Confirm that the misfeed display is cleared.
CHAPTER
5
COPIER TROUBLE? Misfeed removal
5-11
Page 98

MAINTENANCE REQUIRED
When the message “READY TO COPY. (MAINTENANCE REQUIRED)”
appears in the message display, service by an authorised Sharp
Service Technician will be required soon. Contact your Service Centre
as soon as possible.
CHAPTER
5
COPIER TROUBLE? Maintenance required
5-12
Page 99

TROUBLESHOOTING
Always check the message display whenever the copier stops or
operation is not possible. The messages will give you easy-to-follow
directions. If the messages do not give specific instructions, check the
list below.
Problem Solution
Copier does not operate.
Copies are too dark or too
light.
Blank copies.
Copies smear if rubbed.
●
Copier plugged in?
●
Power switch on?
●
Copy density properly adjusted?
●
Is the original placed face down in
the document feeder tray
(AR-280), face up in the document
feeder tray (AR-285/AR-335) or
face down on the document glass?
●
Paper too heavy?
●
Paper damp?
Plug the copier into a grounded outlet.
Turn the power switch on.
See page 2-16.
Place the original face down in the
document feeder tray (AR-280), face
up in the document feeder tray
(AR-285/AR-335) or face down on the
document glass.
Use copy paper within the specified
range. See page 4-2.
Replace with dry copy paper. Be sure
to store copy paper in a dry location.
CHAPTER
5
COPIER TROUBLE? Troubleshooting
Copy size is different from
the selected paper size.
●
Paper size indicator properly set?
When changing the copy paper size in
a tray, be sure to adjust the paper size
indicator. See page 4-4.
5-13
Page 100

TROUBLESHOOTING
Problem Solution
●
Non-standard paper used?
Use standard paper.
If using special papers, feed the paper
through the bypass tray.
Paper misfeeds frequently.
Dust, dirt, smudges appear
CHAPTER
5
COPIER TROUBLE? Troubleshooting
on copies.
Touch panel is too dark or
too light.
●
Is paper properly installed?
●
Pieces of paper inside copier?
●
Paper curled or damp?
●
Document glass, document cover
(AR-280) or RADF transport belt
(AR-285/AR-335) dirty?
●
Is LCD contrast properly
adjusted?
If a problem persists after checking the above, please consult your key
operator prior to contacting your authorised Sharp Service Centre.
See pages 2-14 and 4-2.
Remove all pieces of misfed paper.
See page 5-2.
Store copy paper flat in the wrapper in
a dry location. See page 4-8.
Clean regularly. See page 6-6.
Adjust the LCD contrast.
See page 6-7.
5-14
Self-diagnostic function
An automatic self-diagnostic function is built into this copier. Should
the copier malfunction, the self-diagnostic function will locate the
problem and stop the copier to prevent damage. An alphanumeric
code will appear in the message display.
Example
Should the copier stop completely, and the message “CALL FOR
SERVICE. CODE: ” appear in the message display, contact your
authorised Sharp Service Centre.
★ KEY OPERATOR See page 8-28.
 Loading...