

Sharp AR-250 User Manual

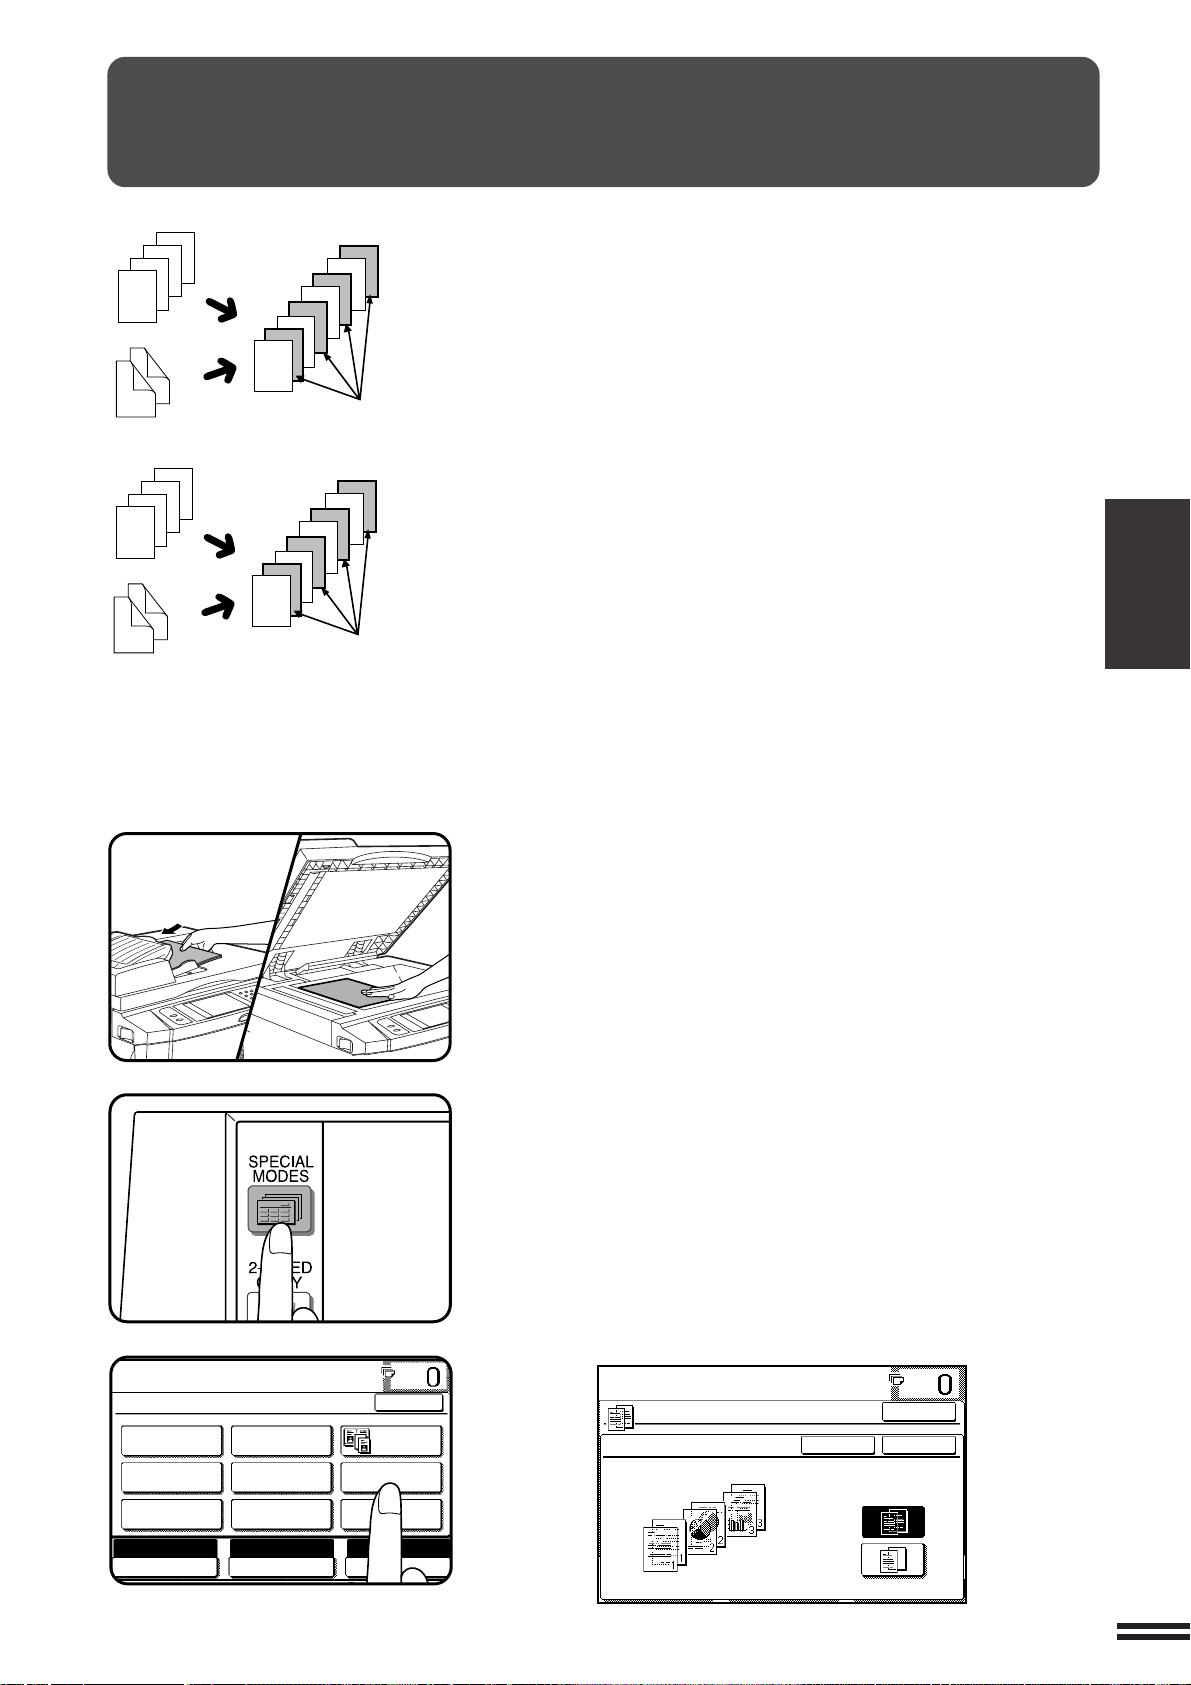
CHAPTER 3
SPECIAL FUNCTIONS
This chapter describes the special copying functions including various
image editing functions which have been made possible by digital image
processing technology.
●●
●
●●
XY ZOOM ....................................... 3-2
●●
●
●●
MARGIN SHIFT ................................... 3-4
●●
●
●●
ERASE ......................................... 3-6
●●
●
●●
DUAL PAGE COPYING ............................. 3-8
●●
●
●●
MUL TI SHOT .................................... 3-10
●●
●
●●
COVERS ....................................... 3-13
●●
●
●●
TRANSPARENCY FILM WITH INSERT SHEETS .......... 3-15
●●
●
●●
P AMPHLET COPY ................................ 3-17
●●
●
●●
IMAGE EDITING FUNCTIONS ....................... 3-20
Centring ........................................ 3-20
Repeat copy..................................... 3-22
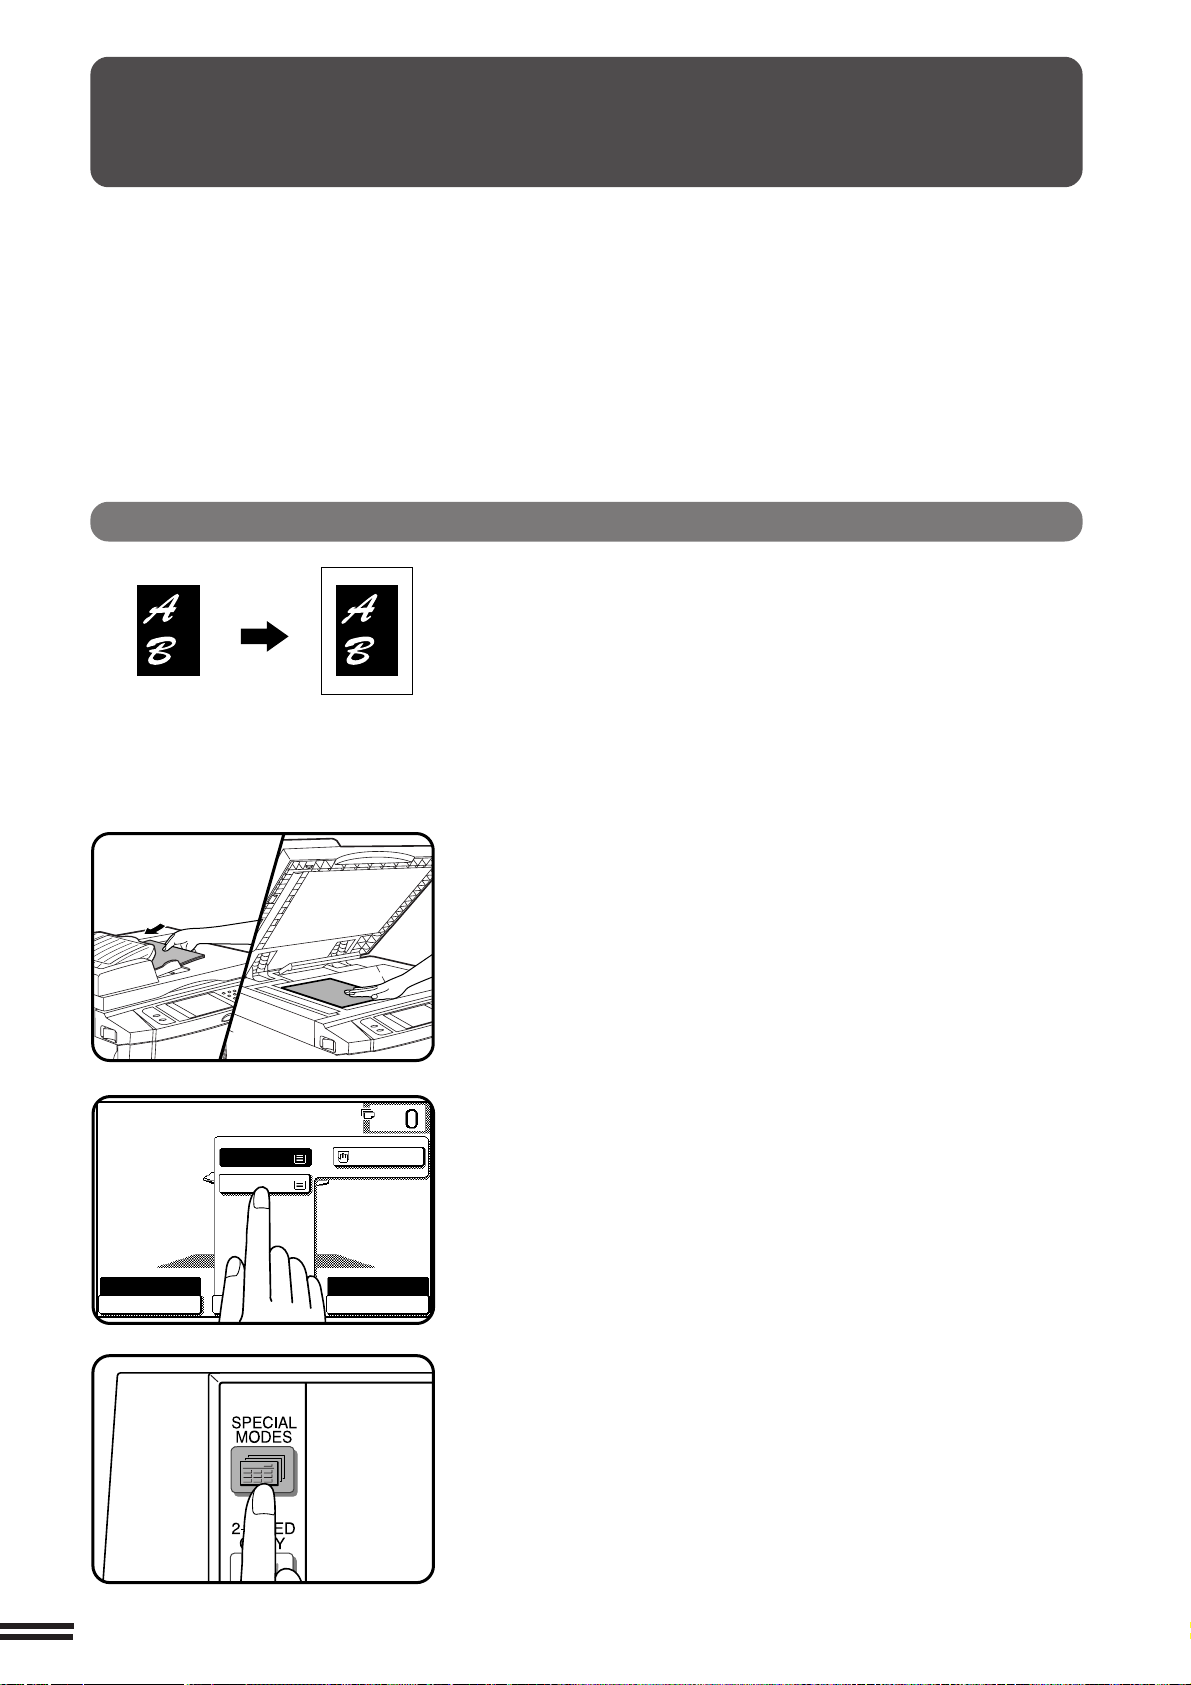
B/W reverse ..................................... 3-25
Binding change................................... 3-27
●●
●
●●
TEXT ST AMP.................................... 3-30
Date .......................................... 3-30
Select stamp .................................... 3-33
Watermark ...................................... 3-36
Page number .................................... 3-39
●●
●
●●
SETTING REVIEW ................................ 3-42
CHAPTER3
Page
3-1
XY ZOOM
100%
COPY RATIO
AUTO
XY ZOOM
10
ZOO
MENU
EXPOSURE PAPER S
AUTO
81%
B5 A5
B4 A4
70%
A4 A5
A3 A4
READY TO COPY.
AUTO
XY ZOOM
X
Y
100%
ZOOM
100
100
%
%
OK
70
%
64
%
50
%
141
%
200
%
400
%
EXPOSURE PAPER SELECT
100%
COPY RATIO
AUTO
A4
CHAPTER3
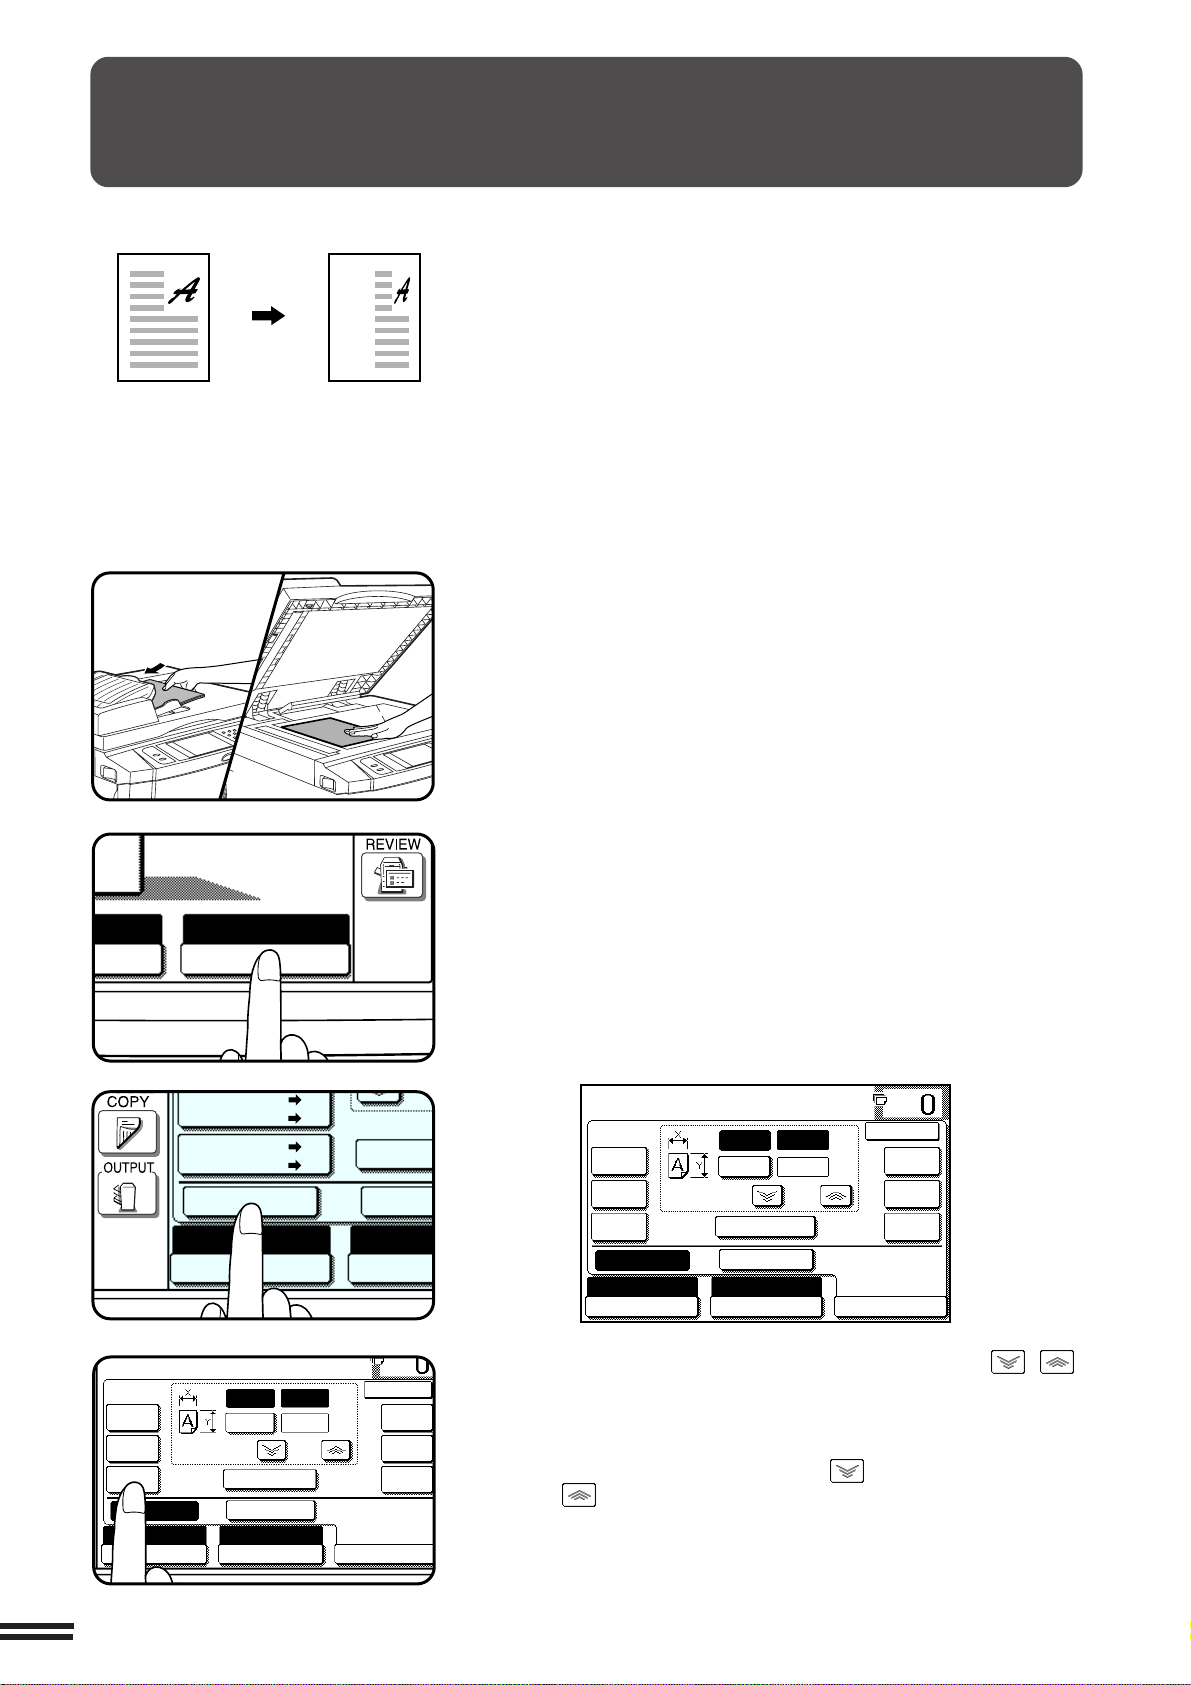
SPECIAL FUNCTIONS XY zoom
Original Copy
The XY ZOOM feature allows the horizontal and vertical copy ratios to
be changed independently. If this feature is selected, the copy ratios
can be set from 25% to 800%.
●
The allowable copy ratio range is limited in the following conditions.
Copying from the optional SPF : 25% to 200%
Photo mode, pamphlet copy, repeat copy: 25% to 400%
Place the original in the optional document feeder tray
or on the document glass.
1
3-2
CANCEL
Press the “COPY RATIO” key on the touch panel.
2
Press the “XY ZOOM” key.
3
●
The following screen will appear.
READY TO COPY.
X
100
70
%
64
%
50
%
XY ZOOM CANCEL
AUTO
EXPOSURE PAPER SELECT
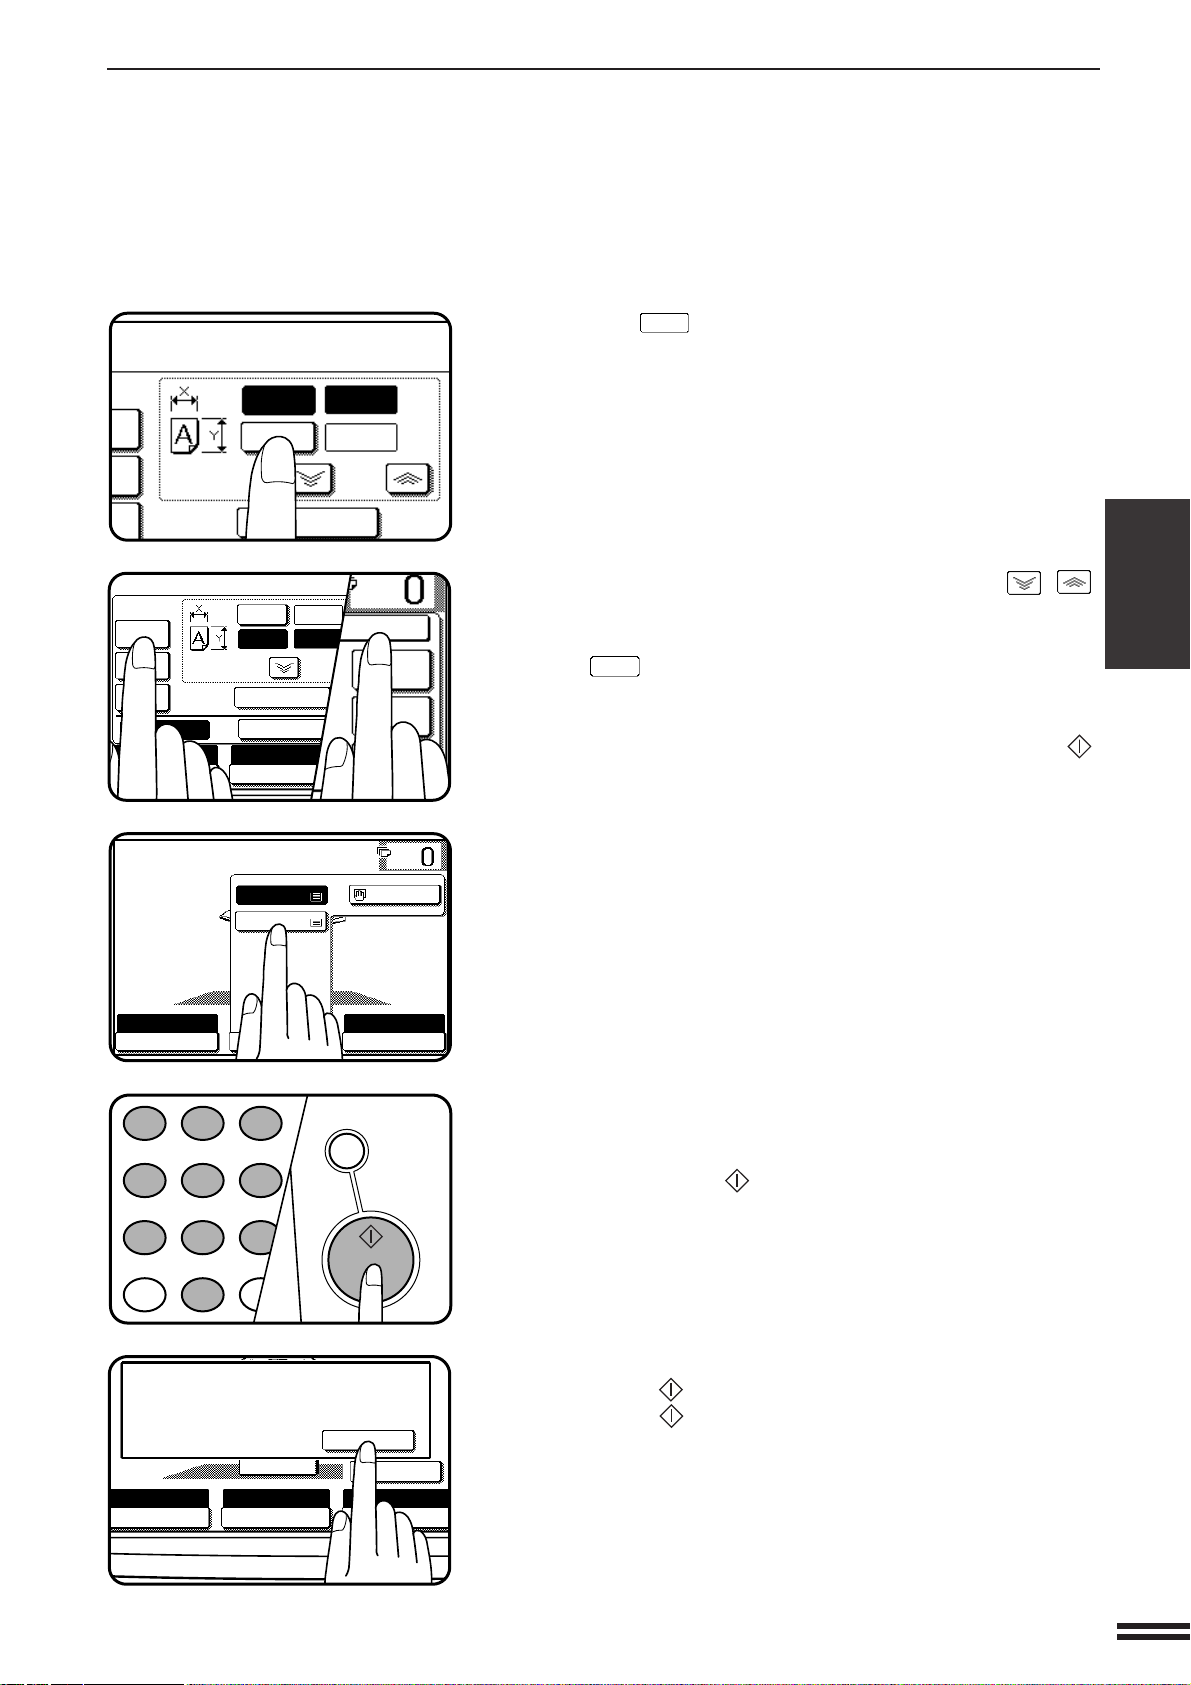
Use the reduction, enlargement , and ZOOM ( , )
keys to change the copy ratio in the horizontal (X)
4
direction.
●
Press a reduction key or an enlargement key to set the
approximate ratio, then press the key to decrease the ratio
or key to increase the ratio.
Y
100%
A4
AUTO
100
ZOOM
OK
%
141
%
200
400
100%
COPY RATIO
%
%
%
Y
TO COPY.
X
Y
100%
ZOOM
%
%
50
100
READY TO COPY.
AUTO
EXPOSURE
PAPER SELECT
X—50% Y—70%
COPY RATIO
AUTO 8/ 11
1
2
1.
A4
2.
A3
1
2 3
4 5 6
7
8
9
0
P
PROGRAM
INT
CA
CLEAR ALL
START
XY ZOOM
READY TO COPY.
AUTO
XY ZOOM
X
Y
ZOOM
50
100
70
%
64
%
50
%
EXPOSURE PAPER SELECT
AUTO
A4
%
%
100%
CANCEL
OK
141
%
200
%
400
%
READ-END
AUTO IMAGE
PLACE NEXT ORIGINAL. PRESS [START].
WHEN FINISHED, PRESS [READ-END].
AUTO
EXPOSURE PAPER SELECT
X—50% Y—70%
COPY RATIO
A4
Press the
5
●
The copy ratio in the vertical (Y) direction will be highlighted.
Use the reduction, enlargement, and ZOOM ( , )
keys to change the copy ratio in the vertical (Y) direction.
6
●
To change the copy ratio in the horizontal direction again, press
X
the
●
The message “IMAGE IS LARGER THAN THE COPY PAPER.”
may appear, indicating that the selected copy ratio is too large
for the copy paper size. However, if you press the START ( )
key, a copy will be made.
Press the “OK” key.
key.
key.
7
Press the “PAPER SELECT” key and select the paper
tray with the desired paper size.
8
●
If the AUTO PAPER SELECT mode is on, the appropriate copy
paper size will have been automatically selected based on the
original size and selected copy ratios.
CHAPTER3
SPECIAL FUNCTIONS XY zoom
9
10
11
Enter the desired number of copies.
Press the START ( ) key.
●
If the optional document feeder is used, scanning of originals and
copying will start.
●
If the document glass is used in the SORT mode, proceed to the
next step.
Replace the finished original with the next original after
the START ( ) key indicator lights up, and then press
the START ( ) key. Repeat this step until all originals
have been scanned. Then, press the “READ-END” key
on the touch panel.
●
Copying will start at this time.
●
To cancel this function, press the “CANCEL” key or the “XY
ZOOM” key again as in step 3.
3-3
MARGIN SHIFT
READY TO CO
(Initial setting:
copy image shifted to the right)
CHAPTER3
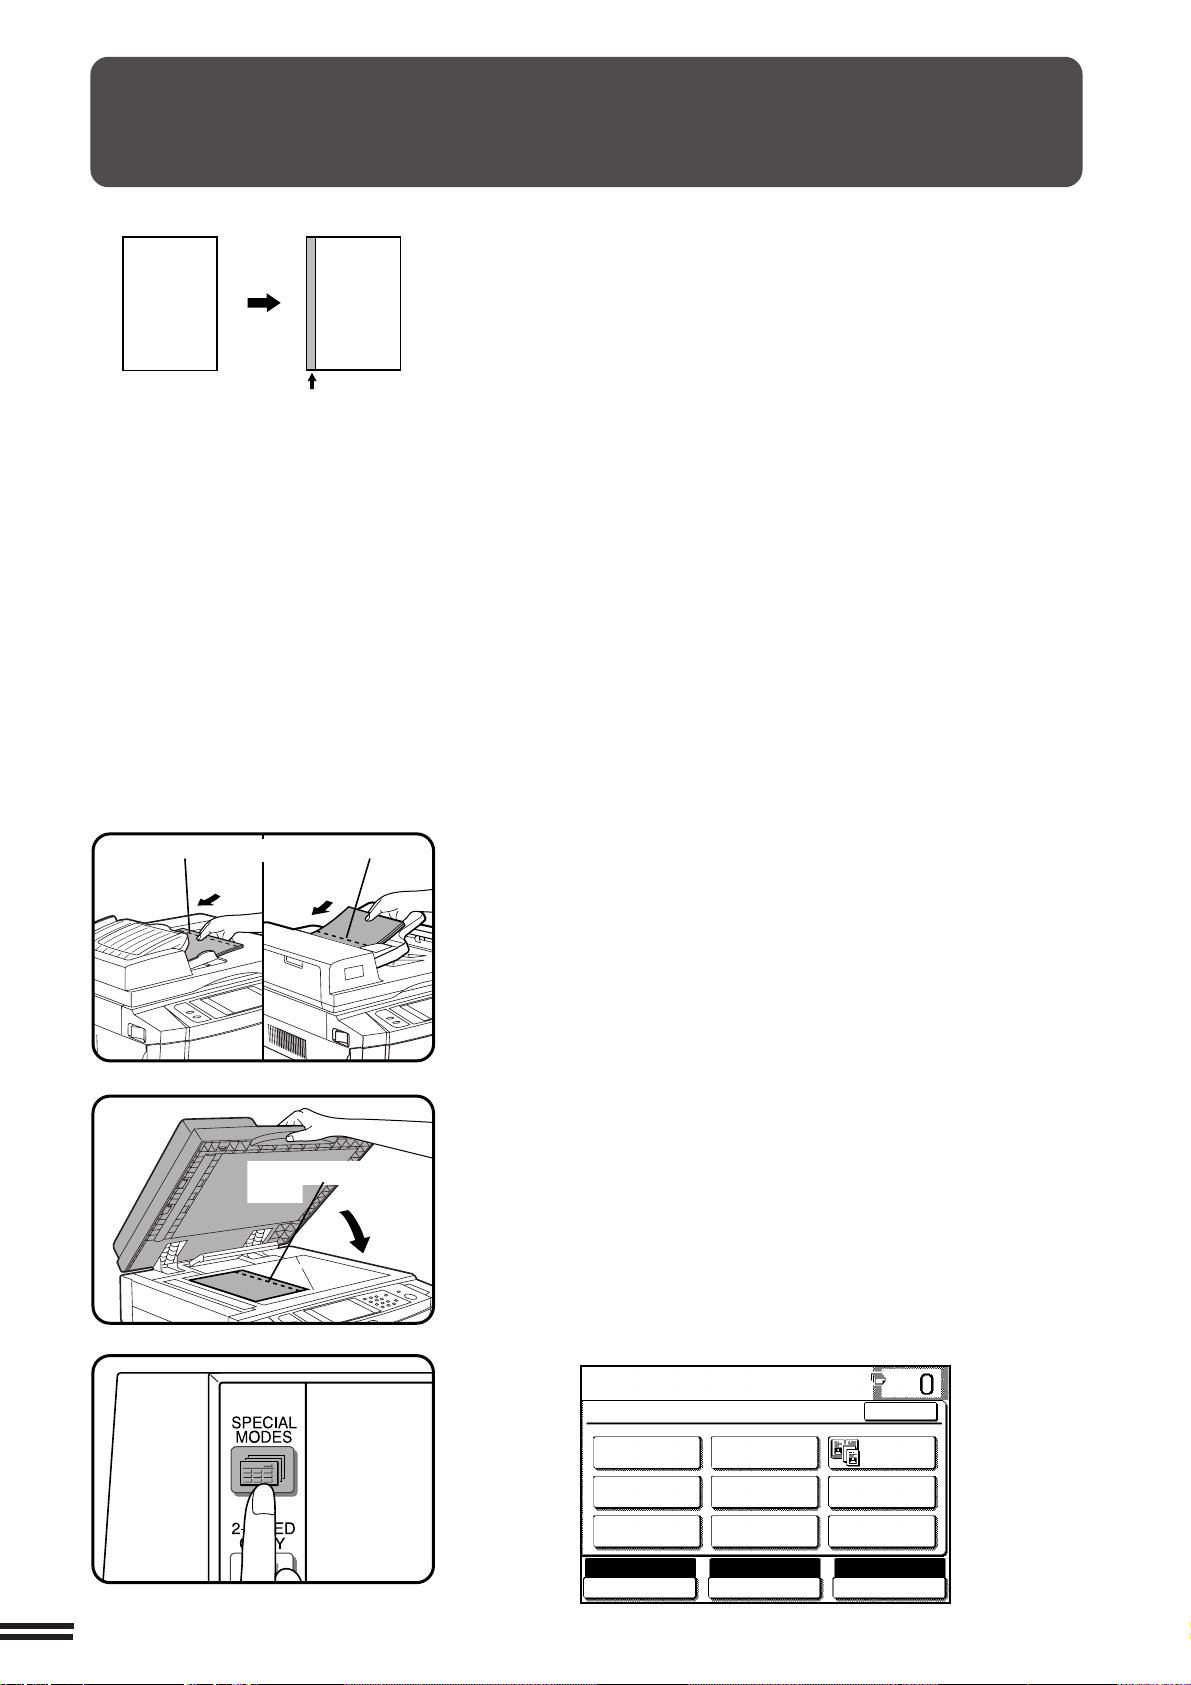
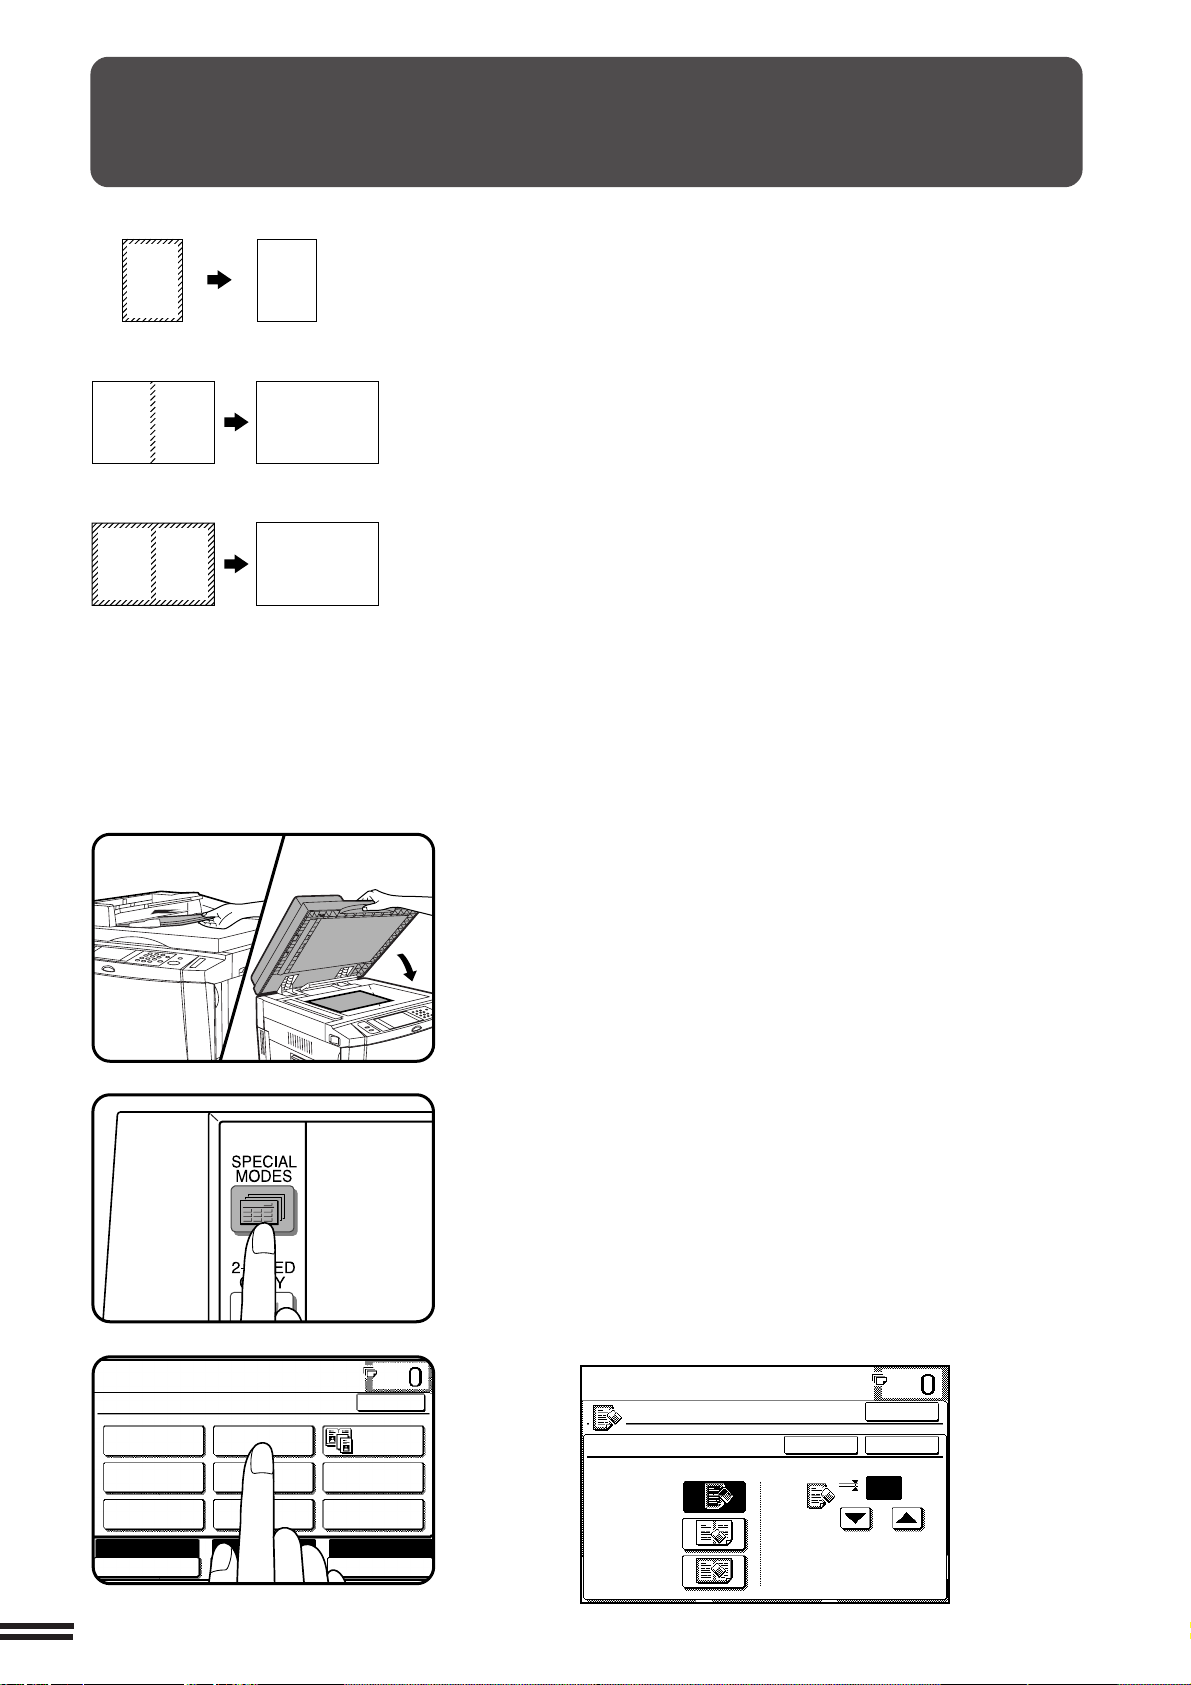
SPECIAL FUNCTIONS Margin shift
Original
Copy
Expanded margin
The MARGIN SHIFT feature, in its initial setting, automatically shifts the text
or image to the right both on one-sided copies and on the front side of twosided copies. The text or image is shifted to the left on the reverse side of
two-sided copies. Shift direction can be changed to left, upper or lower in
the manner described below in step 4.
●
The standard shift amount is 10 mm (1/2"), but can be changed from
0 mm to 20 mm in 1 mm increments (from 0" to 1" in 1/8" increments).
★ KEY OPERATOR The initial shift setting can be changed from 0 mm
to 20 mm in 1 mm increments (from 0" to 1" in 1/8" increments). See page
8-16.
NOTE:
The front side and reverse side are referred to as “SIDE 1” and “SIDE 2”
respectively on the touch panel.
Margin is expanded here.
Margin is expanded
here.
Place the original in the optional document feeder tray
or on the document glass.
1
Press the SPECIAL MODES key.
2
●
The SPECIAL MODES screen will appear.
READY TO COPY.
SPECIAL MODES
MARGIN SHIFT
MULTI SHOT
PAMPHLET COPY
AUTO
EXPOSURE PAPER SELECT
ERASE
COVERS
IMAGE EDIT
A4
AUTO
OK
DUAL PAGE
COPY
TRANSPARENCY
INSERTS
TEXT STAMP
100%
COPY RATIO
3-4
MARGIN SHIFT
MARGIN SHIFT
CANCEL
SIDE 1
10
RIGHT LEFT
DOWN UP
(0~20)
mm
SIDE 1
10
RIGHT LEFT
DOWN UP
(0~20)
mm
SIDE 2
OK
OK
CA
CLEAR ALL
START
READY TO COPY.
SPECIAL MODES
MARGIN SHIFT
MULTI SHOT
PAMPHLET COPY
ERASE
COVERS
IMAGE EDIT
TEXT STAMP
TRANSPARENCY
INSERTS
DUAL PAGE
COPY
OK
AUTO
EXPOSURE PAPER SELECT
100%
COPY RATIO
AUTO
A4
READ-END
PLACE NEXT ORIGINAL. PRESS [START].
WHEN FINISHED, PRESS [READ-END].
AUTO
EXPOSURE PAPER SELECT
100%
COPY RATIO
AUTO
A4
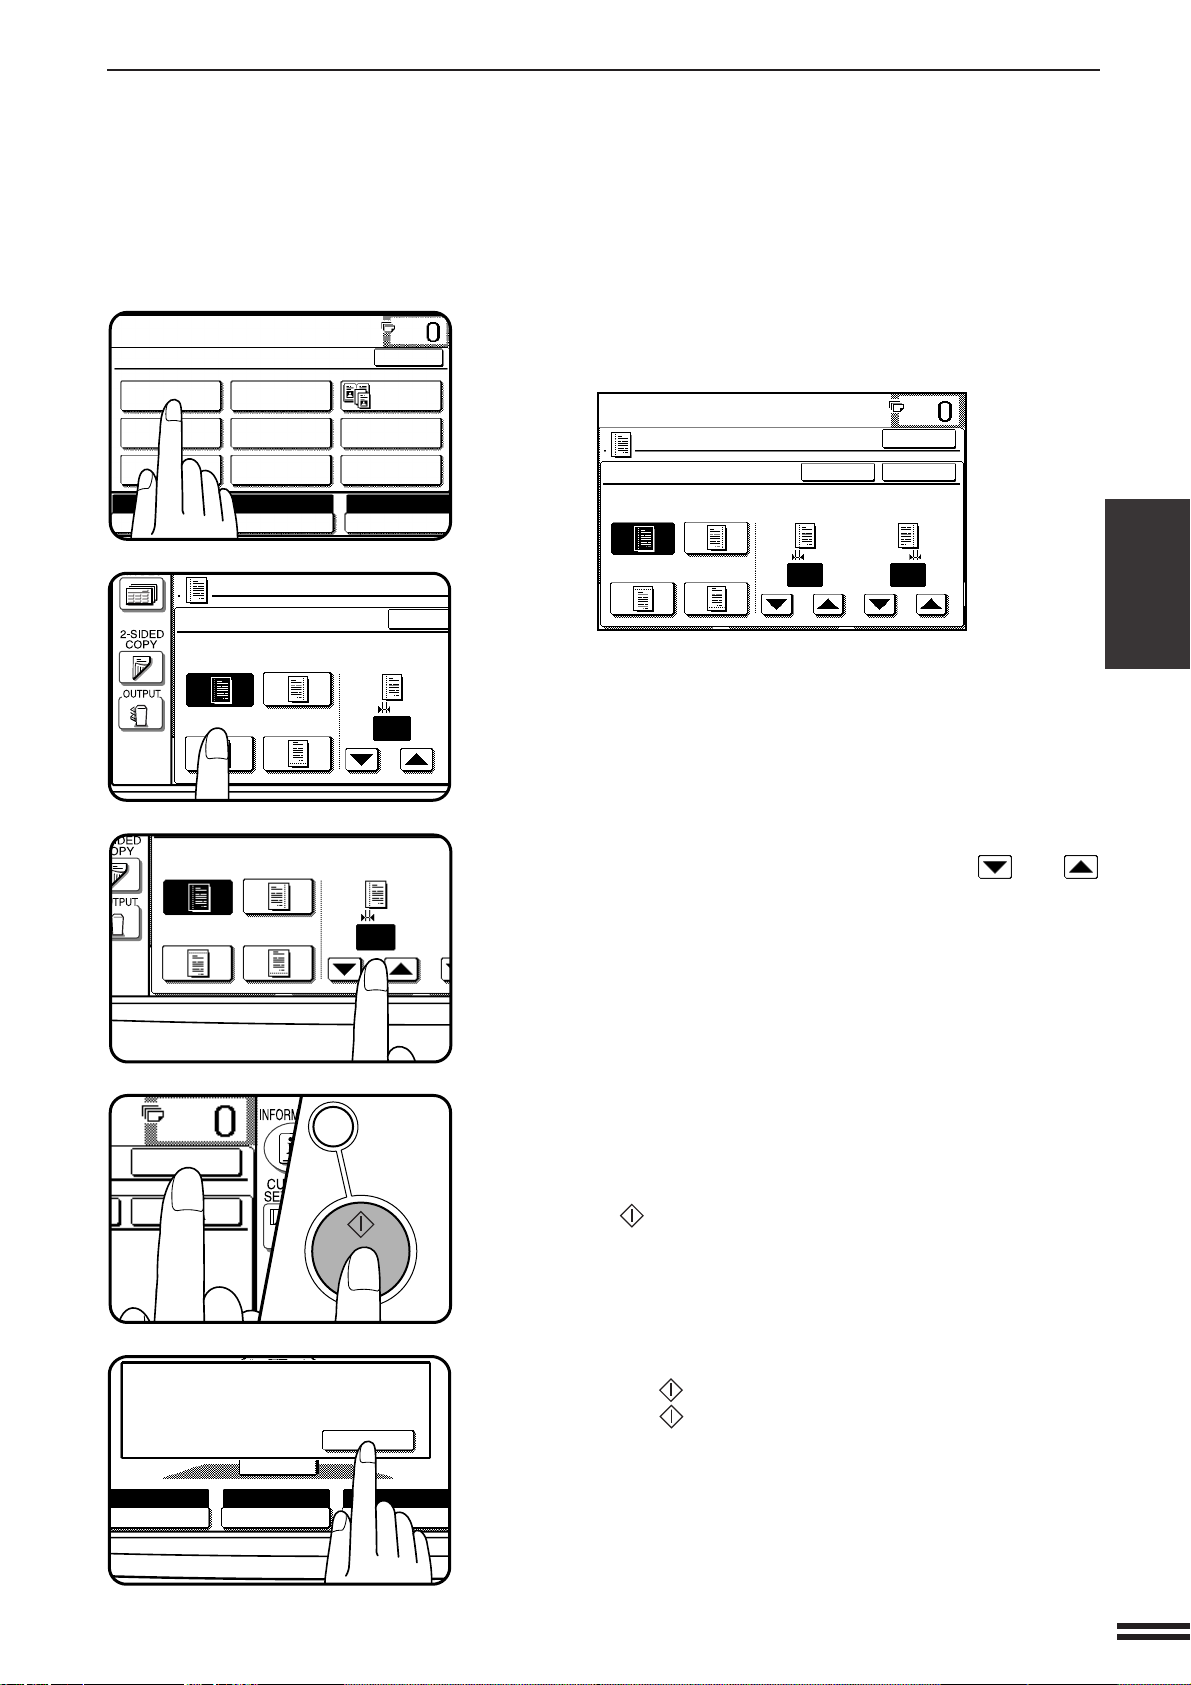
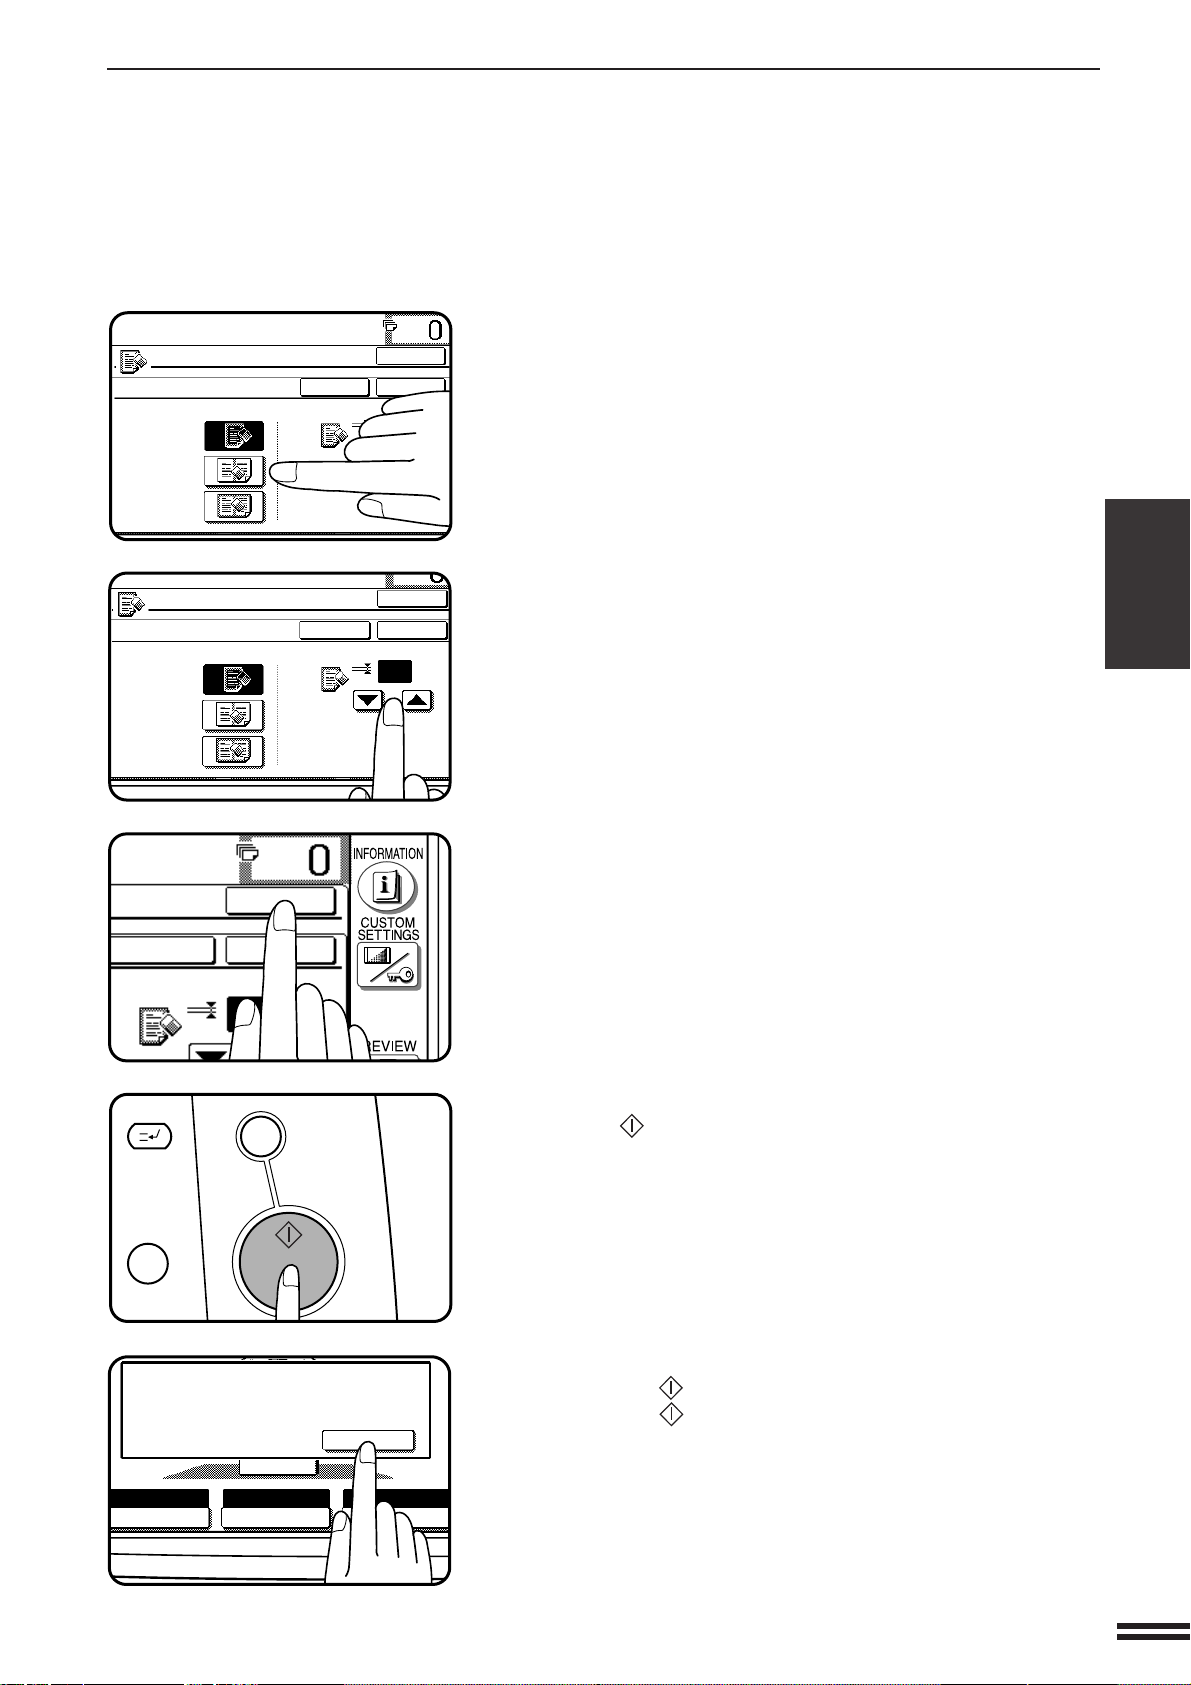
Press the “MARGIN SHIFT” key on the touch panel.
3
●
The setting screen for MARGIN SHIFT will appear.
READY TO COPY.
OK
MARGIN SHIFT
CANCEL
OK
RIGHT LEFT
DOWN UP
●
If an optional duplex module (AR-DU1) is not installed, the
margin shift setting for the reverse side will not be displayed.
Select the shift direction.
4
●
Select “RIGHT”, “LEFT”, “DOWN” or “UP” on the touch panel.
The selected shift direction will be highlighted.
Select the desired shift amounts using the and
keys.
5
SIDE 1 SIDE 2
(0~20)
10 10
mm
(0~20)
mm
CHAPTER3
SPECIAL FUNCTIONS Margin shift
Press the upper “OK” key on the touch panel.
6
Make all other desired copier selections and press the
START ( ) key.
7
●
If the optional document feeder is used, scanning of originals and
copying will start.
●
If the document glass is used in the SORT mode, proceed to the
next step.
Replace the finished original with the next original after
the START ( ) key indicator lights up, and then press
8
the START ( ) key. Repeat this step until all originals
have been scanned. Then, press the “READ-END” key
on the touch panel.
●
Copying will start at this time.
●
To cancel the MARGIN SHIFT function, select the MARGIN
SHIFT function again and press the “CANCEL” key.
3-5
ERASE
READY TO CO
READY TO COPY.
SPECIAL MODES
MARGIN SHIFT
MULTI SHOT
PAMPHLET COPY
ERASE
COVERS
IMAGE EDIT
TEXT STAMP
TRANSPARENCY
INSERTS
DUAL PAGE
COPY
OK
AUTO
EXPOSURE PAPER SELECT
100%
COPY RATIO
AUTO
A4
Edge erase
A
Centre erase
A B
Edge + Centre erase
CHAPTER3
A B
SPECIAL FUNCTIONS Erase
A
A B
A B
This copier has an edge erase mode and a centre erase mode.
●
Edge erase can be used to eliminate shadow lines around the edges of
copies caused when thick paper or a book is used as an original.
●
Centre erase can be used to eliminate the shadow produced by the
bindings of bound documents.
●
Edge + centre erase can be used to eliminate shadow lines around the
edges of copies and to eliminate the shadow at the centre of copies.
●
The standard erase width is 10 mm (1/2"), but can be changed from 0 mm
to 20 mm in 1 mm increments (from 0" to 1" in 1/8" increments).
★ KEY OPERATOR The initial setting of the width for edge erase and centre
erase can be changed. See page 8-16.
3-6
Place the original in the optional document feeder tray
or on the document glass.
1
Press the SPECIAL MODES key.
2
●
The SPECIAL MODES screen will appear.
Press the “ERASE” key on the touch panel.
3
●
The setting screen for ERASE will appear.
READY TO COPY.
OK
ERASE
EDGE ERASE
CENTRE ERASE
EDGE+CENTRE
ERASE
CANCEL
OK
10
(0~20)
mm
Select the desired erase mode.
READY TO COPY.
ERASE
EDGE ERASE
CENTRE ERASE
EDGE+CENTRE
ERASE
CANCEL
1
OK
OK
(0~1)
inch
ERASE
EDGE ERASE
CENTRE ERASE
EDGE+CENTRE
ERASE
CANCEL
10
OK
OK
(0~20)
mm
CANCEL
1
OK
OK
(0~1)
inch
C
CLEAR
INTERRUPT
CA
CLEAR ALL
START
READ-END
PLACE NEXT ORIGINAL. PRESS [START].
WHEN FINISHED, PRESS [READ-END].
AUTO
EXPOSURE PAPER SELECT
100%
COPY RATIO
AUTO
A4
4
●
Select “EDGE ERASE”, “CENTRE ERASE” or “EDGE+CENTRE
ERASE” on the touch panel. The selected erase mode will be
highlighted.
Adjust the amount of edge erase and/or centre erase if
needed.
5
●
The amount can be adjusted between 0 mm and 20 mm in 1 mm
increments (0" and 1" in 1/8" increments).
ERASE
CHAPTER3
SPECIAL FUNCTIONS Erase
Press the upper “OK” key on the touch panel.
6
Make all other desired copier selections and press the
START ( ) key.
7
●
If the optional document feeder is used, scanning of originals and
copying will start.
●
If the document glass is used in the SORT mode, proceed to the
next step.
Replace the finished original with the next original after
the START ( ) key indicator lights up, and then press
8
the START ( ) key. Repeat this step until all originals
have been scanned. Then, press the “READ-END” key
on the touch panel.
●
Copying will start at this time.
●
To cancel the ERASE function, select the ERASE function again
and press the “CANCEL” key.
3-7
DUAL PAGE COPYING
READY TO CO
READY TO COPY.
SPECIAL MODES
MARGIN SHIFT
MULTI SHOT
PAMPHLET COPY
ERASE
COVERS
IMAGE EDIT
TEXT STAMP
TRANSPARENCY
INSERTS
DUAL PAGE
COPY
OK
AUTO
EXPOSURE PAPER SELECT
100%
COPY RATIO
AUTO
A4
TRANSPARENCY
INSERTS
DUAL PAGE
COPY
OK
A4
Paper size index
CHAPTER3
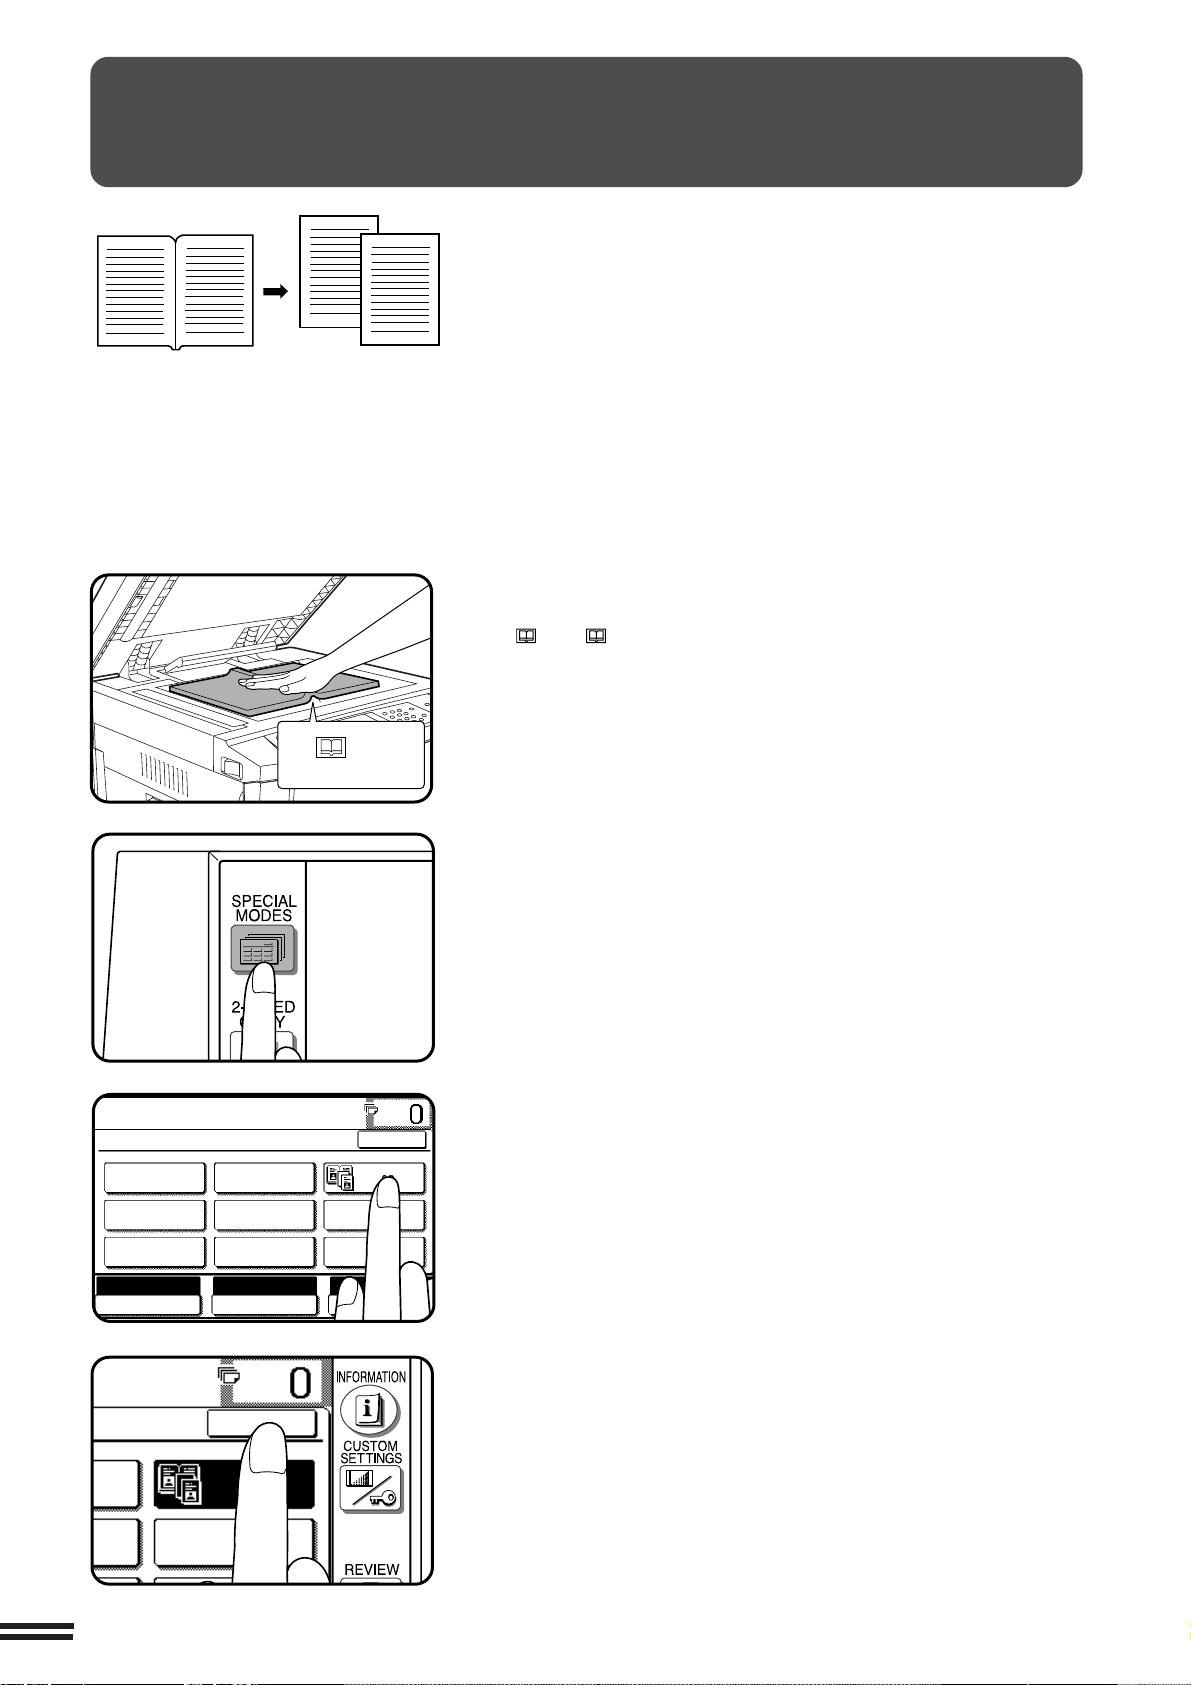
SPECIAL FUNCTIONS Dual page copying
The DUAL PAGE COPY feature produces separate copies of two
documents placed side by side on the document glass. It is especially
useful when copying books and other bound documents.
This feature can be used in the one-sided to two-sided copying mode.
Place the originals on the document glass with the
centre of the two pages aligned with the paper size index
1
A4 ( 81/2). Close the document cover.
●
Set the page to be copied first on the left part of the document
glass.
Press the SPECIAL MODES key.
2
●
The SPECIAL MODES screen will appear.
Press the “DUAL PAGE COPY” key on the touch panel.
●
3
The “DUAL PAGE COPY” key will be highlighted.
●
A4 (8-1/2" x 11") sized copy paper will be automatically selected.
If A4 (8-1/2" x 11") copy paper is not loaded, copying can be
performed with the currently selected tray.
●
To leave a binding margin on the copy, select the MARGIN
SHIFT function. See page 3-4. The MARGIN SHIFT feature
applies only to the left page on the document glass if “RIGHT” or
“LEFT” of MARGIN SHIFT has been selected.
●
To erase shadows caused by document binding, use the EDGE
ERASE feature. See page 3-6.
Press the “OK” key.
4
3-8
DUAL PAGE COPYING
1
2 3
4 5
6
7
8
9
0
C
P
CLEAR
PROGRAM
AUDIT CLEAR
INTERRUPT
C
CLEAR
INTERRUPT
CA
CLEAR ALL
START
AUTO
EXPOSURE PAPER SELECT
100%
COPY RATIO
AUTO IMAGE
A4
1.
A4
2.
A3
11 17
ORIGINAL
READ-END
PLACE NEXT ORIGINAL. PRESS [START].
WHEN FINISHED, PRESS [READ-END].
AUTO
EXPOSURE PAPER SELECT
100%
COPY RATIO
AUTO IMAGE
A4
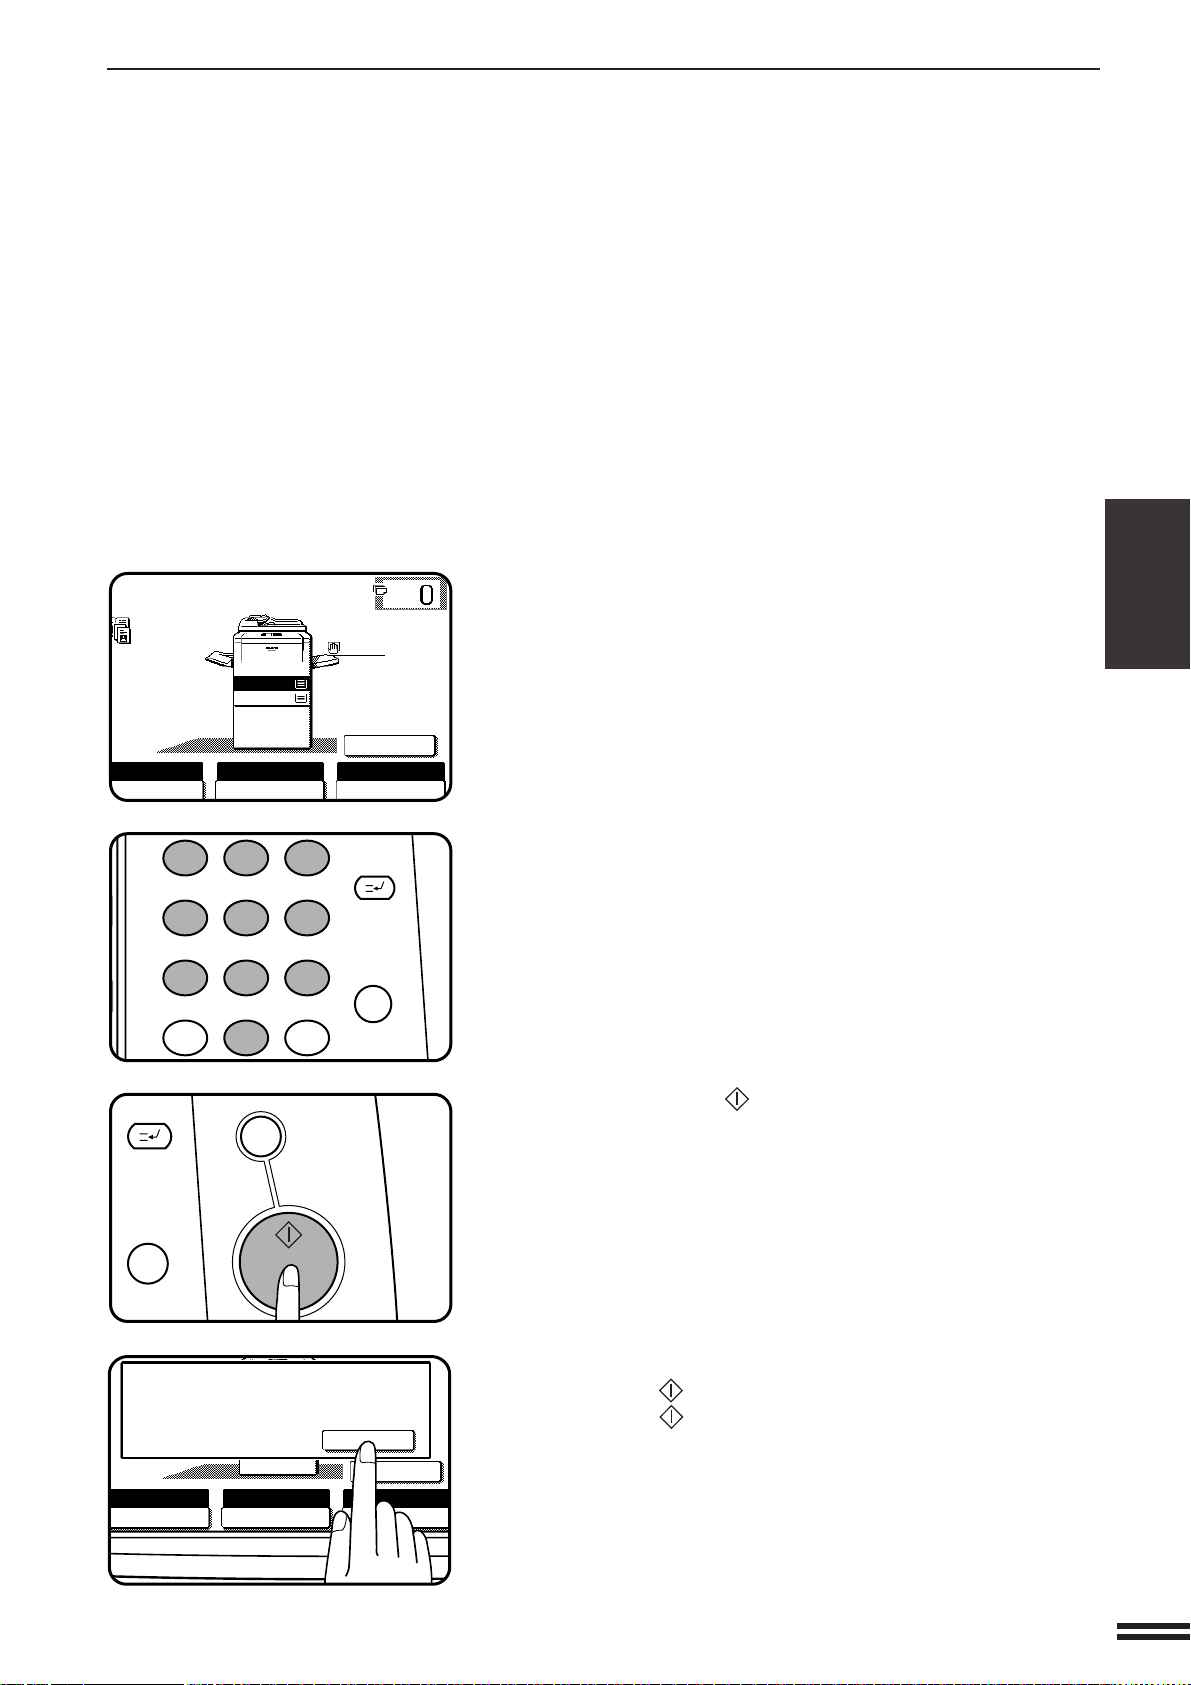
Ensure that the desired tray is selected.
5
CHAPTER3
Enter the desired number of copies.
6
Press the START ( ) key.
7
●
If the SORT mode has been selected for copying multiple
originals, proceed to the next step. If not, copying will start.
SPECIAL FUNCTIONS Dual page copying
Replace the finished original with the next original after
the START ( ) key indicator lights up, and then press
8
the START ( ) key. Repeat this step until all originals
have been scanned. Then, press the “READ-END” key
on the touch panel.
●
Copying will start at this time.
●
To cancel the DUAL PAGE COPY function, press the “DUAL
PAGE COPY” key again on the SPECIAL MODES screen.
3-9
CHAPTER3
READY TO COPY.
AUTO
EXPOSURE PAPER SELECT
100%
COPY RATIO
AUTO 8/ 11
1
2
1.
A4
2.
A3
READY TO CO
SPECIAL FUNCTIONS Multi shot
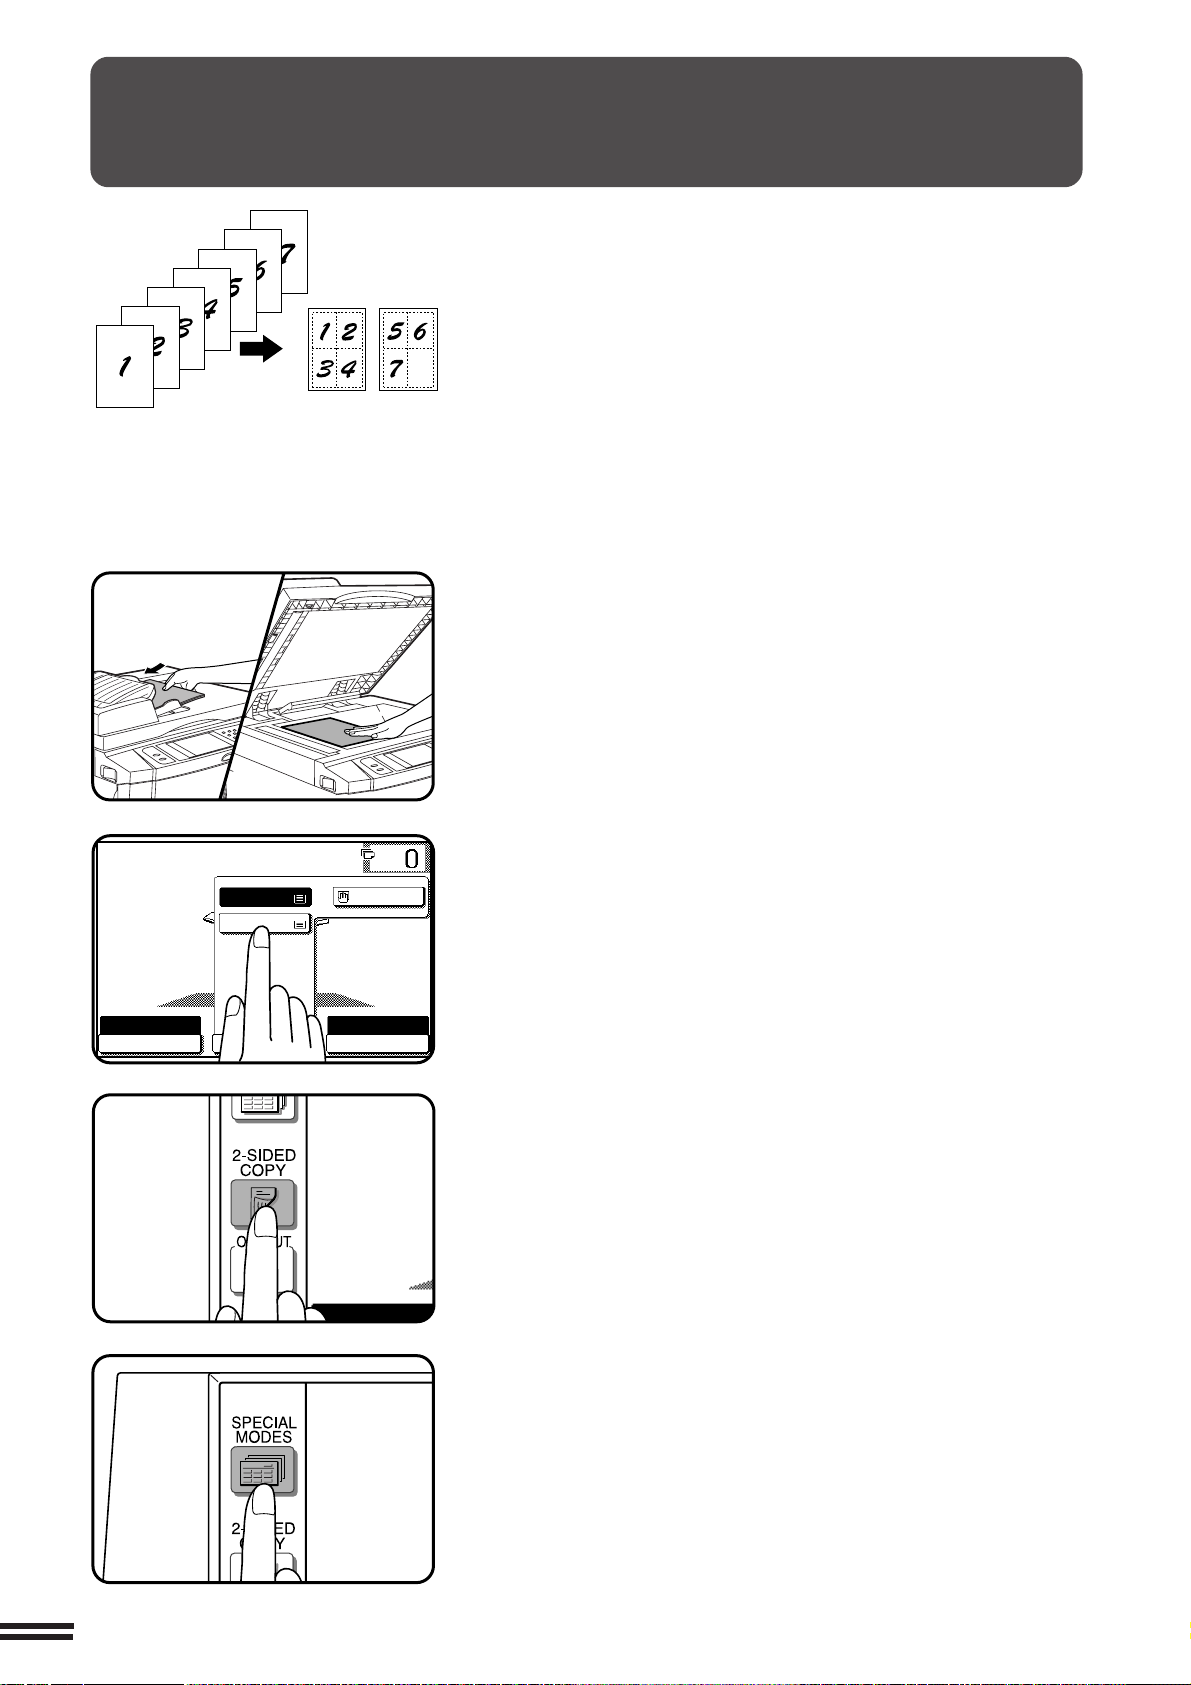
MULTI SHOT
The MULTI SHOT function is used to copy several originals, collectively in
a specified order, onto one sheet.
●
If an optional 1 GB hard disk drive (AR-HD1) is not installed, the originals
must be placed in the optional SPF or RADF when using this feature. The
document glass cannot be used. If an optional 1GB hard disk drive (ARHD1) is installed, the originals can be placed on the document glass.
1
Place the originals in the optional document feeder tray
or on the document glass.
●
The document glass can be used only if an optional 1 GB hard
disk drive (AR-HD1) is installed.When using the document
glass, place the originals one at a time in the reverse order,
starting with the last original first.
Press the “PAPER SELECT” key on the touch panel and
select the desired paper size.
2
Press the 2-SIDED COPY key and select a duplex mode
if desired. Press the “OK” key to close the duplex
3
selection window.
●
The 2-sided to 1-sided and 2-sided to 2-sided copy modes
cannot be selected if an optional RADF is not installed.
●
To copy in the 1-sided to 2-sided or 2-sided to 2-sided copy
mode, an optional duplex module (AR-DU1) must be installed.
Press the SPECIAL MODES key.
4
●
The SPECIAL MODES screen will appear.
3-10

Press the “MULTI SHOT” key on the touch panel.
MULTI SHOT
LAYOUT
CANCEL
OK
OK
BORDER
2inl 4inl
8inl 16inl
MULTI SHOT
LAYOUT
CANCEL
OK
OK
BORDER
2inl 4inl
8inl 16inl
SHOT
LAYOUT
CANCEL
OK
OK
BORDER LINE
READY TO COPY.
SPECIAL MODES
MARGIN SHIFT
MULTI SHOT
PAMPHLET COPY
ERASE
COVERS
IMAGE EDIT
TEXT STAMP
TRANSPARENCY
INSERTS
DUAL PAGE
COPY
OK
AUTO
EXPOSURE PAPER SELECT
100%
COPY RATIO
A4
5
●
The function setting screen for MULTI SHOT will appear.
OK
MULTI SHOT
2inl 4inl
8inl 16inl
CANCEL
LAYOUT
OK
BORDER LINE
MULTI SHOT
CHAPTER3
Select the number of originals to be included on one
sheet of copies.
6
●
Select “2in1”, “4in1”, “8in1” or “16in1” on the touch panel.
●
The copy ratio will be calculated automatically.
●
Portions of original images may not be copied depending on the
original and copy paper sizes and the number of images to be
copied onto a page.
●
Depending on the number of originals and the orientation of the
originals and copy paper, the image of the originals may be
rotated.
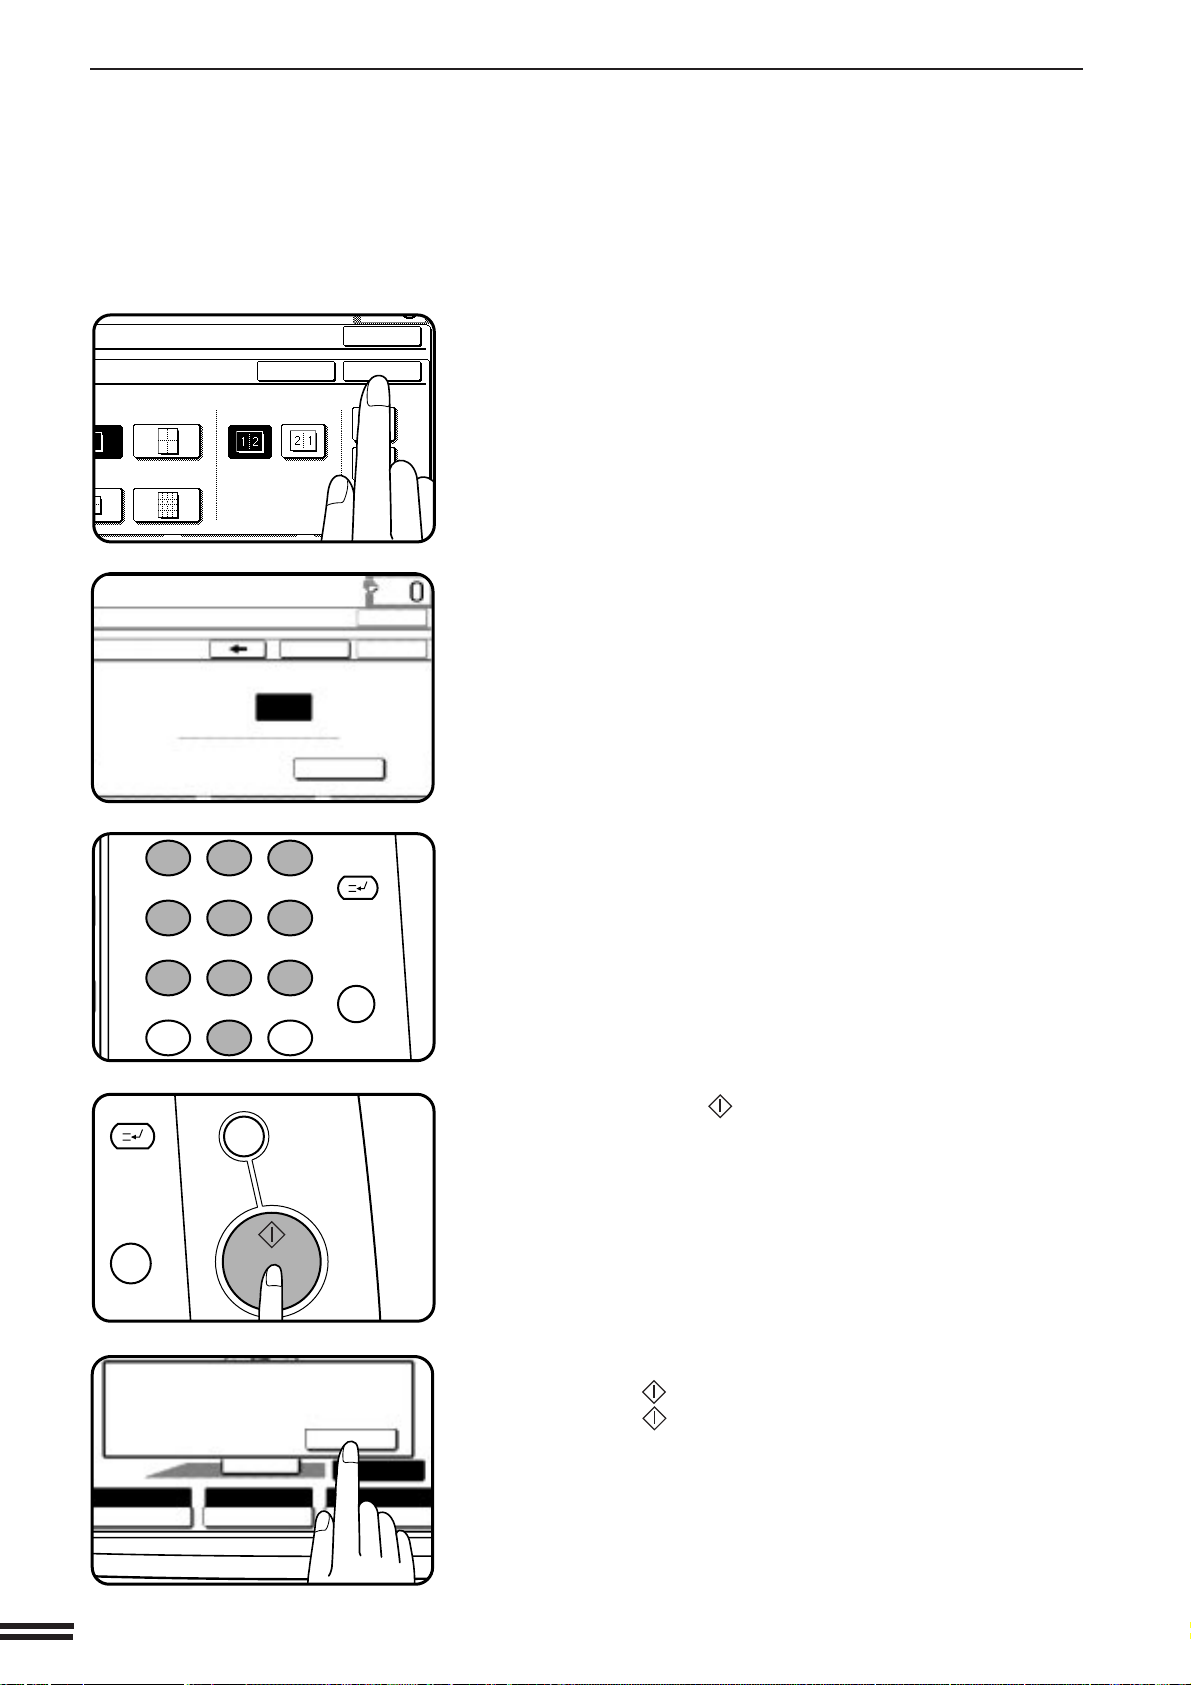
Select the layout of originals on the copy.
7
●
Select the order of originals which will be arranged on the copy.
●
For example, the following types are provided for “4in1”.
12
34
13
24
2
4
1
3
31
42
SPECIAL FUNCTIONS Multi shot
Select a type of border line.
8
●
Select the solid line, broken line or no border line.
3-11
MULTI SHOT
1
2 3
4 5
6
7
8
9
0
C
P
CLEAR
PROGRAM
AUDIT CLEAR
INTERRUPT
C
CLEAR
INTERRUPT
CA
CLEAR ALL
START
READ-END
PLACE NEXT ORIGINAL. PRESS [START].
WHEN FINISHED, PRESS [READ-END].
AUTO
EXPOSURE PAPER SELECT
100%
COPY RATIO
AUTO IMAGE
A4
SHOT
LAYOUT
CANCEL
OK
OK
BORDER LINE
MULTI SHOT
INPUT NO.OF ORIGINALS USING 10-KEY.
NO.OF ORIGINALS
:
PRE-COUNT
2/2
DOCUMENT FEEDER WILL
AUTOMATICALLY COUNT.
SPECIAL MODES
CANCEL
OK
OK
CHAPTER3
SPECIAL FUNCTIONS Multi shot
9
10
Press the lower "OK" key.
Enter the number of originals using the 10-key pad or
press the “PRE-COUNT” key for an automatic count by
the SPF or RADF.
●
When the count is complete, replace the originals in the document
feeder tray.
Press the upper “OK” key.
11
12
Press the START ( ) key.
13
●
●
Enter the desired number of copies.
If the optional document feeder is used, copying will start after all
originals are scanned.
If the document glass is used, proceed to the next step.
3-12
14
Replace the finished original with the next original after
the START ( ) key indicator lights up, and then press
the START ( ) key. Repeat this step until all originals
have been scanned. Then, press the “READ-END” key
on the touch panel.
●
Copying will start at this time.
●
To cancel the MULTI SHOT function, select the MULTI SHOT
function again and press the “CANCEL” key.
COVERS
READY TO CO
READY TO COPY.(DOCUMENT FEEDER MODE)
SPECIAL MODES
MARGIN SHIFT
MULTI SHOT
PAMPHLET COPY
ERASE
COVERS
IMAGE EDIT
TEXT STAMP
TRANSPARENCY
INSERTS
DUAL PAGE
COPY
OK
AUTO
EXPOSURE PAPER SELECT
100%
COPY RATIO
AUTO
A4
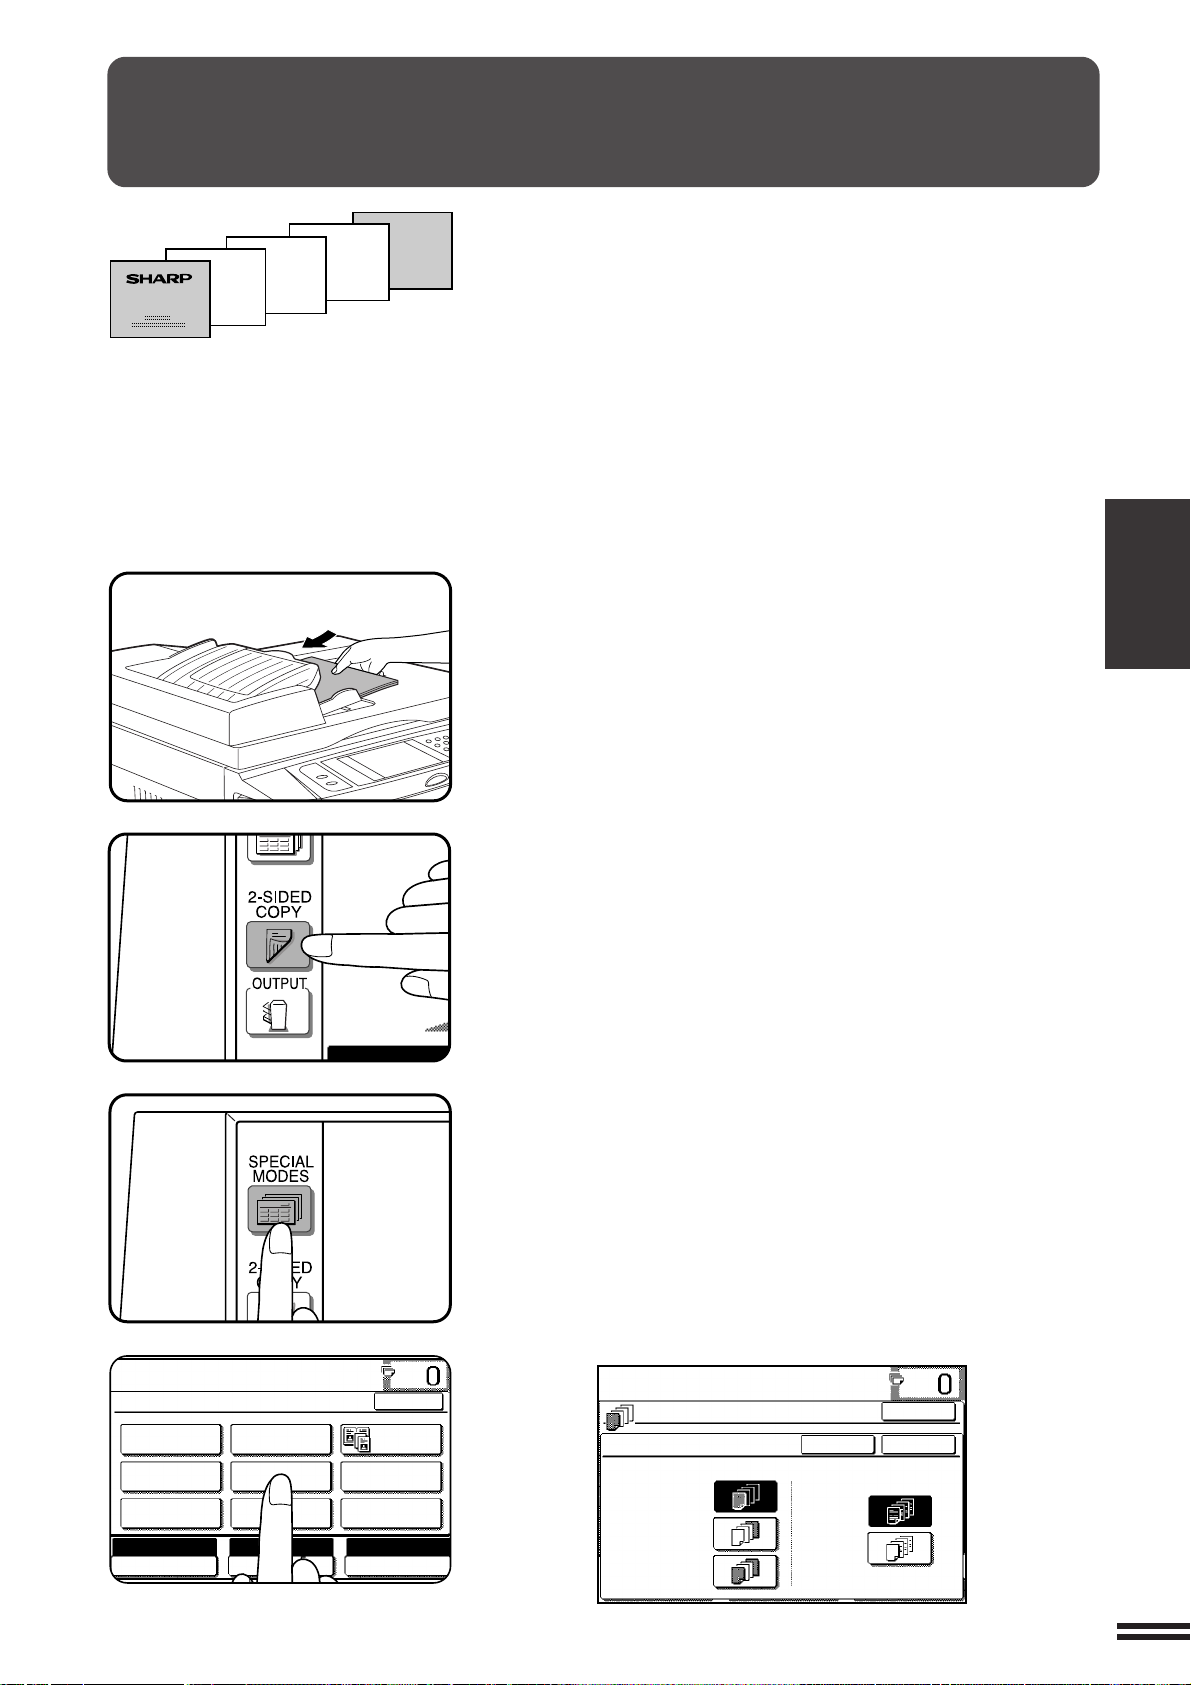
The COVERS mode is used to place covers on the front, back, or both
the front and back of multipage documents.
●
To use the COVERS mode, an optional SPF or RADF must be
installed.
●
Front cover sheets can be copied on, but only on the front side even
in the 1-sided to 2-sided and 2-sided to 2-sided copy modes.
The back side of the original designated as the cover will not be
copied.
●
Back cover sheets cannot be copied on, either on the front side or on
the back side.
●
Cover sheets must be fed from the bypass tray and must be the same
size as the copy paper being used to copy the document.
●
When the COVERS mode is selected, the stream feeding mode of
the SPF/RADF will always be off.
Place the originals in the optional document feeder tray.
1
CHAPTER3
SPECIAL FUNCTIONS Covers
Press the 2-SIDED COPY key and select the desired
duplex mode if needed. Press the “OK” key to close the
2
duplex selection window.
●
The 2-sided to 1-sided and 2-sided to 2-sided copy modes
cannot be selected if an optional RADF is not installed.
●
To copy in the 1-sided to 2-sided or 2-sided to 2-sided copy
mode, an optional duplex module (AR-DU1) must be installed.
Press the SPECIAL MODES key.
3
●
The SPECIAL MODES screen will appear.
Press the “COVERS” key on the touch panel.
4
●
The setting screen for COVERS will appear.
LOAD COVER STOCK INTO BYPASS-TRAY.
OK
COVERS
FRONT
BACK
FRONT+BACK
CANCEL
PRINT ON FRONT COVER?
YES
NO
OK
3-13
COVERS
FRONT
BACK
FRONT+BACK
YES
NO
PRINT ON FRONT
CANCEL
O
O
YES
NO
PRINT ON FRONT COVER?
CANCEL
OK
OK
OK
OK
1
2 3
4 5
6
7
8
9
0
P
PROGRAM
INT
CA
CLEAR ALL
START
COVERS
CHAPTER3
SPECIAL FUNCTIONS Covers
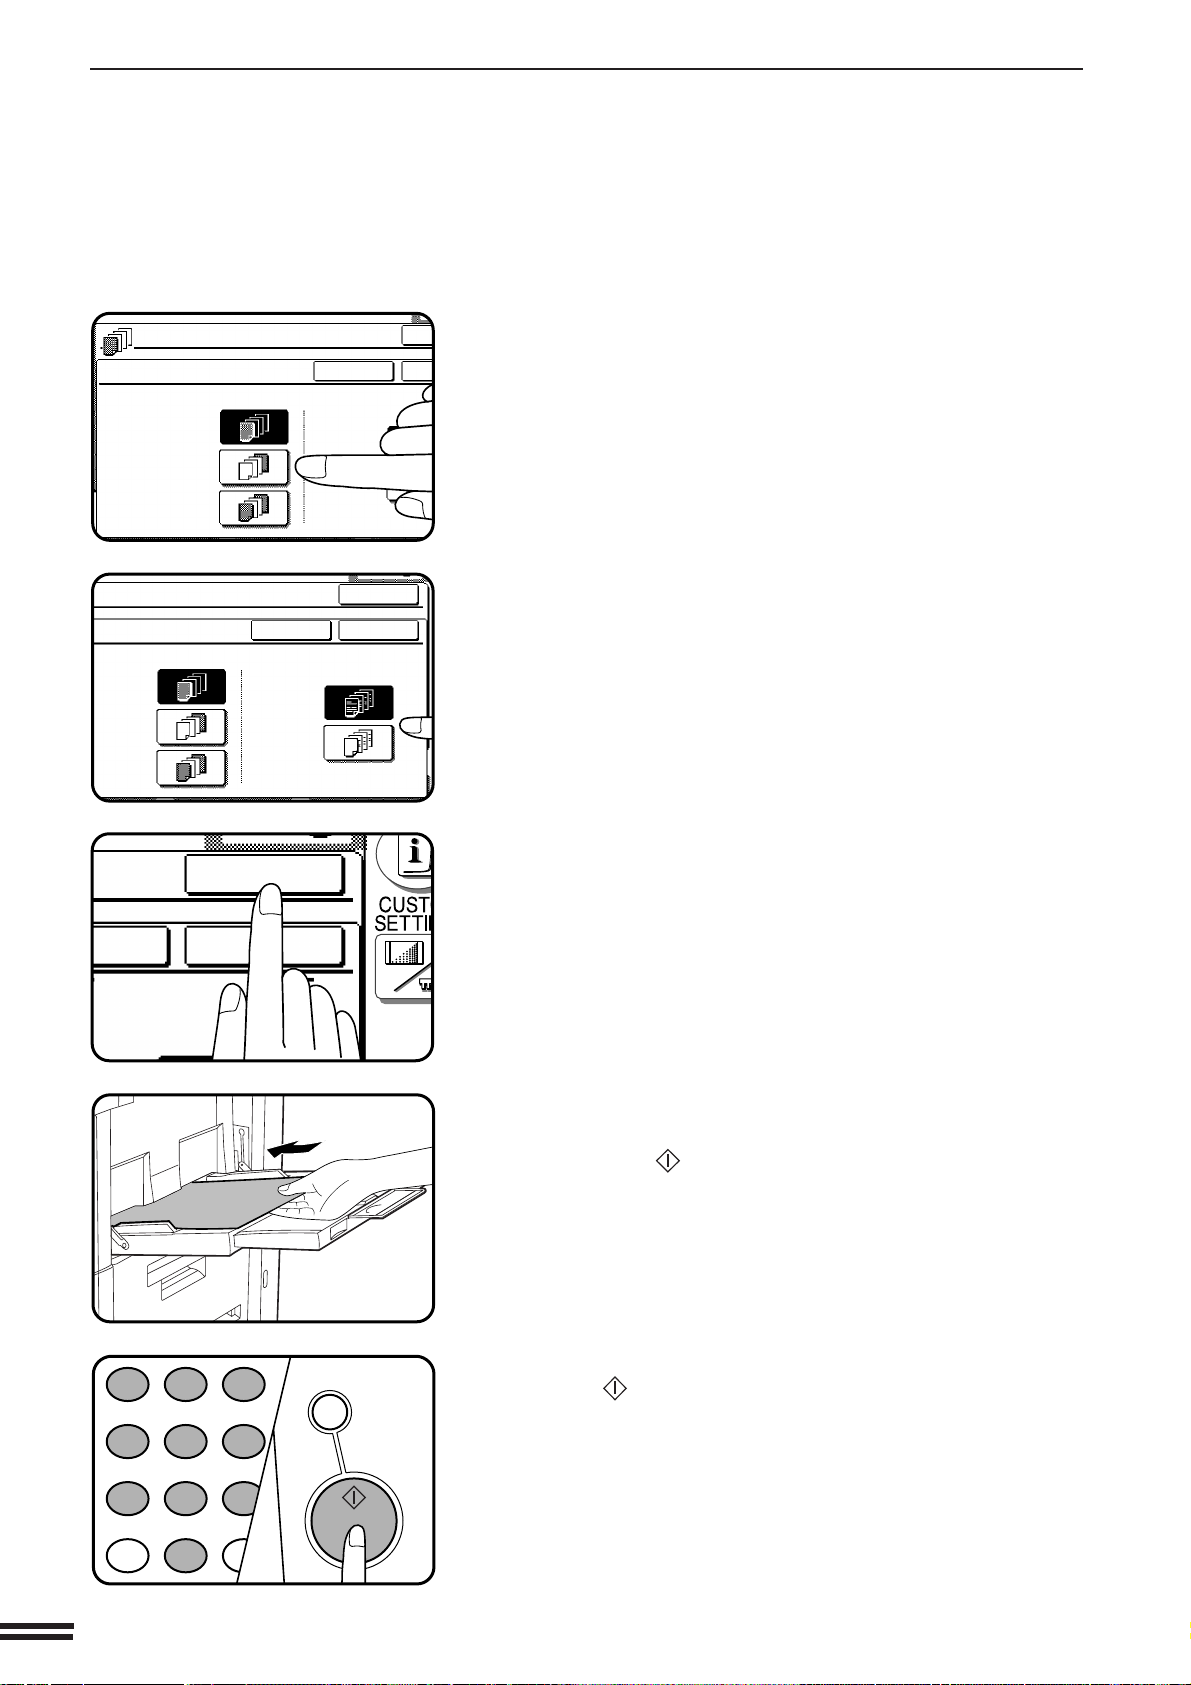
Select cover placement.
5
●
Select “FRONT”, “BACK” or “FRONT+BACK” on the touch
panel.
Indicate whether the front cover sheets are copied on or
not.
6
●
Select “YES” or “NO” on the touch panel. If “YES” is selected, the
first page of the document will be copied onto the front cover
sheet.
●
If “BACK” has been selected in step 5, this selection is not
needed.
Press the upper “OK” key.
7
Load the cover stock into the bypass tray, making sure
that the cover stock is the same size as the copy paper.
8
●
The START ( ) key indicator will light up.
Enter the desired number of copies and press the
START ( ) key.
9
●
To cancel the COVERS function, select the COVERS function
again and press the “CANCEL” key.
3-14
TRANSPARENCY FILM WITH INSERT SHEETS
READY TO CO
READY TO COPY.
SPECIAL MODES
MARGIN SHIFT
MULTI SHOT
PAMPHLET COPY
ERASE
COVERS
IMAGE EDIT
TEXT STAMP
TRANSPARENCY
INSERTS
DUAL PAGE
COPY
OK
AUTO
EXPOSURE PAPER SELECT
100%
COPY RATIO
AUTO
A4
4
3
2
1
2
1
3
1
4
2
4
3
2
1
3
1
4
2
1
2
1
INSERTS WITHOUT
PRINTING
4
4
3
3
2
INSERTS WITH
PRINTING
4
3
following each transparent sheet. The insert sheets can be processed
blank or can be copied with the same image as the transparent sheets.
●
This mode can be selected only in the 1-sided to 1-sided and 2-sided
to 1-sided (only if an optional RADF is installed) modes.
●
A multiple number of copies cannot be selected in this mode.
●
Transparency film must be fed from the bypass tray.
●
Insert sheets must be the same size as the transparency film.
CHAPTER3
SPECIAL FUNCTIONS Transparency film with insert sheets
When copying onto transparency film, insert sheets can be placed
Place the originals in the optional document feeder tray
or on the document glass.
1
Press the SPECIAL MODES key.
2
●
The SPECIAL MODES screen will appear.
Press the “TRANSPARENCY INSERTS” key on the touch
panel.
3
●
The setting screen for TRANSPARENCY INSERTS will appear.
LOAD TRANSPARENCY STOCK INTO
BYPASS-TRAY.
TRANSPARENCY INSERTS
CANCEL
PRINT ON THE INSERT
SHEETS?
YES
NO
OK
OK
3-15
TRANSPARENCY FILM WITH INSERT SHEETS
PAPER SELECT
100%
COPY RATIO
AUTO
A4
1.
A4
2.
A3
A4
ORIGINAL
A4
C
CLEAR
INTERRUPT
CA
CLEAR ALL
START
PRINT ON THE INSERT
SHEETS?
YES
NO
CANCEL
OK
OK
OK
OK
READ-END
PLACE NEXT ORIGINAL. PRESS [START].
WHEN FINISHED, PRESS [READ-END].
AUTO
EXPOSURE PAPER SELECT
100%
COPY RATIO
AUTO
A4
Indicate whether the insert sheets are copied on or not.
4
●
Select “YES” or “NO” on the touch panel.
Press the upper “OK” key.
5
CHAPTER3
Load transparency film into the bypass tray.
6
SPECIAL FUNCTIONS Transparency film with insert sheets
Ensure that the desired tray is selected for insert sheets.
7
●
The copy paper for insert sheets must be the same size as the
transparency film.
Make all other selections and press the START ( ) key.
8
●
If the optional document feeder is used, scanning of originals and
copying will start.
●
If the document glass is used in the SORT mode, proceed to the
next step.
3-16
Replace the finished original with the next original after
the START ( ) key indicator lights up, and then press
9
the START ( ) key. Repeat this step until all originals
have been scanned. Then, press the “READ-END” key
on the touch panel.
●
Copying will start at this time.
●
When copying is completed, remove remaining transparency
film.
●
To cancel the TRANSPARENCY INSERTS function, select the
TRANSPARENCY INSERTS function again and press the
“CANCEL” key.

PAMPHLET COPY
READY TO CO
Originals
(1-sided)
Originals
(2-sided)
The PAMPHLET COPY function is used to arrange copies in proper
order for eventual centre-stapling and folding into a booklet. Four pages
will be copied onto one sheet.
●
To use the PAMPHLET COPY function, an optional duplex module
(AR-DU1) and an optional 1 GB hard disk drive (AR-HD1) must be
installed.
●
Centre stapling cannot be performed by this copier.
Even if PAMPHLET COPY is selected and the optional finisher
(AR-FN1N, AR-FN2) is installed, centre-stapling cannot be performed.
●
This function will not work when non-standard size originals or copy
paper are used.
●
When the PAMPHLET COPY function is set, the maximum allowable
copy ratio is 400%.
CHAPTER3
SPECIAL FUNCTIONS Pamphlet copy
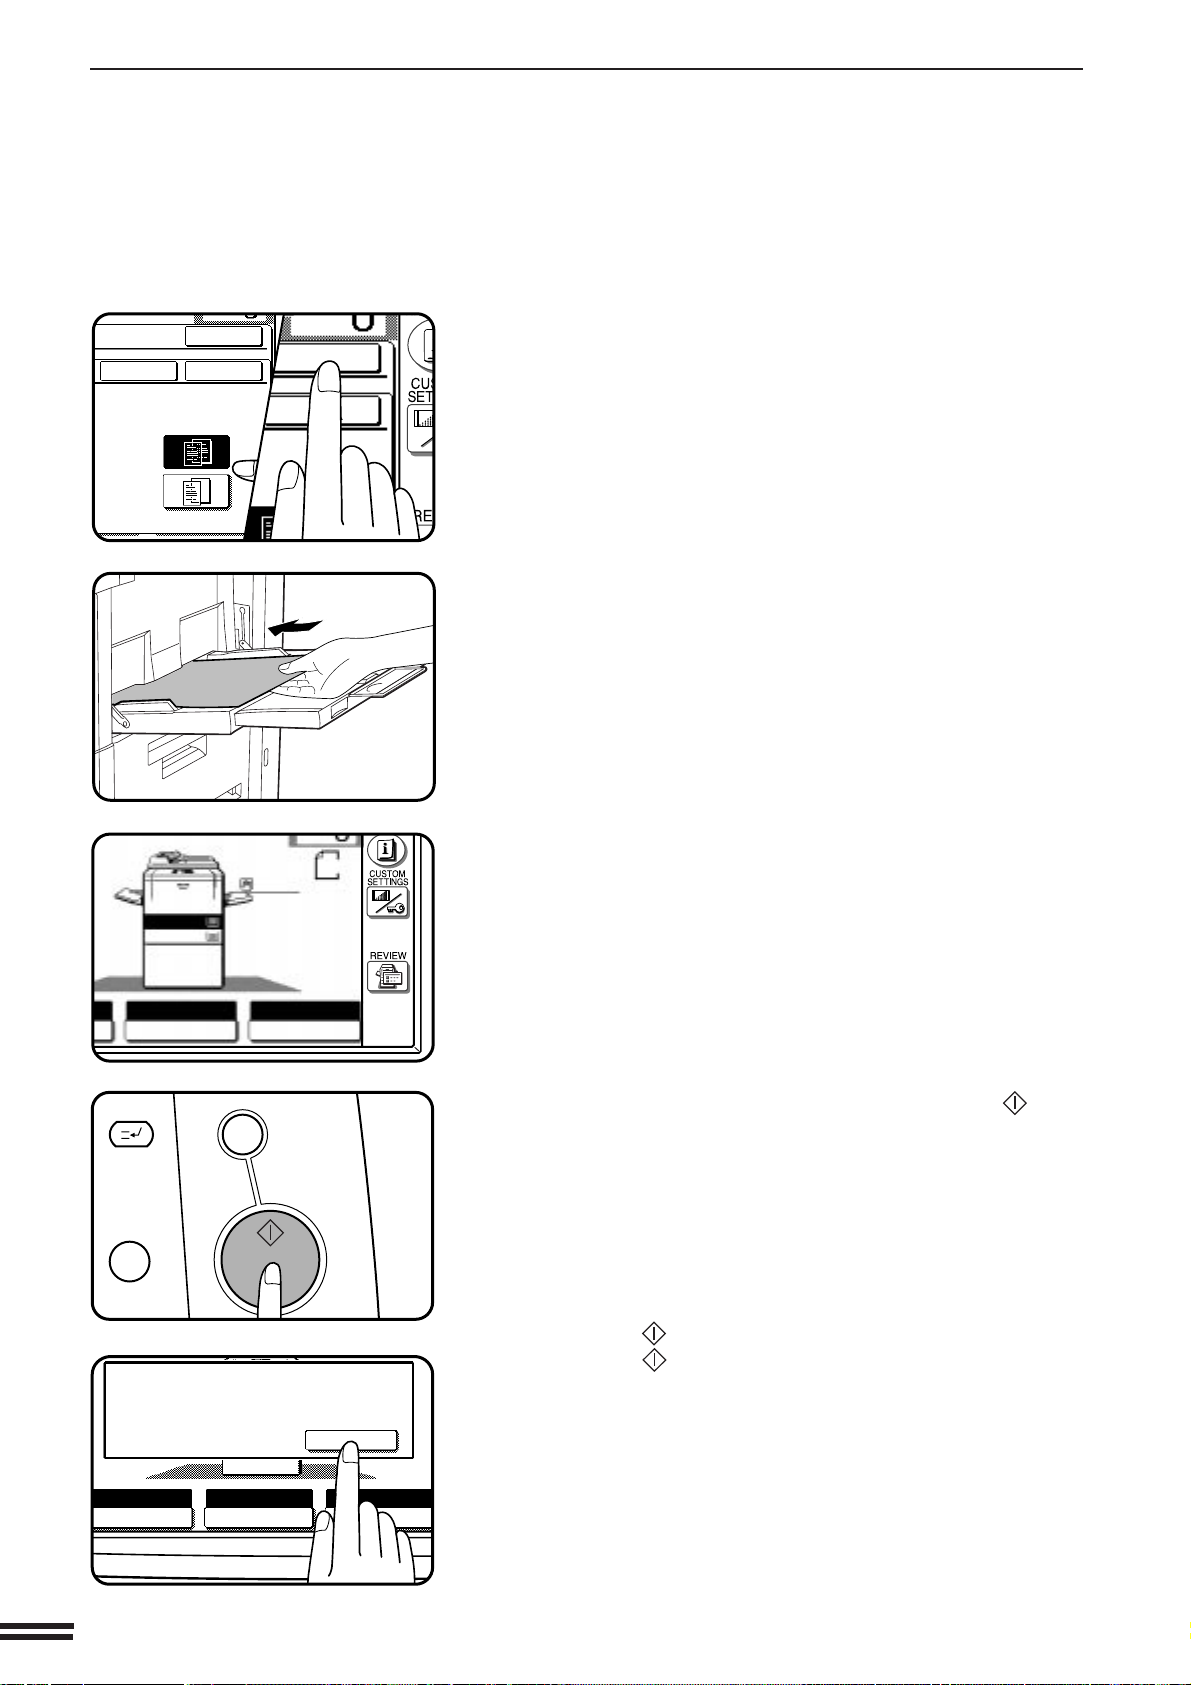
Place the originals in the optional document feeder tray
or on the document glass.
1
●
When using the document glass, place the originals one at a time
in the reverse order, starting with the last original first.
Press the SPECIAL MODES key.
2
●
The SPECIAL MODES screen will appear.
3-17
PAMPHLET COPY
READY TO COPY.
SPECIAL MODES
MARGIN SHIFT
MULTI SHOT
PAMPHLET COPY
ERASE
COVERS
IMAGE EDIT
TEXT STAMP
TRANSPARENCY
INSERTS
DUAL PAGE
COPY
OK
AUTO
EXPOSURE PAPER SELECT
100%
COPY RATIO
AUTO
A4
READY TO COPY.
PAMPHLET COPY
ORIGINAL
1-SIDED
2-SIDED RIGHT BINDING
LEFT BINDING
CANCEL
OK
OK
READY TO COPY.
PAMPHLET COPY
ORIGINAL
1-SIDED
2-SIDED RIGHT BINDING
LEFT BINDING
CANCEL
OK
OK
READY TO COPY.
PAMPHLET COPY
ORIGINAL
1-SIDED
2-SIDED RIGHT BINDING
LEFT BINDING
CANCEL
OK
OK
CHAPTER3
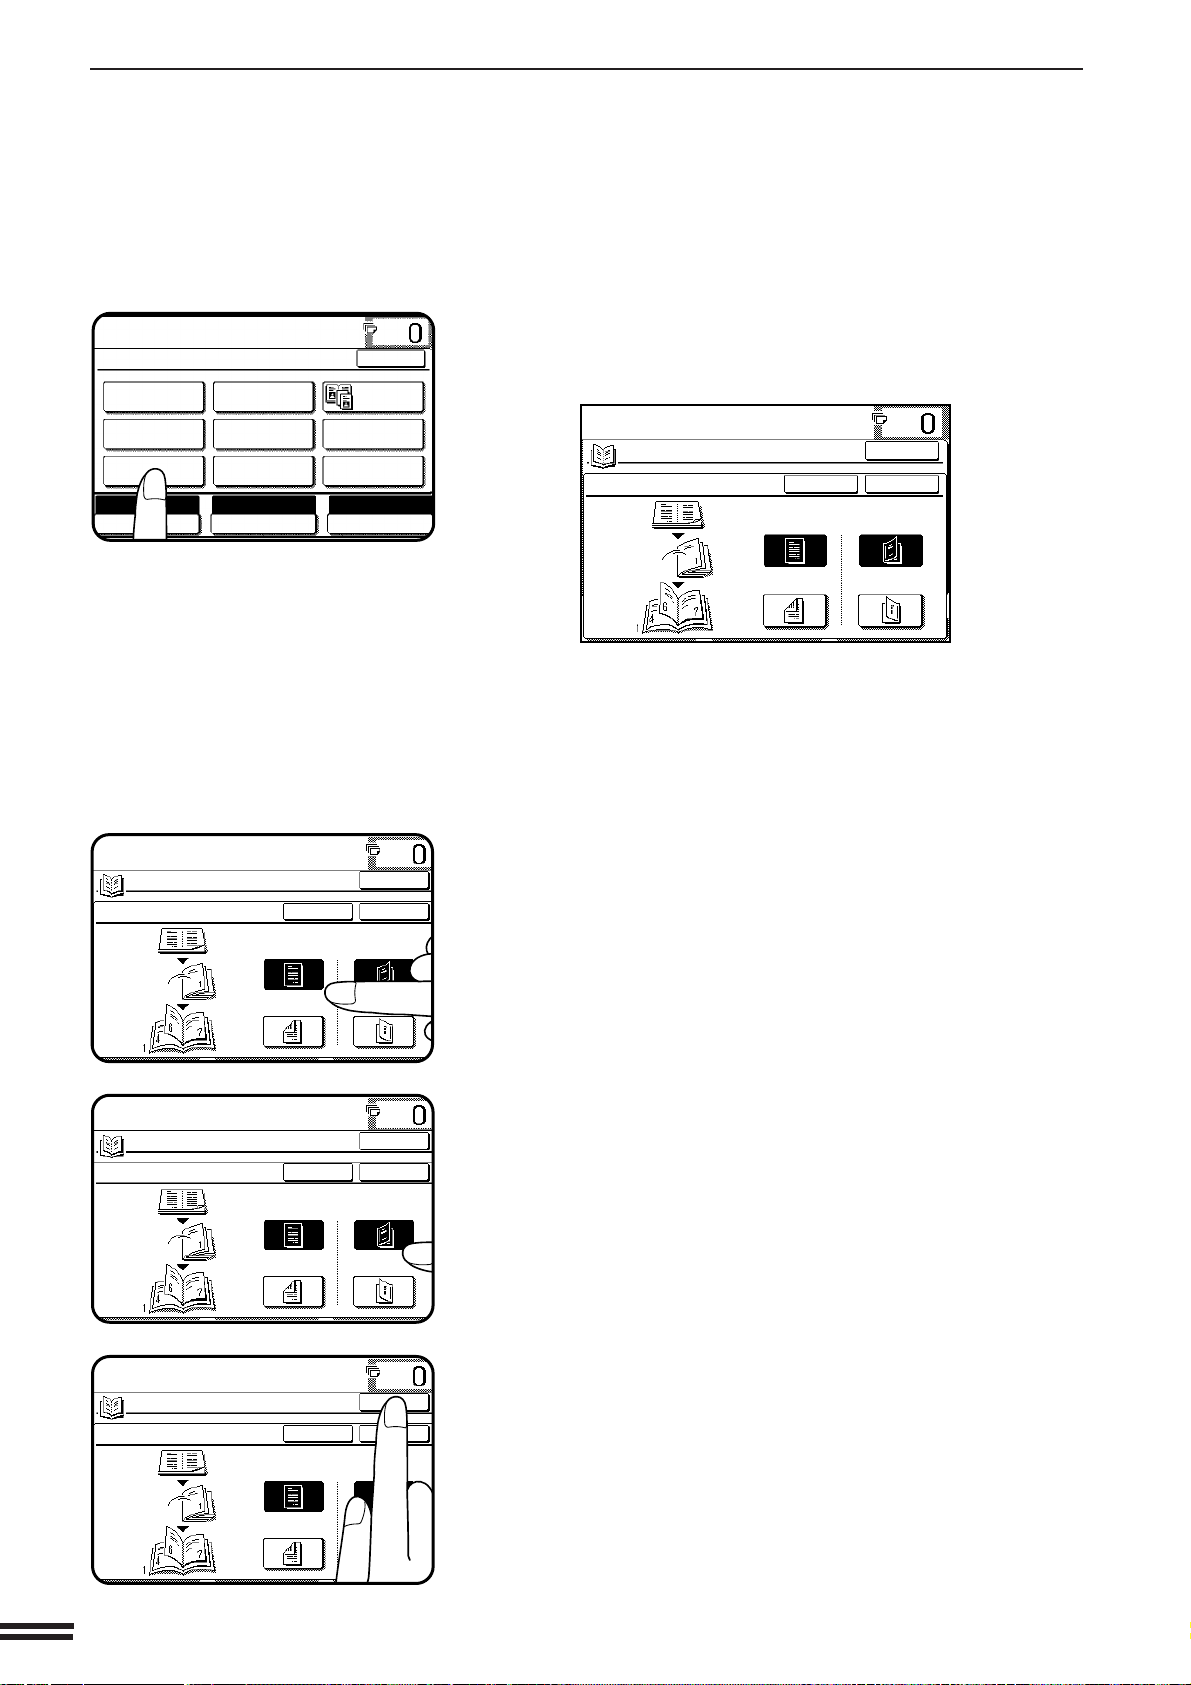
Press the “PAMPHLET COPY” key on the touch panel.
3
●
The setting screen for PAMPHLET COPY will appear.
READY TO COPY.
OK
PAMPHLET COPY
CANCEL
ORIGINAL
1-SIDED
2-SIDED RIGHT BINDING
OK
LEFT BINDING
SPECIAL FUNCTIONS Pamphlet copy
●
If an optional RADF is not installed, the “1-SIDED” and “2SIDED” keys for the originals are not displayed.
Select the type of originals.
4
●
Indicate whether the originals are 1-sided or 2-sided using the
“1-SIDED” or “2-SIDED” key on the touch panel.
●
If an optional RADF is not installed, this selection cannot be
performed.
Select the binding position.
5
●
Select “LEFT BINDING” or “RIGHT BINDING” on the touch
panel.
3-18
Press the upper “OK” key.
6
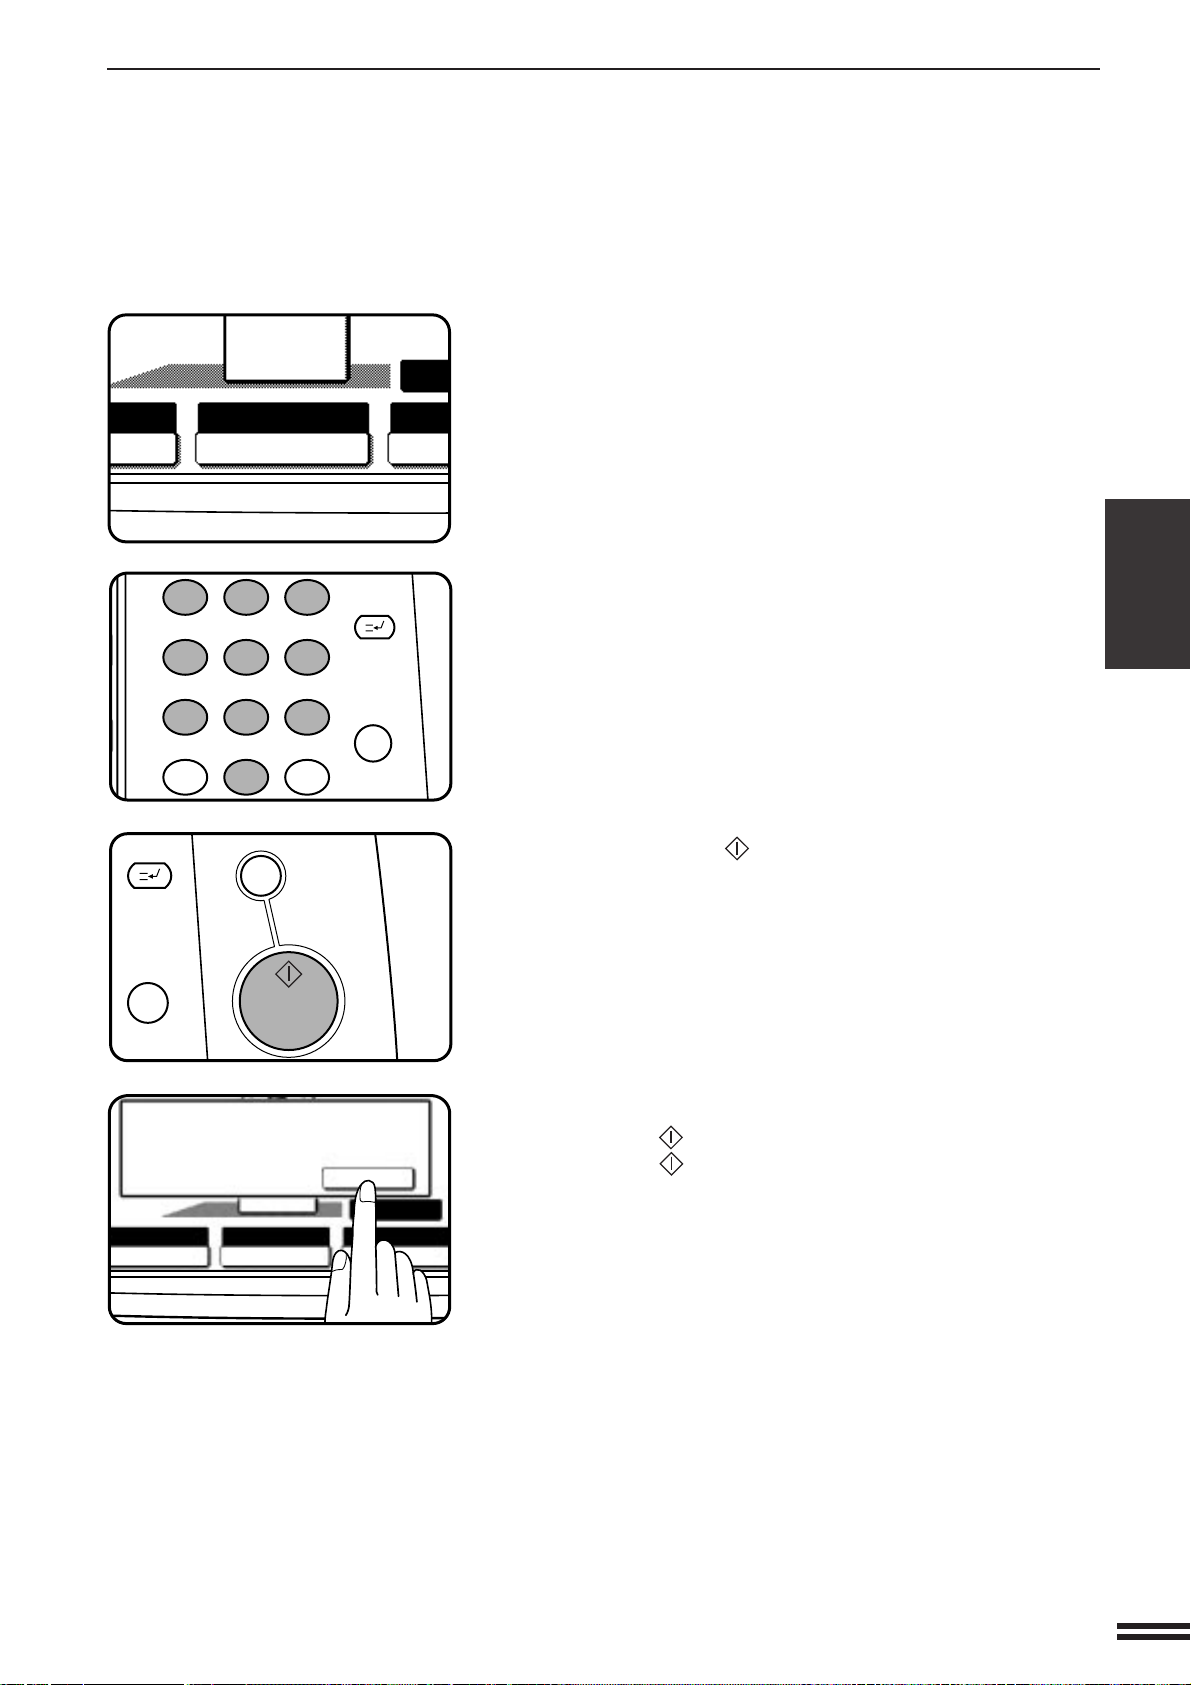
Check the copy paper selection.
1
2 3
4 5
6
7
8
9
0
C
P
CLEAR
PROGRAM
AUDIT CLEAR
INTERRUPT
C
CLEAR
INTERRUPT
CA
CLEAR ALL
START
AUT
A4
AUTO
EXPOSURE PAPER SELECT
70%
AUTO IMAGE
READ-END
PLACE NEXT ORIGINAL. PRESS [START].
WHEN FINISHED, PRESS [READ-END].
7
●
If the AUTO IMAGE function is selected, reduction or enlargement
and image rotation will be automatically performed as required.
●
The AUTO IMAGE function is automatically selected when the
PAMPHLET COPY function is selected.
Enter the desired number of copies.
8
PAMPHLET COPY
CHAPTER3
A4
9
10
Press the START ( ) key.
●
If the optional document feeder is used, copying will start after all
originals are scanned.
●
If the document glass is used, proceed to the next step.
Replace the finished original with the next original after
the START ( ) key indicator lights up, and then press
the START ( ) key. Repeat this step until all originals
have been scanned. Then, press the “READ-END” key
on the touch panel.
●
Copying will start at this time.
●
Up to 120 sheets of A4 (8-1/2" x 11") originals or up to 60 sheets
of originals larger than A4 (8-1/2" x 11") can be scanned.
●
If originals of different sizes are used, the copy paper size will be
determined based on the original that is scanned first. If originals
larger than the first original are used, a portion of the images may
not be copied.
●
You can make a pamphlet by folding the copies in two and
stapling them.
●
To cancel the PAMPHLET COPY function, select the PAMPHLET
COPY function again and press the “CANCEL” key.
3-19
SPECIAL FUNCTIONS Pamphlet copy
READY TO CO
IMAGE EDITING FUNCTIONS
READY TO COPY.
AUTO
EXPOSURE PAPER SELECT
100%
COPY RATIO
AUTO 8/ 11
1
2
1.
A4
2.
A3
The image editing functions include the following functions.
●
Centring: Shifts the image to the centre of copy paper when the
original and the copy paper are of different sizes.
●
Repeat copy: Produces repeated copies on a single sheet of copy
paper.
●
B/W reverse: Reverses the black and white areas.
●
Binding change: Rotates the image of originals for the second side
in the 1-sided to 2-sided copy mode.
These functions are selected by pressing the “IMAGE EDIT” key on
the SPECIAL MODES screen and pressing the key of each function.
CHAPTER3
SPECIAL FUNCTIONS Image editing functions
CENTRING
When the original and copy paper are of different sizes, CENTRING is
used to shift the image as a whole to the centre of the copy paper.
The image will shift only in the left to right direction, not in the top to
bottom direction.
●
This function will not work when non-standard size originals or copy
paper are used. This function cannot be selected when enlargement
copying has been selected.
●
When an optional duplex module (AR-DU1) is not installed, the
"CENTRING" key appears separately from the "IMAGE EDIT" key
on the touch panel.
Place the originals in the optional document feeder tray
or on the document glass.
1
3-20
Press the “PAPER SELECT” key on the touch panel and
select the desired paper size.
2
Press the SPECIAL MODES key.
3
●
The SPECIAL MODES screen will appear.
 Loading...