


MODEL
AR-156
DIGITAL LASER COPIER
OPERATION MANUAL
• GETTING STARTED
Page
3
• MAKING COPIES
• SPECIAL FUNCTIONS
• SUPPLIES AND
USER MAINTENANCE
• COPIER TROUBLE?
• APPENDIX
• OPTIONAL EQUIPMENT
12
20
23
27
36
40

GETTING STARTED
This chapter provides basic information for using the copier.
INTRODUCTION
This copier has been designed to provide intuitive operating ease while requiring a minimum
amount of space. To get full use of all copier features, be sure to familiarize yourself with this
manual and the copier.
For quick reference during copier use, keep this manual in a handy location.
This copier can also be used as a laser printer if an optional printer expansion
kit is installed. This manual describes only the copier features. For description
of the printer features, see their separate manual.
Conventions used in this manual
In this manual, the following icons are used to provide the user with information pertinent to the
use of the copier.
1
Getting started
Warns the user that injury to the user or damage to the copier may result if the
contents of the warning are not properly followed.
Cautions the user that damage to the copier or one of its components may
result if the contents of the caution are not properly followed.
Notes provide information relevant to the copier regarding specifications,
functions, performance, operation and such, that may be useful to the user.
Indicates a letter displayed in the display.
3
1
Getting started
CAUTIONS
Follow the cautions below when using this copier.
●
The fusing area is hot. Exercise care in this area when removing misfed paper.
●
Do not look directly at the light source. Doing so may damage your eyes.
●
Do not switch the copier rapidly on and off. After turning the copier off, wait 10
to 15 seconds before turning it back on.
●
Copier power must be turned off before installing any supplies.
●
.
Place the copier on a firm, level surface.
●
Do not install the copier in a humid or dusty location.
●
When the copier is not used for a long time, for example, for consecutive
holidays, turn the power switch off and remove the power cord from the outlet.
●
When moving the copier, be sure to turn the power switch off and remove the
power cord from the outlet.
●
Do not cover the copier with a dust cover, cloth or plastic film while the power
is on. Doing so may prevent heat radiation, damaging the copier.
●
Use of controls or adjustments or performance of procedures other than those
specified herein may result in hazardous radiation exposure.
SAFETY PRECAUTIONS
This Digital Copier is rated Class 1 and complies with 21 CFR 1040.10 and 1040.11 of the
CDRH standards. This means that the copier does not produce hazardous laser radiation.
For your safety, observe the precautions below.
●
Do not remove the cabinet, operation panel or any other covers.
●
The copier’s exterior covers contain several safety interlock switches. Do not bypass
any safety interlock by inserting wedges or other items into switch slots.
4

MAIN FEATURES
High-speed laser copying
●
Since warm-up time is zero, copying can be started immediately after the power switch is
turned on.
●
First-copy time is only 9.6 seconds (normal mode).
●
Copying speed is 15 copies/min., which adapts to business use, allowing improvement
of working efficiency.
High-quality digital image
●
High-quality image copying at 600 dpi can be performed.
●
In addition to the automatic exposure mode, the manual exposure can be adjusted in five
steps.
●
The photo mode copying function allows clear copying of delicate halftone original images
such as monochrome photos and color photos.
Substantial copying functions
●
Zoom copying from 50% to 200% in 1% increments can be performed.
●
Continuous copying of maximum 99 sheets can also be performed.
●
Automatic document feeding through the reversing single pass feeder (RSPF) can be
performed.
●
Toner save mode reduces toner consumption by approximately 10%.
●
User programs allow setting/modification of functions for customer’s needs.
●
Automatic two-sided copying can be performed.
1
Getting started
Scan once/ Print many
●
This copier is equipped with a 1-page memory buffer. This Memory allows the
copier to scan an original once only and make up to 99 copies. This feature allows for
improved workflow, reduced operating noise from the copier and reduced wear and tear
on the scanning mechanism. This feature provides for a higher reliability.
Printer feature
●
This copier can be used as a laser printer by installing an optional printer expansion kit.
Environmentally friendly design
●
Paper output tray is housed in the copier for space saving.
●
Preheat and auto power shut-off modes are provided to reduce power consumption in
standby mode.
5
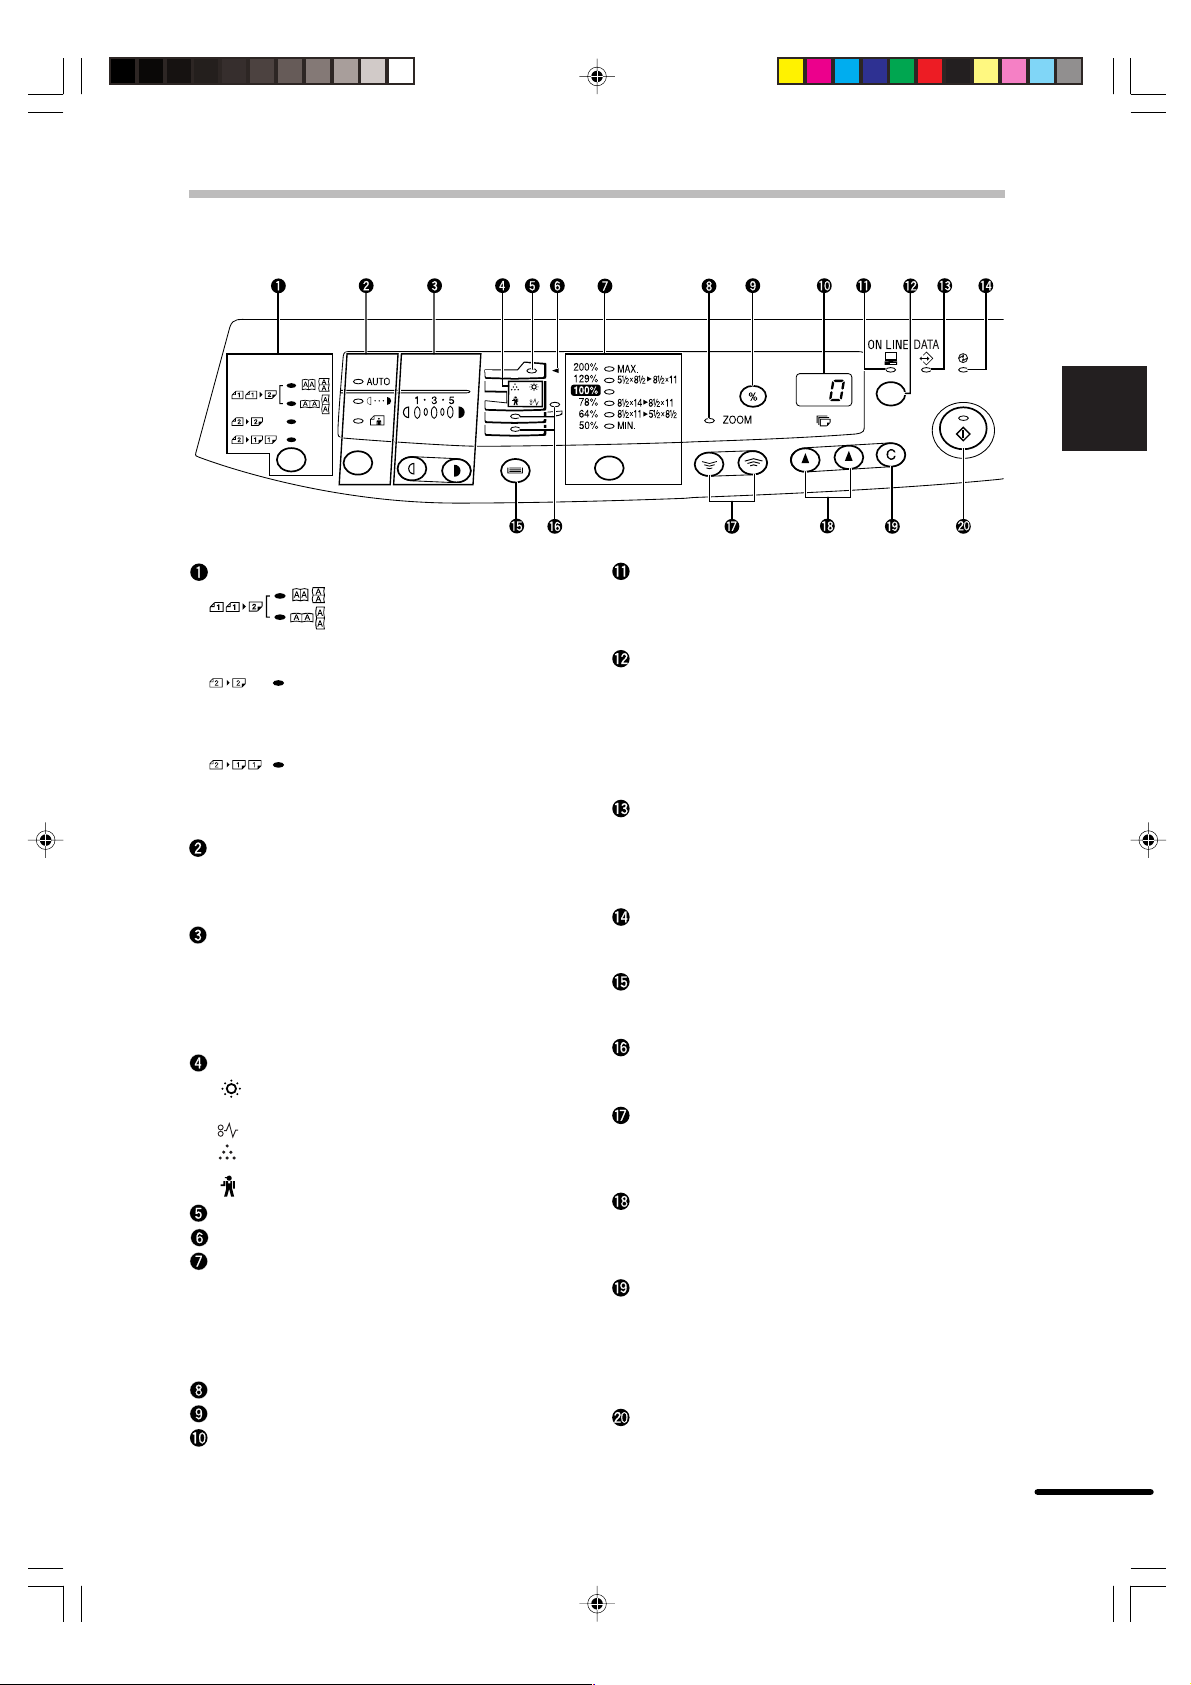
OPERATION PANEL
1
Getting started
Original to copy key and indicators
: Two-sided copies from one-
sided originals.
Turn on Long Edge or Turn on
Short Edge can be selected.
: Two-sided copies from two-
sided originals. (Can be
selected only when the RSPF
is used.)
: One-sided copies from two-
sided originals. (Can be
selected only when the RSPF
is used.)
Exposure mode selector key and indicators
Use to sequentially select the exposure
modes: AUTO, MANUAL or PHOTO. Selected
mode is shown by a lit indicator. (p. 16)
Light and dark keys and exposure indicators
Use to adjust the MANUAL or PHOTO
exposure level. Selected exposure level is
shown by a lit indicator. (p.16)
Use to start and terminate user program
setting. (p. 21)
Alarm indicators
: Developer replacement required
indicator (p. 32)
: Misfeed indicator (p. 27)
: Toner cartridge replacement required
indicator (p. 23)
: Maintenance indicator (p. 32)
RSPF indicator (p. 13)
RSPF misfeed indicator (p. 30)
Copy ratio selector key and copy ratio
indicators
Use to sequentially select preset reduction/
enlargement copy ratios.
Selected copy ratio is shown by a lit indicator.
(p. 17)
Zoom indicator (p. 17)
Copy ratio display (%) key (p. 17)
Display
Displays the specified copy quantity, zoom
copy ratio, user program code, and error
code.
ON LINE indicator
Lights up when the machine is used as a
printer. To use the copier as a printer, an
optional printer expansion kit is needed.
ON LINE key
Changes between the on-line and off-line
modes when the PCL expansion kit has been
installed and a PCL printer is used.
Changes modes from the off-line to on-line
when the GDI expansion kit has been installed
and a GDI printer is used.
DATA indicator
Indicates that the printer is receiving or
processing print data. To use the copier as a
printer, an optional PCL expansion kit is
needed.
Power save indicator
Lights up when the copier is in a power save
mode. (p. 20, 21)
Tray select key
Use to select a paper feed station (paper tray
or bypass tray). (p. 19)
Paper feed location indicators
Light up to show the selected paper feed
station.
Zoom keys
●
Use to select any reduction or enlargement
copy ratio from 50 to 200% in 1% increments.
(p. 17)
Copy quantity keys
●
Use to select the desired copy quantity (1 to
99). (p. 15)
●
Use to make user program entries. (p. 21)
Clear key
●
Press to clear the display, or press during a
copy run to terminate copying. (p. 15)
●
Press and hold down during standby to
display the total number of copies made to
date. (p. 22)
Print key and ready indicator
●
Copying is possible when the indicator is on.
●
Use to set a user program.
7
1
Getting started
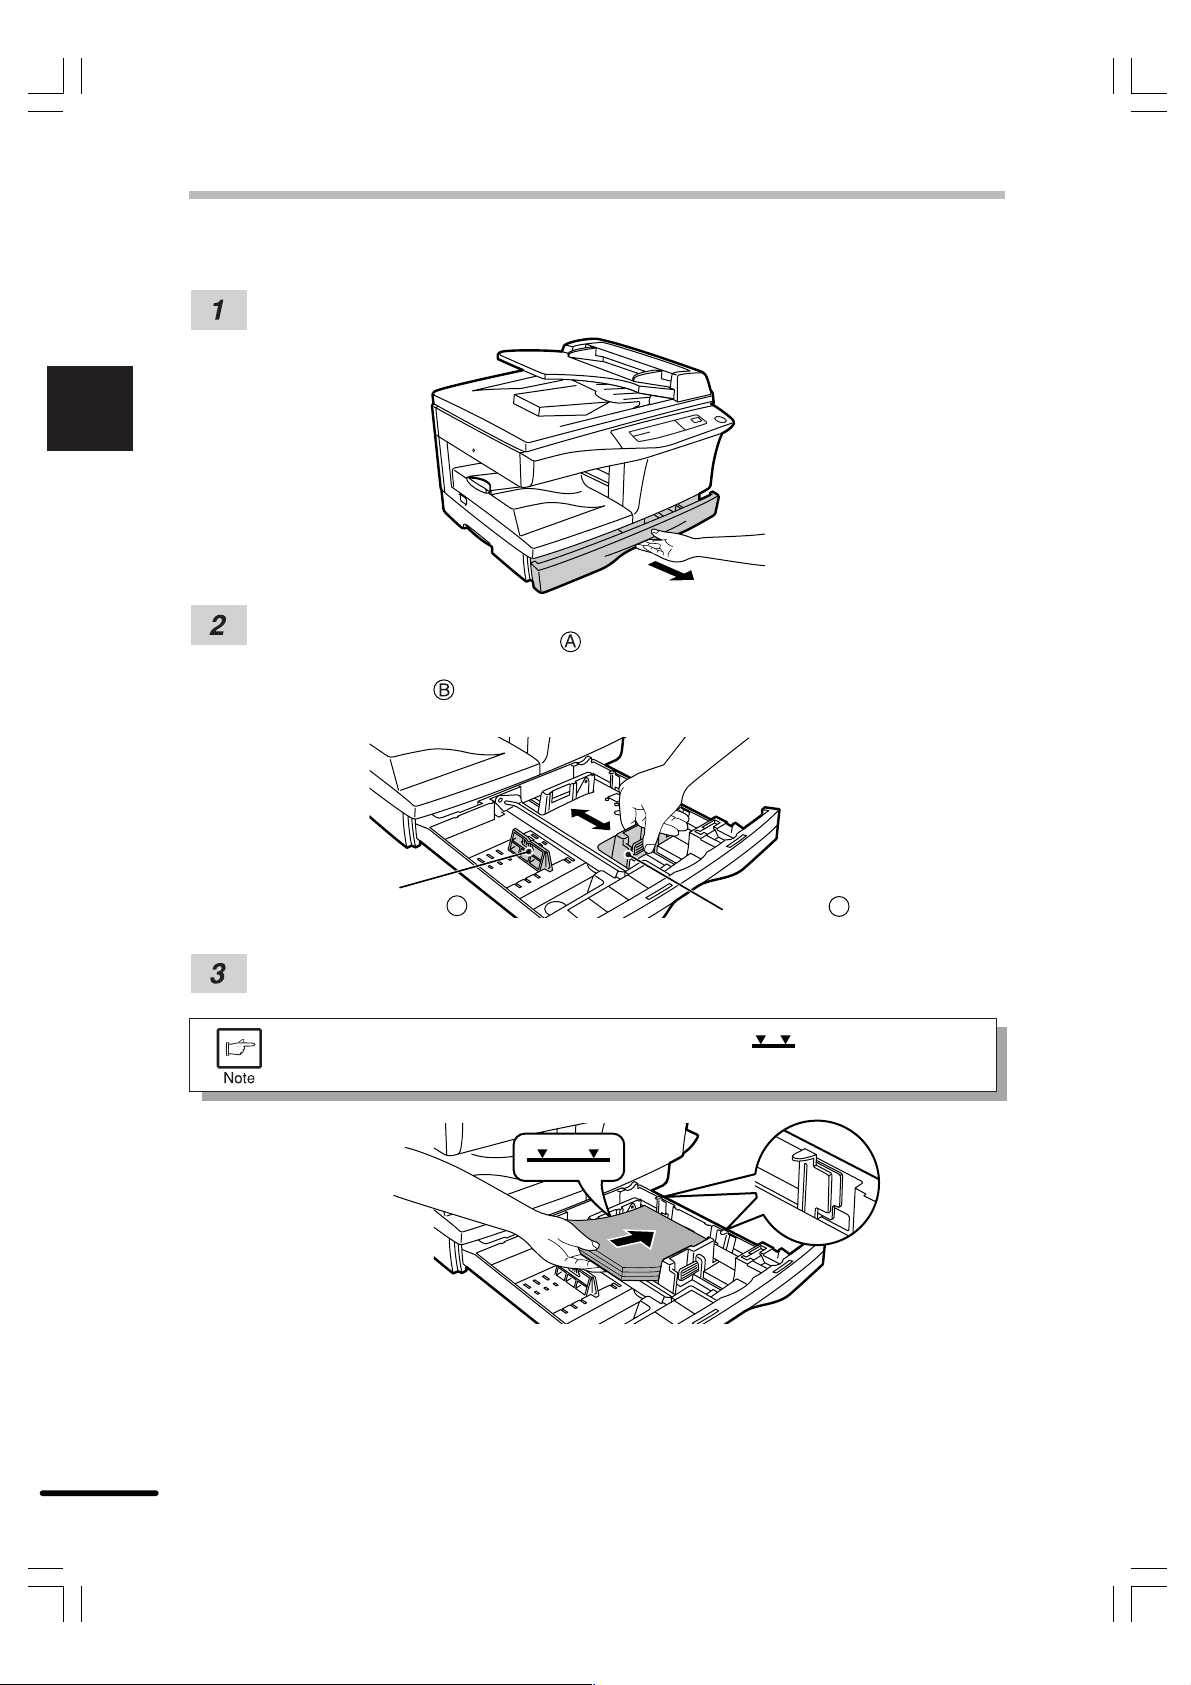
LOADING COPY PAPER
Raise the handle of the paper tray and pull the paper tray out until it stops.
Adjust the paper guides on the paper tray to the copy paper width and length.
Squeeze the lever of paper guide and slide the guide to match with the width of the
paper.
Move paper guide to the appropriate slot as marked on the tray.
Paper guide B
Fan the copy paper and insert it into the tray. Make sure the edges go under the corner
hooks.
Do not load paper above the maximum height line (
will cause a paper misfeed.
Paper guide A
). Exceeding the line
10
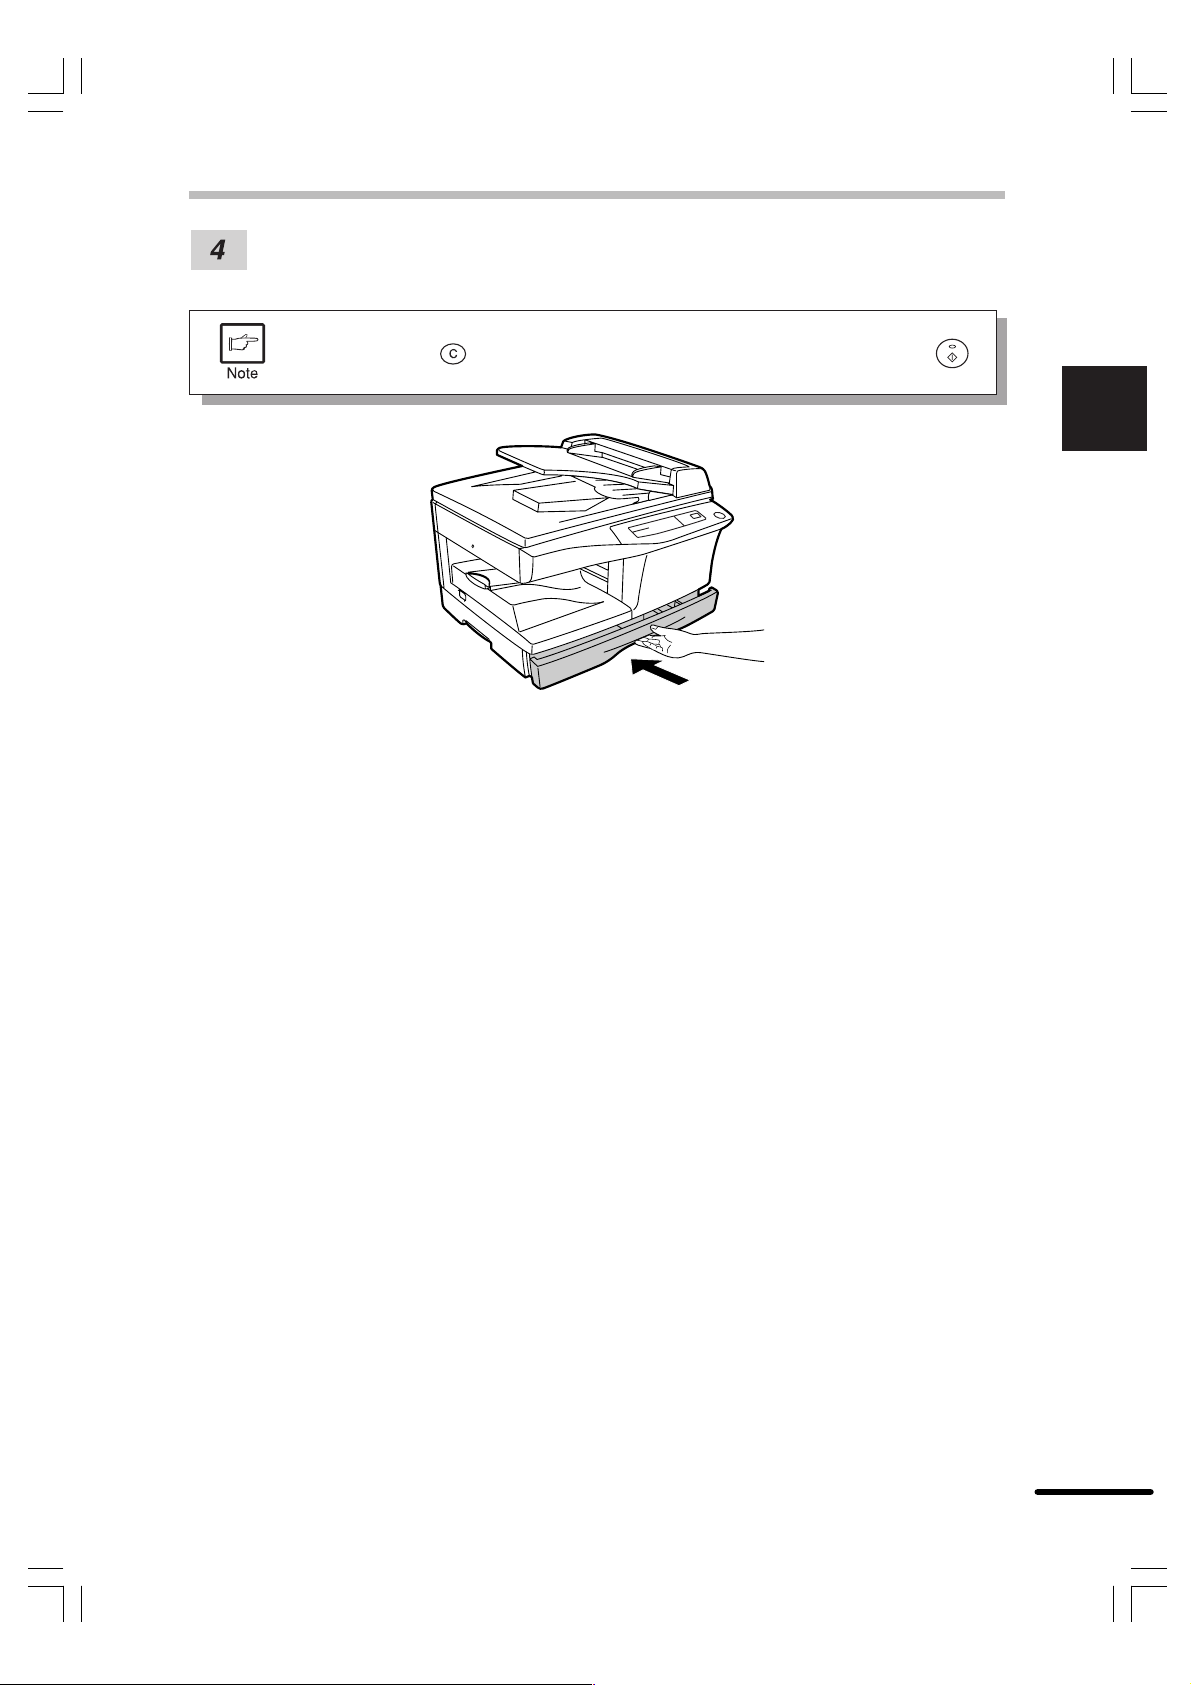
LOADING COPY PAPER
Gently push the paper tray back into the copier.
After loading copy paper, to cancel the blinking “P” without restarting copying,
press the clear (
indicator will light up.
) key. The “P” in the display will go out and the ready (
)
1
Getting started
11
 Loading...