

Page 1
28LF-94EC
32LF-94EC
COLOUR TELEVISION
OPERATION MANUAL
INSTRUKCJA OBS£UGI
TELEWIZORA KOLOROWEGO
SZÍNES TELEVÍZIÓKÉSZÜLÉK
KEZELÉSI ÚTMUTATÓ
NÁVOD K POUITÍ
BAREVNÉ TELEVIZE
FAREBNÝ TELEVÍZNY PRIJÍMAÈ
PREVÁDZKOVÁ PRÍRUÈKA
R
PУКОВОДСТВО ПО ЗКСПЛУАТАЦИИ
ЦВЕТНОГО ТЕЛЕВИЗОРА
CARTE TEHNICÃ PENTRU
TELEVIZOR ÎN CULORI
Please read this operation manual carefully
before using the colour television.
Prosimy uwa¿nie przeczytaæ ten podrêcznik
obs³ugi przed rozpoczêciem korzystania
z telewizora.
Gondosan olvassa el a Használati útmutatót,
mielõtt használná a színes televíziót.
Prosíme pøeètìte si pozornì tento návod
k pouití pøed pouitím barevné televize.
Pred pouitím si pozorne
preèítajte túto príruèku.
Прocьба внимательно ознакомиться
с настоящим Руководством перед
включениeм телевизора .
Consultati acest manual înainte de a utiliza
televizorul color.
Page 2

Contents
Safety Precautions...................................................2
Supplied Accessories...............................................4
Remote Control Buttons..........................................5
Control Panel Buttons..............................................6
Antenna Connections...............................................6
Preparation................................................................7
Features...........................................................................7
Before Switching on your TV..................................7
Power connection.............................................................7
Aerial Connections...........................................................7
How to connect external equipment................................7
Remote Control Battery Installation..................................7
Switching the TV ON/OFF........................................8
To switch the TV on..........................................................8
To switch the TV off..........................................................8
Initial Settings...........................................................8
Operating with the onset buttons......................................8
Operating with Remote Control........................................8
Menu System.............................................................9
Sound menu.....................................................................9
Picture menu..................................................................10
Feature menu.................................................................12
Installation Menu............................................................13
Other Features........................................................15
Information On Screen...................................................15
Sound Mute....................................................................15
Sound Modes.................................................................15
Screen Format...............................................................15
No-Signal Timer Indicator...............................................15
Still Picture.....................................................................15
To Display the Time........................................................15
Flash back ( ).............................................................15
Double-digit (- / - -).........................................................15
AV Modes.......................................................................15
Teletext.....................................................................16
To operate Teletext.........................................................16
To select a page of Teletext............................................16
To Select Index Page.....................................................16
To Select Teletext with a TV Programme.......................16
Searching for a page while watching TV........................16
To Select Double Height Text.........................................16
To Reveal “concealed” Information................................16
To Stop Automatic Page Change...................................16
Split Screen....................................................................16
To Select a Subcode Page.............................................16
Fastext...........................................................................16
To exit Teletext...............................................................17
Connecting external equipment............................17
Via the Euro connector...................................................17
RGB mode.....................................................................17
S-VHS EXT2 Mode........................................................17
Via the ANT (aerial) socket.............................................17
Via the RCA jacks..........................................................17
TV and Video Recoder (VCR)........................................17
NTSC Playback..............................................................17
Copy Facility...................................................................17
To connect to S-VHS input.............................................17
Connecting Headphones................................................17
Connecting external equipment............................18
Typical Connections...............................................19
Typical Connections (Continued)..........................20
Typical Connections (Continued)..........................21
Typical Connections (Continued)..........................22
Typical Connections (Continued)..........................23
21-pin Euro-SCART and 21-pin Audio/Video........24
Troubleshooting......................................................25
Specifications..........................................................26
ENGLISH - 1 -
Page 3
Safety Precautions
Mains Socket Outlet
This equipment complies with the requirements of Directives 89/336/EEC, 92/31/EEC and 73/23/EEC as amended
by 93/68/EEC.
This receiver should only be operated from a 220-240V AC,
50 Hz outlet. Ensure you select the correct voltage setting
for your convenience.
AC 220~240 V, 50 Hz
ANT. EXT.2
EXT.1
To prevent fire or electrical shock, do not use the TV set in
an excessively damp place.
Television equipment and cart combination should be
moved with care. Quick stops, excessive force, and uneven
surfaces may cause the equipment and cart combination to
overturn.
To prevent electrical shock, do not subject the AC power
cord to damage by bending or twisting it, or by placing
heavy items on top of it and do not place the AC power cord
under the TV set. If the AC power cord becomes damaged,
unplug it from the wall outlet immediately and call your dealer for service.
Position the TV set out of direct sunlight and away from
heat, as high temperatures can damage the cabinet, CRT,
or other electronic parts.
Do not cover ventilation slots with objects such as newspapers, tablecloths, curtains, etc.
Do not cover the ventilation holes at the back of the TV set,
this can cause fire or other serious problems. Leave an adequate open space behind the TV set for good ventilation.
In order to ensure that the television is properly ventilated,
leave a space of at least 10 cm around the set.
Do not install this equipment in a confined space such as a
bookcase or a built-in cabinet.
Do not place this television equipment on an unstable cart,
stand, or table. The television equipment may fall, causing
serious injury to a child or an adult, and serious damage to
the equipment.
Use only with a cart or stand recommended by the manufacturer, or sold with the television equipment.
Never remove the back of the cabinet, as there is high voltage in the TV set.
Please call for service.
When replacement parts are required, be sure the service
technician has used replacement parts which are specified
by the manufacturer or have the same specifications as the
original one. Unauthorized substitutions may result in fire,
electrical shock, or other hazards.
ENGLISH - 2 -
Page 4
Unplug the power cord from the wall outlet immediately if
the TV set begins to make unusual noises or give off smoke
or an odd smell, then call your dealer for service.
If the TV set is put onto a smaller size or uneven stand, table or track may cause the TV cabinet distort. Do not put or
insert anything between TV set and the stand, table or track.
Always disconnect your television from the mains and the
aerial cables during thunderstorms.
Even if your television is switched off, it can still be damaged by lightning striking the mains and/or aerial cable.
Do not leave your TV set in Stand-by or operating mode when
you leave the house.
In order to prevent electrical shocks and fires, ensure that
the television is not subjected to splashes or spills of water, and avoid inserting objects or pouring any type of liquid
into the set.
To prevent fire, never place any type of candle or naked
flames on the top or near the TV set.
If an object or liquid enters the set, disconnect the mains
supply and contact technical service.
Wall or shelf mounting should follow the manufacturer’s instructions, and should use a mounting kit approved by the
manufacturer.
The tube of your TV has a special coating. Do not knock or
rub on the tube face with sharp or hard surfaces, otherwise
you will damage the coating.
To prevent damaging the surface of the television screen,
remove finger prints only with a soft cloth dampened with
glass
cleaner. Do not use any abrasive cleaners.
Do not use thinner, benzene or other strong chemical clean-
ers.
Warning!
Any intervention contrary to regulations, in particular,
any modification of high voltage or a replacement of
the picture tube may lead to an increased concentration of x-rays. Any television modified in this way no
longer complies with license and must not be operated.
Instructions for waste disposal:
Packaging and packaging aids are recyclable and
should principally be recycled. Packaging materials,
such as foil bag, must be kept away from children.
Batteries, including those which are heavy metal-free,
should not be disposed of with household waste.
Please dispose of used batteries in an environmentally
sound manner. Find out about the legal regulations
which apply in your area.
Do place the TV set onto an even stand, table or track which
size is bigger than the TV set.
CAUTION: For environmental and safety reasons, it is recommended that this television set is not left in stand-by
mode whilst not in use. Switch it off using the main switch. During periods of absence from home it is also
wise to disconnect the set by unplugging the mains plug.
ENGLISH - 3 -
Page 5
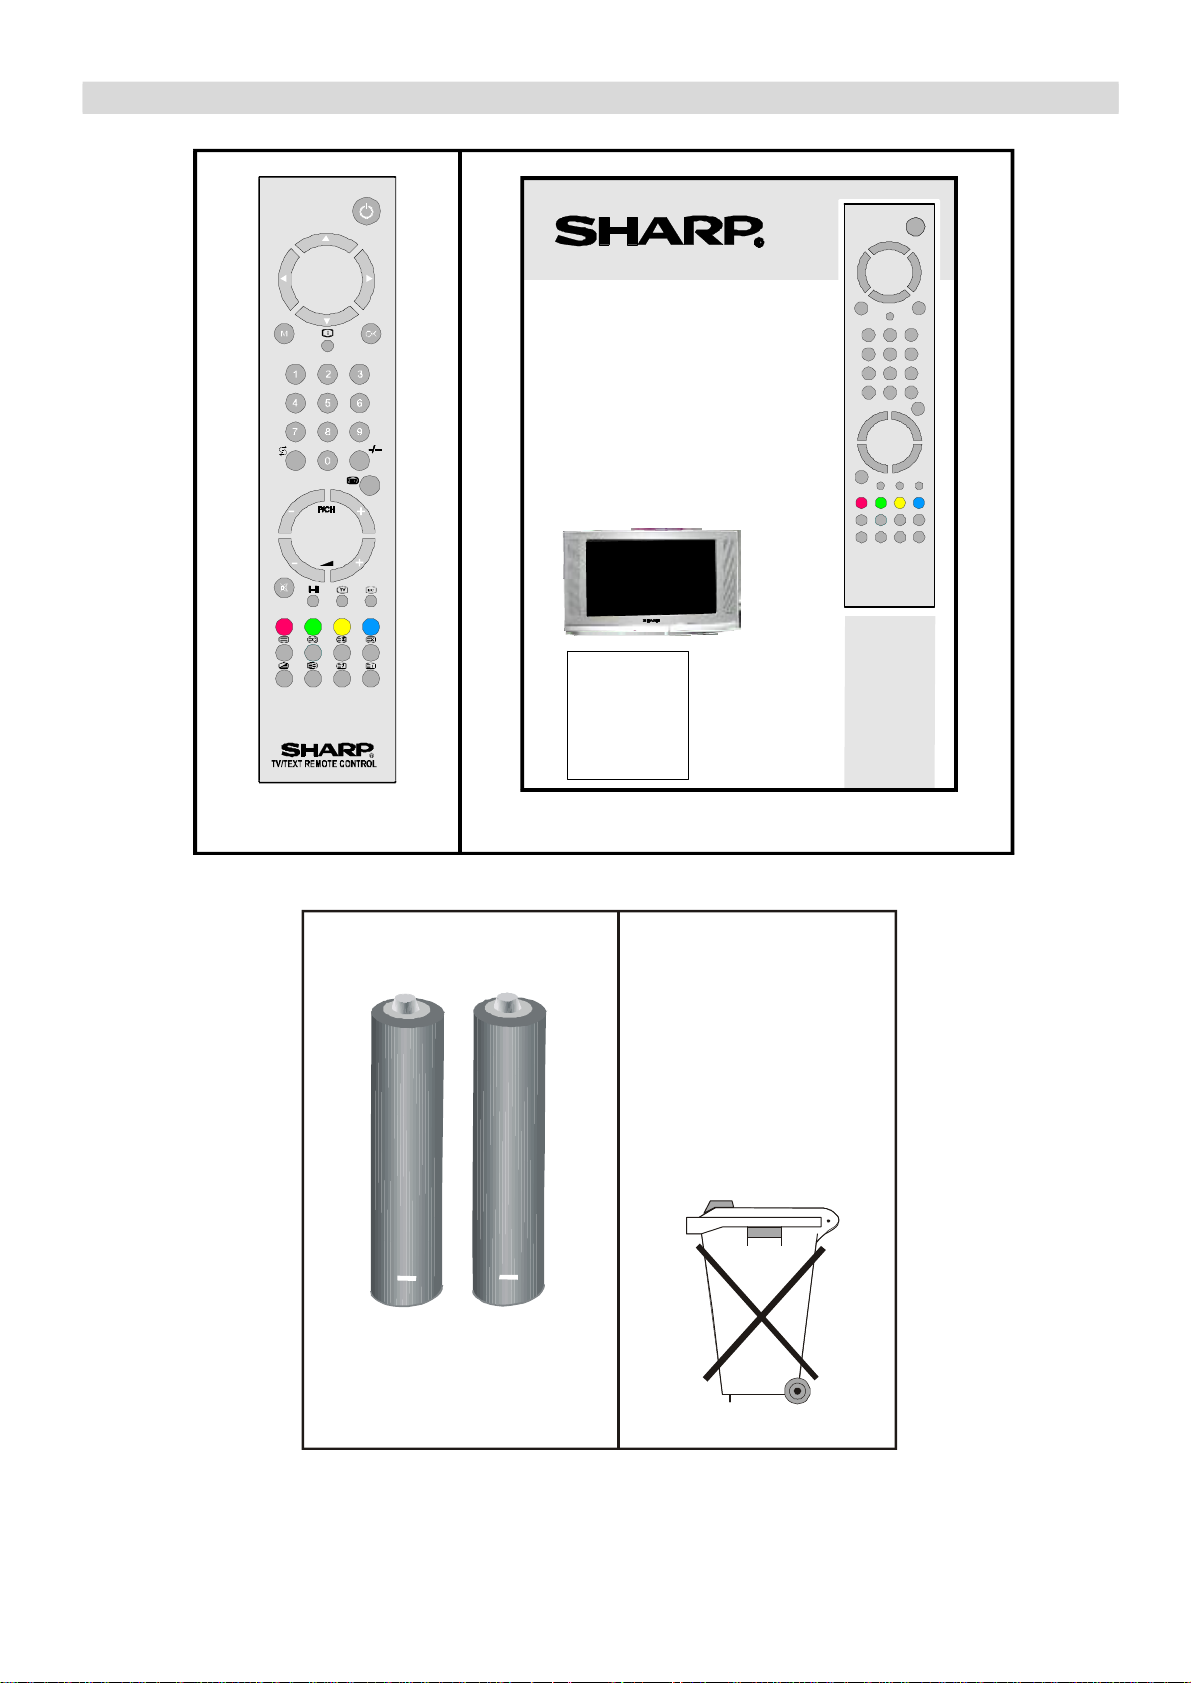
Supplied Accessories
28LF-94EC
32LF-94EC
TELEWIZORA KOLOROWEGO
SZÍNES TELEVÍZIÓKÉSZÜLÉK
FAREBNÝ TELEVÍZNY PRIJÍMAČ
PУКОВОДСТВО ПО ЗКСПЛУАТАЦИИ
Please read this operation manual carefully
Gondosan olvassa el a Használati útmutatót,
Consultati acest manual înainte de a utiliza
Respect the
environment and
put used batteries
in a container that is
COLOUR TELEVISION
OPERATION MANUAL
INSTRUKCJA OBSŁUGI
KEZELÉSI ÚTMUTATÓ
NÁVOD K POUŽITÍ
BAREVNÉ TELEVIZE
PREVÁDZKOVÁ PRÍRUČKA
ЦВЕТНОГО ТЕЛЕВИЗОРА
CARTE TEHNICĂ PENTRU
TELEVIZOR ÎN CULORI
before using the colour television.
Prosimy uważnie przeczytać ten podręcznik
obsługi przed rozpoczęciem korzystania
z telewizora.
mielőtt használná a színes televíziót.
Prosíme přeč těte si pozorn ě tento návod
k použití před použitím barevné televize.
Pred použitím si pozorne
prečítajte túto príručku.
Прocьба внимательно ознакомиться
с настоящим Руководством перед
включениeм телевизора .
televizorul color.
Remote controlOperation Manual
+
Type-(R03 AAA)
Dry Batteries
+
especially designed
for this purpose.
ENGLISH - 4 -
Page 6
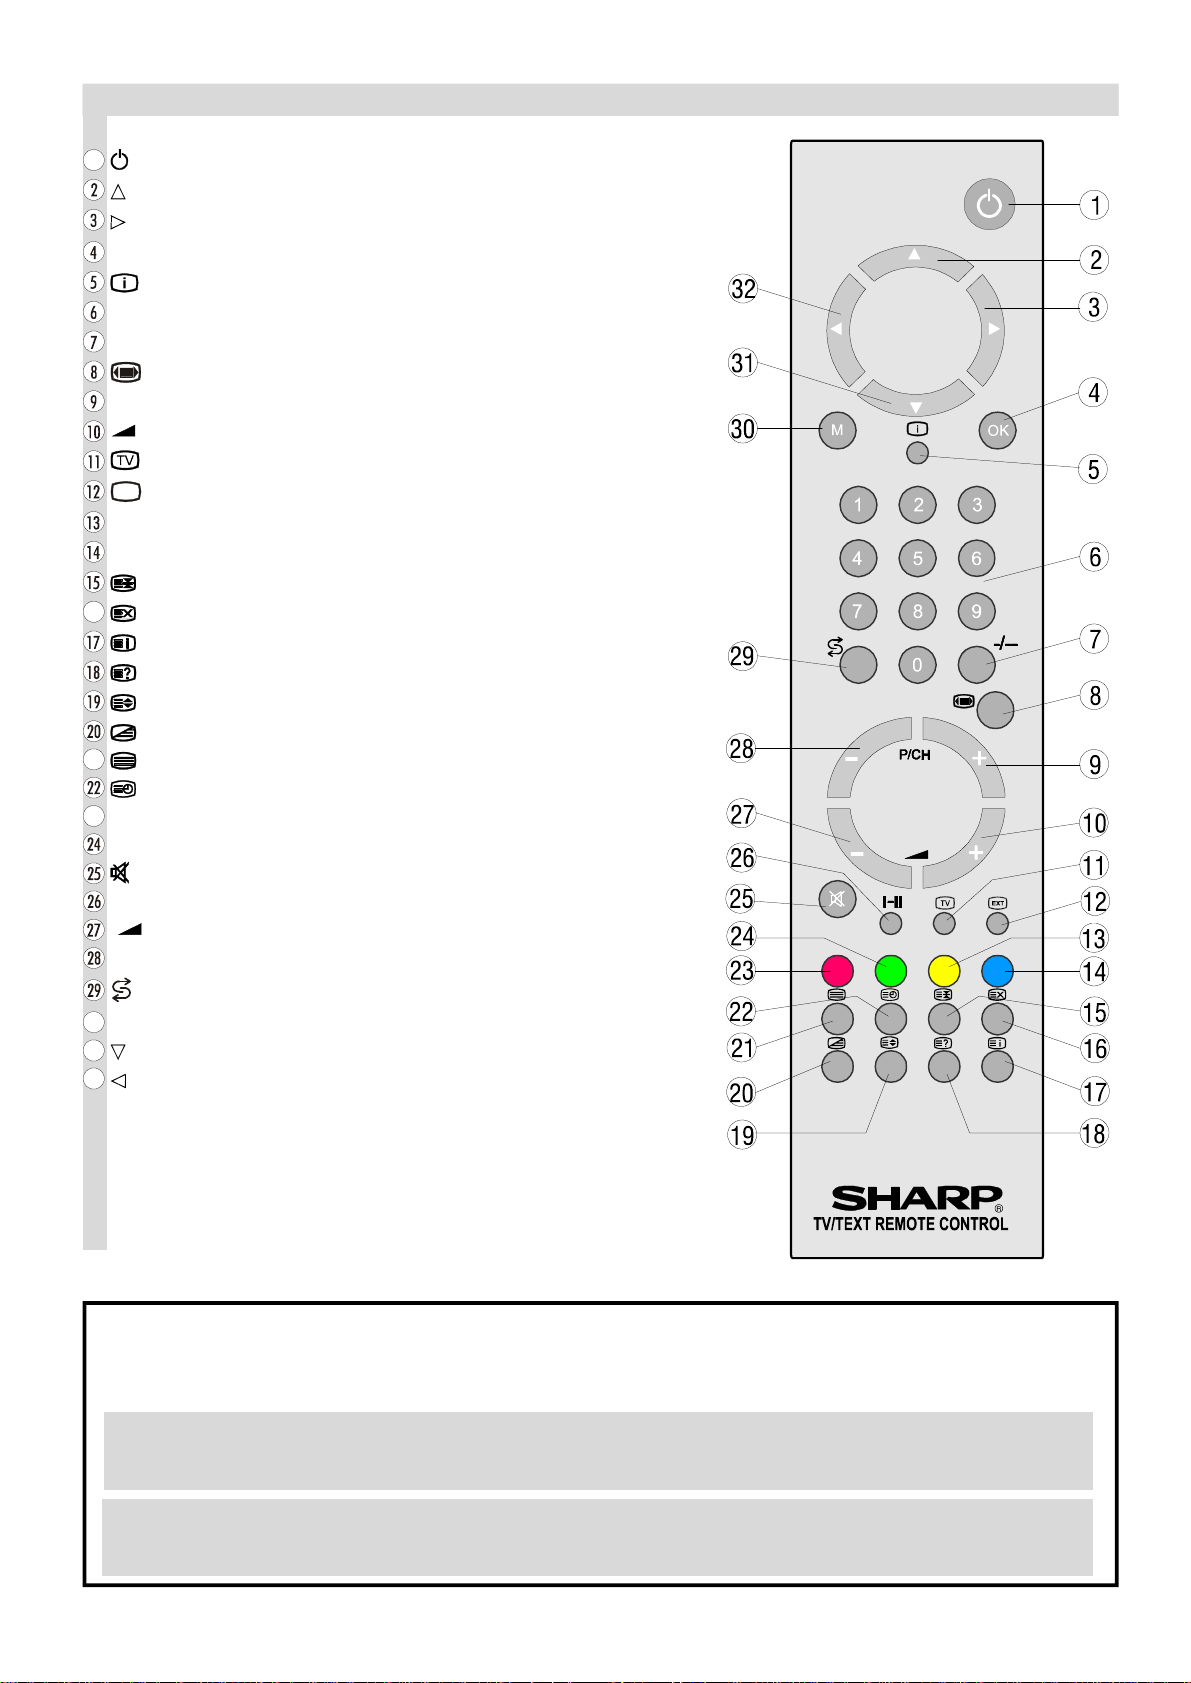
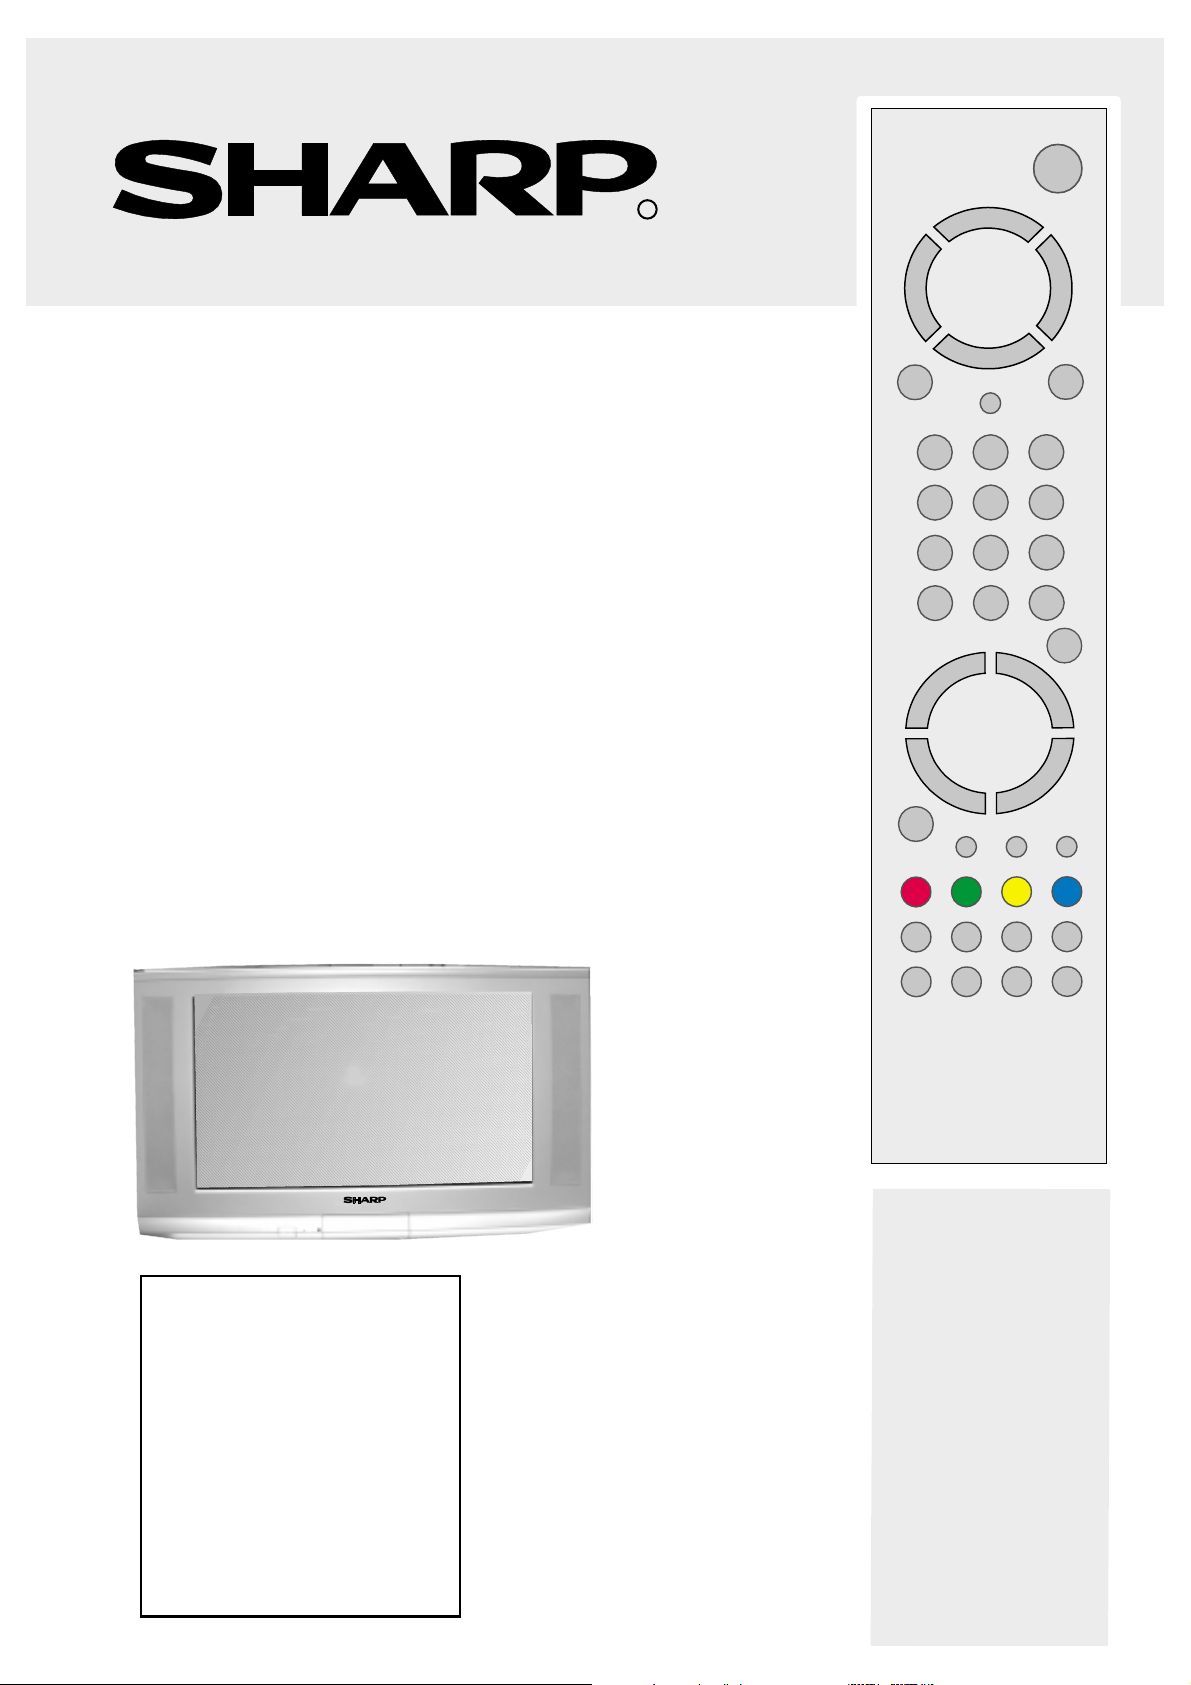
Remote Control Buttons
16
21
23
30
31
32
1
= Stand By
= Cursor Up
= Cursor Right
OK = Store / Still Picture
= Info (Program Table)
0 - 9 = Direct Program
- / - - = Double Digit
= Screen Format button
P/CH+ = Program Up
+ = Volume Up
= TV / Quit Menu
EXT
= EXT button (EXT-1, EXT-2, S-VHS, S-VHS EXT2 or FRONT-AVV )
Yellow = Feature Menu
Blue = Installation Menu
= Hold
= Update
= Index Page
= Reveal
= Expand
= Mix
= Teletext
= Time
Red = Sound Menu
Green = Picture Menu
= Mute
I-II = Mono/Stereo - Dual I-II
- = Volume Down
- P/CH = Program Down
= Flash back button
M = Menu
= Cursor Down
= Cursor Leftt
CAUTION
RISK OF ELECTRIC SHOCK
The lightning flash with arrowhead symbol, within an equilateral triangle, is intended to alert the user to the presence
of uninsulated "dangerous voltage" within the product's enclosure that may be of sufficient magnitude to constitute a
risk of electric shock of persons.
The exclamation point within an equilateral triangle is intended to alert the user to the presence of important operating
and maintenance (servicing) instructions in the literature accompanying the appliance.
ENGLISH - 5 -
Page 7
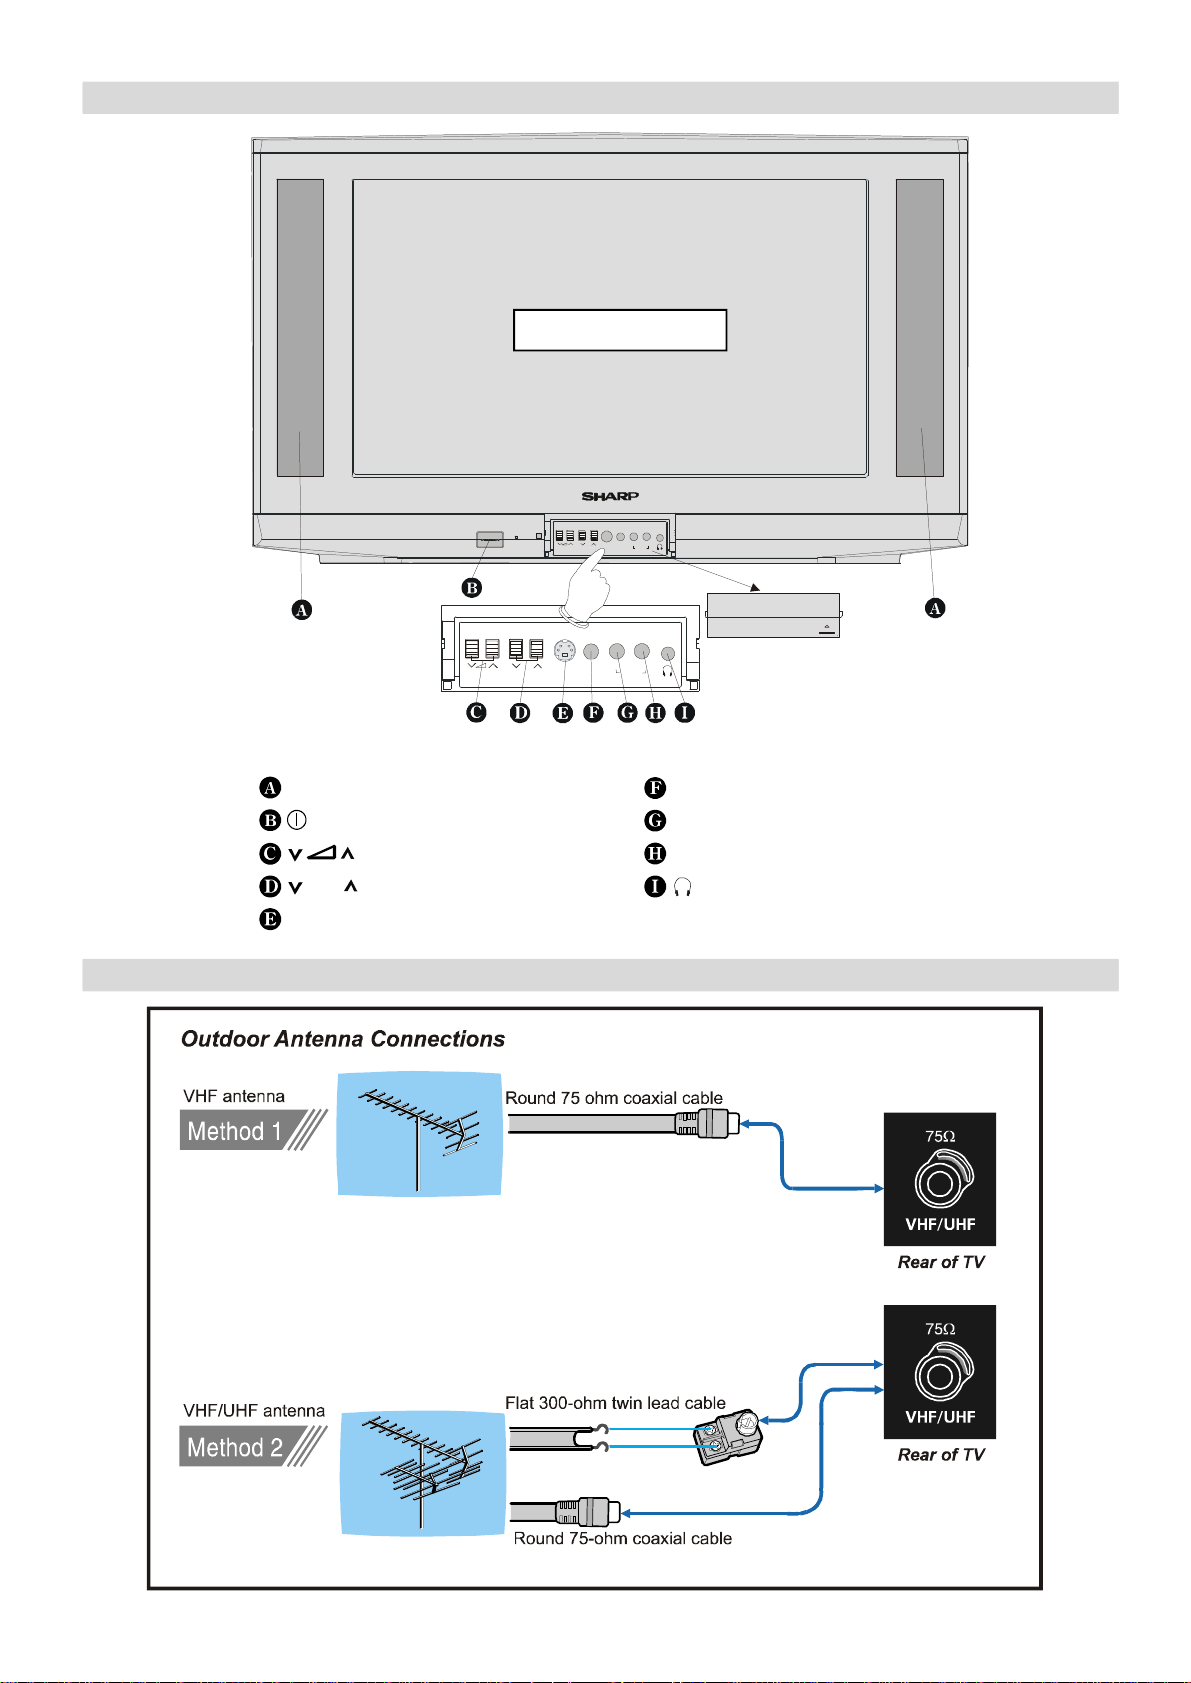
Control Panel Buttons
CH
CH
L/S/G/I R/D/D/D
L/S/G/I R/D/D/D
FRONT PANEL
S-VIDEOVIDEO
AUDIO
S-VIDEOVIDEO
AUDIO
Speakers (left + right)
= Power On / Offf
= Volume -/+
CH = Program -/+
S-VIDEO
VIDEO
AUDIO L (L/S/G/I) = Audio leftt
AUDIO R (R/D/D/D) = Audio right
= Headphone 3,6 mm Ø
Antenna Connections
ENGLISH - 6 -
Page 8
Preparation
1,5 V. (AAA R03)
Before Switching on your TV
Place TV on a solid surface.
For ventilation, leave a space of at least 10 cm free all
around the set. To prevent any fault and unsafe situations,
please do not place any objects on top of the set.
“Use this apparatus in tropical and moderate climates.”
Features
• Remote Control Color Television
• 100 UHF / VHF / Cable channel presets
• Cable Channel Compatible
• Menu Driven functions
• 2 Euro connector Sockets
• Front AV sockets
• Front S-VHS connector
• German+Nicam Stereo
• Full function teletext (Fastext)
• Direct Channel access
• APS (Automatic Programming system) Tuning
• Program custom name feature
• Automatic search tuning
• Sleep Timer
• Child lock
• Blue mute on no video signals
• Audio mute on no video signals
• Auto switch off after 5 mins of no signal
• WSS (wide screen signal decoding)
• NTSC playback
• Headphone
• Split Screen (Picture and Text)
• CTI (Color Transient Improvement)
• Automatic VCR detection
• Simple 100 Hz.
Power connection
Important: The TV set is designed to operate on 220-240V
AC, 50 Hz.
• After unpacking, allow the TV set to reach the ambient
room temperature before you connect the set to the mains.
Aerial Connections
• Connect the aerial plug to the aerial input socket located at
the back of the TV.
How to connect external equipment
See “Connecting external equipment” on page 18.
• See the instruction manuals provided with the external devices too.
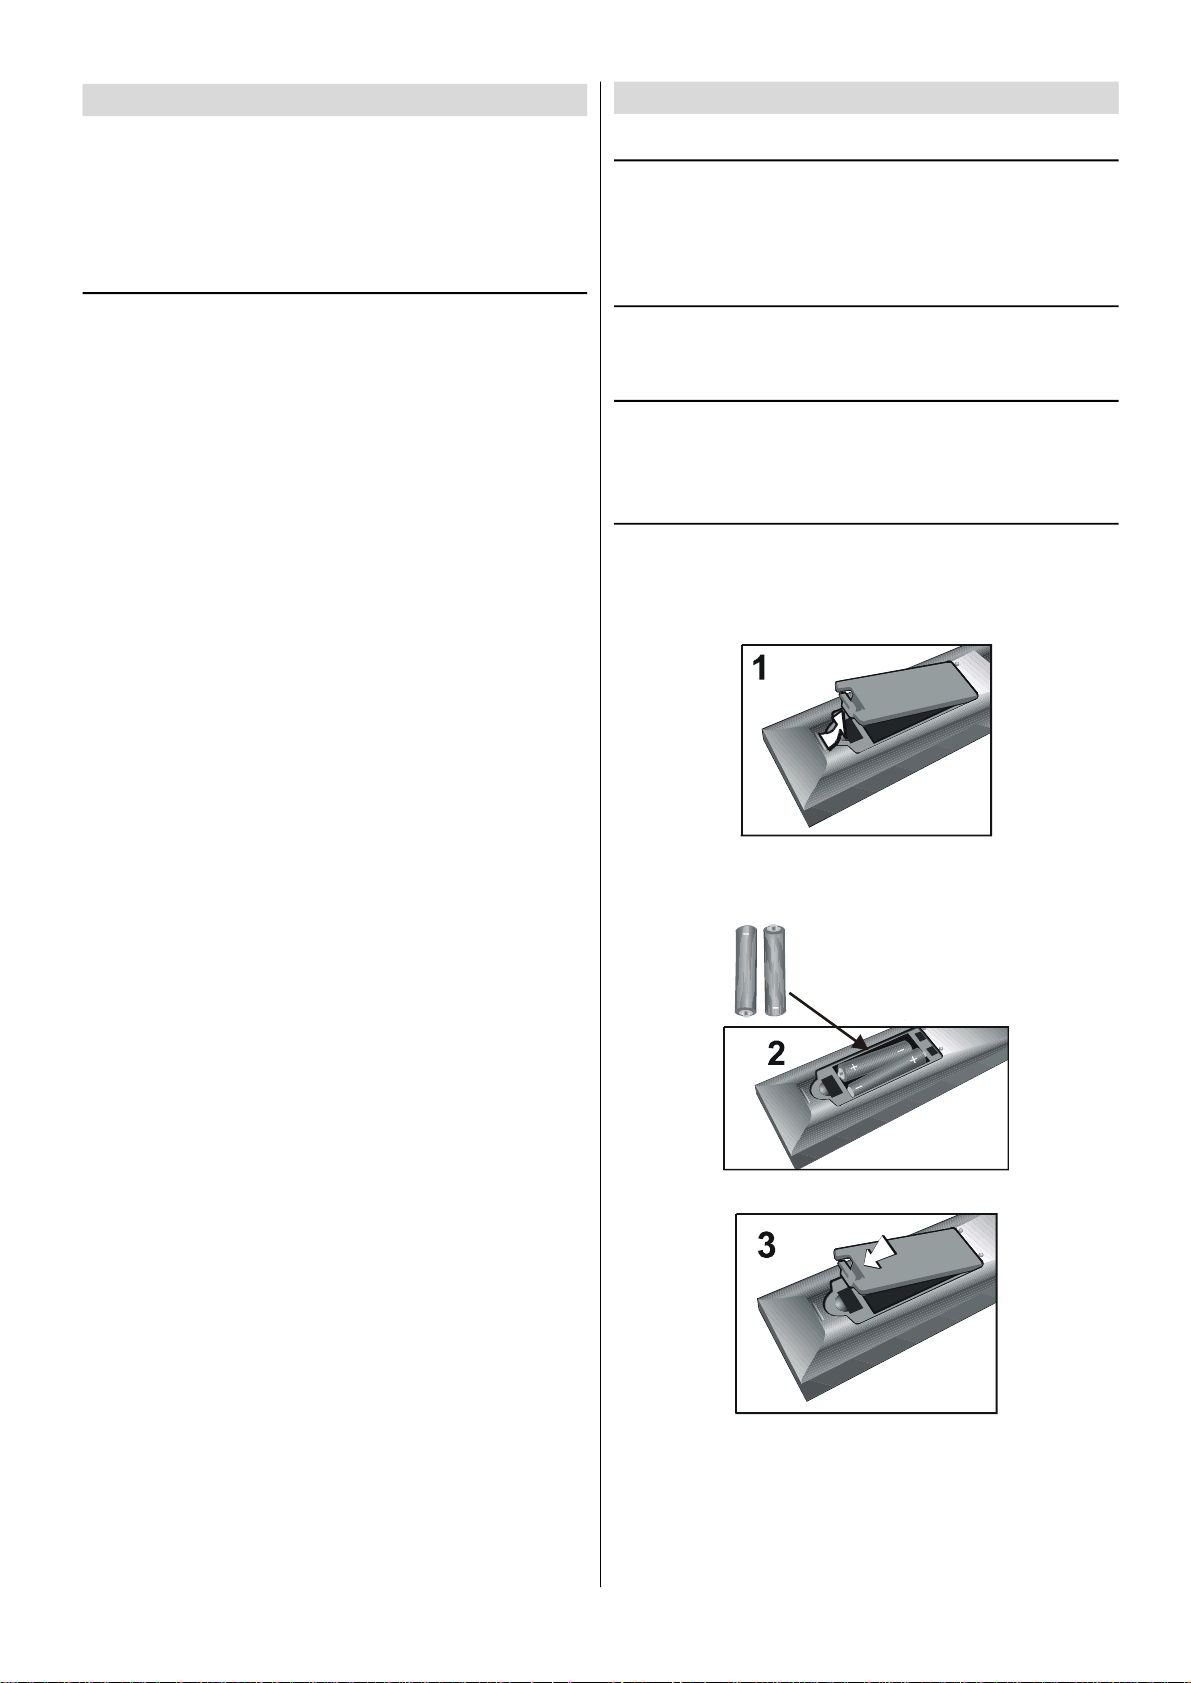
Remote Control Battery Installation
Before using the TV set for the first time, install the supplied
dry batteries in the remote control.
1. With your thumb nail, pull up the slit as indicated by the
arrow to remove the battery cover.
2. Insert two batteries 1.5 V (R03 AAA size). Be sure to
match the battery +/- terminals with the +/- marks inside
the compartment.
+
+
3. Replace the battery cover.
Notes:
• Remove batteries if weak or if the unit is not in use for long
periods.
• Do not mix old and new batteries.
• Incorrect installation of the batteries may damage the remote control.
ENGLISH - 7 -
Page 9
Switching the TV ON/OFF
21 - - - - -
22 - - - - -
23 - - - - -
24 - - - - -
25 - - - - -
26 - - - - -
27 - - - - -
28 - - - - -
29 - - - - -
30 - - - - -
TViEXIT
You can operate your TV either using the remote control handset or directly using the TV onset buttons.
To switch the TV on
Your TV will switch on in two steps:
1- Press the power button located on the front of the TV.
Then the TV switches itself to standby mode and the
RED LED located below the TV turns on.
2- To switch on the TV from stand-by mode either:
Press a digit button or stand-by button on the remote control
so that a programme number is selected,
or,
Press Power Button and “P/CH+” or “-P/CH” buttons on the
TV or on the remote control respectively, so the TV will
switch on and the RED Led will turn GREEN.
To switch the TV off
• Press the stand-by button on the remote control, so the TV
will switch to stand-by mode and the GREEN LED will become RED, or,
• Press the power button located on the front of the TV.
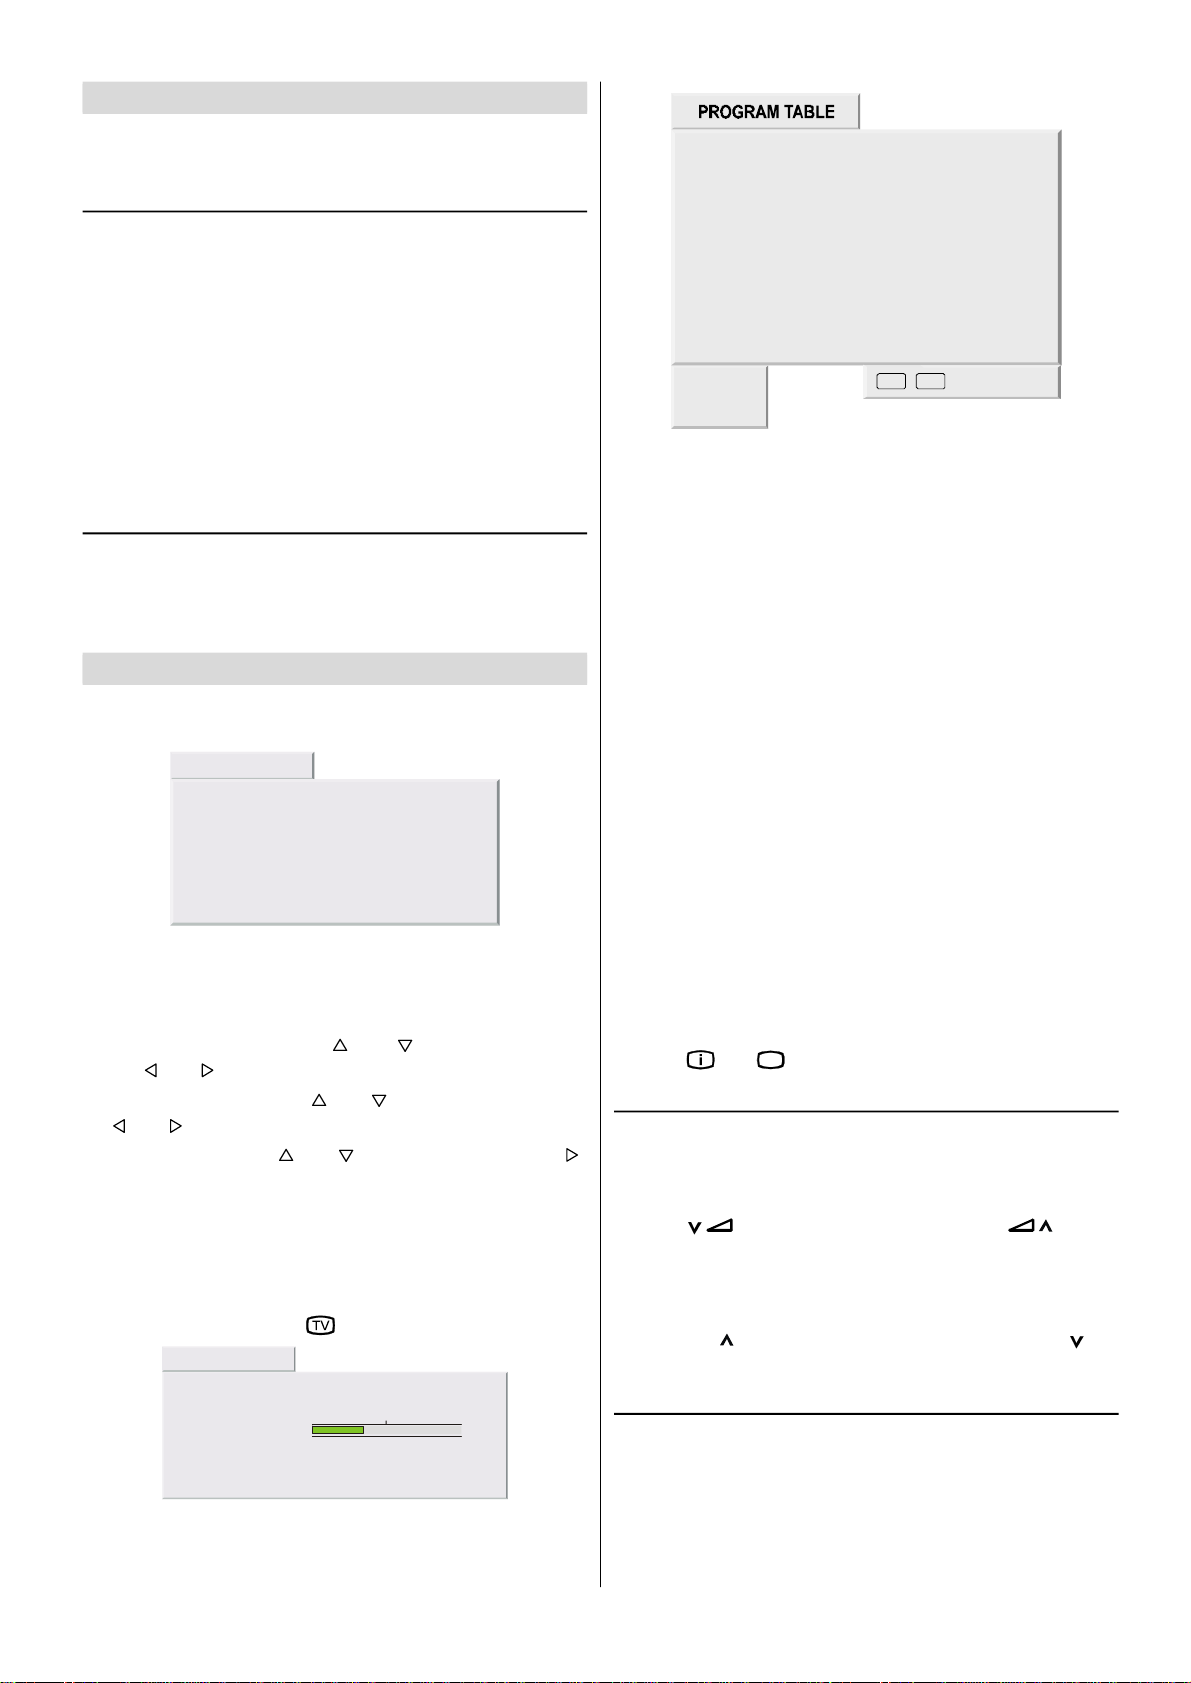
Initial Settings
The message “PLEASE CHECK ANTENNA CABLE!” will
be displayed when you turn on your TV for the first time.
EXECUTION APS
PLEASE CHECK ANTENNA CABLE!
LANGUAGEENGLISH
COUNTRYSPAIN
START
TV CANCEL
11
1 - - - - -
- - - - -
2
- - - - -
3
- - - - -
4
- - - - -
5
- - - - -
6
7 - - - - 8
- - - - -
9
- - - - -
10
- - - - -
change
delete
- - - - -
12
- - - - -
13
- - - - -
14
- - - - -
15
- - - - -
16
- - - - -
17
- - - - -
18
- - - - -
19
- - - - -
20
- - - - -
/
Moving cursor to four direction you can reach 30 programmes in the same page. By scrolling the pages up or
down by pressing the navigation buttons you can select all
the programmes.
By cursor action, programme selection is done automatically.
Programme Number is between 1 and 99. Programme
Name has a name string with 5 characters. After autostore
process the Programme Names are set to:
• Channel search "C-01" or "S-01" (band and channel num-
ber) or name of the tuned channel if defined.
Change:
This function is used to change the places of the programmes in Program Table. Select the programme you
want to move and press BLUE button. Selected programme
will be highlighted. Move the cursor to desired program
place and press BLUE button again.
Delete:
Note: If you connect Video Recorder to your TV via antenna
input (ANT socket); to tune the VCR channel automatically you
must set the VCR in play mode before you start APS. (Please
use a PAL / SECAM Video Cassette).
1- Select LANGUAGE with “ ” or “ ” button, then press
the “ ” or “ ” button to select a menu language.
2- Select COUNTRY with “ ” or “ ” button, then press the
“ ” or “ ” button to select the correct country..
3- Select START with “ ” or “ ” button, then press the “ ”
button to start APS.
APS, (Automatic Programming System) automatically programmes the received channels in your TV’s programme
numbers. During APS, “APS IS RUNNING PLEASE WAIT”
message will be displayed. After APS is finalized, the “PRO-
GRAM TABLE” appears.
To cancel APS, press the “ ” button.
EXECUTION APS
APS IS RUNNING, PLEASE WAIT!
PROGRESS 35%
CHANNEL
TV CANCEL
-----
Select the programme you want to delete and press RED
button. The programme will be deleted from the Program
Table without any warning.
• "delete" string becomes green while the selected channel
is being deleted from the Program Table.
• Press “ ” or “TV” button to exit Program Table.
Operating with the onset buttons
Volume setting and programme selection can be made using the buttons on the front of the TV.
Volume Setting:
• Press “ ” button to decrease volume or “ ” button
to increase volume, so a volume level scale will be displayed on the screen.
Programme Selecting:
• Press “CH ” button to select next programme or “ CH”
button to select the previous programme.
Operating with Remote Control
The remote control handset of your TV is designed to control all
the functions of the model you selected. The functions will be described in accordance with the menu system of your TV.
Functions which you can use out of menu system are described below.
ENGLISH - 8 -
Page 10

Volume Setting:
Press “ +” button to increase volume.
Press “- ” button to decrease volume.
Programme Selecting (Previous or next programme):
• Press “-P/CH” button to select the previous programme.
• Press “P/CH+” button to select the next programme.
Programme Selecting (direct access):
Press digit buttons on the remote control handset to select
programmes between 0 and 9. TV will switch to the selected
program after a short delay.
• For a two digit program number press “- / - -” button. Press
the first digit and then second digit of the programme
channel you want to watch.
Menu System
Your TV has been designed with a menu system to provide
an easy manipulation of a multifunction system. "M" button
has two functions. The first function of it is open and close
the menu, the second function is closing the submenu and
then opening its parent menu. The short way in order to enter the menus, press:
“M” buttonMenu
Red buttonSound menu
Green buttonPicture menu
Yellow buttonFeature menu
Blue buttonInstallation menu
“ ” buttonProgram Table
When you press "M" button, the following menu appears on
the screen.
Press “ ” or “ ” button to select a menu title and then “ ”
or “OK” button to enter the menu.
Sound menu
First icon belongs to the sound menu. By pressing “ ” or
“OK” button, Sound menu appears on the screen.
You can enter Sound menu directly by pressing RED button.
Volume
When you entered the sound menu Volume will be the first
selected item. Press “ ” button to increase volume level.
Press “ ” button to decrease volume level.
SOUND
VOLUME
BALANCE
SOUND MODEMONO
SURROUND MODE
BASS
OFF
Balance
By pressing “ ” or “ ” button, select Balance. Press “ ”
button to move headphone balance rightward. Press “ ” but-
ton to move headphone balance leftward.
SOUND
VOLUME
BALANCE
SOUND MODEMONO
SURROUND MODE
BASS
OFF
Sound Mode
By pressing “ ” or “ ” button, select Sound Mode. You can
change the sound mode to MONO, STEREO (NICAM STE-
REO), DUAL 1 (NICAM 1) or DUAL 2 (NICAM 2) by press-
ing “ ” or “ ” button.
ENGLISH - 9 -
Page 11

Balance
SOUND
VOLUME
BALANCE
SOUND MODEMONO
SURROUND MODE
BASS
OFF
Surround Mode
By pressing “ ” or “ ” button, select Surround Mode. Youou
can change the surround mode to *INCR. STEREO, INCR.
MONO or OFF by pressing “ ” or “ ” button.
* INCR.: Incredible
SOUND
VOLUME
BALANCE
SOUND MODEMONO
SURROUND MODE
BASS
OFF
Bass
By pressing “ ” or “ ” button, select Bass. Press “ ” button to increase Bass level. Press “ ” button to decrease
Bass level.
SOUND
VOLUME
BALANCE
SOUND MODEMONO
SURROUND MODE
BASS
OFF
By pressing “ ” or “ ” button, select Balance. Press “ ”
button to move headphone balance rightward. Press “ ” but-
ton to move headphone balance leftward.
Sound Mode
By pressing “ ” or “ ” button, select Sound Mode. You can
change the sound mode to MONO, STEREO (NICAM STE-
REO), DUAL 1 (NICAM 1) or DUAL 2 (NICAM 2) by press-
ing “ ” or “ ” button.
AVL
Automatic Volume Limiting (AVL) function normalizes sound
to obtain fixed output level between programs, having differ-
ent sound levels. Pressing “ ” or “ ” button will turn ON or
OFF this feature.
SOUND
SURROUND MODE
BASS
TREBLE
HEADPHONE
AVL
OFF
OFF
To Store the Settings
• Press “OK” button to store Sound menu settings.
• “STORED” will be displayed at the bottom of the menu.
Picture menu
By pressing “ ” or “ ” button, select the second icon.
Treble
By pressing “ ” or “ ” button, select Treble. Press “ ” button to increase Treble level. Press “ ” button to decrease
Treble level.
SOUND
SURROUND MODE
BASS
TREBLE
HEADPHONE
AVL
OFF
OFF
Headphone Menu
By pressing “ ” or “ ” button, select Headphone. Press
“ ” button to enter Headphone menu.
Volume
By pressing “ ” or “ ” button, select Volume. Press “ ”
button to increase headphone volume level. Press “ ” but-
ton to decrease headphone volume level.
HEADPHONE
VOLUME
BALANCE
SOUND MODEMONO
By pressing “ ” or “OK” button, Picture menu appears on
the screen.
You can enter Picture menu directly by pressing GREEN
button.
Setting Brightness
When you entered the Picture menu Brightness will be the
first selected item. Press “ ” button to increase Brightness
level. Press “ ” button to decrease Brightness level.
PICTURE
BRIGHTNESS
CONTRAST
COLOR
SHARPNESS
TILT
Setting Contrast
• Using “ ” or “ ” button select Contrast.
• Press “ ” button to increase contrast level.
• Press “ ” button to decrease contrast level.
ENGLISH - 10 -
Page 12

Setting Hue (In AV mode only)
PICTURE
BRIGHTNESS
CONTRAST
COLOR
SHARPNESS
TILT
Setting Color
• Using “ ” or “ ” button select Color..
• Press “ ” button to increase color level.
• Press “ ” button to decrease color level.
PICTURE
BRIGHTNESS
CONTRAST
COLOR
SHARPNESS
TILT
Setting Sharpness
• Using “ ” or “ ” button select Sharpness.
• Press “ ” button to increase sharpness level.
• Press “ ” button to decrease sharpness level.
PICTURE
BRIGHTNESS
CONTRAST
COLOR
SHARPNESS
TILT
Setting Tilt
• Using “ ” or “ ” button select Tilt.
• Press “ ” button to increase tilt level.
• Press “ ” button to decrease tilt level.
PICTURE
BRIGHTNESS
CONTRAST
COLOR
SHARPNESS
TILT
Setting Tint
This item is used to change the Colour Temperature. By
pressing “ ” or “ ” button you may select one of these op-
tions: COOL, WARM, NORMAL.
PICTURE
SHARPNESS
TILT
TINT
SCREEN FORMAT
PICTURE SMART
NORMAL
AUTO
PERSONAL
(During Playback NTSC system, this will appear in AV mode
only when NTSC video source is applied. Otherwise, HUE
option is invisible in Picture menu.):
• Using “ ” or “ ” button select Hue.
• Press “ ” button to increase hue level.
• Press “ ” button to decrease hue level.
PICTURE
TILT
TINT
HUE
SCREEN FORMAT
PICTURE SMART
NORMAL
AUTO
PERSONAL
Screen Format
By pressing “ ” or “ ” button, select Screen Format. Youou
can change the screen format to AUTO, NORMAL, FULL,
14:9, CINEMA, PANORAMA or SUBTITLE by pressing “ ”
or “ ” button.
PICTURE
SHARPNESS
TILT
TINT
SCREEN FORMAT
PICTURE SMART
Screen Format can be set by “ ” button also.
If “ ” button is pressed once, Screen Format indicator ap-
pears on the screen.
Each time you press the “ ” button, the width of the pic-
ture changes as indicated:
When you select 14:9, CINEMA, PANO or SUBTIT you can
change the vertical scroll by pressing “ ” / “ ”.
* Auto mode (WSS data): The WSS data is sent by some
broadcasting stations with information of the original size.
When the TV is in AUTO mode and receives the WSS
data, it changes the size automatically as indicated below:
When the TV is receiving WSS data 16:9 the TV selects
CINEMA automatically.
When the TV is receiving WSS data 14:9 the TV selects
14:9 automatically.
When the TV is receiving WSS data 4:3 the TV selects
NORMAL automatically.
When the TV does NOT receive WSS data the TV selects
FULL automatically.
External source: When you are watching the TV set
through the Euro-SCART EXT.1 terminal and it receives information of 16:9 format (through the audio-video control
pin) the TV selects FULL automatically.
NORMAL
AUTO
PERSONAL
ENGLISH - 11 -
Page 13

Screen Format (Special detail information)
SUBTITLE
FORMAT
FORMAT
FORMAT
SUBTIT
FORMAT
Special detail information about AUTO, NORMAL, FULL,
14:9, CINEMA, PANORAMA and SUBTITLE.
NORMAL
You can watch 4:3 programs in 4:3 format by switching to
NORMAL Mode function.
FULL
With Full Mode you adapt the picture 16:9 format while also
stretching the centre of view. This is an advantage, for example, when watching sports games where there is no real
fixed centre of the picture.
SUBTITLE ( )
Adapts up to the wide picture (16:9 aspect ratio) with subtitle
to the full screen.
Adjusting the visible area of the picture:
If subtitles or the top (or bottom) of the picture are cut off,
you can adjust the visible area of the picture manually.
1. Press “ ” button once.
The SCREEN FORMAT indicator appears. The SCREEN
FORMAT will not be changed.
2. While it is displayed, press “ ” or “ ” to change the po-
sition of the picture.
AUTO
FORMAT
NORMAL
FORMAT
FULL
14:9
14:9 ( )
Adapts the 14:9 broadcast cinema movies to the 14:9 Mode.
CINEMA ( )
Adapts the 16:9 broadcast cinema movies to the 16:9 Mode,
thereby getting rid of the black borders.
PANORAMIC ( )
This stretches the left and right sides of a normal picture
(4:3 aspect ratio) to fill the screen, without making the picture appear unnatural.
CINEMA
FORMAT
PANO
• You cannot adjust the visible area in NORMAL or FULL
mode.
Picture Smart
By pressing “ ” or “ ” button, select Picture Smart. Youou
can change the picture smart to PERSONAL, RICH, NATU-
RAL or SOFT by pressing “ ” or “ ” button.
PICTURE
SHARPNESS
TILT
TINT
SCREEN FORMAT
PICTURE SMART
NORMAL
AUTO
PERSONAL
To Store the Settings
• Press “OK” button to store Picture menu settings.
• “STORED” will be displayed at the bottom of the menu.
Feature menu
By pressing “ ” or “ ” button select the third icon.
• The top and bottom of the picture are slightly cut off.
By pressing “ ” or “OK” button, Feature menu appears on
the screen.
You can enter Feature menu directly by pressing YELLOW
button.
Sleep Timer
As you enter the Feature menu, Sleep Timer will be the first
selected option. Use “ ” or “ ” button to change the Sleep
ENGLISH - 12 -
Page 14

Timer values between OFF, 15 MIN, 30 MIN, 45 MIN, 60
MIN, 90 MIN, 120 MIN, 150 MIN and 180 MIN.
If sleep timer is activated, at the end of the selected the
time, the TV goes automatically to stand-by mode.
To Store the Settings
• All settings are stored automatically in Feature menu.
There is no need to press “OK” button.
Installation Menu
FEATURE
SLEEP TIMEROFF
CHILD LOCK
BLUE SCREEN
EXT2 OUTPUT
OFF
OFF
TV
Child Lock
You can use this feature to prevent children turning on TV or
changing programs or adjustments etc. without remote control.
The Child Lock feature can be set by “ ” or “ ” button to
either ON or OFF. When OFF is selected, there will be no
difference in the operation of your TV. When ON is selected,
the TV can only be controlled by the remote control handset.
In this case, the front panel buttons (except the Power On/
Off button) will not work.
FEATURE
SLEEP TIMEROFF
CHILD LOCK
BLUE SCREEN
EXT2 OUTPUT
OFF
OFF
TV
While the CHILD LOCK is ON, pressing any of the front/
right panel buttons (except Power on/off button) causes the
warning menu to appear on the middle of the screen.
CHILD LOCK
Blue Screen
In case, no valid signal is detected (in TV or AV mode) Blue
Screen is activated. During search process Blue Screen is
not active.
The Blue Screen feature can be set by “ ” or “ ” button to
either ON or OFF.
FEATURE
SLEEP TIMEROFF
CHILD LOCK
BLUE SCREEN
EXT2 OUTPUT
EXT2 Output
• You can use this menu to select the internal or external
source that will be output at EXT.2 terminal.
• In the “Feature” menu select “EXT2 Output” using “ ” or
“ ” button. Then select the source you want to be output
at EXT.2 pressing “ ” or “ ” button (one of the sources:
TV, EXT-1, FRONT-AV or SCREEN.
OFF
OFF
TV
By pressing “ ” or “ ” button, select the fourth icon.
By pressing “ ” or “OK” button, Installation menu appears
on the screen. You can enter installation menu directly by
pressing BLUE button.
INSTALLATION
LANGUAGEENGLISH
COUNTRY
TXT LANGUAGE
PROGRAMMING
EXECUTION APS
UK
WEST EUROPE
Language
By pressing “ ” or “ ” button, select Language. You can
select the language by pressing “ ” or “ ” button.
Country
By pressing “ ” or “ ” button, select Country. You can select the country by pressing “ ” or “ ” button.
Txt Language
By pressing “ ” or “ ” button, select Txt Language. Youou
can select the Teletext Language by pressing “ ” or “ ”
button. The options are WEST EUROPE, EAST EUROPE,
GREEK - TURKEY and RUSSIAN.
WEST EUROPEEAST EUROPEGREEK-TURKEYRUSSIAN
ENGLISHFRENCHENGLISHCZECH/SLOVAK
FRENCHSWEDISHFRENCHGERMAN/DUTCH
SWEDISHFINNISHSWEDISHRUSSIAN
FINNISHDANNISHFINNISHLITHUANIAN
DANNISHCZECH/SLOVAKDANNISHLETTISH
CZECH/SLOVAKGERMAN/DUTCHGERMAN/DUTCHUKRANIAN
GERMAN/DUTCHITALIANPORTUGUESEESTONIAN
PORTUGUESEHUNGARIANSPANNISHBULGARIAN
SPANNISHPOLISHITALIAN
ITALIANSLOVENIANHUNGARIAN
HUNGARIANRUMANIANTURKISH
ICELANDICCROATIANGREEK
NORWEGIANICELANDIC
Programming
By pressing “ ” or “ ” button, select Programming. Youou
can enter the programming menu by pressing “ ” button.
PROGRAMMING
FEATURE
SLEEP TIMEROFF
CHILD LOCK
BLUE SCREEN
EXT2 OUTPUT
OFF
OFF
TV
PROGRAM12
COLOR NORMAUTO
STANDARDBG
SEARCH
FINE TUNING
0
ENGLISH - 13 -
Page 15

Program
21 - - - - -
22 - - - - -
23 - - - - -
24 - - - - -
25 - - - - -
26 - - - - -
27 - - - - -
28 - - - - -
29 - - - - -
30 - - - - -
TViEXIT
By pressing “ ” or “ ” button, select Program. By pressing
“ ” / “ ” or digit buttons, you can select the program num-
ber. There are 100 program storage between 0 and 99.
Color Norm
By pressing “ ” or “ ” button, select Color norm. By pressing “ ” or “ ” button, you can change the standard to
AUTO, PAL or SECAM.
Standard
By pressing “ ” or “ ” button, select Standard. By pressing
“ ” or “ ” button, you can change the standard to BG, L, I
or DK.
Search
By pressing “ ” or “ ” button, select Search. By pressing
“ ” button, you can enter Search menu.
Name
By pressing “ ” or “ ” button in Programming menu, select Name. You can change the program name. When you
select the Name, cursor is on the first letter. By using “ ” or
“ ”‚ buttons you can select the letter. By pressing “ ” or
“ ” button, you can move the cursor to second or third letter
of the program name. Name can be 5 digit length.
To Store the Settings
• Press “OK” button to store Programming menu settings.
• “STORED” will be displayed at the bottom of the menu.
• Press “M” button to exit programming menu.
Execution APS:
By pressing “ ” or “ ” button, select Execution APS in Installation menu. By pressing “ ” button, you can enter Exe-
cution APS menu.
SEARCH
SEARCH
CHANNEL00
BANDC
If you can not tune to a channel, try APS.
Search
By pressing “ ” or “ ” button, select Search. By pressing
“ ” button, you can start Search. When you start the chan-
nel searching “SEARCHING…” is written and when a channel was found which has been searched, “FOUND” is written across the SEARCH item in the menu above.
When word “FOUND” it appears, is not possible to select
“CHANNEL” or “BAND” by pressing the “ ” or “ ” button.
Press “M” button to select these items.
Channel
By pressing “ ” or “ ” button, select Channel. By pressing
“ ” / “ ” or digit buttons, you can change the channel num-
ber.
Band
By pressing “ ” or “ ” button, select Band. By pressing
“ ” or “ ” button, you can change the Band to C or S.
To Store the Settings
• Press “OK” button to store Search menu settings.
• “STORED” will be displayed.
To exit the Search menu, press “M” button.
Fine Tuning
EXECUTION APS
ALL PROGRAMS WILL BE
CLEARED!
OK START TV CANCEL
If you want to cancel APS, press “ ” button, you return to
Installation menu. If “OK” button is pressed, APS function
starts and the following menu comes to the screen.
EXECUTION APS
APS IS RUNNING, PLEASE WAIT!
PROGRESS35%
CHANNEL
TV CANCEL
-----
After APS is completed, the PROGRAM TABLE is displayed.
11
1 - - - - -
- - - - -
2
- - - - -
3
- - - - -
4
- - - - -
5
- - - - -
6
7 - - - - 8
- - - - -
9
- - - - -
10
- - - - -
change
delete
- - - - -
12
- - - - -
13
- - - - -
14
- - - - -
15
- - - - -
16
- - - - -
17
- - - - -
18
- - - - -
19
- - - - -
20
- - - - -
/
By pressing “ ” or “ ” button, select Fine Tuning. By
pressing “ ” or “ ” button, you can fine tune the program
manually.
PROGRAMMING
COLOR NORM
STANDARD
SEARCH
FINE TUNING
NAME
AUTO
BG
0
- - - - -
ENGLISH - 14 -
• Press “ ” or “TV” button to exit Program Table.
Note: To enter PROGRAMME TABLE directly, press “ ”
button.
• See Page 8 Program Table explanation.
Page 16

Other Features
FORMAT
FORMAT
FORMAT
SUBTIT
FORMAT
NO SIGNAL
4 : 50 MIN
Information On Screen
AUTO
FORMAT
NORMAL
FORMAT
FULL
14:9
Programme Number, Programme Name (or AV) and
Sound Indicator are displayed on the upper right of the
screen. They are displayed after programme change for 3
seconds.
- - C01
Programme Number and
Programme Name(5 characters)
, , Sound Indicator (Mono, Stereo, Dual)
The alternatives of Sound Indicator are Mono, Stereo, Dual
which shows the current sound mode.
Programme Number, Programme Name and Sound Indicator OSD’ s are displayed when a new programme is entered
by pressing digit or "- / - -" button, " " button, "P/CH+" or
"-P/CH" button.
Sleep Timer Indicator (If activated)
Screen format Indicator
Sleep Timer and Screen format indicators are displayed with
Programme Number, Programme Name and Sound Indica-
tor by pressing "TV" button.
Sleep Timer Indicator shows the time left if enabled.
Sound Mute
To cut off the sound from the TV press “ ” button. To restore
the sound press the “ ” button again or use the “ +” or
“- ” buttons, in this case the volume will start from minimum
setting.
Sound Modes
This is a stereo option. The alternatives of Sound Modes
are Mono, Stereo, Dual 1 and Dual 2. This indicator is displayed in the lower middle side of the screen. "I-II" button is
used to select Mono, Stereo, Dual 1 or Dual 2.
In Mono broadcast or in forced-mono (for stereo broadcast).
CINEMA
FORMAT
PANO
No-Signal Timer Indicator
It is displayed in the middle of the screen when no valid signal detected. It shows the remained time for the switching to
the Stand-By mode (it will take 5 minutes). The indicator is
displayed in 3 seconds when there is no valid signal.
After a Remote Control command (if No-Signal Timer is active) the timer stops and if no signal detected again the timer is initialized to 5 minutes and starts 3 seconds later again
to count down.
Still Picture
Pressing “OK” button makes the picture on the screen fro-
zen. Pressing this button again enables moving pictures
again.
To Display the Time
• While watching a TV programme with Teletext transmission press “ ” button. The current time information, cap-
tured from Teletext will be displayed at the upper right corner of the screen.
• If the programme being watched does not have Teletext
transmission, no time information will be displayed.
• The time information will disappear after pressing “ ”
button again.
Flash back ( )
This button is used to return to the previous viewed preset.
By pressing the " " button repeatedly it is possible to tog-
gle between two presets.
In Stereo broadcast.
If dual broadcast detected. Dual 1 is selected in default and
also can be selected after Dual 2 by Remote Control.
If Dual 2 selected by Remote Control.
Screen Format
The picture mode OSD is displayed below the sound indicator, by TV Status OSD’s. According to the WSS data, inside
of the OSD box AUTO, NORMAL, FULL, 14:9, CINEMA,
PANORAMA or SUBTITLE is written.
By pressing “ ” button (if Teletext is not active) the picture
mode can be switched into AUTO, NORMAL, FULL, 14:9,
CINEMA, PANORAMA or SUBTITLE Mode.
ENGLISH - 15 -
Double-digit (- / - -)
This OSD is displayed when the "- / - -" button pressed in
place of the programme number indicator.
After then, in order to enter a programme it must be pressed
to two digit consecutively. When it is late to press any digit
button this function will be ignored and the display will be
erased. In the same way it must not be late to press any digit button after entering the first digit. The limit of the delay
time is 3 seconds.
AV Modes
By pressing the “ “ button you can switch your TV to AVV
modes (except being in Teletext). Pressing this button will
switch the TV in one of the optional AV modes: EXT-1,
EXT-2, S-VHS, S-VHS EXT2 or FRONT-AV. EXT.1 supports
the RGB mode and EXT.2 supports S-VHS EXT2 mode unless there is an S-VHS socket..
In order to quit the AV mode press the “TV”, digit buttons or
“P/CH+” / “-P/CH” button.
Page 17

Teletext
Teletext is an information system that displays text on your
TV screen. Using the Teletext information system you can
view a page of information on a subject that is available in
the list of contents (index).
No on screen display will be available in text mode.
No contrast, brightness or colour control, but volume control
is available in text mode.
To operate Teletext
• Select a TV station on which Teletext is being transmitted.
• Press (TELETEXT) “ ”button. Usually the list of contents
(index) is displayed on the screen.
To select a page of Teletext
• Press the appropriate digit buttons for the required Teletext
page number.
The selected page number is displayed at the top left corner
of the screen. The Teletext page counter searches until the
selected page number is located, so that the desired page is
displayed on the screen.
• Press “P/CH+” button to move the Teletext screen forward
one page at a time.
• Press “-P/CH” button to move the Teletext screen back-
ward one page at a time.
the desired page is found the Header of this page will appear on the screen. Press the “ “ button to view the full
page.
To Select Double Height Text
• Press “ “ button for the top half of the information page
to be displayed in double height text.
• Press “ “ button again for the bottom half of the information page to be displayed in double height text.
• Press “ “button once more for the full page of normal
height text.
To Reveal “concealed” Information
• Pressing “ “ button once will reveal answers on a quiz or
games page.
• Pressing “ “ button again will conceal the revealed answers.
To Stop Automatic Page Change
The teletext page you have selected may contain more information than can be displayed on one screen, in such cases the page will update periodically.
• Press “ “ button to stop the automatic page change.
• Press “ “ button again to allow the next page to be displayed.
Split Screen
• To watch a TV programme and teletext at the same time
on the screen this function is used.
• While watching a TV programme with teletext transmission
press “ ” button.
• Teletext is displayed on the screen. Press “ ” button
again. The screen is divided into two parts. TV program is
displayed on the left side of the screen. Teletext is displayed on the right side of the screen.
• To exit split screen press “ ” button one more time.
To Select Index Page
• To select the page number of the index (generally page
100), press “ “ button.
To Select Teletext with a TV Programme
• Press “ “ button. The text is now superimposed over the
programme on the screen.
• Press “ “ button again to return to the Teletext page.
Searching for a page while watching TV
• To search for a specific page whilst viewing the TV picture,
whilst viewing teletext enter the desired Page number,
then press the “ button will restore the TV picture. Once
To Select a Subcode Page
Subcode pages are subsections of long teletext pages that
can only be displayed on the screen one section at a time.
• Select the required teletext page.
• Press “ ” button. number / - - will be displayed on the
left top corner of the screen.
• Select the required subcode page number by pressing 2
digit buttons. (e.g. 0 5)
• You can go to other subcode pages by pressing “ ” or “ ”
buttons or,
• After number / - - displayed, you can simply press “ ”
button again to update the subcode pages automatically.
Fastext
Teletext mode will be selected according to transmission automatically.
Your TV supports the 10 page Teletext system. When the
page number of any of the 10 pages in memory is entered,
the system will not search for the requested page; instead it
will display the page automatically.
• Press “ ” button to move the Teletext screen forward one
page at a time.
ENGLISH - 16 -
Page 18

• Press “ ” button to move the Teletext screen backward
one page at a time.
For Fastext
The subject-heading for the information may have a particular colour or can be in a form located in a coloured box.
• Press an appropriate RED, GREEN, YELLOW or BLUE
button in order to reach the relevant page quickly.
To exit Teletext
• Press “TV” button. The screen will switch to TV mode.
Connecting external equipment
Via the Euro connector
Your TV set has two euro connector sockets. If you wish to
connect external equipment (e.g. video recorder, decoder,
etc.) which have Euro connectors, to your TV, use the EXT.1
(EXT-1) or EXT.2 (EXT-2) terminals.
If an external device is connected via Euro connector sockets the TV will be switched to AV mode automatically.
RGB mode
TV and Video Recoder (VCR)
• Connect the Video Recorder to the ANT (antenna input)
socket of the TV with the aerial cable.
• Connect the Video Recorder to the EXT.1 or EXT.2 terminal with the SCART cable, or connect it to the FRONT-AV
terminal with the audio and video cables.
• VCR is detected automatically.
NTSC Playback
Connect a NTSC video recorder to a terminal. Then press
EXT
“
” button to select the corresponding AV mode.
NTSC 3.58/4.43 system is detected automatically in AV
mode.
Copy Facility
You can output the video and audio signals which inputs
from TV, EXT.1 (EXT-1), FRONT-AV or SCREEN terminal to
the video recorder connected to the EXT.2 (EXT-2) terminal.
• To select the output source, see “EXT2 Output” on page
13.
To connect to S-VHS input
Connect your camera or camcorder at the front or back side
of your TV.
• Connect your equipment to the TV via S-VHS input and
audio inputs of FRONT-AV inputs by using S-VHS cables.
Connecting Headphones
Use the stereo headphone socket on the lower front side of
your TV, to connect headphones.
If a piece of equipment outputs RGB signals use the EXT-1
Euro connector as this is RGB ready.
S-VHS EXT2 Mode
If the equipment connected to your TV set supports S-Video
(Y/C) output from Euroconnector, you can have a better picture quality by selecting S-VHS EXT2 mode and connecting
your equipment to the EXT.2 (S-VHS EXT2) terminal of TV.
See your equipment's booklet to check if your equipment
has such feature.
Via the ANT (aerial) socket
If your equipment does not have an Euroconnector or RCA
jacks, connect it to the TV with an aerial cable. For details,
see the manual provided with the equipment.
• To store the test signal that comes from the equipment,
see “Installation Menu” on page 13 and store it to the
programme number 0. You can watch images from that
equipment to select the programme number which you
stored the test signal.
Via the RCA jacks
If you have an equipment (such as a Camcorder) which has
the RCA jacks, connect it to the FRONT-AV terminal with
the video and audio cables.
• If the equipment has the mono audio jack, connect it to the
AUDIO-L jack.
ENGLISH - 17 -
Page 19

Connecting external equipment
Antenna
EXT-2
EXT-1
Audio Input
Terminal
FRONT-AV
Headphone
L/S/G/I R/D/D/D
Before connecting anything
• Switch off all equipment.
• Read the manuals provided with the equipments.
To select an AV mode
Pressing “
• To return to the TV mode, repeatedly press “
EXT
” button on the remote control selects one of AV modes (EXT-1, EXT-2, S-VHS, S-VHS EXT2 or FRONT-AVV )
EXT
” button.
EXT.1 (EXT-1) terminal: Euroconnector (21-pin, SCART)
• Video input, Audio L/R inputs and RGB inputs are available.
• TV broadcast outputs (Video and Audio L/R) are available.
EXT.2 (EXT-2) terminal: Euroconnector (21-pin, SCART)
• Video input, S-VIDEO (Y/C) input and Audio L/R inputs are available.
• Video and Audio L/R outputs are available. (see “EXT2 Output” on page 13.)
FRONT-AV terminal: RCA connectors x 3
• Video input and Audio L/R inputs are available.
S-VHS terminal:
• S-VIDEO (Y/C) input.
Do not use S-VHS and FRONT-AV inputs at the same time even if those options available in the set.
EXT.2
CH
S-VIDEOVIDEO
EXT.1
S-VHS
Video Input
Terminal
AUDIO
CAMERA
VIDEO
DECODER
AUDIO
HEADPHONE
FOR SATELLITE RECEIVER
ENGLISH - 18 -
Page 20

Typical Connections
Aerial Connections - TV and VCR -
Aerial IN
ANT.
BACK OF TV
EXT.2
EXT.1
AV/TERMINAL
(EXT-1)
BACK OF VCR
Audio/Video
Aerial
(Not supplied)
Scart Lead
(Not supplied)
Aerial Lead
(Not supplied)
RF OUT
Aerial Lead
(Not supplied)
Aerial IN
Note: For further details, please refer to operation manual of your VCR.
ENGLISH - 19 -
Page 21

Typical Connections (Continued)
Connections - TV, DVD Player, DECODER and VCR (Videorecorder) -
DVD PLAYER
Scart Lead
(Not supplied)
(Not supplied)
(Not supplied)
(Not supplied)
(Not supplied)
BACK OF TV
ANT.
EXT.2
EXT.1
AV/TERMINAL
(EXT-2)
DECODER
Scart Lead
Aerial IN
AV/TERMINAL
(EXT-1)
Scart Lead
(Not supplied)
BACK OF VCR
Audio/Video
RF OUT
Aerial Lead
Aerial IN
Aerial
Aerial Lead
Note: For further details, please refer to operation manuals of your DVD Player, DECODER and VCR.
ENGLISH - 20 -
Page 22

Typical Connections (Continued)
Connections - TV, DVD Player and Digital Set Top Box -
DVD PLAYER
Scart Lead
(Not supplied)
(Not supplied)
Satellite dish
(Not supplied)
(Not supplied)
(Not supplied)
BACK OF TV
ANT.
EXT.2
EXT.1
AV/TERMINAL
(EXT-2)
Aerial IN
ANT.
EXT.2
EXT.1
Scart Lead
(Not supplied)
Aerial Lead
(Not supplied)
DIGITAL SET
TOP BOX
Aerial
Aerial Lead
Dish Lead
RF OUTAERIAL IN
TV SCART
DISH IN
Note: For further details, please refer to operation manuals of your DVD Player and Digital Set Top Box.
ENGLISH - 21 -
Page 23

Typical Connections (Continued)
Connections - TV, DVD Player, VCR and Digital Set Top Box -
DVD PLAYER
Scart Lead
(Not supplied)
(Not supplied)
Satellite dish
(Not supplied)
(Not supplied)
(Not supplied)
(Not supplied)
(Not supplied)
BACK OF TV
ANT.
EXT.2
EXT.1
Aerial IN
AV/TERMINAL
(EXT-2)
ANT.
BACK OF VCR
Aerial Lead
(Not supplied)
EXT.2
EXT.1
Scart Lead
(Not supplied)
Audio/Video
Aerial Lead
RF OUT
Aerial IN
Scart Lead
DIGITAL SET
TOP BOX
Aerial
Aerial Lead
Dish Lead
RF OUTAERIAL IN
TV SCART
DISH IN
Note: For further details, please refer to operation manuals of your DVD Player, VCR and Digital Set Top Box.
ENGLISH - 22 -
Page 24

Typical Connections (Continued)
Connection-TV power cable to a 220 ~ 240 V system -
EXT.2
EXT.1
BACK OF TV
Connections - TV and Video camera -
BACK OF TV
ANT.
EXT.2
EXT.1
Mains Socket Outlet
AC 220~240 V, 50 Hz
CAMCORDER
INOUT
IN
OUT
ANT.
Audio/Video lead
(Not supplied)
Note: For further details, please refer to operation manual of your Video Camera.
Front connections -TV and Video camera-
Note:
For further details, please refer to operation manual of your Video Camera.
ENGLISH - 23 -
Page 25

21-pin Euro-SCART and 21-pin Audio/Video
2
3
REAR TV
RF Input
1. Aerial terminal
21-pin In/Out
EXT.2
2. 21-pin Audio/Video (RGB) (EXT.1) With
PAL/SECAM/NTSC
3. 21-pin Audio/Video (EXT.2) With
PAL/SECAM/NTSC/S-Video Input
EXT.1
1
21-pin Euro-SCART with RGB input (EXT.1)
1. Audio right output8. Audio-video control15. Red input
2. Audio right input9. Earth for green16. Red/Green/Blue control
3. Audio left output10. Not used17. Earth for video
4. Common earth for audio11. Green input18. Earth for Red/Green/Blue control
5. Earth for blue12. Not used19. Video output
6. Audio left input13. Earth for red20. Video input (PAL/SECAM/NTSC)
7. Blue input14. Not used21. Plug shield
21-pin Audio/Video with S-Video Input (EXT.2)
1. Audio right output 8. Audio-video control15. Chroma S-Video input
2. Audio right input 9. Earth16. Not used
3. Audio left output10. Not used17. Earth for video
4. Common earth for audio11. Not used18. Earth
5. Earth12. Not used19. Video output
6. Audio left input13. Earth20. Video input (PAL/SECAM/NTSC/S-Video)
7. Not used14. Not used 21. Plug shield
ENGLISH - 24 -
Page 26

Troubleshooting
Check if the Brightness or Contrast setting in the picture setting mode might be all the way
Check if the Brightness or Contrast setting in the picture setting mode might be all the way
CH
CH
CH
The following conditions do not always denote trouble. Therefore, performs the checks described below before calling for
service.
If the problem cannot be corrected by the use of this guide, pull the power plug out from the electrical outlet and call for
service.
PROBLEMS
Remote control
does not work
CH
S-VIDEOVIDEOL/S/G/I R/D/D/D
AUDIO
No colour /
Picture weak
CH
S-VIDEOVIDEOL/S/G/I R/D/D/D
AUDIO
Poor reception on
some channels
S-VIDEOVIDEOL/S/G/I R/D/D/D
AUDIO
POSSIBLE CAUSES / REMEDIES
TV not plugged in Outlet power OFF
Main power button of TV not ON
Turn OFF using the Main Power button, then turn ON again after a minute
Check batteries in the Remote Control
Try a new channel to check for possible station trouble
Aerial not connected to terminal at the back of the TV set
If outside aerial is used, check for broken wires
Adjust COLOUR control
Try fine tuning to correct
Try a new channel to check for possible station trouble
Aerial not connected to terminal at the back of the TV set
If outside aerial is used, check for broken wires
Check for local interference
Try a new channel to check for possible station trouble
Aerial not connected to terminal at the back of the TV set
If outside aerial is used, check for broken wires
Check for local interference
Adjust COLOUR control
Try fine tuning to correct
Sound OK, poor picture
to the minus side
Try a new channel to check for possible station trouble
Check for local interference
S-VIDEOVIDEOL/S/G/I R/D/D/D
AUDIO
Increase the volume / Check Audio levels
Picture OK, poor sound
Try a new channel to check for possible station trouble
TV not plugged in Outlet power OFF
Main power button of TV not ON
Aerial not connected to terminal at the back of the TV set
If outside aerial is used, check for broken wires
S-VIDEOVIDEOL/S/G/I R/D/D/D
AUDIO
No picture or sound
Turn OFF using the Main Power button, then turn ON again after a minute
to the minus side
Increase the volume / Check Audio levels
ENGLISH - 25 -
Page 27

Specifications
TV BROADCASTING
PAL SECAM B/G D/K K’ I/I’ L/L’
RECEIVING CHANNELS
VHF (BANDI/III)
UHF (BAND U)
HYPERBAND
CABLE-TV(BG: S01-S41 / S75-S79
L: S01-S41 / S75-S77
I: S01-S41
DK: S01-S19, S22-S41)
NUMBER OF PRESET CHANNELS
100
CHANNEL INDICATOR
ON SCREEN DISPLAY
RF AERIAL INPUT
75 Ohm Unbalanced
OPERATING VOLTAGE
220-240V AC, 50 Hz.
Cleaning The Screen
Your TV is fitted with a „True Flat" picture tube. The surface of the screen is covered with a foil. Under no circumstances may this be damaged.
To clean
Clean the laminated screen with a soft cotton cloth. Only
non-alkaline, thinned soapsuds on a basis of water or
alkohol be used to moisten the cloth. Rub the surface
gently with the cloth until the surface is completely dry.
Under no circumstances...
may the screen be wiped with conven tional glass cleaning fluid.
may the screen be brought into contact with abrasive
materials.
may soiling be renoved by polishing or scouring.
To clean off sticky substances, the cloth can be
moistened with acetone.
Under no circumstances clean with this acetone
cloth the TV-Cabinet.
POWER CONSUMPTION (W) (28LF-94EC) (32LF-94EC)
120 Watt
Power Consumption at Stand-by < 3 W
AUDIO OUTPUT (RMS)
2x10 W
AUDIO SYSTEMS (Receiving)
Mono FM, German Stereo (IGR) and Digital Stereo NICAM
PICTURE TUBE
28” 16:9
32” 16:9
Safety
CE - MARK
EMC
CE - MARK
DIMENSIONS (DxLxH) (mm) (28LF-94EC)
DIMENSIONS
DLHWeight (kg)
50782749539
DIMENSIONS (DxLxH) (mm) (32LF-94EC)
DIMENSIONS
DLHWeight (kg)
56293055654
ENGLISH - 26 -
Page 28

R
SHARP CORPORATION
50052692
06/04
50052692
 Loading...