

Page 1
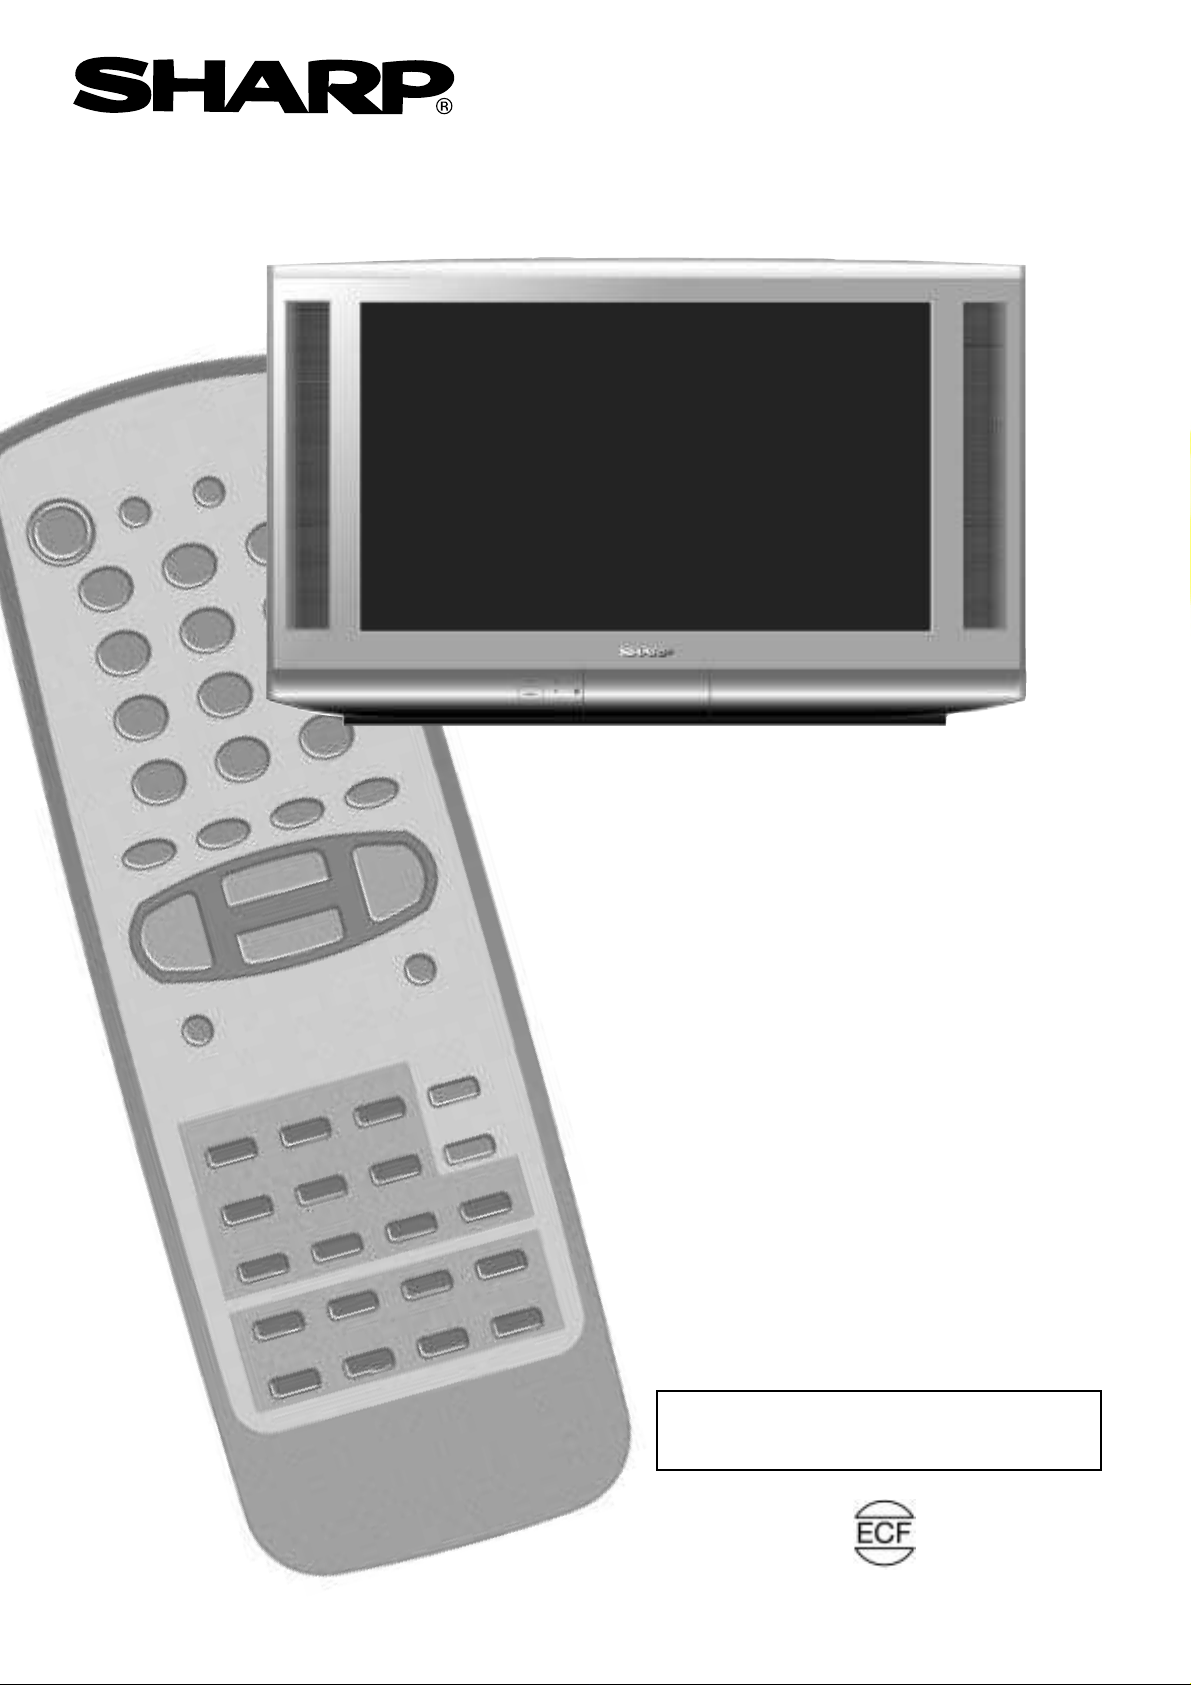
28KF-84H
32KF-84H
COLOUR TELEVISION
OPERATION MANUAL
Please read this operation manual carefully
before using the colour television.
PRINTED ON ENVIRONMENTALLY FRIENDLY PAPER
Page 2
TERMS OF GUARANTEE
Subject to the conditions listed below Sharp Electronics (U.K.) Ltd.(Hereinafter called «the
Company») guarantee to provide for the repair of, or at its option replace the Sharp
Equipment, or any component thereof, (other than Batteries), which is faulty or below
standard, as a result of inferior workmanship or materials.
The conditions of the Guarantee are:
1. This guarantee shall only apply to defects or faults which are notified to the Company,
or its approved Service Facility within one year from the date of purchase of the
equipment.
2. This guarantee covers equipment intended f or priv ate domestic use only.This guarantee
does not apply to equipment used in the course of a business, trade or profession.
3. This guarantee does not cover any faults or defects caused by accident, misuse, fair
wear and tear, neglect, tampering with the equipment, or any attempt at adjustment or
repair other than by an approved Service Facility.
4. In the unlikely event of that your equipment should require repair, please contact the
dealer or supplier from whom it was purchased.
5. The cost of carriage to and from the Dealer, Supplier or Sharp approved Service F acility
shall be borne by the purchaser.
6. No person has any authority to vary the terms or conditions of this guarantee.
7. This guarantee is offered as an additional benefit to the consumer’s statutory rights and
does not affect rights in any way.
In the unlikely event of this equipment requiring repair during the guarantee period, you
will need to provide proof of date of purchase to the repairing company.
Please keep your invoice or receipt, which is supplied at the time of purchase.
1
Page 3
Safety Precautions
This equipment comp lies wit h the requirements o f Directives 89/ 336/EEC, 92/31/ EEC and 73/23/ EEC as amended b y
93/68/ EEC.
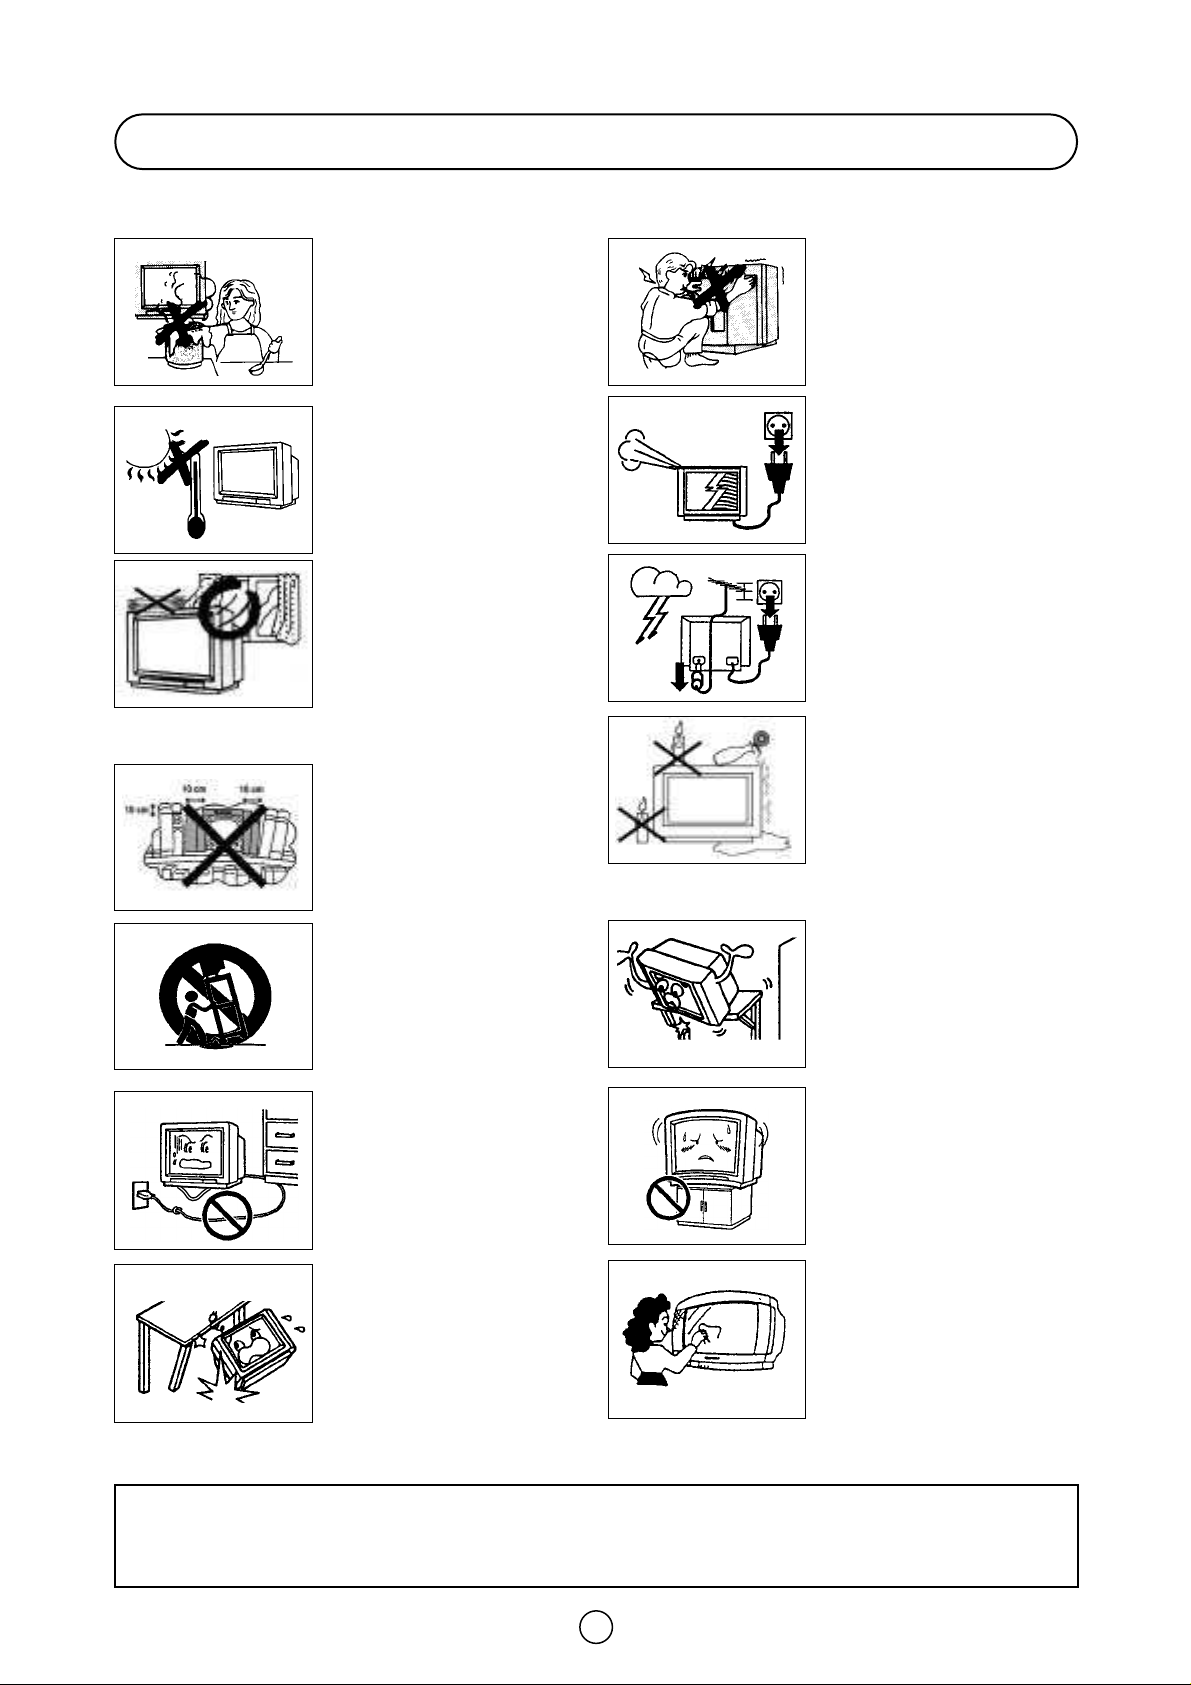
To prevent fire or electrical shock,
do not use the TV set in an
excessively damp place.
Never remove the back of the
cabinet, as there is high voltage in
the TV set.
Please call for service.
Position the TV set out of direct
sunlight and away from heat, as
high temperatures can damage the
cabinet, CRT, or other electronic
parts.
Don't cover ventilation salts with
objects such as newspapers,
tablecloths, curtains, etc.
Do not cover the ventilation holes at
the back of the TV set, this can
cause fire or other serious
problems. Leave an adequate open
space behind the TV set for good
ventilation.
In order to ensure that the television
is properly ventilated, leave a space
of at least 10 cm around the set.
Do not install this equipment in a
confined space such as a bookcase
or a built-in cabinet.
Television equipment and cart
combination should be moved with
care. Quick stops, excessive force,
and uneven surfaces may cause the
equipment and cart combination to
overturn.
Unplug the power cord from the wall
outlet immediately if the TV set
begins to make unusual noises or
give off smoke or an odd smell, then
call your dealer for service.
Always disconnect your television
from the mains and the aerial cables
during thunderstorms.
Even if your television is switched off,
it can still be damaged by lightning
striking the mains and/or aerial cable.
In order to prevent electrical shocks and
fires, ensure that the television is not
subjected to splashes or spills of water, and
avoid inserting objects or pouring any type
of liquid into the set.
To prevent fire, never place any type of
candle or naked flames on the top or near
the TV set. In the case that an object or
liquid enters the set, don't use and contact
technical service.
Wall or shelf mounting should follow
the manufacturer's instructions, and
should use a mounting kit approved
by the manufacturer.
To prevent electrical shock, do not
subject the AC power cord to
damage by bending or twisting it, or
by placing heavy items on top of it
and do not place the AC power cord
under the TV set. If the AC power
cord becomes damaged, unplug it
from the wall outlet immediately and
call your dealer for service.
Do not place this television
equipment on an unstable cart,
stand, or table. The television
equipment may fall, causing serious
injury to a child or an adult, and
serious damage to the equipment.
Use only with a cart or stand
recommended by the manufacturer,
or sold with the television
equipment.
Do place the TV set onto an even
stand, table or track which size is
bigger than the TV set.
If the TV set is put onto a smaller
size or uneven stand, table or track
may cause the TV cabinet distort. Do
not put or insert anything between
TV set and the stand, table or track.
The tube of your TV has a special
coating. Do not knock or rub on the
tube face with sharp or hard surfaces,
otherwise you will damage the
coating.
To prevent damaging the surface of
the television screen, remove finger
prints only with a soft cloth
dampened with glass cleaner. Do not
use any abrasive cleaners.
Do not use thinner, benzene or other
strong chemical cleaners.
CAUTION: For environmental and safety reasons, it is recommended that the
television isn't left in stand-by mode while not in use. Switch it off using the main
button and unplug it during periods of absence from the home.
2
Page 4
Dear SHARP Customer
Note:
Note:
Congratulat ions! You are now the pro ud owner of a SHARP Colour Television Receiver. To ensure prop er operation,
please read this manual carefully. After reading, keep this manual in a safe place for future reference.
Contents
Terms of guarantee ......................................................... 1
Safety precaution ............................................................ 2
Contents ......................................................................... 3
Accessories .................................................................... 3
Remote Control Battery Installation ................................ 3
Remote Control buttons ................................................. 4
Controls and Terminals ................................................... 5
Typical Connections (Aerial, VCR, DVD, etc.).................. 6
Auto Installation ............................................................ 11
Switching on ................................................................. 13
TV operation (Channel selection) .................................. 14
Menu Structures.............................................................15
Picture Adjustments ..................................................... 16
100 Hz Fast Menu ......................................................... 18
Wide Mode ................................................................... 19
Audio Adjustments .........................................................21
Sound Setting Mode.......................................................22
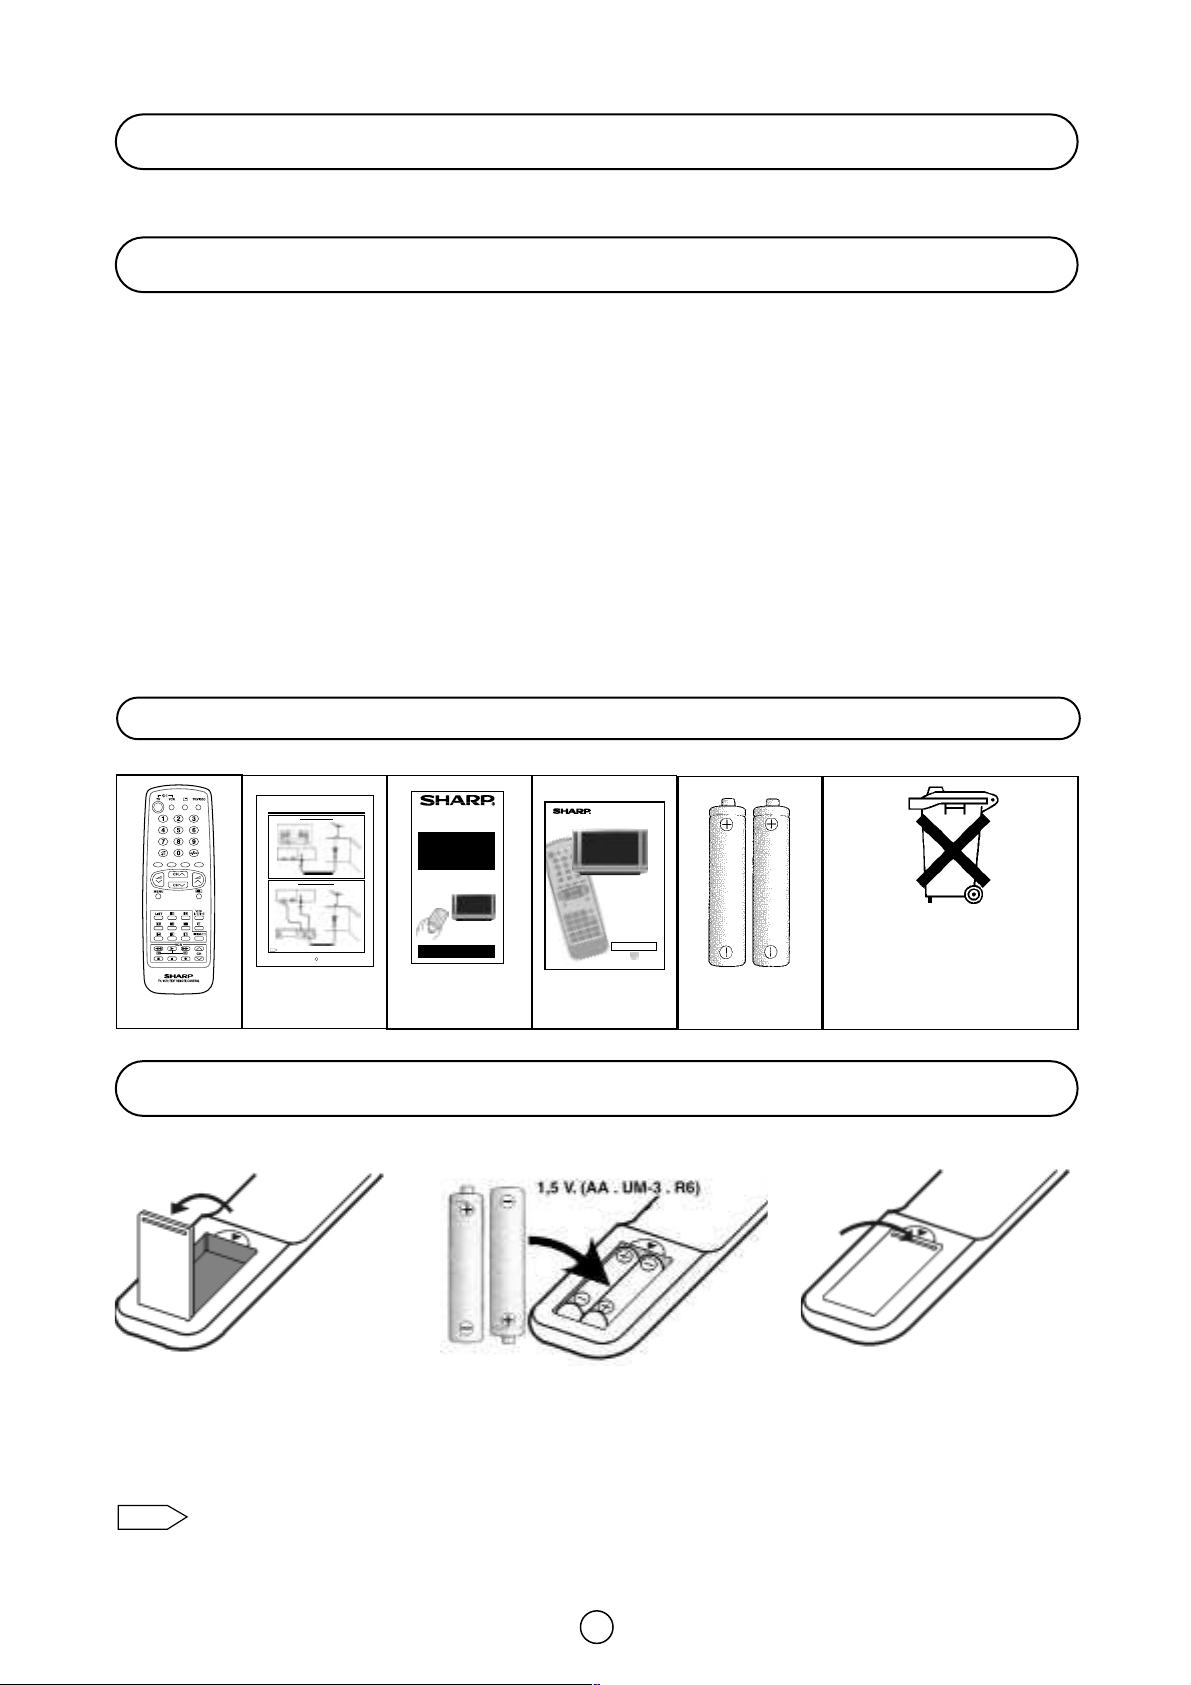
Supplied Accessories
Aerial connection - TV set only -
BACK OF TV
(Not supplied)
Aerial IN
Aerial Connections - TV and VCR -
BACK OF TV
(Not supplied)
Aerial IN
Aerial Lead
(Not supplied)
Scart Lead
(Not supplied)
RF OUT
Audio/Video
Aerial IN
1
Typical
28/32KF-84H
Aerial
Aerial Lead
(Not supplied)
Aerial
Aerial Lead
(Not supplied)
28KF-84H
32KF-84H
COLOUR TELEVISION
QUICK
START
GUIDE
For easy installation
● Fitting the batteries into the remote control
● Connecting the aerial cable
● Tuning the TV channels
Using this installation guide should
enable you to set up your TV in less
than 15 minutes - - -
- - - Please refer to your operation
manual for more tips and advice.
If problems persist, contact the SHARP Helpline (office hours only) on
tel: 08705 274277 (or (01) 676 0648 if telephoning from Ireland) and/or
WEB-SITE: www.sharp.co.uk/support
Quick Start
Guide
Remote control
Typical Connections
AV/TERMINAL
(AV-1)
BACK OF VCR
For further details, please refer to operation manual of your VCR.
Connections
Features setting mode:
On Timer and Off Timer ................................................ 24
Child Lock (Channel Block) .......................................... 25
Demo ............................................................................ 26
Postcode Security ........................................................ 27
TV Channel Setting (Advanced):
To repeat the AUTO INSTALLATION ............................ 29
Manual Channel Preset ................................................. 30
After preset has been performed (Fine-tuning) ............. 32
TV/VIDEO Selector, Clock button, Headphone Jack
and Sub-titles button..................................................... 34
VCR Mode .................................................................... 35
Teletext Mode ............................................................... 36
21-pin Euro-SCART and 21-pin Audio/Video ............... 39
Troubleshoot ing ............................................................ 40
General Specifications for Television Receiver ............ 41
Index page .................................................................... 42
28KF-84H
32KF-84H
COLOUR TELEVISION
OPERATION MANUAL
Respect the
Please read this operation manual carefully
before using the colour television.
PRINTED ON ENVIRONMENTALLY FRIENDLY PAPER
environment and
put used batteries
in a container that is
Operation
Manual
Type-AA
Dry-Batteries
especially designed
for this purpose.
Remote Control Battery Installation
Before using the TV set for the first time, install the supplied dry batteries in the remote control.
1. With your thumb nail, pull up
the slit as indicated by the
arrow to remove the battery
cover.
• Remove batteries if weak or if the unit is not in use for long periods.
• Do not mix old and new batteries.
• Incorrect installation of the batteries may damage the remote control.
2. Insert two batteries 1.5 V (R-6
3. Replace the battery cover.
"AA" size). Be sure to match the
battery ±/— terminals with the
±/—marks inside the
compartment.
3
Page 5
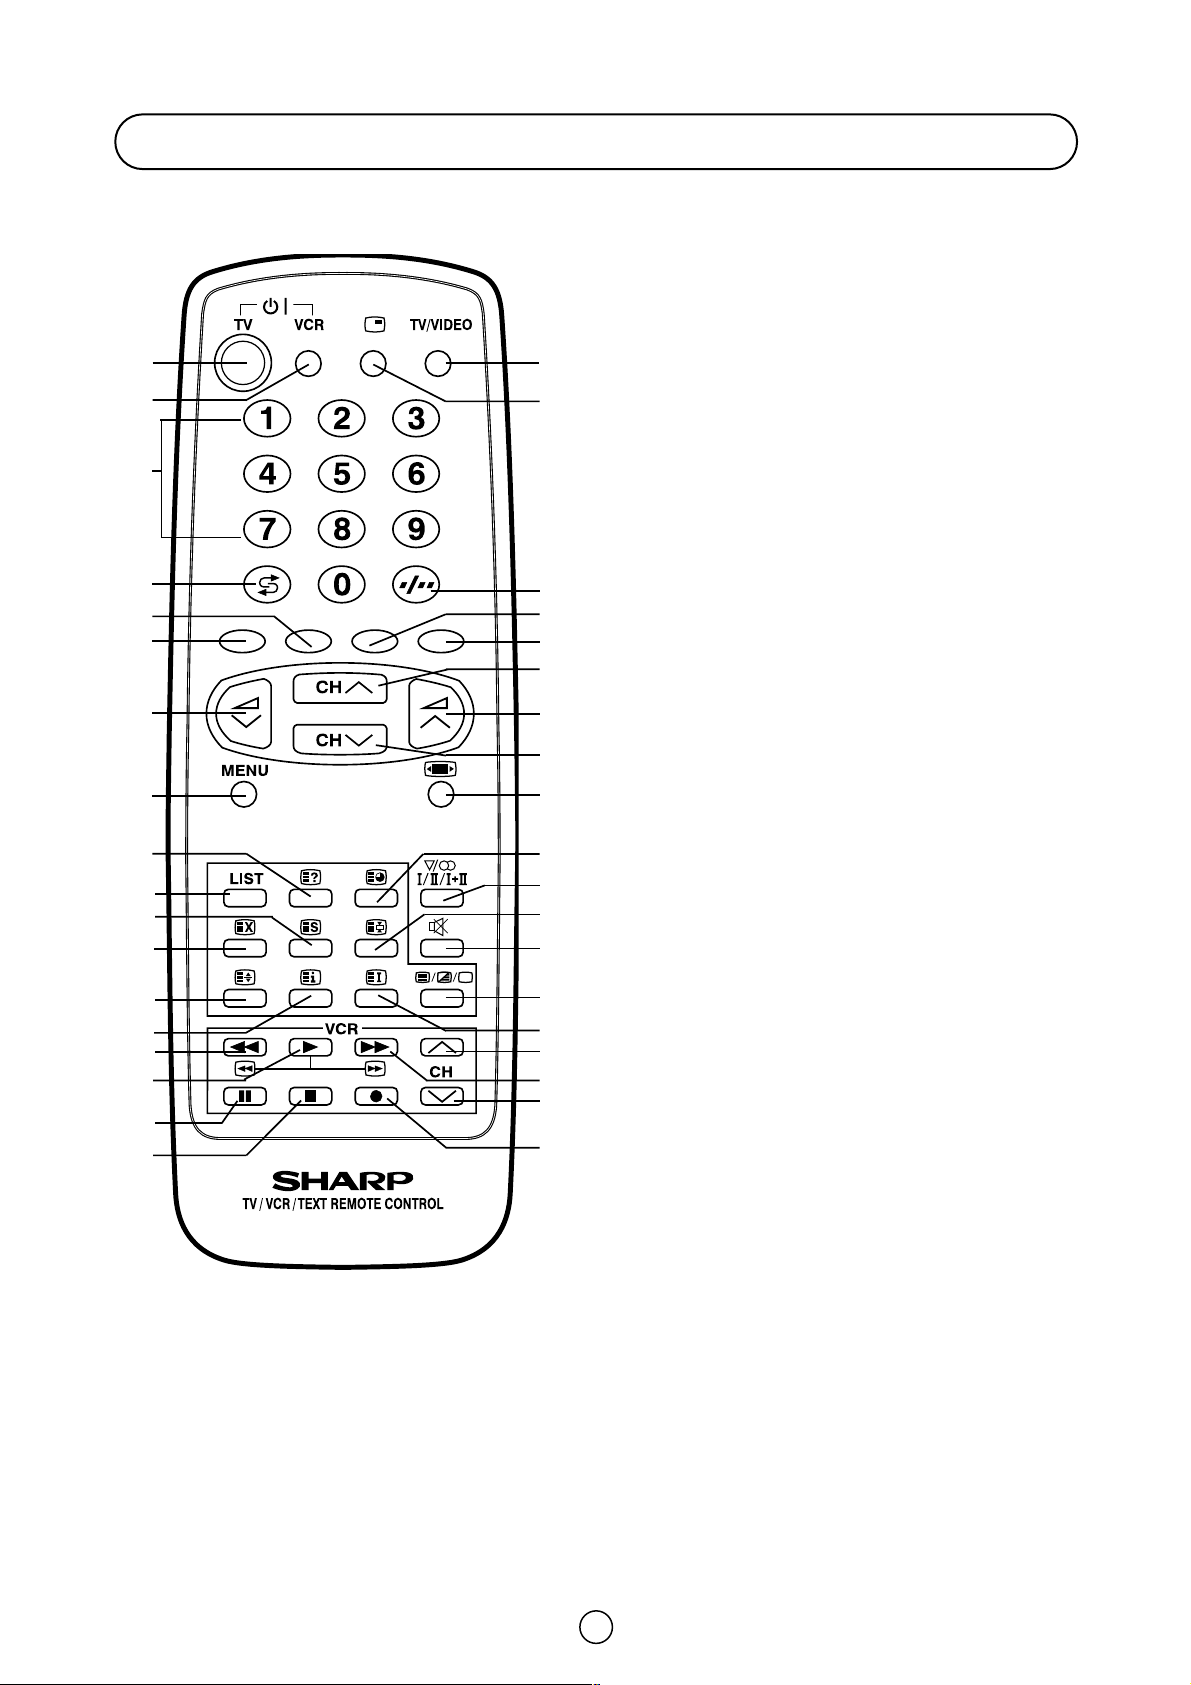
Remote control buttons
TV 1. Stand-by ON/OFF switch (TV)
Video 2. Power ON / OFF switch (VCR)
TV 3. Digit buttons 0 ~ 9
4. Flashback button
1. 19.
2.
3.
4.
5.
6.
7.
8.
9.
10.
11.
12.
13.
14.
15.
16.
17.
18.
20.
21.
22.
23.
24.
25.
26.
27.
28.
29.
30.
31.
32.
33.
34.
35.
36.
37.
Teletext 5. Green button
6. Red button
TV 7. Volume Down/Cursor control Left
8. Menu button
Teletext 9. Reveal button
10. List selector
11. Store button
12. Cancel button
13. Top/ Bottom/Full button
14. Reset button
Video 15. Rewind/picture search/reverse
16. Play button
17. Pause / Still button
18. Stop button
TV 19. TV/VIDEO selector
20. 100 Hz Fast Menu button
21. Single/Double entry
Teletext 22. Yellow button
23. Blue button
TV 24. Channel Up/Cursor control Up
25. Volume Up/Cursor control Right
26. Channel Down/Cursor control Down
27. Wide Mode Selector
TV/Teletext 28. Time button
TV 29. Sound mode selector
Teletext 30. Hold button
TV 31. Sound Mute button
Teletext 32. Text/Mix/Picture button
33. Index button
Video 34. Channel Up selector
35. Fast forward/picture search/forward
36. Channel Down selector
37. Record button
4
Page 6
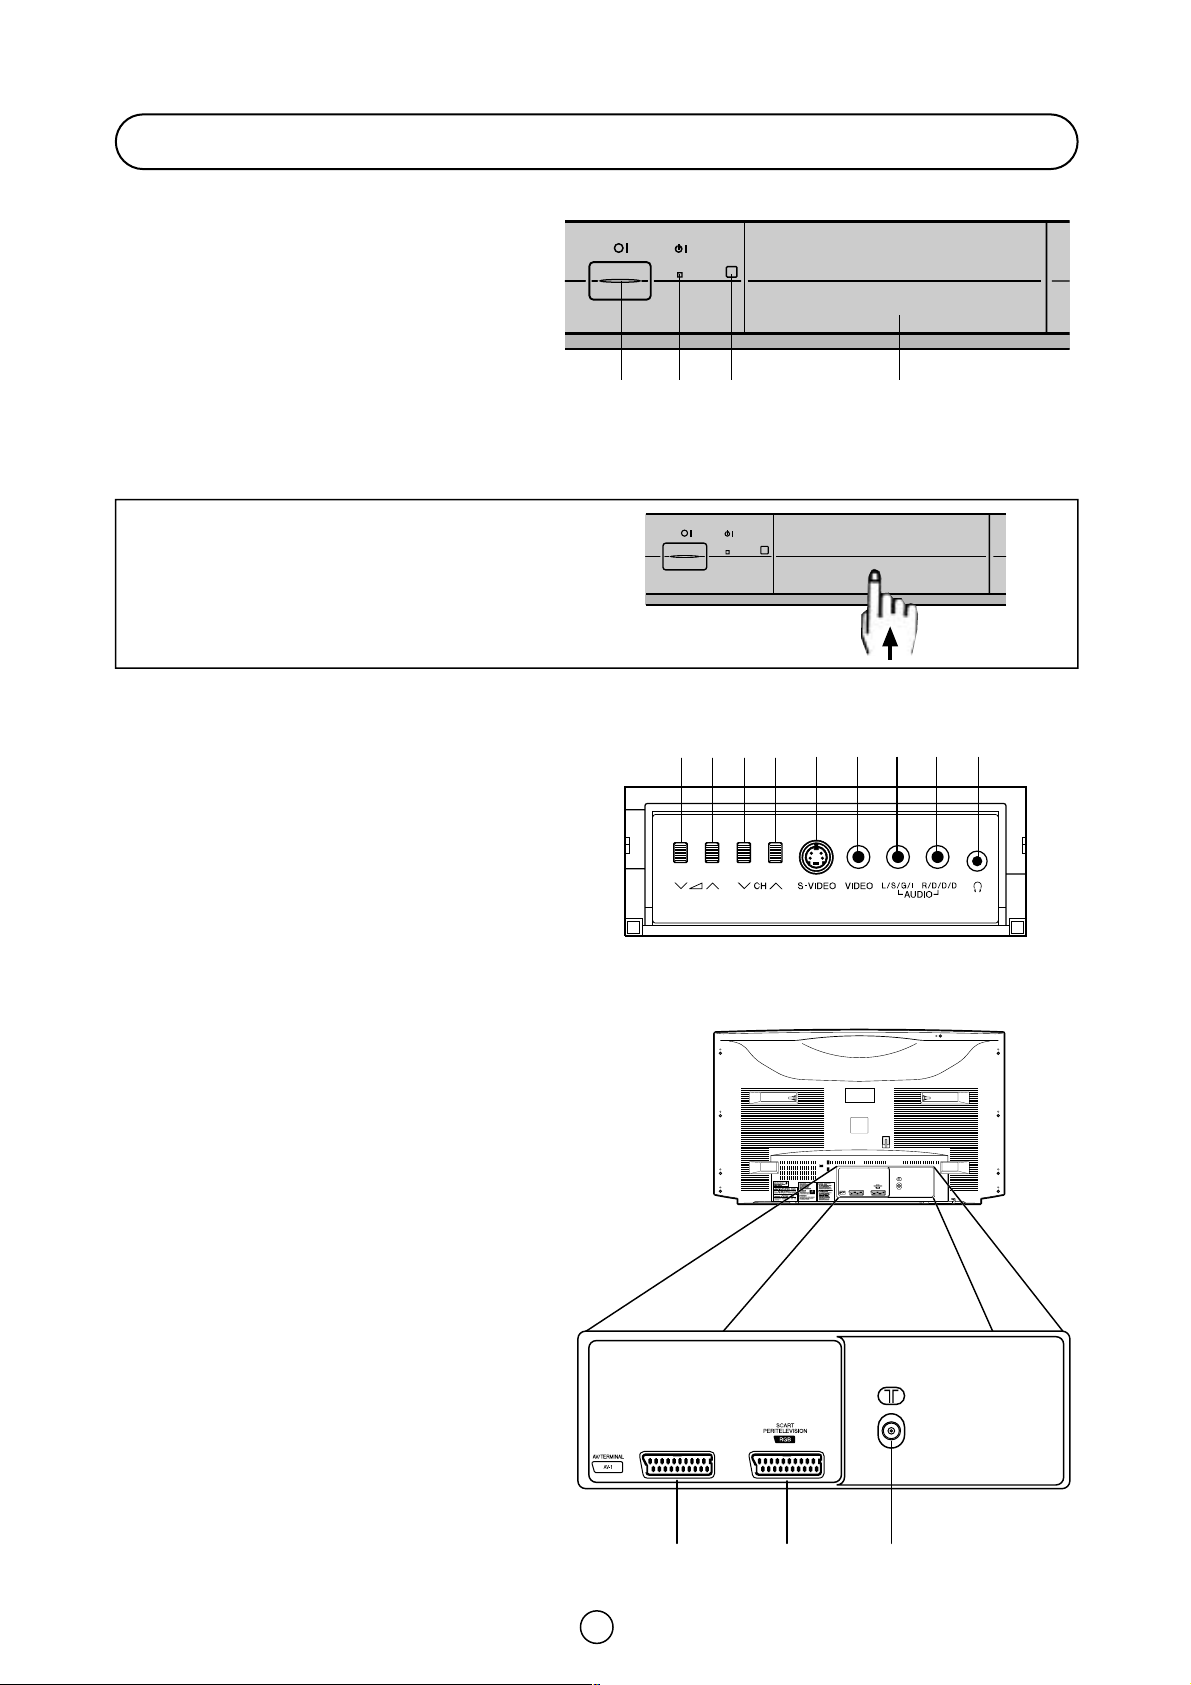
Controls and Terminals
FRONT TV
1. Main Power On/Off Switch
2. Power Indicator
3. Remote Control Sensor
4. Door
HOW TO OPEN THE DOOR
Put the finger in the lower part of the door and
press upward.
1 2 3 4
Behind the door
5. Volume Button (DOWN)
6. Volume Button (UP)
7. Program Selector (NEXT)
8. Program Selector (PREVIOUS)
9. S-Video input terminal
10. Video Input Terminal (PAL/SECAM/NTSC)
11. Audio Input Terminal (left)
12. Audio Input Terminal (right)
13. Headphone Socket (3.5mm Ø, 16~600 ohms)
REAR TV
21-pin In/Out
1. 21-pin Audio/Video (AV-1) With
PAL/SECAM/NTSC/S-Video Input
2. 21-pin Euro SCART (RGB) With
PAL/SECAM/NTSC Video Input
RF Input
3. Aerial terminal
5 6 7 8
9
10 11 12 13
31 2
5
Page 7
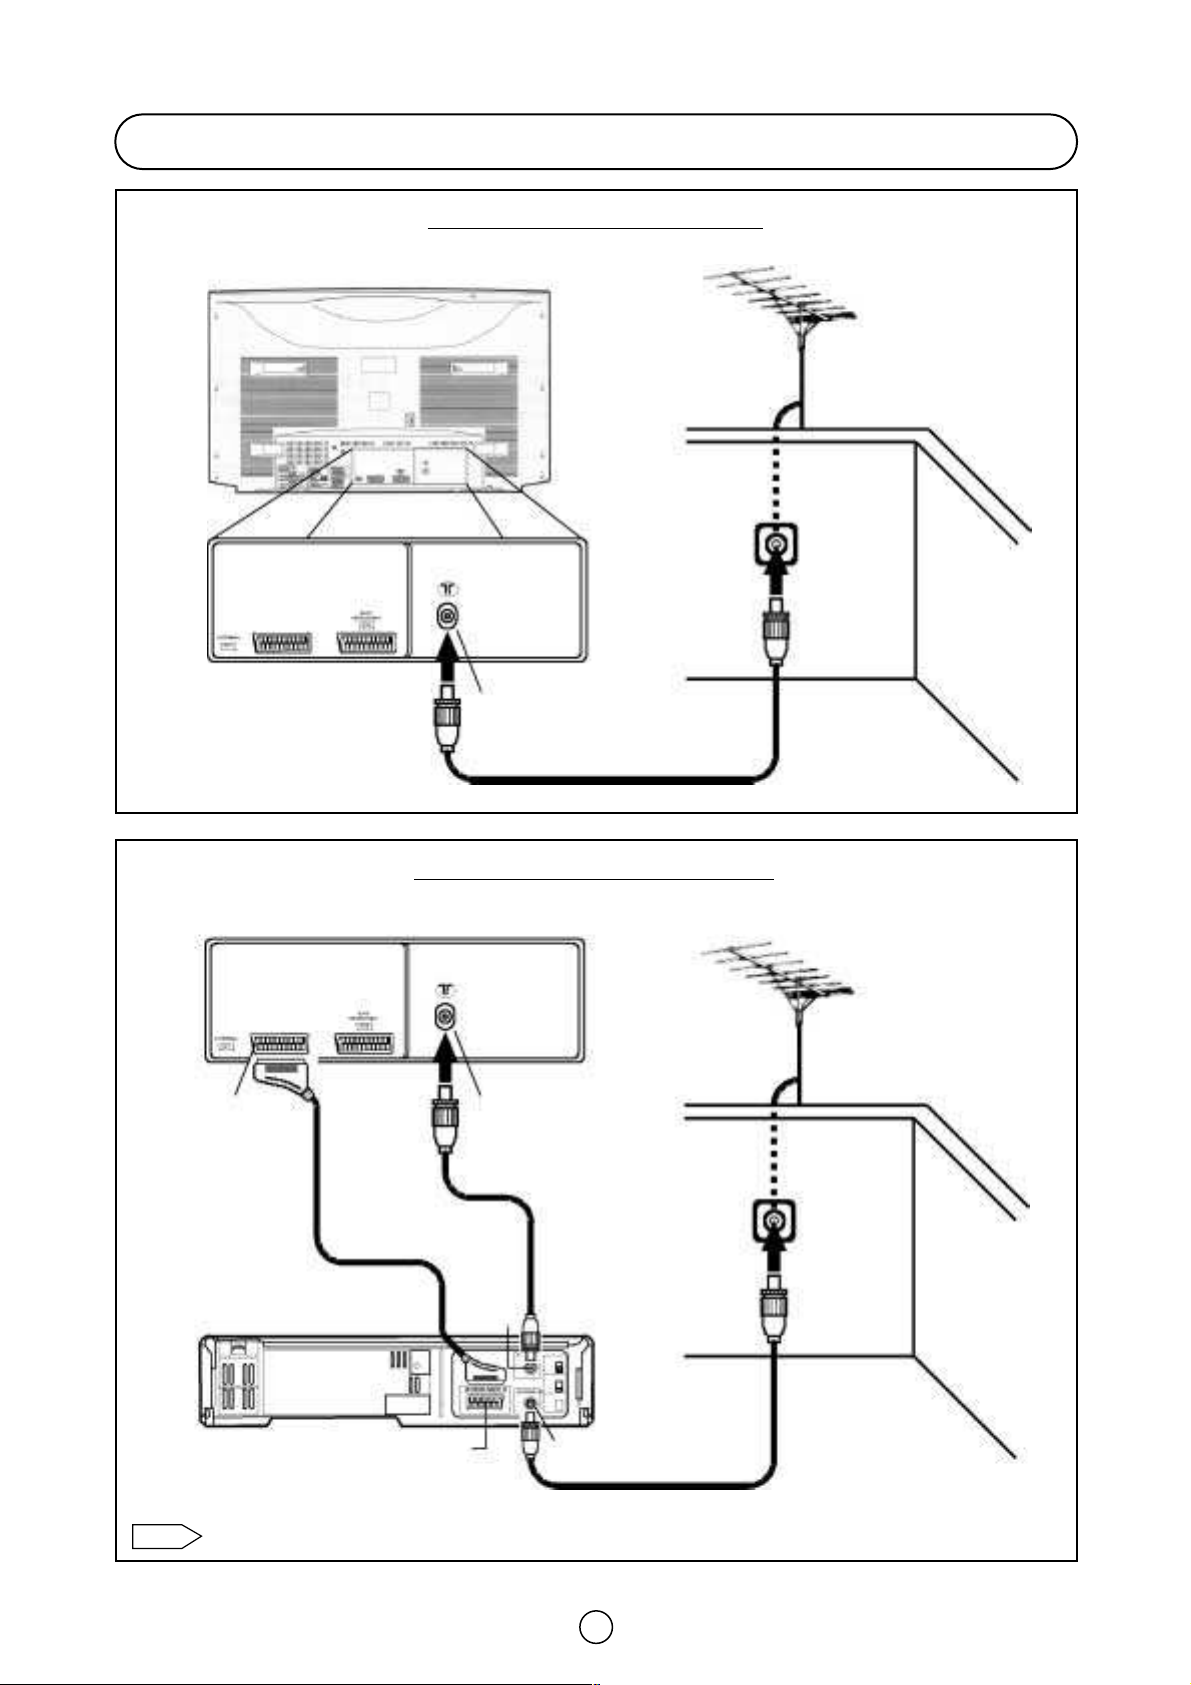
Typical Connections
Note:
Aerial connection - TV set only -
BACK OF TV
Aerial
(Not supplied)
AV/TERMINAL
(AV-1)
Aerial Connections - TV and VCR -
BACK OF TV
Scart Lead
(Not supplied)
Aerial IN
Aerial IN
Aerial Lead
(Not supplied)
Aerial Lead
(Not supplied)
Aerial
(Not supplied)
RF OUT
BACK OF VCR
Audio/Video
For further details, please refer to operation manual of your VCR.
Aerial Lead
(Not supplied)
Aerial IN
6
Page 8
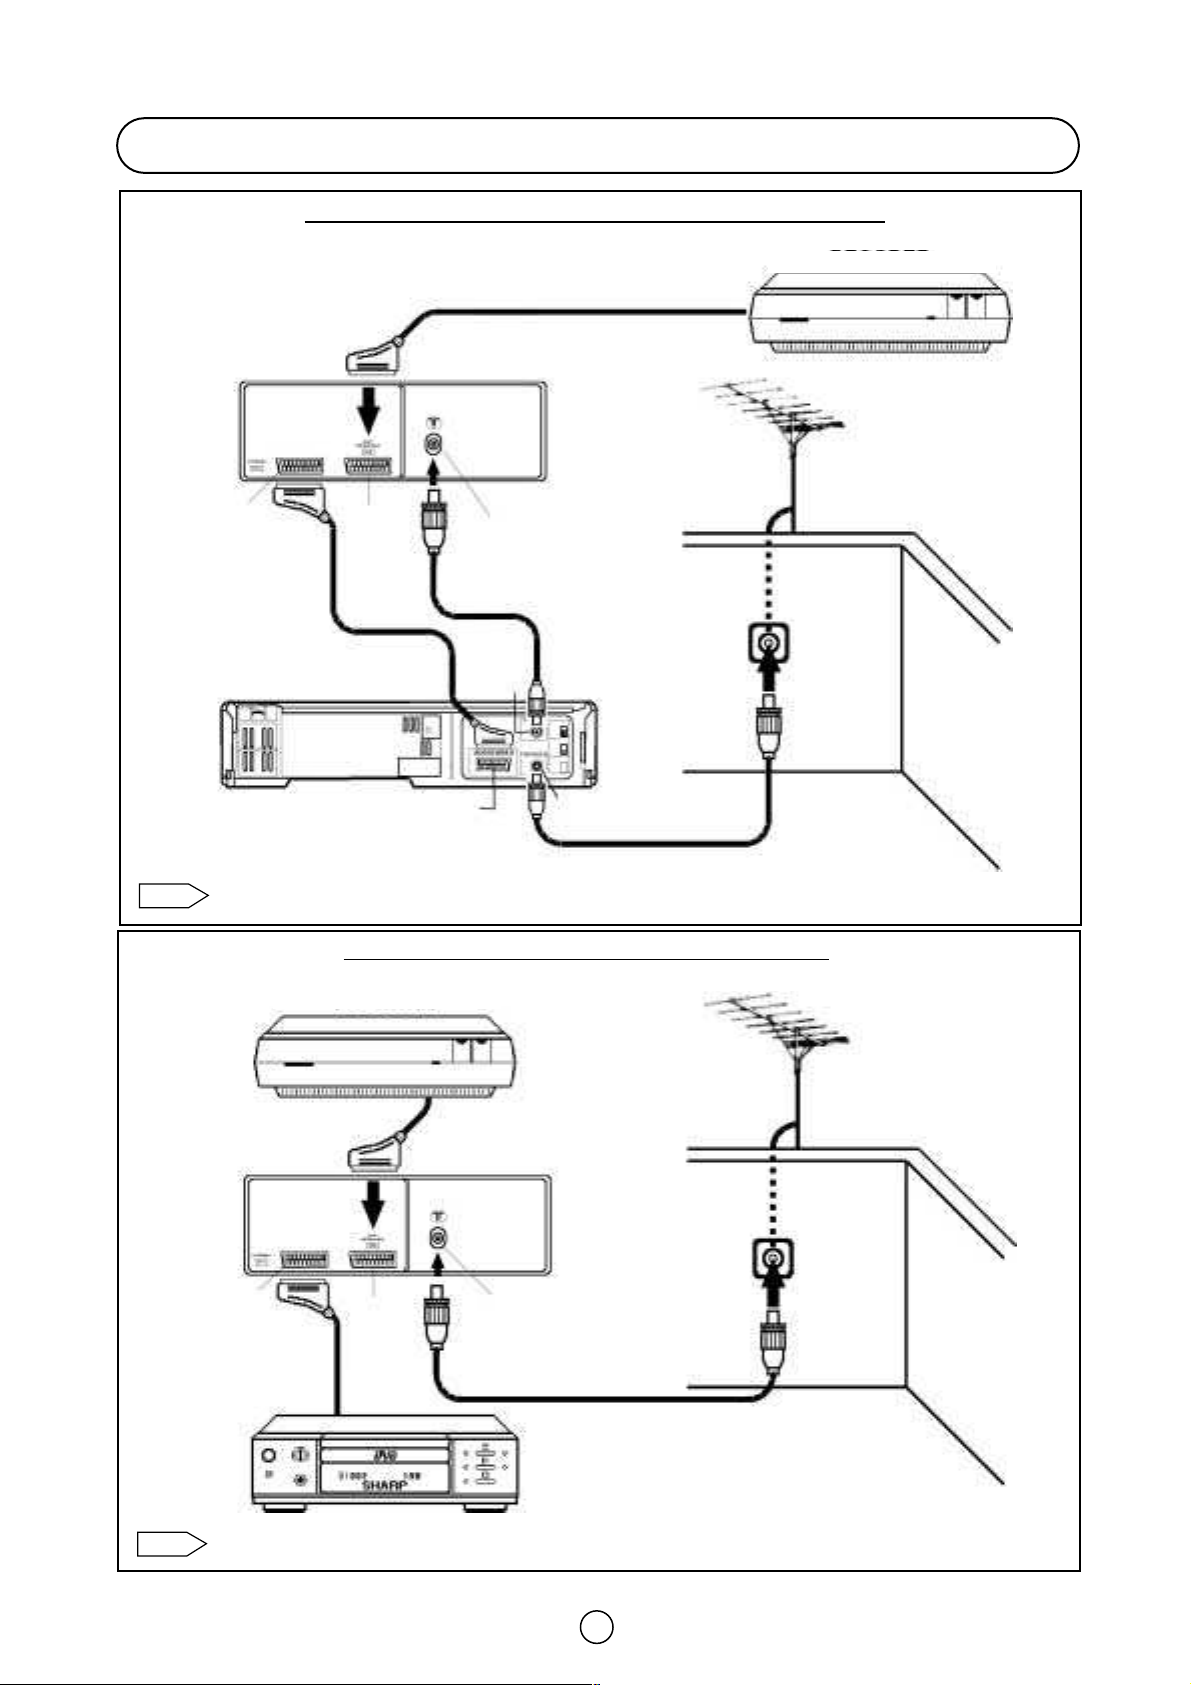
Typical Connections (Continued)
Note:
Note:
Connections - TV, DECODER and VCR (Videorecorder) -
AV/TERMINAL
(AV1)
Scart lead
(Not supplied)
BLACK OF VCR
Euro
SCART
(RGB)
Audio/Video
BACK OF TV
Aerial IN
RF
OUT
Scart Lead
(Not supplied)
Aerial Lead
(Not supplied)
Aerial IN
DECODER
Aerial
(Not supplied)
Aerial Lead
(Not supplied)
For further details, please refer to operation manuals of your DECODER and VCR.
Scart Lead
(Not supplied)
AV/TERMINAL
(AV1)
Scart Lead
(Not supplied)
Connections - TV
DECODER
BACK OF TV
Euro
SCART
(RGB)
DVD
PLAYER
, DECODER and DVD Player -
Aerial
(Not supplied)
Aerial IN
Aerial Lead
(Not supplied)
For further details, please refer to operation manuals of your DECODER and DVD Player.
7
Page 9

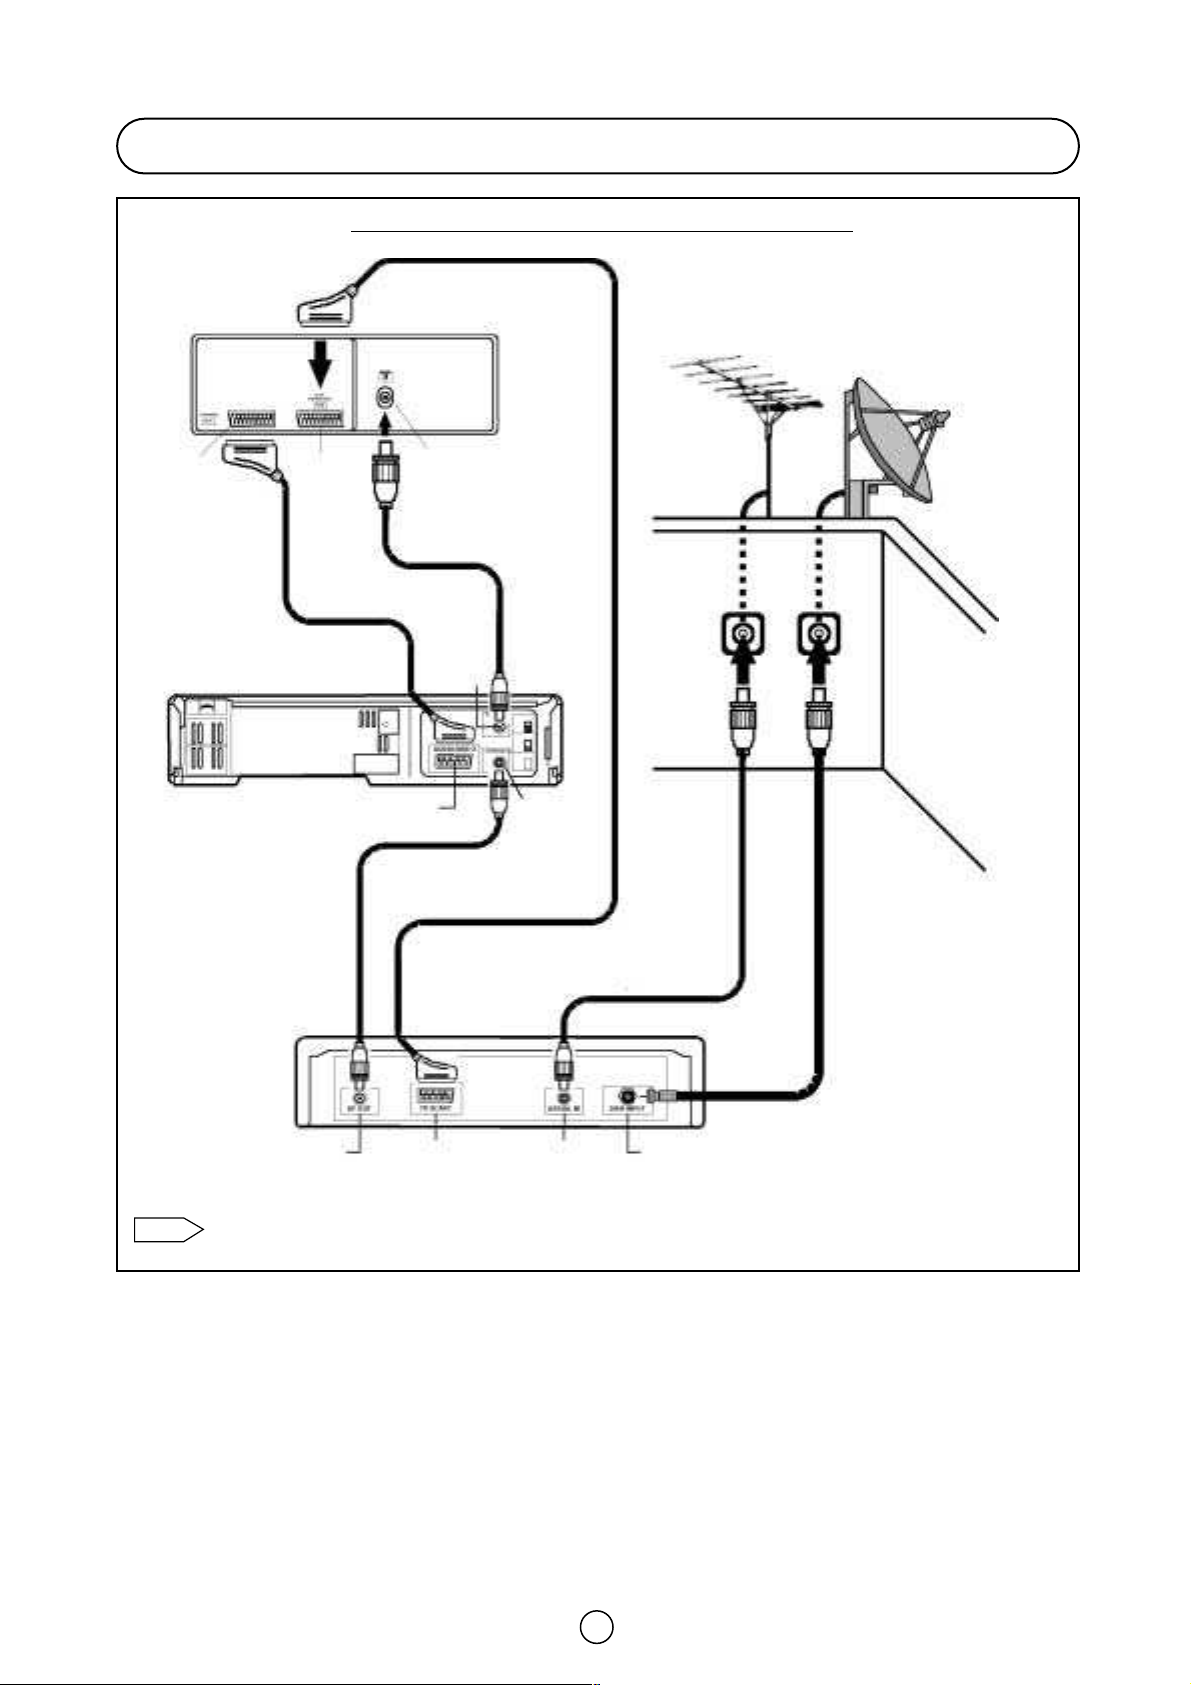
Typiccal Connections (Continued)
Note:
Connections - TV, DVD Player and Digital Set Top Box -
BACK OF TV
DVD PLAYER
Scart Lead
(Not supplied)
Aerial
(Not supplied)
Satellite dish
(Not supplied)
AV/TERMINAL
(AV 1)
Aerial Lead
(Not supplied)
For further details, please refer to operation manuals of your DVD Player and Digital Set Top Box.
Euro
SCART
(RGB)
RF OUT
Aerial IN
Scart Lead
(Not supplied)
DIGITAL SET
TOP BOX
TV SCART
AERIAL IN
Aerial Lead
(Not supplied)
Dish Lead
(Not supplied)
DISH IN
8
Page 10
Typical Connections (Continued)
Note:
Connections - TV, VCR and Digital Set Top Box -
Scart Lead
(Not supplied)
BACK OF TV
(Not supplied)
Aerial
Satellite dish
(Not supplied)
AV/TERMINAL
(AV1)
Scart Lead
(Not supplied)
BACK OF VCR
Euro
SCART
(RGB)
Audio / Vídeo
Aerial IN
Aerial Lead
(Not supplied)
RF OUT
Aerial Lead
(Not supplied)
Scart Lead
(Not supplied)
DIGITAL SET
TOP BOX
Aerial IN
Aerial Lead
(Not supplied)
Dish Lead
(Not supplied)
RF OUT
For further details, please refer to operation manuals of your VCR and Digital Set Top Box.
TV SCART
AERIAL IN
9
DISH IN
Page 11
Typical Connections (Continued)
Note:
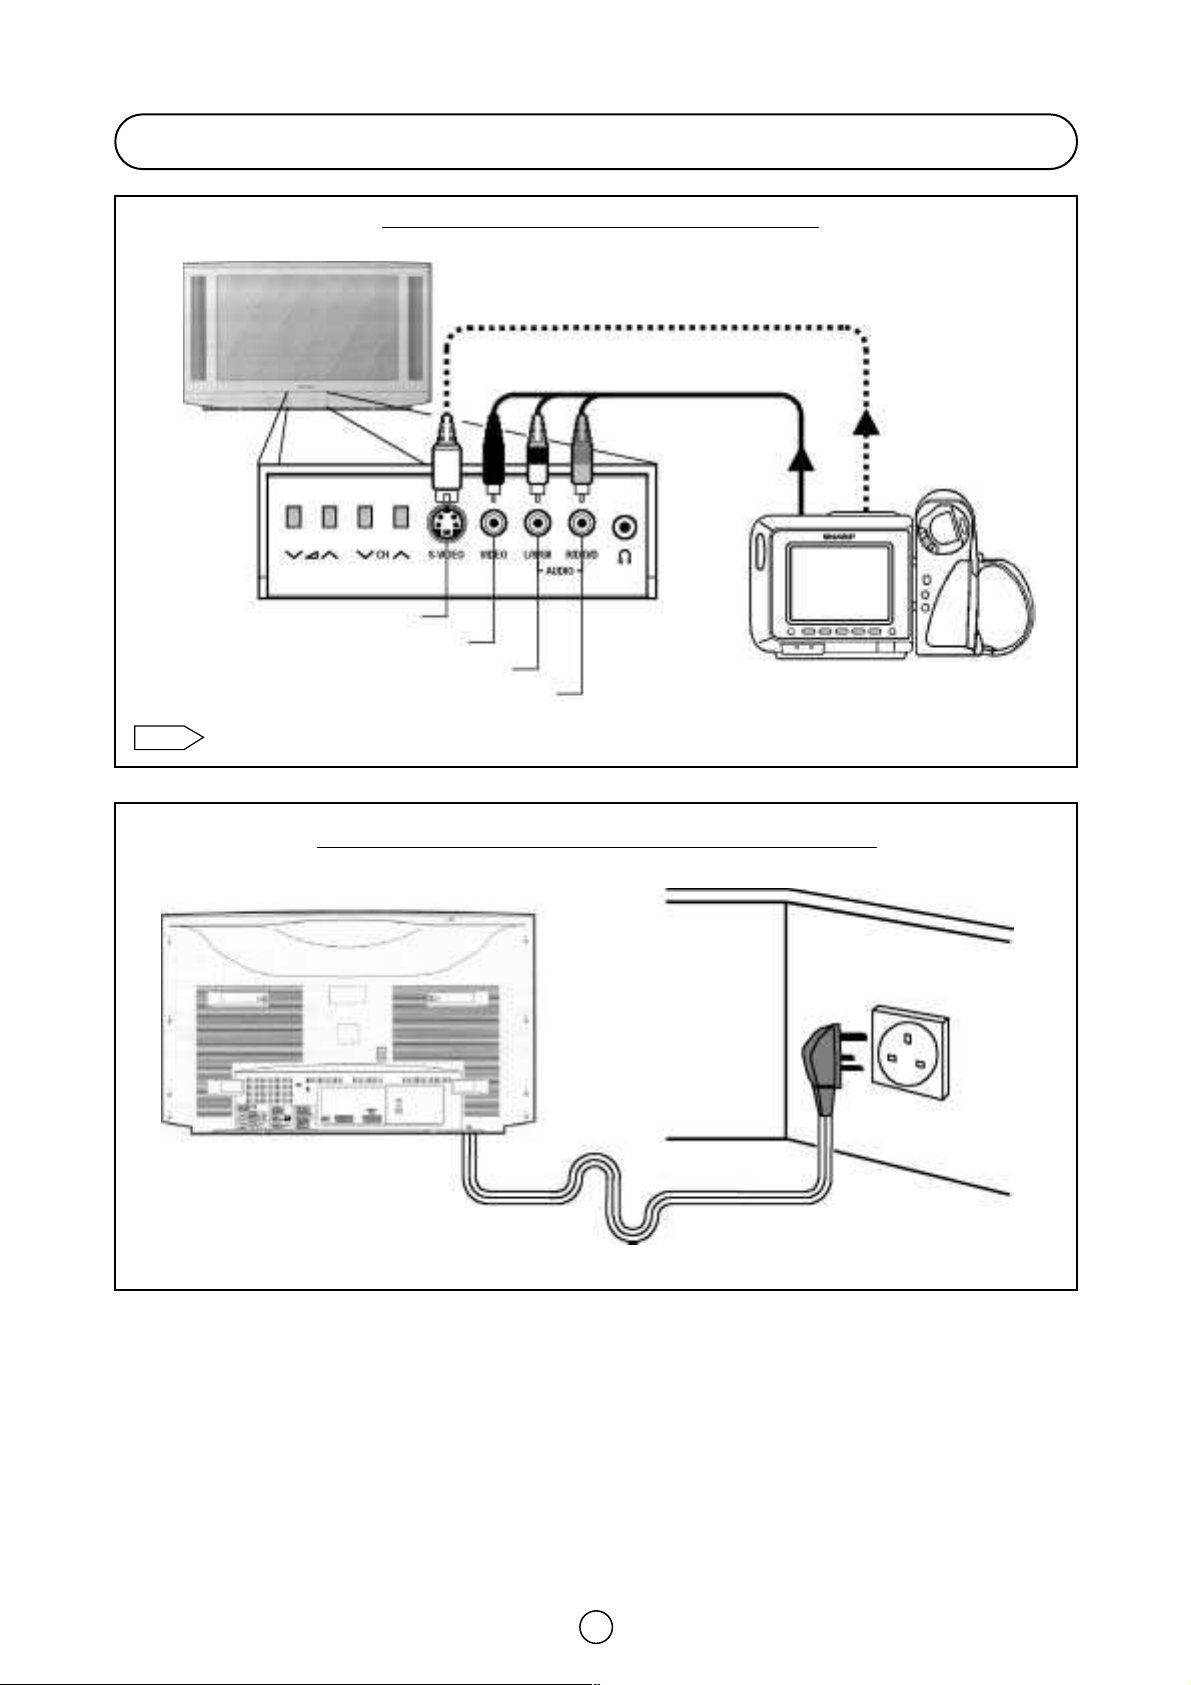
Front connections -TV and Video camera-
FRONT TV
(Behind the door)
S-Video lead (Hi-8)
(Not supplied)
Audio/Video lead
(Not supplied)
S-Video Input Terminal (Hi-8)
Video Input Terminal
Audio Input Terminal (left)
Audio Input Terminal (right)
WIEW CAM
For further details, please refer to operation manual of your Video Camera.
Connection-TV power cable to a 220 ~ 240 V system -
BACK OF TV
Mains Socket Outlet
AC 220~240 V, 50 Hz
10
Page 12
Auto Installation
VÍDEO
Note:
Note:
■ Auto Installation System (AIS)
Your television set is provided with an Automatic Installation System which
makes Installation easier.
This new system is activated when you turn on the TV for the first time.
You may not have to follow this procedure if it has already been
done for you at the establishment where you purchased your TV. If
this is the case, go on to the section entitled -Switching ON-
(page 13).
Procedure:
1. Put batteries into the remote control, as shown on page 3.
2. Connect the aerial jack into the aerial input terminal on the rear
side of your TV, as shown on page 6.
3. Connect the TV power cable to a 220 ~ 240 V system, as shown
on page 10.
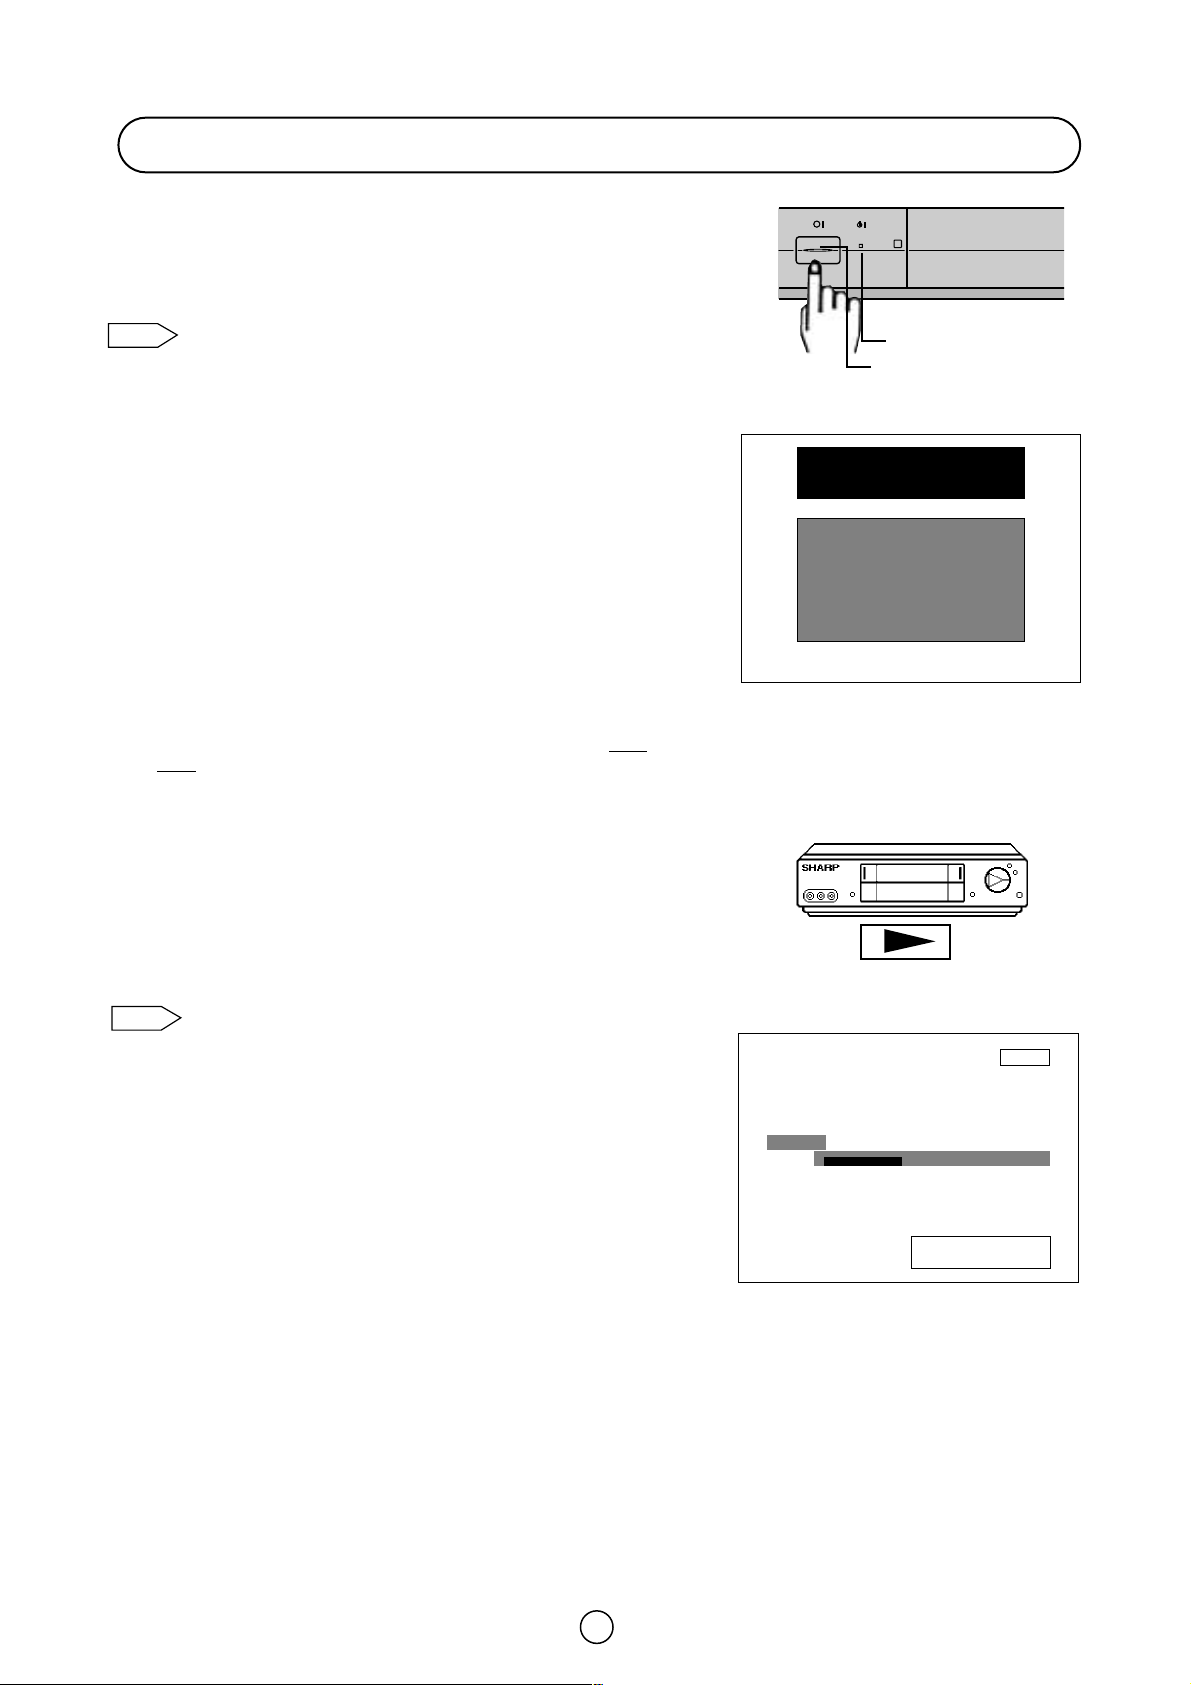
Press the main power button (® ), on the front of the TV set, to start
4.
the “AUTO INSTALLATION”. The orange power indicator will light..
5. The «AUTO INSTALLATION» menu will appear on your TV screen.
The TV is ready to preset automatically all local channels for you.
If the TV is being used with a VCR, turn on the VCR and play
back a pre-recorded tape. The signal from the RF terminal of
your VCR is assigned to a TV channel.
6. Now, press any button on the TV remote control to start Auto
Channel Preset.
The TV will go through the following steps automatically and
sequentially:
Power Indicator
Main power button
«AUTO INSTALLATION»
SHARP
AUTOINSTALLATION
Be sure the antenna cable is
connected…
Press any button on
the handset to start.
VCR
Automatic Channel Sorting System (ACSS): The TV set SEARCHES
FOR FREQUENCIES, memorises the channels found, and sorts them
(according to technical criteria) from Pr-01 of the TV, to a maximum
of 99 programmes.
This tuning process may take several minutes to perform.
If you need to repeat the “AUTO INSTALLATION”, go on to
the section entitled -TV Channel Setting- (page 29).
Editing: When the TV has finished the automatic search, the «Stored
programmes» menu will appears on the screen. In this menu, you can
change the order of the channels and change or give the channels a
four-letter name.
On next page is a detailed explanation of editing options about
«Stored programmes»menu.
Searching
01 %
Searching
please wait
Pr 01
11
Page 13
Stored programmes
CH
CH
When the TV has finished the automatic search, the «Stored programmes»
menu will appear on screen with a list of the channels, which have been
memorised with the available options:
a) Select programme to be edited 씮 / .
b) «Edit this program» 씮 RED button .
c) «Go to sorting mode» 씮 GREEN button .
d) «Delete this program» 씮 YELLOW button .
e) «Exit this menu» 씮 BLUE button .
With these options, you will be able to organise the real channels (CH **)
memorised in the TV programmes (Pr 01 ... Pr 99) and put them into your
own preferred order.
The following is a detailed explanation of options a), b), c), d) and e).
a) Select a programme to be edited.
Use this option to select a programme from the list. Each time you press
CH
CH
/ the memorised channel will be viewed and will remain
selected on the list by means of white letters.
b) «Edit this program» (Change of name)
Use this option for giving a name made up of four digits to the channels or
for changing the one, which appears on some channels, in the following
way:
b.1 Select the channel using the Cursor UP/DOWN buttons /
CH
CH
(marked in white letters).
b.2 Press the RED button to see the Edit name mode.
b.3 Press the Cursor UP button to change the first letter.
CH
Letters A to Z of the alphabet, a blank space and the numbers 0 to 9 will
appear sequentially. Some of the broadcasting stations names such as
BBC1 or ITV are already incorporated in the TV and appear among the
alphabet to make this task easier.
Press the Cursor DOWN button to go backwards in the sequence.
CH
b.4 Press the buttons for changing the position of the cursor and the
CH
CH
/ buttons for changing the letters (repeat this action for other
letters).
When you have finished the fourth letter, press the Cursor button to
quit the Change of Name option.
«Stored programmes» menu
Stored programmes:
(red)
(green)
(yellow)
(blue)
Edit this program
Go to sorting mode
Delete this program
Exit this menu
Pr 01 CH21 BBC1
Pr 02 CH31 BBC2
Pr 03 CH41 ITV
Pr 04 CH51 CH4
Pr 05 CH61 CNN
Pr 06 - - - - - - - Pr 07 - - - - - - - Pr 08 - - - - - - - Pr 09 - - - - - - - Pr 10 - - - - - - - -
«Edit this program» Edit name mode
Stored programmes:
Pr 01 CH21 BBC1
Pr 02 CH31 BBC2
Pr 03 CH41 ITV
Pr 04 CH51 CH4
Pr 05 CH61 CNN
Pr 06 - - - - - - - Pr 07 - - - - - - - Pr 08 - - - - - - - Pr 09 - - - - - - - Pr 10 - - - - - - - -
Press the MENU
button to exit.
c) «Go to sorting mode» (Sorting channels)
Use this option for sorting the channels
(CH) into the desired programme
(Pr), as follows:
c.1 Select the programme (Pr) you wish to change using Cursor
UP/DOWN buttons / (marked in white letters).
CH
CH
c.2 Press the GREEN button to see the Sorting mode.
c.3 Press the Cursor UP/DOWN buttons / to move the
CH
CH
channel (CH) to the required position (marked in red letters on a black
background).
c.4 Press the GREEN button to finish.
d) «Delete this program» (Delete channels)
Use this option for cancelling programmes
, which are badly tuned or
repeated.
d.1 Select the channel you wish to delete using Cursor UP/DOWN buttons
CH
CH
/ (marked in white letters).
d.2 Press the YELLOW button to see the Delete mode.
d.3 The TV will ask for confirmation that you wish to cancel, and you must
press the YELLOW button again. The channels that follow it on the
list will automatically rearrange themselves by moving up one programme
(Pr) place, to restore the space of the cancelled channel (CH).
e) «Exit this menu»
Use this option to quit the menu by pressing the BLUE button .
«Go to sorting mode» Sorting mode
Stored programmes:
Pr 01 CH21 BBC1
Pr 02 CH31 BBC2
Pr 03 CH41 ITV
Pr 04 CH51 CH4
Pr 05 CH61 CNN
Pr 06 - - - - - - - Pr 07 - - - - - - - Pr 08 - - - - - - - Pr 09 - - - - - - - Pr 10 - - - - - - - -
Insert the marked
programme in the
position you wish.
Press green button to
finish.
«Delete this program» Delete mode
Stored programmes:
Pr 01 CH21 BBC1
Pr 02 CH31 BBC2
Pr 03 CH41 ITV
Pr 04 CH51 CH4
Pr 05 CH61 CNN
Pr 06 - - - - - - - Pr 07 - - - - - - - Pr 08 - - - - - - - Pr 09 - - - - - - - Pr 10 - - - - - - - -
WARNING!
This programme
will be erased.
Press yellow
button again
to confirm.
Or press any
other button
to cancel
12
Page 14
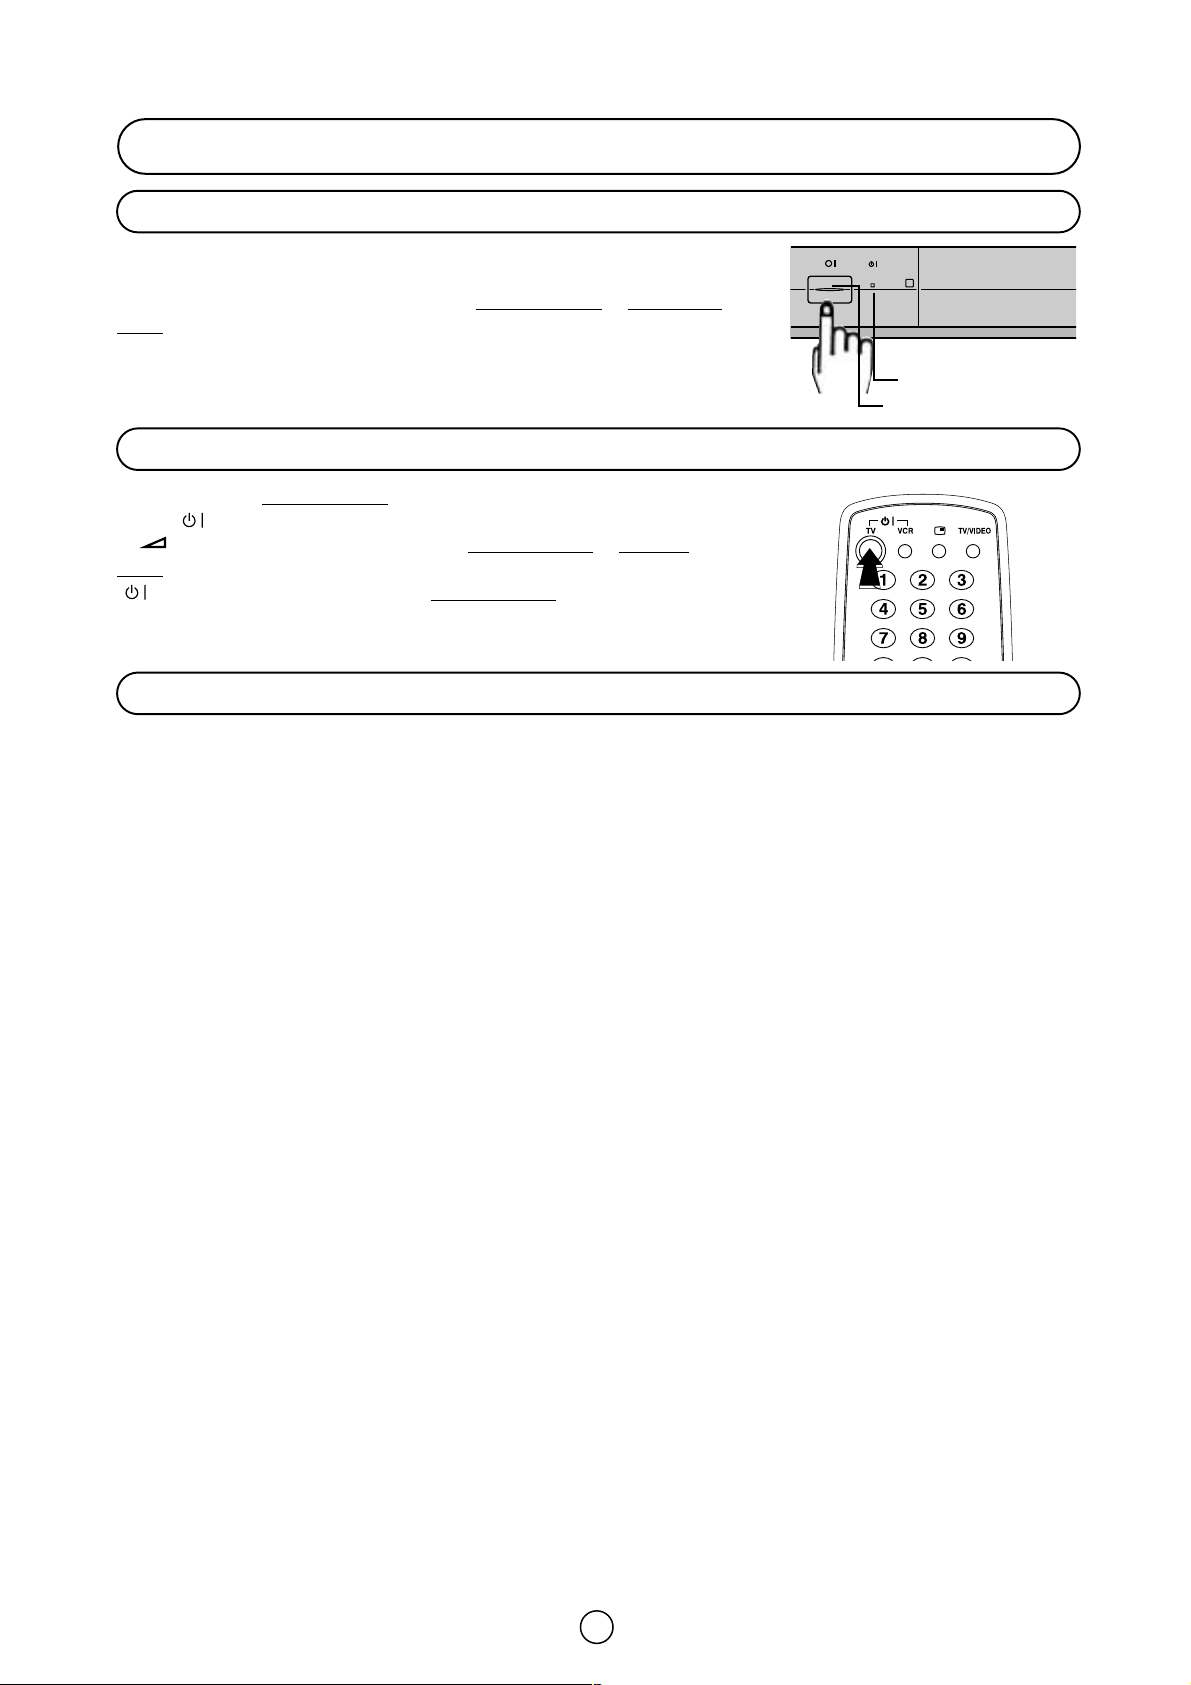
Switching on
Power supply on/off buton
This TV memorizes the Mode last used when it was switched off. When the
main power button (® ) is pressed to turn on the set, the power indicator
will light and the set will resume in either the Stand-by mode or Programme
mode, depending upon its condition when it was switched off.
On-Off/Stand-by button
Power Indicator
Main power button
When the TV is in Stand-by mode
button ( TV) on the remote control, or one of the four buttons on the TV
(
V/\, VCH/\
mode and an image will appear on the screen. Press the Stand-by button
( TV) again and the TV will return to Stand-by mode.
). The TV will change from Stand-by mode to Program
, to turn ON the TV press the Stand-by
Blue back off timer
If noise appears in TV or V CR mode, the screen turns blue. The blue back off-timer is then engaged and will automatically
switch the set to Stand-by mode after 15 minutes.
13
Page 15

TV Operation
Channel Selection
Channel selector CH
ù
/CH Ù buttons
Select the programme channel number you want to see, using the
channel selector buttons ( / ).
CH
CH
As you press these buttons a list of channels appears.
Press the
Note:
CH
The channels that are in SKIP mode cannot be seen with
CH
/ a gain to select another channel.
these buttons. Use numerical buttons to display these
channels.
Single/Double entry selector
This button selects between one or two digit channel number entry.
PR *
Single digit
entry mode
Press
Pr 01
Pr 02
Pr 03
Pr 04
Pr 05
Pr 06
Pr 07
Pr 08
Pr 09
Pr 10
PR * *
Double digit
entry mode
0~9 Digit buttons
You can select channels by pressing the 0 ~ 9 digit buttons on the remote control.
For single and double-digit entry see section B above.
Flashback button
Press this button to switch the currently viewed channel to the previously viewed channel, and vice versa.
This function is only available in programme channel selection mode.
I.e. not when AV terminals are in use.
PR 01
Previously
viewed channel
Press
Currently
viewed channel
PR 12
14
Page 16

Menu Structures
This TV set has: a MAIN MENU with four basic menus, which permit
access to the different functions of the TV.
These menus are as indicated below.
By pressing the MENU Button :
Menu Functions / Options
CONTRAST
COLOUR
BRIGHTNESS
PICTURE
ADJUSTMENTS
SHARPNESS
NORMALISE
TINT CONTROL
ECO MODE
NOISE REDUCTOR
BLACK STRETCHER
ROTATION
SVM
MENU Button
AUDIO
ADJUSTMENTS
OTHER
FUNCTIONS
INSTALL
AND TUNE
LOUDSPEAKERS
VOLUME
EQUALIZER
LOUDNESS
BALANCE
NORMALISE
LOUDSPEAKERS (MODE)
EFFECTS
SOUND IDENTIFICATION
ON TIMER: TIME / SWITCH ON
OFF TIMER: OFF / 120 Min. / 90 Min. / 60 Min. / 30 Min.
CHILD LOCK: LOCK ALL / LOCK PROGRAMME / CLEAR LOCK
DEMO
POST CODE
CHANNEL: CH (Aerial) / CC (Cable)
SEARCH (Frequency Tuning)
FINE TUNE
MODE: TV / VCR / SKIP
EDIT: Edit this program / Go to sorting mode / Delete this
program / Exit this menu
AUTO-TUNE: AUTO INSTALLATION
HEADPHONES
VOLUME
BASS
TREBLE
BALANCE
NORMALISE
HEADPHONES (MODE)
15
Page 17

CH
CH
CH
Picture A djustments
Picture quality ( CONT R A ST, COLOUR, BR IG HT NESS, SHARPNE S S, NO R MALISE, TINT CONT R OL, ECO MODE, NOIS E
REDUCTOR, BLACK STRETCHER, ROTATION and SVM) are adjustable in this menu.
1. Press the MENU button to see the MAIN Menu.
MAIN Menu
2. Press the MENU button to see the PICTURE Menu.
PICTURE Menu
3. Press the Cursor UP/DOWN buttons
/ to select an
option from the list: «CONTRAST», «COLOUR», «BRIGHTNESS»,
«SHARPNESS», «NORMALISE», «TINT CONTROL», «ECO
MODE», «NOISE REDUCTOR», «BLACK STRETCHER»,
«ROTATION» or «SVM».
The selected item will appear on screen in a blue box.
4. Adjust the picture quality to your liking with the Cursor
LEFT/RIGHT buttons / .
MAIN Menu
PICTURE
ADJUSTMENTS
AUDIO
ADJUSTMENTS
OTHER
FUNCTIONS
INSTALL
AND TUNE
Picture Menu
CONTRAST
COLOUR
BRIGHTNESS
SHARPNESS
NORMALISE
➜
NORMALISE Menu
5. Press the MENU button if you wish to normalize video levels
to default factory settings.
6. Press the Cursor DOWN button to see more options.
TINT CONTROL
7 Select «TINT CONTROL» and press the Cursor LEFT/RIGHT
buttons / to adjust your desired skin colour (blue or red).
NORMALISE Menu
CONTRAST
COLOUR
BRIGHTNESS
SHARPNESS
NORMALISE
➜
TINT CONTROL
TINT
CONTROL
ECO MODE
NOISE
REDUCTOR
BLACK STRETCHER
ROTATION
➜
Press the MENU
button to
normalise...
16
Page 18

ECO MODE
CH
8. Select «ECO MODE» and press the Cursor LEFT/RIGHT buttons
/ to reduce contrast in areas of the picture those are
excessively white (ON or OFF).
ECO MODE
TINT
CONTROL
ECO MODE
NOISE
REDUCTOR
BLACK
STRETCHER
ROTATION
➜
OFF
NOISE REDUCTOR
9. Select «NOISE REDUCTOR» and press the Cursor LEFT/RIGHT
buttons / to reduce the noise when receiving a weak
signal and improve the picture quality (OFF, AUTO, MEDIUM or
HIGH).
BLACK STRETCHER
10. Select «BLACK STRETCHER»and press the Cursor
LEFT/RIGHT buttons / to connect or disconnect (ON or
OFF) the Dynamic Compensation in dark area of the picture.
NOISE REDUCTOR
TINT
CONTROL
ECO MODE
NOISE
REDUCTOR
BLACK
STRETCHER
ROTATION
➜
BLACK STRETCHER
TINT
CONTROL
ECO MODE
NOISE
REDUCTOR
BLACK
STRETCHER
ROTATION
➜
OFF
OFF
ROTATION
11. If the picture is tilted, select Rotation and press the Cursor
LEFT/RIGHT buttons / to adjust the picture tilt.
12. Press the Cursor DOWN button to see more options.
SVM
13. Select SVM (Scan Velocity Modulator) and press the Cursor
LEFT/RIGHT buttons / to change the resolution of the
picture (ON or OFF).
14. Press the MENU button to close the Menu.
ROTATION
CONTROL
ECO MODE
NOISE REDUCTOR
STRETCHER
ROTATION
➜
SVM
SVM
➜
TINT
BLACK
OFF
17
Page 19

100 Hz Fast Menu
With this menu you can enter to the following functions: STILL Mode (Frozen picture), SCOPE Mode (Enlarge picture)
and PICTURE MODE (Settings Audio and Video).
1. Press the 100 Hz FAST MENU button l to see the 100 Hz Fast Menu.
100 Hz Fast Menu
2. Press the corresponding coloured button:
Press the RED button «STILL» to freeze the picture.
Press the GREEN button «SCOPE» to enlarge picture.
Press the YELLOW button «PICTURE MODE» to change the
audio and video Settings.
Press the BLUE button «EXIT» to quit the Menu.
100 Hz Fast Menu
FACTORY SETTINGS
(NORMAL PICTURE)
STILL Mode
In this mode the TV set freezes the picture.
You can also enter to the following functions:
«STILL» ON/OFF by RED button .
«SCOPE» ON/OFF by GREEN button .
«PICTURE MODE» by YELLOW button .
«EXIT» by BLUE button .
SCOPE Mode
In this mode you can enlarge and move the picture by means of
UP/DOWN/LEFT/RIGHT buttons E /F /
C/I .
You can also enter to the following functions:
«STILL» ON/OFF by RED button .
«SCOPE» ON/OFF by GREEN button .
«EXIT» by BLUE button .
STILL
RED GREEN
SCOPE
PICTURE
MODE
YELLOW
STILL Mode
FACTORY SETTINGS
STILL ON
(FROZEN PICTURE)
STILL
RED GREEN
SCOPE
PICTURE
MODE
YELLOW
SCOPE Mode
SCOPE ON
( E NLAR GE PI CTUR E )
EXIT
BLUE
EXIT
BLUE
PICTURE Mode
Press the YELLOW button «PICTURE MODE» to select a
predetermined level (Video and Audio): FACTORY SETTINGS / CINEMA /
CINEMA PLUS / SOFT / PERSONAL / SPORT / RICH / FILMS.
You can also enter to the following functions:
«STILL» ON/OFF by RED button .
«SCOPE» ON/OFF by GREEN button .
«PICTURE MODE» by YELLOW button .
«EXIT» by BLUE button .
18
STILL
RED GREEN
SCOPE EXIT
PICTURE MODE
FACTORY SETTINGS
STILL
RED GREEN
SCOPE
PICTURE
MODE
YELLOW
BLUE
EXIT
BLUE
Page 20

Wide Mode Menu
With this menu you can select the width of the picture: AUTO,
PANORAMA, FULL, NORMAL, ZOOM 14:9 or CINEMA, by pressing
the WIDE MODE button .
Each time you press the WIDE MODE button , the width of the
picture changes as indicated:
AUTO * ➔ PANORAMA ➔ FULL ➔ NORM AL ➔ ZOOM 14:9 ➔ CIN EMA
When you Select: PANORAMA, ZOOM 14:9 or CINEMA, 4 options
appear on the screen:
V-SCROLL: Press the RED button to see the Vertical
SCROLL menu.
V-SIZE: Press the GREEN button to see the Vertical SIZE
menu.
NORMAL: Press the YELLOW button to normalize the
Vertical SCROLL and Vertical SIZE.
EXIT: Press the BLUE button to quit the menu.
V-SCROLL menu: Press the Cursor LEFT/RIGHT buttons /
to adjust the Vertical SCROLL (UP/DOWN).
V-SIZE menu:Press the Cursor LEFT/RIGHT buttons / to
adjust the Vertical SIZE (LARGE/SMALL).
AUTO.
PANORAMA
V-SCROLL
RED GREEN YELLOW BLUE
V-SIZE
NORMAL
Vertical SCROLL Menu
WIDE MODE
button
EXIT
BLUE
EXIT
* AUTO mode (VPS code): The VPS signal is sent by some
broadcasting stations with information of the original size.
When the TV is in AUTO mode and receives the VPS signal, it
changes the size automatically as indicated below:
When the TV is receiving VPS code 16:9 the TV selects
CINEMA automatically.
When the TV is receiving VPS code 14:9 the TV selects ZOOM
14:9 automatically.
When the TV is receiving VPS code 4:3 the TV selects
PANORAMA automatically.
When the TV does NOT receive VPS code the TV selects
PANORAMA automatically.
External source: When you are watching the TV-set through the
Euro-SCART or AV-1 terminals and it receives information of 16:9
format (through the audio-video control pin) the TV selects FULL
automatically.
PANORAMA
V-SCROLL
DOWN
Vertical SIZE menu
PANORAMA
V-SIZE
SMALL
UP
EXIT
BLUE
LARGE
EXIT
BLUE
19
Page 21

Wide Mode (Special detail information)
Special detail information about PANORAMA, FULL, NORMAL, ZOOM 14:9 and CINEMA (16:9).
PANORAMA
The Panorama Mode adapts the broadcast
picture to 16:9 format without changing the
centre of view. This is especially useful for
programmes like the News when the speaker
in the centre of the picture needs to be seen
clearly.
FULL
With Full Mode you adapt the picture 16:9
format while also stretching the centre of
view. This is an advantage, for example,
when watching sports games where there is
no real fixed centre of the picture.
NORMAL
You can watch 4:3 programs in 4:3 format by
switching to Normal Mode function.
4:3
16:9
ZOOM 14:9
Adapts the 14:9 broadcast cinema movies to
the 14:9 Mode.
CINE (16:9)
Adapts the 16:9 broadcast cinema movies to
the 16:9 Mode, thereby getting rid of the
black borders.
20
Page 22

Audio Adjustments
Note:
Note:
Loudspeakers Sound Volume /
Use the / buttons to increase/decrease the volume level. The
volume indicator will appear on the screen.
To adjust the headphones volume, go on to the section
entitled -SOUND menu- (page 22).
Sound mute button
Press the button to mute the sound. «MUTE»
appears on the screen. Press the button again to turn
the sound back on.
MUTE
Sound Mode Selector button
Press the butt on to c hange the sound in the sp eakers. The sound
mode will appear on the screen.
Depending on the sound transmission the sound reproduction can
be chosen as indicated below:
When the TV set is receiving a STEREO programme, the TV selects
STEREO automatically, and you can change:
STEREO씯씮MONO
When the TV is receiving a BILINGUAL programme, the TV selects
DUAL CHANNEL A automatically, and you can change:
DUAL CHANNEL A씯씮DUAL CHANNEL B씯씮DUAL CHANNEL A B씯씮MONO
When the TV is receiving a MONO (NICAM) programme, the TV set
selects MONO NICAM automatically, and you can change:
MONO NICAM씯씮MONO (FM)
When the TV is receiving a MONO (FM) programme, the TV set
selects MONO automatically but the sound mode cannot be
change.
STEREO
MONO
See the -SOUND MODE- (page 23) to change the Sound Mode in the headphones.
External source: When you are watching the TV-set through the Euro-SCART, AV-1 or S-Video terminals, the Sound
Mode Selector button is not operative.
21
Page 23

CHCHCH
CH
Sound Setting Mode
Sound qualities are adjustable in this menu.
1. Press the MENU button to see the MAIN Menu.
2. Press the Cursor DOWN button to select «AUD I O A DJUSTMENTS».
CH
MAIN Menu
PICTURE
ADJUSTMENTS
AUDIO
ADJUSTMENTS
3. Press the MENU button to see the SOUND Menu
SOUND Menu
4. Press the RED button to select « LOUD SP EAKERS» or press the GREEN button to select «HEAD P HONES».
SOUND Menu «LOUDSPEAKERS»
VOLUME
EQUALIZER
LOUDNESS
BALANCE
NORMALISE
➜
LOUDSPEAKERS
RED GREEN
LOUDSPEAKERS
HEADPHONES
5. Press the Cursor UP / DOWN buttons
/ to select an option from the list:
SOUND Menu «HEADPHONES»
VOLUME
BASS
TREBLE
BALANCE
NORMALISE
➜
LOUDSPEAKERS
RED GREEN
HEADPHONES
HEADPHONES
For «LOUDSPEAKERS»: VOLUME, EQUALIZER, LOUDNESS, BALANCE or NORMALISE.
For «HEADPHONES»: VOLUME, BASS, TREBLE, BALANCE or NORMALISE.
The selected option will appear in white letters on a blue background.
6. Adjust the so und quality acc ording to yo ur p references w ith the Cursor
LEFT / RIGHT buttons
/ .
«EQUALIZER» Menu
Select «EQUALIZER»to adjust the equalization.
a) Press the Cursor LEFT / RIGHT buttons / to select:
120 Hz, 500 Hz, 1K Hz, 5 KHz or 10 KHz.
«EQUALIZER» Menu
VOLUME
EQUALIZER
LOUDNESS
BALANCE
NORMALISE
➜
LOUDSPEAKERS
120 500 1k 5k 10k
b) Press the Cursor UP / DOWN buttons / to Adjust.
Note:
The Equalizer adjustments are not operative for the headphones.
LOUDSPEAKERS HEADPHONES
«LOUDNESS» mode
Select «LOUDNESS»to improve the sound quality [].
Press the Cursor LEFT / RIGHT buttons
Normal, Special or Off
Note:
The «LOUDNESS» modes are not operative for the headphones.
«LOUDNESS» increases the volume of low and high frequency signals according to the current volume setting.
In «NORMAL» mode keeping the amplitude of the 1 KHz reference frequency constant.
In «SPECIAL» mode keeping the amplitude of the 2 KHz reference frequency constant.
/ to select:
22
«LOUDNESS» mode
VOLUME
EQUALIZER
LOUDNESS
BALANCE
NORMALISE
➜
LOUDSPEAKERS HEADPHONES
LOUDSPEAKERS
OFF
Page 24

«NORMALISE»
CHCHCH
Select «NORM ALISE» and press the MENU but t on to no rmalise
audio levels to default factory settings.
«NORMALISE»
VOLUME
LOUDSPEAKERS
7. Press the Cursor DOWN button to see more options:
«LOUDSPEAKERS» (Mode), «HEADPHONES» (Mode), «EFFECTS»
and «SOUND IDENTIFICATION».
SOUND MODE
8. Press the Cursor UP / DOWN buttons
/ to select:
«LOUDSPEAKERS» or «HEADPHONES».
9. Press the Cursor LEFT / RIGHT buttons / to change the
sound mode, as indicated on page 21, in the -Sound Mode
Selector- chapter.
«EFFECTS»
Select «EFFECTS»and press the Cursor LEFT / RIGHT buttons
/ to activate (ON) or deactivate (OFF) the spatial effect [].
EQUALIZER
LOUDNESS
BALANCE
NORMALISE
➜
SOUND MODE
LOUDSPEAKERS
HEADPHONES
EFFECTS
«EFFECTS»
HEADPHONES
EFFECTS
SOUND
IDENTIFICATION
Press the MENU
button to
normalise...
STEREO
OFF
«SOUND IDENTIFICATION»
«SOUND IDENTIFICATION»
Select «SOUND IDENTIFICATION» and press the Cursor LEFT /
EFFECTS
RIGHT but tons / to activate (ON) or deactivate (OFF) the automatic Identification of audio system of the current program [].
SOUND
IDENTIFICATION
ON
10. Press the MENU button to close the Menu.
«EFFECTS»
EFFECT OFF: Normal sound without sound effect.
EFFECT ON: the spatial effect depends on whether the feed is MONO or STEREO.
If the source feed is MONO, it produces a “Pseudo Stereo” effect.
If the source feed is STEREO, it produces a spatial effect, expanding the stereophonic image.
«SOUND IDENTIFICATION»
IDENTIFICATION ON: The TV automatic ally identifies the received aud io system MONO FM, STEREO or DUAL
SIGNAL.
IDENTIFICATION OFF: Disqualifies the automatic identification of t he audio system and forces the sound into
MONO FM. This mode c an b e co nvenient when the level of the signal received is ex t remely w eak. This function is
independent for every program.
Note: the audio «EFFECTS» do not work with headphones.
23
Page 25

Features setting mode
Note:
Note:
In this mode you can set the «ON-TIMER» an «OFF-TIMER», set the CHILD LOCK, view the all functions implemented in
your TV set demonstration and set the POSTCODE.
1. Press the MENU button to see the MAIN Menu.
2. Press the Cursor DOWN button F to select «OTHER FUNC-
TIONS».
3.
Press the MENU button t o see the «OTHER FUNCTI ON S» Menu.
«OTHER FUNCTIONS» Menu
4. Press the Cursor UP/DOWN buttons E /F to select an option
from the list:
«ON TIMER», «OFF TIMER», «CHILD LOCK», «DEMO» or
«POSTCODE».
The select ed item w ill appear on screen in whit e letters on a blue
back ground.
«OTHER FUNCTIONS» Menu «ON TIMER»
The On-Timer is used to automatically switch on the TV set during the day.
If necessary, repeat steps
1. to 4. to see the «ON TIMER»Menu.
5. Press the Cursor RIGHT butt on to select the «TIME» (current
time) in white letters.
6. To programme the current Time: In order to be able to run this
function, it is essential to adjust the current time.
Automatic Time adjustment: If you are receiving a channel with
Teletext, the Time is automat ically synchronized wit h the Teletext
cloc k.
Important: If a signal via satellite is being rec eived , or if correc t time
*
cannot be obtained, the time will have to be adjusted manually.
M anual Time adjustme nt: To adjust the tim e manually, this sh o uld
be done with the 0 to 9 digit buttons.
7. Adjusting t he «SWITCH ON» Tim e: select «SWITCH ON» in white
letters w ith the Cursor RIGHT butt on and p ress the 0 * 9 digit
buttons to adjust the desired switch on time.
The GREEN butt on is used to cancel the «SWITCH ON» function.
8. Press the MENU button to close the Menu.
9. Press the Stand-b y b ut t on (æ TV) on the remot e c ont ro l to p ut t he
TV into switch on Stand-by Mode.
When the preset time is reached, the TV se t turns ON automatically.
* As a safety precaution, in the case of nobody being home when the
television switches on automatically, the television will return to
Stand-by Mode after 120 minutes; if it is to continue to run, any button
on the remote control functions should be pressed.
In the event of a power cut, disconnection from the plug or
television switch, all the data on the «ON TIMER» will be cancelled.
MAIN Menu
PICTURE
ADJUSTMENTS
AUDIO
AJUSTMENTS
OTHER
FUNCTIONS
INSTALL
AND TUNE
«OTHER FUNCTIONS» Menu «ON TIMER»
ON TIMER
OFF TIMER
CHILD LOCK
DEMO
TIME 08:30
SWITCH ON **:**
➜
CANCEL
GREEN
«OTHER FUNCTIONS» Menu «OFF TIMER»
The «OFF T I MER» automatically switches the TV se t to standby mode
after a predetermined period, (30, 60, 90 or 120 minutes) .
If necessary, repeat steps 1. to 4. to see the «OFF TIMER» Menu.
5. Pressing the Cursor RIGHT button , se lect the desired period in
white letters.
Select «O F F» to disconnect off-timer.
6. Press the MENU button to close the Menu.
After the selected time has passed, the TV will turn itself off automatically,
and switch to Stand-by mode.
The «OFF T I MER» data will be cancelled if you turn off the TV by
the Standby button (æ TV) on the remote control or with the
Main power button (® ) on the TV set.
24
«OTHER FUNCTIONS» Menu «OFF TIMER»
ON TIMER
OFF TIMER
CHILD LOCK
DEMO
OFF
120 Min.
90 Min.
60 Min.
30 Min.
➜
Page 26

Child Lock (Channel Block)
Note:
You can loc k a TV channel to prevent unsup ervised TV viewing by fo llo w ing t hese p rocedures; the pro t ec t io n can
apply t o the television itself «LOCK ALL» or t o specific p ro g ramm es «LOCK PROGRAMME». With t he CHILD LOCK
funct io n, yo u c an also p ro g ramm e a tim e p eriod d u ring which t he TV will be protected. (Your children c annot selec t
the channel, which you loc k ed).
1. Press the MENU but t o n to see the MAIN M enu.
M AIN Menu
2. Press the Cursor DOWN but t o n F to select «OTHER FUNCTIONS».
3. Press the MENU but t o n to see the «OTHER FUNCTI ON S»
M enu.
MAIN Menu
PICTURE
ADJUSTMENTS
AUDIO
ADJUSTMENTS
OTHER
FUNCTIONS
INSTALL
AND TUNE
«OTH ER FUNC TION S» Menu
4. Press the Cursor DOWN but t o n F to select «CHILD LOCK» in whit e
letters on a b lue b ac kg ro und .
5. Press the MENU but t o n to see the CH ILD LOCK Menu.
CHILD LOCK Menu
6. Press the Cursor UP/DOWN buttons E / F to select an optio n from
the list:
«LOCK ALL», «LOCK PROGRAMME» or «CLEAR LOCK»
The select ed it em will appear on sc reen in a blue b ox .
CHILD LOCK Menu «LOCK ALL»
Select this o p tion for p ro t ec ting the acc ess t o t he w ho le TV.
If necessary, repeat step s 1. to 5. t o s ee the CHI LD LOCK Menu.
7. Press the Cursor RIGHT butto n to select t he p ro t ec t io n type (white
letters):
Select «NONE»:To c anc el t he p rotectio n.
Select «ALWAYS LOCKED»: The access t o the TV w ill b e p ro t ec t ed
throug hou t t he d ay.
Select «START: **:**/STOP: **:**»:to bloc k ac c ess t o t he TV during the
desired p eriod o f t im e. Enter the hours and m inut es using the numeric
but t o ns 0 ~ 9 t o set t he st arti ng and end ing t im es of t he lock period .
8. Press the GREEN butt on to m emo rize.
9. Press the MENU but t o n to c lear the on-screen display.
From this t im e fo rw ard , w henever the p rotectio n c o nd itions are met, the
screen will b e b locked and the «LOCKED MODE» message will b e
disp layed.
Press any number key on the remo t e c ontrol to unlo c k t he TV.
«OTHER FUNCTIONS» Menu
ON TIMER
OFF TIMER
CHILD LOCK
DEMO
Press the MENU
button to enter
the CHILD LOCK
menu.
➜
CHILD LOCK Menu «LOCK ALL»
LOCK ALL
LOCK PROG.
CLEAR LOCK
NONE
ALWAYS LOCKED
START: **:**
STOP: **:**
MEMORIZE
GREEN
Since the “key” for unlocking the TV is the remot e c ontrol, ma ke sure you do not misplace it.
25
Page 27

«LOCK PROGRAM ME» m e nu
Note:
Note:
Select this o p tion to p ro t ec t the access to sep arate pro g ramm es.
«LOCK PROGRAMME» menu
1. Press the MENU but t o n to c lear the on-screen display.
LOCK ALL
2. Select t he p ro gram me c hannel numb er yo u w ant t o p ro t ec t u sing
the 0 ~ 9 d ig it b uttons o r t he c hannel selecto r E / F but t o ns.
3. Repeat step s 1. t o 5. (Page 25) to see the CHILD LOCK Menu.
4. Press the Cursor DOWN but t o n F to select «LOCK
LOCK PROG.
CLEAR LOCK
NONE
ALWAYS LOCKED
START: **:**
STOP: **:**
PROGRAMME» (blue b ac kg ro und ).
5. Press the Cursor RIGHT butt on to select t he p ro t ec t io n t ype
(white letters):
Select «NONE»:To c anc el t he p rotectio n fro m t he select ed
MEMORIZE
prog ramm e.
Select «ALWAYS LOCKED»: To prot ect the acc ess fro m the selected
prog ramm e thro ug ho ut t h e day.
GREEN
Select «START **:** / STOP **:**»:to bloc k ac c ess t o the selected c hannel during the desired period of tim e. Enter
the hours and m inutes using the numb er keys (0 ~ 9) set t he st art ing and end ing t im es of t he lock period .
6. Press the GREEN butt on to m emo rize.
7. Press the MENU but t o n to c lear the on-screen display.
From this t im e fo rw ard , w henever the p rotectio n c o nd itions are met, the sc reen will be bloc ked and t he «LOCKED
MODE» message will b e d isp layed.
Press any digit b utton t o unlo c k t he TV.
Since the “key” for unlocking the TV is the remot e c ontrol, ma ke sure you do not misplace it.
«C LEAR LOCK» me nu
«CLEAR LOCK» menu
This optio n enables you to erase all the adjustment s m ade t o t he
CHILD-LOCK func t io n.
If necessary repeat step s 1. t o 5. (Page 25) to see the CHILD LOCK
Menu.
6. Press the Cursor UP button E to select «CLEAR LOCK».
7. Press the MENU but t o n to c o nfi rm that you w ant t o init ialise
LOCK ALL
LOCK PROG.
CLEAR LOCK
Press the MENU
button to clear
the CHILD LOCK
system
the CHILD LOCK system.
8. Press the MENU but t o n to c lear the on-screen display.
Use the «CLEAR LOCK» to cancel any previously set CHILD
LOCK programm es t o avoid m alfunction w hen a new
prog ram is set .
Notes: In order for the timed protection to function correctly, the internal TV clock must be set at the right time.
To check the time setting, see section -Automatic or Manual time adjustment- on page 24.
Demo (Demonstration)
The demonstratio n func tio n allows yo u to see all the menus im plemented in
this TV set.
1. Press the MENU button to see the MAIN Menu.
2. Press the Cursor DOWN button F to select «OTHE R FUNCTI O NS».
3. Press the MENU button to see the «OTHER FUNCTIONS»Menu.
4. Press the Cursor DOWN button F to select «DEMO».
The selected item will appear on screen in white letters on a blue background.
5. Press the MENU button to begin the demonstration.
6. Press any button on remote control to exit this function when you wish.
ON TIMER
OFF TIMER
CHILD LOCK
DEMO
➜
Press the MENU
button to start
the DEMO.
26
Page 28

Postcode Security
This optio n allow s y ou to set a co d e (Postcode), whic h w il l b e d isp layed at TV switc h o n t im e. There is a Password
(PSW) to c h ange the c o d e.
MAIN Menu
SET PASSWORD AND POSTCODE
1. Press the M ENU but t o n to see the MAIN Me nu.
M AIN Menu
2. Press the Cursor DOWN but ton F t o select «OTHER
FUNCTIONS».
3. Press the M ENU but t o n to see the «OTHER FUNCTI ONS»
M enu.
OTHER
FUNCTIONS
INSTALL
AND TUNE
«OTH ER FUNC TION S» Menu
4. Press the Cursor UP b utton E to see the POSTCODE Menu.
POSTCODE M enu / ENTER PSW (Password)
It is indispensable to enter a Password in o rd er t o c o nt in ue
conf igurin g the Postco d e.
5. Enter the 4- d ig it s using t h e numb er b ut tons 0 to 9 t o set t he
Password.
Password set (confirmation)
6. When the Password is first ent ered, t he TV will ask for
confirmation.
If this is t he c ase, press t he BLUE but t o n .
Then the "ENTER CODE" will appear on sc reen.
ENTER CODE (Postcode)
7. Press the Cursor UP/ DOWN but t o ns E / F to set o r c hange
the first let t er/ num ber. Letters A to Z o f t he alphab et , a b lank sp ac e
and the numbers 0 to 9 w ill ap p ear sequenti ally.
8. Press the Cursor LEFT / RIGHT butto ns
/ for changi ng the
posit io n o f t he c urso r (red back gro und) and t he E /F butt o ns
for c hanging t he letter/numb er. Repeat t his ac t io n fo r o t her
letters/ num bers.
9. When you have finished th e eighth l etter/numb er, p ress t he BLUE
but t o n to con firm t he Post code.
«OTHER FUNCTIONS» Menu
ON TIMER
OFF TIMER
TIME 08:30
SWITCH ON **:**
POSTCODE Menu
ENTER PSW (Password)
POSTCODE
INTRODUCE PASSWORD
ENTER PSW
- - - -
Pasword set (Confirmation)
POSTCODE
Press BLUE button to confirm
ENTER PSW
*** *
ENTER CODE (Postcode)
POSTCODE
Press BLUE button to confirm
ENTER CODE
-
- --- ----
Postcode set
10. When the Postc o de has been set:
Press the GREEN but t o n to ac t ivat e the Post code, w hic h will be
disp layed at TV switc h on time (for some second s) or
Press the RED button if you wish to d eactivate the Postcode; in
this c ase it w ill no t b e d isp layed.
About Postcode: If you memorize a «Post Co d e», in the events of
lose or rob b ery of TV set and later recovery, you c an id ent ify yo ur
TV set by Po st c o d e.
Notes: As a precaut io nary measure, make a note of you r
«Password» and the «Post c o d e», and keep it in a familiar pl ace
(see last page of t his m anual).
IF YOU LOSE OR FORGET YOUR «PASSWORD», CONTACT
YOUR TECHNI CAL SERVICE OR DEALER.
27
Postcode set
POSTCODE
DEACTIVATE : RED BUTTON.
ACTIVATE : GREEN BUTTON.
ENTER CODE
*** *****
Page 29

C HANGE PASSWORD AND/OR POSTCODE
If necessary, repeat step s 1. to 4. (page 27) to see the POSTCODE
M enu.
POSTCODE M enu / ENTER PSW (Password)
It is indispensable to enter t he c urrent Passwo rd in o rd er t o c hange
the Password and /or the Post c o d e.
5. Enter the current Passwo rd (4-d ig it s) using the number butt o ns 0
to 9 t o see the CH ANGE PASSWORD Menu.
POSTCODE Menu
ENTER PSW (Password)
POSTCODE
INTRODUCE PASSWORD
ENTER PSW
- - - -
CHANGE PASSWORD Menu
CHANGE PASSWORD Menu
If you do no t int end to change t he Password , press the GREEN
but t o n to con t inue and then please proceed to stage 9..
6. Press the RED button to c hang e the Passwo rd
CHANGE PASSWORD Menu / ENTER PSW
7. Enter the 4- d ig it s using t h e numb er b ut tons 0 to 9 t o set t he new
Password.
Password set (confirmation)
8. When the new Passwo rd is first ent ered, t he TV will ask for
confirmation.
If this is t he c ase, press t he BLUE but t o n .
Then the "ENTER CODE" will appear on screen.
ENTER CODE (Postcode)
9. Press the Cursor UP/DOWN butto ns E / F to set or change
the first let t er/ num ber. Letters A to Z o f t he alphab et , a b lank sp ac e
and the numbers 0 to 9 w ill ap p ear sequenti ally.
10. Press the Cursor LEFT / RIGHT but t o ns
/ for changi ng the
posit io n o f t he c urso r (red back gro und) and t he E /F butt o ns
for c hanging t he letter/numb er. Repeat t his ac t io n fo r o t her
letters/ num bers.
11. When you have finished t he eight h let t er/number, p ress t he BLUE
but t o n to con firm t he Post code.
POSTCODE
RED BUTTON: CHANGE PASSWORD
GREEN BUTTON: CONTINUE
ENTER PSW
*** *****
CHANGE PASSWORD Menu
ENTER PSW
POSTCODE
INTRODUCE PASSWORD
ENTER PSW
- - - -
Pasword set (Confirmation)
POSTCODE
Press BLUE button to confirm
ENTER PSW
*** *
ENTER CODE (Postcode)
POSTCODE
Press BLUE button to confirm
ENTER CODE
-
- --- ----
Postcode set
12. When the Postc o de has been set:
Press the GREEN but t o n to ac t ivat e the Post code, w hic h will be
disp layed at TV switc h on time (for some second s) or
Press the RED button if you wish to d eactivate the Postcode; in
this c ase it w ill no t b e d isp layed.
About Postcode: If you memorize a «Post Co d e», in the events of
lose or rob b ery of TV set and later recovery, you c an id ent ify yo ur
TV set by Po st c o d e.
Notes: As a precautio nary measure, make a note of yo ur
«Password» and the «Post c o d e», and keep it in a familiar pl ace
(see last page of t his m anual).
IF YOU LOSE OR FORGET YOUR «PASSWORD», CONTACT
YOUR TECHNI CAL SERVICE OR DEALER.
28
Postcode set
POSTCODE
DEACTIVATE : RED BUTTON.
ACTIVATE : GREEN BUTTON.
ENTER CODE
*** *****
Page 30

TV Channel Setting (Advanced)
VÍDEO
Note:
T o repeat the AUTO INSTALLATION
In this mode you can to do again the AUTO INSTALLATION (e.g.;
after moving house).
This function frees you of troublesome channel presetting procedures. Simply follow the instructions below to automatically store all onair and cable real channels into the programme channel memories.
1. Press the MENU button to see the MAIN Menu.
MAIN Menu
2. Press the Cursor DOWN butto n F to select «INSTALL AND
TUNE».
3. Press the MENU button to see the TUNE Menu.
TUNE Menu
4. Press the Cursor UP button E to select «AUTO-TUNE» (blue
box ).
5. Press the MENU button to start the “AUTO
INSTALLATION”.
The «AUTO INSTALLATION» menu will appear on your TV
screen.
The TV is ready t o p reset auto matic ally all local c hannels for you.
If the TV is being used with a VCR, turn on the VCR and play back
a pre-rec ord ed t ape. The signal from t he RF terminal of your VCR
is assigned to a T V channel.
6. Now, press any butt on on the TV remot e control t o start Aut o
Channel Preset.
MAIN Menu
OTHER
FUNCTIONS
INSTALL
AND TUNE
TUNE Menu
MODE
EDIT
AUTO-TUNE
«AUTO INSTALLATION»
SHARP
AUTOINSTALLATION
Be sure the antenna cable is
connected…
Press any button on
the handset to start.
VCR
Press MENU button
to Auto-tune
WARNING! All
pretuned channels
will be lost.
The TV will go t hrough the follow ing steps auto matically and
sequentially:
Automatic Channel Sorting System (ACSS): The TV set
SEARCHES FOR FREQUENCIES, memorises the channels
found, and sorts them ( according to technical criteria) from Pr-01
of the TV, to a maximum of 99 programmes.
This tuning process may take several minutes to perform.
Editing:When the TV has finished the automatic search, the
«Stored programmes» menu will appears on the screen.
If you wish to rename the channels or change the order, go on to
the section entitled -Stored programmes- (page 12).
If you wish to go out of the menu, press the BLUE button .
Searching
01 %
«Stored programmes»
Stored programmes:
(red)
Edit this program
(green)
(blue)
Go to sorting mode
Delete this program
Exit this menu
(yellow)
Pr 01
Searching
please wait
Pr 01 CH21 BBC1
Pr 02 CH31 BBC2
Pr 03 CH41 ITV
Pr 04 CH51 CH4
Pr 05 CH61 CNN
Pr 06 - - - - - - - Pr 07 - - - - - - - Pr 08 - - - - - - - Pr 09 - - - - - - - Pr 10 - - - - - - - -
29
Page 31

Manual Channel Preset (Preset using real channel numbers)
1. Select the pro gramme channel number you want to p reset wit h
the 0 ~ 9 digit buttons.
2. Press the MENU button to see the MAIN Menu.
MAIN Menu
3. Press the Cursor DOWN button F to select «INSTALL AND
TUNE».
4. Press the MENU button to see the TUNE Menu.
TUNE Menu «CHANNEL»
5. Press the Cursor RIGHT button to select (w ith white lett ers)
the Channel type: CH (Aerial) or CC (Cable).
6. Enter the real channel number you want to store w ith the 0 ~ 9
digit buttons (two digit entry only).
7. Press the GR EEN button to memorize.
8. Press the MENU button to clear the on-screen display.
9. Repeat the above procedure for presetting other programme.
MAIN Menu
PICTURE
ADJUSTMENTS
AUDIO
ADJUSTMENTS
OTHER
FUNCTIONS
INSTALL
AND TUNE
TUNE Menu «CHANNEL»
CHANNEL
SEARCH
F-TUNE
MODE
EDIT
AUTO-TUNE
CH
CC
Pr 06
CH21
MEMORIZE
GREEN
30
Page 32

Manual Channel Preset (Preset using frequency tuning)
1. Select the pro gramme channel number you want to p reset wit h
the 0 ~ 9 digit buttons.
2. Press the MENU button to see the MAIN Menu.
MAIN Menu
3. Press the Cursor DOWN button F to select «INSTALL AND
TUNE».
4. Press the MENU button to see the TUNE Menu.
TUNE Menu «CHANNEL»
5. Press the Cursor RIGHT but tons t o select (w ith whit e letters)
the Channel type: CH (Aerial) or CC (Cable).
6. Press the Cursor DOWN butt on F to select «SEARCH» (White
letters on a blue background).
MAIN Menu
PICTURE
ADJUSTMENTS
AUDIO
ADJUSTMENTS
OTHER
FUNCTIONS
INSTALL
AND TUNE
TUNE Menu «CHANNEL»
CHANNEL
SEARCH
F-TUNE
MODE
EDIT
AUTO-TUNE
CH
CC
Pr 06
CH21
MEMORIZE
TUNE Menu «SEARCH»
7. Press the Cursor LEFT/RIGHT buttons
/ to start preset.
The tuning sequence w ill stop when a signal is d etect ed, if t he signal
is not the required channel press or to continue.
8. Press the GR EEN button to memorize.
9. Press the MENU button to clear the on-screen display.
10. Repeat the above procedure for presetting other programme
channels.
TUNE Menu «SEARCH»
CHANNEL
SEARCH
F-TUNE
MODE
EDIT
AUTO-TUNE
Pr 06
CH21
MEMORIZE
GREEN
31
Page 33

After preset has been performed
The following features are available for preset channels:
MAIN Menu
Fine-tuning
When a preset programme channel is not exactly tuned, you can
fine-tune the channel in this mode.
1. Select the p rogramm e channel numb er you want to t une using t he
0 ~ 9 digit buttons.
2. Press the MENU button to see the MAIN Menu.
MAIN Menu
3. Press the Cursor DOWN button F to select «INSTALL AND
TUNE».
4. Press the MENU button to see the TUNE Menu.
TUNE Menu
5. Press the Cursor DOWN button F to select «F-TUNE» (FINE
TUNE) (White letters on a blue background).
FINE-TUNE Menu
6. Press and ho ld t he Cursor LEFT or RIGHT butt o ns, unt il t he
best tuning position is found, for the best picture and sound.
After Fine-tuning the programme number will turn from green to
yellow.
7. Press the GREEN button to memorize.
8. Press the MENU button to clear the on-screen display.
Repeat the above procedure for other programme channels as
required.
PICTURE
ADJUSTMENTS
AUDIO
ADJUSTMENTS
OTHER
FUNCTIONS
INSTALL
AND TUNE
TUNE Menu
CHANNEL
SEARCH
F-TUNE
MODE
EDIT
AUTO-TUNE
FINE-TUNE Menu
CHANNEL
SEARCH
F-TUNE
MODE
EDIT
AUTO-TUNE
CH
CC
Pr 06
CH21
MEMORIZE
Pr 06
CH21
MEMORIZE
MODE
This feature allows you t o select TV, VCR, SKIP. First follow the above
steps 1., 2., 3., and 4. The TUNE Menu will appear on screen.
5. Press the Cursor DOWN button F to select «MODE».
6. Press the Cursor RIGHT button to select (with white letters)
TV, VCR or SKIP:
TV: If the TV signal is weak the image can shake.
In this case put it in TV mode.
VCR: In some case, the upper part of the picture may be distorted
when receiving signal from a VCR via RF terminal on the TV
set. Selecting this option will help to reduce his effect.
SKIP:Allows you to SKIP channels you do not want to view when
using channels selector buttons E /F .
7. Press the GREEN button to memorize.
8. Press the MENU button to clear the on-screen display.
9. Repeat the above procedure for other programme channels as
required.
32
MODE
CHANNEL
SEARCH
F-TUNE
MODE
EDIT
AUTO-TUNE
TV
VCR
SKIP
GREEN
Pr 06
CH21
MEMORIZE
GREEN
Page 34

Edit (Stored programmes)
This features allows you to delete, sort or input name for each one of the programmes with A ~ Z, 0 ~ 9 and hyphen.
MAIN Menu
1. Press the MENU button to see the MAIN Menu.
MAIN Menu
2. Press the Cursor UP button E to select «INSTALL AND
TUNE».
3. Press the MENU button to see the TUNE Menu.
TUNE Menu
4. Press the Cursor UP button E to select «EDIT» (blue box).
5. Press the MENU button to see the Stored programmes
Menu
PICTURE
ADJUSTMENTS
AUDIO
ADJUSTMENTS
OTHER
FUNCTIONS
INSTALL
AND TUNE
TUNE Menu
CHANNEL
SEARCH
F-TUNE
MODE
EDIT
AUTO-TUNE
Pr 06
CH21
Press the MENU
button to enter...
«Stored programmes» menu
The «Sto red programmes» menu will appear on sc reen with a list of
the channels, whic h have been memoris ed wit h t he available opt ions:
a) Select programme to be edited 씮 E / F .
b) «Edit this program» 씮 RED button .
c) «Go to sorting mode» 씮 GREEN button .
d) «Delete this program» 씮 YELLOW button .
e) «Exit this menu» 씮 BLUE button .
With these options, you will be able to organise the real channels
(CH **) memorised in the TV programmes (Pr 01 ... Pr 99) and put
them into your own preferred order.
«Edit this program» Edit name mode
Stored programmes:
Pr 01 CH21 BBC1
Pr 02 CH31 BBC2
Pr 03 CH41 ITV
Pr 04 CH51 CH4
Pr 05 CH61 CNN
Pr 06 - - - - - - - Pr 07 - - - - - - - Pr 08 - - - - - - - Pr 09 - - - - - - - Pr 10 - - - - - - - -
Press the MENU
button to exit.
«Go to sorting mode» Sorting mode
Stored programmes:
Pr 01 CH21 BBC1
Pr 02 CH31 BBC2
Pr 03 CH41 ITV
Pr 04 CH51 CH4
Pr 05 CH61 CNN
Pr 06 - - - - - - - Pr 07 - - - - - - - Pr 08 - - - - - - - Pr 09 - - - - - - - Pr 10 - - - - - - - -
Insert the marked
programme in the
position you wish.
Press green button to
finish.
«Stored programmes» menu
Stored programmes:
(red)
(green)
(yellow)
(blue)
Edit this program
Go to sorting mode
Delete this program
Exit this menu
Pr 01 CH21 BBC1
Pr 02 CH31 BBC2
Pr 03 CH41 ITV
Pr 04 CH51 CH4
Pr 05 CH61 CNN
Pr 06 - - - - - - - Pr 07 - - - - - - - Pr 08 - - - - - - - Pr 09 - - - - - - - Pr 10 - - - - - - - -
«Delete this program» Delete mode
Stored programmes:
Pr 01 CH21 BBC1
Pr 02 CH31 BBC2
Pr 03 CH41 ITV
Pr 04 CH51 CH4
Pr 05 CH61 CNN
Pr 06 - - - - - - - Pr 07 - - - - - - - Pr 08 - - - - - - - Pr 09 - - - - - - - Pr 10 - - - - - - - -
WARNING!
This programme
will be erased.
Press yellow
button again
to confirm.
Or press any
other button
to cancel
For more explanation, please go on to the section entitled -Stored programmes- (page 12).
33
Page 35

Other Features
TV/Video selector button
With this button you can select either source of input for the TV.
1. When the TV/VIDEO button is first pressed, the TV/Video
menu appears and TV mode changes to VIDEO mode.
The screen is displayed in the last VIDEO mode.
2. Press the corresponding COLOUR button to select one of
the input sources, as indicated in the diagram.
If you press any COLOUR button during VIDEO mode, the
TV/Video menu will appears again.
Note:
Each time the corresponding COLOUR button is
pressed, AV1 / S-VIDEO and FRONT / FRONT S-VIDEO
change as indicated below.
GREEN button : AV1 씯씮S-VIDEO
BLUE button : FRONT 씯씮FRONT S-VIDEO
The selected input will appear on the screen.
3. Press the MENU button to remove the menu from the screen or press the TV/VIDEO button and you will
exit the menu and VIDEO mode will change back to TV mode.
TV/Video Menu
SCART
REED
AV-1
S-VIDEO
GREEN
EURO-SCART
FRONT
S-VIDEO
BLUE
CLOCK button
Press the button to display the current time on the screen.
Note:
That this function operates only if the station you are tuned
to broadcasts a teletext signal.
Headphone jack
The headphone jack is located behind the door.
How to open the door: Put the finger in the lower part of the door
and press upward.
Safety: In order to protect your ears, turn down the volume of the
headphones before connecting them.
1. Press the MENU button to see the MAIN Menu.
2. Press the Cursor DOWN button F to select
«AUDIO ADJUSTMENTS»
3. Press the MENU button to see the SOUND Menu
4. Press the GREEN button to select « HEADPHONES VOLUME».
5. Turn down the volume with the Cursor LEFT button .
6. Insert the headphone plug all the way into the headphone jack as indicated on the drawing.
7. Adjust the headphone volume with the Cursor LEFT / RIGHT / buttons.
8. Press the MENU button to close the Menu.
Note:
The audio «EFFECTS» cannot be adjusted for the headphones.
BEHIND THE DOOR
DOOR
3.5 mm Ø Jack plug
Earphone or Headphone
Impedance 16~600 Ω
➜
Sub-titles button h
This set has a quick access function for teletext subtitles, so that they can be selected by the press of one button.
Simply press the h button on the remote control whilst in viewing mode (I.E. not teletext etc.) and subtitles will
automatically be selected and displayed on the screen.
To exit this mode, press h button again on the remote control.
Note:
The subtitle page is 888 by default. Maybe it is possible that a broadcaster doesn't use this page for subtitle.
Please check and choose in Teletext mode the correct page manually.
34
Page 36

VCR mode
SHARP VCR can be operated using the TV remote control.
Channel selector buttons (VCR) CH
These buttons are used for changing channels and setting the timer.
Play button
Press this button to start playback.
Record button
Press this button to start recording. If the videocassette is protected
against recording, it will be ejected.
Stop button
Press this button to stop playback or recording.
Operate button VCR
Press this button to turn your VCR on.
Fast forward/picture search forward and Rewind/picture
search reverse buttons
Both these buttons have the following function:
Fast Forwarding and Rewinding
To move through the cassette faster, press the STOP button
to stop and then press the or button to fast forward or
rewind the cassette.
Press the STOP button to stop fast forward or rewind.
Picture Search
During playback, press the button for forward picture search,
or the button for reverse search.
Press the PLAY button to resume normal playback.
For further details, please refer to operation manual of your VCR.
35
Page 37

TELETEXT Mode
What is Teletext?
Teletext is an information service, organized like a magazine, which is provided by
some television stations in addition to regular television broadcasting. Your
television receives spec ial Teletext signals broad cast b y a TV statio n, proc esses
the inform ation and disp lays it graphically o n the screen. News, weather and
sports information, stock exchange prices, program previews and closed
captioning for the deaf are among the many services available through Teletext.
Teletext informat ion is organized m uch like a magazine: acco rding t o pages and
sub-pages. The basic unit of displayed information is the page. A sub-page is one
of a series of pages.
Teletext reception is controlled by using the remote control. Refer to the
appropriate button descriptions for operation of the Teletext functions.
Teletext features
Depending on t he TV programme, t he Teletext pages are transmit ted using
diff erent syst em. Your SHARP TV is ad justed to rec eive 2 Teletext system s,
namely FLOF and LIST, which are automat ically identified by the receiver. The
user can easily identify them by the manner in which they appear on the screen.
FLOF
TELETEXT
News Sports
RED GREEN
Movie
YELLOW
Weather
BLUE
TELETEXT
100 200
RED GREEN
LIST
YELLOW
300
400
BLUE
To switch ON and switch OFF the Teletext
1. Select the TV channel with Teletext information that you want to see.
2. Press the TEXT/MIX/PICTURE button a/b/Q to select Teletext mode.
3. Press the TEXT/MIX/PICTURE button a/b/Q two times to go out from Teletext mode.
Basic TEXT features
a) Fast Page Selection
1. Select the appropriate programme channel.
2. Press the TEXT/MIX/PICTURE button a/b/Q to select Teletext mode.
3. To recall a page number displayed in the coloured brackets, simply press the corresponding coloured button.
b) 0-9 digi buttons
Enter a desired page number with the 0-9 digit buttons. (To select P.100: press 1, 0, 0).
c) Page selector (UP/DOWN)
You can sequentially select page numbers by pressing the Cursor UP/DOWN buttons E /F (channel selector
buttons in the TV mode).
36
Page 38

Other TEXT features
TEXT/MIX/PICTURE button a/b/Q
Every time this button is pressed, the Teletext is displayed in different modes, following the sequence described:
In TV mode: Press the TEXT/MIX/PICTURE button a/b/Q to enter the teletext mode.
In teletext mode: Press the TEXT/MIX/PICTURE button a/b/Q to superimpose a teletext broadcast onto the
current TV programme screen (mixed mode).
In mixed mode: Press the button again to return to the normal screen(TV mode).
HALF PAGE button
Each time you press the button, the upper/lower half of the teletext page is magnified and displayed on the screen.
HOLD button
Any teletext page or subpage can be held on the screen by pressing the HOLD button
Press the button again to cancel the hold mode.
REVEAL button
Press this button to reveal hidden information such as the answer to a quiz.
Press the button again to hide the information.
CLOCK button
In TV mode: When the TV signal with TEXT data is received, by pressing this button the real time information will
appear on the top right area of the screen.
In Teletext mode: When a selected Teletext page has hidden subpages or timed pages, these subpages can be seen
in the following manner:
1. Press the CLOCK button
2. Using the RED button you can select the previous subpage, while with the YELLO W button you can move
on to the following subpage. T hese two buttons are shown on the screen by the signs (—) a nd (+).
3. Wait until the subpage appears.
Note:
You can use this button together with the display CANCEL button
picture until the subpage has been found. The on screen T V icon in the top left side of the screen will show « TXT».
When the subpage has been found, the screen will change to the subpage number.
Press the TEXT/MIX /PICT URE button a/b/Q to view the subpage.
s
a
a
.
d
f
f
. Screen will show - + XXX / 0001
k
. This means that you can view the main TV
CANCEL button
With this button Teletext information is cancelled and TV picture is restored. «TXT»Indication is shown on screen.
In this position, the TV programme cannot be changed, being in Teletext/Cancelled mode. When a change takes place
in the Teletext information, the upper time of the cancelled page or some other indication of special pages is shown on
screen. To uncancel, press TEXT/MIX/PICTURE button a/b/Q and the whole teletext is shown.
Note:
RESET button
Press the reset button
LIST button (LIST)
Pressing this button you force the teletext to LIST Mode. It means that row 24 (bottom row of Teletext) will not have
transmitter information, only the pages that user you have previously stored in the memory (More information on the
next page -Teletext Page memory List-).
Pressing «LIST» button again we go out from LIST Mode and system is going to be identified again (FLOF).
INDEX button
Press the INDEX button
This button can be used together with the clock button while awaiting subpages.
k
h
h
to return back to index page, and go out from Teletext mode.
j
j
to return back to index page.
37
Page 39

Advanced TEXT operation - LIST mode -
Teletext Page memory List
a) How to Operate Page Memory
Your TV has 40 teletext page number memories for fast recall of teletext information.
In programme positions 1 through 9, four teletext page numbers can be stored in each position; a total of 36 pages.
In programme positions 10 through 99, only one programme with 4 page numbers can be stored. If you try to store
more than 4 page numbers in a programme position between 10 and 99, the previously stored page numbers will be
erased.
Select the programme channel number into which you want to store teletext page numbers.
1. Press the TEXT/MIX/PICTURE button a/b/Q to enter the teletext mode.
2. Press the «LIST» button to change from FLOF system to LIST mode.
3. Press a coloured button corresponding to the coloured brackets on the screen for page number storage.
4. Enter the teletext page number using the 0 ~ 9 digit buttons (enter three digits) or channel selector E /F
buttons.
5. Repeat steps 3. and 4. until the numbers for the desired pages have been entered.
6. Press the STORE
screen.
7. Press the TEXT/MIX/PICTURE button a/b/Q two times to go out from Teletext mode.
g button to memorize the page numbers you require. The symbol «STORE» appears on the
Press
LIST
(FLOF TELETEXT)
and
YELLOW
(LIST TELETEXT)
Input
4, 2, 5
buttons
SPORTS MOVIE WEATHER
NEWS
RED GREEN
YELLOW
BLUE
LIST
YELLOW
If you want to store,
press g button
b) Fast Page Selection - LIST mode -
1. Select the appropriate programme channel.
2. Press the TEXT/MIX/PICTURE button a/b/Q to enter the teletext mode.
3. Press the «LIST» button to change from FLOF system to LIST mode.
4. To recall a page number displayed in the coloured brackets, simply press the corresponding coloured button.
5. Press the «LIST» button again to return to FLOF system.
38
Page 40

21-pin E u r o-SCA R T and 21-pin Audio/Vi deo
31 2
REAR TV
21-pin In/Out
1. 21-pin Audio/Video (AV-1) With
PAL/SECAM/NTSC/S-Video Input
2. 21-pin Euro SCART (RGB) With
PAL/SECAM/NTSC Video Input
RF Input
3. Aerial terminal
20 18 16 14 12 10 8 6 4 2
21
19 17 15 13 11 9 7 5 3 1
21
21-pin Euro-SCART (RGB)
1. Audio right output 8. Audio-video control 15. Red input
2. Audio right input 9. Earth for green 16. Red/Green/Blue control
3. Audio left output 10. Not used 17. Earth for video
4. Common earth for audio 11. Green input 18. Earth for Red/Green/Blue control
5. Earth for blue 12. Not used 19. Video output
6. Audio left input 13. Earth for red 20. Video input
7. Blue input 14. Not used 21. Plug shield
21-pin Audio/Video (AV-1) with S-Video Input
1. Audio right output 8. Audio-video control 15. Chroma S-Video input
2. Audio right input 9. Earth 16. Not used
3. Audio left output 10. Not used 17. Earth for video
4. Common earth for audio 11. Not used 18. Earth
5. Earth 12. Not used 19. Video output
6. Audio left input 13. Earth 20. Video input / S-Video input
7. Not used 14. Not used 21. Plug shield
39
Page 41

Troubleshooting
If the fault c annot b e correc ted b y using t his guid e, remove the mains plug from t he wall soc ket and cont act the dealer or
supp lier from w hom it w as purc hased. Where this is not p ossible, p lease visit our web -sit e at www .sharp.co.uk/ support.
Custom ers w it hout Internet acc ess may t elepho ne 08705 274277 [or (01) 676 0648 if telep honing fo rm Ireland] during of f ic e
hours.
Certain replacement part s and acc essories may b e obt ained fro m our M ain Parts Distrib ut or, w ho c an be co ntac ted on t he
following numbers:
Willow Vale Electronics Ltd. 0121 766 5414 and 0161 205 7531
In the unlikely event of t his eq uip m ent req uiring any rep air du ring the guarantee period, you w ill need t o p ro vid e p ro of o f t he
date of purchase to the repairing company. Please keep your invoice or Receipt, which is supplied at the time of purchasing.
PROBLEMS
Remote control does not work
No colour / Picture wear
Poor reception on some channels
Sound OK, picture poor
POSSIBLE CAUSES / REMEDIES
TV not plugged in Outlet power OFF
Main power button of TV not ON
Turn OFF using the Main Power button, then turn ON again after a minute
Check batteries in the Remote Control
Try a new channel to check for possible station trouble
Aerial not connected to terminal at the back of the TV set
If outside aerial is used, check for broken wires
Adjust COLOUR control
Try fine tuning to correct
Try a new channel to check for possible station trouble
Aerial not connected to terminal at the back of the TV set
If outside aerial is used, check for broken wires
Check for local interference
Try a new channel to check for possible station trouble
Aerial not connected to terminal at the back of the TV set
If outside aerial is used, check for broken wires
Check for local interference
Adjust COLOUR control
Try fine tuning to correct
Check if the Brightness or Contrast setting in the picture setting mode might be all
the way to the minus side
PAGE
10
13
13
3
14
6
-
16
32
14
6
-
-
14
6
-
-
16
32
16
Try a new channel to check for possible station trouble
Check for local interference
Picture OK, sound poor
No picture or sound
Increase the volume
Try a new channel to check for possible station trouble
TV not plugged in Outlet power OFF
Main power button of TV not ON
Aerial not connected to terminal at the back of the TV set
If outside aerial is used, check for broken wires
Turn OFF using the Main Power button, then turn ON again after a minute
Check if the Brightness or Contrast setting in the picture setting mode might be all
the way to the minus side
Increase the volume
14
-
21, 22
14
10
13
6
-
13
16
21, 22
40
Page 42

General Specifications for Television Receiver
Models: 28KF-84H and 32KF-84H
1. Receiving Broadcast Standard CCIR TV Standard system PAL-I
2. Receiving Channel VHF: IRA - IRJ (CH01-CH09)
UHF: I21 - I69 (CH21-CH69)
CATV: S01 – S68 CC (Hyper band)
3. Receiving System Sound: FM MONO and DIGITAL STEREO NICAM
Colour System: PAL (SECAM and NTSC playback through the AV Inputs)
Field Frequency: 50/60 Hz Capability
4. Power Source 220V-240V AC 50 Hz
28KF-84H 32KF-84H
5. Power Consumption at 240V AC 50Hz 100 W 110 W
6. Power Consumption at (Stand-by) 1,5 W max. 1,5 W max.
7. Audio Output (mpo): 10 + 10 W 10 + 10 W
8. Dimensions (Approx.) Width: 824 m/m 930 m/m
Height: 495 m/m 558 m/m
Depth: 508 m/m 563 m/m
9. Viewing Area (diagonal measurement) 66 cm (28") 76 cm (32")
10. Weight (Approx.) 37 Kg 52 Kg
11. Speaker (2 pcs.) 6x13 cm. 6x13 cm.
12. Aerial Input Impedance UHF 75 ohm Unbalanced
13. Safety CE - MARK
14. EMC CE - MARK
15. Accessories & etc.
a) User Instruction Yes
b) Quick Start Guide Yes
c) Typical Connections Yes
b) Remote Control Yes
c) Battery 2 pcs.
● Auto Installation System (AIS)
● Automatic Channel Sorting System (ACSS)
● 99 Channel Programming System
● Cable and Hyperband
● Blue Back Noise Mute Function
● OSD System (On Screen Display)
● Flashback
● Simple Scan (100 Hz - Line Flicker Reduction)
● Digital Noise reduction
● Tint Control
● Picture rotation
● ECO mode
● Scope function
● Still mode
NOTE: THE “AV LINK” FUNCTION IS NOT AVAILABLE IN THIS MODEL
● Wide Mode Function
● Stereo (IGR) / Digital Stereo NICAM
● Graphic Equalizer
● ON-OFF Timer
● Child Lock System
● Teletext
● 21 pin Euro SCART Connector (RGB)
● 21 pin Audio/Video Connector (AV-1)
With S-Video Input
● NTSC playback AV Input
● Front Audio/Video Input Terminal
● Front S-Video Input Terminal
● Headphone T erminal
● Postcode Security
41
Page 43

Index
100 Hz Fast Menu ..................................................... 18
21-pin Audio/Video ................................................... 39
21-pin Euro-SCART (RGB) ....................................... 39
A
Accessories ................................................................ 3
After preset has been performed .............................. 32
Aerial Connections ...................................................... 6
Audio Adjustments ................................................... 21
Auto Channel Preset ........................................... 11, 29
Auto Installation System ........................................... 11
Automatic Channel Sorting System .................... 11, 29
B
Balance ..................................................................... 22
Bass .......................................................................... 22
Bilingual .................................................................... 21
Black Stretcher ......................................................... 17
Blue back off-timer ................................................... 13
Bright ness ................................................................. 1 6
C
Clock button ....................................................... 34, 37
Colour ....................................................................... 16
Contents ..................................................................... 3
Contrast .................................................................... 16
Controls and Terminals ............................................... 5
Current time .............................................................. 24
Channel Selection ..................................................... 14
Child Lock (Channel Block) ...................................... 25
D
Delete (Programme) .................................................. 12
Demo (Demonstration) .............................................. 26
E
ECO mode .................................................................17
Edit (Programme) ...................................................... 12
Effects (Sound).......................................................... 23
Equalizer ................................................................... 22
F
Features Setting Mode ............................................. 24
Fine tuning ................................................................ 32
FLOF (Teletext) ......................................................... 36
Front TV ...................................................................... 5
H
Headphone jack ........................................................ 34
I
Identification (Sound) ................................................ 23
L
LIST (Teletext) ............................................... 36, 37, 38
Loudness .................................................................. 22
M
Main power button .................................................... 13
Manual Channel Preset ....................................... 30, 31
Menu Structures ....................................................... 15
Mono ................................................... ...................... 21
N
Noise reductor .......................................................... 17
O
OFF-Timer .............................................. ................... 24
ON-Timer .................................................................. 24
Other Features .......................................................... 34
P
Picture Adjustments ................................................. 16
Picture Mode ............................................................ 18
Postcode Security .................................................... 27
R
Rear TV ....................................................................... 5
Remote Control buttons ............................................. 4
Remote Control Battery Installation ............................ 3
Rotation .................................................................... 17
S
Safety precaution ........................................................ 2
Scope Mode ............................................................. 18
Sharpness ................................................................. 16
SKIP .......................................................................... 32
Sorting (Programme) ................................................. 12
Sound mute .............................................................. 21
Sound Setting Mode ................................................. 22
Specifications ........................................................... 41
Stand-by button ........................................................ 13
Stereo ....................................................................... 21
Still Mode................................................................... 18
Stored programmes .................................................. 12
Sub-titles button ........................................................34
SVM ...........................................................................17
Switching on ............................................................. 13
T
Teletext ..................................................................... 36
Terms of guarantee ..................................................... 1
Tint control ................................................................ 16
Treble ........................................................................ 22
Troubleshoot ing ........................................................ 40
TV/Video selector ...................................................... 34
Typical connections .................................................... 6
V
Volume (Headphones) ........................................ 34, 22
Volume (Loudspeakers) ...................................... 21, 22
W
Wide Mode ............................................................... 19
42
Page 44

PASSWORD
POSTCODE SECURITY
TV SHARP 28/32KF-84H
✂
SHARP ELECTRÓNICA ESPAÑA, S. A.
SHARP ELECTRONICS (U.K.) LTD.
Sharp House, Thorp Road, Newton Heath,
Manchester M40 5BE
PRINTED IN SPAIN
TINS-A828WJN0
06/03
Page 45

documentation manual, user maintenance, brochure, user reference, pdf manual
This file has been downloaded from:
User Manual and User Guide for many equipments like mobile phones, photo cameras, monther board, monitors, software, tv, dvd, and othes..
Manual users, user manuals, user guide manual, owners manual, instruction manual, manual owner, manual owner's, manual guide,
manual operation, operating manual, user's manual, operating instructions, manual operators, manual operator, manual product,
 Loading...