

Sennheiser RS120II, RS126II, RS120 Quick Manual
RS 120
RS 120 II
RS 126 II
Quick Guide
Guide rapide
Instrucciones resumidas
Guida rápido
Kurzanleitung
Guida rapida
Beknopte handleiding
1
2
3
rechargeable batteries
NiMH AAA 1.2 V
4
5
6
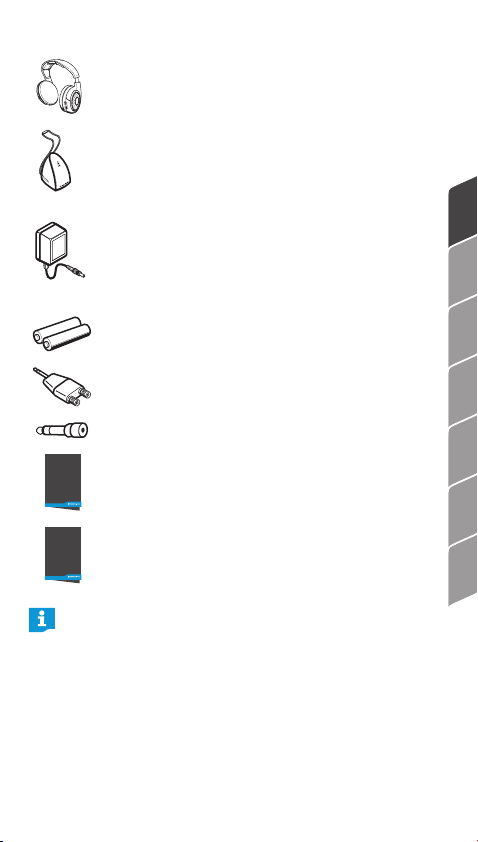
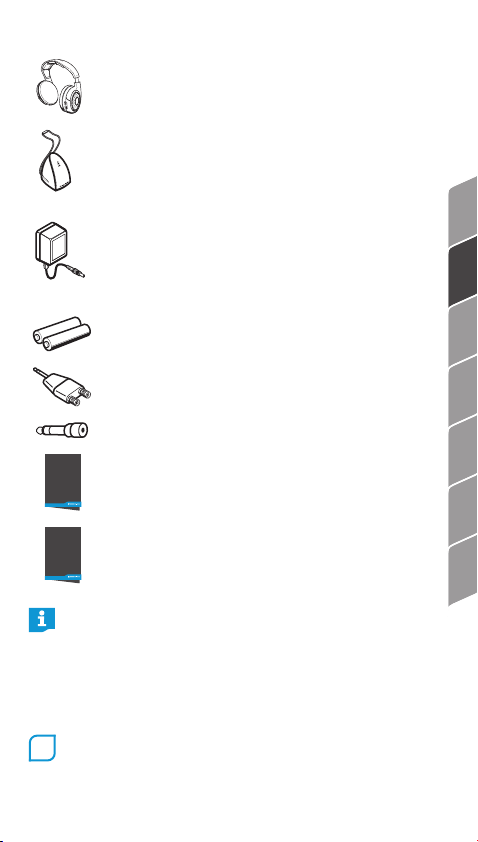
Delivery includes
HDR 120/HDR 120 II/HDR 126 II headphones
TR 120/TR 120 II/TR 126 II transmitter with
audio connection cable
NT9-3A (US) mains unit
(for US and CDN market only)
NT9-3A (AUS) mains unit
(for AUS market only)
NiMH rechargeable batteries, AAA size, 1.2 V
Adapter, 2 RCA sockets to 3.5 mm jack plug
Adapter, 1/4“ (6.3 mm)
Quick
Guide
Quick Guide
Safety
Guide
Safety Guide
The diagrams corresponding to the chapter headings
can be found on the fold-out page.
FRESPTITNLJP DE EN
1

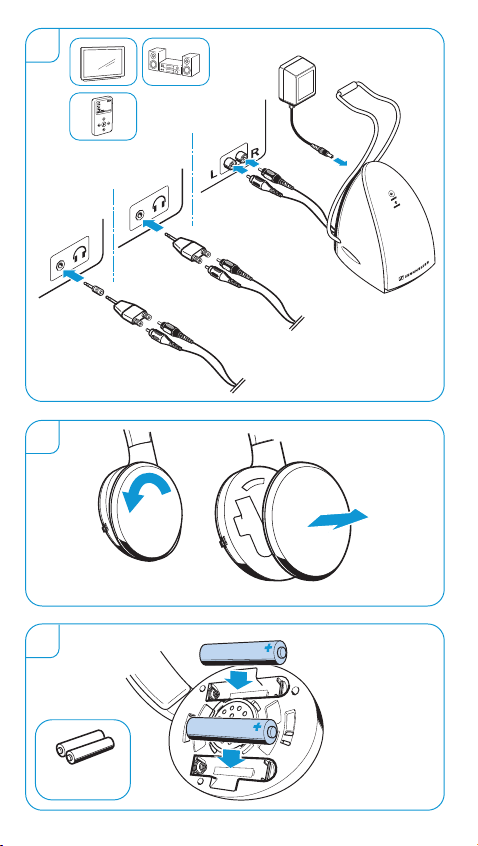
Preparing the transmitter for use
The transmitter is prepared for wall mounting (recess at the
rear of the transmitter). The required mounting material
(screws and plugs) is not included in the delivery.
Connecting the transmitter to an audio output of
1
your audio source
왘 Choose a suitable place near your audio source (e.g. TV,
stereo or home cinema system). Avoid placing the transmitter close to metal objects such as shelf bars, reinforced
concrete walls, etc. as this can decrease the transmitter’s
range.
왘 Connect the transmitter‘s audio connection cable:
• directly to the RCA sockets (
source, making sure to connect the red RCA plug to the
red RCA socket R, or
• to the supplied RCA/3.5 mm adapter for connection to
a 3.5 mm headphone socket, or
• to the supplied RCA/3.5 mm adapter and 1/4“ (6.3 mm)
adapter for connection to a 1/4“ (6.3 mm) headphone
socket.
왘 Set the volume for the headphone output of your audio
source to a medium level. If the headphone output volume is set too low, the transmitter automatically switches
off.
Some TVs have a function that mutes the TV loudspeakers when you connect a transmitter. If necessary, change this setting via the operating menu of
your TV.
Connecting the transmitter to the mains
왘 Connect the mains unit to the socket at the rear of the
transmitter. Plug the mains unit into a wall socket. The
transmitter switches on and the ON/OFF LED lights up
green.
outputs) of your audio
2

Preparing the headphones for use
Opening the battery compartments
2
왘 Turn the ear pads in the direction of the arrow until you
overcome a slight resistance and lift them off the ear
cups.
Inserting and replacing the rechargeable batteries
3
CAUTION
왘 Only use NiMH rechargeable batteries, never
use standard batteries!
왘 Insert the supplied rechargeable batteries. Secure the ear
pads to the ear cups.
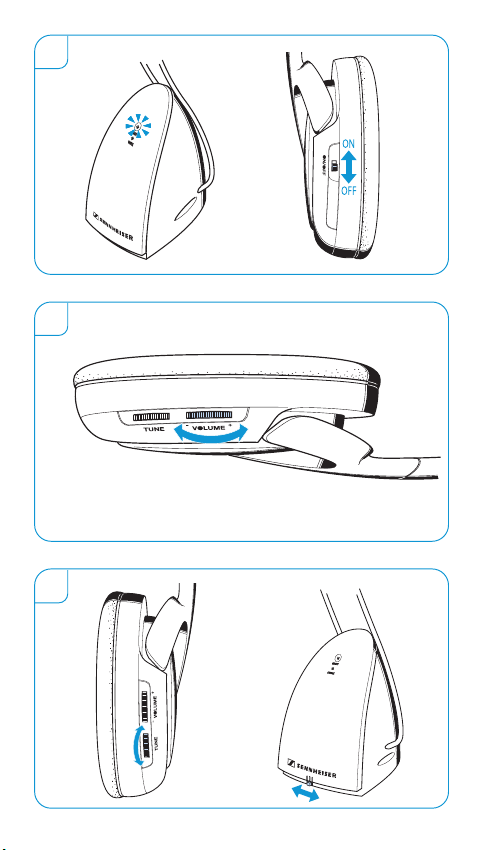
왘 Charge the rechargeable batteries for at least 24 hours
prior to first time use. Subsequent charging time depends on the previous operating time and is up to
18 hours max.
왘 Place the headphones on the charging cradle of the trans-
mitter. The red LED lights up, indicating that the batteries
are being charged. The LED remains lit even when the
r echargeable batteries are fully charged.
Using the RS headphone system
Switching on the audio source
4
왘 Switch on the audio source. The transmitter automatically
switches on and off together with the audio source. The
ON/OFF LED lights up green.
Switching on the headphones/adjusting the volume
5
왘 First, set the volume on the headphones to a low level.
왘 Switch on the headphones and set the volume to the
desired level.
왘 Switch off the headphones after use to avoid discharging
the batteries.
FRESPTITNLJP DE EN
3

Optimizing the reception
6
왘 Adjust the receiver channel with the TUNE control on the
headphones.
However, if reception is subject to interference:
왘 Change the transmission channel by setting the switch
at the bottom of the transmitter to another position and
re-adjust the receiver channel with the
TUNE control on
the headphones. Some electronic devices (e.g. televisions) can cause interference to your wireless headphone
system. If this happens, increase the distance between
the transmitter and the interference source.
Specifications and
Frequently Asked Questions (FAQ’s)
왘 Visit our website at www.sennheiser.com.
Manufacturer declarations
Warranty
Sennheiser electronic GmbH & Co. KG gives a warranty of
24 months on this product. For the current warranty conditions,
please visit our website at www.sennheiser.com or contact your
Sennheiser partner.
Before putting the device into operation, please observe the respective country specific regulations!
FOR AUSTRALIA ONLY
S
ennheiser’s goods come with guarantees that cannot be excluded under the Australian Consumer Law. You are entitled to a
replacement or refund for a major failure and compensation for
any other reasonably foreseeable loss or damage. You are also
entitled to have the goods repaired or replaced if the goods fail
to be of acceptable quality and the failure does not amount to
a major failure.
This warranty is in addition to other rights or remedies under
law. Nothing in this warranty excludes, limits or modifies any
liability of Sennheiser which is imposed by law, or limits or modifies any remedy available to the consumer which is granted
by law.
4
To make a claim under this warranty, contact Sennheiser
Australia Pty Ltd, Unit 3, 31 Gibbes Street, Chatswood NSW 2067, Australia; Phone: (02) 9910 6700,
email: service@sennheiser.com.au.
All expenses of claiming the warranty will be borne by the person making the claim.
The Sennheiser International Warranty is provided by
Sennheiser Australia Pty Ltd (ABN 68 165 388 312), Unit 3, 31
Gibbes Street, Chatswood NSW 2067, Australia.
Statements regarding FCC and Industry Canada
FC C Decla ration of C onformi ty (DoC)
Sennheiser Electronic Corporation
We,
One Enterprise Drive • Old Lyme •
CT 06371 • USA
Tel: +1 (860) 434 9190
Fax: +1 (860) 434 1759
declare the above device comply wit h the requirements of Federal Communic ations Commis sion.
This device complies with Part 15 of the FCC rules. Operat ion is subject ed to the following two condit ions:
1) This device may not c ause harmful interference, and
2) This device must ac cept any interference rec eived, including interference that may cause undes ired operation.
Respon sible P arty: Greg Beebe
This device complies with Part 15 of the FCC rules and RSS-210
of Industry Canada. Operation is subjected to the following two
conditions: 1) This device may not cause harmful interference,
and 2) This device must accept any interference received, includinginterference that may cause undesired operation.
This equipment has been tested and found to comply with the
limits for a Class B digital device, pursuant to part 15 of the
FCC Rules and RSS-210 of Industry Canada. These limits are designed to provide reasonable protection against harmful interference in a residential installation. This equipment generates,
uses and can radiate radio frequency energy and, if not installed
and used in accordance with the instructions, may cause harmful interference to radio communications. However, there is no
guarantee that interference will not occur in a particular installation. If this equipment does cause harmful interference to radio or television reception, which can be determined by turning
the equipment off and on, the user is encouraged to try to correct the interference by one or more of the following measures:
• Reorient or relocate the receiving antenna.
• Increase the separation between the equipment and receiver.
• Connect the equipment into an outlet on a circuit different
SENNHE ISER
Model No:
RS 110 II, RS 116 II,
RS 120 II, RS 126 II
5
FRESPTITNLJP DE EN

from that to which the receiver is connected.
• Consult the dealer or an experienced radio/TV technician for help.
Changes or modifications made to this equipment not expressly
approved by Sennheiser electronic Corp. may void FCC authorization to operate this equipment.
CAN ICES-3 (B)
RF Radiation Exposure Information
Since the radiated output power of this device is far below the
FCC radio frequency exposure limits, it is not subjected to routine RF exposure evaluation as per Section 2.1093 of the FCC
rules. This device complies with the US and Industry Canada
portable device RF exposure limits set forth for an uncontrolled
environment and is safe for intended operation as described in
the user manual. Further RF exposure reduction can be achieved
if the device can be kept as far as possible from the user’s body
or set to lower output power if such provision is available. The
base portion of this device should be installed and operated at
least 20 cm away from the user’s body. Use of other accessories not verified by the manufacturer may not ensure compliance with FCC and Industry Canada RF exposure guidelines. This
transmitter must not be co-located or operated in conjunction
with any other antenna or transmitter.
Industry Canada statement
This device complies with RSS-210 of Industry Canada. Operation is subject to the following two conditions: (1) This device
may not cause harmful interference, and (2) this device must
accept any interference received, including interference that
may cause undesired operation.
In compliance with:
USA FCC ID: DMORS03ABUS
Canada IC: 2099A-TR120II
Australia/
New Zealand
6
Contenu
Casque HDR 120/HDR 120 II/HDR 126 II
Emetteur TR 120/TR 120 II/TR 126 II avec
câble de raccordement
Bloc secteur NT9-3A (US)
(uniquement pour le marché US et CDN)
Bloc secteur NT9-3A (AUS)
(uniquement pour le marché AUS)
Batteries NiMH, type AAA, 1,2 V
Adaptateur, 2 prises RCA vers jack 3,5 mm
Adaptateur vers jack 6,3 mm
Quick
Guide
Guide de démarrage rapide
Safety
Guide
Guide de sécurité
Les illustrations correspondant aux titres des chapitres peuvent être trouvées sur la page dépliable.
FRESPTITNLJP DE EN
Préparer l‘émetteur pour l‘utilisation
L‘émetteur est prévu pour être monté contre un mur. Les
accessoires de montage (vis et chevilles) ne sont pas inclus.
Raccorder l’émetteur à la sortie audio de votre
1
source audio
왘 Choisissez un emplacement adéquat à proximité de votre
source audio (par ex. télé, chaîne hi-fi ou système home
1

cinéma). Evitez de placer l’émetteur à proximité immédiate d’un objet métallique comme une étagère en métal,
un mur en béton armé, etc. La portée de l’émetteur pourrait s’en trouver réduite.
왘 Branchez le câble de raccordement de l‘émetteur :
• directement sur les prises RCA (sorties) de votre source
audio, tout en assurant que le jack RCA rouge est branché sur la prise RCA rouge R, ou
• sur l‘adaptateur RCA/3,5 mm fourni pour raccordement
à une prise casque 3,5 mm, ou
• sur l‘adaptateur RCA/3,5 mm et l‘adaptateur 6,3 mm
fournis pour raccordement à une prise casque 6,3 mm.
왘 Réglez le volume de la sortie casque de votre source audio
sur un niveau moyen. Si le volume de la sortie casque est
réglé trop faible, l‘émetteur s‘éteint automatiquement.
Certaines télés disposent d‘une fonction qui coupe le
son dès que vous raccordez un émetteur. Si nécessaire, changez ce réglage via la menu de commande
de votre télé.
Raccorder l’émetteur au secteur
왘 Branchez le bloc secteur sur la prise à l‘arrière de
l‘émetteur. Branchez le bloc secteur sur une prise de
courant. L‘émetteur s‘allume et la LED ON/OFF s‘allume
en vert.
Préparer le casque pour l‘utilisation
Ouvrir les compartiments à batteries
2
왘 Tournez les coussinets d‘oreille dans le sens de la flèche,
au-delà de la petite résistance perceptible et retirez-les
des oreillettes.
Insérer et remplacer les batteries
3
ATTENTION
왘 Utilisez uniquement des batteries NiMH,
n‘utilisez jamais de piles standard !
왘 Insérez les batteries fournies. Remettez les coussinets
d‘oreille en place.
2
 Loading...