

Page 1

Wireless Listening Pleasure
RS 125
Instruction manual
Page 2
I
1
4
5
25
23
Page 3
II
6
A
0
B
7
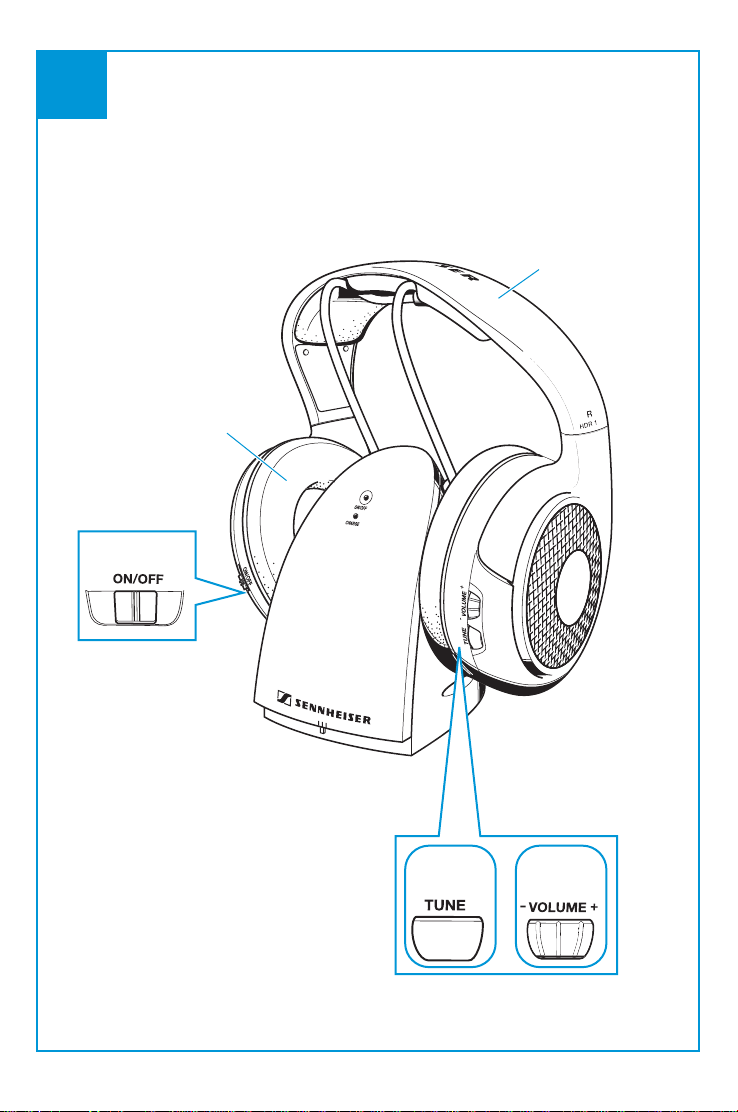
ON/OFF
8
CHARGE
9
Page 4

Page 5

Contents
Contents
Important safety instructions ................................................ 2
The RS 125 RF headphone system ........................................ 4
Delivery includes ...................................................................... 4
Product overview ..................................................................... 5
Overview of the headphones ................................................ 5
Overview of the transmitter ................................................. 5
Overview of the indicators and acoustic signals ............... 6
Putting the RS 125 system into operation ........................... 7
Setting up the transmitter .................................................... 7
Connecting the transmitter to a sound source ................. 8
Connecting the transmitter to the mains ........................... 9
Inserting and changing the headphones’ rechargeable
batteries .................................................................................... 9
Charging the headphones’ rechargeable batteries ........ 10
Adjusting the headband of the headphones ................... 11
Using the RS 125 system ...................................................... 12
Switching the transmitter on and off ............................... 12
Switching the headphones on and off .............................. 13
Searching for a sound source .............................................. 14
Changing the transmission channel .................................. 15
Adjusting the volume ........................................................... 15
Switching the acoustic signals (beeps) on and off ........ 16
Cleaning the RS 125 system ................................................. 17
If a problem occurs ... ............................................................ 18
Accessories and spare parts ................................................. 20
Specifications .......................................................................... 20
Manufacturer declarations ................................................... 22
Index ........................................................................................ 23
1
Page 6

Important safety instructions
Important safety instructions
• Read this instruction manual.
• Keep this instruction manual for future reference. Always include this
instruction manual when passing the devices on to third parties.
• Clean the devices and the mains unit only with a dry cloth.
• WARNING: To reduce the risk of fire or electric shock, do not expose the
devices and the mains unit to rain or moisture.
• Only use the supplied mains unit.
• Disconnect the mains connector from the wall socket
– to completely disconnect the devices from the mains,
– during lightning storms or when unused for long periods of time.
• Ensure that the mains unit is
– always readily operable and easily accessible,
– properly plugged into the wall socket,
– only operated within the permissible temperature range (see
“Specifications” on page 20),
– not covered or exposed to direct sunlight for longer periods of time in
order to prevent heat accumulation.
Intended use of the devices
Intended use includes:
• having read this instruction manual, especially the chapter “Important
safety instructions”,
• using the devices within the operating conditions and limitations
described in this instruction manual.
“Improper use” means using the devices other than as described in this
instructions, or under operating conditions which differ from those
described herein.
2
Page 7
Important safety instructions
Safety instructions for NiMH rechargeable batteries
If abused or misused, rechargeable batteries may leak. In extreme cases,
they may even present:
• a heat hazard,
• a fire hazard,
• a leakage hazard,
• an explosion hazard,
• a smoke or gas hazard.
Please understand that Sennheiser does not accept liability for damage
arising from abuse or misuse.
Keep away from
children.
Observe correct
polarity.
Do not expose to
moisture.
Do not pack charged
batteries loose – danger
of shorting out / fire
hazard.
Do not continue to use
defective rechargeable
batteries.
Do not mutilate or
dismantle.
Immediately remove
rechargeable batteries
from obviously defective devices.
Only charge rechargeable batteries with the appropriate
Sennheiser chargers.
Only use original Sennheiser
rechargeable batteries.
Do not short-circuit.
Switch rechargeable batterypowered devices off after use.
When not using rechargeable
batteries for extended periods
of time, charge them regularly
(about every three months).
Do not heat above 70°C/158°F,
e.g. do not expose to sunlight or
throw into a fire.
Only charge rechargeable
batteries at ambient temperatures between 10°C and 40°C.
Dispose of rechargeable batteries
at special collection points or
return them to your specialist
dealer.
3
Page 8

The RS 125 RF headphone system
The RS 125 RF headphone system
The RS 125 RF stereo hi-fi headphone system offers excellent
sound quality and allows for wireless listening everywhere
in the house and garden. The lightweight headphones are
extremely comfortable to wear and very easy to use.
The volume can easily be adjusted to individual needs. Enjoy a
completely unrestricted listening experience without disturbing others.
Delivery includes
1 HDR 125 headphones
1 TR 125 transmitter with connection cable
2 AAA size NiMH rechargeable batteries, 1.2 V
1 NT-RS 100 mains unit
1 adapter 3.5 mm to ¼“ (6.3 mm) jack socket
1 instruction manual
4
Page 9

Product overview
I
II
Product overview
An overview of the headphones and the transmitter is given
on the inside front cover of this instruction manual.
Overview of the headphones
1 Headband
2 Volume control (VOLUME)
3 Channel search button (TUNE)
4 ON/OFF switch
5 Earpad
Overview of the transmitter
6 Charging cradle
7 Operation indicator, green
8 Charging indicator, red
9 Channel selector switch
0 Connection cable
A Adapter for connection cable
B Connector of mains unit
5
Page 10

Product overview
Overview of the indicators and acoustic signals
Indicators on the transmitter
Indicator Status Meaning
Operation indicator 7
(ON/OFF)
Charging indicator 8
(CHARGE)
Acoustic signals and their meaning
Acoustic signal Meaning
lit The sound source and
the transmitter are
switched on.
lit The rechargeable
batteries are being
charged.
flashes The rechargeable
batteries are fully
charged.
6 short beeps No signal!
The transmitter is switched
off or out of range.
2 long beeps The rechargeable batteries
are almost flat.
Sequence of
3 beeps
The headphones have just
been switched off.
6
Page 11

Putting the RS 125 system into operation
Putting the RS 125 system into
operation
Setting up the transmitter
왘 Choose a suitable place near your sound source (e.g. TV,
stereo or home cinema system).
왘 Do not place the transmitter close to metal objects such as
shelf supports, reinforced concrete walls, etc. as the metal
affects the antenna and can decrease the transmitter’s
range. This can be up to about 150 m in good conditions.
왘 Choose a place for the transmitter where the antenna is in
free space so that transmission can be as effective as
possible.
It is not necessary that the transmitter and headphones are in
the same room, so you can move around freely in the home or
outside in the garden.
One transmitter can be used to transmit to several
headphones on the same frequency.
7
Page 12

Putting the RS 125 system into operation
Wall mounting the transmitter
The transmitter is prepared for wall mounting.
The required mounting hardware (screws and
plugs) is not included in the delivery.
Connecting the transmitter to a sound source
You can connect the TR 125 transmitter to different sound
sources, such as a TV, a DVD player or a stereo system.
왘 Switch your sound source off.
A
0
왘 Connect the connection cable 0 to the headphone socket
of your sound source.
If the plug on the connection cable 0 is too small for your
headphone socket, plug the adapter to ¼“ (6.3 mm) jack
socket A onto the connection cable.
8
Page 13

Putting the RS 125 system into operation
왘 Adjust the volume of the headphone socket on your sound
source to a medium level. This improves the quality of cordless sound transmission. If necessary, check the menu
setting of your TV.
With most TVs, the headphone socket is located at the
front or sides.
Connecting the transmitter to the mains
왘 Connect the yellow connector of the mains unit B to the
yellow socket on the transmitter.
왘 Plug the mains connector into a wall socket.
The transmitter automatically switches on and the operation indicator 7 lights up.
If there is no signal from the sound source for more than three
minutes, the transmitter automatically switches off and the
operation indicator 7 goes off.
Disconnecting the transmitter from the mains
왘 Pull the mains connector out of the wall socket.
Inserting and changing the headphones’ rechargeable batteries
Before using the RS 125 for the first time, you have to insert
the supplied rechargeable batteries.
왘 Lift the left earpad 5 off as described in the chapter
“Replacing the earpads” on page 17.
9
Page 14

Putting the RS 125 system into operation
왘 Insert the rechargeable batteries. Observe
correct polarity when inserting the batteries.
왘 Put the earpad 5 back in place.
If the operating time decreases drastically even when
the rechargeable batteries are fully charged, the
rechargeable batteries are exhausted and have to be
replaced.
Charging the headphones’ rechargeable batteries
Charge the rechargeable batteries for at least 16 hours
prior to first time use. Subsequent charging time is
16h
about the same time as the previous operating time.
The operating time is up to 23 hours.
6
25
8
CHARGE
왘 Place the headphones on the charging cradle 6.Make sure
that the charging indictor 8 lights up.
The headphones automatically switch off and the rechargeable batteries are being charged.
10
Page 15

Putting the RS 125 system into operation
Always store the headphones on the charging cradle 6
to ensure that they are fully charged when they are
needed. When the rechargeable batteries are fully
charged, the transmitter automatically switches to
trickle charging and the charging indicator 8 flashes
slowly.
Nearly discharged batteries will significantly reduce the sound
quality. Approx. 10 minutes before the batteries are completely discharged, an acoustic signal is produced.
Adjusting the headband of the headphones
For good sound quality and best possible comfort, the headband has to be adjusted to properly fit your head:
왘 Wear the headphones so that the head-
band 1 runs over the top of your head.
왘 Adjust the length of the headband so
that
– your ears are completely inside the
earpads,
– you feel even, gentle pressure around your ears,
– a snug fit of the headband 1 on the head is ensured.
1
25
11
Page 16

Using the RS 125 system
Using the RS 125 system
To switch the devices on and to listen to your sound source,
proceed as follows:
Sequence of steps Page
1. Make sure that the rechargeable batteries are
10
charged.
2. Switch your sound source (e.g. TV) on. 12
3. Switch your headphones on. 13
4. Set the desired volume. 15
5. If necessary, set a different channel for your
14
sound source.
Switching the transmitter on and off
Switching the transmitter on
왘 Switch your sound source on.
The transmitter automatically switches on and the operation indicator 7 lights up.
If the transmitter does not switch on:
왘 Increase the volume of your sound source and, if necessary,
read the chapter “The transmitter does not switch on” on
page 18.
Switching the transmitter off
왘 Switch your sound source off.
If there is no signal from the sound source for more than three
minutes, the transmitter automatically switches off and the
12
Page 17

Using the RS 125 system
operation indicator 7 goes off. The transmitter is now in
standby mode, its power consumption is very low so that it
can remain connected to the mains.
When not using the devices for extended periods of
time, pull out the mains connector from the wall socket.
In this case, however, the headphones’ rechargeable
batteries will not be recharged.
Switching the headphones on and off
CAUTION! Hearing damage due to high volumes!
Listening at high volume levels for long periods
can lead to permanent hearing defects.
왘 Before putting the headphones on, set the
volume to a low level.
왘 Do not continuously expose yourself to high
volumes.
Switching the headphones on
왘 Set the ON/OFF switch 4 on the headphones
/
to the position ON.
The headphones switch on and automatically start the
channel search on the last selected channel. If a channel is
found, the channel search stops. You hear the signal of the
found sound source.
If you do not hear the sound source after a short while, please
refer to the chapter “If a problem occurs ...” on page 18.
13
Page 18

Using the RS 125 system
Switching the headphones off
왘 Set the ON/OFF switch 4 on the headphones
/
to the position OFF.
The headphones switch off.
Always store the headphones on the charging cradle 6
to ensure that they are fully charged when they are
needed.
Searching for a sound source
왘 Make sure that the operation indicator 7 on the trans-
mitter is lit.
If you do not hear the desired sound source, continue the
search:
왘 Press the TUNE button 3 on the headphones
until you have found your sound source.
왘 If you cannot find your sound source, please read the
following section.
3
14
Page 19

Using the RS 125 system
9
Changing the transmission channel
If several transmitters are operated simultaneously and are
very close to one another, the sound quality can deteriorate
and you hear e.g. hissing noise. To improve the sound quality,
change the transmission channel:
왘 Set the channel selector switch 9 on
the transmitter to channel 1, 2 or 3.
To set the headphones to the selected channel:
왘 Press the TUNE button 3 on the headphones.
Adjusting the volume
왘 Use the volume control 2 to adjust the volume to a suffi-
cient and comfortable level.
15
Page 20

Using the RS 125 system
Switching the acoustic signals (beeps) on and off
An overview of the acoustic signals is given on page 6. The
acoustic signals can be switched on and off as follows:
왘 Switch the headphones on (see page 13).
왘 Press the TUNE button 3 for 5 seconds.
왘 Switch the headphones off for testing (see page 13).
If the acoustic signals are switched on, the headphones
produce a sequence of three beeps at switch-off. If no
beeps are produced, the acoustic signals are now switched
off.
The setting for the acoustic signals is retained in
memory until you change the setting again or replace
the rechargeable batteries.
16
Page 21

Cleaning the RS 125 system
Cleaning the RS 125 system
CAUTION! Liquids can damage the electronics of the
devices!
Liquids entering the housing of the devices can
cause a short-circuit and damage the electronics.
왘 Keep all liquids far away from the devices.
왘 Do not use any cleansing agents or solvents.
왘 Before cleaning, switch the devices off and disconnect the
transmitter from the mains.
왘 Only use a slightly damp cloth to clean the devices.
Replacing the earpads
For reasons of hygiene, you should replace the earpads from
time to time. Spare earpads are available from your Sennheiser
dealer (see “Accessories and spare parts” on page 20).
왘 To loosen the quarter turn fastener which
secures the earpads to the earcups, turn
the earpads 5 in the direction of the
arrow until you overcome a slight resistance.
왘 Lift the earpads 5 off the earcups.
5
5
17
Page 22

If a problem occurs ...
If a problem occurs ...
The transmitter does not switch on
Possible cause Solution Page
Is the mains unit
connected
correctly?
Check the connection of the
mains unit to the transmitter and
to the mains.
9
Is the volume of
the sound source
sufficient?
Set the volume on your sound
source to a medium value.
12
You cannot hear anything
Possible cause Solution Page
Is the transmitter
placed close to
metal objects?
Are the headphones still within
the transmitter’s
range?
Are all connectors
connected
correctly?
Are the rechargeable batteries
charged?
Choose a different place for the
transmitter. Make sure that the
transmitter is not placed close
to metal objects.
Move the headphones closer to
the transmitter. If necessary,
switch the headphones on again.
Check the connection between
the transmitter and your sound
source.
Place the headphones on
the charging cradle.
Check the charging indicator.
10
7
7
8
Are the rechargeable batteries
properly inserted?
18
Remove the rechargeable batteries
and reinsert them into the
headphones.
9
Page 23

If a problem occurs ...
The sound of your sound source is hardly intelligible
Possible cause Solution Page
You do not hear
your desired
channel?
Is there another
transmitter
operating in
the proximity?
Press the TUNE button 3 on the
headphones to start the search
for your desired channel.
Set the transmitter to a different
channel and press the TUNE
button
3 on the headphones.
14
14
The loudspeakers of your TV are muted
Possible cause Solution
Some TVs have a
function that mutes
the loudspeakers
when you connect a
transmitter.
Via the operating menu of your TV,
check if and how the muting function
can be deactivated.
Alternatively, use a different audio socket
on your TV.
If a problem occurs that is not listed in the above tables or if
the problem cannot be solved with the proposed solutions,
please contact your Sennheiser partner for assistance. For
additional information on Sennheiser, please visit our website
at www.sennheiser.com.
19
Page 24

Accessories and spare parts
Accessories and spare parts
Only use original Sennheiser accessories and spare parts,
otherwise the device quality can be impaired or the devices
can be damaged.
Cat. No. Accessory/spare part
009932 1 HDR 125 additional headphones
511791 1 pair of earpads
Specifications
RS 125 system
Modulation FM, stereo
Frequency range 863 – 865 MHz
Frequency response 18 – 21,000 Hz
Signal-to-noise ratio typ. 68 dBA
Ambient temperature 0°C to +40°C
TR 125 transmitter
Carrier frequencies 863.3 / 864.0 / 864.7 MHz
Radiated RF power ≤ 10 mW
Power supply 9 V DC via NT-RS 100 mains unit
Power consumption < 1.8 VA
Channels 3
Connector 3.5 mm stereo jack plug
20
Page 25

TR 125 transmitter
Weight approx. 430 g
Specifications
Dimensions
(incl. charging cradle)
approx. 85 x 133 x 225 mm
(W x D x H)
HDR 125 headphones
Transducer principle dynamic, circumaural, closed
Max. SPL (at 1 kHz) 104 dB
THD (at 1 kHz) < 0.5%
Power supply 2 AAA size NiMH rechargeable
batteries (LR 03)
Charging time approx. 16 hrs (full charge)
Operating time up to 23 hrs (with fully charged
rechargeable batteries)
Weight approx. 275 g
incl. rechargeable batteries
NT-RS 100 mains unit
Nominal input voltage 230 V AC
Mains frequency 50 Hz
Nominal output voltage 9 V DC
Nominal output current 200 mA
Operating temperature
range 0°C to +40°C
Transmitters that operate in the 863 – 865 MHz frequency
range can be used licence-free in the following countries:
AT, BA, BE, CH, CY, CZ, DE, DK, EE, ES, FI, FR, GB, GR, HU, IE, IS, IT,
LI, LT, LU, LV, ME, MK, MT, NL, NO, PL, PT, RO, RS, SE, SI, SK, TR, UA.
21
Page 26

Manufacturer declarations
0682
Manufacturer declarations
Warranty
Sennheiser GmbH & Co. KG gives a warranty of 24 months on this product.
For the current warranty conditions, please visit our web site at
www.sennheiser.com or contact your Sennheiser partner.
CE Declaration of Conformity
This equipment is in compliance with the essential requirements and other
relevant provisions of Directives
The declaration is available on the internet site at www.sennheiser.com.
Before putting the equipment into operation, please observe the respective country-specific regulations!
Rechargeable batteries
The supplied rechargeable batteries can be recycled.
Please dispose of them as special waste or return them to your
specialist dealer. In order to protect the environment, only dispose
of exhausted batteries.
WEEE Declaration
Your Sennheiser product was developed and manufactured with
high-quality materials and components which can be recycled
and/or reused. This symbol indicates that electrical and electronic
equipment must be disposed of separately from normal waste at
the end of its operational lifetime.
Please dispose of this product by bringing it to your local collection point
or recycling centre for such equipment. This will help to protect the environment in which we all live.
2006/95/EC and 19
99/05/EC.
22
Page 27

Index
Headphones
Adjusting the volume 15
Automatic channel search 14
Charging the headphones 10
Cleaning 17
Operating elements of the headphones 5
Operating time 10
Replacing the earpads 17
Searching for a sound source 14
Switching the acoustic signals on/off 16
Switching the headphones on/off 13
Rechargeable batteries
Changing the batteries 9
Charging indicator 6
Charging the batteries 10
Transmitter
Changing the channel 15
Cleaning 17
Connection to a headphone socket 8
Connection to a sound source 8
Connection to the mains 9
Installation 7
Operating elements of the transmitter 5
Switching the transmitter on/off 12
Troubleshooting 18
Index
23
Page 28

Sennheiser electronic GmbH & Co. KG
Am Labor 1, 30900 Wedemark, Germany
www.sennheiser.com
Printed in China
Publ. 02/09
532024/A01
 Loading...