


myUTN


 USB Dongleserver
 User Manual
 Windows
 dongleserver Pro, dongleserver ProMAX

USB Dongleserver User Manual Windows
Manufacturer & Contact
SEH Computertechnik GmbH
Suedring 11
33647 Bielefeld
Germany
Phone: +49 (0)521 94226-29
Fax: +49 (0)521 94226-99
Support: +49 (0)521 94226-44
Email: info@seh.de
Web: https://www.seh-technology.com
Document
Type: User Manual
Title: USB Dongleserver User Manual Windows
Version: 1.0 | 2020-04
Legal Information
SEH Computertechnik GmbH has endeavored to ensure that the information in this documentation is correct. If you detect any inaccuracies please inform us at the address indicated above. SEH Computertechnik GmbH will not accept any liability for any error or omission. The information in this manual is subject to change without notification.
The original manual is the German version of this document and shall govern. All non-German versions of this document are translation of the original manual.
All rights are reserved. Copying, other reproduction, or translation without the prior written consent from SEH Computertechnik GmbH is prohibited.
These products include 'open source software'. For detailed information, visit https://www.seh-technology.com.
© 2020 SEH Computertechnik GmbH
All trademarks, registered trademarks, logos and product names are property of their respective owners.

USB Dongleserver User Manual Windows
Content |
|
|
1 |
General Information........................................................................................ |
1 |
1.1 |
Product .............................................................................................................................................................................................. |
2 |
1.2 |
Documentation .............................................................................................................................................................................. |
4 |
1.3 |
Support and Service...................................................................................................................................................................... |
6 |
1.4 |
Your Safety ....................................................................................................................................................................................... |
7 |
1.5 |
First Steps ......................................................................................................................................................................................... |
8 |
2 |
Administration Methods................................................................................. |
9 |
2.1 |
Administration using the dongleserver Control Center............................................................................................... |
10 |
2.2 |
Administration via the SEH UTN Manager......................................................................................................................... |
12 |
2.3 |
Administration via the SEH Product Manager.................................................................................................................. |
17 |
2.4 |
Administration via Email .......................................................................................................................................................... |
19 |
3 |
Network Settings ........................................................................................... |
21 |
3.1 |
How to Configure IPv4 Parameters and DNS ................................................................................................................... |
22 |
3.2 |
How to Configure IPv6 Parameters ...................................................................................................................................... |
25 |
3.3 |
How to Configure Bonjour ...................................................................................................................................................... |
27 |
3.4 |
How to Configure Email (POP3 and SMTP)........................................................................................................................ |
28 |
3.5 |
How to Configure Server Services ........................................................................................................................................ |
30 |
3.6 |
How to Use the UTN Server in VLAN Environments....................................................................................................... |
32 |
4 |
Device Settings .............................................................................................. |
34 |
4.1 |
How to Assign a Description................................................................................................................................................... |
35 |
4.2 |
How to Configure the Device Time...................................................................................................................................... |
36 |
4.3 |
How to Configure the (Encrypted) UTN Port .................................................................................................................... |
38 |
4.4 |
How to Assign a Name to a USB Port................................................................................................................................... |
39 |
4.5 |
How to Get Messages................................................................................................................................................................ |
40 |
4.6 |
How to Monitor the UTN Server ............................................................................................................................................ |
42 |
4.7How to Determine what is Shown in the Display
|
(only dongleserver ProMAX)46 |
|
4.8 |
How to Configure Acoustic Signals (only dongleserver ProMAX) ............................................................................ |
48 |
5 Working with the SEH UTN Manager ........................................................... |
49 |
|
5.1 |
How to Find UTN Servers/USB Devices in the Network................................................................................................ |
50 |
5.2 |
How to Establish a Connection to a USB Device ............................................................................................................. |
52 |
5.3 |
How to End the Connection between the USB Device and the Client.................................................................... |
54 |
5.4 |
How to Request an Occupied USB Device......................................................................................................................... |
55 |
5.5 |
How to Automate USB Device Connections and Program Starts ............................................................................. |
56 |
5.6 |
How to Find Status Information on USB Ports and USB Devices............................................................................... |
59 |
5.7 |
How to Use the Selection List and Manage User Access Rights with It................................................................... |
60 |
5.8 |
How to Use the SEH UTN Manager without Graphical User Interface (utnm)...................................................... |
63 |
6 |
Security........................................................................................................... |
69 |
6.1 |
How to Define the Encryption Strength for SSL/TLS Connections........................................................................... |
70 |
6.2 |
How to Encrypt the USB Connection................................................................................................................................... |
72 |
6.3 |
How to Encrypt the Connection to the dongleserver Control Center..................................................................... |
74 |
6.4How to Protect Access to the dongleserver Control Center (User Accounts)75

USB Dongleserver User Manual Windows
6.5 |
How to Block UTN Server Ports (TCP Port Access Control) |
.......................................................................................... 76 |
6.6 |
How to Control Access to USB Devices............................................................................................................................... |
77 |
6.7 |
How to Block USB Device Types............................................................................................................................................ |
80 |
6.8 |
How to Use Certificates ............................................................................................................................................................ |
81 |
6.9 |
How to Configure Network Authentication (IEEE 802.1X) ........................................................................................... |
86 |
6.10 How to Configure SNMP .......................................................................................................................................................... |
89 |
|
6.11 How to Disable a USB Port....................................................................................................................................................... |
90 |
|
7 |
Maintenance .................................................................................................. |
91 |
7.1 |
How to Backup Your Configuration ..................................................................................................................................... |
92 |
7.2 |
How to Reset Parameters to their Default Values........................................................................................................... |
95 |
7.3 |
How to Perform a Device Software Update ...................................................................................................................... |
97 |
7.4 |
How to Restart the UTN Server .............................................................................................................................................. |
98 |
8 |
Appendix ........................................................................................................ |
99 |
8.1 |
Glossary ........................................................................................................................................................................................ |
100 |
8.2 |
Troubleshooting ....................................................................................................................................................................... |
102 |
8.3 |
Parameter lists............................................................................................................................................................................ |
105 |
8.4 |
SEH UTN Manager – Feature Overview............................................................................................................................. |
132 |

USB Dongleserver User Manual Windows |
General Information |
|
|
1 General Information
•Product 2
•Documentation 4
•Support and Service 6
•Your Safety 7
•First Steps 8
1
USB Dongleserver User Manual Windows
1.1Product
Purpose
UTN servers comprise USB Deviceservers and USB Dongleservers. As USB Dongleservers, UTN servers make non- network-ready USB dongles accessible via TCP/IP network. The USB dongles are connected to the USB ports of the UTN server for this purpose. The UTN (UTN = USB to Network) functionality and the corresponding software tool 'SEH UTN Manager' then establish a virtual USB connection between USB dongle and client. The USB dongle can be used as if it were connected locally.
System Requirements
The UTN server has been designed for use in TCP/IP networks.
The SEH UTN Manager can be used in the following systems:
• Windows 7 or higher, except Windows Server 2008
(For Windows 7 and Windows Server 2008 R2, KB3033929 http://technet.microsoft.com/en-us/library/security/3033929 must be installed.)
•macOS 10.9 or higher
•Linux: *.deb (for Debian-based systems) and *.rpm (for Red Hat-based systems) installation packages are available for 64-bit systems. A successful installation cannot be guaranteed due to the multitude of Linux varieties! The installation must be carried out on your own.
Installation was tested successfully under the following 64-bit systems: Debian: Debian 10, Ubuntu 18.04
Red Hat: Red Hat Enterprise Linux 8, Oracle 8, CentOS 8, SUSE Linux Enterprise 15.1, openSUSE Leap 15.1
•IPv4 TCP/IP network
The SEH Product Manager can be used under the following systems:
•Windows 7 or higher
•macOS 10.12.x or higher
•IPv4 TCP/IP network
This document describes usage under Windows environments. Information about the usage in other environments can be found in the relevant system-specific User Manual. More details can be found in chapter ’Documentation’ 4.
Combination with Associated Products
You can combine the UTN server with additional SEH Computertechnik GmbH products to ideally adapt the use of your devices to your environment!
Serviceplus
Service contracts are available for USB Dongleservers, known as Servicepluspackages. The Serviceplus package extends the manufacturer's guarantee on your Dongleserver from 36 to 60 months. In addition, you will receive
quickly and easily an advance replacement device in case of a defect. Serviceplus packages must be purchased separately.
Detailed information:
https://www.seh-technology.com/services/service-packages.html
2
USB Dongleserver User Manual Windows
Rack Mount Kits
We recommend the 'Rack Mount Kits' (RMK) for optimal and safe storage of your Dongleserver. The mounting kits allow the installation of USB Dongleservers in 19" server cabinets and convenient access to the device.
Detailed information:
https://www.seh-technology.com/products/rack-mount-kits.html
3

USB Dongleserver User Manual Windows
1.2Documentation
Please load all current documents from our Website:
http://www.seh-technology.com
Further applicable documents
The USB Dongleserver documentation consists of the following documents:
Quick Installation Guide |
Print, PDF |
Information on safety, technical data, declarations of con- |
|
|
formity and description of the hardware installation and |
|
|
initial setup. |
User Manual |
Detailed description of the UTN server configuration, |
|
|
|
administration and maintenance. System-specific instruc- |
|
|
tions for the following systems: |
|
|
- Windows |
|
|
- macOS |
|
|
- Linux |
Online help |
HTML |
Information on how to use the 'dongleserver Control Cen- |
|
|
ter' web interface. |
|
|
(Embedded into web interface; no download.) |
Product information |
Print, PDF |
Features and technical data |
Brochures |
Print, PDF |
http://www.seh-technology.com |
Open source licenses |
online |
https://www.seh-technology.com/services/licenses.html |
Symbols and Legend
A variety of symbols and mark-ups are used within this document.
WARNING
Warning
Important:
Important information
Requirement
•Numeration
1.Numeration
Result
Tip
Bold
Courier
A warning contains important information that must be heeded. Nonobservance may lead to malfunctions.
These notes contain crucial information for failure-free operation.
Requirements that must be met before you can begin the action.
Listing
Step-by-step instructions
Outcome of a performed action
Recommendations and beneficial advice
Reference (Within the document you can use hyperlinks.)
Established terms (e.g. of buttons, menu items, or selection lists)
Code (e.g. for command lines or scripts), Paths
4

USB Dongleserver User Manual Windows
'Proper names' |
Single quotation marks identify proper names |
5
USB Dongleserver User Manual Windows
1.3Support and Service
SEH Computertechnik GmbH offers extensive Support. If you have any questions, please contact us.
Monday through Thursday |
8:00 a.m. to 4:45 p.m. |
Friday |
8:00 a.m. to 15:15 p.m. |
+49 (0)521 94226-44 |
|
support@seh.de |
|
Customers from the United States of America (USA) and Canada please contact North American Support:
Monday – Friday |
9:00 am – 5:00 pm (EST/EDT) |
+1-610-943-3226
support@sehtechnology.com
All information and downloads regarding your product are available on our website:
http://www.seh-technology.com
6
USB Dongleserver User Manual Windows
1.4Your Safety
Read and observe all safety regulations and warnings found in the documentation, on the device and on the packaging. This will avoid potential misuse and prevent damages to people and devices.
Intended Use
The UTN server is used in TCP/IP networks and has been designed for use in office environments. It allows multiple network users to access non-network-ready USB dongles.
Improper Use
All uses of the device that do not comply with the functionalities described in the USB Dongleserver documentation are regarded as improper use.
Safety Regulations
Before starting the initial setup of the UTN server, read and observe the safety regulations in the 'Quick Installation Guide'. This document is enclosed in the packaging in printed form.
Warnings
Read and observe all warnings mentioned in this document. Warnings are found before any instructions known to be dangerous. They are presented as follows:
WARNING
Warning!
Liability and Guarantee
SEH Computertechnik GmbH will not accept any liability for personal injuries, property damages and consequential damages resulting from the non-observance of the mentioned safety regulations and warnings. Non-obser- vance will also result in any guarantee claims becoming void.
Modifications to the Device and Repairs
It is not allowed to make modifications to the hardware and software or to try to repair the device. If your device needs to be repaired, contact our support 6.
7

USB Dongleserver User Manual Windows
1.5First Steps
1.Read and observe the security regulations in order to avoid damages to people and devices 7.
2.Install the hardware. Hardware installation includes connecting the UTN server to the network, USB devices, and power grid ‘Quick Installation Guide’.
3.Install the software. Software installation includes installing the required 'SEH UTN Manager' software tool on your client and assigning an IP address ‘Quick Installation Guide’.
4.Configure the UTN server so that it is optimally embedded it into your network and sufficiently protected. All information on how to do this you will find in this document.
5.Use the SEH UTN Manager to establish and manage connections to the USB dongles which are connected to the UTN server ’Working with the SEH UTN Manager’ 49.
You can find information on the USB Dongleserver documentation in the chap- ter’Documentation’ 4.
8

USB Dongleserver User Manual Windows |
Administration Methods |
|
|
2 Administration Methods
You can administer, configure and maintain the UTN server in a number of ways:
•Administration using the dongleserver Control Center 10
•Administration via the SEH UTN Manager 12
•Administration via the SEH Product Manager 17
•Administration via Email 19
9

USB Dongleserver User Manual Windows
2.1Administration using the dongleserver Control Center
The UTN server has a user interface, the dongleserver Control Center, which can be opened using an Internet browser (e.g. Microsoft Edge).
The UTN server can be configured, monitored and maintained using the dongleserver Control Center.
•Opening dongleserver Control Center in the Browser 10
•Opening dongleserver Control Center from SEH UTN Manager 10
•Opening dongleserver Control Center from SEH Product Manager 10
•Controls 11
Opening dongleserver Control Center in the Browser
The UTN server is connected to the network and the power grid.
The UTN server has a valid IP address 22.
1.Open your browser.
2.Enter the IP address of the UTN server as the URL.
The dongleserver Control Center will be displayed in the browser.
Important:
If the dongleserver Control Center is not displayed, check if a gateway is configured (22) and the proxy settings of your browser.
Opening dongleserver Control Center from SEH UTN Manager
The UTN server is connected to the network and the power grid.
The UTN server has a valid IP address 22.
The SEH UTN Manager is installed on the client 12.
1.Start the SEH UTN Manager.
2.In the selection list, select the UTN server.
3.In the menu bar, select UTN Server – Configure.
Your browser opens and the dongleserver Control Center is displayed.
Opening dongleserver Control Center from SEH Product Manager
The dongleserver Control Center is displayed directly in the SEH Product Manager. You can also open it separately in the browser.
The SEH Product Manager is installed on the client 17.
1.Start the SEH Product Manager.
2.In the device list, select the UTN server.
The dongleserver Control Center is displayed on the right side in the integrated browser.
3.To access the dongleserver Control Center separately in the browser, select Launch Browser from the
Device menu.
Your browser opens and the dongleserver Control Center is displayed.
Important:
If the dongleserver Control Center is not displayed, check the certificate.
If the certificate chain of trust can not be verified, a security warning will appear instead of the dongleserver Control Center. Review the certificate personally and add an exception rule for the certificate, if necessary. Detailed information can be found in the 'SEH Product Manager Online Help'.
10
USB Dongleserver User Manual Windows
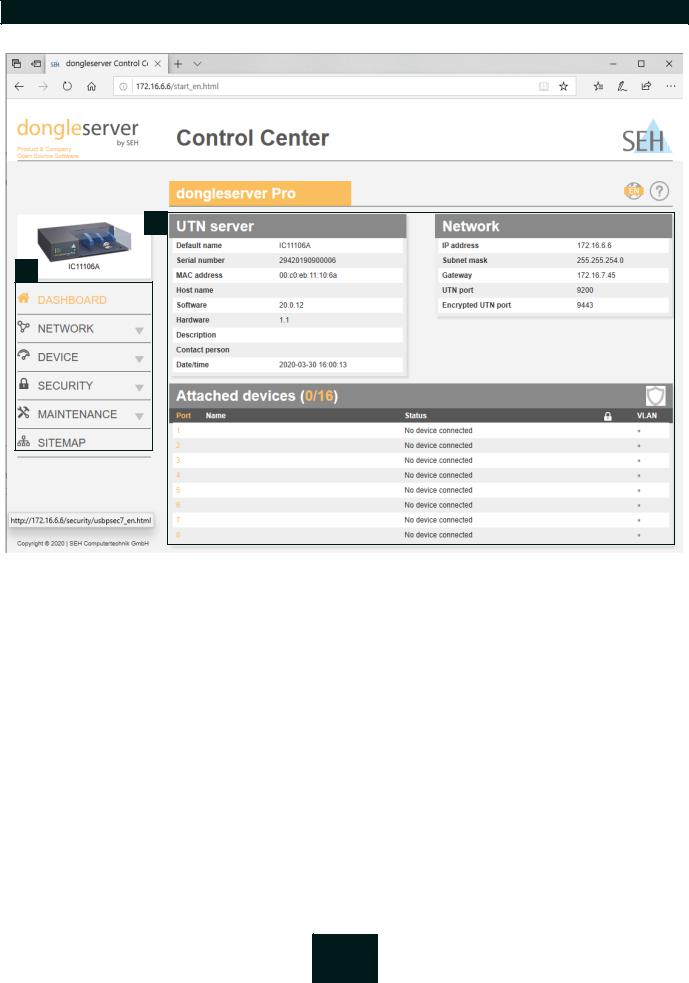
Controls
|
|
|
|
|
|
|
1 |
|
|
4 |
5 |
|
|
|
|
|
|
3
2
Figure 2.1-1: dongleserver Control Center
1 |
Product & Company |
Manufacturer’s contact details and additional product information. |
2 |
Menu item |
After selecting a menu item, the available submenu items are displayed. |
3 |
Page |
Menu content |
4 |
Globe |
Language selection |
5 |
? icon |
Online help |
11
USB Dongleserver User Manual Windows
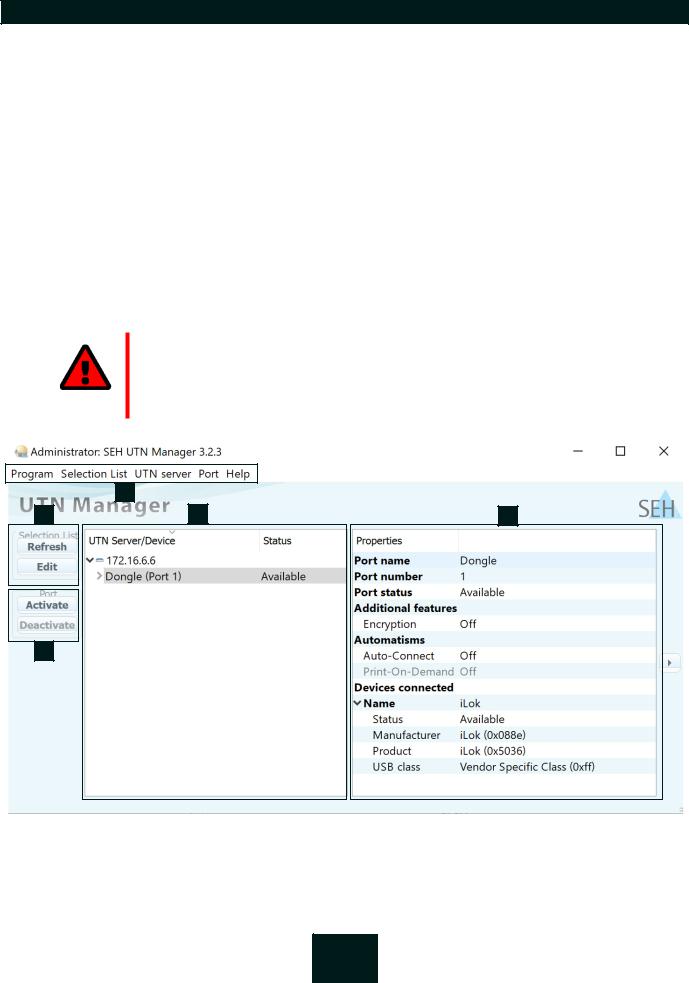
2.2Administration via the SEH UTN Manager
The 'SEH UTN Manager' is a software tool developed by SEH Computertechnik GmbH. The SEH UTN Manager is used to establish and manage connections to the USB devices connected to the UTN servers.
•Features 12
•Versions 13
•Installation 14
•Program Start 16
Features
The software is installed on all clients that are meant to access a USB device in the network. After the SEH UTN Manager is started, the network is scanned for connected UTN servers. All UTN servers found and their connected USB devices are displayed in the 'network list'. To use the USB devices connected to the UTN server, you have to add the UTN server to the 'selection list'. The devices shown in the selection list can be administrated and the connected USB devices can be used. Working working with the SEH UTN Manager is described in detail in the chapter ’Working with the SEH UTN Manager’ 49.
WARNING
UTN (2) and the corresponding SEH UTN Manager only work in IPv4 networks.
In pure IPv6 networks, it is only possible to access the dongleserver Control Center (10) to administer the UTN server.
2 |
1 |
4 |
5 |
3 |
Figure 2.2-1: |
SEH UTN Manager |
12

USB Dongleserver User Manual Windows
1 |
Menu bar |
Available menu items |
2Buttons for editing the selecOpens the dialog for searching UTN servers in the network and for select-
|
tion list |
ing the desired devices 50. |
3 |
Buttons for managing the |
Establishes a connection to the USB device connected to the USB port ( |
|
port connection |
52) or interrupts the connection (54). |
4 |
Selection list |
Shows the selected UTN servers and the connected USB devices. |
5Display area for the properShows information on the selected UTN server or USB device 59. ties
Detailed information on how to use the SEH UTN Manager can be found in the 'SEH UTN Manager Online Help'. To start the online help, go to the SEH UTN Manager menu bar and select Help – Online Help.
Important:
Some SEH UTN Manager features might not be displayed or are displayed as inactive. This depends on
•the type and location of the selection list
•the user's rights and the group memberships on the client
•the client operating system
•the settings of the product-specific security mechanisms
•the status of the UTN server and respective USB port
More details can be found in chapter ’SEH UTN Manager – Feature Overview’ 132.
Versions
The SEH UTN Manager is available in two versions:
•Complete Version:
SEH UTN Manager with graphical user interface (figure 2.2-1 12) and additional features.
•Minimal version (without graphical user interface):
Usage only via command line ('utnm' 63) and automated programs ('UTN Actions' 56).
Important:
The complete version is recommended for general use.
The minimal version is to be used by experts only!
In both versions the 'SEH UTN Service' works in the background and is automatically active after the system start. The service can be controlled by means of the usual administration methods.
Additionally, the following user groups are distinguished:
•users with administrative rights (administrator)
•users without administrative rights (standard user)
Important:
Some features can only be configured by administrators. More details can be found in chapter ’SEH UTN Manager – Feature Overview’ 132.
13

USB Dongleserver User Manual Windows
Installation
In order to use the SEH UTN Manager, the program must be installed on a computer with a Windows operating system. The SEH UTN Manager installation file can be found on the SEH Computertechnik GmbH website:
https://www.seh-technology.com/services/downloads.html
The installation file is available as '*.exe' for Windows systems. The file contains both versions of the SEH UTN Manager. Instead of the standard installation, an unattended installation may be carried out.
•’Standard Installation’ 14
•’Unattended Installation’ 14
Standard Installation
Windows 7 or higher, except Windows Server 2008
(For Windows 7 and Windows Server 2008 R2, KB3033929 http://technet.microsoft.com/en-us/library/security/3033929 must be installed.)
The installation can only be carried out by users with administrative rights.
1.Start the SEH UTN Manager installation file.
2.Follow the installation routine.
The SEH UTN Manager is installed on your client.
If used in server-based environments (Citrix XenApp, Microsoft Remote Desktop Services/Terminal Services) and virtualized environments (VMware, Citrix XenDesktop, Microsoft HyperV, etc.) the Windows system may lack required drivers. The installation routine checks the available drivers during the installation process. If drivers are missing, another installer ('USB driver for SEH UTN Manager'). This installer will prepare the installation of the required drivers.
Unattended Installation
An unattended installation takes place without any time-consuming user input. In addition, the SEH UTN Manager UTN Manager can be automatically installed on a large number of clients via login scripts. For more information, refer to the documentation of your operating system.
Default settings used:
•Complete version
•Installation for all users of the client
•Target directory: %PROGRAMFILES%\SEH Computertechnik GmbH\SEH UTN Manager
(Where %PROGRAMFILES% is a Windows environment variable for the 'Program Files' directory. By means of the command line, the path can be determined as follows: echo %PROGRAMFILES%)
• Start menu folder: SEH Computertechnik GmbH\SEH UTN Manager
•A desktop shortcut will be created.
•SEH UTN Manager will start automatically after the installation.
Windows 7 or higher, except Windows Server 2008
(For Windows 7 and Windows Server 2008 R2, the following must be installed: KB3033929 http://technet.microsoft.com/en-us/library/ security/3033929 and hotfix 2921916 http://support.microsoft.com/en-us/help/2921916/the-untrusted-publisher-dialog-box-appe- ars-when-you-install-a-driver-i.)
14

USB Dongleserver User Manual Windows
The installation can only be carried out by users with administrative rights.
Important:
By installing the SEH UTN Manager, you automatically accept the SEH Computertechnik GmbH agreement concerning the license and the use of the software. The agreement can be found on the website of SEH Computertechnik GmbH:
https://www.seh-technology.com/services/licenses.html
1.Open the command-line interface.
2.Change to the directory containing the SEH UTN Manager installation file.
3.Enter the command sequence: "sehutnmanager-win-X.X.X.exe" /S [<command>]
Commands: table 2.2-1 15.
4.Confirm your entry.
The sequence of commands will be run.
Table 2.2-1: Installation commands
Command |
Description |
|
|
/A |
Installs SEH UTN Manager for all users. |
/C |
Installs SEH UTN Manager for the current user only. |
/F=<folder name> |
Overrides the default folder name of the Start menu folder. Subfolders can be |
|
specified with '/'. |
/G |
Installs the complete version (14) of SEH UTN Manager. |
|
Recommended for general use. |
/I=<path> |
Overrides the default installation directory. An absolute path must be specified. |
|
It has to be the last parameter used in the command line and must not contain |
|
any quotes, even if the path contains spaces. |
/K |
Does not create a desktop shortcut. |
/M |
Installs the minimal version (14) of SEH UTN Manager. |
|
Expert use only! |
/R |
Runs SEH UTN Manager after the installation is complete. |
/S |
Instructs the installation to be silent. There is no user interaction and the user |
|
cannot cancel the installation. |
/U |
Updates an existing SEH UTN Manager. |
|
(If no SEH UTN Manager is installed, it will be installed using the default installa- |
|
tion settings.) |
/V1 |
Enables command line logging to troubleshoot installation problems. |
/V2 |
Creates a log file in the installation folder. The file contains information to trou- |
|
bleshoot installation problems. |
/V3 |
Enables command line logging and creates a log file in the installation direc- |
|
tory. Both provide information to help troubleshoot installation issues. |
/? |
Shows the help page. |
15

USB Dongleserver User Manual Windows
Program Start
You can recognize the SEH UTN Manager by its icon:  . The program is started with the usual methods of your operating system.
Update
You can check for program updated manually and automatically. More information can be found in the 'SEH UTN Manager Online Help'.
16
USB Dongleserver User Manual Windows
2.3Administration via the SEH Product Manager
The 'SEH Product Manager' is a software tool developed by SEH Computertechnik GmbH for the administration and management of SEH Computertechnik GmbH devices on the network.
•Function 17
•Installation 18
•Program Start 18
Function
The software is installed on all clients from which SEH Computertechnik GmbH devices are to be administrated and managed on the network.
After starting the SEH Product Manager, the network is first scanned for connected SEH Computertechnik GmbH devices. All found devices are displayed in the 'device list'. You can select and then administer and manage the devices in the device list.
If a task can be performed using the SEH Product Manager, this will be described in the corresponding chapter.
WARNING
The SEH Product Manager only works in IPv4 networks.
In pure IPv6 networks, it is only possible to access the dongleserver Control Center (10) to administer and manage SEH Computertechnik GmbH devices.
1 |
2 |
3 |
5 |
6 |
4 |
Figure 2.3-1: |
SEH Product Manager |
|
1 |
Menu bar |
Available menu items |
2 |
Filter |
Filters the displayed devices by product type. |
3 |
Searching |
Search function for searching the device list. |
17
USB Dongleserver User Manual Windows
4 |
Device list |
Shows the devices found on the network by SEH Computertechnik |
|
|
GmbH. |
5Control Center
6Functions for editing the device list
Shows the Control Center of the device selected in the device list.
•Refresh: Updates the status of the devices displayed in the list.
•Search: Searches the network for more devices from SEH Computertechnik GmbH. Found devices are added to the device list.
•Delete: Removes all devices from the device list.
Detailed information on how to use the SEH Product Manager can be found in the 'SEH Product Manager Online Help'. To start the online help system, go to the SEH Product Manager menu bar and select Help – Online Help.
Installation
In order to use the SEH Product Manager, the program must be installed on a computer with a Windows operating system. The SEH Product Manager installer can be found on the SEH Computertechnik GmbH website:
https://www.seh-technology.com/services/downloads.html
The installation file is available as '*.exe' for Windows systems.
Windows 7 or higher
The installation can only be carried out by users with administrative rights.
1.Start the SEH Product Manager installer.
2.Follow the installation routine.
The SEH Product Manager is installed on your client.
Program Start
You can recognize the SEH Product Manager by its icon:  . The program is started with the usual methods of your operating system.
The program automatically searches for SEH Computertechnik devices on the network after starting. For more information see the 'SEH Product Manager Online Help'.
Update
You can check for program updates manually and automatically. More information can be found in the 'SEH Product Manager Online Help'.
18
USB Dongleserver User Manual Windows
2.4Administration via Email
You can administrate the UTN server via email and thus from any computer Internet access (remote access):
•Get UTN server status
•Set UTN server parameters
•UTN server update
To do so, you write commands into the email message header table 2.4-1 19.
Table 2.4-1: Commands and comment:
Commands |
Option |
|
|
|
|
<Command> |
get status |
|
|
get |
parameters |
|
set |
parameters |
|
|
|
update utn
help
[<Comment>]
Description
You get the UTN server status page.
You get the UTN server parameter list.
Sends one or more parameters to the UTN server which will then be adopted by the UTN server.
Write the parameters and their values into the email message body: <parameter> = <value>
The syntax and values can be found in the parameter lists 105.
Carries out an automatic update using the software that is attached to the mail.
You get a page with information on remote maintenance.
Freely definable text for descriptions.
The following applies to the instructions:
•not case-sensitive
•one or more space characters are allowed
•max. length is 128 byte
•only the ASCII format can be read.
In addition, a TAN is needed to execute updates or parameter changes. To begin with, you have to get a status page via email (table 2.4-1 19) because it contains the TAN. You enter the received TAN into the email message body. A space character must follow.
An email user account for the UTN server is set up on a POP3 server.
An email user account for the UTN server is set up on an SMTP server.
A DNS server is configured on the UTN server 22.
POP3 and SMTP parameters have been configured on the UTN server 28.
1.Open an email program.
2.Write a new email:
-As recipient enter the UTN server address.
-Enter a command in the subject line: cmd: <command> [<comment>] Commands and comments: table 2.4-1 19.
-Into the email message body enter a TAN, if applicable.
3.Send the email.
The UTN server receives the email and carries out the instruction.
19

USB Dongleserver User Manual Windows
Examples
You want to get the UTN server parameter list: To: UTNserver@company.com
Subject: cmd: get parameters
You want to set the 'configuration' parameter: To: UTNserver@company.com
Subject: cmd: set parameters
Email message body:TAN = nUn47ir79Ajs7QKE sys_descr = <your description>
20

USB Dongleserver User Manual Windows |
Network Settings |
|
|
3 Network Settings
To optimally embed your UTN server into your network, you can configure the following settings:
•How to Configure IPv4 Parameters and DNS 22
•How to Configure IPv6 Parameters 25
•How to Configure Bonjour 27
•How to Configure Email (POP3 and SMTP) 28
•How to Configure Server Services 30
•How to Use the UTN Server in VLAN Environments 32
21

USB Dongleserver User Manual Windows
3.1How to Configure IPv4 Parameters and DNS
In the hardware installation (‘Hardware Installation Guide’) the UTN server is connected to the network. The UTN server then checks if it receives an IPv4 network configuration (IP address, subnet mask, gateway, DNS - Domain Name Service) dynamically over DHCP (Dynamic Host Configuration Protocol). If this is not the case, the UTN server assigns itself an IP address via Zeroconf from the address range which is reserved for Zeroconf (169.254.0.0/ 16).
Important:
If the UTN server is connected to an IPv6 network, it will automatically receive an additional IPv6 address 25.
The IPv4 address assigned to the UTN server can be found via the SEH UTN Manager and SEH Product Manager software tools. This step usually is carried out during the initial set up (‘Quick Installation Guide’).
As an alternative to automatic configuration via DHCP or Zeroconf, you can assign a manual (static) IPv4 network configuration to the UTN server.
•Assigning an IPv4 network configuration using the dongleserver Control Center 22
•Assigning an IPv4 Network Configuration using the SEH UTN Manager 23
•Determining the IPv4 Address using the SEH UTN Manager and Assigning an IPv4 Network Configuration 23
•Determining the IPv4 Address using the SEH Product Manager 24
Assigning an IPv4 network configuration using the dongleserver Control Center
For DHCP: Your network has a DHCP server.
For DNS: Your network has a DNS server.
1.Start the dongleserver Control Center.
2.Select NETWORK – IPv4.
3.Configure the IPv4 parameters; table 3.1-1 22.
4.Click Save & Restart to confirm.
The settings will be saved.
Table 3.1-1: IPv4 parameters
Parameters |
Description |
||
|
|
|
|
DHCP |
Enables/disables the DHCP protocol. |
||
|
If DHCP is enabled in your network, IPv4 network configuration (IP address, |
||
|
subnet mask, gateway, DNS) is automatic. |
||
|
|
|
We recommend disabling this option once an IP |
|
|
|
|
|
|
|
address has been assigned to the UTN server. |
|
|
|
|
ARP/PING |
Enables/disables the ARP/PING protocol. |
||
|
You can use the commands ARP and PING to change an IP address. The imple- |
||
|
mentation depends on your system; read the documentation of your operating |
||
|
system. |
||
|
|
|
We recommend disabling this option once an IP |
|
|
|
|
|
|
|
address has been assigned to the UTN server. |
|
|
|
|
22
USB Dongleserver User Manual Windows
Parameters |
Description |
||
|
|
|
|
IP Address |
IP address of the UTN server. |
||
Subnet mask |
Subnet mask of the UTN server. |
||
|
Subnet masks are used to logically partition big networks into subnetworks. If |
||
|
you are using the UTN server in a subnetwork, it requires the subnet mask of |
||
|
the subnetwork. |
||
Gateway |
IP address of the network's standard gateway which the UTN server uses. |
||
|
With a gateway, you can address IP addresses from other networks. |
||
DNS |
Enables/disables the name resolution via a DNS server. |
||
|
|
|
Important: |
|
|
|
|
|
|
|
Only DNS allows you to use host names instead of IP addresses if |
|
|
|
you define servers such as e.g. a time server on the UTN server. |
|
|
|
Example: Time server configuration (36) with ntp.server.de |
|
|
||
|
|
|
instead of 10.168.0.140. |
|
|
|
|
Primary DNS server |
Defines the IP address of the primary DNS server. |
||
Secondary DNS server |
Defines the IP address of the secondary DNS server. |
||
|
The secondary DNS server is used if the first one is not available. |
||
Domain name (suffix) |
Defines the domain name of an existing DNS server. |
||
|
|
|
|
Assigning an IPv4 Network Configuration using the SEH UTN Manager
The SEH UTN Manager (complete version) is installed on the client 12.
The UTN server is shown in the selection list 50.
1.Start the SEH UTN Manager.
2.In the selection list, select the UTN server.
3.In the menu bar, select UTN Server–Set IP Address. The Set IP Address dialog appears.
4.Enter the relevant TCP/IP parameters.
5.Click OK.
The settings will be saved.
Determining the IPv4 Address using the SEH UTN Manager and Assigning an IPv4 Network Configuration
The SEH UTN Manager searches the network for connected UTN servers.
The SEH UTN Manager (complete version) is installed on the client 12.
1.Start the SEH UTN Manager.
2.Confirm the note dialog Your Selection List seems to be empty with Yes.
If no note dialog is available and the main dialog appears, select Selection List–Edit in the menu bar.
The Edit Selection List dialog appears. 3. In the network list, select the UTN server.
If you are using several UTN servers of the same model, you can identify a specific device by its default name (22) or the connected USB devices.
4.In the shortcut menu, select Set IP Address. The Set IP Address dialog appears.
5.Enter the relevant TCP/IP parameters.
23
USB Dongleserver User Manual Windows
6.Click OK.
The settings will be saved.
Determining the IPv4 Address using the SEH Product Manager
The SEH Product Manager is installed on the client 17.
1.Start the SEH Product Manager. The device list is displayed.
2.Search for the UTN server in the device list. It can be identified by its product type and MAC address (which can be found on the device type plate).
3.Read the UIP address of the UTN server from the device list.
If you select the UTN server in the device list, the dongleserver Control Center will be displayed. If necessary, you can assign the IPv4 network configuration directly there (22).
24

USB Dongleserver User Manual Windows
3.2How to Configure IPv6 Parameters
IPv6 (Internet Protocol Version 6) is the successor of the still predominantly used IPv4 (Internet Protocol Version 4). IPv6 offers the same basic functions but has many advantages such as the increased address space of 2128
(IPv6) instead of 232 (IPv4) IP addresses and auto configuration.
Important:
IPv6 address notation differs from IPv4: An IPv6 address consists of 128 bits. The normal format of an IPv6 address is eight fields. Each field contains four hexadeci-
mal digits representing 16 bits.
Example: 2001:db8:4:0:2c0:ebff:fe0f:3b6b
As a URL in a Web browser, an IPv6 address must be enclosed in square brackets. This prevents port numbers from being mistakenly regarded as part of an IPv6
address.
Example: http://[2001:db8:4:0:2c0:ebff:fe0f:3b6b]:443
The URL will only be accepted by browsers that support IPv6.
You can embed the UTN server into an IPv6 network.
WARNING
UTN functionality (2) and the corresponding SEH UTN Manager only work in
IPv4 networks. The SEH Product Manager also only works in IPv4 networks.
In pure IPv6 networks, it is only possible to access the dongleserver Control Center (10) to administer the UTN server.
The UTN server will automatically receive one or more IPv6 addresses in addition to its IPv4 address. To optimally embed the UTN into your network, you can configure IPv6 parameters.
1.Start the dongleserver Control Center.
2.Select NETWORK – IPv6.
3.Configure the IPv6 parameters; table 3.2-1 25.
4.Click Save & Restart to confirm.
The settings will be saved.
Table 3.2-1: IPv6 parameters
Parameters |
Description |
|
|
IPv6 |
Enables/disables the IPv6 functionality of the UTN server. |
Automatic configuration |
Enables/disables the automatic assignment of the IPv6 address to the UTN |
|
server. |
IPv6 address |
Defines an IPv6 unicast address in the format n:n:n:n:n:n:n:n which is manually |
|
assigned to the UTN server. |
|
• Every 'n' represents the hexadecimal value of one of the eight 16 bit ele- |
|
ments of the address. |
|
• Leading zeros can be omitted. |
|
• An IPv6 address may be entered or displayed using a shortened version |
|
when successive fields contain all zeros (0). In this case, two colons (::) are |
|
used. |
Router |
Manually defines a static router to which the UTN server sends its requests. |
|
|
25

USB Dongleserver User Manual Windows
Parameters |
Description |
|
|
Prefix length |
Defines the length of the subnet prefix for the IPv6 address. The value 64 is pre- |
|
set. |
|
Address ranges (e.g. your network) are specified with prefixes. To do this, the |
|
prefix length (number of bits used) is added to the IPv6 address as a decimal |
|
number and the decimal number is preceded by '/'. |
|
|
26
 Loading...