

Page 1

CCR0406U.qxp_9 4/12/01 9:21 AM Page 2
Page 2

CCR0406U.qxp_9 4/12/01 9:21 AM Page 4
Thank you for purchasing ChuChu
T M
Ro cket !
Please note that this Game
Pak is designed only for use with th e
Game Boy Ad vance. Be sure to read th i s
i n st ruction manual th o ro u g h ly befo r e
you sta rt playing ChuChu Ro cket !
CONTENTS
Story . . . . . . . . . . . . . . . . . . . . . . 4
Controls . . . . . . . . . . . . . . . . . . . 6
Game Display and Rules . . . . . 8
Starting the Game . . . . . . . . . . 10
Mode Explanations . . . . . . . . . . 11
● Help . . . . . . . . . . . . . . . . . . . . 11
● 4P Battle . . . . . . . . . . . . . . . . . 11
● Team Battle . . . . . . . . . . . . . 13
● Stage Challenge . . . . . . . . . 16
● Puzzle . . . . . . . . . . . . . . . . . . 17
● Let’s create a stage . . . . . . . 18
● Let’s create a character . . 20
● Exchange data . . . . . . . . . .22
● Options . . . . . . . . . . . . . . . . 24
Character Introductions . . . . 26
Tips for Playing ChuChu . . . . 28
WA R N I NG: Tu rning power off while game is
being saved can corru pt saved fi l e s .
Page 3

CCR0406U.qxp_9 4/12/01 9:21 AM Page 4
Story
In a far away time on a far away planet,
there is a Space Port.
This Space Port is inhabited by thousands of little ChuChus.
ChuChus aren,t
ordinary mice.
We,re space mice!
The things that ChuChus
detest more than anything
else are KapuKapus.
KapuKapus aren,t
ordinary cats.
We,re space cats!
4
The ChuChus lived happily
until one day, when...
The Space Port became
infested with KapuKapu.
What should
we do?
The fate of the
ChuChus
is in your hands!
The ,,ChuChu Rocket!
launch countdown has
started!
,,
5
Which rocket
should we go in?
Page 4

CCR0406U.qxp_9 4/12/01 9:21 AM Page 6
Controls
L Button
Control Pad
START
SELECT
Controls During the Game
Move the Cursor with the Control Pad.
There are 3 methods to place an Arrow
Panel. “Rotate A/B” is selected by default. But
try and find the method that is best for you.
You can change the method of controls in
the Options.
R Button
A Button
B Button
Rotate A/B
Press either A or B Button, to place a panel
where the cursor is located. Press the button
continuously to rotate the arrow. Perhaps this is
the easiest method to master? Try this first.
A Button:
Places “*”. Press A again continuously
to rotate the arrow in the following
order: “^” to “@” to “$” and so on.
B Button:
Places “@”. Press B again continuously
to rotate the arrow in the following
order: “$” to “*” to “^” and so on.
6
A &
By pressing A and Control Pad simulta n e o u s ly,
you can place the panel to the dire c t i o n
C o n t rol Pad is pressed, where the cursor is
l o c a ted. For exa mple, press A and up on
the Control Pad, and you can place “*”.
Be careful, though, because nothing
happens if you press only the A Butto n .
+
Arrow Panels
You can only place up to 3 panels on
the stage. If you try to place a 4th
panel, the first panel will disappear.
Pro
Press A, B, L or R Button to place an Arrow
Panel that is assigned for each button. It
may be hard, if you don’t get used to it.
A Button: Places “*” Panel.
B Button: Places “@” Panel.
L Button: Places “$” Panel.
R Button: Places “^” Panel.
7
Page 5

CCR0406U.qxp_9 4/12/01 9:21 AM Page 8
Game Display and Rules
Game Display
Rocket
Guide the
ChuChus to
your Rocket!
Cursor
ChuChus
They’re simply
mice.
KapuKapu
Watch out, or
they’ll eat all
the ChuChus!
Hatch
Mice and cats
come out
here.
Arrow Panel
Rule
Use the Arrow Panels to lead ChuChus to
your Rocket! But don’t lead KapuKapus
to your Rocket!
How Do ChuChus Move?
Usually ChuChus run in a straight line, but
if they bump into a wall, they turn right.
If there is an Arrow Panel, they turn in the
direction indicated.
Turn right when they bump
into a wall.
Turn in the direction of an Arrow Panel.
8
Different Sorts of ChuChus!
If you guide a ChuChu with a “?” mark into
your
Rocket, the roulette wheel will spin and
there will be a new game “event”!
If you guide a ChuChu with a “50” mark into
your
Rocket, you will get 50 ChuChus in one
A roulette
spins, and a
random
effect will
occur.
You get 50
ChuChus!
Look Out for KapuKapu!
If a KapuKapu enters your Rocket, you will
lose some of your ChuChus. Guide
KapuKapu to your opponent’s Rocket!
you lose part of your
ChuChus!
When KapuKapu enters…
Arrow Panels Can Break!
If a KapuKapu bumps head-on into an Arrow
Panel once, it will shrink a little. If a KapuKapu
bumps head-on into an Arrow Panel the
second time, it will break and vanish.
One bump from a
KapuKapu and an
Arrow Panel will
shrink…
9
Two bumps from a
KapuKapu and an
Arrow Panel will
vanish.
Page 6
CCR0406U.qxp_9 4/12/01 9:21 AM Page 10
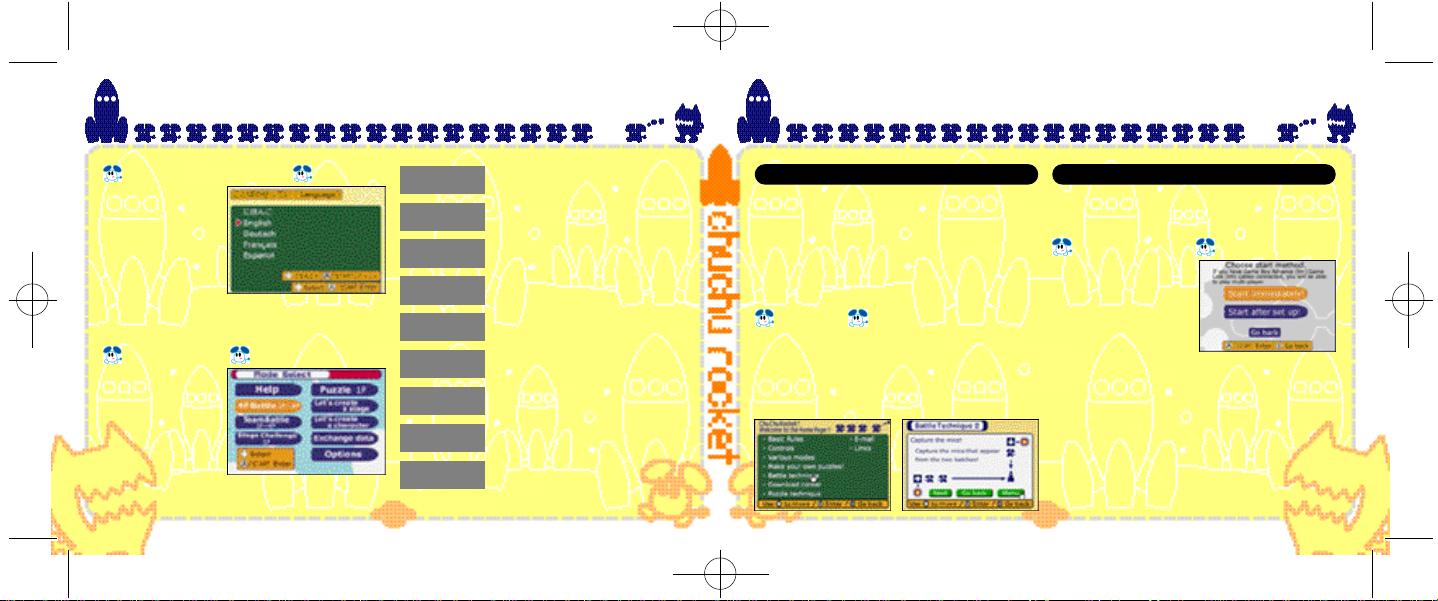
Starting the Game
Language Selection
When you start this
Game Pak for the
first time, you will
be asked to select
the language to
be displayed.
Use *@to select
the language, and
p ress the A Button or STA RT to ente r. After th i s ,
you can ch a n ge this setting from the Opt i o n s .
Mode Select
D u ring the Ti t l e
S c reen, press STA RT
to display th e
Mode Select
S c reen. Use
to select the mode
to play, and pre s s
the A Button or
STA RT to ente r.
* @ $ ^
10
Help
4P Battle
Team Battle
Stage
Challenge
Puzzle
Let’s create
a stage
Let’s create
a character
Exchange
data
Options
View the Help Screen for
further explanations (p.11)
Battle it out with up to 4
players! (p.11)
Play two on two! (p.13)
Try to tackle these
problems! (p.16)
Try to solve these puzzles!
(p.17)
You can make your own
stage (p.18)
You can make your own
character (p.20)
Exchange your creations
with your friends (p.22)
Change the game settings
(p.24)
Mode Explanations
Help
You can view the basic rules and explanations
of every mode. At first you have only a few
selections to choose from. But if you choose
this mode more often, you will get more
explanations. You will even be able to
download the character you use during
the game. To enjoy this game more, view
this mode often.
Controls
Use the Control Pad to move the arrow. If th e
a rrow turns into a hand icon, you can select
the menu. Press the A Button to ente r. Move
the
c u rsor to “Next” and press the A Button to
v i ew
the next page. Either select “Go back” or
p ress the B Button to view the previous page .
Play in a 4-player battle against human players
or CPU players. Collect as many ChuChus as
possible in your Rocket within the time limit.
If you choose “Start
Immediately!”, the game
will start immediately. If
you choose “Start after
set up!”, you will be
able
game
you start the game.
11
4P Battle
Start Selection
to adjust various
settings before
Page 7

CCR0406U.qxp_9 4/12/01 9:21 AM Page 12
Setting Screen
Press START here to select the Stage to play.
Handicap. The Gre a te r
this amount, the less
d a m a ge you re c e i ve
when a Ka p u Ka p u
enters your Rocket.
Select who is going
to control players 1
to 4. You can’t
change if you’re
playing by yourself.
Select the
difficulty
level of the
CPU.
Stage Select
Select the stage to
play, and press the
B u t ton or STA RT
can
select other levels
with theL or R Buttons.
To play in
created, select
“Original”.
Select the
control
method.
Please refer
to p.6.
12
a stage you
. You
Game Start
A
It’s time to start the
game! Place the
Arrow Panels on
the field to guide
as many ChuChus
as you can to your
Rocket. The game
will be over when
the time counter
reaches zero!
SCORE
TIME
Game Over
The player with the
most ChuChus will
have his rocket
launched, and will
earn 1 point. First
to reach the
preselected point is
the winner!
Team Battle
Play 2 on 2, with red
and blue players on
one team, yellow and
green players on the
other. The rules are the
same as 4P Battle.
Link Battle with Everyone
For 4P Battle and Team Battle, up to 4 players
can battle each other with one Game Pak.
Please connect the Game Boy Advance with
a
Game Boy®Advance
shown on the diagram on
of the direction of the cable
connect 1P and 2P.
minute after you select
Game Link®Cable
p.14. Be careful
when you
Please wait about 1
the mode.
13
Page 8

CCR0406U.qxp_9 4/12/01 9:21 AM Page 14
■ H OW TO CONNECT GAME BOY ADVA NCE LINK CABLE (4P Battle, Team Battle)
H e re is an explanation on how to connect each GBA with the Game Boy Ad vance Link Cable.
■ What You Need
Game Boy Advance Systems number of players
ChuChu Rocket! Cartridge . . . . . . . . . . . . . . . . . 1
Game Boy Advance Link Cable
For 2 players . . . . . . . . . . . . . . . . . . . . . . . . . . . . . 1
For 3 players . . . . . . . . . . . . . . . . . . . . . . . . . . . . . 2
For 4 players . . . . . . . . . . . . . . . . . . . . . . . . . . . . . 3
■ How to Connect
1.
Make sure that all Game Boy Advance Systems
are
turned OFF, and insert the cartridge into
1P’s unit.
2.
Connect the
3.
Connect the
to each Game Boy Advance’s expansion
connecter. Make sure that
connected to 1P’s unit.
4.
Turn the power of all Game Boy Advance
Systems
Game Boy Advance
Game Boy Advance
ON.
you intend to have
Link Cables.
Link Cable
the smaller plug is
■ Caution on Link Play
On the following conditions, the game may not
be able to communicate, or may malfunction.
● When linking with a cable other than Game
Boy Advance Link Cable.
● When the Game Boy Advance Link Cable is
not connected all the way in.
● When you disconnect and connect the
Game Boy Advance Link Cable while
communicating.
● When the Game Boy Advance Link Cable
and each Game
connected properly.
●When the cartridge is inser ted into Game Boy
Advance unit other than 1P’s.
● When you have 5 or more Game Boy
Advance Systems connected.
*If you are playing with 2 or 3 players, do not
connect any Game Boy Advance Systems(s)
or Game
Boy Advance
not be used.
Connect the Game Boy Advance Link Cable
and Game Boy
the diagram on the next page.
of the plugs and the location of the cartridge.)
Boy Advance System are not
Link Cable(s) that will
Advance Systems according to
(Notice the size
14
■ H OW TO CONNECT GAME BOY ADVA NCE LINK CABLE (4P Battle, Team Battle)
Four-player hook-up
using the Game Boy
Advance Link Cable.
15
Page 9

CCR0406U.qxp_9 4/12/01 9:21 AM Page 16
Stage Challenge
Stage by stage, try and complete the set
tasks within a 30-second time limit!
Two times will be recorded: the quickest clear
time for each stage, and the total clear time
of all stages. Challenge the same stage
again to shorten the time!
Stage Select
Select the Stage to
play, and press the A
Button or START. You
can select other
stages with the L or R
Button.
Start the Challenge
Press the A Button to
start your challenge!
If you clear a stage,
press the A Button to
advance to the next
stage.
If you fail, select “Try
again” to challenge the same stage again,
or select “Stage Select” to return to the Stage
Select Screen.
16
Puzzle
Guide all ChuChus to the Rocket, but you
can only use the panels displayed to the left
of the screen. There is no time limit, so think
carefully. You will fail if a ChuChu is eaten by
a KapuKapu, falls in a hole, or if a KapuKapu
gets into your Rocket.
Stage Select
Select the stage to
challenge, and press
the A button or START.
You can select other
stages with L or R
Button. In “User”, you
can select one of 2500
puzzles selected from over 17000 that
were created by players worldwide.
Let’s challenge the brains of the world!
Solve the Puzzle
Place the Arrow Panels
to solve the puzzle.
Press the L Button to
cancel the last panel
placed. You can also
cancel the panel by
trying to place the
same panel.
Start!
Press the R Button to
start, and accelerate
the movement afterwards. If you wish to
stop after starting,
press the L Button. If
you clear the stage,
you will advance to the next stage. If you fail,
you will try again with the same stage. If you
wish to quit the game, press the Start Button
and select “QUIT” from the Pause Menu.
17
Page 10

CCR0406U.qxp_9 4/12/01 9:21 AM Page 18
Let’s create a stage
Let’s make your own stage! You can save up
to 25 stages for each mode. If you have a
good stage, trade it with your friends through
Game Boy Advance Link Cable! Please refer
to “Exchange data” on p.22 for more.
Select the Mode to Make
Select which mode
you wish to make a
stage on, and press
the A Button or START.
Please note that
depending on the
mode, the rules on
how to make and what you can place differ.
How to Make a Stage
The basic is:
1.
Select what to place
with SELECT.
2.
Select the location to
place with the
Control Pad.
3.
Place the selected
item with A, B, L or R Button.
You will repeat the above step until you are
finished. To cancel the item you have placed
already, place the same item in the same
location.
18
Various Features
C Saving the Stage Data
When you’re finished, use SELECT to select
“File” and press the A Button to save.
If the necessary condition for the mode is
met, a message “SaveOK” will be displayed
at the lower left of the screen, and you can
save the stage.
When you’re making a stage for Puzzle mode,
select “Play” to see if you can successfully
solve
the puzzle. If you were able to, a mes-
sage “SaveOK” will be displayed.
C Reading the Stage
Use SELECT to select “File” and press the B
Button to load the saved stage. It’s useful
when you wish to edit the stages you created
before.
C Creating a New Stage
Use SELECT to select “File” and press the L
Button to clear all items on the stage and
start creating from the beginning.
C Deleting Saved Stage
Use SELECT to select “File” and press the R
Button to display the saved stages in the
mode. Select the stage you wish to delete.
C Quitting
Press START, and select “QUIT” from the Pause
Menu. Be careful, if you don’t save the stage
you created, it will disappear.
19
Page 11

CCR0406U.qxp_9 4/12/01 9:21 AM Page 20
Let’s create a character
You can create your original characters to
be used in place of ChuChus and KapuKapus.
There are four frames, so make them all.
Each frame will be displayed in sequence to
animate the character. You can exchange
with your friends using the Game Boy
Advance Link Cable!
Drawing a Picture
Basically, after selecting
“Write”:
1. Press the R Button to
select the color from
the palette below.
2. Use the Control Pad
to move the pencil
icon.
3.Press the A Button to paint, the B Button
to cancel.
Repeat the steps above.
When you’re finished
with the first frame, let’s
make the remaining 3
frames as well. You can
change the frames by
pressing the L Button.
It’s easy if you “Copy”
the first frame, and draw based on it.
If you’re finished with all frames, select
“Animation” to view how it animates. Did you
draw it well?
20
Various Features
C Create New Color
Use SELECT to select “Color” and you can
create a new color. Use the R Button to select
the color to be edited from the color palette.
Next, use $^ to select from Red, Green and
Blue, and use the A or B Button to change the
amount of color to be mixed.
C Saving a Character
When you are finished, use SELECT to select
“FILE” and press the A Button to save.
There a four character spaces you can save.
The characters at the top can be used in
place of ChuChus; the bottoms can be used
in place of KapuKapus. When using these
characters, select “Set all modes” in the
Options, and select from Characters 1 to 4 in
the “Character” setting.
C Reading the Character
Use SELECT to select “File” and press
Button to load the character file saved.
C Creating a New Character
Use SELECT to select “File” and press the L
Button to erase the screen, and you can
draw from the blank.
C Deleting a Saved Character
Use SELECT to select “File” and press
Button to display the list of characters saved.
Select the character to be deleted.
C Quitting
Press START, and select “QUIT” from the
Menu. Be careful, if you don’t save
character you created, it will disappear.
the
21
the B
the R
Pause
Page 12

CCR0406U.qxp_9 4/12/01 9:21 AM Page 22
Exchange Data
You can send the stages and characters you
created to your friend’s ChuChu Rocket! or
receive them. You must first connect two
Game Boy Advance units with the Game Boy
Advance Link Cable, as shown in the page
to the right. You can exchange the data with
only two people at once. You must have 2
Game Paks; one on each unit.
Send/Receive Selection
Select Exchange data
on both units. Next,
select whether to send
or receive the data.
The side that selected
“Receive” will only
need to wait now.
Data Selection
The side that selected
“Send” must now select
what to send. Select, in
order, which stage, or
which character.
When the data to be
sent is selected, the
transfer will begin automatically. Don’t
disconnect the Game Boy Advance Link
Cable until the data transfer is completed.
22
■ HOW TO CONNECT GBA LINK CABLE (Exchange Data)
Here is an explanation on how to connect each Game Boy Advance with the
Game Boy Advance Link Cable.
■ What You Need
Game Boy Advance systems . . . . . . . . . . . . . . . 2
ChuChu Rocket! Cartridge . . . . . . . . . . . . . . . . . 2
Game Boy Advance Link Cable . . . . . . . . . . . . . 1
*The unit with smaller plug
connected is the 1P side.
■ How to Connect
1. Make sure that both Game Boy Advance
Systems are turned OFF, and insert the
cartridges to both units.
2.Connect the Game Boy Advance Link Cable
to the expansion connector.
3. Turn the power of the both Game Boy
Advance systems ON.
4. For controls afterwards, please follow the
directions on p.22.
Caution on Network Play
On the following conditions, the game may not be able to communicate, or may malfunction.
● When linking with a cable other than Game
Boy Advance Link Cable.
● When the Game Boy Advance Link Cable is
not connected all the way in.
● When you disconnect and connect the
Game Boy Advance Link Cable while
communicating.
● When a Game Boy Advance Link Cable is
connected to connection box.
● When 3 or more Game Boy Advance Systems
are connected.
23
Page 13

CCR0406U.qxp_9 4/12/01 9:21 AM Page 24
Options
You can adjust various
settings, or even listen
to the background
music and sound
effects. When you
change settings, press
A to enter.
If you change the settings, you may be able to
have a new experience.
Set All Modes
Character
You can change the
ChuChu and
KapuKapu characters
to appear on the
screen. If you wish to
use the characters you
downloaded via HELP or the characters you
created, select this.
BGM Test/SE Test
You can listen to the background music and
sound effects. Select and press the A Button.
Change all settings back to original
Return all settings to the default values.
Set 4 Player Battle/Team Battle
These settings are for 4P Battle and Team
Battle modes.
Play Time
Time limit for one game.
Match Point
Adjust the number of rounds needed to win.
Game Speed
Adjust the speed of the game.
% of “?” Mice
The percentage of the “?” mice appearing.
Change all settings back to original
Return all settings to the default values.
24
Set Control Method
4 Player Battle, Team Battle, Stage Challenge
You can change the
control method for
playing on 4P Battle,
Team Battle, and
Stage Challenge
modes. Please refer to
p.6 for each control
method.
Puzzle
You can change the control method for
playing on Puzzle mode.
Change all settings back to original
Return all settings to the default values.
Records
You can view various records from each
mode. If you wish to delete the records,
simultaneously press the L Button, R Button
and START.
Set Language
You can change the language to be displayed.
You can have it displayed in English, German,
French, Spanish and Japanese.
Change all settings back to original
You can return all settings in the Options to
the default values.
25
Page 14

CCR0406U.qxp_9 4/12/01 9:21 AM Page 26
Character Introductions
The space mice,
running around
at high speed.
The only way to escape the Space
Port. But there's only enough fuel
for one rocket...
26
Space cats with huge,
scary mouths, and
voracious appetites.
Here are the pilots of the ChuChu Rockets. Win the battle and launch the rocket. You'll feel like
a pilot of the rocket!
*The following characters do not appear during game play.
ChuBei is a careless
ChuChu who feigns
ignorance. He's the
pilot of the Yellow
ChuChu Rocket.
Chuih is a ChuChu who
really knows how to
party. He's the pilot of
the Blue ChuChu Rocket.
ChuPea is a moody
daydreamer. She's
ChuBach is a steady
and reliable ChuChu
who does things at his
own pace. He's the pilot
of the Green ChuChu
Rocket.
the pilot of the Red
ChuChu Rocket.
27
Page 15

CCR0406U.qxp_9 4/12/01 9:21 AM Page 28
Tips for Playing ChuChu
MAKE AS MUCH
MAKE AS MUCH
NOISE AS
NOISE AS
POSSIBLE WITH
POSSIBLE WITH
4 PLAYERS!
4 PLAYERS!
Team Battle has a lot of depth to the game!
Give a handicap or advice on control
method when playing with a beginner! Also,
set the game speed to SLOW in the Options!
But if yo u ' re playing with a re a l ly good playe r,
it's fun to play with the fa ste st setting!
TRY AND
TRY AND
CLEAR
CLEAR
THE STAGE
THE STAGE
CHALLENGE
CHALLENGE
Why not compete against your friends to see
who clears the game first?
If you clear the game, challenge the time
attack with your friends. You can view your
record in Options.
28
PUZZLE MODE
PUZZLE MODE
HAS A LOT OF
HAS A LOT OF
DEPTH TOO!
DEPTH TOO!
Not only the stages provided by the Sonic
Team, the “User” Stages designed by players
worldwide are full of challenges! There are
2500 stages selected from over 17000 stages
that were made! Can you solve ‘em all?
Don’t be distressed trying to solve it by yourself. It’s a lot of fun too, trying to solve it with
your friends!
CREATE YOUR
CREATE YOUR
ORIGINAL
ORIGINAL
CHARACTERS!
CHARACTERS!
Through the Options, you can use your
original characters in the game! Let’s surprise
your friends with your cool characters!
29
Page 16

CCR0406U.qxp_9 4/12/01 9:21 AM Page 30
CREATE YOUR
CREATE YOUR
ORIGINAL
ORIGINAL
STAGES!
STAGES!
EXCHANGE
EXCHANGE
YOUR
YOUR
ORIGINAL
ORIGINAL
STAGES WITH
STAGES WITH
FRIENDS!
FRIENDS!
Notes
With your imagination, you can make various
stages!
Make stages for 4P Battle or Team Battle modes,
and play with your friends. It’ll be a lot of fun
making it with playing with your friends in mind.
M a ke sta ges for Sta ge Challenge, and have
your friends ch a l l e n ge it! Your friends will be
s u rp rised with all your tri cks you put in! It’ll be fun
to challenge each other with time attack!
Make Puzzle stages and have your friends
solve them! Your friends will have a sleepless
night thinking about your stages.
30 31
For example, make 5 stages of Stage
Challenge or Puzzle mode, exchange them,
and compete to see who can solve ‘em first!
Page 17

CCR0406U.qxp_9 4/12/01 9:21 AM Page 32
Notes
32
*THIS LIMITED WARRANTY IS VALID FOR U.S. AND CANADIAN GAME BOY ADVANCED PAKS MANUFACTURED
FOR SALE IN AND PURCHASED AND OPERATED IN THE UNITED STATES AND CANADA, ONLY !
Limited Warranty
Sega of America Dreamcast, Inc. warrants to the original consumer purchaser that the Game Boy Advance Game Pak shall be free from defects in material and
workmanship for a period of 90-days from the date of purchase. If a defect covered by this limited warranty occurs during this 90-day warranty period, the
defective Game Pak or component will be replaced free of charge. This limited warranty does not apply if the defects have been caused by negligence,
accident, unreasonable use, modification, tampering or any other causes not related to defective materials or workmanship. Please retain the original or a
photocopy of your dated sales receipt to establish the date of purchase for in-warranty replacement. For replacement, return the Game Pak, with its original
packaging and receipt, to the retailer from which the software was originally purchased. In the event that you cannot obtain a replacement from the retailer,
please contact Sega to obtain support.
Obtaining technical support/service
To receive additional support, including troubleshooting assistance, please contact Sega at:
• web site . . . . . . . . . . . . . . . . . . . . . . http://www.sega.com/customer_service
• e-mail . . . . . . . . . . . . . . . . . . . . . . . . support@sega.com
• 800 number . . . . . . . . . . . . . . . . . . . 1-877-336-1000
LIMITATIONS ON WARRANTY
ANY APPLICABLE IMPLIED WARRANTIES, INCLUDING WARRANTIES OF MERCHANTABILITY AND FITNESS FOR A PA RTICULAR PURPOSE, ARE HEREBY
LIMITED TO 90-DAYS FROM THE DATE OF PURCHASE AND ARE SUBJECT TO THE CONDITIONS SET FORTH HEREIN. IN NO EVENT SHALL SEGA OF AMERICA,
D R E A M C A S T INC., BE LIABLE FOR CONSEQUENTIAL OR INCIDENTAL DAMAGES RESULTING FROM THE BREACH OF ANY EXPRESS OR IMPLIED WA R R A N T I E S .
THE PROVISIONS OF THIS LIMITED WARRANTY ARE VALID IN THE UNITED STATES ONLY. SOME STATES DO NOT ALLOW LIMITATIONS ON HOW LONG AN
IMPLIED WARRANTY LASTS, OR EXCLUSION OF CONSEQUENTIAL OR INCIDENTAL DAMAGES, SO THE ABOVE LIMITATION OR EXCLUSION MAY NOT APPLY
TO YOU. THIS WARRANTY PROVIDES YOU WITH SPECIFIC LEGAL RIGHTS. YOU MAY HAVE OTHER RIGHTS WHICH VARY FROM STATE TO STATE.
Sega is registered in the U.S. Patent and Trademark Office. All Rights Reserved. This game is licensed for use with The Nintendo Game Boy Advance System
only. Copying and/or transmission of this game is strictly prohibited. Unauthorized rental or public performance of this game is a violation of applicable laws.
Original Game © SEGA CORPORATION 1999, 2000. © SEGA CORPORATION/SONICTEAM 2001. Sega of America Dreamcast, P.O. Box 7639, San Francisco, CA
94120. All rights reserved. Programmed in Japan. Made and printed in the Japan.
This software partially uses LCFONT for input characters. The half-sized characters, however, are not LCFONT. LCFONT and LC logo are trademarks
of Sharp Corporation
 Loading...