

Page 1

Securitron Magnalock Corp. www.securitron.com ASSA ABLOY, the global leader
Tel 800.624.5625 techsupport@securitron.com
in door opening solutions
SECURITRON GLASS DOOR MAGNALOCK MOUNTING SYSTEM
MODELS GDB AND AKG; INSTALLATION INSTRUCTIONS
1. DESCRIPTION
To securely mount Magnalocks to 100% glass doors, Securitron offers its Model GDB Glass Door
Bracket and AKG Adhesive Kit for Glass. The bracket is affixed directly to the glass via a
specially engineered adhesive and the strike plate is then affixed to the bracket conventionally.
2. SAFETY WARNING
Glass doors are intrinsically fragile and subject to breakage. Breaking a glass door not only
costs the value of the door but can result in possible injury. Addition of the Magnalock to the
door will introduce a stop point in the swing of the door which may break the glass if the door is
able to "slam" closed. To forestall this, the door must have a closer mechanism which will
insure gentle movement for the final few inches prior to the door closing. These closers are
adjustable for latch speed which is the speed the door is allowed to move just befo re it reaches
the closed position. It must be assured that the closer is functioning and that latch speed is
set as slow as possible or damage and possible injury may result.
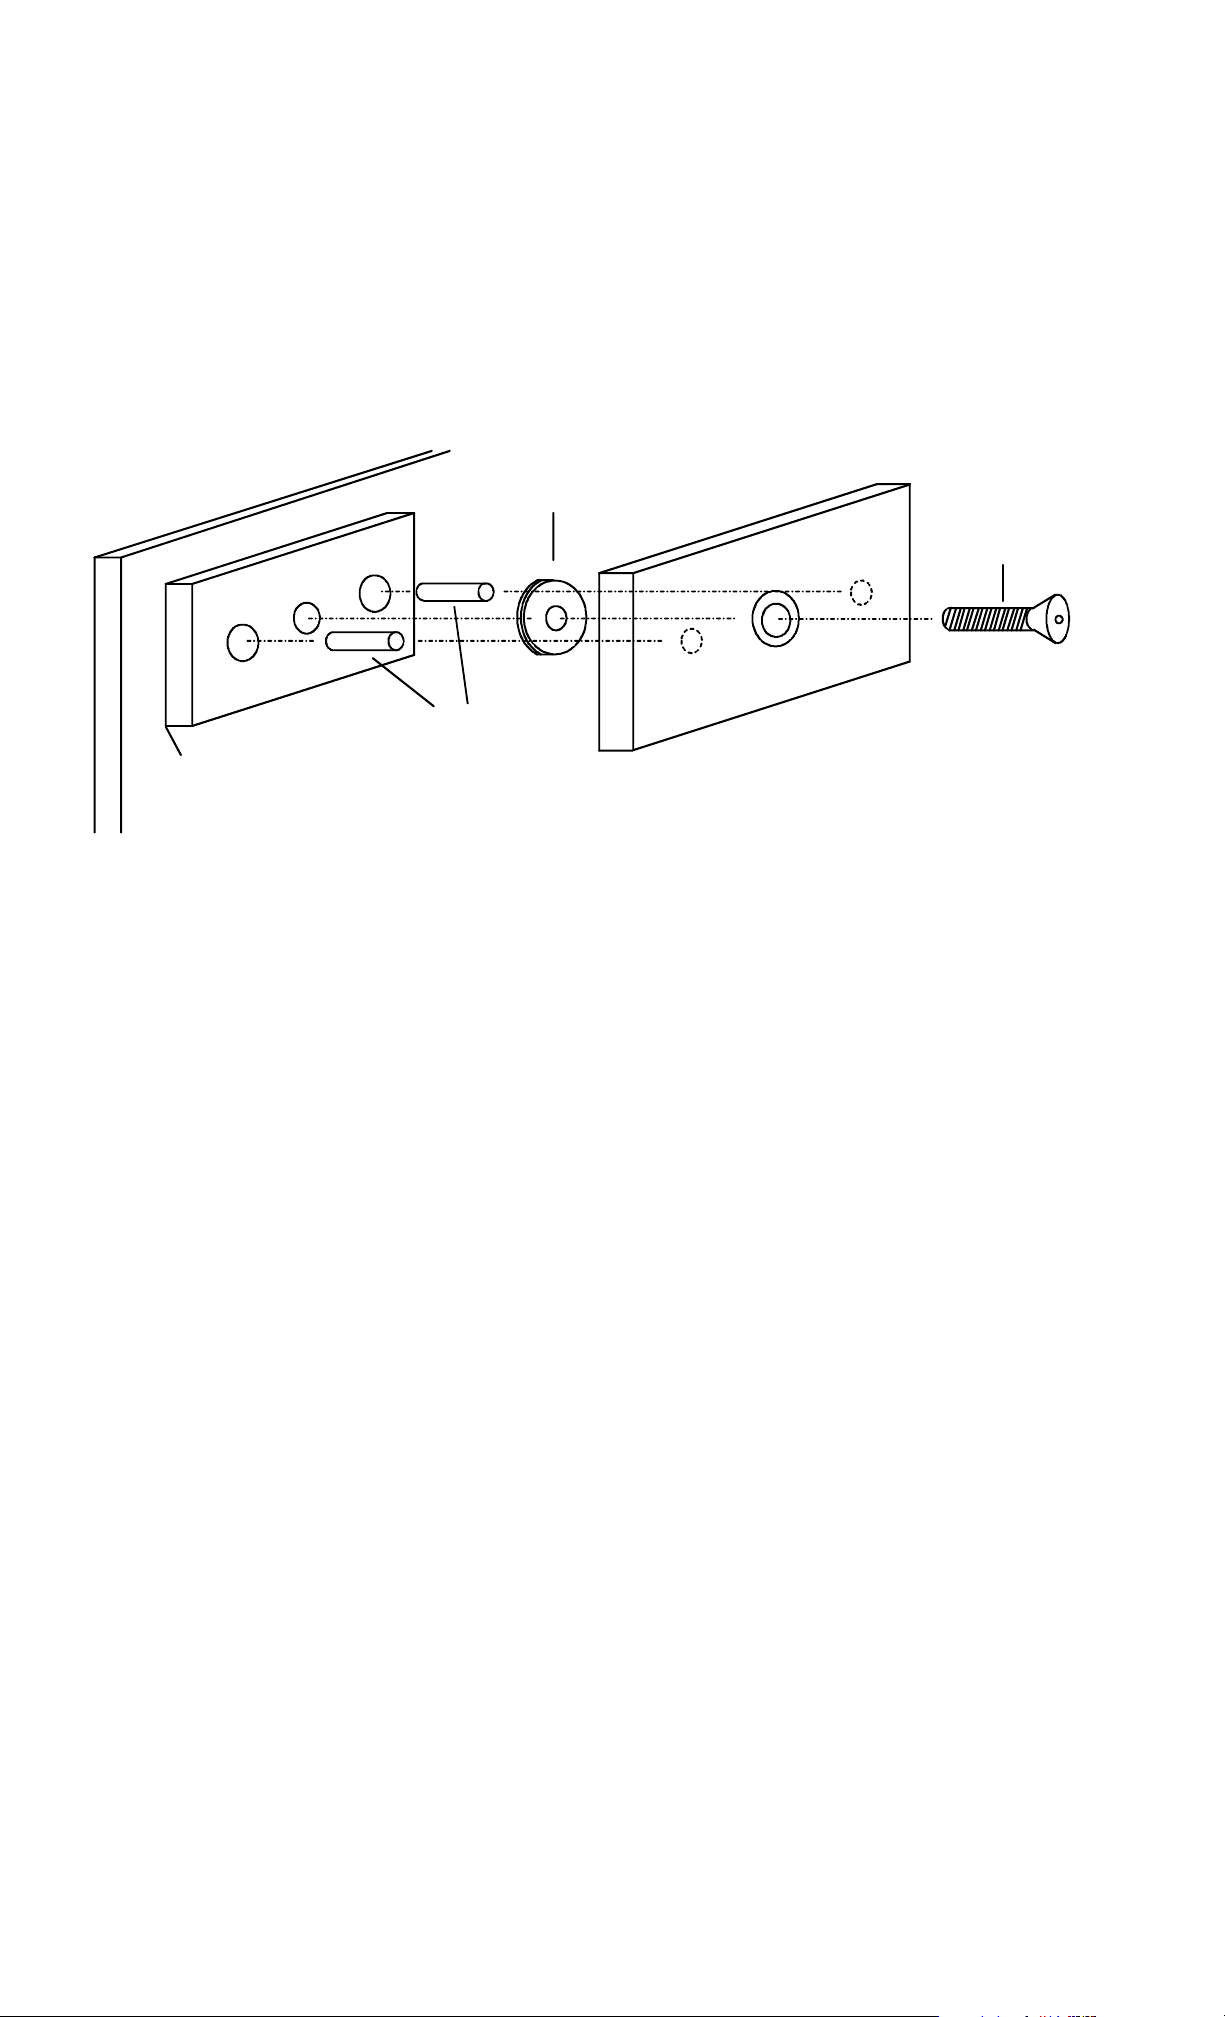
3. USE OF THE BRACKET
The bracket includes a tapped 5/16" center hole which receives the strike mount ing screw. A
shorter strike mounting screw and shorter roll pins are supplied with the bra cket which replace
the ones furnished in the standard hardware pack. Since the bracket is mounted by adhesive, it
must be flat. One surface of the bracket has been fly cut for perfect flatness. The installer must
identify this surface. This is done by observation of a fine pattern of curved grooves in the
surface. It is this surface that must be used against the glass.
4. USING THE ADHESIVE
The adhesive is a Locktite anerobic designed specifically for this application. If the adhesive is
properly used, it will provide a permanent bond stronger than the glass itself. To achieve this
result the following instructions on use of the adhesive should be strictly followed.
The installer must accurately determine where the bracket should go on the door and mark this
position with a grease pencil or other similar technique. This is crucial as once the adhesive
has set, it is virtually impossible to reposition, or for that matter to remove the
bracket. In selecting a position for the bracket, note that the strike is larger than the
bracket and that in most applications, the idea is to align the top of the strike plate just below
the top of the door so that it will mate with the magnet face a nd yet not scrape against the door
header. Take the time to be sure that you have identified the proper position for the bracket for
the specific installation.
If the glass is dirty, it should be cleaned with water. The surface of the glass should then be
lightly roughened with the enclosed emery paper. The fly cut side of the bracket should then be
vigorously abraded with the emery paper. This step removes the aluminum oxide layer and is
crucial to creating a good bond.
Final cleaning for both surfaces should then be done via the enclosed isopropyl alcohol wipes.
The alcohol should be allowed to dry for a minute or so. Once the alcohol has been used,
neither surface should be touched.
Primer "N" should then be sprayed lightly onto both the aluminum and glass. Allow 5 minutes to
dry. Do not touch either surface.
Adhesive should then be applied to the bracket. Apply it liberally as the excess will squeeze out
and can be cleaned off easily. Make sure adhesive covers the bracket out to the edges. The
bracket should then be clamped against the glass. Moderate clamping pressure is sufficient.
Careful clamping of the bracket is vital as the bracket will have a tendency to slide as the cl amp
is turned and can easily get out of position. Successful techniques to avoid this happening
include taping a piece of wood or metal to the glass to act as a block to prevent the bracket from
sliding, or making it a two man job where one man holds the bracket steady and the other
tightens the clamp.
© Copyright, 2011, all rights reserved PN# 500-10600
Page 1 Rev. D, 06/11
Page 2
If the bracket slides a bit it can be repositioned only if this is done very quickly. The adhesive
will set in about 2 minutes. The clamp, however, should be left on for about 30 minutes to
provide a stronger set. The strike may then be installed, but if it does not delay the job, it is
wise to wait 2 hours before putting pressure on the bracket. Full cure of the adhesive takes
about 12 hours. Curing time is dependent on temperature. The higher the temperature, the
more rapidly curing occurs. If temperature is below 60 degrees F, the clamp should be left in
position for 60 minutes.
Adhesive which is squeezed out from the bracket will not cure. Anerobic adh esive will only cure
in the absence of oxygen which occurs only between the glass and the aluminum. Excess
adhesive can therefore be cleaned up with a razor blade or non petroleum based solvent.
2 X RUBBER
WASHERS
S
S
A
L
G
A
L
G
ADHESIVE
BOND
R
O
O
D
B
R
O
O
D
S
S
T
E
K
C
A
R
E
K
I
R
T
S
1/4" X 3/4"
ROLL PINS
5/16-18 X 1"
FLATHEAD SCREW
BE SURE THAT BRACKET IS POSITIONED CORRECTLY BEFORE GLUING
BE SURE THAT FLY CUT SIDE OF BRACKET FACE S GLASS
5. APPLICATION OF DRESS PLATE
A stainless steel self adhesive "dress plate" is included with the GDB bracket. It is intended that
this plate be affixed to the outside of the glass door to improve the appearance of the
installation. The plate will prevent viewing the glass door bra cket through the glass, from the
outside.
PN# 500-10600
Page 2 Rev. D, 06/11
 Loading...