

Page 1

from software version 1.4
seca 115
Instructions for Use
for
Physicians and Assistants
Page 2

English
CONTENTS
1. System description . . . . . . . . . . . . 4
1.1 Congratulations! . . . . . . . . . . . . 4
1.2 Intended use . . . . . . . . . . . . . . . 4
1.3 Description of function. . . . . . . . 5
Installation options . . . . . . . . . . . 5
seca mBCA data transmission. . 5
Transmission of data by seca
scales and stadiometers . . . . . . 6
Managing seca patient files . . . . 6
Recording weight and height . . . 6
Determining body composition . 6
Evaluation . . . . . . . . . . . . . . . . . 7
Administration of user data . . . . 7
Update of the PC software. . . . . 7
Compatibility with seca
measuring devices. . . . . . . . . . . 7
1.4 User qualification. . . . . . . . . . . . 8
Installation and administration . . 8
Measuring mode . . . . . . . . . . . . 8
2. Safety information . . . . . . . . . . . . . 8
2.1 Safety rules in the instructions
for use . . . . . . . . . . . . . . . . . . . . 8
2.2 Basic safety information. . . . . . . 8
Using the software. . . . . . . . . . . 8
Using measured results . . . . . . . 9
3. Overview . . . . . . . . . . . . . . . . . . . . 11
3.1 seca patient list . . . . . . . . . . . . 11
3.2 seca patient file . . . . . . . . . . . . 14
3.3 Color symbols and other
controls . . . . . . . . . . . . . . . . . . 15
3.4 Identification on the
packaging . . . . . . . . . . . . . . . . 16
4. Installation/updates . . . . . . . . . . . 16
5. Operation . . . . . . . . . . . . . . . . . . . 17
5.1 Starting/exiting program . . . . . 17
Opening the program. . . . . . . . 17
Logging off / switching user . . . 18
Exiting program . . . . . . . . . . . . 18
5.2 “Extras” menu . . . . . . . . . . . . . 18
Changing references . . . . . . . . 18
Creating user-specific
modules. . . . . . . . . . . . . . . . . . 20
Viewing measuring device
administration . . . . . . . . . . . . . 21
5.3 Working with the seca
patient list . . . . . . . . . . . . . . . . 23
Adjusting column width. . . . . . 23
Sorting column content in
ascending or descending
order. . . . . . . . . . . . . . . . . . . . 23
Showing and hiding columns . 24
Showing and hiding the seca
patient list from the USB
memory stick . . . . . . . . . . . . . 25
Searching for a seca patient
file. . . . . . . . . . . . . . . . . . . . . . 26
Creating a new seca patient
file. . . . . . . . . . . . . . . . . . . . . . 27
Sending seca patient file to a
seca mBCA . . . . . . . . . . . . . . 29
Copying seca patient files to
USB memory stick . . . . . . . . . 30
Importing seca patient files
from the USB memory stick . . 32
Exporting seca patient files
to .csv format . . . . . . . . . . . . . 33
Deleting individual seca
patient files . . . . . . . . . . . . . . . 35
Deleting all seca patient files . . 36
5.4 Working with the seca patient
file. . . . . . . . . . . . . . . . . . . . . . 37
Opening the seca patient file . . 37
Editing patient data. . . . . . . . . 37
Entering a medical history . . . . 38
Entering laboratory data . . . . . 40
Determining weight and
height . . . . . . . . . . . . . . . . . . . 42
Determining body composition
with a seca mBCA . . . . . . . . . 46
Assessing the examination
results. . . . . . . . . . . . . . . . . . . 47
Writing comments. . . . . . . . . . 56
5.5 Managing a seca patient file . . 57
Printing a seca patient file . . . . 57
Importing a patient file. . . . . . . 58
6. Medical basis. . . . . . . . . . . . . . . . 60
6.1 Evaluation modules. . . . . . . . . 60
2 •
Page 3

English
Cardiometabolic risk . . . . . . . 61
Development/growth . . . . . . . 64
Energy . . . . . . . . . . . . . . . . . 66
Function/rehabilitation . . . . . . 68
Fluid. . . . . . . . . . . . . . . . . . . . 70
Health risk . . . . . . . . . . . . . . . 72
Raw data for impedance . . . . 74
6.2 References . . . . . . . . . . . . . . . 77
7. Technical information . . . . . . . . . 78
7.1 Technical modifications. . . . . . 78
7.2 Display of weight values . . . . . 79
8. Warranty. . . . . . . . . . . . . . . . . . . . 79
• 3
Page 4

1. SYSTEM DESCRIPTION
1.1 Congratulations!
With the seca seca 115 PC software, you have
acquired a product from the
will assist you with the analysis and interpretation of
weight, height and bioimpedance measurements.
For more than 170 years, seca has used its experience
in the service of health care and, as a market leader, it
has always set standards in many countries of the
world with innovative developments for weighing and
measuring.
1.2 Intended use
The seca 115 PC software is mainly used in hospitals,
medical practices and inpatient care facilities in accordance with national regulations.
seca 115 PC software is for administering weight,
The
height and bioimpedance measurements and for calculating automatically parameters which can be derived
from these measurements, e.g. FMI (fat mass index).
Results are displayed in graphical form and assist the
attending physician with the following medical issues:
• monitoring growth processes and weight changes
• determining energy expenditure and energy reserves
in order to assess weight changes and the course of
diseases as well as to provide dietary advice
• estimating cardiometabolic risk
• assessing metabolic activity and the success of a
training program, e.g. within the framework of
rehabilitation or physiotherapy
• determining the fluid status of a patient and
observing changes in fluids as the result of medical
treatment.
• determining general state of health or, in the case of
a previously-known disease, assessing its severity.
seca 115 PC software is not diagnostic software.
The
seca 360° system which
4 •
Page 5

English
1.3 Description of function
Installation options The seca 115 PC software can be installed in the form
of a client/server solution or a standalone solution.
seca 115 PC software consists of the application
The
software and a seca patient database, together with
communication and evaluation modules.
For client/server operation, the application software is
installed on PC workstations (clients). The seca patient
database and the communication and evaluation modules are installed centrally on a server. All clients access
the server and use the seca patient database and communication and evaluation modules there.
For standalone operation, the application software, the
seca patient database and the communication and
evaluation modules are installed on the same PC
workstation.
seca mBCA data
transmission
seca medical Body Composition Analyzers (mBCAs)
have an Ethernet interface and can communicate with
seca 115 PC software in a network.
the
The network connection allows a seca mBCA to use
both the seca patient database and the special print
function of the
The special print function of the
makes it possible to start printing a results report
directly on a seca mBCA.
Alternatively to the Ethernet connection, seca mBCAs
and the
lessly via
seca 360° wireless USB adapter 456 must be con-
nected to a PC on which at least the seca 115 application software is installed.
seca 115 PC software.
seca 115 PC software
seca 115 PC software can communicate wire-
seca 360° technology. For this to happen, the
System description • 5
Page 6

Transmission of data by
seca scales and
stadiometers
seca scales and stadiometers from the seca 360° system can communicate with one another wirelessly and
transmit data to the seca 115 PC software. For this to
happen, the
must be connected to a PC on which at least the
seca 115 application software is installed.
seca scales with an RS232 interface can transmit data
to the PC software by wired connection.
seca 360° wireless USB adapter 456
Managing seca patient
files
Recording weight and
height
seca patient files can be created in the seca 115 PC
software or on a seca mBCA. seca patient files are
saved in the seca patient database of the
software. Alternatively, seca patient files can be saved
on a USB memory stick. The USB memory stick has to
be “initialized” for this purpose.
“Initializing” is a
function allows the administrator to create an empty
seca patient database on a USB memory stick.
seca patient files and seca patient databases contain
exclusively data necessary for working with seca products or determined using seca products. seca patient
files can only be managed and edited using the
seca 115 PC software.
The export and import functions of the
software can be used for exchanging data with surgery
and hospital information systems.
On scales and stadiometers from the seca 360° system and on seca scales with an RS232 interface, it is
possible to start recording weight and height directly
from the
Measured results are sent from the
to the PC software. Alternatively, measured values can
be entered manually in the
seca 115 PC software function. This
seca 115 PC software.
seca 115 PC software.
seca 115 PC
seca 115 PC
seca 360° devices
Determining body
6 •
composition
Measurements with a seca mBCA (determines body
composition by means of bioimpedance measurement)
cannot be started from the
The results of a bioimpedance measurement are
assigned to a seca patient file directly on the
seca mBCA. The seca patient file is transmitted to the
seca patient database of the
seca 115 PC software.
seca 115 PC software.
Page 7

English
The seca 115 PC software can only administer
bioimpedance measurements determined using a
seca mBCA.
Evaluation Measured results are evaluated in graphical form based
on scientifically-established formulas. In-house studies
by seca established formulas for determining the
parameters total body water (TBW), extracellular water
(ECW), fat-free mass (FFM) and skeletal muscle mass
(SMM) for arms, legs, torso and the whole body. In
these studies, in-house reference values were determined for the following parameters to allow normal
ranges to be shown: bioimpedance vector analysis
(BIVA), mass indices (FMI, FMMI), phase angle (φ).
Further information is available in the section entitled
“Medical basis” from page 60.
Administration of user
data
Update of the PC
software
Compatibility with seca
measuring devices
The following roles can be assigned to users of the
seca 115 PC software: physician, assistant or adminis-
trator. User accounts can only be set up or edited by
an administrator. A user name and password are
required for access to the
user account is set up for the seca 115 PC software,
the seca 115 PC software also generates a user PIN.
The user PIN allows access from a seca mBCA to the
seca patient database of the
When the PC software is updated, the seca patient
database and its contents are retained. The seca
patient database is adapted to suit the new version of
the PC software. After the update is complete, it will no
longer be possible to access the seca patient database
with older versions of the PC software.
Version 1.4 of the seca 115 PC software is compatible
only with seca mBCAs on which device software version 1.1 is installed. There is no downward compatibility with seca mBCAs on which older versions of the
device software are installed. For a summary of technical modifications, see the section entitled “Technical
modifications” on page 78.
seca 115 PC software has unlimited compatibility
The
with scales and stadiometers from the
tem and with seca scales with an RS232 interface.
seca 115 PC software. If a
seca 115 PC software.
seca 360° sys-
System description • 7
Page 8
1.4 User qualification
Installation and
administration
The seca 115 PC software may only be installed and
administered by experienced administrators or hospital
technicians.
Measuring mode The seca 115 PC software may only be used by
persons with sufficient expertise.
2. SAFETY INFORMATION
2.1 Safety rules in the instructions for use
DANGER!
Identifies an exceptionally hazardous situation. If
you fail to take note of this information, serious
irreversible or fatal injury will result.
WARNING!
Identifies an exceptionally hazardous situation. If
you fail to take note of this information, serious
irreversible or fatal injury may result.
CAUTION!
Identifies a hazardous situation. If you fail to
take note of this information, minor to moderate
injury may result.
ATTENTION!
Identifies possibility of incorrect operation of the
product. If you fail to take note of this information, the device may be damaged or the measured results may be incorrect.
NOTE:
Includes additional information about use of the
product.
2.2 Basic safety information
Using the software ► Please take note of the information in these
instructions for use.
► Keep the instructions for use and the declaration of
conformity they include in a safe place. The instructions for use are a component of the PC software
and must be available at all times.
8 •
Page 9
English
► Only install the seca 115 PC software on PCs
equipped with an antivirus program. Always keep
your antivirus program up to date to protect your
computer system from current and future malware.
The
seca 115 PC software is protected from manip-
ulation and was checked for malware at the time the
software was created.
► Use the seca 115 PC software only for the specified
intended use.
► Use only seca mBCAs, scales and stadiometers in
conjunction with the
► Keep other electrical medical devices, e.g. high-fre-
quency surgical devices, a minimum distance of
approx. 1 meter away to prevent incorrect measurements or wireless transmission interference.
► Keep high-frequency devices such as cell phones
and televisions, for example, a minimum distance of
approx. 1 meter away to prevent incorrect measurements or wireless transmission interference.
► The actual transmission output of high-frequency
equipment may require minimum distances of more
than 1 meter. For details, go to www.seca.com.
Using measured results WARNING!
Hazard to patient
seca 115 is not diagnostic software. The device
assists the attending physician in producing a
diagnosis.
► To produce an accurate diagnosis and insti-
gate therapies, the attending physician must
commission specific examinations and take
account of their results in addition to using
the seca 115 PC software.
► The responsibility for diagnoses and the
therapies derived from them lies with the
attending physician.
CAUTION!
Hazard to patient
To prevent misinterpretations, measured results
for medical purposes may only be displayed
and used in SI units (weight: kilograms, height:
meters). Some devices and this PC software,
seca 115 PC software.
Safety information • 9
Page 10

too, have the option of displaying measured
results in different units. This is purely an
additional function.
► Only use measured results in SI units.
► The user takes sole responsibility for the use
of measured results in non-SI units.
ATTENTION!
Loss of data
• Before you save and re-use measured results
in the
seca 115 PC software (e.g. in a hospital
information system), make sure that the measured values are plausible and that they correspond to the display on the measuring device.
• If measured values have been transmitted
from the
seca 115 PC software to a hospital
information system, make sure before re-use
that the measured values are plausible and
assigned to the correct patient.
10 •
Page 11

English
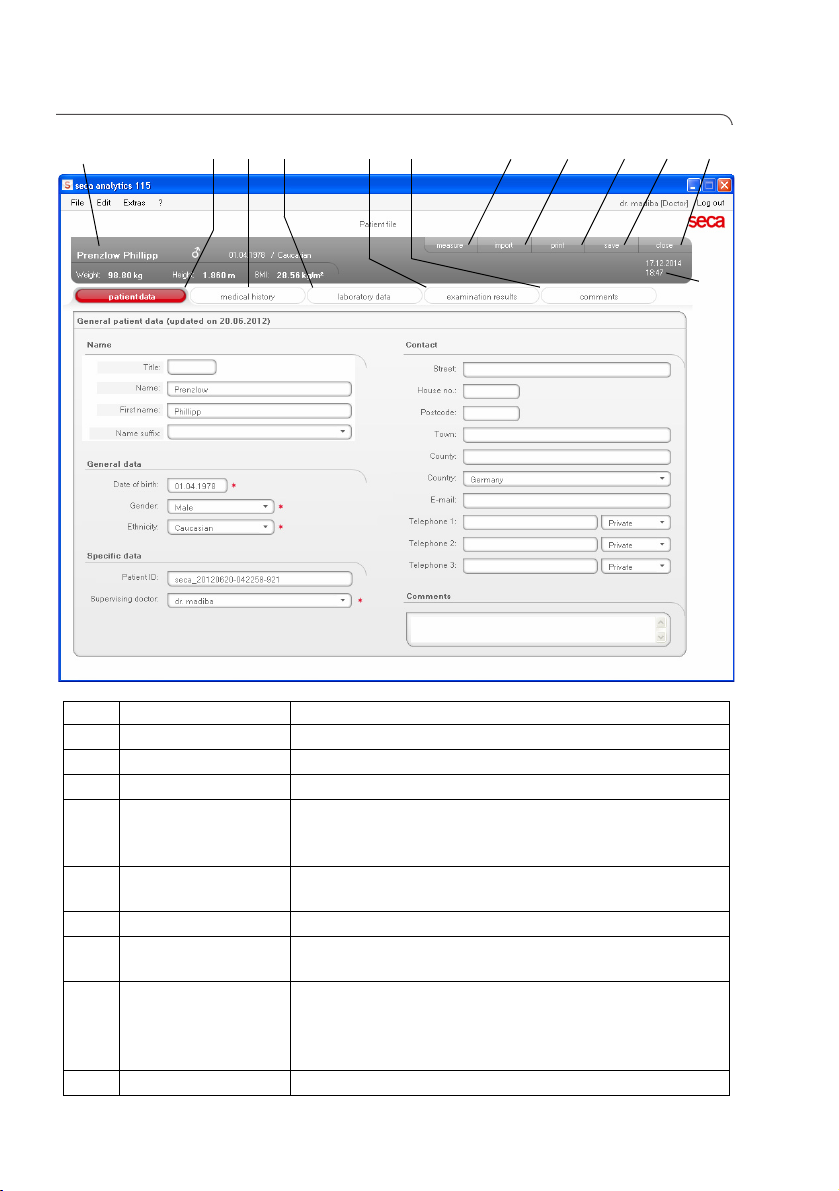
3. OVERVIEW
13 6
78 12
54
14
13
2322
9
2
171615 19
2120
11
18
10
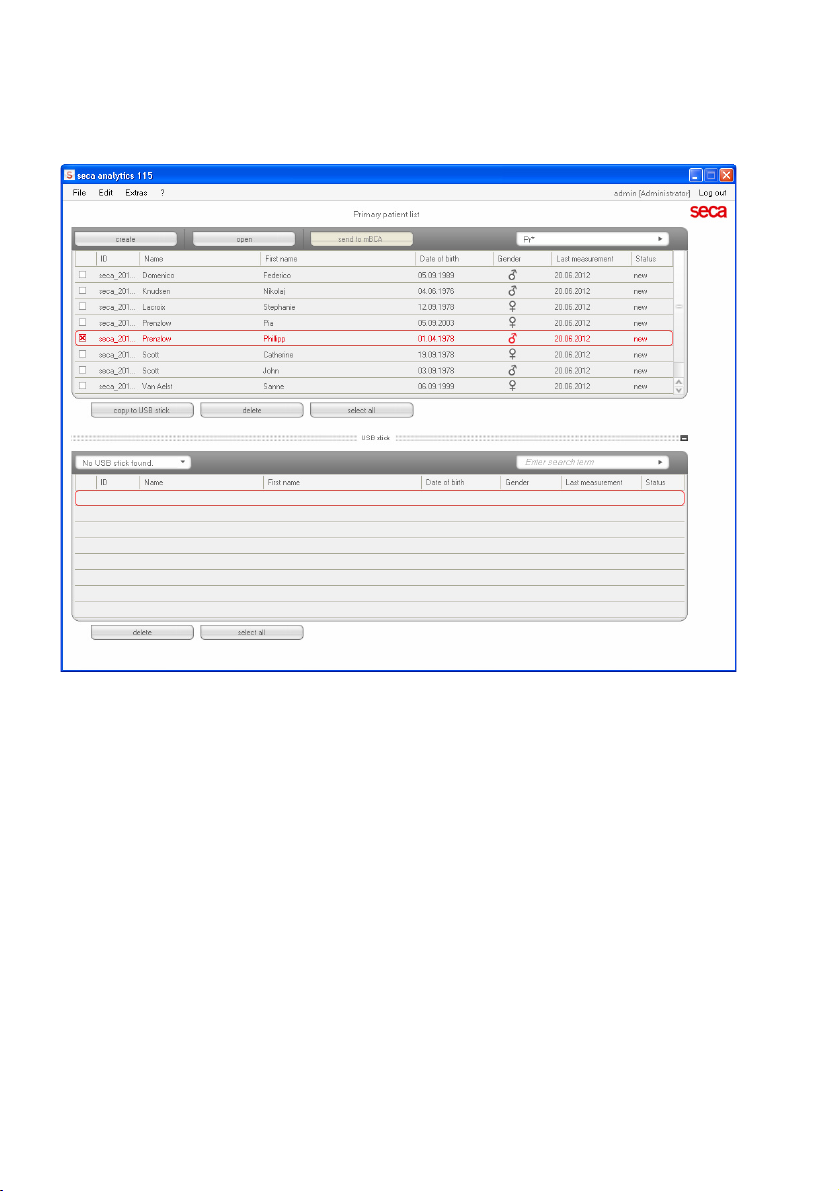
3.1 seca patient list
No. Control Function
1
File
2
3
Edit
Extras
The following functions can be accessed using this
menu element:
CSV export
•
• Exit
The following functions can be accessed using this
menu element (only with aseca patient file open):
Cut
•
• Copy
• Paste
Also as a context menu - right-click
The following functions can be accessed using this
menu element:
References
•
• User-specific modules
• Measuring device administration
Overview • 11
Page 12

No. Control Function
The following functions can be accessed using this
menu element:
4
5
Registered user
6
7
8
9
10
11
12
Column sorting
send to mBCA Send seca patient file to a seca mBCA
Main patient list
Search window
13
14
copy to USB stick
15
16
17
Patient list on USB
18
?
[role]
Log off
new Create a new seca patient file in the main patient list
open Open a seca patient file in the main patient list
Checkbox
Selection bar
delete
select all
deselect all
memory stick
• Product information
• Instructions for Use
• Administrator manual
The following roles are provided:
•
Administrator
• Physician
• Assistant
Changes can only be made by users with the
Administrator role.
Open the login dialog (enter user name and
password) to log in another user
• Up arrow: sort from A - Z
• Down arrow: sort from Z - A
Displays seca patient files:
• data entered in the main patient list
• data imported from the USB memory stick
Search for seca patient files in the main patient list.
• “Asterisk search” - e.g. “Mi*” to find Miller
• Back to the complete list with empty search
• Activates a seca patient file.
• Clicking buttons in the seca patient list affects all
“activated” seca patient files.
Indicates which seca patient file is currently selected.
Clicking buttons has no effect on the selected file (cf.
“Checkbox”)
Copy seca patient files selected in the main patient
list to a USB memory stick, e.g. for use on an mBCA
Delete “activated” seca patient file
(seca patient file can be restored by users with the
Administrator role)
• Select all seca patient files in the main patient list in
order to carry out actions for all
• Deselect all seca patient files in the main patient list if
action for all has been carried out or if no action is to
be carried out
Displays seca patient files saved on a USB memory
stick
• seca patient files copied from the main patient list
• seca patient files newly created on an mBCA
12 •
Page 13

English
No. Control Function
Show/hide patient
19
list from the USB
20
21
Search window
22
23
memory stick
Drive selection
window
delete
select all
deselect all
• seca patient list on the USB memory stick is
automatically shown at system start
• List can be hidden in order to display more entries in
the main patient list
For selecting the USB memory stick
Search seca patient files on the USB memory stick.
• “Asterisk search” - e.g. “Mi*” to find Miller
• Back to the complete list with empty search
Delete seca patient file on the USB memory stick
(seca patient file cannot be restored on the USB
memory stick)
• Select all seca patient files on the USB memory stick
in order to carry out actions for all
• Deselect all seca patient files on the USB memory
stick if action for all has been carried out or if no
action is to be carried out
Overview • 13
Page 14
3.2 seca patient file
A
B
E
F
G
H
D
CI
J
L
K
A
B
C
D
E
patient data Enter, edit, and view the patient's master data
medical history Enter, edit, and view the patient's medical history
laboratory data
examination
F
G
H
I
14 •
Symbol Meaning
Patient info Summary of the most important patient data
results
comments Add and view comments about the seca patient file
measure
import
print Print results report or save as PDF
Enter, edit, and view the patient's laboratory data
Data can be imported if an interface to the hospital
information system is programmed
View examination results
• Start measuring process for weight and height
• Send seca patient file to a seca mBCA
Import patient data
Note: Configuration or programming of an interface to
the patient data management system (PDMS)
required
Page 15
English
Symbol Meaning
J
K
L
save Save changes and additions to the seca patient file
close
Date/time Settings are adopted from the operating system
Close the seca patient file and return to the seca
patient list
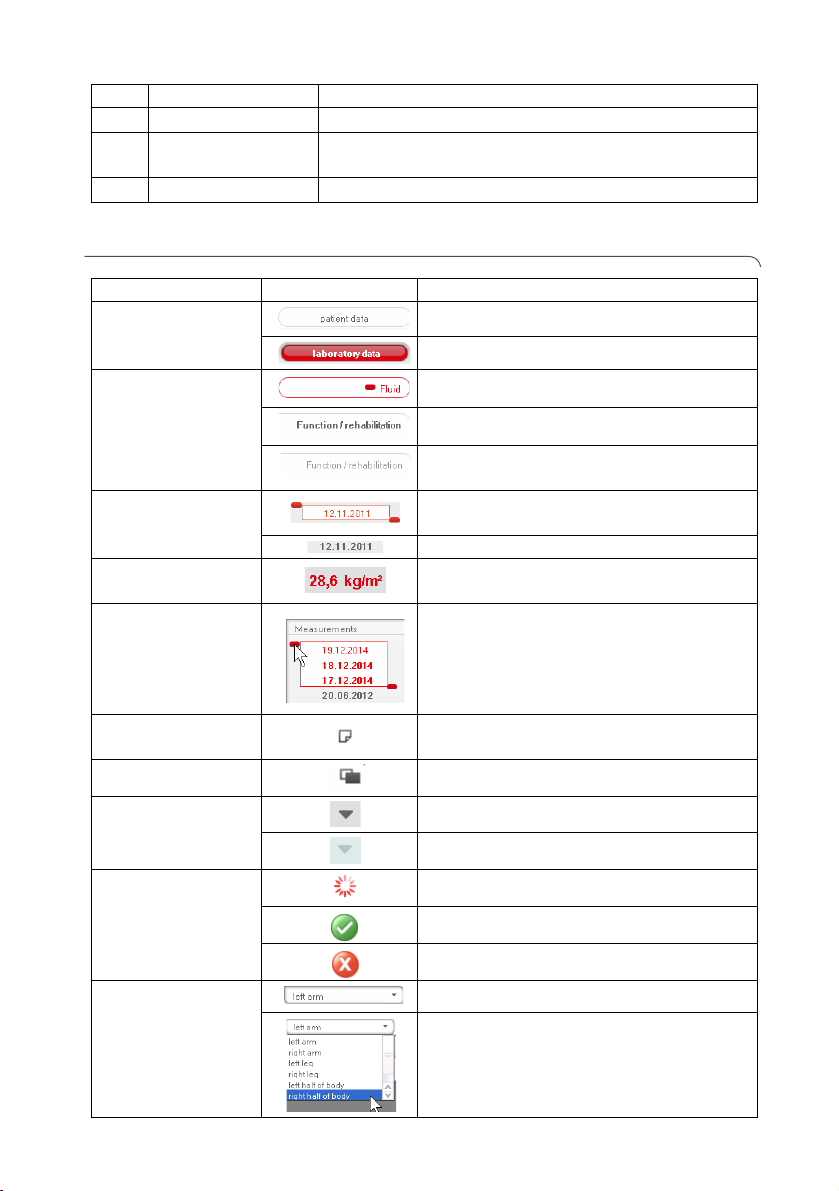
3.3 Color symbols and other controls
Control/display Symbol Meaning
Tab
Typeface, evalua-
tion modules
Typeface,
measurements
Typeface, evalua-
tion parameters
Handles
Comments symbol
Detail symbol Detail view available for results graph
White: tab not selected
Red: tab selected
Red, with selection bar: module is active
Bold: new data available
Gray: module not available
Red, with selection bar: measurement
selected, details shown
Bold: new measurement
Parameter red: value outside normal
range
Selection of several measurements:
• drag left handle upwards: add
measurements of a more recent date.
• drag right handle downwards: add
measurements of an older date
Comment for evaluation parameters
present
Drop-down
triangles
Data transmission
Drop-down menu
Gray: function available
Light gray: function not available
Data transmission in progress
Data transmission successful
Data transmission failed
Selected function
Drop-down menu open
Overview • 15
Page 16
Control/display Symbol Meaning
Checkboxes
Empty: function deactivated
Cross: function activated
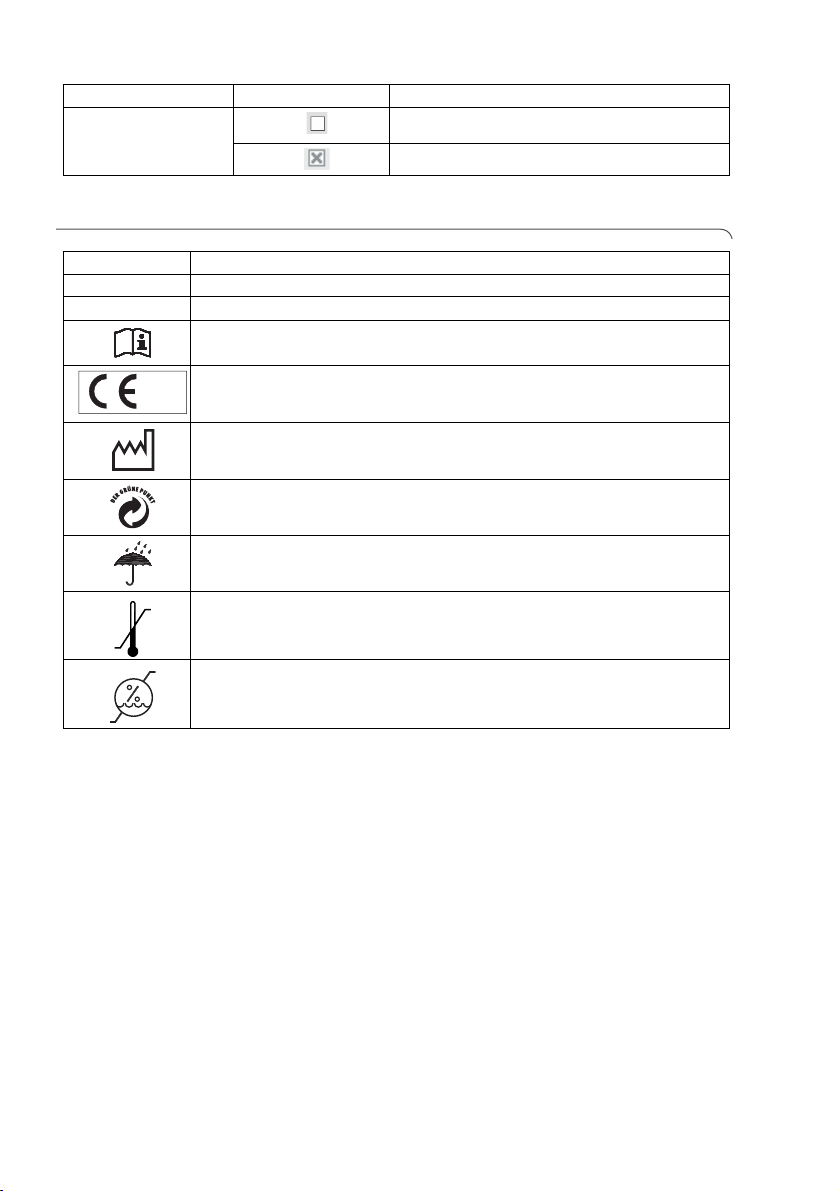
3.4 Identification on the packaging
Text/symbol Meaning
Mod Model number
S/N Serial number
Follow instructions for use
Product complies with EC directives
0123
Name of manufacturer
Packaging material can be disposed of through recycling programs
Protect from moisture
Permitted min. and max. temperature for transport and storage
Permitted min. and max. moisture for transport and storage
4. INSTALLATION/UPDATES
The PC software may only be installed and updated by
experienced administrators or hospital technicians.
Information about the software version installed and
about the availability of updates can be found in the
menu line of the PC software at “
”.
16 •
information
For information about installation and configuration
options, check the menu line of the software under
? Î Administrator manual”.
“
In the event of questions about the system currently
installed on your PC and if you want to make any
changes, please contact your administrator.
? Î Product
Page 17
English
ATTENTION!
Loss of data
Incorrect installation or incorrect changes to the
installation can lead to loss of data and, as a
result, to misdiagnoses.
► Make sure the installation or changes to the
installation are carried out by an experienced
administrator or hospital technician.
5. OPERATION
5.1 Starting/exiting program
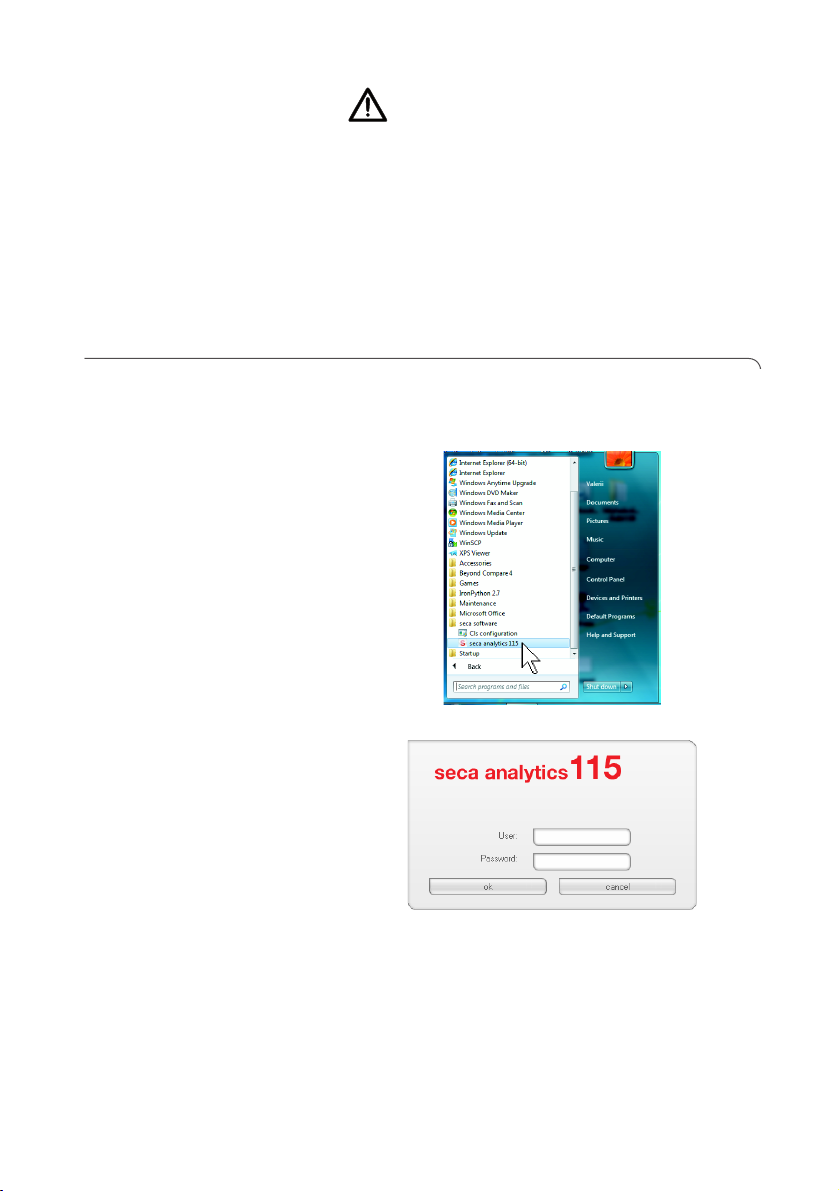
Opening the program 1. Click “Start Î Programs Î seca Î seca medical
software”.
The login dialog opens.
2. Enter your user name.
3. Enter your password.
NOTE:
User name and password are created by the
administrator. If you want to change the user
name or password, please contact your
administrator.
Operation • 17
Page 18
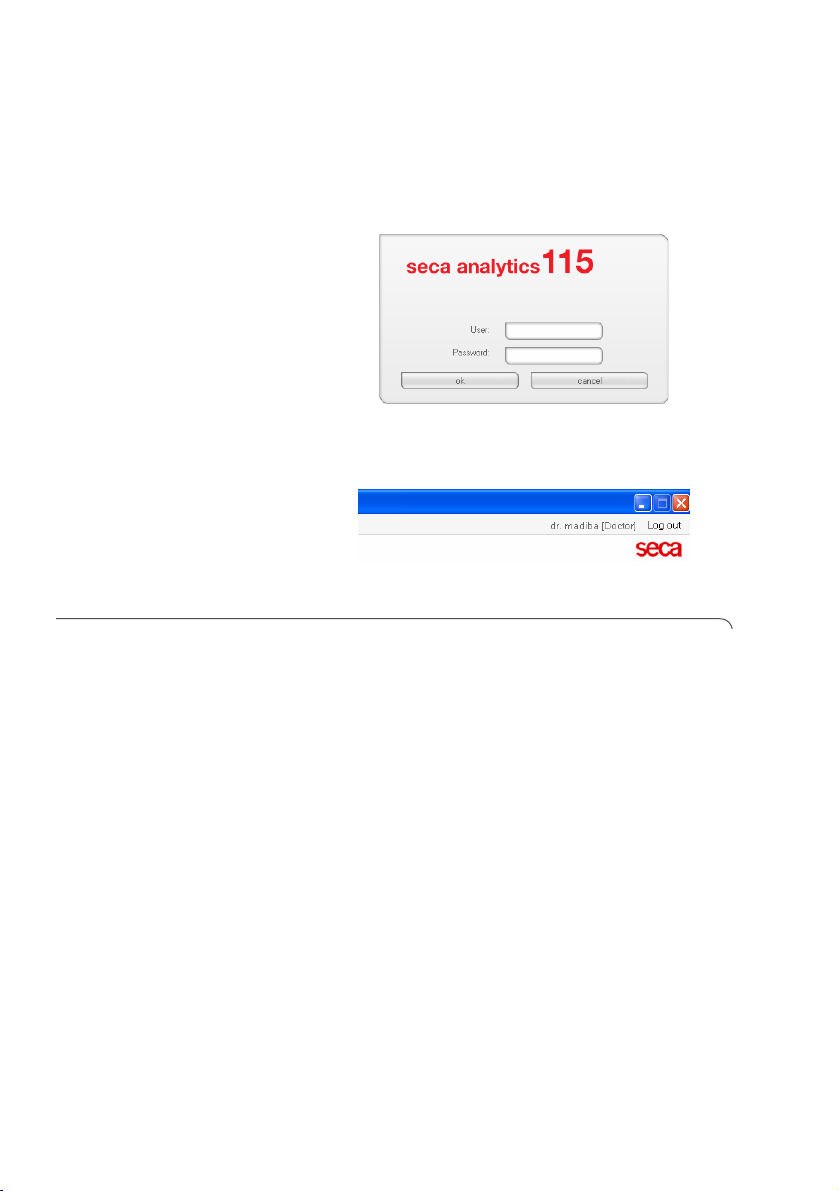
4. Confirm your entries with ok.
The seca patient list opens.
Logging off / switching
user
► Click on Log off.
The login dialog opens.
Another user can log in.
Exiting program ► Click on the cross symbol.
The program will close.
5.2 “Extras” menu
Changing references The seca 115 PC software evaluates measured results
using references. References are formulas and comparison values determined in clinical studies. During the
installation and configuration of the
ware, your administrator sets in which country you are
operating your
the references normally used in your country are preset
automatically.
You can change the preset references to suit the regulations applying in your institution and your personal
preferences. To do so, proceed as outlined below.
seca 115 PC software. With this setting,
seca 115 PC soft-
18 •
NOTE:
This section describes how to use the
PC software For information about the medical
content, see the section entitled “Medical basis”
from page 60.
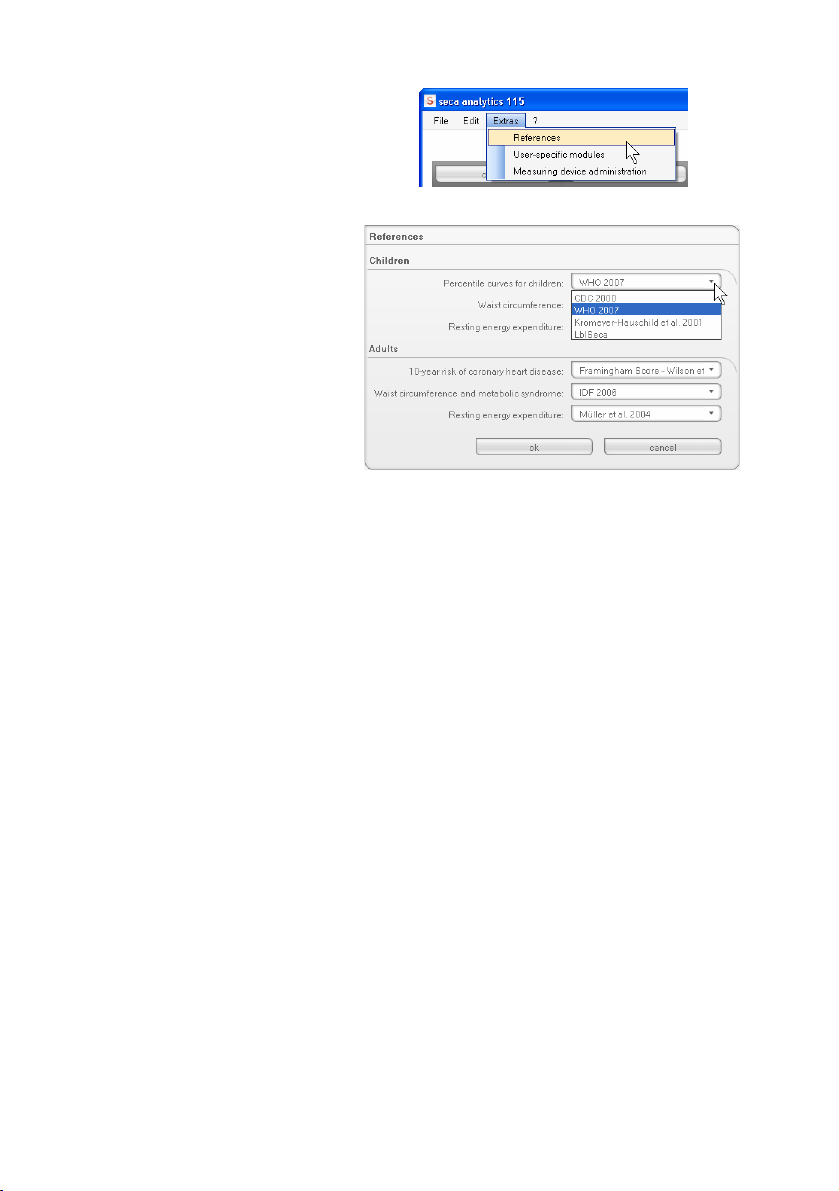
1. From the Extras menu, select the References
element.
seca 115
Page 19
English
The References dialog window opens.
2. Click on the arrow of the parameter for which you
want to select the reference.
A pull-down menu with all the selection options for
the reference opens.
3. Click the desired reference.
The pull-down menu closes.
The selected reference appears in the selection
field.
4. Repeat steps 2. and 3. for all parameters whose
references you would like to change.
5. To save the settings, click
ok.
The dialog window closes.
NOTE:
If you click on “Cancel”, the settings are not
saved.
Operation • 19
Page 20
Creating user-specific
modules
A number of evaluation modules have already been set
up to assess your patient's state of health (see
“Evaluation modules” on page 60).
In the
User-specific modules dialog, you can compile
two further modules. You can view and evaluate these
in the seca patient file under the examination results
tab, just like the preset evaluation modules.
NOTE:
This section describes how to use the
seca 115
PC software For information about the medical
content, see the section entitled “Medical basis”
from page 60.
To compile a user-specific module, proceed as
outlined below.
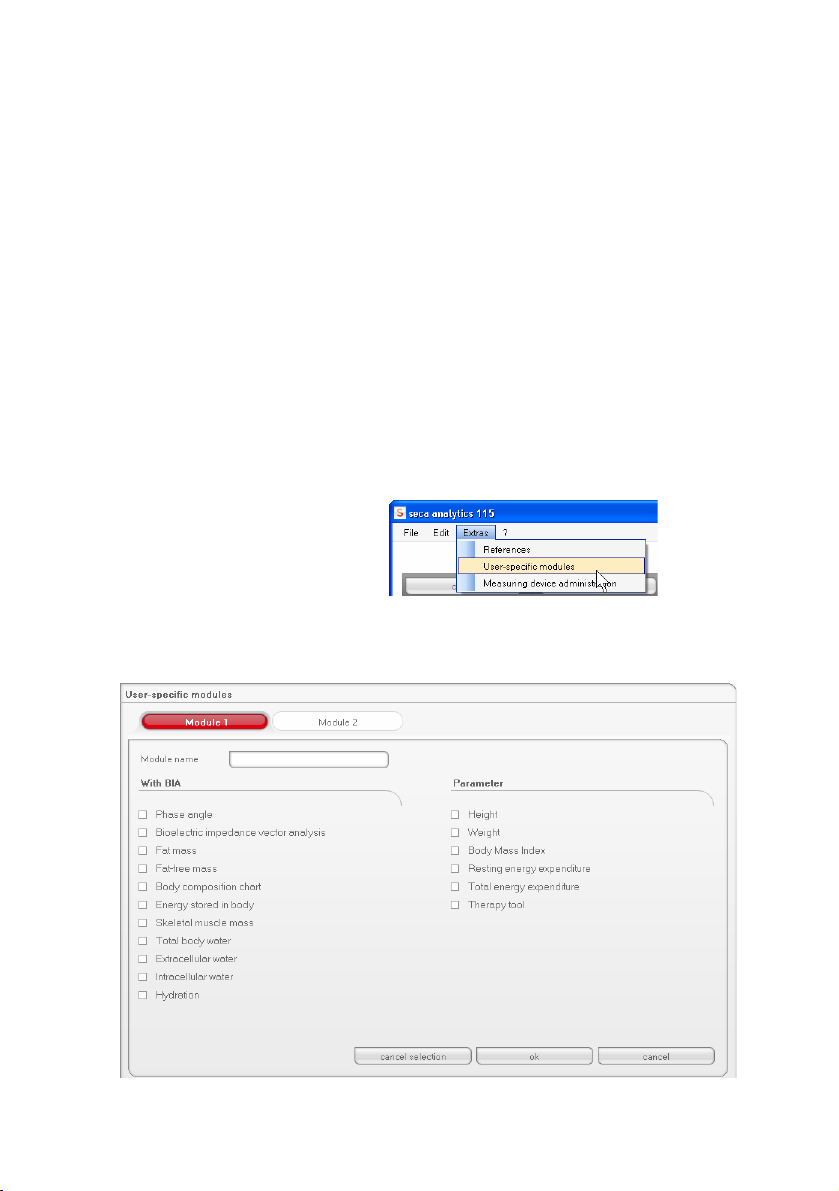
1. In the
Extras menu, click on User-specific
modules
The
.
User-specific modules dialog window
appears.
Module 1 is preselected.
20 •
Page 21
English
2. In the Module name field, enter the name you want
to give the module.
3. Click a maximum of 4 parameters you want
displayed in your module.
4. Click on ok.
The user-specific module is saved.
NOTE:
•With Cancel selection, you can deselect all
selected items with a mouse-click.
•With
Cancel, you can exit the dialog window
without saving settings.
• To delete a saved module, click on
selection
Module name field and click on ok.
, delete the module name in the
5. If desired, repeat the process for
Cancel
Module 2.
Viewing measuring
device administration
You can view which scales and stadiometers are
connected to your PC.
The following information is displayed for each seca
measuring device connected:
• device name if entered by the administrator
(recommended)
•model
• setup location if entered by the administrator
(recommended)
• serial number
• connection properties:
Connection Properties
Ethernet [IP address]:[port]
seca 360°wireless
network
[PC name : channel;
device type]
RS232 devices [PC name : COM port]
To have the measuring device configuration displayed,
proceed as outlined below.
1. From the
device administration
Extras menu, select the Measuring
element.
Operation • 21
Page 22

The Measuring device administration window
appears.
NOTE:
You cannot make any changes in this window.
If changes are to be made, please contact your
administrator.
2. To exit the
Measuring device administration
window, click on close.
22 •
Page 23
English
5.3 Working with the seca patient list
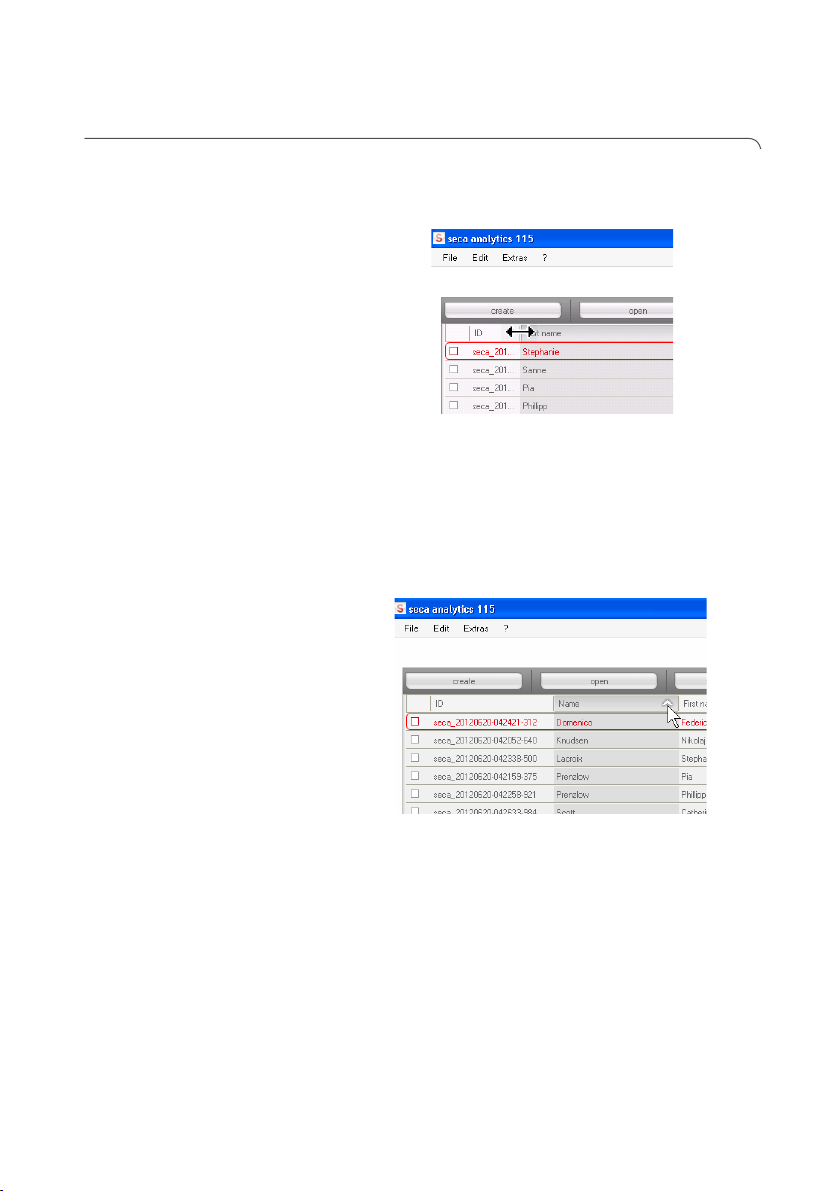
Adjusting column width 1. Position the mouse pointer in the title line on the line
between two columns.
The pointer turns into a double arrow.
2. Hold down the left mouse button and drag to make
the column wider or narrower.
3. Release the left mouse button once the required
column width is reached.
Sorting column content
in ascending or
descending order
1. Click in the title line of the desired column.
An arrow appears next to the column title, to
indicate the current sorting direction.
2. Click the arrow to re-sort column content.
3. To reverse the sorting direction, click the arrow
again.
Operation • 23
Page 24
Showing and hiding
columns
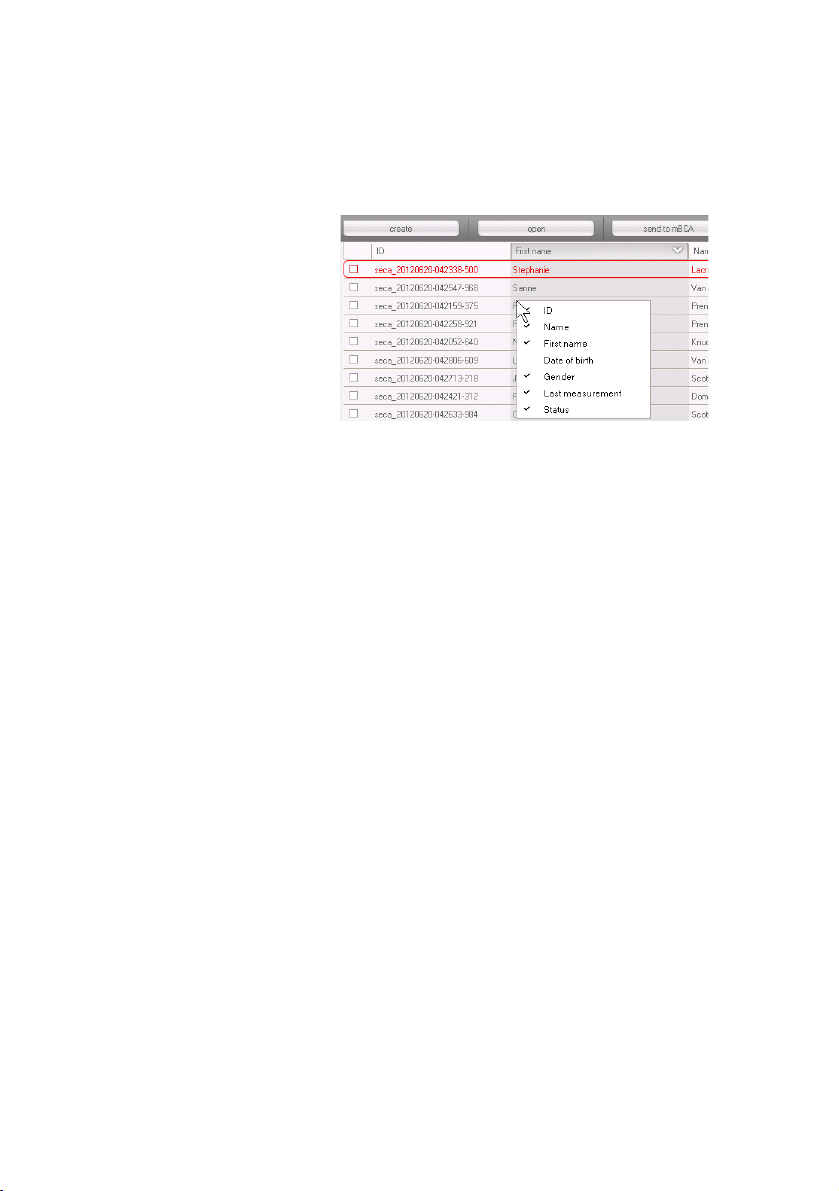
1. Position the mouse pointer in the seca patient list.
2. Right-click.
A context menu with the titles of all columns
appears.
3. Click on the title of the column you want to hide.
The checkmark in front of the column title is no
longer displayed.
The corresponding column is hidden in the seca
patient list.
4. Click on the title of the column again to show it
again.
The checkmark in front of the column title is
displayed again.
The corresponding column is shown in the seca
patient list again.
24 •
Page 25
English
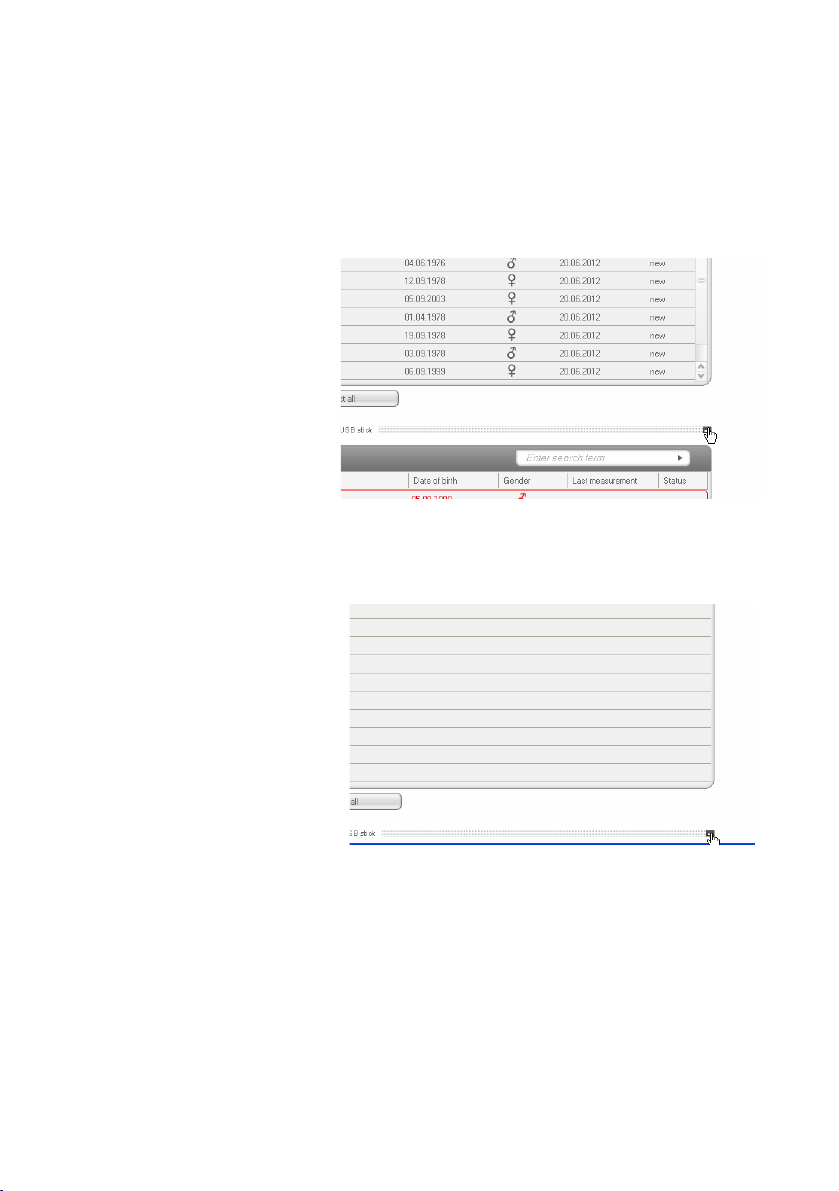
Showing and hiding the
seca patient list from
the USB memory stick
The patient list from the USB memory stick is shown
each time the program starts. You can hide the patient
list from the USB memory stick to obtain more space
for the entries of the main patient list.
1. Click on the “
the USB memory stick.
The patient list from the USB memory stick is no
longer shown.
2. To show the patient list from the USB memory stick
again, click on the “-” symbol again.
-” symbol above the patient list from
Operation • 25
Page 26
Searching for a seca
patient file
1. Enter a search term in the search field.
NOTE:
If you do not know exactly how to spell a name,
you can carry out a so-called “asterisk search” e.g. “Mi*” to find “Miller”.
2. Click the arrow next to the search field.
The search process starts.
The search results are displayed.
3. In order to return to the complete seca patient list,
delete the search term in the search field.
4. Click the arrow next to the search field.
The complete seca patient list is shown again.
26 •
Page 27

English
Creating a new seca
patient file
If you create a new seca patient file, you must fill in at
least the following fields (each marked “*” in the file):
•date of birth
•gender
• ethnicity
• attending physician (if the current user is a physician,
this field will be filled in automatically)
If the patient ID has to comply with a specified structure
in your institution, you can enter it manually. If you do
not enter a “manual” ID, then an ID will be assigned
automatically when the seca patient file is saved.
1. Click on
An empty seca patient file appears.
The
new.
patient data tab is active.
2. Enter the patient data:
Operation • 27
Page 28

NOTE:
If you are logged in as a physician, you will automatically be entered in the
Attending physician
field. The field can be edited.
3. Click on save.
If no manual ID was assigned, the ID created auto-
matically by the
4. Click on
seca 115 software is displayed.
close.
The seca patient list is shown again.
Additional seca patient files can be created.
28 •
Page 29

English
Sending seca patient
file to a seca mBCA
Use this function to send a seca patient file to a
seca mBCA to determine a patient's body composition
on that device.
NOTE:
This function is only available if you have an
Ethernet network connection available.
1. Ensure that the desired seca mBCA is switched on.
2. In the patient list of the PC software, select the
desired seca patient file.
3. Click on
The
send to mBCA.
Measuring device selection dialog window
appears.
4. In the
Measuring device selection dialog window,
select the desired seca mBCA in the Body
composition
5. Click on
line.
Send patient file.
The seca patient file is passed to the selected
seca mBCA where it appears in the
patient tab.
Operation • 29
Page 30

Copying seca patient
files to USB memory
stick
If you want to work with seca patient files on a
seca mBCA and there is no wireless or Ethernet connection to this device, you can use an initialized USB
memory stick.
NOTE:
If you are uncertain of whether the USB memory
stick has been initialized, please contact your
administrator.
In order to copy data to a USB memory stick, proceed
as outlined below.
1. Insert the USB memory stick in a free USB port on
the PC.
The message
2. Click on
The dialog window closes.
3. In the main patient list, select the seca patient files
you want to copy to the USB memory stick.
USB stick detected appears.
ok.
30 •
4. Click on
The copied entries are shown in the patient list of
the USB memory stick.
copy to USB stick.
Page 31

English
5. Eject the USB memory stick in accordance with the
procedure of your PC's operating system.
6. Extract the USB memory stick from the USB port of
the PC.
NOTE:
In order to be able to access seca patient files
on a seca mBCA , you need your user PIN (generated automatically when your administrator
sets up your user account for the
seca 115 PC
software) or the USB PIN (generated when your
administrator initializes the USB memory stick).
If you do not have either of the PINs handy,
contact your administrator.
Operation • 31
Page 32

Importing seca patient
files from the USB
memory stick
If you have created or updated seca patient files on a
USB memory stick, e.g. during a measurement on a
seca mBCA, you can import these data to the patient
database of the
proceed as outlined below.
1. Insert the USB memory stick in a free USB port on
the PC.
The message
2. Click on
The dialog window closes.
The patient files on the USB memory stick are
shown in the patient list of the USB memory stick.
seca 115 PC software. To do so,
USB stick detected appears.
ok.
32 •
Data import starts automatically.
Imported entries are shown in the main patient list.
NOTE:
If you accidentally assign a patient ID which
already exists in the
corresponding seca patient file will be copied
from the USB memory stick to the patient buffer
seca 115 PC software, the
Page 33

English
of the seca 115 PC software. Your administrator can provide the seca patient file with a
unique ID and transfer it to the main patient list.
3. Eject the USB memory stick in accordance with the
procedure of your PC's operating system.
4. Extract the USB memory stick from the USB port of
the PC.
Exporting seca patient
files to .csv format
If you would like to re-use a patient's examination
results outside this program, you can export them to
the .csv format. This data format can be imported into
common spreadsheet programs.
NOTE:
Personal data such as the name and address of
the patient will not be exported.
1. Position the red selection bar on the seca patient
file to be exported.
2. Click the appropriate checkbox.
A cross appears in the checkbox.
The seca patient file is selected.
3. Repeat steps 1. and 2. for all seca patient files to be
exported.
NOTE:
If you want to export all the seca patient files,
use the
4. In the
The export window appears.
select all function.
File menu, click on Export.
5. Select the parameters you want to export.
6. To confirm the settings, click ok.
The
Save as dialog window appears.
Operation • 33
Page 34

7. Select the directory to which you want to export the
patient data.
8. Click on
save.
The data is exported.
NOTE:
If an interface to your PDMS is configured, then
weight and height, as well as a PDF document
with all the measured results and evaluations,
will be exported to the PDMS automatically. If
you are uncertain of whether an interface has
been configured, please contact your
administrator.
34 •
Page 35

English
Deleting individual seca
patient files
You can delete seca patient files both in the main
patient list and in the patient list of the USB memory
stick. To do so, proceed as outlined below.
1. Select the seca patient file to be deleted (in this
case, in the main patient list).
2. Click the appropriate checkbox.
A cross appears in the checkbox.
The seca patient file is selected.
3. Repeat steps 1. and 2. for all seca patient files to be
deleted.
4. Click on
delete.
The seca patient file is deleted.
ATTENTION!
Loss of data
If you delete data on the USB memory stick,
you cannot restore them.
► Before deleting data on the USB memory
stick, make sure that the data have been imported into the main patient list (see “Importing seca patient files from the USB memory
stick” on page 32).
NOTE:
If you have inadvertently deleted data in the
main patient list, your administrator can restore
the data using the
Restore patient data func-
tion. The entire patient data set will be restored.
Entries and measurements which have not
been saved will be lost.
Operation • 35
Page 36

Deleting all seca patient
files
You can delete seca patient files both in the main
patient list and in the patient list of the USB memory
stick. To do so, proceed as outlined below.
1. Click on
select all (in this case, in the main patient
list).
NOTE:
If you want to undo the selection, click on
lect all
.
2. Click on
delete.
dese-
All seca patient files are deleted.
ATTENTION!
Loss of data
If you delete data on the USB memory stick,
you cannot restore them.
► Before deleting data on the USB memory
stick, make sure that the data have been imported into the main patient list (see “Importing seca patient files from the USB memory
stick” on page 32).
NOTE:
If you have inadvertently deleted data in the
main patient list, your administrator can restore
the data using the
Restore patient data func-
tion. The entire patient data set will be restored.
Entries and measurements which have not
been saved will be lost.
36 •
Page 37

English
5.4 Working with the seca patient file
Opening the seca
patient file
1. Click on the checkbox of the seca patient file you
want to open.
A cross appears in the checkbox.
The seca patient file is selected.
2. Click on open or double-click on the entry in the se-
ca patient list.
The seca patient file opens.
Editing patient data When you have opened an existing seca patient file,
the following fields are filled in as a minimum:
•date of birth
•gender
• ethnicity
•patient ID
• attending physician
You can change and add to patient data at any time.
1. Open a seca patient file (see “Opening the seca
patient file” on page 37).
patient data tab is active.
The
2. Select the tab on which you would like to change
data.
Operation • 37
Page 38

3. Change or add to the patient data where
necessary:
– supplement data manually.
– mark entries and use the Cut, Copy and
Paste functions. These functions are acces-
sible via the
clicking on the context menu.
4. Click on save.
5. To close the seca patient file, click
The seca patient list is shown again.
Edit menu element or by right-
close.
Entering a medical
38 •
history
On the medical history tab, you can enter previous illnesses or therapies already started. This information is
included in the evaluation of the measured results (see
“Assessing the examination results” on page 47).
Page 39

English
1. Click on medical history.
The
medical history tab is active.
2. Click on the checkboxes for the relevant previous
illnesses and therapies.
A cross appears in the corresponding checkboxes.
3. Click on save.
NOTE:
Cancel selection to undo the entire
Use
selection. Then click on
save again.
Operation • 39
Page 40

Entering laboratory
data
In the laboratory data tab, you can enter the patient's
current laboratory data and waist circumference and
track the history.
If an interface to your patient data management system
(PDMS) has been configured for this program, patient
and laboratory data can be transferred from the PDMS.
NOTE:
If you are uncertain of whether an interface has
been configured, please contact your
administrator.
To enter laboratory data manually, proceed as outlined
below.
1. Click on
The
2. Click in a value field.
3. Enter the value.
laboratory data.
laboratory data tab is active.
40 •
NOTE:
You can specify the value in mg/dl or in mmol/l.
The conversion to the other value takes place
automatically as soon as you click on the empty
field.
Page 41

English
4. Repeat steps 2. and 3. for all values you want to
enter.
5. Click on
Viewing history for individual values
You can view the history for individual values. To do so,
proceed as outlined below.
save.
1. Click on the
The history field for that value opens.
2. To close the history view, click
3. To return to the seca patient list, click
» symbol next to the desired value.
«.
Operation • 41
close.
Page 42

Deleting values in the history field
You can delete individual values in the history field. To
do so, proceed as outlined below.
1. Right-click on the value you want to delete.
delete button appears.
The
2. Left-click on the
delete button.
The value is deleted
3. To return to the seca patient list, click
close.
Determining weight and
height
To determine a patient's weight and height, proceed as
outlined below.
1. Open the seca patient file (see “Opening the seca
patient file” on page 37) or create a seca patient file
if necessary (see “Creating a new seca patient file”
on page 27).
2. In the title bar of the seca patient file, click on
measure.
Measuring device selection dialog window
The
appears.
3. In the
Weight and Height lines, click on the devices
you want to use to perform the measurement.
42 •
Page 43

English
ATTENTION!
Incorrect measurement if incorrect device
selected
If the incorrect device is selected, measured
results may be assigned to an incorrect patient
or no measurement may be performed at all.
► Use the name of each device to check you
have selected the right devices.
► For selecting devices logged on to the same
USB wireless adapter: make sure that the
selected measuring devices are logged on to
the same wireless group.
► If devices in the network have to be renamed
or the configuration of wireless groups
changed, contact your administrator.
NOTE:
Select the
Manual setting if your scales and
stadiometers are not networked with the PC. In
the next dialog window, you can then enter the
measured values directly.
4. In the
Measuring device selection dialog window,
click on
measure.
The Measured values dialog window appears.
The selected measuring devices are displayed next
to the corresponding value windows.
Operation • 43
Page 44

5. Perform the measurements as described in the
instructions for use for the selected devices.
6. Ensure that the measured values are shown in the
Measured values dialog window:
– If you are using
seca 360° devices on which
automatic data transmission is activated, the
measured values are automatically sent to
the PC.
– If you are using
automatic data transmission is
or is not provided, press the Enter key (
print
) on the measuring devices to send the
seca 360° devices on which
not activated
Send/
measured values to the PC.
– If you are working with scales which are con-
nected to the PC via RS232 interface, the
measured values are transmitted to the PC
automatically.
– If your scales and stadiometers are not net-
worked with the PC, enter the measured values manually.
NOTE:
• If you are unsure whether automatic data
transmission is activated or available on your
seca 360° devices, contact your
administrator.
• Regardless of the setting on the measuring
devices, measured values will be displayed in
the units preset for the
seca 115 PC software.
7. If you want to assess the patient's cardiometabolic
risk, enter the Waist circumference in the
Measured values dialog window.
44 •
Page 45

English
8. If you want to determine the patient's total energy
expenditure (TEE), enter the patient's
Activity Level (PAL)
in the Measured values dialog
Physical
window.
NOTE:
• If you do not enter waist circumference and
PAL, the following modules will not be
displayed in the
Cardiometabolic risk, Energy.
examination results tab:
• If waist circumference is not yet available, you
have the option of entering waist circumference in the
laboratory data tab later. This
must be done the same day as the weight
and height measurement (see “Entering laboratory data” on page 40).
• If you click on the
Physical Activity Level (PAL) line, a table of
? symbol next to the
PAL values appears. If you click on a value, it
will be adopted in the Measured values
window.
Operation • 45
Page 46

9. In the measured values window, click on ok.
The measuring procedure is complete.
The
examination results tab is active.
The results of the examination can be evaluated.
Determining body
composition with a
seca mBCA
If you would like to determine a patient's body composition using a seca mBCA (bioimpedance measurement), you can send an open seca patient file to the
desired seca mBCA. To do so, proceed as outlined
below.
NOTE:
This function is only available if you have an
Ethernet network connection available.
1. Ensure that the desired seca mBCA is switched on.
2. Open the seca patient file (see “Opening the seca
patient file” on page 37) or create a seca patient file
if necessary (see “Creating a new seca patient file”
on page 27).
3. In the title bar of the seca patient file, click on
measure.
The Measuring device selection dialog window
appears.
46 •
Page 47

English
4. In the Measuring device selection dialog window,
select the desired seca mBCA in the
composition
5. In the
click on
line.
Measuring device selection dialog window,
Send patient file.
Body
The seca patient file is passed to the selected
seca mBCA where it appears in the patient tab.
6. Perform the bioimpedance measurement as de-
scribed in the “Instructions for Use for Physicians
and Assistants” for the seca mBCA.
7. Save the bioimpedance measurement on the
seca mBCA as described in the “Instructions for
Use for Physicians and Assistants” for the
seca mBCA.
The seca patient file in the
seca 115 PC software is
updated automatically.
The results can be assessed in the
tab of the seca 115 PC software.
results
examination
Assessing the
examination results
On the examination results tab, you can view the evaluations of all measurements performed for the patient.
In addition to weight and height, the evaluation also
includes waist circumference and physical activity level,
as well as medical history and laboratory data. If the
values for a bioimpedance measurement are available,
these are also taken into account. The results are displayed in evaluation modules.
Operation • 47
Page 48

NOTE:
This section describes how to use the
seca 115
PC software For basic information about the
medical content of the evaluation modules, see
the section entitled “Medical basis” from
page 60.
The following evaluation modules can be considered if
weight, height, PAL and waist circumference are available for a patient.
Cardiometabolic risk
•
• Development/growth
• Energy
The following evaluation modules can be considered in
addition if data from a bioimpedance measurement are
available:
Function/rehabilitation
•
• Fluid
• Health risk
• Raw data for impedance
The principles behind bioimpedance measurement can
be found in the “Medical basis” section of the “Instructions for Use for Physicians and Assistants” for the
seca mBCA.
examination results tab you can also view the
On the
results for User-specific modules.
48 •
Viewing examination results
To view the evaluation modules, proceed as outlined
below.
1. Click on
The
examination results.
examination results tab is active.
2. Click on the module you want displayed.
Page 49

English
3. Click on the measurement you want displayed.
The evaluation of the measurement is displayed.
For some evaluations, a graphical display is
provided.
Operation • 49
Page 50

Adding a comment to an evaluation parameter
You can add a comment to every evaluation parameter
shown.
1. Right-click in a results graph.
A context menu appears.
2. Click on
New comment.
The comments window opens.
The date and time are entered automatically.
3. Enter a
subject.
4. Enter your comment in the comments field.
5. Click on
ok in the comments field.
The comments field closes.
The comment symbol appears in the results graph.
50 •
Page 51

English
Viewing comments on an evaluation parameter
If the comment symbol is shown in the results graph of
an evaluation parameter, there is at least one comment.
1. Right-click in a results graph.
A context menu appears.
2. Click on
Display comments.
The comments list opens.
All the comments on that evaluation parameter are
displayed.
3. To exit the comments list, click on
close.
Deleting comments on evaluation parameters
You can delete comments on the evaluation
parameters.
1. Open the comments list as described in the section
entitled “Viewing comments on an evaluation
parameter” on page 51.
2. Right-click on the comment you want to delete.
Operation • 51
Page 52

The delete button appears.
3. Click on the delete button.
The measurement is deleted.
Displaying results graphs enlarged
The results graphs can be displayed enlarged if the
window symbol appears in the graph. The enlarged
displays contain additional details which enable you to
assess your patient's state of health better.
1. Click on a graph to have it displayed enlarged and
with details (in this case, BMI).
2. Click on the graph again to shrink it back to its
original size.
NOTE:
If you position the mouse pointer on a
measurement point in the graph, the associated
measured values will be displayed.
52 •
Page 53

English
Viewing the history
You can view a patient's history by selecting several
measurements. Measured results and evaluations are
then displayed in progression graphs.
NOTE:
This function is not available in the
Cardiometabolic risk and Raw data for
impedance
modules, as in these modules, a
progression display is not relevant for assessing
a patient's state of health.
Proceed as outlined below to select measurements for
the history.
1. Click on the
examination results tab.
2. Click on the module you want displayed.
The module is displayed in a selection bar.
3. Click on a measurement you wish to select.
The measurement is displayed on a selection bar.
4. While holding down the left mouse button, drag the
selection bar across all the other measurements
you want to view as a history (in this case, left
handle upwards).
The individual parameters of the module will be
displayed as progression graphs.
Operation • 53
Page 54

5. Click on a graph to have it displayed enlarged and
with details (in this case, BMI).
6. Click on the graph again to shrink it back to its
original size.
54 •
Using the therapy planner (
Energy module only)
If the patient's resting energy expenditure and total
energy expenditure are known, you can calculate the
recommended daily energy intake for the patient in
order to achieve a target weight within a defined time
(duration of therapy).
Page 55

English
The seca 115 PC software can calculate resting energy
expenditure (REE) if the following parameters are
entered or have been measured: age, gender, weight
and height. Total energy expenditure (TEE) can be calculated if the physical activity level (PAL) has also been
entered.
1. In the
Energy module, click on Therapy planner.
2. Enter the value and type of the therapy objective.
3. Enter the therapy duration in days.
The recommended daily energy intake is
calculated.
4. To save settings in the
close.
Therapy planner, click on
Deleting measurements
You can delete individual measurements. To do so,
proceed as outlined below.
1. Right-click on the measurement you want to delete.
delete button appears.
The
2. Left-click on the
delete button.
The measurement is deleted.
Operation • 55
Page 56

Writing comments On the comments tab, you can add comments to the
seca patient file.
1. Click on
The
comments.
comments tab is active.
56 •
2. Click on
Writing comments.
The comments window opens.
Page 57

English
The date and time are entered automatically.
NOTE:
Comments can be neither deleted nor
subsequently edited in the
3. Enter a
4. Enter your comment in the comments field.
5. Click on
subject.
ok in the comments field.
The comments field closes.
The comment appears as the top entry in the
comments list.
5.5 Managing a seca patient file
comments tab.
Printing a seca patient
file
In the print dialog, you can save all the results of a
measurement in the form of a PDF file. You can print
out the PDF file using a PDF viewer such as Adobe
Reader.
NOTE:
If you do not have a PDF viewer installed on
your computer, contact your administrator.
1. Open the seca patient file.
2. In the seca patient file, click on
The
print dialog window appears.
print.
Operation • 57
Page 58

3. Specify the scope of the printout:
– no selection: results graphs for all parameters
without further explanations
patient: results graphs for all parameters with
–
explanations for the patient
table: all parameters in tabular form
–
4. Click on
ok to save the evaluation in the form of a
PDF file.
The PDF file created is automatically displayed in
the PDF viewer.
5. Use the print dialog of the PDF viewer to print out
the PDF file.
Importing a patient file If an interface to your patient data management system
(PDMS) has been configured for the seca 115 PC software, you can import patient files from the PDMS.
The import will work differently depending on the configuration of the interface. As an example, the import
may run as described in this section.
NOTE:
If you are uncertain of whether an interface has
been configured and how the import works on
your system, please contact your administrator.
1. In the seca patient list, click on
An empty seca patient file appears.
The
patient data tab is active.
new.
58 •
Page 59

English
2. In the Patient ID field, enter the ID under which the
patient file is managed in your PDMS.
3. Click on import.
The patient data are imported.
Operation • 59
Page 60

6. MEDICAL BASIS
This section briefly describes the content of the preset
evaluation modules in this
together with their medical objectives. The references
on which the evaluations are based will also be
introduced.
For additional information, we refer you to the
appropriate professional literature.
6.1 Evaluation modules
The evaluation modules described below are preset in
this
assessing your patients' state of health.
For information about how to access the evaluation
modules and navigate within them, see “Assessing the
examination results” from page 47.
The following evaluation modules can be considered if
weight, height, PAL and waist circumference are
available for a patient.
•
• Development/growth
• Energy
The following evaluation modules can be considered in
addition if data from a bioimpedance analysis are
available for the patient:
•
• Fluid
• Health risk
• Raw data for impedance
The principles behind bioimpedance analysis can be
found in the “Medical basis” section of the “Instructions
for Use for Physicians and Assistants” for the
seca mBCA.
seca 115 PC software,
seca 115 PC software and will assist you in
Cardiometabolic risk
Function/rehabilitation
60 •
Page 61

English
Cardiometabolic risk This module indicates whether metabolic syndrome is
present and the level of the 10-year risk for coronary
heart disease.
NOTE:
The
Cardiometabolic risk module is only avail-
able if a seca patient file has been created for a
patient and the laboratory data and waist circumference have been entered no later than the
day weight and height were measured (see
“Entering laboratory data” on page 40).
No bioimpedance analysis is required for this module.
The following parameters are displayed:
• body mass index (BMI)
• waist circumference (WC)
• metabolic syndrome (MSX)
• 10-year risk for coronary heart disease
Detail views are available for the following parameters:
Medical basis • 61
Page 62

Detail view, body mass index
Detail view, visceral adipose tissue (VAT)
Detail view, metabolic syndrome
62 •
Page 63

English
Detail view, 10-year risk of coronary heart disease for the age group 30-74 years
Medical basis • 63
Page 64

Development/growth This module indicates both the weight and height of a
person and automatically calculates the BMI. This
allows weight changes to be monitored in both children
and adults.
In children, this module assists with regular checks to
assess growth and development.
No bioimpedance analysis is required for this module.
The following parameters are displayed:
•weight
•height
• body mass index (BMI)
64 •
Page 65

English
A detail view is available for the BMI:
Medical basis • 65
Page 66

Energy The aim of this module is to determine a person's
energy expenditure and energy reserves. The following
parameters are displayed:
• fat mass (FM)
• fat mass index (FMI)
• energy stored in the body (E
body
)
• resting energy expenditure (REE)
• total energy expenditure (TEE)
The parameter resting energy expenditure (REE) is
available without bioimpedance analysis. REE is determined with the aid of the parameters height and
weight, and with the aid of automatic BMI calculation.
For all other parameters in this module, a bioimpedance analysis is required in addition to height and
weight.
66 •
A detail view and a therapy planner are available for this
module:
Page 67

English
Fat mass
Therapy planner
Energy module serves as a basis for dietary
The
advice. The therapy planner of the module assists you
in this. You can use the therapy planner to specify the
following values:
• treatment objective: weight change or BMI change
• duration of treatment in days
From these values, the planner calculates
recommended daily energy intake.
No detail views are available in this module.
Medical basis • 67
Page 68

Function/rehabilitation This module is for determining a person's level of fit-
ness. This allows the success of a training regime to be
assessed.
The parameters height and weight, as well as a bioimpedance analysis, are required for this module. The
following parameters are displayed:
• fat-free mass (FFM)
• fat mass (FM) in kg
• fat mass (FM) in %
• fat mass index (FMI)
• fat-free mass index (FFMI)
• skeletal muscle mass (SMM)
68 •
The following detail views are available for this module:
Page 69

English
Display of normal fat mass range for adults
Skeletal muscle mass
For this parameter, you can have the following additional information displayed for each part of the body:
• skeletal muscle mass (SMM) in kg
• skeletal muscle mass (SMM) in percent
• height and gender as a reference for the limit values
used
1. Click on the drop-down menu
The drop-down menu opens.
2. Click on the desired part of the body.
Medical basis • 69
Page 70

The additional information for the selected part of
the body is displayed.
Body composition chart (mass indices)
Fluid This module allows a person's fluids status to be
determined.
The parameters height and weight, as well as a bio-
impedance analysis, are required for this module. The
following parameters are displayed:
• total body water (TBW)
• extracellular water (ECW)
• hydration (HYD);
HYD = (100 x ECW) / (TBW-ECW) [%]
• bioimpedance vector analysis (BIVA)
70 •
Page 71

English
The following detail view is available for this module:
Bioimpedance vector analysis
Medical basis • 71
Page 72

Health risk The aim of this module is to provide an overview of
body composition and to compare the results with values for healthy people. A body composition which deviates from the normal range is an indicator which can be
used to assess the risk to health. The goal is to determine the general state of health or, in the case of a previously known disease, assess its severity.
The parameters height and weight, as well as a bioimpedance analysis, are required for this module. The
following parameters are displayed:
• phase angle (φ)
• visceral adipose tissue (VAT)
• bioimpedance vector analysis (BIVA)
• fat mass index (FMI)
• fat-free mass index (FFMI)
72 •
The following detail views are available for this module:
Page 73

English
Bioimpedance vector analysis
Body composition chart (mass indices)
Medical basis • 73
Page 74

Raw data for
impedance
This module shows detailed raw data for resistance (R),
reactance (Xc), impedance (Z) and phase angle (φ) for
information purposes.
You can also view impedance (Z), reactance (X
tance (R) and phase angle (φ) for individual parts of the
body and frequencies.
), resis-
c
74 •
Page 75

English
Selecting the part of the body
1. Click on the drop-down menu to select the part of
the body.
The drop-down menu opens.
2. Click on the desired part of the body.
3. The values for the selected part of the body are
displayed.
Medical basis • 75
Page 76

Selecting frequency
1. Click on the drop-down menu to select the
frequency.
76 •
The drop-down menu opens.
2. Click on the desired frequency.
NOTE:
Raw data for impedance module on the
If the
mBCA was not activated, only four frequencies
will be available to choose from.
3. The values for the selected frequency are
displayed.
Page 77

English
6.2 References
Reference used
Bioimpedance analysis using a seca medical Body
Composition Analyzer is scientifically based on clinical
studies. The results of the clinical studies are stored as
references in the seca mBCA and in the
software and form the basis for assessing your
patients' state of health
For some evaluation parameters (e.g. waist circumference for children), the reference used depends on the
patient's ethnicity. The device automatically uses ethnicity-dependent references to suit the corresponding
entry in the seca patient file (see “Creating a new seca
patient file” on page 27).
Which references you use depends on the country in
which you are operating, the regulations applying in
your institution and your personal preferences.
For information about how to set the references in this
seca 115 PC software, see “Changing references” from
page 18.
The evaluation module in question indicates which clin-
ical study is being used as a reference for determining
and assessing an evaluation parameter, e.g. “Peine et
al. 2013”.
seca 115 PC
Details about the clinical studies referenced can be
found on our website www.seca.com.
Medical basis • 77
Page 78

7. TECHNICAL INFORMATION
7.1 Technical modifications
Combination of seca mBCA seca 515/514 (SW version 1.1) and seca 115 (SW
version 1.4)
Downwardcompatible?
seca patient
database
New
Modified
No longer
applicable
No
Existing seca patient database is adopted in the current version of
the PC software; no further access is then possible using older
versions of the PC software
• Regional settings: “Name format” drop-down menu
• Enter waist circumference with “Health risk” evaluation module
activated (seca mBCA only)
• Visceral fat (VAT) parameter in the “Health risk” evaluation module
• Skeletal muscle mass (SMM) parameter in the “Function/
rehabilitation” evaluation module
• In evaluation modules: comments function for every evaluation
parameter
• Send individual secaseca patient file from the
software to a seca mBCA
• Initiate a printout of results reports directly on the seca mBCA
Graphical representation: phase angle (φ), bioimpedance vector
analysis (BIVA), body composition chart (BCC), total body water
(TBW)
Lean soft tissue mass (LST) parameter in the “Function/
rehabilitation” evaluation module
seca 115 PC
78 •
Page 79

English
7.2 Display of weight values
The seca 115 PC software displays the weight values it
receives only in the unit set in the PC software. If the
setting on the transmitting device is different, the
weight values will be converted automatically. Details
are in the table below.
seca 115 PC
software
setting
kg
lbs
sts
1)
Manual entry of measured values directly in the PC software seca 115
seca device
setting
sts
sts
sts
8. WARRANTY
kg
kg
kg
seca 115 display
Weight ≤ 20 kg Weight > 20 kg
kkk.ggg kkk.gglbs
-
kkk.gg
1)
ppp:oo.o ppp.plbs
-
ppp.p
1)
s:pp:oo.o ss:pp.plbs
-
ss:pp.p
1)
Please note that this PC software is subject to restrictions on the warranty which may arise in conjunction
with the license, for example. The warranty restrictions
can be called up at www.seca.com.
Warranty • 79
Page 80

Konformitätserklärung
Declaration of conformity
Certificat de conformité
Dichiarazione di conformità
Declaratión de conformidad
Overensstemmelsesattest
Försäkran om överensstämmelse
Konformitetserklæring
Vaatimuksenmukaisuusvakuutus
Verklaring van overeenkomst
Declaração de conformidade
Δήλωση Συμβατότητας
Prohlášení o shodĕ
Vastavusdeklaratsioon
Megfelelőségi nyilatkozat
Atitikties patvirtinimas
Atbilstības apliecinājums
Oświadczenie o zgodności
Izjava o skladnosti
Vyhlásenie o zhode
Onay belgesi
Page 81

Die Software
The software
Le logiciel
Il software
El software
Softwaren
Programvaran
Programvaren
Ohjelmisto
De software
O software
Το λογισμικό
Software
Tarkvara
A szoftver
Programinė įranga
Programmatūra
Oprogramowanie
Programska oprema
Softvér
Yazılımı
115
Page 82

… erfüllt die geltenden Anforderungen folgender
DGBF
I
E
DK
GR
CZ
EST
HU
LTLVS
N
FIN
NL
P
PL
SLO
SK
TR
Richtlinien:
93/42/EWG über Medizinprodukte.
… complies with the requirements of the following
Directives:
93/42/EEC governing medical devices.
… satisfait aux exigences en vigueur figurant dans les
directives suivantes :
93/42/CEE relatives aux dispositifs médicaux.
… risponde ai requisiti prescritti dalle direttive seguenti:
93/42/CEE in materia di prodotti medicali.
… cumple las exigencias vigentes de las siguientes
directivas:
93/42/CEE sobre productos sanitarios.
... opfylder de grundlæggende krav fra følgende direktiver:
93/42/EØF om medicinprodukter.
... εκπληρώνει τις ισχύουσες απαιτήσεις των ακόλουθων οδηγιών:
93/42/EΟΚ περί ιατροτεχνολογικών προϊόντων.
… splňuje platné požadavky těchto směrnic:
93/42/EHS o zdravotnických prostředcích:
... vastab järgmiste direktiividega kehtestatud
nõuetele:
meditsiinitoodete direktiivid 93/42/EMÜ
... teljesíti a következő irányelvek érvényben lévő köve
telményeit:
93/42/EGK irányelv az orvostechnikai termékekről.
...atitinka tokias galiojančias direktyvas:
93/42/EEB ir medicinos prietaisų.
... atbilst šādu direktīvu spēkā esošajām prasībām:
93/42/EEK par medicīnas ierīcēm.
... uppfyller gällande krav enligt följande direktiv:
93/42/EEG om medicintekniska produkter.
... oppfyller gjeldende krav i følgende direktiver:
93/42/EØF om medisinske produkter.
... täyttää seuraavien direktiivien voimassa olevat määräykset:
93/42/ETY lääkinnälliset laitteet.
..is in overeenstemming met de geldende eisen van de
volgende richtlijnen:
93/42/EEG betreffende medische hulpmiddelen.
... cumpre os requisitos essenciais das seguintes
Directivas:
93/42/CEE relativa a dispositivos médicos:
..spełnia obowiązujące wymagania następujących
dyrektyw:
93/42/EWG o wyrobach medycznych.
... izpolnjuje veljavne zahteve naslednjih direktiv:
93/42/EGS o medicinskih pripomočkih.
…spĺňa platné požiadavky nasledujúcich smerníc:
smernice 93/42/EHS o medicínskych výrobkoch.
... aşağıdaki yönergelerin geçerli talimatlarını yerine
getirir:
tıbbi ürünler hakkında 93/42/AET yönetmeliği.
Hamburg: Febuary 2014
Frederik Vogel
CEO Developement and Manufacturing
seca gmbh & co. kg.
Hammer Steindamm 9-25
22089 Hamburg
Germany
Telefon: +49 40. 20 0 0 00-0
Telefax: +49 40. 20 0 0 00-50
: www.seca.com
Page 83

Page 84

171
0
0
1xx
x/11S
Prü
f
3
0HGLFDO0HDVXULQJ
6\VWHPVDQG6FDOHV
VLQFH
VHFDJPEKFRNJ
+DPPHU6WHLQGDPPো˼ো
+DPEXUJ
7HOHSKRQH
)D[
LQIR#VHFDFRP
VHFDRSHUDWHVZRUOGZLGHZLWKKHDGTXDUWHUV
LQ*HUPDQ\DQGEUDQFKHVLQ
VHFDIUDQFH
VHFDXQLWHGNLQJGRP
VHFDQRUWKDPHULFD
VHFDVFKZHL]
VHFD]KRQJJXR
VHFDQLKRQ
VHFDPH[LFR
VHFDDXVWULD
VHFDSROVND
VHFDPLGGOHHDVW
VHFDEUDVLO
VHFDVXRPL
DQGZLWKH[FOXVLYHSDUWQHUVLQ
PRUHWKDQFRXQWULHV
Յ
*HUPDQ\
17-10-01-254-002/02-2015 G
$OOFRQWDFWGDWDXQGHUZZZ
VHFDFRP
 Loading...