


 ®
®
M2
User Manual

M2 DIVING COMPUTER - DESIGNED BY DIVING ENGINEERS
Welcome to SCUBAPRO dive computers and thank you for purchasing the M2. You are now the owner of an extraordinary partner for your dives. This manual provides you with easy access to SCUBAPRO state of the art technology and key M2 features and functions. Should you wish to know more about SCUBAPRO diving equipment, please visit our website www.scubapro.com.
 WARNING
•The M2 has a depth rating of 120m/394ft.
•If 120m is exceeded, “---“ will be shown in the depth field and the decompression algorithm will not calculate correctly.
•Diving at oxygen partial pressures higher than 1.6bar (corresponding to a depth of 67m/220ft when breathing compressed air) is extremely dangerous and could lead to serious injury or death.
 WARNING
•The M2 is delivered in deep sleep mode where the display is off. You must activate the M2 by pressing and holding the SEL button before the first dive. The M2 will not start the dive mode or may show a wrong depth value if activation is not done before immersion.
M2 dive instrument is a personal protective equipment in compliance with the essential safety requirements of the European Union directive 89/686/EEC. RINA SpA,Via Corsica 12, I-16128 Genoa, notified body no. 0474, have certified its conformity with the European Standard EN 250: 2014 (EN 250: 2014 : Respiratory equipment – Open circuit selfcontained compressed air diving apparatus – requirements, testing and marking);
M2 dive instrument is also compliant with the European Union directive 2014/30/EU.
Standard EN 13319: 2000
M2 dive instrument is compliant with the European standard EN 13319: 2000 (EN 13319: 2000 – Depth gauges and combined depth and time measuring devices – Functional and safety requirements, tests methods).
|
2 |
M2 USER MANUAL |
|
|
|

TABLE OF CONTENTS
1. Introduction to the M2 .......................................................................................... |
|
6 |
||
1.1 |
Battery |
..................................................................................................... |
|
6 |
2. OPERATION MODES ............................................................................................. |
|
7 |
||
3. The M2 as a watch ................................................................................................ |
|
8 |
||
3.1 Clock setting .................................................functions (“SET - WATCH”) |
9 |
|||
|
3.1.1 .......................................... |
Setting the alarm clock (“ALARM”) |
10 |
|
|
3.1.2 ....................................................... |
Setting the UTC (“UTC 1”) |
10 |
|
|
3.1.3 ......................................................... |
Setting the time (“TIME”) |
10 |
|
|
3.1.4 .................................. |
Setting 24h or AM/PM mode (“MODE”) |
11 |
|
|
3.1.5 ................................................. |
Set dual time mode (“UTC 2”) |
11 |
|
|
3.1.6 ........................................................ |
Setting the date (“DATE”) |
11 |
|
|
3.1.7 |
Setting the sound off |
|
|
|
......................................................... |
(silent mode) (“SOUND”) |
11 |
|
|
3.1.8 ........................................... |
Accept code protection (“CODE”) |
12 |
|
|
3.1.9 ................................ |
Checking the battery status (“BATTERY”) |
12 |
|
3.2 Menus .......................................................and functions at the surface |
13 |
|||
|
3.2.1 ................................................ |
Using the stopwatch (“STOP”) |
14 |
|
|
3.2.2 .. |
Using the sport mode (“SPORT - PRESS SEL FOR START”) |
15 |
|
|
3.2.3 ...... |
Reading the altitude, barometer and temperature values (“ALTI”) |
16 |
|
|
3.2.4 |
Using, calibrating and setting the compass |
|
|
|
.................................................... |
(“COMP - USE COMPASS”) |
16 |
|
|
............................................... |
3.2.4.1 |
Declination (“DECLIN”) |
17 |
|
................................................ |
3.2.4.2 |
Timeout (“TIMEOUT”) |
17 |
|
............................................ |
3.2.4.3 |
Recalibration (“CALIBR”) |
17 |
|
3.2.5 ......................................................... |
Planning a dive (“PLAN”) |
20 |
|
|
3.2.6 .................................................. |
Reading the logbook (“LOG”) |
21 |
|
|
................................................... |
3.2.6.1 |
SCUBA log (“%O2”) |
22 |
|
...................................................... |
3.2.6.2 |
APNEA log (“AP”) |
23 |
|
....................................... |
3.2.6.3 Surface exercise logs (“SE”) |
23 |
|
|
................................ |
3.2.6.4 Sport mode exercise logs (“SP”) |
23 |
|
4. The M2 as a dive ................................................................................computer |
|
24 |
||
4.1 Settings ..........................................in the dive mode at surface (“DIVE”) |
24 |
|||
|
4.1.1 ................................................. |
Surface interval counter (“Int”) |
26 |
|
4.2 |
Gas settings ..............................................................................(“GAS”) |
26 |
||
|
4.2.1 .............................................. |
Set Gas 1, 2 or d (“GAS 1/2/D”) |
27 |
|
|
4.2.2 ............................................ |
Enabling the CCR mode (“CCR”) |
28 |
|
|
4.2.3 ............................................. |
Nitrox reset time (“GAS RESET”) |
29 |
|
|
4.2.4 .............................. |
Setting the half tank warning (“HALFTNK”) |
29 |
|
|
4.2.5 ........................... |
Setting the tank reserve (“TANK RESERVE”) |
29 |
|
|
4.2.6 ....... |
Pairing and mounting of the high pressure transmitter (“PAIRING”) |
29 |
|
4.3 |
SCUBA ....................................................................settings (“SCUBA”) |
32 |
||
|
4.3.1 .......... |
Maximum dive depth alarm (“MAX DEPTH WARNING”) |
32 |
|
|
4.3.2 ................ |
Maximum dive time alarm (“MAX TIME WARNING”) |
32 |
|
|
4.3.3 ............................. |
Setting the microbubble level (“MBLEVEL”) |
33 |
|
|
4.3.4 ........................... |
Selecting salt (sea) or fresh water (“WATER”) |
33 |
|
4.4 |
APNEA .....................................................................settings (“APNEA”) |
33 |
||
|
4.4.1 ..... |
Setting the APNEA session total depth (“totAL SESSION”) |
34 |
|
|
4.4.2 ................................. |
Setting the surface interval factor (“SIF”) |
34 |
|
|
4.4.3 .......................... |
Setting the dual depth alarm (“MAX DEPTH”) |
34 |
|
|
4.4.4 ..................... |
Setting the depth incremental alarm (“INCREM”) |
35 |
|
English
M2 USER MANUAL |
3 |
|
|
|
|

|
|
|
|
|
|
4.4.5 |
.......................Setting the dive time interval alarm (“DIVEINT”) |
35 |
|
|
4.4.6 |
Setting the surface interval alarm (“SURFINT”) ........................ |
35 |
|
|
4.4.7 |
Setting the heart rate low limit (“Lo PULSE”) ........................... |
36 |
|
|
4.4.8 |
Setting the ascent speed alarm (“SPEED”) .............................. |
36 |
|
4.5 |
User settings (“USER”) ........................................................................... |
36 |
||
|
4.5.1 |
Workload (“WRKLOAD”) ......................................................... |
36 |
|
|
4.5.2 |
Heart rate limits (“HR WL”) ...................................................... |
37 |
|
|
4.5.3 |
Units (“UNItS”) ........................................................................ |
37 |
|
|
4.5.4 |
Backlight duration (“LIGHT”) ................................................... |
37 |
|
|
4.5.5 |
Desaturation reset (“DESAT”) .................................................. |
37 |
|
4.6 SWIM mode settings (“SWIM”) ............................................................... |
38 |
|||
4.7 |
Algorithm selection (”ALGO”) .................................................................. |
39 |
||
4.8 Diving with the M2 (“SCUBA”) ................................................................ |
39 |
|||
|
4.8.1 |
Display information ................................................................. |
40 |
|
|
4.8.2 |
Display configuration during the dive ...................................... |
40 |
|
|
|
4.8.2.1 |
Skin temperature....................................................... |
41 |
|
|
4.8.2.2 |
Stop timer................................................................. |
41 |
|
|
4.8.2.3 |
Setting bookmarks.................................................... |
42 |
|
|
4.8.2.4 |
Safety stop timer....................................................... |
42 |
|
|
4.8.2.5 |
Activating the backlight............................................. |
42 |
|
|
4.8.2.6 Diving with MB levels................................................. |
42 |
|
|
|
4.8.2.7 |
PDI stops ................................................................. |
43 |
|
4.8.3 |
No-dive warning after a dive ................................................... |
43 |
|
|
4.8.4 |
SOS ....................................................................................... |
|
43 |
|
|
4.8.4.1 |
Desaturation reset..................................................... |
44 |
|
4.8.5 |
Diving with nitrox .................................................................... |
44 |
|
4.9 Diving with two or more gas mixtures ..................................................... |
45 |
|||
|
4.9.1 |
Switching gas mixture during the dive ..................................... |
46 |
|
|
4.9.2 |
Switching back to a gas mixture with lower oxygen concentration ...... |
46 |
|
|
4.9.3 |
Gas switch not carried out at the planned depth ..................... |
47 |
|
|
4.9.4 |
Delayed gas switch ................................................................. |
47 |
|
|
4.9.5 |
Submerging below the MOD after a gas switch ...................... |
47 |
|
|
4.9.6 |
Diving with CCR mode ............................................................ |
47 |
|
|
4.9.7 |
Enabling the CCR mode ......................................................... |
48 |
|
4.10 |
Altitude diving ........................................................................................ |
|
48 |
|
|
4.10.1 |
Altitude classes, altitude warning and NO-FLY time after a dive ... |
48 |
|
|
4.10.2 |
Altitude and the decompression algorithm .............................. |
49 |
|
|
4.10.3 |
Prohibited altitude ................................................................... |
49 |
|
|
4.10.4 |
Decompression dives in mountain lakes ................................. |
50 |
|
4.11 |
Warnings and alarms ............................................................................. |
50 |
||
|
4.11.1 |
CNS O2 = 75% ....................................................................... |
50 |
|
|
4.11.2 |
No-stop time = 2 minutes ....................................................... |
50 |
|
|
4.11.3 |
Entering decompression ......................................................... |
51 |
|
|
4.11.4 |
MB LEVEL ignored ................................................................. |
51 |
|
|
4.11.5 |
Ascent rate ............................................................................. |
51 |
|
|
4.11.6 |
MOD/ppO2 ............................................................................ |
52 |
|
|
4.11.7 |
CNS O2 = 100% ..................................................................... |
52 |
|
|
4.11.8 |
Missed decompression stop ................................................... |
53 |
|
|
4.11.9 |
High workload ........................................................................ |
53 |
|
|
4.11.10 MB level reduced .................................................................... |
53 |
||
|
4.11.11 Low battery ............................................................................ |
54 |
||
|
4.11.12 RBT = 3 min or RBT = 0 min .................................................. |
54 |
||
|
4 |
M2 USER MANUAL |
|
|
|

|
4.12 |
GAUGE mode (“GAUGE”) ...................................................................... |
54 |
|
4.13 |
APNEA mode (“APNEA”) ........................................................................ |
55 |
|
4.14 |
SWIM mode ........................................................................................... |
56 |
5. |
M2 accessories .................................................................................................... |
57 |
|
|
5.1 |
HR belt .................................................................................................. |
57 |
|
5.2 |
Nylon arm strap .................................................................................... |
57 |
|
5.3 |
Wireless high pressure transmitter .......................................................... |
58 |
|
5.4 |
Battery compartment O-ring .................................................................. |
58 |
|
5.5 |
Display guard ......................................................................................... |
58 |
6. |
M2 PC interface ................................................................................................... |
58 |
|
|
6.1 |
Cradle - accessory ................................................................................. |
58 |
|
6.2 |
Introduction to Scubapro LogTRAK ....................................................... |
59 |
|
6.3 |
Change warning settings of the M2 and reading the computer information ...... |
59 |
7. |
Taking care of your M2 ........................................................................................ |
60 |
|
|
7.1 |
Technical information ............................................................................. |
60 |
|
7.2 |
Maintenance .......................................................................................... |
60 |
|
7.3 |
Replacing the battery in M2 or transmitter .............................................. |
60 |
|
7.4 |
Warranty ................................................................................................ |
62 |
8. |
GLOSSARY ........................................................................................................... |
63 |
|
9. |
Index ..................................................................................................................... |
|
64 |
English
M2 USER MANUAL |
5 |
|
|
|
|
1.INTRODUCTION TO THE M2
Your M2 User Manual is divided into the following main chapters.
1 Introduction to M2. This chapter provides an overview of the M2 computer and describes its operating modes and functions when on the surface.
2The M2 as a watch. This chapter describes the M2 when it is used as a watch.
3The M2 as a dive computer. This chapter describes all settings and functions of the M2 as a dive computer and takes you underwater with the M2. It’s about everything the M2 can and will do to enhance your safety and fun underwater.
4M2 accessories. This chapter briefly describes the extras that can be purchased as additional options to get the most of your dive computer in all diving conditions.
5M2 PC interface. This chapter is about linking the M2 to your PC/Mac. It describes how to change settings plus how to download and manage your logbook.
6Taking care of the M2. This chapter describes how you should take care of the M2 after underwater adventures and also summarizes the main technical information of this instrument.
The M2 is a technologically-advanced instrument that can accompany you during your underwater adventures while providing you
with accurate depth, time and decompression information. On the surface its size makes it your ideal everyday companion. With features such as wake-up alarm, dual time, stop watch, barometer, altimeter, SWIM and sport mode, the M2 can tackle almost every possible task.
The buttons allow you to initiate operating functions, make setting changes and access menus while on the surface. During the dive they set bookmarks, show further information on the computer screen and activate the backlight.
Now it is time to dive into the details. We hope you will enjoy getting to know your new computer and we wish you many happy dives with the M2.
1.1Battery
The M2 uses a CR2450 battery which is available at your authorized SCUBAPRO dealer. The M2 will alert you when the battery is approaching a critical discharge level by displaying the battery symbol.
A steady symbol means that the battery is low, with some reserve left. At this point the backlight cannot be activated. If the symbol blinks, the battery level is dangerously low and the backlight and alarm tones cannot be activated; diving is not recommended before replacing the battery.
|
6 |
M2 USER MANUAL |
|
|
|

 WARNING
Starting a dive when the battery symbol is blinking can cause the computer to fail during the dive! Replace the battery before any diving activity if the blinking battery symbol appears. When the ‘do not dive symbol’ appears with the battery symbol, the M2 cannot be used for diving until a fresh battery is installed.
See section “Checking the battery status“ for details on how to manually trigger the battery level check.
 WARNING
Replacing the battery requires opening the electronic compartment of the M2. You must take extreme care when performing the battery change operation in order to ensure the water tightness of the watch. Failing to do so will cause the watch to flood during your next dive and permanently ruin it. Damage to the M2 due to improper battery replacement is not covered under the warranty. We strongly recommend battery changes be carried out by your SCUBAPRO dive retailer.
See section “Replacing the battery in M2 or transmitter“ for information on how to replace the battery.
2.OPERATION MODES
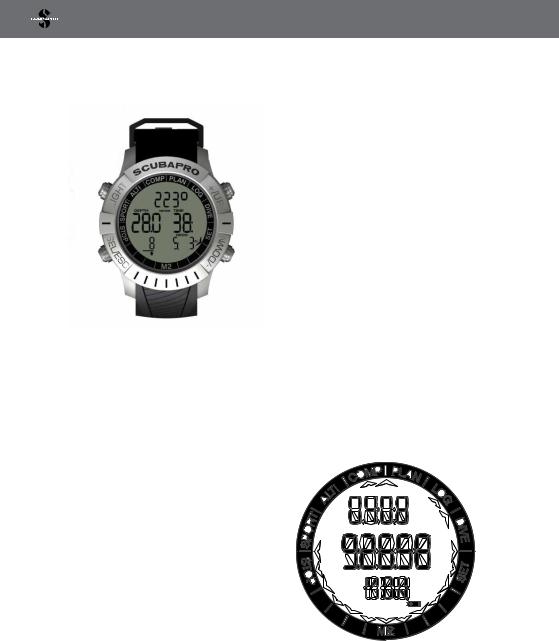
The reference point for any description of the M2 as a watch is the main time of day display. This is the display in which the current time is shown on the middle row. The upper row shows the date and the bottom row shows the day of the week. The example below shows Monday, 4th of August and the time is 26 minutes and 58 seconds past 9 o’clock. If dual time is activated, this display shows dual time on the top row, the main time on the middle row, and the day of the week and date on the bottom row.
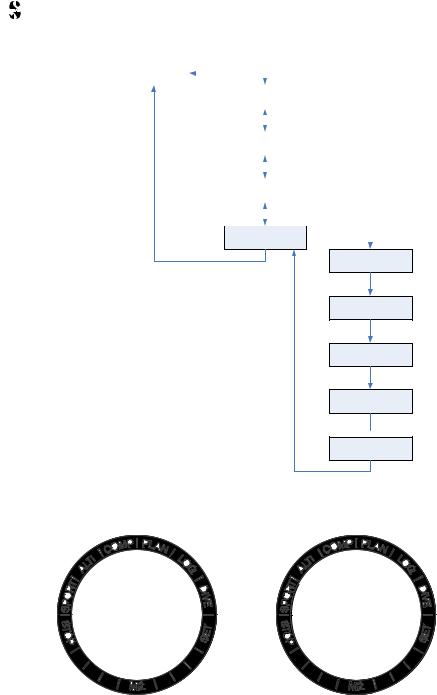
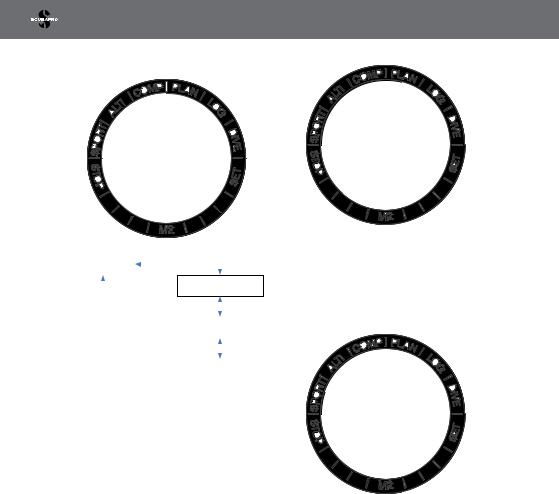
The different modes are shown on the dial ring of the computer and the current function mode is indicated with three arrows. Each mode may have sub functions and menus. By pressing the SEL button you activate the mode and as an indication the arrows start blinking.
The modes are grouped and described in this manual in three chapters:
1.The M2 as a watch.
2.Menus and functions at the surface.
3.The M2 as a dive computer.
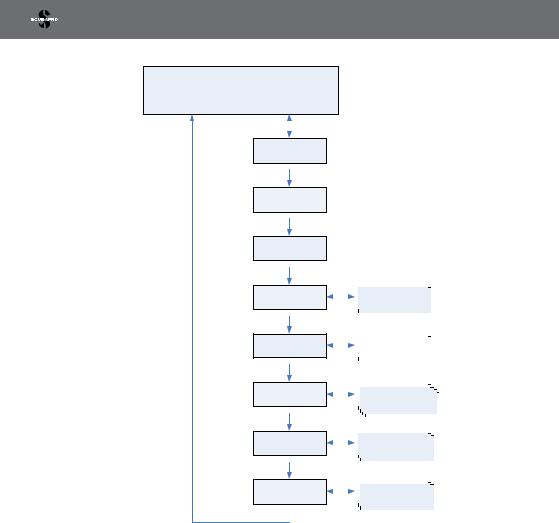
The following chart describes the main menu structure.
.
English
M2 USER MANUAL |
7 |
|
|
|
|
TIME & DATE
UP |
|
|
DOWN |
UP |
|
|
|
|
|
|
|
|
|
STOP watch function
 DOWN
DOWN
UP
Sport mode
 DOWN
DOWN
UP
ALTI / BARO meter
 DOWN
DOWN
UP
Compass 3D
 DOWN
DOWN
UP
PLANner
 DOWN
DOWN
UP
LOG
 DOWN
DOWN
UP
DIVE mode
 DOWN
DOWN
UP
Watch Set
 DOWN
DOWN
|
|
|
|
|
|
|
|
SEL |
Compass |
|
|
||
|
|
|
|
settings |
|
|
ESC |
|
|
||||
|
|
|
|
|
|
|
|
|
|
|
|
|
|
|
SEL |
Planner |
|
|
||
|
|
|
|
pages |
|
|
ESC |
|
|
||||
|
|
|
|
|
|
|
|
SEL |
Logbook |
|
|
||
|
|
|
pages |
|
|
|
ESC |
|
|
||||
|
|
|
|
|
|
|
|
|
|
|
|
|
|
|
SEL |
Dive settings |
|
|
||
|
|
|
|
& menus |
|
|
ESC |
|
|
||||
|
|
|
|
|
|
|
|
|
|
|
|
|
|
|
|
|
|
|
|
|
|
SEL |
Clock settings |
|
|
||
|
|
|
|
& menus |
|
|
ESC |
|
|
||||
|
|
|
|
|
|
|
3.THE M2 AS A WATCH
The M2 is more than just a watch. It features:
•Wake-up warning function.
•SWIM and sport modes.
•Dual time.
•Stopwatch with lap time and 72-hour run time.
•Altimeter for tracking your excursions to the mountains.
•Thermometer and barometer for current weather conditions.
FNOTE: Temperature reading -- when worn on the wrist against bare skin, the reading is influenced by body heat.
The functions of the buttons on the surface are summarized in the table below and explained in detail in the following sections.
|
8 |
M2 USER MANUAL |
|
|
|
|
|
|
|
|
|
|
|
|
|
|
“LIGHT” button, Top Left: |
Press = backlight |
|
|
|
|
|
|
English |
|
|
forward through the menus |
|
|
|
“+/UP” button, Top Right: |
Press = adds numerical values, scrolls |
|
|
|
|
|
|
|
|
“-/DOWN” button, Bottom Right: |
Press = subtracts numerical values, |
|
|
|
|
scrolls back through the menus |
|
|
|
|
|
|
|
|
“SEL/ESC” button, Bottom Left: |
Press = select, |
|
|
|
|
Press and hold = escape (return to previous |
|
|
|
|
menu or cancel the setting) |
|
|
|
|
|
|
|
3.1Clock setting functions (“SET - WATCH”)
By pressing the -/DOWN button once from the main time and date display and selecting the “SET” menu by pressing the SEL button you will get into the clock settings (See chart below).
M2 USER MANUAL
Watch SET |
DOWN |
|
||||||||||||||||||||||
|
|
|
|
|
|
|
|
|
|
|
|
|
|
|
|
|
|
|
|
|||||
|
|
SEL |
|
|
|
|
|
|
|
|
|
|||||||||||||
|
|
|
|
|
|
|
|
|
|
|
|
|||||||||||||
|
|
|
|
|
|
|
SET alarm |
|
||||||||||||||||
|
DOWNUP |
|
|
|
|
|
||||||||||||||||||
|
|
|
|
|||||||||||||||||||||
|
|
|
|
|
|
|
clock |
|
||||||||||||||||
|
|
|
|
|
|
|
|
|||||||||||||||||
|
|
|
|
|
|
|
|
|
|
|
|
|
|
|
|
|
|
|
|
|
|
|
DOWN |
|
|
|
|
|
|
|
|
UP |
|
|
|
|
|
|
|
|
|
||||||||
|
|
|
|
|
|
|
|
|
|
|
|
|
|
|
||||||||||
|
|
|
|
|
|
|
UTC 1 |
|
||||||||||||||||
|
|
|
|
|
|
|
|
|
|
|
|
|
|
|
|
|
|
|
|
|
|
|
|
|
|
|
|
|
|
|
|
|
|
|
|
|
|
|
|
|
|
|
|
|
|
|
|
DOWN |
|
|
|
|
|
|
|
|
UP |
|
|
|
|
|
|
|
|
|||||||||
|
|
|
|
|
|
|
|
|
|
|
|
|
|
|||||||||||
|
|
|
|
|
|
|
SET time |
|
||||||||||||||||
|
|
|
|
|
|
|
|
|
|
|
|
|
|
|
|
|
|
|
|
|
|
|
|
|
|
|
|
|
|
|
|
|
|
|
|
|
|
|
|
|
|
|
|
|
|
|
|
DOWN |
|
|
|
|
|
|
|
|
UP |
|
|
|
|
|
|
|
||||||||||
|
|
|
|
|
|
|
|
|
|
|
|
|
||||||||||||
|
|
|
|
|
|
|
Set 24h or |
|
||||||||||||||||
|
|
|
|
|
|
|
AM/PM |
|
||||||||||||||||
|
|
|
|
|
|
|
|
|
|
|
|
|
|
|
|
|
|
|
|
|
|
|
DOWN |
|
|
|
|
|
|
|
|
UP |
|
|
|
|
|||||||||||||
|
|
|
|
|
|
|
|
|
|
|||||||||||||||
|
|
|
|
|
|
|
UTC 2 |
|
||||||||||||||||
|
|
|
|
|
|
|
|
|
|
|
|
|
|
|
|
|
|
|
|
|
|
|
|
|
|
|
|
|
|
|
|
|
|
|
|
|
|
|
|
|
|
|
|
|
|
|
|
DOWN |
|
|
|
|
|
|
|
|
UP |
|
|
|
||||||||||||||
|
|
|
|
|
|
|
|
|
||||||||||||||||
|
|
|
|
|
|
|
SET date |
|
||||||||||||||||
|
|
|
|
|
|
|
|
|
|
|
|
|
|
|
|
|
|
|
|
|
|
|
|
|
|
|
|
|
|
|
|
|
|
|
|
|
|
|
|
|
|
|
|
|
|
|
|
DOWN |
|
|
|
|
|
|
|
|
UP |
|
|
|
|
|
|
|||||||||||
|
|
|
|
|
|
|
|
|
|
|
|
|||||||||||||
|
|
|
|
|
|
|
SET Sound |
|
||||||||||||||||
|
|
|
|
|
|
|
off |
|
||||||||||||||||
|
|
|
|
|
|
|
|
|
|
|
|
|
|
|
|
|
|
|
|
|
|
|
DOWN |
|
|
|
|
|
|
|
|
UP |
|
|
|
|
|
||||||||||||
|
|
|
|
|
|
|
|
|
|
|
||||||||||||||
|
|
|
|
|
|
|
CHECK |
|
||||||||||||||||
|
|
|
|
|
|
|
battery state |
|
||||||||||||||||
|
|
|
|
|
|
|
|
|
|
|
|
|
|
|
|
|
|
|
|
|
|
|
|
|
The different sub-menu functions are described in later chapters.
9
3.1.1Setting the alarm clock (“ALARM”)
By pressing the SEL button the alarm status will start blinking and can be switched to either on or off by pressing the +/UP or -/DOWN buttons. By pressing the SEL button the hours of the alarm will start blinking. You can scroll the hours setting by pressing the +/UP or -/DOWN buttons. By pressing the SEL button the minutes will start blinking and by pressing the +/UP or -/DOWN buttons you can scroll them. Pressing the SEL button will confirm the settings.
FNOTE: The ‘sound off’ setting does not affect the alarm clock. However, the intelligent battery stretching algorithm disables all warning tones when there are less than 2 dots left in the battery status display or when the battery symbol is blinking in other displays.
3.1.2Setting the UTC (“UTC 1”)
The UTC setting will change the shown time compared to Greenwich 0-Meridian. This feature is practical when travelling through different time zones.
By pressing SEL the hours will start blinking. You may edit them with the +/UP or -/DOWN buttons in a range of +14h..- 13h. By pressing SEL the minutes will start blinking and you may edit them with the +/UP or -/DOWN buttons in 15-minute increments. The UTC setting will be confirmed by pressing the SEL button.
3.1.3Setting the time (“TIME”)
In the display above the current time is shown on the display.
By pressing the SEL button the time setting will be activated: hours start blinking and seconds turn to 00. You may change the hours with the +/UP or -/DOWN buttons. By pressing the SEL button the selection will change to minutes and can be edited. The new time setting will be confirmed by pressing the SEL button.
FNOTE: Seconds cannot be edited; they always start counting from 0.
|
10 |
M2 USER MANUAL |
|
|
|
3.1.4Setting 24h or AM/PM mode (“MODE”)
By pressing the SEL button the 24h or 12h setting on the top row starts blinking. You may change the setting by pressing the +/ UP or -/DOWN buttons. By pressing the SEL button the mode will be confirmed.
3.1.5Set dual time mode (“UTC 2”)
Dual time uses the same “base time” as the main clock. Therefore, adjusting the time as described in section ‘Setting the time’ will also influence the dual time. The dual time zone selection will define the difference to the main clock time. When the time zone selection is OFF, then the dual time is disabled.
When pressing the SEL button the UTC2 time hours start blinking. You may change the setting by pressing the +/UP or -/ DOWN buttons in a range of +14h..-13h or by selecting ‘off.’ By pressing the SEL button, the minutes will start blinking and you may edit them using the +/UP or -/ DOWN buttons in 15-minute intervals. The UTC2 setting will be confirmed by pressing the SEL button.
3.1.6Setting the date (“DATE”)
English
By pressing the SEL button the first two date digits start blinking. In 24h mode the first digits represent days, in 12h mode they represent the month. You may change them by pressing the +/UP or -/DOWN buttons. By pressing the SEL button the next two digits start blinking and you may change them by pressing the +/UP or -/DOWN buttons. By pressing the SEL buttons again, the year starts blinking. By pressing the SEL button the date will be confirmed.
3.1.7Setting the sound off (silent mode) (“SOUND”)
ON/ATT/ALR/OFF
By pressing the SEL button the current setting will start blinking on top of the display. By pressing the +/UP or -/DOWN buttons you may select between the normal mode (ON), where alarm and button tones are on, or the silent mode (OFF), where all tones are off, or alarm mode (ALR) where only alarm tones are on, or attention mode (ATT), where alarm and attention tones are on. The sound off selection is protected with a code.
M2 USER MANUAL |
11 |
|
|
|
|

3.1.8Accept code protection (“CODE”)
When code protection is required the first digit starts blinking. By pressing the +/UP or -/DOWN buttons the number can be changed and by pressing the SEL button the number will be stored.
The protection code is: 313
 WARNING
The sound off selection will disable all audible dive mode alarms and warnings. This is potentially dangerous.
FNOTE: The only exception to the silent mode is the alarm clock, which will beep when activated, even if the main setting is sound off.
3.1.9Checking the battery status (“BATTERY”)
The battery capacity menu shows how much energy is left in the CR2450 battery. A fresh battery shows 5 dots.
While the M2 periodically measures battery status, you can manually trigger a measurement by pressing the SEL button in this menu.
The intelligent battery algorithm will limit some functions towards the end of the battery lifetime. See the table below for the status and functions.
Indicator in battery |
At other displays |
Battery status |
Function limitations |
status display |
|
|
|
|
|
|
|
00000 |
|
Fresh battery |
none |
|
|
|
|
0000_ |
|
Battery ok for diving |
none |
|
|
|
|
000__ |
|
Battery ok for diving |
none |
|
|
|
|
00___ |
Battery symbol |
Weak battery, change |
Backlight |
|
|
to fresh |
not operating |
|
|
|
|
0____ |
Blinking battery symbol, |
Completely used battery, |
Alarms and Backlight |
|
no dive symbol |
change to fresh |
not operating, diving |
|
|
|
not recommended |
|
|
|
|
change battery |
Blinking battery symbol, |
Completely used battery, |
Diving mode not |
|
no dive symbol |
change to fresh, watch |
allowed, only watch is |
|
|
may make a reset any |
active. Settings cannot |
|
|
time and remain off |
be changed (OFF) |
|
|
|
|
|
12 |
M2 USER MANUAL |
|
|
|

FNOTE: Battery capacity and voltage at the end of the lifetime may vary between battery manufacturers. Generally, operation at low temperatures decreases battery capacity. Therefore, when the battery indicator drops below 3 dots, change the battery to a fresh one before making any new dives.
 WARNING
When battery is critically low, the watch and dive settings are disabled (menu off).
3.2Menus and functions at the surface
By simply pressing the +/UP or -/DOWN buttons from the time of day display you can scroll through the M2’s various menus. The diagram below shows the sequence of the menus. Note that when you first reach a menu, you are not yet inside it—you must press the SEL button to enter the actual menu. When the actual menu is selected, the indicator arrows start blinking.
English
M2 USER MANUAL |
13 |
|
|
|
|

|
TIME & DATE |
|
|
|
|
||||||||||||||||||
|
|
|
|
|
|
|
|
|
|
|
|
|
|
|
|
|
|
|
|
|
|
|
|
UP |
|
|
|
|
|
|
|
|
|
|
|
|
|
|
|
|
|
|
DOWN |
|
|
|
|
|
|
UP |
|
|
|
|
|
|
|
|
|
|
|||||||||||
|
|
|
|
|
|
|
|
|
|
|
|||||||||||||
|
|
STOP watch |
|
|
|
|
|||||||||||||||||
|
|
function |
|
|
|
|
|||||||||||||||||
|
|
|
|
|
|
|
|
|
|
|
|
|
|
|
|
|
|
|
DOWN |
|
|
|
|
|
|
UP |
|
|
|
|
|
|
|||||||||||||||
|
|
|
|
|
|
|
|||||||||||||||||
|
|
Sport mode |
|
|
|
|
|||||||||||||||||
|
|
|
|
|
|
|
|
|
|
|
|
|
|
|
|
|
|
|
|
|
|
|
|
|
|
|
|
|
|
|
|
|
|
|
|
|
|
|
|
|
|
|
DOWN |
|
|
|
|
|
|
UP |
|
|
|
|
|
|
|
||||||||||||||
|
|
|
|
|
|
|
|
||||||||||||||||
|
|
ALTI / BARO |
|
|
|
|
|||||||||||||||||
|
|
meter |
|
|
|
|
|||||||||||||||||
|
|
|
|
|
|
|
|
|
|
|
|
|
|
|
|
|
|
|
DOWN |
|
|
|
|
|
|
UP |
|
|
|
|
|
SEL |
|||||||||||||||
|
|
|
|
|
|
||||||||||||||||||
|
|
Compass 3D |
|
||||||||||||||||||||
|
|
ESC |
|
||||||||||||||||||||
|
|
|
|
|
|
|
|
|
|
|
|
|
|
|
|
|
|
|
DOWN |
|
|
|
|
|
|
UP |
|
|
|
|
|
|
SEL |
||||||||||||||
|
|
|
|
|
|
|
|||||||||||||||||
|
|
PLANner |
|
||||||||||||||||||||
|
|
ESC |
|||||||||||||||||||||
|
|
|
|
|
|
|
|
|
|
|
|
|
|
|
|
|
|
|
|
||||
|
|
|
|
|
|
|
|
|
|
|
|
|
|
|
|
|
|
|
DOWN |
|
|
|
|
|
|
UP |
|
|
|
|
|
|
|
|
SEL |
||||||||||||
|
|
|
|
|
|
|
|
|
|||||||||||||||
|
|
LOG |
|
||||||||||||||||||||
|
|
ESC |
|
||||||||||||||||||||
|
|
|
|
|
|
|
|
|
|
|
|
|
|
|
|
|
|
|
|
||||
|
|
|
|
|
|
|
|
|
|
|
|
|
|
|
|
|
|
|
DOWN |
|
|
|
|
|
|
UP |
|
|
|
|
|
|
|
|
|
SEL |
|||||||||||
|
|
|
|
|
|
|
|
|
|
||||||||||||||
|
|
DIVE mode |
|
||||||||||||||||||||
|
|
ESC |
|
||||||||||||||||||||
|
|
|
|
|
|
|
|
|
|
|
|
|
|
|
|
|
|
|
DOWN |
|
|
|
|
|
|
UP |
|
|
|
|
|
|
|
|
|
|
SEL |
||||||||||
|
|
|
|
|
|
|
|
|
|
|
|||||||||||||
|
|
Watch Set |
|
||||||||||||||||||||
|
|
ESC |
|
||||||||||||||||||||
|
|
|
|
|
|
|
|
|
|
|
|
|
|
|
|
|
|
|
|
||||
|
|
|
|
|
|
|
|
|
|
|
|
|
|
|
|
|
|
|
DOWN |
|
|
|
|
|
|
|
|
|
|
|
|
|
|
|
|
|
|
|
|
|
|
|
|
|
|
|
|
|
|
|
|
|
|
|
|
|
|
|
|
|
|
|
|
|
|
|
|
|
|
|
|
3.2.1Using the stopwatch (“STOP”)
Compass
settings
Planner
pages
Logbook
pages
Dive settings & menus
Clock settings  & menus
By pressing the SEL button the stopwatch will be activated. In the first display the stopwatch shows the status, which can be stop, run or lap. When first activating the stopwatch the time display is as shown above.
Press the +/UP button and the stopwatch starts counting and shows the actual state which is: run. By pressing the +/UP button again the stopwatch stops counting and shows the actual state: stop. The counted time stays on the display.
|
14 |
M2 USER MANUAL |
|
|
|
The stopwatch will reset the counted time when the +/UP button is pressed and held.
Laps can be marked by pressing the -/DOWN button when the stopwatch is counting. By doing so the display will freeze for 5 seconds and the M2 will show the lap time.
Counting will continue automatically and the lap counter will show the number of laps on the bottom of the screen.
FNOTE: You can leave the stopwatch actively counting or you can leave the stopped time on the display. The status will be stored in memory that allows you to continue from the same display at a future time.
FNOTE: The stopwatch has a 30-minute timeout before reverting to normal watch display. However, the timeout does not stop the stopwatch function. You can return to the stopwatch menu and continue with the time-taking task just as you did before the timeout happened.
3.2.2Using the sport mode (“SPORT - PRESS SEL FOR START”)
English
When the stopwatch is stopped you can review your lap times from the memory by pressing the -/DOWN button.
By pressing the SEL button you can exit the stopwatch and return to the stopwatch menu.
Pressing SEL in Sport mode will start the exercise. A press-and-hold of the SEL button will end the exercise.
In the middle row the time is counting. The counter can be stopped and restarted by pressing the -/DOWN button. The information in the top or bottom rows can be selected by pressing the +/UP button.
A press of the +/UP button will change the top row information in the following order:
M2 USER MANUAL |
15 |
|
|
|
|
1.Repetitions (initial value), see the note below.
2.Heart rate.
3.Temperature.
4.Current time.
Pressing the SEL button will activate the compass and the 12 o’clock direction is shown in degrees on the top row with an arrow indicating towards north on the dial ring. A press-and-hold of the +/UP button will change the bottom row information in the following order:
1.Repetitions per minute.
2.Minutes per 1000 repetitions.
3.Current altitude.
4.Altitude difference during the exercise (elevation).
5.Total ascent during the exercise.
6.Barometer.
FNOTE: Since the M2 is worn on the wrist, it is counting repetitive movements from its internal sensors in Sport mode. The M2 is not a pure step counter since arm movements may count as repetitions as well. The M2 is also not an activity band since only same-direction movements are counted.
3.2.3Reading the altitude, barometer and temperature values (“ALTI”)
barometric pressure. Altitude is counted from the current barometric pressure and is therefore a relative value.
With a press-and-hold of the -/DOWN button the display changes, now showing barometric pressure at sea level on the top row. Or, with a press-and-hold of the +/ UP button you get the barometric pressure at current altitude in mbar. This barometer feature allows you to foresee approaching weather in the upcoming hours if your altitude remains the same.
When current elevation is known, the altitude can be adjusted by pressing the SEL button. The altitude value will start blinking. By pressing the +/UP or -/DOWN buttons the value can be adjusted in 10m/50ft increments. Adjusting the altitude elevation has no effect on the Altitude Class.
FNOTE: Different combinations m&˚C, Ft&˚C, m&˚F or Ft&˚F can be selected from the Dive mode menu: Units.
3.2.4Using, calibrating and setting the compass (“COMP - USE COMPASS”)
In the altitude menu the current altitude is calculated from the barometric pressure and is shown on the middle row. The current temperature is shown on the top row. The current altitude class is shown on the bottom row.
FNOTE: Barometric pressure is a variable, changing with weather and atmospheric pressure at that particular elevation. The Dive algorithm uses Altitude Classes which are directly derived from the
|
16 |
M2 USER MANUAL |
|
|
|
By pressing the SEL button, the compass is activated and it shows the bearing direction (12 o’clock on the watch) on the middle row in degrees. The North direction is indicated with an arrow on the dial ring.
By pressing the +/UP button the following sub-menus can be selected.
3.2.4.1Declination (“DECLIN”)
A compass points to the magnetic north pole of the earth. Geographic and magnetic north poles are corrected with a declination setting. Declination depends on your current location on the earth.
By pressing the SEL button the declination value starts blinking. By pressing the +/UP or -/DOWN buttons you can select the value from -90..90° in 1° increments. By pressing SEL the value will be confirmed.
3.2.4.2Timeout (“TIMEOUT”)
Compass timeout is the amount of time the compass is displayed when activated. Compass timeout is valid for the display of the compass in all modes: Dive, Sport, etc. You can adjust the timeout setting by pressing SEL button and scrolling the values by pressing the +/UP or -/DOWN buttons between 5, 10, 15, 30, and 60 seconds, or PUSH (on/off). By pressing the SEL button the value will be confirmed.
3.2.4.3Recalibration (“CALIBR”)
FNOTE: The compass must be recalibrated after each battery change or when traveling to another location where the earth’s magnetic field strength is different.
English
M2 USER MANUAL |
17 |
|
|
|
|
|
|
|
|
|
|
|
|
|
|
|
|
|
|
|
|
DOWN |
|
|
|||||||||
|
COMPASS |
|
|
||||||||||
|
|
|
SEL |
|
|
|
|
|
|
|
|
|
|
|
|
|
|
|
|
|
|
|
|
|
|
|
|
|
UP |
|
|
BEARING |
|
|
|||||||
|
|
|
|
|
|
||||||||
|
|
|
|
|
|
|
|
|
|
|
|
|
|
|
|
|
|
|
|
|
|
|
|
|
DOWN |
|
|
|
|
|
|
UP |
|
|
|
|
|
|
|||
|
|
|
|
|
|
|
|
|
|||||
|
|
|
|
DECLINATION |
|
|
|||||||
|
|
|
|
|
|
|
|
|
|
|
|
|
|
|
|
|
|
|
|
|
|
|
|
|
DOWN |
|
|
|
|
|
|
UP |
|
|
|
|
|
||||
|
|
|
|
|
|
|
|
||||||
|
|
|
|
TIMEOUT |
|
|
|||||||
|
|
|
|
|
|
|
|
|
|
|
|
|
|
|
|
|
|
|
|
|
|
|
|
|
DOWN |
|
|
|
|
|
|
UP |
|
|
|
|
|||||
|
|
|
|
|
|
|
|||||||
|
|
|
|
CALIBRATION |
|
|
|||||||
|
|
|
|
SEL |
|
||||||||
|
|
|
|
|
|
|
|
|
|
|
|
|
|
1. START
HORIZONTAL
SEL
2. ROTATE HORIZONTAL
SEL
3. START VERTICAL
SEL
4. ROTATE VERTICAL
SEL 
5. READY
SEL
By pressing the SEL button the recalibration process will start.
Hold the M2 so that its display points upwards. Press the SEL button.
|
18 |
M2 USER MANUAL |
|
|
|

English
Rotate the M2 at least 180° horizontally. Press the SEL button.
Hold the M2 so that its display points sideways. Press the SEL button.
Rotate the M2 at least 180° horizontally. Press the SEL button.
The M2 3D compass recalibration is now complete.
M2 USER MANUAL |
19 |
|
|
|
|
3.2.5Planning a dive (“PLAN”)
PLAN |
DOWN |
||||||||
|
|
SEL |
|
|
|
||||
|
|
|
|
|
|
|
|||
UP |
|
|
|
SURFACE |
|||||
|
|
|
|
INTERVAL |
|||||
|
|
|
|
|
|
|
|
|
DOWN |
|
|
|
|
UP |
|
|
|
|
|
|
|
|
|
|
|
|
|||
|
|
|
|
DEPTH |
|||||
|
|
|
|
(no deco time) |
|||||
|
|
|
|
|
|
|
|
|
DOWN |
|
|
|
|
UP |
|
|
|
||
|
|
|
|
|
|
||||
|
|
|
|
DECO TIME |
|||||
|
|
|
|
|
|
|
|
|
|
|
|
|
|
|
|
|
|
|
|
By pressing the SEL button in the planner menu you will get into the planner directly, or after a repetitive dive into the surface interval setting.
In case you plan to make a second dive during the desaturation phase, you must start the planner by inputting the time you would still stay at the surface.
You can plan your next dive based on your body’s nitrogen saturation. The planner is also using the following information:
1.Selected oxygen concentration.
2.Enabled gases (multi gas diving).
3.Selected water type.
4.Selected microbubble level.
5.Water temperature of the most recent dive.
6.Altitude range.
7.Status of saturation at the time when the planner is started.
8.Observance of the prescribed ascent rates.
FNOTE: When the M2 is in GAUGE or APNEA modes the planner is disabled. This is indicated by showing OFF in this menu.
By pressing the +/UP or -/DOWN buttons you can set the time in 15-minute increments. The prohibited altitude is shown on the bottom row. By increasing the surface interval the allowed limit will reach maximum (level 4). To learn more about altitude diving with the M2, refer to the section on Altitude diving.
In cases where the M2 is displaying the nodive warning, the duration of the warning itself is displayed as recommended surface interval for planning purposes (rounded up to the nearest 15-minute increment).
|
20 |
M2 USER MANUAL |
|
|
|
 Loading...