

Page 1

Galileo 2
(G2)
User Manual
®
Page 2

2
GALILEO 2 (G2) USER MANUAL
Page 3

GALILEO 2 (G2) USER MANUAL
The G2 Diving Computer – Designed for all kinds of diving.
Welcome to SCUBAPRO dive computers and thank you for purchasing the G2. You are now
the owner of an extraordinary partner for your dives. This manual provides you easy access
to SCUBAPRO state-of-the-art technology and the G2’s key features and functions. Should
you wish to know more about SCUBAPRO diving equipment, please visit our website
www.scubapro.com
IMPORTANT
Before using your SCUBAPRO G2, please carefully read and understand the Read First booklet that
is included in the package.
WARNING
• The G2 has a depth rating of 120m/394ft.
• At depths between 115m/377ft and 120m/394ft in dive computer mode the message SWITCHING
TO GAUGE appears on the display, and at depths over 120m/394ft the G2 automatically switches to
Gauge mode and cannot be used as a decompression computer for the remaining time of the dive.
• Diving at oxygen partial pressures higher than 1.6bar (corresponding to a depth of 67m/220ft when
breathing compressed air) is extremely dangerous and could lead to serious injury or death.
English
The G2 dive instrument is a personal protective equipment in compliance with the essential safety requirements of the
European Union directive 89/686/EEC. RINA SpA,Via Corsica 12, I-16128 Genoa, notified body no. 0474, have certified
its conformity with the European Standard EN 250: 2014 (EN 250: 2014 : Respiratory equipment – Open circuit selfcontained compressed air diving apparatus – requirements, testing and marking);
The G2 dive instrument is also compliant with the European Union directive 2014/30/EU.
Standard EN 13319: 2000
The G2 dive instrument is compliant with the European standard EN 13319: 2000 (EN 13319: 2000 – Depth gauges and
combined depth and time measuring devices – Functional and safety requirements, tests methods).
GALILEO 2 (G2) USER MANUAL
3
Page 4

TABLE OF CONTENTS
1 . Introduction to the G2 .......................................................................................... 8
2 . G2 settings and menus ...................................................................................... 17
1 .1 Power concept and charging .................................................................. 8
1 .2 Operating modes .................................................................................. 10
1 .3 Switching on the G2 .............................................................................. 10
1 .4 No-Dive warning .................................................................................... 12
1 .5 No-Fly time ............................................................................................ 12
1 .6 SOS ...................................................................................................... 12
1 .6 .1 Emergency information .......................................................... 13
1 .7 Owner information ................................................................................. 13
1 .8 Mounting and pairing the high pressure transmitter ............................... 13
1 .9 SCUBAPRO Human Factor Diving
TM
...................................................... 16
1 .10 Turning off the G2 .................................................................................. 16
2 .1 O
settings ............................................................................................ 19
2
2 .1 .1 Recreational (factory setting) .................................................. 19
2 .1 .2 Multigas (PMG) ...................................................................... 19
2 .1 .3 Trimix ..................................................................................... 20
2 .1 .4 CCR ....................................................................................... 20
2 .1 .5 MOD setting ........................................................................... 21
2 .2 Dive settings .......................................................................................... 21
2 .2 .1 MB level ................................................................................. 21
2 .2 .2 Dive mode (Algorithm selection) ............................................. 22
2 .2 .3 Safety stop timer .................................................................... 22
2 .2 .4 ppO2 max .............................................................................. 22
2 .2 .5 Water type ............................................................................. 22
2 .2 .6 Nitrox reset time ..................................................................... 23
2 .2 .7 Max surface time .................................................................... 23
2 .2 .8 OTU settings .......................................................................... 23
2 .2 .9 All-silent mode ....................................................................... 25
2 .2 .10 Sidemount ............................................................................. 26
2 .2 .11 CCR ....................................................................................... 26
2 .2 .12 Trimix ..................................................................................... 27
2 .2 .13 PDIS ...................................................................................... 27
2 .2 .14 PMG ..................................................................................... 27
2 .3 Apnea dive ............................................................................................ 27
2 .3 .1 Setting the maximum dual depth alarm .................................. 28
2 .3 .2 Setting the depth incremental warning ................................... 28
2 .3 .3 Setting the dive time interval warning ..................................... 29
2 .3 .4 Setting the surface interval warning ........................................ 29
2 .3 .5 Setting the ascent speed alarm .............................................. 29
2 .3 .6 Low HR alarm ........................................................................ 29
2 .3 .7 Water density ......................................................................... 30
2 .4 Digital compass ..................................................................................... 30
2 .4 .1 Use compass ......................................................................... 31
2 .4 .2 Auto-off time .......................................................................... 31
2 .4 .3 Declination ............................................................................. 31
4
GALILEO 2 (G2) USER MANUAL
Page 5

2 .5 Altimeter ................................................................................................ 32
2 .6 Warning settings .................................................................................... 32
2 .6 .1 Maximum dive depth warning ............................................... 32
2 .6 .2 CNS O2=75% ......................................................................... 33
2 .6 .3 No stop time = 2 min ............................................................. 33
2 .6 .4 Entering deco ......................................................................... 33
2 .6 .5 Maximum dive time warning ................................................... 33
2 .6 .6 Tank pressure ......................................................................... 34
2 .6 .7 RBT = 3 min .......................................................................... 34
2 .6 .8 Pressure signal ....................................................................... 34
2 .6 .9 Entering level stops ................................................................ 35
2 .6 .10 MB stop ignored .................................................................... 35
2 .6 .11 MB level reduced ................................................................... 35
2 .6 .12 L0 no stop time = 2 min ......................................................... 35
2 .6 .13 Entering deco at L0 ................................................................ 36
2 .7 Clock settings ....................................................................................... 36
2 .7 .1 Wake-up alarm ....................................................................... 36
2 .7 .2 T ime ..................................................................................... 37
2 .7 .3 T ime zone .............................................................................. 37
2 .8 Other settings ........................................................................................ 37
2 .8 .1 Device information ................................................................. 37
2 .8 .2 Gas integration ....................................................................... 38
2 .8 .3 Tank reserve ........................................................................... 38
2 .8 .4 RBT warning or alarm ........................................................... 38
2 .8 .5 Breathing sensitivity ............................................................... 38
2 .8 .6 Bar graph .............................................................................. 39
2 .8 .7 Gas summary ....................................................................... 39
2 .8 .8 Pairing ................................................................................... 39
2 .8 .9 Backlight duration .................................................................. 39
2 .8 .10 Backlight intensity .................................................................. 40
2 .8 .11 Water contacts ....................................................................... 40
2 .8 .12 Factory settings ..................................................................... 40
2 .8 .13 Feature upgrade ..................................................................... 41
2 .8 .14 Software update .................................................................... 41
2 .8 .15 Format ash disk .................................................................... 41
2 .9 Personalization ...................................................................................... 42
2 .9 .1 Screen conguration .............................................................. 42
2 .9 .2 Language ............................................................................... 42
2 .9 .3 Start-up picture ...................................................................... 42
2 .9 .4 Setting the user preferred units .............................................. 43
2 .9 .5 Workload ............................................................................... 43
2 .9 .6 Show owner info .................................................................... 44
2 .9 .7 Emergency info ...................................................................... 44
2 .9 .8 Display color .......................................................................... 44
2 .10 Pictures ................................................................................................. 45
2 .11 Dive planner .......................................................................................... 45
2 .11 .1 No-stop plan .......................................................................... 45
2 .11 .2 Decompression plan .............................................................. 46
English
GALILEO 2 (G2) USER MANUAL
5
Page 6

2 .12 Help ...................................................................................................... 46
2 .13 Bluetooth ............................................................................................. 46
2 .14 Logbook ................................................................................................ 46
2 .14 .1 Apnea logs ............................................................................. 48
3 . Diving with the G2 ............................................................................................... 49
3 .1 Dive mode at surface ............................................................................ 49
3 .1 .1 Recreational (factory setting) .................................................. 49
3 .1 .2 PMG ...................................................................................... 49
3 .1 .3 Trimix ..................................................................................... 50
3 .1 .4 Sidemount ............................................................................. 50
3 .1 .5 CCR ....................................................................................... 50
3 .1 .6 Surface interval, no dive and CNS% counters ........................ 50
3 .2 Button functions while diving ................................................................. 51
3 .3 Altitude diving ........................................................................................ 53
3 .3 .1 Altitude classes and altitude warnings after a dive .................. 53
3 .3 .2 Altitude and the decompression algorithm .............................. 53
3 .3 .3 Prohibited altitude .................................................................. 54
3 .3 .4 Decompression dives in mountain lakes ................................. 55
3 .4 Diving with nitrox .................................................................................. 55
3 .4 .1 Technical diving ...................................................................... 57
3 .4 .2 Diving with multiple gas mixtures ............................................ 57
3 .4 .3 Diving with Trimix mode .......................................................... 61
3 .4 .4 Diving with CCR mode .......................................................... 63
3 .5 Warnings and alarms ............................................................................. 64
3 .5 .1 Warning settings .................................................................... 64
3 .5 .2 Maximum depth ..................................................................... 64
3 .5 .3 CNS O
= 75% ....................................................................... 64
2
3 .5 .4 No-Stop time = 2 min ............................................................ 65
3 .5 .5 Entering decompression ........................................................ 65
3 .5 .6 Dive time ................................................................................ 65
3 .5 .7 Tank pressure ......................................................................... 66
3 .5 .8 RBT = 3 min .......................................................................... 66
3 .5 .9 Pressure signal ....................................................................... 66
3 .5 .10 Entering level stops ................................................................ 67
3 .5 .11 MB stop ignored .................................................................... 67
3 .5 .12 MB level reduced ................................................................... 67
3 .5 .13 L0 no-stop = 2 min ................................................................ 67
3 .5 .14 Entering decompression at L0 ................................................ 68
3 .6 Alarms ................................................................................................... 68
3 .7 Ascent rate ........................................................................................... 68
3 .7 .1 MOD/ppO
3 .7 .2 CNS O
............................................................................. 70
2
= 100% ..................................................................... 70
2
3 .7 .3 Tank reserve pressure reached ............................................... 70
3 .7 .4 Missed decompression stop .................................................. 71
3 .7 .5 RBT = 0 min .......................................................................... 71
3 .7 .6 Low battery ............................................................................ 71
6
GALILEO 2 (G2) USER MANUAL
Page 7

3 .8 Display information ................................................................................ 72
3 .8 .1 Display conguration during the dive ..................................... 72
3 .8 .2 Setting bookmarks ................................................................. 75
3 .8 .3 Stop watch timer .................................................................... 75
3 .8 .4 Safety stop timer .................................................................... 76
3 .8 .5 Backlight ................................................................................ 76
3 .8 .6 Compass ............................................................................... 76
3 .9 Diving with MB levels ............................................................................. 77
3 .9 .1 Comparison of dives with MB level L0 and MB level L5 .......... 77
3 .10 PDIS (Prole Dependent Intermediate Stop) ........................................... 77
3 .10 .1 Introduction to PDIS .............................................................. 77
3 .10 .2 How does PDIS work? ........................................................... 79
3 .10 .3 Special considerations when diving with
more than one gas mixture (G2) ............................................. 79
3 .10 .4 Diving with PDIS ..................................................................... 80
3 .11 Gauge mode ......................................................................................... 81
3 .12 Apnea mode ......................................................................................... 82
4 . G2 accessories .................................................................................................... 83
4 .1 Bungee arm strap ................................................................................. 83
4 .2 Wireless high pressure transmitter ......................................................... 83
4 .3 Skin temperature heart rate belt ............................................................ 83
4 .4 Bluetooth USB stick .............................................................................. 84
5 . Interfaces for the G2 and an introduction to LogTRAK .................................. 84
5 .1 Charging and using the G2 with a USB interface ................................... 85
5 .2 Bluetooth .............................................................................................. 86
5 .2 .1 Connecting the G2 with LogTRAK ......................................... 86
5 .2 .2 Download dive proles ........................................................... 87
5 .2 .3 Changing warnings/settings on the G2,
and reading computer info ..................................................... 87
5 .2 .4 USB ash disk operations ...................................................... 88
6 . Taking care of your G2 ....................................................................................... 89
6 .1 Format ash disk ................................................................................... 89
6 .2 Technical information ............................................................................. 90
6 .3 Maintenance ......................................................................................... 90
6 .4 Replacing the battery in transmitter ....................................................... 91
7 .1 Replacing the battery in Heart Rate Belt ................................................ 91
7 .1 Warranty ................................................................................................ 91
8 . Glossary ............................................................................................................... 93
9 . Index ..................................................................................................................... 95
English
GALILEO 2 (G2) USER MANUAL
7
Page 8
The G2 is a technologically-advanced
instrument that can accompany you
during your underwater adventures while
providing you with accurate depth, time
and decompression information.
Your G2 User Manual is divided into 6 main
sections.
Introduction to the G2. This section
provides an overview of the G2 computer
and describes its operating modes and
main functions when on the surface.
G2 settings and menus. This section
goes through the settings of your G2.
Diving with the G2. This section takes you
underwater with the G2, showing you how
to use the G2 as a dive computer. It outlines
everything the G2 can—and will—do to
enhance your safety and fun underwater.
G2 accessories. This section briey
describes the G2’s extras that you can
purchase to get the most out of your dive
computer in all conditions.
Interfaces for the G2 and an
introduction to LogTRAK. This section is
all about personalization and customization.
It describes how to change settings, how
to download and how to manage your
logbook.
Taking care of your G2. This section
illustrates how to take care of your new dive
computer.
1 . INTRODUCTION TO
THE G2
1 .1 Power concept and
charging
The G2 is powered by a rechargeable LiIon battery. SCUBAPRO recommends
fully charging the battery before using the
computer for the rst time.
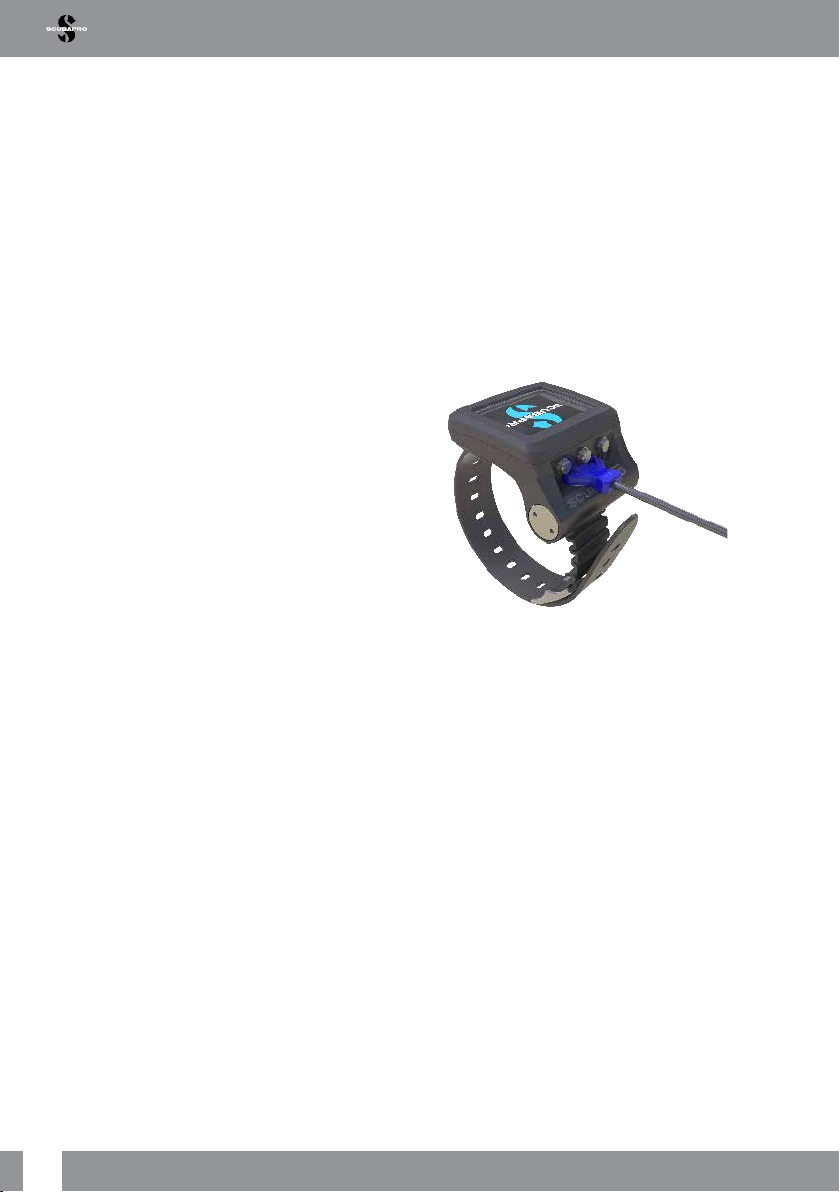
To charge the battery, plug the power/USB
cable into your G2 as shown in the picture
below.
Then, connect the other end of the cable
to a USB charger, or a USB device capable
of providing power for charging. At this
point, the following battery charging status
symbols will appear on the display of the
G2.
NOTE: If the G2’s battery is deeply
F
discharged, nothing will appear on
the display screen until the battery
has reached a safe charge level
for a startup. If this occurs, do not
disconnect the USB, and do not try to
activate the G2 by pressing a button.
Simply leave the G2 charging for at
least half an hour.
8
GALILEO 2 (G2) USER MANUAL
Page 9
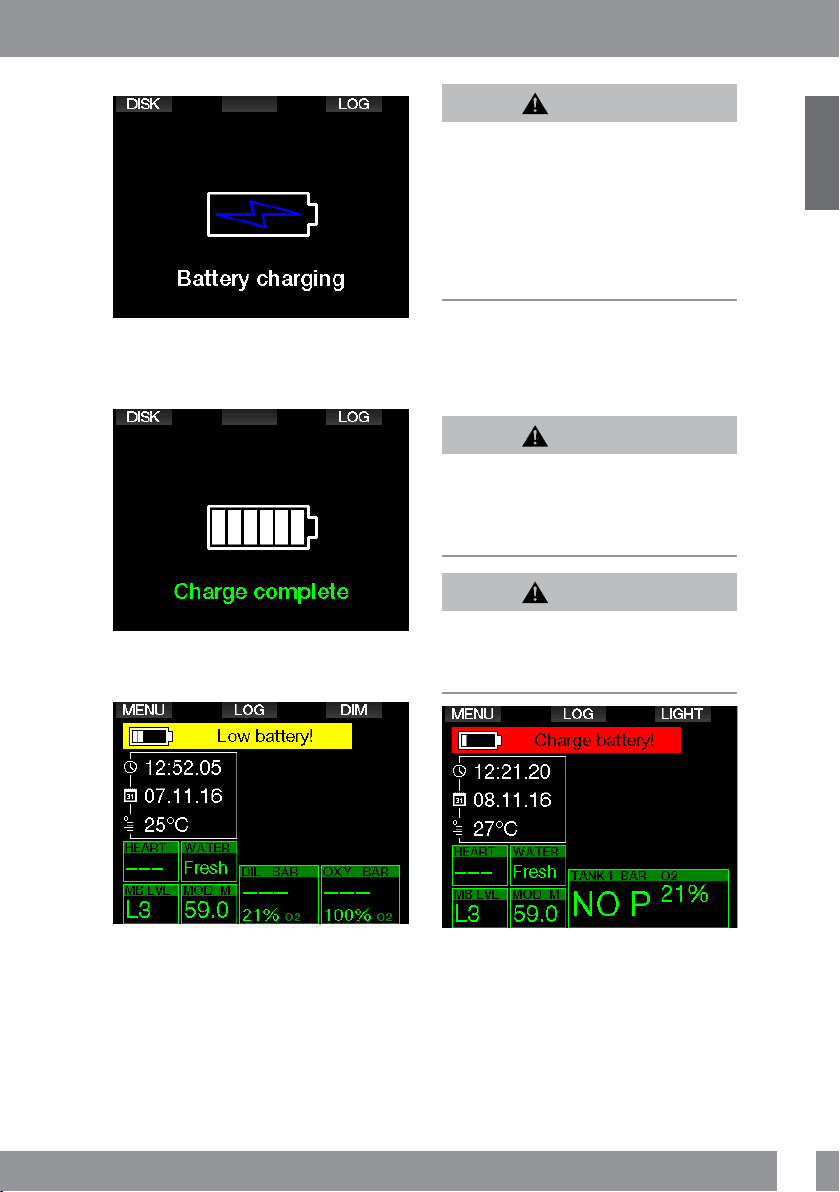
Charging will continue, but the above
display will switch off after 3 minutes.
When the battery is completely charged,
the following display will appear.
The G2 will alert you when the battery is
approaching a critical discharge level by
displaying the following message.
WARNING
Starting the dive with a weak battery may lead
to a situation where the G2 shuts off during
the dive. In case of such an event you should
always carry a backup instrument that will
enable you to complete the dive safely. If the
G2 switches off during a dive it will remain
locked in Gauge mode for 48 hours. (For more
information on Gauge mode operation, see
chapter: Gauge mode.)
NOTE: Storing the G2 with a low
F
battery may lead to a deep discharge
state, which shortens the life of the
battery.
WARNING
During the dive, when the battery charge level
indicator falls to only 1 segment, the display
will switch off automatically to save energy.
However, you can still check the display
manually by pressing the right button.
WARNING
The G2 will not start a dive when the battery
has reached the critical discharge level
indicated by the warning: “Charge battery!”
In this state you cannot use the G2 for diving.
English
In addition, the battery icon with current
charging status is shown above the main
time-of-day display.
GALILEO 2 (G2) USER MANUAL
9
Page 10
WARNING
When your G2’s battery reaches the end
of its lifetime, it can only be replaced by an
authorized SCUBAPRO service center. Do not
open your G2 or try to replace the battery
yourself!
1 .2 Operating modes
The G2 has 4 operating modes:
• Charging and USB communication
mode. When connected to a USB
device the G2’s battery automatically
starts charging. At the same time, you
can access either the flash memory
or the logbook using the LogTRAK
program.
• Sleep mode. In this mode the display is
off, but the G2 still updates desaturation
and monitors ambient pressure for
altitude changes, etc. This mode is
activated automatically at the surface
after 3 minutes without operation.
• Surface mode. After a dive or when
manually activated, the display is on
and you can change settings or operate
the G2 with its buttons. The Bluetooth
interface can be activated in this mode.
• Dive mode. This mode is activated
when the computer reaches a depth
of 0.8m/3ft or more. In this mode the
G2 monitors depth, time, temperature
and wireless sensors. Decompression
calculations are performed in this mode.
1 .3 Switching on the G2
To switch on the G2, press and hold the
right button.
NOTE: You cannot turn the G2 on
F
when it is connected to USB.
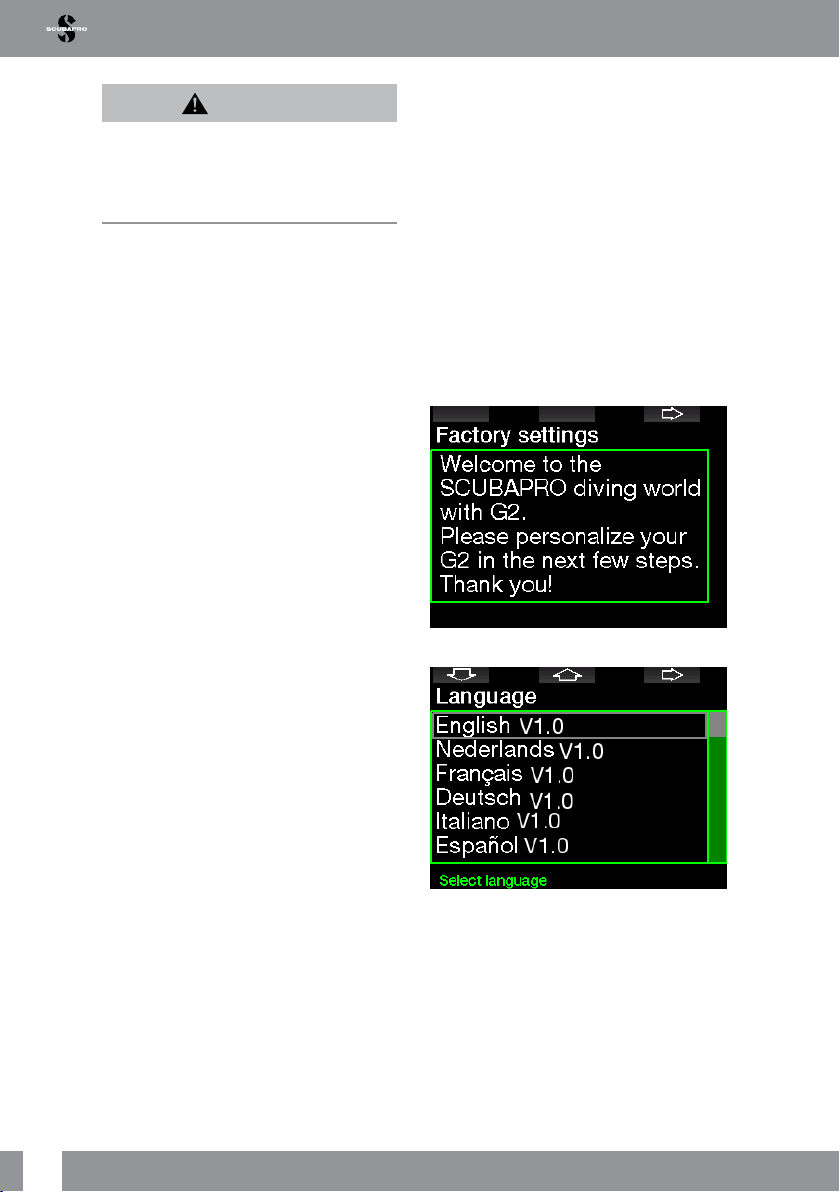
The initial activation of your G2 will require
some basic set up (selecting language,
setting the time, etc.). The G2 will guide
you through them. Simply follow the screen
prompts while using the buttons.
NOTE: The following basic setup will
F
also be required if you reset the G2
with the menu 8.7. Factory settings.
Press the right button.
10
Select your language with the left or middle
button. Then conrm your selection with a
press of the right button.
GALILEO 2 (G2) USER MANUAL
Page 11
English
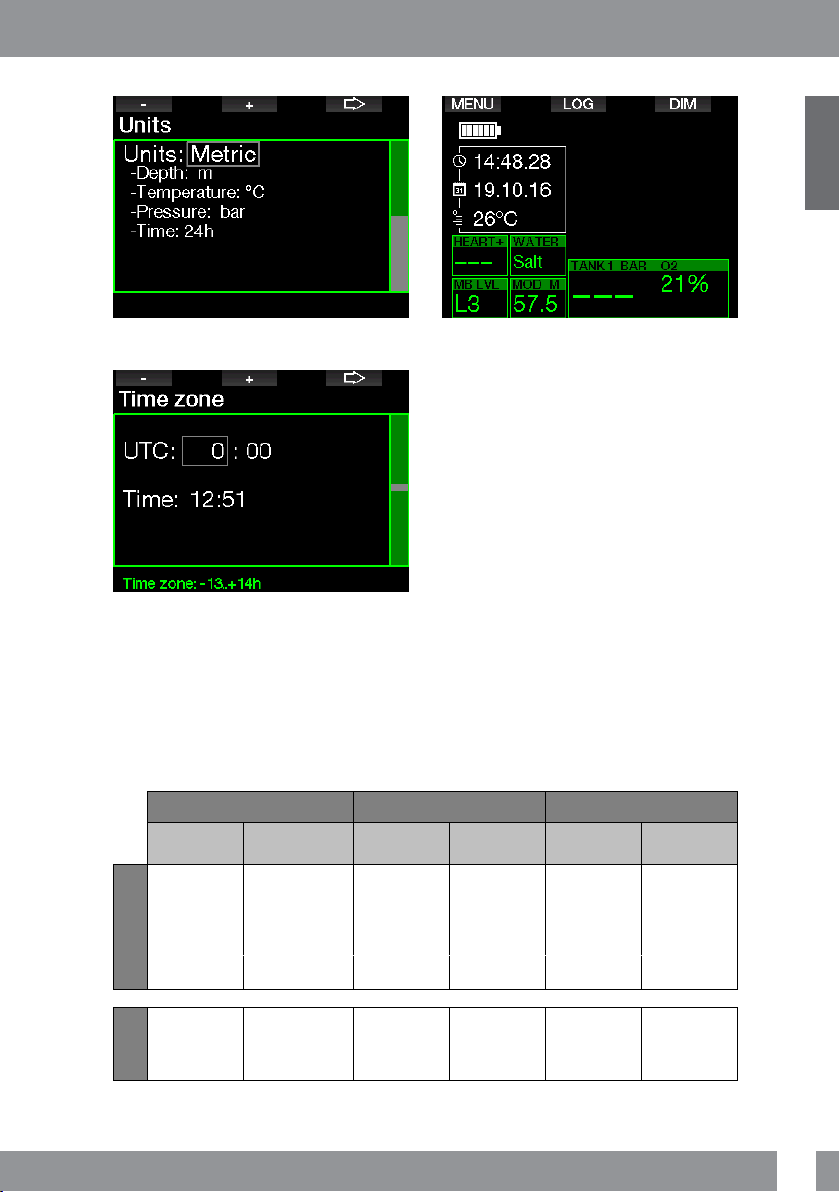
Select each unit with the left or middle
button, and conrm it with the right button.
Set the time zone with the left or middle
button and conrm it with the right button.
After this initial setup, your G2 will boot to
a display that we call the main time-of-
day display. This is the display in which the
current time is shown in the main eld.
LEFT BUTTON MIDDLE BUTTON RIGHT BUTTON
Press Press and hold Press
Main menu Oxygen setting Logbook
You G2’s button functions can be found
on-screen. To illustrate, the screen above
shows that pressing the left button will
take you to the main menu, pressing the
middle button will take you to the logbook
and pressing the right button will dim the
display light.
However, be aware that these function
labels may change depending on the
operational mode you’re currently in.
NOTE: There are two methods for
F
pressing the G2’s buttons:
1. “Short” press. This is the normal
method used in most cases with the
labelled functions.
2. “Press-and-hold.” This method is
used only in special cases. They are
described in this manual but are not
labelled on the screen.
Button functions at the surface are
summarized in the following table.
Press and
hold
Gas summary
table
Press
Backlight Compass
Press and
hold
SCUBA, GAUGE
Pictures
Main menu
APNEA
GALILEO 2 (G2) USER MANUAL
Manual start of
a dive
Logbook Pictures Backlight Compass
11
Page 12
1 .4 No-Dive warning
If the G2 detects a situation of increased risk
(due to potential microbubble accumulation
from previous dives or a CNS O2 level above
40%), the NO DIVE symbol will appear to
advise you against performing another dive
right away. The suggested time interval
that you should wait prior to diving again is
shown on the dive mode display.
You should not undertake a dive as long
as the no-dive warning is displayed on
the computer screen. If the warning is
prompted by microbubble accumulation
(as opposed to CNS O2 over 40%) and
you dive anyway, you will have shorter nostop times or longer decompression times.
Moreover, the duration of the microbubble
warning at the end of the dive can increase
considerably.
WARNING
Flying while the G2 displays the NO FLY
symbol and countdown timer can result in
serious injury or death.
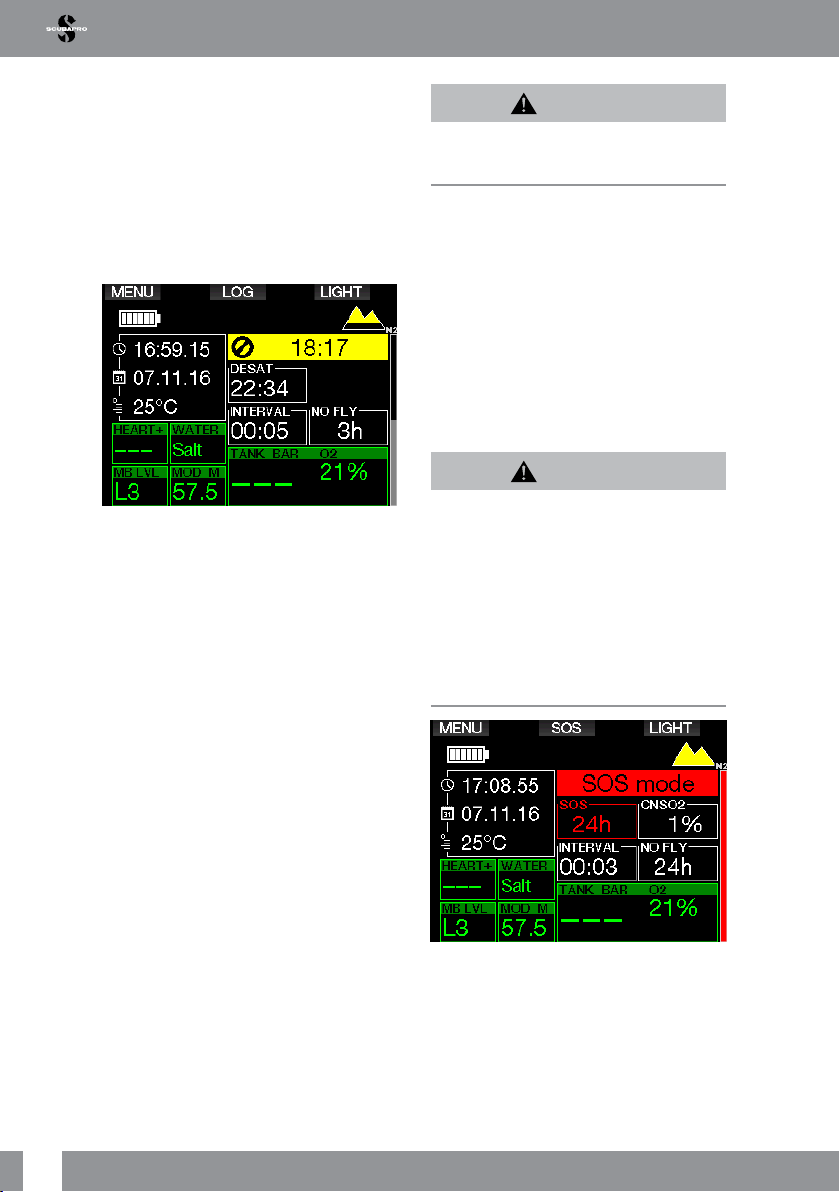
1 .6 SOS
If you stay above a depth of 0.8m/3ft for
more than 3 minutes without observing a
prescribed decompression stop, the G2 will
switch into SOS mode. Once in SOS mode
the G2 will lock up and will be inoperable
as a decompression dive computer for
24 hours. If it is used for diving within the
24hours of an SOS lock, it will automatically
switch to Gauge mode and provide no
decompression information.
WARNING
• Violating a mandatory decompression
obligation may result in serious injury or
death.
• Serious injury or death may result if a diver
does not seek immediate treatment should
any signs or symptoms of decompression
sickness occur after a dive.
• Do not dive to treat symptoms of
decompression sickness.
• Do not dive when the computer is in SOS
mode.
12
1 .5 No-Fly time
The no-y time (NO FLY) is the time during
which an exposure to the reduced pressure
(equal to ascending at higher altitudes)
inside the cabin of an airplane could cause
decompression sickness, as calculated by
the decompression model in the computer.
The no-y text with countdown timer is
shown until the restriction is completed.
To learn more about altitude warnings
and altitude diving, see chapter: Altitude
diving.
GALILEO 2 (G2) USER MANUAL
Page 13
The display shows the same information
as when displaying desaturation but,
in addition, the SOS mode message is
displayed.
Instead of the no-y time, the 24-hour
countdown is shown. The middle button
description changes from LOG to SOS,
and by pressing it an emergency message
is displayed. The emergency information
for this display can be entered using
LogTRAK. Once the emergency message
is displayed, pressing the LOG button
shows the details of the last dive.
NOTE: If the battery becomes fully
F
discharged while at depth in spite
of using the power save mode, the
G2 will remain in SOS mode and
locked into Gauge mode for 48
hours, independent of the remaining
desaturation time.
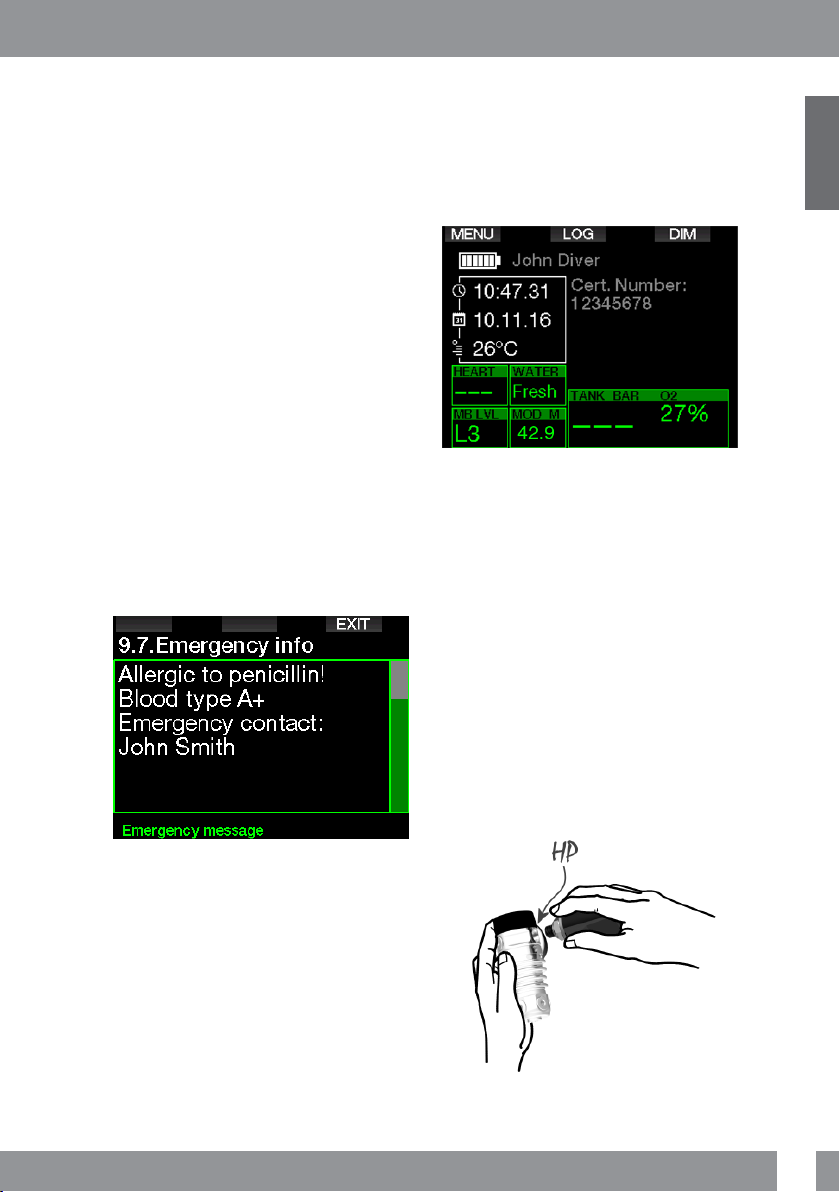
1 .6 .1 Emergency information
To add your emergency information you will
need to use LogTRAK for Windows or Mac.
See section: Interfaces for the G2 and
an introduction to LogTRAK.
1 .7 Owner information
To customize your time-of-day display
with your name or other text you need to
use LogTRAK for Windows or Mac. See
section: Interfaces for the G2 and an
introduction to LogTRAK.
NOTE: In the event you misplace your
F
G2, it is advisable to include some
contact information along with your
owner information.
1 .8 Mounting and pairing the
high pressure transmitter
The G2 can receive tank pressure
information from multiple Smart series high
pressure transmitters. Each transmitter
needs to be mounted on a high pressure
port of a rst stage regulator.
To mount the transmitter, rst remove the
high pressure port plug from the rst stage
regulator, then screw the transmitter in
place.
English
GALILEO 2 (G2) USER MANUAL
13
Page 14
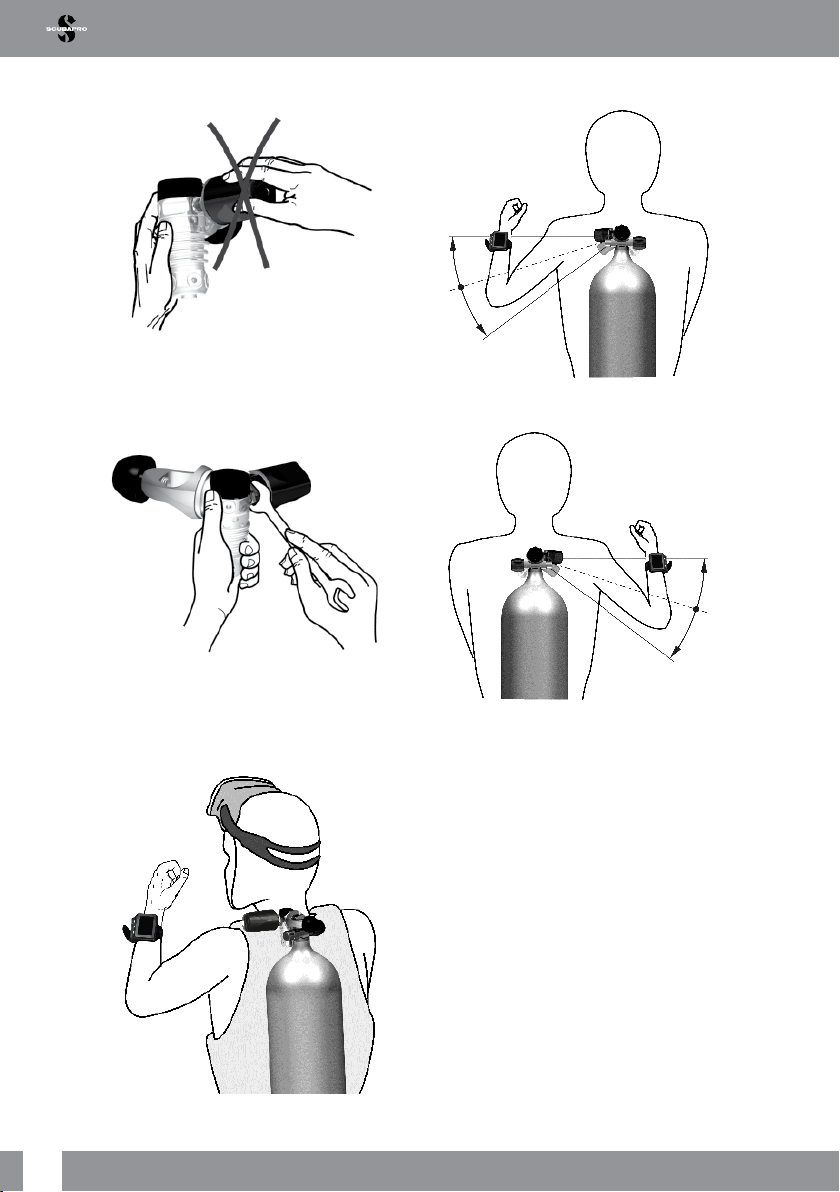
NOTE: Use an appropriate wrench to
F
tighten the transmitter. Take care to
not overtighten.
The Smart transmitter communicates via
radio frequency with the G2. For optimal
transmission performance, we recommend
positioning the transmitter as described in
the pictures below.
Transmitter position for the left hand.
Transmitter position for the right hand.
In order for the G2 to display the pressure
signal from a Smart transmitter, a coded,
interference-free line of communication
must rst be established. This step needs
to be performed only once for each
transmitter.
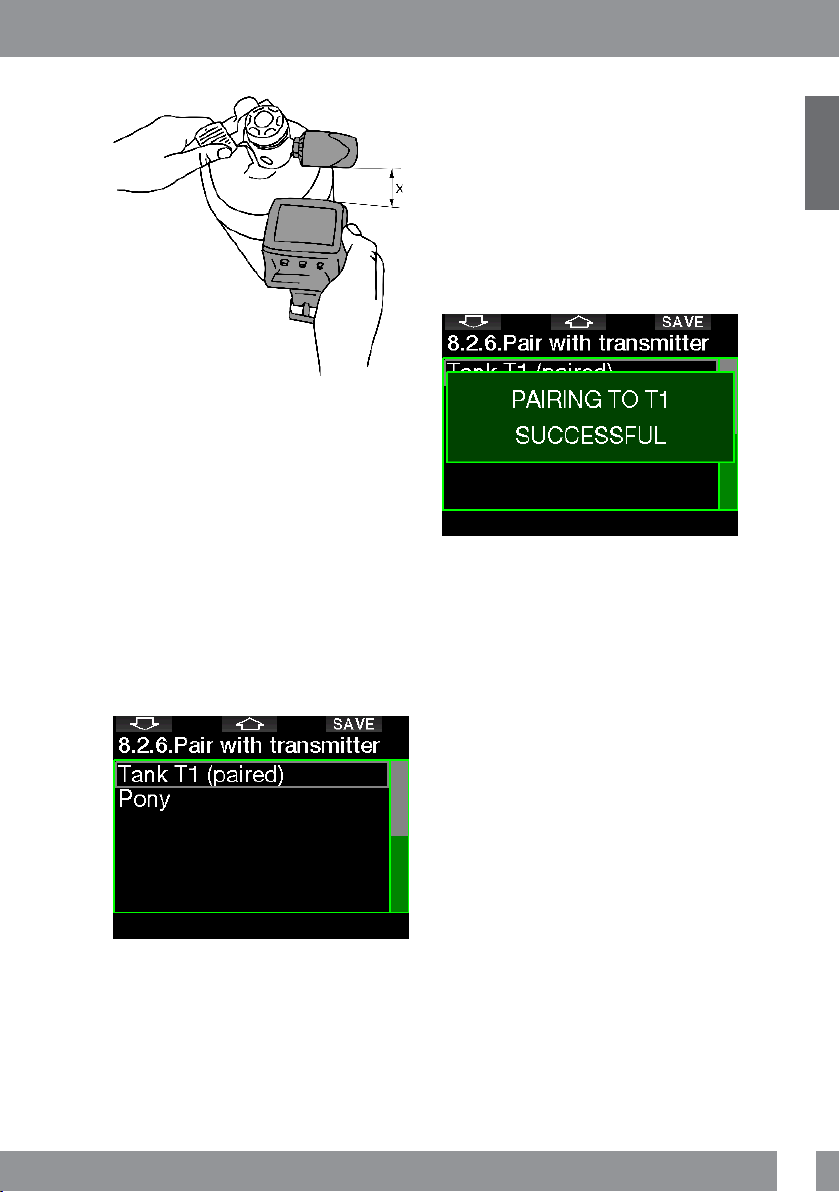
There are two methods for pairing the G2
to a transmitter.
1. For automatic pairing, proceed as
follows:
• Mount the first stage regulator with
the Smart transmitter on a full tank.
• Turn on the G2, ensure it is in the
time-of-day display, and place it near
(x) the transmitter as indicated in the
picture below.
• Open the tank valve.
14
GALILEO 2 (G2) USER MANUAL
Page 15
2. For manual pairing, proceed as follows:
• Mount the first stage regulator with
the Smart transmitter on a full tank.
• Turn on the G2, select menu 8.2.6.
Pair with transmitter.
• Open the tank valve.
Upon pressurization, the Smart transmitter
will send a pairing sequence to the G2.
When the G2 receives this information, the
display changes to show a listing of tank
designations. (T1, T2, etc.).
Tank T1 is always the main tank you start
your dive with. Other tanks are used when
diving with more than one gas mixture
(described in chapter: Diving with
multiple gas mixtures).
Use the ARROW buttons to select the tank
that you want to assign to the transmitter,
then press SAVE to lock in your selection.
The G2 will conrm the pairing with the
message PAIRING TO T1 SUCCESSFUL.
If you do not wish to complete the
operation, with a press-and-hold of the
right button the G2 will show the message
PAIRING CANCELLED. The pairing will
also be cancelled if you do not press SAVE
within 3 minutes of tank selection.
NOTE: The transmitter must have
F
been unpressurized for at least 40
seconds prior to performing the
pairing operation; otherwise it will not
transmit the pairing sequence.
Also, a transmitter can only be paired
to one tank designation. If you pair
the same transmitter to a second
tank designation, the rst one will be
erased. However, you can pair more
than one G2 to the same transmitter.
After a successful pairing of T1 to the G2,
the display will show the tank pressure in
either BAR or PSI. If tank T1 has not been
paired, the G2 will show NO P instead of a
pressure value.
If T1 has been paired but the G2 is not
receiving any signal, it will show - - - instead
of a pressure value.
On the surface, the status of tanks T2, T3,
etc. are shown in the gas summary table,
described in chapter: Gas summary.
English
GALILEO 2 (G2) USER MANUAL
15
Page 16
NOTES:
F
• The Smart transmitter has a range of
approximately 1.5m/5ft.
• To maximize the life of the battery,
the transmitter operates at a low
update rate when there is no pressure
change for more than 40 seconds.
The transmitter also turns itself off
when the pressure is 14bar/200psi
or less.
• If a transmitter battery is weak, the G2
will alert you with a screen message
displaying the tank assigned to that
transmitter as shown on the screen
below.
1 .9 SCUBAPRO Human
Factor Diving
The G2 has patented underwater Heart
Rate, Skin Temperature and Breathing
monitors. These features will customize
every dive based on your body reactions
and provide you more data that enhances
your diving experience and helps you to
become a more advanced diver.
To learn more about the physiology
of the SCUBAPRO Human Factor
TM
Diving
, see the booklet: “HEARTRATE
MEASUREMENT FOR BETTER
WORKLOAD ASSESSMENT,” Dr.
T. Dräger, Dr. U. Hoffmann, 2012,
www.scubapro.com.
TM
1 .10 Turning off the G2
The G2 turns off automatically after 3
minutes without active use, or without an
active Bluetooth link. When in the timeof-day display, you can turn the G2 off
manually with a press-and-hold of both
right and left buttons simultaneously.
16
See chapter: Replacing the battery in
transmitter for information on how to
replace the transmitter battery.
GALILEO 2 (G2) USER MANUAL
Page 17
2 . G2 SETTINGS AND
MENUS
By pressing MENU from the time-of-day
display you will enter the Settings folder.
Note that when you rst reach a menu,
you are “outside” of it. Therefore, you must
press the ENTER button to get inside the
actual menu. Some menus have multiple
levels. You can return to previous levels with
a press-and-hold of the ENTER button.
Also, you can return to time-of-day display
by press-and-hold both right and left
buttons simultaneously.
Simply, by pressing ARROW buttons you
can surf the menu, and by pressing ENTER
you get into the menu selection. For menus
with multiple items there is an indicator bar
on the right side of the screen which shows
your current location.
Regardless of the language setting, all
menus are numbered for easy identication.
All of the sub menus function in a similar
way, meaning that if there is a value that
can be changed, the range will be shown
at the bottom of the screen (see screen
below). Sub menus are also numbered
using the decimal format x.y (x=main menu.
y=sub menu).
In this case, left and middle button functions
are labeled – and + (enabling you to edit the
current selection). The right ARROW button
moves your selection to the next eld and
SAVE stores the entered values. On the
right side of the screen a navigation bar
indicates the value as an analog meter.
English
GALILEO 2 (G2) USER MANUAL
17
Page 18
The Main menu offers the following settings:
Nr. Menu Nr. Menu
1 O
setting 6.10. MB stop ignored
2
2 Dive settings 6.11. MB level reduced
2.1. MB level 6.12. L0 no-stop = 2min
2.2. Dive mode 6.13. Entering deco at L0
2.3. Safety stop timer 7 Clock settings
2.4. ppO
max 7.1. Wake-up alarm
2
2.5. Water type 7.2. Time
2.6. Nitrox reset time 7.3. Time zone
2.7. Max surface time 8 Other settings
2.8. OTU settings 8.1. Device information
2.9. Desaturation reset 8.2. Gas integration
2.10. All-silent mode 8.2.1. Tank reserve
2.11. Sidemount 8.2.2. RBT = 0 min
2.12. CCR 8.2.3. Breathing sensitivity
2.13. Trimix 8.2.4. Bar graph
2.14. PDIS 8.2.5. Gas summary
2.15. PMG 8.2.6. Pairing
3 Apnea dive 8.3. Backlight duration
3.1. Maximum depth 8.4. Backlight intensity
3.2. Depth increment 8.5. Water contacts
3.3. Dive time interval 8.6. Factory settings
3.4. Surface interval 8.7. Feature upgrade
3.5. Low heart rate 8.8. Software update
3.6. Ascent speed 8.9. Format ash disk
3.7. Water density 9 Personalization
4 Digital compass 9.1. Screen conguration
4.1. Use compass 9.2. Language
4.2. Auto-off time 9.3. Start-up picture
4.3. Declination 9.4. Units
5 Altimeter 9.5. Workload
6 Warning settings 9.6. Show owner info
6.1. Maximum depth 9.7. Emergency info
6.2. CNSO
= 75% 9.8. Display color
2
6.3. No-stop = 2min 10 Pictures
6.4. Entering deco 11 Dive planner
6.5. Dive time 11.1. Plan a dive
6.6. Tank pressure 12 Help
6.7. RBT = 3min 13 Bluetooth
6.8. Pressure signal 13.1. Enable Bluetooth
6.9. Entering level stops 14 Logbook
18
GALILEO 2 (G2) USER MANUAL
Page 19
By surng these menus you can quickly
become familiar with them. Following are
short descriptions for each selection.
NOTE: To make it easier to understand
F
the menu system in accordance
with your current level of diving, the
G2 has a feature upgrade function.
More advanced level functions and
selections do not appear in the menu
unless you want them to. (This is why
you might nd some menu numbers
missing from the MAIN menu screen.)
For example, if you are not diving with
rebreathers or using more than one gas,
it’s not necessary to enable the CCR or
PMG menu modes. This keeps the menu
system simple and streamlined to suit your
particular diving style.
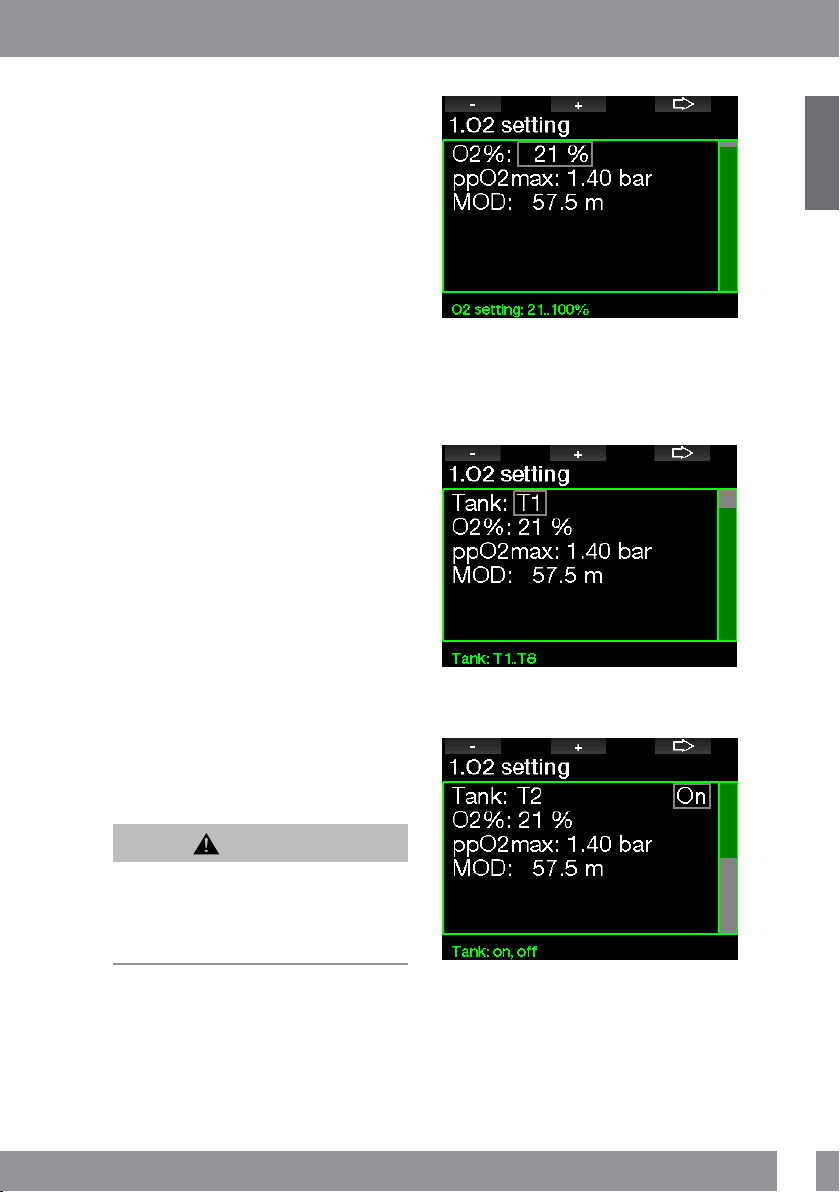
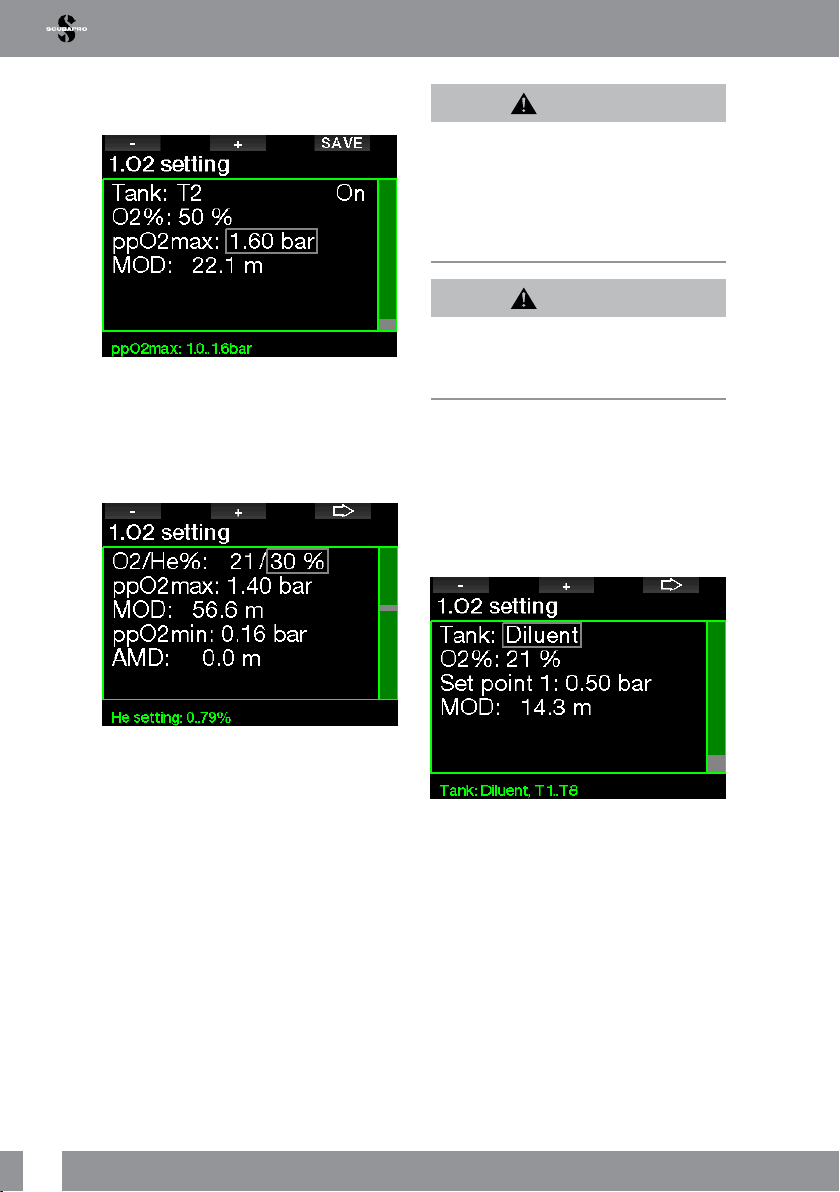
2 .1 O2 settings
Here you can change the gas content of
the tanks that you are using as well as
the partial pressure limit of the gas. The
Maximum Operating Depth (MOD) limit
will be shown for the values that you have
selected. To learn more about diving with
Nitrox and MOD, see chapter: Diving with
nitrox.
2 .1 .1 Recreational (factory setting)
For normal one-tank diving you can select a
gas mix from 21% oxygen (Air) up to 100%
oxygen. The ppO2 max value is required for
the MOD limit you intend to use for this gas.
The factory setting is 1.40bar.
2 .1 .2 Multigas (PMG)
If PMG is enabled, the O
appear as follows. See chapter: Diving
with multiple gas mixtures to learn more
about this feature.
T1 is always the default gas at the start of
the dive. Tank 2 through 8 values can be
adjusted the same way as Tank 1.
setting will
2
English
The MOD limit denes the warning depth
based on oxygen toxicity. However, depth
narcosis can affect a diver’s skills much
earlier, jeopardizing his or her ability to dive
safely at that depth.
GALILEO 2 (G2) USER MANUAL
WARNING
19
Page 20
You can set a different ppO2 setting for
decompression gases.
The maximum ppO2 limit can be modied
at menu 2.4. ppO2max.
2 .1 .3 Trimix
If trimix is enabled the O
as follows. See chapter: Trimix to learn
how to enable this feature.
setting will appear
2
WARNING
The Absolute Minimum Depth (AMD) depends
on ppO2min value. If the alarm depth is
shallower than 0.8m/3ft which is the dive start
depth for the G2, the alarm will not activate
before a 0.8m/3ft depth is reached! This
situation is dangerous and may lead to death
by drowning.
WARNING
Engaging in heavy work while at the surface or
at shallow depths while breathing less than a
21% oxygen (hypoxic mix) fraction may cause
a loss of consciousness and lead to drowning.
2 .1 .4 CCR
If the CCR mode is enabled the diluent tank
will appear as follows. Other tanks (T1 to
T8) can be congured as with PMG mode.
See chapter: CCR to learn how to enable
this feature.
Setpoint 1 can be selected from 0.2 to
0.95bar which denes the MOD.
20
In trimix mode the oxygen fraction can be
selected from 8% to 100%.
NOTE: To ensure an adequate supply
F
of oxygen to the body, the gas used at
the beginning of the dive must contain
enough oxygen (you can use a travel
mix or one of the decompression
gases). Since the dive always starts
with tank T1, the minimum O2 setting
for tank T1 is 18%.
Setpoint 2 can be selected from 1.0 to
1.6bar. Since higher values cannot be
reached at the surface, an AMD will be
calculated for the setting.
GALILEO 2 (G2) USER MANUAL
Page 21
2 .1 .5 MOD setting
It is possible to disable the MOD setting
(- - - shown in the eld) like on the screen
below.
This requires a change at menu 2.4. ppO2
max.
WARNING
Diving with a ppO2 higher than 1.4bar is
dangerous and may lead to unconsciousness,
drowning and death.
NOTE: the ppO2 is xed to 1.6bar
F
when the selected oxygen content is
80% or higher.
2 .2 Dive settings
2 .2 .1 MB level
Here you may select the preferred
Microbubble (MB) level that you want to
follow during your dives. Level 9 is the
most conservative, Level 0 is the least
conservative.
English
GALILEO 2 (G2) USER MANUAL
NOTE: For more about diving with the
F
MB levels, see chapter: Diving with
MB levels.
21
Page 22
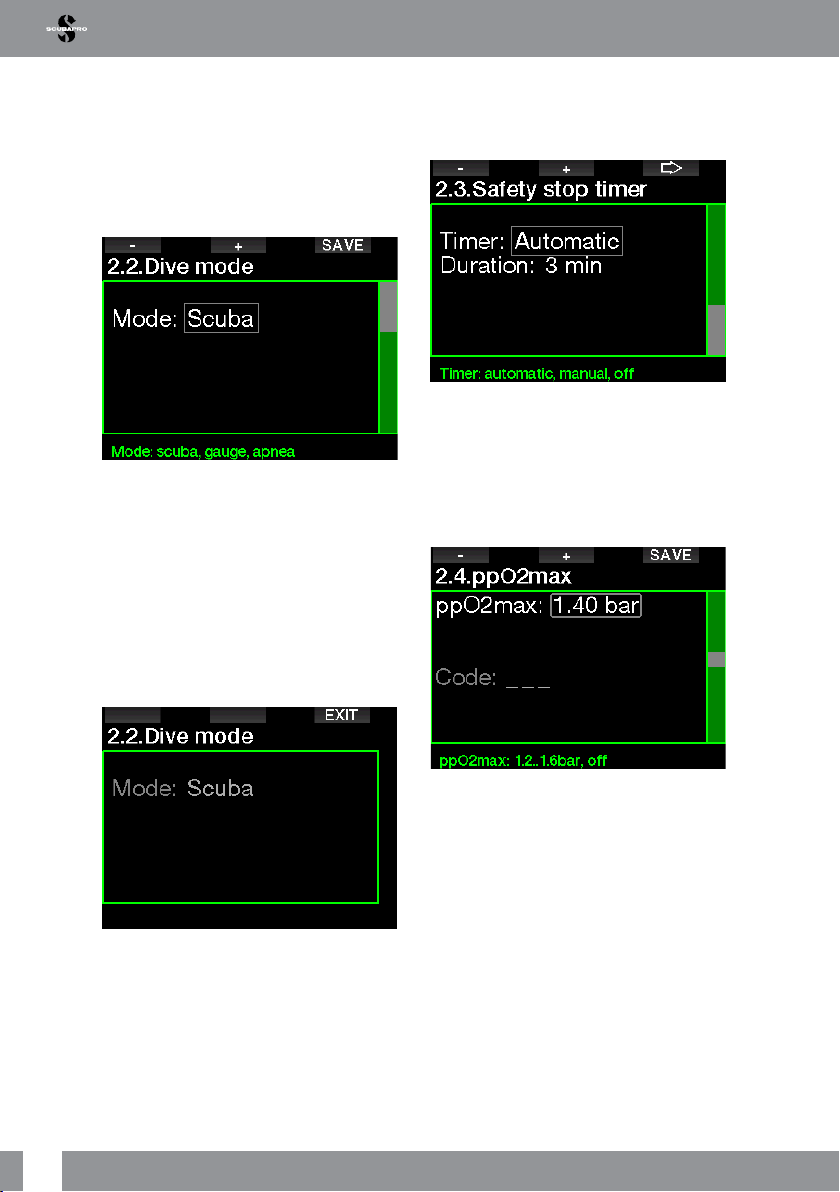
2 .2 .2 Dive mode (Algorithm
selection)
Your G2 allows you to choose between
Scuba, Gauge and Apnea modes.
When the G2 has not been submerged
for a while the display appears as shown
below:
NOTE: Since Gauge and Apnea
F
modes do not track tissue saturation,
a 48-hour locking interval occurs
between the time the last dive is
made in Gauge or Apnea mode and
a change to Scuba mode is possible.
Conversely, the G2 shown below
has been dived in Scuba mode and
cannot be changed to Gauge or
Apnea mode until the desaturation
time has elapsed.
2 .2 .3 Safety stop timer
Safety stop timer duration and start mode
can be edited in this menu.
See chapter: Safety stop timer to learn
how this feature is used while diving.
2 .2 .4 ppO
The ppO
max
2
max setting denes the maximum
2
limit for oxygen partial pressure. Gas O
settings higher than this limit cannot be
selected for any tank.
2
22
2 .2 .5 Water type
The G2 measures pressure and converts it
to a depth value by using water density as a
constant. A depth of 10m/33ft in salt water
corresponds approximately to 10.3m/34ft
of depth in fresh water.
If you decide to change modes before
the 48-hour interval ends, or before full
desaturation occurs, you will have to go to
the desaturation reset menu and make a
manual desaturation reset.
GALILEO 2 (G2) USER MANUAL
Page 23

English
NOTE: This setting will adjust the
F
depth on all modes: Scuba, Gauge
and Apnea.
2 .2 .6 Nitrox reset time
If you are generally diving with air and want
to return to this setting after the occasional
nitrox dive, you can preset a default time
that will enable your G2 to reset back to air.
Reset time can be selected from 1 hour up
to 48 hours, or the nitrox reset time can be
disabled. Gas reset time is disabled when
“no reset” is shown.
2 .2 .7 Max surface time
Maximum surface time allows you to enjoy
short orientations at the surface while
maintaining a single logged dive.
2 .2 .8 OTU settings
Oxygen Toxicity Unit (OTU) information and
settings can be edited in this menu.
The OTU information screen below displays
the current OTU related information:
1. OTUs from the last dive.
2. OTUs from the dives today along with
the maximum allowed value.
3. OTUs allowed for tomorrow along with
the maximum allowed value.
4. Total OTU dose during the mission
(series of diving days).
5. Exposure (how many days of diving
have occurred during this mission).
6. Interval (how many days have passed
since the last dive day).
GALILEO 2 (G2) USER MANUAL
23
Page 24
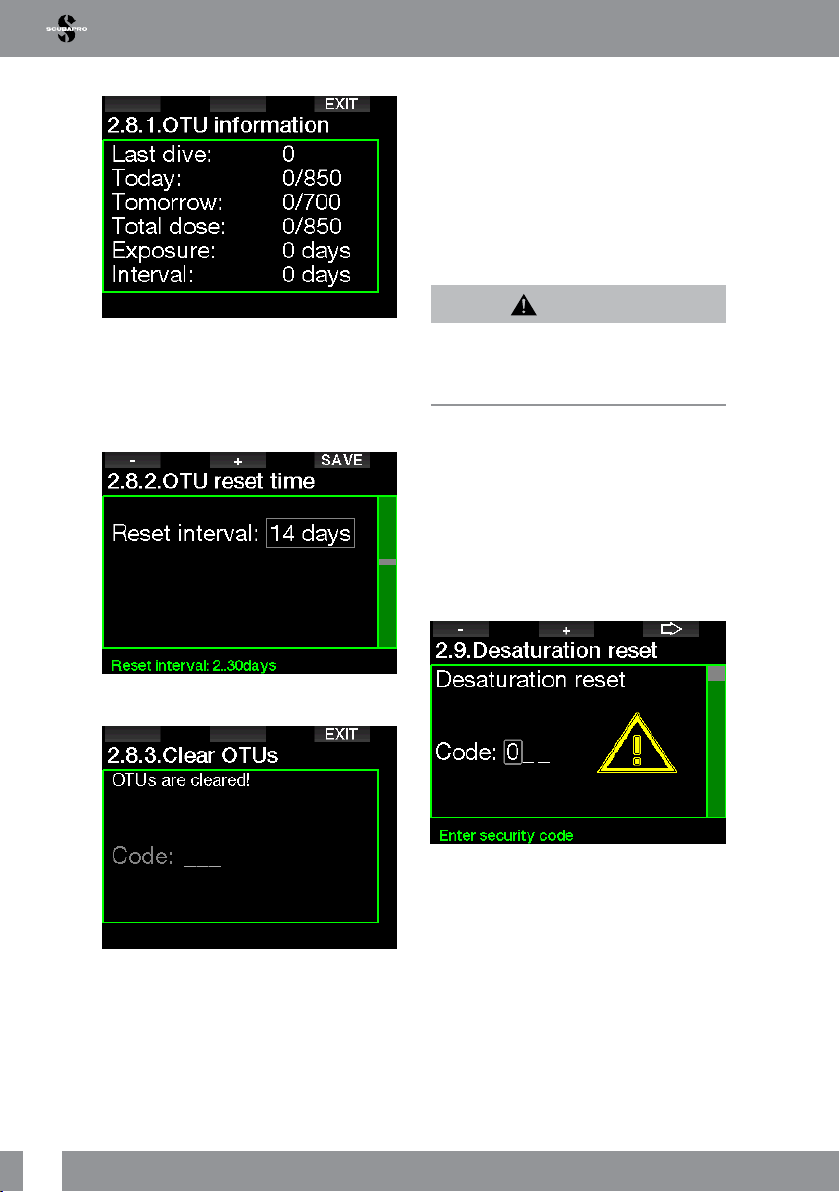
OTUs are calculated per day, changing
at midnight (00:00) with limits changing
accordingly.
You can dene the reset interval, which
is the length of time without logged dives
required to clear the OTU counter.
Desaturation reset
The G2 allows you to reset the desaturation
in the computer. Any tissue saturation
information from a recent dives can be
reset to zero, allowing the G2 to treat the
next dive as a non-repetitive dive. This
function is useful when the G2 is loaned to
another diver who has not dived in the last
48 hours.
WARNING
Resetting desaturation will affect the
calculations of the algorithm, which may
lead to serious injury or death. Do not reset
desaturation without a valid purpose.
NOTE: Some menu changes are not
F
possible while the G2 is counting
down desaturation. If you decide to
reset desaturation, the safety code
313 must be used. This procedure
prevents unwanted resetting, plus
the desaturation reset will be stored
to memory; in the next dive log the
desaturation reset warning will be
shown.
24
Also, if you wish to clear the OTUs manually
you can do this with the following menu.
Clearing the OTUs requires the conrmation
number 313.
GALILEO 2 (G2) USER MANUAL
Page 25
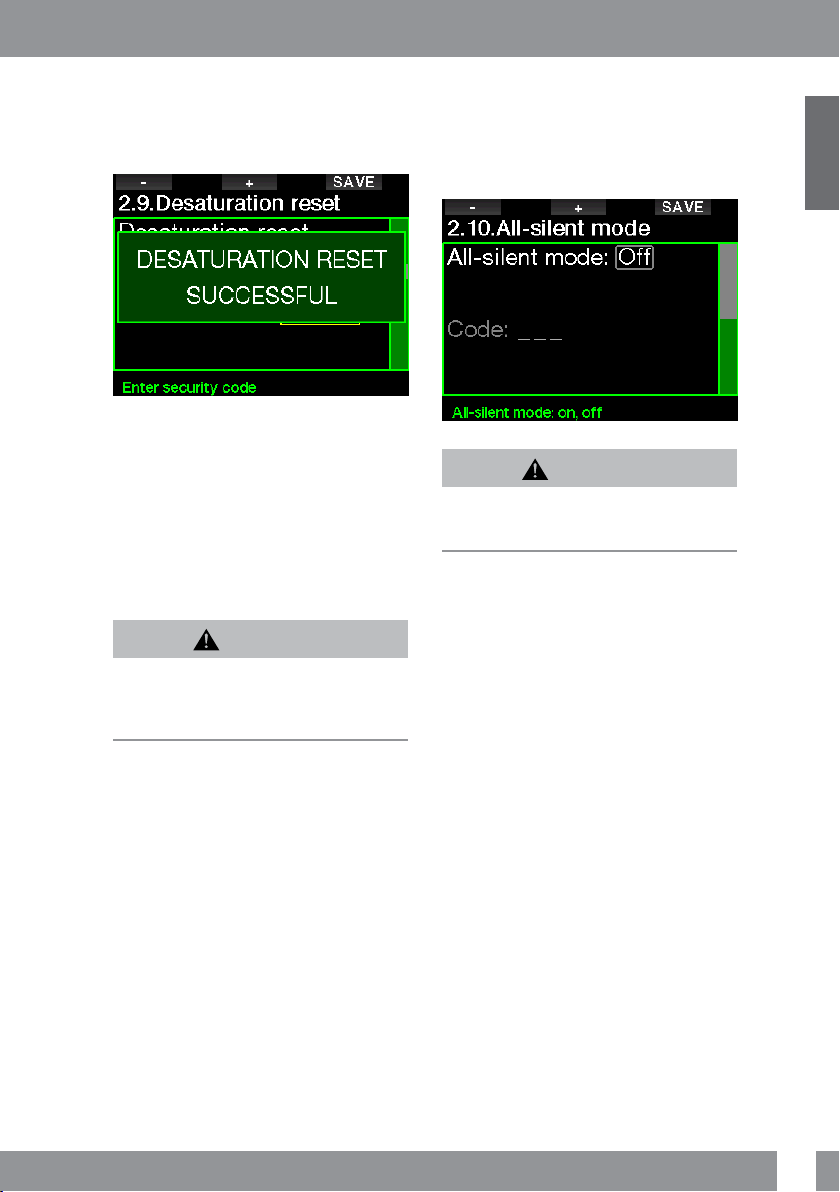
When the safety code is correctly entered
and conrmed by a press of the SAVE
button, the desaturation reset is complete
and the following screen will be shown.
NOTE: After a desaturation reset
F
the change between Scuba, Gauge
and Apnea modes are possible
immediately. However, since the
Gauge and Apnea modes are not
tracking your tissue nitrogen loading,
it is recommended that you maintain
the initial intervals between mode
changes.
WARNING
Diving after a desaturation reset is extremely
dangerous and is very likely to cause serious
injury or death. Do not reset the desaturation
unless you have a valid reason to do so.
2 .2 .9 All-silent mode
With the selection ON, the stealth mode
becomes active and no alarms or warnings
will emitting an audible signal. (The factory
setting is OFF.)
WARNING
The sound OFF selection will disable all
audible dive mode alarms and warnings. This
is potentially dangerous.
NOTE: The only exception to the silent
F
mode is the alarm clock, which will
beep when activated, even if the main
setting is sound off.
English
NOTE: An automatic low battery
F
switch-off will not reset the
desaturation. The G2 stores tissue
saturation information in a nonvolatile memory. During the time
the computer is without power the
desaturation calculation is frozen.
During recharging, the display will light
up and desaturation calculation will
resume as soon as a sufcient level of
charge has been reached.
GALILEO 2 (G2) USER MANUAL
25
Page 26
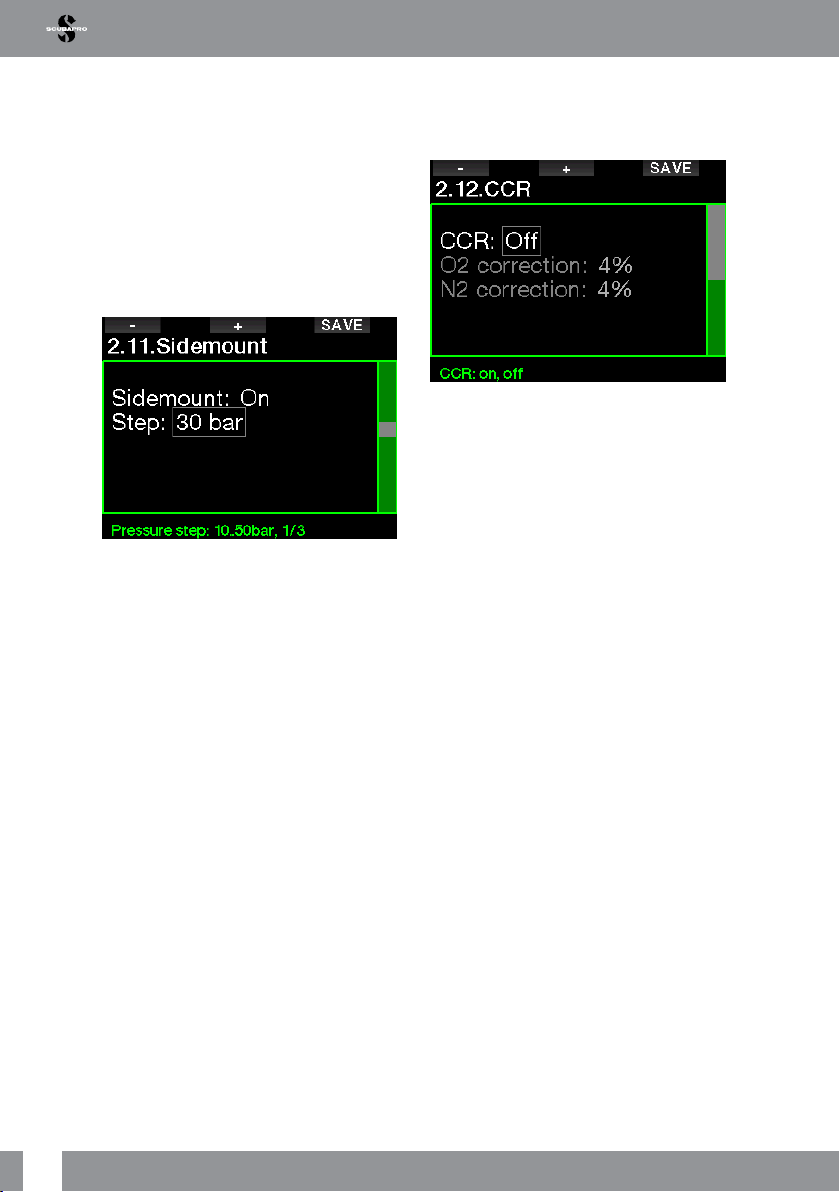
2 .2 .10 Sidemount
In sidemount diving there are normally
two tanks and two regulators, each set
mounted independently on each side of the
diver.
Independent redundant gas delivery
systems should be drawn down equally,
in small steps, so in case one system fails
the other system has maximum reserves to
complete the dive.
When the G2’s sidemount mode is enabled
(ON), two tank pressures are displayed at
the same time. See chapter: Sidemount
to learn more about how the display is
congured in this mode.
NOTE: For proper operation of the
F
sidemount mode, both tanks must be
equipped with a transmitter.
The pressure step denes the pressure
difference between tanks when the G2
alerts you to switch from the lower to the
higher supply side. You can choose a step
between 10 and 50 bars or follow the rule
of thirds.
2 .2 .11 CCR
The Rebreather mode can be selected (ON)
here if the feature is enabled.
Enabling CCR changes the default open
circuit gas content settings to setpoint
settings. Also, the dive display will change
so that both O2 and Diluent tank pressures
are shown at the same time. See chapter:
CCR to learn more how the display is
congured in this mode.
Since the CCR dive unit is responsible for
the setpoint accuracy and the G2 is using
that accurate number, you can select
some conservatism with an O
gas correction (it is shown as N2 but also
inuences He when the TMx option is
enabled).
For example, the % value of the O
correction increases the nominally set
ppO2 value for the CNS% clock value, and
decreases the nominally set ppO2 value for
the inert gas absorption (algorithm).
and inert
2
2
26
NOTE: The Sidemount mode can be
F
used for backmount twin tank diving
as well.
GALILEO 2 (G2) USER MANUAL
Page 27
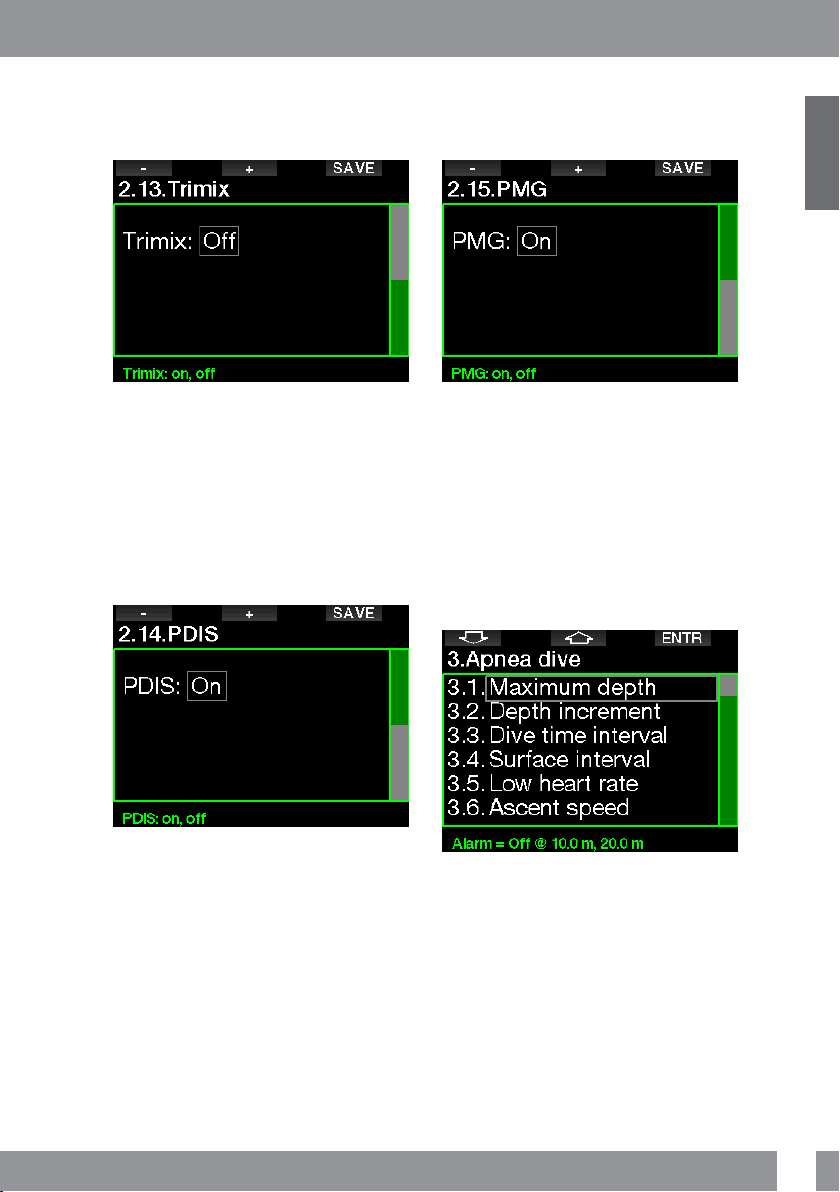
2 .2 .12 Trimix
Trimix can be set to ON here if the feature
is enabled.
2 .2 .14 PMG
Predictive Multigas (PMG) mode enables
the use of multiple tanks from 2 to 8.
English
When Trimix is on, the gas content
presentation follows the standard O2/He.
Also, the AMD (Absolute Minimum Depth)
for each gas is shown. See chapter: Diving
with multiple gas mixtures to learn more
about this feature.
2 .2 .13 PDIS
SCUBAPRO dive computers feature Prole
Depending Intermediate Stops (PDIS)
which can be enabled in this menu.
See chapter: PDIS (Prole Dependent
Intermediate Stop) to learn more about
this feature.
See chapter: Diving with multiple gas
mixtures to learn more about how to use
this feature.
NOTE: PMG must be enabled for
F
sidemount and CCR diving modes.
2 .3 Apnea dive
If the Apnea feature is selected, the
following settings for the Apnea mode can
be edited.
GALILEO 2 (G2) USER MANUAL
27
Page 28
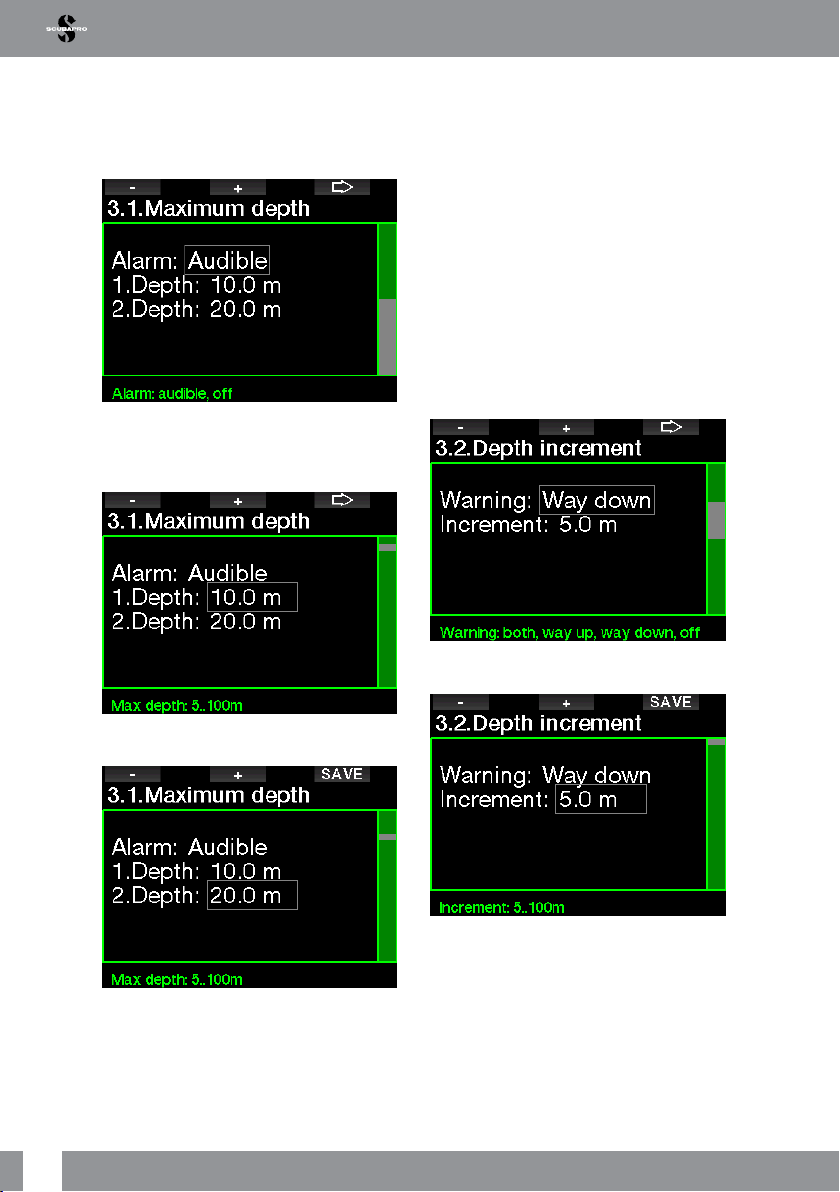
2 .3 .1 Setting the maximum dual
depth alarm
In Apnea mode all alarms can be either
audible or disabled.
NOTE: The rst alarm is short
F
sequence to get your attention, and
the second alarm is continuous. By
setting the rst alarm deeper than
the second, it will be masked by the
continuous alarm and you cannot hear
the rst one.
After enabling the maximum depth alarm
the limits can be selected. The rst depth
alarm can be selected from 5-100m/20330ft.
Equally, the second depth alarm may be set
from 5-100m/20-330ft.
2 .3 .2 Setting the depth
incremental warning
Independent of the maximum depth alarm,
you can set incremental depth warnings.
These depth warnings can be set for
descending (shown as Way down), for
ascending (shown as Way up), or for both
directions.
The depth increment can be selected from
5-100m/20-330ft.
28
GALILEO 2 (G2) USER MANUAL
Page 29
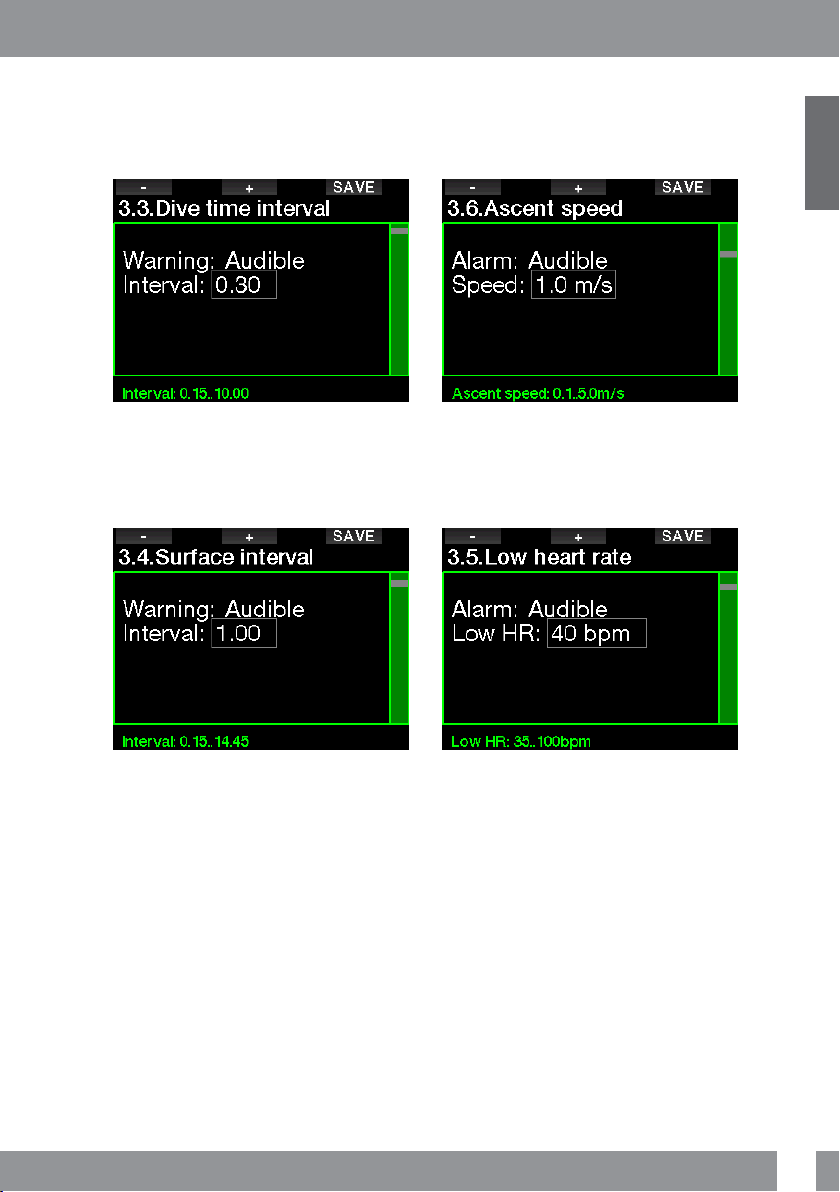
2 .3 .3 Setting the dive time interval
warning
You can set a dive time interval warning
from 15 seconds up to 10 minutes.
2 .3 .5 Setting the ascent speed
alarm
You can select the value from 0.1-5.0m/
1-15ft per second.
English
2 .3 .4 Setting the surface interval
The surface interval warning can be set
from 15 seconds up to 14 minutes and 45
seconds.
F
warning
NOTE: After 15 minutes on the
surface, the G2 automatically ends the
dive session and saves the dive in the
logbook.
2 .3 .6 Low HR alarm
The G2 can trigger an alarm if your heart
rate drops below a set level. The alarm
can be set between 35 and 100 beats per
minute.
GALILEO 2 (G2) USER MANUAL
29
Page 30

2 .3 .7 Water density
For Apnea diving, in which no
decompression calculation takes place, the
maximum depth reached by the diver may
be the main goal of the dive, so accuracy
in the depth measurement itself is the most
important factor. The G2 allows you to
dene a water density between 1.000kg/l
and 1.050kg/l in 0.001kg/l increments.
(For reference, the density of the salt
water setting in Scuba or Gauge mode is
1.025kg/l.)
There is a direct relationship between the
weight of a water column and the pressure
it exerts, and the weight is given by the
depth multiplied by the density of the water.
Hence, the depth displayed by a dive
computer is obtained by a measurement of
absolute pressure.
Water density, however, is a function of
salinity, so the same depth in a lake (fresh
water) and in an ocean (salt water) will yield
a different pressure measurement.
The difference is very small, with a
corresponding error in displayed depth
(approximately 3%). For this reason, in
Scuba and Gauge modes the G2 allows
you to dene whether you’re diving in fresh
or salt water.
A decompression calculation is based on
absolute pressure, so setting the G2 to
fresh water when diving in salt water, or
vice versa, is acceptable. However, the
depth measurement will be slightly off
(approximately 1m/3ft every 40m/130ft),
although the decompression calculation
will be carried out correctly.
2 .4 Digital compass
On this screen, the settings related to the
digital compass can be selected.
30
GALILEO 2 (G2) USER MANUAL
Page 31

2 .4 .1 Use compass
Activating menu 4.1 Use compass
launches the compass screen, which looks
like the following:
2 .4 .2 Auto-off time
With menu 4.2. Auto-off time you can
select a compass timeout, which is the
amount of time the compass is displayed
when activated at the surface or during
a dive. Timeout can be set from 5 to 60
seconds, or the selection “Push on/Push
off” maintains the compass display until it
is switched off by a button press.
2 .4 .3 Declination
A compass points to the magnetic north
pole of the earth. Geographic and magnetic
North Pole difference is corrected with a
declination setting. Declination depends on
your current location on the earth. You can
select a correction value from 0º to 90° in
1° increments and select the direction East
or West.
NOTE: The G2’s compass does not
F
normally need recalibration. If you
note a signicant permanent offset
in compass direction, contact your
authorized SCUBAPRO dealer.
English
GALILEO 2 (G2) USER MANUAL
31
Page 32

2 .5 Altimeter
Here you can check your current elevation.
In the altitude menu, the current altitude is
calculated from the barometric pressure.
The altitude can be adjusted when current
elevation is known. Adjusting the altitude
elevation has no effect on the altitude class.
NOTE: Barometric pressure is
F
variable, changing with weather and
atmospheric pressure at any particular
elevation. Dive algorithms use altitude
classes which are directly derived
from barometric pressure. Displayed
altitude is determined based on the
current barometric pressure and is
therefore a relative value.
2 .6 Warning settings
Warnings represent situations that require
diver’s attention, but ignoring them does
not represent an immediate risk. It is up to
you to decide which ones you would like to
have active and which ones not.
2 .6 .1 Maximum dive depth warning
The maximum depth warning value can be
selected from 5-100m/20-330ft in 1m/5ft
increments.
Warnings can be deactivated when OFF
is selected. The visual warning selection
displays the warning when the warning
situation happens. The audible warning
selection sounds the warning when the
warning situation happens. By selecting
BOTH you get a combination of audible
and visual warnings.
32
GALILEO 2 (G2) USER MANUAL
Page 33

2 .6 .2 CNS O2=75%
The G2 tracks your oxygen uptake via
the CNS O
of CNS O
becomes active.
clock. If the calculated value
2
reaches 75%, this warning
2
2 .6 .4 Entering deco
The G2 can activate a warning when
the rst mandatory decompression stop
appears. This alerts you to the fact that a
direct ascent to the surface is no longer
possible.
English
2 .6 .3 No stop time = 2 min
If you wish to avoid unintentionally
performing a decompression dive, the G2
can activate a warning when the no-stop
time reaches 2 minutes. This applies to
current selected MB level no-stop time (see
chapter: Diving with MB levels, for more
information on MB level diving). It gives you
the opportunity to start ascending before
incurring a decompression stop or a level
stop obligation.
2 .6 .5 Maximum dive time warning
The value can be selected from 5 to 995
minutes in 1-minute increments.
GALILEO 2 (G2) USER MANUAL
33
Page 34

2 .6 .6 Tank pressure
The G2 can activate a warning when the
tank pressure reaches the value dened
here.
2 .6 .7 RBT = 3 min
The RBT (Remaining Bottom Time) is the
time you can spend at the current depth
and still have enough gas supply to make
a safe ascent and reach the surface with
the tank reserve. The RBT calculation is
based on your current breathing rate, and
it accounts for any existing and upcoming
decompression obligation as well as for
any temperature gradient in the water. It
assumes an ascent at the ideal ascent rate
(dened in chapter: Ascent rate). When
the RBT reaches 3 minutes a warning is
shown.
When 0 minutes RBT is reached, an alarm
is triggered: the G2 has computed that if
you start your ascent now and ascend at
the ideal ascent rate, you will arrive at the
surface with just the tank reserve, and any
further delay increases the risk that you will
run out of your gas supply before reaching
the surface.
2 .6 .8 Pressure signal
The G2 can activate a warning when the
wireless tank pressure signal has not
been received in the last 30 seconds. The
warning message is: NO PRESSURE
SIGNAL.
If after another 40 seconds the G2 still has
not received any signal from the transmitter,
another audible sequence are emitted with
the message: PRESSURE SIGNAL LOST,
after which the RBT is not displayed any
longer and the tank pressure is replaced
with - - -.
34
GALILEO 2 (G2) USER MANUAL
Page 35

2 .6 .9 Entering level stops
When diving with a microbubble (MB) level
different than L0, the G2 can warn you
when you are no longer in the MB no-stop
phase.
2 .6 .10 MB stop ignored
When diving with an MB level higher than
L0 and in the presence of MB level stops,
the G2 can warn you if you reach a depth
shallower than the deepest required MB
level stop, therefore allowing you to avoid
missing the required stop.
2 .6 .11 MB level reduced
When diving with an MB level higher than
L0 and in the presence of MB level stops,
if you ascend more than 1.5m/5ft above
the deepest required MB level stop, the G2
reduces your MB level to the next possible
level. The display will show the new active
MB level. You can set your G2 to warn you
when this happens.
2 .6 .12 L0 no stop time = 2 min
When diving with an MB level higher than
L0, the underlying L0 information is not
directly visible on the display (though it is
accessible as alternate information). You
can choose to have your G2 warn you when
the underlying L0 no-stop time reaches 2
minutes while diving with an active MB level
higher than L0.
English
GALILEO 2 (G2) USER MANUAL
35
Page 36

2 .6 .13 Entering deco at L0
When diving with an MB level higher than
L0, the underlying L0 information is not
directly visible on the display (though it is
accessible as alternate information). You
can choose to have your G2 warn you when
you are about to enter a decompression
obligation while diving with an active MB
level higher than L0.
2 .7 Clock settings
On this screen the current time, time format,
date and time zone can be changed. The
alarm clock may also be set and activated
here.
2 .7 .1 Wake-up alarm
This menu allows you to set a wake-up
alarm. The time of the alarm is shown in the
format specied in the Time menu (either in
AM/PM or 24hr). When the alarm is set to
ON, a bell symbol appears in the time-ofday display.
36
GALILEO 2 (G2) USER MANUAL
Page 37

2 .7 .2 Time
This menu allows you to set the time
format, time and date.
2 .7 .3 Time zone
This menu allows you to easily change the
time when traveling to other time zones.
Instead of changing the actual time itself,
in this menu you can dene a number of
hours to add to or to subtract from the
currently displayed time so as to get the
correct time at your travel destination.
2 .8 Other settings
Here you can see your G2’s ID and software
version. You can also manually check the
battery status, set the backlight, enable
upgrades and return the unit to its basic
factory settings.
2 .8 .1 Device information
This menu displays the device ID number
(ID), the hardware version (HW), the
software version (SW) and the battery level.
English
The range of the UTC setting is between
-13 hours and +14 hours in 15-minute
increments.
GALILEO 2 (G2) USER MANUAL
37
Page 38

2 .8 .2 Gas integration
In this menu you can edit various gas
integration related settings.
2 .8 .3 Tank reserve
The RBT (remaining bottom time) is the
time you can spend at the current depth
and still have enough gas supply to make a
safe ascent and reach the surface with the
tank reserve. The RBT calculation is based
on your current breathing rate, accounts for
any existing and upcoming decompression
obligation and for any temperature gradient
in the water. It assumes an ascent at the
ideal ascent rate (dened in chapter:
Ascent rate).
A higher value of the tank reserve is more
conservative, but limits your diving time. A
lower value gives you more diving time but
the risk of running out of gas supply before
reaching the surface increases.
2 .8 .4 RBT warning or alarm
In this menu you can select if the situation
RBT = 0 minutes will be handled as a
warning or alarm (visible only if PMG is
installed).
2 .8 .5 Breathing sensitivity
The sensitivity of the workload calculation
to changes in breathing pattern can be
adjusted in 25 steps: this has an effect on
how the algorithm accounts for changes
in breathing pattern in the decompression
calculation.
38
Value 0 corresponds to neutral breathing
sensitivity. With value -12 the breathing
has the least effect on workload in the dive
algorithm.
GALILEO 2 (G2) USER MANUAL
Page 39

2 .8 .6 Bar graph
The oxygen bar graph can be replaced
with a graphic representation of the tank
pressure (on Classic and Full screens
only). If you turn ON this feature, the label of
the bar graph changes from O
get proper scale, you must dene a value
of the pressure when the tank is full. As you
consume the gas in the tank, the segments
will gradually turn off.
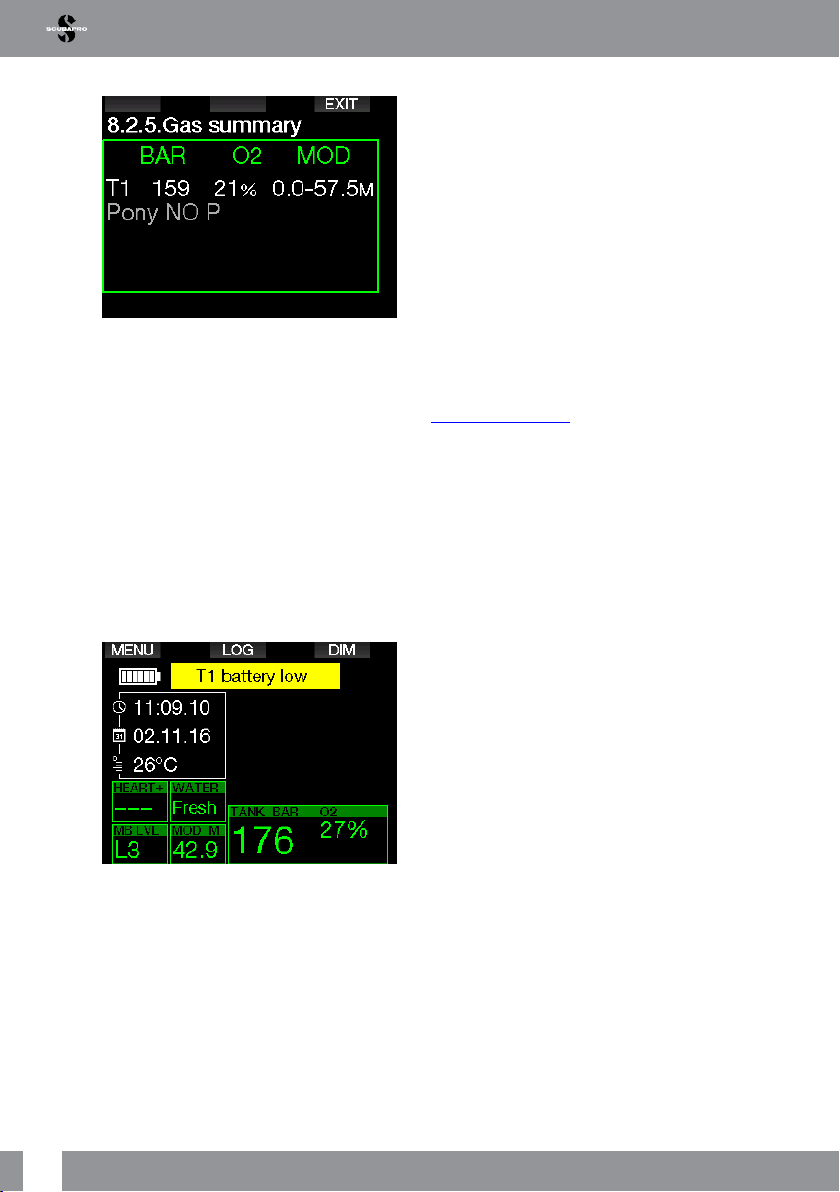
2 .8 .7 Gas summary
The gas summary table provides a fast
overview of the paired tank pressures and
their content.
to TNK. To
2
2 .8 .8 Pairing
When this menu is selected, the G2 listens
to nearby tank transmitters which are
activated (tank valve is opened). This mode
is practical when you cannot place the G2
in close contact with the transmitter.
NOTE: Make sure that only one
F
transmitter is active nearby when
using this mode so that you will pair
the right tank.
2 .8 .9 Backlight duration
Backlight power consumption is the main
factor of the battery lifetime between
charging. The time selected in this menu
will dene the active backlight duration
before dimming function will take over.
Selectable range is from 10 seconds up
to 3 minutes or deactivate the automatic
dimming function (push).
English
NOTE: A shortcut to this screen from
F
the time-of-date display is a pressand-hold of the LOG button.
GALILEO 2 (G2) USER MANUAL
39
Page 40

2 .8 .10 Backlight intensity
The ambient light sensor detects the level of
darkness and the intelligent light algorithm
can be set to provide different contrast
levels if you select the adaptive backlight.
When adaptive backlight is enabled the
intensity range is from 1 to 9 and without
adaptive function the range is from 1 to 15.
Larger numbers correspond to more light,
but also more power consumption and less
battery lifetime.
2 .8 .11 Water contacts
The water contacts allow the G2 to
automatically turn on the moment it senses
the presence of water. This means that you
can jump in the water at any time without
having to worry whether the computer
is turned on. However, if the computer is
stored in a wet environment, it may stay
turned on and consume unnecessary
battery power. To prevent this, you can
turn the water contacts off, but you will
have to remember to turn on the computer
manually before starting the dive.
NOTE: If the water contacts are
F
turned off and you fail to turn on the
computer manually, the computer will
still activate by itself within one minute
of having started the dive. The time
and decompression calculation will
be consequently inaccurate, but the
accuracy of the depth measurement
will be unaffected.
2 .8 .12 Factory settings
This menu allows you to revert all settings
in all menus of the computer back to the
original factory settings (except emergency
information, transmitter pairing, user
information and bluetooth pairing). In order
to do this, you need to enter the safety
code (313).
This prevents unintentionally reverting all
settings.
40
GALILEO 2 (G2) USER MANUAL
Page 41

2 .8 .13 Feature upgrade
Features that enhance your G2’s
capabilities, but that are not initially enabled,
are listed in this menu. If you need one of
the features you can select and install it by
pressing the SAVE button.
Features that you can install or deinstall
are stored in the G2’s memory folder:
\system\feature upgrade
See chapter: USB ash disk operations
to learn how you can store these les in
your G2.
2 .8 .14 Software update
Software updates can be installed from the
list in this menu. Select the software version
and press the SAVE button to proceed with
the update.
Software versions that you can update are
stored in the G2 memory folder: \system\
sw update
See chapter: USB ash disk operations
to learn how you can store these les in
your G2.
2 .8 .15 Format ash disk
See chapter: Format ash disk for this
process.
English
GALILEO 2 (G2) USER MANUAL
41
Page 42

2 .9 Personalization
Here are the settings related to
customization. You can select different
screen congurations, color, language,
owner and emergency info, along with
workload and units.
2 .9 .1 Screen conguration
You can choose between Light, Classic,
Full and Graphical congurations. You
can also rotate the display 180 degrees so
that the buttons are at the bottom of the
computer.
2 .9 .2 Language
In this menu you can set the language used
for all texts displayed on the computer.
Select the language from the list and press
the SAVE button to activate.
2 .9 .3 Start-up picture
The G2 allows you to choose a personalized
picture that will be displayed for 8 seconds
upon turning on the computer. In this menu
you select the picture from those available
in the computer memory.
42
NOTE: The Light conguration does
F
not support dives with level stops or
decompression stops. If you have
chosen the Light conguration and you
enter level stops or decompression,
the screen conguration will switch to
Classic until you have fullled all level
stop and/or deco stop obligations.
See chapter: USB ash disk operations
to learn how you can store the pictures into
your G2.
GALILEO 2 (G2) USER MANUAL
Page 43

2 .9 .4 Setting the user preferred
units
Here you can select between depth,
temperature and pressure unit
combinations. The effect takes place in
dive mode, in the logbook, alarm settings,
altitude settings, etc.
2 .9 .5 Workload
At the base of any decompression
calculation there is the transport of nitrogen
from the lungs to the blood and from there
to the tissues during on-gassing, and the
same but in reverse during off-gassing.
As such, it is obvious that the single most
important parameter in a decompression
calculation is the rate at which blood
travels through the body. During heavy
exercise, the total blood ow from the heart
can be up to 4 times higher than while at
rest. This increase in blood ow is rather
unevenly distributed, with some tissues
such as the Central Nervous System and
the brain being unaffected, while others like
the muscles receiving up to 10 times more
blood than when at rest.
English
The G2 estimates workload based on
heart rate or changes in breathing pattern
from the high-pressure transmitter, and the
decompression calculation in the ZH-L16
ADT model is changed accordingly. This
menu allows you to select the workload
base or switch off the workload estimation,
in which case your G2 will behave like
SCUBAPRO dive computer models without
heart rate or air integration.
SCUBAPRO recommends using the
workload and Heart Rate features on all
dives, but especially when making technical
dives. When the dive goes as planned
there is no effect to the decompression
schedule. However, when workload is high
more decompression time will be required.
Adaptive algorithm additionally incorporates
into the calculation the water temperature
or skin temperature (only with the patented
SCUBAPRO Heart Rate belt) and micro
bubble formation.
GALILEO 2 (G2) USER MANUAL
43
Page 44

2 .9 .6 Show owner info
The owner information in this menu can
only be entered via LogTRAK software.
See section: Interfaces for the G2 and
an introduction to LogTRAK to learn
how to store your owner information in your
G2.
2 .9 .7 Emergency info
The emergency information in this menu
can only be entered via LogTRAK software.
2 .9 .8 Display color
The G2’s display power consumption is
independent of the color that’s used. Using
menu 9.8. Display color you can select
different color combinations, shown on the
screen below.
NOTE: Depending on the water you’re
F
diving in, the best screen readability
may be found using colors other than
the default color combination or with
black and white.
44
See section: Interfaces for the G2 and
an introduction to LogTRAK to learn
how to store your emergency information
in your G2.
GALILEO 2 (G2) USER MANUAL
Page 45

2 .10 Pictures
Here you may look at the pictures that you
have saved in your G2’s memory.
2 .11 Dive planner
With the dive planner you can plan your
next dive based on your body’s nitrogen
saturation. The planner also makes use of
the following information:
1. Selected oxygen concentration.
2. Selected water type.
3. Selected microbubble level.
4. Water temperature of the most recent
dive.
5. Altitude range.
6. Status of saturation at the time the
planner is activated.
7. Observance of the prescribed ascent
rates.
NOTE: When the G2 is in Gauge
F
or Apnea mode the dive planner is
disabled.
2 .11 .1 No-stop plan
If you have completed a dive but plan to
make another during the desaturation
phase, you must start the planner by
adding the time you would otherwise be
on the surface. The time can be added in
15-minute increments.
The prohibited altitude is shown with the
mountain symbol and the peak is not
allowed to be entered by the diver. For
more information on altitude diving with the
G2, see chapter: Altitude diving.
In case the G2 is displaying the no-dive
warning, the duration of the warning itself
is displayed as a recommended surface
interval for planning purposes (rounded up
to the nearest 15-minute increment).
When the surface interval is given, or if
you have no remaining desaturation left,
the planner can show depth in 3m/10ft
increments. The no-decompression dive
time is shown for that depth.
English
GALILEO 2 (G2) USER MANUAL
CNS% and OTU values appear on the
screen when 1% would be reached for that
depth with maximum no-stop time.
The minimum depth for dive planning is
9m/30ft. The planner allows only depths
in line with maximum ppO
content and maximum ppO2 settings are
given in the menu 1. O2 setting.
. The oxygen
2
45
Page 46

WARNING
If you have set the ppO2max to OFF, the
planner will allow depths up to a maximum
of 120m/394ft. Air/nitrox dives with a high
ppO2 are extremely dangerous and can lead to
death. Be aware that exposures to high ppO2
will lead the CNS clock value to exceed the
maximum recommended 100%.
If the MOD is shallower than 9m/30ft,
planning is not allowed and the G2 will
show “ppO
2 .11 .2 Decompression plan
By pressing the ARROW button for
planned depth the dive time can be edited.
The start point (minimum now) is the nodecompression time. Time can be added
in 1-minute increments. The deepest
decompression or MB level stop is also
shown as Total ascent time.
max too low!”
2
2 .12 Help
Frequently asked questions (FAQ) and a
summary of this user manual is stored
here. Updates to this will be available at
www.scubapro.com
2 .13 Bluetooth
Bluetooth communication can be activated
from this menu. How to establish a
connection between your G2 and other
Bluetooth devices is described in chapter:
Bluetooth.
2 .14 Logbook
Here the logbook can be read, including
the overview that we call a dive statistic.
Dive statistics is always the starting point
when the logbook mode is selected.
Dive statistic contains the following data.
46
Each dive is stored with a running dive
number along with immersion date, time,
max depth and total dive time.
GALILEO 2 (G2) USER MANUAL
Page 47

When a dive is selected the following data
is shown on the 1st sub sequential page.
The 3rd sub sequential page shows more
details.
English
The 4th sub sequential page.
NOTE: If a dive is done in Gauge
F
mode, it is indicated on this page. The
Gauge mode contains less information
than what’s offered in Scuba mode;
therefore, some lines will remain blank
in the logbook. Below is an example of
a Scuba mode dive.
nd
The 2
sub sequential page shows the dive
log in graphics.
GALILEO 2 (G2) USER MANUAL
The 5th sub sequential page.
NOTE: Dives with multiple gases
F
will add log pages after the 5th sub
sequential page.
47
Page 48

The 6th sub sequential page summarizes
the warnings and/or alarms of the dive, if
any.
2 .14 .1 Apnea logs
The G2 organizes the Apnea dive log by
grouping the individual immersions to a
dive session. On the three rst pages the
session data is shown.
The following pages provide detailed
information of a specic immersion of
the session (the number is shown at the
bottom of the display; for example, iteration
#1, #2, etc.).
48
GALILEO 2 (G2) USER MANUAL
Page 49

3 . DIVING WITH THE G2
The G2 is a feature-rich yet highly versatile
diving computer, providing decompression
calculations for easy recreational dives up
to complicated mixed gas dives. It also
provides ascent rate calculations and
warnings. Its huge memory stores photos
and provides a logbook capable of holding
more than 1000 hours of dive proles with
a 4s sampling rate. During the dive the G2
displays information like depth, dive time,
decompression status, water temperature
and so much more, while on the surface
after a dive, remaining desaturation time,
no-y time, surface interval and prohibited
altitude classes are shown.
3 .1 Dive mode at surface
3 .1 .1 Recreational (factory setting)
If you have not been diving with your G2 for
a while (no desaturation remaining) the dive
mode screen may appear as shown below:
English
Alternatively, when more advanced dive
modes are activated the display may
appear as follows (shown in PMG mode
without a recent dive).
3 .1 .2 PMG
In Predictive Multigas (PMG) mode the
amount of enabled gas mixes for the
following dive is indicated in the gas
pressure & content window below the mix.
In the screen below two gas mixes are
enabled (2G).
However, in Scuba mode following a dive,
the display may appear as shown below.
The current altitude class and the prohibited
altitude are indicated with the mountain
symbol in the upper right hand corner. The
interval since the last dive, as well as the
remaining desaturation time, are counting
up and down, respectively, in the middle of
the screen.
GALILEO 2 (G2) USER MANUAL
49
Page 50

3 .1 .3 Trimix
In trimix mode the gas content is shown in
the tank pressure & content window in the
Oxygen/Helium format.
3 .1 .5 CCR
In CCR mode the display appears similar
to sidemount mode, but the tank pressure
& content windows show the diluent and
oxygen contents.
3 .1 .4 Sidemount
In sidemount mode the tank pressure &
content window is split into two tanks (left
and right side).
3 .1 .6 Surface interval, no dive and
CNS% counters
After a dive the G2 shows the surface
interval from the latest dive. The surface
interval counter counts until desaturation
is complete. After desaturation is complete
this window disappears.
The no-dive symbol and countdown timer
are shown to indicate the period during
which you should not do another dive
due to microbubbles or excessive oxygen
loading (CNS O
% > 40%).
2
The cumulated oxygen CNS% from the last
dive is counting down to zero next to desat
time, at which point it disappears.
50
GALILEO 2 (G2) USER MANUAL
Page 51

3 .2 Button functions while
diving
The G2’s button functions while diving are
summarized in the table below.
LEFT BUTTON MIDDLE BUTTON RIGHT BUTTON
Press Press and hold Press Press and hold Press Press and hold
Set bookmark -
LIGHT
Access alternate
window in
sequence:
Max depth Dive prole
PDIS
Temperature Pictures
Heart rate
Skin temperature
Battery level
Active MB level if
not L0
MB L0 info
Time of day
CNS%
NOTE: The G2 can be set to three dive
F
modes: Scuba, Apnea and Gauge.
Due to the operational differences
between modes, the buttons will have
different functions.
Access alternate
display in
sequence:
Compartment
saturation
Backlight Compass
English
Set bookmark
and reset
stopwatch
(Conrm gas
switch)
CLASSIC
GALILEO 2 (G2) USER MANUAL
-
(Manual gas
switch)
Access alternate
window in
sequence:
Max depth Gas summary
% Deco summary
O
2
PDIS Dive prole
Heart rate
Skin temperature Pictures
Battery level
Stopwatch
Active MB level if
not L0
MB L0 info
Time of day
CNS%
Average depth
ppO
2
OTU
Access alternate
display in
sequence:
Compartment
saturation
Backlight Compass
51
Page 52

Set bookmark
(Conrm gas
FULL
and reset
stopwatch
switch)
-
(Manual gas
switch)
Access alternate
window in
sequence:
% Dive prole
O
2
PDIS
Access alternate
display in
sequence:
Compartment
saturation
Average depth Pictures
Skin temperature
Battery level
CNS%
PPO
2
OTU
Backlight Compass
Set bookmark
and reset
stopwatch
(Conrm gas
switch)
GRAPHICAL
Set bookmark
and reset
stopwatch
COMPASS
Set bookmark
and reset
stopwatch
GAUGE
-
(Manual gas
switch)
Access alternate
window in
sequence:
Max depth Gas summary
% Deco summary
O
2
Access alternate
display in
sequence:
PDIS Dive prole
Heart rate
Compartment
saturation
Skin temperature Pictures
Battery level
Stopwatch
Active MB level if
not L0
MB L0 info
Time of day
CNS%
Average depth
ppO
2
OTU
- Set bearing Erase set bearing Backlight
-
Set bookmark
and reset average
depth
Access alternate
display in
sequence:
Gas summary
Dive prole
Pictures
Backlight Compass
Manually return
to initial display
Backlight Compass
52
GALILEO 2 (G2) USER MANUAL
Page 53

Manually end
the dive session
(at the surface)
APNEA
- -
Access alternate
window in
sequence:
Heart rate
Skin temperature
Backlight -
English
3 .3 Altitude diving
3 .3 .1 Altitude classes and altitude
warnings after a dive
Climbing to altitude is similar to starting an
ascent from a dive: you expose your body
to a lower partial pressure of nitrogen and
you start off-gassing. After a dive, given the
higher nitrogen loading in your body, even
reaching an otherwise negligible altitude
can potentially cause decompression
sickness. Consequently, the G2 constantly
monitors the ambient pressure and uses it
to evaluate your nitrogen loading and offgassing. If the G2 notices a drop in ambient
pressure not compatible with your current
nitrogen loading, it will activate a warning
to alert you of a potentially dangerous
situation.
The G2 counts down remaining
desaturation and indicates this in the
surface mode display until desaturation is
complete.
The allowable altitudes are indicated with the
mountain symbol in the right upper corner
of the time-of-day display. The prohibited
altitudes (which the G2 has computed to
be incompatible with your current nitrogen
saturation levels) are solid color segments
inside the mountain symbol. For more
details, see chapter: Altitude and the
decompression algorithm.
The current altitude can be checked in the
menu 5. Altimeter.
The remaining nitrogen loading is shown with
an indicator bar along the right edge of the
display labeled with a description text N
NOTE: The no-y, no-dive and altitude
F
restriction symbols are also shown
.
2
on the time-of-day display, when
applicable.
3 .3 .2 Altitude and the
decompression algorithm
Atmospheric pressure is a function of
altitude and of weather conditions. This
is an important aspect to consider for
diving, because the atmospheric pressure
surrounding you has an inuence on the ongassing and off-gassing of nitrogen. Above
a certain altitude, the decompression
algorithm has to change to account for
the effect of the change in atmospheric
pressure.
The G2 divides the possible altitude range
into 5 classes that are illustrated below:
Altitude Class
GALILEO 2 (G2) USER MANUAL
Elevation Barometric
switch point
Dive computer
mode
Gauge
(no deco dat a)
Scuba
Scuba
Scuba
Scuba
53
Page 54

The altitude classes are dened in terms of
approximate elevations because the effect
of weather conditions can make the switch
point pressure occur at different levels.
WARNING
At altitude class 4 the G2 functions in Gauge
mode only (automatic switch from computer
mode).
NOTE: You can check your elevation
F
by activating the altitude meter. Refer
to chapter: Altimeter to learn how
to do so.
NOTE: The G2 deals with altitude
F
automatically. It monitors the
atmospheric pressure every 60
seconds and if it detects a sufcient
drop in pressure, it indicates the
new altitude range and, if applicable,
the prohibited altitude range. It also
indicates the desaturation time which,
in this case, is an adaptation time to
the new ambient pressure. If a dive
is started during this adaptation time,
the G2 considers it a repetitive dive
since the body has residual nitrogen.
3 .3 .3 Prohibited altitude
Going to altitude, as well as ying after
diving, exposes your body to a reduced
ambient pressure. In a manner similar to
no-y time, the G2 advises you the safe
altitude classes to reach after a dive, and
those which are not safe. If you have to
drive over a mountain pass to return home
after a dive, this information can be quite
important.
The prohibited altitude classes are displayed
by yellow (factory initial setting color)
segments inside the stylized mountain icon.
These can be combined with gray (initial
factory setting color) segments indicating
the current altitude. In the example above,
the diver is presently at altitude class 1
and should not reach altitudes of class 4
or higher.
The G2 has an altitude warning. If you
reach an altitude that the G2 considers
incompatible with your current residual
nitrogen levels, it will warn you with an
altitude warning.
54
GALILEO 2 (G2) USER MANUAL
Page 55

3 .3 .4 Decompression dives in
mountain lakes
In order to ensure optimal decompression,
even at higher altitudes, the decompression
stop starts from 2m/7ft in altitude classes
1, 2 and 3.
If atmospheric pressure is below 610mbar
(altitude higher than 4000m/13300ft), no
decompression calculation is carried out
by the G2 (automatic Gauge mode). In
addition, the dive planner is not available in
this altitude class.
3 .4 Diving with nitrox
Nitrox is the term used to describe
breathing gases made of oxygen-nitrogen
mixes with the oxygen percentage higher
than 21% (air). Because nitrox contains
less nitrogen than air, there is less nitrogen
loading on the diver’s body at the same
depth as compared to breathing air.
However, the increase in oxygen
concentration in nitrox implies an increase
in oxygen partial pressure in the breathing
mix at the same depth. At higher than
atmospheric partial pressures, oxygen
can have toxic effects on the human body.
These can be grouped into 2 categories:
1. Sudden effects due to oxygen
partial pressure over 1.4bar. These are
not related to the length of the exposure
to high oxygen partial pressure. Sudden
effects can vary and depend on the exact
level of partial pressure they happen at. It is
commonly accepted that partial pressures
up to 1.4bar are tolerable during the active
part of the dive, and maximum oxygen
partial pressures up to 1.6bar during the
decompression.
2. Long exposure effects to oxygen
partial pressures over 0.5bar due to
repeated and/or long dives. These can
affect the central nervous system and
cause damage to lungs or to other vital
organs. Long exposures can be divided
between more severe Central Nervous
System effects and less dangerous longterm Pulmonary Toxicity effects.
The G2 treats high ppO
effects in the following ways:
• Against sudden effects. The G2 has
an MOD alarm set for a user-dened
ppO
max. As you enter the oxygen
2
concentration for the dive, the G2 shows
you the corresponding MOD for the dened
ppO2max. The default value of ppO2max
from the factory is 1.4bar. This can be
adjusted to your preference between
1.0 and 1.6bar. It can also be turned off.
Please refer to chapter: ppO
information on how to change this setting.
• Against long exposure effects. The
G2 “tracks” the exposure by means of
the CNS O
clock. At levels of 100% and
2
and long exposure
2
max for more
2
English
GALILEO 2 (G2) USER MANUAL
55
Page 56

higher there is risk of long exposure effects,
and consequently the G2 will activate an
alarm when this level of CNS O2 is reached.
The G2 can also warn you when the
CNS O2 level reaches 75% (see chapter:
CNS=75%). Note that the CNS O2 clock
is independent of the value of ppO2max set
by the user.
CNS O
75% warning and 100% alarm can
2
activate during a dive (see chapters: CNS
O
= 75% and CNS O2 = 100%), whereas
2
the remaining CNS O
value after a dive is
2
shown in the time-of-day display.
The CNS O2 clock increases when the
oxygen partial pressure is higher than
0.5bar, and decreases when the oxygen
partial pressure is lower than 0.5bar.
Hence, while on the surface breathing air
you will always be decreasing the CNS O2
clock. During the dive, the depth at which
0.5bar is reached for various mixes is as
follows:
Air: 13m/43ft
32%: 6m/20ft
36%: 4m/13ft
• Against long exposure and repetitive
dives: Repetitive diving and very long
exposures (technical and rebreather
diving) with high ppO
may cause long-
2
term pulmonary Toxicity effects that can
be tracked with OTUs. See chapter: OTU
settings how you can check your current
OTU information or reset the counter. If you
exceed your OTU’s for the dive, this will be
noted in the logbook alarms/warnings as
shown on the screen below.
56
NOTE: For oxygen concentrations of
F
80% and higher, the ppO2max is xed
at 1.6bar and cannot be changed.
GALILEO 2 (G2) USER MANUAL
Page 57

3 .4 .1 Technical diving
You should be trained and properly certied
by a recognized agency in technical diving
before using G2 for that. Decompression
diving, diving with high oxygen percentage
blends, multi gas diving and mixed gas
diving all require skills and demand
know-how that only specic training and
education can provide. A dive computer
is an electronic instrument that cannot
make decisions for you and can not take all
parameters into account while diving.
In technical diving a dive computer is not
the primary instrument to follow during the
dive. Before the dive you must make a plan
and during the dive follow it. If your plan and
the computer show different schedules,
follow the more conservative one.
WARNING
Both G2 Trimix model and trimix diving are
developed for healthy, physically t, advanced
divers. You should have regular medical checkups with a specialized physician, conrming
your physical aptitude for diving. This is even
more important for technical diving.
Patience is a very important characteristic to
maintain when conducting complex dives. It is
necessary to build your personal depth limit
and decompression amount based on your
real diving experience and then increase little
by little as you gain experience.
G2 is not designed for commercial diving.
Special procedures such as surface supplied
gas, heated suit, decompressing in a chamber
or bell and long, high workload dives may
cause algorithm to calculate incorrectly or
even disturb the operation of the G2 dive
computer.
Never dive without a backup instrument.
It is imperative to always have backup
instruments for depth, time and tank
pressure, as well as a dive table with you
while diving.
Plan your dives in advance and cross check
your plan with another commercial planner
program or table. Your dive plan should always
include reserve gas amounts sufcient to
handle emergencies and/or delays. Always
make bailout tables for the dive.
Technical diving is not for everyone.
Decompression diving, especially with Helium
mixes, will always have a higher inherent
potential for an accident, which could lead
to permanent injury and death. The risk may
be higher due to differences in an individual’s
physical condition, environmental conditions,
human errors, etc. If you are not willing to take
the risk, don’t dive!
3 .4 .2 Diving with multiple gas
mixtures
The G2 is equipped with the ZH-L16
ADT MB PMG algorithm. PMG stands for
Predictive Multigas, meaning that when
you program more than one gas mixture,
the G2 will predict the switch to the higher
oxygen concentration gas at the depth
that you specied and alert you at all times
with a comprehensive decompression
schedule of all the gas mixtures that you
programmed.
In other words, you get full credit at any
point during the dive for all the extra gas
mixtures that you are carrying with you.
At the same time, the G2 can also show
you what the decompression schedule
would be if you were to nish the dive using
only the gas mixture that you are currently
breathing from, so that you can be prepared
in the event that something doesn’t work
as planned. See chapter: PMG to learn
how to enable this mode on your G2.
WARNING
VERY IMPORTANT!
! Diving with multiple gas mixtures represents
a much higher risk than diving with a single
gas mixture, and mistakes by the diver may
lead to serious injury or death.
! During dives with multiple gas mixtures,
always make sure you are breathing from the
tank that you intend to use. Breathing from a
high oxygen concentration mix at the wrong
depth can kill you.
! Mark all your regulators and tanks so
that you cannot confuse them under any
circumstances.
English
GALILEO 2 (G2) USER MANUAL
57
Page 58

! Before each dive and after changing a tank,
ensure that each gas mixture is set to the
correct value for the corresponding tank.
! Get the proper training and certications to
make multi-gas dives prior to making them by
yourself.
The G2 enables you to use up to 8 gas
mixtures during the dive.
• For oxygen concentrations of 80% and
higher, the ppO
max is fixed at 1.6bar
2
and cannot be changed.
• The MOD for tanks 2 through 8 are the
switch depths for those gases. This is
what the G2 uses for its calculations,
warnings and suggested switch points.
• When diving with more than 1 gas
mixture, the nitrox reset time function
(described in the chapter: Nitrox reset
time) has the following effect: gas1 is
set to 21% gases 2 through 8 are set
to OFF.
NOTE: Start breathing from the tank
F
with the new gas mixture before
conrming a switch.
WARNING
Always make sure you are switching to the
intended gas. Failure to do so may result in
serious injury or death.
The following chapters about gas switching
are shown with 2 gas mixtures enabled.
However, more than two mixes enabled are
working similarly.
Time
Depth
Switching gas mixture during the dive
During the ascent phase, when you reach
a depth corresponding to the MOD of a
gas other than the one you are currently
using, the G2 will suggest that you
perform the switch. An audible sequence
is played, and the message SWITCH TO
GAS T2 appears on the display. You have
30 seconds to respond to this message;
otherwise, the G2 will conclude that gas
2 will not be used (text: EXCLUDING
GAS T2 will be displayed) and adapt the
decompression schedule accordingly.
To conrm the gas switch, press the SAVE
button. After you conrm the switch,
the message SWITCH TO GAS T2
SUCCESSFUL remains on the screen for
4 seconds.
58
Bottom mix
Diving with 2 gas mixtures
Deco mi x
GALILEO 2 (G2) USER MANUAL
Page 59

Switching back to a gas mixture with
lower oxygen concentration
There may be situations in which you
have to switch back to a tank with lower
oxygen concentration. This can happen,
for instance, if you want to descend again
below the MOD of the higher oxygen
concentration gas (T2), or if you have run
out of T2 gas during the decompression. At
this point you can manually initiate the gas
switch by pressing and holding the BOOK
button.
The G2 will display the message SWITCH
TO GAS T1. At this point press the SAVE
button to conrm the switch and the
ARROW button to select another gas.
English
The G2 will display the text SWITCH
TO GAS T1 SUCCESSFUL 4 seconds
and adapt the decompression schedule
accordingly.
Gas switch not carried out at the
planned depth
If you fail to conrm the gas change within
the 30 seconds of when the G2 suggests it,
the gas is excluded from the decompression
calculation and the decompression
schedule is adapted accordingly, basically
reecting the fact that you will nish the dive
without using the excluded gas.
Delayed gas switch
You can catch up on a planned gas mixture
switch at any time by selecting the gas
manually. Press-and-hold the BOOK
button to start the gas switch procedure.
The G2 will show the message SWITCH
TO GAS T2 on the display. This helps you
verify that you are performing a switch to
a safe gas. At this point you would press
the SAVE button to conrm the switch. The
G2 will display the message SWITCH TO
GAS T2 SUCCESSFUL and adapt the
decompression schedule accordingly.
GALILEO 2 (G2) USER MANUAL
Submerging below the MOD after a
gas switch
If after having switched to gas 2 you
inadvertently drop again below the MOD
for that mixture, the MOD alarm will
immediately be activated. In this case,
you would either switch back to gas 1 or
ascend above the MOD for gas 2.
59
Page 60

Predicted decompression stops and
gas changes during ascent
The main dive display will show only the
deepest decompression stop depth and
time with TAT.
By press-and-hold MORE button the gas
summary table is shown. By pressing MORE
button, the predicted decompression stops
are shown with all enabled gases used
(PMG) and assuming only the current gas
would be used (1G). Also, current selected
MB level as well as MB level 0 schedules
are shown.
By pressing ARROW UP button the current
compartment saturation is shown.
When the previously shown dive proceeds
to the ascent phase the decompression
is still increasing, as seen from the table
information on the right side.
60
By pressing ARROW UP button the prole
display is shown (blue is diven part, gray
line identies current time and green is
predicted ascent prole) with required gas
switching depths according to MOD’s
(white lines).
The fast compartments begin off gassing
and the effect is shown in the saturation
bar diagram below.
GALILEO 2 (G2) USER MANUAL
Page 61

When off gassing the compartment color
changes from red to green.
3 .4 .3 Diving with Trimix mode
WARNING
VERY IMPORTANT!
! When breathing compressed air or EAN
Nitrox during a dive, the diver accepts a
certain level of risk. When breathing a Trimix
gas or other mix gases during a dive, the risk
level increases.
! We have used all relevant data and the most
recent hyperbaric research on Trimix diving
to bring the risk level of our Trimix algorithm
to the lowest possible acceptable level.
Nevertheless, we can in no way guarantee
that breathing Nitrox, Trimix, mixed gases or
compressed air during a dive using our Trimix
algorithm will eliminate or prevent the risk of
serious injury or death from decompression
sickness, oxygen toxicity or some other
inherent risk.
! The Trimix diver using our Trimix algorithm
on our dive computers should be aware of the
risk level and be willing to accept that personal
risk and bear the full legal responsibility of
such risks. If the diver is not willing to accept
those risks, including serious injury or death,
then he or she should not dive with our Trimix
mode.
! Never risk your life on only one source
of information. Eventually, every computer
has the potential to fail, so do not depend
exclusively upon it and always have a plan
for how to handle failures. Use a redundant
divecomputer, carry backup tables and depth/
time instrumentation. If you make riskier dives,
obtain the proper training from a recognized
agency to gain the reguired technical skills
and experience needed for this type of diving.
Computer technology is never a substitute for
knowledge and training
WARNING
Before performing trimix dives with the G2 you
should practice no-stop recreational diving
to become accustomed to the interface and
functions of the dive computer.
Minimum and Maximum Operating
Depth
Absolute Minimum Depth (AMD) and
Maximum Operating Depth (MOD) are
calculated from the oxygen content in the
mix. The ppO2 that is given by the user is
divided by the oxygen fraction. The result
will be pressure, which is converted to
depth. The maximum MOD is valid for all
gases, while the minimum AMD is only
applicable to a gas mix where the oxygen
fraction is less than air.
NOTE: Air (21/0) gives a different MOD
F
than, for example, trimix 21/10. The
reason is, the G2 uses a more precise
value for the oxygen in the air, which is
20.7%.
English
GALILEO 2 (G2) USER MANUAL
61
Page 62

WARNING
Altitude diving with hypoxic mixes requires
proper acclimatization. Adaptation to lower
ppO2 levels is a slow process requiring your
body to produce more red blood cells. The
adaptation time is personal and cannot be
directly calculated. Desaturation due to
pressure drop when arriving at altitude is
another factor (see chapters: Altimeter and
Altitude diving).
Gas selection
In technical diving, especially with Trimix
blends, the decompression efciency
becomes extremely important. Gas
mixes with high helium content and low
oxygen content are not well suited for
decompression.
For example, where two decompression
mixes are in most cases enough when
air or nitrox is used as a bottom gas, in
the case of trimix the optimal off gassing
requires more decompression mixes.
So, the PMG option shall be enabled
together with trimix as described in chapter:
Diving with multiple gas mixtures also
applies to trimix diving.
Tank 1 is always the starting gas from the
surface. When you have set more than one
tank, you may change gas during the dive
manually, or when the G2 suggests it.
The minimum O
18%. This is due to the limitation that a
dive must begin with gas 1. To ensure an
adequate supply of oxygen to the body,
the gas used at the beginning of the dive
must contain enough oxygen (you can use
a travel mix or one of the decompression
gases) as is required for Tank 1. Therefore,
the rst alarm related to Absolute Minimum
Depth would be given at shallower than
1.2m/3.9ft.
setting for tank T1 is
2
WARNING
Heavy work while at the surface or at shallow
depths while breathing with less than
21% oxygen fraction may cause a loss of
consciousness and lead to drowning.
The minimum O
than tank 1 is 8%.
setting for other tanks
2
WARNING
Low Oxygen fraction settings may allow
greater MOD values. The dive computer cannot
evaluate your skills, experience or condition to
dive the MOD which is showing. Dive only at
depths that your certication allows.
The G2 calculates the maximum possible
helium fraction by subtracting the oxygen
fraction from 100%.
WARNING
Helium reduces the narcotic effect of the mix,
but does not remove it. At great depths, helium
may also cause an effect called “Helium
tremors” or HPNS (High Pressure Nervous
Syndrome).
The gas summary table is practical when
handling multiple gas mixtures. It can be
called up on a pre-dive check as well as
any time during the dive.
62
GALILEO 2 (G2) USER MANUAL
Page 63

NOTE: The Smart transmitter
F
communicates the pressure signal
frequently only from the actively used
tank. When the tank is not used within
5 minutes, the transmitter goes to a
power save mode and the pressure
update to a gas summary table may
take longer.
Compartment saturation with Trimix
In Trimix mode the compartment saturation
shows combined both helium and
nitrogen saturations separated by a thin
line. On-gassing and off-gassing of the
compartments are indicated the same way
as with a color change.
PDIS for both N2 and He
Prole Dependent Intermediate Stop
(PDIS), as described in the chapter: PDIS
(Prole Dependent Intermediate Stop),
has been extended to both nitrogen and
helium gases. The optimal off-gassing
depth will be indicated when PDIS is
enabled. PDI stops are not obligatory, but
will potentially assist in reducing possible
bubble formation.
3 .4 .4 Diving with CCR mode
The CCR (Closed Circuit Rebreather)
system is probably older than the Open
Circuit Scuba system because the basic
operating principle with manual control
didn’t require a highly reliable regulator
system.
The CCR system also uses the gas
more efciently than an open loop
system, because the oxygen is added
to the breathing loop only as needed.
Respectively, the carbon dioxide generated
by the body is bound to calc at the scrubber.
As a side effect the CCR system is nearly
bubble-free, which can be benecial when
engaged in photography or observing sh
under water.
In the CCR system the breathing gas ppO
(partial pressure of the oxygen) is kept
constant. The CCR system itself takes care
of this. Compared to an open loop system
the constant ppO2 converts to a variable
nitrox mix at different depths.
For example, a ppO
comparable to an open loop 50% nitrox
mix at a depth of 10m/33ft in salt water.
setting of 1.0bar is
2
2
WARNING
All rebreathers require unit specic education
before using them. Get the proper certications
and follow manufacturer recommendations
and procedures when diving with a rebreather
unit. Deviations may lead to severe injury or
death.
Rebreathers use multiple gases, bailout
procedures which are equal to gas switching
and many technical diving techniques.
Therefore, all considerations and warnings
of the previous chapters apply to rebreather
diving.
English
GALILEO 2 (G2) USER MANUAL
63
Page 64

Enabling the CCR mode
When the CCR mode is activated, the diluent tank appears in O2 setting.
See chapter: CCR to learn how to enable this mode.
The dive start setpoint (SP1) has a selectable range from 0.2 up to 0.95bar ppO
. The
2
bottom setpoint (SP2) has a range from 1.0 up to 1.6bar ppO2 and this is switched normally
active on the way to the bottom or when the bottom depth is reached.
The SP switch depth is suggested by the dive computer the same way the gas switches are
suggested in open circuit mode (predictive gas switching).
The switch points are determined by the equivalent oxygen contents in open circuit mode.
So, when the switch point is reached on the way down when the equivalent content of the
gas at that depth reaches the diluent O
level.
2
For example, with a SP1 of 0.5bar of the air diluent the depth would be approximately
13.8m/45.3ft in salt water.
Time
Depth
Time
SP1
Switch d epth between SP1/SP 2
Depth
SP1
SP2SP2
64
Bottom mix
Diving with 2 gas mixtures
Deco mi x
3 .5 Warnings and alarms
The G2 can alert you to potentially
dangerous situations via warnings and
alarms. You can modify the warning and
alarm settings in the menus or via a PC
interface.
3 .5 .1 Warning settings
Warnings represent situations that require
diver’s attention; however, ignoring
them does not necessarily represent an
immediate risk. It is up to you to decide
which ones you would like to be active.
Warnings are shown in the pop-up window
at the top of the display where button
descriptions are normally viewed. The
warning color is YELLOW and the related
data window is highlighted at the same
time.
Generally, warnings can be set to AUDIBLE,
VISUAL, BOTH (audible and visual) or OFF.
Diving with CCR
The available warnings are:
3 .5 .2 Maximum depth
Maximum depth will trigger a warning. See
chapter: Maximum dive depth warning
to learn how to set the warning depth.
3 .5 .3 CNS O
= 75%
2
The G2 tracks your oxygen uptake via the
CNS O
clock. If the calculated value of
2
GALILEO 2 (G2) USER MANUAL
Page 65

CNS O2 reaches 75%, the G2 will warn you
until the value drops below 75%.
3 .5 .4 No-Stop time = 2 min
If you wish to avoid unintentionally
performing a decompression dive, the G2
can activate a warning when the no-stop
time reaches 2 minutes. This applies to
both L0 no-stop and MB no-stop time (see
chapter: Diving with MB levels) for more
information on MB level diving). It gives you
the opportunity to start ascending before
incurring a decompression stop or a level
stop obligation.
3 .5 .5 Entering decompression
The G2 can activate a warning when
the rst mandatory decompression stop
appears. This alerts the diver to the fact
that a direct ascent to the surface is no
longer possible. This warning applies to
dives with the computer set to L0-L9.
3 .5 .6 Dive time
See chapter: Maximum dive time
warning to learn how to set this warning
time.
When the set dive time is reached (see
example above: 30 minutes) the warning
message is: TIME LIMIT REACHED.
English
GALILEO 2 (G2) USER MANUAL
Half of the dive time warning (above set 30
minutes = 15 minutes) gives the warning
message: TURN-AROUND TIME.
65
Page 66

3 .5 .7 Tank pressure
3 .5 .9 Pressure signal
The G2 can warn you when the tank
pressure reaches a certain level. For
instance, you can set it to half the full tank
pressure as a reminder that it is time to start
a slow ascent.
3 .5 .8 RBT = 3 min
In order to give you sufcient warning that
your gas supply may be running low, the
G2 can warn you when the RBT (remaining
bottom time) drops to 3 minutes. See
chapter: RBT = 3 min for more information
on RBT.
WARNING
If the RBT drops to 3 minutes or less, you may
not have enough gas supply to complete a
safe ascent. Start ascending when you see
this warning.
Wireless tank pressure information,
under certain circumstances—such as
inappropriate positioning of the transmitter
or interference from strong RF sources, can
be momentarily interrupted. Strobes used
in underwater photography, for example,
are known to momentarily affect the
communication between the G2 and the
wireless transmitter.
NOTE: If the G2 receives no signal
F
from the transmitter for 30 seconds,
an audible sequence goes off and the
message NO PRESSURE SIGNAL
appears on the display for 12
seconds. If, after another 40 seconds,
the G2 still has not received any signal
from the transmitter, another audible
sequence sounds and the message
PRESSURE SIGNAL LOST appears
for 12 seconds, after which the RBT is
not displayed any longer and the tank
pressure is replaced with - - -.
WARNING
In the event of a NO PRESSURE SIGNAL
situation, all tank pressure-related information
on the G2 ceases to be valid. In such a case,
you must use a backup instrument for
pressure monitoring and seek a safe ascent to
the surface. Running out of gas under water
is dangerous and may lead to severe injury or
death by drowning.
66
GALILEO 2 (G2) USER MANUAL
Page 67

3 .5 .10 Entering level stops
English
When diving with a microbubble (MB) level
other than L0, the G2 can warn you when
you are no longer in the MB no-stop phase.
For more information, see chapter: Diving
with MB levels.
3 .5 .11 MB stop ignored
When diving with an MB level higher than
L0 and in the presence of MB level stops,
the G2 can warn you if you reach a depth
shallower than the deepest required MB
level stop, therefore allowing you to avoid
missing the required stop.
3 .5 .12 MB level reduced
When diving with an MB level higher than
L0 and in the presence of MB level stops,
if you ascend more than 1.5m/5ft above
the deepest required MB level stop, the G2
reduces your MB level to the next possible
level. The display will show the new active
MB level.
3 .5 .13 L0 no-stop = 2 min
When diving with an MB level higher than
L0, the underlying L0 information is not
directly visible on the display (though it is
accessible as alternate information). You
can choose to have your G2 warn you when
the underlying L0 no-stop time reaches 2
minutes while diving with an active MB level
higher than L0.
GALILEO 2 (G2) USER MANUAL
67
Page 68

3 .5 .14 Entering decompression at
When diving with an MB level higher than
L0, the underlying L0 information is not
directly visible on the display (though it is
accessible as alternate information). You
can choose to have your G2 warn you when
you are about to enter a decompression
obligation while diving with an active MB
level higher than L0.
L0
3 .6 Alarms
The diver cannot turn off alarms because
they represent situations that require
immediate action.
Alarms are shown in the pop-up window
at the top of the display where button
descriptions are normally viewed. The
alarm color is RED and the related data
window is highlighted at the same time.
There are 7 different alarms:
• ASCENT TOO FAST
• MOD EXCEEDED
• CNS O
• TANK RESERVE REACHED
• MISSED DECO STOP
• RBT = 0 min
• LOW BATTERY
= 100%
2
WARNING
• When in Gauge mode, all warnings and all
alarms are OFF except for the low battery,
tank reserve, half tank, max depth, max dive
time and pressure signal alarm
• When the G2 is set to SOUND OFF mode, all
audible alarms and warnings are switched
off.
3 .7 Ascent rate
As you ascend during a dive, the pressure
surrounding you decreases. If you ascend
too quickly, the ensuing pressure reduction
could lead to microbubble formation. If you
ascend too slowly, the continued exposure
to high ambient pressure means that you
will continue loading some or all of your
tissues with nitrogen. Consequently, there
is an ideal ascent rate that is slow enough
to minimize microbubble formation yet fast
enough to minimize the effect of continued
loading on your tissues.
The pressure reduction that the body can
tolerate without signicant microbubble
formation is higher at depth than it is in
the shallows: The key factor is not the
pressure drop by itself, but rather the ratio
of the pressure drop relative to the ambient
pressure. This means that the ideal ascent
rate at depth is higher than it is in the
shallows.
68
GALILEO 2 (G2) USER MANUAL
Page 69

Along these lines, the G2 employs a
variable ideal ascent rate. Its value ranges
from 3 to 10m/min (10 to 33ft/min) and the
actual breakdown by depth range is listed
in the table below.
DEPTH ASC SPEED
m ft m/min ft/min
0 0 3 10
2.5 8 5.5 18
6 20 7 23
12 40 7.7 25
18 60 8.2 27
23 75 8.6 28
31 101 8.9 29
35 115 9.1 30
39 128 9.4 31
44 144 9.6 32
50 164 9.8 32
120 394 10 33
If the ascent rate is greater than 110% of
the ideal value, the speed window turns
yellow.
English
The G2 also provides an audible alarm for
ascent rates exceeding 110%: the intensity
of the alarm increases in direct proportion
to the degree that the ideal ascent rate is
exceeded.
In the event of a too-fast ascent, the G2
may require a decompression stop even
within the no-stop phase because of the
danger of microbubble formation.
From great depths a slow ascent may
cause heightened saturation of tissues
and an extension of both decompression
duration and total ascent time. At shallow
depths, a slow ascent may shorten the
decompression duration.
Excessive ascent rates for longer periods
are entered in the logbook.
For ascent rates higher than 140%, the
ASCENT TOO FAST warning is displayed
and the ascent window changes to red.
GALILEO 2 (G2) USER MANUAL
69
Page 70

WARNING
The ideal ascent rate must not be exceeded at
any time, since this could lead to microbubbles
in the arterial circulation which could cause
serious injury or death.
The alarm persists for as long as the ascent
rate is 110% or more of the ideal ascent rate.
3 .7 .1 MOD/ppO
2
WARNING
• The MOD should not be exceeded.
Disregarding the alarm can lead to oxygen
poisoning.
• Exceeding a ppO2 of 1.6bar can lead to
sudden convulsions resulting in serious
injury or death.
If you exceed the MOD, the depth change
to red with alarm text: MOD EXCEEDED.
The MOD is displayed in an alternate
display window so you can see by how
much you have exceeded it. In addition,
the G2 will beep incessantly. Both the
blinking of the depth value and the beeping
will continue for as long as you stay deeper
than the MOD.
3 .7 .2 CNS O2 = 100%
The G2 tracks your oxygen uptake via the
CNS O
clock. If the calculated value of
2
CNS O2 reaches 100%, the G2 will emit a
sequence of audible beeps for 12 seconds
and the value of the CNS O2 will turn red in
the O2 window. The red color will continue
until the value of CNS O2 drops below
100%.
The audible signal is repeated for 5
seconds in 1-minute intervals after the rst
occurrence, and for as long as the value
of CNS O2 stays at or above 100% or until
the ppO2 drops under 0.5bar (see chapter:
Diving with nitrox for a list of depths at
which the ppO2 equals 0.5bar for typical
nitrox mixes).
3 .7 .3 Tank reserve pressure
See chapter: Tank reserve to learn how
to set the tank reserve pressure limit. When
this set pressure is reached during the dive
an alarm is triggered.
reached
70
WARNING
When the CNS O2 reaches 100% there is
danger of oxygen toxicity. Start the procedure
to terminate the dive.
GALILEO 2 (G2) USER MANUAL
Page 71

3 .7 .4 Missed decompression stop
3 .7 .6 Low battery
WARNING
Violating a mandatory decompression
obligation may result in serious injury or death.
If, when conducting a required
decompression stop, you ascend more
than 0.5m/2ft above the required stop,
the G2 will trigger an alarm. The value of
the current depth and the text: MISSED
DECO STOP! is shown and a sequence of
beeps can be heard. This will continue for
as long as you stay 0.5m/2ft or more above
the required stop
3 .7 .5 RBT = 0 min
The situation when RBT reaches 0 minutes
can be selected as a warning or alarm. See
chapter: RBT warning or alarm to read
more about this setting.
WARNING
Do not start a dive if the low battery warning
is displayed on the screen at the surface. The
computer may fail to function during the dive
and this could lead to serious injury or death.
During the dive, the G2 alerts you of
precarious battery situations in two ways:
1. By displaying a battery symbol with
a background warning color on the
screen.
2. By displaying a warning message at
the top of the display (where button
descriptions are normally shown).
English
GALILEO 2 (G2) USER MANUAL
71
Page 72

3 .8 Display information
Upon immersion, the G2 will automatically
start to monitor the dive regardless of
what state it was in prior to the immersion.
Details on the information displayed can be
found in the next sections.
Dive time. The dive time is displayed in
minutes. If during the dive you ascend to
the surface, the time spent on the surface
will only be counted if you descend again
below 0.8m/3ft within 5 minutes (default
setting, or you can set from 3 to 30 minutes).
This allows for brief periods of orientation.
While on the surface, the time will not
show as progressing but it is running in the
background. As soon as you submerge,
the time will resume, including the time
spent on the surface. If you spend more
than 5 minutes (or which time you have
set) at depth shallower than 0.8m/3ft, the
dive will be considered ended, the logbook
closed and a subsequent immersion would
cause the dive time to start again from zero.
Maximum displayed time is 999 minutes.
For dives longer than that, the dive time
starts again from 0 minutes.
Only dives longer than 2 minutes are stored
to logbook.
Depth. The depth is given in 10cm
resolution in metric mode. When displayed
in feet, the resolution is always 1 foot. At a
depth shallower than 0.8m/3ft, the display
shows ---. The G2’s maximum possible
operating depth is 120m/394ft.
No-stop time. Calculated in real time
and updated every 4 seconds. Maximum
displayed no-stop times is 99 minutes.
Temperature. The G2 displays the
water temperature during the dive and
the air temperature while on the surface.
However, skin temperature inuences the
measurement when the unit is worn on the
wrist in contact with the diver’s skin.
Decompression information. When the
G2 calculates the need for a mandatory
decompression stop, it shows you how
long and how deep your deepest stop is. It
also gives you the total ascent time.
WARNING
During all dives, perform a safety stop
between 3 and 5 meters (10 and 15 feet) for
3 to 5 minutes, even if no decompression stop
is required.
3 .8 .1 Display conguration during
the dive
The G2 lets you select from four screen
layout options: Light, Classic, Full or
Graphical. You can also rotate the screen,
if you prefer, to have the buttons positioned
at the bottom of the screen.
The Light screen conguration is the
factory default. It shows only the basic
information with large numbers. When the
dive requires decompression and more
information must be shown on the display,
the display changes automatically to the
Classic conguration.
72
GALILEO 2 (G2) USER MANUAL
Page 73

The Classic screen presents more
information with smaller numbers in smaller
windows.
The Full screen conguration displays
the maximum amount of information. This
screen is for divers who prefer to monitor all
of the parameters that the G2 can provide.
The Graphical screen conguration
combines numeric information with an
actual dive prole. The diver is represented
by the gray cursor line in the graphical
prole. Projected ascents and stops before
surfacing are shown on the right side of the
cursor line.
English
GALILEO 2 (G2) USER MANUAL
73
Page 74

Regardless of screen conguration, the G2 utilizes one window for displaying additional
information regarding the dive. By pressing the MORE button the G2 will show in sequence
the following data on the different screens:
Screen
conguration
1 Tank pressure Max depth O
2 Max depth O
Light Classic Full Graphical
% Max depth
% PDIS O2%
2
2
3 PDIS PDIS Average depth PDIS
4 Temperature HR Skin temperature HR
5 HR Skin temperature Battery level Skin temperature
6 Skin temperature Battery level CNS% Battery level
7 Battery level Stopwatch ppO
8
Active MB level if
not L0
Active MB level if
not L0
OTU
2
Stopwatch
Active MB level if
not L0
9 MB L0 info MB L0 info MB L0 info
10 Time of day Time of day Time of day
11 CNS% CNS% CNS%
12 Average depth Average depth
13 ppO
2
ppO
2
14 OTU OTU
A press-and-hold of the MORE button
launches a dive prole (or gas/deco
summary displays depending on MB/PMG
settings) display. This screen will remain for
12 seconds and return to the normal dive
display unless buttons are pressed.
74
With the ARROW buttons you can scroll
to the next display, which is the relative
compartment saturation display. The
height of each bar indicates the ratio of
current tissue loading with respect to the
maximum tolerable loading, expressed in a
percentage. The green color indicates that
the compartment is off-gassing, and the
red color shows on-gassing.
The following display shows a list of
pictures stored in the G2’s ash memory.
See chapter: USB ash disk operations
for more information on how and where to
save pictures that can be viewed during the
dive.
With a press-and-hold of the middle button
you will enter the pictures list. With the
ARROW buttons you can select the picture
you want to view. A press-and-hold of the
middle button lets you view the selected
picture.
GALILEO 2 (G2) USER MANUAL
Page 75

English
You can use the pictures for:
• fish identification
• dive site maps
• task/check lists
• notes
and many other underwater purposes.
Following are some examples:
NOTE: Prole, compartment
F
saturation, and pictures can be
viewed for a maximum of 1 minute,
after which the normal dive screen will
appear again. If any warning or alarm
is triggered while viewing alternate
screens, the G2 will immediately revert
to the normal dive screen.
3 .8 .2 Setting bookmarks
By pressing the BOOK button you can set
any number of bookmarks as reminders of
particular moments during the dive. The
bookmarks will appear on the dive prole
in LogTRAK.
3 .8 .3 Stop watch timer
There are many situations during a dive
where a simple stop timer is practical
(timed tasks at dive courses, etc.).
The G2 has a stop timer integrated into
the Scuba mode. The stop timer can be
accessed by pressing the MORE button.
When displayed, the stop watch counting
can be reset by pressing the BOOK button.
The timer starts counting at immersion.
GALILEO 2 (G2) USER MANUAL
75
Page 76

The stop timer generates a bookmark,
which will appear on the dive prole in the
LogTRAK.
3 .8 .4 Safety stop timer
If a minimum depth of 10m/30ft has
been reached during the dive, at a depth
of 5m/15ft the safety stop timer will
automatically start a countdown. If you go
below 6.5m/20ft, the timer will disappear
and the no-stop time is shown again. Upon
returning to 5m/15ft, the timer will start
again automatically.
3 .8 .5 Backlight
In the menu 8.3 Backlight duration you
can select the time and function of the
backlight. Normally the backlight is dimmed
to low intensity and can be brightened by
pressing the LIGHT button.
NOTE: The display is totally off when
F
the low power mode becomes active
(only one battery segment is left)
and by pressing the right button the
display is illuminated for 10 seconds.
3 .8 .6 Compass
The compass can be activated during the
dive by a press-and-hold of the LIGHT/
DIM button. The display will change to the
compass screen where a large compass
rose is shown and the core numeric
information of the dive.
76
The safety stop timer can be restarted by
pressing the TIMER button.
GALILEO 2 (G2) USER MANUAL
Page 77

3 .9 Diving with MB levels
Microbubbles (MB) are tiny bubbles that
can build up inside a diver’s body during any
dive and normally dissipate naturally during
an ascent and on the surface after a dive.
Dives conducted within no-stop times and
the observance of decompression stops do
not prevent the formation of microbubbles
in the venous blood circulation.
Dangerous microbubbles are those
migrating into the arterial circulation. The
reasons for the migration from the venous
blood circulation to the arterial circulation
can be a many microbubbles collecting in
the lungs. SCUBAPRO has equipped the
G2 with technology to help protect divers
from these microbubbles.
With the G2, you can choose – according
to your specic needs – a MB level that
will provide a level of protection from
microbubbles. Diving with MB levels
includes additional ascent stops (level
stops); this slows the ascent process,
giving the body more time to desaturate.
This works contrary to the formation of the
microbubbles and may increase safety.
The G2 features 10 microbubble levels (L0-
L9). Level L0 corresponds to SCUBAPRO’s
well-known decompression model ZH-L16
ADT and does not require level stops due
to microbubble formation. Levels L1 to L9
offer additional protection from microbubble
formation, with level L9 offering the highest
protection.
Similar to the display of information during
decompression dives or dives within nostop time, the G2 displays depth and
duration of the rst level stop as well as the
total time of ascent as soon as the MB nostop time has run out. As the MB no-stop
time is shorter than the ordinary no-stop
time you will be required to perform a stop
(level stop) sooner than a diver using level
L0.
If you ignore a required level stop, the G2
will simply step down to a lower MB level.
In other words, if you choose level L4 prior
to the dive, and during the dive you ignore
the L4’s recommended stops, the G2 will
automatically adjust the setting to level L3
or lower.
3 .9 .1 Comparison of dives with MB
level L0 and MB level L5
When two G2 dive computers are used
simultaneously, with one unit set to a MB
level of L5 and the other to a MB level of
L0, the no-stop time for the L5 unit will
be shortened and more level stops will be
required before the diver has the obligation
of a decompression stop. These additional
level stops help dissipate microbubbles.
L0
Depth
Time
L5
3 .10 PDIS (Prole Dependent
Intermediate Stop)
3 .10 .1 Introduction to PDIS
The main purpose of a dive computer is to
track your nitrogen uptake and recommend
a safe ascent procedure. Diving within the
so called no-stop limits means that at the
end of the dive you can ascend directly to
the surface, albeit at a safe ascent rate,
while for dives outside of the no-stop limit
(so-called decompression dives), you must
perform stops at certain depths below the
surface and allow time for excess nitrogen
to be expelled from your body before
nishing the dive.
In both cases, it can be benecial to stop
for a few minutes at an intermediate depth
between the maximum attained depth
during the dive and the surface or, in case
of a decompression dive, the rst (deepest)
decompression stop.
An intermediate stop of this kind is benecial
as soon as the ambient pressure at that
depth is low enough to ensure that your
body is predominantly off-gassing nitrogen,
even if under a very small pressure gradient.
In such a situation, you can still cruise along
the reef and enjoy the dive while your body
gets a chance to slowly release nitrogen.
English
GALILEO 2 (G2) USER MANUAL
77
Page 78

In recent times, so called “deep” stops have
been introduced in some dive computers
and tables, dened as half the distance
from the dive’s maximum depth and the
surface (or the lowest decompression
stop). Spending 2 or 15 minutes at
30m/100ft would result in the same deep
stop at 15m/50ft.
With PDIS, as the name suggests, the G2
interprets your dive prole and suggests an
intermediate stop that is a function of your
nitrogen uptake so far. The PDI stop will
therefore change through the course of the
dive to reect the continuously changing
situation in your body. Along the same lines,
PDIS will account for the accumulated
nitrogen from previous dives; hence,
PDIS is also repetitive-dive dependent.
Conventional deep stops completely ignore
these facts.
The following gure quanties the extent
of PDIS and illustrates its dependence on
cumulative nitrogen uptake for 2 sample
dive proles. This gure also demonstrates
the conceptual difference between PDIS
and the rather rudimentary “deep” stops.
Specically, the gure compares 2 dive
proles to a maximum depth of 40m/132ft
that are otherwise very different. Prole
1 stays at 40m/132ft for 7 minutes, then
ascends to 30m/100ft for 3 minutes,
followed by 12 minutes at 20m/65ft. Prole
2 stays less than 2 minutes at 40m/132ft,
then ascends to 21m/69ft and stays
there for 33 minutes. Both dive proles
are no-stop dives to the limit of entering
decompression.
The solid line represents the PDIS depth as
displayed on the computer screen during
the course of the dive for prole 1, the
broken line represents the PDIS depth as
displayed on the computer screen during
the course of prole 2. One can see that the
displayed PDIS depth increases as more
nitrogen is accumulated in the body, but
does so very differently in the 2 dives due
to the different exposure in the 2 proles.
The PDI stop is carried out at 25 minutes
for prole 1 and at 37 minutes for prole 2,
followed by the safety stop at 5m/15ft.
The line made up of small solid dots, on
the other hand, represents the depth that
would be displayed by a computer following
the conventional deep stop method, and it
would be the same for the 2 dive proles.
Deep stops completely ignore any facts
about the dives themselves aside from max
depth.
78
10m
20m
30m
40m
8min 16min 24min 32min 40min 48min
PDIS Prole 1 PDIS Prole 2
Deep Stop
DEPTH
Dive Prole 2
Dive Prole 1
DIVE TIME
SAFETY STOP
PDI STOP
GALILEO 2 (G2) USER MANUAL
Page 79

3 .10 .2 How does PDIS work?
The mathematical decompression model in
the G2, called ZH-L16 ADT MB PMG, tracks
your decompression status by dividing
your body into 16 so-called compartments
and mathematically following the uptake
and release of nitrogen in each with the
appropriate laws of physics. The various
compartments simulate parts of your body
such as central nervous system, muscles,
bones, skin and so on.
The depth of the PDI stop is calculated as
that at which the leading compartment for
the decompression calculation switches
from on-gassing to off-gassing, and the
diver is advised to perform a 2-minute
stop above the displayed depth (this is the
opposite of a decompression stop, where
you are asked to remain just beneath the
displayed depth). During this intermediate
stop, the body is not taking up any more
nitrogen in the leading compartment, but
rather releasing nitrogen (though under
a very small pressure gradient). This,
combined with the relatively high ambient
pressure, inhibits bubble growth.
It should be noted that the 4 fastest
compartments, up to 10-minute half-times,
respectively, are not considered for the
determination of the PDI stop depth. This
is due to the fact that these compartments
are only “leading” for very short dives, for
which an intermediate stop is not required
at all.
WARNING
Even when performing a PDI stop, you still
MUST perform a safety stop at 5m/15ft for 3
to 5 minutes. Performing a 3- to 5-minute stop
at 5m/15ft at the end of any dive remains the
best thing you can do for yourself!
3 .10 .3 Special considerations when
diving with more than one
gas mixture (G2)
Switching to a higher oxygen concentration
mix during the dive inuences the PDI stop.
This needs to be accounted for, in line with
the predictive nature of multi-gas handling
in ZH-L16 ADT MB PMG.
When diving with more than one gas
mixture, the G2 displays the PDIS depth
according to the following rules:
• If the PDI stop calculated for the bottom
mix (gas 1) is deeper than the switch
depth, then this calculated value is
displayed.
• If the PDI stop calculated for gas 1
is shallower than the switch depth to
gas 2, then the displayed PDI stop is a
function of gas 2.
In case of a missed gas switch, the G2
reverts to the PDI stop for the actively
breathed mix.
English
NOTE: The PDI stop is not a mandatory
F
stop, and it is NOT a substitute for the
3- to 5-minute safety stop at 5m/15ft.
GALILEO 2 (G2) USER MANUAL
79
Page 80

3 .10 .4 Diving with PDIS
NOTE: To use the PDIS feature, you
F
must enable PDIS (see chapter:
PDIS.).
The PDIS depth is shown in the middle
window. During a no-stop dive, as soon as
you reach that depth during an ascent, a
2-minute countdown will appear. You can
have one of 3 situations:
When the calculated PDI stop is deeper
than 8m/25ft, the G2 shows it on the display
(middle-left window) and continues to do so
until you reach the displayed depth during
an ascent. The displayed value changes
during the dive as the G2 tracks the uptake
of nitrogen in the 16 compartments and
updates the PDIS depth accordingly to
reect the optimum at all times.
1. You have spent 2 minutes within
3m/10ft above the indicated depth. The
countdown timer disappears and the
alternate information window shows OK
as an indication that PDIS is performed.
2. You have descended more than
0.5m/2ft below the PDIS. The
countdown timer disappears and will
reappear again, starting at 2 minutes,
the next time you ascend to the PDIS
depth.
3. You have ascended more than 3m/10ft
above the PDIS. The PDIS value and
countdown timer disappear and the
alternate information window shows
NO as an indication that PDIS is not
performed.
NOTE: The G2 issues no warnings
F
relating to a missed PDI stop.
When diving with MB levels, PDIS follows
the same rules as described above. MB
levels, however, introduce stops earlier
and deeper than the L0 base algorithm. As
such, the PDIS display may be delayed and
for certain dives it may not be displayed at
all. This, for example, would be the case for
a shallow dive with air (21% oxygen) and a
MB level L5.
80
GALILEO 2 (G2) USER MANUAL
Page 81

3 .11 Gauge mode
Possible screen congurations in Gauge
mode are Graphical and Classic. See menu
9.1. Screen conguration to change
between the modes.
When the G2 is set to Gauge mode, it will
only monitor depth, time, and temperature,
and will not carry out any decompression
calculations. You can only switch to
Gauge mode if the computer is completely
desaturated. All audible and visual warnings
and alarms, other than the low battery, tank
reserve, half tank, max depth max dive time
and pressure signal alarm, are turned off.
When on the surface in Gauge mode,
the G2 will show neither the remaining
desaturation time nor the CNS O
It will, however, display a surface interval up
to 24 hours and a 48-hour no-y time. This
no-y time is also the time during which you
cannot switch back to computer mode.
The Gauge mode surface display after a
dive shows the dive time in the top row. In
the middle row the stopwatch is running
from the dive start or last manual restart.
In the bottom row the maximum depth of
the dive is shown. After a 5-minute timeout
the display changes to Gauge menu mode.
During a dive in Gauge mode, the G2
displays a stopwatch. This can be reset
and restarted by pressing the SW button
which also sets a bookmark.
With a press-and-hold of the SW button
the gas switch procedure can be started.
While in Gauge mode, the average depth
can be reset. To reset the average depth,
press the AVG button which also sets a
bookmark.
With a press-and-hold of the AVG button
the prole is displayed followed by the
pictures.
Dimming the display screen is accomplished
by pressing the DIM button. A press-andhold of the DIM button will activate the
compass display.
% value.
2
English
Dives in Gauge mode are performed at your
own risk. After a dive in Gauge mode you must
wait at least 48 hours before diving using a
decompression computer.
GALILEO 2 (G2) USER MANUAL
WARNING
81
Page 82

3 .12 Apnea mode
The G2 has an advanced Apnea diving
mode which can be enabled from the
feature upgrade (see menu 8. Other
settings). The main features include
a faster sampling rate than in Scuba
mode along with alarm functions tailored
specically to Apnea diving.
The G2 measures the depth in Apnea
mode every 0.25 seconds to ensure the
precise maximum depth. In the logbook
the data is saved in 1-second intervals. In
Apnea mode it is also possible to start and
stop the dive manually with a press-andhold of the MENU button. This way you can
use the G2 for static Apnea dives, where a
normal dive start depth of 0.8 meters will
not start a new dive.
As with Gauge mode, the G2 in Apnea
mode doesn’t carry out any decompression
calculations. You can only switch to Apnea
mode if the computer is completely
desaturated.
Apnea mode at the surface after a dive
shows the maximum depth and the dive
duration. The surface interval counter starts
after surfacing and the heart rate shows the
current measured value.
Dive session values like water temperature,
total dive time, number of dives and
minimum heart rate are shown with white
color as shown on the screen below.
Apnea mode during the dive shows the
current depth, dive time, ascent or descent
speed, water temperature, maximum depth
and heart rate.
By pressing the SKIN button the temperature
measured from the SCUBAPRO heart rate
belt will be shown in the window of the
heart rate.
82
GALILEO 2 (G2) USER MANUAL
Page 83

4 . G2 ACCESSORIES
4 .1 Bungee arm strap
Divers wearing thick neoprene wetsuits
or drysuits may prefer bungee mounting
instead of a standard arm strap. The G2 is
designed so that bungees can be afxed
at the corners of the device for maximum
stability.
The arm strap can be removed by pressing
the axle pins sideways through the bungee
rings.
NOTE: Arm strap axle holes
F
in the housing are not symmetric!
When removing the arm strap axis,
place the pressing tool from the
smaller diameter side. Do not use the
opposite side bungee ring as support
when pressing the pin out.
4 .2 Wireless high pressure
transmitter
The G2 supports wireless tank pressure
using Smart series transmitters. With the
PMG function enabled you can use up to 8
transmitters with your G2.
Additional transmitters can be purchased
separately from your authorized
SCUBAPRO dealer.
NOTE: There are 3 generations of
F
Smart transmitters: Smart, Smart+
(longer distance) and Smart+ LED.
The G2 is compatible with all of these
versions.
4 .3 Skin temperature heart
rate belt
The new SCUBAPRO heart rate belt
features a patented skin temperature
measurement and transmission that is
supported by the G2.
The proper positioning for wearing a HR belt
is shown below. Adjust the strap so that it
is comfortable to wear but snug enough so
that it stays in place. When wearing a dive
suit the HR belt must be directly against the
skin. Moisten the electrode areas if your
skin is dry or when using a drysuit.
English
GALILEO 2 (G2) USER MANUAL
83
Page 84

You must enable the heart rate setting on
your G2. Refer to chapter: Workload for
instructions on how to do this.
After a dive rinse the heart rate belt in fresh
water, dry it and store it in a dry place.
For HR belts tted with a battery cap, it is
recommended that the battery be changed
by an authorized SCUBAPRO dealer.
Check the operating conditions and depth
rating of the HR belt from the unit or its
package.
4 .4 Bluetooth USB stick
PC’s with Bluetooth driver version lower
than 4.0 require a generic Bluetooth dongle
4.0 or higher in combination with Windows
operating system 8 or higher.
With older operating systems a BlueGiga
type dongle is required.
NOTE: Laptops with an old internal
F
Bluetooth module (a driver lower than
4.0) will require an external generic
USB Bluetooth stick.
5 . INTERFACES FOR
THE G2 AND AN
INTRODUCTION TO
LOGTRAK
LogTRAK is the software that allows
the G2 to communicate with various
operating systems. LogTRAK is available
for Windows, Mac, Android and iOS. In
the following section, Windows and Mac
versions of LogTRAK are introduced.
Android and iPhone/iPad versions of
LogTRAK operate similarly but do not
have all the features offered in the PC/Mac
versions.
The following functions can be
accomplished using LogTRAK:
• Download dive profiles.
• Personalize your G2 (owner and
emergency information) – currently
Windows and Mac only.
• Enable G2 warnings – Windows and
Mac only.
Other functions can be accomplished by
accessing a ash drive with a Windows or
Mac directly:
• Update G2 firmware.
• Download pictures.
84
GALILEO 2 (G2) USER MANUAL
Page 85

• G2 feature upgrades.
• Special language upgrades.
• Additional color themes.
• Startup picture personalization.
In order to take advantage of these features,
you need to establish a communication
between your PC/Mac and your G2.
5 .1 Charging and using the
G2 with a USB interface
Charging and communication between the
G2 and a PC/Mac is possible with the USB
cable which is included with the G2.
Clean and dry the USB contact pins with
a soft towel before connecting the G2 to
a charger.
English
The correct method for inserting the
connector is shown in the pictures below.
Dirt on any contact surfaces may increase the
electrical resistance and burn/harden the dirt
so that it is difcult to remove afterwards. To
enjoy trouble-free operation and a long service
life, clean the contacts of your G2 before
charging.
Always charge the G2 in a dry and clean
environment.
The connector will be pressed in through
the gap which is behind the buttons.
GALILEO 2 (G2) USER MANUAL
WARNING
WARNING
85
Page 86

5 .2 Bluetooth
When you select menu 13. Bluetooth,
the Bluetooth function will be enabled and
“State: Initializing” will be shown for a few
seconds. After this, the G2 is ready for
communication. Bluetooth is active only
when this menu is displayed.
Set the device to which you want to contact
your G2 to scanning mode. Once you’ve
selected contact with your G2, the pin
code appears on the G2’s display screen
as shown below.
When the code is accepted by the other
device, the link is ready for communication
and the following display is shown on the
G2’s screen.
NOTE: the G2 has a timeout of 3
F
minutes for a non-active Bluetooth
connection. After this interval the G2
will disable Bluetooth and return to
the normal time-of-day screen to save
energy.
5 .2 .1 Connecting the G2 with
You can use either Bluetooth or USB with
LogTRAK.
To start the communication with USB:
1. Connect to your G2 with the USB cable,
2. Push the right button labeled LOG. The
LogTRAK
at which time the following display will
appear on the G2 display:
following screen will appear on the G2
display.
86
3. Launch LogTRAK.
4. Check that the G2 is detected by
LogTRAK.
Extras -> Options -> download
5. If it is not automatically detected, run
the “Rescan plugged device.”
GALILEO 2 (G2) USER MANUAL
Page 87

5 .2 .2 Download dive proles
From LogTRAK, by selecting Dive ->
Download Dives you can transfer the G2
Logbook to your PC/Mac.
There are three main views, each showing
a specic part of your dive logs:
1. Prole, showing the graphical data of
the dive.
2. Details about the dive, where you can
edit, for example, the equipment and
tank information.
3. Location, which shows your dive site on
the world map.
The selection tabs for views are at the top
of the main window.
English
5 .2 .3 Changing warnings/settings
on the G2, and reading
computer info
By selecting Extras -> Read dive computer
settings, you can enable/disable warnings
that cannot be changed on the actual G2
unit via the menu system.
GALILEO 2 (G2) USER MANUAL
Read chapter: Warnings and alarms
about the possible selections that you can
modify on your G2.
You may also change the shown units
between metric/imperial. Select Extras ->
Options -> measurement units:
87
Page 88

5 .2 .4 USB ash disk operations
1. Connect the USB cable to your G2. The
following display will appear on the G2
display:
3. Your PC or Mac will detect the G2 ash
memory as a normal USB memory
sticks.
4. You can now select the G2 ash disk on
your browser.
There are 3 folders on the G2 ash disk:
Logbooks, Pictures and System.
WARNING
Do not erase any of the system folders from
your G2! Removing system folders will lead to
a malfunctioning G2. Diving with a G2 is not
safe if data has been removed.
The logbook folder is a hidden le. You can
make a backup copy of it, but you should
not remove it.
88
2. Select disk. The following display will
appear the G2 screen.
You can store pictures (sh, underwater
plants or maps) that the G2 can display
during diving in the Pictures folder.
The G2 supports the following formats: jpg,
bmp and gif. Pictures must be stored in a
320 x 240 pixels size format!
In the System folder there are several sub
folders.
GALILEO 2 (G2) USER MANUAL
Page 89

6 . TAKING CARE OF
YOUR G2
You can copy data that is provided at
www.scubapro.com to the following
folders for added functionality, or to receive
updates:
• FeatureUpgrade
• Fonts
• Languages
• SWUpdate
• Themes
You can personalize your G2 startup by storing a custom picture in the
StartUpPictures folder.
6 .1 Format ash disk
English
If G2 communication is interrupted during
the ash memory write process, or if the
G2’s battery power is exhausted when the
ash is used, the memory content may
become corrupted. In this case the G2
displays the following warning:
WARNING
Do not use the G2 if the ash disk becomes
corrupted. The G2 may not operate correctly
when ash memory access is not available.
False operations may display faulty
information. During a dive this may lead to
serious injury or death.
GALILEO 2 (G2) USER MANUAL
NOTE: To prevent ash disk
F
corruption, 1) use the Safe Remove
and Eject Media function, and 2) keep
the G2 battery charged to prevent
unintended resets.
In the event the ash disk is corrupted, the
following menu appears in menu 8. Other
settings.
8.11 Format ash disk
89
Page 90

Security code 313 will be required to
proceed with this operation.
WARNING
All data stored to ash will be erased. This
includes all dive logs. To prevent the loss of
your G2 data:
1. Keep a backup on your PC/Mac.
2. Download and store your dive logs with
LogTRAK.
6 .2 Technical information
Operating altitude:
with decompression – sea level to
approximately 4000m/13300ft.
without decompression (Gauge mode) –
at any altitude.
Max operating depth:
120m/394ft; resolution is 0.1m until
99.9m, and 1m at depth deeper than
100m. Resolution in feet is always 1ft.
Accuracy is within 2% ±0.2m/1ft.
Decompression calculation range:
0.8m to 120m / 3ft to 394ft.
Clock:
quartz clock, time, date, dive time display
up to 999 minutes.
Oxygen concentration:
adjustable between 8% and 100%.
Helium concentration:
adjustable between 0% and 92%.
Operating temperature:
-10C to +50C / 14F to 122F.
Power supply:
Li-Ion battery, user chargeable via USB.
Operation time with fully charged battery:
Up to 50h. Actual battery operation
time depends mainly on the operation
temperature and backlight settings, but
also many other factors.
6 .3 Maintenance
The G2’s depth accuracy should be
veried every two years by an authorized
SCUBAPRO dealer.
The tank pressure gauge and the parts of
this product used to measure tank pressure
should be serviced by an authorized
SCUBAPRO dealer every other year, or
after 200 dives (whichever comes rst).
Aside from that, the G2 is virtually
maintenance-free. All you need to do is
rinse it carefully with fresh water after each
dive and charge the battery when needed.
To avoid possible problems with your G2,
the following recommendations will help
assure years of trouble-free service:
• Avoid dropping or jarring your G2.
• Do not expose your G2 to intense,
direct sunlight.
• Do not store your G2 in a sealed
container; always ensure free ventilation.
• If there are problems with the water
or USB contacts, use soapy water to
clean your G2 and dry it thoroughly. Do
not use silicone grease on the water
contacts!
• Do not clean your G2 with liquids
containing solvents.
• Check the battery capacity before each
dive.
• If the battery warning appears, charge
the battery.
• If any error message appears on
the display, take your G2 back to an
authorized SCUBAPRO dealer.
90
GALILEO 2 (G2) USER MANUAL
Page 91

6 .4 Replacing the battery in
transmitter
The following parts of the transmitter are
shown in the drawing above:
1 Transmitter cap screws.
2 HP port O-ring.
3 Main O-ring.
4 CR 2/3 AA battery.
5 Transmitter cap.
To change the battery in the high-pressure
transmitter:
1. Dry the transmitter with a soft towel.
2. Open the screws.
3. Replace the main O-ring (replacement
O-rings are available from your
authorized SCUBAPRO dealer).
4. Remove the empty battery and recycle
it in an environmentally friendly way.
5. Insert the new battery. Note the
polarity, “+” is marked on the body.
Do not touch to poles or contacts with
bare ngers.
6. Close the screws.
7. Check the transmitter function and
housing sealing.
7 .1 Replacing the battery in
Heart Rate Belt
The following parts of the Heart Rate Belt
are shown in the drawing above:
1. Battery cap
2. O-ring
3. CR2032
4. Heart Rate Belt body
To change the battery in the Heart Rate
Belt:
1. Dry the Heart Rate Belt with a soft
towel.
2. Open the battery cap.
3. Replace the main O-ring (replacement
O-rings are available from your
authorized SCUBAPRO dealer).
4. Remove the empty battery and recycle
it in an environmentally friendly way.
5. Insert the new battery. Note the
polarity, “+” is marked on the body.
Do not touch to poles or contacts with
bare ngers.
6. Close the battery cap. (Note the correct
closing position mark).
7. Check the Heart Rate Belt function and
housing sealing.
WARNING
We recommend having the Heart Rate Belt
battery replaced by an authorized SCUBAPRO
dealer. The change must be made with
particular care in order to prevent water
from seeping in. The warranty does not cover
damages due to improper placement of the
battery or the incorrect closing of the battery
cap.
English
We recommend having the transmitter battery
replaced by an authorized SCUBAPRO dealer.
The change must be made with particular
care in order to prevent water from seeping
in. The warranty does not cover damages due
to improper placement of the battery or the
incorrect closing of the battery cap.
GALILEO 2 (G2) USER MANUAL
WARNING
7 .1 Warranty
The G2 has a 2-year warranty covering
defects in workmanship and functioning.
The warranty only covers dive computers
which have been bought from an
authorized SCUBAPRO dealer. Repairs or
replacements during the warranty period
do not extend beyond the warranty period
itself.
91
Page 92

Excluded from warranty coverage are faults
or defects due to:
• Excessive wear and tear.
• Exterior influences, e.g. transport
damage, damage due to bumping and
hitting, influences of weather or other
natural phenomena.
• Servicing, repairs or the opening
of the dive computer by anybody
not authorized to do so by the
manufacturer.
• Pressure tests which do not take place
in water.
• Diving accidents.
• Opening the G2 housing or metal cap
on the side of the G2.
WARRANTY VOID
IF OPENED
For European Union markets, the warranty
of this product is governed by European
legislation in force in each EU member
state.
All warranty claims must be returned
with dated proof-of-purchase to an
authorized SCUBAPRO dealer. Visit
www.scubapro.com for the dealer nearest
you.
92
Your dive instrument is manufactured with high-quality components that can be
recycled and reused. Nevertheless, these components, if not properly managed in
accordance with the regulations on electrical and electronic equipment waste, are
likely to cause harm to the environment and/or to human health. Customers living
in the European Union can contribute to protecting the environment and health
by returning old products to an appropriate collection point in their neighborhood
in accordance with EU Directive 2012/19/UE. Collection points are provided by
some distributors of the products and local authorities. Products marked with the
recycling symbol on the left must not be disposed of in normal household waste.
GALILEO 2 (G2) USER MANUAL
Page 93

8 . GLOSSARY
AMD Absolute Minimum Depth, the depth where a mix can be started to be
used based on its oxygen content
AVG Average depth, calculated from the beginning of the dive or from the
time of reset
CNS O
2
Central Nervous System oxygen toxicity
DESAT Desaturation time. The time needed for the body to completely eliminate
any nitrogen taken up during diving
Dive time The time spent below a depth of 0.8m/3ft
Gas Refers to the main gas that is set for the ZH-L16 ADT MB algorithm
Local time the time in the local time zone
Max depth Maximum depth attained during the dive
MB: Microbubble. Microbubbles are tiny bubbles that can build up in a
diver’s body during and after a dive
MB level: One of the 9 steps, or levels, in SCUBAPRO’s customizable algorithm
MOD: Maximum Operating Depth. This is the depth at which the partial
pressure of oxygen (ppO
) reaches the maximum allowed level
2
(ppO2max). Diving deeper than the MOD will expose the diver to unsafe
ppO2 levels
Nitrox: A breathing mix made of oxygen and nitrogen, with the oxygen
concentration being 22% or higher. In this manual, air is considered as
a particular type of nitrox
NO FLY Minimum amount of time the diver should wait before taking a plane
No-stop time: This is the time that a diver can stay at the current depth and still
make a direct ascent to the surface without having to perform
decompression stops
: Oxygen.
O
2
O2%: Oxygen concentration used by the computer in all calculations
PDIS: Prole Dependent Intermediate Stop is an additional deep stop
which is suggested by the G2 at a depth where the 5th, 6th or 7th
compartment starts off-gassing
: Partial pressure of oxygen. This is the pressure of the oxygen in the
ppO
2
breathing mix. It is a function of depth and oxygen concentration. A
ppO2 higher than 1.6bar is considered dangerous
max: The maximum allowed value for ppO2. Together with the oxygen
ppO
2
concentration, it denes the MOD
Press: The act of pressing and releasing one of the buttons
Press-andhold:
The act of pressing and holding one of the buttons for 1 second before
releasing it
INT.: Surface interval, the time from the moment the dive is closed
SOS mode: The result of having completed a dive without respecting all mandatory
decompression obligations
English
GALILEO 2 (G2) USER MANUAL
93
Page 94

Stopwatch: A stopwatch, for example, to time certain legs of the dive
Switch depth The depth at which the diver plans to switch to a higher oxygen
concentration mix while using the multi-gas option in the ZH-L16 ADT
MB PMG algorithm
UTC: Universal Time Coordinated, refers to time zone changes when
traveling
TAT: Total Ascent Time
RBT: Remaining Bottom Time
CCR: Closed Circuit Rebreather
Trimix: A gas mixture containing Oxygen, Helium and Nitrogen
PMG: Predictive Multi Gas
OTU: Oxygen Toxicity Unit
94
GALILEO 2 (G2) USER MANUAL
Page 95

9 . INDEX
AMD ....................................20, 27, 61, 93
Active backlight ...............................39, 51
Warning clock ............................25, 36, 18
Warnings .......................28, 32, 53, 64, 87
All-silent mode .................................18, 25
Altimeter ..........................................18, 32
Ascent rate ............................................68
Backlight ...................................39, 40, 76
Battery ................................51, 68, 71, 91
Bookmarks ............................................75
Buttons ...........................................11, 51
Clock settings ..................................18, 36
.........................33, 50, 64, 70, 93
CNS O
2
Date ................................................36, 37
Desaturation .............................24, 49, 93
Desaturation reset .....................24, 49, 93
Dive planner ....................................18, 45
Diving at altitude ....................................53
Flying after diving .............................54, 12
Gauge mode .......................81, 11, 52, 54
Logbook ....................................11, 18, 46
Maintenance ..........................................90
MB levels ...............................................77
Microbubbles ...................................77, 93
MOD .........................................21, 59, 61
Mountain lakes ......................................55
No-dive warning .................................... 12
Nitrox ........................................18, 23, 55
Nitrox reset ................................18, 23, 55
No-y time ...........................12, 49, 54, 81
Oxygen concentration
................................59, 79, 90, 93, 55, 57
Oxygen partial pressure ...................22, 55
PC interface .....................................64, 84
ppO
max .............................18, 22, 55, 93
2
Safety stop timer .......................18, 22, 76
LogTRAK ...............................................84
SOS mode ......................................12, 93
Stopwatch .................................51, 74, 94
Surface interval ....................18, 29, 50, 93
Technical information ............................. 90
Time of day ...........................................51
Time zone ...........................18, 36, 37, 94
Units ....................................18, 42, 43, 87
UTC .......................................................94
Wake-up warning ......................25, 36, 18
Water contact ..................................18, 40
Water type .......................................18, 22
English
GALILEO 2 (G2) USER MANUAL
95
Page 96

96
GALILEO 2 (G2) USER MANUAL
 Loading...