

Schwinn 140,240 Owner's Manual
Schwinn® 140/240Exercise Bikes
\
\
\
'\
Ver p_gina 2
\\\ _
• @ ® - @ • . @ • @
003-3235-110609B
Para obtener este manual en EspafiolLatino Americano vaya a:
http://www.sc hwinnfitness.com.
Table of Contents
Important Safety Instructions 3 User Setup
Specifications 5 Workout Programs
Features 6 Pausingor Stopping
Console 7 ConsoleSetup Mode
RemoteHeart RateMonitor 9 Maintenance
Operations 11 Troubleshooting
Adjustments 11 Contacts
QuickStart/Manual Program 12 Manuel du Propri6taire
© 2009Nautilus, Inc., All rights reserved
TMand® indicate a trademark or registered trademark. Nautilus, Inc. (www.nautilus.com) trademarks include
NAUTILUS®, BOWFLEX®,STAIRMASTER®,SCHWlNN® and UNIVERSAL®and respective Iogos.
Other trademarks are the property of their respective owners.
3
4
6
6
7
9
23
25
Patent Information This product maybe covered byUSand Foreign Patents and Patents Pending.
Important Safety Instructions
_, This icon meansa potentially hazardous situation which, if not avoided,could result in death orserious injury.
Before using this equipment, obey the following warnings:
_, Readand understandthe complete Owner's Manual. Keep Owner's Manual for future reference
Readand understand all warnings onthis machine. If at anytime the Warning stickers become loose, unreadable or
dislodged, contact Nautilus® CustomerServicefor replacement stickers.
• Children must not be let on or nearto this machine. Moving parts andotherfeatures ofthe machine can be dangerous
to children.
• Consulta physician before you start an exercise program. Stopexercising if you feel painor tightness in your chest, become
short of breath,or feel faint. Contact your doctor before you usethe machine again. Usethe values calculated or measured
by the machine's computer for reference purposes only.
• Examinethis machinefor loose parts or signs ofwear. Monitor the Seat, Pedals,and CrankArms closely. Donot use iffound
in this condition. Contact Nautilus®CustomerService for repair information.
• Maximum user weight limit: 300Ibs. (136kgs). Donot useif you are overthis weight.
• Thismachine is for home use only.
• Do notwear loose clothing or jewelry. This machine contains moving parts.
• Set up and operate this machine on a solid, level, horizontal surface.
• Stabilizethe Pedals before you stepon them. Use caution when you step off the machine.
• Disconnect all power before servicing this machine.
• Keepatleast19.7"(0.5m)oneachsideofthe machine clear. This istherecommended safedistance for access and passage
around and emergency dismounts from the machine. Keepthird parties outof this space when machine is in use.
• Do not over exert yourself during exercise. Operatethe machine in the manner described inthis manual.
• Correctly adjust and safely engage all Positional Adjustment Devices. Make sure that the Adjustment Devices do not
hit the user.
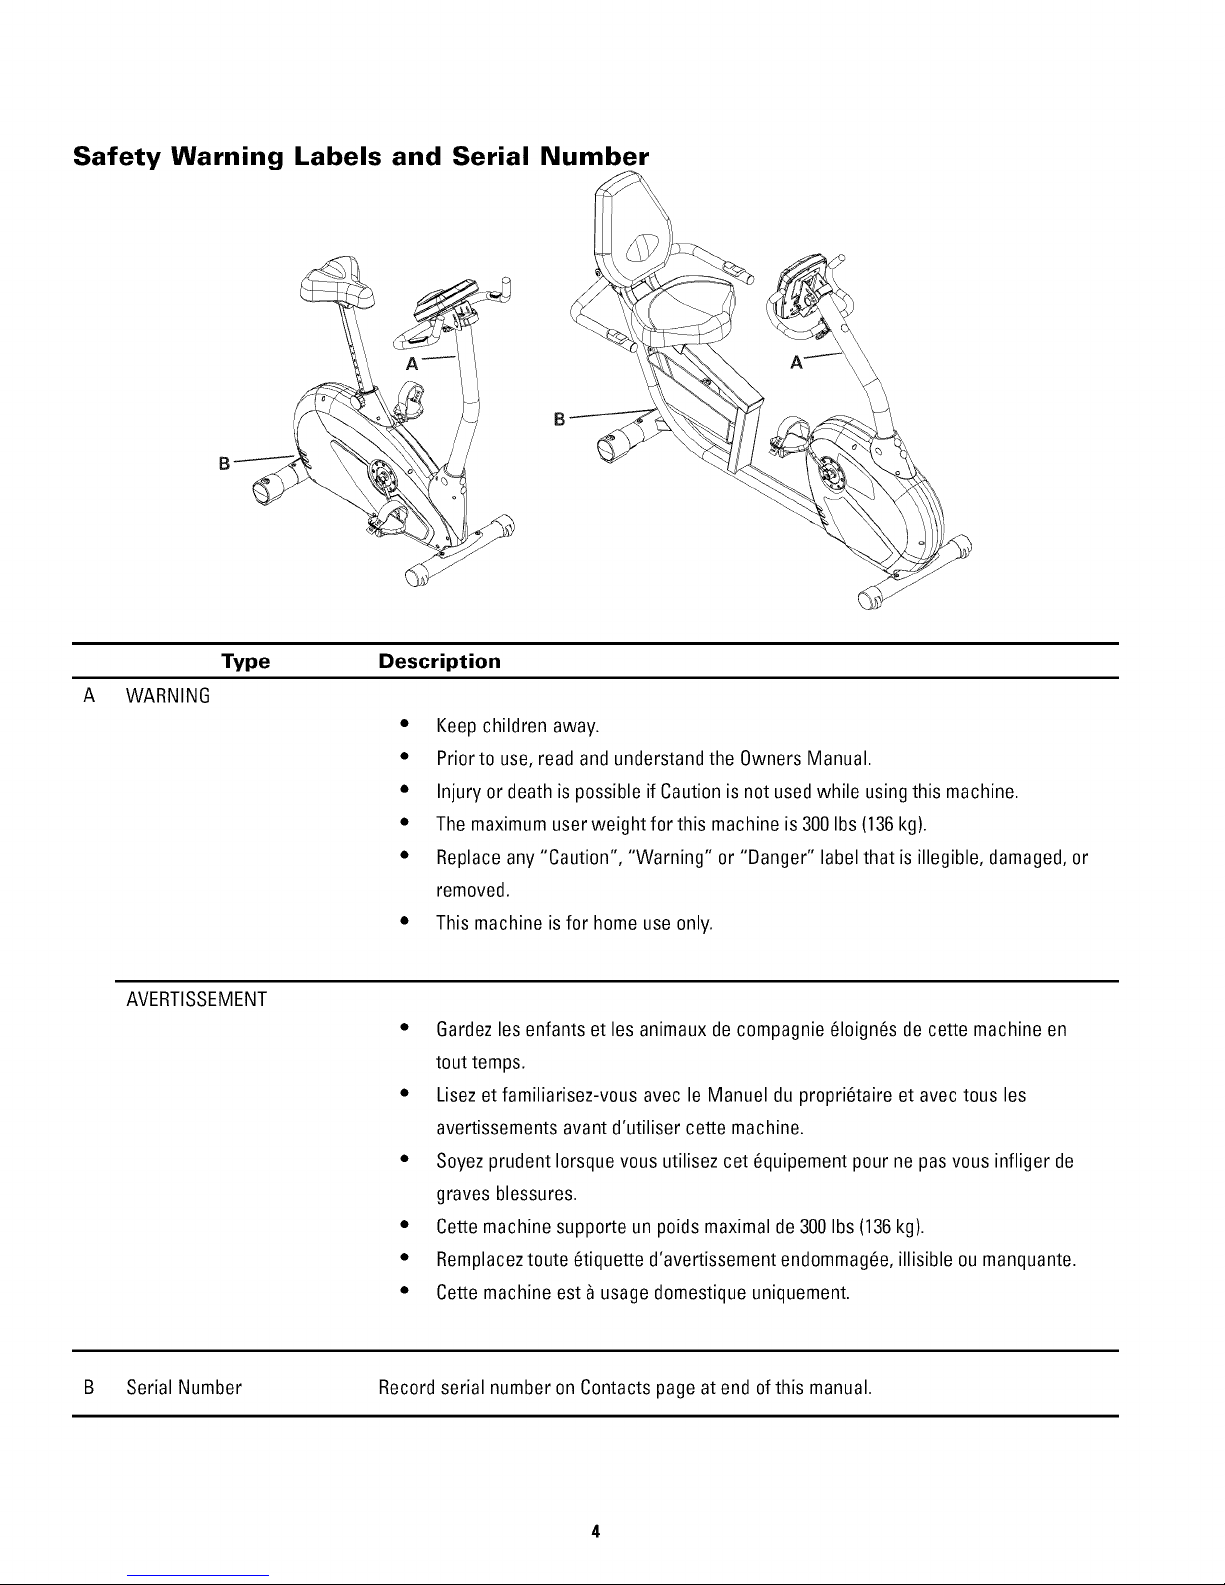
Safety Warning Labels and Serial Number
A
Type Description
A WARNING
• Keep children away.
• Prior to use, read and understand the Owners Manual.
• Injury or death is possible if Caution is not usedwhile using this machine.
• The maximum user weight for this machine is 300Ibs(136kg).
• Replace any "Caution", "Warning" or"Danger" label that is illegible, damaged,or
removed.
• This machine isfor home use only.
AVERTISSEMENT
• Gardezlesenfants et les animaux de compagnie61oign6sde cette machine en
tout temps.
• Lisezet familiarisez-vous avec le Manuel du propri6taire et avec tousles
avertissements avant d'utiliser cette machine.
• Soyezprudent Iorsque vous utilisez cet 6quipement pour ne pasvous infliger de
graves blessures.
• Cettemachine supporte un poids maximalde 300Ibs (136kg).
• Remplaceztoute 6tiquette d'avertissement endommag6e,illisible ou manquante.
• Cettemachine est _ usage domestique uniquement.
B Serial Number Record serial number on Contacts page at end ofthis manual.
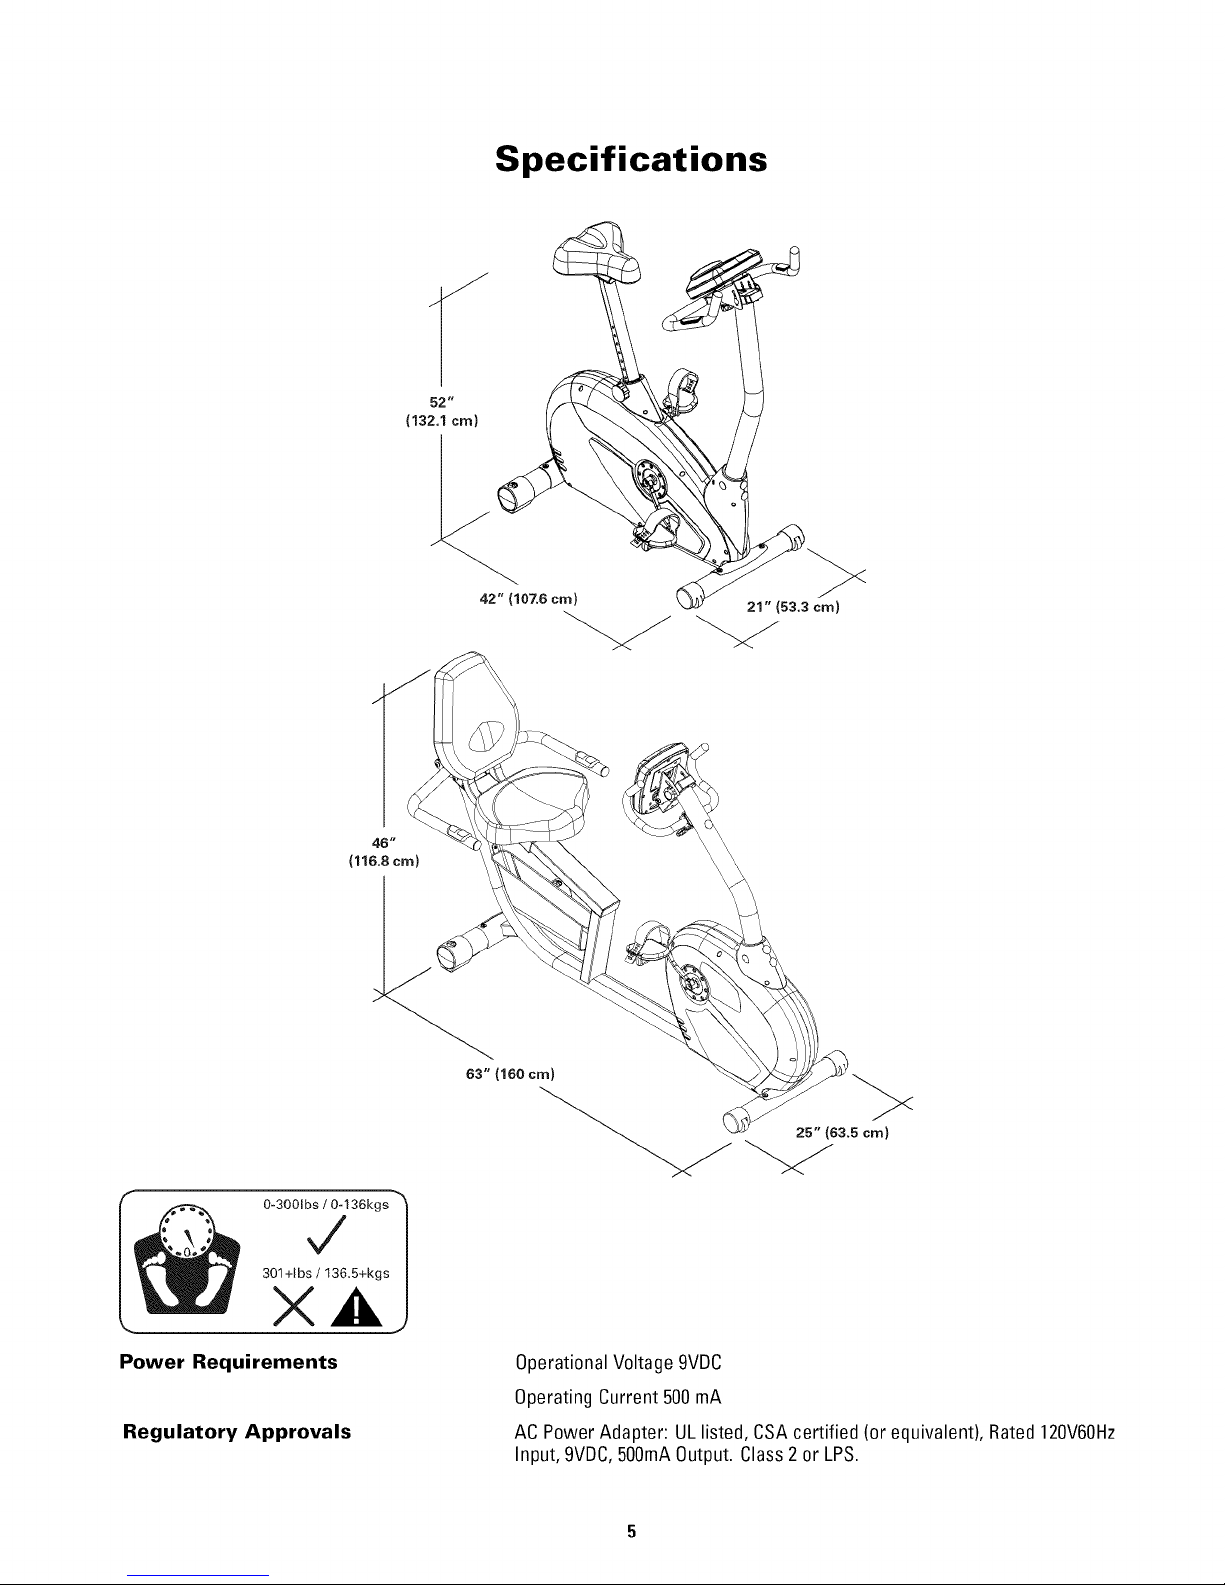
Specifications
O-3001b_136kgs 1
J
Power Requirements
Regulatory Approvals
OperationalVoltage 9VDC
Operating Current 500mA
ACPower Adapter: ULlisted, CSAcertified (or equivalent), Rated 120V60Hz
Input, 9VDC,500mAOutput. Class2 or LPS.
Features
A
A
C
E
L
E
G
F
E
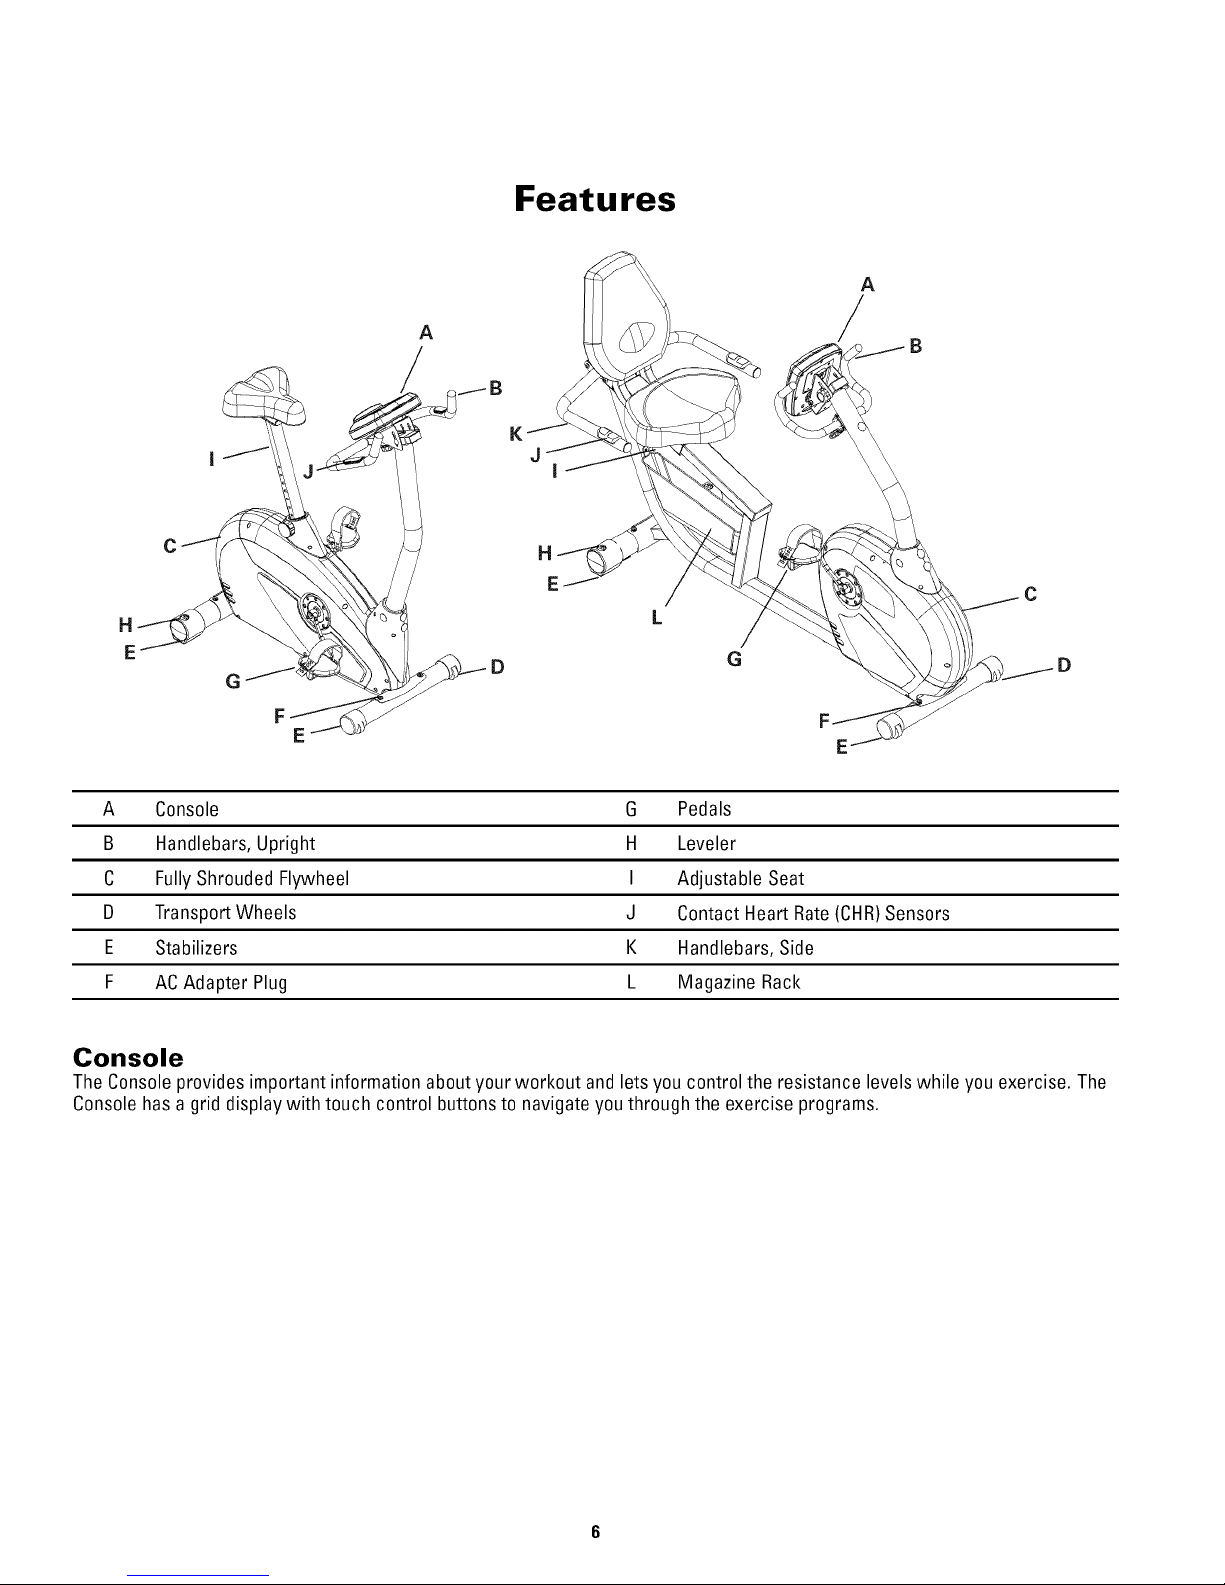
A Console G Pedals
B Handlebars,Upright H Leveler
C FullyShrouded Flywheel I Adjustable Seat
G
/
D
E
D Transport Wheels J Contact Heart Rate (CHR)Sensors
E Stabilizers K Handlebars, Side
F AC Adapter Plug L MagazineRack
Console
The Consoleprovides important information aboutyour workout and lets you control the resistance levelswhile you exercise. The
Console has agrid displaywith touch control buttons to navigate youthrough the exercise programs.
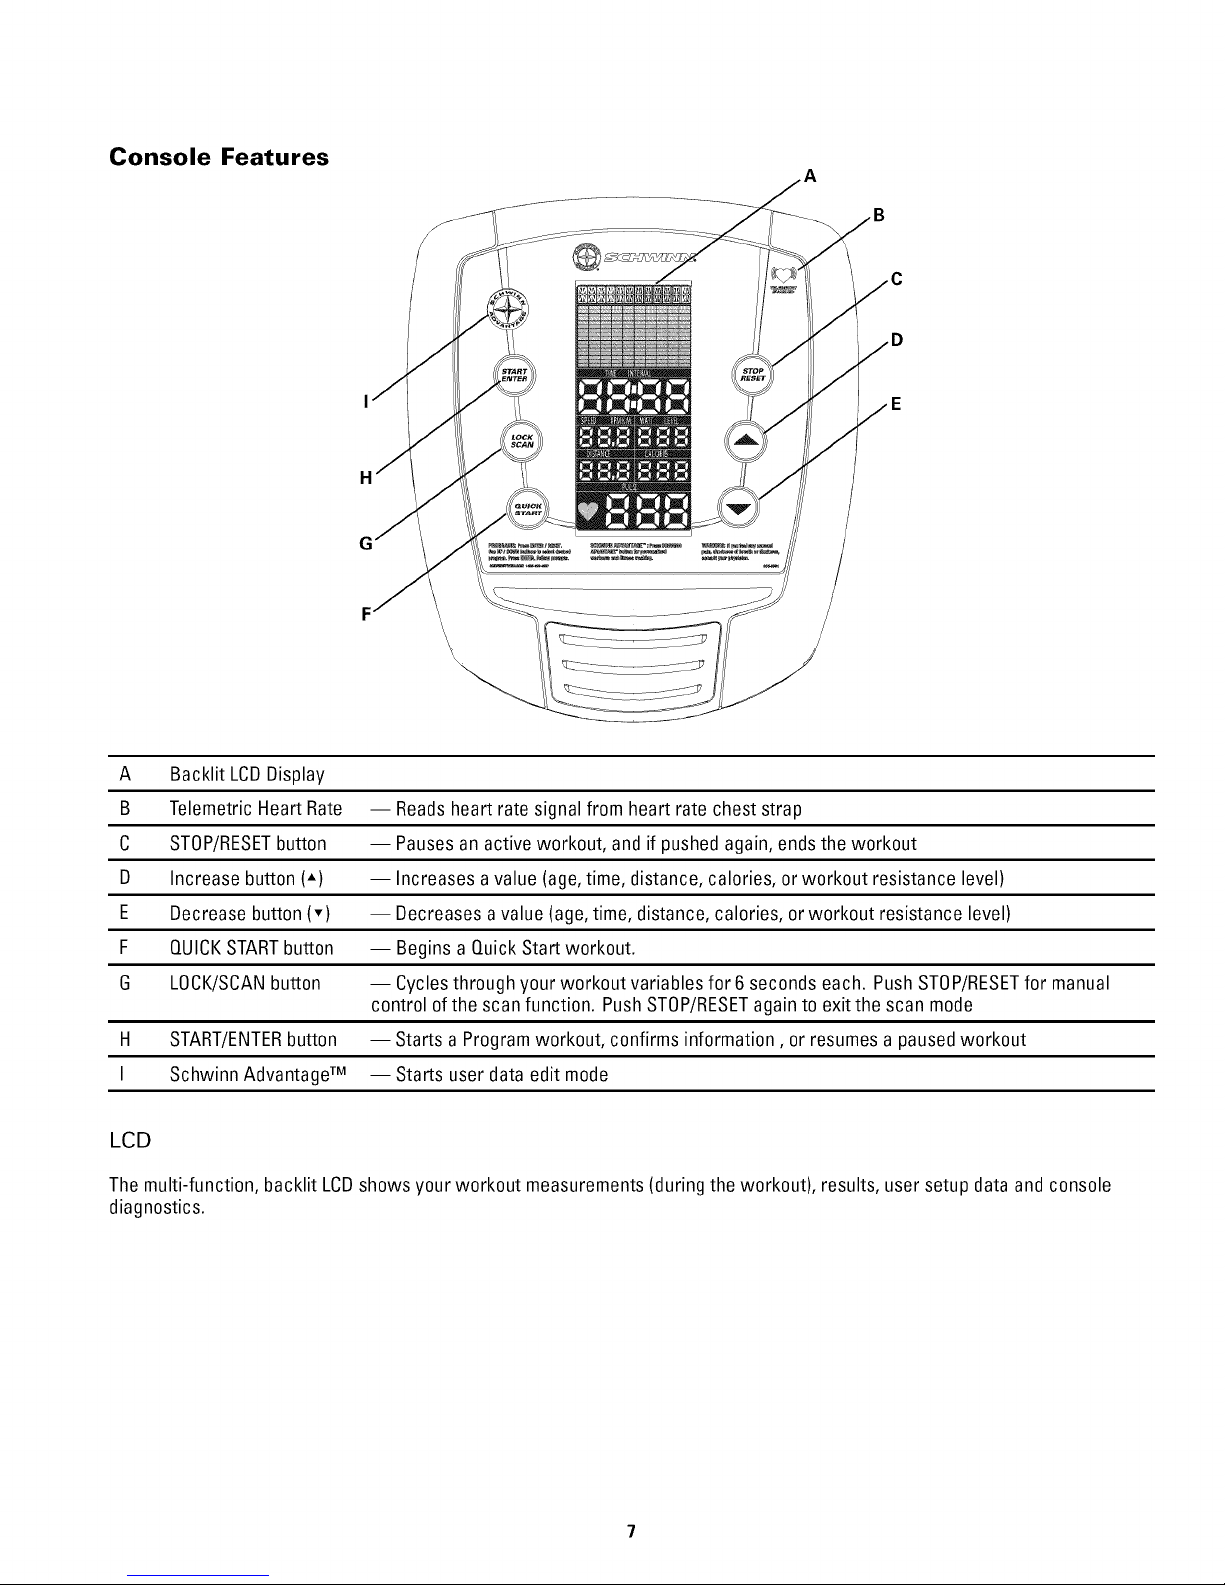
Console Features
A Backlit LCDDisplay
B Telemetric HeartRate -- Readsheart rate signal from heart rate chest strap
C STOP/RESETbutton -- Pausesan active workout, and if pushed again,ends the workout
D Increase button (-) -- Increases avalue (age,time, distance, calories, or workout resistance level)
E Decrease button (v) -- Decreasesa value (age,time, distance, calories, orworkout resistance level)
F QUICKSTARTbutton -- Begins aQuick Start workout.
6 LOCK/SCANbutton -- Cyclesthrough your workout variables for 6 seconds each. PushSTOP/RESETfor manual
control of the scan function. Push STOP/RESETagain to exit the scan mode
H START/ENTERbutton -- Starts a Program workout, confirms information, or resumes a pausedworkout
I Schwinn AdvantageTM -- Starts user data edit mode
LCD
The multi-function, backlit LCDshows your workout measurements(during the workout), results, user setupdata and console
diagnostics.
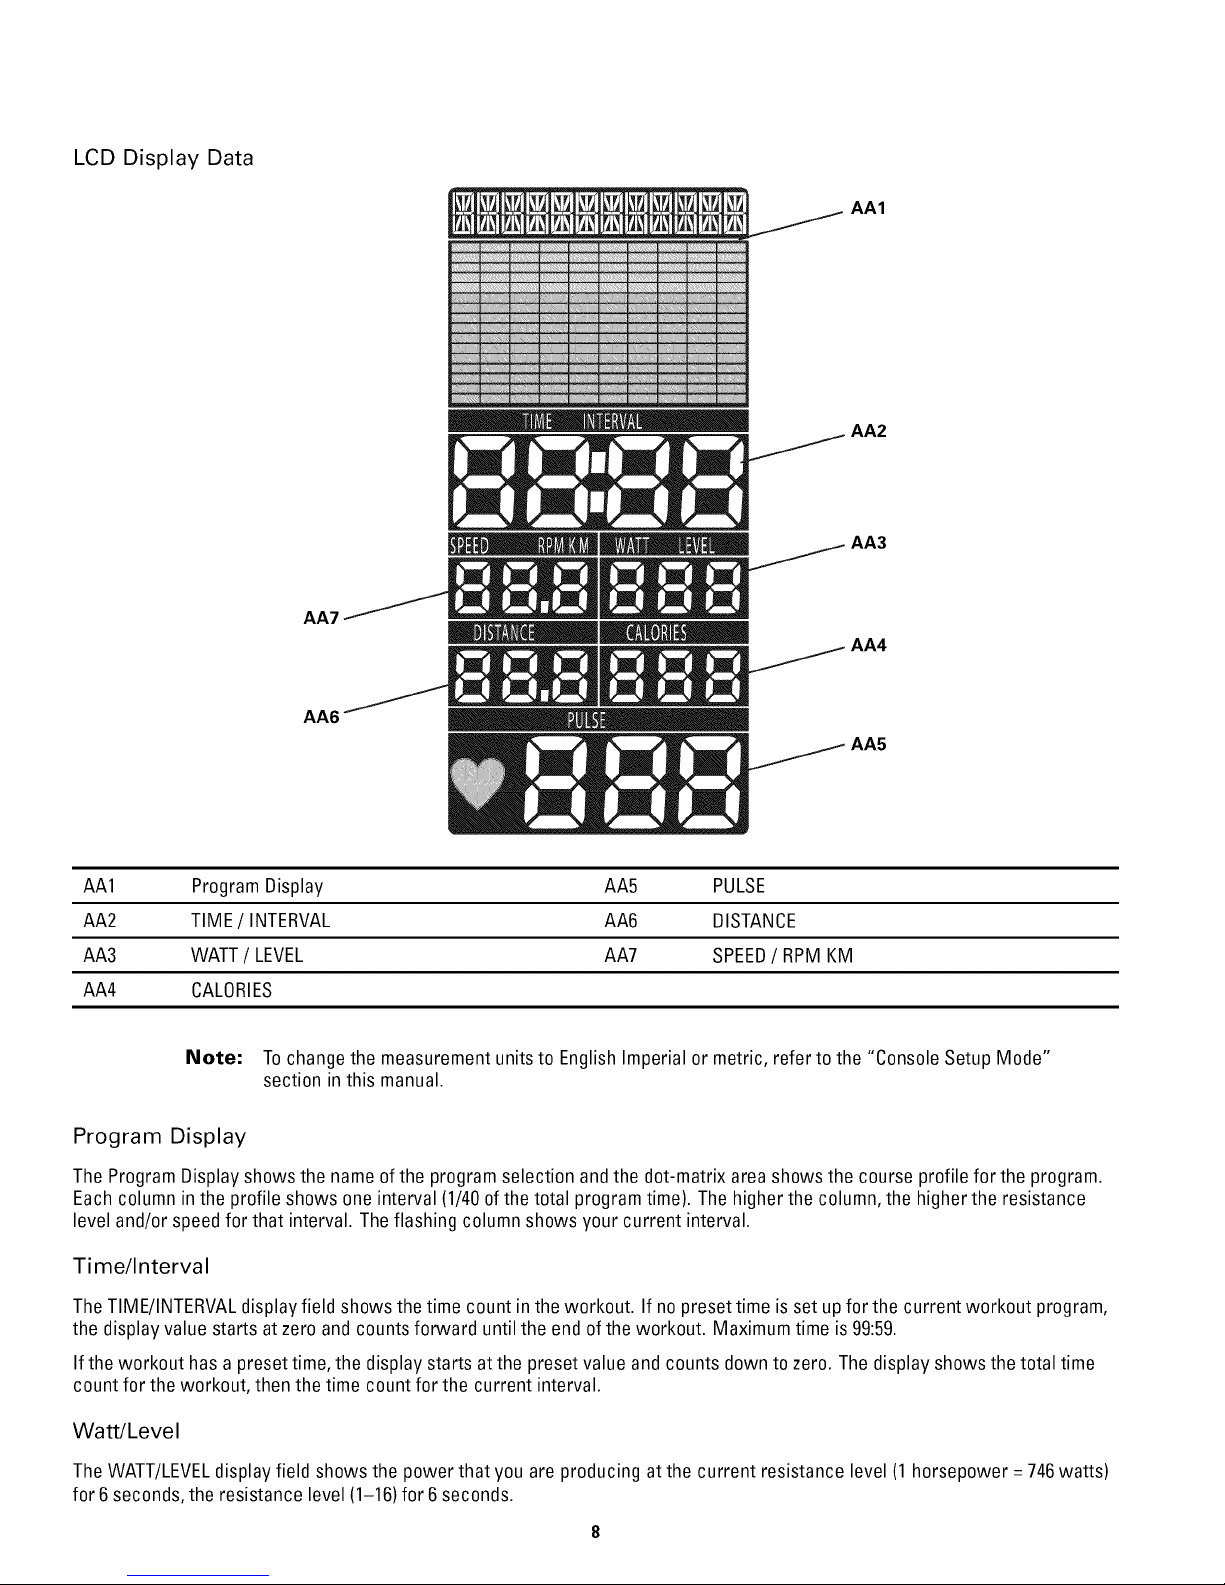
LCD Display Data
AA1
' _ AA2
AA7 AA3
AA6"
AA5
AA1 ProgramDisplay AA5 PULSE
AA2 TIME/ INTERVAL AA6 DISTANCE
AA3 WATT/ LEVEL AA7 SPEED/ RPM KM
AA4 CALORIES
Note: To changethe measurement units to English Imperial or metric, refer to the "Console Setup Mode"
section in this manual.
Program Display
The ProgramDisplay shows the name ofthe program selection andthe dot-matrix area shows the course profile for the program.
Each column inthe profile shows oneinterval (1/40of the total program time). The higherthe column,the higher the resistance
level and/or speedfor that interval. Theflashing column shows your current interval.
Time/Interval
TheTIME/INTERVALdisplay field shows the time count inthe workout. If no preset time is set upfor the current workout program,
the display value starts at zero andcountsforward until the end ofthe workout. Maximum time is 99:59.
If the workout has apreset time, the display starts at the presetvalue and counts down to zero. Thedisplay showsthe total time
count for the workout, then the time count for the current interval.
Watt/Level
TheWATT/LEVELdisplayfield shows the power that you are producing atthe current resistance level (1 horsepower = 746watts)
for 6 seconds,the resistance level(1-16) for 6 seconds.
Calories
The CALORIESdisplay field shows the estimatedcalories that you have burned during the exercise. If nocalorie goal isset up
for the current workout program,the display value starts at zero and counts forward until the endof the workout. If the workout
has a calorie goal,the display starts at the preset value and counts down to zero.
Pulse
The Pulsedisplay field shows the heart rate in beats per minute (BPM)from the heart rate monitor (HRM).
_, onsult a physician before you start an exercise program. Stopexercising if you feel painor tightness in your chest,
become short of breath, orfeel faint. Contact your doctor beforeyou use the machine again. Usethe values calculated or
measured bythe machine's computer for reference purposes only.
Distance
The DISTANCEdisplay field shows the distance count (miles or km) inthe workout. If no distance goalis set up for the current
workout program,the display value starts at zero and counts forward until the end of the workout. If the workout has a distance
goal, the display starts at the presetvalue and counts downto zero.
Speed/RPM KM
The SPEED/RPMKM displayfield shows the machine speed in kilometers per hour (kin/h) or miles per hour (mph)for 6 seconds,
then the revolutions per minute (RPM)for 6 seconds.
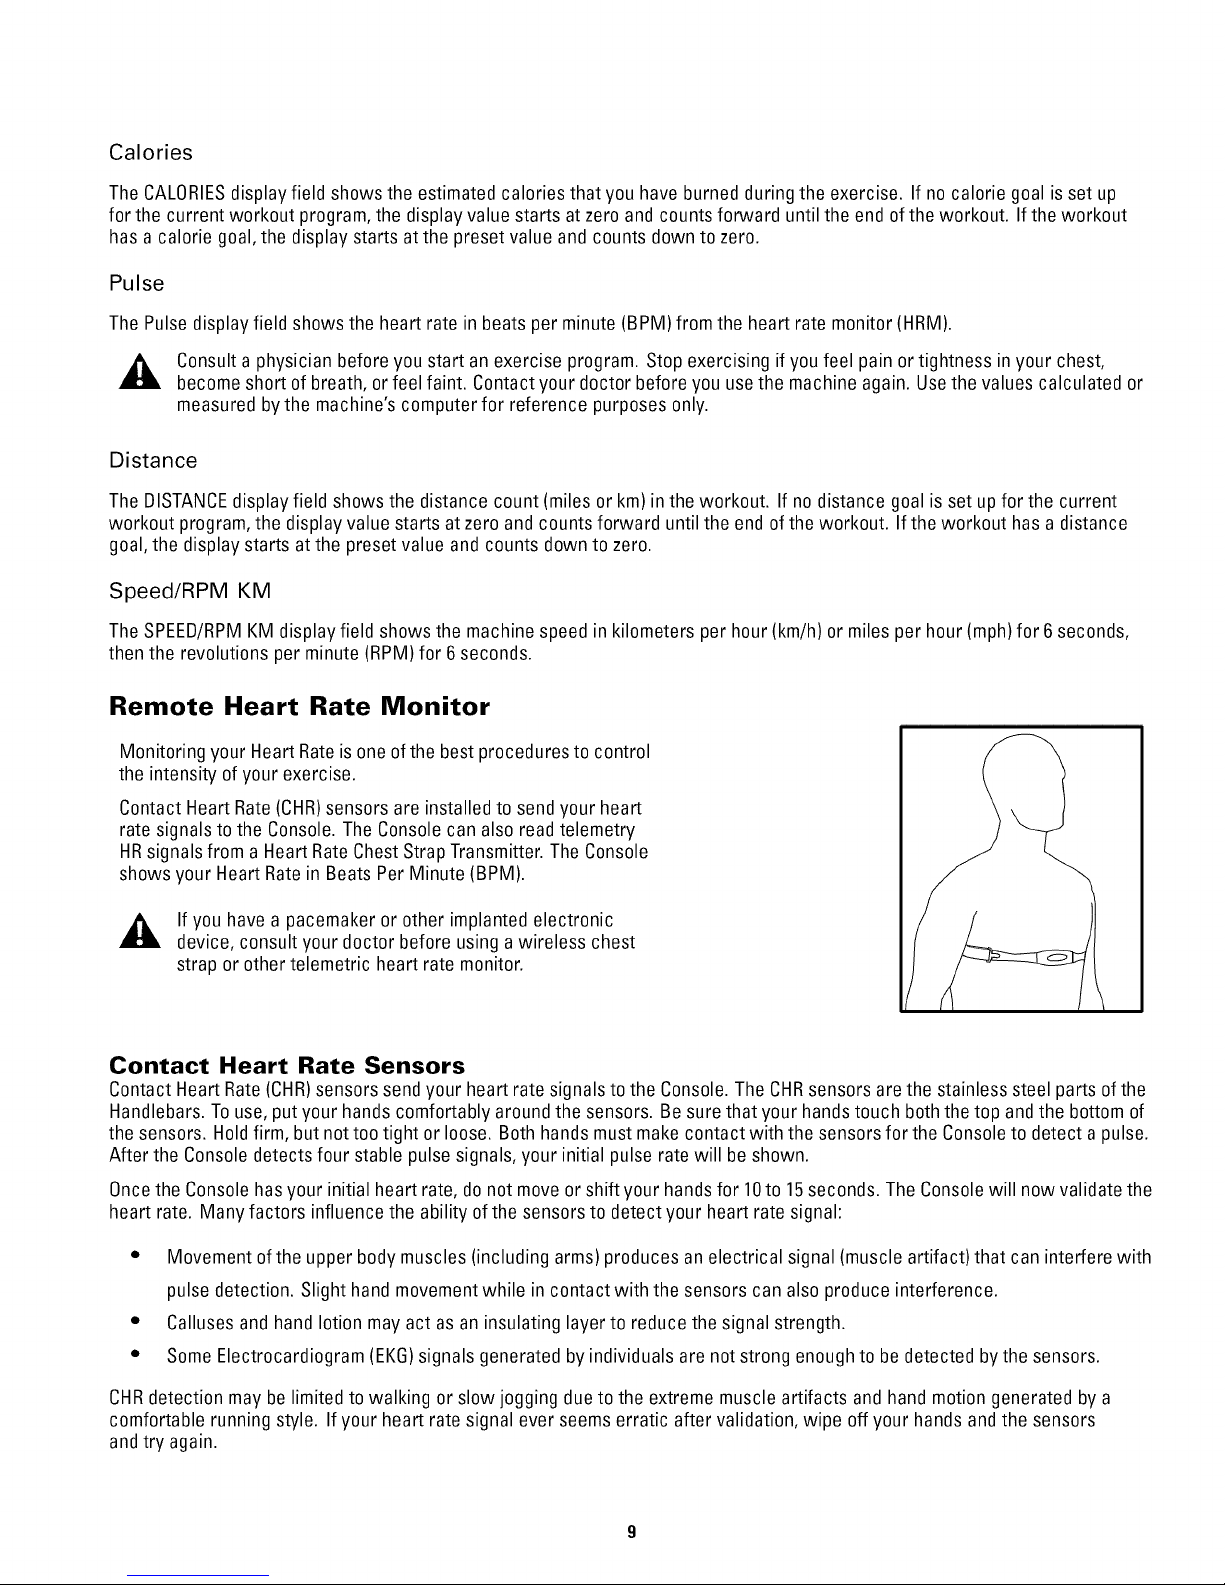
Remote Heart Rate Monitor
Monitoring your HeartRateis oneofthe best procedures to control
the intensity of your exercise.
Contact Heart Rate (CHR)sensors are installed to sendyour heart
rate signals to the Console.The Consolecan also readtelemetry
HRsignals from a HeartRateChest StrapTransmitter. The Console
shows your Heart Ratein Beats Per Minute (BPM).
_, If you have a pacemaker or other implanted electronic
device, consult your doctor before using awireless chest
strap or othertelemetric heart rate monitor.
Contact Heart Rate Sensors
Contact Heart Rate(CHR)sensors sendyour heart rate signalsto the Console. The CHRsensors arethe stainless steel parts ofthe
Handlebars.Touse, putyour hands comfortably around the sensors. Be surethat your handstouch boththe top andthe bottom of
the sensors. Holdfirm, but nottoo tight or loose. Both hands must makecontact with the sensors for the Consoleto detect apulse.
After the Consoledetects four stable pulse signals,your initial pulse ratewill be shown.
Oncethe Consolehas your initial heart rate, do not move or shift your handsfor 10to 15seconds. The Consolewill now validate the
heart rate. Many factors influence the ability ofthe sensors to detect your heart rate signal:
• Movement of the upperbody muscles (including arms) produces an electrical signal (muscle artifact) that can interfere with
pulse detection. Slight hand movementwhile in contactwith the sensors can also produce interference.
• Calluses and hand lotion may act asan insulating layer to reduce the signal strength.
• SomeElectrocardiogram (EK6) signals generated byindividuals are notstrong enoughto be detected bythe sensors.
CHRdetection may be limited to walking or slow jogging due to the extreme muscle artifacts and hand motiongenerated bya
comfortable running style. If your heart rate signal ever seemserratic after validation, wipe off your hands and the sensors
and try again.
Heart Rate Calculations
Yourmaximum heart rate usually decreases from 220Beats PerMinute (BPM) inchildhood to approximately 160BPM by age 60.
This fall in heart rate is usually linear, decreasing byapproximately one BPMfor each year. There is no indication that training
influences the decrease in maximumheart rate. Individuals of the same age could have different maximumheart rates. It is more
accurate to find this value by getting astress test than by using an age related formula.
Yourat rest heart rate is influenced byendurance training. Thetypical adult has an at rest heart rate of approximately 72 BPM,
where as highly trained runners may havereadings of40 BPM or lower.
The Heart Ratetable is an estimate of what Heart Rate Zone (HRZ)is effective to burn fat and better your cardiovascular system.
Physicalconditions vary,therefore your individual HRZcould be several beats higher or lower than what is shown.
The mostefficient procedure to burn fat during exercise isto start at aslow pace and gradually increaseyour intensity until your
heart rate reaches between 60- 85%of your maximumheart rate. Continueat that pace, keeping your heart rate inthat target zone
for over 20minutes. Thelonger you maintainyour target heart rate, the morefat your bodywill burn.
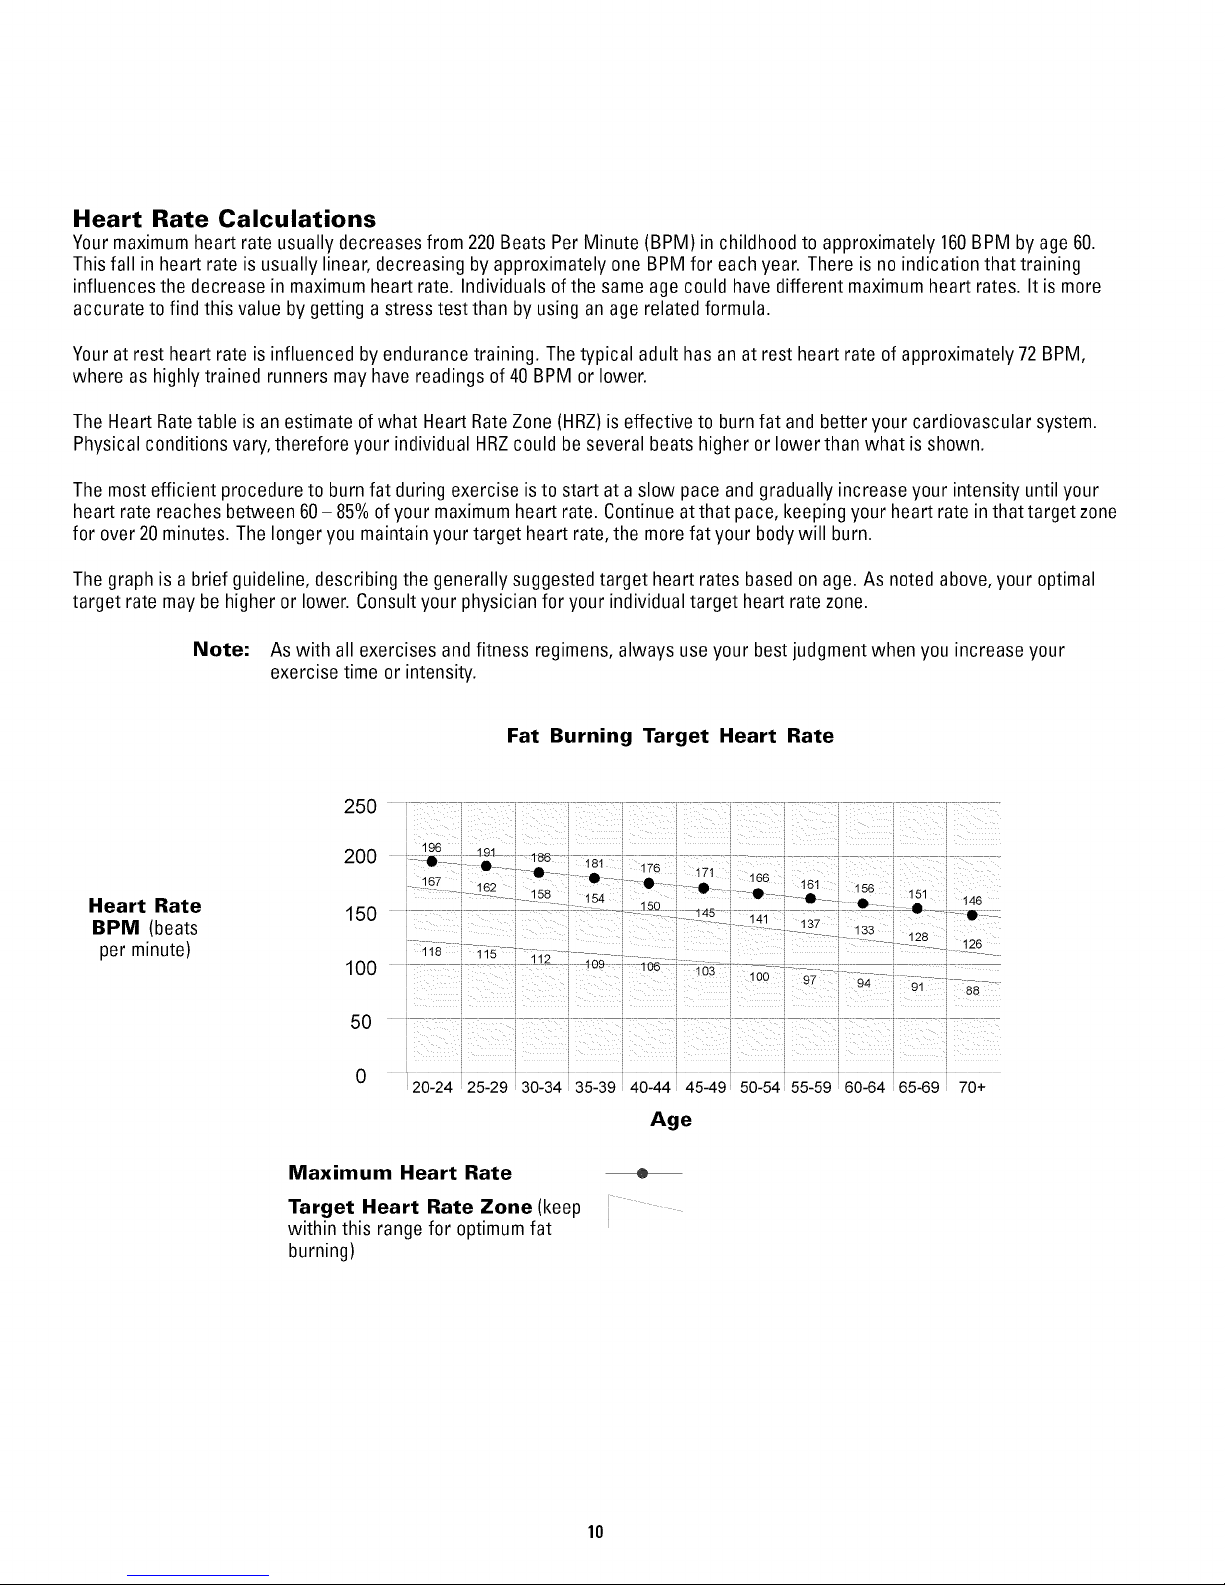
The graph is a brief guideline, describing the generally suggestedtarget heart rates based on age. As noted above, your optimal
target rate maybe higher or lower. Consultyour physician for your individual target heart rate zone.
Note: Aswith all exercises andfitness regimens, always use your best judgment when you increase your
exercise time or intensity.
Fat Burning Target Heart Rate
Heart Rate
BPM (beats
per minute)
250
200 196 191 _
167 _-_ • • A 166 161
/_o
0 181 _
• 4_o 17!
"_ _ 1 58 ! 54 = 150 _ • _ • 1_56 151
150 -_ 145 141
[
118
100 .... _ " 103 ...._^ -
115 112 109 1-
50
0
20-24 25-29 30-34 35-39 40-44 45-49 50-54 55-59 60-64 65-69 70+
Age
Maximum Heart Rate
Target Heart Rate Zone (keep
within this range for optimumfat
burning)
- 137 133 128
uu 97 94 91 88
146
_ 126
10

Operations
What to Wear
Wear rubber-soled athletic shoes. Youwill needthe appropriate clothes for exercise that allow youto movefreely.
How Often Should You Exercise
Consulta physician before you start an exercise program. Stop exercising if you feel painor tightness in your chest,
become short of feel faint. Contact doctor before the machine Usethe values calculated
measured bythe machine's computer for reference purposes only.
• 3times a week for 30 minutes each day.
• Schedule workouts in advance. Tryto work out evenwhen you do notwant to.
breath, or
your you
Seat Adjustment
Correct seat placement encourages exercise efficiency and comfort, while reducing the risk of injury.
1. With a Pedal in the forward position, center the ball of your foot over the center of it. Your leg should
be bent slightly at the knee.
2. If your leg is too straight or your foot cannot touch the Pedal, move the seat down on the upright bike
or forward on the recumbent bike. If your leg is bent too much, move the seat up on the upright bike
or rearward on the recumbent bike.
use
again.
or
Step off the bike before you adjust the seat.
Upright bike--pull the adjustment knob onthe seat tube. Adjust the seat to the desired height. Releasethe
adjustment knob to engage the locking pin. Be surethat the pin is fully engaged. To movethe upright seat closer
to, or away from the console, loosenthe knob. Slidethe seat forward or rearward to the desired position and
tighten the knob.
• Recumbent bike--pull the adjustment knob onthe seat bracket. Slide the seat to the desired position. The
adjustment knob will "pop" intothe next hole.Turn the knobto fully tighten and make surethe seat is stable.
11
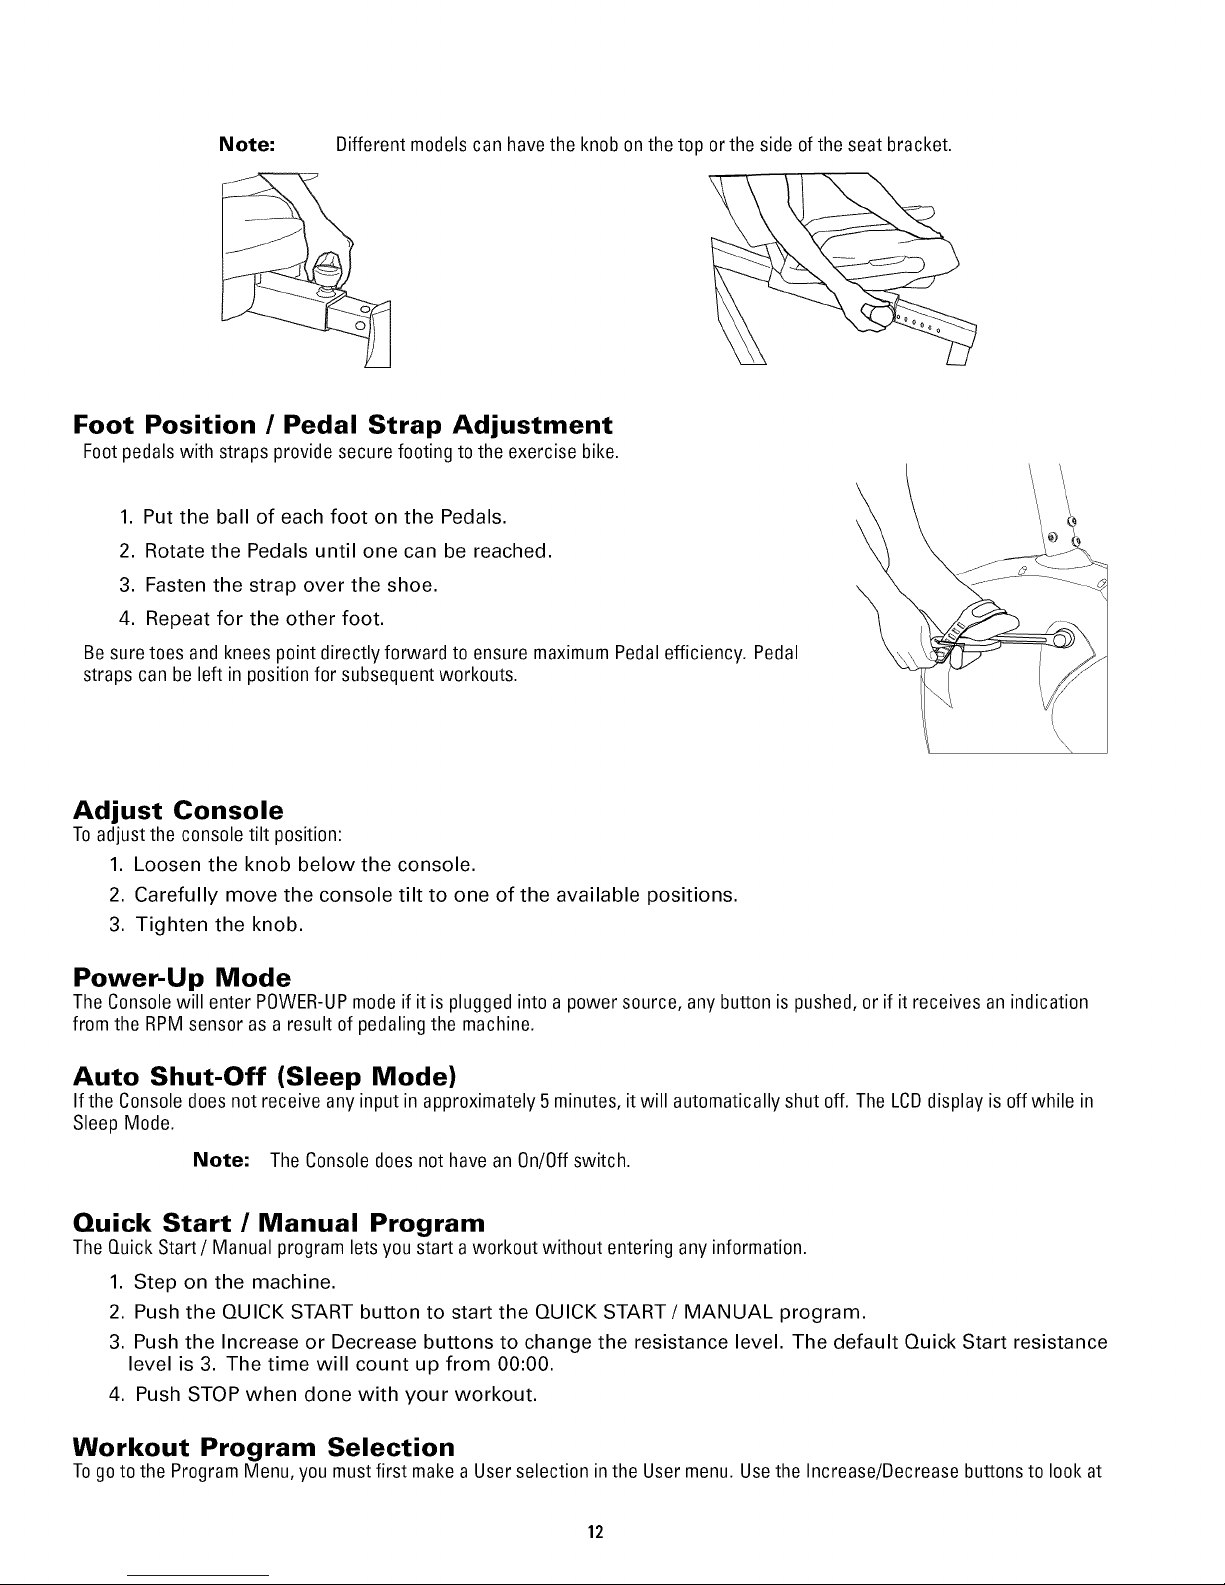
Note: Different models can havethe knob onthe top orthe side of the seat bracket.
Foot Position / Pedal Strap Adjustment
Footpedalswith straps provide secure footing to the exercise bike.
1. Put the ball of each foot on the Pedals.
2. Rotate the Pedals until one can be reached.
3. Fasten the strap over the shoe.
4. Repeat for the other foot.
Be sure toes and knees point directly forward to ensure maximum Pedal efficiency. Pedal
straps can be left in position for subsequent workouts.
Adjust Console
Toadjust the console tilt position:
1. Loosen the knob below the console.
2. Carefully move the console tilt to one of the available positions.
3. Tighten the knob.
Power-Up Mode
The Consolewill enter P0WER-UPmodeif it is pluggedinto a power source, any button is pushed, orif it receives an indication
from the RPMsensor as a result of pedaling the machine.
Auto Shut-Off (Sleep Mode)
If the Consoledoesnot receive any input in approximately 5 minutes, itwill automatically shut off. The LCDdisplay is off while in
Sleep Mode.
Note: The Consoledoes not have an 0n/0ff switch.
Quick Start / Manual Program
The Quick Start/Manual program lets you start aworkout without entering any information.
1. Step on the machine.
2. Push the QUICK START button to start the QUICK START/MANUAL program.
3. Push the Increase or Decrease buttons to change the resistance level. The default Quick Start resistance
level is 3. The time will count up from 00:00.
4. Push STOP when done with your workout.
Workout Program Selection
Togoto the Program Menu,you must first makea Userselection inthe User menu. Usethe Increase/Decrease buttonsto look at
12

the Usermenu options. Youcan usethe GuestUser option to goto the ProgramMenu without user setup data. If you want to save
your workout data, refer to the User Setup procedure in this manual.
User Setup -- Schwinn Advantage TM
The Schwinn® 40 Series console lets youstore and use 2 User profiles (U1 andU2)in addition to a GuestUser with no setup data
stored. The Schwinn AdvantageTM feature automatically records your workout results in your User profile, and lets youtrack
your fitness progress andedit data.
The User profile stores the following information:
1. Name -- up to 12 characters
2. Total number of workouts
3. Total hours
4. Total distance
5. Total calories
6. Starting weight
7. Target weight
8. Current weight
9. Weight change (Starting Weight - Current Weight)
10. Height
11. Age
12. Custom Workout (program profile, time)
Select / Add User
1. From the POWER UP MODE screen, push the Increase/Decrease buttons to move through the User
menu options.
Note: ADD USERand GUESTUSERarethe only options if no Users are set up. If all User profiles are in
use, the ADDUSERoption will not be available.
2. Push START/ENTER to make your selection. If you select GUEST USER or a User (U1 or U2), you can go
to the Program Menu to start a workout.
Note: Pushthe STOP/RESETbutton to go back to the previous screen or character.
3. In the ADD USER option, push START/ENTER 2 times and the console display will show the Name prompt.
Note: Usethe Increase/Decrease buttons to move through the alphabet (or numbers). Torecord each
letter, pushthe START/ENTERbutton. PushSTART/ENTERfor a space.
If your name does not fill the spaces on the Name screen, tap the START/ENTER button to add spaces
until the next data screen appears.
4. Enter your user data on each screen -- Weight, Height, Age, Custom Workout.
5. To set up the Custom Workout, push START/ENTER 2 times. The Program Display will have a default
resistance level of 1 for all columns. Adjust the resistance level of the active column (flashing) with the
Increase/Decrease buttons. Push START/ENTER to record the resistance level. The completed columns
move off the screen to the left, and the next column is active. Continue until all 40 columns are set.
,
The screen shows the message "USER ADDED" and you go to the Program Menu.
Edit
User Data
1.
From the POWER UP MODE screen press the Schwinn Advantage TM button (Schwinn® Quality Seal).
2.
Push the Increase/Decrease buttons to move to a User.
3.
Push START/ENTER make the User selection.
13
4. The Edit options appear on the display: View, Edit, Delete. Push START/ENTER to make your selection.
VIEW--The display shows these screens: TotalWorkouts, Total Hours,Total Miles (km), TotalCalories,Starting Weight, Target
Weight, Current Weight, Weight Change.
EDIT-- Youcanedit the values for: CurrentWeight, TargetWeight, Current Height,EnterAge, CustomWorkout. PushSTART/ENTER
to set each value after you makethe change. When the changes are complete, tap the START/ENTERor STOP/RESETbutton
until you are out of the Edit option.
DELETE--To delete the User data, push START/ENTER.Tocancel the deletion, push STOP/RESET.
Custom Workout
After your CustomWorkout is set upin your User Profile,you can start the program from the CustomWorkout option in the Program
Menu. The console display will prompt you to set the Timefor the workout (default is30:00).Usethe Increase/Decrease buttonsto
adjust the Timevalue, and pushSTART/ENTERto set the time.
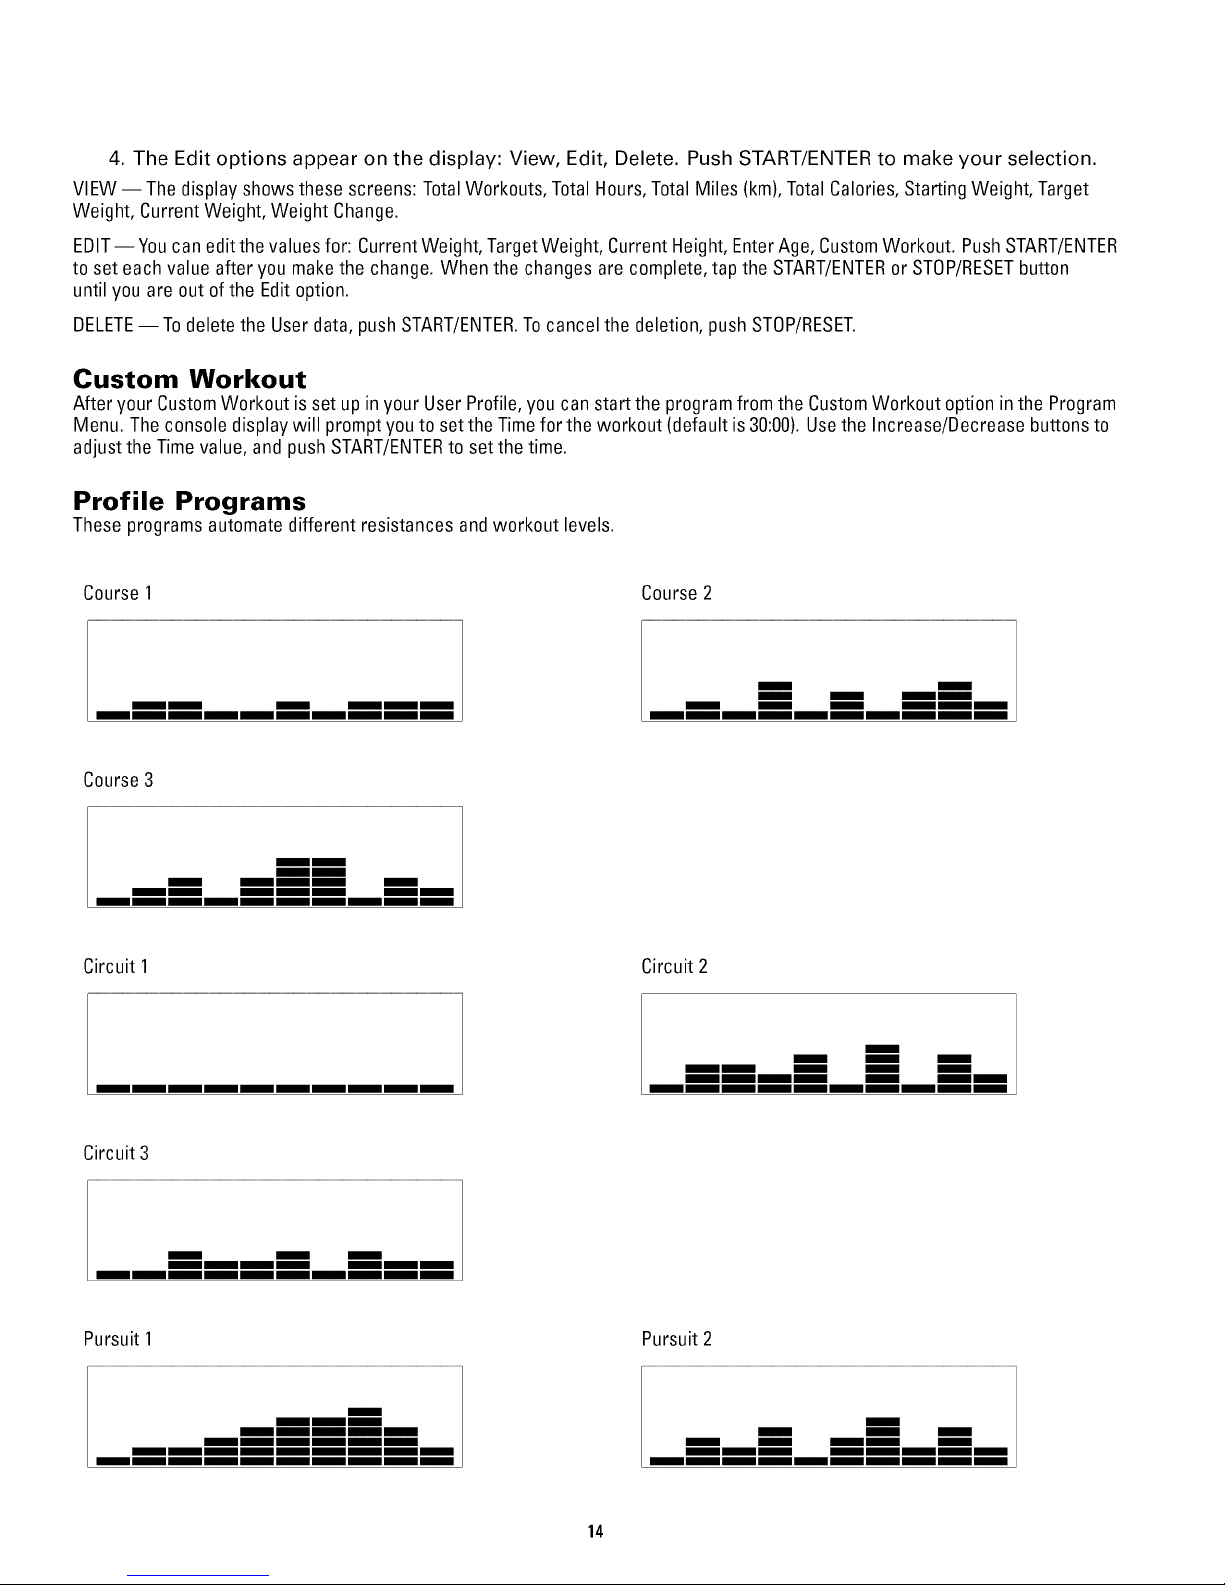
Profile Programs
These programs automate different resistances and workout levels.
Course1
mm m
mm
Course 2
m m m
Course3
mm mm
mm mm
mm
Circuit 1 Circuit 2
Circuit 3
m m m
mm mm mmmm
mm
mm
Pursuit 1
Pursuit 2
m
mm mm mmmm mm
14
mm mm mm
m m
mm
Tostart a Profile Program:
1. Step on the machine.
2. Use the Increase or Decrease buttons to select a user (guest or custom) and push START/ENTER.
3. Use the Increase or Decrease buttons to select one of the above programs. Push START/ENTER.
4. Use the Increase and Decrease buttons to answer the setup questions. Push START/ENTER to record
your answers.
Note: The defaultvalue for TIME is 30:00.The default start value for LEVELis 8.
5. Push the START/ENTER button to start the profile workout.
Changing Resistance Levels
Pushthe Increase or Decrease buttons to change the resistance level at anytime in aworkout program.
Fitness Test
The FitnessTest measures the improvements ofyour physicalfitness level. Thetest compares your power output (inWatts) to your
heart rate. As you become more fit youwill produce more power (Watts) at a givenheart rate.
When the test starts, the power (Watts) slowly increases. This meansyou will work harder, and as a result, your heart rate
increases. The Watts continue to increase automatically until your heart rate reaches the "Test Zone." This zone is individually
computed to be near75percent of your maximumheart rate. When you reachthe TestZoneyour machine holds theWatts steady
for 3 minutes. This lets you reach a stable condition (where your heart rate becomes steady). At the end ofthe 3 minutes, the
Console measures your heart rate and the power output (Watts). These numbers,along with information about your age and
weight, are computed to produce a"Fitness Score".
Note: FitnessTest scores should only be compared to your previous scores and notother users.
Overtime, you will output more Watts of power at acertain Heart Rate.Compareyour FitnessScores to seeyour improvement.
Heart Rate Control (HRC) Program
The Heart RateControl (HRC)program lets you set a heart rate goalfor yourworkout. Theprogram monitorsyour heart rate inbeats
per minute (BPM)from the Contact HeartRate(CHR)sensors on the machine orfrom a Heart RateMonitor (HRM)chest strap.
Note: The console must be able to readthe heart rate information from the CHRsensors or HRMfor the HRC
programto work correctly.
If you goto the HRCprogram from your Userprofile, the Target HeartRateprogram uses your age and other usersetup information
to set the Heart RateZonevalues for your workout. If you area GuestUser,you must enter your age andweight. The console
display then gives promptsfor you to set up your workout:
1. Set the workout level: FIT (beginner) or GETTING FIT (advanced).
2. Set the percentage of maximum heart rate: 60-70%, 70-80%, 80-90%.
_, Consulta physician before you start to exercise inthe 80-90% heart rate zone.
3. Set the Time for the workout. (The default value is 10:00.)
For moredetailed information about fitness zones,please refer to the fitness information on ourwebsite:
www.sc hwinnfitness.com
Distance Goal
The Distance GoalProgram lets you set the total Distance andPacer Speedfor yourworkout. If you are a Guest User,you must
enter yourweight. The console display then givesprompts for you to set up your workout:
1. Enter the distance with the Increase/Decrease buttons (default is 20 mi/20 km). Push START/ENTER.
2. Enter the pacer speed with the Increase/Decrease buttons (default is 25 mph/25 km/h). Push
START/ENTER.
15
 Loading...