

Page 1
Only use appliance
after first reading these
instructions!
Operating instructions
Washing machine
Spirit topLine 740
Page 2
Symbols
Please read the instructions.
Warnings are marked with a warning
triangle.
The text gives information how a
dangerous situation can be avoided.
Signal words indicate the severity
of the danger, if not avoided.
Warning
means that possible personal injuries, and potentially life-threatening
injuries may occur.
Important
means property damages may occur.
2
Page 3

Dear Customer
We are pleased that you have chosen a Schulthess washing machine.
Your new washing machine is the result of many years of development work.
The highest quality requirements, both in development and manufacture, guarantee
a long lifetime.
Its design meets all the demands of modern laundry care and offers you a varied
and individual choice of programmes.
With its extremely efficient use of water, energy and detergent, it helps to reduce
the pollution of our environment and ensures you the maximum possible efficiency
in the operation of your washing machine.
Please read these instructions carefully to enable you to use all the possibilities
and advantages of your new washing machine.
Please note in particular the safety informations and the enclosed guarantee and
customer services booklet.
We hope you will be very happy with your new Schulthess machine.
Your
Schulthess Maschinen AG
3
Page 4

Content
Safety and safety measures .................................................6
Disposal ...................................................................10
Washing tips ............................................................... 11
Detergent ................................................................ 11
Environmentally compatible washing ..........................................14
Washing tips ..............................................................14
Stain removal .............................................................15
Dyeing textiles in the washing
Machine description ........................................................16
Detergent Drawer ......................................................... 18
First-time use ..............................................................19
First wash cycle (without laundry) ............................................19
Washing ...................................................................20
Preparing the appliance ....................................................20
Selecting and starting the programme ........................................20
Changing the programme ...................................................22
Interrupting the programme .................................................23
Cancelling the programme ..................................................23
Adding more laundry .......................................................23
Ending programme with rinsing stop ..........................................24
Programme end ...........................................................24
Programme survey .........................................................26
ECO programme ...........................................................26
Most efficient programmes for cotton textiles .................................27
Programmes Main menu ....................................................27
Sportswear, outdoor .......................................................30
Homecare ................................................................30
Businesswear ............................................................. 31
Antibac ..................................................................32
Special programmes ........................................................ 33
Sportswear, outdoor .......................................................33
Homecare ................................................................34
Businesswear .............................................................34
Antibac ..................................................................34
machine ........................................15
4
Page 5

Programme options ........................................................35
Express ..................................................................35
Prewash .................................................................35
Intensive .................................................................35
Rinse + ..................................................................35
Water + ..................................................................35
Temperature ..............................................................36
Spin speed ...............................................................36
Rinsing stop ..............................................................36
Soaking ..................................................................36
Time preset .............................................................. 37
Settings ...................................................................38
Language (temporarily) .....................................................38
Menu Settings ............................................................39
More settings .............................................................40
Cash-Card / Prepaid Card ....................................................44
Cleaning and maintenance ..................................................45
Hygiene function ..........................................................45
Cleaning the machine ......................................................45
Check water supply hose ...................................................46
Frost protection ...........................................................46
Cleaning the detergent drawer ............................................... 47
Emergency emptying .......................................................48
Cleaning the filters in the water inlet. . . . . . . . . . . . . . . . . . . . . . . . . . . . . . . . . . . . . . . . . . 49
Problems .................................................................. 51
Technical specifications .................................................... 61
Customer service. . . . . . . . . . . . . . . . . . . . . . . . . . . . . . . . . . . . . . . . . . . . . . . . . . . . . . . . . . . 62
Warranty subscription ......................................................62
5
Page 6

Safety and safety measures
The enclosed documents contain
important information on the
installation, use and safety of the
machine.
Keep the documents safe for other
users or subsequent owners.
►
Read the instructions carefully
before operating the machine.
►
Keep the instructions near the
machine for further reference.
This machine meets the stringent
safety regulations for electronic
devices.
►
Please observe the safety instructions in the operating and
installation instructions.
Use in accordance
with the intended purpose
The washing machine is suitable exclusively for the washing of
machine washable textiles in the
household.
The machine may be operated by
children 8 years or older and adults
with impaired physical, sensory
or mental capabilities or lack of
experience and knowledge, if they
are supervised or have been instructed regarding the safe use of
the machine and understand the
dangers resulting from the use of
the machine.
Do not let children play with the
machine. Do not let children carry
out cleaning and user maintenance
without supervision.
Safety while handling
and operating
Warning
Danger of electric shock!
►
Do not connect an appliance
which displays visible damage.
►
Only touch the main switch with
dry hands.
►
Only pull the plug, do not pull
the cable.
►
Under no circumstances spray
the machine with water or clean
it with a steam cleaner.
Repair work may only be executed by
qualified and trained personnel and
defective components may only be
replaced with original spare parts by
the original equipment manufacturer.
Inexpert repairs or non-original parts
can cause considerable property
damage and risk to the user.
Modifications to the appliance are
only admissible after consultation
with the manufacturer.
6
Page 7
►
If the mains supply cable is
damaged, it must be replaced
by a qualified specialist with the
corresponding replacement cable
(available from manufacturer or
customer service)
►
Do not immerse the aquastop
valve in water.
►
Always unplug the machine from
the power source before carrying
out maintenance work.
►
If the machine is not needed for
a longer period of time, disconnect
it from the power supply.
Warning
Risk of injury!
Climbing onto the machine may
cause it to tip and cause injuries.
►
Never climb onto the appliance.
►
Do not sit, lean or support yourself on the loading door.
Reaching into the turning drum may
cause injury to hands.
►
Do not reach into the rotating
drum.
►
Wait until the drum stops turning.
Contact with the hot suds during
wash cycles with hot water may
cause burns.
►
Check before washing that the
pump cover is inserted and fastened securely.
►
Never loosen the pump cover
during an active wash programme.
After interrupting a wash programme,
the laundry may still be very hot.
►
Let the laundry cool before
removing it.
Components sticking out from the
machine (e.g. loading door) may
break off and cause injuries, when
used for lifting.
►
Do not grip the appliance on
components sticking out.
If a puddle forms on the floor near
the appliance (hose tear, leak, etc.),
wipe it dry and eliminate the cause
(see Problems).
Warning
Risk of fire!
Explosive substances may be formed
through improper use of laundry
starch and washing textiles containing solvents.
►
Under no circumstances use any
solvent-based detergents in the
washing machine.
►
Textiles which contain inflammable chemicals, solvent-based
detergents, must be rinsed well
in clear water by hand before
washing.
►
Only add laundry starch in the
final rinse (Finishing rinse).
7
Page 8
►
Only use detergents, washing
agents and other additives (softeners, colouring and bleaching
agents, starch etc), which are
intended for use in household
washing machines (see manufacturer’s information).
Safety for children
Warning
Risk of injury!
Children are in danger of injury or
life-threatening situations, when
playing with the machine.
►
Keep children under 3 years
of age away from the machine,
when not closely supervised.
►
Never permit children to play in,
on or near the washing machine.
►
Activate the child lock, if necessary.
Children may lock themselves in the
machine – this is a life-threatening
situation.
Ensure that an old appliance can no
longer be used:
►
Disconnect the mains cable.
►
Cut through the mains cable and
remove cable and plug.
►
Destroy or remove the door lock.
When playing with packaging material /
film and packaging parts, children
may become entrapped in it or pull
these over their head and suffocate.
►
Keep packaging material away
from children.
Ingesting detergents and care products may lead to poisoning.
►
Keep detergents and laundry
care products away from children.
Safety during installation
Warning
Risk of injury!
If the machine is to be placed on a
plinth, it must be mounted according to the installation instructions,
otherwise this involves danger of
tipping or falling.
►
Have the machine installed
according to the mounting
instructions by qualified and
trained personnel.
►
Do not connect an appliance
which displays visible damage.
8
Page 9

Observe when washing
►
Make certain that transport safety
devices have been removed (see
installation instructions). Reinstall
the transport safety devices for
transport temporarily.
►
The maximum load is 9 kg of dry
textiles.
►
The water used in washing and
rinsing is not drinking water!
Route this wash water into a
sewage system designed for it.
►
When operating the washing
machine at 2000 m above sea
level, it is absolutely imperative to
activate the temperature limiter
to prevent the water from boiling
(see service instructions or ask
the customer service and / or
retailer).
►
Check the hose kit at regular
intervals to ensure it can be
changed in time to prevent water
damage.
►
When closing the door, make
sure not to pinch your fingers.
►
Keep pets away from the
machine.
►
Do no place any objects on the
top cover of the machine: They
might slip off and fall to the floor
during the spinning process.
►
Ask your dealer or customer
service, when in doubt.
9
Page 10

Disposal
Packaging from your new machine
All packaging materials used are environmentally friendly and reusable. All card is
made of 80 – 100 % recycled paper. Wood is
not chemically treated. Films are made of
polyethylene (PE), banding is made of
polypropylene (PP)
tion is made of polystyrene (PS)
materials are pure hydrocarbon compounds
and are recyclable.
Return the packaging to the retailer or
supplier.
Dispose of all packaging materials properly.
Processing and reuse saves raw materials
and reduces waste volumes.
and the corner protec-
. These
Disposal of your old machine
Please do not keep your old machine and
under no circumstances dispose of it in
your normal waste. The old machine contains valuable materials which should be
sent for recycling.
Components from your old machine must
not be reused. Please ensure that your old
machine is disposed of properly. In this way
you can help to ensure environmentally
friendly disposal and/or recycling methods.
Additional information on the recycling
of this product can be obtained from your
commune, your waste disposal.
10
Page 11
Washing tips
Detergent
You can use all powder, compact (concentrated), tablet and liquid detergents
commonly available for use in automatic
washing machines.
Use the right detergent for the type and
colour of your fabrics:
►
Strong detergent for whites
►
Coloured detergent for coloureds
►
Gentle detergent for synthetics,
viscose and microfibre
►
Wool detergent for wool, silk and
outer wear
Detergent dosing
Follow the dosing recommendations on the
laundry packaging. The dosing quan ti ties
given on the packaging usually refer to full
drum loads.
For smaller wash loads reduce the dosing
quantity by one third (for machines with
load measurement: please note the information on the display).
Rule of thumb: If during the washing a foam
layer of the approximate thick ness of 2 cm
above the washing liquid and / or laundry
surface is detected, the dosing quantity has
been selected properly.
The correct detergent quantity is dependent
on:
►
the water hardness
►
the quantity of laundry
►
the degree of soiling
Water hardness
Water hardness plays an essential role in
washing and it is divided in three groups:
Hardness French
(°fH)
Soft 0 – 15 0 – 8
Medium 15 – 25 8 – 14
Hard › 25 › 14
German
(°dH)
Ask your local government about water
hardness in your area.
Quantity of laundry
With a half-full drum, reduce the quantity
of detergent by one third.
The degree of soiling
lightly soiled
No visible soiling or stains, the clothing
has only absorbed body odour for
example.
►
Reduce the quantity of detergent in
accordance with the recommended
dose.
►
Wash these fabrics in the express
programme (this saves time and energy
and is gentle to the textiles).
normal soiling
Visible soiling and a few faint stains.
►
Normal dosing as per the dosing
recommendation.
►
Wash these fabrics in the standard
programme.
11
Page 12

heavily soiled
Clearly visible soiling and stains.
►
Increased dosing as per the dosing
recommendation.
►
Pre-treat stains.
►
Select the programme options
Intensive, Prewash or Soak.
Notice
Insufficient detergent
►
Only becomes apparent after repeated
underdosing
►
The laundry becomes grey or not
properly clean
►
The laundry becomes hard (board-like)
►
Laundry has grey-brown spots
►
May lead to calcified heating elements
Excess detergent
►
Poorer washing results
►
Foaming over of the detergent and
breakdowns
►
Higher water consuption and costs
►
Increased washing programme length
►
Unnecessary environmental pollution
Liquid detergents and start time
pre-selection
If poured directly into the detergent drawer,
liquid detergent slowly runs out of the
detergent dispenser during the pre-set time
and thickens. If this happens several times,
it can lead to blockages due to detergent
deposits.
►
Use dosing aids such as dosing balls or
bags supplied with the detergent.
Soap-based detergents
Because soap does not contain anything
to prevent limescale, you should only use it
with soft or medium-hard water, together
with a separate water softener.
Notice
Without softerner, limescale and soap
residue can build up in the machine, which
will be deposited on laundry in the form of
grease spots or as limescale on the heating
element.
►
Activate the setting Soap wash
programme (see chapter Settings).
Water softeners
Special water softening aids can be used in
the water hardness ranges «medium» and
«hard». Dose detergents according to the
hardness level «soft» (follow the instructions on the packaging).
►
Add the detergent first and then the
water softener into the same compart-
mentfor best washing in results.
12
Page 13
Soaking agents
►
Choose the programme option Soak.
►
Add the soaking agents to compart-
ment of the detergent drawer.
Fabric softener, fabric conditioner
Before adding thick fabric softener add
water and stir to ensure that it is free of
lumps so that the siphon does not get
blocked.
►
Add to the fabric softener to com-
partment of the detergent drawer.
Notice
Do not exceed the «max» mark in the
fabric softener compartment. Otherwise
it will be washed in at the beginning of the
programme together with the detergent,
instead of in the programme step «Finish».
Bleach, stain removal salt
For bleachable stains you can add powered
laundry bleach and stain removal salt to
your laundry detergent.
►
For best washing in results, add the
laundry detergent first and then the
laundry bleach or stain removal salt
into compartment .
Impregnating agent
Garments can be evenly and permanently
impregnated in the washing machine.
Breathable all-weather clothing such as
GoreTex or SympaTex must only be treated
with the specifically designated impregnating agent. Otherwise you risk blocking
the breathing membranes (see also Pro-
grammes / Sportswear, outdoor / Impregnating).
Hot water supply
The following points should be noted:
►
The max. permissible hot water
temperature is 70 °C.
►
For pre-wash, for programme temperature of ≤ 30 °C as well as for the programmes «Delicates» and «Curtains»,
only cold water is used.
►
For programme temperatures ≥ 40 °C,
cold and warm water is mixed until
the programmed wash temperature is
reached.
Notice
In the case or textiles soiled with blood
or proteins, select the option Prewash.
Washing these stains out at a temperature
of about 30 °C prevents setting the stain
on the fabric at higher temperatures during
the main-wash.
13
Page 14
Environmentally compatible
washing
Your washing machine will operate most
efficiently and most environmentally friendly
if you fill it with the maximum laundry
quantity.
Small loads are uneconomical and result in
increased wear of laundry and machine.
Notice
Do not exceed the maximum loading
quantities!
Over filling detracts from the washing result
and may lead to fabric damage.
Save water, energy, detergent and time
by doing without pre-washing for normally
soiled laundry.
Washing tips
Sorting the laundry
Follow the care symbols in the fabrics.
do not wash
Laundry marked with this care symbol may
not be washed in the machine.
Sort the laundry by colour, fabric type and
temperature.
Wash whites and coloureds separately,
otherwise white laundry will become grey.
Knitwear made wholly or partly from wool
must also be labelled «non-felting» or
«machine washable», otherwise there is a
risk of felting during the washing process.
Important
Textiles with metal reinforcements can damage the components of the machine and
must not be washed in the washing machine
►
Wash brassieres with stiffeners in a
fine-mesh laundry bag because of the
risk of the wires becoming detached in
the wash and falling through the drum
perforations with resultant damage.
Preparing the laundry
►
Remove foreign bodies such as safety
pins, paper clips, coins etc from the
laundry.
►
Brush out sand from the pockets and
turn-ups.
►
Close zips, hooks, eyelets and Velcro
closures.
►
Turn trousers, knitwear or knitted fabrics,
e.g. jerseys, T-shirts, sweatshirts inside
out.
►
Button up duvet covers and pillowcases
and tie fabric belts and apron strings
together.
►
Wash laundry with cords and particularly tricky items in mesh bags (Do not
exceed 1.5 kg textiles per mesh).
.
Do not wash new coloureds with other
laundry due to the risk of discoloration!
Check that brassieres are machine
washable.
14
Page 15
Stain removal
Stains that are not pre-treated may
become set on the textiles during the
wash. Such stains may be permanent
or can only be removed with very strong
bleaching agents.
►
Stains should be removed or at least
pretreated immediately, as long as they
are fresh. Stains which have already
dried (in particular in sun light) are much
more difficult to remove.
►
Use water, soap, hard soap or pre-wash
agents for pre-treating.
►
Dab it on and slightly rub it in. Let it soak,
then rinse the textile.
It may sometimes be necessary to
pretreat, wash or soak textiles several
times in order to remove tenacious and
dried stains.
In this way it is possible to completely or
almost completely remove many typical
household stains like gravy, coffee,
chocolate, wine, fat, oil, fruit juices,
blood, etc.
Dyeing textiles in the washing
machine
Starting and interrupting the
programme
►
Choose the washing programme
according to the information of the dye
manufacturer.
►
Press
►
As soon as the water runs in (water
is running over the inside of the door
glass), press
The programme will be interrupted and
the door unlocked.
Important
At the end of the 10 seconds, the door
can no longer be opened. In this case
cancel the programme (see
Cancelling the programme
repeat the procedure.
Adding dye and laundry
►
Place the different components of the
dye (according to the instructions of the
dye) into the drum, with the salt at the
bottom.
►
Afterwards add the textiles.
►
Close the door and re-press
The programme is continued.
to start the programme.
button Open the door
(not lit!)
within 10 seconds
.
Washing /
) and
.
15
Page 16
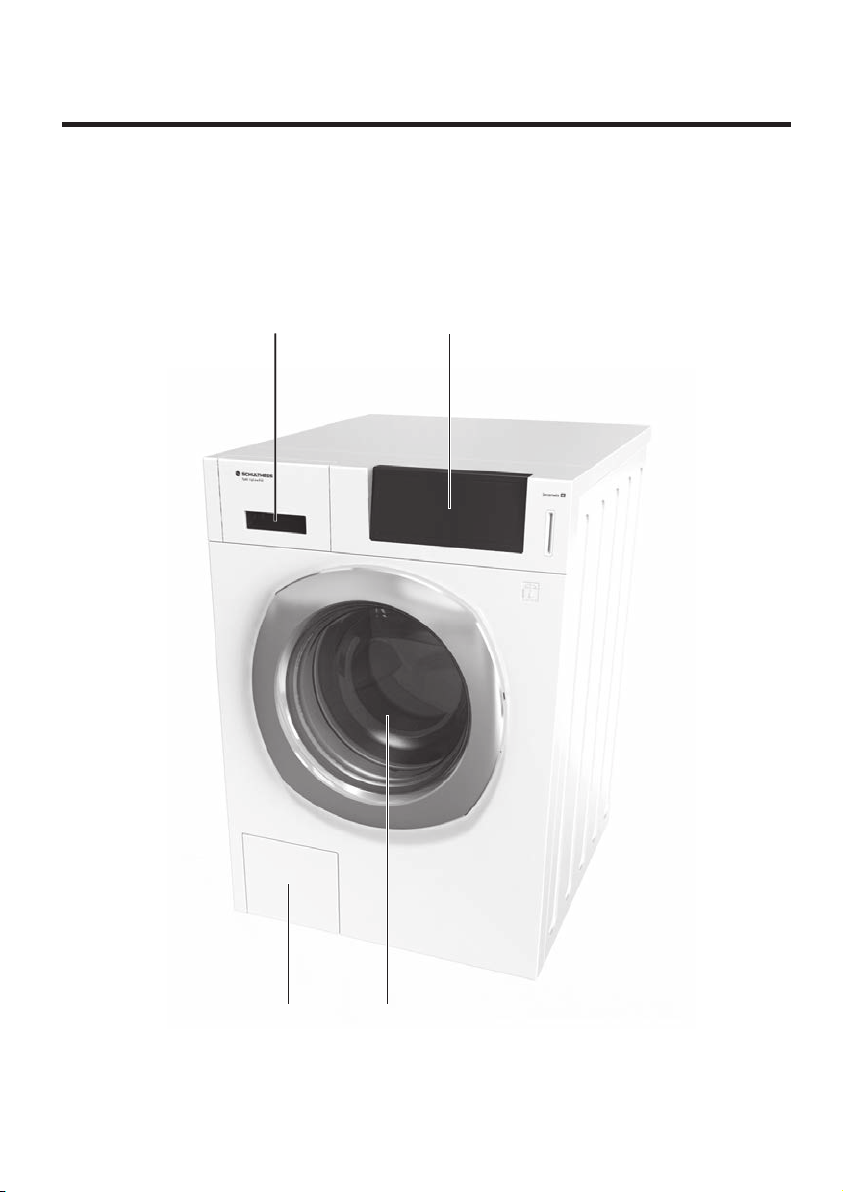
Machine description
Detergent drawer
Control and display area
Maintenance hatch Loading door
16
Page 17
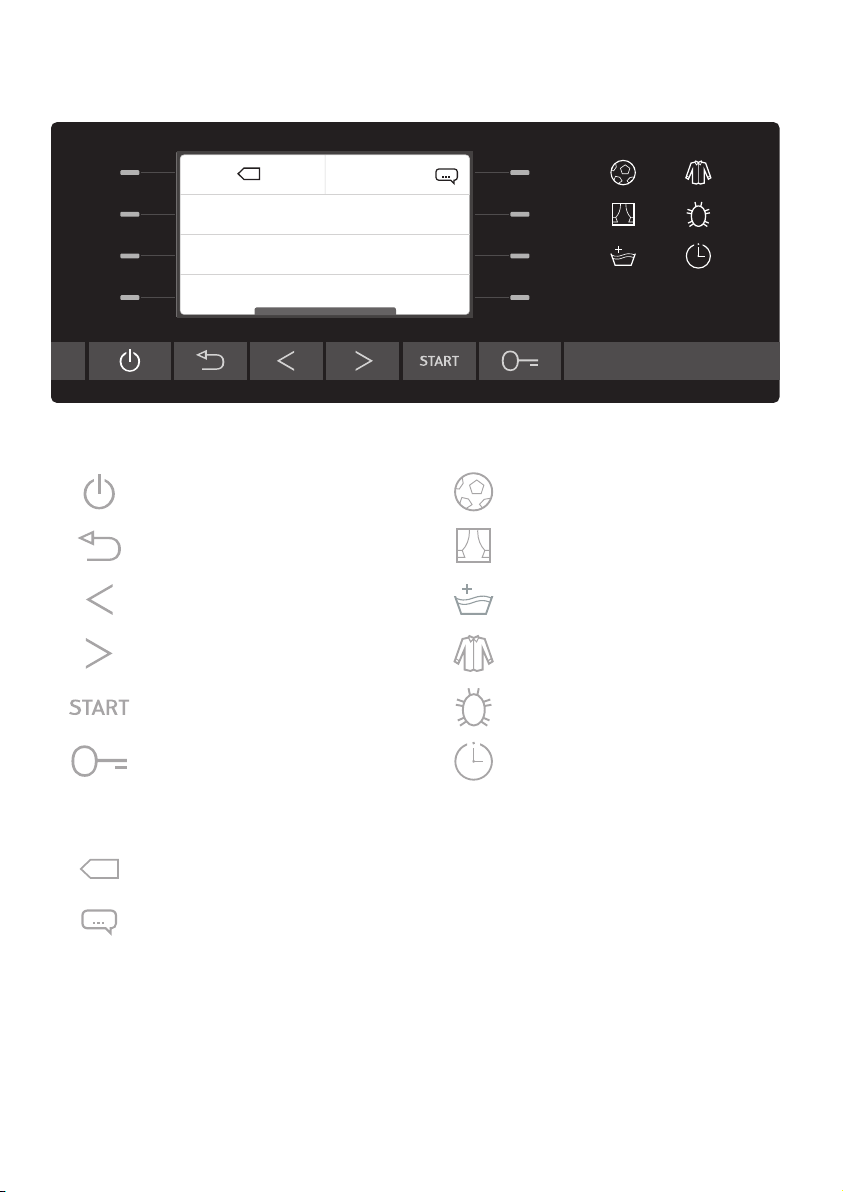
ECO /
30° Cotton
40° Cotton
ECO
40° Cotton Powerclean
On / Off
Back in the menu
Scroll backwards
Scroll forwards
Start programme
Open the door
Eco programmes
Standard programmes
1/6
Sportswear, outdoor
Homecare
Water +
Businesswear
Antibac
Time preset
1/6
Language (temporary) /
Settings
Page number programme
menu
17
Page 18
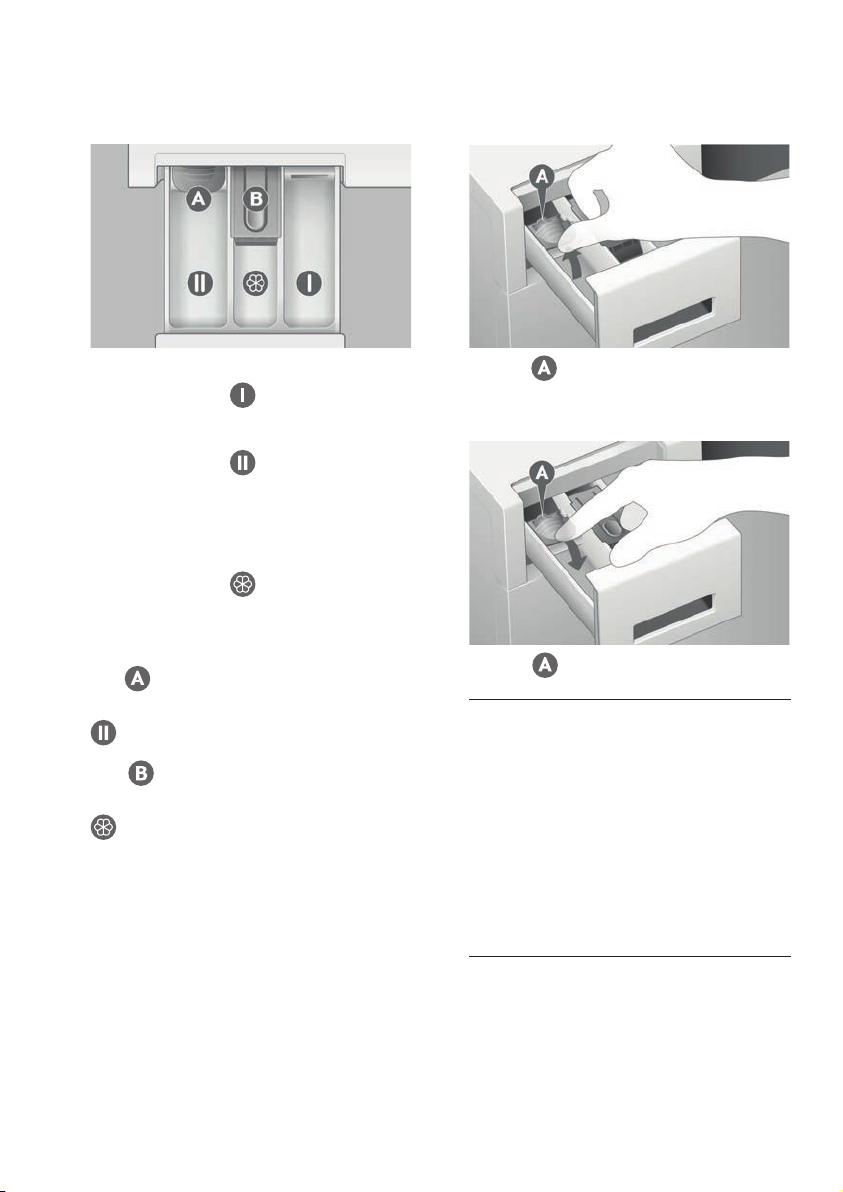
Detergent Drawer
Compartment
Detergent for prewash and soaking.
Compartment
Detergent for the main wash, bleach,
modular detergent, starch, water softener for soap programme.
Compartment
Fabric softener and other laundry care
additives for the final rinse.
Lid
Adjust the blue lid in compartment
to the type of detergent used.
Tab
Press the blue tab in compartment
down, if you want to remove the
drawer for cleaning.
Powder / concentrated detergent
or tabs
►
Lift lid and push back.
Liquid detergent
►
Pull lid forward and flip down.
Notice
Liquid detergent can run out slowly and
thicken, leading to blockages.
When using start time preset, use a dosing ball for liquid detergents and place
it into the drum with your laundry.
►
Use only powder detergents and not
liquid detergents for programmes with
pre-wash or pre-rinse.
18
Page 19
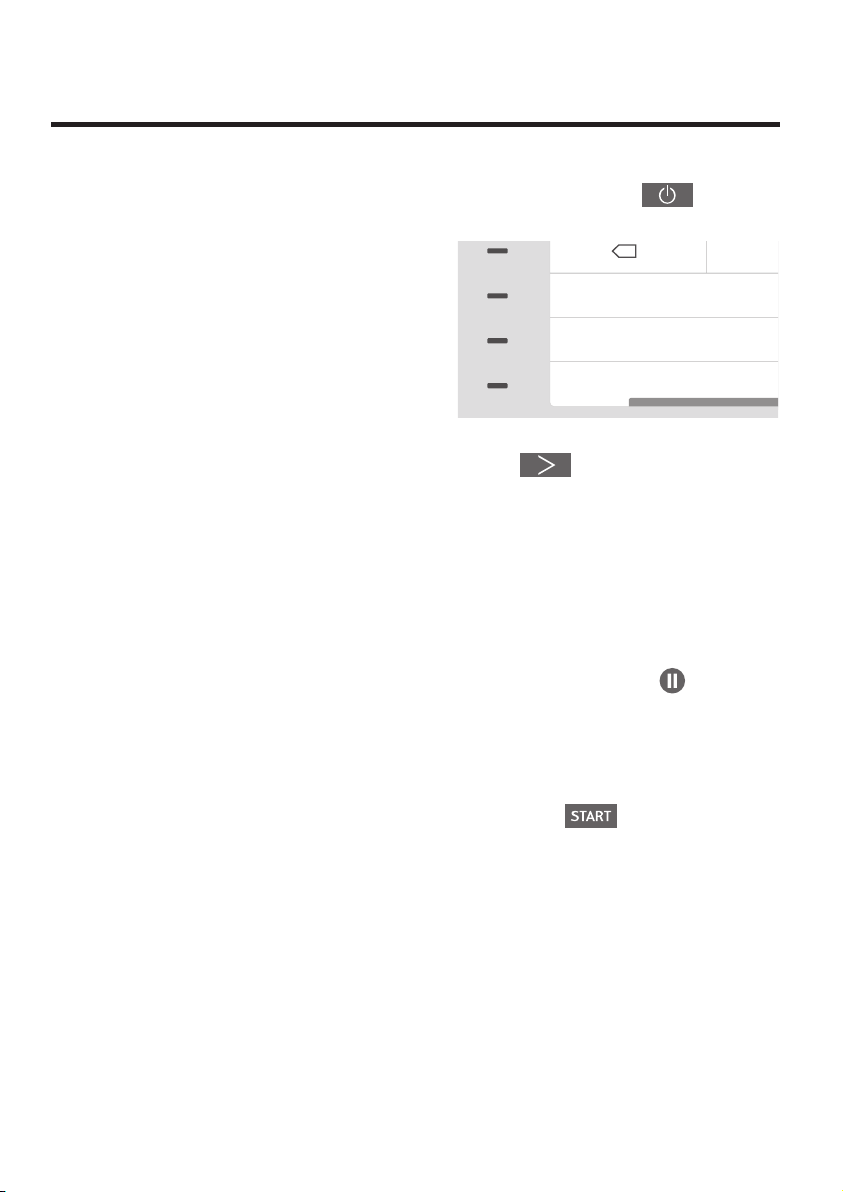
First-time use
ECO /
►
Install the machine according to the
installation instructions.
►
Do not connect an appliance which
displays visible damage.
►
Make certain that transport safety
devices have been removed.
Turn on machine
►
Press button On / Off
starting, the main menu is displayed.
30° Cotton
. After
First wash cycle
(without laundry)
The washing machine underwent extensive testing before leaving the factory.
►
Run the first wash cycle without laundry,
to remove any water remaining from
the manufacturing process.
Preparing the appliance
►
Check if the pump cover is screwed on
(see Cleaning and care).
►
Switch on the power supply.
►
Open the water tap.
40° Cotton
40° Cotton Powerclean
►
Press the arrow button Scroll for-
wards for the next page of the
menu.
►
Tap the light bar next to 60° Cotton.
Adding the detergent
►
Pull out the detergent drawer until it
reaches its stop.
►
Add half a scoop of all purpose detergent to compartment (Do not
use mild or wool detergent to avoid
foaming).
Starting the programme
►
Press button
.
After the end of the programme,
the machine is ready for use.
1/1
19
Page 20
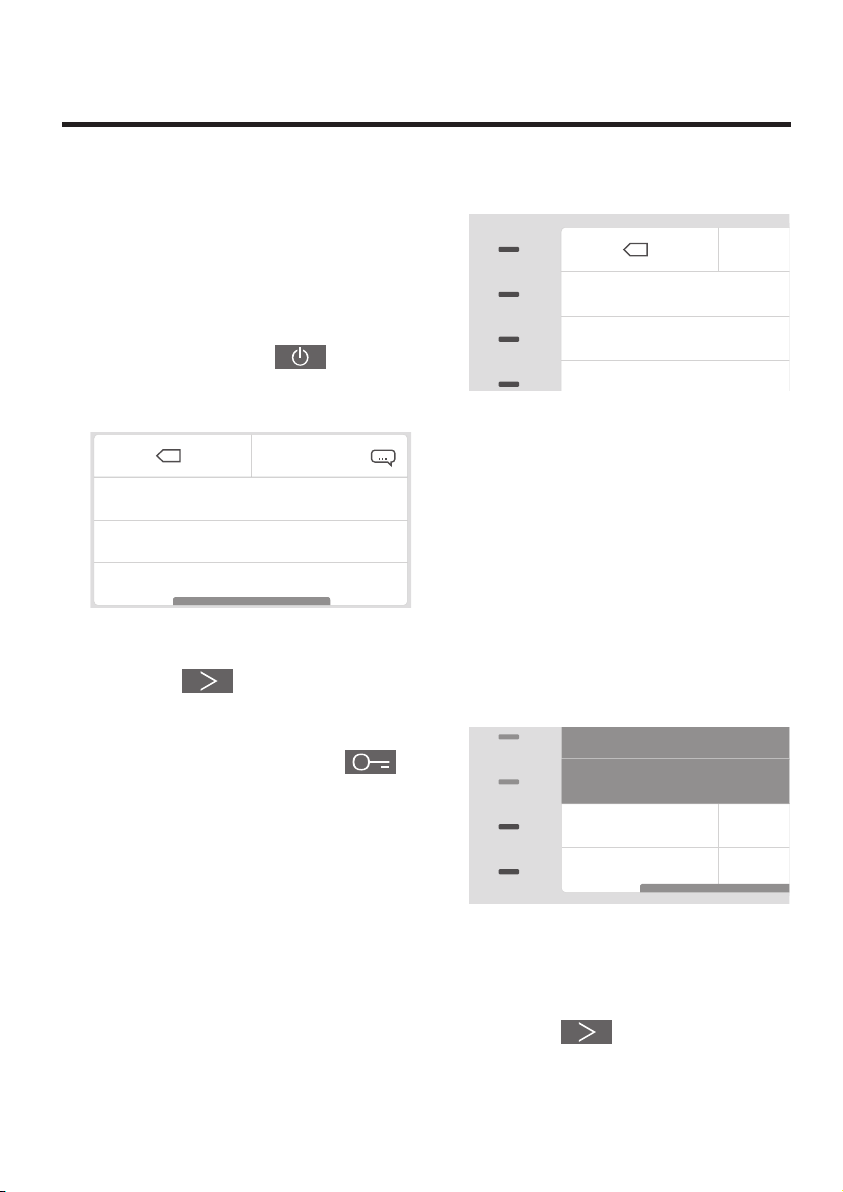
Washing
1/1
40° Cotton Powerclean
0:27 h
max. 4.0 kg
30° Cotton
Rinse +
Intensive
Preparing the appliance
►
Screw on pump cover.
►
Switch on the power supply.
►
Open the water tap.
Turn on machine
►
Press button On / Off
After starting, the main menu is
displayed.
ECO /
30° Cotton
40° Cotton
40° Cotton Powerclean
►
Additional menu pages can be opened
by pressing the arrow button Scroll
forwards .
Opening the door
►
Press button Open the door
The loading door springs open.
Selecting and starting the
programme
ECO /
30° Cotton
.
►
Select the desired programme by tapping the light bar.
The display shows the programme
selected with programme duration, spin
speed, maximum load as well as additional selectable options.
►
Select the desired programme options
and put the laundry in the machine.
Select programme options
The individual options are described in
the chapter Programme options.
.
40° Cotton
1600 rpm
Temperature | Prewash
20
Express
Prewash
►
Select the desired option/s by pressing
1/2
the light bar or the corresponding symbol.
►
Additional options can be accessed
by pressing the arrow button Scroll
forwards .
Page 21
►
Selected options change colour and are
shown in the upper part of the display.
►
If necessary, cancel the selection by
tapping the light bar again.
Adding laundry
►
Make sure that there is no foreign body
in the drum and the detergent drawer
(coins, nails, paper clips, etc.).
►
Distribute the laundry evenly in the
drum.
►
Mix large and small laundry items.
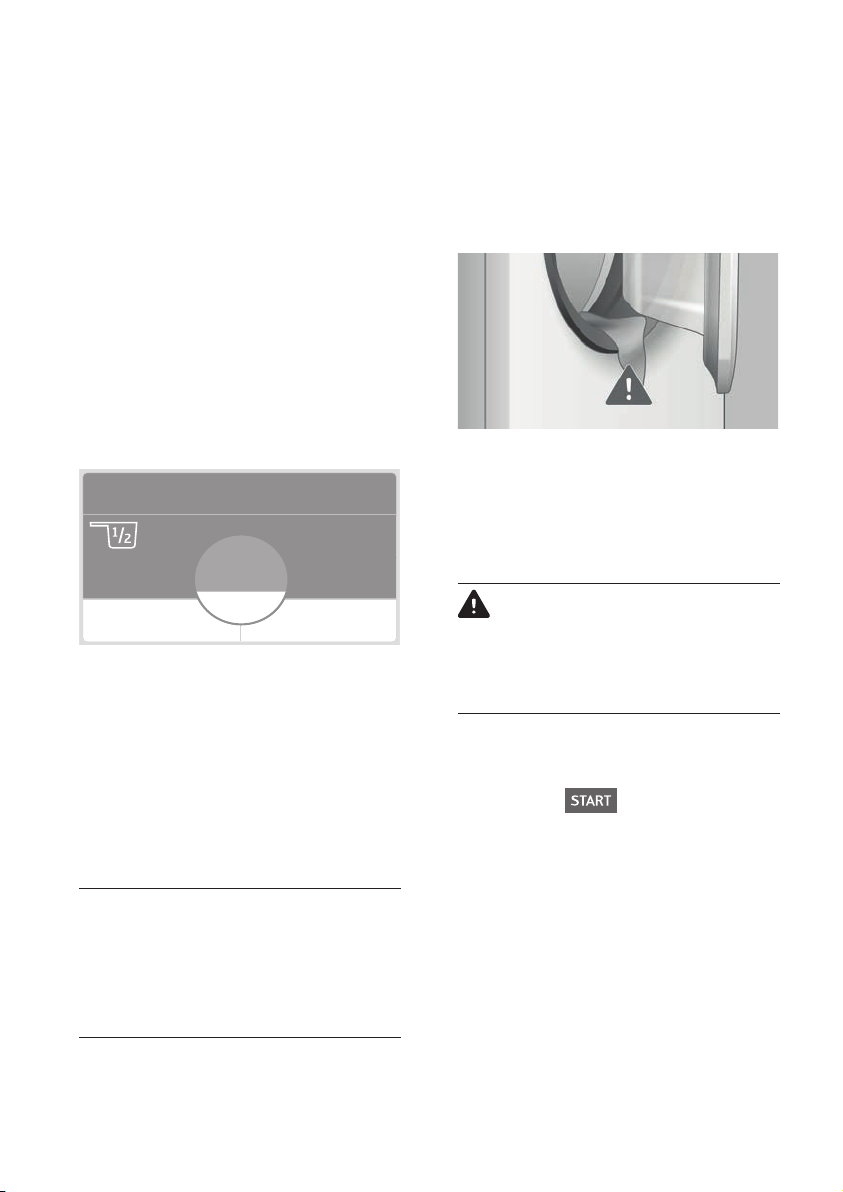
Load measuring
40° Cotton
1600 rpm
max. 9.0 kg
1:01 h
Closing the door
►
Close the door by pushing it until the lock
audibly engages.
►
Ensure that no items of laundry are
trapped between the door and the rubber
seal.
Adding the detergent
►
Please observe the notes under
Machine description / Detergent
drawer.
Cancel Forward
When the machine is loaded, the weight
of the laundry is being measured.
If the laundry weighs less than 50 % of
the maximum load, the washing time is
reduced.
►
Reduce the amount of detergent for
smaller loads (see recommendations on
the display).
Notice
If you open the loading door again after
closing, you need to repeat the procedure, since opening the door resets the
load measuring function.
Important
Risk of water damage.
Close the detergent drawer after dosing
until you feel it lock.
Starting the programme
►
Press button
.
Prepaid Card / CashCard
Card operated machines do not begin
operating until payment has been debited (see Cashcard / PrePaid Card).
21
Page 22
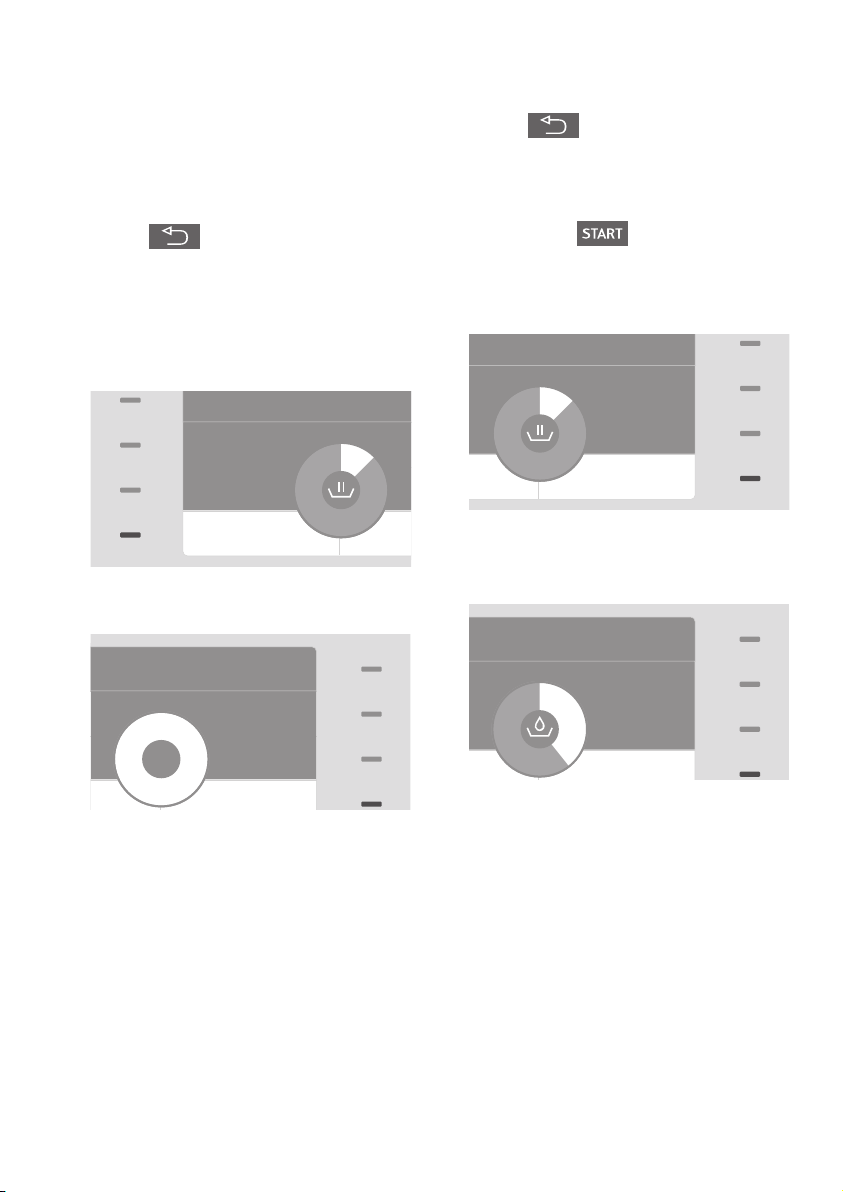
Changing the programme
0:57 h
max. 8.0 kg
40° Cotton
Forward
Washing
0:57 h
Changing the programme before
starting
►
Return to the main menu with the
button Back in the menu.
►
Repeat the selection of programmes
and options.
Changing programme after
programme start
1600 rpm
Express
Cancel
Press the light bar next to Cancel until
End is displayed.
0:01 h
max. 9.0 kg
End
►
Return to the main menu with the
button Back in the menu.
►
Repeat the selection of programmes
and options.
►
If necessary add detergent again.
►
Press button .
Skipping to the next programme
step
max. 9.0 kg
Washing
Forward
►
Press the light bar next to Forward
until the desired programme step is
displayed.
0:35 h
max. 9.0 kg
Rinse
►
The water will be drained and the programme ends.
22
Page 23
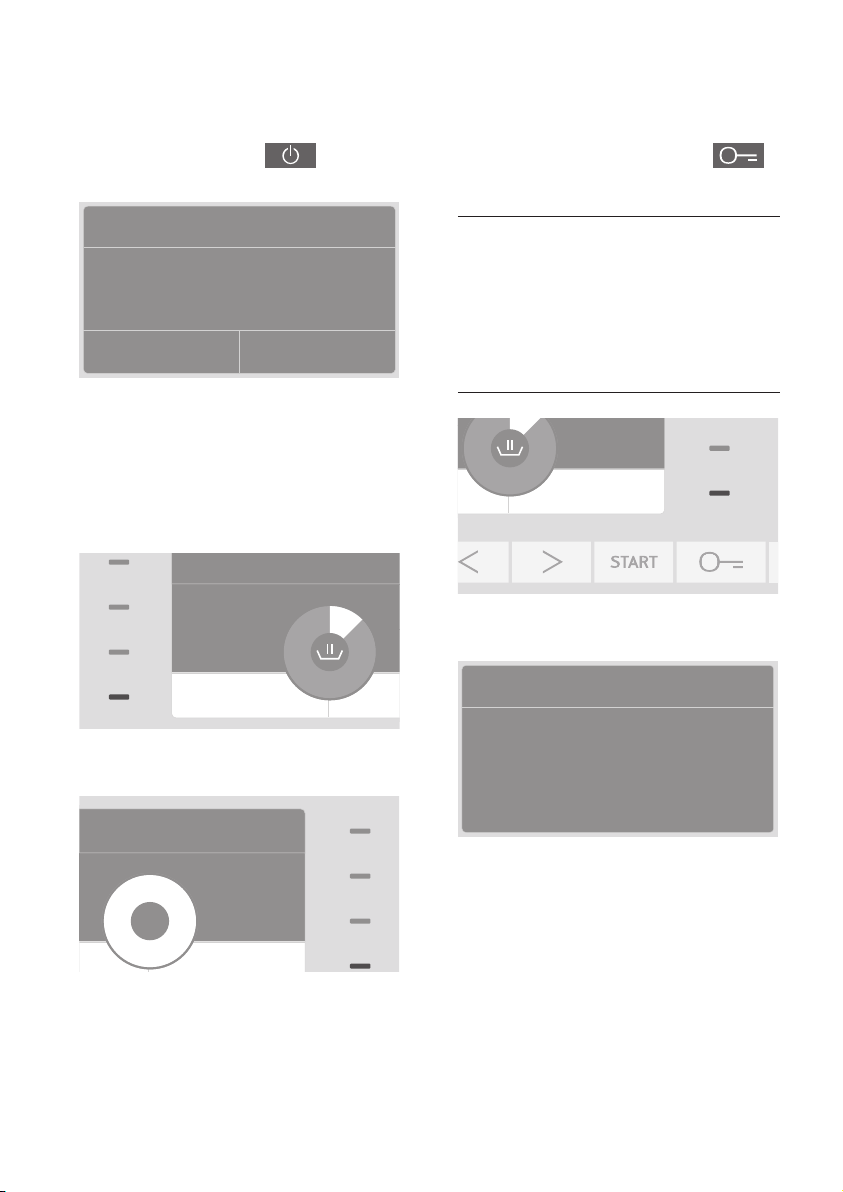
Interrupting the programme
0:57 h
max. 8.0 kg
40° Cotton
Forward
Washing
0:57 h
max. 8.0 kg
WashingRinse+
►
Press button On / Off
following window is displayed:
until the
Adding more laundry
►
Press button Open the door
(is not lit!).
Programme stopped
Stop Continue
►
Press the light bar next to Stop, to
end the programme. To resume the
programme, press the light bar next to
Continue.
Cancelling the programme
1600 rpm
Express
Cancel
►
Press the light bar next to Cancel until
End is displayed.
Notice
At the end of the 10 seconds, the door
can no longer be opened. If this is
the case, cancel the programme (see
Washing / Cancelling the programme) and repeat the process
Forward
The programme will be interrupted and
the door unlocked.
Programme stopped
Add laundry and close door.
0:01 h
max. 9.0 kg
End
►
The water will be drained and the programme ends.
►
Follow the directions on the display.
23
Page 24
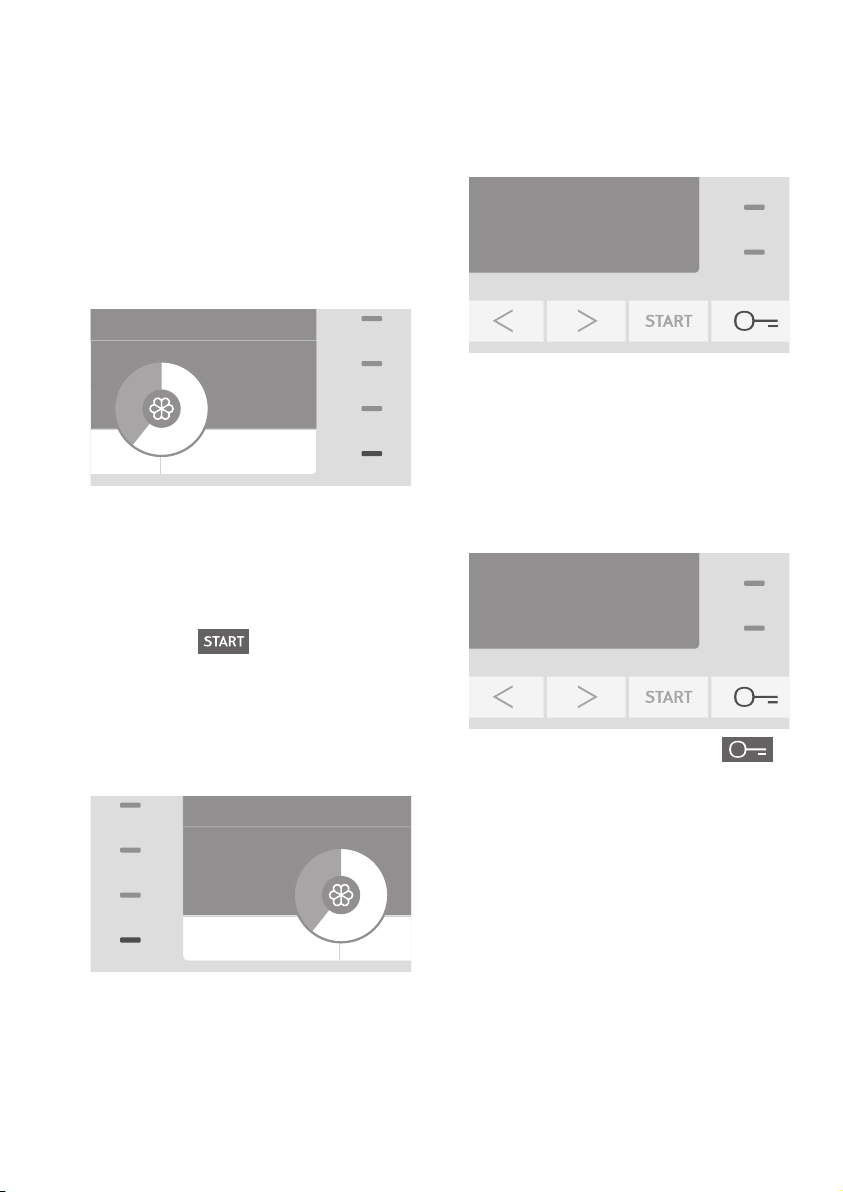
Ending programme
0:12 h
0:12 h
max. 4.5 kg
40° Easy care
Drain
Rinsing stop
0:01 h
max. 8.0 kg
0:01 h
max. 8.0 kg
with rinsing stop
The laundry will be held in the last rinse
water. Now you have two options:
The laundry can be removed
dripping wet
max. 4.5 kg
Rinsing stop
Drain
►
Select Drain. The rinse water is pumped
out and the laundry can be removed.
The laundry can be spun after
rinse stop
►
Press button
pumped out and the laundry spun.
►
To adjust the spin speed before spinning,
press the light bar next to Spin speed
(see Programme options / Spin
speed).
. The water will be
Programme end
The programme end is shown.
Programme end
When crease protection is turned on,
the drum continues to turn in short
intervals after programme end (see
Settings / Crease protection).
The door can be opened.
Remove the laundry
►
Press button Open the door .
►
Remove the laundry.
24
800 rpm
Rinsing stop
Spin speed
Page 25
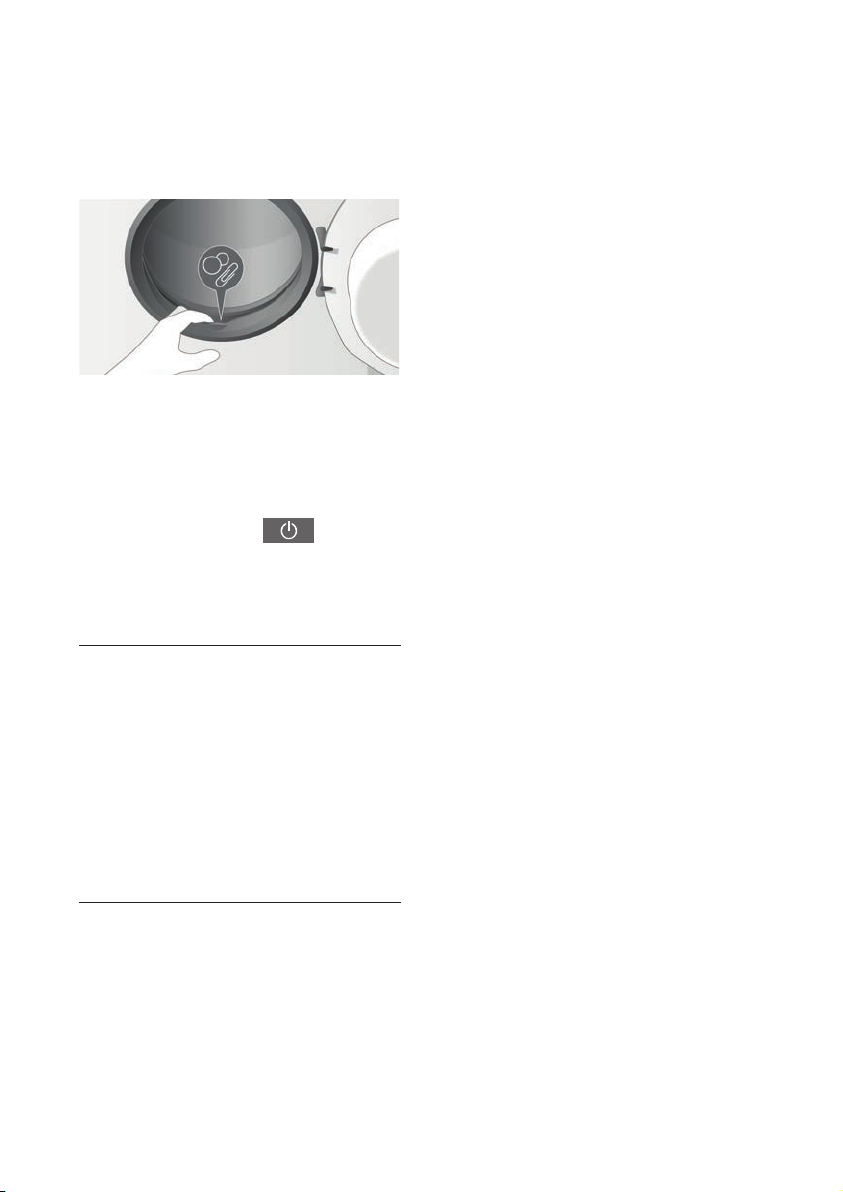
After the wash
►
Remove any foreign objects (e.g. paper
clips) from the drum and rubber seal, to
avoid iron stains.
►
Leave the door open or opened by a
crack after washing. Drying and airing
out the drum prevents odour and mould
formation.
►
Close the water taps.
►
Press button On / Off until the
display turns off.
►
Unplug the machine, when not used for
longer periods of time.
Important
Close the water taps. If the water tap is
open while the power supply is interrupted, the overflow protection does not
function.
(Only for machines without aquastop:
The aquastop valve automatically blocks
the water supply when the programme
has ended.)
25
Page 26
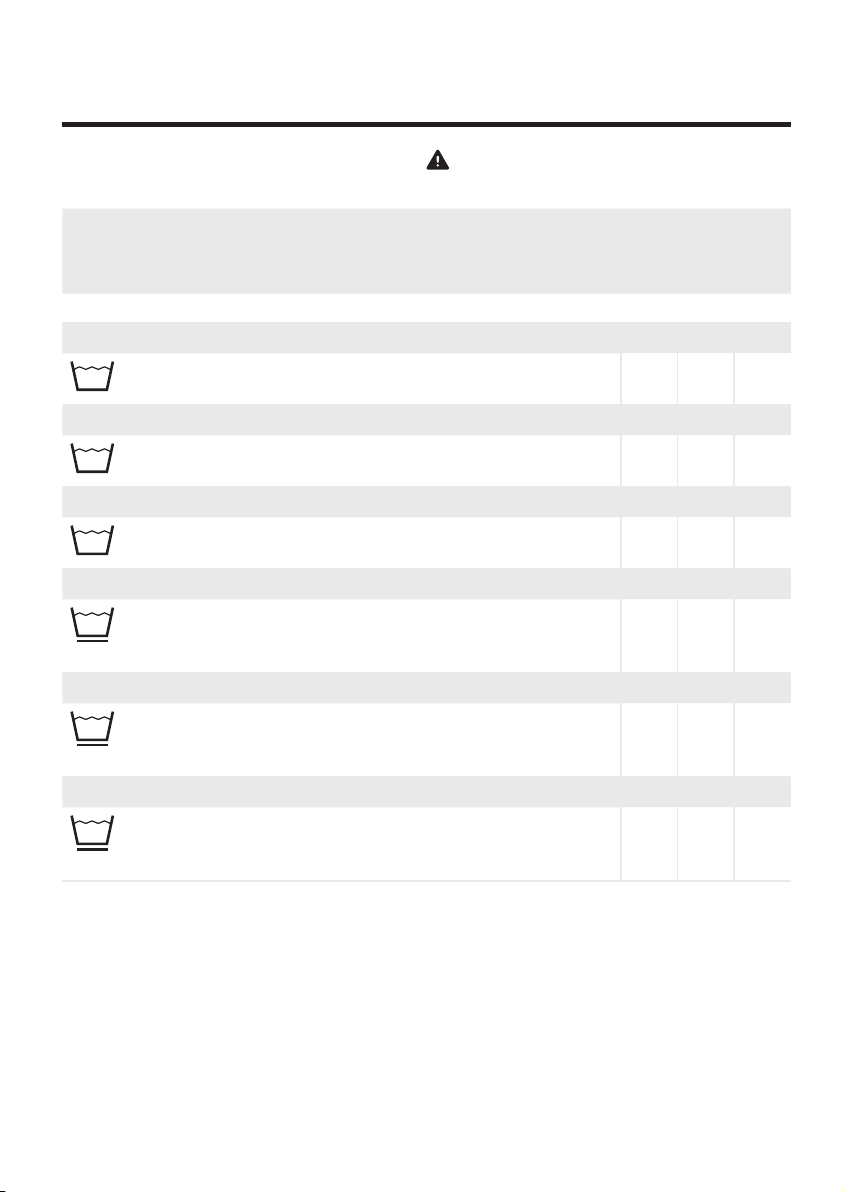
Programme survey
Always check the care symbols on the fabrics
h:min = Duration / l = Water consumption / kWh = Power consumption (Approximate values)
ECO programme
Reduced energy consumption with unchanged cleaning power
9,0 kg
40
9,0 kg
60
9,0 kg
95
4,5 kg
40
4,5 kg
60
4,5 kg
95
40° Cotton ECO
Towelling, jeans, pullover, T-shirts, socks
►
Coloured cotton
60° Cotton ECO
Bed linen, aprons, jeans, towels, shirts, underwear
►
Coloured cotton, line
90° Cotton ECO
Bed and table linen, towels, aprons, underwear
►
White and colourfast cotton and linen
40° Easy care ECO
Outerwear, shirts, blouses, T-shirts, socks
►
Easy care cotton, mixed fibres or textiles with synthetic
fibres
60° Easy care ECO
Outerwear, shirts, blouses, aprons
►
Easy care cotton, mixed fibres or textiles with synthetic
fibres
90° Easy care ECO
Outerwear, shirts, blouses, aprons
►
Easy care cotton, mixed fibres or textiles with ynthetic
fibres, colourfast
h:min l kWh
1:11
1:20
1:33
1:14
1:18
1:23
75 0,45
75 0,9
75 1,5
60 0,55
69 0,9
69 1,5
26
Page 27
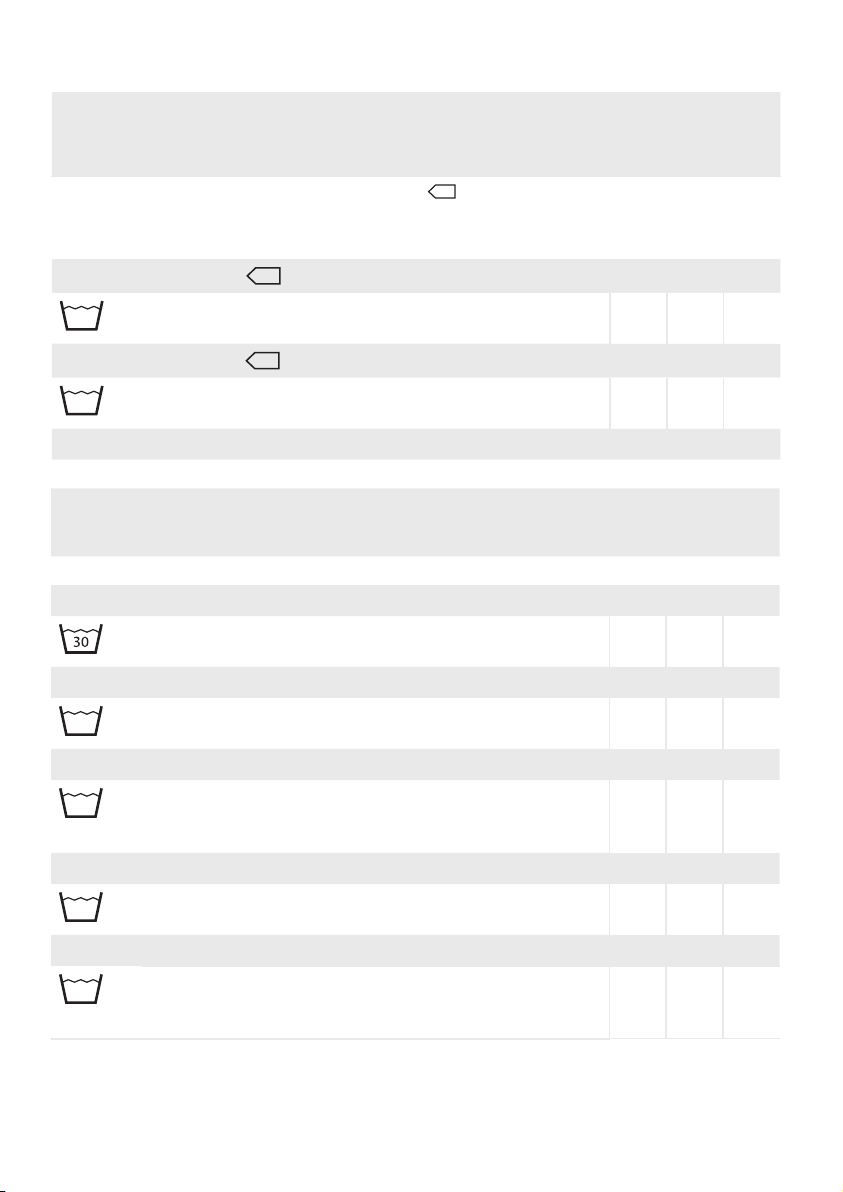
Most efficient programmes for cotton textiles
according to regulation (EU) no. 1015 / 2010
The following standard programmes (marked with
) are suitable for cleaning normally soiled
cotton textiles and are most efficient regarding combined energy and water usage.
h:min l kWh
9,0 kg
40
9,0 kg
60
Programme settings for testing and energy labelling according to directive 2010 / 30 / EU
40°
Cotton
Jeans, pullover, T-shirts, towelling
►
Coloured cotton
60°
Cotton
Bed linen, aprons, jeans, towels, shirts, underwear
►
Coloured cotton, line
40 °C
60 °C
2:49
2:49
Programmes Main menu
h:min l kWh
9,0 kg
9,0 kg
40
4,5 kg
40
9,0 kg
60
4,5 kg
60
30° Cotton
Jeans, pullover, T-shirts
►
Coloured cotton
40° Cotton
Jeans, pullover, T-shirts, socks
►
Coloured cotton
40° Cotton Powerclean
Jeans, pullover, T-shirts, socks
►
Coloured cotton, quick wash
►
Small and medium loads
60° Cotton
Bed linen, aprons, jeans, towels, shirts, underwear
►
Coloured cotton, line
60° Cotton Powerclean
Bed linen, aprons, jeans, towels, shirts, underwear
►
Coloured cotton, line, quick wash
►
Small and medium loads
1:01
1:01
0:55
1:08
0:54
61 0,6
61 0,85
75 0,5
75 0,7
62 0,8
75 1,4
62 1,3
27
Page 28
4,5 kg
4,5 kg
40
4,5 kg
60
3,6 kg
40
3,0 kg
3,0 kg
1,8 kg
4,5 kg
40
3,3 kg
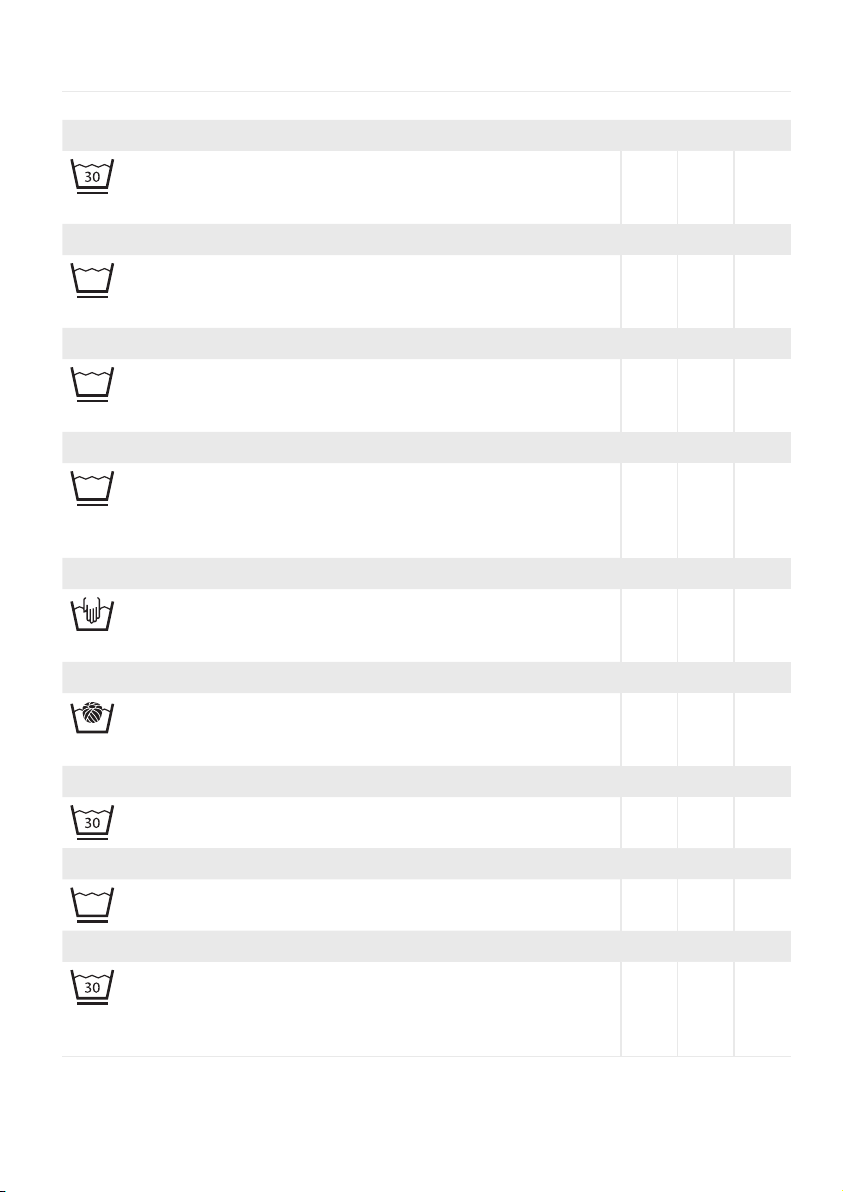
30° Easy care
Outerwear, T-shirts, shirts, sportswear
►
Easy care cotton, mixed fibres or textiles with synthetic
fibres
40° Easy care
Outerwear, shirts, blouses, T-shirts, socks
►
Easy care cotton, mixed fibres or textiles with synthetic
fibres
60° Easy care
Outerwear, shirts, blouses, aprons
►
Easy care cotton, mixed fibres or textiles with synthetic
fibres
40° Delicates
Curtains, dresses, blouses, skirts, panty hoses, bras
►
Particularly sensitive textiles made of cotton or mixed
fibres, synthetics or viscose
►
Reduce spin speed for textiles prone to creasing
20° Hand wash
Textiles made from hand-washable wool or wool blend
►
Dry wool in a dryer in a basket or briefly dry in a dryer with
«Wool finish» and then spread on a terry towel to let air dry
30° Wool
Machine washable fabrics made of or containing wool
►
Wool mark stating «non-felting» or «machine washable»
►
Dry as described above
30° Silk
Handwashables without wool
►
Wash panty hoses and bras in a washing net
40° Mixed laundry
T-shirts, shirts, pullover
►
Cotton, mixed fibre fabrics or synthetics
30° Quickwash
Jeans, pullover (Sportswear), bathing suits, towelling
►
Non-soiled cotton, mixed fibres and synthetic fibres that
are lightly creased
►
New textiles (removal of production residues)
h:min l kWh
0:58
1:01
1:06
0:54
0:38
0:38
0:49
0:57
0:15
62 0,5
68 0,75
68 1,4
59 0,7
55 0,2
55 0,4
53 0,35
76 0,75
30 0,2
28
Page 29
9,0 kg
9,0 kg
95
4,5 kg
95
4,5 kg
40
9,0 kg
9,0 kg
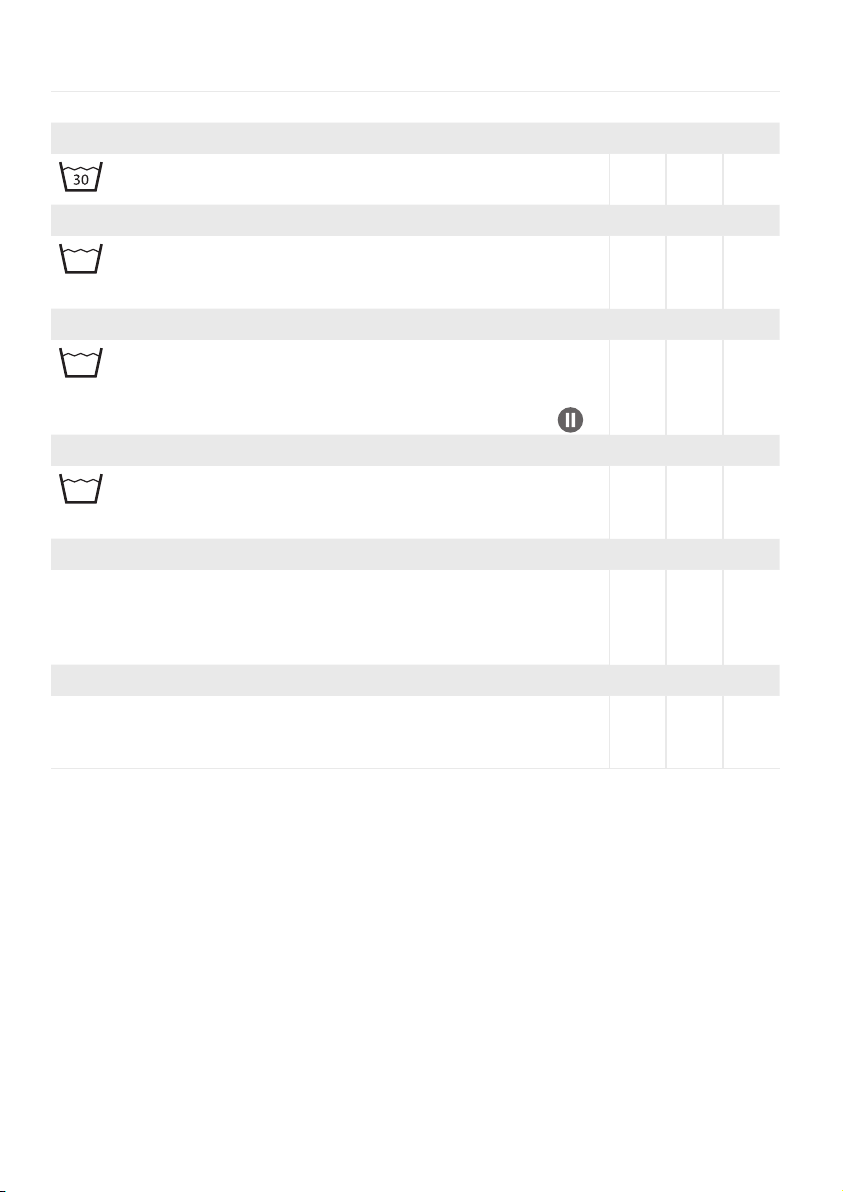
20° Cotton
Jeans, pullover, T-Shirts
►
Lightly soiled coloured cotton, non-colourfast dyed
90° Cotton
Bed and table linen, kitchen laundry, towels, aprons,
underwear
►
White and colourfast cotton and line
70° Baby clothes
Baby clothes:
Diapers, onesies
►
White and colourfast cotton
►
With pre-rinse. Add the detergent to compartment
40° Baby clothes
Baby clothes:
Onesies, rompers, overalls, pyjamas, shirts, pants
►
Easy care cotton or non-iron mixed fibres
Rinse, spin
For rinsing hand-washed textiles
►
Rinse and Spin
►
Follow recommended spin speed for textiles prone to
creasing
Spin
►
Spin only
►
Follow recommended spin speed for textiles prone to
creasing
h:min l kWh
1:01
1:19
1:46
1:13
0:17
0:10
75 0,3
75 2,6
118 1,7
92 0,75
42 0,1
– 0,1
29
Page 30
Sportswear, outdoor
3,3 kg
3,3 kg
2 Pair
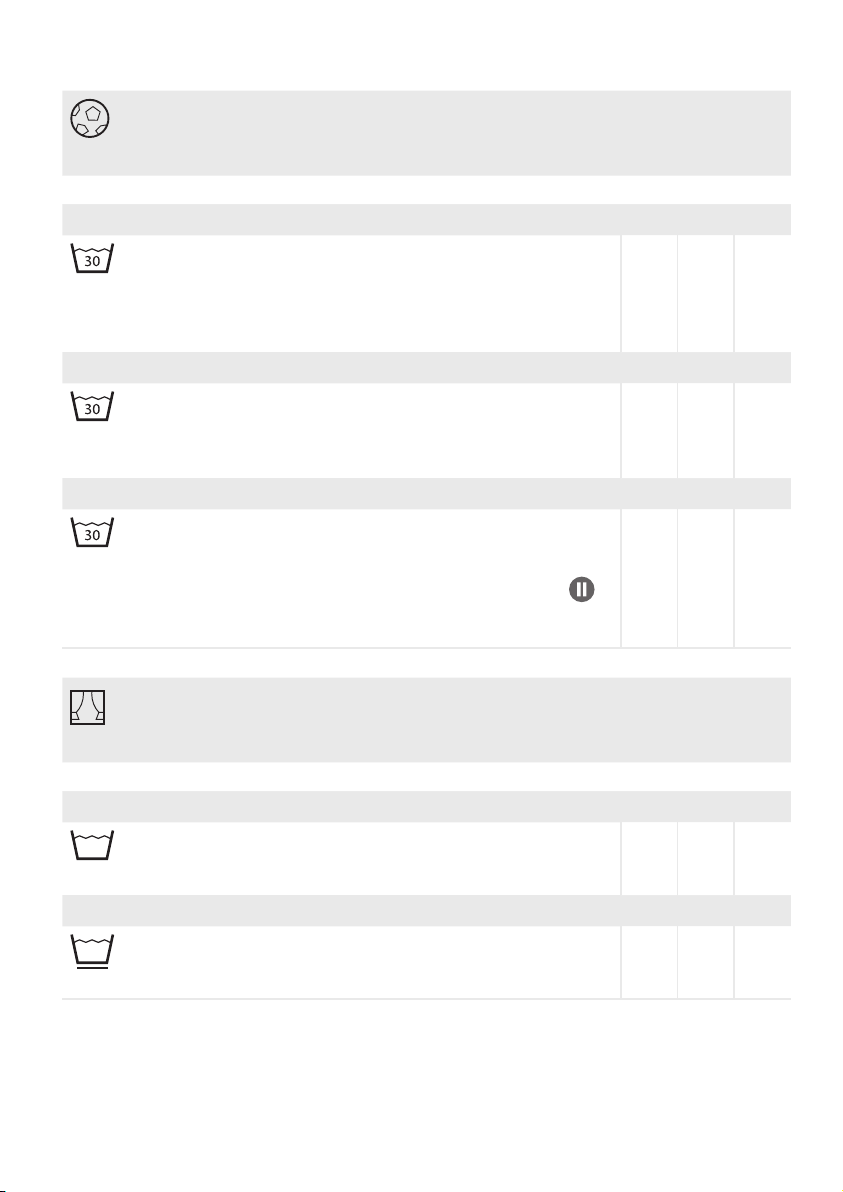
30° Sportswear
Sports and leisure jackets, weather gear, ski wear, fleece,
T-shirts, shorts
►
Modern textiles from microfibre or with a high percentage
of microfibre, e.g. GoreTex or SympaTex
►
Do not use fabric softeners
30° Impregnating
Sports and leisure jackets, weather gear, ski wear, table linen
►
For impregnation of modern textiles from microfibre or with
a high percentage of microfibre (e.g. GoreTex or SympaTex),
to obtain a water- and dirt repelling effect.
30° Athletic shoes
Athletic shoes, sneakers
Washable athletic and leisure shoes made of cotton or
synthetic materials
►
With pre-rinse. Add the detergent to compartment
►
Follow manufacturer’s care instructions (no leather goods)
►
Dry shoes in a dryer in a basket or let air-dry
h:min l kWh
0:58
0:53
1:14
69 0,3
22 0,45
123 0,5
Homecare
9,0 kg
60
9,0 kg
60
30
60° Terry towels
Terry towels:
Bath towels, hand towels, bath ropes
►
Cotton
60° Bed linen
Bed linen:
Bed linens, fitted sheets, comforters
►
Cotton or mixed fibre
h:min l kWh
1:11
1:12
95 1,7
89 1,3
Page 31
2,7 kg
60
4,5 kg
60
2,3 kg
40
–
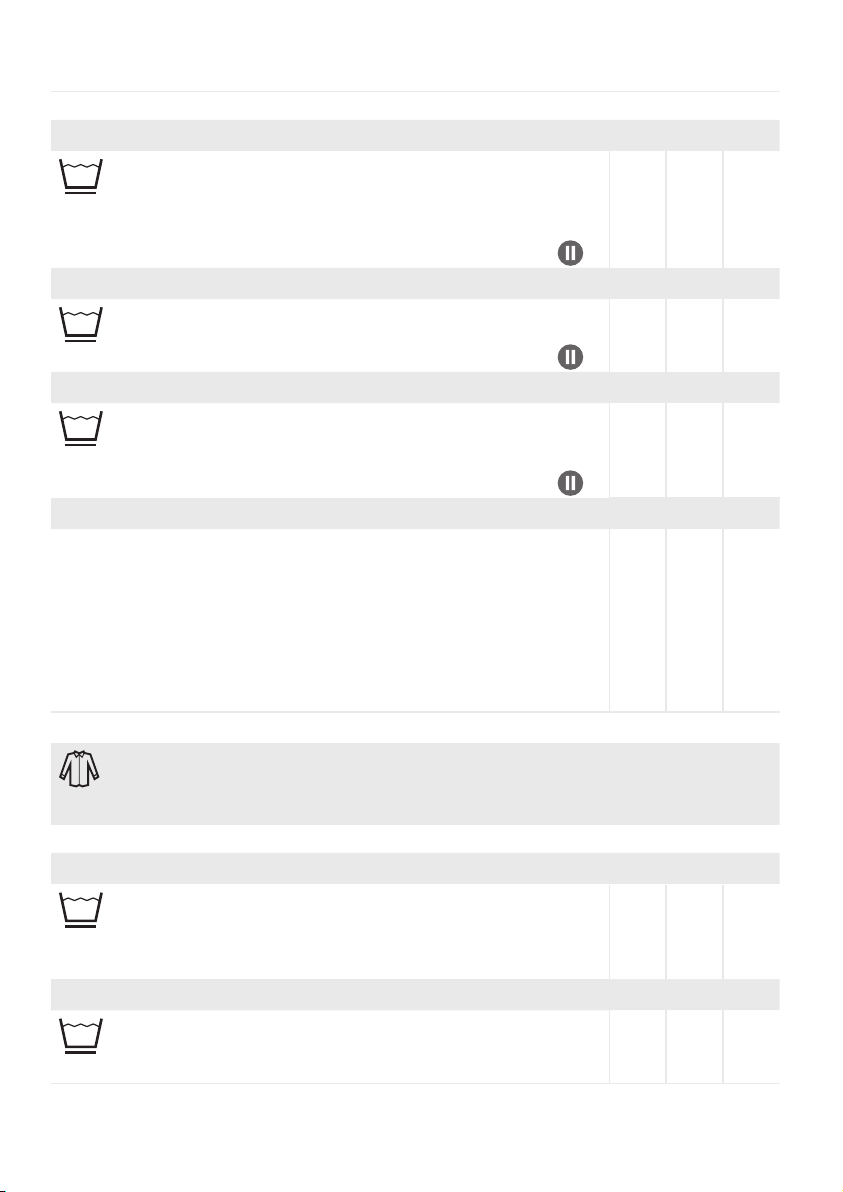
60° Down, cushion
Blankets, pillows, jackets, sleeping bags
Feather, down, synthetic or natural hair stuffing
►
Press the air out of the laundry before washing, so that the
down is wetted faster
►
With pre-rinse. Add the detergent to compartment
60° Cleaning cloths
Cleaning cloths, mops
►
Cotton, mixed fibres or microfibre
►
With pre-rinse. Add the detergent to compartment
40° Curtains
Curtains labelled as machine washable
►
Mixed fibre fabrics or synthetics
►
De-select spinning for curtains prone to creasing
►
With pre-rinse. Add the detergent to compartment
70° Autoclean
Cleaning the machine
without laundry and detergent
►
When frequently washing at low temperatures, there is a risk
of bacterial contamination
►
Hygienically cleans the drum and washing liquor tanks and
prevents odour build-up
►
Using the Schulthess machine cleaner gives you optimal
results
h l kWh
1:24
1:13
1:03
0:22
55 0,9
108 2,1
89 0,9
31 0,95
Businesswear
2,3 kg
40
4,5 kg
40
40° Shirts, Iron finish
9 shirts or blouses made of cotton or mixed fibres
►
Pre-treat collars and cuffs, depending on degree of soiling
►
Hang laundry immediately after washing and let air try. This
way you normally do not have to iron.
40° Jeans
Jeans, chinos, jackets
►
Cotton or mixed fibre
►
Wash jeans fabrics inside out
h:min l kWh
1:11
1:04
42 0,4
69 0,75
31
Page 32
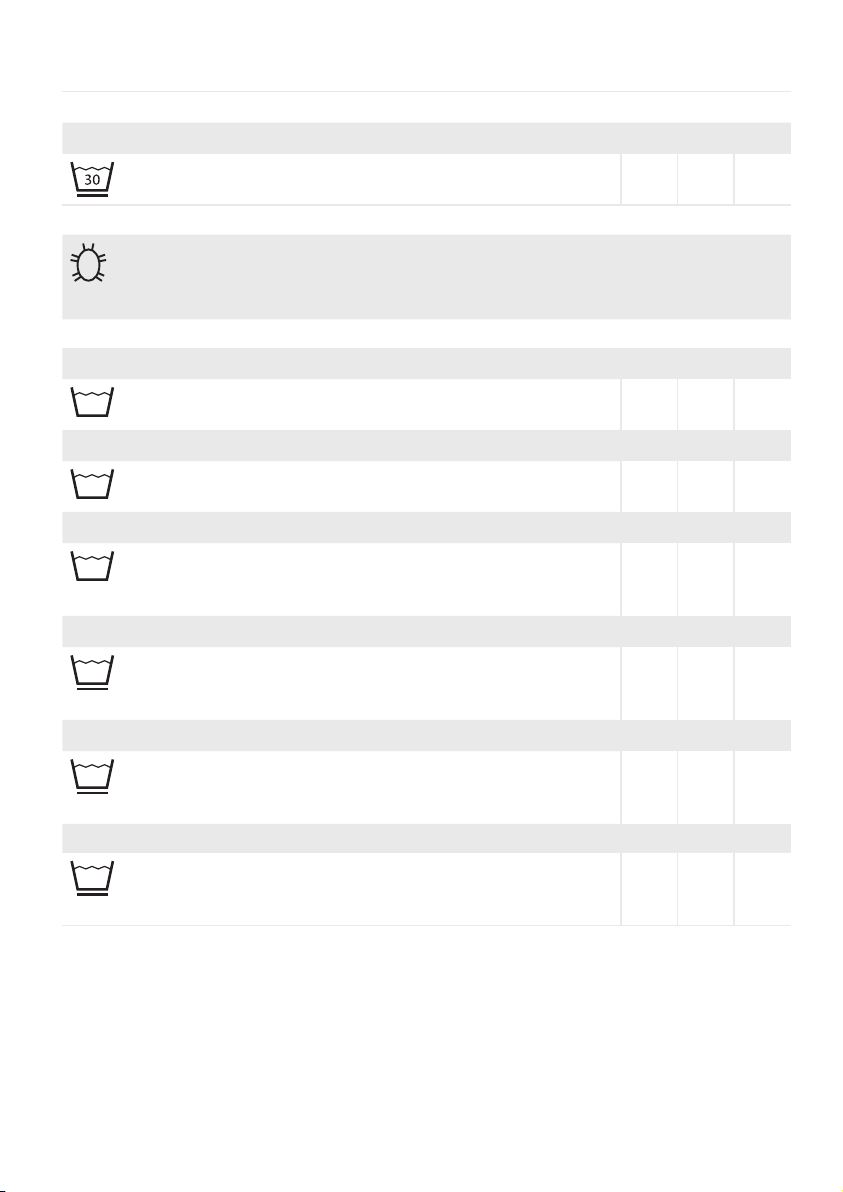
3,0 kg
Antibac
9,0 kg
40
9,0 kg
60
9,0 kg
95
4,5 kg
40
4,5 kg
60
4,5 kg
95
30° Pullover
Pullover
►
Cotton or mixed fibre
40° Cotton Antibac
Jeans, pullover, T-shirts, pants, socks
►
Coloured cotton
60° Cotton Antibac
Bed linen, aprons, jeans, towels, shirts, underwear
►
Coloured cotton, line
90° Cotton Antibac
Bed and table linen, kitchen laundry, towels, aprons,
underwear
►
White and colourfast cotton and line
40° Easy care Antibac
Outerwear, shirts, blouses, T-shirts, socks
►
Easy care cotton, mixed fibres or textiles with synthetic
fibres
60° Easy care Antibac
Outerwear, shirts, blouses, bed and table linen
►
Easy care cotton, mixed fibres or textiles with synthetic
fibres
90° Easy care Antibac
Bed and table linen, towels, underwear
►
Easy care cotton, mixed fibres or textiles with synthetic
fibres, white and colourfast
h:min l kWh
0:49
h:min l kWh
1:15
1:25
1:31
1:11
1:18
1:24
82 0,5
92 1,1
92 2,1
92 3,1
69 0,95
69 1,6
69 2,4
32
Page 33
Special programmes
Pressing the symbol button the menu
of the respective programme group is
called up.
Sportswear, outdoor
These programmes are suitable
weather gear, sports and leisure jackets
as well as modern clothing made of
microfibre or with a high microfibre
content, e.g. Gore-Tex or SympaTex.
►
Only use mild detergents, for GoreTex
and SympaTex, too.
►
Add liquid detergent to a dosing ball and
place it into the drum with your laundry.
Notice
Do not use fabric softener. This can block
the breathable membranes and prevent
successful subsequent impregnation.
Pre-treating stains
Heavy stains e.g. fat, sun cream, lipstick
or cosmetics, require suitable pre-treatment:
►
Rub liquid gentle detergent directly into
the stain with your fingers. Do not scrub
(Risk of damage to the fabric!).
►
Leave to work for around 5 minutes and
then wash the items in the washing
machine.
for
Impregnating
To prepare the laundry for impregnation,
it must first be washed clean and rinsed
with cleaning vinegar:
►
Add the laundry.
►
Add the detergent.
►
Pour the cleaning vinegar into com-
partment , until it reaches the
marking max.
►
Run the programme Sportswear,
outdoor.
►
Immediately after the washing
programme is completed, start the
Impregnating programme.
►
Add 3,5 dl impregnants at the same
time the water runs in into compart-
ment .
►
After impregnation in the washing
machine, the laundry shall be dried
completely at the maximum admissible
temperature for the respective textiles.
Notice
Microfibre fabrics, GoreTex and SympaTex should only be treated with special
impregnation products designed for
them.m. Otherwise, there is a risk that
the breathable membranes become
clogged.
33
Page 34

Homecare
Because of their high water level and
low spin speed, homecare programmes
are particularly well suited for household textiles made of mixed fabrics and
synthetics.
►
Select Rinsing stop to prevent
creasing
►
Place metal rings or plastic hooks in a
at the end of the programme.
laundry net or bag (cushion cover).
Important
Older curtains are often very bleached
by the sun and no longer very resistant.
Machine washing can therefore cause
slight damage.
Businesswear
Usually there is no need to iron on-iron
shirts and blouses.
►
Hang the shirts and blouses up and let
them air dry.
►
Pre-treat heavily soiled collars and cuffs.
Antibac
The Antibac programme kills harmful
germs and mites to a great extent and
flushes out allergens especially well.
34
Page 35

Programme options
By also selecting one or more options,
a wash programme can be specifically
tailored to the particular characteristics
of the laundry.
►
Programme options are only activated
for the duration of the current wash
programme.
►
Long-term modifications can be
made in the user settings (Menu
Settings)
are changed
and stay activated until they
again.
Notice
The programme options Express,
Prewash and Intensive are mutually
exclusive, therefore only one of these
options can be selected.
Express
►
Gentle and energy-saving washing of
lightly soiled textiles. Reduces washing
time.
►
Maximum load: 4,5 kg
►
For small loads of washing or light soiling,
reduce the amount of detergent (see
manufacturer’s information on the
package).
Prewash
For particularly heavily soiled laundry
with bad stains (e.g. blood, proteincontaining stains etc.) as well as occupational laundry.
The prewash temperature is 30 °C.
►
Add ¼ of the detergent to compart-
ment .
►
Use powder detergent.
Intensive
For heavily soiled textiles, especially for
bleachable stains (e.g. fruit, coffee, tea,
red wine, oil).
The washing time is extended.
Rinse +
By selecting an additional rinse cycle,
the rinse result can be improved (for
soft water areas and allergy sufferers).
Water +
If laundry is heavily soiled, increasing
the amount of water in the drum can
improve the washing result.
More water also helps to rinse out dirt
and laundry detergents (for garments
worn directly against the skin and for
people with sensitive skin).
35
Page 36
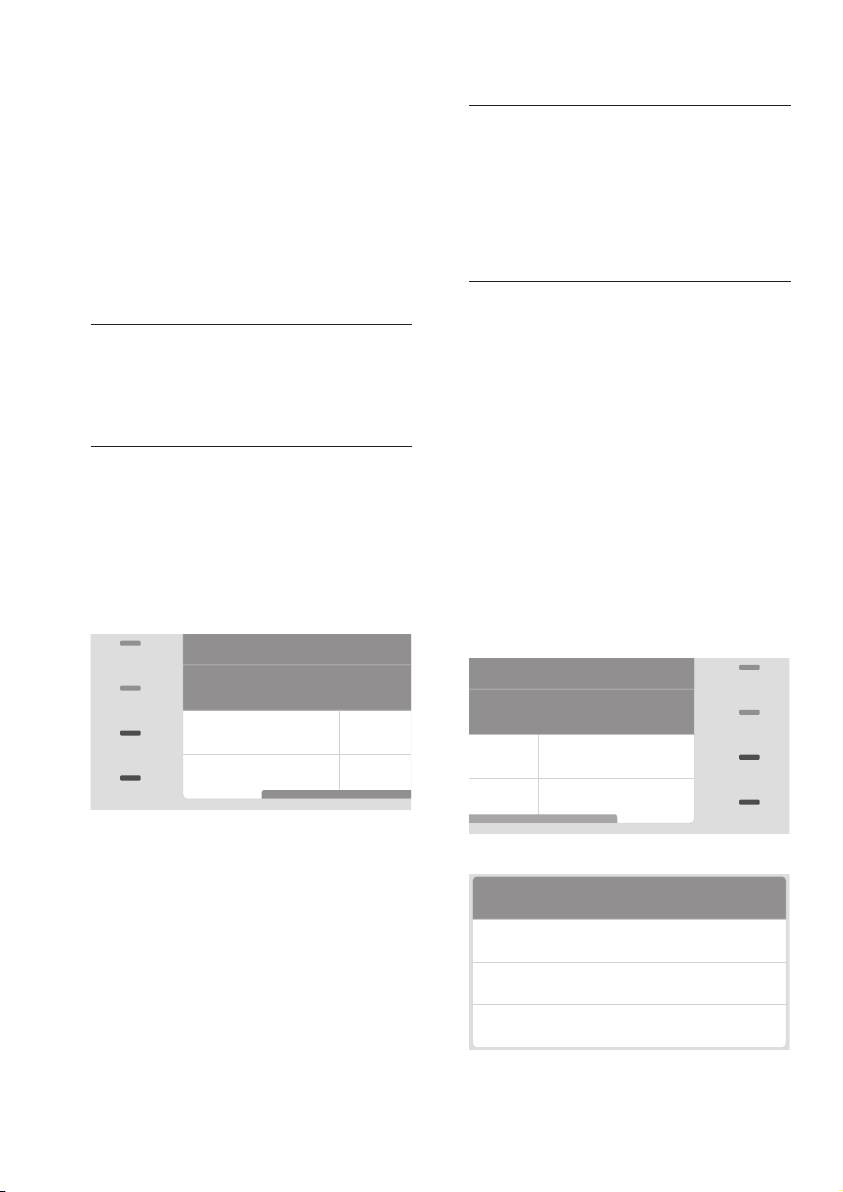
Temperature
40° Cotton
Soaking
Rinsing stop
0:27 h
max. 4.0 kg
0:57 h
−+
−+
The temperature can be reduced in 10 °C
stages. The display shows the current
temperature.
►
Reduce the preset temperature by
tapping the light bar next to Temper-
ature.
Notice
Select a high spin speed for laundry that
will be dried in a dryer or ironed with
a finisher. Well-drained laundry needs
much less energy and time for machine
drying.
Notice
The temperature cannot be lowered
for the programmes Autoclean and
Antibac.
Spin speed
Select a lower spin speed for a gentler
treatment of your laundry. The current
spin speed is shown on the display.
1600 rpm
Prewash
Temperature
Speed
►
Tapping the light bar next to Spin
speed reduces the spin speed in steps
of 100 rpm
At 0 rpm the laundry is not spun and can
be removed wet.
1/2
Rinsing stop
The «Rinsing stop» function is used to
avoid creasing of sensitive fabrics. The
laundry is held in the last rinse water.
►
You can end the programme by draining
the water without spinning or by spinning
(see Washing / Ending programme
with rinsing stop).
Soaking
max. 9 kg
Rinsing stop
2/2
►
Tap the light bar next to Soak.
Soaking
Soaking
Hours
1:52 h
0:00 h
max. 7 kg
Reset
36
Minutes
OK
Page 37
►
−+
−+
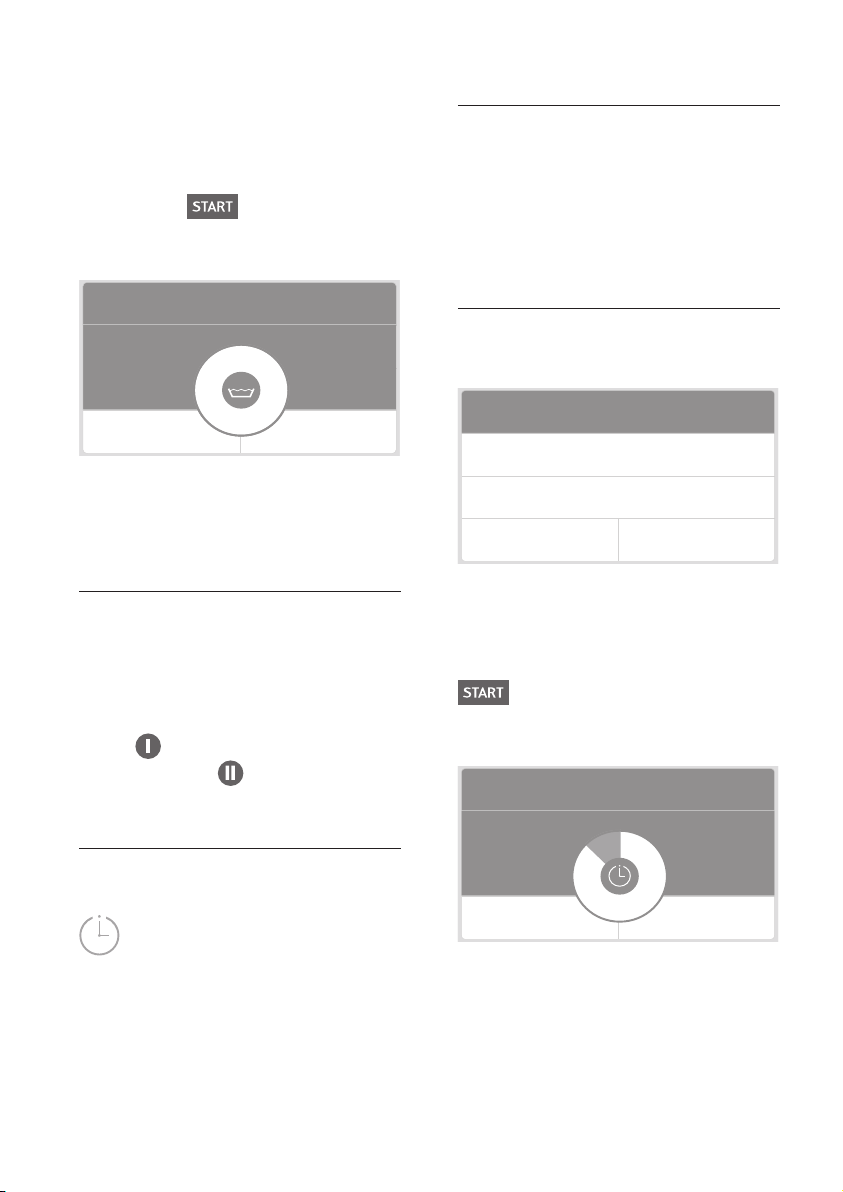
Enter the desired soaking time by
tapping the light bar (15 min-steps /
max. 24 hours).
►
Confirm your entry with OK.
►
Press button
.
The soaking time starts, the remaining
time until programmes start is displayed.
60° Easy care
800 rpm
Programme start
2:27 h
max. 4.5 kg
Soaking
03.12. 13:30
Cancel Forward
►
The selected programme starts automatically after soaking.
►
Select Forward to start the washing
programme immediately.
Notice
In case of a power interruption, the current soaking time is saved. The duration
of the power interruption has no effect.
►
Add soaking detergent to compart-
ment the laundry detergent to
compartment .
►
The Soaking option is not available with
the Express and Antibac programmes.
Notice
►
Check, if the time on the machine is
set correctly (see Settings
Settings
►
When using liquid detergent, fill the
/
Time).
/ Menu
detergent into dosing ball and place it
into the drum with your laundry.
►
First select the desired programme.
►
Press the symbol button Time preset.
Programme end
04.09. 13:15h
1:52 h
max. 7 kg
Date
Time
Reset
►
Enter date and time for the programme
end by tapping the light bar (15 minsteps).
►
Confirm the entry with OK and press
.
The preset time starts. The remaining
time until programmes start is displayed.
60° Easy care
800 rpm
Programme start
0:39 h
max. 4.5 kg
Time preset
03.12. 21:00
OK
Time preset
Cancel Forward
►
►
With the option Time preset the
start time of the programme can be
delayed and thus suit your lifestyle (e.g.
taking advantage of cheaper night-time
electricity).
The selected programme starts
matically when the start time is reached.
►
Pressing the start button again cancels
time preset and the washing programme
can be started immediately.
auto-
37
Page 38
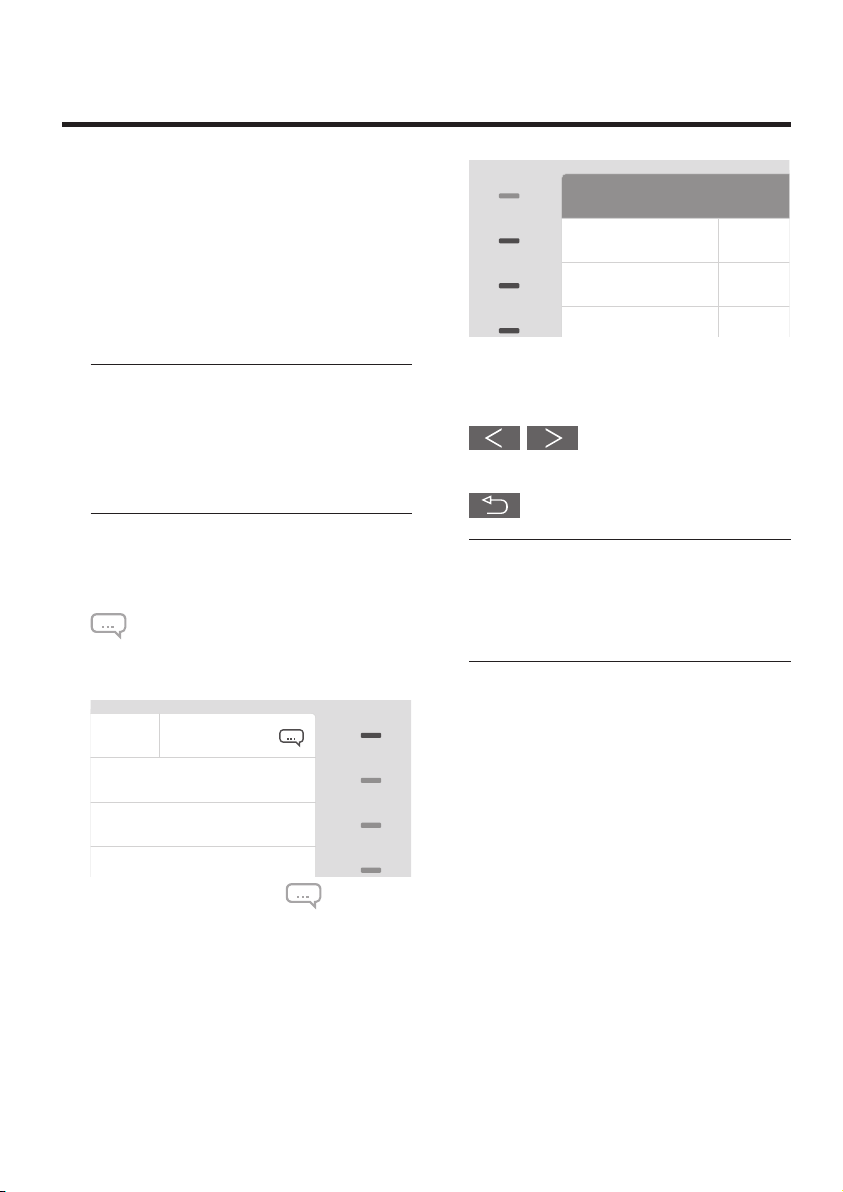
Settings
Deutsch
Rumantsch
Italiano
Español
Your washing machine has default settings
from the factory. The settings can
be adapted to the users individual needs
either when first used or later using the
following functions.
The settings can only be changed if no
wash programme is running.
Notice
Certain settings on your machine can
be blocked. However, the Language
(temporary), Date and Time functions
are always available.
Language
English
Français
►
Select the desired language.
Additional menu pages can be
opened by pressing the arrow buttons
.
Pressing the button Back in the menu
ends the menu Language.
Language (temporarily)
A second language can be selected
temporarily via the Language menu.
►
Tap the light bar next to . The menu
Language is displayed.
38
Notice
This language will remain active until
the machine is switched off or goes into
standby.
Page 39
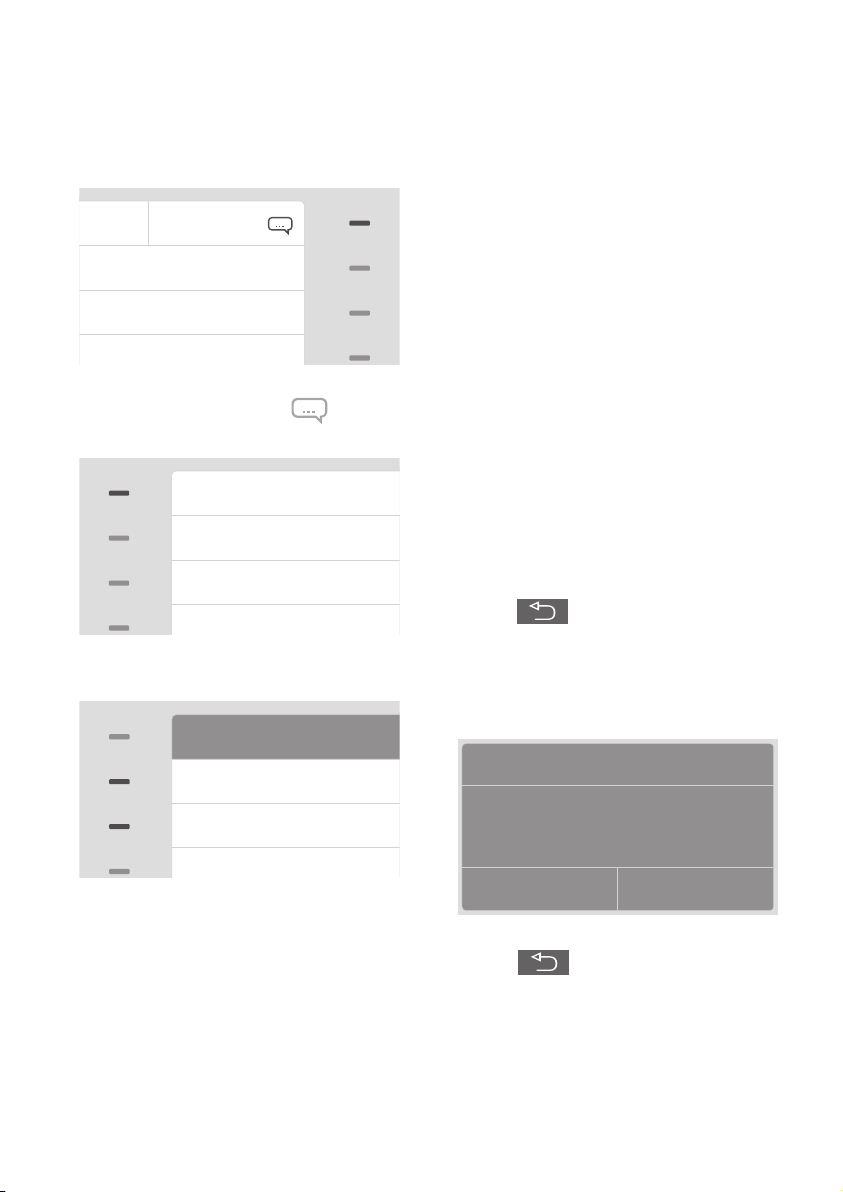
Menu Settings
* = Default settings
►
Press the light bar next to
menu Settings is displayed.
Settings
►
Tap the light bar next to Settings. The
menu Date / Time is displayed.
Date / Time
Date
Time
until the
Date
►
Default settings
By pressing the + and – on the light
bar, you can change the month and day
(keep finger pressed to scroll rapidly)
►
Confirm entry by pressing the light bar
next to OK.
Time
►
Default settings
By pressing the + and – on the light
bar, you can change the hour and minute
(keep finger pressed to scroll rapidly)
►
Confirm entry by pressing the light bar
next to OK.
Save changes
Pressing the button Back in the
menu (or after no more than
2 minutes after the last entry) ends
the menu Date / Time.
Changes must be confirmed when exiting
the menu.
Quit settings
Save changes?
►
Select the desired setting.
No Yes
Pressing the button Back in the
menu (or after no more than
2 minutes after the last entry) ends
the menu Settings.
39
Page 40

More settings
The following settings are not available
for all appliances.
Language
►
Deutsch *
►
.....
Additional menu pages can be opened
by pressing the arrow buttons
►
Select the desired language by tapping
the light bar.
Daylight savings / standard time
.
Signal tone volume
►
Off
►
Volume 1
►
Volume 2
►
Volume 3 *
►
Volume 4
►
Volume 5
The signal tone can be adjusted in
5 steps or set on silent.
Button tone
►
On *
►
Off
The button tone can be turned off.
►
On *
►
Off
The automatic change of the time
display to daylight savings time can be
turned off.
Display programme time
►
Duration *
The display shows the remaining time
of the programme.
►
End
The display shows when the programme
will be finished.
Brightness display
►
50 *
The background light intensity can be
continuously adjusted from 20 to 100 %
(hold bar for fast forward).
►
Confirm entry with OK.
Extra rinse
►
Off *
►
On
Additional rinsing improves the rinse
result in soft water areas or for allergy
sufferers.
The selected setting affects all washing
programmes until the next change of
the settings.
If only the selected washing programme
should receive an additional rinse, select
option Rinse +.
Water level washing
►
Normal *
►
Increased
If the function is set to «Increased»
the water level is higher during washing
in all washing programmes.
40
Page 41
Water level rinse
Intensive
►
Normal *
►
Increased
If the function is set to «Increased»
the water level is higher during rinsing
in all washing programmes.
Spin speed
►
Not reduced *
►
Reduced
►
Reduced +
The spin speed can be reduced by two
levels for all wash programmes.
Skin care
►
Off *
►
On
If the function is set to «On» all washing
programmes have two additional rinse
cycles, which reduces skin allergies.
Hygiene function
►
Off *
►
On
If the hygiene function is switched on,
you will be told to conduct a preliminary machine clean when you select a
low-temperature wash programme (see
Cleaning and maintenance).
Soap wash programme
►
Off *
►
On
A programme sequence optimised for
the use of soap detergents by using
and extra rinse cycle to more thoroughly
rinse out the soap detergent.
The selected setting affects all washing
programmes until the next change of
the settings.
Child lock
►
Off *
►
On
The child lock is to prevent accidental
starting, changing or deletion of a
programme by small children.
Input with child lock activated
0:57 h
max. 9 kg
Rinsing stop
►
Hold the light bar in the upper
right pressed down (is not lit!).
►
At the same time press the desired
button.
Load measurement
►
On *
►
Off
When load measurement is activated,
the laundry load is displayed together
with a recommendation for the appropriate amount of detergent.
41
Page 42
Dirt Sensor
►
Off
►
On *
►
Rinse only
If the dirt sensor is switched on during
washing, the wash time will automatically
be increased in case of heavily soiled
laundry.
The dirt measurement is effected for
Cotton and Easy care programmes.
If the dirt sensor is switched on during
rinsing, up to two extra rinses will be
carried out in case of heavily turbid
rinsing water.
Notice
If liquid detergents or tabs are placed
directly into the drum, the dirt sensor
must be switched off during washing.
►
Standby + *
A few minutes after the programme
has ended or when no further action is
taken after turning the machine on,
all displays turn off.
Power consumption is reduced to an
absolute minimum, while the safety
functions remain activated.
Recommended for machines without
an aquastop device (water intake hose
with overflow protection)
►
Standby
No function.
(Only for machines with payment systems)
Waking up machine
►
Press button On / Off .
Switch off the machine
Settings for switching of the machine
automatically:
►
Off
The machine always remains switched on.
►
On
The machine turn off automatically
after the programme has ended or when
no further action is taken after turning
the machine on.
42
Crease protection
►
Off
►
30 min *
►
6 h
At the end of the programme a crease
protection phase (loosening up of
laundry) for 30 minutes or 6 hours can
be set.
Automatic door opening
►
Off *
►
On
If this function is switched on, the door
will open automatically at the end of
the programme.
Page 43

Default settings
The settings can be reset to default
(state as delivered).
Default settings
Reset to default setting?
No
►
Confirm the reset with Yes.
All settings are reset to default.
Cool down
►
Off *
►
On
Damage to older drains can be prevented
by adding cold water to the boil wash
cycle at the end of the washing process.
To prevent creasing, easy-care programmes are always cooled down, regardless of the selected setting here.
Reduced mains power
►
No *
►
Yes
If the connected load is reduced, the
programme times will be extended
accordingly.
Yes
No = 400 V 3 N ~ 4,8 kW / 10 AT
Yes = 400 V 2 N ~ 2,5 kW / 10 AT
43
Page 44
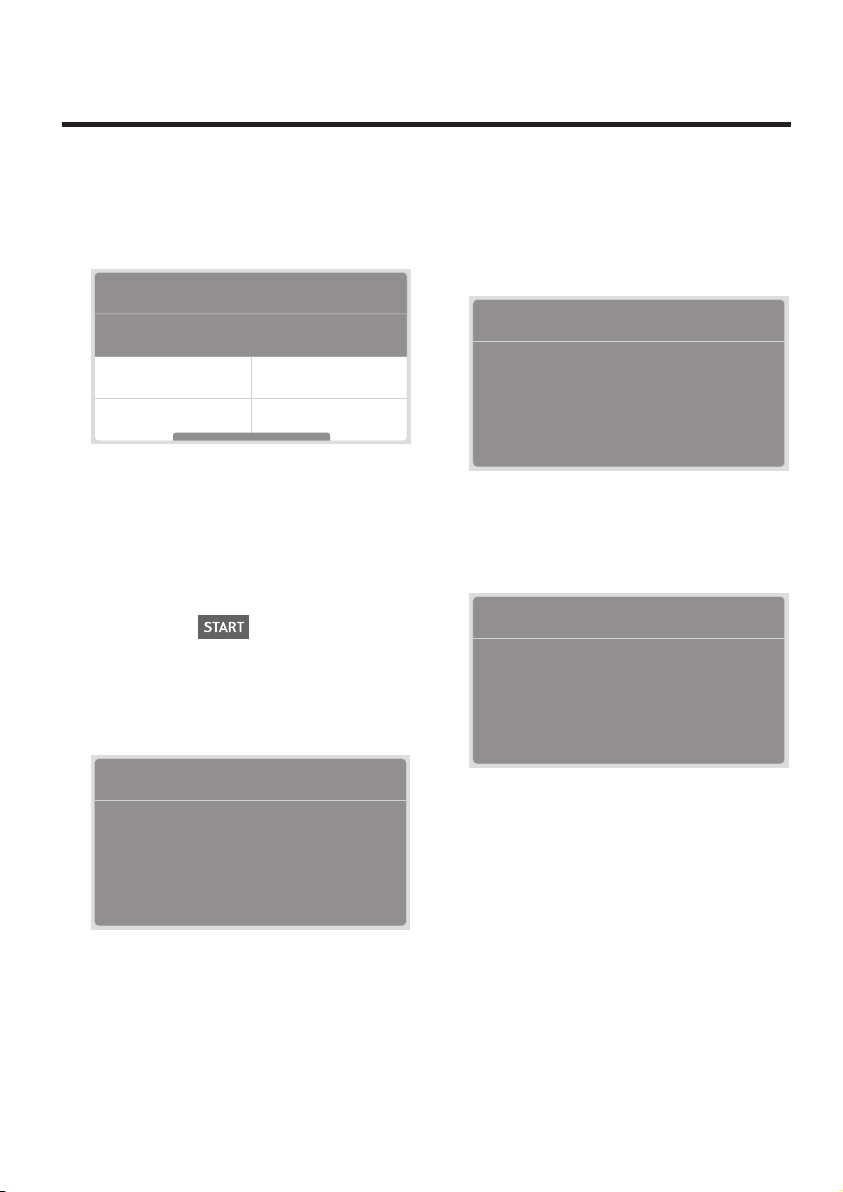
Cash-Card / Prepaid Card
1/2
Selecting the programme
►
Select the desired wash programme
(see Washing / Selecting and
starting the programme).
40° Easy care
800 U/min
Prewash
Express
max. 4.5 kg
Intensive
Prewash
The selected programme will appear in
the display together with duration, rpm,
maximum load, selected options) and
the according programme price.
Starting the programme
►
Press button
and insert the user
card.
The programme price will be deducted
and the remaining credit will appear in
the display.
1:19 h
Price 1.90
Rinse +
Insufficient credit on card
If there is not enough credit on the user
card to cover the programme price,
the following message will appear in the
display.
User card
Not enough balance
Insert different user card
A second user card can be used to
make up the balance..
Top up user card
User card
Card balance almost used up
User card
Card balance
– Programm price
=
New card balance
Remove card
Once payment has been debited, the
programme begins.
►
Remove the user card.
44
XX.XX
XX.XX
XX.XX
When this message appears, credit
needs to be topped up on the card
before it can be used again.
►
See Instructions for the use |
Payment system.
Page 45
Cleaning and maintenance
Hygiene function
The hygiene function ensures the washing machine remains clean even when
using a low temperature programme.
If the temperature of the previous wash
cycle was under 60 °C, the message
« Autoclean 70 °C» will automatically
appear in the display when you select
another programme under 60 °C.
►
You now have the choice to either
switch to a 60 °C or 95 °C programme,
or first run the hygiene programme to
clean the machine.
►
To begin washing without first running
the hygiene programme, press
Hygiene programme
Select the 70 °C Autoclean hygiene
programme to clean the machine
(see Programme survey / Pro-
grammes Main menu / 70 °C
Autoclean).
Notice
Never place laundry in the machine or
use laundry detergents when running
the hygiene programme!
Caution
Danger of electric shock!
►
Switch off the power supply to the
machine before cleaning.
►
Under no circumstances spray the
machine with water.
►
Do not use a steam cleaner.
Notice
Solvents can damage parts of the
machine, produce poisonous vapour and
carry the risk of explosion.
Do not use cleaning agents containing
solvents.
.
Cleaning the machine
►
Do not use abrasive cleaning agents.
►
Never scratch or scrape with sharp
objects.
►
Casings and control areas should only
be cleaned with soap or a commercially
available, solvent-free, non-abrasive
cleaning product.
Notice
►
Never use steel wool!
45
Page 46

Cleaning the drum
►
Rust marks caused by metal parts
standing still for lengthy periods can be
removed with a chlorine-free cleaning
product (look at the description of the
ingredients on the pack).
Descaling the machine
Lime scale formation depends largely
on the hardness of the water. If the
correct amounts of detergent are used,
descaling is no longer necessary in general. If you do, however, wish to descale
the machine, follow the manufacturer’s
instructions on the packet.
Notice
Descalers contain acids, can attack
parts of the machine and cause discolouration of laundry.
Check water supply hose
To avoid water damage, we recommend
having this checked by a specialist after
around 5 years of fault-free operation.
Frost protection
If your washing machine is in a room
susceptible to frost, all residual water
must be removed from the detergent
pump and the water supply and drain
hoses immediately after use.
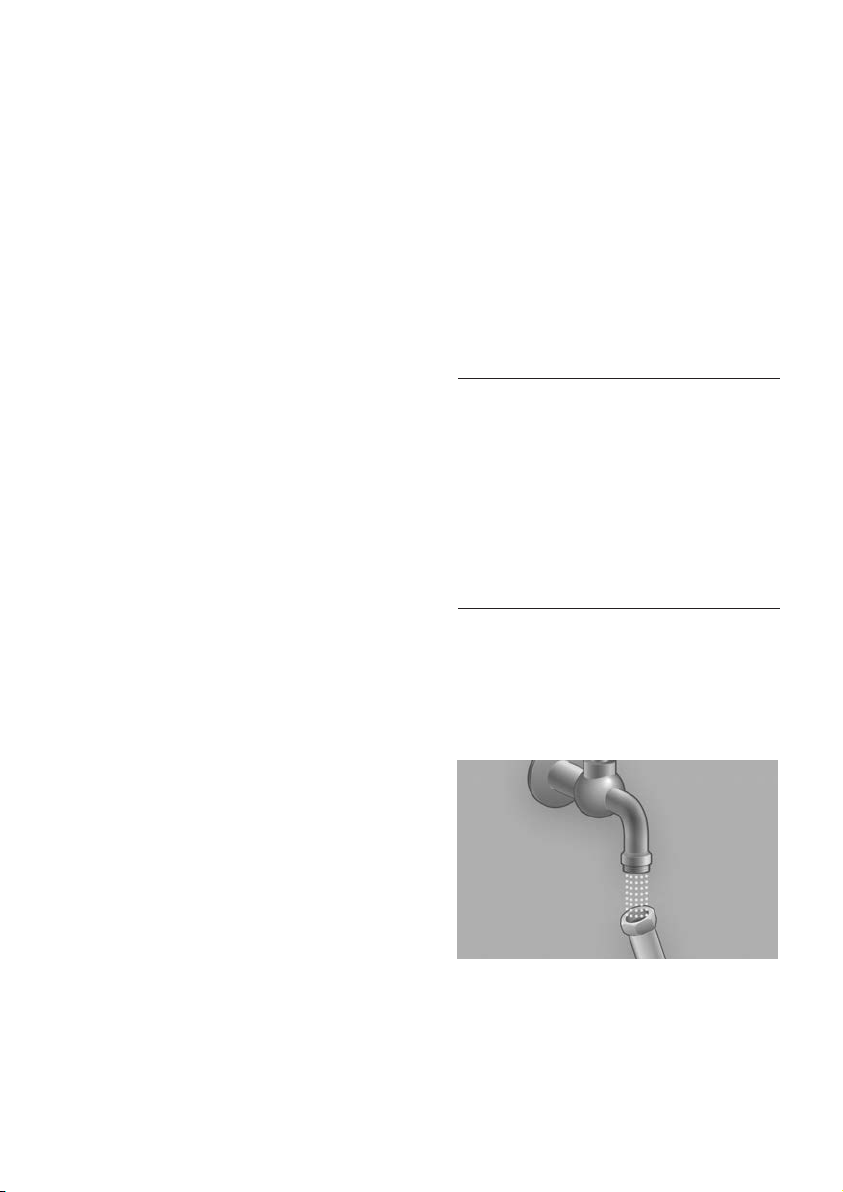
Emptying the water supply hose
Notice
Decrease the pressure in the inlet hose
before unscrewing it:
►
Turn the water tap off.
►
Select any programme, start it and end
it again after approx. 40 seconds. As a
result, the water pressure in the inlet
hose can be reduced.
Without aquastop valve
►
Switch off the power supply.
►
Screw off the supply hose at the tap.
►
Let the water run into a bowl.
►
Screw the hose back onto the tap.
With aquastop valve
►
Screw off the supply hose at the tap.
►
Hold the hose as high as possible.
►
Select any programme, start it and end
it again after approx. 40 seconds. This
way the water drains from the hose into
the washing machine.
►
Screw the hose back onto the tap.
Emptying the drain pump
See Emergency emptying.
46
Page 47
Cleaning the detergent
drawer
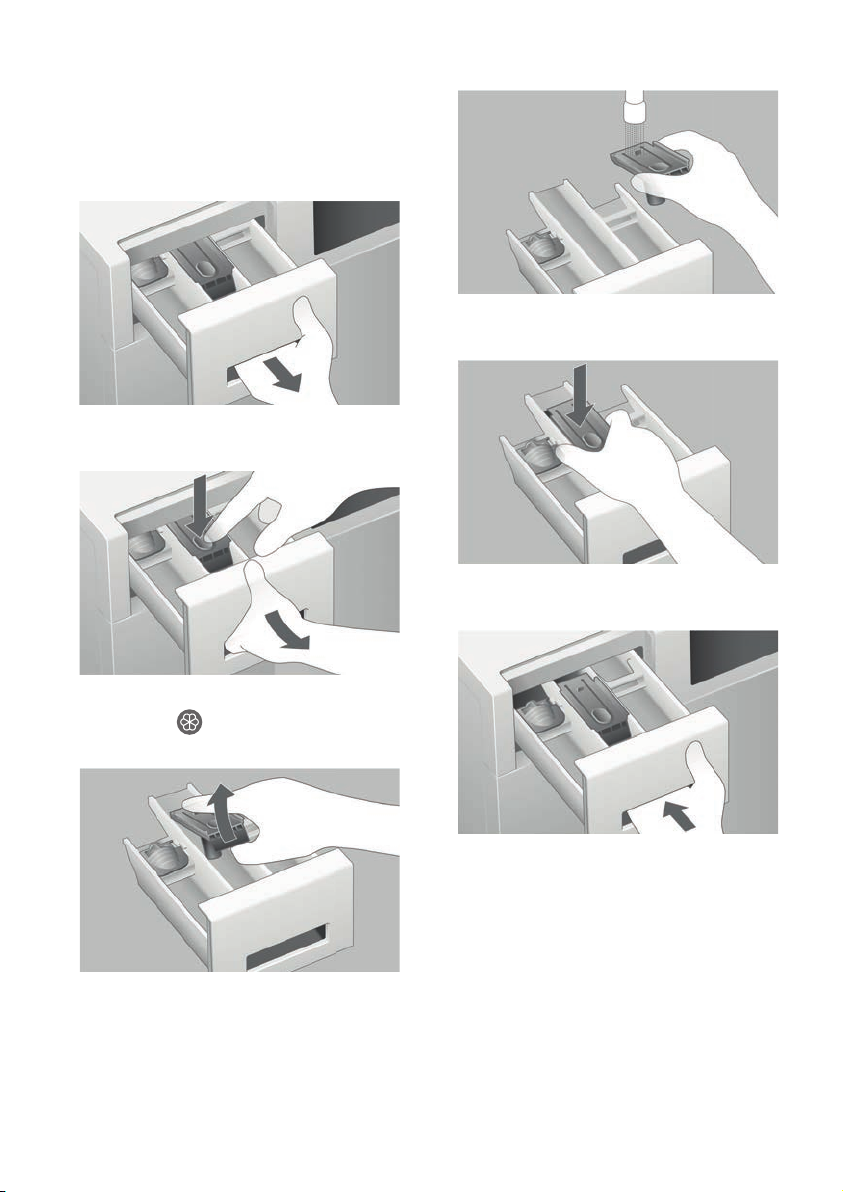
Cleaning the inside (weekly)
►
Pull the detergent drawer out until it
stops.
►
Clean the insert and the detergent
chambers under running water.
►
Replace the insert into the middle compartment.
►
Press down the blue tab in the com-
partment and pull the drawer all
the way out.
►
Release the blue insert by lightly lifting
it up and take it out of the detergent
drawer.
►
Replace the detergent drawer in the
machine.
47
Page 48
Emergency emptying
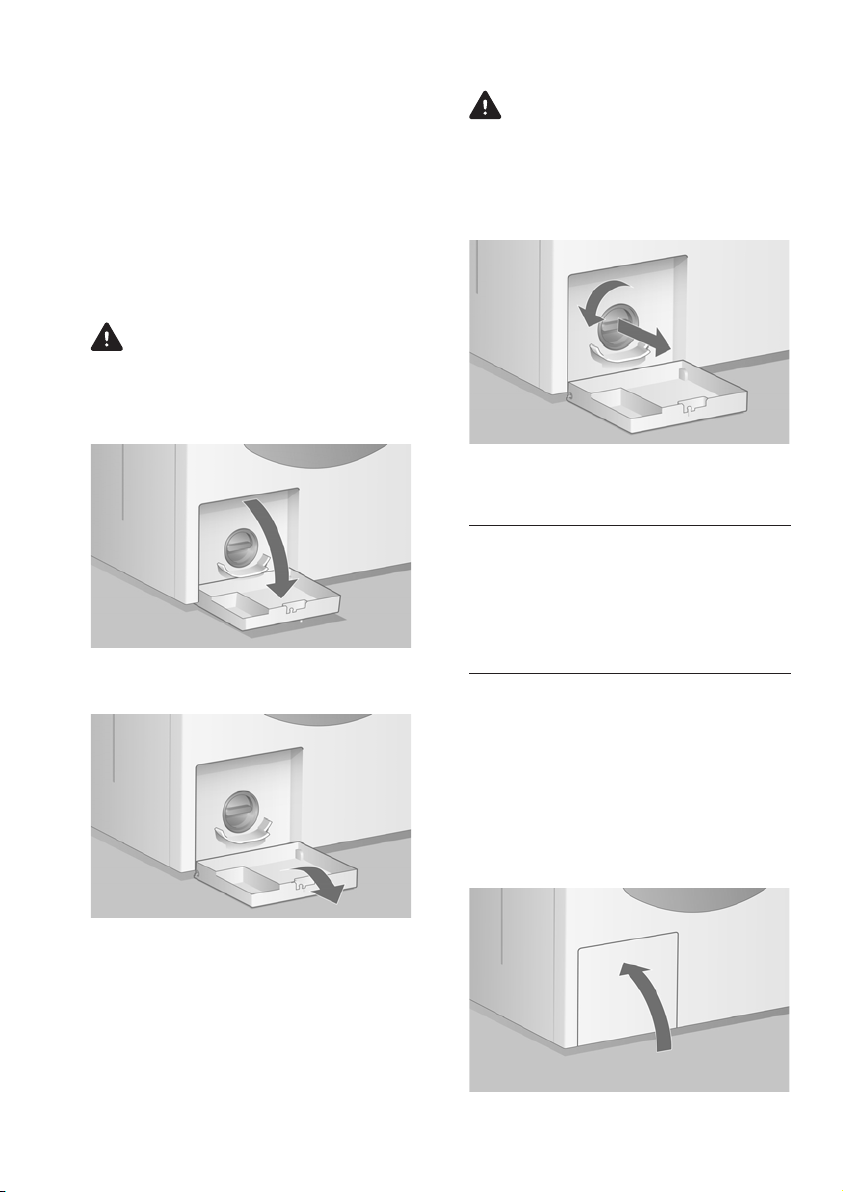
Emergency emptying is necessary if:
►
The error message Check drain
appears.
►
The pump is blocked by a foreign body
(e.g. buttons, paper clip, fluff).
►
The water cannot be pumped out.
Warning
Risk of injury!
►
Switch off the power supply and turn off
the water tap.
►
Open the maintenance hatch at the
machine front.
Warning
Risk of scalding!!
When washing at high temperature the
suds may be very hot. Let the suds cool
down before draining!
►
Unscrew the pump cover stepwise until
the water starts draining out.
Notice
Up to 20 litres of water can drain from
the machine during emptying! Loosen
the pump cover carefully and step by
step.
►
Once all the remaining water is drained,
the pump cover can be unscrewed
completely.
►
Clean the pump interior. Remove foreign
bodies and deposits of fluff. It must be
possible to rotate the pump.
►
Screw on the pump cover.
►
Remove the flip cover from the machine
and use it for catching the draining water.
48
Page 49
►
Close the maintenance hatch.
►
Switch the mains power back on.
►
Select any washing programme and end
it immediately as soon as the water
inlet stops. This procedure prevents
detergent from flowing unused into the
drainage system at the next wash.
Cleaning the filters in the
water inlet
The filter in the water inlet may get
plugged.
Check and clean the filters if:
►
The error message Check water
inlet appears.
►
Insufficient water flows into the appliance when the tap is turned on.
Notice
Decrease the pressure in the inlet hose
before unscrewing it:
►
Turn the water tap off.
►
Select any programme, start it and
end it again after approx. 40 seconds.
As a result, the water pressure in the
inlet hose can be reduced.
Without aquastop valve
►
Switch off the power supply.
►
Screw off the supply hose at the tap.
►
Rinse out the filter under running water.
►
Connect the hose again.
►
Unscrew the other end of the hose from
the back of the machine.
49
Page 50
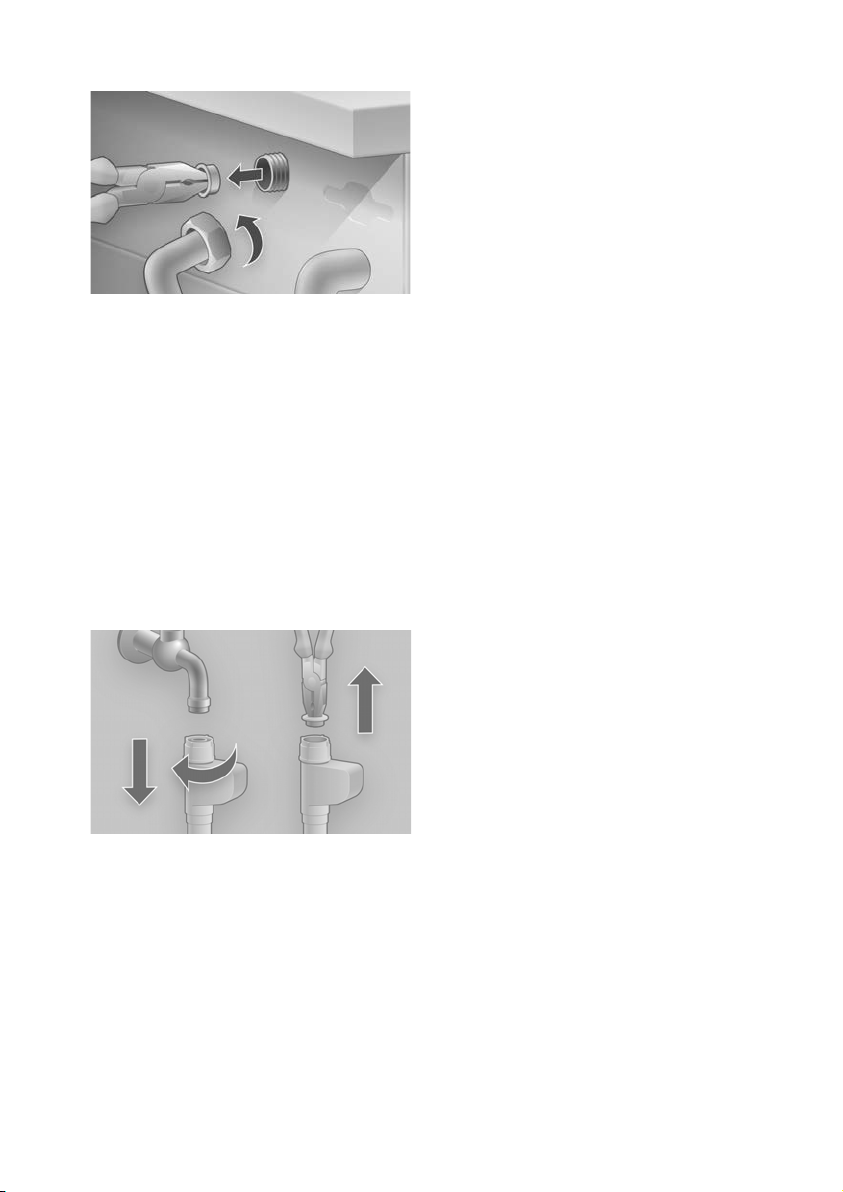
►
Pull out the filter using a pair of lomg
nose plier and rinse it out under running
water.
►
Reinsert the filter and connect the hose
again.
►
Briefly turn the water tap on and make
sure that no water escapes.
►
Turn the water tap off.
With aquastop valve
►
Switch off the power supply.
►
Screw off the aquastop valve at the tap.
►
Pull out the filter using a pair of long
nose plier and rinse it out under running
water.
►
Reinsert the filter and connect the
aquastop valve again.
►
Briefly turn the water tap on and make
sure that no water escapes.
►
Turn the water tap off.
50
Page 51
Problems
Warning
Improper repairs can result in severe accidents, damages and operation
malfunctions!
Do not make any changes, manipulations or attempt repairs using tools such as screwdrivers, etc.
Minor problems which you can rectify yourself
ERROR MESSAGES ON THE DISPLAY
Child lock active
Door open
Check water inlet
Check drain
►
Hold the bar in the upper right (is not lit!) and at the same
time press the desired button.
►
Press the door until you hear the lock snap shut.
►
Press the start button to start the programme.
The door cannot be locked despite another attempt.
►
Press button Open the door
►
Check whether a piece of laundry is stuck in the door.
►
Press the start button after you correct the malfunction.
►
Open the water tap, and press the start button.
.
Filter in water supply is blocked.
►
Clean the filter (see Cleaning and maintenance /
Cleaning the filters in the water inlet).
►
Press the start button after you correct the malfunction.
Interruption in water supply.
►
Check whether the drain hose is clogged.
►
Press the start button after you correct the malfunction.
Foreign bodies block the drain pump.
►
Clean the pump (see Cleaning and maintenance /
Emergency emptying).
►
Press the start button after you correct the malfunction.
The water drain at the installation site is clogged.
►
Carry out an emergency emptying (see Cleaning and
maintenance / Emergency emptying) and clean the
drain siphon (built-in siphon).
►
Press the start button after you correct the malfunction.
51
Page 52

Insufficiently balanced
Too much foam
Programme extended
Too much foam
Programme stopped
Water level too high
►
The position of the drain hose is too high. The maximum
pumping height is 1 m above ground.
The laundry could not be spun due to excessive unbalanced
weight.
►
Press the light bar next to Continue to restart rinsing.
The laundry could not be spun despite pressing the light bar
next to Continue.
►
Open the door and redistribute the load.
►
Press the light bar next to Continue again.
The laundry could not be spun, even after loosening.
►
Press the light bar next to Cancel. The wash programme
will be stopped.
Notice
►
Wash large and small laundry together.
►
Avoid loading the drum with one single heavy item.
The washing machine has detected foam and taken adequate measures. The spinning cycle of the laundry could be
completed.
►
In future, reduce the detergent quantity.
Due to extremely intensive foaming, the wash programme
had to be aborted.
►
Repeat the wash programme without adding any detergent.
►
In future, reduce the detergent quantity.
►
If required use washing powder instead of liquid detergent.
Too much foam in the washing machine, spinning has not
been effected.
►
There are two possibilities to solve the problem:
Option A
►
Stop the programme by pressing button Cancel.
►
Mix approx. 30 ml conditioner and approx. 1 litre water.
►
Start the previously selected wash programme (it may take
several minutes until the machine is released for the selection of a new programme).
►
At the end of the water inlet, switch immediately forward to
Finishing rinse by pressing Forward.
52
Page 53
Please wait, draining
Clean machine
Clean machine now
►
Add the conditioner-water mixture into compartment
of the detergent drawer.
The programme should now end as usually and the spinning
process should take place.
►
Afterwards repeat the wash programme, however without
any detergent.
Option B
►
Wait for approx. 1 hour.
Then press button
and switch immediately forward
to Spin by pressing Forward. Usually the laundry will be
spun and the programme finishes as usual.
►
Repeat the wash programme, however without any detergent.
The maximum admissible water level is reached.
►
Wait until the water has been pumped out completely and
press button
.
Too much water is in the washing machine. Water is
pumped off.
A lot of foam is visible in the door glass: Foaming is too
intensive.
►
Proceed as for the error message Water level too high.
►
In future, reduce the detergent quantity.
The washing machine will need to be cleaned soon.
►
Run the 70°C Autoclean programme (without laundry or
laundry detergents).
►
To defer the cleaning function, select Cancel. You may
now select and run a different programme. At the end of
the programme, the Clean machine message will again
appear in the display.
The washing machine needs to be cleaned immediately.
No other programme can now be selected.
►
Run the 70°C Autoclean programme (without laundry or
laundry detergents).
53
Page 54
ERROR MESSAGES CASH-CARD / P REPAID CARD
Turn card
Not enough balance
Insert different user
►
Turn the card over.
There is not enough credit on the card.
►
Use a card which has credit.
card
Wrong user number
or card type
Cannot read card
Wrong laundry room
This card is not valid.
►
Please contact the person in charge.
This card cannot be read.
►
Try inserting the card again or contact the person in charge.
This user card is not valid for this laundry room.
number
This card could not be
read.
Card balance almost
used up
This card could not be read.
►
Please insert the card again.
The credit on this card is sufficient only for the programme
you have selected.
ERROR MESSAGES F ––
«Error F ––»
is displayed
«Error F ––»
is displayed again
despite programme
restart
«Error F ––» is
displayed again after
interruption of the
power supply
►
Acknowledge the error message with OK. Machine restarts.
►
Press the door until you hear the lock snap shut.
►
Select a programme again and press button
►
Acknowledge the error message with OK.
►
Interrupt the power supply for one minute (switch the main
switch off and on again). As soon as the display lights, the
appliance is again ready to operate.
►
Press the door until you hear the lock snap shut.
►
Select again a programme and press button
►
Note the error message.
►
Close the water tap and switch off the power supply.
►
Contact customer service (see Customer service).
.
.
54
Page 55
MACHINE OPERATION
Machine does not
start when pressing
the On / Off
button
The washing machine
does not start
Loading door
cannot be opened
►
Check whether the mains power is switched on (wall / plug).
►
Check whether all the fuses are intact or the safety switch
has tripped.
Mains blockage (generally at noon).
►
Operate the machine after the mains blockage has ended.
►
If the machine does not start despite correct power supply,
contact customer service.
►
Press button .
►
If the programme does not start despite pressing the start
button, contact customer services.
Notice
When time preset is activated, the programme starts only
at the pre-selected time.
Wait until the message Programme end is displayed.
►
Press button Open the door
.
Option Rinsing stop selected.
►
To proceed further, see Washing / Ending programme
with rinsing stop.
Defect appliance.
►
Contact customer service (see Customer service).
Power outage.
►
Open the loading door manually.
55
Page 56
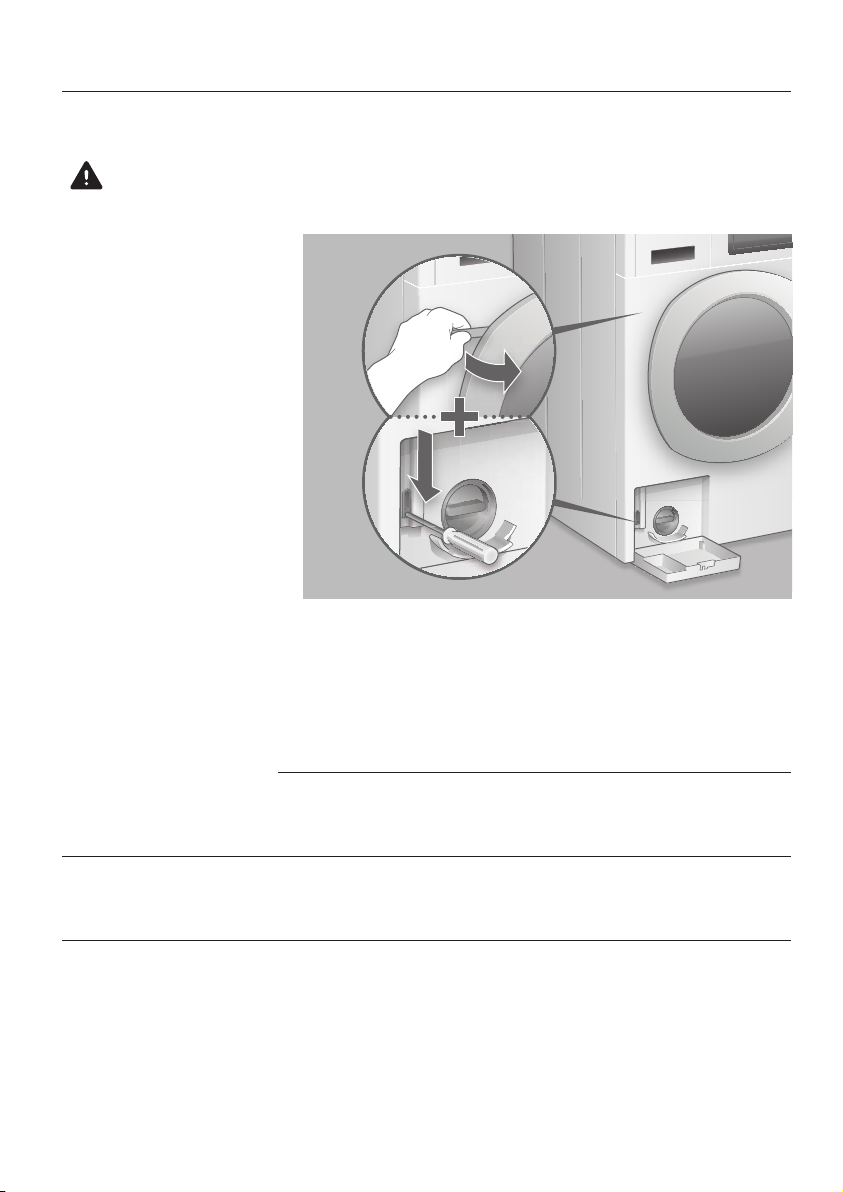
Open the loading door
manually
Warning
Hot wash water!
Danger of burns!
Drain the machine before manual opening!
►
Ensure that the drum stopped turning.
►
Close the water tap.
►
Switch off the power supply.
►
Carry out an emergency emptying (see Cleaning and
Maintenance).
Unlock door and pull open
( Perform both actions simultaneously)
►
Pull the black emergency opener with a screwdriver downwards and keep it pulled.
►
At the same time, pry the door open with a narrow object
(do not use metal!).
Notice
If the door is closed with the power off, it is locked again
and the procedure must be repeated.
The LED is defective.
►
For safety reasons the LED must only be replaced by the
customer service or a qualified specialist.
56
Page 57
WASHING AND WASHING RESULT
Detergent residue in
the detergent drawer
Damp or clumpy
detergent
The blue lid in compartment is in the position
for liquid detergents.
►
Push the lid up and back.
►
Dry the detergent drawer before adding detergent.
►
Add the detergent to the dosing aid and put it in the drum
with the laundry.
Viscous conditioner will remain in the conditioner compart-
ment
.
►
Dilute the viscous conditioner with approx. 100 ml water and
fill it in the conditioner compartment .
►
Do not exceed the mark «max».
►
Clean the conditioner compartment (see Cleaning
and maintenance).
Water not visible
during wash
Laundry does not
get clean
Detergent residue
on the washing
No error.
►
The water is below the visible level in the machine.
Laundry was soiled more heavily than expected.
►
Remove stains from the laundry before washing.
►
Select the maximum permitted temperature for the fabric.
►
Select a stronger wash programme.
►
Dose detergent sufficiently (follow manufacturer’s information).
Detergent residues are not due to poor rinse performance
of your washing machine. Insoluble residues found in a few
phosphate-free detergents tend to be deposited as pale
specks on laundry.
►
Dry and brush off the detergent residue or repeat the whole
rinse process immediately (see Programme survey /
Main menu programmes / Rinse, spin).
►
Use a wash programmes with a higher water level (easy care)
and liquid detergent.
►
Use
additional rinse cycles.
Grey residue (soap
scum) on the washing
The normal amount of detergent is not always sufficient for
soiling from ointments, fats or oils.
►
Increase the amount for the next wash.
►
Select the maximum permitted temperature for the fabrics.
57
Page 58

Grey stains on
the washing
The laundry is hard
and / or like a board:
Drum and tank are
dirty (scraps of paper,
oil etc.)
Laundry smells
unpleasant (e.g. of
sweat or rottenness)
Odour accumulation
in the machine
Laundry mats (pilling)
Tear and hole
formation, fibre wear
of the laundry
Grey stains may be caused by cosmetics or fabric softener
and may have appeared on the laundry outside the machine
before washing.
►
Some stains can be washed out after soaking in liquid
detergent.
►
Use a conditioner for the next wash, if the laundry is dried
in the air after washing.
►
Dry the laundry in a tumble drier.
Tissues or similar objects have not been removed from the
laundry before washing.
►
Clean drum and tank with the Autoclean programme
(without laundry and detergent).
Laundry has been washed too long at only a low temperature
and contains too many odour-producing germs.
►
Wash the laundry at 60 °C or the maximum permitted
temperature for the textiles from time to time, and use
heavy-duty detergent (with bleach).
►
Use special low-temperature detergent when you wash at
20 / 30 °C.
Odour-producing germs have accumulated in the washing
machine or in the drain.
►
Run the maintenance programme Autoclean from time
to time to clean the machine and drain (without laundry and
detergent).
Delicates such as wool can mat due to the high mechanical
load.
►
Select a gentle, special programme suitable for delicates
in the future.
It might be a case of normal wear or mechanical damage
of textiles, which already existed before washing.
►
Remove any foreign articles from the laundry before washing.
►
Close hooks, zips and Velcro closures before washing.
►
Wash sensitive laundry in a mesh bag.
58
Page 59
FOAM AND LEAKAGE
Some foam can be
seen at the
programme end
Too much foam visible
during washing
Foam fills the entire
drum
Foam leaks from
the detergent drawer
during washing,
rinsing or spinning
Puddles and / or water
stains form on the
floor
SPINNING AND NOISE
Pump noise
Repeated spinning
Poor spin result
Vibrations during
washing and spinning
«Machine movements»
during spinning
Some detergents tend to produce more foam, which does not
affect the rinse results.
Too much detergent was used.
►
Mix approx. 20 ml conditioner and approx. ½ litre water.
►
Add the conditioner-water mixture into compartment
of the detergent drawer. Repeat procedure, if necessary.
►
Reduce detergent dose in the future.
Too much detergent was used.
►
Stop the programme by pressing button Cancel.
►
Proceed as with error message Water level too high.
►
Reduce detergent dose in the future.
►
If required use washing powder instead of liquid detergent.
Too much detergent was used.
►
Reduce detergent dose in the future.
►
Check whether the supply and drain hose connections are
watertight and have been effected properly.
No error! Intake noise and «Emptying» noise by the
detergent solution pump is normal.
The appliance detected an imbalance and is rectifying the
imbalance by spinning repeatedly.
The machine has detected an imbalance that it was unable
to rectify.
If there are loads too low or critical laundry pieces, e.g., bathroom
rugs, the laundry cannot be distributed sufficiently.
In this case the spin speed is reduced in a targeted manner
to protect the appliance from extensive stress.
The transport securing devices have not been removed.
►
See the information in the Installation Instructions.
Machine feet were not locked when installing the machine.
►
Relevel the machine with a spirit level and securely lock the
feet as prescribed in the Installation Instructions.
59
Page 60

Programme duration
extended
No error.
►
The machine has recognised foam and implemented remedy.
►
The machine has recognised imbalance and implemented
remedy.
►
The machine has recognised excessive soiling and/or too
turbid rinse water and has extended the programme.
60 61
Page 61
Technical specifications
Product data sheet for household washing machines
according to EC regulation no. 1061 / 2010
Schulthess
Model name / identifier Spirit topLine 740
Nominal capacity
Energy efficiency class
A +++ (highest efficiency) to D (lowest efficiency) A +++
Annual energy consumption
Energy consumption of the standard programme
«Cotton 60°C» at full load
«Cotton 60°C» at partial load
«Cotton 40°C» at partial load
Power consumption in off-mode
Power consumption in on-mode
Weighted annual water consumption
Spinning efficiency class
A (highest efficiency) to D (lowest efficiency) A
Maximum spin speed
Residual moisture
Standard programmes, to which the information in the label and
the data sheet relates
Programme duration of the standard programme
«Cotton 60°C» at full load
«Cotton 60°C» at partial load
«Cotton 40°C» at partial load
Duration of the left-on mode
Airborne acoustical noise
Washing
Spinning
Built-in unit –
1
) kg 9,0
2
) kWh / year 150
kWh
0,85
kWh
0,66
kWh
0,44
3
)
4
) litres / year 11 000
5
) rpm 1 600
5
) % 43
6
)
7
) min 5
8
)
8
)
dB (A) re 1 pW
dB (A) re 1 pW 4873
WW0,15
min
min
min
0,15
Cotone 60 °C
Cotone 40 °C
169
169
169
1
) In kg Cotton for the standard programme «Cotton 60 °C»
or the standard programme «Cotton 40 °C», respectively
with full load, with the lower value being relevant.
2
) Based on 220 standard wash cycles for 60 °C and 40 °C
cotton programmes with full load and partial load as well
as the consumption of operating modes with low power
consumption.
The actual power consumption depends on how the
machine is used.
3
) 3.76 W if the machine is not configured to automatically
4
)
turn off.
Based on 220 standard wash cycles for 60 °C and 40 °C
cotton programmes with full load and partial load. The
actual power consumption depends on how the machine
is used.
5
) For standard programme «Cotton 60 °C» with full load or
for standard programme «Cotton 40 °C» with partial load,
with the lower value being relevant, as well as residual
moisture in standard programme «Cotton 60 °C» with
full load or for standard programme «Cotton 40 °C» with
partial load, with the higher value being relevant.
6
) These programmes are suitable for cleaning normally
soiled cotton textiles and are most efficient regarding
combined energy and water usage.
7
) If the washing machine is equipped with power control.
8
) In the standard programme «Cotton 60 °C» with full load.
61
Page 62
Customer service
Check whether you can correct the fault
yourself before you call customer service
(see chapter Problems).
If advice is required, costs may be incurred
if a service technician is required, even
during the guarantee period.
The guarantee does not cover faults caused
by improper use and by blocked filtres or
foreign bodies.
If you cannot repair a malfunction yourself,
disconnect the power supply (switch of the
main switch / fuse at installation site / close
the water tap) and call customer service.
Call the central customer service number.
You will be automatically connected to the
customer services branch for your region.
24 h telephone service:
Tel. 0844 888 222
Fax 0844 888 223
Give customer services the error message
F –– and the product and appliance number
of your washing machine. You will find this
information on the type label inside the
opened door.
Product number
Appliance number
Warranty subscription
After the normal warranty period of 2 years
has expired, it is possible to extend the
warranty by means of a warranty subscription.
We are happy to send you the requested
documents.
Please observe the enclosed guarantee and
customer services booklet.
62
Page 63

Page 64
Headquarters and Production
Schulthess Maschinen AG
Landstrasse 37, 8633 Wolfhausen ZH
Tel. + 41 (0) 55 253 51 11
www.schulthess.ch
Austria
Schulthess Maschinen GmbH
A-1130 Wien, Hetzendorferstrasse 191
Tel. + 43 (0) 1 803 98 00
www.schulthess.at
Brief instruction
Follow the safety instructions in this manual!
►
Turn on the power switch and open the water tap.
►
Press button On / Off
►
Press button Open the door
►
Select the programme and the programme options (go backwards or
forwards with the arrow buttons ) .
►
Add laundry and close the loading door.
►
Pull the detergent drawer out.
►
Add detergent and close the detergent drawer until you feel it lock.
►
Press button .
.
.
At the end of the programme
►
Press button Open the door
and remove the laundry.
At the end of the washday
►
Clean the detergent drawer.
►
Leave the door open.
en Translation of the original Operating Instructions
03 / 17 Printed in Switzerland / Subject to change without notice
WA 14 MFH
Product number 8740.1
Instruction number 538 749.AB
 Loading...