

Schaerer Siena 1,Siena 2,Siena 1 User Manual
44 User manual SI 2 - EN
www.schaerer.com Version 02 / 06.2005 / REWE
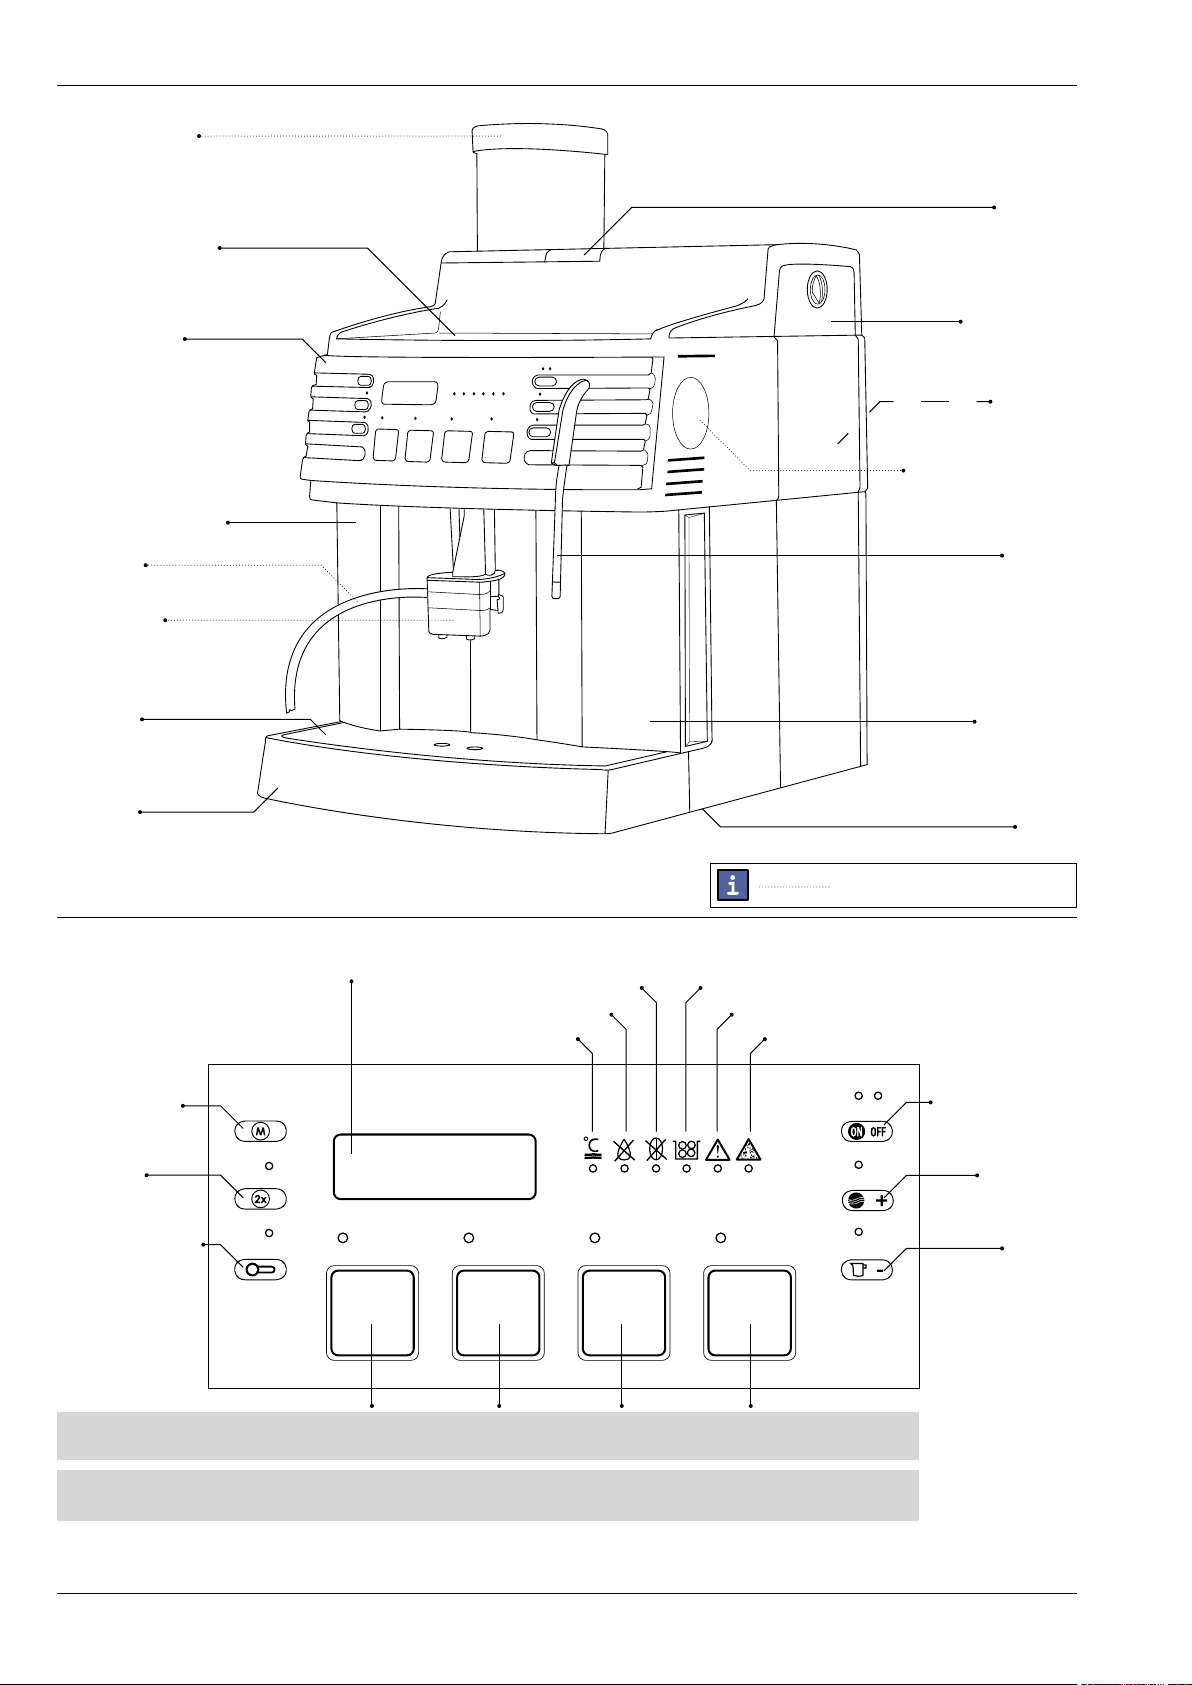
ON / OFF button
Cleaning /
plus button
Siena 2:
Hot water /
minus button
Programming
button
2x button
Coffee powder /
preselection
button
Grounds container
Malfunction/brew unit
Decalcifying
Bean container empty
Water tank empty
Temperature
* Illustration: Standard configuration
Indicator symbols:
Bean container
(with lid)
Cup plate
Control panel
(see below)
Display
Grounds container
Foam head
(refer to page 53)
Siena 1: Beverage outlet
Drip tray
Drip grid
Insert for
coffee powder
(cleaning tablet)
Service door
(2 parts)
Siena 1:
Hot water/steam
outlet
Siena 2:
Hot water outlet
Water tank
Milk tube
Swivel
Brew unit
* Illustration: Siena 2
Espresso Coffee Double
espresso
Double
coffee
Siena 1 Button allocation:
Siena 2 Button allocation: Espresso Coffee Cappuccino Macchiato
Siena 1:
Coffee jug /
minus button
Siena 1: Rotary dial
Steam / hot water
The position differs between
Siena 1 and Siena 2.
=

User manual SI 2 - EN 45
Version 02 / 06.2005 / REWE www.schaerer.com
Publisher:
M. Schaerer AG, CH-3302 Moosseedorf
Edition:
Version 02 / June 2005
Software:
V 2.10 / V 3.03
Concept and editorial office:
M. Schaerer AG, CH-3302 Moosseedorf
© Copyright by:
M. Schaerer AG, CH-3302 Moosseedorf
All rights reserved, including translations into foreign languages.
This document, or any excerpts thereof, may not be copied, reproduced, distributed or electronically
transmitted in any form – regardless of the process used – without first obtaining written consent from
the publisher.
All of the information, technical data, pictures and illustrations used in this manual are based on the
most current data available at the time of printing.
The pictures and illustrations serve only as examples. Your machine may vary from those shown in
the pictures (options). The company M. Schaerer AG reserves the right to make changes at any time
without issuing further notification.
In the event of any misunderstanding (due to an incorrect translation, for example), the German
document shall serve as our reference.
Schaerer Siena 1 / 2
User manual

Introduction
46 User manual SI 2 - EN
www.schaerer.com Version 02 / 06.2005 / REWE
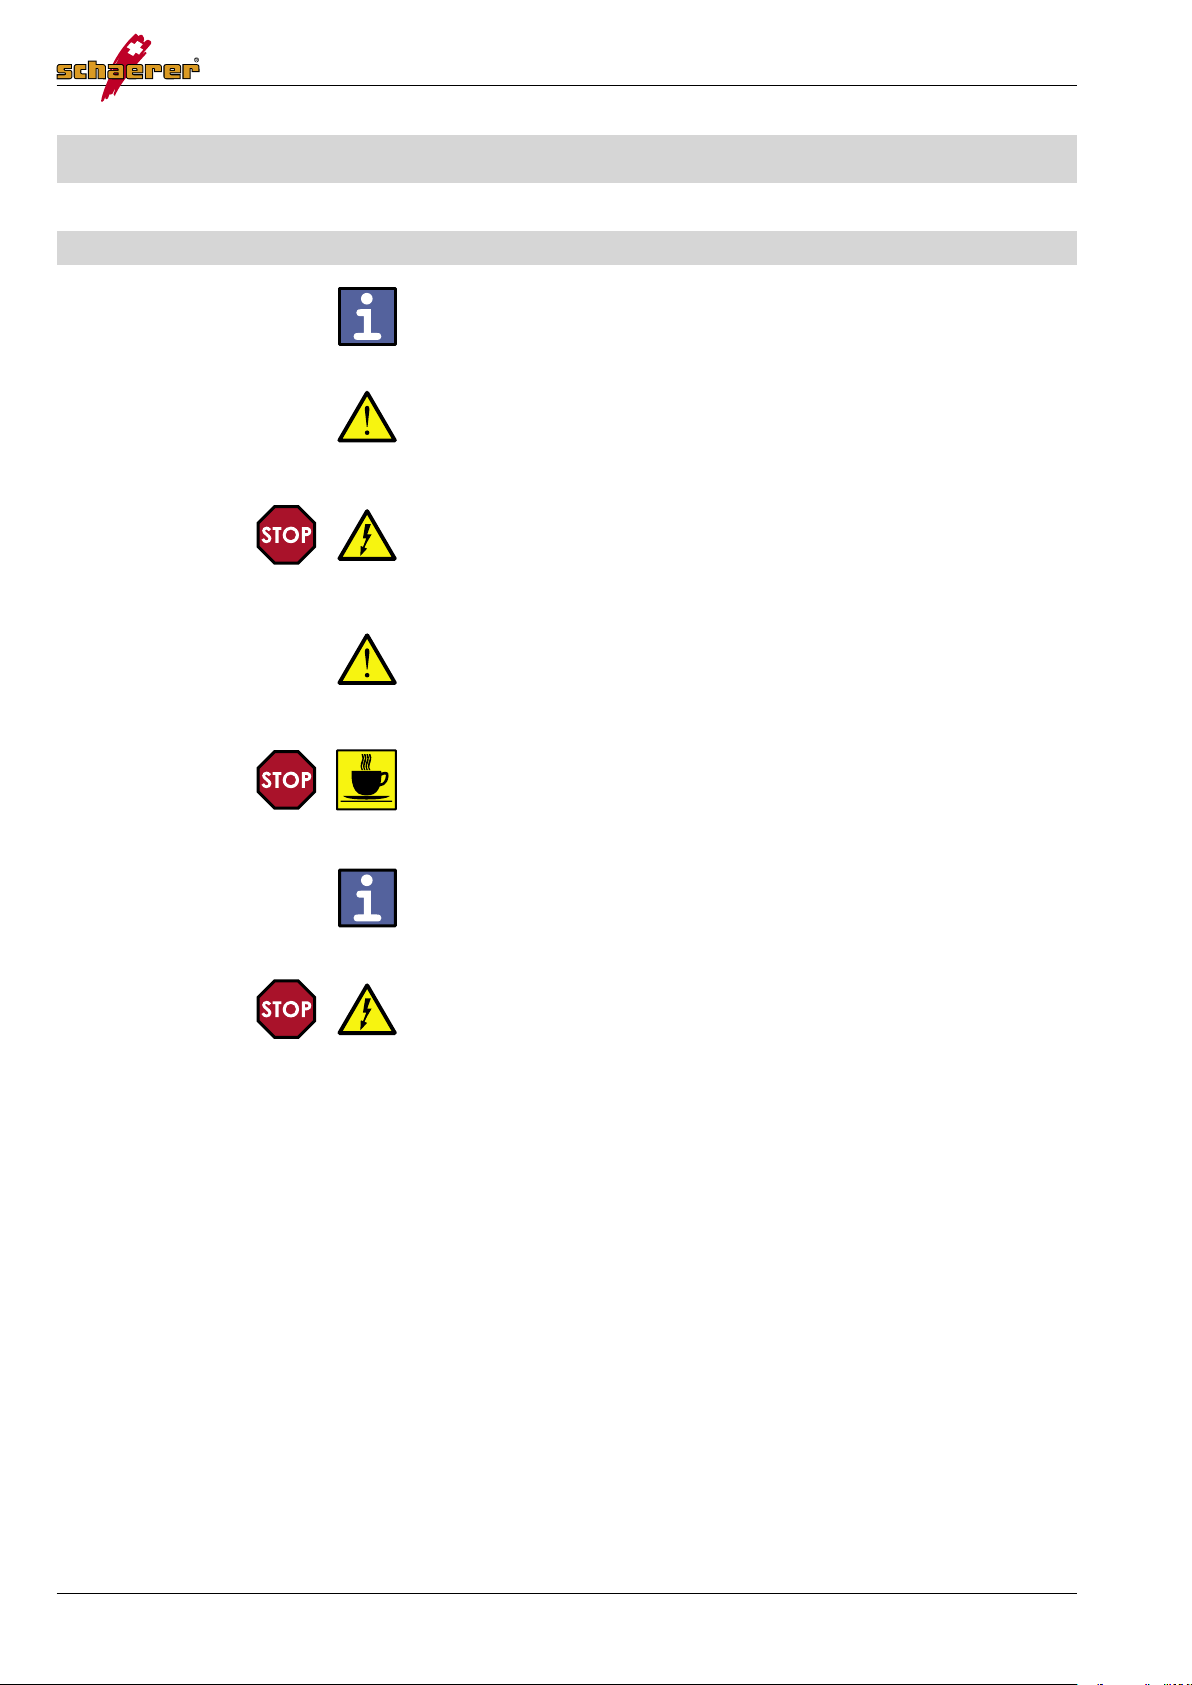
Safety symbols
The following symbols can be found in this instruction manual. Follow the
instructions precisely and use particular caution in these instances.
Danger!
This symbol indicates a risk of injury and/or fatality should certain rules of
conduct be ignored. Take all necessary safety precautions when you see
this symbol in the instruction manual.
Danger / electrical shock!
This indicates a risk of injury and/or fatality as a result of electrical shock.
Caution – hot!
This symbol alerts you to the fact that all beverages dispensed from the
machine are hot.
Caution!
This symbol warns you of possible material damage as well as financial and
legal consequences (e.g. loss of warranty claims, liability claims, etc.).
Remark
Here you will find important notes and information.
Introduction
User manual SI 2 - EN 47
Version 02 / 06.2005 / REWE www.schaerer.com
Introduction
Welcome
By purchasing this coffee maker, you have acquired a high-quality Swiss
product which was specially designed for professional household use or
catering businesses.
This manual provides you with detailed information about how to
commission, program, operate and clean your new coffee maker.
The manual also contains important safety notes which help to ensure safe
usage.
Before commissioning the coffee maker, be sure to read the chapter
"Safety notes" carefully.
Neglecting to use the machine according to the instructions in this manual
rules out any liability claims in the event of damage.
The coffee maker's performance largely depends on its proper usage
and careful maintenance. We recommend reading all the information
thoroughly before using the machine for the first time.
Always keep this instruction manual close to the machine.
We trust that you will enjoy using this coffee maker for a long time!

Introduction
48 User manual SI 2 - EN
www.schaerer.com Version 02 / 06.2005 / REWE
Table of contents
Safety symbols .. . . . .. . . . . .. . . . . .. . . . . .. . . . . .. . . . . .. . . . .. . . . . .. . . . . .. . . . . .. . . . . .. . . . . .. . 46
Introduction . .. . . . . .. . . . . .. . . . . .. . . . . .. . . . .. . . . . .. . . . . .. . . . . .. . . . . .. . . . . .. . . . . .. . . . .. . . . . .. . 47
Welcome . . . . . .. . . . . .. . . . . .. . . . . .. . . . . .. . . . .. . . . . .. . . . . .. . . . . .. . . . . .. . . . . .. . . . . .. . . . .. . . . . .. . . . . .. . . . . .. . 47
Safety notes . . . .. . . . . .. . . . . .. . . . . .. . . . .. . . . . .. . . . . .. . . . . .. . . . . .. . . . . .. . . . . .. . . . .. . . . . .. . . . . 50
General . .. . . . . .. . . . . .. . . . . .. . . . . .. . . . .. . . . . .. . . . . .. . . . . .. . . . . .. . . . . .. . . . . .. . . . .. . . . . .. . . . . .. . . . . .. . . . . .. . 50
Hygiene .. . . .. . . . . .. . . . . .. . . . . .. . . . . .. . . . . .. . . . .. . . . . .. . . . . .. . . . . .. . . . . .. . . . . .. . . . . .. . . . .. . . . . .. . . . . .. . . . . 52
Liability .. . . . .. . . . .. . . . . .. . . . . .. . . . . .. . . . . .. . . . . .. . . . . .. . . . .. . . . . .. . . . . .. . . . . .. . . . . .. . . . . .. . . . . .. . . . .. . . . . . 52
Product description . . .. . . . .. . . . . .. . . . . .. . . . . .. . . . .. . . . . .. . . . . .. . . . . .. . . . . .. . . . . .. 53
Overview - machine . . .. . . . . .. . . . . .. . . . . .. . . . . .. . . . .. . . . . .. . . . . .. . . . . .. . . . . .. . . . . .. . . . . .. . . . .. . . . . . 53
Overview - control panel . . . .. . . . .. . . . . .. . . . . .. . . . . .. . . . . .. . . . . .. . . . . .. . . . .. . . . . .. . . . . .. . . . . .. . . . 53
Detailed picture of the foam head (Siena 2) . . . .. . . . . .. . . . .. . . . . .. . . . . .. . . . . .. . . . . .. . . 53
The display symbols .. . . .. . . . . .. . . . . .. . . . . .. . . . . .. . . . . .. . . . . .. . . . .. . . . . .. . . . . .. . . . . .. . . . . .. . . . . .. . . . . 53
Scope of delivery . . . .. . . . . .. . . . . .. . . . .. . . . . .. . . . . .. . . . . .. . . . . .. . . . . .. . . . . .. . . . .. . . . . .. . . . . .. . . . . .. . . . 54
Overview of accessories . . .. . . . .. . . . . .. . . . .. . . . . .. . . . . .. . . . . .. . . . . .. . . . . .. . . . . .. . . . .. . . . . .. . . . . .. 54
Installation plan for Siena 2 . . .. . . . .. . . . . .. . . . . .. . . . . .. . . . . .. . . . .. . . . . .. . . . . .. . . . . .. . . . . .. . . . . .. . 55
Commissioning . . . . . .. . . . . .. . . . .. . . . . .. . . . . .. . . . . .. . . . . .. . . . . .. . . . . .. . . . .. . . . . .. . . . . .. . 56
Before using for the first time: . . . .. . . . . .. . . . . .. . . . . .. . . . . .. . . . . .. . . . .. . . . . .. . . . . .. . . . . .. . . . . .. . . 56
Installing the milk nozzle (Siena 2) .. . . . . .. . . . . .. . . . .. . . . . .. . . . . .. . . . . .. . . . . .. . . . . .. . . . . .. . . . .. 57
Adjusting milk foam (Siena 2) . . . .. . . . . .. . . . . .. . . . . .. . . . . .. . . . .. . . . . .. . . . . .. . . . . .. . . . . .. . . . . .. . . 57
Operation .. . . . .. . . . . .. . . . . .. . . . . .. . . . . .. . . . . .. . . . .. . . . . .. . . . . .. . . . . .. . . . . .. . . . . .. . . . . .. . . . .. . . 58
Introduction . .. . . . . .. . . . . .. . . . . .. . . . . .. . . . . .. . . . .. . . . . .. . . . . .. . . . . .. . . . . .. . . . . .. . . . . .. . . . .. . . . . .. . . . . .. . 58
Filling coffee beans . .. . . . . .. . . . . .. . . . . .. . . . . .. . . . .. . . . . .. . . . . .. . . . . .. . . . . .. . . . . .. . . . . .. . . . .. . . . . .. . . 59
Making the coffee maker ready to operate . . . . . .. . . . .. . . . . .. . . . . .. . . . . .. . . . . .. . . . . .. . . 59
Switching on the coffee maker .. . . .. . . . . .. . . . . .. . . . . .. . . . . .. . . . . .. . . . .. . . . . .. . . . . .. . . . . .. . . . . 59
Operating modes .. . . . . .. . . . . .. . . . . .. . . . .. . . . . .. . . . . .. . . . . .. . . . . .. . . . . .. . . . . .. . . . .. . . . . .. . . . . .. . . . . . 59
Preparing coffee / espresso (whole-bean coffee) . . . . .. . . . . .. . . . . .. . . . .. . . . . .. . . . . .. 60
Preparing DECAF coffee (coffee powder) . . . . . .. . . . . .. . . . . .. . . . . .. . . . . .. . . . .. . . . . .. . . . . . 60
Preparing hot water (Siena 1) . . . . . . .. . . . . .. . . . . .. . . . .. . . . . .. . . . . .. . . . . .. . . . . .. . . . . .. . . . . .. . . . . 61
Preparing hot water (Siena 2) . . . . . . .. . . . . .. . . . . .. . . . .. . . . . .. . . . . .. . . . . .. . . . . .. . . . . .. . . . . .. . . . . 61
Preparing steam (Siena 1) . . . .. . . . . .. . . . . .. . . . . .. . . . . .. . . . . .. . . . . .. . . . .. . . . . .. . . . . .. . . . . .. . . . . .. . 61
Preparing cappuccino (Siena 2) . . . . .. . . . . .. . . . . .. . . . . .. . . . . .. . . . . .. . . . .. . . . . .. . . . . .. . . . . .. . . 62
Preparing milk foam (Siena 1) . . .. . . . . .. . . . . .. . . . . .. . . . . .. . . . . .. . . . .. . . . . .. . . . . .. . . . . .. . . . . .. . . 62
Preparing milk foam (Siena 2) . . .. . . . . .. . . . . .. . . . . .. . . . . .. . . . . .. . . . .. . . . . .. . . . . .. . . . . .. . . . . .. . . 63
Pre-heating cups . . .. . . . . .. . . . . .. . . . . .. . . . .. . . . . .. . . . . .. . . . . .. . . . . .. . . . . .. . . . . .. . . . .. . . . . .. . . . . .. . . . . 63
Grinder settings . . . .. . . . . .. . . . . .. . . . .. . . . . .. . . . . .. . . . . .. . . . . .. . . . . .. . . . . .. . . . .. . . . . .. . . . . .. . . . . .. . . . . .. 63
Programming . . . . .. . . . . .. . . . . .. . . . . .. . . . . .. . . . .. . . . . .. . . . . .. . . . . .. . . . . .. . . . . .. . . . . .. . . . .. 64
Navigation through the programming level . . . . .. . . . . .. . . . . .. . . . . .. . . . . .. . . . . .. . . . . .. . . . 64
Overview: product programming . . . . .. . . . . .. . . . . .. . . . . .. . . . .. . . . . .. . . . . .. . . . . .. . . . . .. . . . . .. . 65
Overview: product programming (continued) . . .. . . . . .. . . . . .. . . . . .. . . . . .. . . . .. . . . . .. . . 66
Overview: programming common parameters . . .. . . . . .. . . . . .. . . . . .. . . . . .. . . . . .. . . . .. 67
Overview: programming fixed parameters . . . . . .. . . . .. . . . . .. . . . . .. . . . . .. . . . . .. . . . . .. . . . . 68
Default settings: products . . .. . . . . .. . . . . .. . . . . .. . . . .. . . . . .. . . . . .. . . . . .. . . . . .. . . . . .. . . . . .. . . . .. . . . . 69
Default settings: common parameters . . .. . . . . .. . . . . .. . . . .. . . . . .. . . . . .. . . . . .. . . . . .. . . . . .. . 70
Default settings: fixed parameters . . . . .. . . . . .. . . . .. . . . . .. . . . . .. . . . . .. . . . . .. . . . . .. . . . . .. . . . . .. 70

Introduction
User manual SI 2 - EN 49
Version 02 / 06.2005 / REWE www.schaerer.com
Cleaning .. . . . . .. . . . . .. . . . .. . . . . .. . . . . .. . . . . .. . . . . .. . . . . .. . . . . .. . . . .. . . . . .. . . . . .. . . . . .. . . . . .. . . . 71
Introduction . .. . . . . .. . . . . .. . . . . .. . . . . .. . . . . .. . . . .. . . . . .. . . . . .. . . . . .. . . . . .. . . . . .. . . . . .. . . . .. . . . . .. . . . . .. . 71
Daily and weekly cleaning . . .. . . . . .. . . . . .. . . . . .. . . . . .. . . . . .. . . . . .. . . . .. . . . . .. . . . . .. . . . . .. . . . . .. . 72
Decalcifying . . . . .. . . . . .. . . . . .. . . . . .. . . . . .. . . . . .. . . . . .. . . . .. . . . . .. . . . . .. . . . . .. . . . . .. . . . . .. . . . . .. . . . . .. . . 74
Installing/detaching the foam head (Siena 2) . . . .. . . . . .. . . . .. . . . . .. . . . . .. . . . . .. . . . . .. . 75
Cleaning the milk nozzle (Siena 2) .. . . . .. . . . . .. . . . .. . . . . .. . . . . .. . . . . .. . . . . .. . . . . .. . . . . .. . . . . . 75
Troubleshooting . . . . .. . . . . .. . . . . .. . . . . .. . . . . .. . . . .. . . . . .. . . . . .. . . . . .. . . . . .. . . . . .. . . . . .. 76
Malfunctions and possible causes . . .. . . . . .. . . . . .. . . . . .. . . . . .. . . . .. . . . . .. . . . . .. . . . . .. . . . . .. . . 76
Service and maintenance work . . . . . . .. . . . . .. . . . . .. . . . . .. . . . .. . . . . .. . . . . .. . . . . .. . . . . .. . . . . .. . 77
Service request . . . . . . .. . . . . .. . . . . .. . . . . .. . . . . .. . . . .. . . . . .. . . . . .. . . . . .. . . . . .. . . . . .. . . . . .. . . . .. . . . . .. . . . 77
Options . . . . .. . . . . .. . . . . .. . . . . .. . . . . .. . . . . .. . . . . .. . . . . .. . . . .. . . . . .. . . . . .. . . . . .. . . . . .. . . . . .. . . . . .. . 78
Coin tester . .. . . .. . . . . .. . . . . .. . . . . .. . . . . .. . . . . .. . . . .. . . . . .. . . . . .. . . . . .. . . . . .. . . . . .. . . . . .. . . . .. . . . . .. . . . . . 78
Coin tester - operation and maintenance . .. . . .. . . . . .. . . . . .. . . . . .. . . . . .. . . . . .. . . . .. . . . . . 78
Bean container . . . .. . . . . .. . . . . .. . . . . .. . . . . .. . . . . .. . . . . .. . . . .. . . . . .. . . . . .. . . . . .. . . . . .. . . . . .. . . . . .. . . . .. 79
Base with supports (Art. No.: 062'489) .. . . . .. . . . . .. . . . . .. . . . . .. . . . . .. . . . . .. . . . .. . . . . .. . . . . .. 79
Fixed water supply . . . .. . . . . .. . . . . .. . . . . .. . . . . .. . . . . .. . . . .. . . . . .. . . . . .. . . . . .. . . . . .. . . . . .. . . . . .. . . . .. . 79
Fixed water supply - structural requirements . . . .. . . . . .. . . . . .. . . . . .. . . . .. . . . . .. . . . . .. . . . . 79
Appendix . . .. . . . .. . . . . .. . . . . .. . . . . .. . . . . .. . . . . .. . . . .. . . . . .. . . . . .. . . . . .. . . . . .. . . . . .. . . . . .. . . . .. 80
Declaration of conformity . .. . . . . .. . . . . .. . . . . .. . . . . .. . . . . .. . . . .. . . . . .. . . . . .. . . . . .. . . . . .. . . . . .. . . . 80
Cleaning products . . . . .. . . . . .. . . . . .. . . . .. . . . . .. . . . . .. . . . . .. . . . . .. . . . . .. . . . . .. . . . .. . . . . .. . . . . .. . . . . .. 80
Kamareta cleaning tablet (Art. No.: 062’531) . . . . . .. . . . .. . . . . .. . . . . .. . . . . .. . . . . .. . . . . .. 80
"Milk clean" cleaning product (Art. No.: 061’913) . .. . . . .. . . . . .. . . . . .. . . . . .. . . . . .. . . . . . 81
Liquid decalcifier (Art. No.: 062’869) .. . . . .. . . . . .. . . . .. . . . . .. . . . . .. . . . . .. . . . . .. . . . . .. . . . . .. . . 82
Storing cleaning products . . . . . .. . . . . .. . . . . .. . . . . .. . . . .. . . . . .. . . . . .. . . . . .. . . . . .. . . . . .. . . . . .. . . . .. 82
Serial plate . .. . . . .. . . . . .. . . . . .. . . . . .. . . . . .. . . . . .. . . . .. . . . . .. . . . . .. . . . . .. . . . . .. . . . . .. . . . . .. . . . .. . . . . .. . . . 83
Technical data . .. . . . . .. . . . . .. . . . . .. . . . .. . . . . .. . . . . .. . . . . .. . . . . .. . . . . .. . . . . .. . . . .. . . . . .. . . . . .. . . . . .. . . 83
Environmental aspects . . . . . .. . . . . .. . . . . .. . . . .. . . . . .. . . . . .. . . . . .. . . . . .. . . . . .. . . . . .. . . . .. . . . . .. . . . . . 84
Contact address .. . . . .. . . . . .. . . . . .. . . . . .. . . . . .. . . . . .. . . . .. . . . . .. . . . . .. . . . . .. . . . . .. . . . . .. . . . . .. . . . .. . . 84
Safety notes
50 User manual SI 2 - EN
www.schaerer.com Version 02 / 06.2005 / REWE
Safety notes
General
Do not operate the device until you have carefully read the instruction
manual provided. Read all notes thoroughly.
Place the device on a stable, horizontal surface. Do not set it down on
hot or warm surfaces. Choose a location that is not easily accessible to
children or pets.
Never allow live electrical parts to come into contact with water.
Never spray the device with water or any other liquid. Never immerse the
device in water or any other liquid. Do not operate the machine with wet
hands.
Children are often unaware of the dangers which can result from handling
electrical devices improperly.
Never leave children unattended with electrical devices.
Be careful when touching the steam injector, as it becomes hot during
operation. Use the specially designated grips. Do not touch any hot
surfaces. Allow the device to cool before fitting or dismantling any parts.
The same applies to cleaning (risk of burns).
Persons who have not familiarised themselves with the instruction manual,
as well as children or anyone under the influence of drugs, alcohol or
medication may not use the device unless they are supervised.
• Do not pinch or pull the power cord over corners or sharp edges,
and do not place it or hang it over hot objects. When unpacking
the device, please check if the mains voltage corresponds to the
device's voltage stated on the serial plate.
(Refer to "Technical data", page 83).
• Connect the device to a grounded socket only. For safety reasons,
we recommend using a residual current device (RCD - available in
specialty electronics shops). To protect persons from fire, electrical
shock and/or injury, never immerse the power cord or plug in water
or any other liquid.
• Never operate a device with a faulty supply pipe. Should an
additional supply pipe be required as an extension, it must also be
in flawless condition and attached in such a way that no one can
trip over the supply pipe. Keep the supply pipe out of the reach of
children and pets. Never insert the power plug into the socket if it is
wet, and never touch the plug with wet hands.
Safety notes
User manual SI 2 - EN 51
Version 02 / 06.2005 / REWE www.schaerer.com
Do not leave the device switched on if unattended. For reasons of safety
and power efficiency, we recommend switching the device off at the main
power switch over night and during longer periods of non-use (not possible
with the coin tester option). For shorter periods of non-use, the device can
be switched to Stand-by mode via the button. For devices with a
fixed water supply, the tap must be closed.
Disconnect the power cord if the device shall not be used for a longer
period of time.
Never expose the device to outside weather conditions such as rain, snow,
frost, etc.
Do not operate the device without water.
The coffee maker's original packaging has been designed to be especially
robust for postal transport. Therefore, be sure to keep this packaging in a
safe place should a return delivery be necessary.
For safety reasons, machines that have reached the end of their product
life cycles must be rendered unusable. To do so, disconnect the power
cord and sever the connector cable. Afterward, dispose of the device in
accordance with regulations.
Old devices still contain valuable materials. Instead of taking your old
device to the nearest refuse dump, you should therefore ask your service
technician or city administration office what recycling options are
available. In any case, make sure that the device is not thrown into the bin
for household rubbish.
The device is designed for preparing coffee, hot water and steam and
may not be operated for any other purpose. The coffee maker is suitable
for household and industrial use. If it is used for industrial purposes, the
warranty claims are different.
Please observe the warranty conditions.
Devices with a damaged connector cable or plug, or devices which
are damaged in any way or not functioning optimally, may not be
commissioned. In the event of damage, the device may only be opened
by authorised service technicians and repaired using original spare parts or
accessory parts. This also applies to instances in which the connector cable
is faulty. Otherwise, the manufacturer accepts no liability whatsoever. The
use of accessory parts not recommended by the device manufacturer can
lead to fire, electrical shock or personal injury.
Safety notes
52 User manual SI 2 - EN
www.schaerer.com Version 02 / 06.2005 / REWE
Hygiene
International guidelines regarding food hygiene are defined by the
HACCP = Hazard Analysis and Critical Control Points. Many countries also
observe national hygiene regulations in addition to the HACCP.
The coffee maker may only be operated in accordance with the HACCP
and all valid national and industry-specific hygiene regulations for the
country in which it is used.
Excerpt from the HACCP:
• Do not use raw milk. Use only pasteurised or UHT milk.
In any case, the milk must be homogenised!
• Milk that has already been heated or that has already exceeded its
expiry date may not be used.
• If pre-packaged milk is used, it is recommended for hygienic reasons
to use the milk directly out of the original package.
• The milk must have a temperature of approx. 3 °C to 5 °C. If this is not
observed, an optimal product cannot be dispensed.
Liability
All warranty and liability claims are null and void in the event of personal
injury or damage to property if the injury or damage can be traced back
to one of the following causes:
• Improper use of the device
• Improper installation, commissioning, operation and maintenance of
the device and the associated options
• Non-observance of maintenance intervals
• Use of the coffee maker despite faulty safety devices or improperly
attached or non-functional safety and protective devices
• Non-observance of the safety notes in this instruction manual
regarding positioning, installation, commissioning, operation and
maintenance of the machine
• Operation of the device in less than optimal condition
• Improperly conducted repairs
• Catastrophic cases due to the effects of foreign matter, an accident,
vandalism, as well as acts of God
• Reaching into and/or opening the housing with objects of any kind.
The manufacturer only accepts warranty and liability claims as long as the
specified maintenance and service intervals are observed, and if original
spare parts are used in the device supplied by the manufacturer and/or by
an authorised supplier.
The device must be serviced every 6 months or after 6,000 coffees have
been dispensed.
Safety-related parts, such as safety valves, safety thermostats, and boilers,
must not be repaired under any circumstances. They must be replaced:
• Safety valves every 24 months
• Boiler (steam producer, flow heater) every 60 months.
Product description
User manual SI 2 - EN 53
Version 02 / 06.2005 / REWE www.schaerer.com
Product description
Overview - machine
(Refer to page 44)
Overview - control panel
(Refer to page 44)
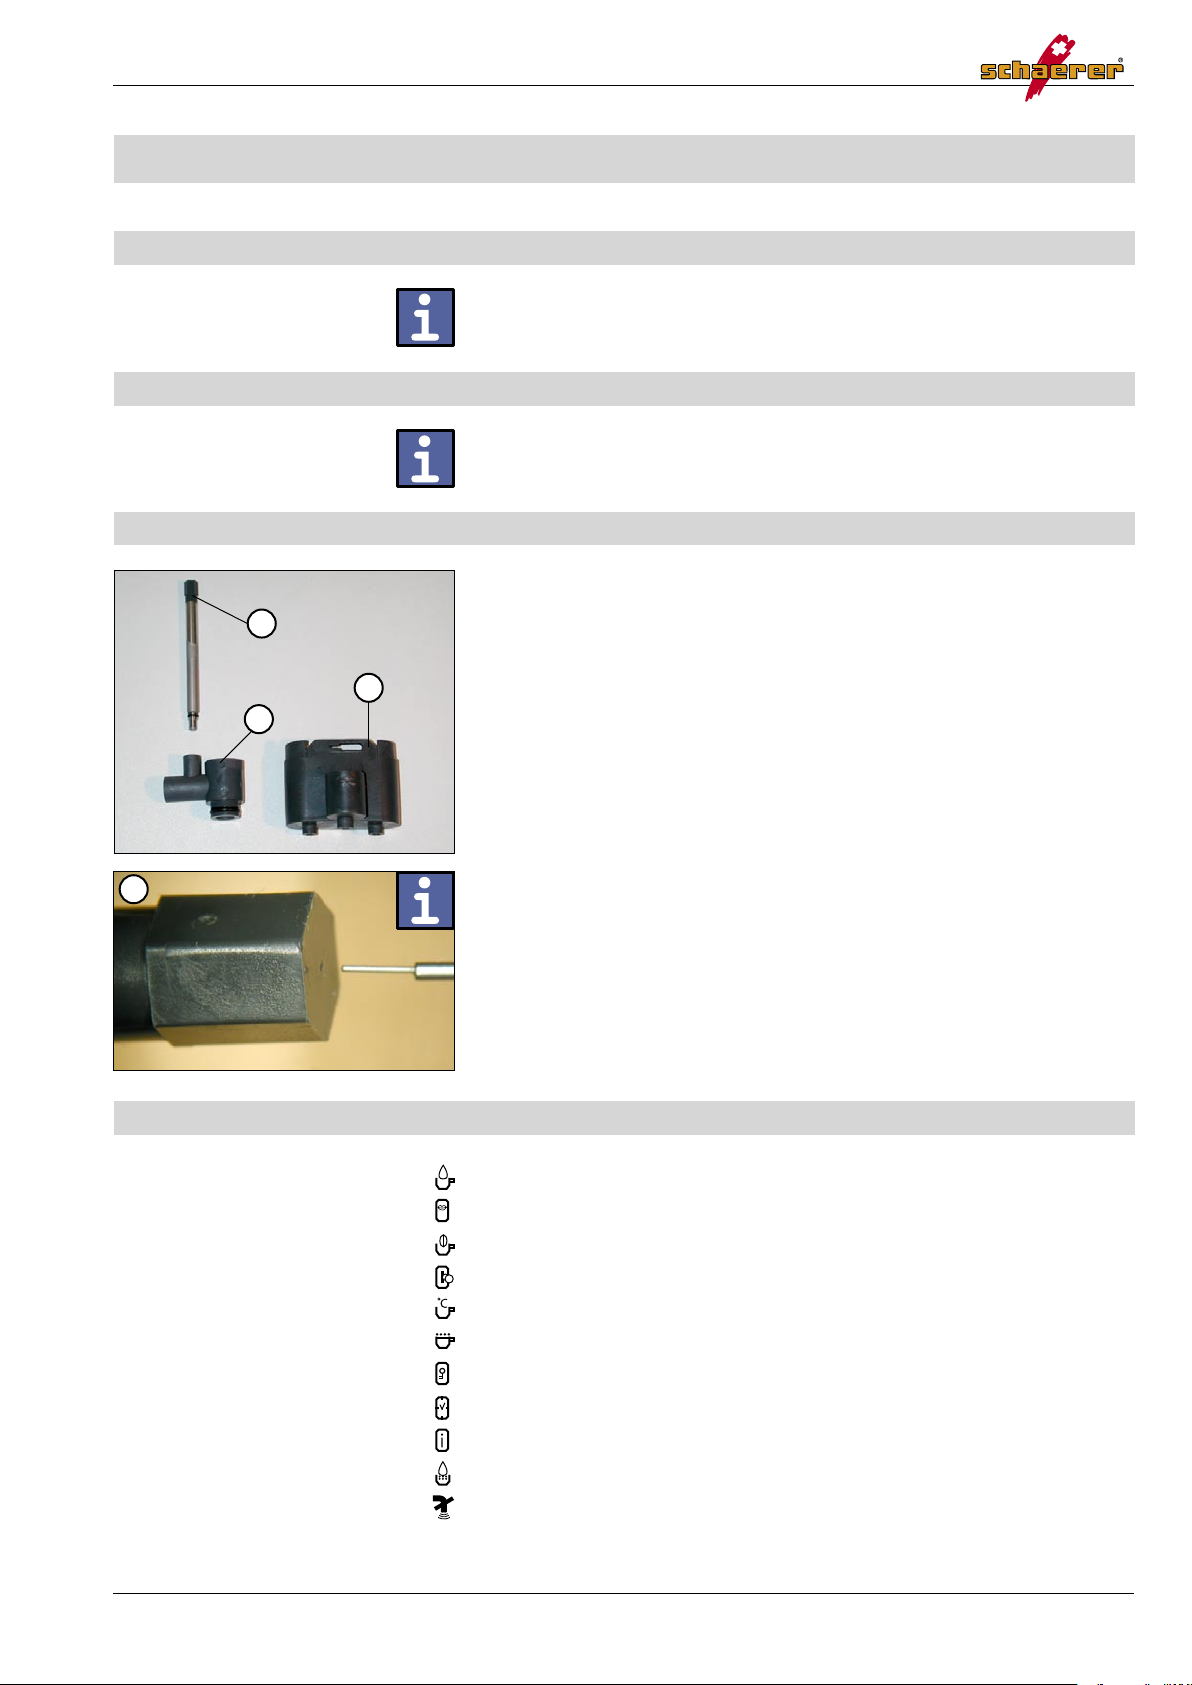
Detailed picture of the foam head (Siena 2)
1. Foam head
2. Corner piece
3. Foam nozzle
If no milk foam is dispensed, insert the supplied instrument (air valve pin)
into the foam nozzle [ 3 ].
(Refer to the detailed picture on the left).
The display symbols
Water volume indicator
Language indicator
Coffee grinding time indicator
Coin tester indicator
Temperature indicator
Milk foam quantity indicator
PIN code indicator
Switch-off time indicator
Service number indicator
Indicator for pre-brewing switched on
Indicator for steam switched off
1
2
3
3
Product description
54 User manual SI 2 - EN
www.schaerer.com Version 02 / 06.2005 / REWE
1 2 3 4 5 7 8
6
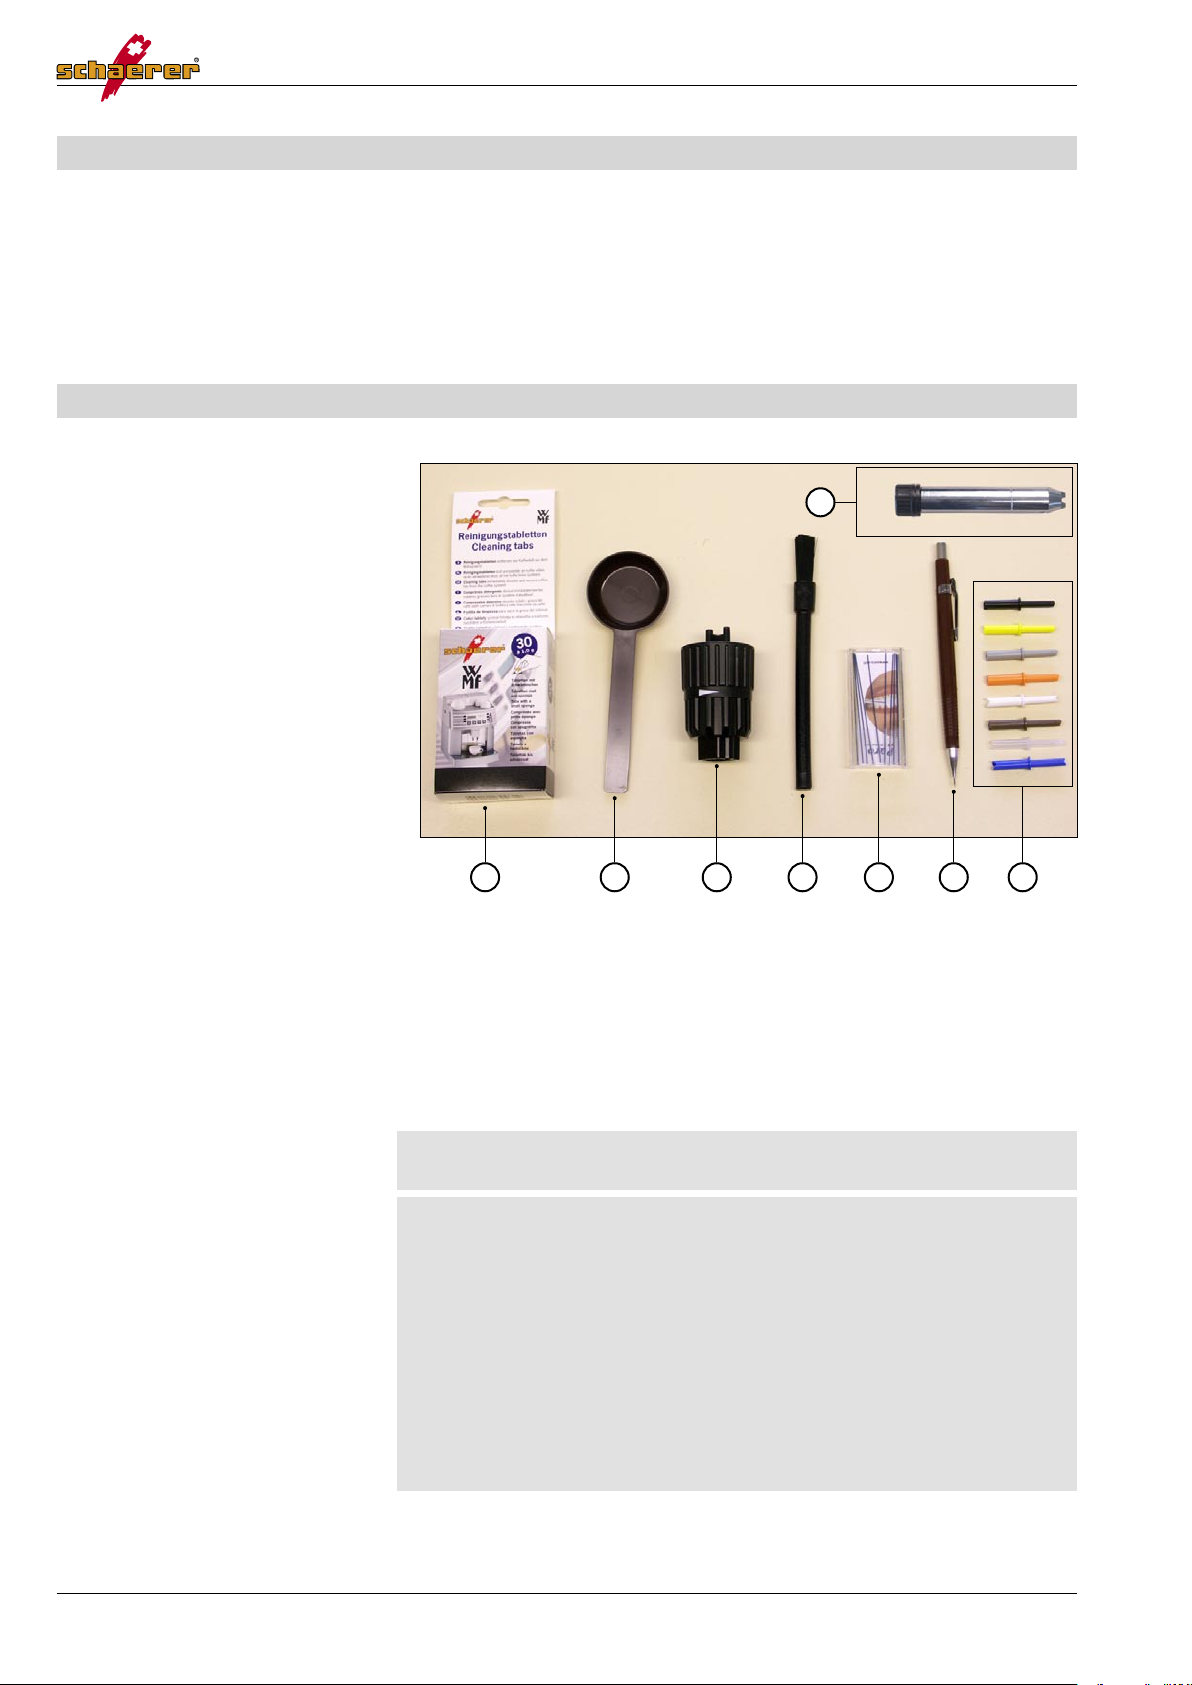
Article: Art. No.:
1. Cleaning tablet 062’531
2. Measuring spoon 067’111
3. Multi-tool adjusting knob 062’985
4. Brush 062’951
5. Brush set (10 pcs.) 061’174
Included with Siena 1 only:
6. Foam nozzle 062‘945
Included with Siena 2 only:
7. Air valve pin 061’454
8. Milk nozzle set 071’246
Includes:
Black: diam. 1.00 mm 071’247
Yellow: diam. 1.05 mm 071’248
Grey: diam. 1.10 mm 071’249
Orange: diam. 1.15 mm 071’250
White: diam. 1.40 mm 071’251
Brown: diam. 1.50 mm 071’252
Transparent: diam. 1.70 mm 071’253
Blue: diam. 2.00 mm 071’254
Scope of delivery
Qty.: Article: Art. No.:
1 Instruction manual 062'417
1 Cleaning card *
1 Milk foam nozzle
1 Accessory set (see below) *
* = Country-specific
Overview of accessories
Product description
User manual SI 2 - EN 55
Version 02 / 06.2005 / REWE www.schaerer.com
8
7
5
2
4
6
9
1
Milchpack
Milchschlauch
Auszug für
3
10
11
Wasseranschluss 3/8"
Brüheinheit
gezeichnet
Ersatz für: Ersetzt durch:
Bemerkungen:Aenderungen:
kontrolliert
freigegeben
geprueft
Massstab
Teilekategorie:
Anz. Bl.
1 Blatt-Nr. 1
Achtung: CAD-Zeichnung! Aenderungen nur auf CAD-System vornehmen!
. .
. .
. .
i)f)
e)
d)
c)
b)
a) g)
h)
j)
k)
Projekt:
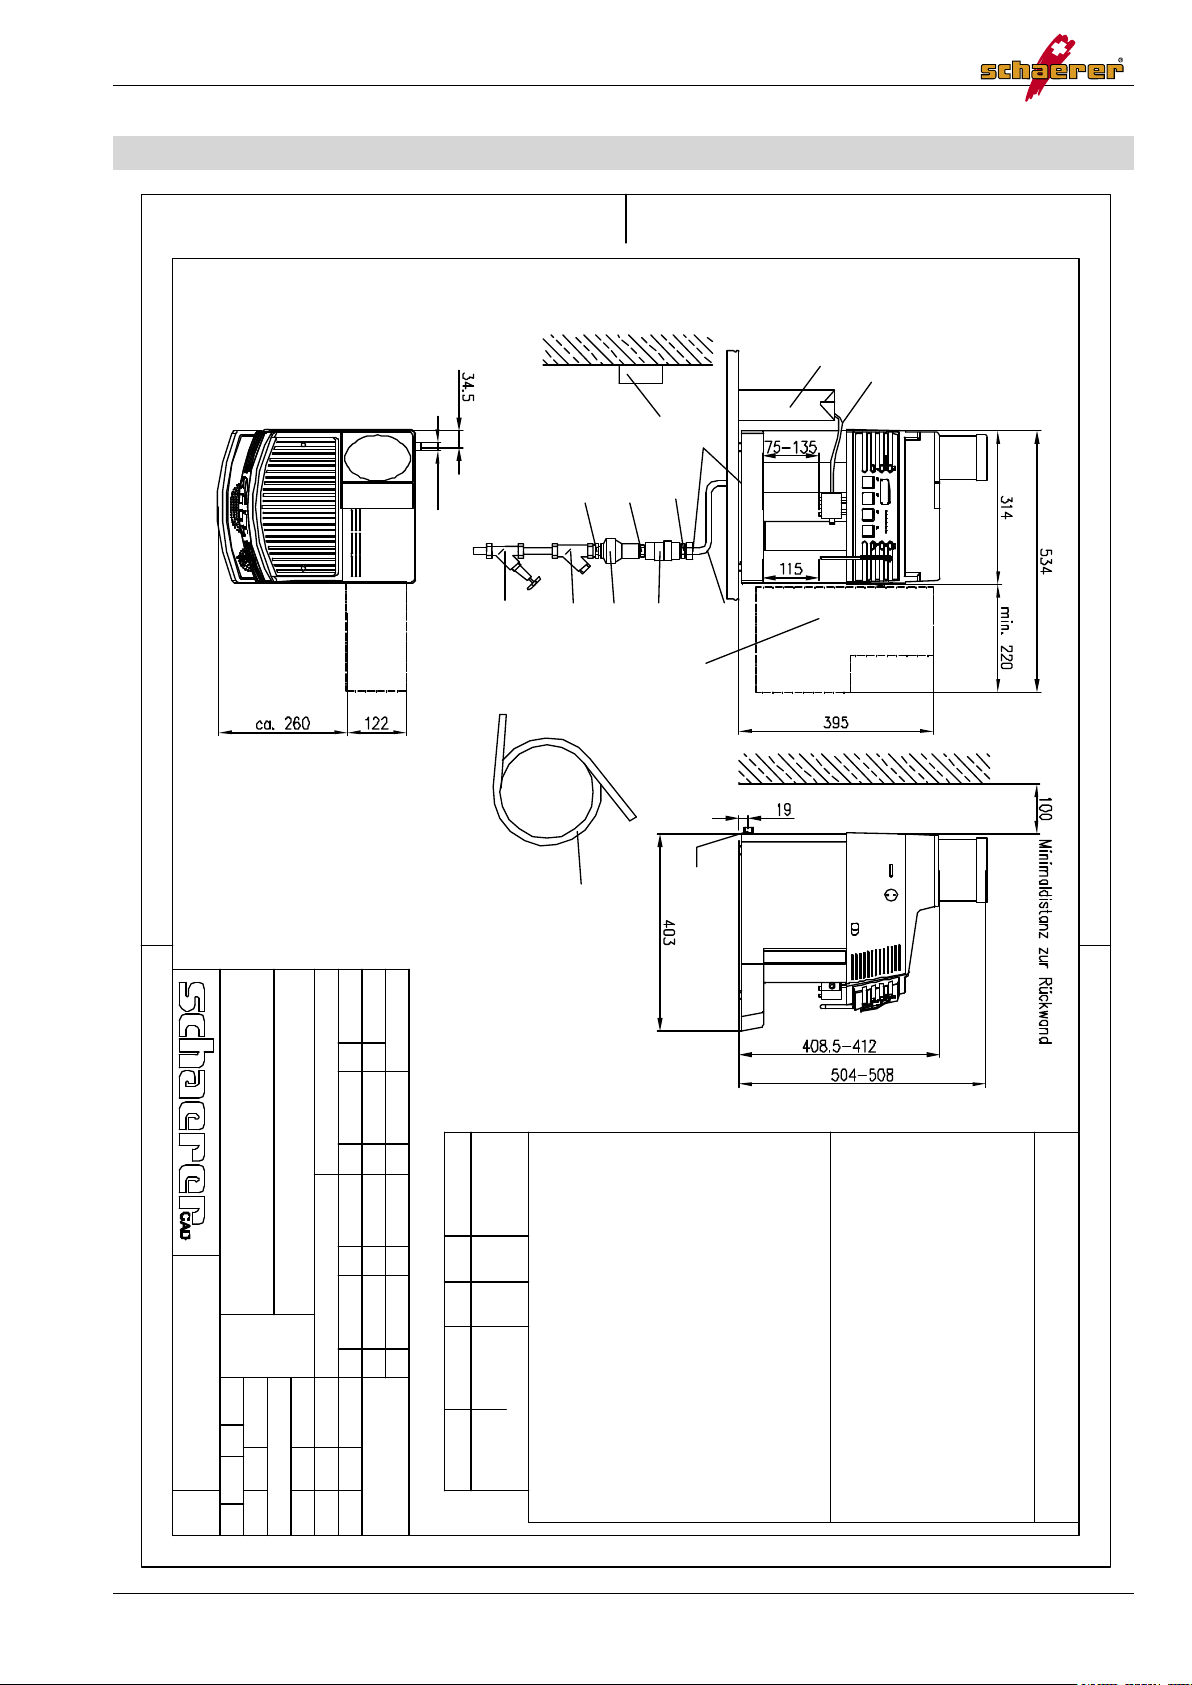
Installationsplan / Installation diagram / Plan d'installation
--
KKM Siena 2
3.8.6463
30.06.04 R. Joye
%
.
. .
. .
. .
. .
. .
. .
. .
. .
. . . .
. .
. .
Modell
Anschlusswert
Mühlen
3x 400VAC
1x 230VAC
- 2,2kW/10A
Anzahl
50-60Hz
Siena 2
Kolben
Anzahl
1
50-60Hz
1
1x 230VAC
Folgende Installationen müssen vorhanden sein:
1 Steckdose, 3polig
2 Wasseranschluss mit Absperrventil
Idealhärte des Wassers:
8° - 12° französische Wasserhärte
5° - 7° deutsche Wasserhärte
Im übrigen verweisen wir auf die örtlichen Vorschriften.
Optionen:
- Verschiedene Bohnenbehälter (Fassungsvermögen bis 1kg)
- Münzprüfer oder Jetonprüfer
- Festwasserset, Art.-Nr. 062812, best. aus:
3 Wasserfilter 3/8", Art.-Nr. 067310
4 Doppelnippel 3/8"K - 1/4"K, Art.-Nr. 068191
5 Druckreduzierventil 1/4", auf 2bar eingestellt, Art.-Nr. 069436
6 Doppelnippel 1/4"K - 1/4"K, Art.-Nr. 055109
7 Rückschlagventil 1/4", Art.-Nr. 063208
8 Verschraubung 3/8"Z - 1/4"K, Art.-Nr. 068501
9 Panzerschlauch 1000mm lang, 3/8", Art.-Nr. 067764
10 Flachdichtung ø15x9x0,8mm, Art.-Nr. 064249
11 Silikonschlauch ø12/8mm, Art.-Nr. 067722
3/8"
Änderungen vorbehalten!
D
Installation plan for Siena 2
Commissioning
56 User manual SI 2 - EN
www.schaerer.com Version 02 / 06.2005 / REWE
Commissioning
Before using for the first time:
Never operate the device without water.
After longer periods of non-use (e.g. due to holiday), it is recommended
for hygienic reasons that the device be rinsed by means of the hot water/
steam injector and the cleaning program started before the device is used
again.
1. Place the package on the ground with the number facing up;
carefully cut the adhesive tape open.
2. Place the device on a stable, horizontal surface. Do not set it
down on hot or warm surfaces. Choose a location that is not easily
accessible to children or pets.
3. Insert the drip pan as far as it will go.
4. Fill the water tank with (cold) water (max. 2.4 litres), insert it at the
front of the device and press it on firmly.
On devices with the fixed water supply option, the tank cannot be
removed.
5. Pull the connector cable on the rear of the device out to the
required length, and connect the device to a grounded socket.
Never insert the power plug into the socket if it is wet, and never touch the
plug with wet hands.
6. Reclose the cord compartment.
7. Switch on the power switch. The device is now in Stand-by mode.
This does not apply to coffee makers with the coin tester option.
8. Press the button to switch on the device
(LED in the button lights up).
9. Fill the bean container (capacity: max. 1 kg). Close the bean
container with the lid to form a tight seal.
Only pure whole coffee beans may be used – no coffee with caramelised
or aromatised beans.
10. When the temperature indicator lights up (in green) and the
message "Ready" appears on the display, the machine is ready to
operate.
Each time the device is commissioned, the device automatically rinses the
brew unit. During this rinse procedure, no products can be dispensed.
11. Touch the product button. The first beverage is dispensed.
This beverage is not edible, since the grinder's coffee duct must first be
filled/rinsed.
Please wait to drink the following beverage.
 Loading...