

Page 1
Schaerer Siena 1 / 2
V04 08.2007
Bedienungsanleitung, Seite 2
User manual, Page 35
Manuel d'utilisation, Page 69
Gebruiksaanwijzing, Pagina 103
Manual del usuario, Página 137
Návod k obsluze, Strana 171
Használati útmutató, Oldalt 205
SWISSMADE www.schaerer.com
Page 2

Schaerer Siena 1 / 2
User manual
V04 08.2007
Publisher:
M. Schaerer Ltd., CH-3302 Moosseedorf
Edition:
Version 04 08.2007
Ex. software V 4.00
Concept / editorial ofce:
M. Schaerer Ltd., CH-3302 Moosseedorf REJO
© Copyright by:
M. Schaerer Ltd., CH-3302 Moosseedorf
www.schaerer.com
Before commissioning the coffee machine, be sure to read the chapter "Safety notes" carefully.
All rights reserved, including translations into foreign languages. This document, or any excerpts thereof, may not be copied, repro-
duced, distributed or electronically transmitted in any form – regardless of the process used – without rst obtaining written consent
from the publisher. All of the information, technical data, pictures and illustrations used in this manual are based on the most current
data available at the time of printing. Your machine may vary from those shown in the pictures (options). The company M. Schaerer
Ltd. reserves the right to make changes at any time without issuing further notication.
BASI 2 - EN
Version 04 08.2007
35
Page 3
www.schaerer.com
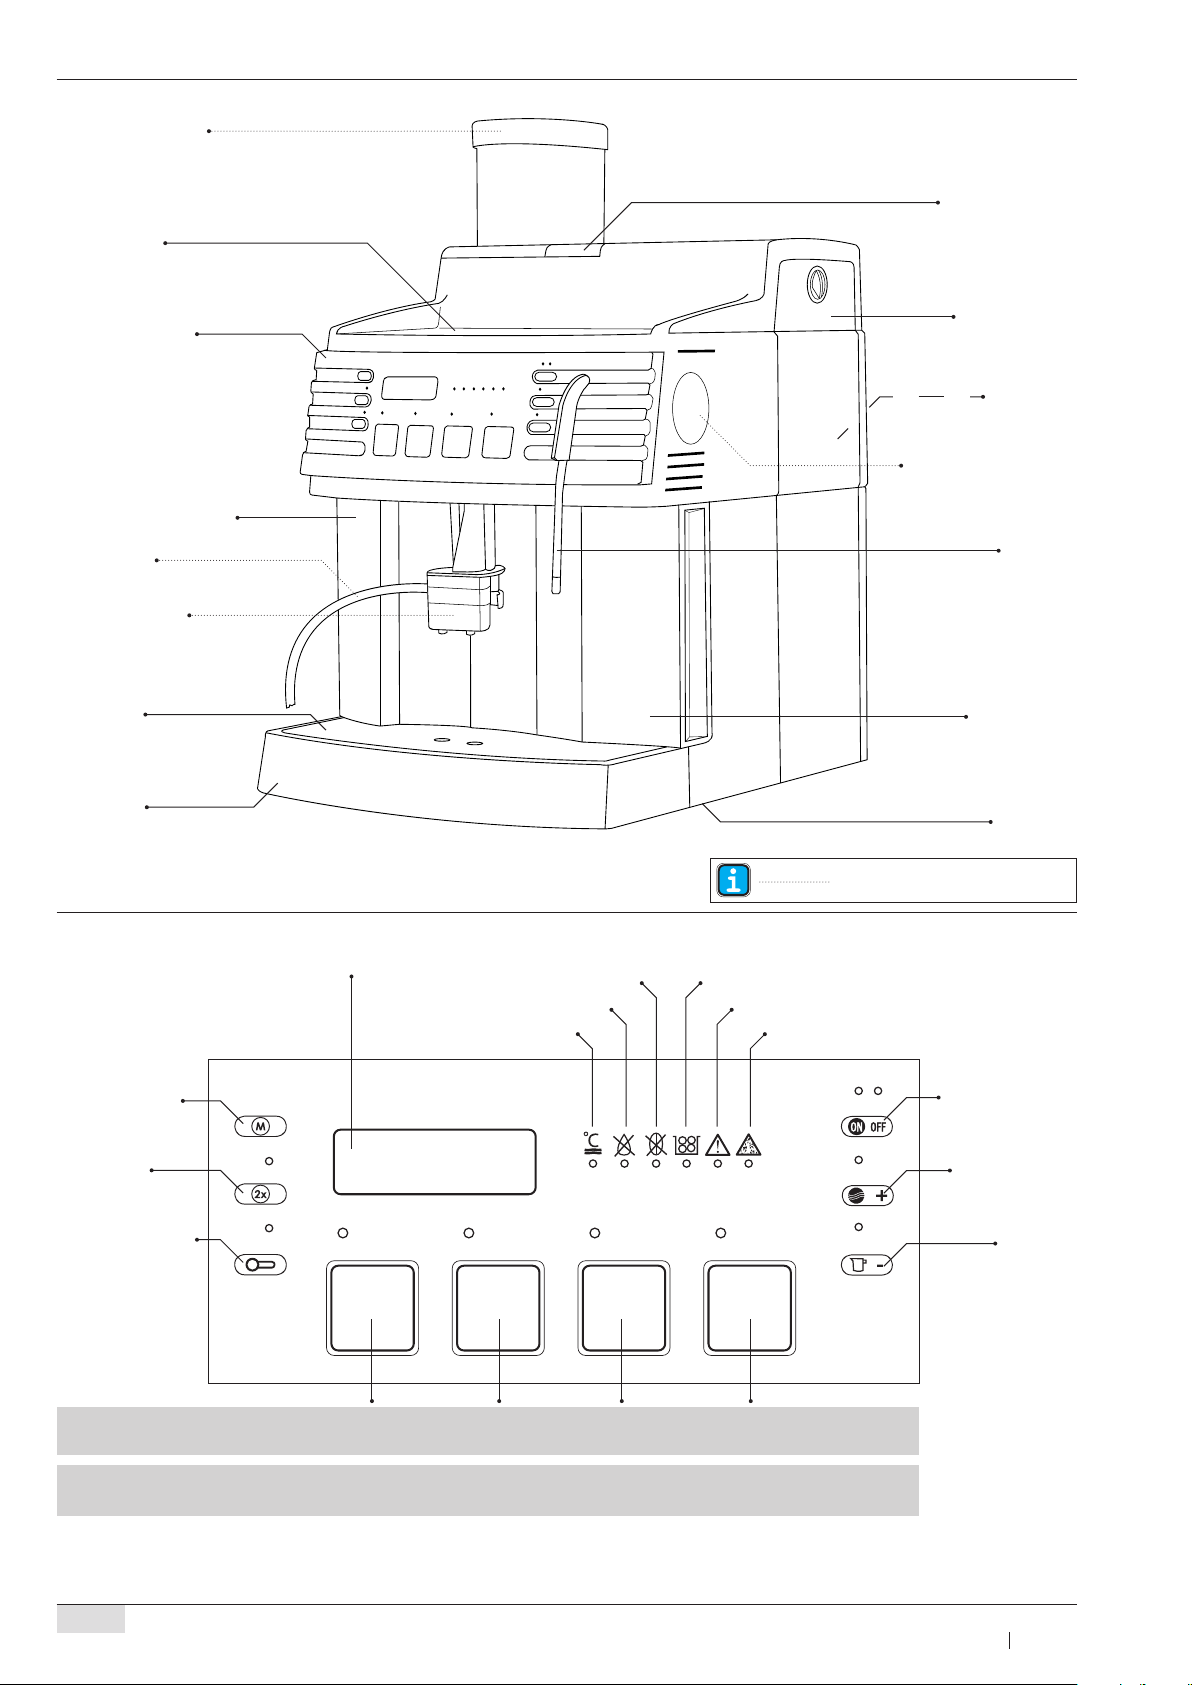
Bean container
(with lid)
Cup plate
Insert for
coffee powder
(cleaning tablet)
Control panel
(see below)
Grounds container
Milk tube
Foamer head
(refer to page 43)
Siena 1: Beverage outlet
Drip grid
Drip tray
* Illustration: Siena 2
Service door
(2 parts)
Brew unit
Siena 1: Rotary dial
Steam / hot water
Siena 1:
Hot water / steam
Siena 2:
Hot water outlet
Water tank
The position differs between
=
Siena 1 and Siena 2.
outlet
Swivel
Indicator symbols:
Display
Bean container empty
Water tank empty
Grounds container
Malfunction/brew unit
Temperature
Programming
button
2x button
Coffee powder
/ preselection
button
Siena 1 Button allocation:
Espresso Coffee Double
espresso
Double
coffee
Siena 2 Button allocation: Espresso Coffee Cappuccino Macchiato
Decalcifying
ON / OFF
button
Cleaning /
plus button
Siena 2:
Hot water /
minus button
Siena 1:
Coffee jug /
minus button
* Illustration: Standart conguration
36
BASI 2 - EN
Version 04 08.2007
Page 4
Introduction
www.schaerer.com
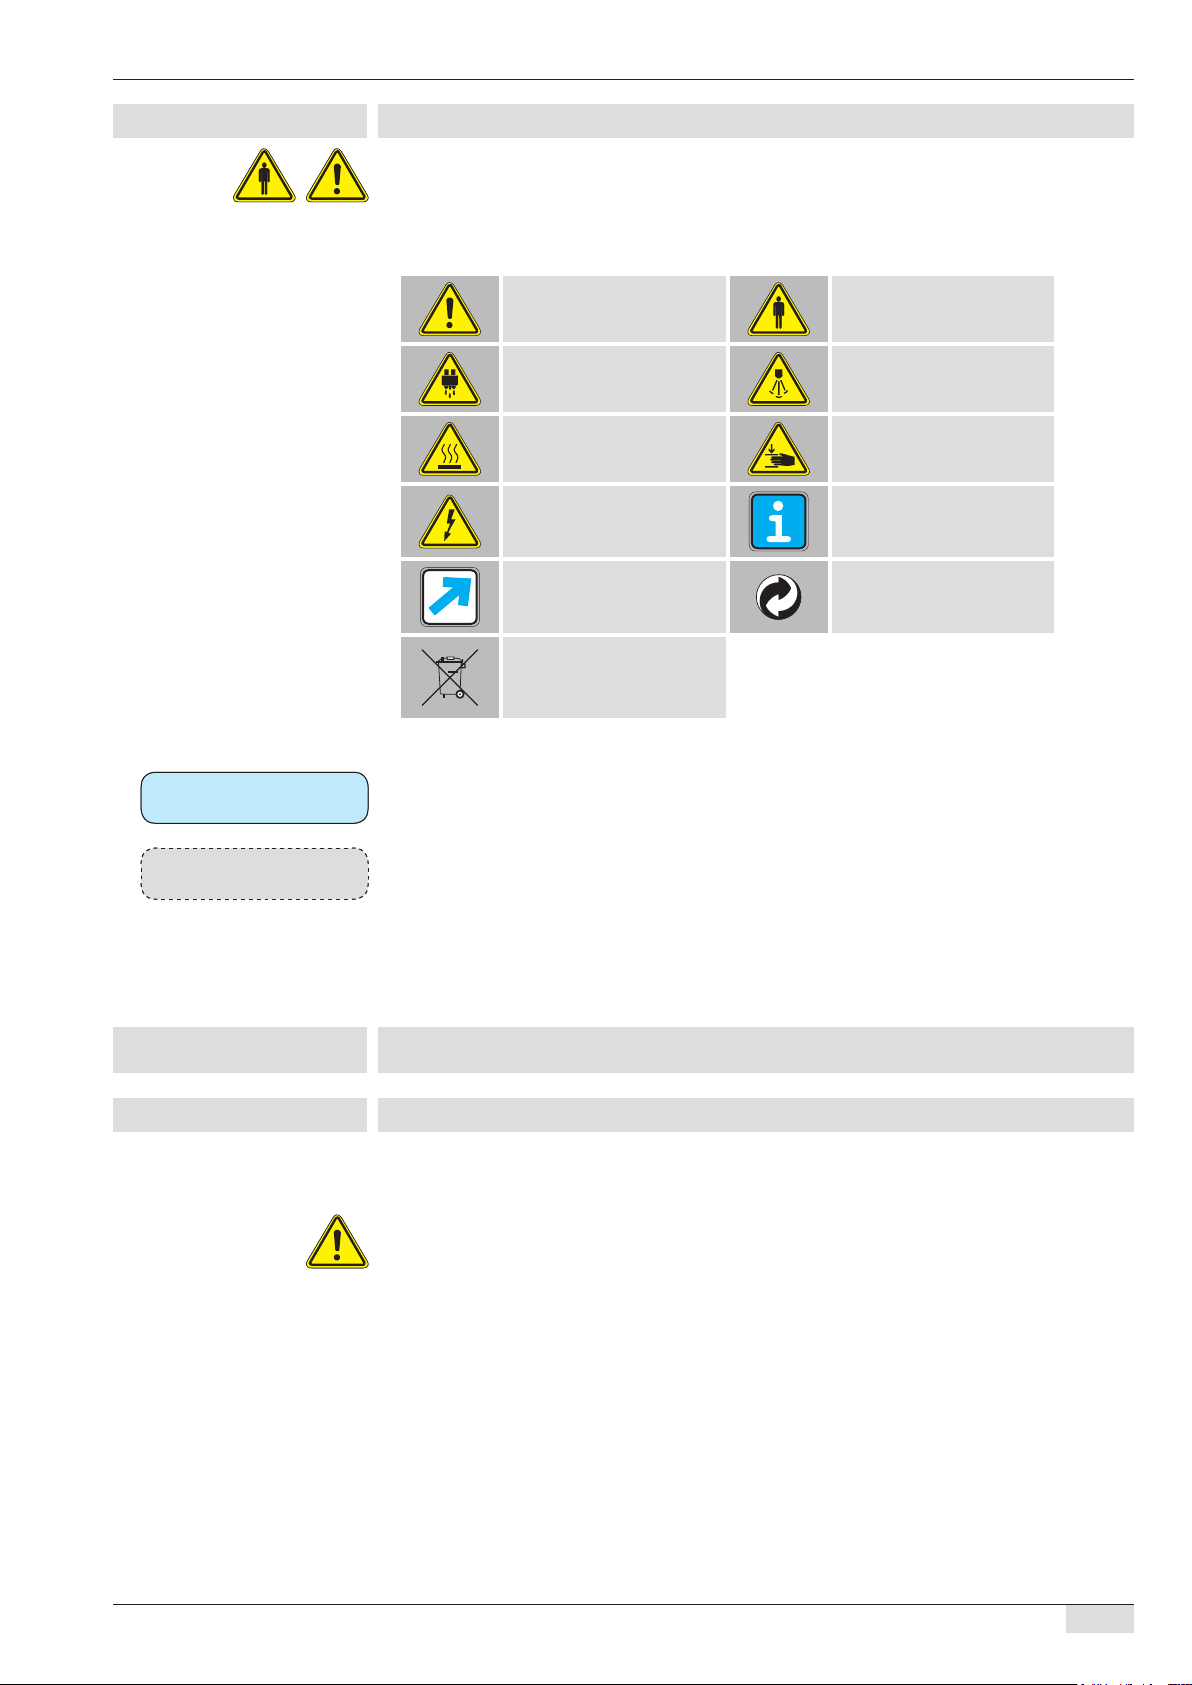
Safety symbols
Observe the safety instructions on page 40!
Exercise extreme caution when these
12:00 01.07.2007
12:00 01.07.2007
<< Stand by >><< Stand by >>
symbols appear!
Ready
Ready
Caution!
Risk of damage to
machine!
Caution!
Hot uid!
Caution!
Hot surface!
Caution!
Electrocution!
Cross-reference Environmental aspects
Disposal!
The machine must be
disposed of according to
regulations!
Active display (ready)
Inactive display („Standby“ mode)
Caution!
User at risk!
Caution!
Hot steam!
Caution!
Risk of squeezing!
Remark
Information, tips
BASI 2 - EN
Version 04
08.2007
Introduction
Welcome
By purchasing this coffee machine, you have acquired a high-quality Swiss product which was
specially designed for professional household use or catering businesses.
This manual provides you with detailed information about how to commission, program, operate
and clean your new coffee machine. The manual also contains important safety notes which
help to ensure safe usage.
Before commissioning the coffee machine, be sure to read the chapter „Safety notes“ carefully.
Neglecting to use the machine according to the instructions in this manual rules out any liability
claims in the event of damage. The coffee machine‘s performance largely depends on its proper
usage and careful maintenance. We recommend reading all the information thoroughly before
using the machine for the rst time. Always keep this instruction manual close to the machine.
We trust that you will enjoy using this coffee machine for a long time!
37
Page 5

Introductionwww.schaerer.com
38
BASI 2 - EN
Version 04
08.2007
Table of contents
Safety symbols . . . . . .. . . . . . .. . . . .. . . . . . .. . . . .. . . . . . .. . . . .. . . . . . .. . . . .. . . . . . .. . . . .. . . . . . .. . . . .. . . . . . .. . . . .. . . . . . .. . . . .. . 37
Introduction . . .. . . . .. . . . .. . . . .. . . . .. . . . .. . . . .. . . . .. . . . .. . . . .. . . . .. . . . .. . . . .. . . . .. . . . .. . . . .. . . . .. . . . .. . . . .. . . . . 37
Welcome .. . . . .. . . . .. .. . . . .. . . . .. .. . . . .. . . . .. .. . . . .. . . . .. .. . . . .. . . . .. .. . . . .. . . . .. .. . . . .. . . . .. .. . . . .. . . . .. .. . . . .. . . . .. .. 37
Safety notes . . . . .. . . . .. . . . .. . . . .. . . . .. . . . .. . . . .. . . . .. . . . .. . . . .. . . . .. . . . .. . . . .. . . . .. . . . .. . . . .. . . . .. . . . .. . . . .. . . 40
General. .. . . . . . .. . . . .. . . . . . .. . . . .. . . . . . .. . . . .. . . . . . .. . . . .. . . . . . .. . . . .. . . . . . .. . . . .. . . . . . .. . . . .. . . . . . .. . . . .. . . . . . .. . . . .. . . 40
Hygiene . .. . . . .. . . . .. . . . .. . . . .. . . . .. . . . .. . . . .. . . . .. . . . .. . . . .. . . . .. . . . .. . . . .. . . . .. . . . .. . . . .. . . . .. . . . .. . . . .. . . . .. . . . .. . . . . 41
Intended use . . . .. .. . . . .. . . . .. .. . . . .. . . . .. .. . . . .. . . . .. .. . . . .. . . . .. .. . . . .. . . . .. .. . . . .. . . . .. .. . . . .. . . . .. .. . . . .. . . . .. .. . . . 42
Liability . . . .. . . . .. . . . .. . . . .. . . . .. . . . .. . . . .. . . . .. . . . .. . . . .. . . . .. . . . .. . . . .. . . . .. . . . .. . . . .. . . . .. . . . .. . . . .. . . . .. . . . .. . . . .. . . . . 42
Product description . . . .. . . . .. . . . .. . . . .. . . . .. . . . .. . . . .. . . . .. . . . .. . . . .. . . . .. . . . .. . . . .. . . . .. . . . .. . . . .. . . . 43
Overview - machine .. . . . .. . . . . . .. . . . .. . . . . . .. . . . .. . . . . . .. . . . .. . . . . . .. . . . .. . . . . . .. . . . .. . . . . . .. . . . .. . . . . . .. . . . .. . . . . . 43
Overview - control panel . . .. . . . .. . . . .. .. . . . .. . . . .. .. . . . .. . . . .. .. . . . .. . . . .. .. . . . .. . . . .. .. . . . .. . . . .. .. . . . .. . . . .. .. . . 43
Detailed picture of the foamer head (Siena 2) . . .. . . . .. . . . . . .. . . . .. . . . . . .. . . . .. . . . . . .. . . . .. . . . . . .. . . . .. . . . . 43
The display symbols . .. . . . .. . . . .. . . . .. . . . .. . . . .. . . . .. . . . .. . . . .. . . . .. . . . .. . . . .. . . . .. . . . .. . . . .. . . . .. . . . .. . . . .. . . . .. . . . . 43
Water connection / draining (option) . .. . . . .. . . . .. .. . . . .. . . . .. .. . . . .. . . . .. .. . . . .. . . . .. .. . . . .. . . . .. .. . . . .. . . . .. 44
Installation plan for Siena 2 . . . .. . . . .. . . . . . .. . . . .. . . . . . .. . . . .. . . . . . .. . . . .. . . . . . .. . . . .. . . . . . .. . . . .. . . . . . .. . . . .. . . . . . 45
Commissioning . . . . .. . . . .. . . . .. . . . .. . . . .. . . . .. . . . .. . . . .. . . . .. . . . .. . . . .. . . . .. . . . .. . . . .. . . . .. . . . .. . . . .. . . . .. . 46
Before using for the rst time: . . .. .. . . . .. . . . .. .. . . . .. . . . .. .. . . . .. . . . .. .. . . . .. . . . .. .. . . . .. . . . .. .. . . . .. . . . .. .. . . . .. . 46
Operation . .. .. . . . .. . . . .. .. . . . .. . . . .. .. . . . .. . . . .. .. . . . .. . . . .. .. . . . .. . . . .. .. . . . .. . . . .. .. . . . .. . . . .. .. . . . .. . . . .. .. . 47
Introduction . . . . . .. . . . . . .. . . . .. . . . . . .. . . . .. . . . . . .. . . . .. . . . . . .. . . . .. . . . . . .. . . . .. . . . . . .. . . . .. . . . . . .. . . . .. . . . . . .. . . . .. . . . . 47
Filling coffee beans . . . . . .. . . . .. .. . . . .. . . . .. .. . . . .. . . . .. .. . . . .. . . . .. .. . . . .. . . . .. .. . . . .. . . . .. .. . . . .. . . . .. .. . . . .. . . . .. . 47
Making the coffee machine ready to operate . . . . . .. . . . .. . . . .. . . . .. . . . .. . . . .. . . . .. . . . .. . . . .. . . . .. . . . .. . . . . 47
Switching on the coffee machine . . . . .. . . . .. . . . .. . . . .. . . . .. . . . .. . . . .. . . . .. . . . .. . . . .. . . . .. . . . .. . . . .. . . . .. . . . .. . . 47
Operating modes . . . . .. . . . .. . . . .. . . . .. . . . .. . . . .. . . . .. . . . .. . . . .. . . . .. . . . .. . . . .. . . . .. . . . .. . . . .. . . . .. . . . .. . . . .. . . . .. . . . 48
Preparing products . .. .. . . . .. . . . .. .. . . . .. . . . .. .. . . . .. . . . .. .. . . . .. . . . .. .. . . . .. . . . .. .. . . . .. . . . .. .. . . . .. . . . .. .. . . . .. . . . . 48
Preparing coffee / espresso (whole-bean coffee) . . . . .. . . . .. . . . . . .. . . . .. . . . . . .. . . . .. . . . . . .. . . . .. . . . . . .. . . . 48
Preparing DECAF coffee (coffee powder) . . .. .. . . . .. . . . .. .. . . . .. . . . .. .. . . . .. . . . .. .. . . . .. . . . .. .. . . . .. . . . .. .. . 48
Preparing hot water (Siena 1) . . .. . . . .. .. . . . .. . . . .. .. . . . .. . . . .. .. . . . .. . . . .. .. . . . .. . . . .. .. . . . .. . . . .. .. . . . .. . . . .. .. . 48
Preparing hot water (Siena 2) . . .. . . . .. .. . . . .. . . . .. .. . . . .. . . . .. .. . . . .. . . . .. .. . . . .. . . . .. .. . . . .. . . . .. .. . . . .. . . . .. .. . 49
Preparing steam (Siena 1) . . . . .. . . . .. .. . . . .. . . . .. .. . . . .. . . . .. .. . . . .. . . . .. .. . . . .. . . . .. .. . . . .. . . . .. .. . . . .. . . . .. .. . . . 49
Preparing cappuccino (Siena 2) . .. . . . .. . . . .. . . . .. . . . .. . . . .. . . . .. . . . .. . . . .. . . . .. . . . .. . . . .. . . . .. . . . .. . . . .. . . . .. . . 49
Preparing milk foam (Siena 1) .. . . . .. .. . . . .. . . . .. .. . . . .. . . . .. .. . . . .. . . . .. .. . . . .. . . . .. .. . . . .. . . . .. .. . . . .. . . . .. .. . . . 49
Preparing milk foam (Siena 2) .. . . . .. .. . . . .. . . . .. .. . . . .. . . . .. .. . . . .. . . . .. .. . . . .. . . . .. .. . . . .. . . . .. .. . . . .. . . . .. .. . . . 50
Milk foam quality (installing the milk nozzle) . . . .. . . . .. . . . .. . . . .. . . . .. . . . .. . . . .. . . . .. . . . .. . . . .. . . . .. . . . .. . . . .. 50
Pre-heating cups . . . . .. . . . .. . . . .. . . . .. . . . .. . . . .. . . . .. . . . .. . . . .. . . . .. . . . .. . . . .. . . . .. . . . .. . . . .. . . . .. . . . .. . . . .. . . . .. . . . . 50
Grinder settings . .. . . . . . .. . . . .. . . . . . .. . . . .. . . . . . .. . . . .. . . . . . .. . . . .. . . . . . .. . . . .. . . . . . .. . . . .. . . . . . .. . . . .. . . . . . .. . . . .. . . . . 50
Programming . . .. . . . .. . . . .. . . . .. . . . .. . . . .. . . . .. . . . .. . . . .. . . . .. . . . .. . . . .. . . . .. . . . .. . . . .. . . . .. . . . .. . . . .. . . . .. . 51
Navigation through the programming level . . .. . . . . . .. . . . .. . . . . . .. . . . .. . . . . . .. . . . .. . . . . . .. . . . .. . . . . . .. . . . .. . 51
Counter functions in standby mode . . . .. . . . . . .. . . . .. . . . . . .. . . . .. . . . . . .. . . . .. . . . . . .. . . . .. . . . . . .. . . . .. . . . . . .. . . . . 51
Overview: product programming (coffee, cappuccino) . . .. . . . .. .. . . . .. . . . .. .. . . . .. . . . .. .. . . . .. . . . .. .. . 52
Overview: product programming (milk foam, hot water) . . . . .. . . . .. . . . .. . . . .. . . . .. . . . .. . . . .. . . . .. . . . .. . . 53
Overview: programming common parameters .. . . . .. . . . .. .. . . . .. . . . .. .. . . . .. . . . .. .. . . . .. . . . .. .. . . . .. . . . .. . 54
Overview: programming xed parameters . . . . . .. . . . .. .. . . . .. . . . .. .. . . . .. . . . .. .. . . . .. . . . .. .. . . . .. . . . .. .. . . . .. 55
Cleaning . .. .. . . . .. . . . .. .. . . . .. . . . .. .. . . . .. . . . .. .. . . . .. . . . .. .. . . . .. . . . .. .. . . . .. . . . .. .. . . . .. . . . .. .. . . . .. . . . .. .. . . . 56
Informations about cleaning . .. .. . . . .. . . . .. .. . . . .. . . . .. .. . . . .. . . . .. .. . . . .. . . . .. .. . . . .. . . . .. .. . . . .. . . . .. .. . . . .. . . . 56
Daily and weekly cleaning . . . . .. . . . .. .. . . . .. . . . .. .. . . . .. . . . .. .. . . . .. . . . .. .. . . . .. . . . .. .. . . . .. . . . .. .. . . . .. . . . .. .. . . 57
Descaling . . . . . .. . . . . . .. . . . .. . . . . . .. . . . .. . . . . . .. . . . .. . . . . . .. . . . .. . . . . . .. . . . .. . . . . . .. . . . .. . . . . . .. . . . .. . . . . . .. . . . .. . . . . . .. 59
Installing/detaching the foam head (Siena 2) . . . . . . .. . . . .. . . . . . .. . . . .. . . . . . .. . . . .. . . . . . .. . . . .. . . . . . .. . . . .. . 60
Cleaning the milk nozzle (Siena 2) . . . . .. . . . .. . . . . . .. . . . .. . . . . . .. . . . .. . . . . . .. . . . .. . . . . . .. . . . .. . . . . . .. . . . .. . . . . . .. 60
Troubleshooting . . . . .. . . . .. . . . .. . . . .. . . . .. . . . .. . . . .. . . . .. . . . .. . . . .. . . . .. . . . .. . . . .. . . . .. . . . .. . . . .. . . . .. . . . .. 61
Malfunctions and possible causes . . .. . . . .. . . . . . .. . . . .. . . . . . .. . . . .. . . . . . .. . . . .. . . . . . .. . . . .. . . . . . .. . . . .. . . . . . .. . . 61
Service and maintenance work .. . . . .. . . . .. . . . .. . . . .. . . . .. . . . .. . . . .. . . . .. . . . .. . . . .. . . . .. . . . .. . . . .. . . . .. . . . .. . . . . 62
Service request . . .. . . . .. .. . . . .. . . . .. .. . . . .. . . . .. .. . . . .. . . . .. .. . . . .. . . . .. .. . . . .. . . . .. .. . . . .. . . . .. .. . . . .. . . . .. .. . . . .. . . . 62
Page 6

Introduction
www.schaerer.com
Options . . . . .. . . . .. .. . . . .. . . . .. .. . . . .. . . . .. .. . . . .. . . . .. .. . . . .. . . . .. .. . . . .. . . . .. .. . . . .. . . . .. .. . . . .. . . . .. .. . . . .. . . . .. 63
Coin tester . . . . .. . . . .. . . . .. . . . .. . . . .. . . . .. . . . .. . . . .. . . . .. . . . .. . . . .. . . . .. . . . .. . . . .. . . . .. . . . .. . . . .. . . . .. . . . .. . . . .. . . . .. . . . 63
Coin tester - operation and maintenance . . .. . . . .. . . . .. . . . .. . . . .. . . . .. . . . .. . . . .. . . . .. . . . .. . . . .. . . . .. . . . .. . . . 63
Bean container . .. . . . .. . . . .. . . . .. . . . .. . . . .. . . . .. . . . .. . . . .. . . . .. . . . .. . . . .. . . . .. . . . .. . . . .. . . . .. . . . .. . . . .. . . . .. . . . .. . . . .. 63
Base with supports (Art. No.: 062489) . .. . . . .. . . . .. .. . . . .. . . . .. .. . . . .. . . . .. .. . . . .. . . . .. .. . . . .. . . . .. .. . . . .. . . . .. . 64
Fixed water supply . . . . . . .. . . . .. . . . . . .. . . . .. . . . . . .. . . . .. . . . . . .. . . . .. . . . . . .. . . . .. . . . . . .. . . . .. . . . . . .. . . . .. . . . . . .. . . . .. . 64
Appendix . . . . .. . . . .. . . . .. . . . .. . . . .. . . . .. . . . .. . . . .. . . . .. . . . .. . . . .. . . . .. . . . .. . . . .. . . . .. . . . .. . . . .. . . . .. . . . .. . . . .. . . 64
Declaration of conformity . . . . .. . . . . . .. . . . .. . . . . . .. . . . .. . . . . . .. . . . .. . . . . . .. . . . .. . . . . . .. . . . .. . . . . . .. . . . .. . . . . . .. . . . . 64
Cleaning products . . . .. . . . .. . . . .. . . . .. . . . .. . . . .. . . . .. . . . .. . . . .. . . . .. . . . .. . . . .. . . . .. . . . .. . . . .. . . . .. . . . .. . . . .. . . . .. . . . 65
IBEDA cleaning tablet (Art.-No.: 062867) . . . . . .. . . . .. . . . .. . . . .. . . . .. . . . .. . . . .. . . . .. . . . .. . . . .. . . . .. . . . .. . . . .. . . . 65
"Milkpure" cleaning product (Art.-No.: 071531) . . . . . .. . . . .. .. . . . .. . . . .. .. . . . .. . . . .. .. . . . .. . . . .. .. . . . .. . . . .. .. 65
Liquid descaler (Art.-No.: 062869) . .. .. . . . .. . . . .. .. . . . .. . . . .. .. . . . .. . . . .. .. . . . .. . . . .. .. . . . .. . . . .. .. . . . .. . . . .. .. . . 65
Emergency information: . .. . . . .. . . . .. . . . .. . . . .. . . . .. . . . .. . . . .. . . . .. . . . .. . . . .. . . . .. . . . .. . . . .. . . . .. . . . .. . . . .. . . . .. . . . 66
Storing cleaning products . .. . . . .. . . . .. . . . .. . . . .. . . . .. . . . .. . . . .. . . . .. . . . .. . . . .. . . . .. . . . .. . . . .. . . . .. . . . .. . . . .. . . . .. . 66
Serial plate . . . . .. . . . .. . . . .. . . . .. . . . .. . . . .. . . . .. . . . .. . . . .. . . . .. . . . .. . . . .. . . . .. . . . .. . . . .. . . . .. . . . .. . . . .. . . . .. . . . .. . . . .. . . 66
Technical data . . . .. . . . .. . . . .. . . . .. . . . .. . . . .. . . . .. . . . .. . . . .. . . . .. . . . .. . . . .. . . . .. . . . .. . . . .. . . . .. . . . .. . . . .. . . . .. . . . .. . . . 66
Overview of accessories . . .. . . . .. . . . .. . . . .. . . . .. . . . .. . . . .. . . . .. . . . .. . . . .. . . . .. . . . .. . . . .. . . . .. . . . .. . . . .. . . . .. . . . .. . . 67
Environmental aspects . . . .. . . . .. . . . .. . . . .. . . . .. . . . .. . . . .. . . . .. . . . .. . . . .. . . . .. . . . .. . . . .. . . . .. . . . .. . . . .. . . . .. . . . .. . . . 67
BASI 2 - EN
Version 04
08.2007
39
Page 7
Safety noteswww.schaerer.com
40
BASI 2 - EN
Version 04
08.2007
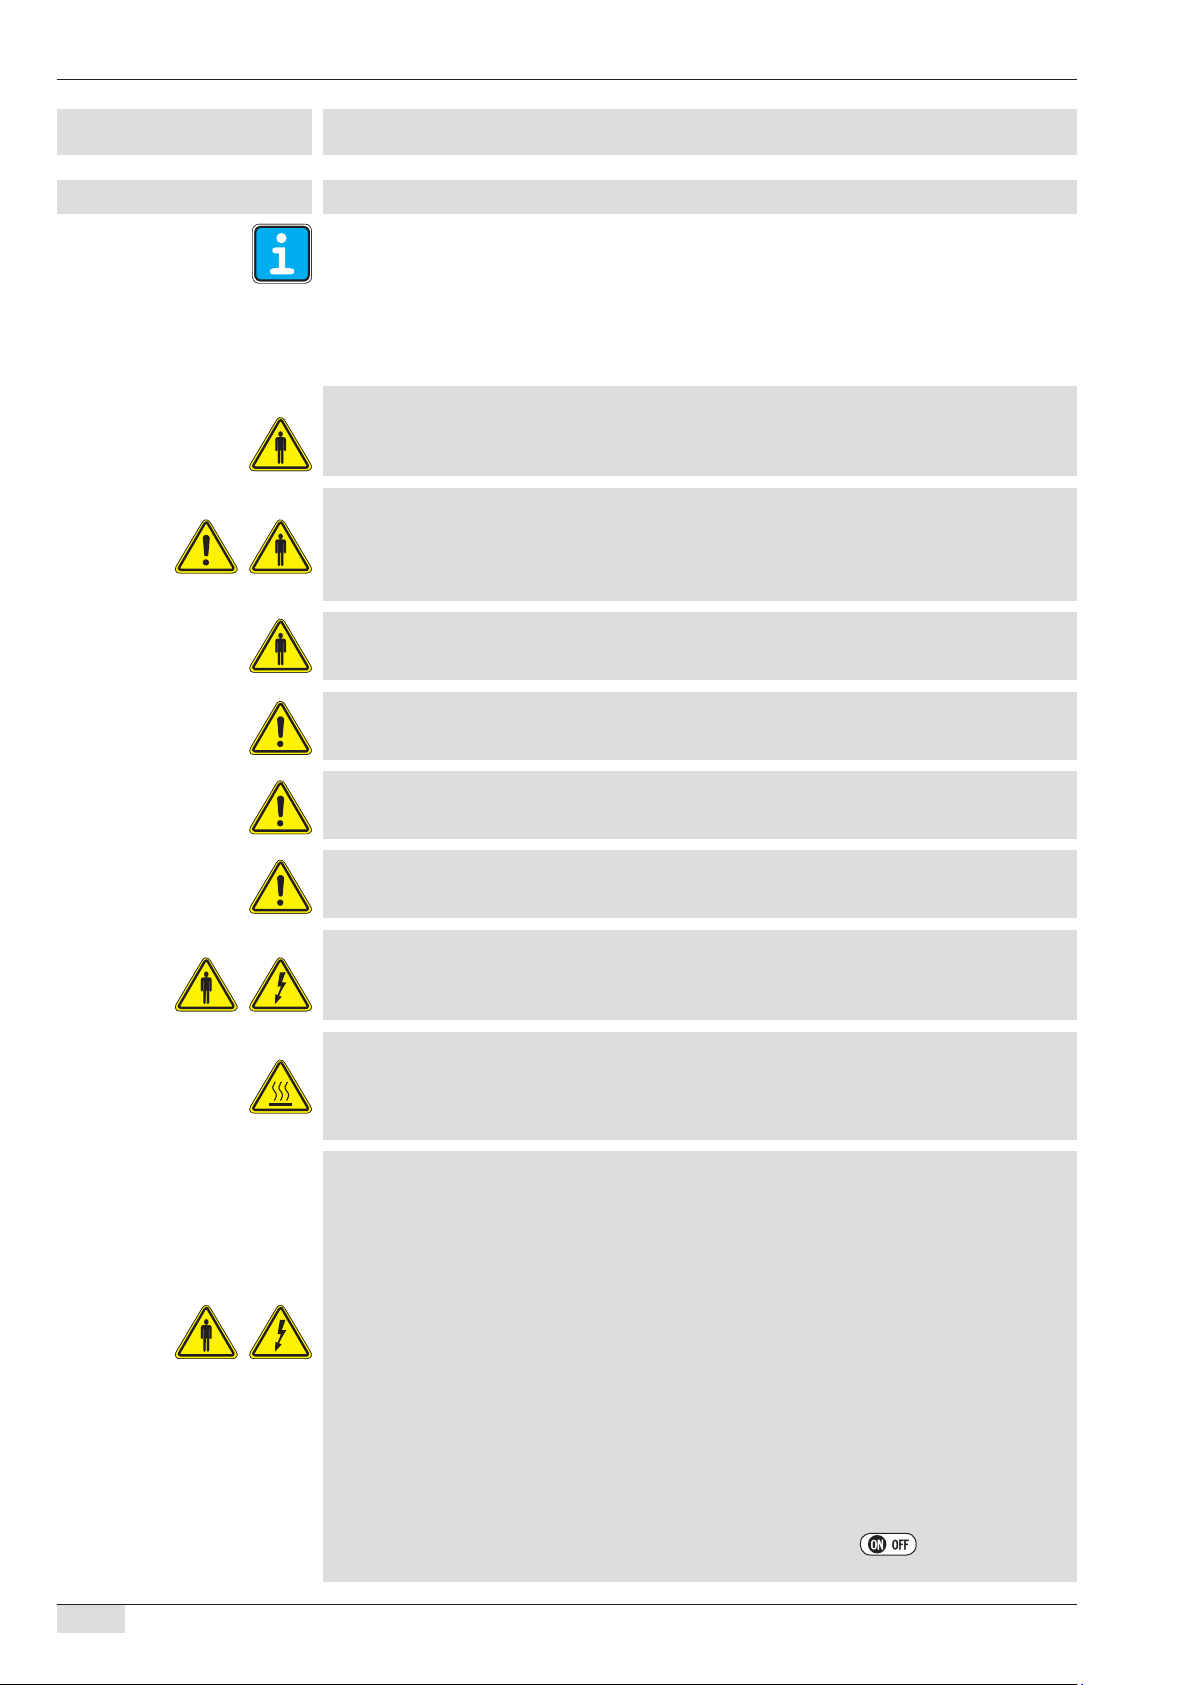
Safety notes
General
At M. Schaerer AG, the highest degree of safety is one of the most important product features.
The effectiveness of the safety devices is guaranteed only if the following instructions are observed to prevent injuries and health hazards:
• Read the User Manual carefully before using the device.
• Do not touch any hot machine parts!
• Do not use the coffee machine if it is not working properly or is damaged.
Under no circumstances may the installed safety devices be modied!
•
Health hazard!
Children and persons under the inuence of alcohol, drugs or medication or those with physical,
sensory or mental impairments may not use the device or may use it only under supervision.
Health hazard!
The coffee machine must be installed by the operator so that there are no impediments to care
and maintenance. In both self service and full service applications, trained personnel must supervise the machine in order to ensure that the care instructions are observed and the personnel is available for questions regarding use.
Health hazard!
Children are often unaware of the dangers which can result from handling electrical devices
improperly. Never leave children unattended with electrical devices.
Health hazard!
Place the device on a stable, horizontal surface. Do not set it down on hot or warm surfaces.
Choose a location that is not easily accessible to children or pets.
Caution!
The coffee machine is not suitable for installation on a surface where a water jet could be
used.
Caution!
The machine is not suitable for outdoor use. Never expose the device to outside weather conditions such as rain, snow, frost, etc.
Health hazard!
Never allow live electrical parts to come into contact with water. Never spray the device with
water or any other liquid. Never immerse the device in water or any other liquid. Do not operate
the machine with wet hands.
Risk of burns!
Be careful when touching the steam injector, as it becomes hot during operation. Use the spe-
cially designated grips. Do not touch any hot surfaces. Allow the device to cool before tting or
dismantling any parts. The same applies to cleaning (risk of burns).
Caution, electrocution!
•
Do not pinch or pull the power cord over corners or sharp edges, and do not place it or
hang it over hot objects. When unpacking the device, please check if the mains voltage
corresponds to the device‘s voltage stated on the serial plate. (Refer to „Technical data“,
page 67).
• Connect the device to a grounded socket only. For safety reasons, we recommend using a
residual current device (RCD - available in specialty electronics shops). To protect persons
from re, electrical shock and/or injury, never immerse the power cord or plug in water or any
other liquid.
• Never operate a device with a faulty supply pipe. Should an additional supply pipe be re
quired as an extension, it must also be in awless condition and attached in such a way that
no one can trip over the supply pipe. Keep the supply pipe out of the reach of children and
pets. Never insert the power plug into the socket if it is wet, and never touch the plug with wet
hands.
• Disconnect the power cord if the device shall not be used for a longer period of time.
• Do not leave the device switched on if unattended. For reasons of safety and power ef
ciency, we recommend switching the device off at the main power switch over night and
during longer periods of non-use (not possible with the coin tester option). For shorter periods
of non-use, the device can be switched to Stand-by mode via the button. For devices
with a xed water supply, the tap must be closed.
-
-
Page 8
Safety notes
www.schaerer.com
Disposal!
For safety reasons, machines that have reached the end of their product life cycles must be
rendered unusable. To do so, disconnect the power cord and sever the connector cable. Afterward, dispose of the device in accordance with regulations.
Disposal!
Old devices still contain valuable materials. Instead of taking your old device to the nearest
refuse dump, you should therefore ask your service technician or city administration ofce what
recycling options are available. In any case, make sure that the device is not thrown into the bin
for household rubbish.
The device is designed for preparing coffee, hot water and steam and may not be operated for
any other purpose.
Devices with a damaged connector cable or plug, or devices which are damaged in any way
or not functioning optimally, may not be commissioned. In the event of damage, the device
may only be opened by authorised service technicians and repaired using original spare parts
or accessory parts. This also applies to instances in which the connector cable is faulty. Otherwise, the manufacturer accepts no liability whatsoever. The use of accessory parts not recom-
mended by the device manufacturer can lead to re, electrical shock or personal injury.
If the coffee machine and/or auxiliary devices are transported at temperatures below 10°C, the
coffee machine and/or auxiliary devices must remain for 3 hours at room temperature before
it can be connected to a power supply and switched on. If this is not observed, there is a risk of
short circuits or damage to the electrical components as a result of condensation.
The coffee machine‘s original packaging has been designed to be especially robust for postal
transport. Therefore, be sure to keep this packaging in a safe place should a return delivery be
necessary.
Hygiene
Before initial commissioning, run the cleaning program (see User Manual, Chapter „Cleaning“,
page page 56).
Observe the general applicable hygiene regulations according to HACCP!
(HACCP= Hazard Analysis and Critical Control Point)
Coffee, milk and other contents:
• Do not use raw milk. Use only pasteurised or UHT milk. In any case, the milk must be homog-
enised!
• Only use pre-refrigerated milk with a maximum temperature of 5 °C. If the milk is at a temperature of over 5°C, an optimum product cannot be dispensed.
• We recommend using the milk directly from the original package for sanitary reasons.
• When using a milk container: never top up milk, and always thoroughly clean the container
before lling.
• Do not add more coffee or milk than will be needed for one day.
• We recommend pouring out milk remains at the end of the day (if the milk was in contact with
the milk hose).
• Check packages for damage
• Store coffee and other products in a cool, dry and dark location.
• Use the oldest products rst („rst-in-rst-out“ principle).
• Use up products before their expiration dates.
• Always reclose packages after opening to ensure that the contents remain fresh and are protected from contamination.
• Store coffee and products separately from cleaning agents.
• Reclose the bean hopper cover immediately after adding beans!
before opening them.
BASI 2 - EN
Version 04
08.2007
41
Page 9
Safety noteswww.schaerer.com
Cleaning:
• Thoroughly wash and disinfect hands before cleaning the machine!
• Clean the machine daily after all beverages have been dispensed.
• For daily and weekly cleaning, follow the instructions in the User Manual (Chapter „Cleaning“,
page 57) and on the cleaning card.
• Never mix cleaning products!
• Do not use any abrasive products, brushes, or cleaning tools made of metal!
• Do not touch parts that touch drinks (while they are dispensed) after they have been
cleaned.
• Follow the dosage and safety instructions on the cleaning product! For information on the
cleaning agents, refer to the chapter entitled „Appendix“, page 66/67.
• Clean the refrigerator/cooling element (optional) at least once a week if the machine is
equipped with one!
Intended use
The intended use of the device and associated options are subject to the contractually agreed
intended use and any existing supplementary agreements, the „General terms and conditions“
of M. Schaerer AG and this User Manual. In legal terms, any other use is not an intended use. The
manufacturer accepts no liability for damage resulting from unintended use.
Liability
All warranty and liability claims are null and void in the event of personal injury or damage to
property if the injury or damage can be traced back to one of the following causes
• Improper use of the device;
• Improper installation, commissioning, operation and maintenance of the device and the as
sociated options;
• Non-observance of maintenance intervals;
• Use of the coffee machine despite faulty safety devices or improperly attached or non-func
tional safety and protective devices;
• Non-observance of the safety notes in this instruction manual regarding positioning, installa
tion, commissioning, operation and maintenance of the machine;
• Operation of the device in less than optimal condition;
• Improperly conducted repairs;
• Catastrophic cases due to the effects of foreign matter, an accident, vandalism, as well as
acts of God;
• Reaching into and/or opening the housing with objects of any kind.
The manufacturer only accepts warranty and liability claims as long as the specied maintenance and service intervals are observed, and if original spare parts are used in the device supplied by the manufacturer and/or by an authorised supplier.
In the event of material defects, claims must be submitted to M. Schaerer AG in writing immediately.
The device must be serviced every 6 months or after 6‘000 coffees have been dispensed.
-
-
-
42
Safety-related parts, such as safety valves, safety thermostats, and boilers, must not be repaired
under any circumstances. They must be replaced:
• Safety valves every
• Boiler (steam producer, ow heater) every
24 months
60 months
BASI 2 - EN
Version 04
08.2007
Page 10
Product description
Product description
Overview - machine
(Refer to page 36)
Overview - control panel
(Refer to page 36)
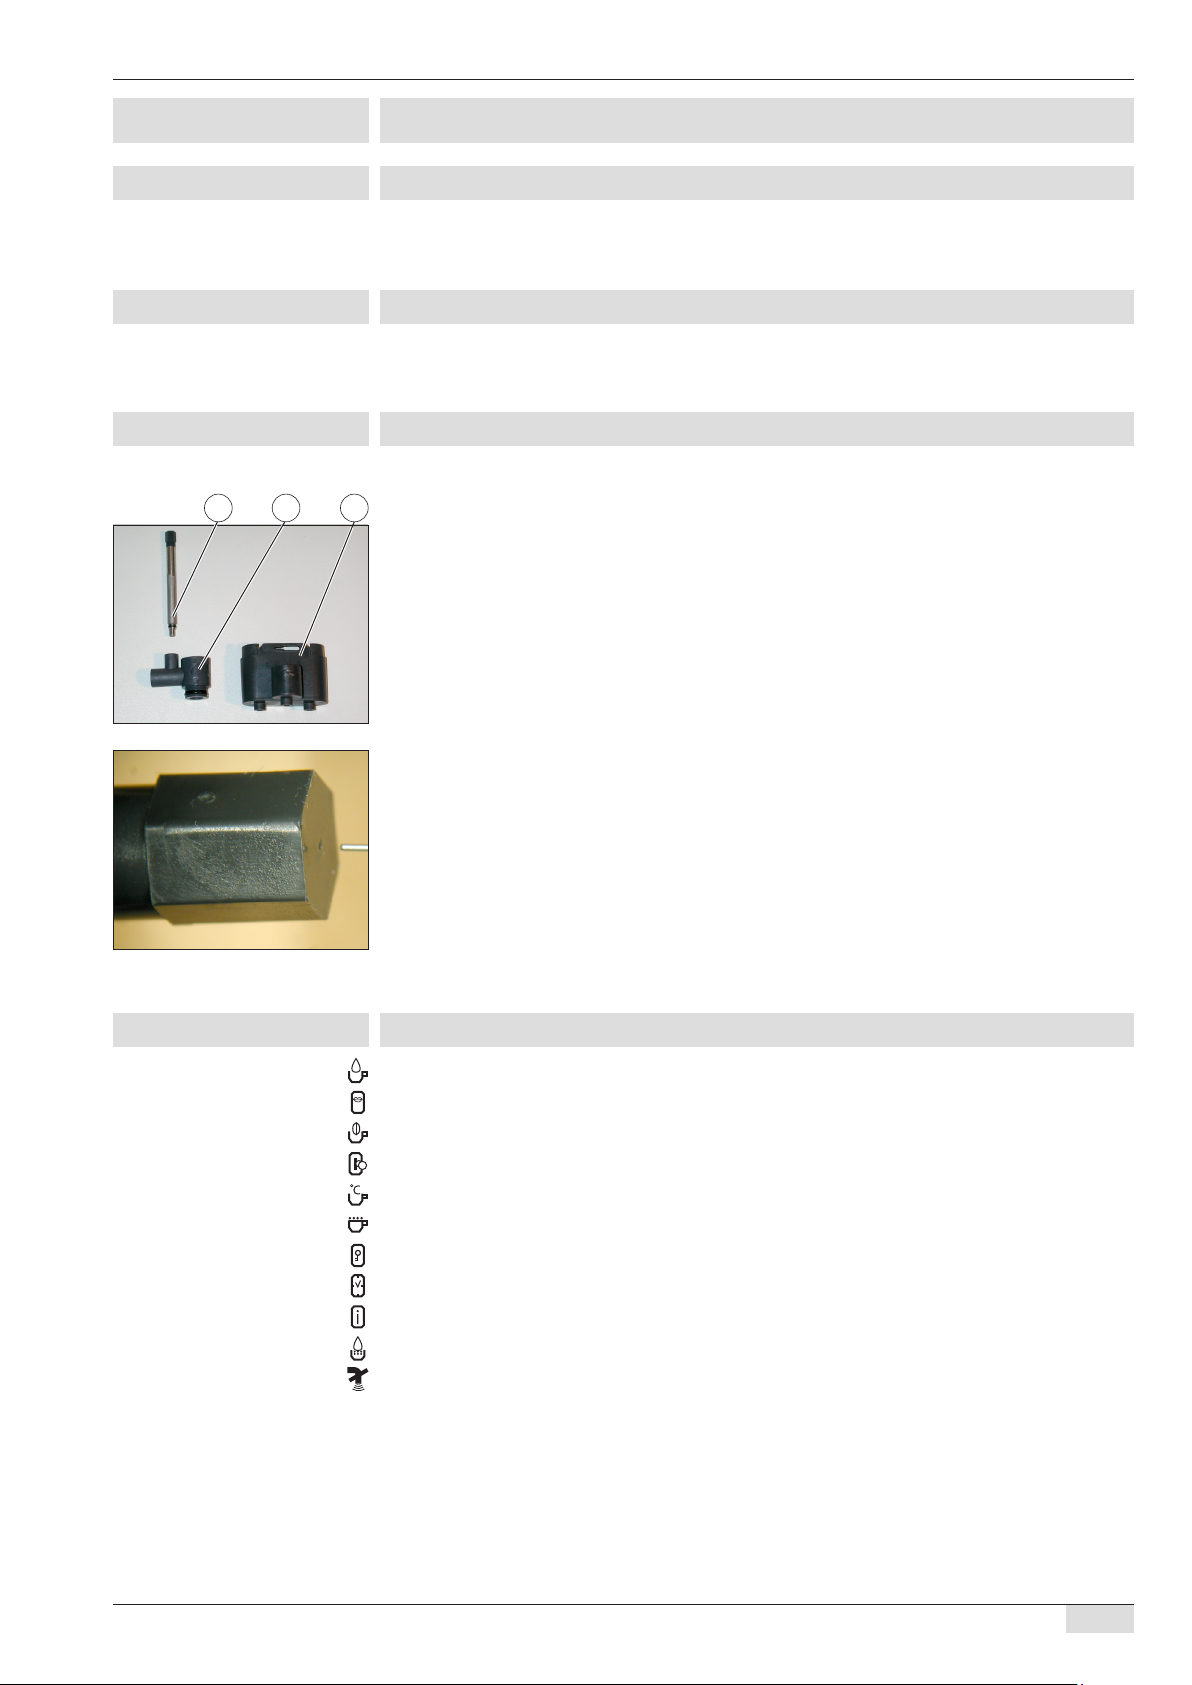
Detailed picture of the foamer head (Siena 2)
1. Foamer head
2. Corner p
123
3. Foam nozzle
www.schaerer.com
If no milk foam is dispensed, insert the supplied instrument (air valve pin) into the foam nozzle
[ 3 ]. (Refer to the detailed picture on the left).
3
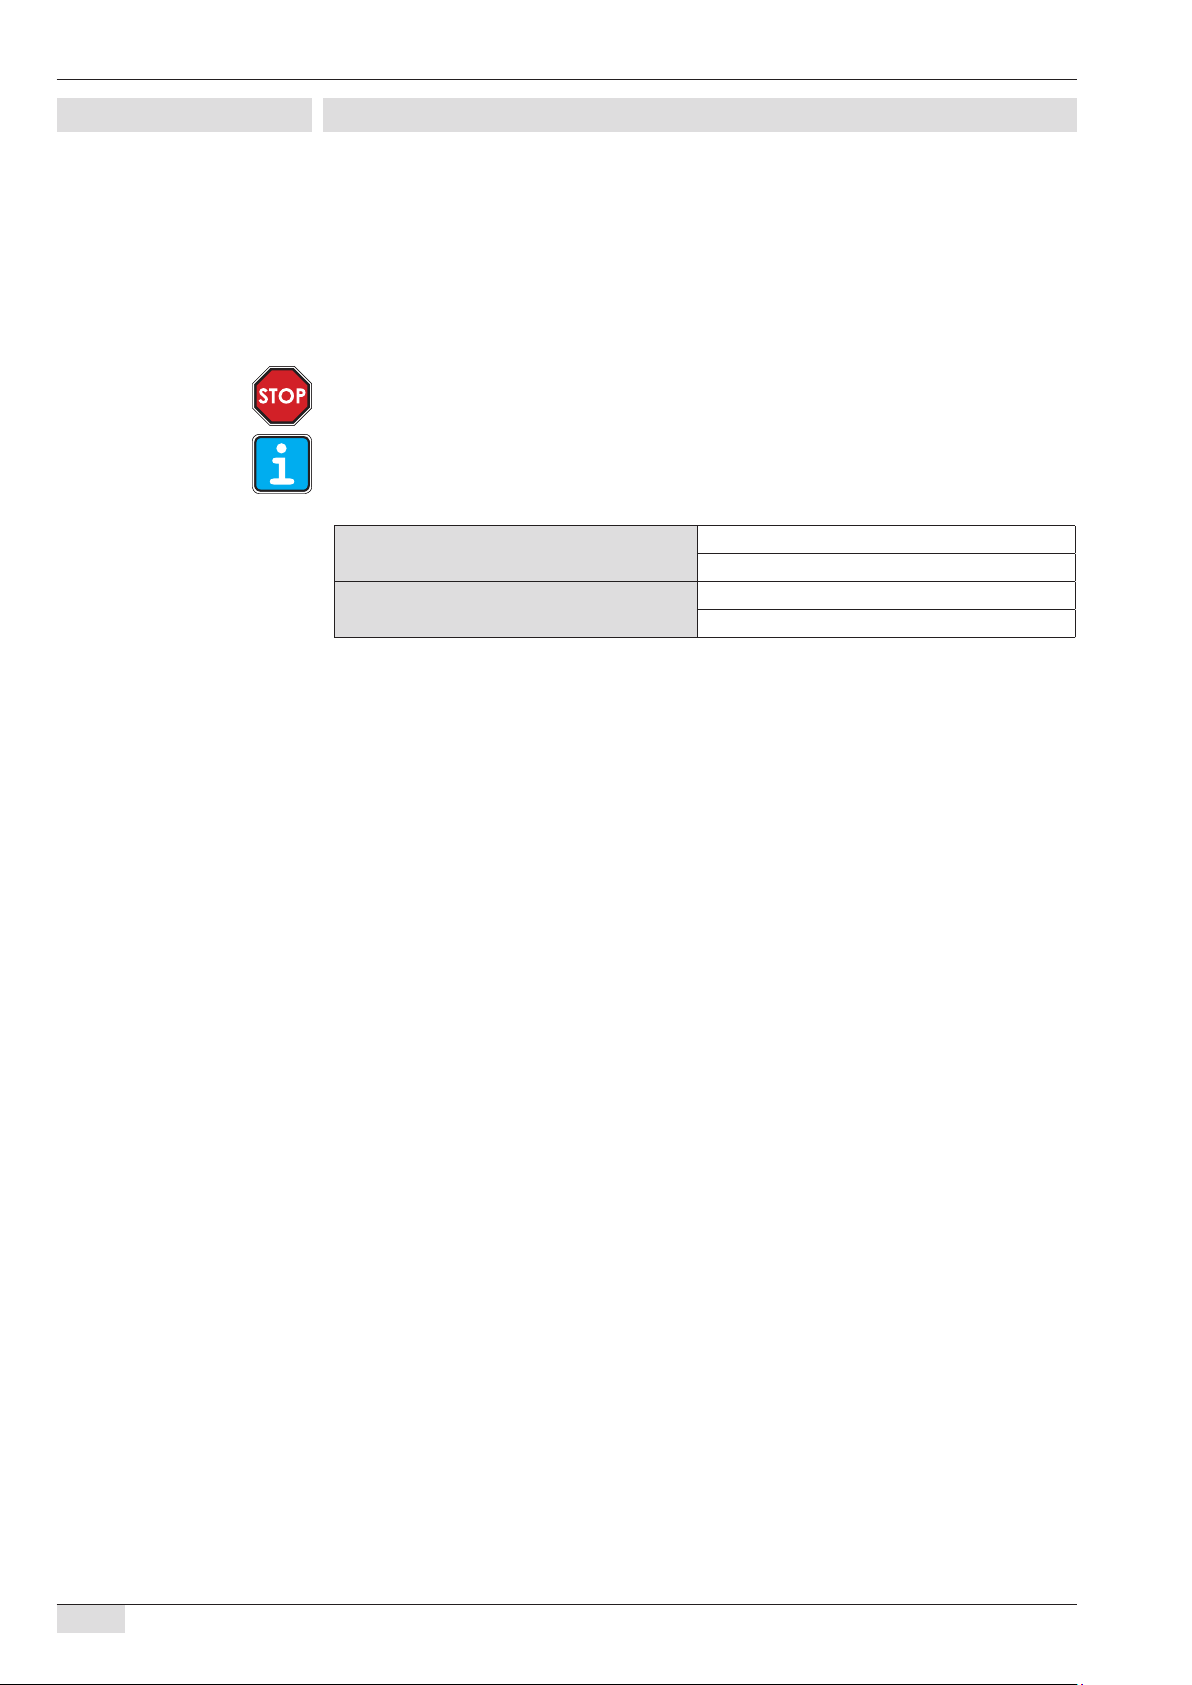
The display symbols
Water volume indicator
Language indicator
Coffee grinding time indicator
Coin tester indicator
Temperature indicator
Milk foam quantity indicator
PIN code indicator
Switch-off time indicator
Anzeige Servicenummer
Indicator for pre-brewing switched on
Indicator for steam switched off
BASI 2 - EN
Version 04
08.2007
43
Page 11
Product descriptionwww.schaerer.com
44
BASI 2 - EN
Version 04
08.2007
Water connection / draining (option)
The water supply connection must be made in accordance with the applicable requirements
and the regulations of the respective country.
If the machine is connected to a newly installed water pipe, the pipe and the supply tube must
be thoroughly rinsed so that no dirt particles can enter the machine. The coffee maker must be
connected to an installed drinking-water pipe with shutoff valve. The machine is installed by using
the mounted pressure tube and the G 1/4“ screw at the pressure relief component mounted to
the tap (set to 2 bar). If the machine is attached to a water drainage system, the supplied tem-
peratureresistant drain hose must be connected to the drip pan and siphon. It must be rmly attached to the drain and slanted at a downward angle (so that the water can ow downward).
Always use the new hose set (fresh water/outlet hose) provided with the machine!
The ideal hardness of the water is 5 – 7 °dH (German hardness) or 8 – 12 °fH (French hardness).
The chlorine content should not exceed 100 mg per litre. Ideal Ph value = 7. Otherwise, the local
regulations are binding
Water pressure
Water ingress temperature
Minimum pressure: 1 bar
Maximum pressure: 3 bar
Minimum: 5 °C
Maximum: 30 °C
Page 12

Product description
www.schaerer.com
Installation plan for Siena 2
BASI 2 - EN
Version 04
08.2007
45
Page 13

Operationwww.schaerer.com
Commissioning
Before using for the rst time:
Never operate the device without water. After longer periods of non-use (e.g. due to holiday), it is
recommended for hygienic reasons that the device be rinsed by means of the hot water/steam
injector and the cleaning program started before the device is used again.
► Place the package on the ground with the number facing up; carefully cut the adhesive tape
open.
► Place the device on a stable, horizontal surface. Do not set it down on hot or warm surfaces.
Choose a location that is not easily accessible to children or pets.
► Insert the drip tray as far as it will go.
► Fill the water tank with (cold) water (max. 2.4 litres), insert it at the front of the device and press it
on rmly.
On devices with the xed water supply option, the tank cannot be removed.
For machines with xed water supply:
Always use the new hose set (fresh water hose) provided with the machine!
► Pull the connector cable on the rear of the device out to the required length, and connect the
device to a grounded socket.
Never insert the power plug into the socket if it is wet, and never touch the plug with wet hands.
► Reclose the cord compartment.
► Switch on the power switch. The device is now in Stand-by mode.
This does not apply to coffee machines with the coin tester option.
► Press the button to switch on the device (LED in the button lights up).
► Fill the bean container (Siena 1: 300 g Siena 2: 600 g). Close the bean container with the lid to
form a tight seal.
Only pure whole coffee beans may be used – no coffee with caramelised or aromatised beans.
► When the temperature indicator lights up (in green) and the message „Ready“ appears on
the display, the machine is ready to operate.
Each time the device is commissioned, the device automatically rinses the brew unit. During this
rinse procedure, no products can be dispensed.
► Touch the product button. The rst beverage is dispensed.
This beverage is not edible, since the grinder‘s coffee duct must rst be lled/rinsed. Please wait to
drink the following beverage.
46
BASI 2 - EN
Version 04
08.2007
Page 14

Operation
www.schaerer.com
Operation
Introduction
This chapter describes the basic functions of the coffee machine. Observe these instructions in
order to ensure smooth and safe daily operation.
Please observe the safety notes on page 40!
Correct and optimal operation of the coffee machine is required and ensured through proper
installation and programming by a qualied service technician.
Never reach under the beverage outlet or the hot water outlet while a product is being dis-
•
pensed. The beverages dispensed from the device are hot!
• Never direct the steam jet or hot water jet towards parts of the body!
• Do not touch the hot plate for cups or the beverage outlet. Only touch the burn-proof xture of
the hot water outlet and the steam pipe.
• The device does not stop if the carafe or cup is removed from the beverage dispensing area
while a beverage is being dispensed.
If a liquid is accidentally poured over the hot plate for cups, the device must be switched off (risk
of short-circuit). Please notify customer service immediately.
Filling coffee beans
Fill only roasted coffee beans into the container.
► Remove the lid from the bean container.
► Fill beans (
A well-sealed bean container prevents the loss of aroma.
Siena 1: 300 g Siena 2: 600 g) into the bean container and t the lid back on.
Making the coffee machine ready to operate
Please check the following before switching on the machine:
► Fresh water supply is open (with xed water supply option only).
► The bean containers are lled (see above).
► The grounds container is empty.
► The machine is connected to the mains.
Switching on the coffee machine
► Flip the main power switch to „ON“ (refer to the picture).
► Now press the
button.
Ready
As soon as the display message
shown here appears, the machine is
BASI 2 - EN
Version 04
08.2007
ready to operate..
47
Page 15

Operationwww.schaerer.com
48
BASI 2 - EN
Version 04
08.2007
<< Stand by >><< Stand by >>
Operating modes
The Siena 1 / 2 has two (2) operating modes:
The machine is switched off but still connected to the power supply.
The following message appears on the display (shown left).
ReadyReady
The machine is ready to operate.
The following message appears on the display (shown left).
Preparing products
If the „water low“ function indicator blinks during product dispensing, top up with water and
re-insert the tank.
Preparing coffee / espresso (whole-bean coffee)
The following instructions assume that the machine is ready to operate.
► Place a cup under the outlet (adapt the size to the product).
Touch the desired product button. The product is dispensed.
►
► Wait until „
For a double product (2 cups), press the button before pressing the product button.
Ready“ appears on the display. Remove the cup from under the outlet.
Preparing DECAF coffee (coffee powder)
Do not use any water-soluble, freeze-dried or similar products. Use only pure, ground coffee. Fill
no more than 1-2 (level) measuring spoons into the coffee hopper.
► Press the
► Place a cup under the outlet. The indicator ashes.
►
Touch the desired product button. „Coffee powder“ appears on the display.
► Remove the lid from the hopper and add coffee powder. Press the
dispensed.
► Remove the cup from under the outlet.
If no additional product button is pressed within ± 2 minutes after the button is pressed, the
red indicator for coffee powder goes out.
For a double product (2 cups), press the button before pressing the button.
button. The indicator lights up.
button. The product is
Preparing hot water (Siena 1)
The temperature indicator lights up in green.
► Place a cup under the hot water outlet.
Turn the rotary dial (on the right-hand side) to the [ Hot water ] position.
►
► To cancel the dispensing procedure, turn the rotary dial back to its starting position (centre).
► Remove the cup from under the outlet.
Page 16

Operation
www.schaerer.com
Preparing hot water (Siena 2)
The temperature indicator lights up in green.
► Place a cup under the hot water outlet.
Press the button. The dispensing procedure is stopped by pressing the button
►
again.
► Remove the cup from under the outlet.
Preparing steam (Siena 1)
Not possible with the Siena 2!
► Place a cup under the hot water outlet.
Turn the rotary dial (on the right-hand side) to the [ Steam ] position.
►
► To cancel the dispensing procedure, turn the rotary dial back to its starting position (centre).
► Remove the cup from under the steam outlet.
► Clean the steam wand with a paper towel.
If products have been heated or frothed, dispense steam for a brief period in order to clean the
steam outlet of residue.
Preparing cappuccino (Siena 2)
Die Cappuccino Ausgabe kann nicht unterbrochen werden!
Move the milk tube with the milk nozzle downwards into the milk container (refer to the pic-
►
ture).
► Place a cup under the outlet.
►
Touch the cappuccino button. The product is dispensed.
► Remove the cup from under the outlet.
To prepare macchiato, follow the same instructions as for preparing cappuccino. The only
difference is that milk is poured into the cup before the dispensing procedure and the time-out
between the dispensing of milk and coffee is longer.
Preparing milk foam (Siena 1)
Milchschaum kann jederzeit bezogen und/oder nachdosiert werden.
► Unscrew the screw.
► Fit the foam nozzle to the steam outlet. Retighten the screw.
► Place a cup under the steam outlet.
►
Place a cup under the steam outlet. Turn the rotary dial (on the right-hand side) to the [ Steam ]
position.
► To cancel the dispensing procedure, turn the rotary dial back to its starting position (centre).
► Remove the cup from under the outlet.
BASI 2 - EN
Version 04
08.2007
After dispensing milk foam, dispense some steam for a short period in order to clean the foam
nozzle and the outlet of milk remains.
► After dispensing foam, clean the foam nozzle under warm, running water.
49
Page 17

Operationwww.schaerer.com
Preparing milk foam (Siena 2)
Milk foam can be dispensed and/or added at any time.
► Place a cup under the outlet.
► Press the
►
Press and hold the cappuccino/macchiato button to dispense milk foam. „Milk“ appears on
the display.
► The dispensing procedure is stopped by releasing the cappuccino/macchiato button.
► Remove the cup from under the outlet.
button and keep it pressed.
Milk foam quality (installing the milk nozzle)
Depending on the milk and milk temperature used, (see Chapter „Safety notes“ ► „Hygiene“ on
page 41), the milk foam quality can be controlled using the milk nozzles provided. They feature
different dispensing diameters (diam.).
► Insert the milk nozzle into the milk tube as far as it will go (refer to the picture).
nozzle, the milk tube can become stuck to the bottom of the container.
Adjusting milk foam:
► Milk foam too cold:
►
Milk foam too hot: t a larger diameter (milk nozzle).
t a smaller diameter (milk nozzle).
Without the milk
Pre-heating cups
This is recommended for smaller quantities of coffee (espresso). In addition to the coffee mixture
used and the water quality, the right temperature is important for making good coffee.
There are two ways to pre-heat cups:
Place cups on the hot plate for cups (refer to the picture).
►
► Rinse cup with hot water by using the hot water nozzle. (Refer to page 49/50, „Preparing hot
water“).
50
Grinder settings
The grinder comes with a default setting that processes most coffee beans optimally.
The grinder setting may only be adjusted while the grinder is in operation.
Using the multi-tool adjusting knob (included in the scope of delivery), adjust the grinder setting
►
to the desired position (see below):
• Grinder setting 1 = fine / turn clockwise
• Grinder setting 6 = coarse / turn anti-clockwise
• Default setting = grinder setting 3-4 (intermediate grinding)!
When coffee is nely ground, brewing times are increased (the coffee becomes stronger), and
the volume of foam increases.
BASI 2 - EN
Version 04
08.2007
Page 18

Programming
www.schaerer.com
Programming
Your coffee machine is pre-programmed at the factory. You also have the option, however, of
adjusting the device to your individual tastes. You can program the following product-related
elements (refer also to the programming overview):
Water volume - coffee quantity - pre-brew function
In addition, you can program various device functions individually.
If no entry is made during programming, the device automatically switches to the next menu
►
after 30 seconds and/or switches to “Ready“ mode.
► The device can only be programmed in forward-moving steps.
► Programming in the
The following instructions assume that the machine is ready to operate.
Navigation through the programming level
= Access to programming level / Conrm parameters; proceed to the next step
level can only be carried out with a PIN code.
1 4
The factory settings are shown in
bold on the display!
*Illustration: Standard configuration,
Siena 2
= Product settings
= General settings
= System settings
= ncrease or decrease values./ Block or release parameters
Button
[ 1 ]
button
[ 2 ]
Buttone
[ 3 ]
Button
[ 4 ]
BASI 2 - EN
Version 04
08.2007
1 4
Counter functions in standby mode
Switch the machine into standby mode by pressing the button. Afterwards, you can press
the various buttons to show the respective counter status.
= Total drinks dispensed by machine (all products)
= Double products dispensed
= DECAF drinks dispensed (ground coffee)
= Product counter per product button
= Cleaning counter
= Hot water dispensed
51
Page 19

Programmingwww.schaerer.com
52
BASI 2 - EN
Version 04
08.2007
Overview: product programming (coffee, cappuccino)
Accessing the programming level::
Ready
Product, 2x, C
+ 0% ##
+ 0% #.## s
Pre-brewing ON
Ready
+ 0% ##
► Press to access the programming level.
Siena 1 + 2: Press button [ 1 ] or [ 2 ] (see page 52)
► Set the water volume (ml) using or .
► Conrm by pressing
► Set the coffee quantity (grinding time) using or .
► Conrm by pressing
► Switch pre-brewing on or off using or .
►Confirm by pressing .
End of product programming.
Siena 2: Press button [ 3 ](seepage 52)
► Set the water volume (ml) using or .
► Conrm by pressing
.
.
.
+ 0% #.## s
Pre-brewing ON
+ 0% #.## s
Milk ► Coffee
Ready
► Set the coffee quantity (grinding time) using or .
► Conrm by pressing
► Switch pre-brewing on or off using or .
► Conrm by pressing
► Set the milk volume (sec.) using or .
► Conrm by pressing
► Change the dispensing order using or .
► Conrm by pressing
End of product programming.
.
.
.
.
Page 20

Programming
www.schaerer.com
Overview: product programming (milk foam, hot water)
Accessing the programming level:
Ready
Product, 2x, C
+ 0% #.## s
Ready
+ 0% #.## s
Ready
► Press to access the programming level.
Siena 2: Product programming: milk foam ► Press button [ 4 ]
► Set the milk foam volume (sec.) using or .
► Conrm by pressing
End of milk foam programming.
Siena 2: Product programming: hot water ► Press
► Set the water volume (sec.) using or .
► Conrm by pressing
End of hot water programming.
.
.
BASI 2 - EN
Version 04
08.2007
53
Page 21

Programmingwww.schaerer.com
54
BASI 2 - EN
Version 04
08.2007
Overview: programming common parameters
Accessing the programming level:
Bereit
Product, 2x, C
Press the button
English
Temp. 86 °C
Stand by 1 h
+41318585111
10:29:10
► Press to access the programming level.
► Set the language using or .
► Conrm by pressing
► Set the brewing temperature using or .
► Conrm by pressing
► Set the automatic switch-off time using or .
► Conrm by pressing
► Service telephone number.
► Conrm by pressing
Ex. software V3.03!
► Set the time (HH:MM:SS) using or .
► Conrm by pressing
bestätigen.
.
.
.
.
10.10.2007
Cleaning 00:00
Ready
► Set the date (DD.MM.YYYY) using or .
► Conrm by pressing
► Set the moment of the cleaning request-indication (HH:MM) using or .
► Conrm by pressing
End of common parameter programming.
.
.
Page 22

Programming
www.schaerer.com
Overview: programming xed parameters
Accessing the programming level:
Ready
Product, 2x, C
Press the button
Code ####
Counter status?
Lock button
Descaling ON
Prod. prog. ON
Sys. prog. ON
► Press to access the programming level..
► Set each digit using or .
► Conrm by pressing
► Set counter level to 0 using (if desired).
► Conrm by pressing
► Block individual buttons from use by pressing or .
► Conrm by pressing
► Grant authorisation to descaling using or .
► Conrm by pressing
► Grant authorisation for product programming using or .
► Conrm by pressing
► Grant authorisation for system programming using or .
► Conrm by pressing
.
.
.
.
.
.
Counter ON
16 ° - 20 ° dH
Change price
Acc. syst. OFF
Change code
Factory set.
Base cong.
► Switch the counter display of the product buttons on or off using or .
► Conrm by pressing
► Set water hardness using or .
► Conrm by pressing
With coin tester option only:
► Set the product button price using or .
► Conrm by pressing
With coin tester option only:
► Switch accounting on or off using or .
► Conrm by pressing
► Set the authorisation code (each digit) using or .
► Conrm by pressing
► The machine can be reset to factory settings by pressing .
► Conrm by pressing
► The parameters can only be changed by a qualied service technician (protected by PIN
code)!
► Conrm by pressing
.
.
.
.
.
cancel by pressing .
.
BASI 2 - EN
Version 04
08.2007
Ready
End of xed parameter programming.
55
Page 23

Cleaningwww.schaerer.com
56
BASI 2 - EN
Version 04
08.2007
Cleaning
his chapter describes the cleaning of the coffee machine. To achieve the best possible quality
of the dispensed beverages, it is necessary to clean the machine properly and thoroughly on a
daily and weekly basis.
Please observe the safety notes on page 41!
Never reach into the machine during the automatic cleaning cycle and never place your
•
hands under the beverage outlets.
• Never spray the machine with a hose or high-pressure cleaner for cleaning purposes. You
should also avoid using steam cleaning devices.
• Never immerse the machine in water!
• Observe all general valid hygiene regulations according to HACCP! (Refer to page 41).
• Use only cleaning products recommended by the manufacturer to clean the device.
• Never use abrasive cleaning products, abrasive devices or cleaning tools made of metal!
• There is a risk of injury while cleaning and using cleaning tools and cleaning products!
• Never mix cleaning products!
Informations about cleaning
Proceed daily!
Ex. software V3.10!
Folgende Reinigungsmöglichkeiten sind möglich (also see „Daily and weekly cleaning“,
page 57):
Cleaning mode Cleaning for: Press button: Information
If no milk product has been
Coffee system
Complete cleaning
Kaffee-System
Reinigung
Coffee system rinsing
Milk system cleaning Milk system
Milk system rinsing Milk system
(Brew piston)
Milk system
Kaffee-System
(Brühkolben)
Coffee system
(Brew piston)
3 x briey
4 sec.
1 x briey
3 x briey
2 x briey
dispensed since the last
cleaning, the milk system
cleaning won‘t start!
The cleaning counter*1 and
the cleaning timer*2 will be
reseted.
The cleaning counter*1 will
be reseted.
The cleaning counter*1
won‘t be reseted.
If also a coffee system
cleaning is required, then
this will be done before the
milk system cleaning!
The cleaning counter*1 and
the cleaning timer*2 will be
reseted.
Milk system cleaning:
The cleaning timer*2 for the
actual day will be reseted.
The cleaning timer*2 won‘t
be reseted.
*1
Cleaning counter = Number of dispensed coffee products (programmable)
*2
Cleaning timer = Displays the daily cleaning for the milk system (programmable)
As soon as the programmed number of dispensed products is reached (or the cleaning timer) the
cleaning must be done (cleaning request)!
Page 24

Cleaning
1
www.schaerer.com
Daily and weekly cleaning
Carefully read the information given in the user manual as it contains important information regarding safety,hygiene, use and
maintenance of the machine.
Never reach into the machine or under the beverage outlets during the automatic cleaning!
If the LED of the cleaning button is ashing, always press the button 3 times (execute daily)!
If the display shows „Tablet“, the coffee system has to be cleaned before the milk system (see 2 b)!
The milk system cleaning starts automatically after the coffee system cleaning. If the „water low“ function indicator blinks during
the cleaning, top up with water and re-insert the tank.
Cleaning possibilities:
1. Milk system cleaning = Press the
2. Coffee system cleaning = Press the
3. Milk system rinsing = Press the
4. Weekly cleaning = ► see
5. Coffee system rinsing = Press the
Milk system cleaning:
(Siena 2)
button three times ► see 1 a - f
button for 4 seconds ► see 2 a - b
button twice ► see 3 a
a - c (1 x per week)
4
button once (not described / Duration: ± 1 minute).
► Mix the cleaning solution into a container
(Dosage see below).
Dosage:
Milkpure (or Daypure): 20 ml
Water: 300 ml
1d
1b1a 1c
► Put the milk tube into the cleaning con
tainer (nozzle downwards).
The tube end must touch the bottom of the container!
► Place a container (± 0.5 Litre) under the
outlet.
-
► Press the button three times.
1f1e
If the Coffee-System cleaning
was running before only press the
button once!
Milk system cleaning is running!
(duration: ± 40 seconds)
► Empty the container and place it back
under the outlet.
► Rinse the cleaning container and rell it
with fresh water (± 300 ml).
► Put the milk tube into the cleaning con-
tainer.
BASI 2 - EN
Version 04
08.2007
► Press the
Wait until the display shows:
button once.
Milk system rinsing is running!
(duration: ± 40 seconds)
Ready
► Disassemble the foamer head and clean
it under warm running water.
► Re-assemble the foamer head.
► Clean the fridge (option) and the ma-
chine with a damp paper tissue.
Do not use any abrassives!
► Milk system cleaning is nished.
57
Page 25

Cleaningwww.schaerer.com
58
BASI 2 - EN
Version 04
08.2007
Coffee system cleaning:
2
(Siena 1 / Siena 2)
► Fill the water tank with fresh water.
► Empty the drip tray and place a contain-
er (Volume: ± 1.5 Litre) under the outlet.
► If „Tablet“ already appears on the display
don‘t press the button! Otherwise
press the button for 4 seconds, until
following message displays:
Tablet
2b2a
► Insert the cleaning tablet into the funnel.
► Press the
Wait until the display shows:
button.
Cleaning programme is running!
(duration: ± 5 minutes)
Ready
Milk system rinsing:
3
(Siena 2)
3a
► Put the milk tube into a container with
fresh water (± 150 ml).
► Place a container (Volume: ± 200 ml) un-
der the outlet.
► Press the button twice.
Milk system rinsing is running!
(duration: ± 40 seconds)
Wait until the display shows:
Ready
Weekly cleaning:
4
(Siena 1 / Siena 2)
4a 4b
► Press the button to enter the Stand-
by mode.
► Open the service door at the side.
► Pull out the drawer (Press „Press“) and lift
out the brewer.
► Clean the brewer under warm running
water.
Never clean brewer in the dish
washer! The brewer has to be dry
before it is placed back in!
► Remove and clean the plastic tray.
► Remove the coffee grounds in the brew-
► Re-place the plastic tray and the brewer.
► Press the
Siena 1:
► Brewer cleaning is nished.
er area using a vacuum cleaner or the
brush.
button to switch-on the
machine.
If the function indicator is blinking the brewer is not right in place
or the door is not closed properly.
4c
Siena 2:
► Clean the foam nozzle (see picture) with
the supplied instrument (Art.-No.: 061454)
Observe all hygiene regulations according to HACCP!
Extract from HACCP:
• Never top up milk! Always throw leftovers away.
• Use milk from its original packing!
• Always clean the milk container before lling it with fresh milk.
• Fill up with fresh milk, chilled to 3 °C - 5 °C, just before restarting the machine!
• The milk must be homogonised! Use pasteurized or ultra high temperature treated (UHT) milk! Do not use raw milk!
• For optimum hygiene use a refrigerator (optional) to maintain milk temperature.
• Clean the refrigerator/cooling element (optional) at least once a week if the machine is equipped with one!
Page 26

Cleaning
Descaling
Carefully read the information given in the user manual as it contains important information regarding safety, hygiene, use and
maintenance of the machine.
Never reach into the machine or under the beverage outlets during the descaling process! Never interrupt the descaling process! Never use vinegar as the descaling agent!
Machines connected to the mains supply must be descaled by a qualied service technician! Descaling of the machine is
a must when the function indicator blinks! With Software Versions under V 2.10 the display messages „Attention hot“ and
„2 container“ will not appear! If the „water low“ function indicator blinks, top up with water and re-insert the tank (The descaling process will start automatically).
1 2 3
www.schaerer.com
► Press the button to enter the
Stand-by mode.
► Remove the outlet.
► Remove the water tank.
► Mix water and the descaling agent into
the water tank (Dosage see below).
Dosierung:
Descaler + Water
(1 x 750 ml) (2 x 750 ml)
► Re-place the water tank.
4 5
Siena 2:
► Place a container under the outlet
(Volume: ± 2.0 Litre).
Siena 1:
► Turn the rotary knob (on the right side)
to the [ Steam ] position!
► Place a container under the hot water
outlet (Volume: ± 2.0 Litre).
► Press the button (± 5 sec.).
On the display appears:
Descaling?
► Press the button.
Ex. Software:
V 2.10
V 3.03
Caution HOT!
Only appears if the steam generator temperature is over 90 °C!
► Press the button.
On the display appears:
Descaling 0 %
Descaling is running!
(duration: ± 40 minutes)
6
Wait until the display is showing:
2nd container
If this message apears, always
put a 2nd container under the hot
water outlet.
► Press the button.
BASI 2 - EN
Version 04
08.2007
Ex. software:
V 2.10
V 3.03
Wait until the display is showing:
Fresh water
► Rinse the water tank with water and re-
ll it with fresh water (± 1.5 Litre).
► Re-place the water tank.
► Place a container under the outlet (Vol-
ume: ± 2.0 Litre).
► Press the
button.
Rinsing is running!
(duration: ± 8 minutes)
59
Page 27

7
► Descaling process is nished. On the
display appears:
<< Stand by >>
► Reinstall the outlet.
Installing/detaching the foam head (Siena 2)
► Press the front of the foam head [ 1 ].
► Remove the foam head by pulling it downwards [ 2 ].
2
► Remove the milk tube and tube connector.
Cleaningwww.schaerer.com
When the descaling is nished, a prompt to carry out the
daily cleaning appears automatically.
1
► Swing the foam chamber (with outlet pipe) away from the outlet beaker [ 3 ].
3
► Remove the foam chamber by pulling it upwards [ 4 ].
► Unscrew and remove the outlet pipe [ 5 ].
5
► Clean all parts under running water.
► Re-attach the parts in reverse order.
4
60
Cleaning the milk nozzle (Siena 2)
► Insert a brush into the milk nozzle.
BASI 2 - EN
Version 04
08.2007
Page 28

Troubleshooting
To ensure the best possible coffee
quality, it is necessary to clean and
decalcify the coffee
machine regularly.
Troubleshooting
Before having the machine repaired, please check the following points:
Malfunctions and possible causes
Fault Cause/remedy
► The power plug is not properly connected
Does the coffee machine not
switch on?
Does the indicator ash?
Does the indicator light up
and does a message appear on
the display?
Do the indicators ash/light up;
do display messages appear?
Is the pump causing loud noises
and/or does the indicator
light up?
Is there no milk foam (Siena 2)?
Is the milk only hot (Siena 2)?
Does the milk foam have large
bubbles (Siena 2)?
Is the milk foam too cold (Siena
2)?
Does the coffee not have any
foam?
No hot water? ► Insert a ne needle into the outlet opening.
Can the brew unit not be pulled
out or inserted?
Does the coffee machine not
react to buttons being pressed?
► The main power switch (on the left-hand side) is not set to
ON
► Check fuses
► The brew unit has not been properly inserted
► The door is not properly closed
► This fault can only be rectied by a qualied service tech
nician
► Check the indicator symbols on page 36 (for their mean-
ing)
► The water tank has not been properly inserted (air in
the system)
Siena 2:
► Bleed the device using the
(press for ± 6 sec.). (The indicator goes out when the
next beverage is dispensed).
Siena 1:
► Turn the rotary dial (on the right-hand side) to the [ Hot
water ] position in order to bleed the device.
► The milk nozzle is clogged (in the milk container). Insert a
brush into the milk nozzle (refer to page 60)
► The foam nozzle on the milk foam producer is clogged.
Insert the air valve pin into the milk nozzle (refer to
page 43)
► Milch ist zu warm (Milch immer im Kühlschrank aufThe milk
is too warm (always keep milk in the refrigerator). (Optimal milk temperature: 3 °C to 5 °C)
► The O-rings on the milk foam producer are defective.
Check and replace them, if necessary.
► The milk suction tube is defective. Check and replace it, if
necessary.
► The milk nozzle (Ø) is too small.
► The milk nozzle is defective or a nozzle of the wrong diam-
eter has been tted.
► The cups are too cold (pre-heat the cups for ideal foam).
► The operating temperature (indicator is lit) has not yet
been reached.
► The coffee (beans) is not fresh.
► The coffee grinder setting is too coarse (high number).
► The coffee grinder setting is too ne (low number)
► The wrong coffee mixture is being used.
► The brew unit is not in its basic position. Close the service
door and switch on the device.
► Use the multi-tool adjusting knob to turn the brew unit a
little to the left or right while inserting it (carrier position is
incorrect).
► The operating temperature has not yet been reached
(The indicator lights up).
► A rinse or cleaning program is in progress (the cleaning
button ashes).
► Another indicator ashes/lights up. Rectify the fault/re
move the cause.
www.schaerer.com
-
hot water button
-
-
BASI 2 - EN
Version 04
08.2007
61
Page 29

Troubleshootingwww.schaerer.com
Service and maintenance work
Even if the coffee machine is cleaned and maintained in an ideal manner, it must be serviced
(once a year). Having a qualied service technician inspect the coffee machine regularly extends its product life cycle.
Service request
The service request only appears if it has been programmed by one of our partners or a qualied
service technician.Once it is time to service the machine, the message „Service“ appears in the
display alternately with the normal operation indicator.
The service must be carried out!
• The service request can only be reset by a qualied service technician.
• Products can still be dispensed while the service request is displayed, but it can damage your
coffee machine.
62
BASI 2 - EN
Version 04
08.2007
Page 30

Appendix
www.schaerer.com
Options
Coin tester
The following accounting systems are available:
• Tokens
• Coins
The coin tester option is possible in country-specic currencies. Please contact your customer
service representative for further information.
Coin tester - operation and maintenance
Amount 1.20
1
The sum of money inserted into the machine appears in the display:
No more than 10 units of the respective currency can be inserted. This sum can be changed by a
qualied service technician. If the coffee machine is switched off, the coins are ejected through
the return slot.
If a coin is not accepted, it can be ejected by pressing the release button [ 1 ] (refer to the picture). It is also possible that the coin container is full and no more coins can be accepted. Empty
the coin container (see below).
For safety reasons, the coin tester should be emptied every day.
► Open the coin tester (refer to the picture).
► Lift out the coin container and empty it.
► Re-insert the coin container.
► Close the coin tester again.
BASI 2 - EN
Version 04
08.2007
Bean container
Various bean hoppers are available:
Siena 1 = Maximum capacity 300 g. (also available for Siena 2)
►
►
Siena 2 = Maximum capacity 600 g.
63
Page 31

Appendixwww.schaerer.com
64
BASI 2 - EN
Version 04
08.2007
Base with supports (Art. No.: 062489)
A base is required for machines with a wastewater connection (supply and drainage pipes).
This is only required if no holes are to be drilled into the counter!
Fixed water supply
FA xed water supply is strongly recommended for coffee machines dispensing a large quantity of beverages.A xed water supply is generally possible wherever supply pipes and drainage
pipes are present. The ideal water hardness for a xed water supply is between:
5 – 7 °dH / 8 – 12 °fH (= carbonate hardnes)
Fixed water supply - structural requirements
FMinimal, basic structural conditions are required for the xed water supply. (Refer to the installation plan, page 45).
The xed water supply option may only be installed by a qualied service technician!
Appendix
Declaration of conformity
These products correspond to the requirements of the EU directives.
2006/95/EC EC low-voltage directive
2004/108/EC EC Directive, Electromagnetic Compatibility
Information about the declaration of conformity can be obtained from the manufacturer upon
request:
Manufacturer:
M. Schaerer AG
Gewerbestrasse 15
3302 Moosseedorf
Switzerland
info@schaerer.com www.schaerer.com
For more information please contact your local dealer!
Page 32

Appendix
www.schaerer.com
Cleaning products
IBEDA cleaning tablet (Art.-No.: 062867)
Before using the cleaning tablet, please read the information on the tablet‘s packaging as well
as the safety data sheet („HEALTH & SAFETY DATA SHEET“). If you do not have this safety data
sheet, please request it from your sales centre.
Purpose:
For cleaning your coffee machine‘s coffee system on a daily basis.
Shape and odour:
Refer to the safety data sheet („HEALTH & SAFETY DATA SHEET“).
Use:
• Keep the cleaning tablet out of the reach of children and unauthorised persons.
• Do not swallow!
• Do not mix the cleaning tablet with other chemicals (cleaning products).
• Do not eat or drink anything while using the cleaning tablets.
• Wash hands and face immediately before breaks and after handling the cleaning tablet.
• Never mix the cleaning tablet with liquid or powder cleaning products or with acids.
"Milkpure" cleaning product (Art.-No.: 071531)
Before using the cleaning product, please read the information on the tablet‘s packaging as
well as the safety data sheet („HEALTH & SAFETY DATA SHEET“). If you do not have this safety data
sheet, please request it from your sales centre.
Purpose:
For cleaning your coffee machine‘s milk system on a daily basis.
Shape and odour:
Refer to the safety data sheet („HEALTH & SAFETY DATA SHEET“).
Use:
• Keep cleaning products out of the reach of children and unauthorised persons.
• Do not swallow!
• Do not mix cleaning products with other chemicals (cleaning products).
• Do not eat or drink anything while using cleaning products.
• When diluting with water, first fill the water (no warmer than 20 °C) and then the cleaning product carefully.
• Make sure that there is adequate ventilation and air circulation when working with cleaning
products.
• Wash hands and face immediately before breaks and after handling cleaning products.
Liquid descaler (Art.-No.: 062869)
Before using the liquid descaler, please read the information on the tablet‘s packaging as well as
the safety data sheet („HEALTH & SAFETY DATA SHEET“). If you do not have this safety data sheet,
please request it from your sales centre.
Purpose:
For descaling the coffee machine.
BASI 2 - EN
Version 04
08.2007
Shape and odour:
Refer to the safety data sheet („HEALTH & SAFETY DATA SHEET“).
Use:
• Keep descaling agent out of the reach of children and unauthorised persons.
• Do not swallow!
• Do not mix descaling agents with other chemicals (cleaning products).
• Do not eat or drink anything while using the descaling agent.
• When diluting with water, first fill the water (no warmer than 20 °C) and then the descaler carefully.
• Make sure that there is adequate ventilation and air circulation when working with descalers.
• Wash hands and face immediately before breaks and after handling descalers.
65
Page 33

Appendixwww.schaerer.com
66
BASI 2 - EN
Version 04
08.2007
Emergency information:
Please ask your sales centre or a cucological information centre) in your country. If your country
does not have any such institution, dial the following telephone number in Switzerland in an emergency or for information:
++41 01 251 51 51 (Toxicological Information Centre)
www.toxi.ch (DE / UK / FR)
First aid:
Refer to the safety data sheet („HEALTH & SAFETY DATA SHEET“).
Important for the physician to know:
If possible, show the treating physician the information listed on the package or the safety data
sheet („HEALTH & SAFETY DATA SHEET“).
Storing cleaning products
• Keep cleaning products in locations inaccessible to children and unauthorised persons.
• Store cleaning products in such a way that they are protected from heat, light and moisture.
• Vor Säuren örtlich getrennt lagern.
• Store them in a location separate from acids.
• Do not store them together with food, alcohol or tobacco.
• Comply with all local and legal regulations regarding the storage of chemicals (cleaning prod
ucts).
-
Serial plate
Machine-specic data (voltage / output) can be found on the serial plate. It is afxed to the
back of the device under the cable cover.
Maximum voltage deviation: + 5% / - 10%
Technical data
Outside dimensions
Width:
Height:
Depth:
Water tank (capacity): 2.4 litre
Bean container:
Empty weight: ± 15.7 kg
Power cord (Length): 1.1 m
Electrical socket: Do not use any multiple sockets, especially if de-
Ambient temperature: + 5°C to + 35°C max.
Continuous sound pressure level (Lpa): < 70 dB (A)
314 mm 415 mm with coin tester (option)
508 mm
403 mm 460 mm with wastewater (option)
Siena 1: ± 300 g Siena 2: ± 600 g
vices such as air conditioners, computers, typewriters or copiers are connected to it and can
generate interfering frequencies. Do not overload
the electrical socket! The connected consumers must not exceed the amperage of the house
fuse.
(in case of frost, drain the water system)
Page 34

Appendix
www.schaerer.com
Overview of accessories
Qty. Article Art.-No.
1 User manual (EN) 062417
1 Quick reference card (EN) 062107
10 Cleaning tablets IBEDA 062867
1 Measuring spoon 067111
1 Multi-tool adjusting knob 062985
1 Brush 062951
1 Brush set (10 pcs.) 061174
Accessories for Siena 1:
1 Foam nozzle 062945
Accessories for Siena 2:
1 Milk foam nozzle 1 Milkpure 250 ml 071531
1 Air valve pin 061454
1 set Milk nozzles set (8 pieces) 071246
Environmental aspects
Packaging:
The devices are delivered in recyclable cartons and pallets.
Coffee grounds:
Coffee grounds can be strewn on your garden or added to a compost system.
Maintenance parts:
Parts which are exchanged during a service are reprocessed whenever possible and reused.
Cleaning products:
If they cannot be recycled, cleaning products and their containers must be disposed of according to the information on the safety data sheet („HEALTH & SAFETY DATA SHEET“), as well as all
local and legal regulations.
Energy consumption:
The device‘s energy consumption corresponds to the latest state of technology known during
the device‘s development.
Disposal / environmental protection:
The devices must be disposed of properly, in accordance with all local and legal regulations.
BASI 2 - EN
Version 04
08.2007
67
Page 35

Appendixwww.schaerer.com
68
BASI 2 - EN
Version 04
08.2007
 Loading...