

Page 1

Page 2

M. Schaerer Ltd. Telephone: +41 31 858 51 11 User manual
Gewerbestrasse 15 Fax: +41 31 858 51 40 BASCC BC - 02
3302 Moosseedorf E-Mail: info@schaerer.com
Switzerland Internet: www.schaerer.com Order number: 021'221
Page 3

Introduction
Schaerer Coffee
Celebration BC
User manual
Published by: M. Schaerer Ltd., CH-3302 Moosseedorf
Version: Version 01a / April 2004
Software: V 1.26
Designed and edited by: M. Schaerer Ltd., CH-3302 Moosseedorf
© Copyright by: M. Schaerer Ltd., CH-3302 Moosseedorf
All rights reserved, including translation into other languages. This manual may not be
copied, photocopied or distributed, in whole or in part, by any means, nor transmitted
electronically, without the publisher’s written consent.
All information, illustrations, and specifications in this manual are based on the latest
product information available at the time of publication approval. M. Schaerer Ltd.
reserves the right to change the content at any time without any prior notice.
BASCC BC - 02.01 - V01a Page1-1
Page 4

Introduction
Page 1-2 BASCC BC - 02.01 - V01a
Page 5

Introduction
1 INTRODUCTION
1.1 Welcome
D e a r C u s t o m e r,
With Schaerer Coffee Celebration, we have developed the next generation of fully automated coffee
machines. Core competence as well as decades of experience from our company went into the
design of this machine.
The large control panel makes operation extremely easy for you. Cleaning is done very quickly with
just a few steps.
Total: A machine and coffee products which you will like!
This operating manual will give you information on the product, usage and cleaning of the Schaerer
Coffee Celebration.
Important!
Prior to commissioning the machine, carefully read the chapter "Safety instructions". The
manufacturer rejects any liability for damages that are caused by improper use of the
machine.
The performance of the machine depends on proper usage and service. We therefore recommend
that you read the operating manual carefully before commissioning the machine and that you keep it
handy for future reference.
We hope you enjoy Schaerer Coffee Celebration!
BASCC BC - 02.01 - V01a Page1-3
Page 6
Introduction
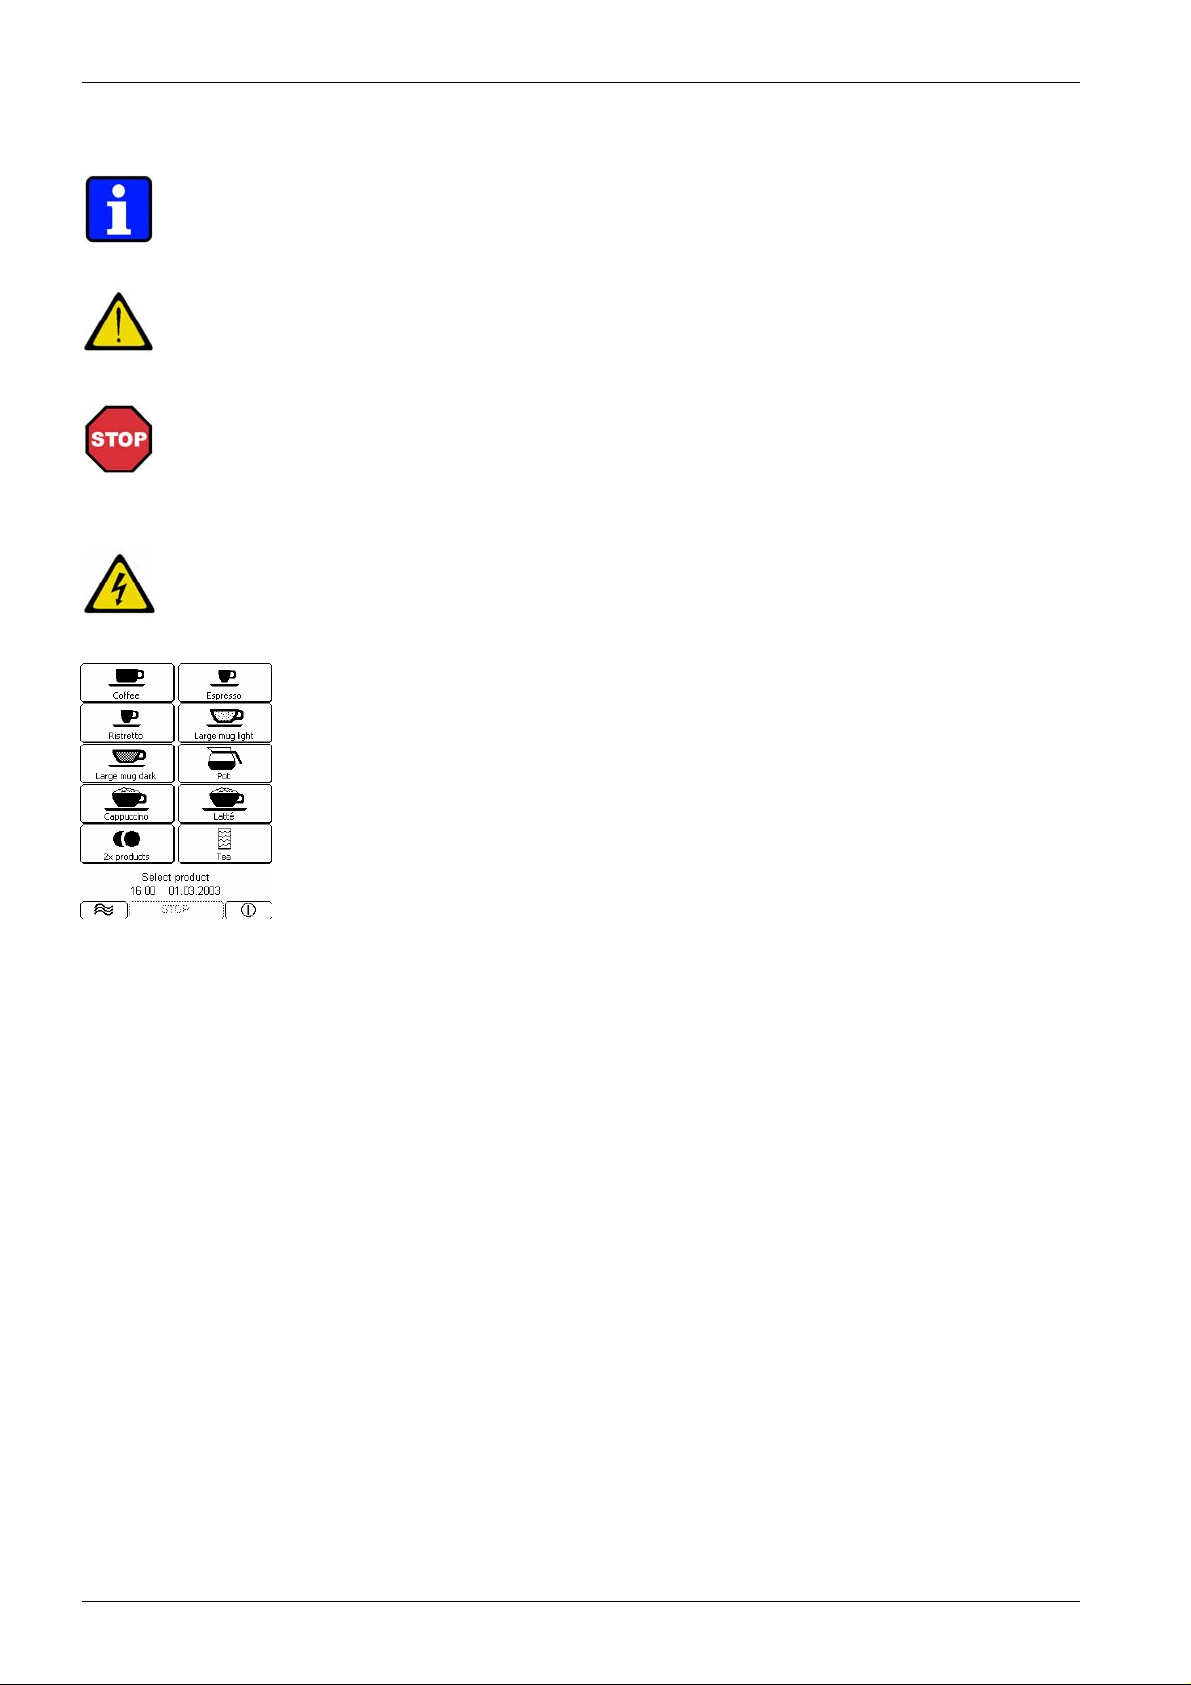
1.2 Symbols and Pictograms
Note:
This section provides you with important notes and information.
Important!
This note indicates possible damage to property as well as possible financial and
statutory penalties (e.g. loss of rights to claim under guarantee, liability suits, etc.).
Danger!
This note indicates a risk of severe and/or fatal injury if specific procedural
rules are violated.
Whenever you see this symbol in the operating manual, take all necessary
safety precautions.
Electric shock!
Risk of severe and/or fatal injury due to electric shock!
Illustrations
An example is shown to illustrate the individual descriptions.
Status line
The status line displays the current operating state (e.g. Select product).
Messages in the control panel
Situations which require your attention or an action by you are displayed in the
information window in the control panel (e.g. Grinder Front Add Beans).
Page 1-4 BASCC BC - 02.01 - V01a
Page 7

Introduction
1.3 Table of contents overview
Chapter Page
Copyright .............................................................................................................................................1-1
1 Introduction .........................................................................................................................................1-3
1.1 Welcome ...............................................................................................................................................1-3
1.2 Symbols and Pictograms ......................................................................................................................1-4
1.3 Table of Contents Overview..................................................................................................................1-5
2 Safety instructions..............................................................................................................................2-1
2.1 General..................................................................................................................................................2-2
2.2 Safety Symbols .....................................................................................................................................2-2
2.3 Accident Prevention / Operational Safety.............................................................................................2-3
2.4 Hygiene.................................................................................................................................................2-5
2.5 Designated Use.....................................................................................................................................2-5
2.6 Liability ..................................................................................................................................................2-6
3 Product description ............................................................................................................................3-1
3.1 Coffee Machine Specifications..............................................................................................................3-2
3.2 Operating Information for the Coffee Machine......................................................................................3-7
3.3 Design of the Coffee Machine...............................................................................................................3-9
3.4 Commissioning....................................................................................................................................3-10
4 Operation .............................................................................................................................................4-1
4.1 Introduction............................................................................................................................................4-2
4.2 Daily Operation......................................................................................................................................4-3
4.3 Making the Coffee Machine Ready for Operation.................................................................................4-3
4.4 Setting Coffee Outlet Height .................................................................................................................4-4
4.5 Beverage Output...................................................................................................................................4-5
4.6 End of Operation.................................................................................................................................4-10
4.7 Programming Using Standard Chip Cards..........................................................................................4-11
5 Cleaning .....................................................................................................................
5.1 Important General Notes on Cleaning ..................................................................................................5-2
5.2 Daily Cleaning.......................................................................................................................................5-3
5.3 Cleaning As Required ...........................................................................................................................5-4
6 Error Messages and Malfunctions ....................................................................................................6-1
6.1 Error Messages With Display on the Control Panel..............................................................................6-2
6.2 Malfunctions Without Display on the Control Panel..............................................................................6-4
7 Optional Features................................................................................................................................7-1
7.1 Payment Systems .................................................................................................................................7-2
7.2 Water Softener (Filados/Brita)...............................................................................................................7-2
7.3 Cup Warmer..........................................................................................................................................7-2
7.4 Coffee Grounds Disposal to Container.................................................................................................7-2
7.5 Brew Accelerator...................................................................................................................................7-2
7.6 Wastewater and Fresh Water Container...............................................................................................7-2
7.7 Grinders and Funnel for Ground Coffee...............................................................................................7-3
7.8 Base Material ........................................................................................................................................7-3
7.9 Cup Plate Frames Illuminated...............................................................................................................7-3
8 Appendix..............................................................................................................................................8-1
8.1 CE Declaration of Conformity................................................................................................................8-2
8.2 Cleaning agent......................................................................................................................................8-3
8.3 Serials Plates of Steam Generator and Instant Heater.........................................................................8-4
8.4 Environmental Aspects .........................................................................................................................8-4
9 Index.....................................................................................................................................................9-1
..........................5-1
BASCC BC - 02.01 - V01a Page1-5
Page 8

Introduction
Page 1-6 BASCC BC - 02.01 - V01a
Page 9

Safety instructions
2. Contents
Chapter Text Page
2
2.1
2.2
2.3
2.4
2.5
2.6
General ..............................................................................................................................................2-2
Safety Symbols.................................................................................................................................2-2
Accident Prevention / Operational Safety......................................................................................2-3
Hygiene..............................................................................................................................................2-5
Designated Use.................................................................................................................................2-5
Liability ..............................................................................................................................................2-6
Safety instructions............................................................................2-2
BASCC BC - 02.02 - V01 Page 2-1
Page 10

Safety instructions
2 SAFETY INSTRUCTIONS
This chapter warns you about possible dangers when operating the machine. The
information contained herein on how to recognize hazardous situations allows safe
and proper operation.
2.1 General
The coffee machine will be handed over by a service technician authorised by the
manufacturer. However, you should read the operating instructions carefully and
ensure that you fully understand them prior to commissioning the machine.
Always comply with your local safety regulations and hygienic guidelines.
Be sure that only authorised and trained personnel work on the machine!
Always keep this manual in a handy place near the machine.
2.2 Safety Symbols
You will see the following symbols with all safety instructions.
Follow the instructions to the letter and proceed with particular care in the cases
described.
Danger!
This note indicates a risk of severe and/or fatal injury if specific procedural
rules are violated.
Whenever you see this symbol in the operating manual, take all necessary
safety precautions.
Electric shock!
Risk of severe and/or fatal injury due to electric shock!
Important!
This note indicates possible damage to property as well as possible financial and
statutory penalties (e.g. loss of rights to claim under guarantee, liability suits, etc.).
Page 2-2 BASCC BC - 02.02 - V01
Page 11
Safety instructions
2.3 Accident Prevention / Operational Safety
In the event of incorrect operation or misuse, one or more of the following might occur:
• Risk of severe and/or fatal injury of the operator, third persons or animals that are
in close proximity to the machine,
• Risk of damage to machine and other property of the operator or of third parties,
• Inefficient performance of the machine.
Danger!
People who are not familiar with these operating instructions, as well as
children or people under the influence of alcohol, drugs or medication may not
operate the machine. On self-service units, danger zones such as the steam
pipe and the hot water outlet must be labelled in such a manner that the
warning is clearly visible to the customer.
Important!
The installation, programming, maintenance and repair of the coffee machine must be
carried out only by an authorised service technician.
Important!
The machine must be connected to the power supply system and fresh water lines in
compliance with the regulations of your local service providers.
Electric shock!
Work on electric systems may be carried out only by qualified engineers or
technicians.
The machine must be connected to a fuse-protected circuit.
Appropriate EU directives on low voltage systems and/or the country's or local
safety rules and regulations apply.
We recommend connection through a residual current operated circuit-breaker.
The connection must be grounded and protected against spark-over in
compliance with regulations.
The voltage must comply with the information given on the machine's serial
plate.
Important!
To prevent water damage caused by hose breakage, it is recommended to run the
water line via a water stop valve (mains-side).
Electric shock!
Never insert the power plug into the socket when wet and do not touch the plug
with wet hands.
Danger!
The beverages delivered by the coffee machine are hot! To protect yourself
against scalding, keep hands and other body parts away from the outlet area
during the preparation and delivery of beverages.
BASCC BC - 02.02 - V01 Page 2-3
Page 12
Safety instructions
Danger!
Parts of the product outlets, the hot water pipe and the steam pipe become very
hot during the machine's cleaning cycle and when coffee, milk, hot water or
steam are delivered. Always touch all outlets only at the specially designed
protective elements.
Important!
Pressing the Stand-by button will only switch off the machine, but not physically
separate it from the mains.
Important!
The machine may not be operated if the fresh water supply is disabled.
Important!
Never disconnect the water line while the machine is switched on or in stand-by mode.
Electric shock!
Never touch live parts!
Always switch off the main switch or disconnect the machine from the mains
before carrying out any maintenance work.
Important!
Malfunctions may be repaired only by manufacturer-authorised and qualified
personnel.
Important!
Only use original spare parts.
Electric shock!
Immediately report damaged cables and plugs to an authorised and qualified
technician and have them repaired or replaced.
If the mains cable is damaged, it may be replaced only by a service technician
authorised by the manufacturer.
Important!
Immediately report visible damages and leakages to an authorised and qualified
technician and have them repaired or replaced.
Environmental protection!
Use cleaning agents recommended by the manufacturer.
Page 2-4 BASCC BC - 02.02 - V01
Page 13

Safety instructions
2.4 Hygiene
Note:
Prior to commissioning, run the cleaning program (see chapter "Cleaning").
Important!
• Observe the general hygiene regulations according to HACCP!
• For daily and weekly cleaning, proceed as described in chapter "Cleaning".
• Never spray the machine with water or other liquids.
• For cleaning, never immerse the machine in water or any other liquid.
Danger!
During cleaning and usage of cleaning tools or products, there is a risk of
injury.
2.5 Designated Use
Designated use of the machine and the included accessories and optional features
are subject to the agreement on use, any other existing additional agreements and the
general terms and conditions of the M. Schaerer Ltd.. The operating manual is an
integral part of the above agreement of use. Any usage other than within the limits
specified herein shall be regarded as not in accordance with the designated use. The
manufacturer shall not be liable for any resulting damage.
BASCC BC - 02.02 - V01 Page 2-5
Page 14

Safety instructions
2.6 Liability
Guarantee and liability claims in the event of injury to people and damage to property
cannot be entertained if they are due to one or more of the following causes:
• Any use other than the designated one
• Improper assembly, commissioning, operation and maintenance of the machine
and its optional features.
• Non-compliance with specified maintenance intervals
• Operating the machine with defect safety devices or with safety devices that are
either not in place or not functioning properly
• Non-compliance with safety instructions in this manual with special regard to
storage, installation, commissioning, operation and maintenance of the machine,
• Operating the machine in other than perfect condition
• Repairs not carried out by a qualified technician
• Catastrophic damage due to the influence of foreign bodies, accidents, vandalism
and force majeure
• Intrusion into the machine with objects and opening of the housing
Important!
The manufacturer's warranty exclusively covers machines that have been properly
maintained at the intervals specified and where original spare parts are used that were
directly supplied by the manufacturer or one of the manufacturer's authorised
suppliers.
Maintenance of the machine has to be carried out either after 12 months or after
70,000 coffee products have been dispensed.
Safety-relevant parts, such as safety valves, safety thermostats, boiler, etc., must be
replaced and may not to be repaired under any circumstances. These parts
always have to be replaced.
- Safety valves every 12 months
- Boilers (steam generators, instant heaters) every 60 months
Page 2-6 BASCC BC - 02.02 - V01
Page 15

Product description
3. Contents
Chapter Text Page
3
3.1
3.1.1 Exterior View..........................................................................................................................................2
3.1.2 Interior View...........................................................................................................................................3
3.1.3 Control Panel of the Coffee Machine ....................................................................................................4
3.1.4 Installation Layout..................................................................................................................................5
3.1.5 Purpose of Coffee Machine...................................................................................................................6
3.1.6 Serial Plate on the Coffee Machine.......................................................................................................6
3.2
3.2.1 Performance Characteristics.................................................................................................................7
3.2.2 Dimensions and Weight.........................................................................................................................7
3.2.3 Power Supply.........................................................................................................................................8
3.2.4 Water Supply/Drain................................................................................................................................8
3.2.5 Volumes.................................................................................................................................................9
3.3
3.3.1 Model Variations....................................................................................................................................9
3.3.2 Included in Shipment.............................................................................................................................9
3.3.3 Optional Features..................................................................................................................................9
3.4
3.4.1 Initial Commissioning of the Coffee Machine......................................................................................10
3.4.2 Set-Up Conditions................................................................................................................................10
3.4.2.1 Location...............................................................................................................................................10
3.4.2.2 Installation of the Coffee Machine.......................................................................................................10
3.4.3 Counter Lead-Throughs ......................................................................................................................10
Product description ............................................................................. 2
Coffee Machine Specifications...........................................................................................................2
Operating Information for the Coffee Machine.................................................................................7
Design of the Coffee Machine............................................................................................................9
Commissioning..................................................................................................................................10
BASCC BC - 02.03 - V01a Page 3-1
Page 16
Product description
3 PRODUCT DESCRIPTION
3.1 Coffee Machine Specifications
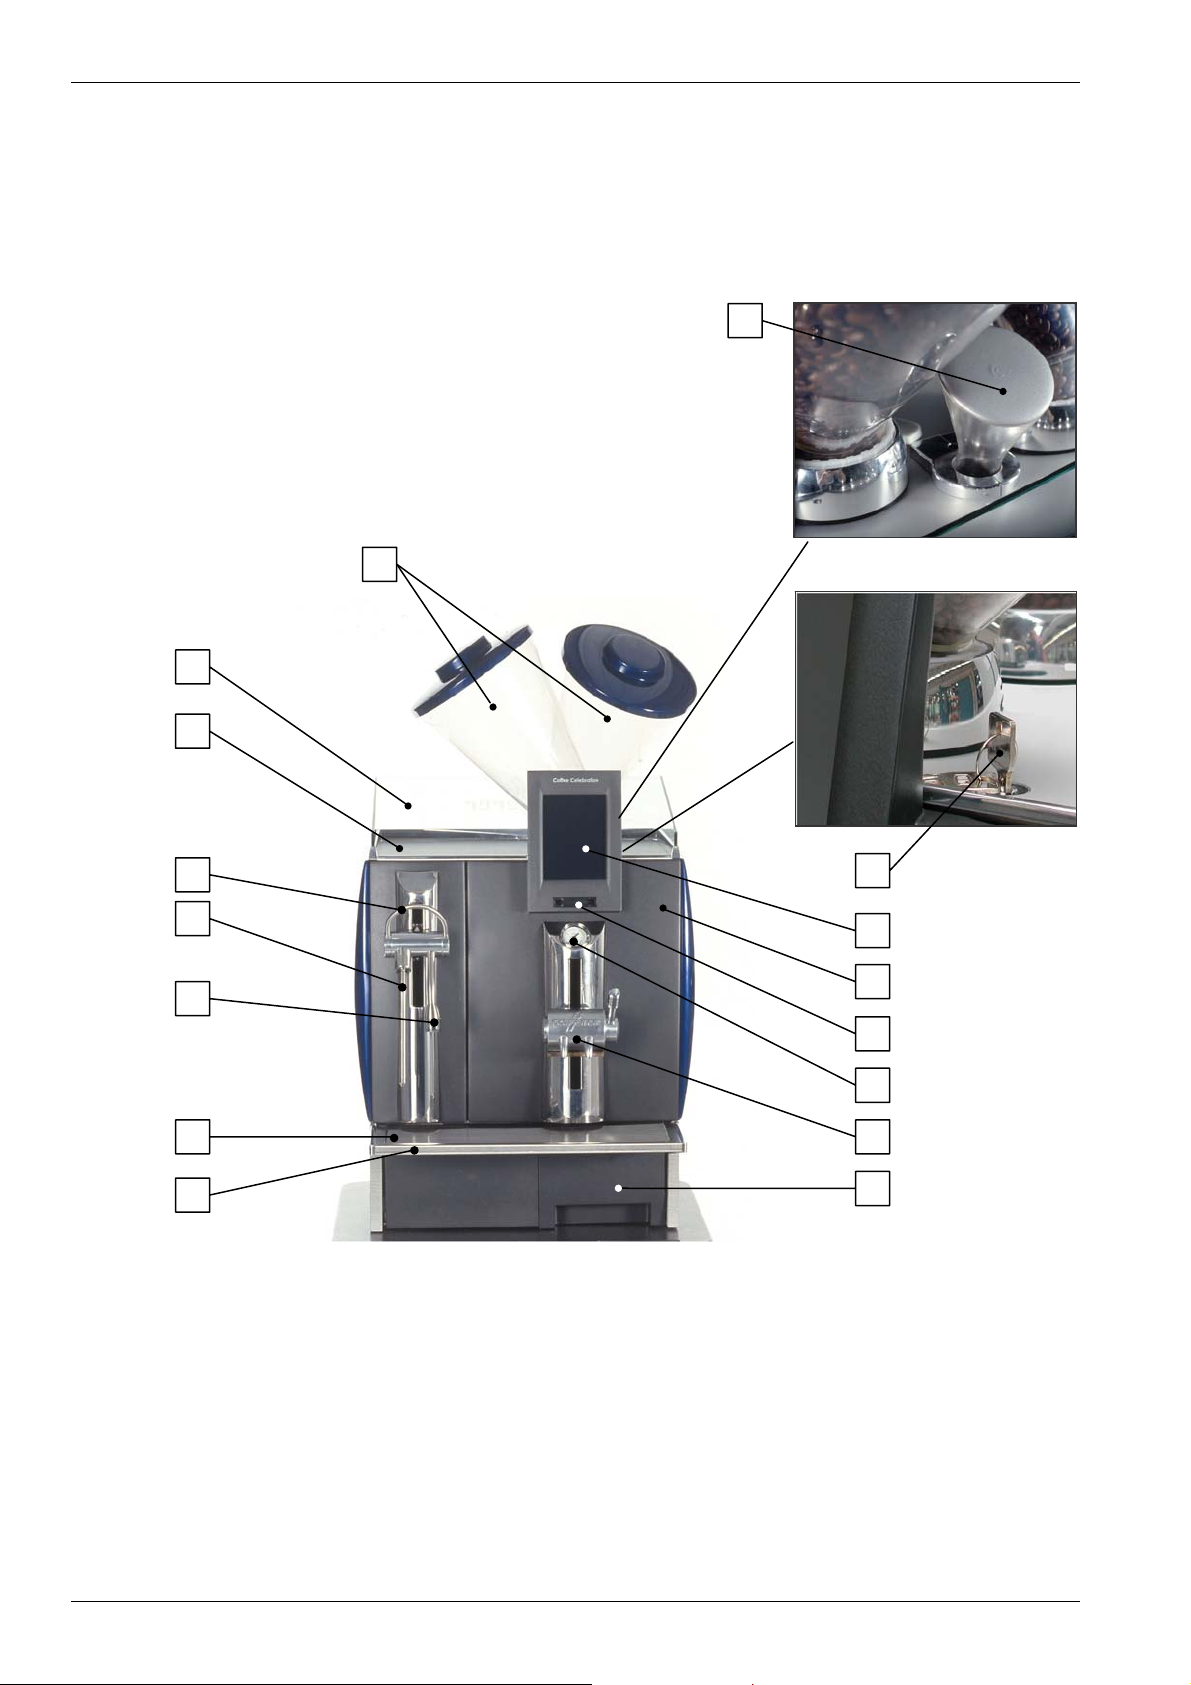
3.1.1 Exterior View
2
3
4
5
6
7
8
Fig. 001
Legend:
1 Coffee beans container
2 Cup plate frame
3 Heated cup plate
4 Valve bow steam
5 Steam pipe
6 Hot water outlet
7 Drip grid
8 Drip tray with drain
1
9
Fig. 002
Fig. 003
10
11
12
13
14
15
16
9 Funnel for ground coffee
(e.g. decaffeinated)
10 Lock with key
11 Control panel (Touch Screen)
12 Front door
13 Chip card reader
14 Manometer
15 Coffee outlet (height adjustable)
16 Grounds container
Page 3-2 BASCC BC - 02.03 - V01a
Page 17
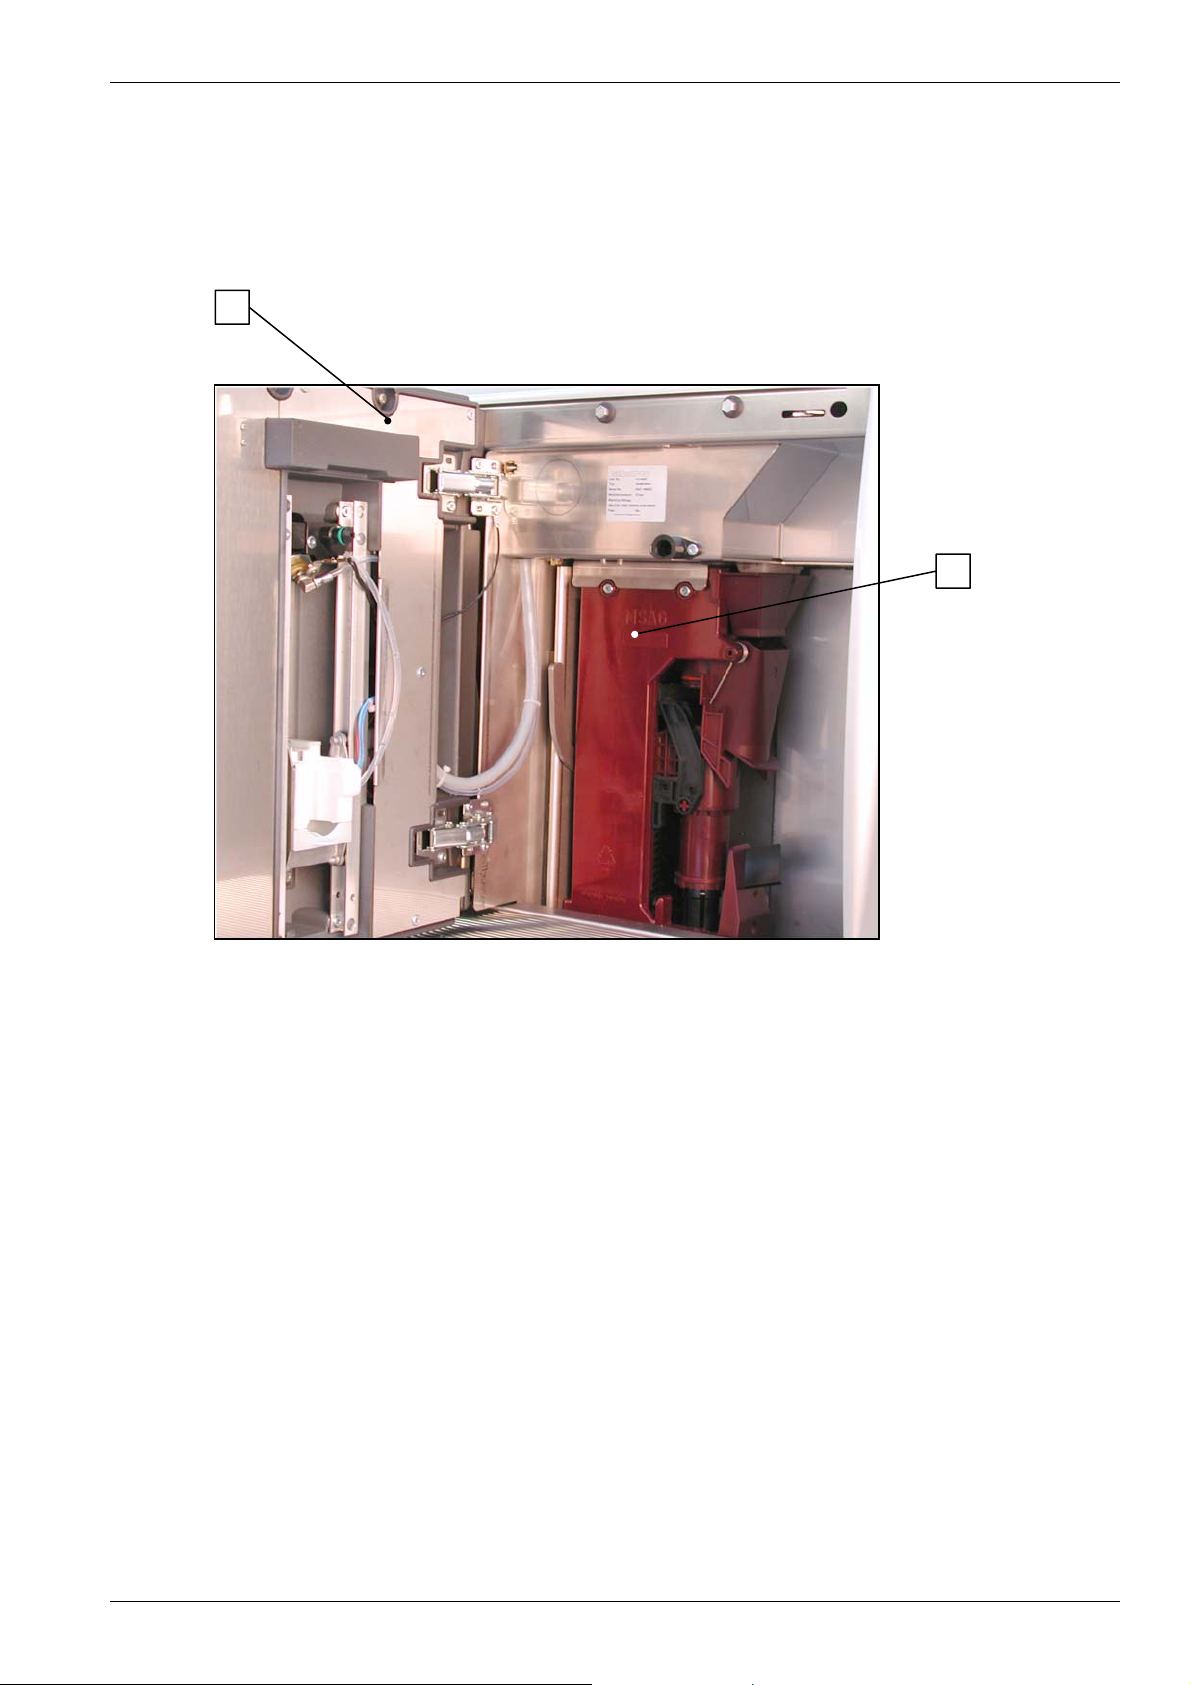
3.1.2 Interior View
1
Product description
2
Fig. 004
Legend:
1 Front door
2 Brewing unit
BASCC BC - 02.03 - V01a Page 3-3
Page 18
Product description
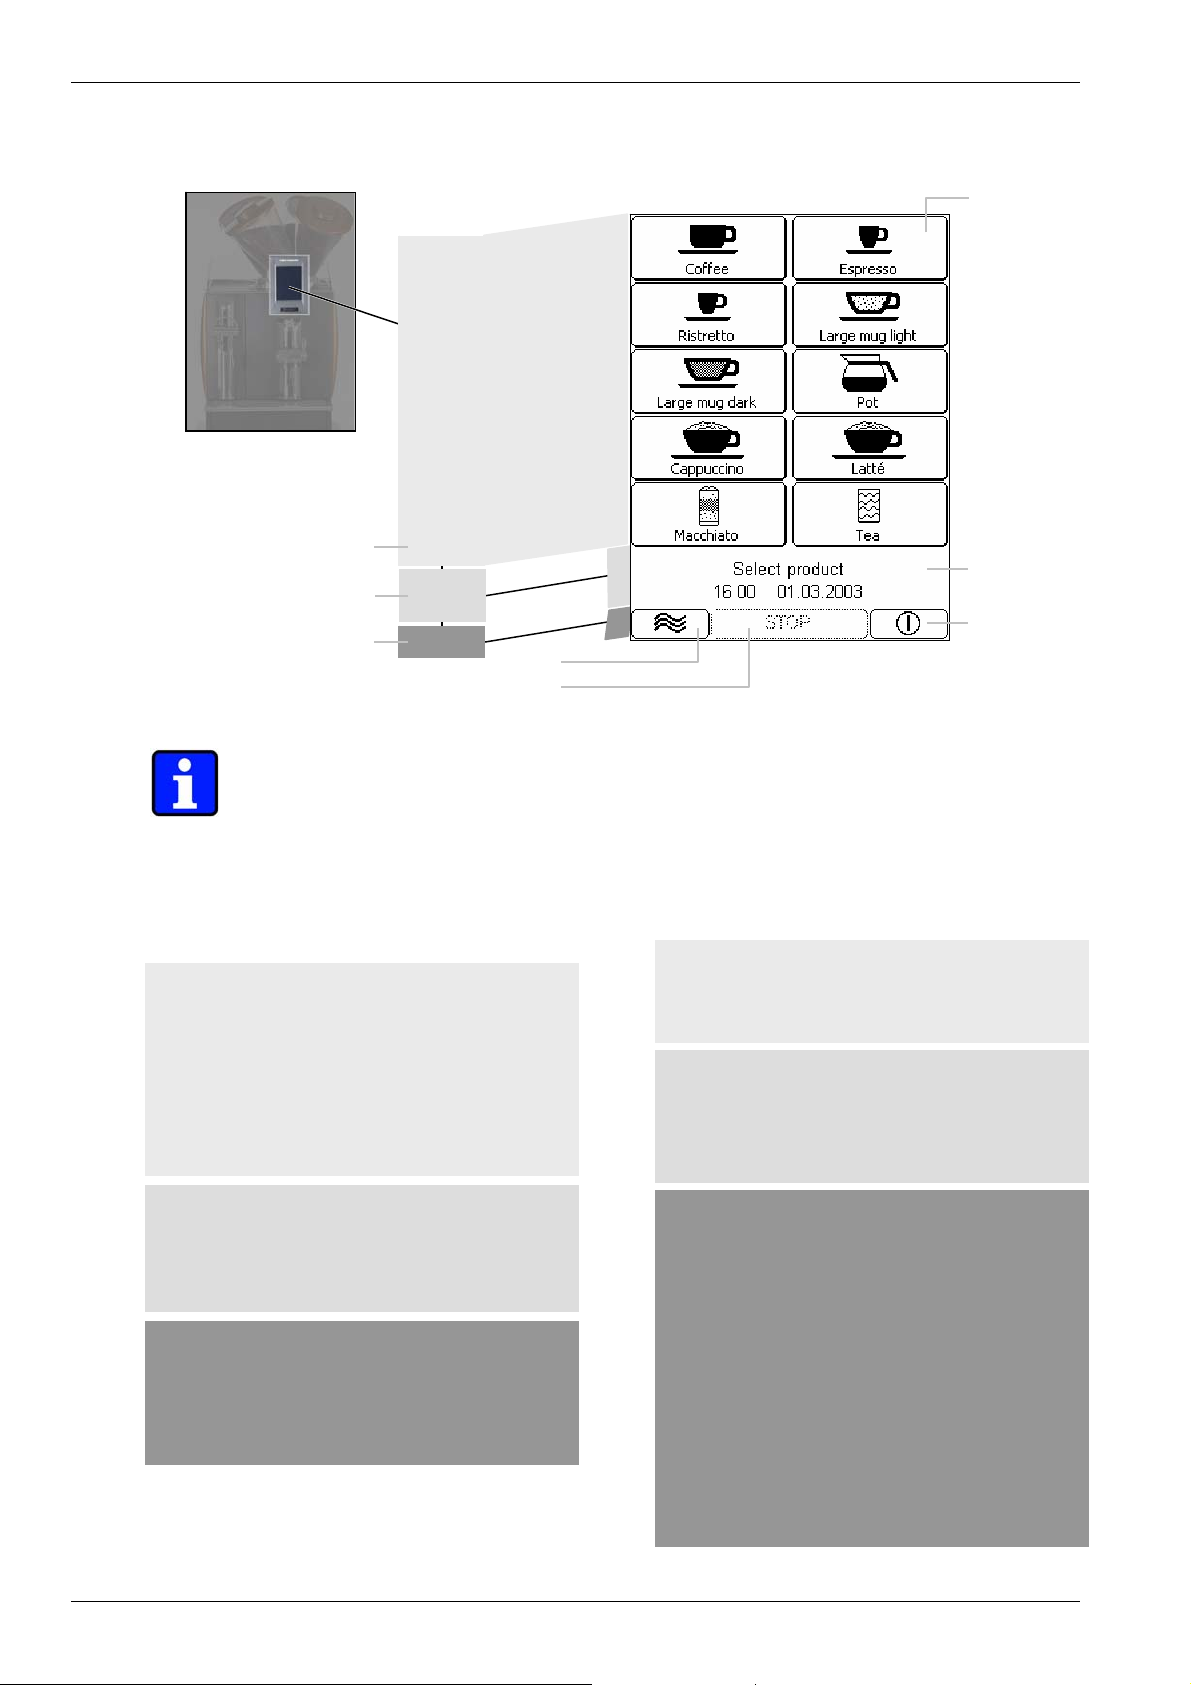
3.1.3 Control Panel of the Coffee Machine
Fig. 005
1
2
3
Note:
The control panel can have different buttons depending on the configuration.
Here only an example is shown.
Legend:
Basic configuration of control panel:
1 Field for freely selectable buttons
z Product fields
z Freely-selectable configuration
z Instructions and information during the
cleaning process
z Malfunction messages
z Error messages
2 Field for messages and information in
normal mode
z Status line
z Information
3 Field with function buttons:
z Cleaning button
z STOP button
z Stand-by button
4
5
6
8
Fig. 006
7
Example:
4 Product field on the control panel
z Programmable buttons to dispense
coffee and hot water
5 Status line:
z Displays activities
z Time and date
z Problems
6 Stand-by button
z From stand-by mode:
Switch on machine
z From normal mode:
Switch to stand-by mode
7 STOP button:
z Cancel beverage output in process
z Cancellation of pre-selected products
8 Cleaning button:
z Starting cleaning
Page 3-4 BASCC BC - 02.03 - V01a
Page 19
Product description
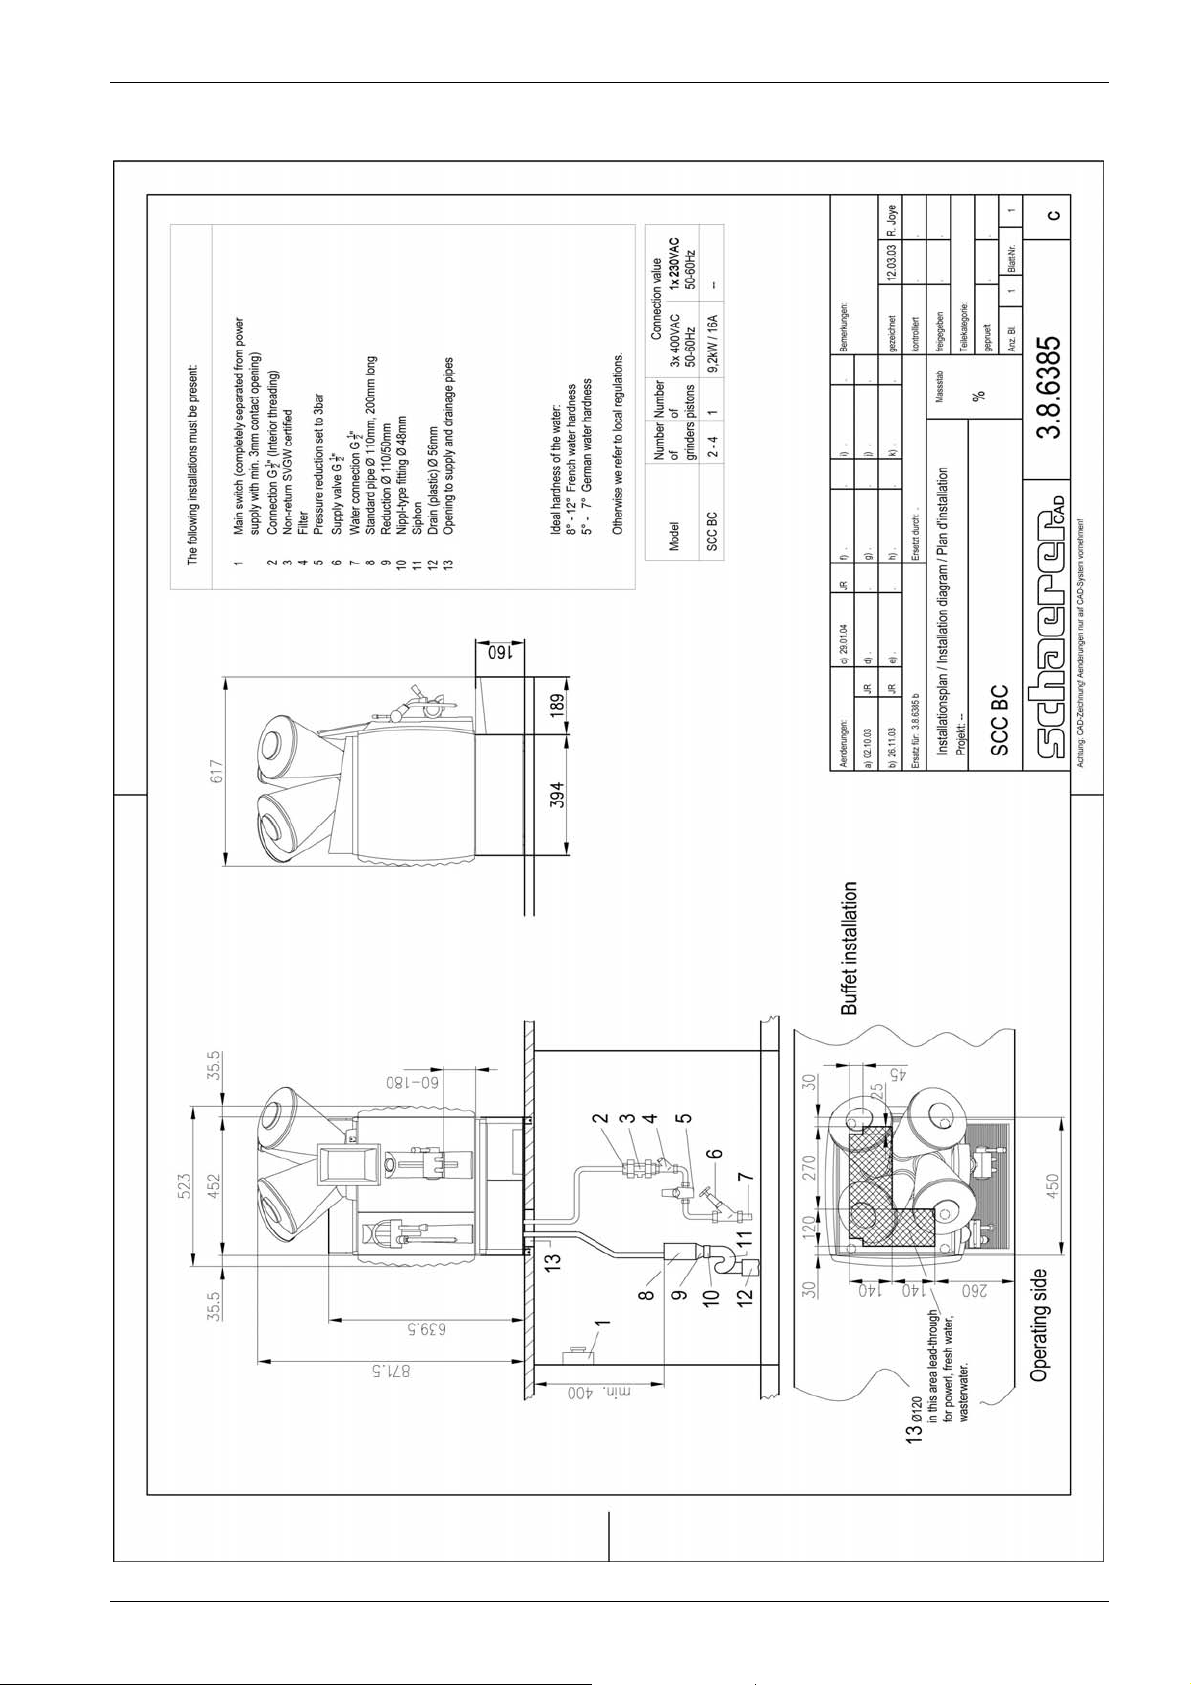
3.1.4 Installation Layout
Installation Plan 3.8.6076 ---
BASCC BC - 02.03 - V01a Page 3-5
Page 20

Product description
3.1.5 Purpose of Coffee Machine
The coffee machine can prepare the following beverages:
• Espresso
• Coffee
• Ristretto (short espresso)
• Coffee pot
• Decaffeinated coffee
• Hot water for tea, punch etc.
• Steam to foam up milk (e.g. hot milk, milk foam, cappuccino, macchiato etc.)
3.1.6 Serial Plate on the Coffee Machine
For warranty purposes, and in case of failure, please copy the machine’s serial plate
data in the field on this page!
Fig. 007
If you have opened the front door, the
serial plate is located on the brewing unit.
Inst. No. 4.6.9450
Type Celebration
Serial No. 0000 000000
Nominal pressure 12 bar
Electrical Ratings
380-415V 3NAC 50/60Hz 9300-9800W
Fuse: 16A
Installation No.: .............................................
Type: Celebration...........................
Serial No.: .............................................
Nominal pressure:
................................... ..........
Electrical ratings:
.....................V ......NAC ……...Hz ………….W
Fuse: ……….A
Page 3-6 BASCC BC - 02.03 - V01a
Page 21

Product description
3.2 Operating Information for the Coffee Machine
3.2.1 Performance Characteristics
The output per hour depends on the product type.
Output per hour: 240 cups
3.2.2 Dimensions and Weight
Width : 521 mm
Height : 871.5 mm
Depth : 617 mm
Coffee outlet height : 60 -180 mm
Outlet height hot water : 180 mm
Net weight : approx. 50 kg
Subject to changes without notice!
BASCC BC - 02.03 - V01a Page 3-7
Page 22

Product description
3.2.3 Power Supply
Model Connected load
SCC BC 9,3 kW / 16 A 3 x 400 VAC 50/60 Hz
SCC BC Self 9.3 kW / 16 A 3 x 400 VAC 50/60 Hz
The voltage on the serial plate must correspond to the local mains voltage.
For special voltages ask the manufacturer or one of your authorised after sales
service people.
Electric shock!
• An authorised specialist must install or inspect the installation!
• The phase must be protected with 16 A fuse.
• The machine must be fully disconnected from the power supply.
• Never operate the coffee machine if the mains cable is defective. A defective
mains cable or plug must immediately be replaced by a service technician
authorised by the manufacturer.
• Use extension cords only when you are sure that they are in perfect condition.
The extension cord must have a minimum cross section of 1.5 mm² for each core
and a permitted 5 pole plug (PNE) for 16 A.
• Power cable and/or extension cords must be placed so that they pose no safety or
health hazard. Do not pinch the cords or pull them around sharp corners and over
sharp edges; do not let them hang exposed in the room. Do not place the cords
on hot surfaces and protect them from oil and harsh cleaning agents.
• Never lift or pull the appliance by the mains cable. Never pull the plug out of the
socket by gripping the mains cable or extension cord. Never touch cord and plug
with wet hands. Never insert a wet plug into the socket.
3.2.4 Water Supply/Drain
The machine must be connected as shown in the installation diagram to a G 1/2"
drinking water line (section 3.1.4, page 3-5).
If the coffee machine is to be connected to a newly installed water line, the line and
the pressure hose must be properly rinsed to ensure that no dirt particles are fed into
the machine.
If the machine is to be connected to a water drain, the supplied drainage hose should
be connected to the drip tray and the siphon and fastened securely. The hose should
point downwards so that water can easily flow out of the drip tray.
Note:
The coffee machine is specifically designed for a water hardness of between 5° - 7° dH
(German hardness) or 8° - 12° fH (French hardness). Chlorine content should not
exceed 100 mg per litre. The ideal pH value is 7. For all other values, local
regulations apply.
Page 3-8 BASCC BC - 02.03 - V01a
Page 23

Product description
Water pressure:
Minimum pressure: 1 bar
Maximum pressure: 3 bar
Note:
We recommend setting the decompression valve to 3 bar.
Feed water temperature:
Min. 10 °C
Max 30 °C
3.2.5 Volumes
2 hot water boilers
1.2 l hot water
0.8 l coffee water
1 steam boiler
0.8 l, of which 0.4 l are steam
2 coffee grounds containers
1 kg each coffee grounds container
1 funnel for ground coffee (e.g. decaffeinated)
1 to 2 portions
3.3 Design of the Coffee Machine
3.3.1 Model Variations
SCC BC Coffee, hot water, steam
SCC BC Self Coffee, hot water
3.3.2 Included in Shipment
Item Order. no.
- 1 User manual *
- 1 Daily cleaning short cleaning instructions *
- 1 Measuring spoon for ground coffee (e.g. decaffeinated) 067’111
- 1 Cleaning tab 065’221
- 1 Cleaning brush 067’409
- 1 CHEF chip card 063’930
- 1 SAVE DATA chip card 063’929
- 1 Case for chip cards 065’278
- 2.0 m Drainage hose 063'345
- 1 Bride to drainage hose Ø 29 mm 063'119
- 1 Flat packing 064'249
- 1 Screw fittings 068'179
- 2 O-rings coffee outlet 070’195
- 1 O-ring coffee outlet 070’408
- 1 Turning handle grinder adjustment 061’977
* Customized items!
Subject to changes without notice!
3.3.3 Optional Features
See Chapter 7 “Options“.
BASCC BC - 02.03 - V01a Page 3-9
Page 24

Product description
3.4 Commissioning
3.4.1 Initial Commissioning of the Coffee Machine
The coffee machine must be installed and commissioned by a service technician
authorised by the manufacturer.
3.4.2 Set-Up Conditions
3.4.2.1 Location
Danger!
- Prior to installing, ensure that the coffee machine will not be positioned on a
hot surface or near an oven.
- Not suitable for outdoor use. Never expose the coffee machine to external
conditions such as rain, snow, frost, etc.
- Do not place the coffee machine on a surface cleaned with a hose.
- Only place the appliance where it can be supervised by trained personnel.
- The support surface for the unit must be stable and level and may not be
deformed by the weight of the coffee machine.
Important!
The location must comply with the following climatic conditions:
- Ambient temperature from 10 °C to 35 °C
- Relative humidity max. 80 % rF
- The machine is designed exclusively for interior use.
- Protect the coffee machine from frost. If the coffee machine has been exposed to
temperatures below freezing point, contact an authorised customer service
representative before you start the unit.
3.4.2.2 Installation of the Coffee Machine
Installation of the coffee machine should be done under the following conditions:
- Install the supply lines as shown in the mains-side installation diagrams to within one
meter of the place of installation.
- Conform to the technical data.
- - Provide and maintain sufficient clearance for maintenance work and operation:
- above for filling coffee beans
- Keep approx. 35 cm clear on left side
- A minimum of 15 cm between machine back panel to wall (air circulation)
- Comply with the respective local statutory regulations regarding catering premises.
Note:
- The dimensions of the installed coffee machine are given in the corresponding
installation plan (section 3.1.4, page 3-5).
3.4.3 Counter Lead-Throughs
Note:
You can find the counter lead-through specifications on the corresponding installation
plan (Section 3.1.4, Page 3-5).
Page 3-10 BASCC BC - 02.03 - V01a
Page 25

Operation
4. Contents
Chapter Text Page
4
4.1
4.2
4.2.1 Refilling Coffee Beans...........................................................................................................................4-3
4.3
4.3.1 Pre-Checks............................................................................................................................................4-3
4.3.2 Switching on the Coffee Machine .........................................................................................................4-3
4.4
4.4.1 Setting Coffee Outlet Height.................................................................................................................4-4
4.5
4.5.1 Output of Coffee Beverages..................................................................................................................4-5
4.5.2 Pre-Selecting Beverage Type...............................................................................................................4-5
4.5.3 Double Button........................................................................................................................................4-6
4.5.4 Dispensing Coffee With Previously Ground Coffee..............................................................................4-6
4.5.5 Dispensing Hot Water........................................................................................................... ................4-7
4.5.6 Generating Steam.................................................................................................................................4-8
4.6
4.6.1 Shutting Off the Coffee Machine...........................................................................................................4-9
4.6.2 Extended Idle Time...............................................................................................................................4-9
4.6.2.1 Disassembly..........................................................................................................................................4-9
4.7
4.7.1 Navigation on Programming Level......................................................................................................4-10
4.7.2 Inserting the Chip Card into the Chip Card Reader............................................................................4-11
4.7.3 CHEF Chip Card.................................................................................................................................4-11
4.7.3.1 Menu Overview CHEF chip card.........................................................................................................4-11
4.7.3.2 Introduction to the CHEF Programming Level....................................................................................4-12
4.7.3.3 Reading the Counter...........................................................................................................................4-12
4.7.3.4 Configuring Products...........................................................................................................................4-14
4.7.3.5 Configuring the Display.......................................................................................................................4-15
4.7.3.6 Time / Date..........................................................................................................................................4-16
4.7.3.7 Automatic Timer..................................................................................................................................4-16
4.7.3.8 Language ............................................................................................................................................4-16
4.7.3.9 Changing PIN code.............................................................................................................................4-17
4.7.4 SAVE-DATA PLUS Chip Card............................................................................................................4-17
4.7.4.1 Saving Coffee Machine Data to Chip Card.........................................................................................4-17
4.7.4.2 Saving Data from the Chip Card to the Coffee Machine.....................................................................4-17
OPERATION 4-2
Introduction .........................................................................................................................................4-2
Daily Operation....................................................................................................................................4-3
Making the Coffee Machine Ready for Operation............................................................................4-3
Setting Outlet Height ..........................................................................................................................4-4
Beverage Output .................................................................................................................................4-5
End of Operation.................................................................................................................................4-9
Programming Using Standard Chip Cards.....................................................................................4-10
BASCC BC - 02.04 - V01 Page 4-1
Page 26

Operation
4 OPERATION
4.1 Introduction
This chapter describes the basic functions of the coffee machine. Read them carefully
to ensure easy and problem-free routine operation.
Note:
Proper installation and programming of the coffee machine by an authorised service
technician are crucial for a smooth operation and good product quality.
Danger!
- During product release, never move cups or other objects positioned below
the beverage outlet, the hot water outlet or the steam pipe! The beverages
delivered by the machine are hot!
After having pressed the selection button, keep hands and other body parts
away from the outlets to prevent scalding!
- Never aim steam or hot water jets against persons!
- Do not touch the hot cup plate or the beverage outlets. Touch the hot water
outlet and the steam pipe only at the insulated handles.
- The coffee machine does not stop when a cup is removed from underneath an
outlet during serving. Delivery (including pre-selected delivery) can only be
terminated by pressing the [STOP] button.
Danger!
Switch off the coffee machine if you accidentally pour liquid over the cup plate
(risk of short-circuit)!
Contact a customer service representative immediately.
Environmental protection!
Noise emission levels can be up to 70 dB (A), particularly when heating up beverages.
Page 4-2 BASCC BC - 02.04 - V01
Page 27

Operation
4.2 Daily Operation
4.2.1 Refilling Coffee Beans
Note:
Only pour roasted coffee beans into the coffee bean container(s)!
Danger!
Never reach with your hands into the coffee bean container(s) when the machine is
switched on. When refilling the bean container(s), do not reach into the grinder and do not
press any of the product fields!
1. Remove the cover (1) from the coffee bean container (2)
1
(see Fig. 008).
2. Refill with coffee beans (max. 1 kg). Close the cover again.
Note:
A well closed cover prevents the loss of aroma.
2
2
Fig. 008
4.3 Making the Coffee Machine Ready for Operation
4.3.1 Pre-Checks
Prior to switching on the machine, check the following:
- The fresh water supply is open
- The coffee bean containers are filled (see section 4.2.1 “Refilling Coffee Beans”, page 4-3).
- The grounds container is empty
- The coffee machine is connected to the power supply.
- Check whether the coffee sliding hatches are open.
4.3.2 Switching on the Coffee Machine
1. Switch the coffee machine on by touching the control panel
at any point for approx. 3 seconds.
2. Wait for product output until the message Select Product
appears on the status line.
Fig. 009
BASCC BC - 02.04 - V01 Page 4-3
Page 28

Operation
4.4 Setting Outlet Height
4.4.1 Setting Coffee Outlet Height
Danger!
Set the correct outlet height before selecting the coffee product!!
Fig. 010
1
Fig. 011
Note:
There are two possibilities for setting the outlet height
to the optimal height:
(Max. cup height: 180 mm)
1. Rough setting:
Press in the fixing button on the right side of the
coffee outlet body. Push the coffee outlet to the
desired position (see Fig. 010).
2. Fine setting:
You can do the fine setting by moving the handle
(1) on the coffee outlet upward or downward (see
Fig. 011).
Page 4-4 BASCC BC - 02.04 - V01
Page 29

Operation
4.5 Beverage Output
Danger!
The beverages delivered by the coffee machine are hot! To protect yourself
against scalding, keep hands and other body parts away from the outlet area
during the preparation and delivery of beverages.
Set the correct outlet height before selecting the coffee product!!
4.5.1 Output of Coffee Beverages
1. Place one or two empty cup(s) under the beverage outlet
(see Fig. 012).
2. Push the coffee outlet to the correct position.
3. Select the desired beverage on the control panel.
Your Product is Being Prepared appears in the status line.
4. Only remove the cup(s) if the text in the current product field
no longer blinks and Select Product appears on the status
line.
Fig. 012
4.5.2 Pre-Selecting Beverage Type
When configured in this way, you can select several products in succession. The
coffee machine will dispense the selected beverages in this order.
Display example:
Fig. 013
The control panel in Fig. 013 displays the selected products in each product field:
1 Espresso was selected
1 Ristretto was selected
1 white coffee was selected
The first selected product is served first. The text blinks during preparation. Æ Product
name blinks
The product dispensed next is displayed by the blinking number (number of preselected products) in the corresponding product field. Æ Number blinks
The pre-selected amount for each product is displayed at the top right in each product
field. Æ The number does not blink yet
Deleting pre-selected beverage types and cancelling and beverage output:
Select the STOP button again and the originally saved pre-selection of the coffee
output is deleted. The current beverage continues to be dispensed and can be
cancelled by selecting the STOP button again.
BASCC BC - 02.04 - V01 Page 4-5
Page 30

Operation
4.5.3 Double Button
The beverage type on the product button, if configured in this way, is dispensed twice.
Perform the following procedure:
Fig. 014
1. Place one or two empty cup(s) under the coffee outlet.
If two cups on the coffee output are to be filled simultaneously, ensure that
the cups are positioned exactly under the outlet openings.
2. Press the button programmed for double beverage output
(see Fig. 014).
3. The displayed buttons for products change to "double beverage output" (see
Fig. 015).
4. Select the desired beverage on the control panel.
Fig. 015
5. Only remove the cup(s) if the text in each product field no longer blinks and
Select Product appears on the status line.
4.5.4 Dispensing Coffee With Previously Ground Coffee
- The coffee machine can be configured for coffee preparation with previously ground
coffee beans.
- Beverages prepared with previously ground coffee beans cannot be pre-selected.
- Only use ground coffee (e.g. decaffeinated)
1. Place the empty cup(s) under the coffee outlet
Fig. 016
2. Press the button Decaffeinated
3. All of the displayed buttons for possible
4. Pour ground coffee for one or two cups into the
Fig. 017
5. Press the button for the desired beverage.
6. Only remove the cup(s) if the text in the
1
Fig. 018
(see Fig. 012).
(see Fig. 016).
decaffeinated products change to
"decaffeinated beverage output" (see Fig. 017).
The following appears in the status line: Pour
in the coffee powder and select the product.
funnel for ground coffee (1) (see Fig. 018)
corresponding product field no longer blinks
and Select Product appears on the status line.
Fig. 018
Page 4-6 BASCC BC - 02.04 - V01
Page 31

Operation
4.5.5 Dispensing Hot Water
Press the Tea product field on the control panel
to dispense hot water (see Fig. 019).
Depending on the configuration, the output is either dosed or manual (Start / Stop)
via the hot water pipe located to the left next to the coffee outlet (see Fig. 020).
In self-service mode, products are selected via an external button directly above the
hot water pipe.
Fig. 019
- Hot water cannot be pre-selected.
- Coffee and hot water can be dispensed simultaneously.
Danger!
Risk of injury by scalding! Keep hands and other body parts away from the
outlet!
If portioned delivery is programmed:
1. Place an empty cup under the hot water outlet
(see Fig. 020).
2. Touch the Tea product field (Fig. 019).
3. To cancel the current output:
Press the STOP button.
Note:
If, after output of an appropriately large amount of hot
Fig. 020
water, the message "Under-Temperature Tea"
appears, it means that the boiler is being heated up to
the set temperature.
If start / stop mode is programmed:
1. Place an empty cup under the hot water outlet
(see Fig. 020).
2. Touch the Tea button (Fig. 019).
The hot water is delivered continuously.
3. Press the Tea button again or the STOP button
to end the hot water output or to cancel.
BASCC BC - 02.04 - V01 Page 4-7
Page 32

Operation
4.5.6 Generating Steam
Note:
To output steam, press the steam valve bow. Output is through the steam pipe located
to the left of the hot water pipe (Fig. 021).
Steam is used for heating beverages such as milk or cocoa.
Danger!
Keep away from underneath the steam pipe while steam is delivered! Hold the
cup in such a way that no liquid is spilled onto your hands or other body parts
during heating!
1
Fig. 021
Danger!
When the boiling point is reached, the beverage may start to spill over. During
steam output, ensure that the steam pipe remains immersed in the liquid.
1. Point the steam pipe towards the drip grid.
Remove the condensation water from the pipe
system by briefly folding down the steam valve
bow to open it. If steam escapes from the
steam pipe, turn the bow upward again.
2. Immerse the steam pipe into the container of
the beverage to be heated until it reaches the
bottom.
3. Press the steam valve bow.
Steam is released. No message is displayed on
the control panel during the steam output.
4. Heat the content to the desired temperature.
Ensure that the steam pipe is always immersed
in the liquid.
Tip: The deeper the sound, the higher the
temperature of the heated liquid.
5. To end or cancel steam output:
Close the steam valve by moving the bow
upward.
6. Put the cup aside.
7. Clean the outside of the steam pipe with a wet
and clean paper tissue.
8. Point the steam pipe towards the drip grid. To
clean the steam pipe on the inside, open it
briefly, twice in succession.
Page 4-8 BASCC BC - 02.04 - V01
Page 33

Operation
4.6 End of Operation
4.6.1 Shutting Off the Coffee Machine
If the coffee machine is not used for longer periods, e.g. nights, it can be switched to stand-by. In
this mode, the boilers are not heated and no beverages are available.
1. Touch the Stand-by button in the control panel until the background lighting of
the control panel goes out.
4.6.2 Extended Idle Time
1. Do the daily cleaning:
(See section 5.2 “Daily Cleaning“, page 5-3)
2. Pull the mains plug from the socket, respectively cut off the power supply with the
master switch.
3. Close the stop valve on the fresh water line if the machine has a fixed installation.
4. To empty the boiler, ask a customer service representative authorised by the
manufacturer for assistance or advice.
5. Store the coffee machine in a dry and dust-free location. On premises where the
temperature can drop below zero, the boilers have to be emptied. For this you
should call in a service technician authorised by the manufacturer.
4.6.2.1 Disassembly
1. Contact a manufacturer-authorised customer service representative.
BASCC BC - 02.04 - V01 Page 4-9
Page 34

Operation
4.7 Programming Using Standard Chip Cards
For all the functions described in this chapter, it is assumed that the coffee
machine is ready for routine.
The CHEF and SAVE DATA cards are part of the standard delivery package and
provide a simple means of changing settings or retrieving information from the
coffee machine.
Note:
- Keep the chip cards in a safe place where only authorised persons have access
to them.
- When a chip card is in the card reader, product selection is disabled.
4.7.1 Navigation on Programming Level
With the following control elements, you are at the right place at the
programming level and can change settings.
You exit a menu or sub-menu with an upward arrow (see Fig. 022)
Fig. 022
Fig. 023
Display example:
Fig. 024
Fig. 025
Fig. 026
and return to the next highest level.
You can navigate to the next page with the right arrow (see Fig. 023)
to read information or change settings.
If values can be changed/ set, a key block appears after the
selection of the desired function (see display example, Fig. 024).
Confirm your entry with the button (see Fig. 025) (e. g. “Enter
PIN Code“).
You can adjustment values which were entered incorrectly with the
adjustment button (see Fig. 026).
Page 4-10 BASCC BC - 02.04 - V01
Page 35

Operation
4.7.2 Inserting the Chip Card into the Chip Card Reader
1. Insert the desired chip cared with the print
image facing upward into the chip card reader
(1) Fig. 027.
1
2. Follow the instructions presented in the
individual chapters.
Fig. 027
4.7.3 CHEF Chip Card
The CHEF card allows the principal settings or modifications to be made for routine
operation.
- Read product counter for coffee and tea per button
- Reset counter
- Read monthly counter
- Read machine counter
- Change grinding quantity.
- Change coffee water volume
- Change water dosing time and steam
- Change time and date display
- Change on/off time (automatic timer)
- Change display language
- Change PIN code
4.7.3.1 Menu Overview CHEF chip card
Æ See section 4.7.3.3, Page 4-12
Æ See section 4.7.3.4, Page 4-14
Æ See section 4.7.3.5, Page 4-15
Æ See section 4.7.3.6, Page 4-16
Æ See section 4.7.3.7, Page 4-16
Æ See section 4.7.3.8, Page 4-16
Æ See section 4.7.3.9, Page 4-17
Fig. 028
BASCC BC - 02.04 - V01 Page 4-11
Page 36

Operation
4.7.3.2 Introduction to the CHEF Programming Level
1. Insert the CHEF chip card into the card reader (see section 4.7.2,
page 4-11).
2. Enter the PIN code and confirm it.
Fig. 029
3. Select one of the buttons listed to move to the desired sub-menu.
Fig. 030
4.7.3.3 Reading the Counter
Æ Section 4.7.3.3.1, Page 13
Æ Section 4.7.3.3.2, Page 13
Æ Section 4.7.3.3.3, Page 13
Fig. 031
1. Perform steps 1…3, as described in section
“4.7.3.2 Introduction to the Programming
Level“, page 4-12.
2. Select one of the displayed sub-menus.
Page 4-12 BASCC BC - 02.04 - V01
Page 37

Operation
4.7.3.3.1 Reading Daily Counter
Fig. 032
Fig. 033 Fig. 034
4.7.3.3.2 Reading Monthly Counter
Fig. 035
Fig. 036 Fig. 037 Fig. 038
4.7.3.3.3 Reading Machine Counter
Fig. 041 Fig. 040 Fig. 039
Fig. 042
BASCC BC - 02.04 - V01 Page 4-13
Page 38

Operation
4.7.3.3.4 Clearing the Daily Counter
In this function, the count of the daily counter is cleared.
1. Proceed as in section “4.7.3.3 Read Counter“, page 4-12, steps 1…2.
2. Press the Daily Counter button (see Fig. 043).
3. Now press the button Clear Statistics (see Fig. 044).
Fig. 043 Fig. 044
4.7.3.4 Configuring Products
1. Proceed as described in section “4.7.3.2 Introduction to the Programming
2. Press the Configure Products button.
3. Select one of the displayed sub-menus.
Fig. 045
Level“, page 4-12.
Æ See next page!
Page 4-14 BASCC BC - 02.04 - V01
Page 39

Operation
Fig. 046 Fig. 047 Fig. 048 Fig. 049
1. Select the product field for which you would
like to change the settings.
Possible settings:
- Adjust Product Name through a key block.
- Set water quantity through a key block.
- Set powder quantity through a key block.
- Set powder quantity for a Double Product.
Other settings:
- The desired mixture can be adjusted through
a key block.
You can enter the grinding quantity per
grinder in percentages.
Note:
While adjusting values, you can also
prepare a test product (see Fig. 49).
Press the button with the name of the
currently programmed products.
4.7.3.5 Configuring the Display
Set contrast:
darker
lighter
Fig. 050
Fig. 051
Fig. 052
BASCC BC - 02.04 - V01 Page 4-15
Page 40

Operation
4.7.3.6 Time / Date
Fig. 053 Fig. 054
4.7.3.7 Automatic Timer
Fig. 055 Fig. 056
4.7.3.8 Language
Select the desired function to adjust or set the values.
With this function, you
can specify the time of
the day when the
machine is to be shut on
or off.
Fig. 057
Select the button with the desired language.
Fig. 059 Fig. 058
Page 4-16 BASCC BC - 02.04 - V01
Page 41

Operation
4.7.3.9 Changing PIN code
By pressing on the PIN Code button, you can change the PIN code you are
currently using to another one.
Fig. 060
4.7.4 SAVE-DATA PLUS Chip Card
The SAVE DATA PLUS card is a backup card to which all the coffee machine
data can be saved.
The SAVE DATA PLUS chip card should be stored in a safe place where it can be
found easily.
You can:
- transfer data from the coffee machine to the chip card
- transfer data from the chip card to the coffee machine
4.7.4.1 Saving Coffee Machine Data to Chip Card
1. Insert the SAVE DATA PLUS chip card into the card reader (see
section 4.7.2, page 4-11).
2. Select the button Save in the dialogue window.
The following message appears: Please wait: Data are being
saved.
3. Then remove the chip card if the following appears in the control
panel on the dialogue field: Data were successfully saved.
Press the Ok button.
4.7.4.2 Saving Data from the Chip Card to the Coffee Machine
1. Insert the SAVE DATA PLUS chip card into the card reader (see
section 4.7.2, page 4-11).
2. Select the button Load in the dialogue window.
The following message appears: Please wait: Data are being
saved.
3. Then remove the chip card if the following appears in the control
panel on the dialogue field: Data were successfully saved.
Press the Ok button.
BASCC BC - 02.04 - V01 Page 4-17
Page 42

Operation
Page 4-18 BASCC BC - 02.04 - V01
Page 43

Cleaning
5. Contents
Chapter Text Page
5
5.1
5.2
5.3
5.3.1 Drip Tray Coffee Coupling..................................................................................................................5-4
5.3.2 Control Panel (Touch Screen)............................................................................................................5-5
5.3.3 Longer Idle Time.................................................................................................................................5-5
5.3.4 Disassembly .......................................................................................................................................5-5
Cleaning.............................................................................................5-2
Important General Notes on Cleaning............................................................................................5-2
Daily Cleaning...................................................................................................................................5-3
Cleaning As Required ......................................................................................................................5-4
BASCC BC - 02.05 - V01 Page 5-1
Page 44

Cleaning
5 CLEANING
5.1 Important General Notes on Cleaning
Danger!
Never reach into the machine during automatic cleaning and keep clear of the
beverage outlets.
Danger!
Never clean the machine with a hose or a high pressure cleaner. Do not use
steam cleaning devices.
Never immerse the machine in water!
Important!
• Wash and disinfect your hands tho rou ghly before cleaning the machine!
• Follow the dosing instructions, safety notes and warnings included with the cleaning
products! Also read the information on cleaning agents in section 8.2 on page 8-3.
• Never use abrasives, scrubbers or cleaning tools made of metal!
• Only use cleaning agents approved by the manufacturer.
• Ask the manufacturer o r a cu stomer service, authorised by the manufacturer, for
advice on the cleaning tools you should use.
Note:
• Please note that some compone nts in the following illustrations may differ from those
in your machine.
• All the machine’s product outlets will be disabled duri ng the cleaning cycle.
• The machine cleaning p rog ram consists of an automatic self-cleaning cycle and a
manual cleaning cycle. Together they form one operation cycle.
• To ensure that all products are avail able in best quality, careful daily and weekly
cleaning is imperative
• The cleaning steps are displayed on the control panel. Follow the instructions.
Page 5-2 BASCC BC - 02.05 - V01
Page 45

5.2 Daily Cleaning
1
z Hold down the cleaning button
the control panel for approx. 4 seconds.
4
z Open the front door.
7
The cleaning program is running
(5 minutes).
on
2
z Remove and clean the coffee grounds
container.
If you have accidentally activated
the cleaning mode, press Cancel.
5
z Clean the brewing unit with the included
brush.
8
z Remove the drip grid and clean it.
z Clean the coffee machine from the
outside.
z Clean the drip tray with clean water.
z Confirm by clicking on Ok on the control
panel.
Cleaning
3
z Insert the coffee grounds container.
z Follow the instructions on the control
panel.
6
z Add the cleaning tablet to the brewing
chamber.
z Close the front door (turn the key)
z Move the coffee outlet to the lowest
position.
z Confirm that you have inserted the
cleaning tablet by clicking on Ok on the
control panel.
9
Daily cleaning is completed.
BASCC BC - 02.05 - V01 Page 5-3
Page 46

Cleaning
5.3 Cleaning As Required
5.3.1 Drip Tray Coffee Coupling
Note:
If necessary, the drip tray of the coupling in the front door can be removed and
cleaned.
Fig. 060
1. Unlock the front door by turning the key to the left
until it stops (see Fig. 060).
2. Pull the drip tray by the handle from the holder
(see Fig. 061).
3. Clean the drip tray under clean water.
4. Dry the drip tray off and re-insert it.
Fig. 061
Page 5-4 BASCC BC - 02.05 - V01
Page 47

5.3.2 Control Panel (Touch Screen)
Note:
The control panel interface (touch screen) should always be kept clean. A dirty touch
screen no longer functions properly.
Fig. 062
5.3.3 Longer Idle Time
See section 4.6.2 on page 4-12.
5.3.4 Disassembly
Contact a manufacturer-authorised customer service representative.
Cleaning
Important!
Use a commercial window cleaner. Do not use any
other cleaning agents! Do not use any cleaners with
abrasive effects.
Do not apply the cleaner directly to the control panel
but always onto a piece of cloth!
You can use cleaning clothes for PC screens for
heavy contamination.
If necessary, clean the control panel as follows:
1. Take a clean piece of cloth.
2. The piece of cloth may only be damp, not
wet.
3. Carefully wipe the piece of cloth over the
control panel.
4. Re-rub the area with a dry piece of material.
BASCC BC - 02.05 - V01 Page 5-5
Page 48

Cleaning
Page 5-6 BASCC BC - 02.05 - V01
Page 49

Error messages and malfunctions
6. Contents
Chapter Text Page
6
6.1
6.1.1 Error Messages - Coffee Machine.........................................................................................................2
6.2
Error messages and malfunctions ..................................................... 2
Error Messages with Display on the Control Panel.........................................................................2
Malfunctions Without Display on the Control Panel........................................................................4
BASCC BC - 02.06 - V01 Page 6-1
Page 50

Error messages and malfunctions
6 ERROR MESSAGES AND MALFUNCTIONS
6.1 Error Messages with Display on the Control Panel
6.1.1 Error Messages - Coffee Machine
Danger!
Inform your authorised customer service representative immediately if
you cannot rectify a malfunction!
Do not attempt to repair the coffee machine yourself!
Control panel display Cause Remedy
"Under-temperature steam"
"Under-temperature coffee"
"Under-temperature tea"
"Flowmeter timeout"
"Front door open"
"Grinder L./B. motor driver
error"
"Grinder R./F. motor driver
error"
"Brewing piston motor driver
error"
- Excessive steam outputs.
- Phase fuse defective.
- Safety fuse has opened.
Steam discharge is blocked.
Other products can be dispensed.
- More coffee servings than normal.
- Phase fuse defective.
- Safety fuse has opened.
No coffee can be dispensed.
Steam and hot water can be dispensed.
- More hot water servings than normal.
- Phase fuse defective.
- Safety fuse has opened.
Hot water dispensing is disabled.
Other products can be dispensed.
- Fresh water supply is blocked or one of the
stop valves is defective.
- Brewing unit dirty.
Products can still be served.
- The front door is open or the lock bolt did
not engage.
- Limit switch is damaged.
The coffee machine is blocked.
Control defective.
The coffee machine is blocked.
Control defective.
The coffee machine is blocked.
Control defective.
The coffee machine is blocked.
Wait for approx. 3 minutes. If during this
time "Timeout Heating Steam" appears
on the display, check if phase fuse is
defective. If the fuse is in working order,
contact a manufacturer-authorised
customer service representative.
Wait for approx. 3 minutes. If during this
time "Timeout Heating Coffee" appears
on the display, check if phase fuse is
defective. If the fuse is in working order,
contact a manufacturer-authorised
customer service representative.
Wait for approx. 3 minutes. If during this
time "Timeout Heating Tea" appears on
the display, check if phase fuse is
defective. If the fuse is in working order,
contact a manufacturer-authorised
customer service representative.
- Open stop valve and press the desired
button again.
- Clean the brewing unit.
- If the message persists, contact a
manufacturer-authorised customer
service representative.
- Close the front door.
- Contact a manufacturer-authorised
customer service representative.
-
Contact a manufacturer-authorised
customer service representative.
-
Contact a manufacturer-authorised
customer service representative.
-
Contact a manufacturer-authorised
customer service representative.
Page 6-2 BASCC BC - 02.06 - V01
Page 51

Error messages and malfunctions
Control panel display Cause Remedy
"Grinder left no beans"
"Grinder right no beans"
"Grinder front no beans"
"Grinder back no beans"
"Grinder left blocked
"Grinder right blocked"
"Grinder front blocked"
"Grinder back blocked"
"Timeout level supply "
"Coffee grounds container is
missing"
”Clean the coffee grounds
container”
”Coffee grounds container
full”
"Temperature sensor - steam”
"Temperature sensor coffee”
"Temperature sensor tea”
One of the coffee bean containers is empty.
An object (e.g. a stone) is stuck in the
grinder.
The water level in the steam generator is
not correct.
Steam discharge is blocked.
Other products can be dispensed.
- The coffee grounds container is not in its
- The coffee grounds container is not in its
- Limit switch is damaged.
The coffee machine is blocked.
The coffee grounds container is full.
The coffee machine is blocked.
You can still serve 5 products before the
coffee machine gets blocked.
The temperature sensor in the steam
generator is defective.
Steam discharge is blocked.
Other products can be dispensed.
The temperature sensor in the instant
heater for coffee water and hot water is
defective:
No coffee can be dispensed.
Other products can be dispensed.
The temperature sensor in the instant water
heater is defective.
Hot water dispensing is disabled.
Other products can be dispensed.
compartment.
proper final position.
Pour in 1 kg of coffee beans and click
on Ok.
- If the message on the control panel
persists, disconnect the coffee machine
from the power mains. Vacuum the coffee
beans out of the grinder. Check the
grinder for stuck objects.
- If the problem still persists, contact an
authorised customer service
representative.
- Check whether the stop valve of the
water mains is open.
- Switch the machine off and on again.
- If the problem still persists, contact an
authorised customer service
representative.
- Push coffee grounds container fully into
coffee grounds container compartment.
- Check whether the coffee grounds
container is fully inserted into the coffee
grounds container slot. Always remove
the ground coffee residue from the back
panel of the coffee grounds compartment.
- If the message persists, contact a
manufacturer-authorised customer
service representative.
Empty the coffee grounds container.
Empty the coffee grounds container.
Contact a manufacturer-authorised
customer service representative.
Contact a manufacturer-authorised
customer service representative.
Contact a manufacturer-authorised
customer service representative.
BASCC BC - 02.06 - V01 Page 6-3
Page 52

Error messages and malfunctions
Control panel display Cause Remedy
“Timeout heating steam”
“Timeout heating coffee”
“Timeout heating tea”
The programmed target temperature was
not reached within the specified time.
Steam discharge is blocked.
Other products can be dispensed.
The programmed target temperature for the
coffee water was not reached within the
specified time.
No coffee can be dispensed.
Other products can be dispensed.
The programmed target temperature for the
hot water (hot water outlet) was not reached
within the specified time.
Hot water outlet is disabled.
Other products can be dispensed.
6.2 Malfunctions Without Display on the Control Panel
Note:
The following problems may occur without causing the coffee machine to
display an error message.
- Switch the machine off and on again.
- Check the phase fuse.
- If the message persists on the control
panel, contact a manufacturer-authorised
customer service representative.
See “Timeout heating steam”.
See “Timeout heating steam”.
Malfunction Cause Remedy
Dark display, no
message
Plug at power socket is disconnected or
main switch is OFF.
Control panel (Touch screen) defective.
Reconnect plug at power socket or switch
main switch to ON.
Contact a customer service representative
authorised by the manufacturer.
Page 6-4 BASCC BC - 02.06 - V01
Page 53

Options
7. Contents
Chapter Text Page
7
7.1
7.2
7.3
7.4
7.5
7.6
7.7
7.8
7.9
Payment Systems.............................................................................................................................7-2
Water Softener (Filados/Brita).........................................................................................................7-2
Cup Warmer ......................................................................................................................................7-2
Coffee Grounds Disposal to Container..........................................................................................7-2
Brew Accelerator..............................................................................................................................7-2
Wastewater and Fresh Water Container ........................................................................................7-2
Grinders / funnel for Ground Coffee...............................................................................................7-2
Base Material.....................................................................................................................................7-2
Cup Plate Frames Illuminated.........................................................................................................7-2
Optional Features..............................................................................7-2
BASCC BC - 02.07 - V01 Page 7-1
Page 54

Options
7 OPTIONAL FEATURES
Note:
You can obtain additional information on the optional features described in this chapter
form a manufacturer-authorised customer service agent.
7.1 Payment Systems
Your coffee machine can be connected to your cash register by means of a payment
system, for example. This facilitates daily, weekly and monthly accounting.
Your coffee machine has been prepared for connection to a payment system and it is
compatible with all conventional systems on the market.
7.2 Water Softener (Filados/Brita)
A water softener helps to reach a better water quality and softens it.
It allows the recommended value for the coffee machine to be achieved.
7.3 Cup Warmer
The cup warmer consists of an additional framing. Cups can be pre-heated in large
quantities.
7.4 Coffee Grounds Disposal to Container
If a large amount of coffee is served or if the coffee machine is used in a self-service
establishment, we recommend adding a coffee grounds container. the coffee grounds
container is attached under the counter.
7.5 Brew Accelerator
The brew accelerator can be used, for example, in self-service mode to achieve an even
higher output capacity.
7.6
7.7
7.8 Base Material
7.9
Wastewater and Fresh Water Container
If there is no fixed water supply present, the machine can be supplied with water via a
fresh water container.
Grinders / funnel for Ground Coffee
The following configurations are also possible with this model:
- 3 grinders and a funnel for ground coffee (e.g. decaffeinated)
- 4 grinders
Special base materials are available upon request:
- Wood base
- Concrete base
- Granite base
Cup Plate Frames Illuminated
The cup plate frames is also available in an illuminated version.
Page 7-2 BASCC BC - 02.07 - V01
Page 55

Appendix
8. Contents
Chapter Text Page
8
8.1
8.2
8.2.1 Cleaning Tablet for the Coffee Machine.............................................................................................8-3
8.3
8.4
APPENDIX..........................................................................................8-2
CE Declaration of Conformity .........................................................................................................8-2
Cleaning Agent .................................................................................................................................8-3
Serials Plates of Steam Generator and Instant Heater.................................................................8-4
Environmental Aspects....................................................................................................................8-4
BASCC BC - 02.08 - V01 Page 8-1
Page 56

Appendix
8 APPENDIX
8.1 CE Declaration of Conformity
These products meet the requirements of EC guidelines.
73/23/EEC Electrical Equipment for Use within Stipulated Voltage
Limits.
89/336/EEC Electromagnetic Compatibility.
The declaration of conformity can be obtained from the following
addresses:
M. Schaerer Ltd.
Gewerbestrasse 15
3302 Moosseedorf
Switzerland
Phone: ++41 031 85 85 111
Fax : ++41 031 85 85 140
E-Mail: info@schaerer.com
Internet: http://www.schaerer.com
Page 8-2 BASCC BC - 02.08 - V01
Page 57

Appendix
8.2 Cleaning Agent
8.2.1 Cleaning Tablet for the Coffee Machine
Important!
Before you use the cleaning tablets read the label on the cleaning tablet
container and the "HEALTH AND SAFETY DATA SHEET." Should you
not be in possession of the safety sheet, please order it from the
distributing company.
PURPOSE: For the daily cleaning of the coffee machine’s coffee system.
APPEARANCE AND ODOUR: Cf. "HEALTH AND SAFETY DATA SHEET."
USE: - Keep the cleaning tablet away from children and unauthorised people.
- Do not swallow!
- Never mix the cleaning tablet with other chemicals (cleaning agents)!
- Do not eat or drink while using the cleaning tablet.
- Wash hands and face immediately before breaks and after using the cleaning tablet.
- Never mix the cleaning tablet with liquid or pulverised cleaning agents or with acids.
EMERGENCY INFORMATION: Ask the distributing company or a customer service authorised by the distributor
for the telephone number of the emergency information centre (toxicological
information centre) in your country.
If your country has no such or similar institution, call the following number in
Switzerland for information in emergencies.
++41 01 251 51 51 (Toxicological Information Centre)
FIRST AID: CF. "HEALTH AND SAFETY DATA SHEET."
Note:
Important note for physicians:
If possible show the doctor the cleaning agent label or the "HEALTH & SAFETY DATA
SHEET."
STORAGE OF THE CLEANING TABLET:
- Keep out of the reach of children and unauthorised persons.
- Protect from heat, direct light and moisture
- Store separately from acids
- Store only in original container/packaging.
- Do not store together with food, beverages and other items of human consumption
- Always follow your local regulations concerning the storage of chemicals (cleaning
agents).
BASCC BC - 02.08 - V01 Page 8-3
Page 58

Appendix
8.3 Serials Plates of Steam Generator and Instant Heater
Type DA HW HW
Excess operating pressure 2.5 bar 2.5 bar 2.5 bar
Maximum operating. pressure p max 12 bar 12 bar 12 bar
Test excess pressure 24 bar 24 bar 24 bar
Maximum op. temperature T max 192 ºC 192 ºC 192 ºC
Minimum op. temperature T min 10 ºC 10 ºC 10 ºC
Operating temperature 140 ºC 95 ºC 95 ºC
Water capacity Vol. 0.8 l 0.8 l 1.2 l
Constr. year: 20.. 20.. 20..
Manufacture number DA..... HW..... HW.....
Voltage U 230 VAC. 230 VAC. 230 VAC.
Frequency f 50/60 Hz 50/60 Hz 50/60 Hz
Capacity (Watts) P 3000 W 3000 W 2x3000 W
Design and testing according to SVTI and TÜV regulations.
8.4 Environmental Aspects
Packaging: The machines are delivered in recyclable cardboard boxes on reusable pallets.
Spare parts: Parts exchanged during a service are reconditioned as far as possible and used
again.
Cleaning agent Environmental protection!
If no recycling is possible, cleaning agents and their packaging must be disposed of in
line with local laws and regulations in accordance with the "HEALTH AND SAFETY
DATA SHEET."
Energy consumption The energy consumption corresponds to the technical state of the art at the time the
machine was developed.
Disposal: Environmental protection!
The machines must be disposed off correctly and in line with local laws and
regulations.
Page 8-4 BASCC BC - 02.08 - V01
Page 59

Index
9. Index
Text
Chapter
Page
A Index
Accident Prevention / Operational Safety .......................................................................... 2.3 ................ 2 -3
Appendix............................................................................................................................. 8 ................... 8 -1
Automatic Timer ................................................................................................................. 4.7.3.7 .......... 4 -16
B Index
Base Material...................................................................................................................... 7.8 ................ 7 -2
Beverage Output ................................................................................................................ 4.5 ................ 4 -5
Brew Accelerator................................................................................................................ 7.5 ................ 7 -2
C Index
CE Declaration of Conformity............................................................................................. 8.1 ................ 8 -2
Changing PIN code............................................................................................................ 4.7.3.9 .......... 4 -17
CHEF Chip Card................................................................................................................. 4.7.3 ............. 4 -11
Cleaning ............................................................................................................................. 5 ................... 5 -1
Cleaning Agent................................................................................................................... 8.2 ................ 8 -3
Cleaning As Required ........................................................................................................ 5.3 ................ 5 -4
Cleaning Tablet for the Coffee Machine............................................................................. 8.2.1 ............. 8 -3
Commissioning................................................................................................................... 3.4 ................ 3 -10
Coffee Grounds Disposal to Container .............................................................................. 7.4 ................ 7 -2
Coffee Machine Specifications........................................................................................... 3.1 ................ 3 -2
Configuring Products.......................................................................................................... 4.7.3.4 .......... 4 -14
Configuring the Display ..................................................................................................... 4.7.3.5 .......... 4 -15
Control Panel (Touch Screen)............................................................................................ 5.3.2 ............. 5 -5
Control Panel of the Coffee Machine................................................................................. 3.1.3 ............. 3 -4
Copyright............................................................................................................................ 1.1 ................ 1 -1
Counter Lead-Throughs..................................................................................................... 3.4.3 ............. 3 -10
Cup Plate Frames Illuminated............................................................................................ 7.9 ................ 7 -2
Cup Warmer....................................................................................................................... 7.3 ................ 7 -2
D Index
Daily Cleaning .................................................................................................................... 5.2 ................ 5 -3
Daily Operation................................................................................................................... 4.2 ................ 4 -3
Design of the Coffee Machine............................................................................................ 3.3 ................ 3 -9
Designated Use.................................................................................................................. 2.5 ................ 2 -5
Dimensions and Weight ..................................................................................................... 3.2.2 ............. 3 -7
Disassembly....................................................................................................................... 4.6.2.1 .......... 4 -9
Dispensing Coffee With Previously Ground Coffee Powder.............................................. 4.5.4 ............. 4 -6
BASCC BC - 02.09 - V01 Seite 9-1
Page 60

Index
.
.
.
.
.
.
.
.
.
.
.
.
.
.
.
.
.
.
.
.
.
Text
Chapter
Page
D Index
Dispensing Hot Water........................................................................................................
Disassembly ......................................................................................................................
Double Button....................................................................................................................
Drip Tray Coffee Coupling.................................................................................................
4.5.5.............. 4 -7
5.3.4.............. 5 -5
4.5.3.............. 4 -6
5.3.1.............. 5 -4
E Index
End of Operation ................................................................................................................4.6................. 4 -9
Environmental Aspects......................................................................................................
Error Messages and Malfunctions.....................................................................................
Error Messages - Coffee Machine.....................................................................................
Error Messages With Display on the Control Panel..........................................................
Extended Idle Time............................................................................................................
Extended Idle Time............................................................................................................
Exterior View .....................................................................................................................
8.4................. 8 -4
6.................... 6 -1
6.1.1.............. 6 -2
6.1................. 6 -2
4.6.2.............. 4 -9
5.3.3.............. 5 -5
3.1.1.............. 3 -2
F Index
Funnel for Ground Coffee...................................................................................................7.7................. 7 -2
G Index
General...............................................................................................................................2.1................. 2 -2
Generating Steam .............................................................................................................
H
Hygiene...............................................................................................................................2.4................. 2 -5
Index
4.5.6.............. 4 -8
I Index
Important General Notes on Cleaning................................................................................5.1................. 5 -2
Included in Shipment.........................................................................................................
Initial Commissioning of the Coffee Machine....................................................................
Inserting the Chip Card into the Chip Card Reader ..........................................................
Installation Layout..............................................................................................................
Installation of the Coffee Machine.....................................................................................
Interior View ......................................................................................................................
Introduction........................................................................................................................
Introduction........................................................................................................................
Introduction to the CHEF Programming Level...................................................................
3.3.2.............. 3 -9
3.4.1.............. 3 -10
4.7.2.............. 4 -11
3.1.4.............. 3 -5
3.4.2.2 .......... 3 -10
3.1.2.............. 3 -3
1.................... 1 -3
4.1................. 4 -2
4.7.3.2 .......... 4 -12
Seite 9-2 BASCC BC - 02.09 - V01
Page 61

Index
Text
Chapter
Page
L Index
Language............................................................................................................................ 4.7.3.8 .......... 4 -16
Liability................................................................................................................................ 2.6 ................ 2 -6
Location.............................................................................................................................. 3.4.2.1 .......... 3 -10
M
Making the Coffee Machine Ready for Operation.............................................................. 4.3 ................ 4 -3
Malfunctions Without Display on the Control Panel........................................................... 6.2 ................ 6-4
Menu Overview CHEF chip card........................................................................................ 4.7.3.1 .......... 4 -11
Model Variations................................................................................................................. 3.3.1 ............. 3 -9
Index
N Index
Navigation on Programming Level..................................................................................... 4.7.1 ............. 4 -10
O Index
Operation............................................................................................................................ 4 ................... 4 -1
Operating Information for the Coffee Machine................................................................... 3.2 ................ 3 -7
Optional Features............................................................................................................... 3.3.3 ............. 3 -9
Optional Features............................................................................................................... 7 ................... 7 -1
Output of Coffee Beverages............................................................................................... 4.5.1 ............. 4 -5
P Index
Payment Systems............................................................................................................... 7.1 ................ 7 -2
Performance Characteristics.............................................................................................. 3.2.1 ............. 3 -7
Power Supply ..................................................................................................................... 3.2.3 ............. 3 -8
Pre-Checks......................................................................................................................... 4.3.1 ............. 4 -3
Pre-Selecting Beverage Type ............................................................................................ 4.5.2 ............. 4 -5
Product Description............................................................................................................ 3 ................... 3 -1
Programming Using Standard Chip Cards......................................................................... 4.7 ................ 4 -10
Purpose of Coffee Machine................................................................................................ 3.1.5 ............. 3 -6
R Index
Reading the Counter.......................................................................................................... 4.7.3.3 .......... 4 -12
Refilling Coffee Beans........................................................................................................ 4.2.1 ............. 4 -3
BASCC BC - 02.09 - V01 Seite 9-3
Page 62

Index
.
.
.
.
.
.
.
.
.
.
.
.
.
.
.
.
.
.
.
.
Text
S Index
Safety instructions.............................................................................................................
Safety Symbols..................................................................................................................
Saving Data from the Chip Card to the Coffee Machine...................................................
SAVE-DATA PLUS Chip Card...........................................................................................
Saving Coffee Machine Data to Chip Card .......................................................................
Serial Plate on the Coffee Machine...................................................................................
Serials Plates of Steam Generator and Instant Heater.....................................................
Setting Coffee Outlet Height..............................................................................................
Setting Coffee Outlet Height..............................................................................................
Set-Up Conditions .............................................................................................................
Shutting Off the Coffee Machine .......................................................................................
Shutting on the Coffee Machine........................................................................................
Symbols and Pictograms...................................................................................................
Chapter
2.................... 2 -1
2.2................. 2 -2
4.7.4.2 .......... 4 -17
4.7.4.............. 4 -17
4.7.4.1 .......... 4 -17
3.1.6.............. 3 -6
8.3................. 8 -4
4.4................. 4 -4
4.4.1.............. 4 -4
3.4.2.............. 3 -10
4.6.1.............. 4 -9
4.3.2.............. 4 -3
1.2................. 1 -4
Page
T Index
Table of Contents Overview..............................................................................................
Time / Date........................................................................................................................
1.3................. 1 -5
4.7.3.6 .......... 4 -16
V Index
Volumes.............................................................................................................................
W
Wastewater and Fresh Water Container...........................................................................
Water Softener (Filados/Brita)...........................................................................................
Water Supply/Drain ...........................................................................................................
Welcome ...........................................................................................................................
Index
3.2.5.............. 3 -9
7.6................. 7 -2
7.2................. 7 -2
3.2.4.............. 3 -8
1.1................. 1 -3
Seite 9-4 BASCC BC - 02.09 - V01
 Loading...